Funky beats, exciting battle system, stellar character design based on mythology with an interesting storyline to boot, Dislyte is an urban mythological pop-fantasy RPG published by Lilith Games on iOS and Android platforms.
Hailing from the same creator of popular titles such as AFK Arena and Rise of Kingdoms, it adopts a turn-based, gacha and optional auto-battler system similar to mobile games such as Dragon Tamer and Knighthood. What sets Dislyte apart from most mobile titles is the dynamic soundtrack that keeps you nodding your head to the beat, the intriguing lore behind the characters and their world and the unique battle system that simplifies the usually complicated and tedious experience of turn-based RPGs.
The combination feels very reminiscent of the way Persona 5, a turn-based RPG currently released on Playstation 3 and 4, hypes up one of the usually boring game genres and makes it more fresh and engaging. Coupled with a large array of Espers you can collect from finishing chapters in Story Mode, spinning Gold Records in Echo, which you can buy from shops or receive as a reward from Bounties or Trials, you are set up for a groovy, action-packed time!
Dislyte is set in the year 2027 where remains of ancient antiquity, mysterious alien-like obelisks, sprout out from the ground, releasing divine waves that transformed certain people into Espers. Regarded as the chosen ones, Espers are granted near-magical powers which were influenced by gods from four different Mythologies: Norse, Greek, Chinese and Egyptian. But with this “gift” comes aggressive and dangerous monsters called Miramons and Sentinels that guard the mysterious entity.
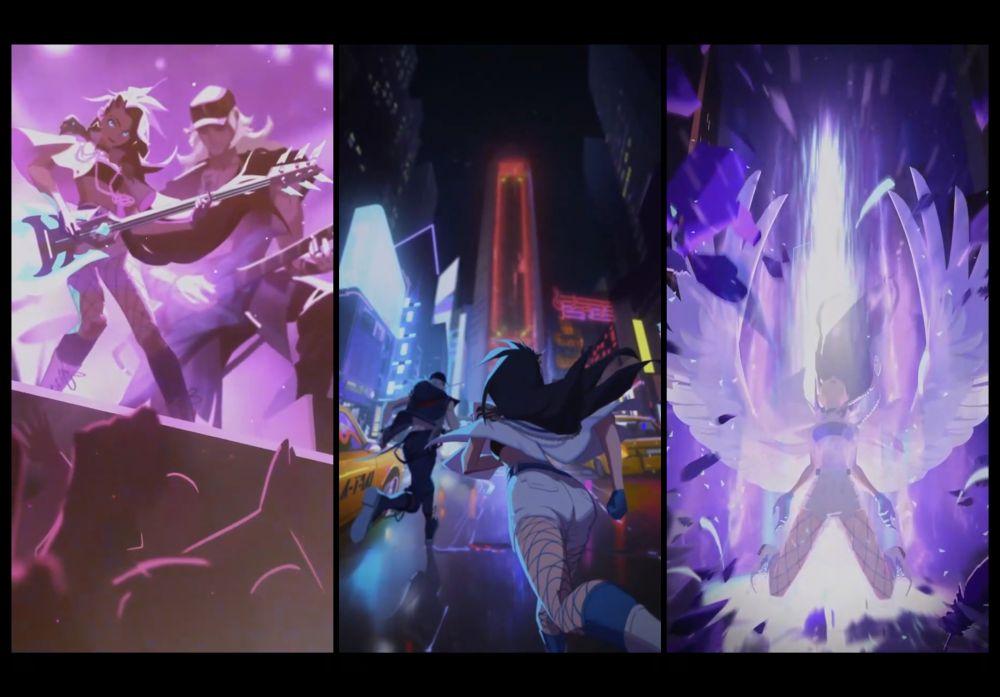
The story starts with Brynn, a punk rocker, as she performs live in front of a crowded arena with Sieg, her partner, as they announce their intention to stay in Gyrate for their music business. As their performance comes to an end, Miramons start to attack, causing them to run away to safety. The Miramon attack subsequently triggers Brynn’s own Esper transformation, giving her a pair of wings that sprouted from her back and a surge of unexplainable power.
However, as a newly-turned Esper, Brynn was powerless to stop the two shadowy figures, a wolfman and a sharpshooter, from taking Sieg away and knocking her unconscious. Rescued by the Esper Union, she is joined by two other Espers: Drew, a former butler with the powers of Anubis, and Q, a vlogger with the powers of Cupid, to find Sieg whilst also uncovering the insidious agenda of the Shadow Decree. Will Brynn be able to save her partner from the Shadow Decree? And what was Sieg’s past with the enigmatic organization?

If you are invested in the story and want to progress with more ease or simply want to learn how to effectively fight through waves of battles and defeat mind-numbingly difficult bosses, our detailed Dislyte beginner’s guide is here for you!
It will explain all the basics you need to know to learn the ins and outs of the game. We’ve written down as many tips and tricks as we could think of that would aid you at the start of your heroic quest to reunite with Sieg and become a master strategist in battle.
1. Know Your Strengths and Weaknesses
Elemental Classes
There are four major elemental classes in Dislyte, but unlike most games where they usually use the same structure of Earth,Wind, Water and Fire, this one has Shimmer, Wind, Flow and Inferno.
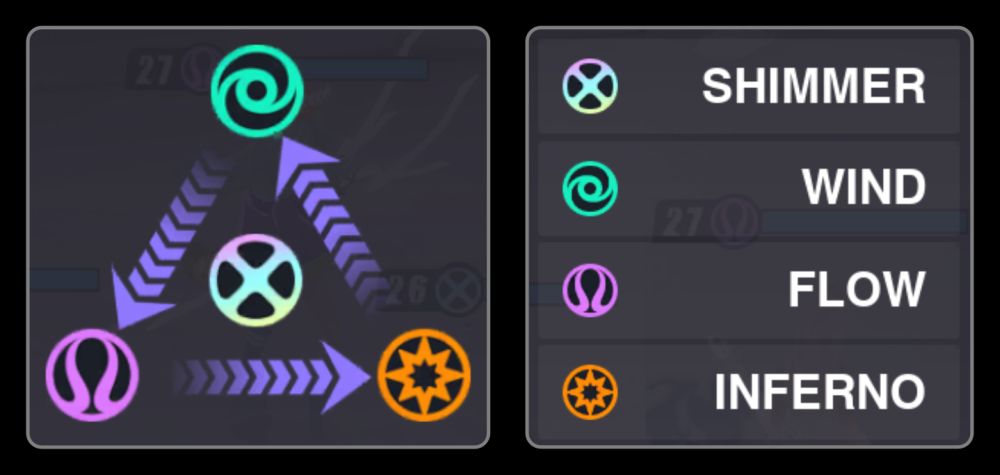
• Shimmer – has no elemental advantages or disadvantages. It is represented by an X symbol inside a circle with a colorful gradient.
• Wind – strong against Flow, weak against Inferno. It is represented by a small circle surrounded by curves inside a circle and colored green.
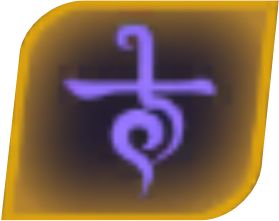
• Flow – strong against Inferno, weak against Wind. It is represented by a pair of curved lines inside a circle and colored purple.
• Inferno – strong against Wind, weak against Flow. It is represented by an 8 pointed star inside a circle and colored orange.
They also do not typically work the same way as other RPGs so remembering which element is stronger than the other could prove to be confusing at first. But not to worry as the developers have already anticipated this and they have put several indicators during battle that can help you determine which is which.
Related: Dislyte Rare Espers Guide: A Complete Description of Each Rare Esper
Advantage & Disadvantage Indicators
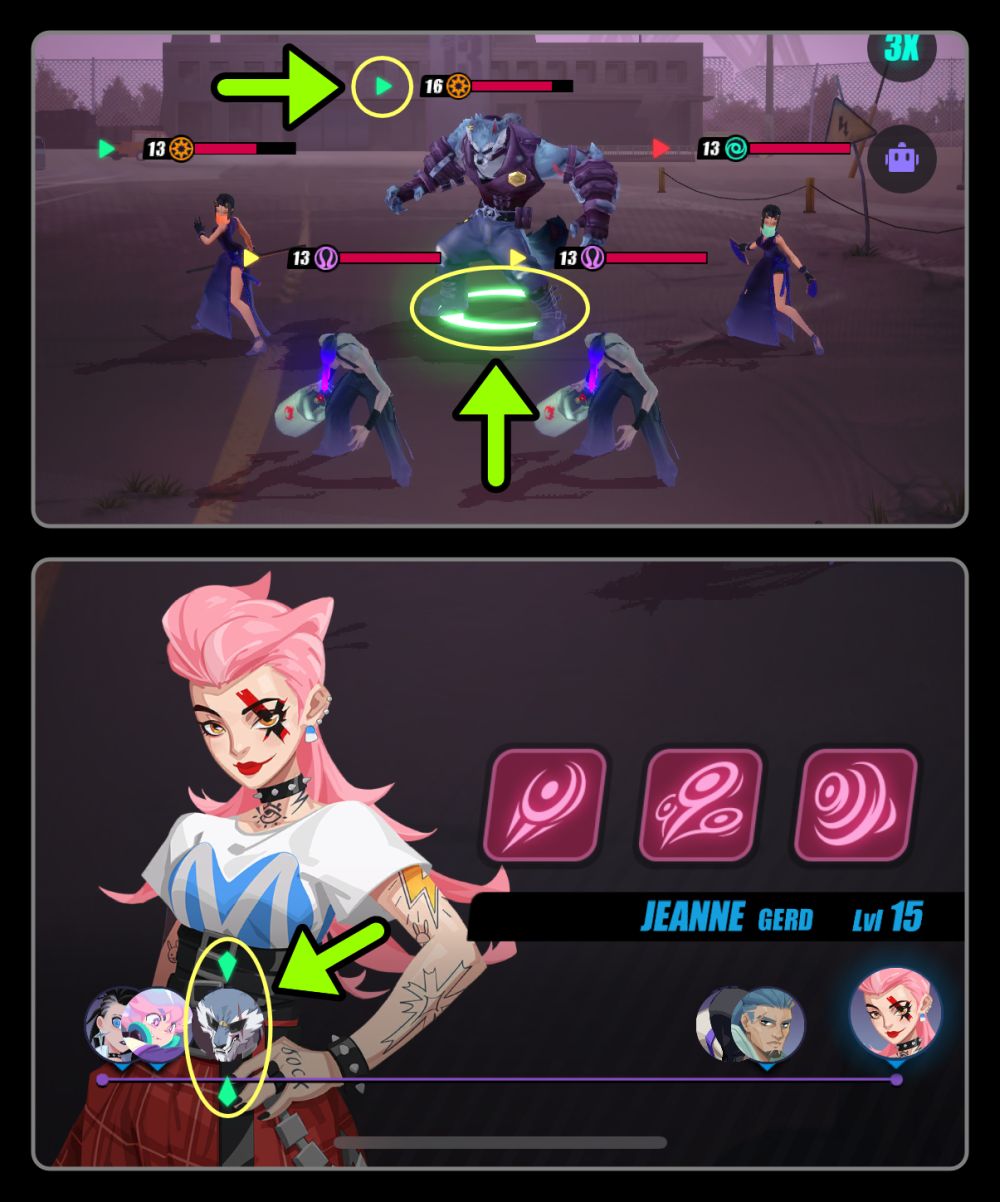
During your turn, you may see an arrow at the left side of the HP bar of an enemy, a circle underneath your selected enemy and two arrows pointing at the AP Bar where your selected enemy is. All of those are indicators that change color to either red, yellow or green depending on your currently selected ally’s advantage or disadvantage against your enemy.
• Red – Your selected ally’s element has a disadvantage over the element of the enemy. Attacks towards this enemy have a +50% chance to trigger a Miss.
• Yellow – Your selected ally’s element has no advantage or disadvantage over the element of the enemy. This happens when both your ally and the enemy have the same element or if you are using or targeting someone with the Shimmer element. Attacks towards this enemy deal normal damage.
• Green – Your selected ally’s element has an advantage over the element of the enemy. Attacks towards this enemy have a +15% chance to trigger a Crit and +50% chance to trigger an Elemental Boon.
Attack Outcomes
While in battle, you have a chance to trigger certain attack outcomes while attacking and depend on different factors. These attack outcomes affect how much damage is dealt during an attack.

• Miss – deals 25% less damage and is triggered by attackers with an elemental disadvantage.
• Crit – deals extra bonus damage that scales according to the attacker’s C. DMG (Critical Damage) and can be triggered regardless of advantages or disadvantages to elements. The chance of this triggering is based on the C.RATE (Critical Rate) of the attacker.
• Elemental Boon – deals 30% more damage and is triggered by attackers with an elemental advantage.
Attack outcomes are judged in the order of Miss > Crit > Elemental Boon. You can have just one of these outcomes or a combination of Crit and Miss or Elemental Boon. You cannot have an outcome of Miss + Elemental Boon.
Related: Dislyte Epic Espers Guide: A Complete Description of Each Epic Esper
Status Effects
You may sometimes find symbols above the HP Bar. These represent buffs and debuffs that currently affect the character. Buffs and Debuffs are status effects that can positively or negatively impact the character. These range from increasing or decreasing a certain stat, adding more damage or healing more HP to a character, preventing them from moving and so on.
The number attached to it indicates the number of turns the status will last. Each buff or debuff has a unique symbol that represents it but they all share a certain color or frame that signifies what they are.
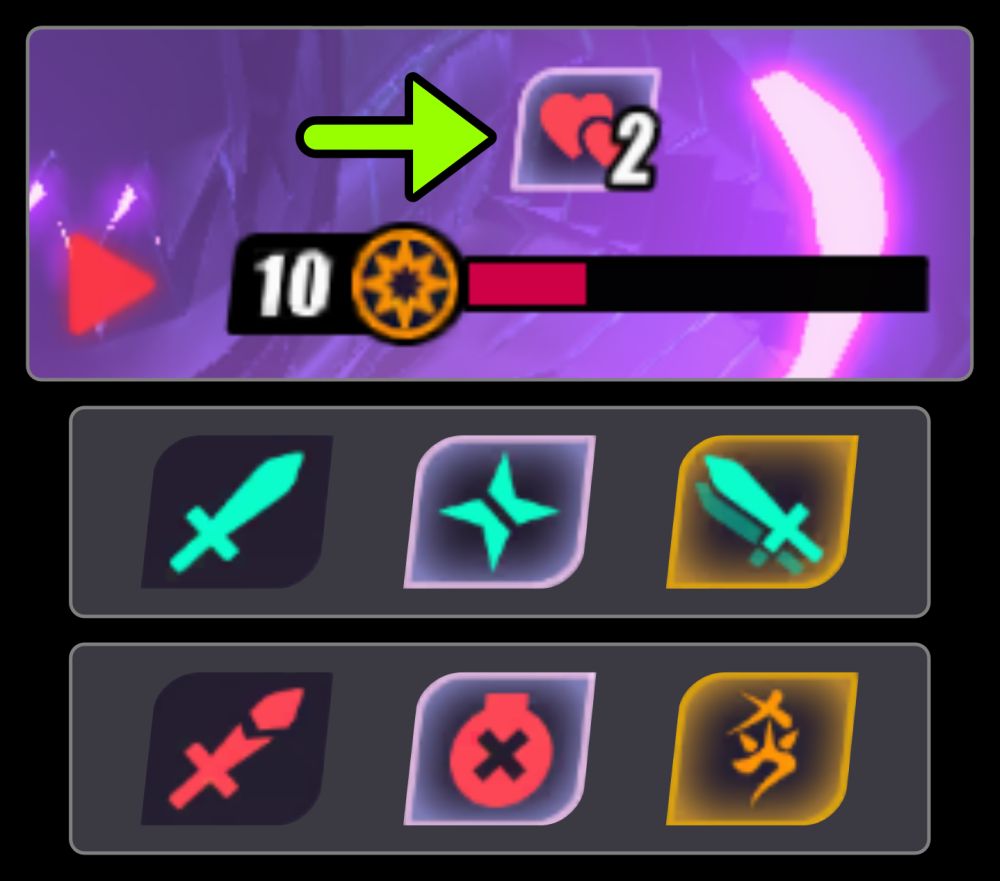
• Green Symbol – represent Buffs which are positive status effects.
• Red Symbol – represent Debuffs which are negative status effects.
• Silver Frame – represent status effects that ignore ACC and RESIST, cannot Miss and must be triggered. Appears on buffs or debuffs that are specific to a certain Esper or enemy. The only unique debuff so far that does not have this frame is Celine (Siren)’s Sleep.
• Gold Frame – represent undispellable / unremovable status effects. Appears on buffs or debuffs that are specific to a certain Esper or enemy.
Related: Dislyte Legendary Espers Guide: A Complete Description of Each Legendary Esper
Be warned that most bosses or Sentinels are resistant to many debuffs so it is often better to inflict those debuffs on other enemies surrounding them.
2. Form a Strong Squad!
The main goal of the game is to eliminate your enemies by getting their HP down to zero and clearing all the waves in a stage. Each stage can have 1-3 waves each, with the last wave containing the strongest enemies and sometimes a boss. In order to survive those waves and win your battles, you have to form a strong squad. You can have up to 5 Espers (and sometimes spirits like Starimon which I’ll talk about later) in battle.
While the combination of Espers based on their abilities and strengths to form your squad matter, the actual order of formation does not except for the very first character which will serve as your Captain.
Related: Dislyte Tier List: A Complete Ranking of All Espers
Choosing your Captain
Any Esper can be a captain, but not every captain has a Captain Ability. Captain Abilities are unique abilities that some Espers have that increase a certain stat of the whole squad. If you place an Esper with a Captain’s Ability in the Captain’s slot, the ability’s description will show up just below your squad.
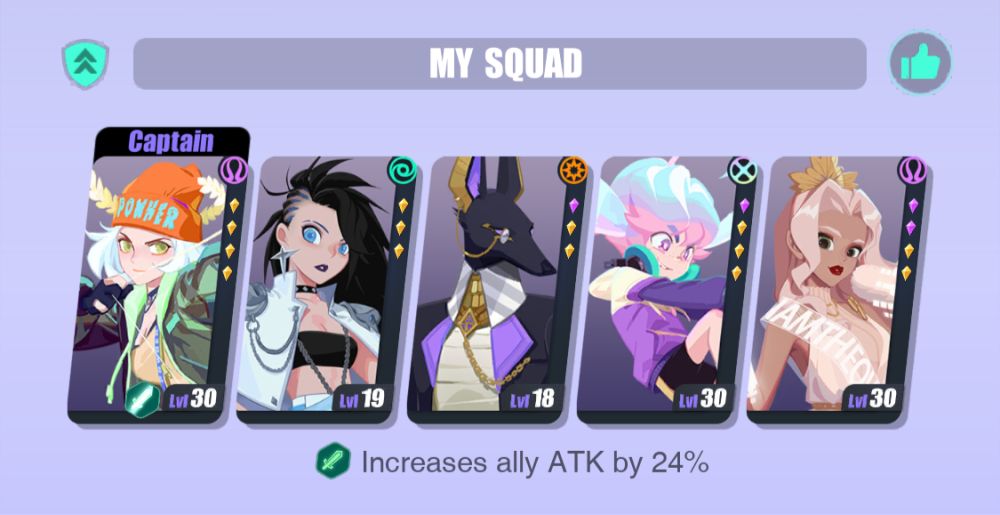
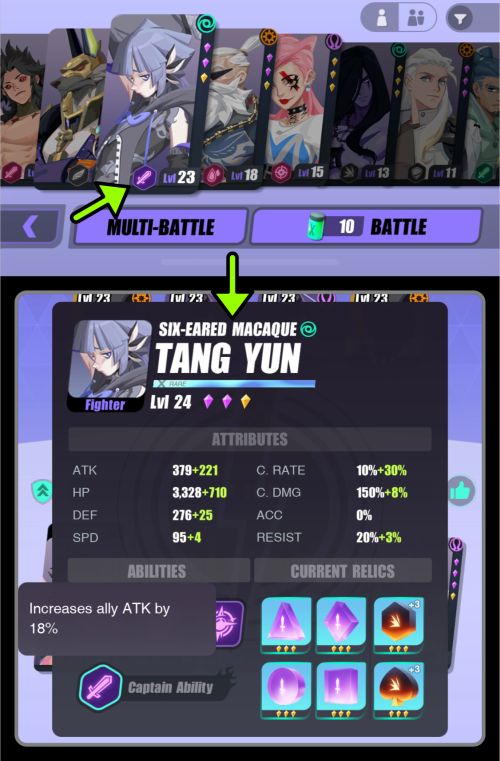
You can easily determine which Esper has a Captain’s Ability based on the symbols next to their levels when you scroll through your selection of Espers when you form a team before battle or when you check the Espers tab outside of battle. If you select your Esper and click on the Captain Ability Icon that appears on their Stats page, it will tell you what their ability does.
As you scroll through your selection of Espers, you may notice that some of their icons are grayed out. This is because not all Captain Abilities can work in all modes. Some Captain Abilities only work in certain modes like Ritual and Sonic Miracles in Trials or Point War. Below is a list of Espers that have Captain Abilities:
For Any Mode
Legendary
| Increases ally HP by 30% | Jin Yuyao (Queen Mother), Gabrielle (Njord), Ahmed (Geb) |
| Increases ally ATK by 30% | Sun Wukong (Tang Xuan), Raven (Odin), Li Ling (Nezha) |
| Increases ally DEF by 30% | Donnar (Thor) |
| Increases ally SPD by 25% | Tiye (Nut), Ollie (Osiris) |
| Increases ally C.RATE by 25% | Lewis (Ares) |
| Increases ally ACC by 40% | Triki (Loki), Lucas (Apollo) |
| Increases ally RESIST by 40% | Sally (Sif), Sienna (Gaia) |
Epic
| Increases ally HP by 24% | Heng Yue (Chang’e) |
| Increases ally ATK by 24% | Mona (Artemis), Eira (Freya), Stewart (Dionysus) |
| Increases ally DEF by 24% | Ren Si (Black Tortoise) |
| Increases ally SPD by 20% | Long Mian (Ao Bing) |
| Increases ally C.RATE by 20% | Falken (Horus), Kaylee (Anuket) |
| Increases ally ACC by 30% | Celine (Siren), Chloe (Medea) |
| Increases ally RESIST by 30% | Fabrice (Freyr) |
Rare
| Increases ally HP by 18% | Unky Chai (Yue Lao) |
| Increases ally ATK by 18% | Tang Yun (Six-Eared Macaque), Chalmers (Idun) |
| Increases ally DEF by 18% | Lauren (Heket) |
| Increases ally SPD by 15% | Melanie (Medusa) |
| Increases ally C.RATE by 15% | Leon (Vali) |
| Increases ally ACC by 20% | Jeanne (Gerd) |
| Increases ally RESIST by 20% | Berenice (Bastet) |
For Point War only
Legendary
| Increases ally HP in Point War by 40% | Cecilia (Isis) |
| Increases ally ATK in Point War by 40% | Narmer (Ra), Biondina (Poseidon) |
| Increases ally DEF in Point War by 40% | Clara (Hera) |
| Increases ally RESIST in Point War by 50% | Hyde (Hades) |
Epic
| Increases ally HP in Point War by 30% | Alexa (Aphrodite), Dhalia (Calypso), Nicole (Nephthys) |
| Increases ally ATK in Point War by 30% | Arcana (Hermes), Bonnie (Eris) |
| Increases ally DEF in Point War by 30% | Laura (Neith) |
| Increases ally ACC in Point War by 40% | Anesidora (Pandora) |
| Increases ally RESIST in Point War by 40% | Luo Yan (Yanluo Wang) |
Rare
| Increases ally DEF in Point War by 24% | Bardon (Baldr) |
| Increases ally SPD in Point War by 20% | Li Ao (Tao Tie) |
For Ritual and Sonic Miracles only
Epic
| Increases ally HP in Ritual and Sonic Miracles by 30% | Jacob (Jormungand), Meredith (Scylla) |
| Increases ally ATK in Ritual and Sonic Miracles by 30% | Lu Yi (Dayi), Hathor (Lynn), Xie Chuyi (Death Guard Hei) |
| Increases ally DEF in Ritual and Sonic Miracles by 30% | Asenath (Nefertem) |
| Increases ally SPD in Ritual and Sonic Miracles by 25% | Sander (Set) |
| Increases ally ACC in Ritual and Sonic Miracles by by 40% | Kara (Serket), Xie Yuzhi (Death Guard Bai) |
Rare
| Increases ally C.RATE in Ritual and Sonic Miracles by 20% | Hall (Hodur) |
Always have a Healer
Unlike most RPGs, Dislyte does not provide you with an inventory that you can open up in battle nor does it provide you with potions that you can use. If an ally dies in battle, you won’t be able to use items to bring them back either. Fortunately, even if a member of your team dies but you still win the battle, they will still gain experience points.
Related: Dislyte Squad Formation Guide: Recommended Team Formations
For the casual gamer who doesn’t have as much time on their hands, this is perfect as it keeps the length of battles short but it also makes it difficult to survive fights with tough opponents. Instead of stocking up on potions, you have to increase your HP stat or add an Esper with a healing or resurrecting skill or buff to keep your squad alive.

The very first healer you will receive is Helena (Helen) and you can take her into your roster as soon as you finish the first chapter. While her first two skills are not particularly strong they do have effects that could disable a buff from an enemy and reduce the target’s AP which can be useful. However, the most important skill she has is her third, which is Whispered Blessing.
What it essentially does is heal a targeted teammate for a percentage of their HP (20% at level 1) but also heal all other allies for a smaller percentage (10% at level 1). Having her on the team instantly increases your team’s survivability. As you continue to play the game and shift through various Espers, you’d want to explore your other options for healers. Below is a list we have compiled for you:
All Healers in the Game
| Legendary | Epic | Rare |
| Clara (Hera) | Alexa (Aphrodite) | Berenice (Bastet) |
| Cecelia (Isis) | Asenath (Nefertem) | Chang Pu (Yao Ji) |
| Jin Yuyao (Queen Mother) | Fabrice (Freyr) | Helena (Helen) |
| Sally (Sif) | Heng Yue (Chang’e) | Lauren (Heket) |
| Luo Yan (Yanluo Wang) | Ye Suhua (Shao Siming) |

When it comes to resurrection, the only Esper at the moment that can resurrect an ally is Luo Yan (Yanluo Wang) who is also a healer.
Alternatives to Healers
Alternatively, if you do not want to use any of the healers and want to have a different team combination, you may include these Espers on your squad instead:

Catherine (Hela)’s third skill, Underworld Presence, grants a Standoff buff to all allied Espers for one turn. What this buff does is keep an Esper alive with at least 1 HP until the next turn, no matter how many times they are attacked.

Gabrielle (Njord)’s third skill, Rush, blesses all allies with Immunity (that prevents you from being debuffed) and DEF Up for 2 turns.

Celine (Siren)’s second skill, Sound of Nature, grants SPD Up for 2 turns and DEF Up for 1 turn.

Bardon (Baldr)’s third skill, Rise to Honor, grants DEF Up to all allied Espers for 2 turns.
Multiple Target Skills are a must
Since you usually have 5 enemies per battle and may battle up to 3 waves, having an Esper on your team that can attack more than one enemy at a time is a must. This will not only save you time, but will also let you kill your enemies before they kill you. Weakening your enemies with multiple target skills, especially if those skills have debuffs, will greatly turn the tide of battle as your other allies finish the job.
Espers that attack more than 1 enemies
| Legendary | Epic | Rare |
| Tiye (Nut) | Celine (Siren) | Q (Cupid) |
| Tang Xuan (Sun Wukong) | Kara (Serket) | Melanie (Medusa) |
| Raven (Odin) | Eira (Freya) | Layla (Medjed) |
| Narmer (Ra) | Falken (Horus) | Jeanne (Gerd)** |
| Li Ling (Nezha) | Lu Yi (Dayi)* | Bai Liuli (White Snake)* |
| Triki (Loki) | Arcana (Hermes) | |
| Hyde (Hades) | Luo Yan (Yanluo Wang) | |
| Biondina (Poseidon) | Chloe (Medea)* | |
| Gabrielle (Njord) | Catherine (Hela) | |
| Unas (Shu) | Pritzker (Mimir) | |
| Lucas (Apollo) | Jacob (Jormungand) | |
| Sienna (Gaia) | Ren Si (Black Tortoise) | |
| Lin Xiao (White Tiger) | ||
| Long Mian (Ao Bing) | ||
| Anesidora (Pandora) | ||
| Bonnie (Eris) | ||
| Xie Chuyi (Death Guard Hei) | ||
| Xie Yuzhi (Death Guard Bai) | ||
| Kaylee (Anuket) |
*Attacks random enemies but may not attack all.
**Attacks more than one enemy but not all.
As long as you have these three types of Espers in your team (or maybe even a combination of these traits on one or two Espers), you have a solid foundation and can confidently battle against all sorts of enemies.
Pick a good balance of Elements
Before each battle, you will go to the Formation Screen where you can choose which Espers to use for battle. Aside from the three types of Espers we mentioned, it is also important to consider what Elemental Type to pick for your team. There are 4 Elements and 5 Espers, so at least one Element will duplicate. You do not need to have all Elements to be present to succeed in battles, but it is often the safest choice if you are unsure of what enemies you will face and especially if this is the first time you will encounter the stage or level.

In the example above, the potential enemies that are shown include 1 boss enemy with a Wind element and 3 regular enemies with Flow elements. If you base your formation on that alone, you might think of having 1 or 2 Inferno elements (strong against Wind) and up to 3 or 4 Wind elements (strong against Flow). However, what you see in potential enemies don’t always represent all of the enemies that you will actually face in this stage.
In the second picture, you can see that on the first wave, there are enemies that also have the Inferno element. If I had done the formation I described before, those enemies, which are strong against Wind element, would have beaten most of my Espers before I reached the last wave.
The potential enemies that appeared on the Formation Screen only seemed to show the ones on the final wave in this stage and not the ones on the first wave. So in general, it is best to get a good balance of all elements in your team and only focus on specific elements if you have already finished the stage and know how the enemies attack.
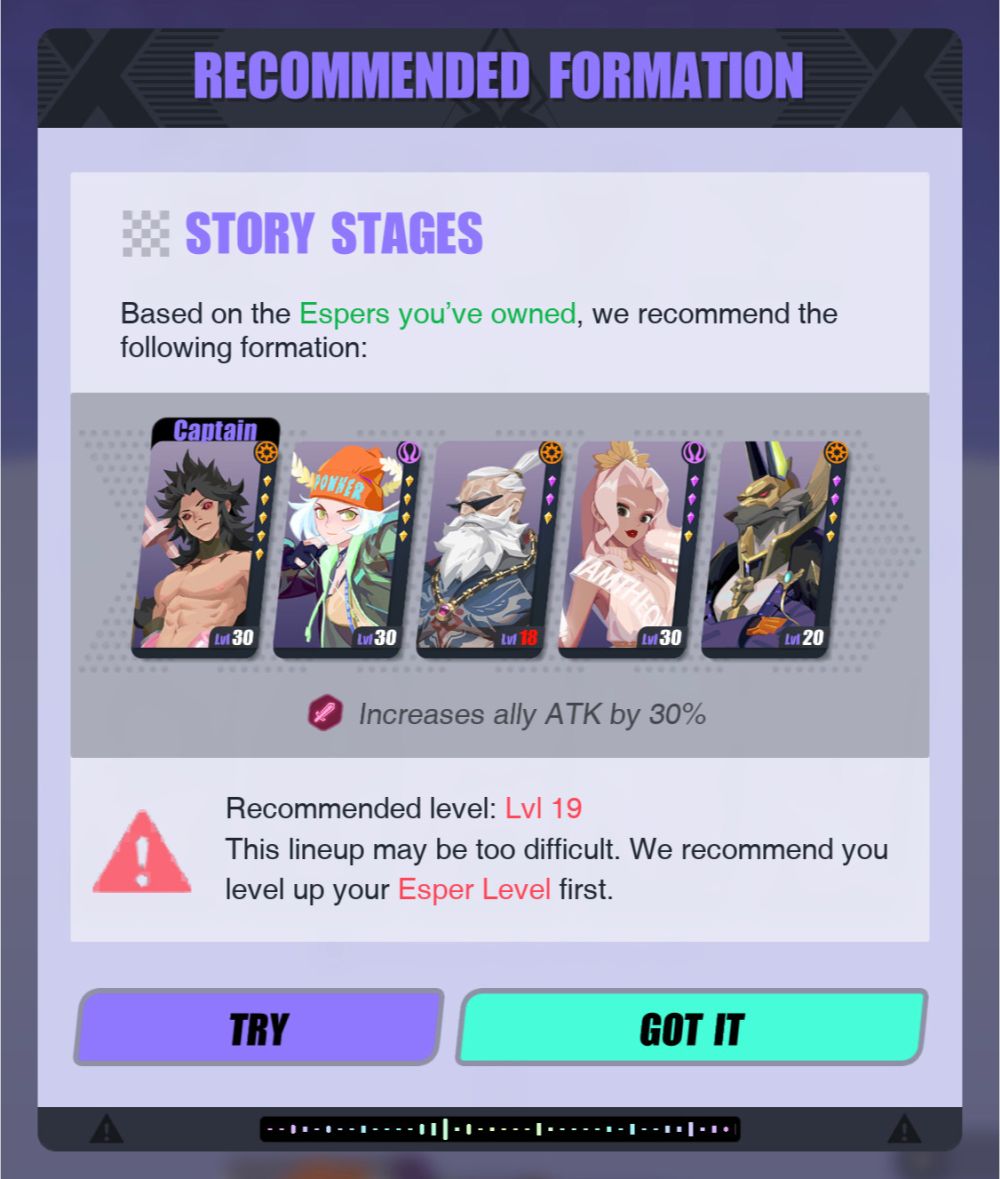
In the Formation Screen, you may also notice a thumbs up sign next to My Squad. When you click on it, the game will suggest a formation for you to use. While it may sometimes have good suggestions, we do not recommend depending on this function all the time because their suggestions do not really consider the elements that you are going up against. Had I followed their suggestion for this stage, the 4 enemies with Flow elements would have easily killed the 3 Inferno Espers I had.
3. Speed Is Key
One thing you need to remember is that the order of the Espers on your team will not actually affect the order in which they will attack. That will solely depend on their SPD and AP. Before we can give you tips on how to abuse or take advantage of Cooldowns, SPD and the Action Point Bar, let us explain what they are and what they do first.
Skills and Cooldowns
For certain skills that you have just used, a number will appear on top of it when you use the character on your next turn like the third skill on the picture below. This is a cooldown number. Cooldowns are a way for the game to prevent you from becoming too overpowered and spamming a very strong skill. The number that appears on top of it is the number of turns that must pass before you can use it again.
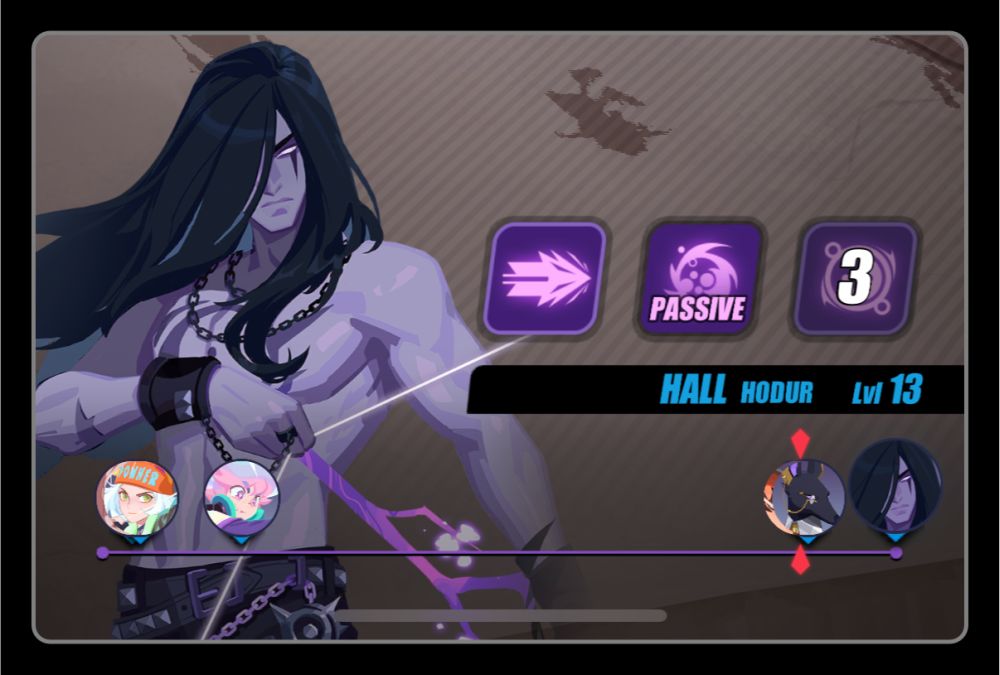
The first skill on your Esper is the basic skill which has no cooldowns and will always be available to use unless you were hit by a debuff that makes it impossible for you to take any actions.
The second skill is either a stronger active skill with a cooldown or a passive skill. Passive skills activate by themselves and may often have a trigger or a condition for it to activate. In our example, Hall (Hodur)’s Passive only activates when an ally attacks individual targets. When they do, Hall (Hodur) would follow it up with an extra strike of his bow, dealing damage equal to 40% of ATK and inflicting Poison on the enemy for 1 turn.
The third skill is the character’s most powerful skill and is usually the one that has the highest cooldown.
AP, SPD and the Action Points Bar
The Action Points Bar is the thin purple bar with arrows and icons of your Espers and enemies. Each character in battle has their own AP or Action Points that fill up over time. You can check it by pressing an enemy or ally for a couple of seconds for the character’s stats to show up or check it by pressing the cogwheel icon at the right side of the battle screen. Once it fills up to 100%, that character will have a turn to move.
The faster you reach 100% AP, the faster you can have your next turn and the faster your cooldowns pass. However, not all characters’ AP fill up at the same pace. This is why there are times when you’d notice that the enemy is suddenly overtaking your allies even though they were far behind before and vice versa.

The rate at which an AP fills up depends on SPD. Unfortunately, there is no way to determine or compare your allies’ SPD and your enemies’ SPD during battle, only the AP %. You will have to rely on your own observational skills to notice if your enemies are moving much faster than your allies. This is where the Action Points Bar becomes useful as it provides a good visual.
There are several ways to turn the tides of battle by efficiently working with APs and Cooldowns.
Manipulate SPD
Speed affects how fast a character fills up their AP and takes their next turn. You can increase it by equipping relics that have SPD bonuses, improving your Esper through Ascension, using Esper abilities that have a SPD Up buff and assigning an Esper with an increased SPD Captain Ability to your squad.
This is very useful if you have allies that are either slower than your enemy or you need that extra speed up to make certain buffs, debuffs and skills work better to your advantage. Having high speed also gives you a preemptive edge and lets you move first at the start of the battle. Taking the initiative will ensure that your enemies don’t debuff or kill you before you get to attack.
Alternatively, you can also focus on putting Espers with SPD debuffs on your squad and targeting either the enemies that move the fastest, the enemies that hit the hardest or the enemies that can heal. Those three types of enemies can prove to be the toughest ones to beat so targeting them first is important. Below we have compiled a list of Buffs & Debuffs that modifies SPD or AP and the Espers that have it as well as a list of Captains that have SPD buffing abilities:
SPD & AP Buffs
 | SPD Up | Increases SPD by 30%. | Sienna (Gaia), Celine (Siren), Eira (Freya), Sander (Set), Anesidora (Pandora), Xie Yuzhi (Death Guard Bai), Meredith (Scylla) |
 | Brisingamen’s Watch | Grants 15% bonus AP at the end of each teammate’s turn. This debuff ignores ACC and RESIST, cannot Miss and must be triggered. | Eira (Freya) |
 | Haste | (Undispellable) Grants 30 SPD per Haste (max 3 stacks). Dispelled after launching an attack. | Unas (Shu) |
SPD & AP Debuffs
 | SPD Down | Reduces SPD by 30%. | Tiye (Nut), Kara (Serket), Eira (Freya), Sander (Set), Lin Xiao (White Tiger), Long Mian (Ao Bing), Dhalia (Calypso), Xie Chuyi (Death Guard Hei), Kaylee (Anuket), Brynn (Valkyrie), Melanie (Medusa), Lauren (Heket) |
Captain Abilities with SPD Buffs
| Increases ally SPD by 25% | Tiye (Nut), Ollie (Osiris) | Legendary |
| Increases ally SPD by 20% | Long Mian (Ao Bing) | Epic |
| Increases ally SPD by 15% | Melanie (Medusa) | Rare |
| Increases ally SPD in Point War by 20% | Li Ao (Tao Tie) | Rare |
| Increases ally SPD in Ritual and Sonic Miracles by 25% | Sander (Set) | Epic |
| Increases ally SPD in Holobattle by 35% | Unas (Shu) | Legendary |
| Increases ally SPD in Holobattle by 25% | Pritzker (Mimir) | Epic |
Stop them completely
Another way to deal with High SPD enemies as well as hard-hitting and healing enemies is by stopping them from moving or taking actions. This method is also useful for preventing enemies that are closest to the right end of the Action Point Bar from attacking or healing, thus skipping a turn. Below is a list of debuffs that can help you achieve that.
Action-Stopping Debuffs
 | Devour | Prevents the target from taking actions, being selected, being attacked and being buffed/debuffed. | Li Ao (Tao Tie) |
 | Freeze | Cannot take actions. | Long Mian (Ao Bing), Dhalia (Calypso), Kaylee (Anuket), Brynn (Valkyrie) |
 | Petrification | Cannot take actions or reduce ability cooldown. | Triki (Loki), Jacob (Jormungand), Melanie (Medusa) |
 | Sleep | Cannot take actions until damaged. | Celine (Siren), Stewart (Dionysus) |
 | Stun | Cannot take actions. | Jin Yuyao (Queen Mother), Tiye (Nut), Triki (Loki), Lucas (Apollo), Sienna (Gaia), Arcana (Hermes), Sander (Set), Pritzker (Mimir), Anesidora (Pandora), Bonnie (Eris), Dhalia (Calypso), Xie Yuzhi (Death Guard Bai), Bardon (Baldr), Tang Yun (Six-Eared Macaque), David (Jason), Layla (Medjed), Jeanne (Gerd) |
Alternatively, you can choose to force your enemies to use their weakest attack, which is their basic attack, so they won’t be able to use any of their stronger hard-hitting or healing skills.
Action-Limiting Debuffs
 | Silence | Cast only basic ability. | Jiang Man (Meng Po), Bai Liuli (White Snake), Ollie (Osiris), Laura (Neith) |
 | Taunt | Forced to attack the debuff caster with basic ability at the start of turn. | Djoser (Atum), Falken (Horus), Ren Si (Black Tortoise), Bardon (Baldr), Li Ao (Tao Tie), David (Jason), Ollie (Osiris) |
Use the enemies’ high SPD to your advantage
Sometimes, when you can’t control something, the best thing to do is to embrace it. Since their turns come by so quickly, there are certain debuffs that you can use against your high SPD enemies that will trigger a negative effect at the start of every turn.
Debuffs best used on High SPD Enemies
 | Bleed | Receives True Damage equal to 50% of the debuff caster’s ATK at the start of the turn. | Lu Yi (Dayi), Lin Xiao (White Tiger), Zelmer (Sekhmet) |
 | Pandora’s Box | Takes effect at the start of the target’s 2nd turn. Removes a certain percentage of current HP and inflicts Stun for 1 turn. | Anesidora (Pandora) |
 | Poison | Loses 4% of max HP at the start of the turn. | Jiang Man (Meng Po), Kara (Serket), Jacob (Jormungand), Hall (Hodur), Layla (Medjed), Meredith (Scylla) |
Making the most out of your high SPD
Alternatively, if your Espers are the ones with high SPD, there are some buffs that will complement this stat very well that also trigger at the start of each turn:
Buffs best paired with High SPD
 | Recovery | Recovers 15% max HP at the start of the turn. | Asenath (Nefertem), Fabrice (Freyr), Heng Yue (Chang’e), Luo Yan (Yanluo Wang), Berenice (Bastet), Ye Suhua (Shao Siming), Ollie (Osiris), Nicole (Nephthys) |
 | Conductor | Deals damage to all enemies based on DEF at the beginning of each turn. Removed upon receiving disables. | Donnar (Thor) |
 | Neko-Sense | Each stack increases Tevor’s damage taken by 15%. When stacks are maxed, resets all ability cooldowns and attacks a target twice the next turn, then removes all existing stacks. Max 2 stacks. | Tevor (Sphinx) |
4. Know When to Use Your Skills
Each Esper has their own unique set of skills. How you use those skills will dictate how you do in battle. Basic skills, the first skill on your set, have no cooldowns and can be used anytime. On the other hand, your higher damage skills, healing skills or buff and debuff skills (which are usually the second or third skill) have cooldowns of their own unless they’re a passive skill. Because of this, you won’t always have the option to use them so you have to be wise when it comes to timing.
When to use Basic Skills
Since this is usually the least powerful skill you usually use this when your two other powerful skills are on cooldown. Aside from that though, it may benefit you to use them if you are saving your stronger skills for the next wave and the enemies that are left are close to death. The first skill is also typically a one-target skill, and depending on the Espers on your team, using this skill can be the best choice in a situation.
An example of this is Mona (Artemis)’s first skill, Moonshot, where she gains an additional turn if she kills an enemy with this attack. Another example is Hall (Hodur)’s Passive 2nd skill where each time an ally attacks individual targets, he deals an attack of his own on the same target.
When to use your High Damage Skills
This depends greatly on the kind of enemies you have. If you have 1 wave of enemies, use them as soon as you can to finish the battle. If you have 2-3 waves of enemies, it’s best to use just a couple of them at a time so that when you reach the next wave, there are still some strong skills that are not on cooldown that you can use on the fresh batch of enemies.
Avoid using your high damage skills on enemies that are already near death unless it is the last enemy. You would not want to waste a skill that could be used to attack a healthier enemy. Aside from this, prioritize using multiple-target skills at the start so that you could weaken the enemy and it would be easy to pick them off with your one-target skills.
When to use your Healing Skills
The best time to use them is when your ally’s life is less than 50% unless you are fighting an enemy or boss that could launch a fairly strong attack like Kronos from Ritual Miracle. In those cases, you’d want to make sure to keep your HP as full as possible before Kronos attacks as he launches a second attack as a bonus turn if he successfully kills at least one ally with it. There are also a couple of Espers with that type of skill that could wipe out your team blow after blow so be careful.
When it comes to fighting in multiple waves, I highly suggest that you hold off on using your healing skills when the wave you are currently in is about to finish and you still have a next wave waiting for you. This is because the game heals you in between waves. If you have 50% or more HP left in you before the wave ends, save your heals for later.
When to use your Buff and Debuff Skills
Buffs and debuffs are always best used at the start of a battle so that each attack would be at its best potential. Just make sure that your first turns are not all buff and debuff skills and balance them out with some damage attacks (unless of course your buff and debuff skills deal damage as well). However if you would like to know each specific buff and debuff’s best use, read on to the next section below.
5. Strategize with Buffs and Debuffs
There are many different buffs and debuffs in the game and a few of them are unique to certain Espers. You don’t need to learn all the buffs and debuffs by heart to play the game and win your battles, but when you find yourself stuck on a level or stage, it has its advantages.
Learning what they do and how to use it can greatly help you in battle and even help you form your squad. Below is a list of buffs and debuffs and which Espers possess them as well as our notes on their recommended use. Take note that this list does not involve buffs and debuffs of Miramon, Sentinels and other enemies.
How to utilize Buffs
Buffs are status effects that positively affect a character.
Regular Buffs
These are buffs that are usually shared by many different Espers and can be disabled.
 | ATK Up | Increases ATK by 40%. | Narmer (Ra), Sally (Sif), Sienna (Gaia), Fabrice (Freyr), Luo Yan (Yanluo Wang), Dhalia (Calypso), Taylor (Hercules), Brynn (Valkyrie), Freddy (Fenrir), Ye Suhua (Shao Siming), Unky Chai (Yue Lao) |
Useful against enemies with high HP or DEF. Low ATK allies will greatly benefit from this.
 | C.RATE Up | Increases C.RATE by 30%. | Lewis (Ares), Dhalia (Calypso), Taylor (Hercules), Xie Chuyi (Death Guard Hei), Kaylee (Anuket), Helena (Helen), Unky Chai (Yue Lao) |
Use with allies that have high C.DMG to fully utilize this buff.
 | CRIT RESIST | +30% CRIT RESIST | Laura (Neith), Meredith (Scylla) |
Best used on low HP or DEF allies or when against enemies with high C. RATE or C. DMG.
 | DEF Up | Increases DEF by 60%. | Donnar (Thor), Gabrielle (Njord), Celine (Siren), Bardon (Baldr), Ye Suhua (Shao Siming), Nicole (Nephthys), Meredith (Scylla) |
Useful against enemies with high ATK. Low DEF allies will greatly benefit from this. May not be so useful against enemies with True Damage.
 | Immunity | Cannot be debuffed. | Donnar (Thor), Gabrielle (Njord), Sally (Sif), Unas (Shu), Clara (Hera), Cecilia (Isis), Fabrice (Freyr), Lynn (Hathor), Chang Pu (Yao Ji) |
Useful against enemies with many debuff skills.
 | Invincibility | Immune to all damage. | Fabrice (Freyr), Ye Suhua (Shao Siming), Ollie (Osiris) Nicole (Nephthys) |
Useful for when you are up against enemies that you have an elemental disadvantage with. Also useful for when you have an ally that is near death and cannot be healed immediately or at all.
 | Recovery | Recovers 15% max HP at the start of the turn. | Asenath (Nefertem), Fabrice (Freyr), Heng Yue (Chang’e), Luo Yan (Yanluo Wang), Berenice (Bastet), Ye Suhua (Shao Siming), Ollie (Osiris), Nicole (Nephthys) |
Useful for all situations but best used during battles that you have a hard time surviving. Good to pair with an Esper with a SPD buff so heals would be frequent.
 | Shield | Absorbs damage equal to shield strength. | Tang Xuan (Sun Wukong), Berenice (Bastet), Lynn (Hathor), Cecilia (Isis), Clara (Hera), Lynn (Hathor), Berenice (Bastet), Laura (Neith) |
Shield Strength is not a base stat and usually depends on many factors like the caster’s HP, the HP of the ally it is casted on or overflow healing. To maximize its use, focus on increasing the HP of the Esper that has this buff or use on high HP allies depending on how the Esper’s skill that has this buff works.
 | SPD Up | Increases SPD by 30%. | Sienna (Gaia), Celine (Siren), Eira (Freya), Sander (Set), Anesidora (Pandora), Xie Yuzhi (Death Guard Bai), Meredith (Scylla) |
Useful against enemies with high SPD. Low SPD allies will greatly benefit from this.
 | Standoff | Retains at least 1 HP. (In this state, Esper is Immune to AP Down.) | Catherine (Hela), Freddy (Fenrir), Nicole (Nephthys) |
Best used when fighting through multiple waves and boss fights or Sentinels. Useful to use just before a strong enemy attacks or when an ally is in danger of dying. Do not use it when your allies are at full health or are not in danger of dying yet.
 | Soul Guard | 30% of the damage taken by the carrier is redistributed to the caster. The carrier, when dies, revives immediately and restores 10% of their max HP. This buff expires on the caster’s death. | Nicole (Nephthys) |
Best used on low HP or DEF Espers on your team.
Silver-Framed Buffs
These are buffs that are unique to their Espers and ignore ACC and RESIST, cannot Miss and must be triggered.
| Brisingamen’s Watch | Grants 15% bonus AP at the end of each teammate’s turn. | Eira (Freya) |
Best used on allies with low SPD. May also be beneficial to use it along with allies that can stun or silence or increase other allies’ speed, letting your team attack more often than your enemies.
 | Death Tome | Marks the current HP% of a teammate. After 2 turns, if the teammate has lost some HP, then restores to the marked HP%; if the teammate has died, then resurrects them. | Luo Yan (Yanluo Wang) |
Allies with low maximum HP would benefit greatly from this buff. It is also helpful for dealing with multiple waves of enemies and fighting boss battles or Sentinels.
 | Fangs | Can’t be Poisoned. May retaliate to an attack with Poison for 1 turn. | Jacob (Jormungand) |
A good counter against enemies with Poison debuff.
 | Kiss of the Nightingale | Blesses an allied Esper, returning 60% of damage received as True Damage to the attacker. (Alexa (Aphrodite)’s third skill returns 75% of damage instead). | Alexa (Aphrodite) |
A good counter against enemies with high ATK. Best used with high HP allies so that they could take in a lot of damage and return a lot of them back to the enemy.
 | Lotus Mark | Reduces damage taken by 50%. Disappears when attacked. | Asenath (Nefertem) |
Best used before a strong enemy would attack, especially enemies that have skills that damage more than one enemy. Very useful against Sentinels or boss battles.
 | Tiger Roar | C.RATE increases 100% during the next attack. | Lin Xiao (White Tiger) |
Best paired with allies that have high C.DAMAGE.
Gold-Framed Buffs
These are buffs that are unique to their Espers and are undispellable or not removable.
 | Breath of the Deep | (Undispellable) Grants +5% ATK per stack, and +3% damage reduction per 10 stacks; up to 50 stacks. | Hyde (Hades) |
To fully utilize this, use against enemies with debuffs and / or allies with buffs as each buff or debuff on Hyde (Hades) will grant a stack of this buff.
 | Bull Rage | +10% DEF and +5% RESIST per stack. Max 10 stacks. | Djoser (Atum) |
Useful against most enemies, especially those that have debuff skills.
 | Burning Sun | Amplifies the power of Emblazoned Strike. | Narmer (Ra) |
To fully utilize this buff, increase Narmer (Ra)’s ATK stat through buffs during battle or advancements, resonance or ascension outside of battle.
| Conductor | Deals damage to all enemies based on DEF at the beginning of each turn. Removed upon receiving disables. | Donnar (Thor) |
Avoid using against enemies with disabling debuffs. To fully utilize this buff, increase Donnar (Thor)’s DEF stat through buffs during battle or advancements, resonance or ascension outside of battle.
 | Death | (Undispellable) Inflicts additional damage equal to 5% of the target’s max HP (under 50% of ATK) upon dealing damage. | Tang Xuan (Sun Wukong) |
Useful against enemies with high HP. Even more useful when paired with an ally that does multiple attacks per turn that would trigger the additional damage for each time.
| Haste | (Undispellable) Grants 30 SPD per Haste (max 3 stacks). Dispelled after launching an attack. | Unas (Shu) |
Best used against enemies that have high SPD or when your team has low SPD.
| Neko-Sense | Each stack increases Tevor’s damage taken by 15%. When stacks are maxed, resets all ability cooldowns and attacks a target twice the next turn, then removes all existing stacks. Max 2 stacks. | Tevor (Sphinx) |
Best used with an ally that can heal Tevor (Sphinx) as he takes additional damage from the buff before he can use it against enemies.
 | Scorch | (Undispellable) Inflicts Diseased for 2 turns upon damaging the target. | Tang Xuan (Sun Wukong) |
Useful against enemies with healing abilities. Even more useful when paired with an ally that has a poison debuff.
 | Shackle | (Undispellable) Has a 40% chance to inflict DEF Down for 2 turns upon damaging the target. | Tang Xuan (Sun Wukong) |
Useful against enemies with high DEF. Even more useful when paired with an ally that does multiple attacks per turn for a higher chance to trigger DEF Down.
 | Supporting Song | (Undispellable) Grants +2% base ATK per stack (max 25 stacks). | Ahmed (Geb) |
Best used on high damage-dealing Fighters or Espers that may need a little ATK boost.
 | Sweet Harvest | Can’t Move. All Allied Espers take 25% less damage. Each time before an ally moves, dispels a debuff on them and heals them for some HP. | Sally (Sif) |
Best used against enemies that have skills that cause debuffs. Also very useful against Sentinels or boss battles.
 | Thunder Blessing | Increases DEF by 20% upon receiving damage (stacks up to 5 times). | Donnar (Thor) |
Best used against enemies that deal multiple attacks per turn.
How to utilize Debuffs
Debuffs are status effects that negatively affect a character.
Regular Debuffs
These are debuffs that are usually shared by many different Espers and can be disabled.
 | ATK Down | Reduces ATK by 40%. | Donnar (Thor), Gabrielle (Njord), Falken (Horus), Lynn (Hathor), Anesidora (Pandora), Q (Cupid), Hall (Hodur), David (Jason), Ye Suhua (Shao Siming) |
Useful against enemies with high ATK. Low DEF Esper allies have a higher chance of surviving when this is used.
| Bleed | Receives True Damage equal to 50% of the debuff caster’s ATK at the start of the turn. | Lu Yi (Dayi), Lin Xiao (White Tiger), Zelmer (Sekhmet) |
Useful against enemies with high DEF since True Damage ignores it. To fully utilize this buff, increase your Esper’s ATK stat through buffs during battle or advancements, resonance or ascension outside of battle.
 | Buff Blocker | Cannot be buffed. | Raven (Odin), Biondina (Poseidon), Chloe (Medea), Chalmers (Idun) |
Useful against enemies with buffing skills.
 | DEF Down | Reduces DEF by 60%. | Tang Xuan (Sun Wukong), Raven (Odin), Gabrielle (Njord), Unas (Shu), Djoser (Atum), Ren Si (Black Tortoise), Lin Xiao (White Tiger), Xie Chuyi (Death Guard Hei), Brynn (Valkyrie), Drew (Anubis), Q (Cupid), Zelmer (Sekhmet), Hall (Hodur), Berenice (Bastet), Ollie (Osiris) |
Useful against enemies with high DEF. High ATK Esper allies will have the best advantage over this.
 | Diseased | Cannot be healed. | Tang Xuan (Sun Wukong), Kara (Serket), Lin Xiao (White Tiger), Luo Yan (Yanluo Wang), Chalmers (Idun), Layla (Medjed), Leon (Vali) |
Useful against enemies with healing abilities. Even more useful when paired with an ally that has a poison debuff.
| Freeze | Cannot take actions. | Long Mian (Ao Bing), Dhalia (Calypso), Kaylee (Anuket), Brynn (Valkyrie) |
Target enemies closest to your current character in the Action Point Bar to make them skip a turn or enemies with the highest AP percentage. Can be used to prevent high damage-dealing enemies or enemies with strong abilities from attacking.
 | Miss Rate Up | Increases Miss Rate by 50%. | Triki (Loki), Arcana (Hermes), Alexa (Aphrodite), Catherine (Hela) |
Choose a team of Espers that have an elemental advantage over your enemies to efficiently utilize this buff.
| Poison | Loses 4% of max HP at the start of the turn. | Jiang Man (Meng Po), Kara (Serket), Jacob (Jormungand), Hall (Hodur), Layla (Medjed), Meredith (Scylla) |
Very useful against enemies that have high HP. May also be useful against enemies that have high SPD since their turns come by so quickly and they get damaged at the start of each turn.
| Petrification | Cannot take actions or reduce ability cooldown. | Triki (Loki), Jacob (Jormungand), Melanie (Medusa) |
Target enemies closest to your current character in the Action Point Bar to make them skip a turn or enemies with the highest AP percentage.
 | Sear | Increases damage received by 25%. | Raven (Odin), Tevor (Sphinx), Xie Chuyi (Death Guard Hei), Leon (Vali), Bai Liuli (White Snake), Nicole (Nephthys) |
Useful against enemies with high DEF. High ATK Esper allies will have the best advantage over this. Espers with skills with True Damage would be even more effective.
| Silence | Cast only basic ability. | Jiang Man (Meng Po), Bai Liuli (White Snake), Ollie (Osiris), Laura (Neith) |
Very useful against enemies that have strong 2nd and / or 3rd skills but weak basic abilities. Can prevent some healer enemies from healing their team.
| Sleep | Cannot take actions until damaged. | Celine (Siren), Stewart (Dionysus) |
Target enemies closest to your current character in the Action Point Bar to make them skip a turn or enemies with the highest AP percentage. Can be used to prevent high damage-dealing enemies or enemies with strong abilities from attacking or from healers to heal their team.
| SPD Down | Reduces SPD by 30%. | Tiye (Nut), Kara (Serket), Eira (Freya), Sander (Set), Lin Xiao (White Tiger), Long Mian (Ao Bing), Dhalia (Calypso), Xie Chuyi (Death Guard Hei), Kaylee (Anuket), Brynn (Valkyrie), Melanie (Medusa), Lauren (Heket) |
Useful against enemies with high SPD or when allied Espers have low SPD.
 | Stun | Cannot take actions. | Jin Yuyao (Queen Mother), Tiye (Nut), Triki (Loki), Lucas (Apollo), Sienna (Gaia), Arcana (Hermes), Sander (Set), Pritzker (Mimir), Anesidora (Pandora), Bonnie (Eris), Dhalia (Calypso), Xie Yuzhi (Death Guard Bai), Bardon (Baldr), Tang Yun (Six-Eared Macaque), David (Jason), Layla (Medjed), Jeanne (Gerd) |
Target enemies closest to your current character in the Action Point Bar to make them skip a turn or enemies with the highest AP percentage. Can be used to prevent high damage-dealing enemies or enemies with strong abilities from attacking or from healers to heal their team.
| Taunt | Forced to attack the debuff caster with basic ability at the start of turn. | Djoser (Atum), Falken (Horus), Ren Si (Black Tortoise), Bardon (Baldr), Li Ao (Tao Tie), David (Jason), Ollie (Osiris) |
Very useful against enemies that have strong 2nd and / or 3rd skills but weak basic abilities. Can prevent some healer enemies from healing their team. Can be used to prevent high damage-dealing enemies or enemies with strong abilities from attacking or from healers to heal their team.
Silver-Framed Debuffs
These are debuffs that are unique to their Espers and ignore ACC and RESIST, cannot Miss and must be triggered.
| Devour | Prevents the target from taking actions, being selected, being attacked and being buffed/debuffed. | Li Ao (Tao Tie) |
Target enemies closest to your current character in the Action Point Bar to make them skip a turn or enemies with the highest AP percentage. Can be used to prevent high damage-dealing enemies or enemies with strong abilities from attacking or from healers to heal their team.
 | Eye of Horus | When this debuff expires, the carrier receives True Damage equal to 20% of total damage they received during this debuff. | Falken (Horus) |
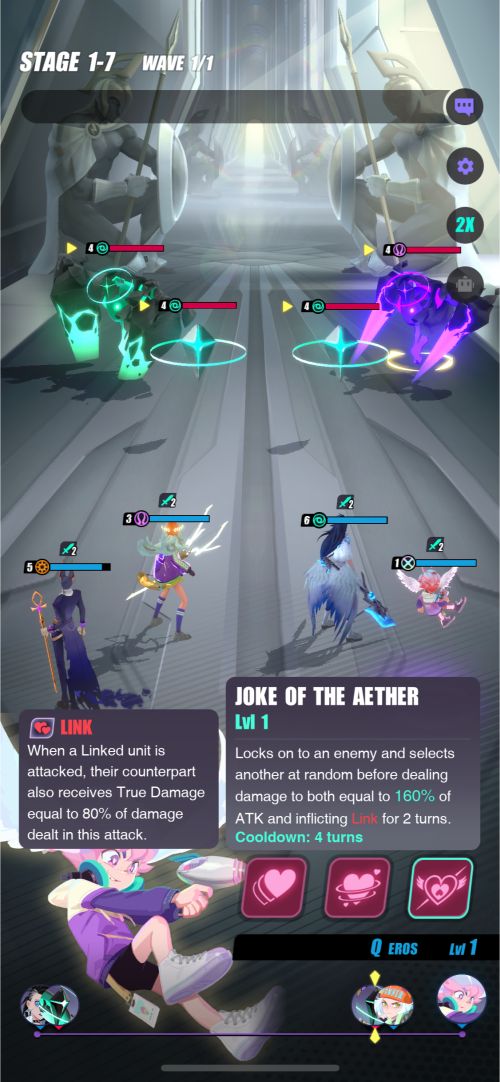
Useful against enemies with high DEF since True Damage ignores it. Best paired with allies that have a buff that increases ATK.
 | Link | When a Linked unit is attacked, their counterpart also receives True Damage equal to 80% of damage dealt in this attack. | Q (Cupid) |
Useful against enemies that are in stealth and enemies that your team has an elemental disadvantage against. The skill will link your selected enemy randomly, but if you happen to link an enemy you have an elemental disadvantage against and an enemy you have an elemental advantage against, attacking the latter will make it easier to kill the former. Linking two enemies then using an area attack or any attack that affects more than one enemy will make each Linked enemy experience almost twice the damage.
 | Netherbloom | Enemies marked with Netherbloom will suffer a Netherbloom blast after taking 5 attacks, receiving damage equal to 85% of Meng Po’s ATK. This blast also deals damage of the same amount to 2 other random enemies. Has a 50% chance of Silencing the affected targets for 2 turns. | Jiang Man (Meng Po) |
Best used with an ally that does multiple attacks so that you can trigger a Netherbloom blast more quickly. Allies with high SPD or those that have buffs that increase speed may also be beneficial paired with this debuff.
 | Neko-Curse | This debuff is removed upon the carrier’s death, dealing 40% of Tevor’s ATK as True Damage to all enemies. Each Stack increases the multiplier by 40%, max 5 stacks. | Tevor (Sphinx) |
To fully utilize this debuff, increase Tevor (Sphinx)’s ATK stat through buffs during battle or advancements, resonance or ascension outside of battle. Helpful when fighting against high HP enemies or enemies that heal often.
| Pandora’s Box | Takes effect at the start of the target’s 2nd turn. Removes a certain percentage of current HP and inflicts Stun for 1 turn. | Anesidora (Pandora) |
Very useful against enemies that have high SPD as they will reach their 2nd turn before most characters in battle.
6. Enhance your Espers
At some point you will find that no matter how many times you redo a level and no matter how many different combinations of teams and strategies you’ve tried, you still can’t pass a certain stage. When that time comes, it means it’s time to enhance your Espers through the Espers tab.
Equip them with Relics
Relics are the equivalent of equipment in most RPGs. It is one of the easiest improvements to implement as you can freely equip and unequip them to any Esper you have. Relics increase certain stats of your Esper, and if you manage to equip them with a set of four (Triangle, Diamond, Circle and Square) or a set of two (Hexagon and Club) you get a set bonus. You can easily identify which are sets because they have the same names.
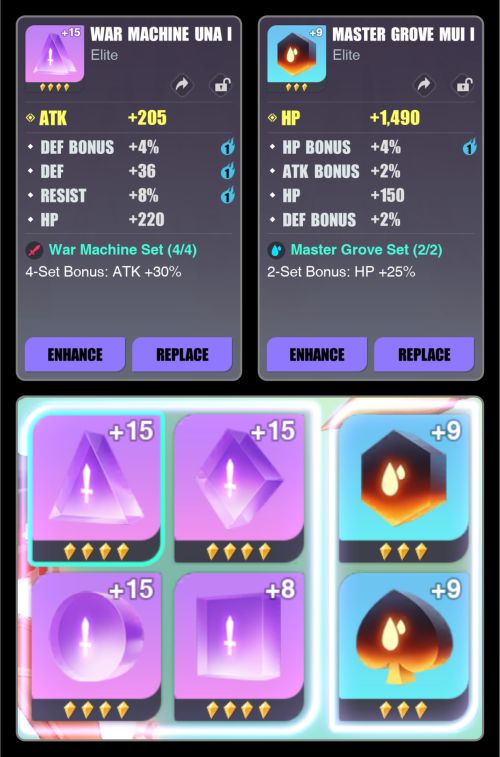
Relics have a main attribute and can have up to 4 secondary attributes. Each Relic slot has a different main attribute:
• Triangle – ATK
• Diamond – DEF
• Hexagon – HP
• Circle – ATK / ATK% / DEF / DEF% / HP / HP% / C.RATE / C.DMG
• Square – ATK / ATK% / DEF / DEF% / HP / HP% / ACC / RESIST
• Club – ATK / ATK% / DEF / DEF% / HP / HP% / SPD
Secondary Attributes on the other hand may vary.
The stars on the Relic determine how high are the stats you can get from it. The number of stars on a Relic can go as low as 2 or as high as 6. The higher the number of stars, the more gold it costs to enhance. However, the number of stars does not determine the quality of the Relic.
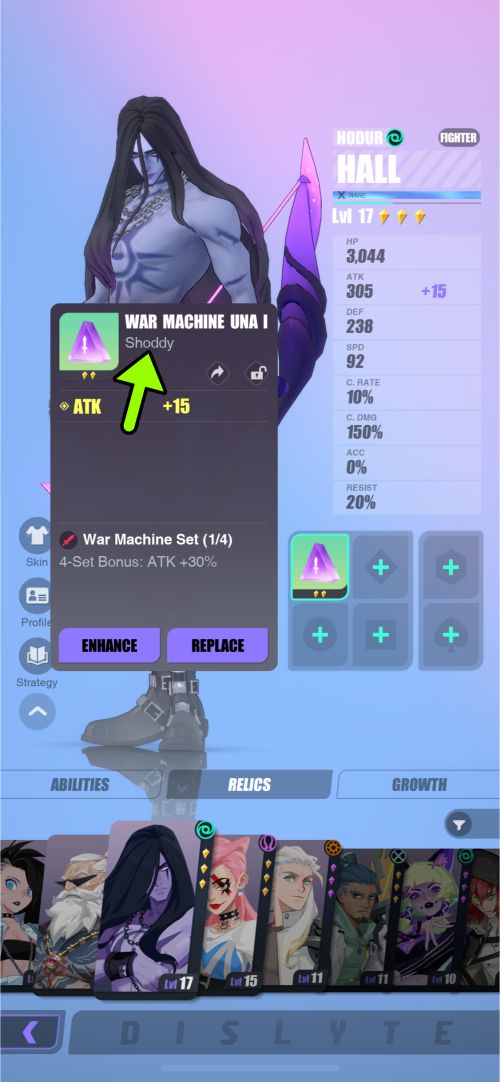
Relic Quality determines how many secondary attributes they can have at level 0 and how many attributes they can have when fully enhanced at lvl 15. You can find out what quality your Relic is by clicking on the Relic and checking underneath the name of the relic.
Below, we have listed the different Relic Qualities, their number of secondary attributes at Lvl 0 and how many boosted secondary attributes you can get at Lvl 15.
| Quality | Number of Secondary Attributes at Lvl 0 | Boosted Secondary Attributes at Lvl 15 |
| Shoddy | 0 | 1 |
| Good | 1 | 2 |
| Elite | 2 | 3 |
| Superior | 3 | 4 |
| Flawless | 4 | 5 |
When you enhance a relic, the main attribute is improved. For every three enhancements, a secondary attribute is unlocked. Once it is, the next enhancements at three intervals will boost a random secondary attribute.
We highly suggest not investing too much in Shoddy or Good Quality Relics. Elite Relics may be fine for a while when you are just starting, but Superior and Flawless Relics are the ones that are worth investing in for the long run.
However, they cost a lot more to enhance, especially since the Success Rate of the enhancement lowers and the price increases for each level up. If you fail an enhancement, you can try again until you reach the limit of failures. Once you reach that limit, your Relic will be guaranteed to enhance. The number of tries until guaranteed enhancement only appears when you auto enhance.
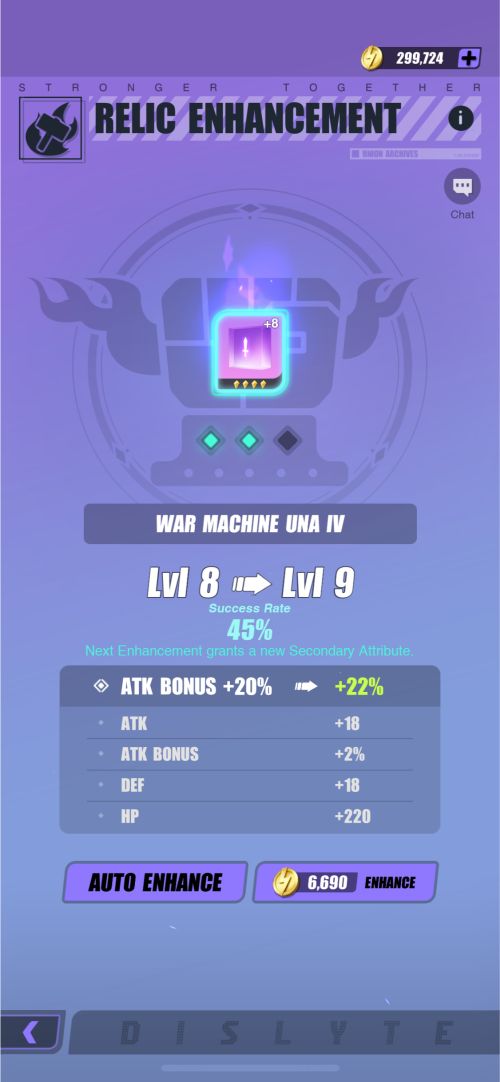
Auto Enhance will let the Relic enhance automatically until a certain level. Keep in mind that if you do, the game will keep enhancing it, even after failing, until you succeed or until you run out of funds.
You can obtain Relics by playing through Story Mode or Ritual Miracle and Cube Miracle in Trials or buying them in Shops. When you reach account level 7, you also have the option of making your own 6-Star Relics but they are very expensive to make and you need to gather Relic Dust, Relic Crystals or Relic Essences from Cube Miracle for it. However, if you want a specific type of Relic sometimes this is the only way to obtain it.
Experimons, Abilimons and Starimons
In Advancement, you can enhance your Esper with the use of special entities called Experimons, Abilimons and Starimons. You can buy these in Shops or earn them as rewards in the Infinite Miracle under Trials, Bounties, Achievement Rewards, Course Rewards, and Daily Login Gift. You may also check under Events to see if there are any quests or freebies that give those out.

Use Experimons to increase your levels
There are four different types of Experimons that you can use to increase your level: Basic, Advanced, Elite and Special. To give you an idea of their differences, we made a table comparing how much XP or experience points you can get and how much a level 1 Esper can level up if an Experimon of a certain type is used for Level Advancement. You can also use Experimons on Starimons to level them up. You can use up to 5 Experimons at a time to level up.

| Experimon | XP | Leveling up a Lvl 1 Esper |
| Basic | 1,000 | Lvl 4 |
| Advanced | 4,000 | Lvl 10 |
| Elite | 20,000 | Lvl 20 |
| Special | 75,000 | Lvl 30 |
Use Abilimons to enhance your abilities
Abilimons come in three types of rarities that you can use to enhance your abilities: Rare, Epic and Legendary. Unlike Experimons that you can use on any Esper, Abilimons have to match the same rarity as the Esper you are enhancing. You can also use up to 5 Abilimons at a time to enhance your abilities.
These upgrades can potentially increase your abilities’ damage, decrease cooldowns, increase trigger chance and so on. Unfortunately, you cannot use which ability to upgrade as it chooses a random ability that has not been maxed yet.

Use Starimons to promote your Esper
A Esper’s level cap depends on their rarity. In order to increase their level cap, you must promote them, adding a star next to their level. Each star increases the level cap by 10. A Rare Esper can be promoted 3 times, an Epic 2 times and a Legendary 1 time. However, you can only promote them when your Esper has reached its maximum level.
| Esper Rarity | Level Cap |
| Rare | Lvl 30 |
| Epic | Lvl 40 |
| Legendary | Lvl 50 |
Starimons, like Abilimons, also come in three types of rarities that you can use to promote your Esper: Rare, Epic and Legendary. Similar to Abilimon, you also need to match the Starimon you will use to the Esper of the same rarity. You may also promote your Starimon the same way so that you can have Starimons of higher rarity as it is a lot harder to get.

There is also an option to use other Espers to promote your Starimon or other Espers but it is not advisable as duplicate Espers are best used for Resonance. On the other hand, if you’ve already maxed out your Esper through Resonance, this would be the best way to dispose of your extras.
Merging your duplicate Espers
Since you can only get Espers through Echo, which is a Gacha system where everything is random, you will sometimes get duplicates of your Espers. Duplicates may seem like a waste at first glance but you can actually increase your ATK, HP and DEF when you resonate them with the same Esper. Rare Espers get 4 Energy when resonating, 5 for Epic Espers and 6 for Legendary Espers.
All of them will get a Lvl 1 Starimon of the same Star Rating afterwards. There doesn’t seem to be a benefit from leveling up a duplicate before Resonating them. If you try to Resonate a higher leveled or upgraded Esper to a new, Unresonated Esper, you will still get the same result.
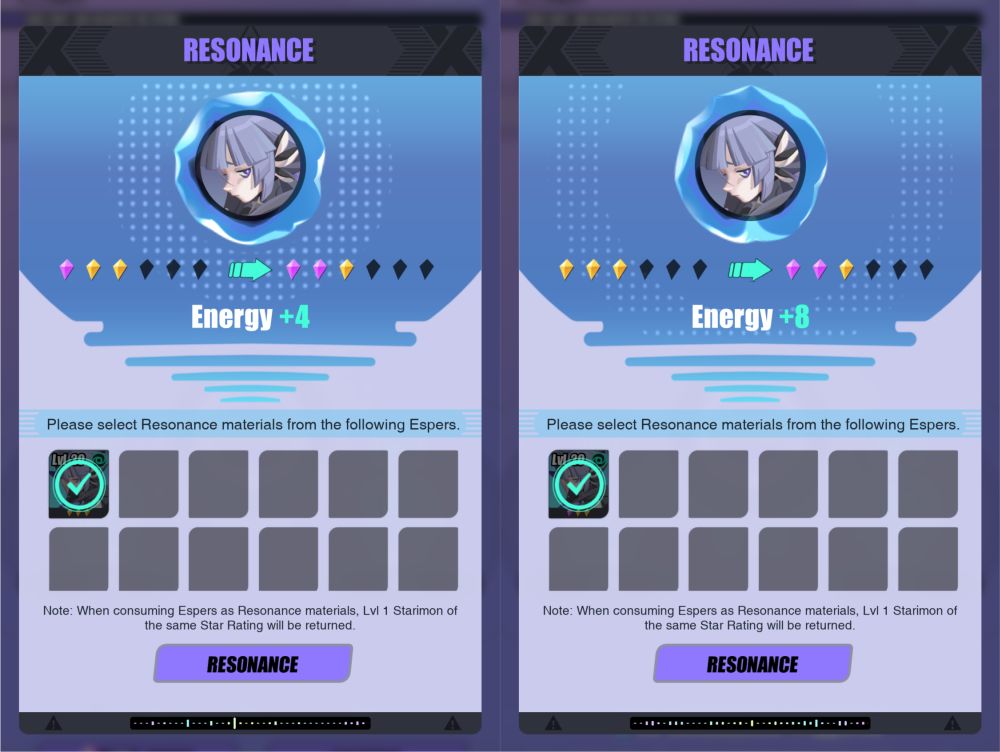
In the example below, the image at the left includes an Esper that was Resonated once (already received +4 Energy) and is being combined with an Unresonated Esper. From this, they will get another +4 Energy. All in all, they have a total of +8 Energy received from the two Resonance which is the same result as the right where an Unresonated Esper is combined to an Esper that was Resonated once.
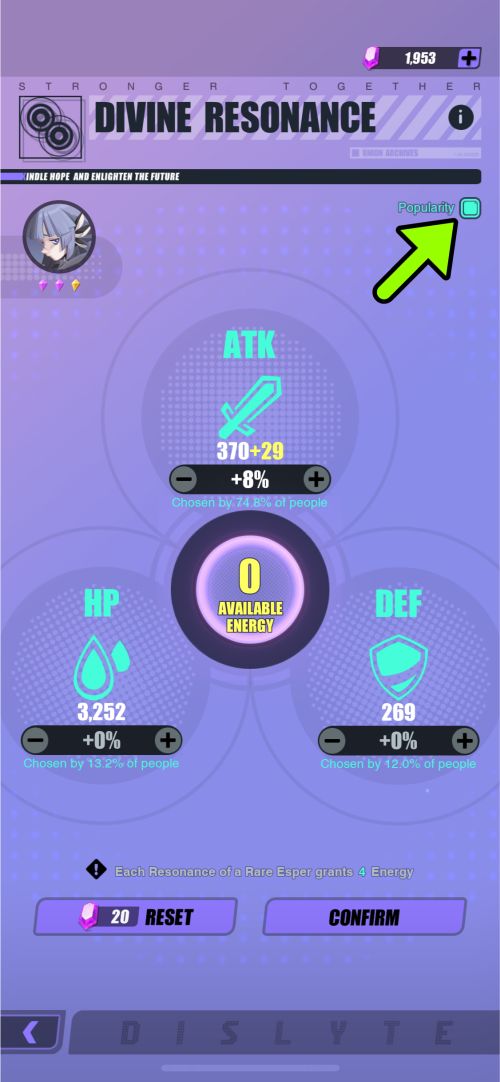
Since each Esper is unique, you need to take a couple of minutes to read what each of their skills do in order to fully use them to your advantage. You might think that adding more ATK to your character would be the best way to increase their damage in battle, but some skills may depend more on HP or DEF. If you’re unsure, there’s a popularity tab at the upper right side that can tell you which stat most people choose to apply to the Esper.
Alternatively, you could also save your duplicates and use them in Esper Fusion to unlock new Espers. However, you can only unlock this at account level 25.
Unlocking more Upgrades
Ascension is unlocked at Account Level 15. Here, each Esper gets 6 Phases of Bonuses that they can get at Lvl 1, 10, 20, 30, 40 and 50. Each Phase costs Waves that match the Esper’s element. Each bonus ranges from Stat increases to Ability Upgrades. You can get Waves from Sonic Miracle in Trials.

You can also use the S-Remixer to turn Basic Waves into Advanced Waves and then into Elite Waves which are required to unlock later Phases.
7. Farm with Multi-Battles
When you’re in the Formation Screen, you might have noticed the option at the lower left that says “Multi-Battle”. Multi-Battles are a great way to farm for relics and materials while easily leveling up your Espers or Starimon if you have enough Stamina to use.
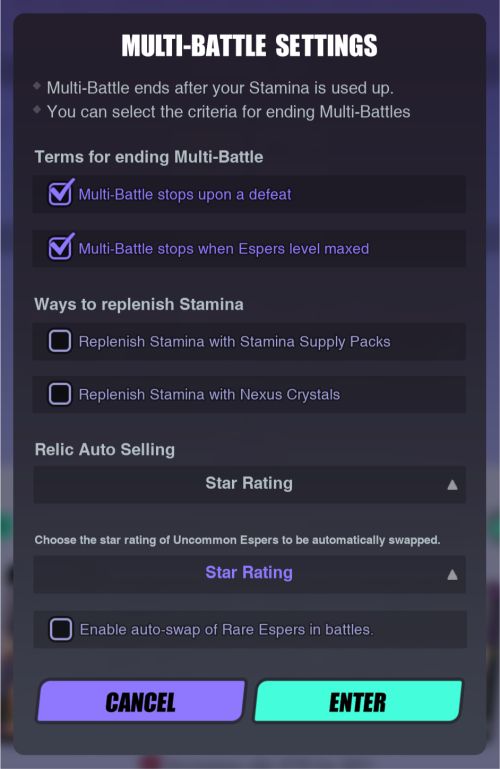
Before it proceeds, the game will allow you to set the terms for ending a Multi-Battle, ways to replenish Stamina and Relic Auto Selling. Even without setting any terms, Multi-Battles always end at the 10th round. We recommend keeping the terms “stops upon defeat” and “stops when Espers level maxed” to minimize the amount of stamina and experience points wasted.
We also recommend Auto Selling Relics that are 1-2 stars. If your level is even higher and you’re Multi-battling against stronger enemies, you may even set it to 1-3 or 4 stars. As for replenishing stamina, that is up to you. But take note that the settings you chose in a Multi-Battle will be retained on the next one.
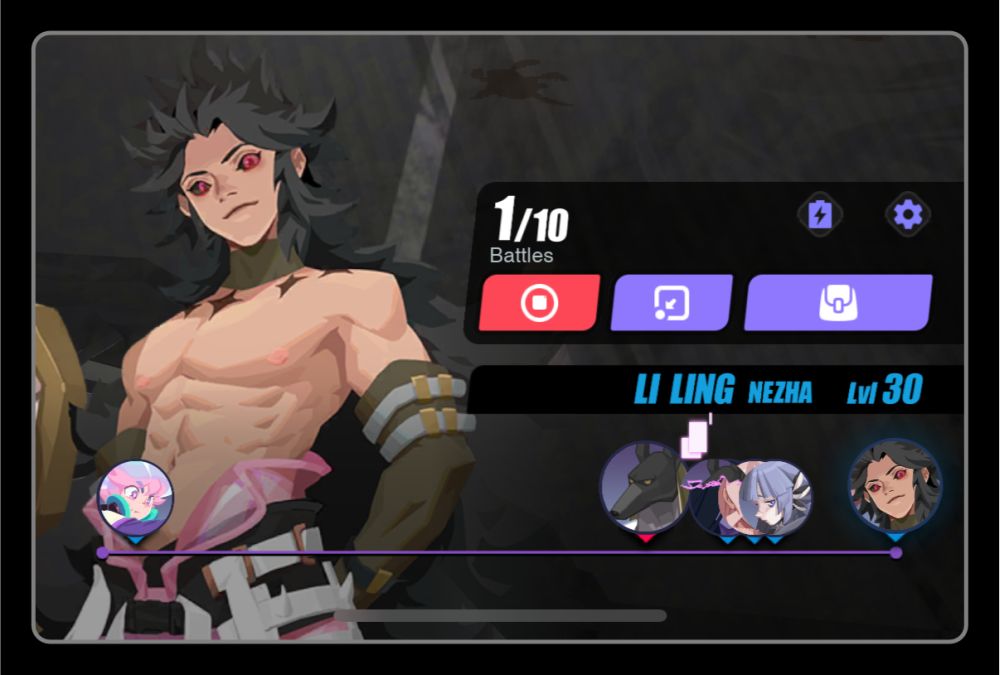
Once the Multi-Battle starts, a different set of buttons will appear where your abilities usually are. Clicking the cogwheel icon will allow you to change the settings at any time during the Multi-Battle. The bag icon contains all the Relics, Experimons and other resources you gathered during the Multi-Battles. The red stop icon will stop the Multi-Battles after the current battle has finished. The second button allows you to minimize the current Multi-Battle and play on another game mode which is great because you get to farm in two different modes at the same time.
However, you cannot do a Multi-Battle on one mode then play on the same mode. You also cannot do more than one Multi-Battle at the same time. Aside from this, you have to clear the stage at least once before you can Multi-Battle it. Currently the only modes where Multi-Battles are possible are Story Mode, Ritual Miracle and Sonic Miracle.
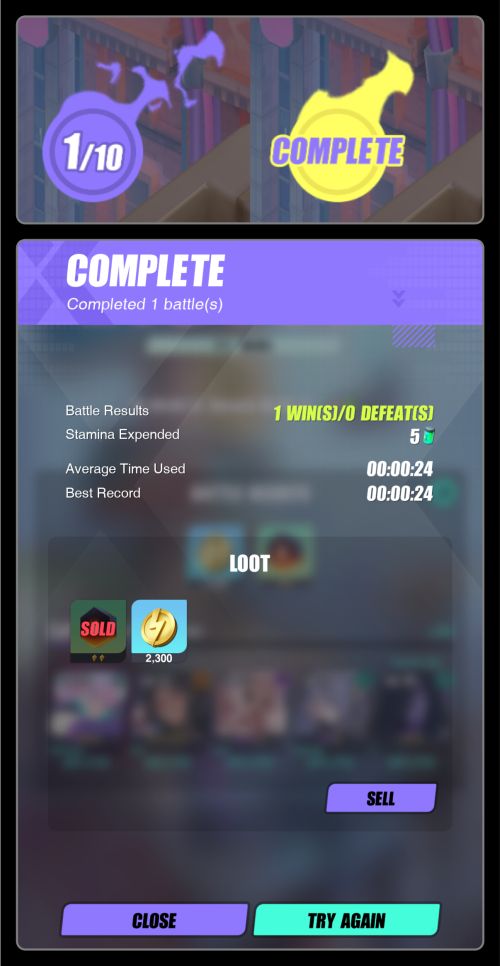
Once you’ve minimized your Multi-Battle, you will see a purple flame with numbers on it on the lower left part of your screen. This will track your Multi-Battle’s progress. Once this turns yellow, the Multi-Battle is complete and you can click on it to collect your XP and loot.
8. Collect Freebies and Rewards
There are a lot of Freebies and Rewards you can get in the game if you know where to look. They range from daily rewards to tasks that may not be easily noticed.
Getting Daily Gifts
These Daily Gifts greet you as soon as you open the game for the first time in the day so it would be very hard to miss. You don’t even have to worry about missing a day as the game just picks up where you left off!

Plaza’s Daily Pack
While Plaza is the place to go to buy resources with real money, they do provide a daily pack for free so be sure to check once a day.

Friendship Matters
In the Friends Tab, you can add your friends or recommended players to be your friend. Having friends in the game has many benefits. By just having friends and an Esper on your Friend Assist slot, you can earn 100 Friendship Points daily. You can also give and claim friendship points from them which you can exchange at the shop for Stamina, Random Wish Stickers and Starimon among others.

Aside from this, you can assign one of your strongest Espers for Friend Assists, letting your friends add your Esper to their team in Ritual Miracle and Sonic Miracle. In turn, you can also use theirs up to 50 times a day. This is very handy when you’re stuck on a stage or you just want some help leveling up.
Limited-Time Events
This changes all the time and has a time limit so be sure to check often which missions are available to gain more rewards. These usually offer the same items as the ones in Missions, but sometimes they will offer Espers that are difficult to obtain.
Passive Missions
Just by playing the game normally, you can accomplish rewardable tasks from Courses, Quests and Achievements under the Missions Tab so be sure to check often! Rewards range from Experimon, Abilimon, Starimon, Relics, Relic Sets, Gold Records, Nexus Crystals, Gold, Relic Dust, Waves, Supply Vouchers, Friendship Points, Admission Certificates and more.

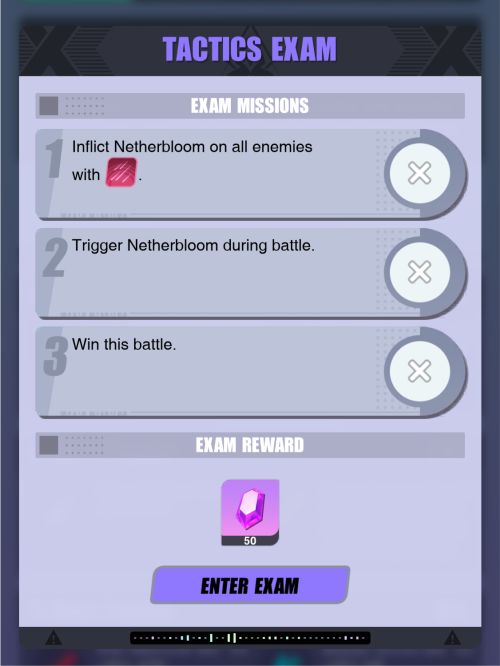
Passing the Tactics Exam
When you first get your Epic and Legendary Espers, you can take the Tactics Exam by going to the Espers Menu, selecting your Esper and clicking Strategy. Passing a Tactics Exam will reward you with Nexus Crystals. All you need to do is to accomplish the three exam missions to pass it which can be done in less than 5 minutes.
Unlocking Espers’ stories in Careers & Diary
When you go to an Esper’s Profile and check Careers you can find the conditions to unlock each segment which is to reach Level 20 and 30 and sometimes there is a fourth segment that you can unlock when you reach Esper Ascension Phase 4.
Unlocking these segments will not only tell you an Esper’s back story, but also reward you some Nexus Crystals. Diary does the same thing except you have to complete a Friendship Commission Bounty to unlock it. Friendship Commission Bounties usually just require you to watch a cutscene about the Esper. The reward for this is Gold.

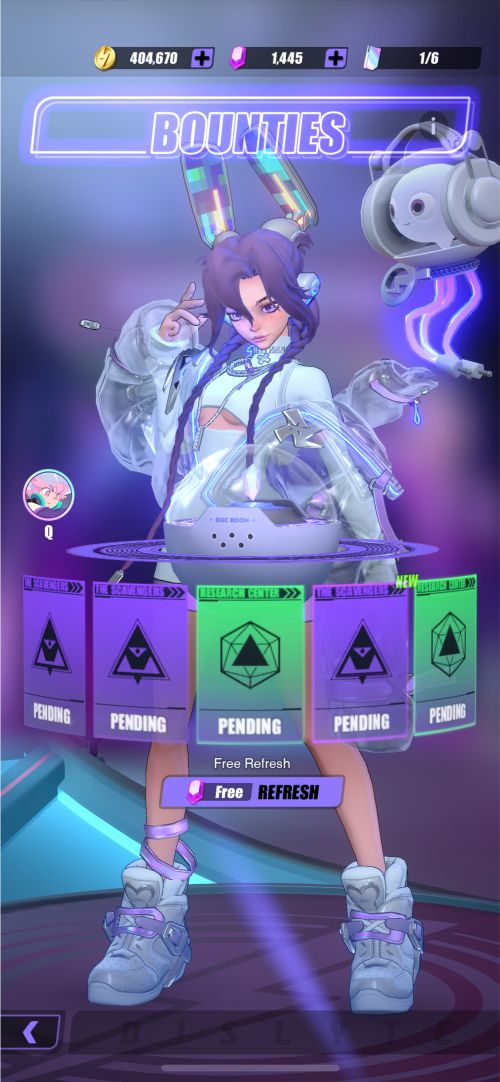
Become a Bounty Hunter
Another way to earn more rewards is by fulfilling Bounties. Five Bounties are displayed at a time and the tasks vary from acquiring certain items, defeating specific enemies and even watching cutscenes of an Esper’s story.
To accept a bounty, you have to exchange a Mission Letter. 3 Mission Letters are given to you at 00:00 UTC everyday and you can have a maximum of 6 Letters. Rewards vary from Gold, Gold Records, Stamina and Nexus Crystals. We recommend checking the Bounties before playing in different game modes since certain Bounties may be easily completed as you play.
9. Other Hints and Easter Eggs
These are hints that don’t necessarily make you better at the game but can improve your gaming experience.
Get rid of distractions!
By default, world chat pops up on the screen just below the bar that displays your currencies. While this may not be a big deal for some people, it can prove to be distracting, especially if you are trying to immerse yourself in the game and there are system announcements about the Ripple Dimension or someone is debating about whether pineapple deserves to be on pizza.
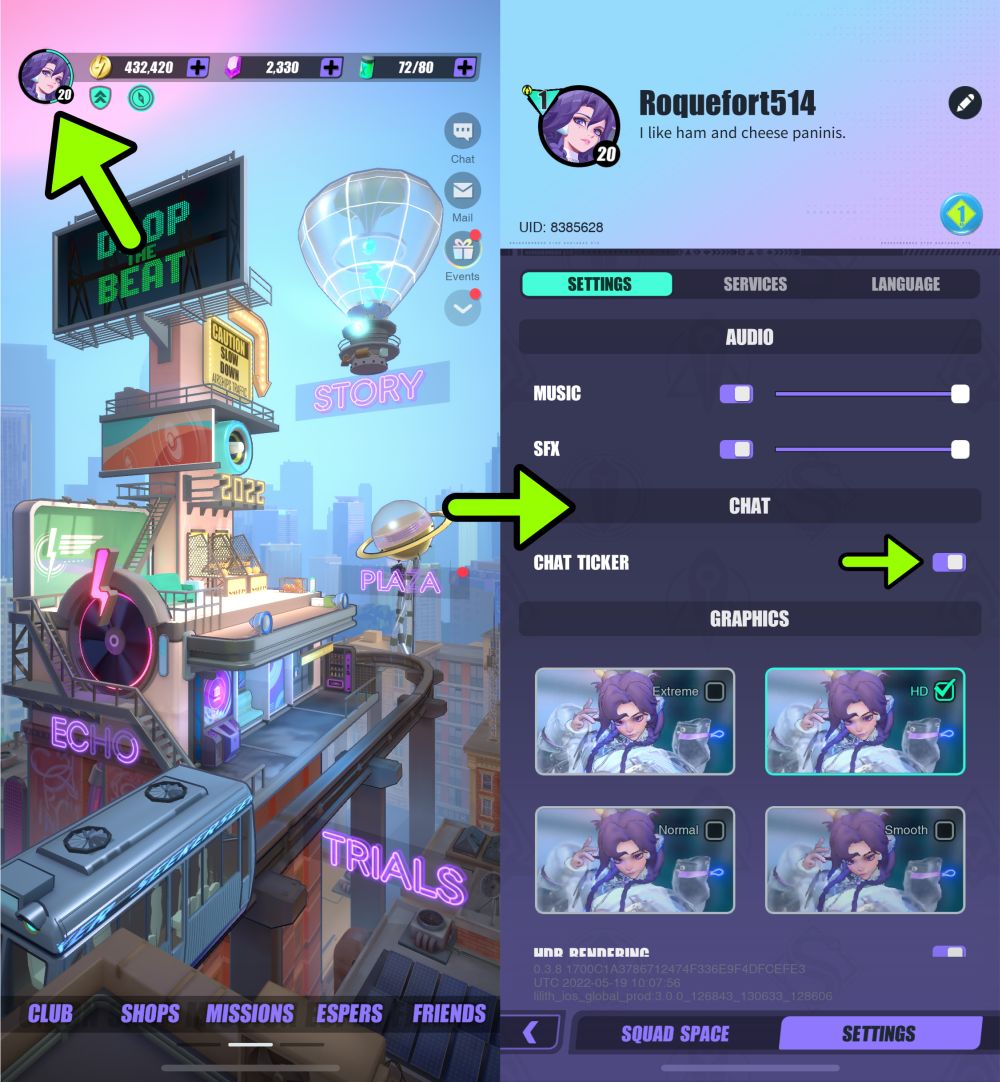
If this is something you want to hide, you can easily stop the chat from appearing by clicking on your profile picture at the upper left side of the screen, going to the settings tab and turning off the Chat Ticker.
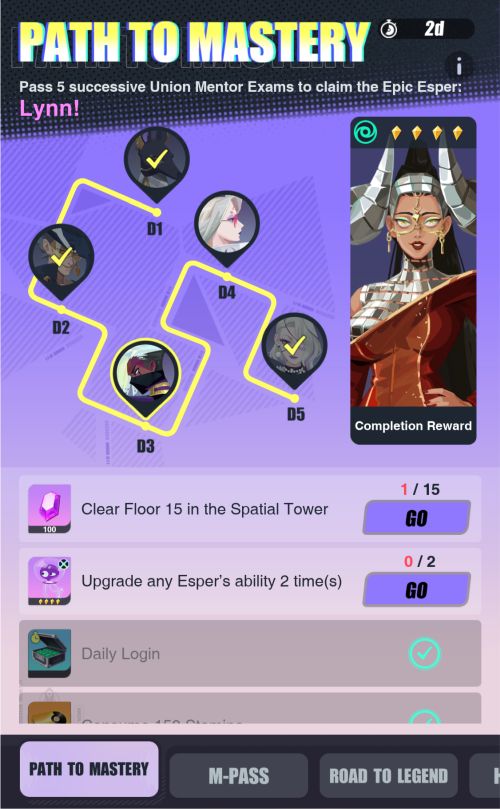
Play Music at the Bar!
This was more of an easter egg but since one of the Path to Mastery Quests was to Play “We Could Have a Good Time” at the bar, it is helpful to know where it is as it is an easy quest to accomplish. Aside from this, If you just genuinely want to know which artists are responsible for the sick, funky beats that’s invading your earbuds, read on!
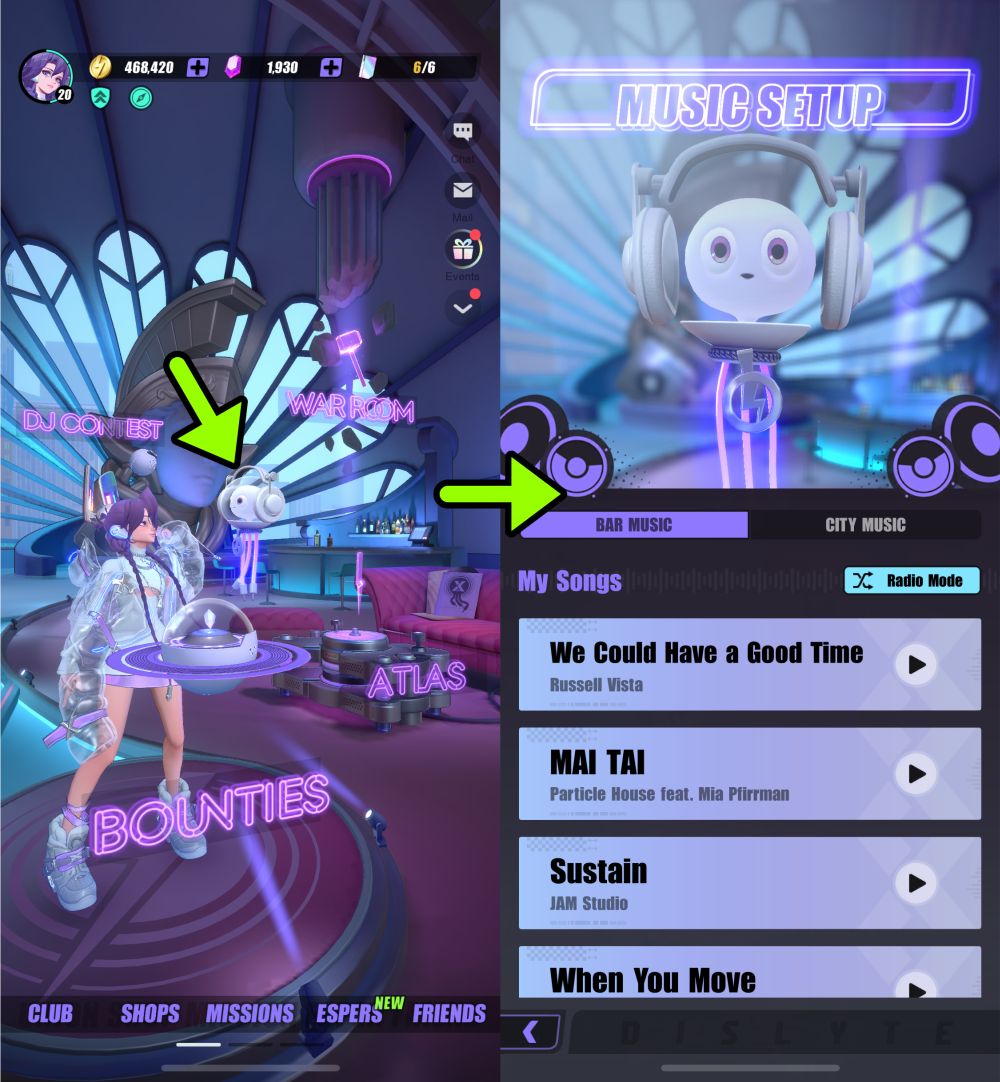
Swipe left to go to the bar. There you will find Discoboom with her pet, BoomBoom. If you click it, it will come up to you and show you the list of music the game has and play it for you!
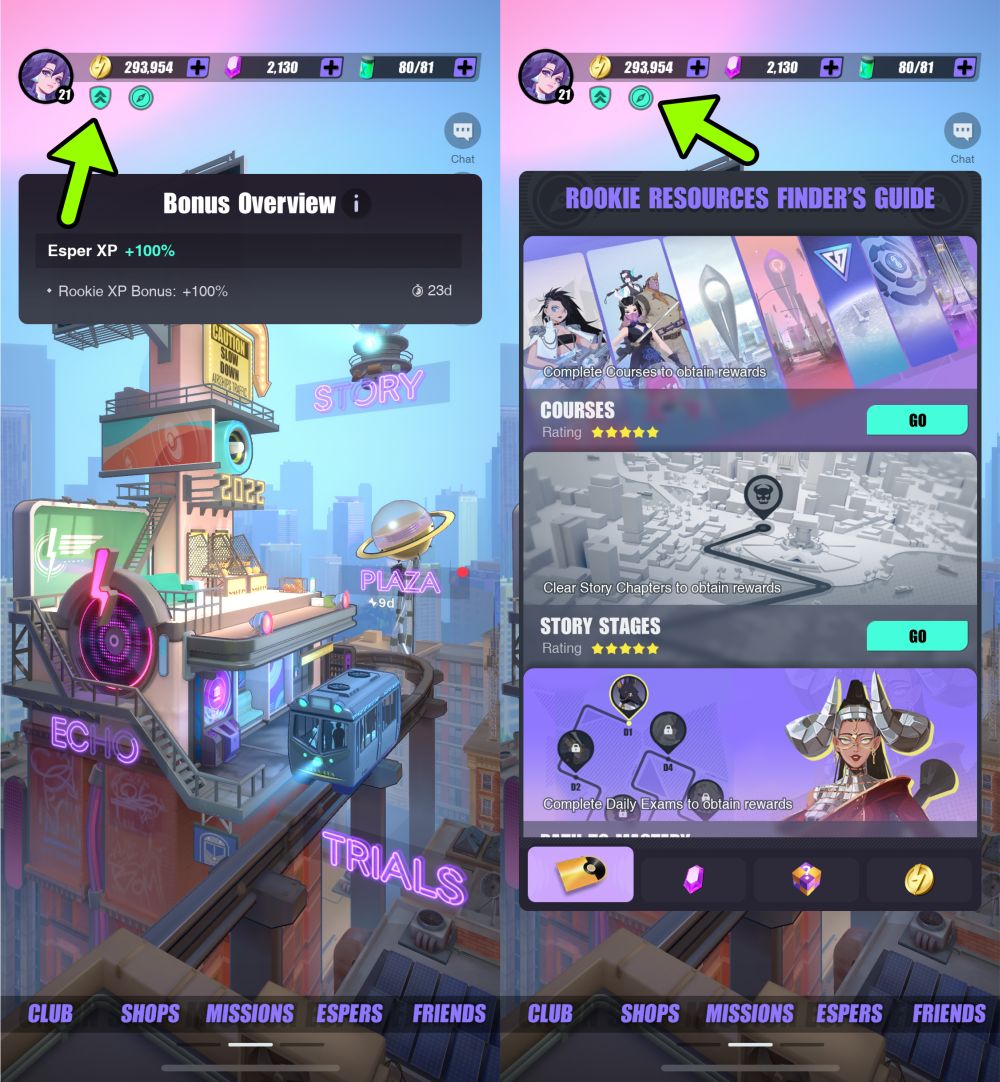
Check Bonuses & Resource Finder!
Sometimes, Dislyte gives away bonuses when they have special events like +100% Esper EXP they had on their global launch. To check, you can click on the badge icon with two up arrows just below the coin currency to see.
The button right next to it on the other hand leads you to the Rookie Resource Finder’s Guide. It’s very handy as it tells you exactly where to go to get more Gold Records, Crystals, Relics and Coins.
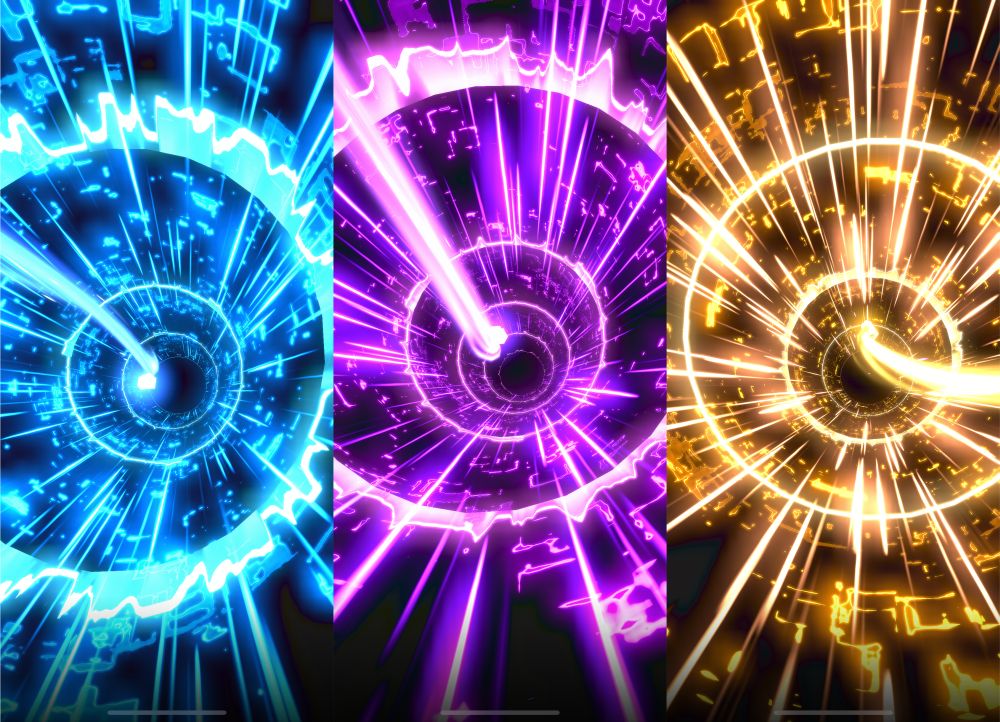
Know what tier of Esper you’ll get before it appears!
Knowing this will not in any way help you change the result, but it does make things exciting and is something that other people don’t notice straight away. When you spin a Gold Record in Echo, there is a chance to get a Rare, Epic and Legendary Esper. The animation sequence before the reveal shows a light traveling through a portal. The light color changes depending on what Esper you will get. It turns blue for Rare, Purple for Epic and Gold for Legendary.
And this marks the end of our beginner’s guide to Dislyte. As long as this was, it barely scratched the surface of what the game has to offer. Since this game just had its official global recently, there are many features that have yet to be introduced and many more adventures waiting to be unveiled.
We hope that you find our tips helpful as you play to the beat of this funky fresh game. If you have any tips and tricks that were not mentioned in this guide, feel free to share them in the comment section below!