After spending some time analyzing the variety of Espers in Dislyte, we present to you the first part of three of our Esper Guides! With 77 Espers (and counting) we’ve decided to split our guides based on the rarity of the Espers. For this guide, we will be looking over the strengths and weaknesses of the 22 Rare Espers you can obtain and encounter in the game.
This guide assumes you’ve been playing Dislyte for some time and are familiar with a few terminologies. However, if you’re new to the game, you can check out our Dislyte Beginner’s Guide! We also recommend that you check out our Epic and Legendary Esper Guides!
Before we jump in to the Rare Espers’ individual guides, let’s talk briefly about their roles and attributes:
Esper Roles
Each Esper fills a different role in battle. There are four main roles:
Fighter – concentrates on dealing high amounts of damage
Support – supports with heals, buffs and debuffs
Defender – has decent DEF or HP and usually have skills that direct enemies to them since their primary role is to take the blunt of the enemies’ attacks
Controller – their primary role is to slow down enemies and prevent them from moving or attacking
While the game labels Espers the way they do, for our guide we have also labeled them with sub roles in order to more accurately explain what their abilities are:
Chain Striker – has a skill that allows them to attack more than once in a turn
AoE – has an offensive, damage-dealing skill that targets all enemies
Nuker – has a skill that deals a great amount of damage in a single attack on a single target
Related: Dislyte Tier List: A Complete Ranking of All Espers
Disabler – has skills that decrease AP and SPD, affect the skills that enemies can use and can remove, take, transfer and block Buffs (Freeze, Buff Blocker, Diseased, Miss Rate Up, Petrification, Silence, Sleep, SPD Down, Stun, Taunt, Devour, Pandora’s Box)
Debilitator – has a skill that inflicts Debuffs that weaken or damage enemies or makes attacks more effective (ATK Down, Bleed, DEF Down, Poison, Sear, Eye of Horus, Link, Netherbloom, Neko-Curse, Pandora’s Box)
Buffer – has a skill that grant Buffs, increase AP and other bonuses that can strengthen themselves or their allies
Healer – has healing skills
Reviver – can revive
Dispeller – can remove, take and transfer Debuffs
For the purpose of this guide, we also made a table of Base Attribute Ranges to gauge how high or low an attribute is based on the highest and lowest starting level stats of all Espers of all rarities.
Base Attribute Range based on Starting Level
| ATK | HP | DEF | SPD | |
| GODLY | 325 - 366 | 4,115 - 4,583 | 308 - 341 | 105-107 |
| EXCELLENT | 288 - 324 | 3,649 - 4,114 | 273 - 307 | 102-104 |
| HIGH | 251 - 287 | 3,183 - 3,648 | 238 - 272 | 99-101 |
| GOOD | 214 - 250 | 2,717 - 3,182 | 203 - 237 | 96-98 |
| AVERAGE | 177 - 213 | 2,251 - 2,716 | 168 - 202 | 93-95 |
| LOW | 140 - 176 | 1,785 - 2,250 | 133 - 167 | 90-92 |
For comparison, we also made a table listing the base starting level attributes and max level attributes of all Rare Espers. At this moment, the starting and max level percentage of C.RATE (10%), C.DMG (150%), ACC (0%) and RESIST (20%) seem to be the same for all Espers and the SPD stat does not change as you level up.
Related: Dislyte Squad Formation Guide: Recommended Team Formations
Rare Esper Attributes
| ESPER | ATK (lvl1) | ATK (lvl60) | HP (lvl 1) | HP (lvl 60) | DEF (lvl 1) | DEF (lvl 60) | SPD |
| Bardon (Baldr) | 152 | 829 | 2,051 | 11,035 | 200 | 1,082 | 95 |
| Chang Pu (Yao Ji) | 180 | 963 | 2,247 | 12,081 | 157 | 850 | 94 |
| Brynn (Valkyrie) | 224 | 1,203 | 1,888 | 10,159 | 140 | 753 | 105 |
| Drew (Anubis) | 221 | 1,144 | 1,924 | 10,343 | 150 | 810 | 91 |
| Li Ao (Tao Tie) | 140 | 753 | 2,761 | 14,855 | 159 | 860 | 100 |
| Q (Eros) | 207 | 1,123 | 2,004 | 10,784 | 148 | 796 | 104 |
| Melanie (Medusa) | 166 | 886 | 2,247 | 12,081 | 170 | 912 | 102 |
| Zelmer (Sekhmet) | 207 | 1,123 | 2,004 | 10,784 | 148 | 796 | 90 |
| Hall (Hodur) | 200 | 1,082 | 2,000 | 10,771 | 156 | 849 | 92 |
| Tang Yun (Six-Eared Macaque) | 211 | 1,144 | 1,860 | 10,002 | 154 | 831 | 95 |
| Freddy (Fenrir) | 224 | 1,203 | 1,974 | 10,629 | 133 | 722 | 91 |
| David (Jason) | 160 | 861 | 2,177 | 11,708 | 182 | 991 | 92 |
| Lauren (Heket) | 143 | 780 | 2,566 | 13,798 | 171 | 925 | 92 |
| Chalmers (Idun) | 207 | 1,123 | 2,004 | 10,784 | 148 | 796 | 95 |
| Berenice (Bastet) | 159 | 860 | 2,381 | 12,810 | 168 | 910 | 97 |
| Layla (Medjed) | 151 | 811 | 2,653 | 14,269 | 156 | 850 | 94 |
| Leon (Vali) | 217 | 1,173 | 1,785 | 9,608 | 154 | 831 | 92 |
| Helena (Helen) | 163 | 874 | 2,631 | 14,152 | 146 | 794 | 94 |
| Ye Suhua (Shao Siming) | 159 | 859 | 2,086 | 11,217 | 191 | 1,031 | 101 |
| Unky Chai (Yue Lao) | 140 | 753 | 2,730 | 14,687 | 162 | 874 | 101 |
| Jeanne (Gerd) | 147 | 795 | 2,710 | 14,577 | 156 | 850 | 102 |
| Bai Liuli (White Snake) | 204 | 1,097 | 2,022 | 10,877 | 150 | 810 | 99 |
Legend:
| Highest among Rare Espers | Lowest among all Espers |
Now that we have that out of the way, let’s take a look at our Rare Espers.

Rare Espers
Rare Espers appear most often when spinning a record in Echo. They often have Low and Average stats, sometimes have Good and High stats, and rarely Excellent and Godly stats. One benefit of Rare Espers is the fact that you have a higher chance of getting duplicates of them which you can use in Resonance to strengthen your Rare Espers.
Bardon (Baldr)
Role: Defender
Sub Roles: Buffer, Disabler
Buffs: DEF Up
Debuffs: Stun, Taunt
Other Abilities: —
Captain Ability: Increases ally DEF in Point War by 24%
Attributes:
Average SPD & DEF (Highest among all Rare Espers)
Low ATK & HP
Skills:
| Lightshield | Honorbound (Passive) | Rise to Honor | |
| Target | 1 Enemy | Ally’s Attacker | 1 Enemy |
| Damage / Heal | Damage: 100% (max lvl) of ATK | Damage: 20% of ATK + 80% (max lvl) DEF | Damage: 250% (max lvl) of ATK |
| Effects | 50% (max lvl) chance to Stun, 1 turn | — | DEF Up, 2 turns To all allies |
| Triggers / Cooldown | — | Triggered once per turn when an ally under 50% HP is attacked | 3 turns (max lvl) |
| Ascension Upgrade | — | 60% chance to Taunt target, 2 turns | — |
Recommended x4 Relic Sets:
War Machine, Hades
Recommended x2 Relic Sets:
Stoneveins, Sword Avatara
Bardon’s DEF lets him handle strong enemy attacks, especially when he uses his Rise to Honor skill’s DEF Up buff that also affects all allies. His Light Shield’s chance to Stun and his Honorbound’s chance to Taunt (once upgraded in Ascension) could prove to be useful in disabling your enemies.
While his passive, which makes him attack the enemy that attacks allies with below 50% HP, may be an interesting skill, it is not always practical because it involves getting your character to be less than 50% health to work. However, Espers like Freddy and Catherine may benefit from him when they use Standoff (which keeps health at atleast 1 HP) on Espers that are near death, letting the passive trigger more without the danger of the Esper dying.
Chang Pu (Yao Ji)
Role: Support
Sub Roles: Healer, Buffer, Disabler
Buffs: Immunity
Debuffs: —
Other Abilities: Reduces AP, Single-Target Healing, All-Ally Healing
Captain Ability: —
Attributes:
Average ATK & SPD
Low HP & DEF
Skills:
| Orb of Vaxar | Restoration | Prayer of Renewal | |
| Target | 1 Enemy | 1 Ally | All Allies |
| Damage / Heal | Damage: 120% (max lvl) of ATK | Heal: 15% of target’s max HP + 160% (max lvl) of Chang Pu’s ATK Each 10% of max HP lost grants + 10% healing | Heal: 15% of target’s max HP + 85% (max lvl) of Chang Pu’s ATK |
| Effects | 100% (max lvl) chance to reduce AP by 15% | — | — |
| Triggers / Cooldown | — | 2 turns (max lvl) | 4 turns (max lvl) |
| Ascension Upgrade | — | — | Immunity, 2 turns |
Recommended x4 Relic Sets:
Abiding Panacea, War Machine
Recommended x2 Relic Sets:
Adamantine, Master Grove, Stoneveins
Chang Pu’s strength lies in her healing skills. Restoration (heals one ally) and Prayer of Renewal (heals all allies) depend on the ally / allies’ max HP plus Change Pu’s ATK. Her last skill, when upgraded in Ascension, can grant Immunity, protecting allies from debuffs. She can also deal a decent amount of damage with her Orb of Vaxar skill that can also reduce an enemy’s AP.
While many players may prefer equipping her with the Abiding Panacea Set to increase her healing efficacy, equipping her with the War Machine Set is also viable since her ATK is directly tied to her healing skills. You may need to give her a little bit of DEF or pair her with an Esper that can keep her from dying since she has Low HP & DEF. She is best paired with Fighter Espers if you decide to go with the Abiding Panacea set and make her focus more on support than damage.
Brynn (Valkyrie)
Role: Support (Possible Fighter)
Sub Roles: Chain Striker, Nuker, Disabler, Buffer, Debilitator
Buffs: ATK Up
Debuffs: SPD Down, Freeze, DEF Down
Other Abilities: —
Captain Ability: —
Attributes:
Godly SPD (Highest SPD among all Rare Espers)
Good ATK (Highest ATK among all Espers; tied with Freddy)
Low HP & DEF
Skills:
| Cold Edge | Rock’n’Roll | Advent of the Goddess | |
| Target | 1 Enemy | All Allies | 1 Enemy |
| Damage / Heal | Damage: 2 hits, 60% (max lvl) of ATK each | — | Damage: 300% (max lvl) of ATK |
| Effects | 50% (max lvl) chance of inflicting SPD Down, 2 turns | ATK Up, 2 turns | Freeze, 1 turn |
| Triggers / Cooldown | — | 4 turns (max lvl) | 3 turns (max lvl) |
| Ascension Upgrade | — | — | DEF Down, 2 turns |
Recommended x4 Relic Sets:
War Machine, Wind Walker,
Recommended x2 Relic Sets:
Master Grove, Fiery Incandescence, Sword Avatara
Brynn may be labeled as a Support in the game, but this Esper can definitely pack a punch like a Fighter. Having the highest attack among all Rare Espers (tied with Freddy), she even surpasses some Epic Espers. When it comes to SPD, she’s only 2 points below the Esper with the highest SPD (Triki), which makes her attack first in most battles. She can start it off by buffing the team with ATK Up with Rock’n’Roll, lower an enemy’s SPD with Cold Edge or Freeze an enemy with Advent of Goddess. Her last skill can be an amazing Defender and boss killer as it can deal as high as 300% of ATK as damage and even give the enemy a DEF Down debuff when upgraded in Ascension.
Brynn can work with any team, but having Low HP and DEF could make her an easy target. She is best paired with a Support that can heal her and increase her defense or a Defender that can maneuver enemies to attack them instead of her.
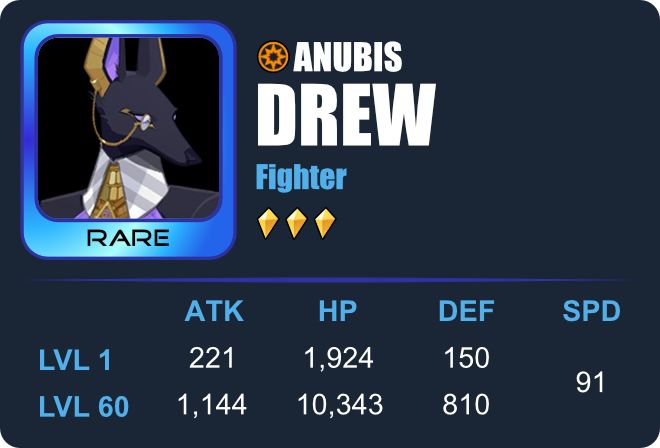
Drew (Anubis)
Role: Fighter
Sub Roles: Nuker, Debilitator, Buffer
Buffs: —
Debuffs: DEF Down
Other Abilities: Reduce Cooldown
Captain Ability: —
Attributes:
Good ATK
Low HP, DEF & SPD
Skills:
| Piercing Strike | Shadow Shock | Death’s Judgment | |
| Target | 1 Enemy | 1 Enemy | 1 Enemy |
| Damage / Heal | Damage: 130% (max lvl) of ATK | Damage: 220% (max lvl) of ATK | Damage: 260% (max lvl) of ATK |
| Effects | Reduces Death’s Judgment’s cooldown by 1 turn | 85% (max lvl) chance of inflicting DEF Down, 2 turns | If the target dies, attack a random enemy and deal 150% of ATK as damage Can be triggered 2 times |
| Triggers / Cooldown | — | 2 turns (max lvl) | 3 turns (max lvl) |
| Ascension Upgrade | — | — | Ignores enemy DEF |
Recommended x4 Relic Sets:
War Machine, Hammer of Thor
Recommended x2 Relic Sets:
Master Grove, Fiery Incandescence, Sword Avatara
Drew is great at wiping out up to 3 low health enemies in one turn with his third skill. Using his first and second skills, which can deal strong blows themselves, make his third skill more effective. When Piercing Strike gets a critical, it will lower Death’s Judgment’s cooldown by 1. Shadow Shock on the other hand has a chance to trigger DEF Down. Once upgraded in Ascension, Death’s Judgment’s bonus attacks can ignore enemy DEF, making it even deadlier, especially against high HP and DEF enemies.
Increasing ATK is ideal to fully take advantage of his skills, but increasing SPD could also be beneficial as it will let him use Death’s Judgment much quicker. However, his low HP and DEF could be a problem so picking relics with HP and DEF as attributes as well as pairing him with support Espers that can heal and buff him may help him survive in battle. He is also best paired with an Esper with an AoE skill that can lower most of the enemies’ health before Drew uses his last skill.

Li Ao (Tao Tie)
Role: Defender
Sub Roles: Disabler, Healer
Buffs: —
Debuffs: Taunt, Devour
Other Abilities: Removes Buffs
Captain Ability: Increases ally SPD in Point War by 20%
Attributes:
High SPD
Good HP (Highest among all Rare Espers)
Low DEF & ATK (Lowest among all Espers; tied with Unky Chai)
Skills:
| Ravenous One | Binge | Uncaged Beast | |
| Target | 1 Enemy | 1 Enemy | 1 Enemy |
| Damage / Heal | Damage: 100% (max lvl) of ATK | Damage: 200% (max lvl) of ATK Heal: 5% of max HP to self | Damage: 18% (max lvl) of max HP |
| Effects | 60% (max lvl) chance of inflicting Taunt, 1 turn | 100% (max lvl) chance of removing all buffs affecting the target | Devour, 1 turn If target has more than 50% HP, Devour lasts for 2 turns Target is released immediately if Li Ao dies or has no other teammates alive |
| Triggers / Cooldown | — | 3 turns (max lvl) | 4 turns (max lvl) |
| Ascension Upgrade | — | Heals Li Ao for 3% of max HP per buff removed | — |
Recommended x4 Relic Sets:
Wind Walker, Ocean Waves
Recommended x2 Relic Sets:
Master Grove, Adamantine
Li Ao’s most important stat is his HP since his Binge skill uses 5% of his HP to heal himself (and an additional 3% per buff dispelled once upgraded in Ascension) while his Uncaged Beast skill converts up to 18% max of his HP to Damage.
While his ATK may not be his best feature, he makes up for it with disabling debuffs and his high SPD. His Ravenous One skill’s Taunt debuff makes the enemy target only him while his Uncaged Beast skill’s Devour debuff will keep an enemy from using their abilities. When using Binge, he has a chance to dispel all buffs affecting his target which can be disastrous to Espers that rely on buffs. On top of that, his high SPD lets him use Devour and Taunt often and at the start of battle, keeping enemies from using their skills.
His low DEF may be a problem as hard-hitters may take advantage of it so either pair him with another Disabler to prevent that or a Support that can heal or buff him to keep him alive if fighting against a strong team with a lot of DPS, especially Chain Strikers. For relics, focus on increasing his HP, DEF or SPD.
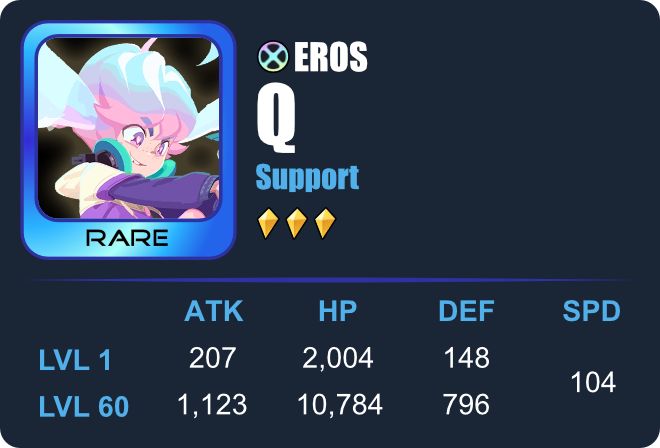
Q (Eros)
Role: Support (Possible Fighter)
Sub Roles: AoE, Debilitator
Buffs: —
Debuffs: DEF Down, ATK Down, Link
Other Abilities: —
Captain Ability: —
Attributes:
Excellent SPD
Average ATK
Low HP & DEF
Skills:
| Lover’s Curse | Heartbreaker | Joke of the Aether | |
| Target | 1 Enemy | All Enemies | 1 Chosen Enemy + 1 Random Enemy |
| Damage / Heal | Damage: 120% (max lvl) of ATK | Damage: 100% (max lvl) of ATK | Damage: 180% (max lvl) of ATK |
| Effects | 75% (max lvl) chance of inflicting DEF Down, 2 turns | 75% (max lvl) chance of inflicting ATK Down, 2 turns | Links 2 enemies, 2 turns |
| Triggers / Cooldown | — | 2 turns (max lvl) | 3 turns (max lvl) |
| Ascension Upgrade | — | — | Link lasts for 3 turns |
Recommended x4 Relic Sets:
War Machine, Ocean Waves
Recommended x2 Relic Sets:
Fiery Incandescence, Master Grove
Q may be categorized as a Support but his skills prove he can be a Fighter. Each of his attacks deal good damage and have debuffs which makes him deadly in battle. Lover’s Curse can inflict DEF Down, Heartbreaker can inflict ATK Down while Joke of the Aether will Link 2 enemies, which makes both enemies share 80% damage to their other pair. His skills are also very versatile since he has one for single targets, one for all enemies and one for two enemies.
Joke of the Aether can be used in several strategies against a variety of enemies. With Link, Q can damage enemies that cannot be targeted in some cases like when an enemy is in Stealth mode. Attacking the enemy attached to it will give 80% damage that ignores DEF to the Stealthed enemy, a real nightmare for high DEF Espers. If the two enemies are attacked with an AoE skill, it would deal almost twice the damage on both of them.
Unfortunately, you can only choose one enemy to be linked while the other one is picked at random. If you’re lucky, you may end up pairing an enemy with an element disadvantage to you to an enemy with an element advantage to you. Focusing on the disadvantaged enemy will deal more damage to the advantaged enemy than if you just attack it normally without the link. Equipping Q with Ocean Waves to have a 30% chance to lessen cooldown or pairing him with an Esper that can lower cooldowns will allow him to set up more than one Link at a time.
One major disadvantage with using Q is his low HP and DEF, making him an easy target for high damage dealing enemies so consider equipping him relics with HP and DEF attributes. He is best paired with Healers or Supports that can keep him alive.
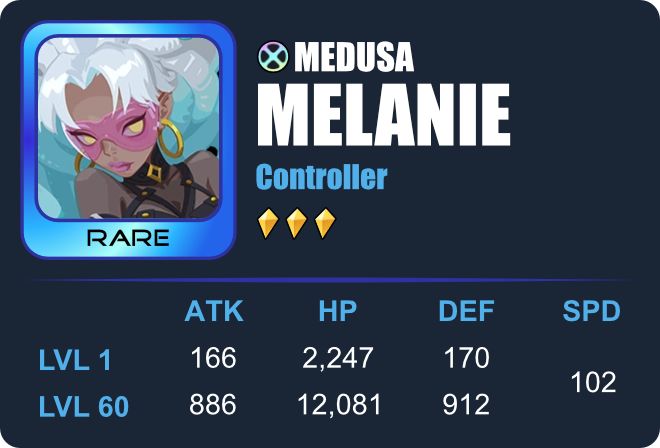
Melanie (Medusa)
Role: Controller
Sub Roles: Disabler, AoE, Dispeller
Buffs: —
Debuffs: Petrification
Other Abilities: Reduces AP, Transfers debuff to target
Captain Ability: Increases ally SPD by 15%
Attributes:
Excellent SPD
Average DEF
Low ATK, HP
Skills:
| Fatal Gaze | Covenant of Punishment (Passive) | Queen of the Night | |
| Target | 1 Enemy | 1 / All Enemies | All Enemies |
| Damage / Heal | Damage: 120% (max lvl) of ATK | — | Damage: 100% (max lvl) of ATK |
| Effects | 75% (max lvl) chance of transferring debuff to the target | Each attack reduces the target’s AP by 15% If target has less than 30% AP, inflict Petrification, 1 turn | 100% (max lvl) chance of reducing their AP by 15% |
| Triggers / Cooldown | — | 4 turns | 4 turns |
| Ascension Upgrade | — | — | If target is debuffed, reduce an extra 15% AP |
Recommended x4 Relic Sets:
Wind Walker, Ocean Waves
Recommended x2 Relic Sets:
Apollo’s Bow, Master Grove, Sword Avatara
Melanie is arguably one of the best Controllers in the game. Her excellent SPD paired with her SPD increasing Captain’s Ability, AP-reducing skills, debuff transfers and Petrification, she and her team can deal strike after strike before enemies do. If Covenant of Punishment is triggered while using Queen of the Night, AP reduction will stack and there is a high chance of petrifying all or most of your enemies. Use this skill at the start of the game to give your team a leading advantage.
Melanie’s weakness lies in her low ATK and HP. Pair her with Espers that can deal more damage in order to make the most out of her Disabling skills. You may also pair her with a Support that can heal and keep her alive. You may increase her SPD even more with relics and add some DEF or HP attributes to increase her survivability.
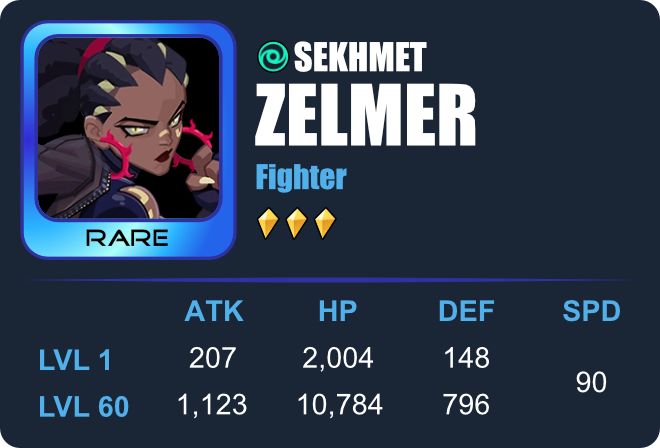
Zelmer (Sekhmet)
Role: Fighter
Sub Roles: Chain Striker, Debilitator, Nuker, Dispeller
Buffs: —
Debuffs: DEF Down, Bleed
Other Abilities: Chain Attacks, Transfers debuff to target
Captain Ability: —
Attributes:
Average ATK
Low HP, DEF & SPD
Skills:
| Beast Attack | Hunter | Scarlet Tides | |
| Target | 1 Enemy | 1 Enemy | 1 Enemy |
| Damage / Heal | Damage: 2 hits, 60% (max lvl) of ATK each | Damage: 3 hits, 80% (max lvl) of ATK each | Damage: 250% (max lvl) of ATK If enemy is debuffed, deal +20% damage per debuff, up to 120% |
| Effects | 35% (max lvl) chance of inflicting DEF Down, 2 turns | 30% chance of transferring debuff to target | — |
| Triggers / Cooldown | — | 2 turns (max lvl) | 4 turns (max lvl) |
| Ascension Upgrade | — | If critical is triggered, inflict Bleed, 2 turns | — |
Recommended x4 Relic Sets:
War Machine, Hades, Hammer of Thor
Recommended x2 Relic Sets:
Fiery Incandescence, Sword Avatara, Master Grove
Zelmer greatly benefits from debuffs casted on both sides. Not only can she inflict debuffs (DEF Down with Hunter & Bleed with Beast Attack (when upgraded in Ascension)), but she can also transfer debuffs casted on herself back to her target. Aside from this, she deals bonus damage per debuff placed on the target when using her last skill, Scarlet Tides.
However, while her ATK is decent, her initial stats in HP, DEF and SPD is low and may spell trouble for her if she is put up against Espers that can hit hard and move fast. While supplementing her with relics that increase her ATK would help her destroy her enemies faster, giving her some relics with HP or DEF attributes could help keep her in battle. She is best paired with Controllers, Disablers or any Esper that can cast multiple debuffs in order to maximize her abilities.
Hall (Hodur)
Role: Fighter
Sub Roles: Debilitator
Buffs: —
Debuffs: ATK Down, DEF Down, Poison
Other Abilities: Attacks a target after an ally does a 1 target attack
Captain Ability: Increase ally C. RATE in Ritual and Sonic Miracles by 20%
Attributes:
Average ATK
Low HP, DEF & SPD
Skills:
| Arrow of Eternal Solitude | Mistletoe Hunter (Passive) | Silent Night | |
| Target | 1 Enemy | Single targets that allies attack | 2 Random Enemies |
| Damage / Heal | Damage: 110% (max lvl) of ATK | Damage: 40% (max lvl) of ATK | Damage: 180% (max lvl) of ATK |
| Effects | 40% (max lvl) chance of inflicting ATK Down, 2 turns | — | 80% (max lvl) chance of inflicting DEF Down and Poison, 2 turns |
| Triggers / Cooldown | — | Each time an ally attacks individual targets | 4 turns (max lvl) |
| Ascension Upgrade | — | Poison, 1 turn | — |
Recommended x4 Relic Sets:
War Machine, Hades, Hammer of Thor, Tyranny of Zeus
Recommended x2 Relic Sets:
Fiery Incandescence, Apollo’s Bow, The Enchanter
Hall makes for a good Fighter as his skills can deal a good amount of damage but also debilitate his enemies with ATK Down, DEF Down and Poison. His passive skill, Mistletoe Hunter, can be a real game changer when paired with the right Esper. Each time Hall’s allies attack individual targets, he attacks the same target straight after. Once upgraded in Ascension, his passive can also inflict Poison. Unlike other Espers with passives, this one does not have a cooldown and will always trigger, letting him deliver strike after strike. Since the ATK percentage of the passive skill is not very high, increasing this Esper’s C. RATE and C. DMG or equipping him with relics that can add more debuffs or extend its turns can make it more effective.
Hall has low HP, DEF and SPD so he needs to be equipped with relics that can increase them and be paired with Espers that can keep him from dying. He is also best paired with Espers that have strong 1-target skills, especially Chain Strikers.
Tang Yun (Six-Eared Macaque)
Role: Fighter
Sub Roles: Disabler, Chain Striker
Buffs: —
Debuffs: Stun
Other Abilities: Pursuit
Captain Ability: Increases ally ATK by 18%
Attributes:
Average ATK & SPD
Low HP & DEF
Skills:
| Iron Polearm | Talisman of Inward Devilry | Avatara | |
| Target | 1 Enemy | 1 Enemy | 1 Enemy |
| Damage / Heal | Damage: 130% (max lvl) of ATK | Damage: 2 hits, 120% (max lvl) of ATK each | Damage: 3 hits, 100% (max lvl) of ATK each |
| Effects | 40% chance of inflicting Stun, 1 turn 30% chance of triggering Pursuit through Iron Polearm | 50% chance of triggering Pursuit through Iron Polearm | Critical hit triggers Pursuit through Iron Polearm |
| Triggers / Cooldown | — | 3 turns (max lvl) | 3 turns (max lvl) |
| Ascension Upgrade | — | Ignores 40% of enemy DEF | — |
Recommended x4 Relic Sets:
War Machine, Hades, Hammer of Thor, Tyranny of Zeus
Recommended x2 Relic Sets:
Fiery Incandescence, Sword Avatara
Tang Yun’s skills revolve around Pursuit through Iron Polearm which triggers chain attacks. With Talisman of Inward Devilry, his second skill which attacks the enemy two times, Pursuit has a 50% chance to trigger and may even ignore 40% of enemy’s DEF once upgraded in Ascension. With Avatara, his third skill which lets him attack an enemy three times, Pursuit is triggered when he gets a critical hit.
Equipping him with relics that increase his C. RATE (Fiery Incandescence) or grant him counterattack (Sword Avatara) when taking damage can let him fully utilize his Pursuit ability. He is best paired with Support Espers that can heal and buff him or Espers that can play off his Pursuit ability like Hall (Hodur)’s Passive, Mistletoe Hunter, which makes him attack right after an ally attacks a single target. There are even instances where he will trigger a Pursuit right after it.

Freddy (Fenrir)
Role: Fighter
Sub Roles: Buffer, Chain Striker, Nuker
Buffs: ATK Up, Standoff
Debuffs: —
Other Abilities: Deals more damage the lower his HP is
Captain Ability: —
Attributes:
Good ATK (Highest ATK among all Espers, tied with Brynn)
Low SPD, HP & DEF (Lowest DEF among all Espers)
Skills:
| Claw of Greed | Wolf Strike | Thrill of the Hunt | |
| Target | 1 Enemy | 1 Enemy | 1 Enemy |
| Damage / Heal | Damage: 120% (max lvl) of ATK | Damage: 210% (max lvl) of ATK | Damage: 260% (max lvl) of ATK + 5% damage per 10% HP Freddy has lost |
| Effects | If Freddy has less than 50% HP remaining, attack again with: 120% of ATK as damage 30% C. RATE Ignore 20% DEF | ATK Up, 2 turns | Remove 2 buffs from enemy |
| Triggers / Cooldown | — | 3 turns (max lvl) | 4 turns (max lvl) |
| Ascension Upgrade | — | Standoff, 2 turns | — |
Recommended x4 Relic Sets:
War Machine, Hades
Recommended x2 Relic Sets:
Fiery Incandescence, Sword Avatara
Freddy may have low DEF, but he uses this to his advantage since he gets stronger the lower his HP percentage is. When he uses Claw of Greed, he will attack again if he only has 50% HP remaining. His third skill, Thrill of the Hunt deals an additional 5% damage for every 10% HP lost while dispelling 2 of their buffs.
Having low HP for a significant period of time may be disastrous for most Espers, but once his second skill has been upgraded in Ascension, Wolf Strike will let him gain not only ATK Up but also Standoff which lasts for 2 turns. This would be enough time for him to deal lots of damage to his enemies. Target enemies with the highest HP and DEF or the ones that can heal to make the most of it. He is best paired with Espers that can revive or Espers that can heal him once or before his Standoff buff wears off. You may also consider equipping him with a relic set that can give him a chance to counter attack (Sword Avatara) so he can get more attacks in before the buff expires.
David (Jason)
Role: Fighter (Possible Defender)
Sub Roles: Disabler, Debilitator, Chain Striker, Dispeller
Buffs: —
Debuffs: ATK Down, Taunt, Stun
Other Abilities: Steals Buffs, Remove Debuffs
Captain Ability: —
Attributes:
Average DEF
Low ATK, HP, SPD
Skills:
| Roundhouse Dance | Moonwalk (Passive) | Curtain Call | |
| Target | 1 Enemy | Self + 1 Random Enemy | 1 Enemy |
| Damage / Heal | Damage: 130% (max lvl) of ATK | — | Damage: 3 hits, 60% of ATK each + Finishing Strike Damage: 85% (max lvl) of ATK |
| Effects | 100% (max lvl) chance of inflicting ATK Down, 2 turns | Remove a debuff Taunt a random enemy, 1 turn | Steals 3 buffs from enemy, each buff empowering finishing strike to reduce the target’s AP by 30% Stun, 1 turn |
| Triggers / Cooldown | — | If David is disabled from taking action before his turn starts | 5 turns (max lvl) |
| Ascension Upgrade | — | Skill has 30% chance to trigger after David is attacked | — |
Recommended x4 Relic Sets:
War Machine, Wind Walker, Snow Dowager
Recommended x2 Relic Sets:
Apollo’s Bow, Fiery Incandescence, Stoneveins Set
David may be categorized as a Fighter but his stats and skills show that he can be a Defender. His Roundhouse Dance skill’s ATK Down paired with his Moonwalk skill’s Taunt and ability to dispel debuffs create a powerful combination that works well for a Defender. Once Moonwalk is upgraded in Ascension, this ability will have a chance to trigger after David is attacked. His third and strongest skill, Curtain Call, lets him attack an enemy three times while stealing up to 3 buffs which empowers his finishing move to reduce the target’s AP by 30% while also stunning the target.
Based on his skills, he may be a strong counter against groups of enemies that cast a lot of buffs and seems to pair well with low HP or DEF characters since he could Taunt enemies into focusing their attacks on him. Increasing his DEF or SPD with relics may potentially be useful if you decide to build him as a Defender. Alternatively, you can focus on building his ATK and equipping him a Fiery Incandescence Set for critical hits.
Lauren (Heket)
Role: Support
Sub Roles: Healer, Disabler, Reviver, Buffer
Buffs: —
Debuffs: SPD Down
Other Abilities: Increase AP, Single-Target Healing, Bonus Turn, Revive
Captain Ability: Increases ally DEF by 18%
Attributes:
Average HP & DEF
Low ATK, SPD
Skills:
| Leapfrog | Brush of Vitality | Healing Water | |
| Target | 1 Enemy | 1 Ally | 1 Ally |
| Damage / Heal | Damage: 120% (max lvl) of ATK | Heal: 40% (max lvl) of ally’s max HP at the cost of 20% HP | Heal: 20% (max lvl) of ally’s max HP |
| Effects | 40% chance of inflicting SPD Down, 2 turns | Increase target’s AP by 50% | Bonus Turn (Self) |
| Triggers / Cooldown | — | 3 turns (max lvl) | 4 turns (max lvl) |
| Ascension Upgrade | — | — | If selected teammate is dead, revive with 30% of their max HP |
Recommended x4 Relic Sets:
Abiding Panacea, Ocean Waves
Recommended x2 Relic Sets:
Master Grove, Adamantine
Lauren is a Healer that has decent HP and DEF and one of the only Espers that can revive fallen allies. Her Brush of Vitality skill sacrifices some of her own health in order to heal an ally while her Healing Water skill heals and grants a bonus turn. Once upgraded in Ascension, she can resurrect a dead ally with 30% of their max HP remaining, making her a hidden gem among Rare Espers. Aside from her healing skills, her Leapfrog skill can deal damage and has a chance to inflict SPD Down which balances out her low SPD.
Since her skills can decrease her HP by a percentage with her second skill, equipping her with relics with HP attributes is ideal. She may also benefit from relics with SPD attributes. She is best paired with other Fighter Espers that have low HP and DEF that need a lot of Support.
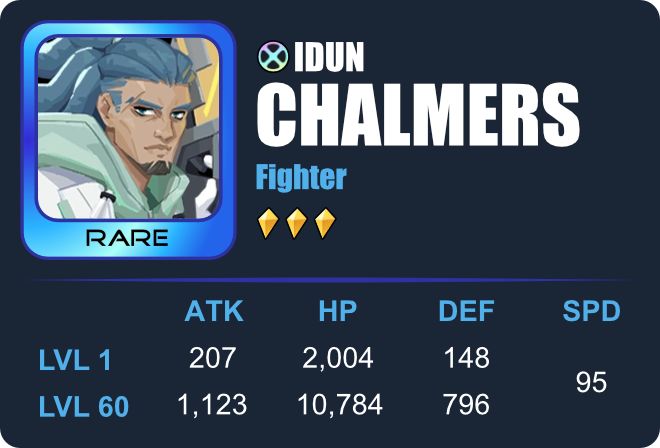
Chalmers (Idun)
Role: Fighter
Sub Role: Disabler, Nuker, Chain Striker
Buffs: —
Debuffs: Diseased, Buff Blocker
Other Abilities: Sacrifices HP to attack
Captain Ability: —
Attributes:
Average ATK & SPD
Low HP & DEF
Skills:
| Gold Ray | Vita Lightbeam | Gold Pulse | |
| Target | 1 Enemy | 1 Enemy | 1 Enemy |
| Damage / Heal | Damage: 120% (max lvl) of ATK + 3% of target’s max HP (should not exceed 100% of Chalmer’s ATK) | Damage: 2 hits, 75% (max lvl) of ATK each | Damage: 120% (max lvl) of ATK + 10% of target’s max HP (should not exceed 300% of Chalmer’s ATK) |
| Effects | Consumes 5% of Chalmer’s current HP | 60% (max lvl) chance of inflicting Diseased, 2 turns | Consumes 40% of Chalmer’s current HP Inflicts Buff Blocker, 2 turns |
| Triggers / Cooldown | — | 3 turns (max lvl) | 4 turns (max lvl) |
| Ascension Upgrade | — | If target’s HP ceiling is higher than Chalmers, each strike deals extra damage equal to 3% of target’s max HP (should not exceed 100% of Chalmer’s ATK) | — |
Recommended x4 Relic Sets:
Hades, War Machine
Recommended x2 Relic Sets:
Fiery Incandescence, Sword Avatara
Chalmer’s skill set greatly depends on his enemies having more HP than him and him having more ATK.
All of his skills deal extra damage equal to a percentage of the target’s max HP but it cannot exceed a certain percentage of his ATK. For his Gold Ray and Gold Pulse skills, it’s important to note that they sacrifice Chalmer’s current HP and not max HP which means the lesser the HP Chalmer currently has, the lesser the HP sacrificed will be.
It may be good to build up his ATK with relics and pair him with a Healer since his skills will keep eating up his HP. While the way his damage output is calculated seems odd, this actually makes him really strong against high HP enemies or Bosses since he benefits greatly from it for his extra damage.
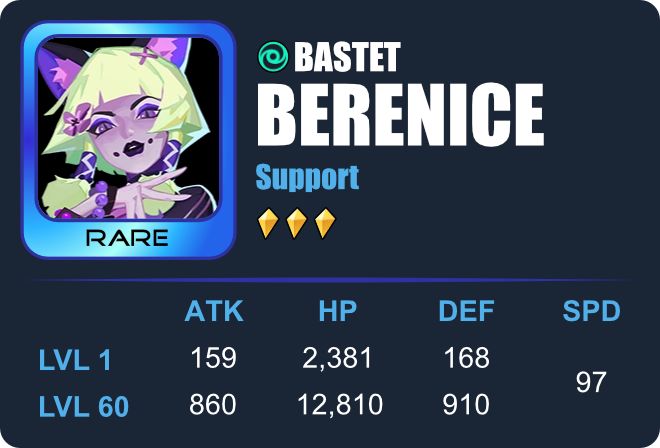
Berenice (Bastet)
Role: Support
Sub Roles: Chain Striker, Disabler, Buffer, Debilitator, Healer
Buffs: Shield, Recovery
Debuffs: DEF Down
Other Abilities: Reduce AP, Chain Attacks
Captain Ability: Increases ally RESIST by 20%
Attributes:
Good SPD
Average HP & DEF
Low ATK
Skills:
| Feline Grace | Instant Combo | Moon Dance | |
| Target | 1 Enemy | 1 Enemy | All Allies |
| Damage / Heal | Damage: 3 hits, 40% (max lvl) of ATK each | Damage: 3 hits, 60% (max lvl) of ATK each | — |
| Effects | 30% (max lvl) chance of inflicting DEF Down, 2 turns | 50% (max lvl) chance of reducing target’s AP by 15% | Shield: 22% (max lvl) of Berenice’s max HP, 2 turns If ally is buffed, grant +30% shield |
| Triggers / Cooldown | — | 3 turns (max lvl) | 3 turns (max lvl) |
| Ascension Upgrade | — | — | Recovery, 2 turns |
Recommended x4 Relic Sets:
Wind Walker, Ocean Waves
Recommended x2 Relic Sets:
Adamantine, Master Grove
Berenice’s first and second skills both deal 3 hits with Feline Grace inflicting DEF Down and Instant Combo reducing AP. Moon Dance on the other hand grants all allies a shield equal to a percentage of Berenice’s max HP, granting even more if the ally is buffed. Once upgraded in Ascension, it grants Recovery, allowing her to heal her allies.
Healing, chain attacks, debuffs, buffs and AP reduction paired with her good SPD and average HP and DEF makes her a sturdy Support that can also fight back. However, her downside lies in the fact that her starting ATK is low and you need to build it up with relics to make the most of it if you want to give her more fighting power. Concentrate on HP to increase her Shield’s effectiveness. Adding more SPD or equipping her with a relic that reduces cooldown (Ocean Waves) will allow her to use her skills more often. Because of the flexible nature of this Esper, she can be added to any team.

Layla (Medjed)
Role: Fighter
Sub Roles: Chain Striker, Disabler, Debilitator, Nuker, AoE
Buffs: —
Debuffs: Stun, Diseased, Poison
Other Abilities: Bonus damage to Poisoned targets, Chain Attacks
Captain Ability: —
Attributes:
Average HP & SPD
Low ATK & DEF
Skills:
| Fainting Lightwave | Berserker Ray | Gaze of the True God | |
| Target | 1 Enemy | 1 Enemy | All Enemies |
| Damage / Heal | Damage: 120% (max lvl) of ATK | Damage: 200% (max lvl) of ATK | Damage: 2 hits, 55% (max lvl) of ATK each |
| Effects | 40% (max lvl) chance of inflicting Stun, 1 turn | Transfers 1 debuff from each ally to an enemy 75% (max lvl) chance of inflicting Diseased, 2 turns | 100% (max lvl) chance of inflicting Poison, 3 turns |
| Triggers / Cooldown | — | 3 turns (max lvl) | 4 turns (max lvl) |
| Ascension Upgrade | — | Deals +100% bonus damage to Poisoned targets | — |
Recommended x4 Relic Sets:
Wind Walker, Ocean Waves
Recommended x2 Relic Sets:
Apollo’s Bow, Master Grove
Layla’s build centers around inflicting debuffs with an inclination to Poison. Berserker Ray, once upgraded in Ascension, would let her deal 300% damage to poisoned targets. Pair that with the skill’s Diseased debuff and her two other skills’ Stun and Poison debuffs, Layla can have a significant effect on long battles against high HP and DEF enemies. Her Diseased debuff alone is a Healer’s nightmare.
Layla’s skill set also makes her a great Esper to use against enemies with debuffs and works well paired with allies that can inflict Poison. While ATK bonuses are usually the focus of most Fighters, in Layla’s case, she works best when equipped with relics that increase her SPD (Wind Walker), or decrease her cooldowns (Ocean Waves).
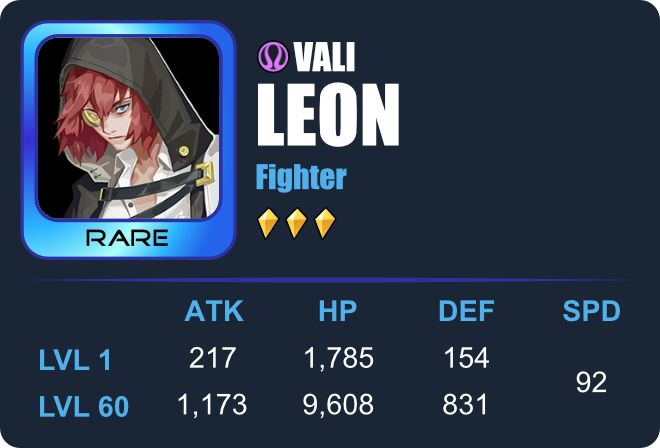
Leon (Vali)
Role: Fighter
Sub Roles: Debilitator, Nuker, Dispeller, Disabler
Buffs: —
Debuffs: Diseased, Sear
Other Abilities: Transfers Debuffs to target
Captain Ability: Increase ally C. RATE by 15%
Attributes:
Good ATK
Low DEF, SPD & HP (Lowest among all Espers of all rarities)
Skills:
| Coldhearted | Eye for an Eye (Passive) | Marked | |
| Target | 1 Enemy | 1 Enemy | 1 Enemy |
| Damage / Heal | Damage: 140% (max lvl) of ATK | — | Damage: 300% (max lvl) of ATK |
| Effects | 100% (max lvl) chance of inflicting Diseased, 2 turns | Transfers 1 debuff from Leon to the target | Sear, 2 turns |
| Triggers / Cooldown | — | Before each attack | 4 turns |
| Ascension Upgrade | — | — | If target is affected by any debuffs, attack will crit |
Recommended x4 Relic Sets:
War Machine
Recommended x2 Relic Sets:
Fiery Incandescence, Apollo’s Bow, Sword Avatara
Leon is a strong Fighter with a good ATK starting stat and relies on debuffs to make his skills more effective. His first two skills can make his third skill scarily effective once it has been upgraded in Ascension since it will make the attack more likely to trigger a Critical Hit if the target is affected by any debuffs.
Pairing Leon with Disablers and any other Espers with debuffs will make him a force to be reckoned with, especially when he is assigned Captain which increases ally C. RATE by 15%. However, his low HP, DEF & SPD can make him an easy target by other Fighters so keep that in mind when choosing which attributes to put in his relics. Pairing him with Supports that can buff and heal would also benefit him in battle.
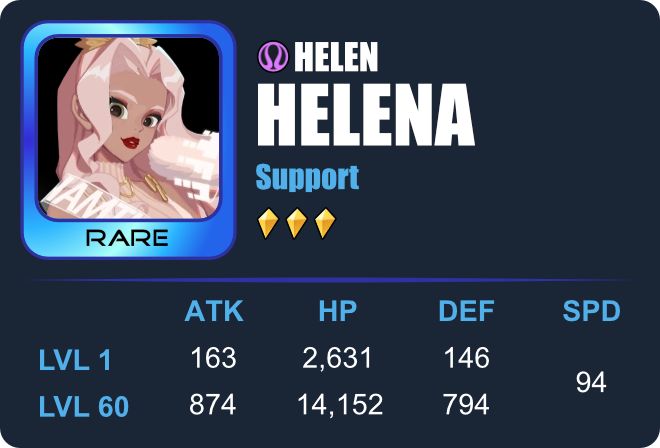
Helena (Helen)
Role: Support
Sub Roles: Healer, Disabler, Chain Striker
Buffs: C. RATE Up
Debuffs: —
Other Abilities: Reduces AP, Removes Buffs, All-Ally Healing, Chain Attacks
Captain Ability: —
Attributes:
Average HP & SPD
Low ATK & DEF
Skills:
| Downfall | Poetry | Whispered Blessing | |
| Target | 1 Enemy | 1 Enemy | 1 Chosen Ally + Other Allies |
| Damage / Heal | Damage: 120% (max lvl) of ATK | Damage: 2 hits, 90% (max lvl) of ATK each | Heal: 30% (max lvl) of Chosen Ally’s max HP Heal: 15% (max lvl) of Other Allies’ max HP |
| Effects | 100% (max lvl) chance to dispel a buff | Reduce AP by 15% | — |
| Triggers / Cooldown | — | 3 turns (max lvl) | 3 turns (max lvl) |
| Ascension Upgrade | — | — | C. Rate to all allies, 2 turns |
Recommended x4 Relic Sets:
Abiding Panacea, Wind Walker, Ocean Waves
Recommended x2 Relic Sets:
Master Grove, Adamantine, Stoneveins
Helena’s best skill is Whispered Blessing which can heal one chosen ally up to 30% of their max HP while the rest of your allies get 15% of their max HP healed. Once upgraded in Ascension, it can grant all allies C. RATE Up which can benefit a lot of Fighters, especially ones that have high C. DMG. Since her ATK is pretty low, this skill balances that out and makes her two other damage skills, which dispels an enemy’s buff and reduces an enemy’s AP, deal more damage.
She may have decent HP & SPD but low DEF so it may help her survive longer if equipped with relics that can increase her HP or DEF. The Abiding Panacea Set, which increases Healing Efficacy, may be your best bet to maximize her third skill. Alternatively, you can equip her with Wind Walker to increase SPD or Ocean Waves for a chance to lessen cooldowns. She can be placed on any team but is best paired with Fighter Espers.

Ye Suhua (Shao Siming)
Role: Support
Sub Roles: Healer, Buffer, Debilitator
Buffs: Invincibility, Recovery, ATK Up, DEF Up
Debuffs: ATK Down
Other Abilities: Single-target Healing
Captain Ability: —
Attributes:
High SPD
Average DEF
Low ATK & HP
Skills:
| Stardust | Astral Guardian | Star Dancer | |
| Target | 1 Enemy | 1 Ally | All Allies |
| Damage / Heal | Damage: 130% (max lvl) of ATK | Heal: 30% (max lvl) of target’s max HP | — |
| Effects | 70% (max lvl) chance to inflict ATK Down, 2 turns | Invincibility, 1 turn | ATK Up + DEF Up, 2 turns |
| Triggers / Cooldown | — | 3 turns (max lvl) | 3 turns (max lvl) |
| Ascension Upgrade | — | If teammate has less than 50% HP, healing amount doubles + Grant Recovery, 2 turns | — |
Recommended x4 Relic Sets:
Wind Walker, Abiding Panacea
Recommended x2 Relic Sets:
Master Grove, Adamantine, Stoneveins
Ye Suhua is a sturdy Support with average DEF and high SPD. Her most important skill is Astral Guardian, which can heal a teammate for 30% of their HP while also granting them Invincibility. Once upgraded in Ascension, it would double the healing amount and grant Recovery if the target has less than 50% HP, making it one of the strongest healing skills in the game. As for her two other skills, Stardust, her only offensive skill, deals damage and has a chance to inflict ATK Down while Star Dancer buffs her allies with ATK Up and DEF Up.
While her SPD is already pretty high, raising it even more will let her pass her turns quickly, letting her use her buffs and healing skills more often to aid the team. She may work well when paired with Unky Chai since he can decrease cooldowns if allies already have an ATK Up buff on them which she can also cast.

Unky Chai (Yue Lao)
Role: Support
Sub Roles: Buffer
Buffs: C.RATE Up, ATK Up
Debuffs: —
Other Abilities: Reduces Cooldowns, Increases AP
Captain Ability: Increases ally HP by 18%
Attributes:
High SPD
Good HP
Low DEF & ATK (Lowest among all Espers, tied with Li Ao)
Skills:
| Under That Moon | Ties that Bind (Passive) | Ropes of Destiny | |
| Target | 1 Enemy | 2 Random Allies | All Allies |
| Damage / Heal | Damage: 130% (max lvl) of ATK | — | — |
| Effects | Increases AP by 25% | C. RATE Up, 2 turns | ATK Up , 2 turns Reduces ability cooldowns of an ally by 1 turn if an ATK Up buff is already present Cooldown will not be affected by unit abilities |
| Triggers / Cooldown | — | Triggers at the start of each turn | 4 turns (max lvl) |
| Ascension Upgrade | — | ATK Up, 1 turn Reduces skill cooldown by 1 turn if an ATK Up buff is already present | — |
Recommended x4 Relic Sets:
Wind Walker, Ocean Waves
Recommended x2 Relic Sets:
Adamantine, Master Grove
Unky Chai may seem like a weak Esper, with his low ATK and DEF, but he makes for a very capable Support, helping your team by granting ATK Up and C. RATE Up buffs and reducing ability cooldowns.
This Esper can last long into battle with his HP and high SPD but cannot be depended on when it comes to dealing damage. His only offensive skill, Under That Moon, deals decent but not amazing damage but does increase his AP, giving him a speed boost to his next turn. He is best paired with strong Fighters that have skills with long cooldowns.
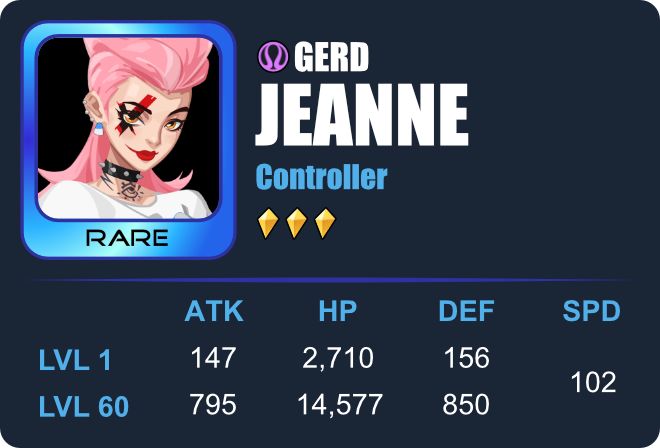
Jeanne (Gerd)
Role: Controller
Sub Roles: Disabler
Buffs: —
Debuffs: Stun
Other Abilities: Absorbs AP, Removes buffs
Captain Ability: Increases ally ACC by 20%
Attributes:
Excellent SPD
Average HP
Low ATK & DEF
Skills:
| Punk | Cool Rhythm | Beat Burst | |
| Target | 1 Enemy | 3 Random Enemies | 1 Enemy |
| Damage / Heal | Damage: 40% (max lvl) of ATK | Damage: 90% (max lvl) of ATK | Damage: 120% (max lvl) of ATK + 12% (max lvl) of max HP |
| Effects | 25% (max lvl) chance to inflict Stun, 1 turns | 100% (max lvl) chance to inflict Stun, 1 turns | Removes all buffs Inflicts Stun, 1 turn |
| Triggers / Cooldown | — | 3 turns | 4 turns (max lvl) |
| Ascension Upgrade | — | Absorbs 30% AP from each target | — |
Recommended x4 Relic Sets:
Wind Walker, Ocean Waves, War Machine
Recommended x2 Relic Sets:
Apollo’s Bow, Master Grove
Jeanne’s skills revolve around Stunning her enemies. Once upgraded in Ascension, Cool Rhythm lets her absorb 30% AP from each of her targets (up to 3) allowing her to get to her next turn quickly and potentially Stun even more enemies.
The downside to using this Esper is dealing with enemies that have Immunity or cannot be affected by her Stuns. Fortunately, her Beat Burst skill has the ability to remove all buffs from her target.
Since her HP is higher than some Espers and you can focus on increasing it since her last skill, Beat Burst, can convert up to 12% max of her Max HP to damage. Equipping her with relics that increase her HP and ATK is a must. She is best paired with Fighters that deal more damage in order to efficiently utilize her disabling skills.
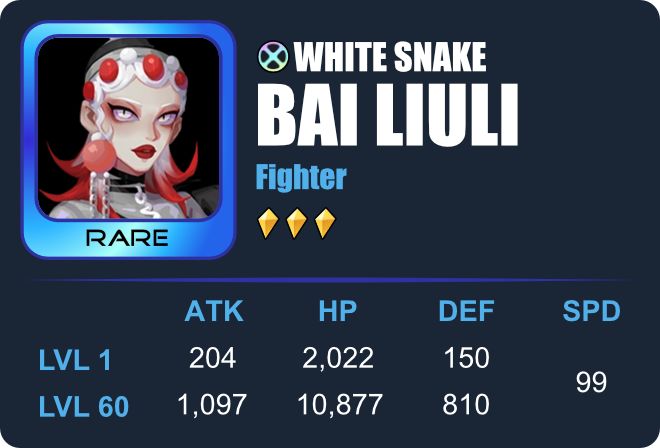
Bai Liuli (White Snake)
Role: Fighter (Possible Supporter)
Sub Roles: Disabler, AoE / Chain Striker, Healer, Debilitator, Dispeller
Buffs: —
Debuffs: Silence, Sear
Other Abilities: Removes debuffs, Steals buffs, All-Ally Healing
Captain Ability: —
Attributes:
High SPD
Average ATK
Low HP & DEF
Skills:
| Hiss | Shedding | Incorporeal | |
| Target | 1 Enemy | Self, All Allies | Up to 5 Random Enemies |
| Damage / Heal | Damage: 120% (max lvl) of ATK | — | Damage: 5 hits, 110% (max lvl) of ATK each Prioritizes new targets and deals -15% damage per attack to the same target |
| Effects | 60% (max lvl) chance to inflict Silence, 1 turns | Removes a random debuff (Self) | 70% (max lvl) chance to steal 1 buff + inflict Sear, 2 turns |
| Triggers / Cooldown | — | Start of each turn | 4 turns (max lvl) |
| Ascension Upgrade | — | Restores team-wide HP by 5% of max HP of target at the start of each turn | — |
Recommended x4 Relic Sets:
War Machine, Hammer of Thor
Recommended x2 Relic Sets:
Fiery Incandescence, Master Grove, Sword Avatara
Bai Liuli is a Fighter-Support combo that can not only deliver blows with debuffs such as Silence and Sear, but can also dispel debuffs inflicted on her and steal her target’s buffs. Her skills make her a good counter against enemies that are reliant on buffs and debuffs while also dishing out her own debuffs. Being able to restore her allies’ health at the beginning of her turn with her high SPD of 99 makes her a fairly good minor healer but cannot completely take the place of other more effective Healers. Her third skill, Incorporeal, works like an AoE when against 5 enemies but a chain attack when there are lesser targets.
She seems to fit in with any team but does not seem to have a solid build that makes her an expert in a field. She can fit many roles, but not one completely. She feels like a jack of all trades, which is not necessarily a bad thing but it makes her an Esper that you need to definitely invest in to get the most out of her abilities. Focusing on ATK and SPD for her relics would benefit her abilities while putting some points on HP and DEF will help her stay alive. The Sword Avatara Set can be a nice match for her since her basic attack has Silence which will be applied to every counterattack.
And this concludes our guide for Rare Espers. We hope that this guide helped you in understanding what makes each Rare Esper special, what relics to equip them and what type of Espers they are best paired with. If you have learned other tips and tricks regarding the Espers discussed in this guide, feel free to leave your discoveries in the comment section below!