Lumia Saga may be the cutest MMORPG on Android and iOS today, but don’t let that fool you. The game packs quite a punch with all its features and challenges. You start off with creating a character, choosing a starting class, and jumping into the world. From there, it’s a whirlwind of battles, boss raids, dungeon runs, quests, and more. You can customize how your equipment looks by playing around with cores.
There are pets you can collect in order to become stronger in battle. Lumia Saga also has several Mounts you can use in order to explore the different maps quicker. There are skill customization paths that will allow you to tailor your character’s combat style to what suits you best. The game just has so many things to offer that it can be overwhelming for beginners. It’s a good thing that we have compiled a detailed Lumia Saga beginner’s guide with tips, cheats and strategies to help you stay on top of everything.
1. Choose The Right Class

This is the first step you will ever take in Lumia Saga, and it is an important one. There are currently four starting classes in the game, with a fifth one coming some time in the future. Each class will be able to unlock an alternate class when you reach level 30. The description of the alternate class will be visible during character creation, though. The classes all have their roles in a party, so you won’t find yourself left out regardless of what you choose. The only thing that should affect your decision is which class suits your playstyle the best. We have listed the different classes below to give you a better idea.
Knight – A standard tank class with high survivability. It unlocks the Swords class at level 30.
Swords – A DPS class with high mobility but low survivability.
Mage – High DPS class that uses magic to deal damage. It unlocks the Warlock class at level 30.
Warlock – Support class with above average survivability. Uses life magic for group and sustained healing.
Adjudge – Well-rounded melee class with medium damage and survivability. It unlocks the Guardian class at level 30.
Guardian – A tank-DPS class with decent attack strength and above average survivability.
Oracle – A pure support class with high survivability and low damage output. This class has multiple powerful healing skills but are all single-target. It unlocks the Scholar at level 30.
Scholar – Ranged magic class with high DPS but low survivability. Deals massive damage even on tanks if used correctly.
Archer (Unreleased) – Pure DPS class with ranged attacks. Unlocks the Assassin class at level 30.
Assassin (Unreleased) – Pure DPS class with melee attacks. Deals massive damage but has high difficulty.
2. Level Up Both Classes
Remember when we said you unlock the alternate class at level 30? In most other MMORPGs, the second class is an advanced class that you use exclusively when you unlock it. Lumia Saga allows you to switch back and forth between the two classes, and you will find that you will actually need both classes. You will be going through thousands of battles in the game, and your opponents will have different strengths and weaknesses. Each class and alternate are designed in a way that will allow you to handle a variety of situations. For example, if you’re doing solo runs, you can use the Scholar then switch to the Oracle class once you join a party.
Related: Lumia Saga Class and Character Skills Guide: The Best Setups for Each Character
Each class has its own Skill tree and Talent tree. All you have to do is switch back and forth between the two classes whenever you have skill points available. The two classes do not share the pool of points, so you will be able to level them up independently without having to worry about running out of points for either one.
3. Building Up Your Skills And Talents
Each class has a number of active and passive skills. You can level them up individually or choose the quick upgrade option that maxes out all skills at once. In the beginning, when you’re short on resources, you might want to focus on leveling up only the skills that you usually use. Once you have more resources, though, you would want to max them all out. The game gives you three slots for Skill Plans. Skill Plans let you switch skill configurations quickly, allowing you to customize a plan for different situations. You can assign a plan for solo runs, a plan for boss raids, and a plan for party PVP.
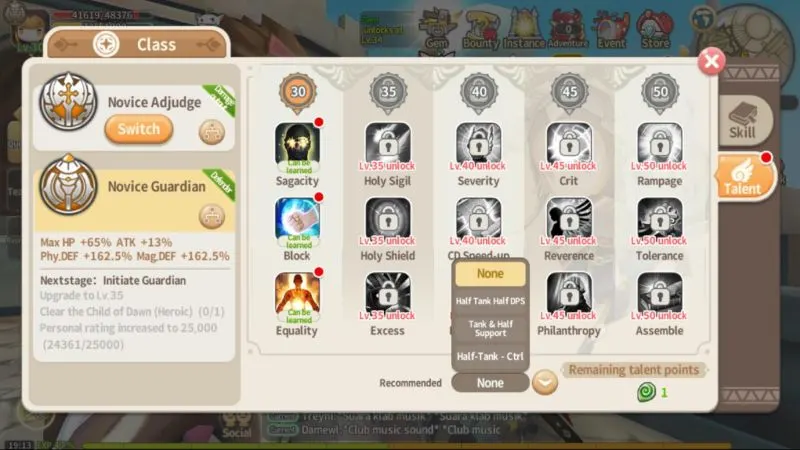
Talents have three paths straight paths, but you are free to level up without sticking to a single path. You can experiment with the different Talents and reset if it isn’t working out for you. If you aren’t sure on how to build and don’t feel like experimenting, you can choose preset recommendations from the dropdown at the bottom of the Talent window. It will give you three options depending on the type of character you want to build up. Choose the type you want and the game will mark which talents work best for the build that you want.
4. Promote Both Classes
While you are working on leveling up both classes, don’t forget to complete your class promotion quests as well. Whenever you are promoted to the next stage of your class, you get a new Title. Every Title you unlock in Lumia Saga adds to your overall combat power. Aside from the free Title, you also get percentage boosts to your stats.

The higher your class stage is, the bigger the boosts. The promotion quests for each class are separate, so you will need to switch to your other class in order to complete its promotion. Open up your skills menu to see the promotion requirements on the left side. The current boosts you are receiving will also be listed below your current class Title.
5. Working With Cores
Lumia Saga has a lot of features, but one of the things that set it apart from other games is the core system. Instead of picking up new weapons and armor from looting, you only get cores. Each gear type can equip up to three cores, allowing you to customize which attributes go into your gear. You start out with just the Weapon and Garb slots. Additional gear slots are unlocked when you reach the required levels. Only the Weapon and Garb slots will change your character’s appearance.
Each core slot in the Weapon and Garb gear will affect a specific part of your character’s appearance. You can drag the position of the core to customize your look. The position of the core won’t affect the character’s stats, so don’t worry about having to choose between fashion and function.
6. Modify Gears For Full Customization
Before we talk about upgrades, let’s delve deeper into customization. We’ve talked about core slots and how you can equip up to three cores into each gear. Each core has up to four attribute slots. If you have good attributes old cores, you can use the Refine function to transfer them into your new cores. Keep in mind that you can’t have two attributes in the same core. For example, if you have ATK + 55 in your new core, and the old core had ATK + 65, the ATK + 65 will replace your ATK + 55 even if you have free attribute slots.
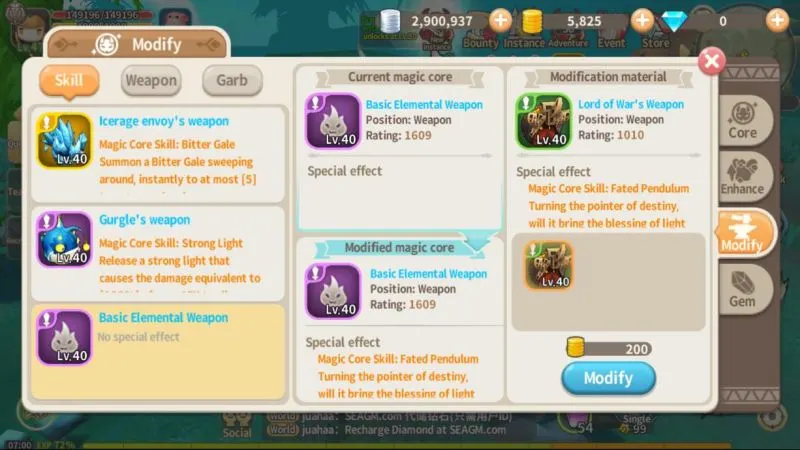
Some cores have special effects that grant you additional skills. If you have a skill that you like in a low-level core, you can transfer that skill into your new core through the Modify menu. Just choose the new core where you want to insert the special effect, then choose the core you want to extract from. You will need to spend Gold coins here, so make sure you only transfer special effects that you will actually use.
Now what do you do if you like how a low-level core looks but have new ones that have better stats? You can use the Modify function as well. The Modify menu has three tabs. The Skill tab is for transferring special effects like we discussed earlier. The Weapon tab and the Garb tab are both for transferring the Appearance of one core to another. This way, you can keep your character’s look without sacrificing stats.
7. Strengthening Your Gear
There are two ways to power up gears in the game. The first one is by using the Enhance system. You use enhancement stones to level up your gear. Don’t worry about investing early in Enhancement because the enhancement levels remain even if you swap out cores. Try to enhance all your gear to the same level because the cost increases as the level goes up. You will be able to maximize your combat power if you spread out your stones across the different gear instead of investing heavily on a single one.
Another way to power up your gear is by inlaying Gems. Each gear has three Gem slots, and you can mix and match the different Gems depending on the build that you want. You can then upgrade each Gem in order to increase the effect it gives you. You can use duplicate Gems in your backpack to upgrade the ones you have equipped. Otherwise, you can use the auto-purchase function to automatically buy the type of Gem you need for the upgrade. Just keep in mind that this will cost you a lot of silver, so you may want to farm for Gems instead.
8. Gather More Cores
Cores are essentially your equipment in Lumia Saga. Even if you have good cores equipped, you can always refine them further by picking better attributes from other cores. Nearly every dungeon and every boss in the game drops cores. As you probably expected, the Bosses drop the best cores in the game. If you are looking for extra cores for Refining stats, however, you can complete Instance dungeons instead.
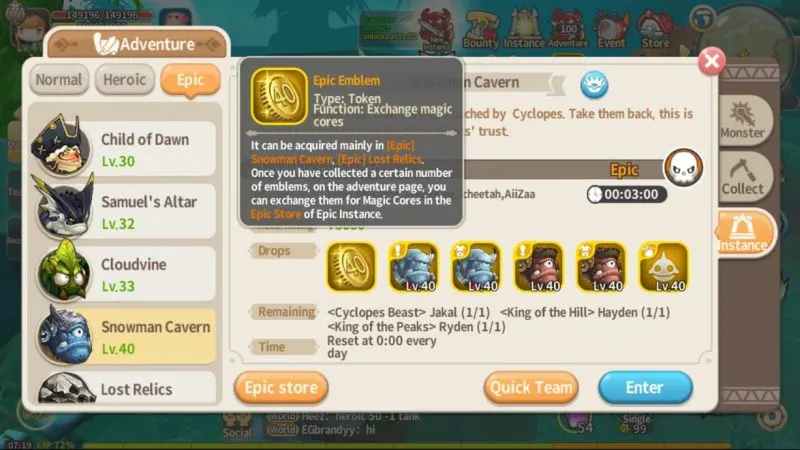
Heroic Instance dungeons drop Hero Emblems that you can trade for Purple cores. Epic Instance dungeons drop Epic Emblems that you can exchange for Gold cores. You get two runs on each Heroic dungeon per day. You also get one run on each Epic dungeon each day. Make sure you use up these runs for the dungeons that match your level. You can run through the lower levels for extra experience and resources if you have time.
Related: Lumia Saga Farming Guide: Tips & Strategies for Gaining Cores, EXP and Gold
9. Set Up Your Runes
The Rune system is set up around specific Rune skills. You can choose between two central Rune masteries and build a network of Runes around them. Make sure you read the description of each mastery before choosing to level it up. Upgrading the central Runes will cost you increasing amounts of Rune Essences and will require Ancient Statues every 10 levels. These are hard to come by, so it will be difficult for you to upgrade both central Runes at the same time.
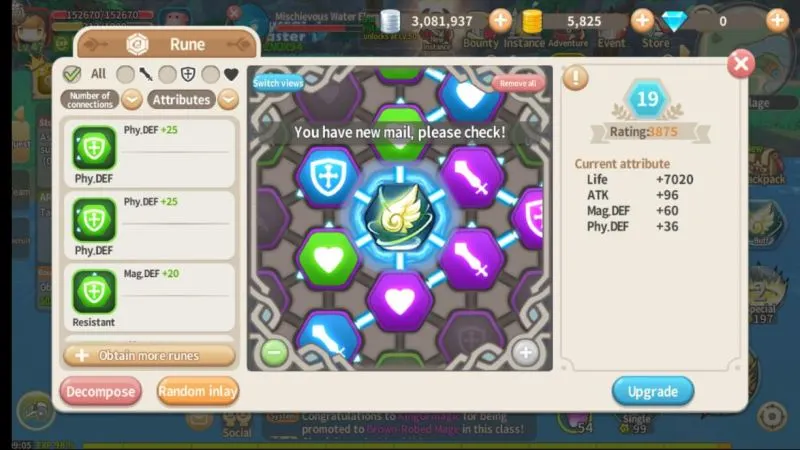
The layout of the surrounding Runes can be a bit confusing for new players. Each slot is unlocked depending on the level of the central Rune. On top of that, you can only inlay Runes that match the image of the slot. That’s not where the problem ends, though. You will notice that Runes have small arrows on certain sides. A rune will only work if it is linked to the central rune through these arrows. If a Rune doesn’t light up when placed, that means there are no arrows connecting it to the central rune.
10. Beware Of Auto-Battle
As with most mobile MMORPGs, the game has an auto-battle system that allows your character to fight battles on his own without waiting for instructions from you. This is a useful feature that can help you through daily grinding. Lumia Saga’s auto-battle feature even allows you to set specific thresholds for when each skill will be used. For example, you can set a healing skill to only cast when your hp falls below 50%.
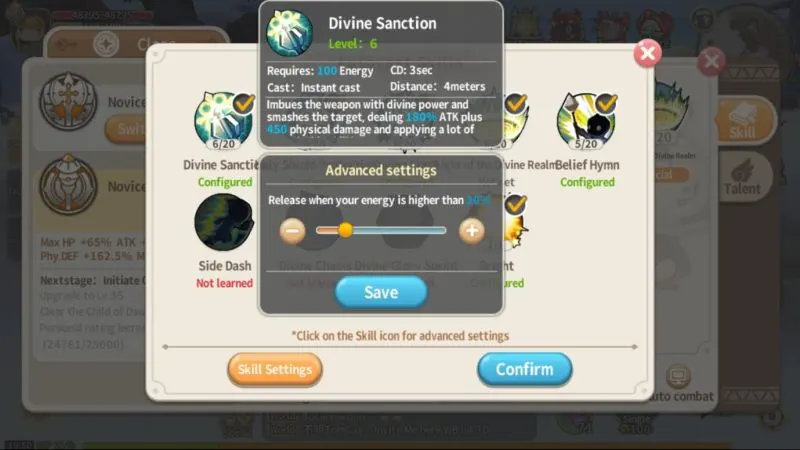
While this is a great feature, you should not be overly dependent on it. You will be able to get away with auto-battling through the first 40 levels of the game. After that, you will start encountering stronger opponents that require strategy to take down. For example, the Epic Snowman Cavern Instance has a level 40 recommendation, but we guarantee that you will die if you auto-battle here even if you are level 49. There are two bosses in this Instance, and they have opposing elements. You will need to go to the safety zone of one boss to dodge skills of the other one in order to survive. If you auto-battle here, your character will just keep hacking away at the first boss he sees even if it ends up killing him. Only use auto-battle for stages that are way below your level.
11. Use Up Your Cultivation Experience
Every day, you have a certain amount of Cultivation Experience that you can earn. Once you use it up, you will no longer be able to earn from activities that give Cultivation Experience. The cap does not carry over to the following day, so you will be missing out on opportunity to gain more experience if you do not use it all up.
Aside from gaining more experience, you can also use up to four Hunting Gems per day in order to gain Hero Emblems, cores, and Pet Training Balls while grinding for Cultivation Experience. We recommend that you grind in the highest possible map because you only get a limited number of Hunting Points per day. The level of the Hero Emblems and cores that you pick up will be based on the level of the monster you kill while hunting.
12. All About Professions
There are five professions in Lumia Saga, each one has its own level and unlocks more options as the level increases. Performing any of the profession activities will consume Vitality. Once you run out, you will have to wait for it to regenerate or use Vitality potions to recover. Unlike other MMORPGs, you can level up all five professions in order to reap their benefits. The first three professions are unlocked from the beginning, and you will need to complete a series of quests in order to unlock the Fishing and Chef professions. Check out the list below to learn more about each profession.

Botanist – This is the first profession unlocked and it allows you to gather herbs and plants that can be used for cooking and alchemy. Higher levels allow you to gather better resources and unlocks auto-collect options for lower-level items.
Alchemist – Alchemy allows you to craft potions, cores, novelty items, and runes. Higher levels will allow you to craft better items, but you will still need the necessary materials to craft. This is possibly the best profession in the game, though you will still need the other profession to gather materials for alchemy.
Mineralogist – Gathers stones, metals, and minerals that can be used for Alchemy. Higher levels will allow you to gather better resources and unlock auto-collect options for lower level items.
Fishing Child – Lets you catch fish that can be used for cooking. There is also a chance to catch other resources as well as treasure boxes. Fishing is the only profession with its own minigame. You need to repeatedly tap to keep the bar on top of the fish icon until the gauge on the right is full. Be careful when tapping because the bar has the sensitivity of Flappy Bird. It barely moves with a single tap, but it suddenly flies up if you keep your finger on the screen for a split second too long.
Chef – This allows you to cook various food items in order to gain temporary boosts. The boosts last quite some time, so it is actually worth investing in this profession. Higher levels allow unlock better recipes for you to cook.
13. Follow The Newbie Orientation
When you first start out, the game will give you a series of tasks that need to be done during the first seven days. This is called the Newbie Orientation Guide. Each task you complete will give you a reward. A bigger reward is waiting for you when you complete all of the tasks for that day. Don’t worry because all of these tasks are achievable, and they help make sure that your progress is on track per day. You can even grind in advance if you have more time to play, so that you can get a head start on the next day’s tasks. You won’t be able to claim the rewards in advance, though.
14. Complete Your Daily Events

Aside from the Newbie Orientation, you also have a list of daily events that you can accomplish in order to gain Activity Points. You get rewards when you reach 30, 60, 90, 120, and 150 Activity points. The list of tasks in the Event Center increase as you level goes up. If you don’t have time to complete all of the tasks, at least try to get to 150 Activity points in order to claim all of the rewards. If you don’t know which events to prioritize, you can follow the game’s recommendation. The recommended events will be marked with a flag that says Must.
15. Find An Active Guild
Lumia Saga has a Guild system that lets you work with other players in order to grow stronger. Aside from having guildmates to help you in various quests and events, Guilds have several benefits that you can only take advantage of if more members are active daily. Most Guild Events require multiple members to accomplish. If no one else on your Guild goes online during Events, you won’t be able to earn much. This is why we recommend that you join one instead creating a new Guild unless you already have several friends that will help you.

Perhaps the single most important benefit of being part of a guild is the Tech Tree. The Tech Tree allows you to purchase permanent boosts for your character. The maximum level of each boost is determined by the Tech level of your Guild. Try to max out these techs as much as you can because they will stay with you even if you decide to transfer to a different Guild later on.
16. Don’t Forget Your Pets
Pets play a huge role in your overall combat power. They’re not just there to follow you around and be cute. Once you unlock a pet, you can feed it to level it up, and train it to change its stats. Your pet cannot exceed your level, so don’t forget to feed it every time you level up. As for training, you will need to use Pet Training Balls. Training increases the stats if your pets, but there is also a chance for other stats to decrease. It’s all random, so you will have spend a lot of Pet Training Balls in order to max out your pet’s aptitude.
Aside from feeding and training, you can also Star-up your pet in order to boost its stats. You will need Starlight in order to Star-up your pets. The Starlight required depends on the rarity of your pet, so it will be hard to come by. You can purchase Starlight from various in-game stores, but you can also acquire them by releasing any extra pets you may have.
Related: Lumia Saga Pets Guide: How to Feed, Train and Unlock Pets
Pets also have Talent skills that give you additional boosts depending on where they are assigned. You can teach your pets new skills by using essences. Keep in mind that there is a chance the old skills may be overwritten, so proceed with caution.
Once you are satisfied with your pets, don’t forget to assign them to slots in the Funland tab of your pet menu. Each slot has a specific attribute that it transfers from your pet to your character. The higher the level of the slot, the higher the percentage of transfer. The exception to this is the Caring Principal slot which transfers all of the attributes at 100%. You can assign up to five pets in the Funland tab. Make sure you assign the right pets to the correct slot, and your most powerful pet in the Caring Principal slot.
17. Increase Your Adventurer Level
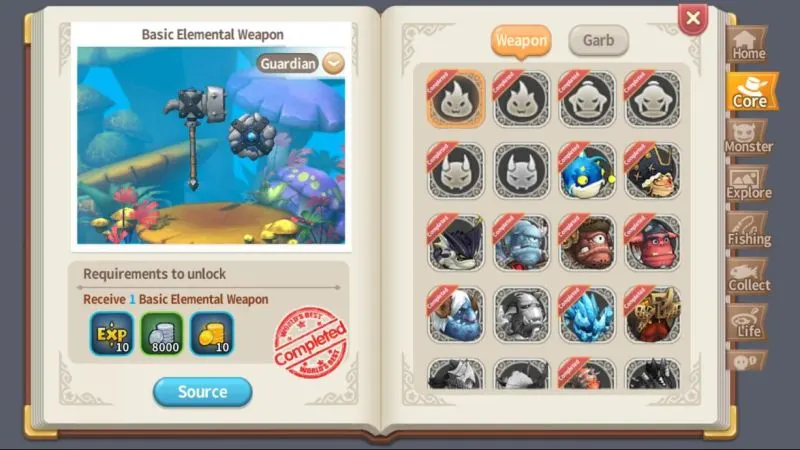
Tap on the Function icon on the top right of your screen then tap on the Manual icon to view your Adventurer Manual. This Manual records all the Cores you collect, the places you explore, the monsters you kill, the types of resources you gather, and more. Every entry gives you certain rewards, but you also earn Adventurer experience whenever you fill up the Manual. Higher Adventurer levels unlock Adventurer skills that you can level up. These Adventurer skills give permanent boosts to different stats. Try to complete the Manual as much as you can in order to get the most out of your Adventurer boosts.
18. Check Your Combat Rating
As you progress in the game, it will become increasingly difficult to keep track of your progress. Since there are so many ways to increase your combat rating, you might get lost on which ones need work. The game has a way to help you stay on top of it all. Tap on the Guide icon inside the Function menu. This will take you to the Rating screen. This screen will tell you which areas of your character’s progress are on track and which ones need work. If a certain area is marked as Low, you can simply tap on it to view the related menu and address it directly.
19. Befriend The NPCs

There are several NPCs in the game that you can be friends with. These NPCs sell useful items and you will be able to unlock better options in their respective shops if you increase your intimacy level with them. To increase your intimacy level, you can give the NPC up to five gifts per day. Different NPCs like different things, so make sure you check which ones give the most intimacy points and stock up on those. Another way to increase intimacy is by completing quests. Each NPC gives out up to three quests per day. Max out both options daily in order to raise Intimiacy levels quickly.
20. Claim All Those Free Rewards
Lumia Saga is pretty generous to active players. There are several free rewards waiting for you to claim if you know where to look. Right off the bat, there are two login rewards waiting for you at the moment. The first is the Login Carnival which gives you rewards for every day that you log in. The Login Carnival gives you rewards based on the number of days you log in. That means if you log in for 7 days in a row, you skip one day, then log in on the 9th day, you will be able to claim rewards for 8 days.

The other login reward is the Daily Check-In. This one follows a monthly calendar. If you miss the reward on a certain day, you will no longer be able to claim it. That means if you log in for 7 days in a row, skip one day, then log in on the 9th day, you will not be able to claim the reward for Day 8 unless you spend gems for a late check-in.
Another free reward you get is the Level-up Gift. You get various rewards whenever you reach level milestones, starting with level 15. The higher the level, the better the rewards will be. Finally, you also get rewards for staying online, even if you aren’t doing anything. The longer you stay online, the more rewards you get. You will see a Fay Fay icon with a timer on it on the upper right side of your screen. When the timer ends, you will be able to claim the reward the Fay Fay is holding.
Mastering the world of Lumia Saga isn’t easy, but with the help of our tips and tricks above, you will be maxing out your combat rating in no time! If you happen to know additional tips or strategies for this exciting MMORPG, then please let us know in the comments below!

Antoinette Hines
Wednesday 11th of December 2019
Which is the best class for new players?