NetEase’s latest big hit for the iOS and Android platforms is called LifeAfter, and as the name of the game may suggest, this is a zombie survival game. LifeAfter is not your ordinary zombie survival game, which is just what you should expect from a developer that released titles like Identity V and Rules of Survival among others. This is an in-depth game in this very popular sub-genre of gaming, and aside from the usual mechanics where you would need to fight off hordes of attacking zombies (aka Infected), there’s a very deep crafting system in this title, which you may have surmised when we published our guide for food recipes. There are also various areas on the in-game map where you can travel to via helicopter, and it’ll be up to you to fight, craft, and strategize your way through the wilderness as you try to survive for as long as possible without getting knocked out.
We already published a beginner’s guide for this game, as well as a complete list of food recipes, but since the learning curve is rather steep, to say little of the various features and mechanics, we’re following up our beginner’s guide with a more advanced LifeAfter strategy guide. Some of these tips may build on what we mentioned in the first guide, but most of them will give you an idea of what else you need to do once you’ve survived the first few days after completing the tutorial stage in the game.
1. Play The Card Game To Earn Resources
One of the easiest ways to get social in LifeAfter, while also earning some valuable, if oftentimes basic, resources is to play the card game anywhere you see a shelter with other players inside. Over at one of the tables, you’ll see a deck of cards, and you will then have the option of inviting one of the other players in the house, or waiting until someone invites you. (The latter could be tricky if there are several players in the same shelter, as there’s only room for two players!)
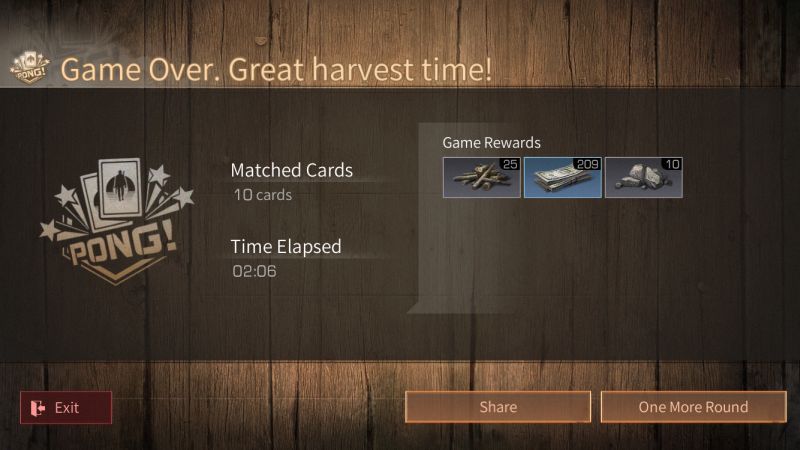

The game itself is very simple, and there’s very little to it — it’s a card matching game, and you can win resources by matching the card played by your opponent, and so can they. The player who sent the invite for the game would flip the coin — if they win, they draw first, if they lose, first draw is yours. You’ll be given two minutes to play the entire game and 10 seconds to draw a card, and once it’s all over, you’ll win the rewards reflected by the cards you were able to match. (Matching a card with the plus sign extends the game time by five seconds.) Memorizing which resources showed up when a certain card was drawn is important, but luck could also play a part, as you have no control over how good the other player turns out to be. If the other player draws second but can’t match the cards you’re drawing, it’s tough luck for you, though you can always choose another opponent for your next game. Likewise, you can also have a rematch with the same player you competed against with — this is useful if you were able to match a lot of cards in your first game!
2. Put Those Resources To Good Use
At some point in the game, you will notice that your cabinet won’t be able to hold everything you’ve gathered. Certain slots can only hold so much of a certain resource, so you will, at one point, see resources such as Wood and Stone occupy multiple slots. So what’s to do in such a situation? Simple — you can transfer some resources back to your backpack and use them to create basic (or sometimes, not so basic) items that you can use while exploring or completing quests. One quick way to remedy this would be by creating new arrows for your bow with the surplus wood you’ve gathered so far. Got too much hemp lying around? Use it to craft bandages. That extra stone can be used in conjunction with your surplus wood to craft new tools weapons if your existing ones have been damaged a bit too much by Infected attacks.
When all else fails, you can fly from your base to Hope 101 to sell your resources for some New Dollars. Considering all the items you can buy from the NPC merchants, you will need a fair amount of that currency at some points, so this isn’t necessarily a bad thing, if you come to think of it.
3. After Gathering Resources, Head To An Evac Point
In the fifth newbie quest, you will be asked to head to a helicopter evacuation point so you could ship certain resources back to your home base in the development zone. This, of course, would give you additional confidence while exploring out in the wild, because you no longer need to worry about dropping stuff after getting knocked out by an Infected. (Just make sure you’re careful climbing up and going back down — you could get seriously injured and lose a great deal of HP if you fall down a good distance while on the ladder!)
As you can see, the game is showing you, through this quest, that there is a way to safeguard your hard-earned resources, and that way is by climbing the ladder at the evac point and having the “postman” fly your stuff back to your base, where you can redeem it by accessing your Mailbox. Take note, however, that you are only allowed so many chances to fly your stuff back to home base free of charge, though this is per evac station, and not cumulative. It’s not exactly the best in-game mechanic in LifeAfter, but then again, that’s part of what makes things challenging in this game, while also forcing you to think twice before spending your in-game currency. (For example, you probably wouldn’t want to ship back extra wood or stone when you’ve got more than enough of it back home.)
4. Join A Camp
It can be said that camps are LifeAfter’s equivalent to guilds in role-playing/multiplayer games. So why should you join a camp when you could, aside from the opportunity to interact with other players from all over the world, or players from your part of the world, as would often be the case?
The benefits of joining a camp in LifeAfter are similar to those of joining guilds in the aforementioned MMO titles. For starters, the special camp events allow you to earn more rewards, including stuff you might not be able to normally during your usual explorations. Target training, fishing at the camp pond, and boss battles are just a few of the special activities you can take part in, if you’re hoping to score more rewards that could help you increase your odds of surviving while out there. Just a reminder, however — some events may only be available on certain days, so you may want to set aside some free time on the day of the event you want to participate in.
You will also be able to purchase items through camp-exclusive shops and merchants — again, you’ll be able to buy some items that aren’t available through the usual channels.
5. Playing The Game Is More Fun With Friends
This is something we had touched on a couple of times in our beginner’s guide, but we’re going to discuss it nonetheless in this intermediate guide because it could be such a big help at several points in the game. So why should you add friends? For one, playing alongside a partner or in a party could increase your chances of survival, especially if you run into a large horde of Infected. Secondly, there are some areas on the map which can only be accessed by pairs, which means that if you’re playing solo, such an area would be off-limits, thus potentially reducing your destination options when it comes to acquiring one resource or another.
In order to add friends in LifeAfter, simply head to the Chatbox at the bottom center of your screen, then go to the Contacts tab. Look for the name of the player you wish to add, send your request, then you’re all set. Don’t worry if you don’t have any friends on social media who play the game — you may opt to add friends through the LifeAfter Facebook or Reddit pages, for instance. There’s also the possibility that you may get some random requests from time to time — don’t hesitate to approve their requests, as this could be the start of a solid partnership going forward!
6. Don’t Forget The Abilities Next To The Skill Tree
In our LifeAfter beginner’s guide, we had given you a brief overview of the Abilities tab, which can be accessed by tapping on the Home button on the upper left of your screen, then tapping on Abilities. You should know by now that it’s important to revisit this tab from time to time in order to upgrade your abilities as your Gather, Craft, and Combat masteries level up. We also told you that you should choose your upgrades wisely, considering that each upgrade costs a progressively greater amount of New Dollars and Gold Bars — for example, you wouldn’t want to upgrade firearm-related abilities when you haven’t even crafted any firearms to begin with, and you don’t want to move from level 1 to 2 for an ability that doesn’t come in handy just yet. However, we’re mainly here to discuss the abilities on the left side of each skill tree — it’s easy to neglect them, but it’s just as important to upgrade those abilities as well.
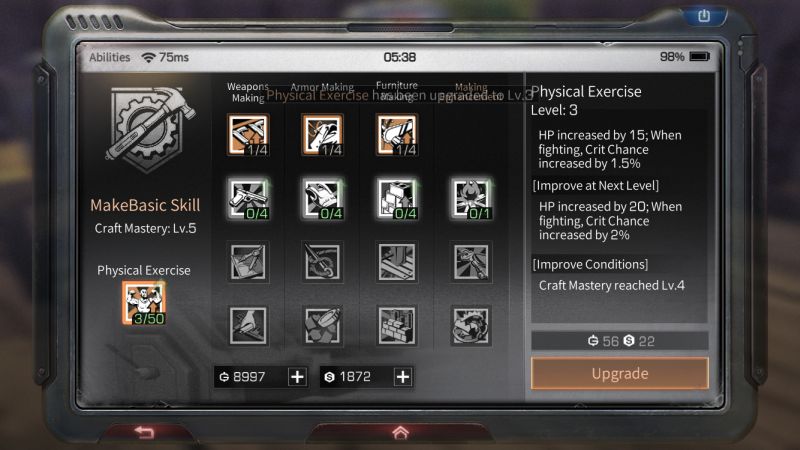
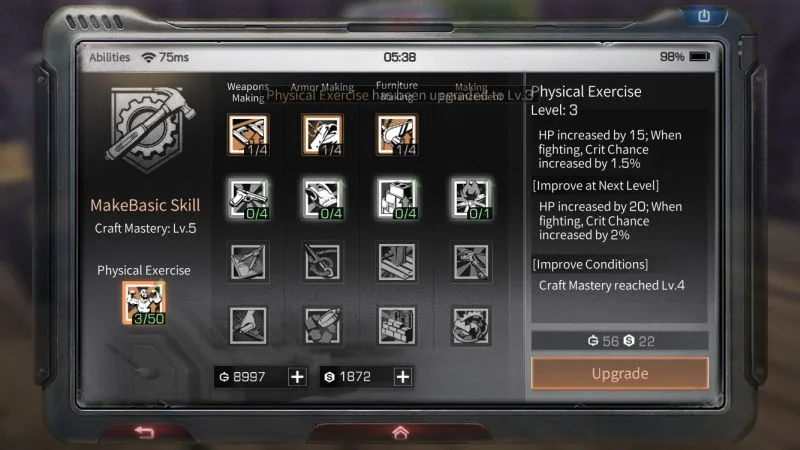
For the Gather skill, Strength Power would be the special ability to upgrade. This increases your Crit Immunity and Crit Chance when fighting and gathering, and for each time you level up, you will get incrementally better in the particular areas specified. Physical Exercise is under Craft, and it increases your HP cap, as well as your Crit Chance, albeit this time, for fighting. Lastly, Battlewise can be found under Combat, and it improves your damage stats for short- and long-range attacks. Remember that you can only level up these abilities so far, depending on what level of mastery you are at for Gather, Craft, or Combat.
We should also emphasize that the figures listed, may it be whole numbers or percentages, are cumulative from your level 1 stats. For example, if the description says that your HP will be “increased by 25,” that doesn’t mean jumping from 220 for level 4 Physical Exercise to 245. Instead, it means moving up to an HP cap of 225 from 220, which is still 25 HP more than the 200 you start out with in the game.
7. Some Ability Upgrades Could Allow You To Craft Better Items
Pardon us for repeating ourselves, but there are many reasons why you shouldn’t upgrade those abilities willy-nilly. One of those reasons is the fact that some abilities will allow you to create higher-level, more powerful, and better-quality items. Let’s look at a basic example — under Logging, upgrading the Basic Logging ability from level 1 to level 2 will allow you to craft a level 2 Stone Axe, which would allow you to cut level 2 trees and below. For Mining, the Basic Mining skill gets you a level 2 Pickaxe once you level that skill up from 1 to 2. You may also gain the ability to craft different types of individual tools or weapons.
Related: LifeAfter Walkthrough: A Complete Walkthrough for Chapter 1 (Survival in the Wilderness)
Regardless of what you’re trying to craft, may it be an axe for chopping down trees, a pickaxe for mining stone, or guns for blasting Infected, higher-level items mean more damage, faster gathering, and more durability. That’s something you may want to keep in mind when deciding which abilities you should prioritize over the others.
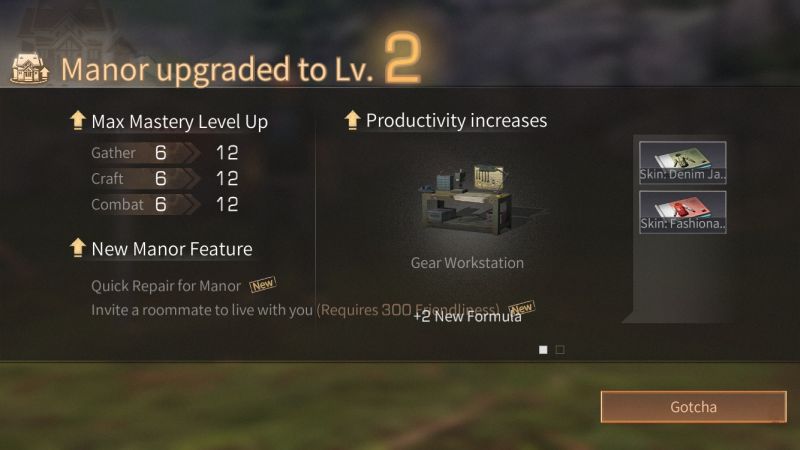
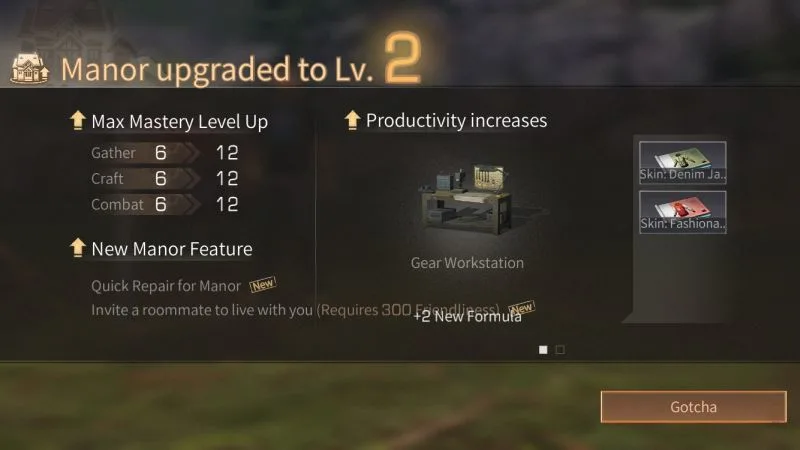
8. Upgrade Your Manor
That’s what they call it in LifeAfter, no matter how basic, crowded, and run-down it may look like in the beginning. Not only is it important to make your Manor as functional as possible. You should also make sure to upgrade it whenever possible by going to the Controller outside and tapping on the Manor Upgrade button. If you’ve got all the required resources — you may need to create them yourselves with one of your work benches, such as you would with the five Wooden Boards required for upgrading to Level 2 — then you can simply hit the Upgrade button and wait a few seconds. Upgrading your Manor allows you to unlock new features (Quick Repair, option to invite a friend to share your Manor for the upgrade from level 1 to level 2), and also unlocks new items for you to craft!
In addition to upgrading your manor itself, you should also make sure to upgrade your Manor’s walls by using the Material bench and choosing the Level X Enhancement (that is, level 2 and greater) option once you’ve got the necessary materials. This first becomes available once your Manor is at Level 3, so you may need to be patient. Still, your patience will definitely be rewarded, as a Manor with higher-level walls will be more resistant to attacks from Infected! The last thing you would want in this game (among other last things) would be for Infected sieging that one building in the Development Zone that is as close as it gets as a literal safe space for your character.
9. Open Chests When You See Them
You may have seen them pop up occasionally in the tutorial stage in CharlesTown. But the in-game universe in LifeAfter has several chests hidden in various parts of the map. You may find them in Fall Forest, Farstar City, and even in Hope 101, and once you’re in any one of these areas and others, they can be found in evacuation points, inside houses, or inside specific buildings. If you aren’t lucky, you won’t find anything inside, but if you luck out, you could collect a wide range of rewards, ranging from basic stuff such as stone, wood, and bandages to more advanced materials you could use in the crafting process. You could also end up with some New Dollars, though we’ve yet to encounter a scenario where we ended up with Gold Bars (the premium currency) as a reward.
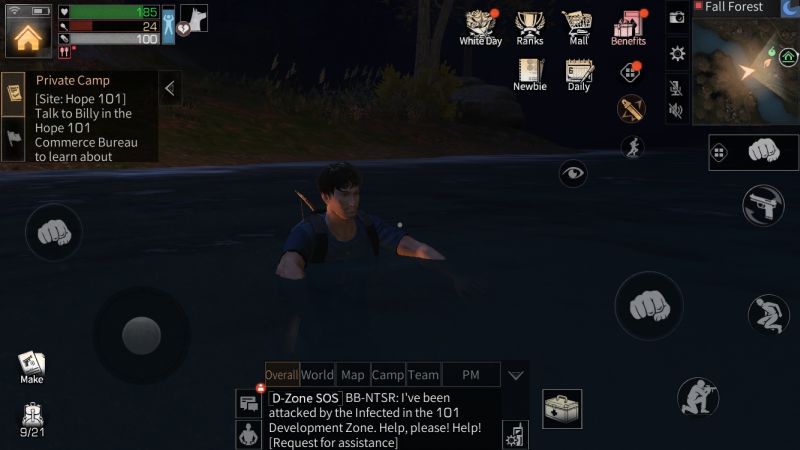
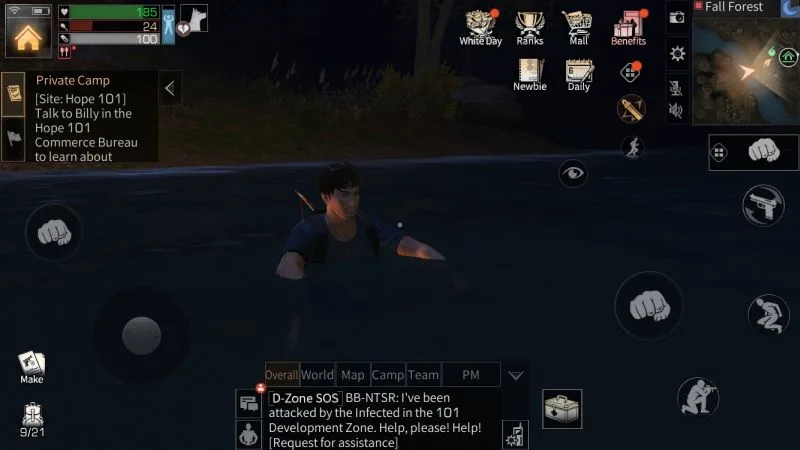
10. Spend The Night In The Water To Avoid Attacks From Infected
Now you may or may not be a fan of preventative measures, but sometimes, especially when your basic stats are at a rather low point, it’s better to hide out in safety than risk your life in a battle against one or more Infected. We’ve gotten good results by staying in the water when it’s dark — of course, you’ll need to be exploring an area that has a lot of bodies of water, such as Fall Forest, and you’ll need to be near one of those bodies of water. And one important caveat is that you stand the chance of catching a cold or, at the very least, having your body temperature drop. Still, we’d call this the lesser of the evils in a game where your goal is to survive as long as possible and make sure your don’t lose those resources you worked so hard to collect.
And that’s all there is to it. We hope you’ve enjoyed this LifeAfter guide and learned something new. If you know tips or strategies for the game that you would like to share with us, feel free to drop us a line in the comment box!