Earlier this year, Hutch Games, the maker of racing games such as Hot Wheels: Race Off, MMX Hill Dash, and many others in this genre, released F1 Clash for iOS and Android platforms. As we mentioned in our previous F1 Clash guides, this is just the game you should be looking for if you want something similar to Motorsport Manager, but with an easier learning curve and actual human opponents.
F1 Clash comes with real-life teams and drivers from the 2019 Formula 1 season, as well as all the tracks — you’ll need to unlock them slowly, but surely, as you progress from one series to the next and tackle new challenges along the way. For example, you may have to deal with rainy weather in Series 3, while Series 7 will exclusively feature street tracks with a lot of intricate twists and turns.

As the name of the game suggests, your ability to manage your drivers’ strategies in PvP races will partly determine whether you win more often than you lose. But aside from smart strategy, you’ll also need to have the right drivers behind the wheel, as well as a car outfitted with parts in such a way that you’re getting the best stats and the shortest average pit times.
And that’s what we’ll be tackling in our third F1 Clash guide — we’re going to look at all 20 drivers available in the game and see how they compare statistically, then we’re going to do the same and review the stats of all the available car parts — that’s all Brakes, Front Wings, Rear Wings, Suspensions, Gearboxes, and Engines — with pit time effect included.
List Of Drivers In F1 Clash
Before we get to the list of drivers, here’s a brief primer on what to expect from this section of this new F1 Clash guide. All stats represented below refer to the drivers’ level 1 stats, meaning the base figures you see when you unlock these drivers for the first time, or, if you’re just starting out, once the game assigns Lance Stroll and Alexander Albon as your default drivers.
Leveling up drivers doesn’t necessarily result in their stats improving evenly across the board — for example, upgrading Antonio Giovinazzi (Series 2, Common) from level 1 to level 2 increases his Overtaking stats by 21, but only results in incremental upticks for his Consistency, Fuel Management, and Tyre Management, and no increase whatsoever for Defending and Wet Weather Ability.
Also keep in mind that higher-series drivers will cost more to upgrade than those which you unlock in the lower series, just like it does depending on a driver’s rarity (Common, Rare, Epic).
We’ve also included each driver’s real-life team in the 2019 Formula 1 season, as we believe this could give you a better (if not exactly perfect) idea of what to expect from the AI drivers you and your opponent will be dealing with. Unlike real-life F1 grids, which include 20 cars/drivers, the grids in this game include 24 cars — the real-world field of 20 plus your two drivers and the two being managed by your opponent.
Series 1 Drivers
Lance Stroll (Common — Racing Point)
Overtaking — 10
Defending — 15
Consistency — 10
Fuel Management — 20
Tyre Management — 20
Wet Weather Ability — 39
Alexander Albon (Common — Toro Rosso)
Overtaking — 12
Defending — 9
Consistency — 25
Fuel Management — 9
Tyre Management — 38
Wet Weather Ability — 15
Nico Hulkenberg (Epic — Renault)
Overtaking — 40
Defending — 60
Consistency — 12
Fuel Management — 0
Tyre Management — 40
Wet Weather Ability — 20
Series 2 Drivers
Antonio Giovinazzi (Common — Alfa Romeo)
Overtaking — 10
Defending — 45
Consistency — 5
Fuel Management — 20
Tyre Management — 50
Wet Weather Ability — 10
Robert Kubica (Rare — Williams)
Overtaking — 84
Defending — 28
Consistency — 4
Fuel Management — 5
Tyre Management — 25
Wet Weather Ability — 20
Max Verstappen (Epic — Red Bull)
Overtaking — 17
Defending — 35
Consistency — 30
Fuel Management — 72
Tyre Management — 10
Wet Weather Ability — 60
Related: F1 Clash Grand Prix Events Guide: Everything You Need to Know About the Grand Prix Events
Series 3 Drivers
Daniil Kvyat (Common — Toro Rosso)
Overtaking — 35
Defending — 60
Consistency — 38
Fuel Management — 25
Tyre Management — 49
Wet Weather Ability — 26
Pierre Gasly (Rare — Red Bull)
Overtaking — 55
Defending — 15
Consistency — 12
Fuel Management — 20
Tyre Management — 42
Wet Weather Ability — 14
Daniel Ricciardo (Epic — Renault)
Overtaking — 79
Defending — 78
Consistency — 30
Fuel Management — 20
Tyre Management — 33
Wet Weather Ability — 64
Series 4 Drivers
Lando Norris (Common — McLaren)
Overtaking — 2
Defending — 8
Consistency — 46
Fuel Management — 45
Tyre Management — 70
Wet Weather Ability — 15
Carlos Sainz (Rare — McLaren)
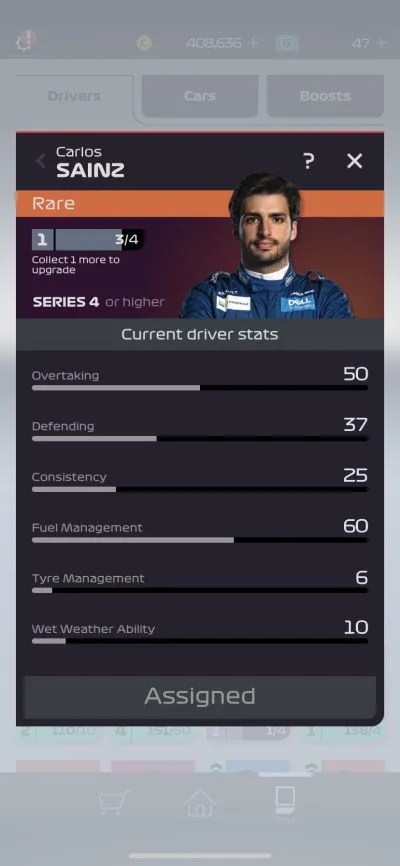
Overtaking — 40
Defending — 37
Consistency — 25
Fuel Management — 60
Tyre Management — 6
Wet Weather Ability — 10
Valtteri Bottas (Epic — Mercedes)
Overtaking — 37
Defending — 16
Consistency — 65
Fuel Management — 76
Tyre Management — 65
Wet Weather Ability — 15
Series 5 Drivers
George Russell (Common — Williams)
Overtaking — 54
Defending — 25
Consistency — 20
Fuel Management — 7
Tyre Management — 33
Wet Weather Ability — 76
Charles LeClerc (Rare — Ferrari)
Overtaking — 20
Defending — 20
Consistency — 80
Fuel Management — 10
Tyre Management — 10
Wet Weather Ability — 41
Kimi Raikkonen (Epic — Alfa Romeo)
Overtaking — 65
Defending — 64
Consistency — 74
Fuel Management — 30
Tyre Management — 20
Wet Weather Ability — 17
Series 6 Drivers
Romain Grosjean (Common — Haas)
Overtaking — 13
Defending — 15
Consistency — 4
Fuel Management — 66
Tyre Management — 70
Wet Weather Ability — 70
Sergio Perez (Rare — Racing Point)
Overtaking — 40
Defending — 3
Consistency — 75
Fuel Management — 7
Tyre Management — 95
Wet Weather Ability — 42
Sebastian Vettel (Epic — Ferrari)
Overtaking — 61
Defending — 75
Consistency — 35
Fuel Management — 60
Tyre Management — 64
Wet Weather Ability — 39
Series 7 Drivers
Kevin Magnussen (Rare — Haas)
Overtaking — 38
Defending — 78
Consistency — 20
Fuel Management — 79
Tyre Management — 20
Wet Weather Ability — 30
Lewis Hamilton (Epic — Mercedes)
Overtaking — 81
Defending — 45
Consistency — 45
Fuel Management — 45
Tyre Management — 45
Wet Weather Ability — 100
List Of Car Parts In F1 Clash
Like drivers, car parts are subdivided into Common, Rare, and Epic categories, and while this isn’t a rock-solid rule of thumb, Epic parts are typically better than Rare parts, which are typically better than Common. Upgrades also cost more as the rarity and earliest available series go up, so you’ll want to choose your parts wisely if you want to get the most out of your cars and give them the best possible stats and shortest possible pit times. Again, upgrades will not always be similar across the board in terms of statistical improvement — sometimes, one stat may benefit much more so than the others when you level up a part.
For the list below, all ratings represent base stats for level 1 versions, with the plus and minus figures you see when viewing parts all getting applied to the stats of non-stock parts. For example, you’ll see +1 Power and +3 Grip when viewing The Anchor (the Series 1 brakes), which means this part’s Power and Grip stats will be 9 and 4 respectively, since the stock brakes are rated at 8 Power and 1 Grip.
Related: F1 Clash Advanced Guide: 7 Tips, Strategies & Tactics to Win Races and Earn More Currency
Pit times, however, are reflected in non-stock parts as the time added or subtracted when using these parts — a car with all-stock parts would take an average of 6.3 seconds to service in the pits, so if you replace the stock brakes with The Anchor, the +0.1 figure means that your average pit time will go up to 6.4 seconds.
Brakes
Stock
Power — 8
Aero — 1
Grip — 1
Reliability — 3
Average Pit Stop Time — 6.3s
The Anchor (Series 1, Rare)
Power — 9
Aero — 1
Grip — 4
Reliability — 3
Average Pit Stop Time —+0.1s
Heavy-Duty (Series 2, Epic)
Power — 8
Aero — 9
Grip — 0
Reliability — 6
Average Pit Stop Time — -0.04s
Soft Touch (Series 3, Common)
Power — 11
Aero — 7
Grip — 1
Reliability — 3
Average Pit Stop Time —+0.1s
Slam Stop (Series 4, Rare)
Power — 9
Aero — 4
Grip — 1
Reliability — 11
Average Pit Stop Time —-0.04s
WTWT (Series 5, Rare)
Power — 9
Aero — 11
Grip — 3
Reliability — 3
Average Pit Stop Time — -0.04s
The Chute (Series 6, Common)
Power — 12
Aero — 10
Grip — 1
Reliability — 3
Average Pit Stop Time — +0.1s
Calipso (Series 7, Epic)
Power — 14
Aero — 6
Grip — 6
Reliability — 6
Average Pit Stop Time — -0.04s
Gearboxes
Stock
Power — 4
Aero — 1
Grip — 1
Reliability — 3
Average Pit Stop Time —6.3s
The Revolution (Series 1, Common)
Power — 4
Aero — 2
Grip — 0
Reliability — 3
Average Pit Stop Time —+0.1s
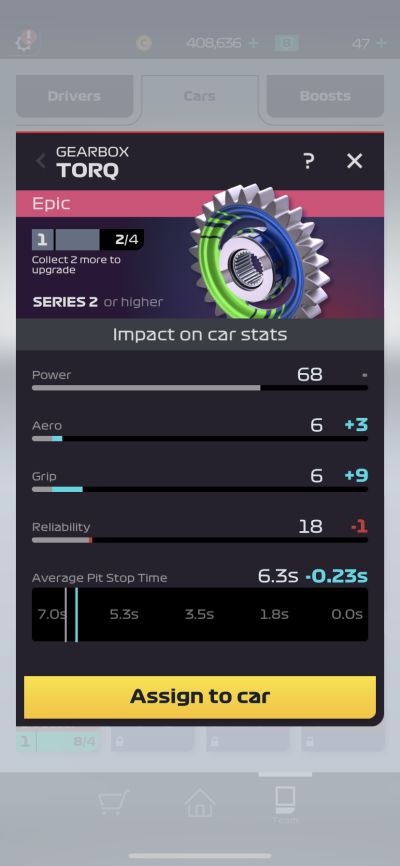
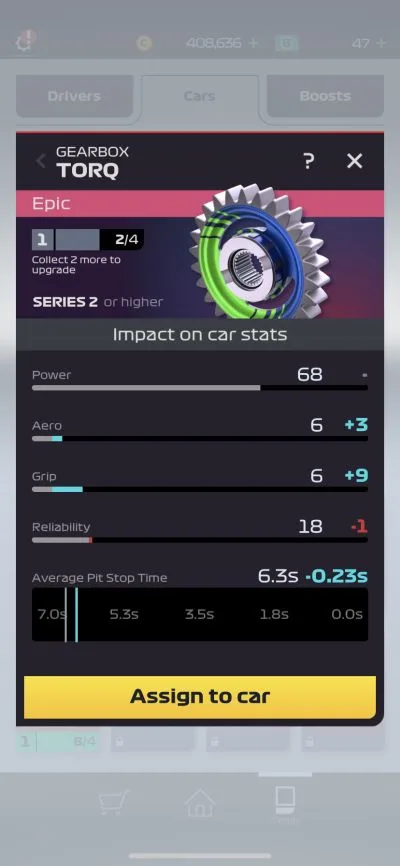
TorQ (Series 2, Epic)
Power — 4
Aero — 4
Grip — 10
Reliability — 2
Average Pit Stop Time —-0.23s
The Holeshot (Series 3, Epic)
Power — 4
Aero — 0
Grip — 1
Reliability — 11
Average Pit Stop Time —+0.1s
The Shredder (Series 4, Rare)
Power — 5
Aero — 11
Grip — 0
Reliability — 3
Average Pit Stop Time —+0.1s
King Cog (Series 5, Common)
Power — 4
Aero — 4
Grip — 4
Reliability — 6
Average Pit Stop Time — 0.0s
The Screamer (Series 6, Epic)
Power — 4
Aero — 10
Grip — 4
Reliability — 3
Average Pit Stop Time — -0.38s
Sync Star (Series 7, Rare)
Power — 4
Aero — 6
Grip — 7
Reliability — 9
Average Pit Stop Time —-0.04s
Rear Wings
Stock
Power — 18
Aero — 1
Grip — 1
Reliability — 3
Average Pit Stop Time — 6.3s
Sticky (Series 1, Epic)
Power — 19
Aero — 1
Grip — 11
Reliability — 3
Average Pit Stop Time — -0.15s
Jet Stream (Series 2, Common)
Power — 18
Aero — 3
Grip — 1
Reliability — 3
Average Pit Stop Time — +0.1s
The Afterburner (Series 3, Rare)
Power — 19
Aero — 3
Grip — 6
Reliability — 3
Average Pit Stop Time — +0.1s
Air Force 1 (Series 4, Epic)
Power — 19
Aero — 9
Grip — 6
Reliability — 3
Average Pit Stop Time — -0.04s
Dream Stream (Series 5, Rare)
Power — 18
Aero — 7
Grip — 0
Reliability — 11
Average Pit Stop Time — +0.1s
Wind Tunnel (Series 6, Common)
Power — 18
Aero — 14
Grip — 1
Reliability — 3
Average Pit Stop Time — -0.42s
The Heavyweight
Power — 19
Aero — 4
Grip — 7
Reliability — 7
Average Pit Stop Time — -0.08s
Front Wings
Stock
Power — 13
Aero — 1
Grip — 1
Reliability — 3
Average Pit Stop Time — 6.3s
Ramjet (Series 1, Epic)
Power — 13
Aero — 4
Grip — 1
Reliability — 6
Average Pit Stop Time — 0.0s
The Turbulence (Series 2, Common)
Power — 13
Aero — 6
Grip — 1
Reliability — 3
Average Pit Stop Time — 0.0s
Laser Lock (Series 3, Rare)
Power — 14
Aero — 2
Grip — 9
Reliability — 4
Average Pit Stop Time — -0.04s
The Rollercoaster (Series 4, Common)
Power — 13
Aero — 3
Grip — 3
Reliability — 4
Average Pit Stop Time — +0.1s
The Racing Line (Series 5, Epic)
Power — 14
Aero — 9
Grip — 1
Reliability — 4
Average Pit Stop Time — -0.3s
The Limpit (Series 6, Rare)
Power — 14
Aero — 10
Grip — 1
Reliability — 3
Average Pit Stop Time — -0.15s
Flicky (Series 7, Epic)
Power — 14
Aero — 3
Grip — 14
Reliability — 10
Average Pit Stop Time —+ 0.1s
Suspensions
Stock
Power — 4
Aero — 1
Grip — 1
Reliability — 3
Average Pit Stop Time — 6.3s
The Magic Carpet (Series 1, Epic)
Power — 9
Aero — 1
Grip — 2
Reliability — 5
Average Pit Stop Time — -0.03s
The Smoothie (Series 2, Common)
Power — 6
Aero — 0
Grip — 7
Reliability — 3
Average Pit Stop Time — 0.0s
The Stilts (Series 3, Rare)
Power — 9
Aero — 9
Grip — 1
Reliability — 3
Average Pit Stop Time — -0.12s
Shox (Series 4, Epic)
Power — 11
Aero — 2
Grip — 4
Reliability — 6
Average Pit Stop Time — -0.09s
The Profiler (Series 5, Epic)
Power — 8
Aero — 19
Grip — 3
Reliability — 3
Average Pit Stop Time — 0.0s
Spirit Level (Series 6, Rare)
Power — 9
Aero — 1
Grip — 1
Reliability — 14
Average Pit Stop Time — 0.0s
Recoil (Series 7, Epic)
Power — 13
Aero — 7
Grip — 10
Reliability 1—
Average Pit Stop Time — 0.0s
Engines
Stock
Power — 21
Aero — 1
Grip — 1
Reliability — 3
Average Pit Stop Time — 6.3s
The Inferno (Series 1, Common)
Power — 21
Aero — 3
Grip — 1
Reliability — 3
Average Pit Stop Time — 0.0s
Zen (Series 2, Rare)
Power — 24
Aero — 9
Grip — 3
Reliability — 3
Average Pit Stop Time — +0.1s
Tractor Beam (Series 3, Epic)
Power — 23
Aero — 1
Grip — 14
Reliability — 3
Average Pit Stop Time — +0.1s
Free Wheeler (Series 4, Common)
Power — 22
Aero — 10
Grip — 1
Reliability — 3
Average Pit Stop Time — 0.0s
The X-1 (Series 5, Rare)
Power — 23
Aero — 9
Grip — 1
Reliability — 3
Average Pit Stop Time — -0.3s
The Block (Series 6, Epic)
Power — 24
Aero — 7
Grip — 6
Reliability — 6
Average Pit Stop Time — -0.04s
Warp Drive (Series 7, Epic)
Power — 25
Aero — 5
Grip — 5
Reliability — 3
Average Pit Stop Time — 0.0s