The year is 2063. After the events of the Third World War, technology had reached new heights after each recovering nation deemed it necessary to reclaim and develop zones that have been contaminated by radiation. This resulted in expeditious strides into the fields of artificial intelligence as well as robotics in order to develop and restore areas that have been lost to the war. Accompanying this boom in advancement is the technology to upload one’s consciousness into cyberspace. Do you have what it takes to uncover the secrets of the Magrasea server?
Darkwinter Software, the group behind the immensely popular Girls’ Frontline, comes to you with an all-new tactical RPG set in the near future—Girls’ Frontline: Neural Cloud. Sometimes known as Project Neural Cloud, or shortened to just Neural Cloud, this title features a story that attempts to uncover the truth about the mysterious Wipe-Off Incident, as well as rescue a person who seems to have lost their way in Magrasea itself.
But cyberspace isn’t entirely safe—several antivirus programs called Sanctifiers have run amok and began to terminate anything they deem hostile to Magrasea’s integrity. It’s time to take a dive and find your way through this digital world.
If you’ve just started your journey and wish to know how to survive in the wild cyber world that is Magrasea, then you’ve come to the right place! Make sure you’re comfy, because this is going to be a wild ride. Get your hackerman on and read our beginner’s guide below!
NOTE: If you wish to skip information about the lore of the game and understand fully what’s happening, you may proceed past the first two sections of this guide. The lore is somewhat important, however, as some terms are used as in-game terms as well.
Preface Part 1: World War III and the Genesis of Project Neural Cloud
For the unfamiliar, Neural Cloud is set in the universe of Girls’ Frontline. But that isn’t to say that you should first play Girls’ Frontline in order to understand this game. Regardless, Neural Cloud has a lot of terminologies that may overwhelm the average gamer or anyone completely alien to the lore. Do not fret—the first two sections of the guide aim to clear the air. That way, you’ll be put up to speed. This is important because the game is quite story-driven in itself.
World War III ended in the year 2051 and the world has been contaminated by Collapse radiation that plagues many a country. This radiation is from a mysterious resource that humanity had a hard time handling. Because of this mess, man has once again banded together to rebuild the world.
With this newfound peace, a great boom in the advancement of AI and robotics has happened. Assisting humans in their quest to rebuild what was once lost are Dolls—androids that operate with sophisticated AIs and are capable of making their own decisions. The extent of the decisions they make and their restrictions and rights depend on their manufacturers or their employers. Dolls were created to help fill in manpower shortages in years as early as 2030.

In the events of this game’s story, the majority of the Dolls in the real world have been brought back to their factory settings in an event known as the Wipe-Off Incident. For employers who work with them en masse, this poses a problem.
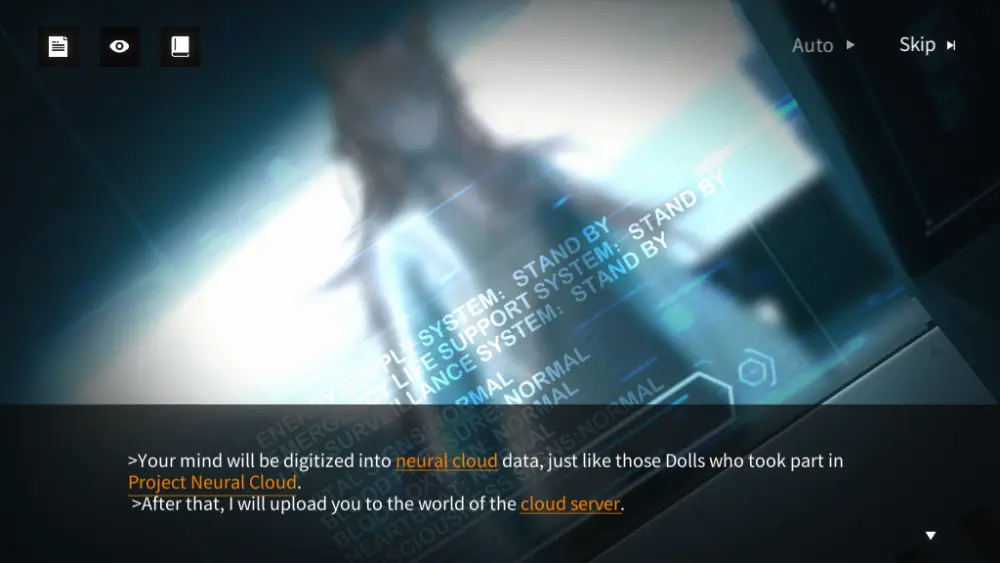
To investigate this occurrence, a person spearheading Project Neural Cloud simply known as the Professor uploaded their consciousness into Magrasea, a superserver containing many of the Dolls’ Neural Clouds, as well as a plethora of other things used for mankind’s cyber needs. Neural Clouds are the “souls” of the Dolls, so to speak.
Unfortunately, the Professor has been lost and, now, it’s up to you to bring them and the Dolls back to reality. Dr. Persica, a good friend of the Professor, uploads your consciousness into Magrasea as well with the technological permissions of the previous Professor who is currently in a coma in the real world. The worst that could happen is that if Magrasea’s physical form gets destroyed in the real world, the previous Professor could die and all of the Dolls will be lost with them, jeopardizing humanity’s quest in reviving the world.
Related: Neural Cloud Tier List: A Complete Ranking of All Dolls
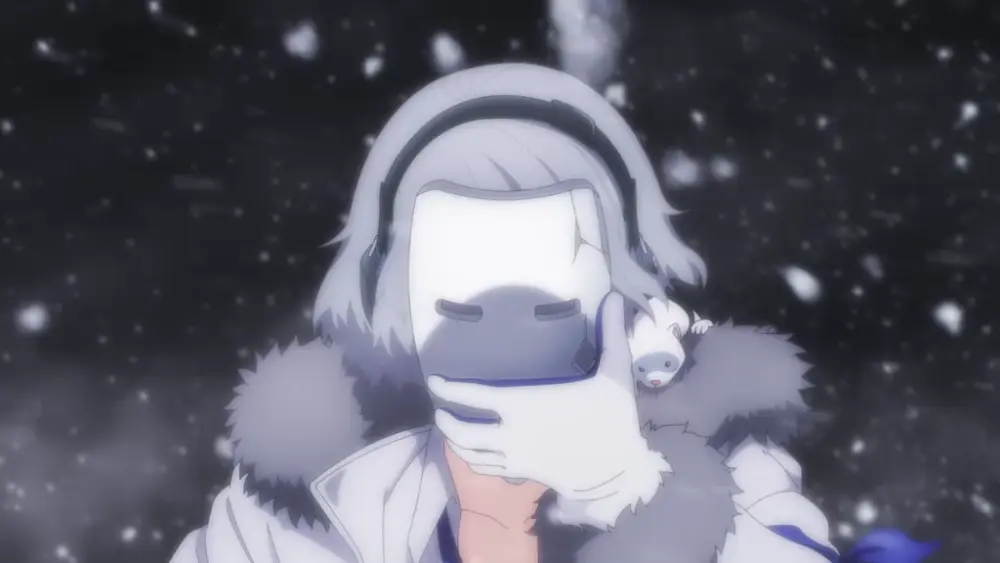
Dr. Persica tells you that you will meet a Doll named Persicaria within Magrasea. While she somewhat greatly resembles the image of Dr. Persica, Persicaria is completely different in personality. She will become your guide through the world henceforth.
Preface Part 2: The Boundaries of Realspace and Cyberspace
Your character awakens in Magrasea and is assisted by Persecaria, Dr. Persica’s Doll. Alongside the headstrong warrior, Sol, and the steadfast guardian, Croque, you perform a defense against a powerful attack by the Sanctifiers—antivirus software that went rogue and have taken upon the duty of eliminating anything they see as a threat to Magrasea’s safety. It’s suspected that the Wipe-Off Incident had something to do with the Sanctifiers going berserk, but that’s a story for another time.
As an entity within Magrasea, you—alongside any Doll, AI (regardless of its sapience), process, or Sanctifier that you may come across—are now what’s called an Intelligent Agent (or Agent, for short).
Agents that are native to Magrasea have no bodies in the real world. Ergo, Sanctifiers, AIs, processes, and other entities that aren’t Dolls, the Professor, or other humans like yourself that had their consciousness uploaded, only exist here. Should the server terminate or be destroyed, their existence will be forfeited as well. However, this can be avoided if they are migrated to another server, much like copying files from one computer to another.
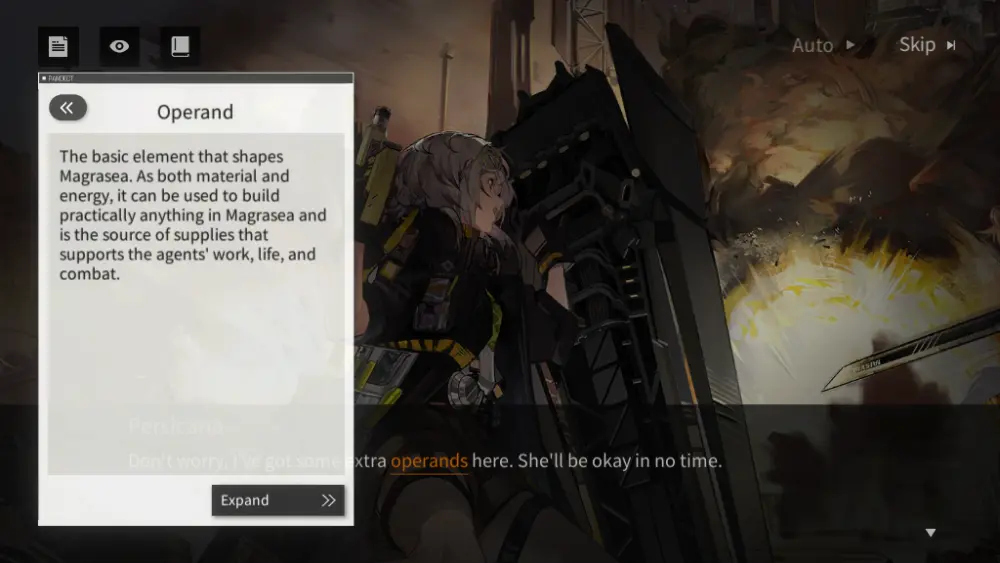
Your body, everything else around you, all the Dolls who accompany you, and anything that exists within Magrasea’s cyberspace is made up of a material called operands. In short, everything is now made of data; intangible in the real world but completely tangible within cyberspace.
Each sector, each area would seem like a mirror to the real world complete with buildings and people living their daily lives albeit different from us humans, but you’re in an alternate plane of reality where you have become nothing more than a mortal among mortals. After all, humans are the Dolls’ creators and they themselves can decide what happens to Magrasea from the outside, so in a way, humans are the fickle gods of these beings.
Because you need to investigate the Wipe-Off Incident, your task now is to interact with each and every Doll you come across because they seem to know what might’ve happened. You first start with more pressing matters, however, when the Oasis—a safe haven within Magrasea that is protected by what is called the Sandbox Barrier—has been besieged by the Sanctifiers, it needs to be repaired by a ludicrous amount of operands. If the Oasis falls, your operation would come to a complete halt due to the Sanctifier onslaught.
Can you complete the first, gigantic step to your journey within 2 hours (in-lore time)?
An Overview of Neural Cloud
Neural Cloud is among the many hero collector RPG titles out there in the App Store and PlayStore today. At a glance, it looks like it plays quite similarly to titles like Mythic Heroes, Valor Legends, and AFK Arena where you have a group of 5 heroes and you position them on the battlefield to face the enemy head on.
As it is a hero collector, the game features a gacha mechanic where you spend a currency of some sort to summon heroes. Each hero has a purpose or a role that completes the player’s party when you’re off to battle (we’ll discuss this soon). Much like other hero collectors, Neural Cloud’s heroes come in rarity tiers measured in a number of stars with 1-star heroes being the lowest and most common ones to obtain to 3-star heroes being the highest and most difficult heroes to obtain.
Eventually, each hero can be maxed out to 5-stars through the use of certain materials. A hero’s rarity is also denoted by color where blue heroes are the most common, purple heroes are a little less common than blue ones, and orange heroes are the rarest ones. While in most hero collectors, a hero’s efficacy in combat is dictated by their rarity, that isn’t the case here in Neural Cloud. Strengthening those who you have early on might change the difficulty of the game in your favor.
The gacha mechanic aside, Neural Cloud comes with a rich and deep story packed with easter eggs and twisting plotlines. The characters therein are all quite interesting and they all have their own little goals to fulfill apart from leaving Magrasea and returning to the real world. You’d be mostly involved in this story (if you don’t skip the cutscenes, anyway) and a part of the game features an intimacy system that slowly lets you know more and more about your favorite Dolls.
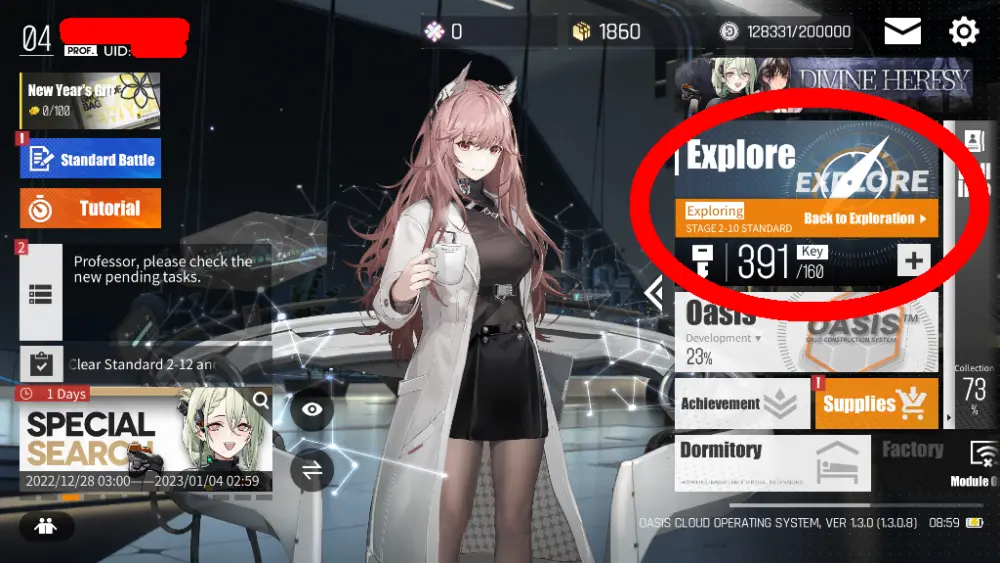
The main mode of Neural Cloud is the Exploration mode where you follow the game’s main storyline. In this mode, you’ll encounter all kinds of enemies and different ways to deal with them through thought-provoking scenarios and split-second decision-making. Each time you decide to Explore, you’ll be using up a special currency called Keys. Keys are needed to gather loot at the end of the battle. Without any Keys, you’ll forfeit the loot you obtained. You will need at least 1 Key to access any stage in the game and the stages within. Stages that are purely story-driven do not require Keys.
There is plenty to do in this game, combat notwithstanding, and almost anything you do here helps make your Dolls stronger each time. If you still don’t know how to keep yourself alive in this digital battlezone, then read on and we’ll tackle each aspect of the game as accurately as possible!
Combat Tips
Combat plays a major part in Neural Cloud’s story. The Sanctifiers will all be up and about, attempting to exterminate anything and everything they deem an Irregular Agent. This would include you and those who accompany you on your journey to save the Professor. Without fighting, the Sanctifiers would have their way and the real world could be doomed to a slow, painful recovery with several Dolls ceasing to function properly.
Following the tips below, you’ll be able to command your Dolls like a small army with enough tactics and cunning to make it through battle despite power level differences.
1. Assemble a Balanced Team
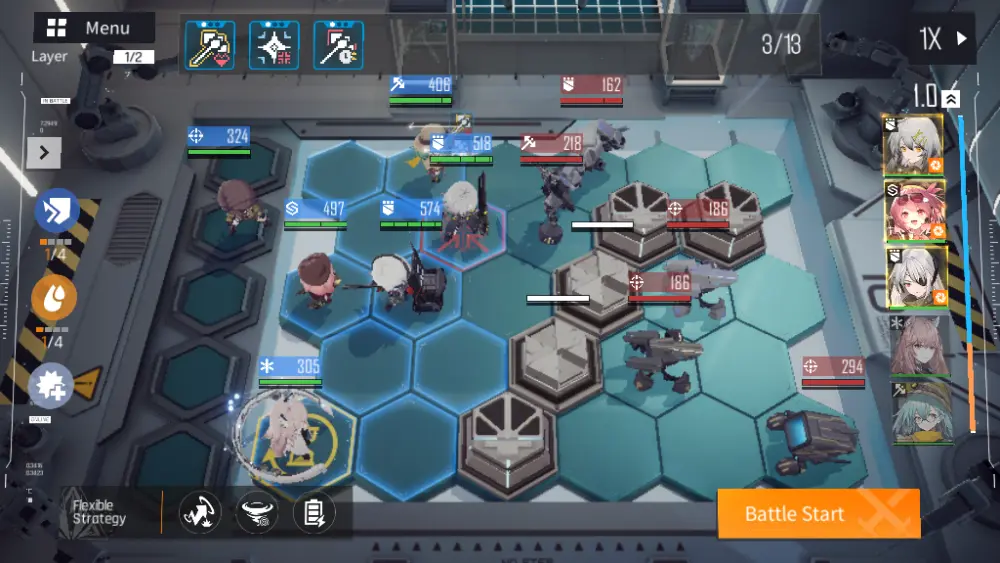
Because Neural Cloud is a hero collector, you’d be sure to expect that each Doll has a class akin to that of any RPG out there today. A class is a role that a Doll fulfills in a team. Each class contributes something to a fight and it’s up to you to make sure that the team is well-balanced. Here are the various classes to give you an idea of what you should consider when putting a team together:
- Guard — Guards protect any and all of your friendly Dolls. These mighty glaciers can take hits and are only ready for more. They’re best used to protect softer Dolls like Medics, Snipers, and Specialists, if need be. This class bears the symbol of a shield.

- Medic — Medics keep your team alive through the use of healing abilities. Without them, you might find your Dolls dying out rather quickly. The symbol of this class is an asterisk.
- Sniper — Snipers are powerful from a distance. Deploying them behind barriers or a friendly Guard will make them stand out as their job is to deal extraordinary amounts of damage. They are, unfortunately, quite soft up close. A Sniper’s insignia is a reticle.
- Specialist — Specialists are Dolls who have several tricks up their sleeves. They can be jacks of all trades, incredibly dangerous damage dealers who inflict area damage, or debuffers who make sure that the enemy has a hard time fighting back. Dolls who fall under this class are designated with an S-shaped emblem.
- Warrior — Warriors are the vicious counterparts to Guards. Through brute force and sheer strength, they inflict damage up close and aren’t afraid to take a beating from the enemy. While they aren’t as hardy as Guards, they’re ideal for backline infiltration. To know which of your Dolls are of the Warrior class, they’re the ones who bear a battle axe symbol.
Following these main classes, the game also offers subclasses that span across the different classes. The subclasses are as follows:
- Assassin — Any Doll with this subclass specializes in annihilating targets one by one. They deal lots of increased damage but normally focus on one target at a time.
- Attacker — Dolls bearing the Attacker subclass deal sustained amounts of damage and easily bring the fight to the enemy. They don’t hit as hard as Assassins, but they can go toe-to-toe with a lot of tougher enemies.
- Control — Dolls that are classified under the Control subclass specialize in weakening the advance or the attacks of the enemy. These Dolls employ special debuffs like stuns, blindness, and others.
- Recover — Dolls that are considered a part of the Recover subclass have the ability to heal their allies. The Dolls that bear this label are usually part of the Medic class.
- Supporter — Any Doll under the Supporter subclass is capable of inflicting debuffs onto the enemy. Conversely, Supporter Dolls can also empower their allies and help push the enemy back using buffs. Some Supporters may even be able to cleanse their allies of any debuffs plaguing them.
- Tank — Tank Dolls are the sturdiest of the bunch. They do anything and everything to stand tall even when the going gets tough. These Dolls may be able to greatly protect their allies or themselves.
What exactly does a balanced team look like? It depends entirely on what you might need for the level. For instance, if the enemy looks like they’ll be spearheading an attack with multiple Warrior-class Sanctifiers, more than one Guard will be needed. You might also want to back up said Guard with a group of damage dealers like Snipers or Specialists.
When deploying your team, make sure that you see what the enemy might be up to as well. You wouldn’t want to be caught off-guard. This is where you should first study the battlefield and take advantage of what’s present.
2. Study the Battlefield Before Deployment
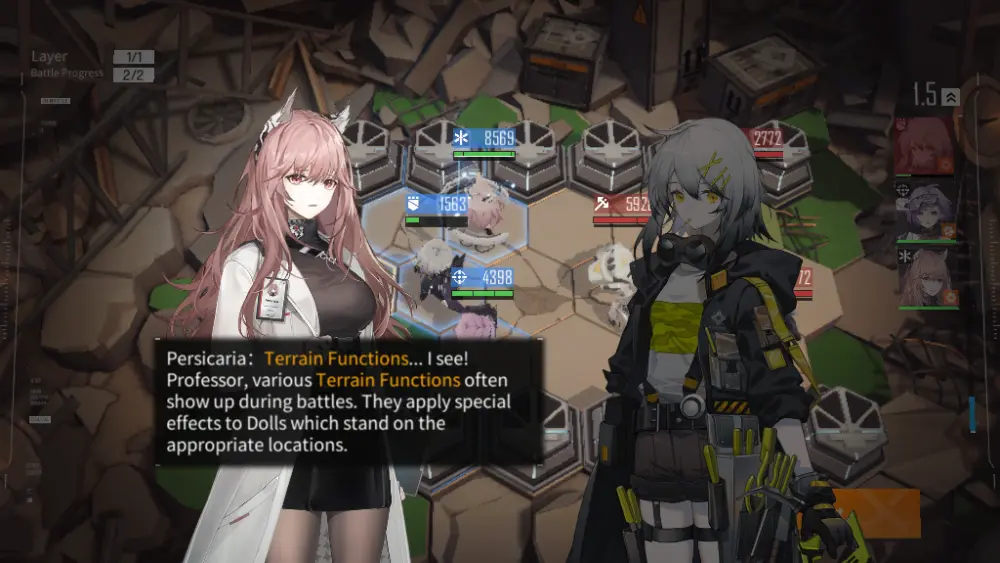
Much like any great tactician in history, it’s important to study the field presented to you before sending your troops to battle.
You will notice that the battlefields of Neural Cloud will contain Terrain Functions—tiles that affect your Dolls—or destructible barriers. These can play an important role depending on how you want the battle to go. Let’s talk about the barriers, for example.
These sturdy structures will be attacked by melee-combat units like Warriors and Guards and can be shot by ranged-combat units like Snipers and Medics. Specialists vary in combat ranges, so it depends. If an enemy is nearby or an enemy is directly in the line of sight of the Doll, they will immediately engage the enemy. Oftentimes, it’s best to make Guards hold choke points down so that friendly units can bombard the enemy safely from behind barriers or a friendly Guard.
The Terrain Functions, on the other hand, range from a variety of buffs or effects. For instance, some of them will have a Sniper’s reticle on them—this will enable whatever ranged Doll is on it to have infinite range for their attacks, so it’s ideal to put Sniper-class Dolls on tiles like these.
Other examples would be teleport tiles which look like they’re marked with downward-pointing arrows. Setting your melee Dolls on these tiles will immediately send them to the frontlines while their teammates are left to safely support them from behind.
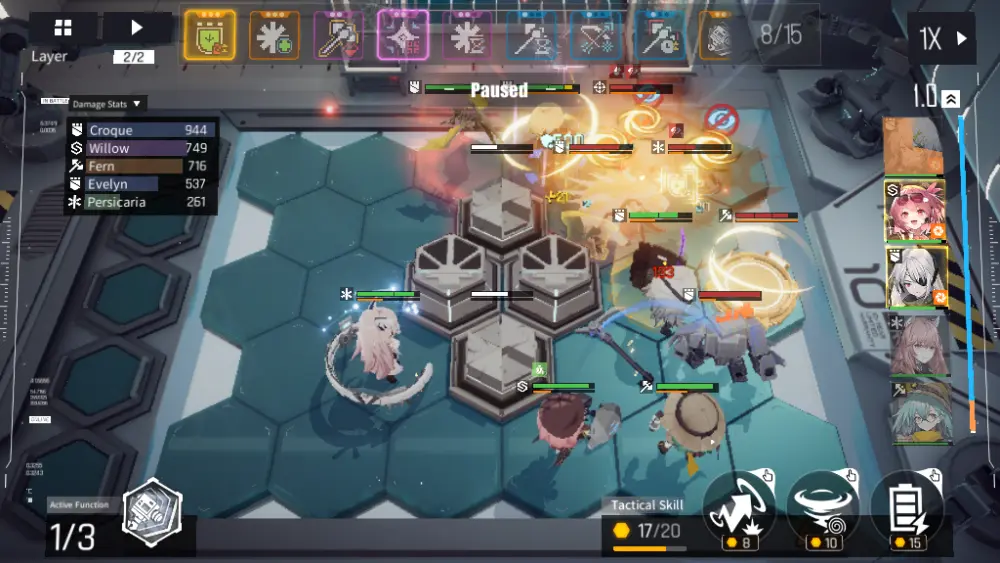
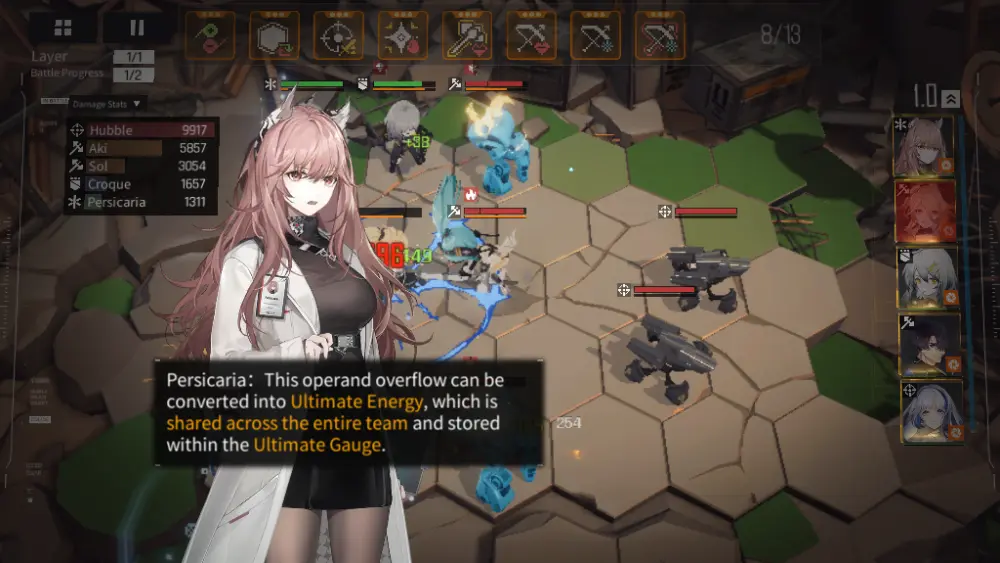
One thing that’s worth noting is that as the battle rages on, you will notice that all damage dealt by both friend and foe will be drastically increased. This is called a Battlefield Overload.
All things considered, it’s a double-edged sword, but it can be advantageous to you if you’ve been diligently stacking your Function Cards (more on this soon). The moment a Battlefield Overload happens, don’t panic—consider this an opportunity to push your Dolls to end the fight and minimize casualties.
Sometimes, apart from taking note of what might be present on the battlefield, it’s important to try putting your Dolls in different positions. It can really change the outcome of a fight.
3. Experiment with Different Formations
What kind of enemies are on the field and how do you think they’ll press on with their attack? Time to think of ways to keep your group safe.
If you have free reign over the starting tiles you’ve been given, you should be able to easily decide where you should deploy your Dolls. A formation denotes the positions of each Doll on the field as a countermeasure against the enemy’s advance. To decide on a formation means that you’ve taken into account the types of Sanctifiers on the enemy team.
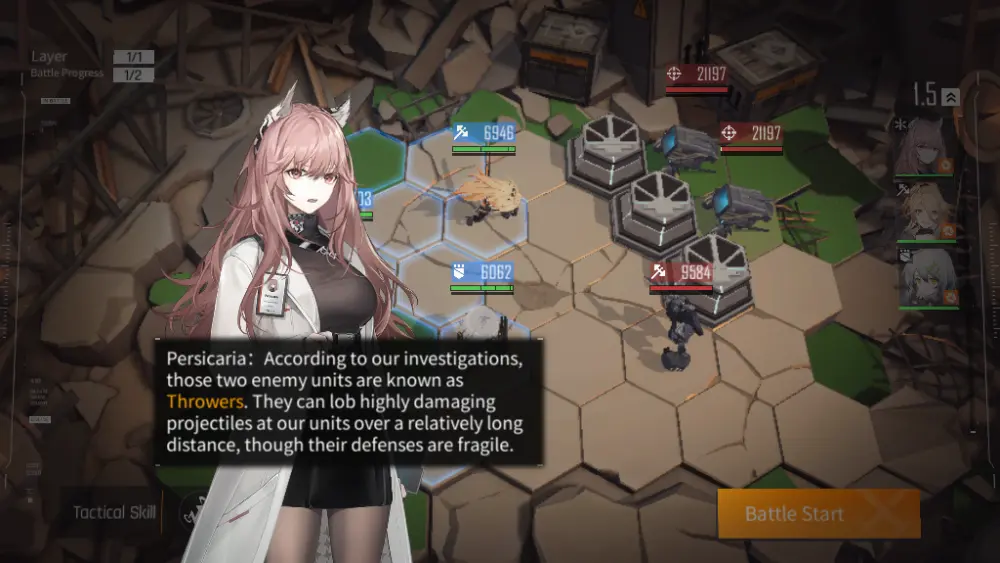
Let’s consider Throwers, for instance. Throwers are mortar-shaped Sanctifiers that lob explosive charges at your team. The charges fly over barriers and bombard your Dolls with Area of Effect (AoE) damage. Should you huddle your Dolls together or spread them out on the field if the field allows it? Perhaps, depending on who’s tanking for your team, you’d huddle them together, but it’s more practical to have them spread out, especially if you have a Warrior ready to seek the Throwers out and exact punishment.
How about Protectors? They’re nice and sturdy Sanctifiers that know how to really take a hit thanks to their Halo Masking. What’s an effective way to put these guys down? Most certainly, a Guard can stall the Protector, but if you want the Protector dead, you might as well send out a Warrior to deal with it, preferably backed by a Sniper or a Specialist.
As we’ve mentioned earlier, it’s a Guard’s duty to keep the squishy Dolls safe from harm, so putting Guards in front of Medics and Snipers is also a decent formation in this case: the Guard takes the heat, the Sniper deals damage, and the Medic makes sure the Guard doesn’t get too banged up.
Each formation that you execute is vital to the success of the mission, especially if you know where the enemy will go. But when push comes to shove, you might as well use your Tactical Skills to turn a fight around.
4. Use Tactical Skills and Active Functions to Your Advantage
Perhaps you’d be thinking that you’re powerless to help these Dolls fight since you’re human and you’re more or less on the same level as the rest of the Agents that exist within Magrasea. That isn’t entirely the case.
A Professor like you assists Dolls with powerful skills called Tactical Skills. These skills can be used to make the battle go the way you want it to if used properly. There are a total of 6 Tactical Skills available for all Professors to exercise during an encounter. Each Tactical Skill comes with a pair of enhancements that can be changed at any time. First, we have the Tactical Skills under the Flexible Strategy category:
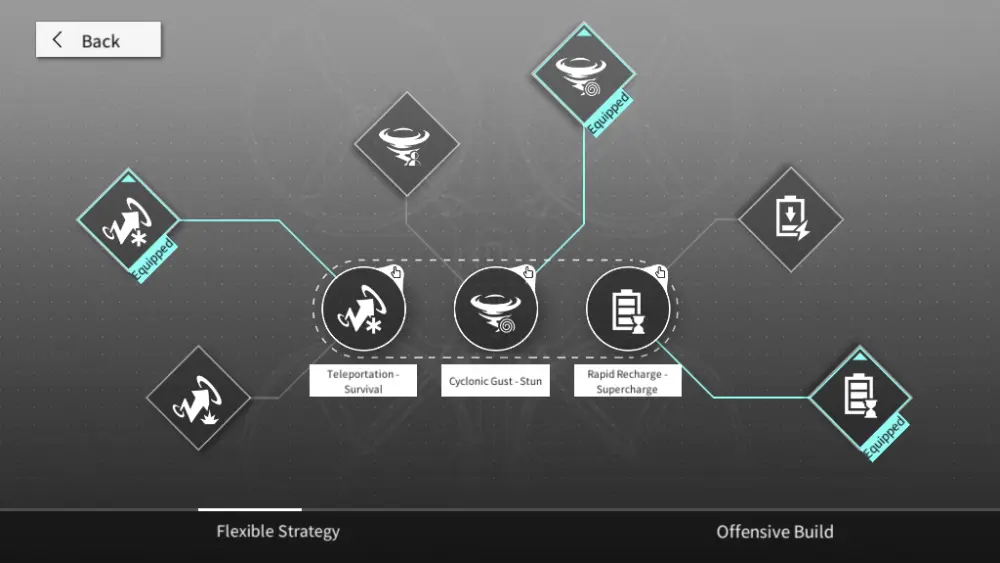
a. Teleportation (expends 8 energy) — This allows you to relocate any single ally Doll onto any empty tile on the battlefield. Its two enhancements are Teleportation – Offensive and Teleportation – Survival. The first enhancement grants the Doll a brief boost in damage dealt and the second enhancement slightly heals the Doll after the teleportation.
b. Cyclonic Gust (expends 10 energy) — This Tactical Skill propels your Doll or a Sanctifier into the air, making them unable to be targeted. On one hand, this can be used defensively to keep your selected Doll from being hit by a powerful ultimate skill (or ult) from the enemy; on the other hand, it can be used offensively to keep the hardest-hitting Sanctifier from causing a lot of damage for a short period of time.
Its enhancements are Cyclonic Gust – Concealment, which allows the Doll to briefly become invisible after landing, and Cyclonic Gust – Stun, which will stun the lofted enemy target as soon as they land from the cyclone.
c. Rapid Recharge (expends 15 energy) — A most powerful Tactical Skill, this one. Rapid Recharge instantly fills the Auto Skill gauge of your Doll. This causes the Doll to immediately activate their Auto Skill, which can be quite valuable in dire situations.
Take for example that your enemy team is faltering in health. Using Rapid Recharge on your healer, especially if their Auto Skill heals all, if not most, of your Dolls, will certainly save them all from death. Rapid Recharge’s enhancements are Rapid Recharge – Interference and Rapid Recharge – Supercharge.
Interference allows you to use Rapid Recharge on enemies and reduce their Auto Skill bar by half, whereas Supercharge allows your Dolls to momentarily gain speed in recharging their Auto Skills after having performed them.
Then we have Tactical Skills under the Offensive Build category:
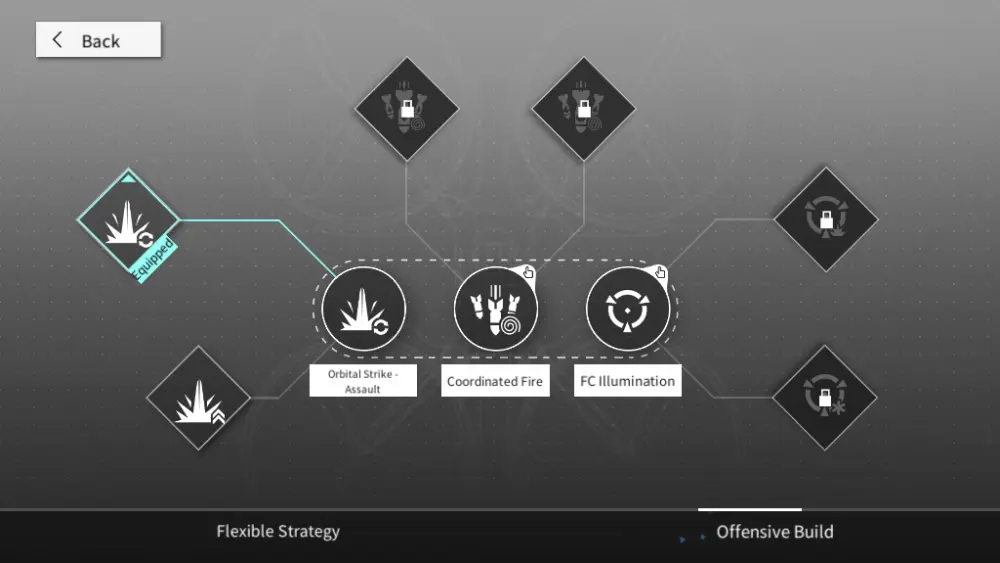
d. Orbital Strike (expends 3 energy) — A powerful laser smites the enemy with the lowest remaining HP, dealing damage derived from a percentage from the ally with the greatest Hashrate. Its enhancements are Assault and Breakpoint. Assault grants a boost to all the damage dealt by your dolls for the next 5 seconds while Breakpoint, at the cost of 7 energy instead of 3, will deal more damage to the target the lower their HP is. Breakpoint also restores 4 points of energy if the Orbital Strike kills the target.
e. Coordinated Fire (expends 10 energy) —A volley of shells rains from the sky at an area selected by the Professor. Whatever is caught in this area, not including allied Dolls, will receive Operand Damage and get stunned for 1 second. Coordinated Fire’s enhancements are Suppression and Ordnance. Suppression reduces the damage of the target’s next 3 Normal Attacks by a small percentage, while Ordnance sets alight all enemies caught in the blast. The enemies will burn for 7 seconds.
f. FC Illumination (expends 10 energy) — This Tactical Skill is simple as it is powerful: it makes your Dolls turn their attention to a target chosen by the Professor. They will continue to attack the specified target until it is dead.
Its enhancements are Focus and Reflow, which increase the amount of damage your other Tactical Skills deal onto the chosen target and heal all your Dolls by a small amount of HP when they execute normal attacks on the target, respectively. One thing to note about Reflow, however, is that the recovery can only trigger once per attacking Doll, meaning once they’ve hit the target, they’ll heal once.
Both Tactical Skill categories cannot be interchanged with each other. Either you use Flexible Strategy or Offensive Build. Flexible Strategy focuses solely on utility, whereas Offensive Build is more centered toward taking the enemy down quickly. Consider which type of Tactical Skills to select before you head into battle as this may change its outcome completely.
You might notice that each Tactical Skill listed here has an energy expense. This is because during battle, you charge up energy points as the fight rages on. You will find them on the lower right.
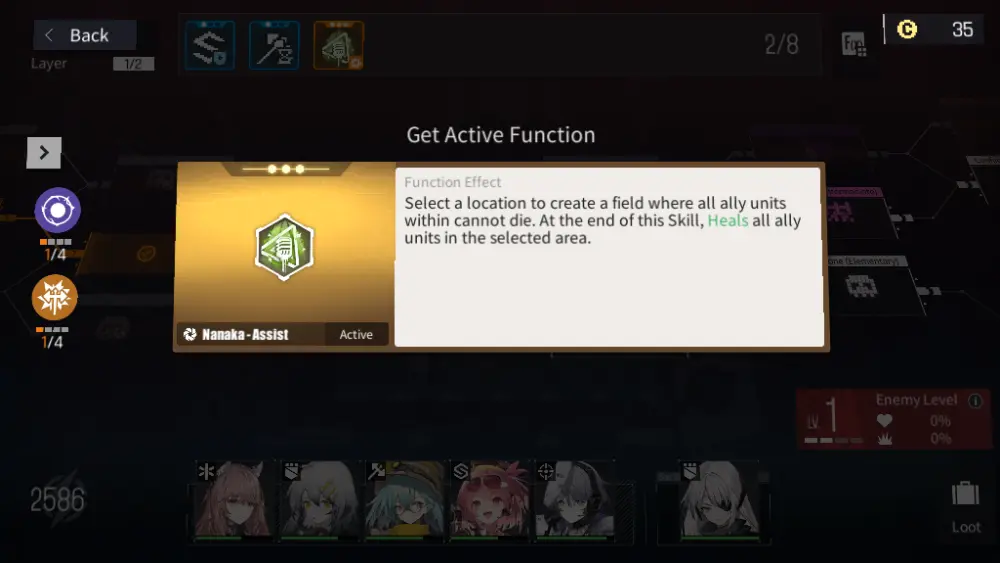
Accompanying Tactical Skills are nifty little things called Active Functions, which you occasionally gain while exploring areas. Active Functions are basically ults separated from the Dolls who own them. They can be used even if you don’t have the respective Doll on the field.
To activate these, you may find them on the lower left portion of the screen when in combat. Active Functions can be extremely useful when activated at the moment they’re needed, especially if they belong to powerful healer Dolls like Persicaria.
Speaking of ults, there are a few things Professors should understand about them, especially if they’ve come from other hero collector games.
5. Make Your Ultimate Skills Count
Ultimate Skills, or ults for short, have been around for a long time. They’re powerful abilities that often make a hero stand out in a battle.
In most hero collectors, ults are readily available for use by any character and they usually gain their other skills as you build them up through your gameplay progress. But in Neural Cloud, ults are rather different here.
The game holds them in such high regard that their overall power and efficacy are truly things that one shouldn’t take for granted. In fact, it helps to know that while each Doll has their own ult, you may only activate these one at a time or two at a time. Allow us to elaborate:
Dolls have what are called Passive Skills and Auto Skills. Passive Skills directly affect a Doll’s normal attacks for the most part. Auto Skills are activated as soon as their Skill Charge Bar fills (the thin yellow bar below their green health bars). These are different from Ultimate Skills.
Ults, on the other hand, are charged on the right side of the screen, via a long, vertical blue bar that fills up. Once it’s full, portraits of Dolls that can activate their ults will shine gold and all you need to do is simply tap the portrait of the Doll of your choice. As you fight, it also turns orange, allowing for a second ult to take effect.
An ult can dictate the outcome of a fight. Try not to execute all of them at once if you can help it as you might need that bar to be full in case things go south. For the most part of the early game, it’ll be Croque who can cast her ult, which causes map-wide damage. This is extremely useful in whittling down the enemy’s fighting strength as a whole since the damage dealers of your team will do the cleanup when Croque is done raining bullets on them.
Keep in mind that only Dolls that have reached 3 stars can execute their ults. Some of them may take a while to upgrade, but we promise that it’s all worth it (especially the 1-star Dolls!). This is why upgrading your Dolls is just as important as knowing how to use them in battle.
6. Upgrade Your Dolls Before Combat
Your tactics alone aren’t enough to win a fight—your Dolls need to be strong enough to take on enemy toughies.
It’s a norm in hero collectors for the player to upgrade their heroes and work with a team that they’re comfortable commanding. As for Dolls, you’re most certainly going to develop some favorites among the ones in your ranks and you’ll prioritize their upgrades above everyone else’s. Just make sure that you have that balanced team idea in mind so you know who to rely on mostly for your missions.
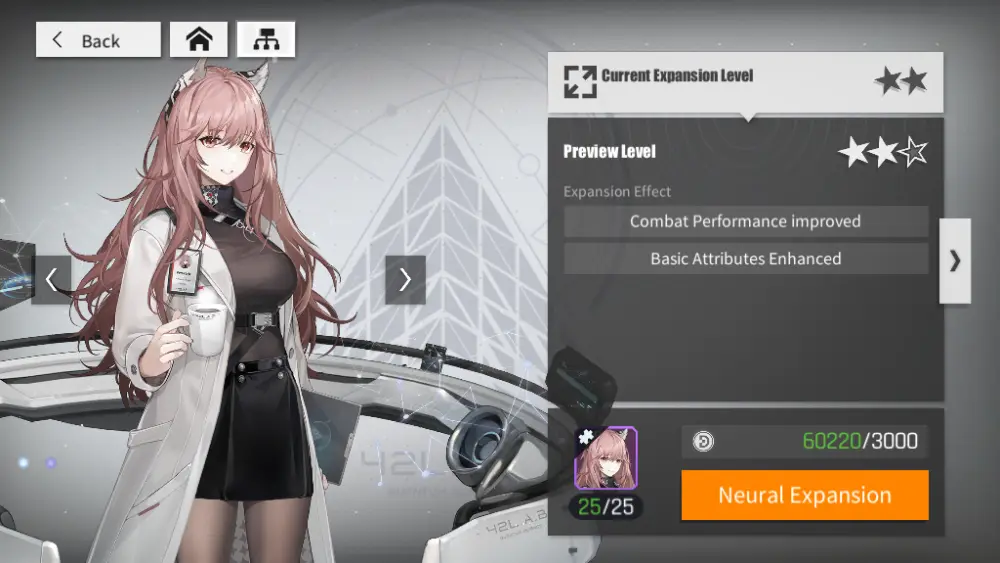
Dolls can be upgraded in two ways (at least before you unlock Algorithms): by using Combat EXP and by using Neural Fragments. Combat EXP is the most common way you can increase a Doll’s power. With these, you’ll increase their levels, improving their overall performance. Neural Fragments, on the other hand, are needed to boost a Doll’s level beyond 10. This is what’s called a Breakthrough.
With each Breakthrough performed, a Doll will gain a star. As we’ve mentioned earlier, Dolls will gain their ults when they hit 3-stars. While Combat EXP is gained by simply playing the game, it’s a bit more difficult to earn Neural Fragments as you will have to perform Resource Gathering to get these. We’ll talk about that later.
You might want to divide your upgrades evenly among your Dolls so as not to make any one of them perish early in a fight. As long as they roughly average the same level, they should all be fine when they fight alongside each other. Just imagine if your Medic were overleveled or underleveled.
A Medic overleveled would surely keep their friendly Dolls alive but should they all die out, the Medic could become overrun by the enemy forces. On the other hand, an underleveled Medic will have a hard time keeping up since their healing power won’t be sufficient to keep their allies’ health in check.
Alternatively, you may try activating Procedural Efficiency Nodes (let’s call them PENs for short). These are special buffs that apply directly to your team as a whole and they take effect whenever you and your team are out for Exploration or Resource Gathering. Gaining Blueprints for PENs is done through Endless Exploration, a mode where you can play freely but each Layer gets more difficult than the last. There’s lots of loot to be had, so think of the Combat EXP you’ll gain. Naturally, it’s best to choose your battles—never send your Dolls on suicide missions as you’ll only waste time and Keys.
If you think you need the strength of such a powerful unit, you might want to consider hiring Support Dolls, especially for more difficult missions.
7. Make Use of Backups and Support Dolls
In a battle, you can have a maximum of 5 Dolls deployed at a time.
Along the way, you will unlock team slots that are called Backup Slots that can be filled in by extra Dolls. Backup Dolls are spare units that you can field just in case their need arises. You will first unlock one Backup Slot at first, but you’ll be able to unlock the rest as you play through the game, giving you even more tactical opportunities. Eventually, certain Backup Slots will also have special effects like healing, for example.
Backup Dolls can change your playstyle drastically. Tying into an earlier bullet on this list about making a balanced team, Backup Dolls can involve Dolls of extra classes that you’ve already fielded. For example, if you feel like the enemy onslaught will be fierce at this stage, bring a spare Guard or a Medic. If you wish to hit the enemy harder, bring an extra Specialist or an extra Sniper. If you think that there will be a lot of enemies present, bring aboard another Warrior to help the Guard fight better. The possibilities are quite endless.

Backup Dolls aside, early on, you will be introduced to Support Dolls (not to be confused with Dolls that are of the Supporter subclass) that can be selected from your roster of in-game friends and other players. This can come in handy, especially if the friend has a powerful Doll that fills in for a missing role in your team. If you, for example, require an extra Guard, try looking for a friend whose Support Doll is a member of the Guard class. They can be fielded in as Backups or a part of your main team, if you desire so.
You may set which of your Dolls can be sent out as a Support Doll while editing your Profile. While at the Main Menu of the game, tap the upper-left corner of the screen (which has your name), and you should see a trio of boxes with plus signs on them. These are slots in which you may assign Supporter Dolls. Put only your strongest—you’ll never know when a friend will need them!
Your only source of new Dolls is to roll the gacha. Keep in mind that getting new Dolls is a great way to even out your team if you don’t have people to fill missing slots. You may even discover new combinations or powerful Dolls that may substitute for missing roles (i.e. Banxsy is a Specialist, but she may double as a Sniper).
Now that you know how to effectively manage your team, let’s tackle the ins and outs of the main mode of Neural Cloud: the campaign.
8. Know How to Navigate the Campaign
A good story should entail a campaign, especially if the game is of the RPG genre.
You won’t have to worry too much about a dull moment here in Neural Cloud because the campaign is as exciting as it looks: danger, drama, destruction—it’s all present in the storytelling and the gameplay. The moment you set foot in a stage, you’ll be hit with a sit-rep on where you stand in the events that transpire within Magrasea. Will you lead the Dolls home and find the Professor? Will mankind struggle to rebuild their world from the ashes of war? Only you’ll be the deciding factor to all of these questions.
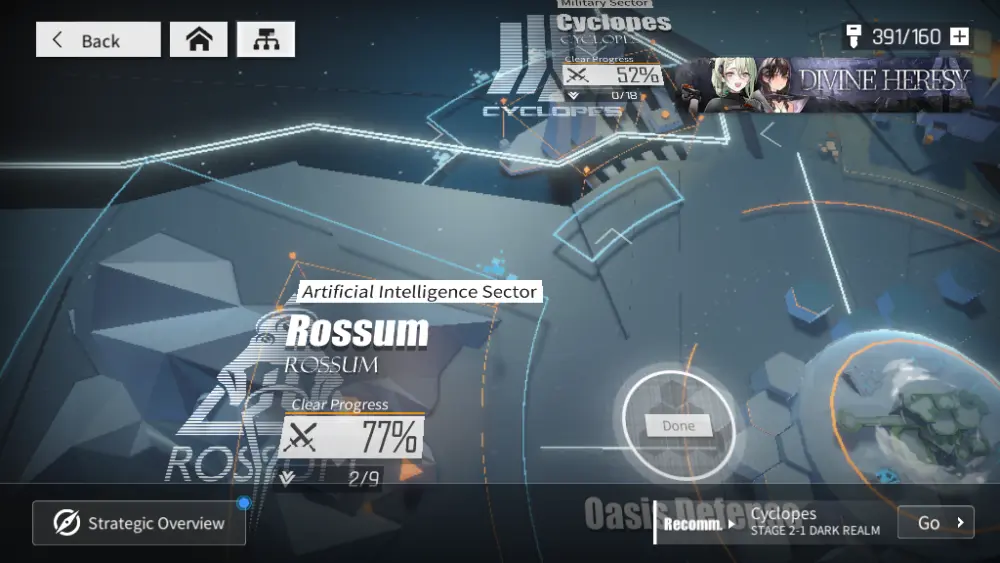
If you’d like to know, hit the Explore button in the main screen of the game. You’ll first start in the Rossum sector, then move onto Cyclopes, then Helios, then Enigma, then Pierides, and lastly, Copley. As of this writing, Copley is the latest sector added to the campaign.
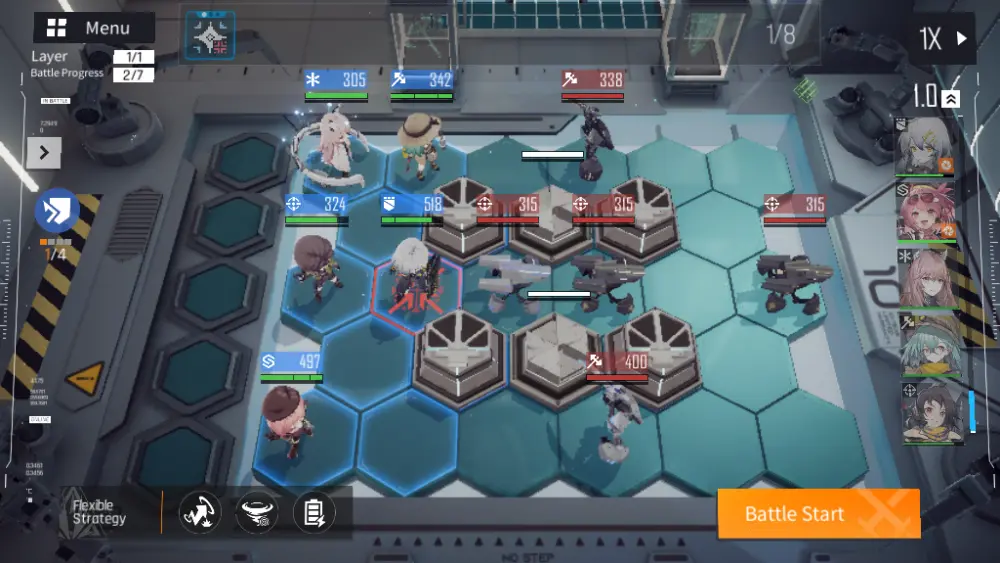
When you enter a stage in the campaign that involves battle and exploration, you’ll be greeted by a colorful map of some sort. Sure, the game will walk you through this, but it’s better to know what you might be getting into before you access any of these colored rooms. What is written below will be sure to guide you in figuring out which rooms you may want to take during your next adventure.
a. Conflict Zone (Elementary, Intermediate, Advanced)
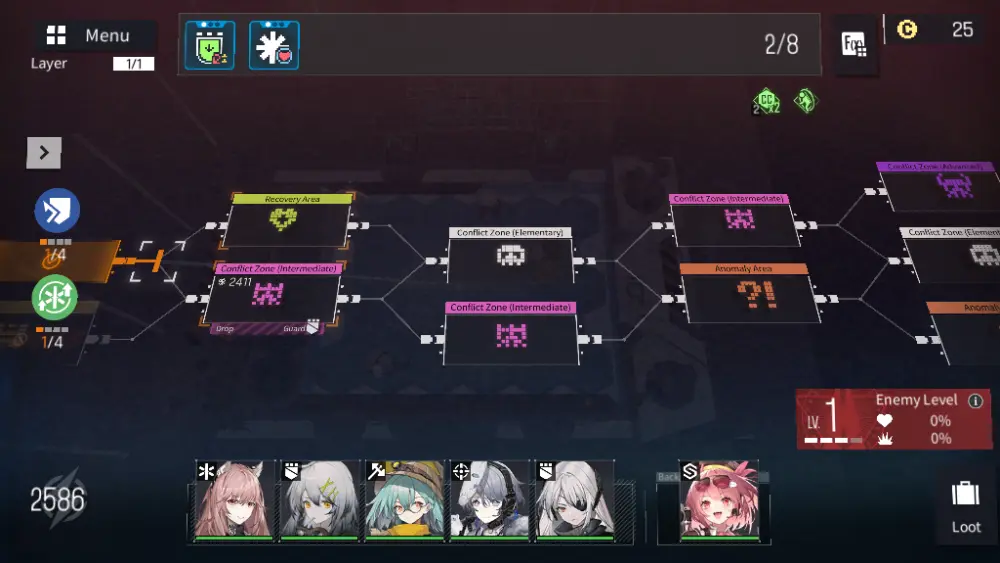
A Conflict Zone is where you engage Sanctifiers. In other words, this is where the combat happens.
Conflict Zones contain Sanctifiers of varying roles, changing terrain, and different circumstances that directly affect your strategy in completing them. These zones are divided into three different difficulties: Elementary (White), Intermediate (Pink), and Advanced (Purple). Completing a Conflict Zone will result in dropping a Function Card, a power-up for a specific class (or all classes) of Dolls in your team.
Naturally, higher difficulties mean tougher Sanctifiers, but that also means the quality of the Function Cards you receive are more favorable. You will know what type Function Card a Conflict Zone has a chance of dropping by looking at the indicator bar below the Conflict Zone in the map screen.
Additionally, Conflict Zones drop Cache Coins, a currency used only within the campaign stage you are currently playing. There are ways you can maximize your earnings along the way as some events may give you more Cache Coins or allow you to sell Function Cards.
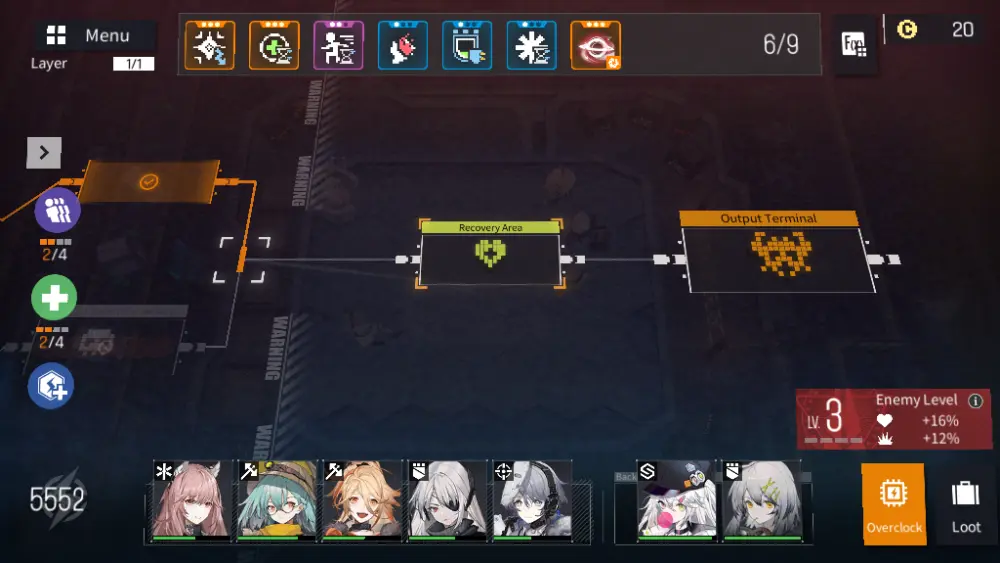
b. Output Terminal
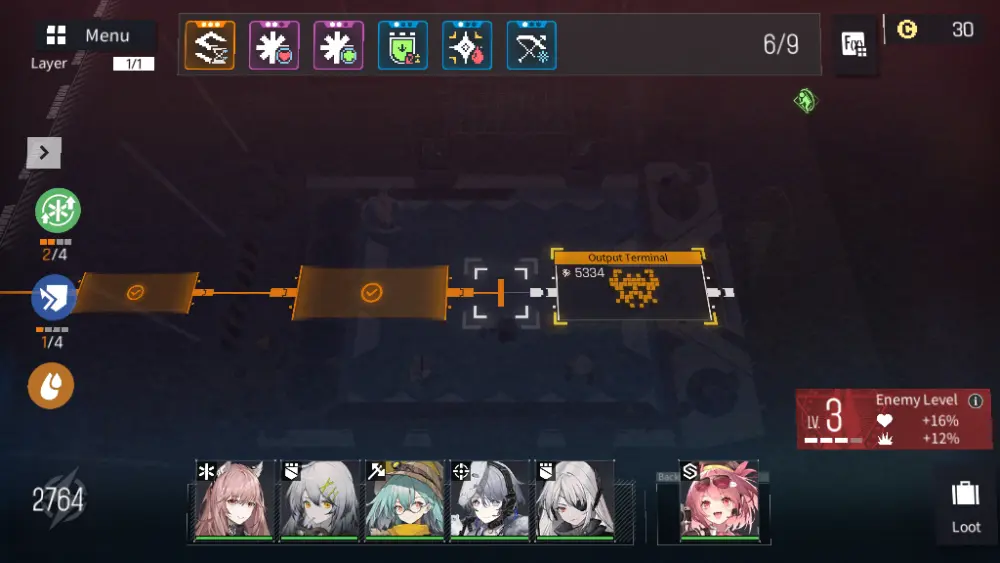
The Output Terminal is a Conflict Zone but with more powerful units.
This could mean that a boss will show up or elite units will give you a difficult time completing the entire stage. Much like Conflict Zones, Output Terminals also have their own terrain.
Additionally, they drop a great deal of loot. If the stage of the campaign is multi-layered, defeating the enemies here will grant you access to the next level or, if you did extraordinarily well at this stage, you’ll gain access to the Data Encryption.
Layers are like the parts of the stage. A stage will show how many Layers it has on the upper left when you’re navigating the map screen.
c. Data Encryption
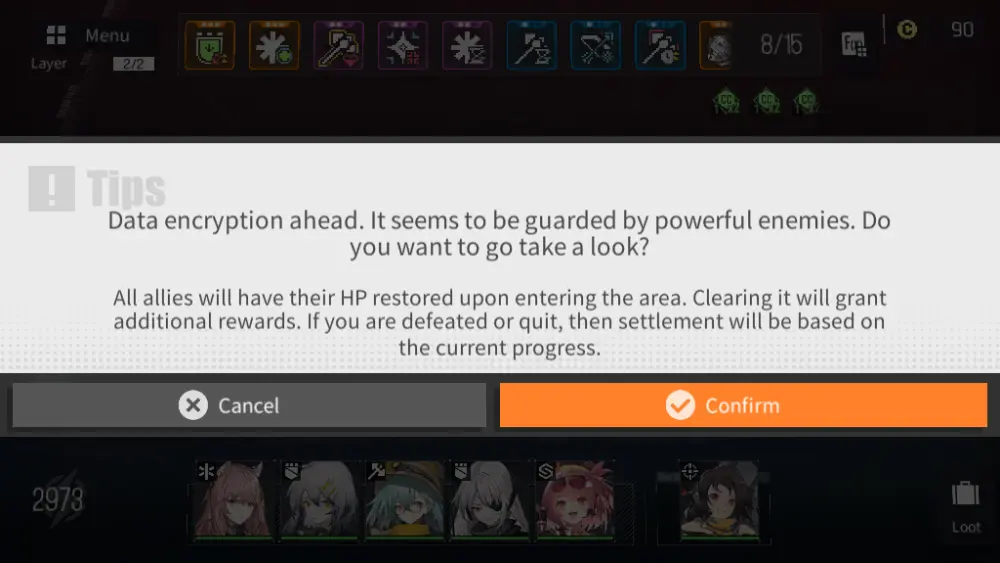
The Data Encryption is a bonus level that mimics the Output Terminal but is far more difficult.
Unlike the Output Terminal and Conflict Zones, however, all of your Dolls are healed upon entering the Data Encryption. You may choose to ignore this room and proceed to the next Layer of the stage or finish the stage if it only has a single Layer. But this means forfeiting the extra loot from inside the Data Encryption. Do you feel like you have the elements of strategy perfectly aligned at your disposal? Give Data Encryption a shot. Good luck!
d. Recovery Area
This zone is self-explanatory in nature. However, it does have its nuances.
There are two ways you can recover the HP of your Dolls: by evenly distributing heals of 30% of their max HP collectively, or by healing the most injured Doll by 80% of their max HP. If you have Cache Coins to spare, these actions can be repeated at an increasing price each time in the Recovery Area you are presently at.
If none of your Dolls need healing, you may instead turn it into a Trading Area.
e. Trading Area
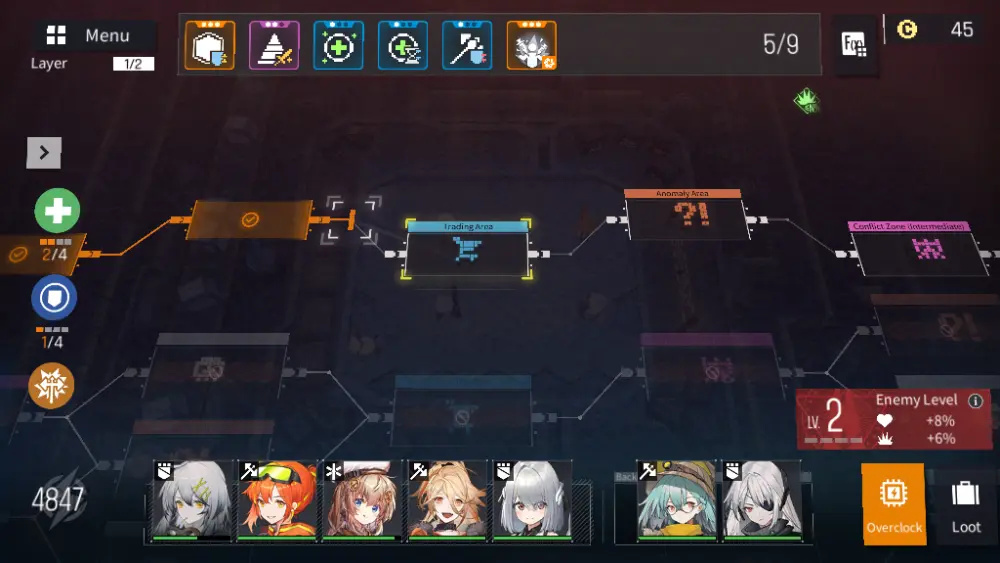
A Trading Area is where you can spend your hard-earned Cache Coins.
This area mostly specializes in selling you new Function Cards or Function Cards you presently have. Buying the latter will cause your Function Card to become an upgraded version of itself. You might also notice that some Function Cards belong to what is called a set. This is denoted by a small circle at the lower right-hand portion of the card.
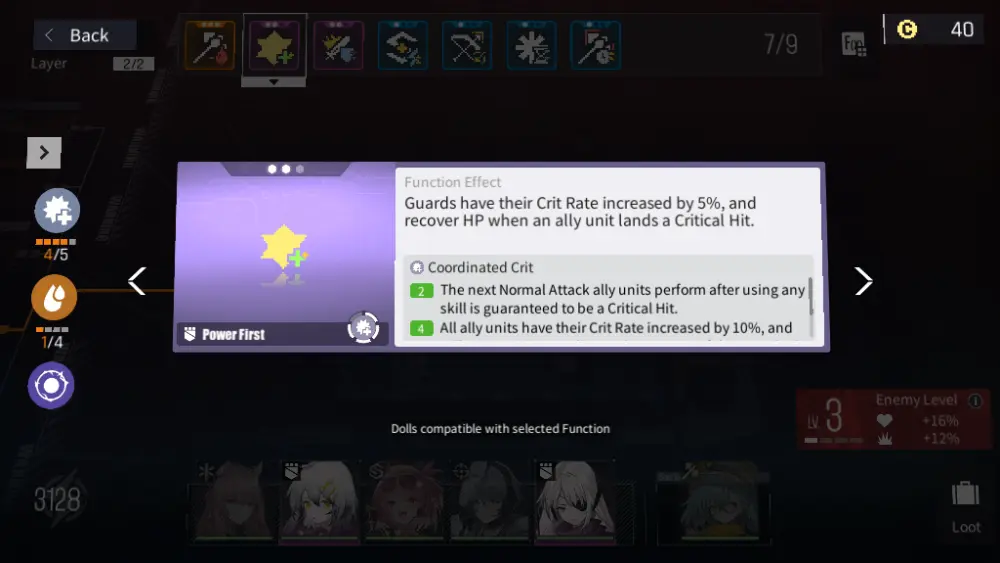
Completing a Function Set will grant the class of Dolls a powerful buff that could also help clear Conflict Zones quickly. For example, Functions under the Desperate Raze set will grant Warrior Dolls the chance to deal a double strike when 2 of these Functions have been obtained.
If there are 4 Functions that belong to the Desperate Raze set, Warrior Dolls will deal True Damage at the cost of their HP every 3 Normal Attacks. Consider getting Functions that belong to a set that you need to get through a stage.
Conversely, you may also choose to sell some of the Function Cards you received through your exploration in exchange for more Cache Coins. Be careful with which ones you sell; you might be better off with them!
f. Function Library
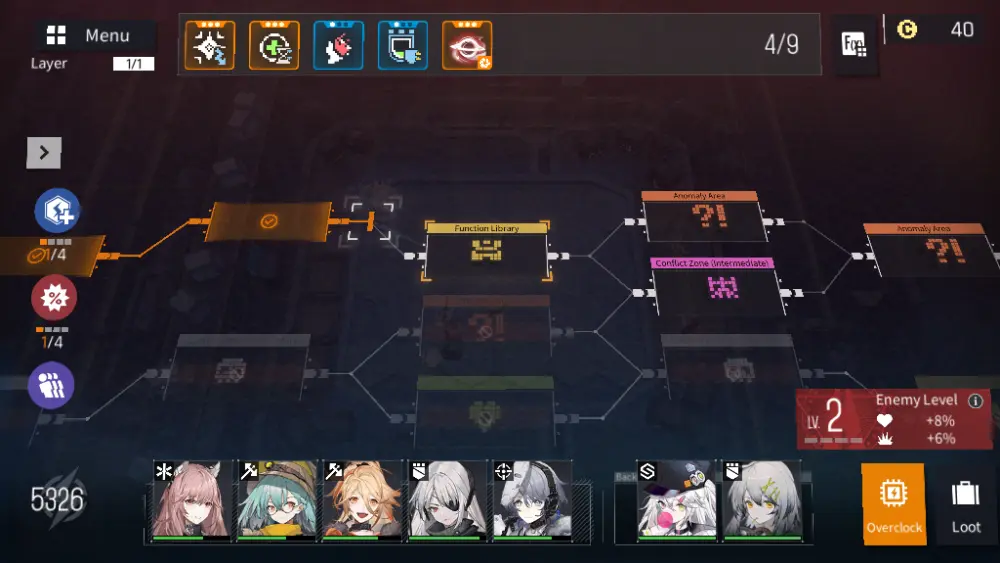
This room in a stage gives out Function Cards for free.
Upon entering a Function Library, you will be given a choice among 3 different Function Cards. It would seem that you can take them all, but you may only take 1 of these, so pick wisely.
We recommend picking one that would help complete a Function Set (as we discussed earlier), or one that could upgrade an existing Function Card. If neither of these are present, pick the one that you feel might be the most beneficial to your current run.
g. Anomaly Area
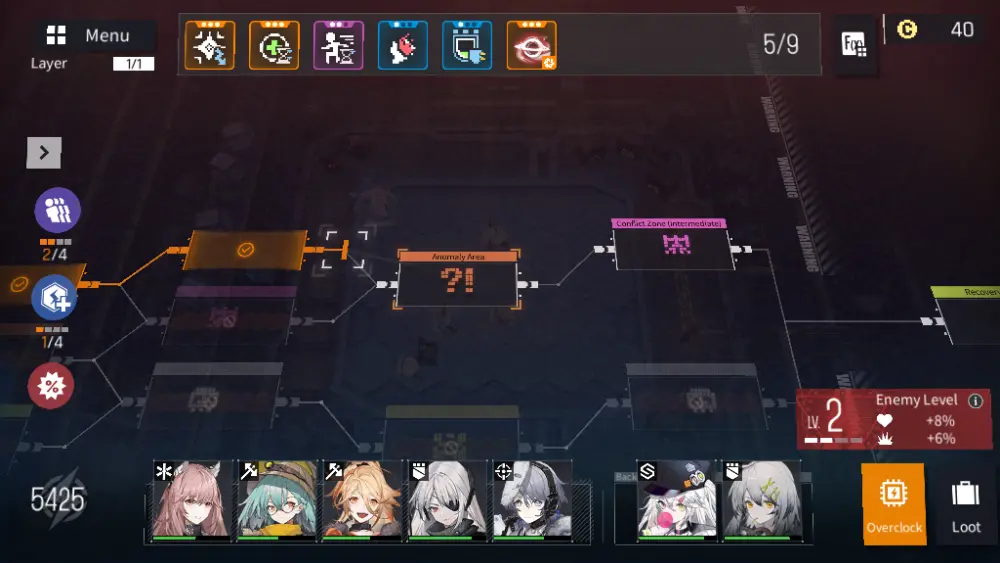
The Anomaly Areas are rooms where random events happen.
These can range from receiving Function Cards, Cache Coins, or other special items but at varying costs. The costs we speak of are a collective of all of your Dolls’ current HP. You will be given the choice not to push through with receiving the items or you can still get at least 1 of these without having to hurt your Dolls. As Persicaria herself said: “Risk and reward often go hand in hand.”
h. Deep Diagnosis Area
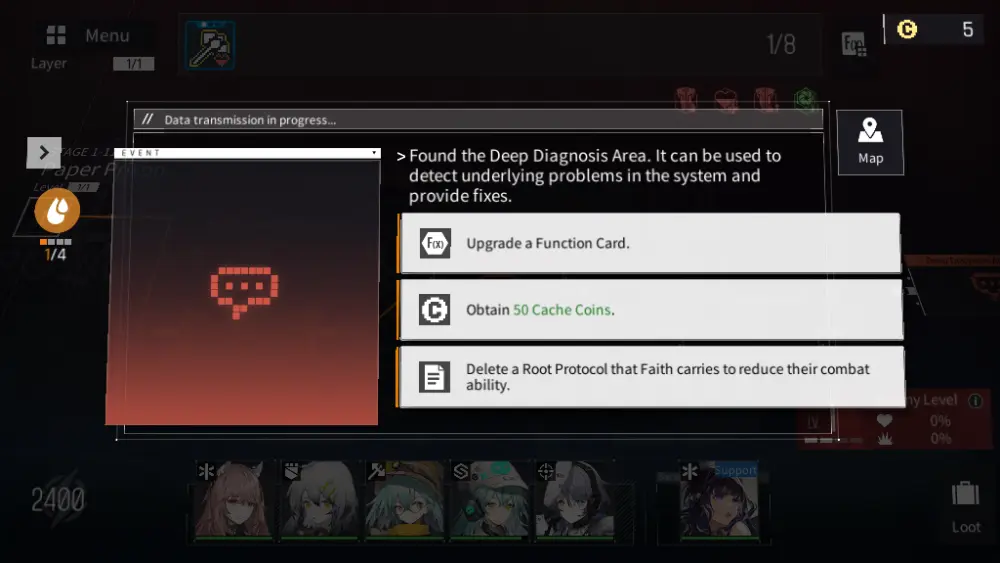
This area is quite special as it only shows up when you are fighting a boss.
A boss usually comes with what are called Protocols. These Protocols are powerful statuses that make the boss battle difficult for your team. For instance, a boss might possess the ability to steal health from your Dolls with each strike, or a powerful shield protects them when they are fighting your Dolls.
A Deep Diagnosis Area will allow you to remove one of the bosses’ Protocols at a time, but the Protocols have their safeguards. This means you will have to fight a weak copy of the boss in order to successfully deactivate a Protocol.
Upon the copy’s defeat, you will have succeeded in disabling the Protocol and you’ll be able to defeat the boss without too much trouble. The downside here is that there are only so many of these in a stage, so prioritizing which ones you’ll need to deactivate first is important.
The campaign in itself is a great place to find all kinds of loot. But eventually, you will want to find more specific drops for your Dolls. This is where you fight outside of the campaign.
9. Fight Outside of the Campaign
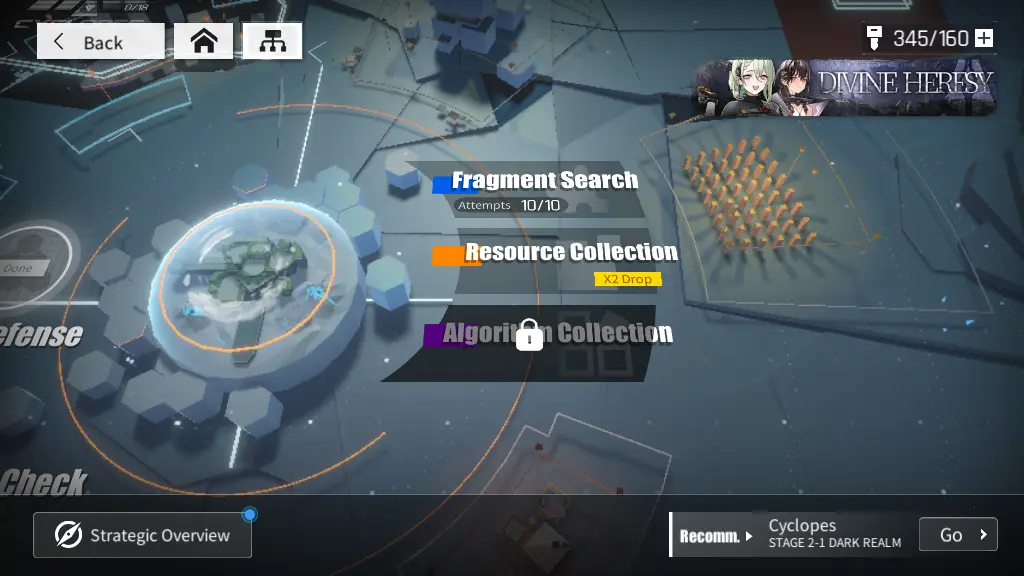
If you need a break from the grueling battles of the campaign, it’s time to try out the other battles that the game has to offer.
But this isn’t merely to continue exploration; you do this when you need to power up your Dolls. The extra battles apart from the campaign drop items that are dedicated to making your Dolls stronger. If you ever feel like you’re stuck, give these two zones a try:

a. Fragment Search — This is where you find the Neural Fragments of Dolls that you own. Gaining these will allow you to star up your Dolls and give them an overall boost in stats. Not to mention, 1-star and 2-star Dolls in your roster will gain their ults when they hit 3-stars, broadening your avenue for strategic maneuvers in combat. You only have a number of attempts of these
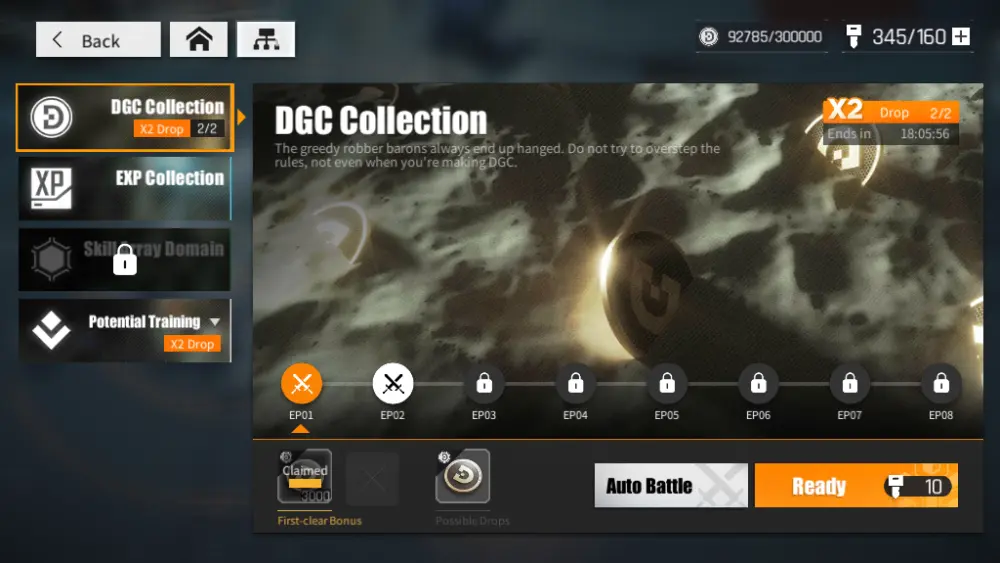
b. Resource Gathering — This is where you can gather valuable resources like EXP, Breakthrough Widgets, and Diggcoin. The first two are quite important when strengthening your Dolls since leveling them up stops at each increment of 10.
They become eligible for a Breakthrough when you have enough Breakthrough Widgets of your desired Doll’s class. For example, you need a certain number of Medic Breakthrough Widgets to increase Persicaria’s level beyond 10, if she hasn’t had a Breakthrough yet.
There is a third area to explore, but we’ll leave that up to you. In the meantime, let’s talk about Neural Cloud’s greatest teacher: defeat.
10. Learn from Your Defeats
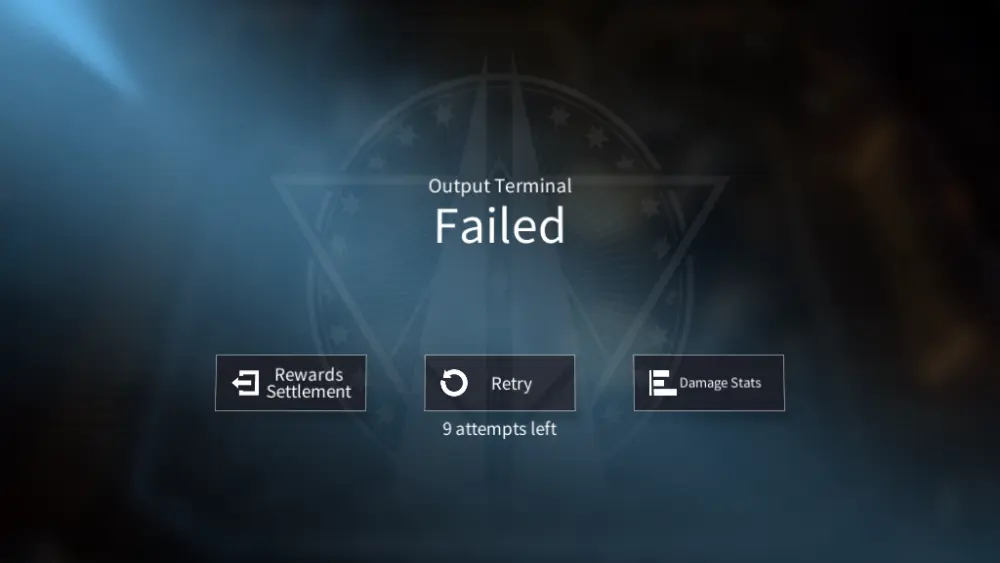
Let’s get this one out of the way: you will lose at one point or another. But don’t let this fact discourage you.
Defeat shouldn’t be treated as just a “Game Over”; rather, it should be a means for you to reassess your strategy. Perhaps you might have put one of your Dolls on the wrong tile, or you’ve used a Tactical Skill at the wrong time, or maybe even used an ult when such power isn’t needed. These are all little factors that you may need to take a look at before attempting the same stage all over again. Otherwise, you’d be wasting your attempts and you’ll ultimately fail the stage.
Each time you play a stage, you have 10 attempts. If you’re defeated and retry, the attempt counter goes down by 1. The game is generous enough for you to figure out a way you can best a stage and, in most cases, your greatest weapons here aren’t your Dolls or your Tactical Skills—it’s your thinking. Always go over what you learned in this guide thus far and find a way around the stage. If push comes to shove, try boosting your Dolls a few levels upward—those are good overall improvements.
There’s more to life in Magrasea than constantly trying to emerge from Sanctifier rule. When the battles are over, you and your Dolls will need a place to call home. That home is the Oasis.
The Oasis and What to Do Here
The Oasis, for lack of a better term, is a hideout for you and your Dolls. It’s the center of your operations and your home away from your home in the real world. If you didn’t have a place to stay at all, you will most likely get picked up by Sanctifiers and get deleted from the system as an Irregular Agent, right? That said, let’s talk about keeping house in the Oasis!
1. Tend to the Oasis
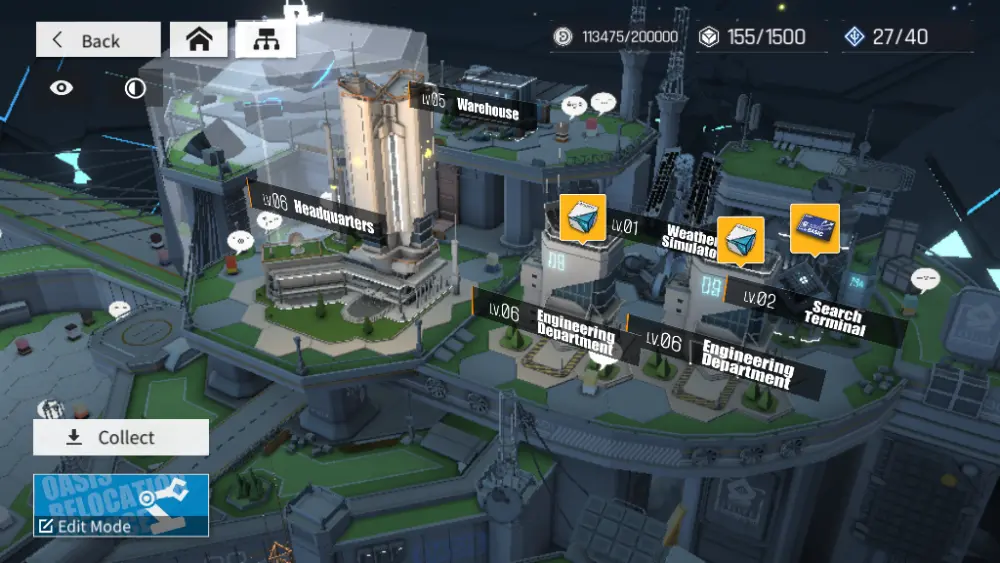
Each home needs a renovation every now and then and the Oasis is no different.
What exactly do we mean? For starters, each building in the Oasis serves a purpose to your operations. To illustrate, the DGC Banks generate Diggcoin, the Engineering Department produces Pre-Fab Material, the Search Terminal hands out Basic Search Commands, and so on. Each of these buildings have a level and their level is directly proportional to how much of these resources they generate.
Your Headquarters’ level denotes the maximum level of all of your other buildings. This means that no other building in the Oasis can exceed that of the Headquarters. If you want more buildings and more materials produced, you will need a higher level for your Headquarters. Though, unlocking new buildings or duplicates thereof will require you to mostly progress through the story.
If you’re reading this guide especially because you’re new to this game, the next bullet is for you! This also goes for intermediate players who may or may not have noticed this in the beginning.
2. Accomplish the Tutorial Quests for Rewards
Questing is a popular way to get strong in any RPG conceivable. You do something, you get rewarded. It’s simple! Neural Cloud rewards its newbies specifically with Tutorial Quests.
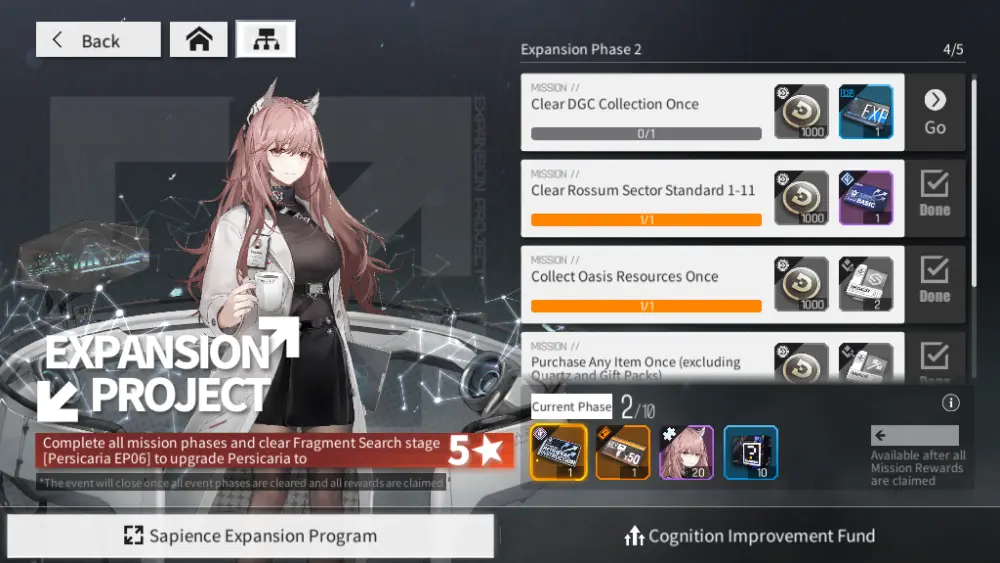
Tutorial Quests are a slew of tasks for you to do that offer really useful rewards to keep you going on your adventures. These range from Key Memory Cards, Breakthrough Widgets, Search Orders, and most importantly, Neural Fragments. The Sapience Expansion Program specifically has Persicaria’s Neural Fragments in them and if you want Persicaria to be an even more effective healer than she already is, perhaps this is a good road for you to follow.
Allow us to elaborate further: Persicaria starts at 1-star when you receive her as a starter in-game. If you remember what we touched upon earlier on how star levels and ults are directly tied to one another, this means that Persicaria’s potential is yet to come to fruition. Her ult is so powerful that it may save your Dolls from almost any dire situation (we promise). Why wouldn’t you want that? Complete those Tutorial Quests!
If you feel like you’ve had enough of Tutorial Quests, there are still other things you can do.
3. Complete Daily Quests for Resources and Materials
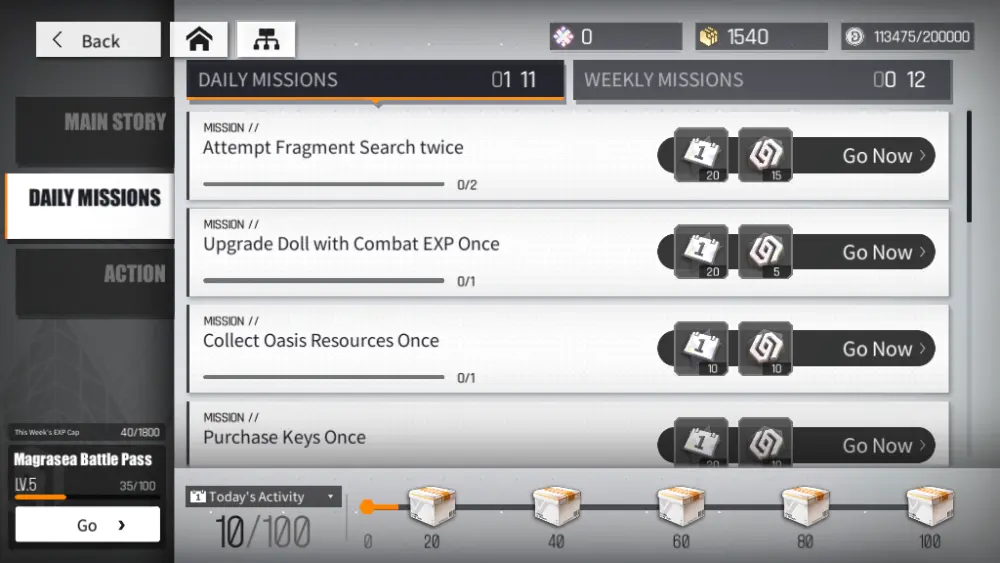
Daily Quests are common in most hero collectors, too! They’re so common, they’re often called Dailies. But like all Dailies out there, there’s plenty of reason why you should do these.
Dailies in Neural Cloud fill up an activity bar. You do this by acquiring Daily Activity Points, which you gain from completing your Dailies. In increments of 20, you are rewarded with a crate that has a bunch of neat swag in them. The rewards vary but they usually contain Combat EXP, Basic Search Commands, Key Memory Cards, and the like—more useful stuff for your adventures.
Each objective in the Dailies usually involves doing anything within the game and completing all of these can be done within a couple of minutes within the day (if you happen to play fast enough). Here are a few examples of what you might expect from a list of Dailies:
- Attempt Fragment Searches
- Level up your Dolls
- Collect resources generated by the Oasis
- Purchase Keys using Quartz Sand
- Spend a Number of Keys
- Attempt Resource Collection
- Complete a Vulnerability Check
If you successfully complete your Dailies, you will be rewarded with Quartz Sand, the game’s premium currency. Getting a lot of this and saving up will benefit you greatly as Quartz Sand can be used for Neural Fragment Searches (or running the gacha) or spending for daily Key Refreshes. Either of these is quite useful—the former may get you new Dolls and the latter helps you grind for material and resources in the campaign.
But you might be asking: “Is this the only way you can gain Quartz Sand for free?” Nope. There are still a few more ways you can gain this precious resource.
4. Get Quartz Sand from Achievements
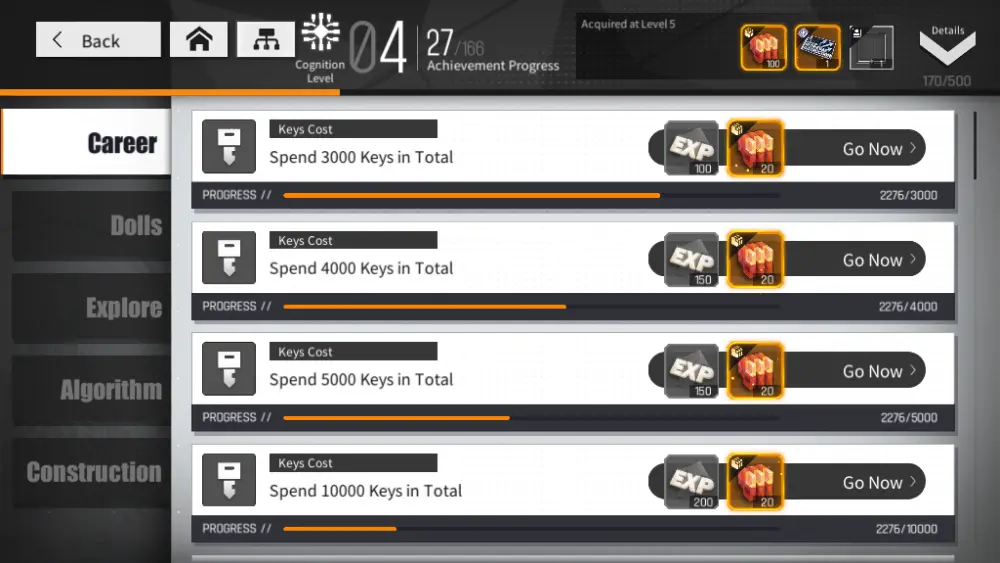
What’s an achievement to you?
Is it how long you’ve stayed awake trying to perfect something and succeed? Is it reaching a dream in life? Is it making the perfect cup of coffee? Achievements are big things and they should be celebrated. In this game, Achievements reward you with Quartz Sand—and lots of it when you’re starting out.
Achievements, in a way, are like quests of their own. The only difference between these and quests is that Achievements take much longer to complete albeit they reward more consistently.
A few examples of achievements would be having at least 5 Dolls at level 20, a few Oasis buildings at level 5, having completed certain story chapters, and so on. Like we said, completing these very early on is going to be easy since these are all small numbers. It’ll be much more difficult the longer you play, but trust us when we say that it’s gonna be worth it in the long run.
After doing so much work around the Oasis, it’s time to kick back and relax and what better way is there than to do that in the Dorms?
5. Make Your Dorms Comfy
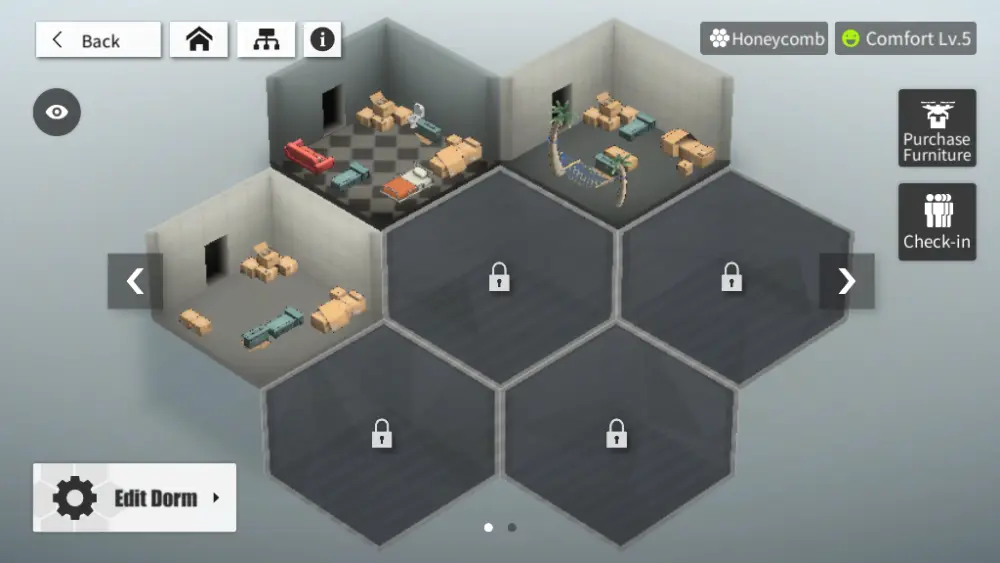
Dorms—essentially a housing system in the game.
Now, before you go nuts a la Animal Crossing or WildStar (rest in peace, you magnificent game), Dorms get unlocked after completing a certain stage in the campaign. Don’t worry, though, you can finish this stage quite early, and that’s why we’re including this in the guide.
Dorms are essentially a place where you can let your Dolls stay and relax when they’re not out there fighting for their lives against Sanctifiers. For a Doll to move into a Dorm, you will need a bed-type or sofa-type furniture piece. Any Dorm can have up to 10 Dolls living in it at once and this can only be done if the space allows it (that’s a lotta beds).
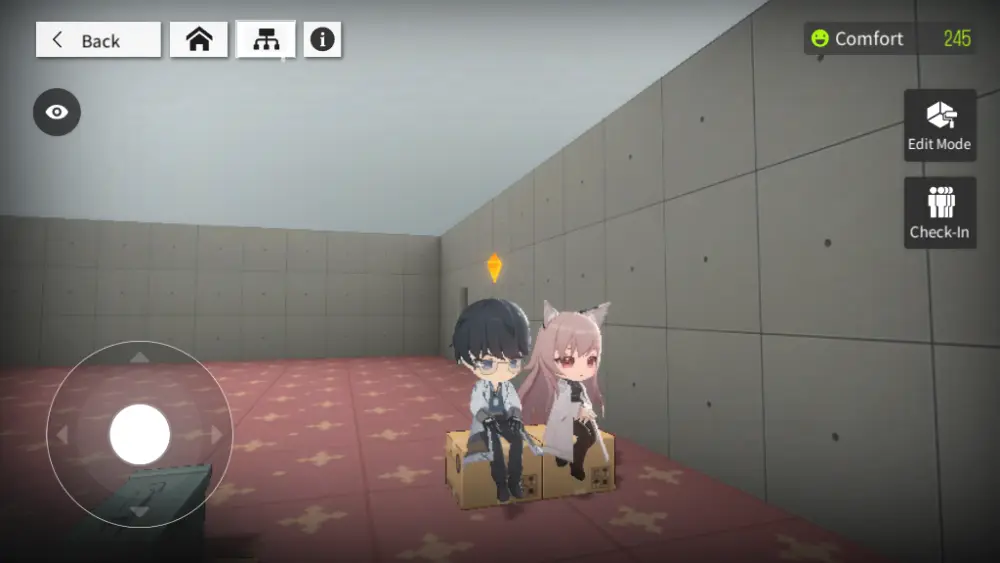
But there’s one thing you need to know about Dorms, and that’s Comfort. Comfort is the degree of—well—comfort within a Dorm. If you make your Dorms more comfortable, you will be rewarded with large amounts of Quartz Sand with a few extras thrown in like Search Commands. Imagine that: you get rewarded to pamper your Dolls. Doesn’t that sound fun?
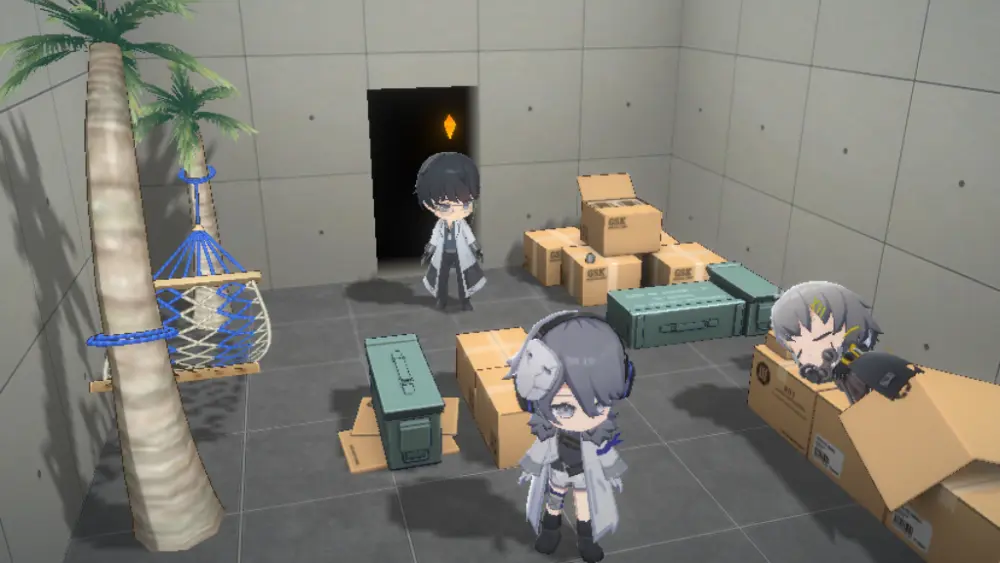
When you first open your starter Dorm, you’ll notice that it’s packed full of heavy crates and cardboard boxes. As cheap as it may be, it doesn’t offer enough Comfort to raise the Comfort Level of your Dorm. This is where you come in. You may choose to replace some of the cardboard furniture (or hey, keep it for aesthetic) with real ones and change the Dorm’s drab wallpaper and flooring with something more lively. Picture it this way: these Dorms are places where you’d want to stay.
Furniture doesn’t grow on trees, though! You will need to spend Furniture Coins in order to purchase these. Furniture Coins can be obtained simply through playing the game or, if you need the coins immediately, you can spend your Quartz Sand to get them. The exchange rate is 5 Quartz Sand for 10 Furniture Coins.
Because you’ll be rewarded in Quartz Sand anyway for increasing the Comfort Levels of the Dorms, spending plenty of time here to give your Dolls a place they can call home is an investment worthy of your efforts. You may be a Professor, sure, but you’re now an interior designer, too!
There are still many more secrets to mastering Neural Cloud. We did not go over Algorithms, the Dark or Endless Exploration Modes of the campaign, and a few other things because their involvement is heavy mid to late game. Let’s go over what we’ve learned over the course of this guide, shall we?
- A balanced team is key in most cases.
- Studying the battlefield already wins you half the battle.
- Change your formations up every now and then.
- Tactical Skills turn battles in your favor… if used correctly.
- Ultimate Skills are powerful and should only be used when the moment calls for them.
- Upgrading your Dolls can save your hide.
- Backup Dolls and Support Dolls are crazy useful.
- The campaign is full of twists and turns, so navigating it and knowing which rooms to go to makes all the difference.
- Fighting outside the campaign nets you some really good rewards.
- Defeat is the best teacher of the game.
- The Oasis is your home—keep it spick, span, and sturdy.
- Tutorial Quests are the best way to get a newbie ahead.
- Dailies get you premium currency if you complete them all.
- Achievements also help get you premium currency and doing these early is a boon.
- Dorms—make them comfy, make them cute, make them cozy… for rewards!
Neural Cloud is a huge game with plenty to do and plenty to discover. Now that you’re nicely settled within the safety of the Sandbox Barrier surrounding the Oasis, it’s probably better now that you get to work. The Professor’s waiting and so are the other Dolls. While this reality is simulated to you, it’s quite real to your new friends. The world needs to heal, the world needs you. Welcome to Magrasea.
This concludes our beginner’s guide for Neural Cloud. If you’re still hankering for more tips and tricks, be sure to stop by at the Official Neural Cloud Discord! Befriend other Professors and get insights on Dolls, Algorithms, and more!
Are you a well-traveled Professor yourself? Have you fought against the Sanctifier hordes more than you can count? Is there any valuable information that we might have forgotten in this guide? Feel free to drop your thoughts in the comment box below!