Is that you, Professor? Welcome back to the real world!
You’ve fought countless Sanctifiers, been through the different sectors of Magrasea, and have won over some powerful allies. All of the Dolls vary in occupation and job skill, and it’s probably time to consider who you should bring along with you on your adventures. Oh, don’t worry too much about the ones you’re leaving behind—they’ll stay to keep the Oasis protected. This is the Neural Cloud Tier List!

Before we continue, do know that this is not the beginner’s guide. Here’s a quick summary of what we’ve touched upon in that article:
- Study who you have and what you have. Making a balanced team and surveying the battlefield before you begin is important.
- Formations will help you achieve victory. If the arrangement of your Dolls isn’t as helpful as it seems, try changing them up the next round.
- Tactical Skills and Ultimate Skills rely on your utmost timing. Use them wisely.
- Upgrade your Dolls and keep them in tip-top shape if you want to win your battles.
- Rely on Backup Dolls or Support Dolls often. They can help change the outcome of any battle.
- Play through the Campaign and outside of it to maximize your loot gains. Don’t be afraid of losing—it’s how you learn!
- Keep the Oasis upgraded as much as possible to maximize material generation.
- Complete the Tutorial Quests, your Dailies, and Achievements to get Quartz Sand.
- You’re also an interior designer! Make the Dorms comfy for your Dolls and get rewarded for it!
If you’d like to read more about this in-depth, please click this link to proceed to our beginner’s guide for Neural Cloud.
Doll Stats at a Glance
Before we start off the Tier List, we would first like to point out that the Doll descriptions below are chock-full of technical terms that we would like to briefly touch upon. Please refer to the mini glossary we have prepared below:
- Attack Speed —This is the rate at which a Doll attacks. The higher the number, the less their interval between attacks.
- ATK —Their main damage stat. This usually affects Physical Damage.
- Auto Skill —Dolls perform these when their Auto Skill Gauge fills. This gauge can be found beneath their HP in battle.
- Buff — A temporary status that is beneficial to a unit.
- Current HP —The Doll’s current HP at the time of battle.
- Critical Hit Chance —The chance at which a Doll strikes the enemy harder than usual.
- Critical Damage —The amount of damage inflicted when a Critical Hit is landed.
- Debuff —A temporary status that is detrimental to a unit.
- Dodge — The likelihood a Doll avoids an attack. No damage is received upon a successful dodge.
- Hashrate —The Doll’s intelligence. This usually affects Operand Damage.
- HP Shield — A shield that acts like an extra layer of health.
- Lifesteal — The unit gains HP from attacking an enemy.
- Max HP —The amount of HP a Doll has in total.
- Normal Attacks —Basic attacks that a Doll performs that require no special conditions. The interval of which they are performed is affected by Attack Speed.
- Operand Damage —A type of damage derived from a Doll’s Hashrate.
- Operand DEF —A stat that mitigates the amount of Operand Damage received by a Doll.
- Passive Skill — A skill that occurs regularly. Depending on the Doll, it sometimes accompanies the Doll’s Normal Attacks.
- Physical Damage —A type of damage derived from a Doll’s ATK.
- Physical DEF —A stat that mitigates the amount of Physical Damage received by a Doll.
- Professor — You!
- Stack — An overlap of the same status.
- Stealth — The unit becomes invisible and cannot be targeted by the enemy in this duration. If the enemy has targeted them prior to them going into stealth, the enemy will switch targets.
- Super Armor —A protective layer that keeps your Doll immune against controlling debuffs like stun. Apart from that kind of protection, Dolls with Super Armor are immune to damage for a few seconds.
- True Damage — This is a type of damage that cannot be mitigated by any means.
- Ultimate Skill —The Doll’s most powerful skill. It can only be activated on the Professor’s signal. Often shortened to Ultimate or just Ult.
Tier Lists and You
Because Neural Cloud is a hero collector, it’s bound to have a Tier List. But we’re getting ahead of ourselves here.
A Tier List is a special type of chart that distinguishes the different heroes in a game according to certain criteria. In most cases, a Tier List would measure heroes in terms of power strength and their overall performance in the META (that’s short for “most efficient tactics available”). But because there are many factors in Neural Cloud that make a Doll fade or shine, we won’t classify them according to power strength, but their flexibility in a team.
To further expound our point, each Doll in Neural Cloud is greatly viable; the degree of how viable they are, however, depends on how much resources and effort you put into making them strong or taking care of them. The game has made each Doll quite powerful in their own right, but they could stick out like a sore thumb in a team if they aren’t versatile enough. Ergo, the primary criterion we seek is the Doll’s ability to perform independently in a team.
A Tier List is, plainly, composed of tiers. While a typical Tier List would rank its heroes based on how “broken” to how underwhelming they are, our Neural Cloud Tier List will rank Dolls based on their practicality and ease of use. This doesn’t mean that Dolls ranked on the lower rungs of the ladder are inferior, they just require a bit more attention when fielded. They can be difficult to have in a team, but they are no pushovers. To put it colloquially, the game favors waifu over META.
Below are our tiers for Neural Cloud:
- Practical — These Dolls go with almost any team. They’re the go-to Dolls of most Professors.
- Auxiliary — The Dolls placed in this category may be just as practical but they’re not a must-have. They still have quite a powerful presence in the team, however.
- Situational — Situational Dolls are those that excel in specific scenarios. They have one job, and boy, they are going to do it.
- Rigid — These Dolls, while powerful in their own right, may require some setup before putting them in a team. They aren’t often deployed, but they stand out if a Professor knows their ins and outs.
With that all said, let’s now proceed to the Tier Lists themselves! Each Tier List below will be arranged according to class.
NOTE: We are aware that Clukay, a Doll belonging to the Sniper class, is missing from this list. This is because the developers of the game have purposefully written and programmed her to be overpowered and thus she goes with any team, if the Professor has her. This list also does not take Arma Inscripta into account, since this only applies to Dolls that the Professor has invested in.
GUARD TIER LIST
| PRACTICAL | Bonee, Evelyn, Millau |
| AUXILIARY | Croque, Python |
| SITUATIONAL | Souchun, Yanny |
| RIGID | Zion |
MEDIC TIER LIST
| PRACTICAL | Gin, Nanaka, Persicaria |
| AUXILIARY | Florence, Imhotep, De Lacey |
| SITUATIONAL | Helix, Jessie |
| RIGID | Choco, Panakeia |
SNIPER TIER LIST
| PRACTICAL | Fresnel, Hubble, Kuro, Simo, Uranus, Zangyin |
| AUXILIARY | Chanzhi, Daiyan, Earheart, Lam |
| SITUATIONAL | Max, Sockdolager |
| RIGID | Octogen |
SPECIALIST TIER LIST

| PRACTICAL | Abigail, Angela, Antonina, Dushevnaya, Mai, Rise, Sueyoi, Turing |
| AUXILIARY | Banxsy, Nora, Sakuya |
| SITUATIONAL | Groove, Hannah, Ksenia, Puzzle, Willow |
| RIGID | N/A |
WARRIOR TIER LIST
| PRACTICAL | Aki, Betty, Chelsea, Hatsuchiri, Magnhilda, Nascita |
| AUXILIARY | Vee |
| SITUATIONAL | Fern |
| RIGID | Centaureissi, Sol |
Additional Doll Info
Would you like to know why we’ve arranged the Dolls this way? Read on and we’ll explain it all to you below!
NOTE: For the reader’s convenience, we’ve arranged the Dolls’ names in alphabetical order.
Name: Abigail
Class: Specialist
Base Rarity: 1-star
Manufacturer: Svarog Heavy Industries
Tier List Rating: Practical
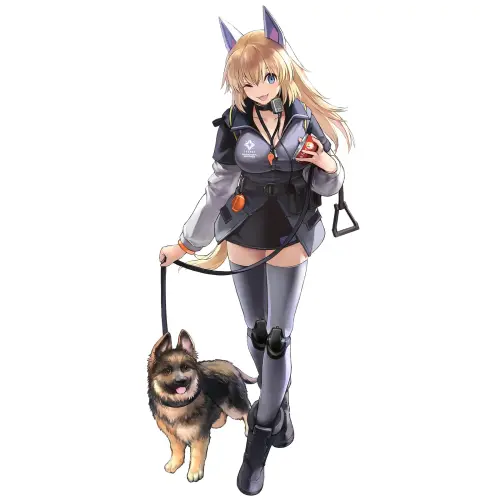
Notes: This canine trainer and communicator can go well with any team. Within the range of 1 tile, Abigail provides her friends with physical resistance, and can increase their critical hit rate and critical hit damage using her Auto Skill. Her Ult, Marks of the Hunt, is just as special as she is: she can single out an enemy by throwing a bone at them and causing her Hound to deal a big percentage of damage from her Hashrate. This is useful against bosses and particularly annoying enemies. Sic ‘em!
Name: Aki
Class: Warrior
Base Rarity: 3-stars
Manufacturer: Universal Anything Services
Tier List Rating: Practical
Notes: Aki is an excellent bodyguard. His abilities to easily annihilate singular targets are a valuable asset to teams that require some muscle. In one-on-one fights, he can make short work of his enemies thanks to his Auto Skill that rapidly slashes them 5 times. This can deal Critical Damage.
What makes him really special is his Ult, Chidori Gaeshi, which may continuously pick off weakened opponents. How it works is that he inflicts a massive percentage of his ATK onto a single target, and if the target dies, he will perform Chidori Gaeshi again on the target with the next-lowest current HP. The lower the current HP of his target, the more damage he deals. Let Aki give you the edge you need.
Name: Angela
Class: Specialist
Base Rarity: 2-stars
Manufacturer: Universal Anything Services
Tier List Rating: Practical

Notes: As one who protects children as well as watches over them, you can only imagine the powers that Angela wields. She puts the enemies in a time-out where their skills get slowed. This especially happens when an enemy activates one of their skills for the first time.
Additionally, she helps all friendly Dolls activate their skills again while setting enemy skills back by a few seconds. As far as her Ult goes, Here Be Dragons, she banishes all enemies apart from her target and inflicts the target with Dragonbreath, making them take increased amounts of Operand Damage for a time. This Ult is especially powerful against bosses. It’s beddy-bye time.
Name: Antonina
Class: Specialist
Base Rarity: 2-stars
Manufacturer: 42LAB
Tier List Rating: Practical
Notes: Antonina—a network security engineer who is affectionately called Anna by a lot of the characters in the canon—is a formidable Specialist. With her quick fingers, she can easily hack into the inner workings of the enemy and infect them with viruses (Trojans are her favorite).
What makes her quite practical in particular is that her Ult, Global Intrusion, stuns all enemies and infects them with Trojans. If you need a Doll that slows the enemy down or stops them from working entirely by loading them up with malware, Anna is your gal.
Name: Banxsy
Class: Specialist
Base Rarity: 3-stars
Manufacturer: Cyber Media
Tier List Rating: Auxiliary
Notes: A street artist with the power to express her individuality, Banxsy is as great a visionary as she is a fighter. The battlefield is her canvas and the enemy are her subjects. She can reduce the enemy’s hit and dodge rates by applying Graffiti Marks onto them. She may also give them marks by staining the tiles of the battlefield—enemies who pass over these get marked.
Her Ult, Subverting Artistry, is what really makes it tough for the enemy to keep up. She detonates all Graffiti Marks on the field and greatly reduces the enemy’s hit and dodge rates greatly. Having her onboard your team may greatly reduce the efficacy of the enemy’s attacks. This’ll especially help if you don’t have enough tanks on your side. Banxsy will be sure to put the pain in paint.
Name: Betty
Class: Warrior
Base Rarity: 2-stars
Manufacturer: Universal Anything Services
Tier List Rating: Practical
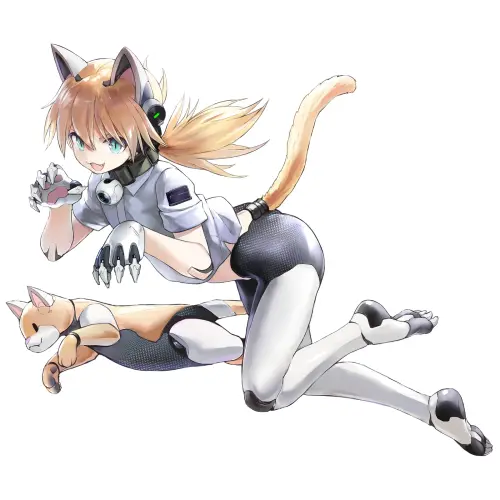
Notes: They say cats can never be domesticated properly, but what do you think about a home security guard with a cat’s reflexes and behavior? Betty is no one to sneeze at when it comes to inflicting great amounts of damage onto the enemy. Like a cat, she hunts her prey quietly and takes them out with finesse. When her Auto Skill activates, Betty gains a Super Armor and lifesteal, putting herself one step ahead of the enemy.
If you think that there are enemies blocking her path or the path of your friends, her Ult, Chatte Fatale, turns her into a flurry of fury, slicing through all the enemies in her way while inflicting a large amount of damage as well as stacks of Bleed for 5 seconds. Betty is a real cat-tastrophe for the Sanctifiers and a meowster of misery.
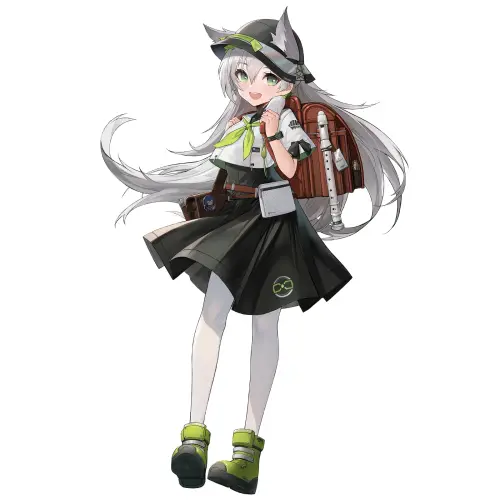
Name: Bonee
Class: Guard
Base Rarity: 1-star
Manufacturer: Ultimate Life Holdings
Tier List Rating: Practical
Notes: How are your bones feeling? Bonee, an orthopedic surgeon, is not at all a Medic like her occupation would make it seem. She’s actually a formidable tank that can quickly become a mainstay on your team if you take good care of her.
Bonee excels in protecting herself and her teammates through using her skills. She grants shields to herself and, through her Auto Skill, her ally with the lowest current HP. Her Auto Skill, in particular, greatly increases the amount of defense an ally has and the healing they receive. Bonee, in turn, also receives increased healing if she uses the Auto Skill on herself. Otherwise, her shields stay up if she’s constantly healed.
Her Ultimate Skill, called Medullary Transfusion, sacrifices her shield to grant all of her allies shields equal to a small percentage of Bonee’s Max HP, as well as the value of her shields when she activates the Ult. This said, she is easily one of the more versatile tanks in the game. Got a bone to pick with the enemy? Pick Bonee!
Name: Centaureissi
Class: Warrior
Base Rarity: 3-stars
Manufacturer: Universal Anything Services
Tier List Rating: Rigid

Notes: It’s time to clean up the mess the Sanctifiers made and Centaureissi is up for the task. This maid has Normal Attacks that stun and deal small area of effect damage. Her Auto Skill allows her to inflict multiple strikes onto her target, with the final strike sending the enemy flying to the far end of the battlefield.
Any enemies who are within the vicinity of the falling enemy will be stunned for a few seconds. Her Ult, Perfect Maid, causes Centaureissi to fling knives in the direction of the skill. Each of the knives deal damage to the enemies caught in the flurry. While her kit sounds good on paper, Centaureissi might require some support from her friends since her attacks don’t deal as much damage as they would seem. Centaureissi might need some extra “Oomph!” in her sweep—pick out some good friends to help her out!
Name: Chanzhi
Class: Sniper
Base Rarity: 3-stars
Manufacturer: Cyber Media
Tier List Rating: Auxiliary
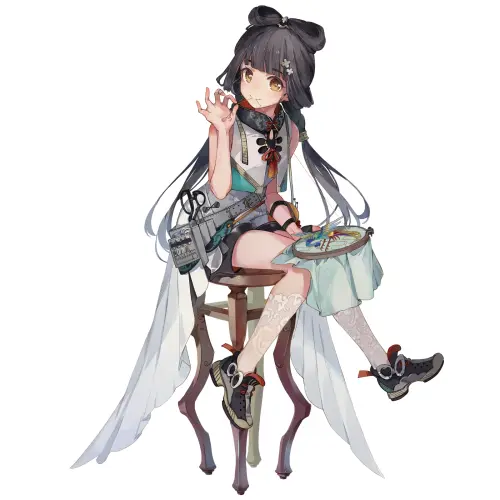
Notes: Chanzhi, an embroidery artist, attacks the enemy from afar with her needles and inflicts special debuffs called Needlework and Quilting. Needlework detonates after a short period of time and inflicts damage based on its stack count, and Quilting, through the activation of her Auto Skill, allows Chanzhi to throw three needles in different directions that pass through each enemy.
When the Quilting ends, all Needlework detonates, causing massive damage. Magnificent Embroidery, her Ult, deals massive damage to enemies in the direction of the skill and extends the duration of Quilting if it’s active. Chanzhi is great at dealing damage to groups en masse, but you might only want her if you don’t already have Dolls that do this. A stitch in time saves nine, and that’s exactly what Chanzhi does.
Name: Chelsea
Class: Warrior
Base Rarity: 1-star
Manufacturer: Svarog Heavy Industries
Tier List Rating: Practical
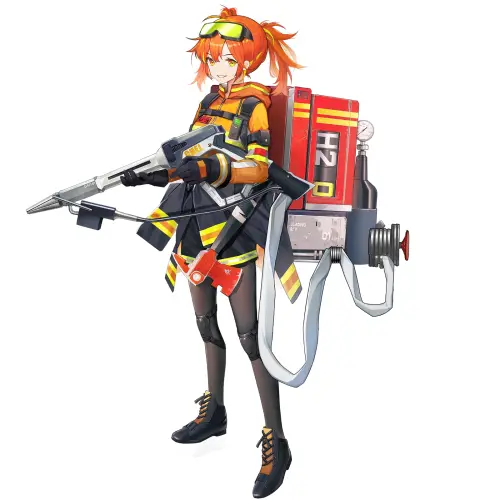
Notes: Where there’s smoke, Chelsea’s on her way. A fearless firefighter, Chelsea is armed with her powerful high-pressure hose, which is said to be able to cut through enemies. Whenever she hoses an enemy down with her Normal Attacks, any enemy caught behind her current target will receive additional damage.
Additionally, she can knock enemies back using her Auto Skill. Enemies that aren’t knocked back are instead stunned for a duration. What makes her a true threat to the Sanctifiers is her Ult, Supercooled Nitrogen.
This Ult freezes all of her enemies in their tracks, opening them to a wave of attacks from your friends—perfect for any occasion. In addition, Supercooled Nitrogen can also inflict Critical Damage. Count on Chelsea to save the day!
Name: Choco
Class: Medic
Base Rarity: 1-star
Manufacturer: Universal Anything Services
Tier List Rating: Rigid
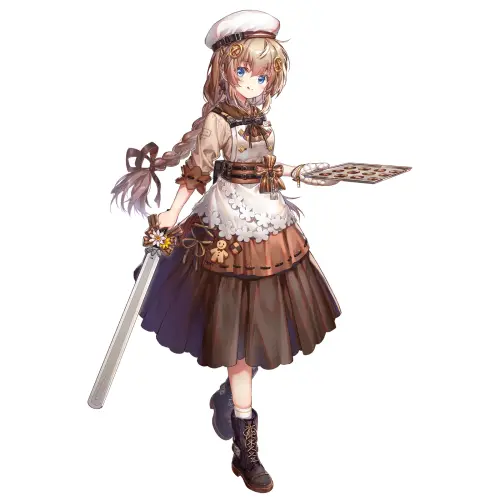
Notes: Fancy yourself some sweets? Choco can deliver. As a Medic, Choco is quite unorthodox in that she is a melee unit. If there are any Dolls around her, this dessert chef can easily feed them chocolates, which heals them and herself. Using her Auto Skill, Choco feeds the Doll with the lowest current HP a gingerbread man.
This gingerbread man gives the target Doll a slight defense boost and a slight increase in attack power, apart from healing them every second. Heartwarming Cookie, her Ultimate Skill, will make her feed all of her allies and slightly boost their ATK and Hashrate. Should any of her friends take damage in this state, they consume the cookie and reduce the incoming damage to 1.
As we’ve mentioned earlier, Choco is a melee unit, putting her at great risk of getting killed early. Will you taste sweet victory or bitter defeat? It all depends on who comes along with her.
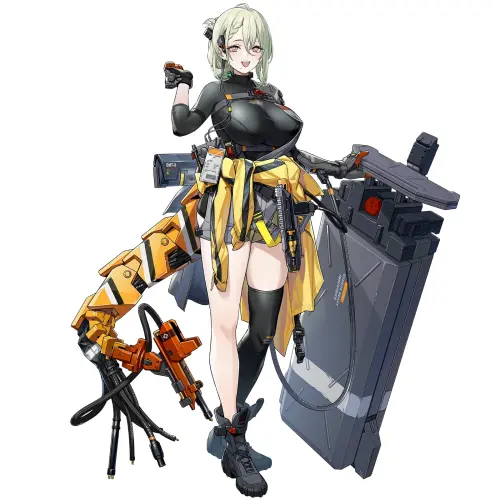
Name: Croque
Class: Guard
Base Rarity: 3-stars
Manufacturer: Svarog Heavy Industries
Tier List Rating: Auxiliary

Notes: Though one of your starter Dolls, Croque is a tour de force. Her Aegis is a formidable defense and she isn’t afraid to flaunt it at the enemy. Any enemy taunted by her contributes to the recovery of her HP. Not to mention, her Auto Skill allows her to gain a Super Armor and a shield based on a multiplier of her Hashrate.
Being a mechanical design engineer, Croque can hurl her Aegis upward and perform Machine God’s Call, her Ultimate. This skill rains bullets down onto all her enemies, dealing Operand Damage whilst also inflicting the Cripple debuff for a few seconds.
This will make the enemy easier to kill. While Croque is quite a powerful tank in her own right, her Ult offers area of effect damage as opposed to traditional protection akin to Evelyn who fits her role as a tank to a tee. That isn’t to say that Croque is a terrible tank, she’s just one of the many ways to throw a spanner in the works of the Sanctifier regime.
Name: Daiyan
Class: Sniper
Base Rarity: 3-stars
Manufacturer: Cyber Media
Tier List Rating: Auxiliary

Notes: Music can both be that which soothes the savage beast and a conduit of which the warrior spirit is carried—Daiyan is sure to convey this message well whenever her presence graces the battlefield. A guzheng performer by trade, her deft fingers glide, strum, and pluck across her instrument, causing a swell of inspiration among her allies and letting her enemies hear their dirge of defeat.
Positioning is a key factor to consider when fielding Daiyan into any team as her skills involve buffing allies as well as dealing damage to enemies based on how many allies her soundwaves have passed through. Her Auto Skill allows her to fire a wider soundwave which, when passing through allies, grants a special buff called Concordia as well as deals damage to all enemies struck by it.
Concordia will give all ally abilities the chance to score Crit Damage based on the ally Dolls’ individual Crit Rates. Lend your ears to this performance, Professor: Daiyan’s Ult, Austere Desires, is like an upgrade of her Auto Skill, with the exception of making Daiyan herself untargetable by the enemy for 5 seconds.
In this performance, she will fire wide soundwaves at all enemies in the path of Austere Desires whilst giving Concordia to all allies at the same time. While not a true Sniper compared to her peers who focus solely on destroying the enemy outright, Daiyan is a great addition to any team that needs buffs to their attacks. Let each string plucked and strummed from Daiyan’s instrument carry the tide of battle in your favor.
Name: De Lacey
Class: Medic
Base Rarity: 3-stars
Manufacturer: Svarog Heavy Industries
Tier List Rating: Auxiliary
Notes: De Lacey is what you might call a Medic for Dolls. As a Doll maintainer, it’s her job to ensure that Dolls fighting alongside her are always at the top of their game. She would immediately tether herself to an ally with the greatest Hashrate on the same row. The tethered ally would be healed continuously. With her Auto Skill, De Lacey strengthens the effectiveness of the tether and causes enemies to be harmed by it should they cross the tether.
Her Ult, Cardinal Splendor, will make De Lacey shoot 5 energy pulses from the cables in her tail, which deal Operand Damage to her enemies and grant an HP shield and healing to all of her allies. De Lacey is powerful albeit a bit gimmicky, especially because her tether relies on the specific Hashrate of her ally Doll—on the same row, no less.
While Cardinal Splendor looks like a great way to keep your allies in check and the enemy at bay, there are other Dolls who are more straightforward in their healing or harm. However, De Lacey is still a great way to keep your squishy Dolls like Specialists or Snipers company—perhaps a few adjustments before battle should be made for her to be even better at her job.
Name: Dushevnaya
Class: Specialist
Base Rarity: 2-stars
Manufacturer: Universal Anything Services
Tier List Rating: Practical
Notes: Dushevnaya is a caretaker with a musical gift. Her melodies are sure to empower allies by increasing their damage resistance and weaken enemies by decreasing their damage resistance and reducing their Hashrate. Her Auto Skill does this but for much longer.
Using her Ultimate called Immaculate Gift, she can greatly inspire her allies to deal even more Operand Damage, as well as make her enemies suffer a massive defense penalty. This double-sided buffing and debuffing is very welcome in any team because Dushevnaya sure knows how to take good care of her friends… and her enemies.
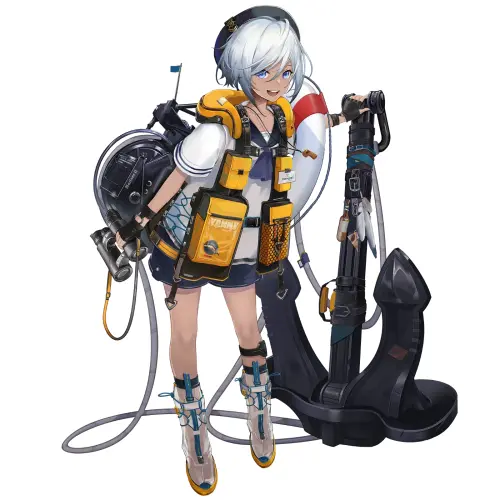
Name: Earhart
Class: Sniper
Base Rarity: 2-stars
Manufacturer: Svarog Heavy Industries
Tier List Rating: Auxiliary
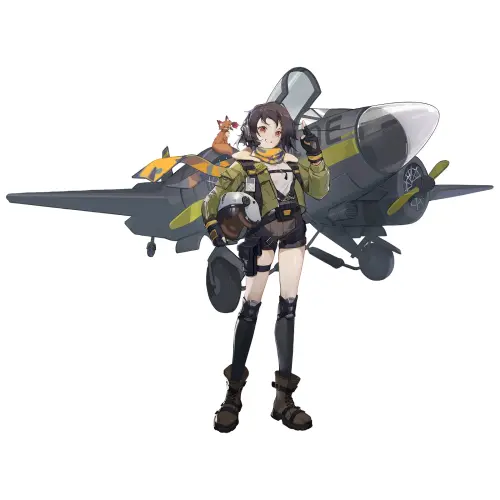
Notes: Watch the skies, Professor—here comes Earhart. This pilot Doll is skilled at picking off her enemies from great distances. With a kit reliant on critical hits, Earhart increases her Attack Speed and Auto Skill gain. Speaking of her Auto Skill, she boards her plane and deals extra Operand Damage and gains a Super Armor while she’s onboard.
When you feel like the enemy needs a serious spanking, using her Neptune’s Onslaught Ult will deal Operand Damage equal to a large amount of her Hashrate. Neptune’s Onslaught can hit critically and the rate of the critical hits increases for each enemy hit by the Ult. This stays active for a few seconds. Earhart is airworthy and combat ready—send her out alongside some hard-hitting Dolls for a quick mission accomplished.
Name: Evelyn
Class: Guard
Base Rarity: 3-stars
Manufacturer: Svarog Heavy Industries
Tier List Rating: Practical
Notes: Time for the Sanctifiers to drop their weapons and come quietly. Evelyn, a Doll designated for riot control, is a textbook Guard. She’s prepared to take a beating from the enemy and has an increased amount of damage reduction on herself.
With her Normal Attacks, she has a chance to knock enemies back and stun them. If the stun is successful, she recovers a portion of her HP equal to a small percentage of her Hashrate. When a group of enemies congregate in an area on the map, Evelyin chucks a riot grenade their way and stuns them briefly. This Auto Skill deals Operand Damage.
To truly keep her friends safe, she has the Steelguard Array, her Ultimate Skill. Evelyn calls her allies to where she deploys the Steelguard Array and protects them in a shield for a few seconds. Allies within the shield will have their damage reduction greatly increased. If you need anyone to keep your team safe from enemy attacks, call Evelyn onto your side.
Name: Fern
Class: Warrior
Base Rarity: 2-stars
Manufacturer: 42LAB
Tier List Rating: Situational
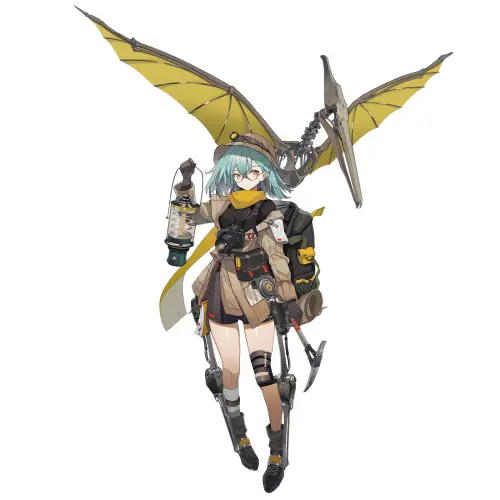
Notes: What secrets of the old world remain uncovered? Fern is here to help you explore. As an archaeologist, Fern comes armed with her trusty pickaxe and a pterosaur skeleton she managed to bring to life. It’s with this pterosaur that makes Fern stand out in situations that require bypassing barricades.
At the start of battle, Fern will summon her pterosaur one tile ahead. If Fern is obstructed by a barricade, the pterosaur will spawn behind it. Should the pterosaur die, it will be re-summoned when 15 seconds have passed. Once her Auto Skill bar fills, another pterosaur will swoop in and carry a Sanctifier into the air.
After a moment, the pterosaur will drop the Sanctifier on an empty tile near the enemy farthest away from your team. It will stun them briefly, as well as deal Operand Damage. The Sanctifiers better cover their ears if they have any as Fern’s Ult, Ancestral Shriek, allows her to summon a giant pterosaur that knocks all enemies back toward the far right of the map. They get stunned for a long time, as well as receive Operand Damage equal to a medium percentage of Fern’s Hashrate.
A solid reason for why she is considered a Situational Doll in this roster is because she is greatly reliant on her pterosaurs. Consider deploying her if summoning enemies like Modesty are present—Fern’s pterosaurs are sure to help control the crowds. The world has secrets still, and Fern will be around to help you unearth them.
Name: Florence
Class: Medic
Base Rarity: 3-stars
Manufacturer: Ultimate Life Holdings
Tier List Rating: Auxiliary
Notes: Florence is a nurse but don’t let her sweet demeanor fool you—she has a penchant for drugging friend and foe alike. Every 5 Normal Attacks, Florence can charm the enemy for a short moment, causing them to turn against their allies. Florence’s Auto Skill truly brings out the Medic in her since she heals an ally with the lowest current HP for a large amount of her Hashrate.
For every 1% of HP the ally has lost, Florence will heal them even more. However, it’s when she uses her Ult that things take a dark turn. Forbidden Concoction will cause Florence to harm an ally by reducing 60% of the target’s HP but greatly boost their ATK and Hashrate for a few seconds.
Fortunately, this ally will also gain lifesteal, so consider this turning a friend into a temporary vampire or berserker of some sort. Florence’s Ult may seem powerful, but consider fielding a co-Medic alongside her just in case.
Name: Fresnel
Class: Sniper
Base Rarity: 2-stars
Manufacturer: 42LAB
Tier List Rating: Practical

Notes: Light is such a mysterious thing, isn’t it? But that’s why Fresnel manages to weaponize it against the Sanctifier threat. Fresnel, an optical researcher, is a Sniper-class Doll with a bag full of tricks that complements regular Sniper behavior. For instance, she can warp 1 tile away from her attacker if she takes melee damage.
Utilizing her Auto Skill makes her burn the enemy to a crisp—anyone caught in the path of the laser will be inflicted with a stack of Burn. The laser will fire all the way to the edge of the map and ricochet back, dealing damage both ways.
But her Ult might be her most dangerous skill yet: Liminal Glory Burns all enemies within an area and those that are already Burning will receive additional damage. If you’re looking for a Sniper who also deals damage to multiple targets, then look no further than Fresnel. Don’t forget your sunglasses!
Name: Gin
Class: Medic
Base Rarity: 3-stars
Manufacturer: Universal Anything Services
Tier List Rating: Practical
Notes: The bar’s open and there’s free drinks for everyone… even your enemies. Fix up the Sanctifiers a cocktail of disaster because Gin’s here to keep your friends nice and healthy. Being a part of the Medic class, Gin certainly heals his friend with the lowest current HP through his Normal Attacks.
He can also increase all of his allies’ critical hit rates with his Auto Skill, but his Ult is what lands him a spot in the Practical tier of the Medic Tier List. Gin’s very own Amber Dream, a special drink, heals all of his allies for a large percentage of his Hashrate. If any of his allies are currently under a defensive boost (e.g. Guard-class Dolls), they receive even more healing. Gin’s the life of the party—literally!
Name: Groove
Class: Specialist
Base Rarity: 1-star
Manufacturer: Cyber Media
Tier List Rating: Situational

Notes: Are you ready to party, Professor? Groove, a Doll that works as a DJ, can give all of her friends increased dodge rates and Attack Speeds for a few seconds using her Auto Skill. Whenever her friends dodge, they speed up the rate at which her Auto Skill recharges.
If you feel like the battlefield is getting a bit crowded, her Ult, Clamorous Finale, can displace any enemies hit in random directions. Consider bringing Groove along if there are summoner units, like Modesty, present on the battlefield and if you have powerful tanks on your side.
This also works if there are plenty of enemies on the map and you have Dolls like Earhart or Simo who can deal lots of damage for short periods of time. Groove’s Auto Skill spam is needed if you want to drop a sick beat onto the enemies. Break it down!
Name: Hannah
Class: Specialist
Base Rarity: 3-stars
Manufacturer: 42Lab
Tier List Rating: Situational

Notes: A very important character to the lore and one of the brightest minds to exist in Magrasea, Hannah is a budding administrator of the Rossum sector. After Turing had saved her life in the first chapter of the game, she now tries her best to fill the shoes that Turing had once worn to run the sector. While she is a brilliant AI researcher agent, Hannah is also a capable leader when put in a team.
So long as she is on the battlefield, if 3 of her allies are targeting a single enemy, she increases the attack speed of said allies as well as smite the targeted enemy with a percentage of her Hashrate. Using her Auto Skill, she can dramatically increase the Crit Rate of all ally units, allowing the Professor to push the enemy back in times most dire.
If there’s an enemy on the board that needs to be made dead immediately, Hannah’s Ult, Fusion Upheaval – α, will direct all allies’ attention to that one target. Hannah will increase the damage that this target takes as well as link all other enemies on the board to receive a shared portion of damage that the primary target receives. Hannah is small, but she should be brought along if there are huge monsters to take down. Bring her to a boss fight and let her lead your team to victory.
Name: Hatsuchiri
Class: Warrior
Base Rarity: 3-stars
Manufacturer: 42LAB
Tier List Rating: Practical
Notes: Who’s there to find the things that make the Oasis go bump in the night? Hatsuchiri, of course. Being an unknown organism surveyor, studying these creatures is one thing, but if you need anyone to hunt monsters like the Sanctifiers down, Hatsuchiri is the Doll for the job. She can enter what is called the Prowl state at the start of battle, which makes her dig beneath the map and move to an empty tile near the enemy that’s farthest away from the party.
When she emerges, she sends all surrounding units flying. In the Prowl state, she cannot be targeted—she may also use this to save her own life by retaining 1 HP upon taking damage that would otherwise kill her. Upon emerging from the Prowl during this near-death scenario, she recovers 25% of her Max HP. This can only happen once per battle.
Her Auto Skill is just as impressive: if she happens to kill her target with it, she immediately enters the Prowl state. Her Ultimate is quite similar to her Auto Skill and her Passive Skill, where she will immobilize her selected target and burrow towards it, causing massive damage. The Ult, Forgotten Wgah’nagl, fully recharges her Auto Skill. Perhaps Hatsuchiri is the only one standing between the Earth and the ancient ones that prowl the cosmos.
Name: Helix
Class: Medic
Base Rarity: 3-stars
Manufacturer: Ultimate Life Holdings
Tier List Rating: Situational
Notes: Initially created from a scientist’s desire to delve deep into DNA research as well as indirectly bring his daughter back to life, Helix’s past is a rocky one. This hardy little genetic engineering researcher, sometimes akin to a little hamster, may double as a support in any team she’s put in. Helix can heal her friends when their HP reaches a certain percentage and increases her healing based on the number of Geneforce stacks her friends have gained from her Auto Skill.
The additional healing will only take effect once per ally, however, but what makes this truly unique is that this additional healing cannot be hindered by a Battlefield Overload. Aside from healing her friends from a multiplier of her Hashrate, her Auto Skill also briefly increases their Attack and Hashrate for a couple of seconds.
So long as any friend she healed has a stack of Geneforce, other friends within a 1-tile radius will receive the buff as well, but not the healing. Sequence Transcription, Helix’s Ult, is one of the most unique Ultimate Skills in the entire game, especially since only she has this. After any allied Doll has performed their own Ult, Helix can cast this one and refresh the Ult of the Doll that recently cast theirs.
The clincher here is that when Helix casts Sequence Transcription, the Doll whose Ult has been refreshed will hit even harder or heal for much more because their Hashrate and ATK will both be increased. Even more peculiar, Helix cannot use Sequence Transcription if no Doll has cast their Ult yet. Helix dabbles in new possibilities when it comes to taking care of her friends—why don’t you give her a try yourself, Professor?
Name: Hubble
Class: Sniper
Base Rarity: 3-stars
Manufacturer: 42LAB
Tier List Rating: Practical

Notes: Hubble is a gifted Doll dedicated to studying heavenly bodies. When she isn’t performing her astronomical research duties, she can be a formidable area-of-effect Sniper. Her Auto Skill is particularly dangerous since she inflicts a great amount of Operand Damage to the enemy with the highest ATK stat and 30% of this attack is splash damage to all the enemies within 2 tiles. The splash damage counts as True Damage.
Her Ult, despite being impressive, is also a utility skill: Astral Oblivion causes Hubble to summon a black hole in a selected location, dragging all enemies into it whilst dealing heavy Operand Damage. This can crit and it stuns all those caught in the vortex for a few seconds. Space is mysterious, but even the Sanctifiers should learn how to fear the great unknown.
Name: Imhotep
Class: Medic
Base Rarity: 2-stars
Manufacturer: Ultimate Life Holdings
Tier List Rating: Auxiliary
Notes: They say that in Magrasea, the pets of Dolls (or animals in general) are made from data about them formed through operands. Despite being made from a different material other than flesh and bone, Imhotep can still exercise her veterinarian know-how all the same. Imhotep, a member of the Medic class, heals friends closest to her by dealing damage to the enemy.
If any of her friends are within one tile, she can heal them using her Auto Skill. Her Ult is one of the more unique ways to heal an ally: Plume of Slumber puts the Doll into a Deep Sleep state, which lasts for 8 seconds. Within those 8 seconds, the Doll will be immobile and unselectable. The sleeping Doll will also steadily recover their HP and, upon their awakening, they will receive a boost to their ATK, Hashrate, and critical hit rate for a few seconds.
Given that her healing range is short, she may need to be alongside a co-healer or fight amongst a group of melee Dolls to be really effective. Any living organism should be treated with equal care and Imhotep is sure to show you how it’s done.
Name: Jessie
Class: Medic
Base Rarity: 1-star
Manufacturer: Universal Anything Services
Tier List Rating: Situational
Notes: Does anything need disinfection in particular? Are there nasty viruses plaguing the operands of your body? Time to get Jessie onboard. Jessie, a domestic services specialist, works hard at keeping all of her friends squeaky clean. Any Doll within 1 tile of Jessie will have their debuff resistance greatly increased, as well as their received healing.
When her Auto Skill activates, all ally units on the battlefield will be given an Antibacterial Layer that makes them completely immune to debuffs. Apart from protecting the Doll from debuffs, it cleanses debuffs if they’ve already been afflicted while healing them for a percentage of Jessie’s Hashrate.
If the Antibacterial Layer wasn’t enough, her Ult, Weekend Clean-Up, will make sure that none of her friends have been afflicted as it instantaneously removes all debuffs on allied Dolls, as well as heals them for a great amount of Jessie’s Hashrate. Jessie excels at cleansing debuffs, so bring her along if there are some particularly nasty debuffing enemies in your next mission. She’ll keep your team perfectly spotless.
Name: Ksenia
Class: Specialist
Base Rarity: 2-stars
Manufacturer: Universal Anything Services
Tier List Rating: Situational

Notes: Order up! Ksenia’s about to deliver a serving of butt kicking and a side of pity. As a waitress, it’s her duty to serve meals—and serve them she will. In battle, Ksenia has to be deployed directly 1 tile behind a friendly Doll. With this, she boosts the friendly Doll’s Hashrate by a small amount at the very beginning of the battle.
The boosted friendly Doll will greatly benefit from her Auto Skill since Ksenia will grant them an HP shield equal to a large amount of Ksenia’s Hashrate, as well as increase the friendly Doll’s Physical DEF. When the going gets tough, this intrepid waitress can provide an even more powerful HP shield to a selected ally using her Ult, VIP Time. VIP Time doesn’t just shine in defensive capabilities, but it also increases the selected ally’s Attack Speed for a few seconds.
Think of putting Ksenia behind fast attackers like Simo or Lam, but also consider fielding her if you have a specific Doll you’d like to protect. For instance, if you’ve built a team around your favorite Doll, consider Ksenia to give them excellent service throughout the duration of the fight.
Name: Kuro
Class: Sniper
Base Rarity: 3-stars
Manufacturer: Cyber Media
Tier List Rating: Practical

Notes: Any Sanctifier on the battlefield need a shoutout? Good. Kuro’s here to give them just that. This internet streamer’s not just out to entertain you—she’s here to even out her KDA ratio (that’s gamer talk for kills, deaths, and assists).
To put it simply, Kuro can shoot enemies and not miss a single shot. Her Danmaku debuff, which she inflicts through her Normal Attacks, causes her Normal Attacks to inflict Operand Damage that cannot be dodged. The Danmaku can hit even harder through critical hit chance.
Her Auto Skill makes Kuro remain stationary for a few seconds, channeling an attack at an enemy. If the channeling goes uninterrupted, Kuro inflicts massive damage onto them. Traumatic Outro, Kuro’s Ult, makes her exceptionally dangerous against the Sanctifiers.
She first throws a grenade at the enemy and creates a Minefield within a 7-tile area for 5 seconds. Allies who inflict damage unto enemies affected by the Minefield will receive additional damage derived from a percentage of Kuro’s Hashrate. Bring Kuro along if you really wanna put on a good show.
Name: Lam
Class: Sniper
Base Rarity: 1-star
Manufacturer: Universal Anything Services
Tier List Rating: Auxiliary

Notes: Before you relax in the Oasis from a round of exploration, you’ll need someone to give you a resource check. Lam, an accountant Doll from Universal Anything Services, has quick calculations running through her head all the time, and when it’s time for a fight, you’d bet that she’ll know how to apply said calculations.
Her Attack Speed is fixed at 100 points. Should her Attack Speed increase, every 5 points of that will be converted into her critical hit rate. Her Vector Cannon becomes increasingly powerful when her Auto Skill gets activated. Her Auto Skill hits harder the lower the enemy’s health is, so you’d better get used to seeing vaporized Sanctifiers when this happens, especially when she starts aiming for weakened enemies.
The most devastating thing she could do is perform her Ult, the Vector Bayonet. Once you’ve selected a direction for her, preferably one filled with enemies, all enemies caught in the Vector Bayonet’s path will receive massive damage. Because this Ult can crit, having Lam’s Attack Speed increased by the likes of Ksenia or Mai can make her quite powerful. Look out, Professor, maybe you’ll have to keep track of Lam’s kill count when the mission’s over.
Name: Mai
Class: Specialist
Base Rarity: 1-star
Manufacturer: 42LAB
Tier List Rating: Practical

Notes: Today’s forecast is a slew of storms and Mai’s bringing them all. Being a meteorological researcher, Mai knows how the weather can greatly affect the battlefield, but the twist here is that she can bend it to her will. If you deploy Mai between two dolls (1 tile ahead and behind), she will increase their Attack Speed by 10% at the start of the battle.
To keep the enemy in control, she can summon a tornado in the area that is packed with the most enemies. This 5-second tornado deals Operand Damage equal to a percentage of Mai’s Hashrate and inflicts Blind to all enemies caught within the whirlwind.
The Sanctifiers should’ve stayed at home, because Mai’s Ult will certainly make them wish they did. Cascading Windbloom starts with Mai channeling a storm on a selected area of 7-tiles that deals Operand Damage every 0.4 seconds.
Much like the tornado, all enemies caught within will be Blinded but they will also have their skill bars decreased by a few seconds. Your enemies are not ready for Mai—she is the storm that is approaching.
Name: Magnhilda
Class: Warrior
Base Rarity: 3-stars
Manufacturer: Svarog Heavy Industries
Tier List Rating: Practical
Notes: Ding ding! The enemy better put their fists up, lest they get swung at by this boxer Doll. Magnhilda is an incredibly durable and powerful member of the Warrior class that she can sometimes be fielded in as a pseudo-Guard. With every hit she takes directly from the enemy that equals a small percentage of her HP, her Auto Skill is recharged by a second.
Her Auto Skill launches a trio of punches into the enemy’s face as well as granting her a buff which allows her to resist any control effect. This Auto Skill also gives her a stack of a special buff called Unyielding, which will keep her in the fight for much longer than she should.
A part of her Passive Skill enables her to resist death once per battle wherein all the Unyielding stacks she amassed will be converted into an HP shield. Does the enemy still need a pounding? Maggie’s Ult, Relentless Combo, is quite dangerous for them since she will strike 5 times at a single target—each stack of Unyielding will dramatically increase the damage of the final blow in the combo.
Be mindful of how you use her in a fight, however; Unyielding is what would keep her alive, but using all of these for her Ult is sure to deal a deadly punch. Magnhilda is designed to stay in the fight for as long as possible. If you think the enemy’s relentless, send Magnhilda out to put their endurance to the test. They’re sure to be proven wrong.
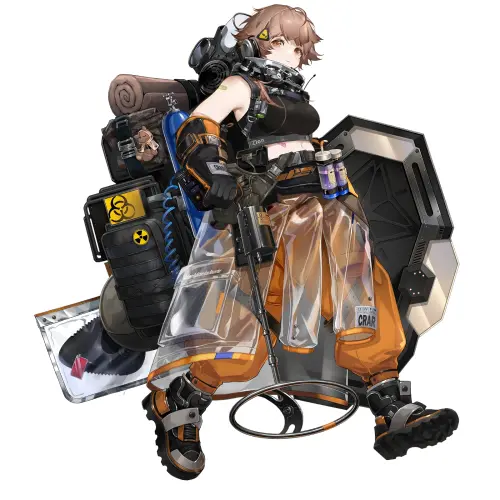
Name: Max
Class: Sniper
Base Rarity: 1-star
Manufacturer: 42LAB
Tier List Rating: Situational
Notes: What’s the best way to shut machines down? Through electromagnetism, of course. Max, an electromagnetism researcher, is armed with powerful electromagnetic pulses. Her Normal Attacks inflict a unique debuff onto the Sanctifiers called Electrocute, which deals True Damage equal to a percentage of Max’s Hashrate after 3 seconds.
The bolts of electricity also bounce from the current target to another enemy within 1 tile. When her skill gauge is filled, Max performs her Auto Skill—a ball of lightning that moves toward an area on the map filled with the most enemies. This lightning ball lasts for 3 seconds and zaps all enemies within 1 tile of it every 0.5 seconds with a 30% chance of being stunned.
Do you think the enemy still shouldn’t be moving? Unleash her Ultimate, Polarized Electric Field. This Ult, when cast in the desired direction, stuns all enemies for 0.2 seconds and inflicts True Damage equal to a large percentage of Max’s Hashrate for 2 seconds. Consider bringing Max along if you wanna keep those pesky Sanctifiers from advancing at all. Give them an electrifying experience they won’t ever forget!
Name: Millau
Class: Guard
Base Rarity: 3-stars
Manufacturer: Cyber Media
Tier List Rating: Practical

Notes: What comes to mind when you taste the flavor of any of your favorite dishes? For Millau, it’s all part of her job. In spite of all this, this gastronomist Doll is a hefty tank, ready to take on the next meal—or in this case, the next wave of enemies. Lugging her heavy suitcase around, Millau grants lifesteal to any friendlies within a 1-tile radius at the start of battle through a special buff called Indulgence.
After 10 seconds, she will create a Fine Cuisine, a basket of food that can be picked up by allies on the battlefield, next to an event (a fight, a skill being cast/performed, etc.). This picnic basket will appear 10 more seconds after its first appearance and another 10 more seconds after that. The Fine Cuisine, when picked up by allies, will receive a boost in ATK and Hashrate as well as an HP shield equal to a large percentage of Millau’s Physical DEF.
If this wasn’t picked up by any ally within the first 5 seconds, it will automatically be given to the ally with the greatest ATK/Hashrate albeit with a lesser bonus. The effects of Fine Cuisine are doubled if these are picked up by Millau herself or allies who have the Indulgence buff. Millau’s Auto Skill allows her to stun her current target as well as heal for a large percentage of her Hashrate and Physical DEF. This skill deals Operand Damage.
Remember that feasts are only for the victor, Professor—Pristine Aftertaste, Millau’s Ult, grants herself and all of her allies a special buff called Extraordinary Delicacy, which provides them a massive HP shield, a boost to ATK and Hashrate, and Lifesteal. These effects still stack if anyone under Extraordinary Delicacy picks up a Fine Cuisine. Being extremely versatile in any situation, Millau lends her strength as both tank and support, surely giving the enemy the bitter taste of defeat.
Name: Nanaka
Class: Medic
Base Rarity: 3-stars
Manufacturer: Cyber Media
Tier List Rating: Practical

Notes: Despite being an idol, Nanaka is not a Specialist but a Medic. After all, music can heal wounds we cannot see. Nanaka exudes a Rhythmic Aura, which boosts the ATK and Hashrate of nearby Dolls within 2 tiles. Her Auto Skill expands the reach of her Rhythmic Aura, which now heals anyone within it.
At the end of the duration of her Auto Skill, all allies within the Rhythmic Aura will then be healed by a percentage of Nanaka’s Hashrate. Good music never dies, and neither will your Dolls, Professor: Dancing Starlight, Nanaka’s Ult, allows her to create a field wherein Dolls inside it cannot take fatal damage for 5 seconds.
At the end of her song, the allies affected in the field of Dancing Starlight will be healed by a huge multiplier of Nanaka’s Hashrate. Nanaka’s voice heals, Professor—bring her along if you wish to keep your Dolls safe from the woes of war.
Name: Nascita
Class: Warrior
Base Rarity: 3-stars
Manufacturer: Cyber Media
Tier List Rating: Practical
Notes: Henshin! Prepare for an unforgettable battle, Professor, the fearless and mighty fighter, Nascita, is here! From the shadows she prowls the streets and she jumps out like a lone wolf in the moonlight to serve justice to all evildoers across Magrasea! This tokusatsu Doll is just as imposing as she looks. With the special Whirlwind buff, Nascita can greatly increase her attack speed for her next 5 Normal Attacks as well as teleport to random enemies for each attack.
While in this state, her Normal Attacks only hit for half their original damage but apply the Dissolution debuff on her target which causes Nascita to inflict true damage equal to a percentage of her ATK instead. Dissolution also reduces the enemy’s Max HP, crippling them for the rest of the fight. This effect stacks.
Nascita can’t use her Auto Skill while in the Whirlwind state. Her Auto Skill, on the other hand, deals a grievous blow to the enemy whilst applying 3 stacks of Dissolution. If the targeted enemy has an HP Shield, this damage is further increased. When the enemy is weakened, it’s time for a spectacular final blow!
Nascita’s Ult, Lupus Powerup, grants her a special buff called Heroic Intervention for 10 seconds wherein she will increase her Attack Speed and enter a prolonged Whirlwind state. When she uses her Auto Skill while under the Heroic Intervention buff, 30% of her Auto Skill charge will be refunded, allowing her to cast the skill even sooner. Blink and you’ll miss her—Nascita is a true hero. She’s here one second and gone in the next, off to protect her friends and the innocent wherever she is needed.
Name: Nora
Class: Specialist
Base Rarity: 3-stars
Manufacturer: Cyber Media
Tier List Rating: Auxiliary
Notes: A deadline is coming… for Nora, that is! This scriptwriter Doll works swiftly the closer her deadline approaches and even works fastest on the day before the deadline itself. The same could be said about her overall performance as a member of your team.
At the start of the fight, Nora will enter the Mindsurge state which increases her ATK by a large percentage. This effect wanes over time, bringing her to the Wit’s End state permanently if she is kept in the fight for too long. In the Wit’s End state, she can no longer perform any action but has an increased dodge rate, interrupting all skill usage.
That said, she is ideal for short battles and her Auto Skill allows her to make short work of her enemies. Her Auto Skill will fire different characters at the enemy, dealing a lot of damage and increasing after it’s been cast 8 times. The different characters each inflict negative effects on the enemy such as stuns, decreased defense, and increased damage taken. Even writers get a surge of inspiration in their most dire moments—when Nora casts her Ult, Finality’s Shorthand, she will increase the damage done by her Auto Skill if she isn’t in the Wit’s End state.
However, when Finality’s Shorthand while she is in the Wit’s End state, she will enter a special state called Quick-Witted wherein her ATK is increased by a large amount for 30 seconds. After which, she’ll return to the Wit’s End state. There is an ebb and flow of creativity, and in the time it takes to process things, Nora makes sure she pulls through… albeit at the deadline itself.
Name: Octogen
Class: Sniper
Base Rarity: 1-star
Manufacturer: Svarog Heavy Industries
Tier List Rating: Rigid
Notes: Better take cover when Octogen’s around, Professor! He’s loud, he’s proud, he’s an explosives engineer. Octogen’s attacks involve explosives, naturally, so every 3 of his Normal Attacks performed causes the next one to explode in a cross-shaped area. With his Auto Skill, Octogen drops 5 bombs randomly in the vicinity of his target or at random locations if no open tiles exist at the moment.
When the bombs are in contact with an enemy, they explode, dealing Operand Damage equal to a percentage of Octogen’s Hashrate. If none of the bombs have been set off, they explode after 5 seconds, dealing half their intended damage.
His Ult is what makes him certainly special: Curtain Call causes Octogen to blow himself up, dealing a massive amount of Operand Damage to enemies within a selected tile. This, unfortunately, kills Octogen and he cannot be saved by the likes of Persicaria or Nanaka. If you wish to build a team around Octogen, you’d best bring your best Medics to patch him up during the next battle or someone who can greatly increase the strength of his bombs (especially Curtain Call). Fire in the hole!
Name: Panakeia
Class: Medic
Base Rarity: 1-star
Manufacturer: Ultimate Life Holdings
Tier List Rating: Rigid
Notes: What do you think ails Dolls, Professor—or Sanctifiers for that matter? Regardless of the ailment, Panakeia might be the one you could turn to. Her Normal Attacks sedate the enemy with the Tablet debuff, reducing their Physical Damage by a small amount. Whenever Panakeia attacks enemies afflicted with Tablet, she has a chance of healing Dolls within 1 tile by a small amount of her Hashrate.
Her Auto Skill is unique: she will heal the allied Doll with the lowest current HP percentage and deal Operand Damage to a random enemy unit 7 times. When you feel like everyone on the battlefield requires a proper set of prescriptions, her Ult, Medicinal Mania, where her chance to heal allies within 1 tile, is guaranteed and the healing effect is greatly boosted.
In the duration of Medicinal Mania, her Auto Skill will also be triggered 3 more times, making it trigger a total of 10 times instead of 7. Given that Panakeia is a ranged Doll, having other Dolls near her to get healed would mean that they’d have to be ranged fighters as well. Most of the healing is done to melee fighters, but if you have built yourself a team of ranged units, make Panakeia their Medic. Time for your dose!
Name: Persicaria
Class: Medic
Base Rarity: 2-star
Manufacturer: 42LAB
Tier List Rating: Practical

Notes: The game’s poster girl and arguably one of the most practical Medics around, Persicaria is given to you as one of your starter Dolls. Despite being an artificial intelligence researcher, her healing capabilities are quite easy to work with.
One of her most noteworthy abilities is to instantly spare a Doll from death once per battle. When the Doll receives damage that should otherwise kill them, Persicaria heals them for a large percentage of her Hashrate. When your allies are in a bind, she can also fire a healing wave at the ally with the lowest current HP percentage.
This wave will bounce between the healed ally and the rest of the team, with each bounce halving the healing delivered. In the hairiest of situations, Persicaria can perform Etheric Field, her Ult, which heals a selected ally of a percentage of their Max HP with a massive addition from Persicaria’s Hashrate over the span of 4 seconds, effectively bringing them back on their feet. Persicaria truly knows what makes Dolls and Sanctifiers tick. Take her wherever you go.
Name: Puzzle
Class: Specialist
Base Rarity: 3-stars
Manufacturer: Cyber Media
Tier List Rating: Situational
Notes: Puzzle has a reputation that precedes her—her statues have been known to come to life and cause all sorts of trouble, she is as mischievous as she is chaotic and eccentric, and she can turn into a cat! But beneath all that is the earnest soul of a sculptor that only strives for perfection in her art.
Similar to Fern and Turing, Puzzle is a summoner who creates a Toad Idol at an area where the enemy population is most dense. This Toad Idol, a Guard-class summon, will bear the Physical and Operand DEF equal to 70% of Puzzle’s Hashrate and a Max HP equal to a large multiplier thereof. It will also inherit the rest of Puzzle’s stats.
Once summoned, the Toad Idol will taunt all enemies within a 2-tile radius as well as slow those in a 1-tile radius around it. Puzzle’s Auto Skill will cause enemies nearby the Toad Idol to be tossed Airborne toward it. They’ll be stunned for 2 seconds when they land whilst taking Operand Damage equal to a multiplier of Puzzle’s Hashrate.
However, if she has yet to summon another Toad Idol (if the first one is defeated), she will need to perform her Auto Skill 3 more times. This is because the Toad Idol will start as a Bizarre Carving; something completely inanimate. As such, one cannot rush art, and thus Puzzle’s Ult is proof of this. Phantasmal Custodian will cause Puzzle to summon a Puppet to protect an allied Doll, granting them an HP Shield.
If she has yet to summon a Toad Idol and Phantasmal Custodian is cast on Puzzle herself, she will summon a Toad Idol instantly and the enemies near the Puppets or the Toad Idols will be thrown Airborne toward the direction of the Toad Idol.
Puzzle is a master of crowd control thanks to the presence of her mighty sculptures, it’s preferable to bring her if you’re about to face a lot of enemies. This will throw their formation into shambles and allow your other Dolls to clean up the mess afterwards, then Puzzle should have the enemy’s tombstones carved out before long.
Name: Python
Class: Guard
Base Rarity: 3-stars
Manufacturer: Svarog Heavy Industries
Tier List Rating: Situational
Notes: Don’t keep your Dolls waiting—send in the instructor. Python, a seasoned soldier that has seen many missions now turned into a military instructor, is yet another imposing figure on the battlefield. With his trusty hatchet, Python can reduce the enemy’s overall Physical and Operand DEF by a small amount whilst increasing his own.
After every 2 Normal Attacks, Python will perform a Cleave which will damage all targets within the skill’s range. His Auto Skill also helps wear down the enemy’s charge since it inflicts a special debuff called Shortsight. On top of already burning the enemy with a cone-shaped flame and restoring a bit of Python’s HP, the Shortsight from the Auto Skill will reduce the enemy’s range to 2 tiles, forcing ranged units to come closer or stop firing altogether if their targets are out of range.
Oh, what a thrill this Doll is. His Ult, Snake Eater, will cause Python to throw a smoke grenade in the area designated by the Professor. The smoke cloud will conceal any units inside with the Smokescreen buff and, if they’re ranged units, boost the damage they deal. If this smoke grenade was thrown at enemy units, they’ll be knocked away from the radius by 1 tile.
For the duration of this skill, all of Python’s attacks will be Cleaves. If there is an excess of enemy ranged units and you’d want backup for your own backliners and Medics, take Python along—he’ll make sure that his enemies aren’t still in a dream.
Name: Rise
Class: Specialist
Base Rarity: 2-stars
Manufacturer: Ultimate Life Holdings
Tier List Rating: Practical
Notes: Rise is often the bearer of bad news. Her macabre sense of humor stems from her unhealthy obsession with sci-fi movies and being a forensics assistant. But her fascination for anything morbid certainly helps in a fight. Allied Dolls who kill Sanctifiers in battle will receive a small percentage of the slain enemy’s ATK and Hashrate to boost their own.
When Rise uses her Auto Skill, she grants all enemies a debuff called Exclusive Files. The Exclusive Files debuff is stacked according to the descending order of enemy HP, wherein the enemy whose current HP percentage is the lowest receives 5 stacks of the debuff; any enemy whose current HP is higher than that receives 1 less stack.
Exclusive Files increases all the damage taken by that enemy for 6 seconds. If you think that this can’t get anymore sadistic, Rise’s Ult, Befogged Stalking, will make the Sanctifiers want to stay hidden. Befogged Stalking will call your allies’ attention to a selected target.
If this target dies, all allies boost their own attack and Hashrate by a percentage of the fallen enemy’s own. Rise’s always watching and she’s surely seen a lot of really messed up stuff—your tactics might even top that which she already saw.
Name: Sakuya
Class: Specialist
Base Rarity: 2-stars
Manufacturer: Universal Anything Services
Tier List Rating: Auxiliary

Notes: Would you like to cut the enemy down to size? Sakuya will shear them to pieces like she artfully shapes shrubs, bushes, bonsais, and all manner of plant life. Being a horticulturist, Sakuya cares for plants, but this also means that many of her tools are edged in nature.
Any Normal Attack she performs onto a target marks them and gives them a chance to Bleed from any attack from allies. Sakuya herself is granted a double chance to inflict Bleed onto her enemies while they are in this state.
If there are enemies within Sakuya’s range of 2 tiles, her Auto Skill inflicts 1 stack of Bleed for 5 seconds on any of them caught here. They also receive a percentage of damage derived from Sakuya’s ATK. Sakuya’s Ult, Thousand Snowy Leaves, causes her to inflict a large amount of damage derived by a multiplier of her ATK to all enemies in a direction specified by the Professor.
Enemies caught in Sakuya’s Ultimate will be randomly afflicted with 1-9 stacks of Bleed for 5 seconds. Truly, Sakuya can cut down the enemy’s ranks and make something beautiful of the battlefield.
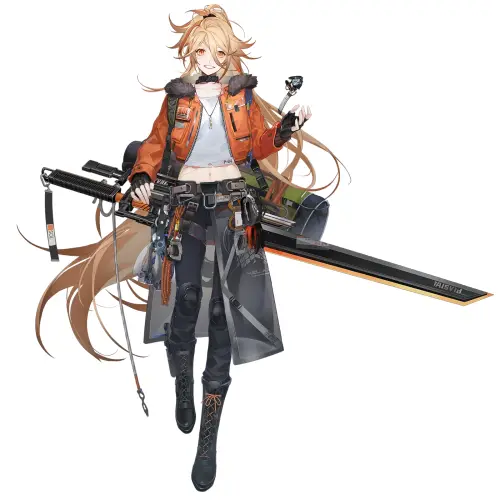
Name: Simo
Class: Sniper
Base Rarity: 1-star
Manufacturer: Svarog Heavy Industries
Tier List Rating: Practical
Notes: The Sanctifiers better keep their heads down while Svarog HI’s perfect Sniper is around. Simo is a basic Sniper who easily focuses on singular targets. After every 5 Normal Attacks, Simo enters Stealth for a brief moment before dashing to a nearby tile. His next Normal Attack upon de-cloaking is a guaranteed Critical Hit.
To add to his already steady damage output, his Auto Skill makes him fire 6 arrows in rapid succession. The arrows themselves deal a medium percentage of Simo’s ATK and can hit Critical Damage. Strangely, Simo’s Ult does not amplify the damage he deals or have him score spectacular headshots—Wintery Stillness enshrouds Simo and his allies in Stealth for 3 seconds.
All allies get healed for a small percentage of their Max HP for the duration of the Ult. If you feel like the enemy’s got a strong backline and important targets there, call on Simo the Pale Ghost.
Name: Sockdolager
Class: Sniper
Base Rarity: 2-stars
Manufacturer: Svarog Heavy Industries
Tier List Rating: Situational

Notes: Nature and the wild must be preserved, and that’s why Sockdolager has been called to the occasion. This wildlife conservationist and huntress is no pushover, however, she’s one deadly member of the Sniper class if put into capable hands.
After every 2 shots fired from her Normal Attacks, Socky will increase the damage of her next arrow multiplied by the number of tiles it requires to get to her target. This arrow cannot be dodged. Her Auto Skill will buff the ally with the highest Attack Speed—said ally will be buffed by a percentage of Sockdolager’s own ATK for a medium duration.
The enemy may try to run, but they won’t get away so easily once Sockdolager’s got her sights on them. Spaceripper Arrow, her Ult, will pierce through all enemies in the direction of the skill, dealing a large multiplier of Socky’s ATK while boosting all of her allies’ movement and Attack Speed for a short time. Sniper Tiles on the field? Annoying enemy backliners? Sockdolager is your girl. Field her immediately and watch her pick off the enemy from a distance as a predator swiftly ends their prey.
Name: Sol
Class: Warrior
Base Rarity: 2-star
Manufacturer: 42LAB
Tier List Rating: Rigid
Notes: Another one of your starter Dolls, Sol is an expert melee fighter and a fiery research team guide. Up close, Sol has a high chance of parrying her enemy’s attacks, reducing the damage she takes by a medium percentage. Whenever Sol fills her Auto Skill Gauge, she strikes her target twice in succession and deals Operand Damage whilst inflicting 2 stacks of Burn onto them.
Lastly, Blazing Blade of Leo, Sol’s Ultimate Skill, sweeps at all enemy units in a fan-shaped range, dealing a large amount of Operand Damage derived from her Hashrate. If there are any enemies afflicted with Burn stacks, Blazing Blade of Leo will inflict additional True Damage.
Sol’s reckless playstyle often lands her in trouble, so be sure to back her up with a Medic or two. Consider also playing to her strengths by teaming her up with the likes of Ksenia, Angela, or Dushevnaya. Ker-SCHWING!
Name: Souchun
Class: Guard
Base Rarity: 2-star
Manufacturer: 42LAB
Tier List Rating: Situational

Notes: Plants are fascinating things that we only know so much about, but this botanical researcher from 42LAB can weaponize them against the enemy. Souchun is an unusual member of the Guard class in that she relies on healing herself to keep herself sturdy.
Every 3 Normal Attacks she performs, she boosts her Max HP by a medium percentage of her Hashrate and recovers her HP by the same amount. Every time she accumulates an increment of 30 extra HP, she increases her Operand DEF by 1 point.
With her Auto Skill, Souchun will bind all enemies using vines within the range of 1 tile and disarm them for 3 seconds, meaning they cannot attack over the course of this duration. The enemies bound by the vines will continuously take damage while Souchun heals herself depending on how many enemies were bound multiplied by a tiny percentage of her Max HP.
Is she done keeping the enemy from moving? She certainly isn’t. With her Ult, Bramble Prison, Souchun will launch all enemies into the air within a selected area and deal Operand Damage equal to a percentage of her Hashrate. Within this area, a thicket of thorns will emerge, which can immobilize all enemies passing through for a few seconds. Give the enemy unto the overgrowth.
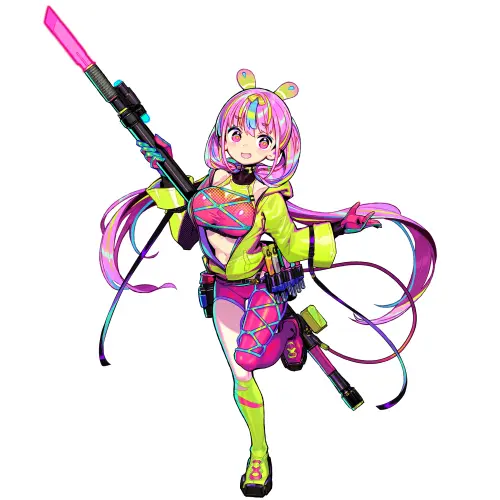
Name: Sueyoi
Class: Specialist
Base Rarity: 3-stars
Manufacturer: 42Lab
Tier List Rating: Practical
Notes: Despite being a mineral sampling engineer, Sueyoi, the brother of Hatsuchiri, is as studious as he is deadly. His Normal Attacks are replaced by a steady channeling attack which steadily whittles away at the enemy’s HP. This attack deals True Damage initially until Sueyoi has generated enough energy to deal a burst of Operand Damage which is treated as his actual Normal Attack. His Auto Skill marks his current target, allowing him to draw more energy from them.
Once the target is hit by the Operand Damage burst from his channeling or gets damaged from by his Ult, the mark detonates and damages Sueyoi’s current target as well as any enemies surrounding it in a 1-tile radius. Any debuffs his current target has will all be applied to the enemies in the 1-tile radius.
Sueyoi may be a diamond in the rough, but his Ult is what turns him into something truly precious. Punctured Leylines will cause Sueyoi to gain a Super Armor while channeling at his enemy, gaining a greatly increased amount of energy. Once the charge is completed, Sueyoi will deal a burst of Operand Damage far greater than that done by his Normal Attacks.
If his target dies, he will do the same to his next target until all of his energy has been expended. This Ult will also detonate any marks given to enemies affected by his Auto Skill. His skill setup makes him ideal for both bosses and large groups of enemies. When you think that your team’s at the rocks, have Sueyoi aboard—he’ll be sure to grind all your enemies into gem dust.
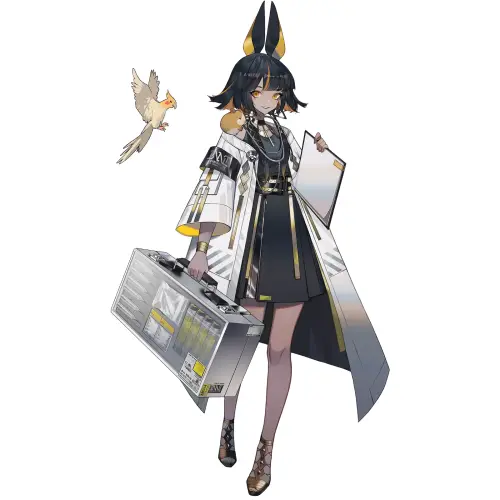
Name: Turing
Class: Specialist
Base Rarity: 3-stars
Manufacturer: 42Lab
Tier List Rating: Practical
Notes: Formerly the administrator of the Rossum sector, Turing has been reset and is now ready to defend those she holds dear. Every few seconds, Turing summons a Mecha Hound (a Sniper-class unit) that have 5 tiles of range, and inherit a percentage of each of Turing’s stats. These robo doggies deal Operand Damage that reduce their targets’ Physical and Operand DEF for 2 seconds and can be stacked repeatedly.
However, only 3 Mecha Hounds can exist at any given time. If all 3 Mecha Hounds are present, they all increase their attack speed over the course of a few seconds. Her Auto Skill makes Turing analyze the ally unit with the greatest ATK/Hashrate, giving them the Anulein buff. The Anulein buff increases the damage dealt by the affected Doll’s Auto Skill and decreases after it’s been used and after any damage has been dealt.
If Turing analyzes a friend who already has Anulein, she will instead apply this buff to the ally with the next greatest ATK/Hashrate. Granted that she herself is an AI researcher and she is in a world full of AI, it’s natural that she is always one step ahead. Her Ultimate Skill, Genesis’ Deciphering – Ω, will cause Turing to analyze an enemy granting her allies protection depending on the enemy she was chosen to analyze.
If the target’s Hashrate is greater than their ATK, Turing will grant all her allies a reduction of all Operand Damage received as well as an HP Shield equal to a multiplier of Turing’s Hashrate. If the target’s ATK is greater than or equal to their Hashrate, Turing will instead grant all her allies a reduction of all Physical Damage received as well as the same HP Shield. She is well-suited for facing any foe and if the enemy thinks that they’ve got solid plans for their attack, Turing already knows when their checkmate will come.
Name: Uranus
Class: Sniper
Base Rarity: 2-stars
Manufacturer: Svarog Heavy Industries
Tier List Rating: Practical
Notes: You might be wondering who he is, machine or mannequin, with parts made in Eastern Europe, he is a modern Doll. Uranus is a supposed military automaton but was made as part of the main skeletal force in professional military activity.
Unfortunately, due to a severe accident during a live fire training, Uranus has been changed forever. This kooky Doll—more robot than Doll—is a real crackshot. He has a 50% chance to fire an EMP projectile which deals a moderate amount of Operand Damage, slowing their attack speed.
Using his Auto Skill, Uranus will throw an Electromagnetic Grenade at his target, causing an explosion that deals a large amount of Operand Damage in a 1-tile radius. If there are multiple enemies within a 1-tile radius of the explosion, the grenade will bounce to another target and cause the same amount of damage.
Prepare to turn the enemy into Swiss cheese, Professor—Uranus’ Ult, All-Out Bullet Storm, will have him fire rapidly at the selected target. If he kills this target, Uranus will direct his fire at the enemy with the lowest HP percentage which will increase the duration of this skill by a small percentage of time. Ideal for almost any situation, Uranus is quite a versatile addition to any team. At the end of the battle, you’ll be left with nothing but enemy bodies everywhere. Thank you very much, Mr. Robot!
Name: Vee
Class: Warrior
Base Rarity: 3-stars
Manufacturer: Ultimate Life Holdings
Tier List Rating: Auxiliary
Notes: They say beauty is skin deep and Vee can truly bring the ugly monster out from within. Vee, a cosmetic surgeon, can alter more than just her enemy’s looks—she can inflict damage in some of the most creative ways possible.
Vee’s Normal Attacks ignore the distance between her and her target, and may deal additional damage wherein she absorbs a small percentage of the enemy’s ATK to amplify her own. When her Auto Skill is active, she will affix a Mask of Suffering onto her target, which reduces their Operand DEF and deals a large percentage of Operand Damage equal to Vee’s Hashrate.
The Mask of Suffering stays on for 6 seconds. Vee’s Ult, Freaky Mask Show, creates a Mask Domain within a designated location for 5 seconds and enemies trapped within will take Operand Damage that equal a large percentage of Vee’s Hashrate. The damage this Ult can deal may reach critical levels.
As a warrior, Vee’s abilities may seem different, but her area of effect damage should be taken into account when dealing with large hordes of enemies. Only Vee can turn a masquerade of madness into a real spectacle.
Name: Willow
Class: Specialist
Base Rarity: 3-stars
Manufacturer: Cyber Media
Tier List Rating: Situational

Notes: Are you looking to make headlines? Do you want to let the real world know that Magrasea exists? Don’t worry, Willow’s already on it. As a journalist, Willow is never without her notepad, her recorder, and her trusty camera. That said, she uses the camera to Blind her enemies for 4 seconds and for every Blinded enemy, Willow increases her Attack Speed.
To up this boon, she can use her Auto Skill to Blind the most populated area of enemies whilst dealing Operand Damage. Parallel Investigation, her Ult, will have Willow summon a Photo Stand at a selected area. Upon summoning the Photo Stand, enemies within the selected area will be Taunted and, as soon as it disappears, they will all suffer the Blind debuff.
The Photo Stand will be destroyed after being hit a few times or after a couple of seconds pass. Consider bringing Willow along if you feel like the enemies will be numerous this level or if there are Summoners around. Say cheese!
Name: Yanny
Class: Guard
Base Rarity: 1-star
Manufacturer: 42LAB
Tier List Rating: Situational
Notes: Anchors aweigh! If you aren’t at all versed with nautical know-how, then Yanny’s your guy. While he may be a Doll that’s programmed as a sailor, Yanny’s no slouch in a fight either. He charges into a fight with his mighty anchor and boosts his Physical DEF by a small percentage of his Hashrate.
Whenever he is healed, Yanny can increase his Physical DEF by an even smaller percentage for 5 seconds, but this can stack up to 6 times. At the start of a fight, Yanny will hurl his anchor at the enemy farthest away from him and yank the enemy close.
The enemy that’s been pulled will be targeted by the rest of the team. If the enemy advance is a bit much for your team to handle, Yanny can confine them all in his Ephemeral Prison, his Ult. This will stop them from moving for 6 seconds but some of them can break out early when they take damage.
Yanny is a Situational Guard and he’s the Doll to have on your team if the enemy has pesky backliners like Medics or strong Sniper units. Consider fielding him at the back of your team so he can pull your enemies closer with maximum effectiveness. In a proper setup, Yanny’s a sailor that’s strong to the finish.
Name: Zangyin
Class: Sniper
Base Rarity: 3-stars
Manufacturer: Cyber Media
Tier List Rating: Practical

Notes: In almost any folktale, there is a hero and there is a calamity or a monster to be stopped. Zangyin, a folklorist, is here to shed light and apply this kind of knowledge to any enemy you may encounter on the battlefield. After every 2 Normal Attacks, Zangyin will produce what’s called a Kindlespirit. Her Soulserpent, Little Si, will strike at her target dealing damage equal to a percentage of her Hashrate with the total number of Kindlespirits adding to the damage.
Her Auto Skill will cause her to deal Operand Damage equal to a percentage of her Hashrate as well as the number of Kindlespirits the enemy currently has on them. Additionally, she will also buff her own Attack Speed. The more Kindlespirits the enemy has currently, the longer this buff will last.
Little Si isn’t as friendly as it looks, when Zangyin uses her Ult, Serpent, Rapturing Stratus, she will release it unto a target for 5 seconds dealing Operand Damage equal to a percentage of her Hashrate as well as the number of Kindlespirits they have on them, 3 times per second. She will gain even more Kindlespirits upon using this Ult, further increasing her attack speed.
When the big, bad monsters are present, Zangyin will know how to deal with them as well as their horde of little goblins. Whether the foe is big or small, you’re guaranteed that she’ll swiftly strike all their weak spots before they even know it.
Name: Zion
Class: Guard
Base Rarity: 1-star
Manufacturer: Svarog Heavy Industries
Tier List Rating: Rigid
Notes: While the ashes of war scatter about in the real world, Zion never abandoned her job in Magrasea. Being a ruins investigator, Zion takes her trusty equipment and tries to uncover the secrets that ruins hold. This also means that the equipment she carries is protective, given that she is a member of the Guard class. Whenever her HP falls below 25%, Zion activates a Graphite Force Field that reduces the damage she takes by a percentage of her Hashrate.
Her Auto Skill further contributes to her protective nature: she creates an HP shield over herself from a multiplier of her Hashrate. What makes this HP shield special is that it becomes stronger for every 1% of HP Zion has lost. Ruins Transportation, her Ult, gives her a Super Armor and an HP Shield equivalent to a percentage to her Max HP within a range of 2 tiles.
The Super Armor and HP Shield lasts for 6 seconds and any direct damage received by allies within the HP Shield will be inflicted on Zion. After 6 seconds, the HP Shield shatters and deals True Damage to surrounding enemies, inflicting a percentage of the total damage absorbed by Zion. Zion’s tanking is very focused on herself and fielding her may require a second tank or so.
As she moves around, allies who are left out of the HP Shield don’t receive her benefits. Consider having melee Dolls fight alongside her as she might leave ranged units behind whenever she moves from tile to tile.
And that covers our Tier List for Neural Cloud! Do you agree with our choices? Do you disagree? Is there anyone you believe should be in another tier? Let us know your thoughts in the comment area!