Metamoki Inc. has taken the zany and dank concept of Wiz Khalifa’s Weed Farm and the simple and cartoonish vibe of Dungeon Shop Tycoon, both their previous games, to bring you the newest line from their roster: Weed Inc: Idle Tycoon.
Weed has always been shown in fiction and media as this product that is connected to either crime syndicates or carefree characters. The vibe of this business simulation leans toward the latter, giving you a game that gives an interesting and unique flavor to the usual games of the same genre. Available on both the iOS and Android, Weed Inc. puts you in charge of a weed business empire.
You take control of the different departments of the business which is reminiscent of other business simulation games like Coffee Inc. 2, Game Dev Story, and Roller Coaster Tycoon Classic. You have the Grow Room, where weed of different strains are cultivated, The Bottler, where weed is bottled, and The Dispensary, where weed is sold to customers. The game also introduces the player to different strains of weed, some of which are based on real life strains. Like any business, you will eventually get the opportunity to expand from the United States to Canada to Europe and even to the Moon!
Whether you are a user or just a fanatic of incremental idle games, Weed Inc. is sure to entertain you during your off or lazy hours! If you are new to the game or just need some extra help to move your weed-selling business along, stick around and take a look at our Beginner’s Guide to Weed Inc.!
1. Choose Quality over Quantity
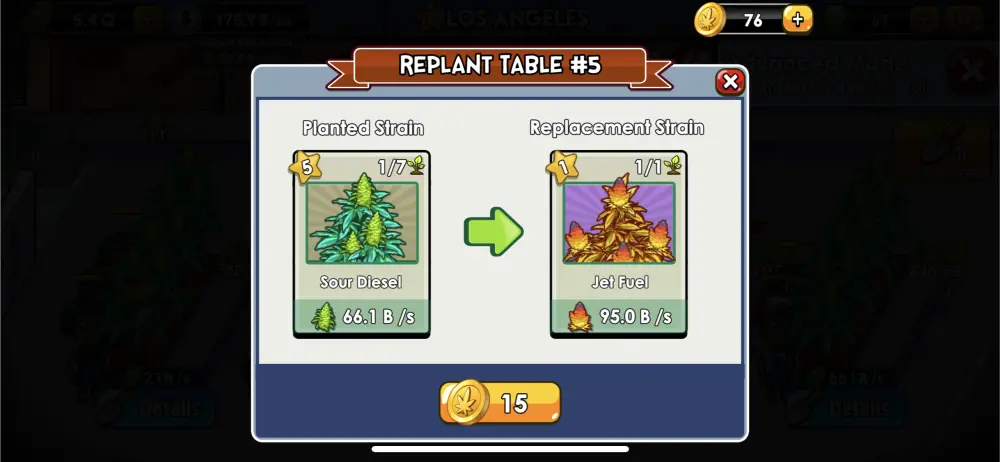
While it might be tempting to choose the newest seeds and a good variety of strains for your factory, it is not always the most profitable move. Quality over quantity holds true even in Weed Inc. You will want to plant strains that make the most money over the strains that look pretty. The rarer a weed strain is, the higher their income and bud value is.
As soon as you get high rarity strains, replace your lesser rarity ones. A level 1 Epic is usually a lot more profitable than a level 5 Common. However, if your Commons have higher levels, there are cases where it will be more profitable than your rarer strains so be sure to compare their Cash per second.
2. Tap to Manually Speed Up the Process
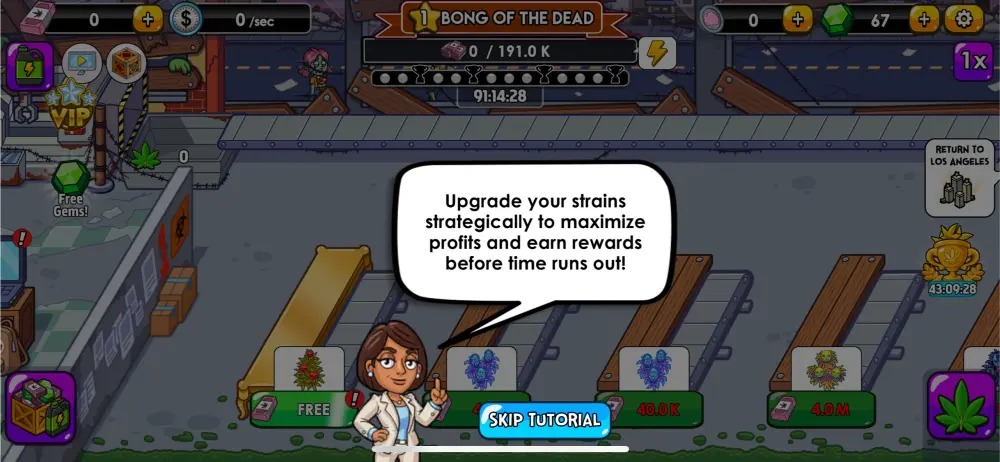
Taking an active role in your factory will significantly speed up the process. You can tap on the tables of weed to cut extra buds. Tapping will not interfere with the natural rate at which your workers cut buds. Your taps count separately from them, however, each tap is just a fraction of how much they normally get per cut. Because of this, you have to tap multiple times quickly to make even more than the usual amount. You can also do the same thing with Bottler and Dispensary, making them bottle and sell weed faster.
As long as you have them all in range, you can tap multiple things at once. Up to 5 rows of weed can be seen on the screen at a time. Tapping them all together with multiple fingers or hands will allow you to harvest as much weed as you can in a short period. You can also position your camera to show the Dispensary, Bottler, and 1 row of weed and tap them all simultaneously.
If you have managers active in the room, make sure to take advantage of it and tap until the end of their effects’ duration. In some cases, it may even be better to use one manager at a time so you can focus on one section of your business before activating managers to other sections to make the most out of their traits.
3. Utilize Your Managers Wisely
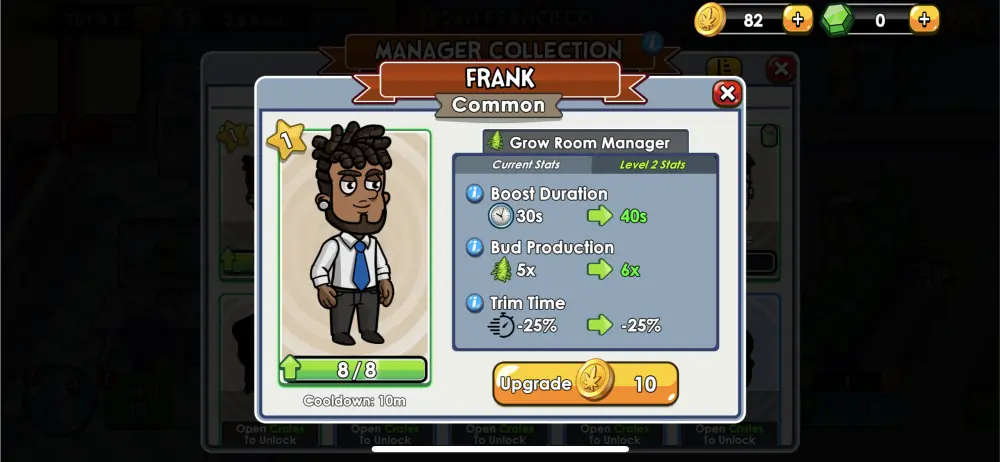
Each manager has their own special traits, cooldown time, and boost duration. They can be activated per city which means you don’t have to wait for the cooldown to pass before using them in another location. Regardless of rarity, each manager has their use. Before just assigning them to their floors, take some time to consider what they’ll be most useful for based on their traits:
Decreased Upgrade Cost

Managers with Decreased Upgrade Cost traits are the most effective when you are upgrading your tables or facilities. Room Managers like Steve who only has an Upgrade Cost stat will only be useful if you use him while upgrading and not for anything else. It is advised for players to only buy upgrades while a manager with this trait is active as much as possible. This trait is found in managers for all rooms.
Increased Customer Rate and Sale Volume
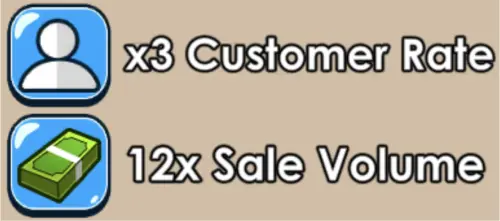
Managers with Increased Customer Rate traits increase the number of customers that come into the store and sell out your stock. Managers with Increased Sale Volume increase the amount of weed sold per customer. We recommend only using managers with these traits if you have an overflowing number of bottled weeds in your inventory. These traits are found in Dispensary Room managers.
Restock 100 Jars

Managers with Restock 100 Jars trait will add to your stock upon activation and are great for putting in extra stock as you sell weed in your dispensary. This trait is found in Dispensary and Bottler Room managers with a Legendary rarity.
Increased Bottle Value and Tap Strength
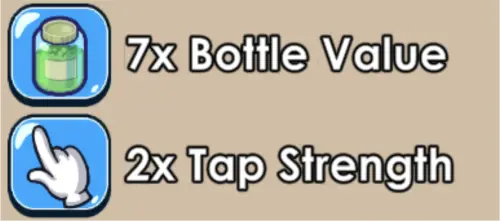
Managers with Increased Bottle Value traits increase the amount of weed you can bottle at a time. Managers with Increased Tap Strength increase the number of bottles produced per tap. We recommend only using managers with these traits if you have an overflowing number of weeds ready to be bottled. These traits are found in Bottler Room managers.
Increased Belt Speed

Managers with Increased Belt Speed trait will speed up the rate at which harvested weed arrives at the Bottler Room. This trait is most useful in factories with multiple Grower Rooms and is found in Bottler Room managers.
Increased Bud Production & Decreased Trim Time
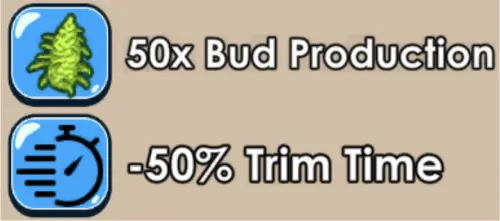
Managers with Increased Bud Production trait will increase the amount of buds you can harvest at a time. Managers with Decreased Trim Time will speed up the rate at which a worker harvests buds naturally without tapping. You can use managers with these traits at any time but they are best utilized when there is hardly any stock by the Bottler. This trait is found in Grow Room managers.
Increased Bud Collector

Managers with Increased Bud Collector trait will add an extra Bud Collector to help bring cut buds to the conveyor belt. Since there is usually only 1 Bud Collector collecting per room at a time, this trait can be useful at any point in time, especially if there is not enough weed to be bottled at the Bottler Room. This trait is found in Grow Room Managers.
100x Super Buds

Managers with 100x Super Buds trait will add super buds to your inventory upon activation and are great for putting in extra weed to be bottled. This trait is found in Grow Room managers with a Legendary rarity.
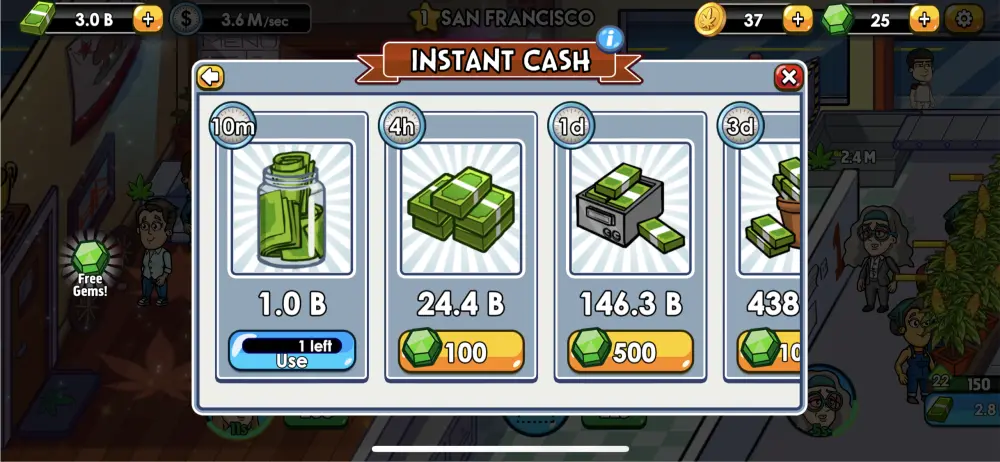
4. Delay Cash Purchases

While purchasing Cash with Gems may sometimes be tempting in order to progress to the next stage of your business quickly, we recommend delaying it. The amount of cash you can purchase is dependent on the amount of cash you currently have. If you only have 100 M on hand, the amount of Cash offered in the store ranges in the M denomination. If you must purchase Cash with Gems, wait until later in the game when your money has reached a high denomination.
5. Multiply Your Profits
There are many ways you can multiply your profits in Weed Inc.:
Welcome Back Multiplier
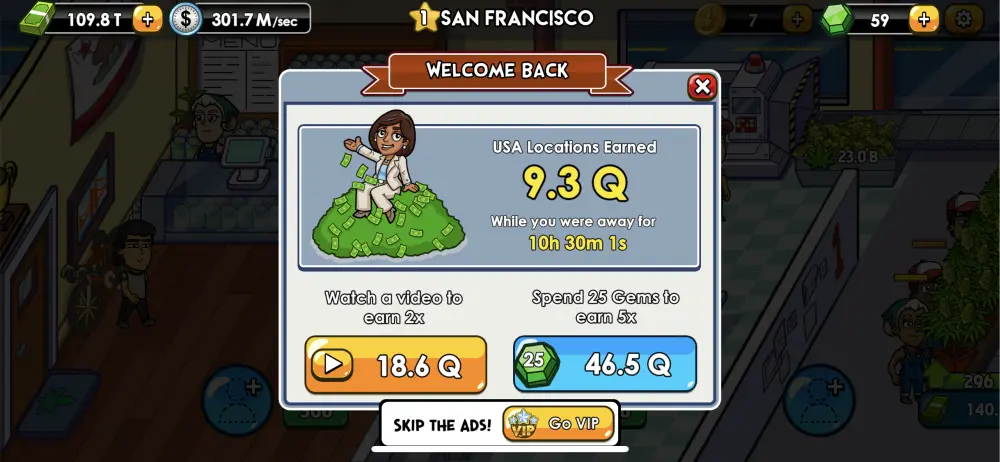
After some time has passed since you last entered the game or a location, you will be greeted with a welcome back screen showing you how much profit your business has accumulated in your absence. It can be after several hours or even just a few minutes.
Along with that are the options to watch an ad to gain double your profits, pay gems to gain 5 times your profit, skip the ads and gain the multiplier by buying VIP or just clicking x or away from the window to take your base profit as it is. The longer you’ve been gone, the higher your profit. We recommend only using the multiplier options if a few hours have passed in order to maximize it.
Ad Boosts
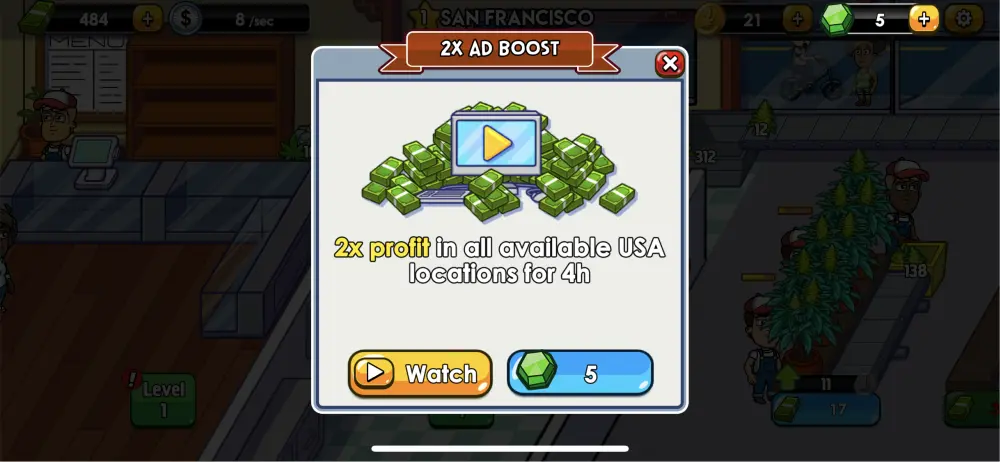
Below the Bottler Section of your store, you will see a monitor with a Play button. This represents your Marketing Department. Clicking on it will open up a window that lets you double your profits in all available locations in the area you are in for 4 hours.
You can either watch an ad, pay gems or go VIP to get the boosts without viewing the ads. You can keep boosting until you fill up the bar. It takes 6 boosts to get 24 hours of doubled profit. It can even go over 24 hours if the bar isn’t completely filled up and there are less than 4 hours left in the bar to complete.
Between watching ads and paying with gems, we recommend choosing the former instead of the latter since gems are hard to come by in-game and are an expensive purchase with real-life money. Remember that this ad boost only affects the area of the city you watched it on (America, Canada, Europe, The Moon) and you will have to watch ads in other areas for it to work there.
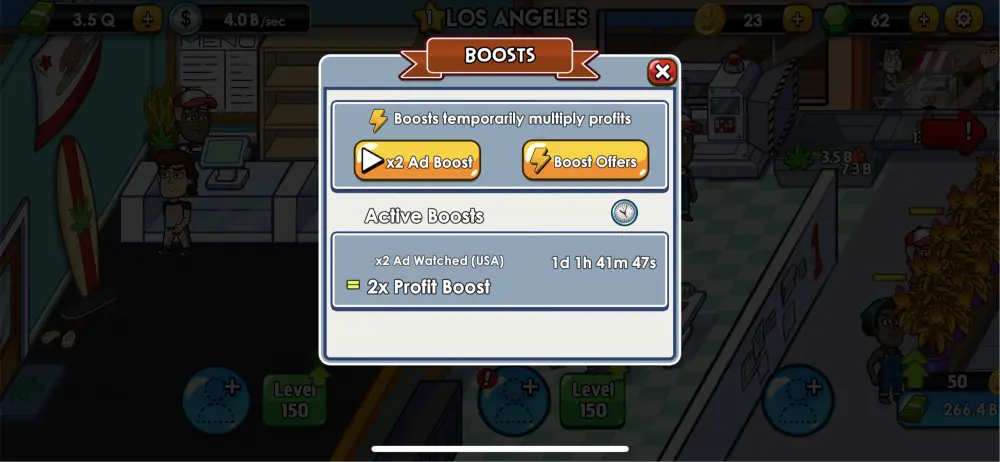
You can view your active boosts by clicking on the lightning button at the lower left side of your screen. It is also from this window that you can purchase boost multipliers with gems that range from 2x for 1 day to 20x for 12 hours.
Rearrange Your Tables
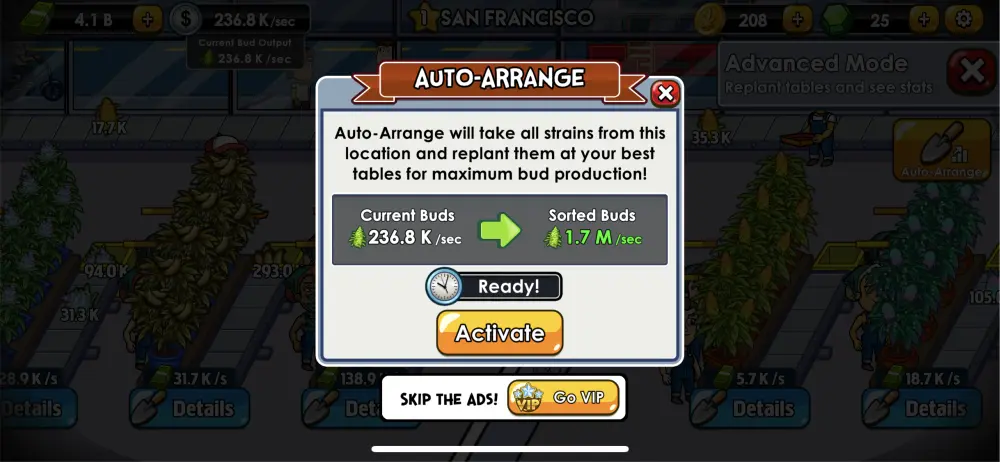
Rearranging tables is one of the simplest ways to effortlessly increase your profit. Just click on the trowel icon on the upper right side of the screen and you will go to Advanced Mode. Clicking Auto-Arrange will take all the strains from the current location and rearrange them at the best tables to maximize production and profit.
The game will place the most profitable strains on the table with the highest upgrades. Rearranging also lowers the cost of upgrading the tables right after so it’s always a good idea to do it when upgrades have become too expensive. You can rearrange the tables for free once every 12 hours. If you would like to rearrange more locations or the same location again, you can watch an ad or pay with gems.
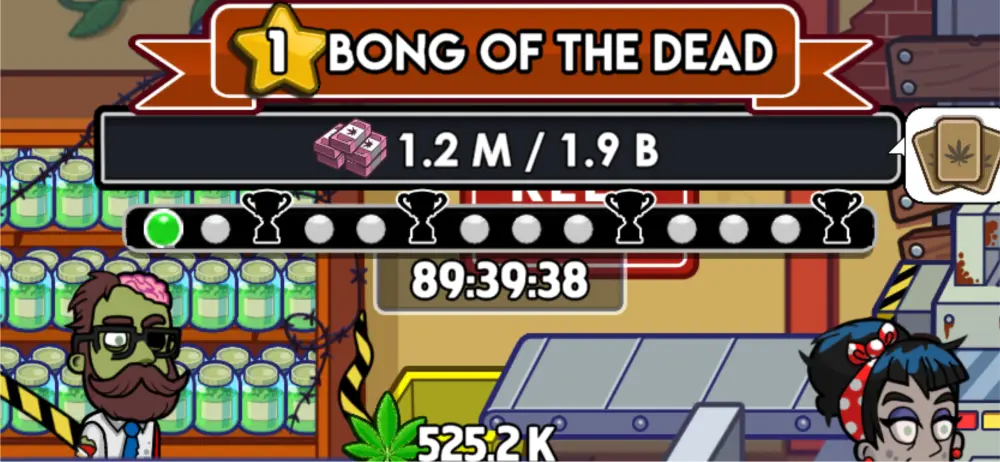
Renovate Your Factory
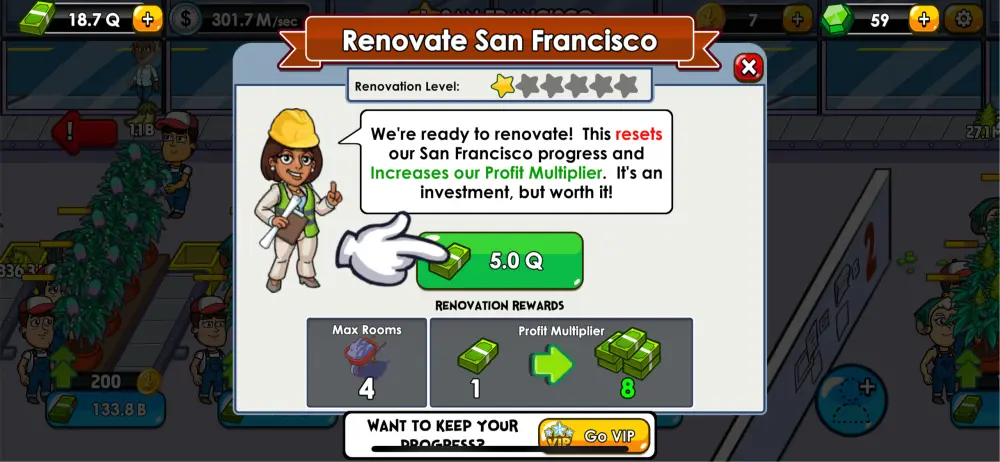
Once you get $5.0 Q, you’ll be able to renovate your factory. The first upgrade will increase your profit multiplier by 8 and increase max rooms by 4. Each factory can be renovated up to 5 times. However, once you renovate your factory, you will have to start from scratch, putting your Dispensary, and Bottler back to level 1 and Grow Room with no plants and upgrades.
Because of that, we recommend only renovating your factory if you have more than $5.0 Q or have another factory running because it will set your income back temporarily. Fortunately, the cost of upgrades is the same as when you first started so it won’t be too difficult to set them all back if you’ve got enough funds. Make sure to use managers with Decreased Upgrade Cost traits when you do!
Since Renovating wipes out your factory, it is the perfect opportunity to plant the best strains you have. It is a lot cheaper than replanting each strain individually, so if you feel that you are close to being able to afford a renovation, hold off on replanting, especially if there are so many that must be replanted.
6. Be Selective of Offers
It’s understandable to feel excited when offers appear in front of you. However, not all offers are created equal. Some could be a waste of time, money, and resources so it is best to always review your offers before making a trade. There are two types of offers you can encounter: Offers and Trade Offers.
Offers
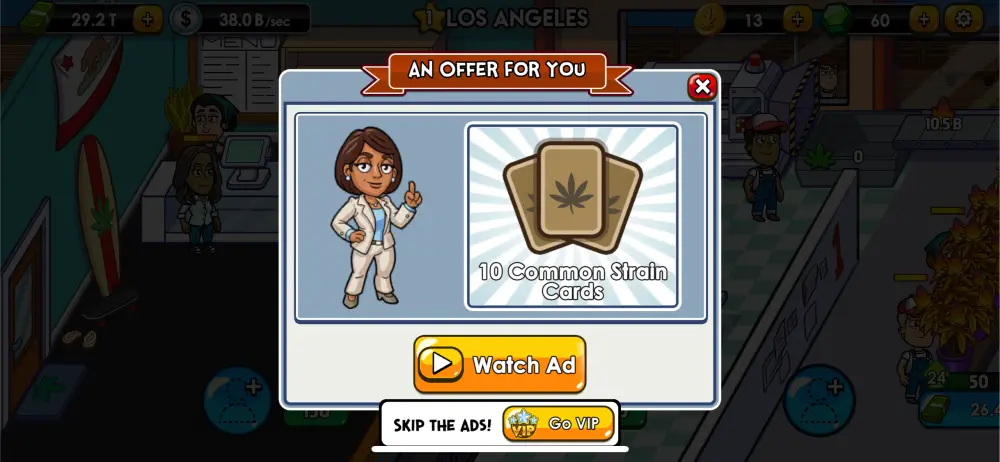
Offers are freebies that are given to you in exchange for watching an ad. They appear every minute and are usually in the form of Strain cards, Tokins, Cash, or Boosts. We recommend only accepting offers through this based on your current needs to avoid constantly watching ads since these offers appear very often.
Trade offers
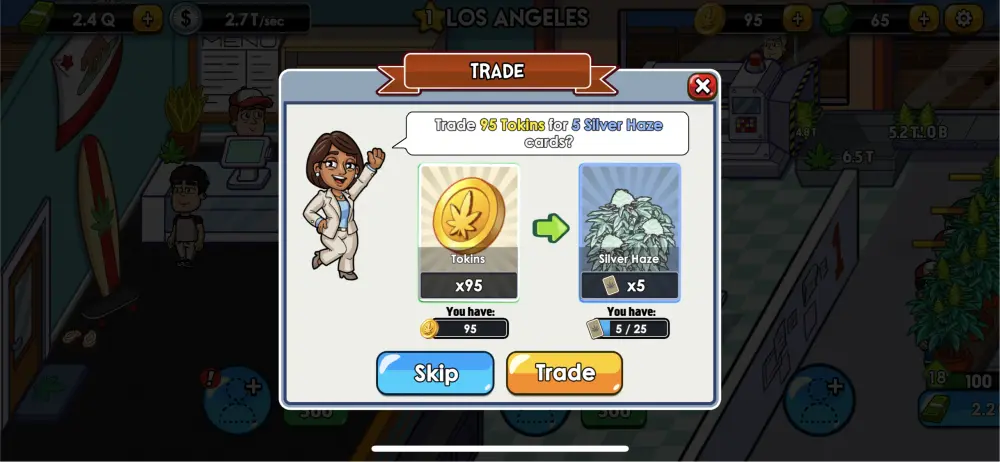
Trade Offers are items or resources offered to you in exchange for something you currently own. Some can be greatly beneficial to you and will exchange not-so-useful items like Common Strain cards for something more useful like Tokins. However, you will sometimes encounter trades that ask you to
exchange a large sum of Tokins or items for a measly offer. If you are not careful, you may end up losing a lot of resources from it. Unlike Offers, these do not appear as often and will not disappear until you click skip.
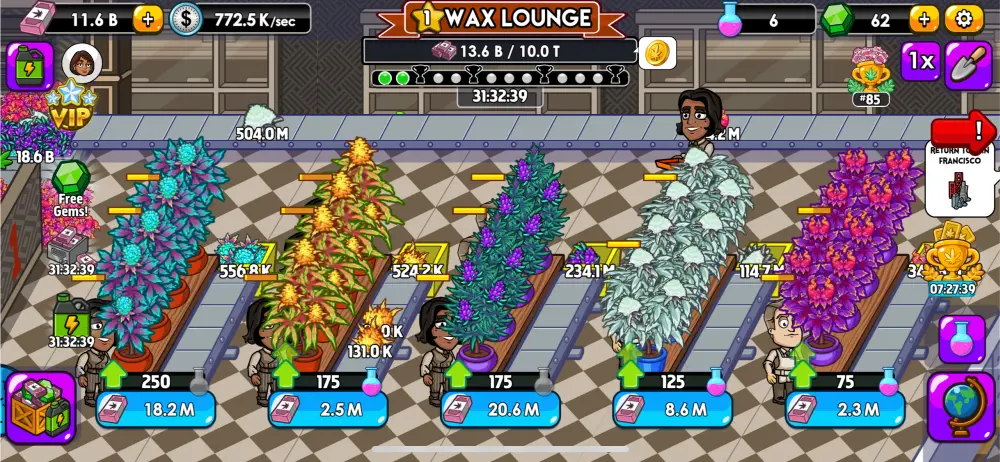
7. Toggle Max Button to Upgrade Quickly
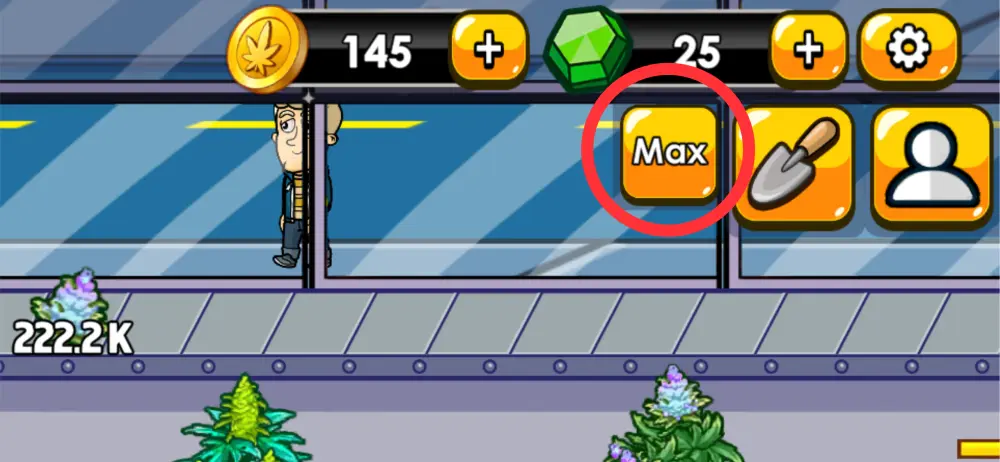
By default, you can upgrade your tables and facilities in increments until you reach a milestone. If you click the 1x button at the upper left side of your screen, it will change to Max. Once you do, each time you click to upgrade a table or facility, it will upgrade it to its next milestone. If you do not have enough Cash for the next milestone, it will instead upgrade it to the most that it can. Switching from 1x to Max will allow you to upgrade tables and facilities a lot quicker.
8. Make Wise Upgrade Choices
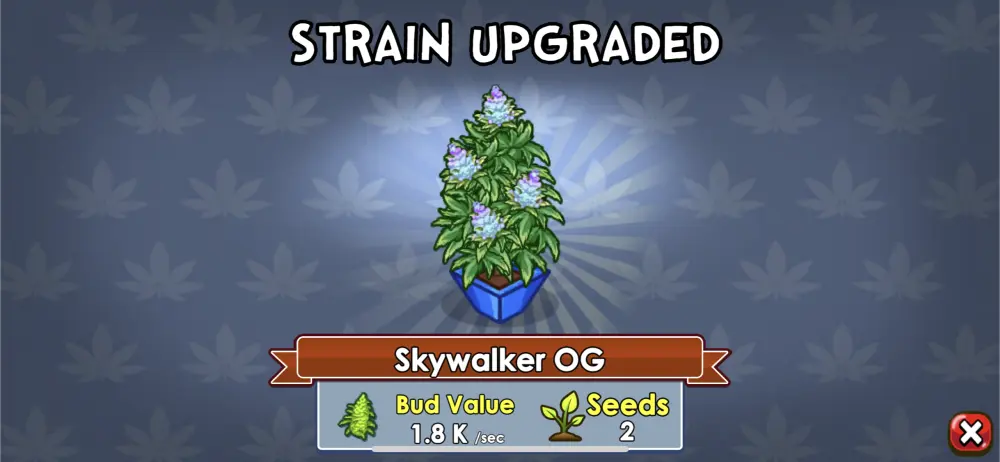
When it comes to Strain Cards, always prioritize upgrading Rares, Epics, and Legendaries. These will earn you more profit in the long run than Commons. However, as you are starting out and don’t have that many options yet, choose 1-3 Common Strains to concentrate on as you wait for better and rarer strains. We advise not to upgrade every weed strain in your collection since each upgrade costs Tokins and they are not as easy to get as Cash. Aside from that, Common Strain Cards can be traded with Tokins through trade offers which you can then use to trade for rarer cards.
It’s a little bit different for Manager Cards. Naturally, you’d still want to level up your Rares, Epics, and Legendaries first, but you should not ignore your Commons. Each manager can be utilized since they only appear for a short amount of time. Your Common Manager Cards, while not as good as higher rarity cards, will still be instrumental for your business’ success, unlike some of your Common Strains that you don’t need to all utilize. Upgrade your managers as soon as you are able to.
9. Use Research Points to Advance Your Growth
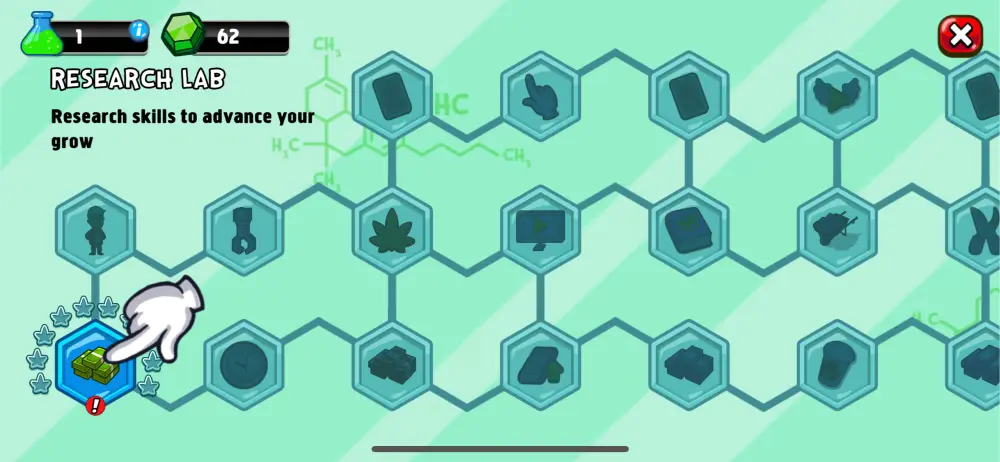
You can use Research Points on skills at the Research Lab to advance your growth. Each skill can be upgraded up to 10 times, with each level increasing the Research Point requirement. Research Points can be obtained by participating in Events and Tournaments. You can also get Research Points from the Daily Rewards, with the soonest being Day 7.
10. Participate in Tournaments
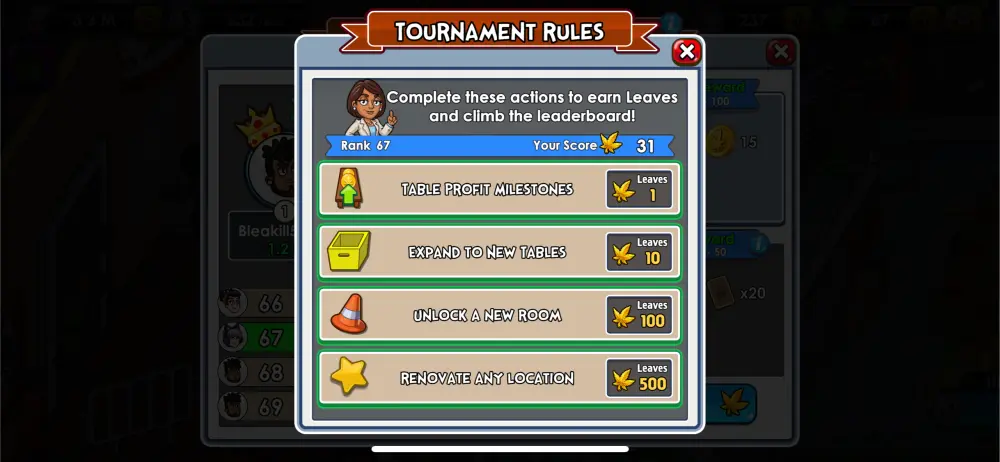
Tournaments typically last for 2 days and are held between a pool of 200 players. Players are automatically placed in the tournament but are not required to participate. Each Tournament has certain tasks that will earn you points which you can find by clicking the “How to earn” button. Tasks may include collecting cards, upgrading cards, reaching table profit milestones, expanding to new tables, unlocking rooms, renovating locations, and so on. There are four tasks you can do that change for each Tournament.
The higher your ranking is by the end of the Tournament, the more rewards you can earn. Below is an example of a typical Tournament’s rewards:
| Rank 1 | 200 Tokins | 5 Epic Strain Cards | 10 Rare Strain Cards | 7 Research Points |
| Rank 2 | 150 Tokins | 4 Epic Strain Cards | 7 Rare Strain Cards | 5 Research Points |
| Rank 3 | 100 Tokins | 3 Epic Strain Cards | 5 Rare Strain Cards | 5 Research Points |
| Rank 4-6 | 75 Tokins | 2 Epic Strain Cards | 4 Rare Strain Cards | 3 Research Points |
| Rank 7-10 | 50 Tokins | 1 Epic Strain Cards | 3 Rare Strain Cards | 3 Research Points |
| Rank 11-25 | 25 Tokins | 25 Common Strain Cards | 2 Rare Strain Cards | |
| Rank 26-50 | 20 Tokins | 20 Common Strain Cards | 1 Rare Strain Cards | |
| Rank 51-100 | 15 Tokins | 15 Common Strain Cards | ||
| Rank 101-200 | 10 Tokins | 10 Common Strain Cards |
11. Participate in Events
Events typically last for 4 days and open up a special stage or location with its own special currency, weed strains, managers, and rules. Cash is replaced with Pink Cash as the primary currency while Tokins are replaced with special tokens that vary per event. Boosts are replaced with Fertilizer which is its weaker version.
Instead of multiplying your cash flow, it only increases your Growth Boost or the number of buds you harvest by 2. This lasts 1 hour (15 Gems), 4 hours (45 Gems), or 1 day (100 Gems). There will sometimes be offers to give you x4 Growth Boost for 5 minutes when you watch an ad. Gems can still be used to buy extra Pink Cash, special tokens, and Fertilizer.
While each event has its own set of rules, its prize system is the same. A bar with nodes and trophies can be seen at the top center of the screen along with a cash goal. Every time you meet the cash goal, a node or trophy will be lit up and you will be rewarded with a prize. Below is an example of a typical Event’s goal rewards:
| Node 1 | 2x Profit for 3 Days |
| Node 2 | 10 Common Strain Cards |
| Node 3 (Bronze Trophy) | 4 Hours of Income |
| Node 4 | 1 Research Point |
| Node 5 | 15 Common Manager Cards |
| Node 6 (Silver Trophy) | 3 Rare Strain Cards |
| Note 7 | 1 Research Point |
| Node 8 | 2 Rare Manager Cards |
| Node 9 | Unlock Survival Kit x2 (New Strain) |
| Node 10 (Gold Trophy) | 3 Epic Strain Cards |
| Node 11 | 2 Research Points |
| Node 12 | 3 Epic Manager Cards |
| Node 13 | 3 Research Points |
| Node 14 (Platinum Trophy) | 400 Gems |
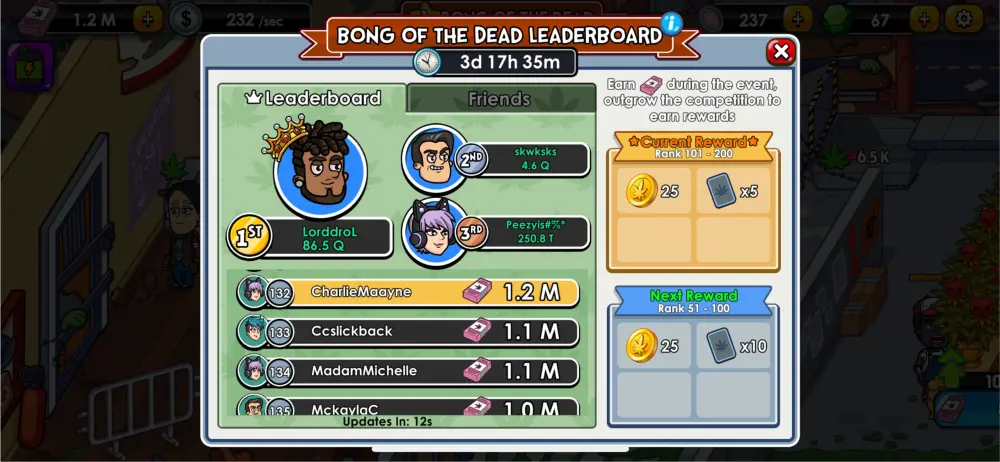
Each Event also has its own Tournament Leaderboard which works the same way as regular Tournaments. The higher your ranking is by the end of the Event, the more rewards you can earn. Like regular Tournaments, they also have their own reward tiers but based on the amount of money you earned. Event Tournament prizes tend to have more valuable prizes than regular Tournaments. Below is an example of a typical Event Tournament’s rewards:
| Rank 1 | 250 Tokins | 10 Epic Strain Cards | 500 Gems | 15 Research Points |
| Rank 2 | 125 Tokins | 5 Epic Strain Cards | 250 Gems | 10 Research Points |
| Rank 3 | 75 Tokins | 3 Epic Strain Cards | 125 Gems | 5 Research Points |
| Rank 4-6 | 75 Tokins | 2 Epic Strain Cards | 100 Gems | 3 Research Points |
| Rank 7-10 | 50 Tokins | 1 Epic Strain Cards | 75 Gems | 2 Research Points |
| Rank 11-25 | 25 Tokins | 20 Rare Strain Cards | 50 Gems | |
| Rank 26-50 | 25 Tokins | 15 Rare Strain Cards | 25 Gems | |
| Rank 51-100 | 25 Tokins | 10 Rare Strain Cards | ||
| Rank 101-200 | 25 Tokins | 5 Rare Strain Cards |
12. Expand Your Business
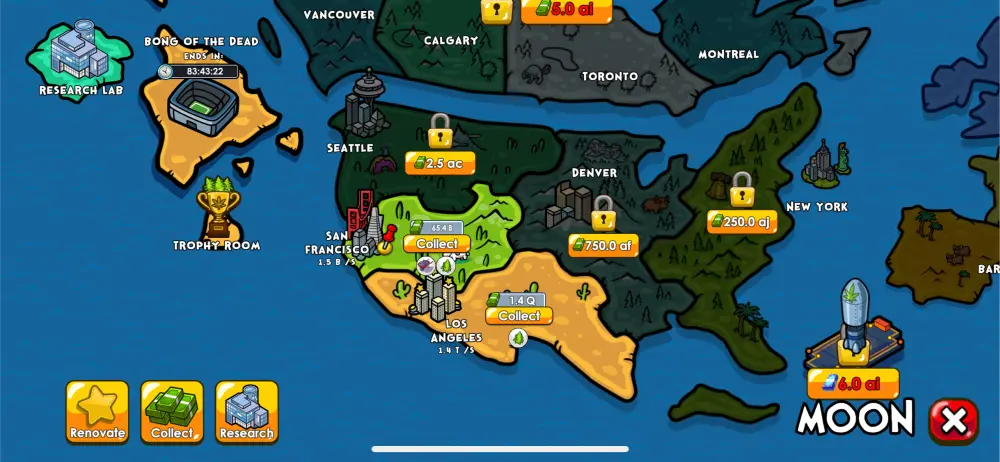
Once you’ve started earning trillions of Cash (T), you will be able to buy your next branch in Los Angeles. However, as you look through your World Map, you may notice that the currencies after that are in ac, af, aj, or ai while other locations such as Europe and the Moon seem to have different cash. The reason for this is that denominations after Q (quadrillion) will be represented by aa, ab, ac, ad, ae, af, ag, ah, ai, and aj. While Canada can be unlocked with the usual green Cash, Europe can only be unlocked with Canadian Cash (Red Cash), and the Moon can only be unlocked with European Cash (Blue Cash).
Unlike your first branch, expect the upgrades for your tables and facilities in the next ones to be more expensive. Be sure to have some extra cash before buying your next branch!
13. Collect Freebies
Weed Inc. isn’t stingy about giving away Freebies, you just have to know where to look. Below is a list of freebies you do not want to miss out on:
Daily Rewards

Daily Rewards can be claimed every 24 hours by clicking the green calendar icon that shows up on the upper left side of your screen. There are a total of 30 rewards prepared for 30 days. After reaching the 30th day, the calendar restarts to day 1. You can obtain Gems, Tokens, Research Points, Profit Multipliers, Cases, and Crates.
Daily Goals
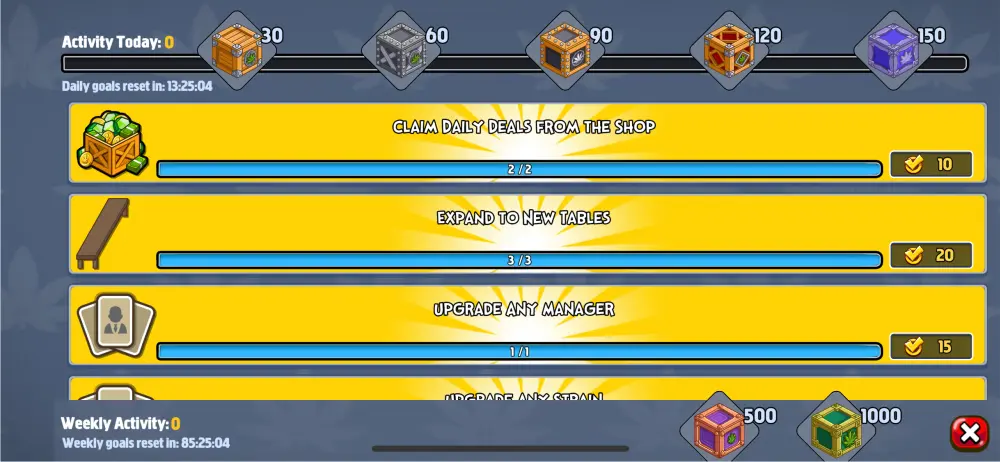
Daily Goals give you 12 tasks to complete within the day. Each task completed will reward you with points depending on difficulty. Once you hit a point goal (30, 60, 90, 120, and 150), you will be rewarded with a crate. The higher the point goal achieved, the rarer the crate. Aside from these daily point goals are weekly point goals (500 and 1000) which grant even better rewards.
Daily Deals
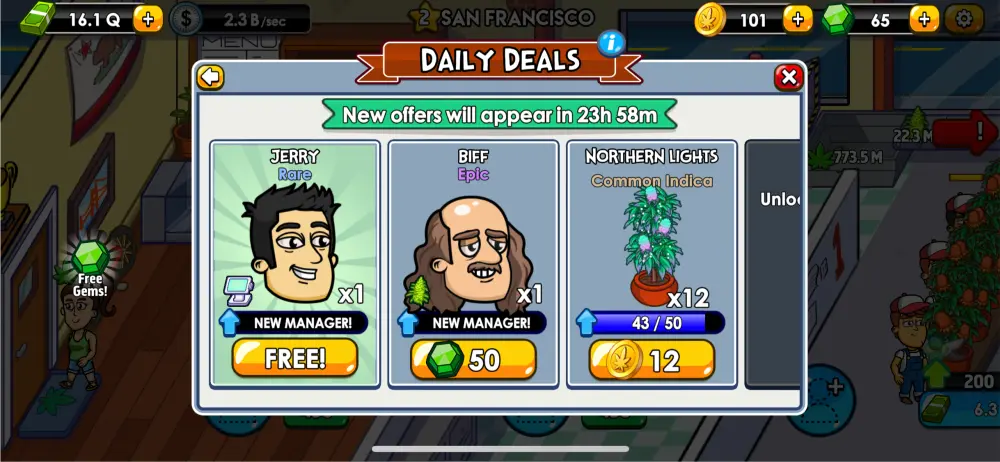
Daily Deals are offers that change every 24 hours. The first offer is always free while the others may cost Gems or Tokins. The more locations you unlock, the more offers will be available to you. You can access Daily Deals in the Shop.
Free Crates
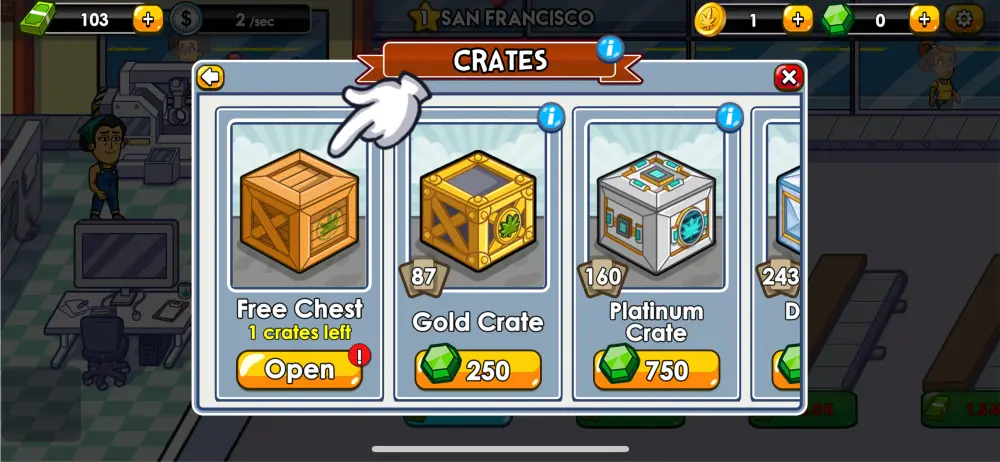
Free Crates can be claimed every 6 hours. These Crates vary in rarity and may sometimes even be replaced with Free Cases instead. Unclaimed Crates can stack up to two so be sure to check in every 6 to 12 hours to not let the wait time go to waste. You can access Free Crates in Shop > Crates.
Free Cash and Profit Boosters
Free Cash and Profit Boosters are typically obtained from Offers and Crates. However, this Cash or Profit Booster is not immediately added to your wallet. You have to go to Shop > Cash to claim your Cash and Shop > Boosts to claim your Boosts.
Invite Friends and Get Crates

Inviting your friends to play the game with your friend code will reward you with a free crate. The more friends you invite, the closer you get to getting more free crates!
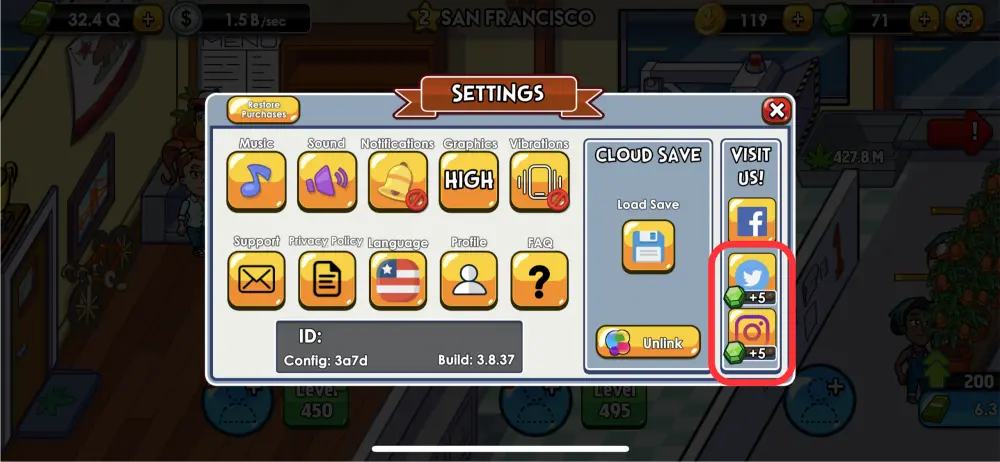
Follow Their Social Media to get Gems!
Register Your Email to get Gems
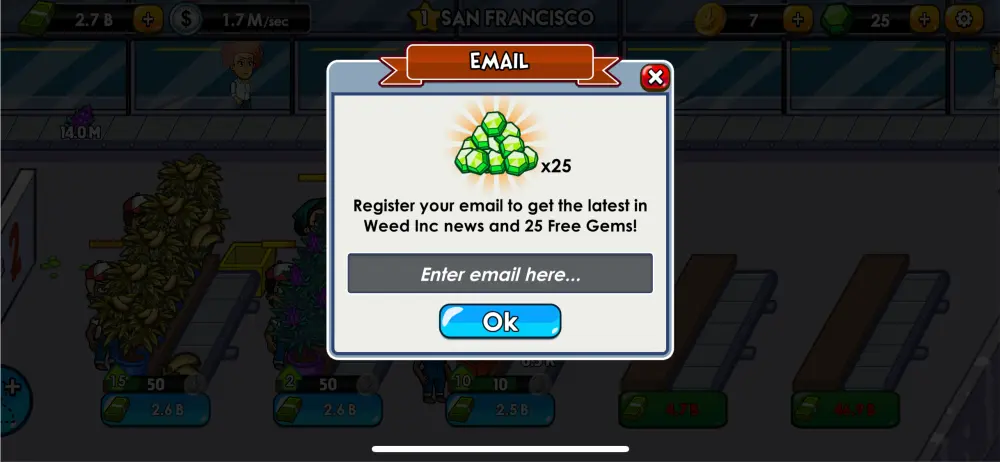
Registering your email will reward you with 25 gems so if you do not want to miss this freebie, be sure to type in your email when the prompt appears!
And this marks the end of our Beginner’s Guide to Weed Inc.! We hope that our research serves you well in your journey to become the best weed-selling business tycoon! Did we cover everything or have you discovered other tips and tricks in the game that we did not mention? We’d love to hear about it! Let us know in the comment area!
Luka
Monday 6th of November 2023
What to do when adds are not working?
David
Sunday 3rd of September 2023
I'm looking for a list of city strains
c
Sunday 22nd of October 2023
@David, me too, did you end up finding it?