In our walkthrough for Chapter 1 of The House of Da Vinci 3, we followed Giacomo at the catacombs of the Sacra Di San Michele. Here, we were able to solve our first puzzles, discovered how to work the Oculus Perpetua, traveled back in time, and ultimately eluded capture. With this triumphant escape, we now follow Giacomo to the Villa of Luca Pacioli in the riveting second chapter of the game.
Unlike in the first chapter, The Villa of Luca Pacioli won’t have guards chasing after you. In fact, you’ll practically be alone roaming his estate. However, this stage offers more puzzles, more mysteries to solve, and more challenges that will really pick your brains and test your observation and critical thinking skills. This chapter also gives us a peek into the genius of Leonardo as the puzzles not only become more elaborate, but take on various forms that involve model carts to an Archimedes screw that’s larger than life.

But we’re getting way ahead of ourselves. There are tons to discover in the Villa of Luca Pacioli so let’s have a very quick recap of some of the important things you need to remember when playing the game:
- Items that have + signs on their inventory icons mean that they require another item to be used properly.
- Items that have a cogwheel on their inventory icons mean that they must be tweaked in the inventory to be used the way they’re meant to.
- When activated, Oculus Perpetua can either let you travel through time or allow you to see hidden elements in many puzzles.
- Be observant and pay attention even to the smallest details. Don’t just rely on what you can see—sometimes, what you can hear will also give you a hint of what you need to do next.
- Make a habit of checking your items via the inventory view. You might just find a clue or hint of where an item ought to fit.
There’s going to be a lot of back-and-forth in this chapter so being patient will be rewarding in the long run. In this stage, it’s all about exploring the villa and being curious enough about everything to arrive at the right solutions to its wonderful puzzles.
With that, let’s dive right into the second chapter of The House of Da Vinci 3.
Chapter 2: Villa of Luca Pacioli
Location: Northern Tuscany, 1508
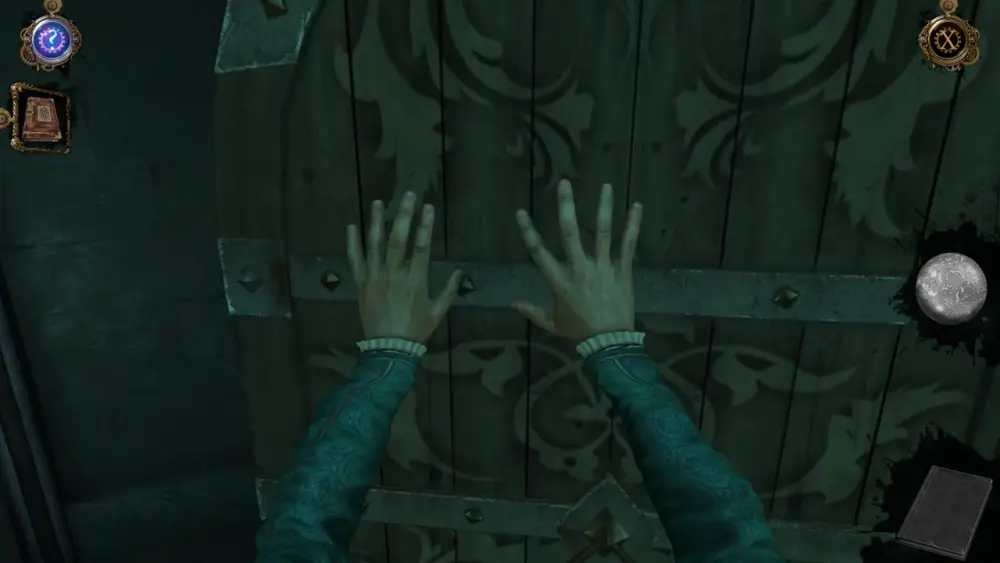
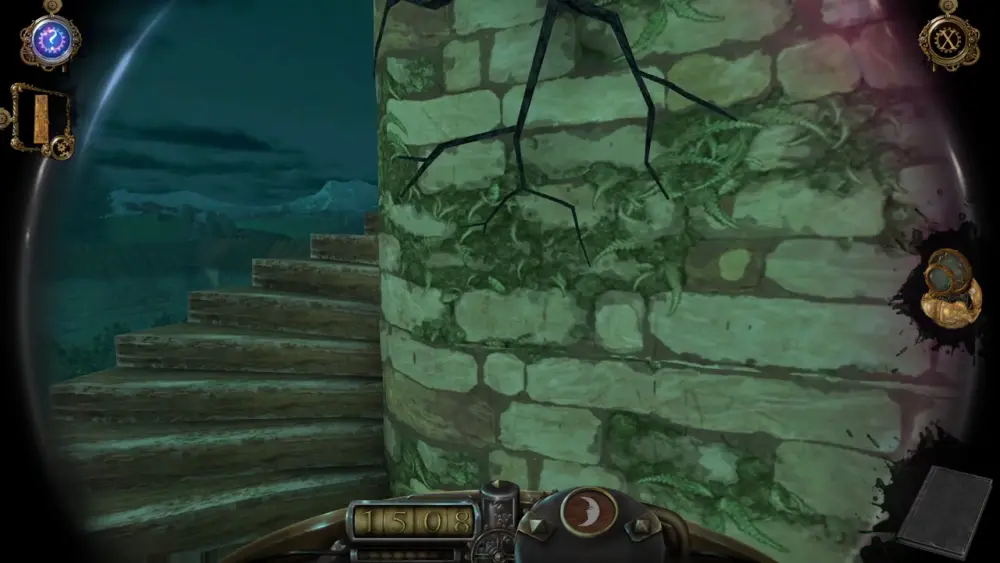
After following the instructions that Leonardo had left, you were able to reach the remote villa of Luca Pacioli. You were supposed to meet Leonardo here, but the large, high-walled villa gives off an impression of being strangely silent, perhaps even empty. Of course, the first thing you need to do is to get in, particularly through this door.
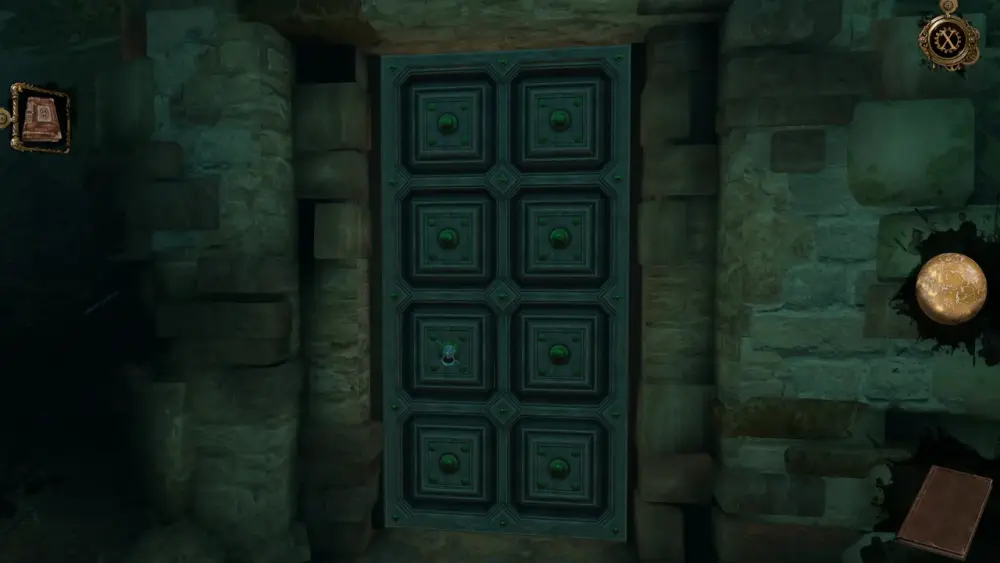
Right off the bat, the most noticeable thing about the door is the oddly placed knocker. If you turn the knocker, the green roses on the corners will move closer and closer to the center.
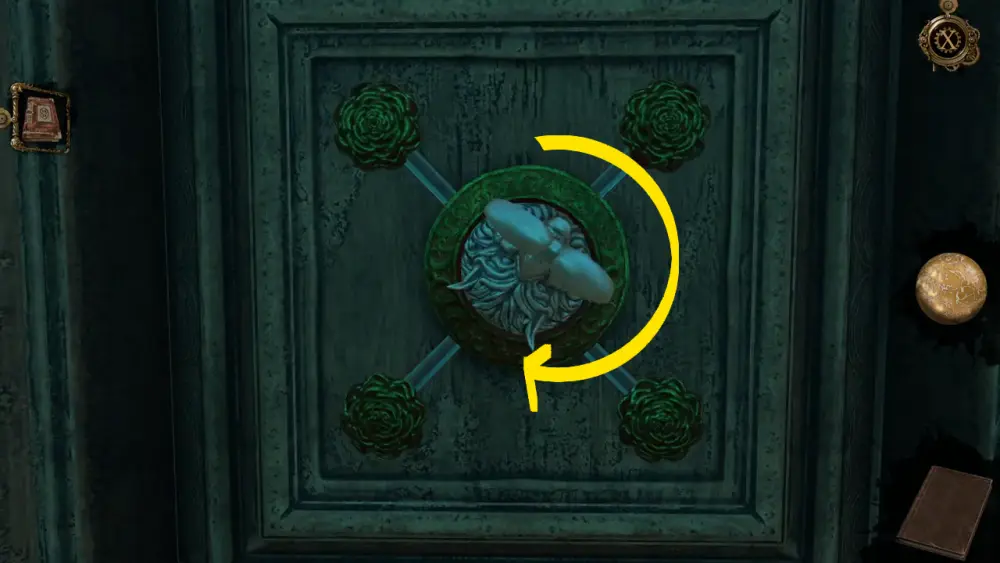
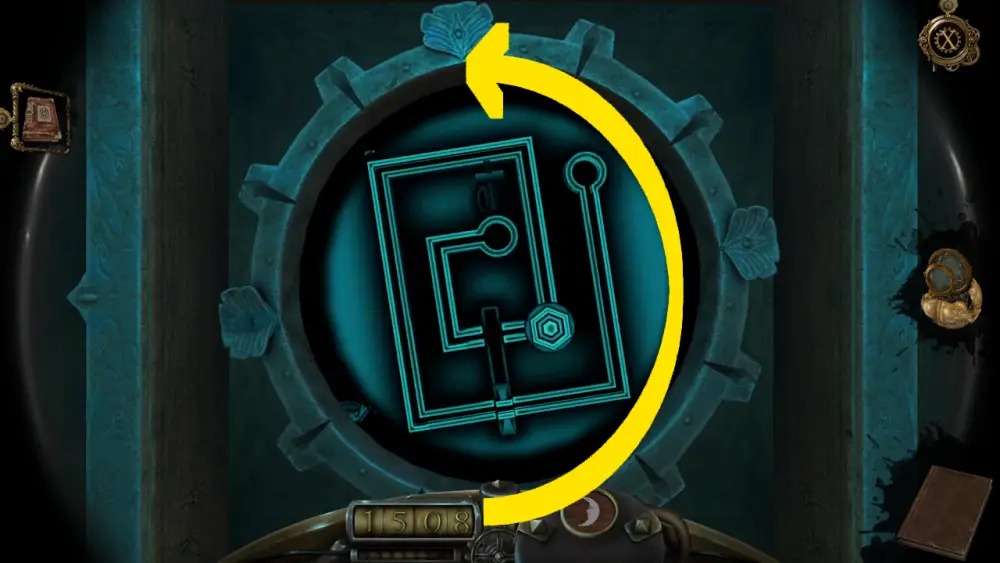
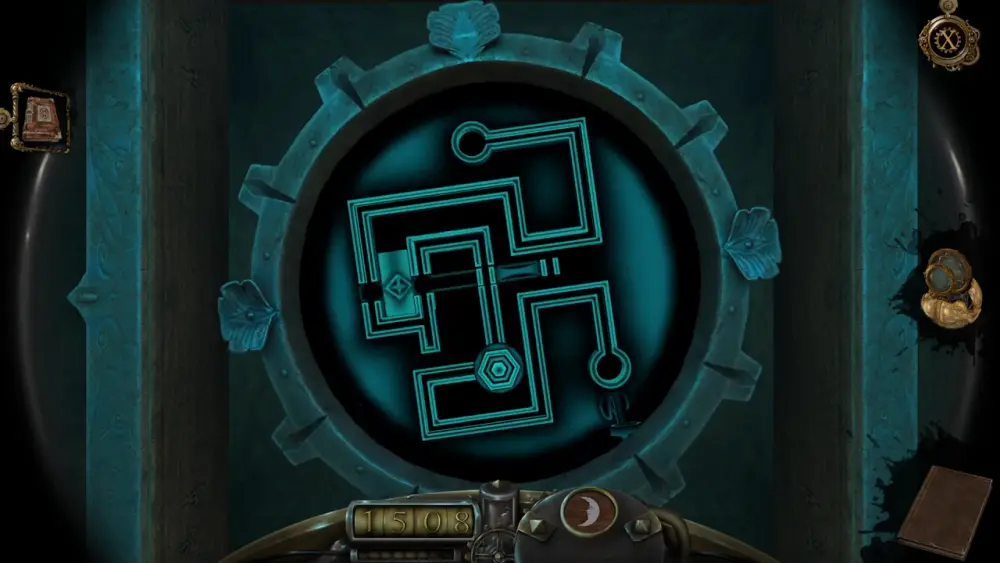
When you’ve turned the knocker all the way, a hatch will open, revealing a lock. With the Oculus Perpetua, you can see the mechanism and how you can unlock it. For this door, you will have to go through 3 locks, each of which have their own unique mechanism to work through. For the 1st lock, you need to rotate the dial so the hexagon marker can move along the direction of the small “maze” and reach the other end with the lock.
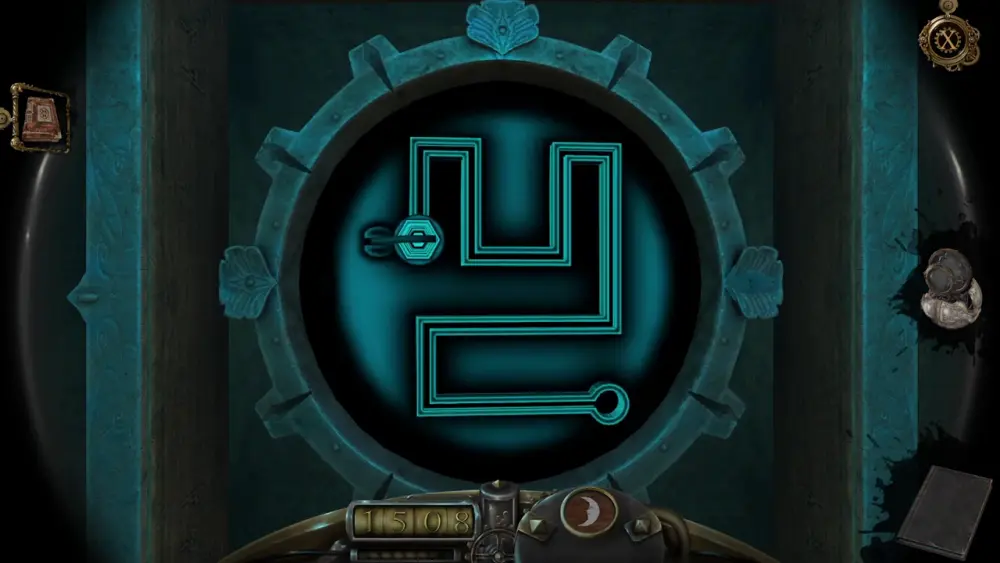
Once you’ve done this, the hatch will turn, revealing the 2nd lock. Now this one’s a little more tricky as the maze has a moving part that may shift its position as you turn the dial. This moving part needs to be aligned with the gaps in the maze for the hexagon to pass.
The 2nd gap nearing the end is a bit trickier as rotating the dial will cause the movable part to fall out of alignment with the 2nd gap. All you need to do is rotate it counterclockwise to get the movable part to fall right back into the gap.
Then as the movable part is aligned with the gap, rotate it clockwise to let the hexagon pass.
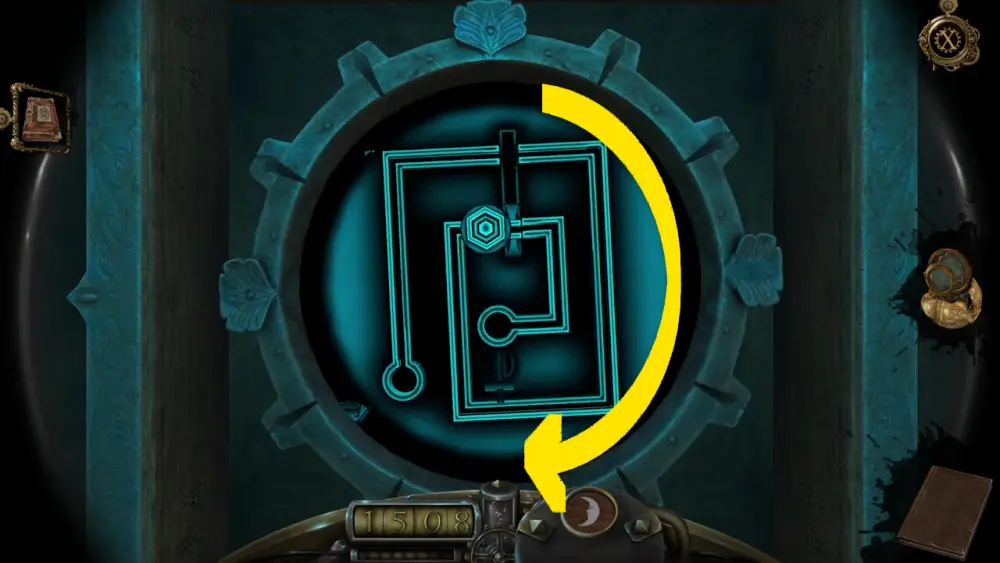
This way, you can get the hexagon to the end of the maze.
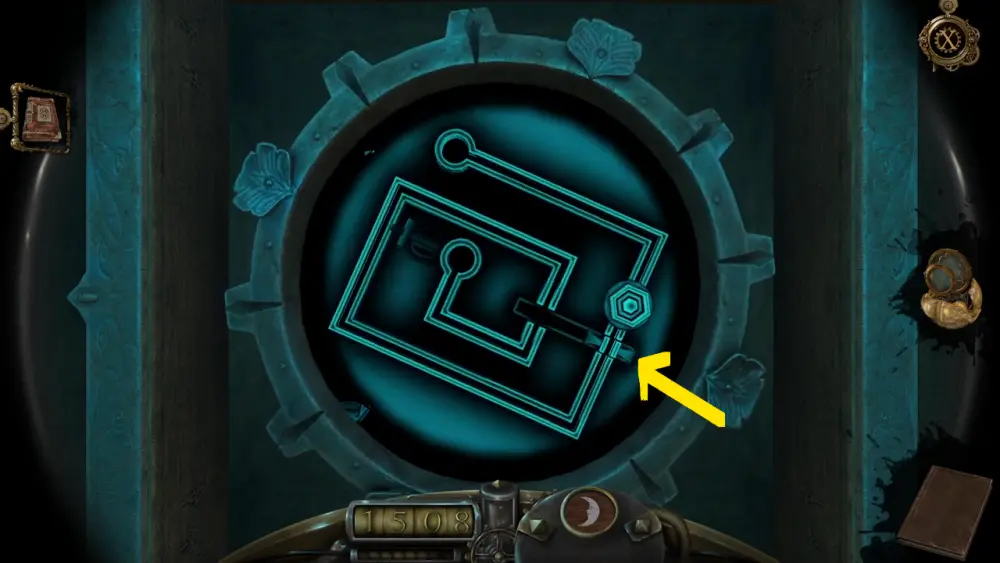
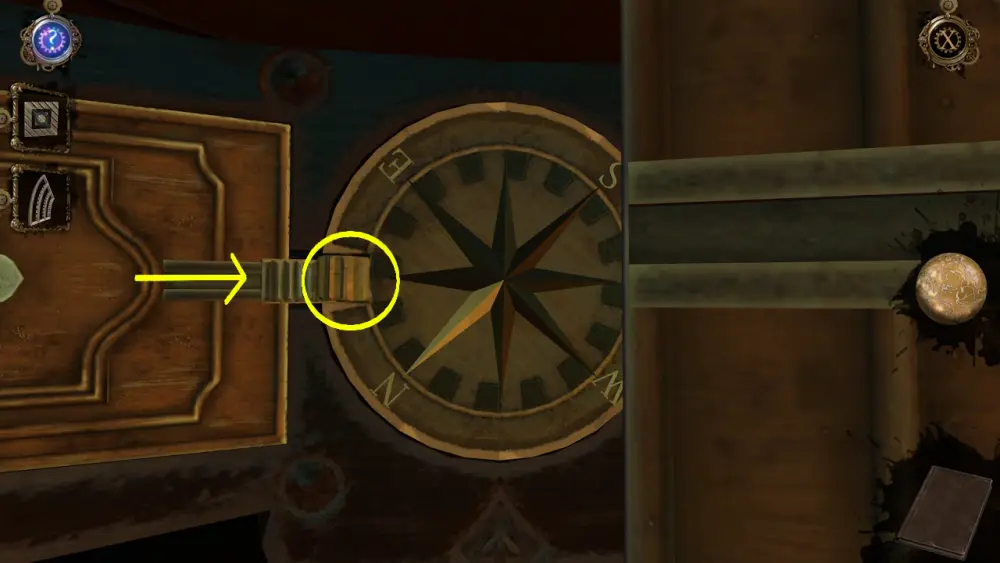
For the last lock, you will notice that there are now 2 movable parts: the strip that aligns with the maze and a small rectangular block. This may take several rotations to accomplish, but the objective is to get the strip aligned properly to the part of the maze where the hexagon will pass.
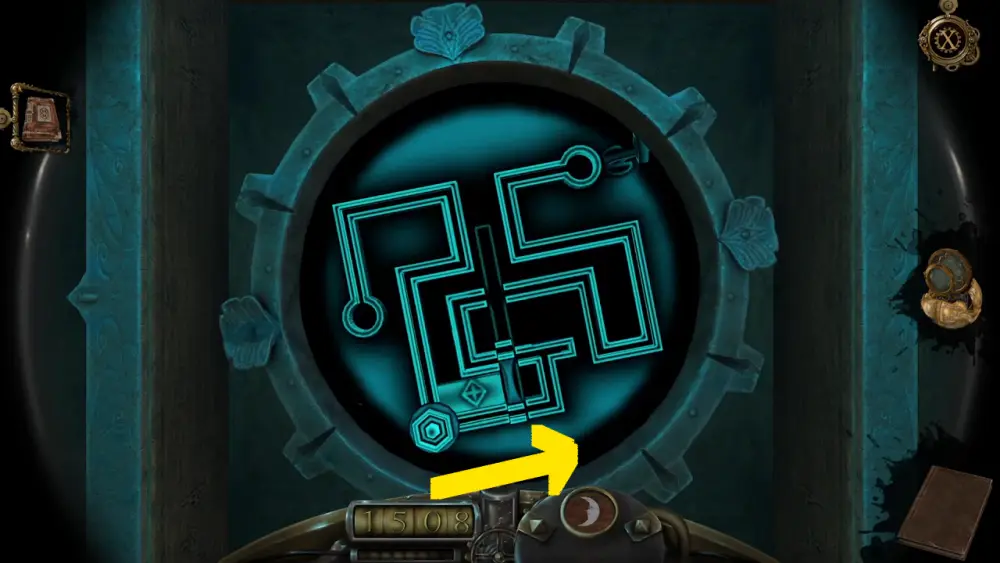
The block, on the other hand, can be used to keep the strip in place so the hexagon can pass.
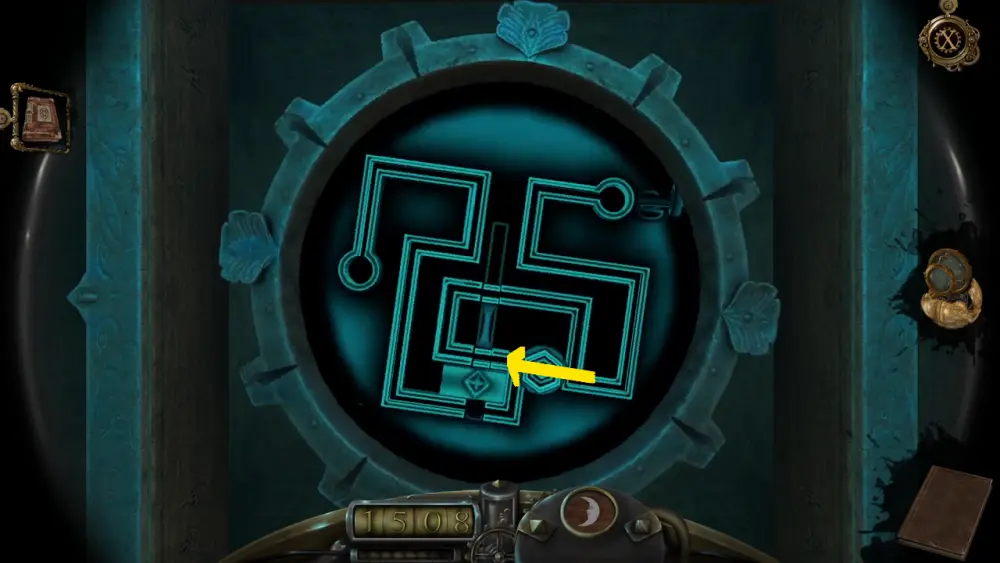
From this point, you can shift the dial a little to perfectly align the moving strip with the maze. The hexagon will slide down and the moving strip will follow, aligning itself with the next gap. Once you get past this, all you need to do is follow the maze until you reach the end.
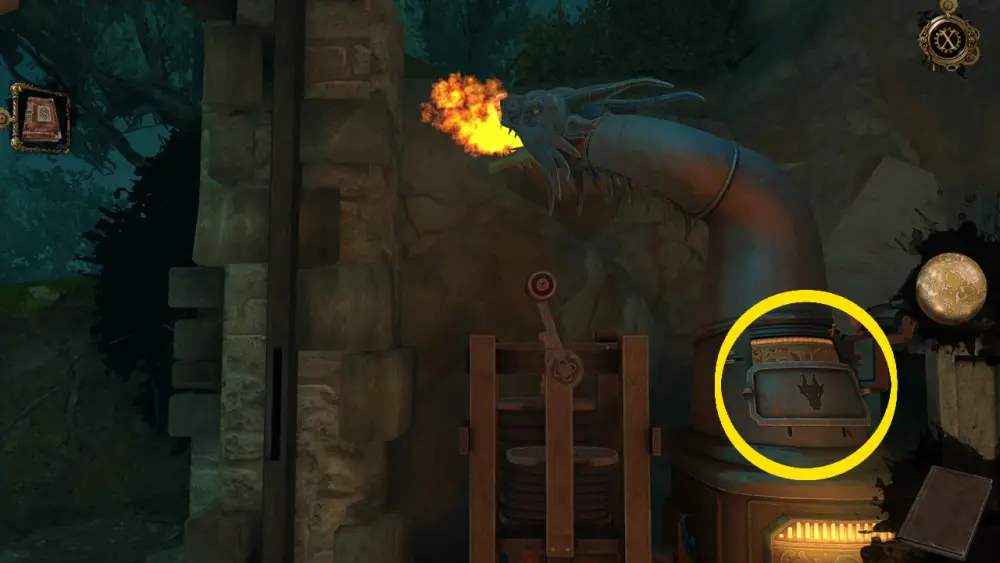
With the lock puzzles solved, the knocker’s secret hatch will close and the door will open. Ahead of you lies a dark stairway, the path illuminated only by a small light coming from a furnace on the left side.
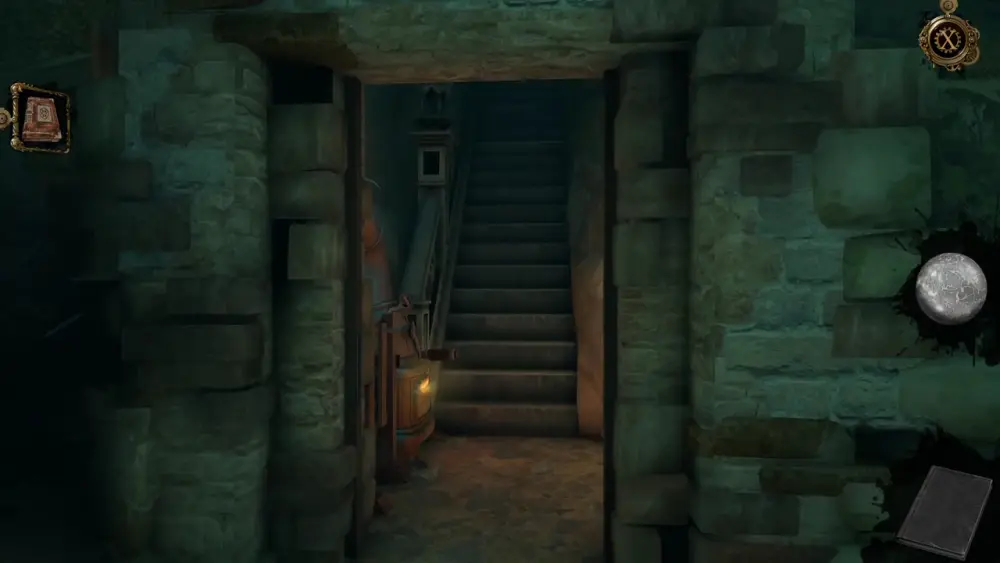
Walk to the furnace so you can take a closer look. There are two rather noticeable things here: the rotating handle and the dragon head. If you turn the rotating handle, fire will rise up the dragon’s mouth, but it’s being blocked as the dragon’s jaw is closed.
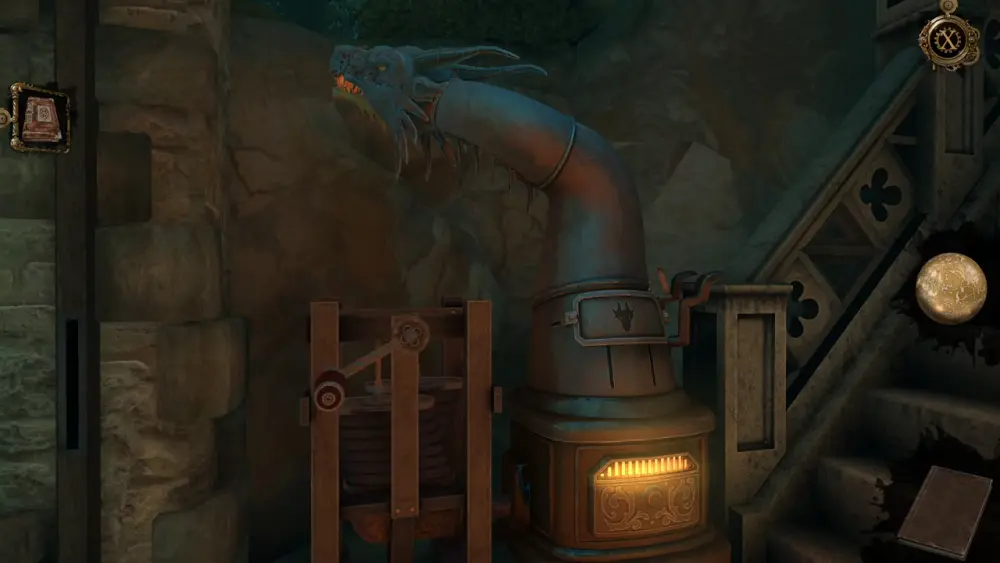
Double tap on the dragon’s head to zoom in and open its lower jaw.
Opening the dragon’s mouth will cause a vent in the furnace to open, revealing what looks like symbols on some kind of golden plate.
If you turn the handle, you’ll also notice that the fire coming out of the dragon’s mouth is much larger now.
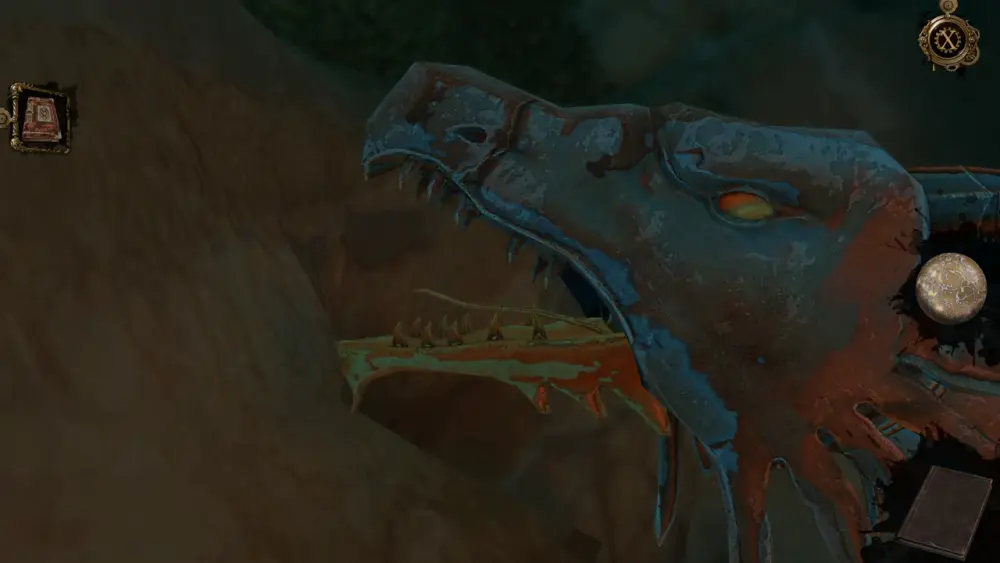
With the vent open, activate the Oculus Perpetua. This will reveal that the vent is actually a puzzle of sorts connected to the stone lantern on the rails of the stairs, which you will see when you pan a little to the right.
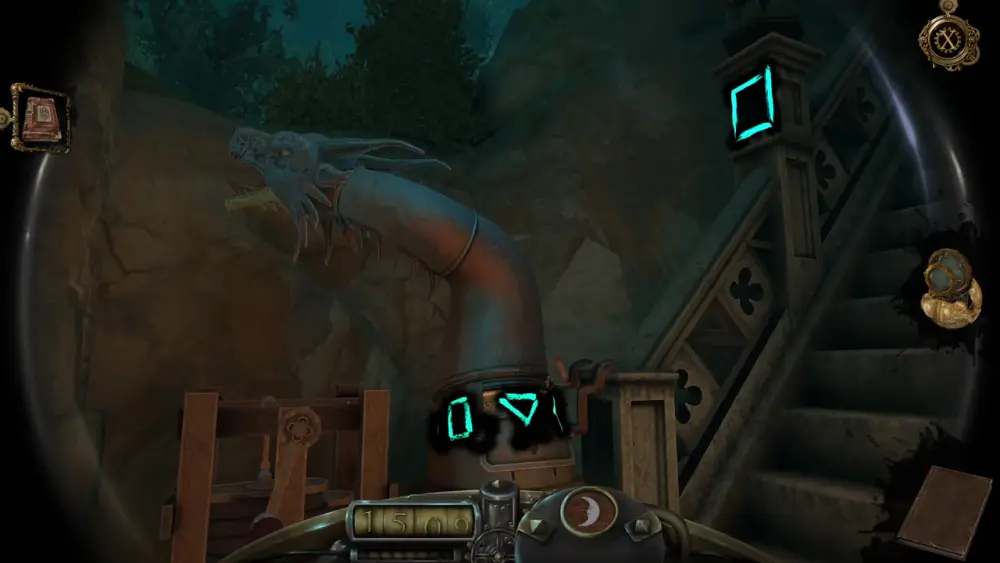
Move toward the furnace to get a better look at the vent puzzle. Slide the symbols until you match the symbol on the vent with that displayed on the stone lantern. Then move the handle above the vent to register what you’ve chosen.
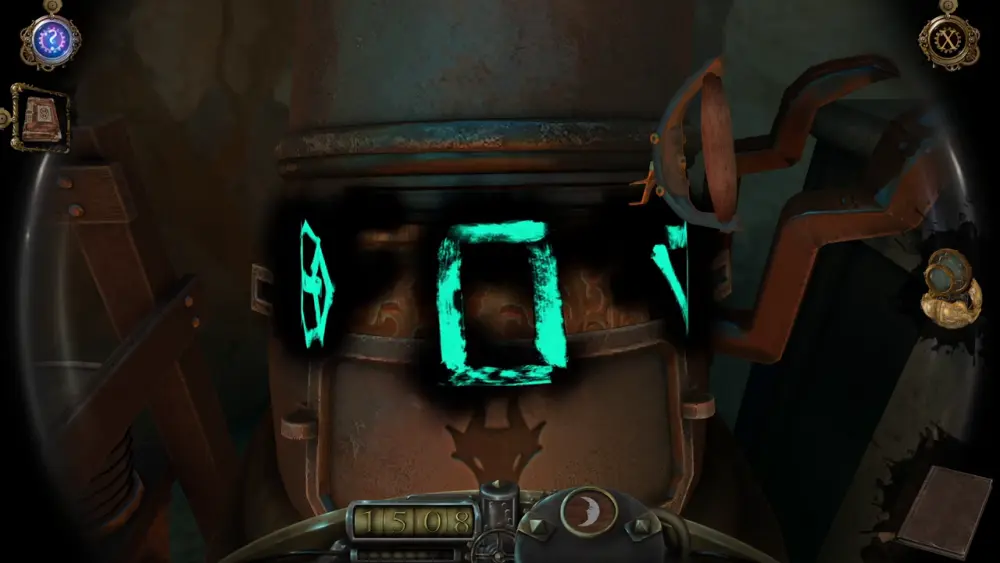
Choosing symbols will cause the dragon’s head to move a certain direction. If you pick the incorrect symbol, the dragon’s head will be slightly off point and won’t illuminate the stone lantern. But with the right symbol, the dragon’s head will be angled perfectly toward the lantern. Turn the furnace’s handle so the dragon can breathe fire into the stone lantern.
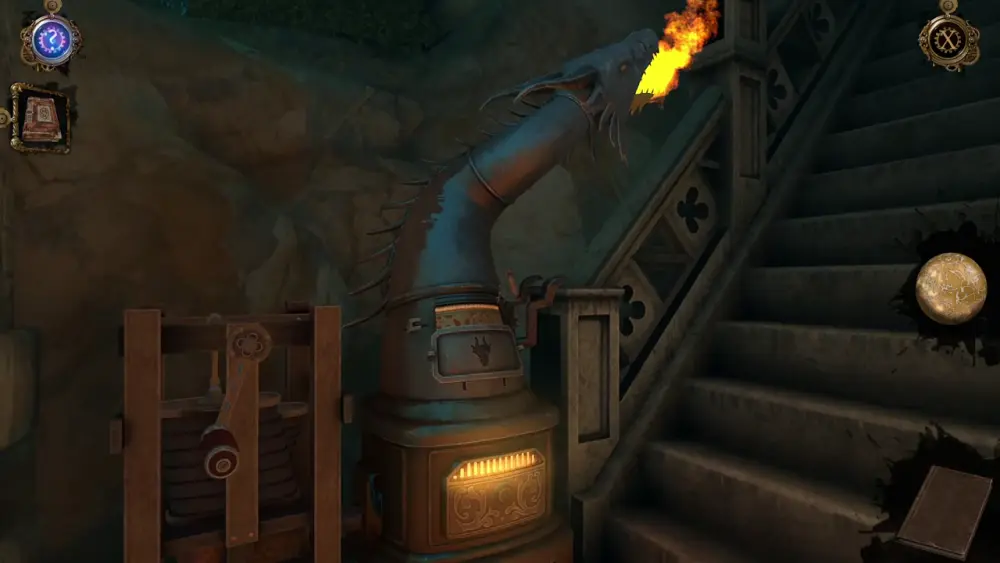
With the first lantern illuminated, other lanterns will soon be lit as you walk up the stairs. At the very top, you will move past a stone arch leading to this area.
As always, it’s a good idea to take stock of your surroundings first by panning your camera in all directions. That said, you will instantly notice a door to your left.
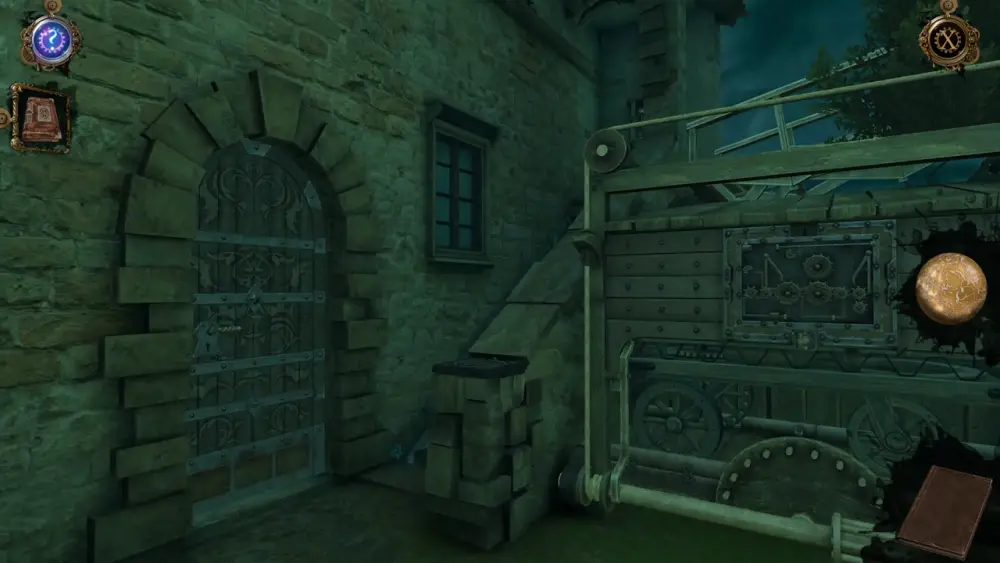
If you turn the knob, you will discover that it’s been barricaded from the inside, but with a little push, you’ll manage to open it.
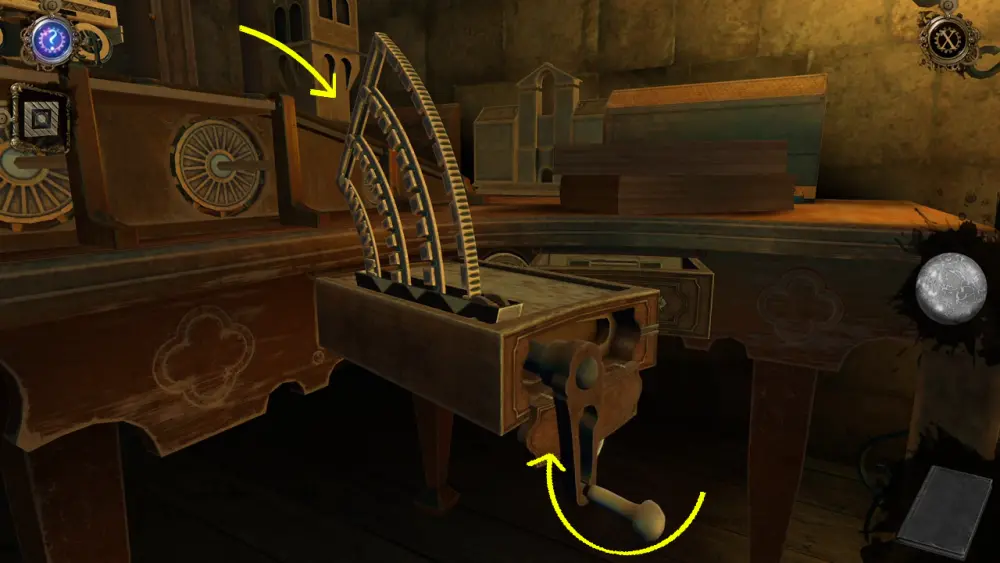
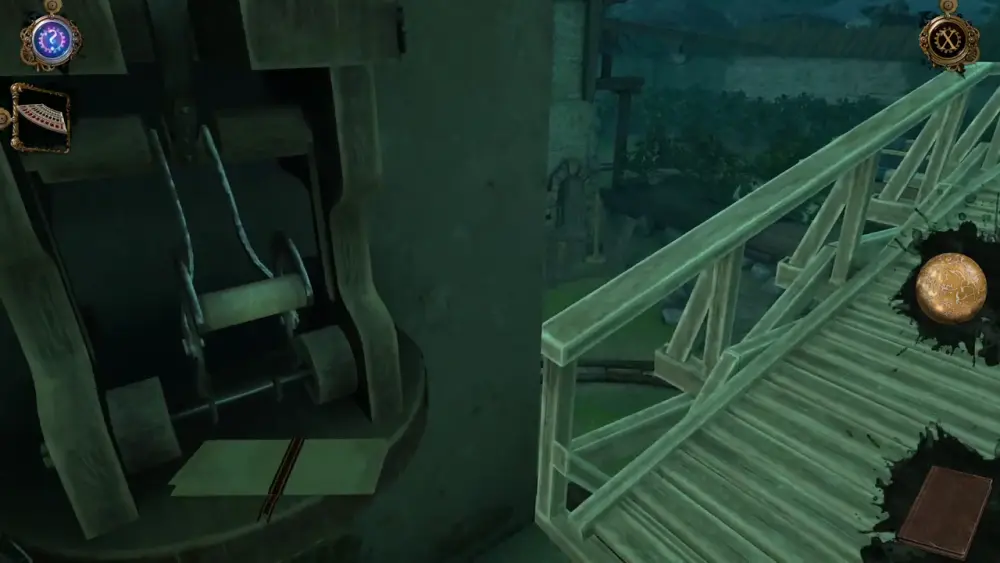
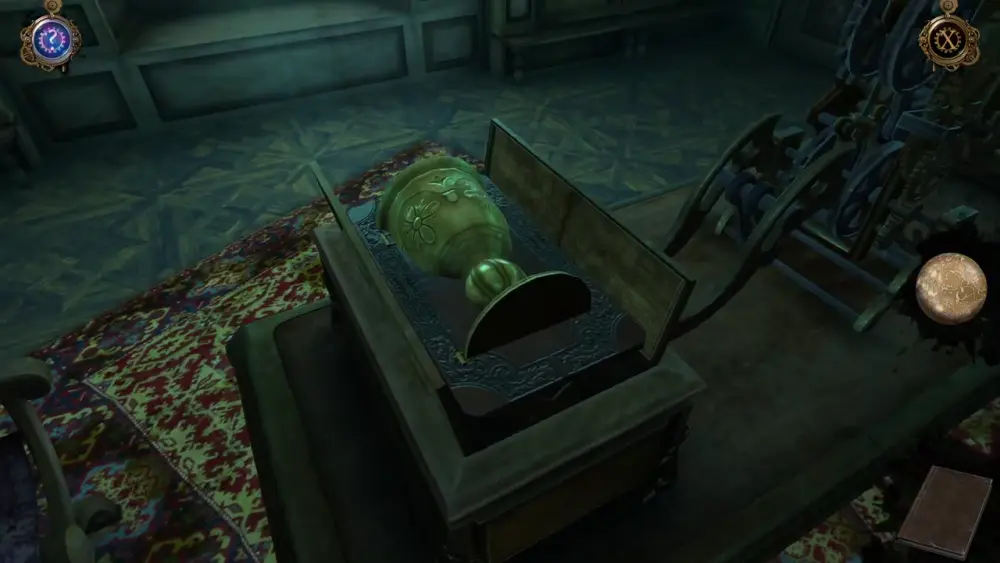
Upon entering, you’ll find a study room of sorts with an odd-looking mechanism left on the table flanked by two large wooden boxes connected to the device. Giacomo notes that though it’s likely that Leonardo and his friend Luca, who owns the house, had already left, there may be a message he left behind.
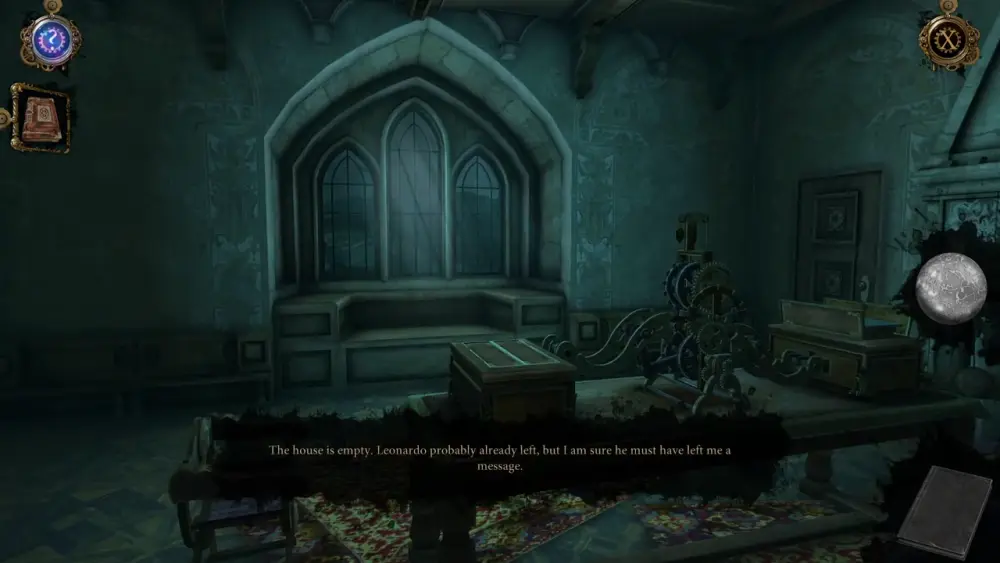
Clearly, the odd-looking device on the table may provide just what you’re looking for. Thus, move closer to the device, paying particular attention to the right side, which has the open box. You may notice that the box is similar in shape and size to the Chronicle of Ordo Iustitialis sitting in your inventory. Place the book on top of the box’s platform. The book will act as a sort of weight and the box will lower the platform and close itself, triggering the mechanism in the middle.
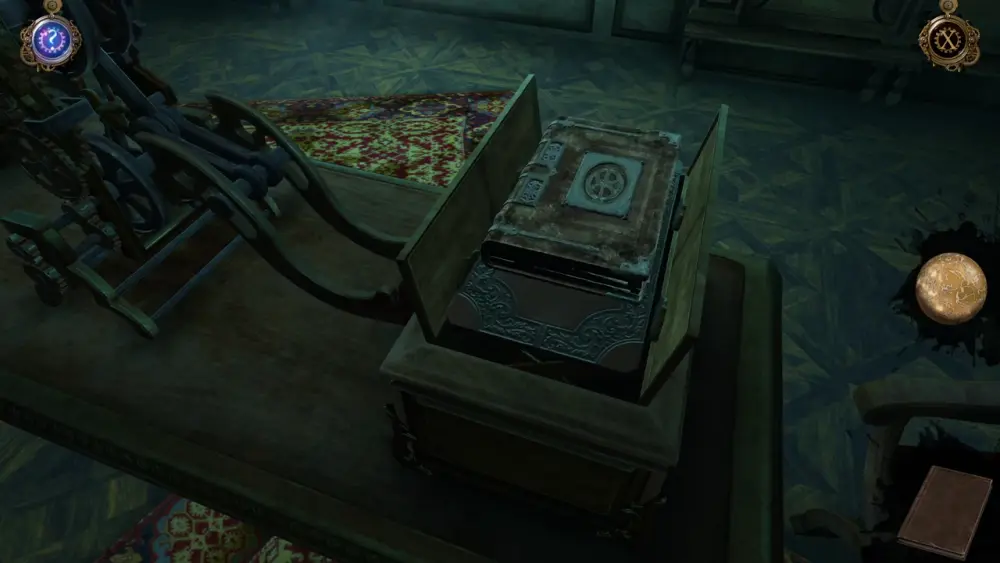
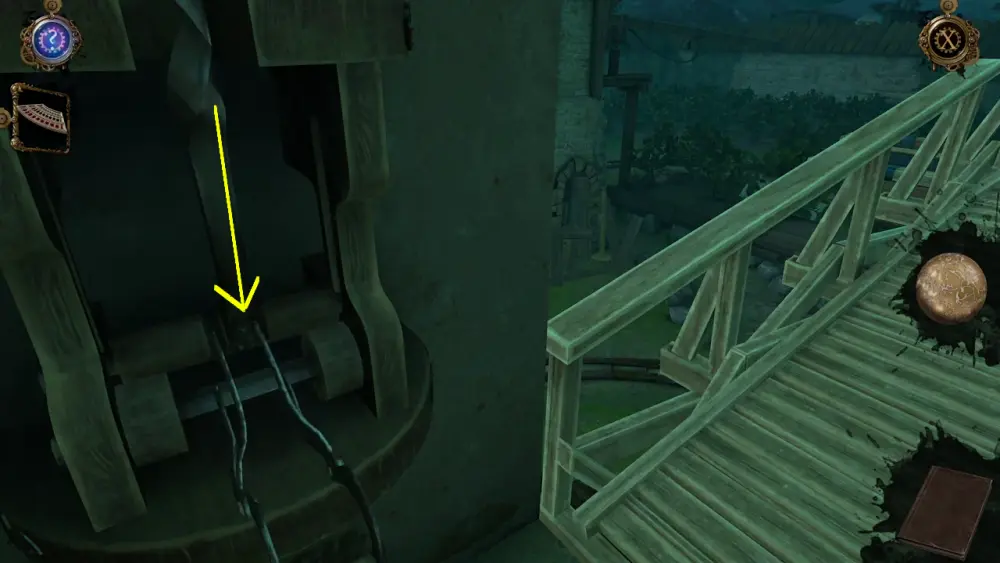
Once the right box is closed, the left box will open, revealing a letter and a strangely shaped crank.
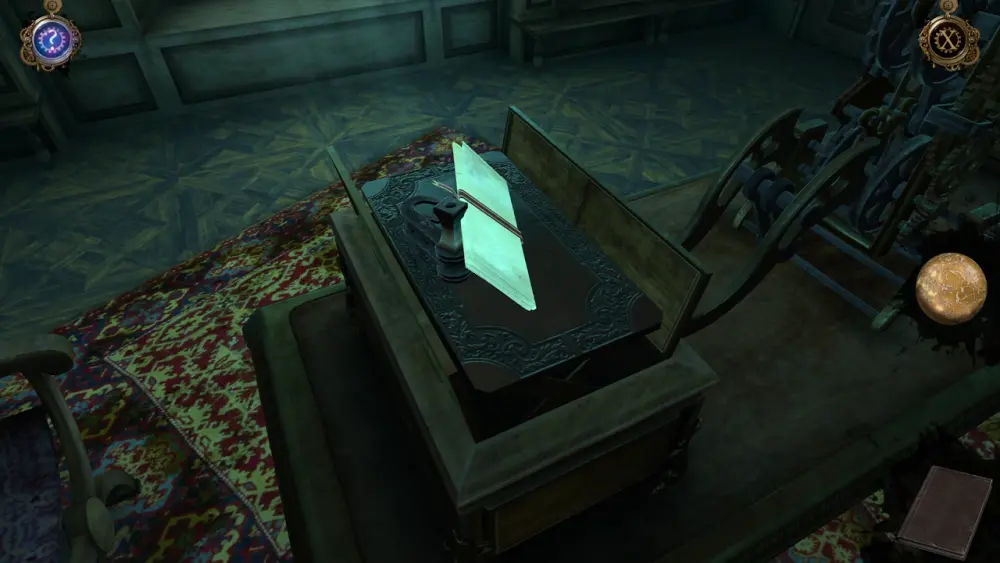
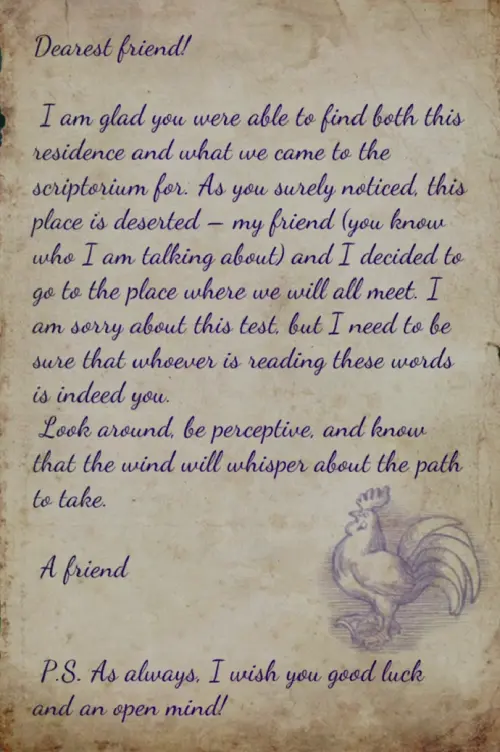
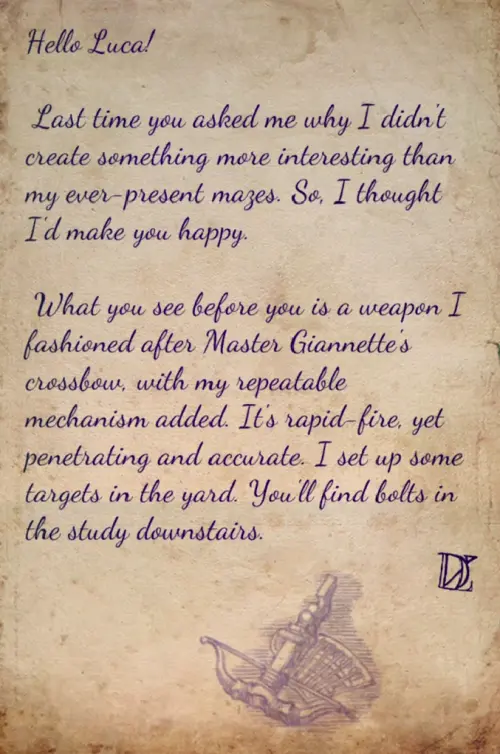
Here’s what the letter says, which is quite obviously from Leonardo:
With the strangely shaped crank in your inventory, head back out to where you came from. Don’t worry about the Chronicle of Ordo Iustitialis—you will have a chance to reclaim it by the end of the chapter.
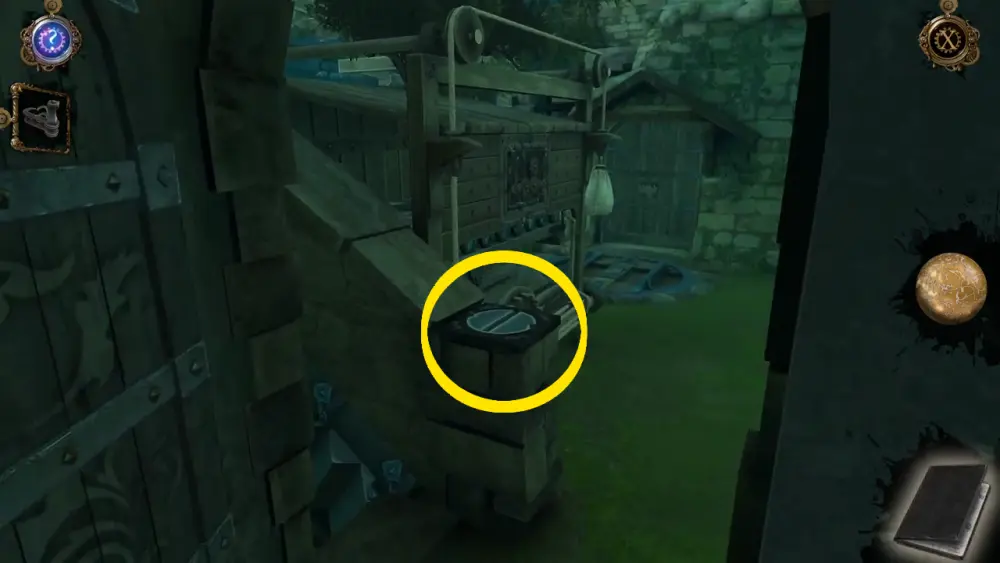
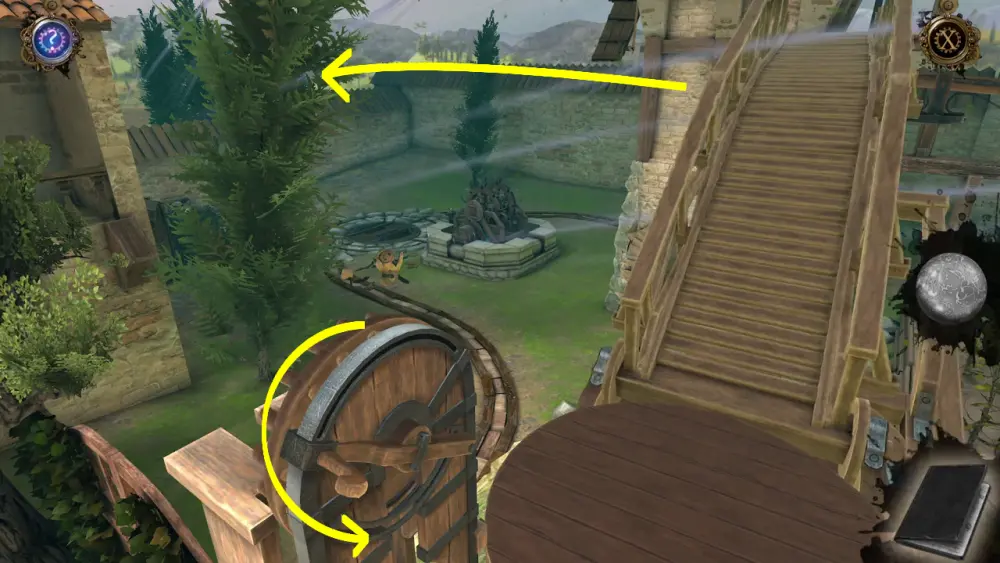
While going out the door, you might notice something that had escaped your attention at first: a panel with a circular surface on the staircase’s newel. Make a mental note of this as you will have to interact with it later.
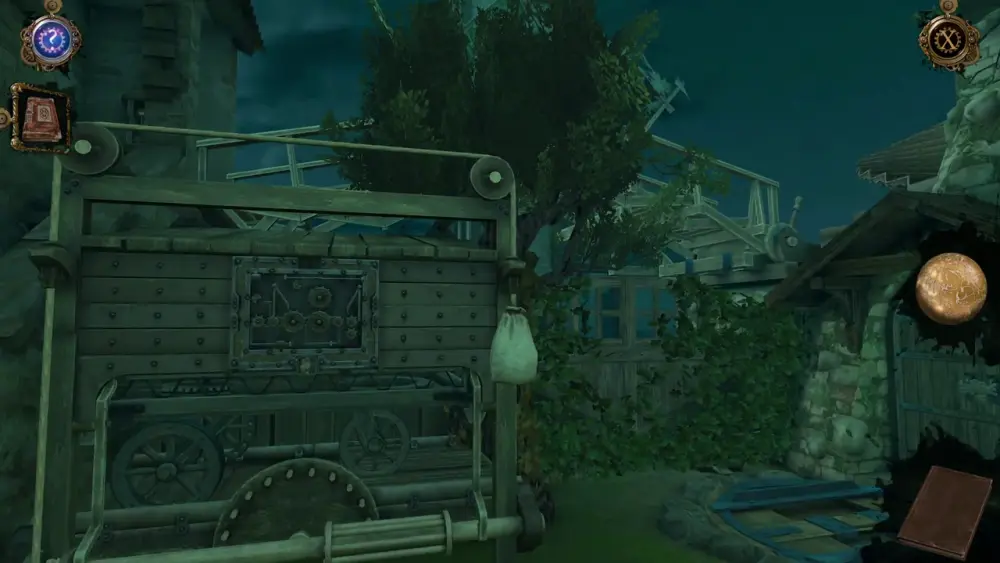
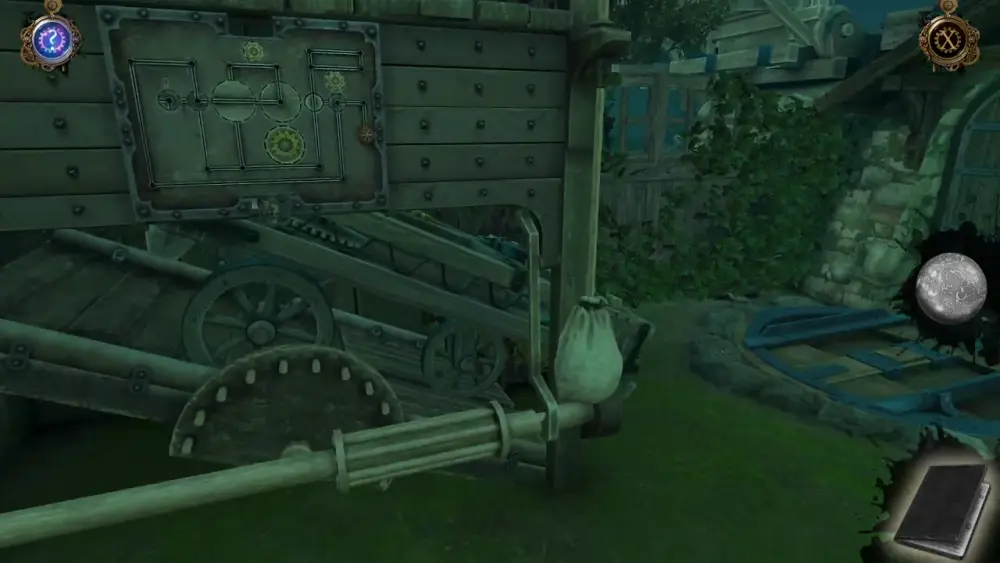
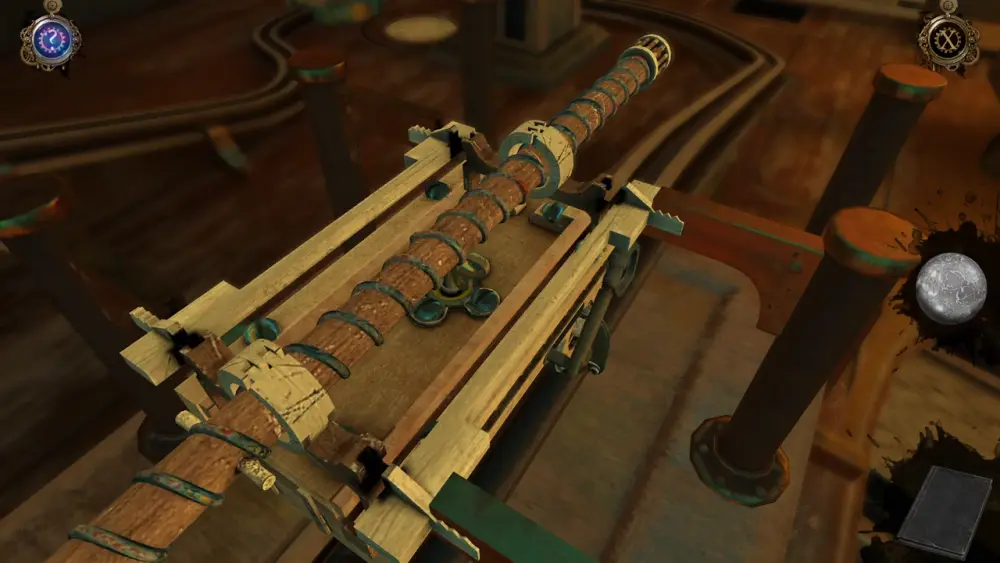
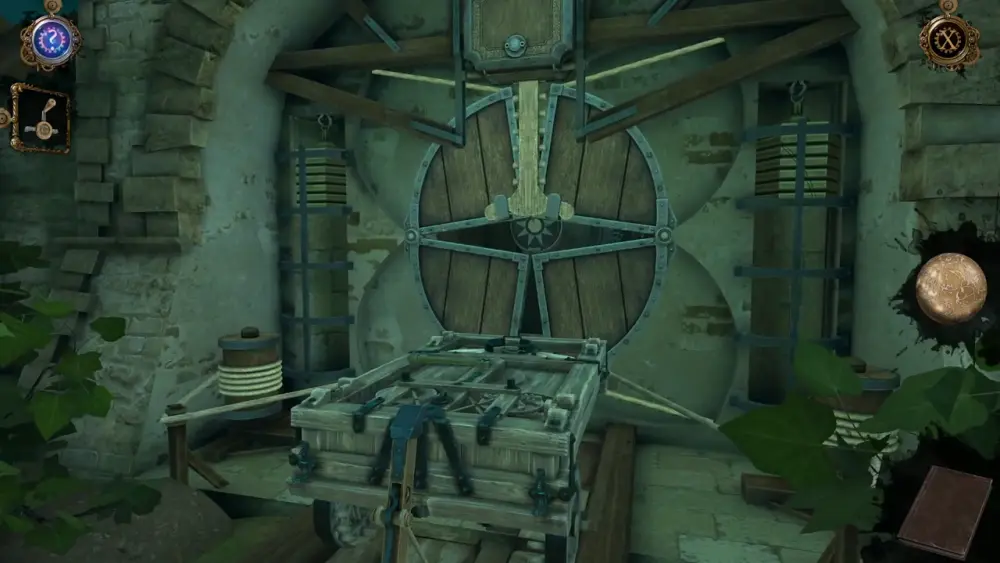
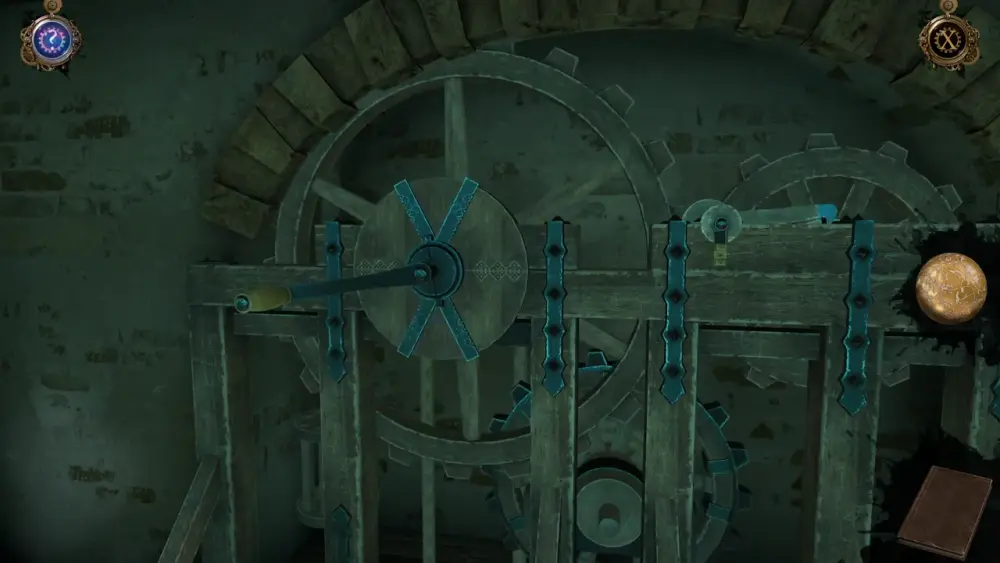
You can’t access the staircase to the side at this point, but you can interact with the cart and its strange-looking panel of dials. Pay particular attention to the handle at the bottom of the dials.
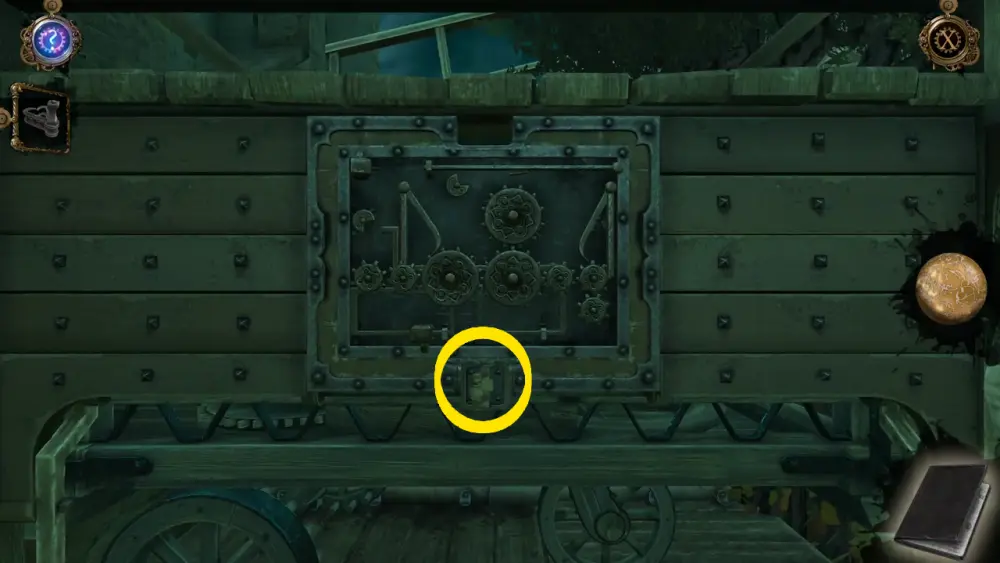
If you zoom into the panel, you’ll be able to see this handle more clearly. If you’re thinking it’s a strangely shaped handle, then it must be perfect for a strangely shaped crank. Drag this item from your inventory to fit it with the handle.
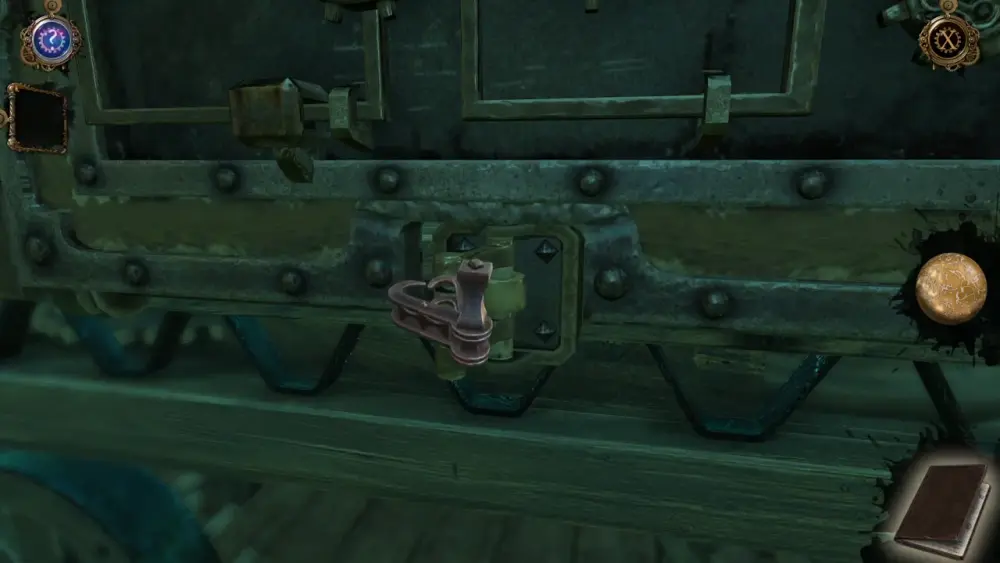
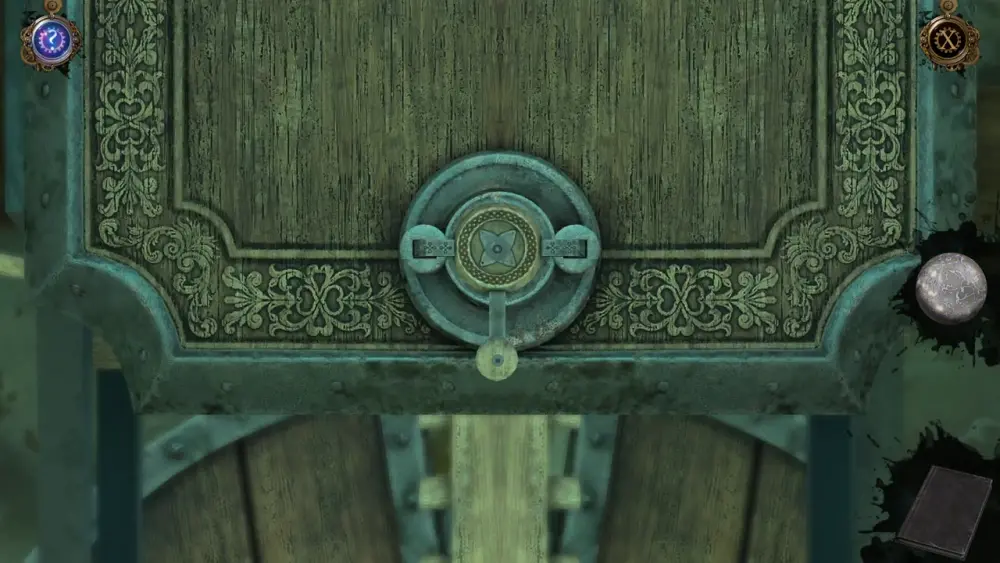
Once attached, the handle can be moved, which will turn the panel of dials over, revealing a puzzle at the back.
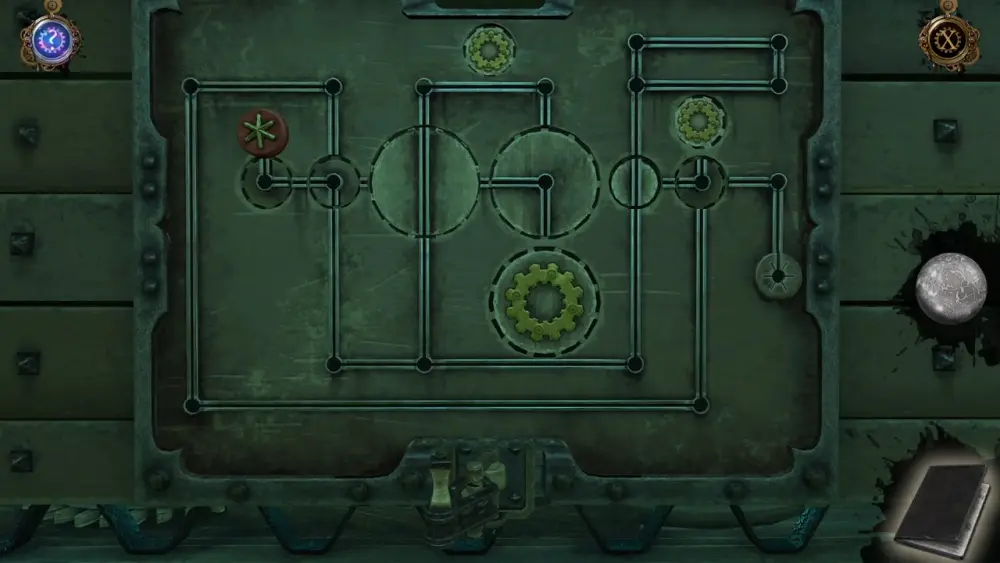
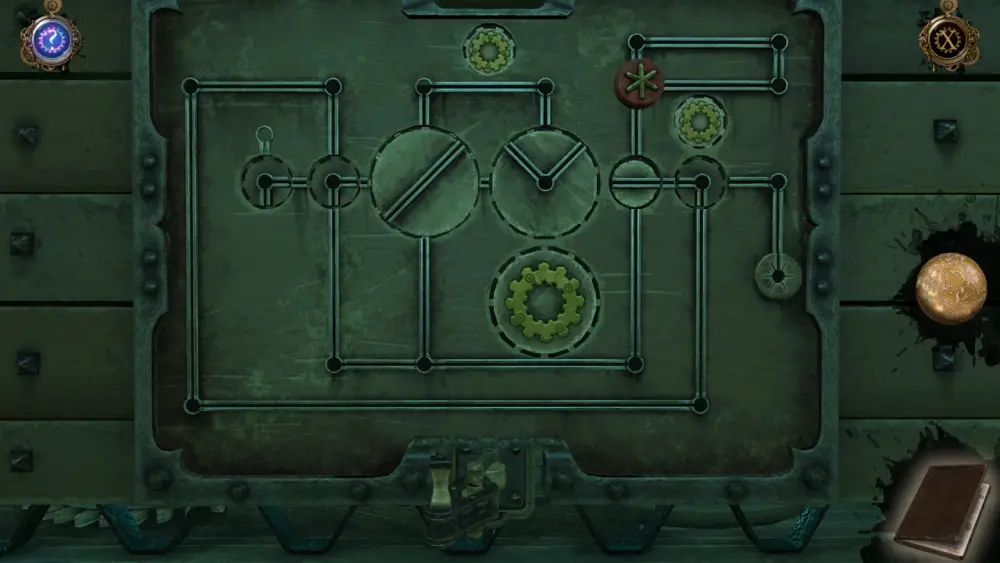
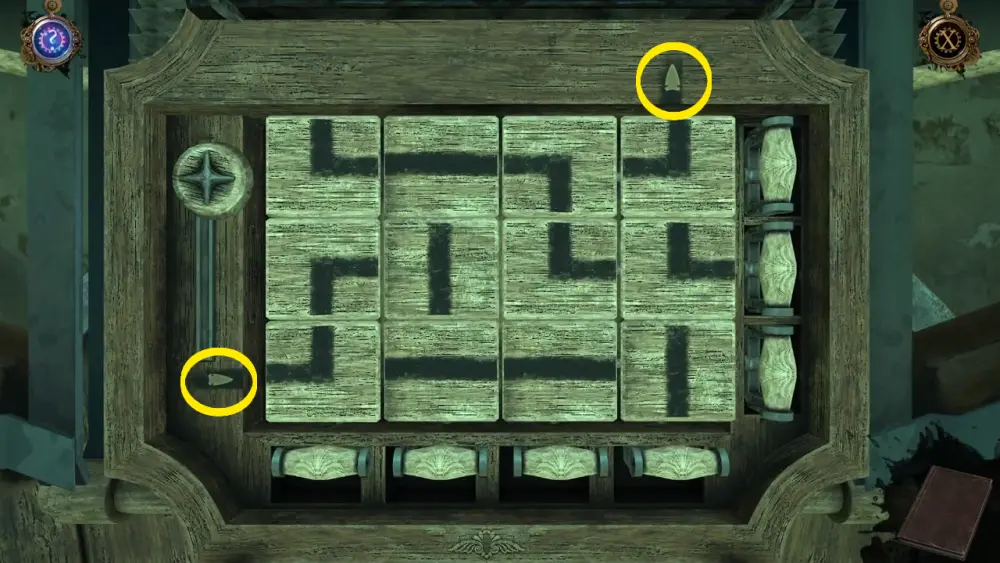
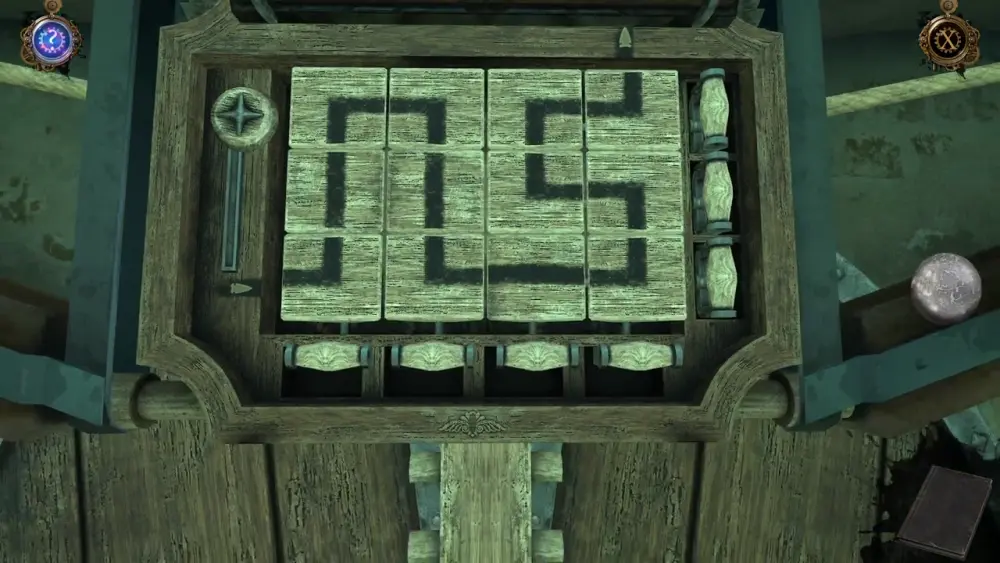
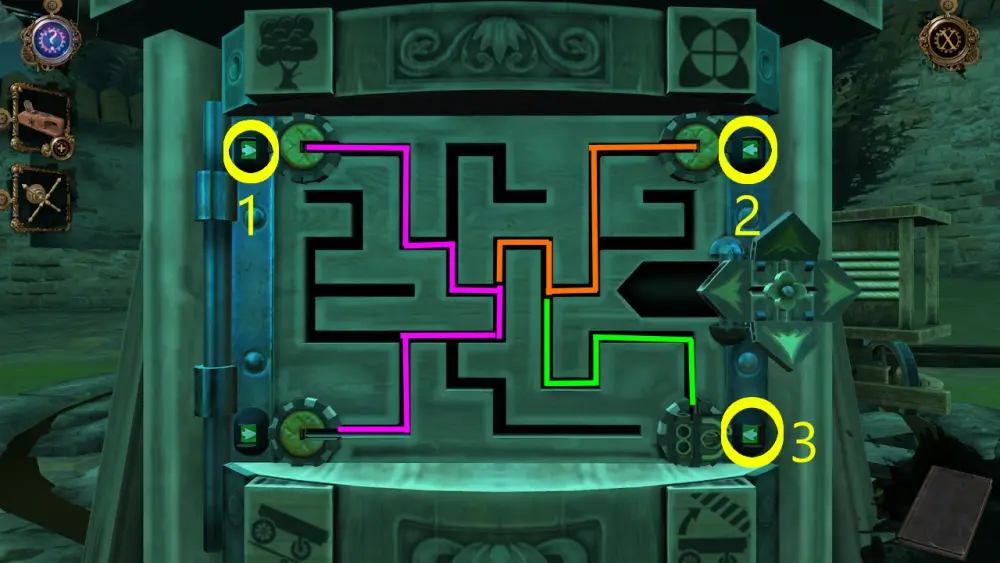
For this on-line maze (not to be confused with online, as in connected to the internet), you will have to move the red circle through the lined paths until you reach the other end, which is marked by what looks like a circular wooden chip. The challenge is that every time the red circle passes one of the golden gears, the dials with lined paths change position depending on the direction the golden gears are rotated.

As you can see, this is an extremely tricky puzzle that takes a lot of patience and some back and forth. Below is a set of directions you can follow when moving the red circle. For the sake of convenience, we have grouped the directions together depending on whether the last move of that particular group will pass a golden gear, thus changing the arrangement of the dials. That said, take note of how the dials should be positioned upon passing golden gears. All images below the directions are how the dials should look after the last move of a set of directions has passed a golden gear.
- Down > Right > Down > Right (up to the 3rd dot, passing the golden gear)
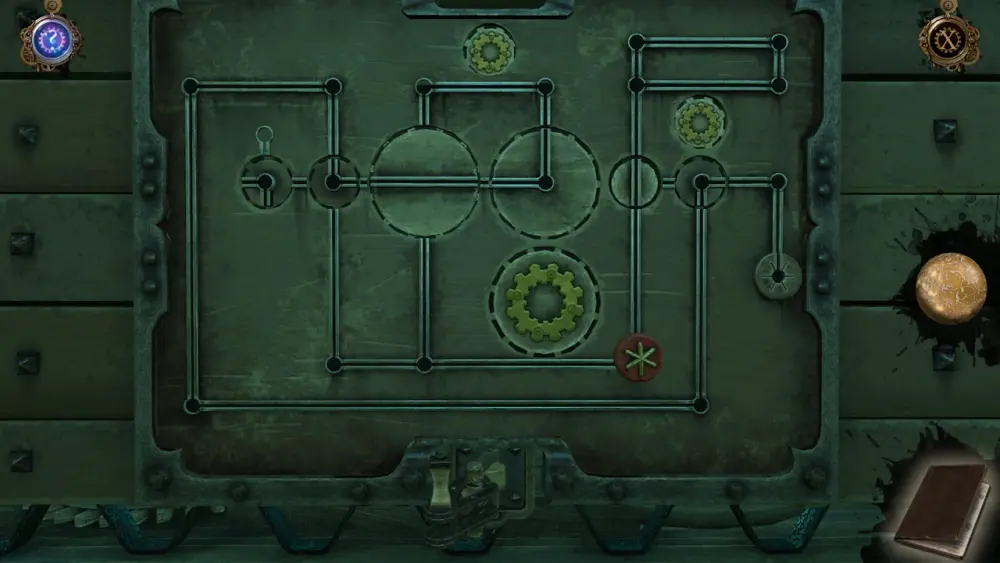
- Up (all the way to the 3rd dot) > Right > Down > Left (passing the golden gear)
- Up > Right > Down > Left (passing the same golden gear a 2nd time)
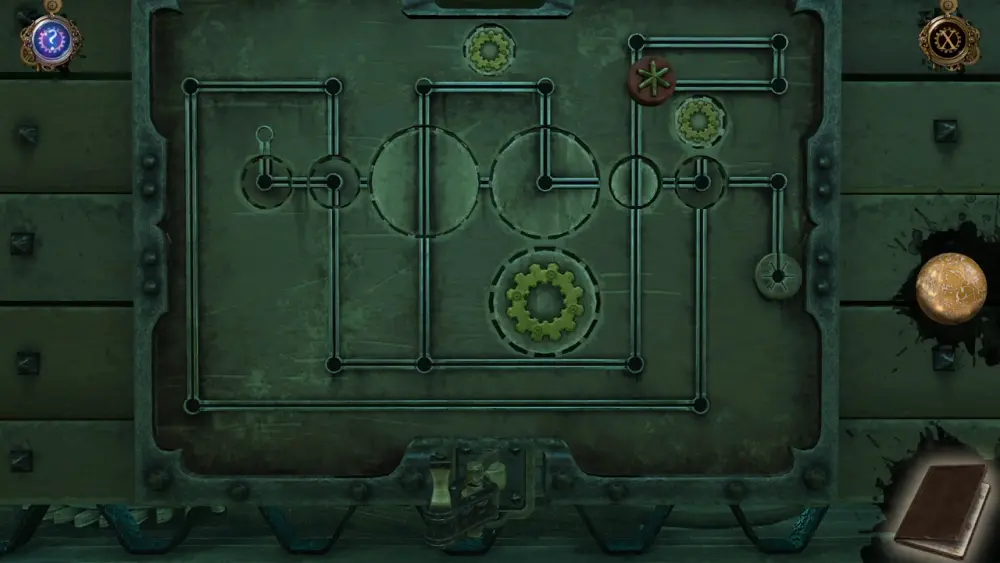
- Up > Right > Down > Left (passing the same golden gear a 3rd time)
- Up > Right > Down > Left (passing the same golden gear a 4th time)
- Down to the 3rd circle > Left (up to 2nd circle only, passing the golden gear)
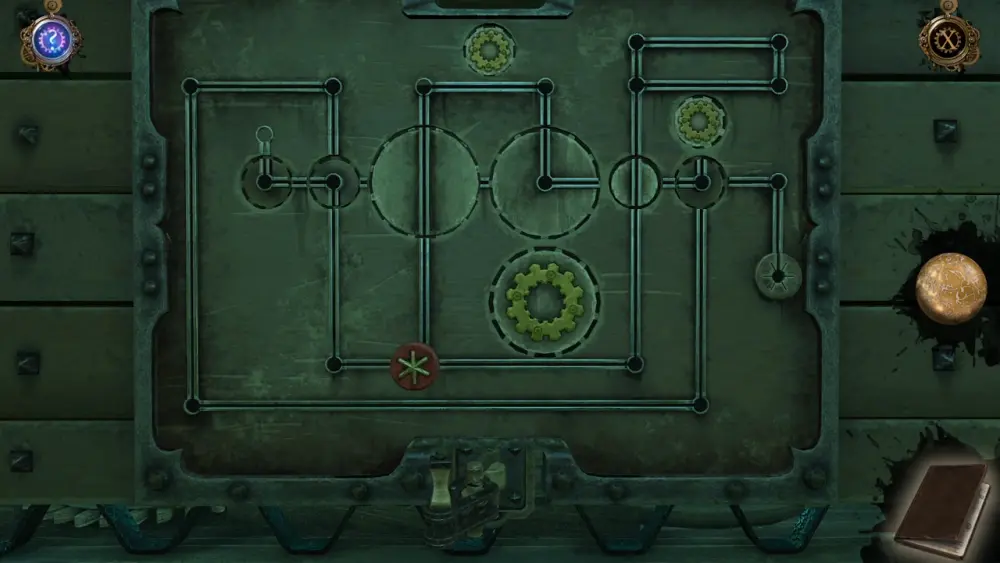
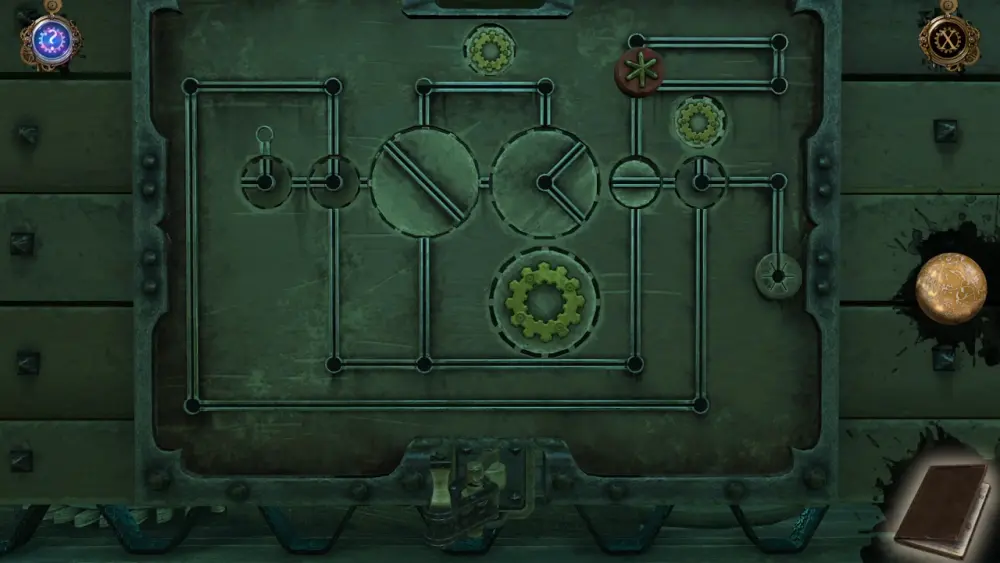
- Up > Right (passing the golden gear)
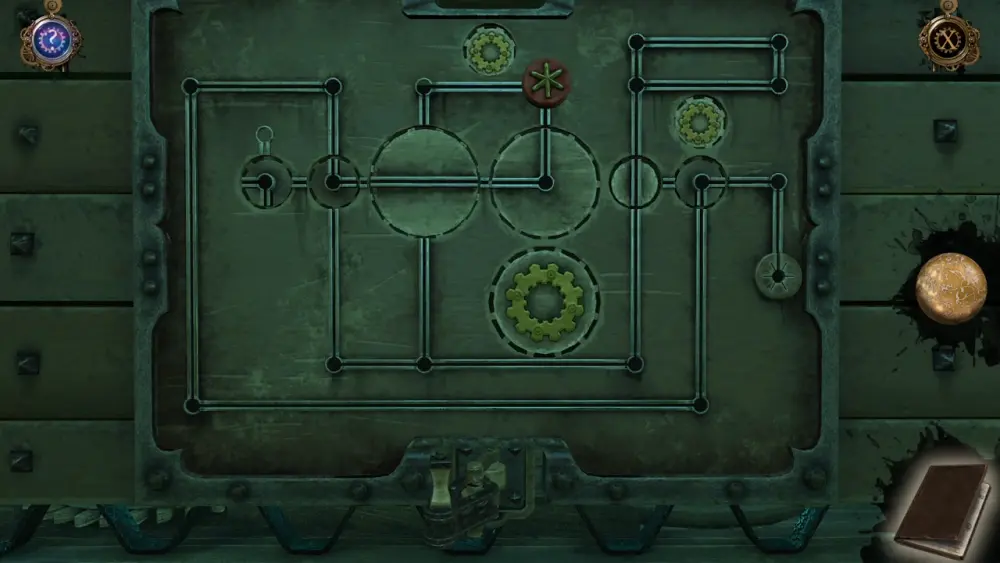
- Down > Left > Up > Left > Down > Right > Up > Right > Down

With that, you’ve successfully solved the puzzle, which will trigger the sandbag to lower itself.
This will cause the cart to move and crash onto the locked door to your right.
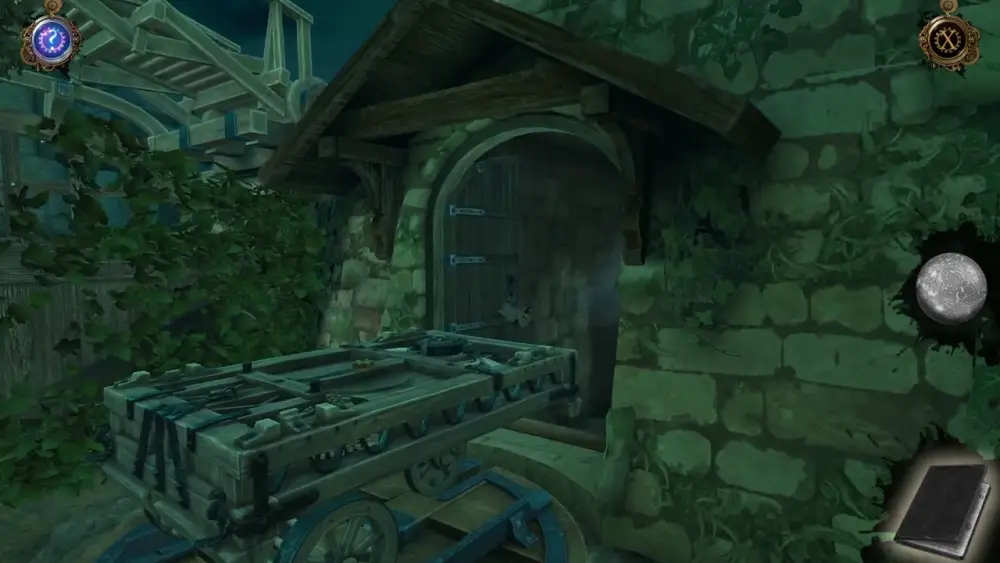
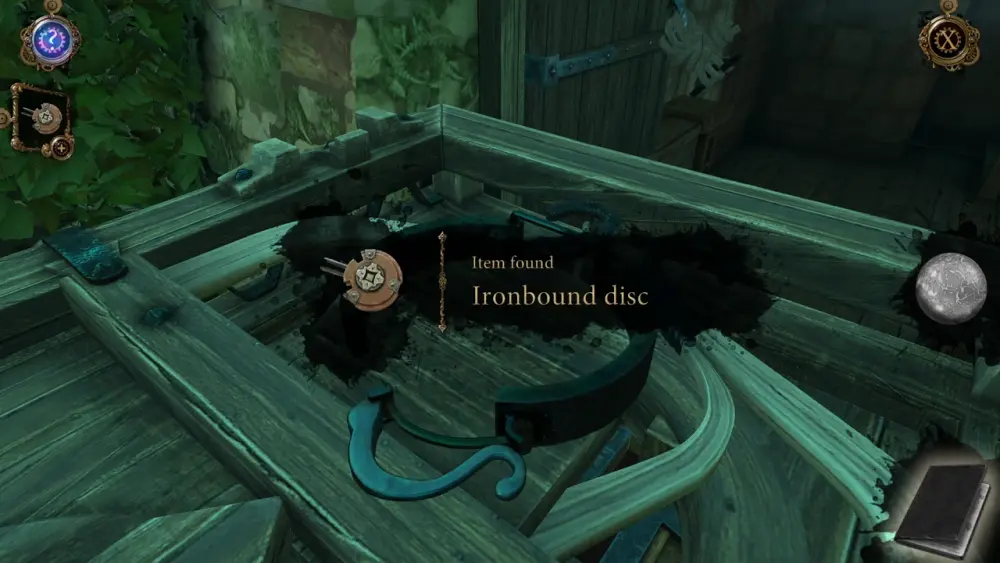
Walk to the cart as you will find something when you zoom into it. You will notice a circular device that’s held by a metal lock on the cart. You can loosen the lock by simply moving it until the device is free.
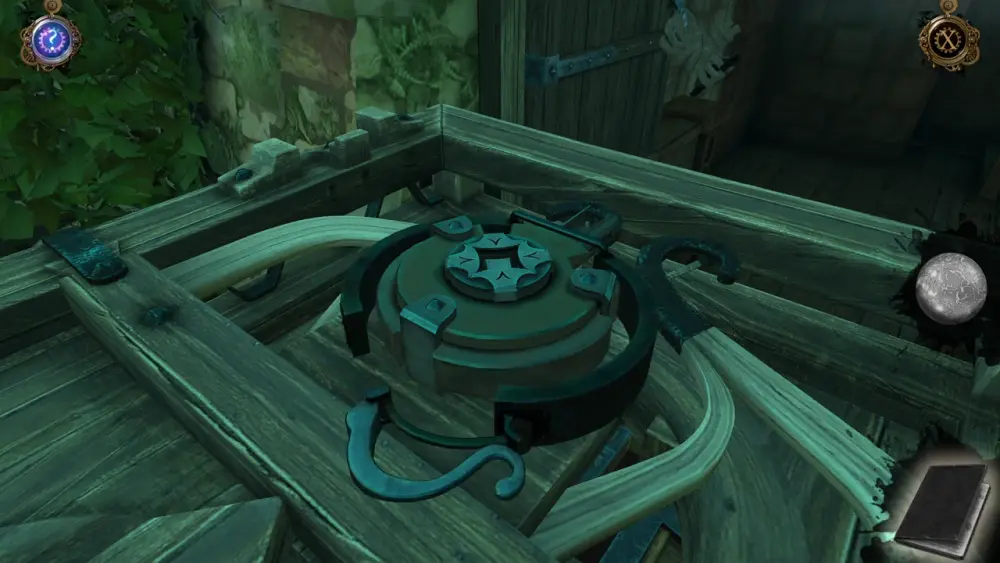
This device will be placed in your inventory as an Ironbound Disc. Take note of this for later use.
Now it’s time to explore the room—a workshop—you’ve just unlocked. Upon entering, you’ll immediately notice the rather odd contraptions inside the workshop, which means you have tons of puzzles to solve here.
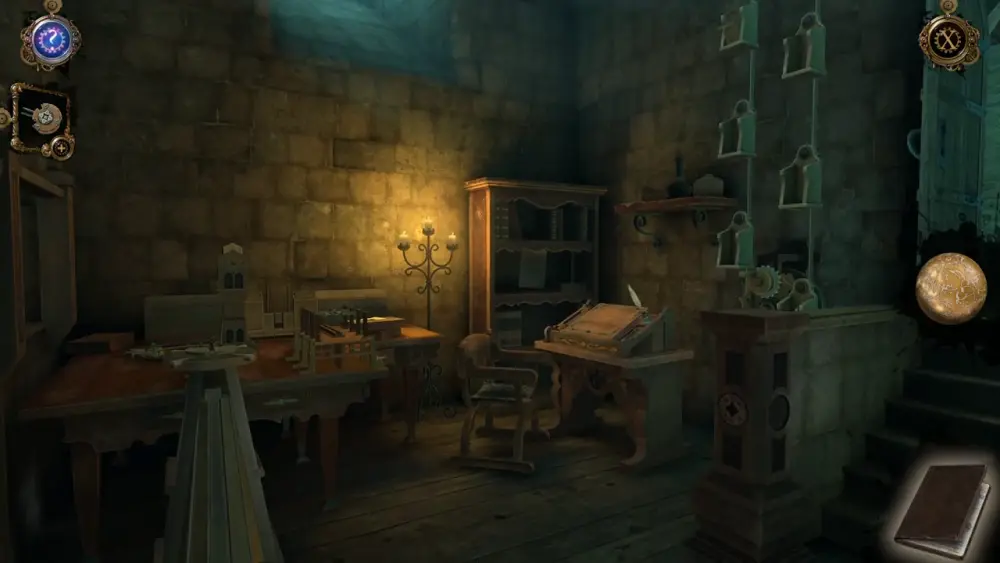
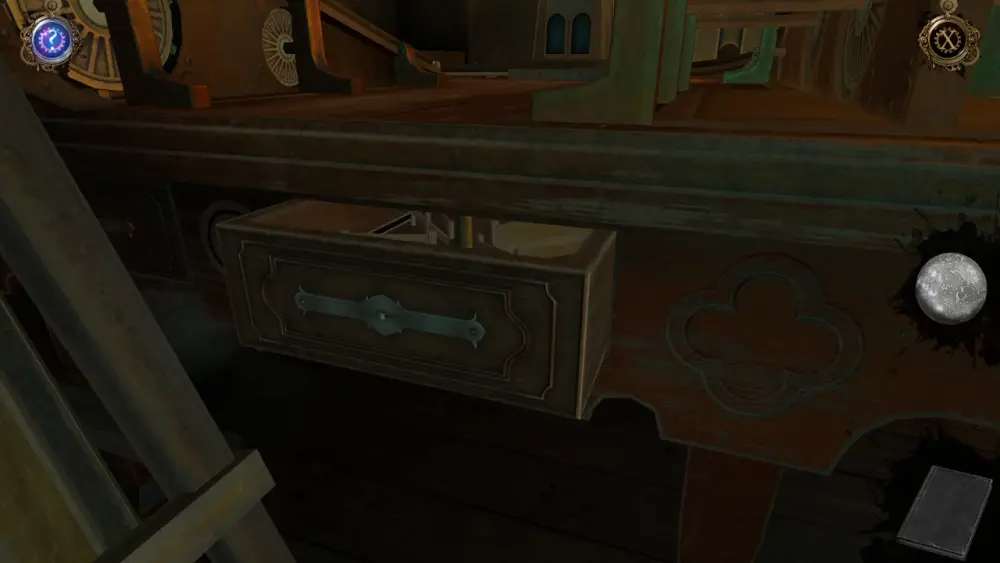
The most noticeable (and perhaps the most normal-looking) fixture in this room is the desk. Move closer to it to observe its finer details.
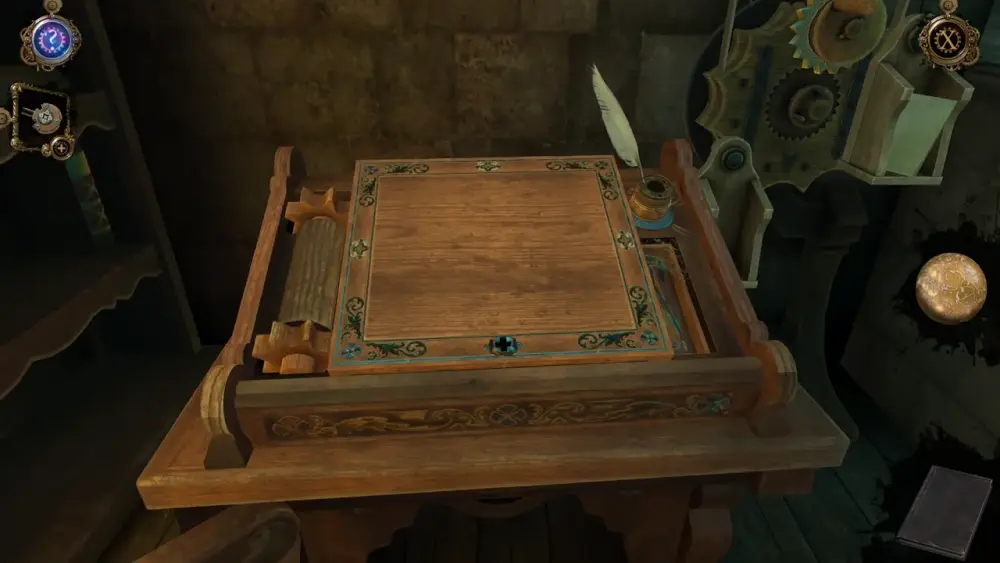
As you can see, the box has a lock that requires a cross-shaped key, but you won’t find it just yet in this puzzle. For now, turn your attention to the quill and the inkwell. If you zoom into it, you will see that the table has markings resembling the Roman numerals I, II, and III. Upon closer inspection, you will see that the inkwell also has the same markings on its outer rim, and that it can be rotated.
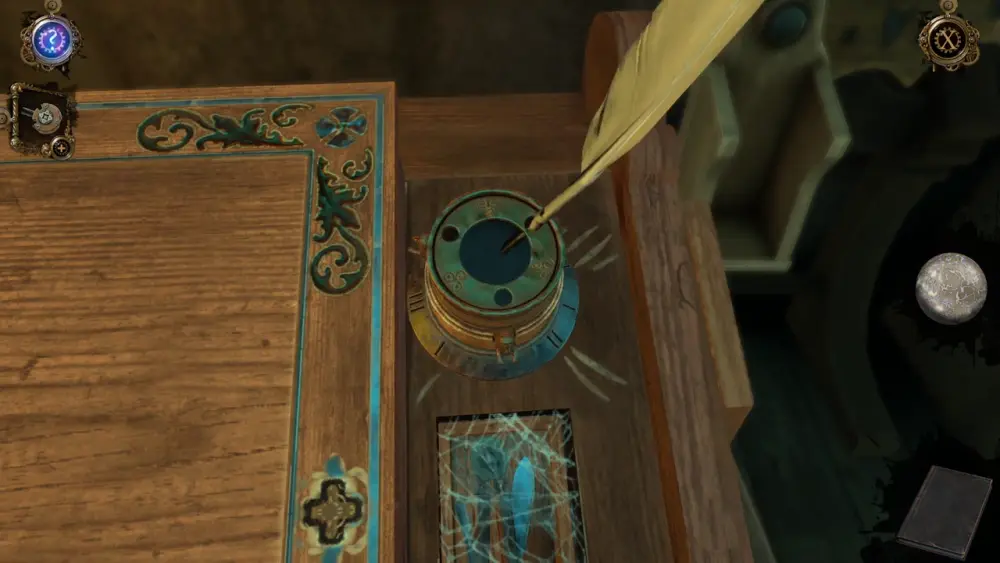
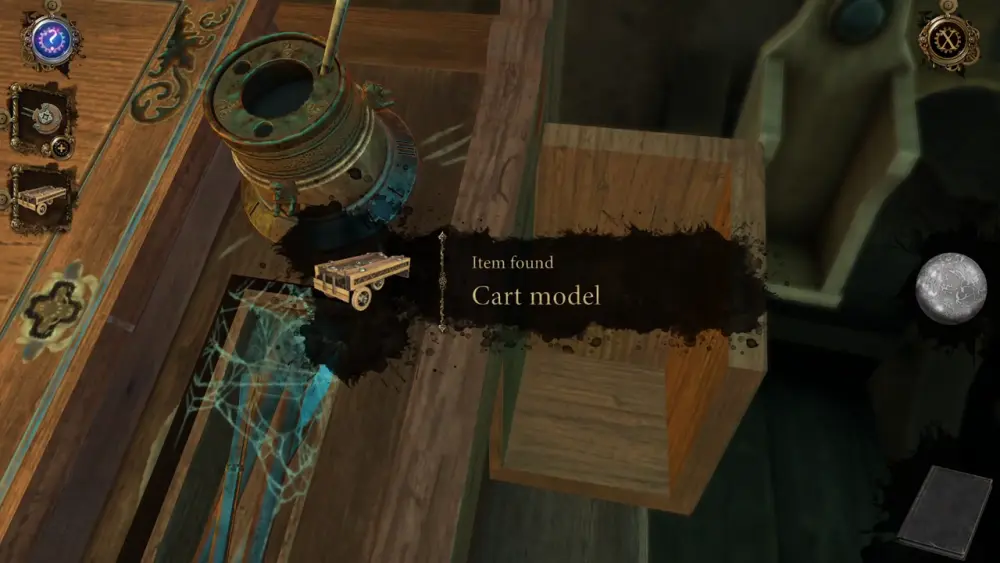
As you may have guessed, you will have to match the markings on the inkwell with the markings on the table by rotating the inkwell. Once you’ve done this, you’ll unlock a compartment to the side, wherein you will find a Cart Model. This will be placed in your inventory.
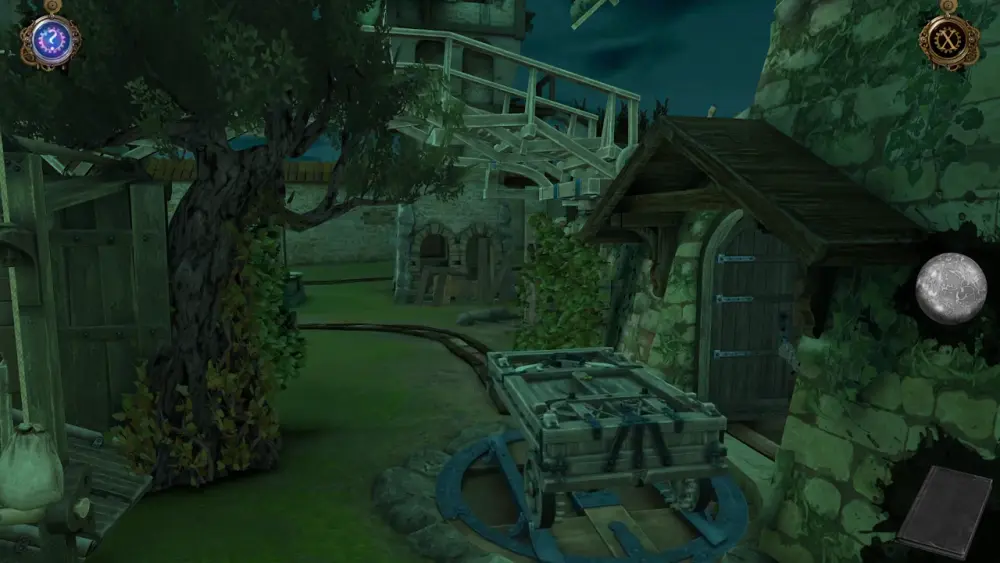
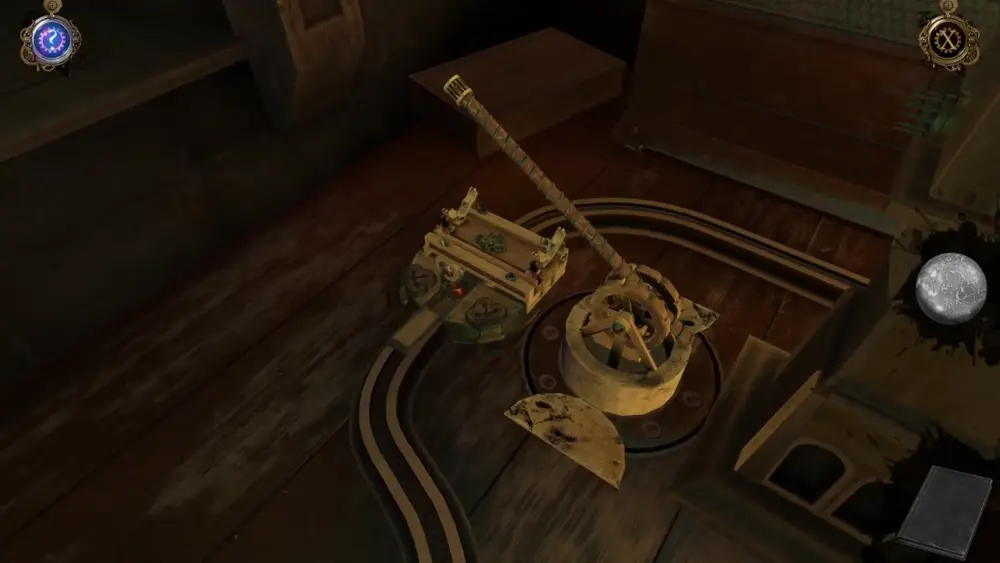
Let’s leave the desk for now and turn our attention to the rather strange but fascinating table to your left: here, you’ll see what looks like a model-scale rendition of the garden. However, you’ll only see the garden once you’ve managed to unlock the gate fronting the cart outside.
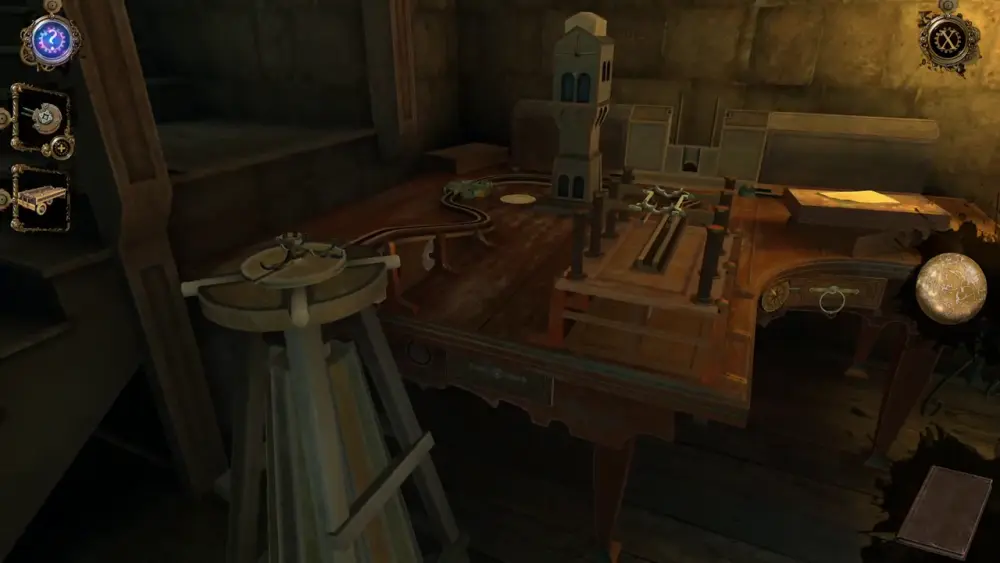
In any case, you’ll notice that there’s a track where a small vehicle can travel. This is where your Cart Model will come in handy. Place it onto the circular mount. You’ll notice that when you mount it on the circular platform, the Cart is facing backwards. Lift the mount using the handles and turn it until Cart Model’s wheels are at the rear and the gap on the circular mount is facing the winding path.
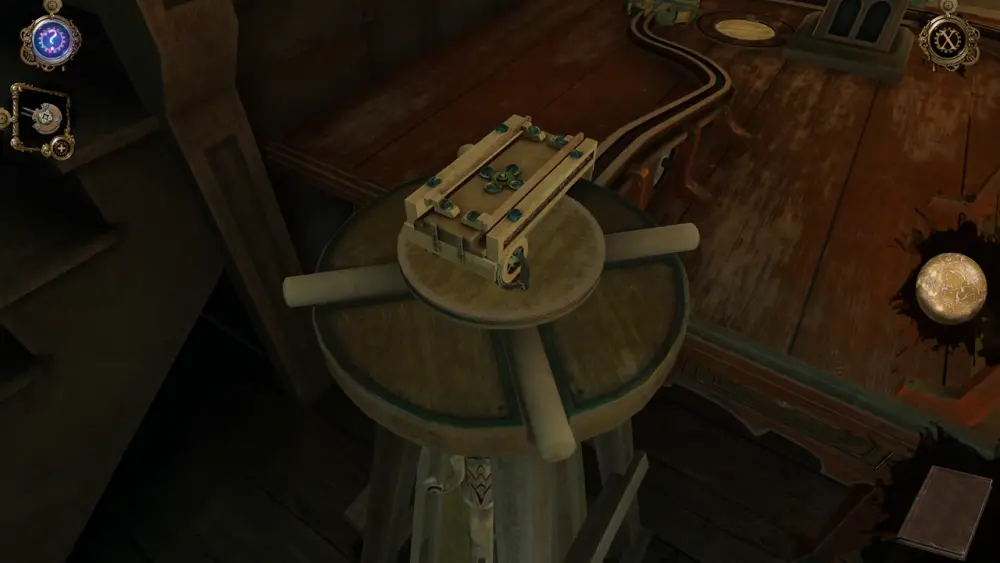
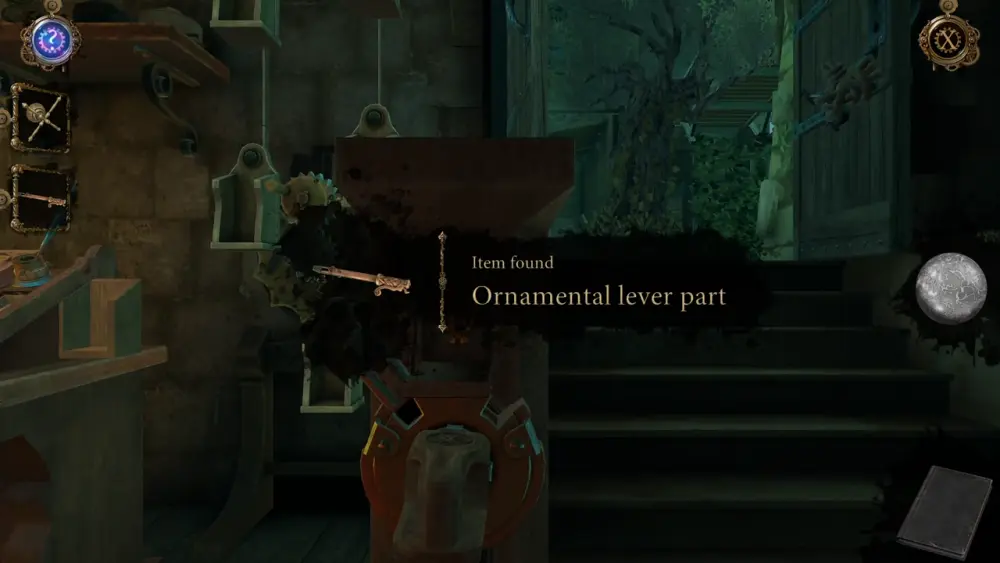
Upon looking around, there isn’t anything that would seem to set the Cart in motion just yet. However, you will find that just underneath the circular mount is a lever. Zoom into it and you’ll be able to find and take the item labeled Ornamental Lever Part, which will be placed in your inventory.
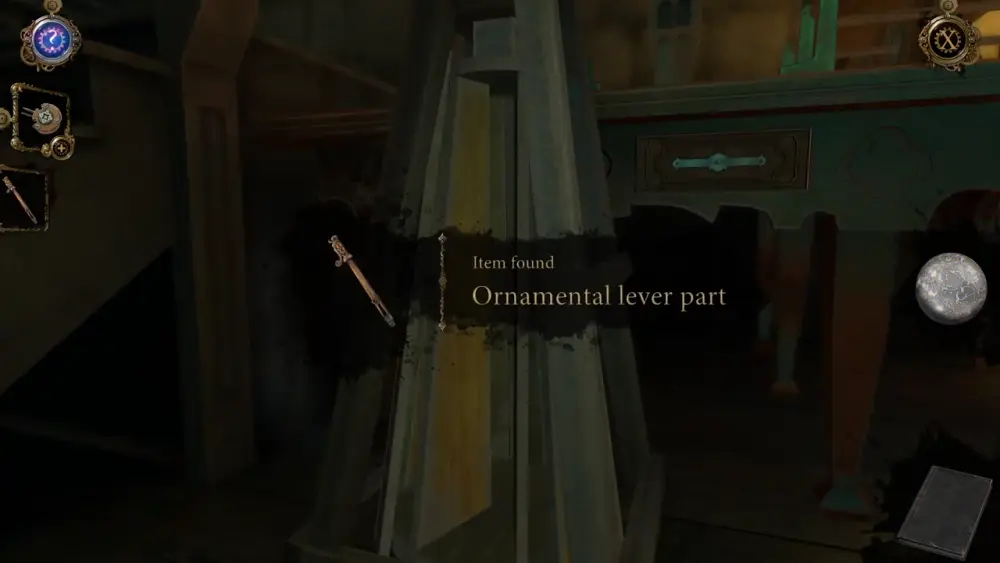
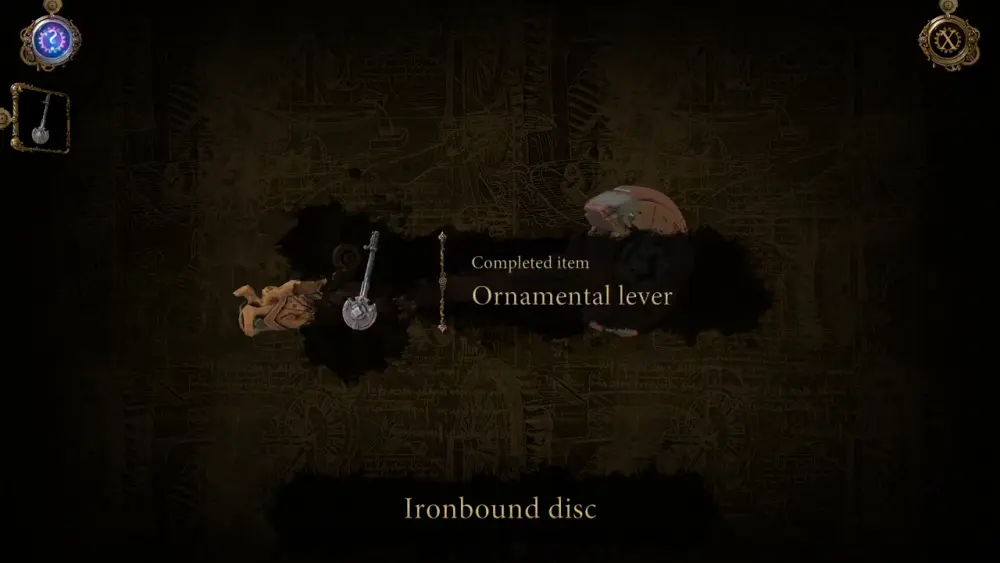
Speaking of your inventory, you’ll now have two items in it: the Ornamental Lever Part and the Ironbound Disc. Because the Ironbound Disc is marked by a + sign, access your inventory to put these two items together, resulting in a completed Ornamental Lever.
If you look around the room some more, you’ll notice a familiar looking shape on the post of the staircase.
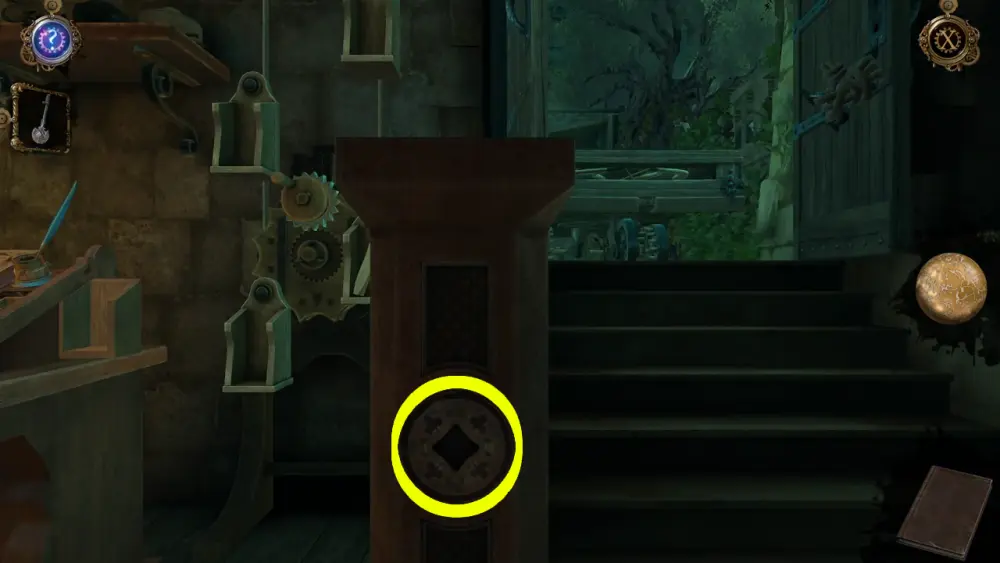
This is a shape that matches the orientation of the Ornamental Lever you just completed. Take the lever and place it onto the circular mount of the staircase post. Crank the lever to the left and it will open a compartment right on top of it.

With this, you will be treated to a very brief cutscene where the (life-size) cart outside will turn on its platform and the gates fronting it will be opened, giving you access to the garden.
After this cutscene, your perspective will return to the compartment you’ve just opened. When you zoom in, you’ll see a small circular mechanism. Align the top and bottom segments within the circle. Afterwards, turn the circle as you would a knob for 180 degrees.
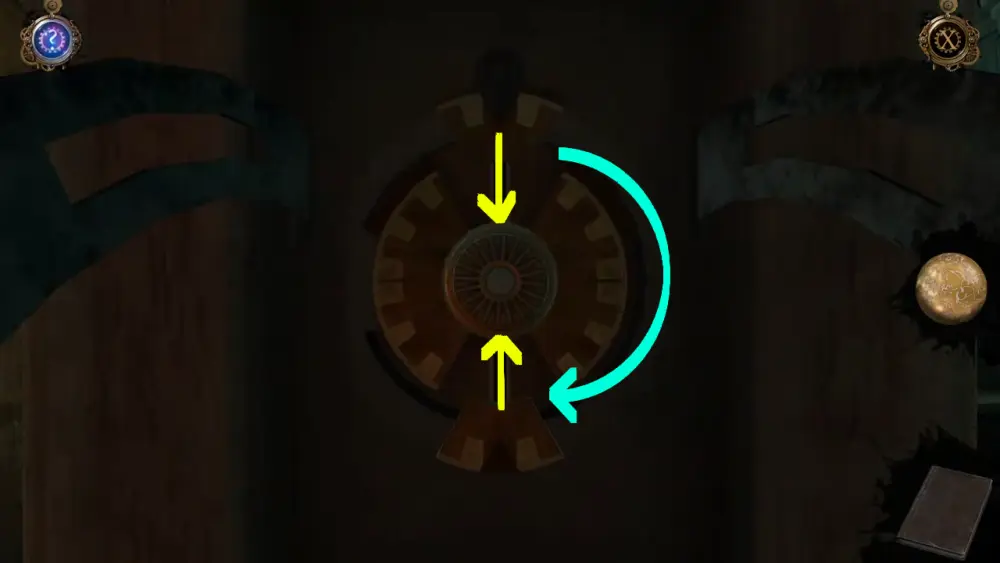
Once the mechanism has been unlocked, it will reveal that the small circle in the middle is actually a clever compartment. Turn the small circle until you see the hidden item.
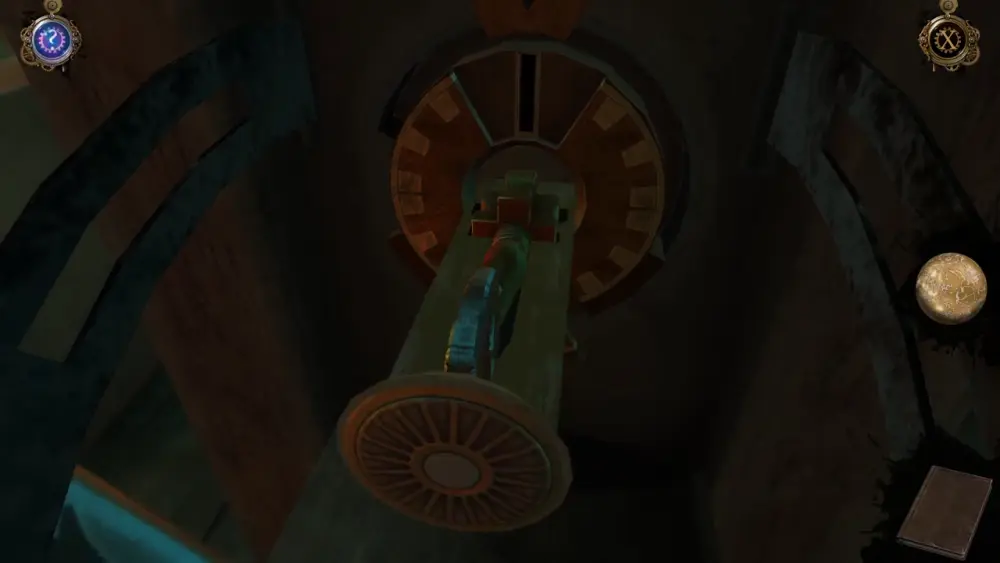
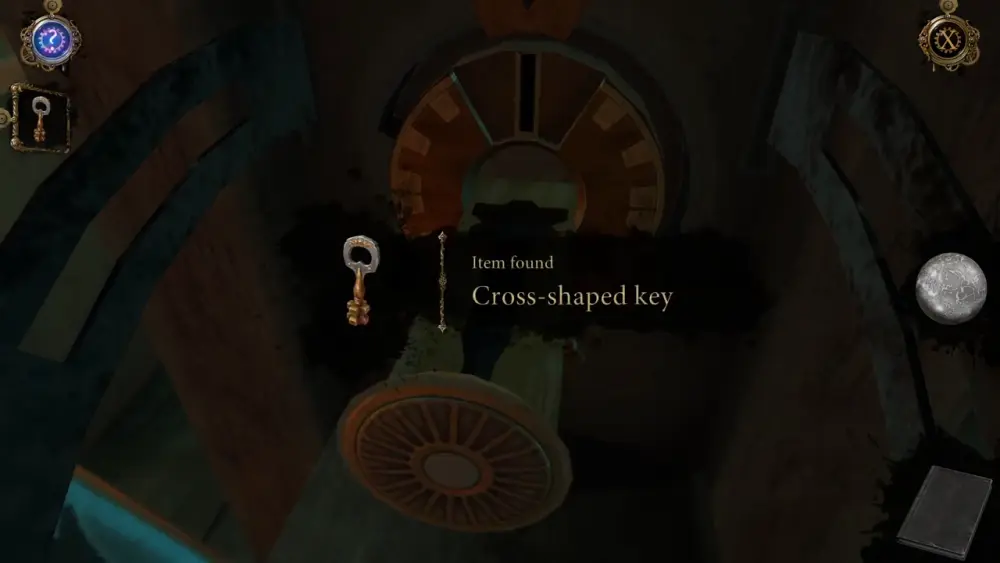
Take the item, which is, as you might have guessed, a Cross-Shaped Key. This will be placed in your inventory.
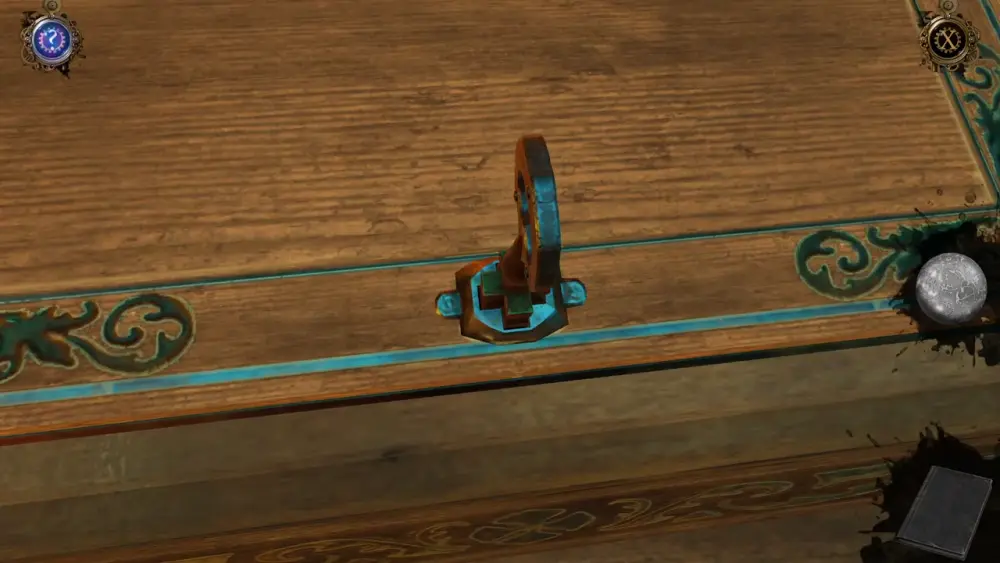
If you will recall, we previously mentioned a desk in the workshop that requires a Cross-Shaped Key. With this new item on hand, head back to the desk and unlock the box on top of it. Turn the key until the box opens.
As the cover of the box slides upward, you’ll discover an interesting contraption: a piece of paper divided into two parts. At first, this won’t make much sense until you pay particular attention to the rotating gear on its left.
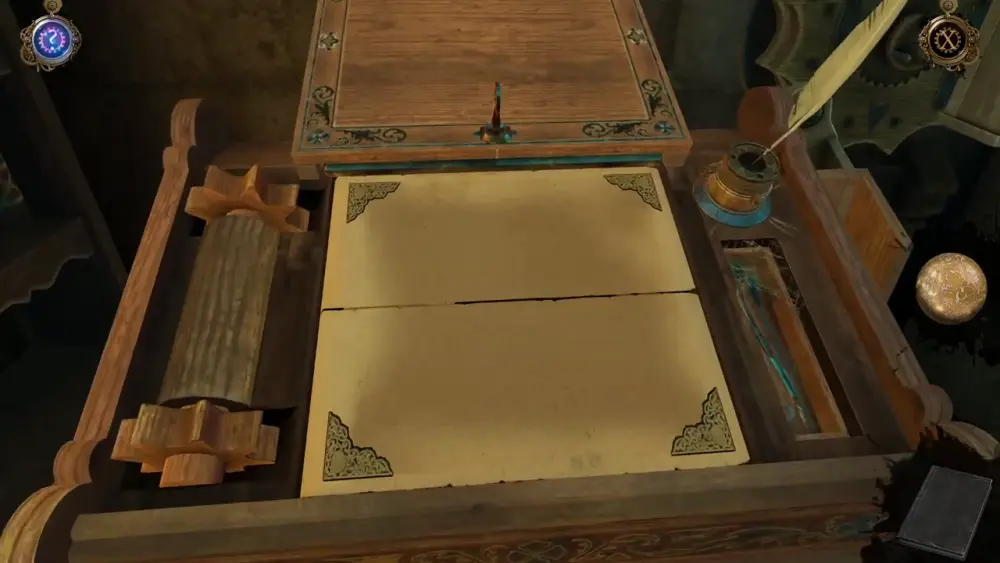
Once you move these gears, you’ll discover that the pages are actually attached to a conveyor underneath, which allows you to scroll through the different images drawn on both segments of paper. However, scrolling through the images won’t lead to anything if you don’t know the right image you’re looking for. For that, you’ll need to activate the Oculus Perpetua. Looking through the Oculus Perpetua, you’ll see that certain images will have glowing symbols on them. Align these symbols on the top and bottom segments of paper. This will trigger another mechanism to slide on top of the drawing.
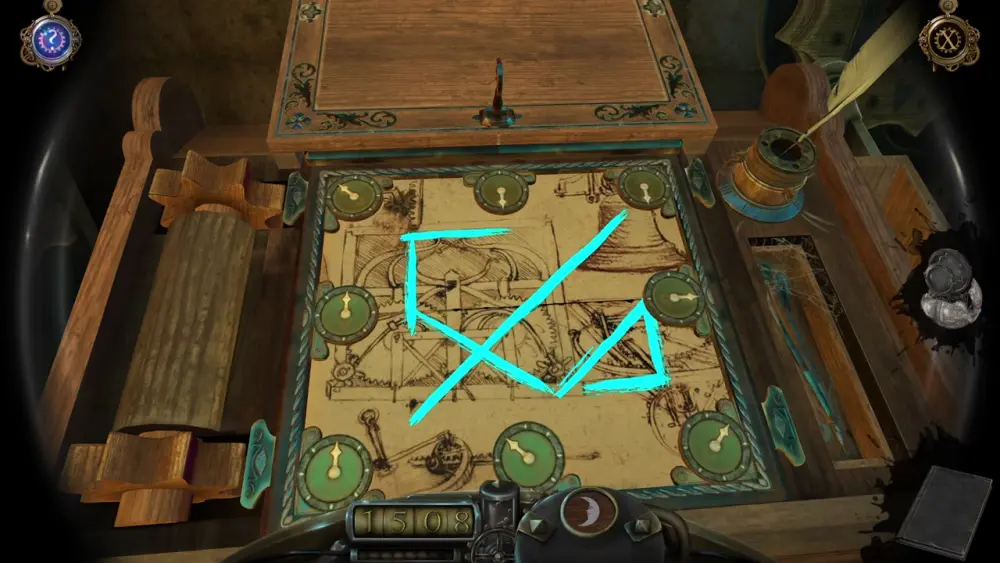
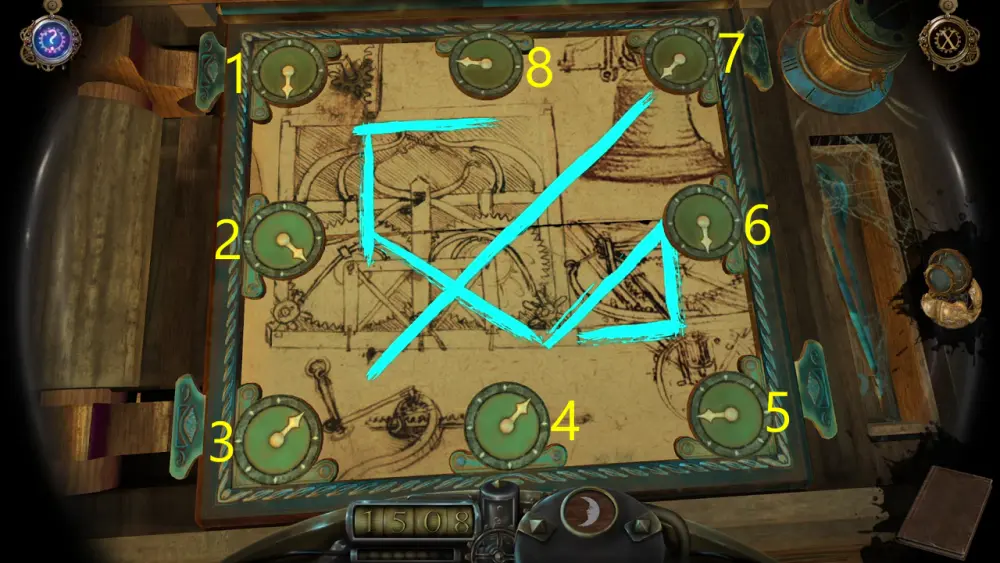
The goal for this puzzle is to align the arrows on the circles with the glowing symbols on the pages. You can move the arrows by rotating the 8 dials.
There’s no particular order in which the arrows ought to be arranged, only that all the arrows must match the symbols they correspond with. It’s a little easier to view this from a counterclockwise perspective. Thus, you can start with the top leftmost corner arrow and work your way from there. Below is an image detailing which arrows must point where, starting from the top leftmost corner arrow:
Once you’ve aligned all the arrows with the symbols, the frame containing the dials will slide back up the cover of the box. To the left of the box, a compartment will open, which will reveal another item: a Belfry Model.
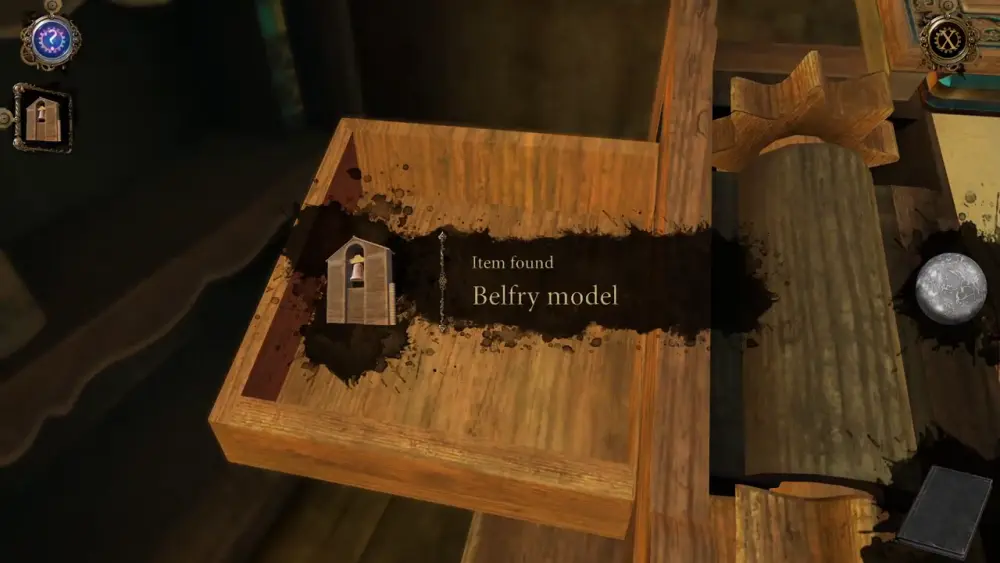
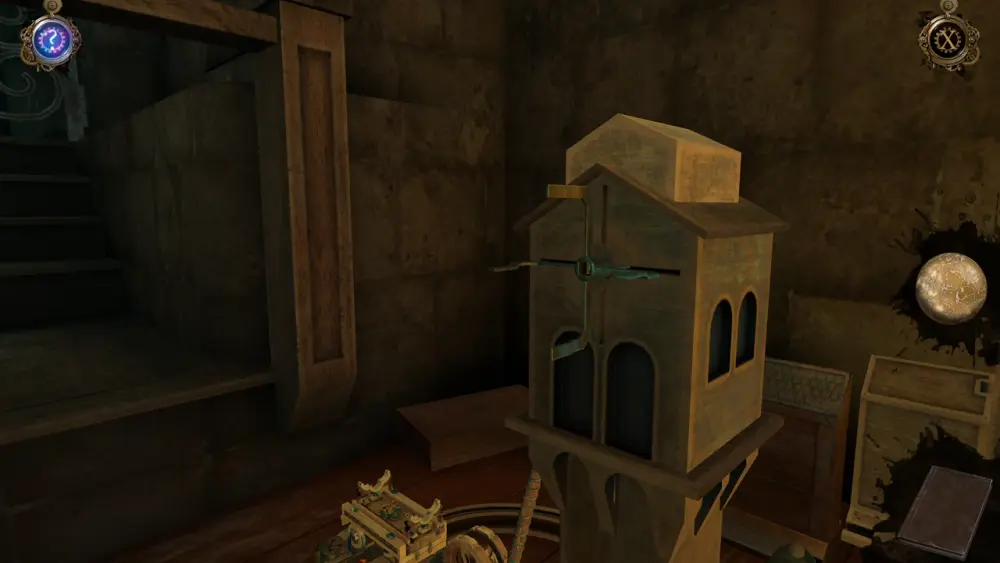
Like the Cart Model, the Belfry Model goes into the table with the model-scale structures. Zoom into the far end of the table and you’ll see an empty slot with two small poles. This is where you can mount the Belfry Model by sliding it down the poles.
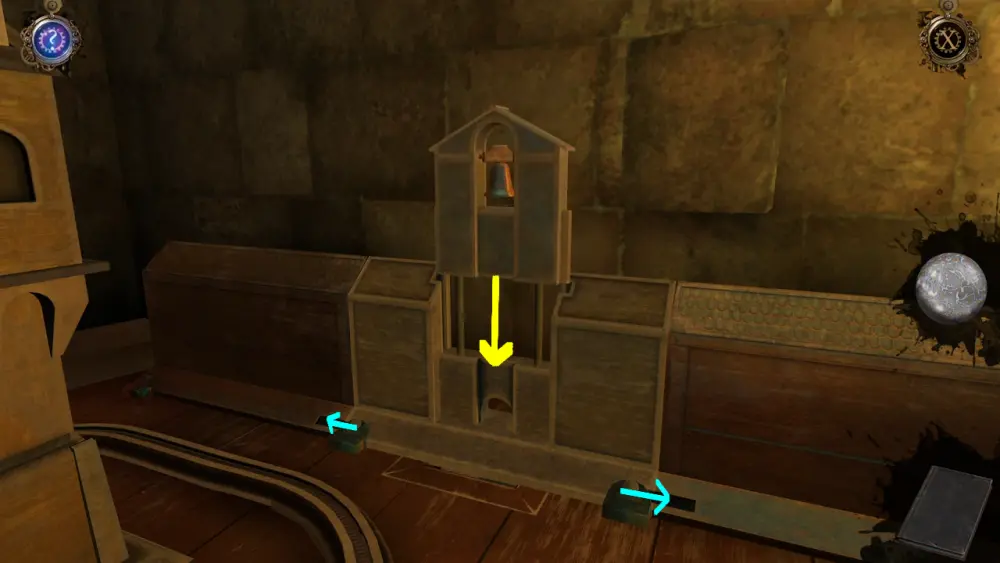
This action will trigger the locks at the side of the segment of the Belfry Model to move to the sides. This will allow the entire wooden segment to align with the two other segments beside it. Underneath the middle segment, you’ll notice that there’s a partially revealed symbol.
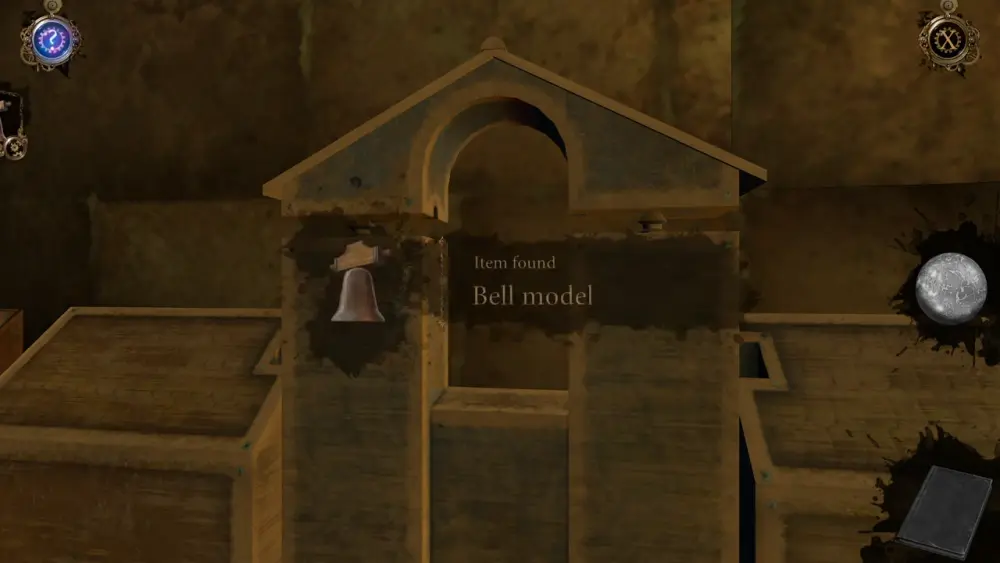
If you’re extremely observant, you’ll also hear a ringing from the tiny bell of the Belfry Model. Take this as a sign to zoom into the bell as you can take it and keep it in your inventory as a Bell Model.
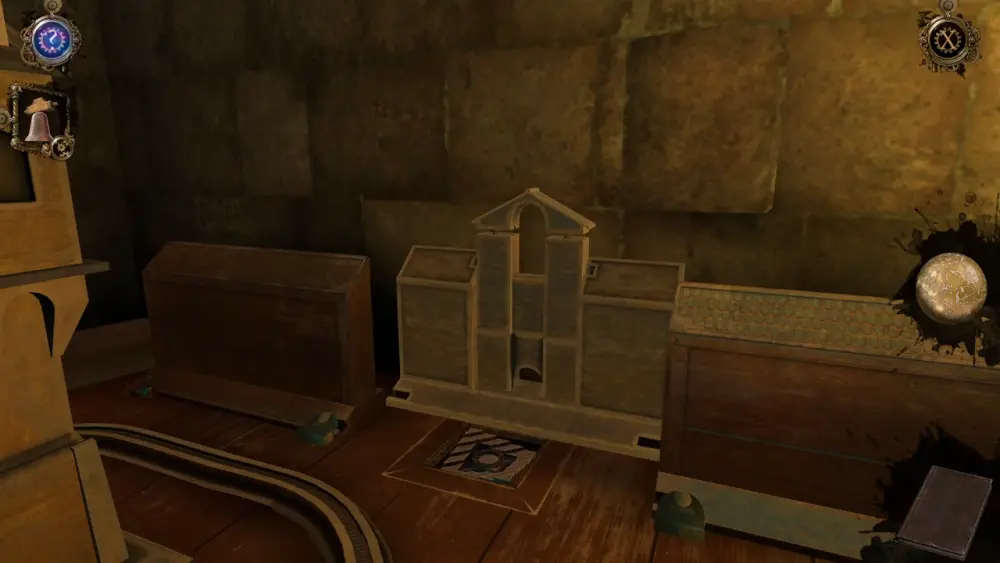
With the Bell Model removed, you can push the middle segment all the way back, revealing what’s really underneath it.
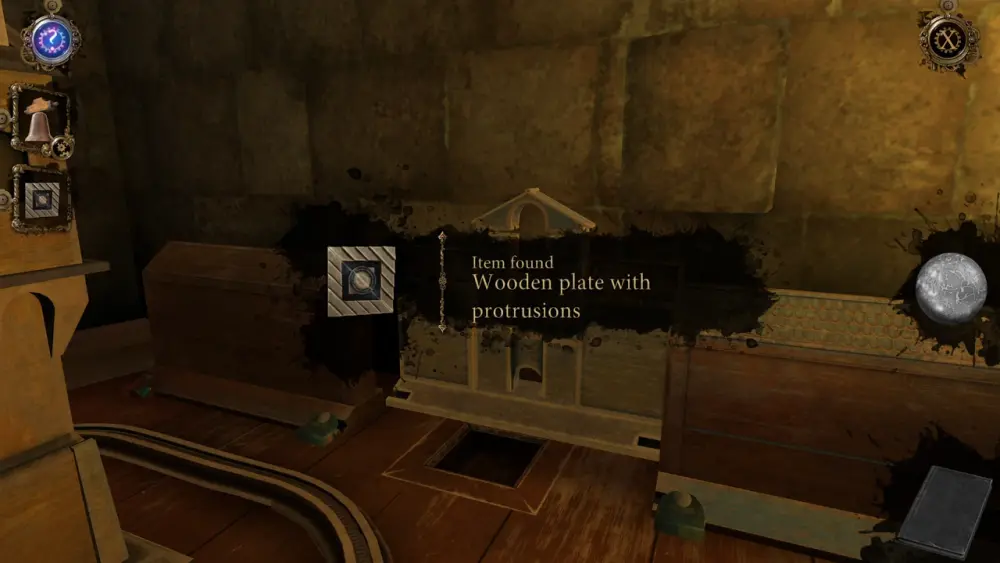
Apparently, it’s not a symbol but a shallow compartment hiding a Wooden Plate with Protrusions. Take this item for your inventory.
Speaking of inventory, you’ll see that the Bell Model, when viewed as part of your inventory list, is marked by a cogwheel symbol. This means you have to tweak it in the inventory first for the item to be used properly. That said, access the Bell Model via your inventory and turn it around. Keep on rotating it until you get the Small Key Item.
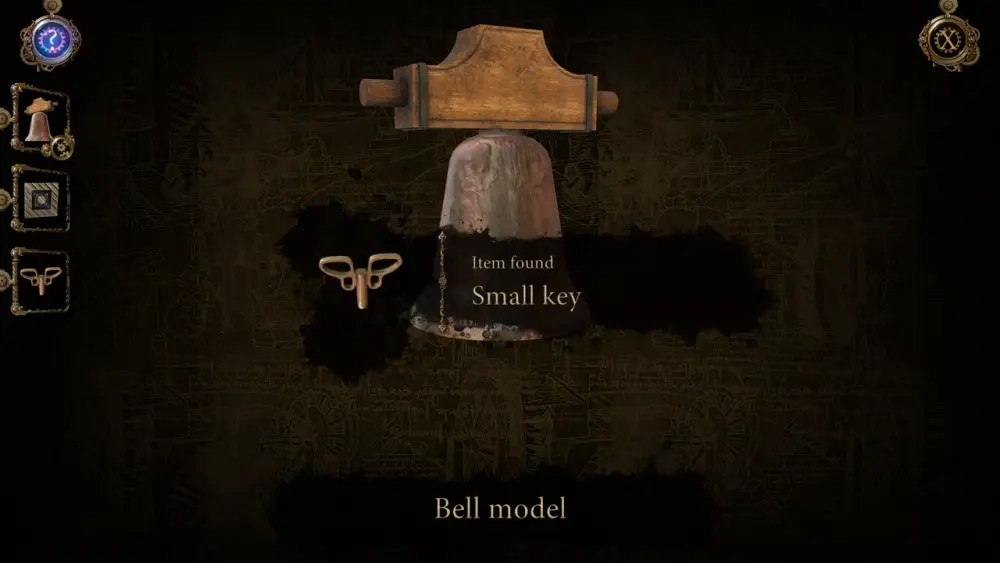
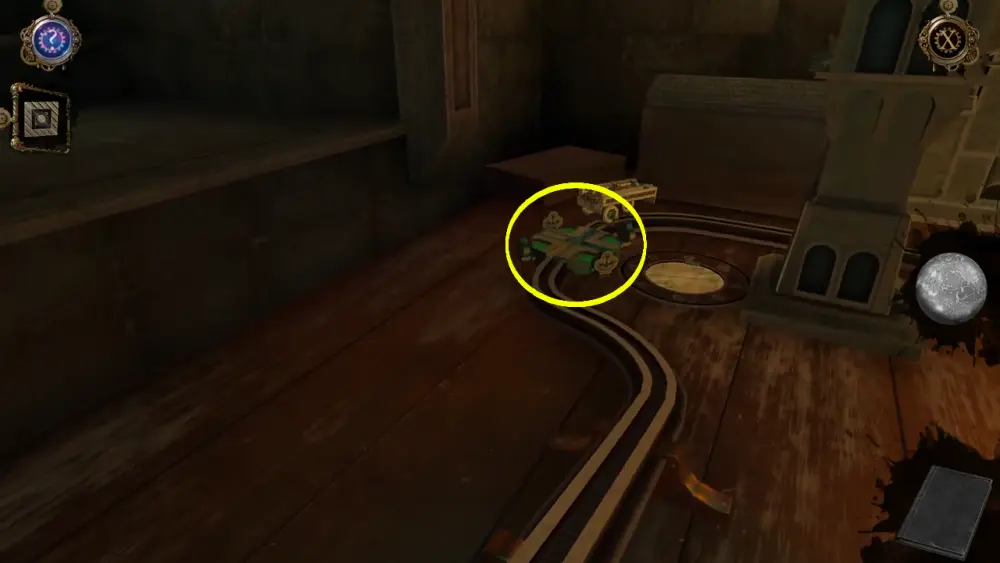
Now one thing you’ll notice about this small key is that it has no head, meaning it’s not for a door but for a device with a wind-up mechanism. Go back to the circular platform with the Cart Model and you’ll find just what this key is useful for.
Insert the Small Key item at the top of the mounted Cart Model. After turning it around, a lever will spring out of the left side of the Cart. Pull the lever down and watch the Cart Model go down the winding track on the table.

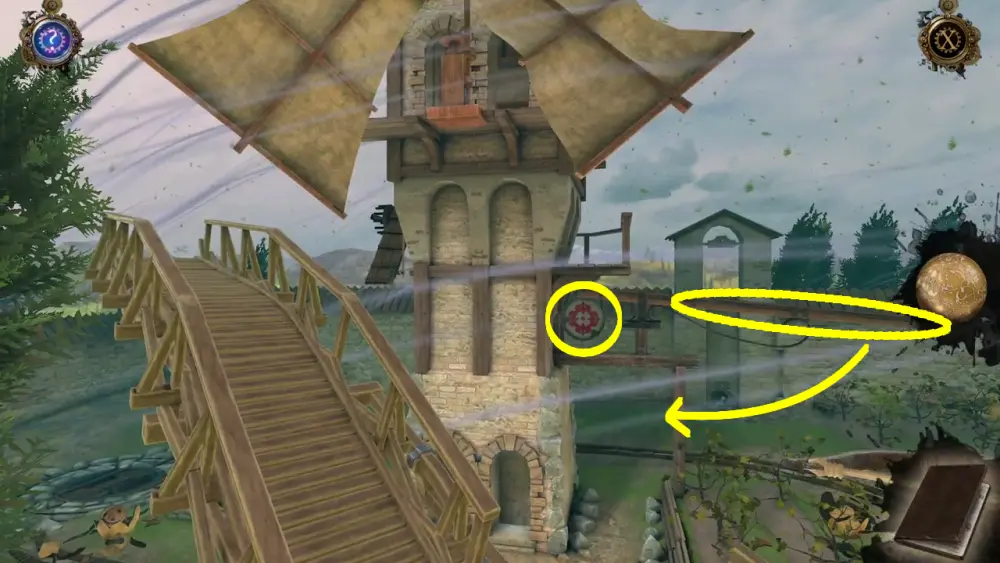
As the Cart Model travels the track, you’ll hear a clicking sound when it passes a circular mechanism just right in front of the model windmill. As shown in the image below, the circular mechanism will open itself once the Cart Model passes it.
After the Cart Model reaches the end of the track, turn your attention first to the circular mechanism we just mentioned. Zoom into it and turn it, making sure the club-shaped locks are aligned with the corner hatches, until the mechanism locks itself.

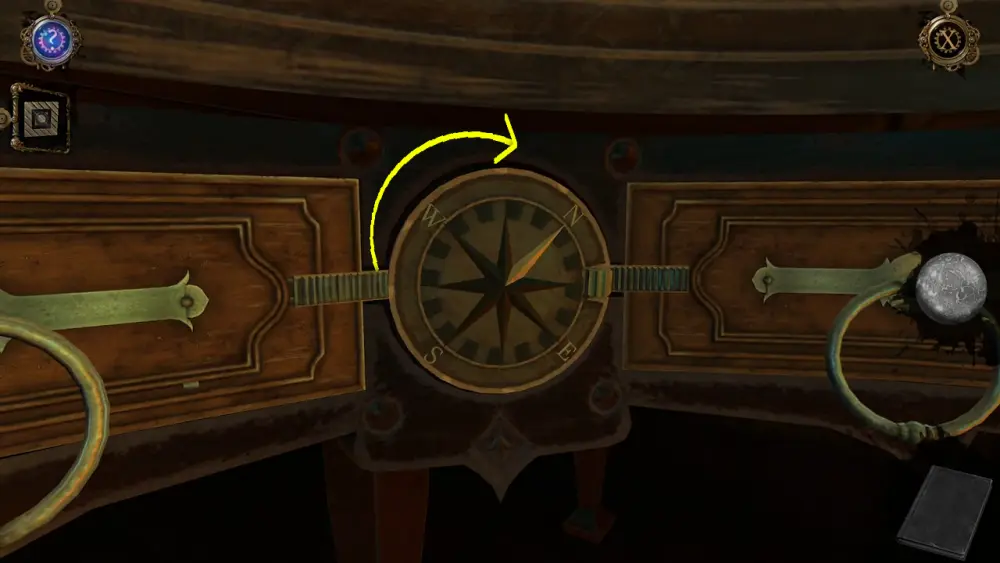
This action will trigger a brief cutscene showing a compass found at the side of the table where the model buildings and vehicles are located. The compass, whose northern pointer was previously facing northwest, will now point to the northeast.
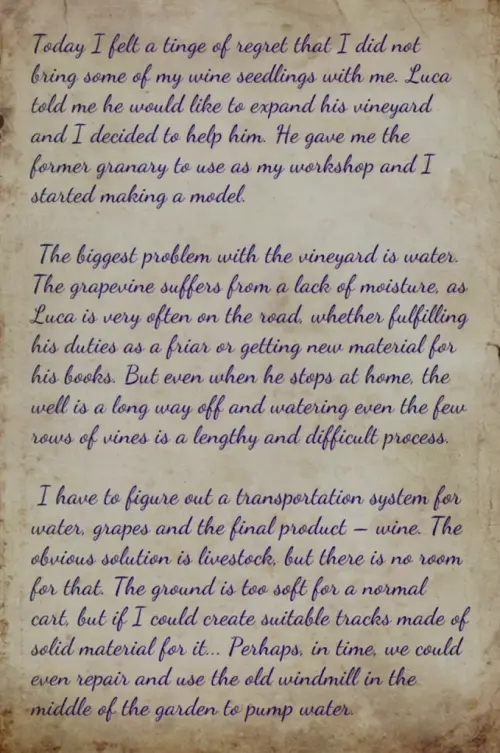
After the cutscene, you can zoom out of the circular mechanism you just locked so you can turn your attention to the compass. However, before you do, you’ll notice a piece of paper left on top of some books at the side of the table. Take this piece of paper to read its contents, which are pictured in the image below:
After reading the letter, you can now proceed to interact with the compass at the side of the table. Immediately, you’ll see that the compass is flanked by two drawers, both of which are locked if you try to pull the handles.
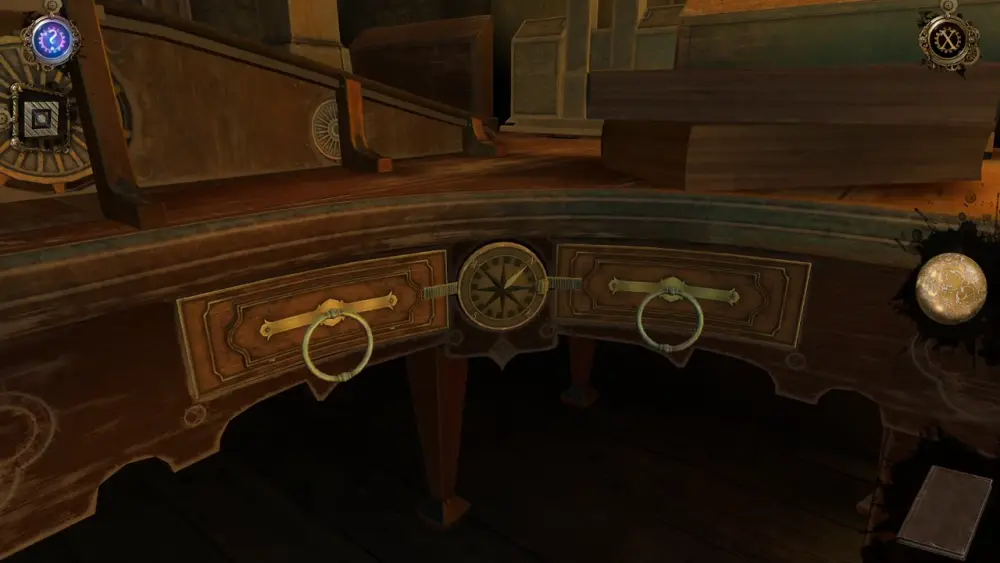
To unlock the drawers, zoom into the compass. Upon closer inspection, you’ll notice that either side of the compass has a metal strip that looks like a rolling conveyor. However, only the right strip is attached to a small roller that can make the strip move. Turn the roller so you can pull back the metal strip until it no longer blocks the drawer.

As the right drawer is now open, you can find and collect a Wooden Frame item inside.
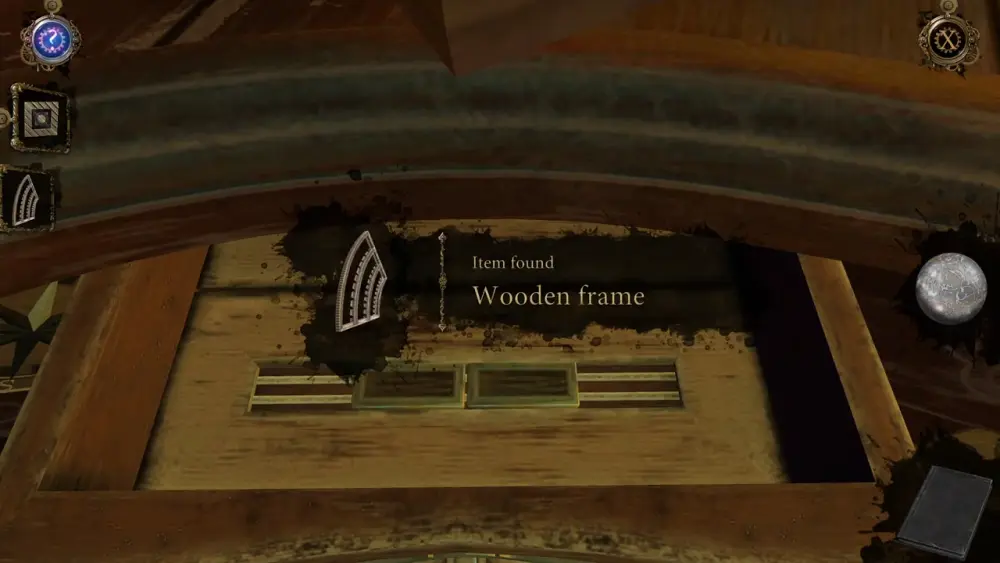
After collecting the Wooden Frame, you’ll see two rectangle sliders. Moving them to either side will partially reveal a rotating disc underneath.
Push back the wooden frame to reveal the remainder of the disc, which resembles the compass without the directional markers. If you rotate the compass inside the drawer, the compass on the side of the table will also move. Turn the drawer compass until the white arrow is facing southward.
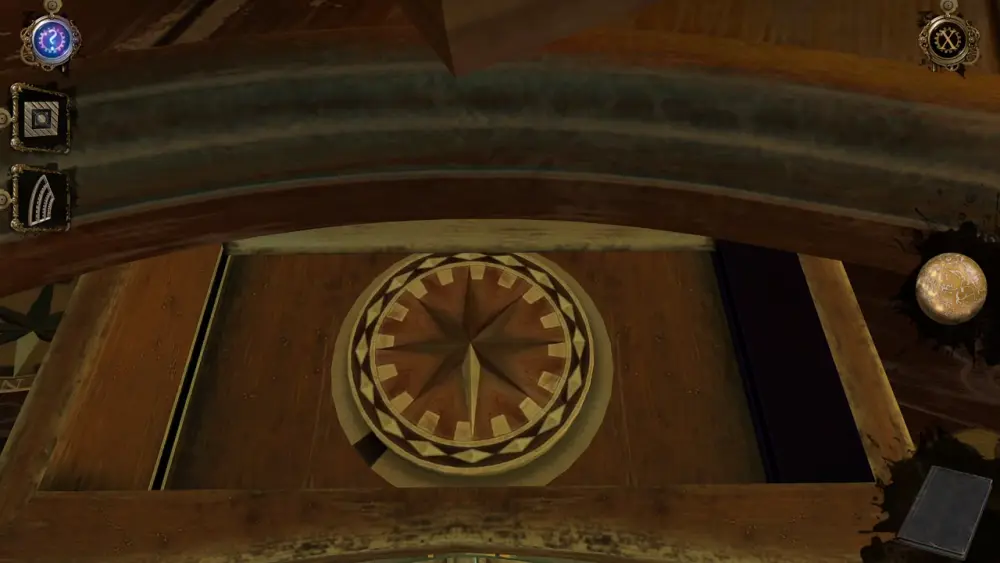
This action will cause the compass on the side of the table to align the small roller with the metal strip keeping the left drawer locked. Pull back the metal strip using the roller to open the left drawer.
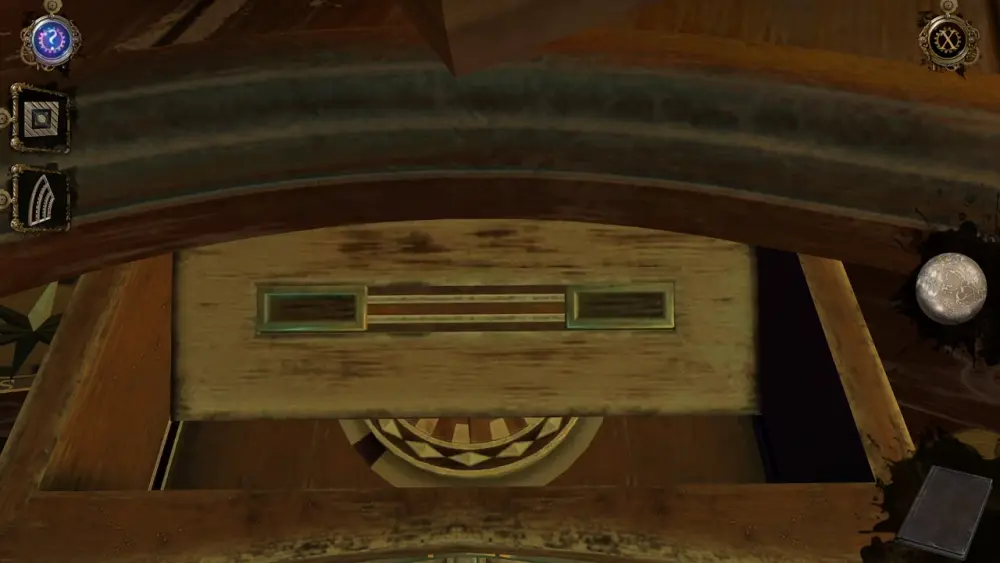
Once the left drawer is open, you’ll notice that it has some kind of slot at the side. Take the Wooden Frame item you’ve found and insert it into the slot. A crank handle will then appear, which you can turn.
Turning the crank handle all the way will refill the Wooden Frame with what looks like bolts for a crossbow. Once it’s done being refilled, you will receive a new item called Full Magazine.

With that, let’s momentarily leave the workshop and explore outside. We recommend walking around and observing as many things and fixtures as you possibly can, taking note of details and oddities here and there.
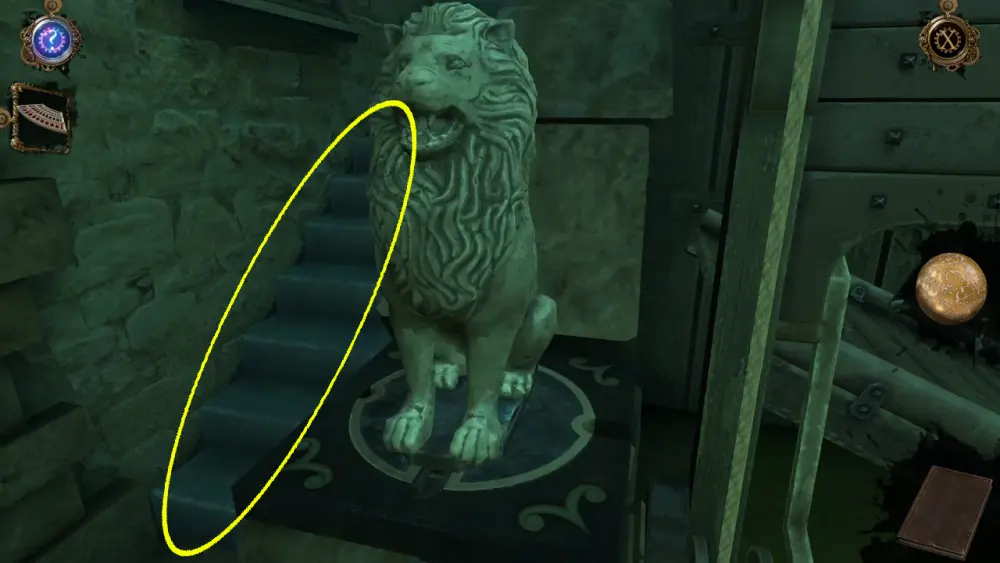
If you pay attention closely enough, you’ll see quite a number of devices and mechanisms you can interact with. One of these is a metal diamond with some shapes on it. Right behind it is a statue that’s seemingly trapped in a cage.
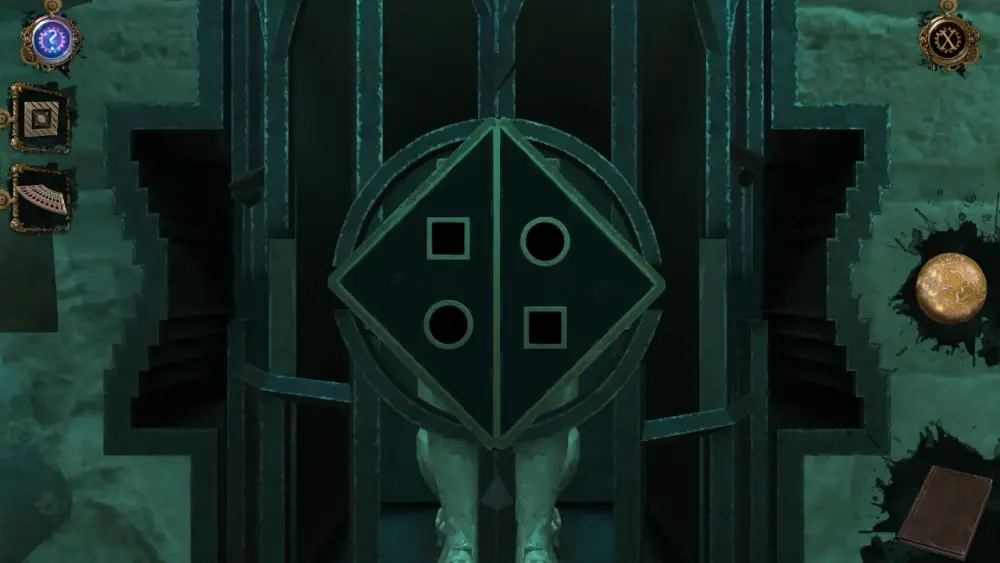
You can easily access this area by zooming in at the points indicated in the images below.
Initially, you might think that you haven’t encountered the metal diamond yet, but if you look at the Wooden Plate with Protrusions, you’ll find the very same shapes at the back of the Wooden Plate when you turn the item around in your inventory. Thus, put the Wooden Plate on top of the metal square as it will act as a key when turned.
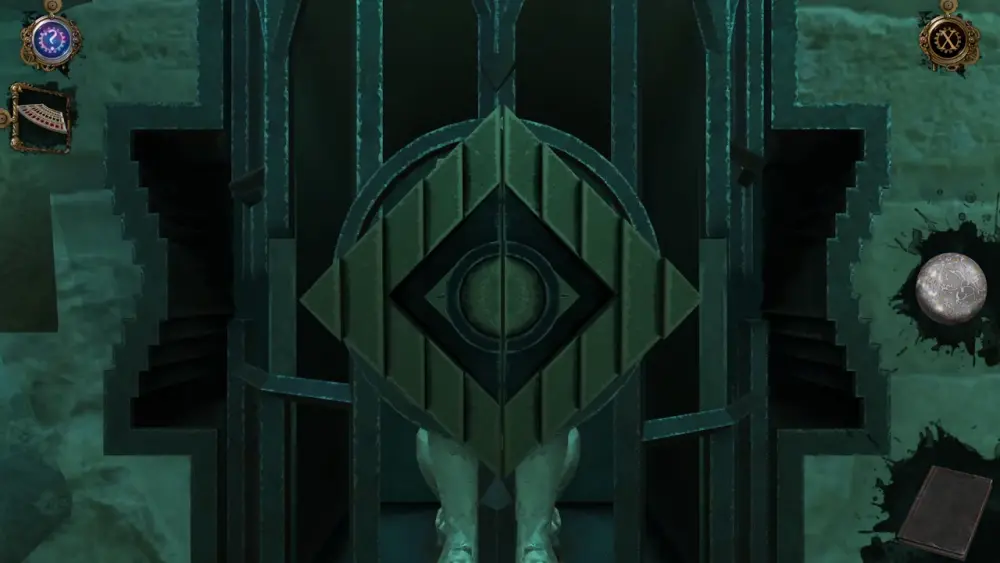
With the metal diamond turned, you can now move the top and bottom segments of the cage. Rotate these top and bottom segments until you find gaps that are big enough to fit the statue out.
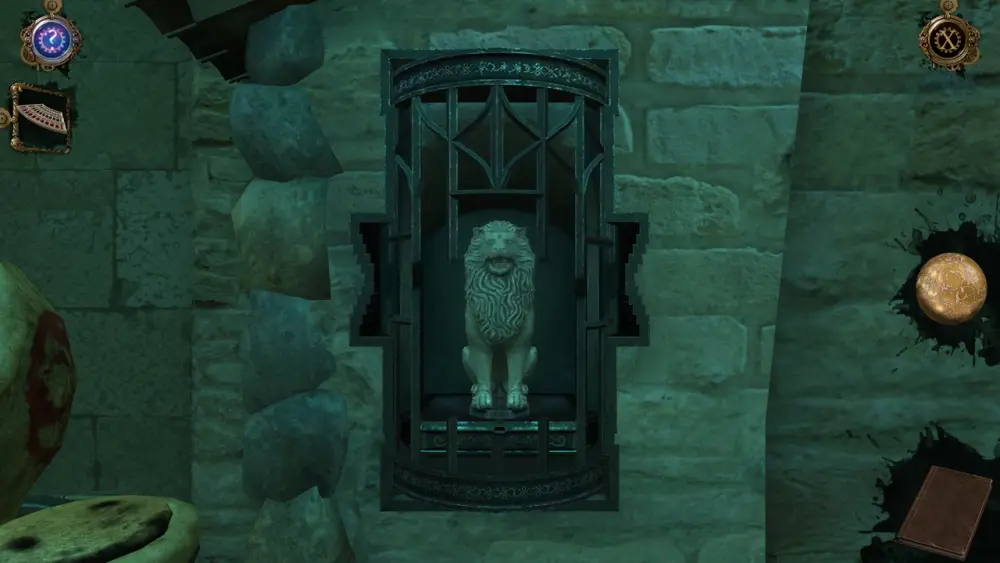
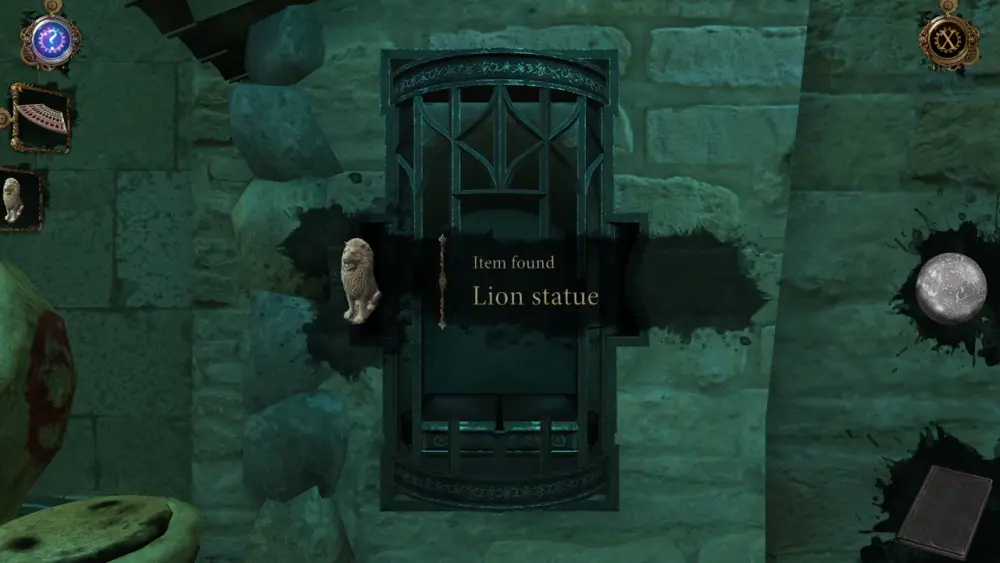
Reach for the Lion Statue so you can keep it in your inventory.
At this point, it can be a little bit hard to guess which puzzle the statue figures into but after some more exploring and walking around, you might find yourself going back to the area where you first arrived when you took the flight of stairs after solving the dragon furnace puzzle. Here, you will notice a familiar panel on the newel of the staircase, which you might have passed before.
Zoom into this panel as this is where you can slide the Lion Statue in place. If you look closely, you’ll notice that the staircase behind it is turned sideways, rendering it unusable.
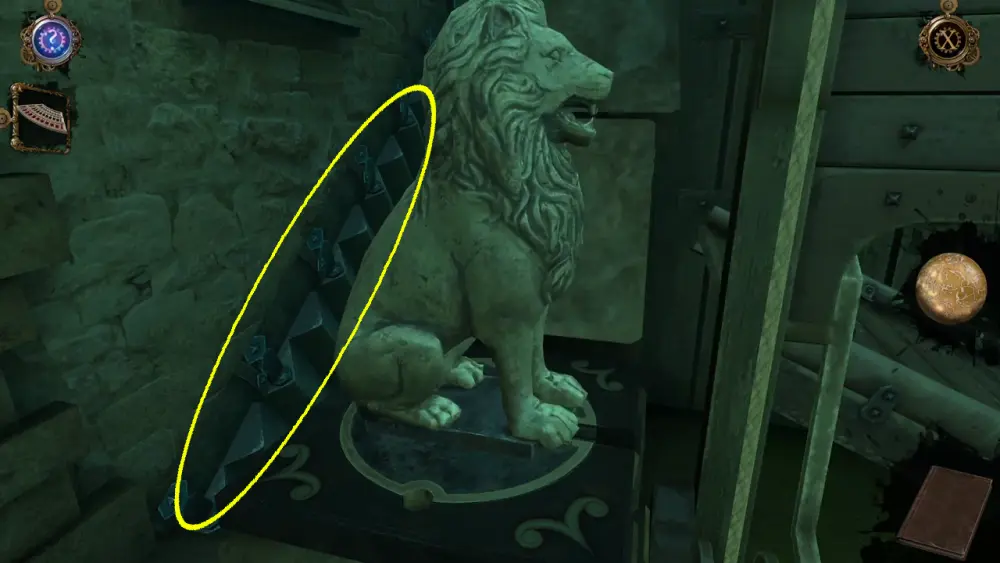
To access the stairs, turn the Lion Statue until it’s facing you. As you turn the statue, the stairs behind it will move until it becomes upright.
With this, you’re now free to head up the staircase. What you’ll immediately see at the top is a lever and piece of paper to your left, and a view of the wooden bridge to the right.
First, take the piece of paper to read another letter from Leonardo to Luca:
Take note of the mention of crossbow and bolts: in your inventory is an item called Full Magazine, which looks like a casing full of bolts. This will certainly come in handy later. Leonardo even leaves a sketch of what this crossbow looks like at the bottom of his letter.
After reading the letter, turn your attention to the lever on your left and pull the handle down.
This will trigger a brief cutscene where you will see a wind vane emerge from one of the rooftops.
After this, your perspective will return to the lever, where you can collect the handle as part of your inventory.
Once you’ve collected this item, cross the bridge to your right, which will lead you to another flight of winding stairs.
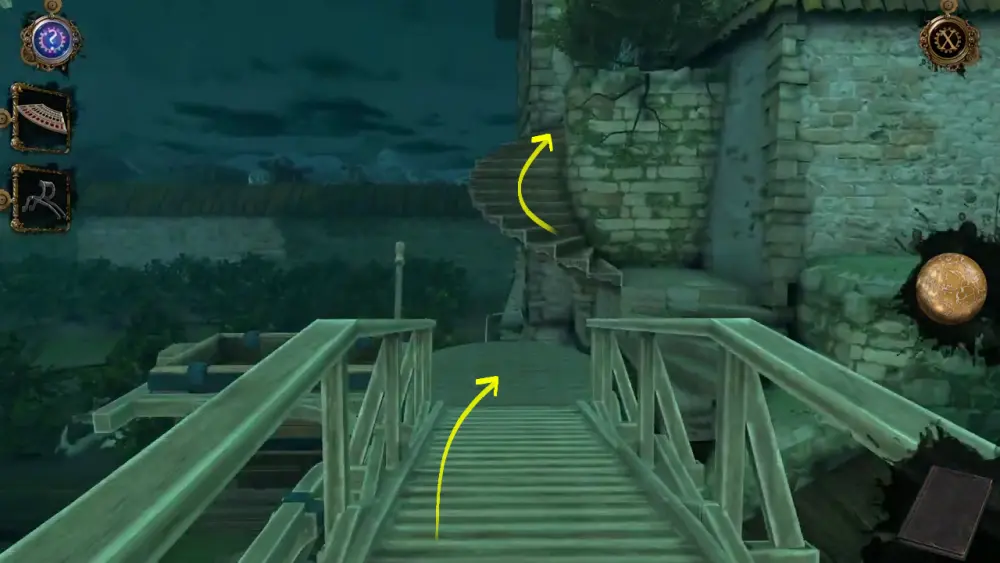
Before heading up the stairs, take note of two things: one is a lever below the stairs that you will definitely have to interact with later. Another less obvious thing is a small target right across where you’re standing from.
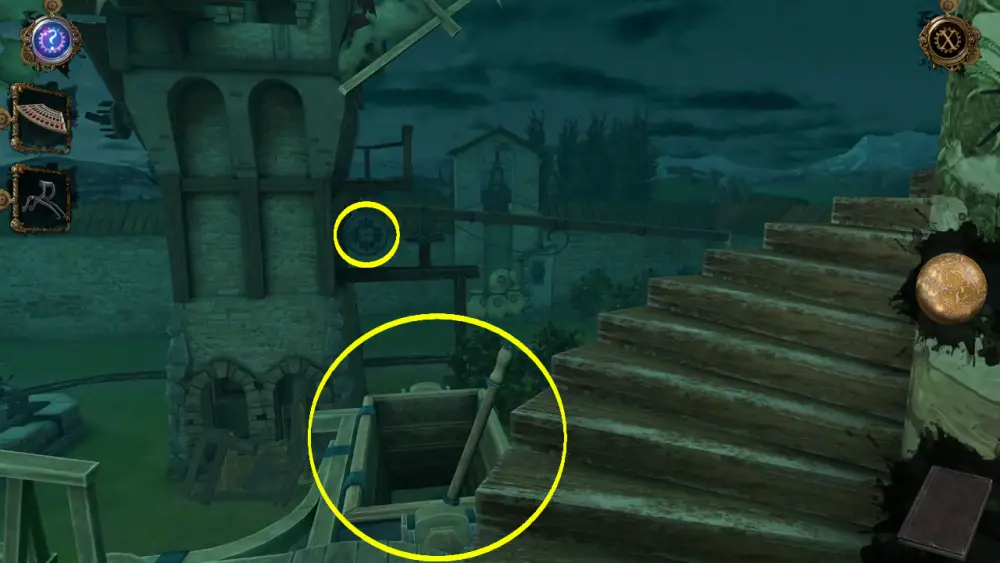
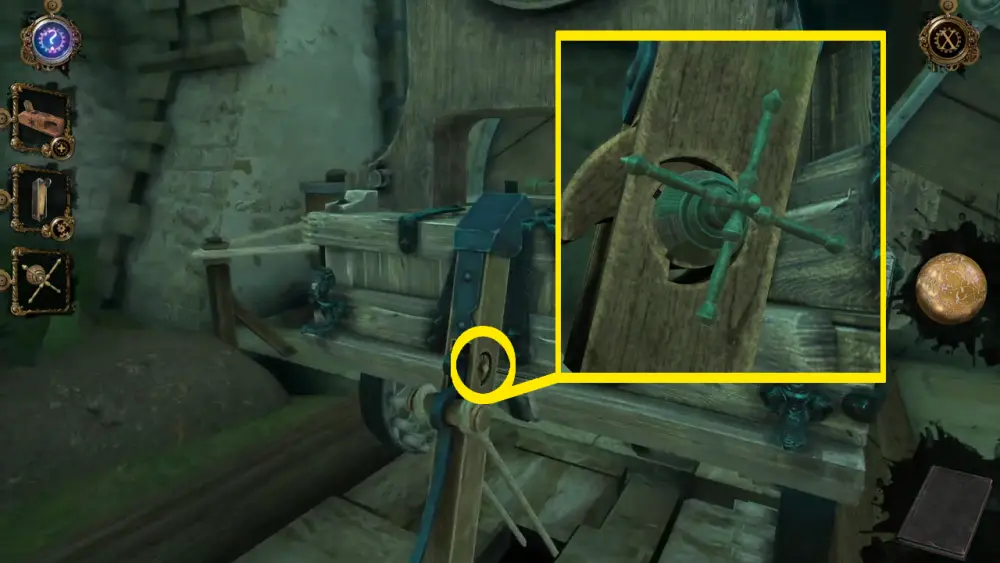
At the top of the stairs, you’ll find a hallway with another odd-looking mechanism fronting the arching windows.
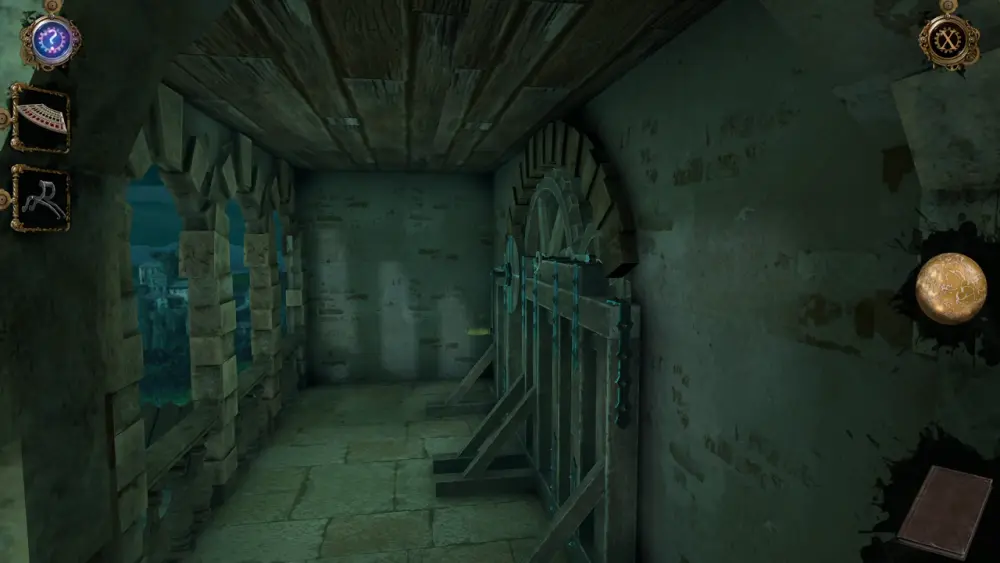
Upon zooming into this mechanism, you’ll see that it has a crank handle that can be turned to rotate the gears. However, you will be promptly alerted that something is blocking the mechanism.
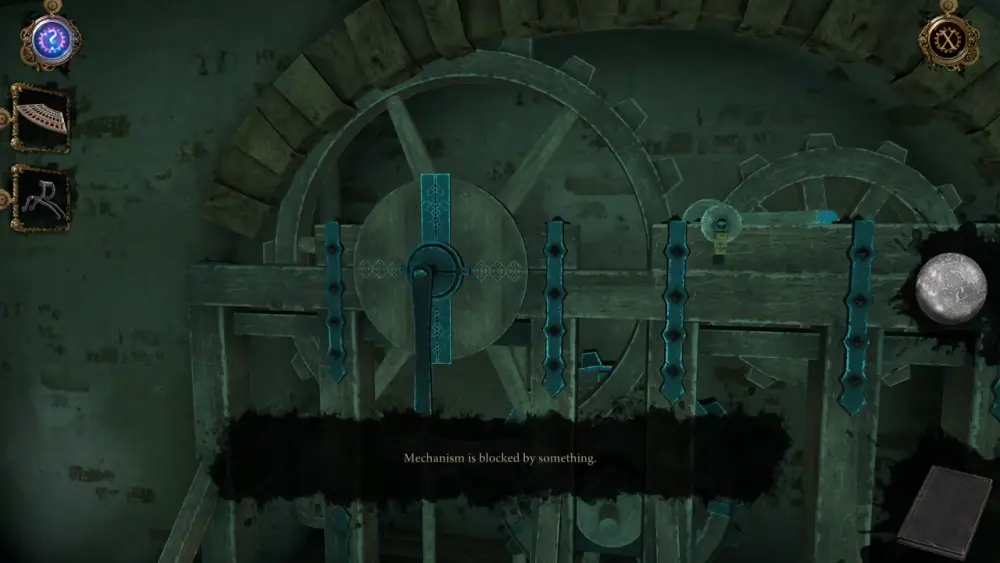
Zoom into that small, inconspicuous circle just beside the crank handle. Pull down the metal slide with arrows to release the lock that’s keeping the gears from turning.
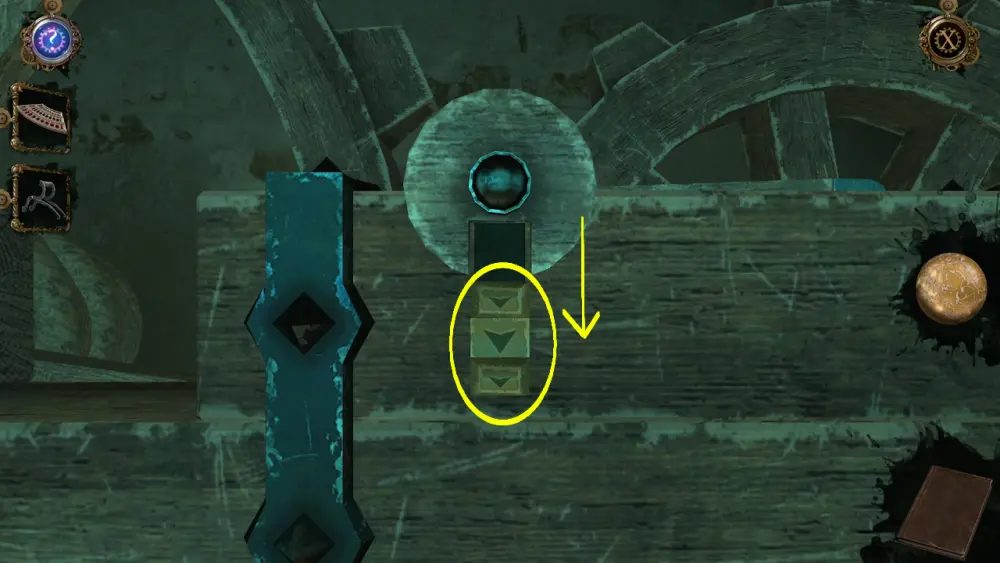
When you’re able to turn the gears, a brief cutscene will show you that this action is intended to open a gate.
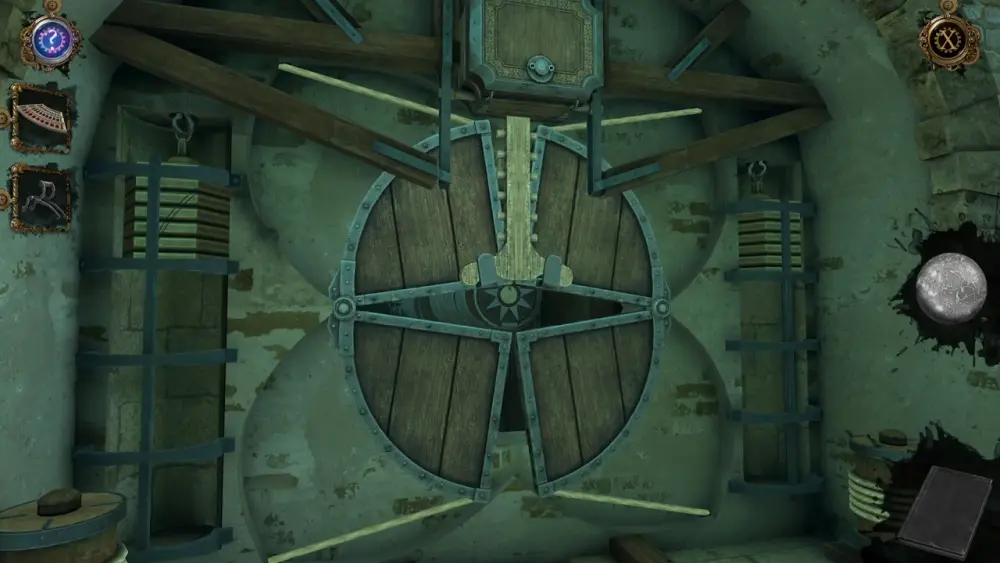
But, again, you will be alerted that something is keeping the gate from opening.
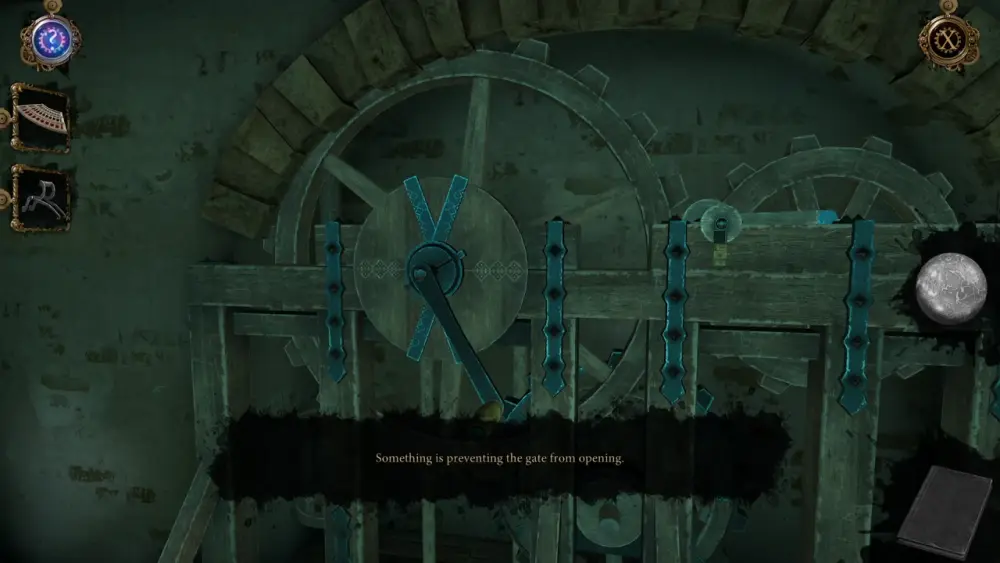
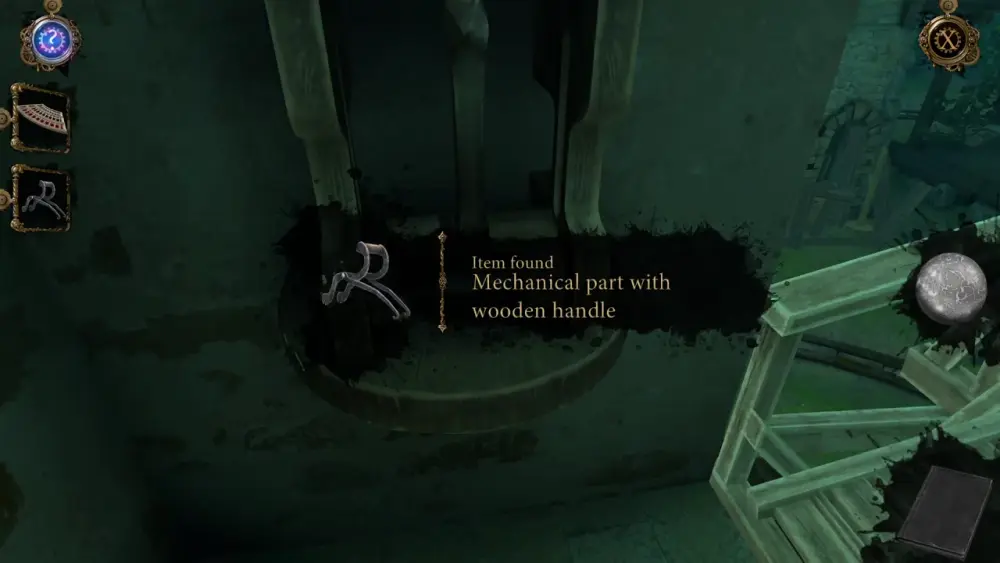
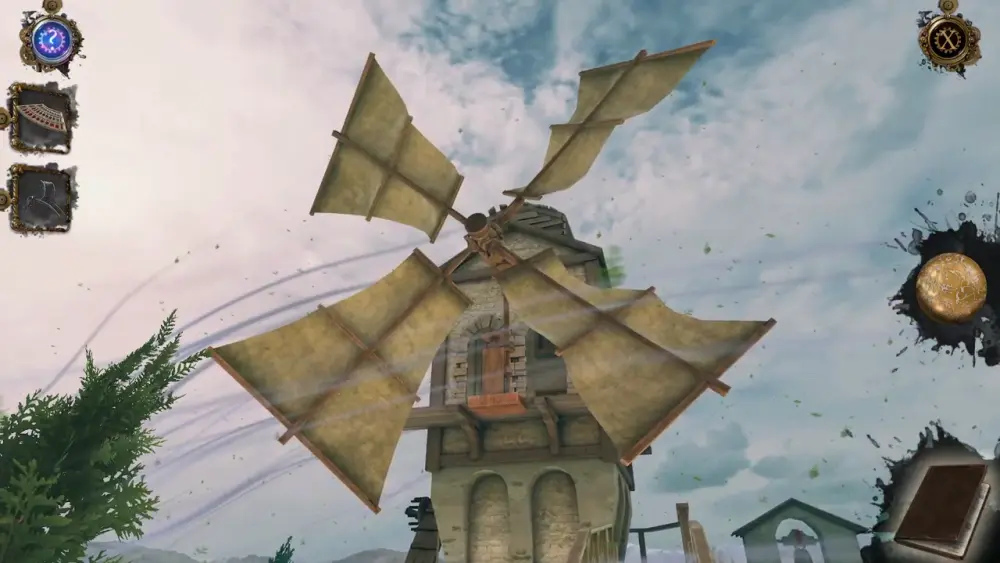
Since this can’t be solved by simply turning the mechanism, let’s head back down the flight of stairs. From this vantage point, you’re able to see two more things of note: first is a rundown windmill…
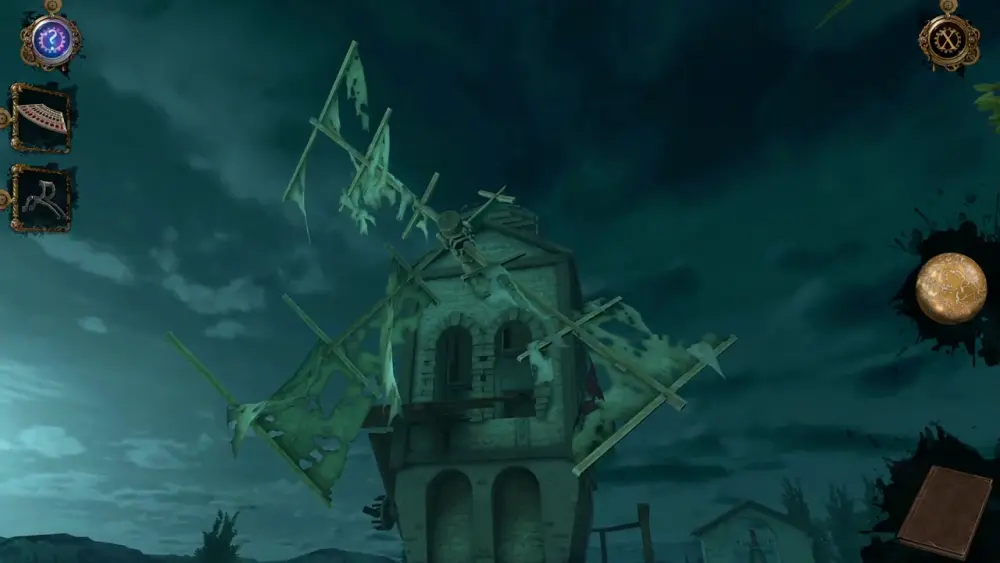
… and second is the wind vane on the rooftop, which happens to be the roof of the area where you collected the Mechanical Part with Wooden Handle.

So this is where it can get a little tricky. Aside from the Mechanical Part with Wooden Handle, the other item in your inventory would be the Full Magazine. However, after some exploring, you might have noticed that the crossbow mentioned in the letter to Luca is nowhere to be found—at least in the present.
That’s right: you’ll be able to find this crossbow in the past, specifically in 1506, which is 2 years before the current timeline. Thus, head back to the wooden bridge and position yourself just at the bottom of the winding staircase. Here, open up the Oculus Perpetua to travel back to the past.
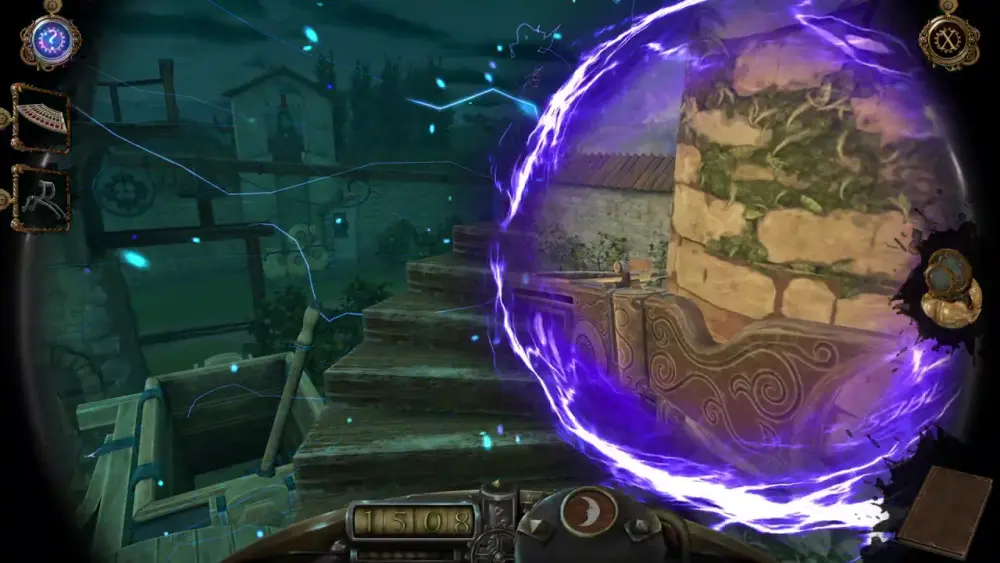
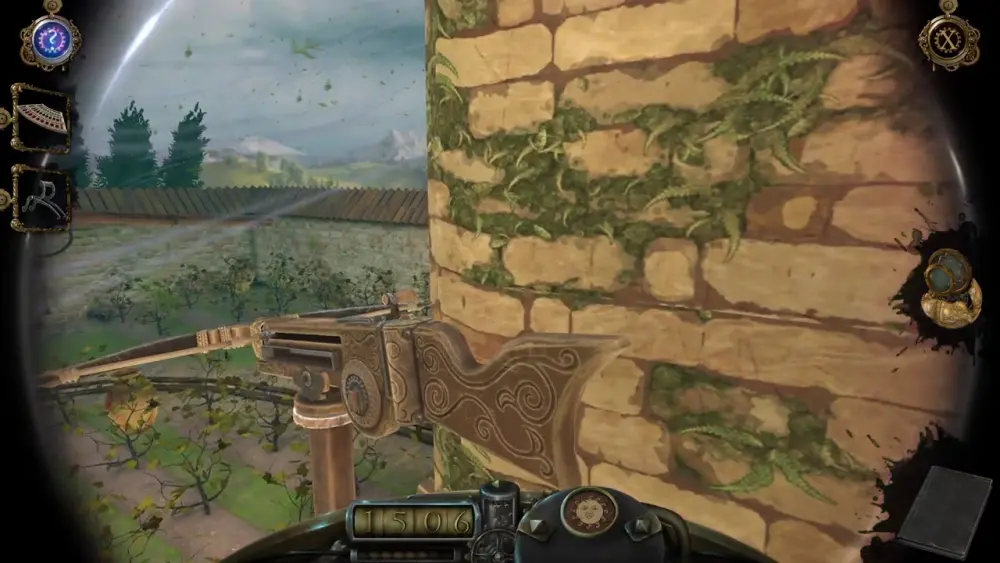
Instantly, you can already see a preview of the crossbow’s handle. When you fully step into the past, you’ll see that, 2 years ago, a fully functional crossbow was mounted into the empty space at the base of the winding stairs.
You’ll also see that the worn windmill is in much better shape.
Now that you have access to the crossbow, take the Full Magazine from your inventory and load it up to the left side of the crossbow. Then, take the Mechanical Part with Wooden Handle and mount it on top of the crossbow.
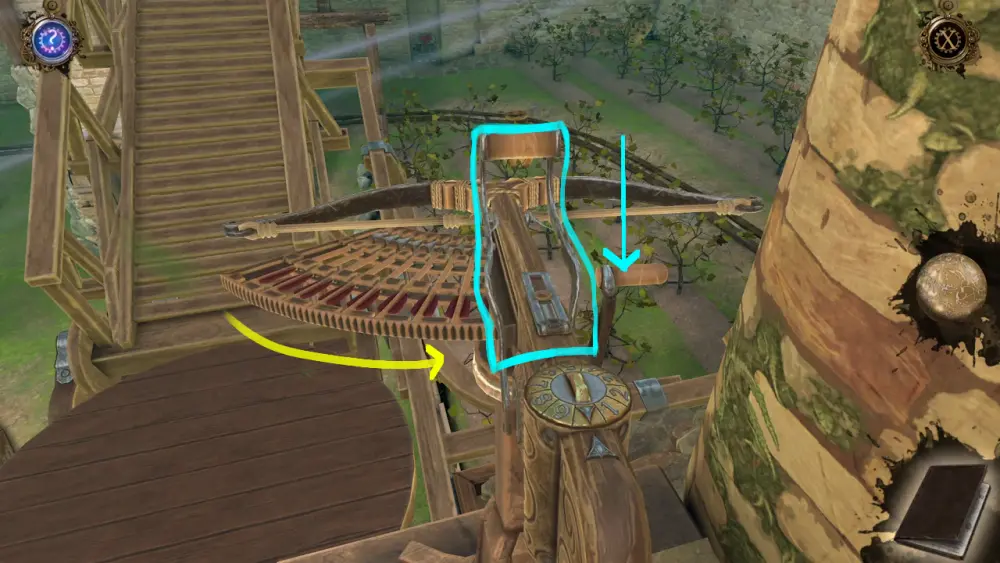
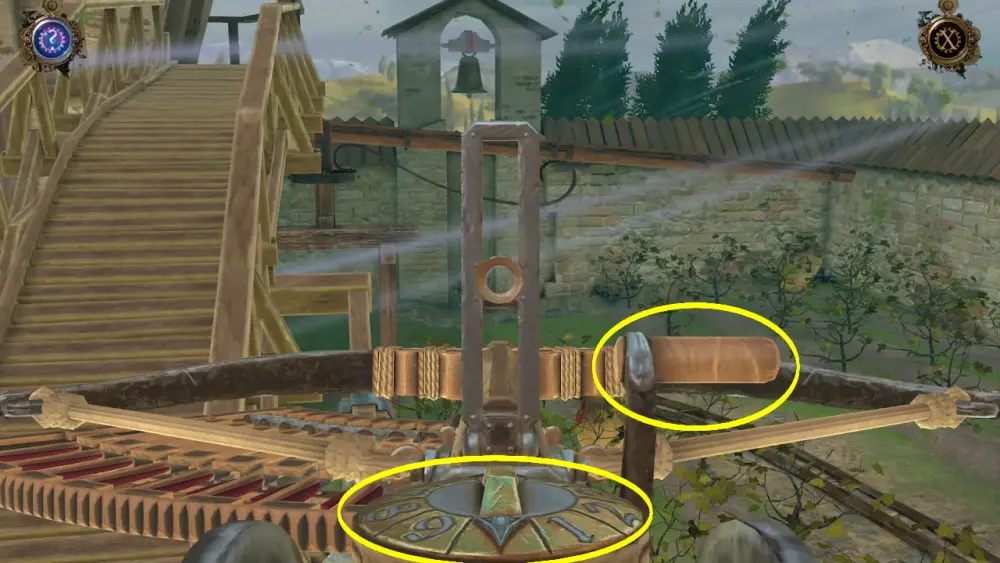
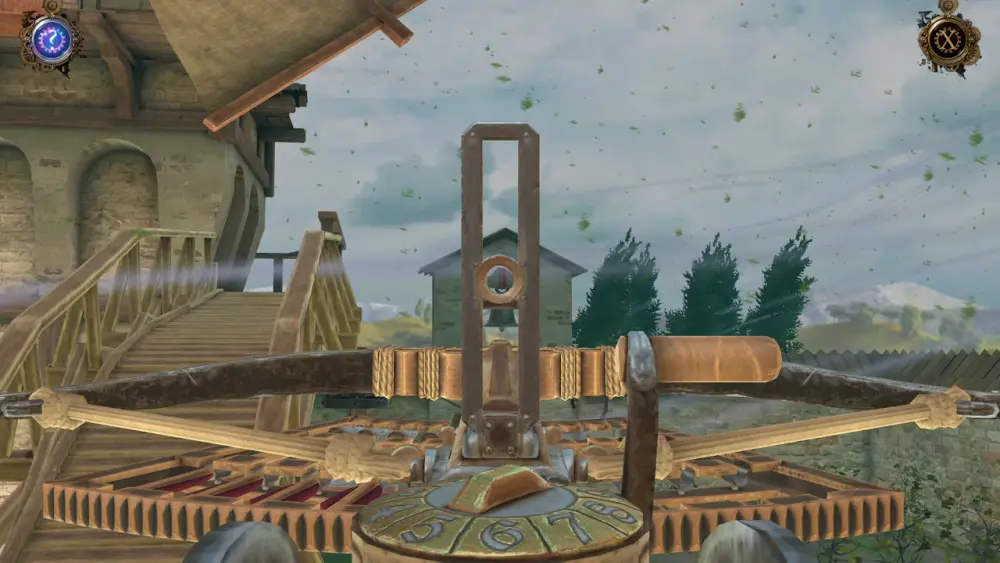
Pull back the wooden handle so the metal sight will spring up. You can now peer through the sight and commandeer the crossbow. If you want to fire a bolt, you need to pull down the handle on the right side. However, keep in mind that you only have a total of 9 bolts, as indicated in the dial on the crossbow, so use them wisely.
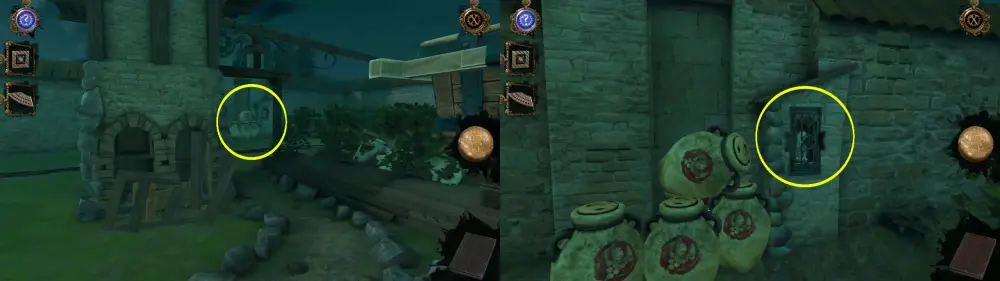
If you recall Leonardo’s letter to Luca, he mentions setting up targets in the yard. These targets come in the form of vases, which you would have actually seen before: these are the vases that were put aside next to the cage that kept the Lion Statue. The image below shows where you would have found them 2 years later, in 1508.
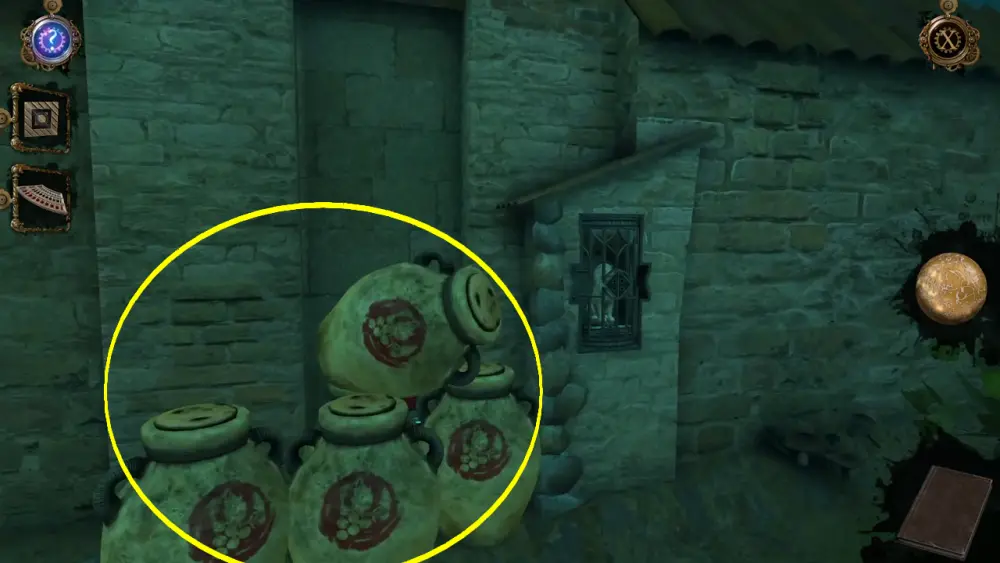
In 1506, all 4 of these vases were placed in different locations in the yard as targets. Here’s where you can find them:

Shoot each of these vases with the bolts from the crossbow. Then, turn your sight toward the bell at the tower. Shoot the bell.
This will trigger a brief cutscene where the bell will fall from the tower and land behind a small gate marked by red rope.
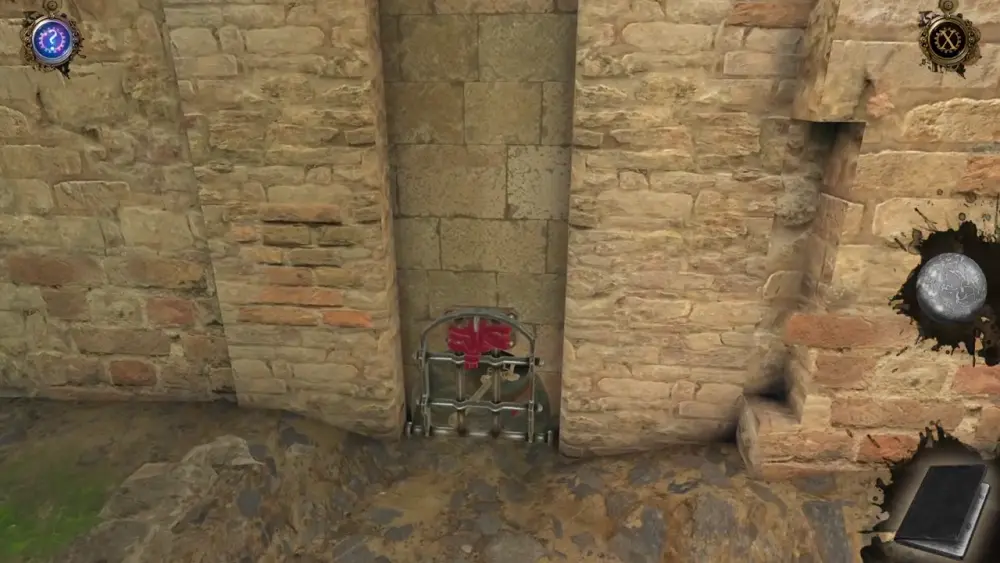
Using the red rope as a marker, shoot that area as well.
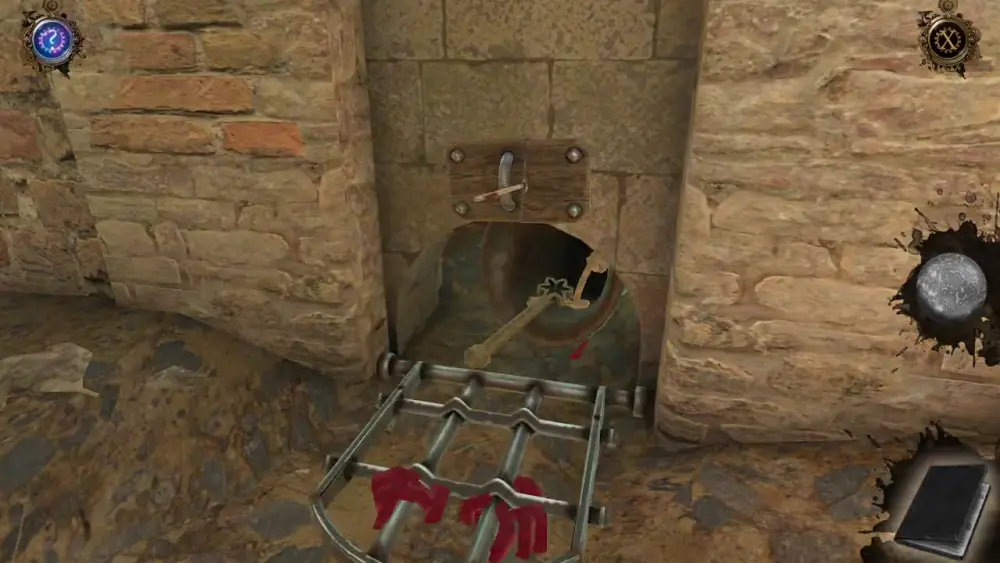
This will break the wooden panel keeping the gate upright. The gate will fall, giving you access to the bell. Take note of the metal rod with a star-shaped end that sprung out of the bell. You’re going to collect this later.
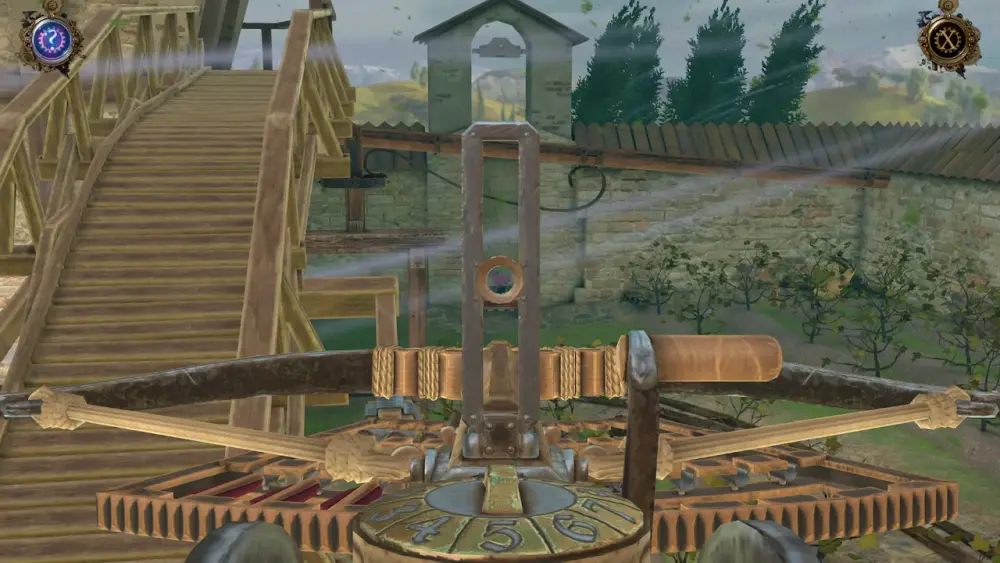
Zoom out of the crossbow for the meantime. You’ll notice that beside it is a crank with a handle that can be turned. Turning this will move the bridge situated directly in front of you. In 1508, this bridge is the one you used to cross from the opposite area to where you are now. Turn the handle and the bridge will move, hitting the tree.
With the bridge out of the way, you’ll notice a familiar looking target at the right side of the windmill. As you can see, the target is connected to what looks like a wooden pipe. Hitting the target with a bolt will cause the wooden pipe to rotate and move closer to you.
Hit the target 3 times or until the pipe has swung all the way to face you. Adjust the sight ever so slightly as the target moves.
To get the item at the end of the pipe, you’ll need to turn the crank handle again, this time in the opposite direction. This will bring the bridge back to its original position, which will allow you to get as close to the pipe as you can.
Zooming into the pipe will let you walk on the bridge and finally collect the Ring with Ornamental Handle.
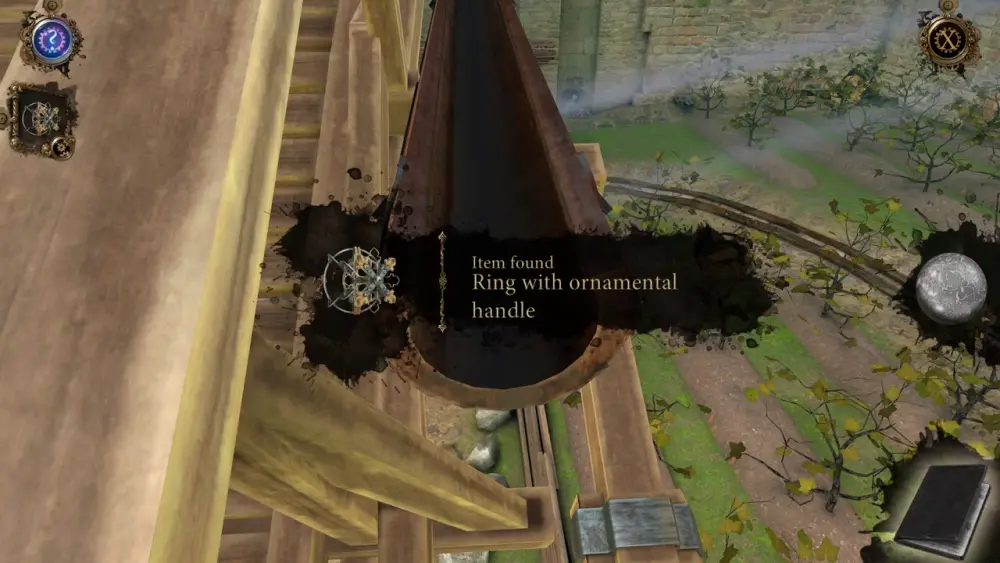
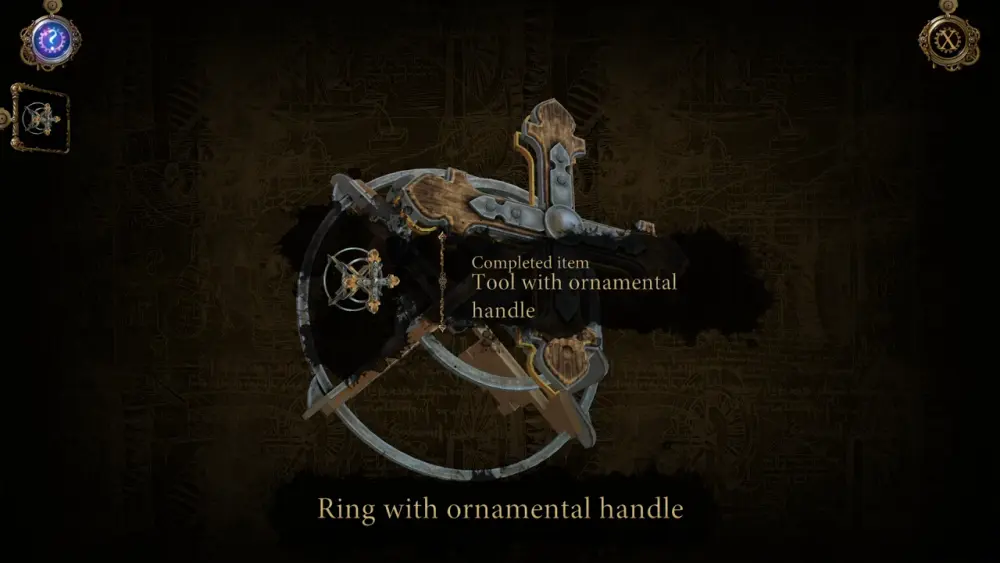
Since this item is marked by a cogwheel, you’ll need to tweak it in your inventory first before you can use it properly. Turn the ring so you can get its completed form: the Tool with Ornamental Handle.
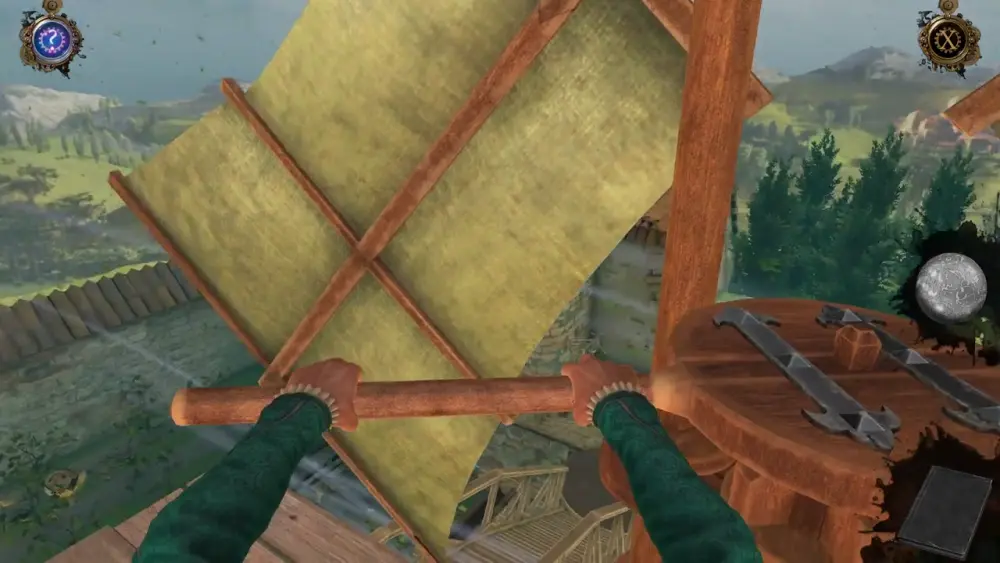
With that, you can now cross the bridge and head to the windmill. At the windmill, turn the corner and you will find a door with a mechanism beside the handle acting as the lock.
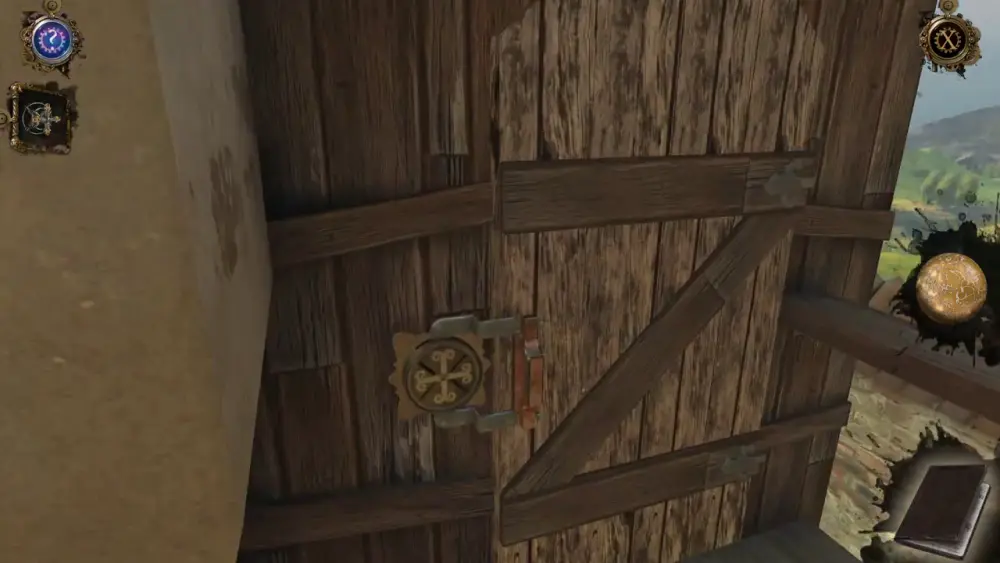
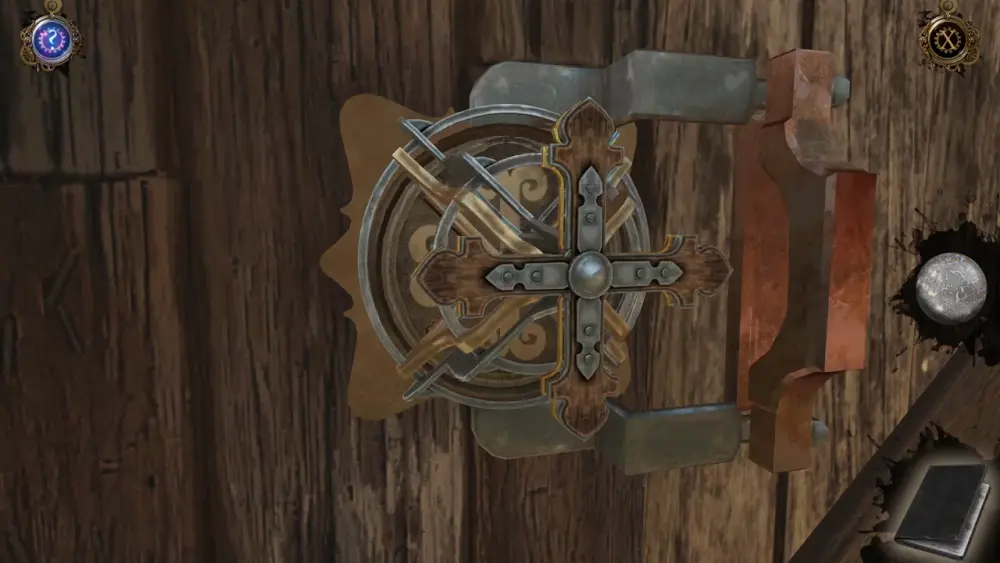
Zoom into the mechanism and use the Tool with Ornamental Handle to unlock the door by turning it.
Pull the door open and enter the room. Here, you’ll find another one of Leonardo’s letters left on a rotating device on the wall.

Like many of Leonardo’s messages, this one contains some helpful hints about puzzles you will soon encounter:
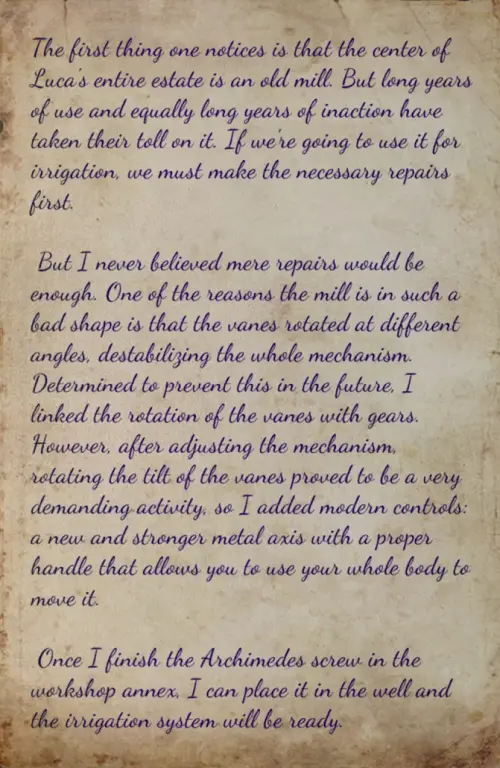
Some things that are particularly noteworthy are mentions of the vanes and an Archimedes screw in the workshop annex.
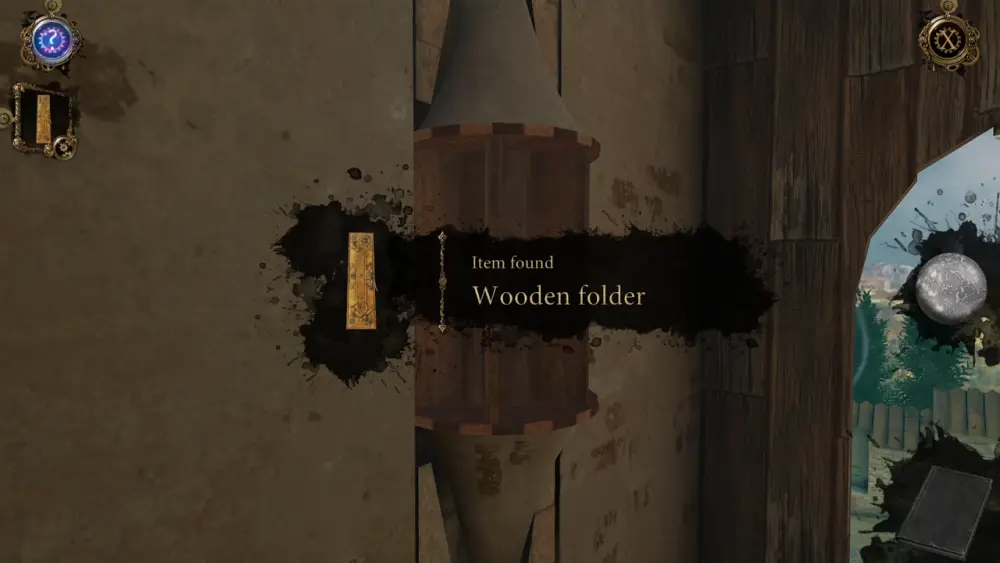
After reading the letter, turn the rotating device on the wall as you’ll find another item: a Wooden Folder.
Since the Wooden Folder is marked by a cogwheel, access it in your inventory to unravel the folded areas. Pull down the seal to unravel the entire page. When you’ve completely opened the folder, you will obtain the item Sketch of Windmill.
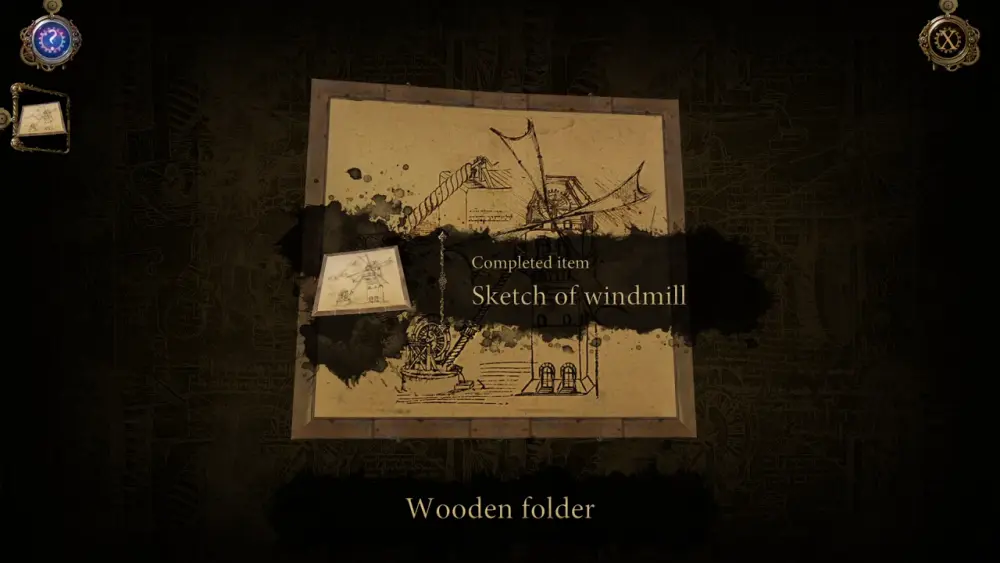
If you think this sketch is familiar, then this should give you an idea of the next place you should head to once it’s time to return to the present.
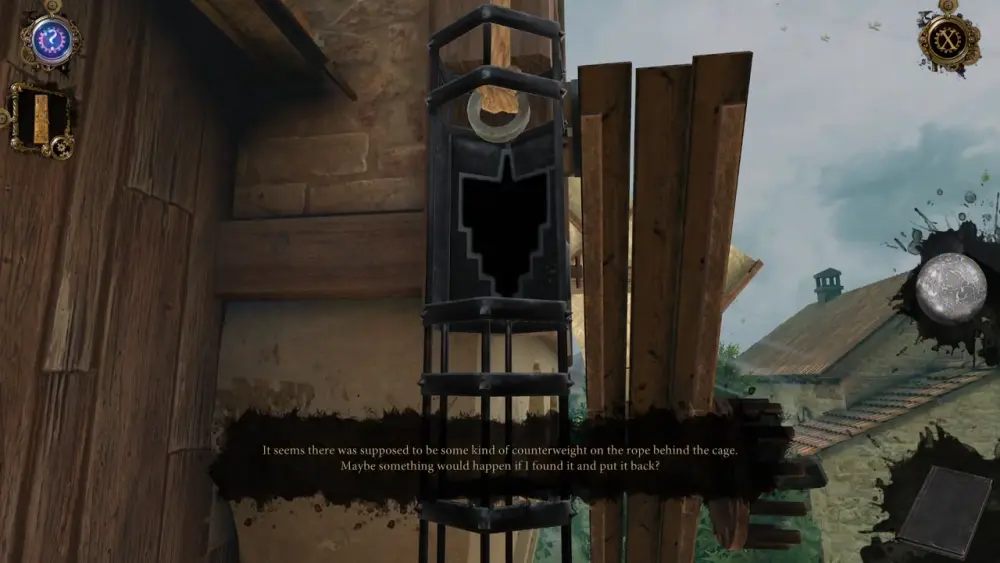
With this item now on hand, step outside of the windmill through the opening on the right side of the wall. Here, you’ll encounter a black metal cage that requires a counterweight on the empty space. Pay attention to the beehive-looking symbol on it.
This definitely isn’t the Wooden Folder so your best bet is to cross the bridge and go back to the crossbow, which is the area from which you traveled through time. Once you’re back in this spot, open the Oculus Perpetua and slip back to the present year, which is 1508.
Now that you’re back in the present, head to the workshop annex and access the desk with the sketches. You would have left the desk displaying a sketch so turn the rollers until both segments of the page are blank.
Place the Sketch of Windmill item on top of the blank page and a frame would slide down from the cover of the box.

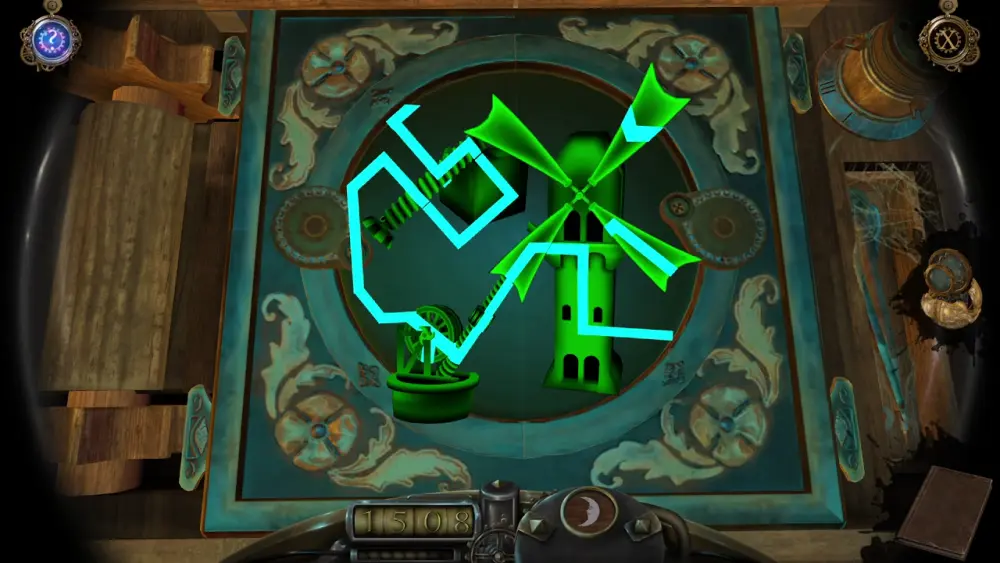
With the frame in place, the sketch will turn green and resemble a more 3D-like appearance. Like the last puzzle you’ve solved on this desk, open the Oculus Perpetua so you can see the secret symbols on the sketch.
To solve the puzzle, rotate the two dials on either side of the frame. The left dial controls the screw and the wheel, while the right dial controls the blades of the windmill. The goal is to connect the secret symbols as shown in the image below:
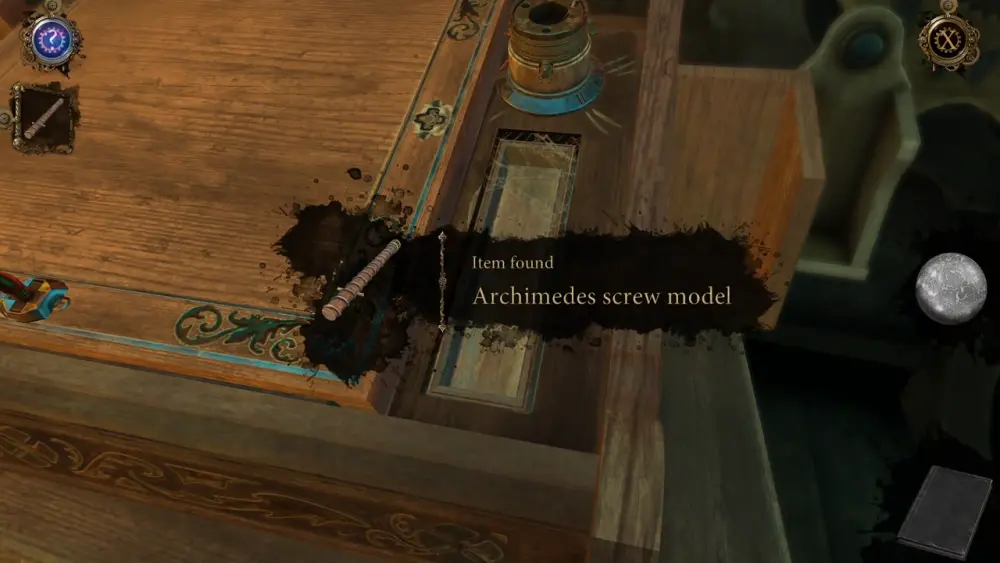
With this, the box on the desk will close and the compartment just under the inkwell will open. This is where you can get the Archimedes Screw Model.
Go back to the table and place the Archimedes Screw Model on top of the Cart Model. The screw will be locked in place, and a small metal handle will appear on the right side of the Cart Model.
With the screw fastened, this will trigger a very brief cutscene that shows a drawer opening. This drawer is situated right beside the stool where the Cart Model was first mounted.
After this, your perspective returns to the Cart Model. Pull back the handle to make it go down the track again until it encounters the circular device in the middle. This time, instead of unlocking the device, the Cart Model will push out a wooden tile, revealing a red slider with a yellow arrow.
Zoom into the red slider and push it upward, to where the arrow is pointing. This will change the direction of the Cart Model so it will face the model windmill to its right. What appears like a wheel on a mount will appear in front of the Cart Model. This model represents the well in the garden. The gap on this model wheel fits exactly with the Archimedes Screw Model. The wheel will turn and lift the screw until it is leaning on the side of the windmill model.
As the screw is set in place, the frame of the model windmill’s blades will emerge from the slits on the wood.
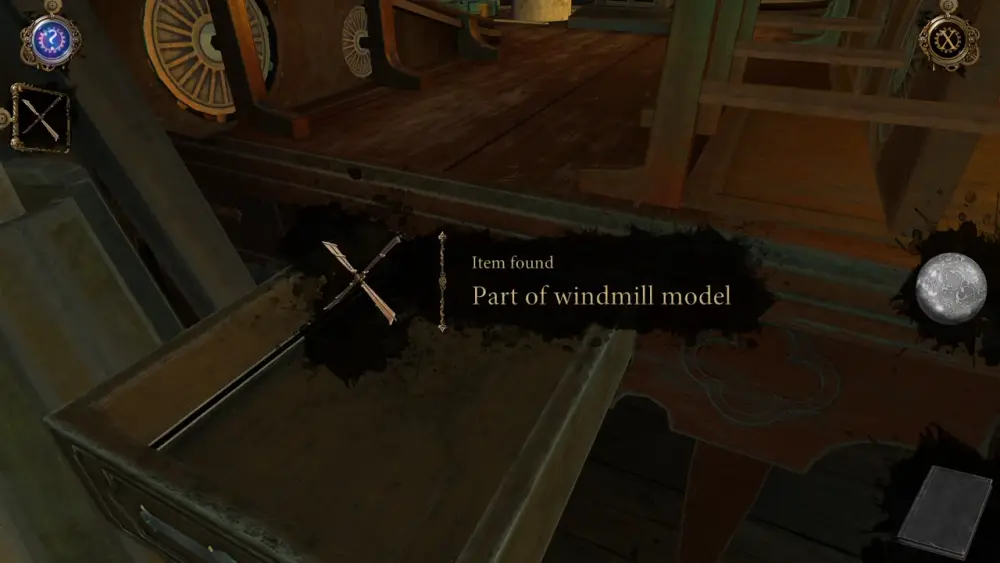
As you might have guessed, the missing blades are in the drawer that was just opened. Zoom out of the model windmill and collect the item Part of Windmill Model from the drawer.
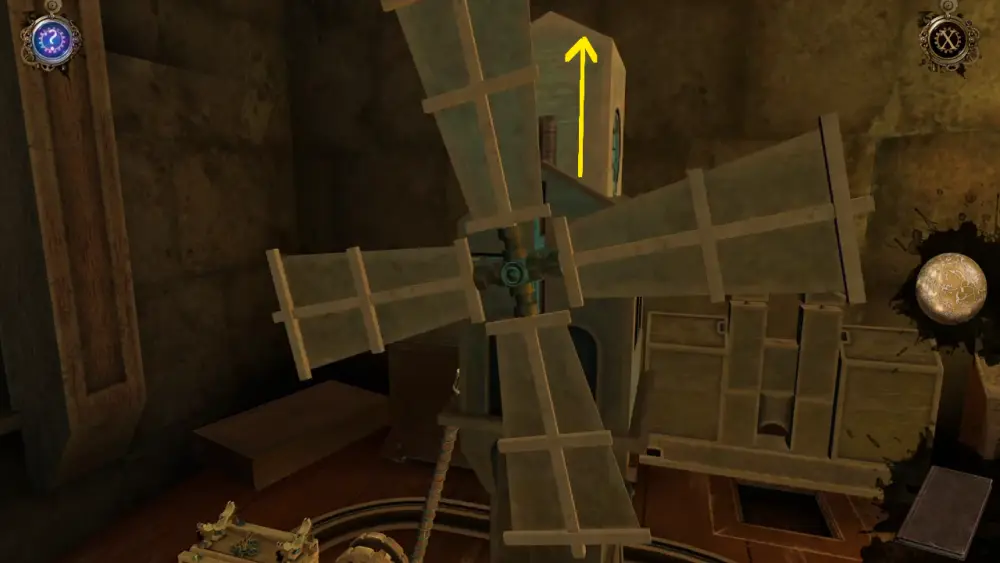
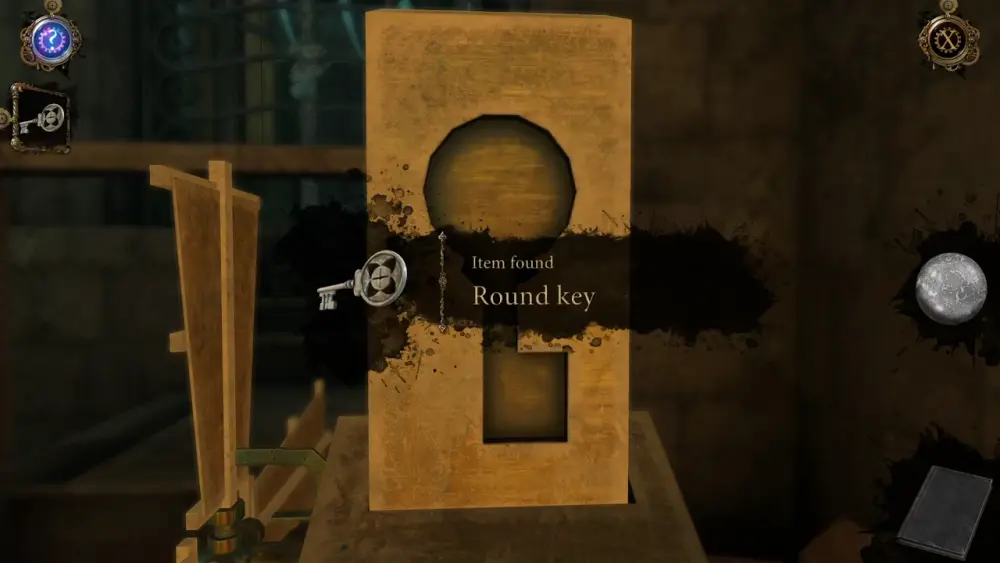
Return to the windmill model and place the missing part on the frame. Flip the blades so the flat sides will face up front then rotate the blades. This will cause a tower to rise from behind it. Keep rotating until the entire tower has risen.
Apparently, it’s a secret compartment housing a key. Zoom into the compartment so you can collect the Round Key embedded on its side.
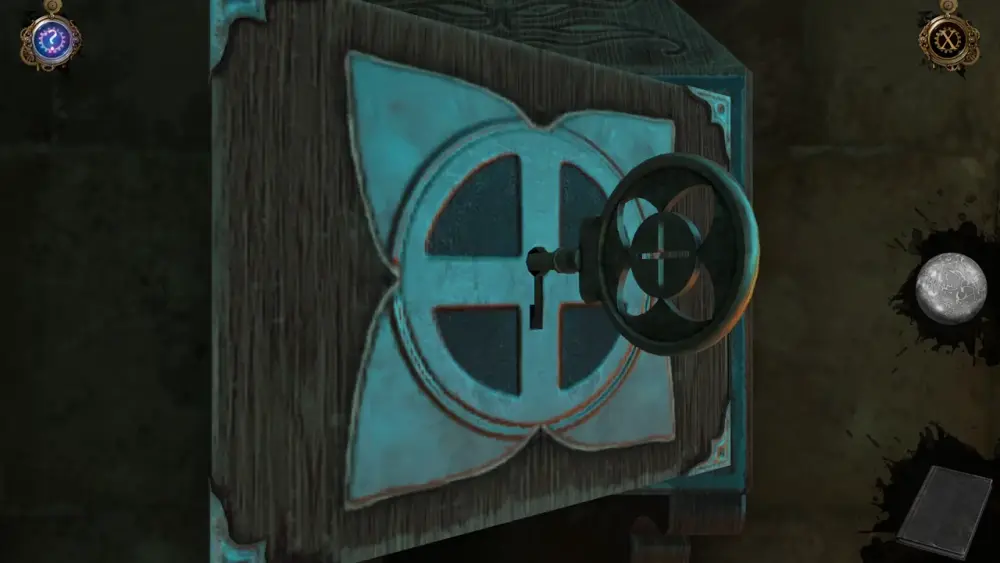
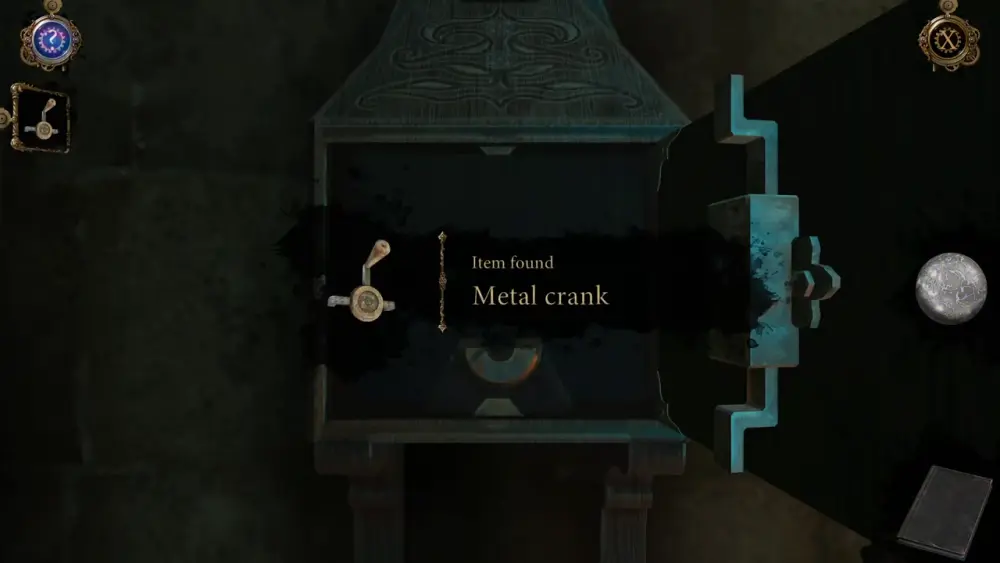
You’ve probably done your own exploring into the workshop but in case you haven’t, there’s a short staircase to the left side of the table with the models. Go up the staircase and you’ll find a box that has a keyhole. This is where the Round Key item should be used.
Open the box and, inside, you will find a Metal Crank.
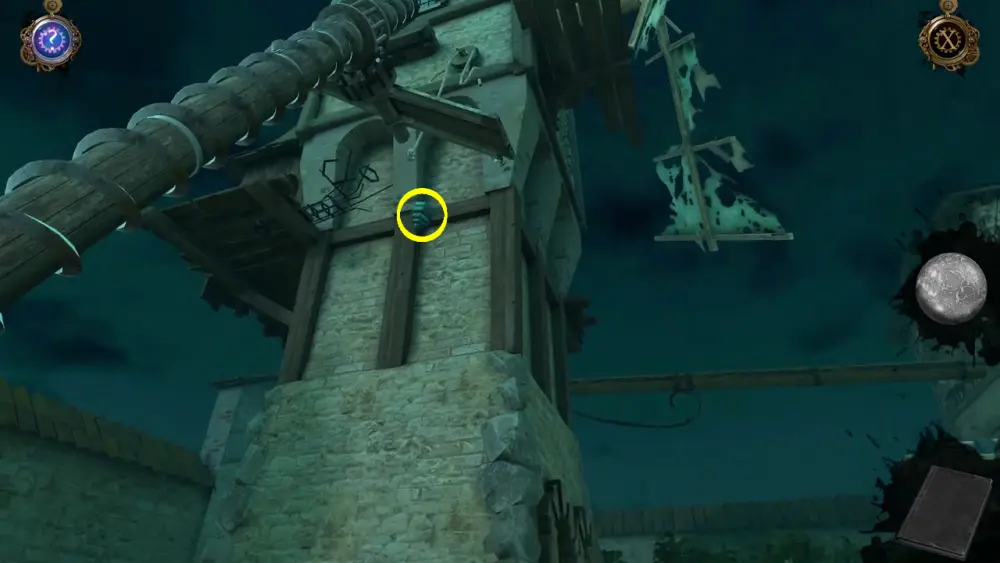
Now we’ve been a bit busy with the workshop but let’s step outside a bit before we forget to collect an important item: remember when you shot the bell with the crossbow? You might have noticed that when the bell landed, there was a metal rod with a star-shaped end that fell along with it. Return to that area where the bell fell and you’ll get an item called the Clapper.
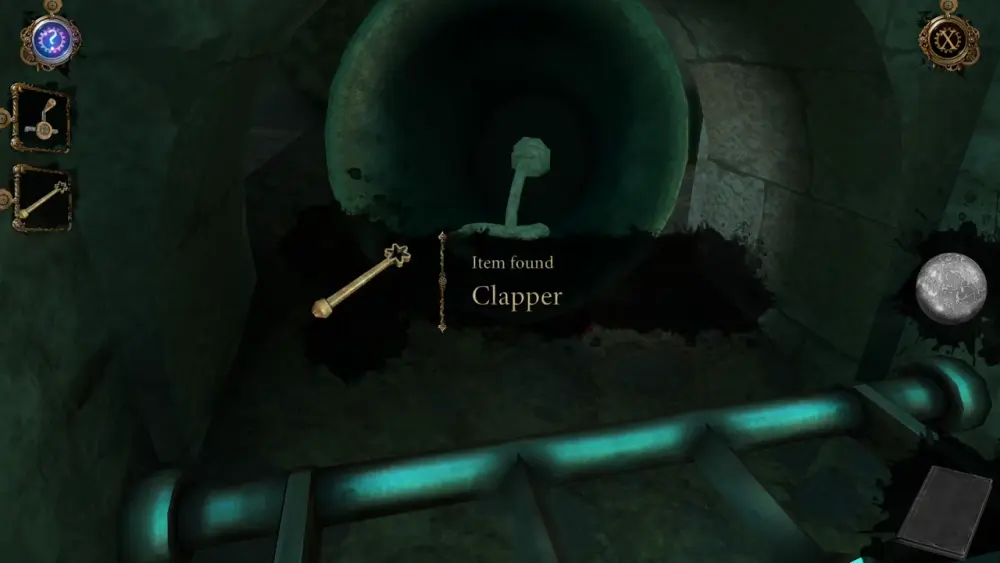
If you think the star shape at the end of the Clapper looks familiar, then you’re definitely right: you’d have seen it on the cart right outside the workshop. Head back to that cart and place the clapper on top of the golden star dial in the middle of the cart. Turn the clapper around until it opens a hatch.
Once the hatch is opened, rotate the mechanism until the hatch closes again. This should trigger the cart to move toward the tracks.
The cart will move all the way to the end of the tracks, stopping right in front of the gate you previously attempted to open using the mechanism on top of the winding stairs.
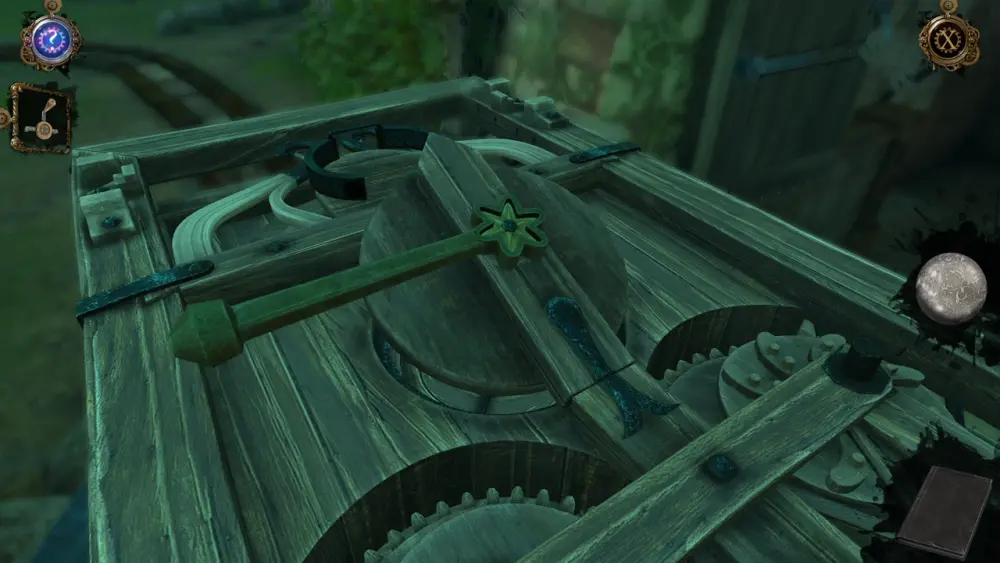
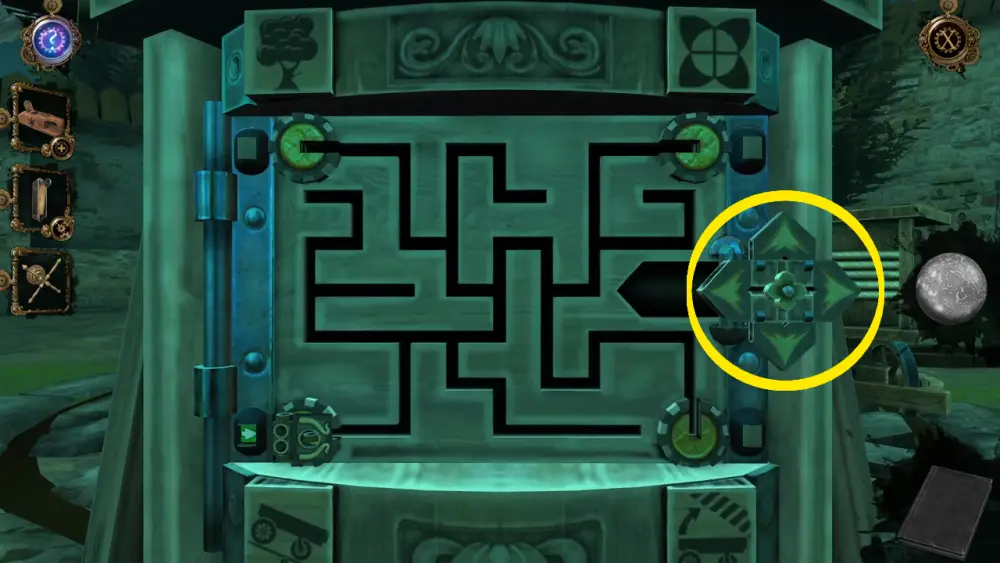
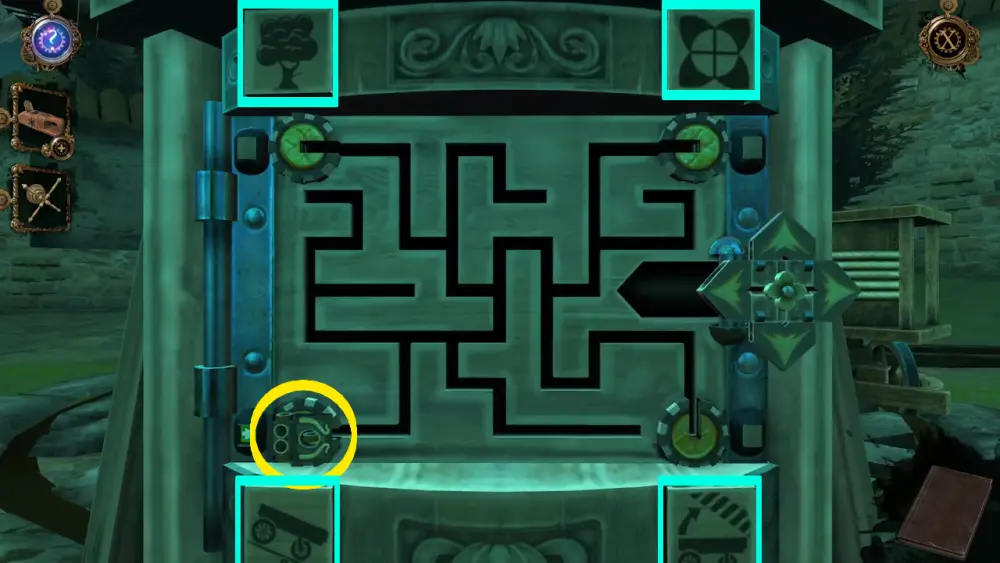
Take your time zooming into places that may be accessible as there will be a few that you’ll go back to later. For now, let’s focus on the box right on top of the cart. This is where you can insert the Metal Crank.
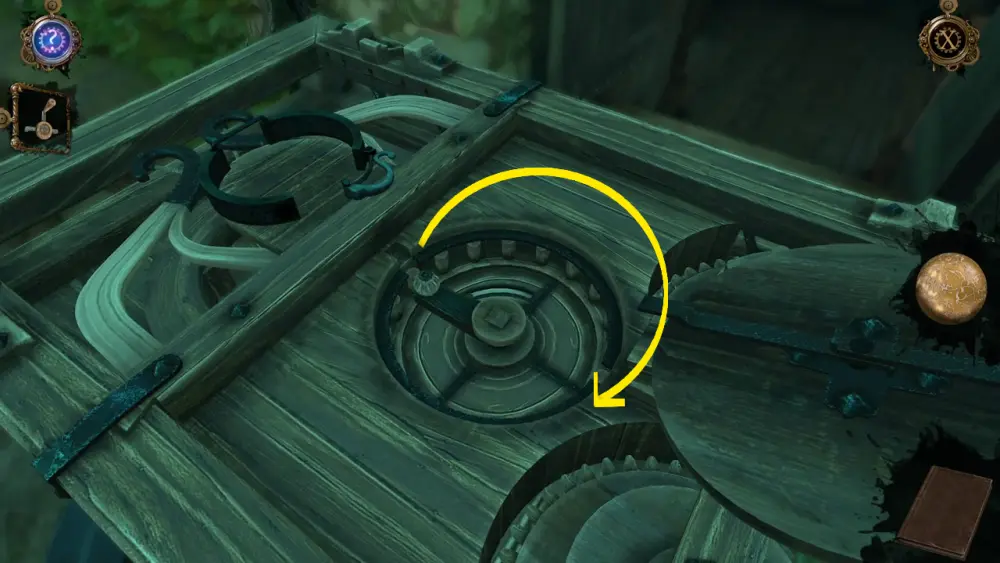
Turn the crank around until the box reveals a new puzzle. As you’ll notice, this puzzle involves 7 levers, 12 pieces, 3 rows, and 4 columns. Each lever affects either a row or a column. Each piece has symbols and since they look like pipes or paths, it makes sense to try and connect them all using the levers. If you zoom into the puzzle, you’ll also see that the beginning and ends of the path are marked by small arrows on the lower left-hand side and the top right-hand side of the wooden frame.
By pulling each lever, you affect the pieces on the row or column each lever is aligned with. Pull the levers to flip the blocks until they’re all connected. The final image of the puzzle should be the one pictured below:
Once you’ve solved the puzzle, the box will close again and you’ll receive a prompt that the gate has been unblocked and can be opened through the mechanism on the upper floor. Thus, head up to the second floor, cross the wooden bridge, and go up the flight of winding stairs until you reach the mechanism with the circular crank.
Rotate the circular crank until it triggers a brief cutscene showing how the gate at the yard has now been opened.
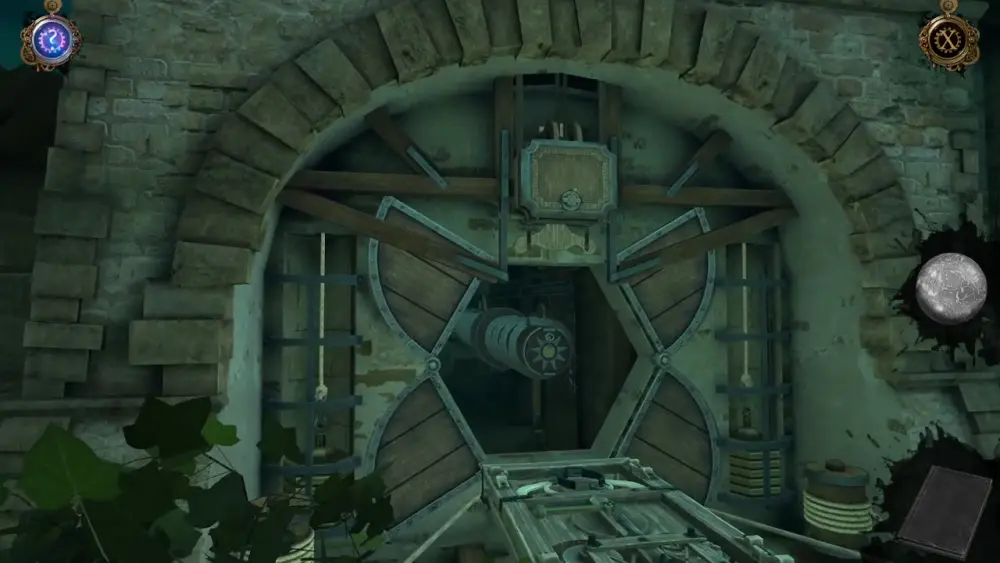
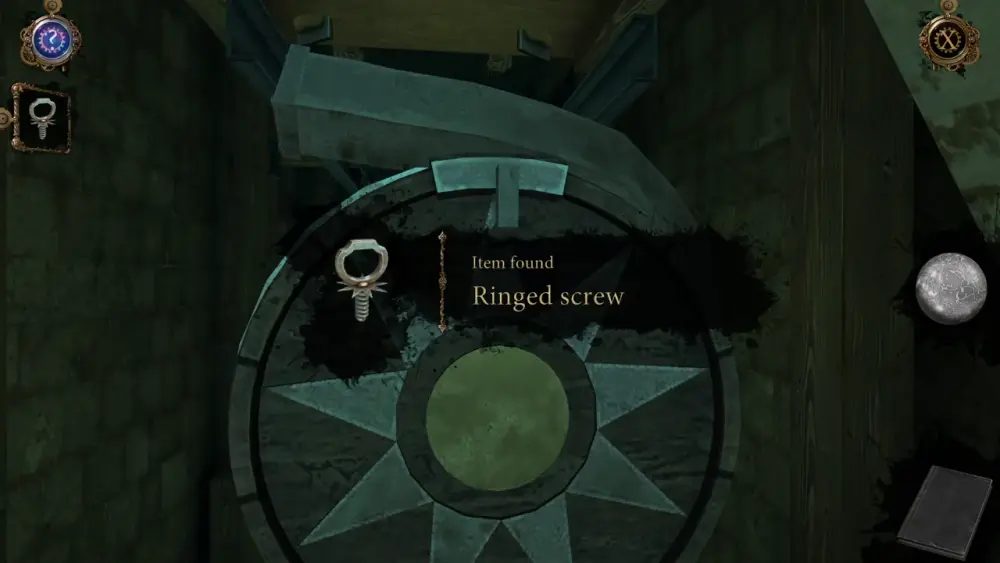
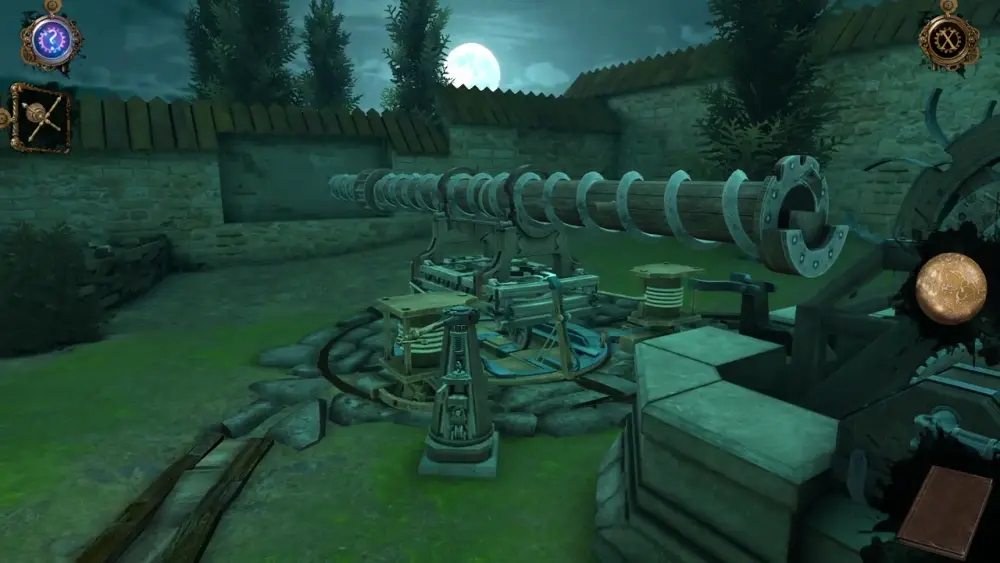
Return downstairs and head to the opened gate. At this point, you may have realized that the models in the workshop were basically a small-scale simulation and representation of what has been constructed in the garden all along—which means you’re now facing the life-size Archimedes screw that Leonardo had mentioned. Zoom into the end of the giant Archimedes screw, which displays an image that looks like the sun, so you can obtain the Ringed Screw.
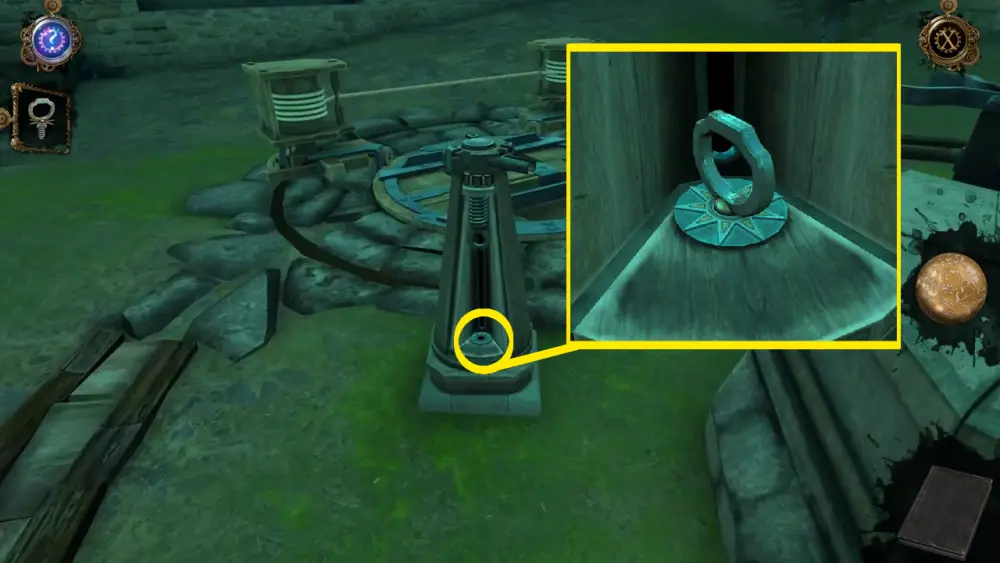
To make use of this screw, head to the well. Right next to it is a stand. Zoom into the lower part of the stand and here you will find a hole with a symbol of the sun. Insert the Ringed Screw here and turn it all the way down.
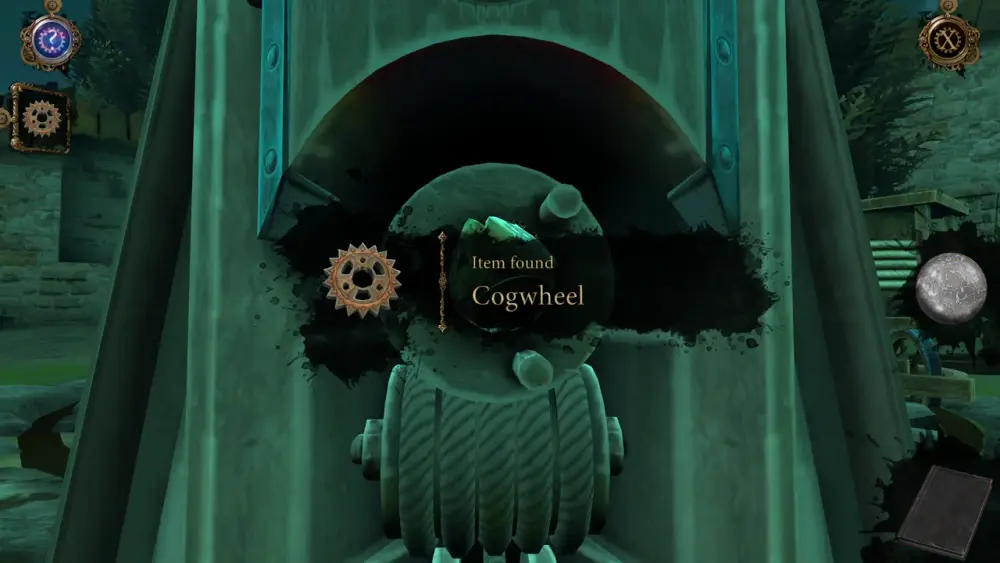
This won’t trigger anything, but if you zoom out of the stand, you’ll see that just above the screw is a spring with a circular metal clasp. Pull the spring down so the clasp can fasten onto the head of the screw. This will cause the carts behind the stand to ring around the path and the spring to pull up what appears to be a labyrinthine puzzle. Take note that just below the puzzle is a Cogwheel you can collect.
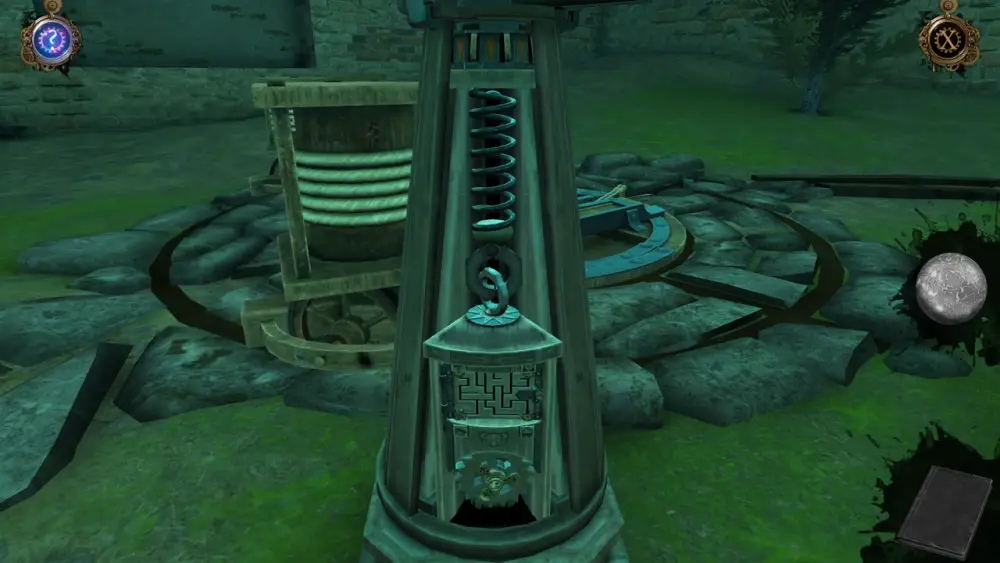
Zoom into the cogwheel and turn the golden dial in the middle, which will make the small locks bend. With this, you’re free to collect the Cogwheel item.
We’ll put the puzzle on the backburner for now, but we’ll return to it shortly after visiting the workshop once again.
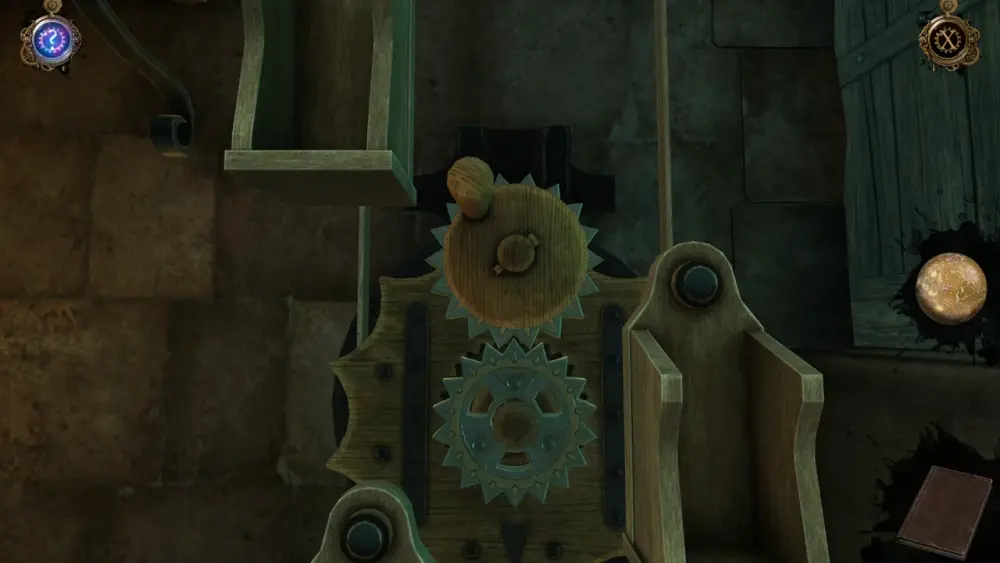
Inside the workshop, turn your attention toward the pulley, which you might have tried rotating a couple of times but never made the strings move. Clearly, this is where the Cogwheel is supposed to go.
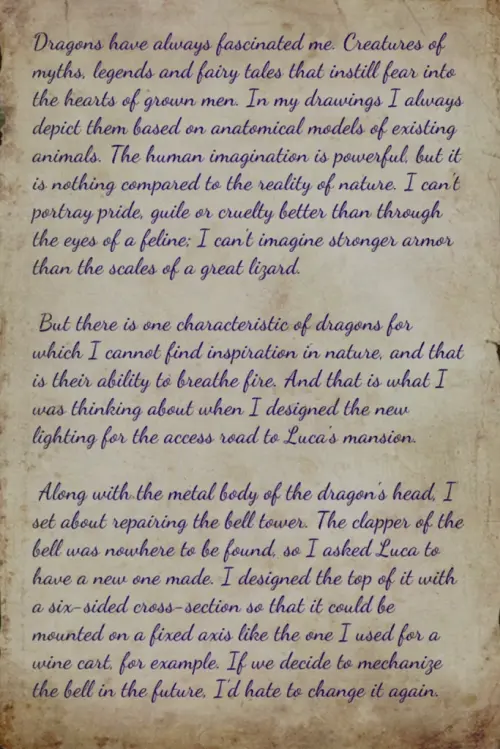
There are 4 items you can get from the compartments in this pulley. One of them is a letter from Leonardo explaining how he designed the dragon puzzle at the beginning of the chapter, and how he asked Luca to make a new clapper for the cart.
The 3 other items are the Hand Plane, Handle in Metal Frame, and a Cutter.

Take note that the Hand Plane has a + sign on its inventory icon, meaning it needs another item to complete it. If you view the Hand Plane from your inventory, you’ll see that it has a flower-shaped indentation on the side. This might just be the other item you need to complete it.

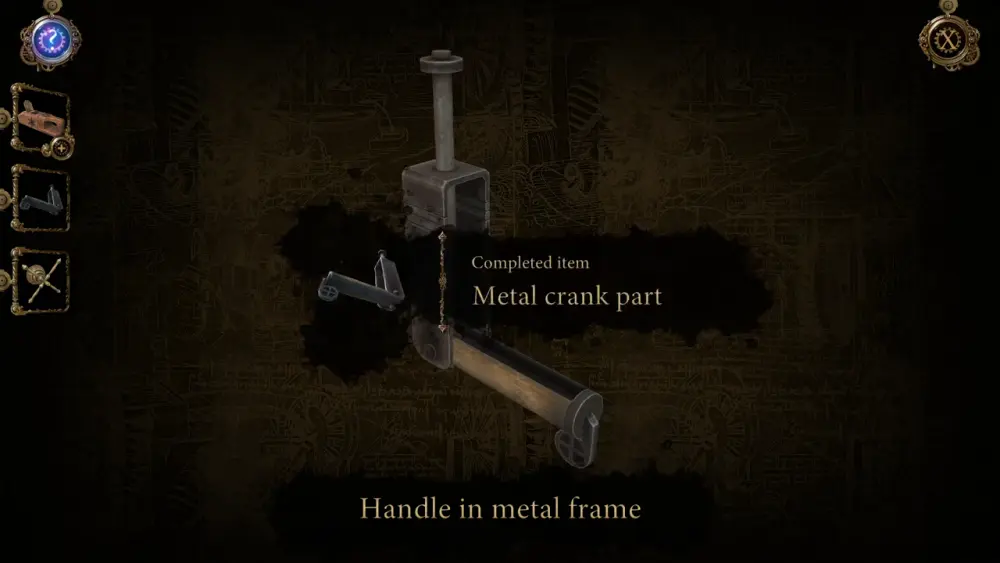
On the other hand, the Handle in Metal Frame has a cogwheel on its inventory icon. Thus, head to your inventory to tweak it by pulling the handle down. The completed item should be a Metal Crank Part.
For now, let’s turn our attention to the Cutter: head to the locked gate above the short staircase to the left of the workshop. Place the Cutter on top of the bolts, turn it to the side, then keep pulling it up and down until the bolts are cut.
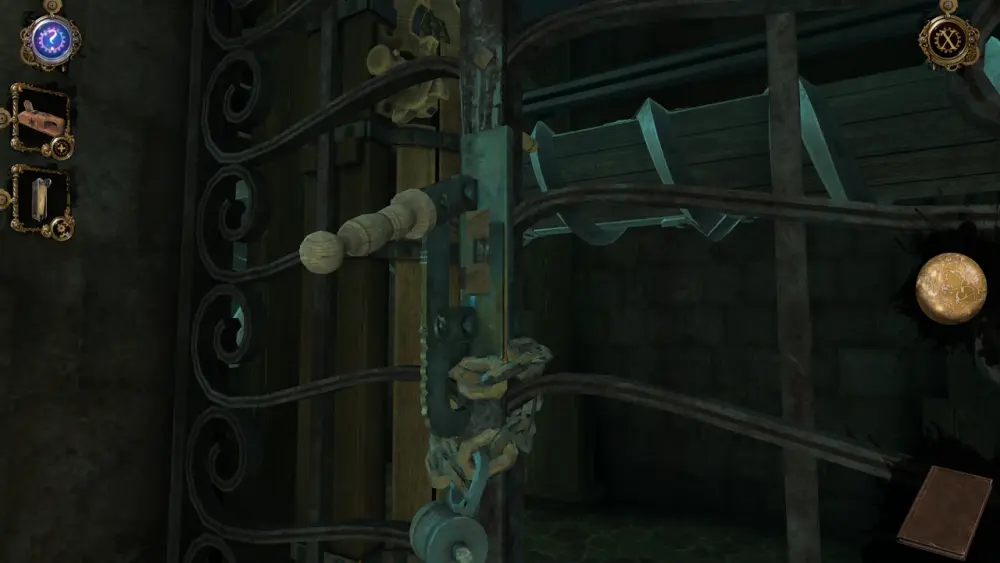
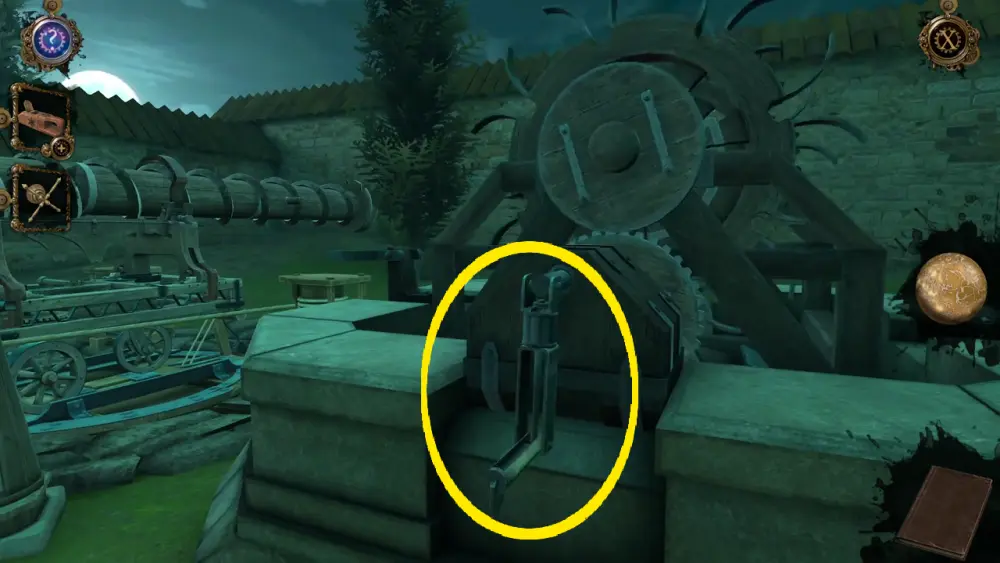
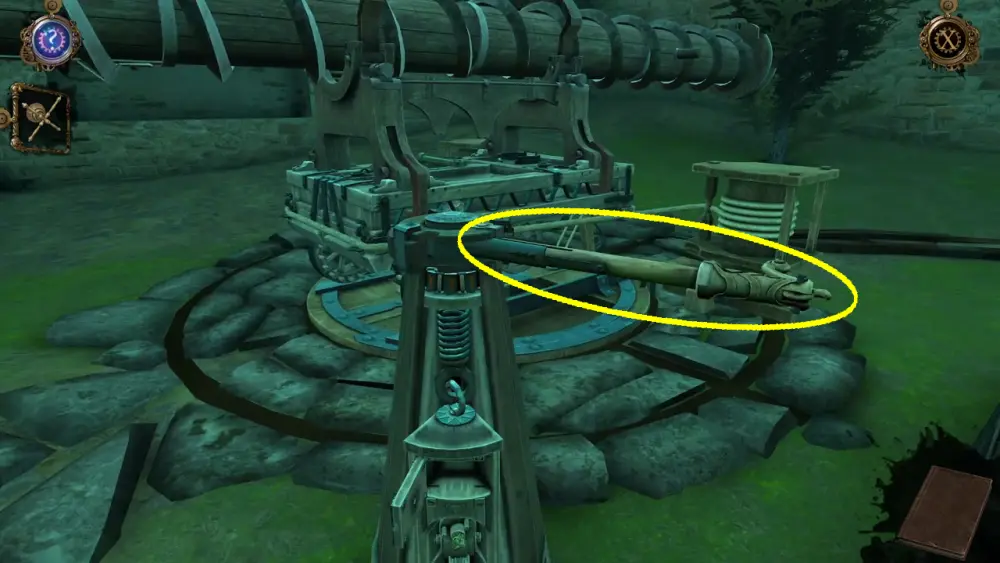
Open the gate so you can enter the room where the giant Archimedes Screw is being kept. To your left is a lever that moves the screw forward. Press the lever down until the screw is properly aligned with the cart outside. At the rear end of the screw, you’ll also notice an item you can collect.
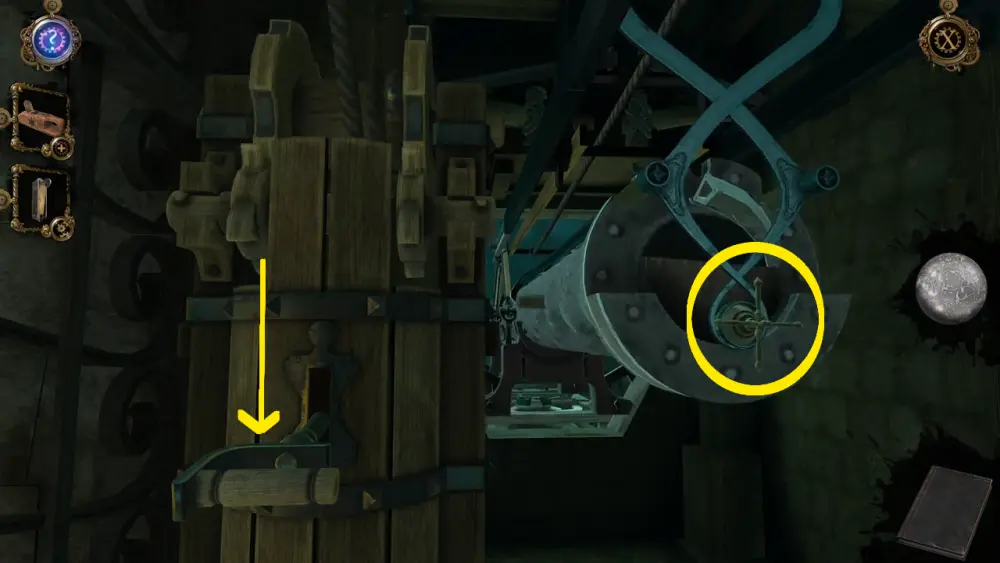
Turn the item until the lock surrounding it is loose and you can collect the Tool with Cross-Shaped Handle.
After collecting the item, a brief cutscene will show you that the Archimedes Screw is now mounted on the cart. Head back to the yard and zoom into the cart’s lower front area. Here you’ll see a small circular indentation where the Tool with Cross-Shaped Handle will fit. Place the item here and rotate it until it loosens up the wooden post keeping the cart from moving down the tracks.
The cart will roll all the way back to where the stand with the labyrinthine puzzle is. Once the cart is in place on the circular mechanism along the tracks, a metal controller will spring up from the side of the labyrinthine puzzle.
When the cutscene is over, walk back to the well. Remember that Metal Crank Part you have in your inventory? Place it on the crankshaft on the well.
If you turn the crank, you’ll notice that it doesn’t do anything yet, so turn your attention toward the labyrinthine puzzle on the stand for the meantime. Zoom into the puzzle and you’ll observe a couple of interesting things: first is that you have a marker at the beginning of the maze, which is controlled by the metal controller to the side. The arrows indicate which direction the marker will move. Second, there are four symbols on each corner of the puzzle. Your marker starts where the symbol of a slanted cart is below it.
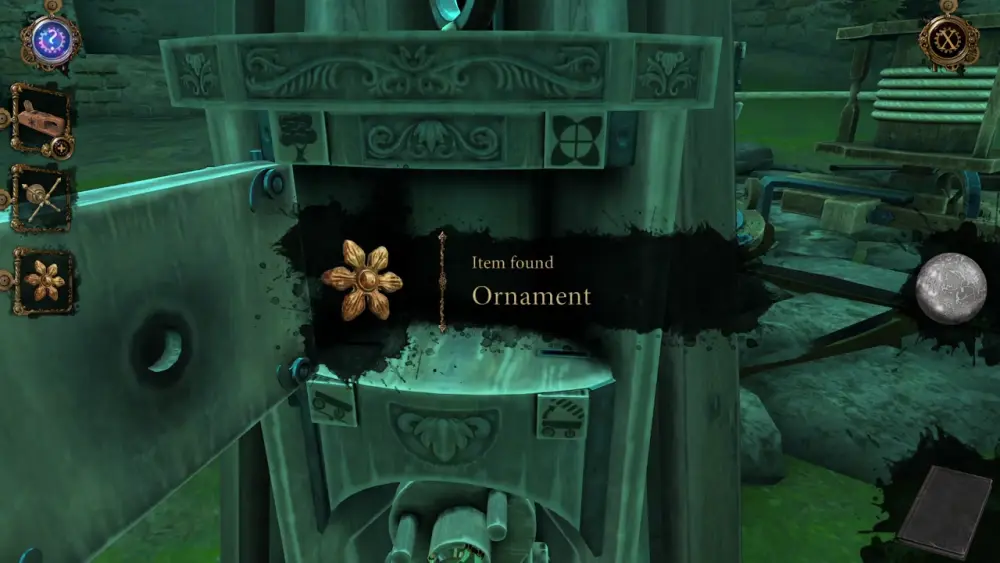
Your objective is to bring the marker to each corner of the maze in the order of the locations you went to before reaching the Archimedes screw. In the image below, we’ve marked the symbols in chronological order. Going to the correct symbol in order will cause a green arrow to appear beside the circle where you’ve brought your marker using the controller.
With the puzzle solved, the controller will retract, allowing you to open the hatch upon which the puzzle was made. Inside the compartment, you will find a flower-shaped Ornament fastened to the door.
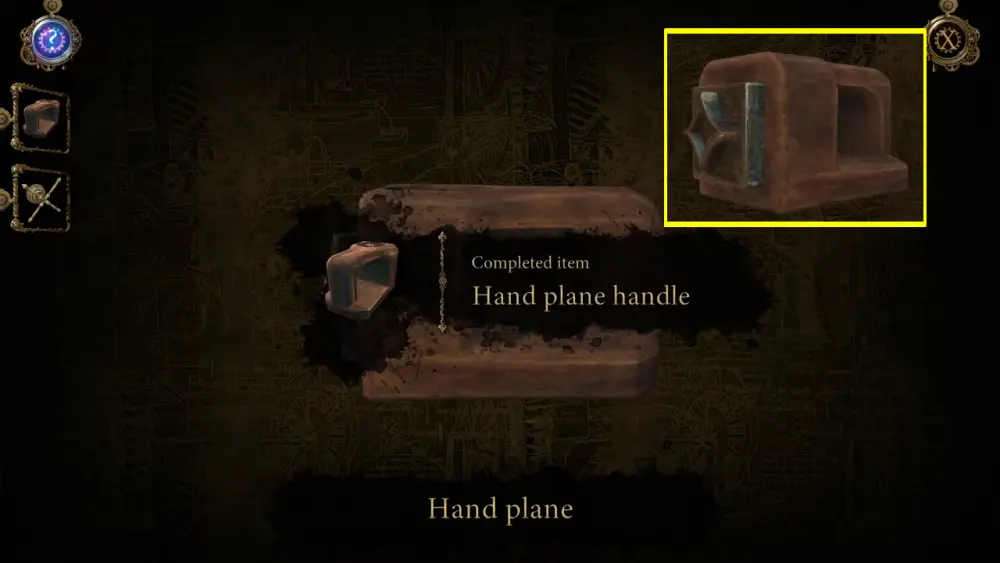
Open your inventory and place this Ornament on the flower-shaped indentation on your Hand Plane. This will result in its completed form, which is the Hand Plane Handle. As you can see from the image below, the Hand Plane Handle has a diamond-shaped end.
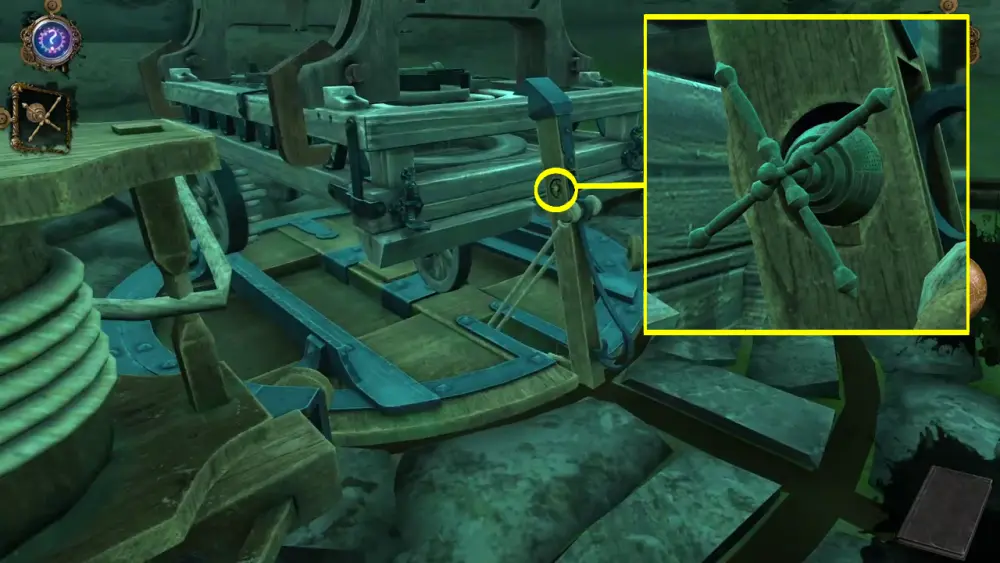
Back again to the workshop, use the Hand Plane Handle on the circular mechanism located at the post of the short staircase inside the workshop. Rotate the handle so it can unfasten the Ornamental Lever Part, which you can recollect.
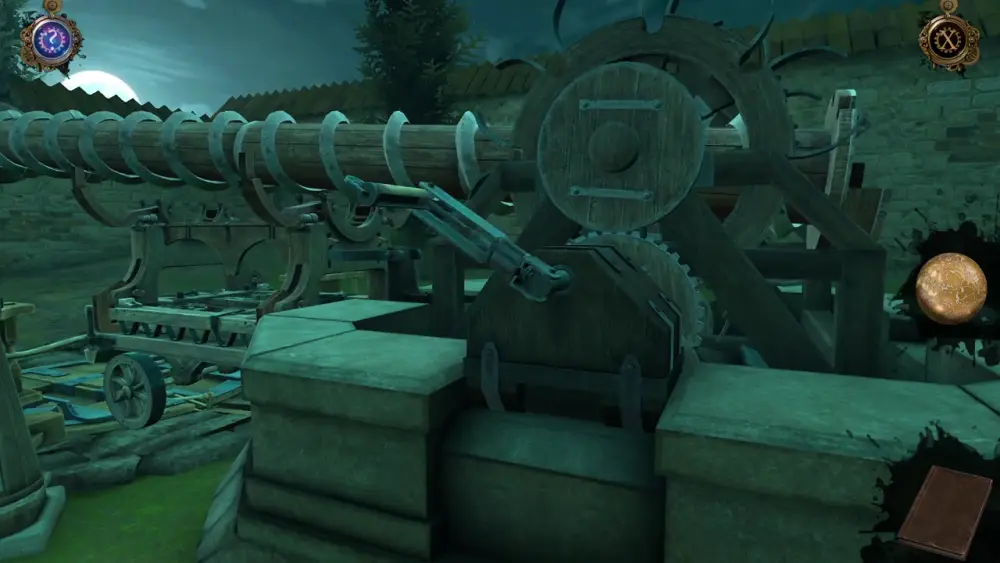
Since you have the lever back in your inventory, you can now use it for the stand next to the well. Place the Ornamental Lever Part on the shaft of the stand.
Turn the lever to the left. This will make the cart rotate, with the Archimedes screw facing the well.
Even if you rotate the well’s cogs with the crank, this still won’t do anything as the screw isn’t mounted between the gaps of the wheel. Zoom into the cart first as you’ll find the same circular indentation you did on the wooden post keeping it in place at the end of the tracks. Place the Tool with Cross-Shaped Handle on that circular indentation and turn it.
This will make the wooden post unfasten, allowing the cart to move forward, thus aligning the Archimedes screw between the large wheel on top of the well. With the screw properly in place, you can now turn the crank on the well, which will lift the screw until it leans on the side of the windmill, similar to what you did with the models previously.
Once the screw is leaning on the windmill, its weight will tip over a platform, which will drop an item.
It’s a good thing that you’re nowhere near where that item dropped as it is, quite literally, a Massive Weight.
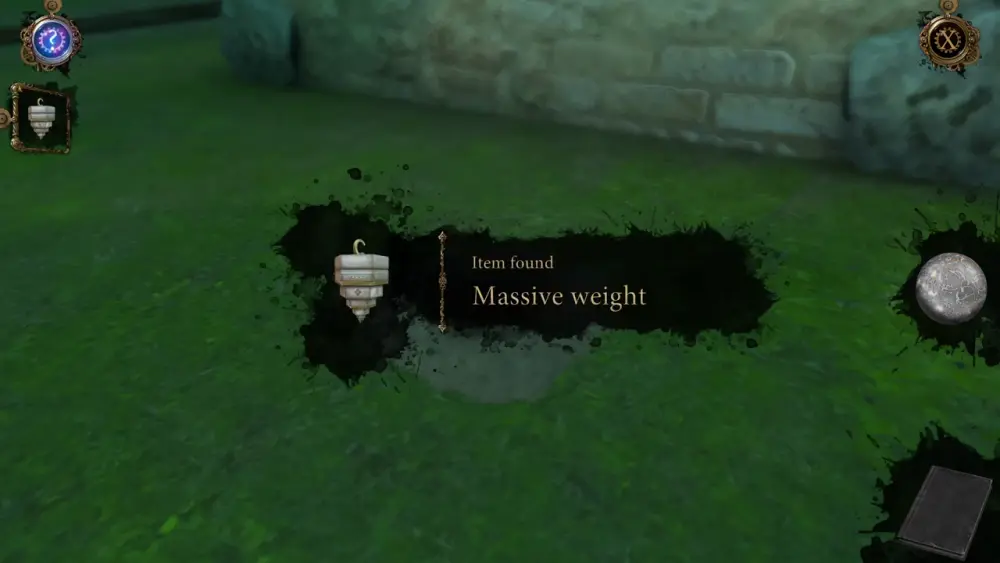
If you recall a prompt mentioning a counterweight when you entered the windmill upon going back to 1506, then you now have the answer to that inconclusive part of your time-traveling adventure. That’s right: this Massive Weight is the counterweight missing from the windmill.
Since you won’t be able to access the windmill in the present time, head back to the foot of the winding staircase where you first accessed the Oculus Perpetua to travel back to 1506. Once more, you’ll find yourself beside the crossbow and right in front of the wooden bridge directly in front of the windmill. Cross the bridge to the windmill, enter the door, and step out from the opening on the right side of the room. Here, you should find a familiar metal pole with a symbol that looks like a beehive and a rope on top. Place the Massive Weight right in front of the beehive-looking symbol.
As the counterweight goes down, the plank beside it will follow. Use this plank as a platform to head farther up the windmill.
When you reach the top of the plank, you’ll find a wooden lever connected to the blades of the windmill. Push the lever by long pressing on the handle.
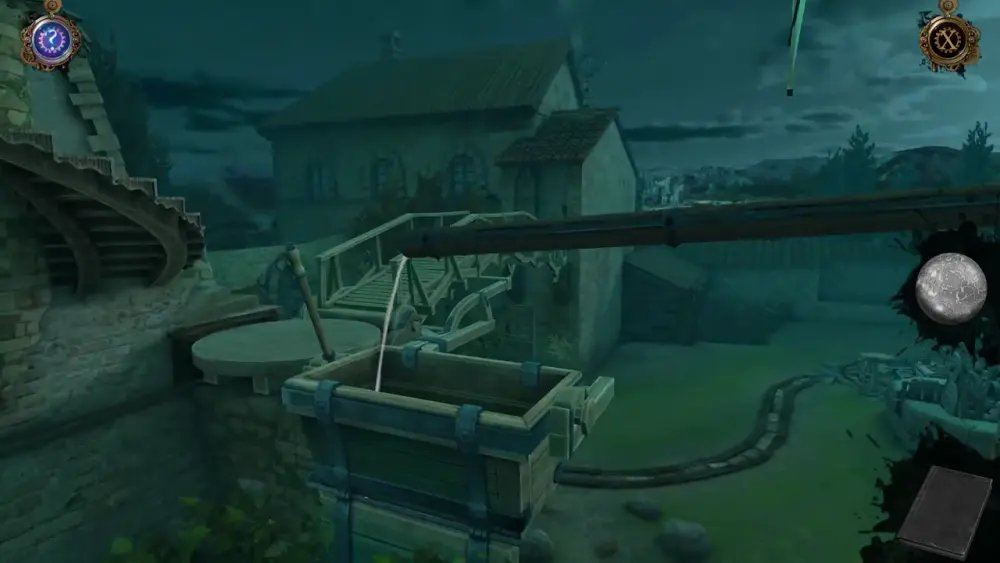
As the blades of the windmill start to move, this will prompt a cutscene where you’ll see that the windmill of 1508 is magically being restored and the windmill’s mechanisms begin to move once more. One thing that’s worth taking note of is that water will now flow to the pipe fronting the winding staircase.
As the windmill has been repaired in 1506, you will be immediately brought back to 1508 even without activating the Oculus Perpetua. Thus, after the cutscene, you will find yourself in the same place, on top of the windmill, but already in the present timeline.
Behind you, you’ll hear the sound of pulleys moving. True enough, human-sized compartments (which look like life-size versions of the ones from the workshop) are rotating on pulleys. Step into one of these compartments so you can easily descend from the windmill and back into the yard.
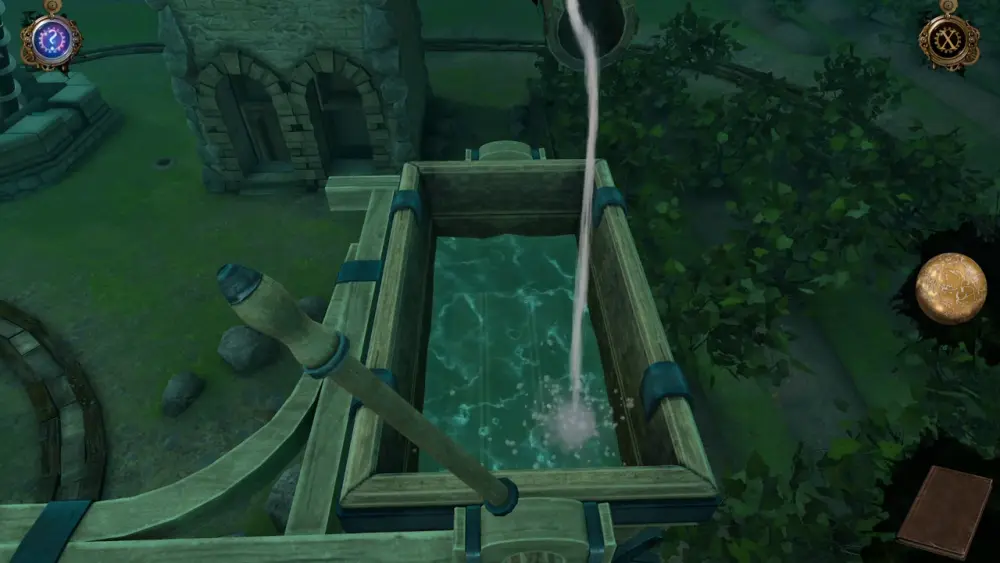
Going back down, you’ll be greeted by the sound of running water. Take this as your cue to head up the second floor. Cross the bridge and walk to the foot of the winding staircase. We previously mentioned that there’s a lever right in front of it. You’ll see that the water from the pipe goes down an open hatch, which is controlled by the lever.
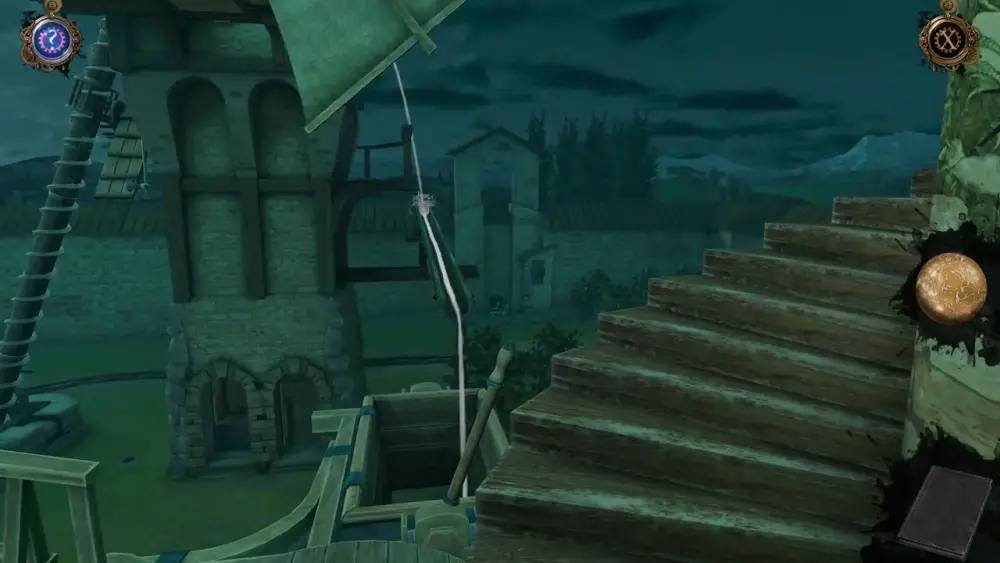
Of course, pulling the lever will close the hatch, causing the water to fill up the container. This container will then act as a counterweight, causing the bridge to rise.
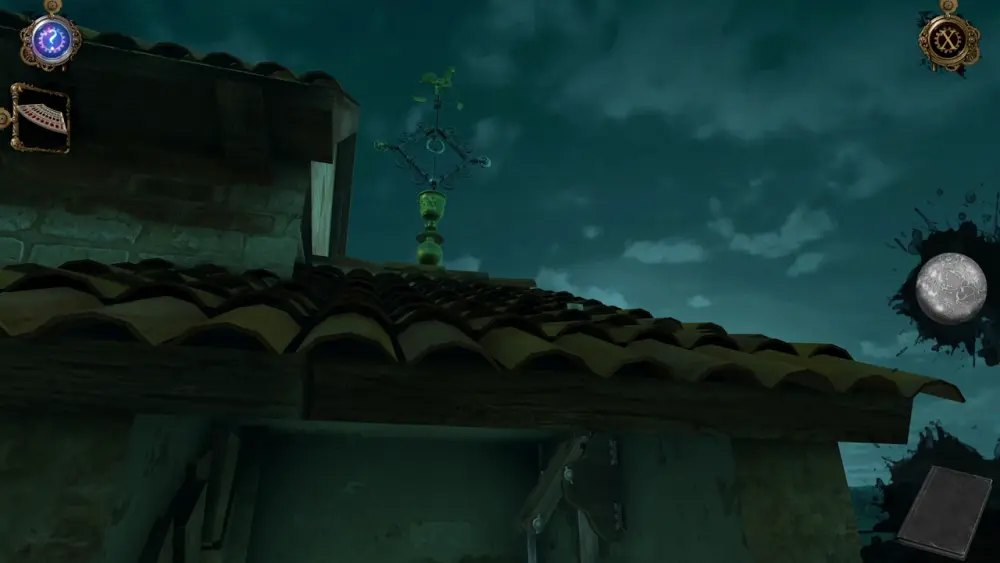
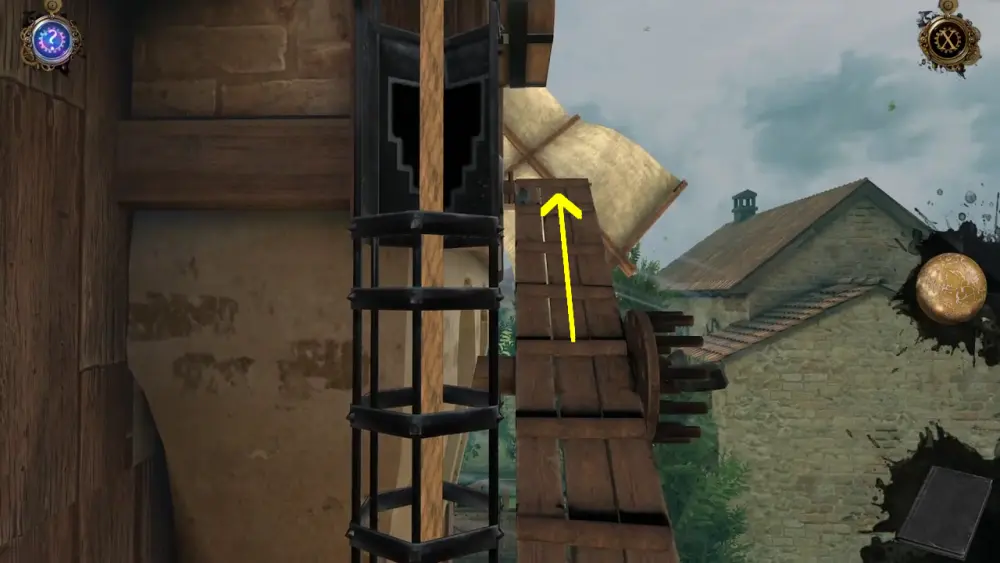
Cross the lifted bridge to get to the weathervane on top of the roof.

Zoom into the weathervane and turn the metal sun on the left. This will cause two steel bars to descend in the middle of the diamond frame. Then, turn the circular device at the center of the weathervane.
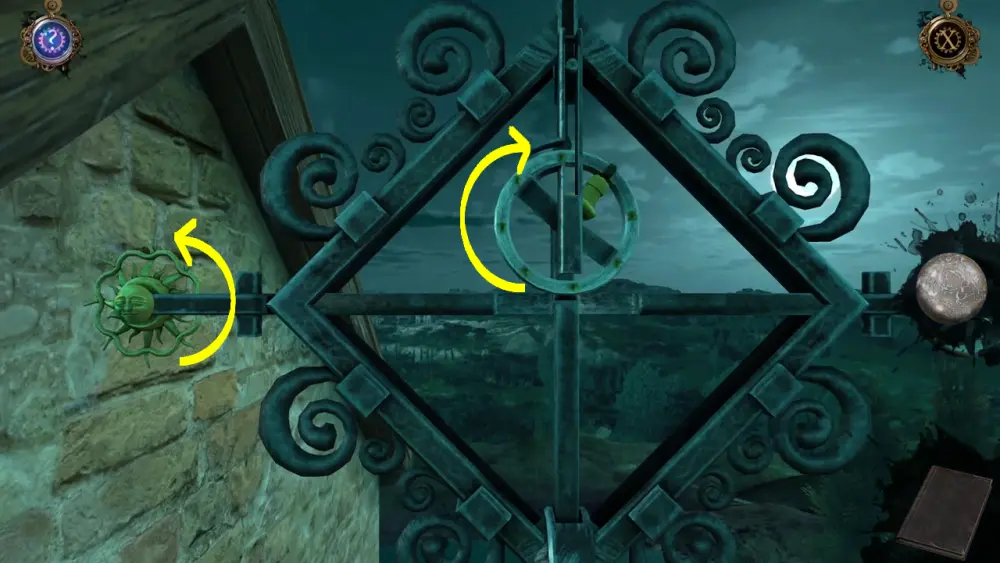
Keep turning it until it opens up a compartment at the base of the vane.
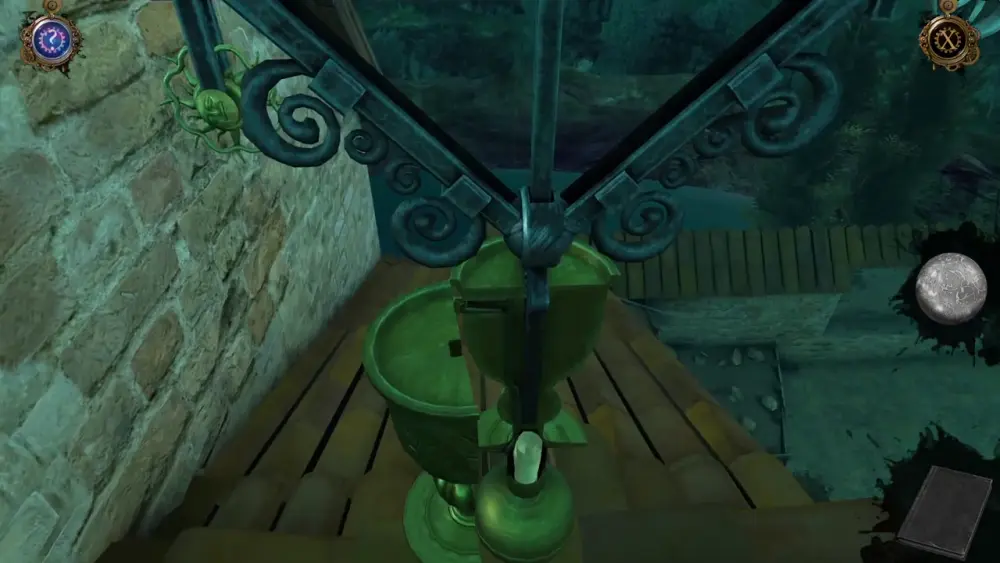
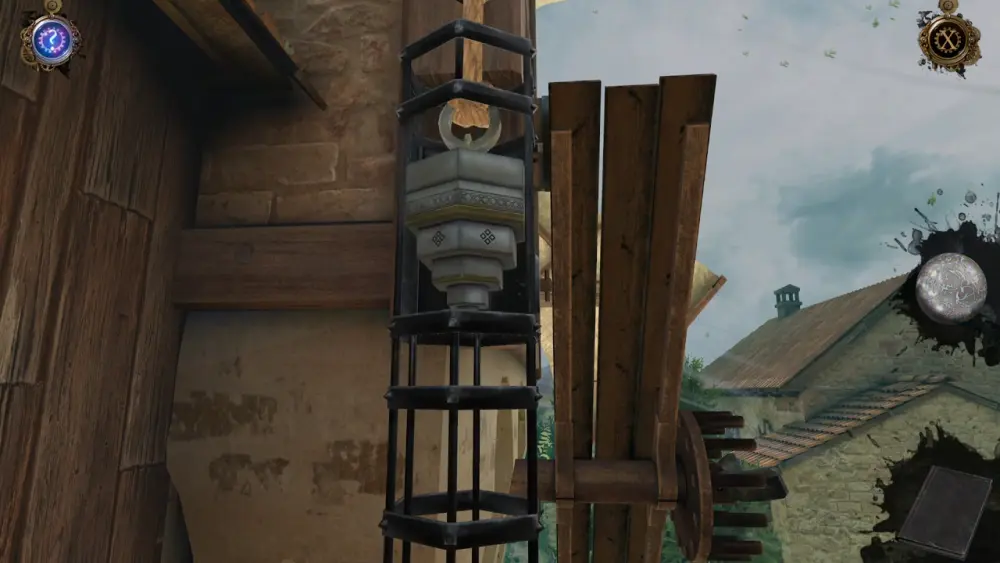
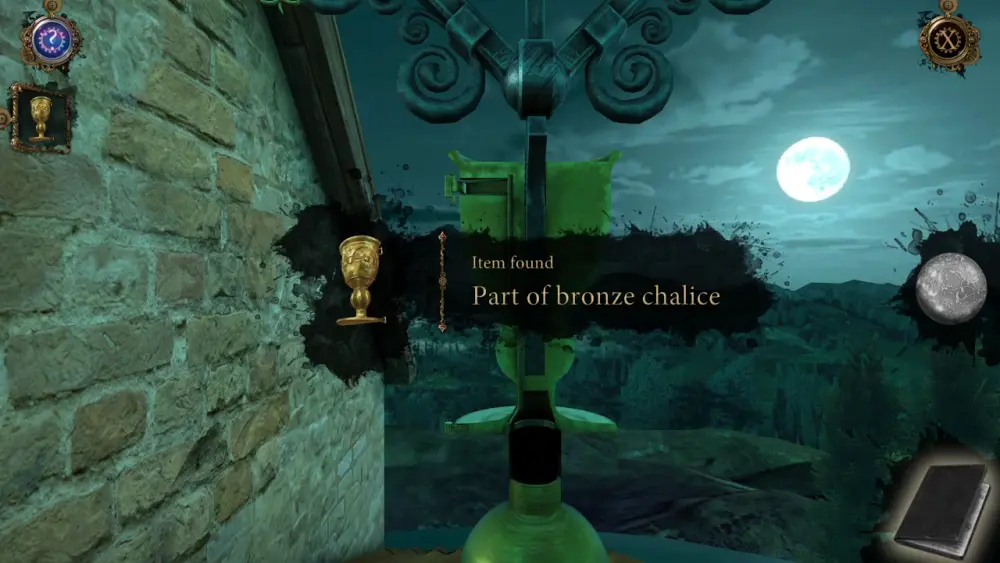
You’ll get two things from opening this compartment: first is another letter from Leonardo and another is the item Part of Bronze Chalice.
The letter from Leonardo is the last one you’ll receive in this chapter. It outlines where you are headed next, as well as reminds you of the last thing you ought to do to complete this stage of the game:
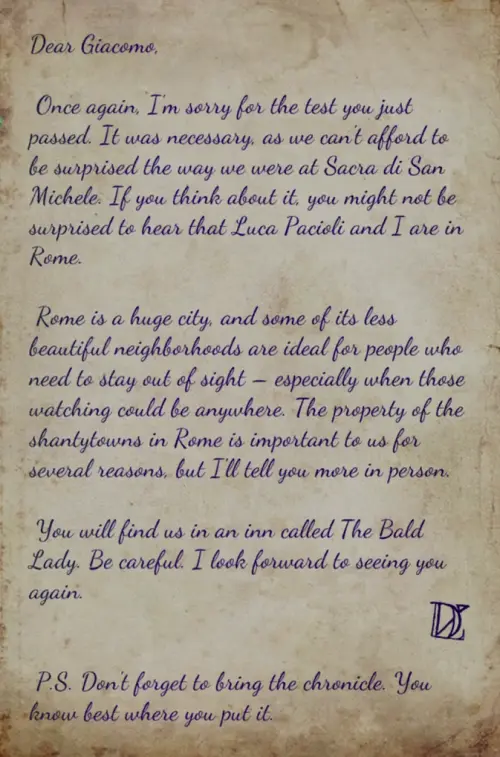
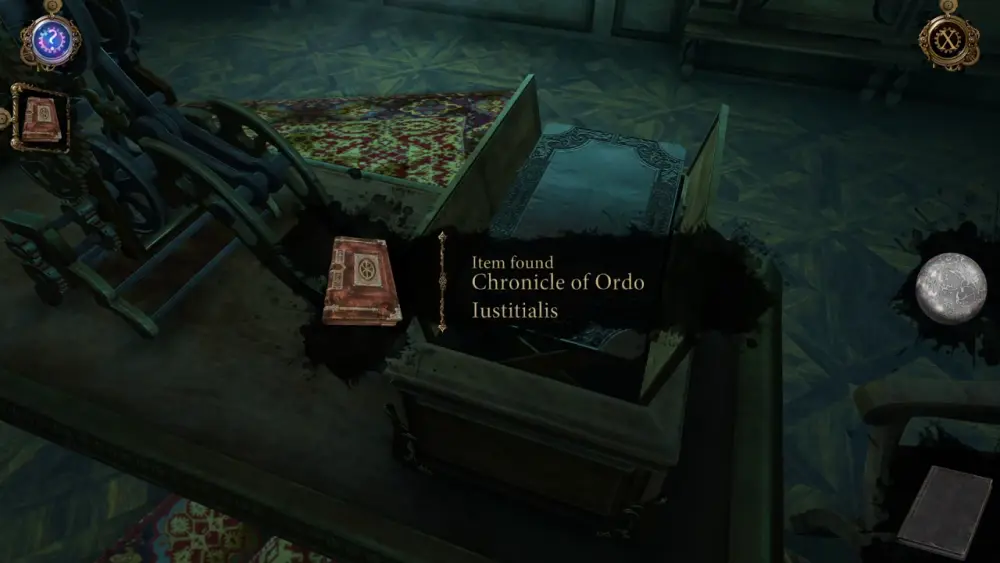
With Leonardo’s instructions on hand alongside the chalice, you need to head back downstairs to retrieve the Chronicle of Ordo Iustitialis. Cross the bridge, pull the lever to open the hatch of the container, draining the water. This should make the bridge return to its original height, which will allow you to cross again and descend the stairs. Enter the room with the odd-looking mechanism where you’ve kept the chronicle at the beginning of the chapter. Place the chalice on the empty box.
As it did before, the mechanism will move and you’ll be able to collect the Chronicle of Ordo Iustitialis on the other end.
With that, you’re ready to follow Leonardo and Luca to Rome at an inn called The Bald Lady.
This concludes our in-depth walkthrough for Chapter 2 of The House of Da Vinci 3. What adventures lie in wait for Giacomo? What trials await him in Rome? Will he ever get to meet Leonardo or is this all a wild goose chase? Share your thoughts in the comment section below!