After the long wait, The House of Da Vinci trilogy finally concludes with The House of Da Vinci 3, the last installment of the highly interactive puzzle story set in the beautiful yet mysterious backdrop of the Renaissance. Developed by indie studio Blue Brain Games, it’s clear that The House of Da Vinci 3 is a labor of love as this last leg of the adventure comes with more puzzles, mysteries, more intuitive controls, and even fully-voiced historical figures.

In The House of Da Vinci 3, you return as Giacomo, a friend, and apprentice of the famous Leonardo da Vinci. Following the story, your objective is to solve puzzles, unravel mysteries, and discover the conspiracies surrounding the most powerful personages in Italy at the time. With the aid of the Oculus Perpetua, you can open portals that will let you travel through space and time, as well as gain another “perspective” whenever you encounter a slew of puzzles and clever mechanisms. With this device, you can change the past and influence not just the present, but even your future.
One thing that’s notable about The House of Da Vinci 3 is that there’s a seamless transition between puzzle-solving and cutscenes, making your entire gaming experience more fluid and engaging. With its beautiful locations and sophisticated puzzles, every player who enjoys this genre will certainly be transported wholeheartedly into this imaginative, ingenious world.
But make no mistake: despite its breathtaking surroundings, The House of Da Vinci 3 is a certified challenge, one that will pick your brains and test your skills in observation, memory, and exploration. Playing this game is perhaps best done at your leisure as it will require you to focus and give it your undivided attention.
Since it’s all about solving puzzles and unraveling mysteries, The House of Da Vinci 3 can, admittedly, take time to complete. It’s normal to even sometimes feel lost or unsure of what you’re doing. The good news is, we’ve prepared this walkthrough just for you!
In this article, we’ll guide you through the 1st chapter of The House of Da Vinci 3 and help you navigate the game to prepare you for other, more challenging puzzles that will come your way in succeeding chapters. If you haven’t played the previous installments, don’t worry, you can still start with this one and won’t lose any context. Without further ado, let’s dive into this walkthrough for The House of Da Vinci 3 Chapter 1!
Chapter 1: Catacombs (Sacra Di San Michele)
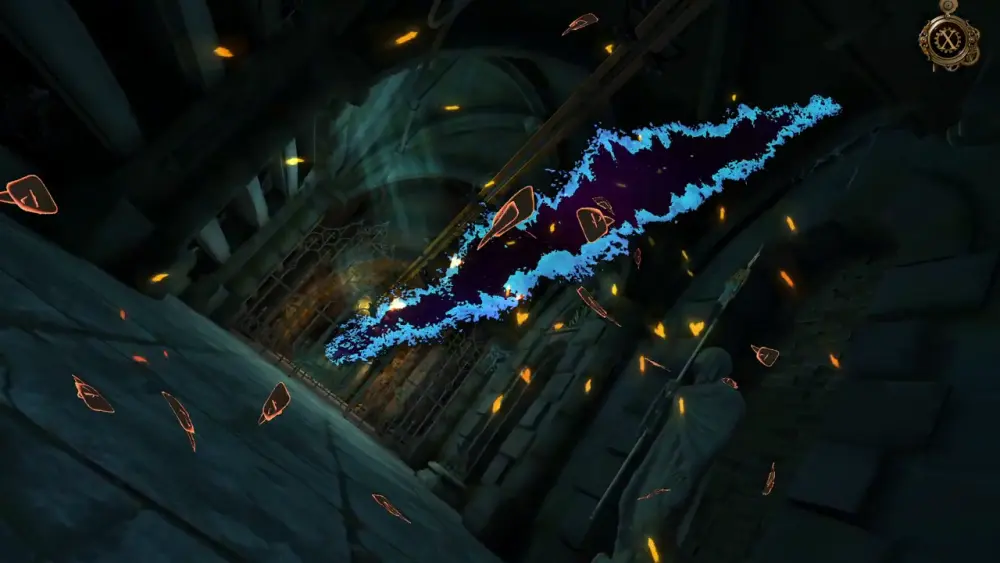
The first chapter begins with you looking out from the second story of an old abbey, the Sacra Di San Michele. You’re being chased by guards, who’ve spotted you peeking from the window across the room. They try to shoot you with an arrow and miss. Stepping back, you find yourself in a hallway fronting a door. Just before it opens, you activate an orb-like mechanism, but it was shot to pieces by a guard who managed to enter just as the mechanism revealed some kind of lens.
As the device shatters, a portal surrounded by red lightning tears through the air, sucking in the broken pieces of the device along with you.
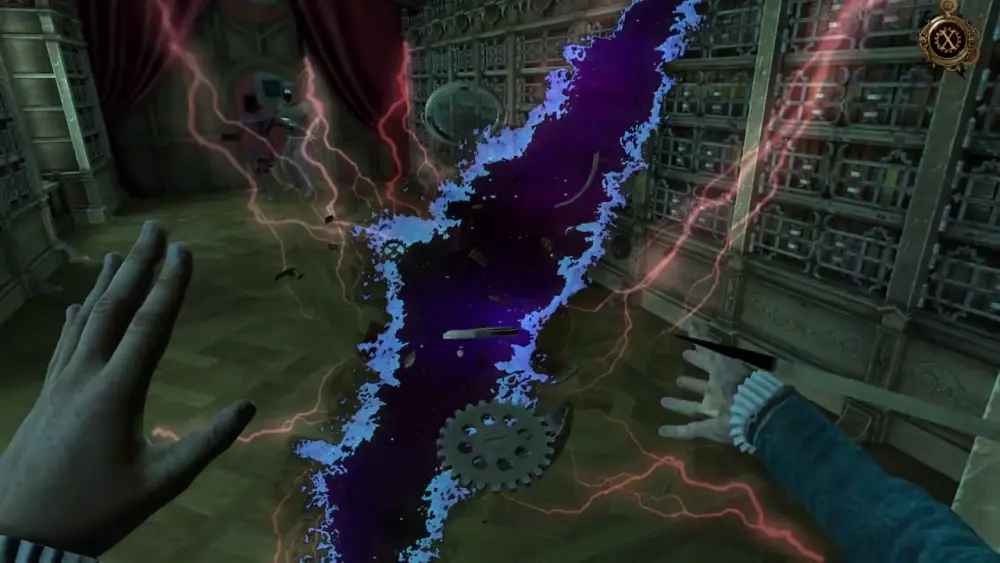
After a moment of darkness, you seem to have been transported to another place, the Catacombs of the Sacra Di San Michele. From the floor, you watch the portal close, but there are no signs of the broken device’s pieces near you.
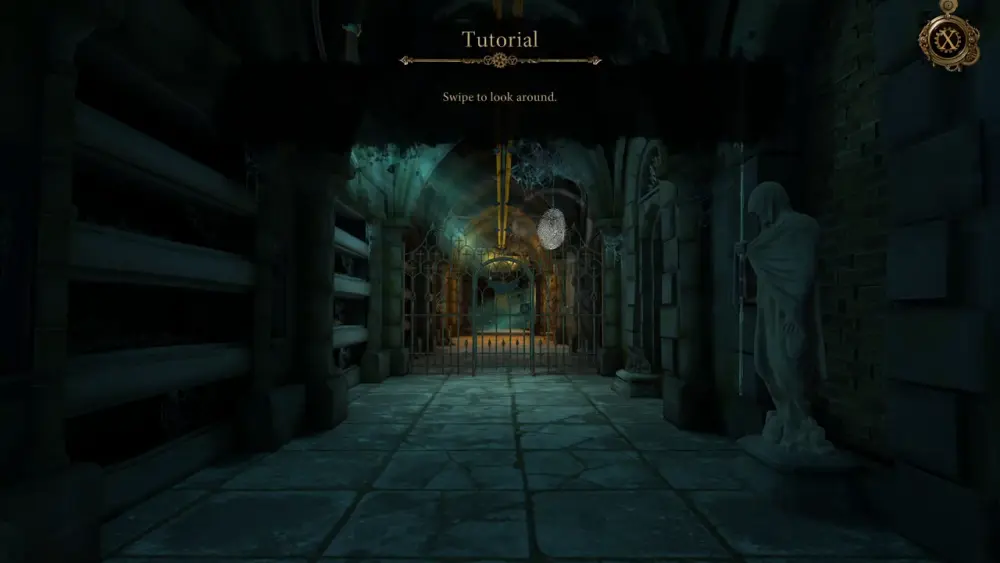
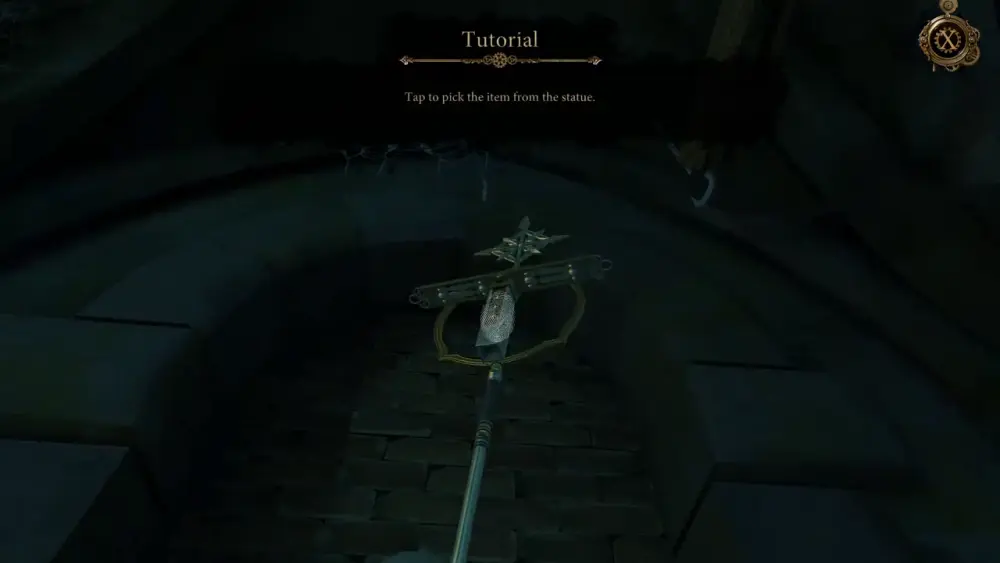
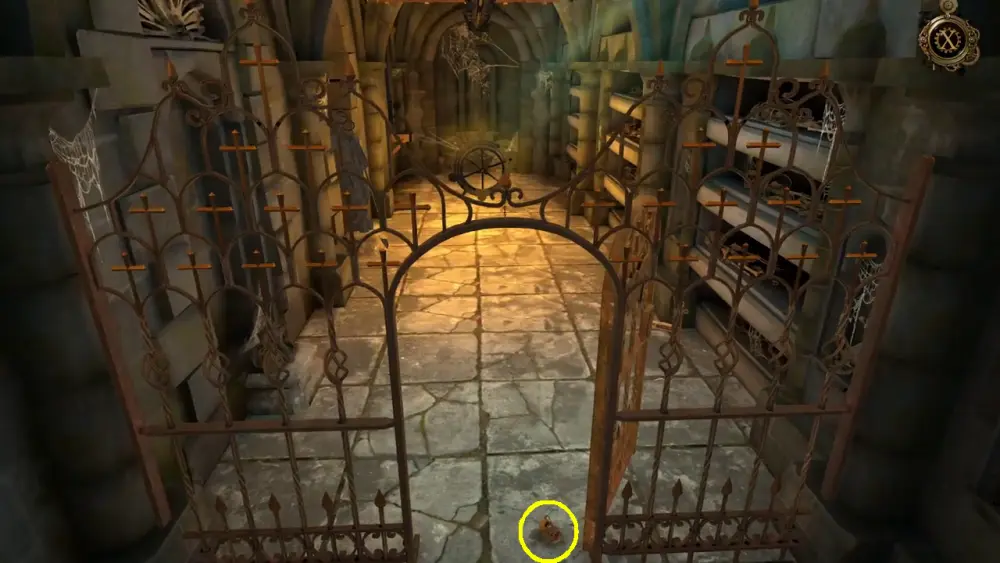
You get up and find yourself in a dark, stone hallway with statues, a gate, and a faint light shining from the far end. This is where the tutorial for the game starts.
First, you have to swipe the screen to look around. Make this a habit wherever, or whenever, you are, as being a keen observer is the key to solving the mysteries and puzzles laid out before your path.
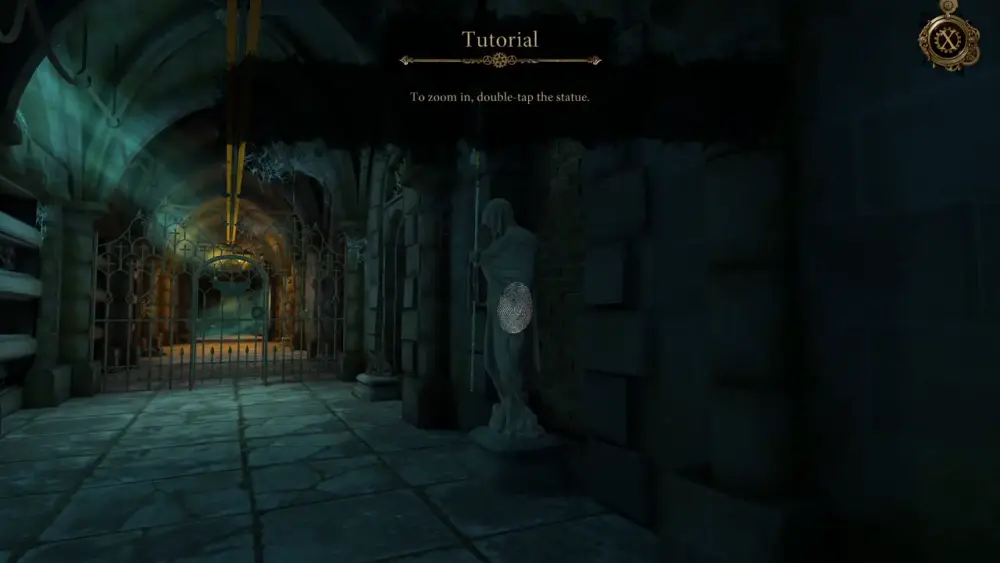
The nearest thing of note is the statue to your right, which you can double-tap to zoom in. Double-tapping objects to zoom in on them is another feature of the game that you ought to constantly try so you can observe things up close and unravel their mysterious nature.
Upon getting close to the statue, the game will direct you to an object on top of it.
The problem is that the item is too high, which your character, Giacomo, comments on. The House of Da Vinci 3 may have supernatural portals in it, but there’s just no way it’s going to break the laws of physics. You’re going to have to find a way to reach that item, as Giacomo notes.
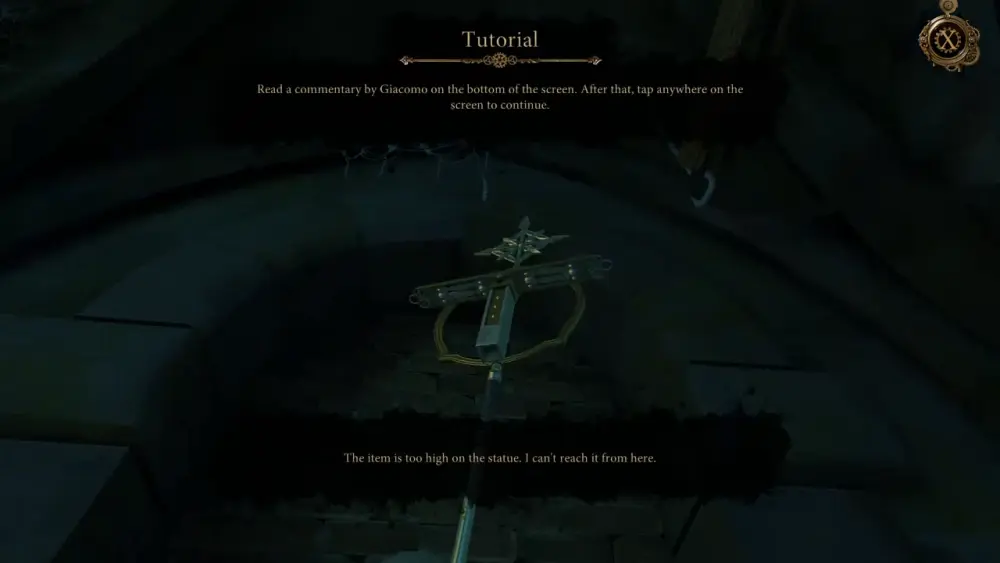
Taking note of Giacomo’s commentary may seem simplistic and easy to overlook, but it’s a crucial part of the game as these observations may also serve as hints or guideposts for what you need to accomplish next.
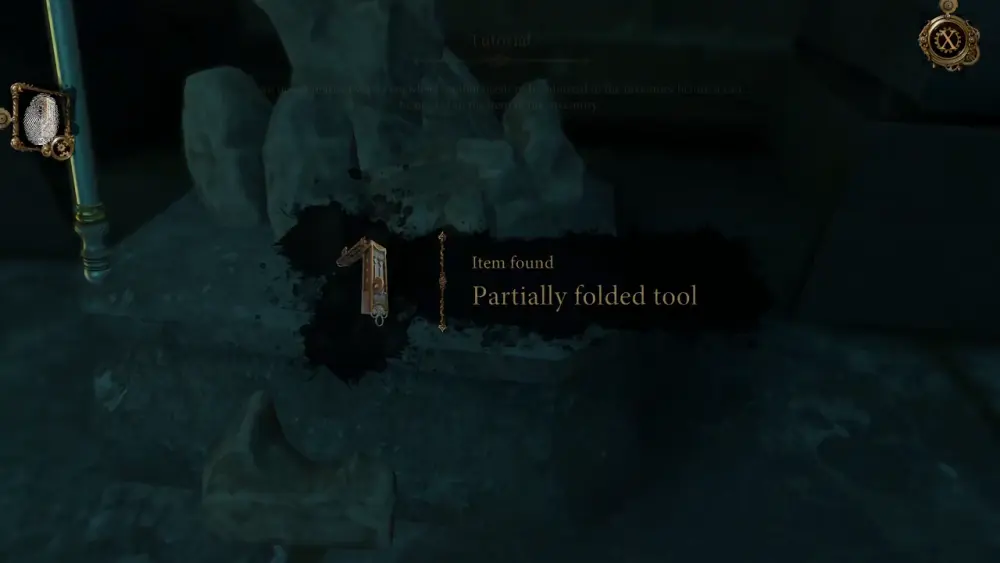
Now that you’ve established what you need to do, you turn your attention back to the statue and give it a mighty push by holding your finger over the icon serving as a prompt.

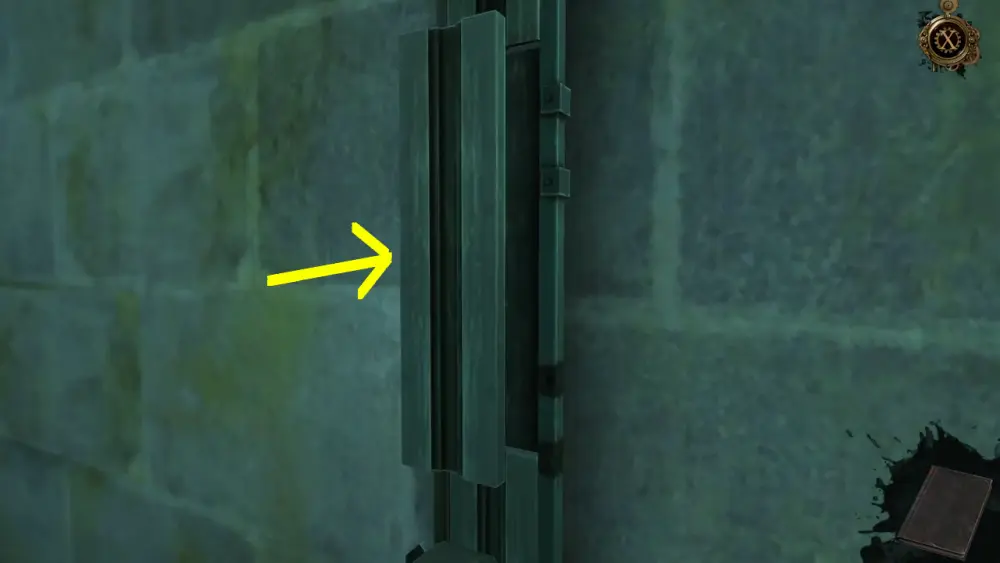
After the statue tips over to the brick wall behind it, the item will drop at the pedestal, which you can tap on to pick it up. You discover that it is a partially folded tool.
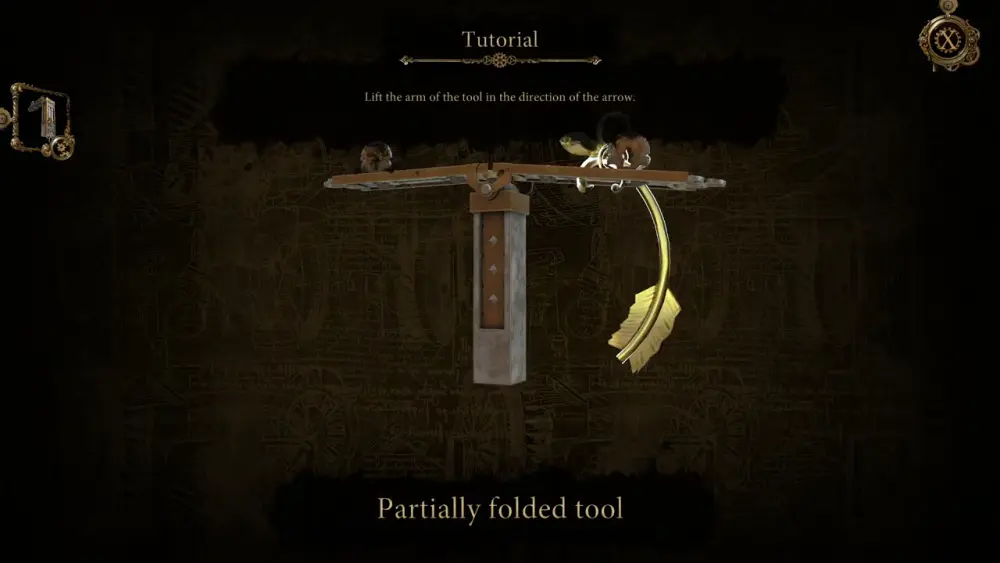
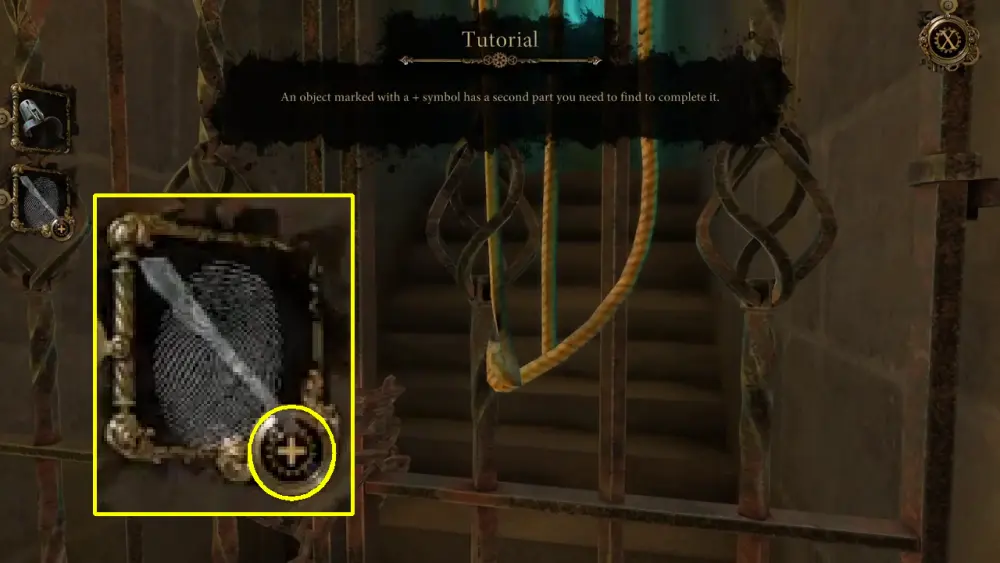
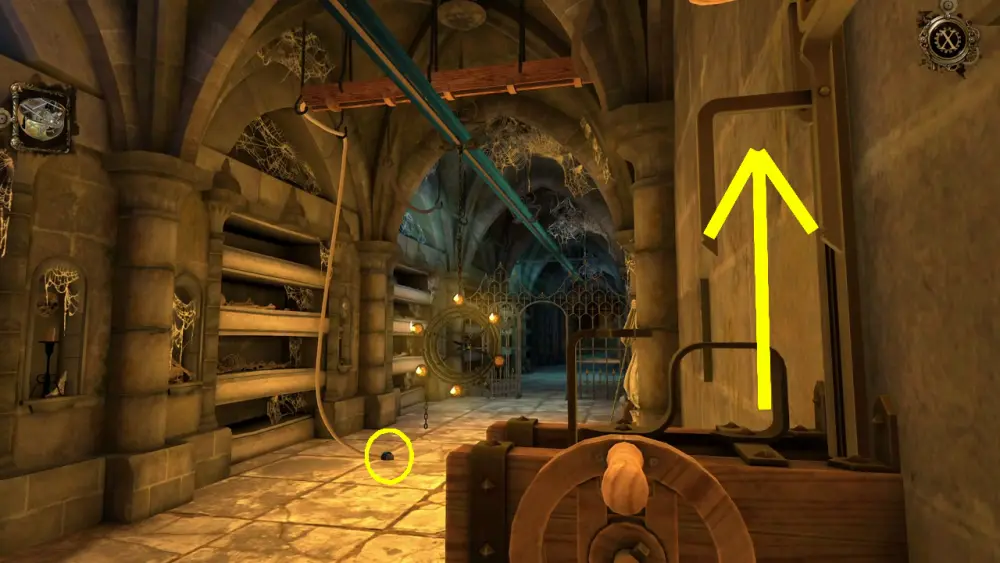
With this tool acquired, you will notice that an icon of this object has appeared on the left side of your screen. As remarked by the tutorial, the icon of the partially folded tool is marked by a cogwheel. This means you have to adjust the item in the inventory before you can make use of it properly. We’ve highlighted this in the image below.
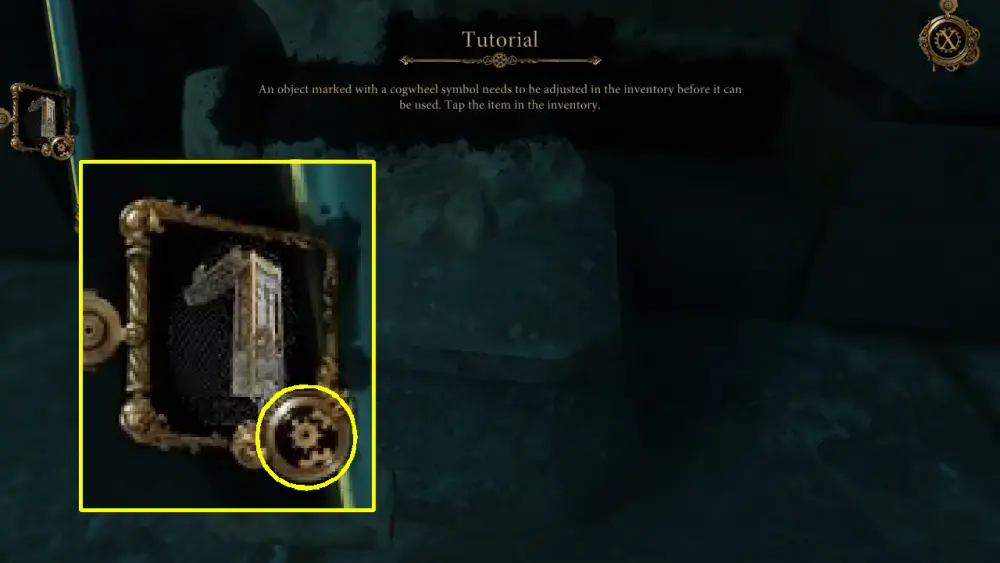
Clicking on the item will let you access it via your inventory, and this is where you can make adjustments if needed. For the partially folded tool, you need to lift the folded arm in the same direction as the arrow serving as a prompt.
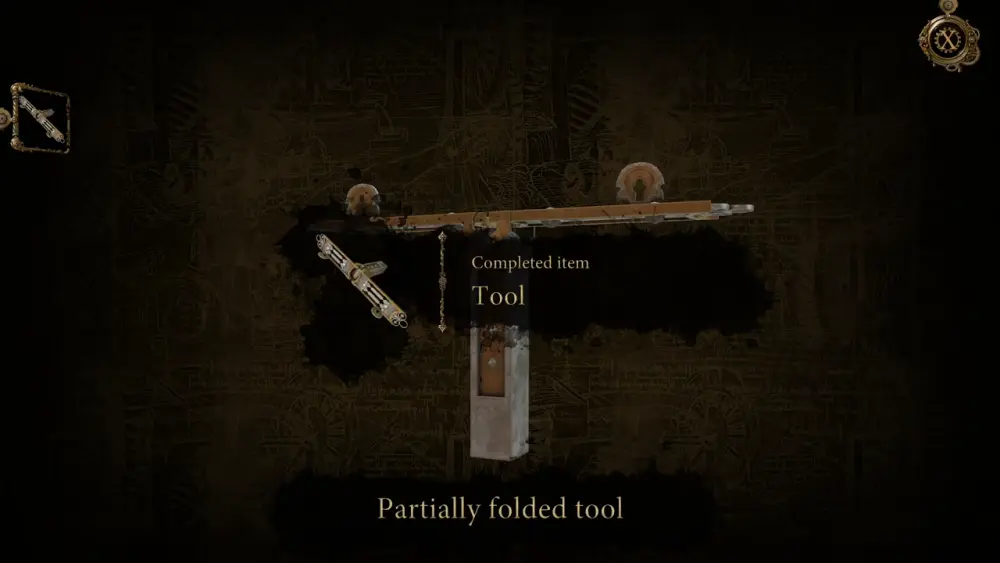
With the item properly adjusted, it will be marked complete.
Exit the inventory view by pinching the screen or tapping the back button, which is found in the upper right corner of the screen (the one that looks like a combination of gold gear and a pocket watch with an elaborate X in the middle).
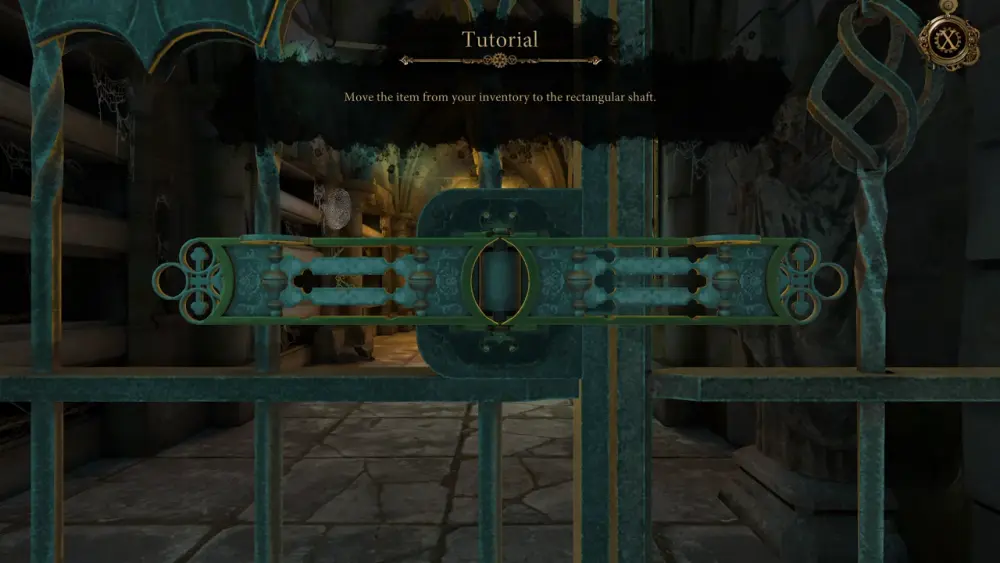
Pinch the screen to move away from the statue and you will find your perspective returning to the stone hallway in the beginning. Go to the closed gate and use the tool you’ve just completed to unlock it. You can do this by dragging the tool from the inventory and into the gate’s rectangular shaft.
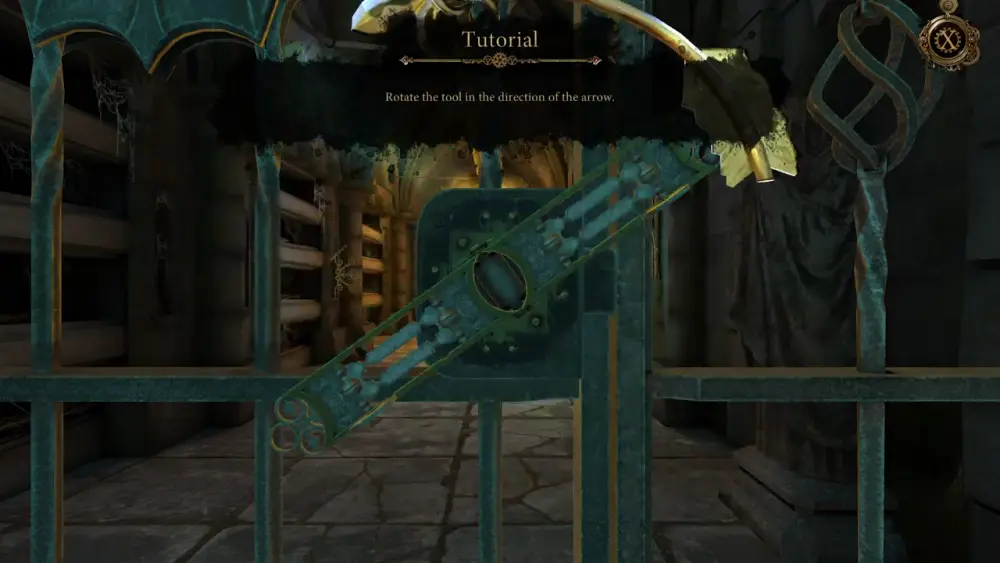
Afterward, you need to rotate the tool in the direction of the arrow to fully unlock the gate.
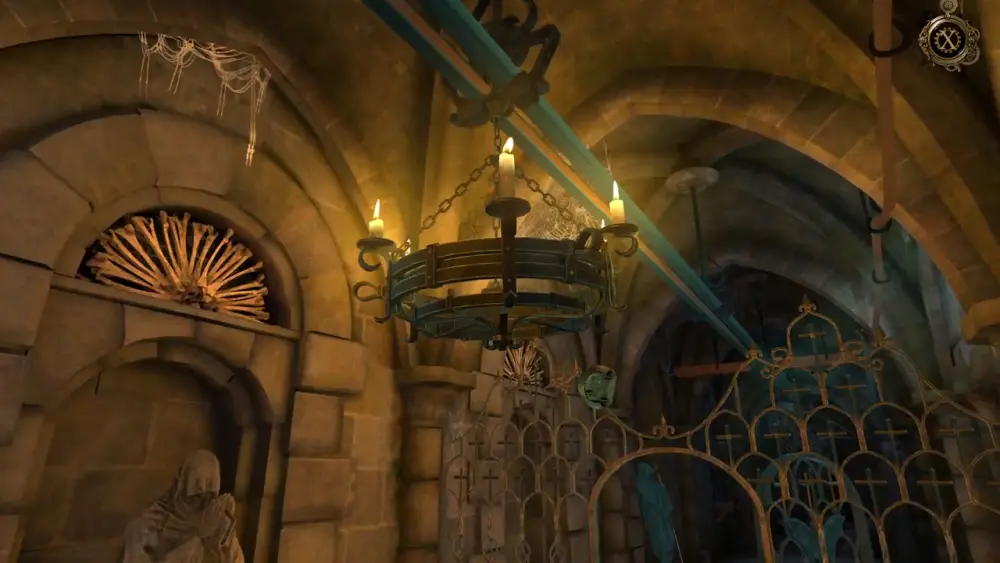
Slide the door open in the direction of the arrow and you will enter the remainder of the hallway. Here, your attention will be directed toward a couple of things: a circular crank, a lever, and an old chandelier with something hanging from it.
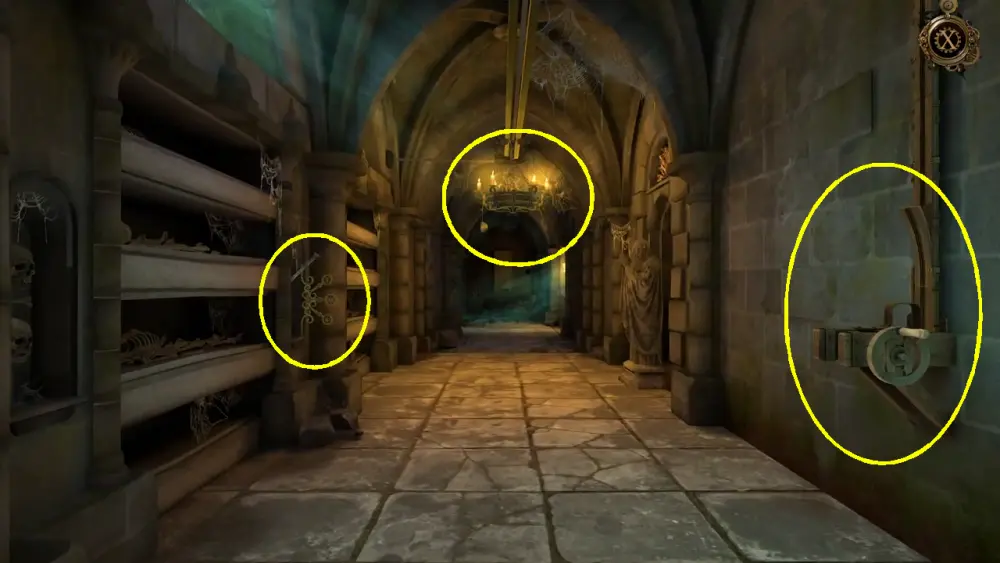
The way these items are arranged may also provide a clue as to the order you might want to approach them later. Here’s a hint: the item closest to the screen is the first one you should try working on. The next item you should pay attention to is the second closest, and so on. In short, you should work the circular crank to the right first, then the lever to the left, and finally, the chandelier.
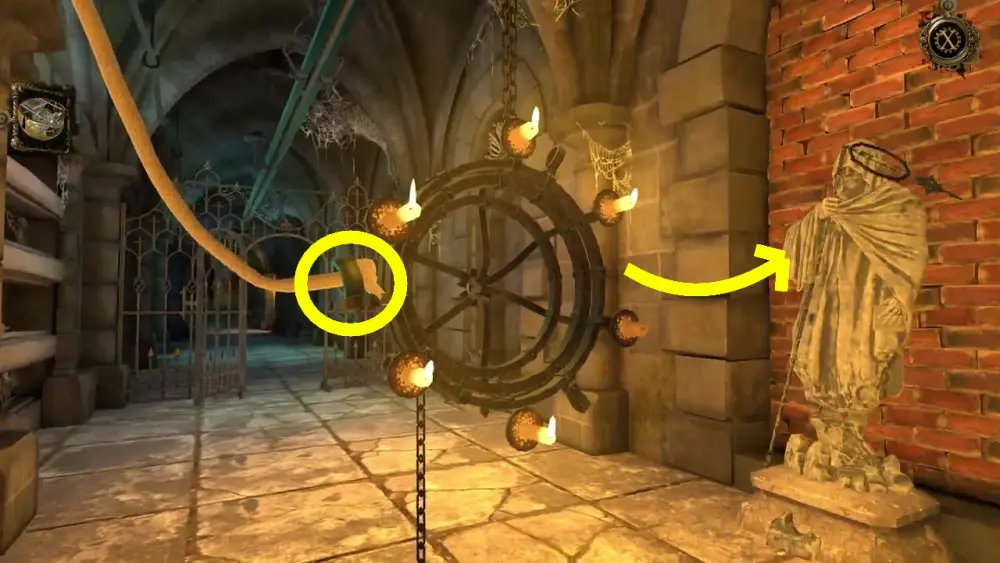
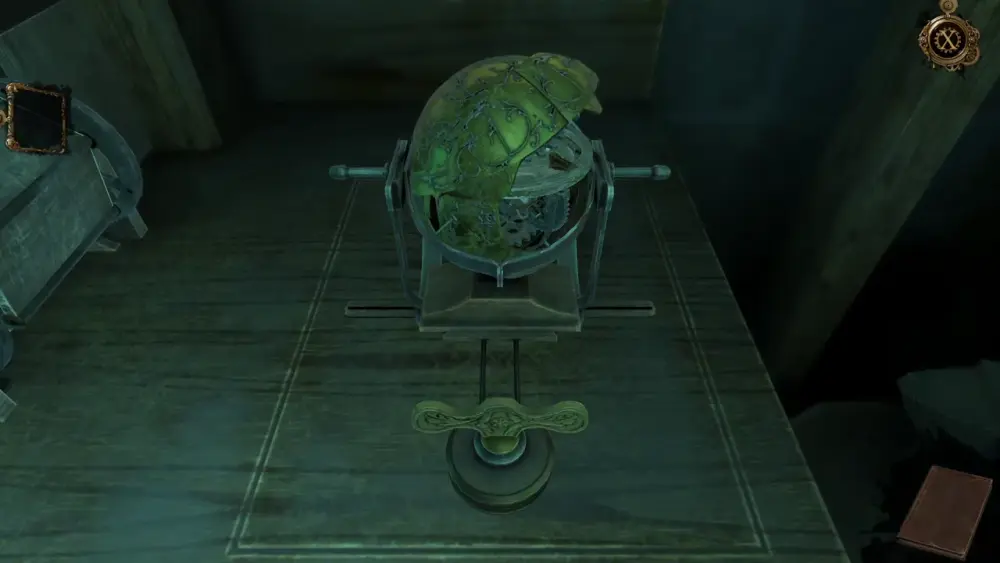
However, the chandelier is undoubtedly the most noticeable as it appears to have one of the pieces of the orb-like mechanism that broke just before you entered the portal.
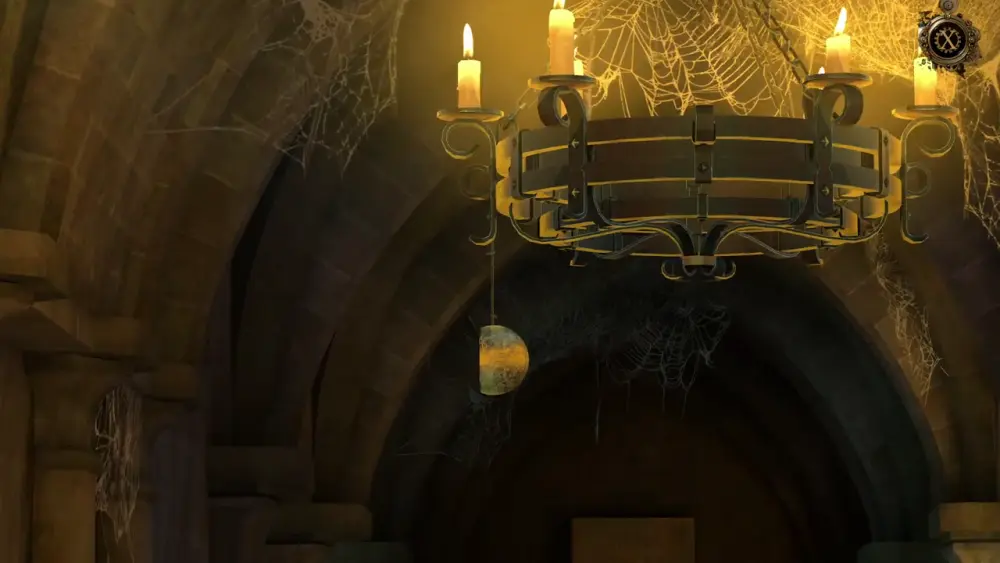
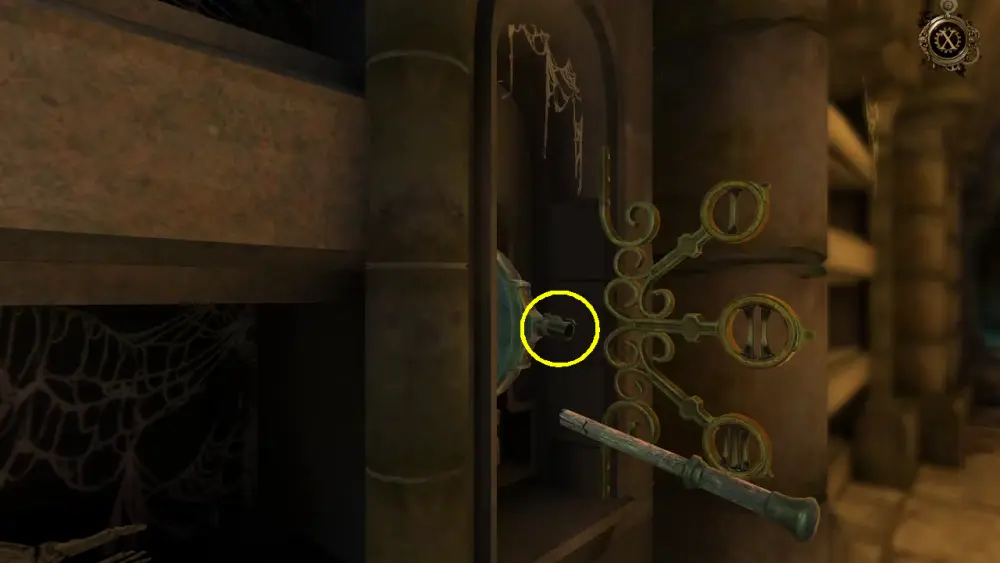
Two other pieces can also be found on top of the circular crank to your right. One is a cogwheel and the other is similar to the part hanging from the chandelier. We’ve highlighted it in the image below.
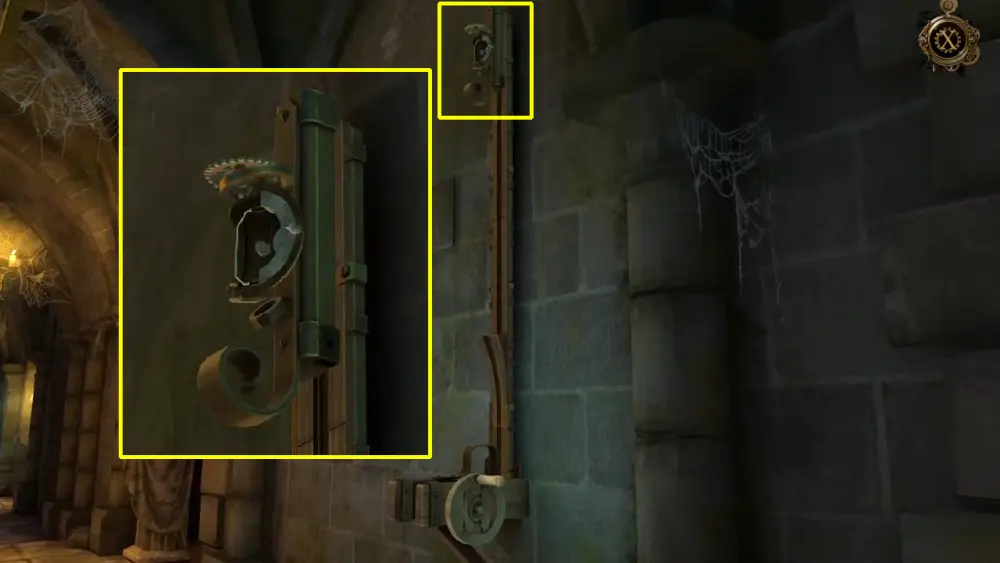
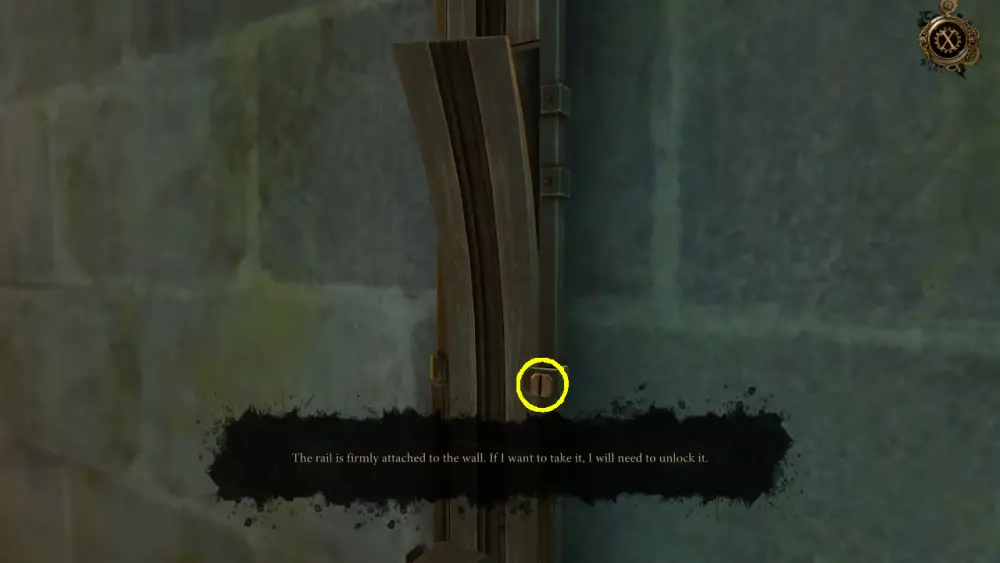
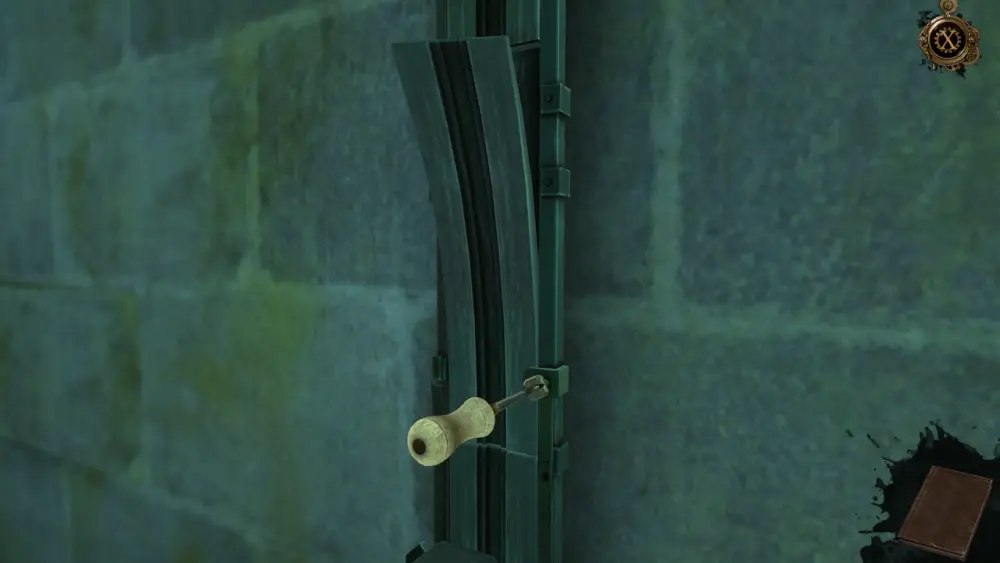
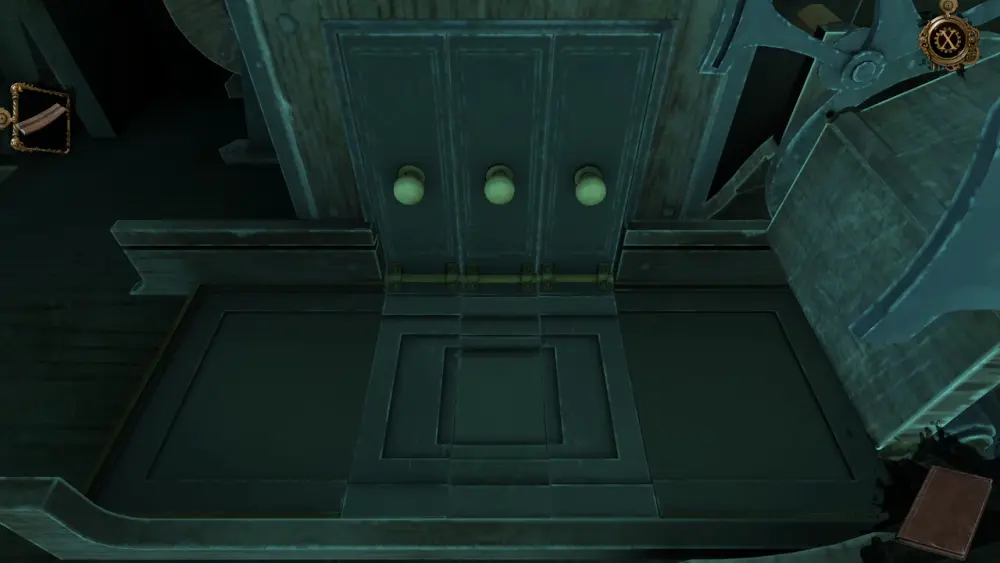
This gives you 3 pieces of the broken Oculus Perpetua, the orb-like mechanism. If you try to turn the crank, you will notice that the bent rail prevents the device from descending completely, hindering you from getting the parts on top. The game will focus your attention on the bent rail. Take note of the screw keeping it in place.
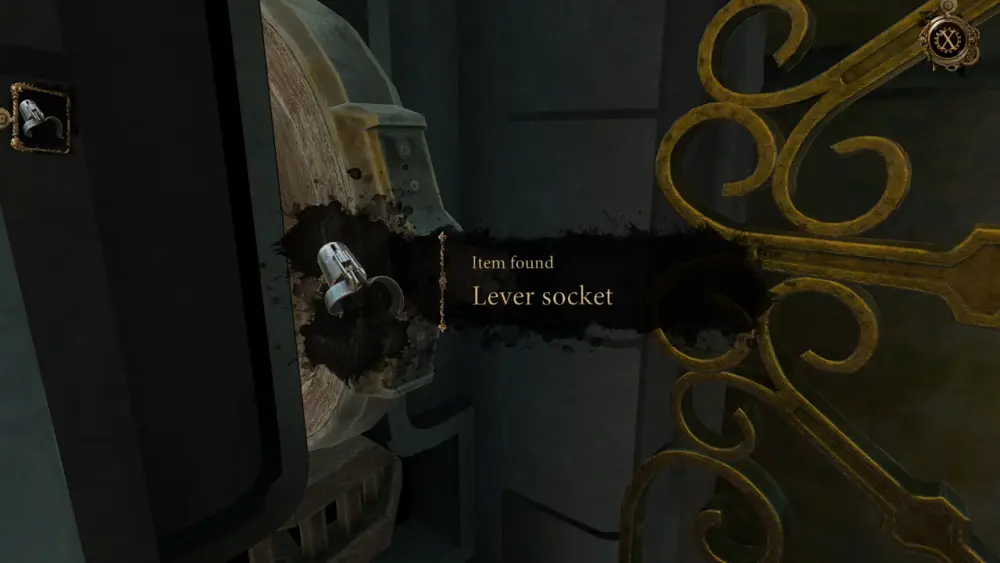
Since you can’t work the circular crank properly, turn your attention to the lever instead. Upon observing the lever closely, you will notice that it has 3 levels. However, when you pull the lever down, it will only reach the 2nd level before the brittle handle breaks. Take note of the small lever socket left on the remains of the handle.
Having pulled the lever, the chandelier will then move to the other side of the hall and halt just before passing over the gate.
Your perspective will then return to the lever socket you’ve left on the broken handle. Click on it to get the item, which will be transferred to your inventory.
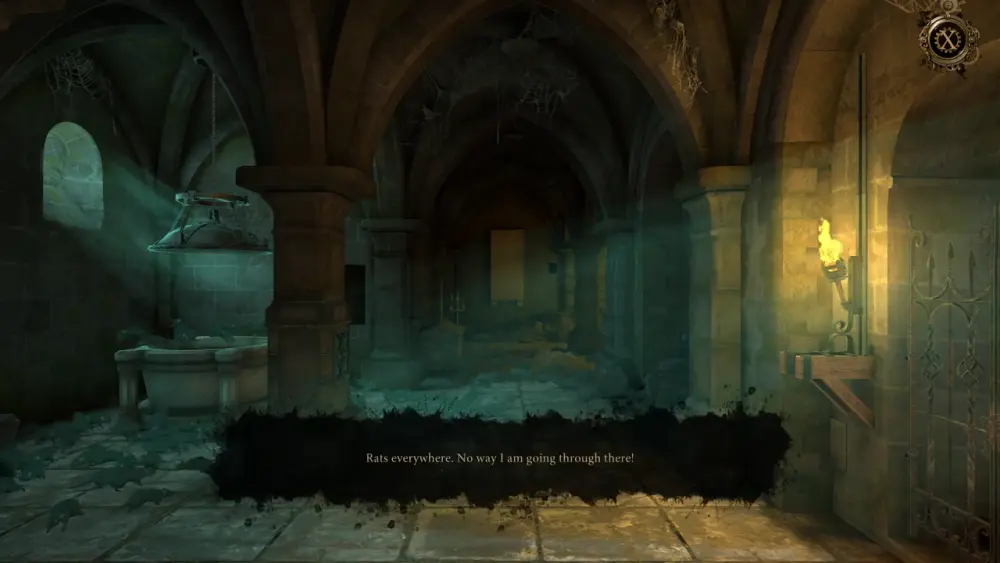
With the chandelier on the other side of the hall, you will notice another light down the hall, but with a fainter glow. If you’ve been listening to and observing your surroundings, you will notice that you’ve been hearing squeaking and the scritch-scratching of small feet from time to time. Upon reaching the end of the hall, you’ll have your answer: there’s a terrible rat infestation blocking your way.
Since you can’t go through the horde of rats, you can instead observe the gate illuminated by the torch on your right. Here, you will find a most useful item: a metal shaft.
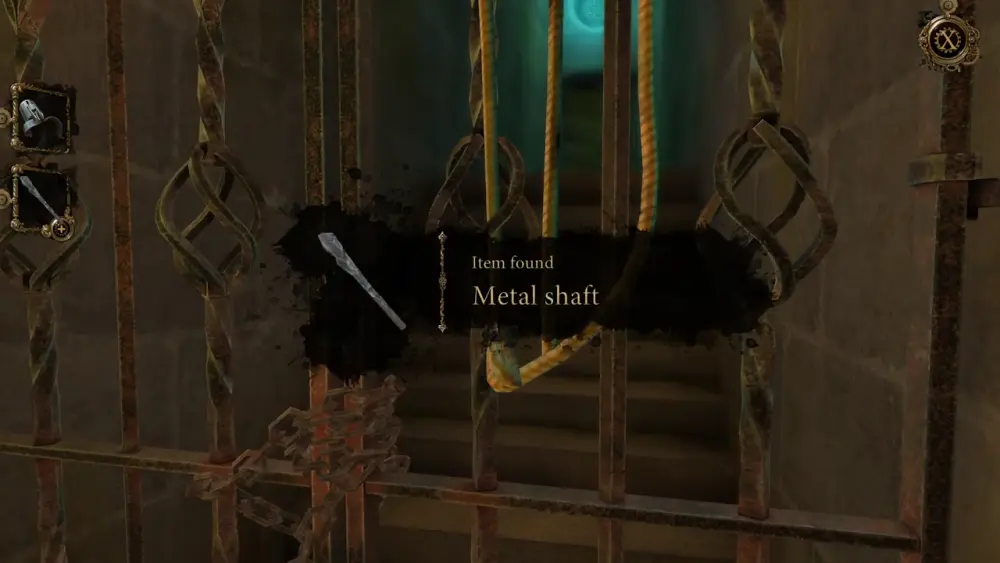
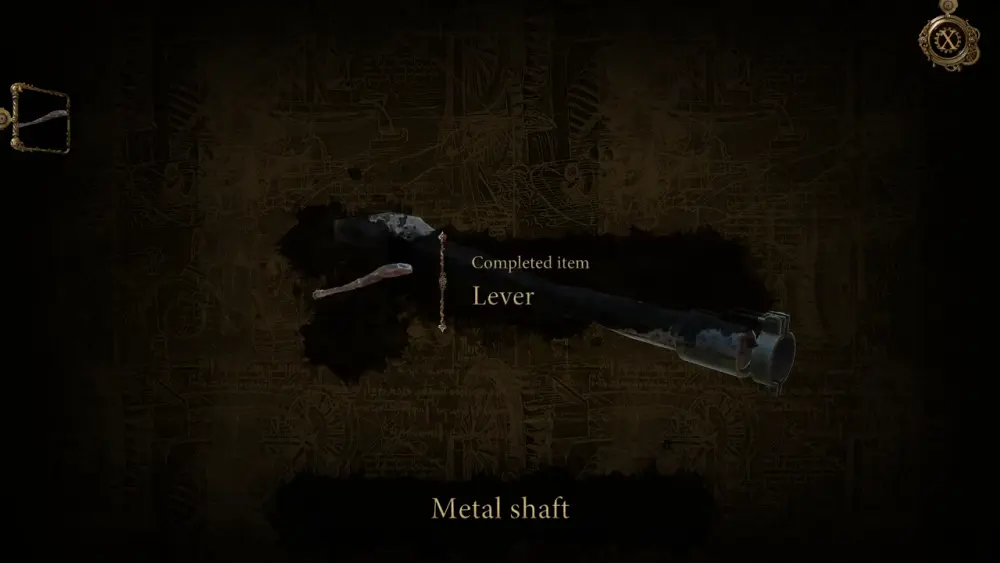
What’s this for, you ask? Remember that lever socket in your inventory? That’s right: this metal shaft will serve as the new handle for a lever so you can bring it down to the 3rd level.
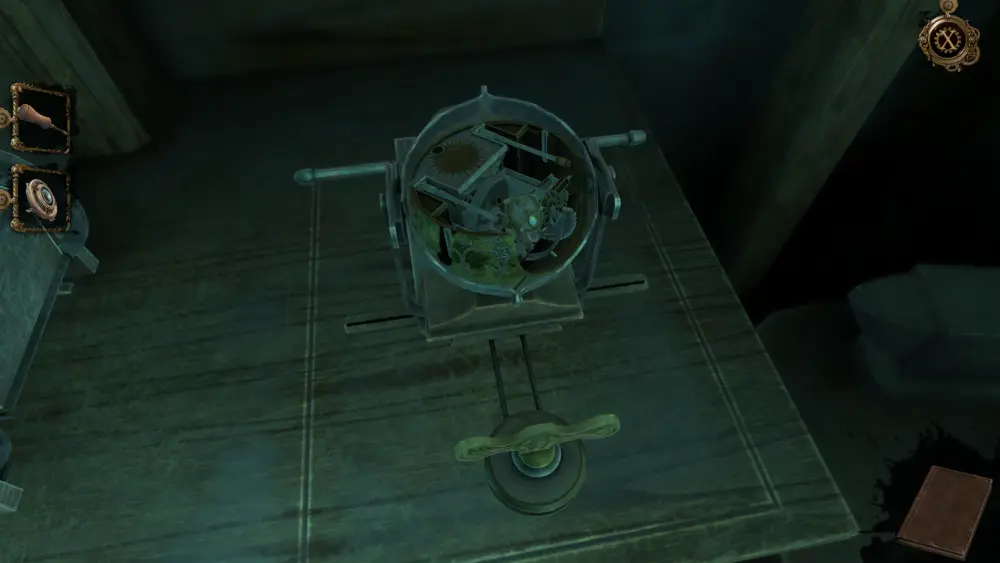
With this, the game gives you another tidbit of wisdom: items marked with a (+) symbol mean they need to have a 2nd part to be completed. We’ve highlighted this in the image below.
To complete the item, click on the metal shaft to access your inventory. You will be asked to combine the lever socket with the metal shaft, which will result in your new lever.
Now that you have a new lever, head back to bring the device down to the 3rd level.
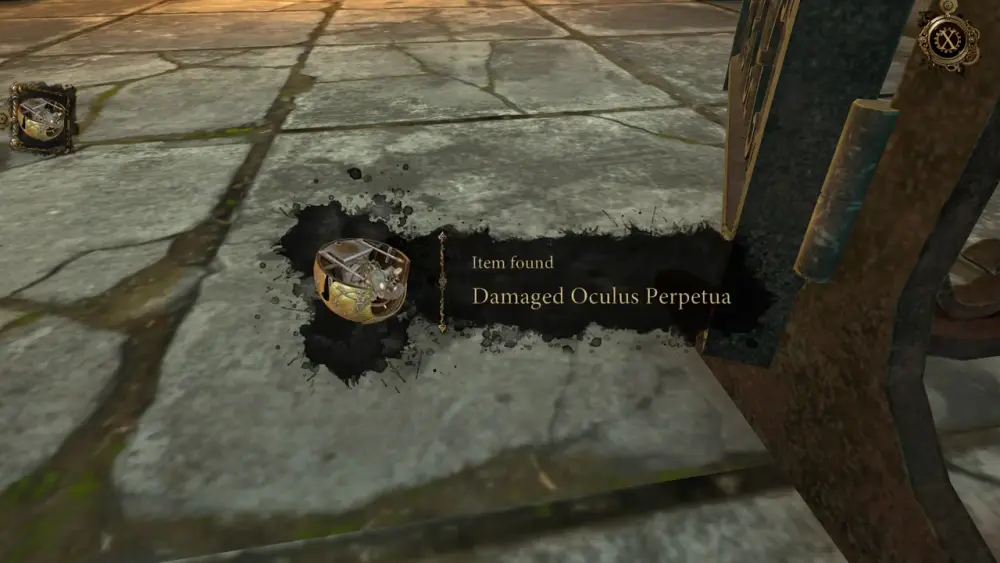
This action will cause the chandelier to move past the gate. But since it’s old and worn, it becomes unstable and drops a part of the Oculus Perpetua near the gate. Ultimately, the chandelier ends up hanging on its side.
After the cutscene is done, pick up the damaged Oculus Perpetua near the gate.
Head to where the chandelier is. There, you will see a circular crank. Unlock it by swiping the lock-up. After being unbolted, some rope would hang loosely from the ceiling and fall to the ground.
Fasten the end of the rope to the side of the chandelier. When you go back to the circular crank and turn it, the rope will tighten and lift the chandelier, then make it smash against the statue in front of it.
Repeat this twice. After the second attempt, the brick wall would have caved slightly, with the chandelier falling on the ground and losing its illumination.
Turn your attention to the statue next and give it a push. The bricks would come loose, revealing a secret room that looks like a mini-workshop. The first thing you will notice is a workbench with a couple of items on top of it.

Since the notebook seems like the most familiar thing, check it out. This will serve as the journal logging what has happened to you in the game thus far. You can also access this in the Index at the Main Menu.
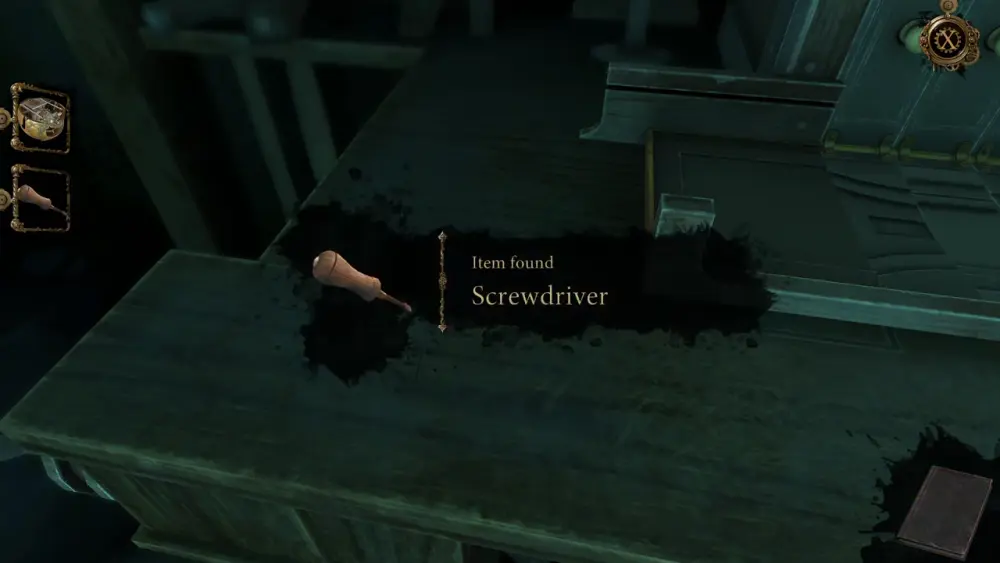
After picking up the notebook, you will find a letter and a screwdriver under it. The letter reveals why the workshop has been boarded up and hidden in the first place. Then, take the screwdriver as you will have use for it later.
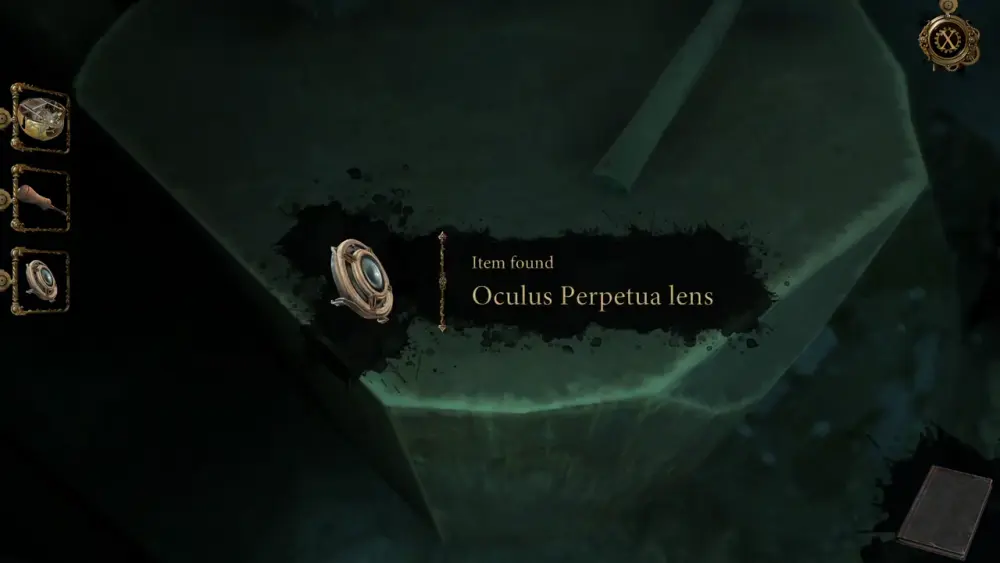
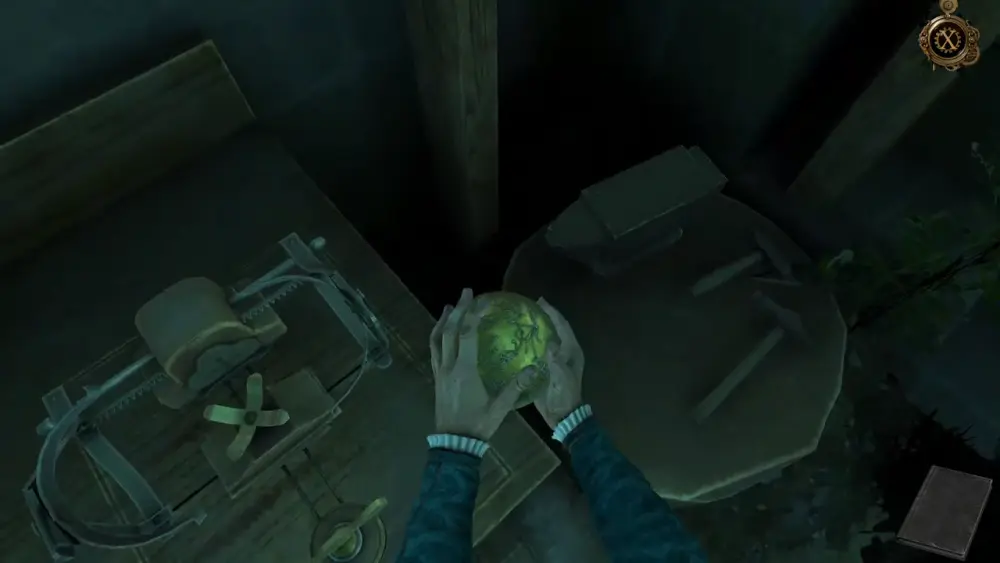
If you zoom out from the workbench and pan to the right, you will spot a familiar item that resembles some kind of lens.
Pick it up and you will now have the Oculus Perpetua Lens.
At this point, you have 2 parts of the broken Oculus Perpetua: one that had fallen from the chandelier, and the other is the lens you’ve just acquired. If you recall, there are 2 other parts left above the circular crank in the other room. For now, focus on the parts you have on hand.
Since you have a workbench before you, use it to your advantage.
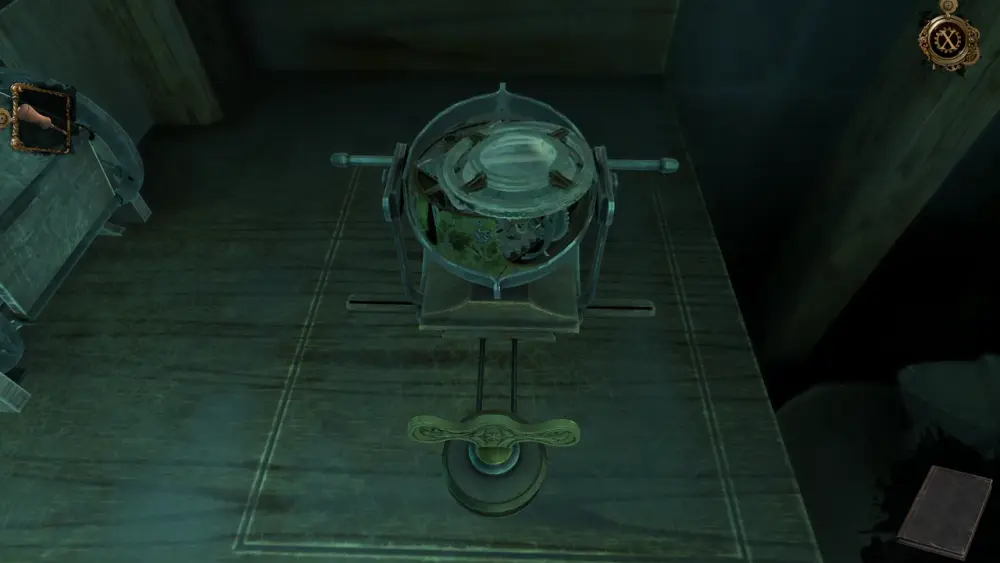
At the right side of the workbench, you’ll notice a curious-looking device holding what resembles a metal ball, just like your Oculus Perpetua. If you turn the knob that looks like it’s used for faucets, the device would loosen its grip on the metal ball, letting it fall on the floor. This is where you can mount a part of the Oculus Perpetua. Turn the knob again to lock it in place.
With the Oculus Perpetua held in place by the device, mount the lens on top of it.
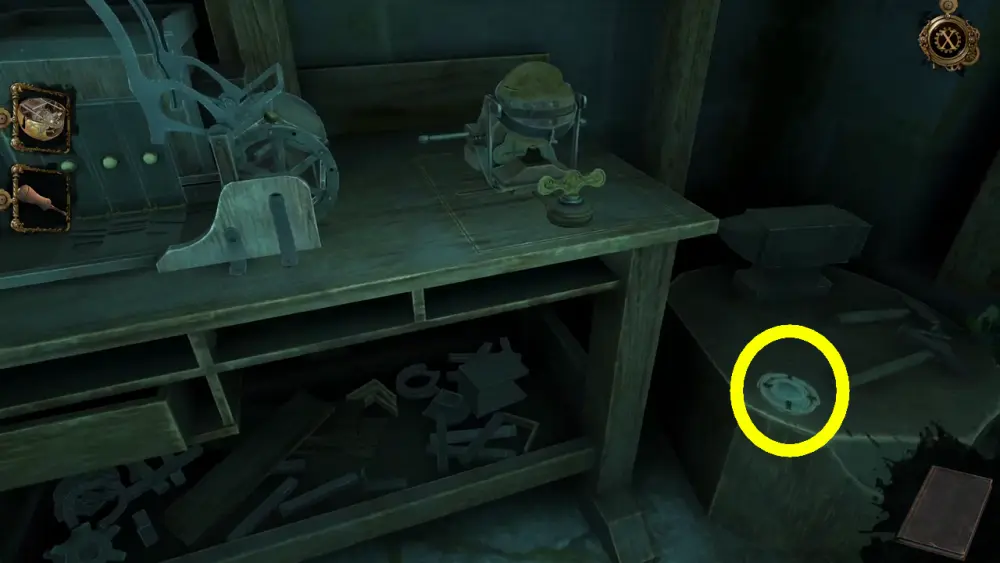
With these parts in place, head back to the hall where the 2 other Oculus Perpetua parts remain stuck at the top of the circular crank with a bent rail. You can find this in the same hall with the lever and just before the area with the horde of rats running around. Once you’ve found the bent rail, take the screwdriver and unscrew the bolt holding the rail in place.
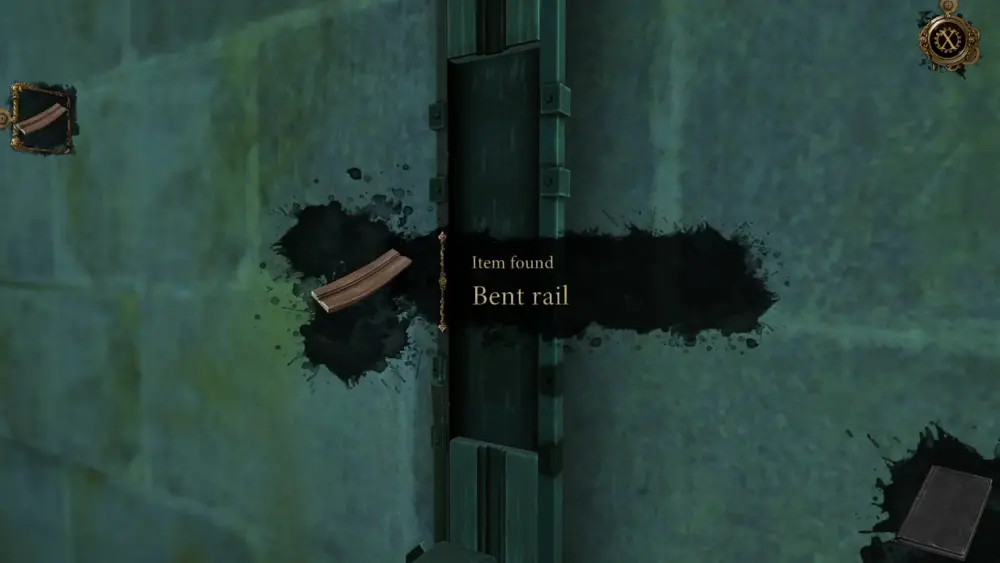
The bent rail would then be placed in your inventory.
If you’ve previously tried to work this particular circular crank a couple of times, you’d know this bent rail is what’s keeping you from reaching the two other Oculus Perpetua parts stuck at the top. Luckily, we have the workbench to straighten things out, literally.
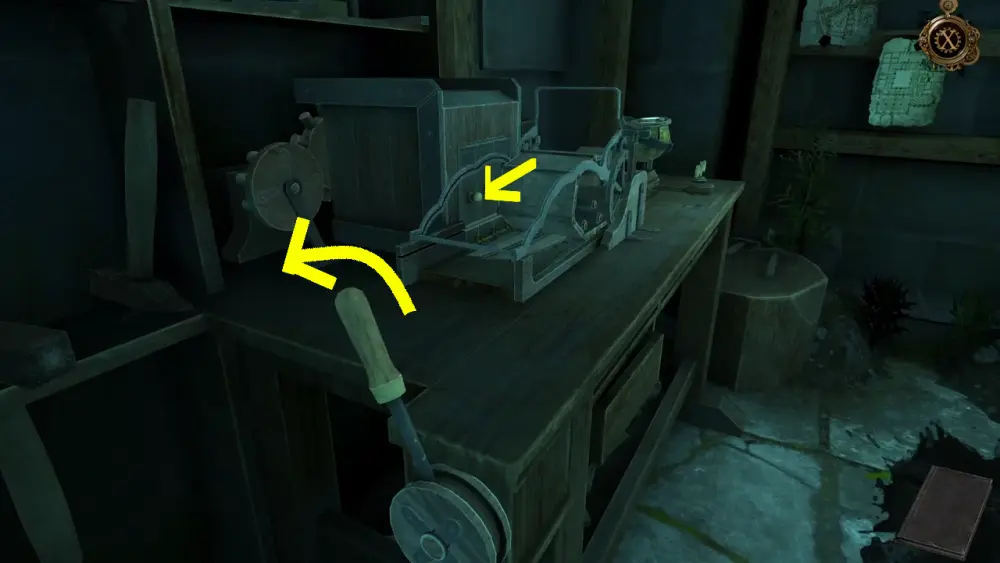
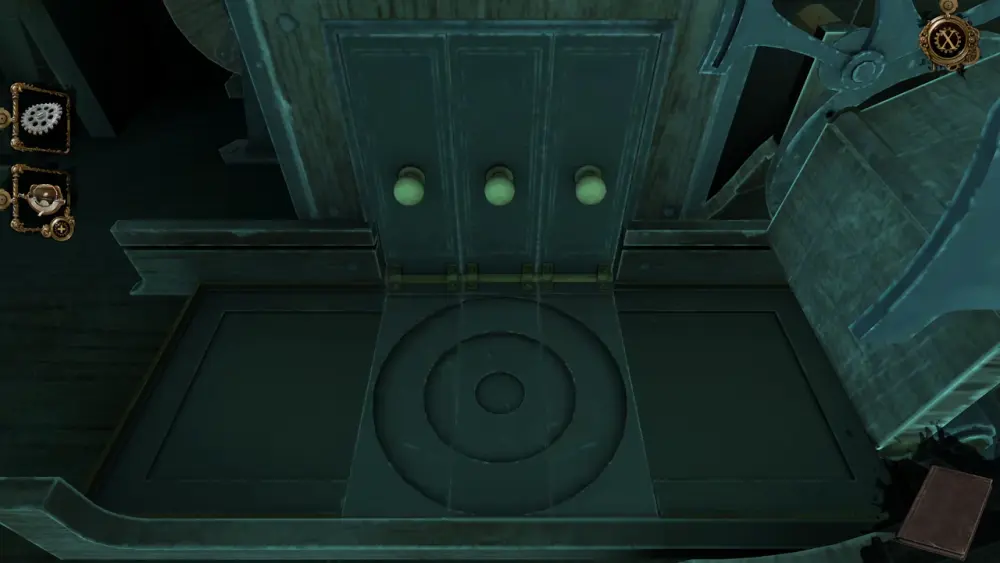
So, head back to the workbench and pay attention to the other curious-looking device on the left side. Zoom into it and you will see that it has 3 segments that can be rotated. Each segment appears to have different parts of a shape on the metal surface.
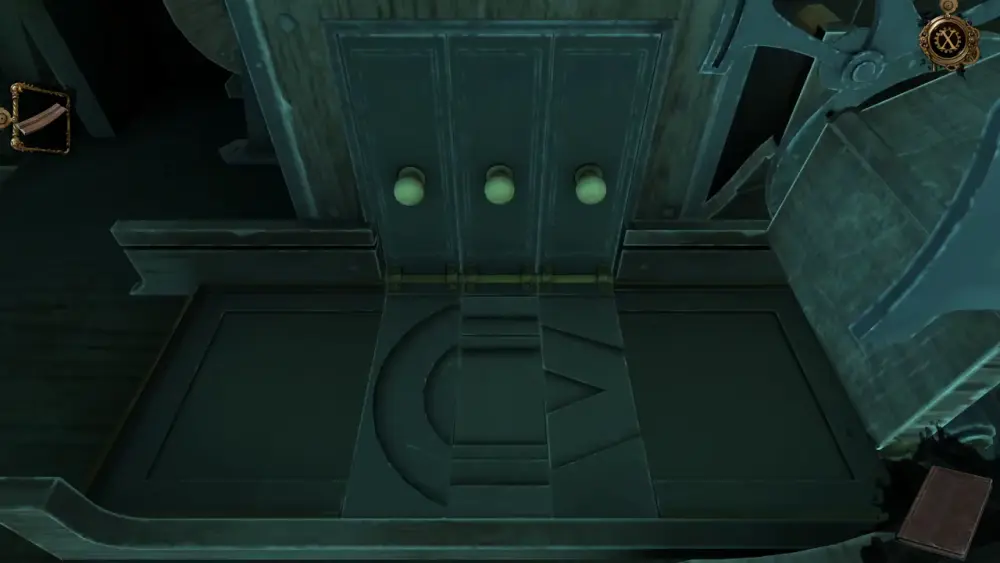
By inference, you can deduce that the other segments will then form the correct shape when rotated in their proper places. To fix the bent rail, rotate the segments so the overall shape will form a rectangle, as seen in the image below.
Once you’ve got the right shape, place the bent rail on top of the metal surface of the device.
Zoom out and pan to the left side of the workbench, where you will find a lever. Turning this lever to the left will activate the device you’ve just placed the bent rail on. What the device does is straighten out any object left on its surface by pressing a series of planks and moving weights on top of it.
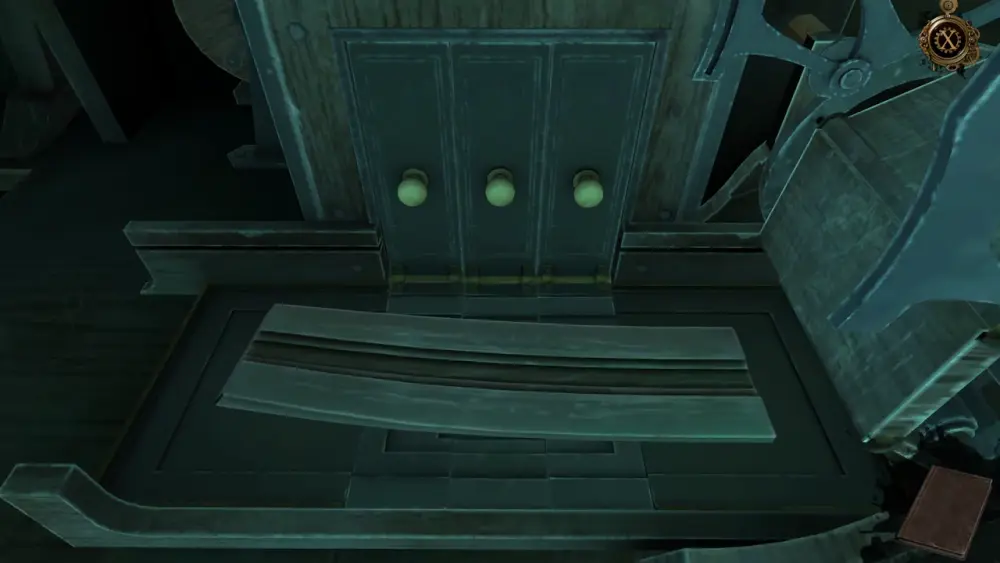
When this nifty mechanism is done doing its job, you will have a straight rail instead of a bent one. The device will automatically return to its default setup, and you’re free to claim the rail for your inventory.
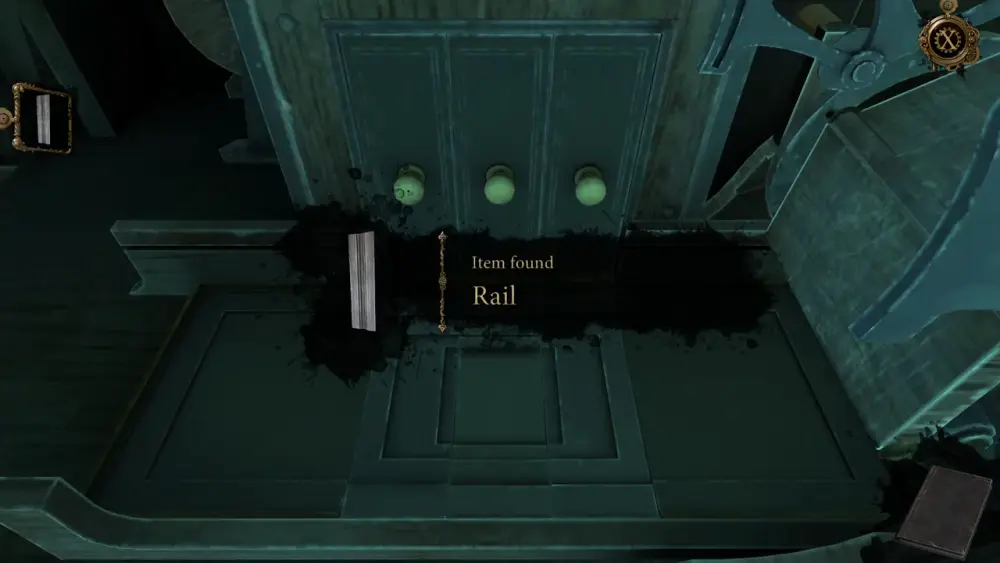
With the rail finally straightened out, you can go back to the circular crankshaft where you found it. Drag the rail from your inventory to insert it back on the spot it used to belong.
With the rail in place, turn the circular crank again. When the mechanism goes down, the parts of the Oculus Perpetua will fall to the floor. Collect the cogwheel and the incomplete Oculus cover.
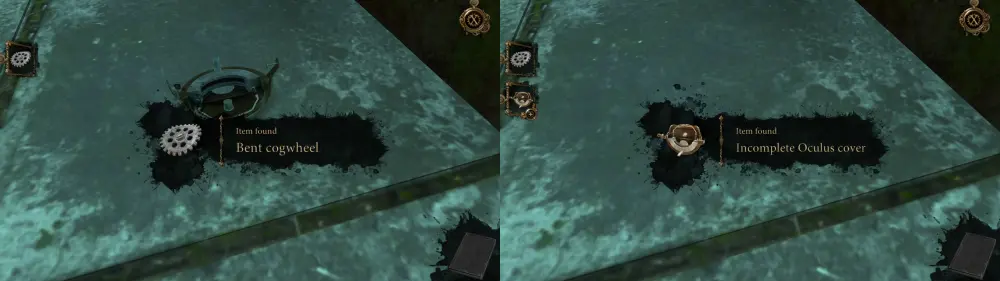
Like the rail, the cogwheel is bent so you need to straighten it out. Head back to the workbench and rotate the segments of the straightening device to form a circle upon which you can place the cogwheel.
Drag the cogwheel on top of the circular shape and push the workbench’s lever to the left. When the device is done straightening out the cogwheel, it will return to your inventory upon collection. Since the incomplete Oculus cover has a + symbol, access the inventory and drag the cogwheel onto the incomplete cover. You will then have completed the Oculus cover, which is ready to be placed with the other parts.
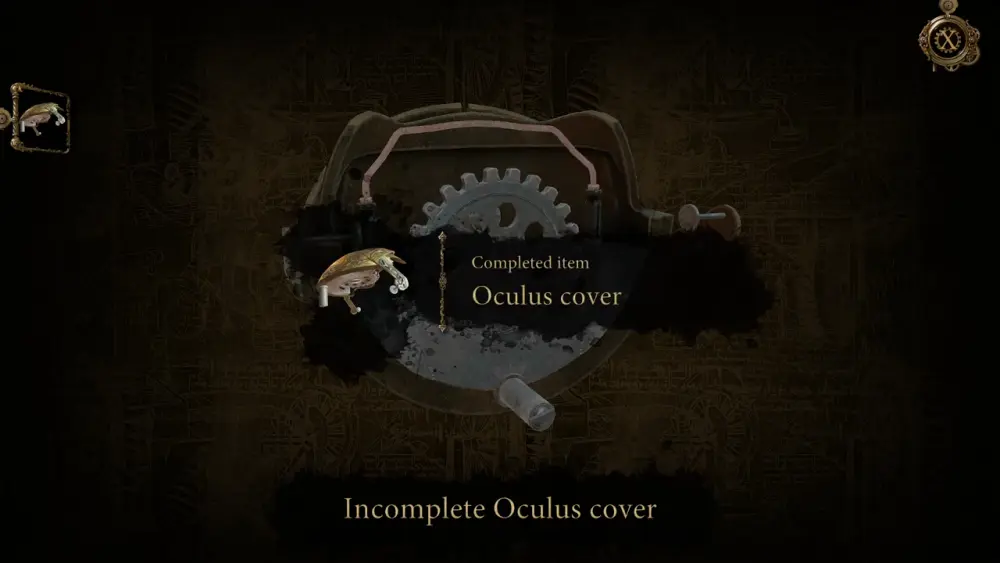
Turn to the device holding the rest of the Oculus Perpetua. With the cover now complete, drag this part onto the device holding the other parts.
With all of them now properly mounted, the Oculus Perpetua’s parts will all shift and fall into place automatically. Release the repaired Oculus Perpetua from the circular device by turning the knob. The orb will roll off but you’ll be able to catch it just in time.
As you head out of the workshop, the Oculus Perpetua’s icon will appear on the right side of your screen. Tapping this icon will activate it whenever you need to. During this instance, tapping the Oculus Perpetua will reveal a portal to the past. Walk closer to it.
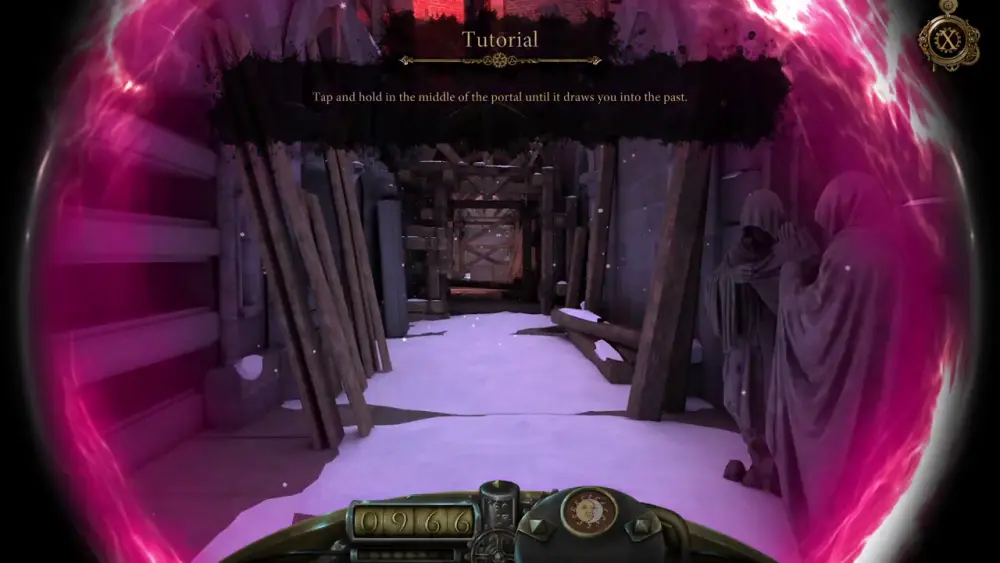
Tap and hold the middle of the portal so you can enter into the year 966, around 542 years into the past, though you’re still in the same location.
Looking around, you will see that, behind you, the part of the catacombs you’ve just been in hasn’t been constructed yet. You’re at a dead end so the only thing to do is move forward. Ahead of you is the familiar hallway, but it hasn’t been fully constructed either as it doesn’t even have a ceiling yet.
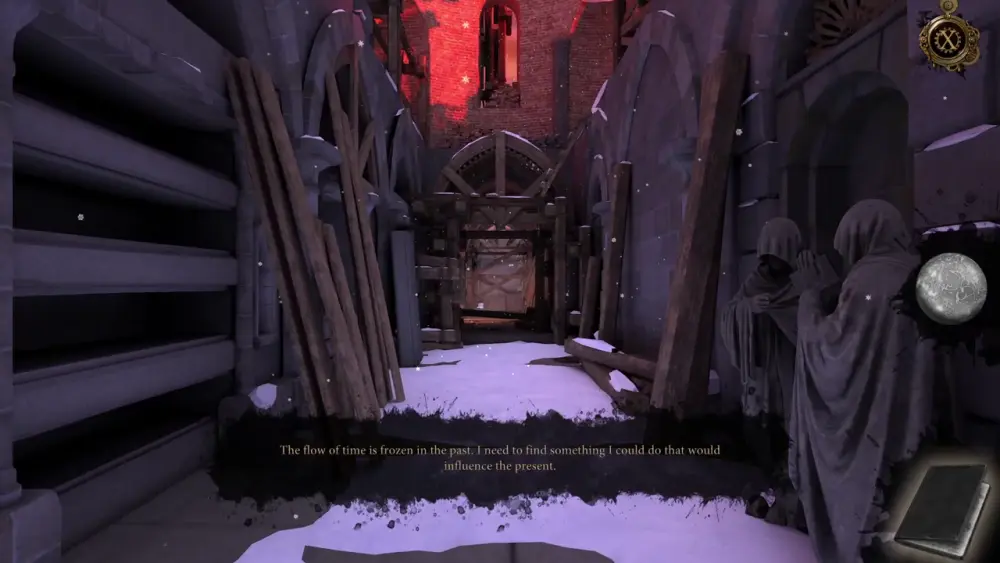
As you can see, a prompt will appear suggesting that you do something to influence the present, which is the year 1508. But what is it about the present can you change? You’ve managed to repair the Oculus Perpetua, but there’s something that’s keeping you from escaping the catacombs, or else you wouldn’t have to go to the past to try and change it.
If you think you haven’t been hearing the squeaking of rats, then you have your answer.
When you walk further down the hall and past the arch, you will see a very familiar sight that may have, until now, remained an obstacle to your escape (and maybe a source of disgust if you hate vermin). Here’s a side-by-side comparison of what roughly 500 years can do to the same place:
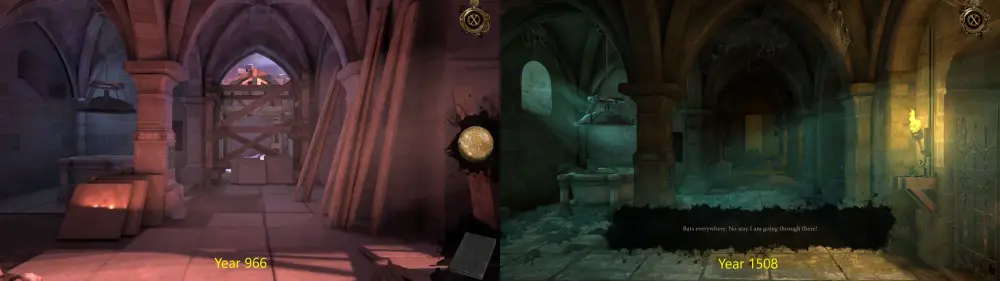
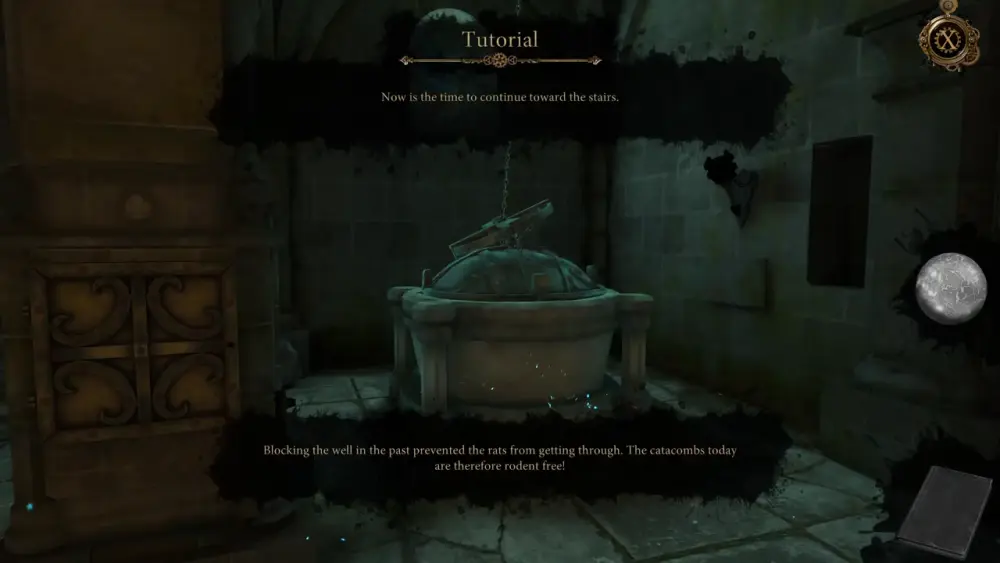
Fortunately, since you’re now in 966, you can prevent the rat infestation that will plague you in the present. This time, this particular area can be accessed freely since there isn’t a horde of rats to keep you away. If you look to the left, you will see a well with its cover lifted and what looks like a small door on the pillar.
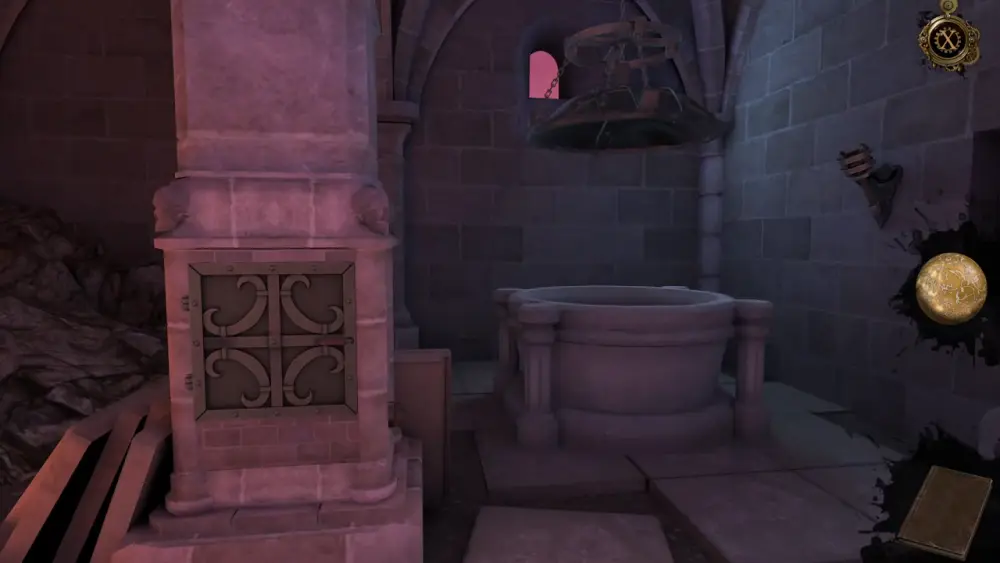
Zoom in on the door and turn the small knob to open it. Swipe the door to the left so you can expose the mechanism hidden inside.
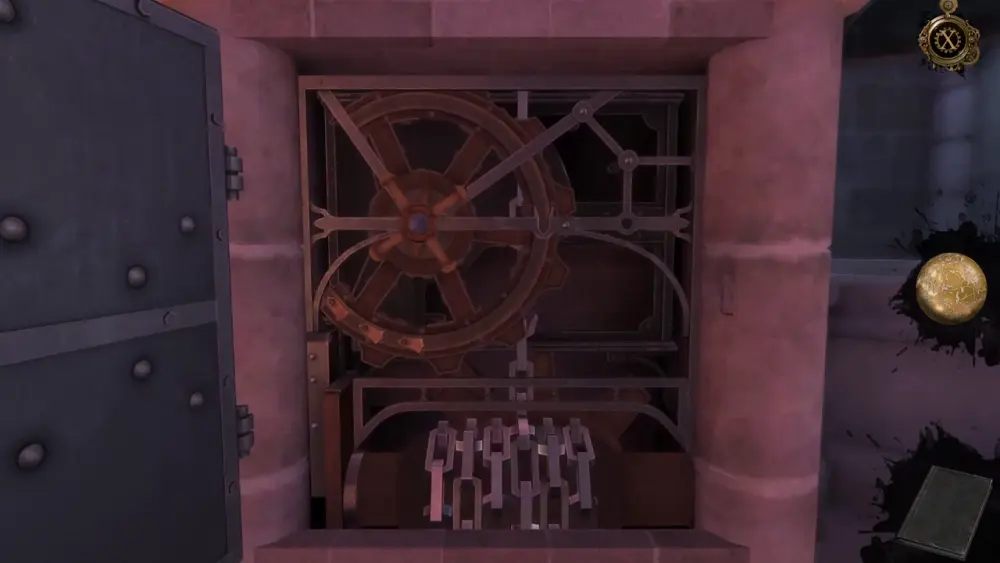
As you zoom in further into the mechanism, turn the cog clockwise to reveal a weak link in the chain holding the lid of the well up. Once exposed, tap on the chain to break it.
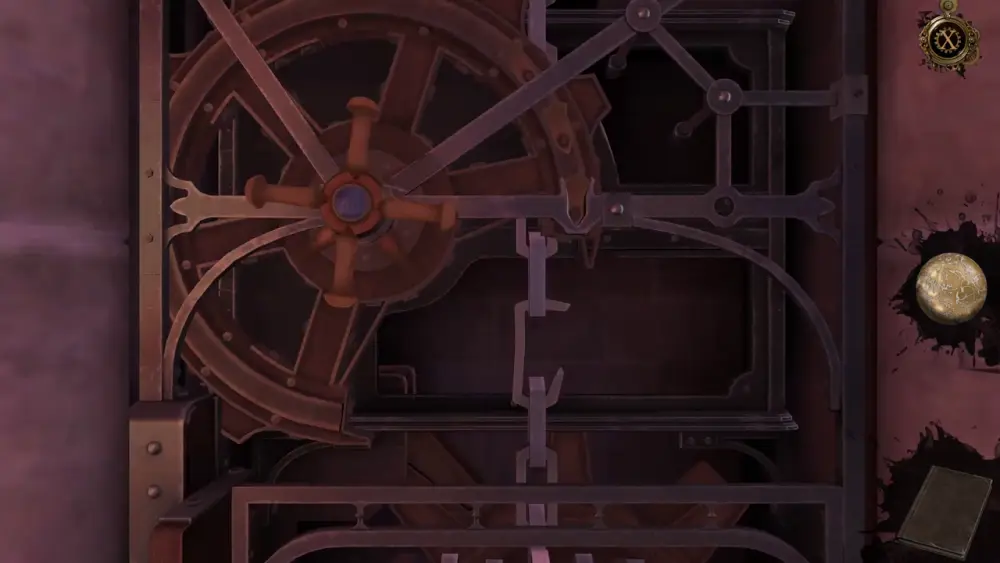
Once the chain breaks, the lid of the well will fall, sealing it shut. Automatically, you will be taken by the Oculus Perpetua back to 1508, your present timeline. Since you’ve affected the past by sealing the well, the rat infestation keeping you from escaping will no longer be around. Why there was even a well inside the catacombs is anybody’s guess.
Take this chance to move forward to the stairs to your right. At the foot of the stairs, you will find a book lying around.
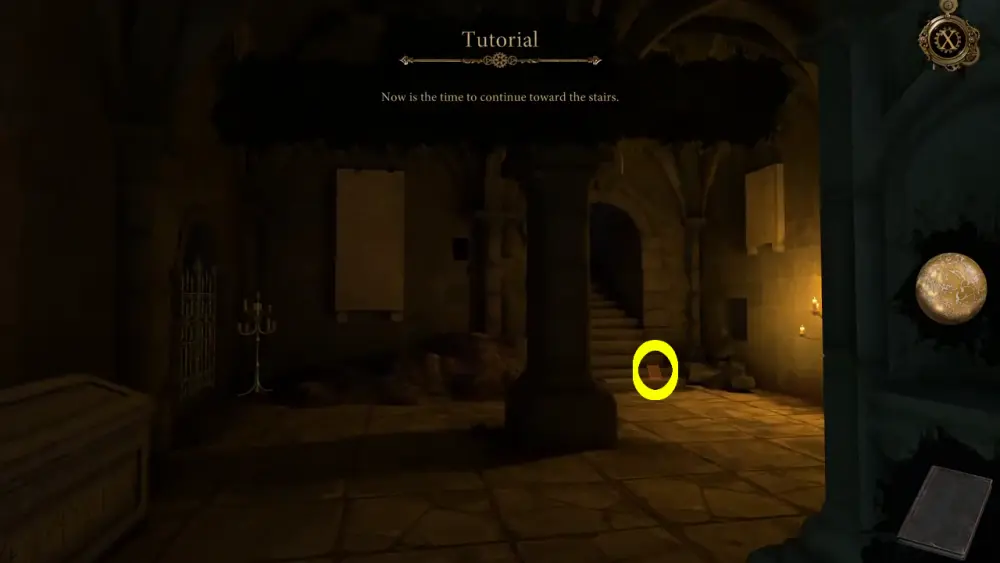
After picking up the book and dusting it off, a letter will slip out of its pages. The book is called the Chronicle of Ordo Iustitialis. An entry about your discovery of the book will be added to your journal.
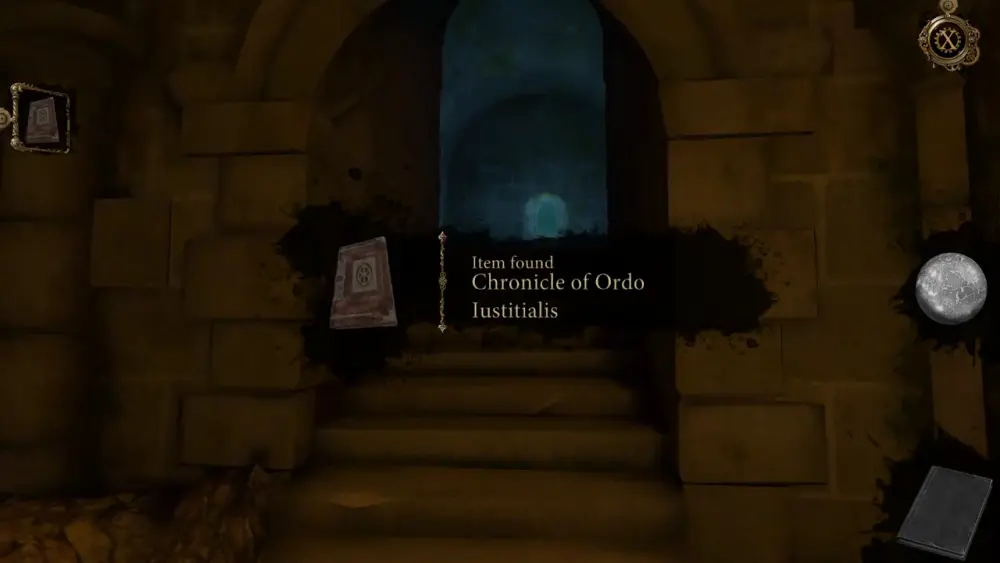
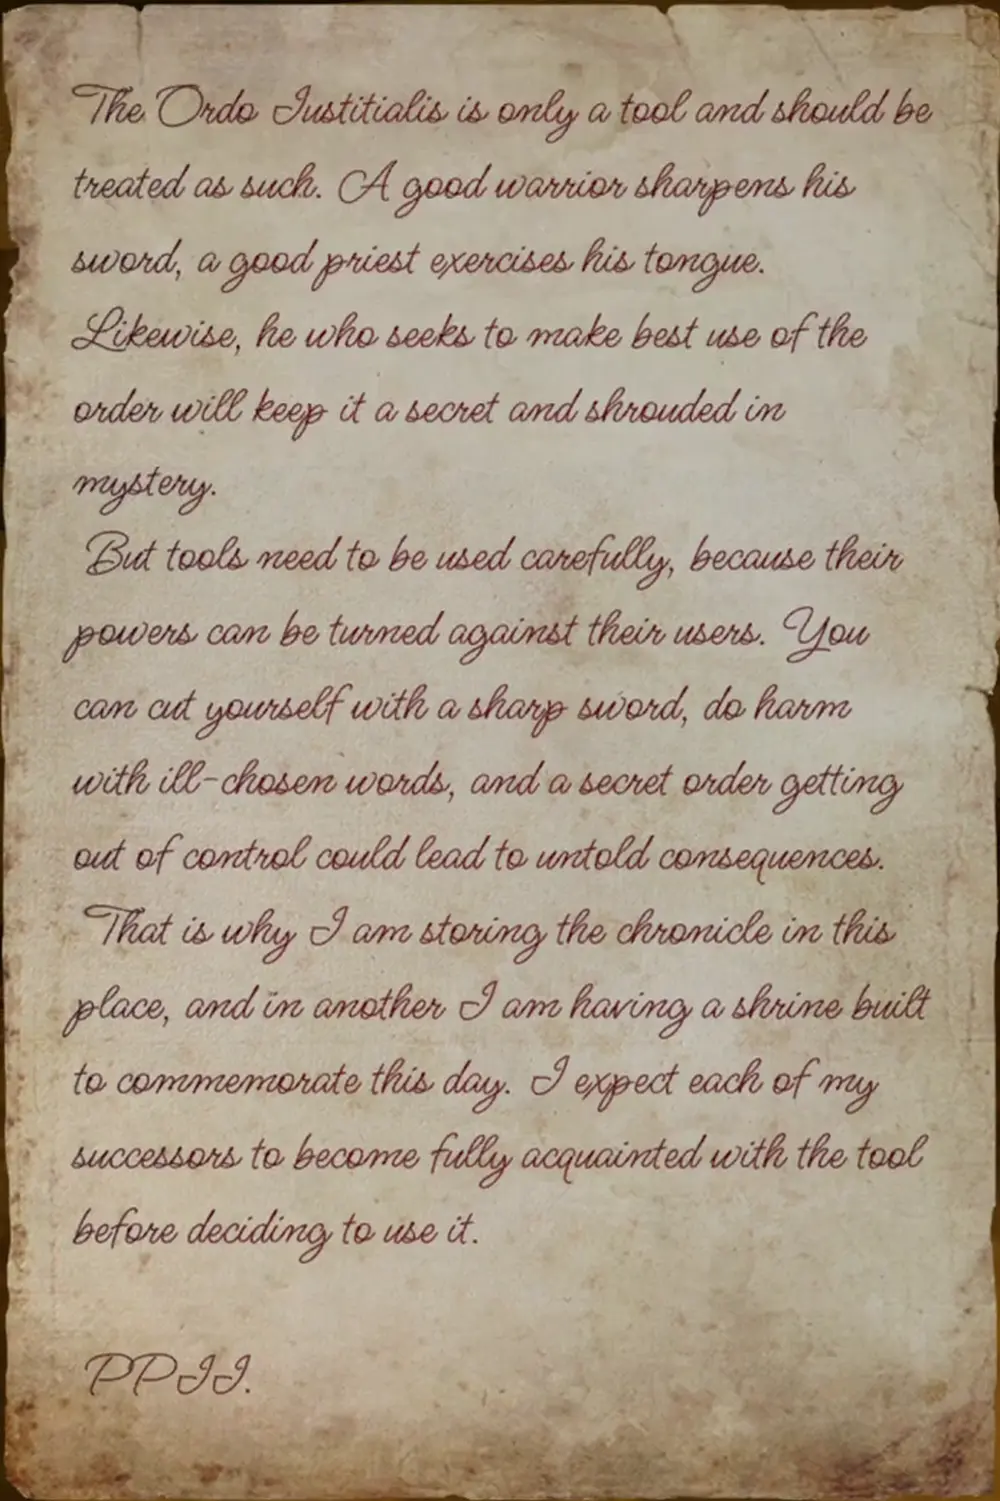
With the book safely tucked in your inventory, you can now pick up the letter. Here’s a copy of what it says, which reads somewhat like a warning, and perhaps even as a hint:
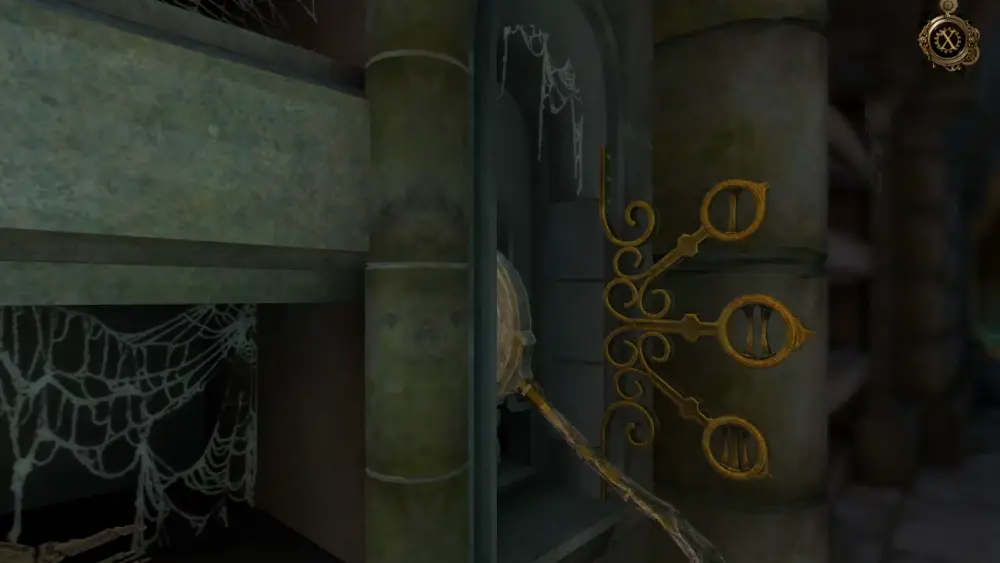
After reading the letter, head up to the stairs. Here, you will pass two more hallways, turning right each time. At the end of the passage, you will be greeted by a locked door and a skull that looks happy to see you.
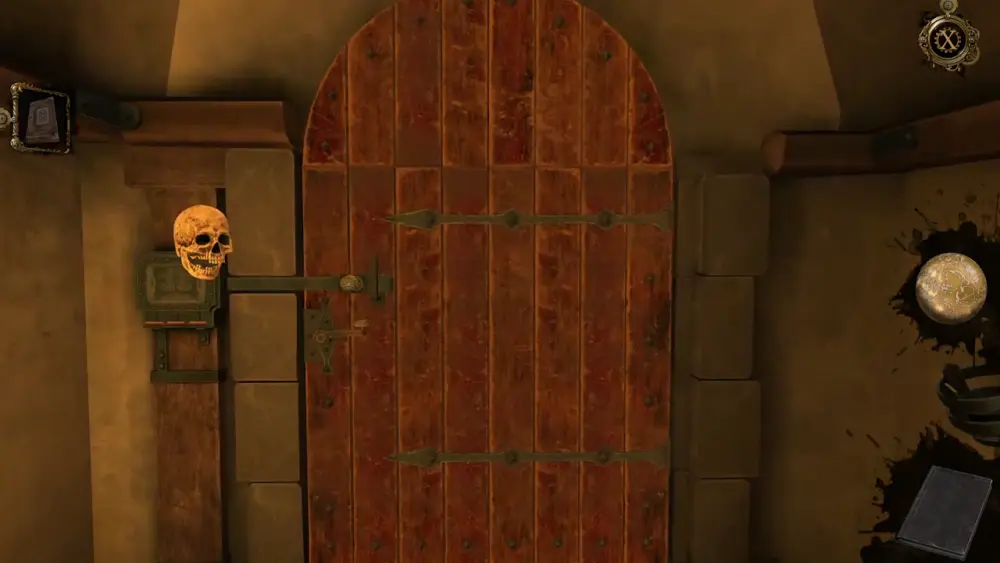
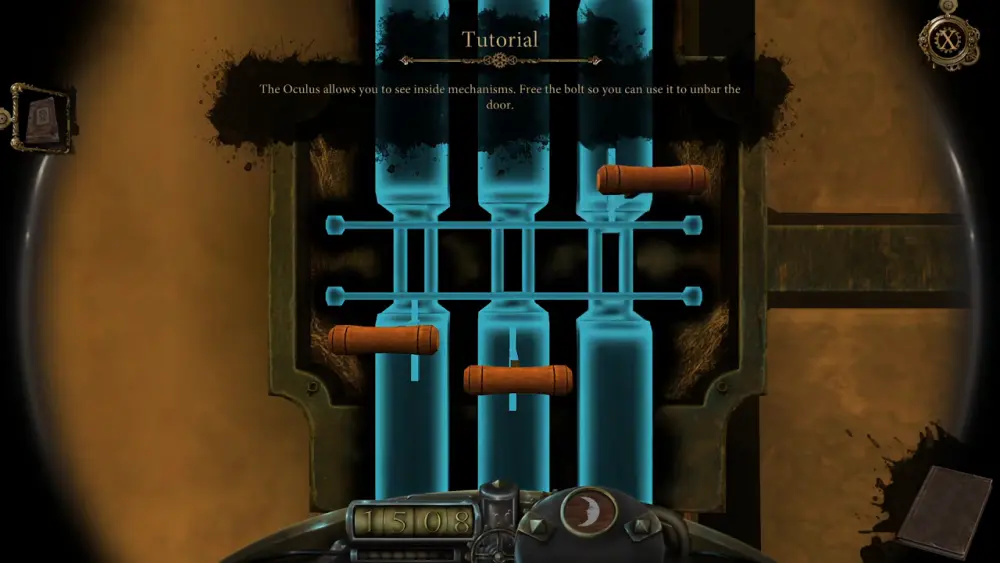
If you zoom in on the lock, you’ll discover that the door is indeed bolted. Trying to move the bolt will cause the skull to fall, revealing the panel with which you can try to unlock the gate. Upon accessing the panel, the game will ask you to activate the Oculus Perpetua by tapping its icon.
Aside from opening time portals, the Oculus Perpetua is also extremely helpful in letting you see things from a different perspective. In this case, you’ll be able to see inside the mechanism and figure out how to unlock the door. Thus, whenever you encounter locks, devices, drawings, etc., make a habit of activating the Oculus Perpetua to see if there’s some kind of hidden message.
For this particular door, you need to unbar it by aligning the mechanisms in a way that will free the bolt.
Once unlocked, pull the bar, turn the knob, and the door will be open. This will lead you to a short flight of stairs, but you soon find out that guards are patrolling the area.
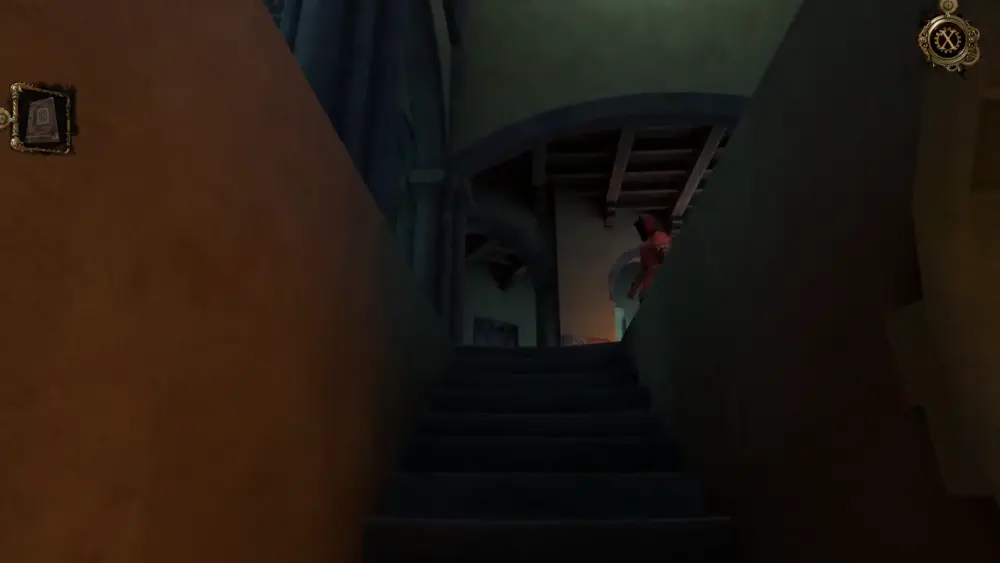
In this part, the game will move your character Giacomo automatically, allowing you to successfully evade being noticed by the guards (after all, this is The House of Da Vinci, not Metal Gear) so you don’t have to worry. Having escaped their attention, you will find yourself situated in this area looking right ahead at a candlelit space with what appears to be more guards and several lecterns.
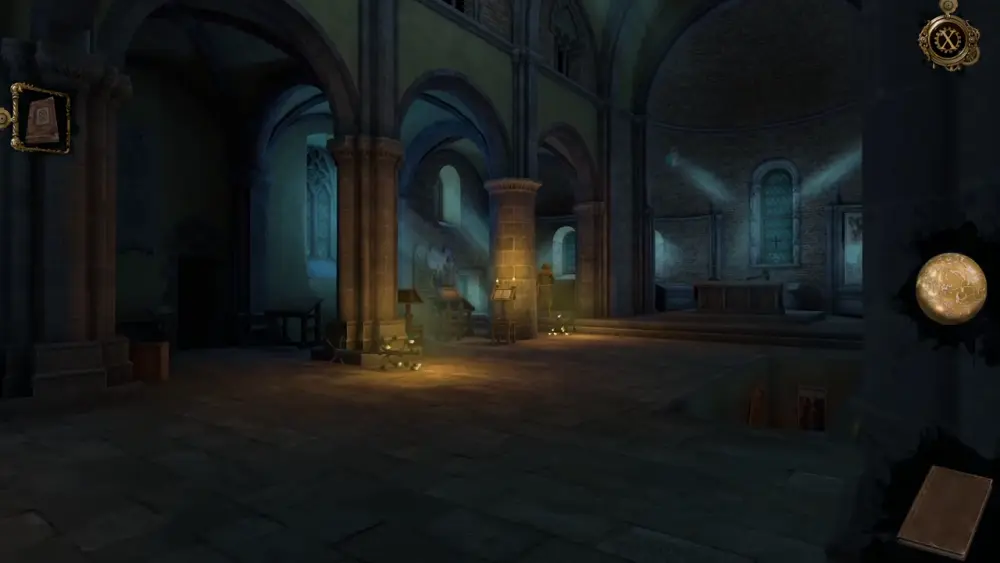
If you swipe to your left, you will see a door, but it’s also closed. This may be the exit you’re looking for, but you will, of course, have to open it first.
Turn your attention back to the candlelit area with the guards and lecterns. If you double-tap the area, you will be able to sneak around back and hide your presence from the guards. Move to the lectern illuminated in front. As you do, you will hear the guards having a conversation they’re still chasing after you so you need to escape soon.
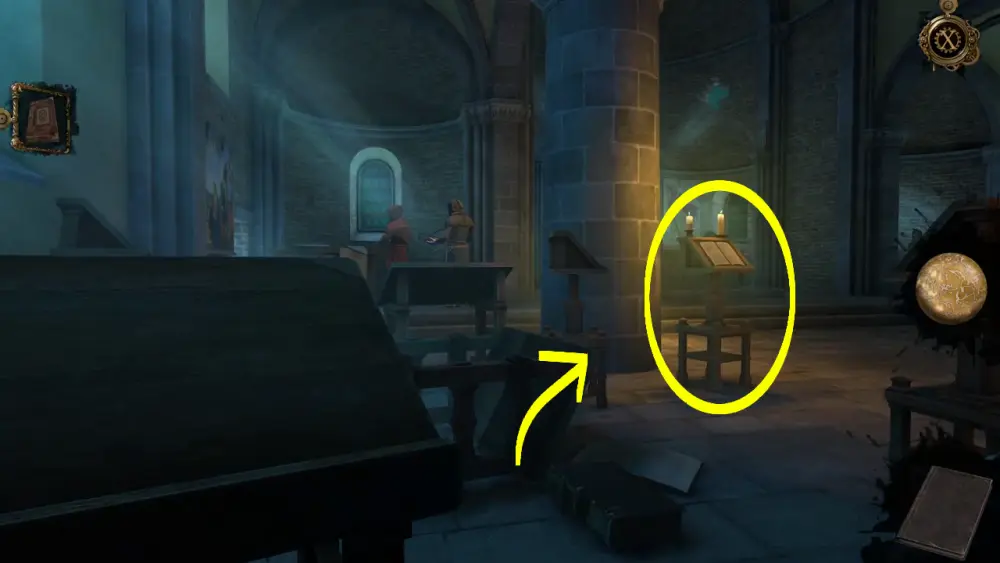
Once you’ve gotten close to the lectern, you’ll be able to observe its back portion, which has a secret compartment. Move the two sliders from the top to the middle to open the hatch.
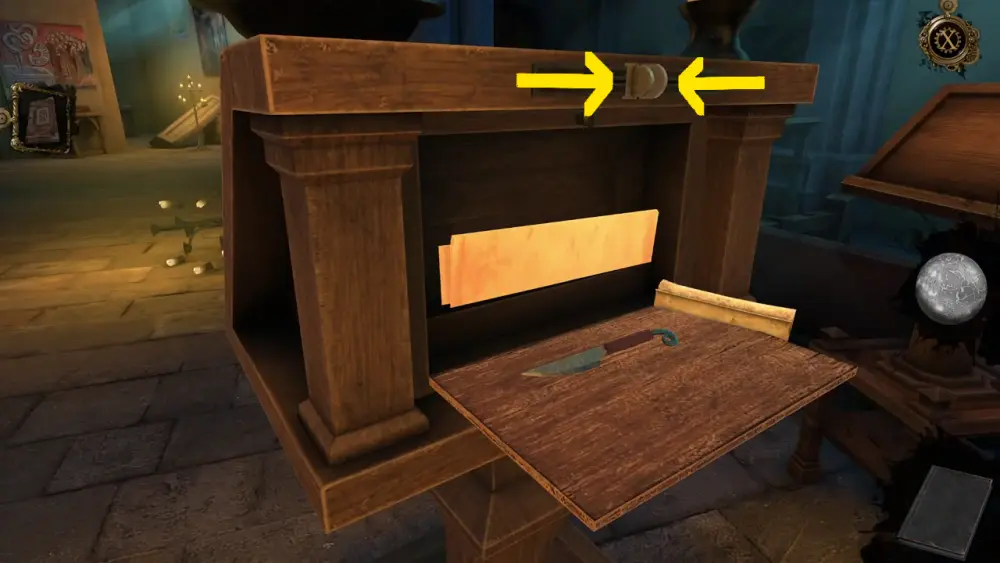
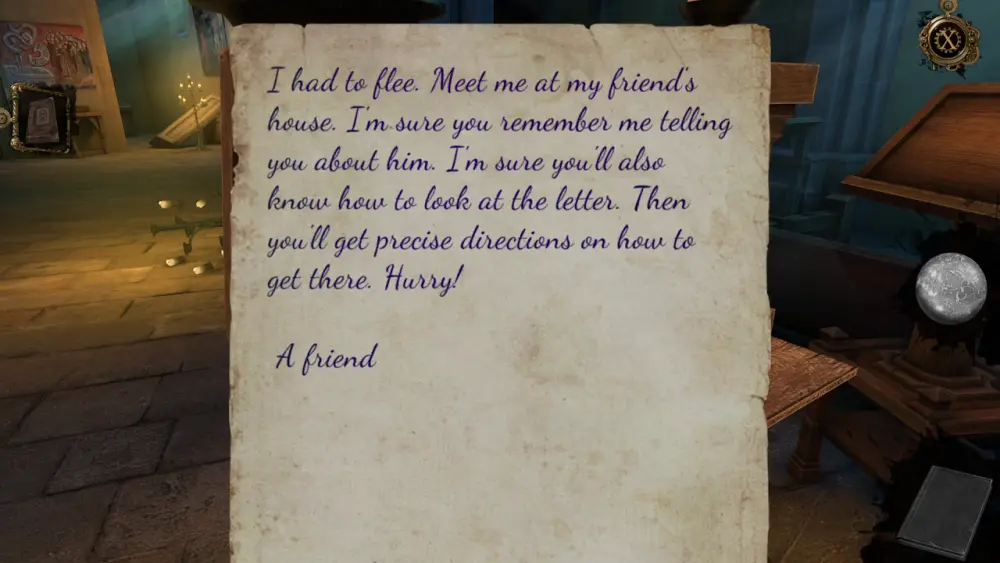
Inside, you’ll find a letter and a letter opener, the latter of which will be placed in your inventory. Here are the contents of the letter:
With the letter opener in your possession, you have an item that you can use to unlock the door to the left of where you hid before moving to the lecterns. Go back to that door and use the letter opener to pick up the lock. As you try to pick the lock, you’ll notice that you can’t simply slide the letter opener down to open the door. Here’s where the Oculus Perpetua will come in handy: activate it to see how you can manipulate the lock’s mechanism.

With the help of the Oculus Perpetua, turn the gear until the slot aligns in the middle, which will allow the letter opener to easily slide down and disable the lock.
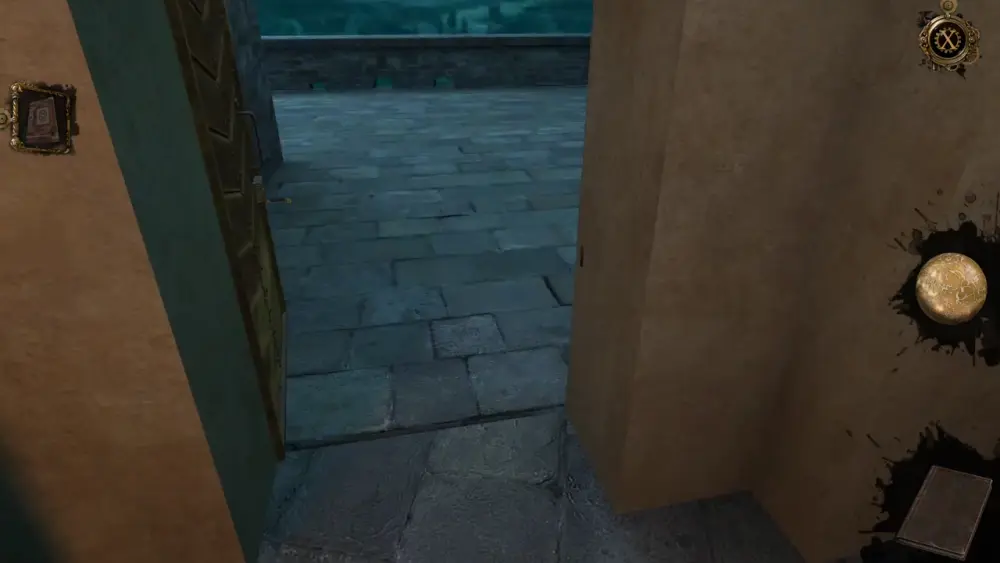
As the door opens, you’re now free to escape the Sacra Di San Michele.
This concludes our walkthrough for Chapter 1 of The House of Da Vinci 3. How did you find the game? How long did you get to unlock its secrets? Share your experience in our comment section below!
If you wish to continue your journey in The House of Da Vinci 3, then be sure to check out our complete walkthrough for Chapter 2.