After solving the intricate puzzles left in Luca Pacioli’s villa in Chapter 2, the third chapter of The House of Da Vinci 3 takes you to Rome, where you continue your mission to assist Leonardo and finally meet the master himself. This chapter acts as a short reprieve from the last two as it features an extended cutscene explaining Leonardo’s ultimate goal: to destroy a time machine that Césare Borgia wants to get built.
After finally meeting with Leonardo and Luca Pacioli in Chapter 3, you as Giacomo will be tasked in Chapter 4 to infiltrate Borgia’s hideout to retrieve a special glove, which is vital for your plans of destroying the time machine. At Borgia’s hideout, you’ll encounter a variety of puzzles and sophisticated machines designed not only to test your wits, but also to hide the glove’s location.

We decided to combine Chapter 3 and 4 into one walkthrough as Chapter 3 only has about 2 puzzles at most before proceeding to the long cutscene where Giacomo meets with Leonardo and Luca. Chapter 4, on the other hand, bears a bit of similarity with Chapter 2, where you get to roam Borgia’s empty hideout solving puzzles. However, what Borgia’s hideout lacks in physical scale is more than made up for by the challenging puzzles you need to solve.
One important tip we’d like to point out for these two chapters is to treat illumination (candles, sunlight, etc.) as hints in themselves. More often than not, places marked by various means of lighting tend to contain important tools or have entryways that can be accessed later on. Of course, this doesn’t mean you should completely ignore shadowy corners as they have their secrets, too.
Additionally, items, tools, handles, and things that are colored red or have some kind of red wrapping around them are important. You’re going to see this a lot in Chapter 4 so consider these as subtle hints that tell you the significance or importance of an item or tool.
With that, let’s dive into the walkthrough for Chapter 3 and 4 of The House of Da Vinci 3.
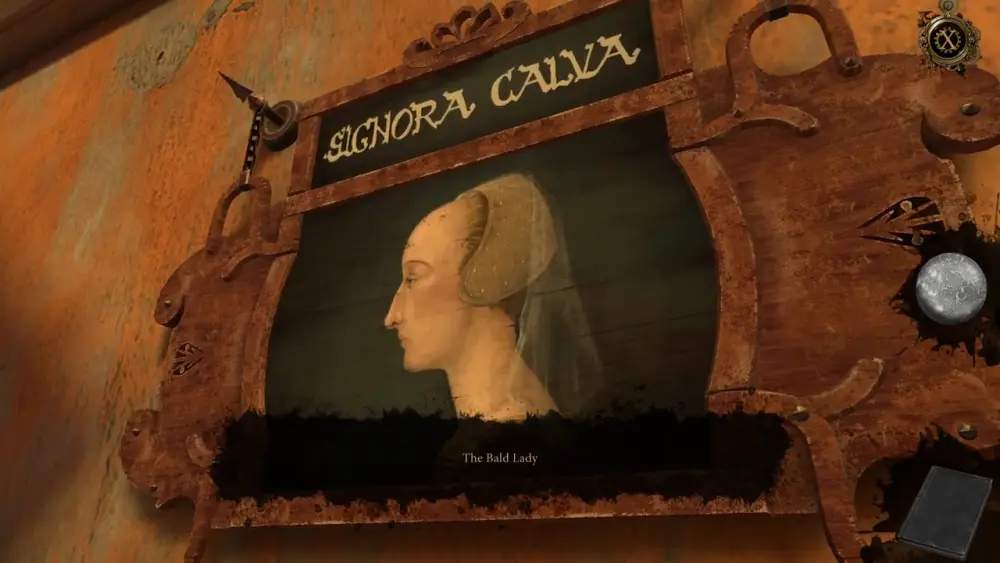
Chapter 3: Rome (The Bald Lady)
From the villa of Luca Pacioli, you travel to a slum in Rome where Leonardo has instructed you to meet him at a place called The Bald Lady Inn.
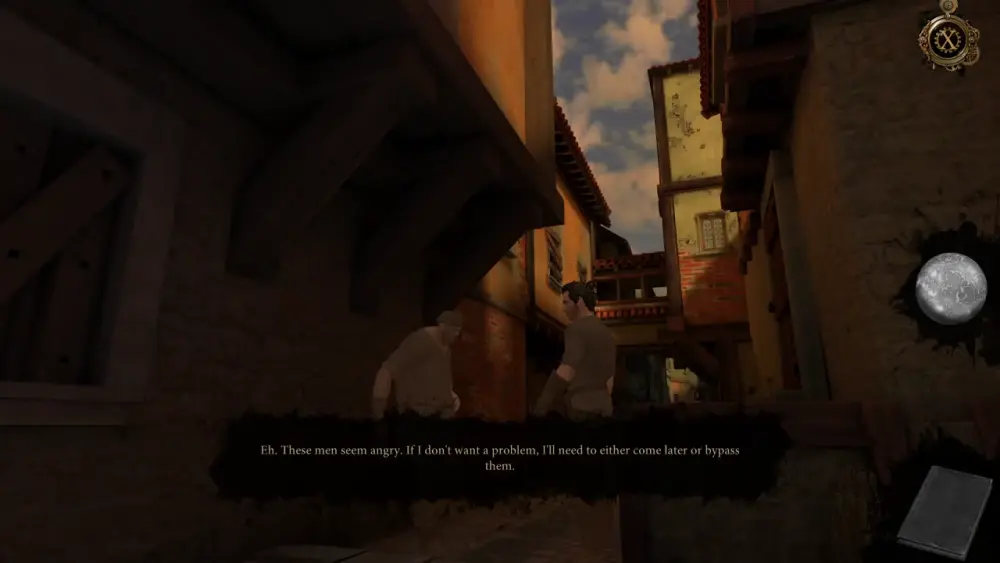
Upon arriving, you find yourself in an alley outside of the inn. If you try to talk to the men on the street, they will rudely brush you off.
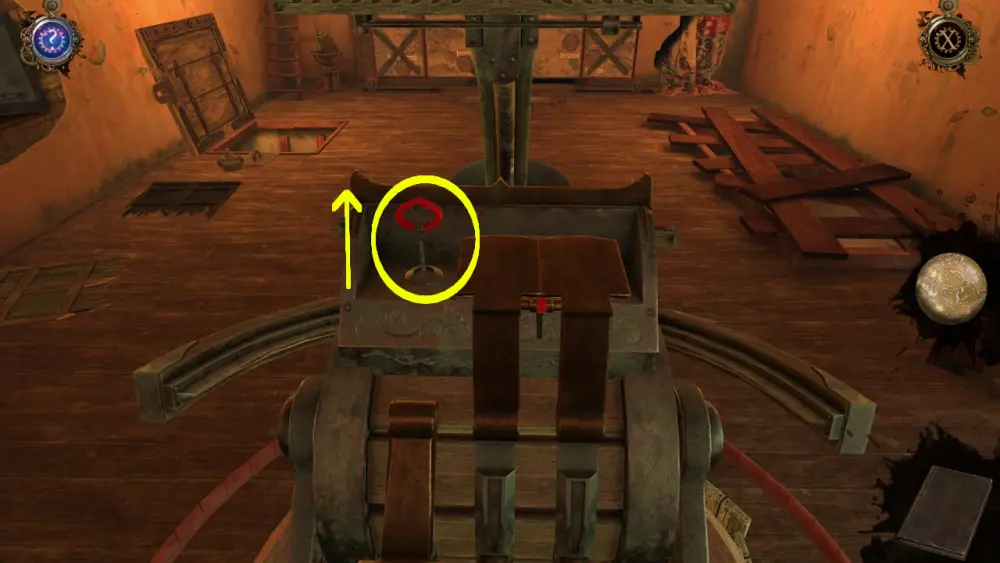
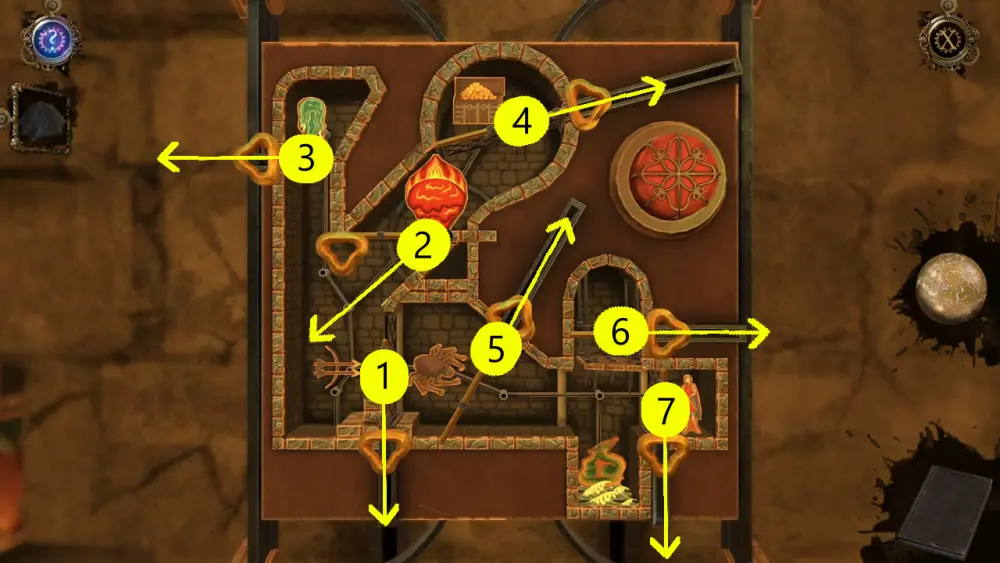
Since the men are clearly inhospitable, pan to your left and you will see a makeshift gate of dilapidated wood. Approach it and you will see a chain hanging from one of the broken panels. Pull the chain down to reveal the locking mechanism behind it.
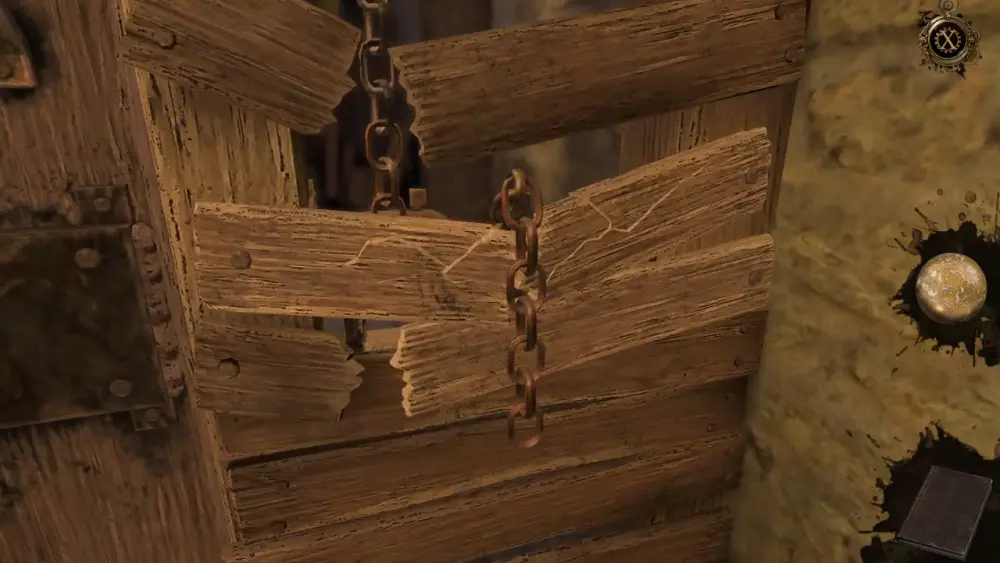
This is a fairly easy puzzle as all you need to do is pull up the piece of wood serving as a lock and once you’ve taken that out, slide the tool with the jagged teeth to the right. This will unlock the door.

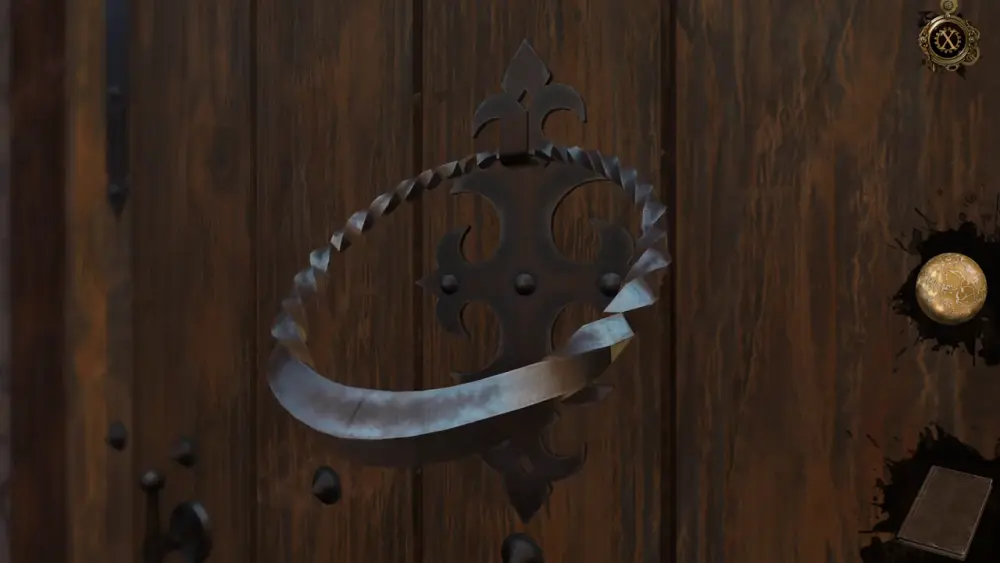
Push the gate open to enter the area fronting The Bald Lady Inn. To the right is the door leading inside.
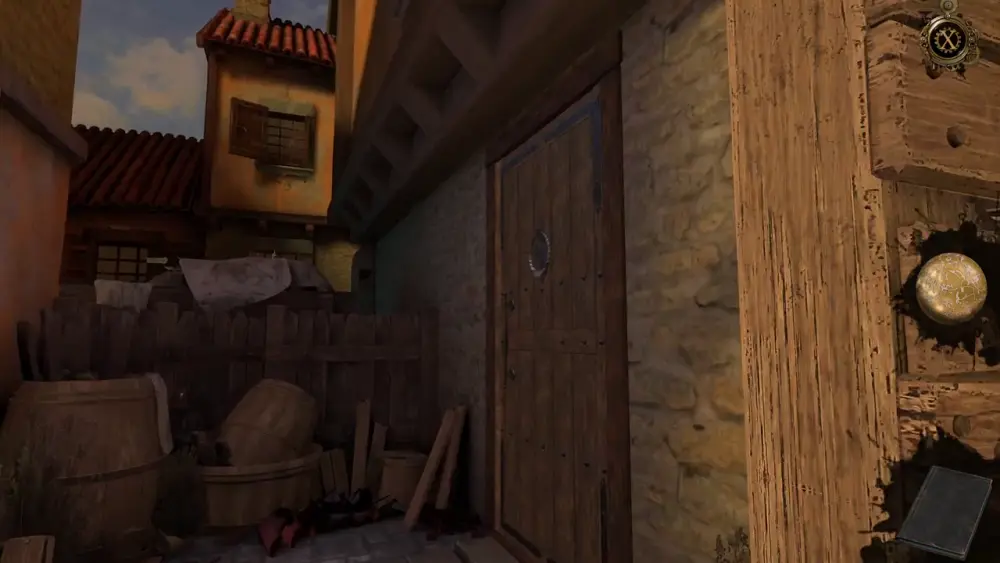
Approach the door and use the circular metal knocker.
After knocking, you’ll be greeted by a burly man with a mustache. He appears to know who you are—in fact, he’s been expecting you. It seems that Leonardo has alerted Marco, the mustached doorman, of your impending arrival.

After being ushered inside, you walk up a short flight of stairs leading to three rooms. To your left are Rooms 1 and 2.
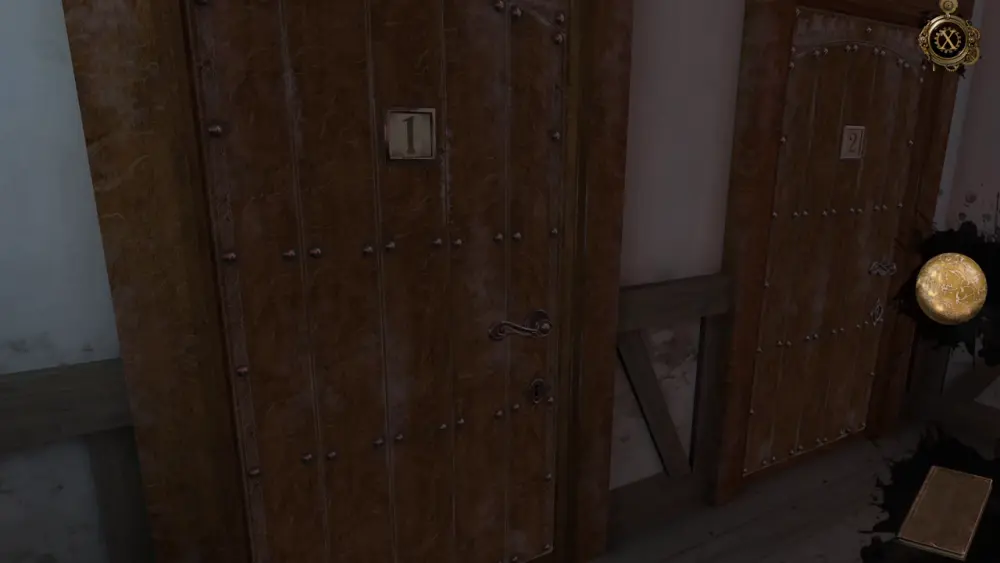
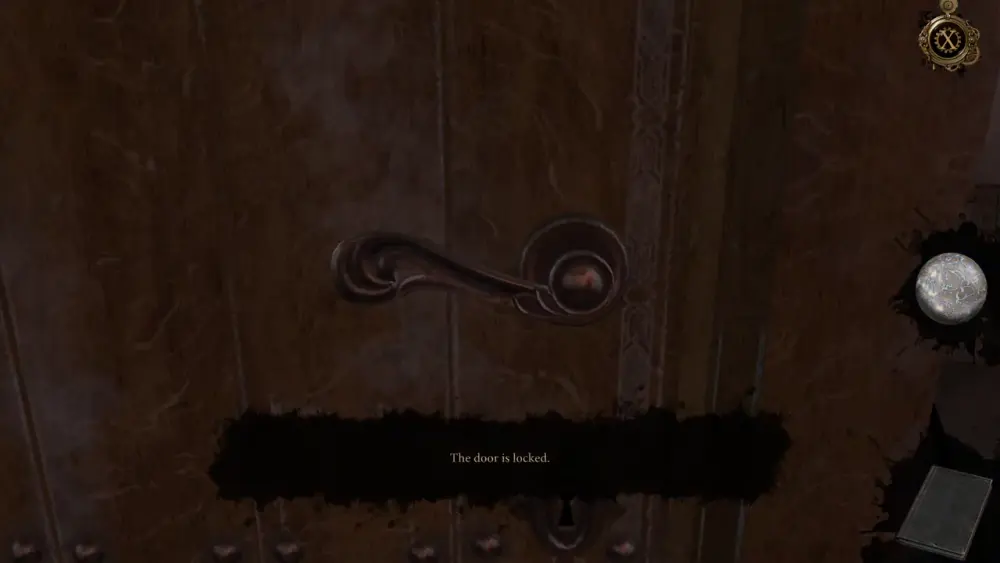
If you try either of these doors, you’ll get a prompt saying they’re locked.
Pan to your right and, at the end of the hall, you’ll see Room 3, which is somewhat more illuminated than the other two.
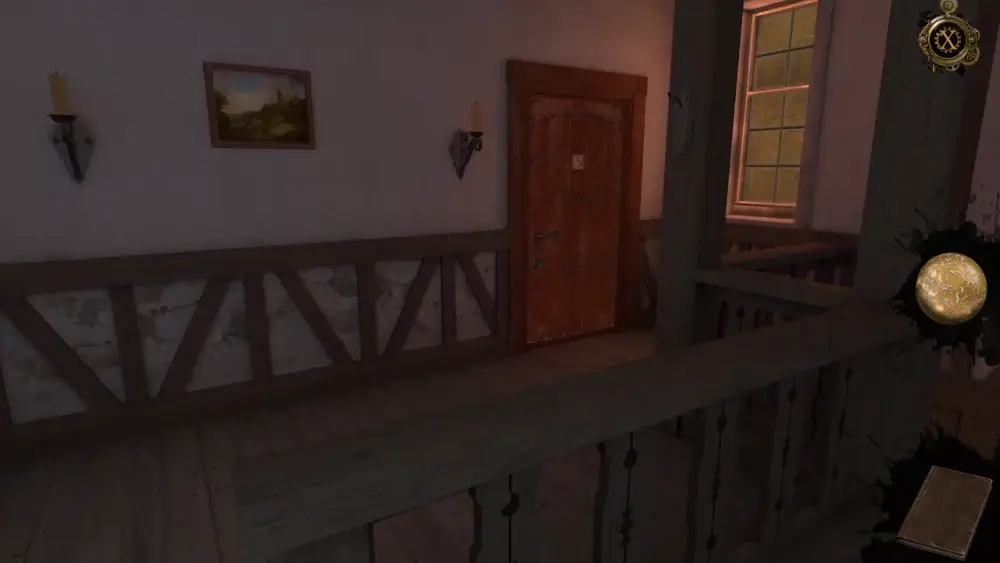
Turn the knob and it will, indeed, open. As you enter, you will hear someone talking—finally, you’ve reached Leonardo himself. With a cheerful and relieved greeting, he welcomes you inside. Behind him is his friend and monk, Luca Pacioli.
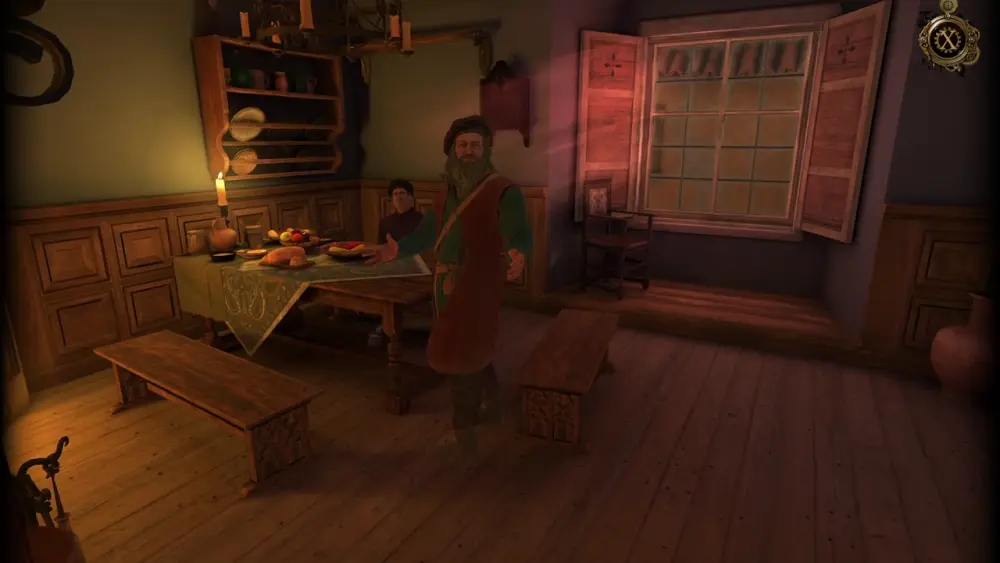
From hereon, the rest of Chapter 3 will play out like a long cutscene wherein Leonardo, along with Luca, will share a bit of banter while explaining what has happened so far and what this journey has been all about. With the help of the Chronicle of Ordo Iustitialis, which you’ve brought to Leonardo, you’ll discover the plans of Césare Borgia—once a powerful and influential man who belonged to the Order of Justice—to construct a time machine, which the secret organization calls the Gate to the Temple of Wisdom.
This long cutscene is in itself a treat, especially if you’re someone who appreciates a game with high production value. From the dialogue to the voice acting and everything in between, Chapter 3 delivers the important information you need while immersing you further into the story.
We don’t want to reveal too much in this regard so as not to spoil the experience, but to summarize, aside from going back in time to destroy the original time machine made 45 years ago, your immediate mission will involve looking for a special glove that Borgia had previously stolen from you. Leonardo and Luca believe that this glove is located in Borgia’s hideout, which happens to be right across the street from The Bald Lady Inn.
According to Leonardo and Luca, Borgia’s hideout is currently empty, thus giving you the timely opportunity to obtain what you need to succeed in your plans. It has been decided that out of the three of you, you’re the most suited to the task of entering the fortified hideout through a burnt pub next to it, thus beginning the events of Chapter 4.
Chapter 4: Rome (Borgia’s Hideout)
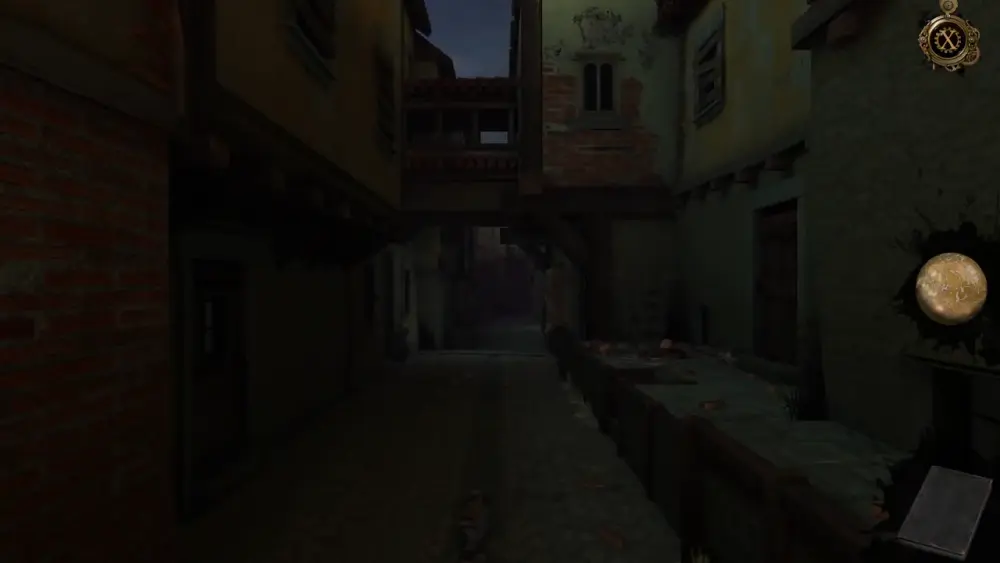
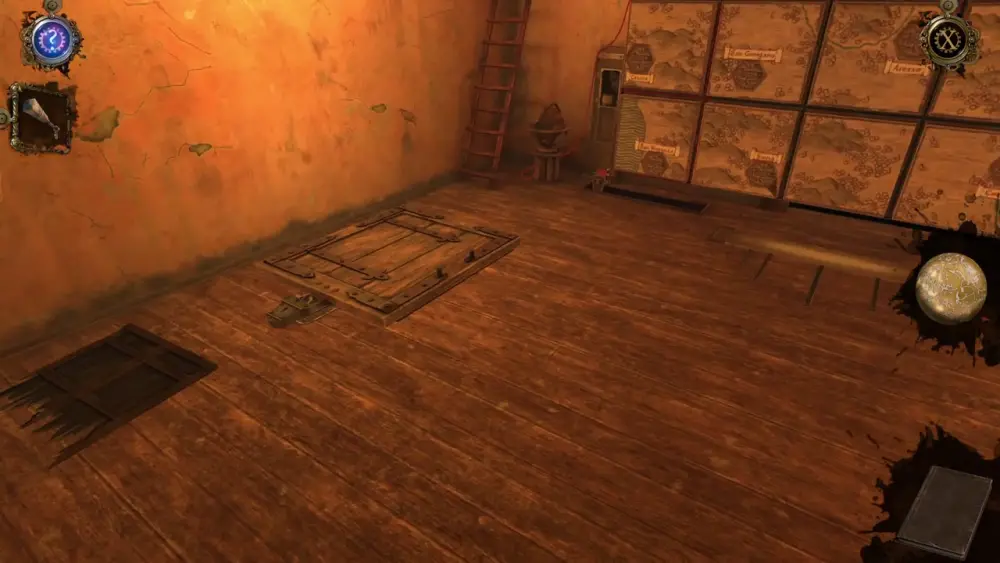
After the conversation with Leonardo and Luca, you find yourself in a dark back alley outside of The Bald Lady Inn.
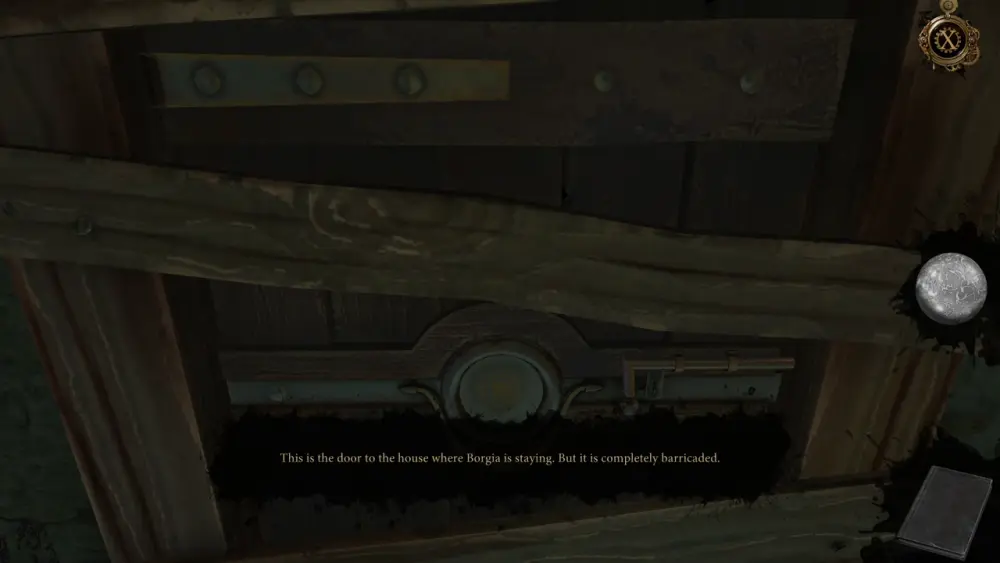
If you go a little further down the street, you’ll encounter a door to your right leading to Borgia’s hideout. As expected, this door is barricaded.
Since you can’t enter there, go even further down the street and you’ll find the burnt pub that Leonardo and Luca had mentioned in your conversation. This is where you can enter so go up the stairs. The pub itself is dilapidated and you’re unable to walk through the debris because it’s too dangerous, with large pieces of wood scattered around and blocking your path.
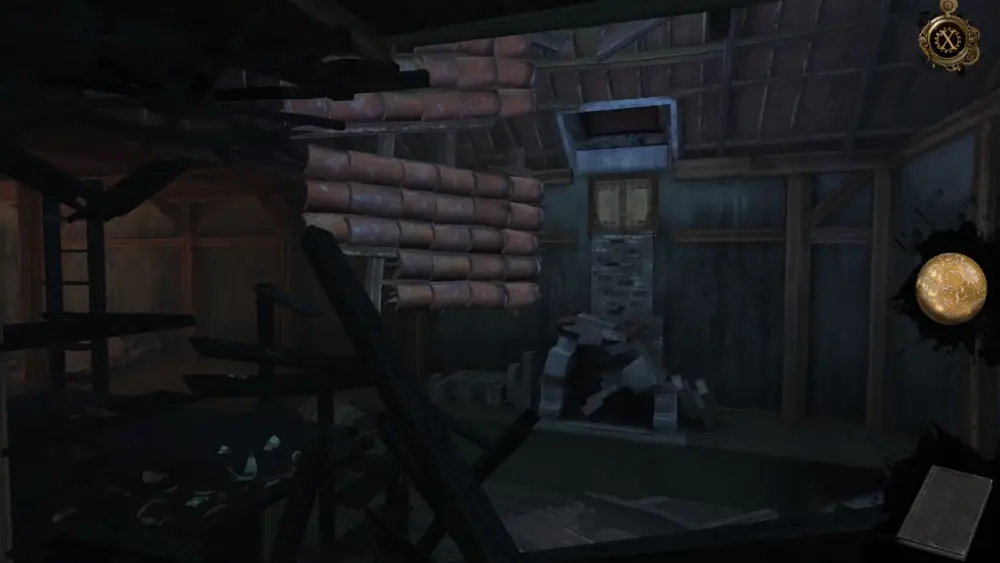
As with similar obstacles you’ve encountered in the last two chapters, opening the Oculus Perpetua will allow you to go back in time, when the pub was still in good shape.
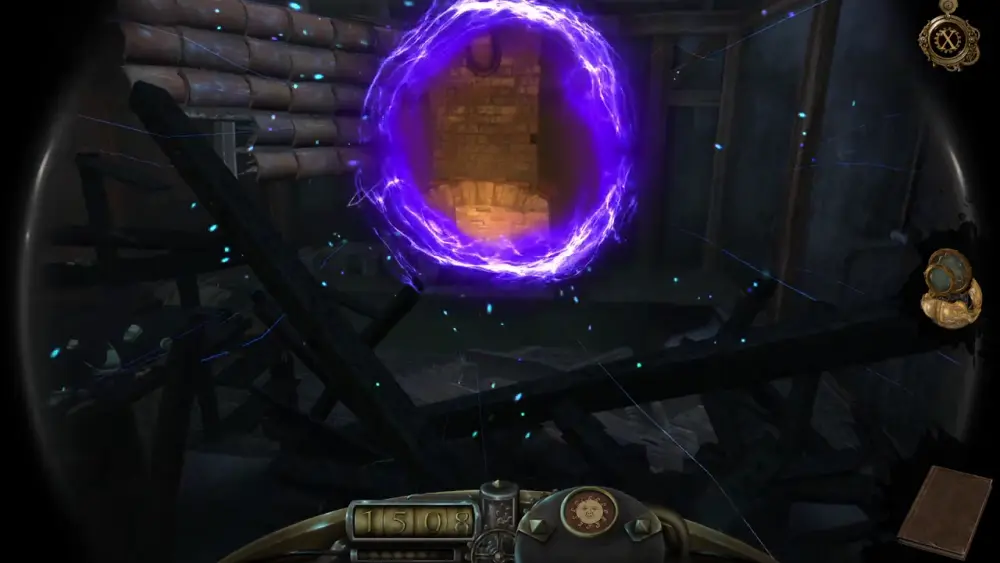
Enter into the time portal to go back 12 years, to 1496, before the pub burnt down. The debris will clear and you’ll find yourself in front of a working fireplace. To your left will be a bar.
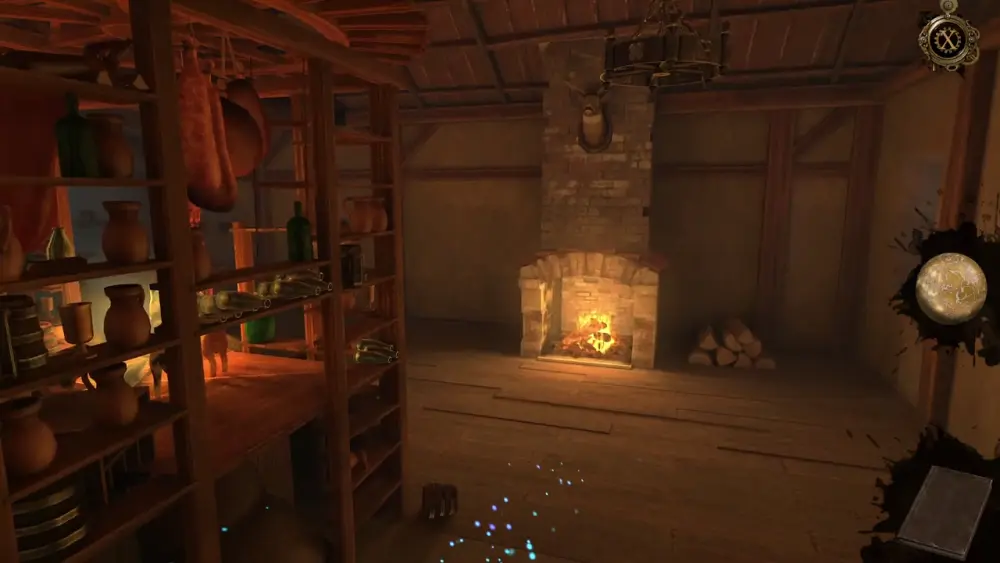
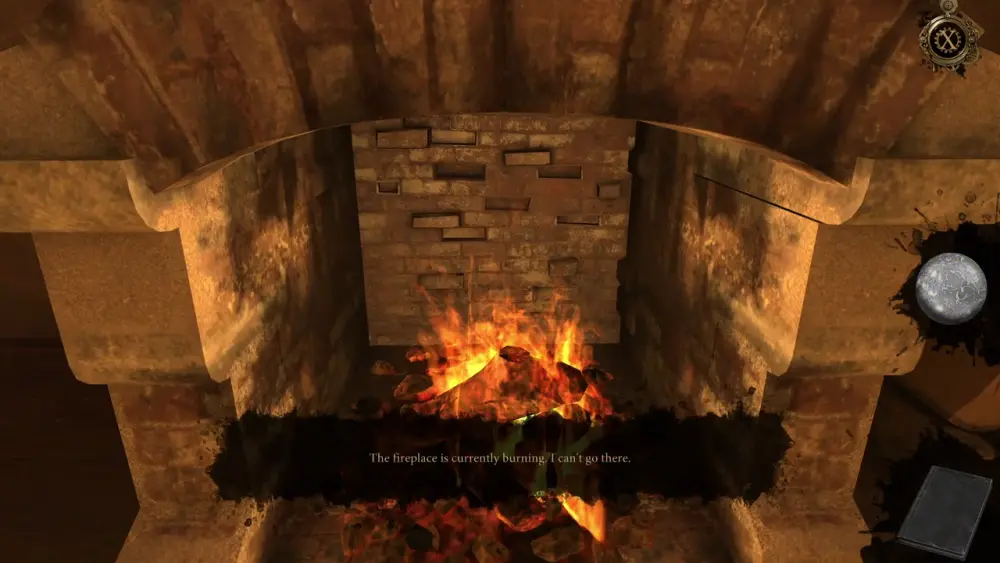
The most sensible way to get to Borgia’s hideout is through the fireplace and up the chimney. However, it’s currently burning, thus blocking any possible entry.
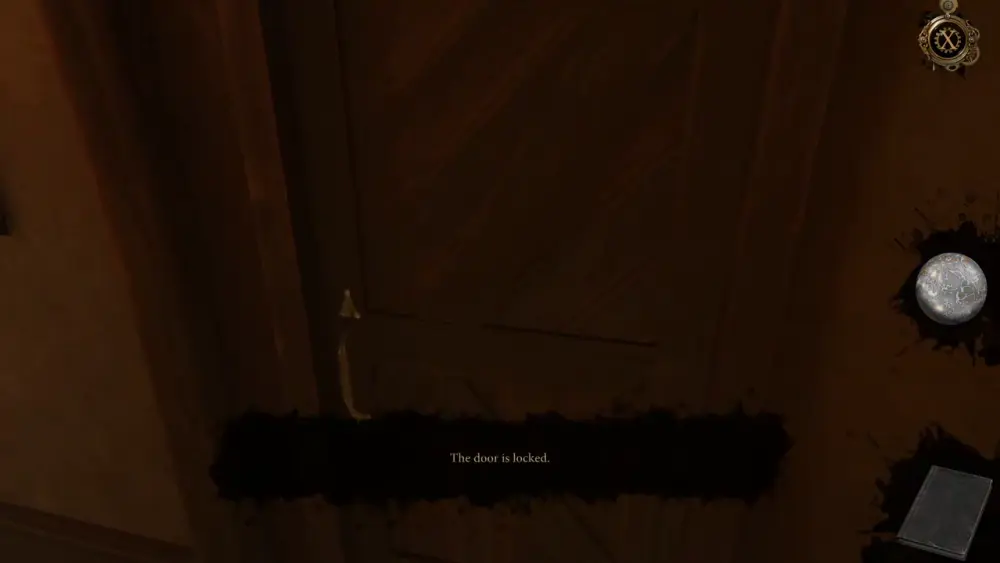
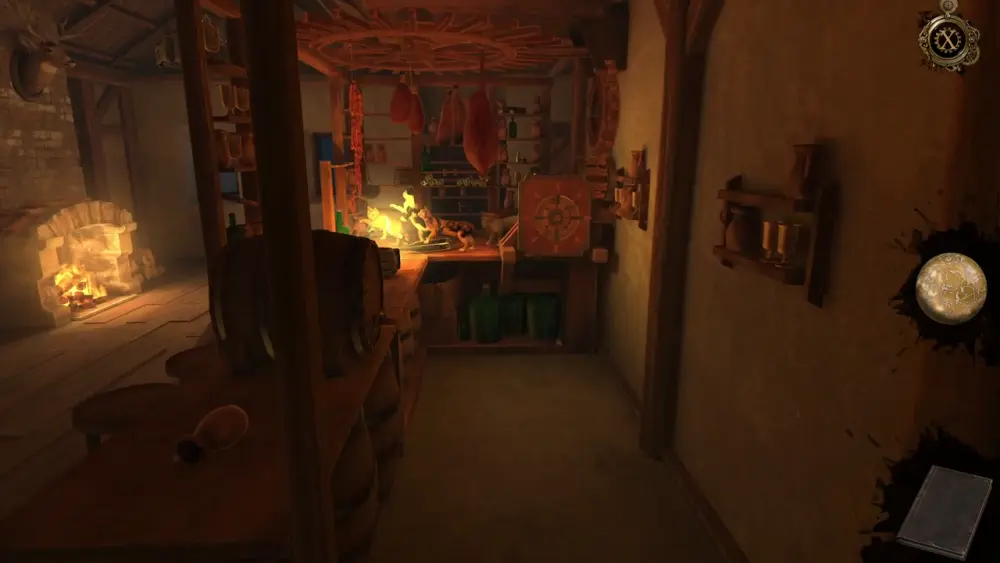
With this puzzle before you, scan your surroundings and go around the pub for a bit, seeing if there’s an alternative means of entry. You’ll see a few tables and chairs, as well as a door next to the bar. Unfortunately, this door is also locked.
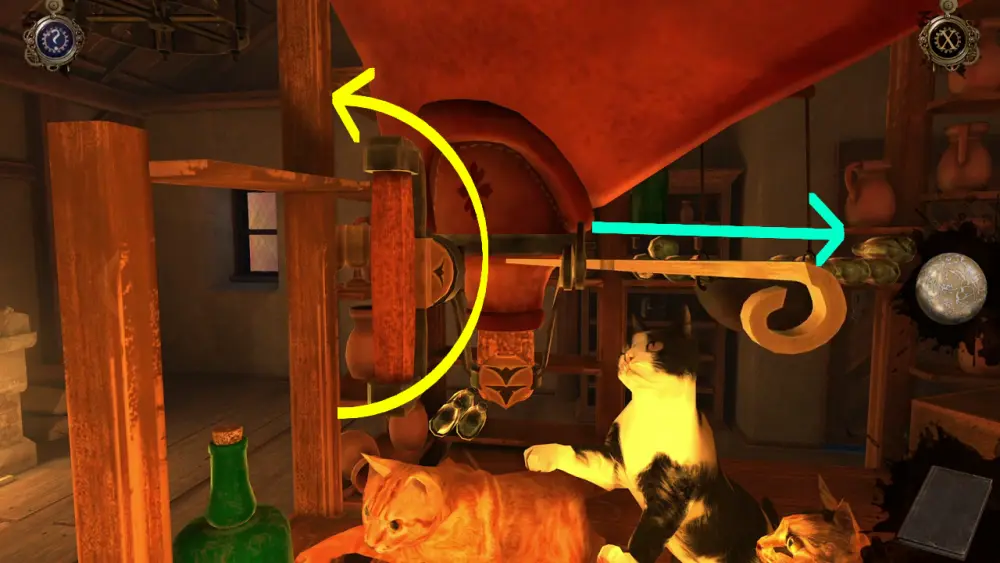
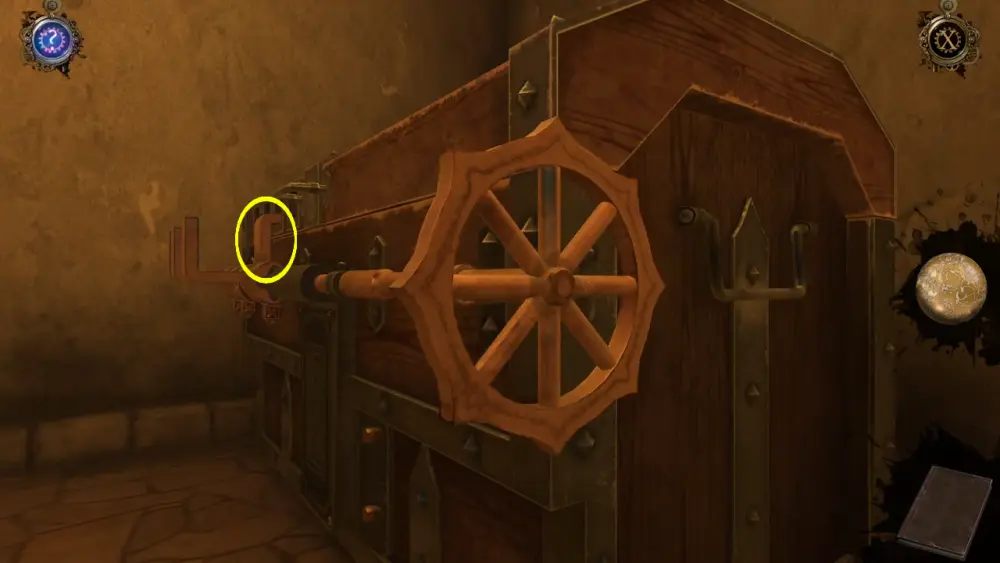
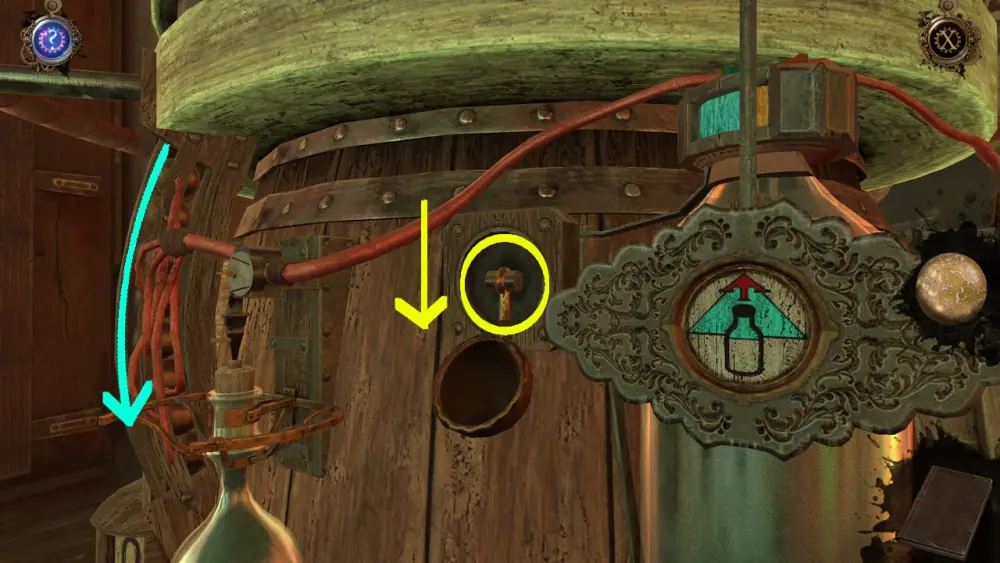
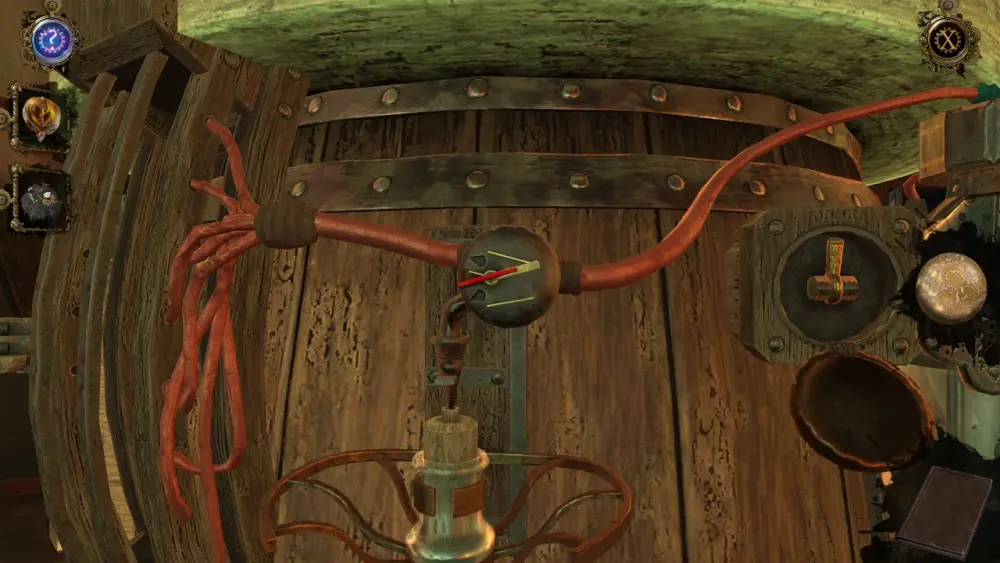
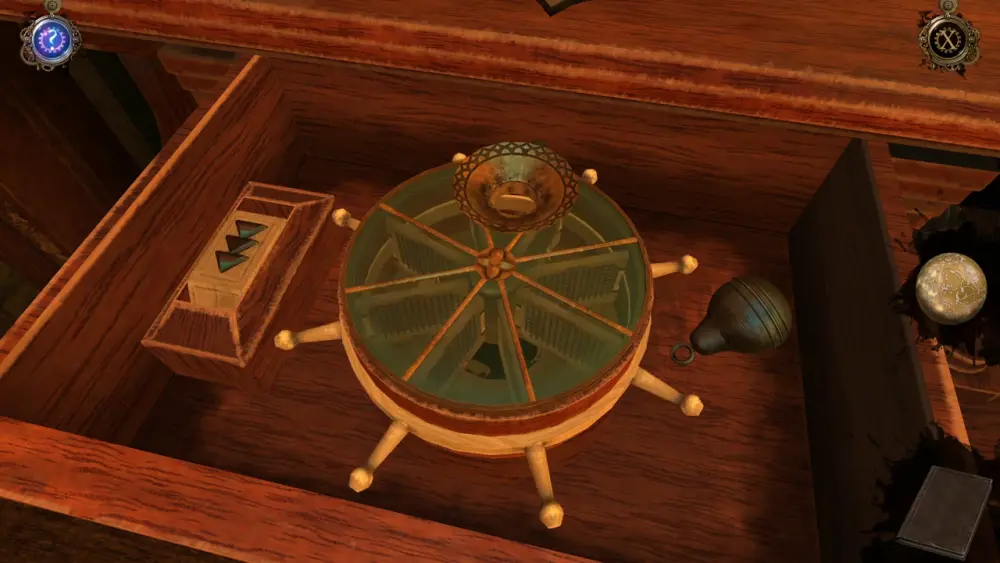
From the door, you’ll see that the bar, particularly a corner of the table, is illuminated by a fallen candle surrounded by cat statues. You’ll also notice that there’s what looks like a ship’s steering wheel mounted on a panel.
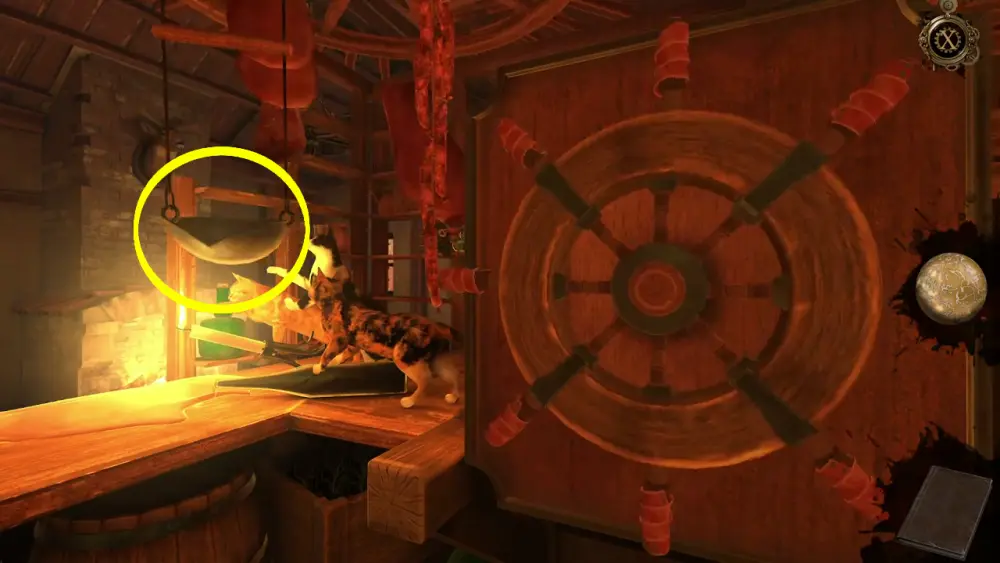
If you approach the wheel and turn it, a rotating mechanism hanging from the ceiling will also turn. One of the things you’ll instantly notice is a leather water vessel with a lock.
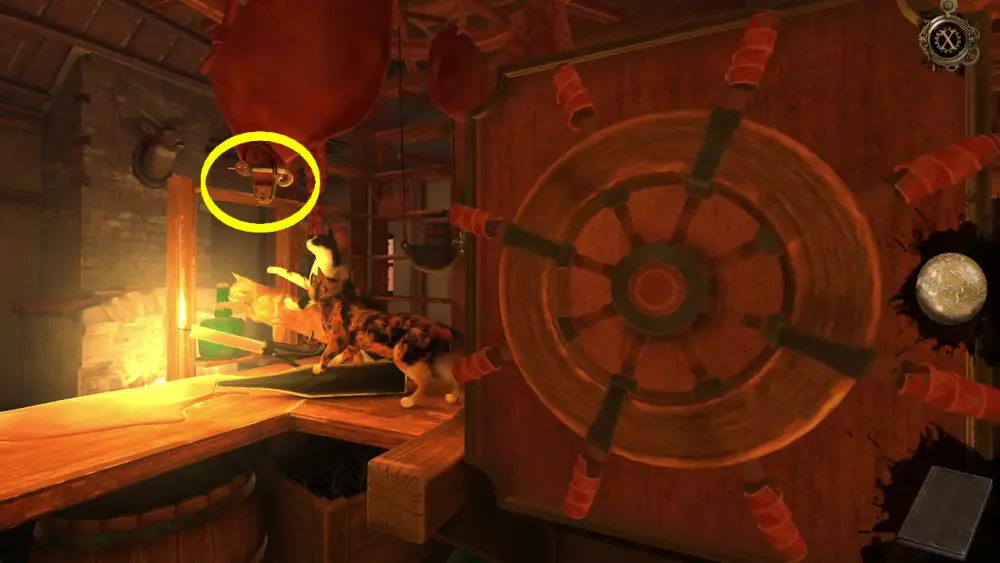
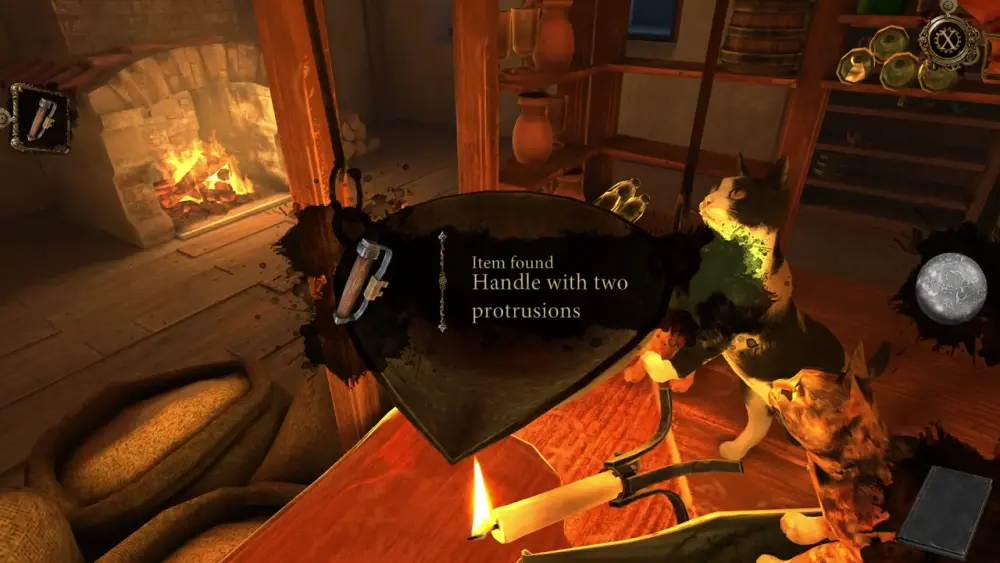
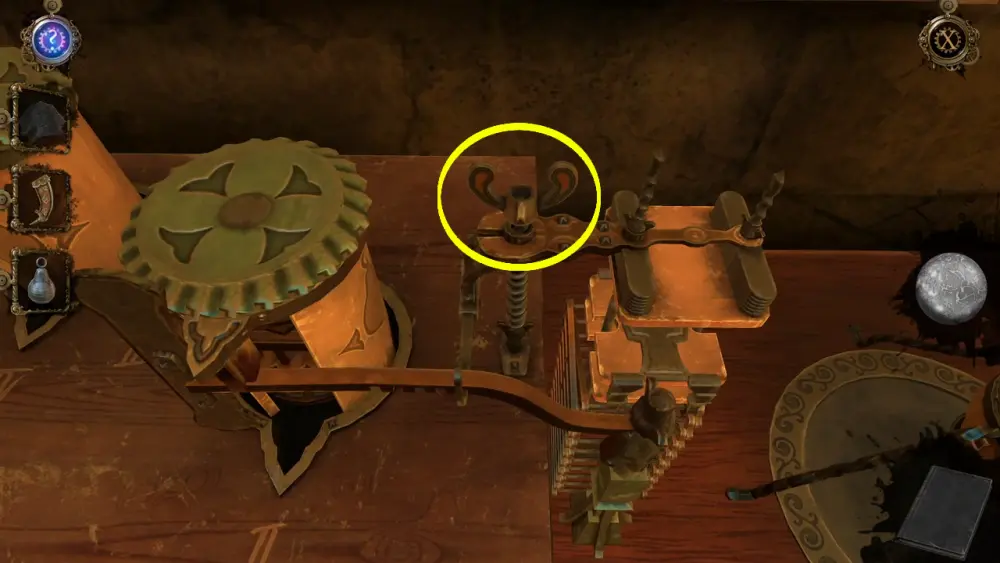
Fortunately, you can find the key to this if you continue to turn the wheel and chance upon the small metal bowl hanging from the rotating mechanism on the ceiling.
This will come in the form of a Handle with Two Protrusions.
Turn the steering wheel again so you can access the locked water vessel. Use the item you’ve just found to unlock the vessel by turning the handle and taking out the wooden stick acting as the lock.
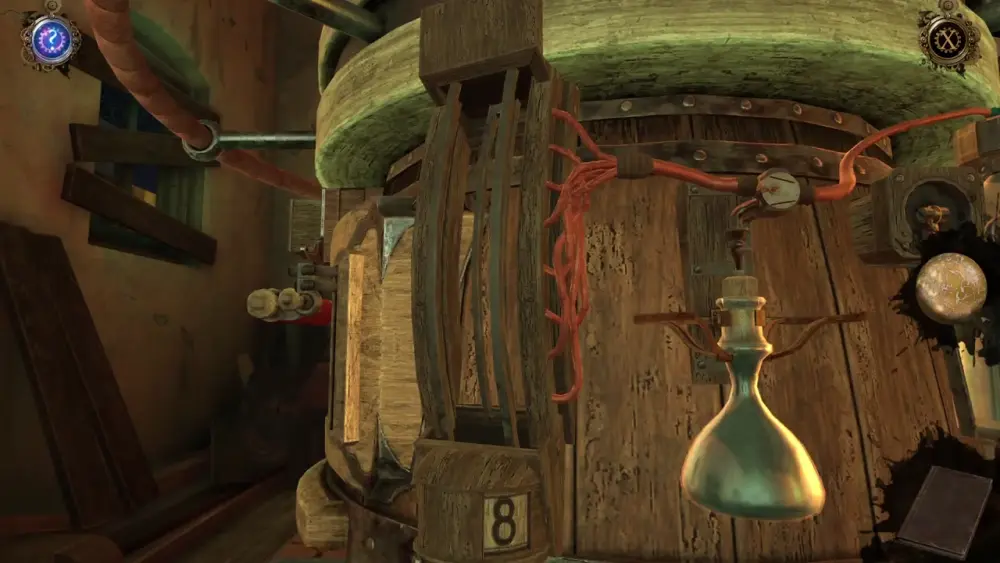
Once the lock has been opened, water will come out of the vessel’s nozzle, extinguishing the candle beneath it.
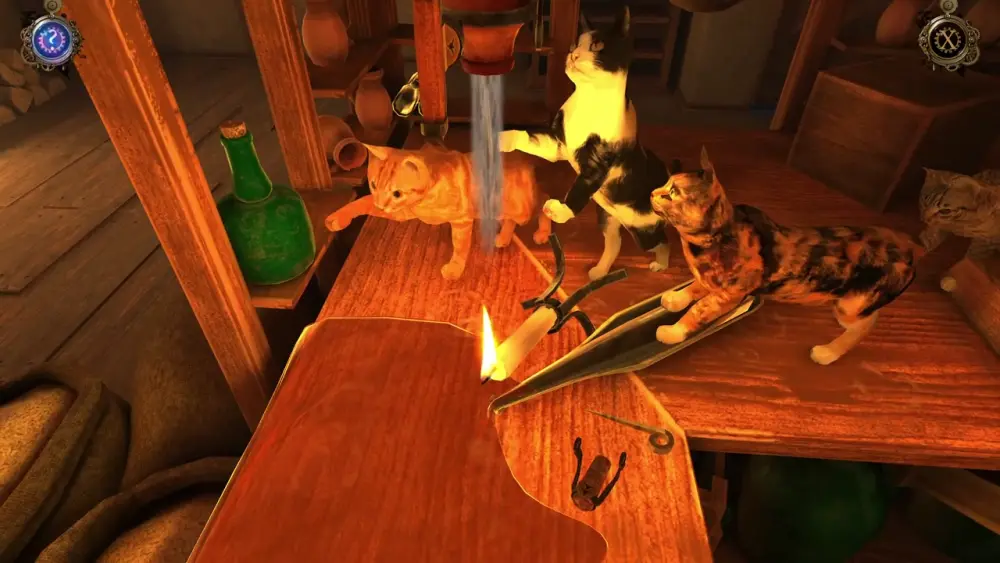
Since you’re still in the year 1496, this simple act will affect future events, thus preventing the pub from burning down. After the candle’s flame has been put out, you will be instantly transported back to the present. The once dilapidated pub is now free of debris and you’re able to access the fireplace without a hitch.
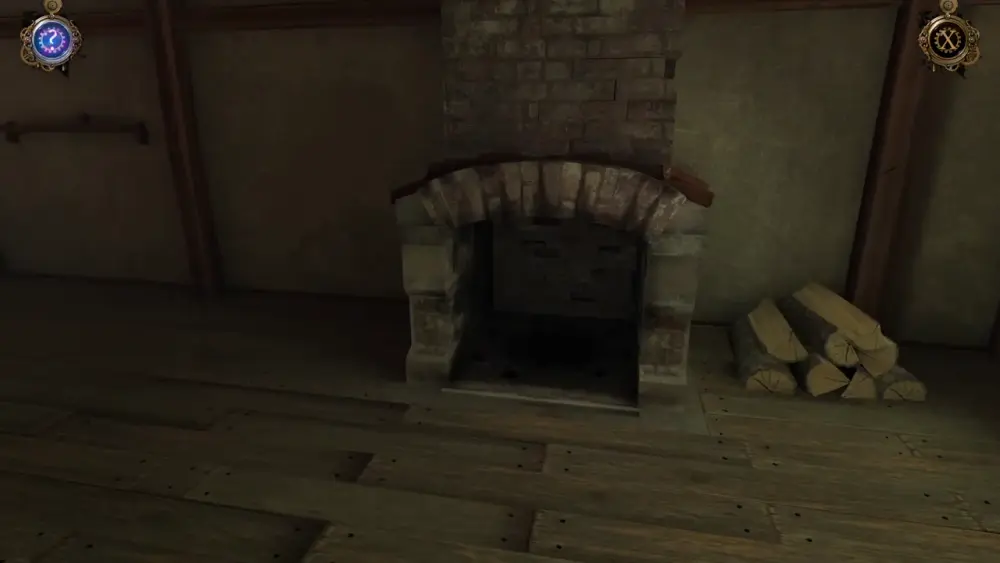
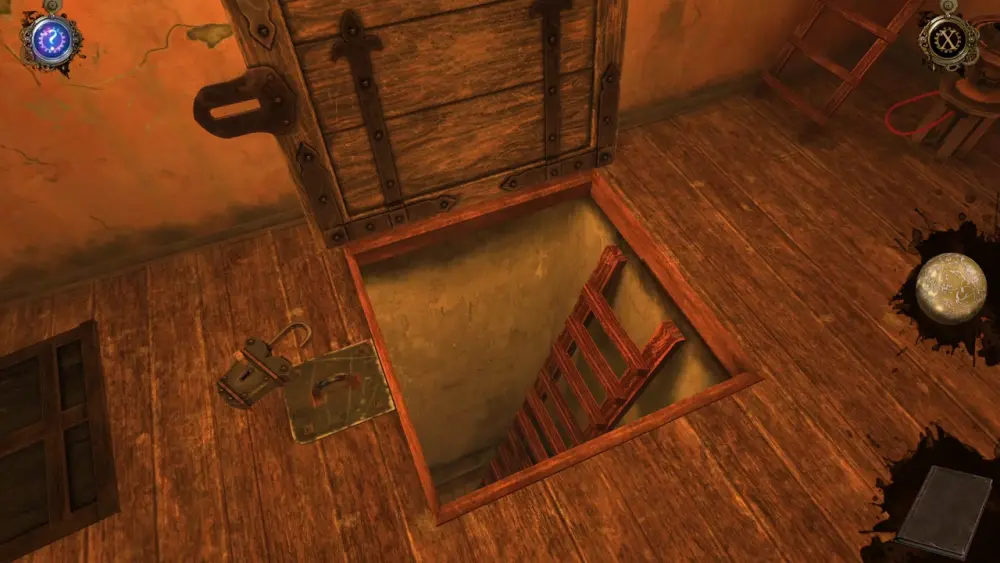
Enter the fireplace and climb up until you reach what looks like a small metal door or hatch. Lift the lock to unbolt the door.
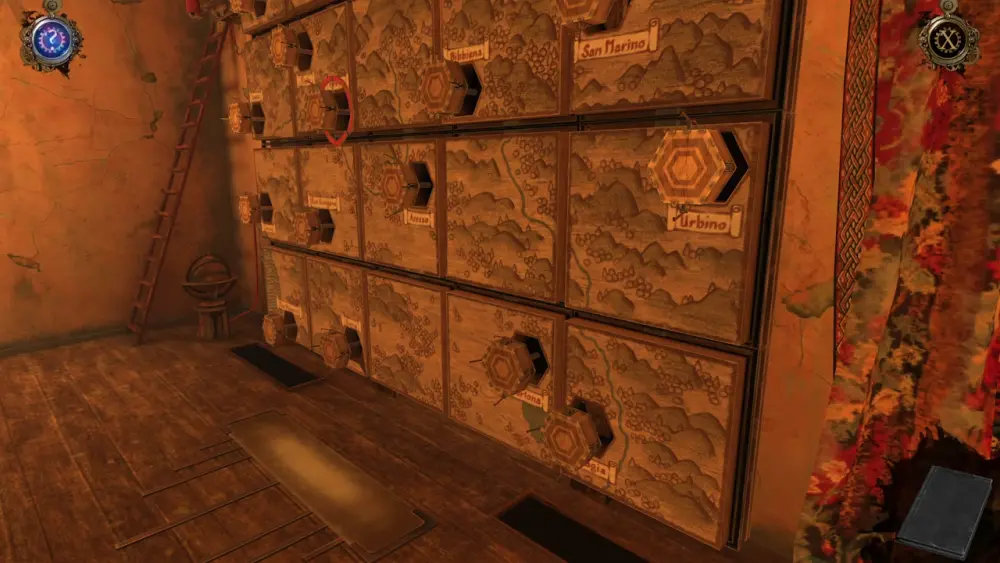
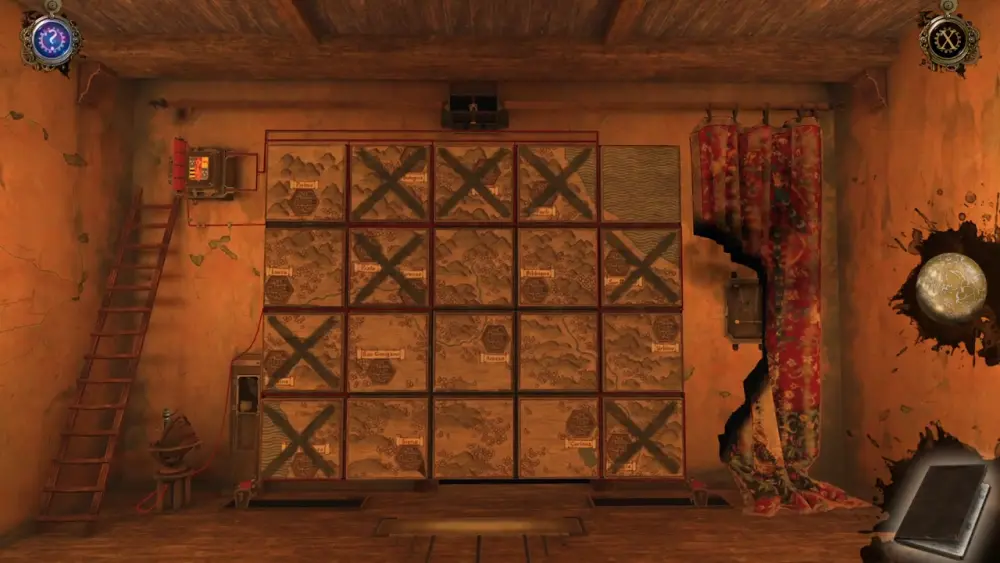
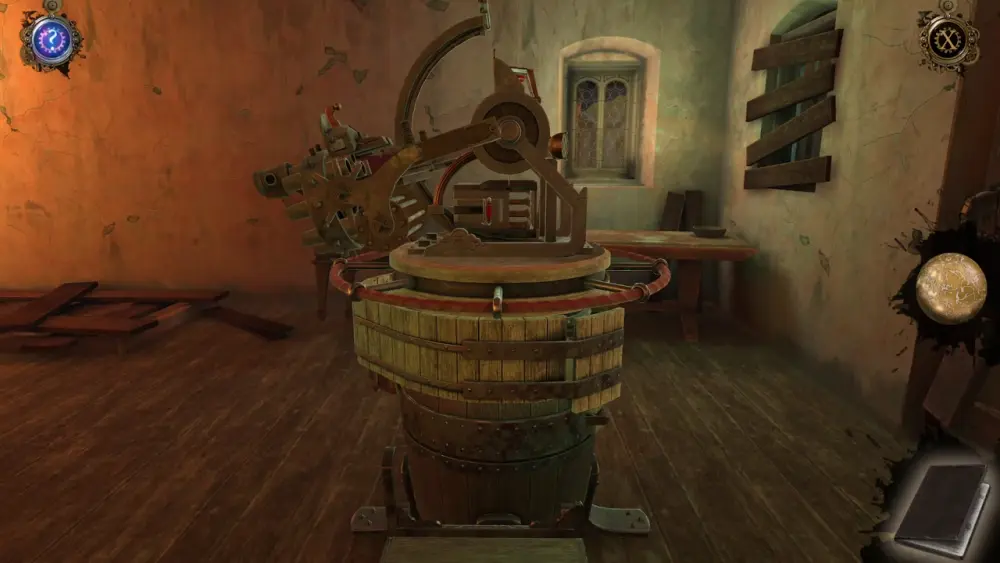
Once unlocked, give the door a push until the thin wooden wall behind it gives way, thus leading you into a room in Borgia’s hideout. When you come out of the door, the first thing you will see is what looks like a giant map of Northern Italy.
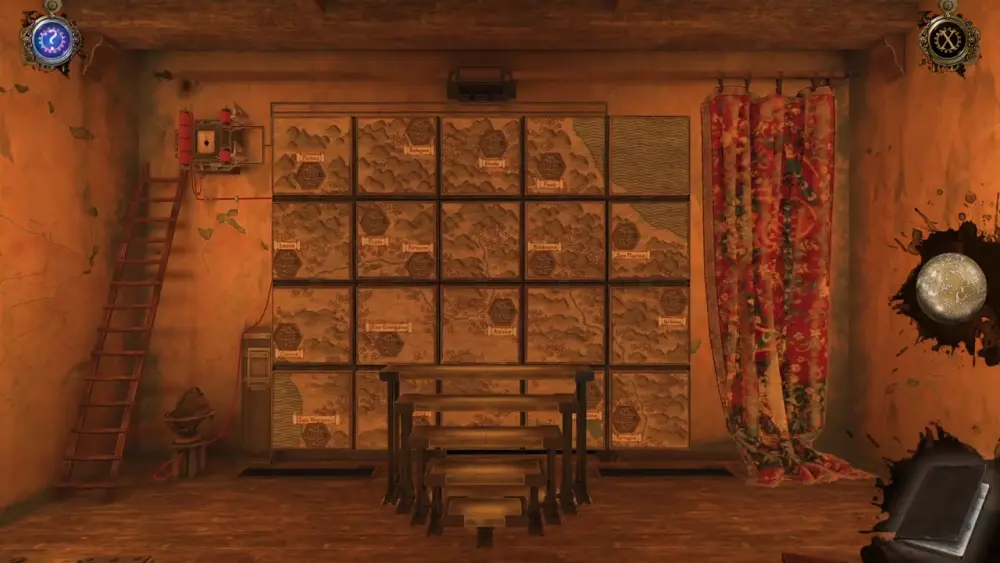
As you may have guessed, there’s a puzzle here that’s waiting to be unraveled but there doesn’t seem to be a clear way to do that—yet.
That said, turn your attention to what’s behind you, the most noticeable of which is an odd-looking machine to the left and a portrait of Césare Borgia to the right.
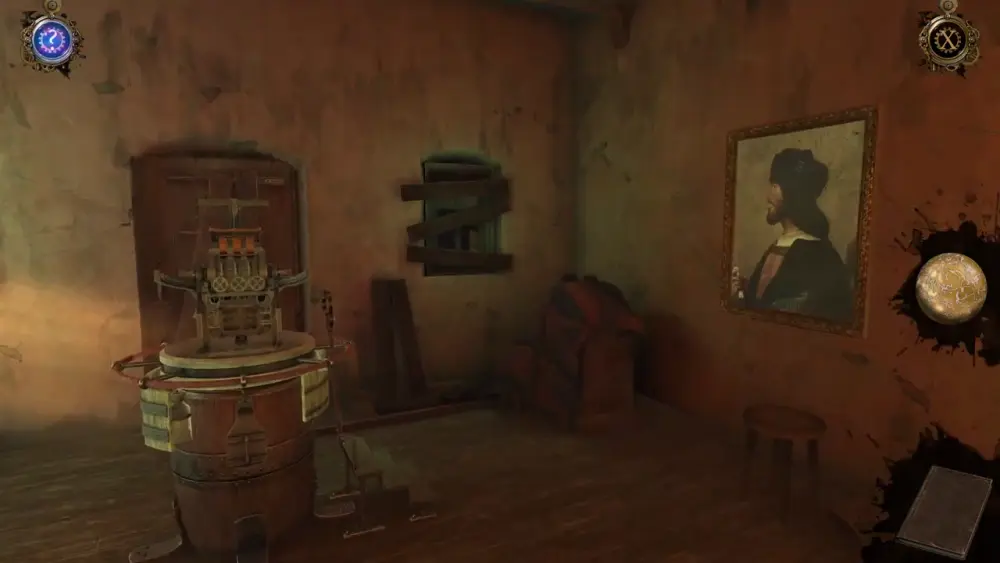
We recommend observing the machine and going around it, as with any device that you encounter in this game. However, you won’t be able to activate the machine until later so that leaves us with Borgia’s portrait as the item that’s most likely to have some use.
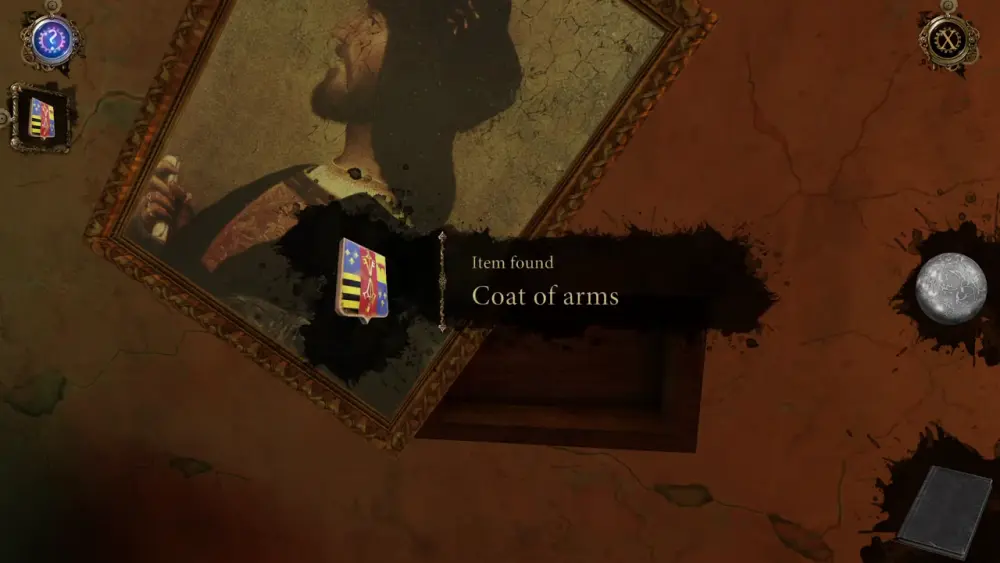
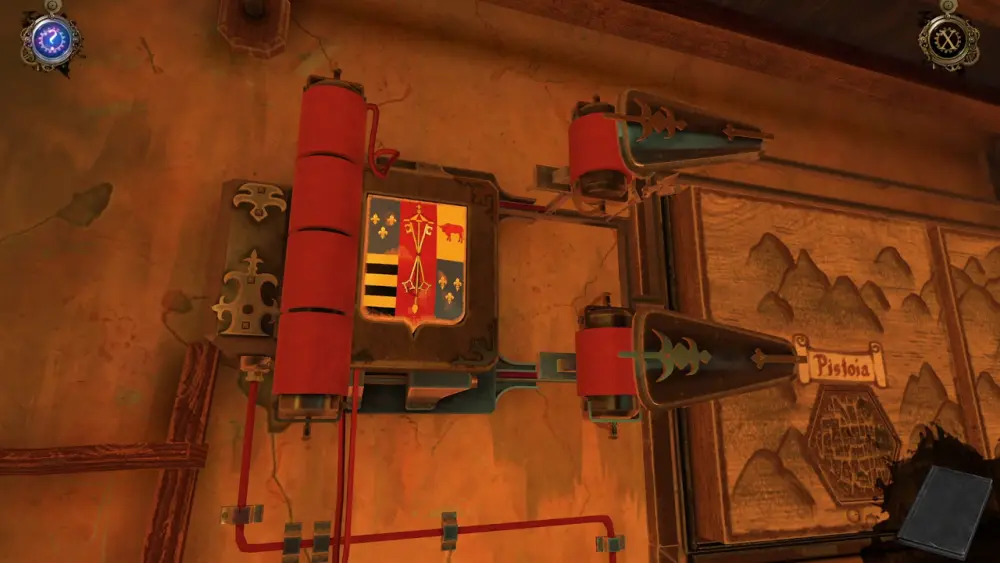
Indeed, when you push the portrait to the side, you’ll find a small compartment containing two things, one of which is a Coat of Arms.
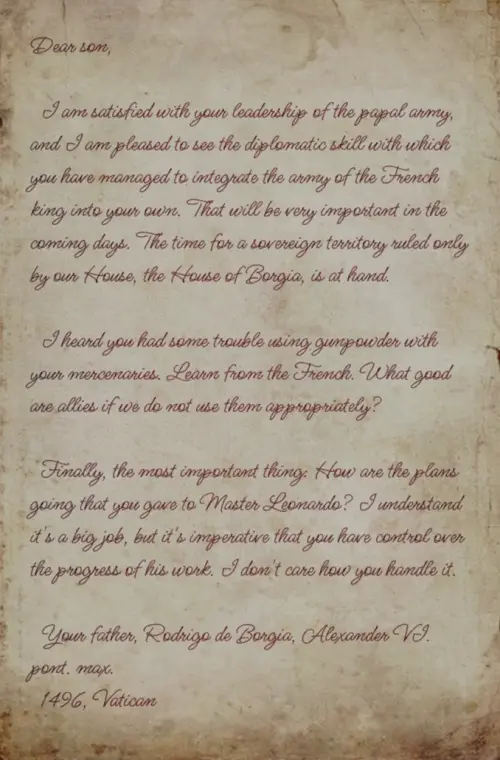
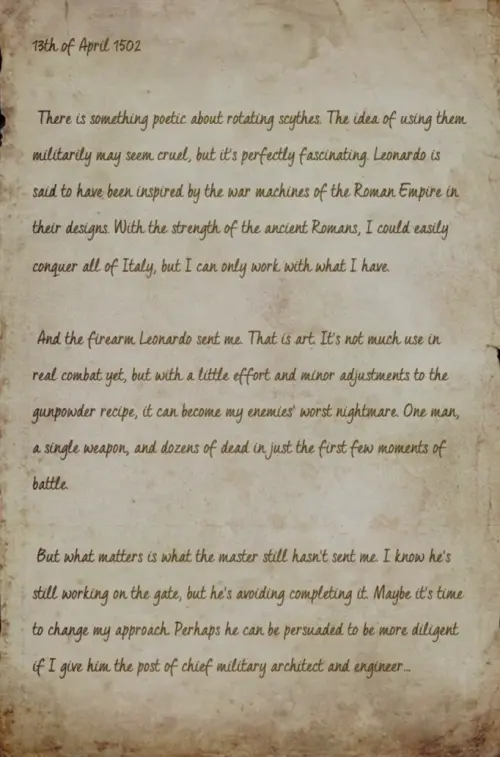
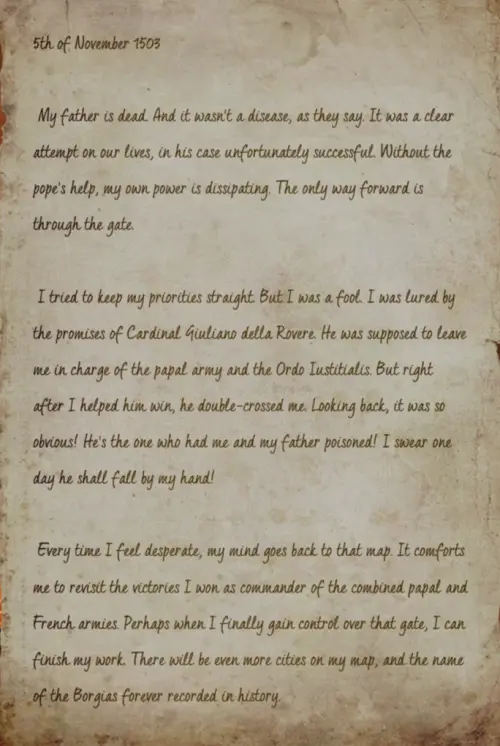
The other item you’ll find hidden behind the portrait is a letter to Césare Borgia from his father. Below are the contents of this letter:
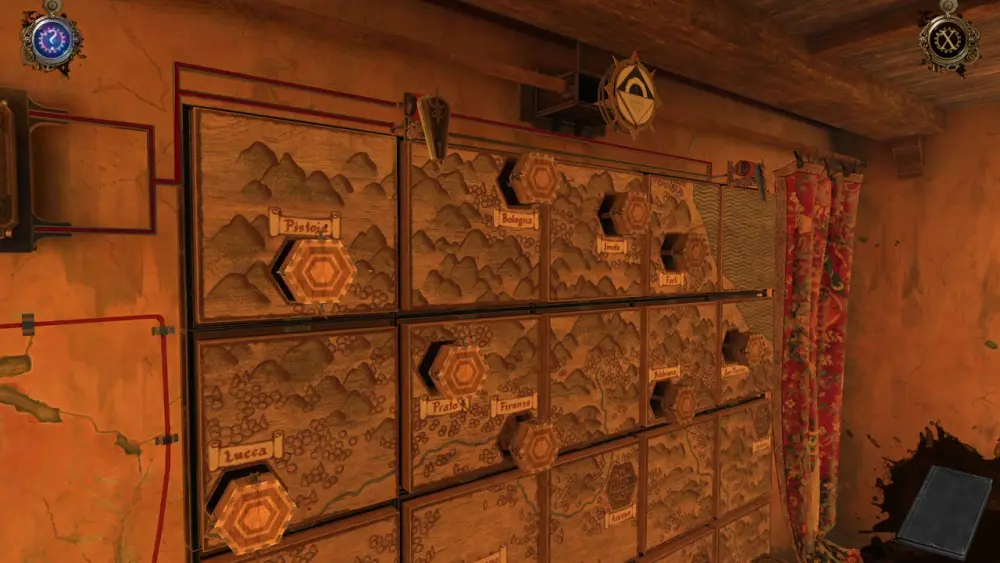
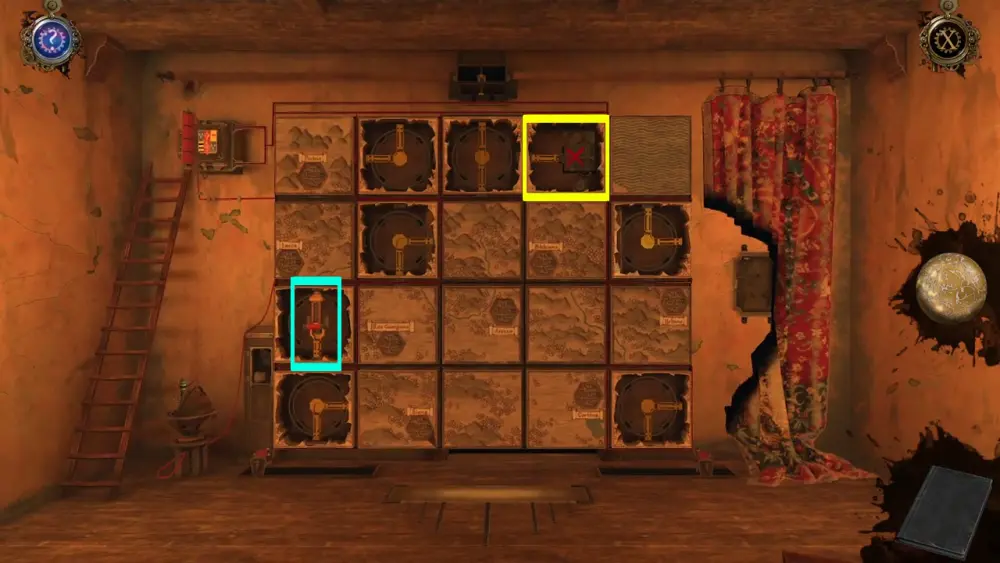
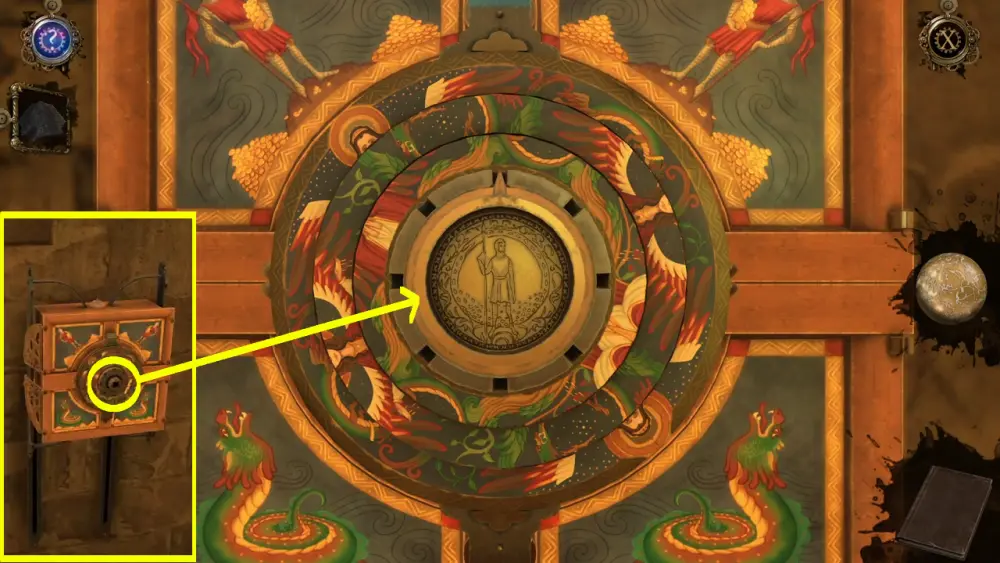
Since the Coat of Arms won’t fit into the strange-looking machine, turn around and face the large map once more. To its left, you will see a ladder leading to a box-like device attached to the map. Below it is a circular object mounted on a tiny stool. Place the Coat of Arms on the rectangular slit on the surface of the box.
This will activate two devices that look like mini military canons, which will move toward either ends of the map. Similarly, the hexagonal markers representing northern Italian provinces on the map will open, revealing wooden blocks of the same shape. At the very top of the map is a circular device with a symbol.
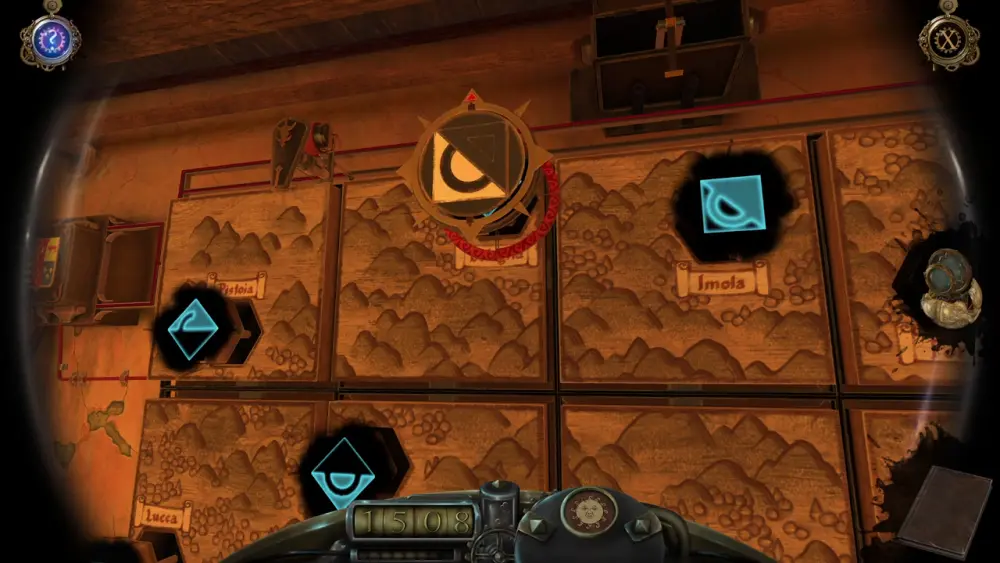
Go up the stepladder fronting the map and take the circular device with the symbol. Looking at the map as is won’t reveal what the device is for, but opening the Oculus Perpetua will. Upon activating the Oculus Perpetua, you will see that the hexagonal markers each bear a symbol corresponding to the symbol on the circular device.
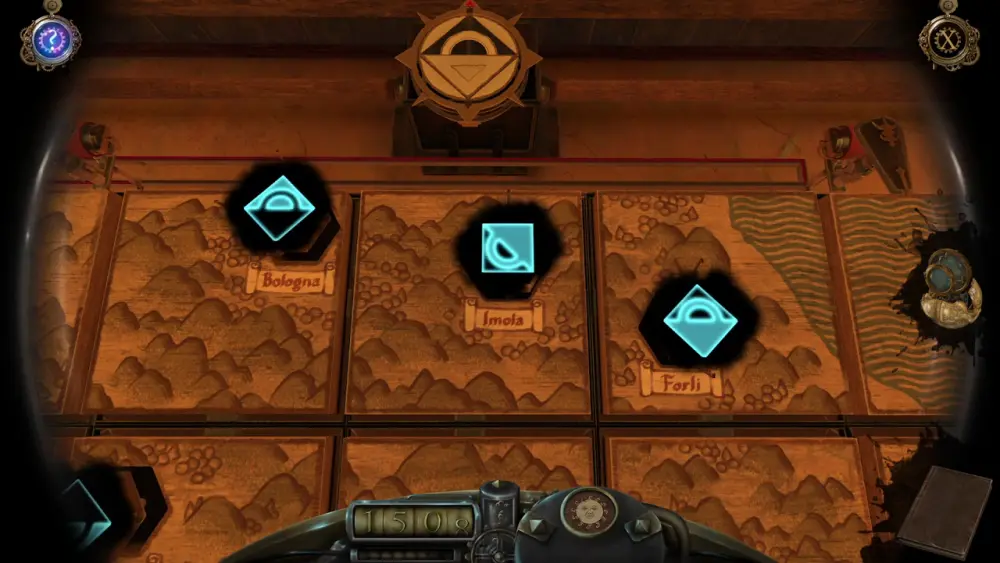
What you need to do is to pick the symbol that the circular device is currently displaying and place the device on that marker. With each correct hexagonal marker chosen, the circular device will turn and change the symbol on its surface. You’ll know that it’s the right symbol you’ve picked as the marker will bear a red circle.
Here is the order in which you should choose the hexagonal markers named after provinces in northern Italy:
- Bologna
- Imola
- Firenze
- Forli
- Cecina
- San Marino
- San Vicenzo
- Perugia
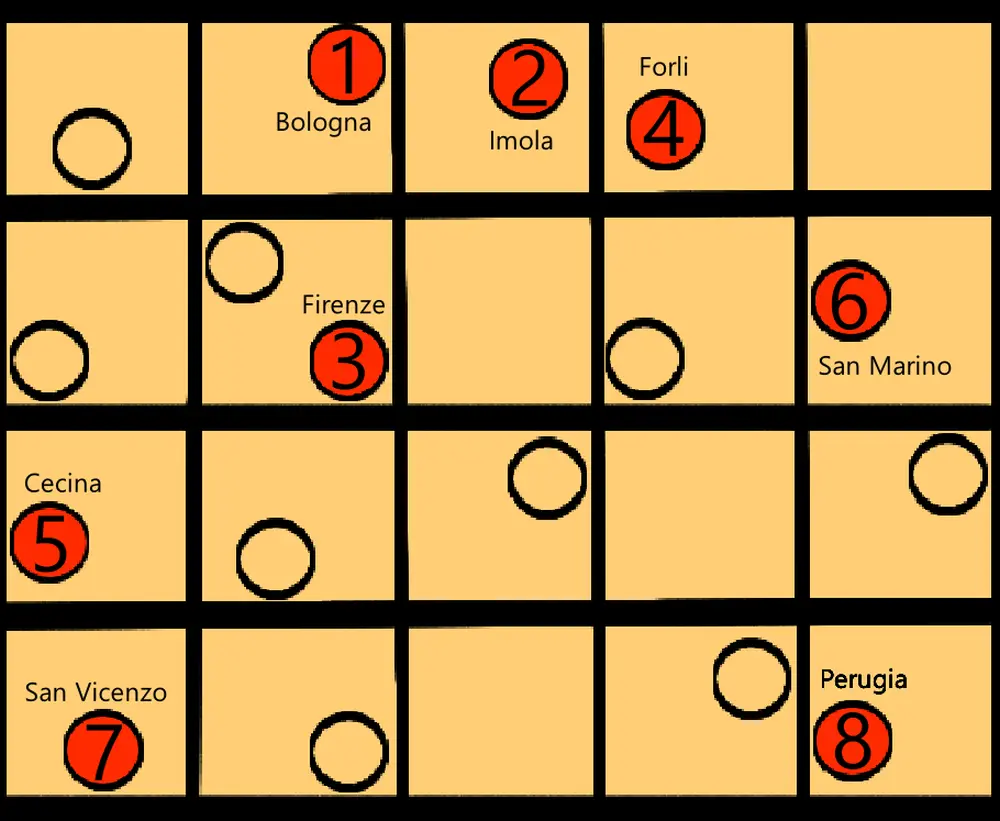
Once you’ve used the circular device on the first four provinces, the map will then reveal more hexagonal blocks at the bottom and the stepladder will retract into the floor.
After this, you’re free to access the last four provinces.
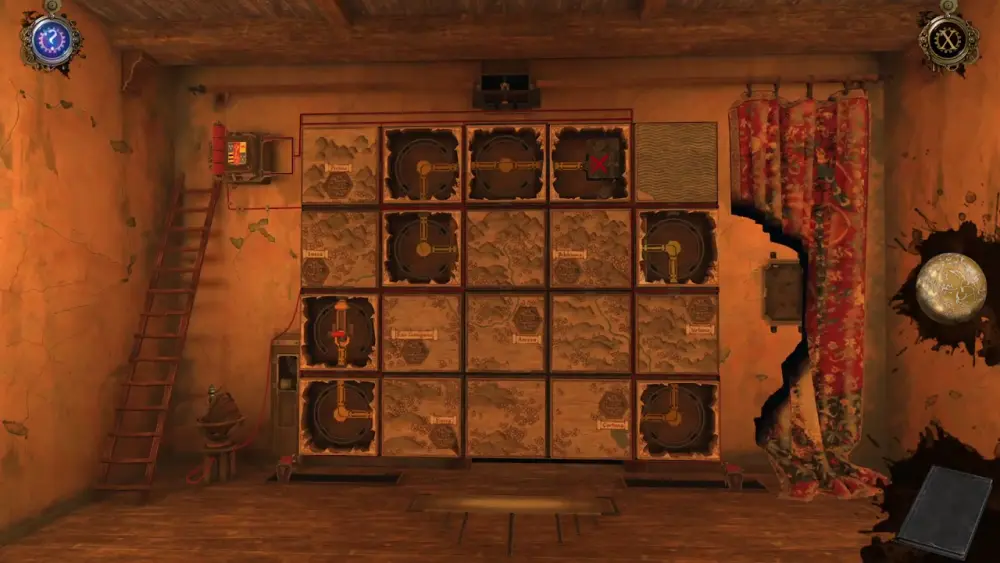
Once you’ve managed to complete the map puzzle, a hatch will open to the left side of the map.
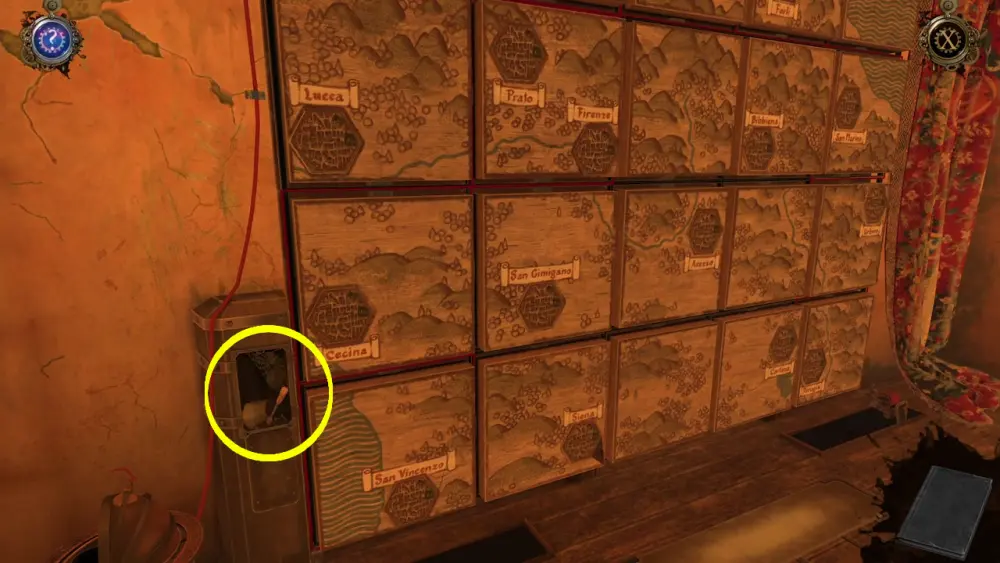
This is where you can obtain the Lock Pick item.
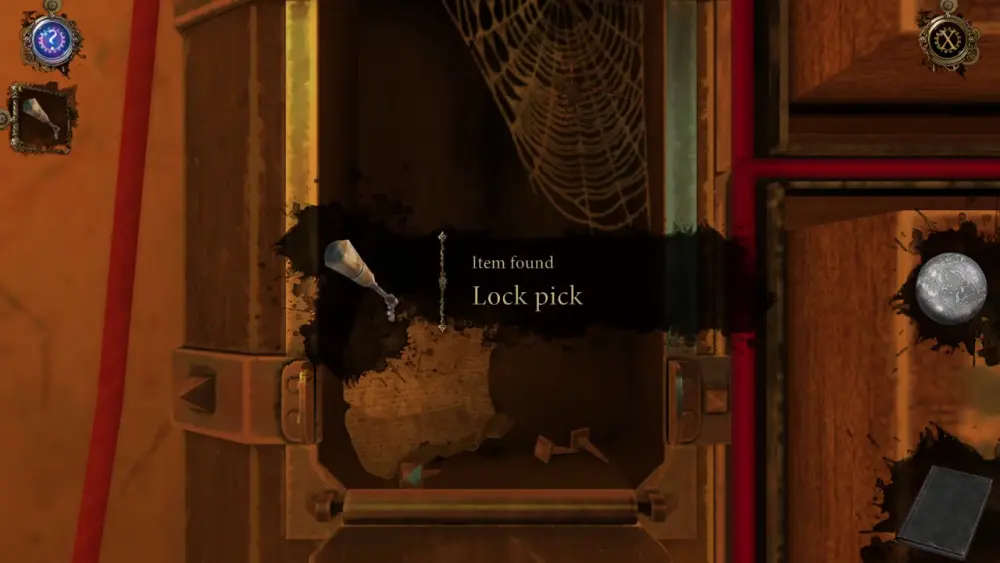
There’s only one door where the Lock Pick can be used, which is the trapdoor to your left.
Use the Lock Pick on the lock and turn it, then lift the trapdoor to open it. This will reveal a secret room below, which you can access via a ladder.
In this room, you will immediately notice two things: a stamping machine and a locked chest.
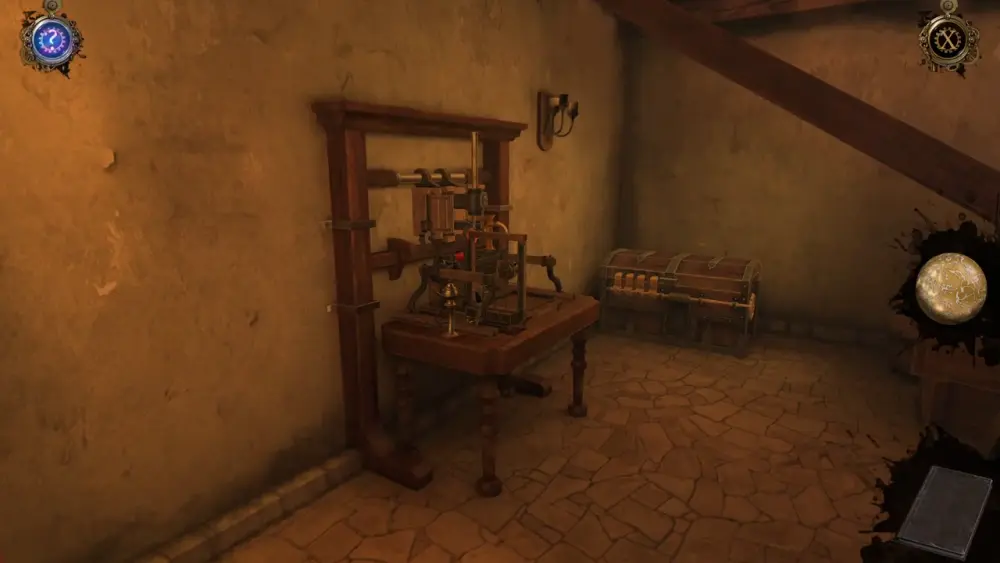
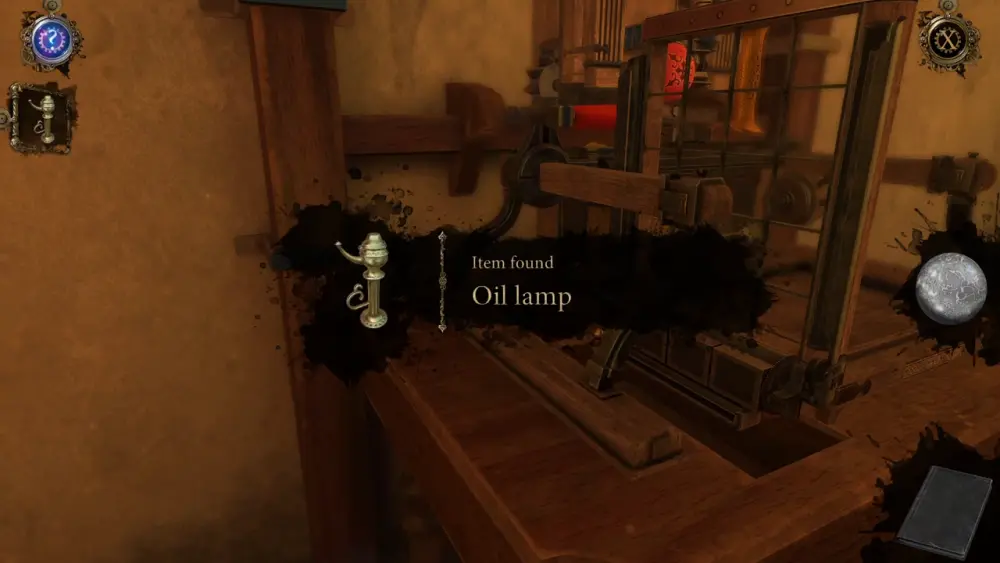
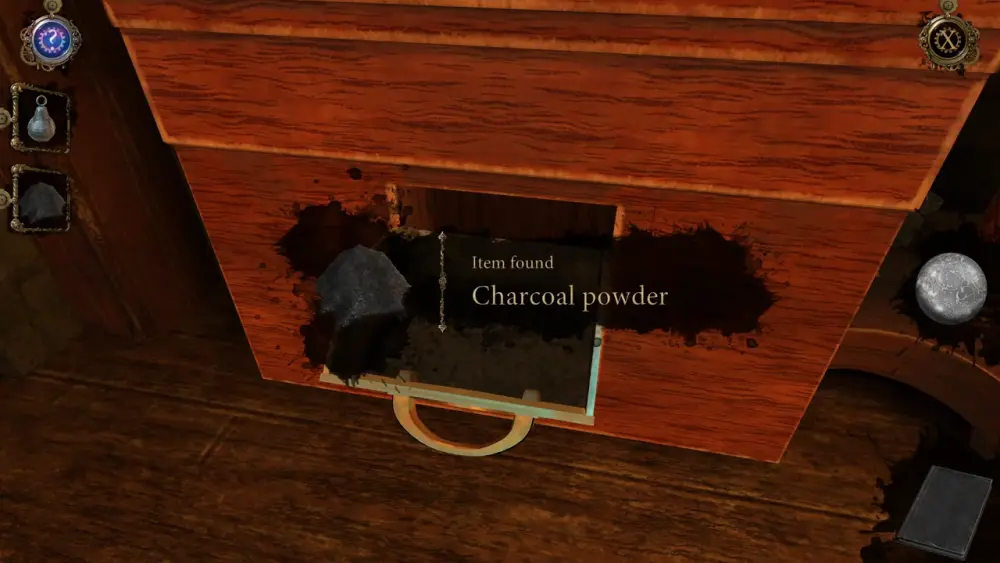
Like the machine from upstairs, you don’t seem to have anything for the stamping device yet as your inventory is empty, but you can take the Oil Lamp on its left side.
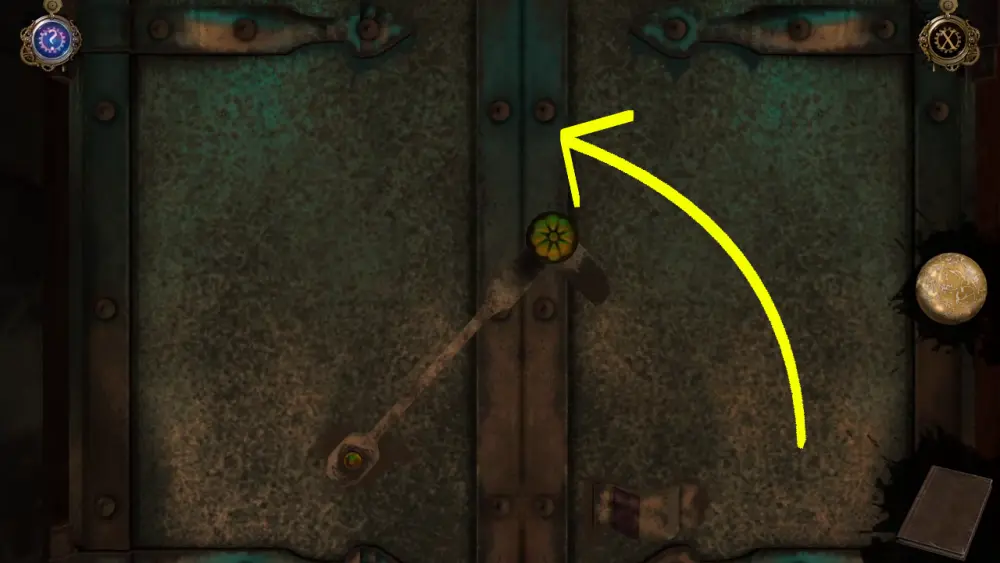
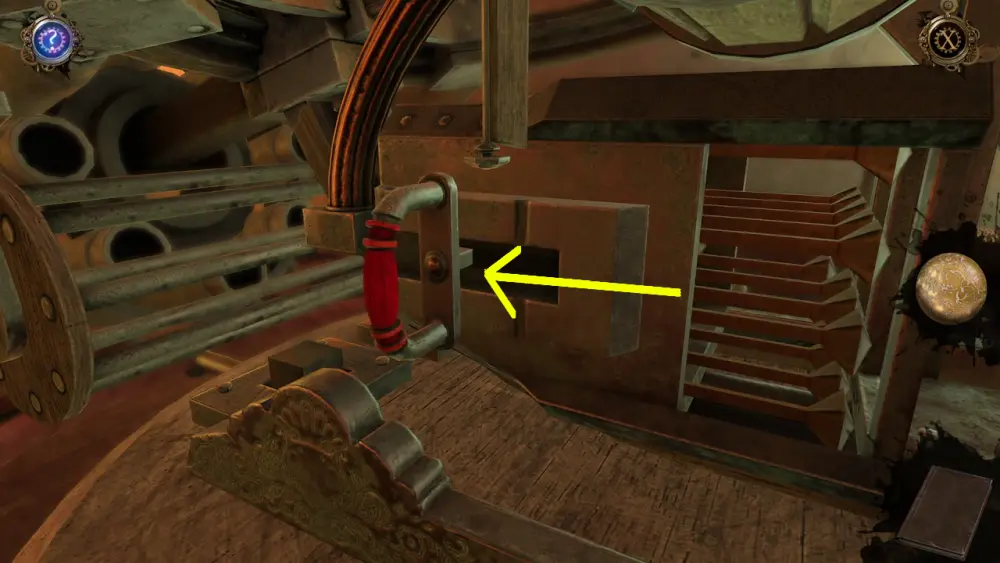
Next, turn your attention to the locked chest. If you approach its right side, you’ll see that there’s a wheel you can turn that will remove the four locks. However, one lock is still latched onto the chest, which means you need to find a way to connect this lock with the wheel’s mechanism.
If you closely observe the locks, you’ll see that the one lock you can’t move is missing some kind of bolt or screw. As the screw isn’t in this room, you might have better luck upstairs.
With the Oil Lamp on hand, the metal device mounted on a small stool next to the map makes more sense. Why is that? Because if you look closely, the red string winding around the map is actually a long wick. Thus, place the Oil Lamp on the open space of the device.
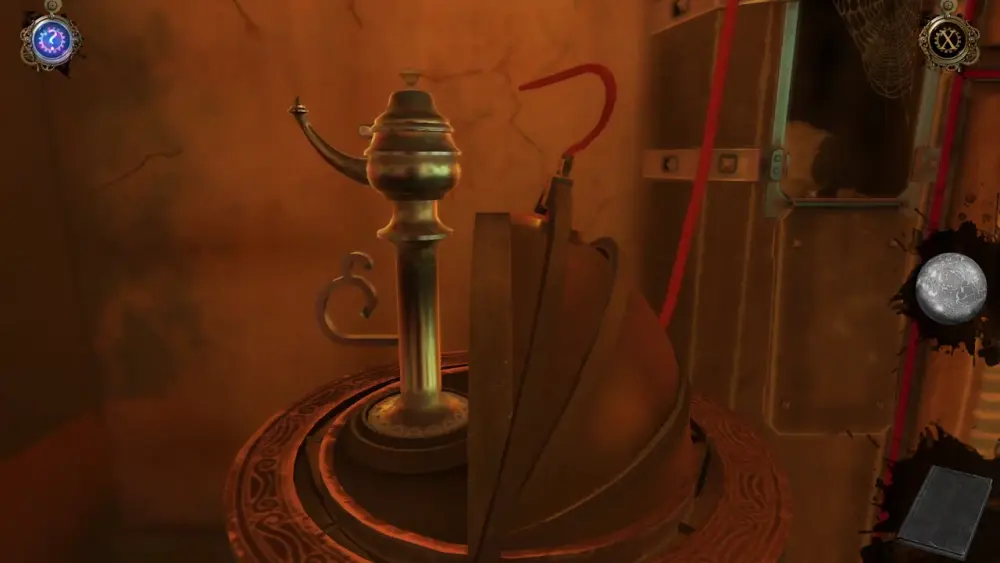
Lift the cap of the Oil Lamp, then flick the flint thrice, which will ignite a small flame.
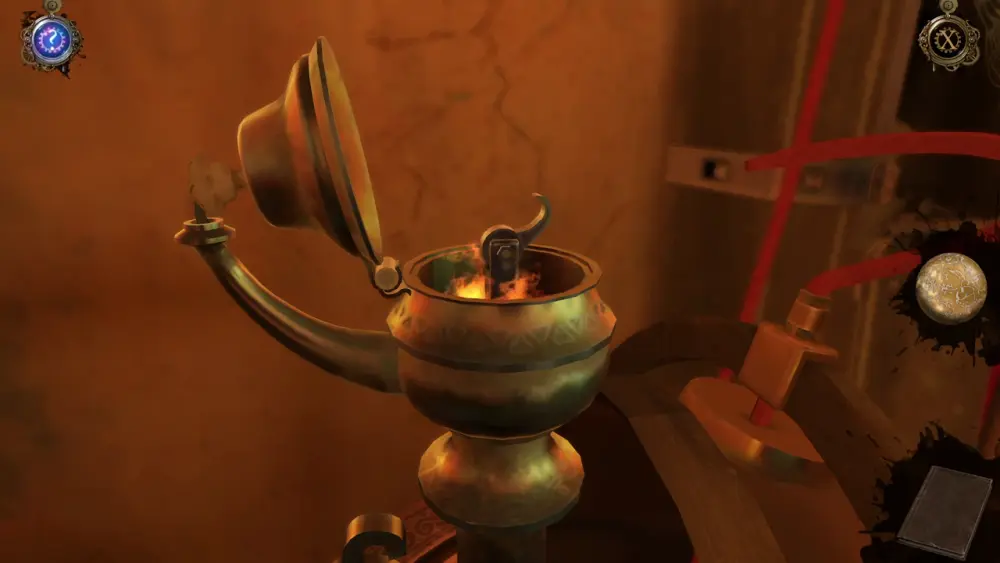
Don’t forget to put the cap back on so the flame can travel to the nozzle of the Oil Lamp. Once the nozzle is ablaze, turn it to face the end of the red string.
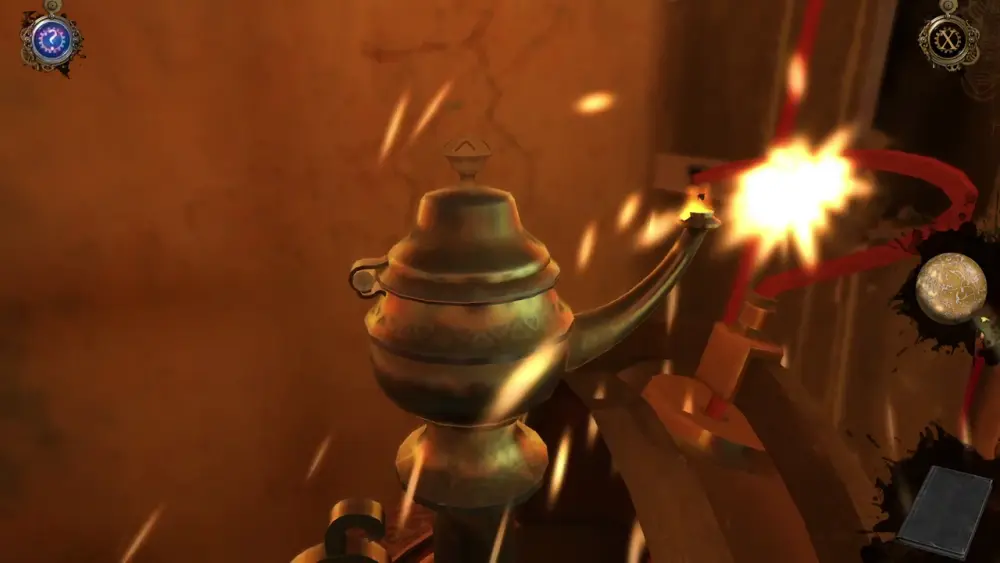
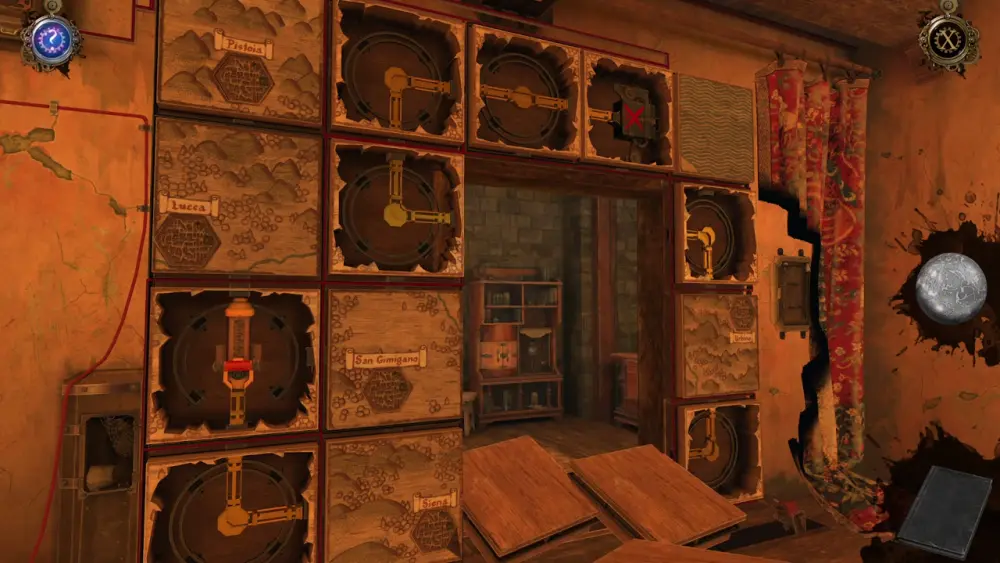
Doing this will cause the spark to travel through the red string, which is connected to the map, effectively burning it. As the flames consume the map, large Xs will emerge and once the smoke clears, you’ll also notice that there is some kind of rectangular object hidden behind the partially burnt curtain.
If the locations of these X marks look familiar, then you’re right! These mark the eight northern Italian provinces you’ve just been acquainted with in the previous map puzzle. If you access the journal icon under the Oculus Perpetua, you’ll see that you have a hand-drawn copy of this marked map.
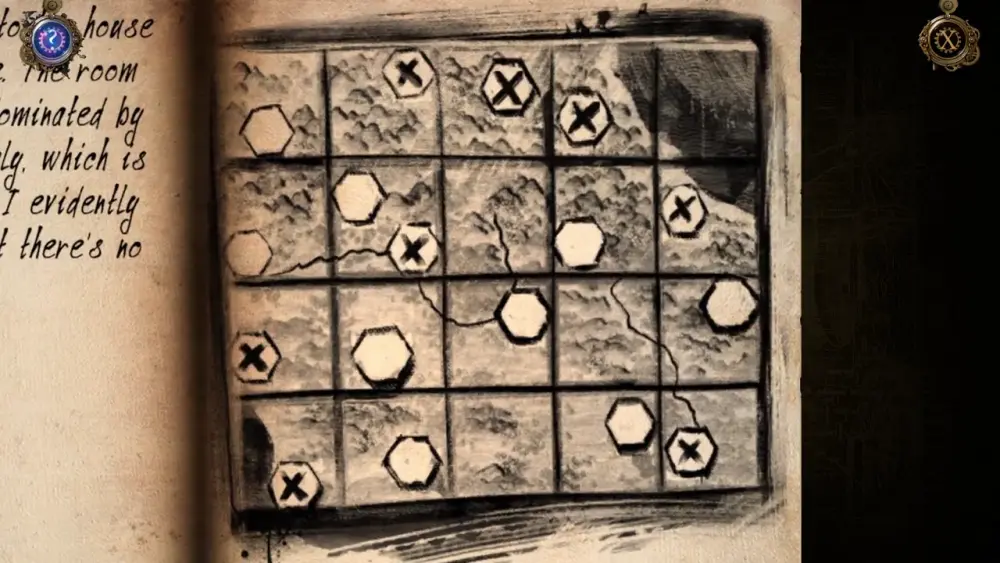
This copy will come in handy later. For now, approach the partially burnt curtain as, here, you’ll be able to obtain the item Tool with Rotary Handle.
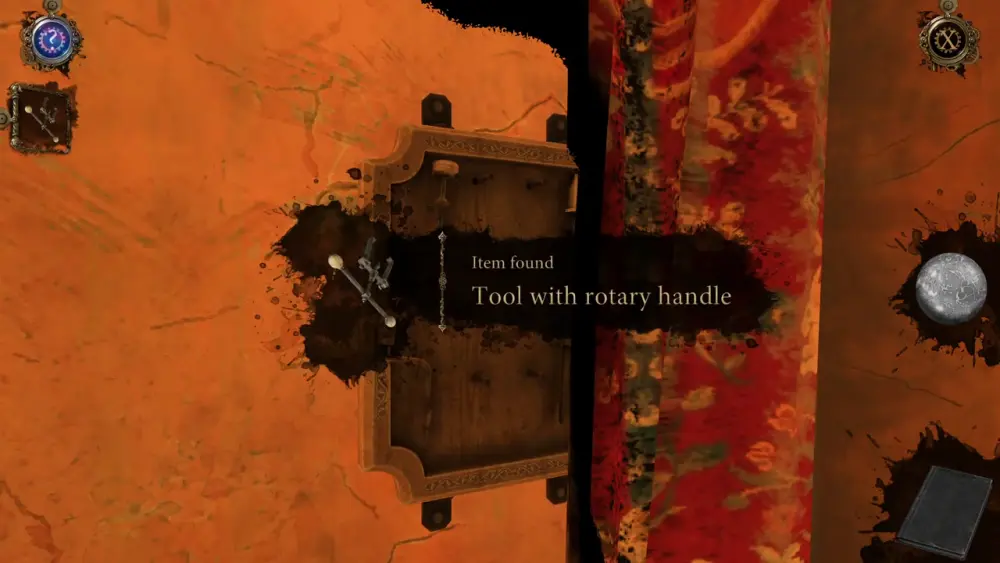
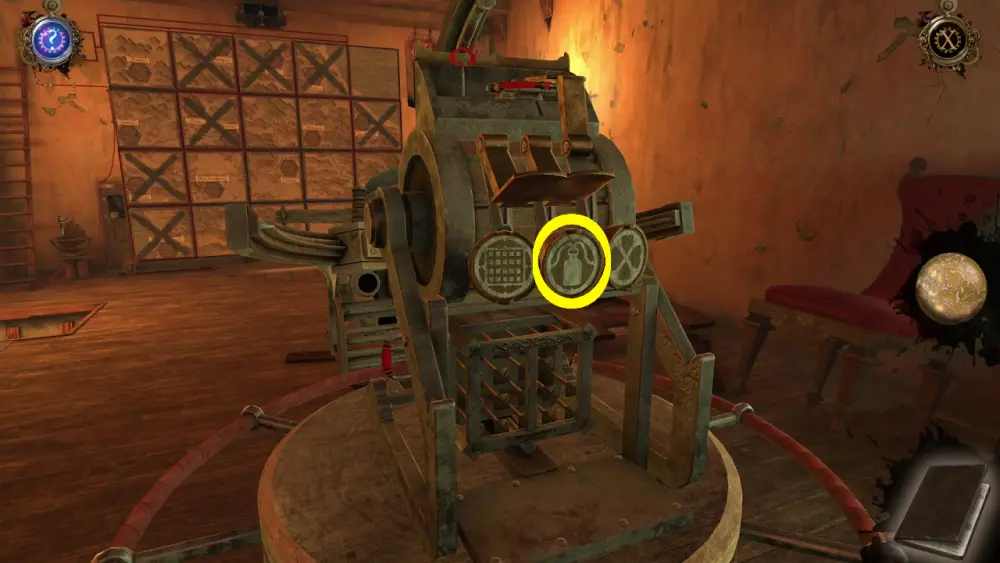
If you’ve done your cursory observation of the strange-looking machine, you’ll remember that the Tool with Rotary Handle might just fit something in that device—and you’d be right.
Approach the right side of the machine and place the Tool with Rotary Handle on the metal shaft that looks like a figure eight with a bolt. Rotate the tool to loosen the bolt until it falls off.
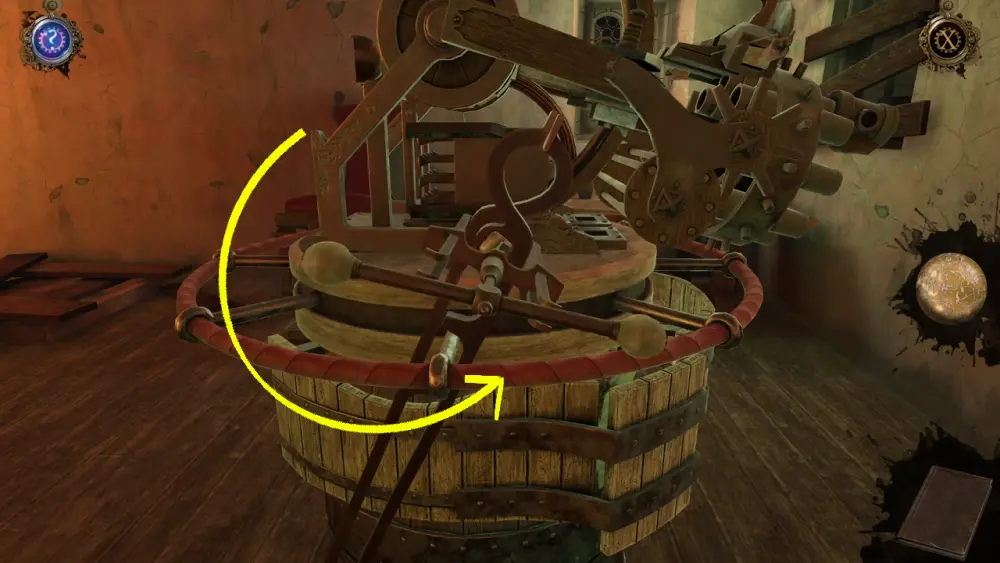
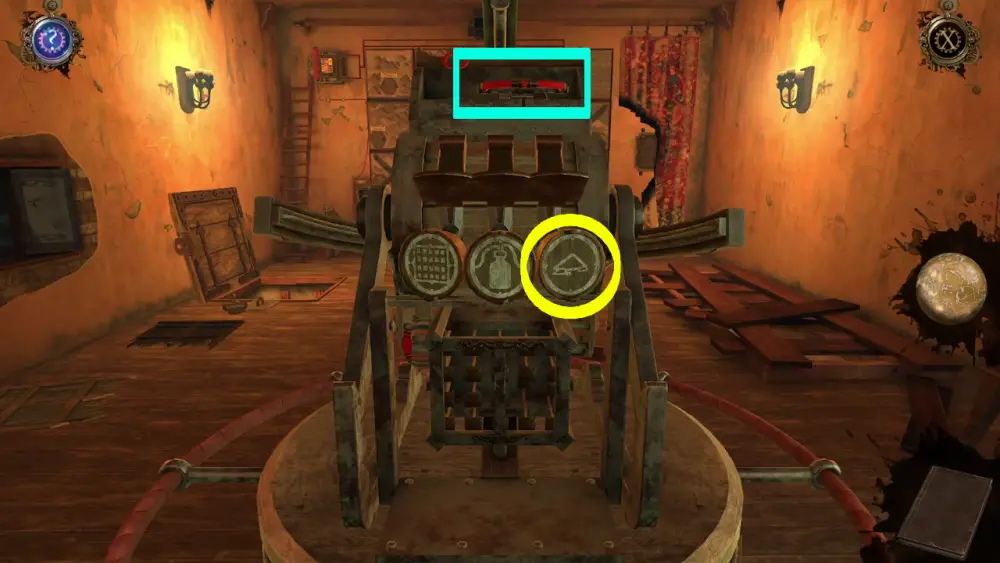
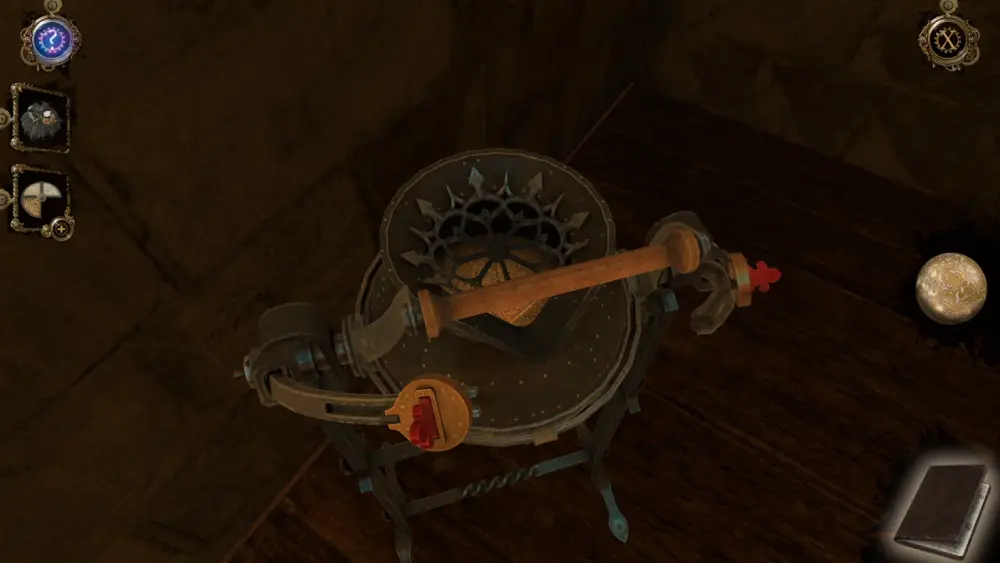
Once the bolt has unlocked the metal shaft that looks like a figure eight, you’re now free to rotate the machine. Turn it 180 degrees and you will find yourself facing what apparently looks like a mini cannon.
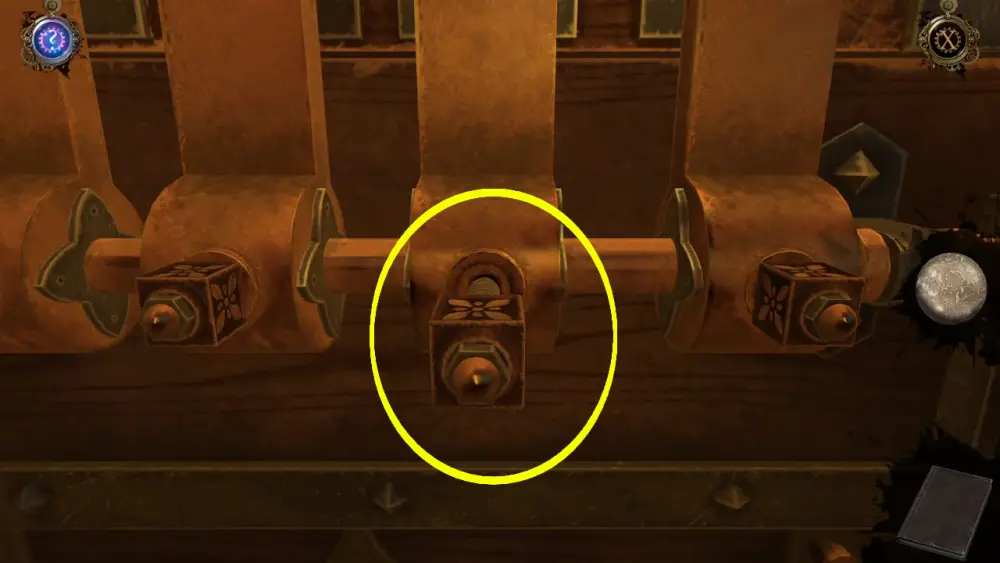
Now that the cannon has been turned, you can access its rear part, which you’ll see has a red button. Pushing this red button will reveal a slot for a plate or card. On top of this empty slot is a Bead Screw.
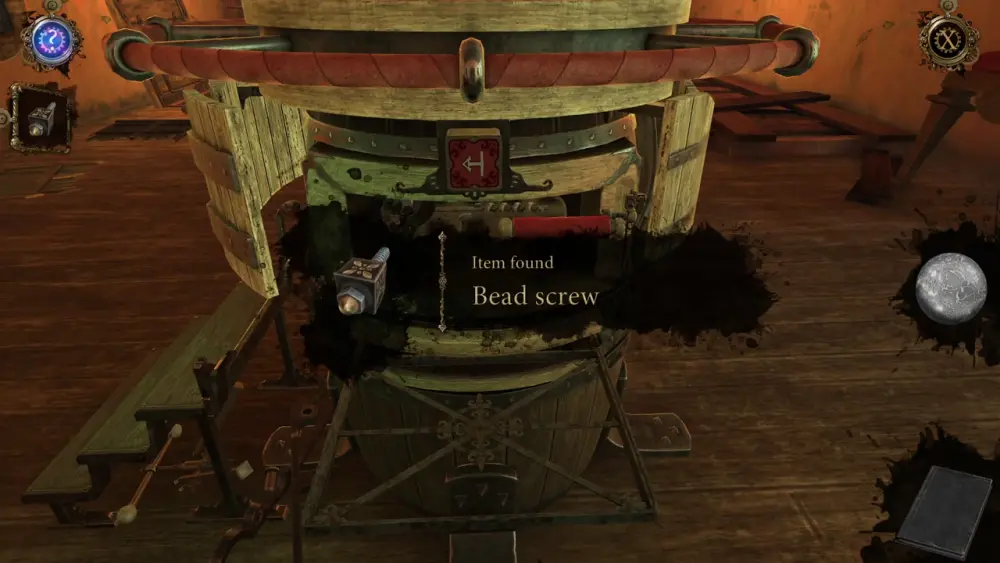
With this item, return to the room downstairs and approach the locked chest. You now have the missing screw that will connect that one lock to the wheel’s mechanism. Place the Bead Screw on the lock and turn it until it’s properly in place.
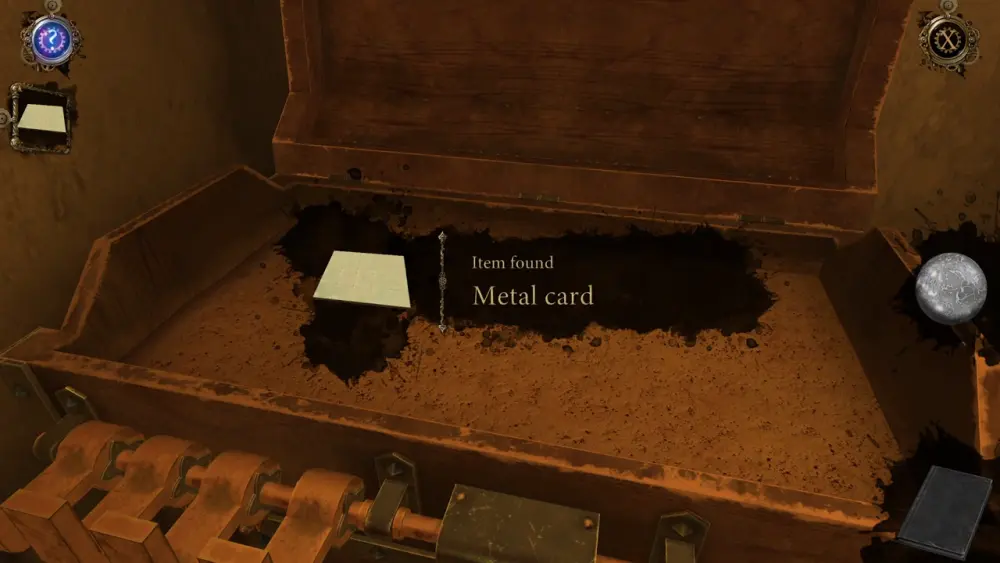
And voila! You may now open the chest by turning the wheel on its right side. Strangely enough, when you open the large chest, there’s only one item inside: a Metal Card.
If you recall, the mini cannon upstairs has a slot for such a card. But don’t run upstairs just yet—you’re going to need the help of the stamping machine to complete this card.
That said, approach the stamping machine near the chest and place the Metal Card on the empty work area. Then, pull down the cover on the left side of the work area.
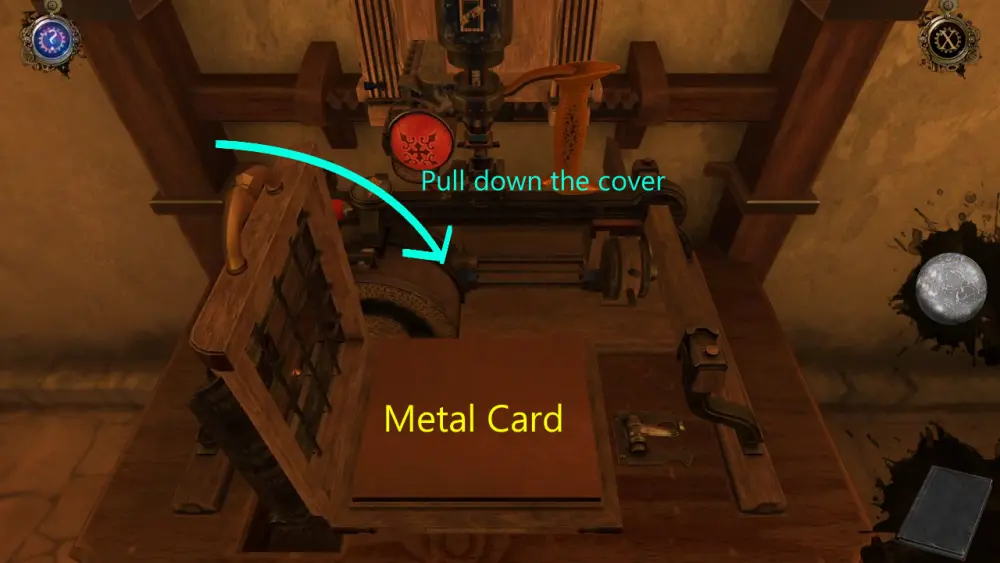
The cover will serve as grid lines over the metal card. If you think this is familiar, then you’re right again! It looks just like the large map in the room upstairs.
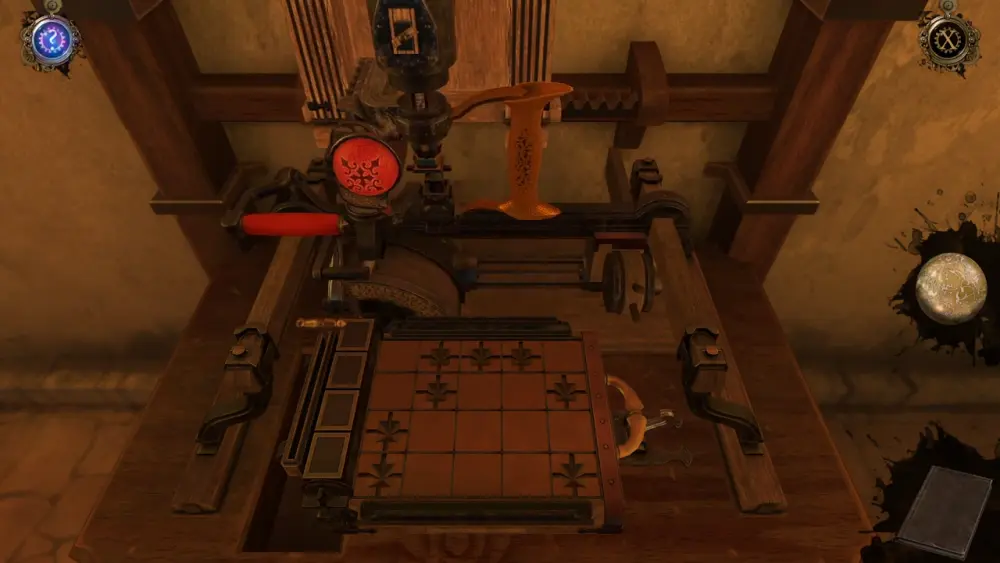
Pull the red lever on the left to draw the stamping machine closer to the work area and use the brown handle on the right to control where the stamp should go. If you make a mistake, you can clear the whole card by pulling down the small lever right next to the four rectangles on the left side.
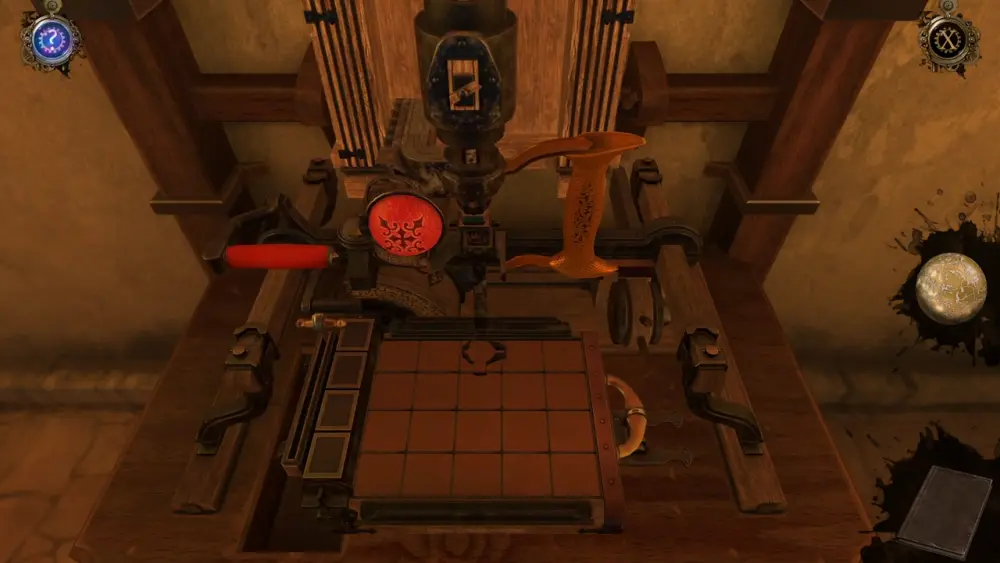
As you might have guessed, it’s time to refer back to the hand-drawn copy of the map so you can put the stamps on the right spots on the grid. Open your journal and use this to mark the Metal Card using the stamping machine. Unlike the first map puzzle, there’s no particular order in which the marks ought to be stamped. Just as long as they’re in the correct location, this should be fine. Here’s where the stamps should go:
Pull the red lever to retract the machine and lift the cover to remove the grid lines so you can take back the stamped Metal Card. Go back upstairs and approach the mini cannon. Place the Metal Card on the empty slot you’ve just opened a while ago.

Press the red button to retract the slot back into the machine, then pull the red lever on the right. A mechanism inside the mini cannon will start moving. This will cause one of three circles at the top to turn, revealing a symbol that looks like a grid. The flat metal latch on top of it will also go down.
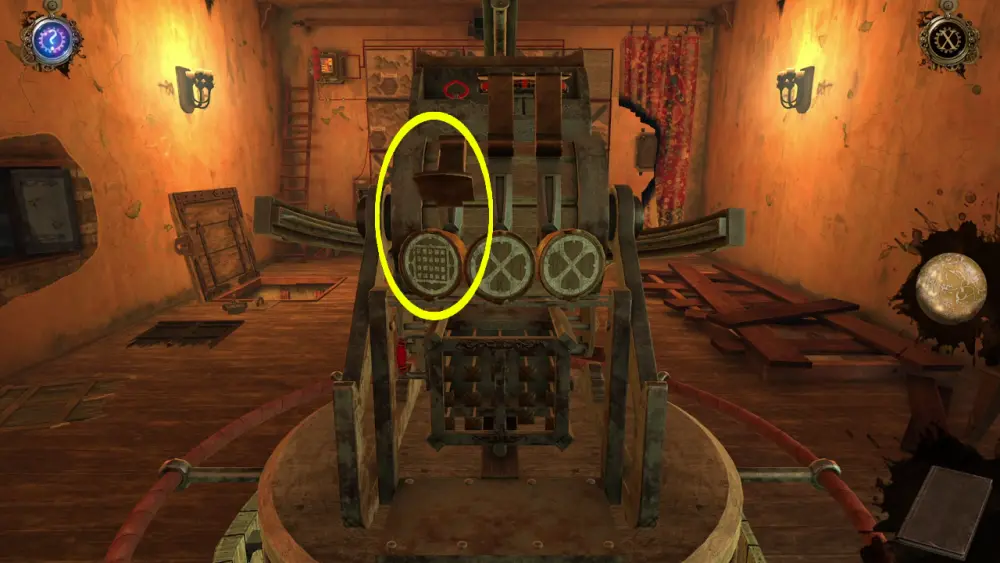
It’s not very obvious at first, but the metal latch, when it goes down, reveals a small, red hook at the top. Zoom into this spot and pull the red hook up.
This will trigger more movement in the machine. You’ll see that a small, flat wooden piece will be lifted from behind a red lever to the left side of the mini cannon, thus allowing you to move it. You’ll also see that some kind of ring made of wooden panels at the bottom of the mini cannon falls down.
After the brief cutscene, push the red lever located at the left side of the mini cannon.
This will cause the middle circle to turn, revealing a symbol that looks like a flask with two wires coming out of the opening.
This should give you an idea for your next move: go to the bottom right side of the mini cannon and you’ll find exactly what this symbol is representing: a flask with two red wires attached to its opening. Pay particular attention to the picture in front of the bottle: there’s an upside-down yellow triangle behind the bottle and a red arrow pointing into the opening of the bottle. This indicates that you’re about to fill the bottle. Use the red pump next to it to fill the bottle. As the bottle is being filled, a stick will rise from the top.
This causes the circular slider behind it to change color from yellow to blue. The symbol on the bottle will also change from one that has a blue triangle and a red arrow pointing upward. Beside the bottle, a small circular hatch will open, revealing a tiny lever. Pull this small lever down and you’ll see bullet-shaped objects descend into some sort of empty magazine on the left side.
Use the pump again to retract the stick on top of the bottle, thus changing the slider’s color from blue back to yellow. The symbol on the bottle will also return to how you’ve found it, which has the yellow upside-down triangle and an arrow that’s facing down.
This action will also trigger the bullet-shaped objects to disappear into the mini cannon. A counter will tell you how many of these bullets you have: eight in total.
Once all the bullets have been counted and fed into the machine, the final circle will turn, revealing the symbol of a mountain. With the second and third latch unbolted, you’ll see a red lever at the top, presumably to work the mini cannon.
Zoom into the red lever and pull it. This will cause the cannon to aim at the map and automatically fire at the areas marked with an X, which has also been programmed on the stamped Metal Card you fed into the slot of the machine.
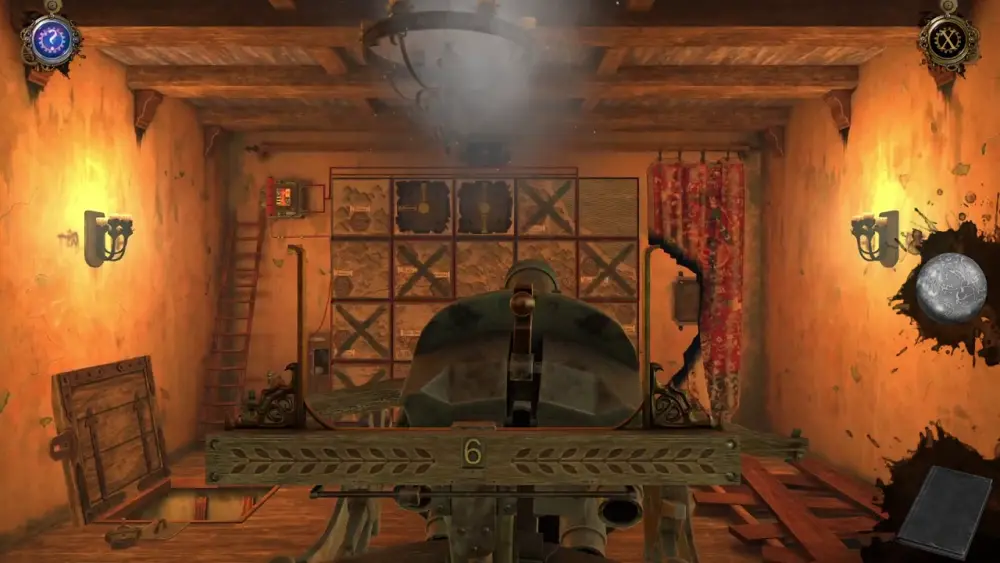
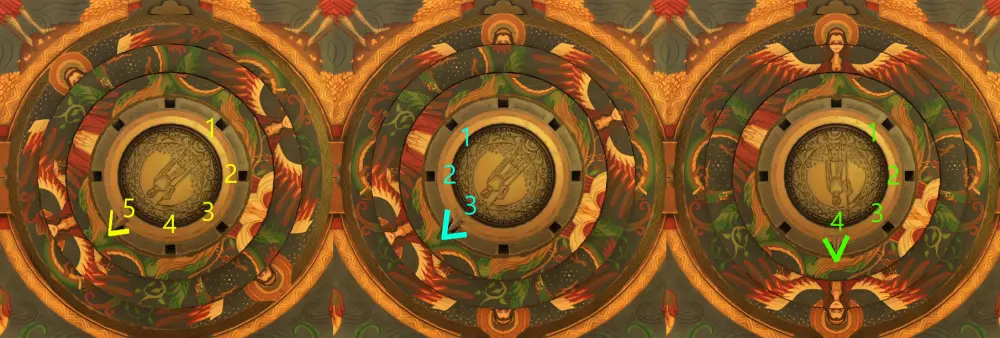
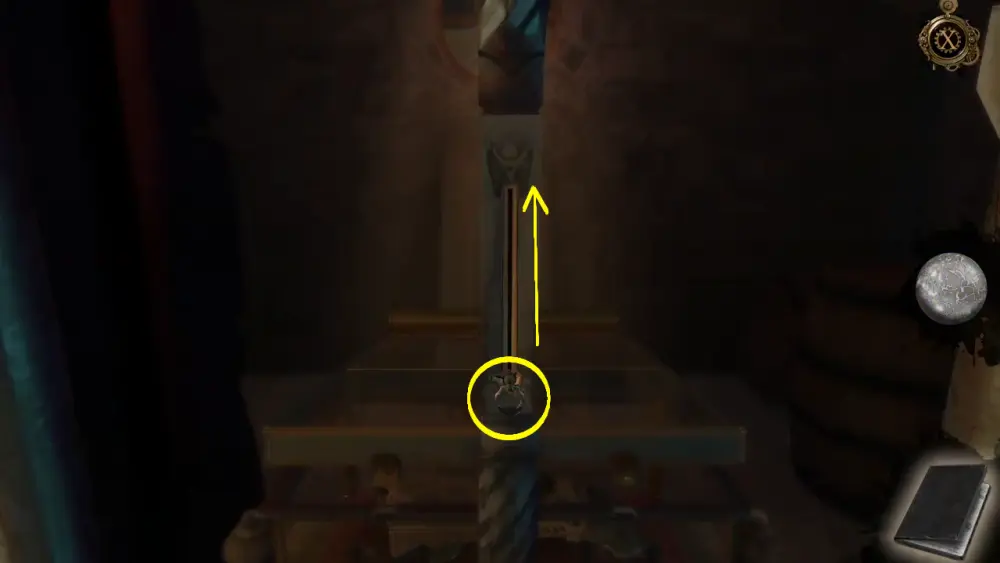
When the cannon is done firing at all the marked spots, it will lock itself once more. A closer inspection of the map will reveal that each marked spot has rotating pipes that you need to connect. There are two important things you must pay attention to when observing the map: one is the red X on the upper right side and the other is the red lever on the lower left side.
Because this is a “connect the pipes” puzzle, it’s important to recognize that the red lever is the beginning of the puzzle while the red X is the end. If you pull the red lever, you’ll see that it shoots out a small circular projectile and is reloaded repeatedly until you solve the puzzle.
The challenge here is that the rest of the other pipes are hidden behind the map. Thus, you can only assume the positions of the other pipes by way of inference. Assuming that all other hidden pipes are linear, the solution to this puzzle is the one pictured below:
Once all the pipes have been arranged this way, pull the lever to release the projectile. With the projectile hitting the red X mark, other grids of the map will crumble, revealing a secret lab.
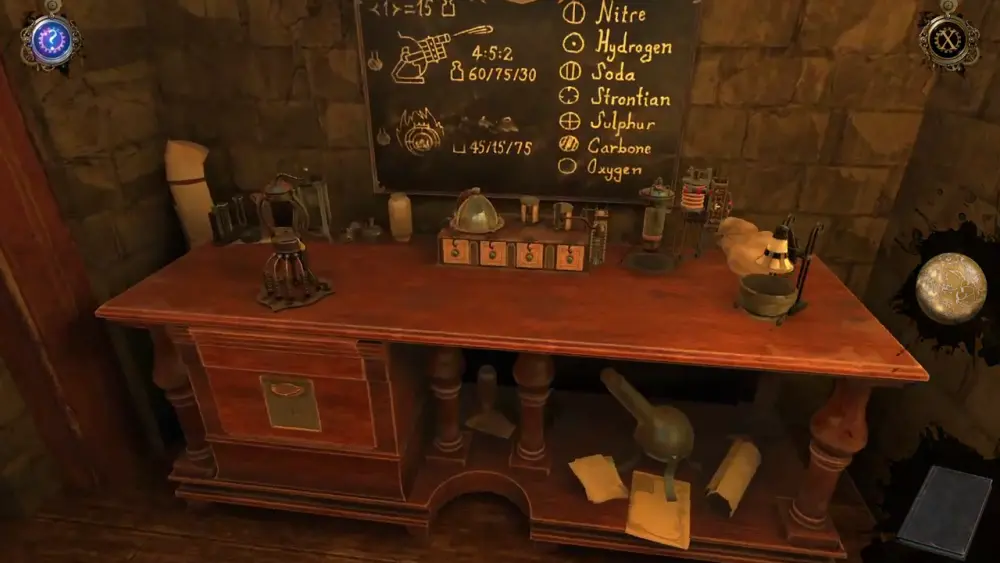
There are actually many things of note in this lab. Let’s try to first deconstruct the scene you’ll immediately come across: in the image below, you can see the boiler, or a metal circle that looks like a diver’s helmet; a gilded square on the wall with a hole in the middle, possibly for a mount or a key; a weighing scale on the low table; a shelf with books that has a small cabinet and various items; and a winding staircase to the left, which can be easily missed.
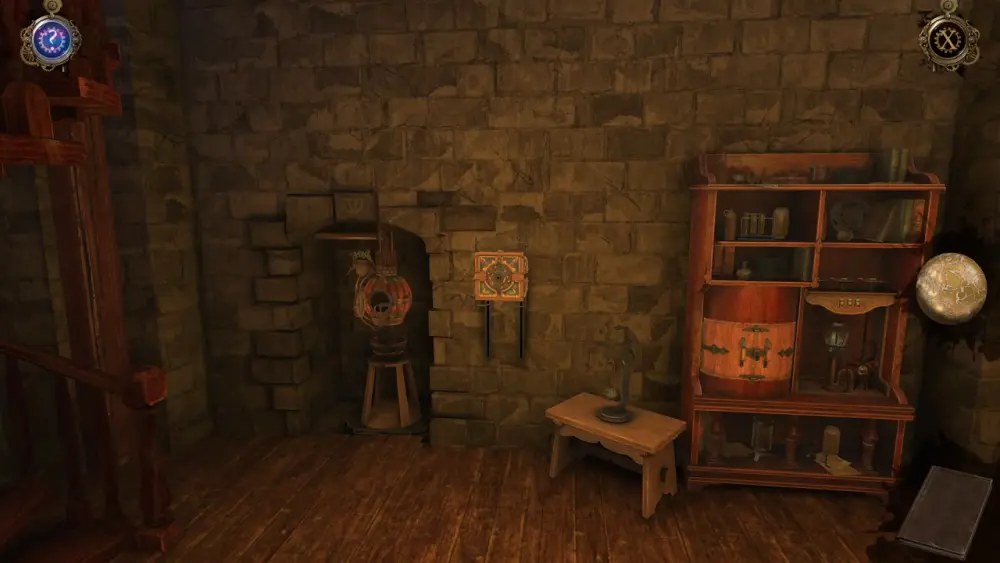
If you pan a little to the right, you’ll see the rest of the lab, which is basically just an alchemy table. The contents of the table are also rather interesting as you can zoom into almost every item, indicating that they can be accessed at a later time. The wooden box with the four tiny drawers can be zoomed into twice, with the much closer inspection revealing Roman numerals scratched on the surface of the box, as you will see later. Additionally, pay particular attention to the items that are marked with red.
For now, this cursory observation of the alchemy table should suffice.
There’s one more corner of the lab that’s left unexplored, and that’s beneath the winding staircase. Look behind you and you’ll see this curious object in the corner.
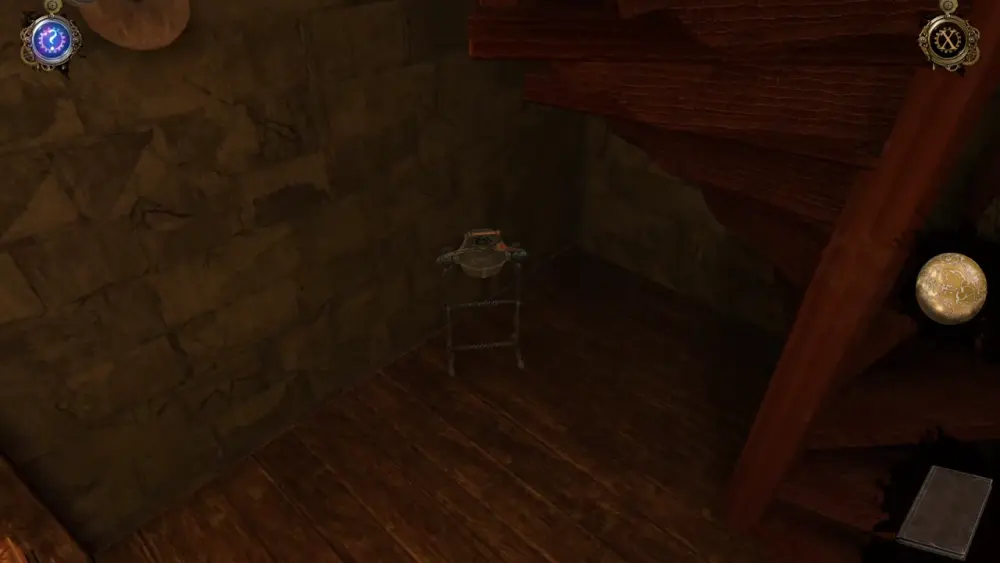
If you approach it, you’ll discover that you can hold the handle to move the pot back and forth, and that it’s missing some kind of circular lock with a red protrusion.
Since it doesn’t look like you can use anything in the lab for now, go up the winding staircase to explore some more. Precisely because this is Borgia’s hideout, you’re greeted upstairs by the spinning blade of a scythe, which you, fortunately, narrowly escape.
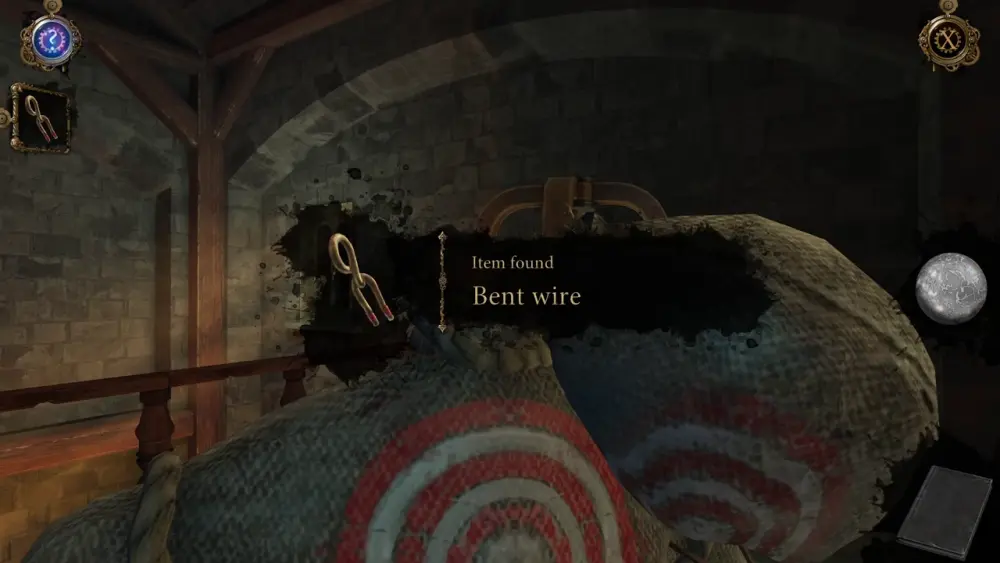
Here, Borgia’s intentions become clear—that he doesn’t take kindly to intruders, and the doll with the nearly severed head could have been your fate. Speaking of this doll, approach it and you’ll find a Bent Wire hanging from its almost decapitated head.
Seeing as you’re out of danger for now, go to the end of the room and you’ll find a glass case on top of a table with a strange-looking mechanism at the bottom. If you look closely at the case, you’ll see that it contains the glove you’ve been asked by Leonardo to retrieve.
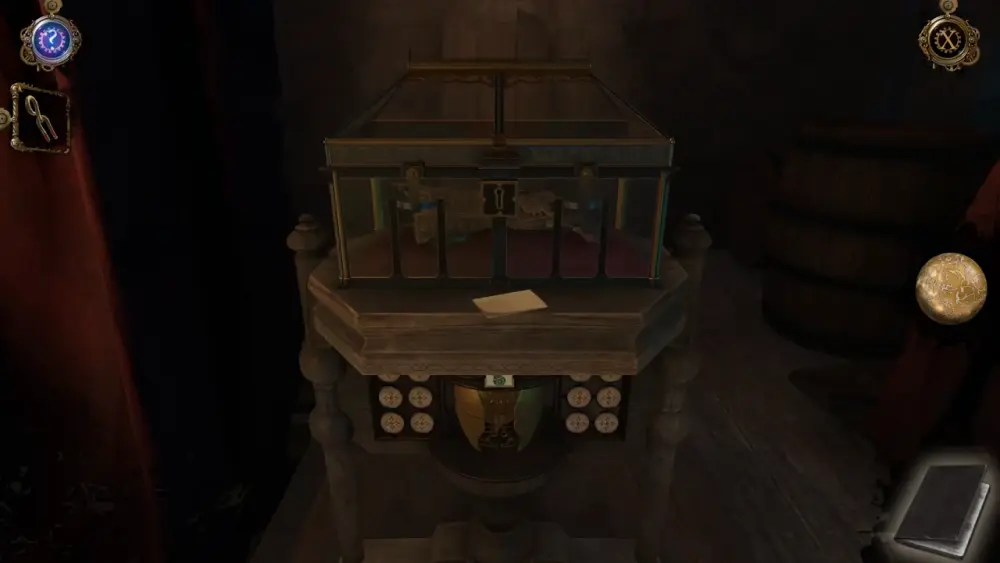
In front of the case is also a letter, the contents of which are pictured below. It looks like a journal entry written by Césare Borgia.
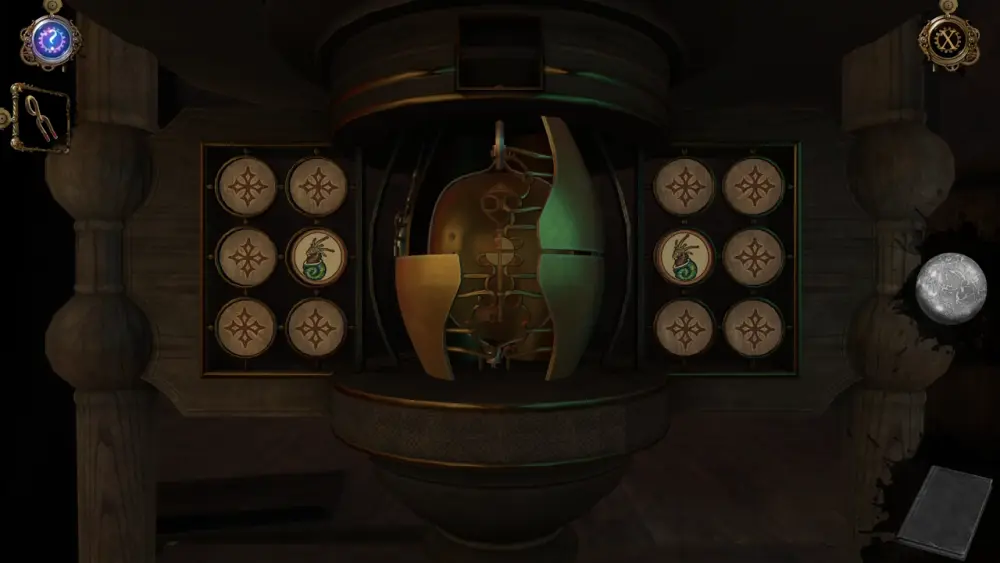
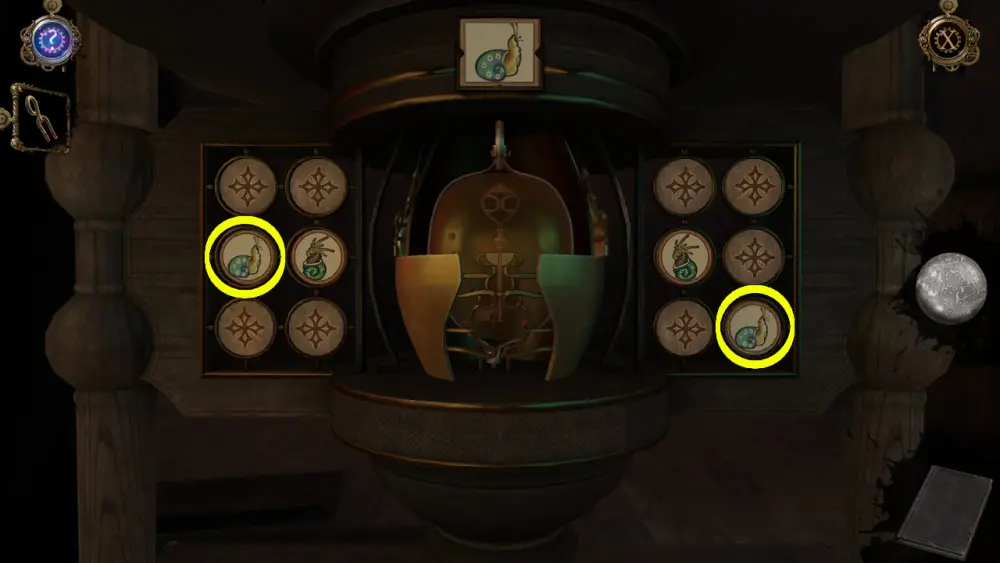
As expected, the glass case containing the glove is locked tight. Check beneath the table to see the mechanism under it. Here, you’ll see 12 circular chips (six on each side), a picture at the top of the mechanism, and at the center is a locked compartment. If you press on any chip, it will display a picture. This puzzle plays like a memory game wherein you’re supposed to match a pair of images by opening two chips.
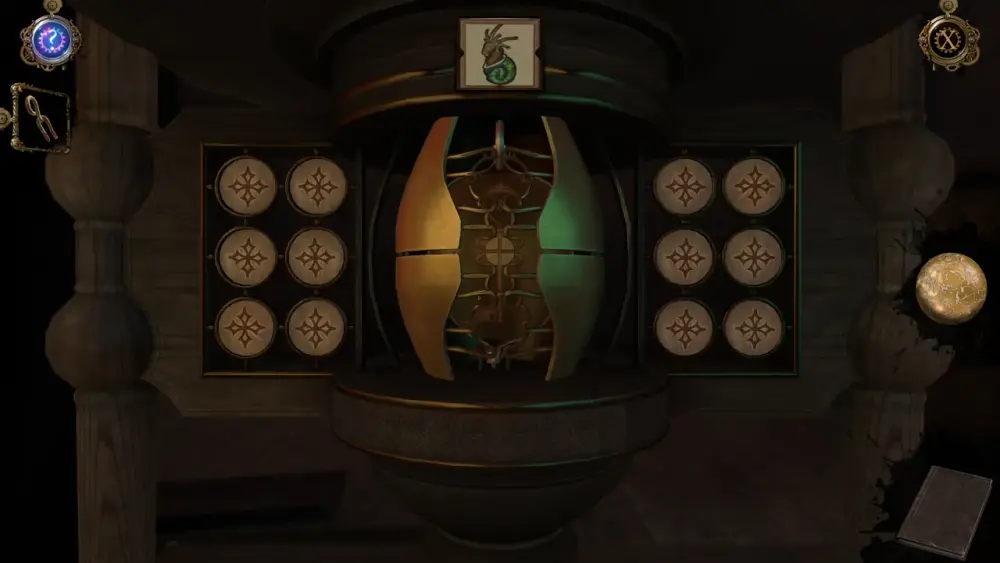
If you happen to press two chips that don’t have the same image, both chips will reset. You need to match four pairs of images as there are four segments acting as locks for the metal compartment in the middle.
As the first image displayed on top looks like a snail, opening chips that will display the same image will unlock the first segment. Here’s where these images are found:

Once the right images have been paired, the image at the top will change and the first segment locking the center will retract, as seen in the photo below:
Here’s the second pair:
Here’s the third pair:
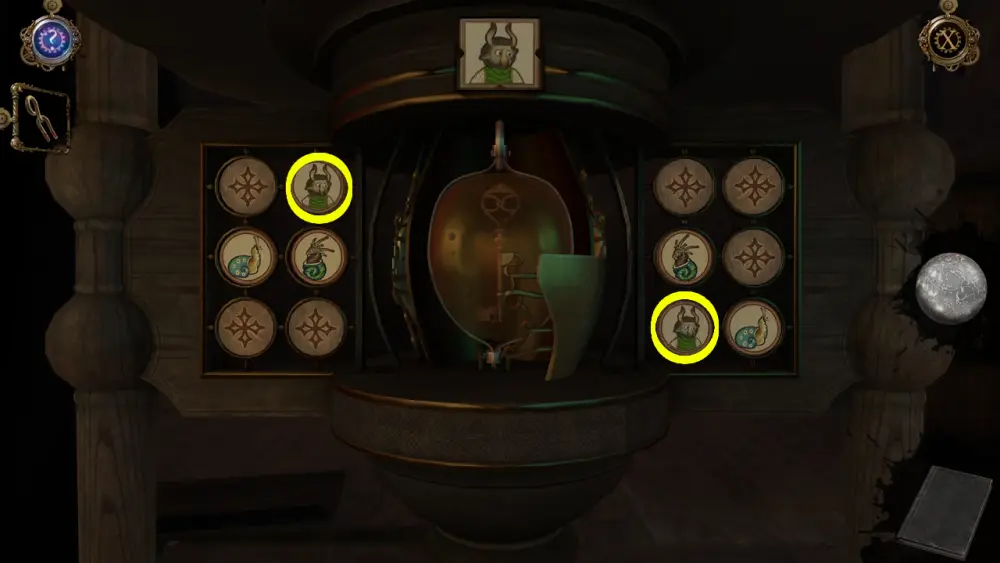
And here’s the fourth and last pair:

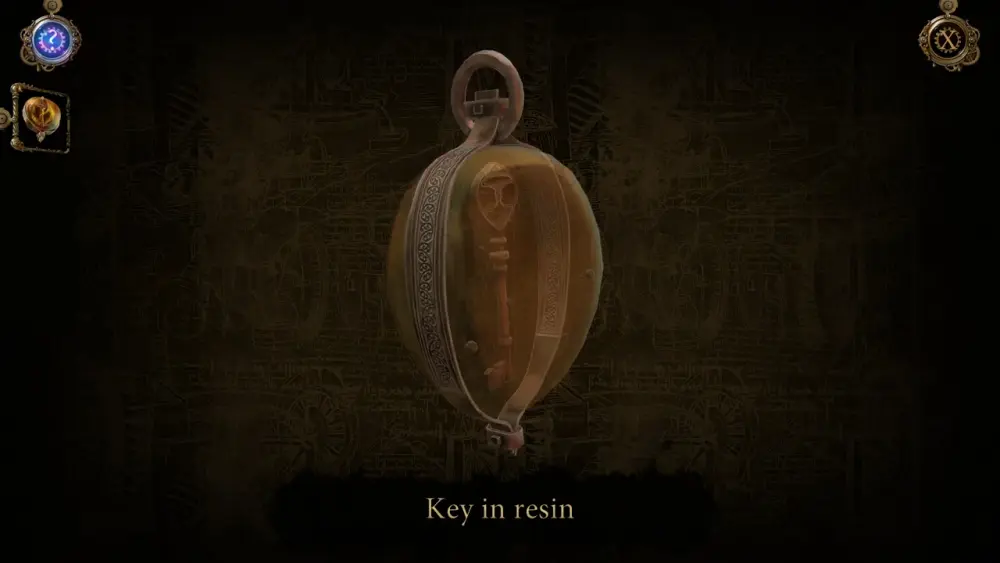
As the compartment is now fully unlocked, you can now clearly observe the key it was hiding. However, the key is encased in resin, which means you can’t use it yet. You need to be able to remove the resin first to access the key.
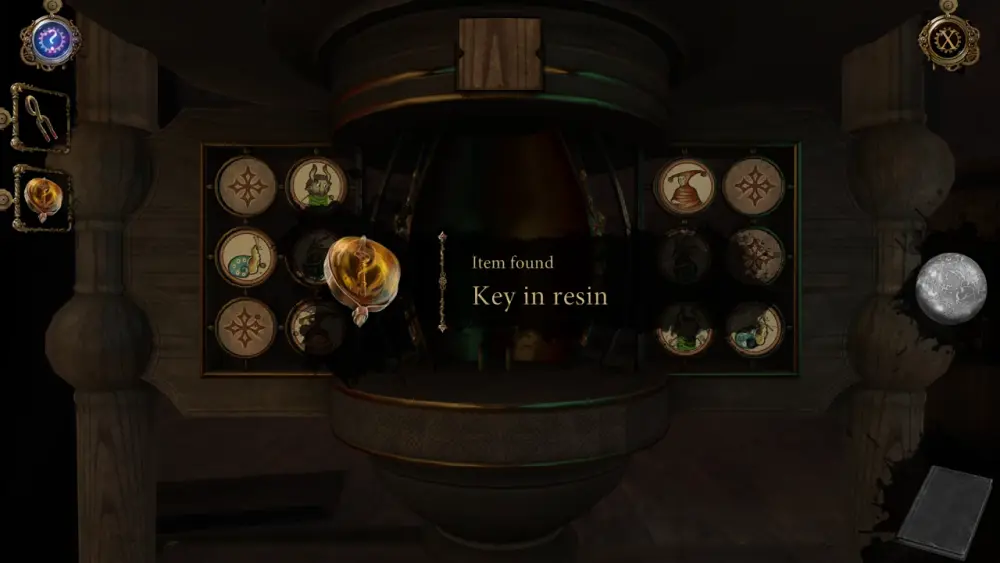
If you check the item in your inventory, you’ll have a better idea of what exactly this key looks like.
Fortunately, Borgia’s lab downstairs is still fully functional so you can use the tools in it to take the key out of the resin.
Upon returning downstairs, first approach the shelf near the desk. Pay particular attention to the spot that has a cylindrical cabinet. Insert the bent wire on the two holes then pull it all the way down to unlock the cabinet doors.
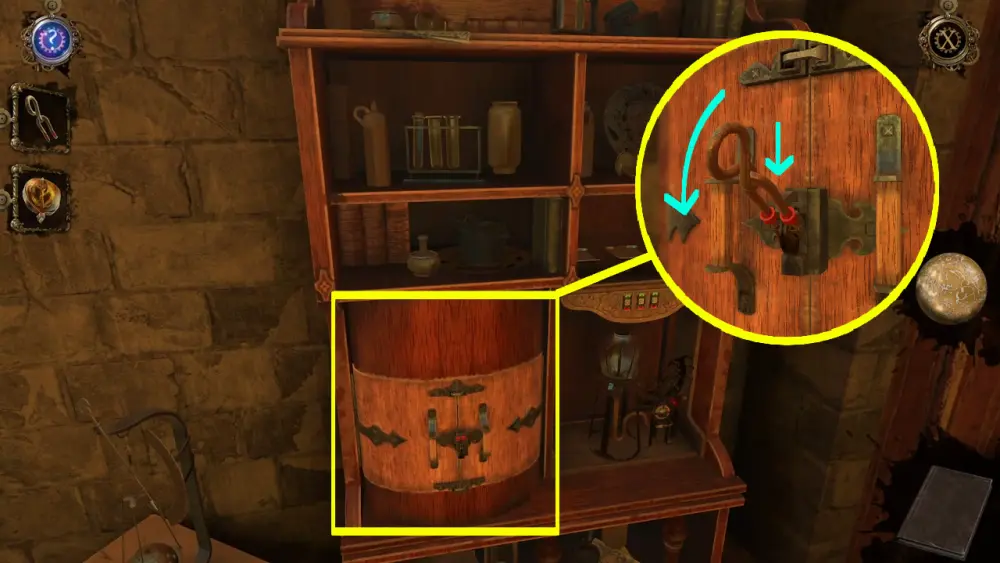
Open each door and you’ll find several items hidden inside.
You can collect two of these items. One is a handful of Impure Charcoal Powder.

The other is a small Switch.
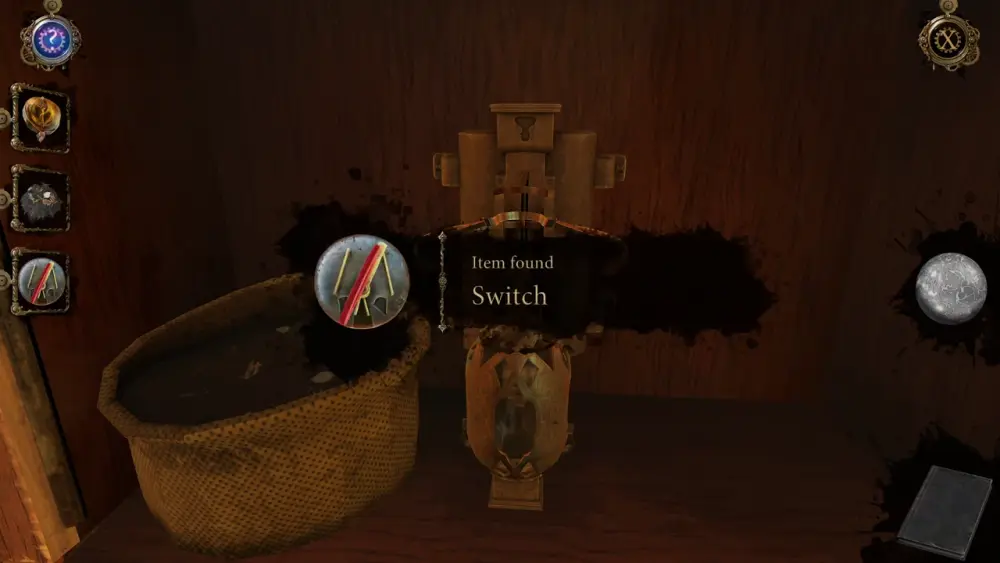
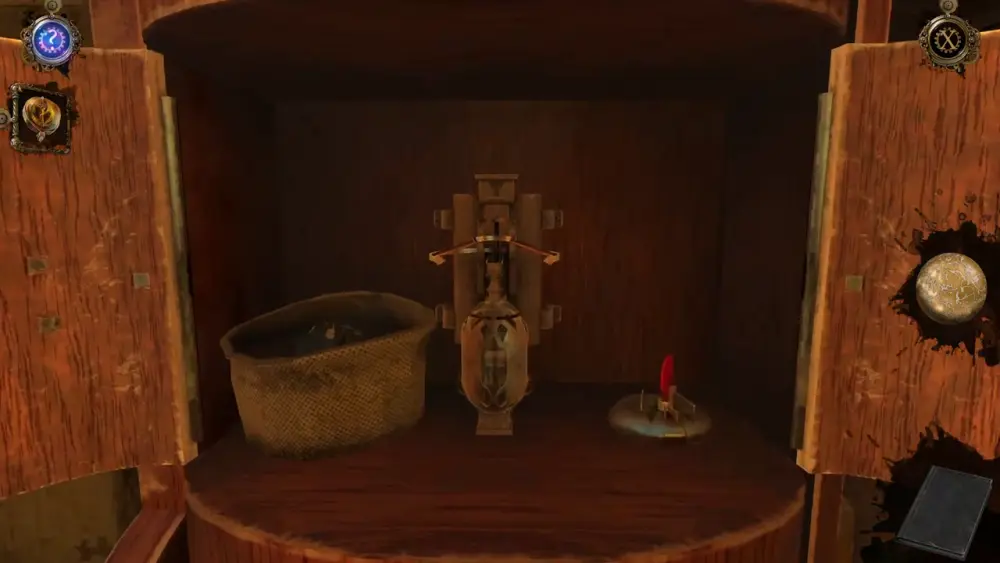
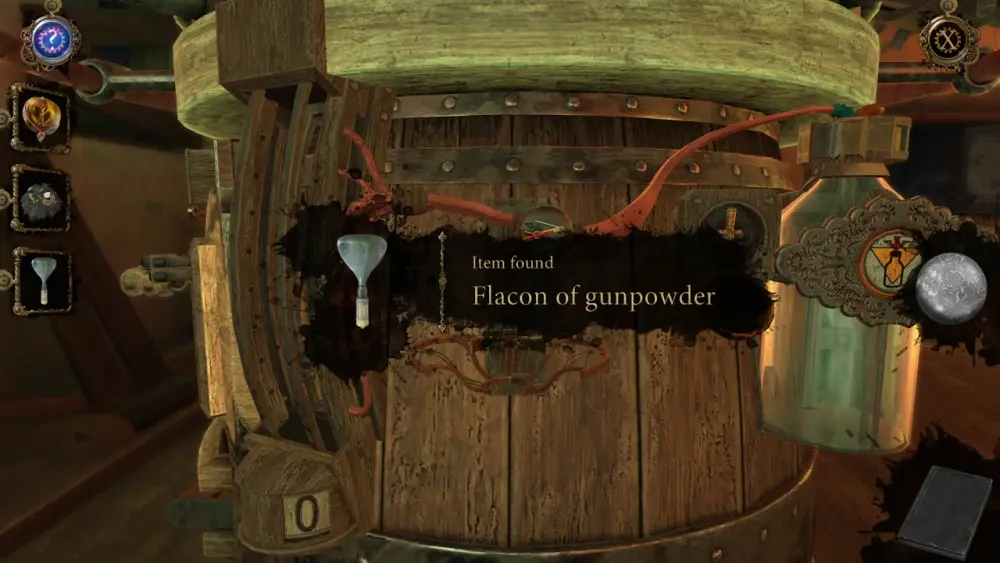
You can try to drag any of these two items to fit tools in the lab but they won’t. Thus, go back to the room where the mini cannon is. Zoom into the left side (if you’re facing the front of the cannon) and place the switch on the metal circle resting in between the red wires. Pull the small red bar of the Switch down.
This won’t trigger a reaction so zoom out of the switch first and start working the red air pump to the side. Keep pumping until the triangle changes from yellow to blue, then pump again to retract the stick, changing the triangle back to yellow again. This will unlock the Flacon of Gunpowder, which you can collect.
After obtaining this item, go back to the shelf in the lab and place the Flacon of Gunpowder on the device inside the cabinet.

You’ll hear that the contents are being poured into the oblong-shaped container. Once all the gunpowder has been transferred, you can now collect the item Container with Gunpowder.

After this, the cabinet will close. Next, turn your attention to the alchemy table. There is a device to the left that looks like it has a rotating handle at the top. Place the Container with Gunpowder in the middle of this device. Then, push the slider to the left, locking the container in place. After that, spin the handle, which will cause the container to rotate.
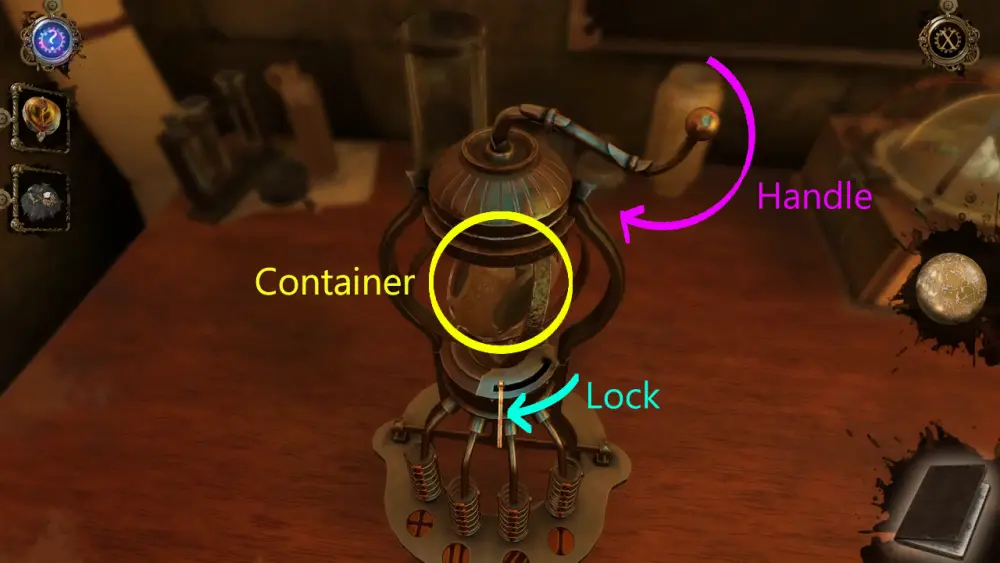
When the container is done rotating, the device will open in the middle, allowing you to collect an Incomplete Filter.

As its name suggests, the filter needs another piece to be used properly. If you look at it from the inventory list, you’ll also see that it has a + symbol on its icon, meaning it must be merged with another piece first.
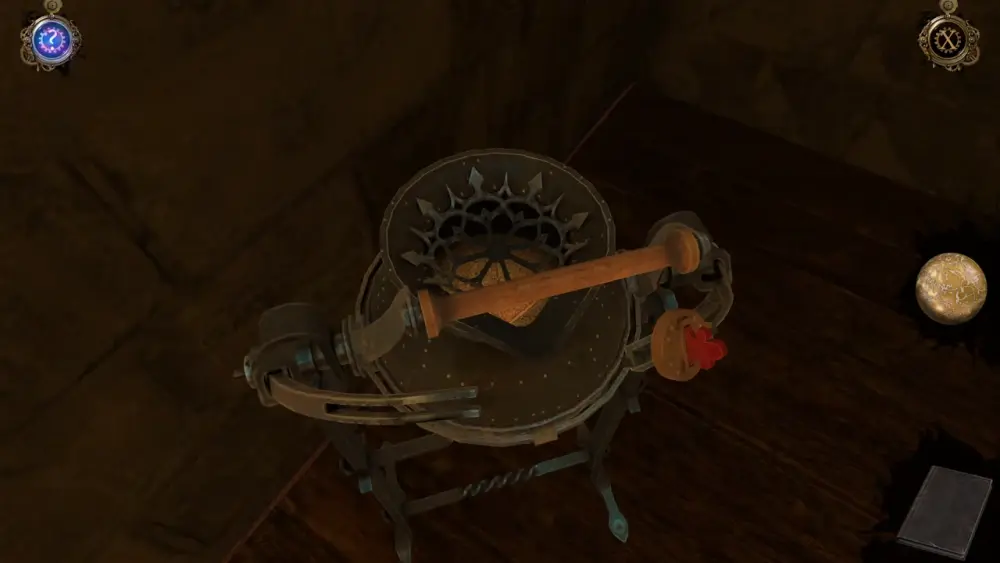
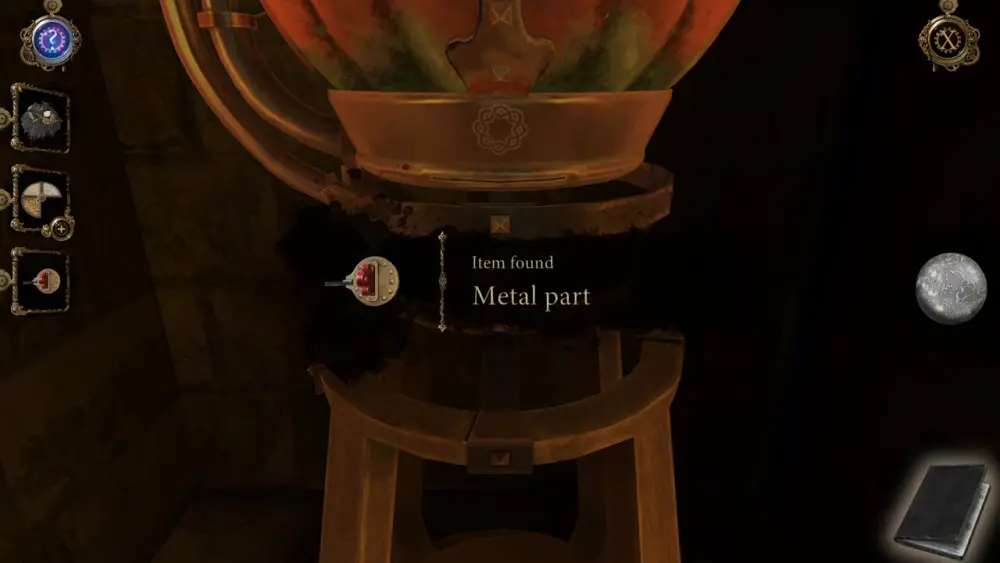
To find this piece, you must first place the Key in Resin item inside the boiler, or the device that looks like a diver’s helmet. Don’t forget to close the lid or else no further action will be triggered.

After a brief cutscene, a small item will fall from the bottom of the boiler. Collect this Metal Part.
If you think this part looks a little familiar, it’s because this is the metal slider missing from that small pot beneath the winding stairs. Go to the pot and place the Metal Part on the sliding lock on the left side. Push both locks to the side to allow the pot to tip over.
Pull the handle down and some sand will pour out of the pot and onto the floor, along with a small, triangular shaped item. You’ve found the part for the Incomplete Filter, which is a Metal Lattice.
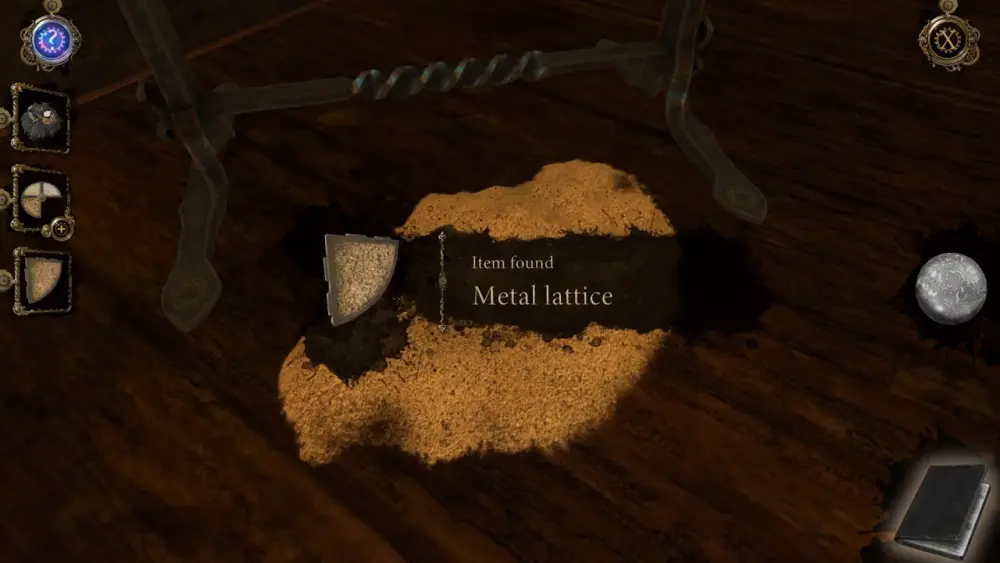
Access your inventory and drag the Metal Lattice to the Incomplete Filter. This will get you the completed Filter.
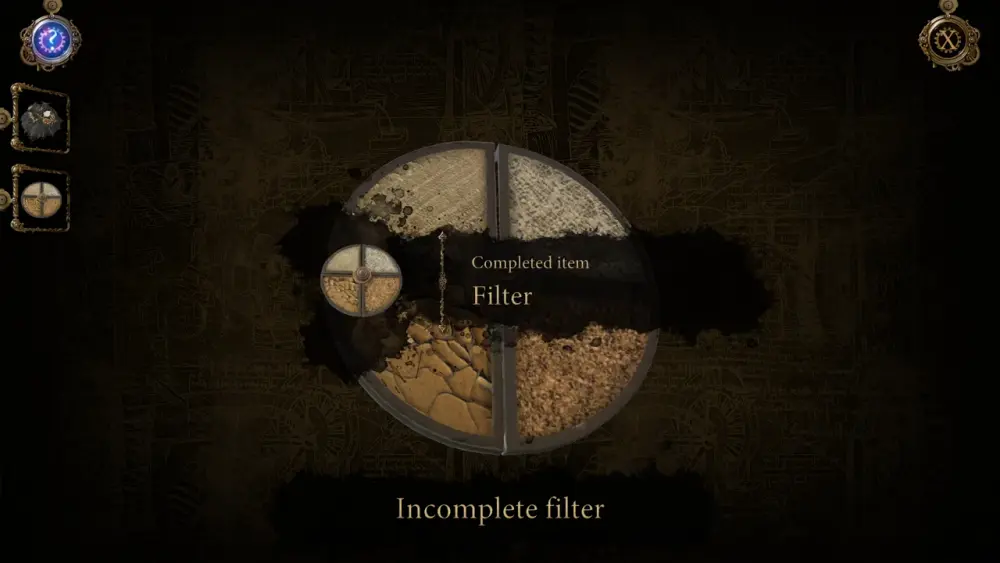
Now that the filter is complete, go back to the device with the rotating handle where you’ve put the Container with Gunpowder. Place the completed Filter on the slot where you’ve collected the incomplete version.
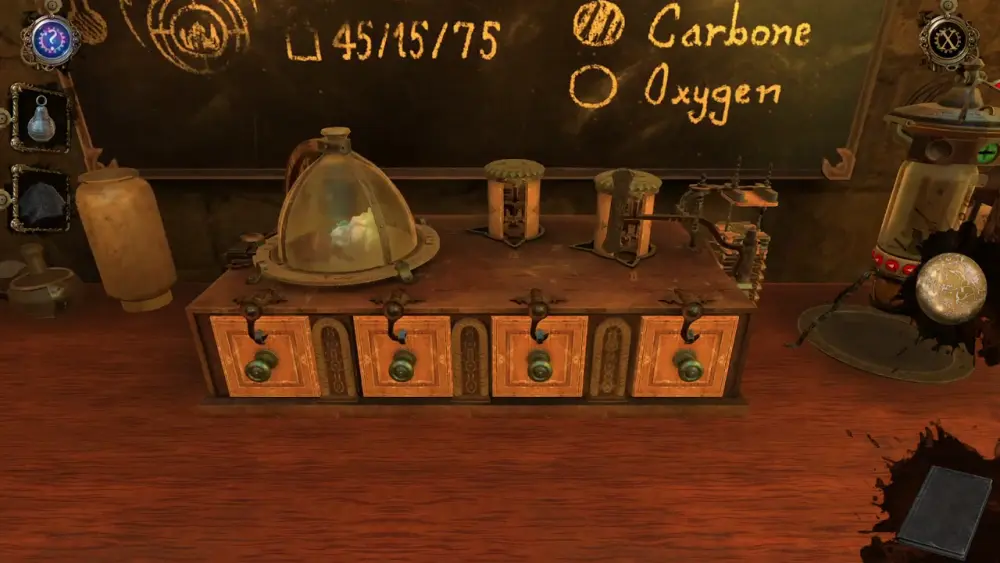
Close the device and start spinning the handle again. This will cause the gunpowder to be sifted into four different containers in four different volumes.
At first glance, this doesn’t make much sense. What are these numbers for? More importantly, what are these symbols representing each container?
The numbers represent a ratio or volume. There’s no exact unit measurement for this so it’s best to just go by these simple numbers. On the other hand, these symbols are something you’ve seen before if you observed the alchemy table. That’s right: these symbols tell you what kind of elements are in each of these containers. Below is an image illustrating the relationship between these elements and what they might mean:
Simply put, these are the elements used to fire the mini cannon, as indicated by the figure drawn on the board beside the measurement ratios.
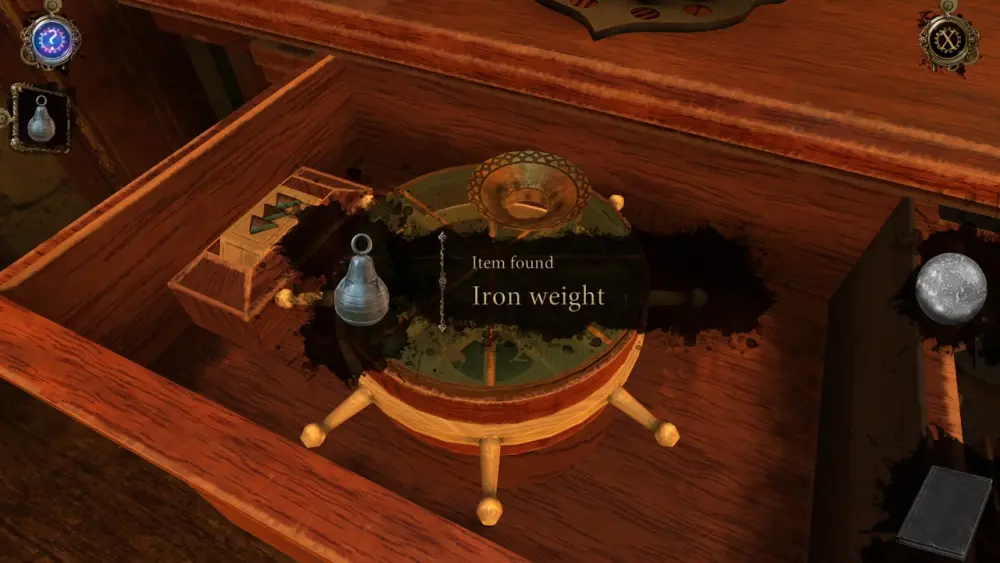
You may have noticed that part of what’s written on the board has been erased. Don’t worry as you’ll have another cheat sheet later. Basically, these three elements are what you need to ultimately work the boiler later. For now, let’s turn our attention to the drawer that has opened after you’ve filtered the gunpowder. Pull the drawer and one of the things you can collect is an Iron Weight.
As you can see, there’s a rotating filter in the middle of the drawer. At this point, what’s left in your inventory should be the Impure Charcoal Powder. Place it on top of the filter and start rotating it counterclockwise until all the gunpowder has been sifted.
You’ll know it’s done when an arrow appears on the wooden switch-like object beside the filter.
Following the arrow as it signifies “down,” approach the bottom of the drawer. Here you’ll find a hatch you can open from which you can collect the filtered Charcoal Powder.
After collecting the powder, the drawer will close by itself.
If you’re wondering what the Iron Weight is for, all you need to do is approach the device with the four small drawers on the table.
If you zoom in on the two cylindrical buttons and rotate them, you’ll see that they bear a symbol resembling the Iron Weight. Additionally, there are also Roman numerals scratched on the surface of the wood. You can rotate the cylindrical buttons so that the arrow pointer will face a particular number, all of which correspond to a specific drawer. For instance, the Roman numeral II corresponds to the second drawer from the left.
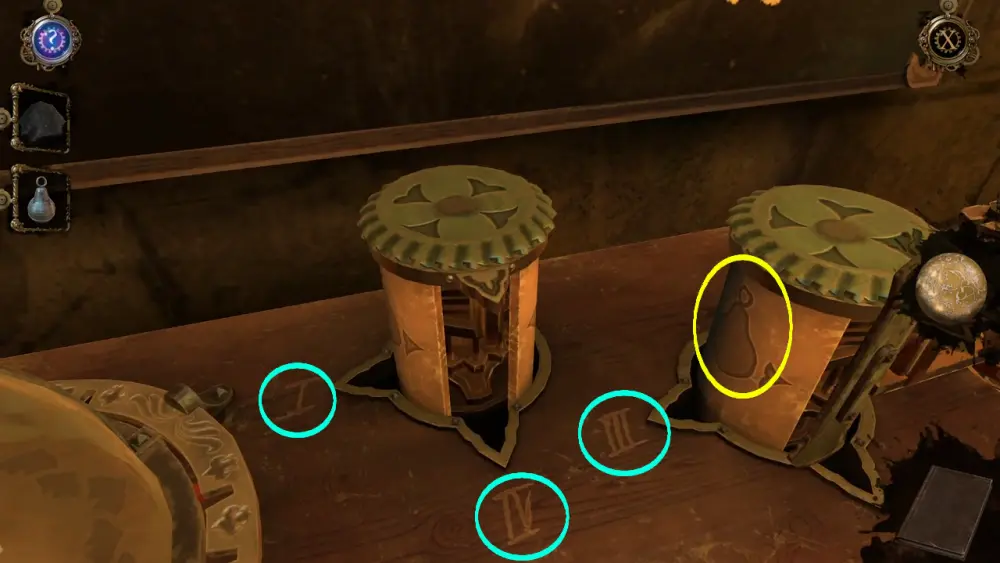
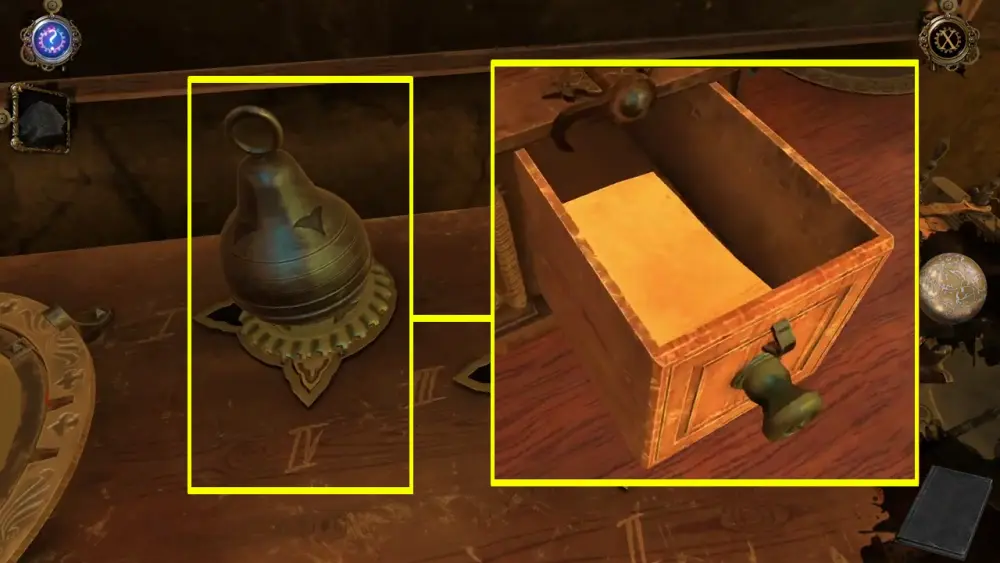
If you put the weight on both buttons, you’ll discover that the one on the right is locked. Since you don’t have a key yet, focus on the button on the left. If you set the pointer to I and put the weight on top of it, you’ll open the leftmost drawer and get a Rotary Switch.
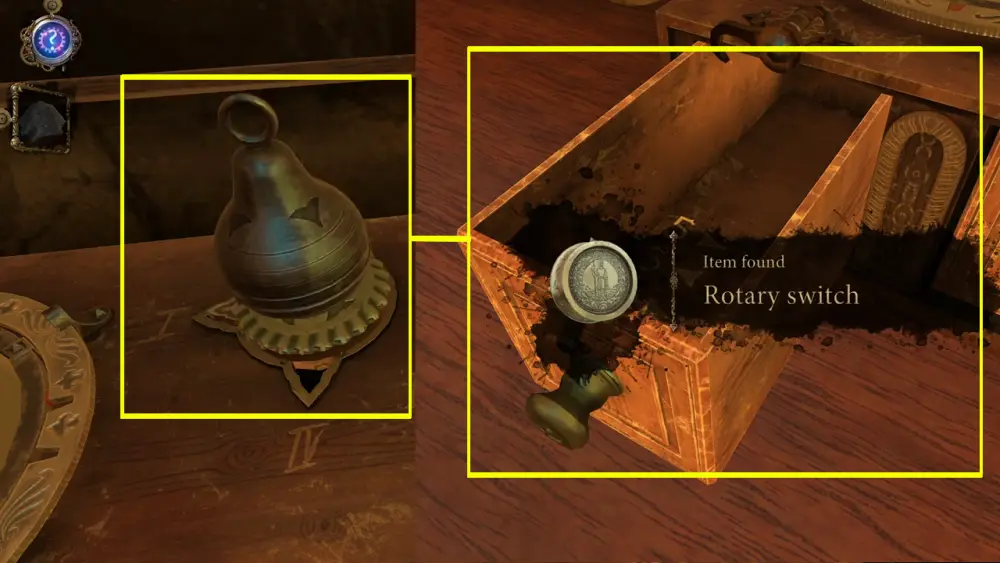
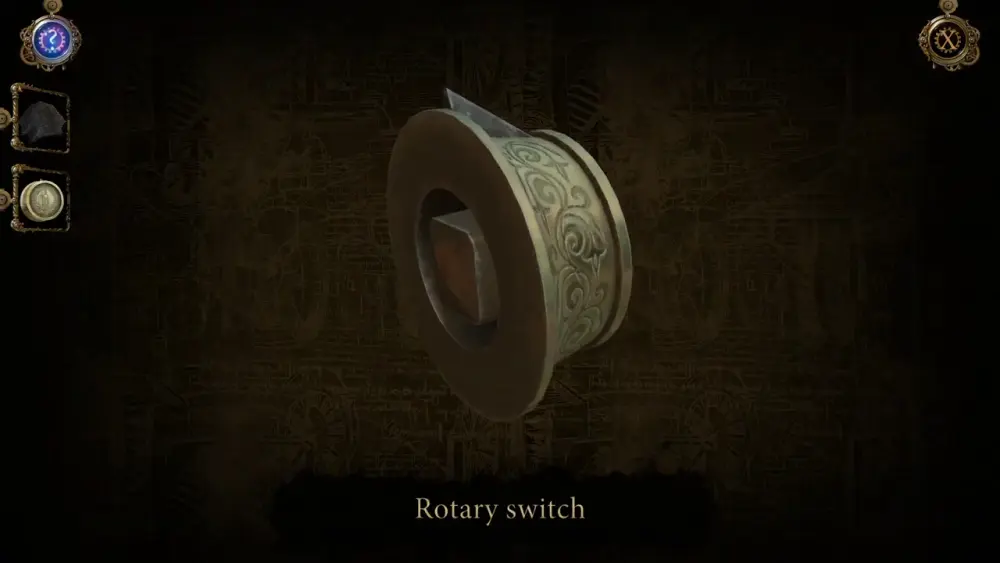
If you observe the Rotary Switch in your inventory, you’ll see that its back has a square peg, which may help you figure out where it can possibly fit.
On the inside surface of the same drawer are markings:
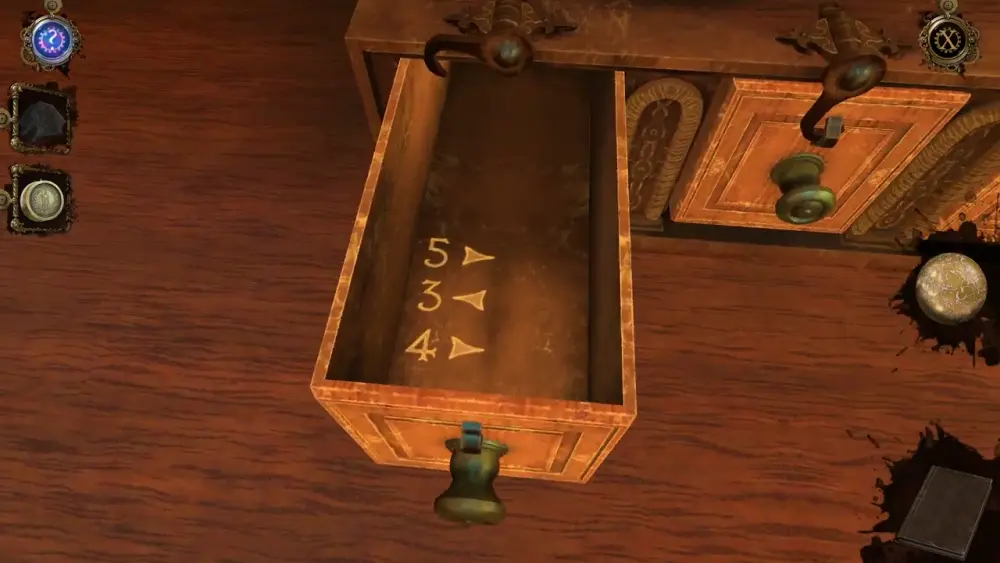
Remember these as they will surely come in handy later.
Click on the weight to put it back in your inventory, then set the button’s pointer to IV and drag the weight back on top of the cylindrical button. This will open the rightmost drawer, which contains another one of Borgia’s journal entries.
These are the contents of the journal entry:
With these items on hand, approach the gilded box with the elaborate design to the right of the boiler. Place the Rotary Switch in the middle, which has a square hole.
As you can see, the Rotary Switch will act as a lock similar to when you’re trying to open a vault or a safe. There are eight small square holes surrounding the Rotary Switch, which you can move to let the pointer face a particular hole. This is where the numbers etched on the first drawer will come in handy: you need to turn the switch 5 times clockwise, 3 times counterclockwise, and 4 times clockwise. Take note that each time you stop at a square hole, the switch will reset the pointer back to the top.
With each correct move, the circular segments surrounding the switch will rotate to align in place, revealing the image of two angels at the top and bottom of the switch. Once the images have been properly aligned, the box will open into another puzzle.
You might have seen similar puzzles if you’ve ever come across an ad for Evony: The King’s Return, or if you happen to have played this type of puzzle as a mini game. Basically, the goal here is for your avatar (represented by the small cutout at the lower right-hand side of the box) to reach the treasure chest (found at the top) safely. You can move the keys, which act as barricades as well as trap doors. The key (no pun intended) to solving this kind of puzzle is the order in which the keys are moved. If you make a mistake and end up getting your cutout “killed,” the box closes and displays a skull image, then opens up again after resetting the pieces back in place.
Here’s the solution to this puzzle based on which keys need to be moved first:
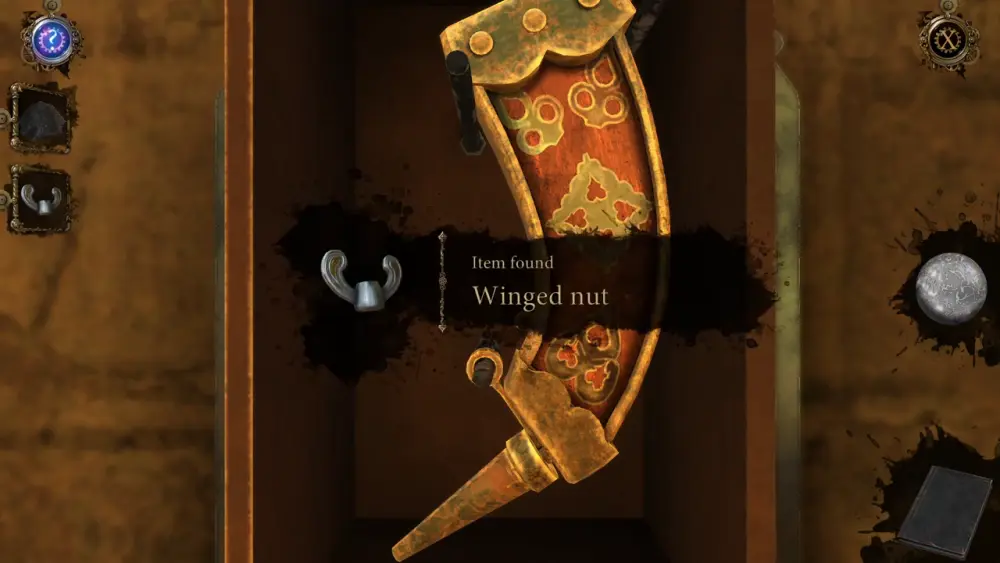
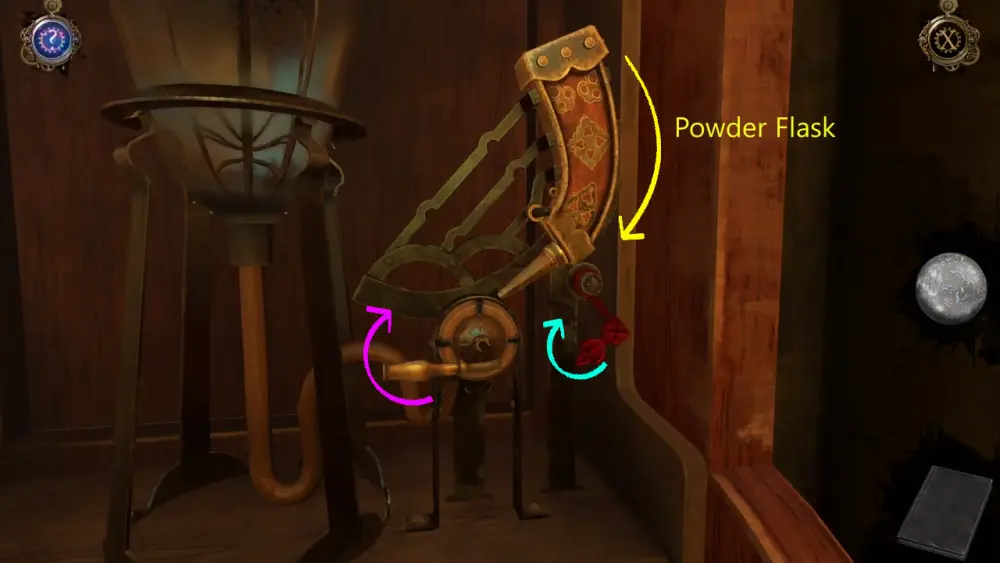
Once your cutout has safely reached the treasure, the puzzle box will close and display the image of a treasure chest. Then, it will fall down and reveal a compartment behind it containing two items. One of these is a Winged Nut.
The other is a Powder Flask.
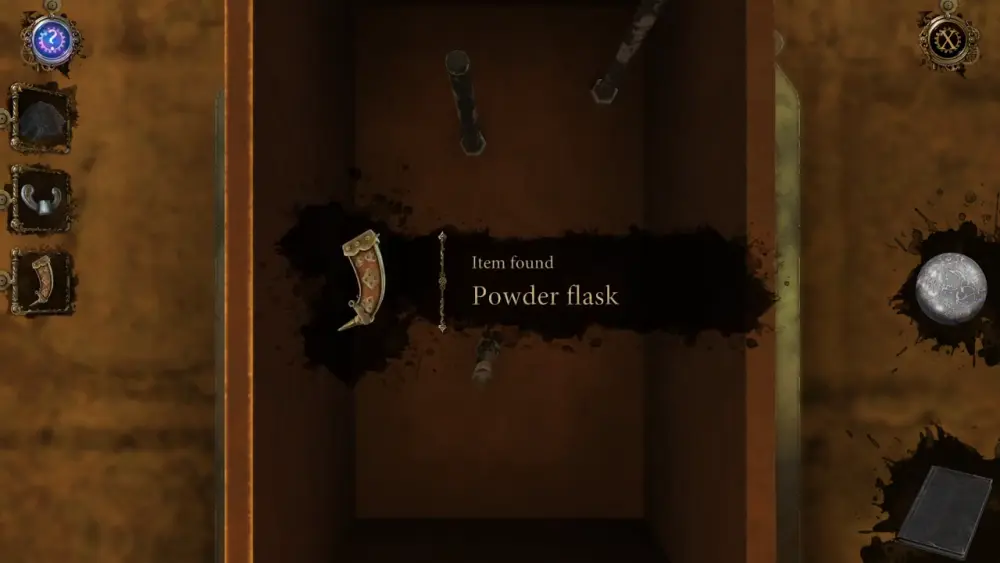
Collect these items to place them in your inventory. Afterwards, go back to the alchemy table. Zoom into the lock preventing the cylindrical button from moving. Place the Winged Nut on the tip of the screw then rotate it to push the lock down.
The lock being eased will trigger a small change in the glass container covering the saltpeter next to the drawer. On its side is a tiny circular bolt whose lid will open.
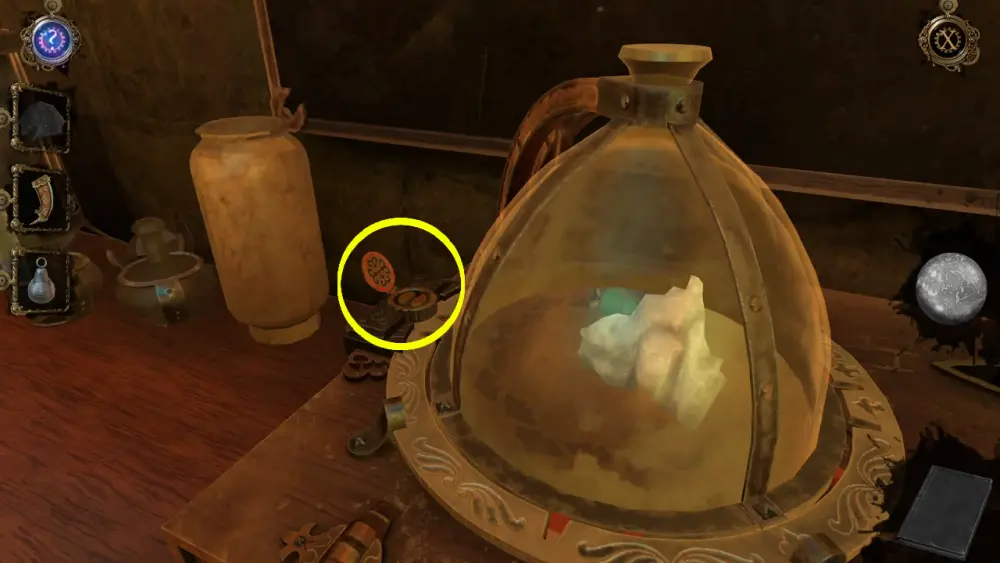
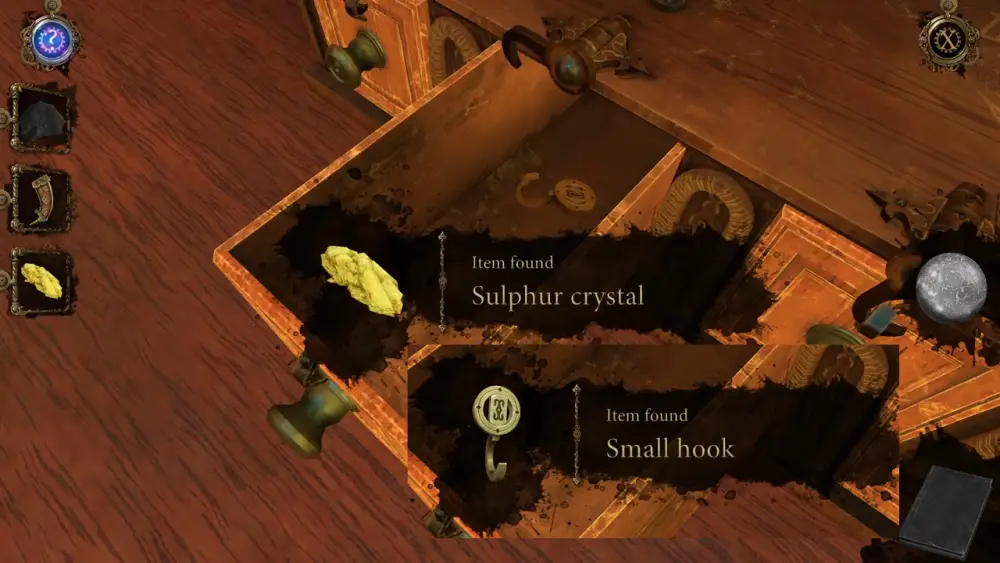
Since the second cylindrical button has been unlocked, you’re free to take the Iron Weight back to your inventory, then place it again on top of the cylindrical button. Drawer II has two items: a Sulphur Crystal and a Small Hook.
Drawer III has another letter, but this time, it’s addressed to Césare Borgia from Pope Julius II.

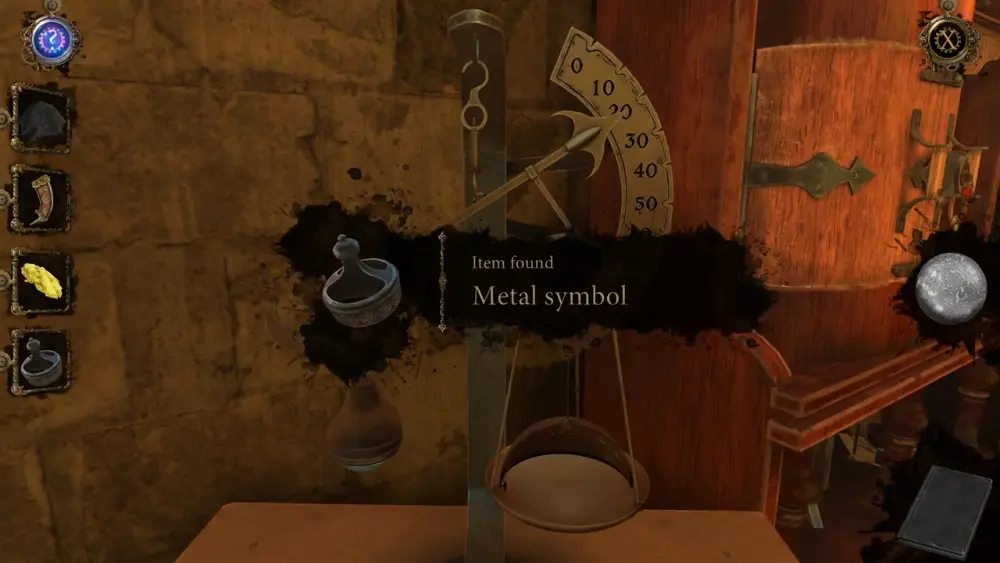
Now that you’ve opened all four drawers and have collected the contents inside them, take the Iron Weight back as you’ll need it for the weighing scale on the low table, which is on the left side of the shelf.
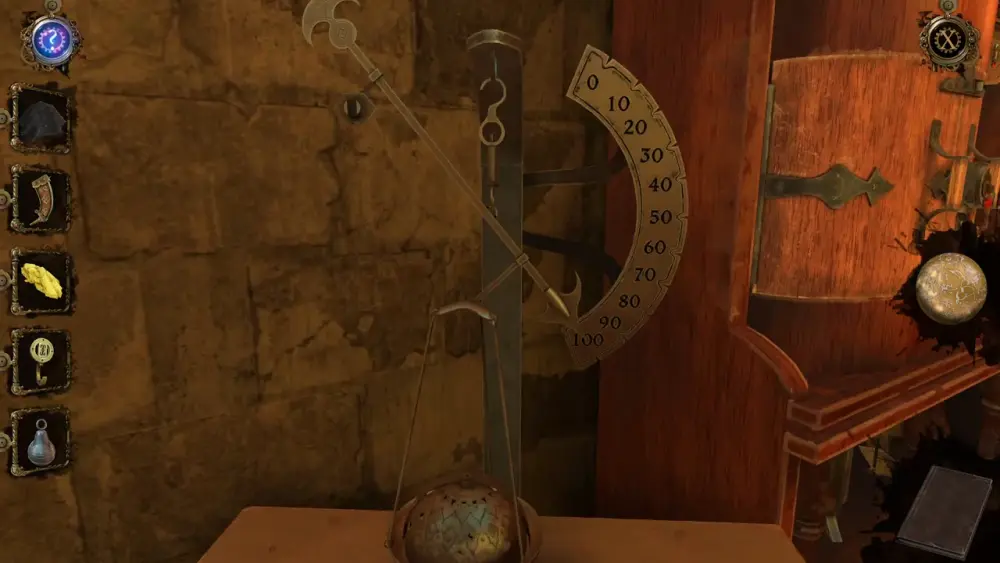
To balance out the scales, place the Small Hook on the metal circle fastened on the rod. Then hang the Iron Weight on the Small Hook.
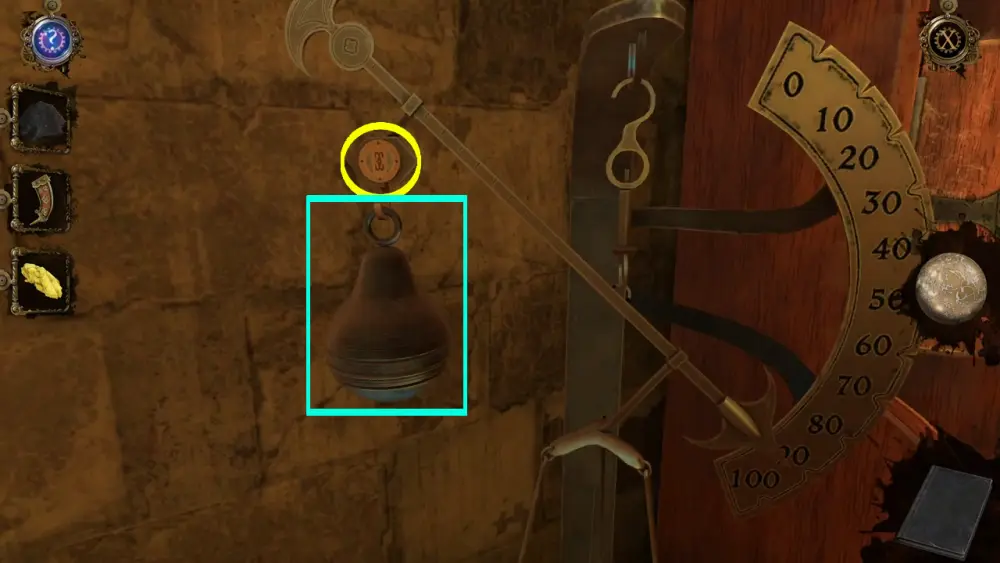
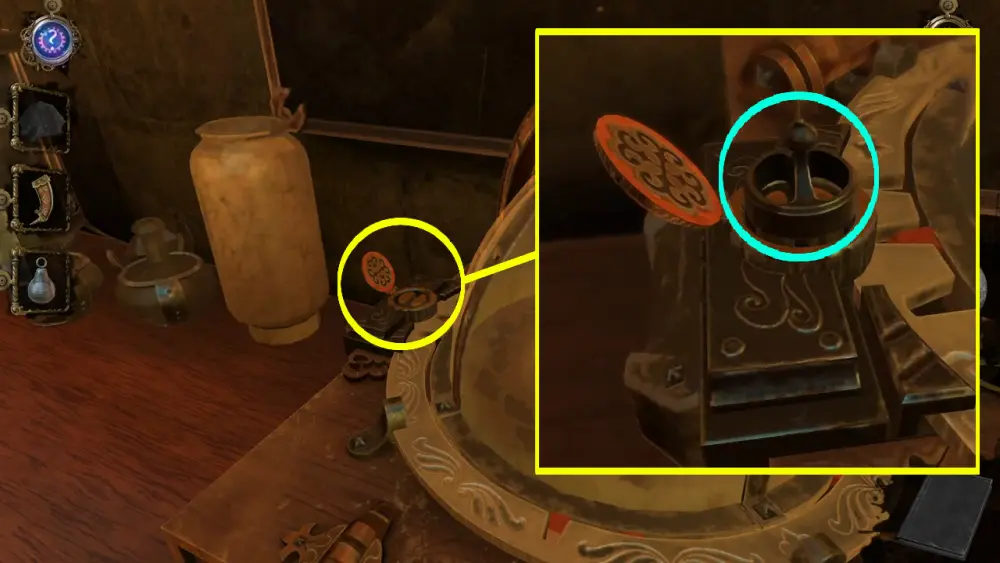
This will tip the scale and open the half circle compartment on the other scale, thus revealing a Metal Symbol.
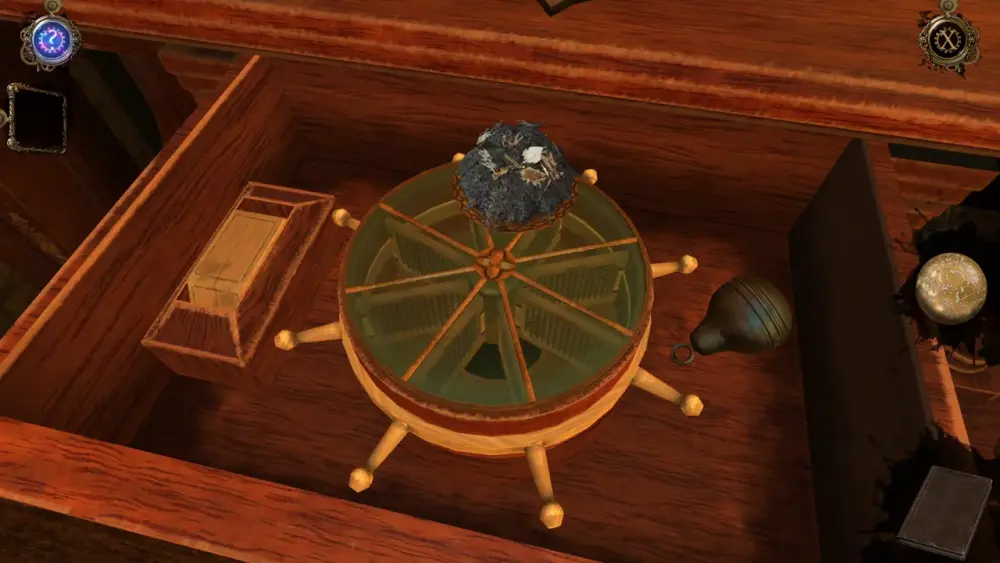
Take this item and place it on the circular slot with an open lid on the glass dome housing the saltpeter. Turn the Metal Symbol around to open the dome.
Lift the dome and collect the Saltpeter Crystal.
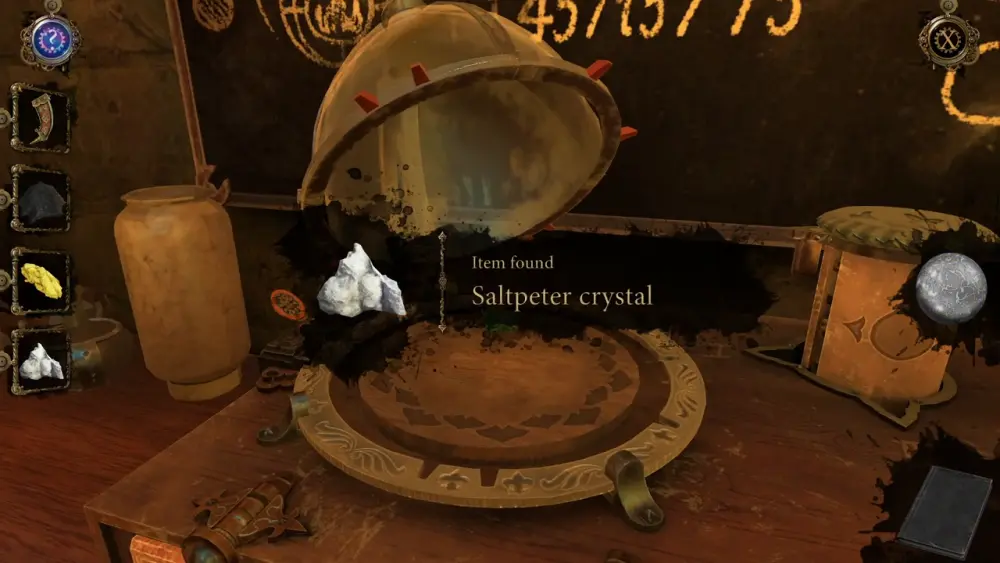
Behind it is also a green Strange Key.
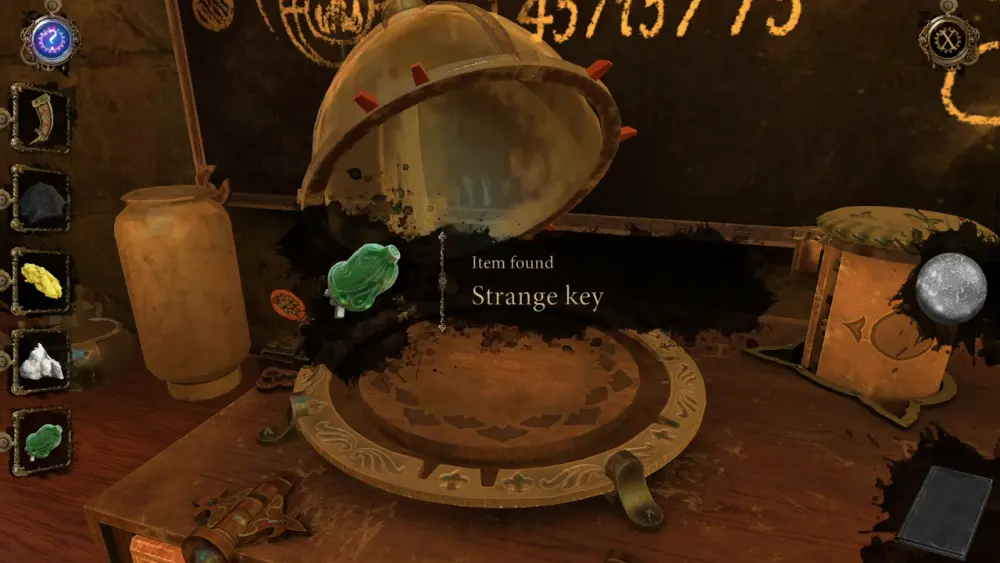
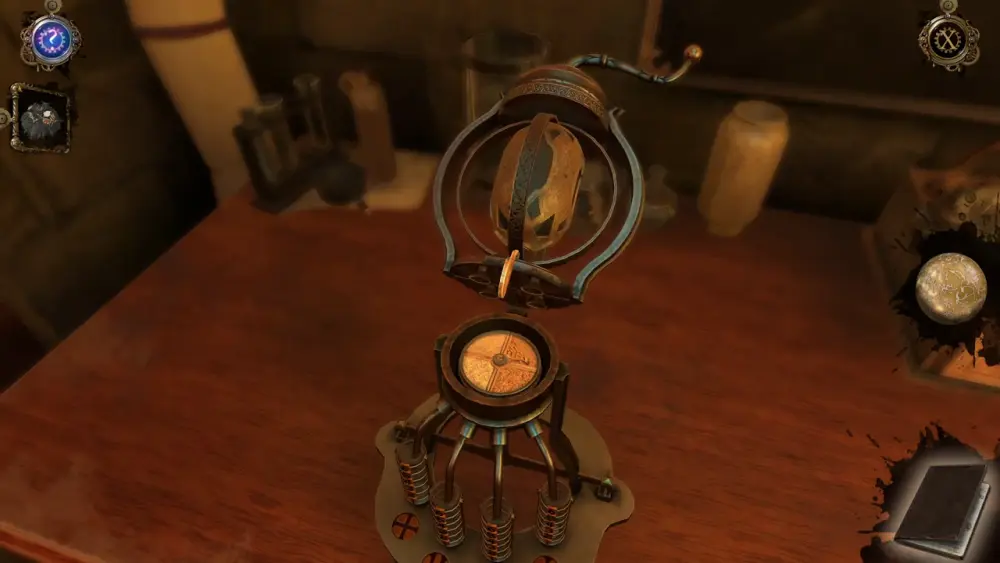
The next part is going to get slightly science-y so let’s take it one step at a time: first, place the green Strange Key into the green slot of the device on the table that’s connected to a pump. Upon inserting the key, the lid can be opened.
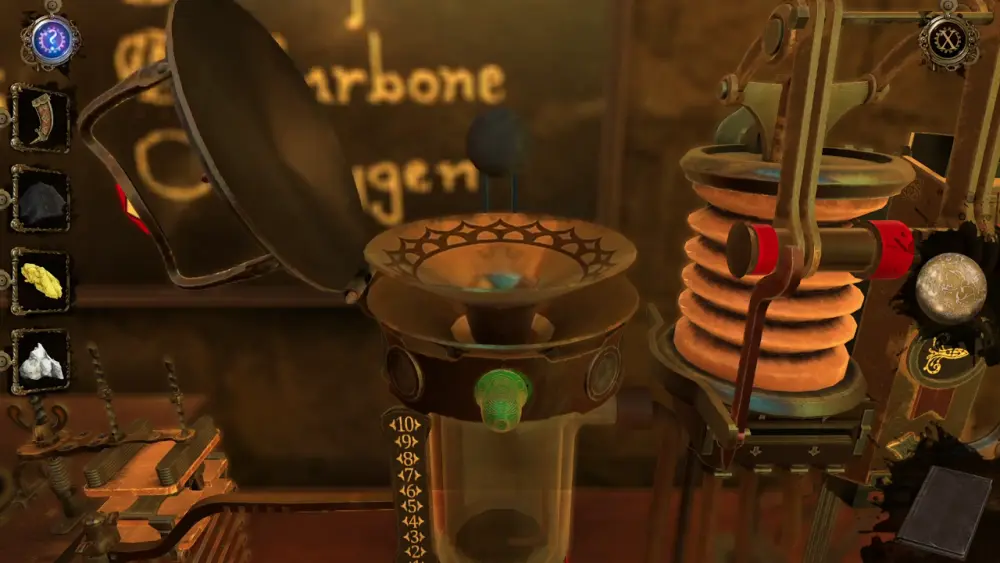
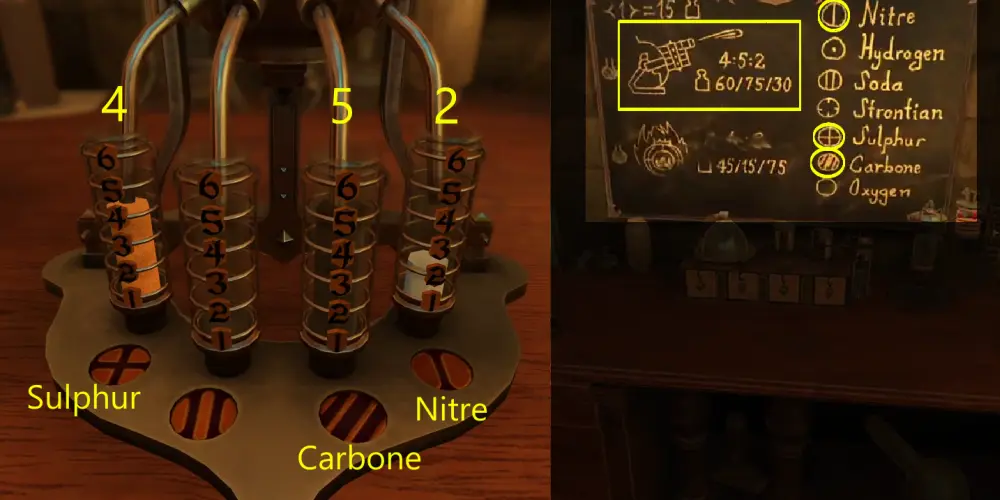
Because it opens into a funnel, we can safely assume that we can put the Charcoal Powder in here. Charcoal is made of carbon, which we previously established is one of the three elements that can activate the boiler. You also have Sulphur Crystal in your inventory, which is self-explanatory, and Saltpeter Crystal, which is the more common term for calcium nitrate. So you have sulphur, carbone, and nitre all present in your inventory.
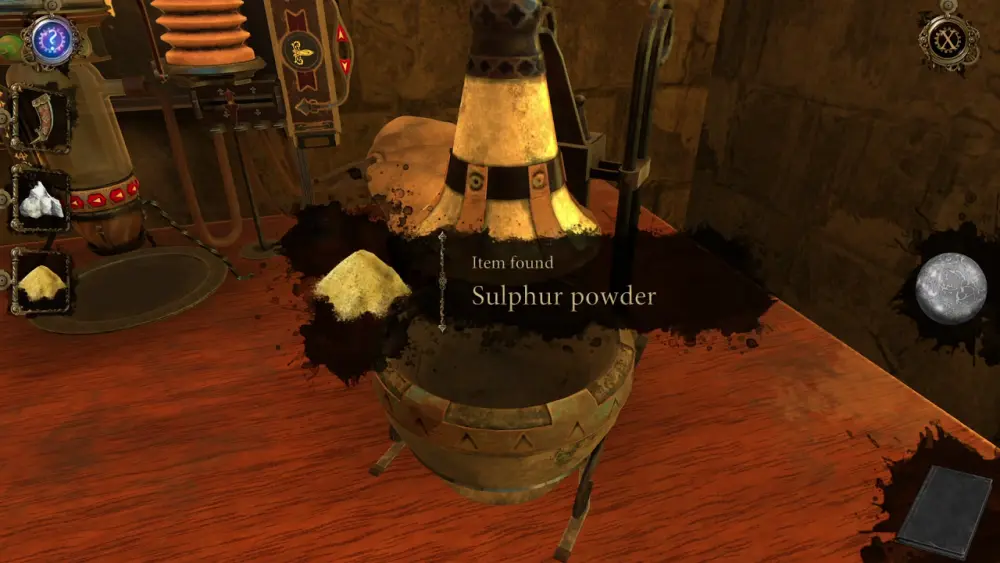
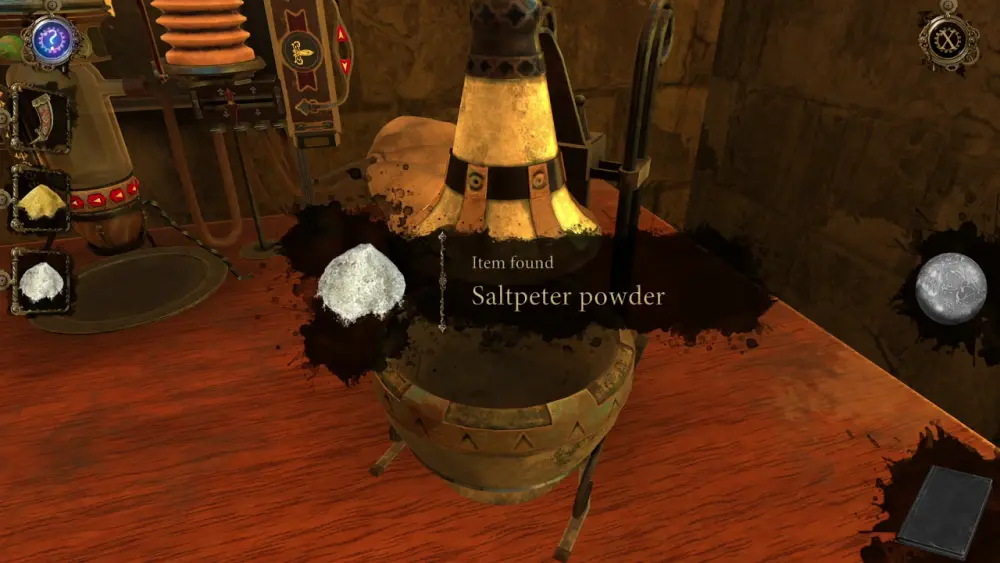
However, you need to turn the Sulphur Crystal and Saltpeter Crystal into powder before you can feed it into this device, which allows you to ratio the powder into the proper measurements. To turn the crystals into powder, approach the mortar on the right side of the table.
Place the crystal on the mortar and pull down the lamp-shaped pestle until the crystal has turned into dust.
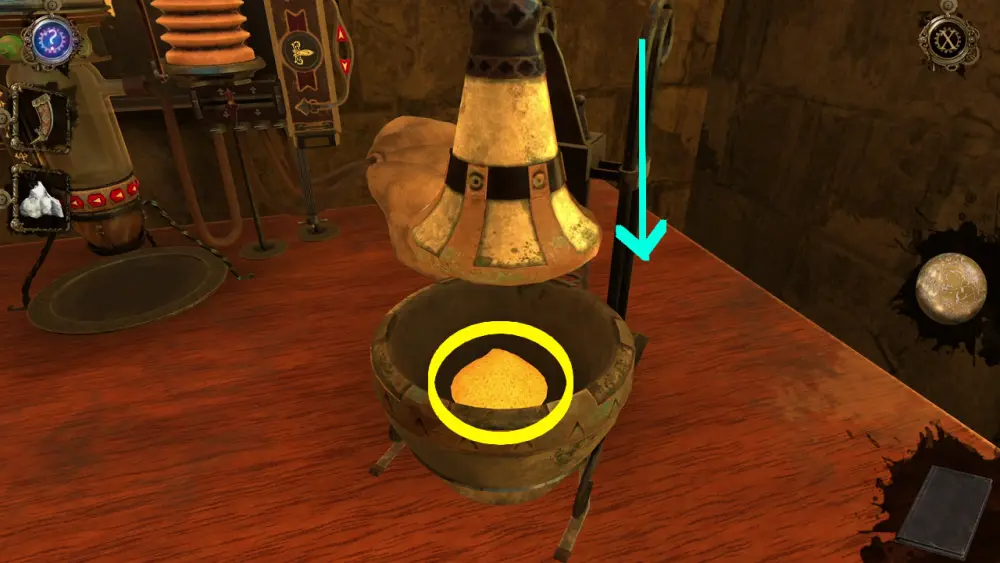
Do this for both the Sulphur Crystal and the Saltpeter Crystal and you will collect the powder versions of both elements.
But how do we know how much we need for the boiler? This is where taking a peek at your journal comes in handy. You’ll notice that, in that specific journal page, there is a 3:1:5 ratio on the spot that’s supposedly erased from the board on the table. This is how much sulphur, carbone, and nitre you need, following the order they were presented in when you first saw the device identifying these elements.
This isn’t a magic number or ratio—you can actually find the conversion method for this on the upper left corner of the board, which you’ve also copied in your journal.
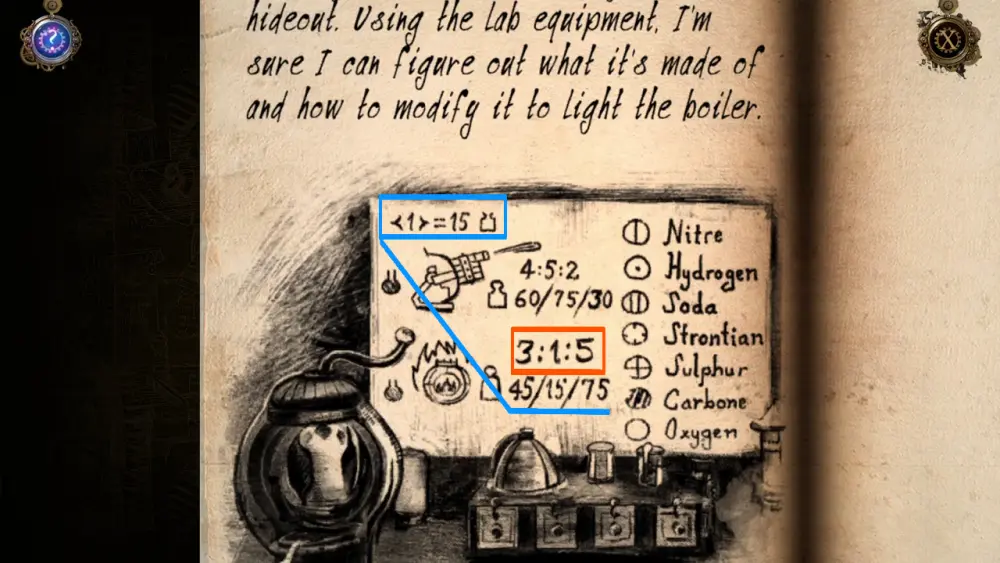
Basically, if you divide the higher numbers 45/15/75 (which may represent the unit of measurement for grams) by 15, you’ll get the 3:1:5 ratio. If you use the weighing scale to measure the amount of powder you have for each element, you’ll easily discover that you don’t have the right amounts yet. For that, we need to go back to the device where we used the green Strange Key.
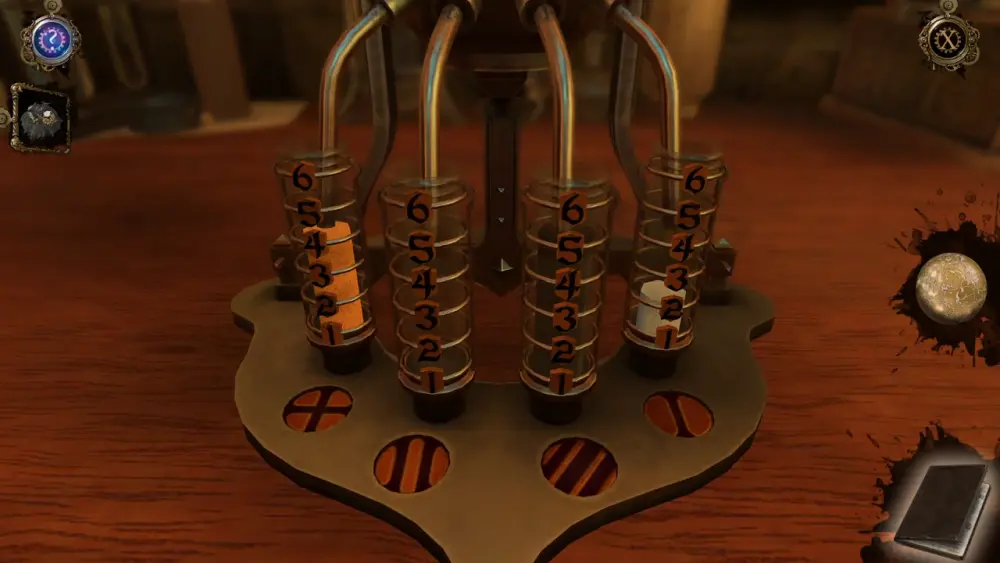
When using this device, you need to pour the powder into the funnel and close the lid. Work the air pump by pulling the lever, which will, by default, decrease the amount of powder in the glass container. You can see how much powder you’re going to get through the gilded numbers (1 to 10) on the left side of the glass container. If you made a mistake, you may increase or decrease the powder measurement by moving the rectangular bar on the right side up or down. The golden arrow will face to the left if the powder will be decreased, and to the right if the powder will be increased.
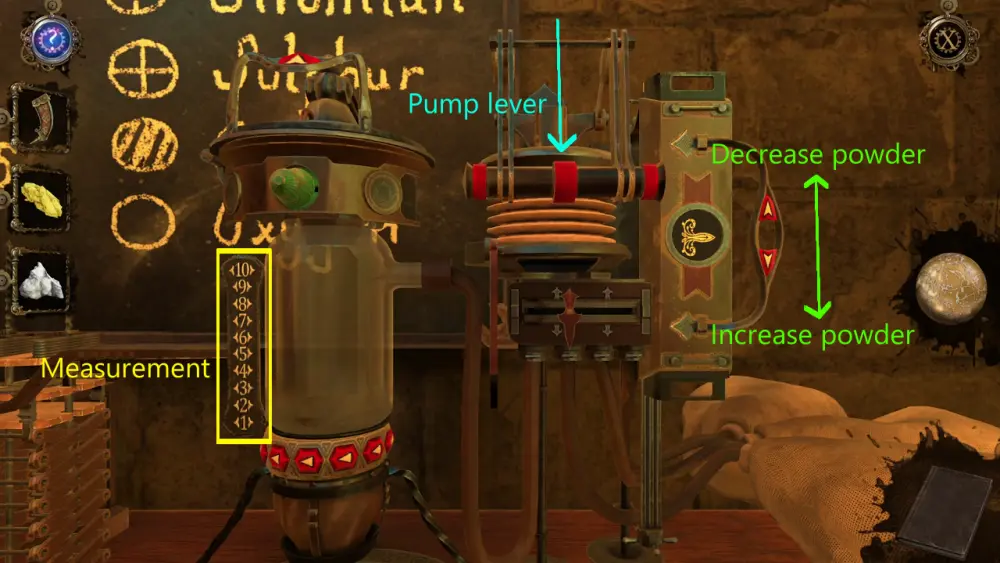
Pour the three different kinds of powder into the device one by one. Adjust their measurements using the pump lever. Sulphur should be 3, Carbone or the charcoal should be 1, and Nitre or the saltpeter should be 5.

When you’ve achieved the right amount for each powder type, move the bottom lid with the red arrows to collect the powder from the tray below the device.
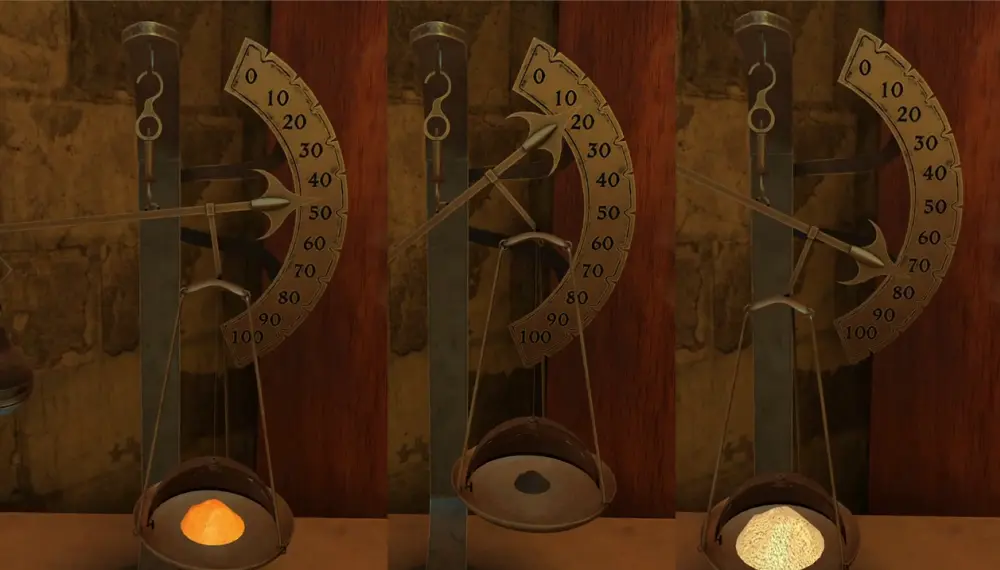
If you really want to make sure that you’ve got all the measurements right, place the different powder types on the weighing scale. Again, do this one at a time. Sulphur should measure 45 on the weighing scale; Carbone should measure 15; and Nitre should measure 75.
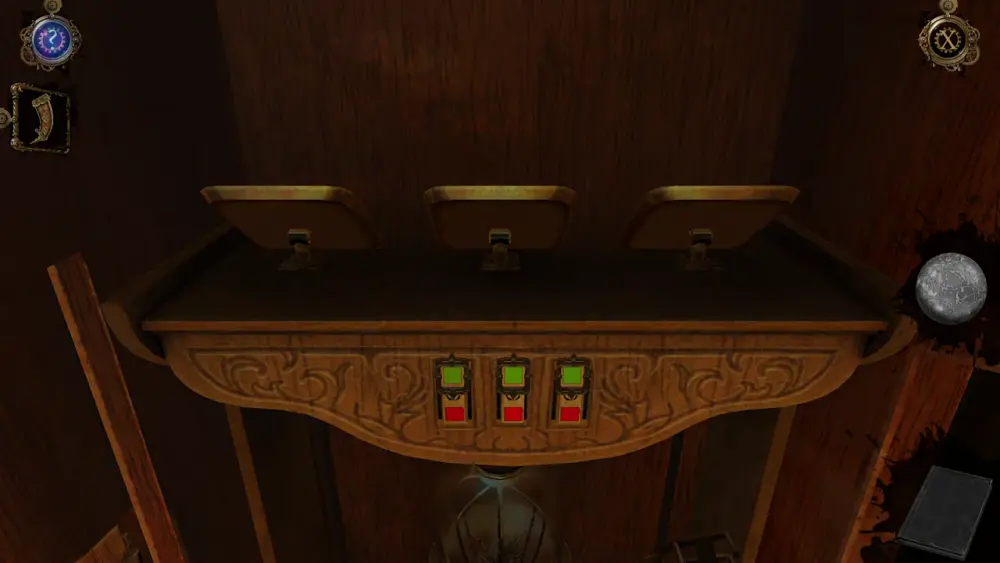
Now that you’re all set, approach the shelf, particularly the part where there are three trays. Place each powder type on top of those trays. There’s no particular order in which this could be done. For as long as you have the correct amount of each powder type, the tray will incline backward and the three corresponding switches in front will turn green.
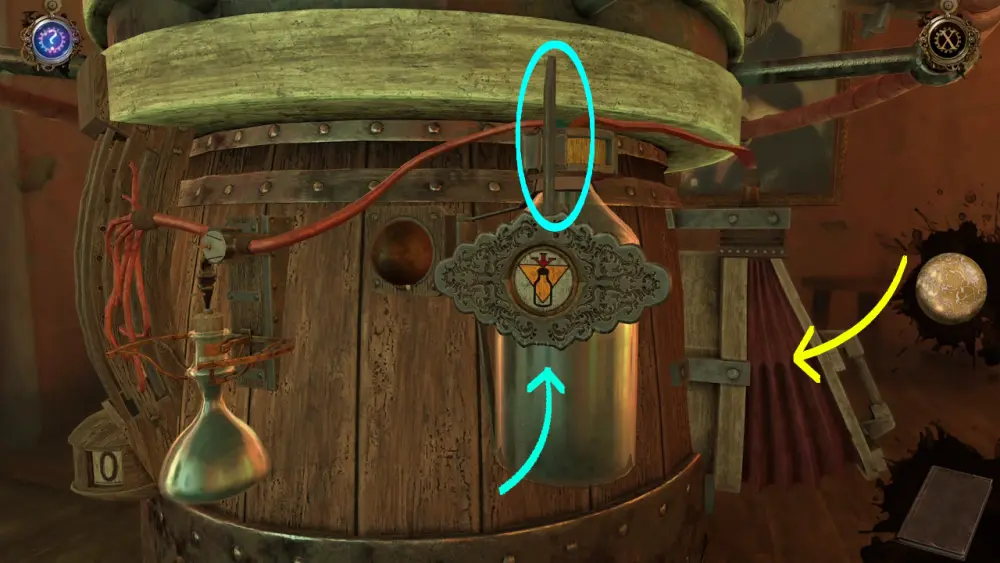
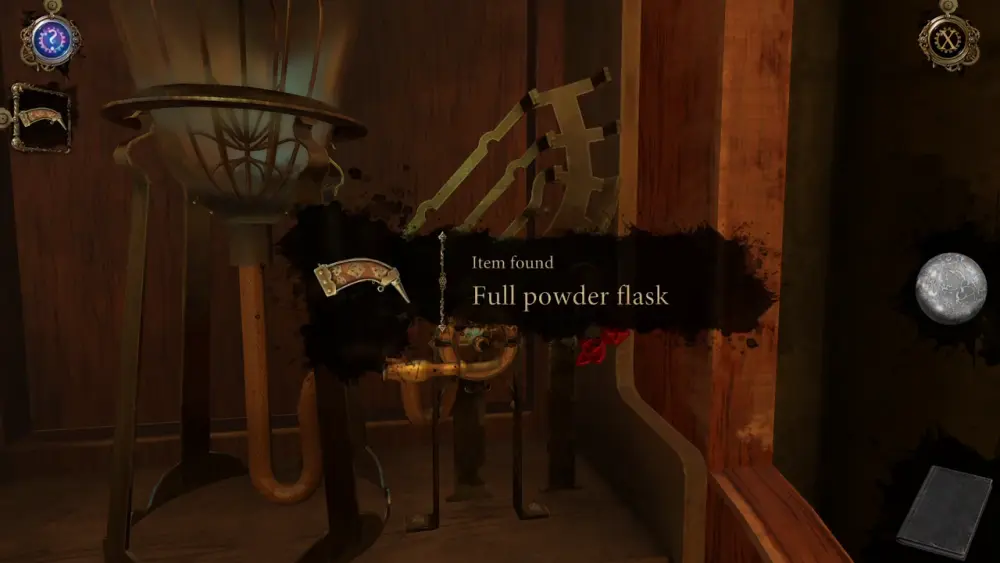
This will trigger a red lock to move from the device directly underneath the shelf where the three trays are located. Place your curved Powder Flask on the metal mount bearing the same shape. Then move the red lock and the metal pipe.
After turning the red lock and the pipe, you may now collect the Full Powder Flask.
Finally, you have all you need to make the boiler work. Place the Full Powder Flask on the boiler’s curved mount. The flask will then begin to pour powder into one of the boiler’s containers.
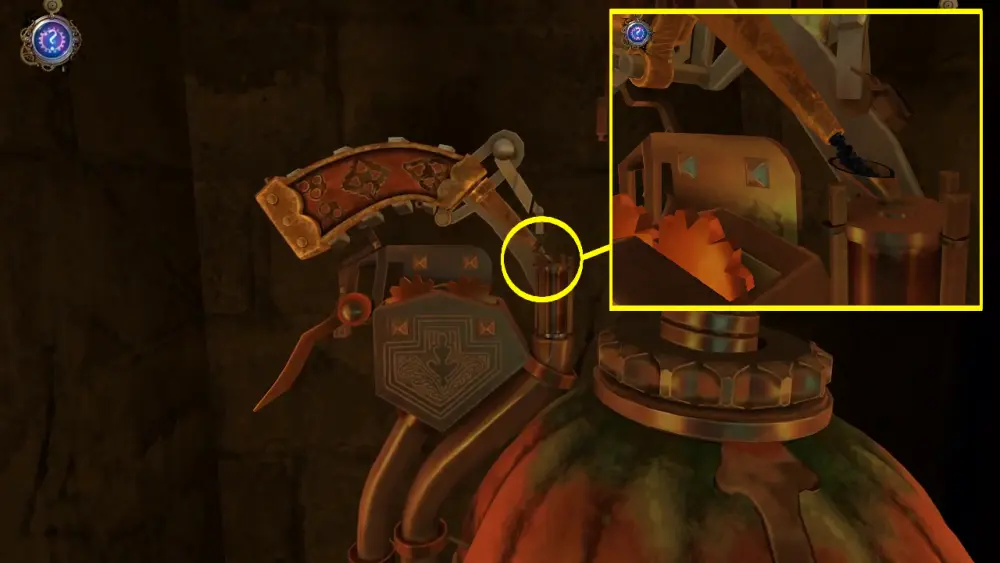
With the powder all poured into the boiler, it’s time to set it alight by triggering the flint under the flask until it produces fire.
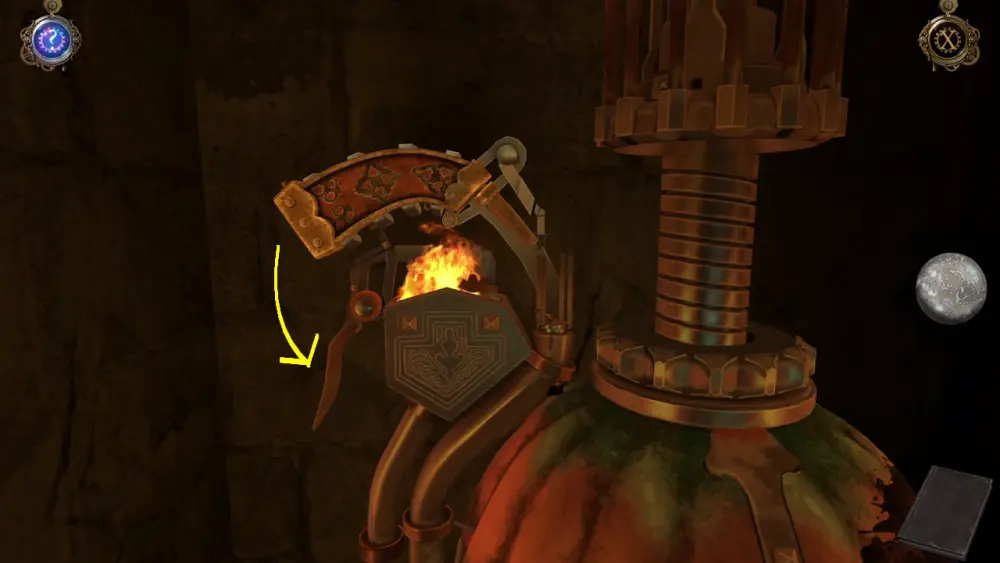
This will start up the boiler and you can see the flames burning brightly underneath its circular body.
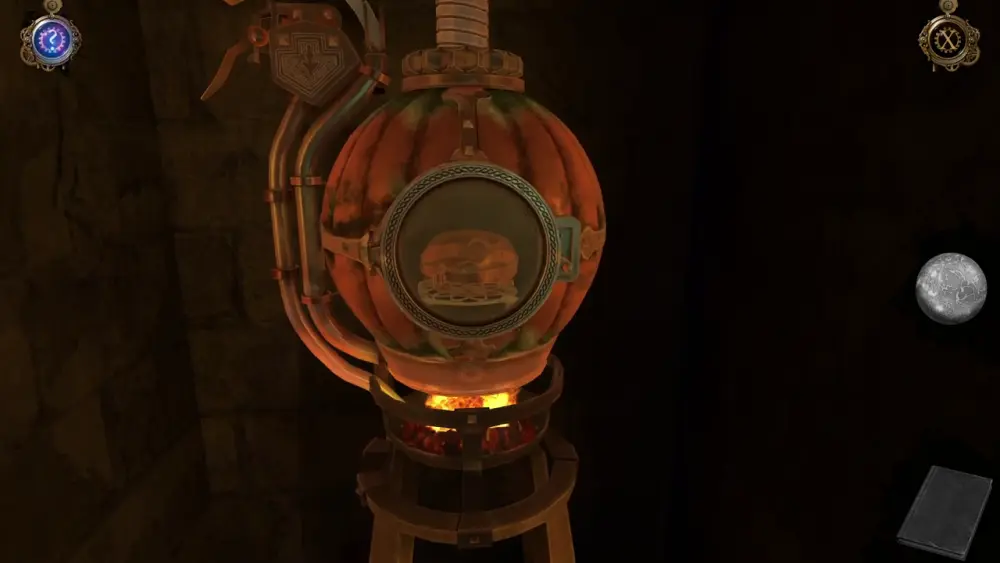
After a short while, there would be a small explosion. Open the lid of the boiler and collect the Ornamental Key inside.
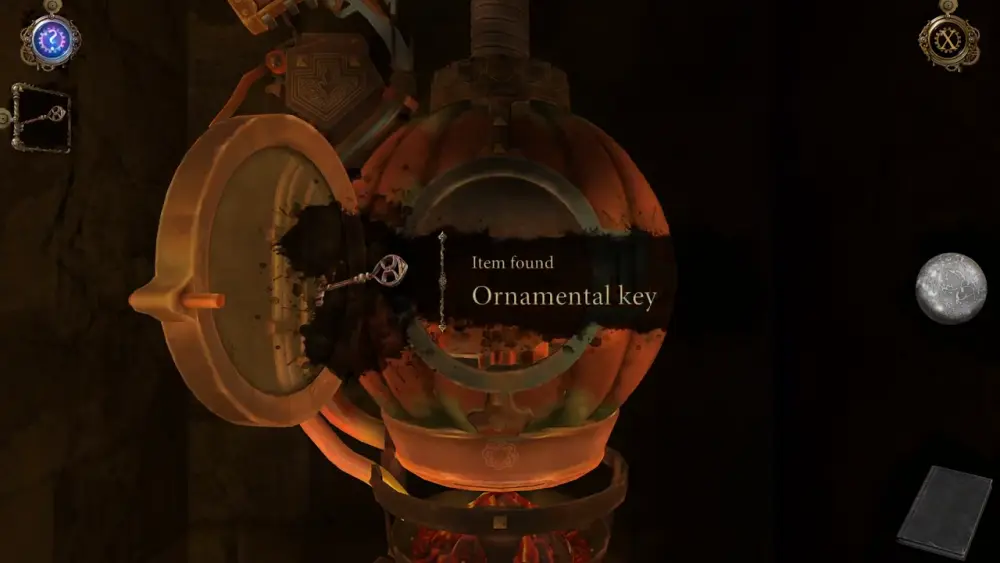
With the key now in your hands, head back upstairs to the case where Borgia is keeping the special glove. Insert the key into the lock and turn it until the fasteners of the case loosen up and cause the cover to open.

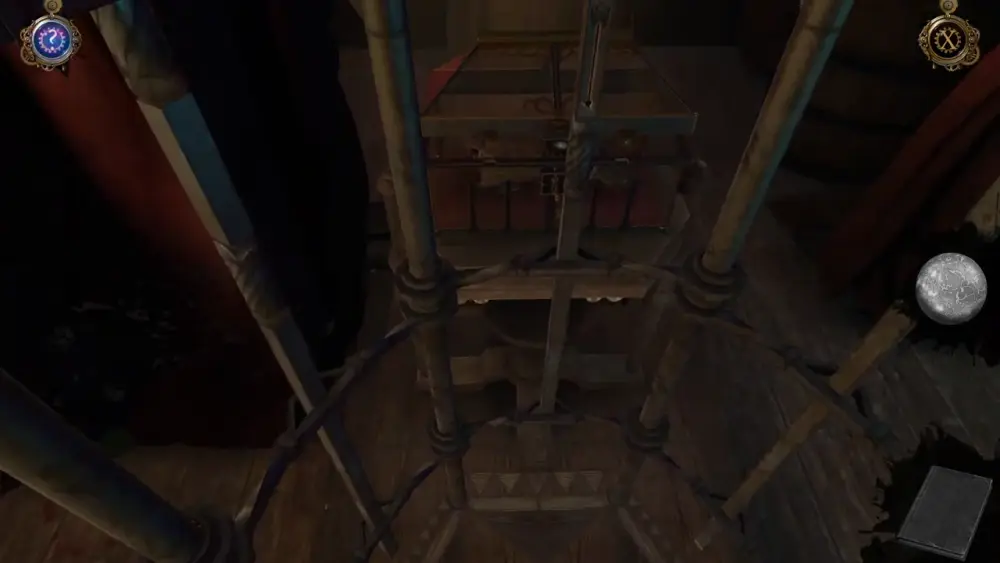
You’re one step away from completing your mission but wait! As expected of a man like Césare Borgia, he’s not going to just let anyone walk out of his hideout unscathed. Out of the blue, a trap will spring from the ceiling wherein metal bars will fall into slots on the floor, surrounding you.
You’re trapped in Borgia’s own makeshift jail.
From here, a long cutscene will play out wherein Borgia will go on a classic villain monologue explaining his reasons for even wanting the time machine and the tragic events that led to such a scheme.

We don’t want to spoil this part as this can be considered the highlight or even the reward for getting so far into this chapter. Apart from learning Borgia’s true intentions, his short but memorable diatribe is interspersed with masterful artwork depicting the fall from grace of one who used to be the most powerful man in Italy. In terms of production value, Borgia’s vengeful speech is superbly delivered, with the music providing an energized yet eerie backdrop that provides quite a unique experience for anyone who appreciates a well-crafted story.
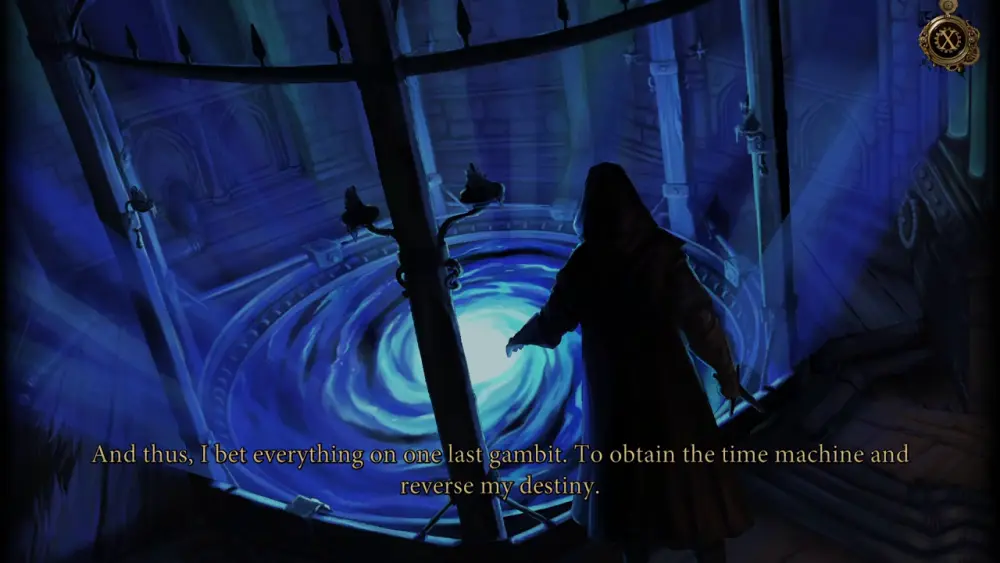
Some highlights from Borgia’s speech include his intentions to obtain a time machine to change his fate, as well as the Pope being the head of the Ordo Iustitialis. Borgia also wants you, as Giacomo, to obtain for him an amulet from the Pope in exchange for letting you keep the glove.
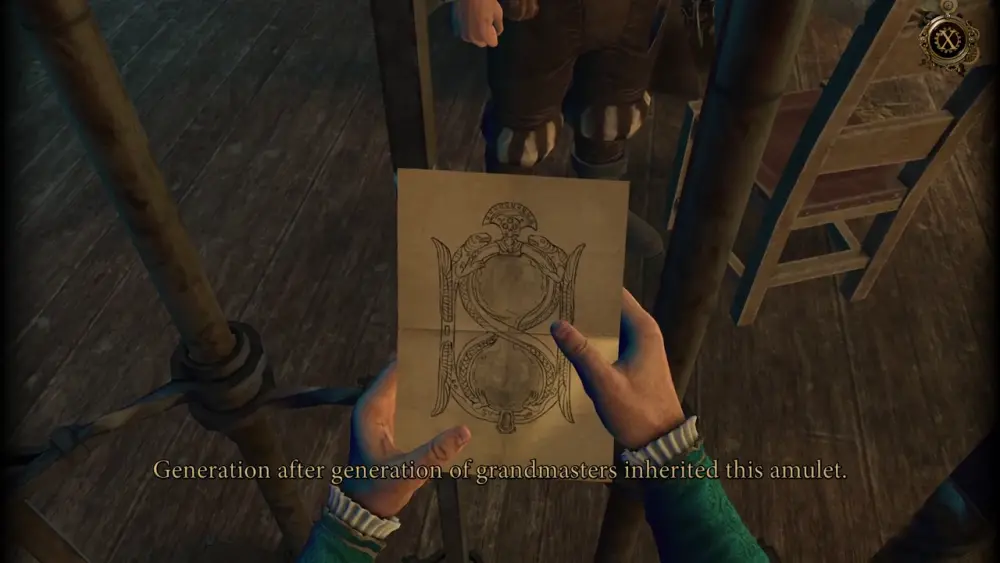
He even gives you a hint…
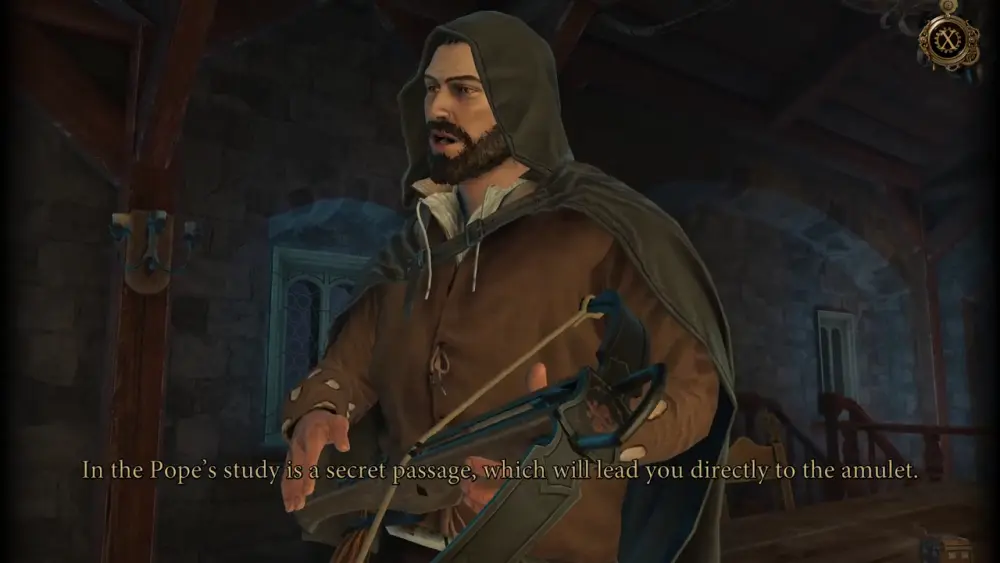
… and suggests that you use Luca Pacioli to get to the Pope’s study.
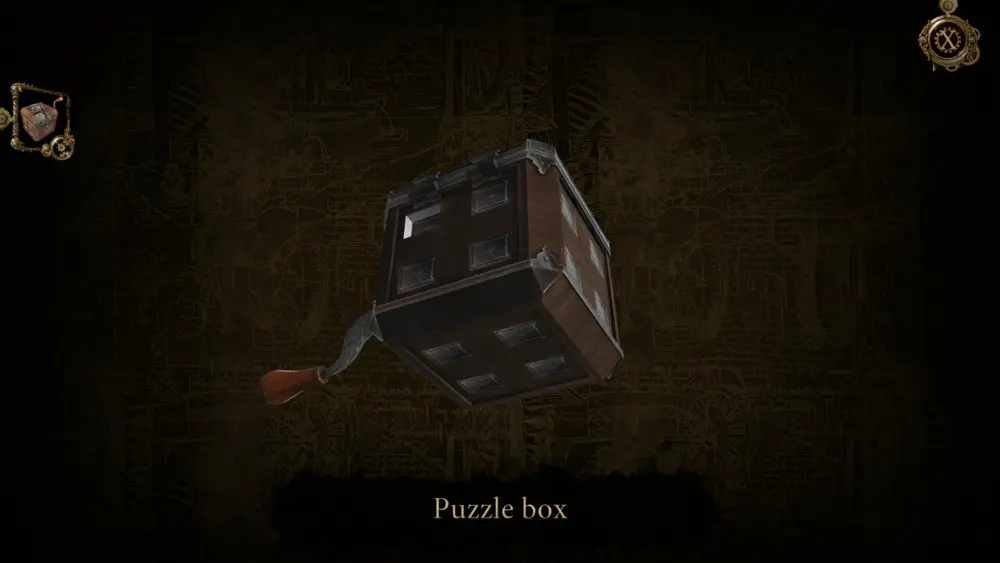
You don’t really have a say in the arrangement and Borgia eventually leaves, confident that you will fulfill your end of the bargain. Definitely, it won’t be the last time you see him. Just before leaving, he gives you a Puzzle Box, which you have to solve to get out of the trap you’re in.

Unlike other puzzles, you need to solve this one by accessing it in your inventory. Up close, you’ll see that the Puzzle Box has a rotating handle, a wheel with ridges, and colored squares at the top. Notice that the yellow square has an arrow.
If you turn the box some more, you’ll see that the bottom, rear, and the side opposite the handle all have buttons. Some buttons correspond to a colored square at the top, wherein if you press a button bearing a specific color, that same color will retract the square representing it at the top of the box. For instance, the button being pressed in the image below corresponds to the white square.
Your goal here is to make the yellow square with the arrow move forward until it reaches the end. The wheel with ridges is connected to the yellow square wherein moving the wheel will also move the yellow square forward—provided the latter has space to move.
The solution to this puzzle is to find the buttons on the box with colors that match those that are the closest to the yellow square with the arrow. Thus, the order in which buttons on the box must be pushed should be purple, green, white, and red.
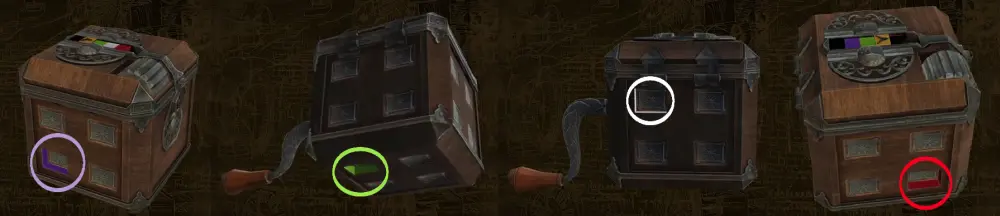
Each time you press the right button with the right color, don’t forget to move the wheel so that the yellow square with the arrow will also move forward.
Once the yellow square reaches the other end, the box will be unlocked. Rotate the handle to reveal what’s inside—which is a small Jack-in-the-box rendition of what’s probably the Pope bearing a Special Key.
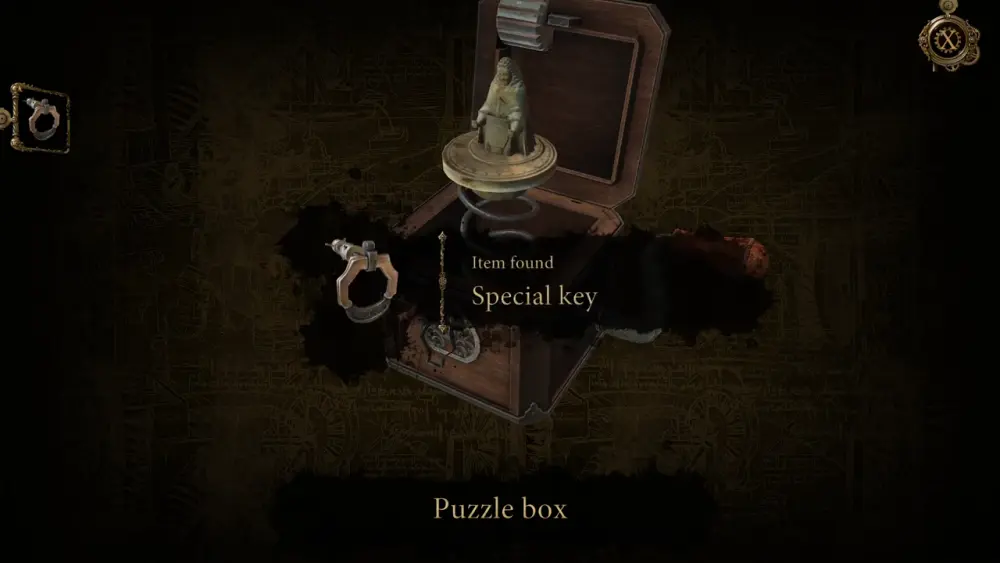
After collecting the key, zoom into one of the metal bars of the trap, which has a tiny slot. Place the key into the slot and slide it all the way up. This will cause the bars to retract, giving you an opening to escape Borgia’s prison.
This concludes the events of Chapter 4 as you’re free to leave Borgia’s hideout and return to The Bald Lady Inn. As Giacomo, you’re left to contemplate whether Borgia knew all along that you would try to take the glove. In fact, he could have deliberately fed you, Leonardo, and Luca the information that he’d be away to simply trap you in his hideout so he can get you to do what he wants. With these thoughts and more in your mind, it’s time to return to Leonardo and Luca to deliver the glove.
What do you think about this possibility of Borgia setting you up? More importantly, what other dangerous adventures and challenges await our heroes? Do you think they would succeed in traveling back to the past to destroy the time machine—or will Borgia’s unrelenting quest for vengeance prevail? Which part of these chapters were your favorite or were the most memorable for you? Which ones did you have difficulty solving? Don’t forget to share your thoughts in the comment section!
Tom bleecher
Tuesday 27th of February 2024
ABSOLUTELY loving the game! I've played them all! Keep doing what do!