In Part 1 of our walkthrough for The Room: Old Sins, you’ve become acquainted with the attic in Waldegrave Manor and the mysterious dollhouse left inside this room. With the help of your special eyepiece, you’ve managed to unlock some of the secrets of the dollhouse, gradually opening rooms such as the Foyer, the Study, and the Kitchen. Within each room lies many puzzles, and in between solving them, you slowly unravel what had happened to Edward and Abigail Lockwood, the couple living in Waldegrave Manor who had disappeared without a trace.
In this second part of our walkthrough, we pick up where we left off and continue exploring the rest of the Study, as well as the Kitchen, which we’ve previously gained access to. In this walkthrough, we will also tackle puzzles in the remaining rooms, namely the Curiosity Room, Maritime Room, Garden, Japanese Gallery, Art Studio, and finally, back to the Attic.
Without further ado, here is the continuation for Part 2 of our walkthrough for The Room: Old Sins.
Study (Part II)
After solving the puzzle in the chimney, a new room directly above the Foyer will open. Use the eyepiece to break the seal and enter the Curiosity Room.
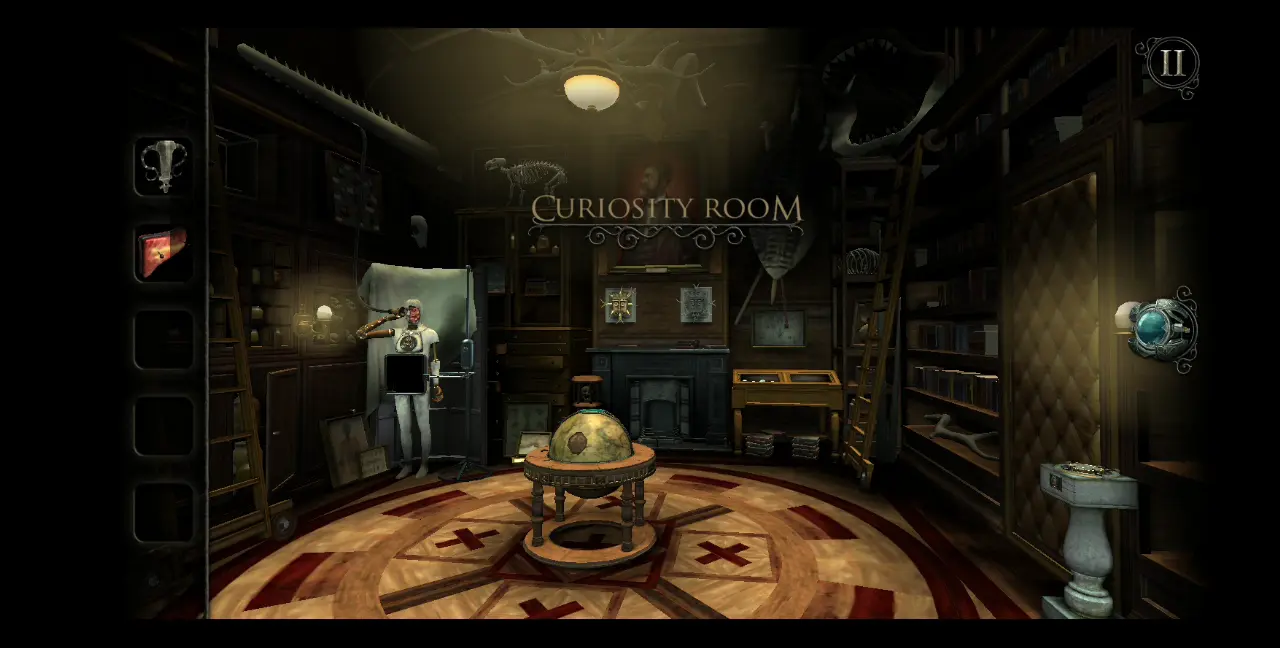
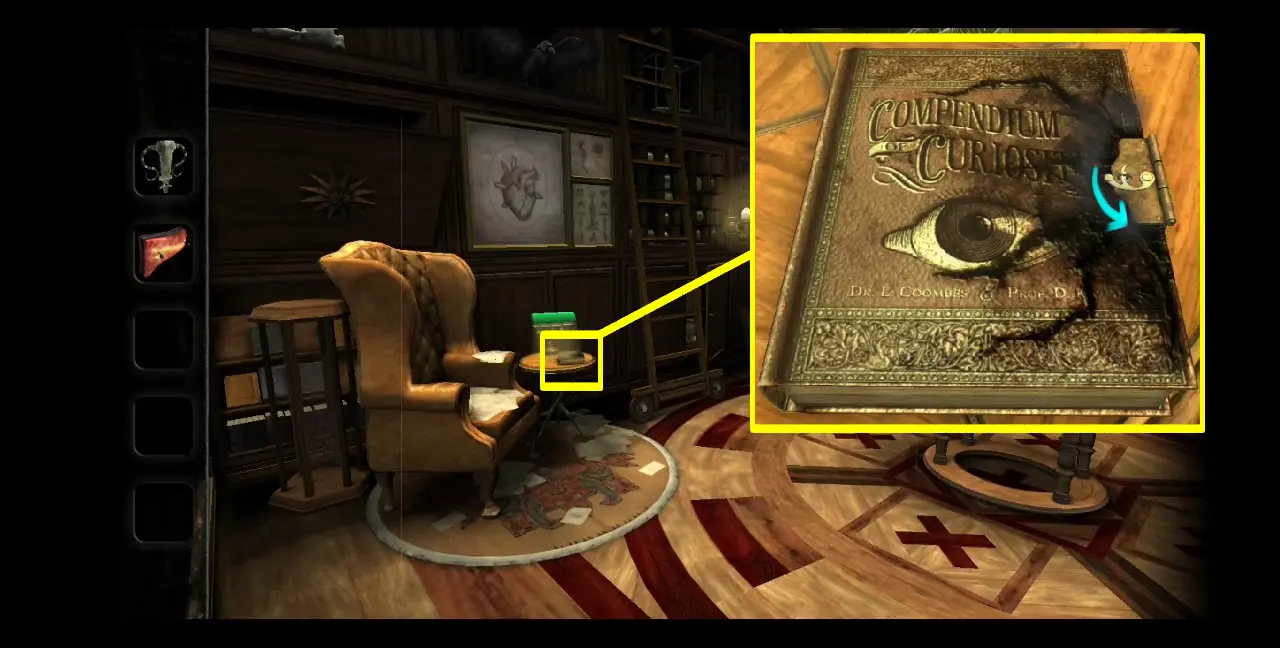
True to its name, there are more than a handful of curiosities inside this room. Before anything else, pan to your left and you will notice a small round table next to an armchair. On the table with a lamp is a book, aptly titled Compendium of Curiosities. As always, pull the lock down to access the contents of the book.
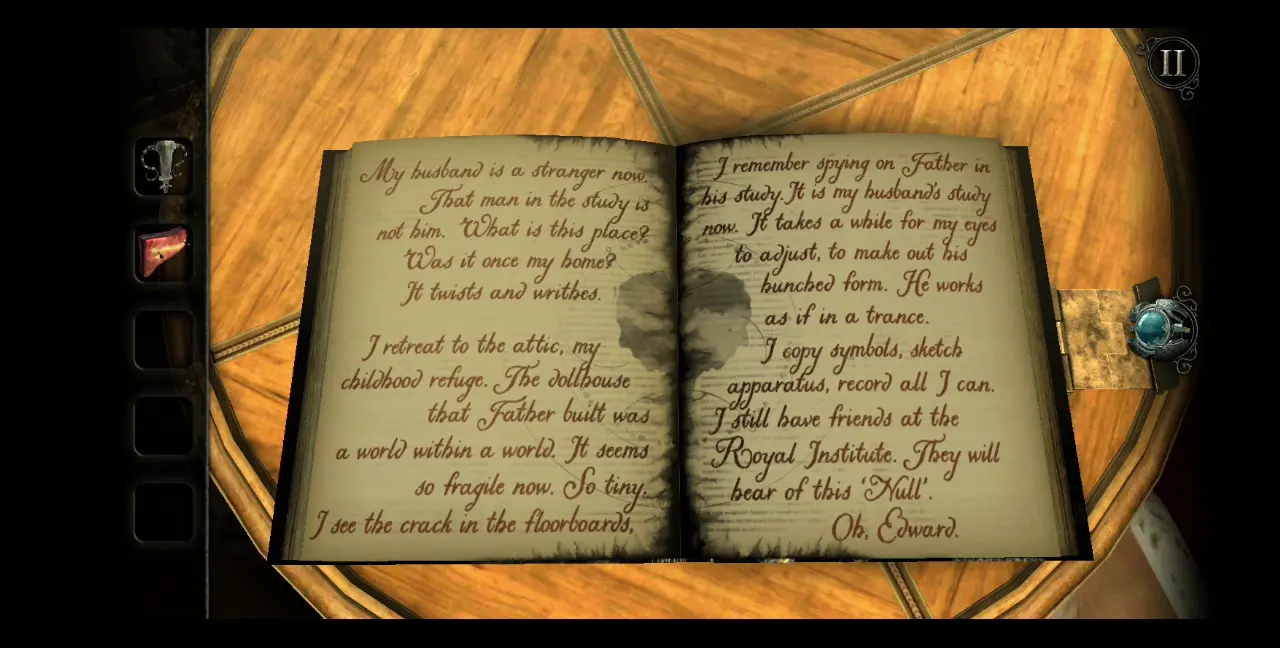
As with the other books you’ve previously encountered, you will find another journal entry inside.
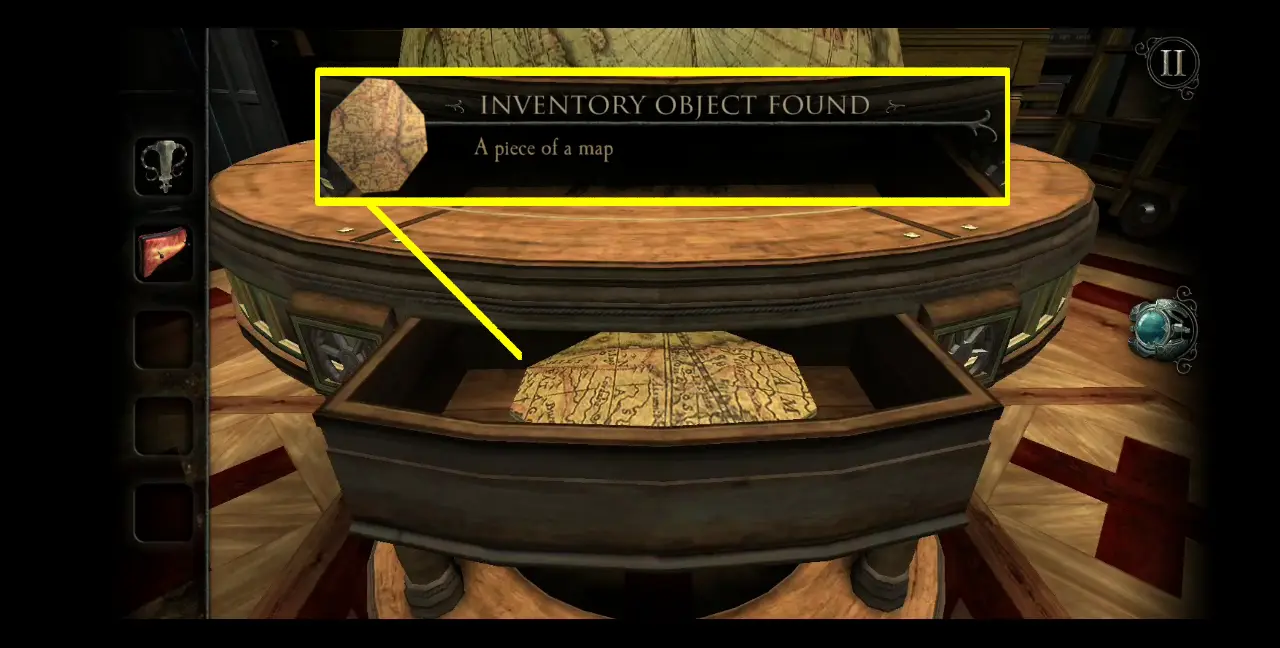
After reading the journal entry, move to the upper right corner of the room where you will find a display case. You’ll notice that there are stones in the display case, but it looks as though the case on the left is missing its centerpiece. However, there seems to be an item on the right case. Pull the glass cover of the right display case to the side then collect a piece of a map.
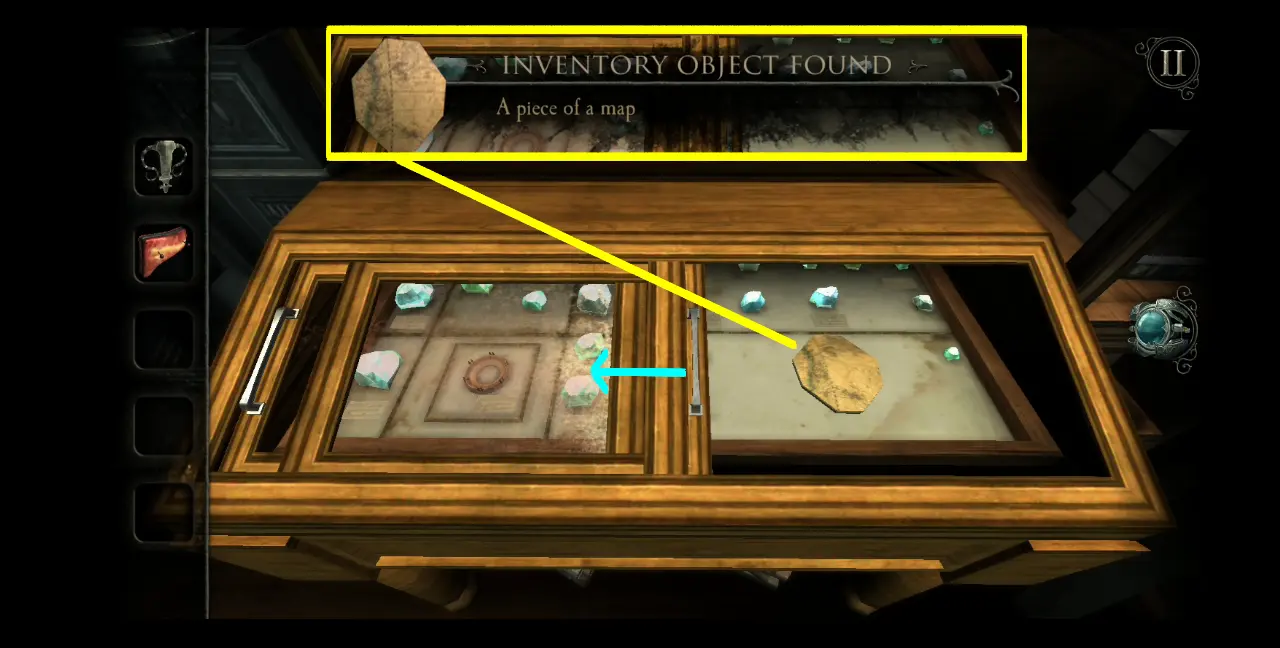
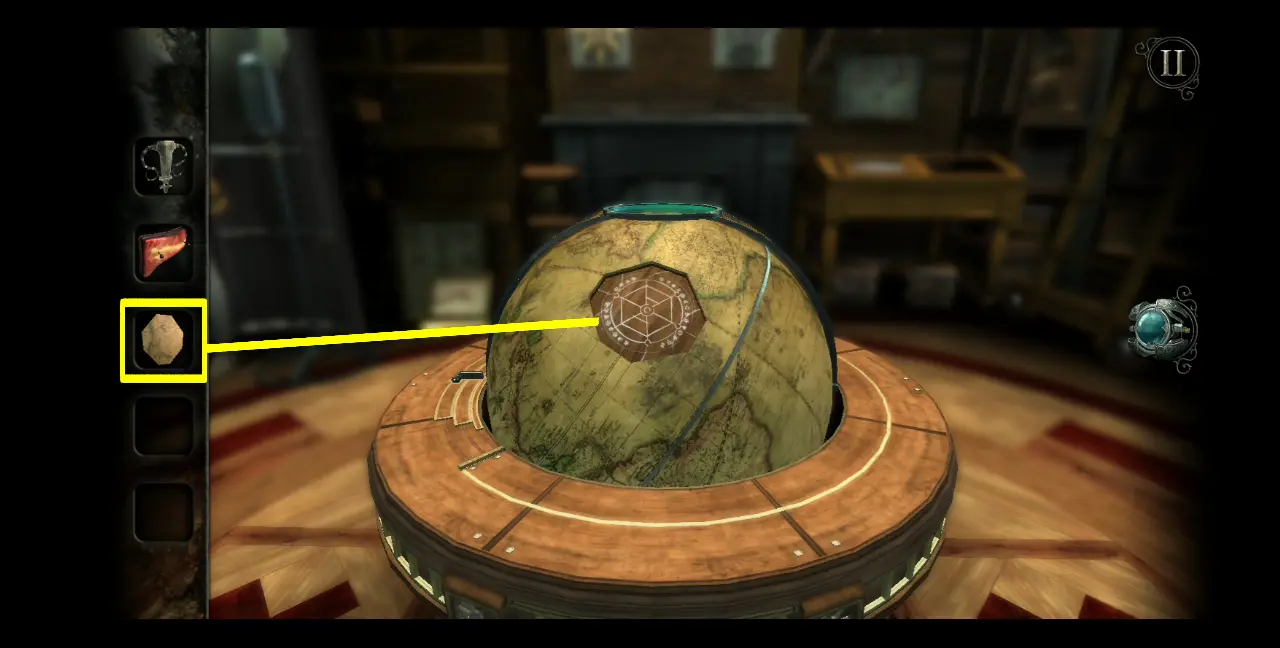
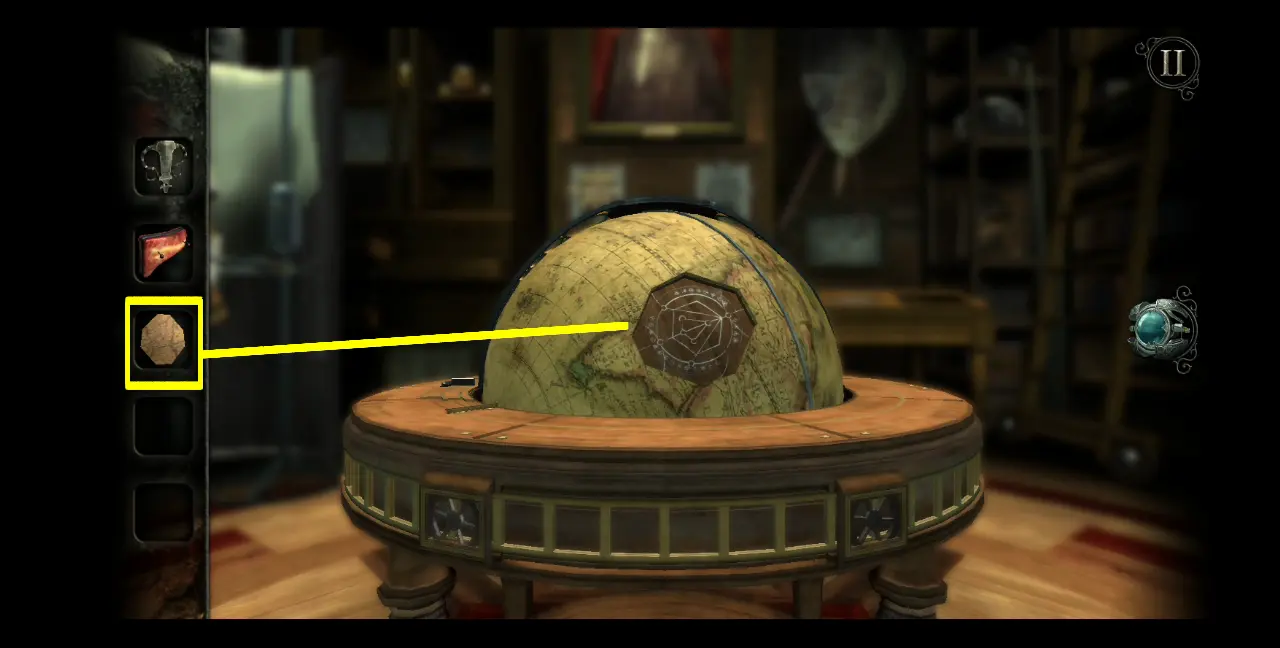
Obviously, the piece of the map goes into the globe that you can find in the middle of the room. If you check the piece from your inventory, you’ll see that it’s part of Africa’s northwestern shores. Head to the globe and place the map piece on one of the missing slots near Africa. If the map piece is placed on the incorrect slot, the game will display a prompt and you’ll be able to recollect the map piece and place it in the right slot.
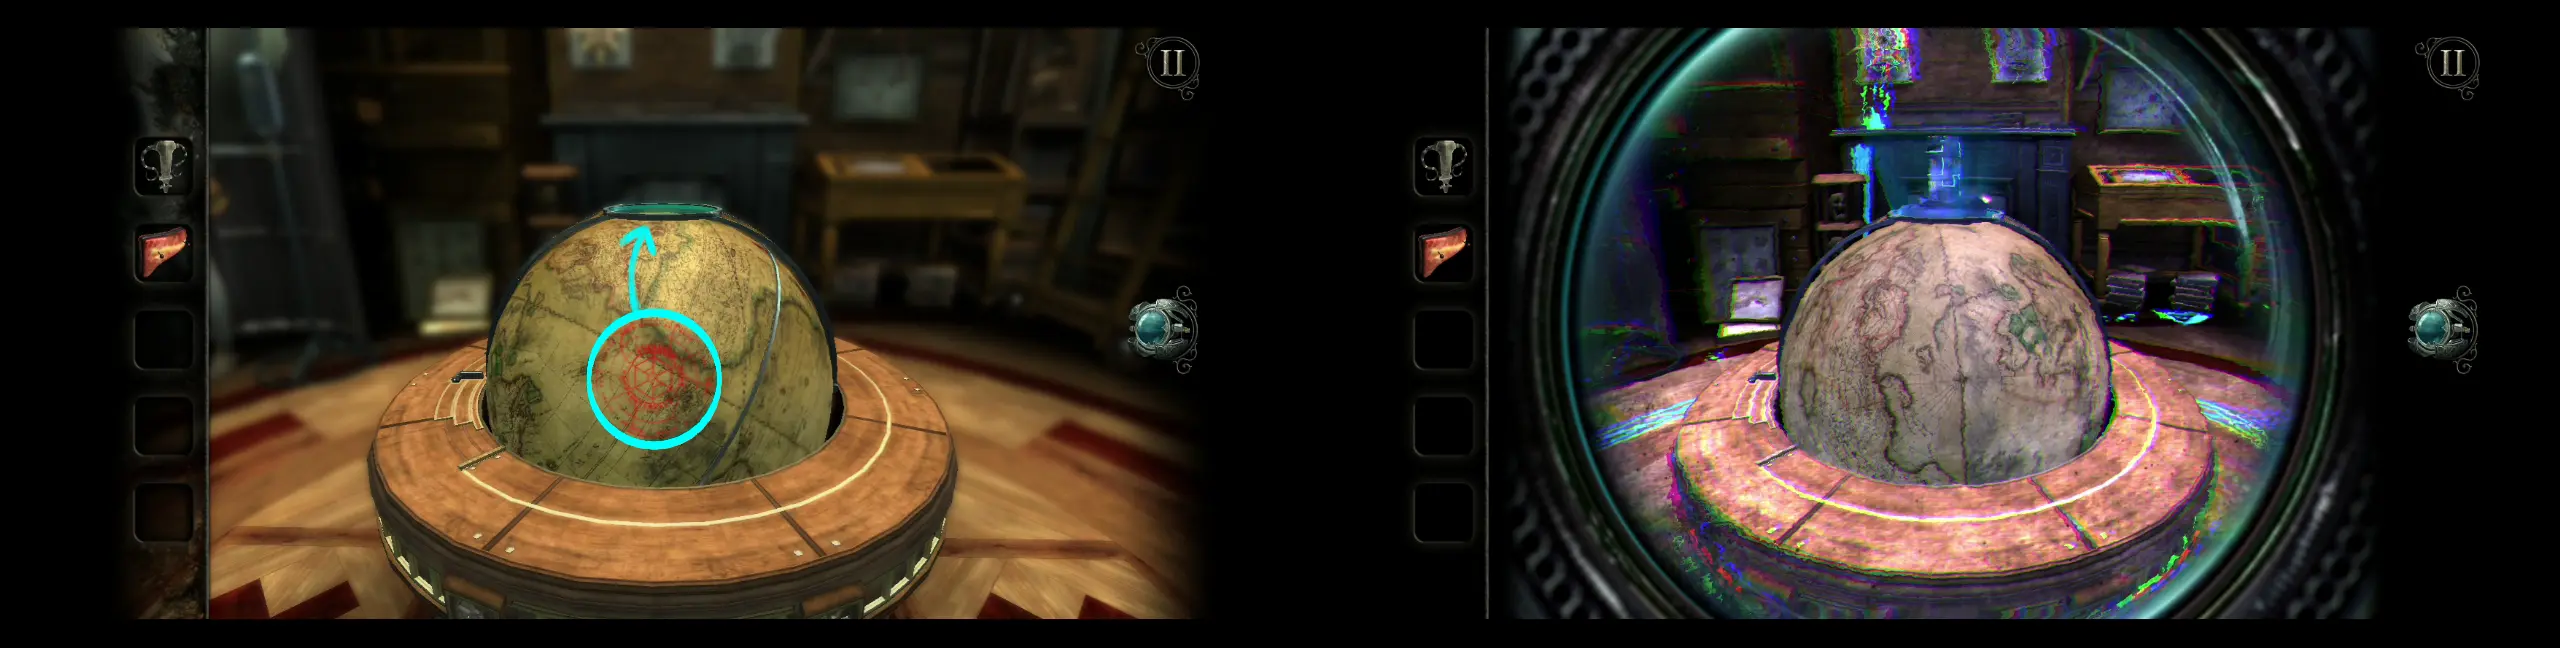
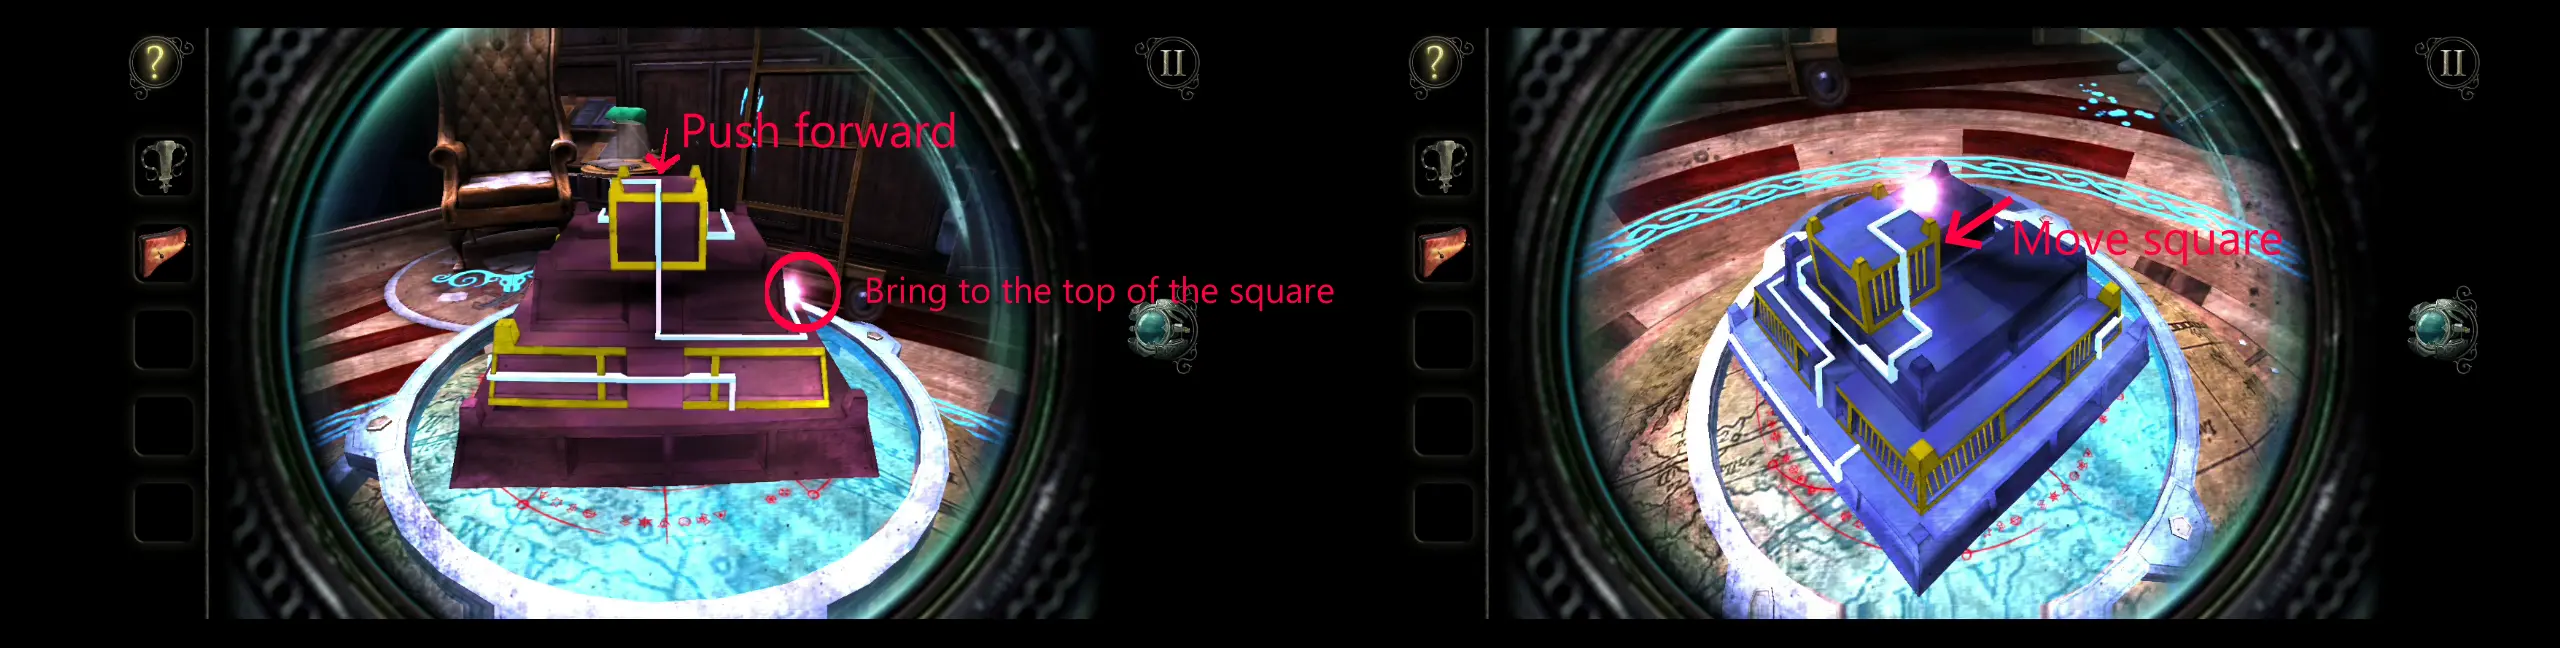
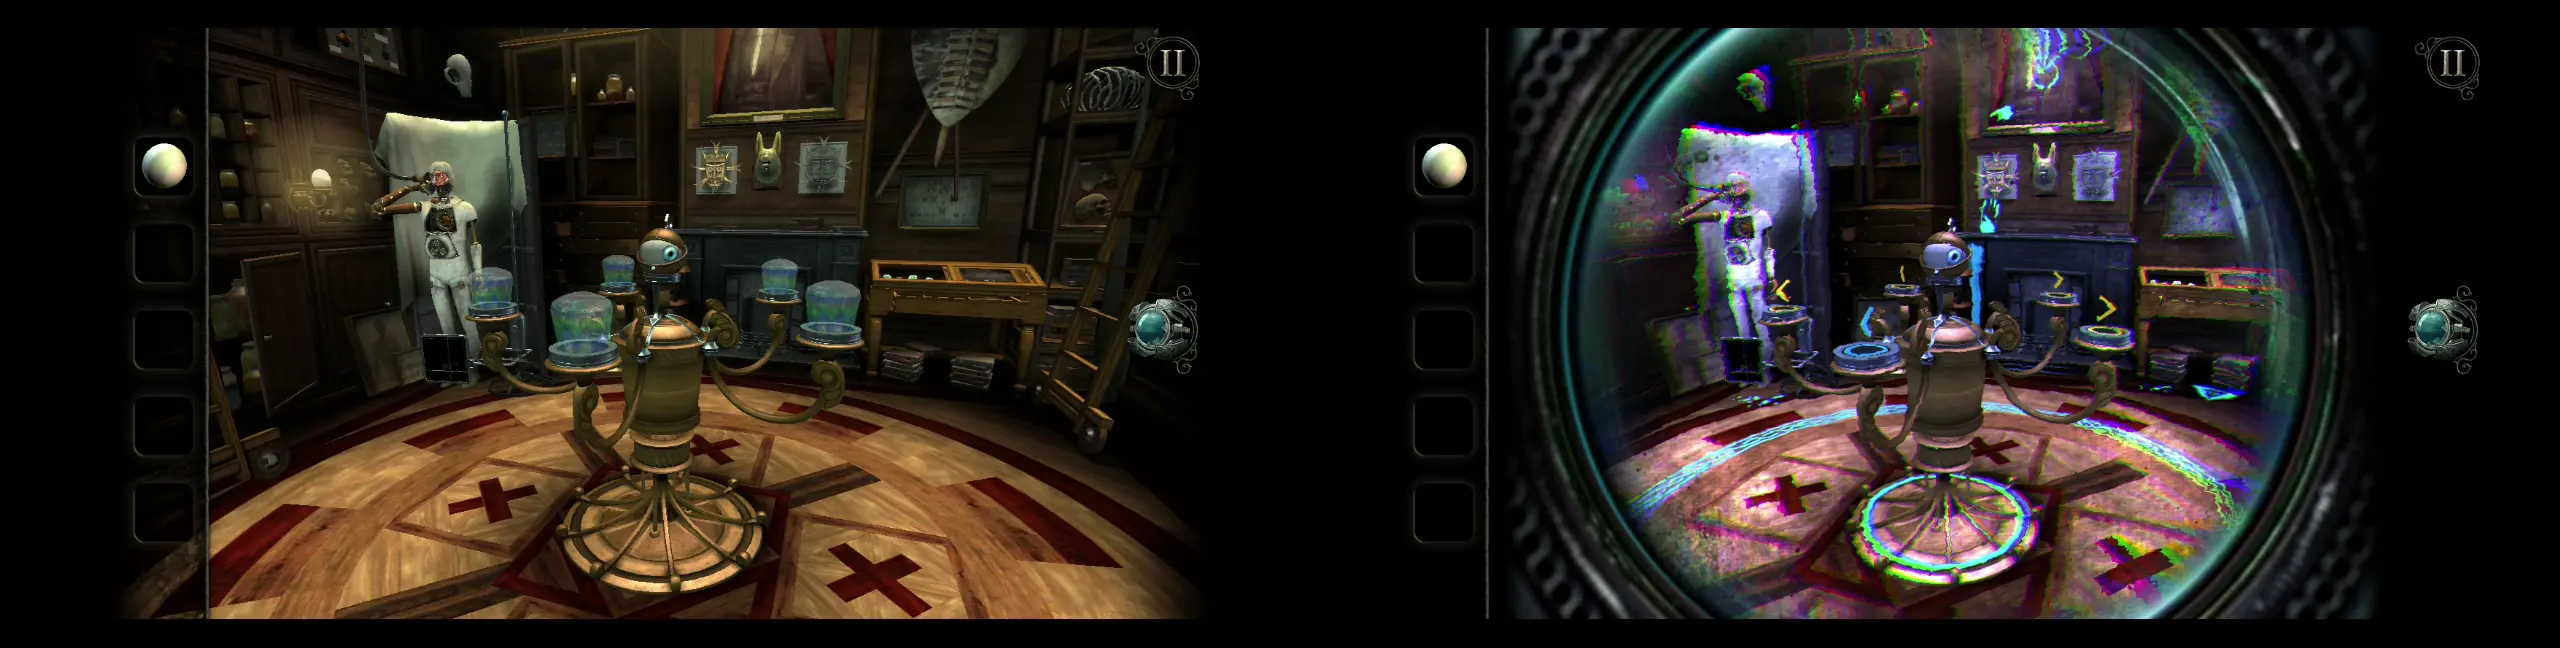
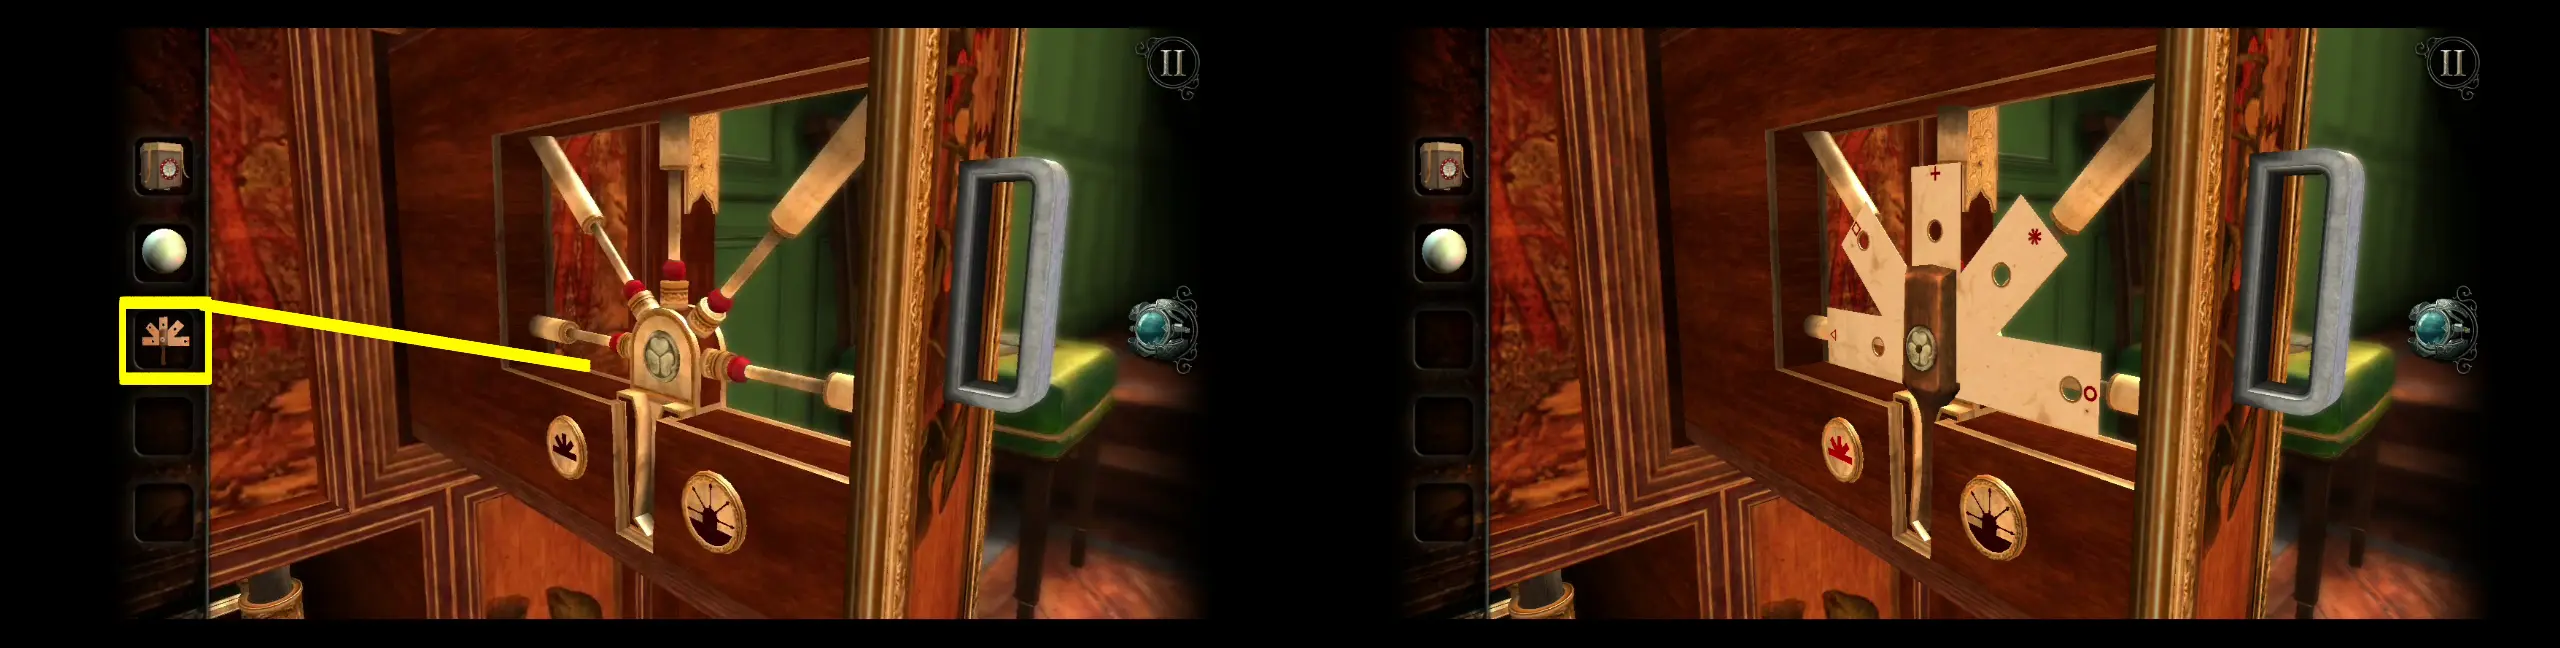
A red, glowing symbol will mark the correct piece. Move the globe so that this part marked in red will be placed directly under the lens situated on top of the globe. If you open your eyepiece, you’ll see that a figure will emerge.
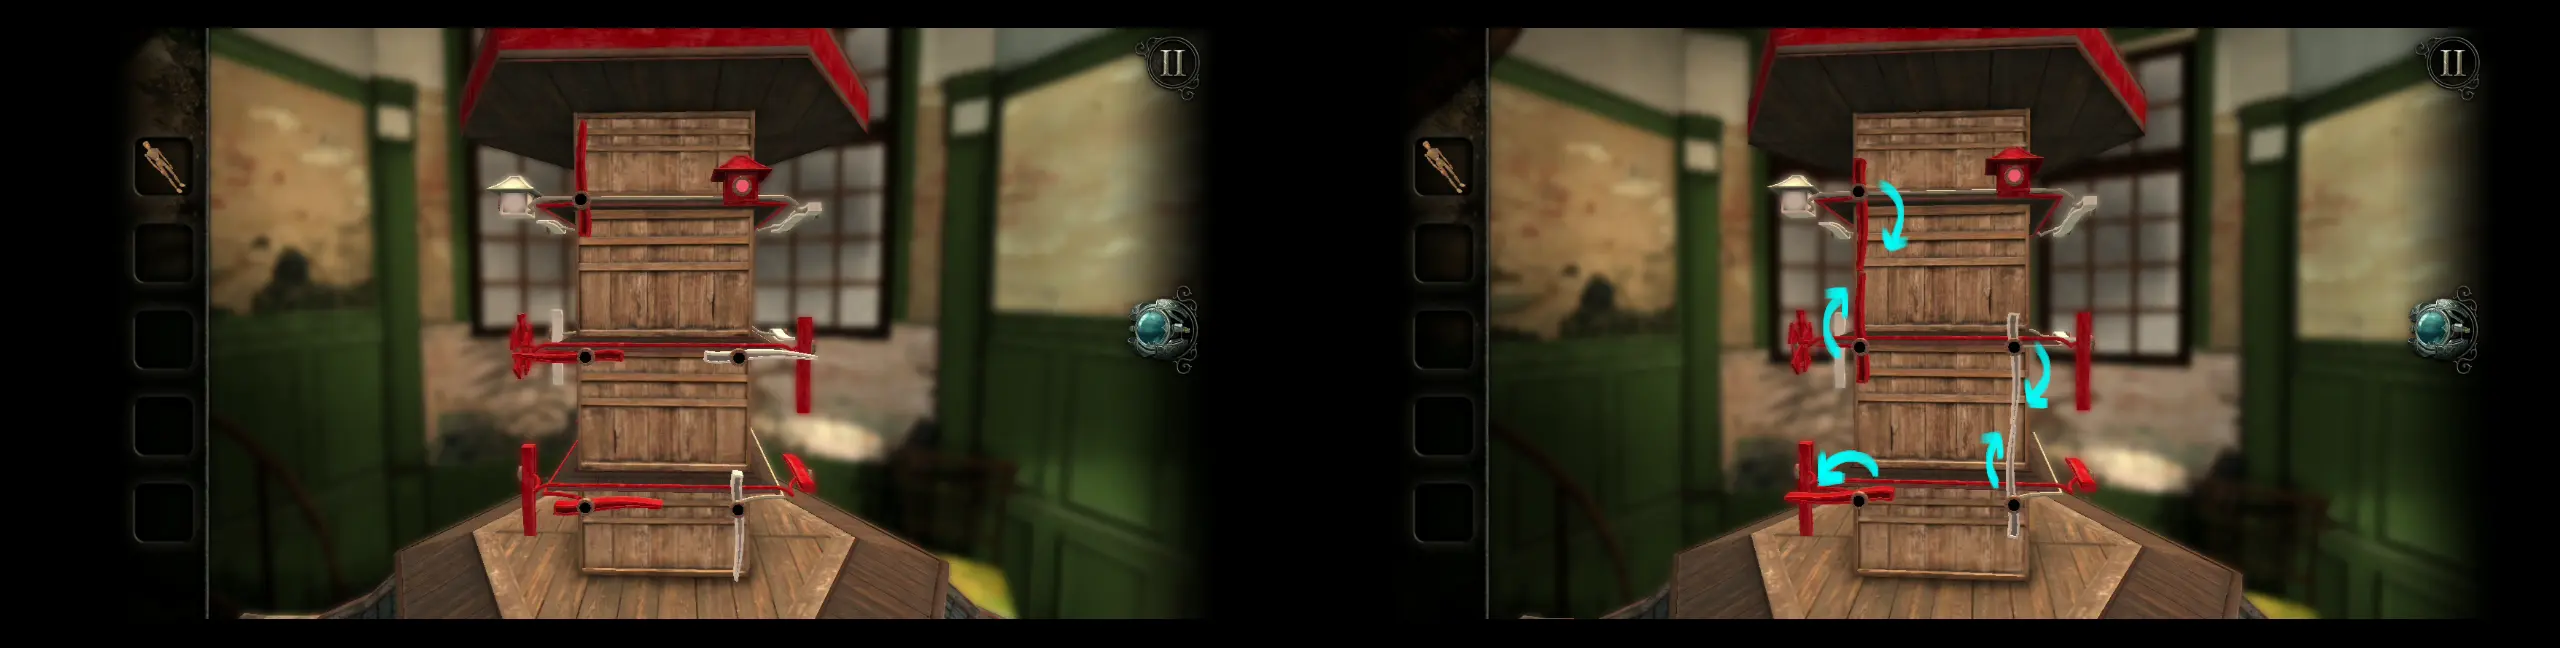
Zoom into the figure, which looks like a tower. You’ll notice that there’s a ball of light at its foot. There are also blue lines marking a path where the ball of light can move. If you try to move any segments of the tower, you’ll see that the 2nd, 4th, and 6th segments can be turned all together while the 1st, 3rd, and 5th segments will remain fixed in place. You may move around the tower as well to get a good look of the rest of the structure.
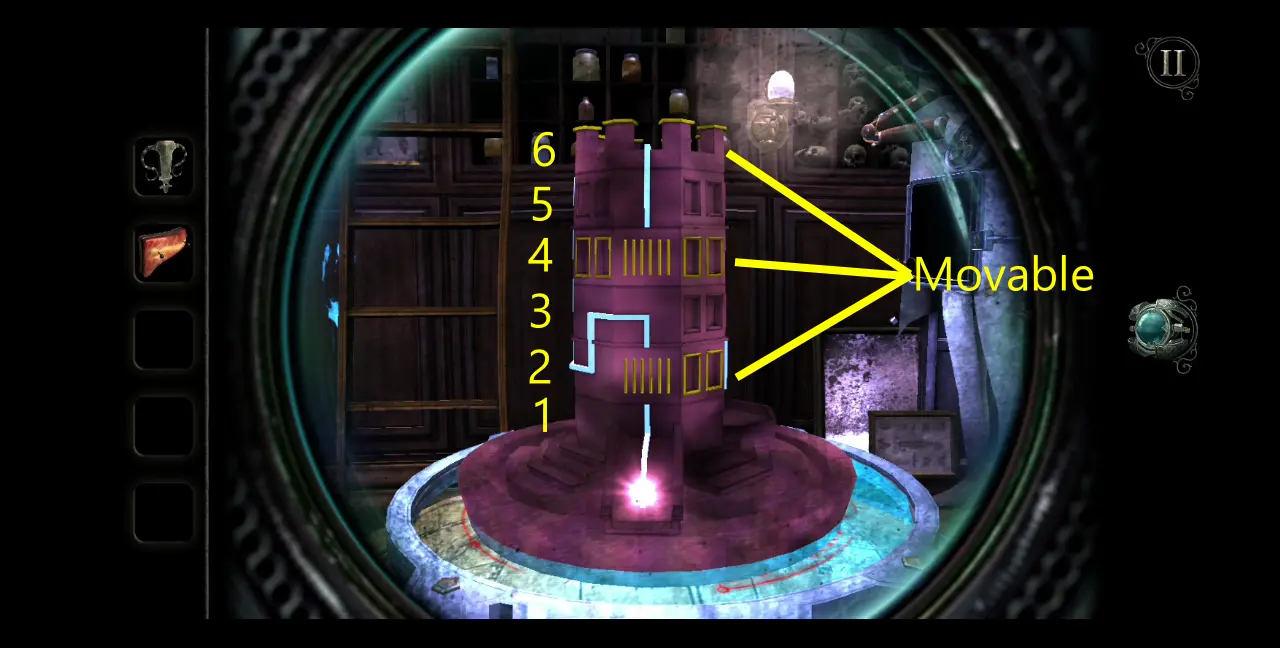
The objective of this puzzle (and two more similar puzzles that you will encounter after this one) is to bring the ball of light to the right location in the structure, which is marked by a circle at the end of the path. In this case, you can find this at the top of the tower.
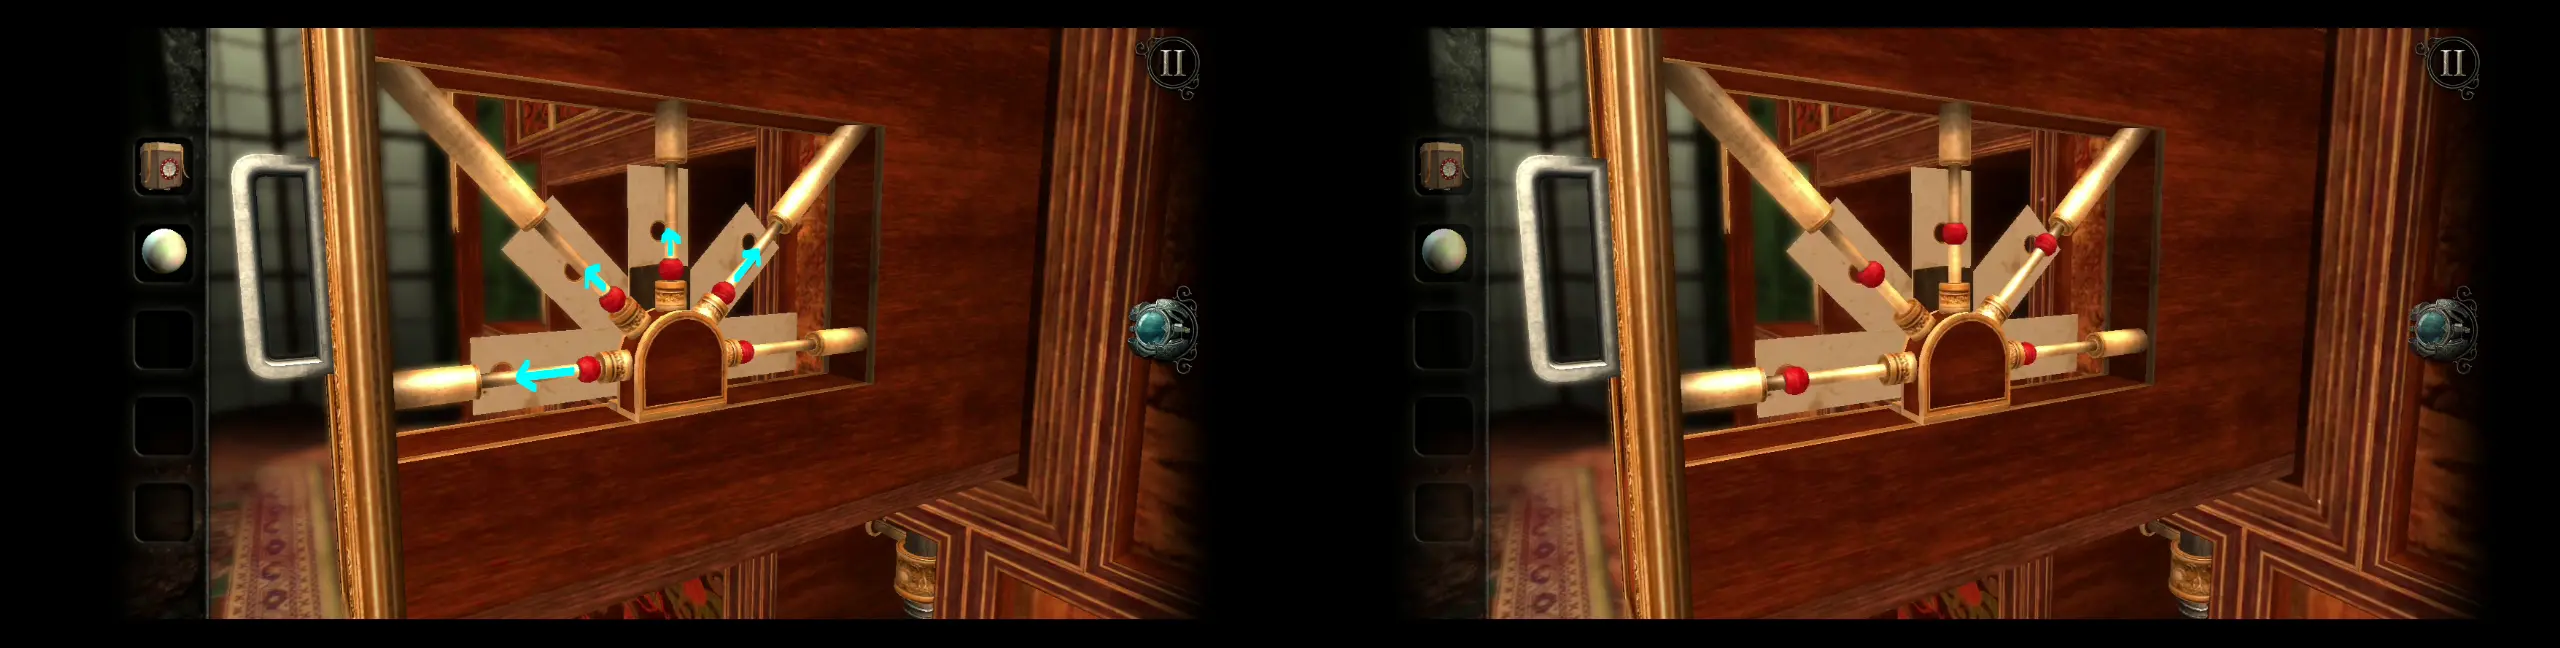
For this puzzle, make sure you begin directly facing the ball of light at the foot of the tower. Turn the segments so the 2nd segment will be a straight line toward which the ball can ascend. However, don’t move the ball of light to the 3rd segment.
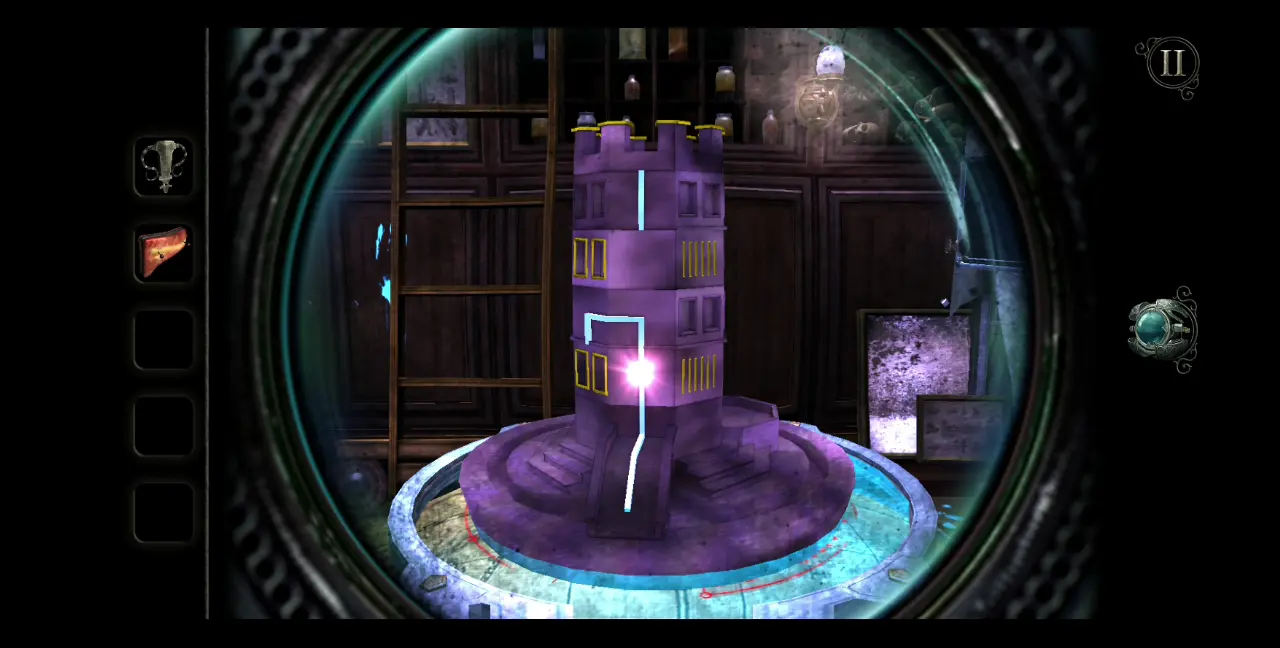
Instead, turn the 2nd segment until you’re facing a path that looks like an N. You can find this if you move to the left of the tower. Bring the ball of light up that N path to the 3rd segment.
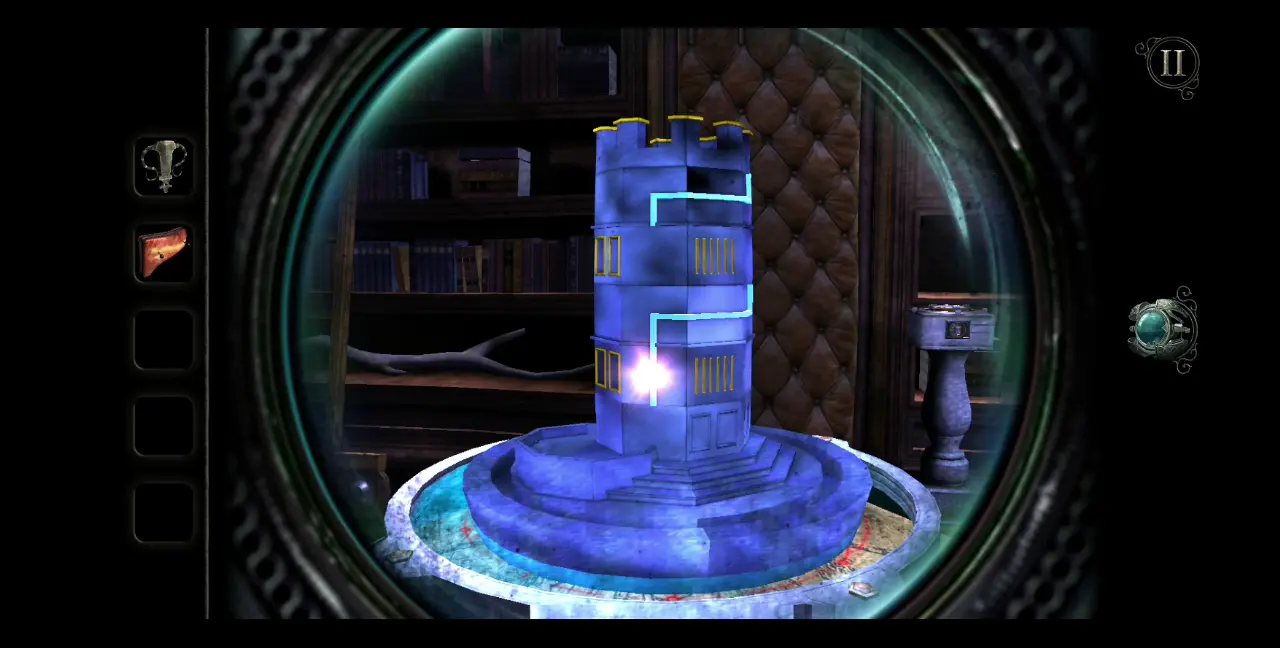
As the ball of light is at the 3rd segment, move the 4th segment until you connect a straight line to the 3rd segment. Bring the ball of light up the 4th segment.
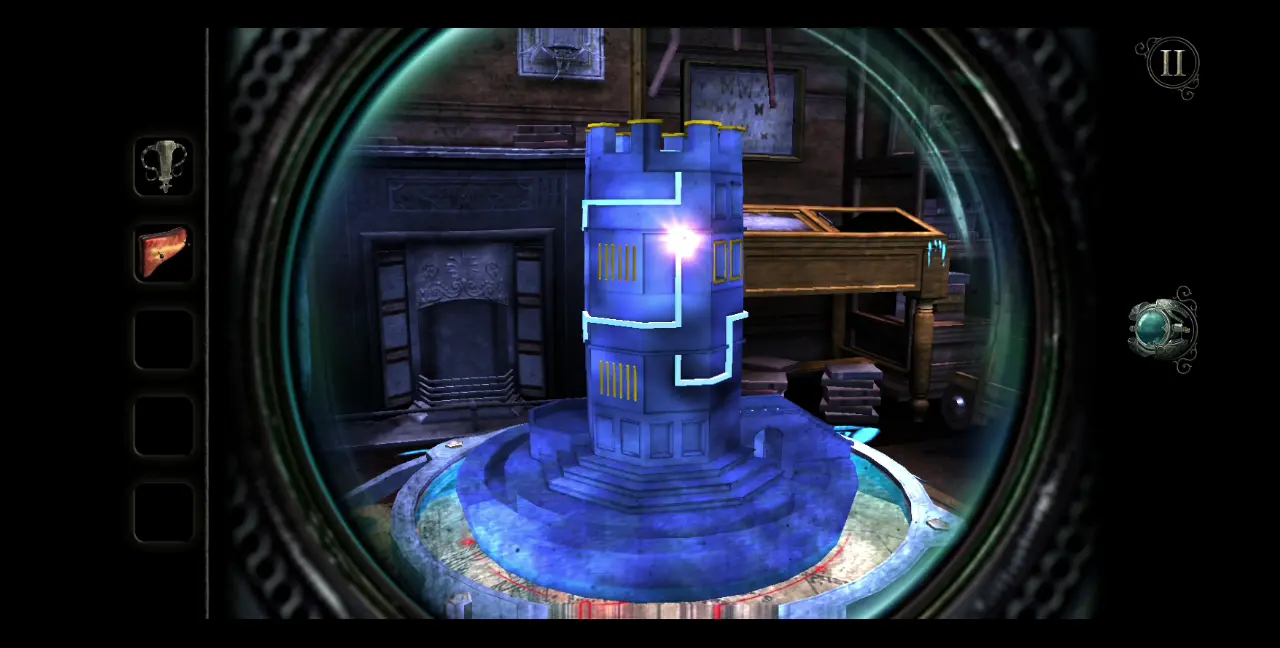
Since you can’t move the 5th segment, move the 4th segment until you connect to a straight line so the ball of light can go up the 5th segment.
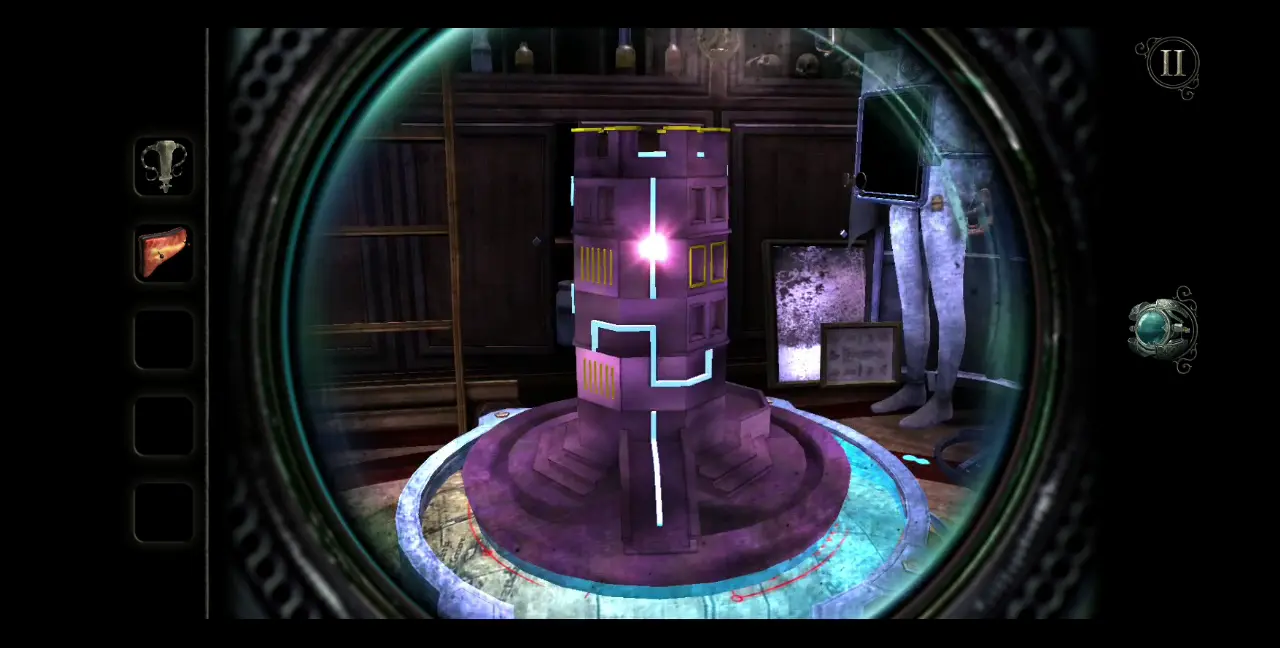
Turn the 6th segment so you can connect the 5th segment to a line that goes right up the top of the tower.
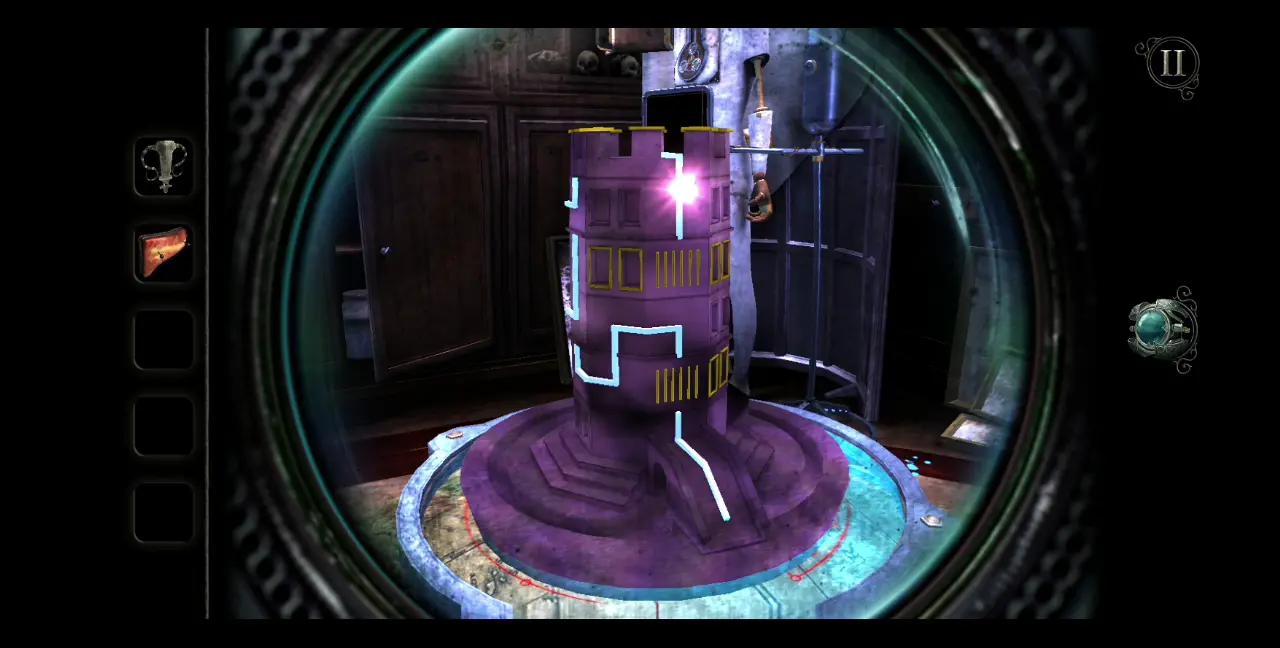
At the end of the puzzle, you should be able to bring the ball of light to the very top.
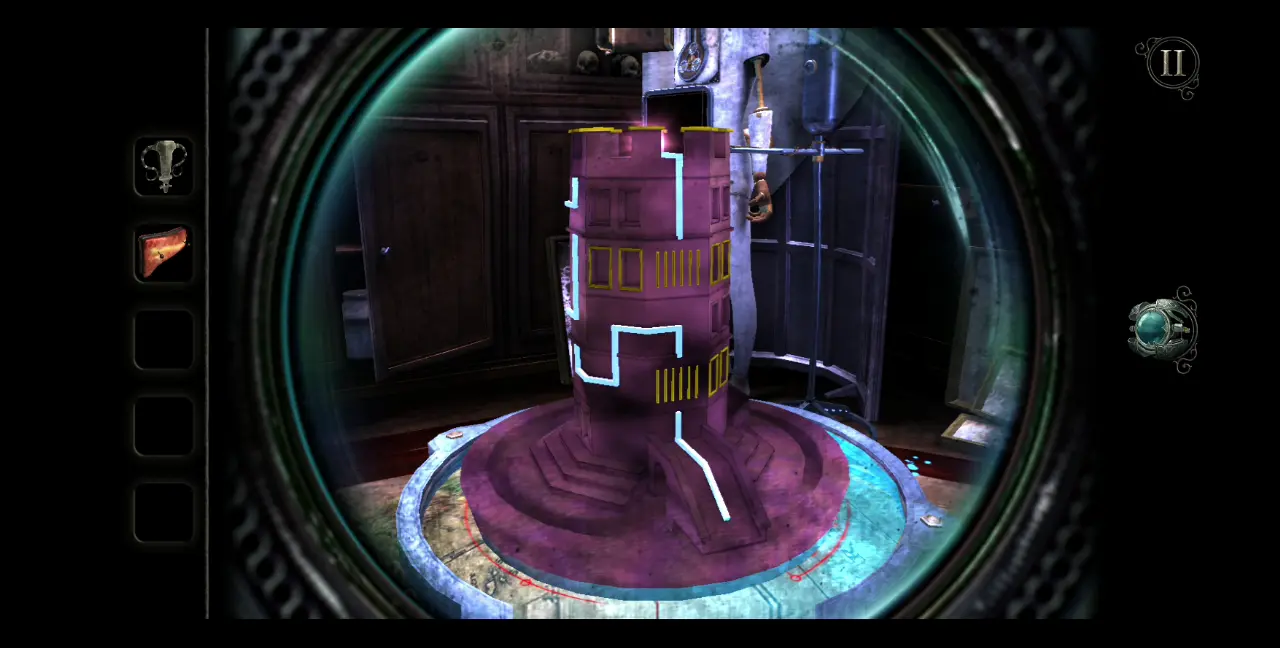
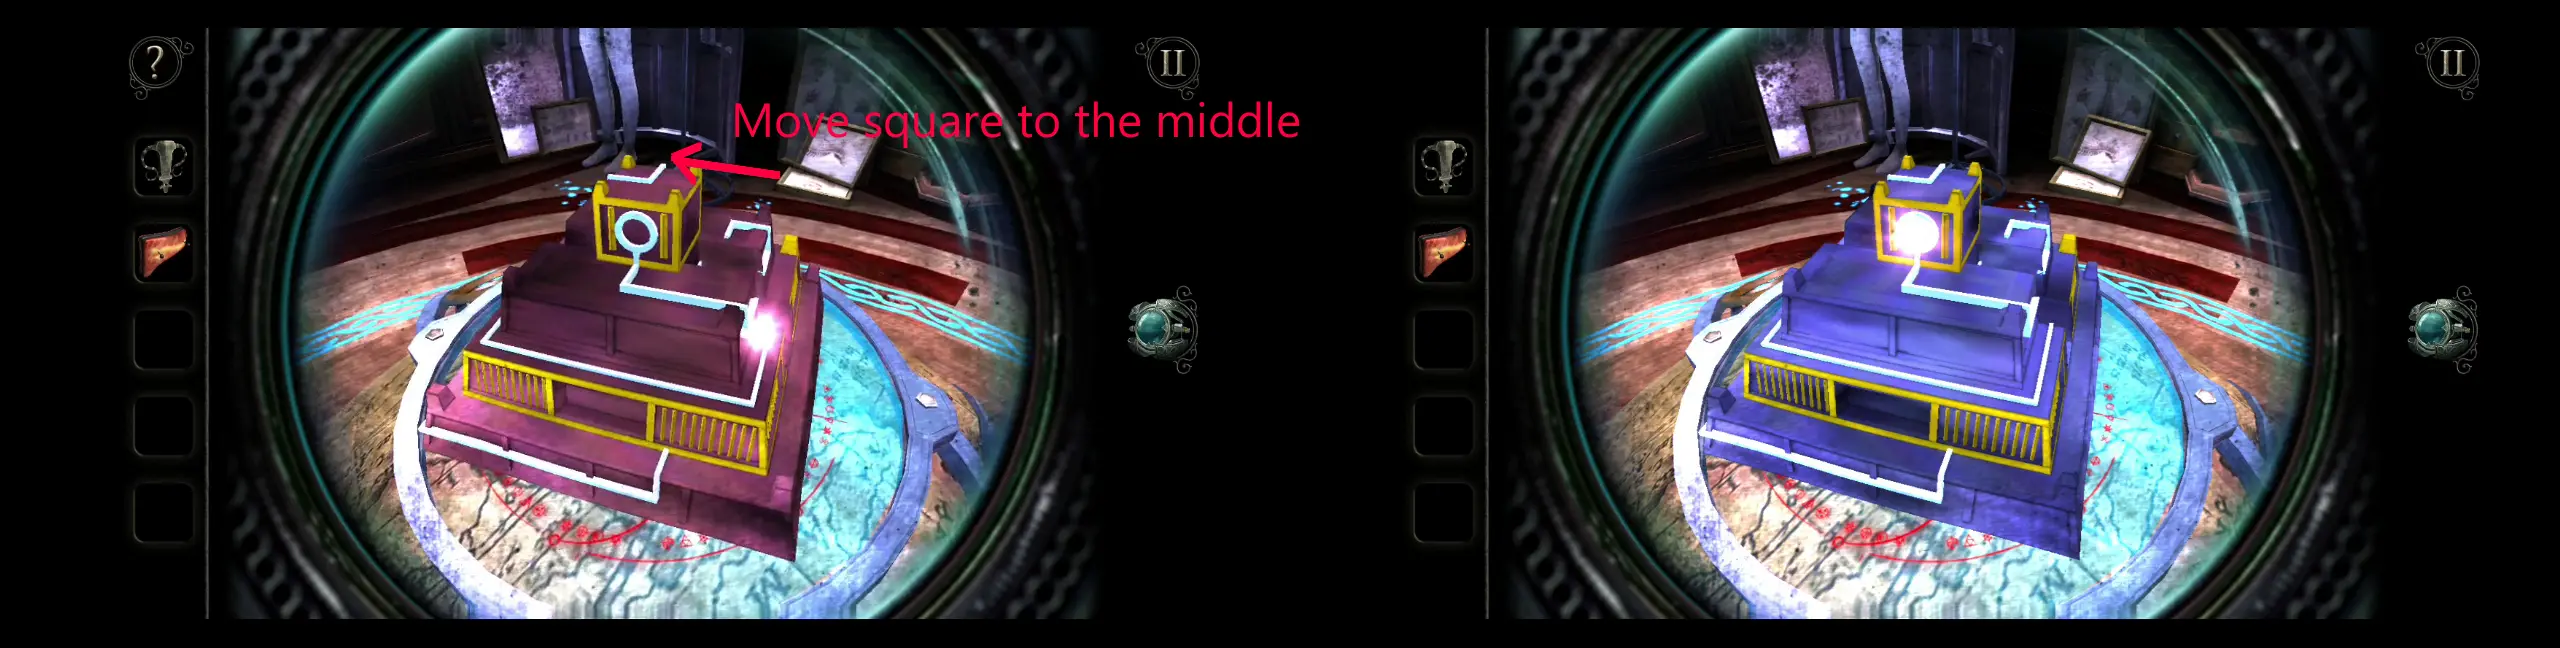
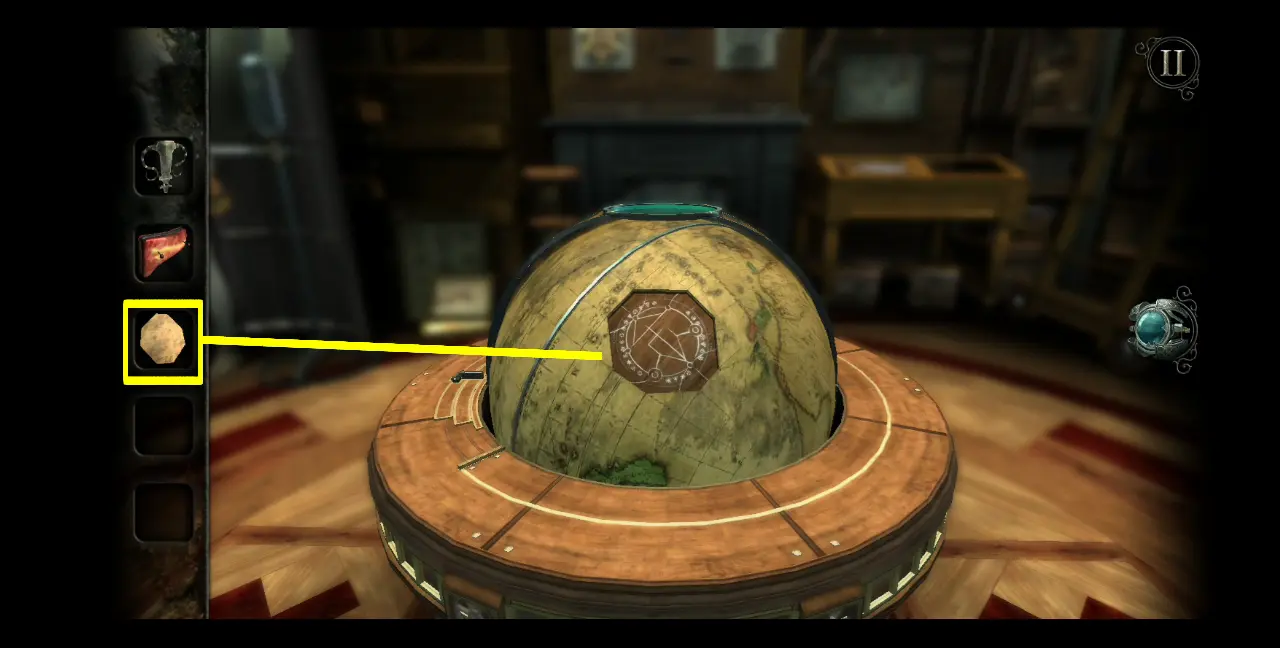
A burst of light will briefly flash. Afterwards, gears from the table upon which the globe is situated will turn. A drawer will open, revealing another piece of the map.
This piece, when viewed from the inventory, is one that fits near South America. Find this region on the globe and place this piece on that slot.
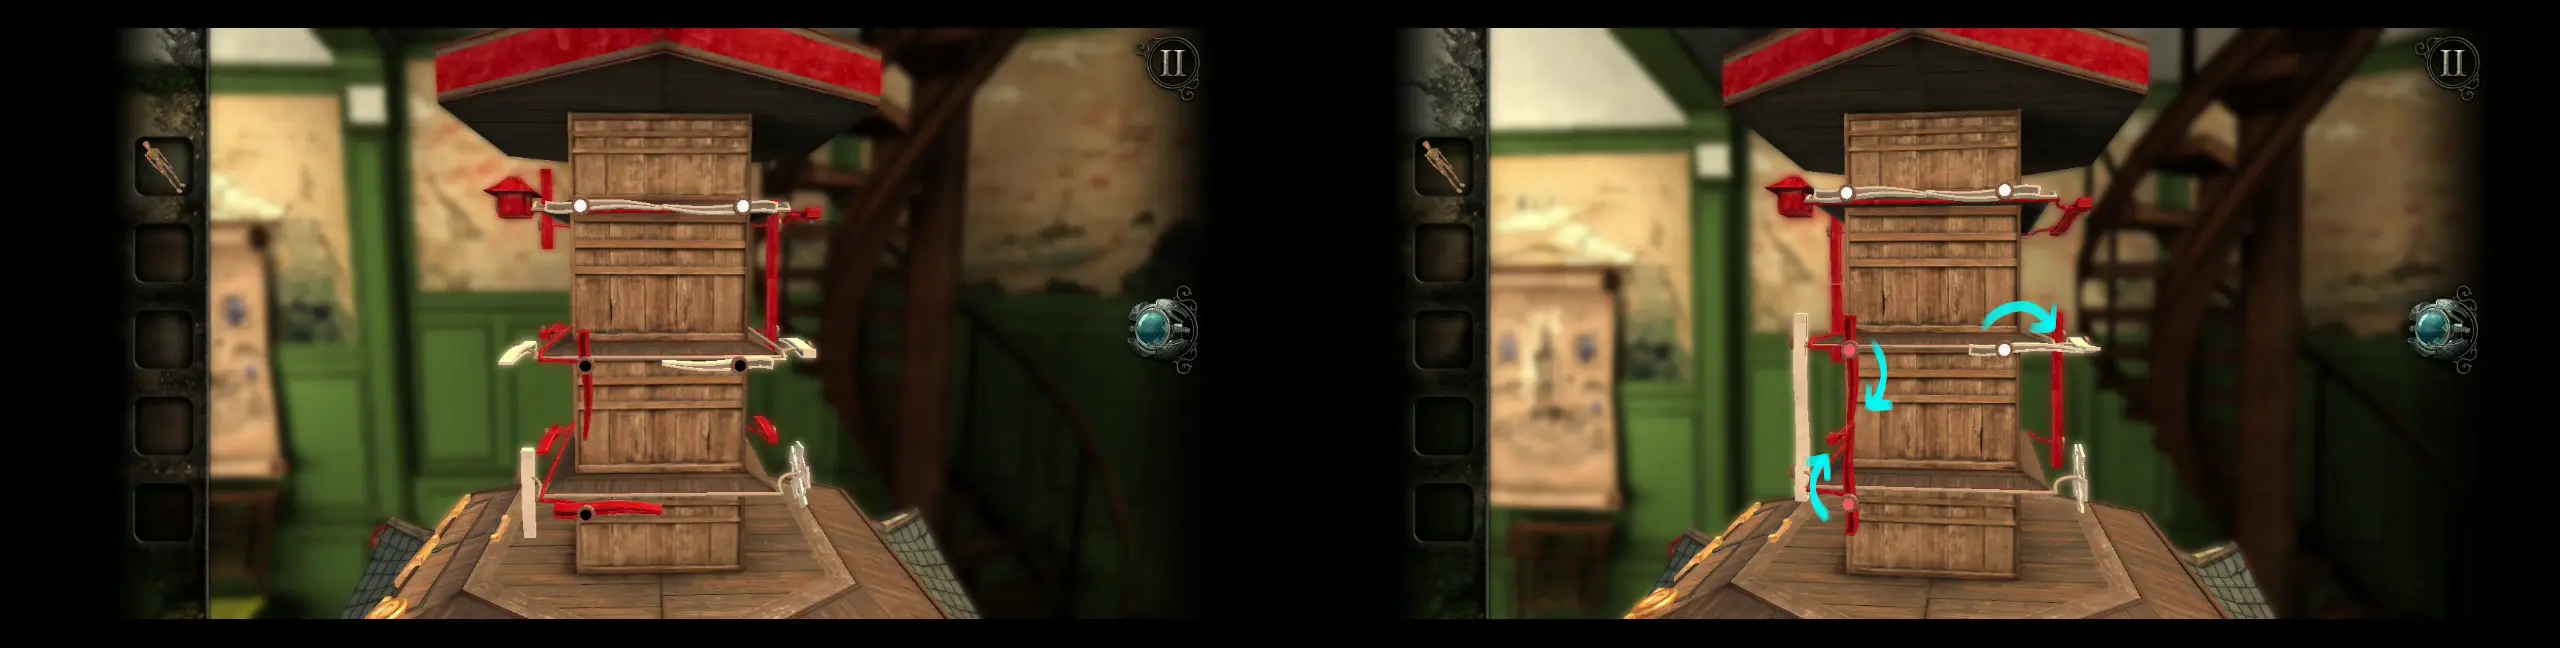
Similar to the first puzzle, this region will be marked in red. Move the globe so that this piece is placed directly under the lens at the top. Then, open your eyepiece to reveal the new structure, which, this time, is a pyramid.
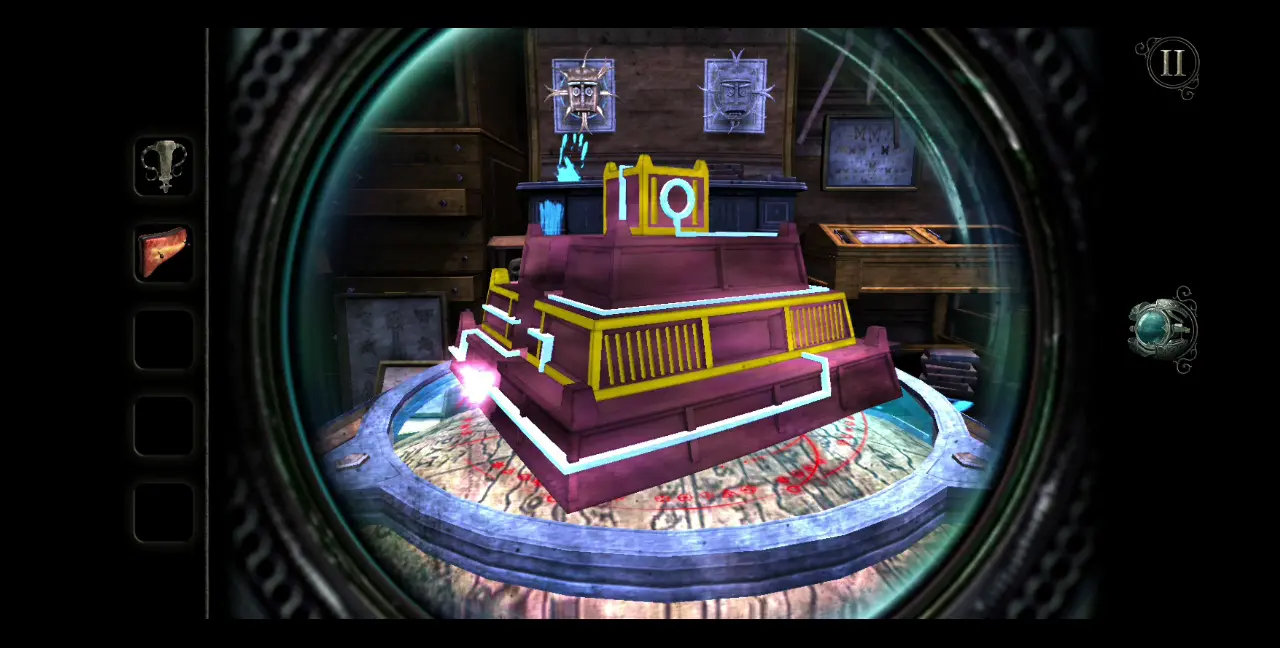
Similar to the last puzzle, your objective is to bring the ball of light to the circle at the end of the path. For this structure, the very bottom of the pyramid remains fixed but the 2nd and 3rd layers can be rotated as one piece. The only other piece that can be moved somewhat separately is the rectangle at the center of the pyramid, which is connected to the 4th layer or the square found at the very top. This piece can be moved back and forth the slot it’s on.
To begin this puzzle, move a little to the left of the pyramid, which is where you will find the ball of light. Move the ball of light all the way to the right.
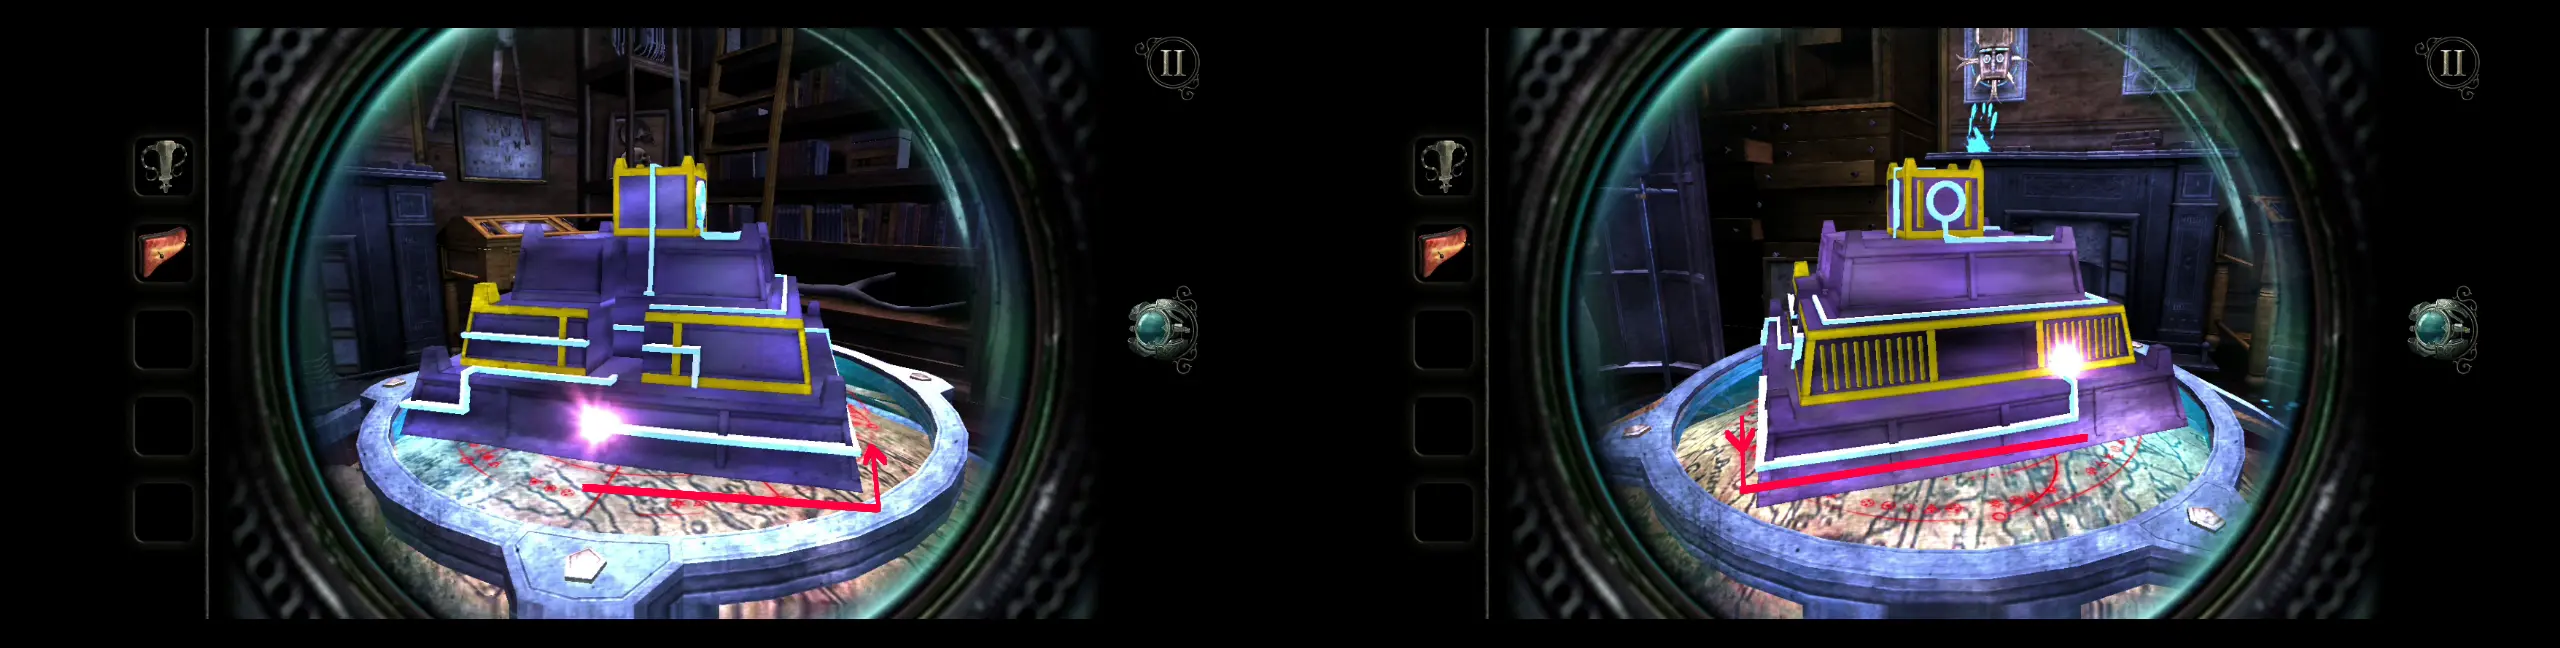
Then, turn the top half of the pyramid until you come across the part that looks like a segment with a line connecting to the bottom and separated only by a gap in the middle. Then, move the square part of the pyramid forward, which will then connect the gap between the blue lines in the 2nd layer. Move the light ball all the way to the left of the 2nd layer.
With the ball all the way to the left, turn the top half of the pyramid twice until you come across the path shown in the screenshot to the right. Follow the path all the way to the left.
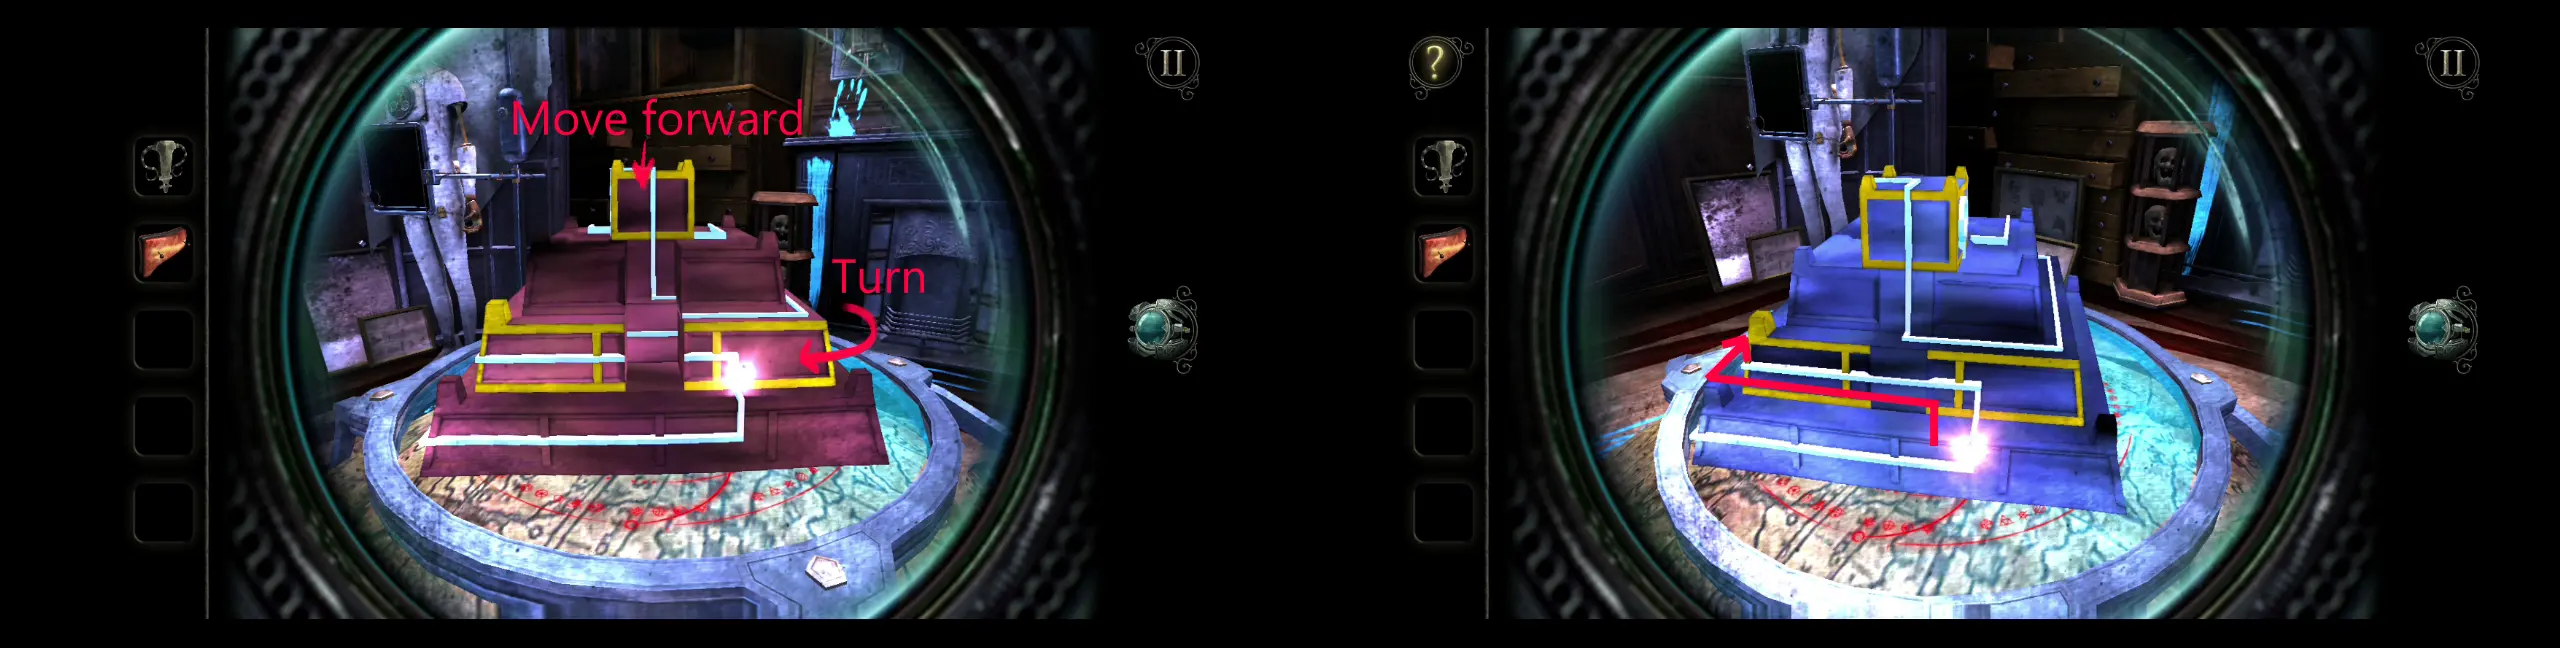
Push the square forward to align with the path on the 3rd level of the pyramid. Bring the ball of light all the way to the top of the square. Once the light is at the top, shift your perspective to the left then move the square forward as shown in the screenshot to the right. This should be the path that the square is aligned with. Follow the path all the way to the left.
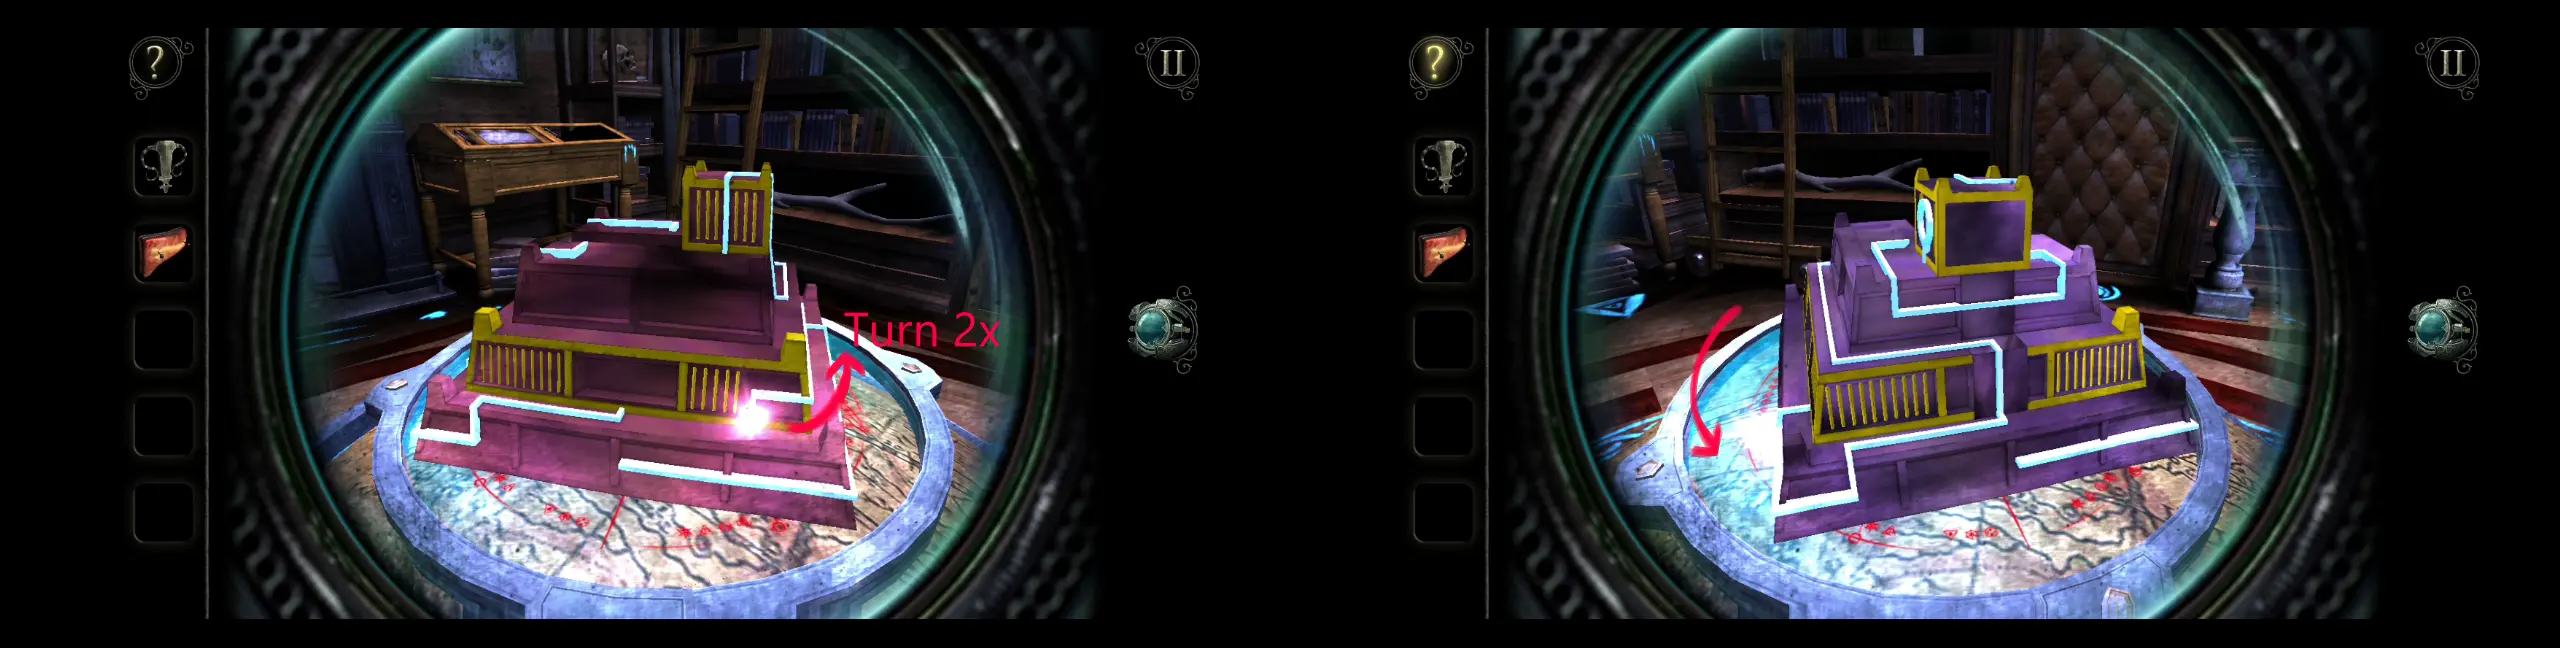
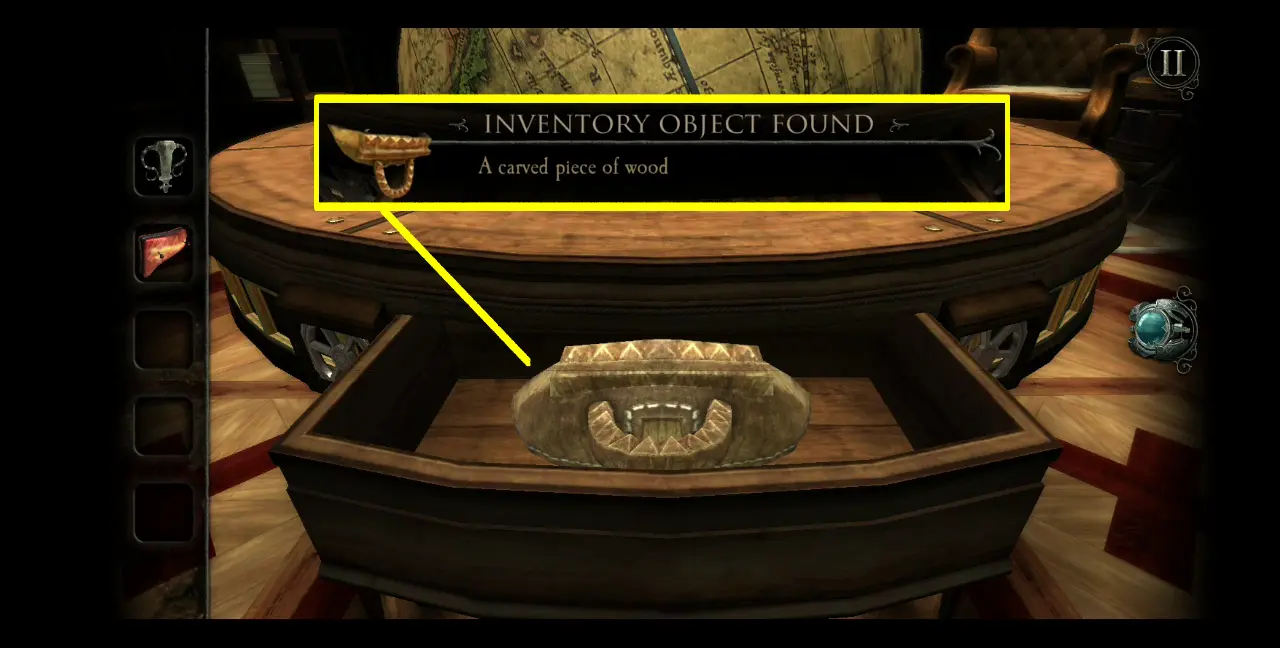
The ball of light should still be in the 3rd segment of the pyramid. Shift your perspective to the left again, then move the square to the middle of the slot, aligning it with the path that the ball of light should be currently on. Follow the path all the way up until the ball of light reaches the circle, as shown in the screenshot on the right.
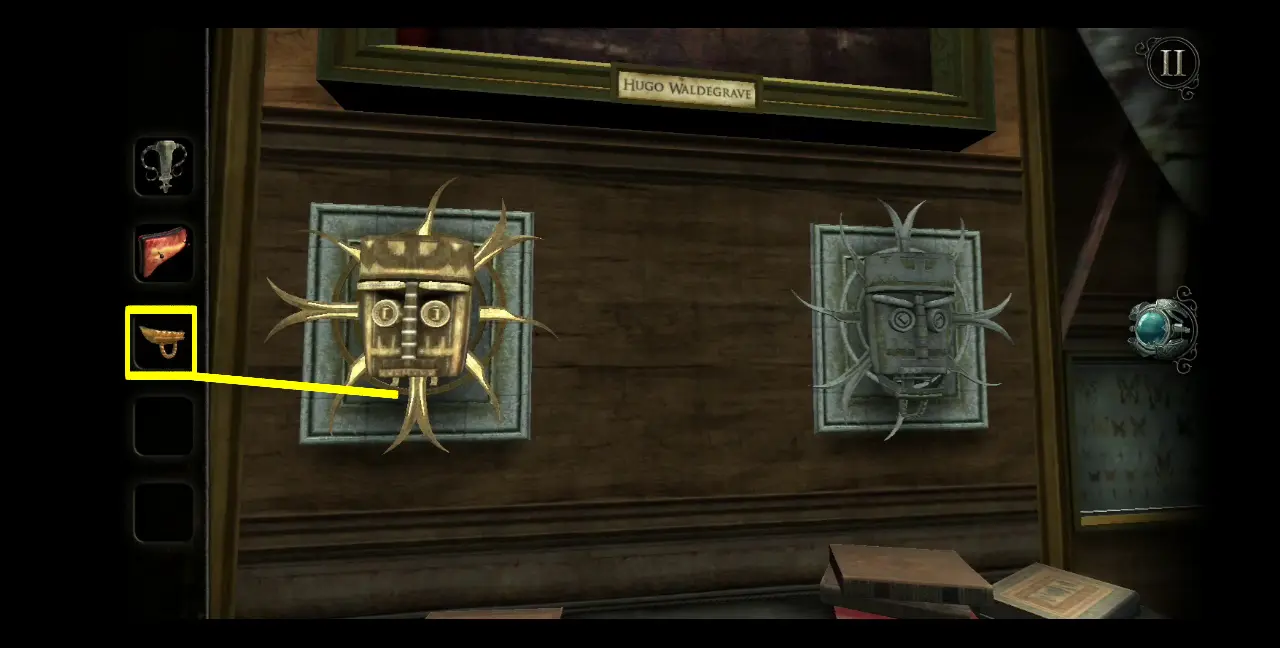
With the puzzle solved, the drawer beneath the globe will open once more. This time, it will have a new item for you: a carved piece of wood.
This carved piece of wood fits perfectly with the wooden tiki mask just under the large portrait of Hugo Waldegrave at the end of the room. Drag the carved piece of wood onto the tiki mask, and you’ll see that it fits perfectly as its jaw.
Beside the wooden tiki mask is a metal tiki mask, which serves as your guide for how to solve this next puzzle. Basically, all you have to do is move the parts of the wooden tiki mask to mirror the metal tiki mask. You have to specifically move the wooden tiki’s eyes, eyebrows, jaw, and the branches surrounding it. Below is a screenshot of the correct position of all these pieces.
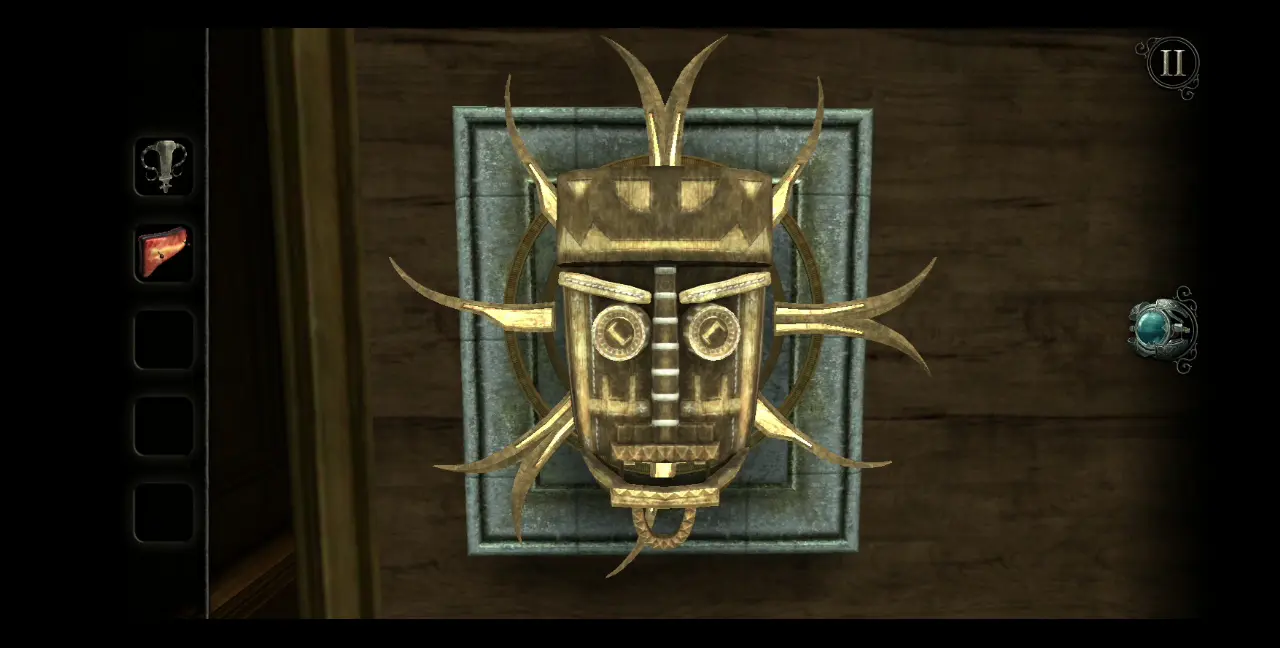
Once you’ve arranged the tiki mask correctly, the branches will spin, causing a compartment between the two tikis to open. It looks like a bracket with a missing object. Take note of this for later as the game will also give you a prompt that something must fit on this bracket. In the meantime, collect the item that’s on it: a piece of map that you can place on the final slot on the globe.

Return to the globe and find the final slot where the map piece can fit.
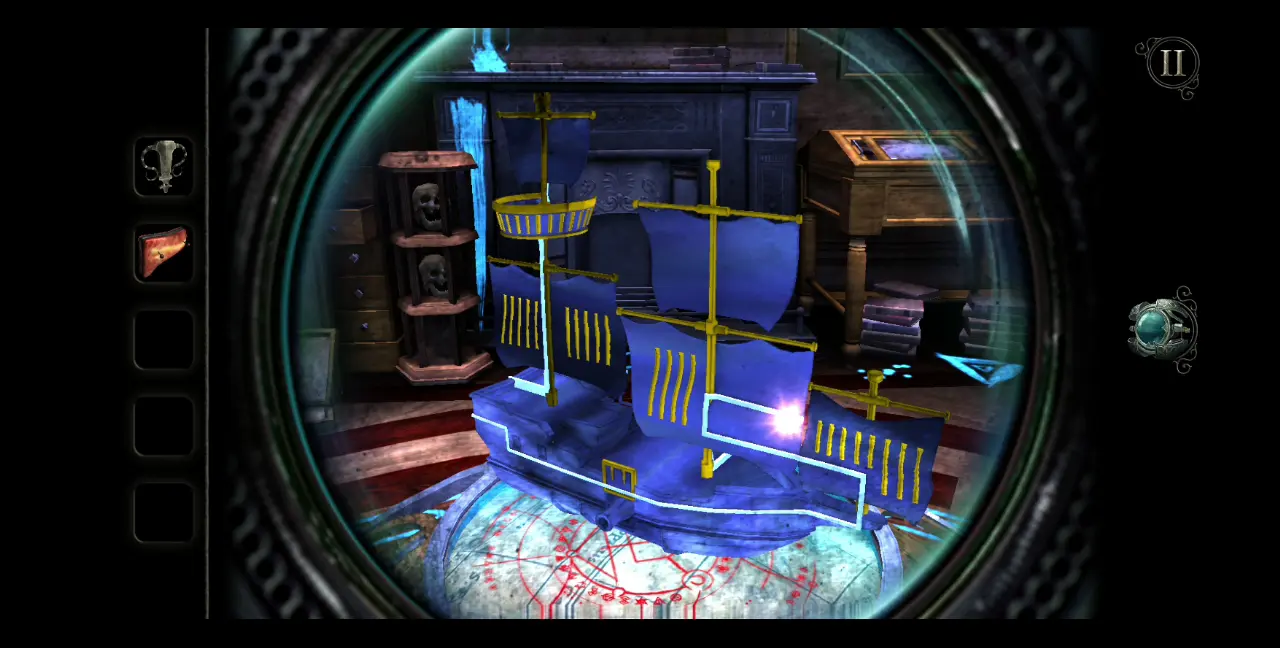
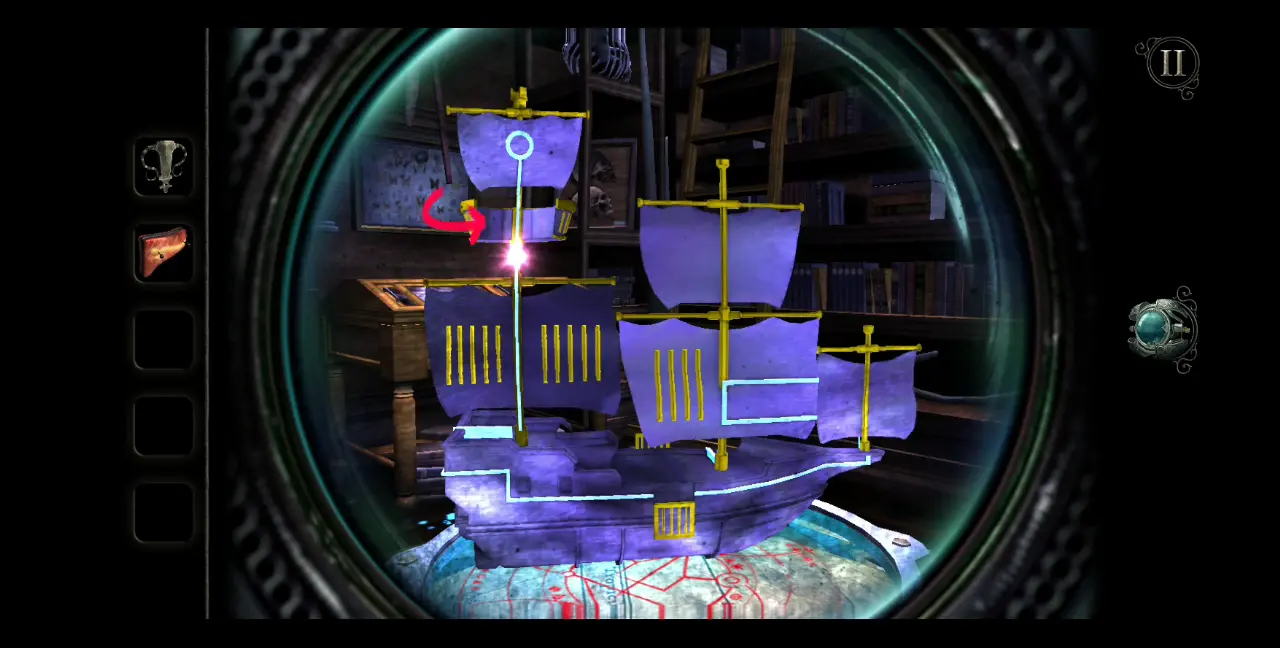
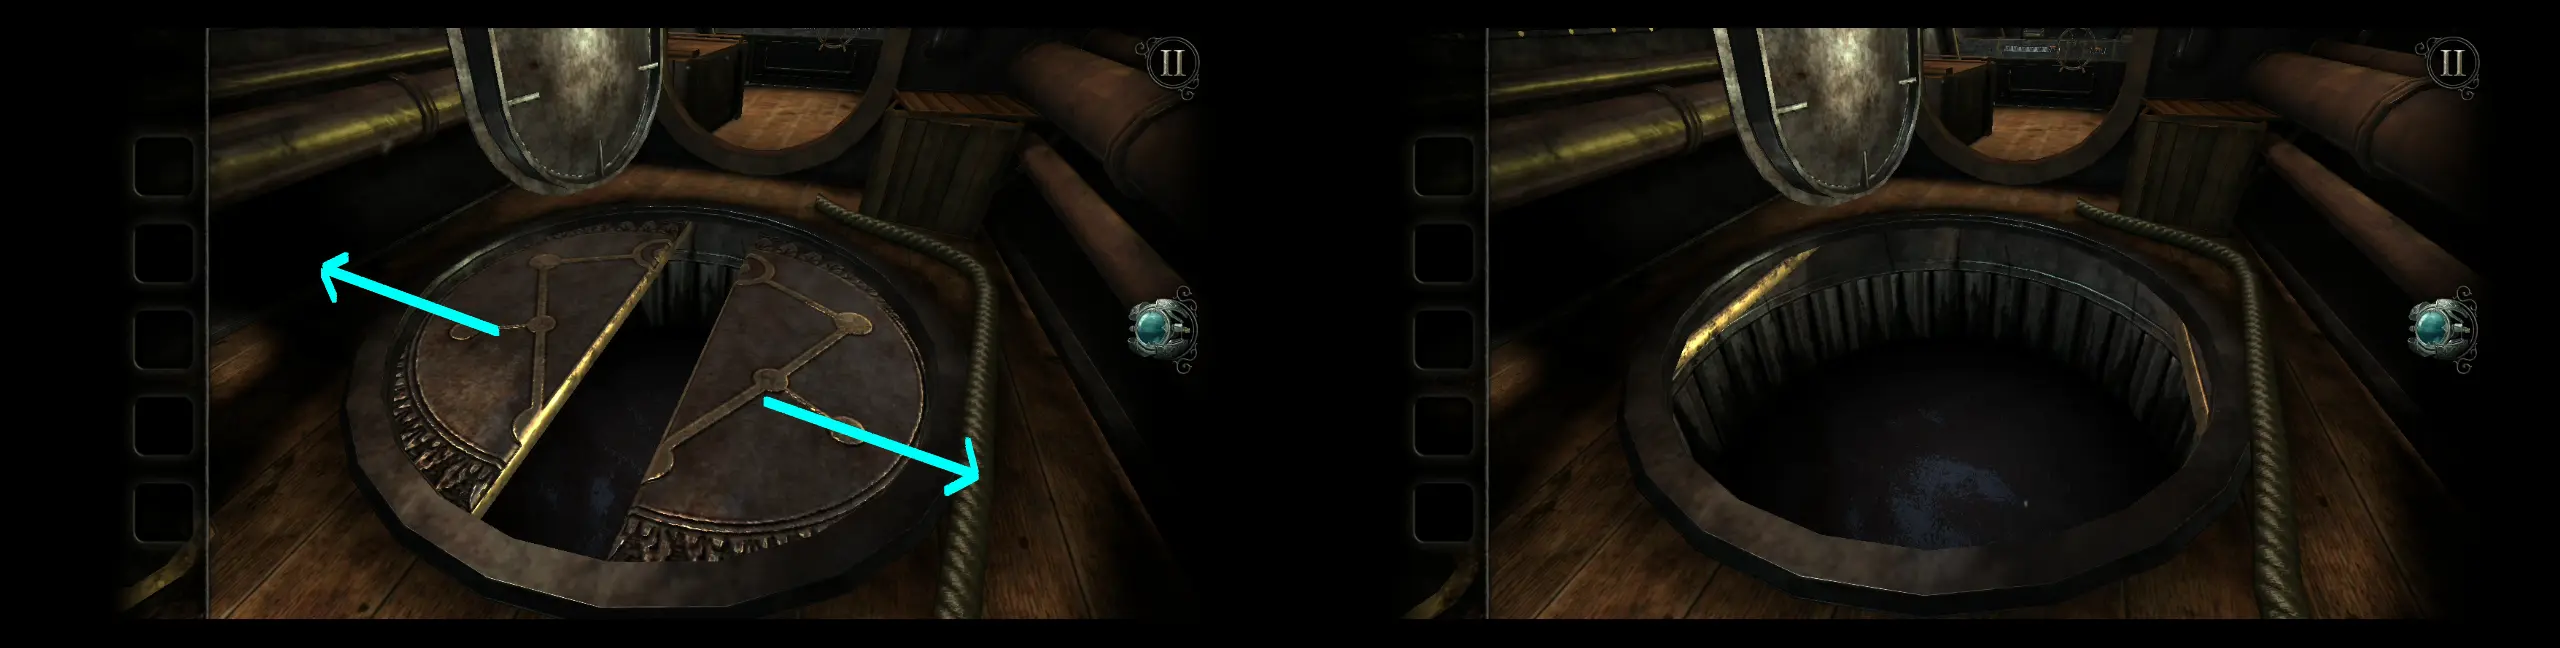
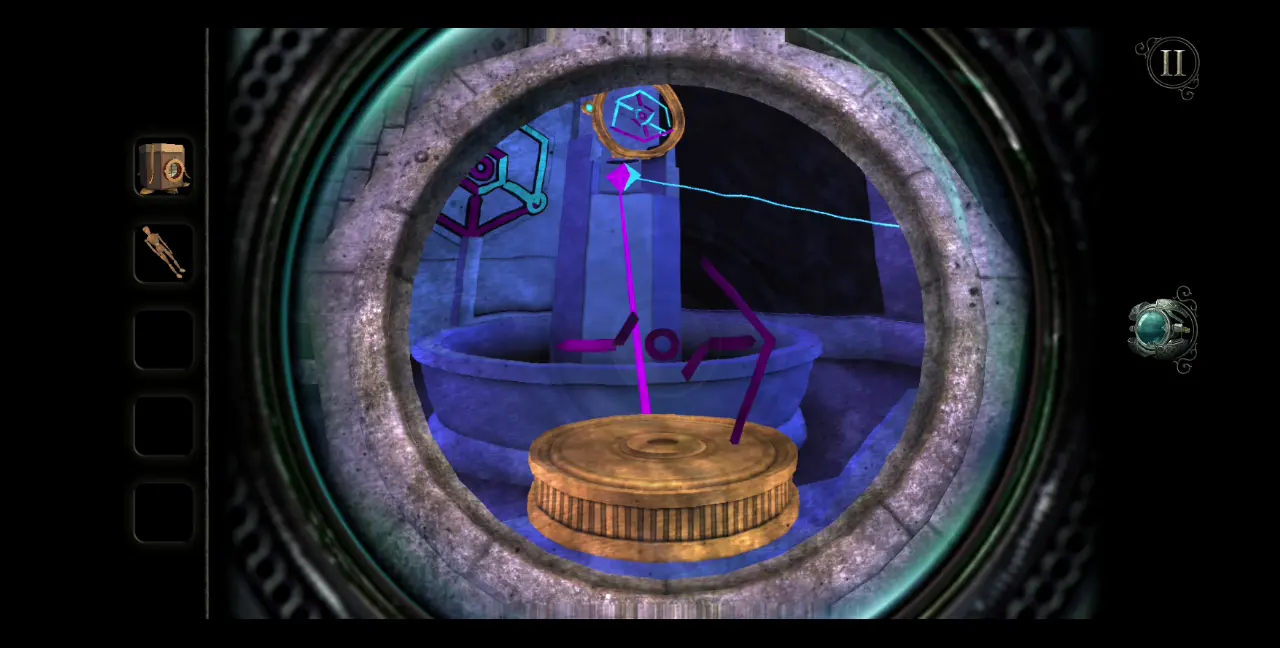
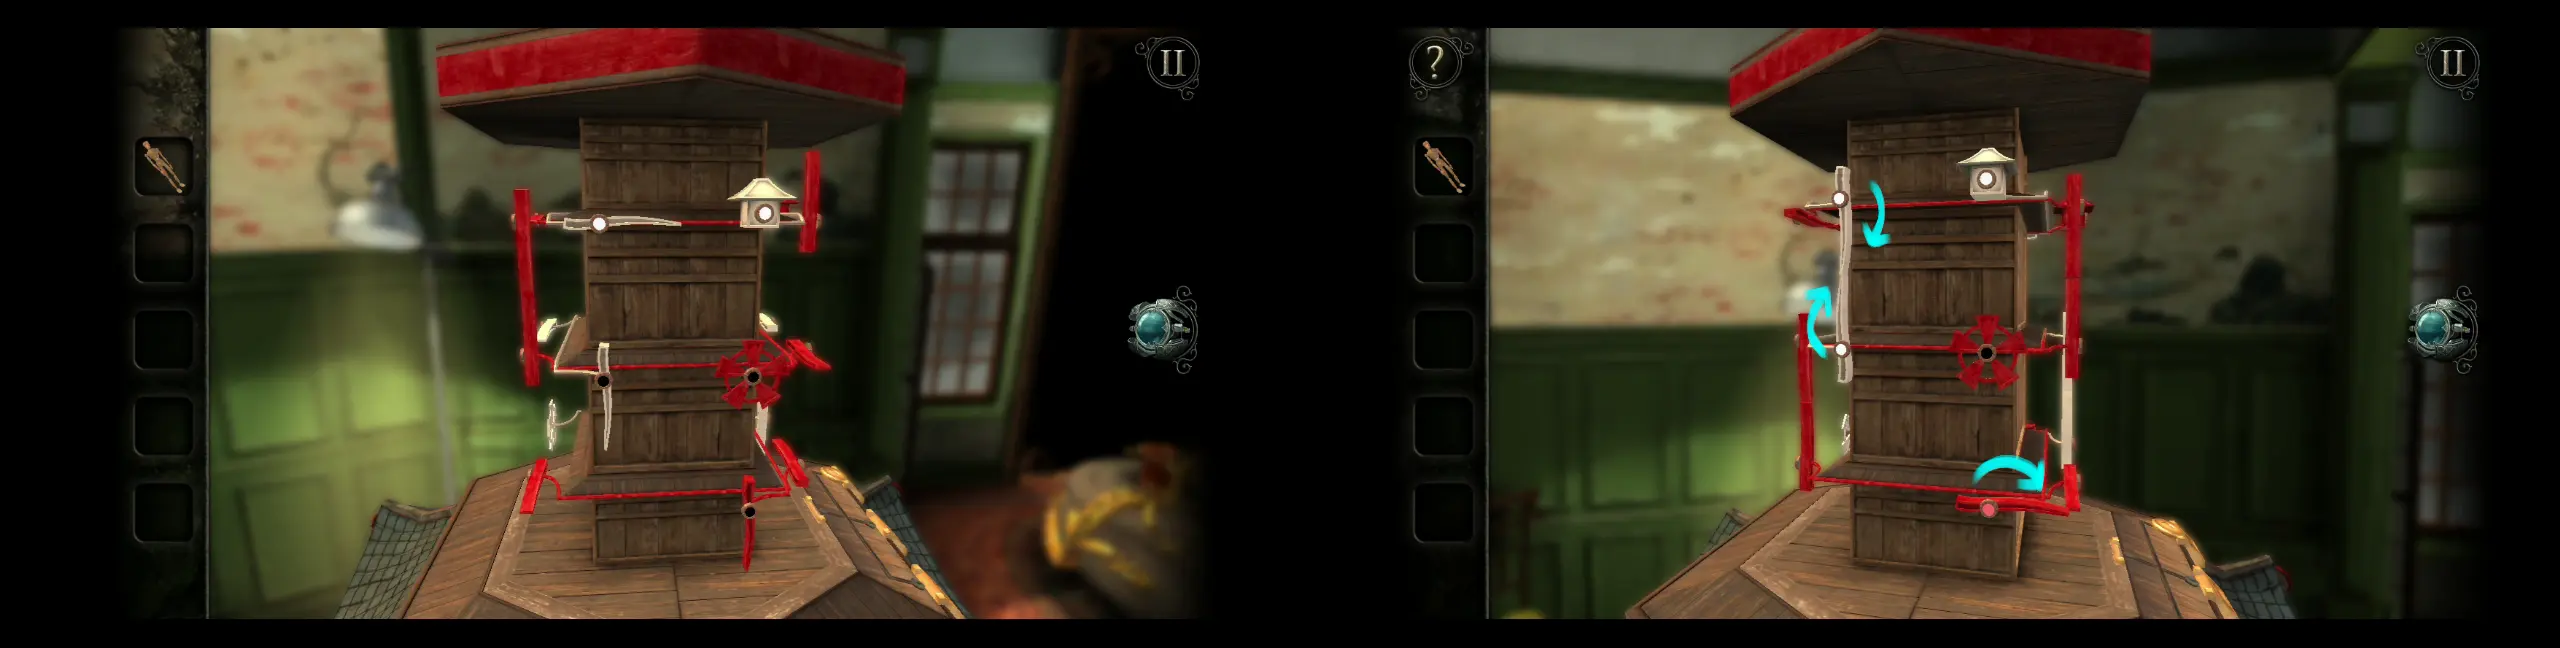
For the final puzzle with a light ball, you will have to move it through a structure that looks like a ship.
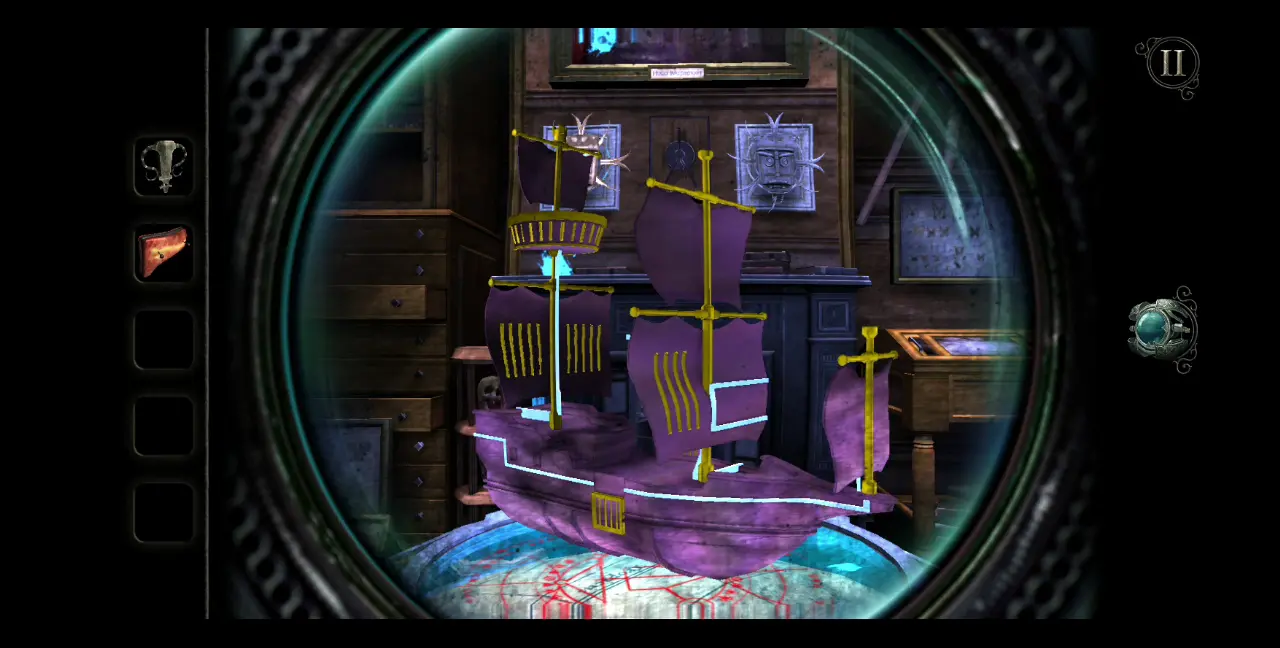
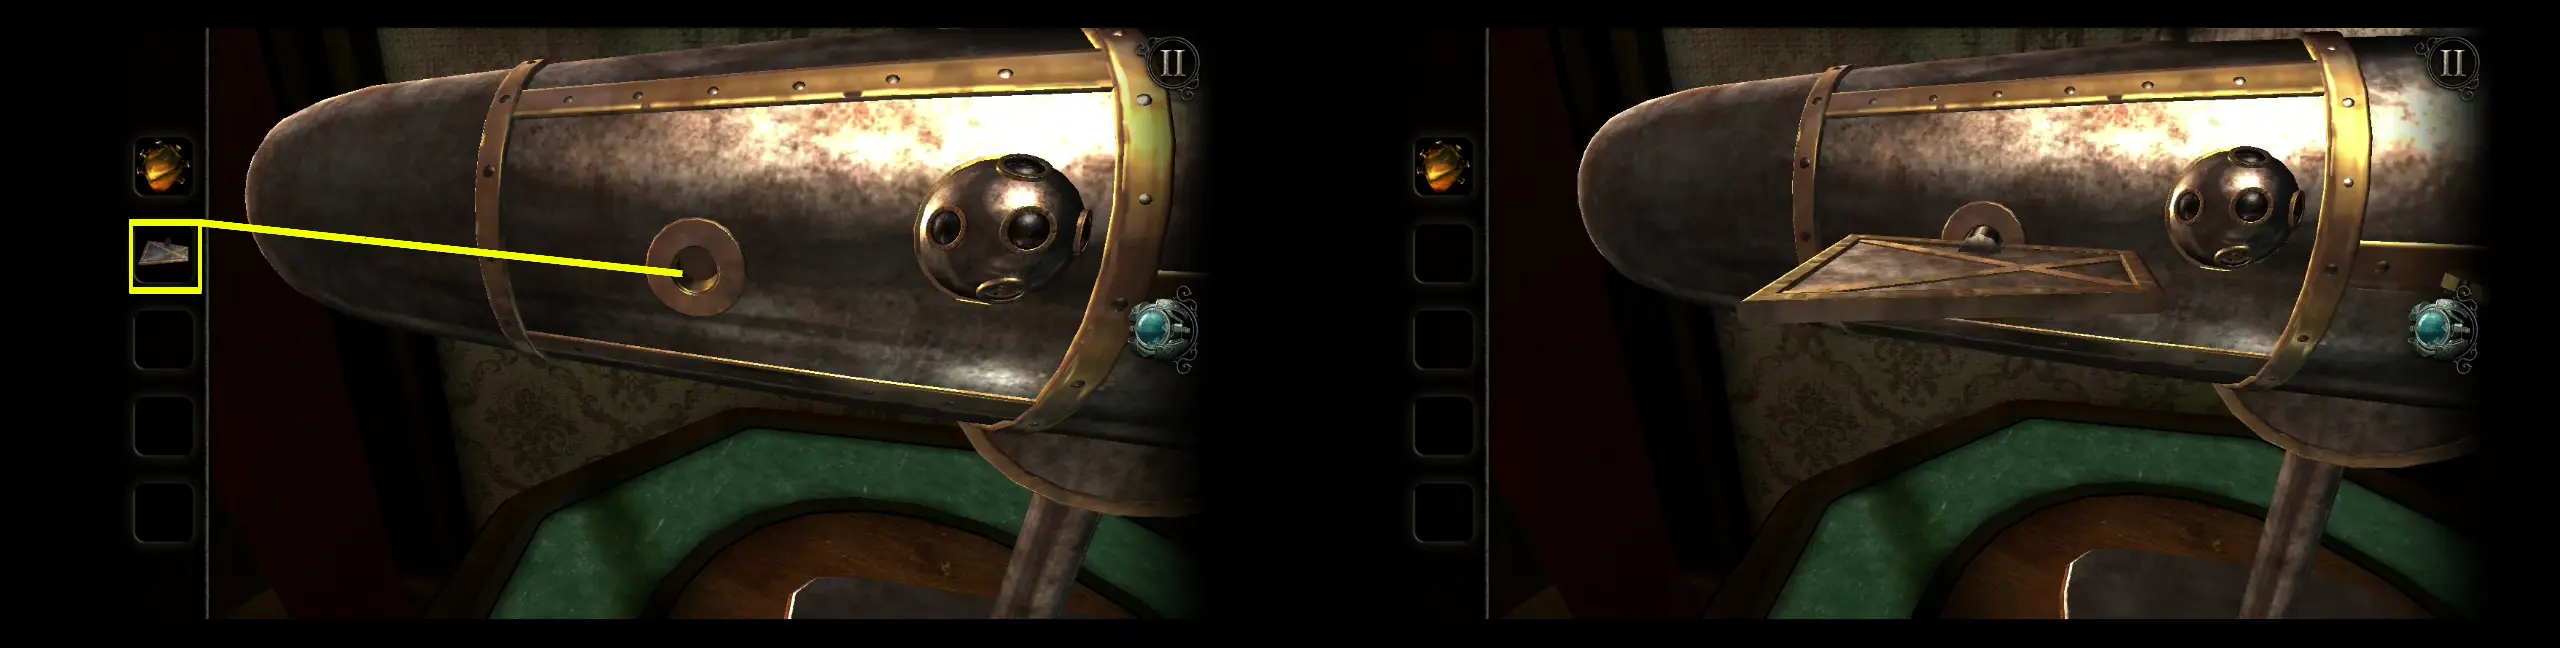
Similar to the previous puzzles, there are pieces that can be moved on the ship. These are the ship’s sails and the vents for the cannonballs at the side.
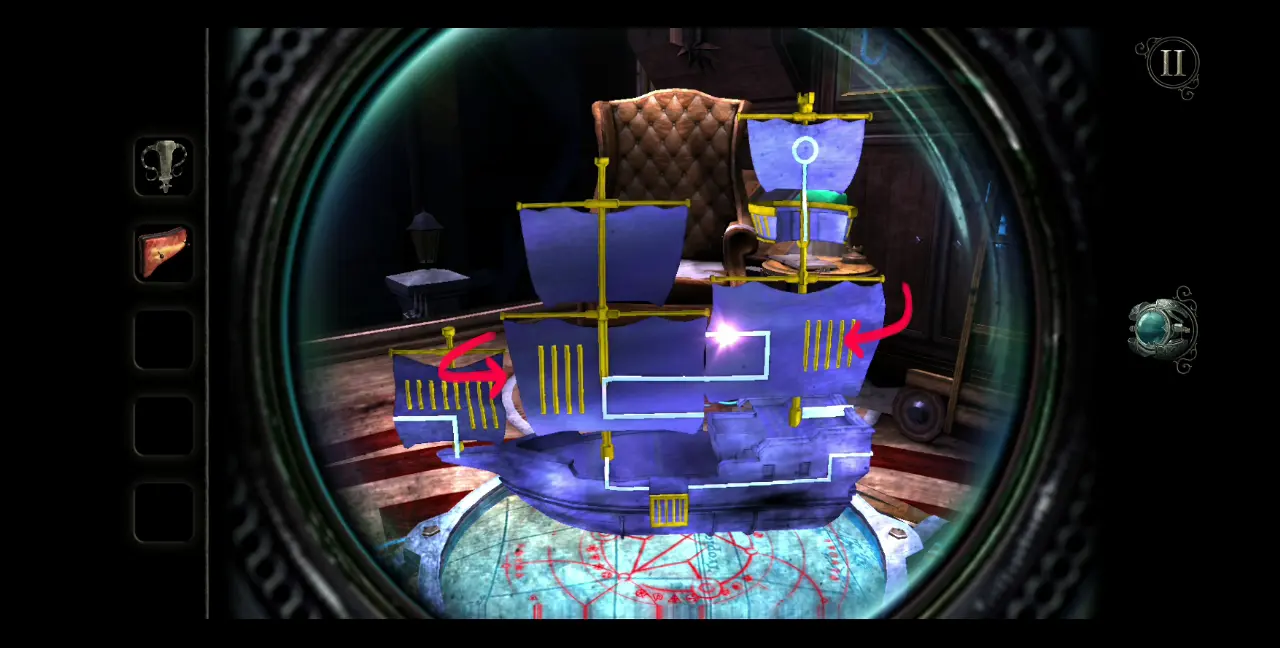
To solve this puzzle, shift your perspective to the back of the ship, where the light ball is located. Follow the path to the right. You’ll see that there’s a vent blocking the light ball’s passage. Simply lift the vent, which will reveal a cannonball and a path connecting those at the side of the ship, as seen in the screenshot to the right. Follow the path all the way to the front of the ship.
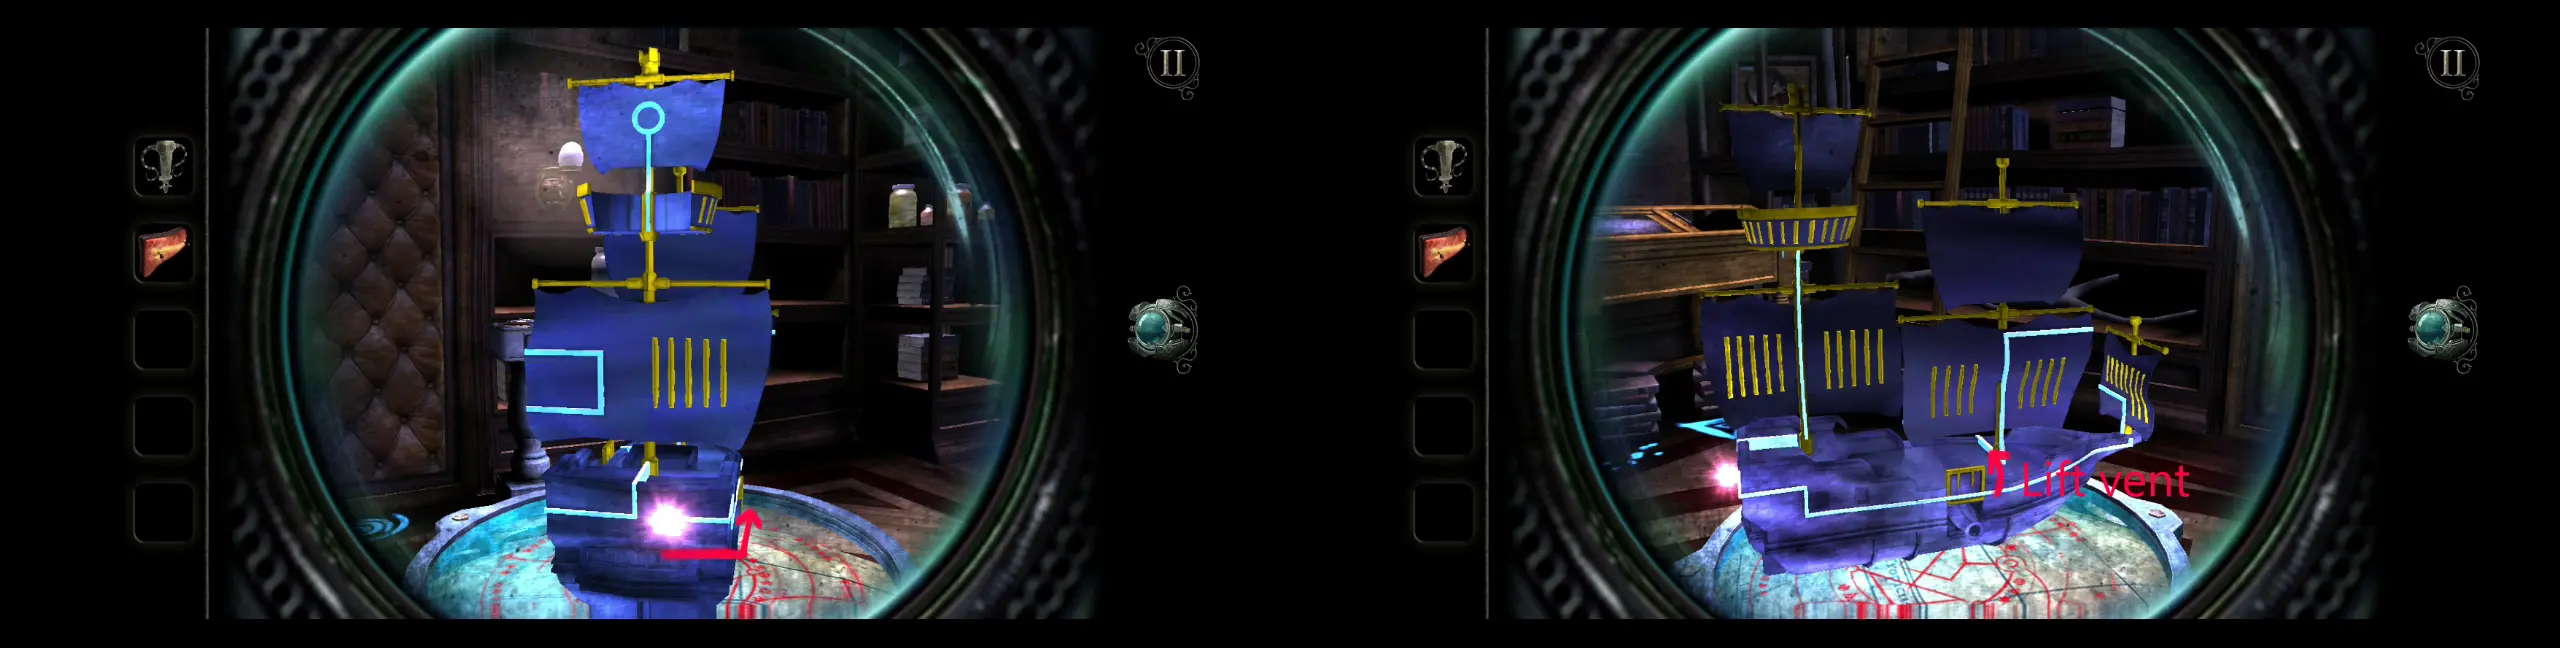
Turn the rightmost and middle sails as shown in the screenshot below so they can connect a path that the light ball can follow to the edge of the middle sail.
Turn the middle sail so it will face the opposite side of the ship. Shift your perspective to view the other side of the ship when you do so. Basically, if the front of the ship was previously to your right, the front should now be on your left. Afterwards, turn the rightmost sail to connect with the middle sail. Let the ball of light follow the path, which should place it at the edge of the rightmost sail.
Turn the middle sail again so it will connect a path down to the side of the ship, which the ball of light can follow. Lift the cannonball vent to fill the gap on the ship’s side and move the light ball all the way to the back of the ship.
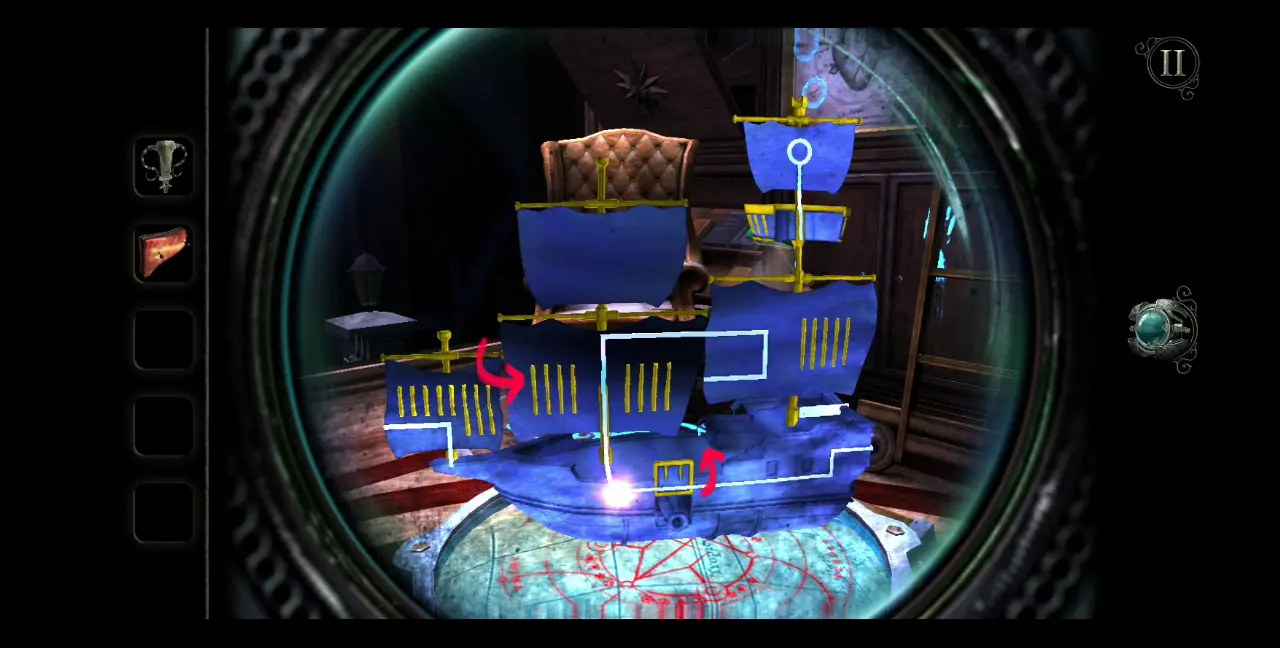
Shift your perspective to face the back of the ship. Turn the sail to connect a path going upward, as seen in the screenshot below.
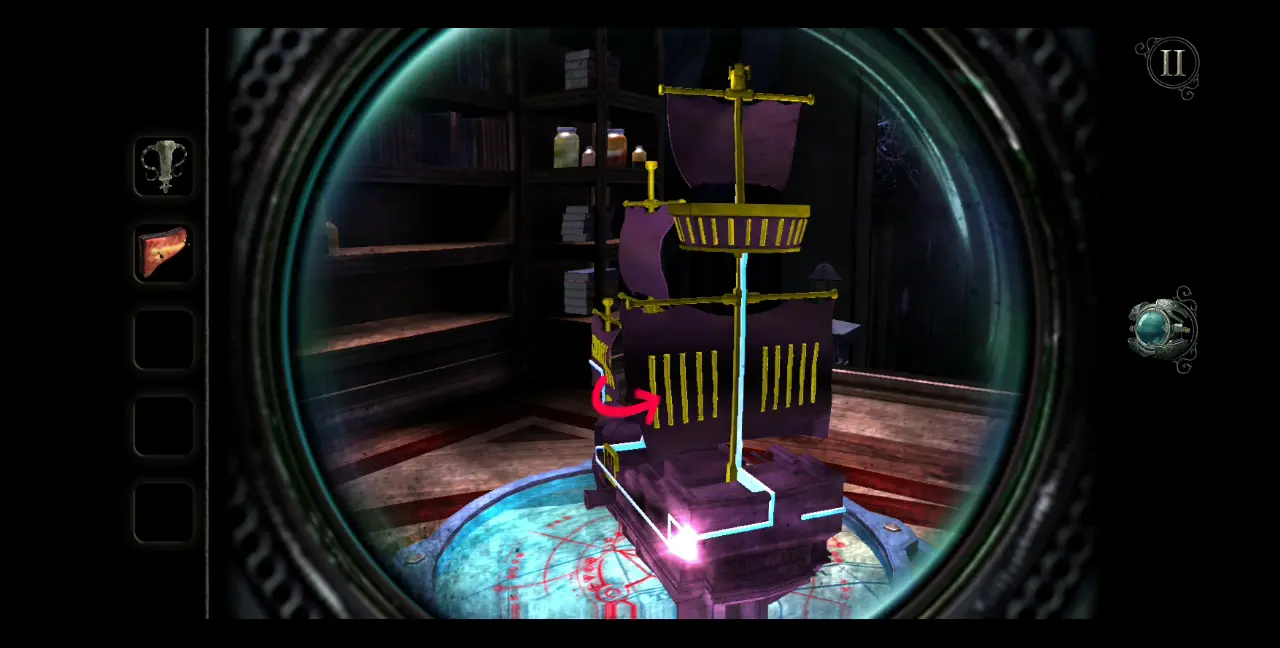
Above this sail is the “crow’s nest” or the lookout point of the ship. Turn the crow’s nest to connect with the path on the mast so the ball of light can reach the circle on the topmost sail.
After the flash of light, the drawer beneath the globe will move once again, but this time, instead of revealing an item, you’ll have to pull a lever, which will cause the globe to spin and open into a new puzzle.
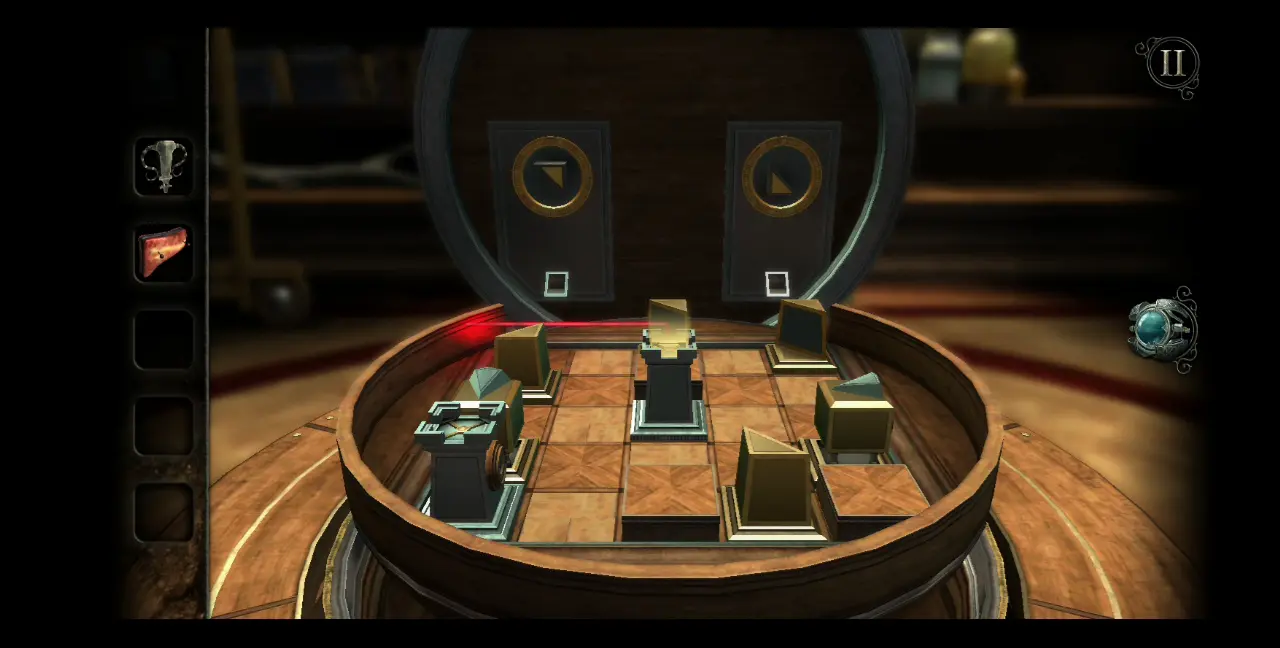
Here, you will see a small wooden board with various odd-looking pieces. Each piece has a different function or effect on the red laser light being emitted from the fixed piece in the middle of the board. The objective of this puzzle is to direct the laser light toward the other fixed piece on the lower left-hand corner. You’ll see that these two fixed pieces both look like small towers.
Here are the other pieces significant to the puzzle and what they do. We used letters to represent them so they can be easily determined in the accompanying illustration below this list:
- Two pieces with gray arrows on top and a small aperture in the middle. Think of these pieces as portals of some sort. Basically, if the laser goes through one piece, it won’t come out of the end where the arrow is pointing. Instead, the laser will be redirected to enter the other piece, like transporting light through a portal. These pieces are movable.
- Four pieces that each look like a portion of a square. Each piece has a gray reflector on the sides, which can reflect and redirect the laser beam depending on how each piece is positioned on the board. These pieces are movable.
- Two reflector strips with rotatable arrows. This is located on the cover of the puzzle. How this works is that the laser will reach the slanted square at the bottom of the strip, causing the laser to point upward, which can be redirected by the rotatable arrows in the middle of the gold circle.
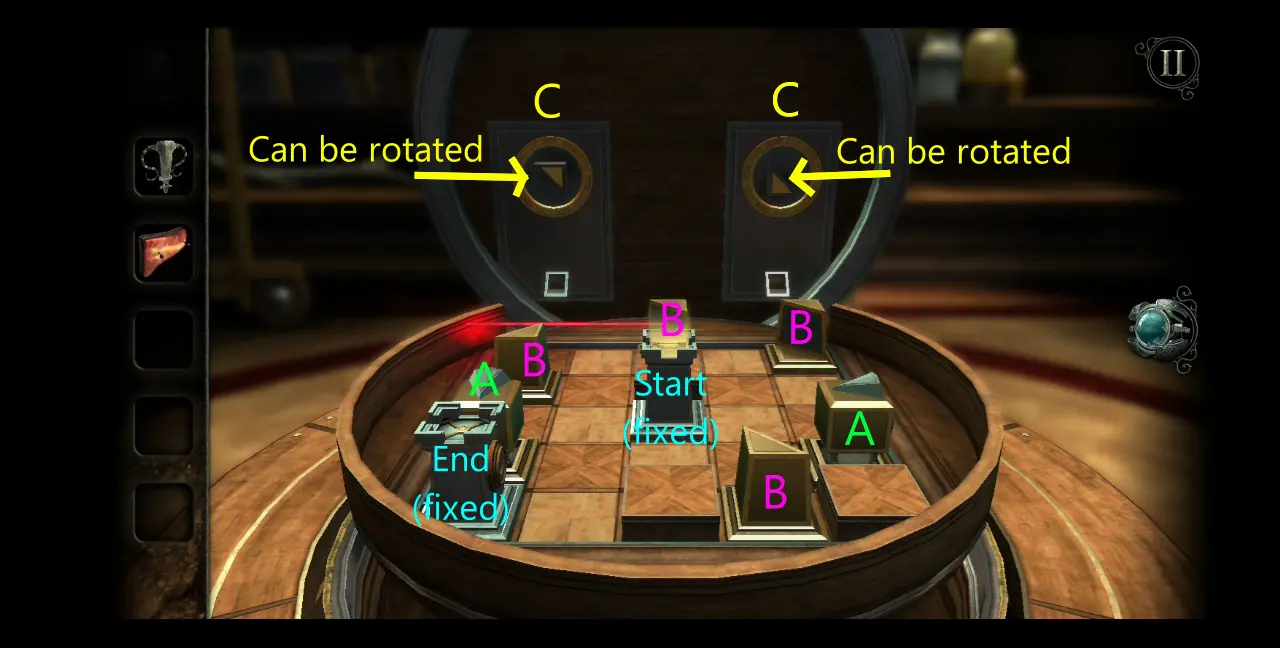
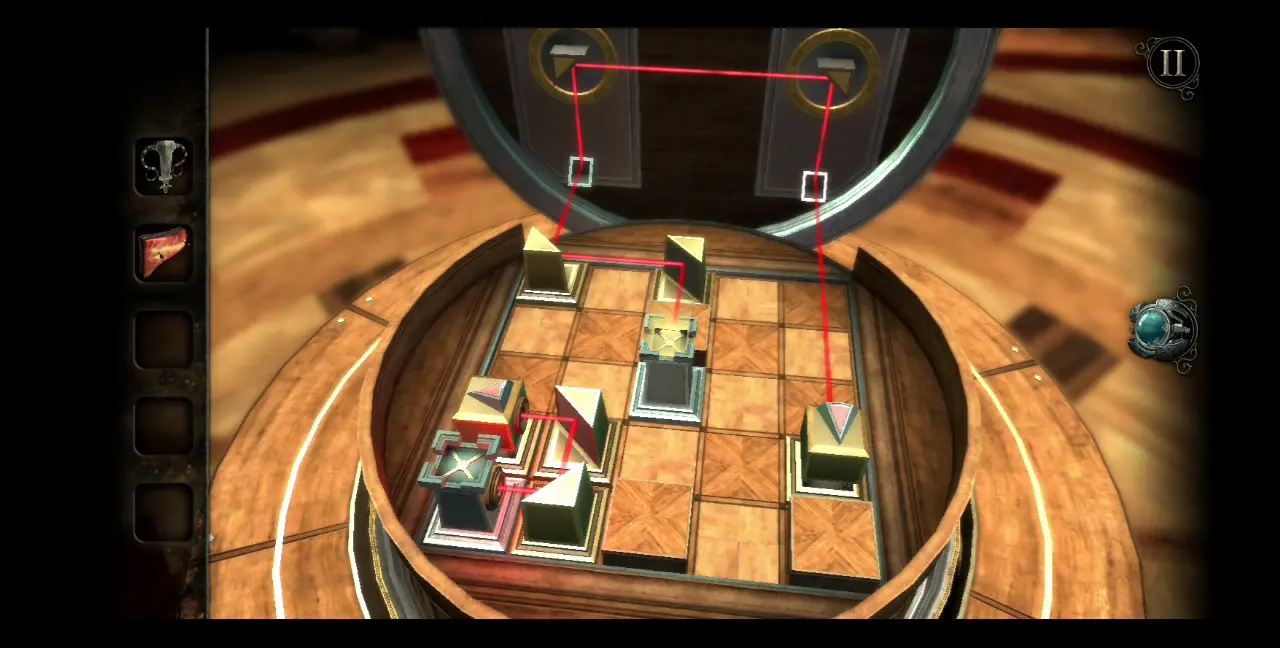
To solve the puzzle, you need to move and make use of all the pieces accordingly so the red laser light will reach the starting point to the end point. The correct positions of all the pieces are indicated in the screenshot below. Take note of how the arrows on the reflector strips are positioned.
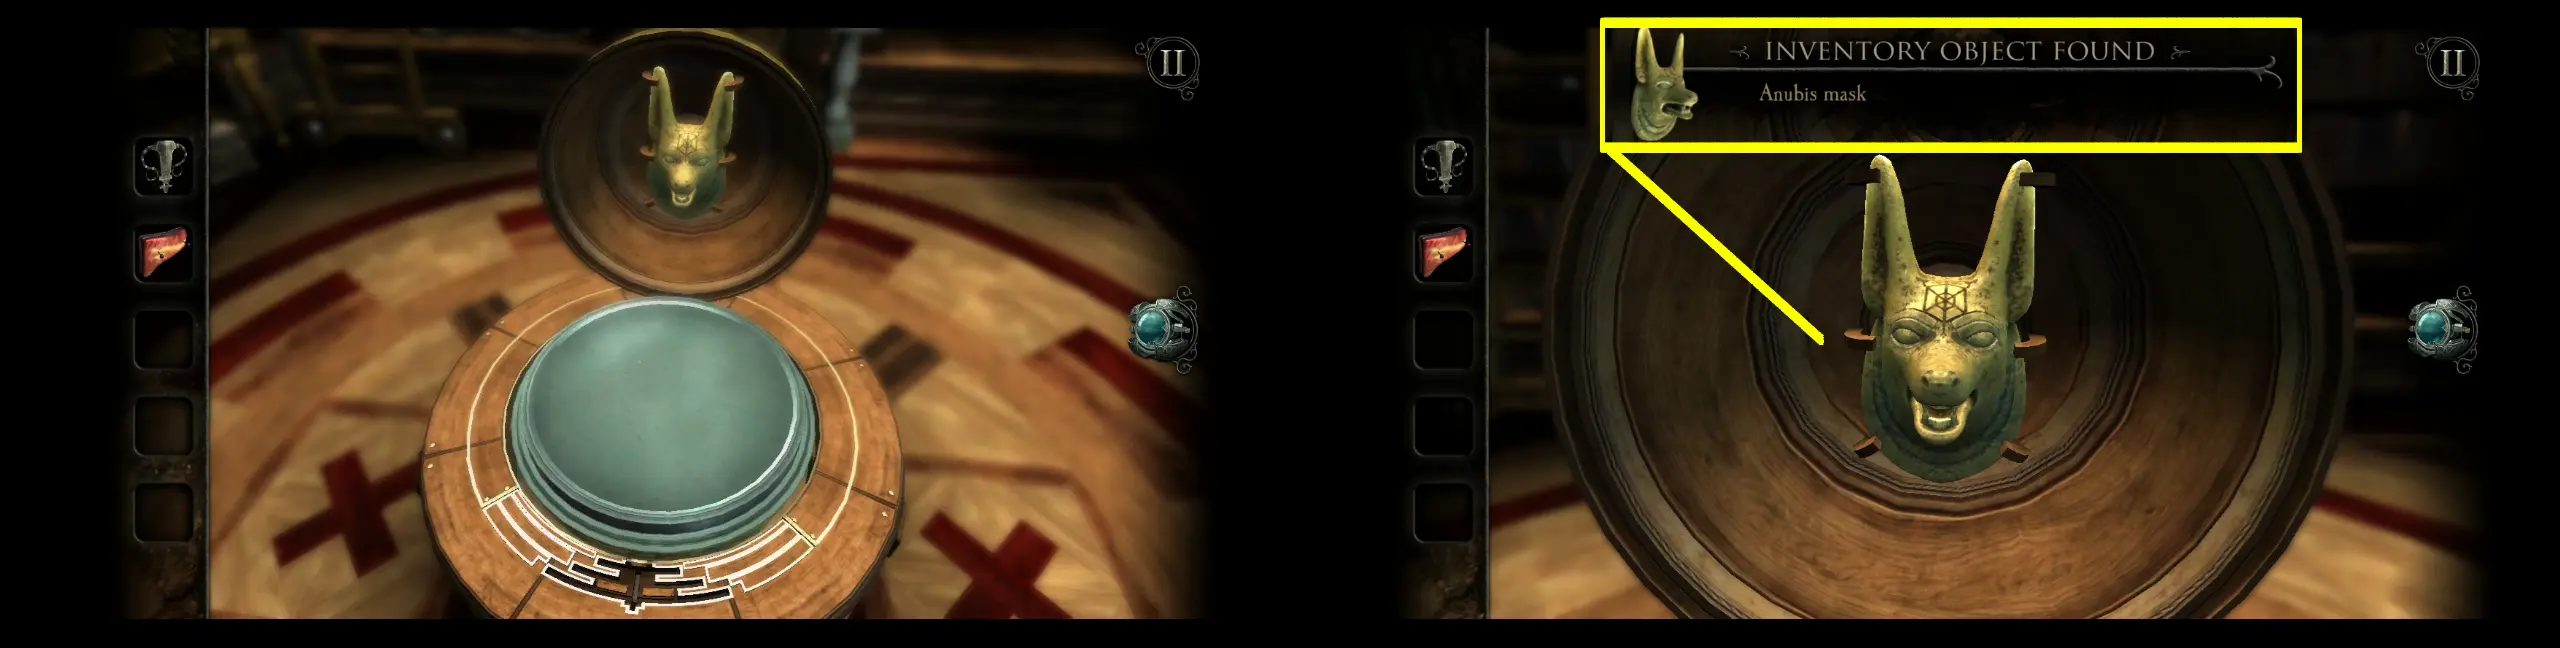
With the puzzle solved, the top part of the puzzle’s cover will open, revealing a new item: an anubis mask.
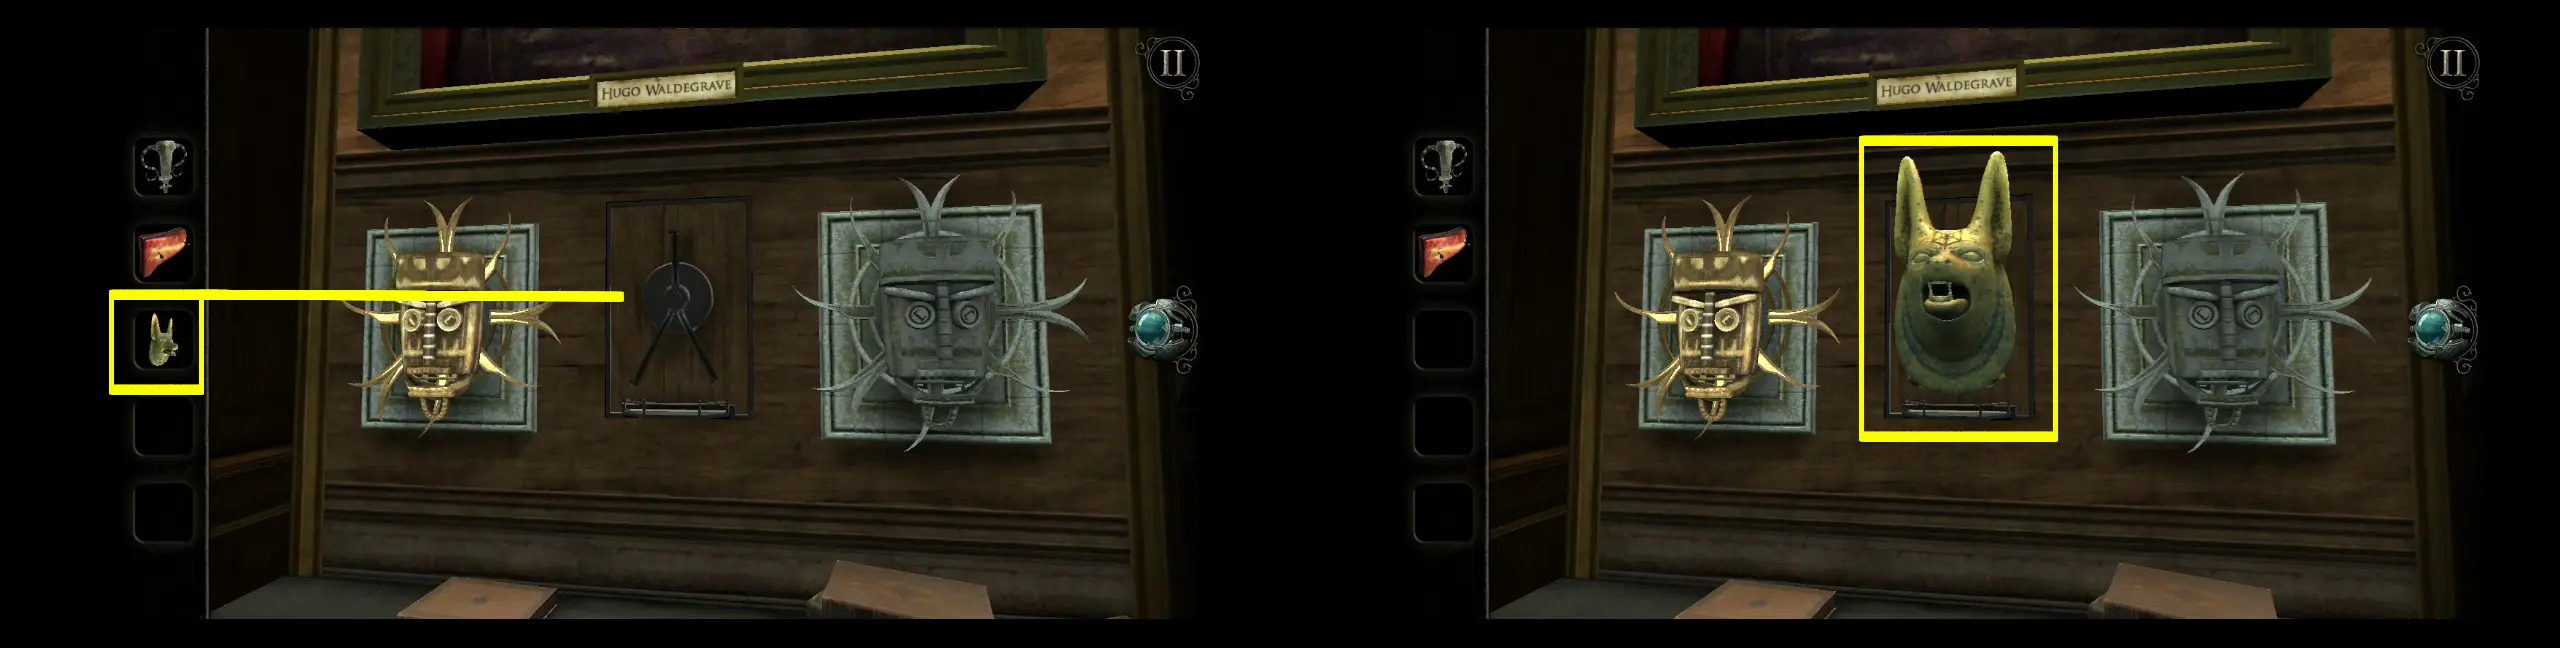
Go back to the part of the room with the two tiki masks, right beneath Hugo Waldegrave’s portrait. In between the tiki masks is the bracket you’ve seen earlier. When you try to interact with the bracket, it will always say that something is missing from the bracket. This is where you can place the anubis mask.
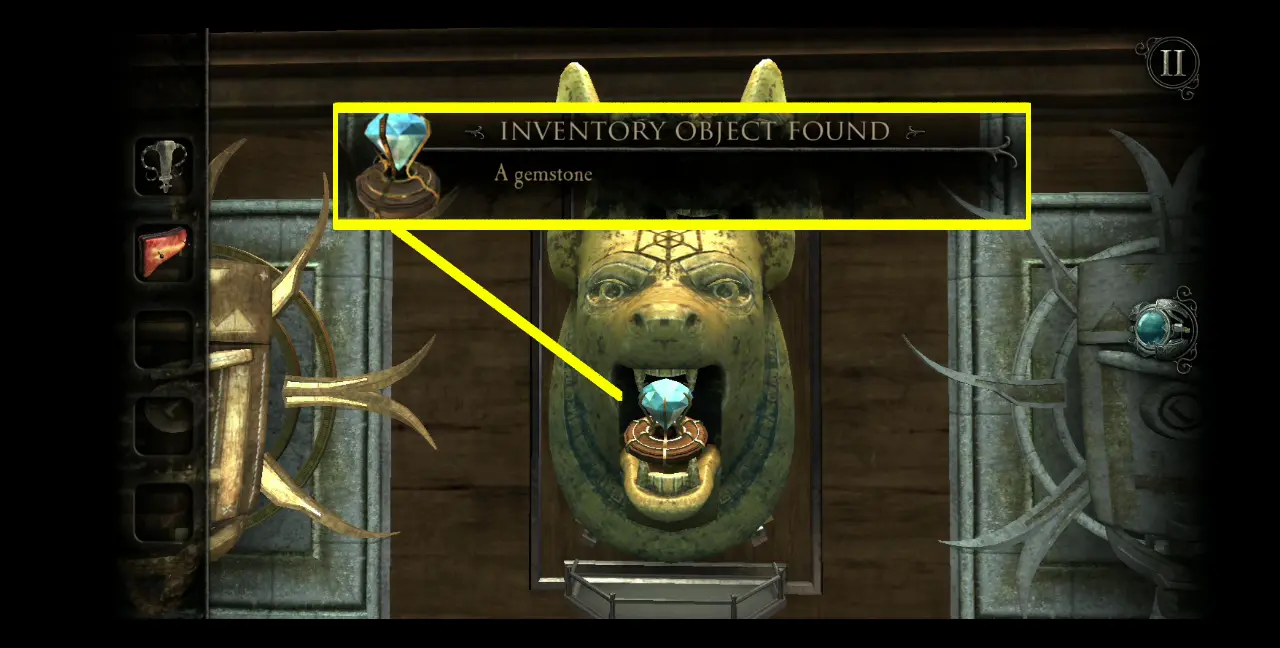
A brief but rather creepy cutscene will play out and, at the end of it, the anubis will open its jaw and reveal a new item: a gemstone.
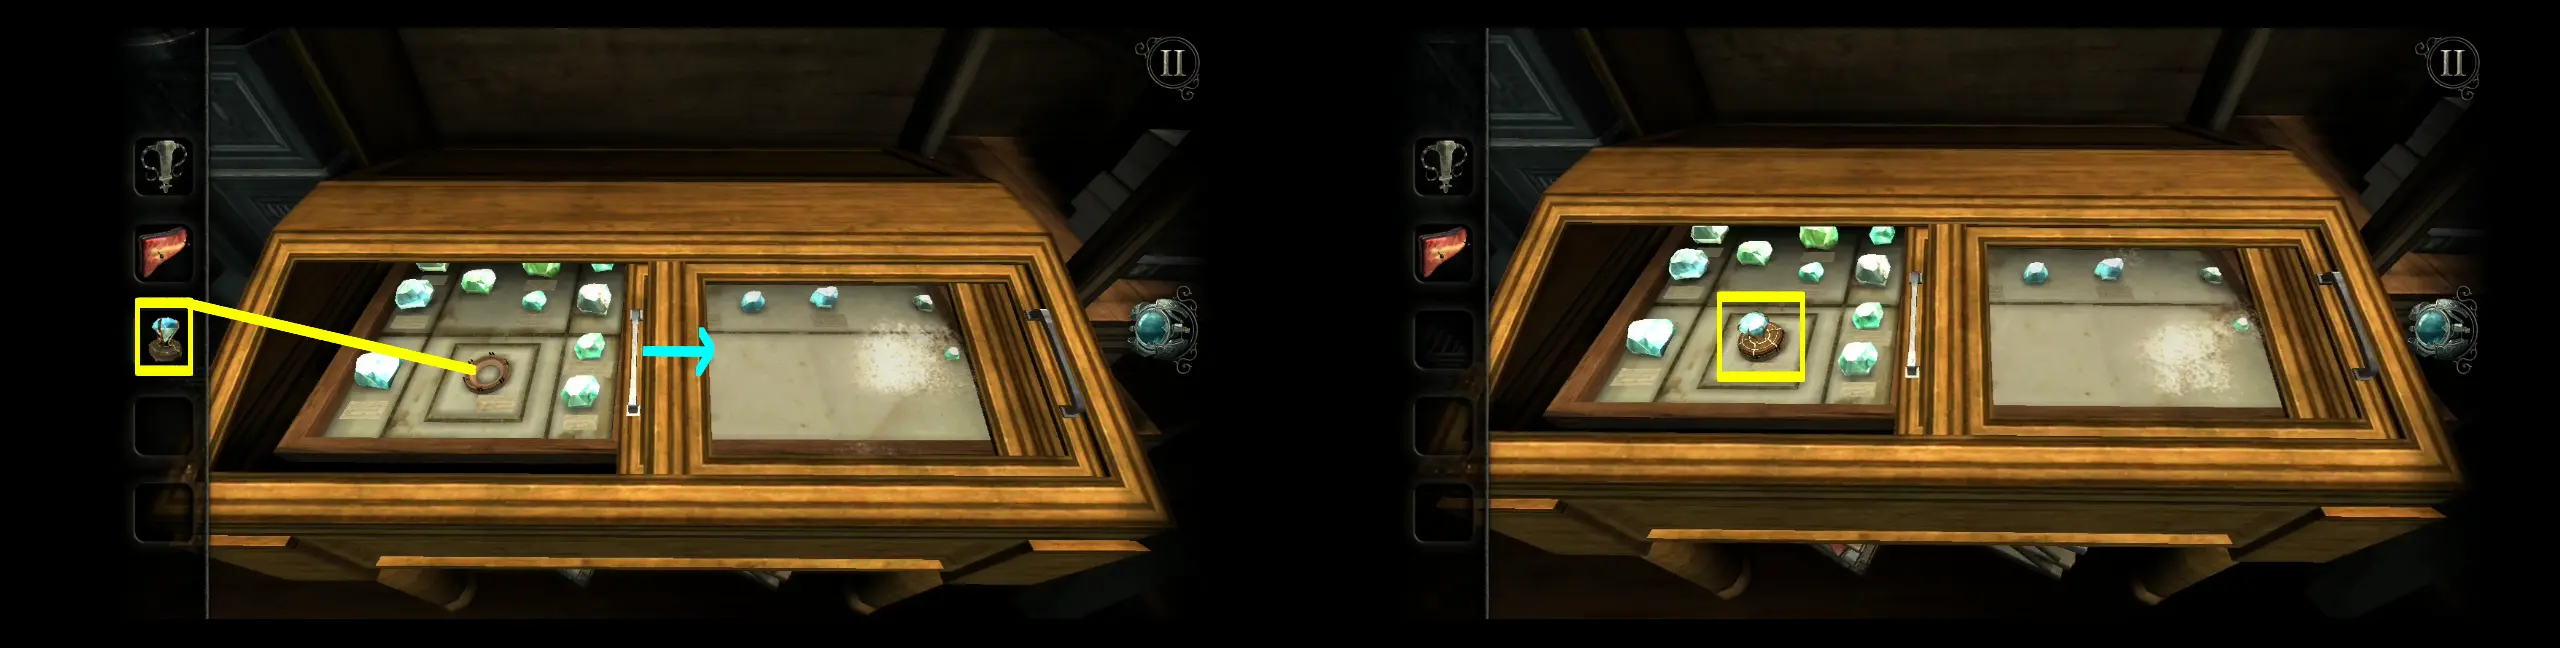
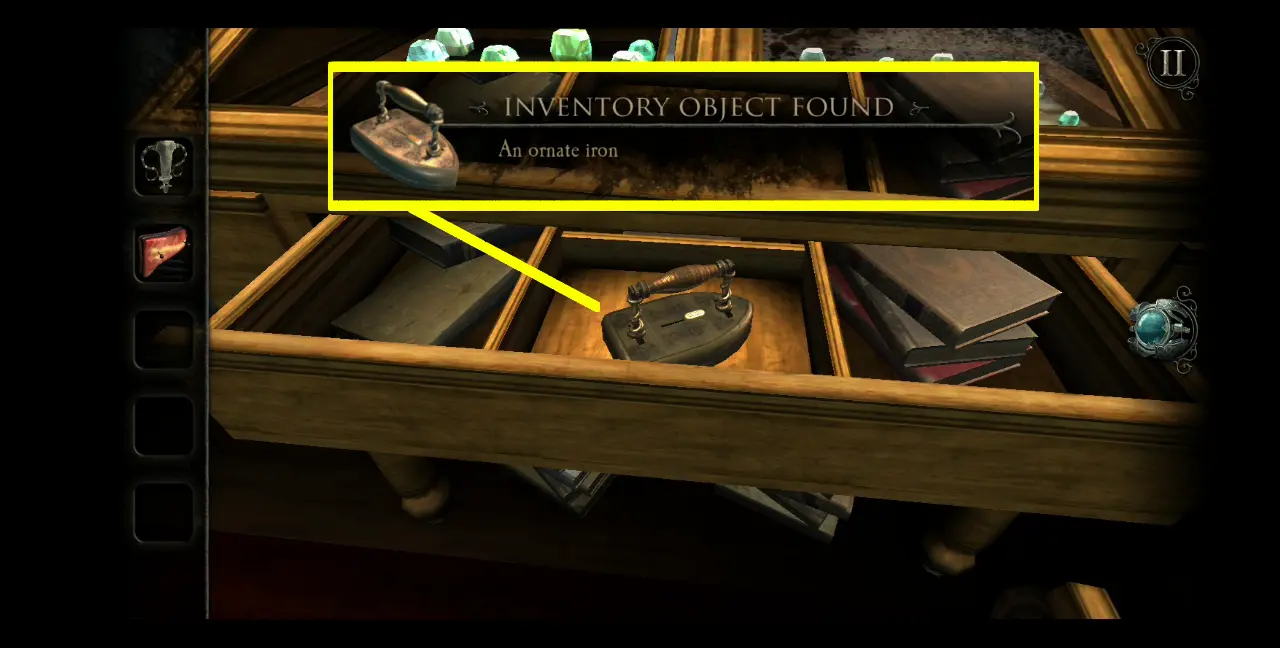
Once you’ve collected the gemstone, go to the display case to the right of where you placed the anubis mask. You’ll recall that the covers of the display case slide from side to side. On the right side of the display case is where you previously obtained the first map piece for the globe. Slide open the cover of the left side of the display case then place the gemstone on the small stand in the middle.
This will cause the drawer below the display case to open, where you’ll obtain another item: an ornate iron.
View the ornate iron in your inventory. You’ll notice that the button in the middle of the iron can be moved back and forth. This will make sense in a while.
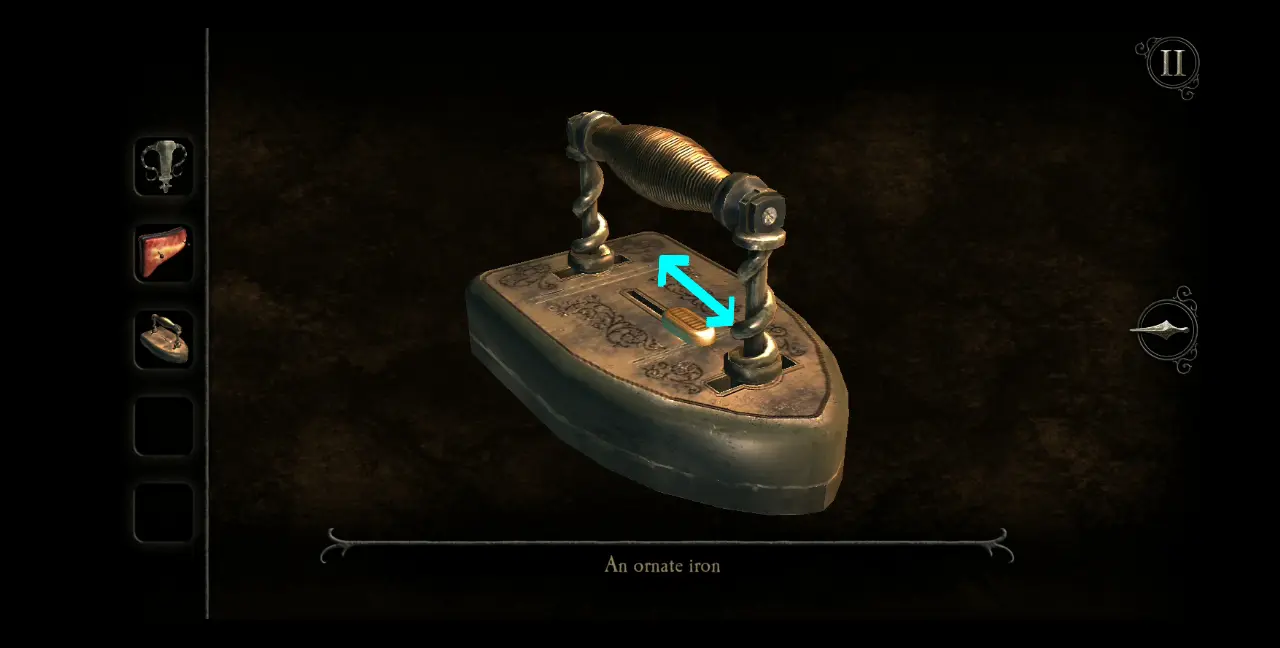
In the meantime, Turn the ornate iron so you can see its left side, wherein you’ll notice a small square slider. Slide it all the way to open the bottom part of the iron.

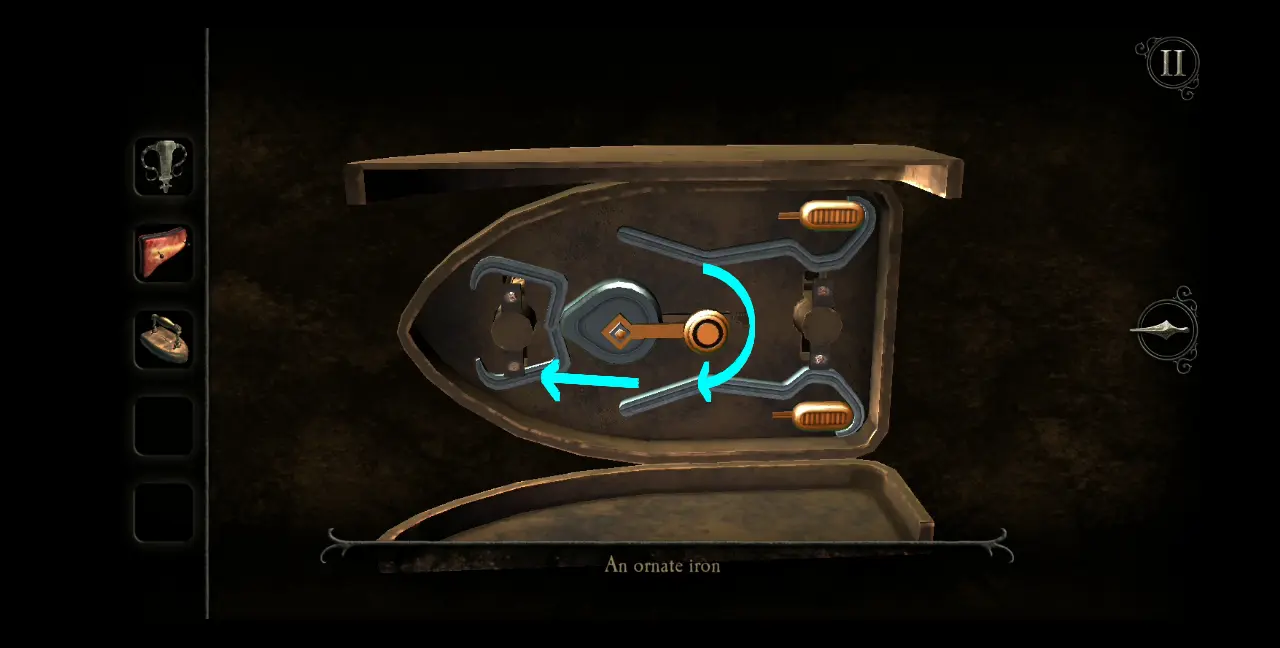
Turn the iron again so you can get a good look of the mechanism inside it. This is what you’ll see:
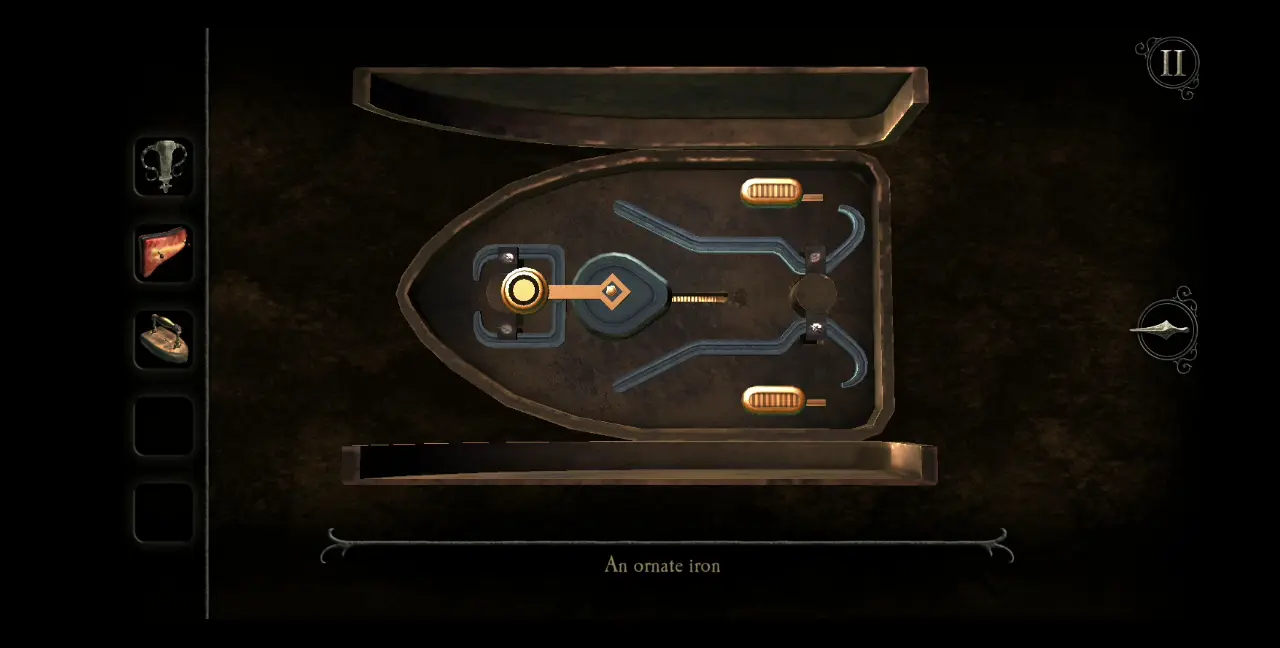
First, rotate the spade-shaped mechanism 180 degrees so that the golden circular part is facing the right side of the iron. Pull it to the right using the button at the top of the iron.
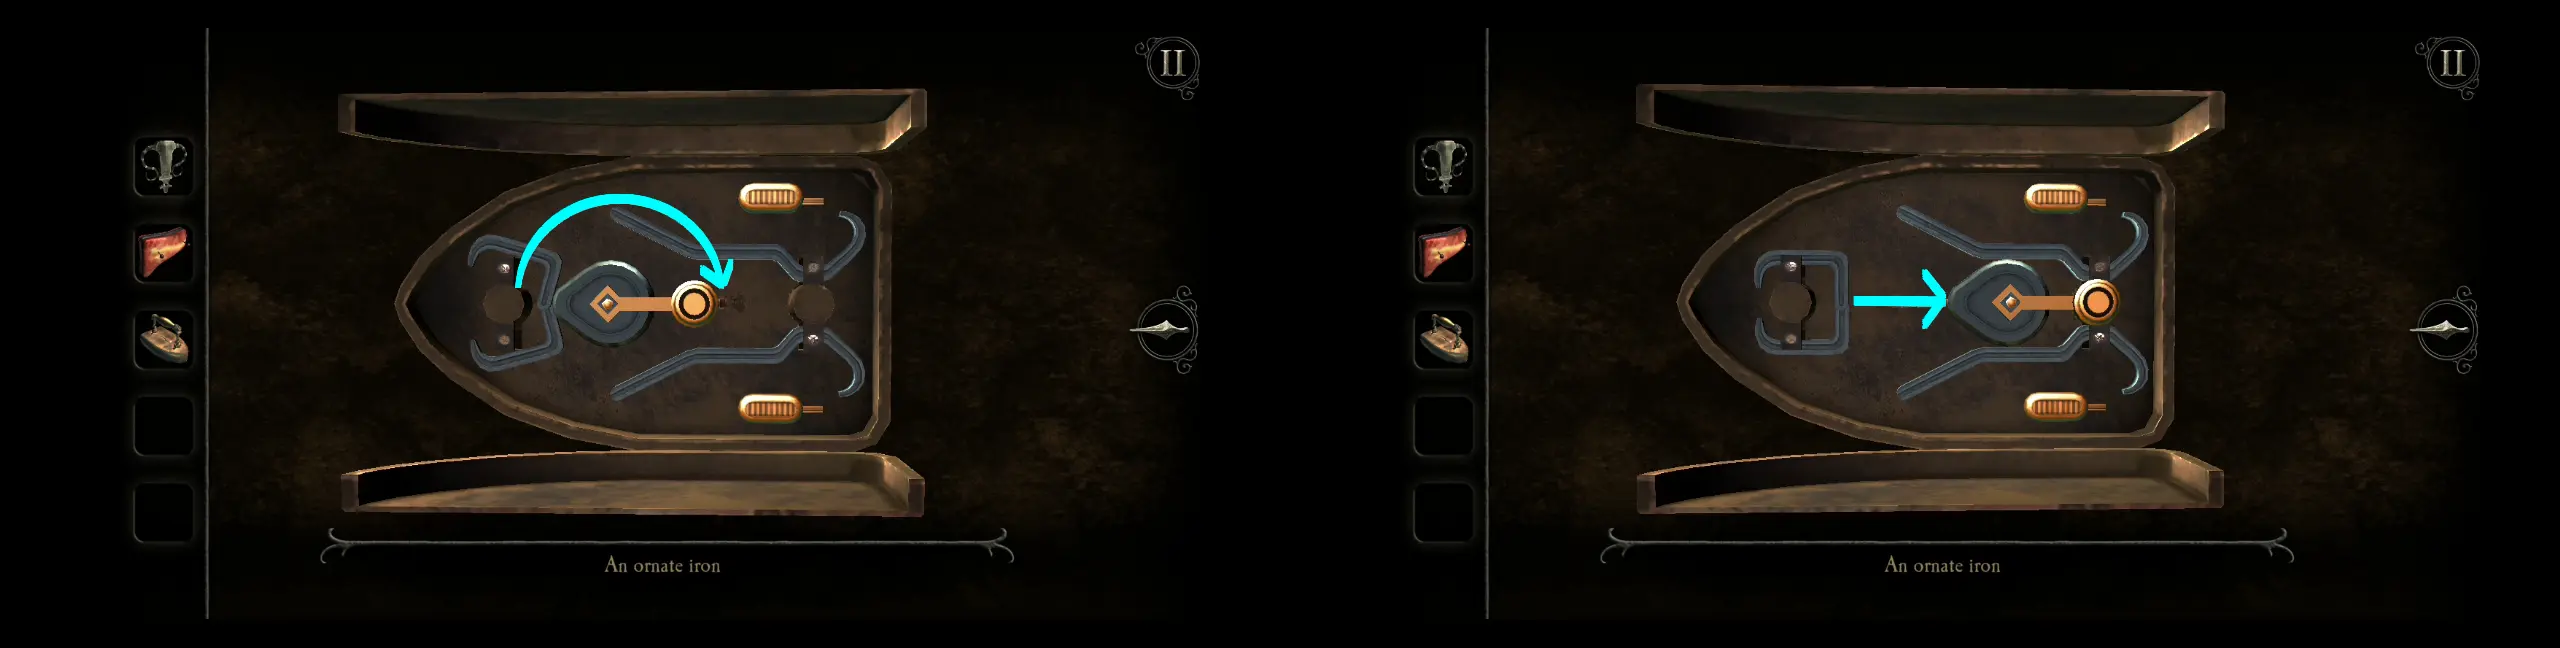
Next, turn the spade upward, which will push the metal rod. Lock the metal rod in place using the bronze slider next to it. Do the same for the bottom rod: turn the spade downward to push the metal rod at the bottom and lock it in place using the bronze slider next to it.
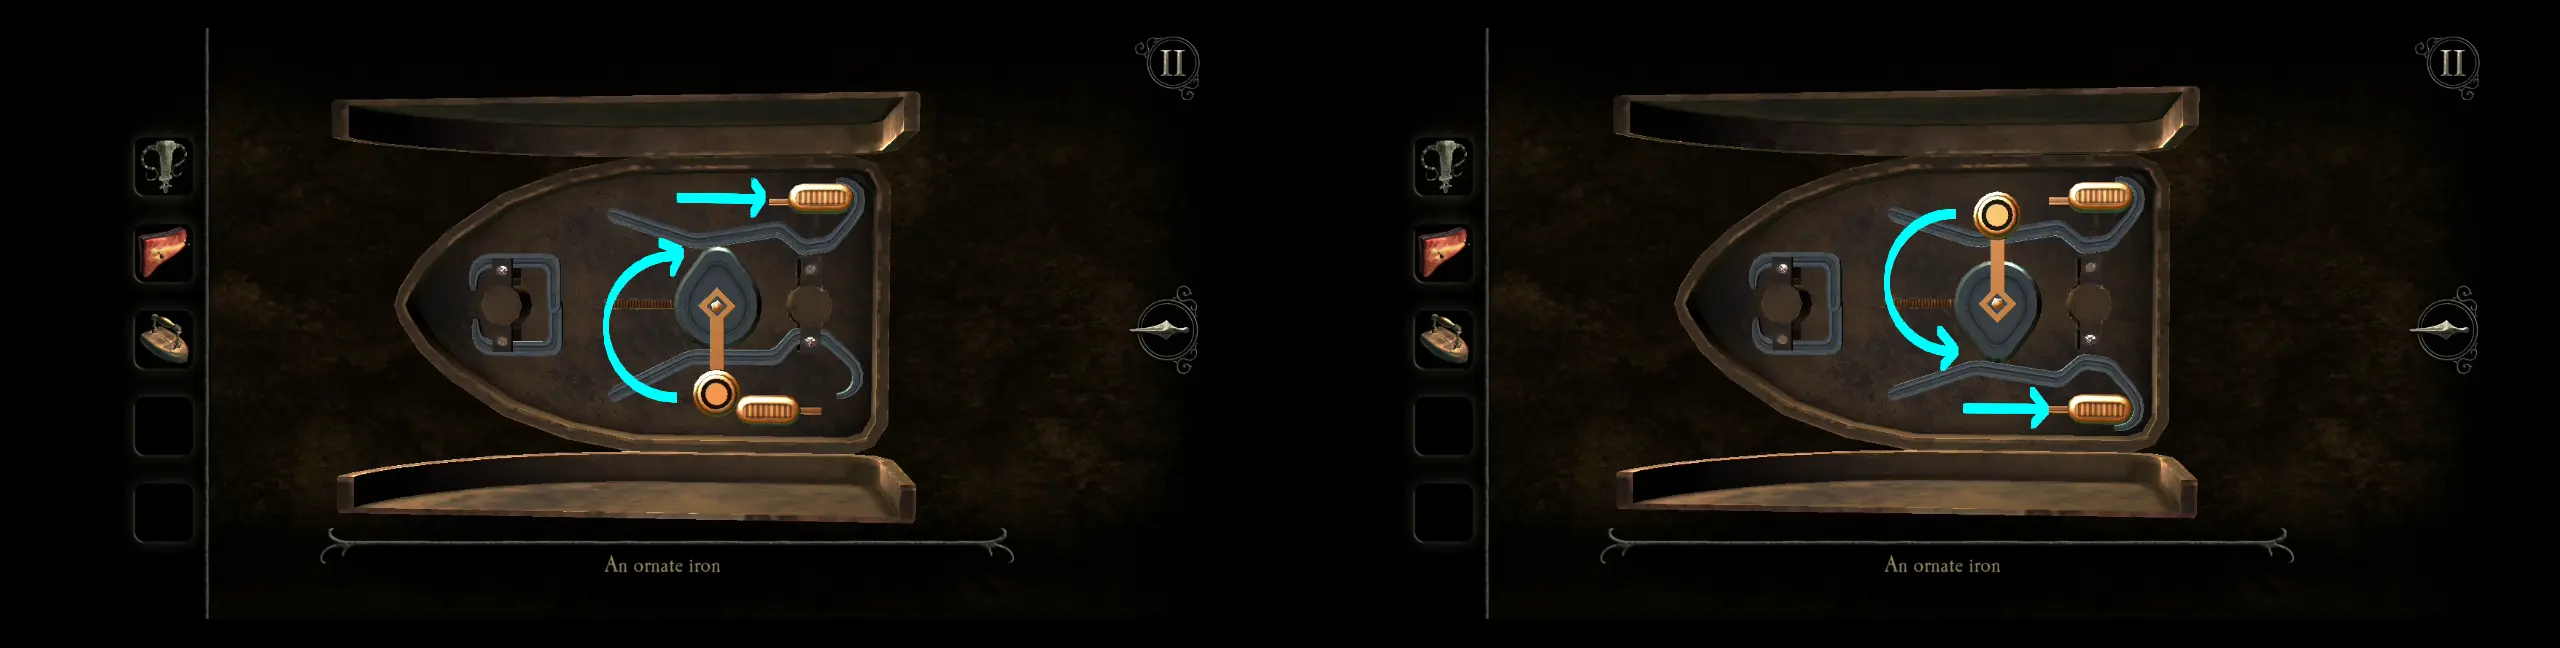
With the two rods in place, rotate the spade so it faces the left side of the iron. Slide it toward that direction using the button at the top.
Turn the iron itself so you can see the top part. Pull the handle to collect a new item for your inventory: a metal handle.
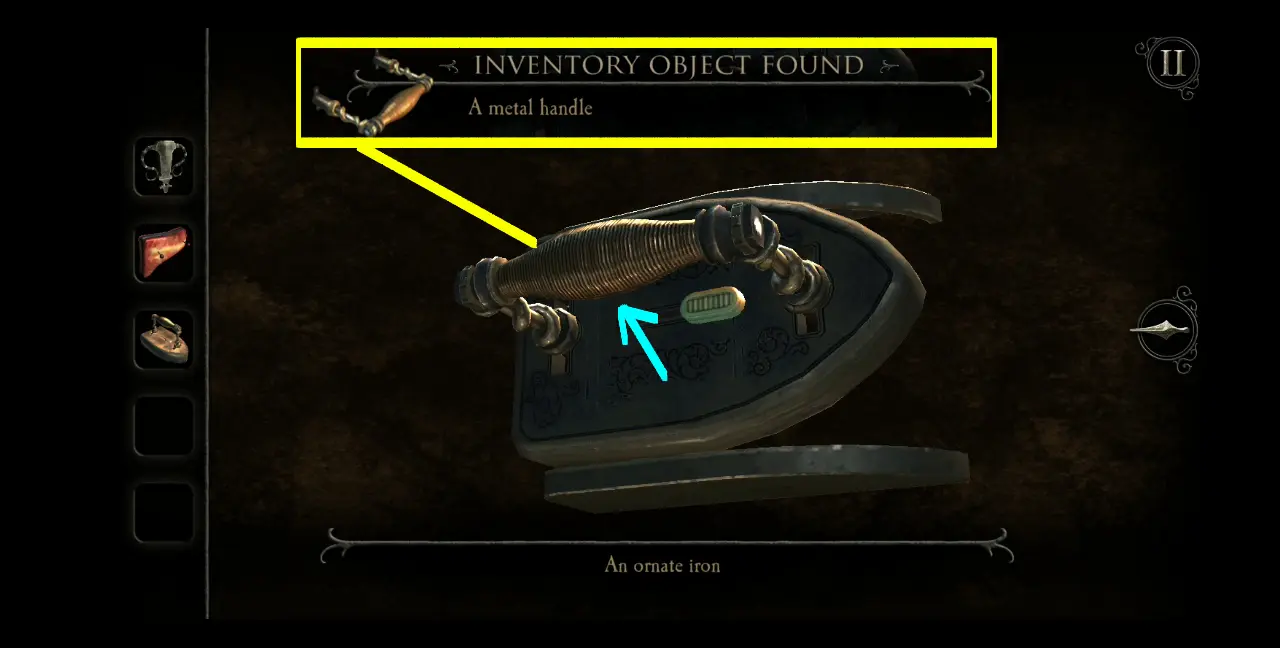
If you think this metal handle looks familiar, you’re correct! Head back to the Kitchen and you’ll see that this metal handle fits into a slot for one of the cabinets near the furnace.
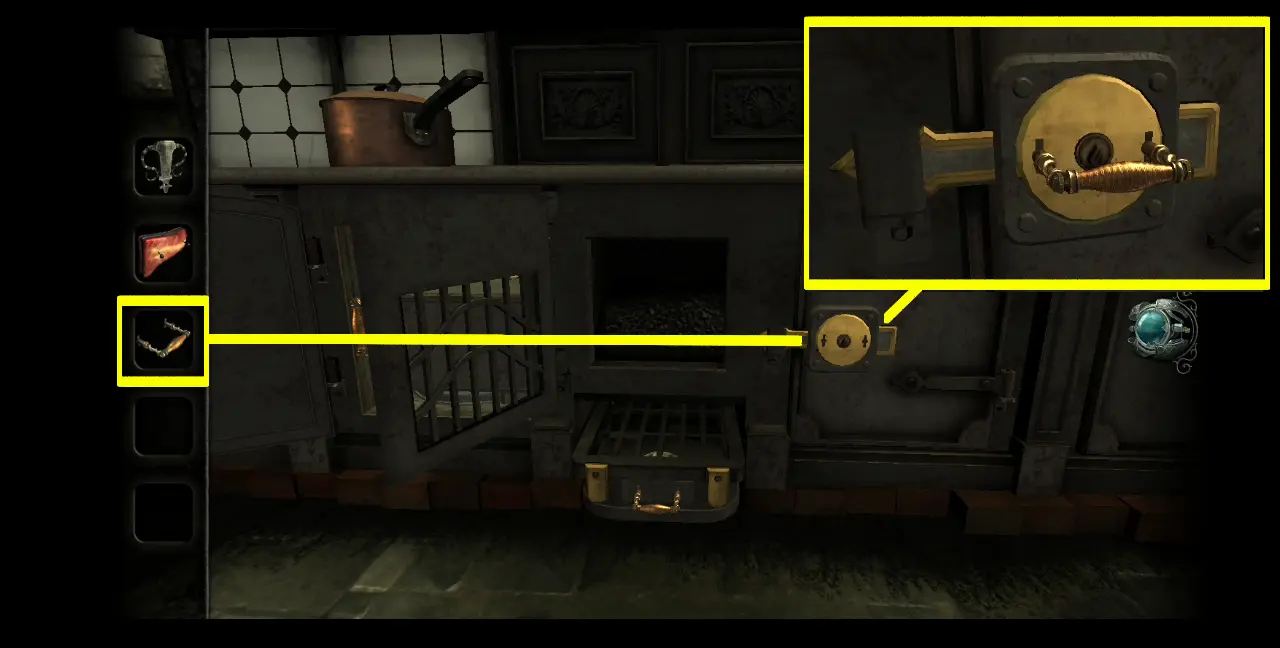
After placing the handle into the slot, turn it to unbolt the lock.
Open the cabinet and you will find some kind of mechanism inside. If you turn the crank handle on the lower right side, you’ll see that it activates the mechanism, causing the slot in the middle to move back and forth as you keep turning the handle. It’s very subtle, but if you look closely, you’ll see a peculiar shape in the middle slot that moves (we’ve highlighted this in the screenshot below). You’ll recognize this shape as belonging to the fire steel you’ve obtained previously from solving a puzzle at the Study’s roll-top desk. Thus, place the fire steel here.
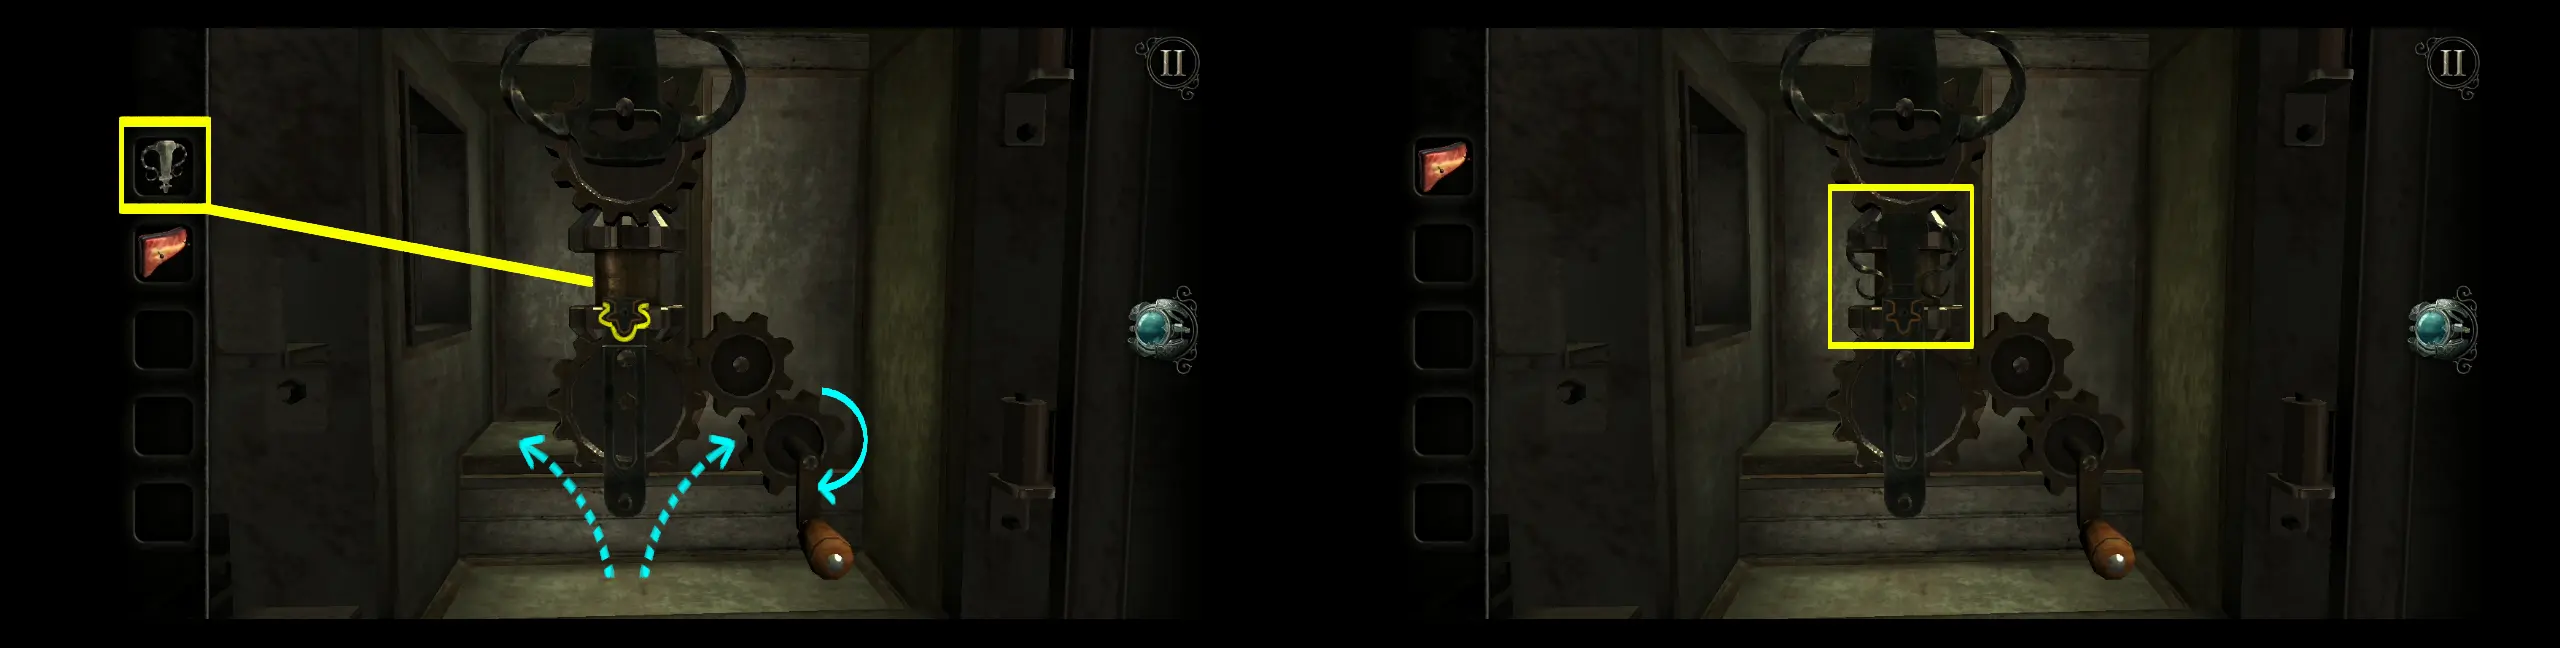
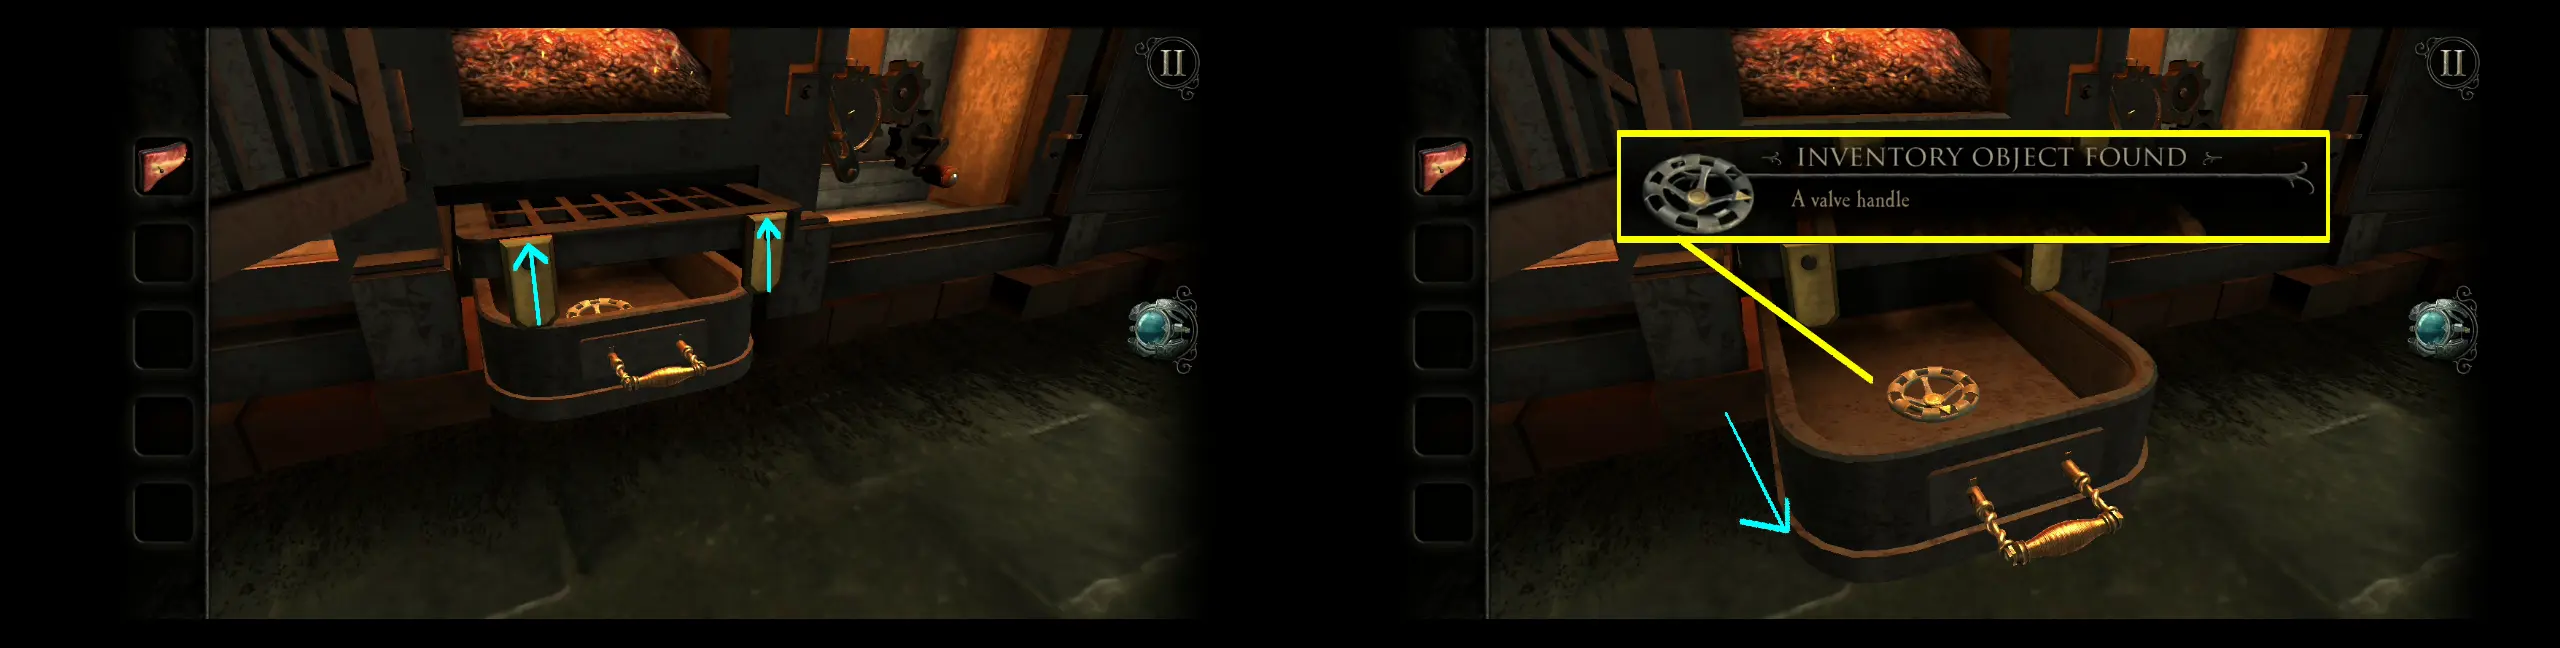
Keep turning the handle clockwise until the fire steel ignites the furnace. Take note that if you turn it counterclockwise, the sparks will go to the right instead of the left, which will not ignite the furnace no matter how long you turn the handle. When the coal catches fire, this will cause the compartment underneath to loosen up, its lid lifting because of the heat. Pull the compartment forward and collect a new item: a valve handle.
If you’re a little more observant, you’ll hear the sound of running water in the background. This is, of course, from the pipe to the left of the kitchen. Go to that area and place the valve handle on the slot that has an inverted Y shape.
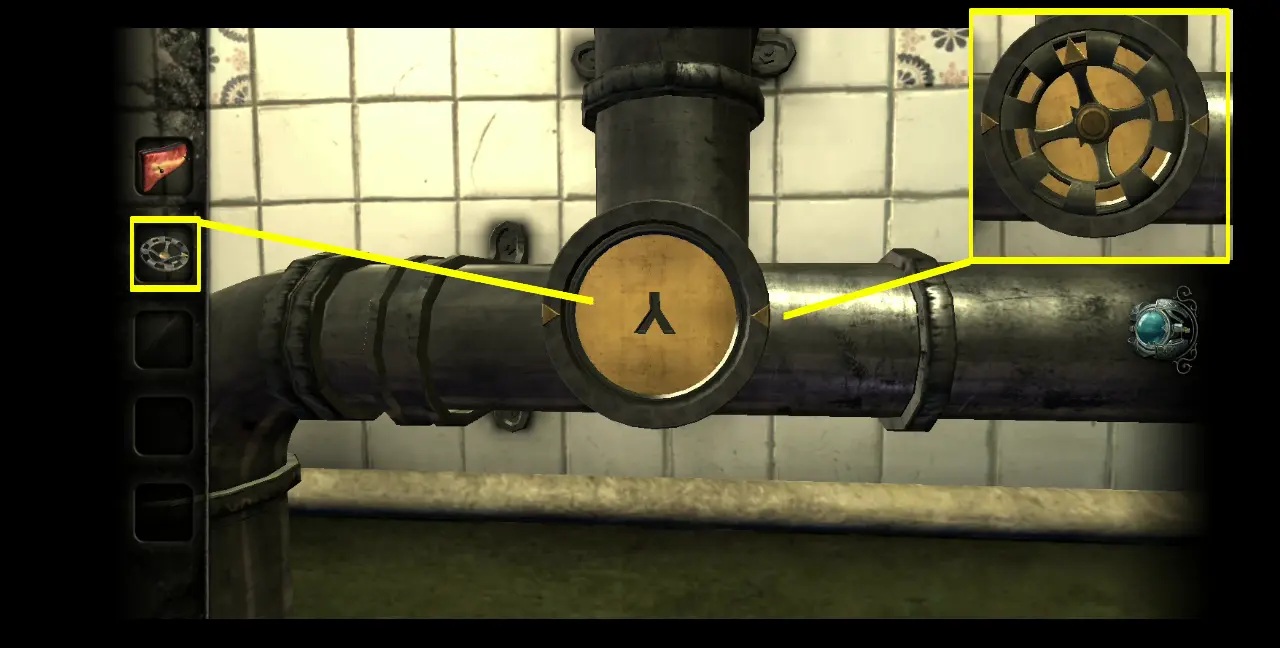
Turn the valve handle so that the arrow on it points to the right, which dictates the direction of the water’s flow.
A brief cutscene will play and it will show you where the water flows based on the pipes connected to the Kitchen. You’ll quickly discover that the pipes go up, to the room right above the Kitchen, which is the Study.
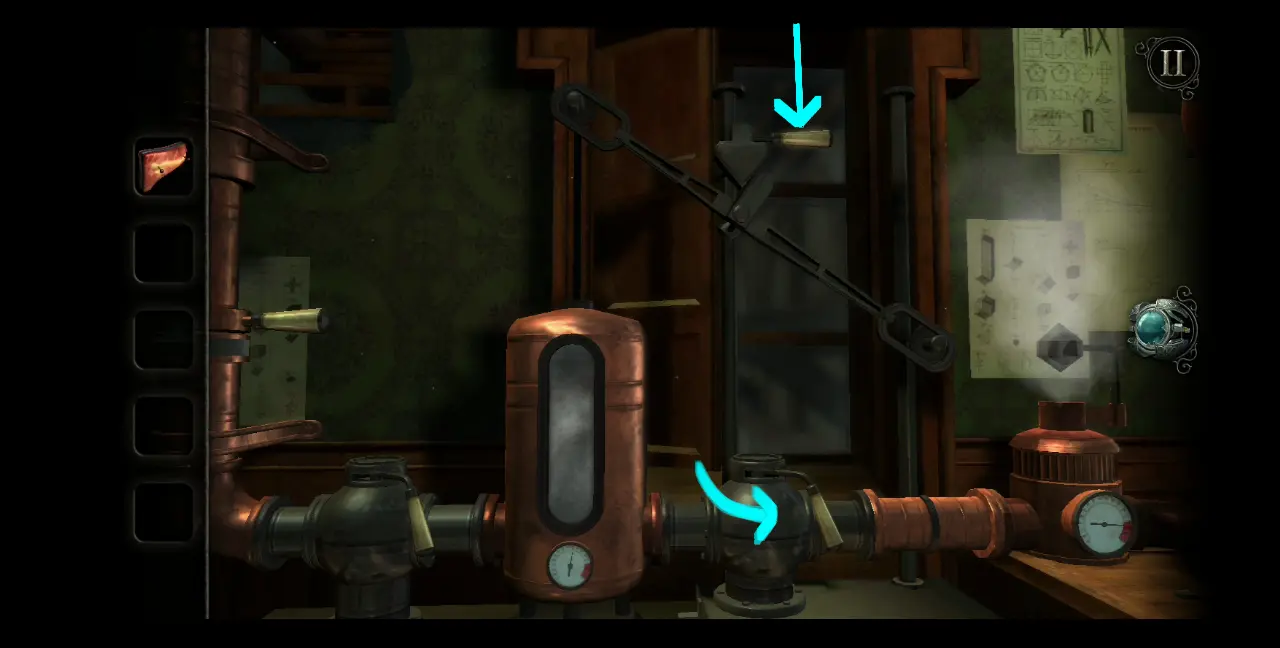
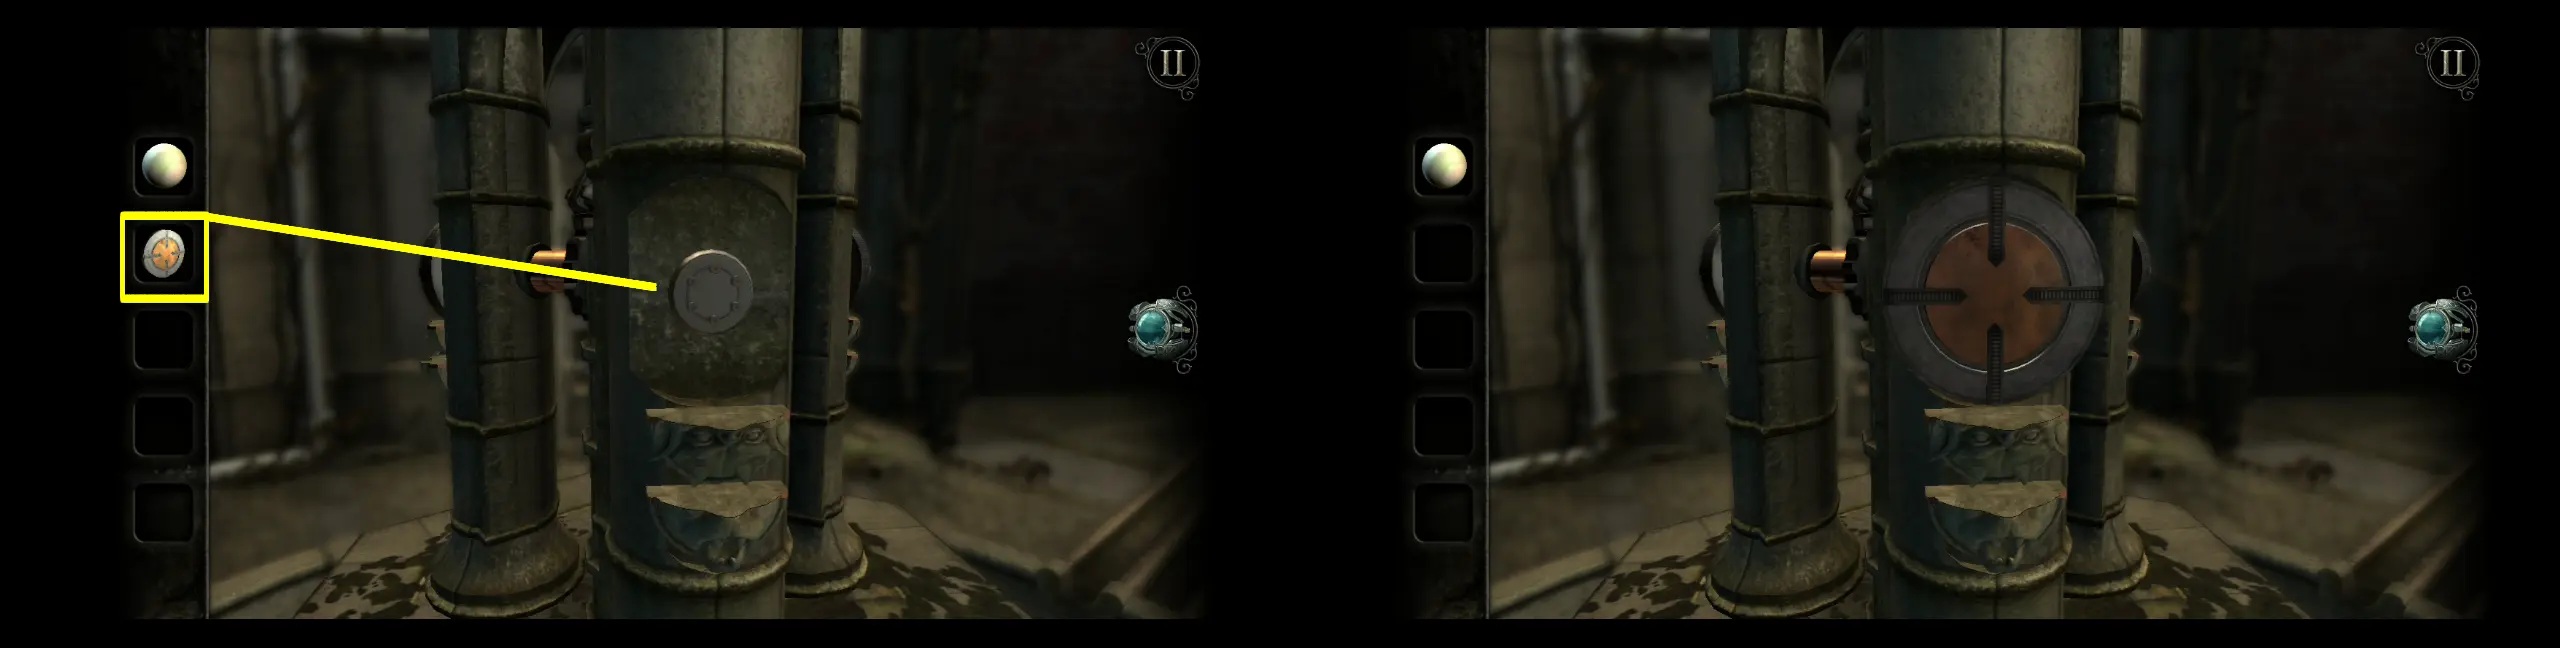
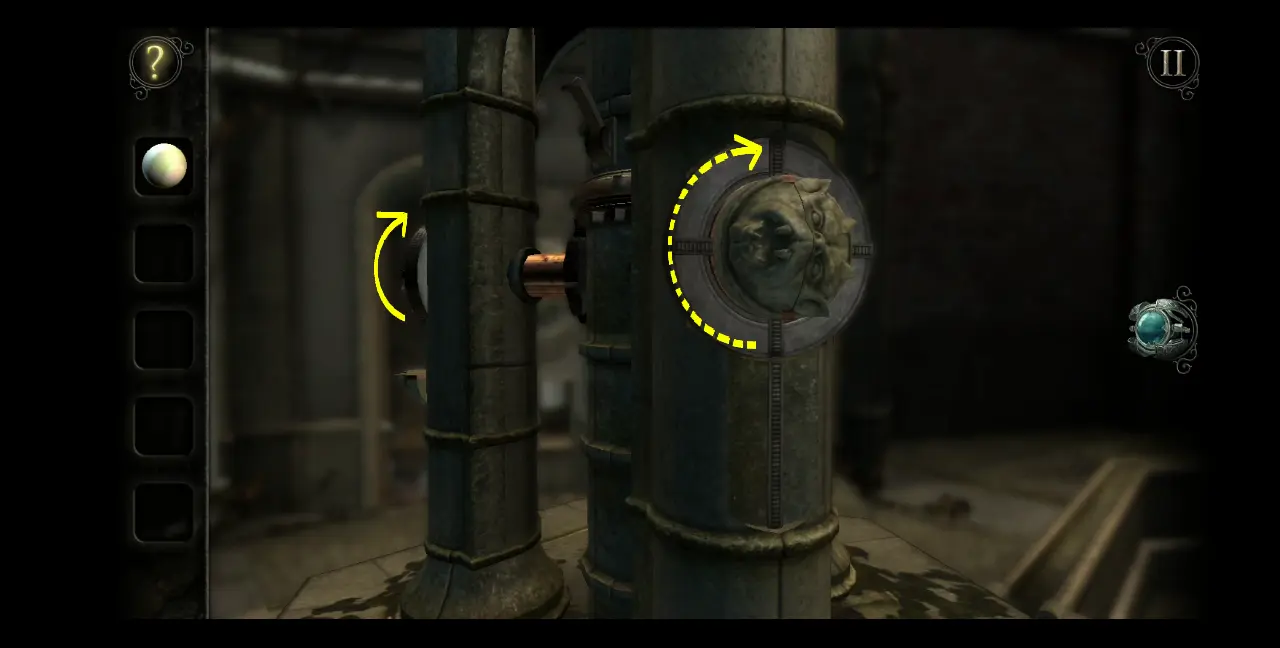
Thus, return to the Study. Immediately, you’ll hear a hissing sound to your left as steam is coming out of one of the pipes in the same direction.
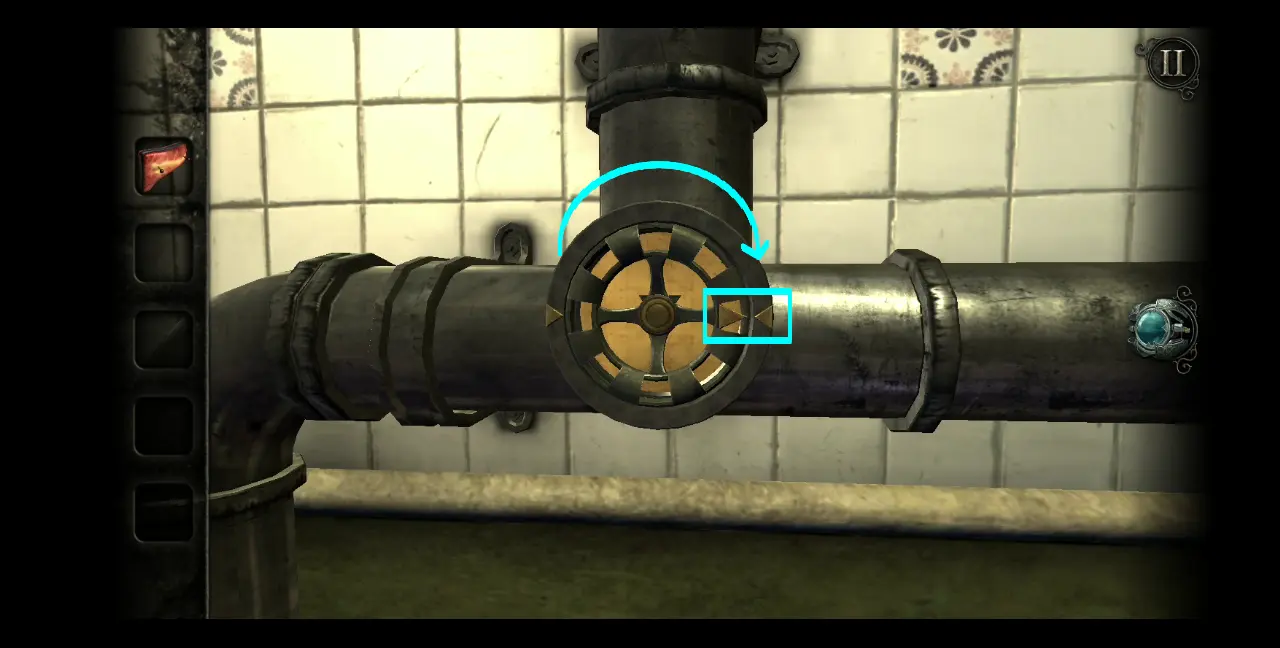
Turn your attention toward this particular table. To keep the steam from coming out, pull down the handle connected to a vertical pipe.
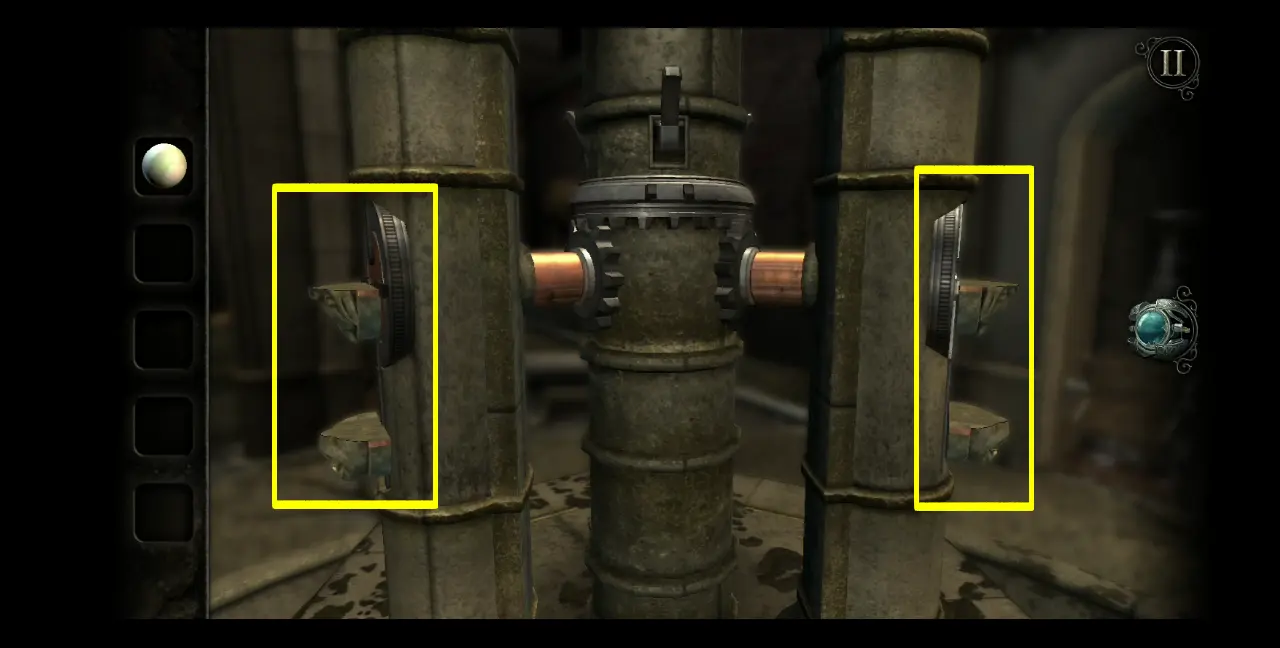
Next, you’ll see horizontal pipes connected to a cylinder and similar levers on either side of this cylinder. Turn the handle on the left pipe to the right while the handle on the right pipe should remain pointed to the left. This should cause steam to build up inside the cylinder and make the horizontal pipe connected to a pivoting arm to descend because of the balanced weight.
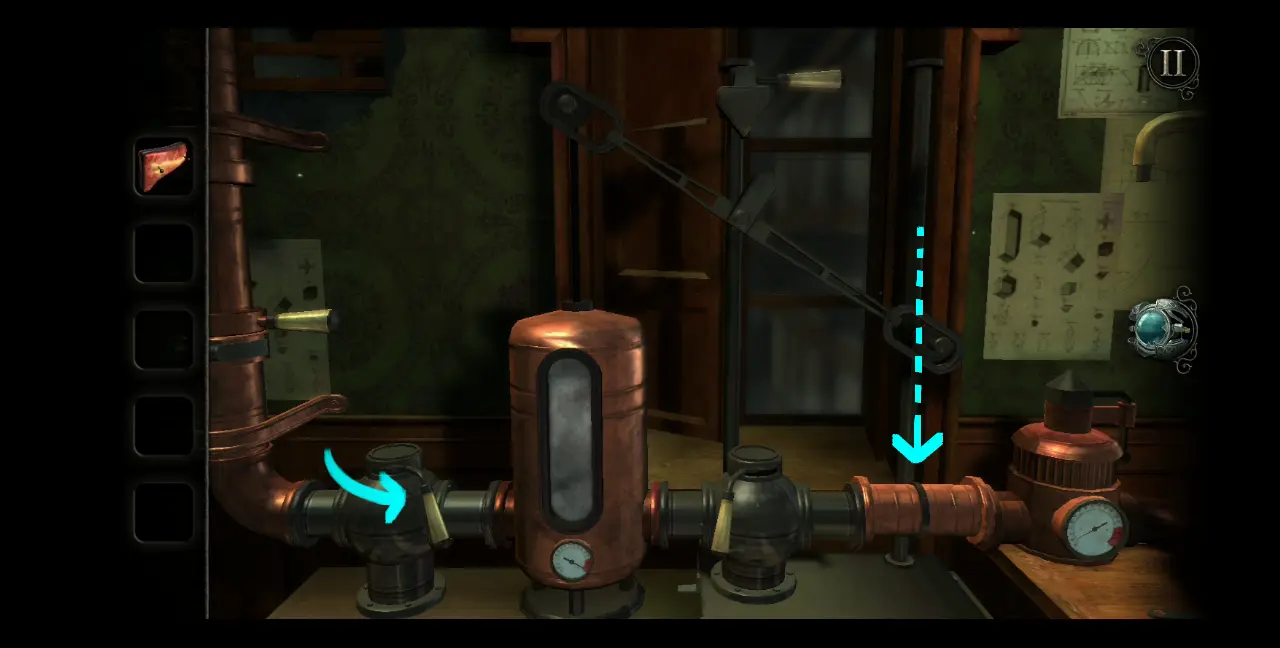
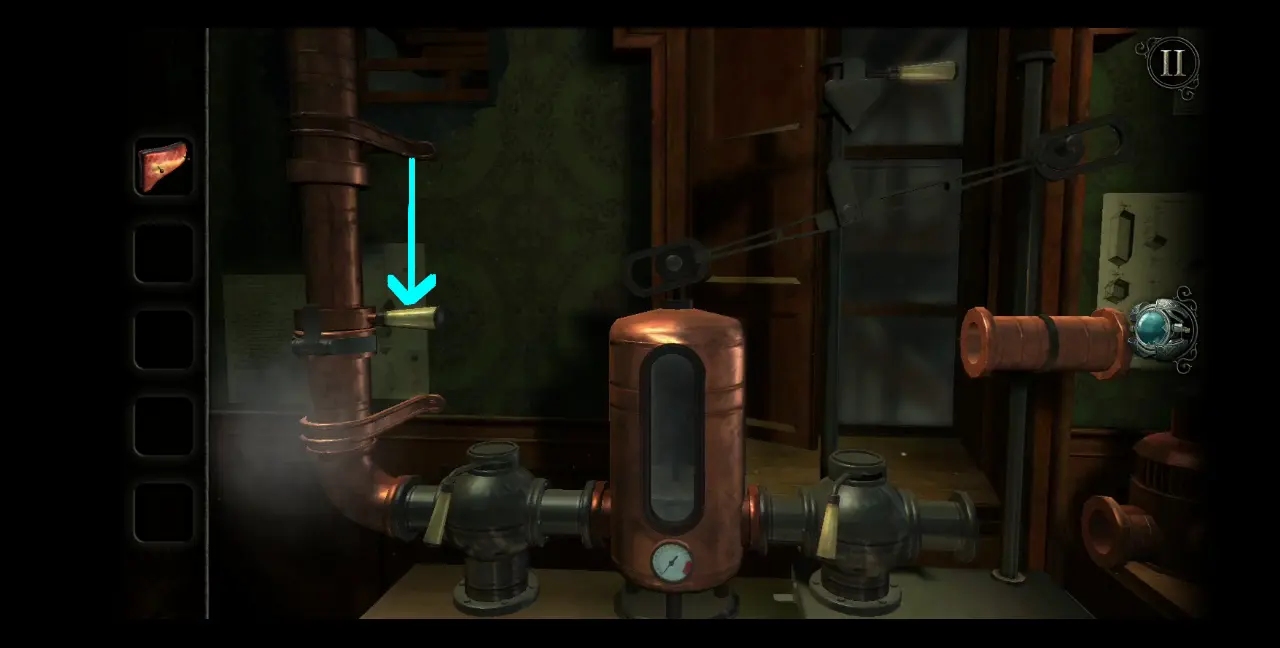
Lock this horizontal pipe in place by pulling down the handle connected to a metal wedge that looks like an arrow. Now you can turn the handle on the horizontal pipe on the right to the right, toward the direction of the pipe connected to a pivoting arm.
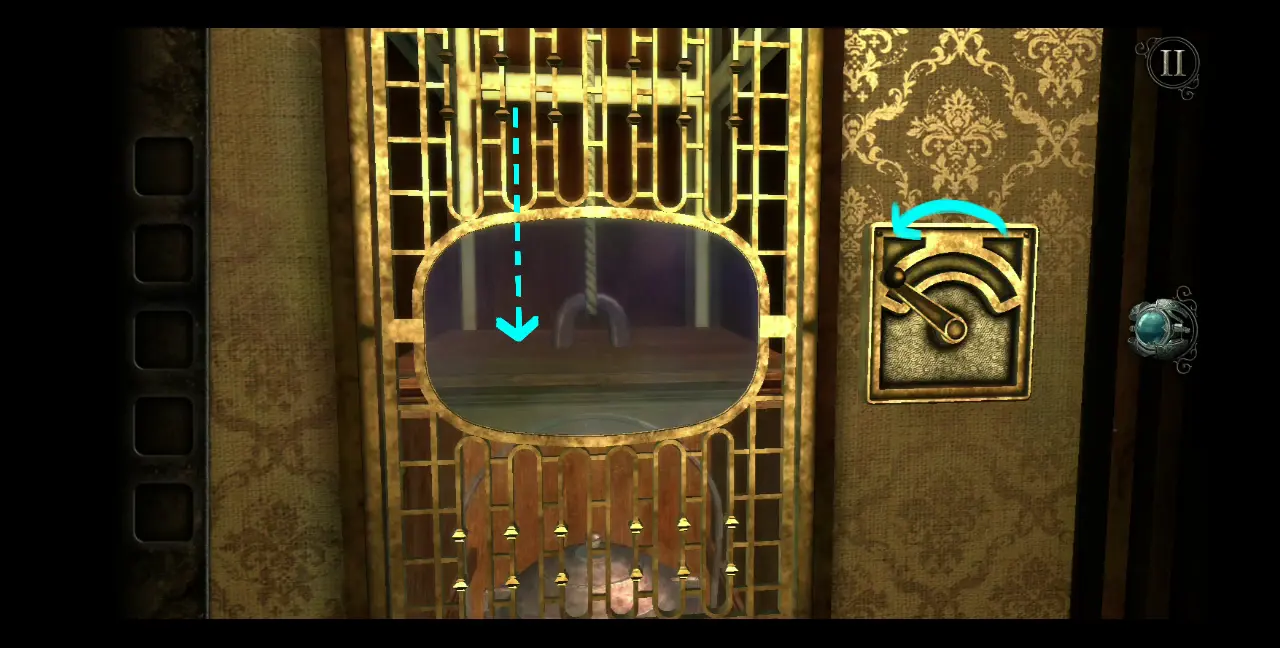
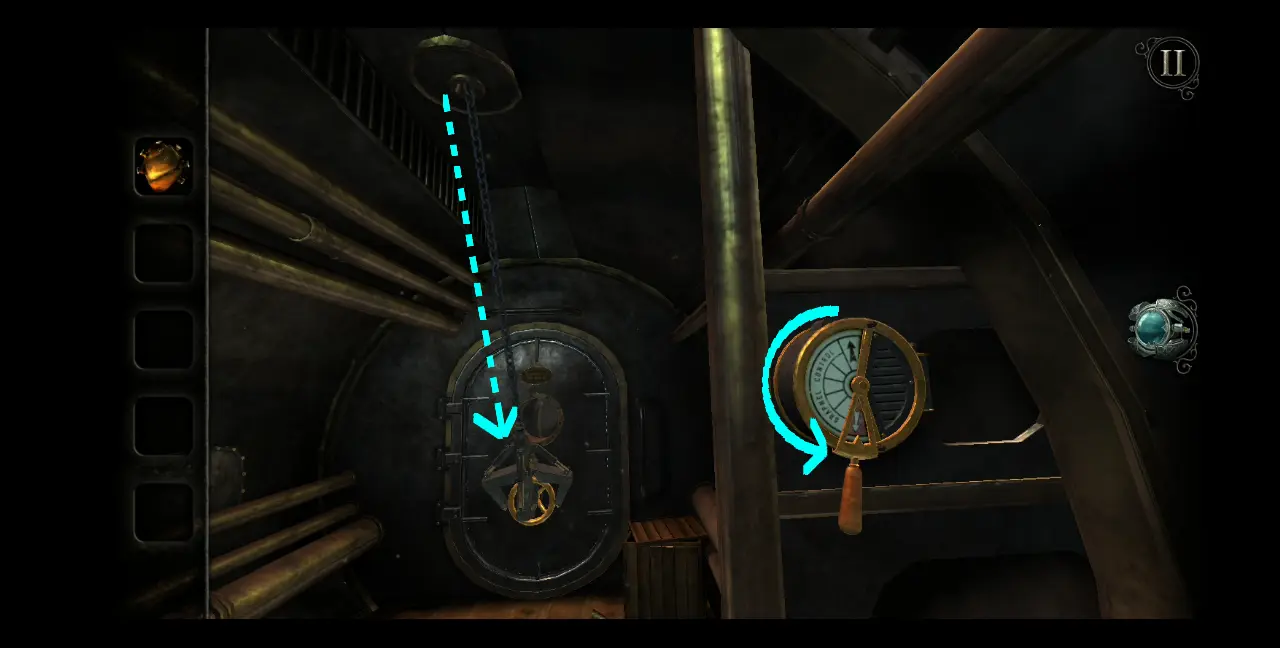
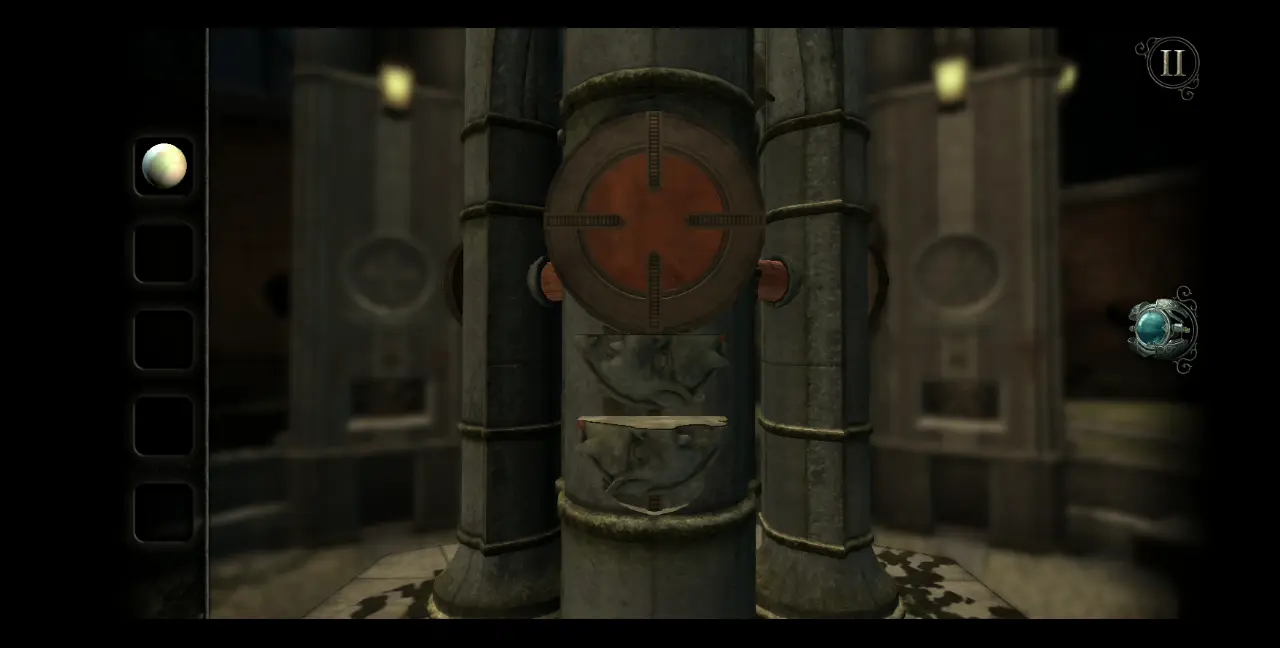
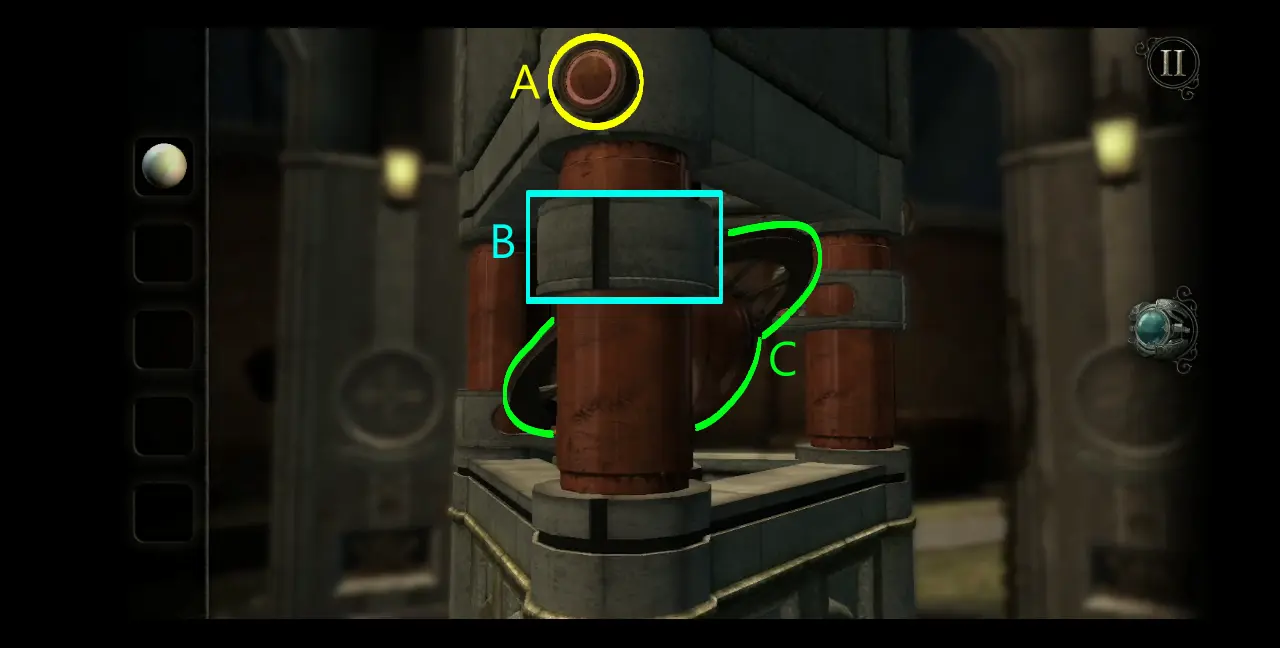
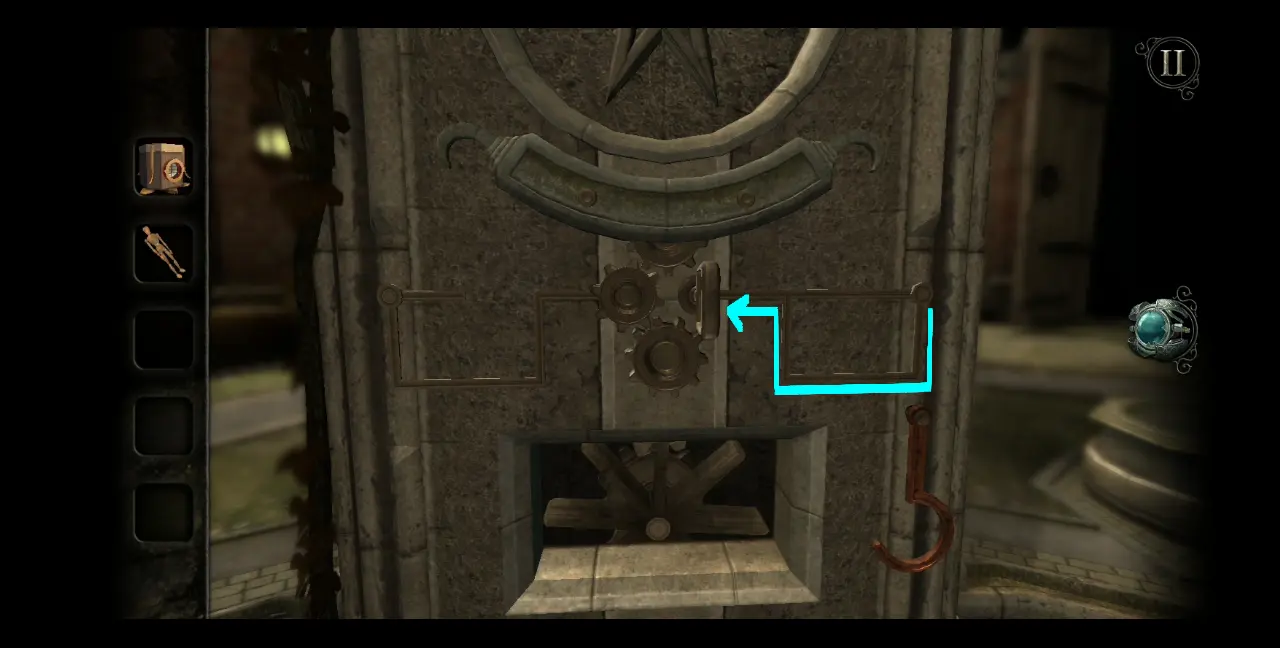
Turn your attention now to the next table, where you can see a large brass orb with pipes sticking out of its sides. Turn these pipes sideways then pull the handle beneath it to the right for steam to flow out of these pipes. The steam running through these pipes will cause the brass orb to spin rapidly.
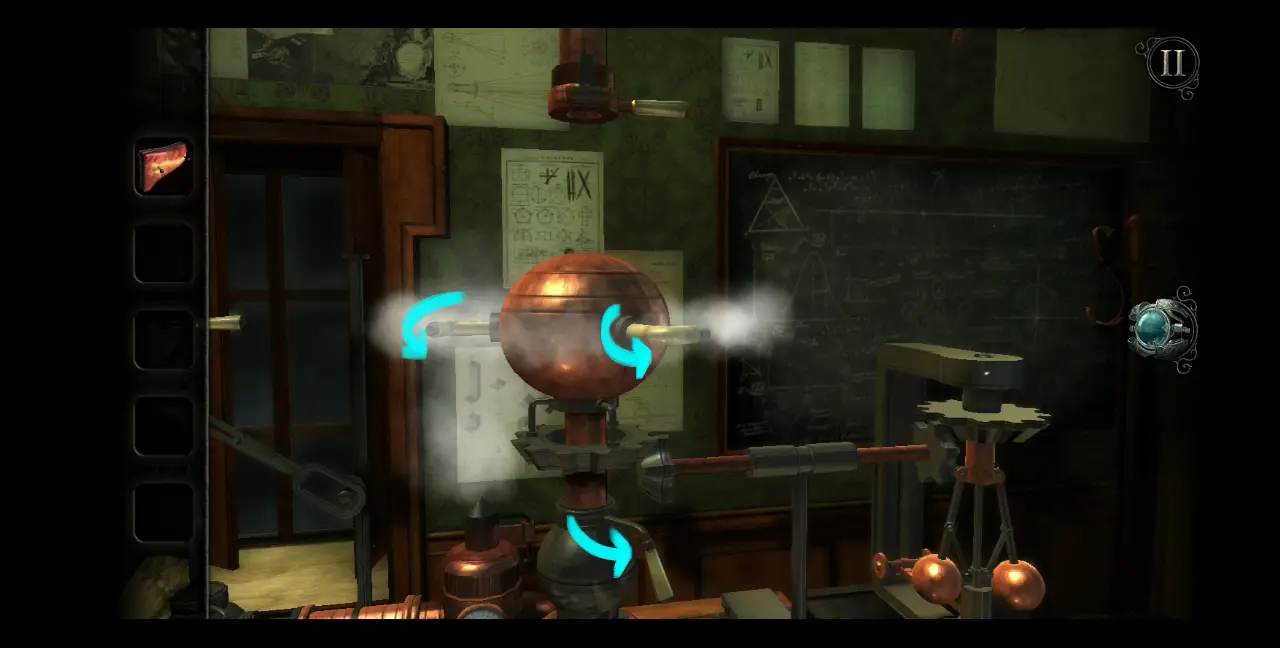
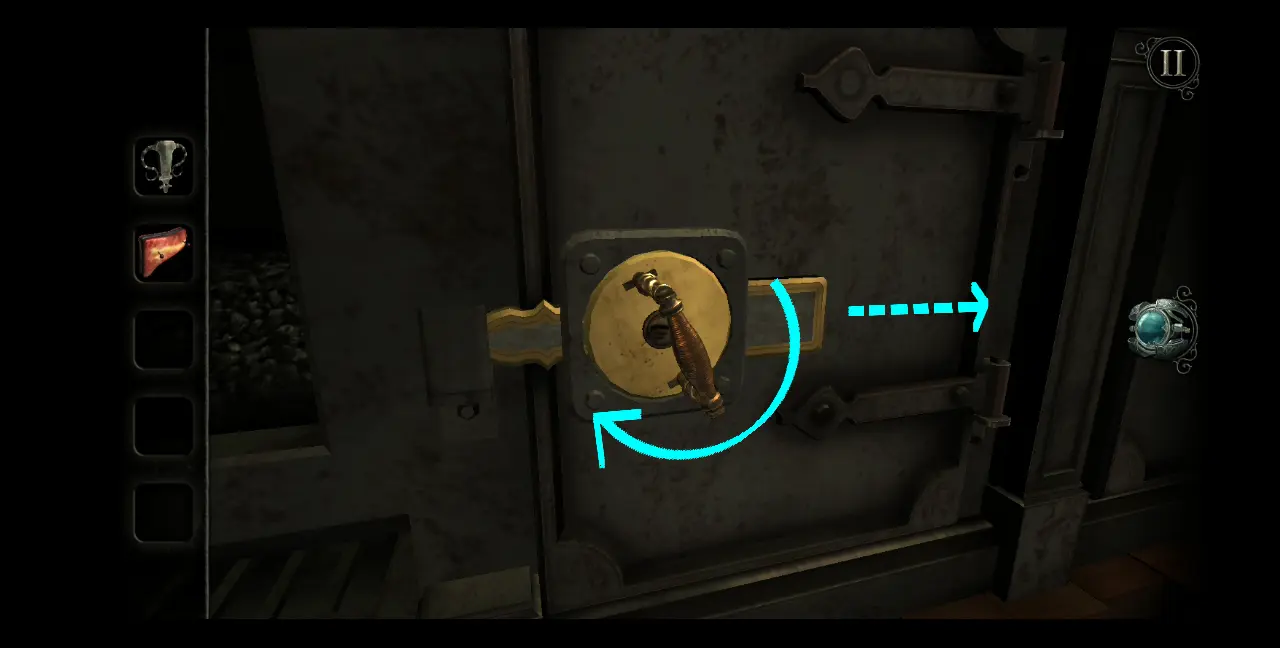
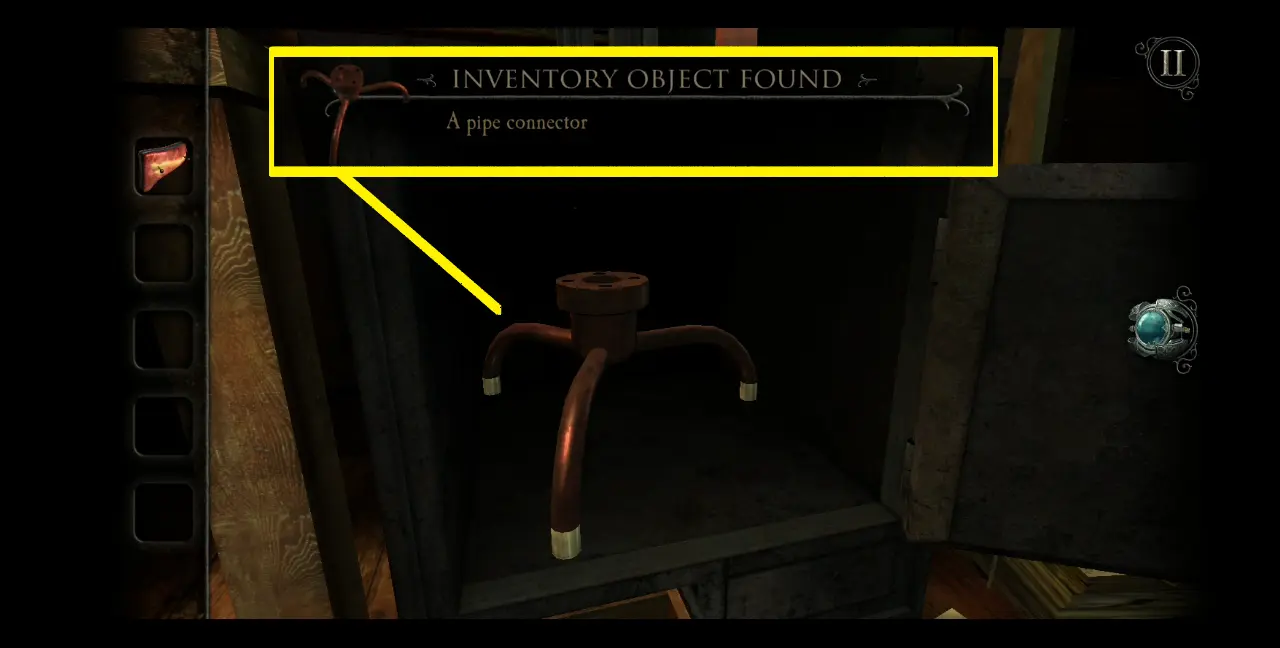
This will loosen up and lift a brass bar blocking the lock of a black safe. Zoom into the safe and turn the handle to move the safe’s bar lock to the right.
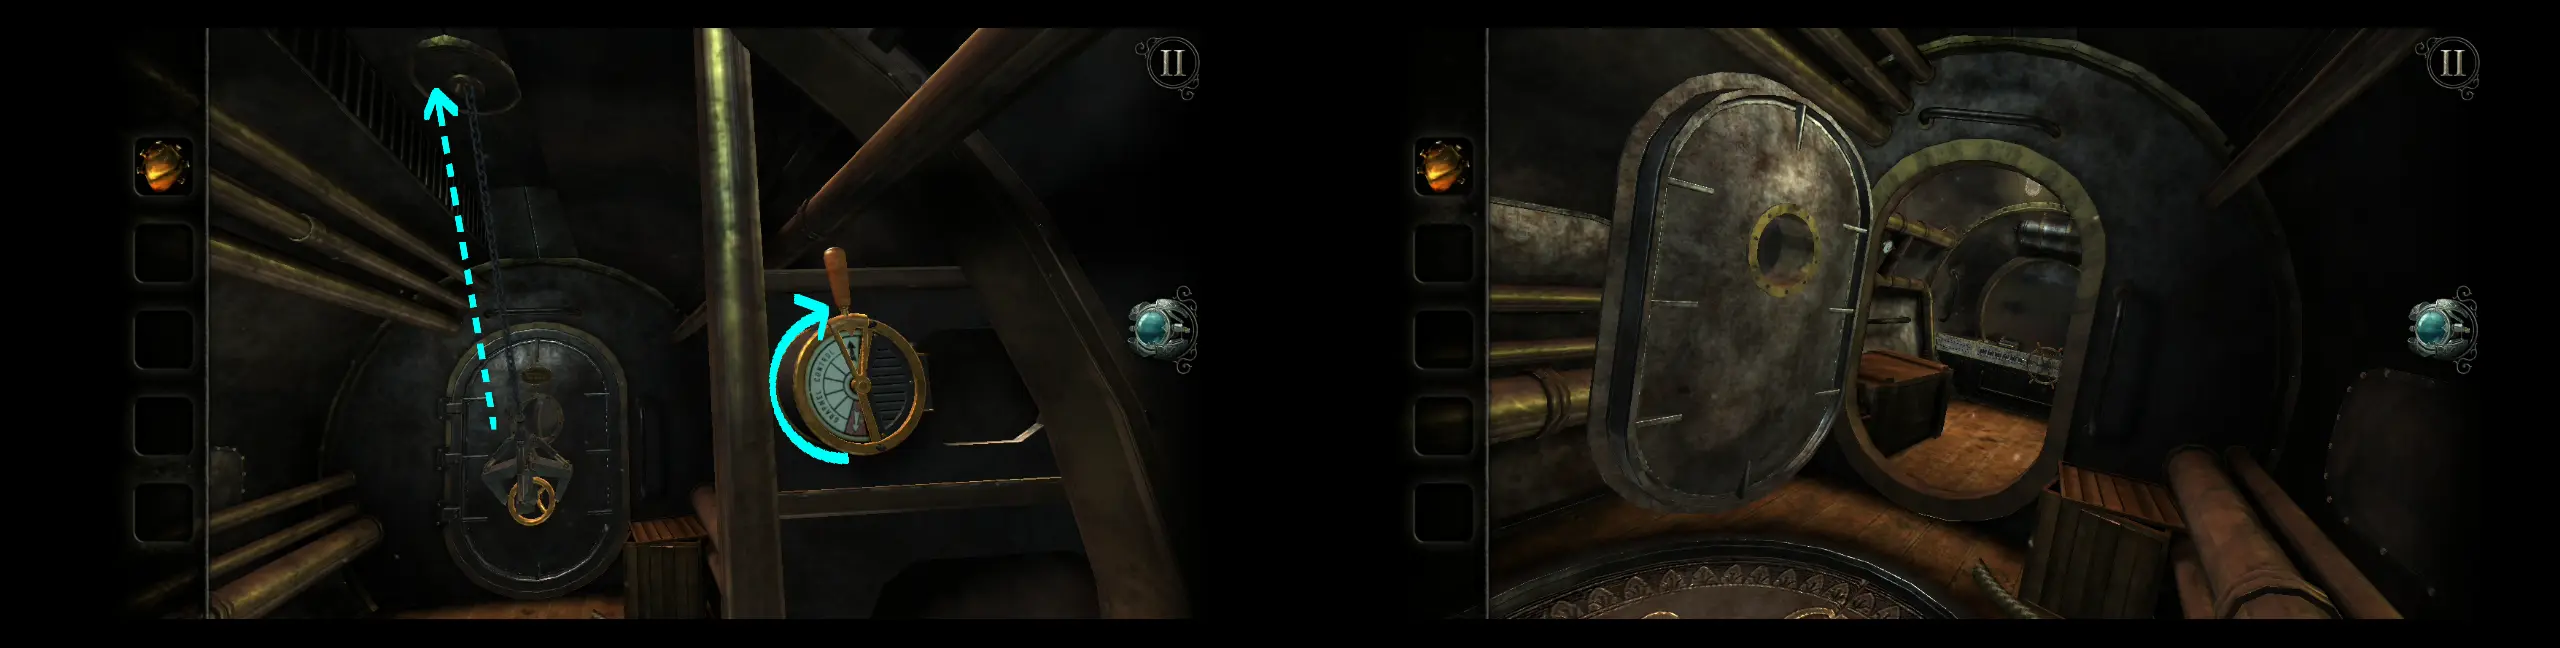
Open the door of the safe and, inside, you’ll find a pipe connector.
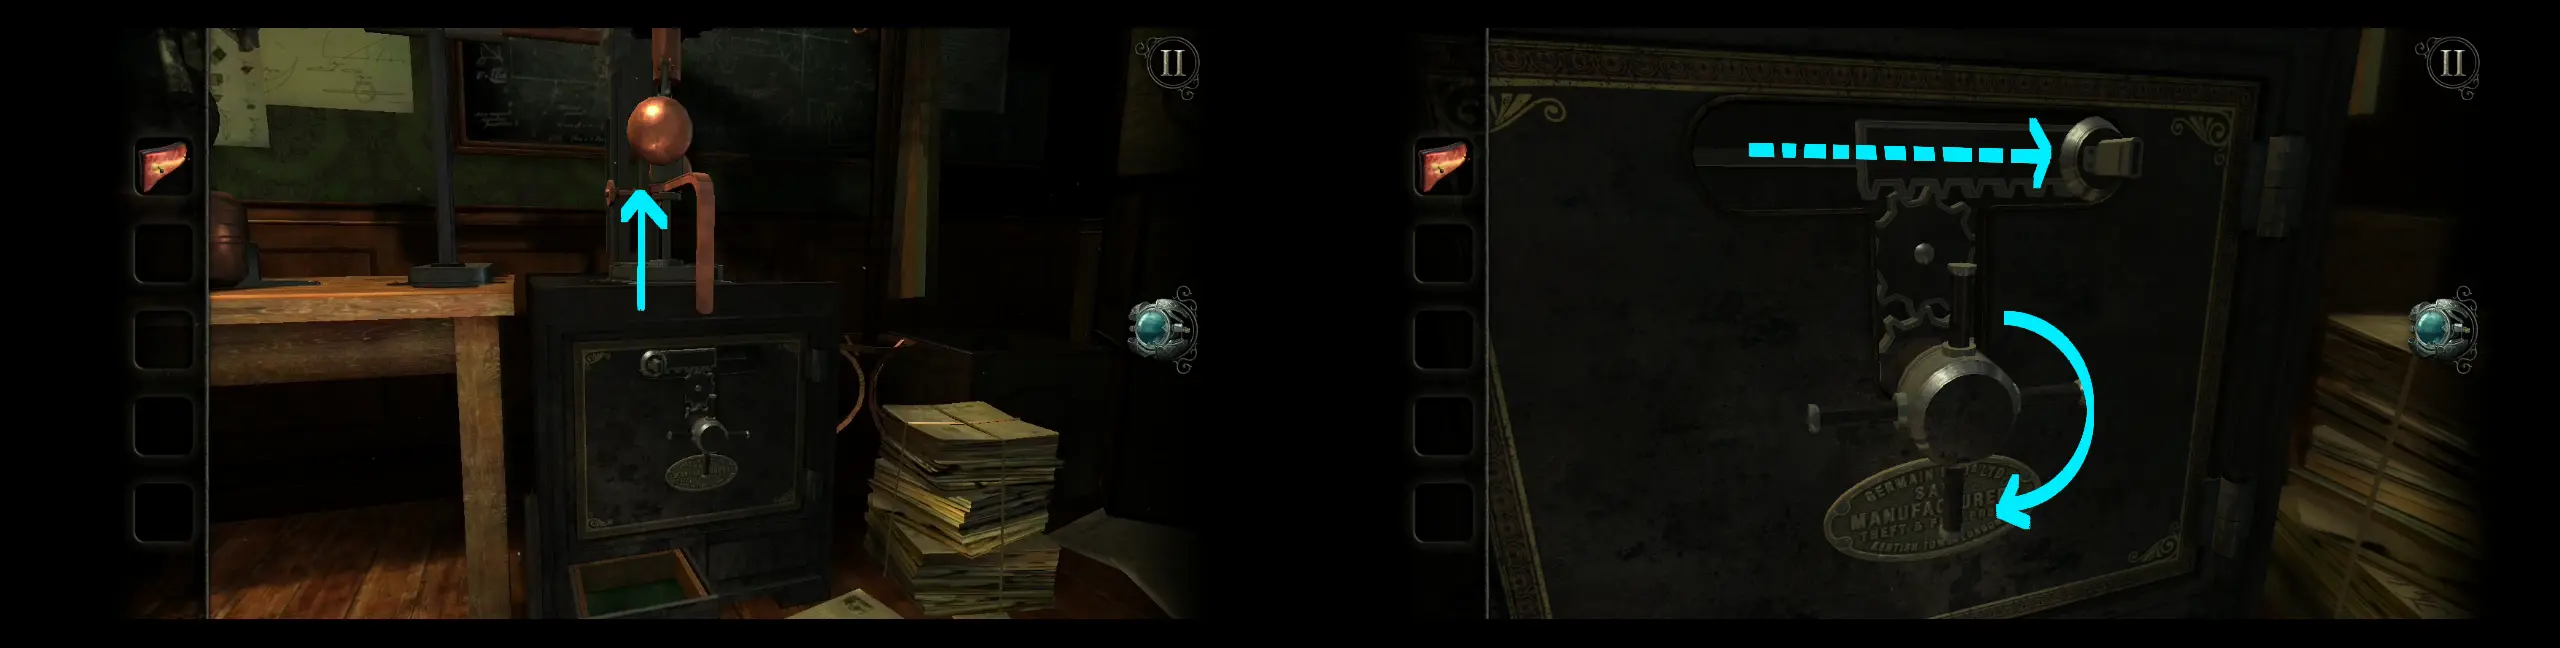
Return to the device with the brass orb. First, turn the handle at the bottom to the left to redirect the steam away from the orb. This will cause the orb to stop moving. Next, turn the pipes at the side of the brass orb upward. Then, place the pipe connector on top of the brass orb. Once done, pull the handle at the top of the brass orb, which is connected to a vertical pipe. After the pipe has locked itself in place, turn the bottom handle again to the right, redirecting the flow of steam back to the brass orb.
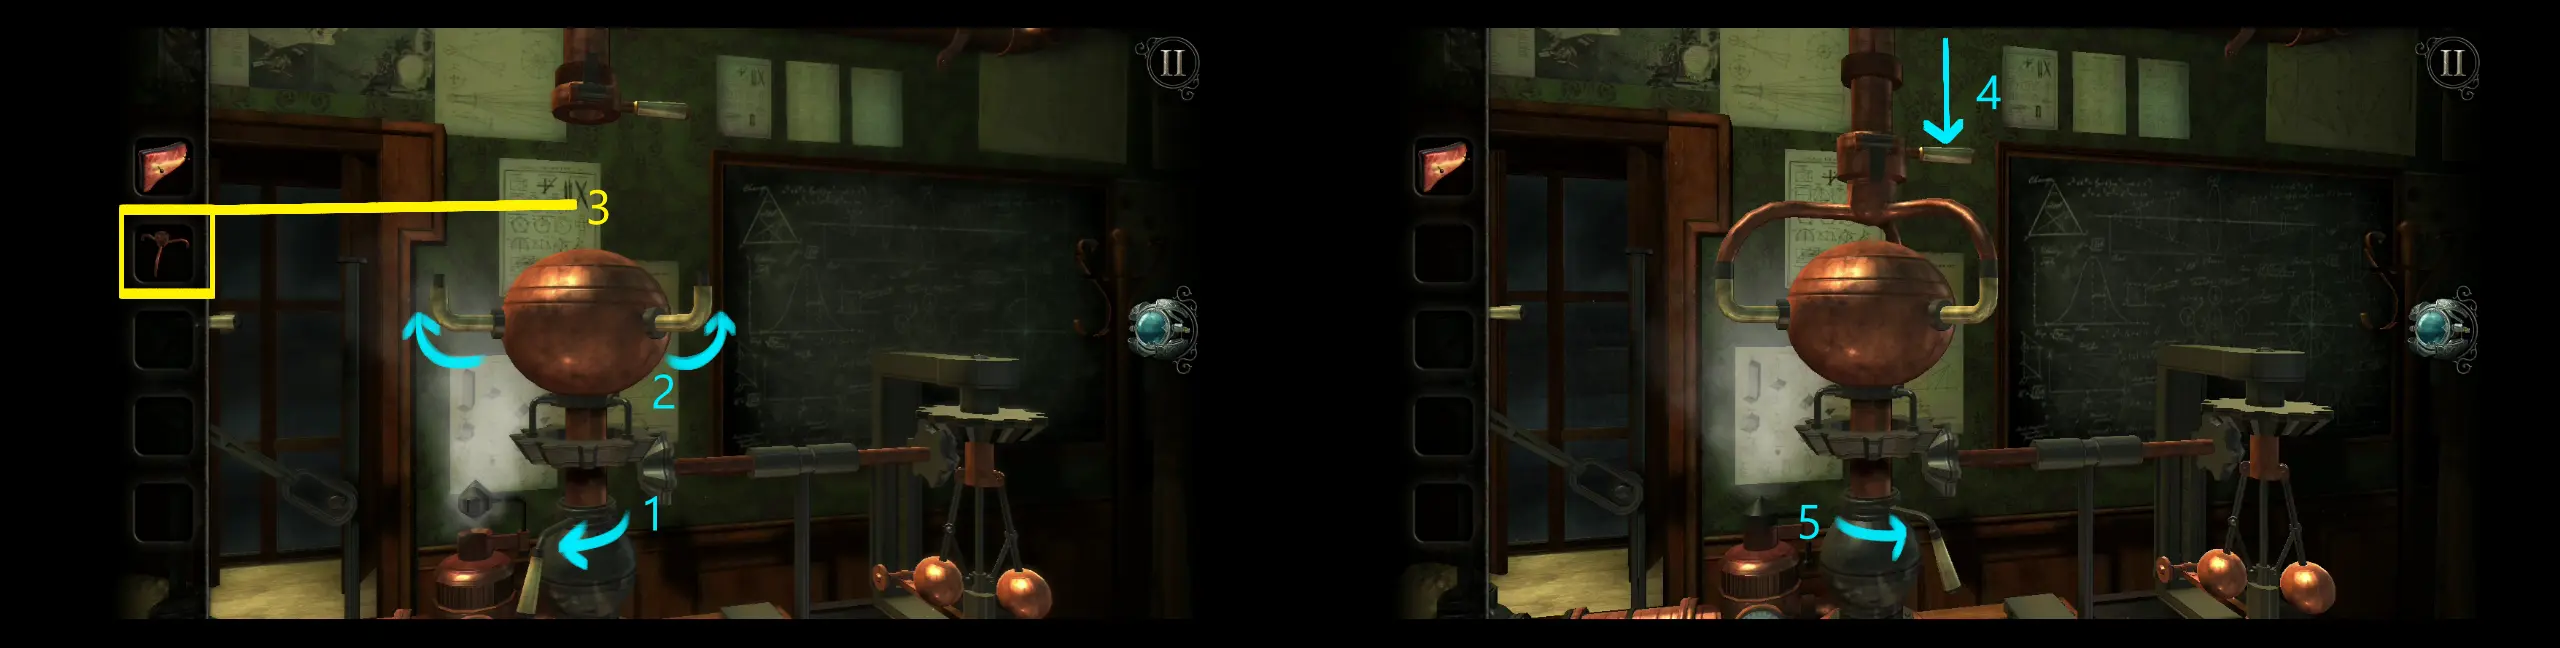
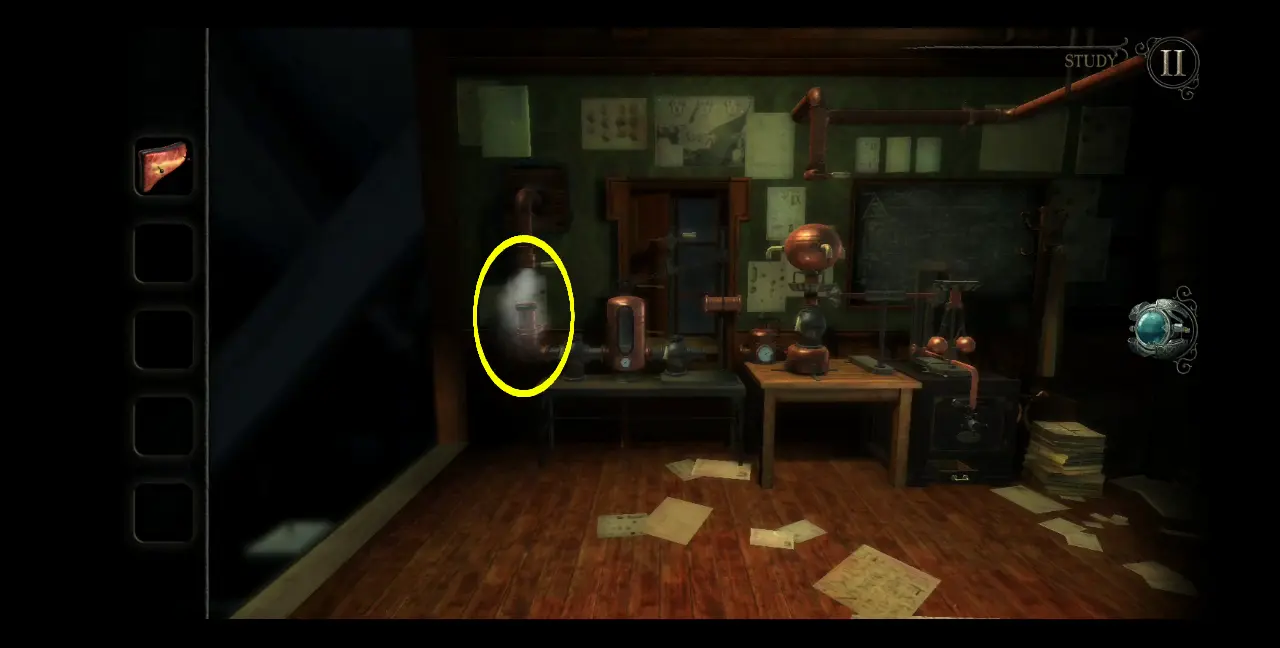
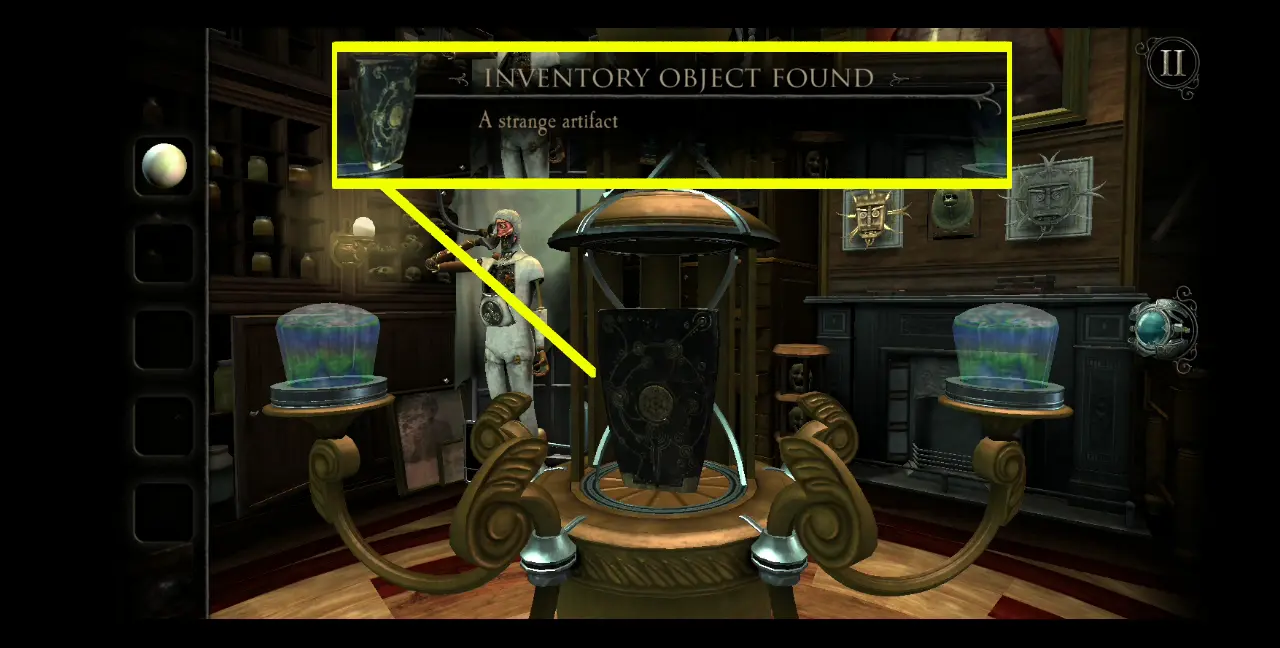
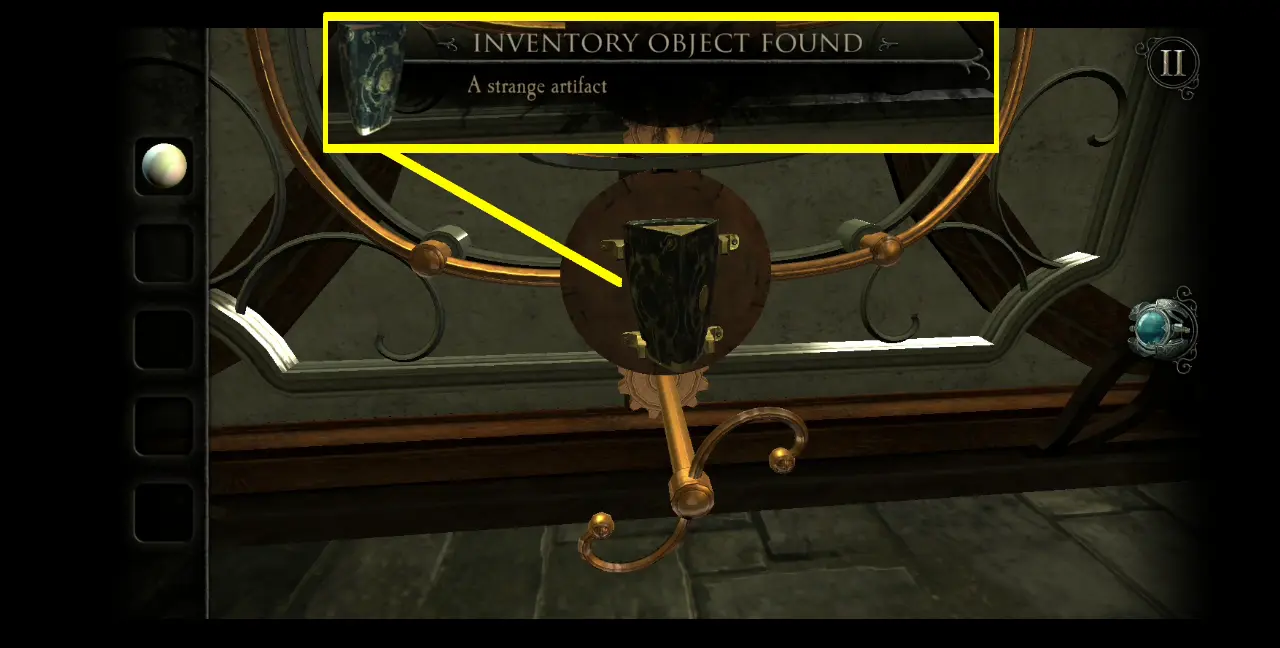
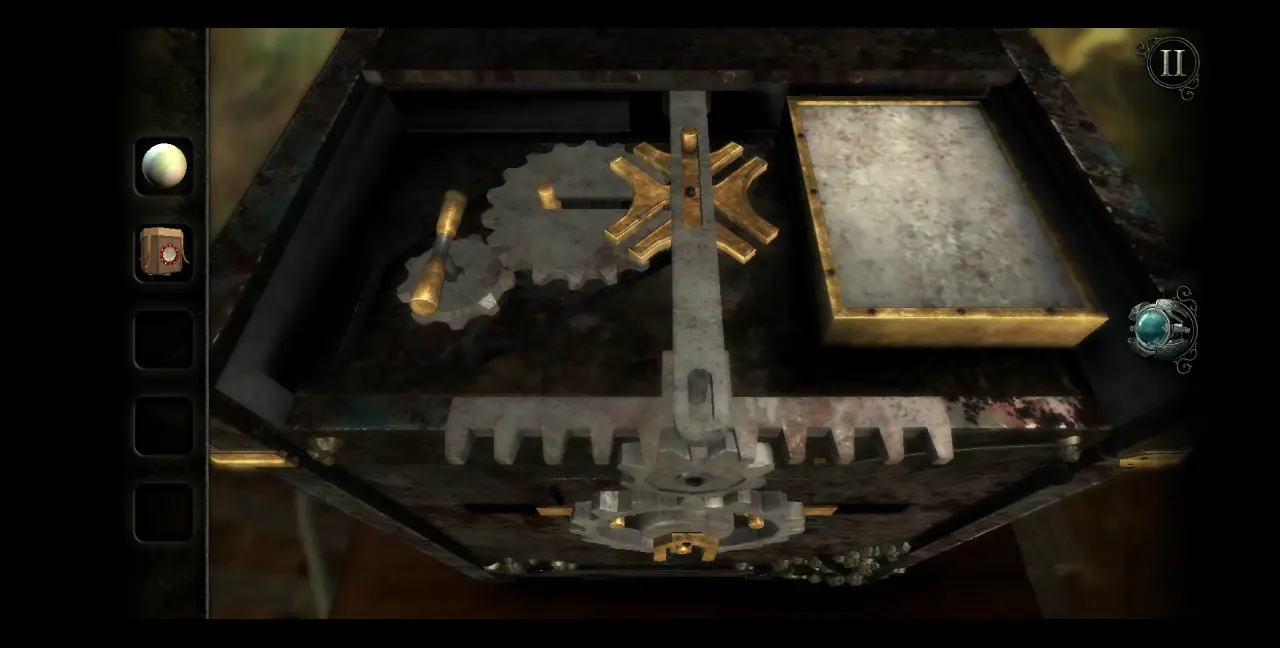
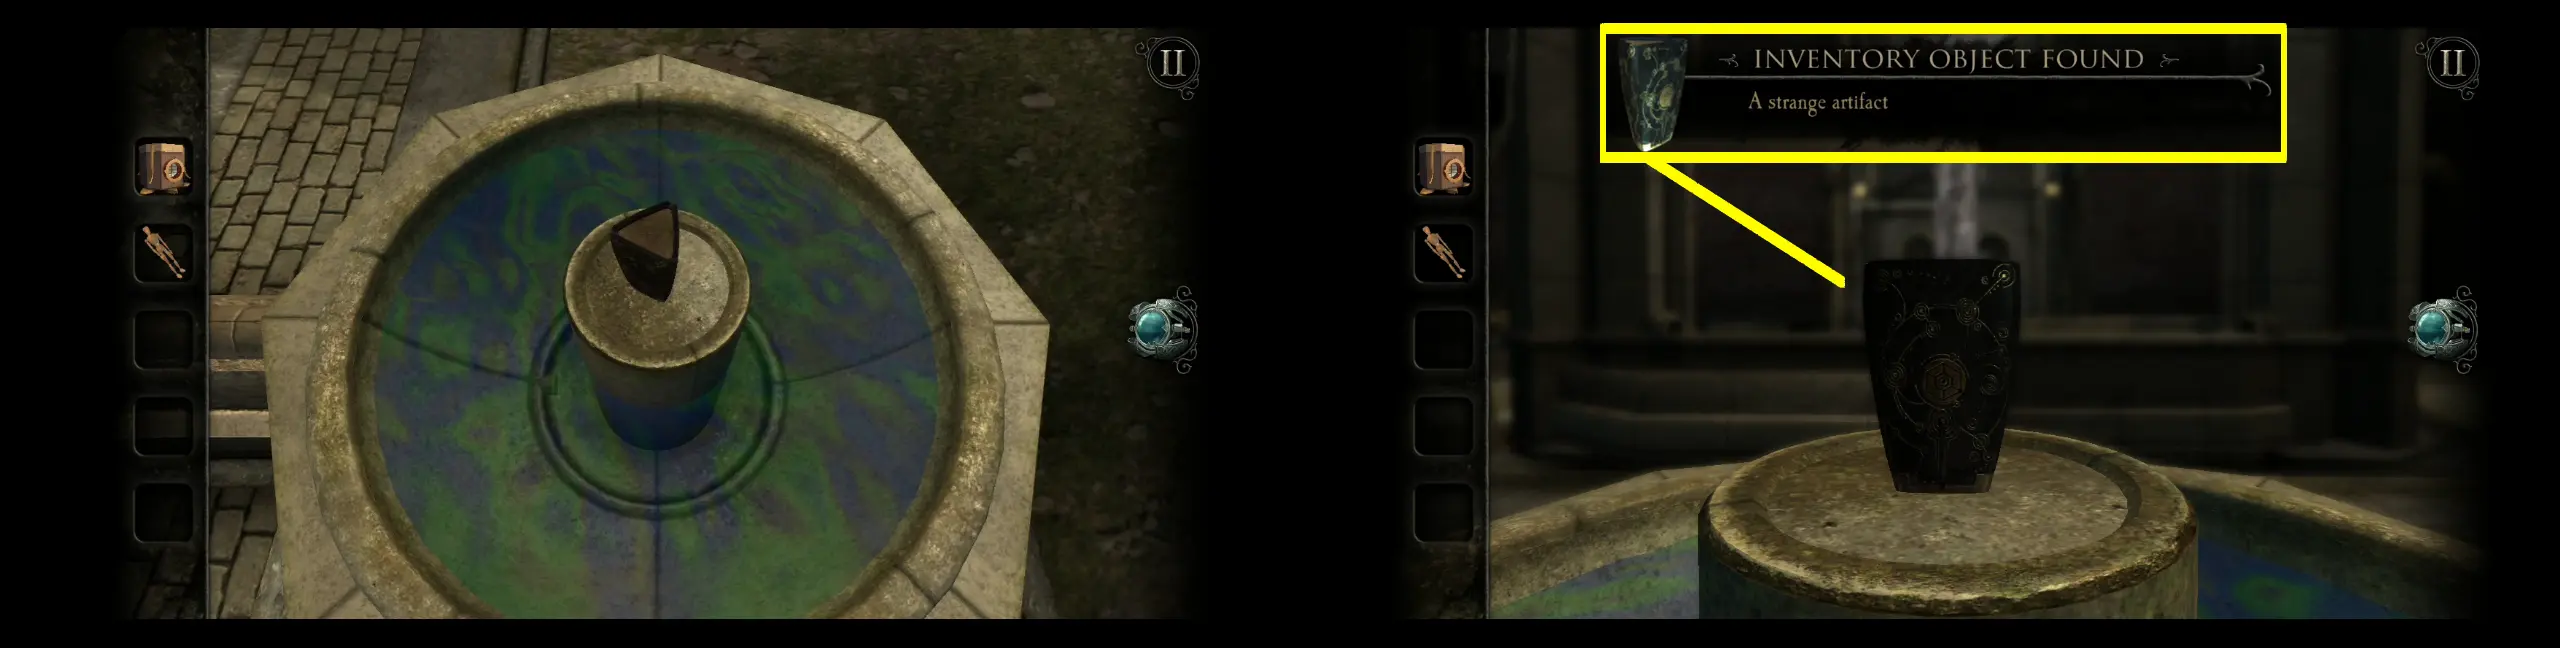
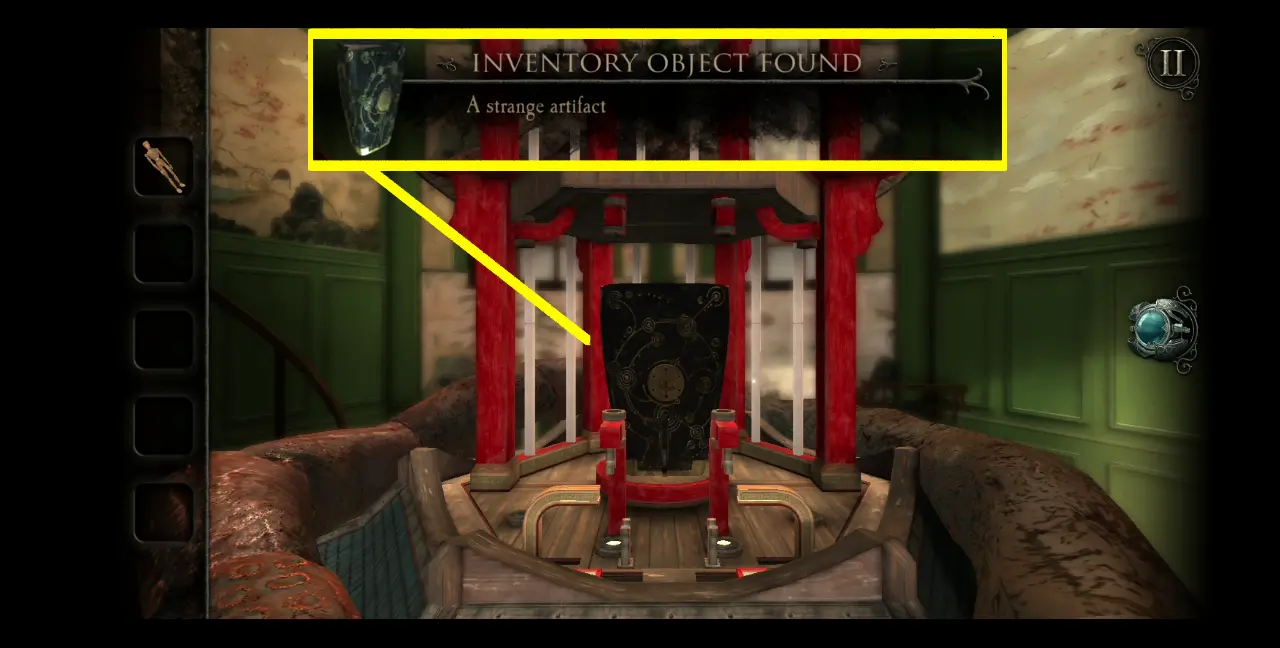
The steam will go up the pipes and flow toward the device on the table at the center of the Study. Here, you will find a mechanism that seems to work with electricity. To activate the machine, turn the bottom handles both to the right. This will cause the center to spin and some electrical sparks to fly out of it. You’ll see that there’s an item in the middle of the spinning center. To get this, turn the top handle to the right, which will cause the center to open up and spin rapidly.
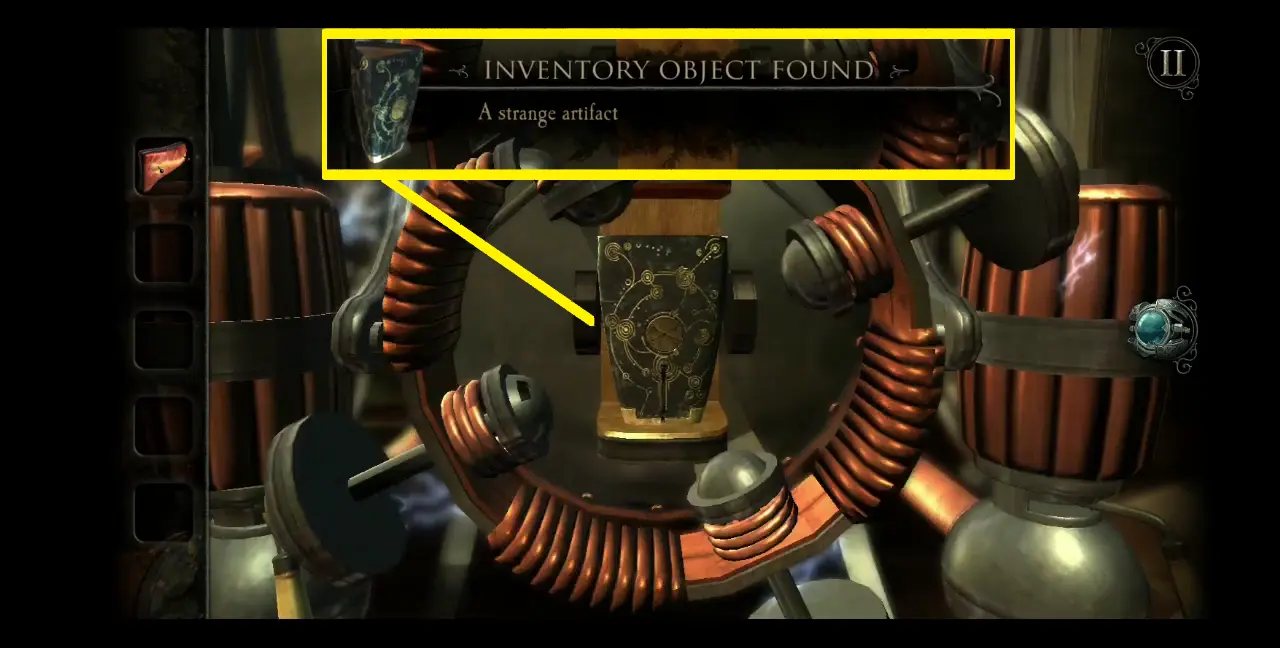
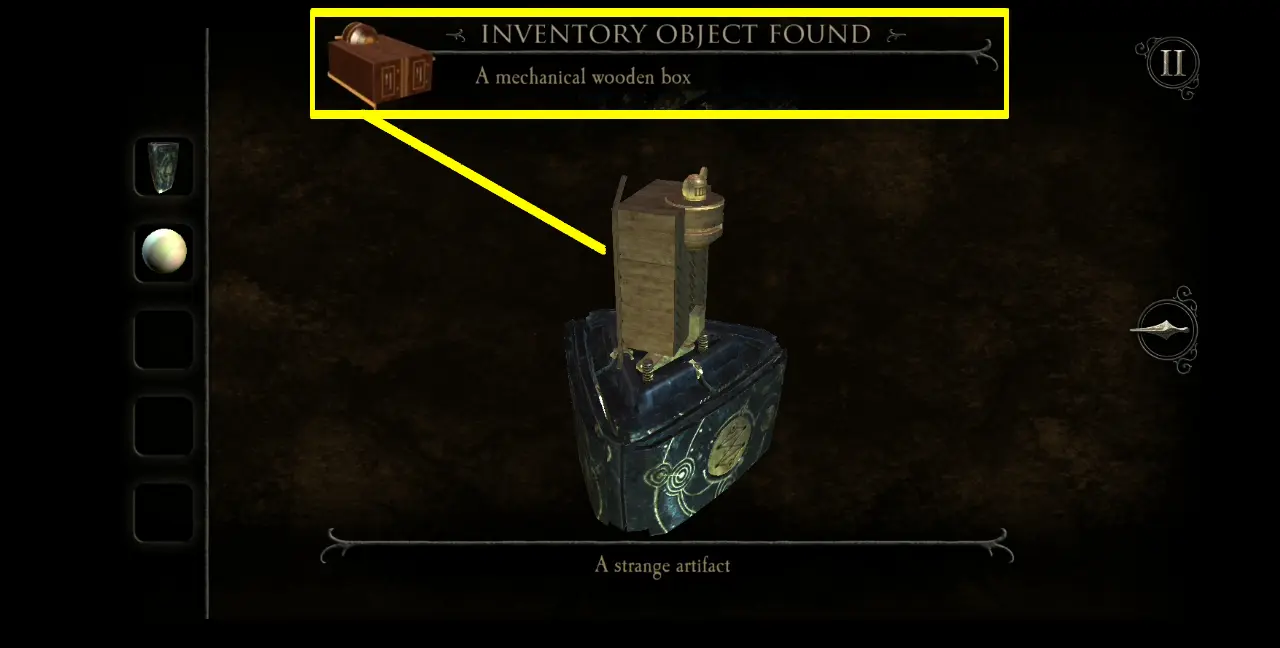
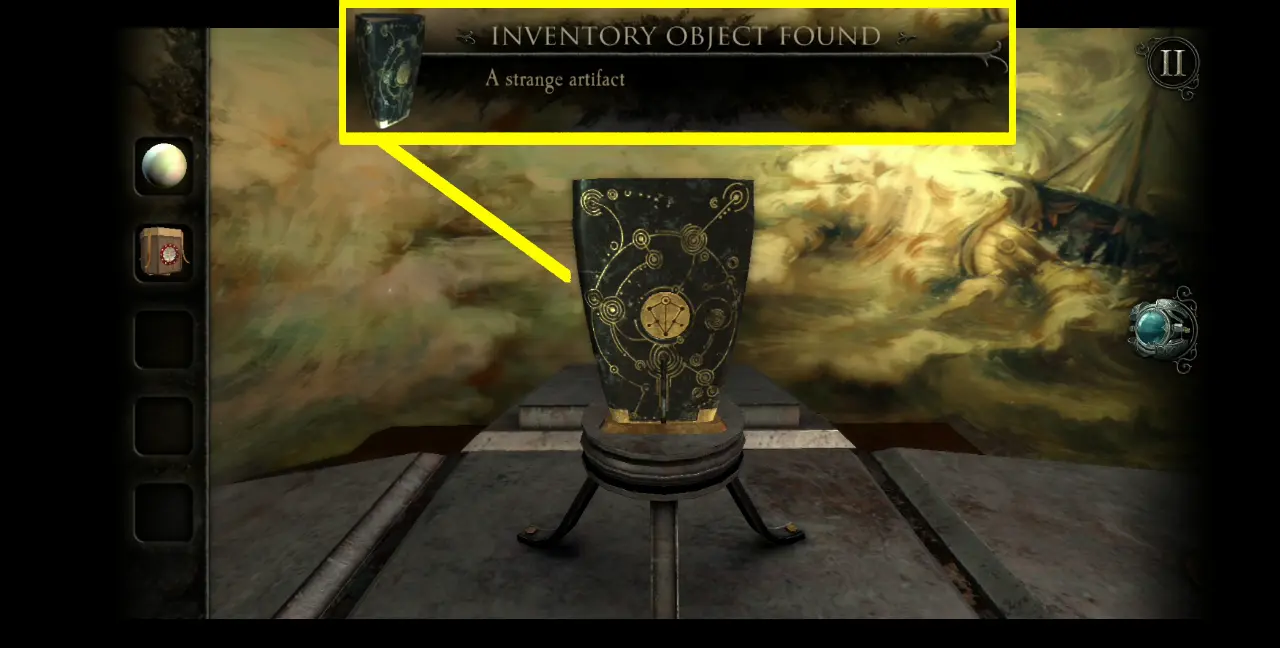
Zoom into the center and collect the item: a strange artifact.
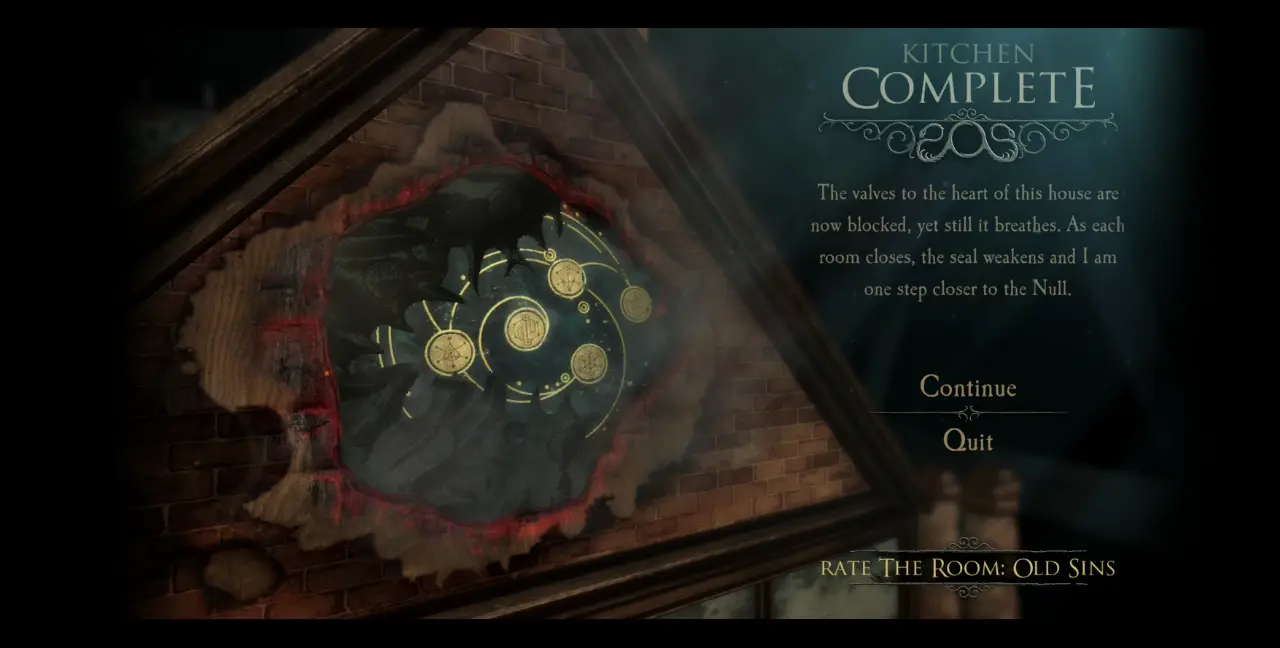
Just like in the Foyer, the Study will be overtaken by black, inky tendrils, rendering the room inaccessible. As the lights flicker and the machines explode, you’re forced out of the room and back to the front of the dollhouse. Here, you’ll see that another symbol on the lower left side of the seal has been covered by black ink. This completes your exploration of the Study.
Curiosity Room
With the new strange artifact in your hands, view it in your inventory. Long press on the symbol in the middle. This will light up the artifact and open it up. Collect the moon emblem.

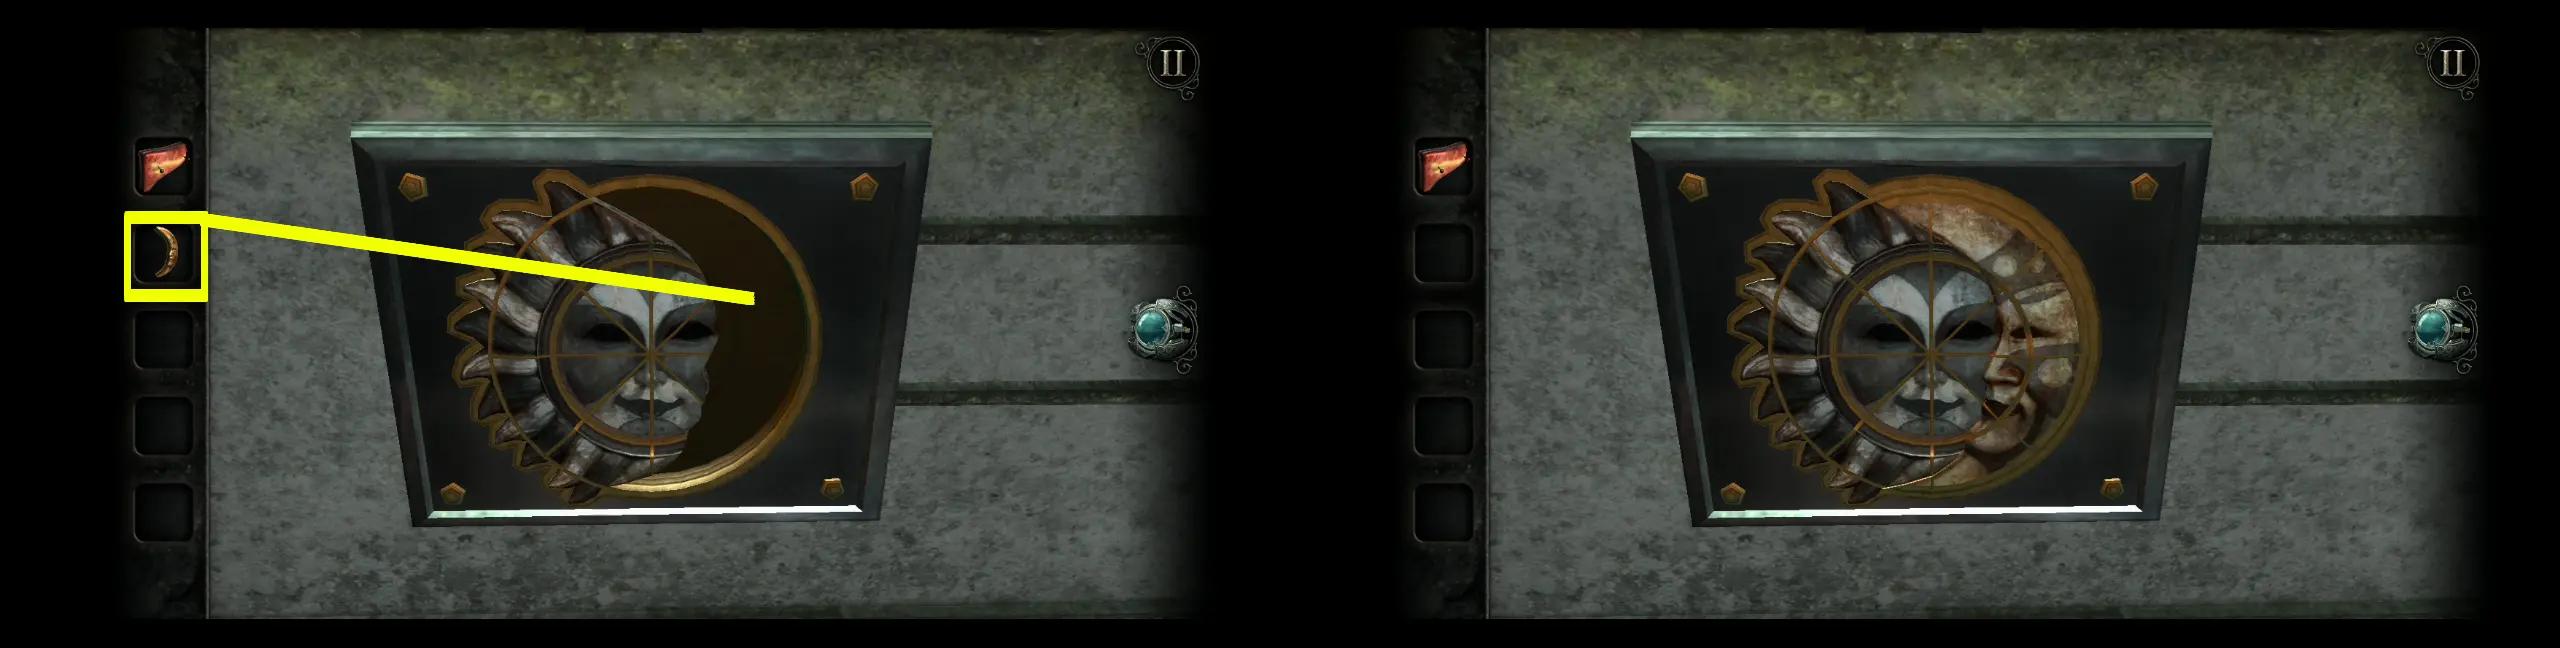
Return to the Curiosity Room. To the right of the center table, which houses the globe, is a small stone pedestal. If you look closer, you’ll see that it has a slot that has the sun emblem with a missing moon. Take note that at the top of the pedestal is a circular plate with a golden vase symbol.
Place the moon emblem on the slot next to the sun emblem, where its shape fits perfectly.
The metal frame holding the emblems will automatically move to the right, revealing a compartment with an artificial eye.
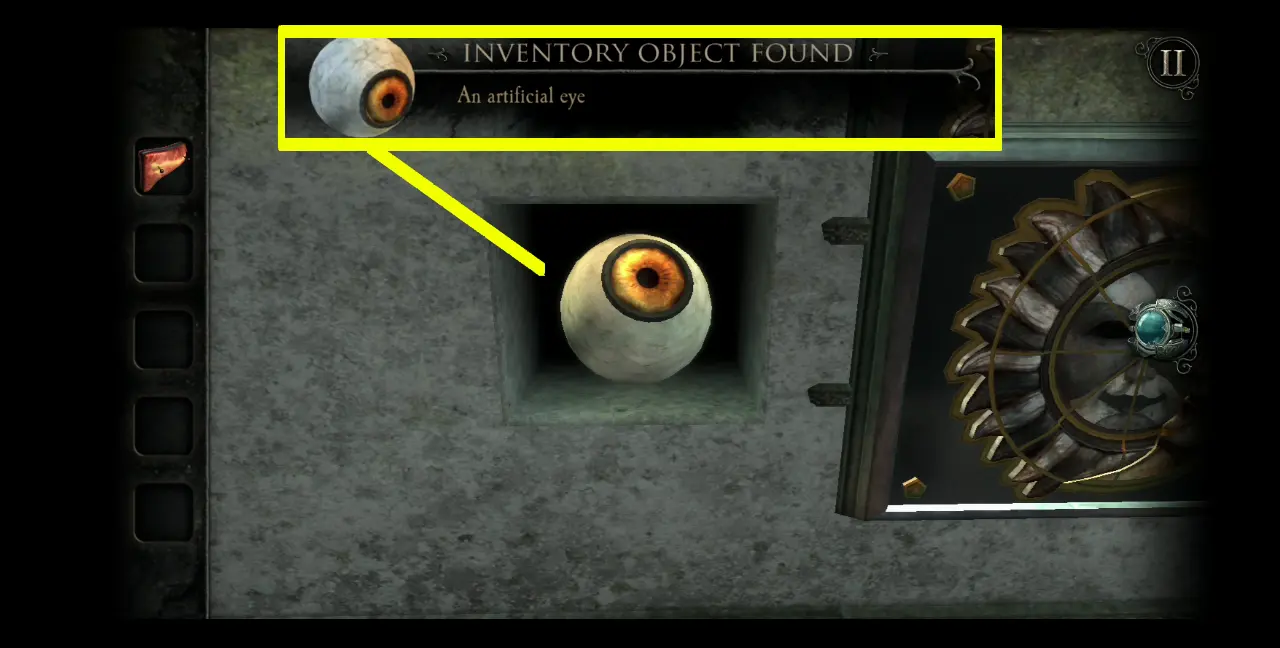
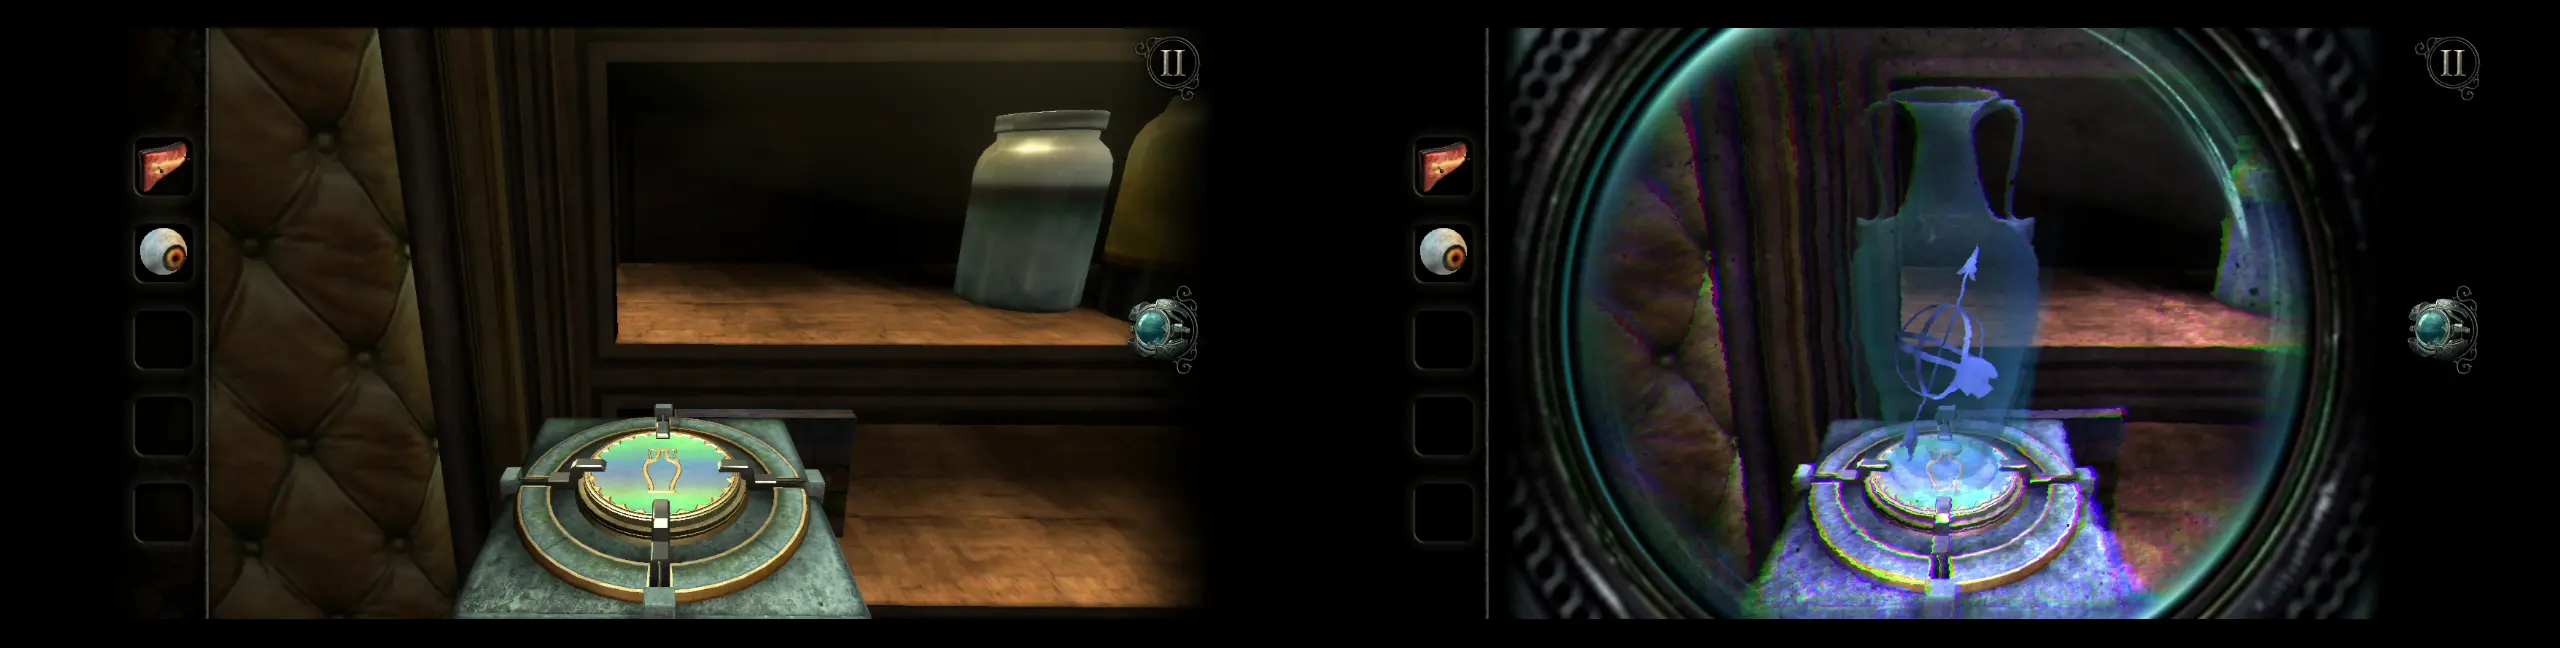
Upon collecting the artificial eye, the frame will slide back to its rightful place. At the top of the pedestal, you will see the circular plate with the golden vase symbol glowing with the strange rainbow-like surface, indicating you need to open your eyepiece to view it. The picture on the right shows you that there’s an arrow-like object inside what looks like a holographic vase.
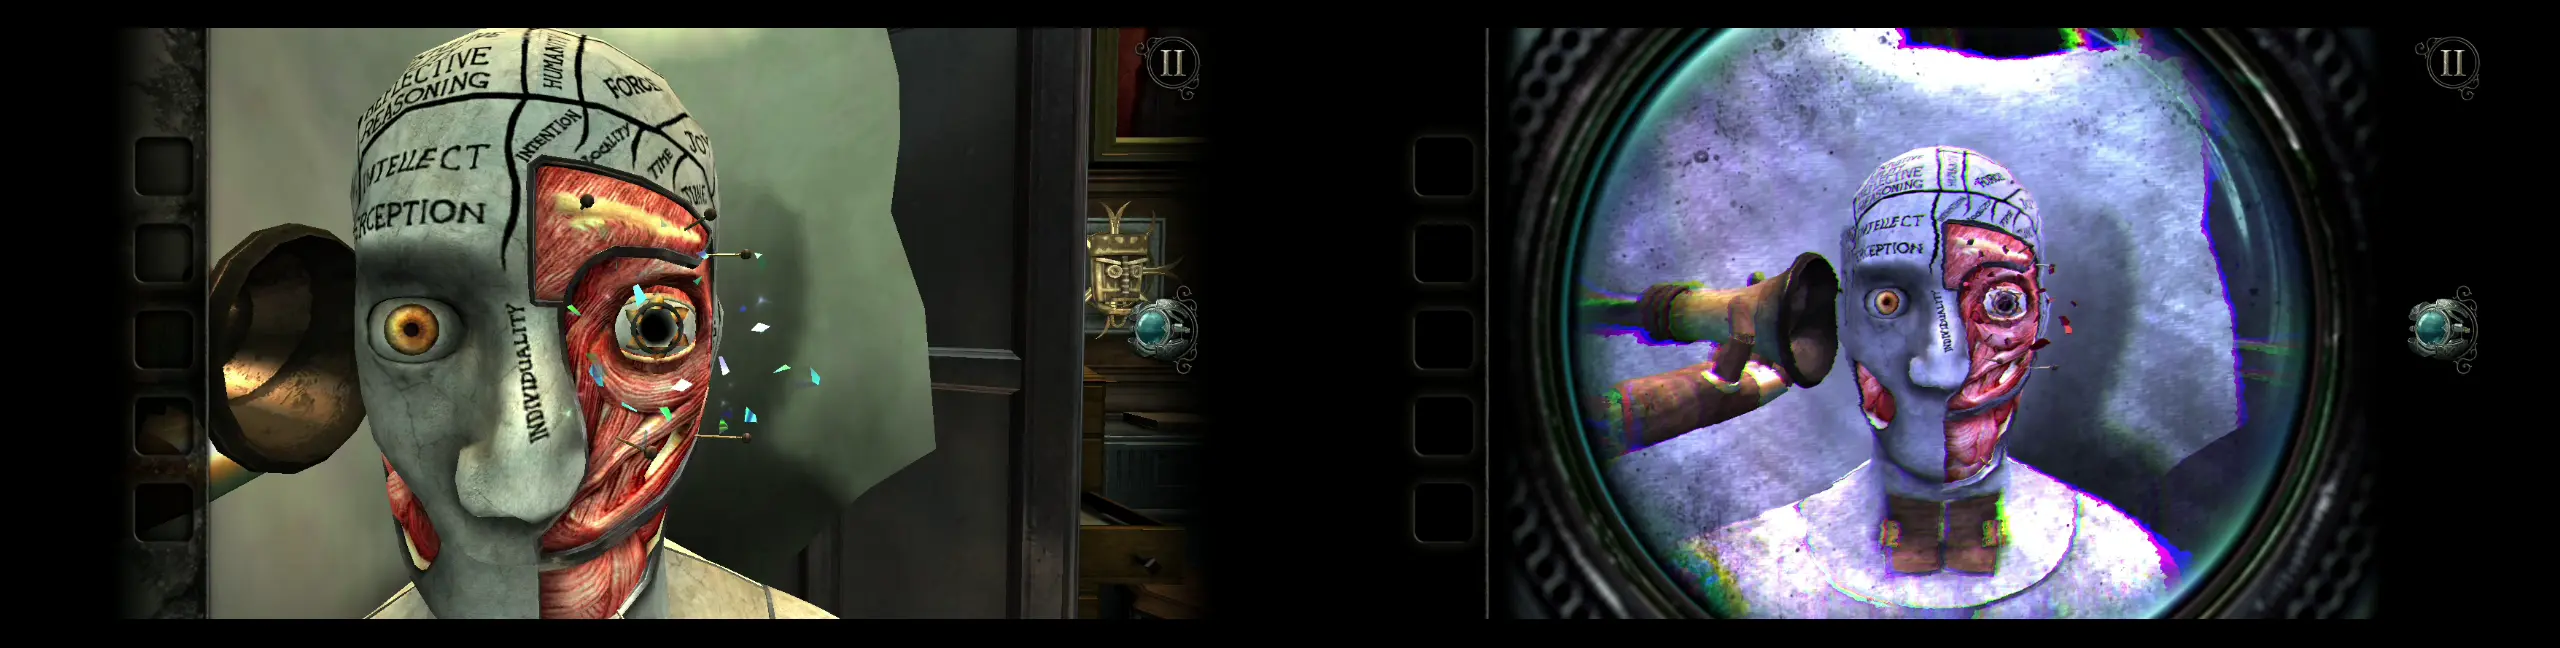
To retrieve the item inside the vase, approach the model of the human body at the left-hand corner of the room. On its head, you’ll notice a slot whose shape looks familiar. This is where you should place the strange enamel fragment, which you’ve previously obtained from the Study. Once the enamel fragment is in place, the model’s closed eye will open. Of course, this is where you can place the artificial eye.

From the eye will emerge a familiar sight: tiny crystal shards. Open your eyepiece and these shards will look red, indicating that it has become a portal. Enter it.
A brief cutscene will play, which shows what one could surmise as Edward and Abigail arguing. At the end of their argument, Edward breaks the vase, which is the only object that’s colored blue among a sea of red.

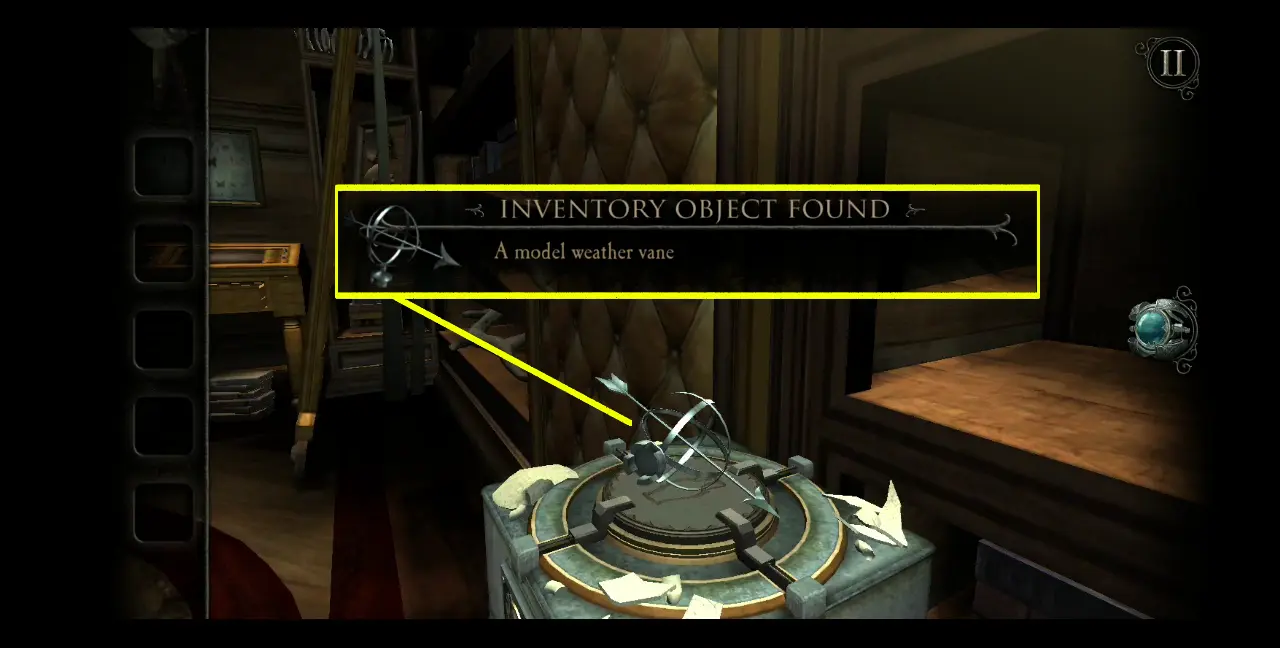
When the cutscene is over, go back to the actual location of the vase inside the Curiosity Room. On top of the pedestal, you’ll discover that the arrow-like object has now materialized. Collect it as a model weather vane.
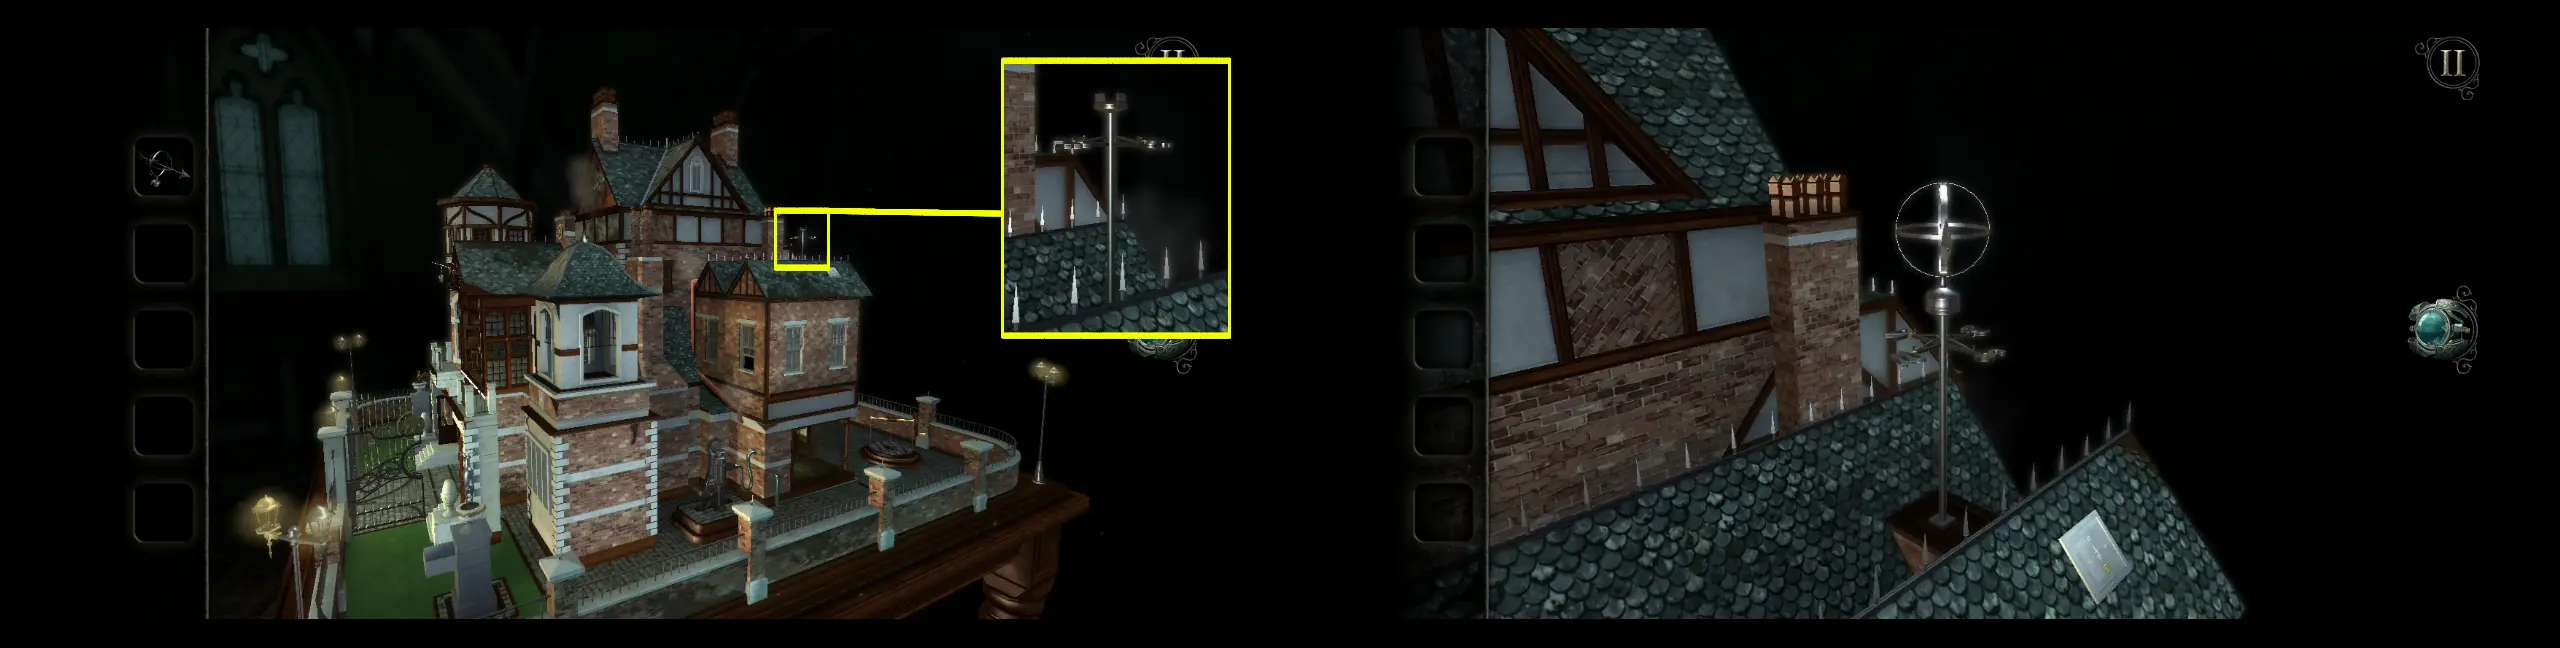
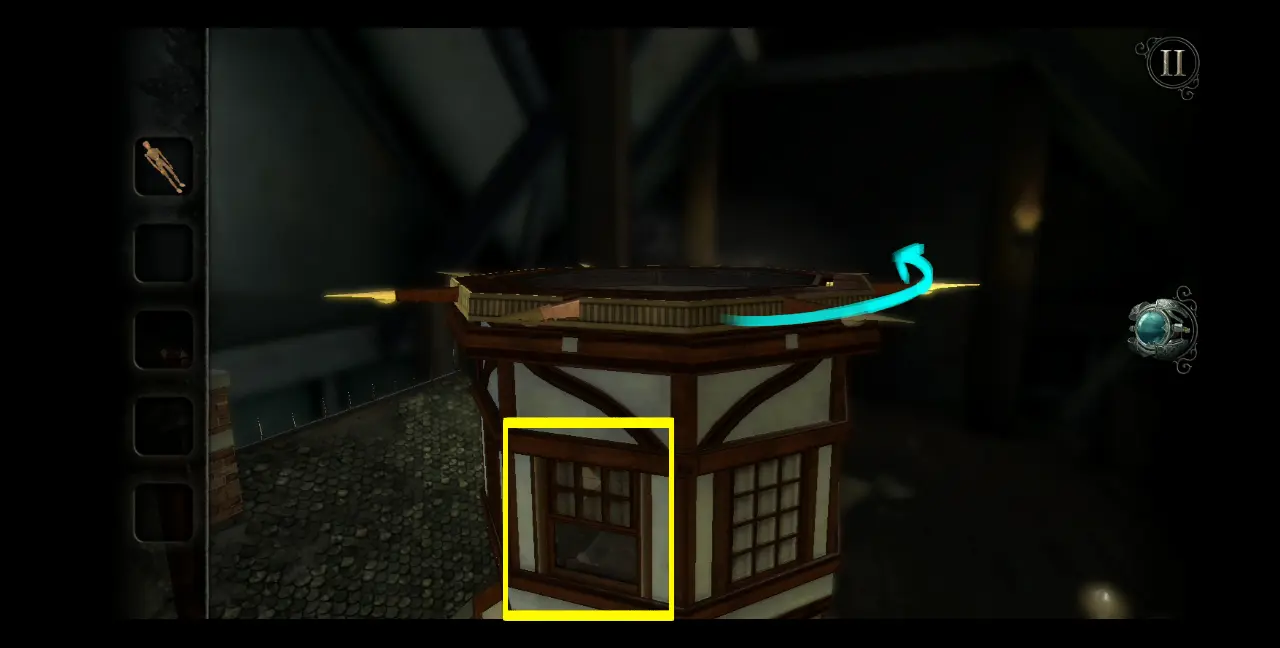
Since this item is a weather vane, we can deduce that its rightful place is somewhere on the roof of the dollhouse. Thus, leave the Curiosity Room for now and turn your attention to the right side of the dollhouse. You’ll see a metal rod on one of the roofs. Place the model weather vane here.
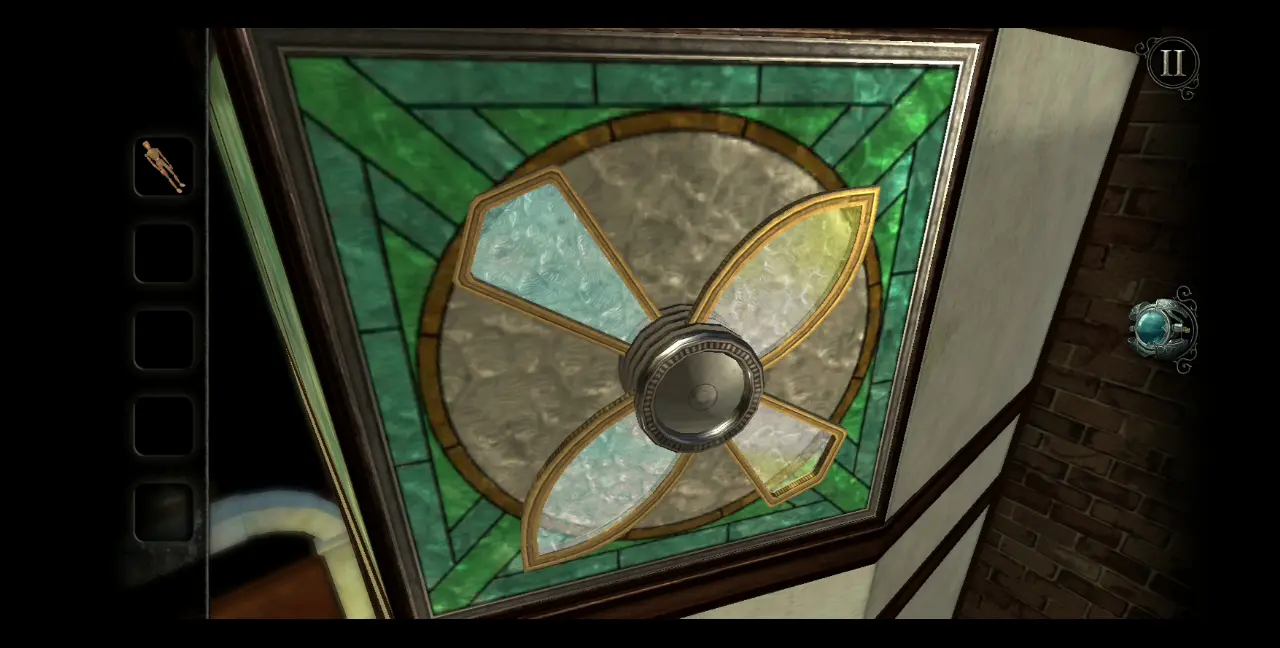
To get a good look at the weather vane, view it from directly below you so you can see where its arrows are pointing, as well as the letters representing the four cardinal directions. Turn the weather vane so its arrow is pointing South. Once the arrow is pointed here, you’ll see that a hatch on the roof has opened. Inside the hatch is a lever. Pull it up. This will cause the letter representing the direction to stand upright.
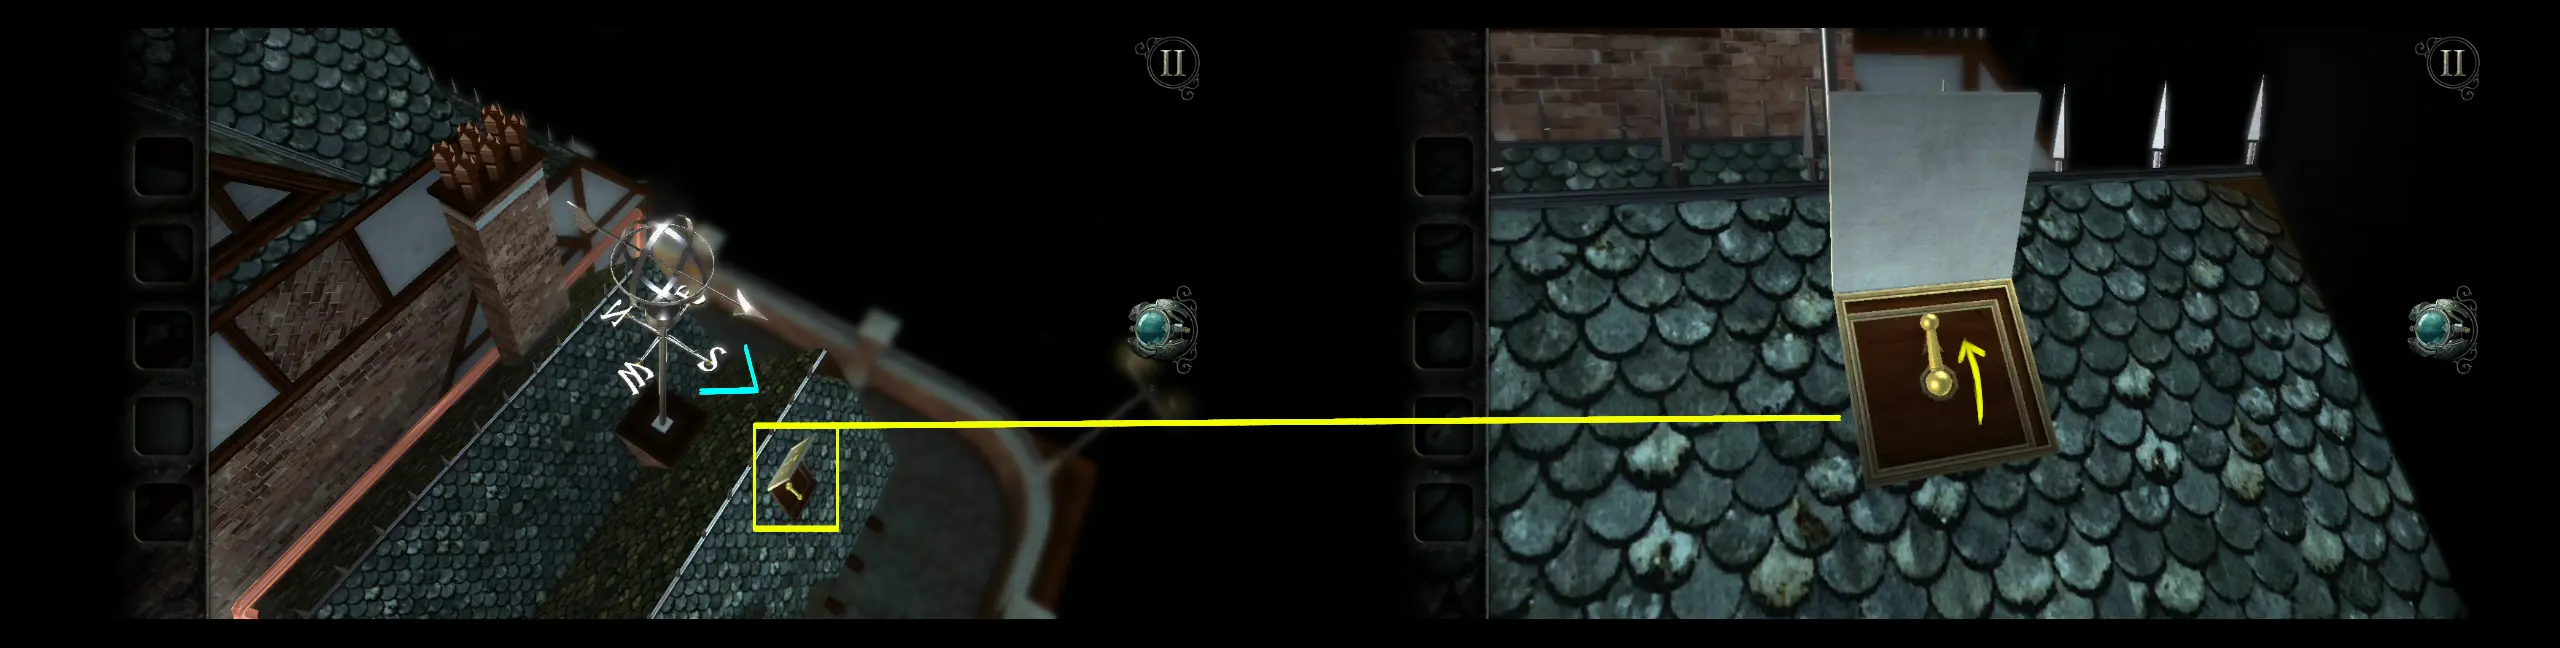
This will happen for the rest of the cardinal directions whenever you turn the weather vane’s arrow to point at each of them: a hatch will open in some part of the house and you need to pull the lever up. Pictured below is the weather vane pointed to the East and the location of the hatch that will open.
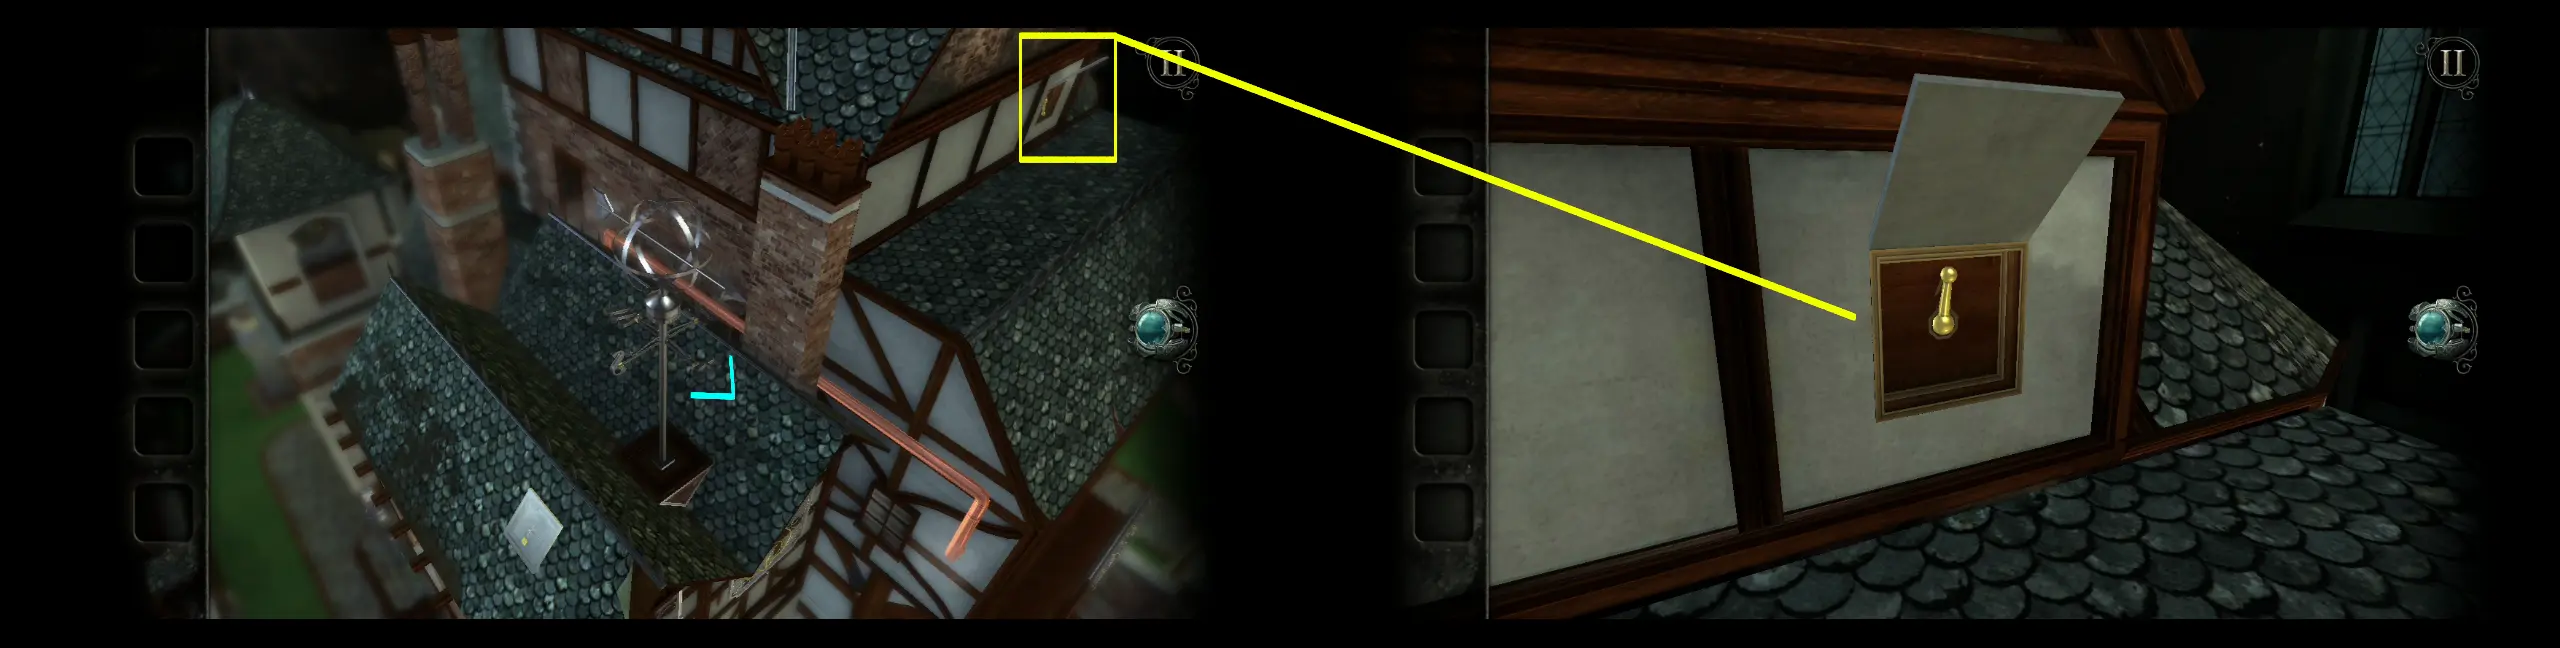
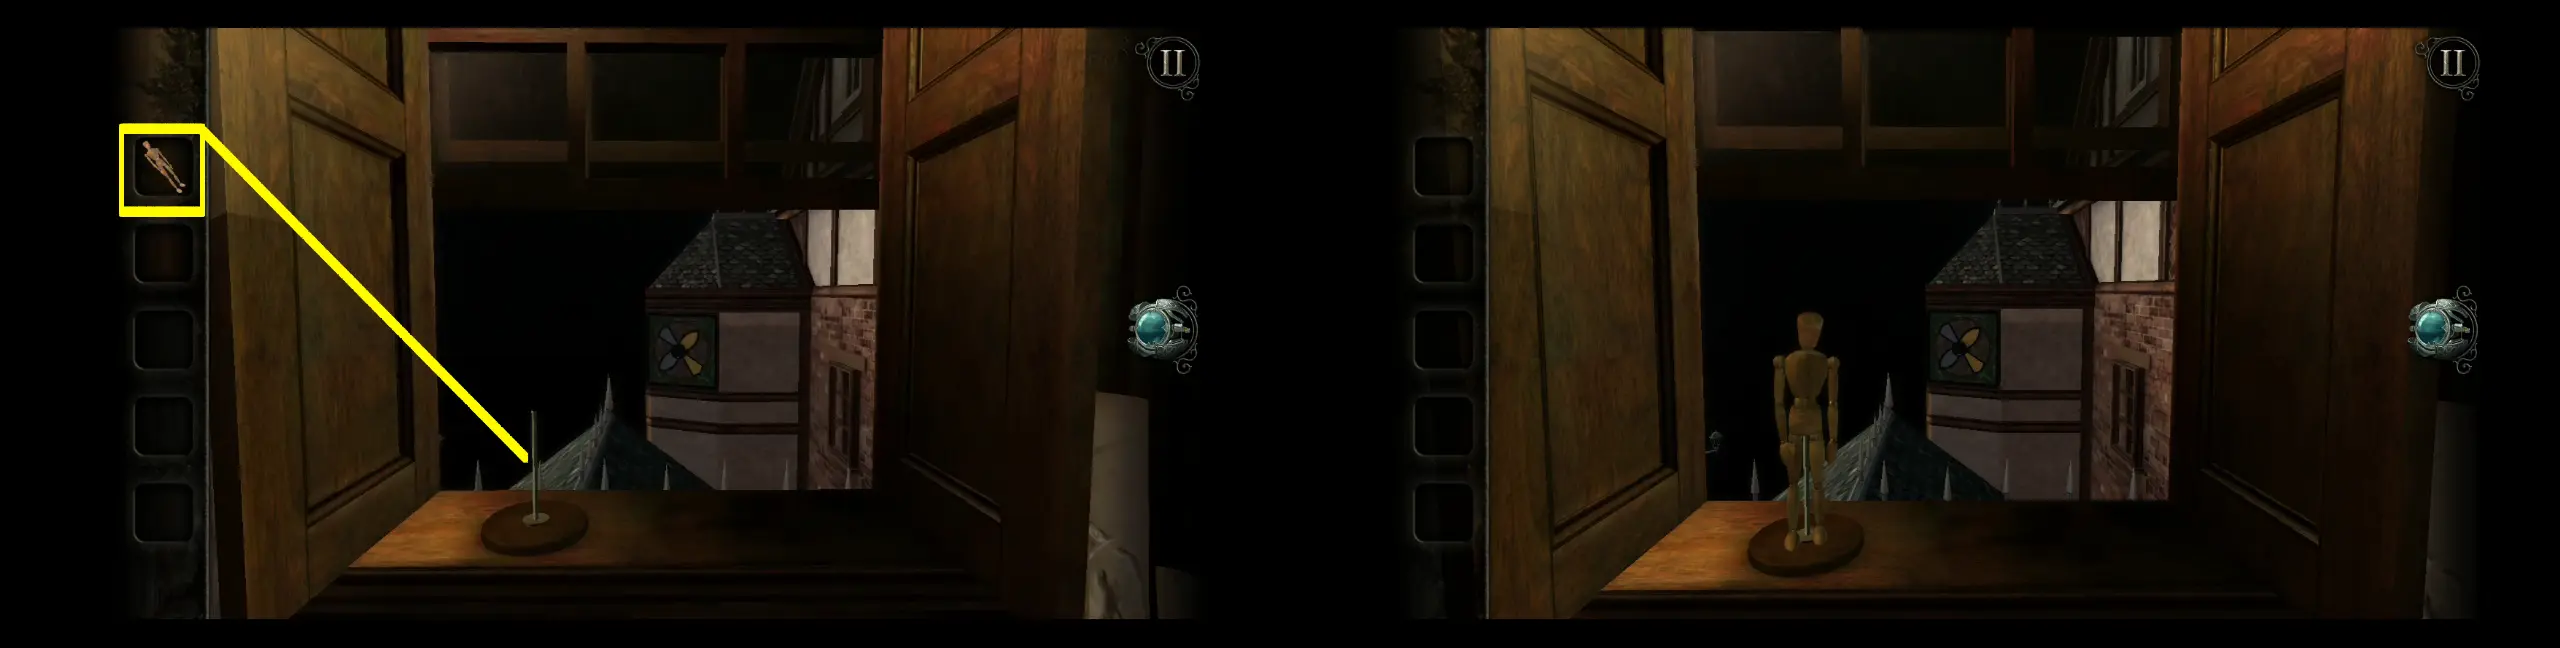
Next, point the weather vane North. From your current location, turn to the right side of the dollhouse. You’ll find the opened hatch on the turret to the right.
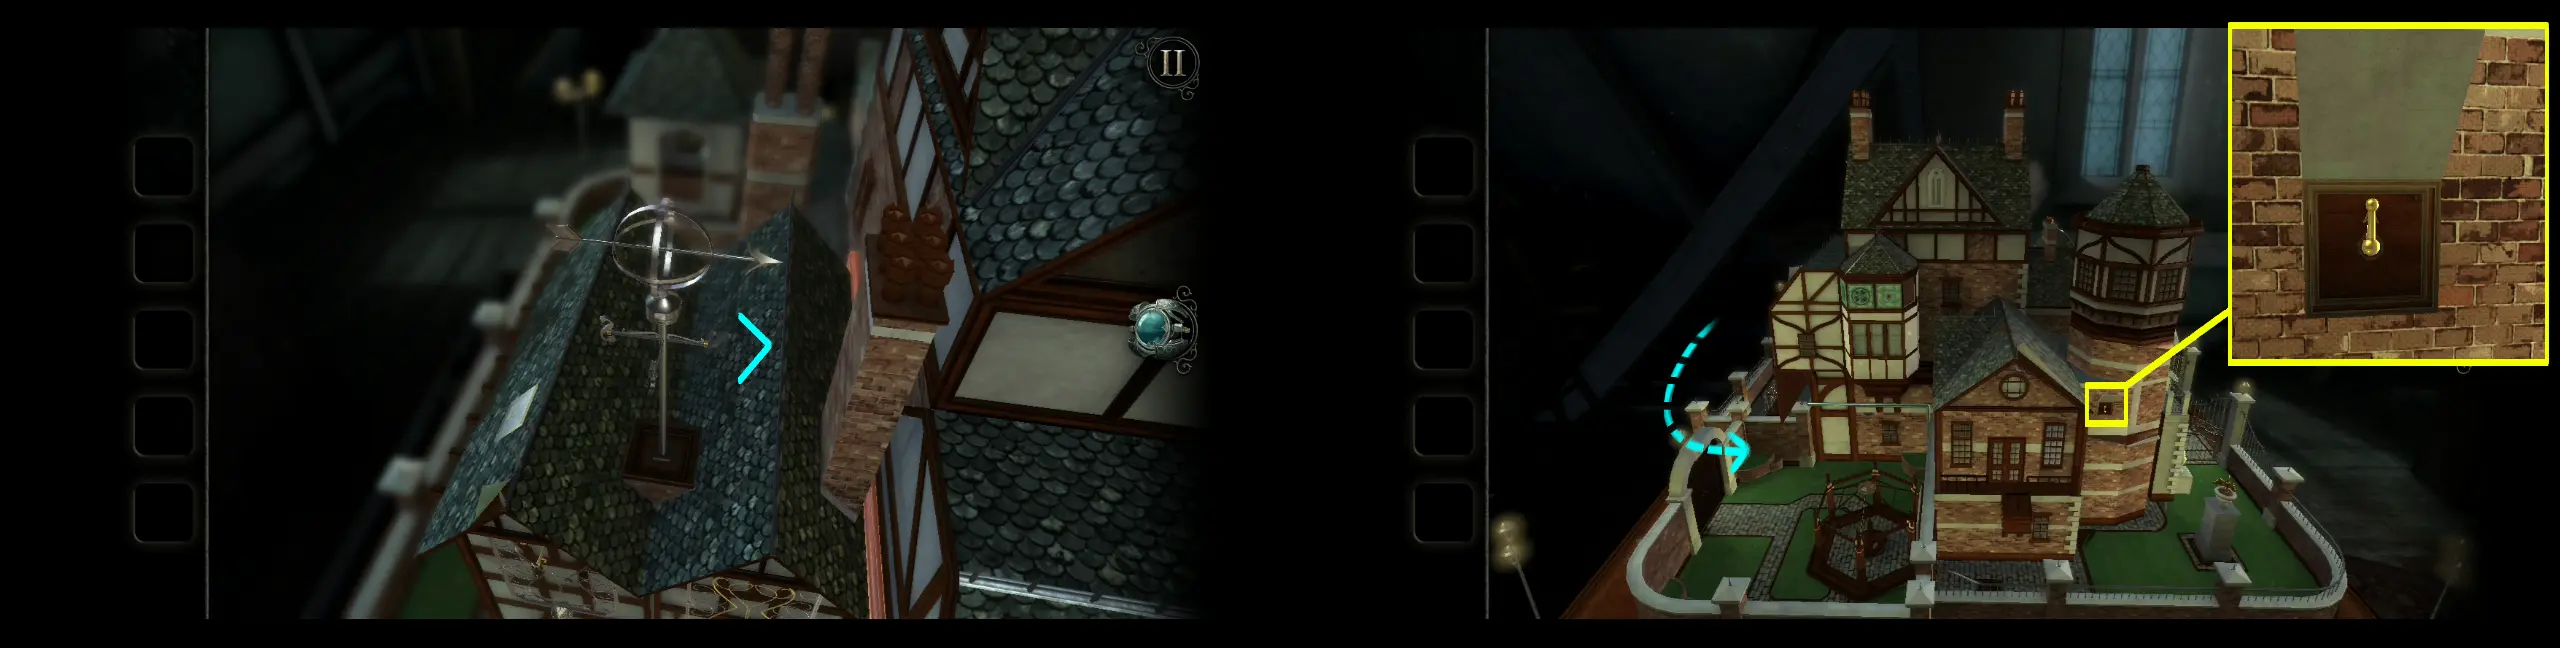
Lastly, turn the weather vane so it would point to the West. From your current location, turn to the left side of the dollhouse. The opened hatch should be right under the belfry.
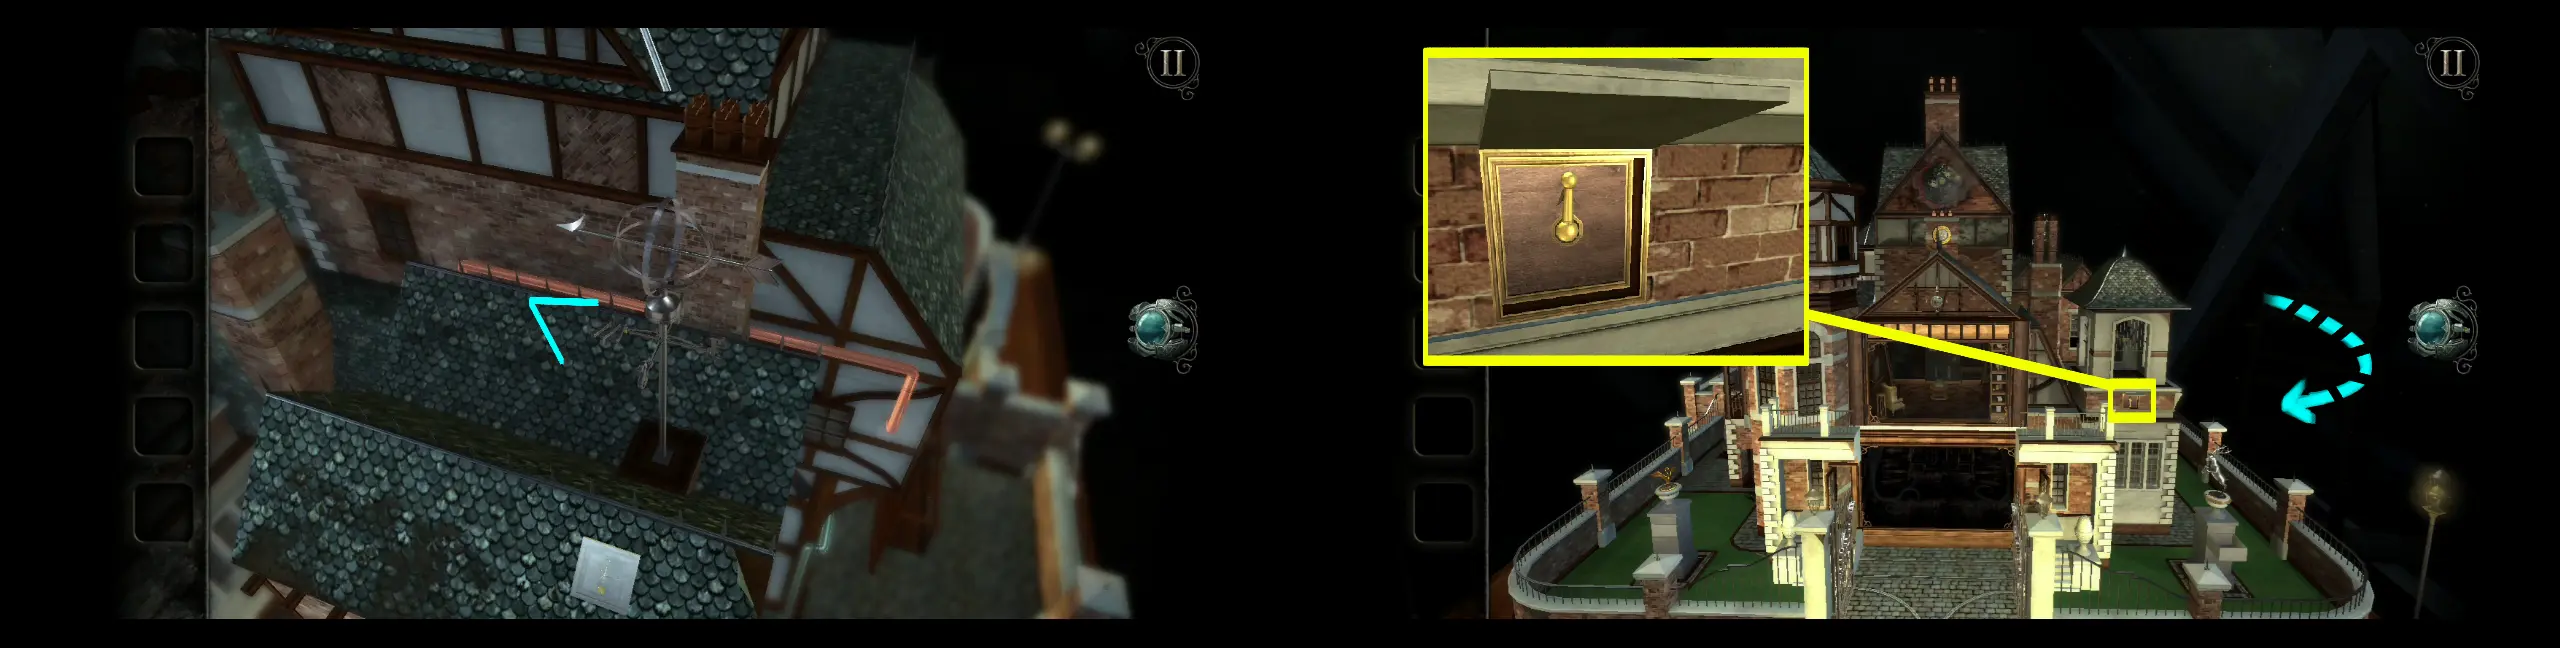
WIth the weather vane puzzle solved, a new room directly under it will open.
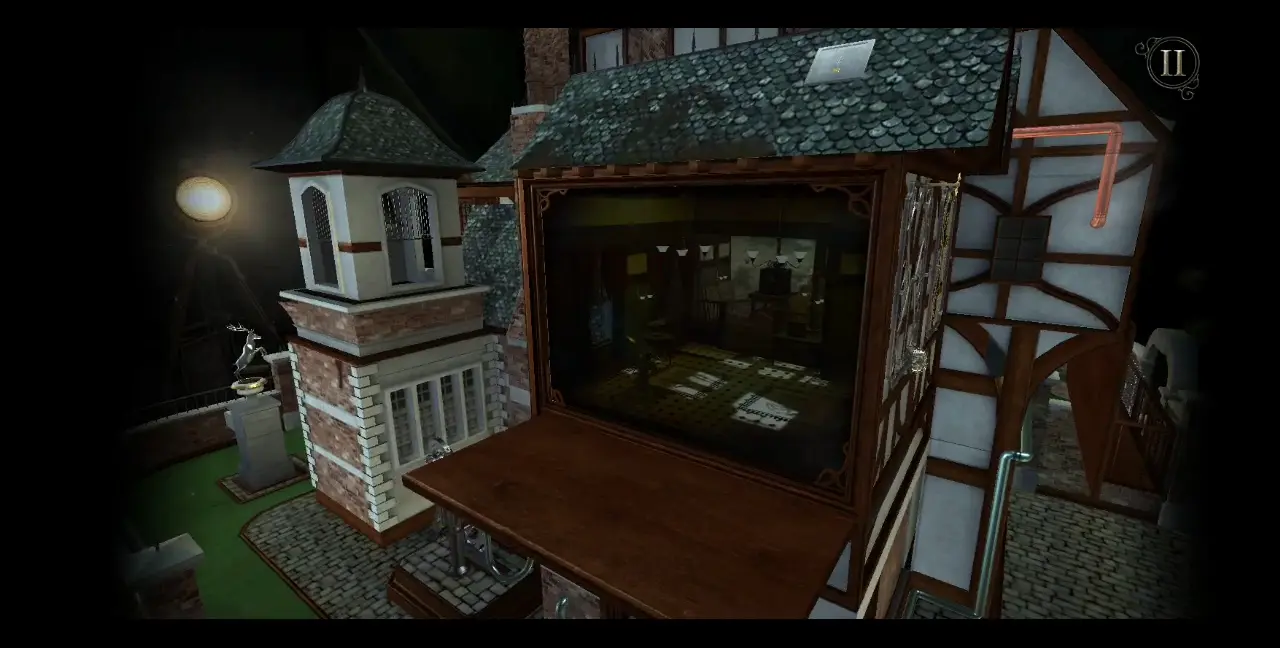
If you enter, you’ll be inside the Maritime Room.
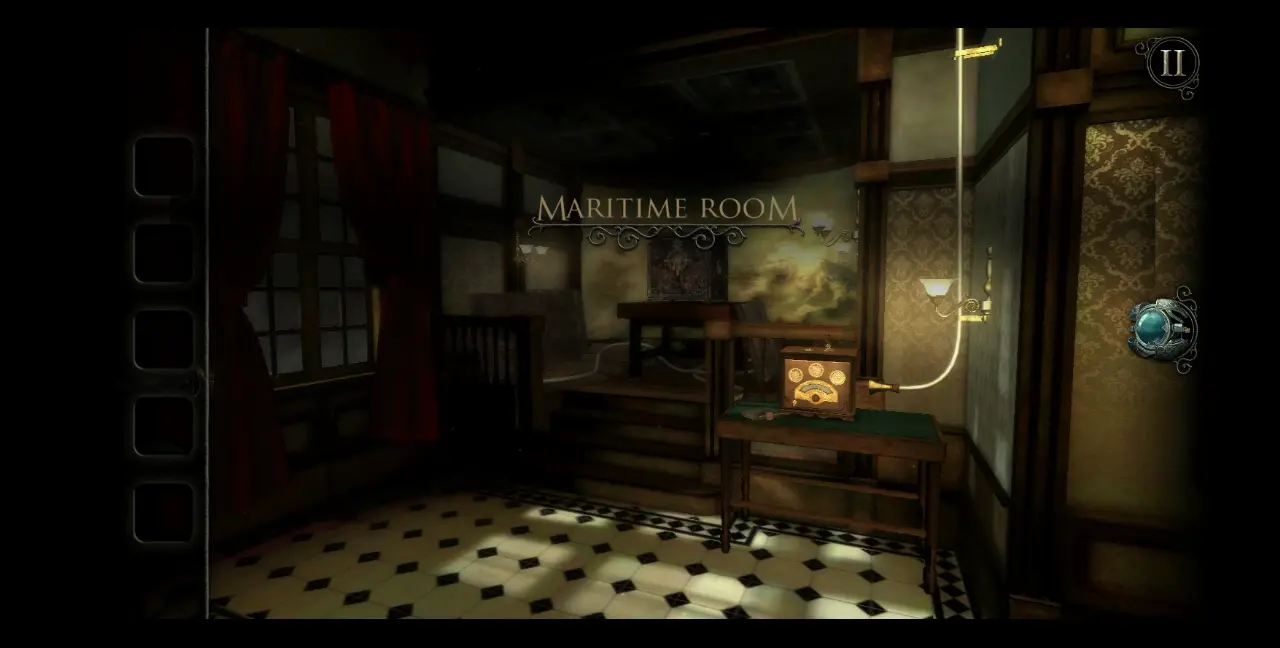
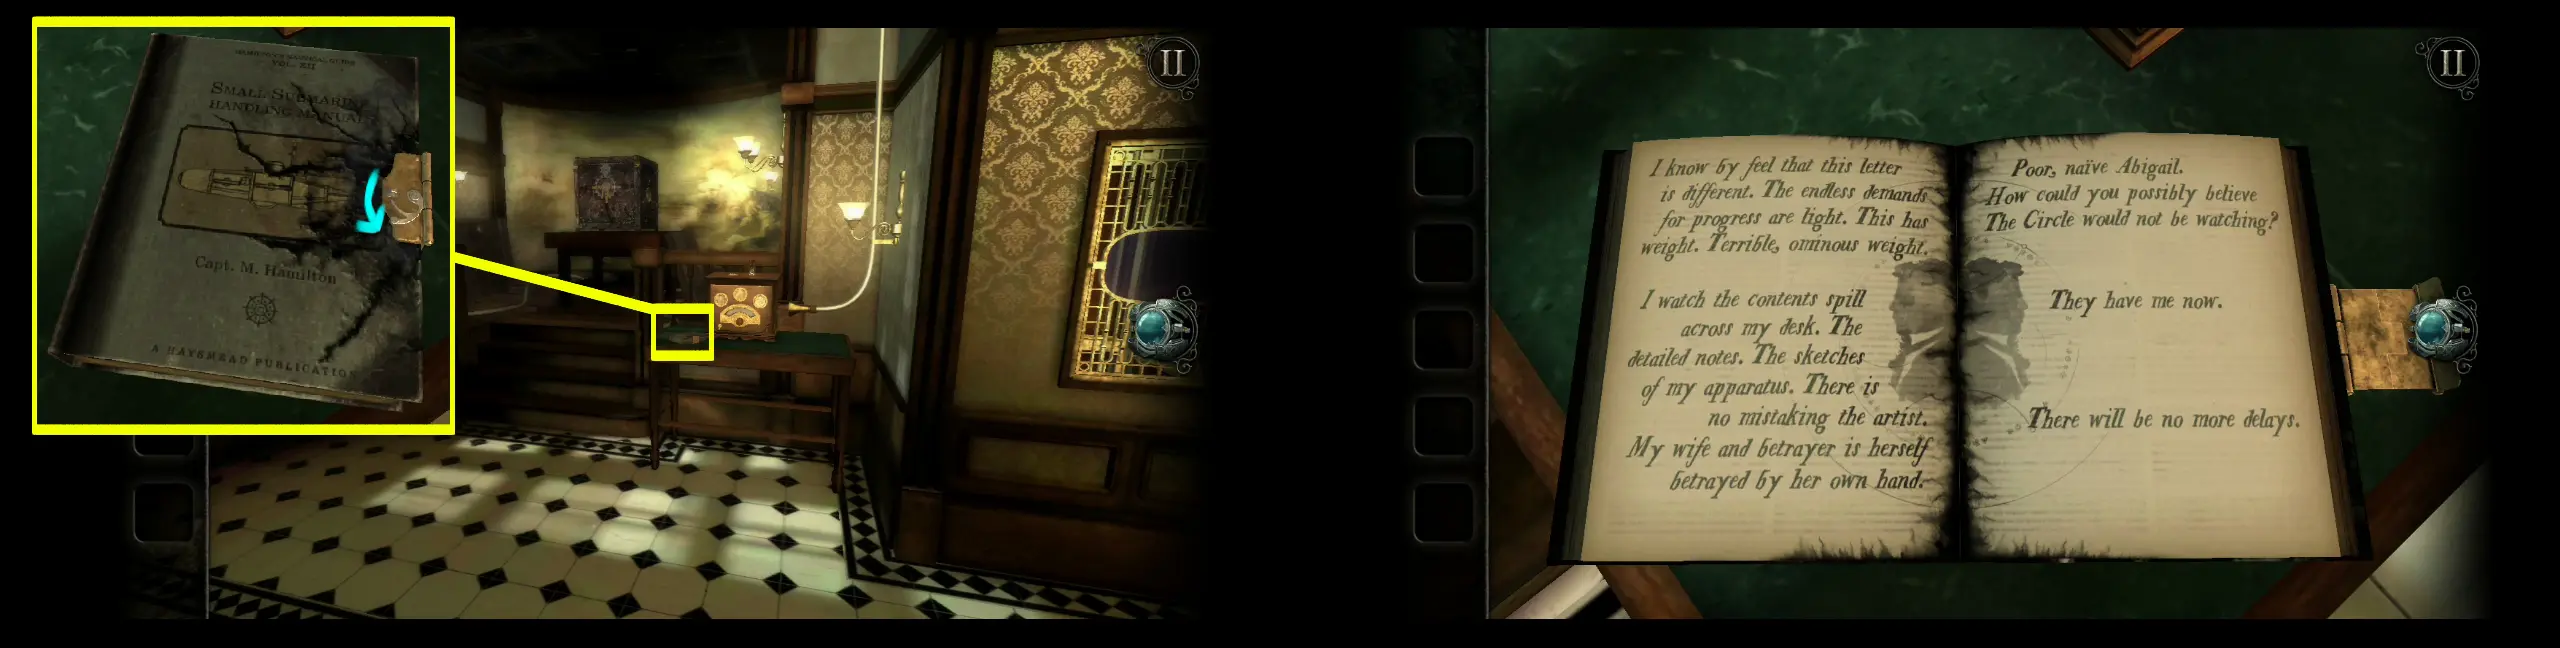
As you may have guessed, several items inside this room are related to maritime exploration, such as the radio on the table, a submarine model to the left, etc. Before anything else, turn your attention toward the table with the radio. Beside the radio is a book called Small Submarine Handling Manual. Unhook the lock to see the new entry inside.
After you’ve read the entry, turn to your right, where you will find some sort of lift. Pull the lever to the right, which will cause the lift to ascend with a locked pot. You may have seen this pot from the Kitchen, which means this lift is directly connected to that part. From inference, we can then deduce that this lift is actually a dumbwaiter. As you’ll notice, the surface looking into the pot is covered by a multicolored film, which means you need to use your eyepiece to view it properly.
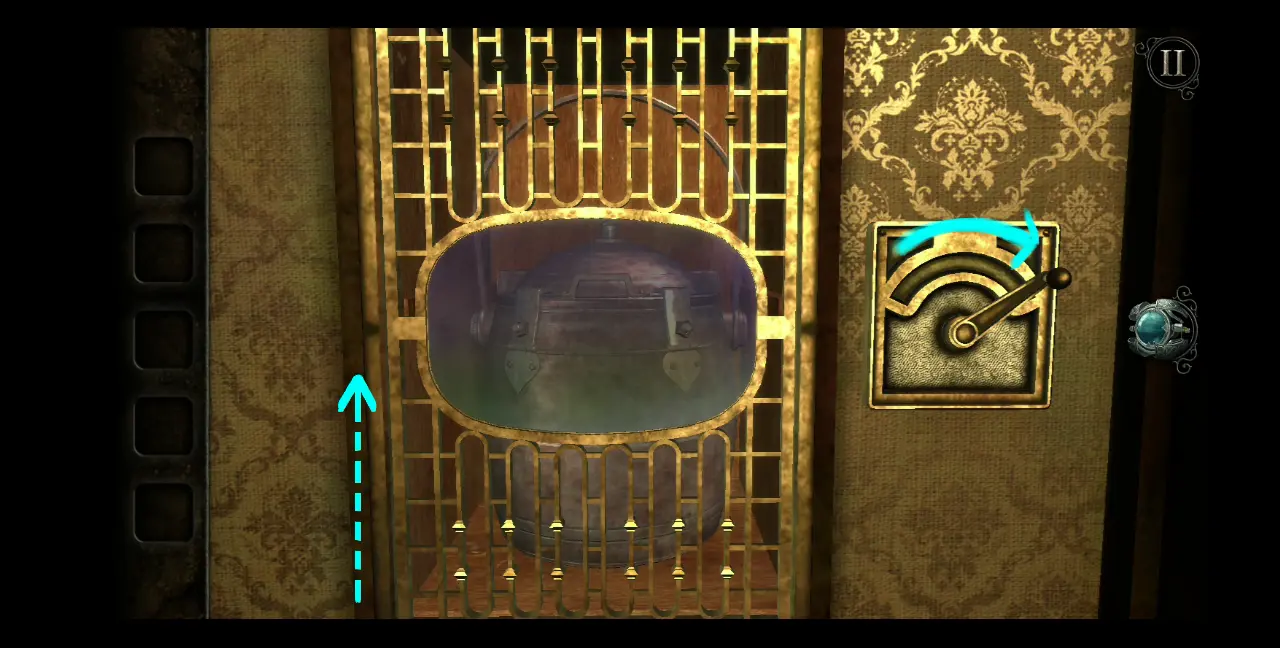
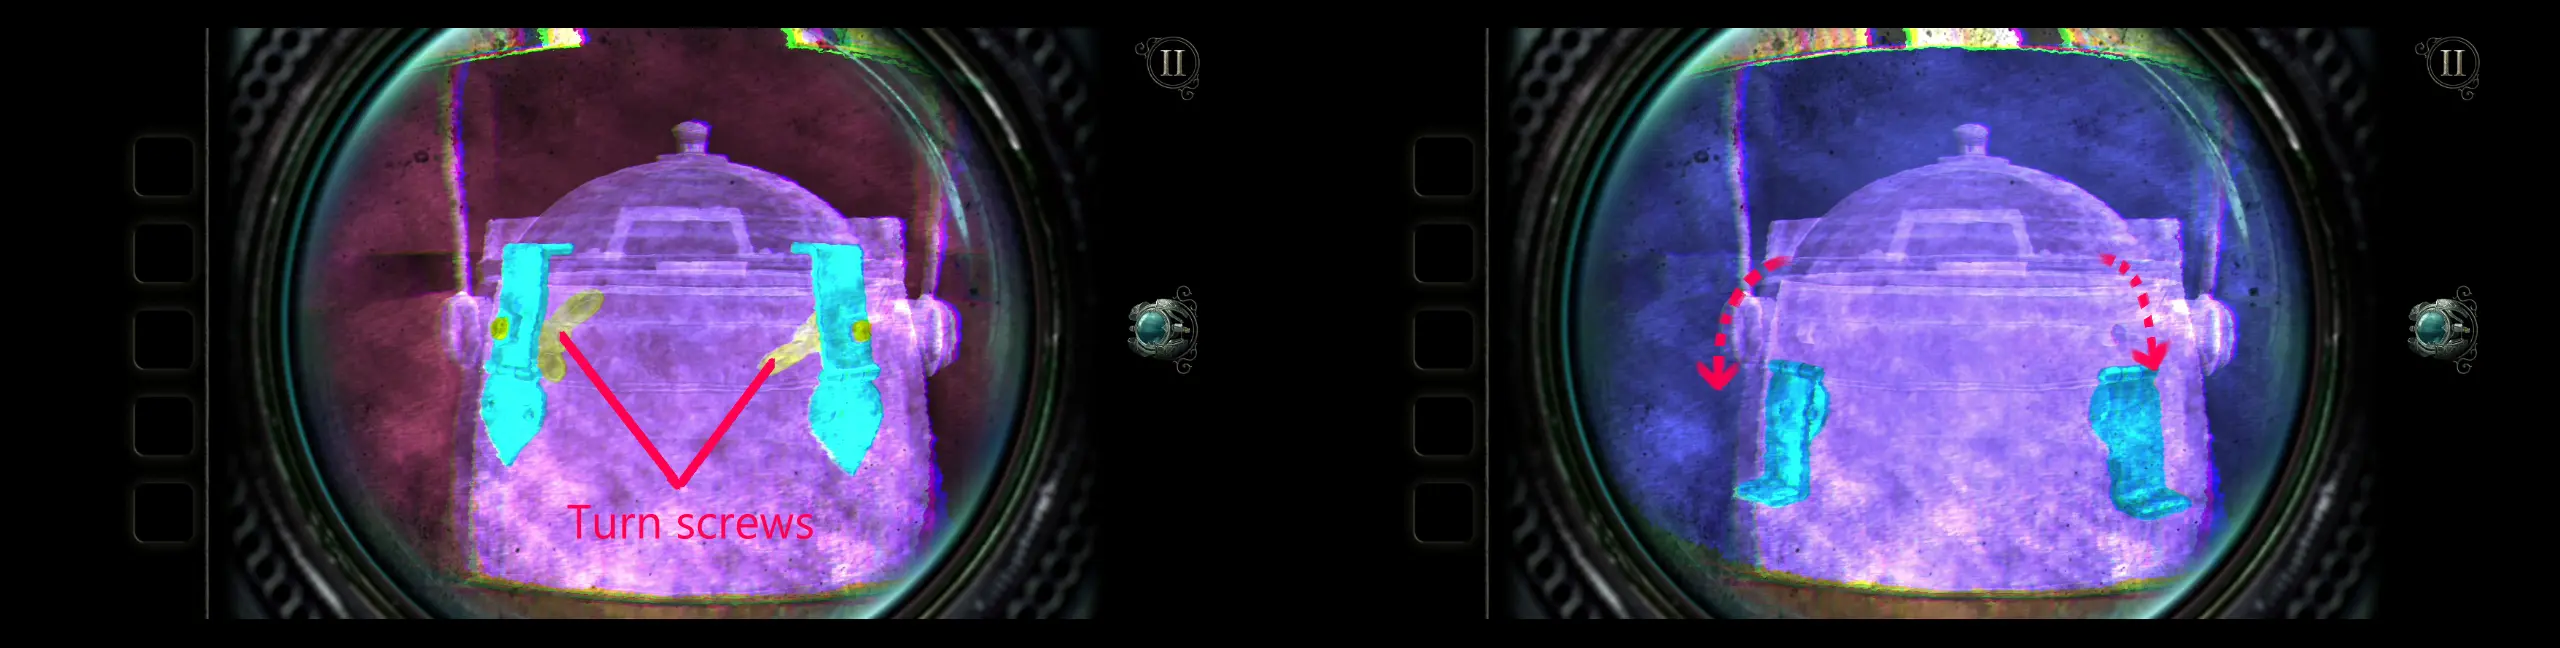
With your eyepiece open, you’ll see that the locks of the pot are held together by two screws. Turn the screws loose to unlock the flaps keeping the pot closed.
Since this part of the dumbwaiter doesn’t have a door, pull its lever back to the left, which will make it descend back to the Kitchen with the pot. You’ll get to open this pot later.
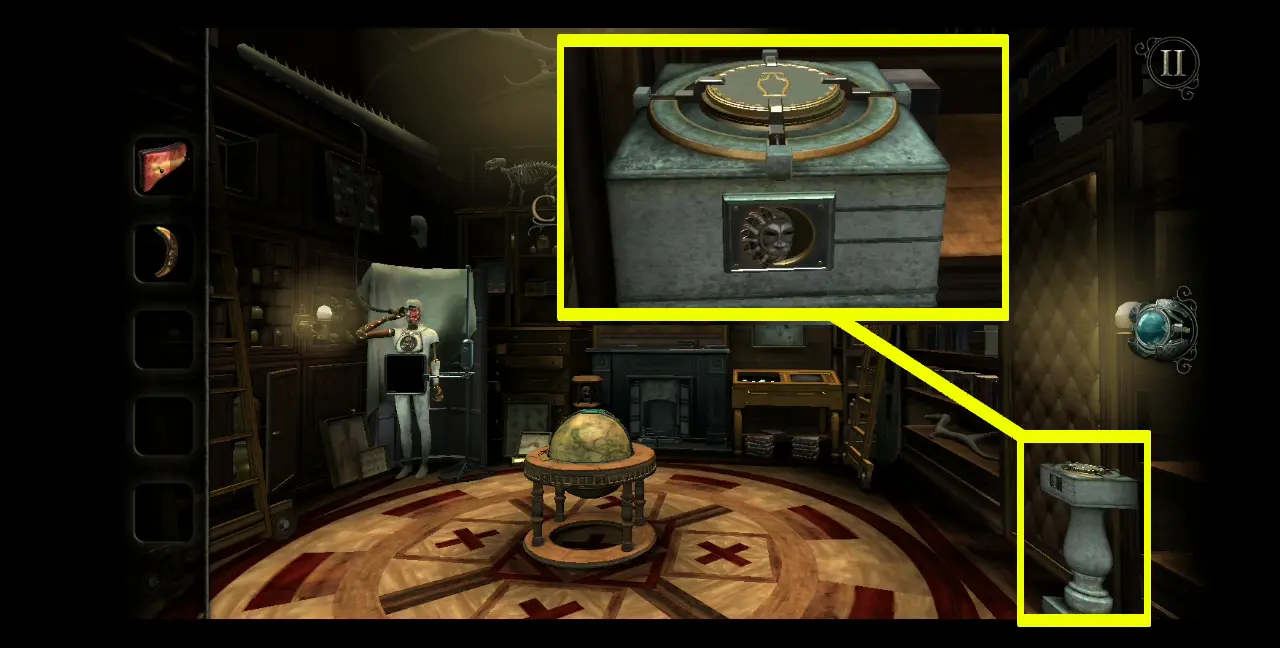
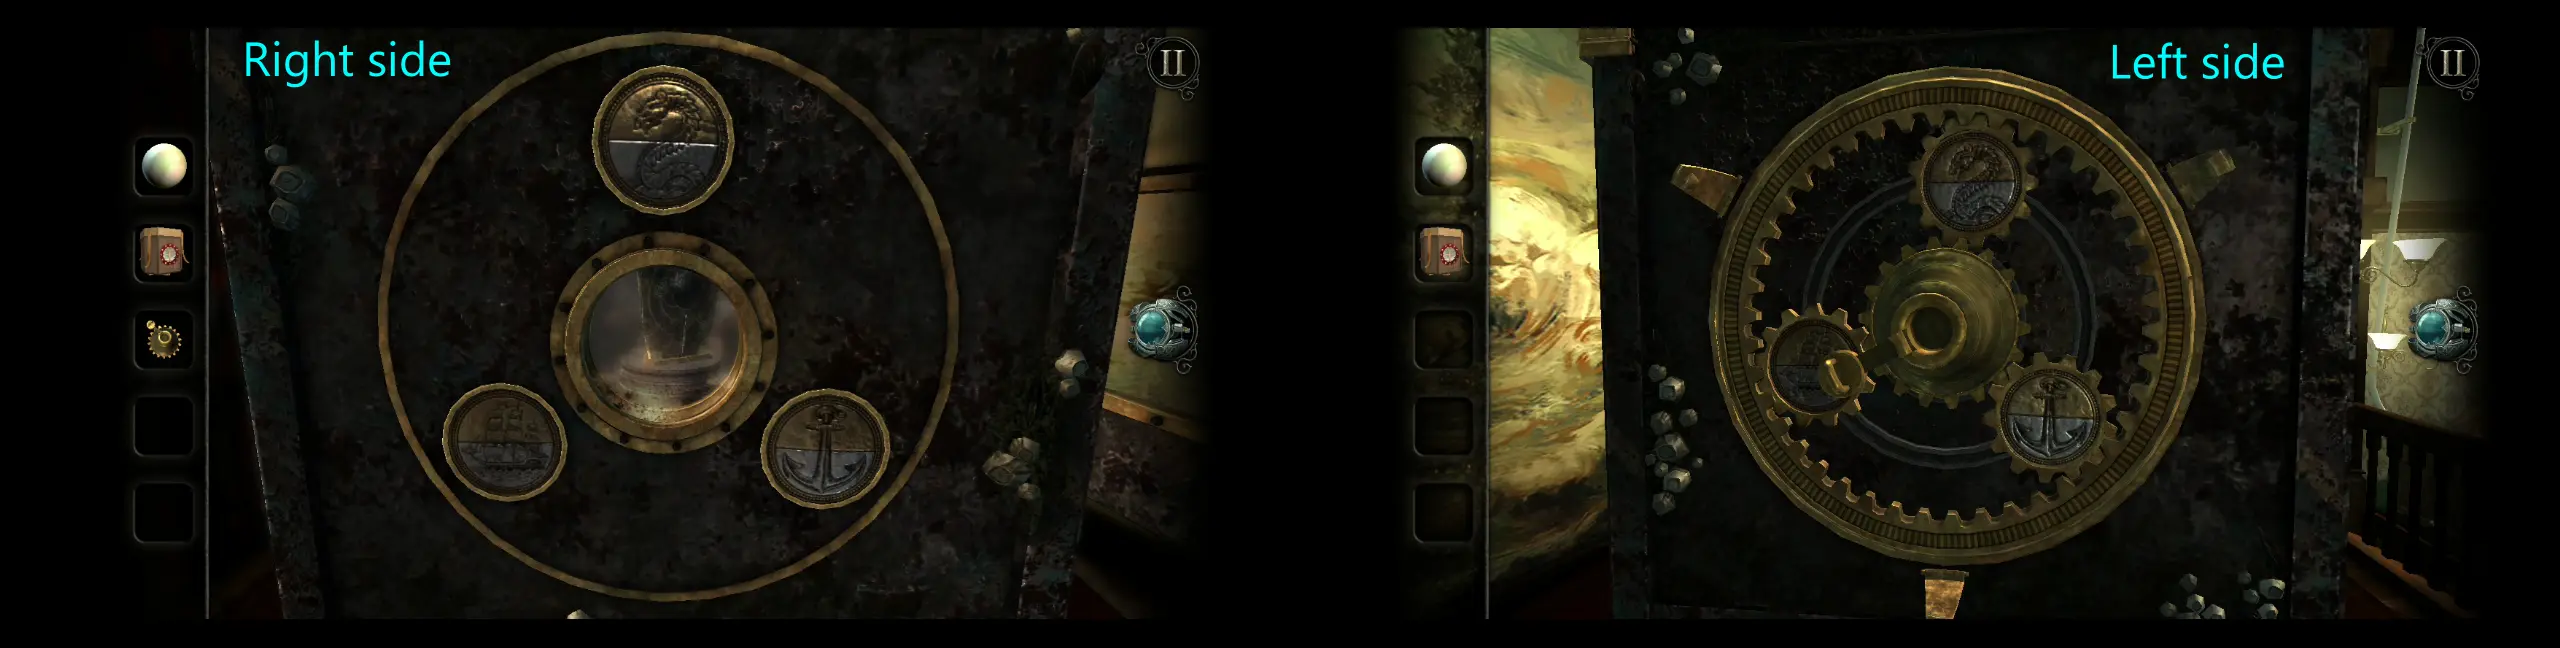
For now, let’s focus on the objects found inside the Maritime Room. At the far end of the room, you’ll see a table with a rusty safe. Approach it.
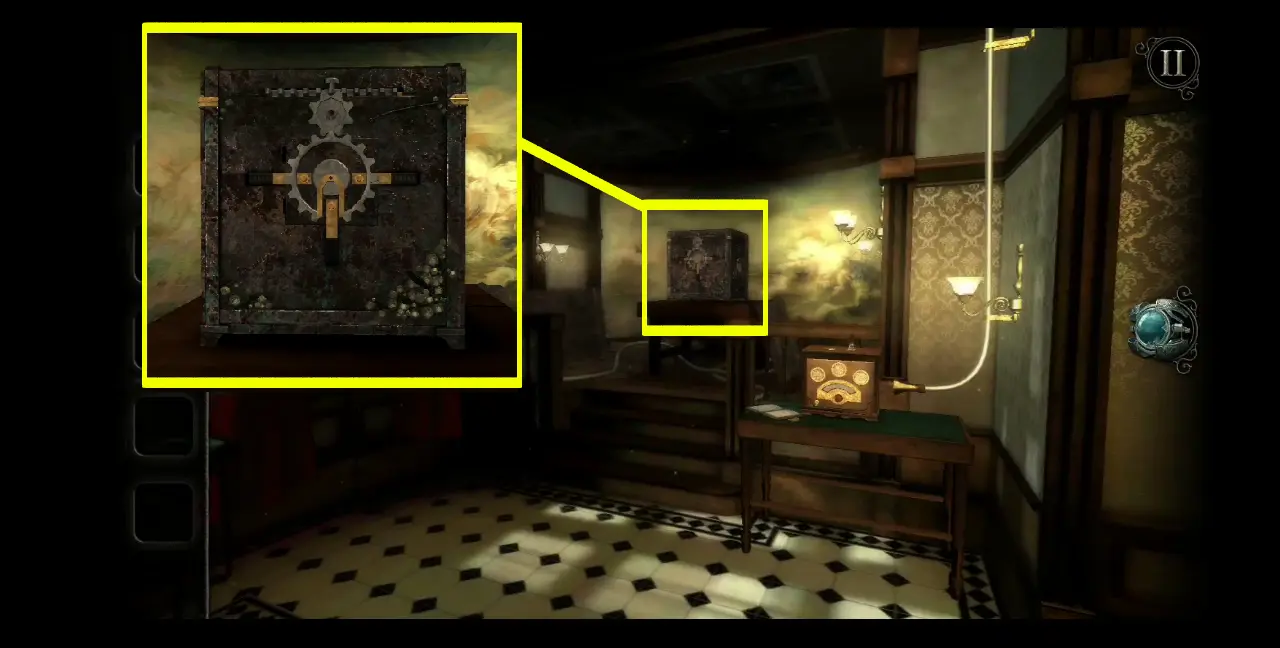
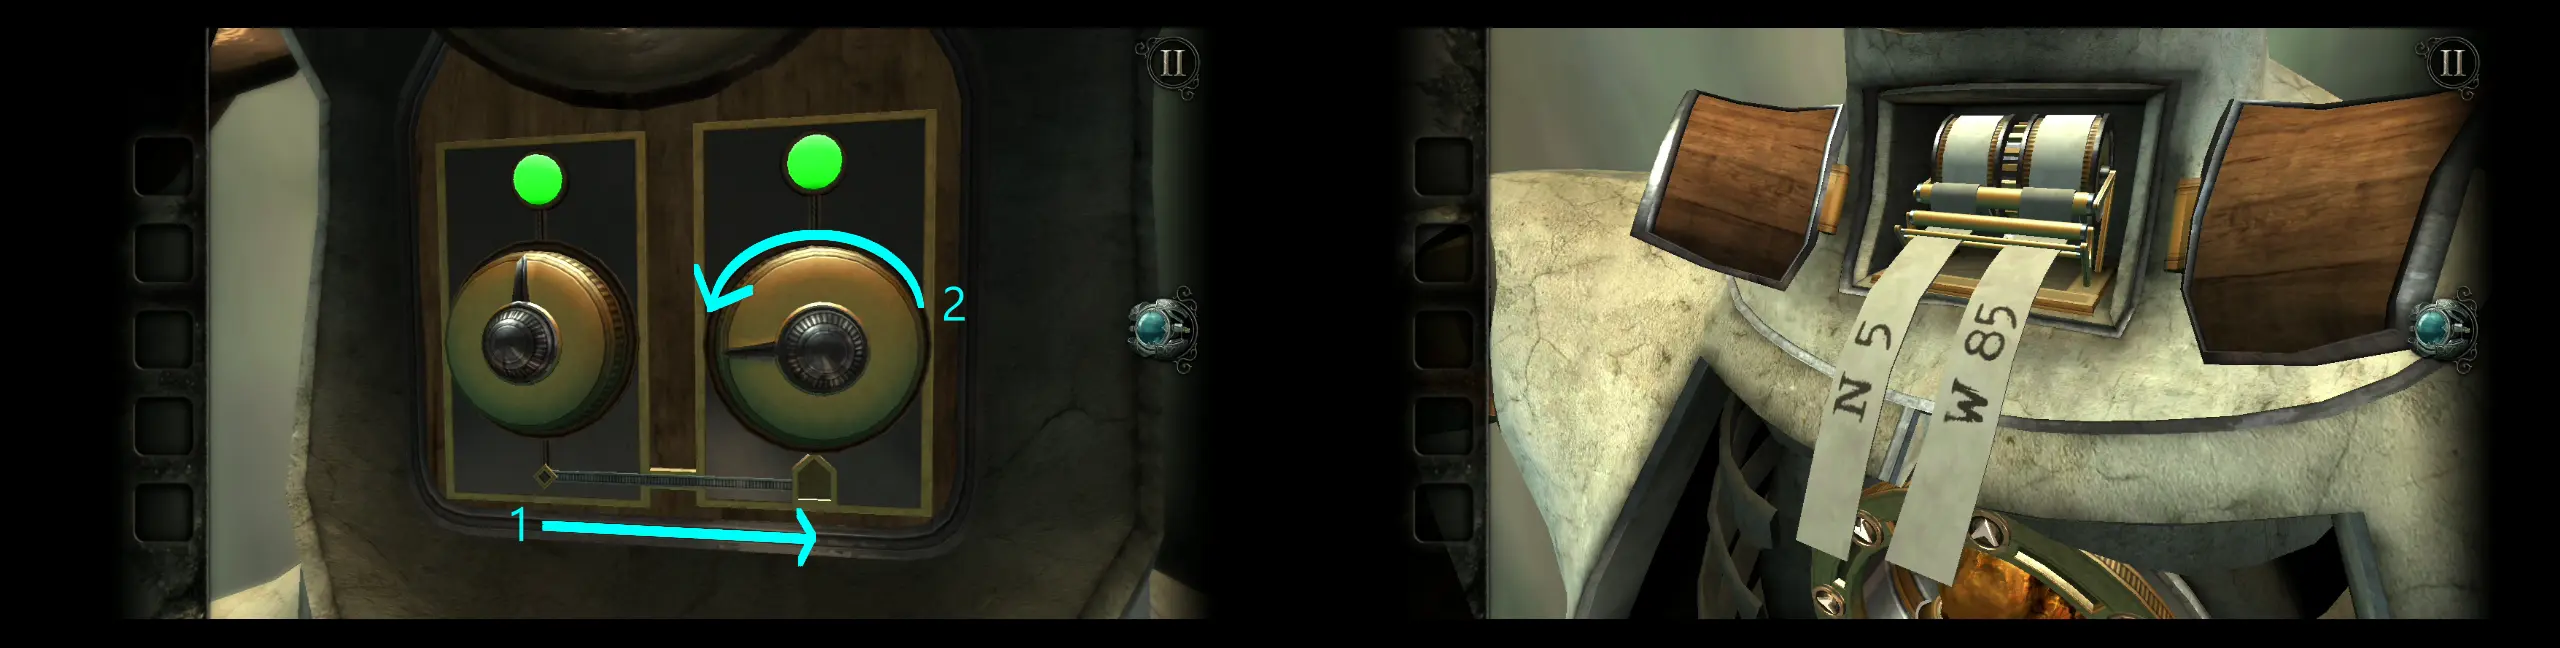
At the very front of the safe is, of course, its lock. Pull down the bronze strip in the middle of the gear-looking lock. There are two more locks to the side, which we will get to much later.
Next, move to the back of the safe. Here, you’ll see a hatch whose lens has been covered by dirt. Swipe your fingers across the lens to remove the dirt and reveal the lock behind it.
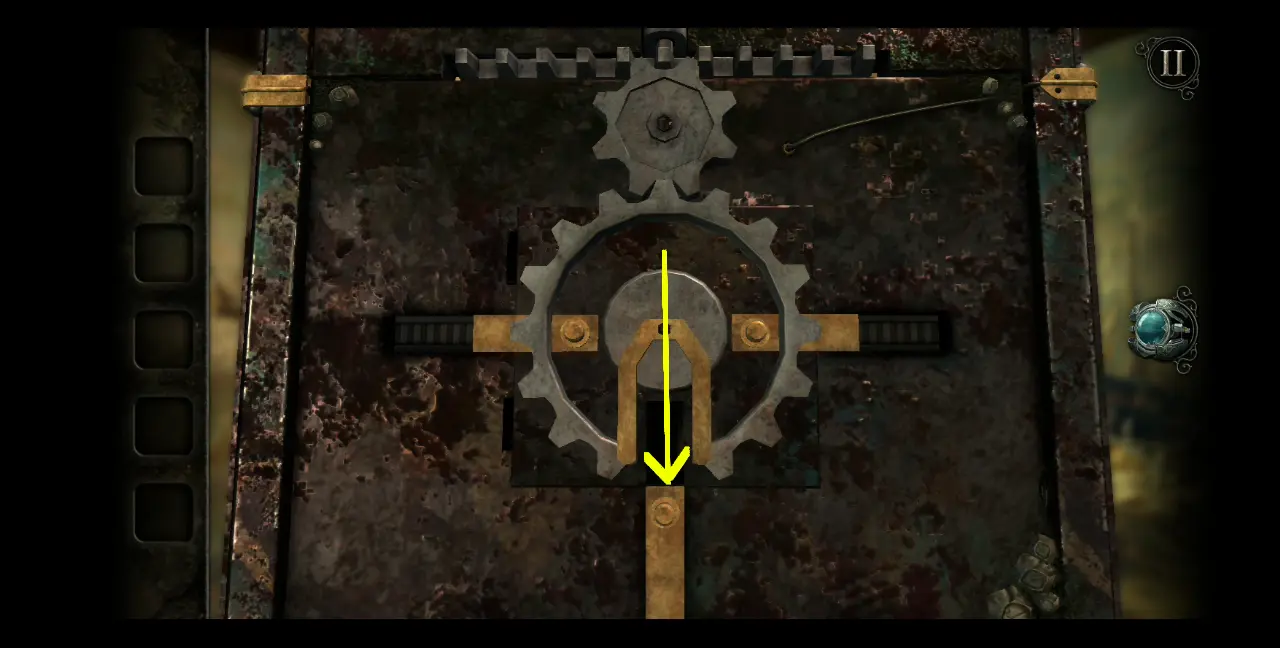
Once the glass is clean and perfectly clear, turn the dial at the top, which also moves the center gear connected to the top and bottom latches. For the top latch, move the dial to the left, which will cause the top latch to rise, allowing you to freely pull the bronze tab to the right. Do the same to unlock the bottom latch: turn the dial to the right, which will cause the bottom latch to descend and free the tab so you can pull it to the right.
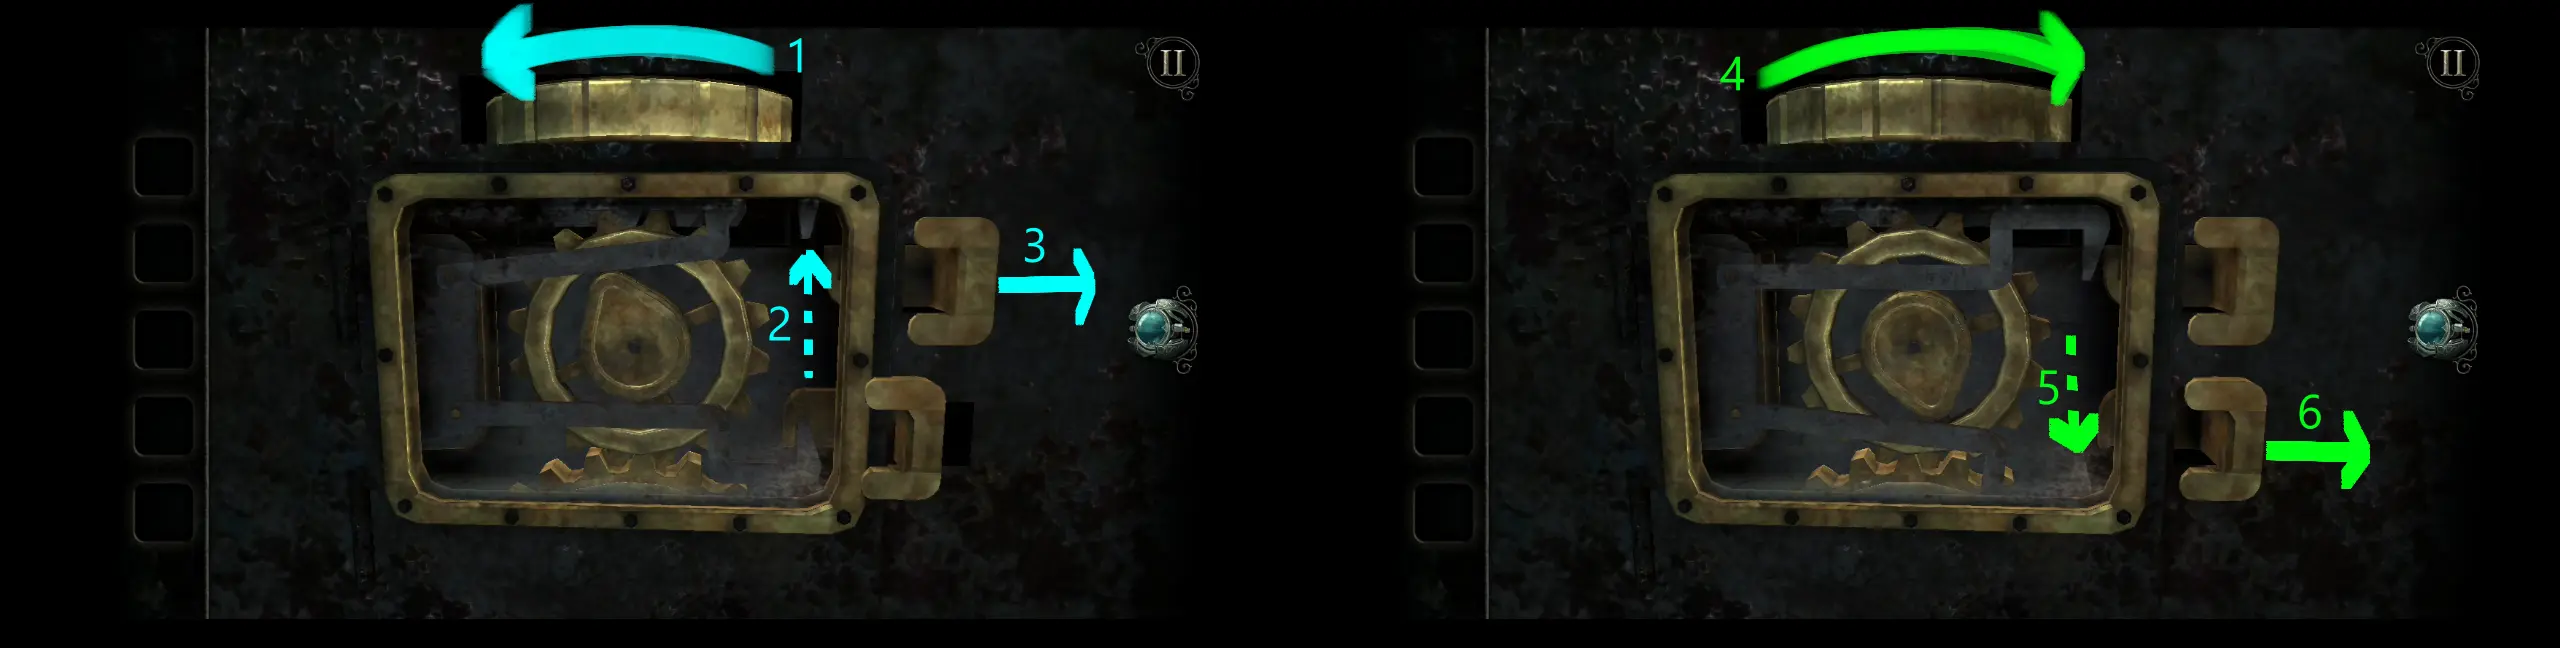
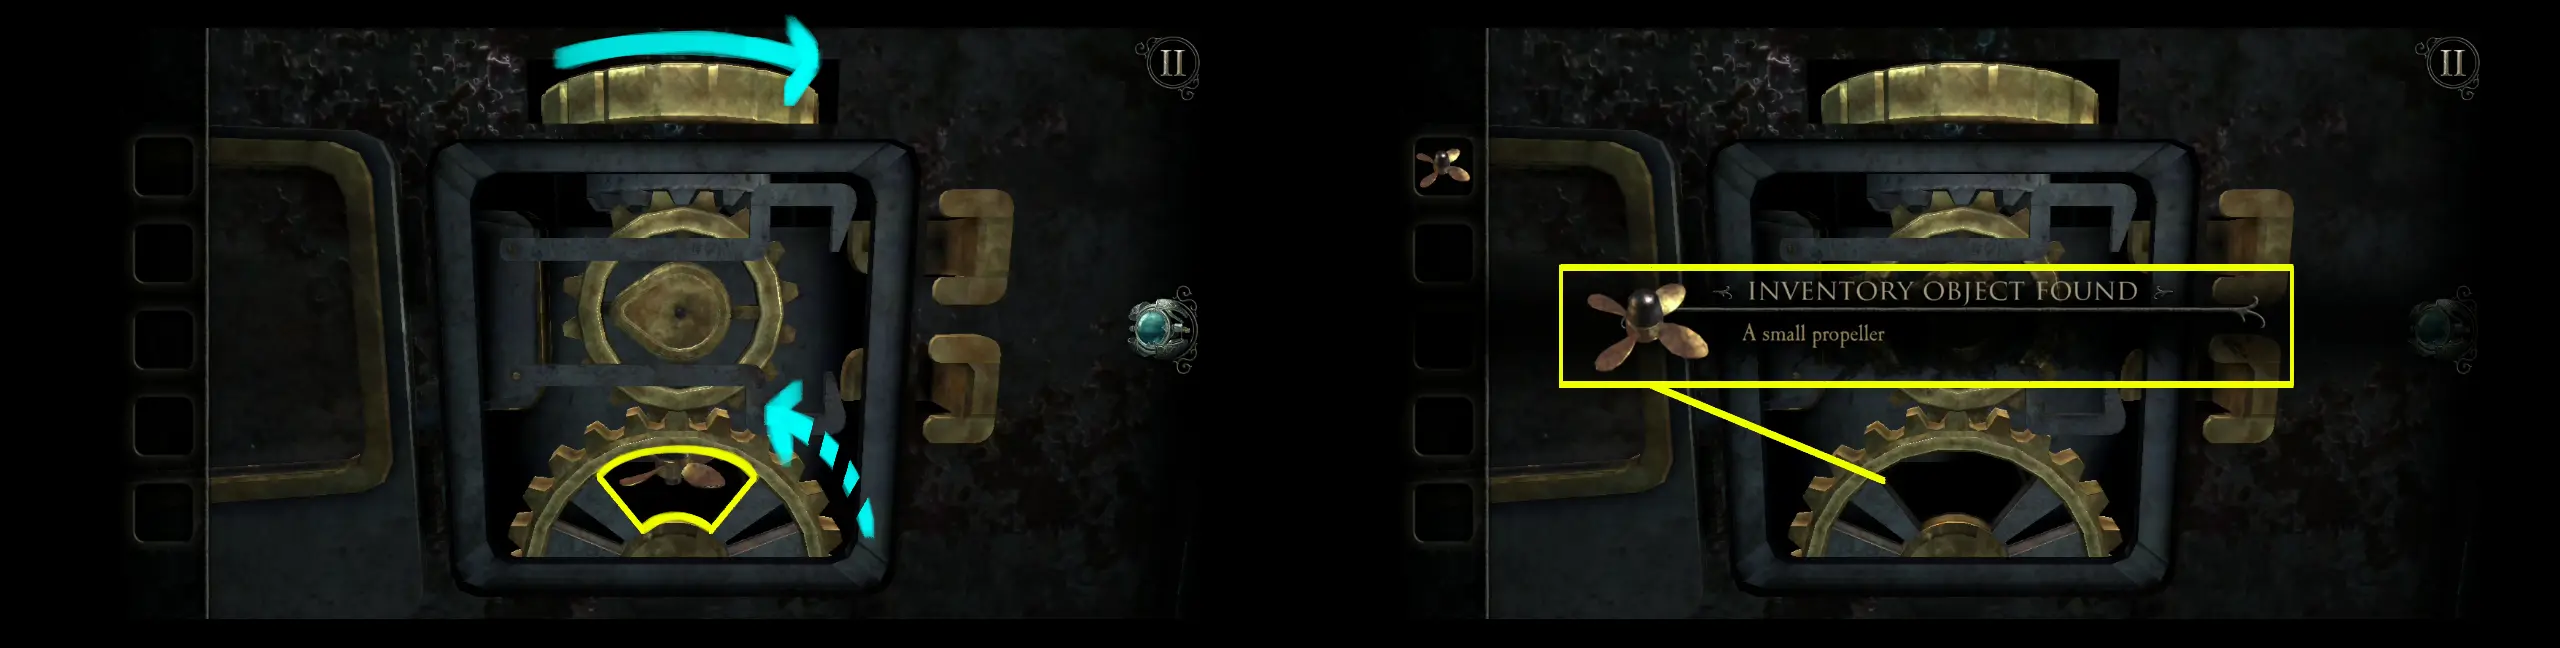
You may now open the hatch to access the gear-like mechanism inside. Move the dial to the right until the space of the gear at the bottom aligns with the item hidden behind it. Since you have space to reach in, you may now collect the small propeller.
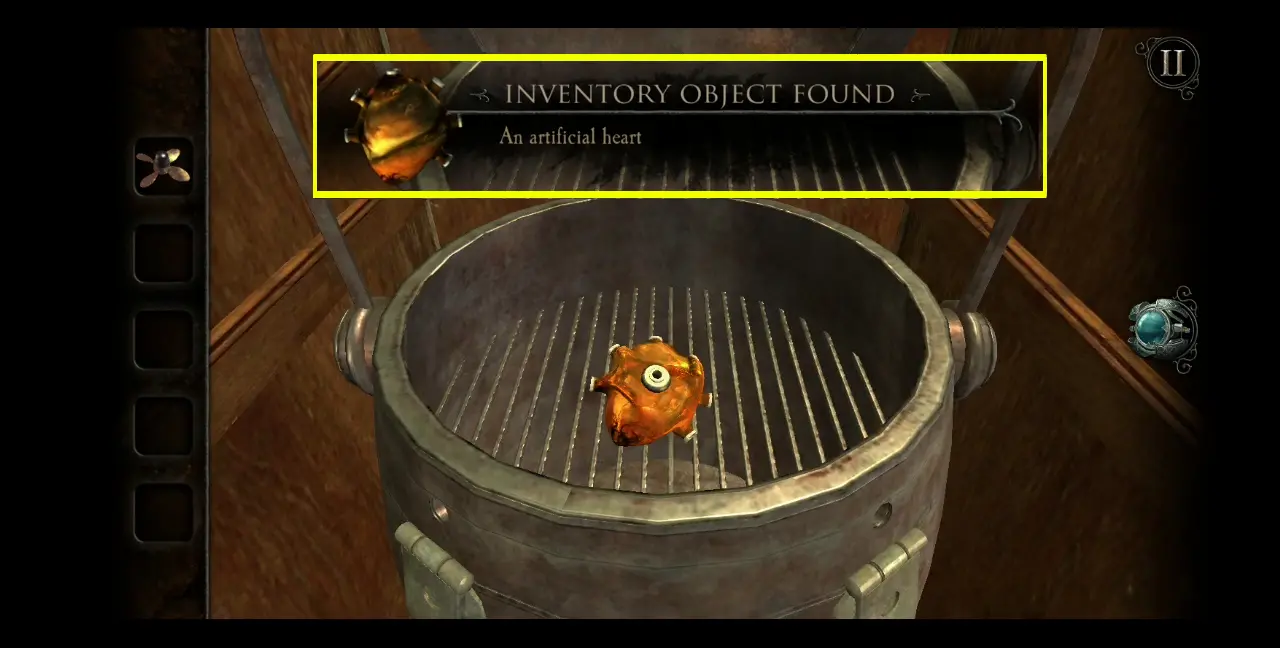
Before we proceed, let’s go back to the Kitchen first before we forget that we have something to collect from the pot we unlocked. Once you’re inside the Kitchen, turn to your right and you’ll immediately see the dumbwaiter with the pot.
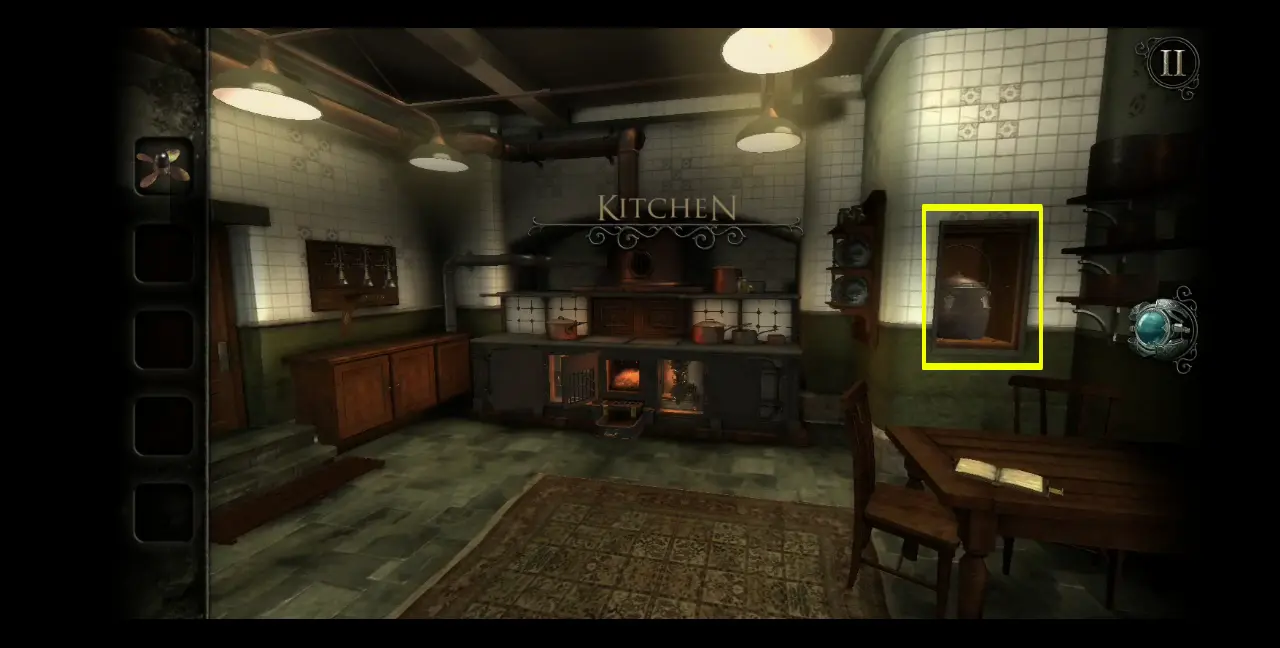
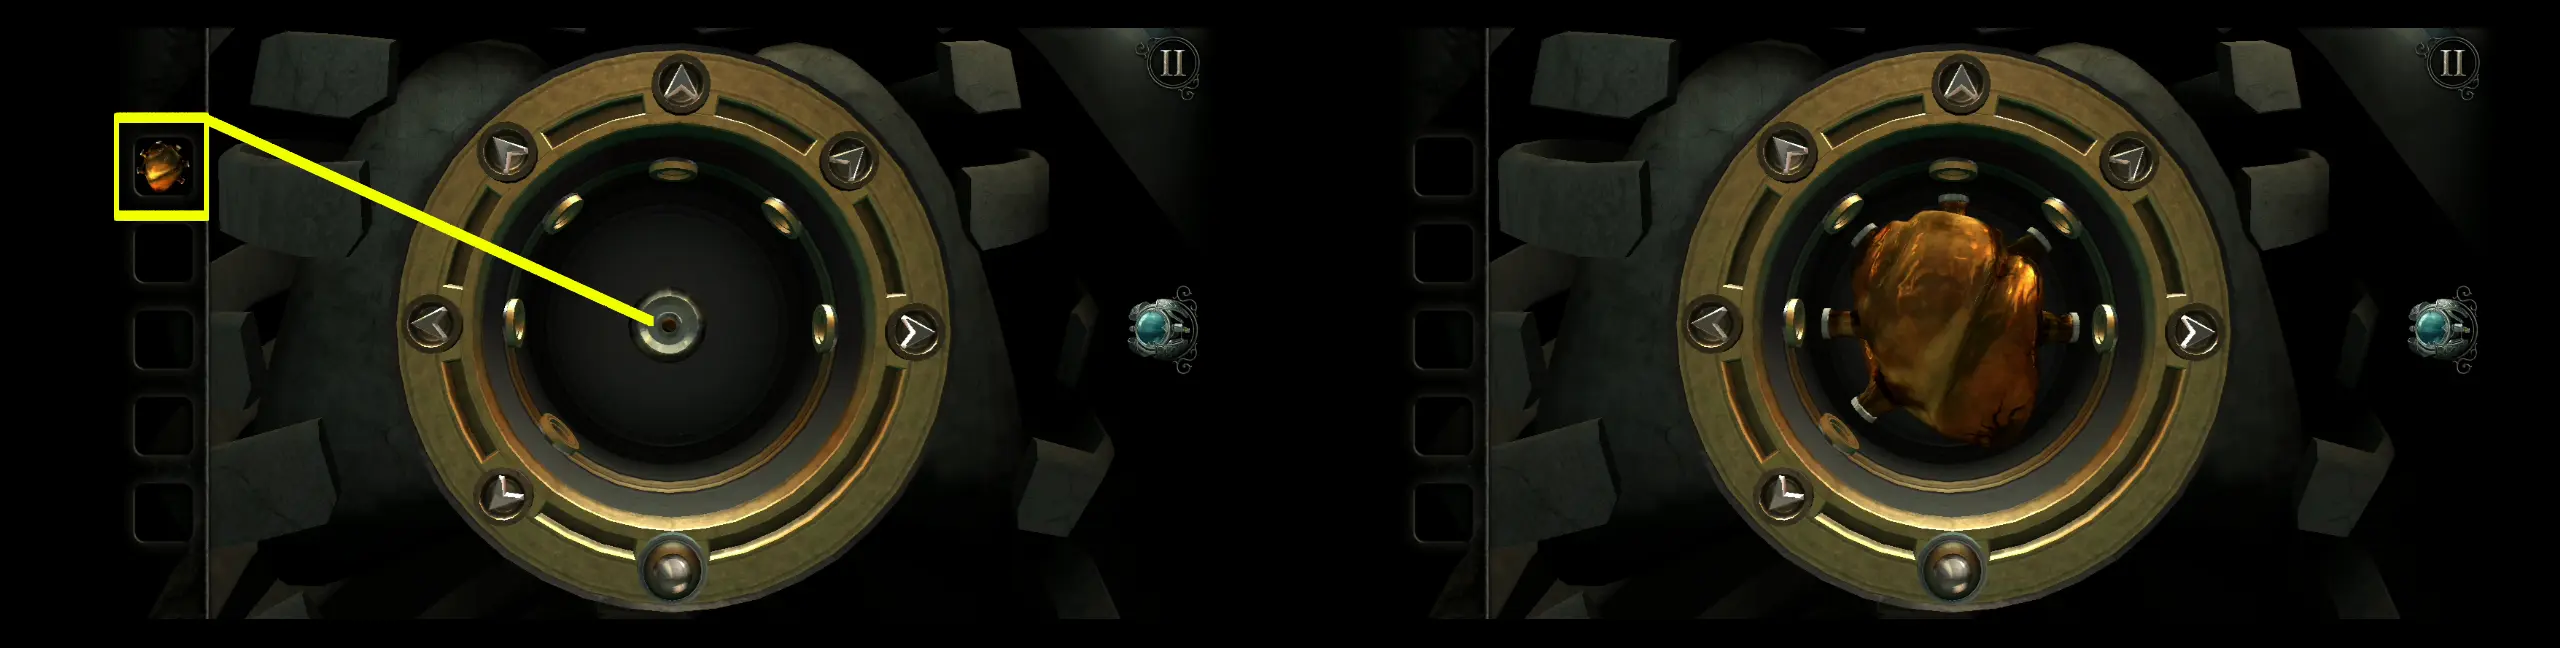
Approach it, open the lid, and collect the artificial heart inside.
With that, leave the Kitchen and return to the Maritime Room. To your left is a model submarine. Approach the back of the submarine and place the small propeller there.
The propeller will start turning, which will open a small hatch at the top of the model submarine. Crystal shards will emerge from its surroundings. Use your eyepiece to enter the interior.
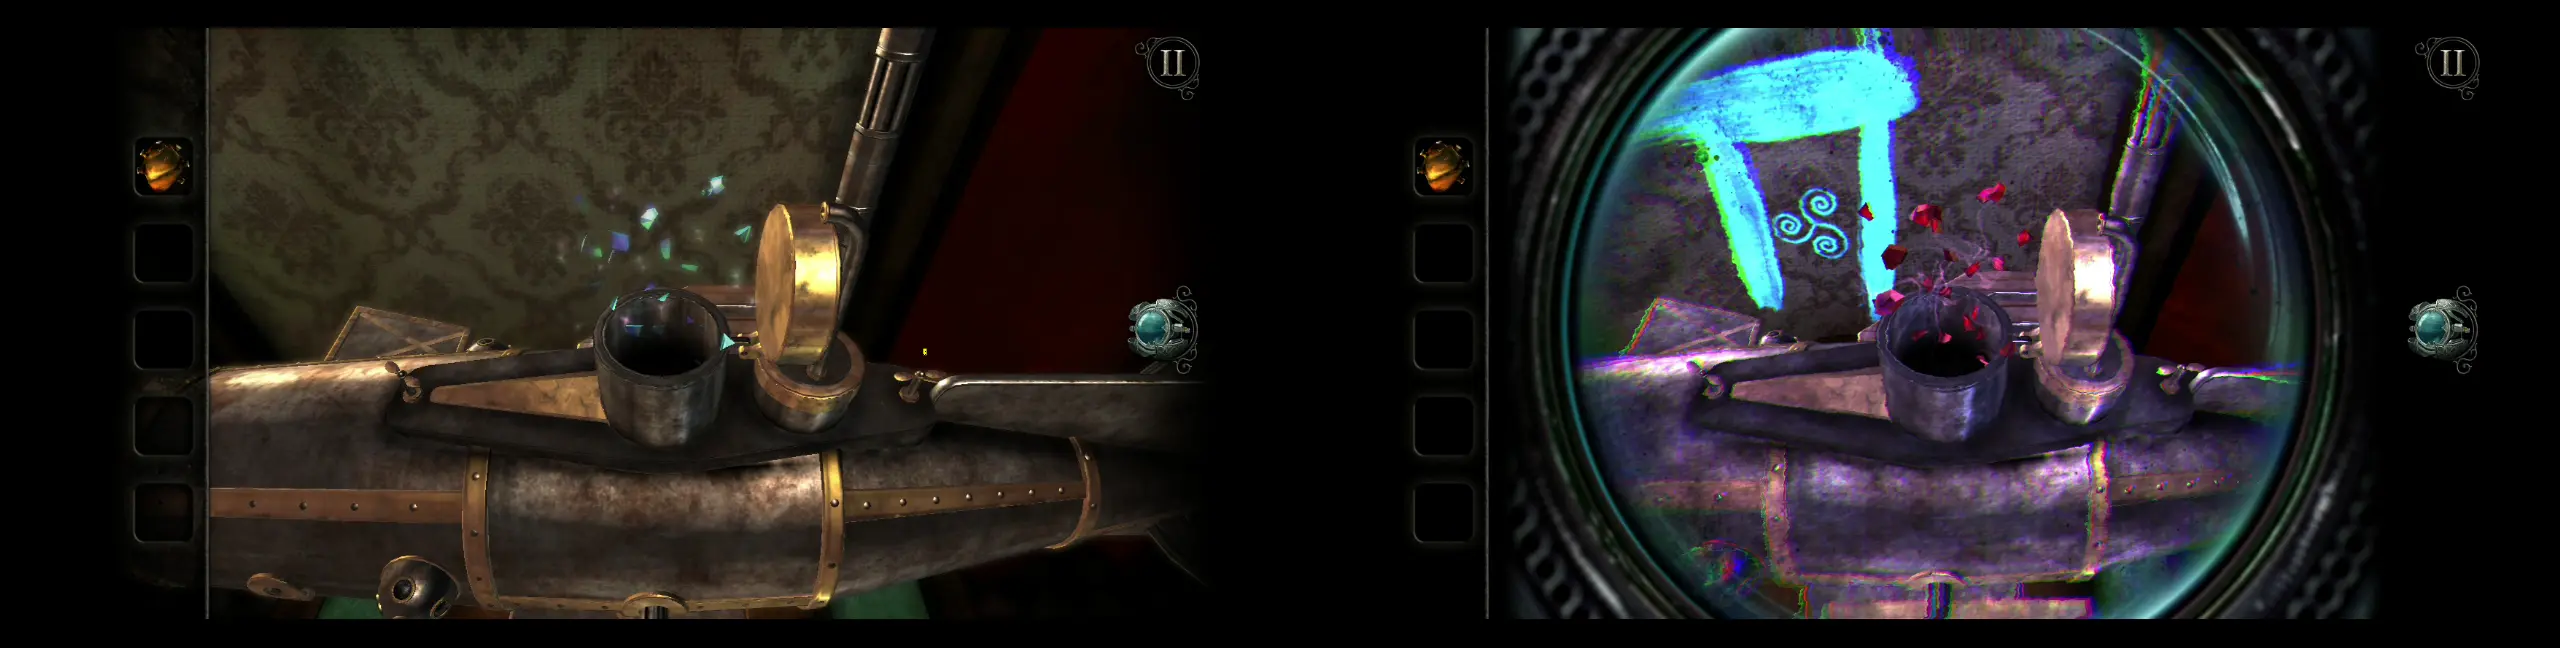
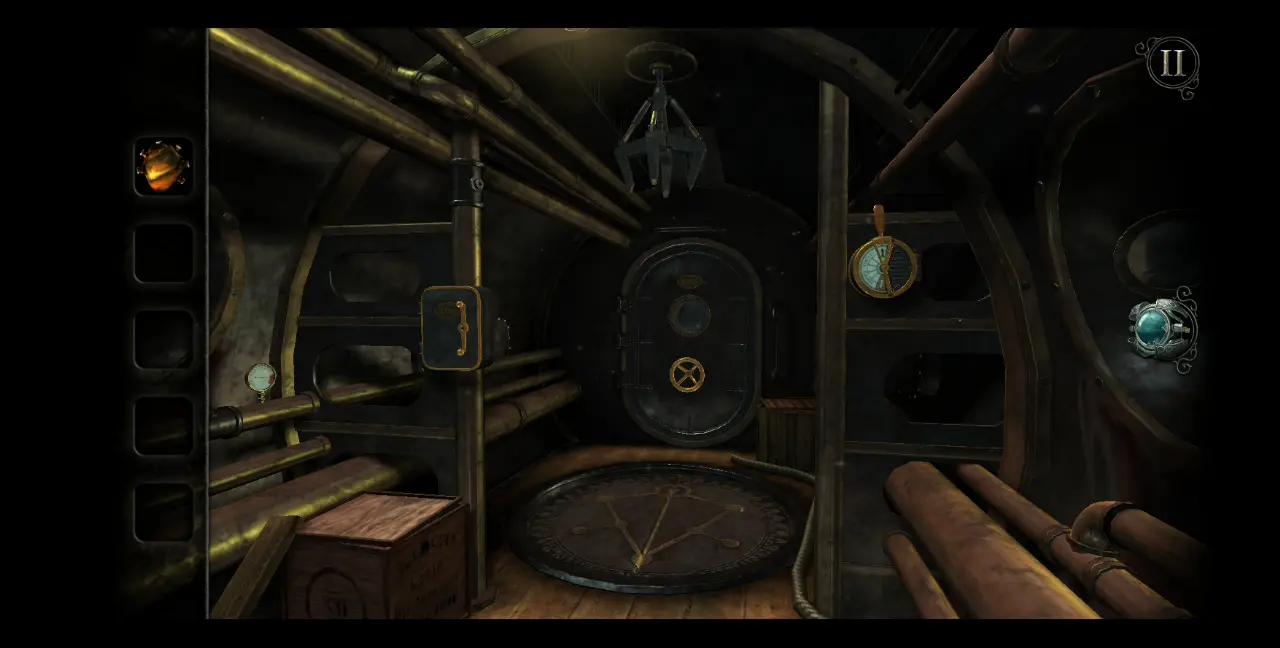
Pictured below is what will greet you inside the model submarine. For this puzzle, you will be going in and out of the submarine until such time you’ve solved it. Take note of the triangular symbol on the floor right in front of the bulkhead door. Remember what it looks like as it will come in handy later.
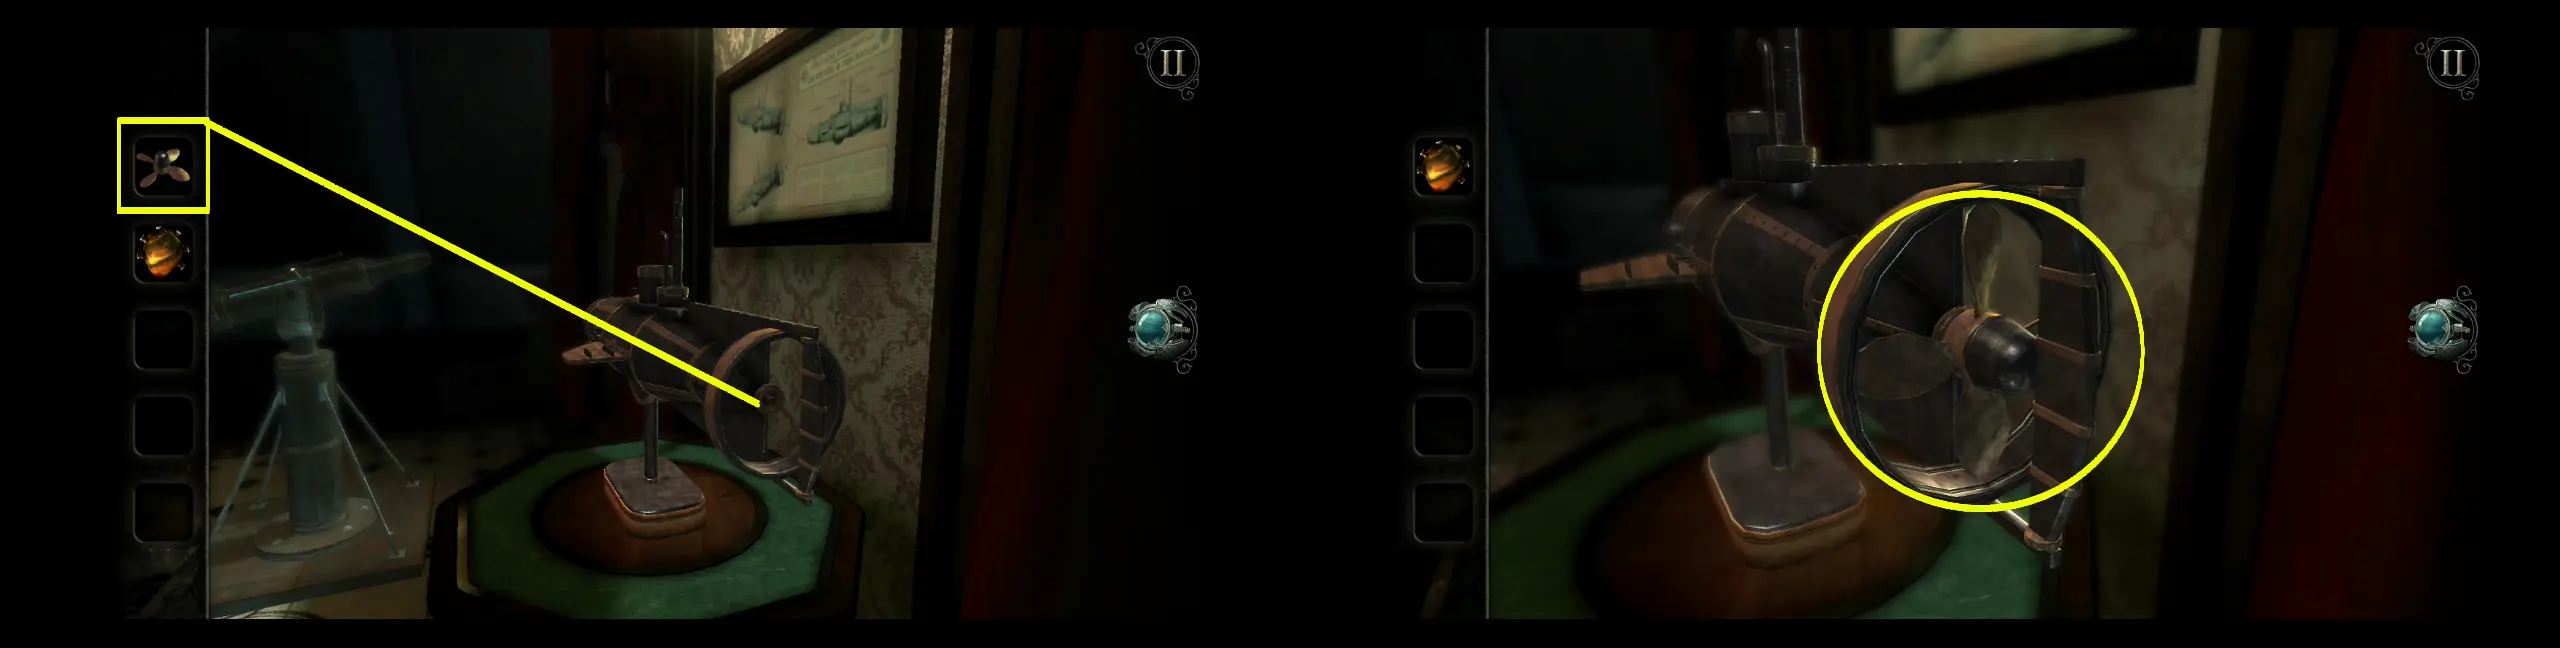
Much like the train from the Study, an objective of this puzzle is to activate the submarine and get it working. To do this, first go to the small compartment on your left that has a handle. Turn the handle to the side to open it. Inside is a metal fin you can collect.
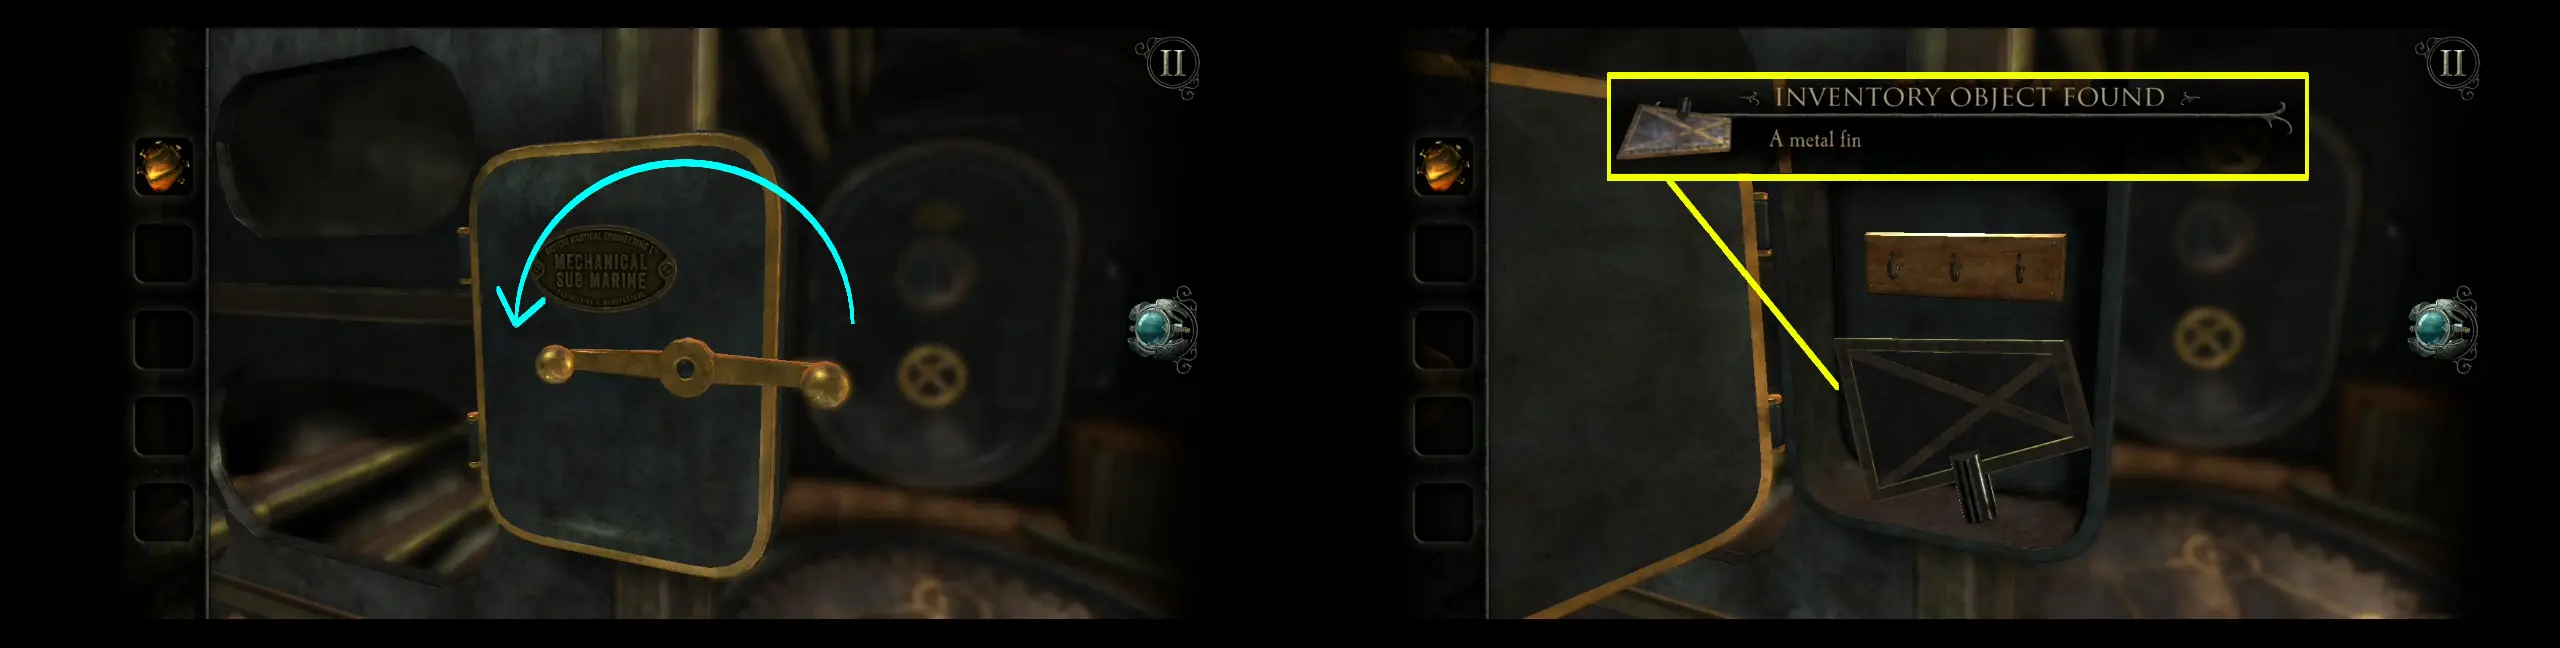
Exit the model submarine. Place the metal fin on the circular slot near the front.
On the wall just above the model submarine is a diagram showing how adjusting the fins will cause it to either tilt downward or upward. Adjust the metal fins in a way that will make the submarine tilt downward.

Enter the model submarine again. To your right is a telegraph that controls the grapnel hanging from the ceiling. Pull the telegraph’s handle all the way down. This will make the grapnel descend and latch onto the bulkhead door’s dog, which is the wheel-looking knob below the window.
Once the grapnel is locked onto the bulkhead door’s dog, pull the handle of the telegraph back up. This will cause the grapnel to retract, forcing the bulkhead door open.
You’ve now gained access to the bridge. Some notable things in this section of the submarine are a map to your right, the helm right in front, and the viewport.
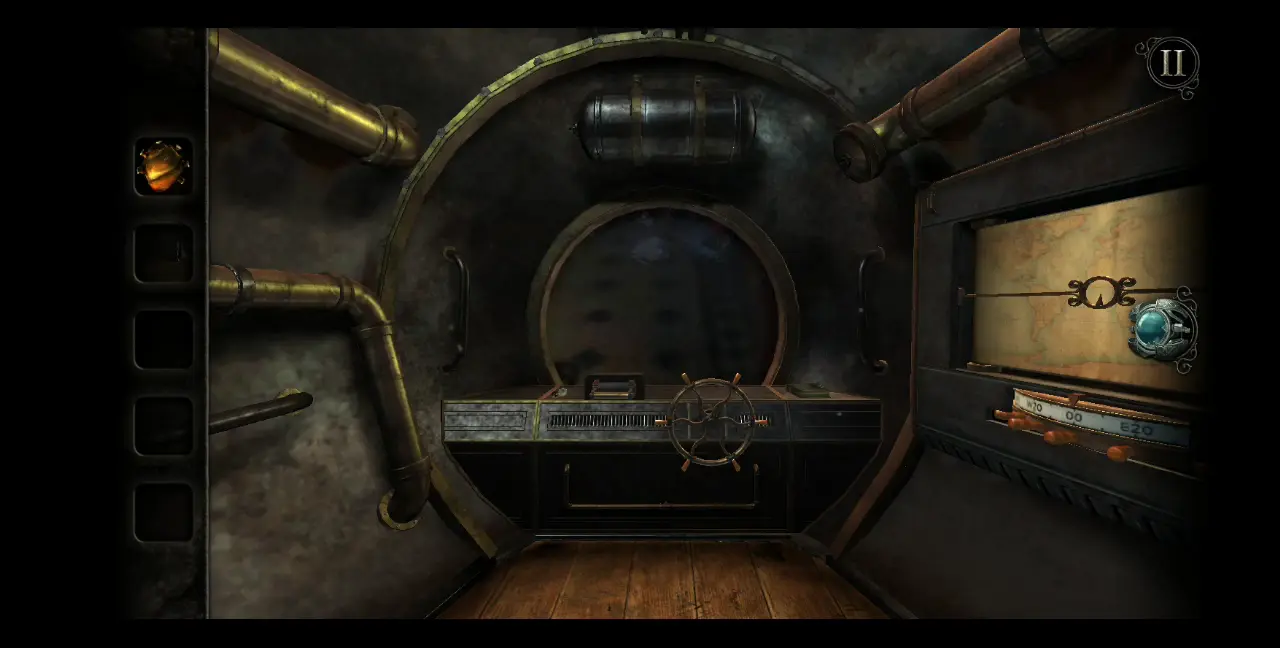
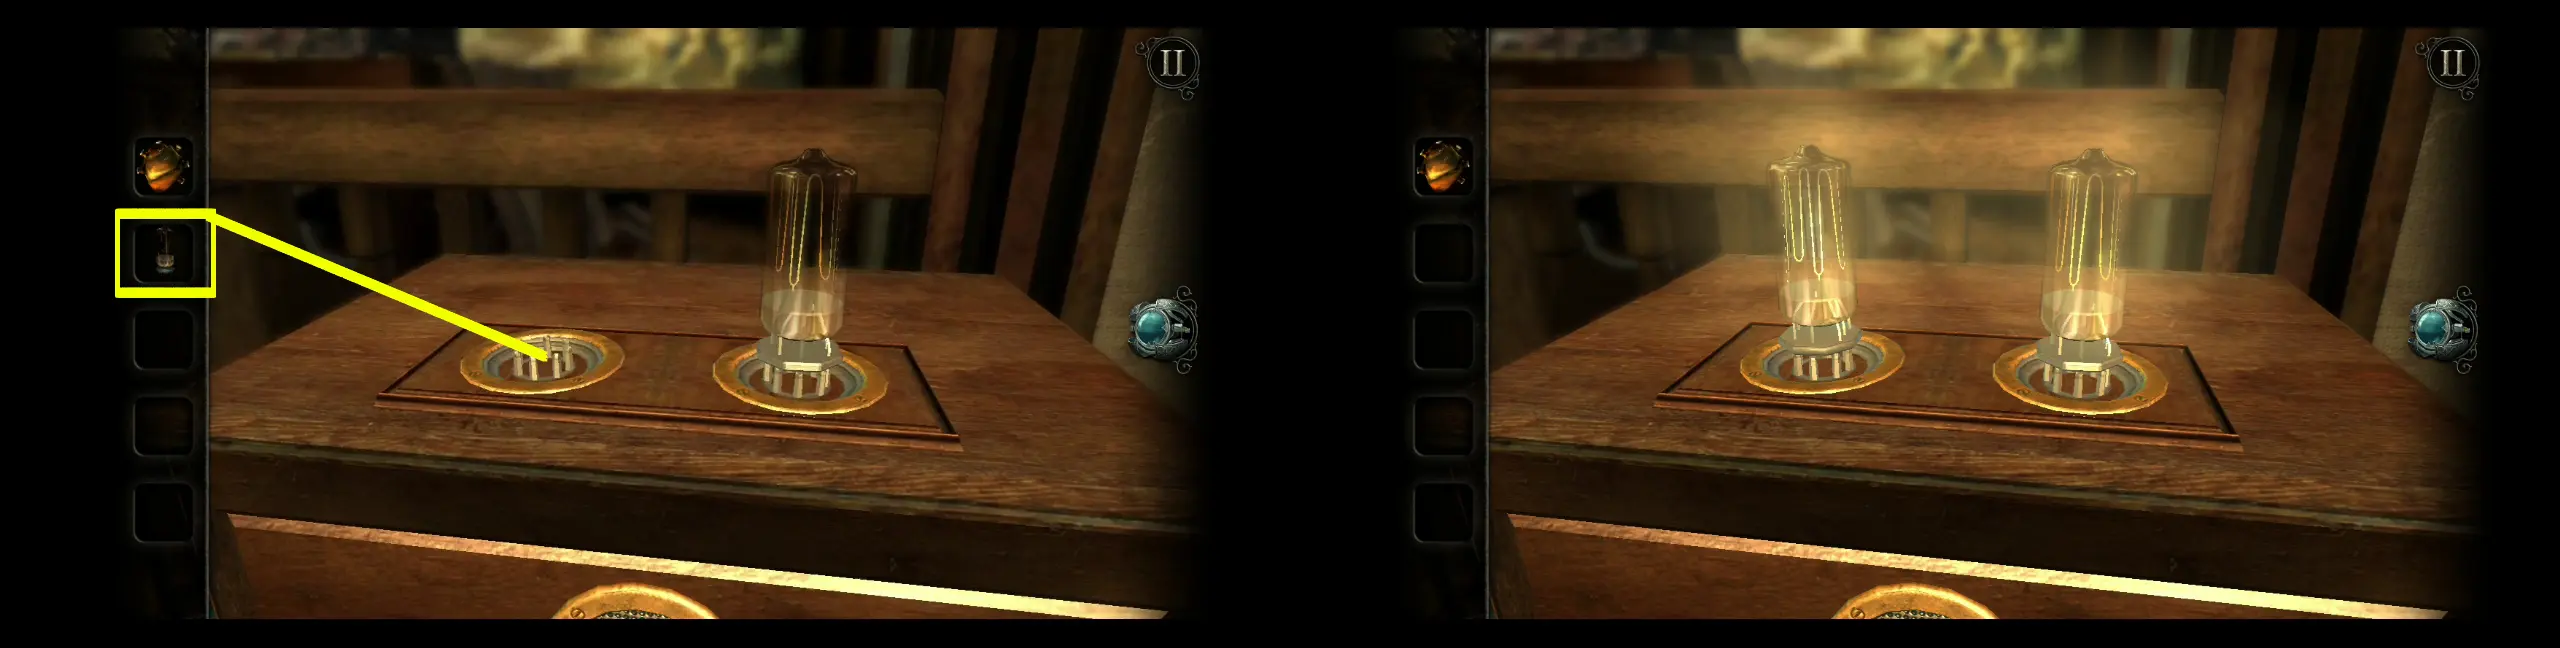
Approach the left side of the helm. Here you’ll find a new item: a vacuum tube.
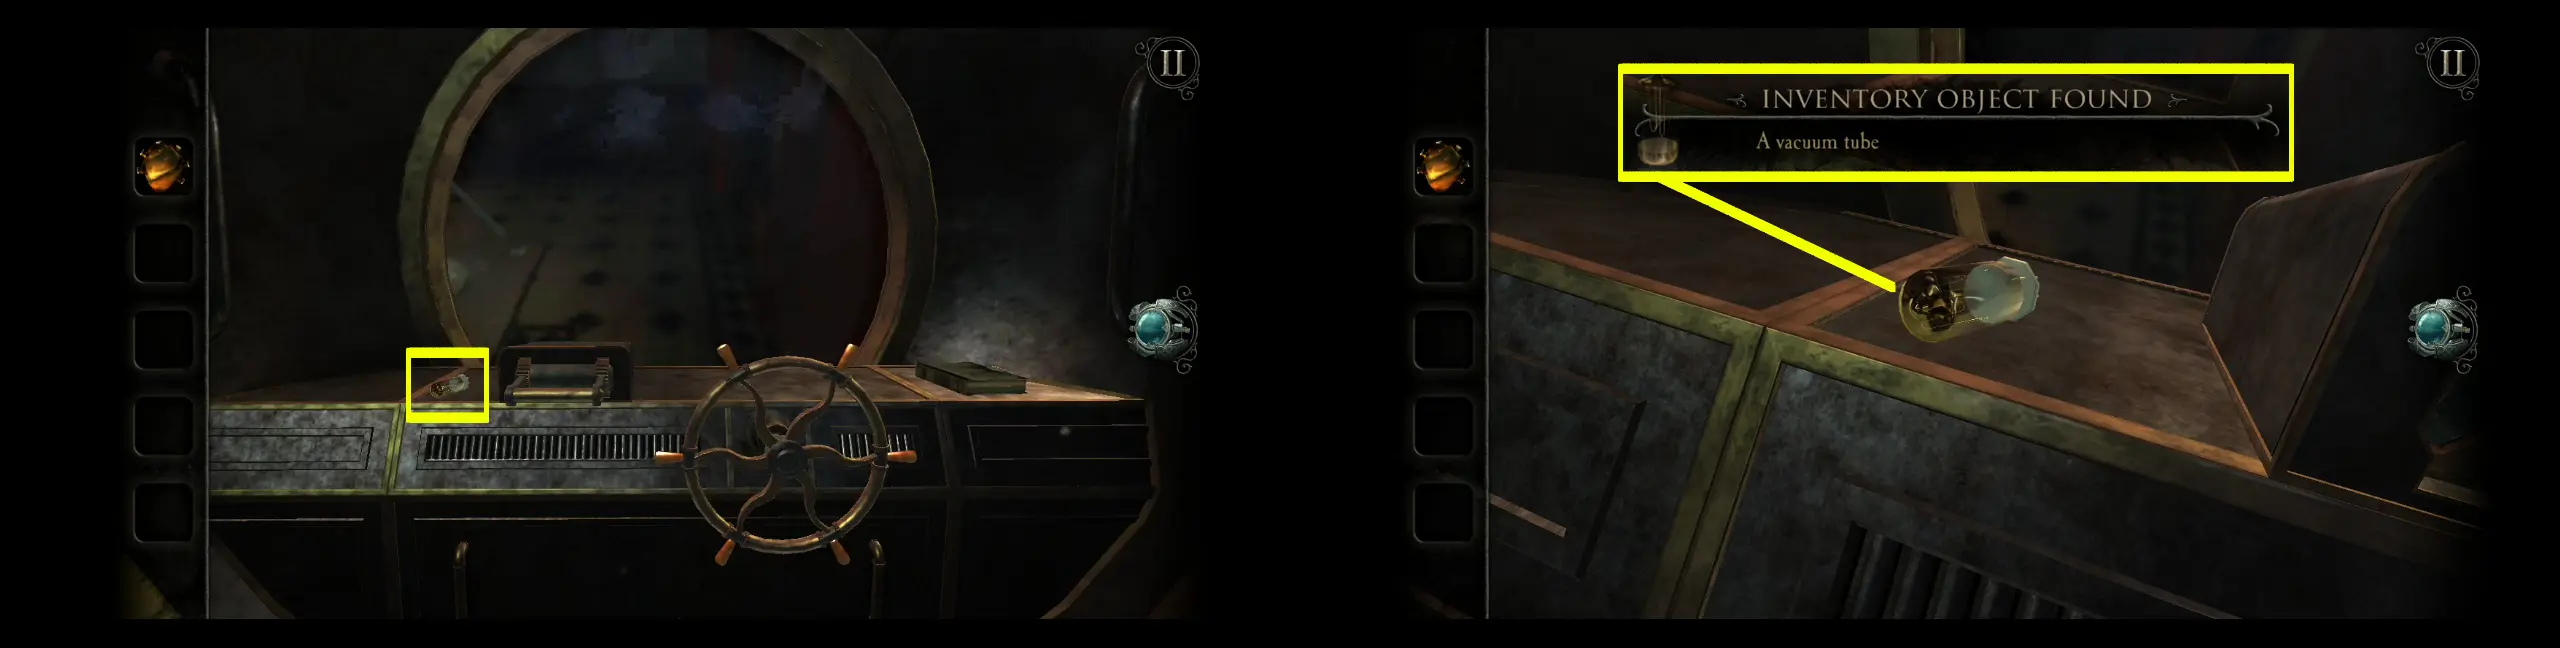
Exit the submarine again and turn your attention toward the radio on the table to the right of the room. Place the vacuum tube on the slot next to the other vacuum tube. Both will glow like lightbulbs, signifying that the radio is working.
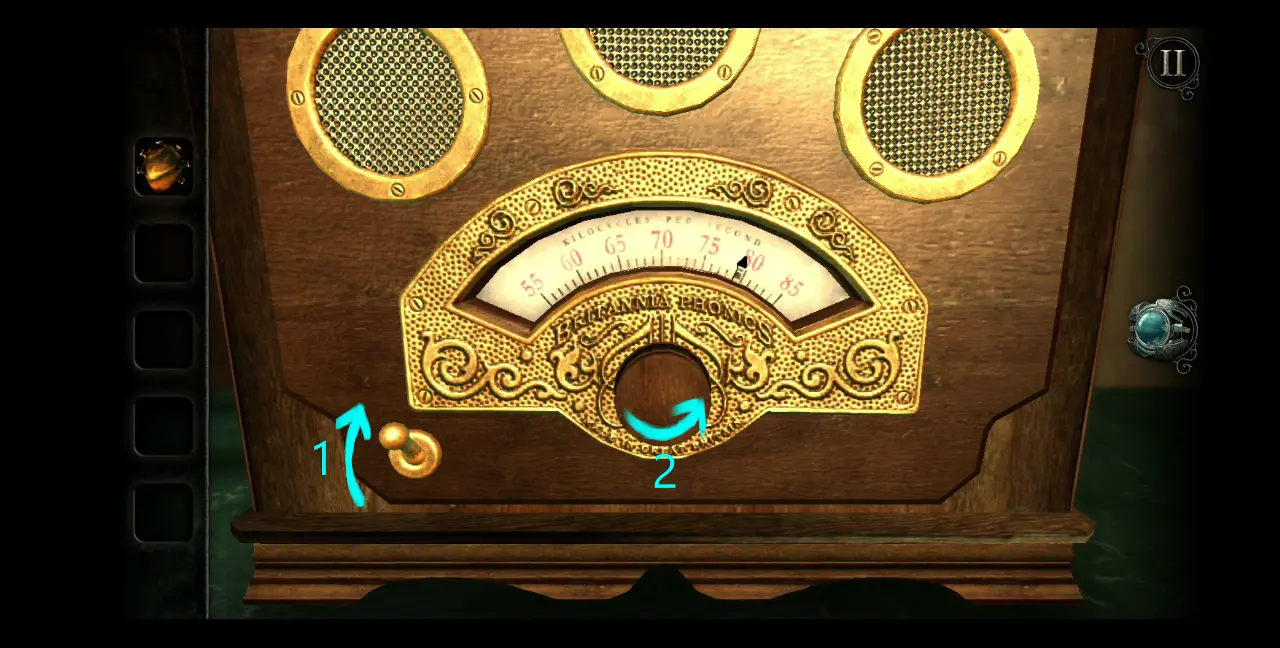
At the bottom of the radio is a switch. Pull it up to open the device. At first, you’ll hear a bit of static, but if you move the dial and change the station of the radio to around 80, you’ll hear a creepy, garbled noise that sounds like someone talking extremely slowly that none of the words can be understood. Keep the radio in that station.
For now, leave the Maritime Room and head to the Curiosity Room. Approach the anatomical model, particularly the switch beside it. Pull the switch down.
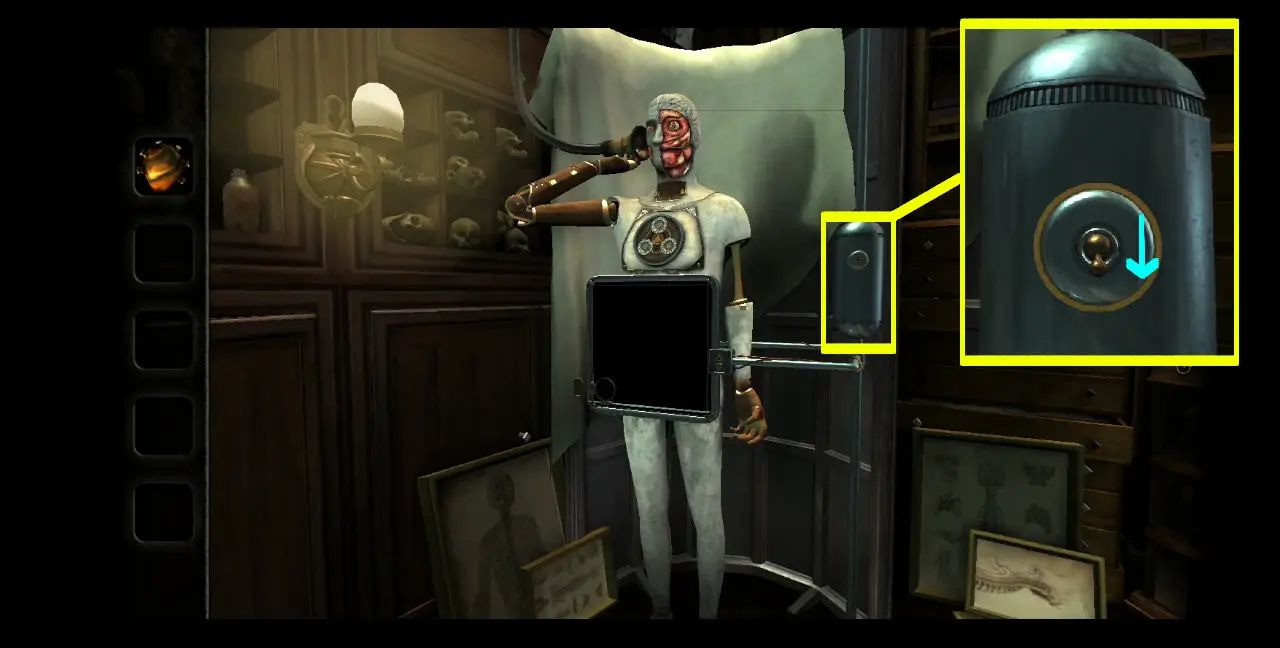
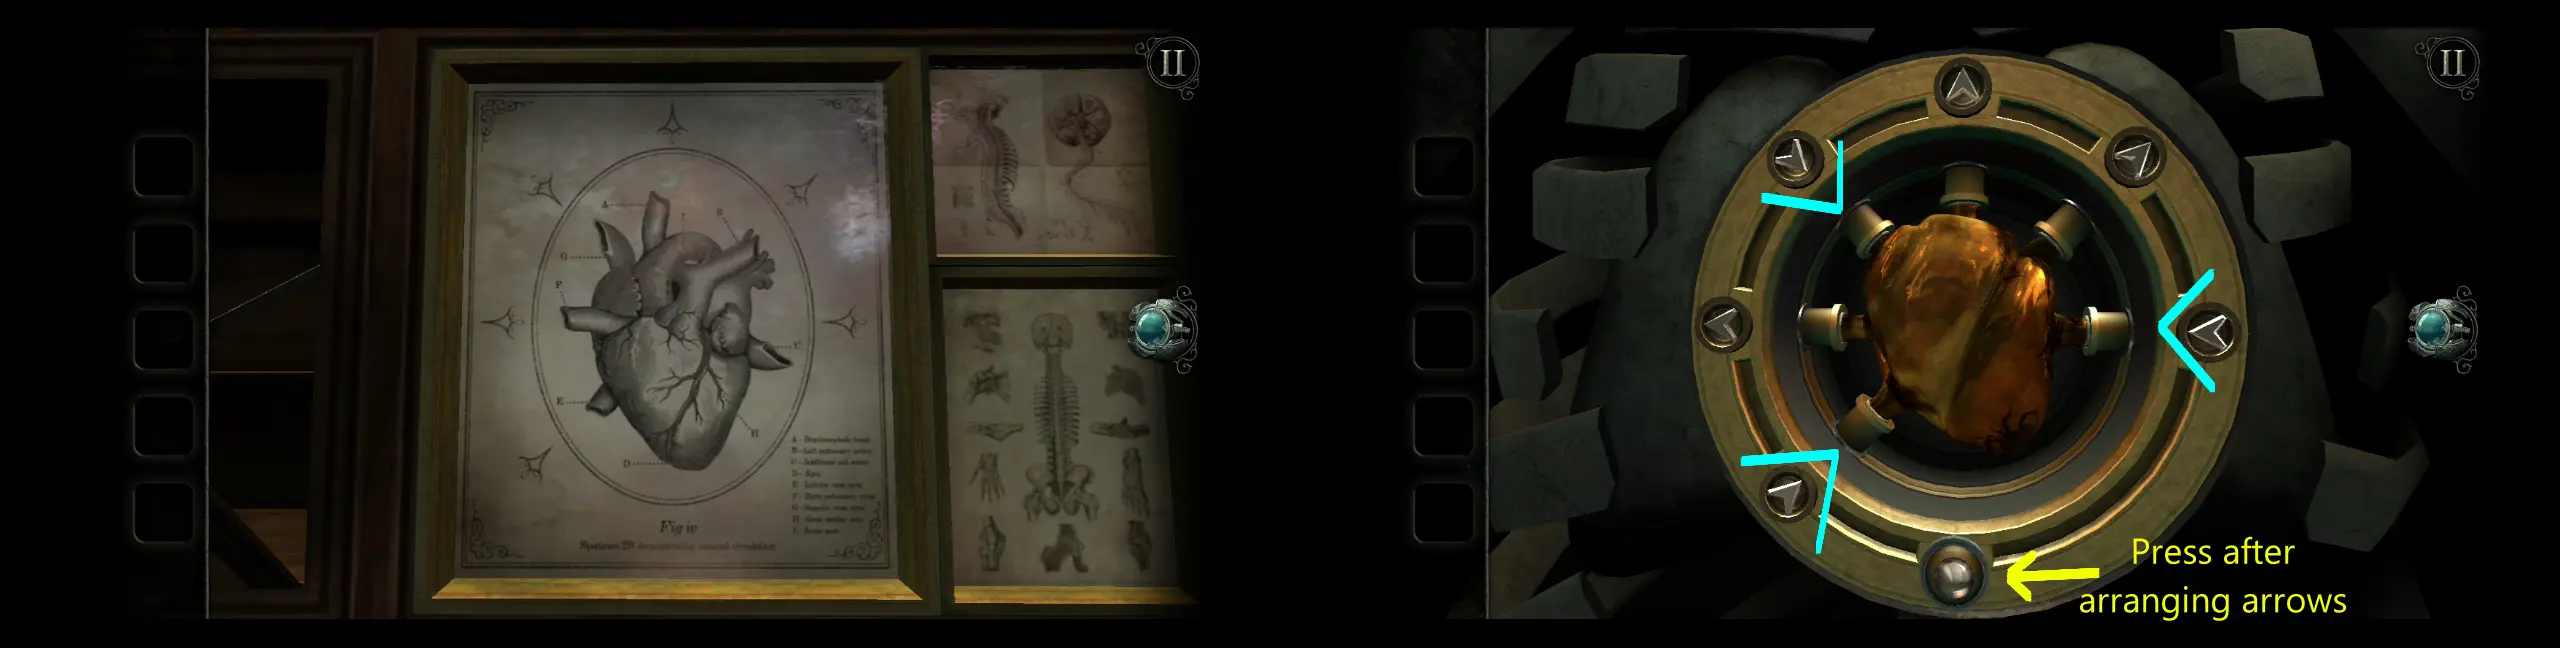
This will activate the X-ray in front of the anatomical model. The up and down buttons on the right will move the entire frame of the X-ray while the lens can be moved anywhere within the frame. Your objective is to find symbols hidden within the X-ray. You can do this by first locating “anomalies” in the bone structure that are represented by black splotches. Pictured below is the first symbol you will find if you place the lens above this anomaly on the hip bone.
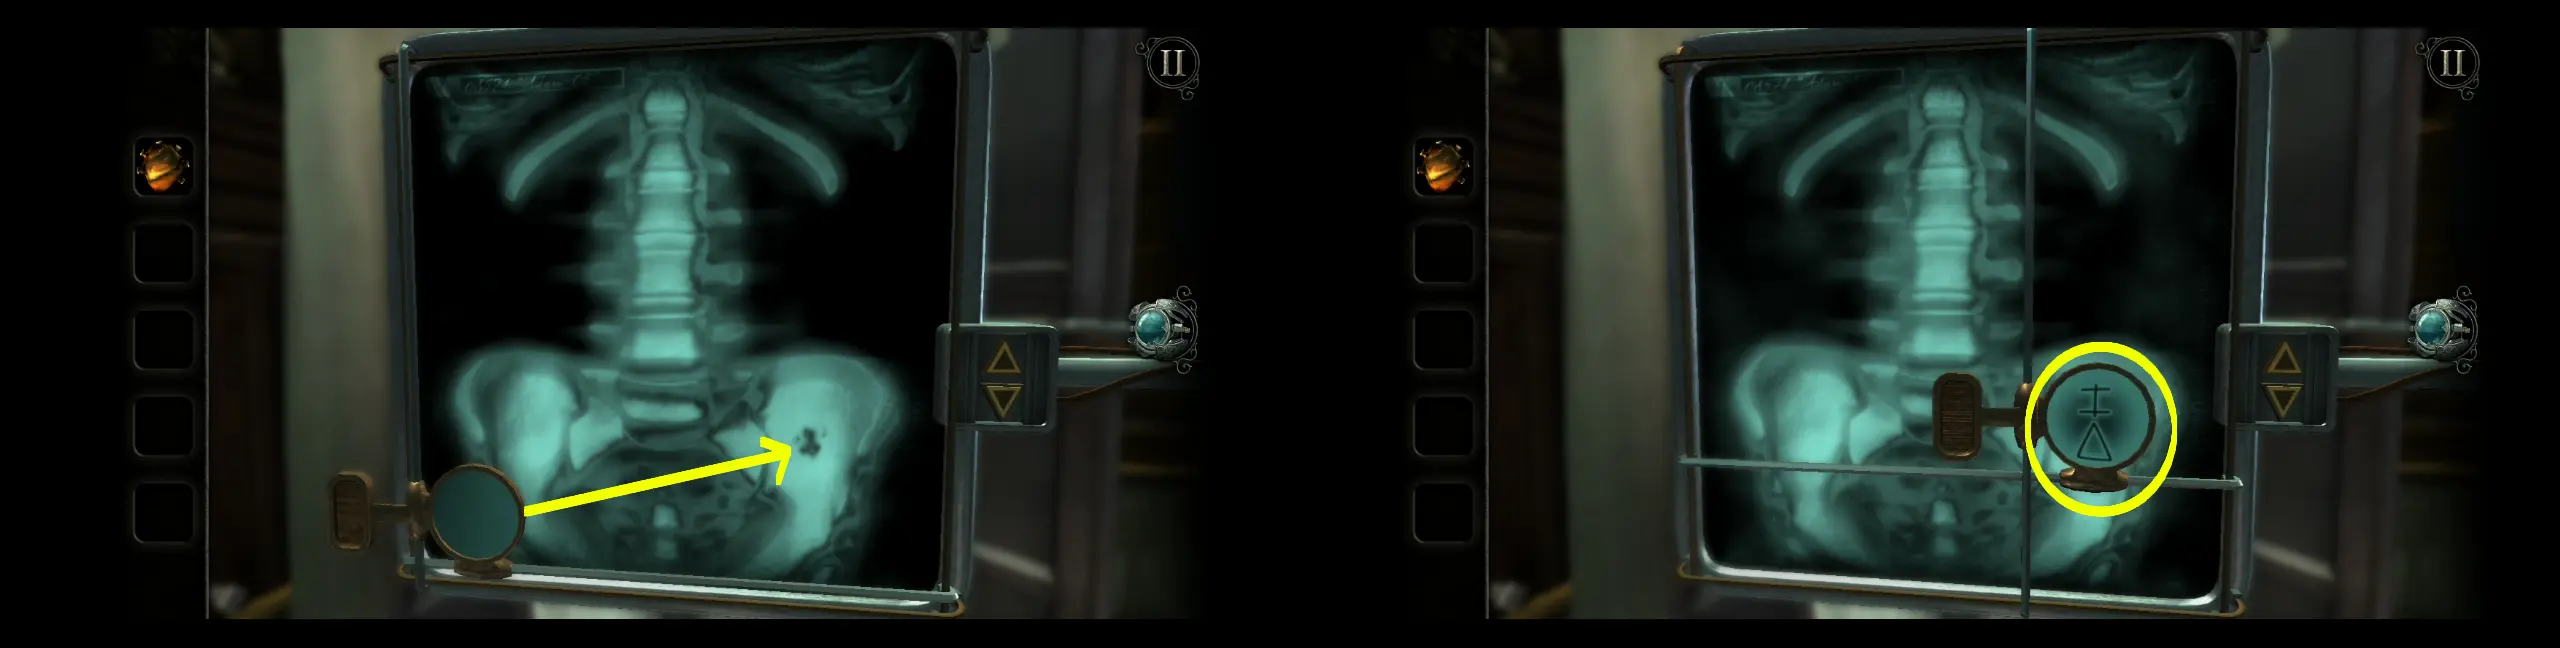
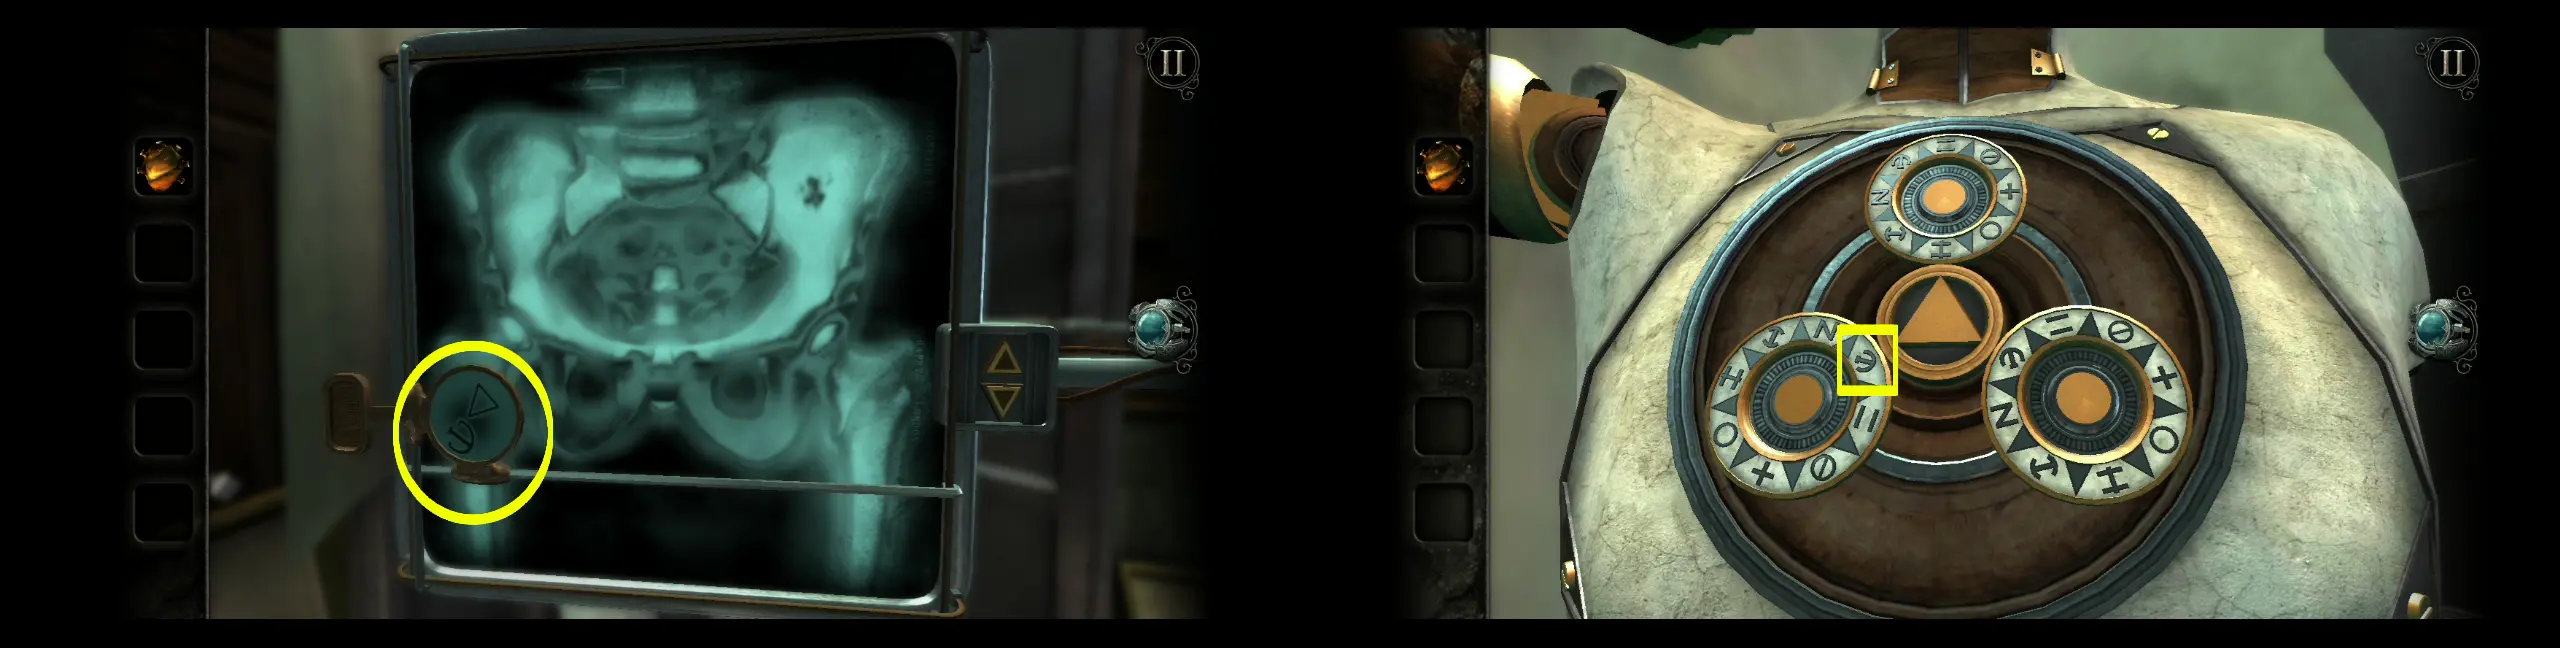
Once you’ve seen the symbol, turn your attention to the three dials on the anatomical model’s chest. Turn the top dial so that the symbol you’ve just seen is aligned with the tip of the golden triangle in the center.
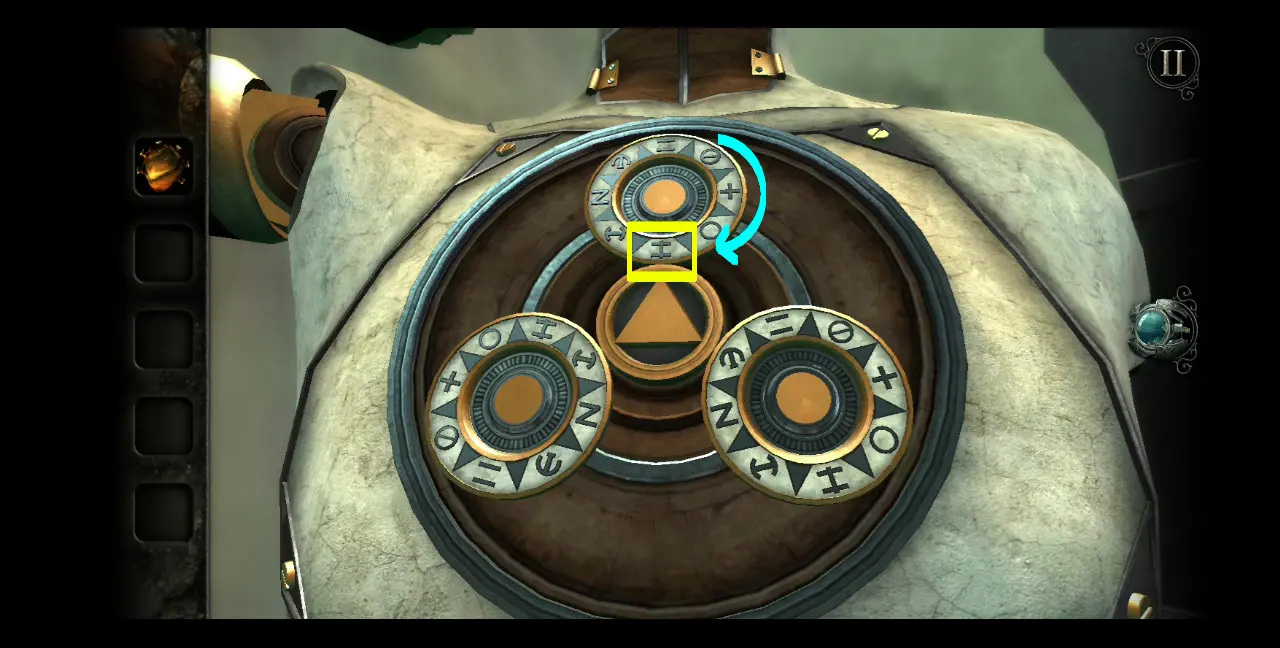
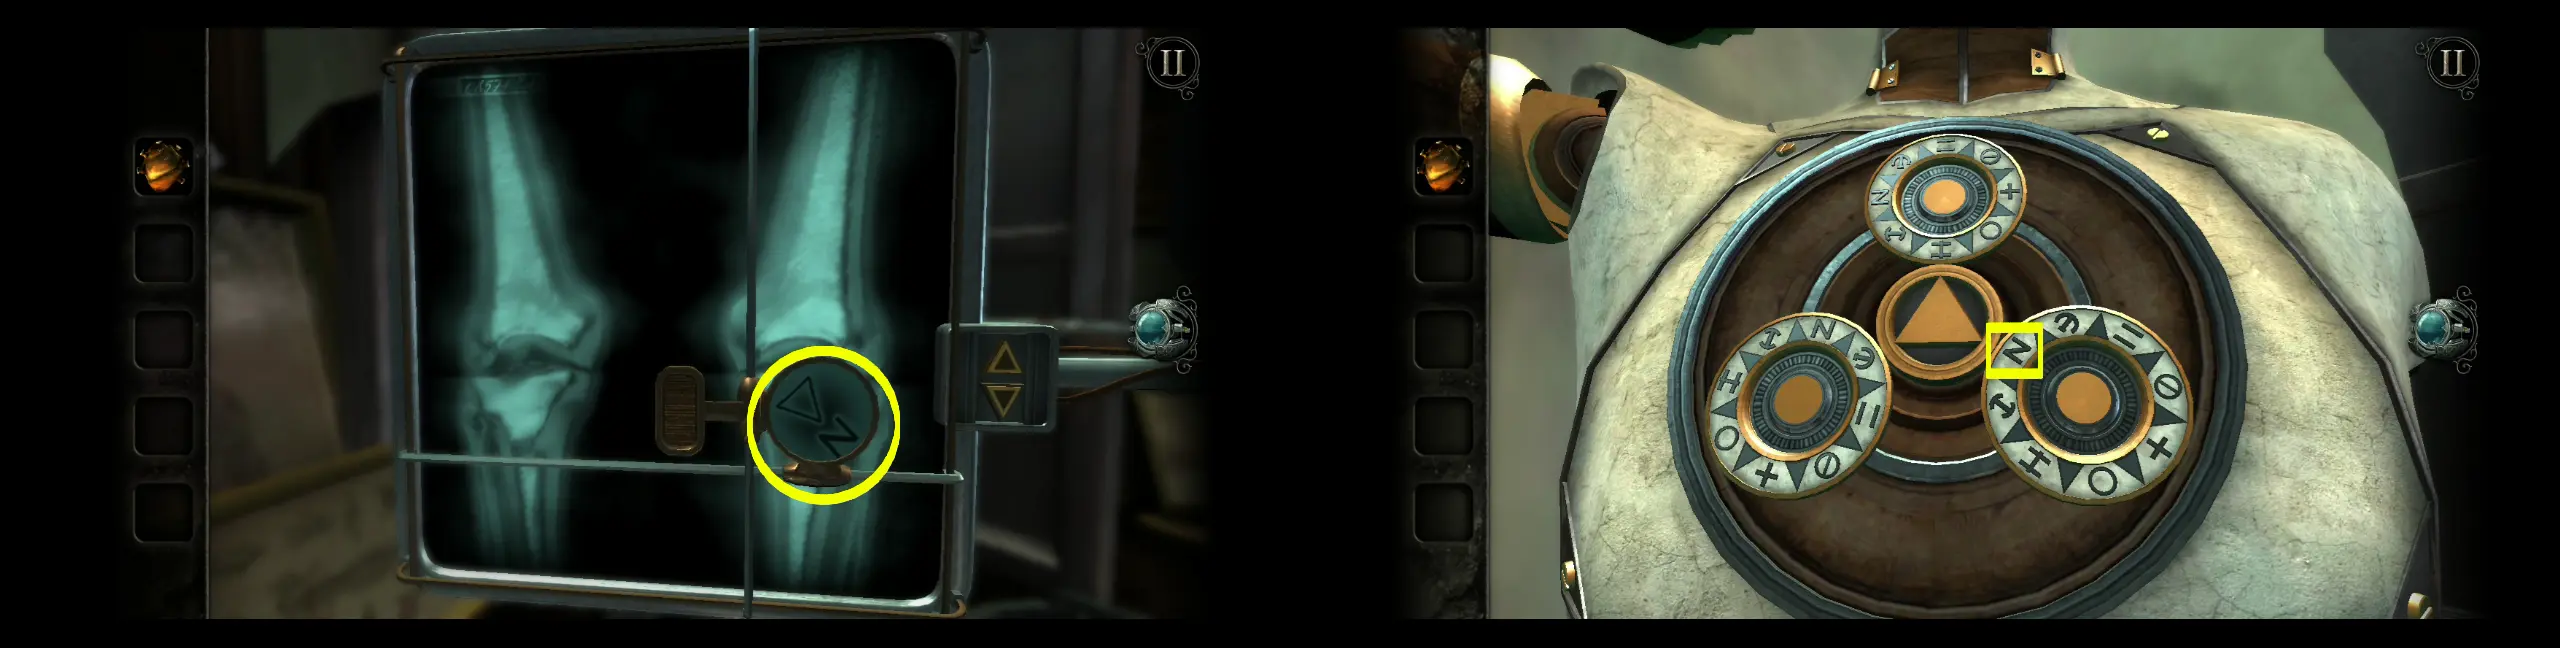
Do this for the two other symbols and dials. Here is the position of the second symbol on both the X-ray and the dial.
Here is the position of the third symbol on both the X-ray and the dial.
When all the right symbols are in place on the dial, the chest cavity of the anatomical model will open, revealing a circular slot. This is where you can place the artificial heart.
Around the slot are arrows that correspond to tubes connected to the artificial heart. If you press the button at the bottom of the slot, the tubes will try to connect to the heart, but won’t latch onto it unless all the arrows are facing the proper direction.
Now you will notice that these arrows are all pointed outward. There are actually only 3 arrows you need to move so that they will be pointing inward. You can actually find the answer to this puzzle in a diagram on the wall, right next to the leather recliner. Refer to the diagram so that you can redirect the arrows on the northwest, southwest, and east of the slot. Pictured below is the diagram and the proper arrangement of the arrows on the slot itself. After the arrows have been redirected, press the button at the bottom of the slot and the tubes to the artificial heart will connect.
Two parts of the anatomical model will then open: its throat and its jaw.
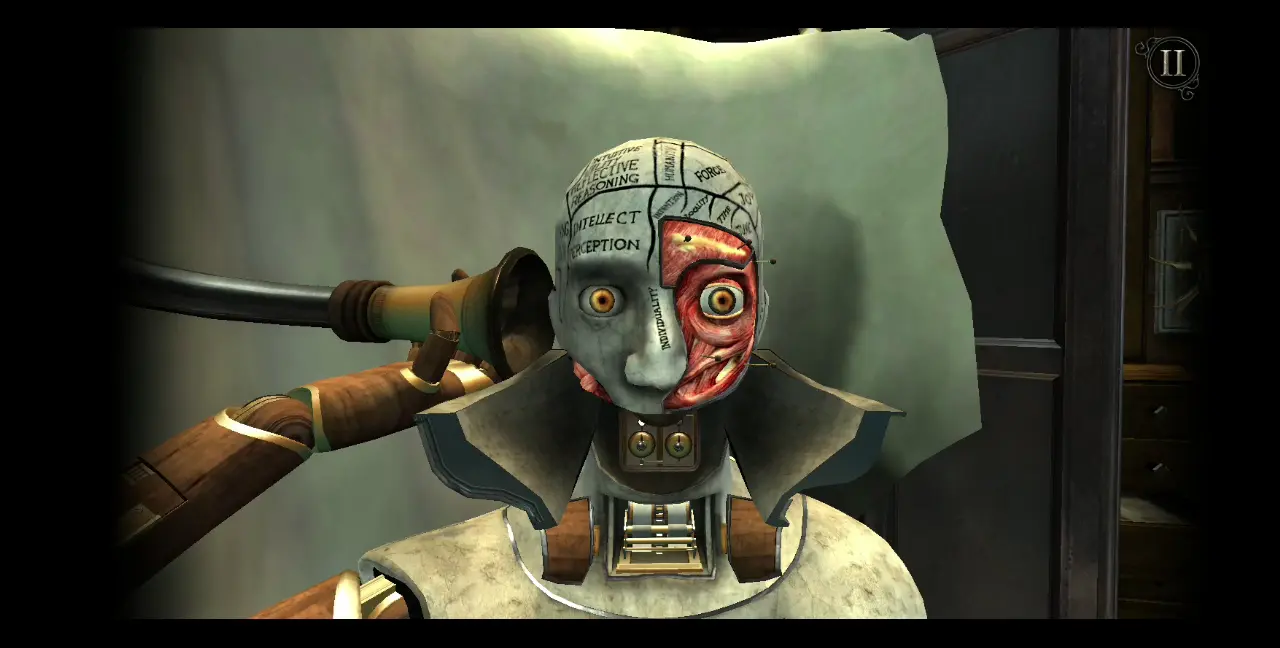
If you’ve noticed, since entering the Curisority Room, you’ve been hearing the same garbled noise coming from the radio in the Maritime Room. This is because, as you can see from the picture above, the anatomical model is “listening” to the radio through a receiver. With its throat and jaw now opened, the garbled noise seems to become louder.
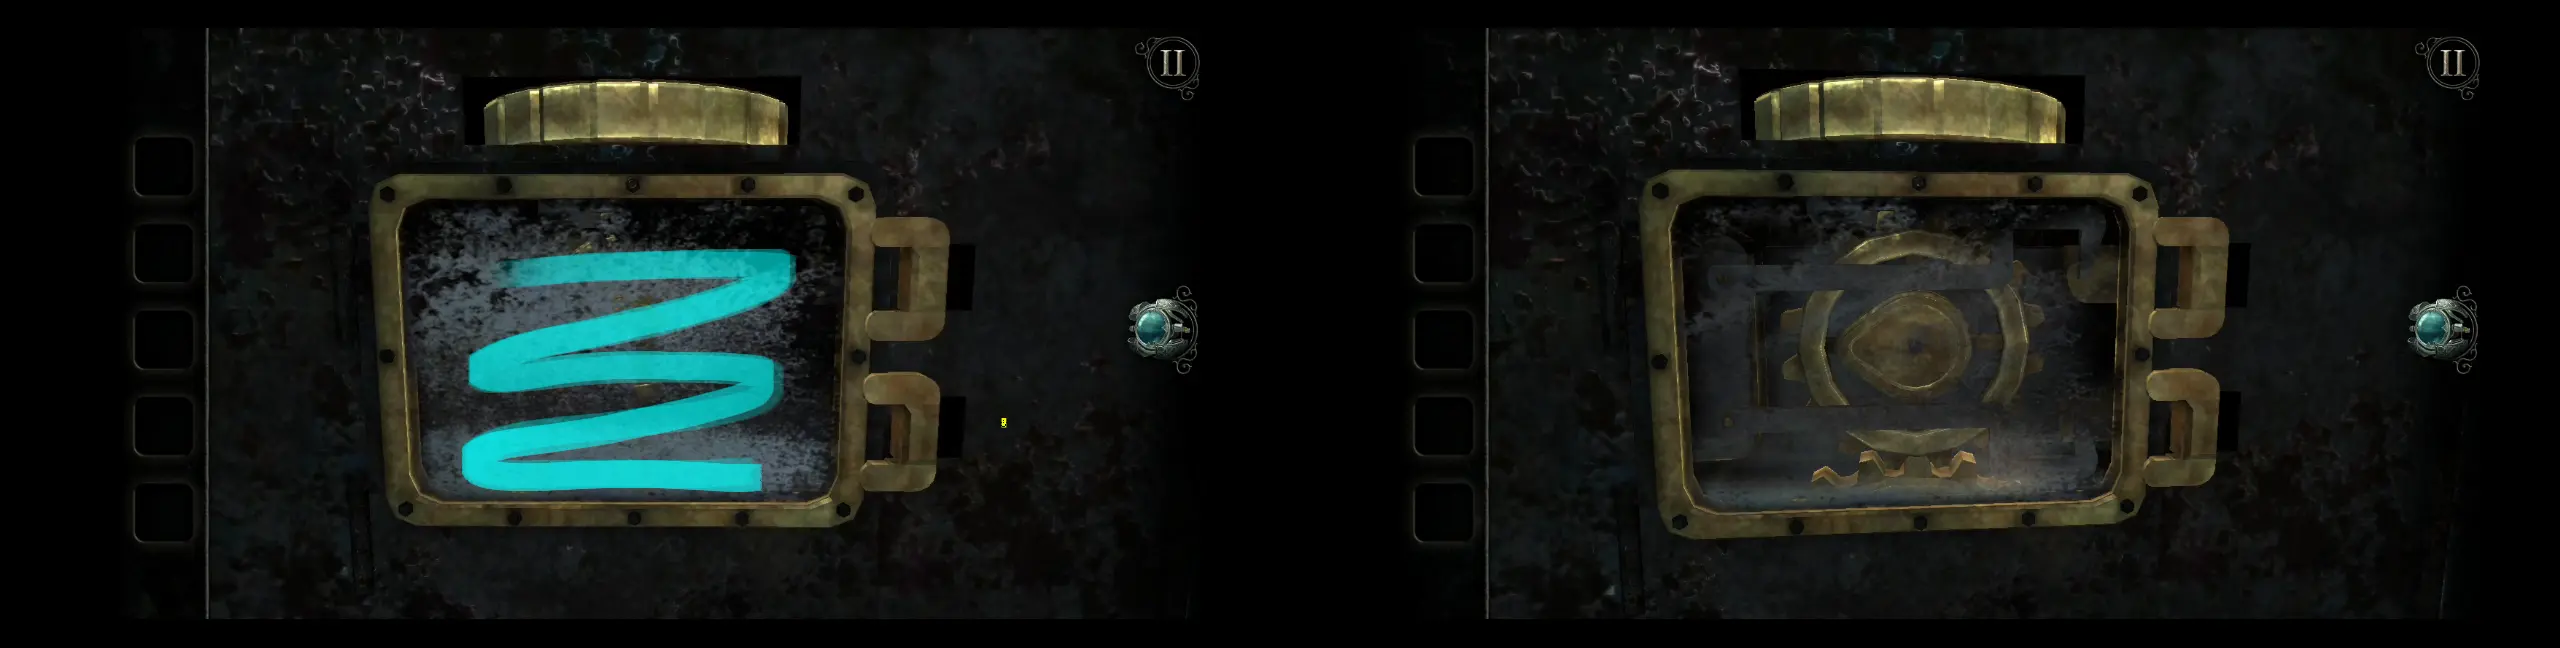
To fix this and finally discover what’s being said, zoom into the anatomical model’s jaw area. Turn the dial on the left clockwise by 90 degrees or until the light above it turns green and the garbled noise becomes a clear human voice. This will trigger a mechanism from the throat area to print something on a strip of paper. Remember what is written.
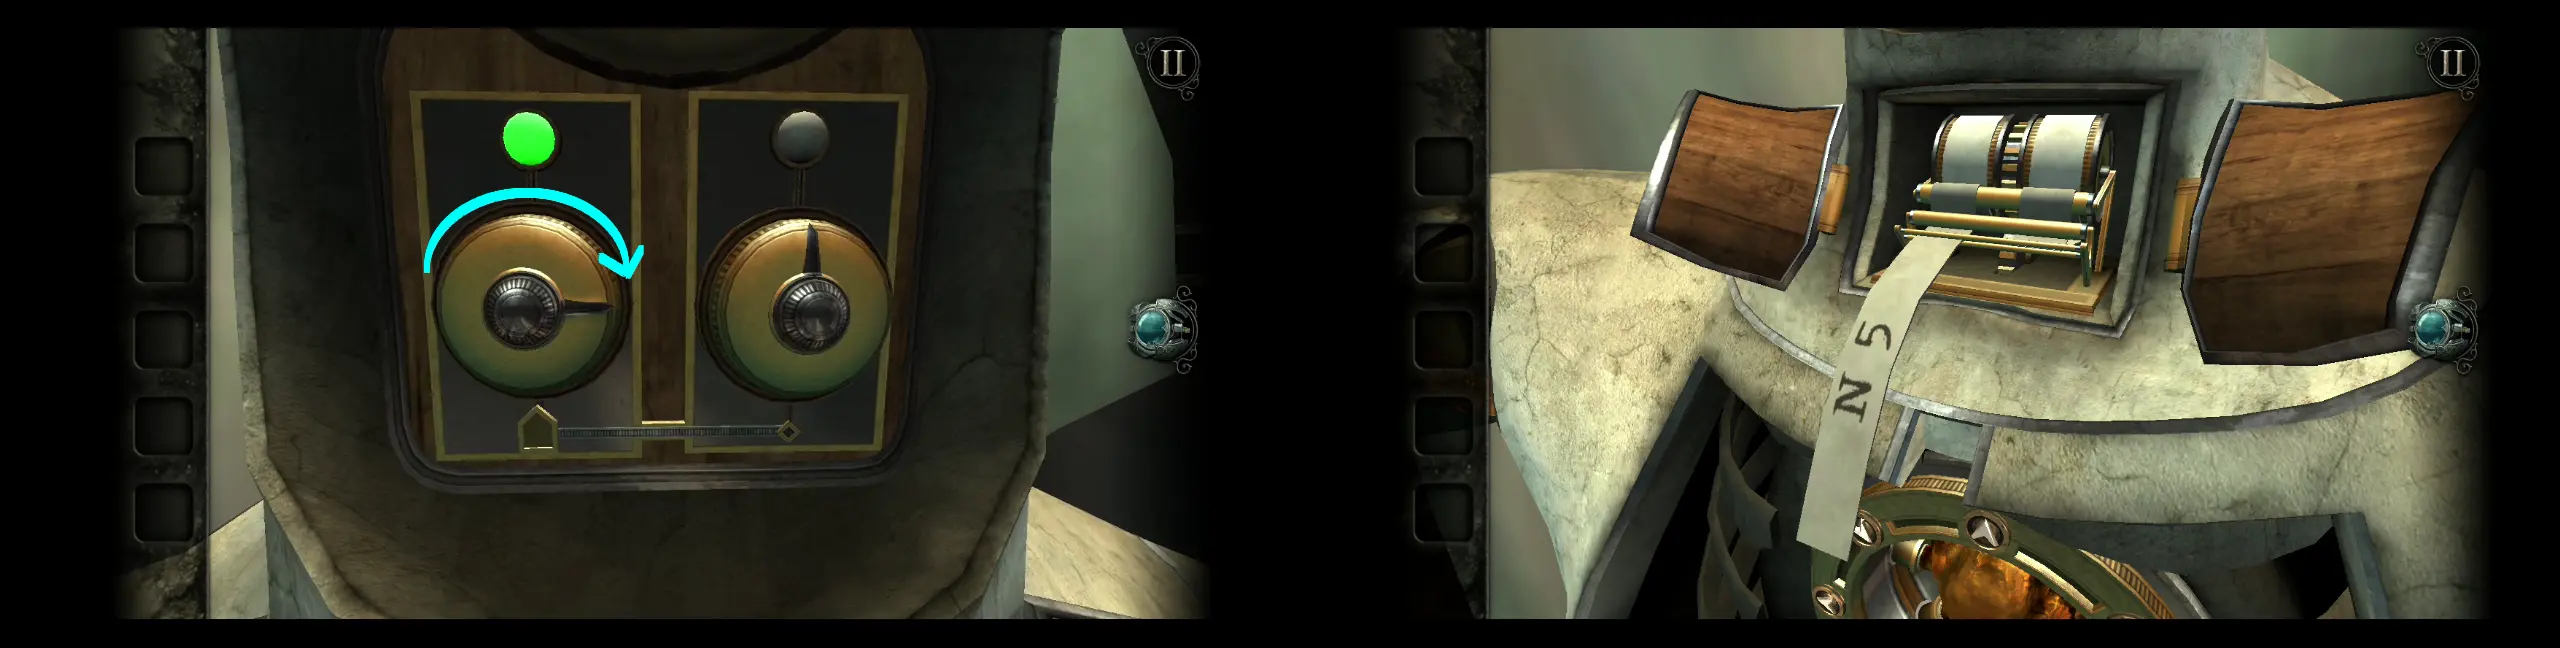
You’ll be brought back to the jaw area so move the slider at the bottom to the right. Then, turn the right dial 90 degrees counterclockwise or until the light above it turns green and the human voice becomes clear. Another strip of paper will be printed on.
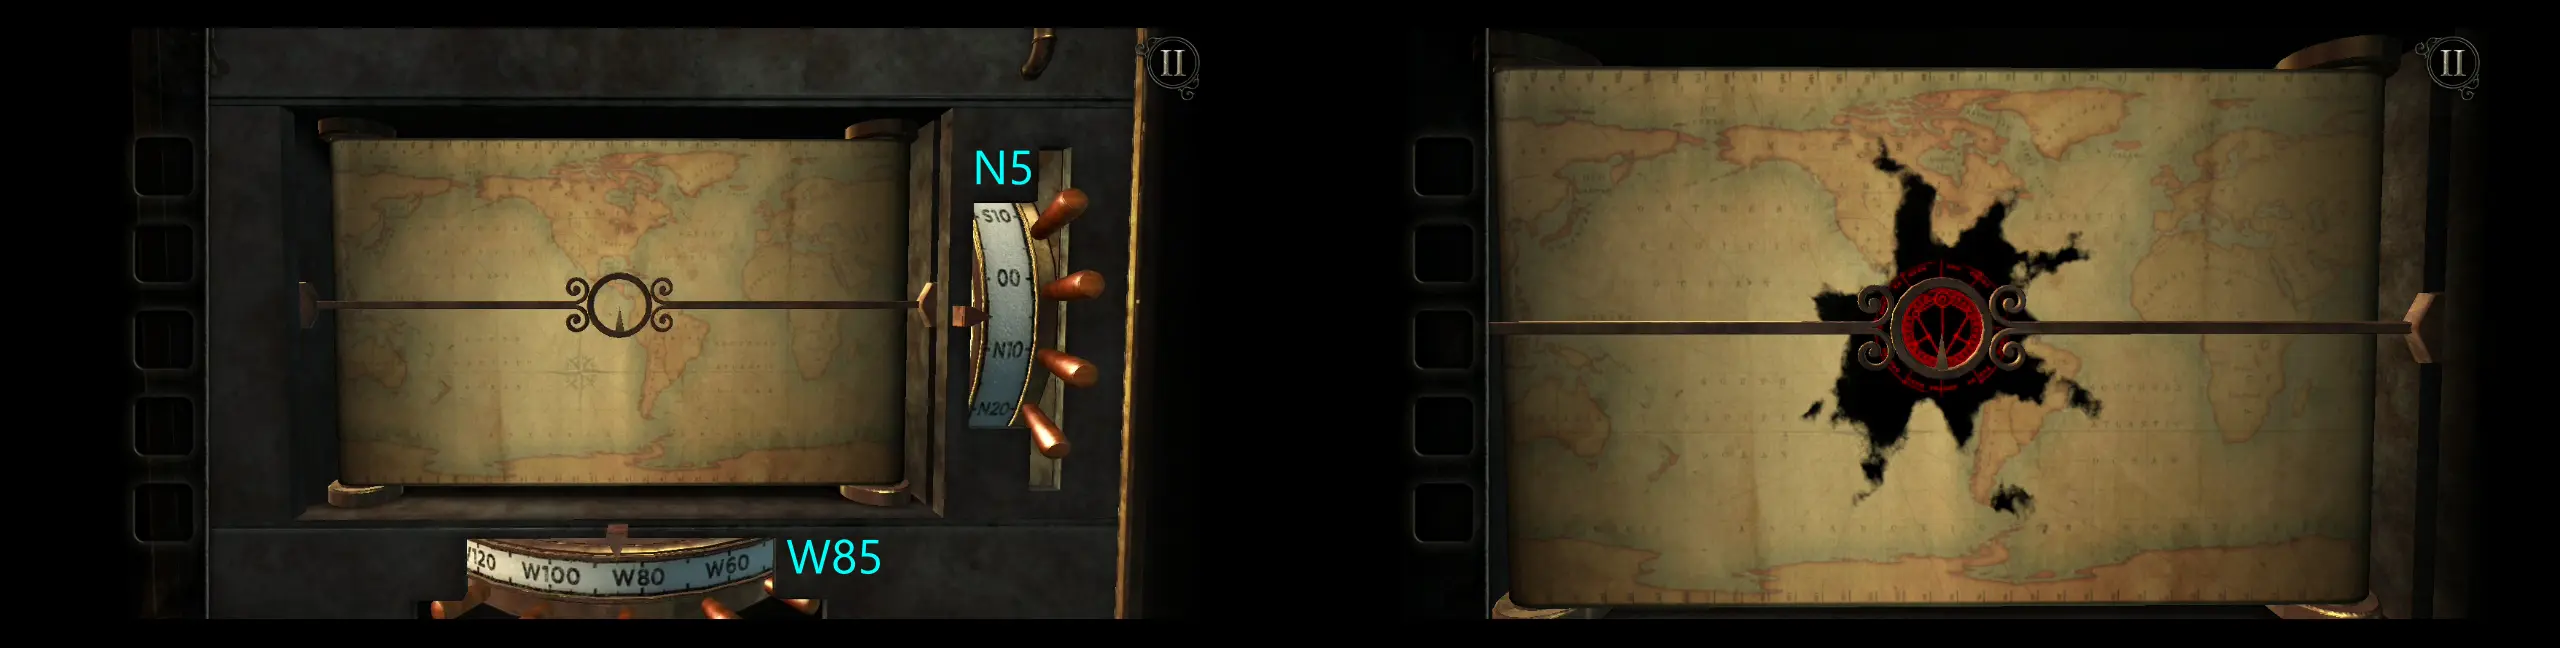
From the letters and numbers printed on the strips of paper, you can already tell that these are coordinates. If you also listen to the voice being played on the speakers, it’s evident that these coordinates refer to a location that can be explored by a submarine. That said, return to the Maritime Room and go back inside the model submarine, particularly inside the bridge. To your right is the map, which has two scrollers. Move the scrollers to reflect the coordinates N5 (right scroller) W85 (bottom scroller). Upon inputting the correct coordinates, a black stain will spread at this location on the map and a red symbol will emerge. This red symbol is the same one you’ve seen on the floor of the submarine.
The window of the viewport will then be covered by a multicolored film. Open your eyepiece to see past this film.
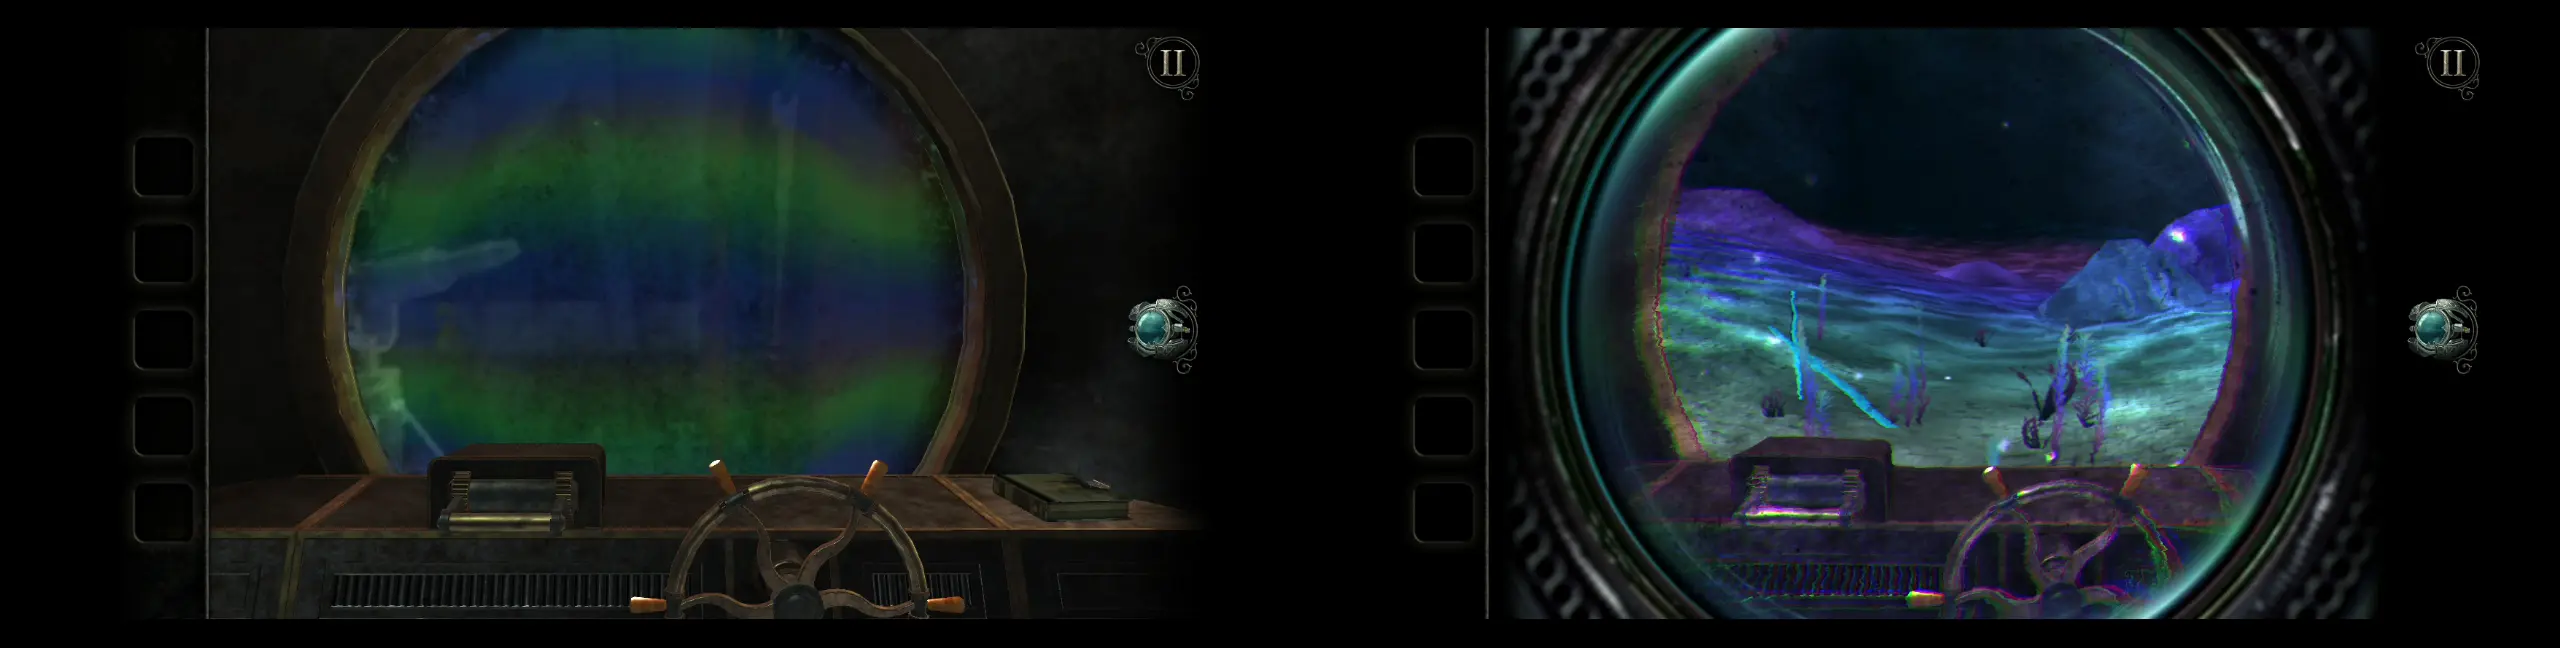
To navigate through this seeming seascape, use the helm to move the submarine left and right, and use the lever next to it to move the submarine up and down. Based on what happened to the map, your objective then is to find the coordinates you’ve been given, which is represented by the red triangular symbol that appeared on the map. The submarine moves slowly and it can be a little hard to navigate, but if you continuously turn to the right, you’ll find yourself seeing some kind of wreckage on the seafloor and right above it is the red symbol. Adjust the submarine’s position until the red symbol glows.
The submarine will automatically move forward, right above the spot of the wreckage. Thereafter, you will be sent out of the bridge and back to where you entered the submarine. The part with the symbol on the submarine’s floor will open, revealing a black watery pool.
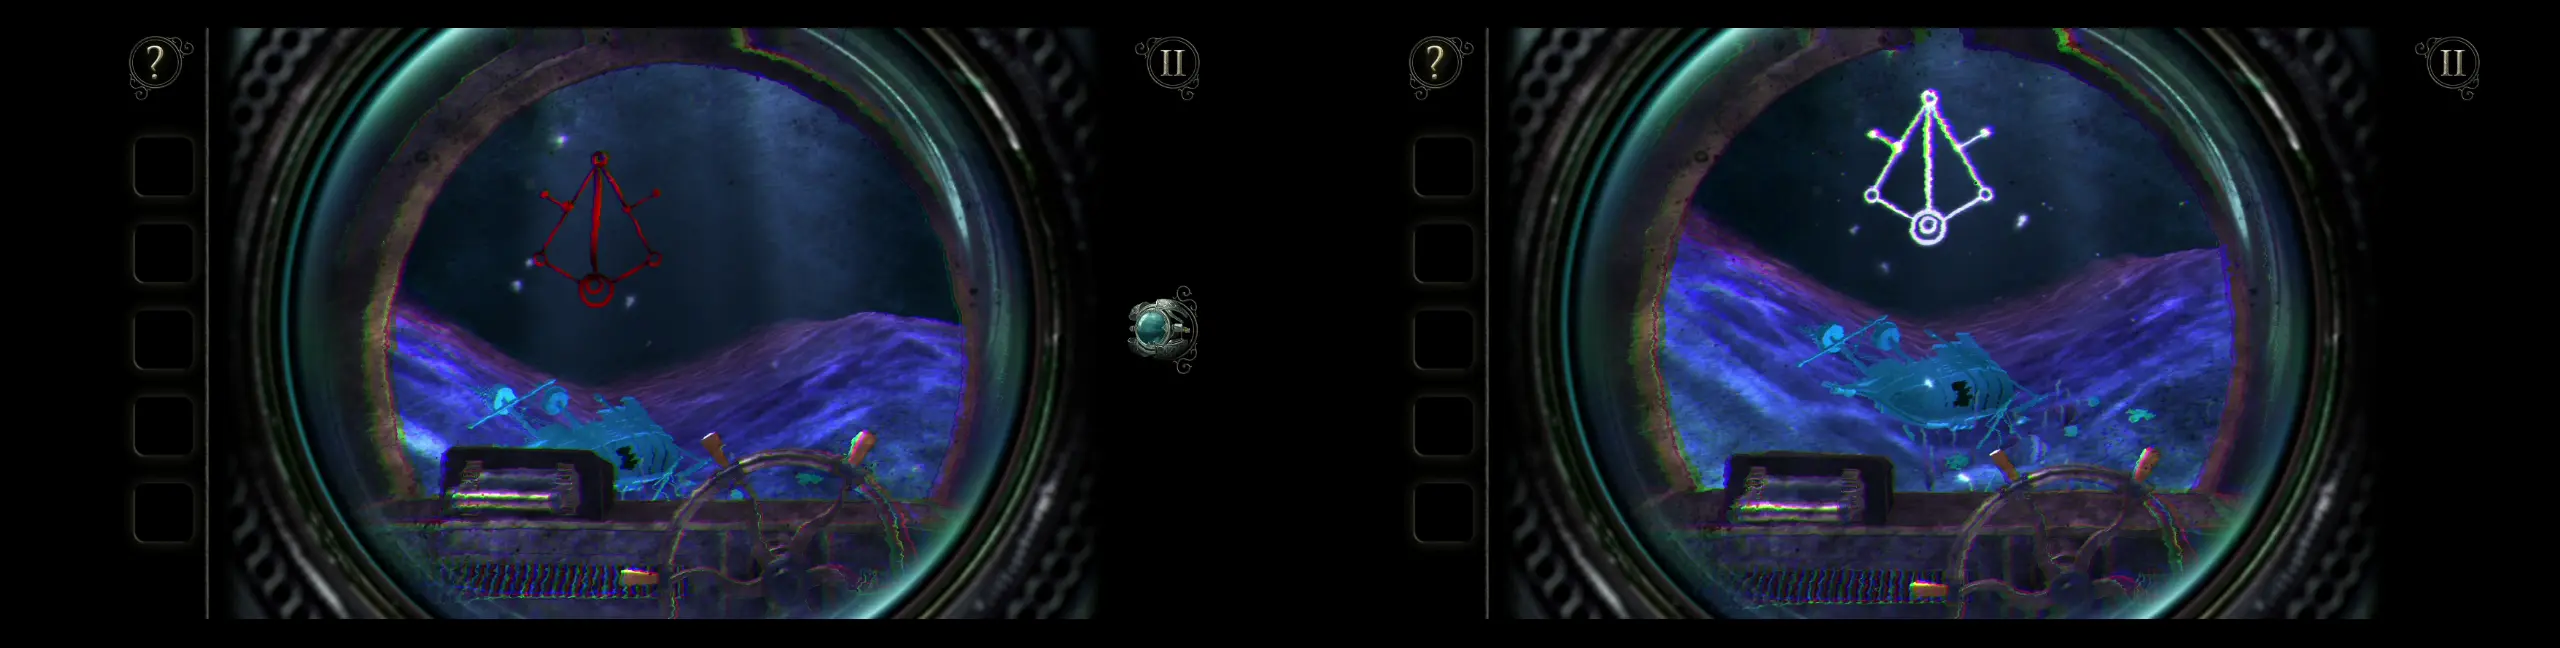
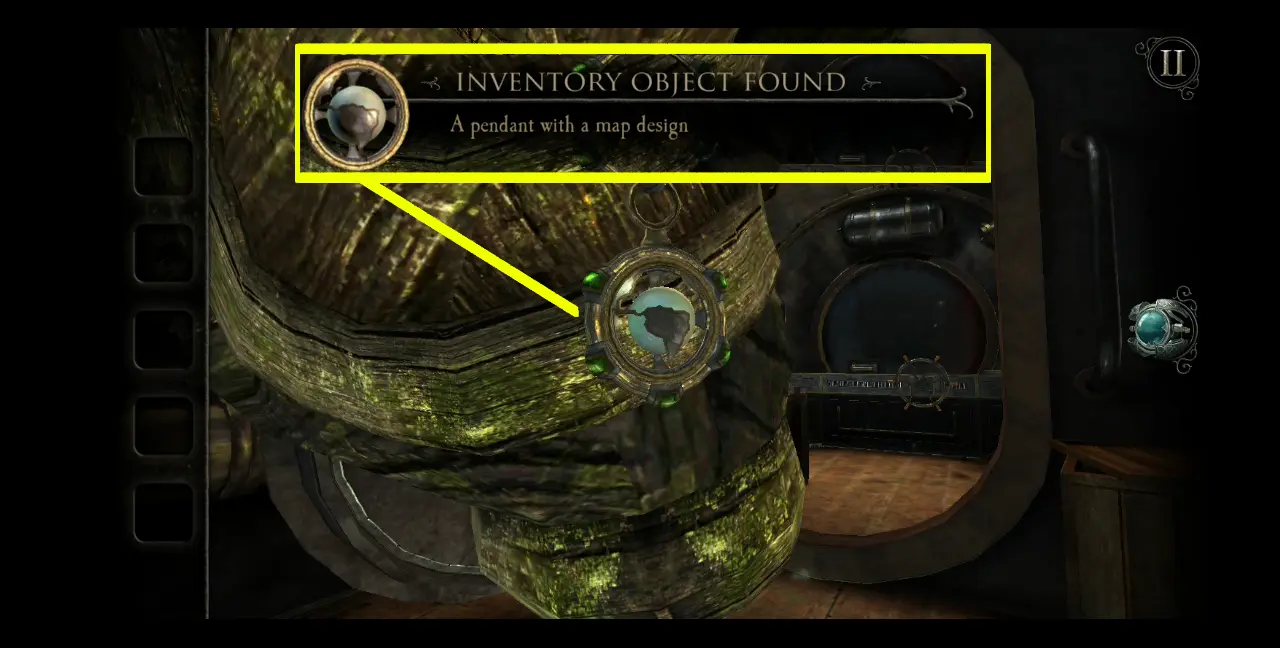
Use the telegraph to move the grapnel down, then back up again. The grapnel will fish out a portion of a statue.

To the right side of a statue is a pendant. Zoom into it to collect this pendant with a map design.
After getting the pendant, you’ll be automatically booted from the submarine and the entrance will be closed, barring you from accessing it any longer.
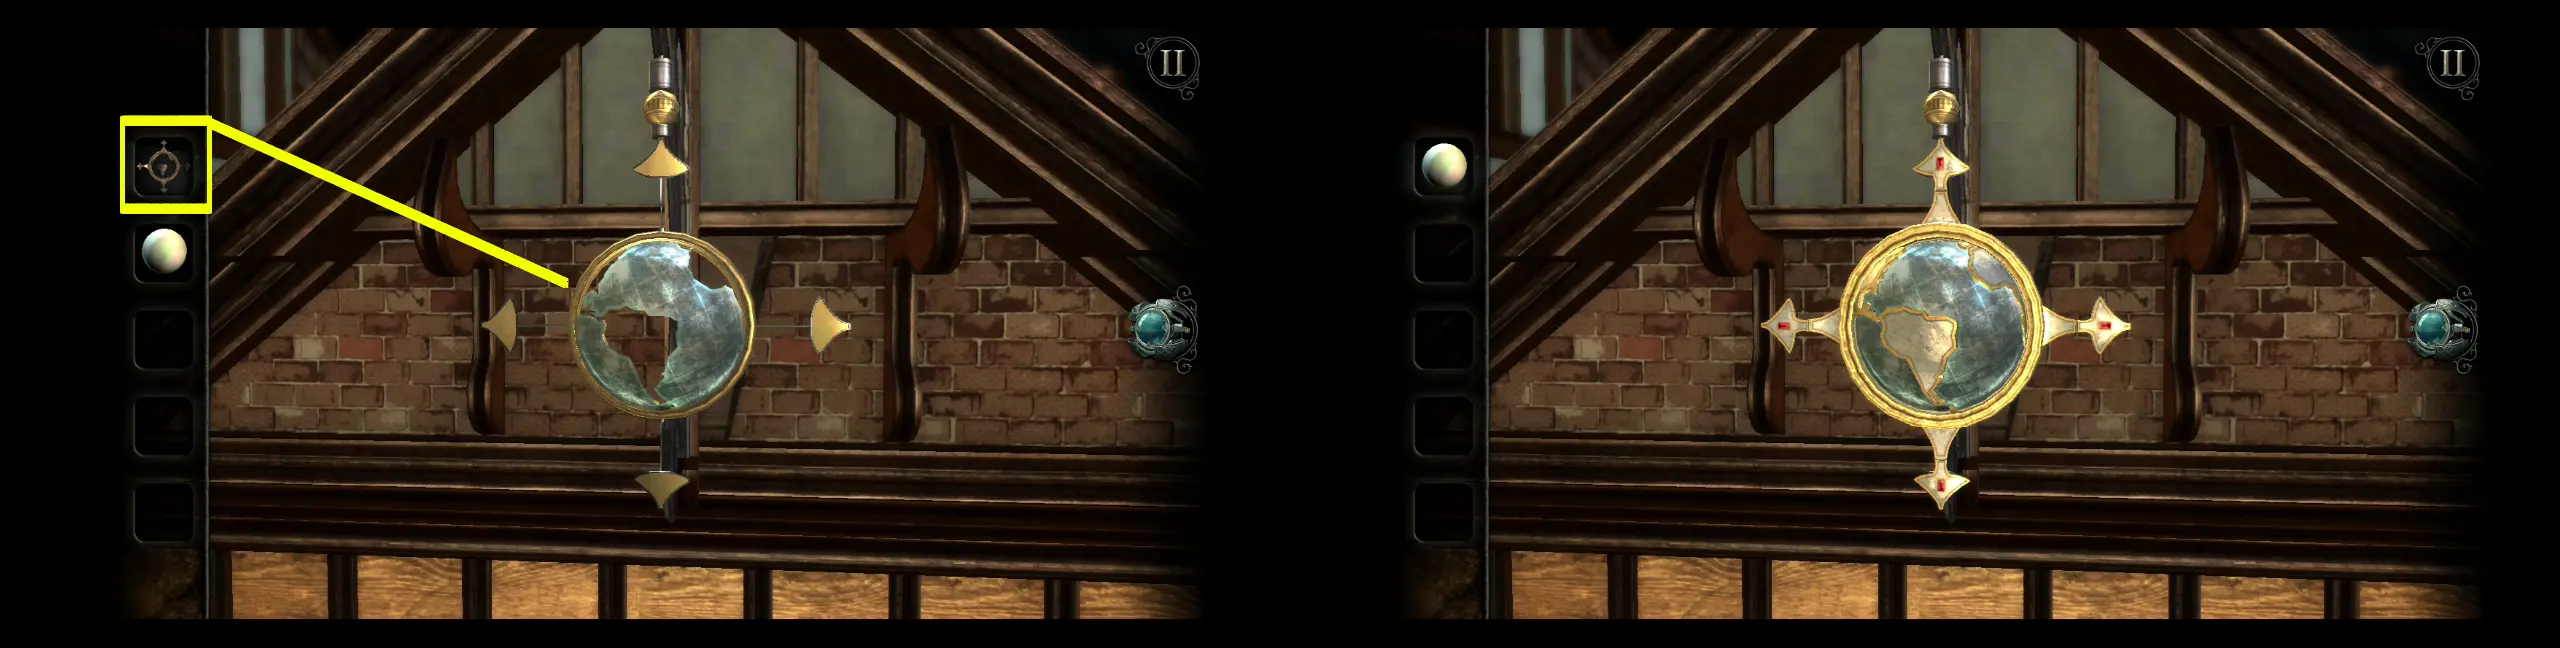
Since you have a new item on hand, view it in your inventory. Upon closer inspection, you’ll see that the center of the pendant is enclosed in a frame. Open up the four “locks” of the frame so you can collect the center of the pendant, which is a pearl.

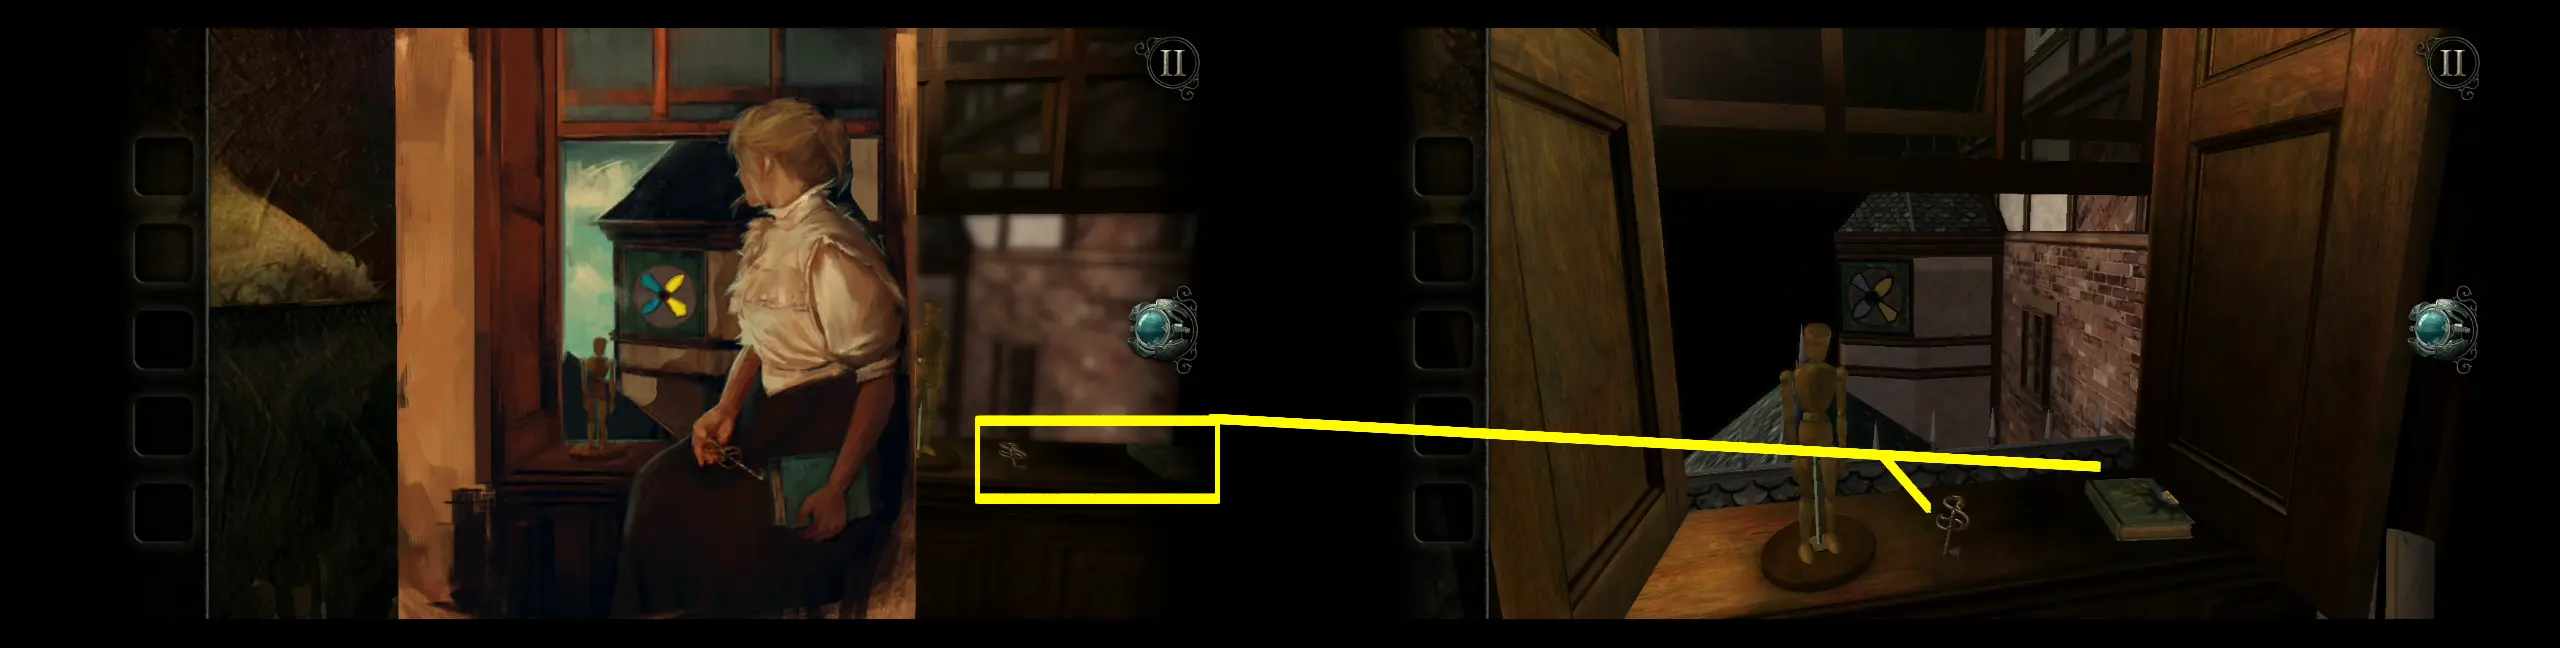
You’ll see that both the frame and the pearl are still in your inventory, which means that they have their own appropriate places in the dollhouse. For the frame, head out to the front of the dollhouse, just right above the Curiosity Room. Hanging here is a similar looking frame with a map design. Place the frame of the pendant here.
From the outside, you’ll see that the table with the globe inside the Curiosity Room will turn upside down and be replaced by the chandelier from the Foyer. Thus, enter the Curiosity Room and approach the chandelier. Zoom into the top and pull the tab up. A moving eye will then be revealed.
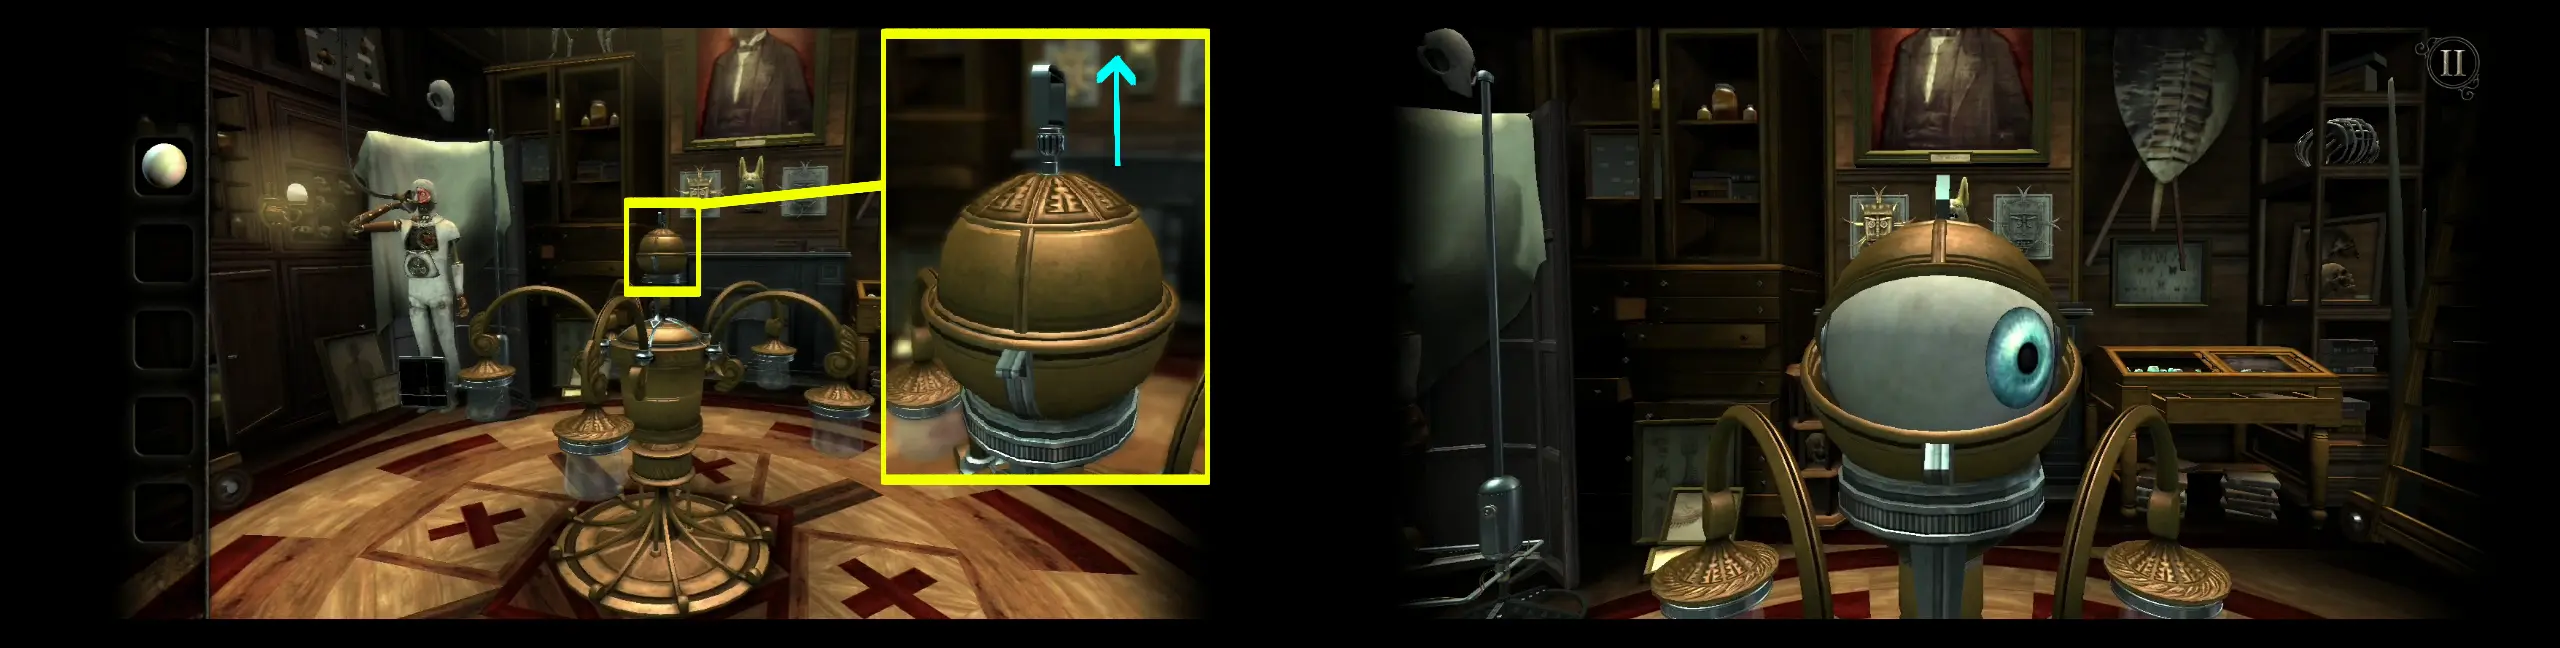
The arms of the chandelier will also turn upright and the bulbs will be painted by a multicolored film. When you open your eyepiece, you’ll see arrows in the same places as the bulbs. One thing you’ll immediately notice with these arrows is that one of them is blue and the rest are yellow.
Basically, the way this puzzle works is that the direction of the blue arrow should correspond to the direction the eye is looking toward. Arrows can be moved through the dial right under them. Once you’ve positioned a blue arrow correctly, zoom into the eye and turn it toward the next arrow (the pointer under it should align with the line connected to the next arrow). This arrow, which is previously yellow, will turn blue. The eye will also look in another direction upon being turned. Reposition the current blue arrow to follow where the eye is looking toward.

Repeat this process until you’ve changed the direction of all the arrows in the chandelier. Once all their positions are correct, the center of the chandelier will rise and reveal a new item: a strange artifact.
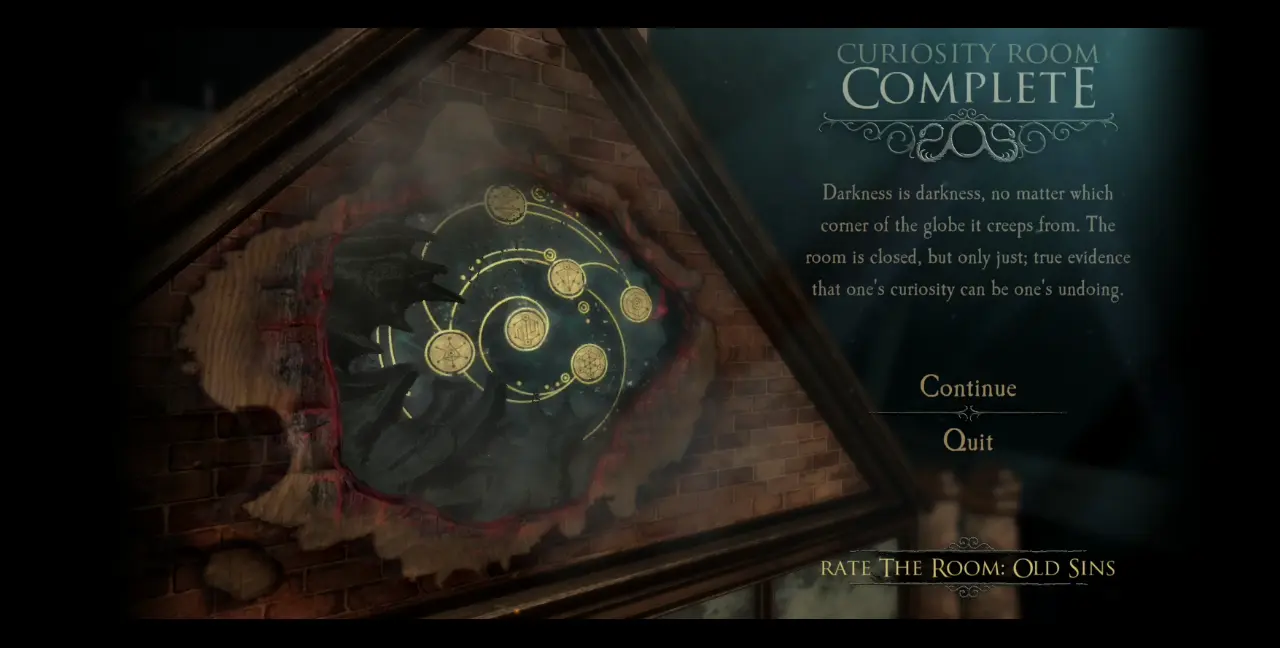
As you’ve seen in previous rooms, collecting a strange artifact basically means that your time exploring that particular area of the dollhouse has come to an end. True enough, familiar black tendrils will emerge from the room, overtaking it with inky darkness. Another symbol on the seal will be covered in black. This completes your exploration of the Curiosity Room.
Kitchen
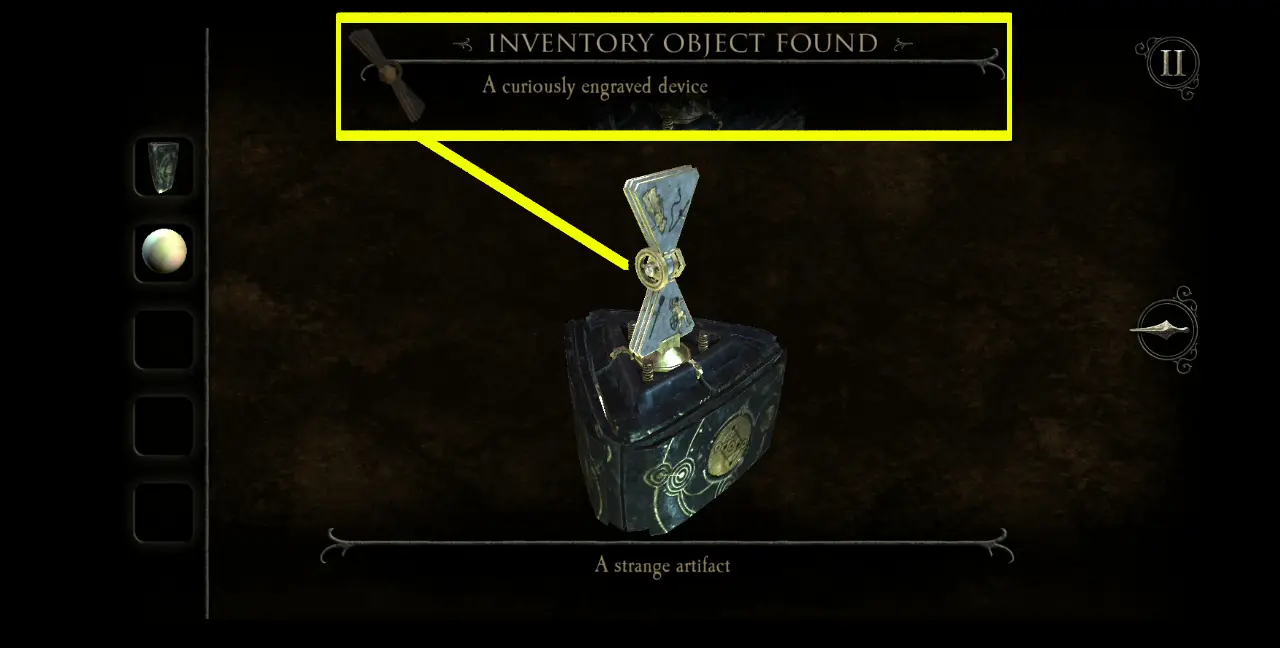
As usual, open the strange artifact in your inventory. Long press on the symbol in the middle until the artifact opens up. Collect the curiously engraved device.
But don’t exit out of your inventory yet. Instead, view the curiously engraved device still in your inventory and turn it to the side where you can see a circular dial. Turn the dial, which will make the device open up and look more like a fan of sorts.
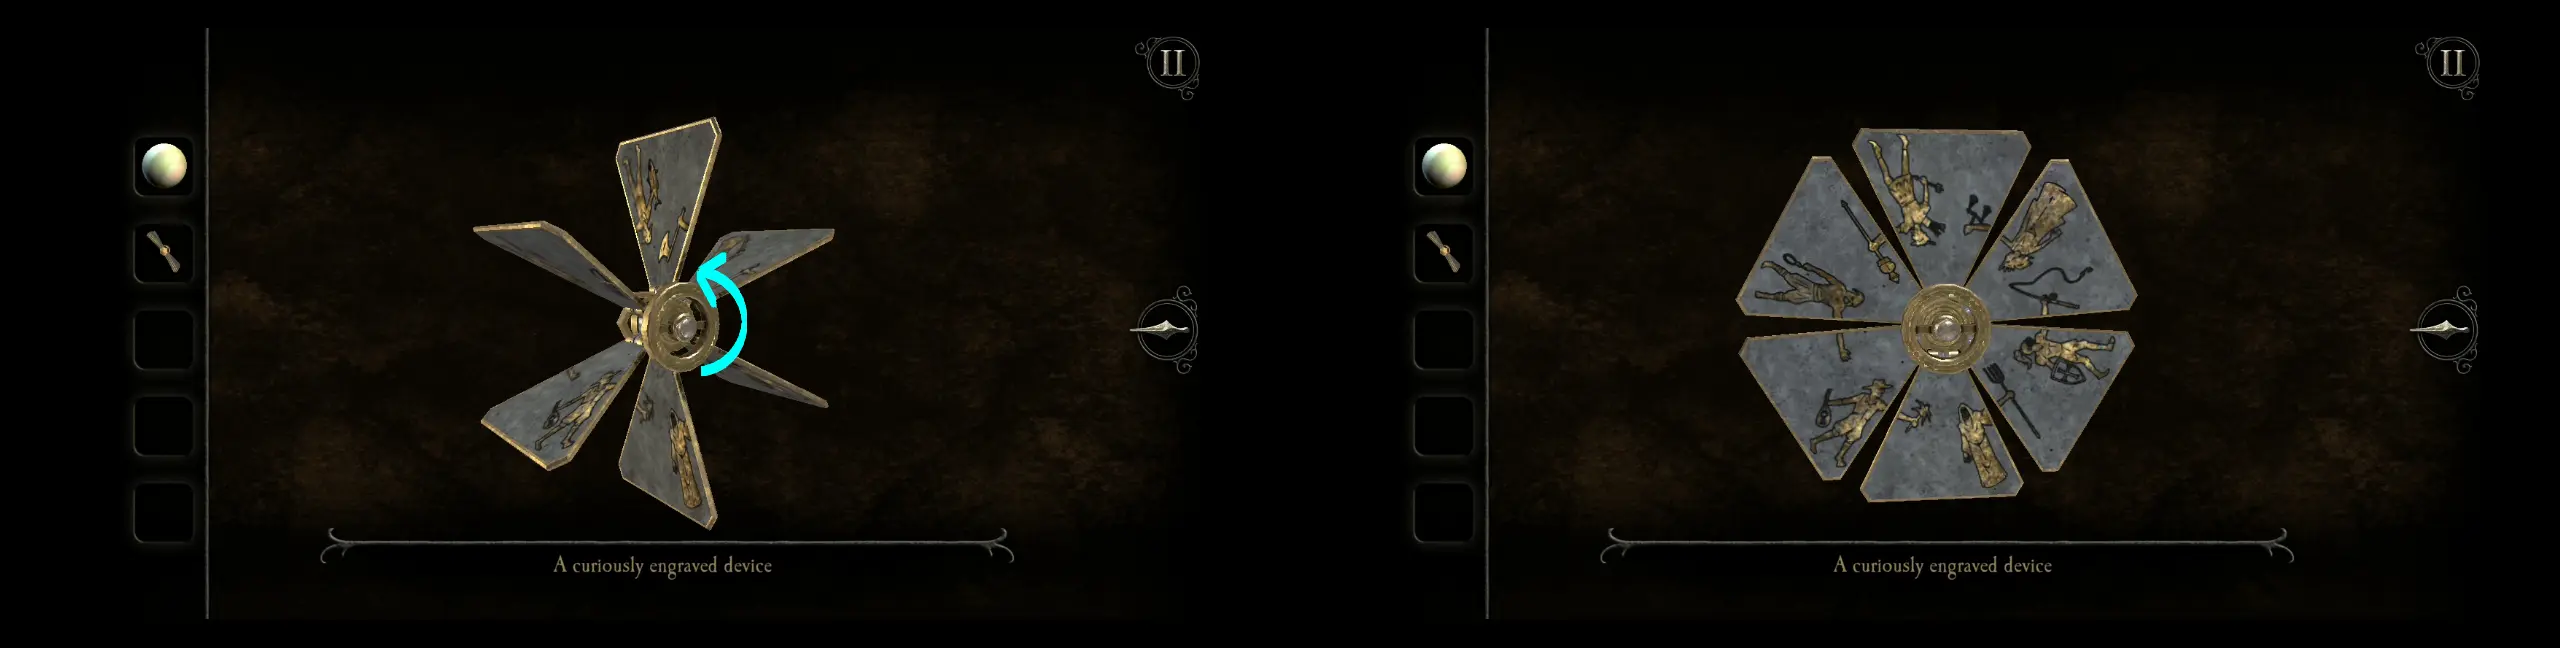
On the surface of these flaps are images connected to each other, but three flaps don’t correspond to the others beside them. All you need to do, however, is turn three flaps, which we have numbered. The left screenshot below already depicts the correct images. Upon turning all these three flaps correctly, the curiously engraved device will fold toward the center a bit, and will become an engraved model roof.
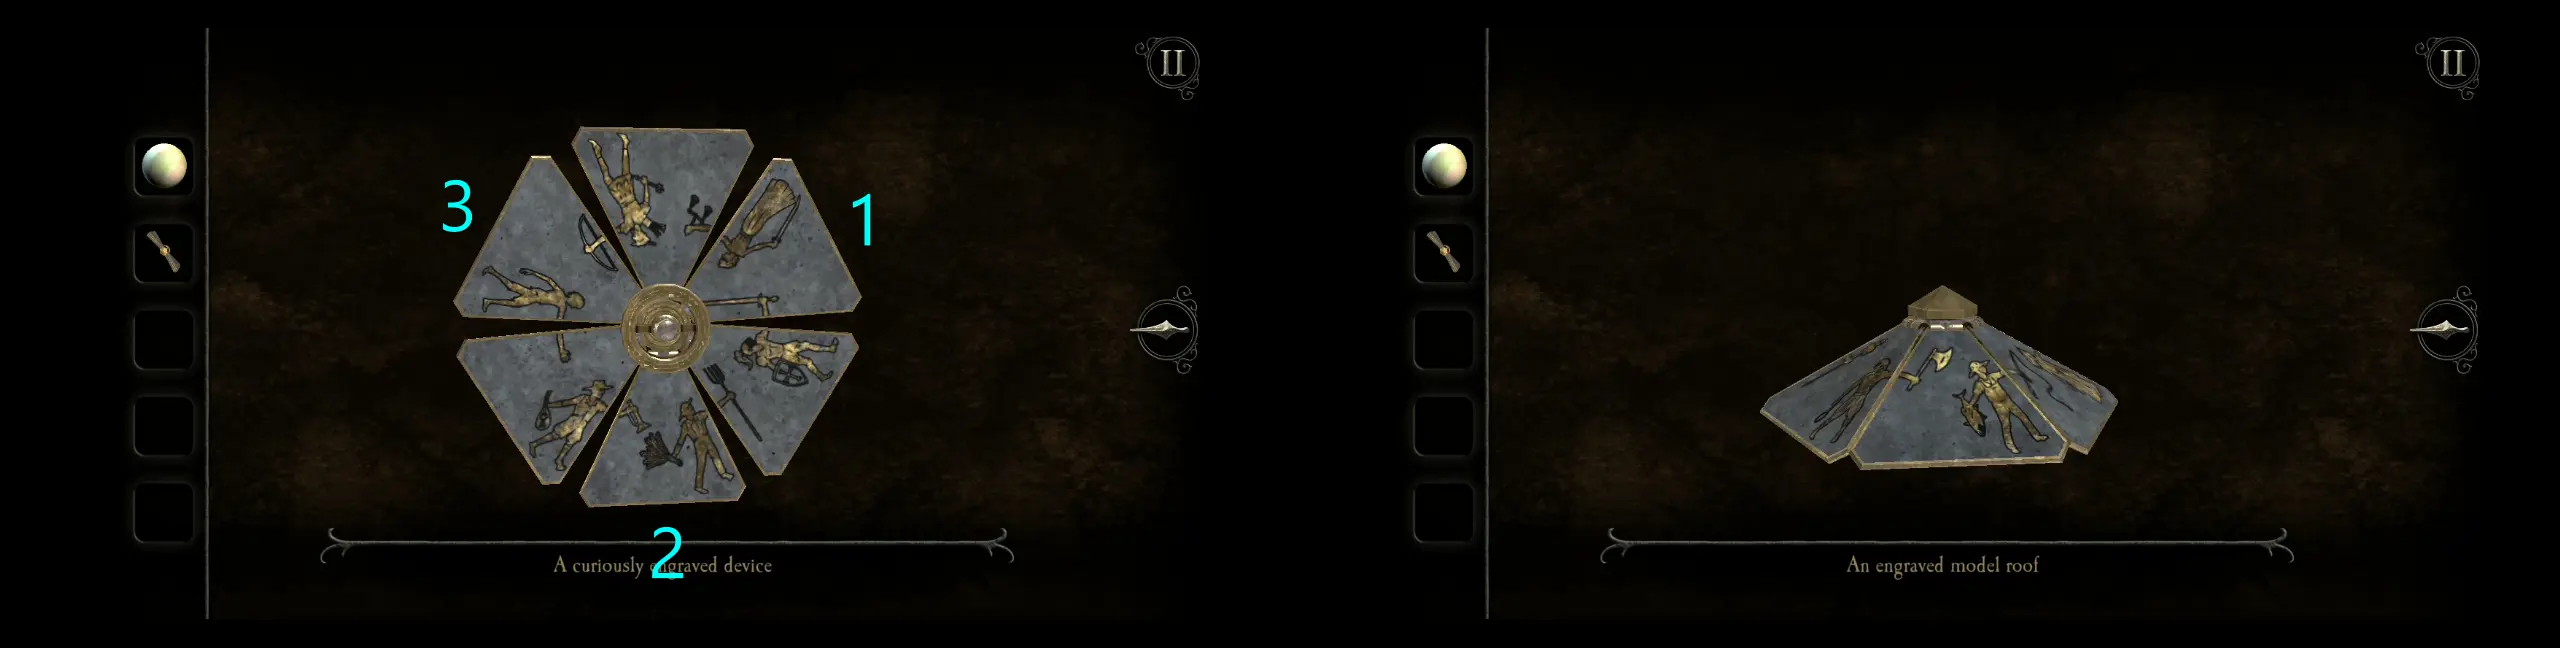
Since the object is a roof, it stands to reason that it fits somewhere outside the dollhouse. True enough, it fits at the back of the dollhouse, on top of what looks like an incomplete gazebo in an open area.
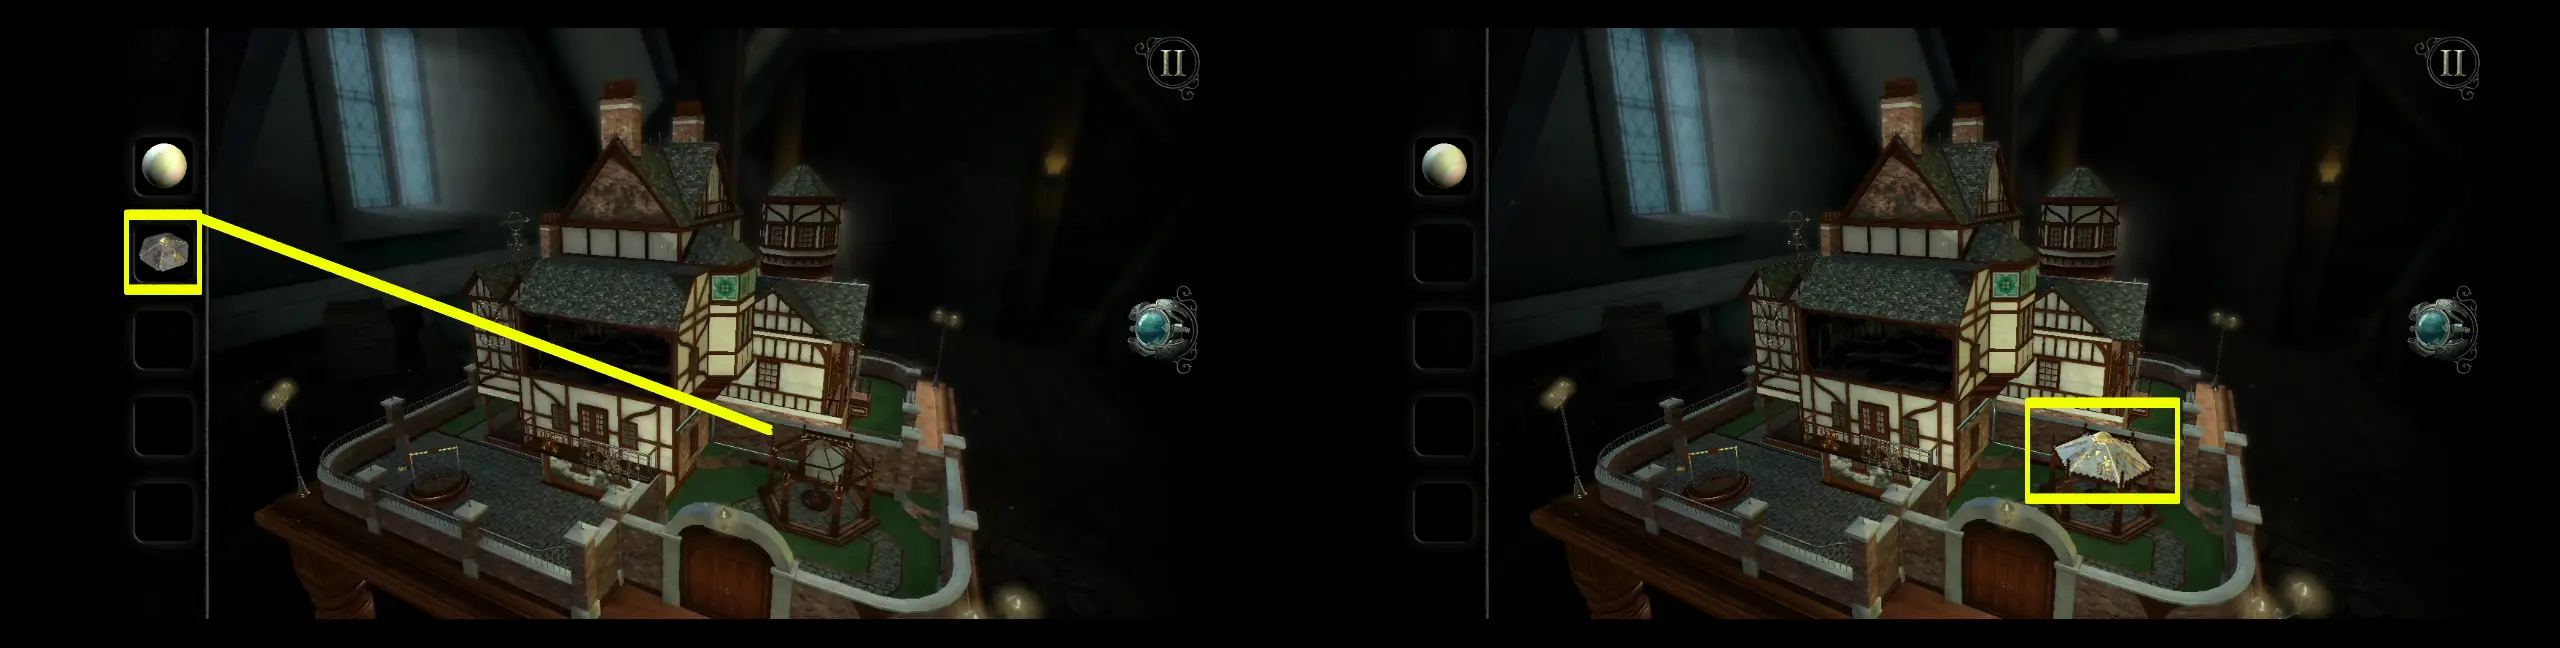
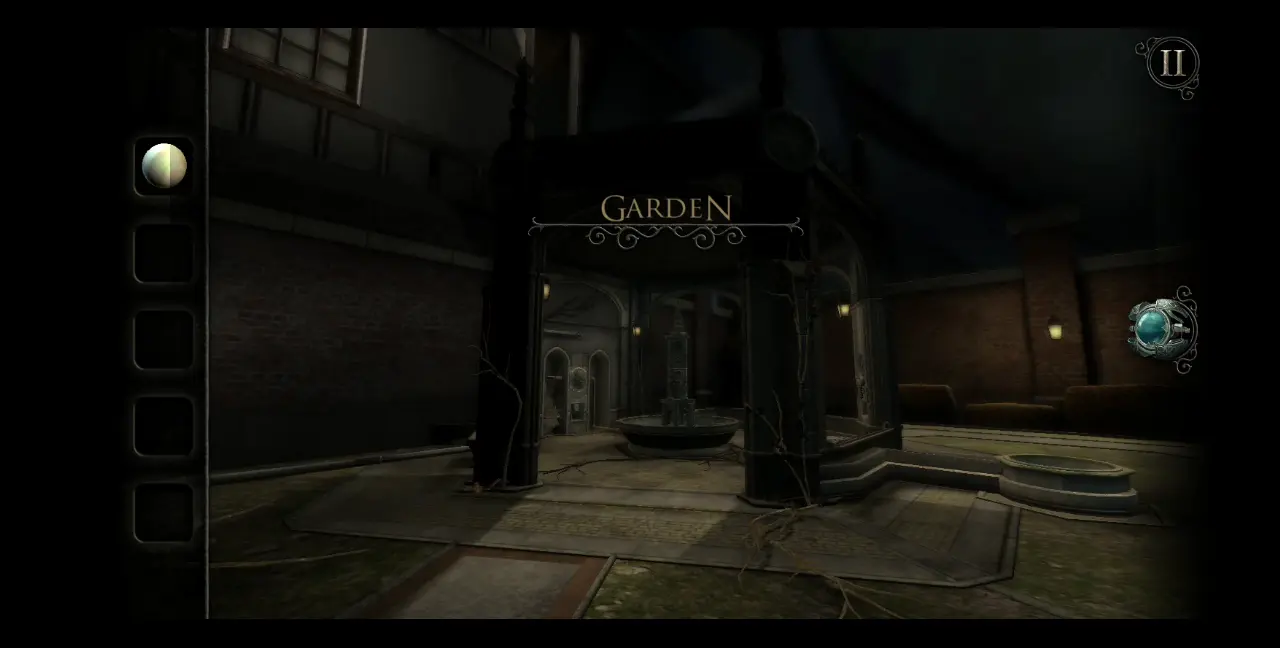
This will open the gate to a new room you can access: the Garden.
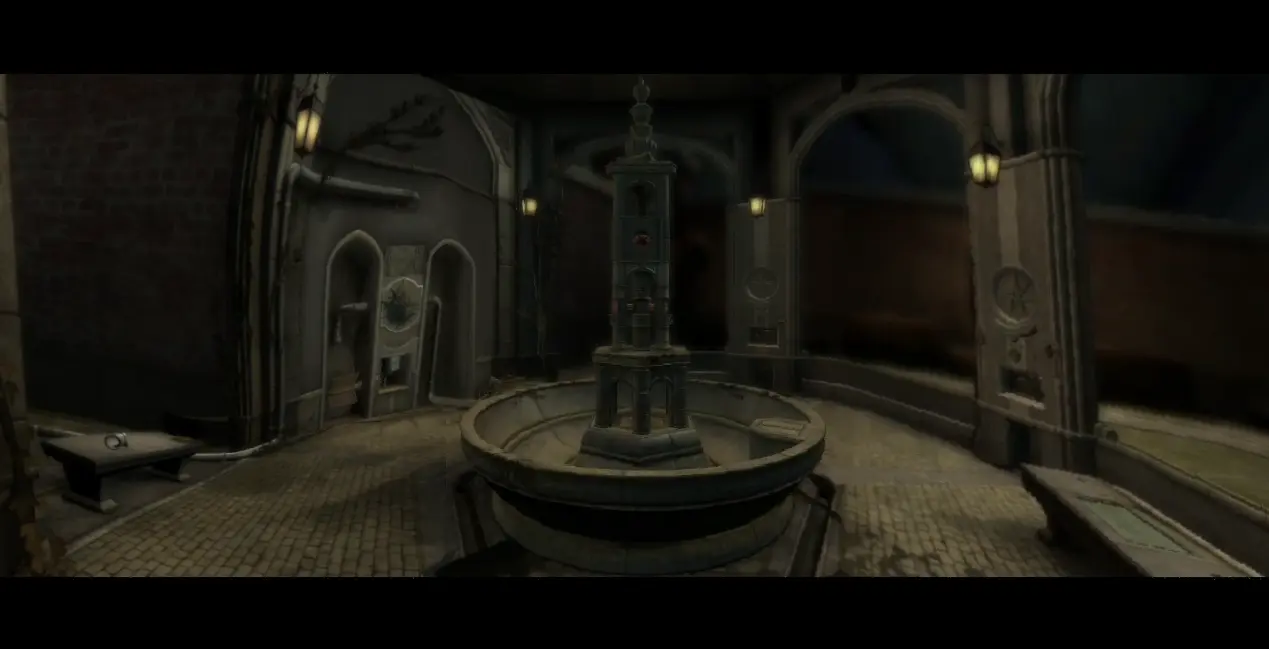
Just to give you an overview of the Garden, we’ve edited this screenshot below to encompass the left, right, and center areas of the Garden, particularly the space under the gazebo. Some of the most notable points from the get-go are the fountain at the center, the bench on the left, the water wheel next to it, another bench to the right, and the pillars of the gazebo bearing different decor.
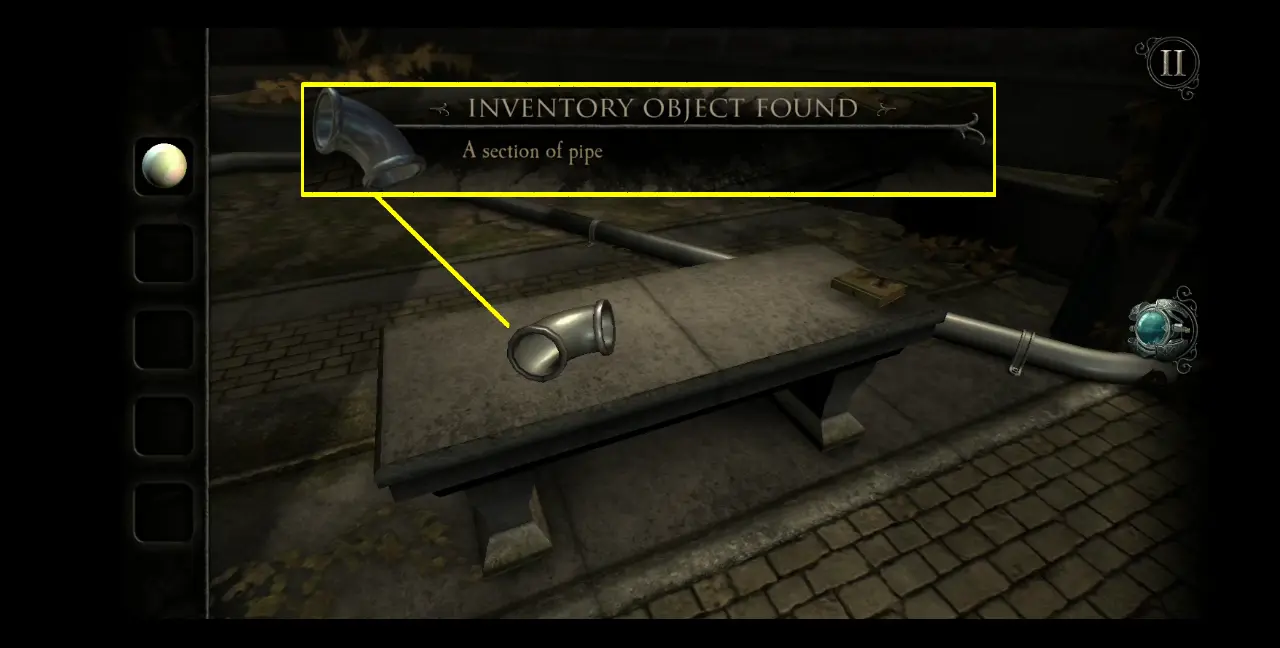
First, head to the bench on the left. Here you will find a section of pipe.
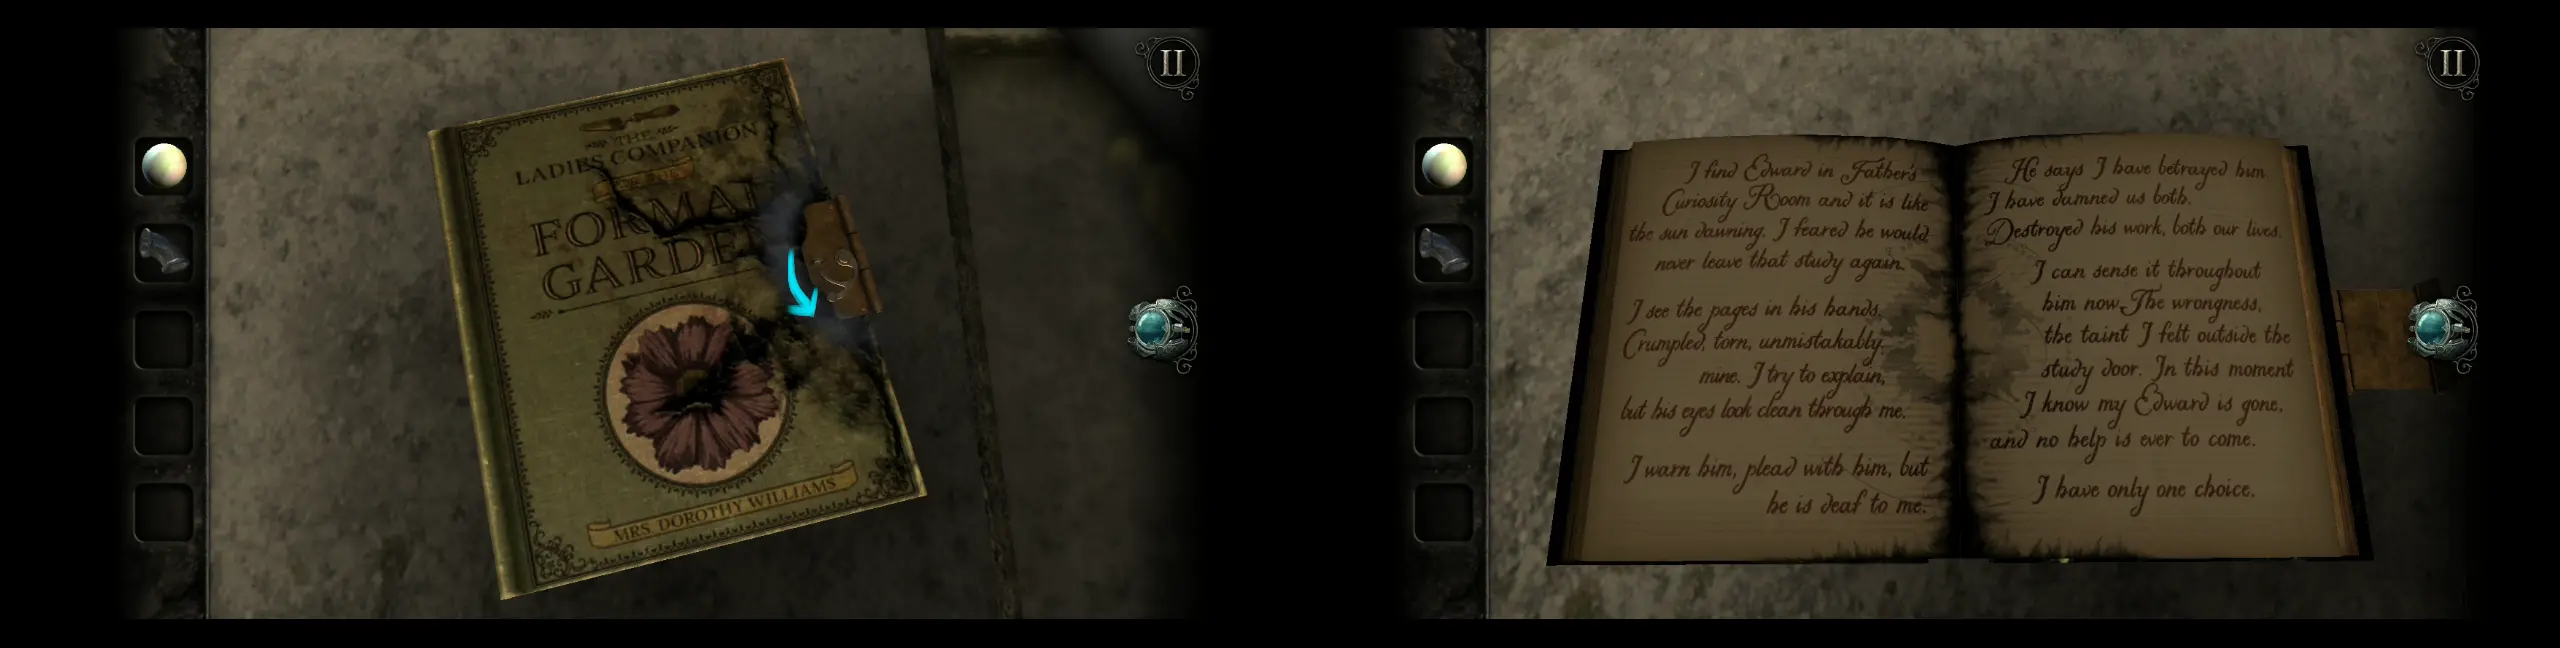
Next to this is a book titled The Ladies Companion for the Formal Garden, which contains another journal entry.
Now, the section of pipe you’ve obtained won’t fit anywhere in the Garden, so leave it for now and head to the Kitchen. You’ll remember that to your left are the pipes connected to the Study. But since the Study is now inaccessible, you need to redirect the flow of water. To do this, turn the valve to the left so that its arrow points to the left. This will cause water to flow right out of the gap between the pipes. This is where you can put the section of pipe you’ve obtained from the Garden.

Speaking of the Garden, let’s return there. One thing you’ll notice is that the water wheel has begun turning. From inference, we can deduce that the water we’ve redirected from the Kitchen is flowing through this water wheel. Connected to this water wheel is a rotating device on the smaller slot to the right. As the device turns, you’ll see that there’s an item at its center. You can collect the metal dial by clicking on it once you can see it from the gap.
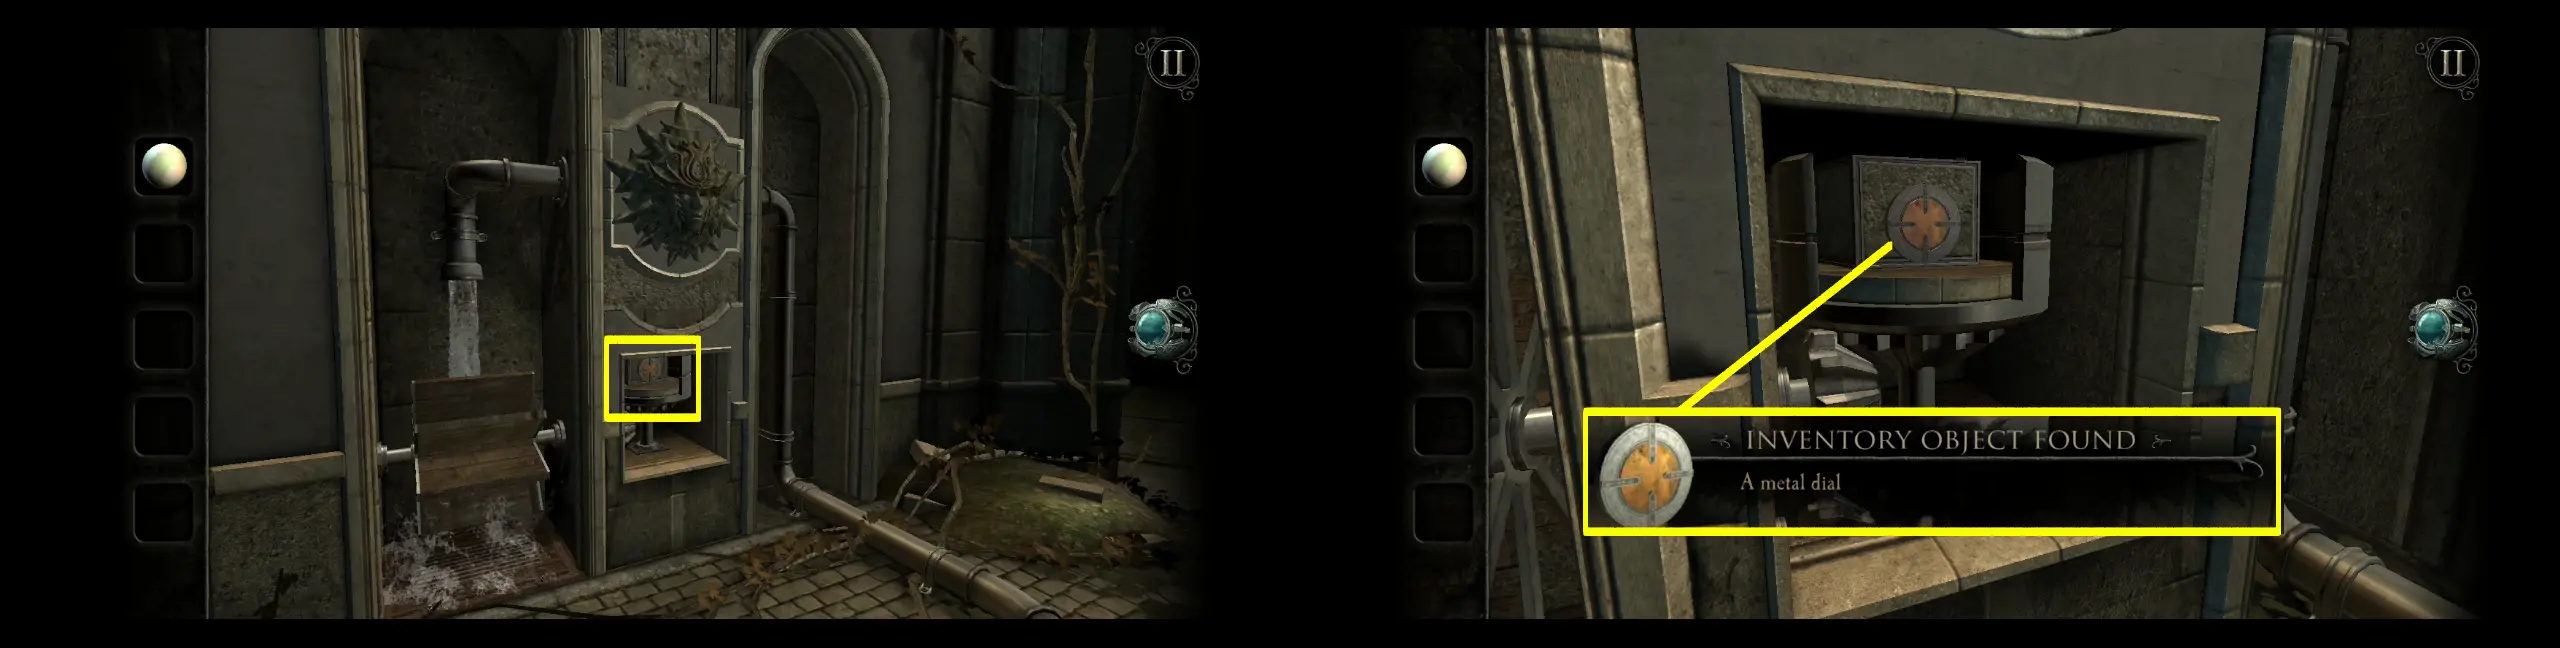
If you’ve done some cursory observation of the fountain, you’ll see that this metal dial fits right into a slot on one of the three pillars of the fountain.
Beneath all three metal dials are two halves of a gargoyle head. These halves can be slid up the lines on the metal dial. Each half can fit on one line. These metal dials can also be rotated. Basically, the goal of this puzzle is to complete all the gargoyle heads right side up on each metal dial.
Now this puzzle is a bit tricky to explain, but the basics are illustrated in the screenshots below: First, slide up the top piece, which is the gargoyle’s forehead and eyes. Then, turn the dial so that this piece will become upright. Slide up the bottom piece, which is the gargoyle’s jaw. This will then give you the complete gargoyle head.

However, this solution only works for two of the three dials. These two dials should have the same gargoyle head pieces in the same positions, and you can alternate between each dial when turning them or sliding up a piece.
The third dial is different. From the get-go, you will notice that the pieces of the third dial are halved vertically instead of horizontally. Remember that to solve the puzzle, all gargoyle heads must be identical to each other when placed on the dials.
The good news is that you can use the other dial right across it as a sort of reference. Before placing any of the gargoyle heads on the current dial, turn it first so that the other dials will follow. The gargoyle on the opposite dial should be turned to its side and not upright, as shown in the image below.
Return to the current dial then slide up the first piece. Turn the dial 180 degrees and slide up the second piece. Turn the dial for the last time at 90 degrees, thus making the gargoyle head look upright. The rest of the dials should follow.

With the gargoyle heads all in place and turned upright, the top of the fountain will open to reveal another puzzle. In this puzzle, you have three movable pieces as illustrated in the image below:
- A phase of the moon. Two other moon phases can be found on the other pillars, namely a half moon and a quarter moon. This one is the full moon. These can be moved anywhere along the ridges or paths on the gray stony areas of this puzzle.
- Movable stone section with a path. This moves according to how you move the planet in the middle of the puzzle.
- This planet in the middle of the puzzle controls how the stone sections on the red pillars move. It can make the stone sections go up or down.
Let’s set the quarter moon on the proper slot first. Here’s how to do it:
- Move the quarter moon all the way to the right, following the path at the top of the pillars.
- Turn to the area where you can see the half moon. Move it down the stone section, thus revealing that the slot behind it is for the full moon.
- Go back to the area with the quarter moon. The full moon is in the way of the slot so move the stony section up so that the full moon can slide down.
- Slide the quarter moon to the right in its correct slot.

Next is the full moon:
- Since the full moon is already situated on the stone section, bring this stone section down the pillar.
- Once the full moon is at the bottom, slide it all the way to the right, following the path.
- Turn to that pillar, then slide the full moon upward, placing it on one of the stone sections.
- Move the stone section up using the planet.
- Slide the full moon in its proper slot.

Last but not least is the half moon:
- Picking up where you left off from the full moon slot, the half moon should be on the stone section. Move the stone section down the pillar using the planet.
- Slide the half moon down the path then all the way to the right.
- Move the stone section down so you can slide the half moon up and in the middle of the stone section.
- Move the stone section up using the planet.
- Slide up the half moon in its correct slot.

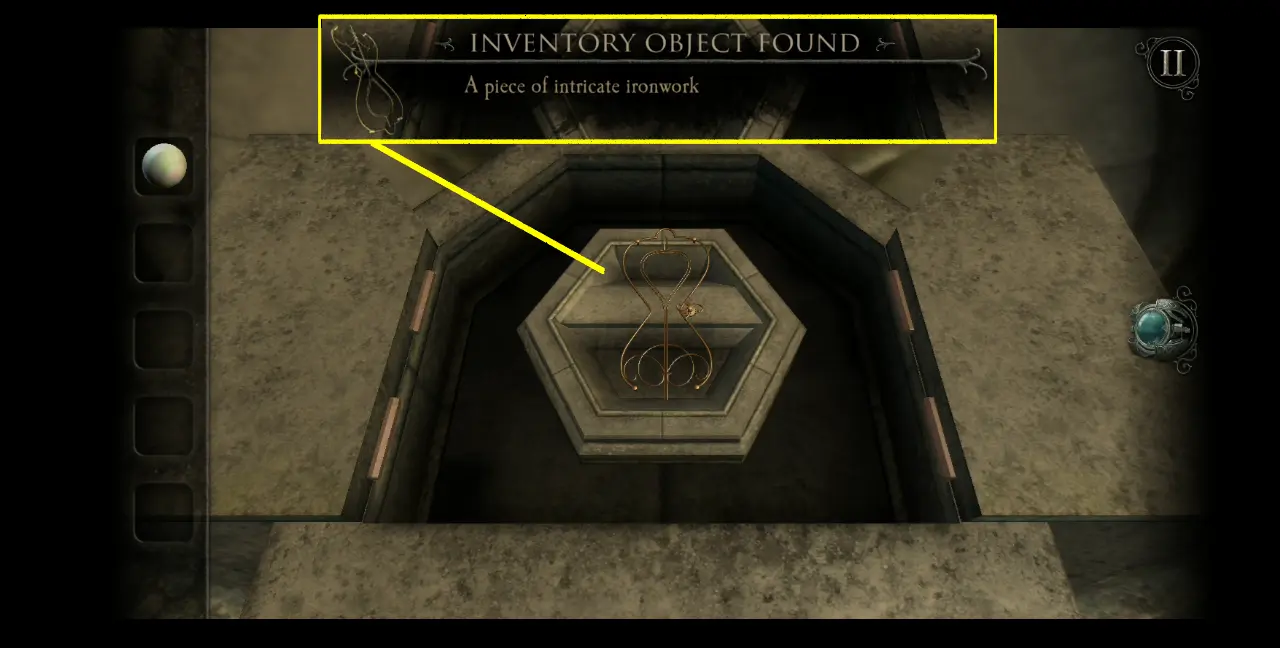
Once all the phases of the moon are in their correct positions, a compartment from the base of the fountain will open where you can collect a piece of intricate ironwork.
This compartment will close again once you’ve collected the item. For now, leave the Garden and head to the exterior of the dollhouse, particularly the area above the Kitchen. Zoom into the area indicated in the first image below. This is where you should place the piece of intricate ironwork.

This will cause this portion of the window to fall right into the Kitchen.

Enter the Kitchen and look to your right. You’ll see the window with the intricate piece of ironwork. Zoom into the center and turn the S-shaped knob. This will loosen the lock on the dome and make it fall to the bottom. Once it’s at the bottom, turn the S-shaped knob again until the dome cover has been lifted.

Collect the strange artifact.
This concludes your exploration of the Kitchen. Another symbol from the seal will be covered in black ink, leaving five more symbols before the entire seal at the front of the house is covered in black ink.
Maritime Room
Next up is completing the Maritime Room. Let’s start by opening the strange artifact in your inventory, which is first labeled as a mechanical wooden box.
But this isn’t the item’s actual form. View the mechanical wooden box still in your inventory. Turn it to the side where you can see a rotating handle. Turn the handle to open up the box. Two thin handles will emerge. Pull these up.

On the opposite side, two button-like protrusions will pop out. On both sections of the item, you’ll see that the left section has arrows pointing down while the right has arrows pointing up. Move each section following the direction of their respective arrows. This will give you the item’s completed form, which is a model staircase.
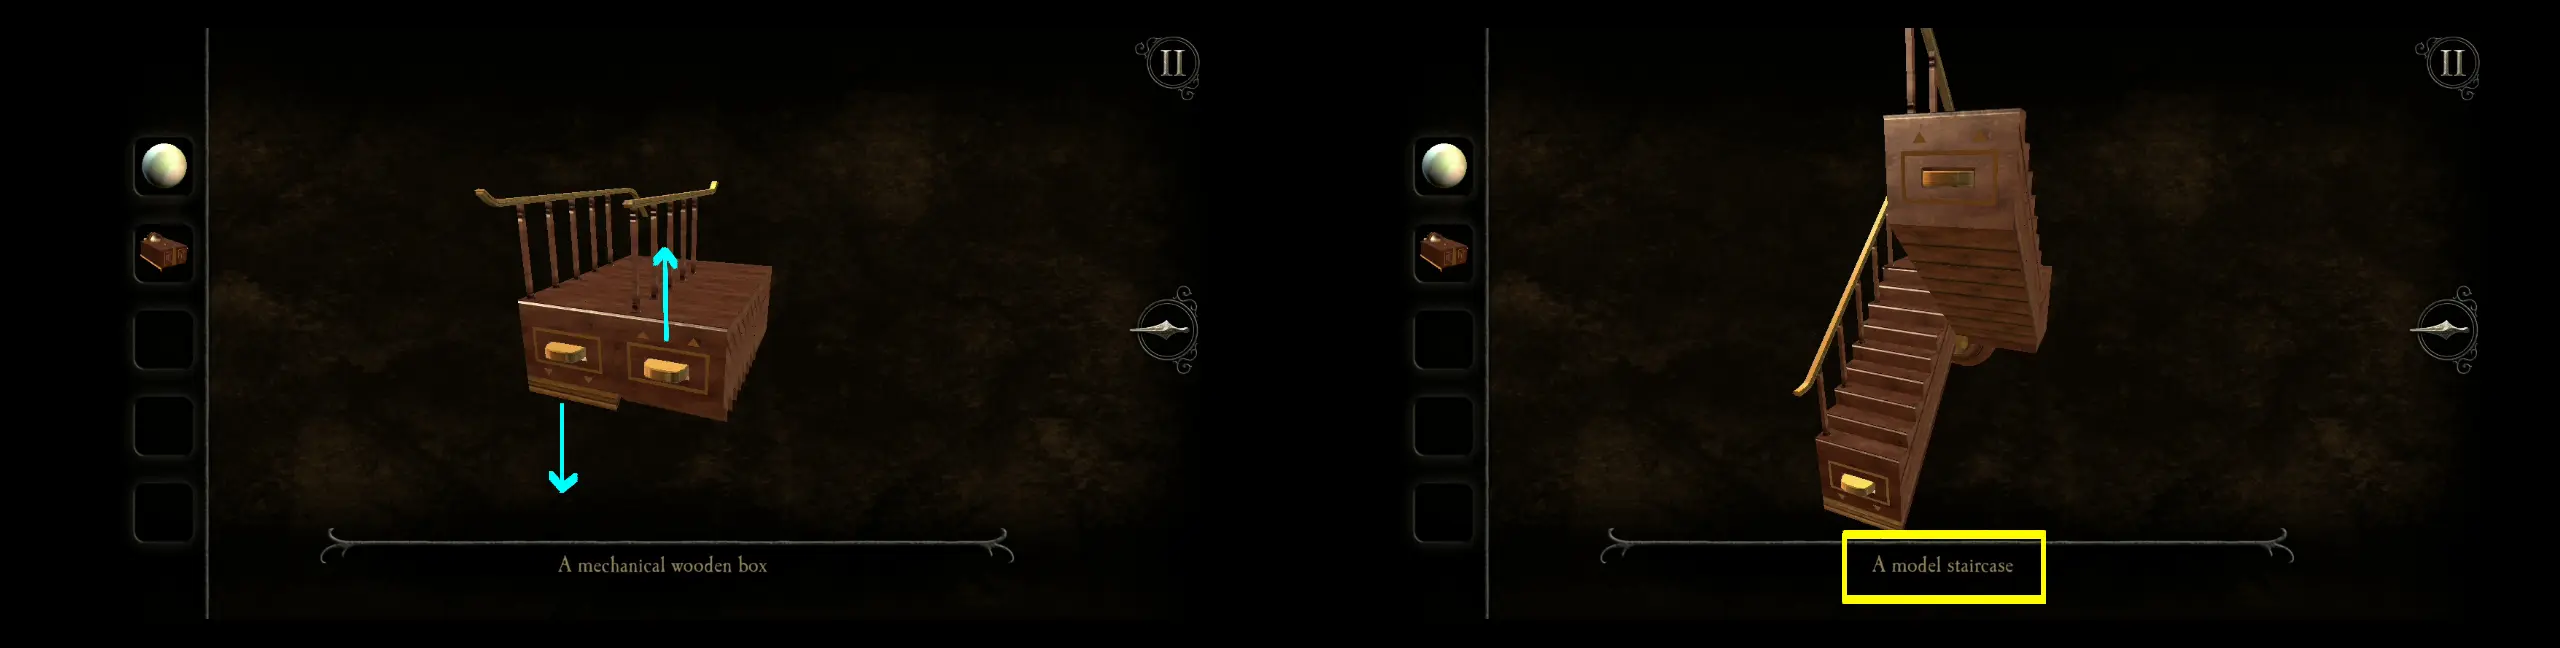
If you’re viewing the dollhouse from the front gate, head to the left side. Right beside the Garden is a space where you can place the model staircase.

This gives you access to another room: the Japanese Gallery.
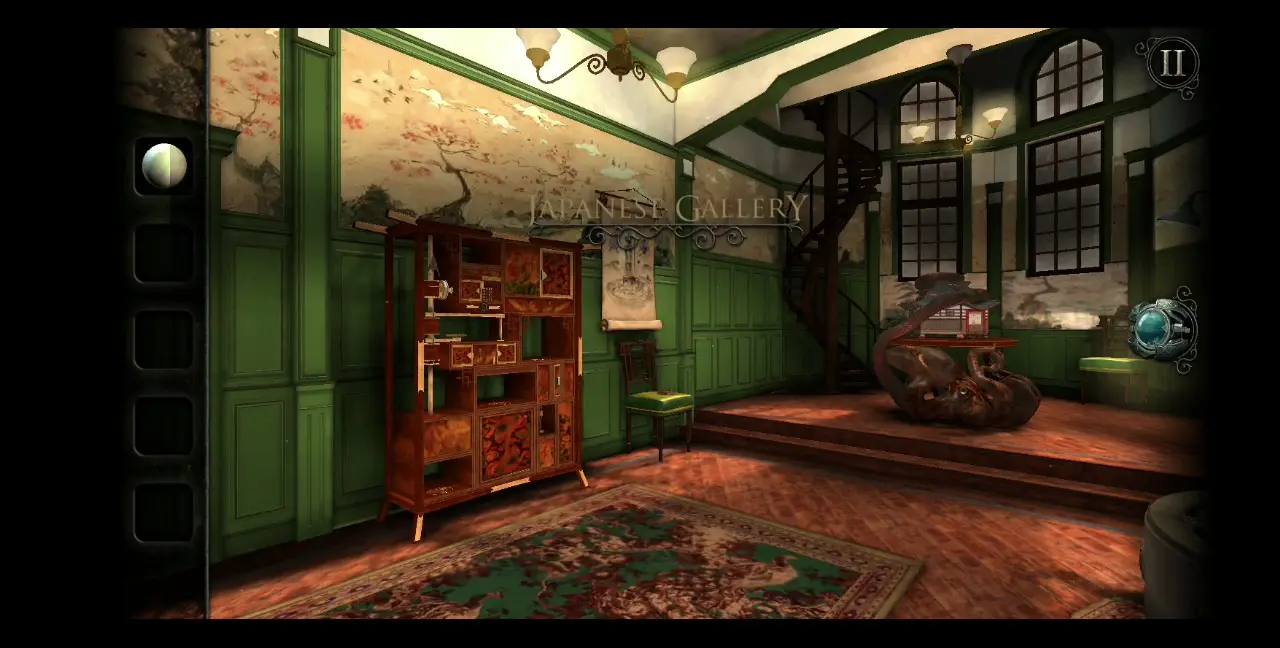
There are quite a number of interesting items and puzzles in this room. First, turn your attention to the green chair beside the odd-looking closet. Here you’ll find another book titled History of Japan, which will contain another journal entry.

Once you’ve finished reading, turn to the complex-looking closet beside the green chair. The next sequence will be focusing mostly on one drawer, which is highlighted in the first image below. Here are the next steps for this drawer:
- Slide the door on the left to open the drawer.
- Slide the button to the right. This will cause an item that looks like a popsicle stick in between the two drawer doors to fall.
- Close the door to the left and open the one on the right.
- Collect the carved stone sphere.
- Turn the wooden screw at the top of the drawer. This will open up the middle rotating “lock” keeping the harpoon in place.
- Turn the other wooden screw on top of the left drawer door. This will open up the bottom rotating lock keeping the harpoon in place.

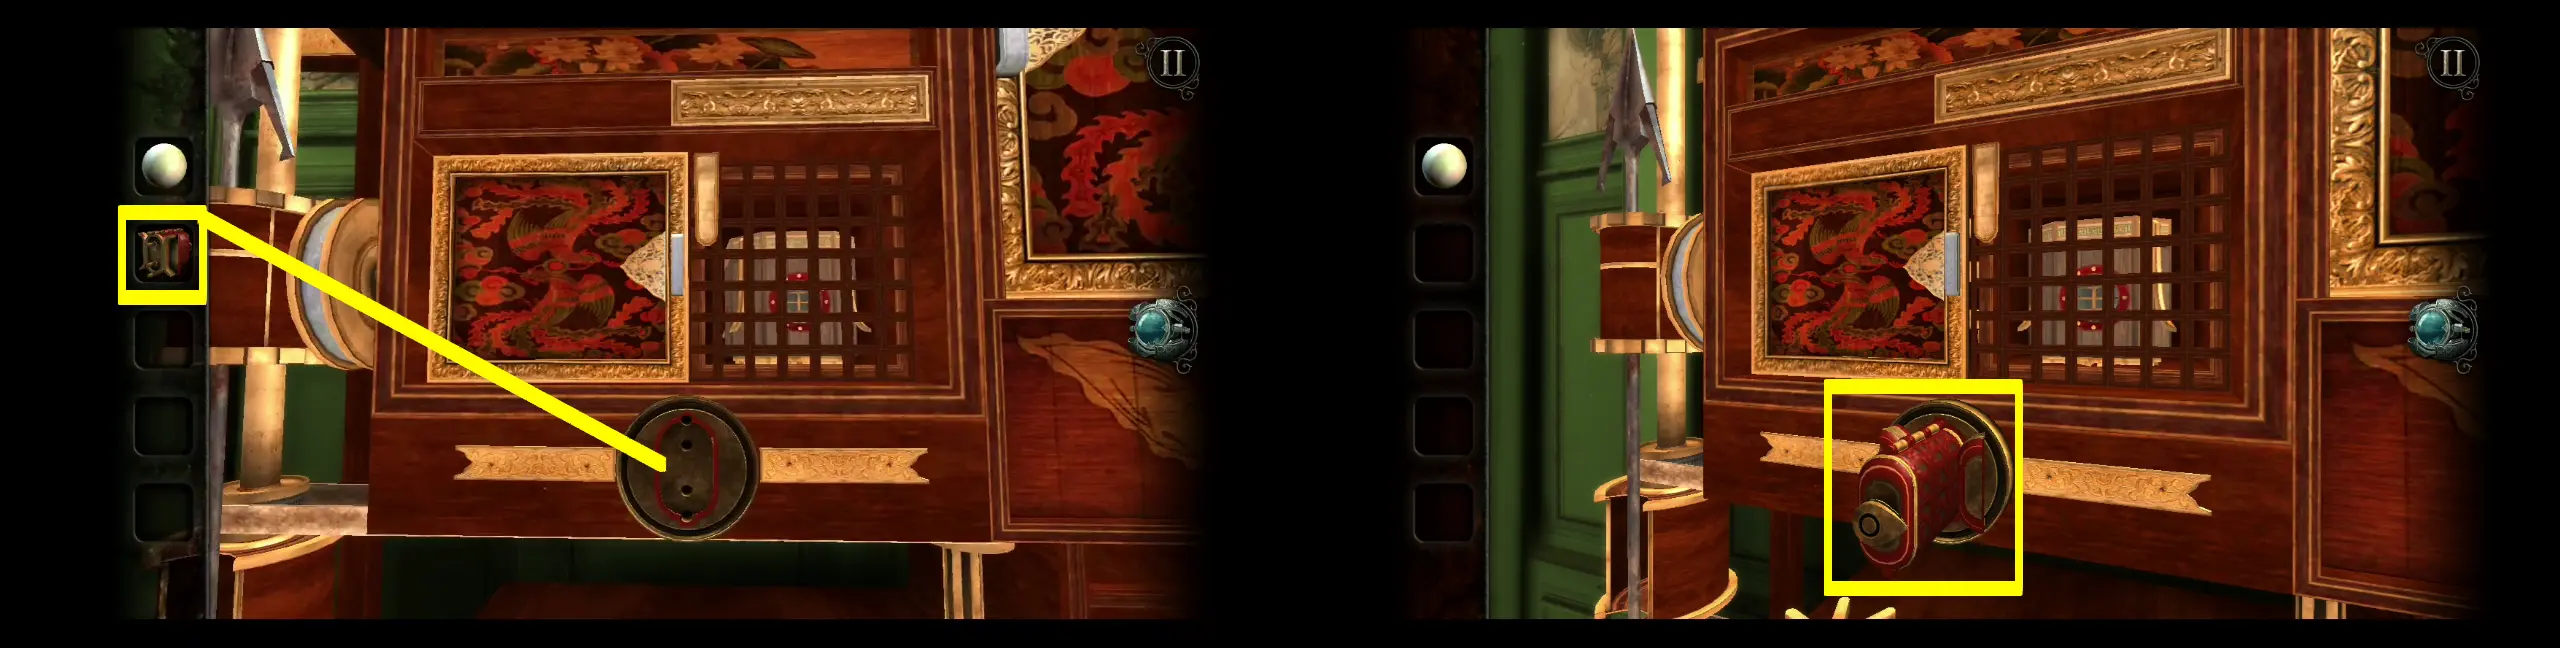
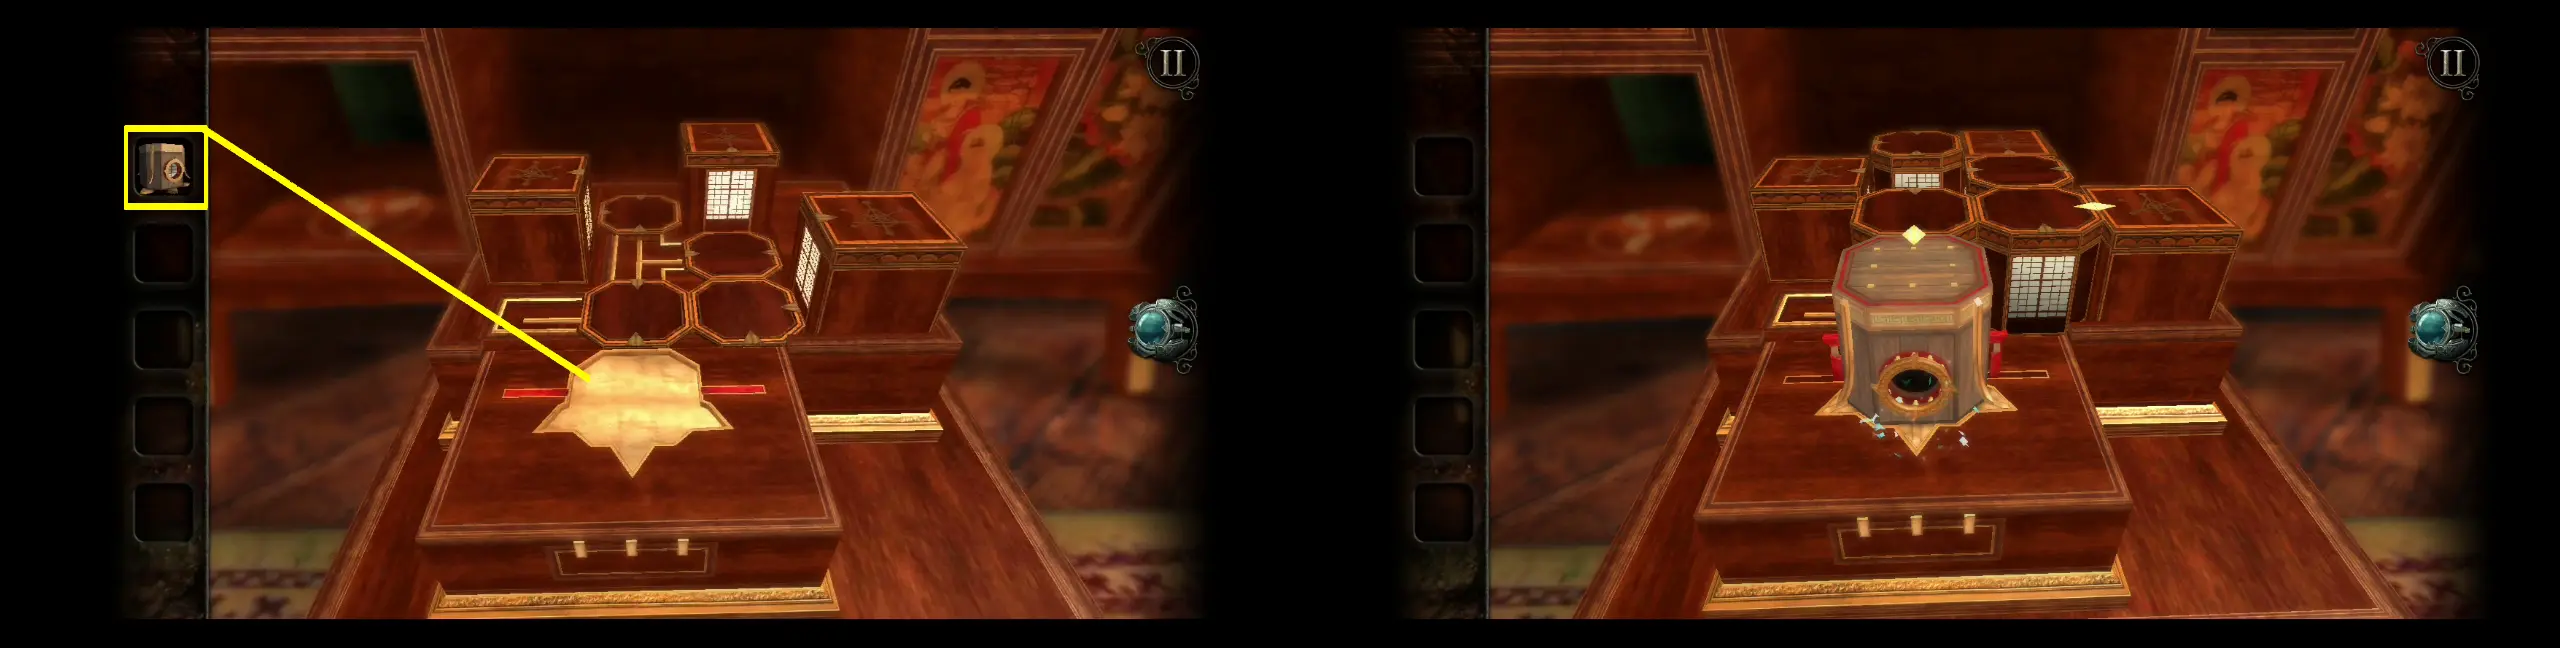
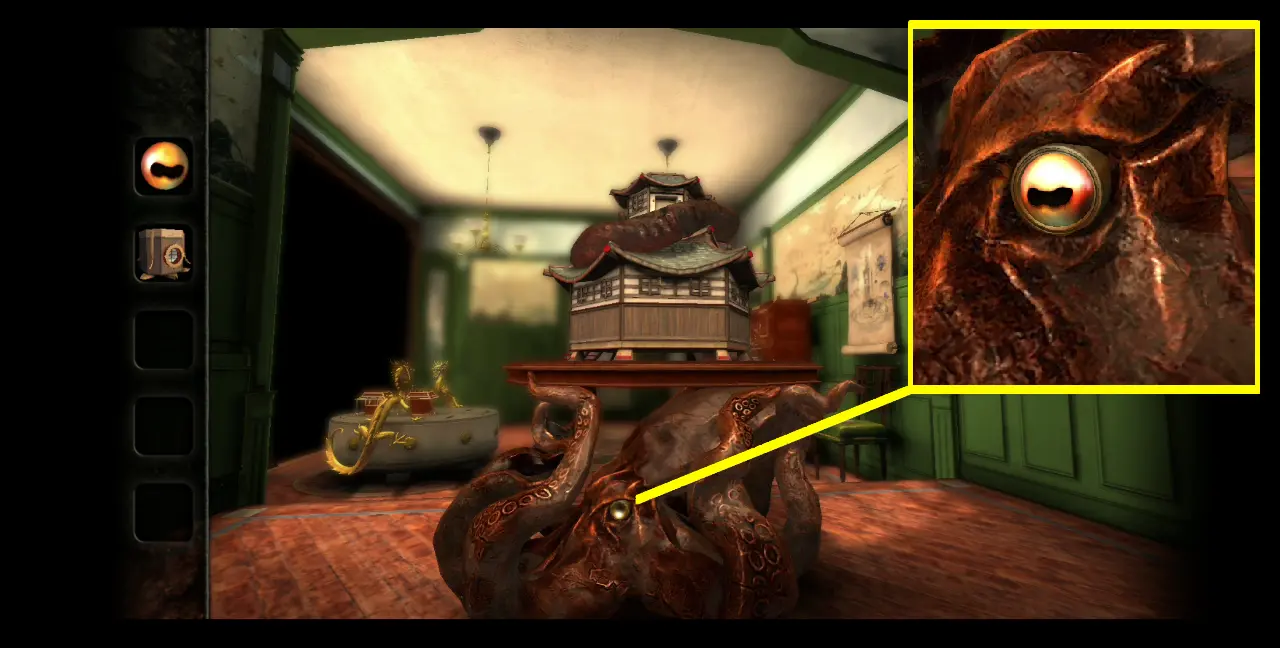
As mentioned, there’s a harpoon behind these three rotating locks, which is one of your objectives for this room. Since you were able to collect the carved stone sphere, turn your attention toward the model pagoda on the table to your right. You’ll notice that this pagoda is surrounded by tentacles and under it is an octopus statue. Place the carved stone sphere in the slot of the octopus’ eye.

With the eye in place, the tentacle at the top will move, allowing you access to the top and back of the pagoda. Turn your attention to the back of the pagoda first. You’ll see a lock here. Turn the shell to push up the red parts then simultaneously slide the silver bar lock into the gap. Upon unlocking this compartment, you can collect the ornate wooden capsule.

Open the ornate wooden capsule in your inventory. Turn the teardrop-shaped knob at the top. This will open up the capsule in segments. On the first segment, which is closest to the bottom, you will see a photo of a fly. On the segment right in front of it is a roller with different photos. Basically, you have to choose the predator of the previous animal. Thus, the correct order of pictures should be fly > spider > bird > cat. With the pictures in the right order, the bottom flaps of the capsule will open up and reveal two protrusions that look like sockets.

This fits perfectly in a slot on the strange-looking cabinet.
The next sequence will focus on this part of the cabinet:
- Turn the capsule so that the teardrop-shaped knob will point to the left.
- Slide the gold button at the top to the right.
- Open the panel of the drawer.
- Collect the unfinished wooden sculpture inside.
- Turn the capsule again so that the teardrop-shaped knob will now point to the right. This will unlock a wooden screw on top.
- Turn the wooden screw. This will open up the top rotating lock to its side. With this, all three rotating locks keeping the harpoon in place are now unlocked.

Now, you can collect the harpoon.
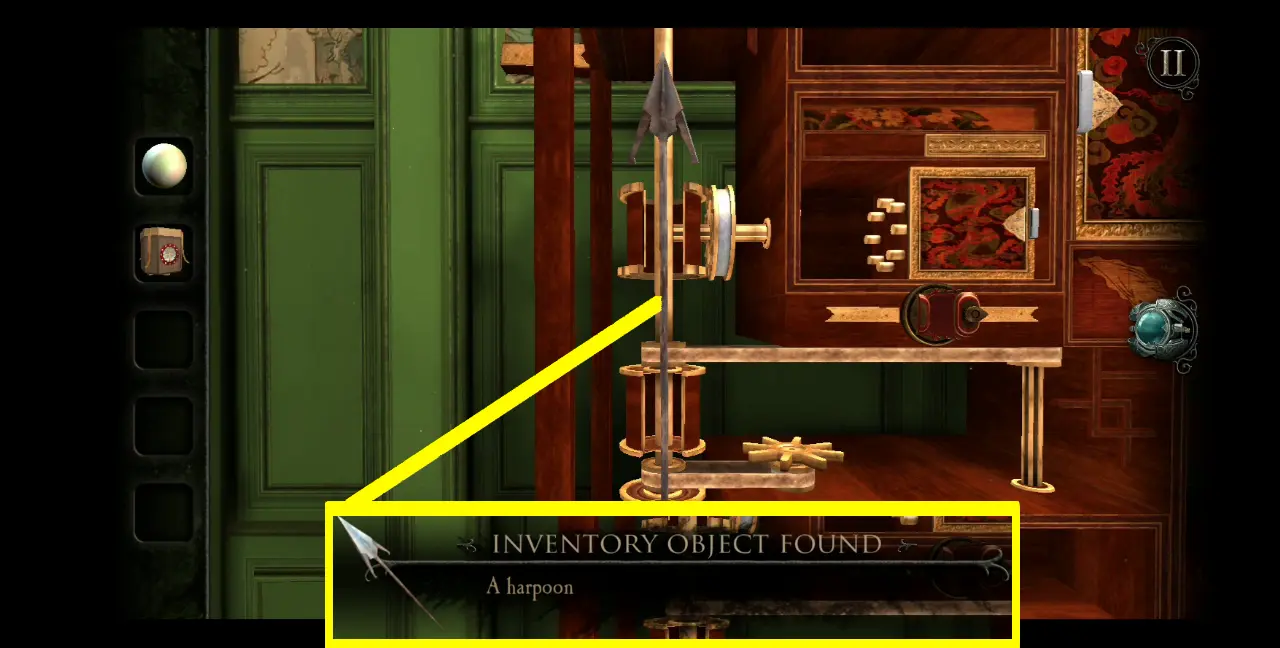
A harpoon hardly fits a Japanese Gallery, and neither does it fit in the Garden, so go back to the Maritime Room. To your left is a harpoon gun. Below are the next steps:
- Place the harpoon at the barrel of the gun.
- Load the harpoon by sliding the lever on the side.
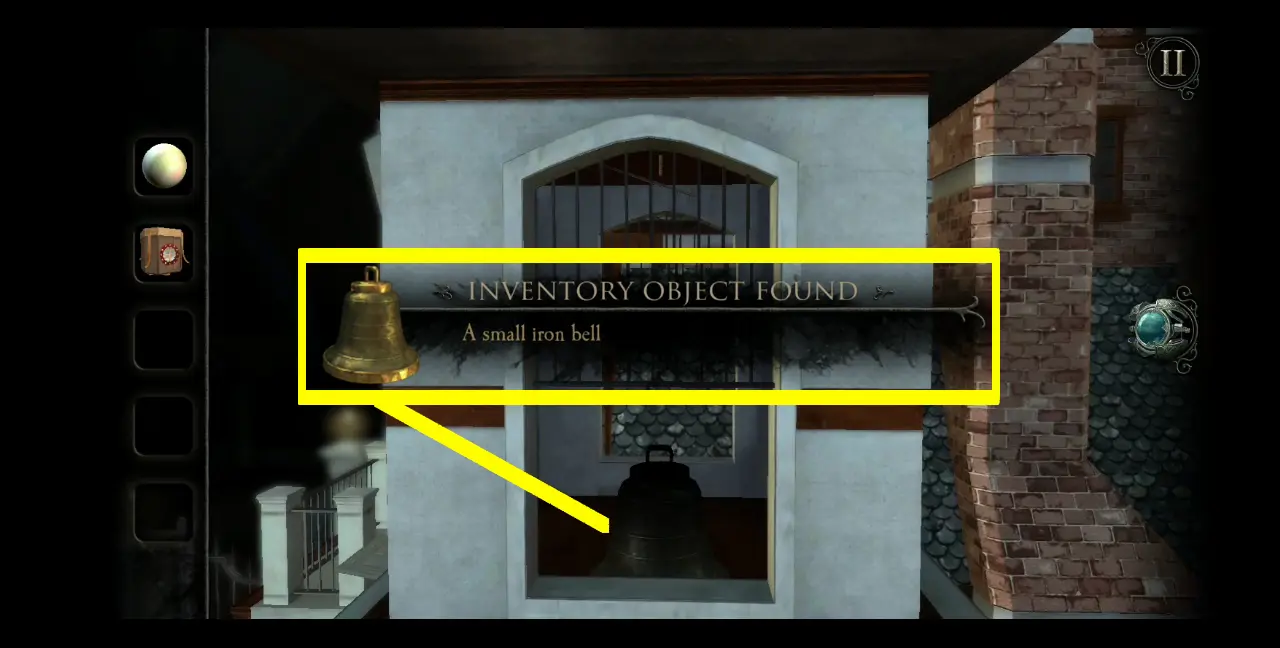
- Look through the gun and pull the trigger to the left.

The harpoon will shoot straight at the belfry and cause the bell inside to fall. Leave the Maritime Room and collect the small iron bell.
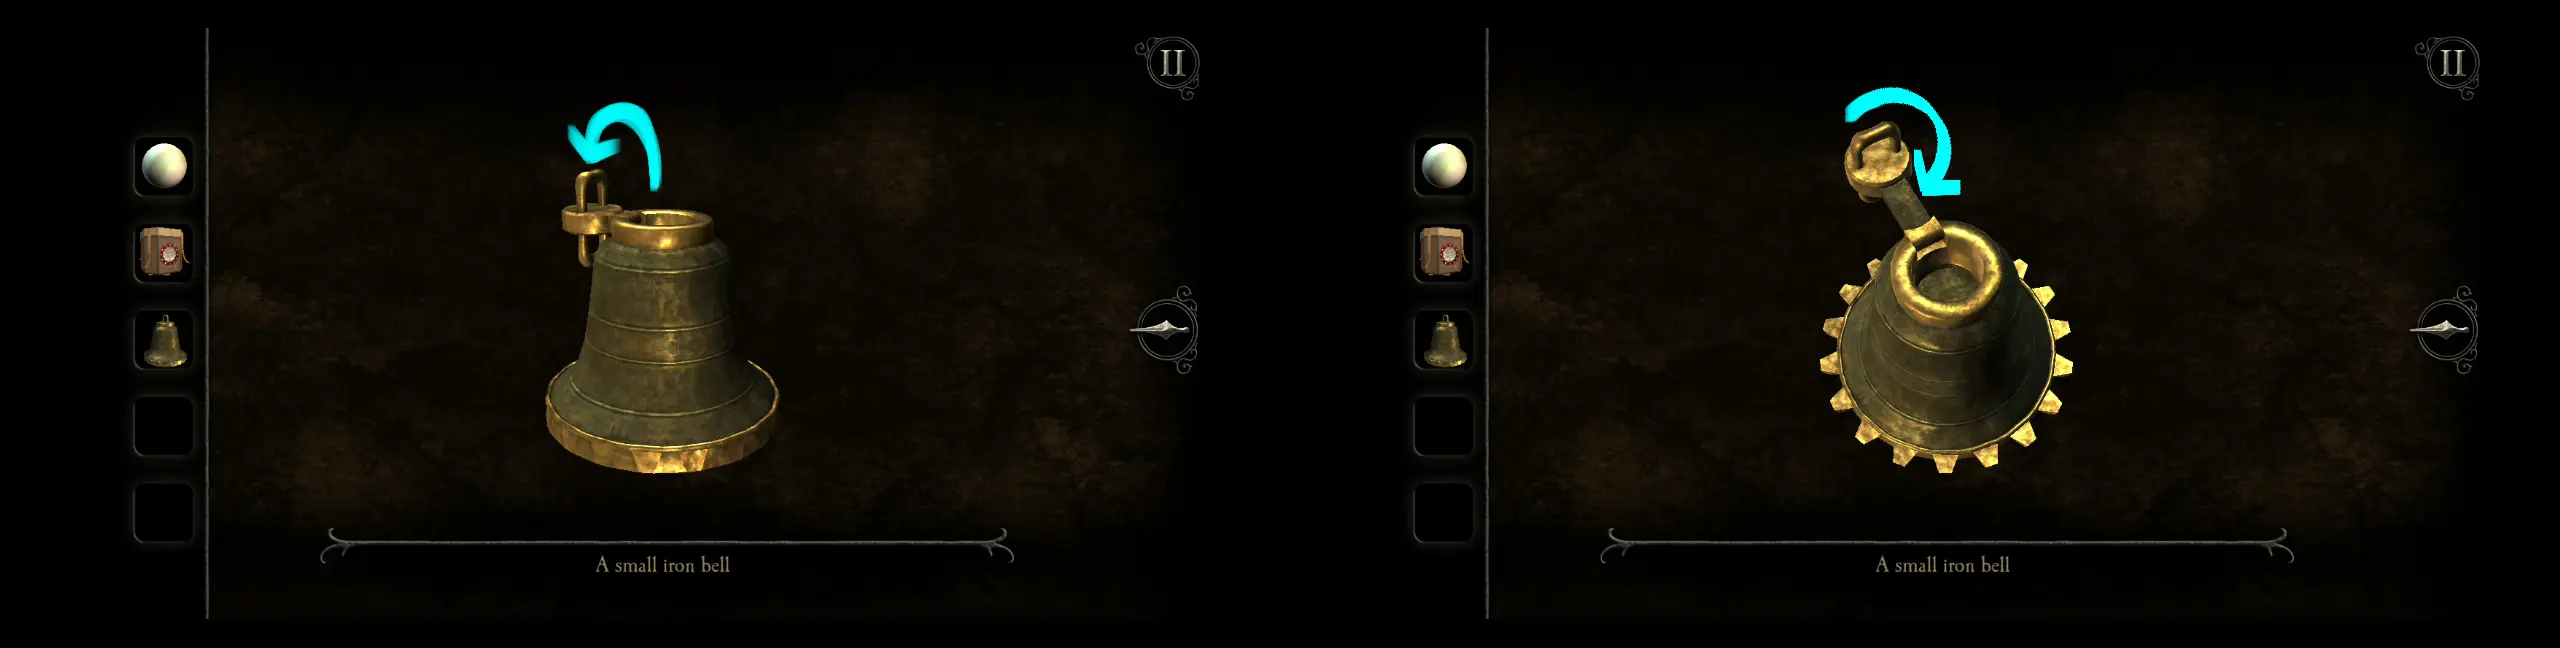
To use the bell properly, view it in your inventory. Flip the top of the bell. This will turn into a handle. Turn this handle until ridges emerge from the bottom of the bell.
Return to the Maritime Room and go to the rusty safe on a table at the far end. Place the bell on the left side of the safe. This will cause the locks on the dial to loosen.
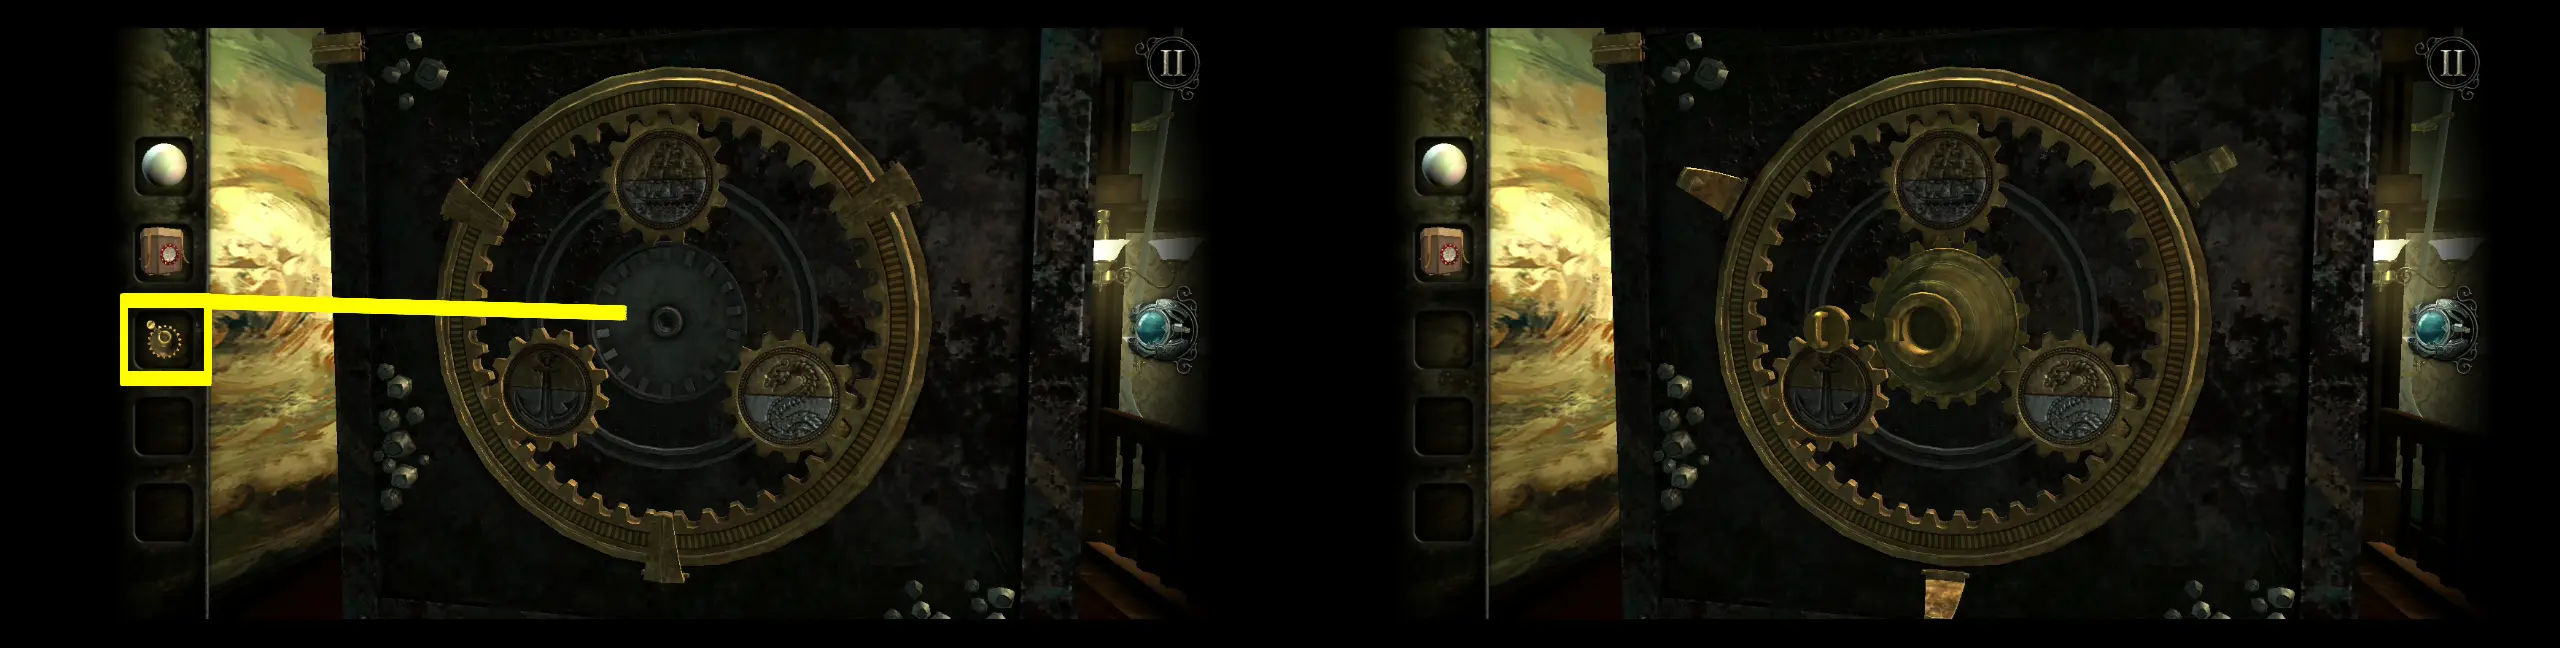
If you turn the bell, you’ll see that the three symbols will also rotate. The dial surrounding the ridges can also be turned so you can set the symbols upright upon being moved. To solve this puzzle, check the right side of the safe, which also has the same symbols in the correct positions. Refer to this when repositioning the symbols on the left side using both the bell and the dial.
Once all the symbols are in the correct positions, the top of the safe will loosen up. Open the top by flipping the cover so you can see the new puzzle.
The way this puzzle works is that the gears on top directly affect those at the bottom. Where you place the peg on the slots on the X and how you move it using the gears will unlock the three locks at the bottom one by one. The three locks are at the left, center, and right of the safe’s face. The position of where the rake-looking part of the safe will tell you which lock has been freed.
Let’s unlock the right lock first:
- Move the peg down and place it in the bottom left slot of the X.
- Turn the gear so that the golden lock at the bottom will face right.
- Pull the gold bar lock to the right.

Next is the left lock:
- Move the peg up and place it in the upper left slot of the X.
- Turn the gear so that the golden lock at the bottom will face left.
- Pull the gold bar lock to the left.

Lastly, the center lock:
- Move the peg back down and place it in the bottom left slot of the X.
- Turn the gear so that the golden lock at the bottom will face down at the center.
- Pull the gold bar lock down.

Open the front hatch of the safe. Inside the small compartment is what looks like a flint. Pull the flint back, which will trigger a spark.

It looks as though dynamite is rigged throughout all sides of the safe. A brief cutscene will show parts of the safe imploding until the entire safe opens up and reveals a new item: a strange artifact.
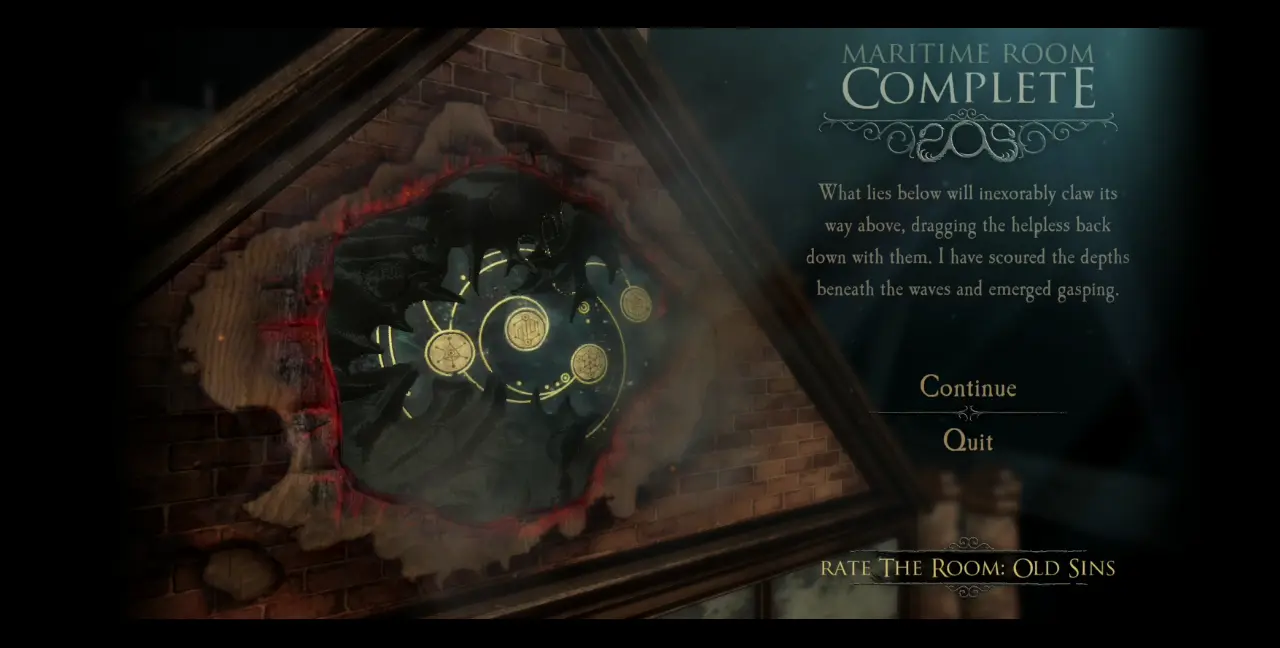
On cue, the black tendrils will appear and consume the entirety of the Maritime Room. Another symbol on the seal in front of the dollhouse will once again be covered by black ink. Your exploration of the Maritime Room is now complete.
Garden
Finishing the Garden segment will require you to go back and forth between three rooms: the Garden itself, the Japanese Gallery, and the Art Studio, which we will unlock later down the line.
Let’s start by opening the strange artifact in the inventory. Here, you will acquire the parchment fan.
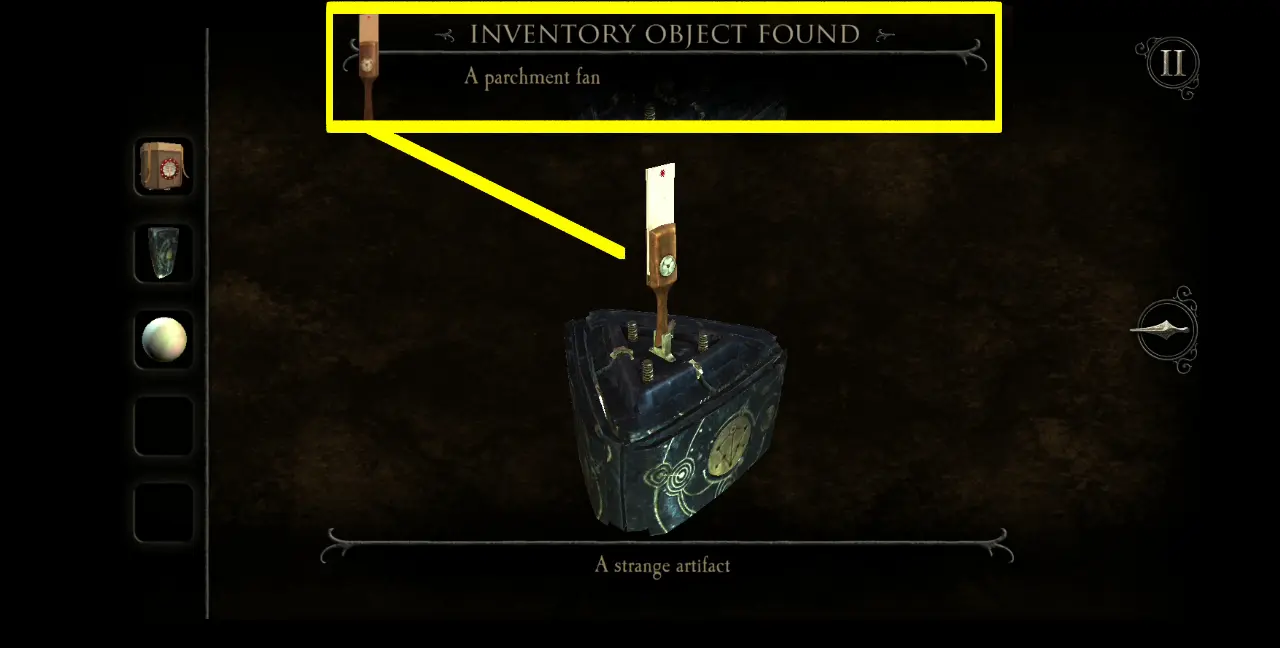
The motif of the parchment fan is obviously Japanese so return to the Japanese Gallery, particularly to the right side of the pagoda on top of the octopus. You’ll see a slot where the handle of the parchment fan fits so place the parchment fan there. A prompt will appear saying that you can pick up the parchment fan again. Once you’ve placed the fan on the slot, spread out the flaps of the fan according to the symbols seen on the pagoda’s wall.

Click on the now spread fan to return it to your inventory. Go back to the strange-looking cabinet and open the thin drawer on the right. You’ll see it contains some kind of wooden device in the same shape as the parchment fan. Place the item here.
Look at the back of the fan and you will see that it has holes. Move each red bead from the wooden sticks to align with these holes.
The drawer will retract but another one will open. The new drawer contains some kind of puzzle, but it’s not yet complete.
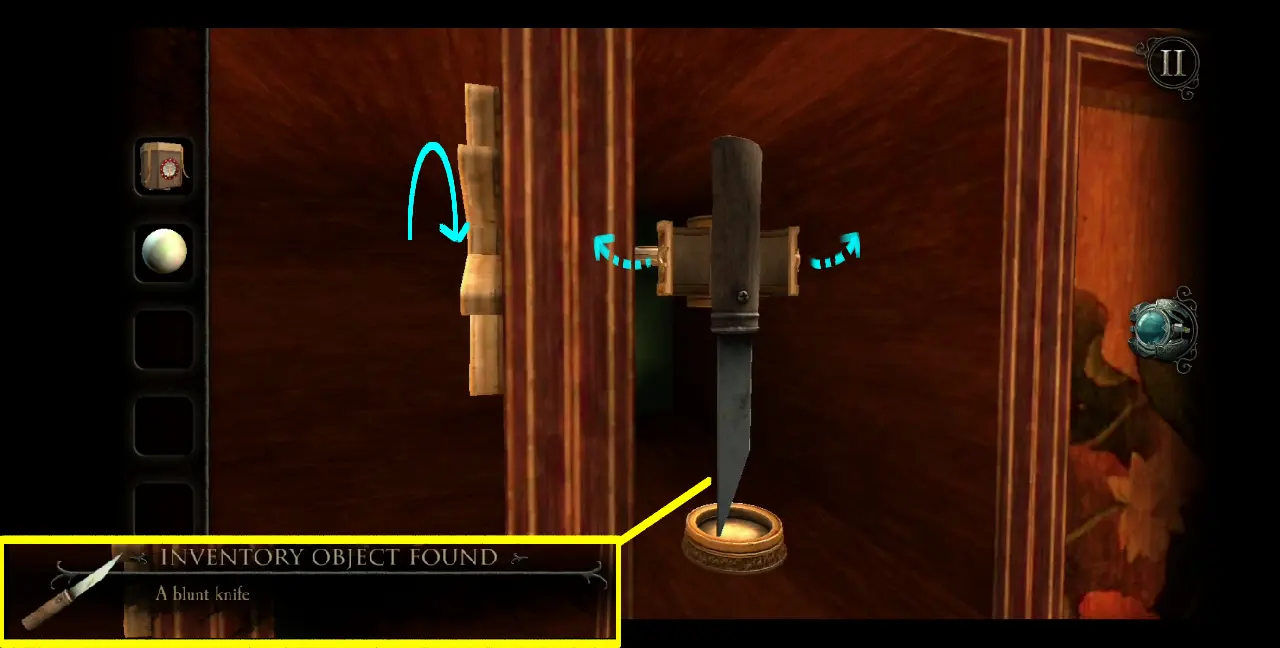
Leave this puzzle for now and turn your attention to the open shelf just a little above it to the right. Here you’ll see a knife but it’s locked in place. Turn the wooden screw beside it to loosen the lock. Thereafter, you can collect the blunt knife.
Open the top right-hand corner panel of the cabinet. Inside, you’ll find an oyster. Place the blunt knife on the “keyhole” in front of the oyster. Turn it a little and the oyster will open. Place the pearl from your inventory in the middle of the oyster, which will trigger a wooden platform to emerge from underneath the oyster. Collect the circular metal casting from this platform.

Return to the pagoda on top of the octopus. If you look closely, you can see three symbols in front of the slot that fits the unfinished wooden sculpture. The first symbol is a circle, the second is a roof, and the third is a spire. Here is how this sequence goes:
- Place the unfinished wooden sculpture in the star-shaped slot on top of the pagoda.
- Move the circular dial to the circle symbol on the left.
- Ridges will appear on the red window of the unfinished wooden sculpture. Place the circular metal casting here.
- Bring the circular dial back to its original place on the pagoda.

After this sequence, collect the unfinished wooden sculpture back in your inventory. You’ll see that its base has changed shape, with three triangles protruding from the base. This now matches with the shape of the slot on the previous puzzle we unlocked from the cabinet. Place the unfinished wooden sculpture in the slot pictured below. This will trigger four columns to rise from the puzzle, as well as open an aperture at the front of the unfinished wooden structure.
To solve this puzzle, let’s first identify the important parts, highlighted in the picture below: those marked in blue are the three endpoints you need to reach. You can do this by moving the four hexagonal columns in the middle. However, take note of the arrows on top of these hexagonal columns, which are marked in yellow. Notice that arrows that aren’t properly connected to each other are dull while those connected properly are brighter.
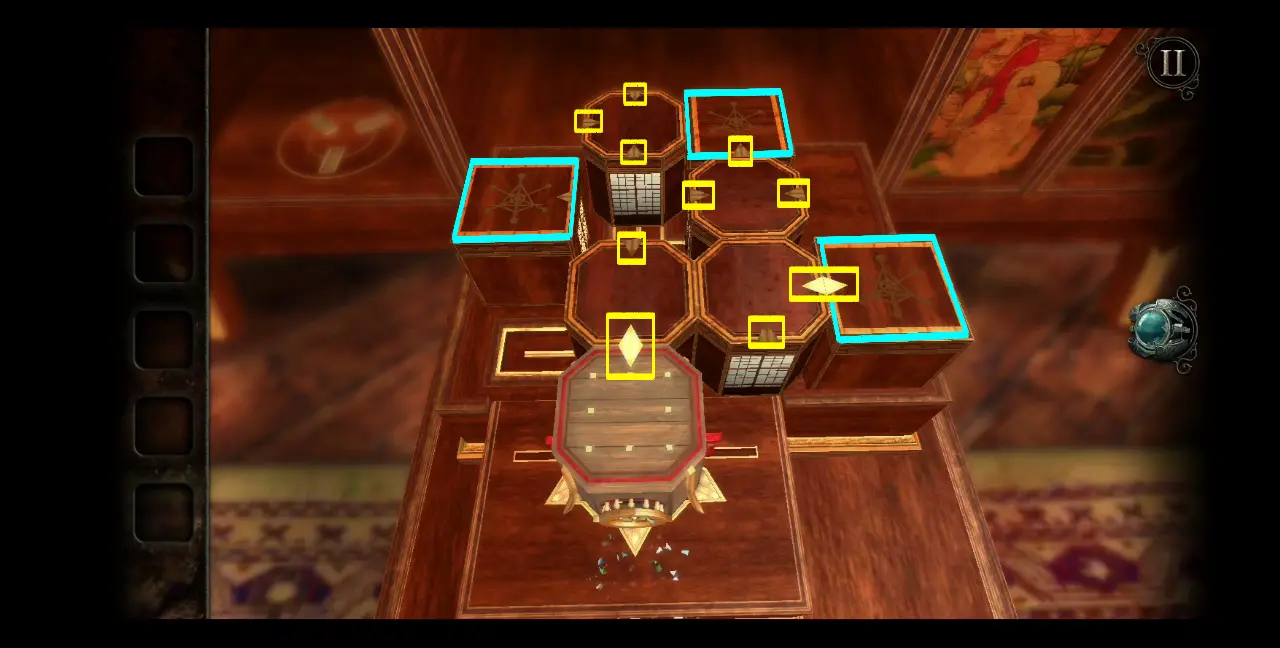
Basically, what you will be doing is using the hexagonal columns to create “hallways” you can pass through to get to each end point one at a time. We say “hallways” because once you manage to connect to one endpoint, you have to enter the aperture using your eyepiece, follow the hallways, and ring the gong (located at the endpoint) by turning the handle on its side.

Again, you have to do this three times for each endpoint. Now for reaching the endpoints themselves, the solutions are as follows:

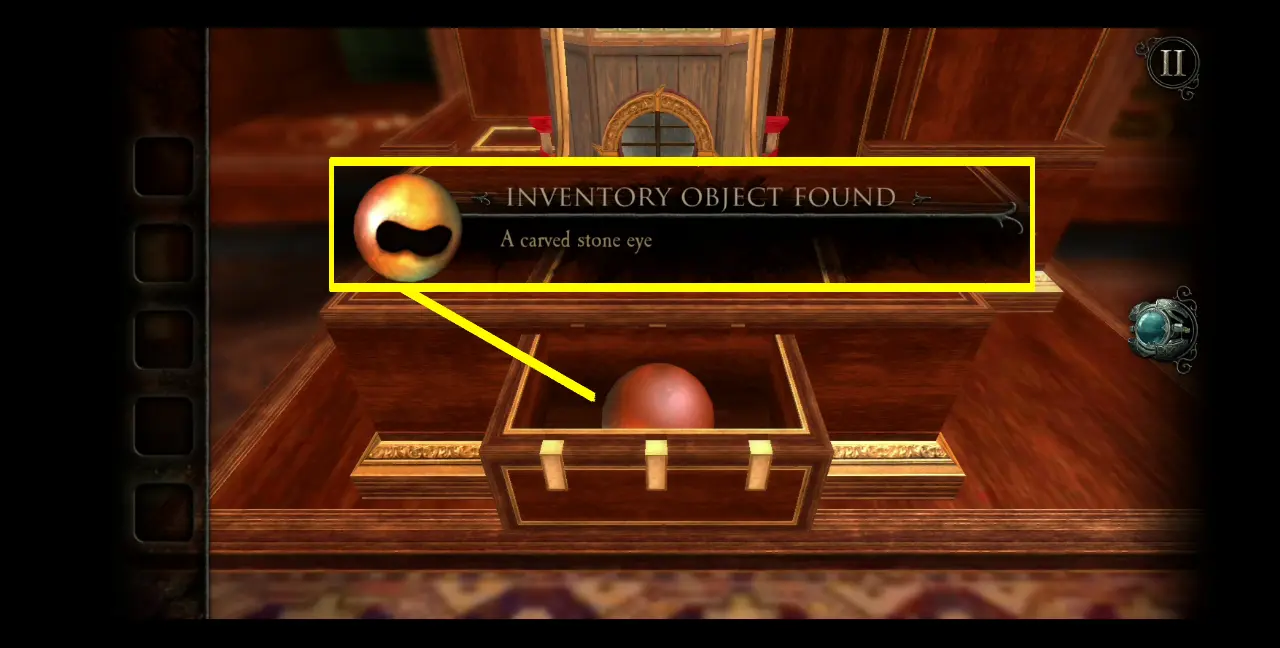
For each endpoint you reach, there will also be a lock that will loosen up. These three locks are for a drawer at the front of the puzzle. Once all endpoints have been reached and the gong has been rung thrice, the drawer will open and you can collect the carved stone eye.
After collecting this item, you can also collect the unfinished wooden sculpture again in your inventory. By then, the drawer will retract back into the cabinet.
For the new item you collected, go to the octopus under the pagoda. Since one side already has an eye, go to the opposite side and place the carved stone eye in the appropriate slot.
This will cause a tentacle to move and the pagoda to rise, revealing a new segment to the building.
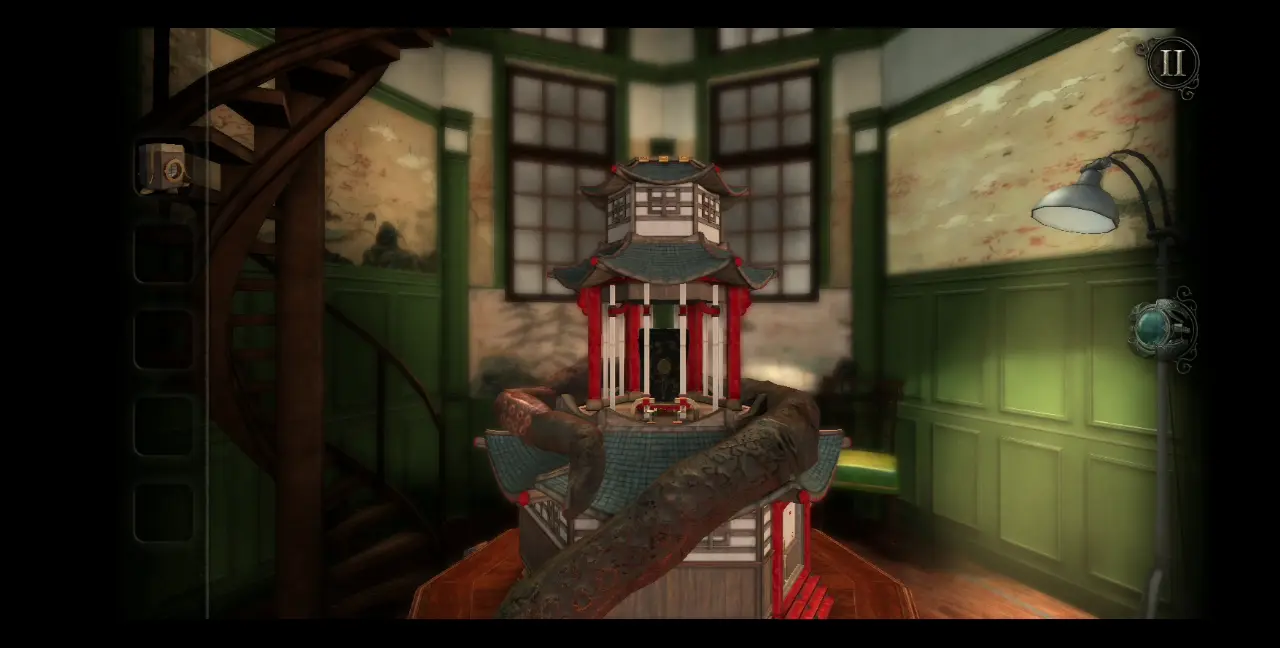
You’ll notice that in this new segment, a strange artifact is sealed behind the cage with white bars. However, we’ll be collecting this much later. For now, what you have to do is zoom into the front of this new segment, where you will see two switches connected to two locks. Slide both switches at the same time so you can collect the model spire.
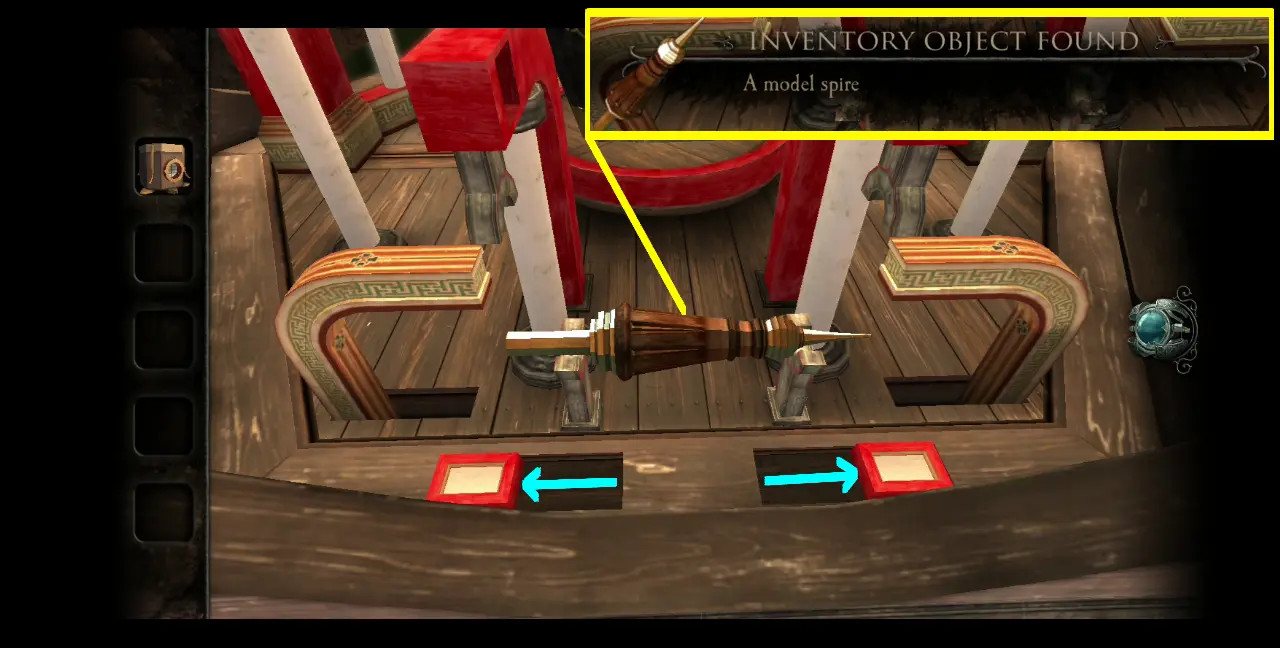
The model spire is a part of the dollhouse so head out of the Japanese Gallery. Place the model spire on top of the turret right beside the part of the dollhouse where you enter the Japanese Gallery.
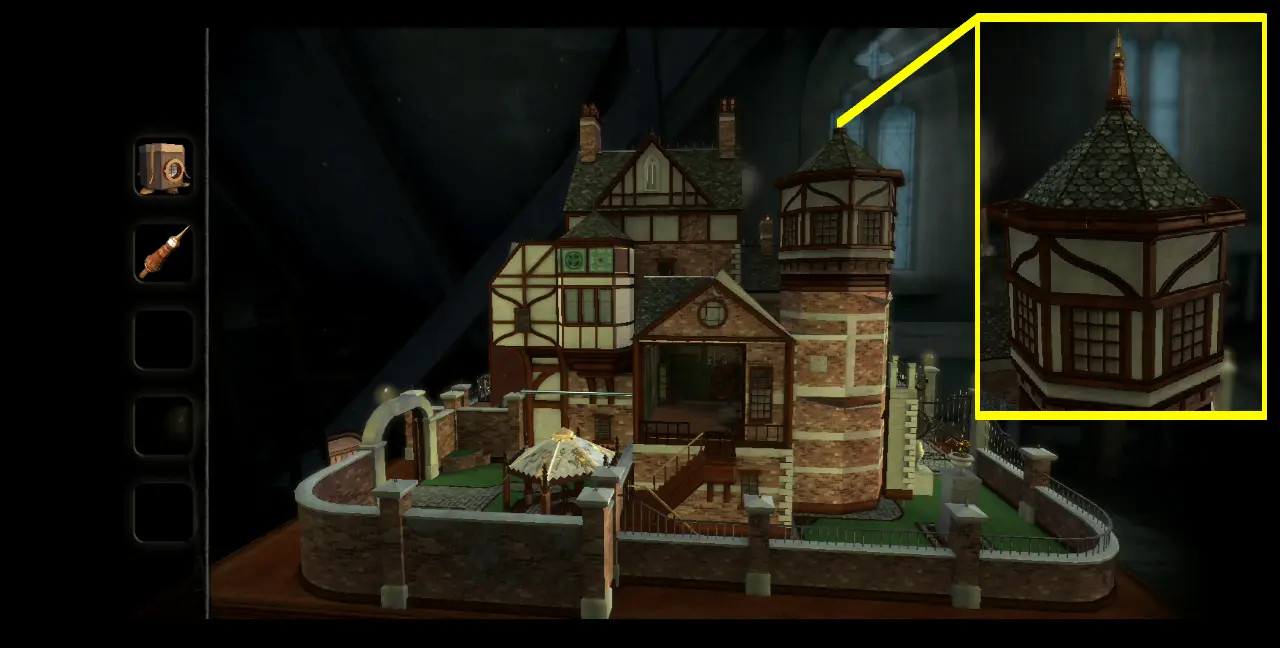
This will trigger the roof of the turret to open up, giving you access to a new room: the Art Studio.
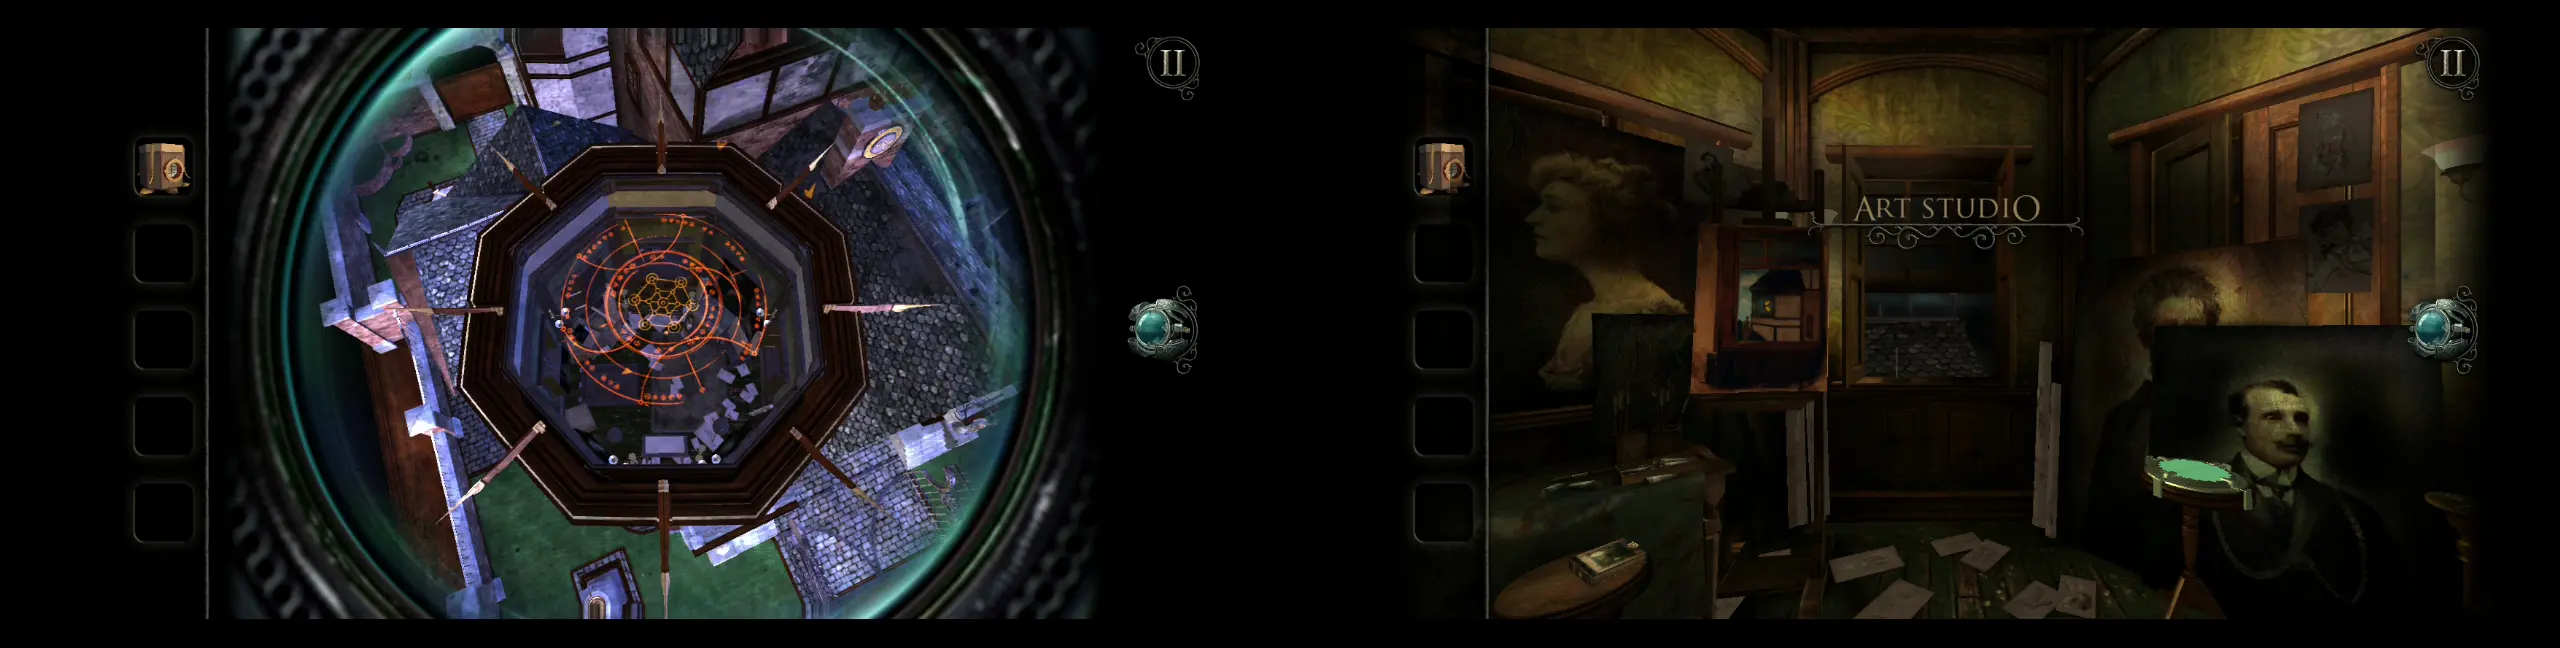
Unlike the other rooms, the Art Studio looks like a mess, with papers, paint, and art tools scattered everywhere. Among the mess, one of the most noticeable items here is a stand whose surface has a multicolored film. If you use your eyepiece to view it, you’ll see the strange artifact on top of this stand, but it’s not something you can collect yet. Instead, remember this for later.
For now, zoom into the stool to your left. On top of it is a book titled Oil Painting: Advanced Techniques. Slide the hook down to open the book. Here, you can flip the pages and see the current entry and all the previous entries.
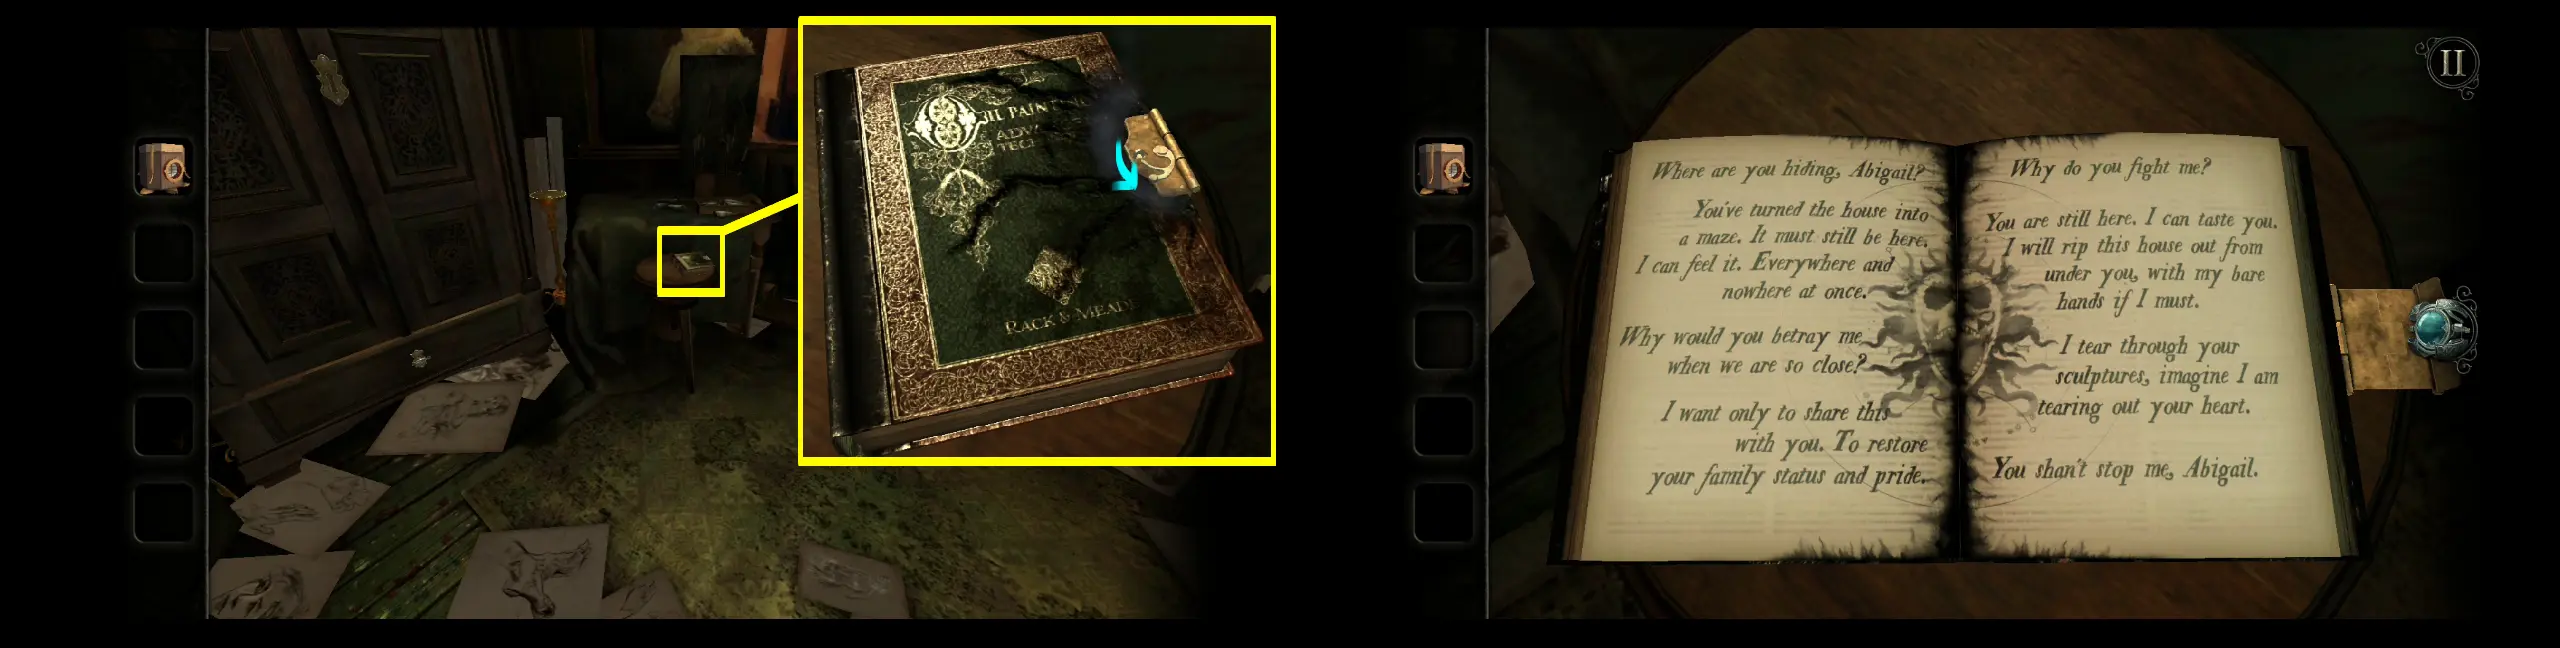
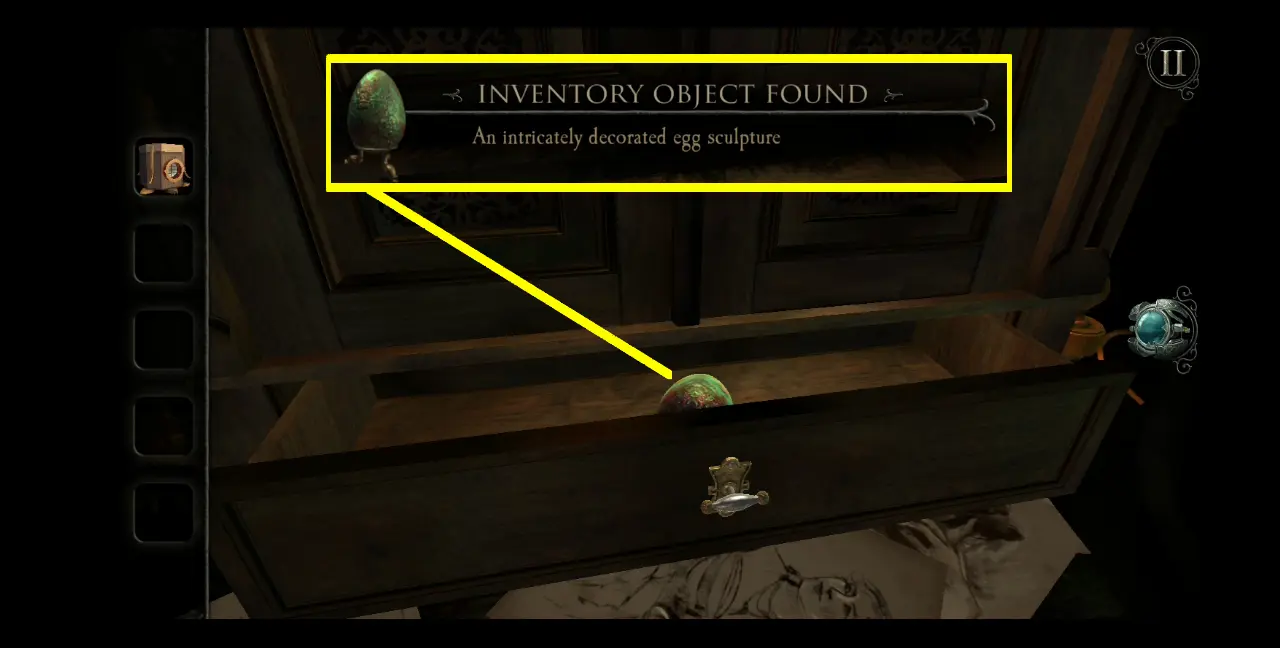
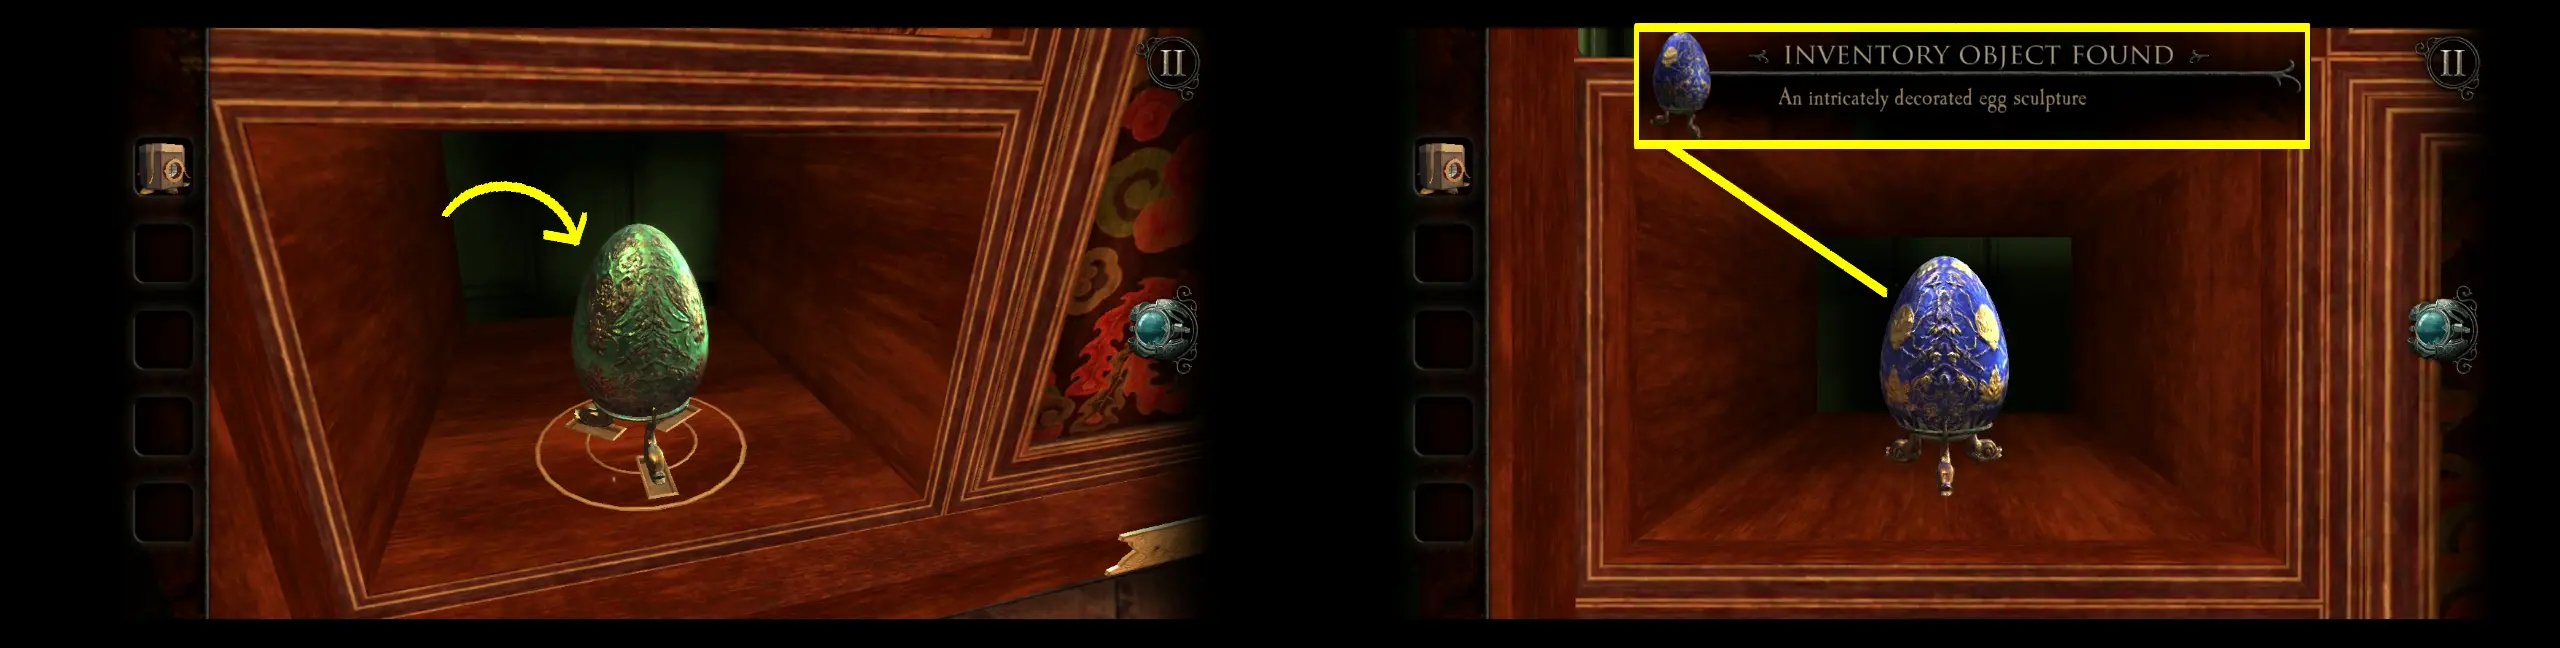
After reading the journals, go to the large wooden cabinet to your left. Pull the drawer at the bottom and collect the green intricately decorated egg sculpture.
There will be two other egg sculptures but for this green one, you can find where it belongs if you turn to your right and refer to the illustration on the drawing board.
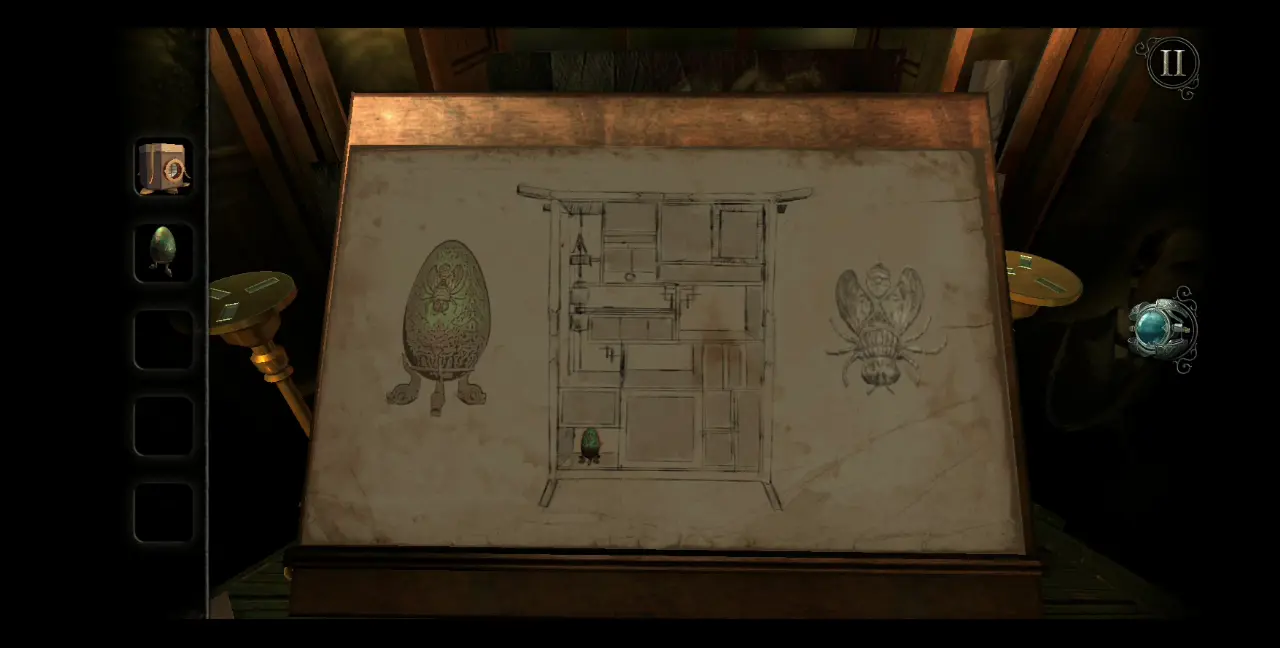
Clearly, the illustration features the cabinet from the Japanese Gallery so go back to that room and place the green egg sculpture in the indicated shelf. A panel on top of the shelf will open up, revealing a blue intricately decorated egg sculpture, which you can collect.
Like the green egg sculpture, you can find where the blue egg sculpture belongs by referring to an illustration on the wall next to the cabinet. Here, you can clearly see that the blue egg belongs to a bench to the right of the Garden’s fountain.
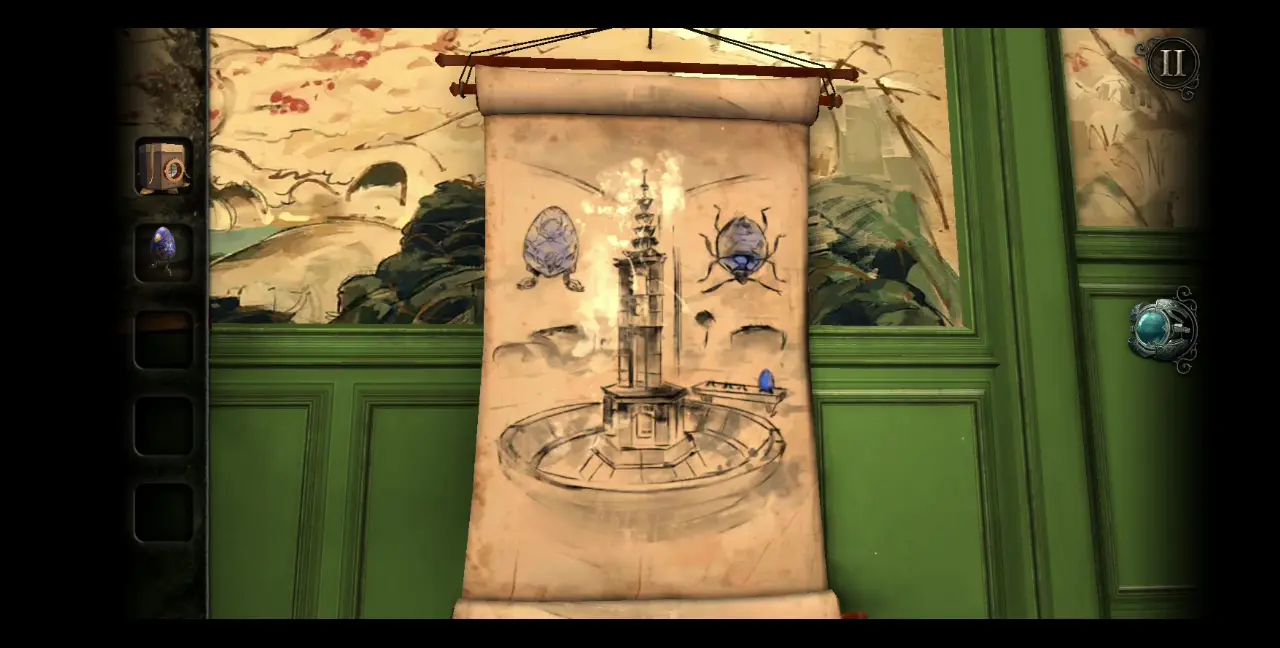
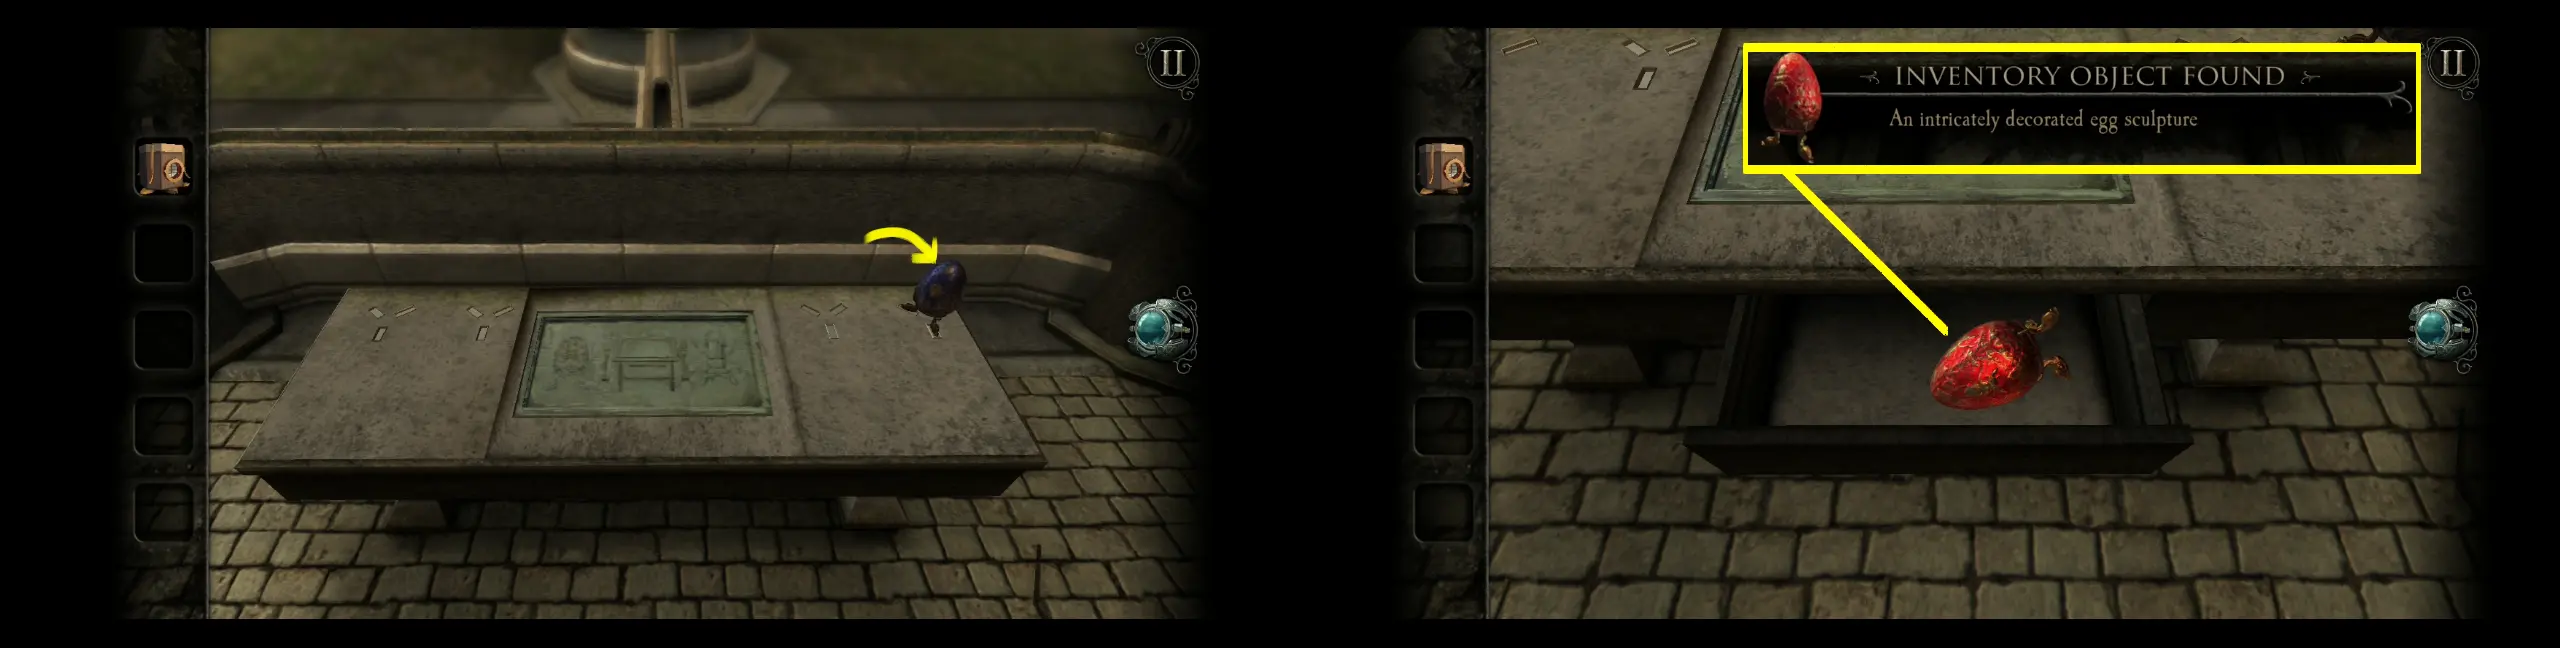
Thus, go to the Garden and place the blue egg sculpture on the rightmost slot on the bench. This will trigger a drawer under the bench to open. From here, you can collect a red intricately decorated egg sculpture.
If you look closely at the panel on the bench, you will see where the red egg sculpture should be placed. On the panel is the drawing board from the Art Studio, and the egg is illustrated as being placed on the stand to the right of the drawing board.

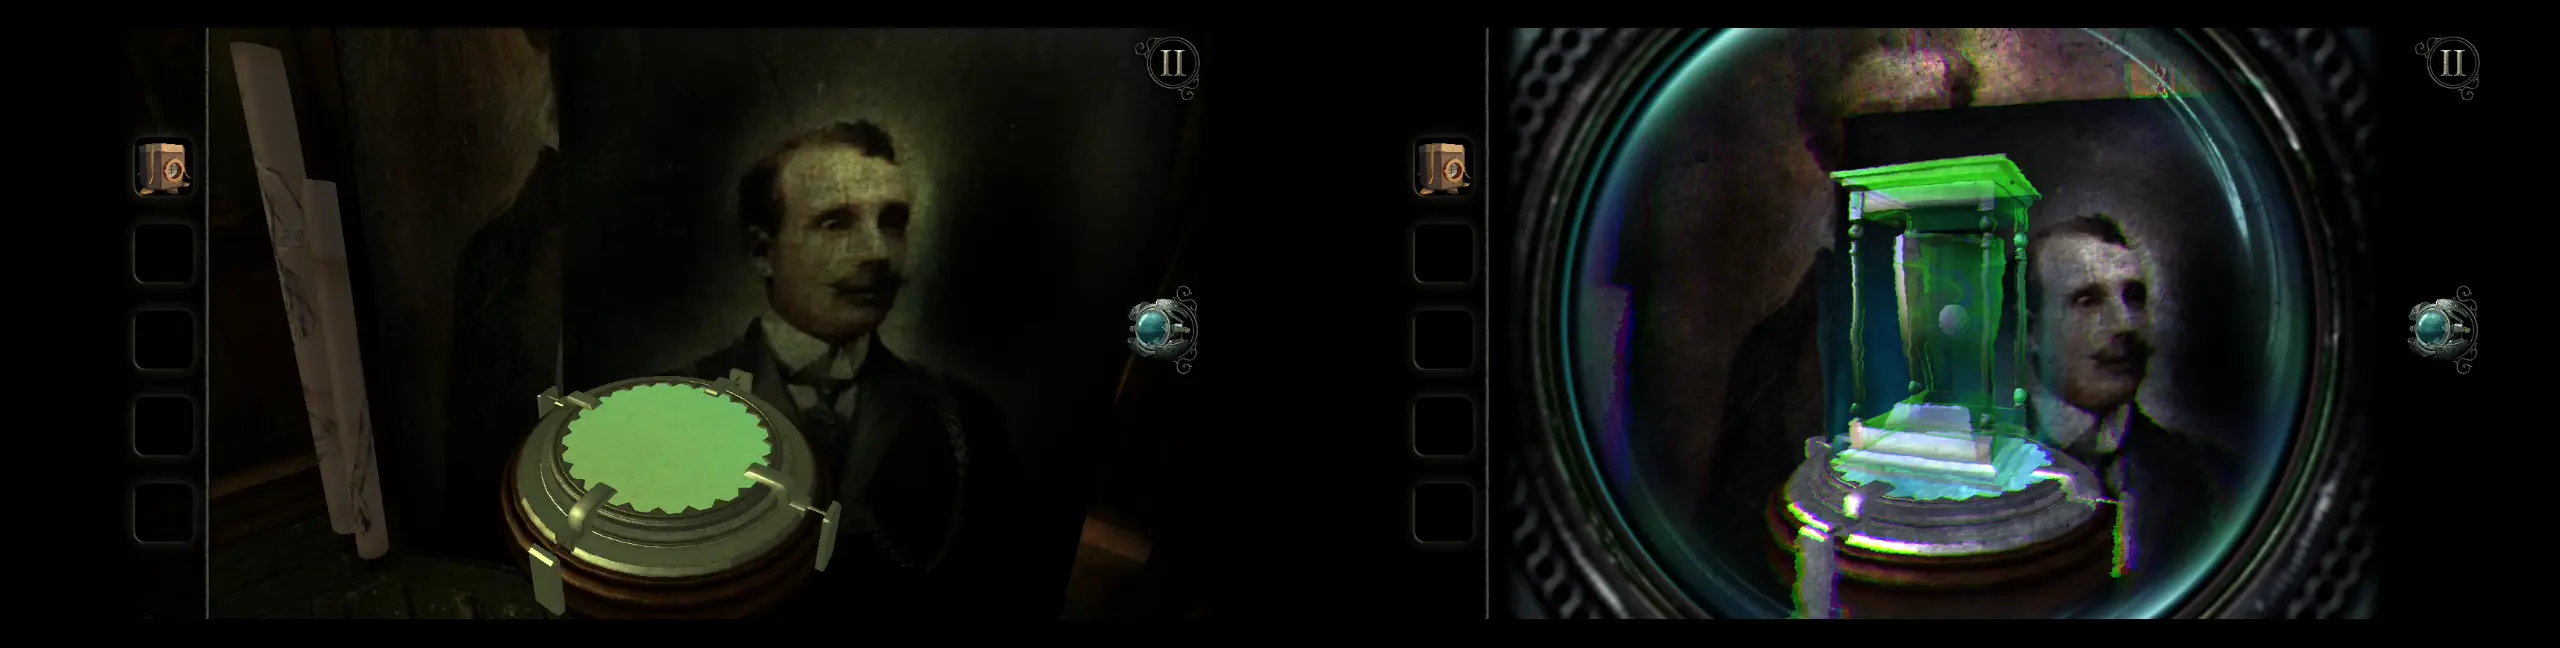
With that, return to the Art Studio and place the red egg sculpture on the stand to the right, just a little behind the drawing board. The red egg will open up and reveal a new item: a small stone carving.
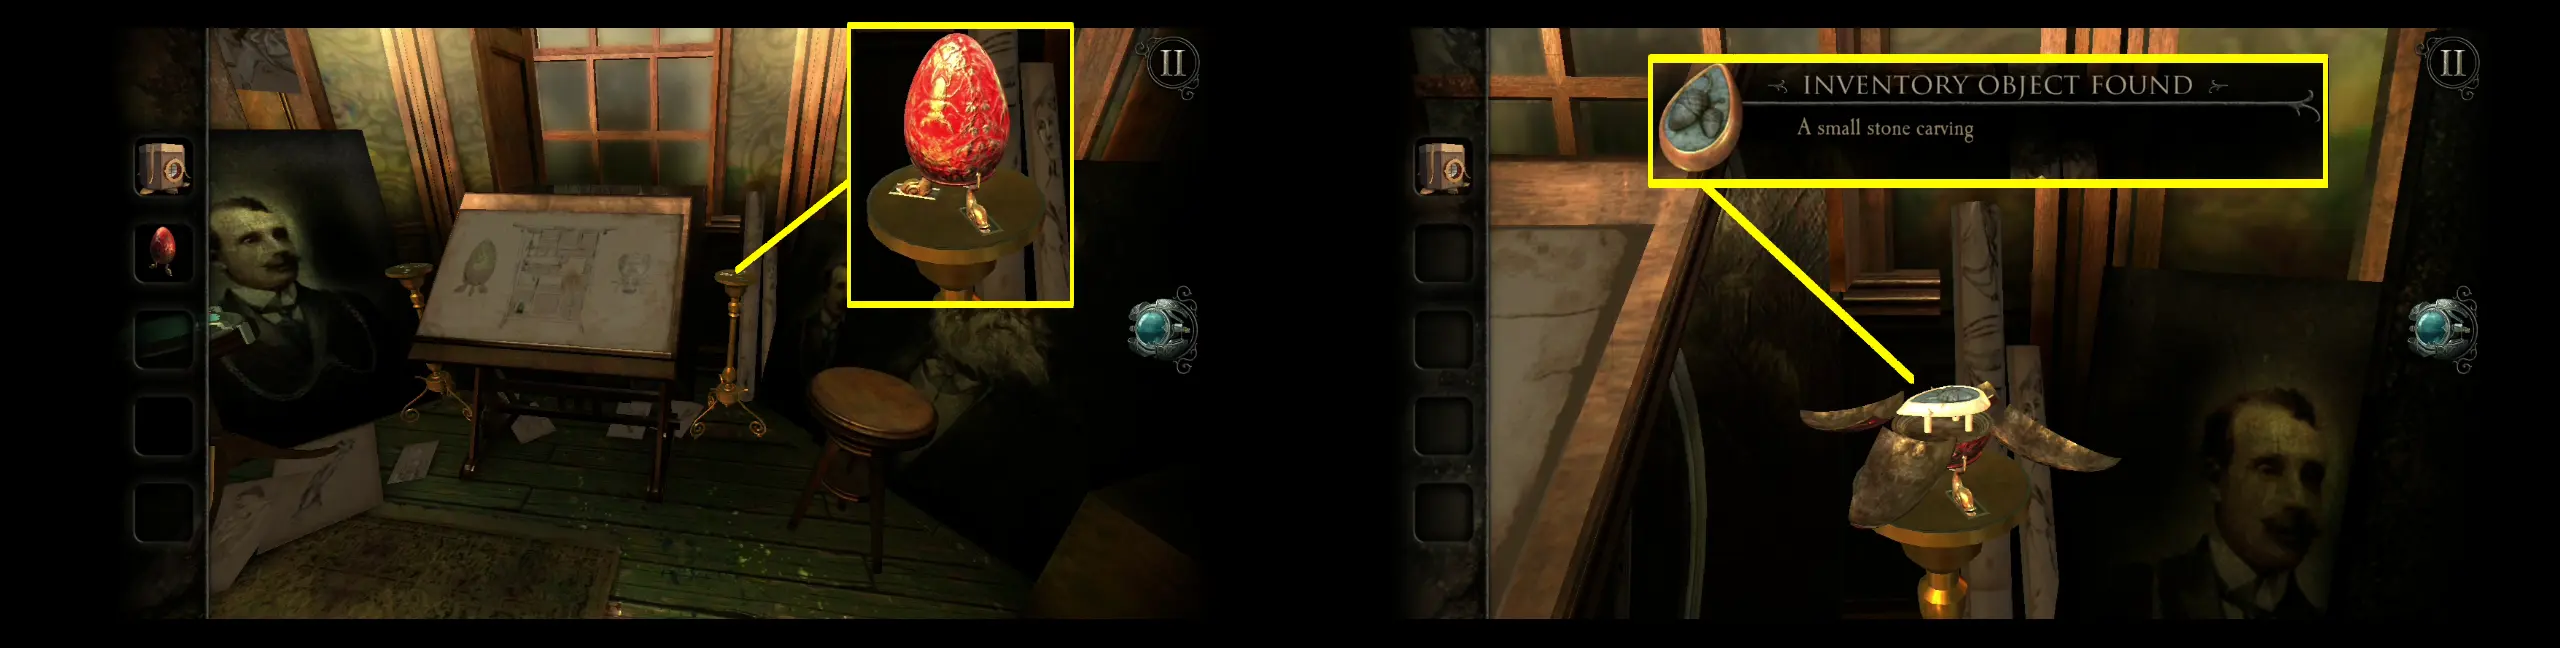
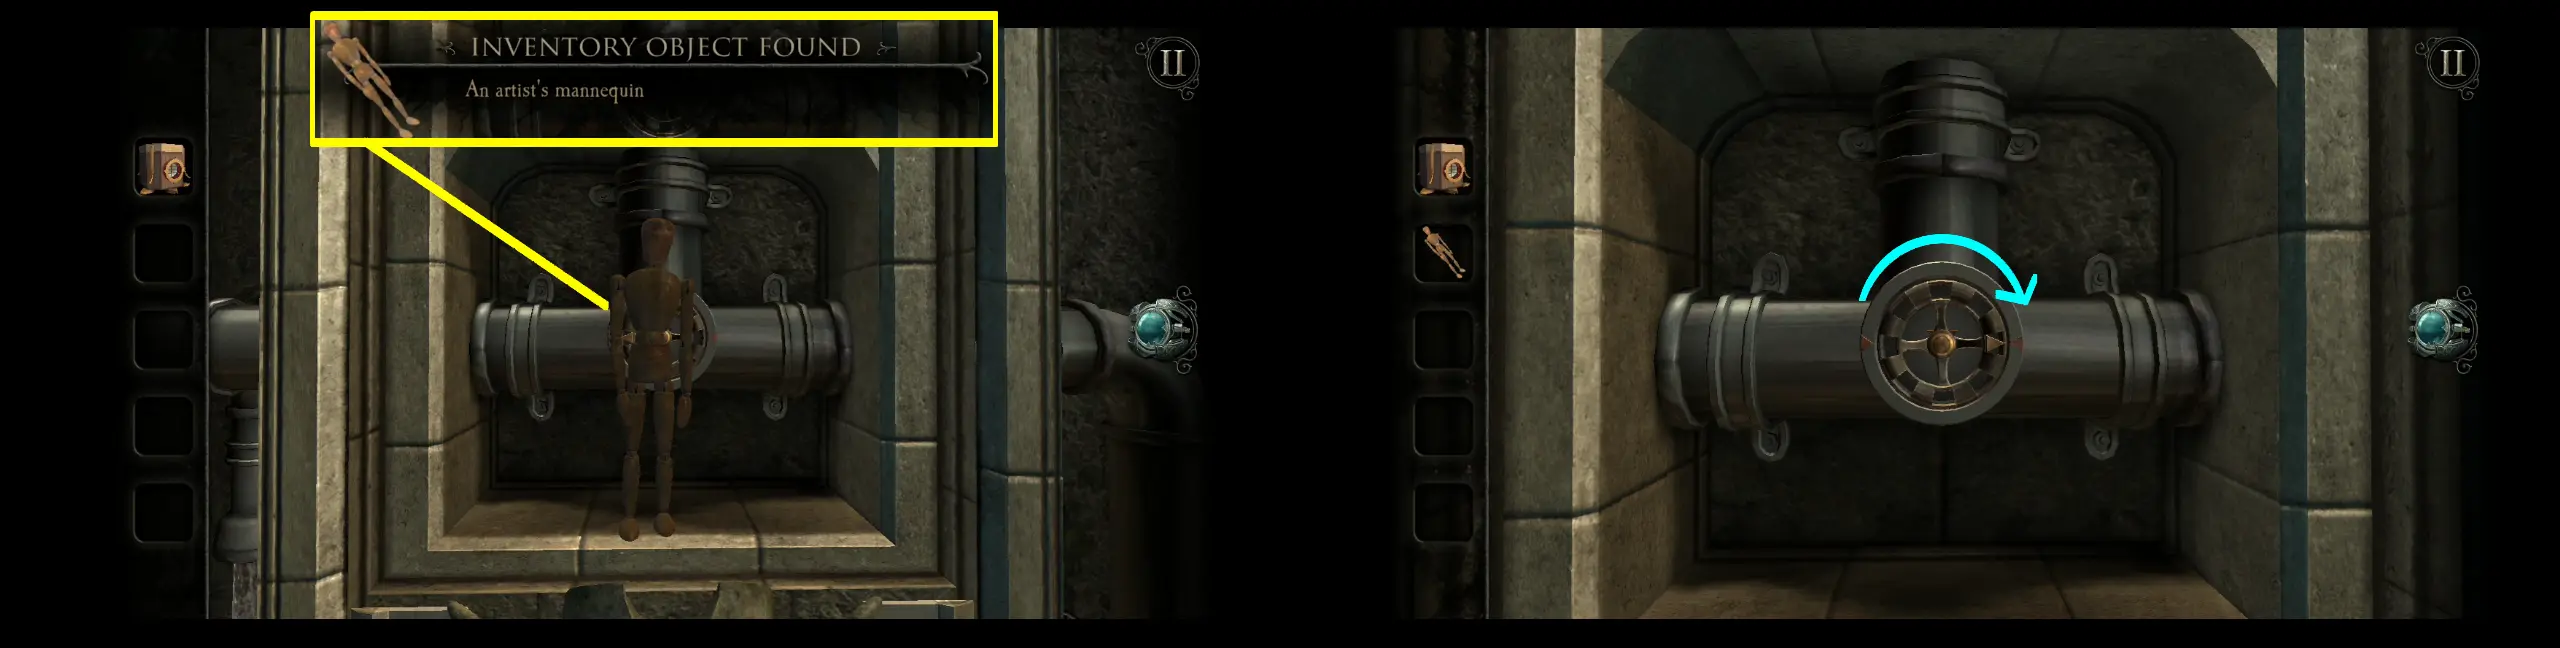
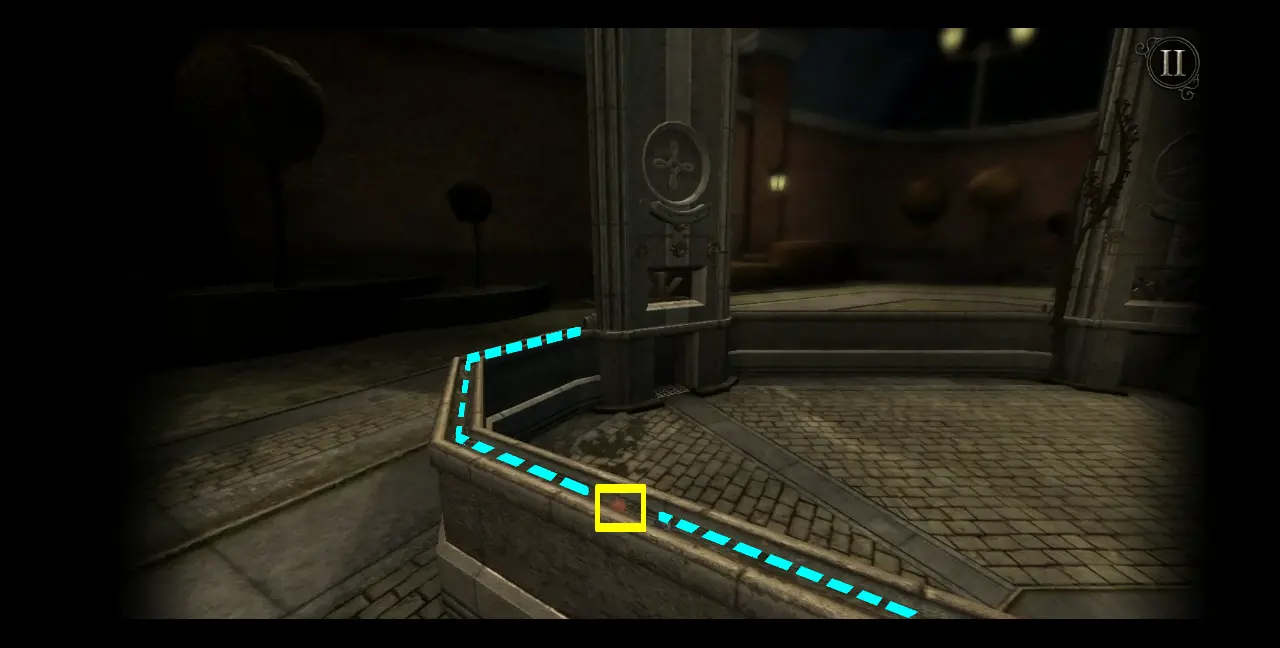
This small stone carving fits on a slot on the forehead of a statue at the Garden. This statue is to the left of the fountain.

Once the stone carving has been placed, the statue will open up. From here, you can collect an artist’s mannequin. Behind the mannequin is a valve, which you need to turn to the right, redirecting the water from the water wheel to the fountain.
The fountain will start working again, the water from it traversing the waterways leading to the pillars surrounding it. You’ll also notice that there’s some kind of object floating in the water, moving along with the current.
Following the water, head to the pillar that’s closest. Move the handle on the right along the path on the wall. Moving the handle will also move the gear opposite it.
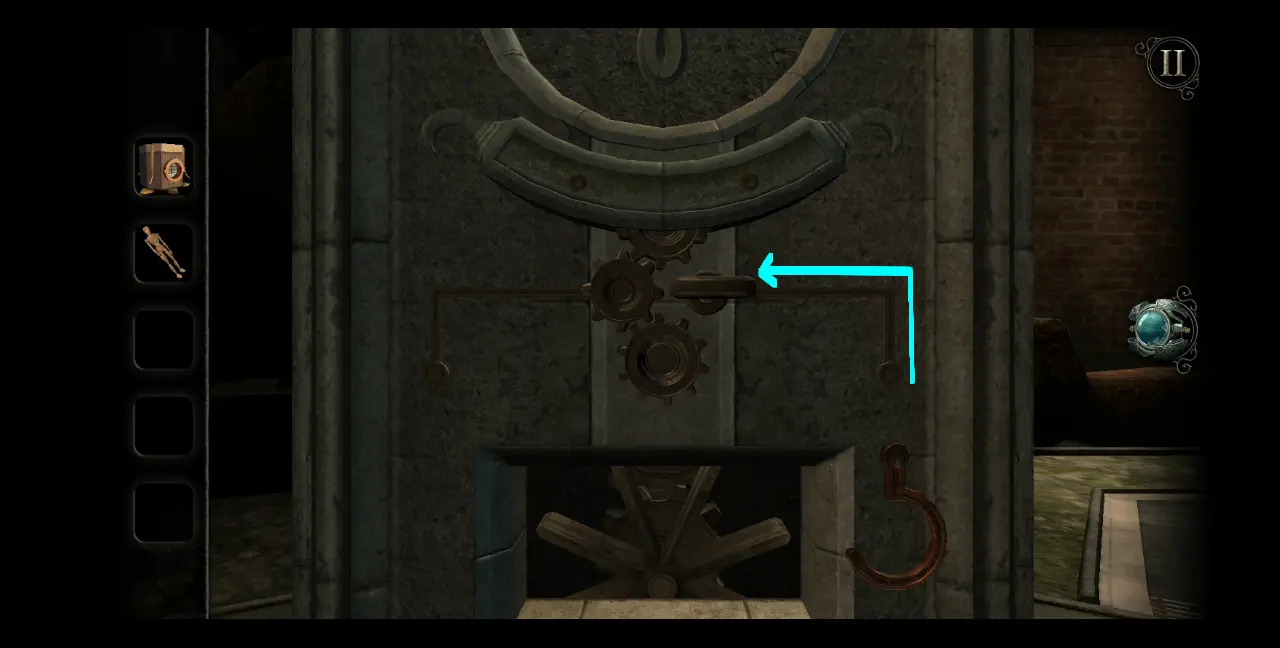
The gears will connect and start moving, which will cause the symbol on the pillar to have a multicolored film over it. When you open your eyepiece, you will see a mechanism where one end can be rotated while the other end will “draw” symbols based on where it’s placed and how you rotate the mechanism. The goal, therefore, is to adjust the drawing end so that it will draw the exact same symbol seen on the pillar.

Upon successfully drawing the symbol, head to the next pillar. Move the handle on the right following the path highlighted in the image below.
Here is the drawing puzzle for this pillar:

For the last pillar, solving the first lock takes a few steps because there are two movable panels obstructing the paths. Below are a sequence of images illustrating the steps to unlock this puzzle:

Once this lock has been broken, you’ll be tasked to draw the last symbol, but this time, there are two adjustable parts on the mechanism. While there are also two rotatable knobs, you only need to use one to move the entire mechanism.

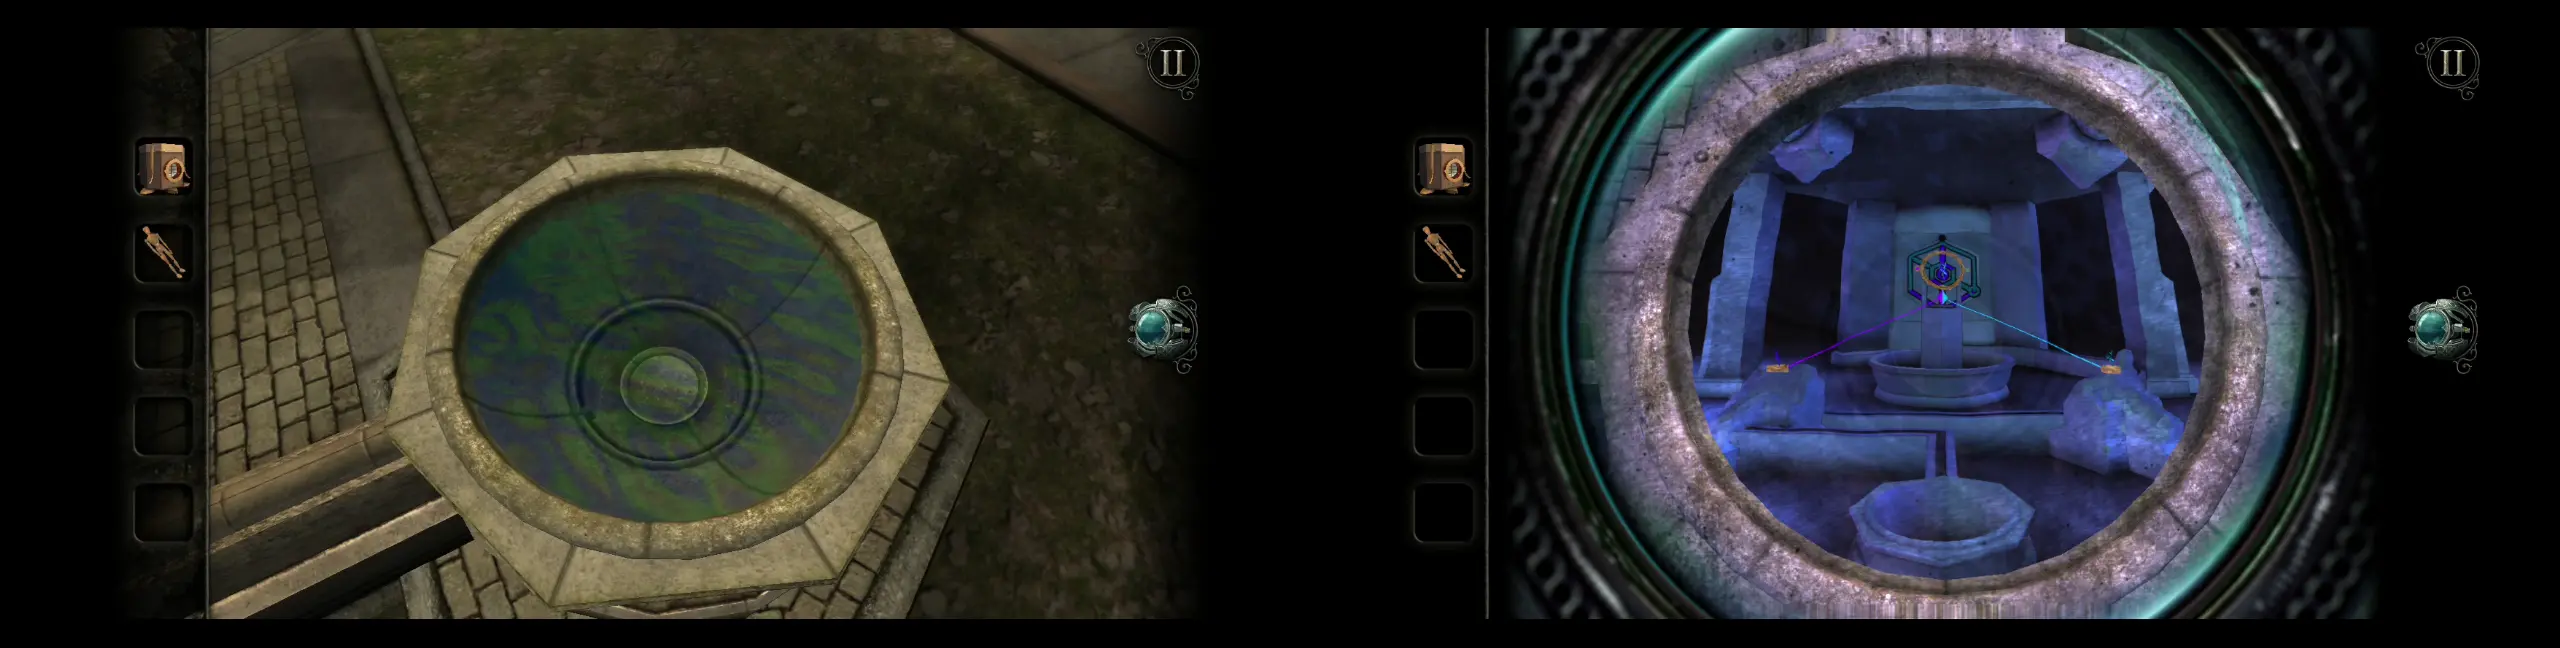
When the last symbol has been drawn, a brief cutscene will lead you to another part of the fountain where a small well is. Water will fill up the well and its surface will be covered in a multicolored film. When you use the eyepiece, you’ll see the final puzzle inside this well. From the second photo, you will see that there are three pieces of the puzzle: left, right, and center.
Zoom into the well, first to the piece at the center of the puzzle. You can see that there is a symbol in the middle of the golden dial. That is the symbol you need to imitate using the three pieces of the puzzle. For this piece at the center, there is a blue knob and a pink knob on a dial. Reposition the blue knob to the west of the dial, and the pink knob to the north of the dial.
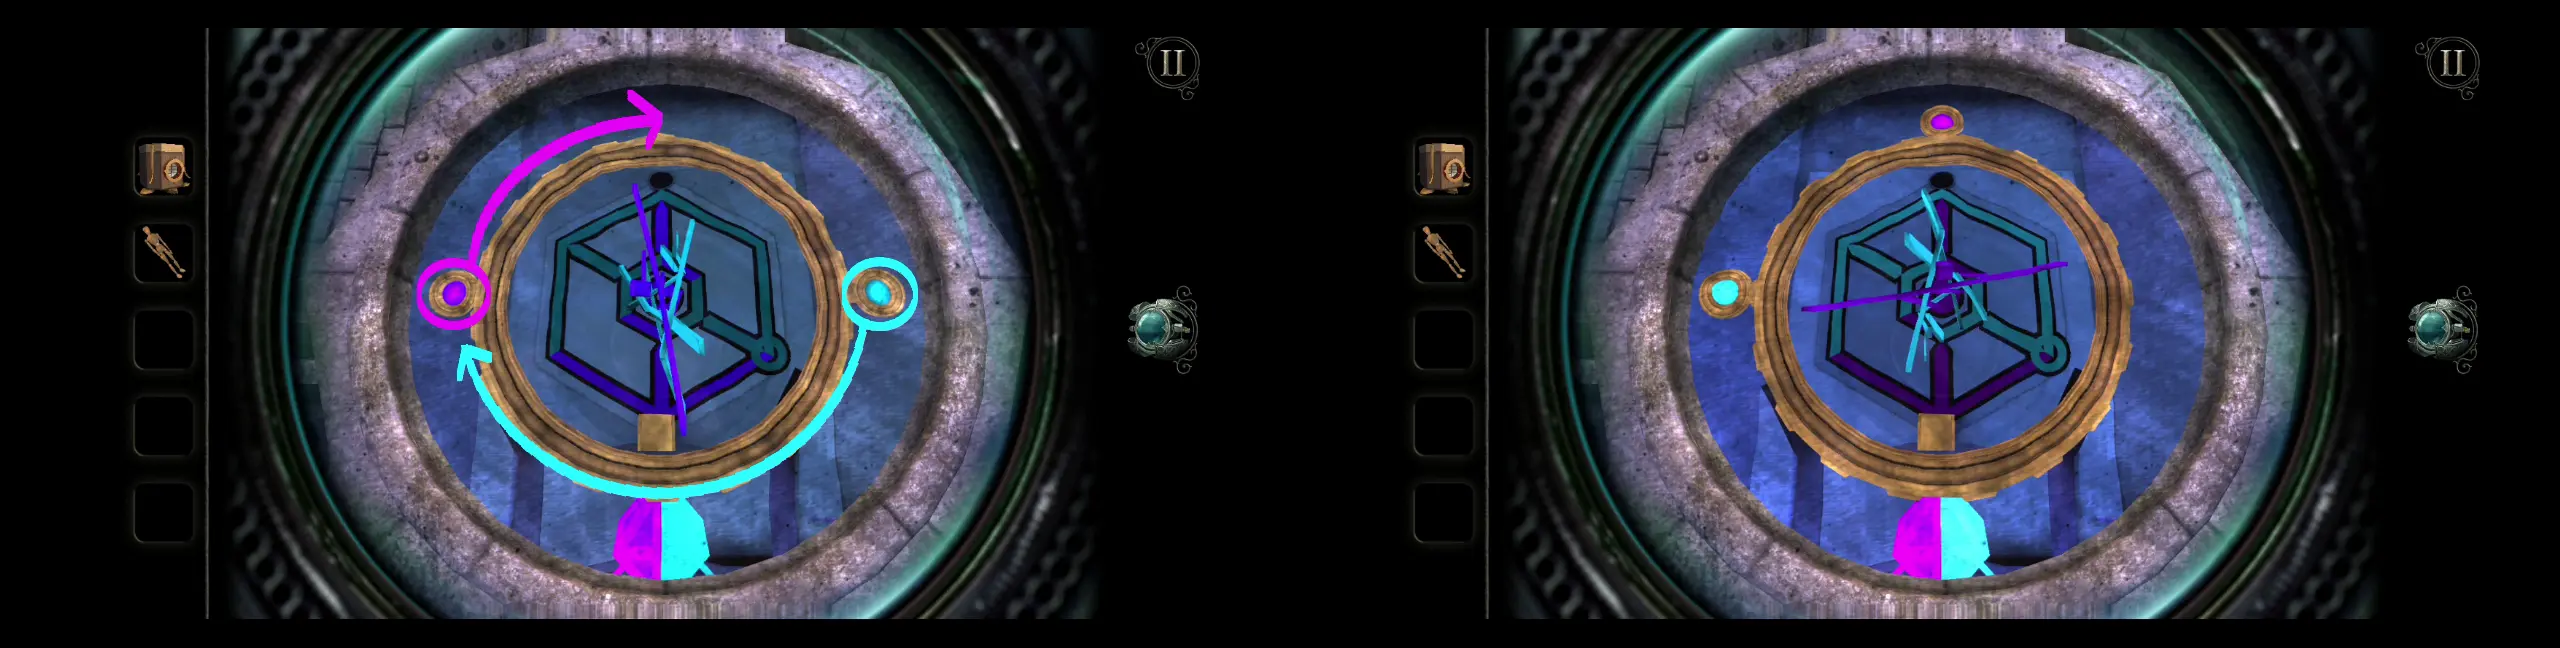
Zoom out of the center and turn to the piece on the right. Turn the gold dial underneath the symbol fragment so that it looks exactly like the symbol on the picture below. From a distance, you will see that the symbol on the gold dial from the center is starting to take form.
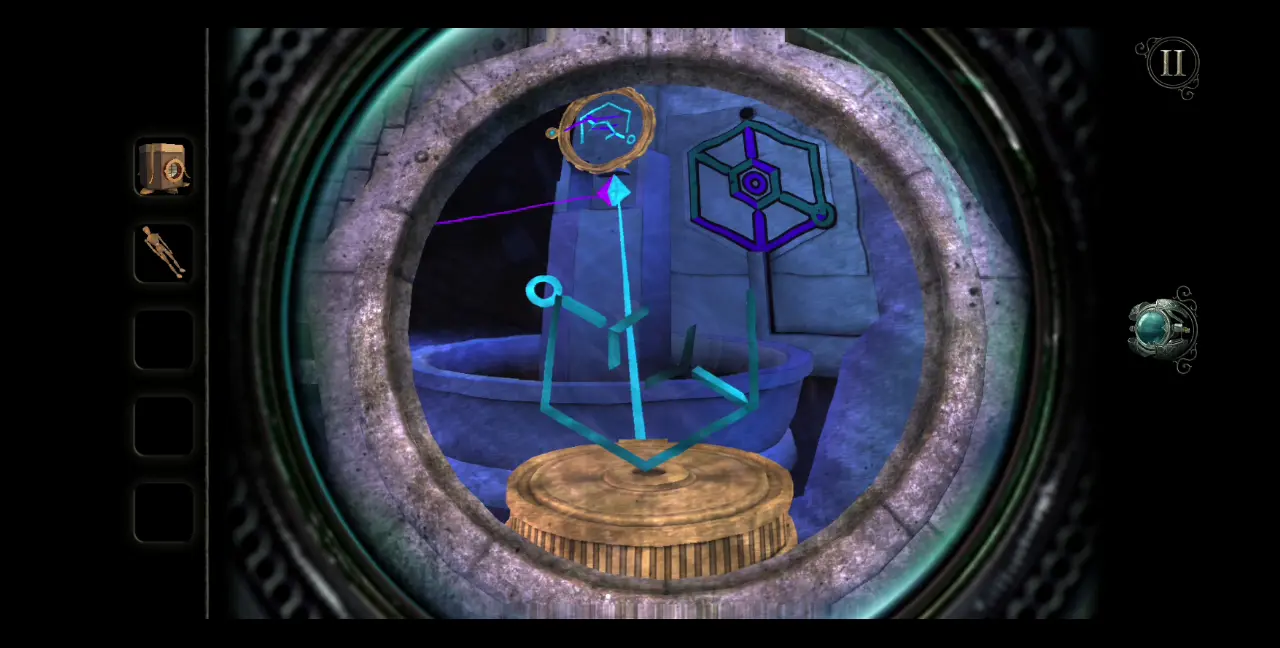
Zoom out of the right piece and move to the left piece. Again, turn the gold dial underneath the symbol fragment so it looks exactly like that shown in the picture below. The symbol on the dial from the center should now look more like a hexagon.
A cutscene will play out, indicating that you’ve successfully solved the puzzle. From the small well, a stone column will emerge with an item on it. Finally, it’s the strange artifact.
Upon collecting this item, the Garden will be taken over the black tendrils and rendered inaccessible. At the front of the house, another symbol is blacked out by ink on the seal. The Garden is now closed and this segment is complete.
Japanese Gallery
Now we will be completing the Japanese Gallery. As usual, check the strange artifact in your inventory. This should give you a mechanical cicada.
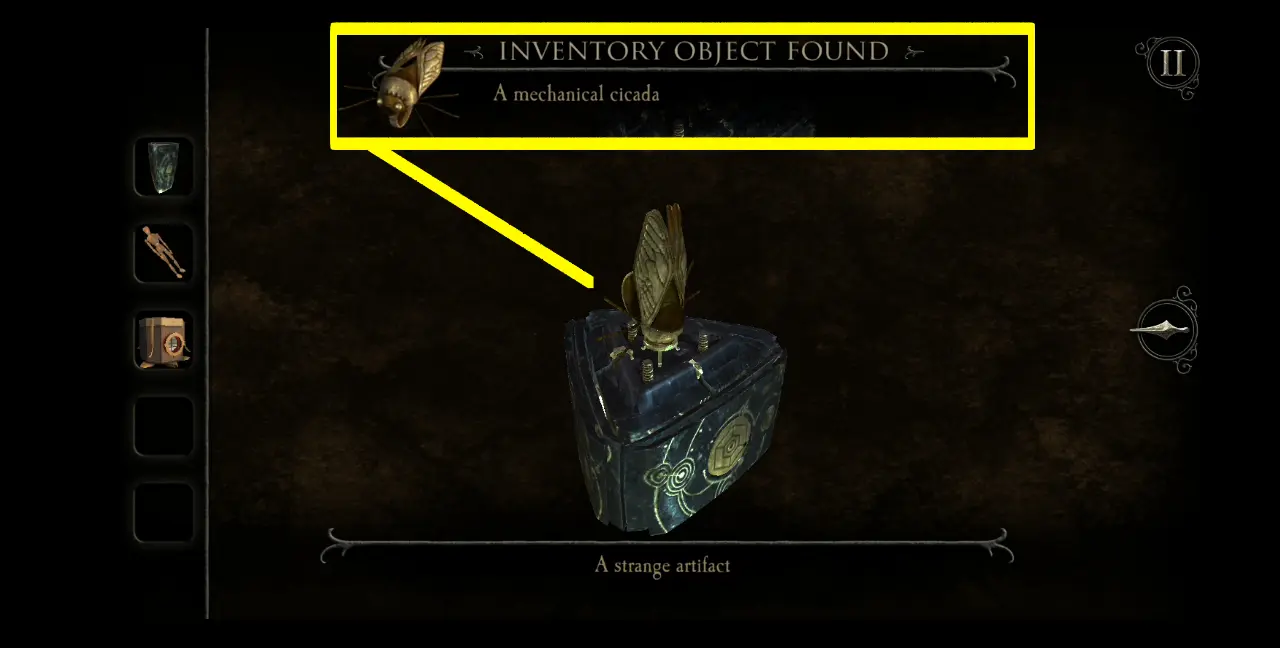
However, this is not the item’s complete form. Again, in your inventory, view the mechanical cicada. Open up both of the cicada’s wings and this will cause the bottom to open up into a flat circle.
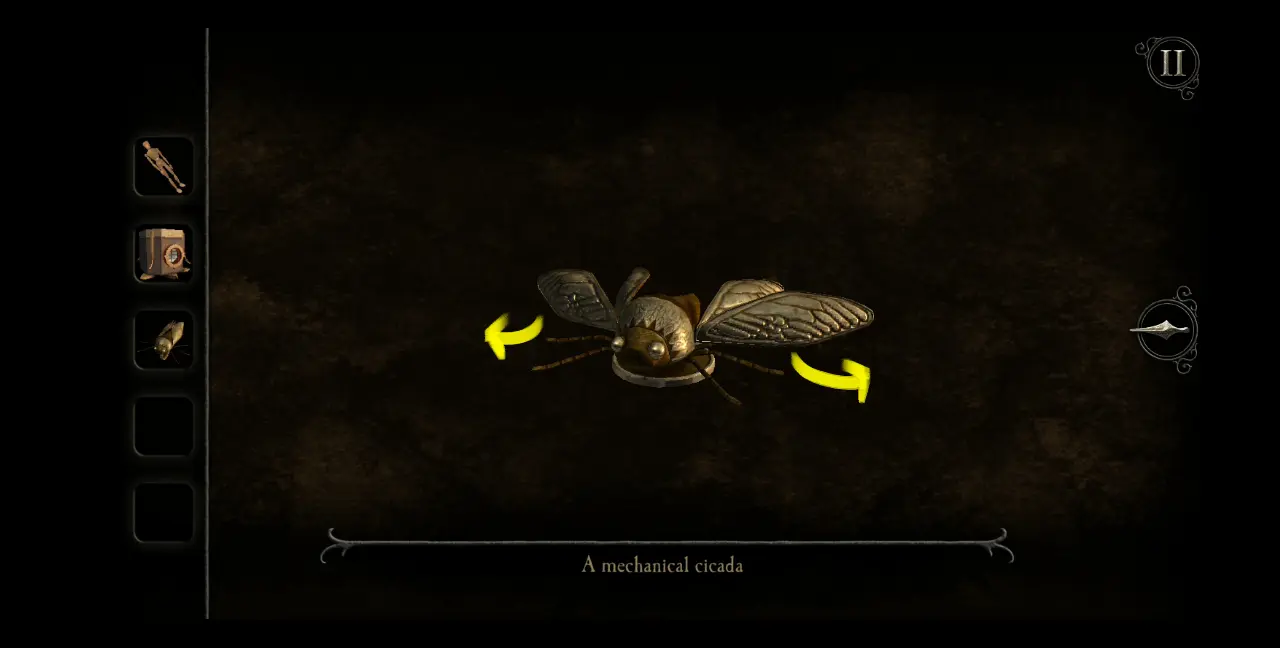
Return to the Japanese Gallery. To your right is a table with two dragons and pagodas in between them. At the front of the table is a circle with a cicada symbol. Place the mechanical cicada on the circle.

The cicada will move along the straight line from the circle and when it reaches the opposite end, the cicada will disappear under the table and two halves of a painting will emerge from either side, each one aligned with a dragon. These two halves are covered in a multicolored film, which means you need to open your eyepiece to use them properly.
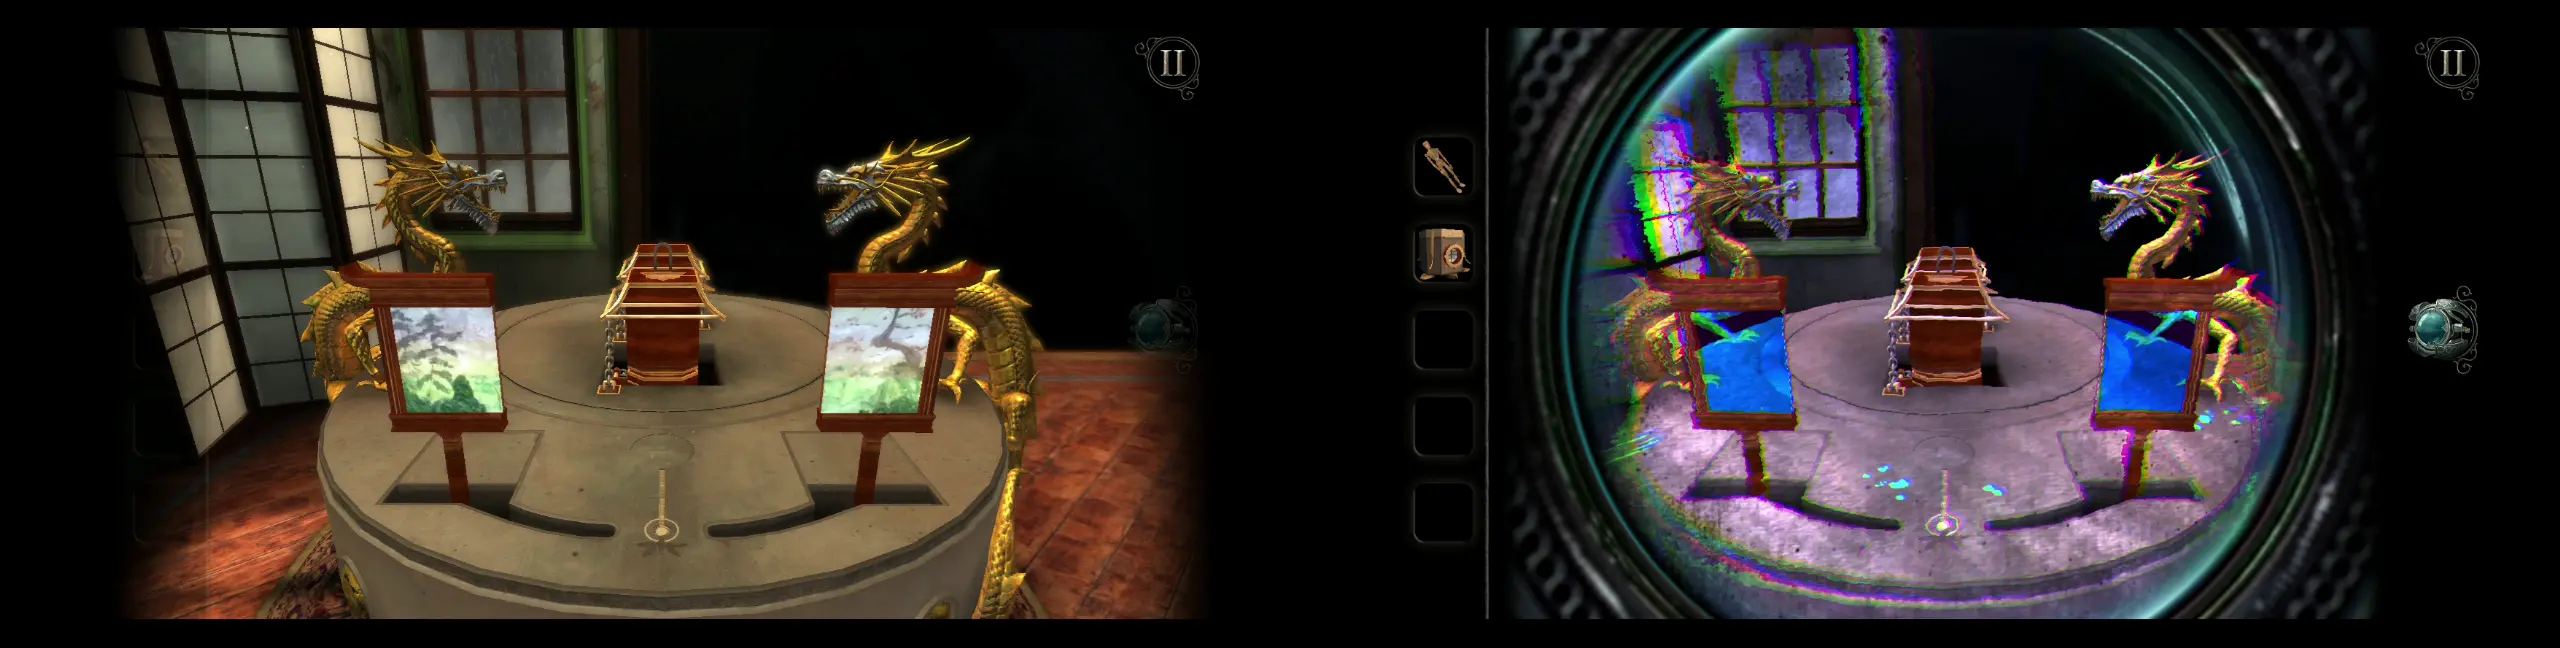
When you zoom into one of the paintings, you’ll see that you can control the dragon right in front of it. To begin solving the puzzles in this table, you’ll have to start with the left dragon:
- With your eyepiece open, peer through the left half of the painting. Move the dragon’s head so that its mouth directly faces the railing attached to the pagoda.
- Close your eyepiece and zoom into the dragon’s head. Clamp the mouth onto the railing.
- Open your eyepiece again and peer through the left painting. Move the dragon up so it unchains the pagoda.

Now that the pagoda is raised, zoom into its bottom segment. Move the dial so that the railing faces the right dragon.

Now for the right dragon, follow these steps:
- Open your eyepiece and view the right half of the painting. Move the dragon’s head so its mouth is directly facing the railing on the pagoda.
- Close your eyepiece and zoom into the dragon’s head. Clamp the mouth onto the railing.
- Open your eyepiece again and peer through the right half of the painting. Pull the dragon to your right.

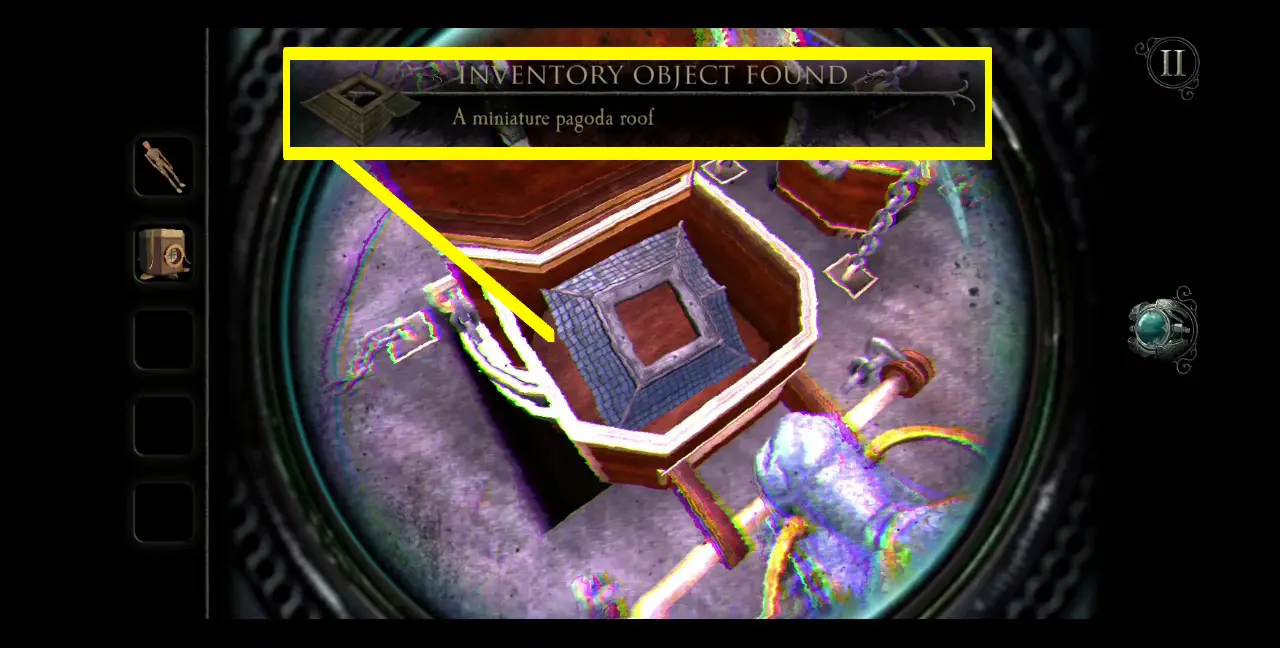
This should open a drawer on the pagoda. Zoom into the drawer and you’ll be able to collect a miniature pagoda roof.
Return to the pagoda on top of the table with the octopus. We’ll be following a similar sequence to when we installed the circular metal casting, except this time, we will be installing the roof we just obtained. Here’s how the sequence goes:
- Place the unfinished wooden sculpture on top of the hexagonal slot.
- Move the circular dial to the middle, which holds the roof symbol.
- Install the miniature pagoda roof.
- Move the circular dial back to its original position.
- Collect the structure, which is now an unfinished pagoda sculpture.

With this new item, go back to the table with the dragons. Place the unfinished pagoda sculpture on the hexagonal slot above the pagoda on the table. The circular window on the sculpture will open into an aperture and crystal shards will appear around it.

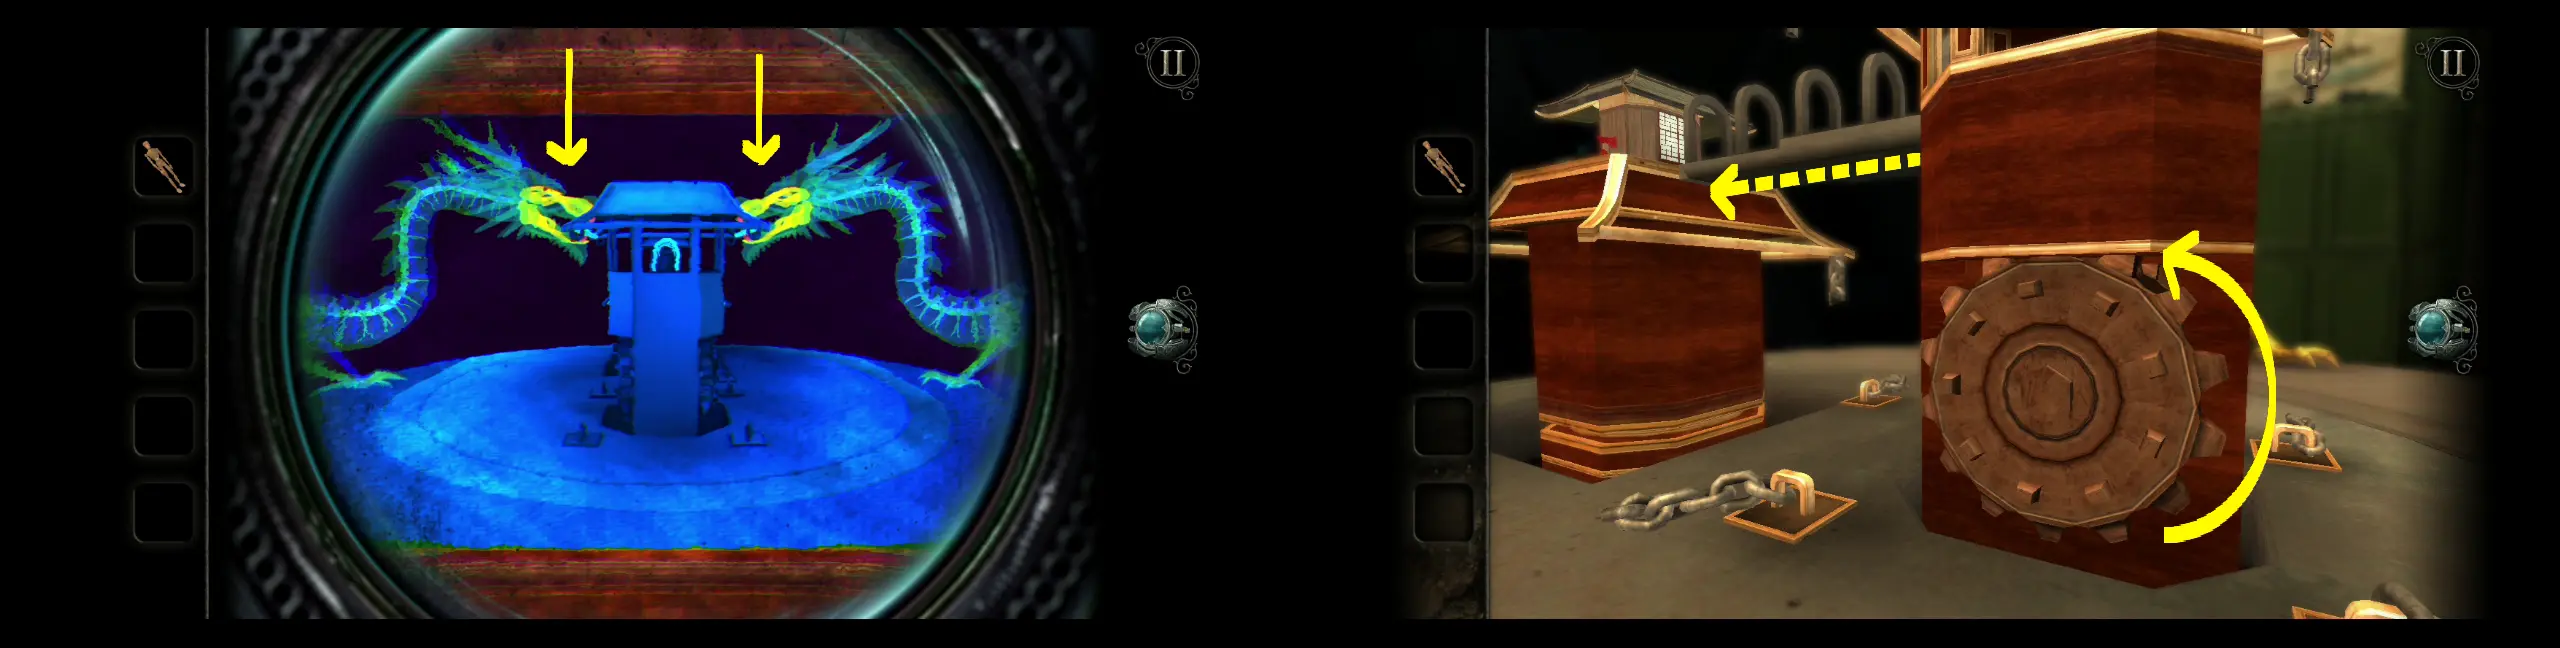
However, this part of the table will rotate, thus making the pagoda at the back now face the dragons. Additionally, the two halves of the painting in front will come together. Just like the previous sequences, you need to peer through the painting using your eyepiece and move the two dragons’ mouths close to the railing of the pagoda. Clamp the jaws of both dragons on the railing then, by peering into the painting again, pull up both dragons simultaneously to unchain the pagoda.

If you view the two pagodas, you’ll see that the pagoda the dragons pulled up looks much taller than the one behind it. Use the dragons to move the pagoda down, making it the same height as the other pagoda. Once these two structures are aligned, turn the wooden cog on the left side of the front pagoda. This will extend a bridge that will connect both structures.
Head to the structure at the back where the unfinished pagoda sculpture is installed. Use your eyepiece to view through the aperture and enter the structure. Inside, cross the bridge connecting the two structures and you’ll find a table with wooden box frames containing an item. On either side of the table is a circular dial. Turn each dial so the wooden box frame will move. This will allow you to collect a new item: a miniature pagoda roof and spire.

Return to the pagoda on top of the octopus. This will be the third and last sequence you need to follow for the pagoda sculpture:
- Place the unfinished pagoda sculpture on top of the hexagonal slot.
- Move the circular dial to the right, which holds the spire symbol.
- Install the miniature pagoda roof and spire.
Unlike the previous sequences, you don’t have to place the circular dial back in its original position as you won’t be able to collect the miniature pagoda anymore. Instead, a column will rise from under the miniature pagoda, opening up the final puzzle for the Japanese Gallery.

In this raised column, you will see that there are wooden pieces and lamps surrounded by a red circuit. The objective of this puzzle is to connect all the wooden pieces to the illuminated pieces until all the pieces around the column are lit. There are four sides in this column and the following pictures below illustrate how the pieces should be arranged so they will light up. All pictures on the left are the default setting of that particular side while all pictures on the right are how the pieces should be arranged.
Front side:
Right side (from front):
Left side (from front):

Back side:
At the end of the puzzle, all the lights should be on. At the bottom of this puzzle is the familiar wooden cage holding the strange artifact. The bars will retract, thus freeing the strange artifact. Collect it.
As expected, the Japanese Gallery will be overtaken by the black tendrils and you won’t be able to access it. This completes your exploration of the Japanese Gallery.
Art Studio
The Art Studio is the second to the last room you need to complete, and perhaps also the shortest. With the strange artifact at hand, view it in your inventory. You’ll get a stained glass panel.
This stained glass panel belongs to a part of the dollhouse right across the Art Studio. Place this item on the empty slot right beside two other stained glass panels.

This will cause the top part of the Art Studio to reveal a gold dial, which indicates that the Art Studio can now be rotated. This will come handy shortly.
Back to the stained glass panel, its embellishments can actually be movable, but to see the correct pattern, return to the Art Studio. On a canvas to the left side of the open window, you’ll see that the window itself is painted looking out to the stained glass panel you just installed. If you zoom further in, you’ll see the correct pattern in which the stained glass panel embellishments should be arranged. Also notable in this painting is the presence of the artist’s mannequin on the window.
Let’s do this step by step: first, exit the Art Studio and rotate it so that the window is facing the stained glass panel as indicated on the painting.
Next, arrange the stained glass panel embellishments to reflect the correct pattern you’ve seen on the painting.
Lastly, return to the Art Studio and peek out of the window. You should be looking directly at the stained glass panel from where you’re standing. Place the artist’s mannequin on the stand to complete your recreation of the painting.
With this, the canvas beside the window will be covered in a multicolored film. Open your eyepiece and a symbol that looks like the stained glass pattern will appear on the canvas. Trace the infinity symbol starting from the small gold dot at the bottom.

Part of the canvas will burn away, revealing another layer of the painting where Abigail is sitting on the window holding a key and a book. This key and the book will appear on the window.
Open the book, which is titled Principles & Fundamentals of Perspective, and collect the key with a swan motif.
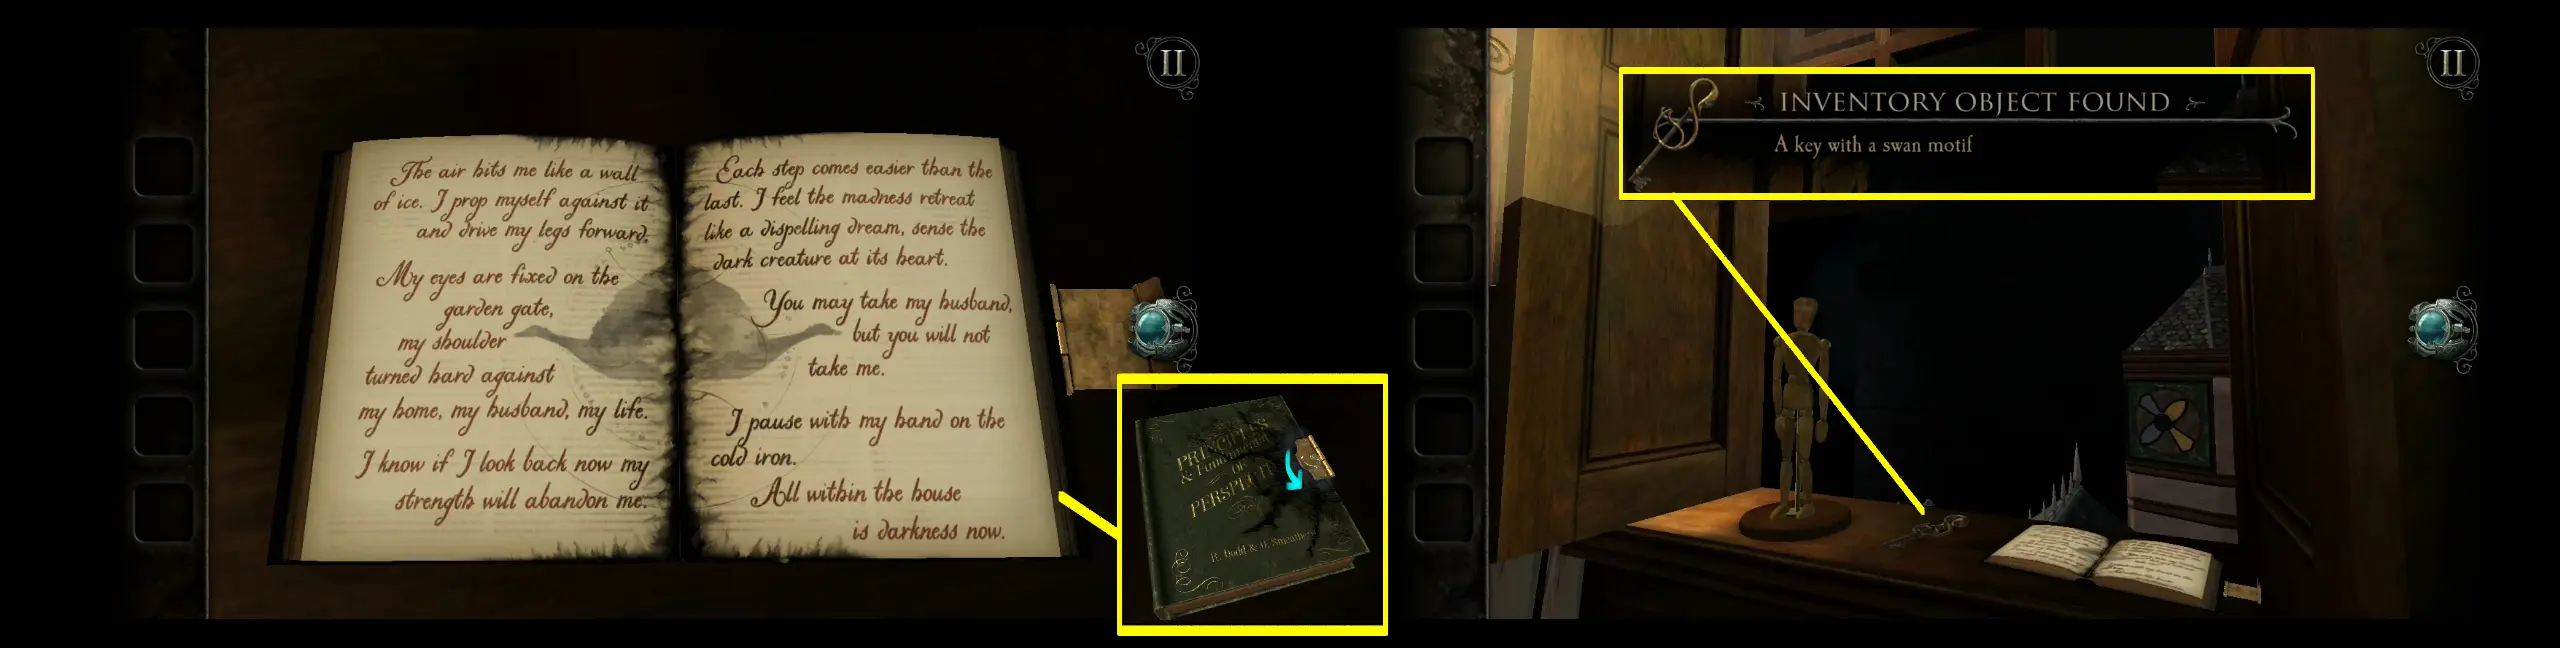
As you recall, there’s a closet at the left side of the room. Use the key on the closet, turn it, and open the doors. Inside it is a picture covered by multicolored film. Use your eyepiece and another symbol will appear. Trace the symbol for the fibonacci spiral.

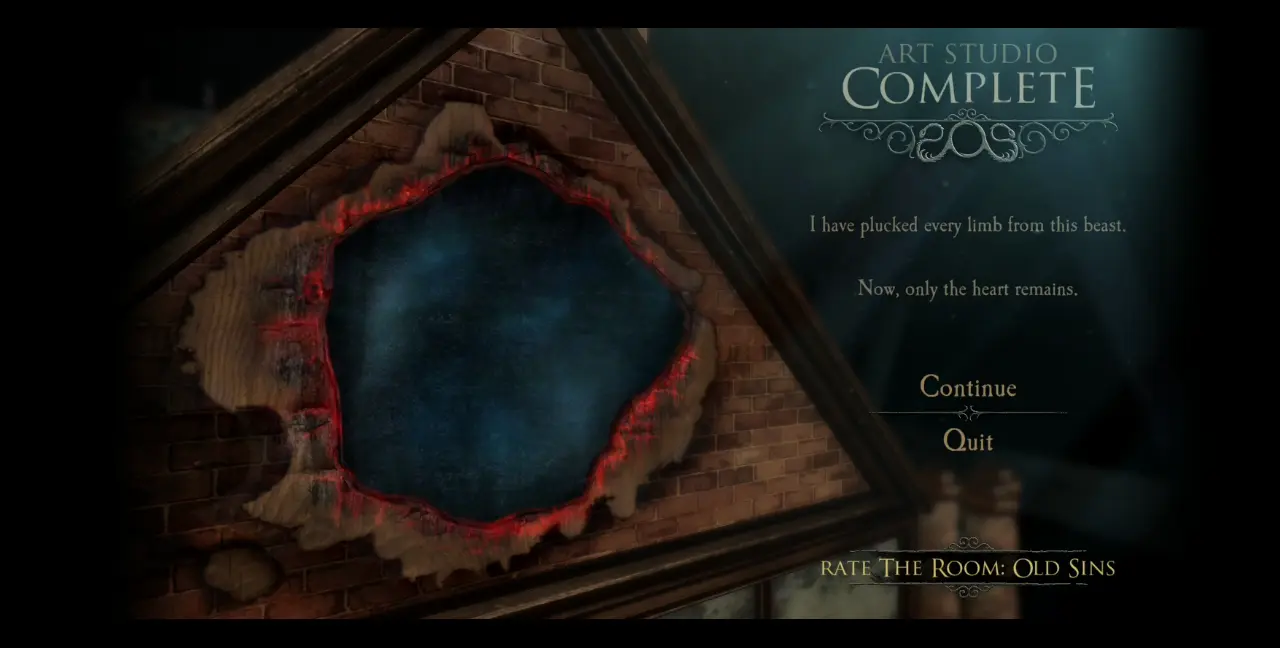
A cutscene will play where the photo will start to burn and reveal different layers, with each one depicting Edward thrashing the Art Studio. At the end of the cutscene, you’ll see that the photo is ripped and displaying various items in the room being thrown and overturned. The Art Studio will mirror this scene so when you look at the room again, it will look just as the photo depicts. At the center of the mess is the strange artifact.

After the Art Studio has been overtaken by tendrils, you’ll see that the symbols on the seal at the top of the dollhouse will be swallowed up entirely by the black goo. The seal will then break, leaving you with a hole at the top of the dollhouse, which leads to the final room…
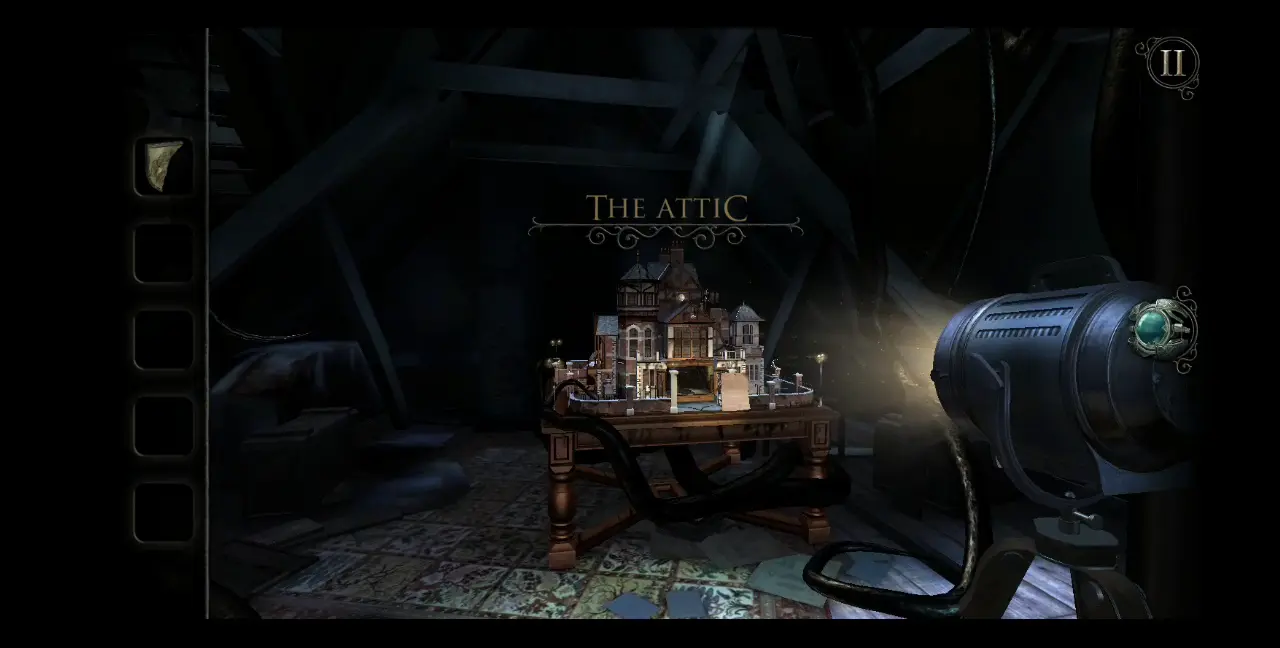
The Attic (Finale)
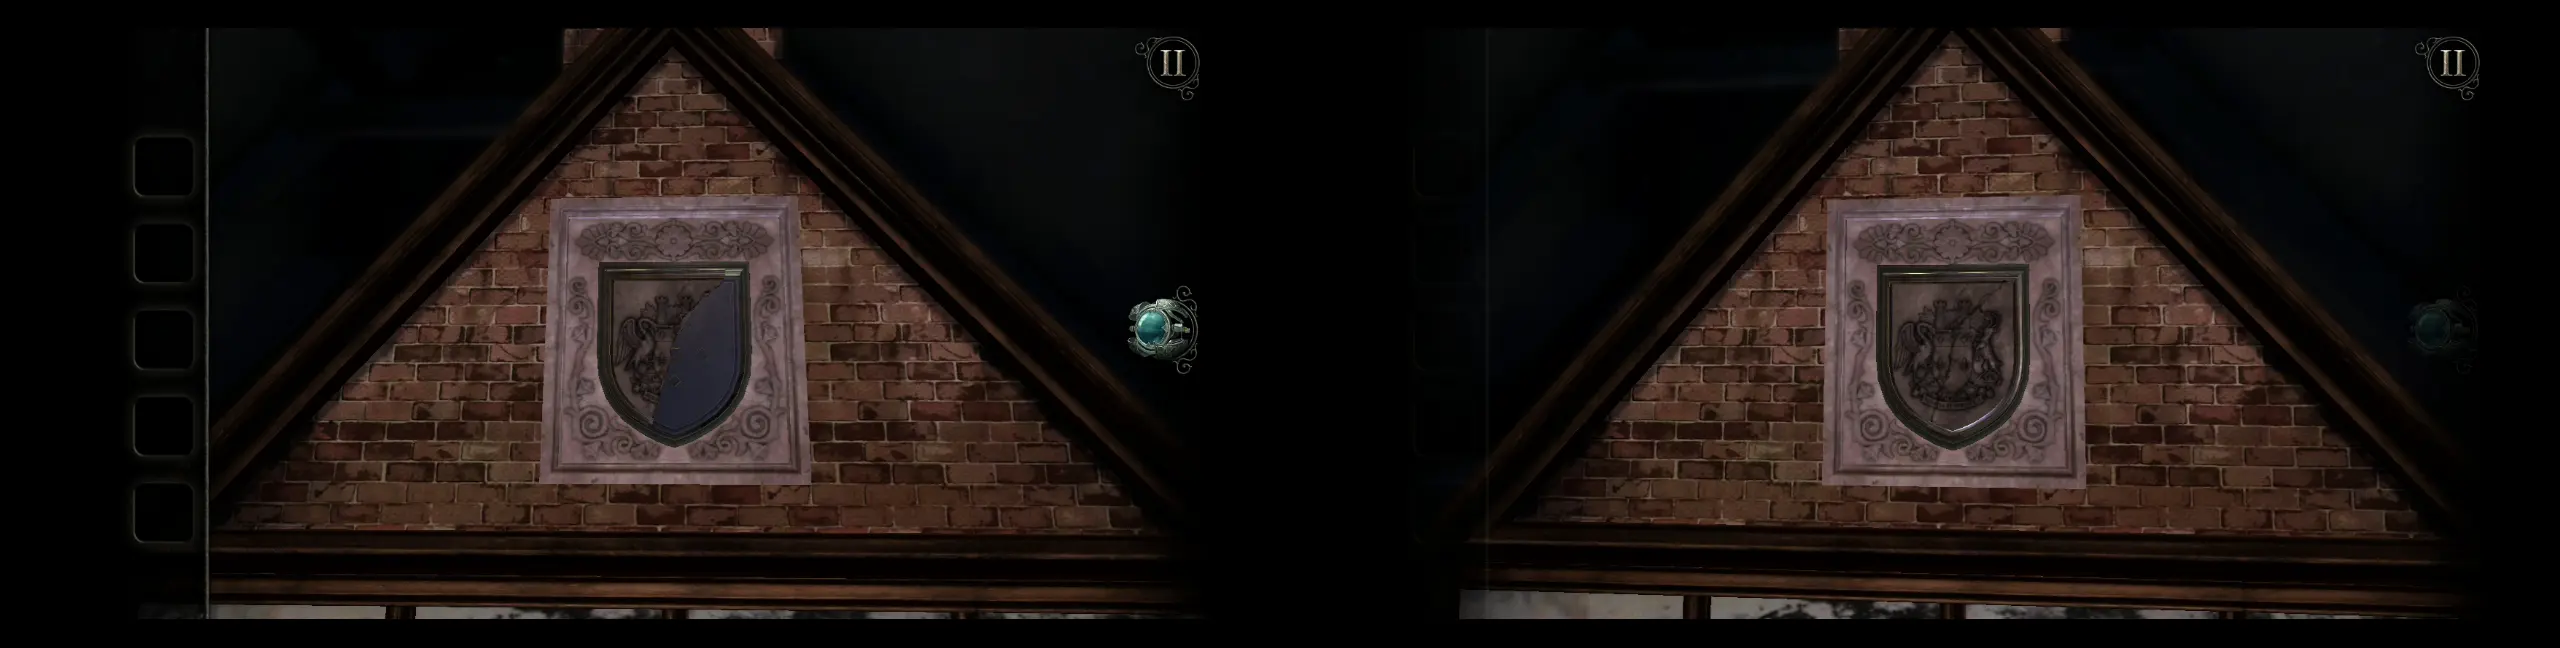
The Attic. But before you enter, there’s one last item that will be yielded by the strange artifact: half a family crest.
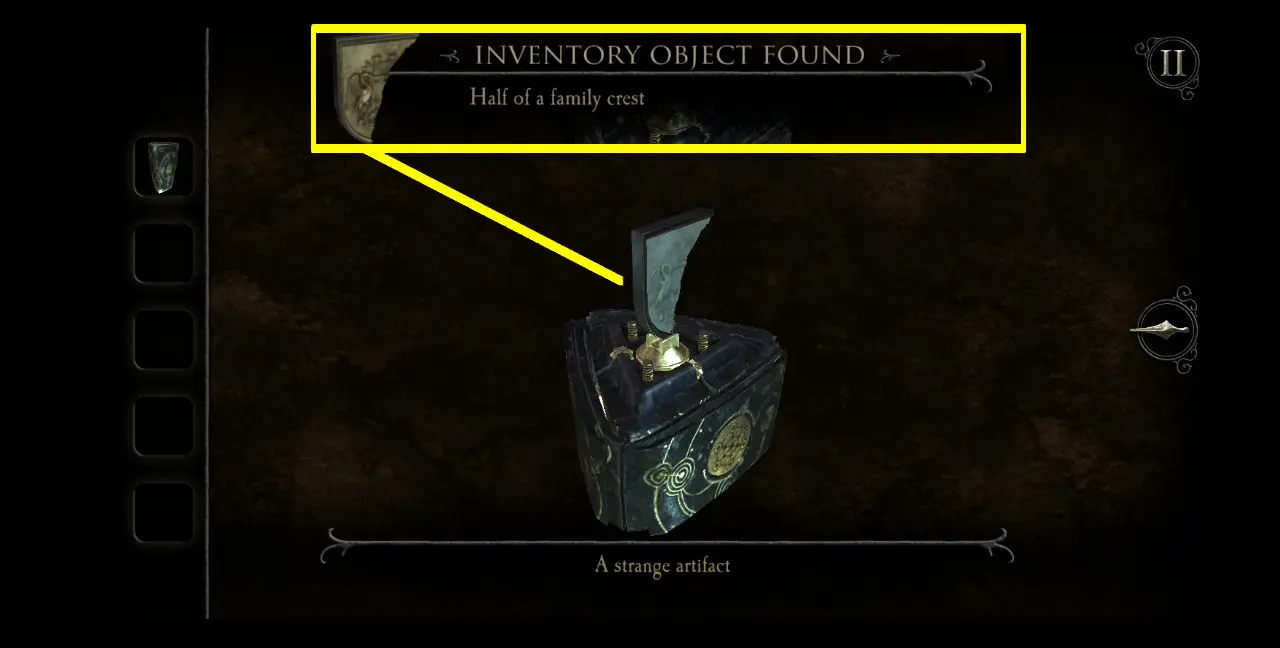
If you recall, the family crest belongs in the part of the dollhouse now occupied by the broken seal. Thus, for now, we can’t use this item yet. In the meantime, open your eyepiece and enter the hole for the broken seal.
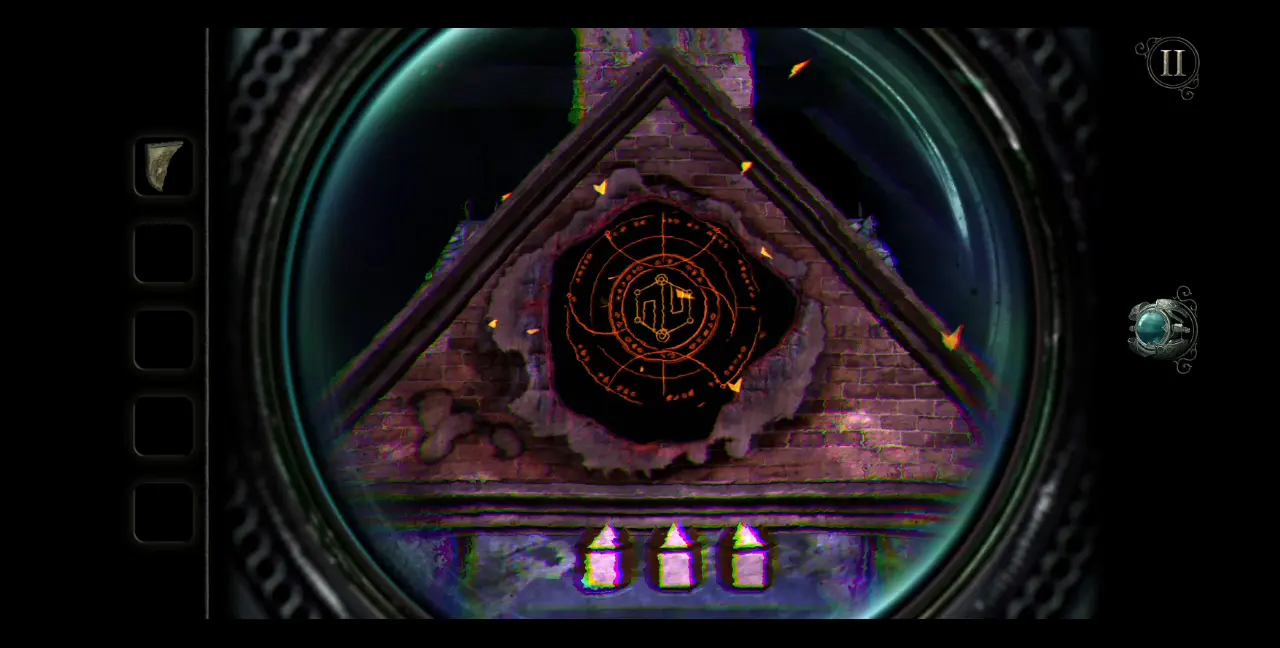
You will find yourself in the Attic.
In this segment, you will be entering the Attic three times, wherein each instance is like a different layer or level of reality. Every time you enter the Attic, you’ll have to solve a puzzle in the dollhouse, as well as find a note from Edward each time.
For the sake of convenience, we’ll be referring to these instances in the Attic as Attic I, Attic II, and Attic III.
Below are the notes you will find from Edward during each instance:

Now for the mechanics of the puzzle: in the dollhouse, you will find a doll of both Abigail and Edward located in different rooms. The objective is to get Edward into the same room as Abigail. You can do this by opening your eyepiece and getting Edward’s doll to enter the mirror behind him, at which point, you will find his doll transported to another room. Specific rooms are chosen based on the symbol you select, but this is only applicable to Attic II and Attic III.
That said, Attic I is like a test run. Here, Abigail’s doll is in the Foyer. To reach her, you need to go to the Study, which is the room where Edward is always found in the beginning, and turn his doll to face the mirror. Once he’s inside the mirror, you’ll find Edward’s doll in the Foyer. Turn his doll to face Abigail’s doll, which will vanish into flames.

Enter Attic II through the black hole that will appear on top of the dollhouse. You’ll notice that the surroundings look considerably more dismal and creepy. In this segment, Abigail is in the Curiosity Room. Edward is, again, in the Study. This time, though, you will see two symbols on either side of Edward’s doll. Each symbol represents a room as you’ve seen every time you complete exploring a room. To select a symbol, you just need to click it. For Attic II, the correct order of rooms is the Study, Kitchen, and Curiosity Room. The images below illustrate the correct symbols.

Enter Attic III. At this point, the roof is completely gone and the house is surrounded by some kind of dark, enigmatic force. In this instance, Abigail’s doll is in the dollhouse’s Attic. To get there, begin in the Study then go to the Maritime Room, Curiosity Room, Foyer, then the Attic. The images below illustrate the correct symbols.

A seal will appear once more in the dollhouse’s Attic. Enter it and you will return to what is presumably the real or original Attic where you came from. By this time, the dollhouse is covered in black tentacles and Edward’s lifeless body is to the left of the table. Approach Edward’s corpse and you’ll see his final letter, as well as the other half of the family crest lying on top of the letter.

With both halves of the family crest at hand, place them on the frame at the top of the dollhouse.
The dollhouse will suddenly open, revealing the item you’ve been seeking all this time: the Null.
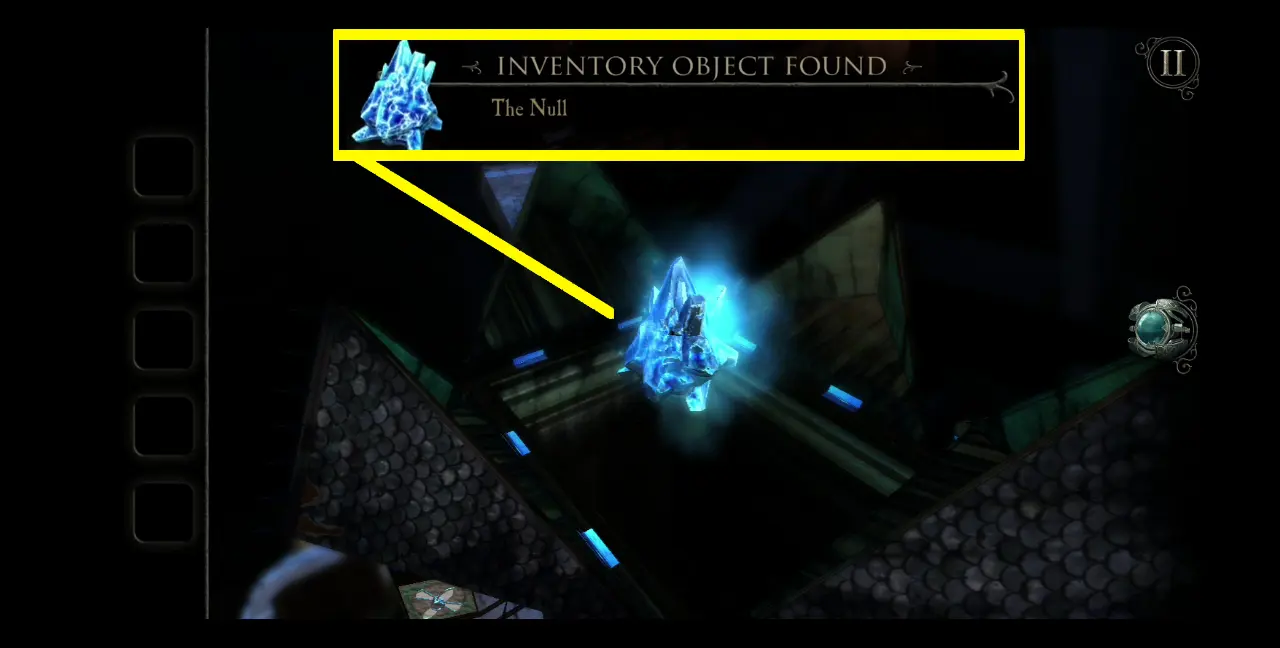
Once you’ve collected the Null, you’ll be returned to the real Attic this time, where you’ll find that the dollhouse is no longer a mystical entity but just an ordinary dollhouse. A short cutscene will show your briefcase opening into a container for the Null. Place the Null into the specialized hatch.
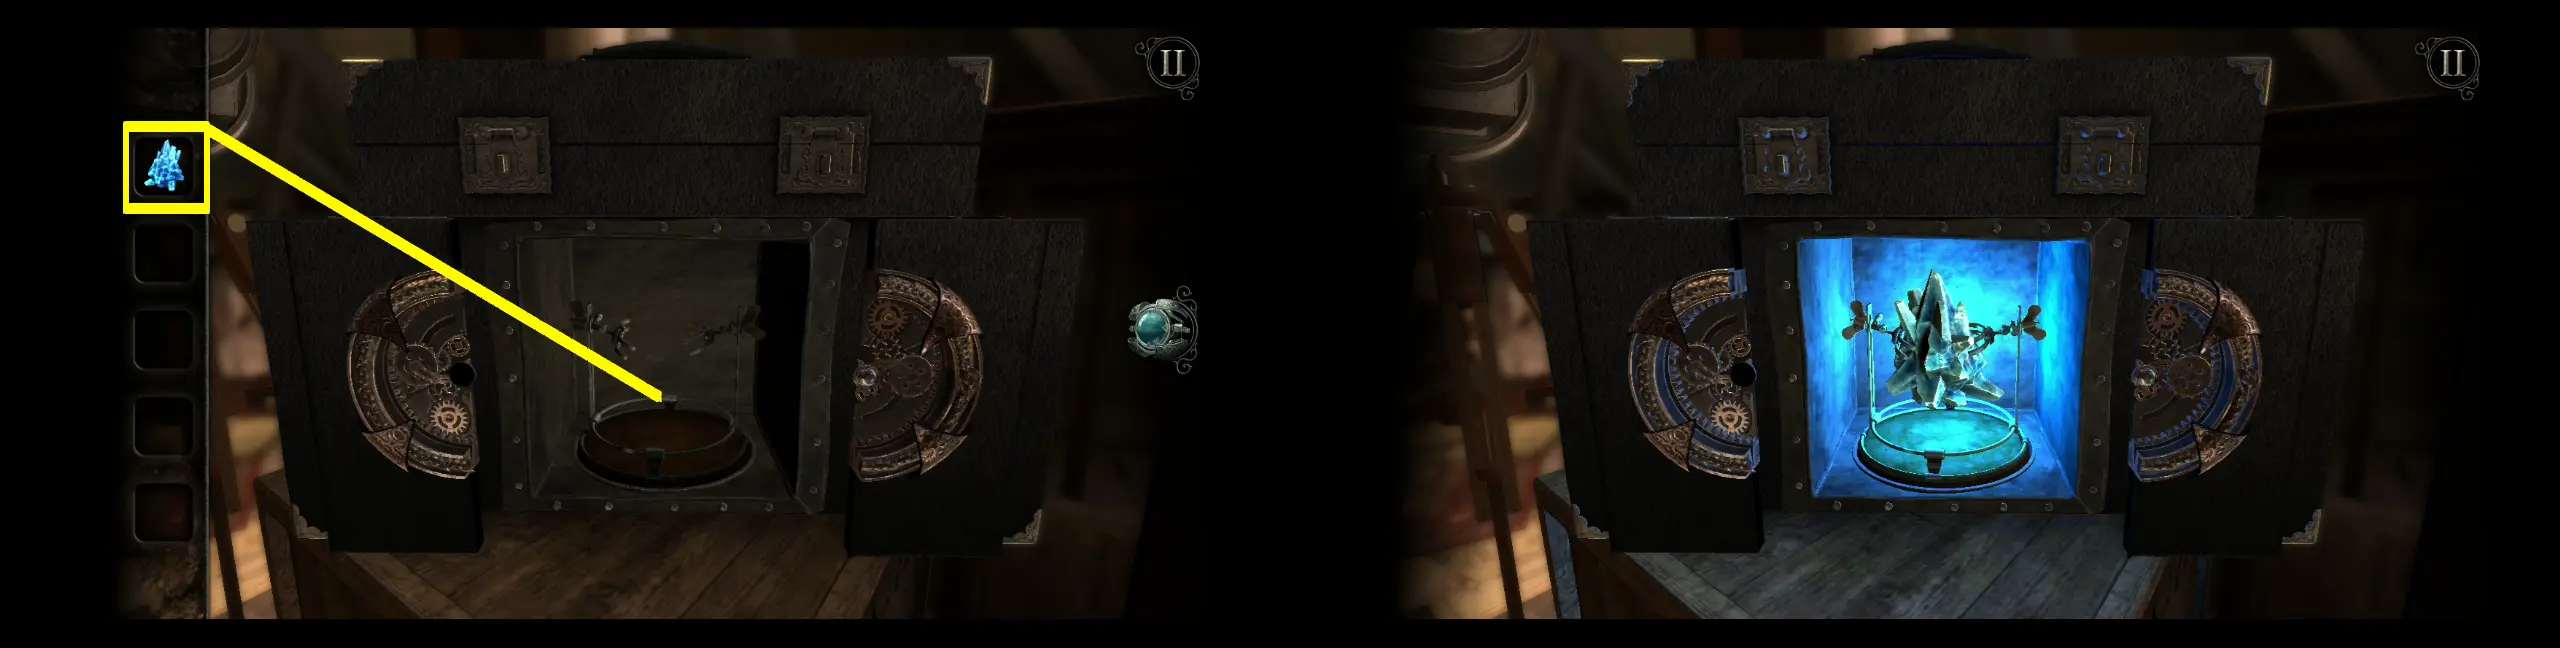
The briefcase will close and a final cutscene will play, revealing who you were working for all along…
And this finally concludes our two-part walkthrough for The Room: Old Sins. Among all the rooms you’ve explored, which did you find most interesting? Which puzzle did you enjoy most, and which one felt the most challenging? Was the revelation at the end something you expected? Share your thoughts in our comment section below!