Wouldn’t it be nice to be a kid again? Just imagine summers spent playing in the afternoons, or biking around the neighborhood park after school, or just plain playing with your siblings, cousins, or friends at home or the playground. As a kid, birthday parties are still exciting, storybooks are great companions, and the simplest of toys can create the happiest memories.
Growing up, some of these things inevitably become less enjoyable and our imagination isn’t as wonderful and whimsical as it used to be. But being an adult doesn’t mean losing all the things that make our childhoods fun and fantastic—and Lost in Play reminds us of that no matter our age, we can still create wonderful stories and memories when we invoke the child in each and everyone of us.
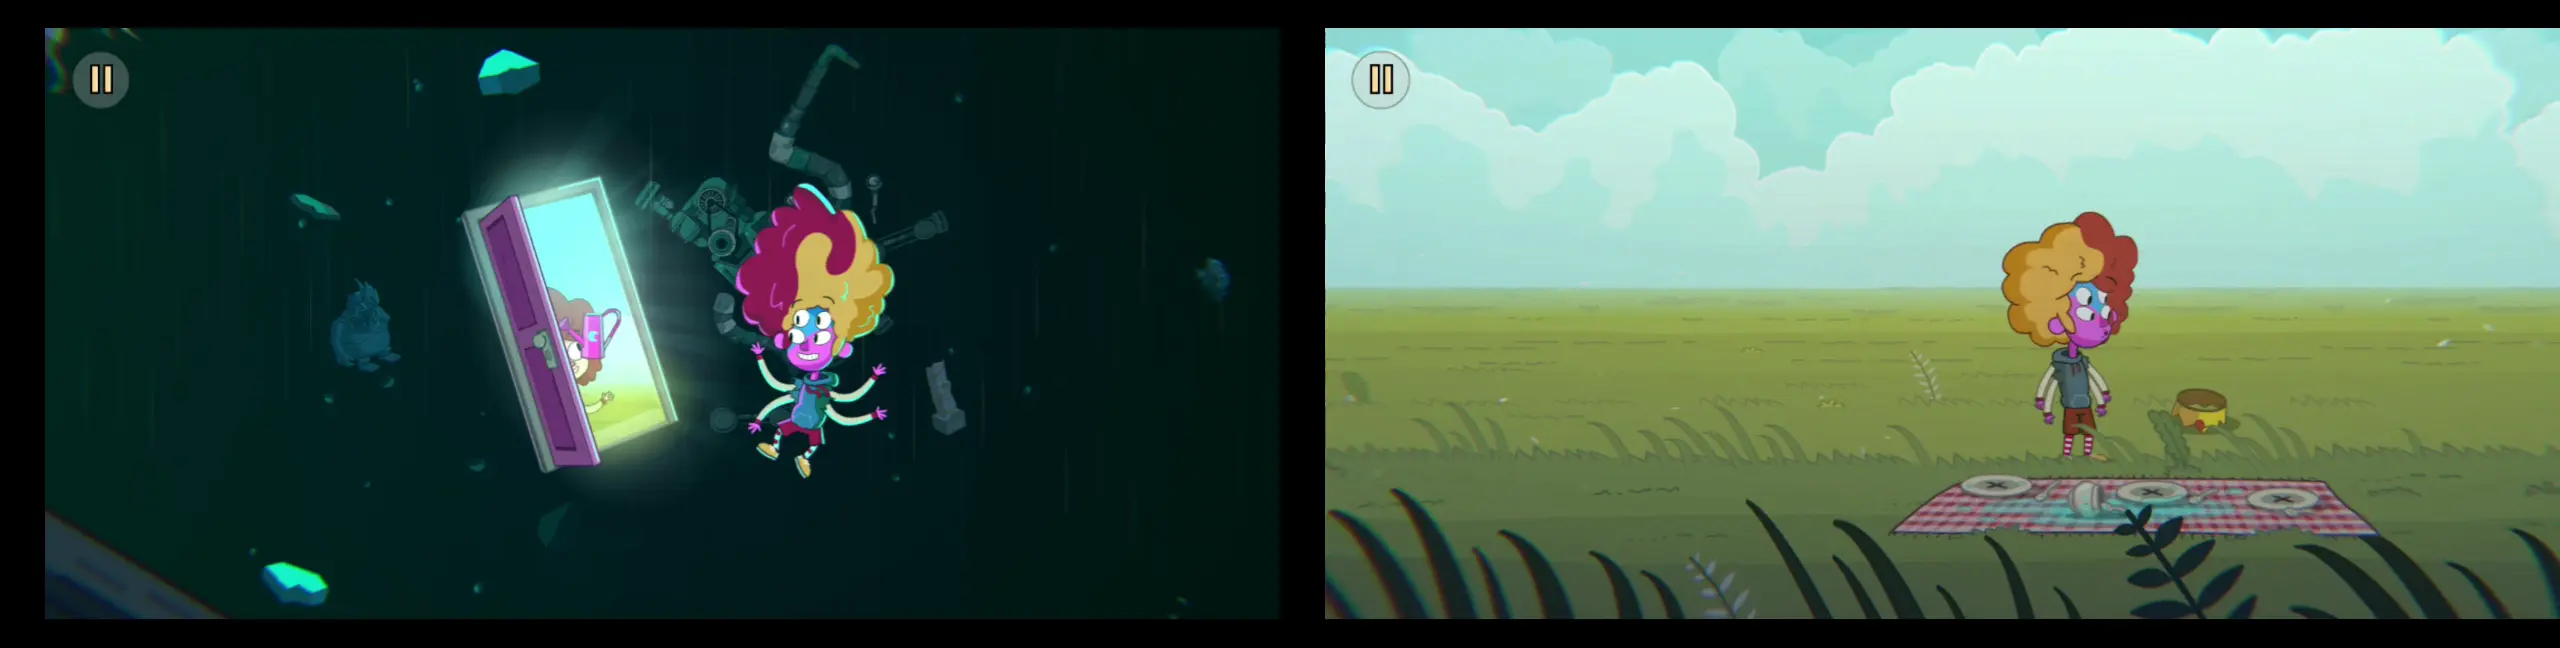
Released in July 2023 by Snapbreak, Lost in Play is a whimsical, imaginative, and creative point-and-click puzzler that can entertain players of all ages. Here, you get to play as siblings Gal and Toto, who embark on a crazy adventure as they try to find their way home. They encounter a myriad of creatures and challenges that encourage them to work together, meet new friends, and test their wits.
As you’ll soon discover, there are many puzzles that will pick your brains, which is why we prepared this Lost in Play walkthrough just for you! When reading this walkthrough, we will refer to the player as “you” since you will sometimes be playing as either Gal or Toto, or as both of them. Additionally, the basic mechanic of the game is that you will collect items that will be placed in your inventory. Using items typically means dragging the item from the inventory to a specific character or location in a particular scene.
Since Lost in Play is mostly point-and-click, we’ve structured the walkthrough in a way where it’s easy to follow step-by-step instructions when it comes to where players ought to go and what items they can collect. In cases where there are mini puzzles, we will also provide pictured solutions for these, though keep in mind that not all puzzles have a single solution and you may have to solve them on your own as the circumstances vary between players.
Without further ado, let’s dive into the whimsical and imaginative world of Lost in Play with our in-depth walkthrough!
Chapter 1
Main Player: Gal
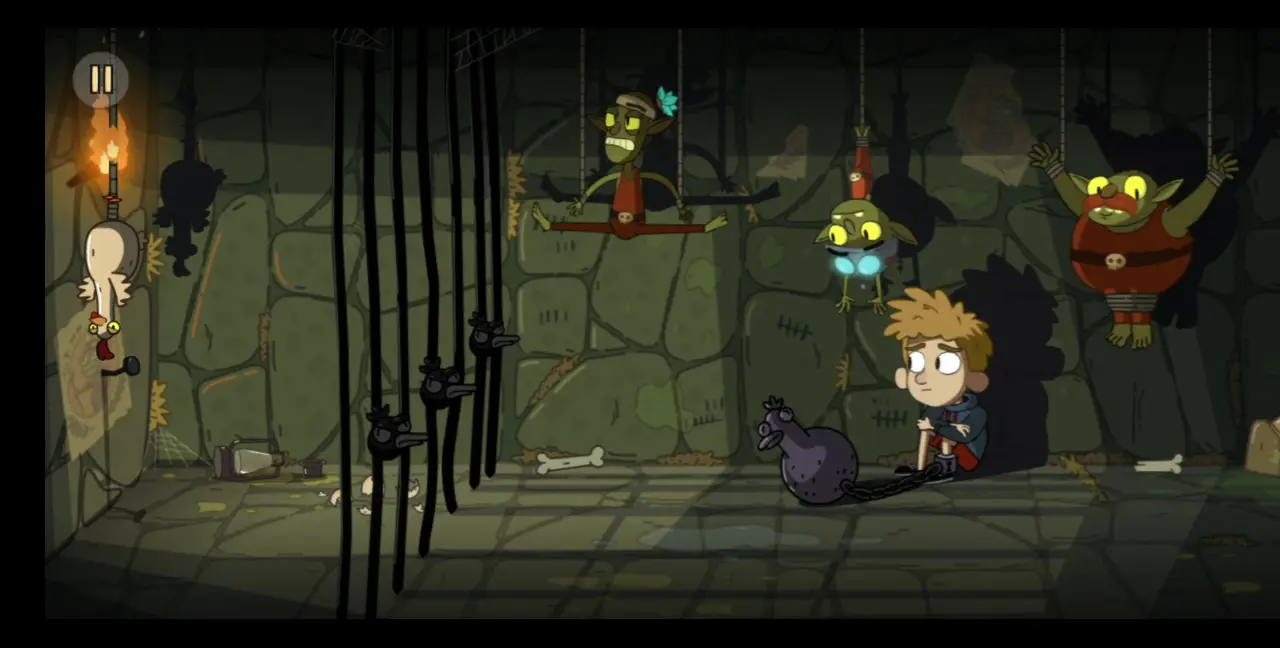
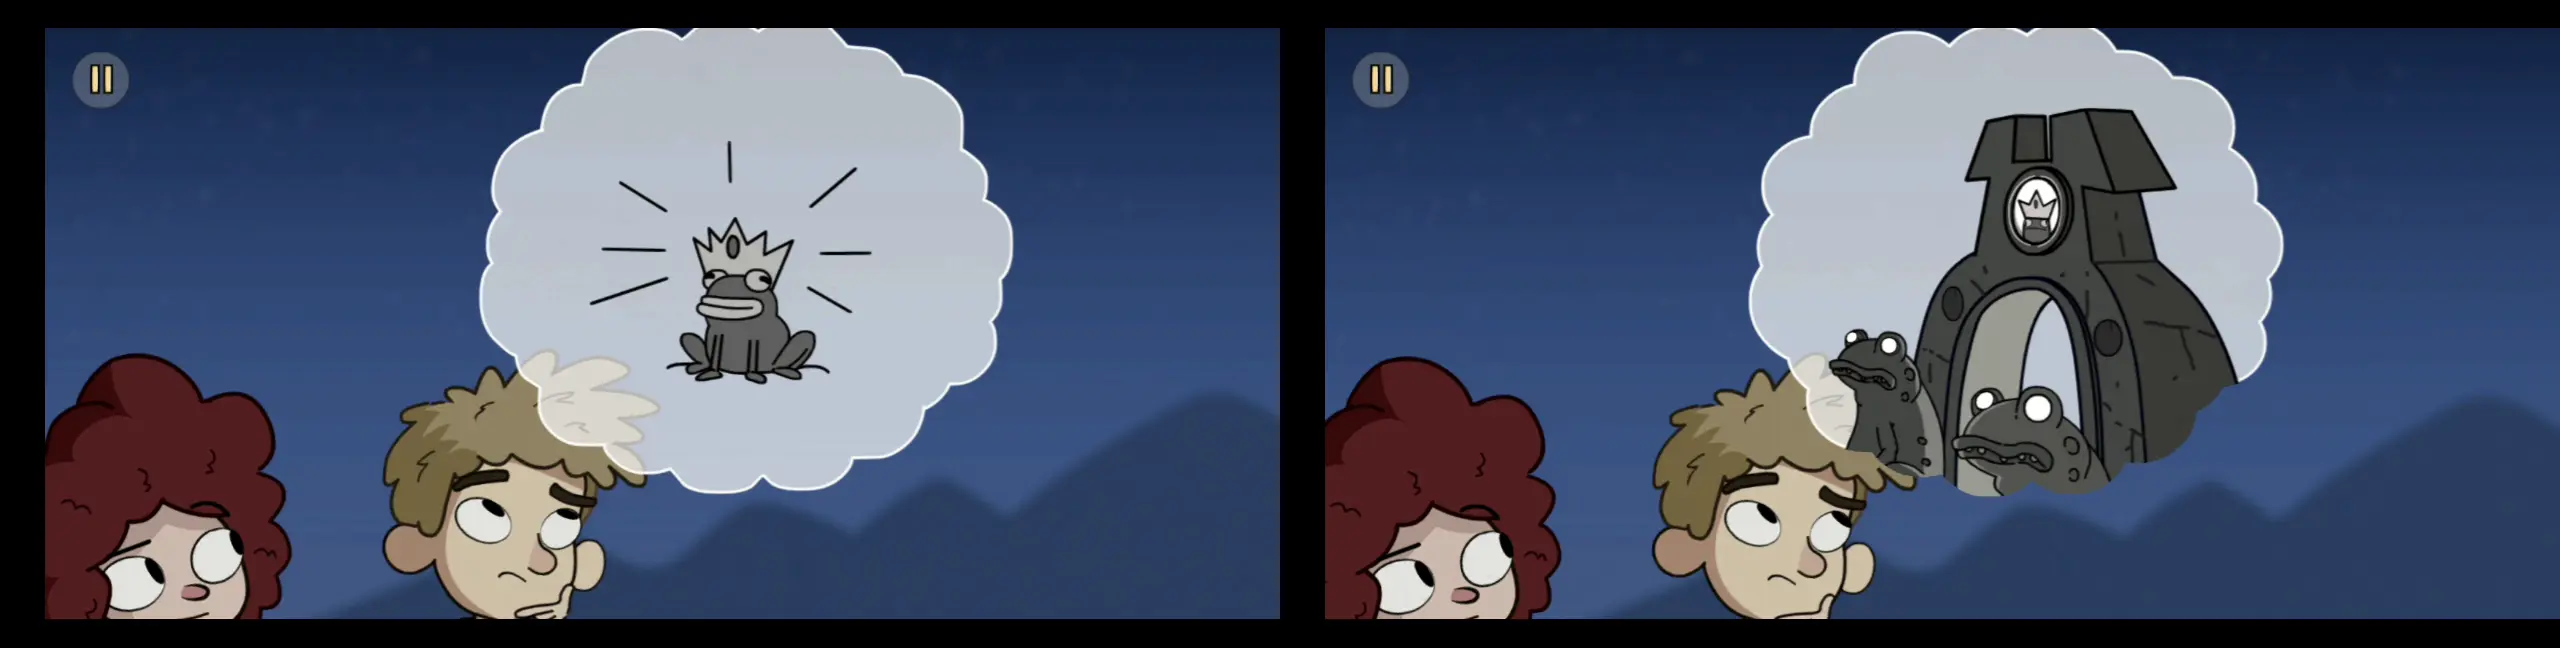
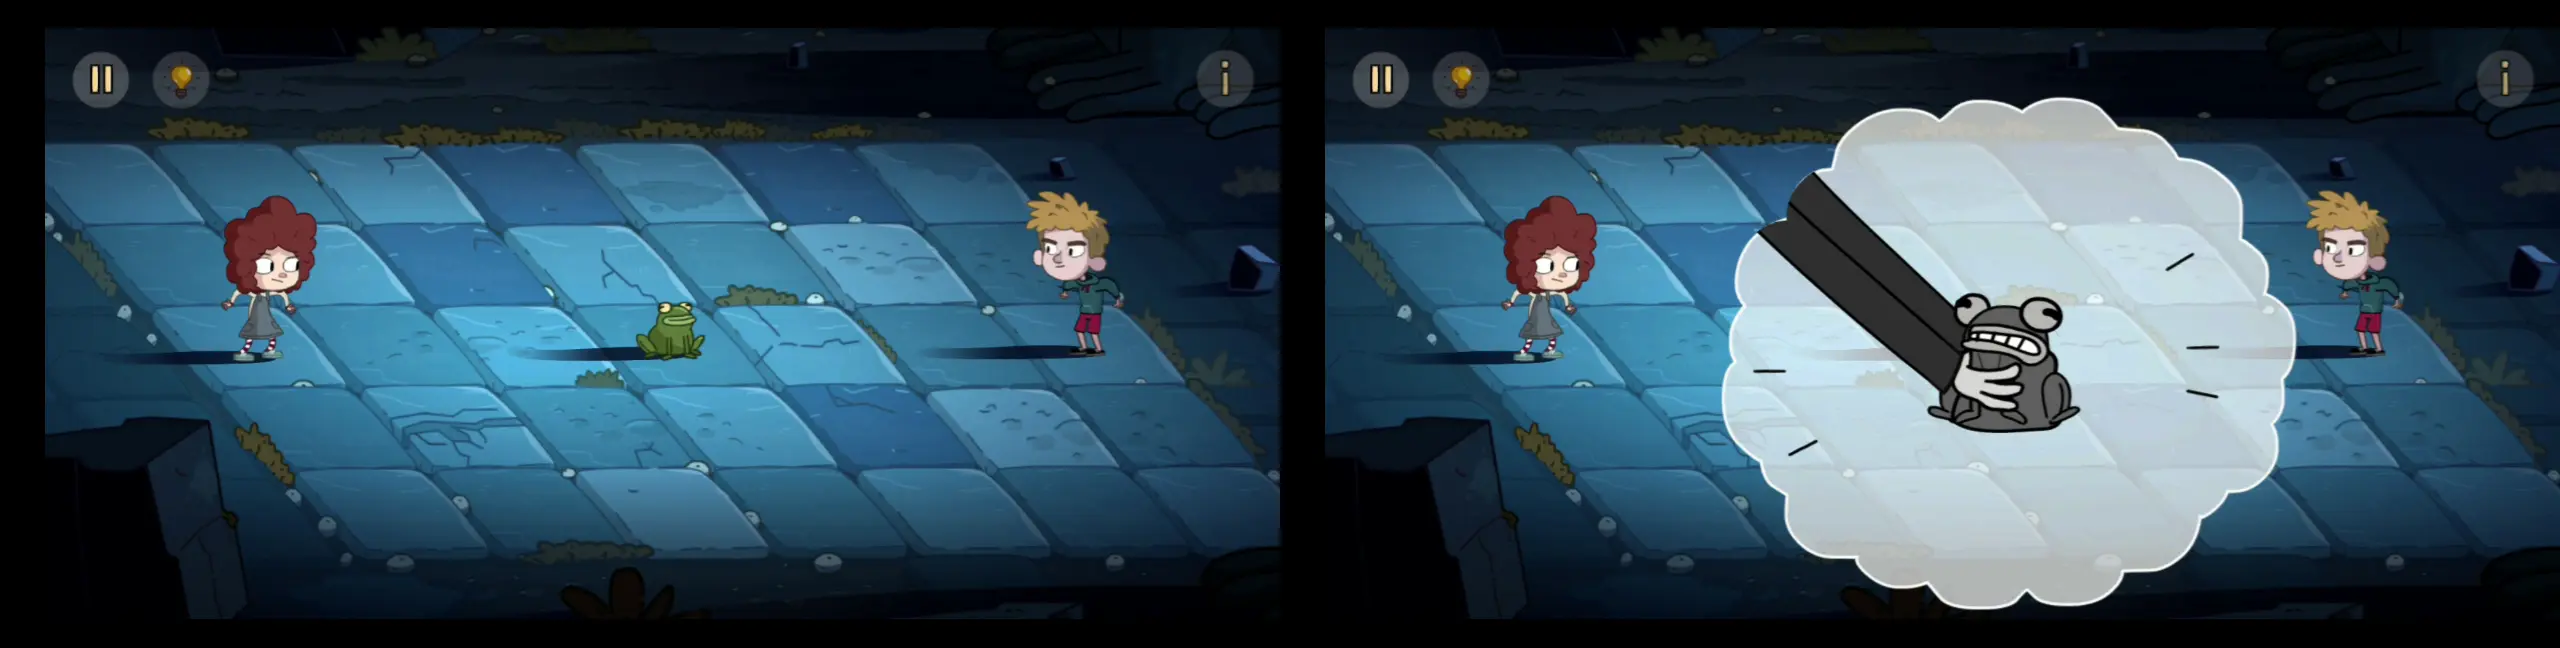
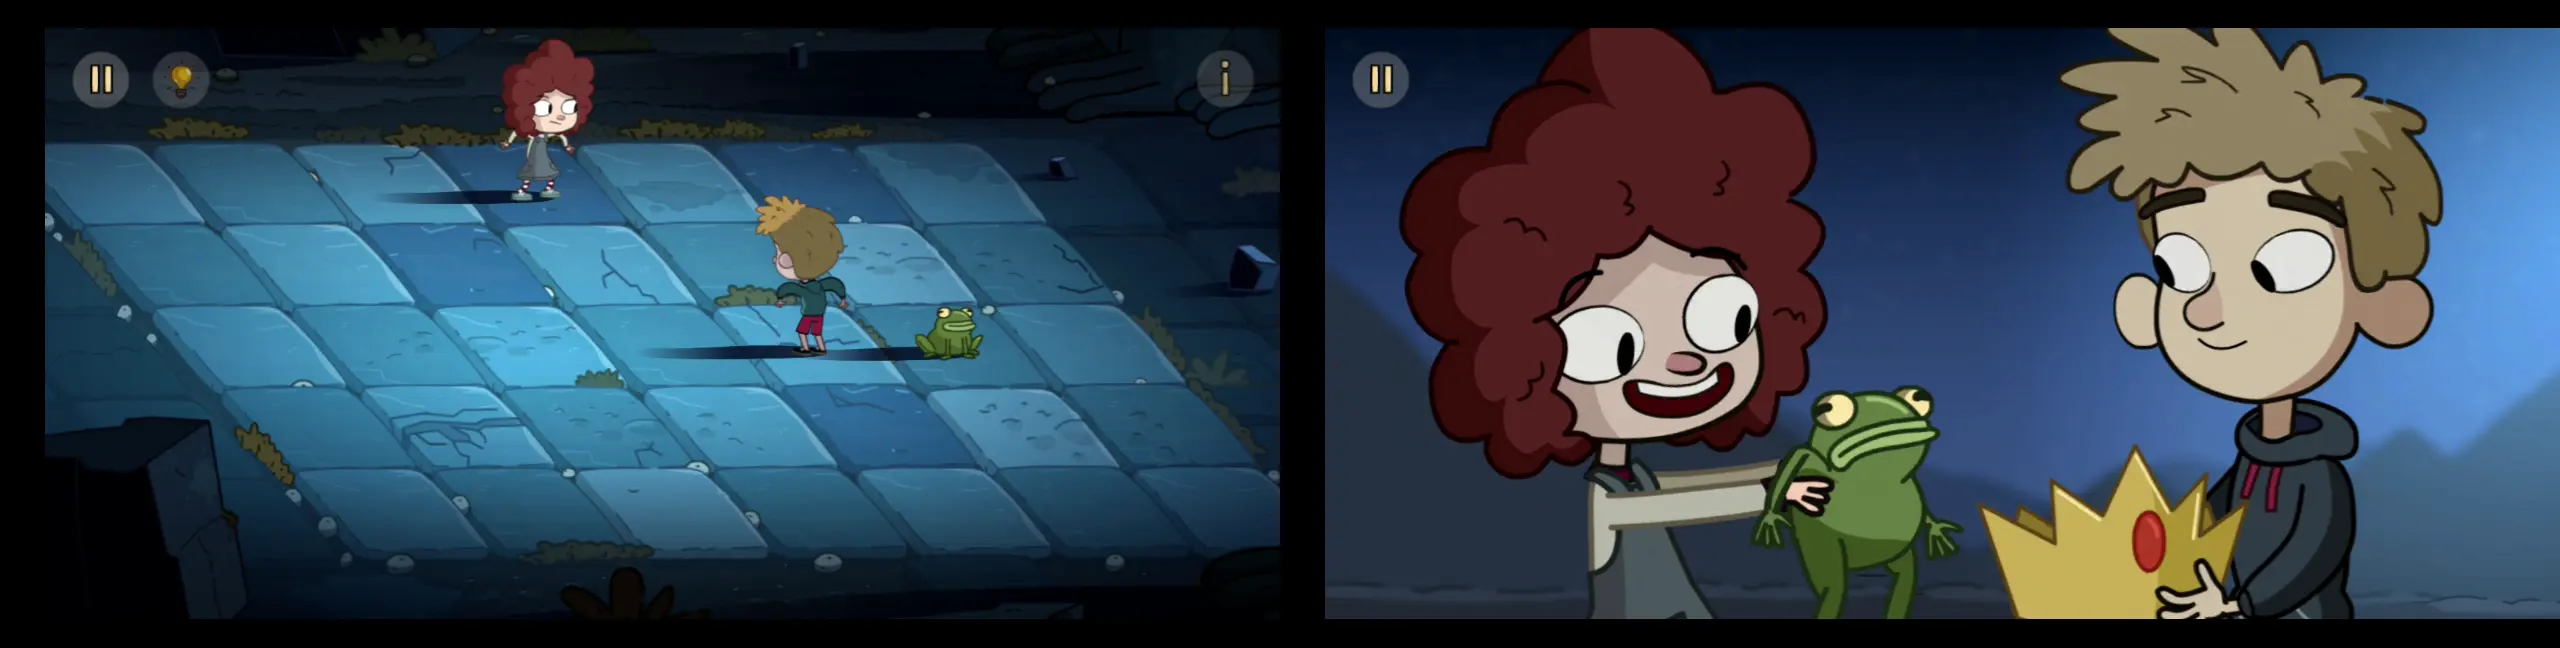
- A frog is croaking to the side and will jump around before settling on a rock. Click on the frog and your character, Gal, will emerge from the grass. You won’t catch the frog, though. Nevertheless, start walking to the right.
- Along the way, you’ll see a red bird. If you try to walk to it, it will pop up behind you. Walk to it again and it will pop up in front of you. Finally, if you walk to it again, a dwarf will emerge from the grass.
- Continue walking to the right. You’ll see a telephone booth. When the phone rings, pick up the receiver. After speaking with the person on the other end of the line, the phone booth will be pulled into the grass and disappear. Keep walking to the right.
- You’ll pass by a semi-cracked standing mirror where, at first, you’ll see the reflection of a bear instead of your own. But if you look into the mirror again, you’ll see your own reflection. Continue walking to the right.
- Along the way are two rocks on the path and a floating teacup. Click on the rock closest to you to jump on it, then click on the other. The rocks are apparently goblin heads that rise little by little every time you jump on them. Keep clicking on the rocks alternately until you can reach and grab the red teacup. The teacup will be placed in your inventory.
- Continue walking to the right. The dwarf you’ve seen a while ago will pop out from the grass again and run off-screen, playfully daring you to catch him. As you continue walking, you’ll see three flowers on the path. The middle flower is glowing blue. Click the flower on the left then the flower on the right for all three flowers to glow.
- Once all three flowers are glowing, a fish monster will emerge from the ground. Click on it to stroke its face. The monster appears to be happy and will slide away off-screen.
- Keep walking to the right. You’ll encounter a red door accessible by a ladder. If you click on the door to try and open it, a thought bubble will appear, indicating you need a key. Seeing as you don’t have one yet, keep walking to the right.
- The title of the game will appear down the line. Click on the floating letters and the title will disperse into red butterflies.
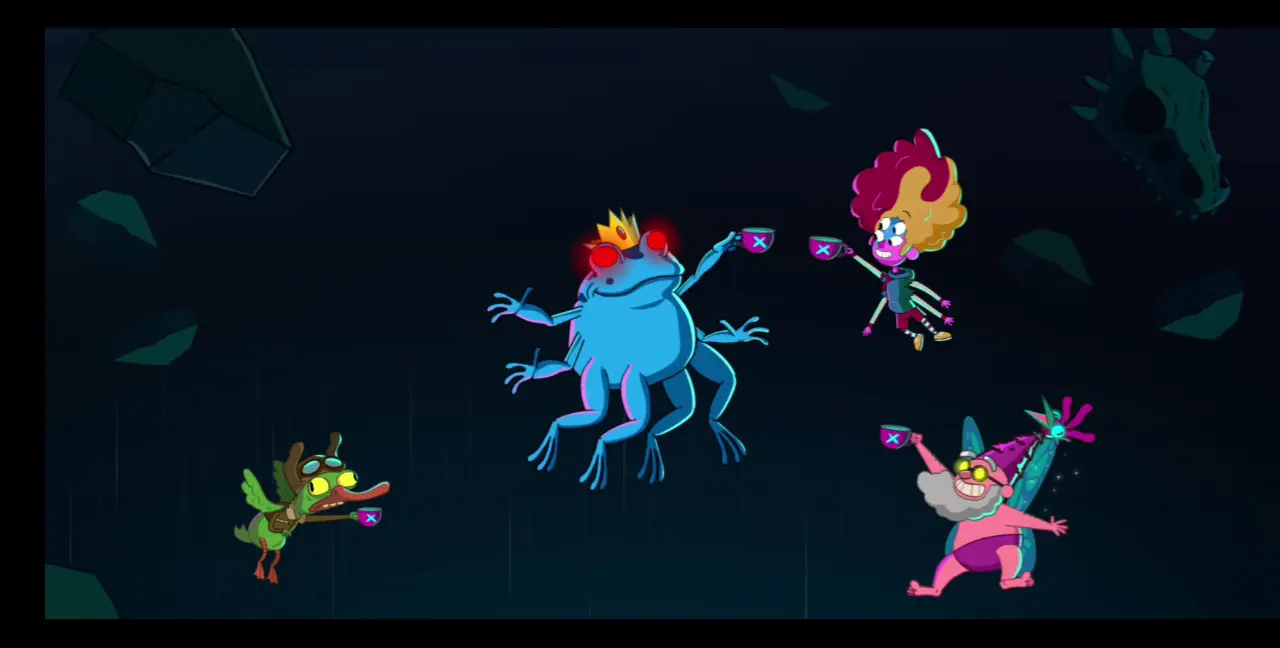
- Keep moving to the right. Eventually, you will see a duck, a frog, and the dwarf having a tea party. Notably, the dwarf is holding a red teacup with a yellow key symbol on it. If you click on the dwarf’s teacup, he will tell you that he wants to exchange the key for three teacups. Drag your teacup from your inventory and it will float above the coaster closest to you. Then, click on the frog so it opens its mouth and a red teacup would float out from it. Do the same with the duck so it lifts its hat and another red teacup would float out from it. Both teacups will float above two of the three coasters on the picnic mat.
- With all three teacups on the coasters, the key symbol from the dwarf’s teacup will clink and glow. He fishes the key out. Click the key, which will sprout wings and fly to your pocket. The key is now kept in your inventory.
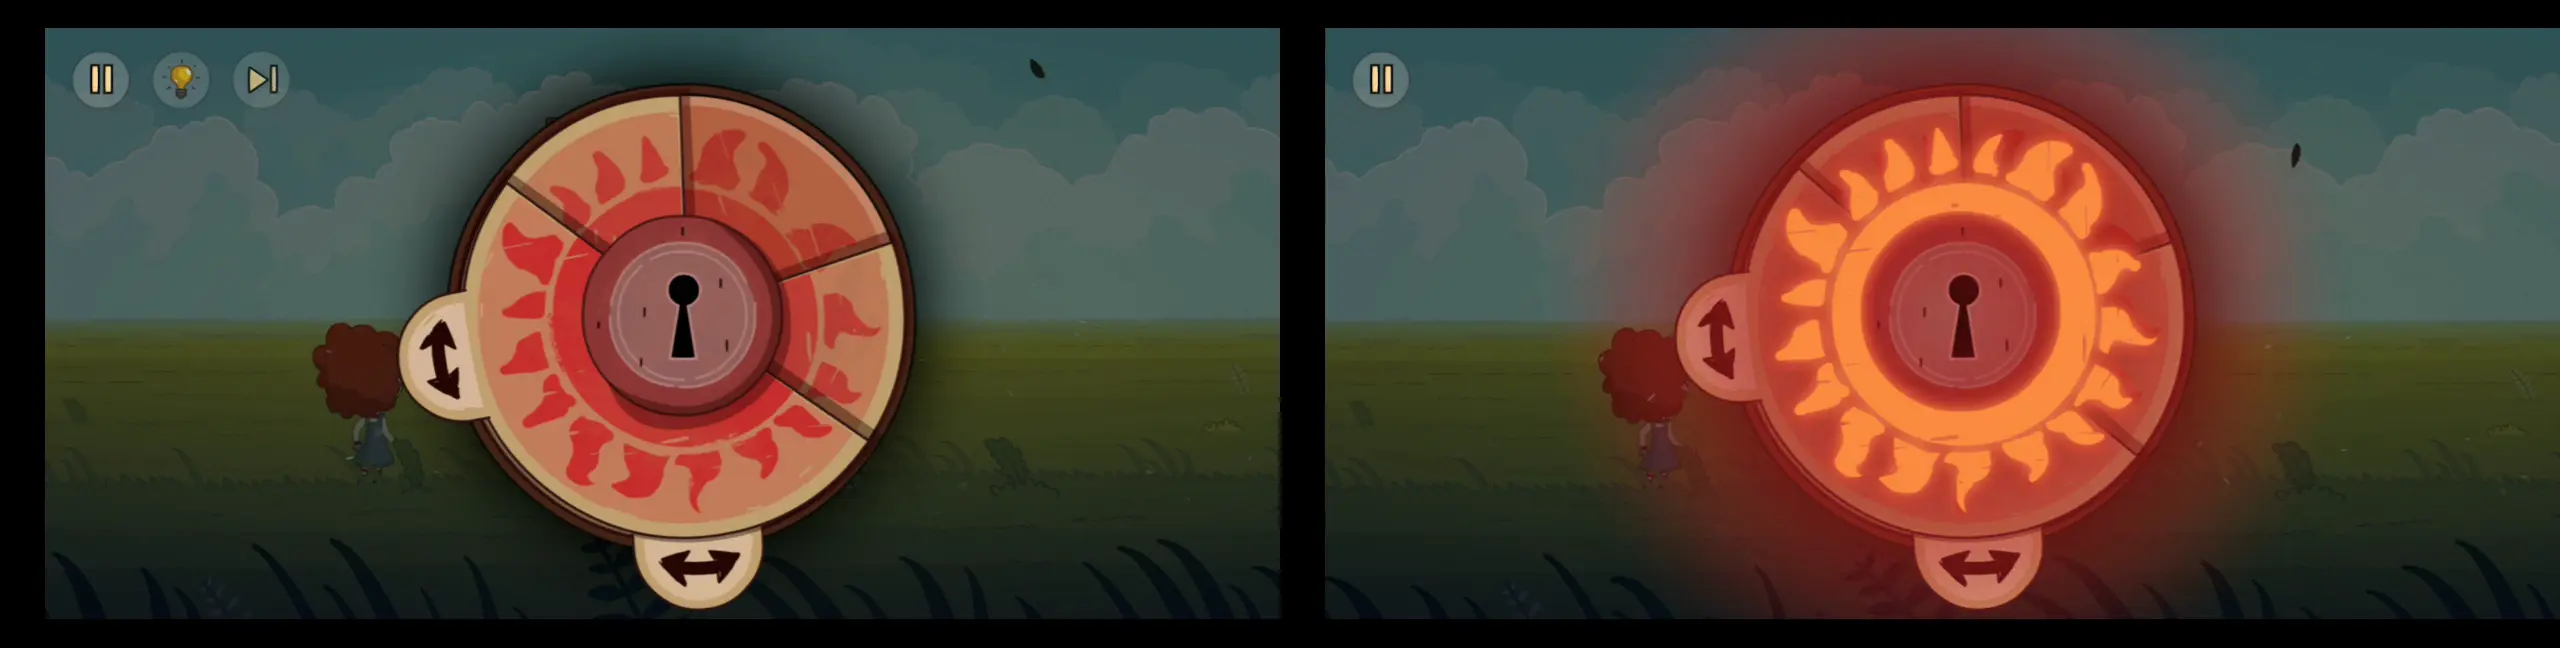
- Walk to the left and return to the red door. Drag the key to the door. The key will fly to the keyhole but it can’t seem to get inside. For the door to open, you have to solve a puzzle first. The goal of this puzzle is to slide the movable segments of the dial until you form a completely red sun symbol. The solution is pictured below. Take note of the positions of the arrows on the sides of the dial.
- Once the dial is set, the key will be able to go through the keyhole and open the door. A hand holding a watering can will peek from the door. Click on the watering can. This will be kept in your inventory.
- Walk to the right and go back to the tea party. Drag the watering can from your inventory and into a teacup. You’ll produce the watering can from your pocket and start pouring water into all the teacups one by one. Click on your teacup and you’ll share a toast with your new friends.
- Suddenly, you will all begin to float… This concludes Chapter 1.
Chapter 2
Main Player: Gal
- It turns out that you (as Gal) were dreaming all along. You’re back in your room, which you share with your brother Toto. A beam of light is shining through a small gap from the curtains. Click on Gal’s face to wake her up.
- Drowsily, you get out of bed. After putting on your slippers, click the beam of light. You’ll march up your brother’s bed and pull the curtains open, shining a bright light inside the room. Toto remains asleep.
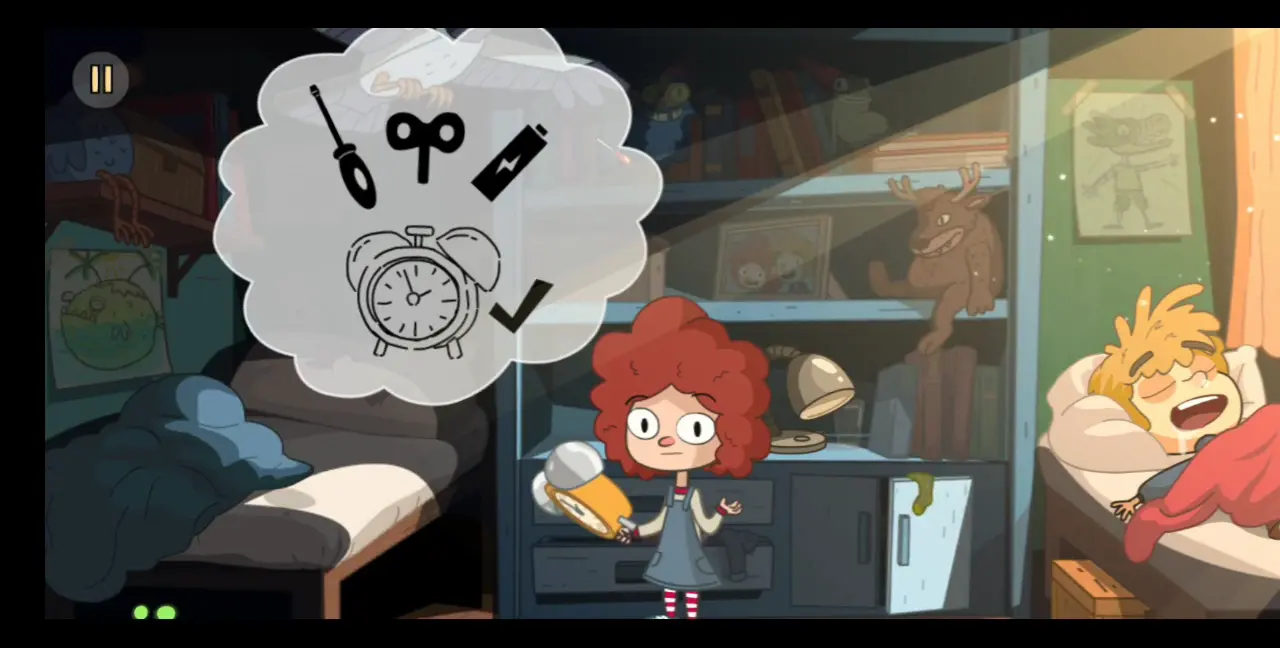
- Click on Toto to try and wake him, but to no avail. Click on the alarm clock on the shelf, but it’s not working. You’re going to need a screwdriver, turnkey, and battery to make it work. You place the alarm clock back on the shelf and start looking for the items you need.
- The screwdriver is on the topmost level of the shelf. To reach it, pull the wooden box underneath Toto’s bed and use this as a stepladder. Click the screwdriver and you’ll mount the box and shelf to get it. The screwdriver will be kept in your inventory.
- On the shelf next to the alarm clock is a lamp. Take the lamp so you can shine a light on the darker corners of the room. Click the area under your bed. Here, you will find a cat licking himself. Upon realizing that the light is shining on him, the cat will run off, causing a robot toy to pop out of the bed.
- Click on the robot toy. After switching it on, the robot will shoot lasers from its eyes, singeing your hair a little, before dropping to the ground. A battery will pop out of the toy. Click on the battery. This will be kept in your inventory. You now have two of the three items needed to make the alarm clock work.
- As for the turnkey, open the cabinet at the bottom right side of the shelf, the one where a green sock is sticking out. A wind-up toy will zoom out. Click on the cabinet door to close it or else the toy will go back inside. Once the cabinet door is closed, the toy will bump into it, causing the turnkey to drop. Take the turnkey. In your inventory, you have all three items that will make the alarm clock work.
- Drag the three items to the alarm clock. A mini puzzle will appear where you need to drag the screwdriver into the three blue screws behind the clock. Once these three are unscrewed, you’ll see the mechanism inside the clock. Reverse the default position of the battery so the positive side will shift to the right, then drag the battery into the slot. This will cause the gears inside the alarm clock to move. Connect all the gears to make the alarm clock work again. Solutions to this mini puzzle are all pictured below.

- After fixing the alarm clock, this will be placed in your inventory. Drag the alarm clock to Toto to wake him up.
- Toto wakes up but he’ll toss the alarm clock and break it. You invite him to play but, instead, he puts his hoodie over his head, gets out of bed, and plays with his gameboy. He walks out of the room and you follow him. This concludes Chapter 2.
Chapter 3
Main Player: Gal
- Toto heads down the stairs and disappears into the next room. Keep clicking until you go down the stairs.
- On the rug is a comic book. Click it and you will read a comic about frogs fighting a deer-bear and taking a sword from a stone. Remember this for later.
- Keep flipping the pages until you reach the part that teaches you how to make a deer-bear monster head using a box, a pair of scissors, and some crayons. These are three items you need to find.
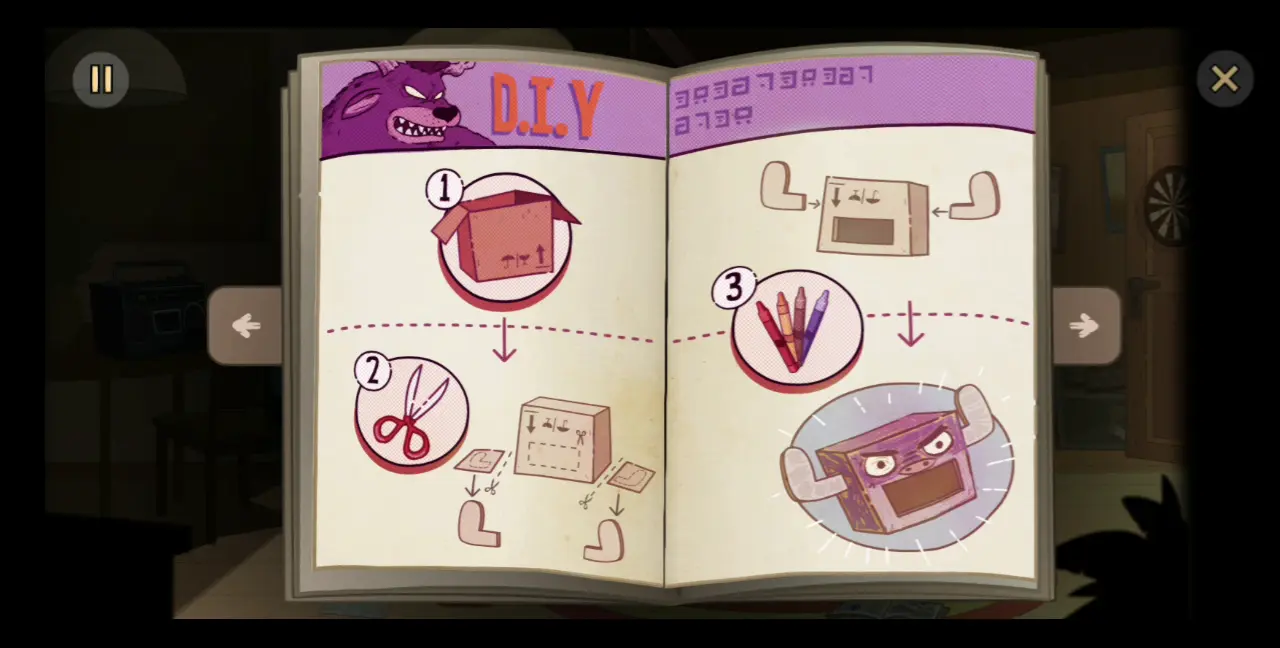
- To the left of the rug are the crayons. Click on them and they will be placed in your inventory.
- Walk to the right to go to the next room, where you will find Toto sitting on the couch, still preoccupied with his gameboy. Tap on his shoulder. At first, he will ignore you. Tap him again and he’ll roll over the couch in annoyance. Behind him is a pendulum. Click on this.
- On the shelf behind you is a bell. Click on this as well to collect it.
- There’s also a blue laundry basin to the side. Keep clicking until you find a green ball. Collect this ball.
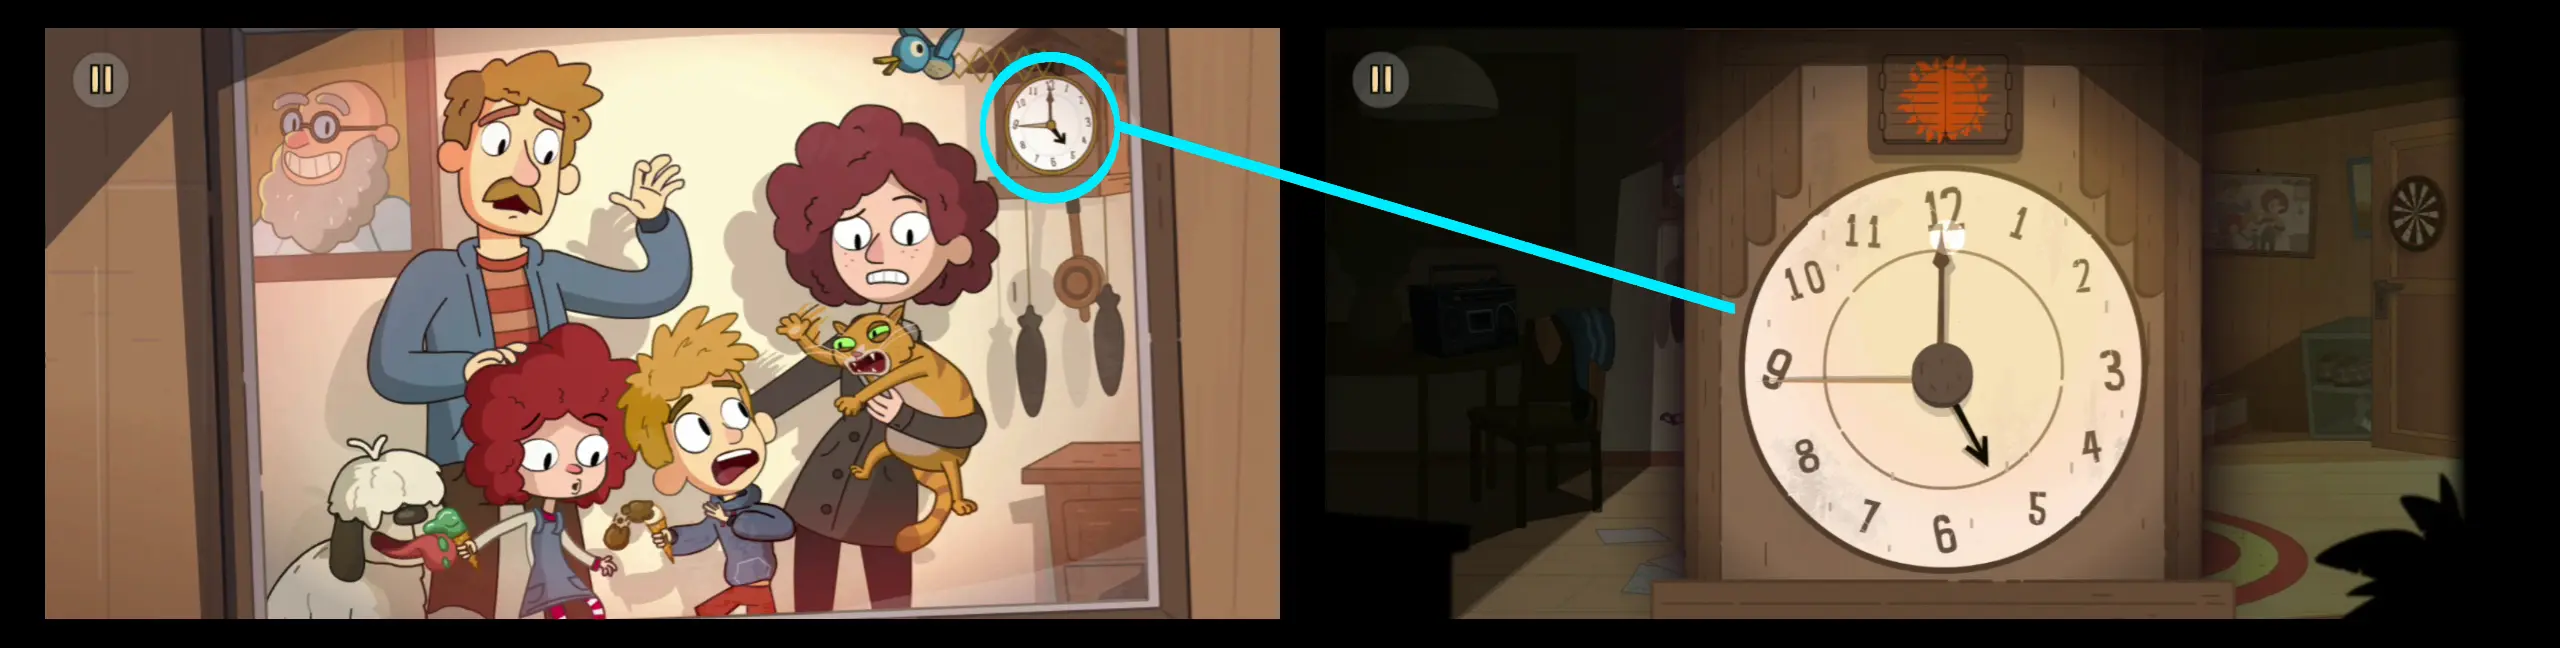
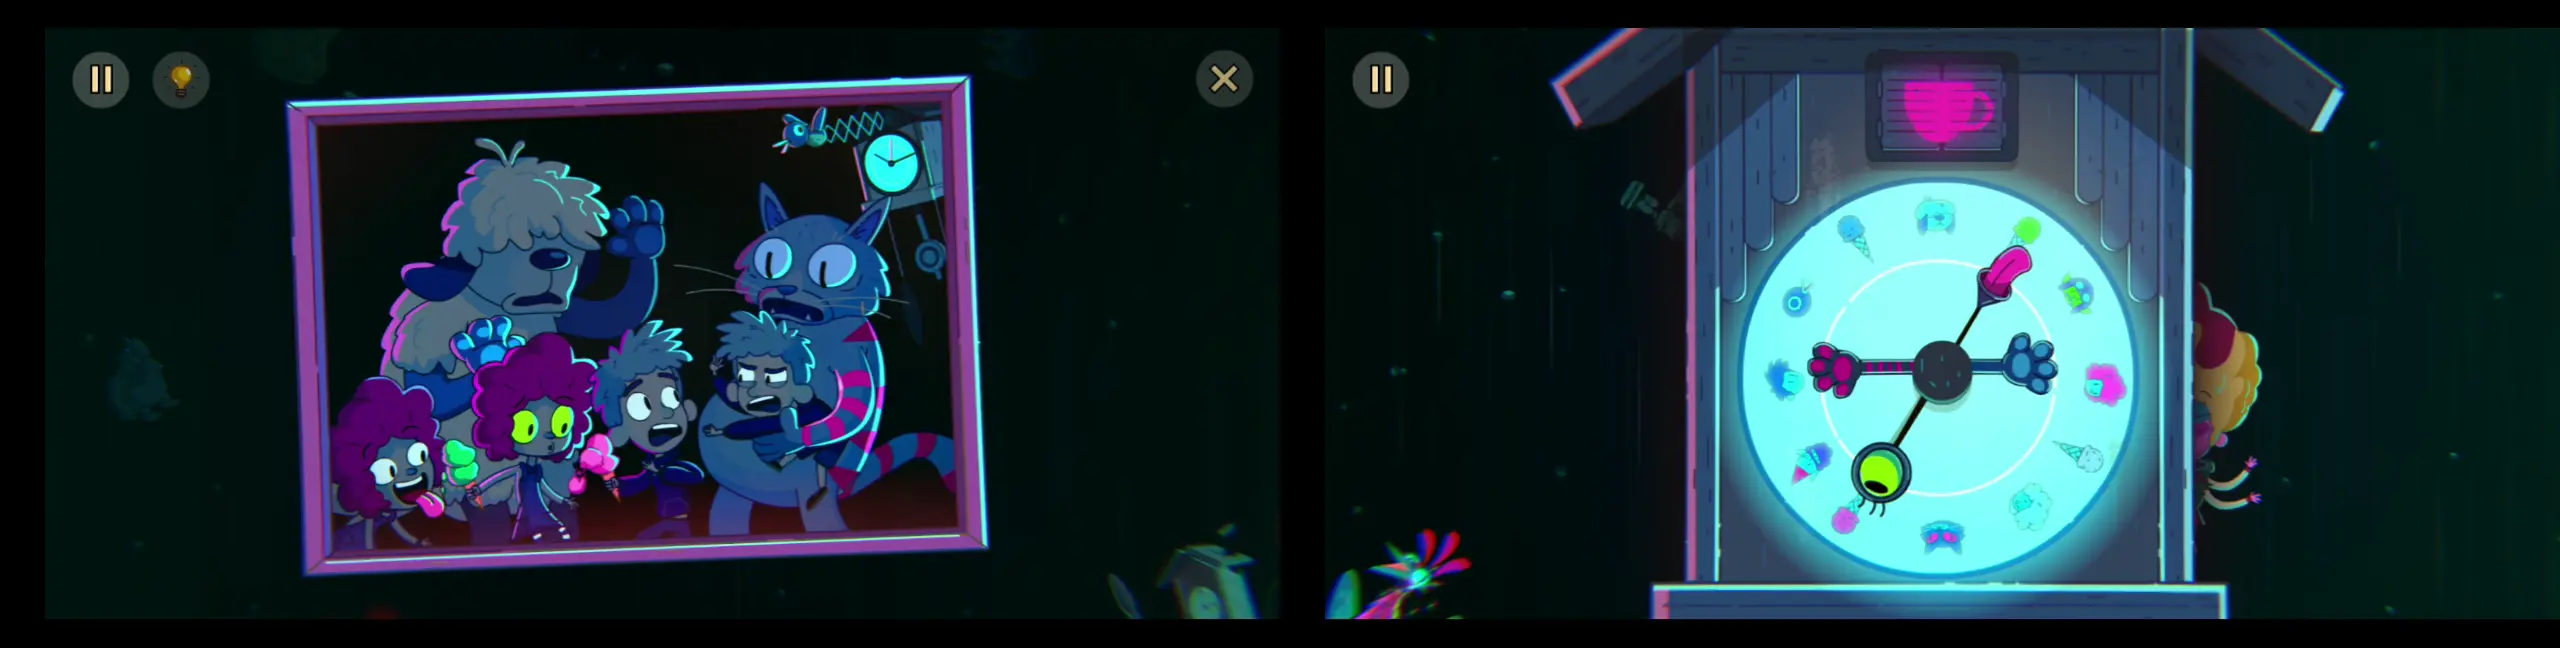
- Walk left to go back to the previous room. On the wall, you’ll notice a family picture. Click it. On the right side of the picture is the clock with the time set at 5 o’clock. Remember in particular where the hands of the clock are positioned.
- After viewing the photo, go to the clock. Drag the pendulum toward the clock to install it. This will prompt a mini puzzle where you’ll have to arrange the clock hands. Thus, put the hour hand on 5, the minute hand on 12, and the second hand on 9, as you’ve seen in the family photo.
- The cuckoo bird will ring and drop a key. Take the key and use it to open the drawer to the right side of the clock. You’ll be able to collect a pair of scissors from it.
- On the left side, you’ll find a radio in the shadowy area. Click on the radio and it will start playing music.
- From your inventory, drag the bell to the dog sleeping on the stairs. The dog will start thinking of chasing sheep because of the sound. The dog will wake up but he won’t move from the stairs.
- Take the green ball from your inventory and drag it toward the dog. You’ll have to throw the ball on the dartboard by dragging the ball back then releasing it once the arc of its trajectory is set to hit the target. The ball will bounce across a bunch of stuff until it bounces all the way to the next room. The dog will chase after it. The jar-looking chandelier from the ceiling will also fall on you but you manage to take it out of your head.
- In the next room, the door is sniffing around for the ball. The ball bumps into the cat sleeping in the box. The dog chases the cat out of the box. Once the dog jumps out of the box, click on the box to collect it. You now have all three items needed to make the deer-bear head.
- Drag all three items behind Toto and you’ll proceed to make the cardboard head. After making this, you’ll hide behind Toto. Click on him and he’ll be startled by you wearing the deer-bear head.
- He runs out, past the gate, and you chase after him. The gate, which is painted on with frogs, will momentarily flash into some kind of mystical arch or portal flanked by frog statues with glowing eyes. Neither you nor your brother see this.
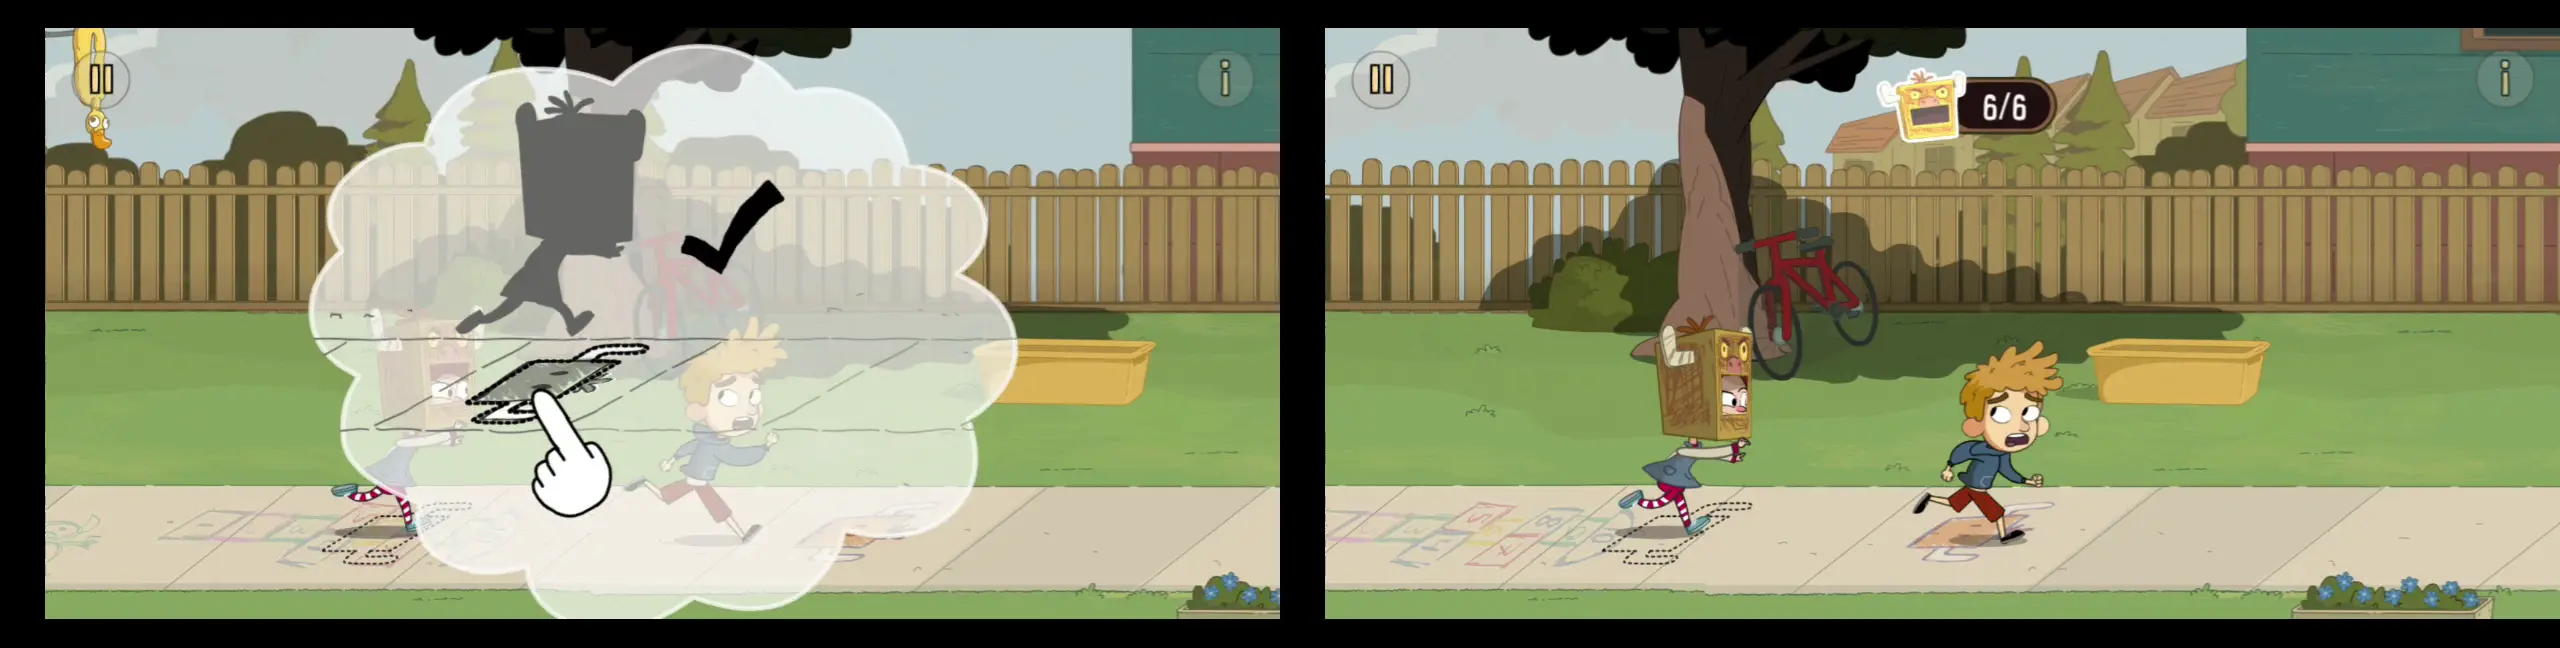
- On the pavement, you continue chasing your brother. This will prompt a mini puzzle where you have to click on the deer-head drawings on the pavement as soon as you step on them. You have to do this six times. Each time you miss a pavement, the counter will reset back to zero.
- Upon successfully completing the mini puzzle, you’ll suddenly transform into a deer-bear monster and the yard will turn into a dark forest. Toto runs away and hides inside the hollow of a tree. This concludes Chapter 3.
Chapter 4
Main Player: Toto
- In this chapter, you’ll be playing as Toto. Keep clicking on Toto until he comes out of the tree.
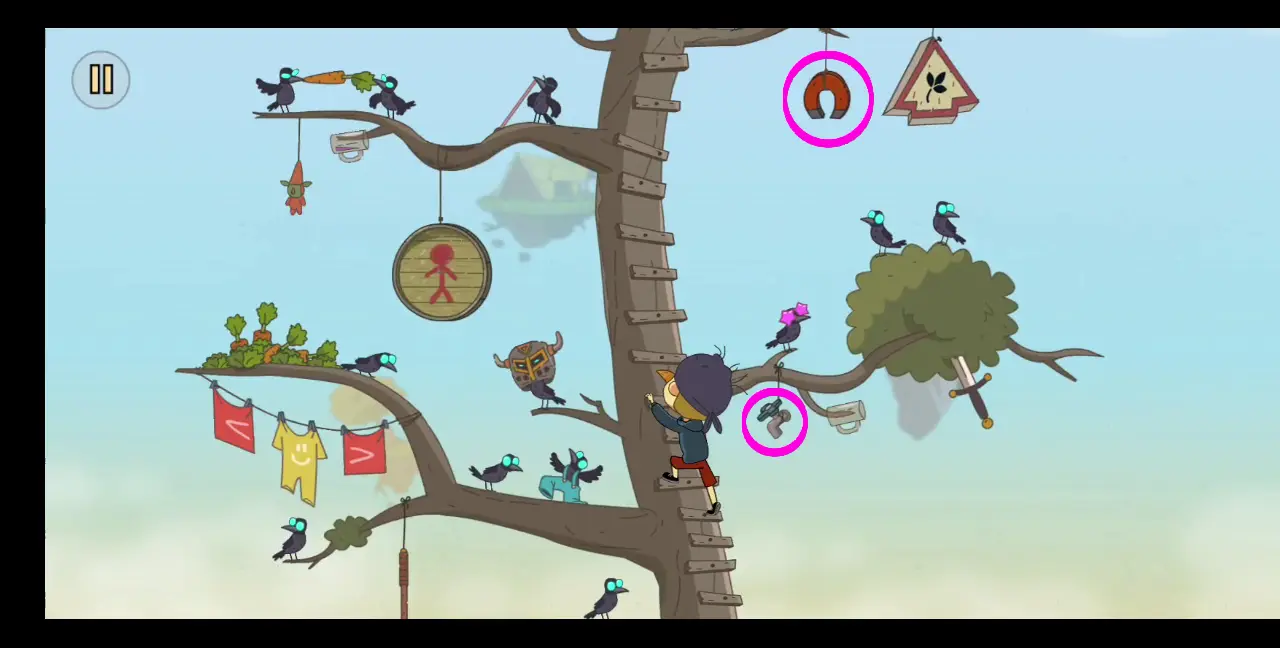
- Perched on the tree branch to your left is a small shadowy creature reading a book. If you talk to it, it will explain that it needs glasses to see what it’s reading.
- On the left side of the tree you were hiding in is a red button. Press it and a can opener will dangle from a string. You won’t be able to get this item yet since there’s no way you can reach it.
- In the meantime, walk to the right and you’ll find yourself in another part of the forest. In this area, some of the immediate things you’ll see are a log with a shadowy creature inside it, a blue fairy that the creature is trying to catch, the glasses right next to the log, a metal handle with a blue tip stuck on a bush, and the deer-bear monster who appears to be searching for you in another tree. The monster’s back is turned so it can’t see you sneaking behind him.
- Still in this area, you’ll notice a knife stuck to a rock. Take the knife. However, in your excitement, you exclaim triumphantly, which catches the deer-bear’s attention. You run back to the part of the forest you came from.
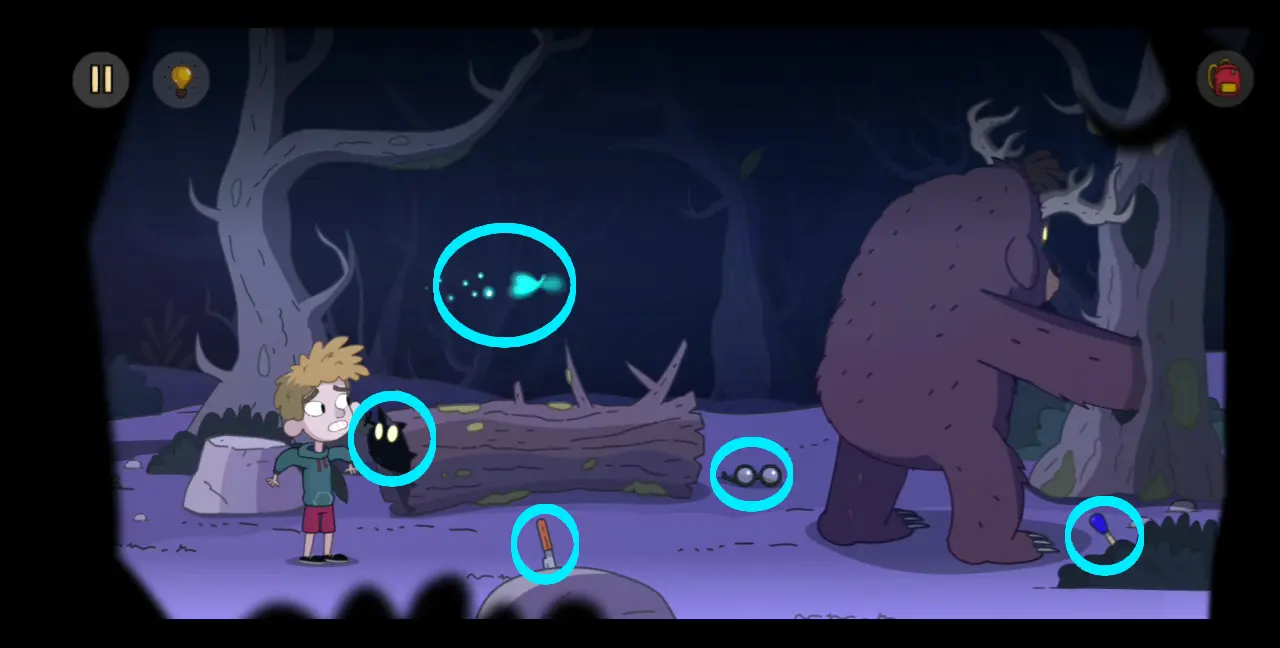
- Walk again to the right and, this time, take the knife from the ground. This will be kept in your inventory.
- Instead of going right, walk now to the left side of the forest. Here you will find three frogs. But first, click on the upturned bowl next to your feet. It turns out that a shadowy imp is hiding under the bowl and was upset you disturbed it. It throws the bowl at you and you take the bowl.
- Now, click on each frog to talk to them. They will explain what they need: one frog needs to get its hat, another frog needs to pull the sword out of the stone with your help and the help of the other frogs, and the third frog needs to open its can of flies.
- Notably, one stone nearby has a rectangular slot that looks like it could fit a lever. Take note of this for later.
- After talking to all the frogs, walk right to return to the middle part of the forest. You’ll notice that on the tree that you hid in is a small gash with a bit of yellow sap coming out. Use the knife you got to make the gash longer, allowing the sap to drip.
- Then, use the bowl to catch some of the sap.
- With the bowl of sap on hand, walk right to go to the part of the forest with the deer-bear monster. Place the bowl of sap on the rock with a flat top next to the log.
- What would have been a good lure for the monster is quickly foiled by the blue fairy getting stuck to the sap. However, the creature inside the log grabs the fairy and they both fly away. So even though the bowl of sap is gone, at least now you can enter the log. Do so, then grab the pair of glasses on the other side.
- Walk left to return to the middle part of the forest. Give the pair of glasses to the creature with a book. It will leave the tree and you’ll be able to collect the branch it was perched on.
- Walk left and go to the frogs. Drag the branch to the frog trying to get its hat so you can help it. Once it gets its hat, it will thank you and show its gratitude by following you around.
- Now with a trusty sidekick, go to the area with the deer-bear monster. Click on the log to hide inside it. The frog will remain outside. Click on the frog and it will make noise to distract the deer-bear. The deer-bear will try to catch it, but the frog is too fast. Use this opportunity to grab the blue lever from the bush.
- However, before you can grab the blue lever, a creature from the tree hollow will take it before you do. Click on the hole it disappeared into.
- Inside, you will see the creature sitting in front of a table with a board of checkers. It’s holding the blue lever. If you talk to the creature, it will tell you that to get the lever, you have to beat it in a round of checkers.
- In order to win in the game of checkers, your goal is to keep the singular black piece from reaching your end of the board. All pieces can only move one tile diagonally each turn. However, only the black piece can move anywhere. On the other hand, all the white pieces, which you command, can only move forward. You will win if you manage to trap the black piece in such a way that it cannot move anywhere. Take note that the game of checkers will play out differently for every player. There’s no one-size-fits-all solution. Pictured below is how we won the game, but how the black piece moves in your playthrough may be different from the one we experienced.
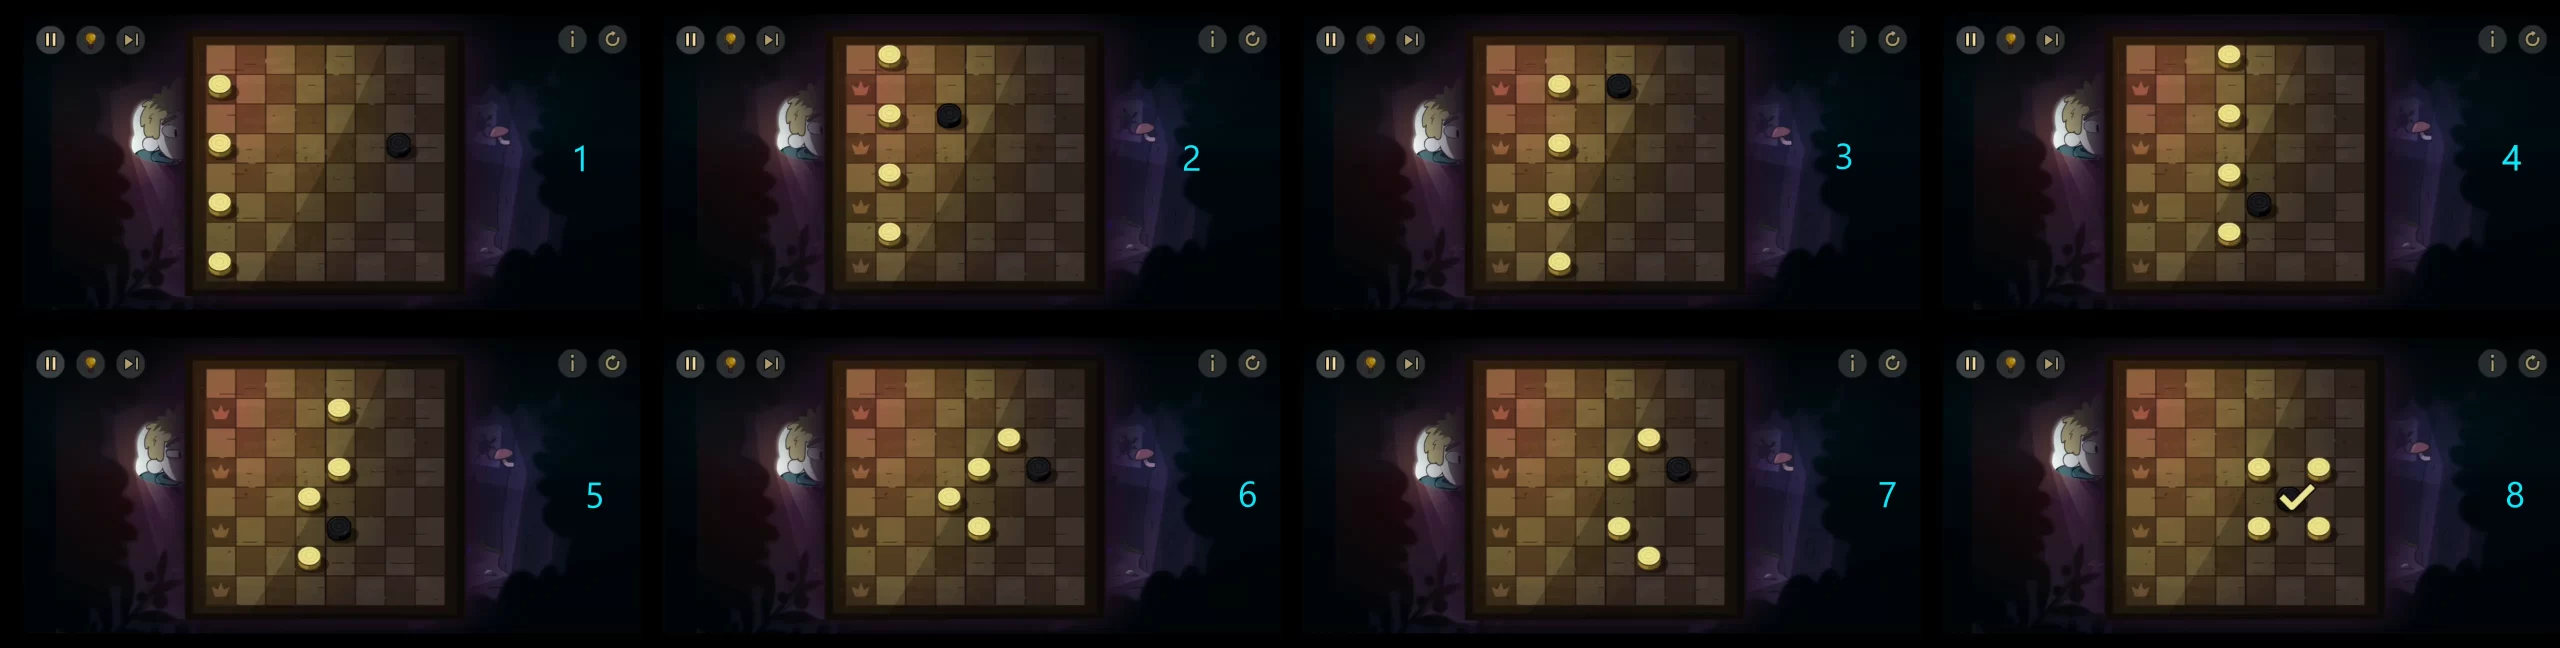
- After winning the round of checkers, the creature will give you the blue lever. Once you’ve left the hollow, you will discover that the deer-bear monster is still preoccupied with the frogs. Click on the deer-bear monster to distract it, then hide inside the log. Move out of the log and return to the part of the forest with the frogs.
- Place the blue lever on the stone with a rectangular slot. If you pull the lever, it will show you that doing so activates a stone on a spring in the middle part of the forest. So go there and the frog will follow you. Click the stone on the spring and the frog will stand on it.
- Go back to the area with the blue lever and pull it down. This will spring up the frog and it will be able to grab the can opener hanging from the string. Walk to the frog and click on it so it can give you the can opener.
- Return to the area with the other frogs. Drag the can opener to the frog trying to open a can. A swarm of flies will fly out. Click the swarm, which will chase after you. You’ll walk back to the frog and it will eat the flies off of you. Since you’ve helped out this frog, it will also follow you along with the first frog.
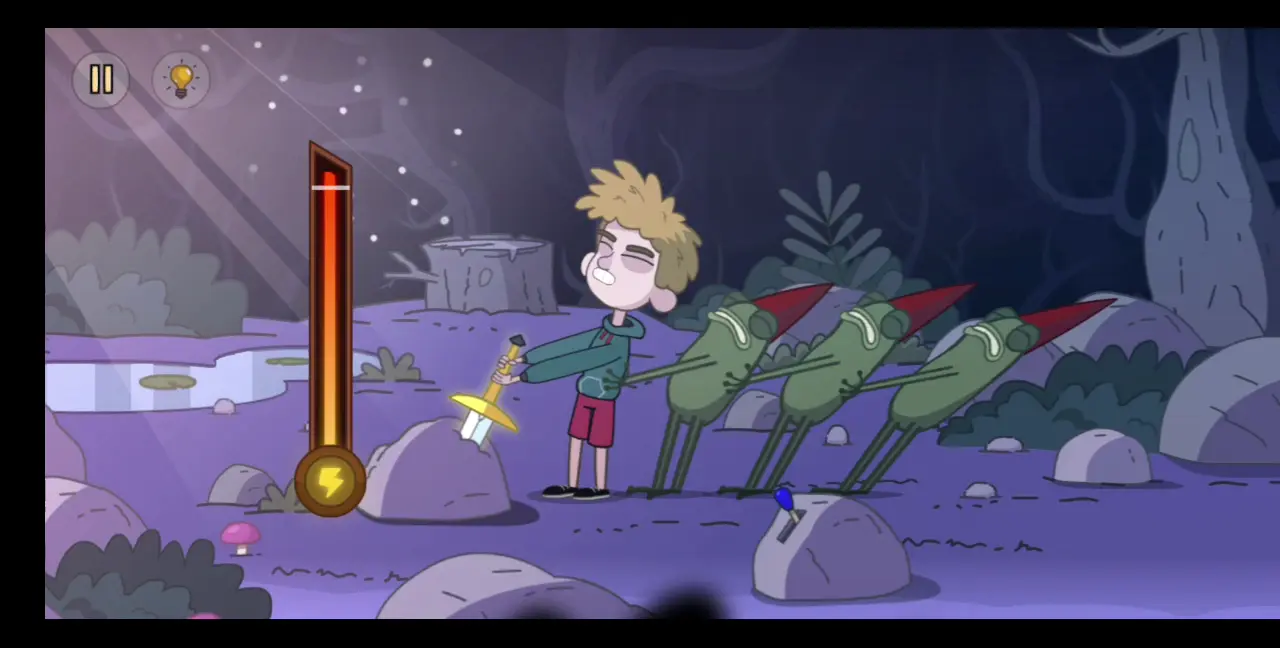
- Since you have both frogs following you now, click on the sword on the stone. You won’t be able to pull it by yourself so you invite the frogs to help you. Keep clicking until a meter appears to the side. Keep clicking or tapping the screen until the meter fills up and you’re able to pull the sword out.
- Go to the area with the deer-bear monster. Click it to get its attention, and again to fight it with the sword—except it will easily get the sword from you and roar. The monster will try to eat you but click the frogs hiding behind the tree to get them to distract the bear. While the deer-bear is distracted, use this opportunity to slip under the bear.
- You’ll manage to run away from the deer-bear and eventually come across a cave with some runes marking its entrance. As you hear the deer-bear coming, you run inside the cave, and so does the creature. This concludes Chapter 4.
Chapter 5
Main Player: Toto
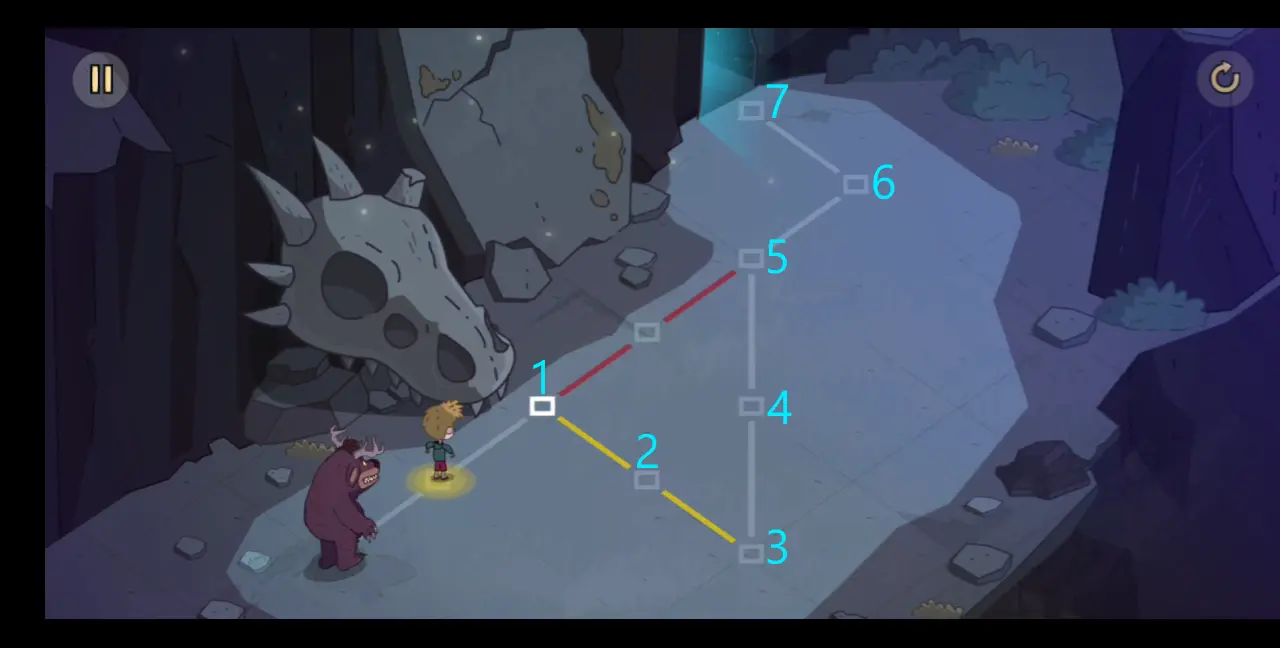
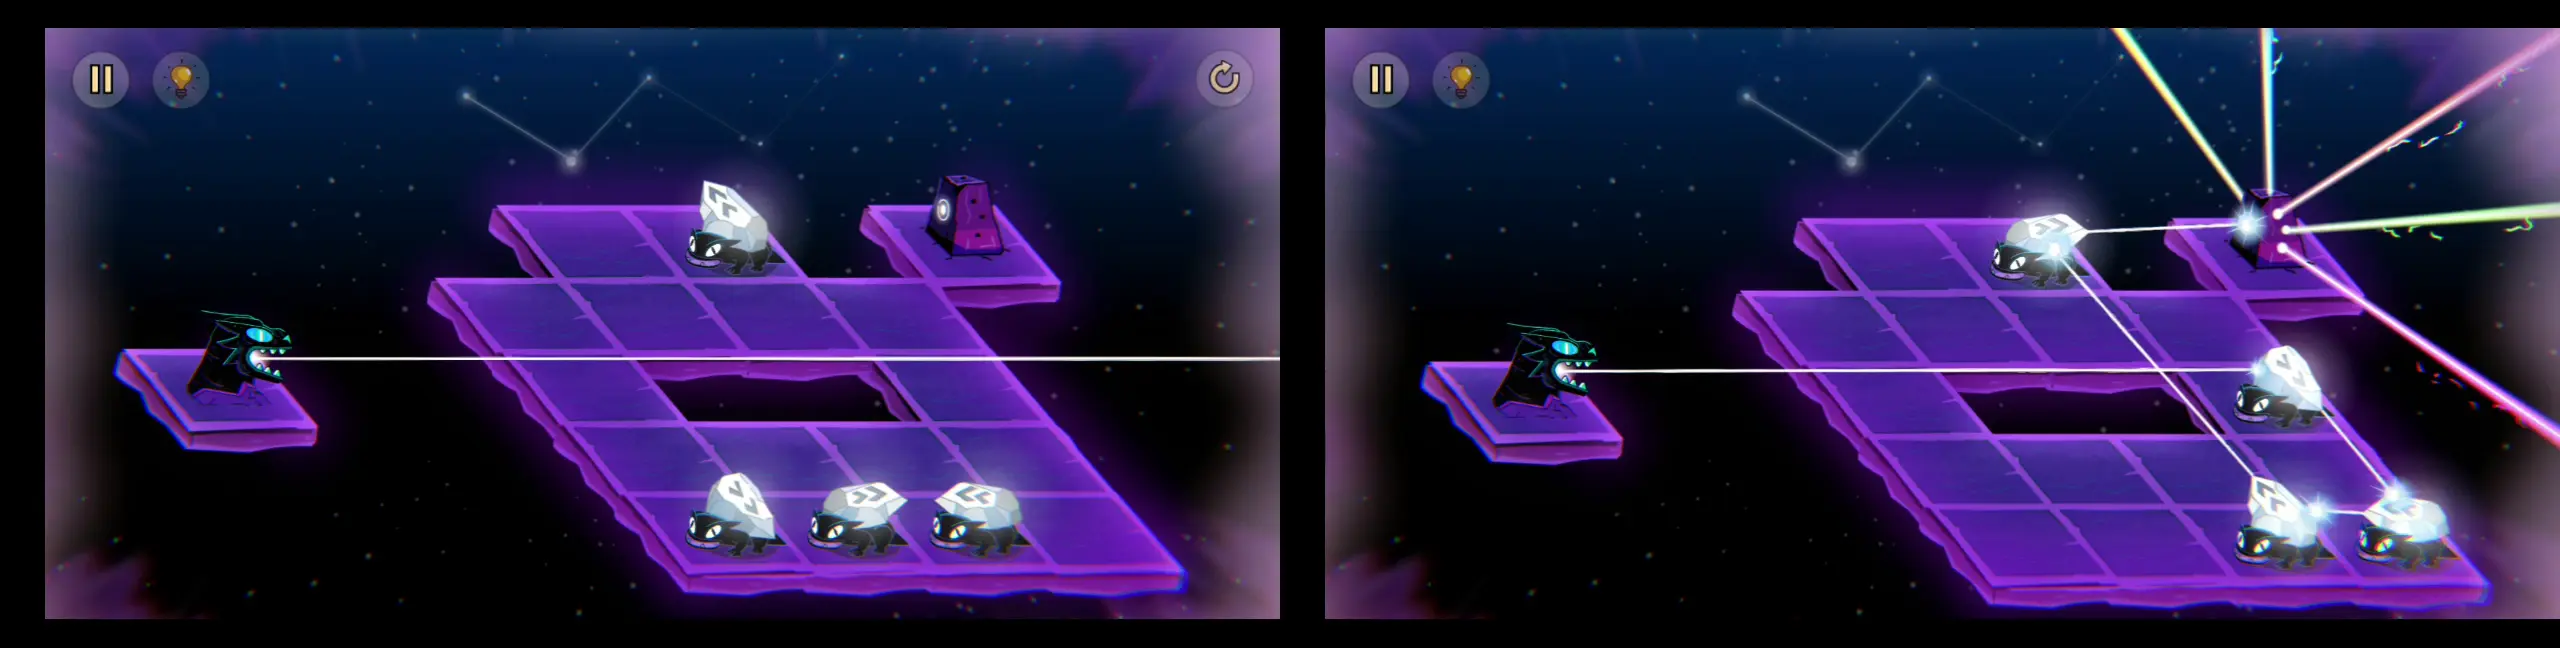
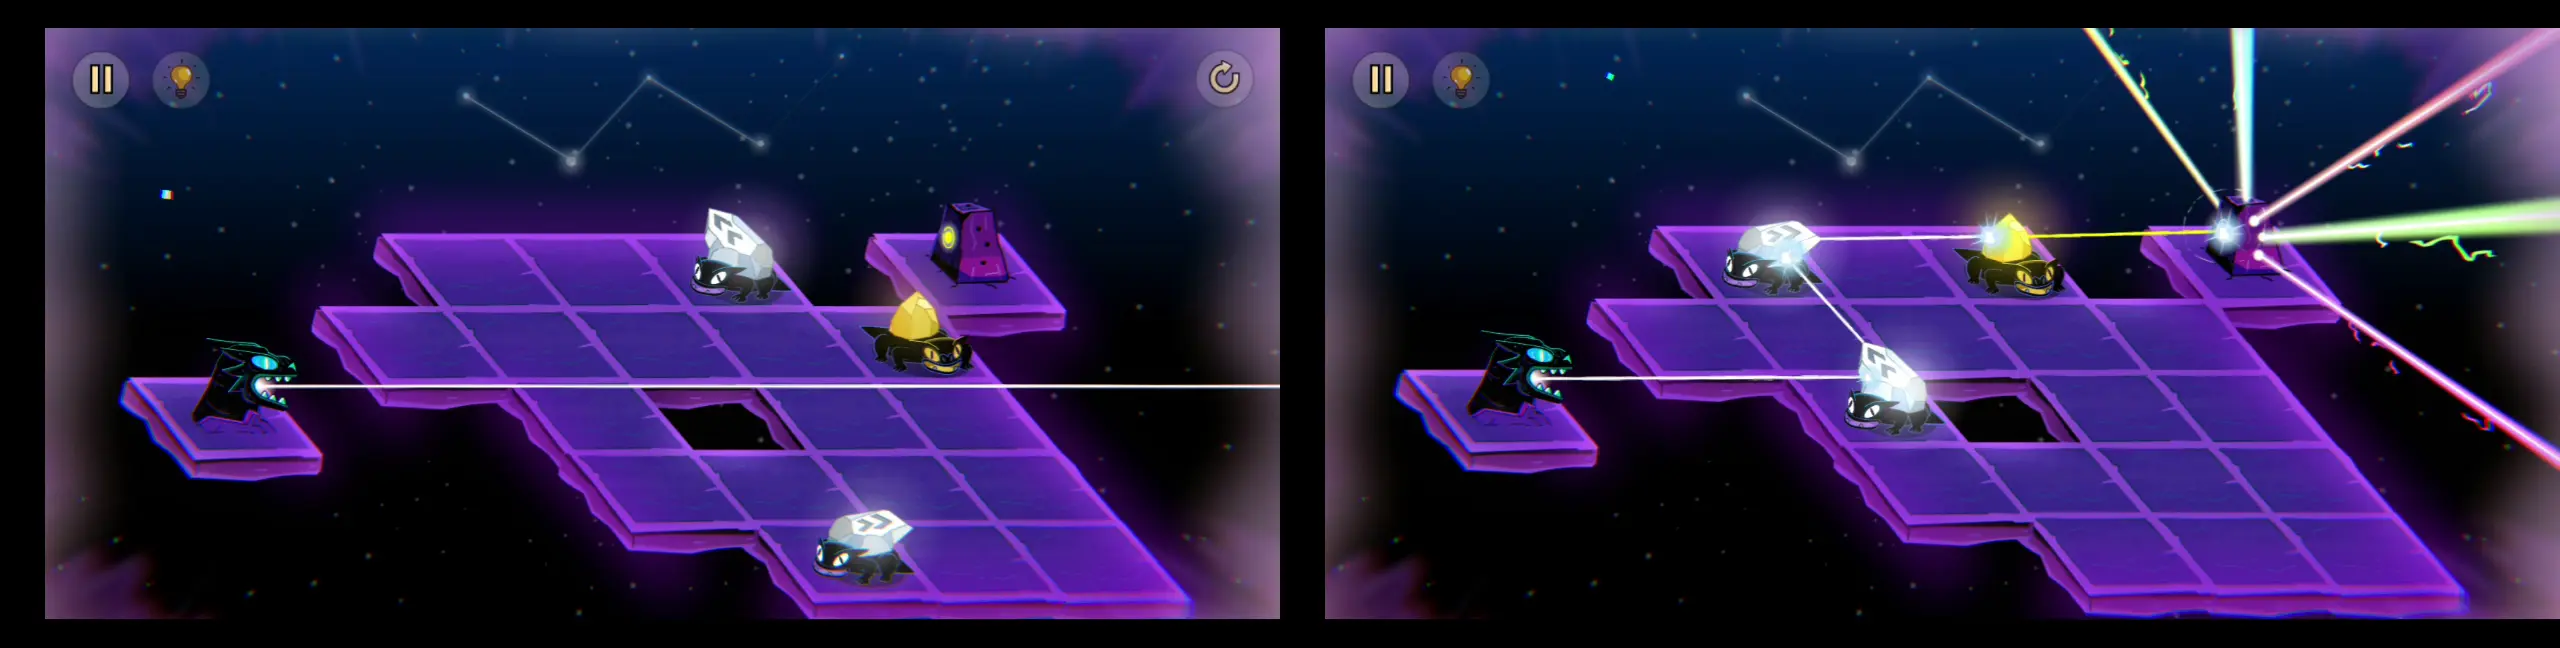
- Inside the cave, you’ll find yourself solving five puzzles with the same mechanic, each one becoming harder than the last. Basically, the objective of this puzzle is, of course, to avoid getting caught by the deer-bear monster. However, the only way you can escape is by moving to the squares indicated on the floor. As you’ll see, each square is connected by a line that dictates how you can move. The same is applicable to the deer-bear monster, except you can’t move along red lines, but the creature can. The only upside you have against the monster is that you can trick it into chasing you if you land on a square aligned with the square it’s situated on.
- Pictured below is the solution to the first puzzle:
- Pictured below is the solution to the second puzzle:

- Pictured below is the solution to the third puzzle:

- Pictured below is the solution to the fourth puzzle. Take note that you will be picking up a golden statue along the way.

- Pictured below is the solution to the fifth and final puzzle:

- Once you get out of the cave, you’ll encounter an area where a frog is tied to a log. Pull on the rope to release the frog. Click on the rope to collect it.
- Drawn on the ground is some kind of ritual circle with runes. Beside it are a pair of paws that look about the size of the deer-bear’s. Walk left and you’ll see the entrance of the cave you just came from. Around the cave’s mouth are different runes. Click the runes according to how they were laid out on the ritual circle. Pictured below is the correct order of which runes to click. If you click the runes in the incorrect order, nothing will happen and you’ll have to try again.
- Once you click the correct runes, one of them will fall, particularly the one that looks like it has the symbol of a snake. Walk back to the frog and place the snake rune on the similarly shaped slot on the stone.
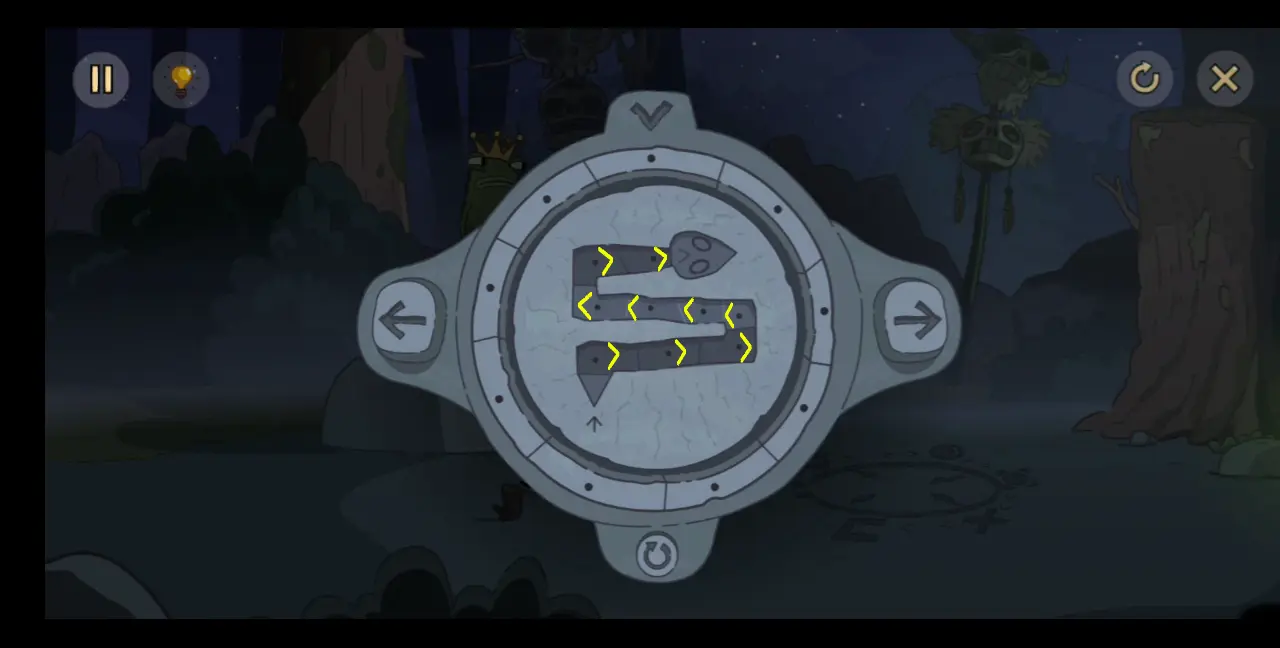
- This will prompt a mini puzzle where you’ll see the snake rune up close and it’s surrounded by a dial with dots. The rune is also flanked by left and right buttons. Basically, all you need to do is press the left and right buttons following the shape of the snake. Pictured below is the solution wherein the yellow marks indicate which of the directional buttons to press:
- Once you’ve solved the puzzle, the rune will glow and so will the ritual circle on the ground. This looks like a trap so before you set the bait, drag the rope from your inventory so you can set up the trap to catch the deer-bear monster. The rope will be set around the pawprints on the ground.
- Once the rope is placed, put the golden statue you obtained from the previous cave puzzle in the middle of the glowing ritual circle. It will show a holographic projection of yourself. The projection makes noise and catches the monster’s attention. Hide behind the stone.
- The monster will run up to the projection and try to swipe at it. Click the rope so it will bind the deer-bear monster’s legs. Click the monster to push it to the ground.
- The forest disappears and you are back in the real world where it’s revealed that you’re still playing with your sister and pushed her to the ground. You laugh and she pretends to have fainted, but it’s a prank. You help her up anyway. This concludes Chapter 5.
Chapter 6
Main Player: Gal/Toto
- In this chapter, you will play alternately as Toto or Gal with a shared inventory. First, Gal asks Toto where their house is so they can go home, but neither of them know the answer. Like the forest segment, this chapter is divided into three areas: the left, middle, and right.
- You begin in the middle area, where an old lady is sitting on a bench next to a tree. She’s surrounded by pigeons. Behind the bushes is a hand holding up a rubber duck on a stick. There’s also an empty pizza box on the ground.
- To your left is a goblin riding a giant heron resting on a pond. On the pond is a piece of bread.
- To the right is a phone booth and a wooden trash can. In the background are garden frogs on mushrooms and a view of houses with roofs in different colors.
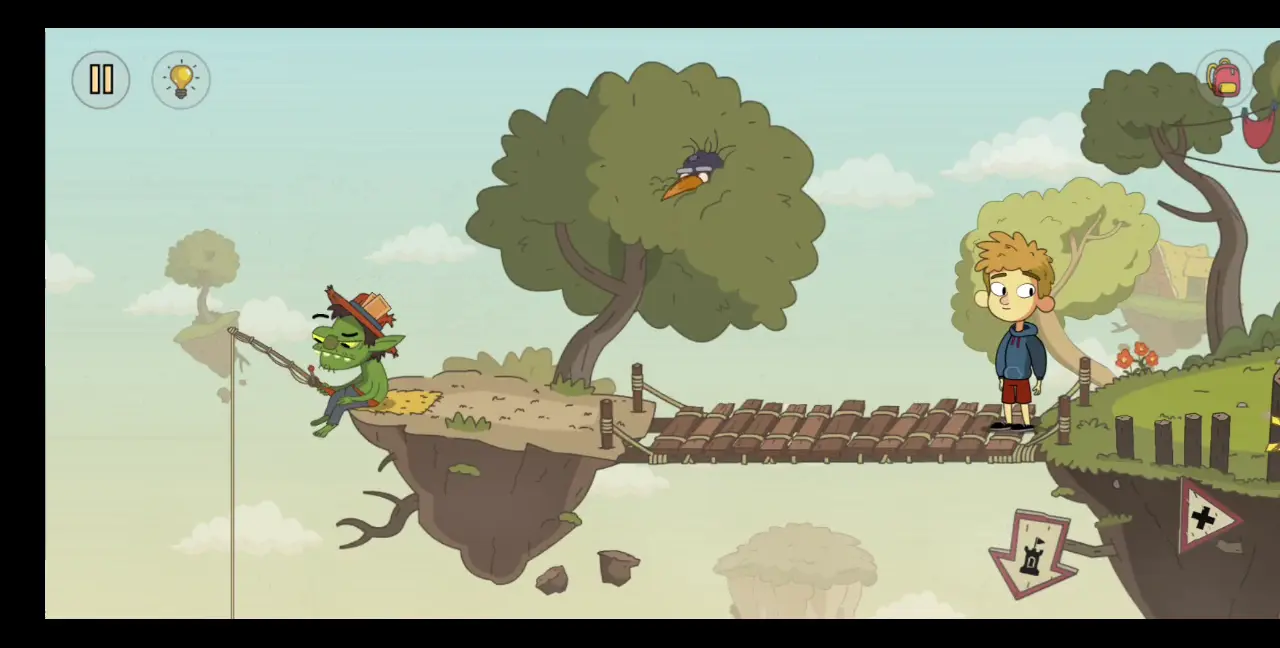
- First, go to the left area and talk to the goblin. You’ll ask the goblin if it knows the way to your house. The goblin laughs and asks for four rubber ducks in exchange for telling you the way. This will be your objective for the entire chapter.
- Pick up the piece of bread floating on the pond. You won’t be able to reach it at first, but you will as both Gal and Toto will help each other. After picking up the piece of bread, you’ll let it go again, startled by the fish stuck to it. The fish is eaten by the heron. You take the bread and it’s placed in your inventory.
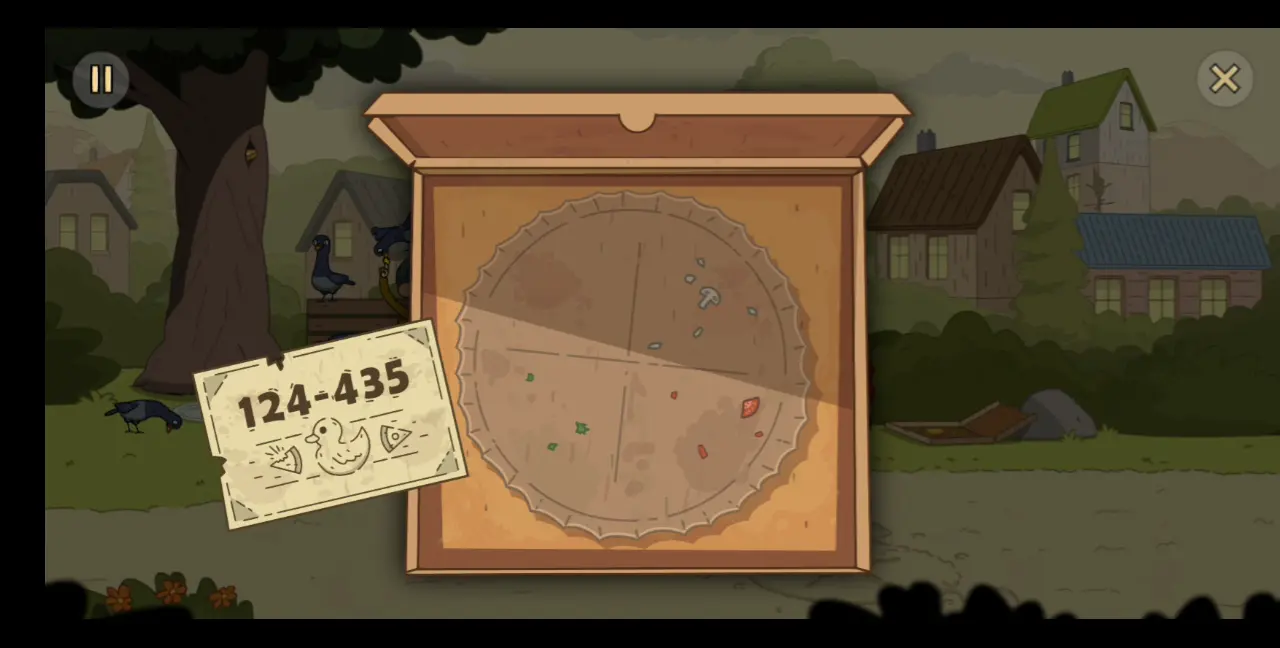
- Go back to the middle area. As mentioned, there’s a hand behind the bushes waving around a rubber duck on a stick. To get that rubber duck, you need to bribe the hidden stranger with pizza. Click the empty pizza box in front of the bushes. Inside is a card with the number of the pizza delivery place. Additionally, take note of the toppings left inside the pizza box and which slice of the pizza they’re on. This will come in handy later.
- If you check out the phone booth, you’re going to need a coin to call the number on the pizza box. You happen to find a coin stuck on the tree next to the bench where the old lady is sitting. You approach the tree and pigeons will surround you, so take out the bread from the inventory and drag it toward the pigeons. This will cause you to place the bread on the plate near the tree, which all the pigeons will eat. You’re now free to take the coin lodged on the tree trunk.
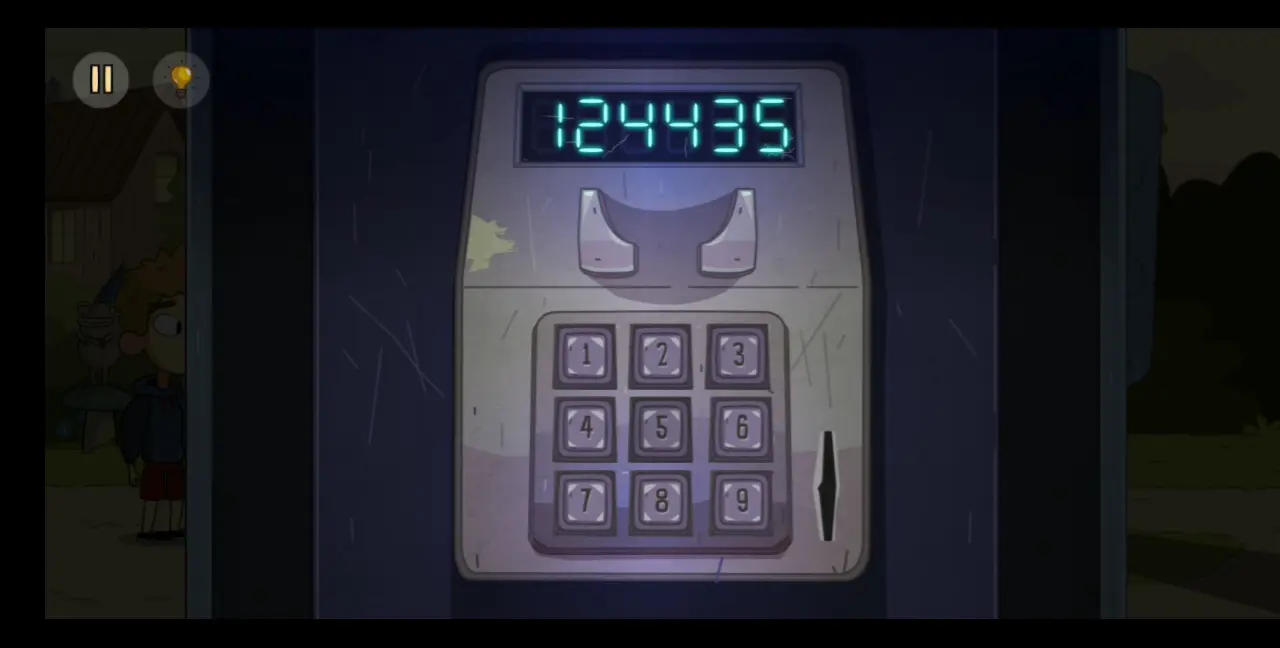
- Walk to the right and use the phone booth by dragging the coin to it. You’ll be asked to enter the number of the pizza delivery place, which is 124435.
- The delivery guy will pick up your call and ask you what kind of toppings you want on your pizza. Based on the empty pizza box you saw, your answers, in order, should be mushrooms, tomatoes, herbs, and nothing.

- Once you get the pizza, return to the middle area and drag it to the empty pizza box to replace it. The hand waving around the rubber duck will get pizza and drop the rubber duck. Take the rubber duck. This is duck #1 out of 4.
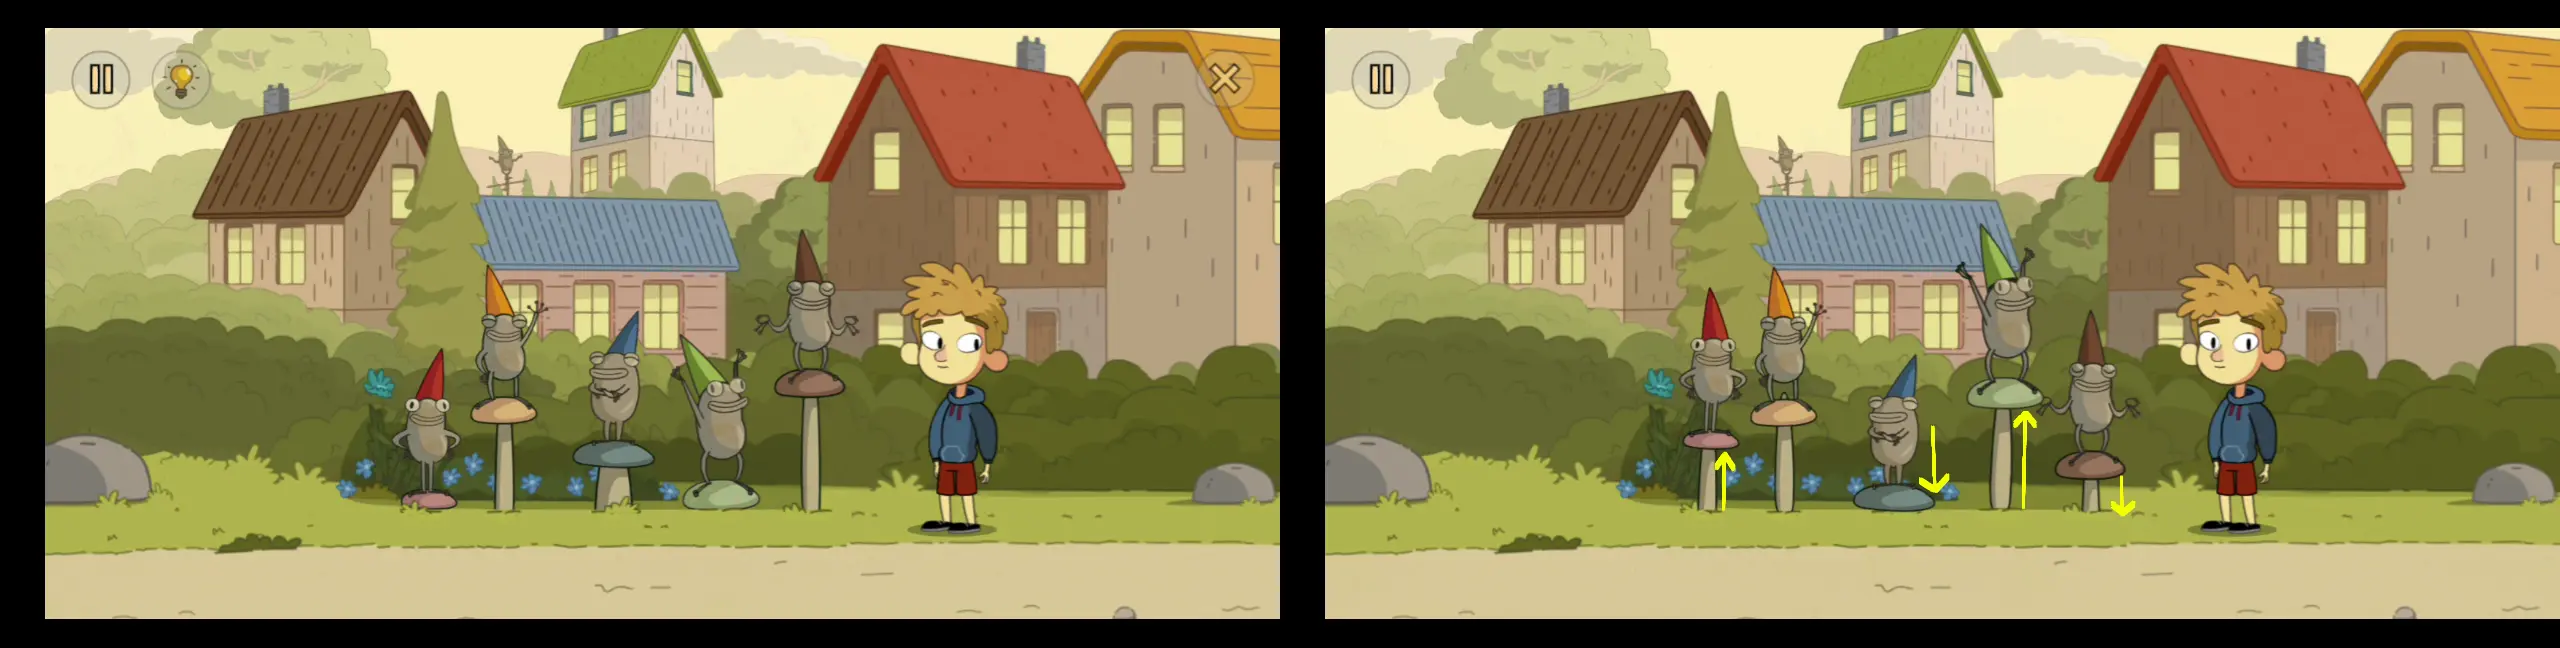
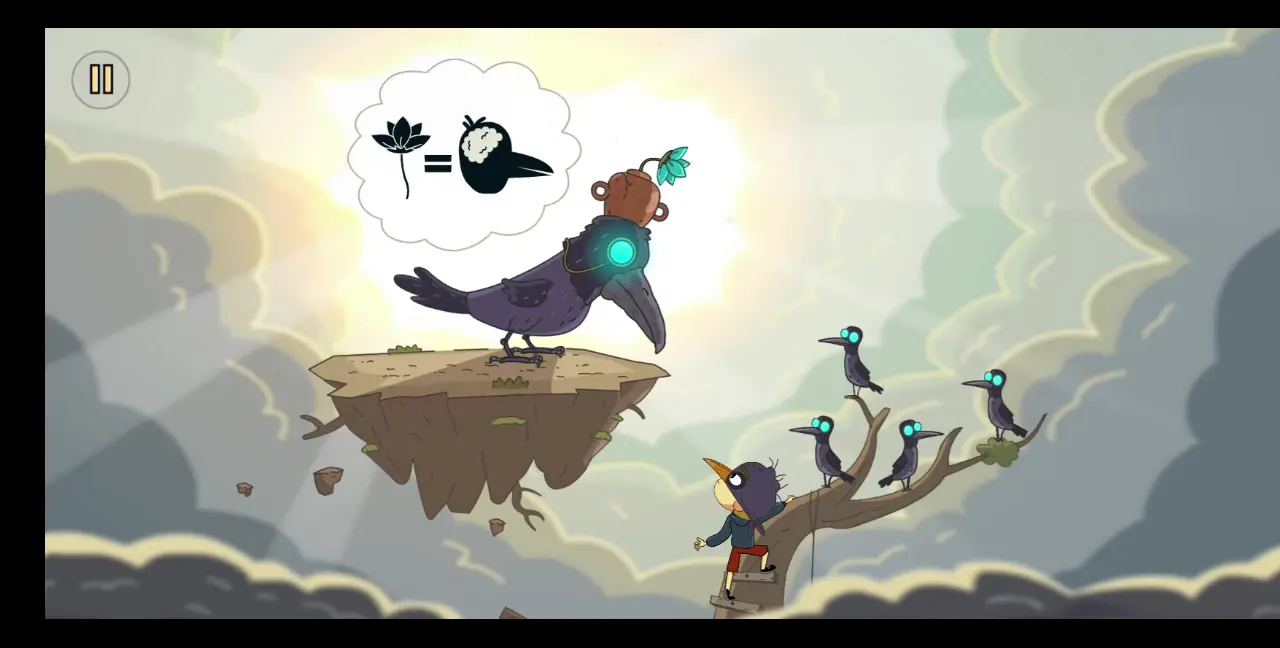
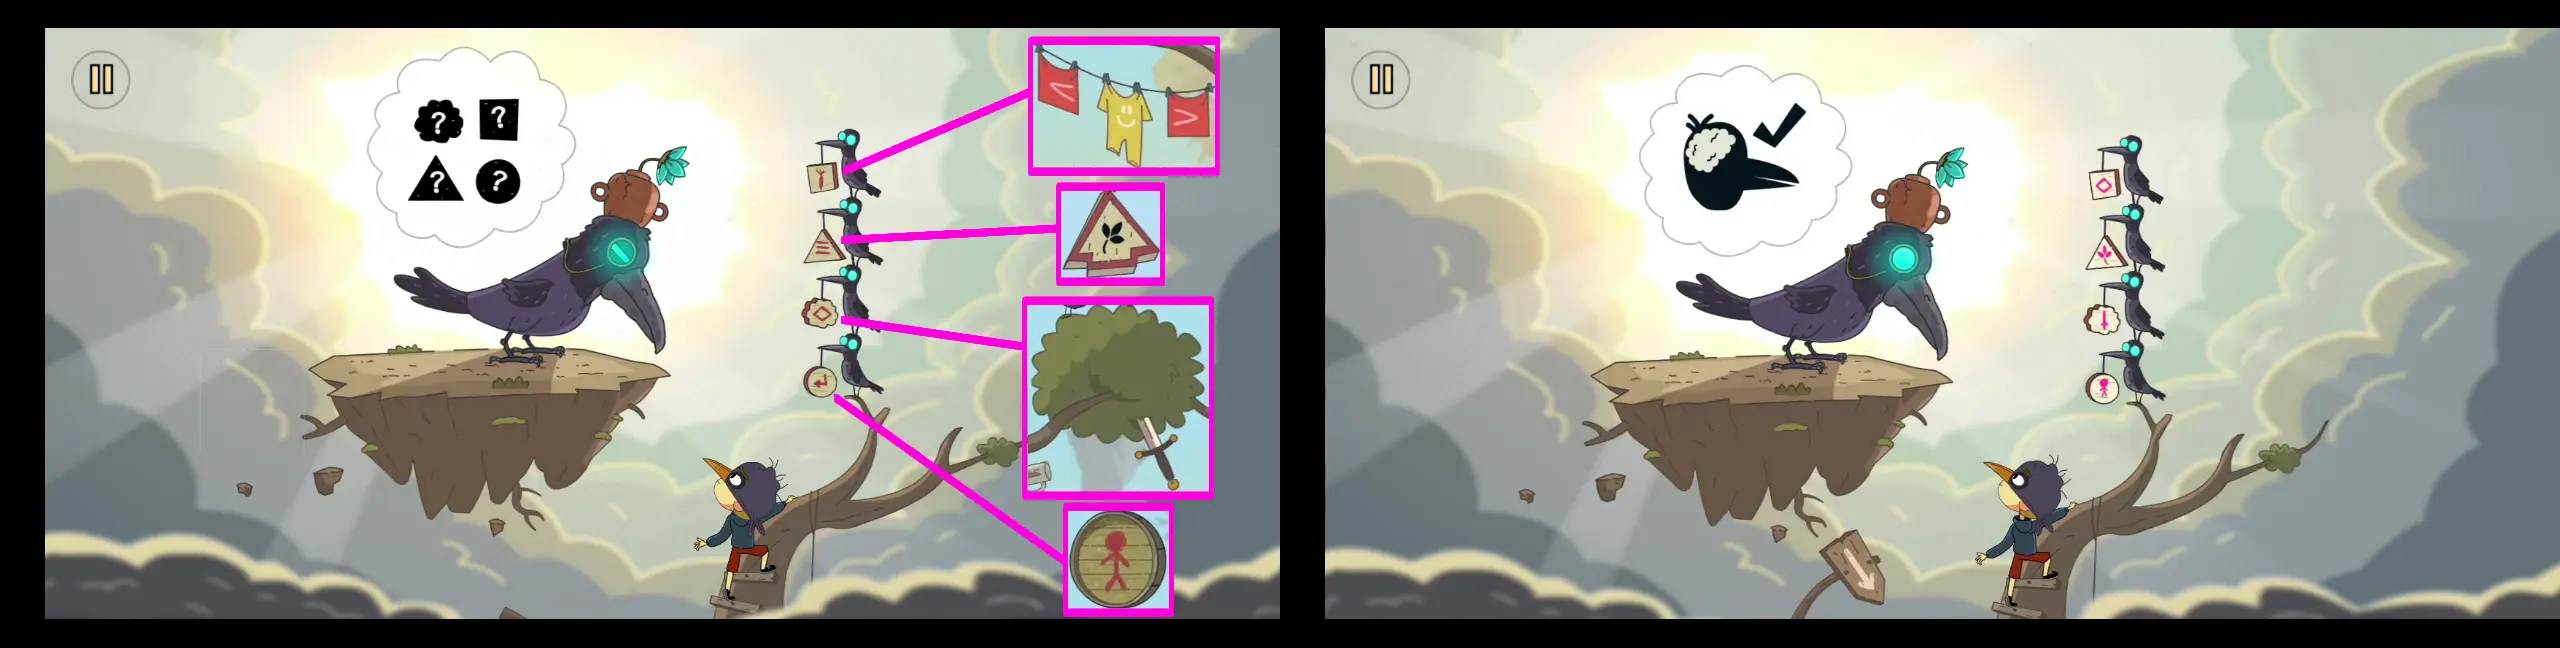
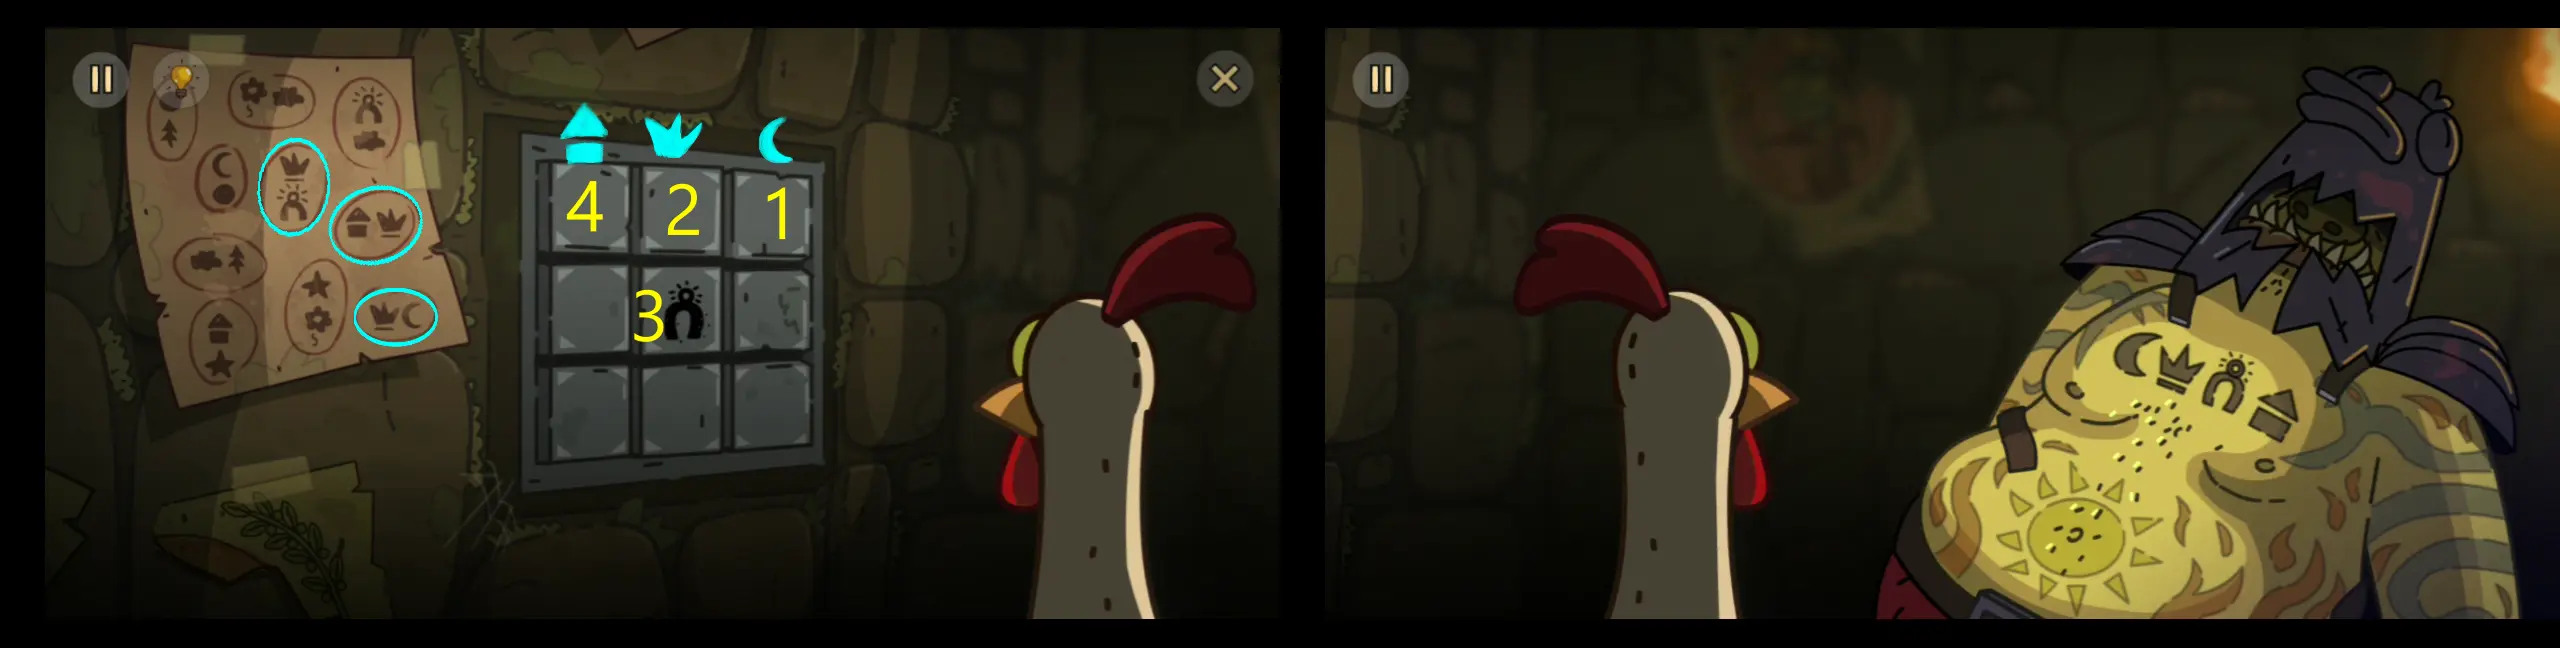
- Go back to the area on the right and approach the garden frogs. You’ll notice that their hats are the same color as the roofs of the houses behind them. Move the frogs up and down according to the height of the houses they correspond with. One of the frogs will then give you a rubber duck. This is duck #2 out of 4.
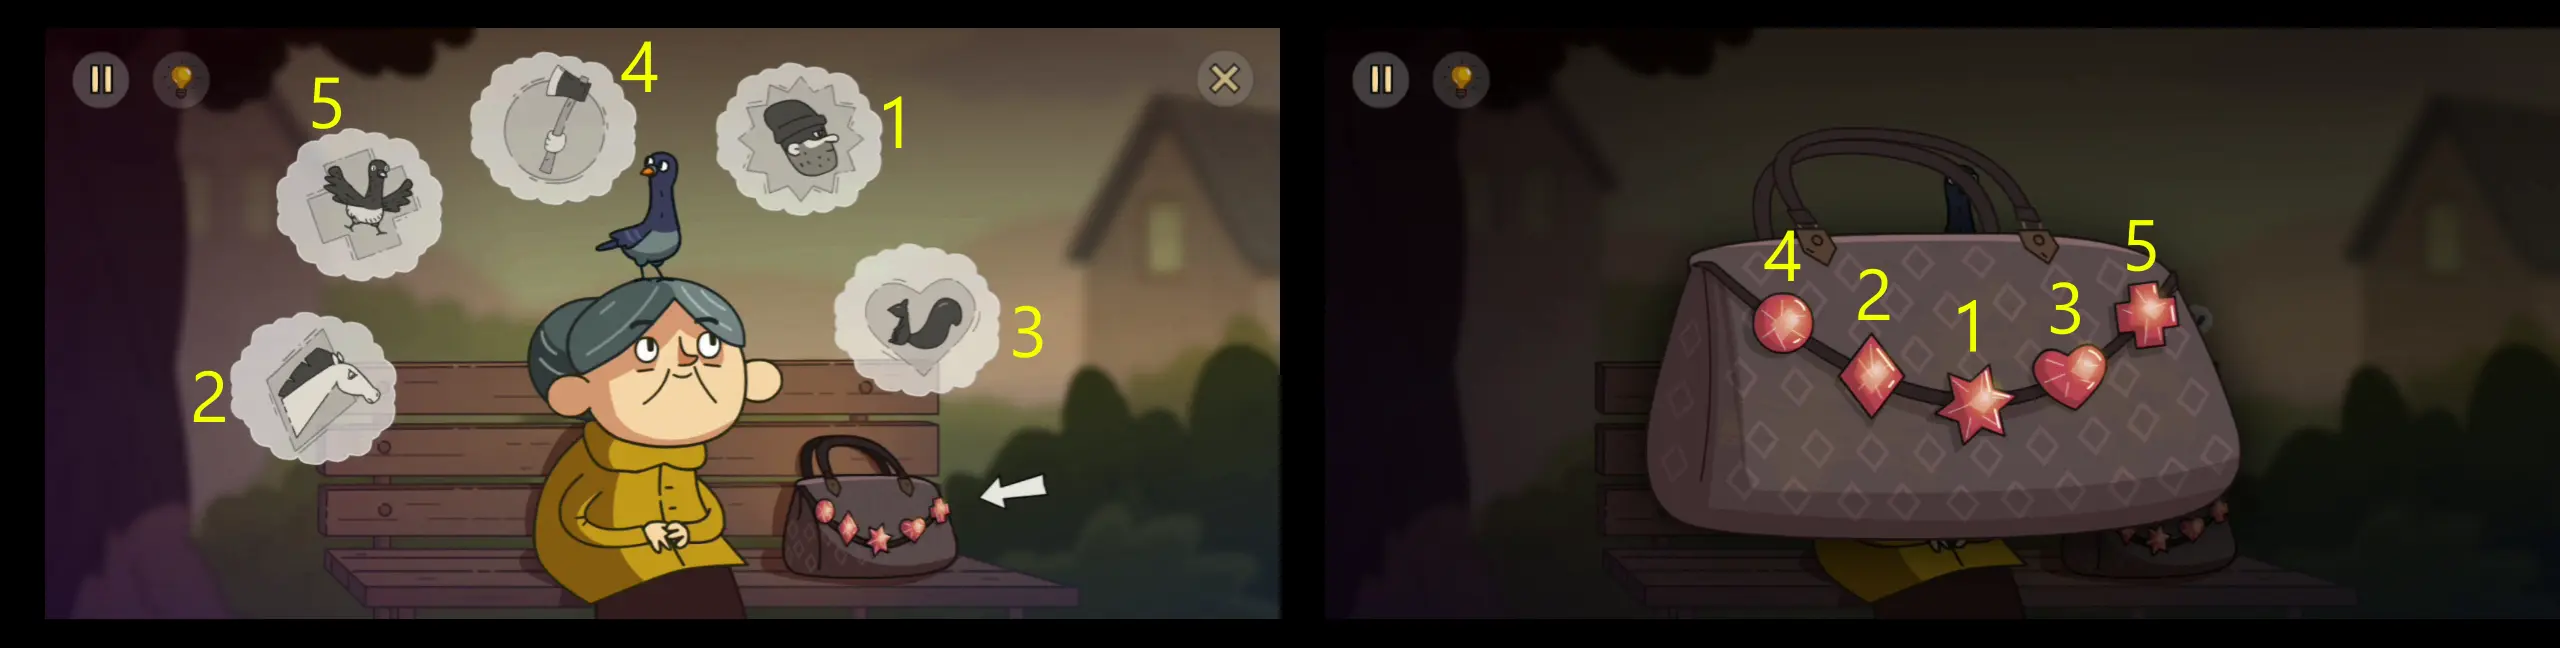
- Return to the middle area and talk to the elderly lady. You’ll ask her if she has a rubber duck. She’ll tell you that she has one in her bag, but her bag can only be opened if the right shapes are clicked in the right sequence. To find out the right shapes and sequence, you need to piece together the story she will tell you, which are represented by the gray clouds around her. In each piece of the story is a shape corresponding to those on her bag. Pictured below is the correct story sequence and the correct sequence of shapes to open her bag. With this, you’ll get duck #3 out of 4.
- For duck #4, return to the area on the right and approach the trash can. The stink is too much so you won’t be able to dig inside. So, go back to the left area and you’ll see a fairy hiding behind a wooden cylinder that looks like the trash can. Click on it so the fairy can give you a clothespin with which you can cover your nose.
- Return to the area on the right and use the clothespin to cover your nose before rummaging through the trash can. You can do this by dragging the clothespin to the trash can. This is where you will find the last duck.
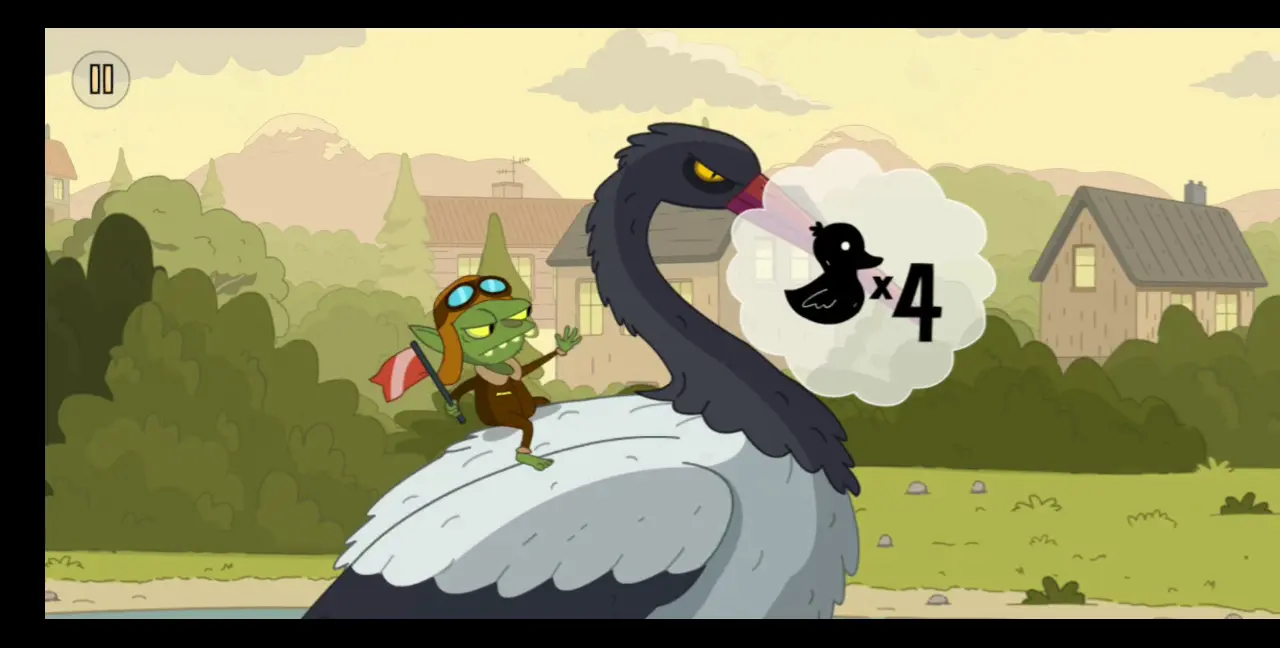
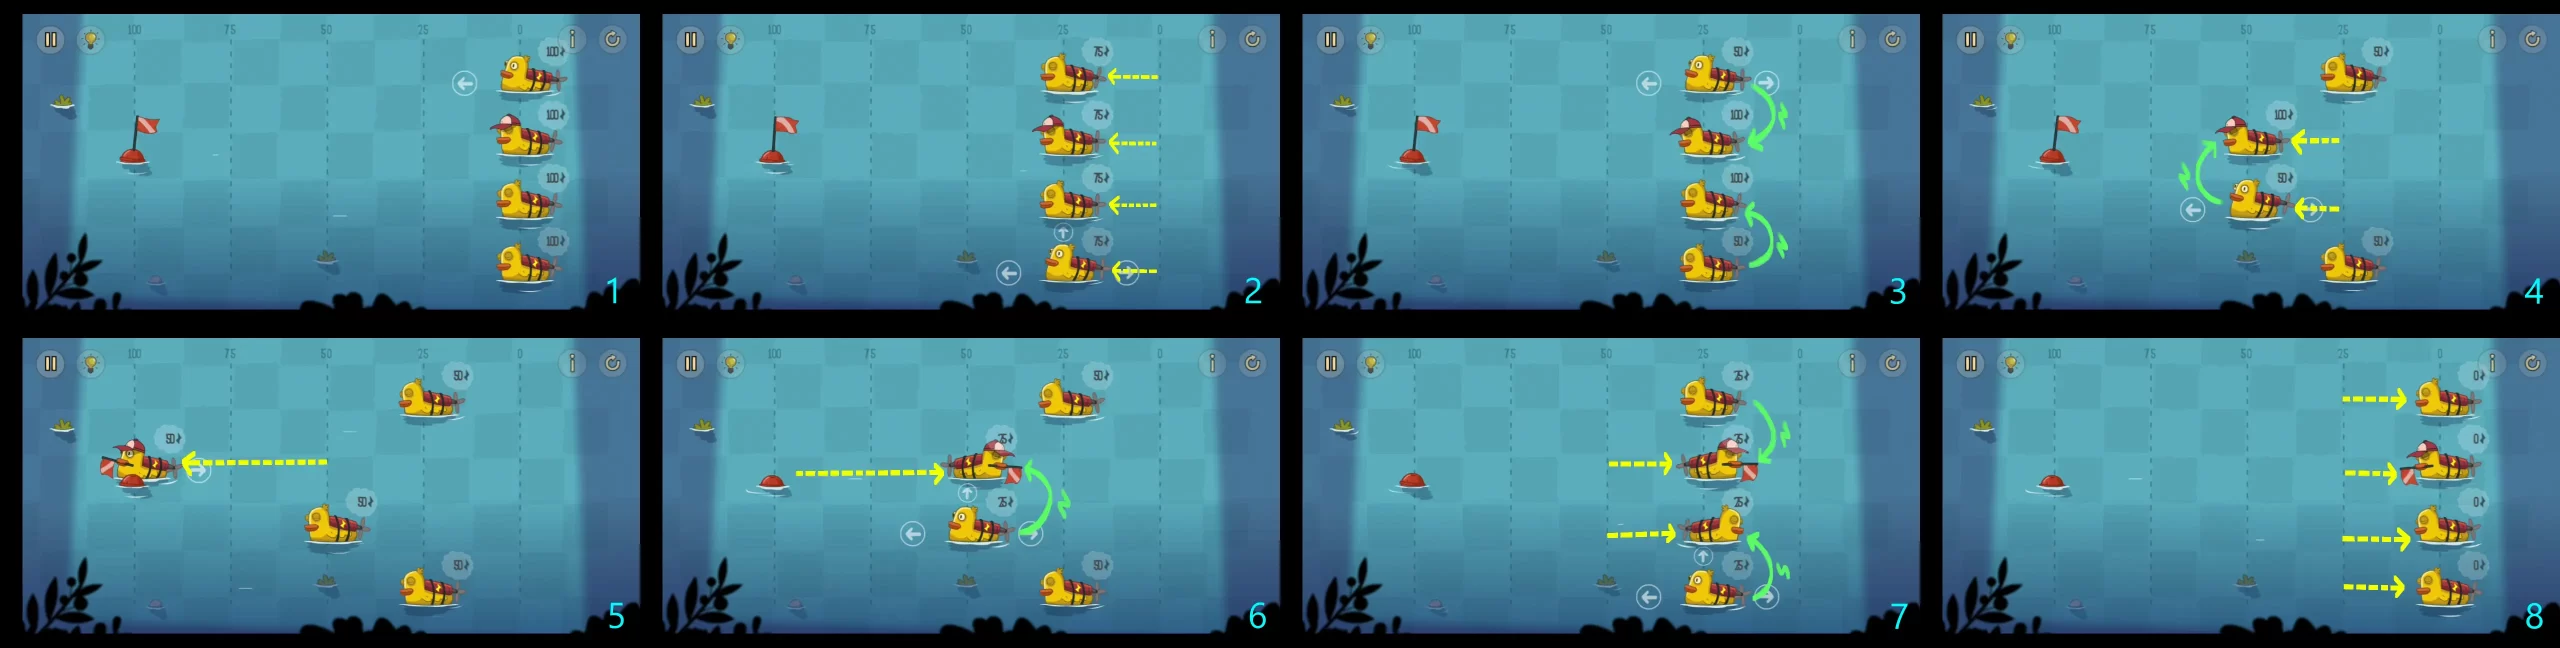
- Go back to the left area and give the goblin on the heron all four rubber ducks. This will prompt a mini puzzle where all four ducks are in the pond and given 100 energy each. The goal is for duck #2 (the one with the hat) to get the flag on the other end, and all ducks must return to the starting point. Every time a duck moves, it spends 25 energy. Energy can be shared between ducks. Pictured below is how to solve this puzzle. Take note which ducks give the energy and which ones receive them.
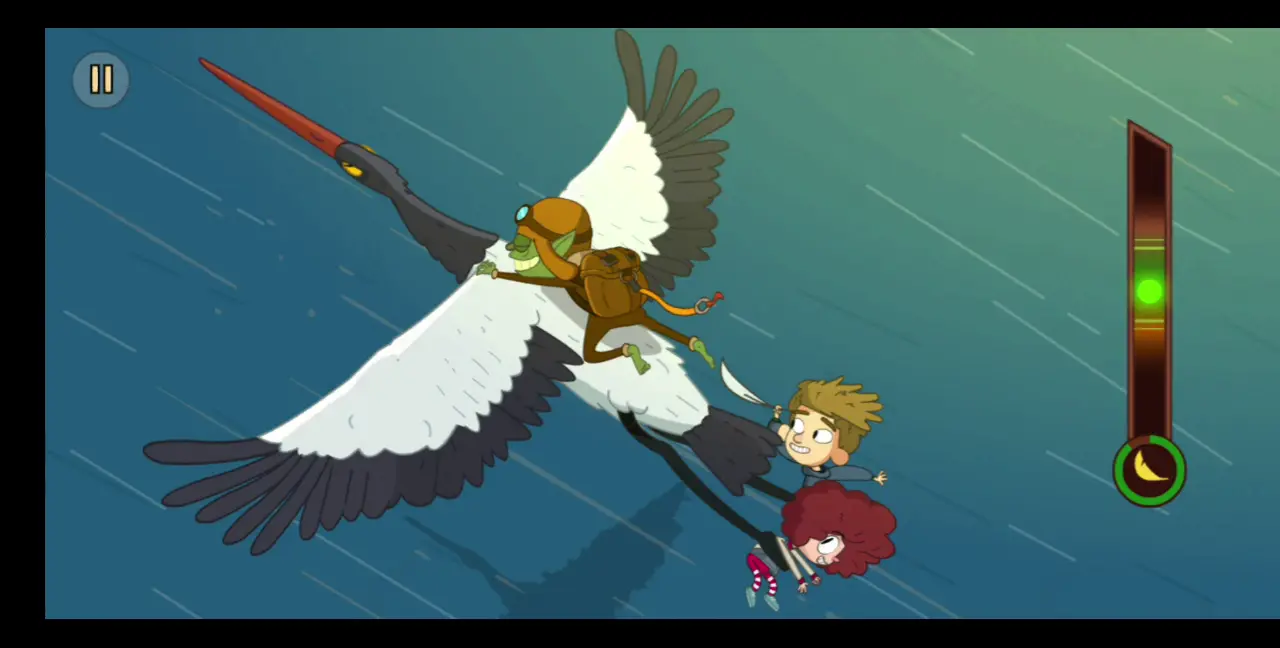
- After winning the puzzle, the goblin will get angry. You run away but the heron takes you (Gal and Toto) and flies away. In mid-air, click on the lone white feather sticking out of the heron’s left wing. Use this to tickle the goblin. A meter will appear on the right side of the screen. Keep tapping the screen so that the ball will rise up the meter and stay on the green area while the bar at the bottom fills up. Once the bar is filled, the goblin will start laughing uncontrollably.
- Pull the orange string sticking out of the goblin’s backpack. This will open its parachute, launching it off the heron.
- As both Gal and Toto are still hanging onto the heron’s legs, a slider will appear on the right side of the screen. What you need to do is keep sliding it up and down until you fill up a meter. When the meter is filled, both Gal and Toto will swing out of the heron’s legs and fall from the sky. This concludes Chapter 6.
Chapter 7
Main Players: Gal and Toto
- From the heron, Gal and Toto will land on a boat. In this chapter, you will play as Gal in some parts and Toto in others. Unlike the last chapter, they won’t have a shared inventory, but have separate inventories.
- Upon landing on the boat, click it so Gal and Toto will stand up. Click the boat again and you will get a view of the boat floating in the middle of the ocean.
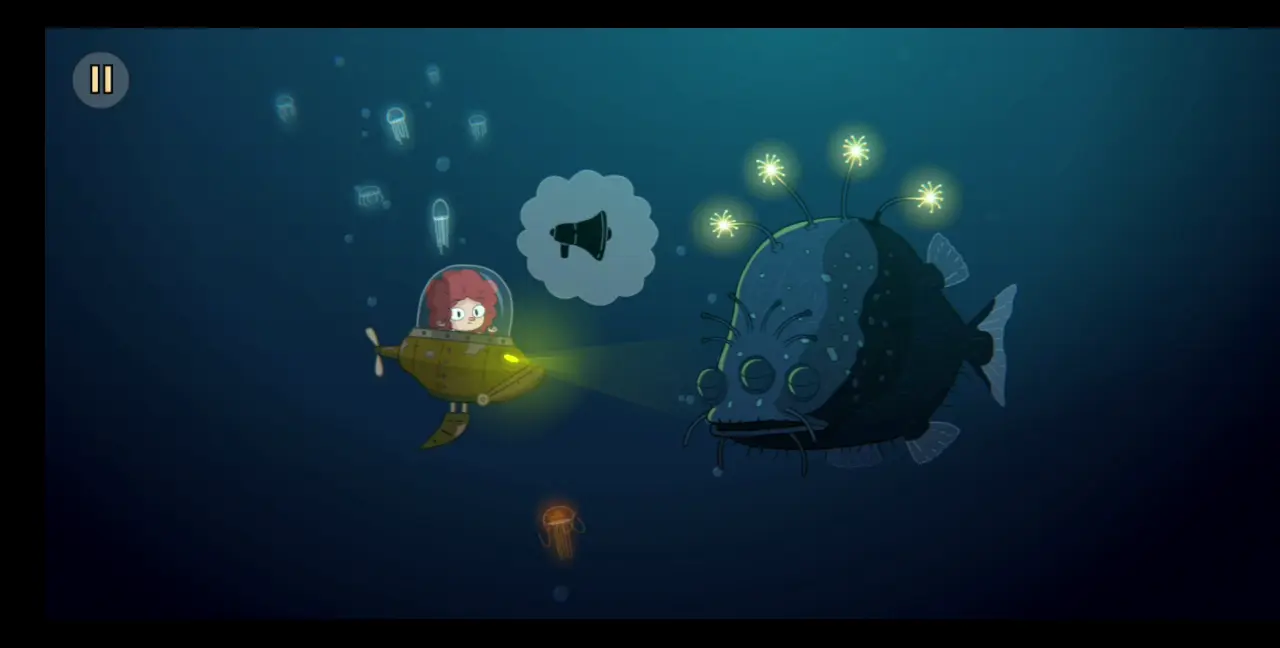
- A shark’s fin will suddenly appear on the water and swim around the boat. Click the shark’s fin and you’ll discover that the shark is just a bearded fairy wearing a gray hat.
- Talk to the fairy and it will give you a map to your destination (your house) before flying away. After reading the map, Toto suggests going right.
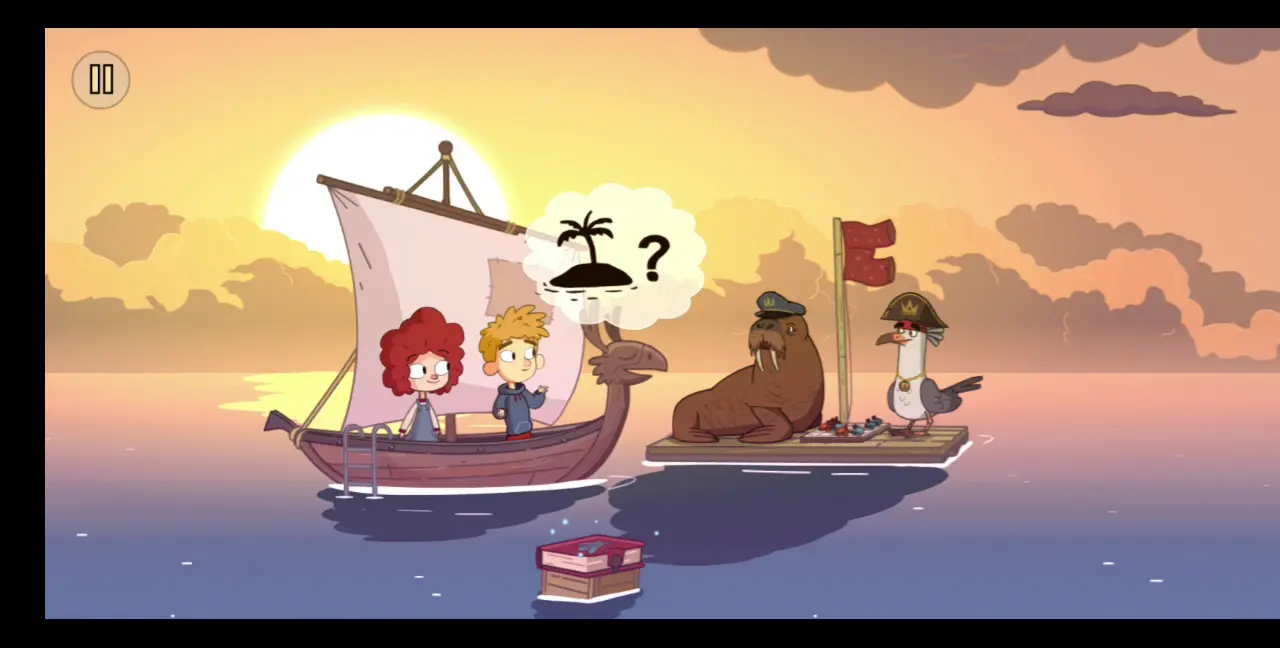
- Move the boat to the right and you’ll find a walrus and a seagull on a raft playing some kind of board game.
- Next to the raft is a stack of books. If you click on it, you’ll see a book with the picture of an insect. Remember this for later.
- Ask the walrus and seagull where you can find an island, which is one landmark you need to pass on the way home. They will tell you to go right.
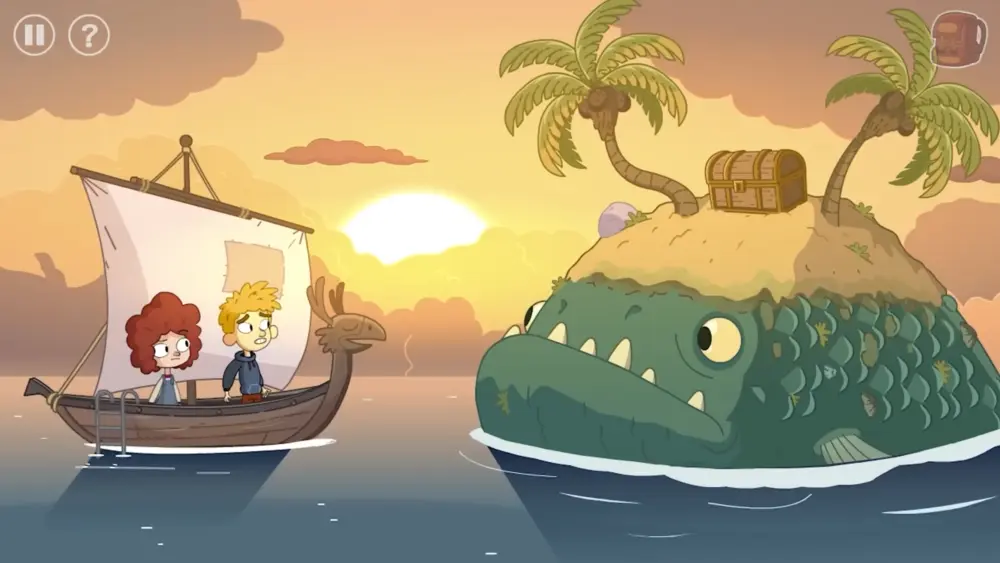
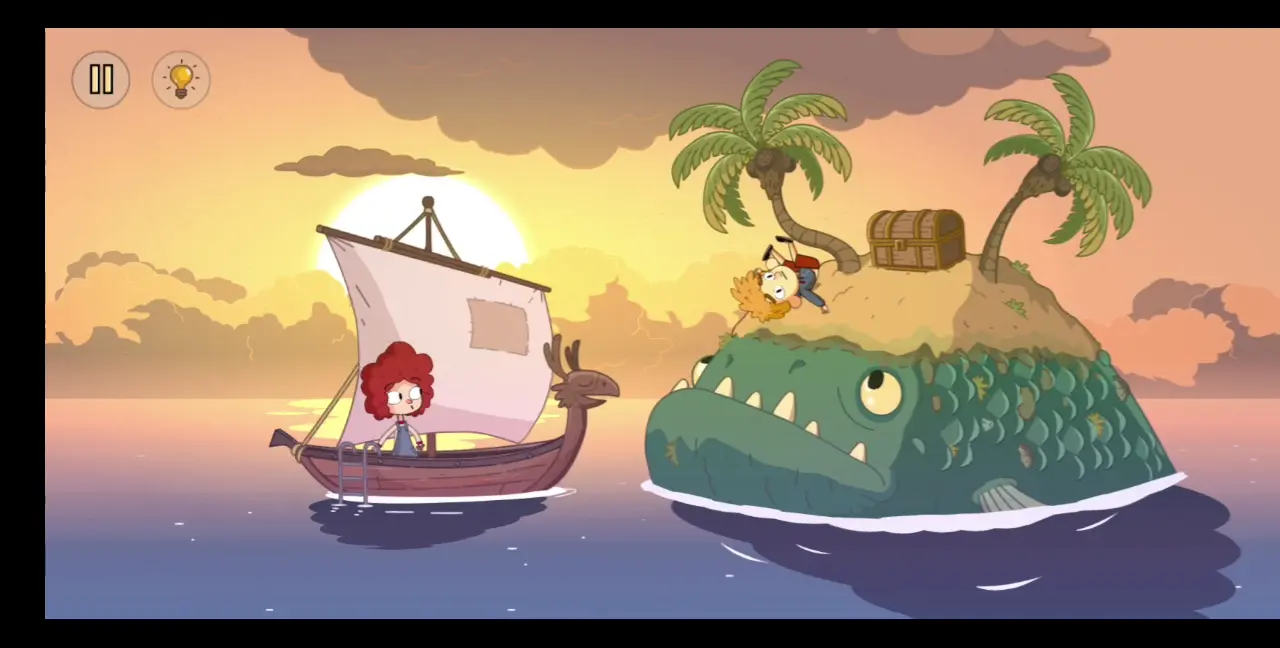
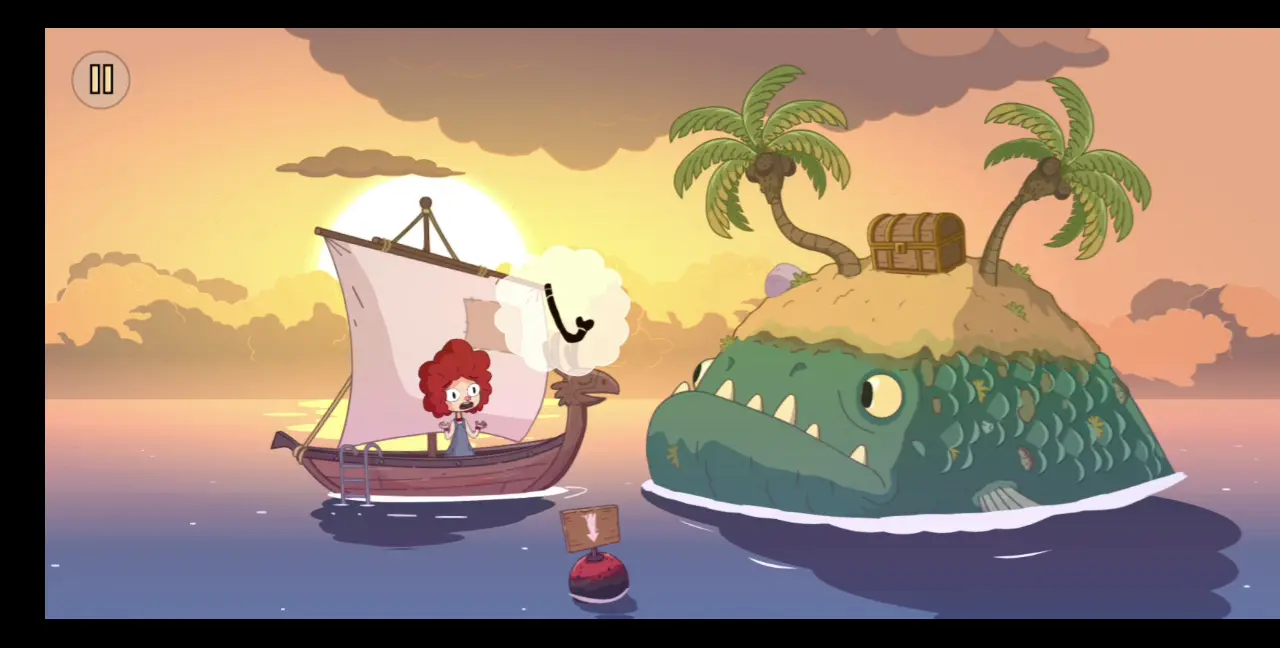
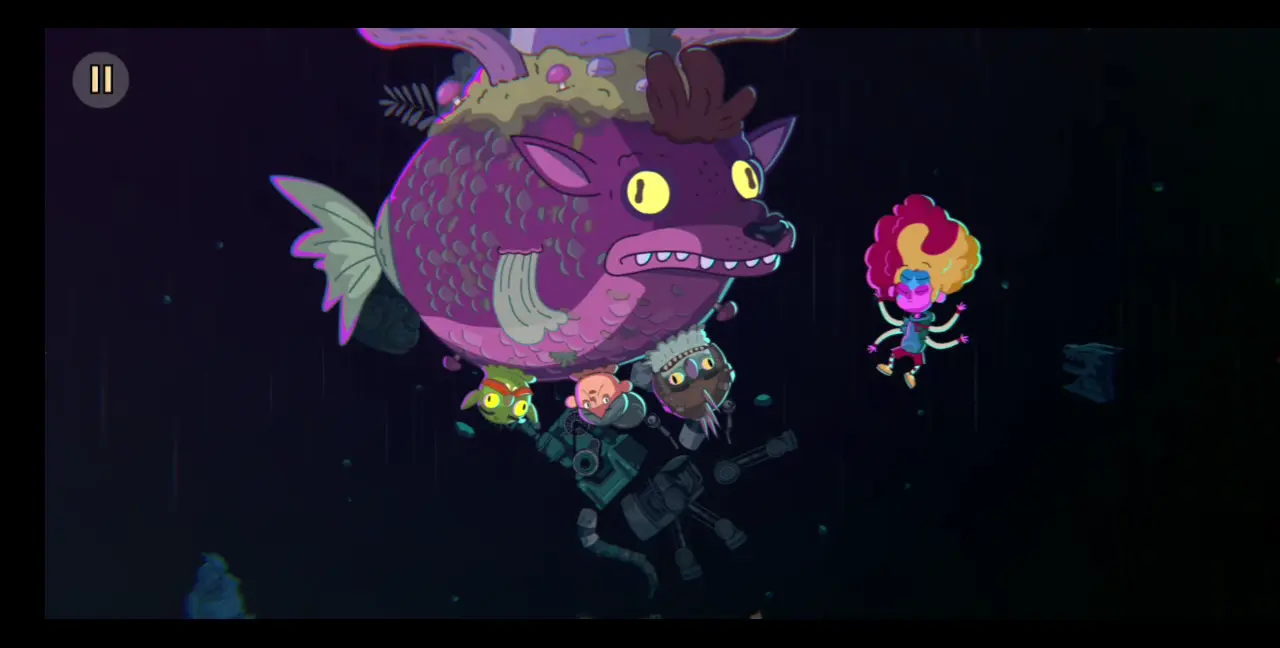
- Move the boat all the way to the right again and you’ll see an island with a treasure chest flanked by two palm trees. If you click on the treasure chest, Toto will jump on the island in an attempt to open the chest, but it’s locked. A giant fish will emerge from under the island (the island is like its hat) and swallow Toto. Gal demands that the fish cough up her brother but it doesn’t. From this point on, you will occasionally switch between playing Gal and Toto.
- A buoy will pop up the surface of the water with a sign that points downward. As Gal, you have to dive into the ocean, but you will first need a snorkel.
- Move the boat all the way to the left, past the walrus and the seagull, and into the area where you’ll see a log with a fish that has a snorkel. Ask the fish for the snorkel and it will give it to you before jumping back down the water.
- Near where the fish sat are three hand puppets floating above the water. There is also a bottle floating next to them. Click the bottle to try and get it, but an octopus with a tophat will emerge from the surface and take the bottle, suggesting that the bottle belongs to it. The octopus will sink down the water and only the hand puppets and the bottle will remain afloat.
- Move all the way to the right again until you reach the giant fish and the island. Drag the snorkel from your inventory to the buoy and Gal will dive down the ocean.
- Underwater, you’ll see that Toto is stuck inside the fish’s belly with an old man fishing in a bucket. Take note that the fish has four sea creatures stuck to it. Remember this for later.
- As Gal, you won’t have much to do right now, so switch to playing as Toto by clicking on him. Then, as Toto, click the old man to talk to him. He will tell you that he needs a worm as bait for his fishing rod in exchange for the plunger on his head.
- Click the crate beside you to move it. Under it is a pirate hand puppet stuck to one of the fish’s suctions. You can’t pull it out so instead you push it into the suction and it comes out of the hole.
- Switch to Gal and take the pirate hand puppet floating in the water.
- You’ll notice that there’s a worm swimming around near the fish, but if you try to catch it, it will swim away. Remember this for later.
- As Gal, go back up the surface of the water and into the boat. Move all the way to the left, to the area with the hand puppets and bottle. Use the pirate hand puppet you obtained to scare away all the other hand puppets, as well as the octopus. Once the octopus has left, click on the bottle to claim it.
- Inside the bottle is a glowing insect that, when panned across a piece of paper, illuminates hidden symbols.
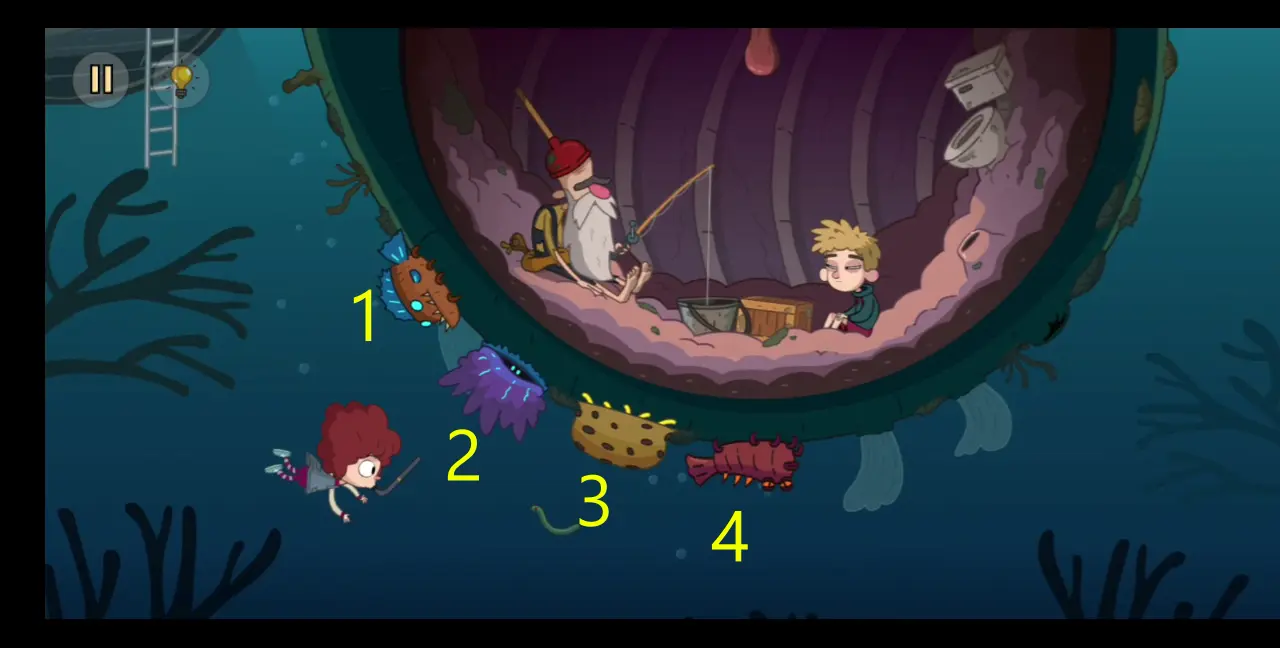
- With this insect on hand, go back to the area with the walrus and the seagull. Drag the insect to the stack of books and move it along the pages to see which symbols are hidden on each page. As you flip the pages, you’ll discover that the book is all about various sea creatures. However, four sea creatures have numbers on them when placed beneath the light of the insect. Remember which sea creatures are marked with what number. Pictured below are the sea creatures with the corresponding numbers in order:

- Head to the right and dive right back into the water. Remember the four sea creatures stuck to the fish? If you click on them, they will change their appearance. From what you’ve discovered in the book, click each sea creature (left one first) so they will change their appearance according to how they’re numbered in the book, starting from 1. Pictured below is the correct order and appearance of the four sea creatures:
- The sea creatures will then merge together into one fish. If you click on the worm floating around the water, the fish will chomp on it and electrocute it. Once it stops moving, take the worm as Gal and go back up the water. Drag the worm to the giant fish, which will eat the worm. Inside the fish’s stomach, Toto will catch the worm and place it in his inventory.
- As Gal, you have to dive back down the water then switch to playing as Toto. Give the old man the worm and he will give you the plunger on his head. He will also give you the fish he obtained from the bucket.
- Use the plunger on the toilet and you’ll get a key. Slip the key and the fish on the suction so they can exit from a hole and into the water.
- Switch to Gal and take both the key and the fish.
- Still as Gal, go back up the water and return to the boat. Go left, to the walrus and the seagull. Give them the fish. They’ll fight over it and the seagull will end up kicking the walrus off the raft and eating the fish.
- The seagull will then invite you to play a board game where you use blue and red crabs as pieces. To win this game, you need to line up four red crabs vertically or horizontally. The caveat is that crabs cannot move one tile at the time. Rather, they can only slide from end to end vertically or horizontally.

- Similar to the checkers puzzle, your experience may be different from that of other players. There’s no one-size-fits-all solution and you’re going to have to beat the seagull by keeping it from lining up the blue crabs while lining up your own red crabs. This can take several tries, but it’s not impossible.

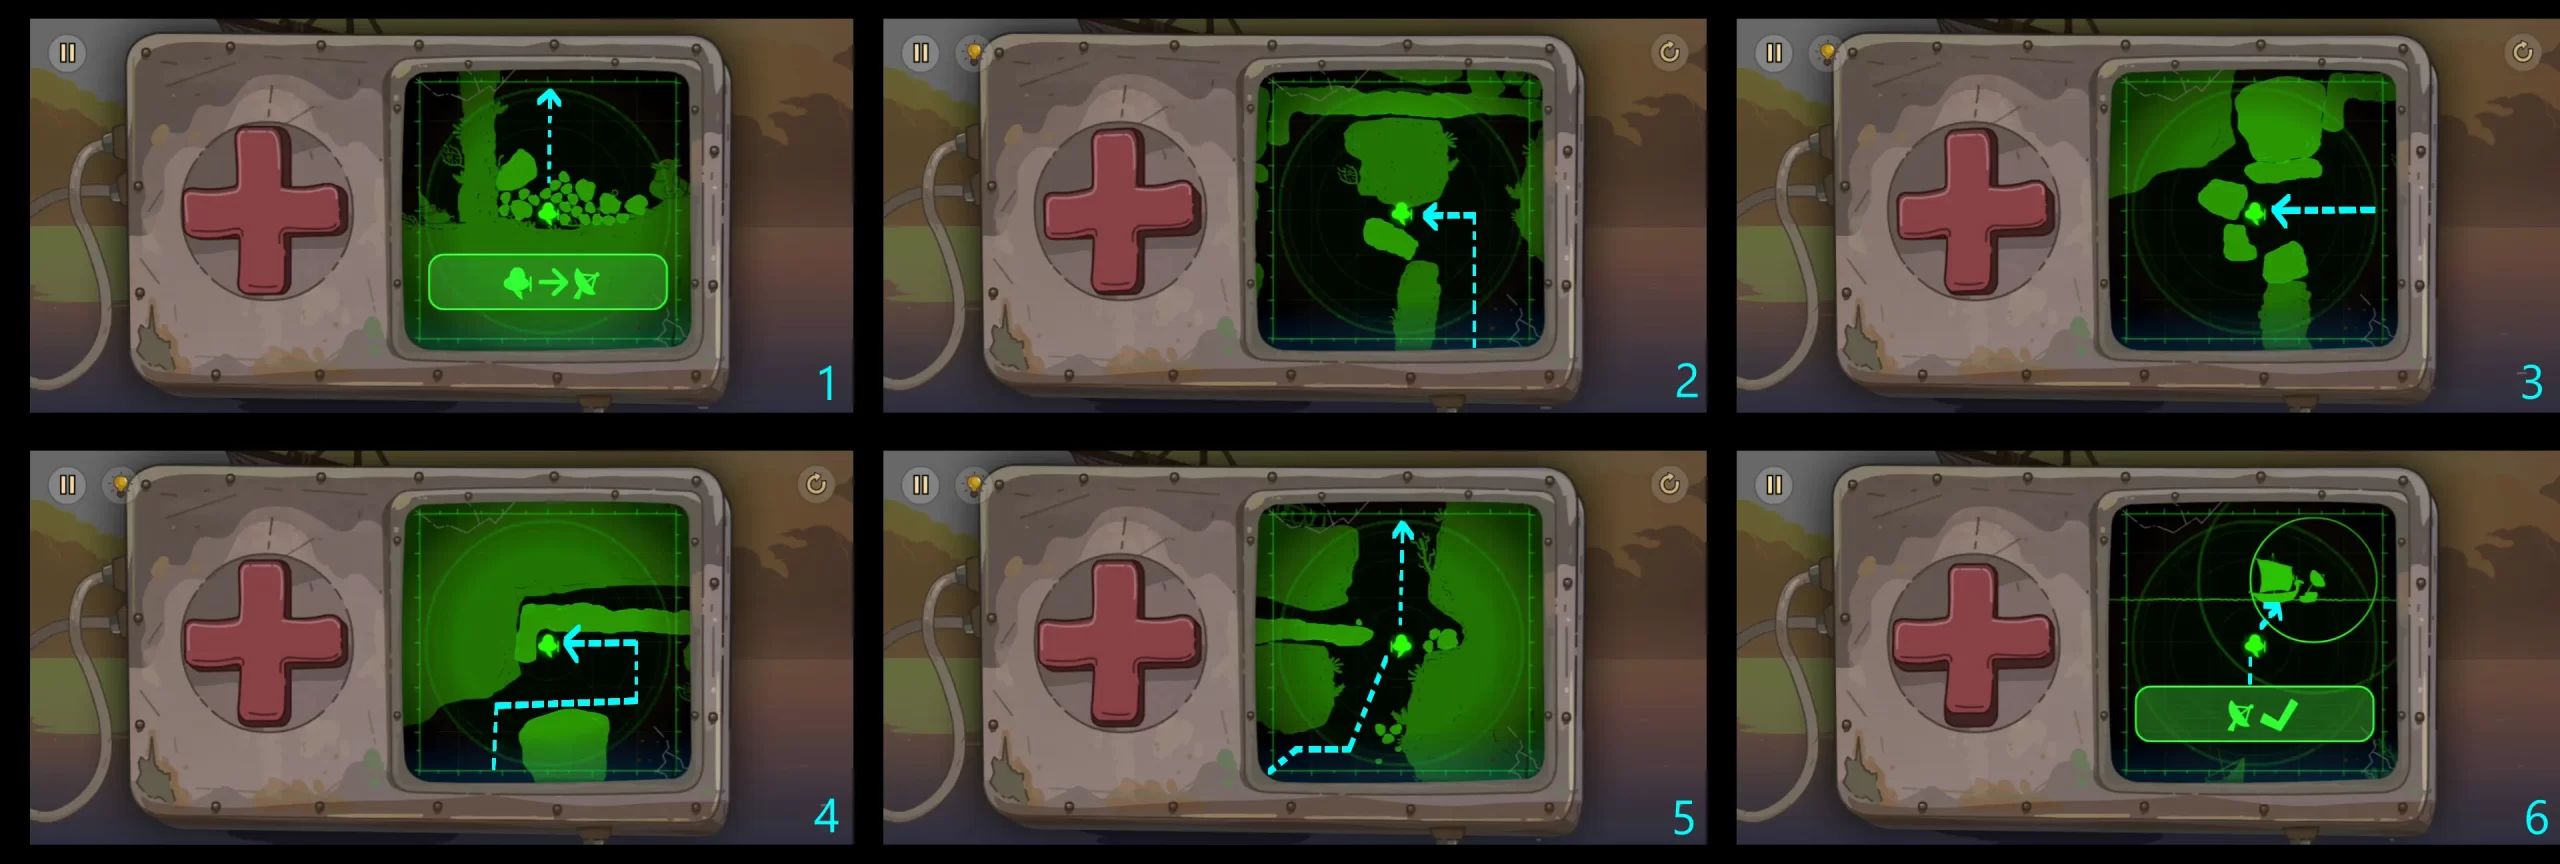
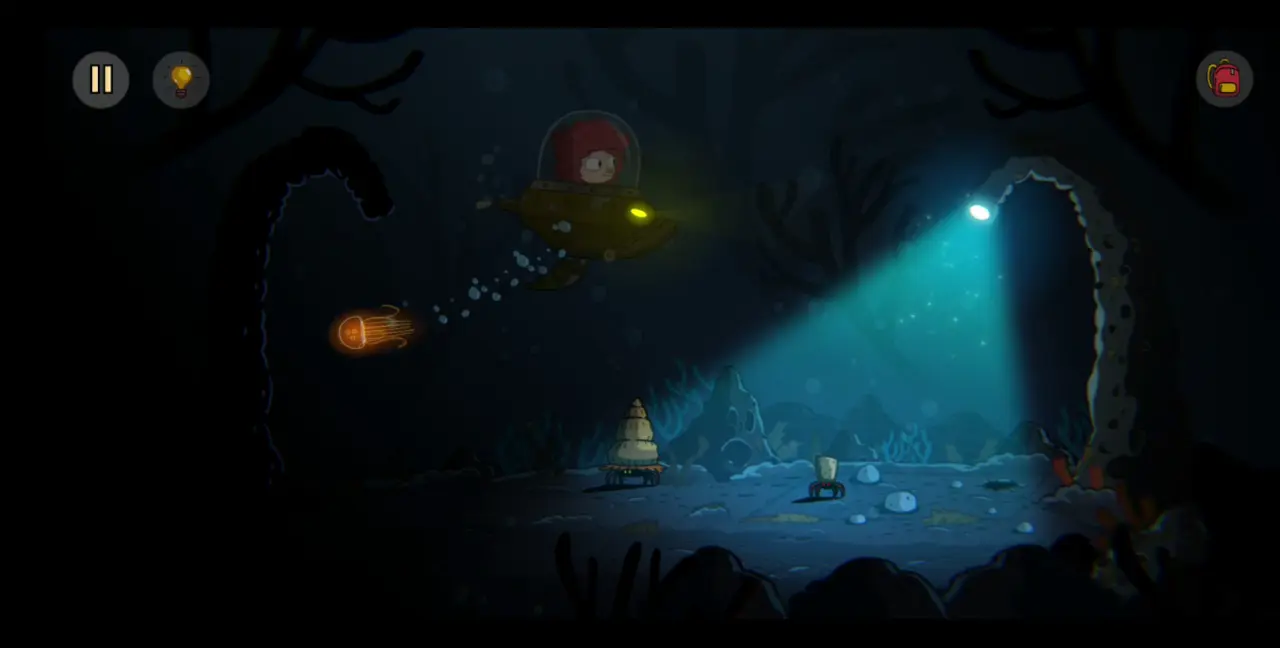
- When you beat the seagull, it will help you by taking the treasure chest from the island and flying it next to your boat. Use the key to open the chest. Inside the chest is a satellite. This will prompt another mini puzzle where you get to pilot a bathyscaphe using a radar and a controller. Your goal is to get the bathyscaphe to the satellite. You can push the rocks to move around and open up paths to the satellite. Pictured below is where to go and what to do to reach the satellite.
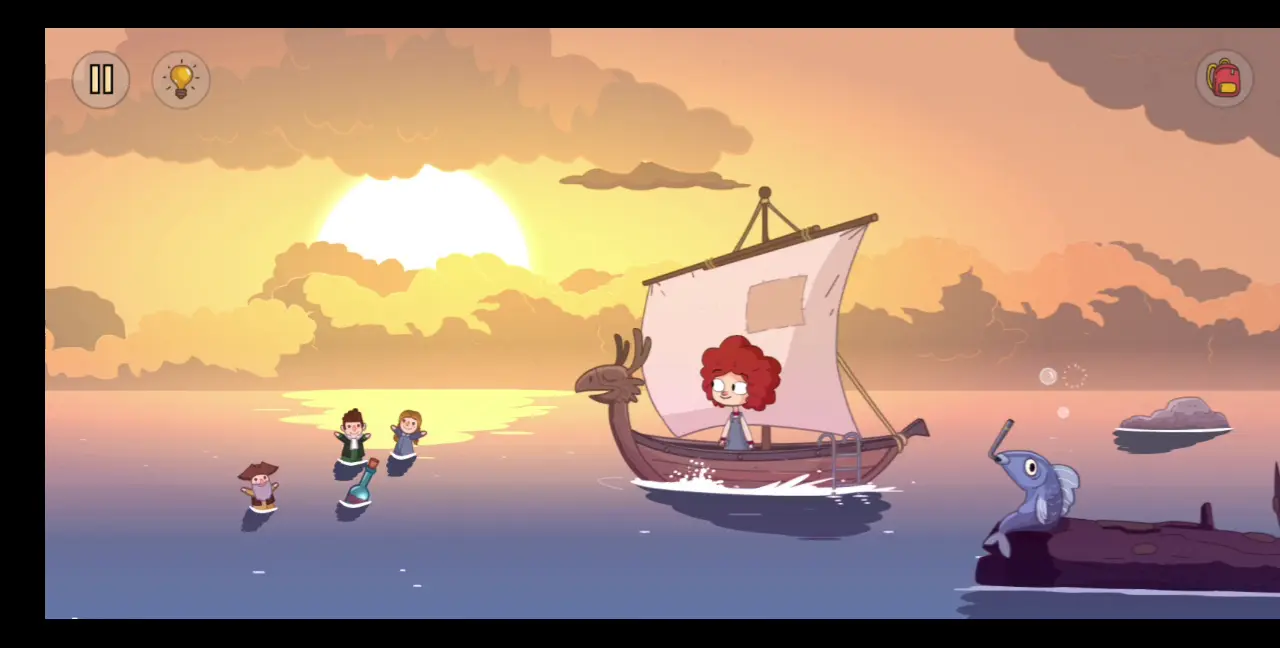
- When you reach the satellite and finish the puzzle, an actual bathyscaphe will pop out of the water. Ride this bathyscaphe and you will dive down the water. This concludes Chapter 7.
Chapter 8
Main Players: Gal and Toto
- Inside the bathyscaphe, you (still as Gal) will come across a red glowing sea creature. If you try to get it, it will always hide in one of the coral reefs.

- Dive further down and you’ll see a sleeping three-eyed fish with glowing flowers on its head. If you click the fish, you’ll try to wake it up but you need a horn.
- Go further down and you’ll reach the seafloor. Here you’ll see a coral reef that looks like a lamp. On the other side is another lamp, but it has no light yet. On the floor are two crabs. One has a cork for a shell and the other has a shell that looks like a horn. Click the one with a cork until it slips into a hole and leaves the cork shell. Take the cork. For now, you won’t be able to get the crab with the horn shell because it’s hiding in the dark.
- Go all the way back up to the area with the red glowing sea creature. Plug the hole that it hides into and you’ll be able to get the glowing sea creature.
- Then, go all the way back down to the seafloor. Place the glowing sea creature on the lamp to the right. This should illuminate the other side, where the crab with the horn shell runs to. Click this crab and it will hide in a hole. Grab the horn shell.
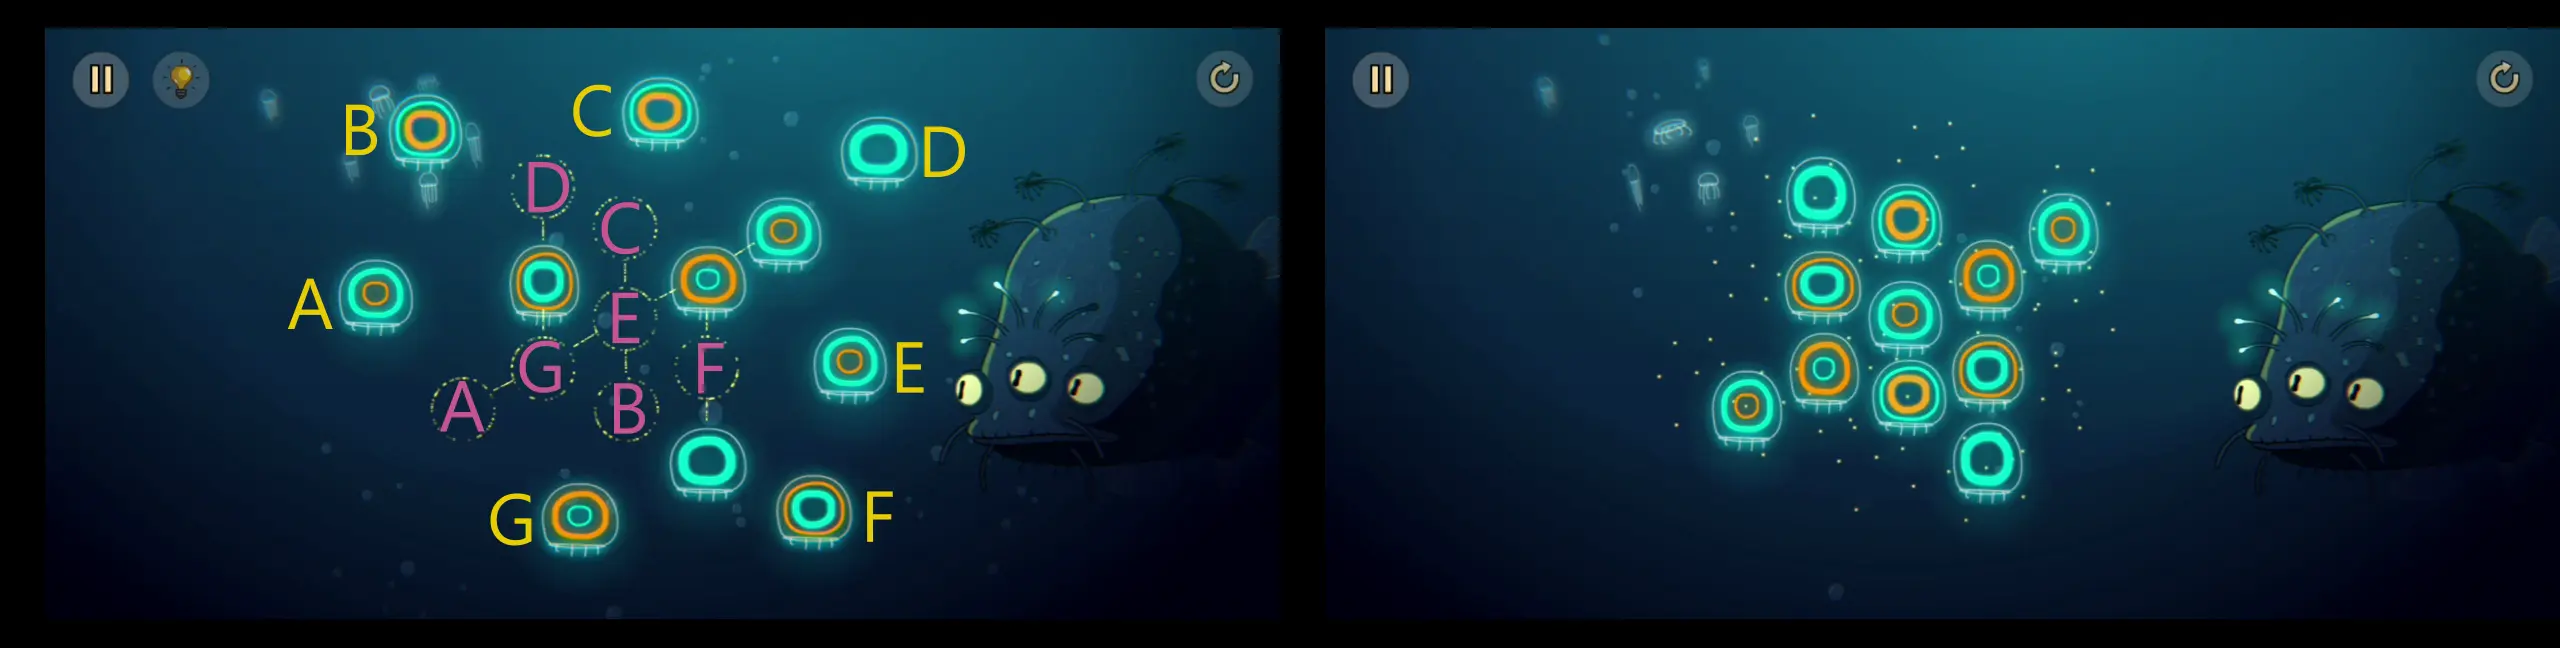
- Float up to the area where the sleeping three-eyed fish with flowers is. Use the horn to wake the fish up. You ask it for one of the glowing flowers on its head. The fish tells you that it will give you a flower in exchange for getting puzzles correct. These puzzles all involve jellyfish and are all about figuring patterns out. What you need to do is drag the correct jellyfish in the correct places in each puzzle.
- This is the solution to the first puzzle:
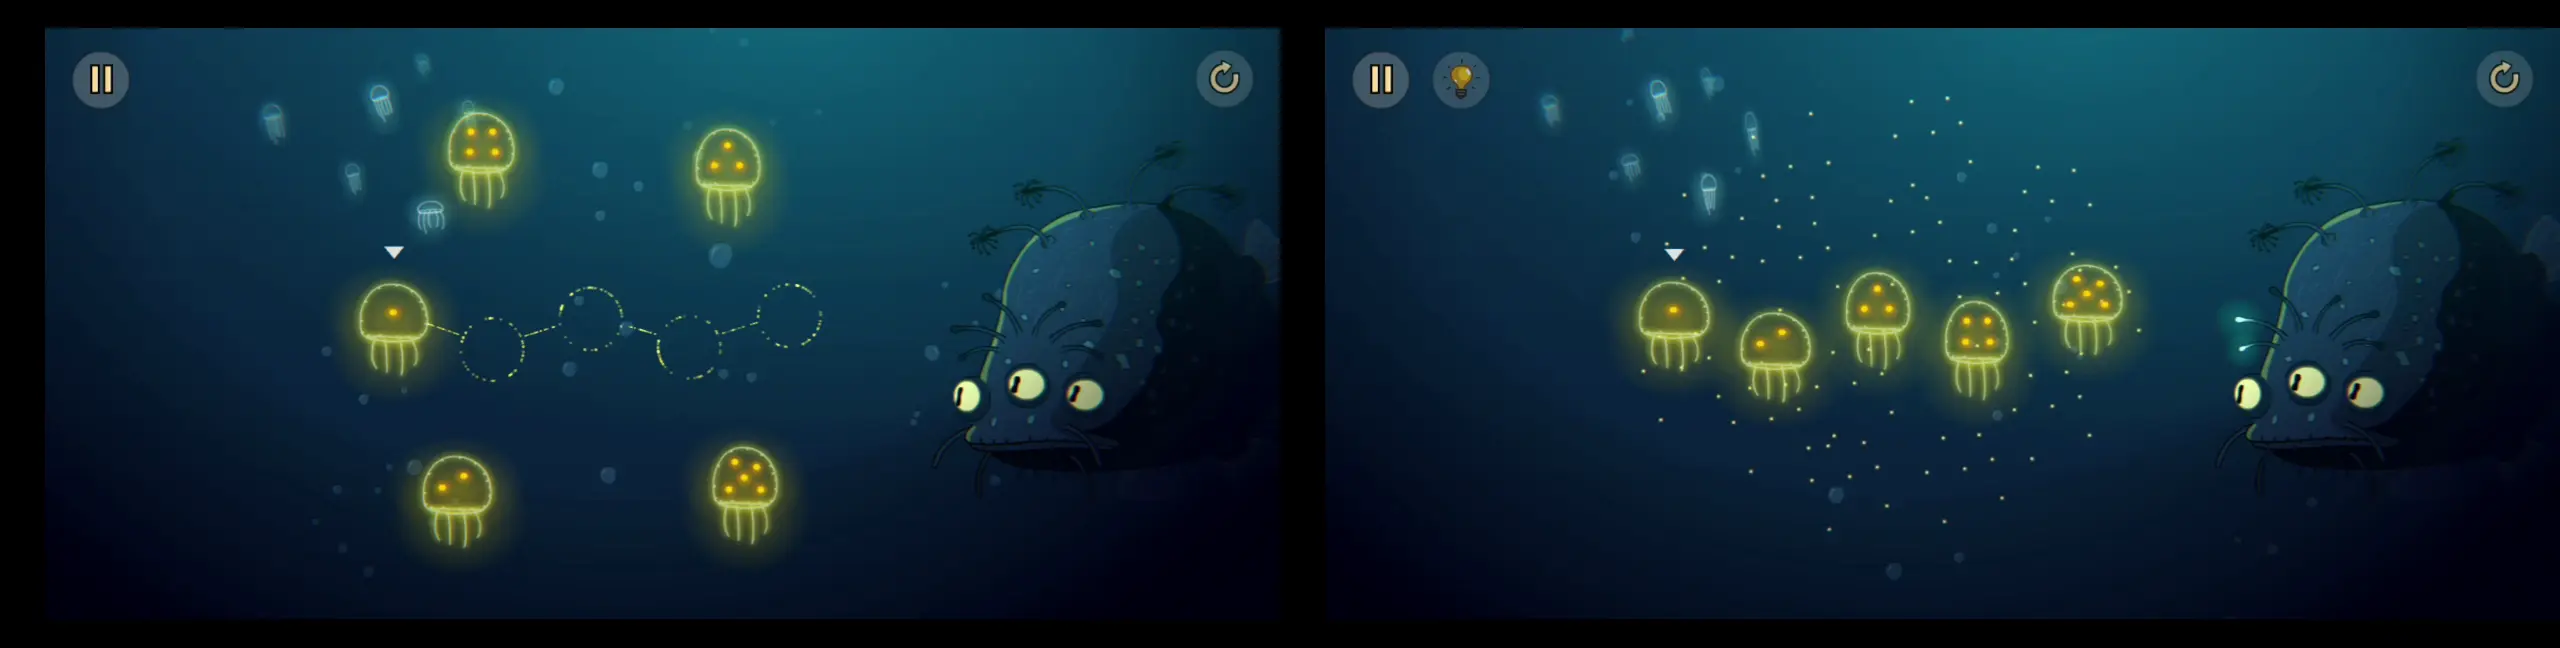
- This is the solution to the second puzzle:
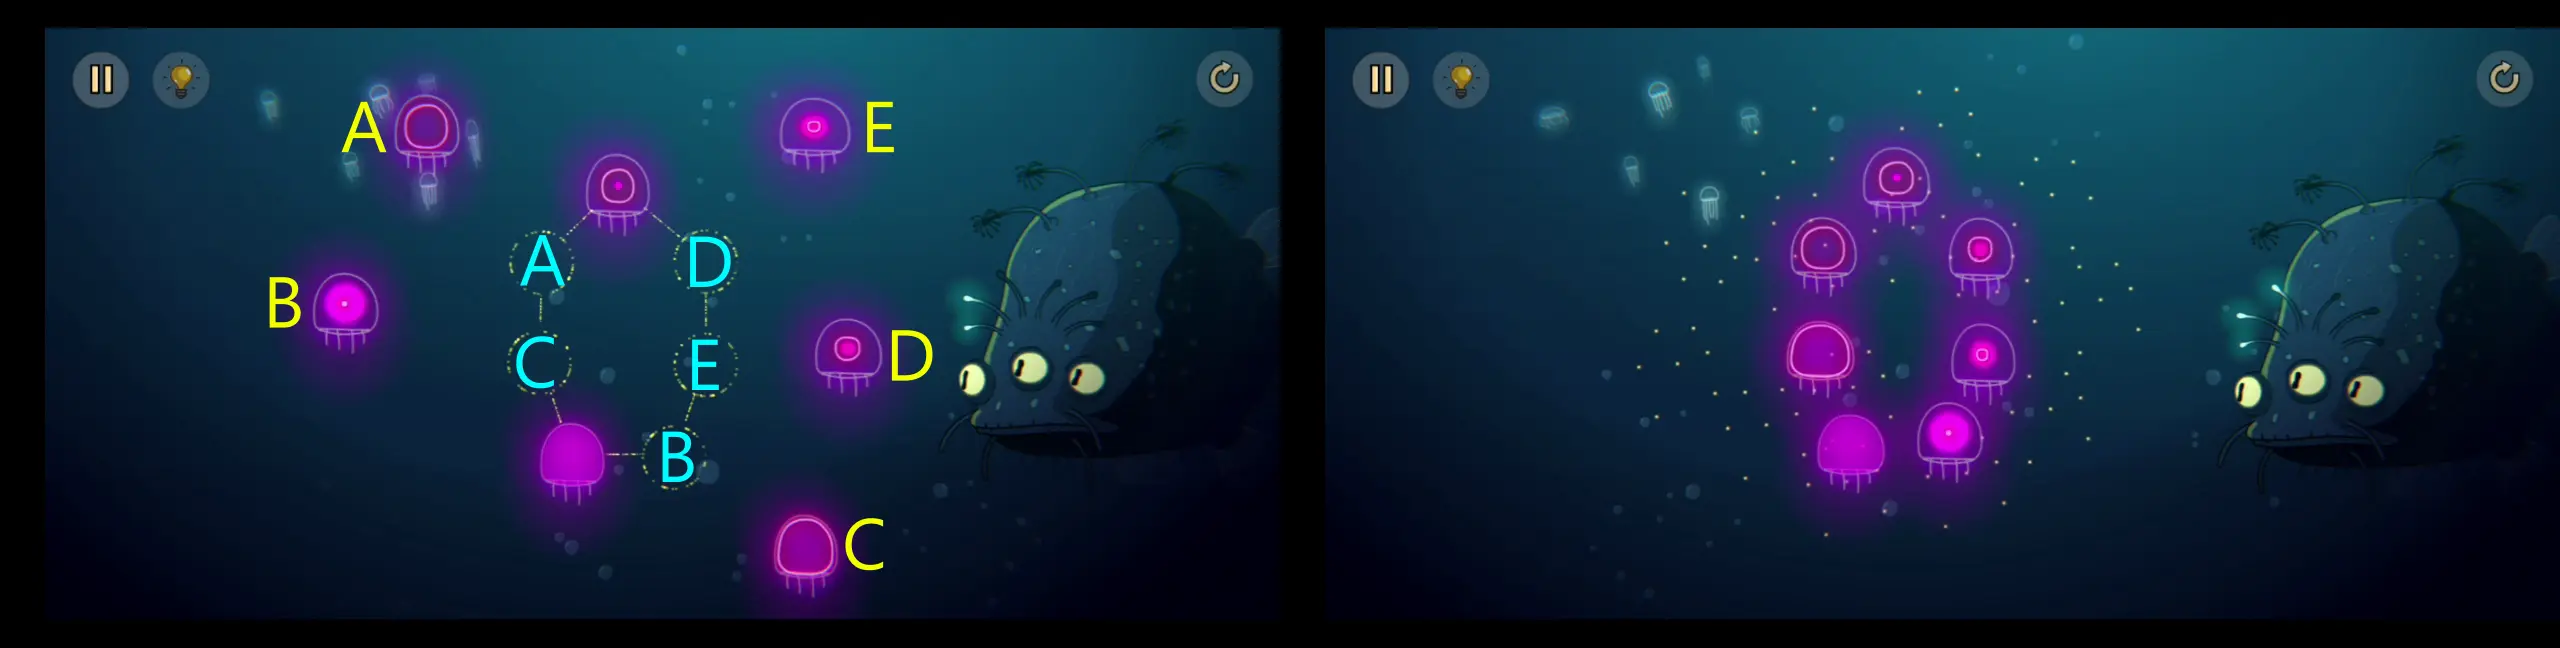
- This is the solution to the third puzzle:
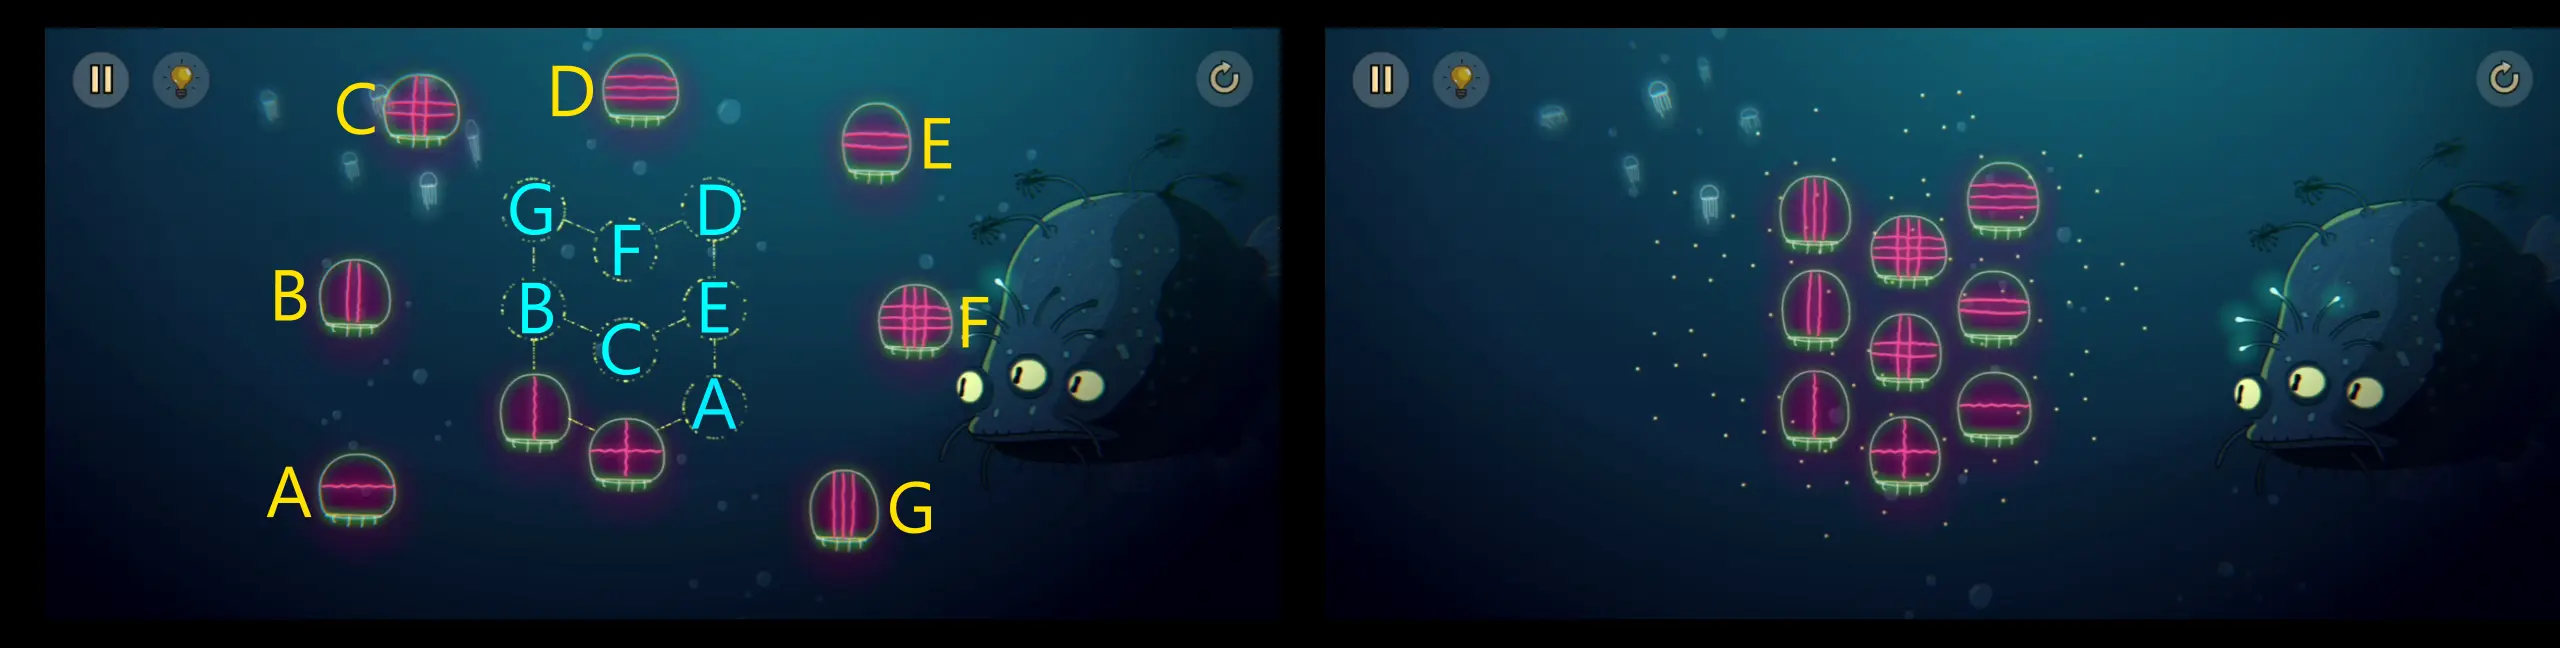
- This is the solution to the fourth and last puzzle:
- When you’ve solved all the puzzles, the fish will give you one of the glowing flowers on its head. Head to the surface of the water and leave the bathyscaphe for the boat. Go all the way to the right and make the giant island fish eat the glowing flower.
- Toto will catch the glowing flower inside the fish. As Toto, use this to tickle the fish’s tonsils. This will cause the fish to spit him and the old man out before disappearing into the water.
- Reunited once again, Gal and Toto travel forward for several days, coming across different places and encountering different creatures. Eventually, they land on what looks like the shore of a beach. This concludes Chapter 8.
Chapter 9
Main Player: Toto
- On the beach, you’re welcomed by a comically long sign indicating how far the house is. Gal and Toto walk to the right until you come across a cactus and a broken down bike.
- Click the cactus and a fairy will come out. You ask it where your home is, and the fairy will tell you that it’s behind a portal flanked by two stone frogs, similar to the one that previously appeared in place of the garden door. The fairy also explains that as the phases of the moon change, the portal and stone frogs become weak, and will ultimately crumble under a new moon, implying that they must reach the portal before it’s destroyed, or else they can’t go back home.
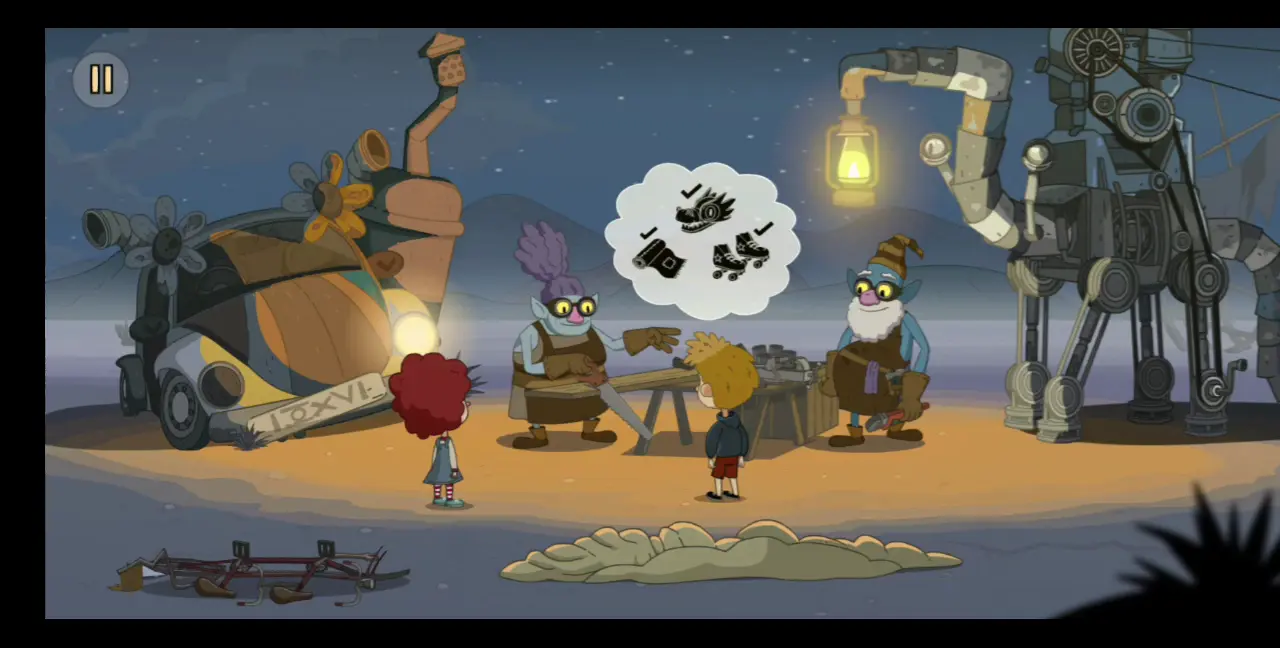
- The fairy will fix the bike and give it to both Gal and Toto. You ride away from the beach and further down land until you come across two mechanics working on some kind of mechanical statue made of spare parts. You ask the mechanics where the house is and one of them tells you that you need to pass several places with creatures like dragons and sea monsters along the way.
- One of the mechanics suggests using a flying machine to travel to the house. One of them gets a blueprint of the vehicle inside the trunk of a car by punching the busted light, kicking the front plate, and bonking the hood twice. Remember this sequence of actions for later.
- The mechanic shows Gal and Toto the blueprint for the machine and tells them that they need three items: a cloth or fabric, a pair of skates, and a dragon head.

- One of the mechanics also tells them that the bike can be fixed if they can get a pair of wheels.

- In this part of the segment, Gal will be left with the mechanics to fix the bike while Toto will be the one to explore and find the items needed for both the bike and the flying machine.
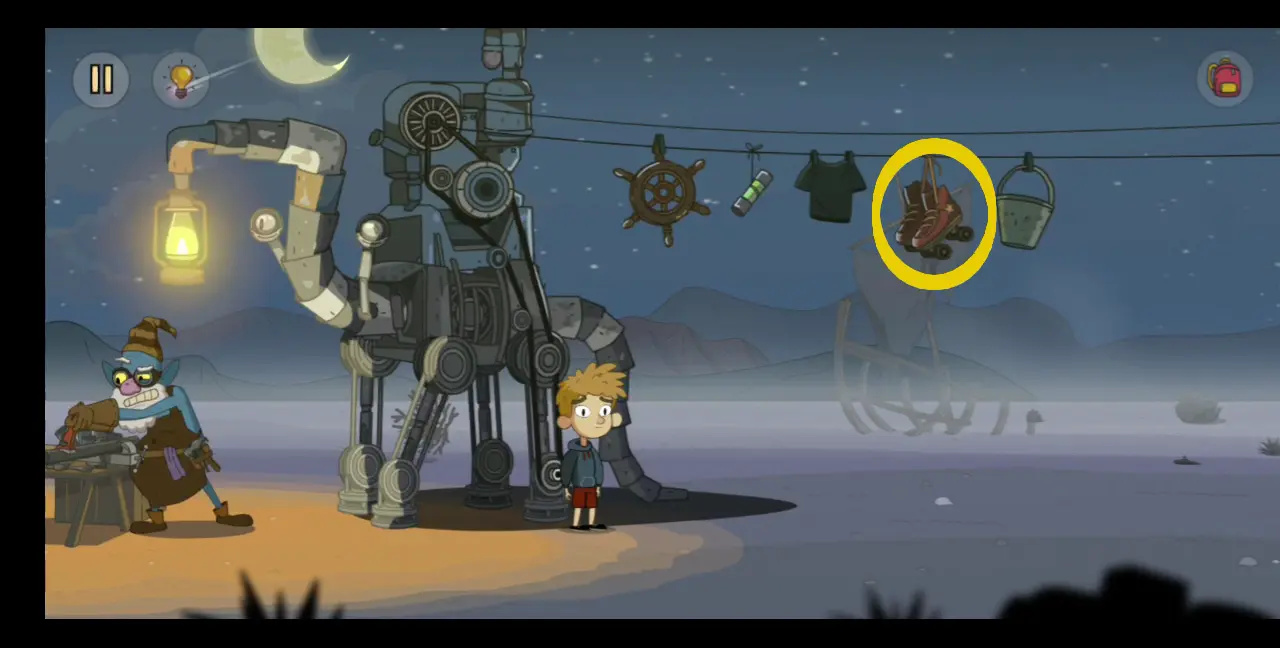
- One of the items, the pair of skates, is hanging on a clothesline next to the machine the mechanics are working on. However, you can’t reach this yet, but keep it in mind for later.
- Unlike the previous chapters, this one doesn’t have a “linear” way of exploring, where you go left and right or up and down. There are instances where you can explore areas you can reach by going diagonally or in the background. For now, keep heading right and you’ll encounter a creature sitting at a “driver seat” while holding a steering wheel and pedaling in front of a TV. The TV is only showing static. If you click on the creature, it will tell you that it needs a tape to play on the TV.
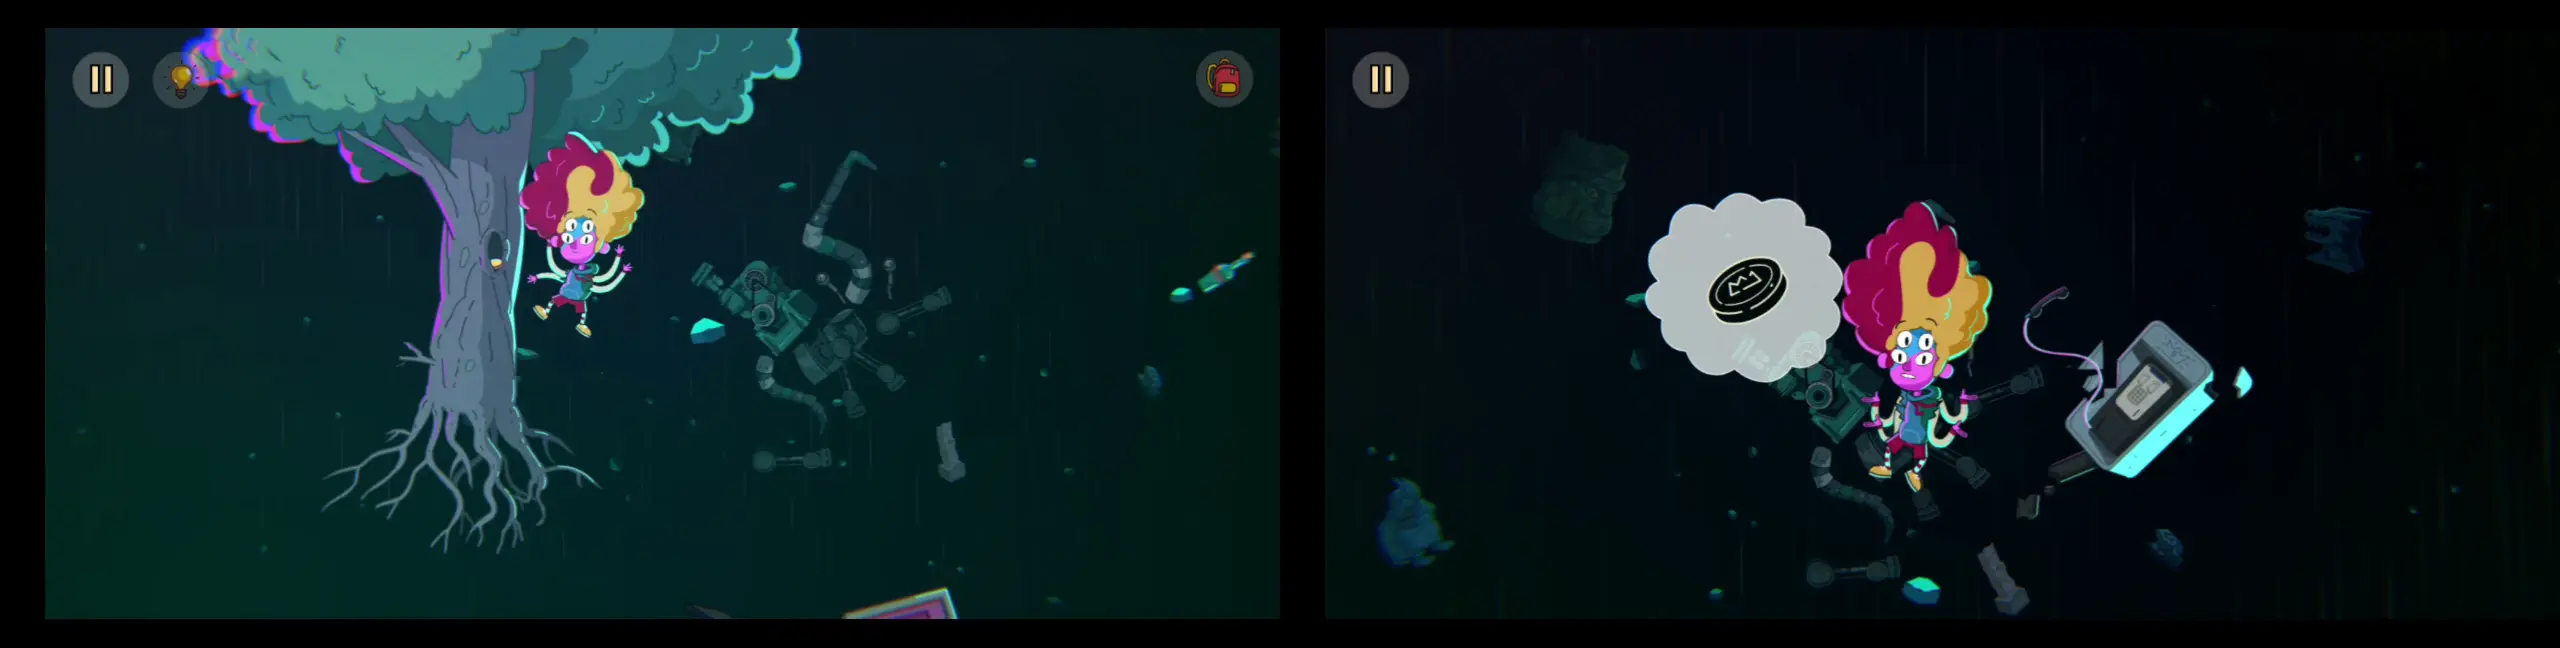
- Keep going right and you’ll see an arrow pointing to a car. Go to the broken down car. Punch the busted light, kick the front plate, and bonk the hood twice—just as the mechanic did a while ago. The hood will open. Take the tape inside it.
- Continue exploring to the right and you’ll see a goblin on a parachute stuck on a tree. It looks like the goblin that you launched off the heron. If you talk to it, it will ask for your help to get down. You try helping the goblin by pulling him down, but he’s still stuck.
- Keep heading right. You’ll see a tree with objects hanging from it, such as metal drums, tires, and a lawnmower.
- Keep going right. Two lizard-like creatures will appear out of nowhere. They light up a scepter left on some kind of pedestal. They play around with the scepter, which shoots a green laser. Walk to the creatures and they will try to shoot you with the laser. You run away and the creatures end up shooting the tree with objects hanging on it. The lawnmower will fall from the tree. Take the lawnmower.
- Pass the goblin on the tree and return to the creature in front of the TV. Place the tape inside the TV. The TV will play some kind of game displaying a road cutting across a scenery. Sit on the chair behind the creature.
- This will trigger a mini puzzle where you are shown a map with different colors corresponding to different sceneries that will be displayed on the TV depending on the directional buttons you press on the remote. On one end of the map is the symbol of a house, which is your destination. On different ends of the map are skull symbols, which signify dead-ends.

- If you click the lightbulb button to get a hint, you will discover that you begin at the lower left-hand side of the map. Here are the directional buttons, in order, that you can press on the remote to reach the house: ↑↑↑←→↑↑↑←↑↑ (up, up, up, left, right, up, up, up, left, up, up).
- A house on stilts wearing boots suddenly runs up to the creature. The creature enters the house and they run off. Take the steering wheel that the creature left behind.
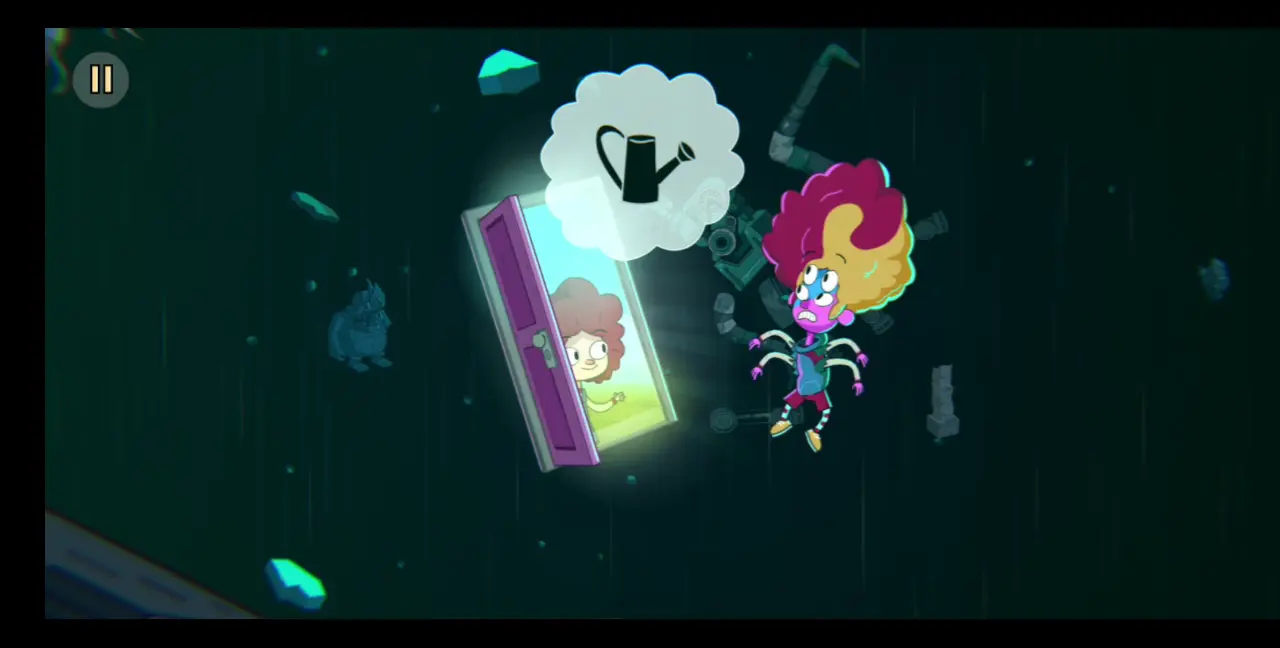
- Walk left and you’ll see an arrow pointing to a cactus in the distance. Go to the cactus, who is trying to shave its beard using a razor. Its stubble grows back quickly. Give the cactus the lawnmower you’ve previously obtained. The cactus seems pleased and it drops the razor in exchange for the lawnmower. Take the razor.
- Go back to the goblin stuck on a parachute. Give it the razor so it can free itself. Once it does, it will express its gratitude by hugging you, then berating you again before it walks off. Pick up the parachute the goblin dropped. You’ll drag it to the mechanics and they will approve it as one of the three items you’re supposed to get for the flying machine.
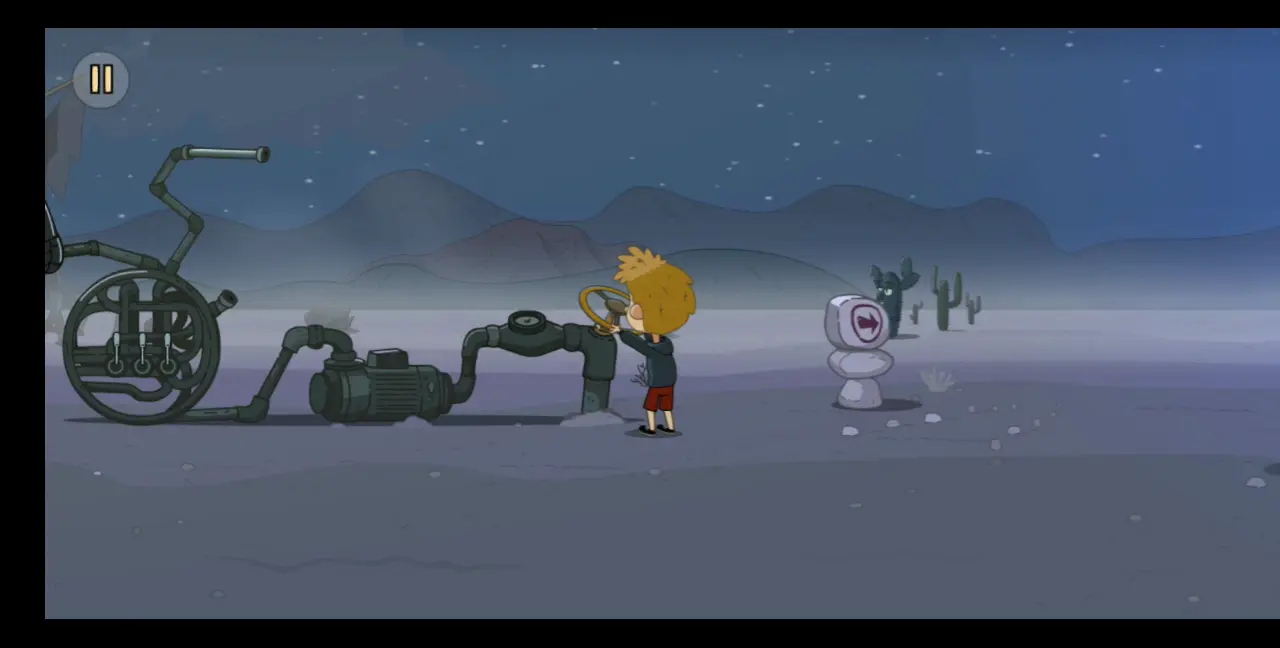
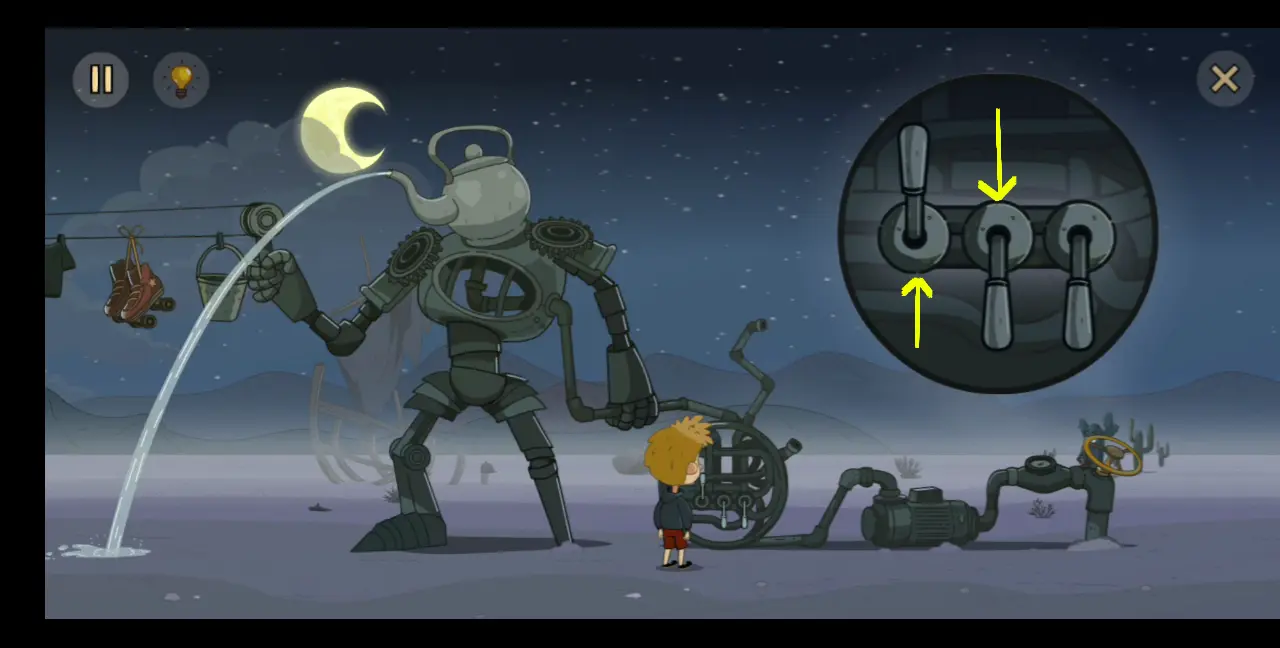
- The only other item in your inventory is a wheel so go to the pipe next to the metal statue with a teapot for a head. Place the wheel on the pipe, turning it into a water valve.
- Water will come out of the teapot and a small pipe on the opposite side. On the wheel-looking engine attached to the metal statue are three knobs. Pull down the first and third knob up, which will cause the small water pipe to burst out of the statue. Collect the small pipe.

- Give the small pipe to the mechanic on the right and he will bend the pipe into a Z shape and return it to you. Next to the mechanic is another metal statue that looks like a dinosaur of sorts. Drag the Z-shaped pipe here and use it as a handle that moves the clothesline in between the two metal statues. The items on the clothesline will move to the right.
- Go to the metal statue with the teapot head. Pull down the middle knob and pull up the first knob.
- The teapot will pour water into the bucket on the clothesline. The weight of the full bucket will make the clothesline drop, allowing you to get the pair of skates hanging on it. Also collect the tube-like object that fell from the clothesline.
- Go all the way to the right, near the tree where metal barrels are hanging. Click on the barrel on the floor and you’ll use it as a hiding place. Nearby are the two lizard-like creatures horsing around with the scepter. Hiding inside the barrel, carefully walk to the lizard creatures. If you get caught by the lizard on the left, it will shoot you with the laser scepter and the metal barrel will disintegrate. In this case, another metal barrel will fall from the tree. Use this to hide again. We recommend studying the movement patterns of the two lizards and moving forward whenever the lizard on the left has its back turned on you.
- When you finally reach the lizards without being caught, you’ll pull one of its tails and the other lizard will make fun of it. The two fight and roll off the screen, leaving the scepter. Take the scepter and you’ll place it on the pedestal you found it on.
- A green laser will shoot up and three gem-like objects will fall from the sky. If you observe these objects closely, one has four sides, one has five sides, and one has six sides. This corresponds to the three stone pedestals around the scepter. You’ll notice that each pedestal has dots on it: one has four dots, one has five dots, and one has six dots. Place the appropriate gem-like objects on the pedestal that corresponds to how many sides each one has.
- The first two pedestals will light up. The third one (the one with the four dots/sides) seems to be broken as a tube-like object will fall from the hatch. Replace this with the tube-like object in your inventory. Now, all three pedestals and gems will light up.
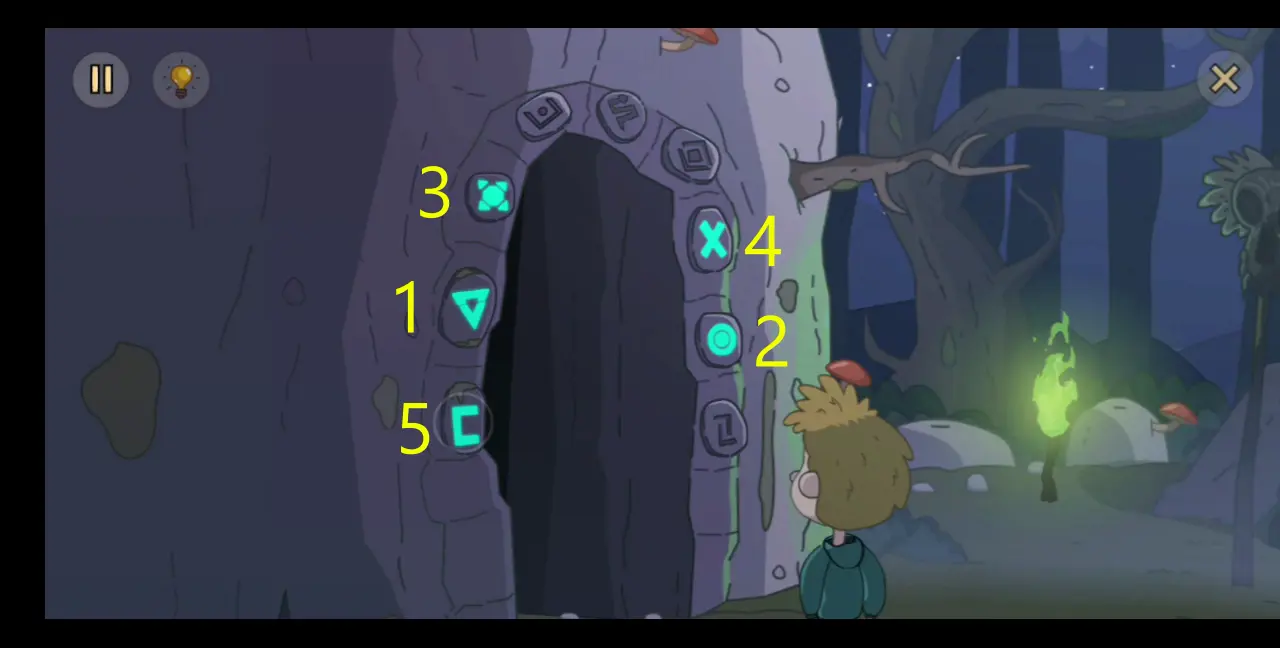
- A dragon head cave will emerge from the ground. Enter the cave through the dragon’s open mouth. Inside the cave, the entrance behind you will be blocked by a slab of stone.
- As you walk, you will see four glowing cave drawings. First is a boy holding a scepter in front of two lizard-like creatures. Second is the drawing of a boy kneeling in front of a dragon breathing fire; inside the fire is a dragon head facing down. The third drawing depicts a boy triumphantly holding up a dragon head facing right. The fourth and final drawing is that of a boy wearing the dragon head facing left while flanked by two stone creatures.

- At the end of the drawings is a pedestal with a dragon head. However, before you can get it, you need to solve a mini puzzle. In this mini puzzle, you’re presented with four buttons that change between X, up, down, left, and right. The correct order of the buttons corresponds to where the dragon head is facing as depicted in each cave drawing you saw. Therefore, the correct order of the buttons should be X (there was no dragon head in the first drawing), down, right, and left (X↓→←).
- Click the dragon head and the cave will shake, blocking the path behind you. Keep moving right.
- You’ll come across a path supposedly connected to what looks like a board, but the path is missing a platform, hindering you from crossing. On the board is a stone dragon head that looks like the mask you took from the pedestal, as well as two stone carvings that have arrows above them. Click the stone dragon head and you will activate a mini puzzle.
- In this mini puzzle, you have a board, a dragon head shooting a laser, an object or portal that the laser needs to reach, and creatures carrying stones with arrows on them. Your objective is to use the creatures to redirect the laser to the portal. The challenge here is that the creatures carrying stones move similarly to the crabs on the previous board game you played with the seagull: you can only move the creatures across the entire board over multiple tiles and not singular tiles. There are four puzzles of the same nature as this and there are many ways you can solve them. Each time you successfully solve these puzzles, the missing platform will appear and you’ll be able to move forward into the cave. Pictured below is our solution for the first puzzle. The screenshot on the left is the beginning of the puzzle and the one on the right is the solution we came up with. Take note again that there are many ways this can be solved and will differ for each player.
- This is our solution to the second puzzle:
- This is our solution to the third puzzle:
- This is our solution to the fourth puzzle:
- When you’ve finally solved all the puzzles, continue walking right until you reach a giant frog statue with a crown. Press the red button on the frog. The cave will rumble and the frog’s eyes will glow red. A flash of white light will engulf the screen.
- Suddenly, you’ll find yourself in a grassy field, similar to the one you’ve seen Gal traverse at the beginning of the game. Stand up from the grass and keep walking right. You’ll see a familiar red bird across the path, but instead of a dwarf popping out of the grass, you see a variation of yourself as Toto.
- Continue walking right until you reach the tea party. Instead of seeing the dwarf, frog, and duck, you see different variations of yourself that sort of resemble the dwarf, frog, and duck. You ask the “frog” for the crown on its head. It gives you the crown and you wear it, but it turns you into a yellow duck.
- You wake up from the “dream” and see yourself back in the cave. Stand up and you’ll remove the dragon head mask, whose eyes open the exit from the cave. Collect the crown on the floor and exit the cave.
- The dragon head will be swallowed up by the ground and disappear. You can keep walking right but will be blocked by a giant cat. So go back to the mechanics and give them the pair of skates and the dragon head. Click on Gal and she will take the wheel off the bike and give it to the mechanic. Now you have all three items for the flying machine.
- Before you can use it, though, you need to help the mechanics assemble it first. They will give you a manual for assembling a portion of the flying machine, which consists of three parts. Basically, you need to follow the instructions on the manual.
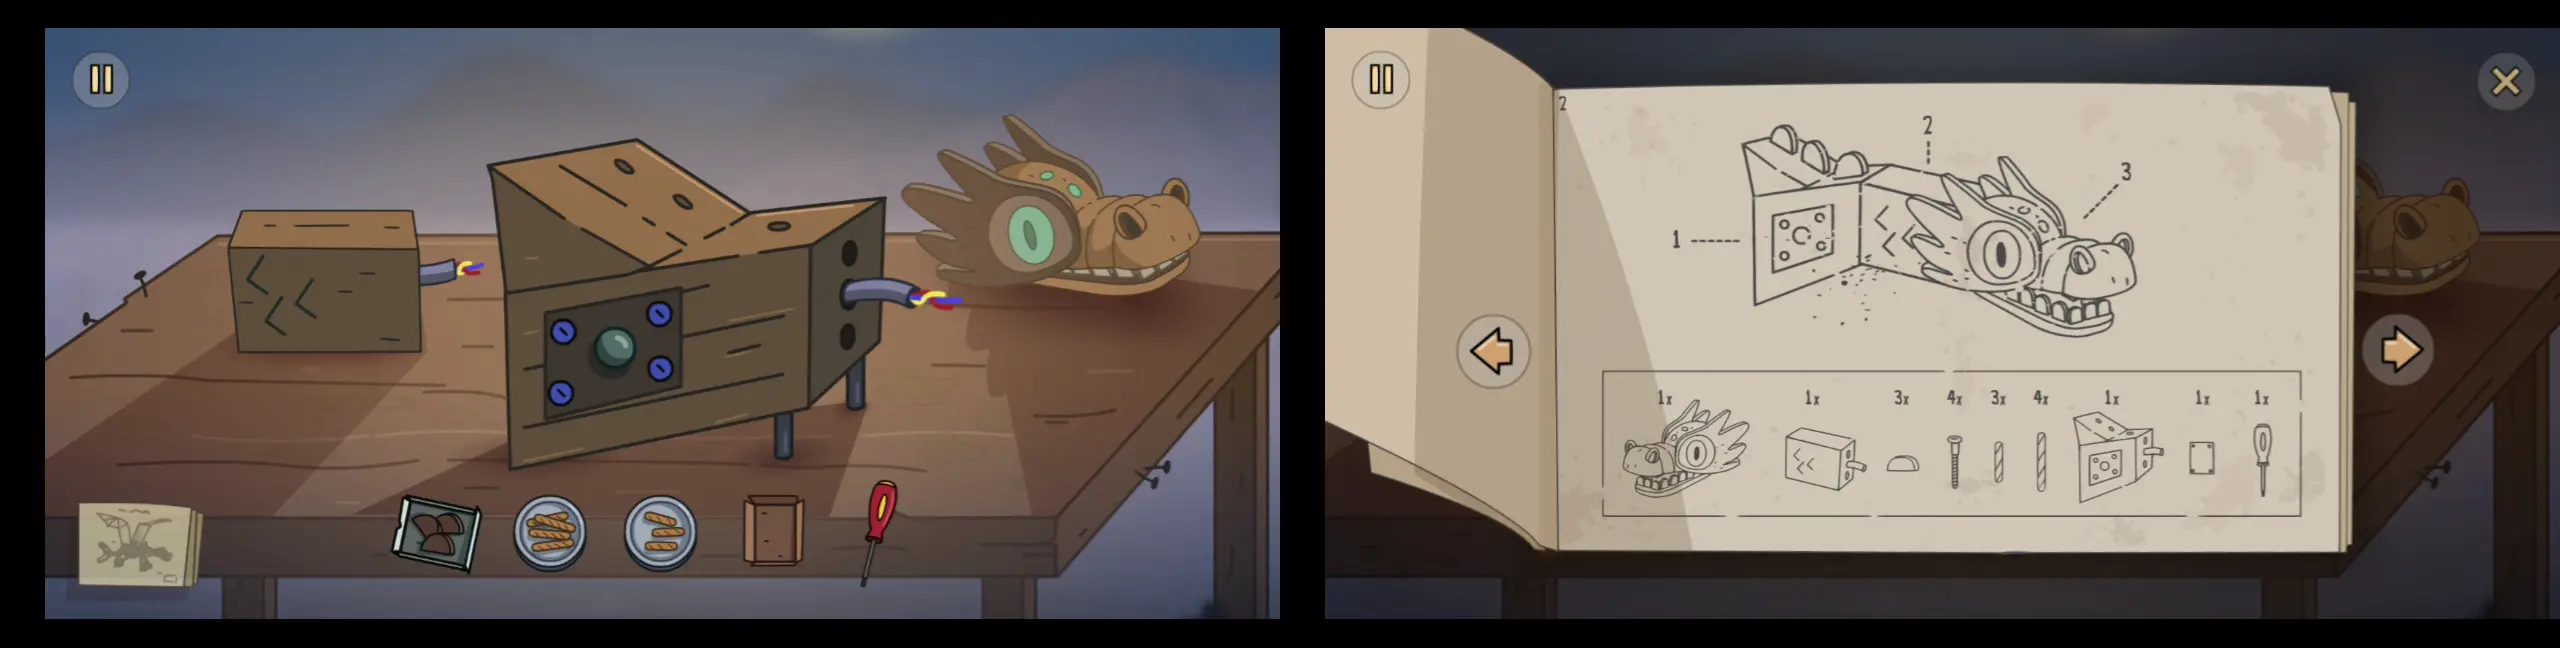
- Here’s what you do for the first 3 steps:

- Here’s what you do for the next set of steps:

- Here are the next steps:

- Here are the last steps:

- With that, the flying machine is complete. Gal and Toto ride the machine, with Toto wearing the crown he got from the cave and Gal piloting the machine. This concludes Chapter 9.
Chapter 10
Main Player: Gal/Toto
- During this short segment, you’ll be able to pilot the flying machine as you pass through different sceneries and see various creatures. While moving the flying machine, try to catch all the blue butterflies you’ll come across.
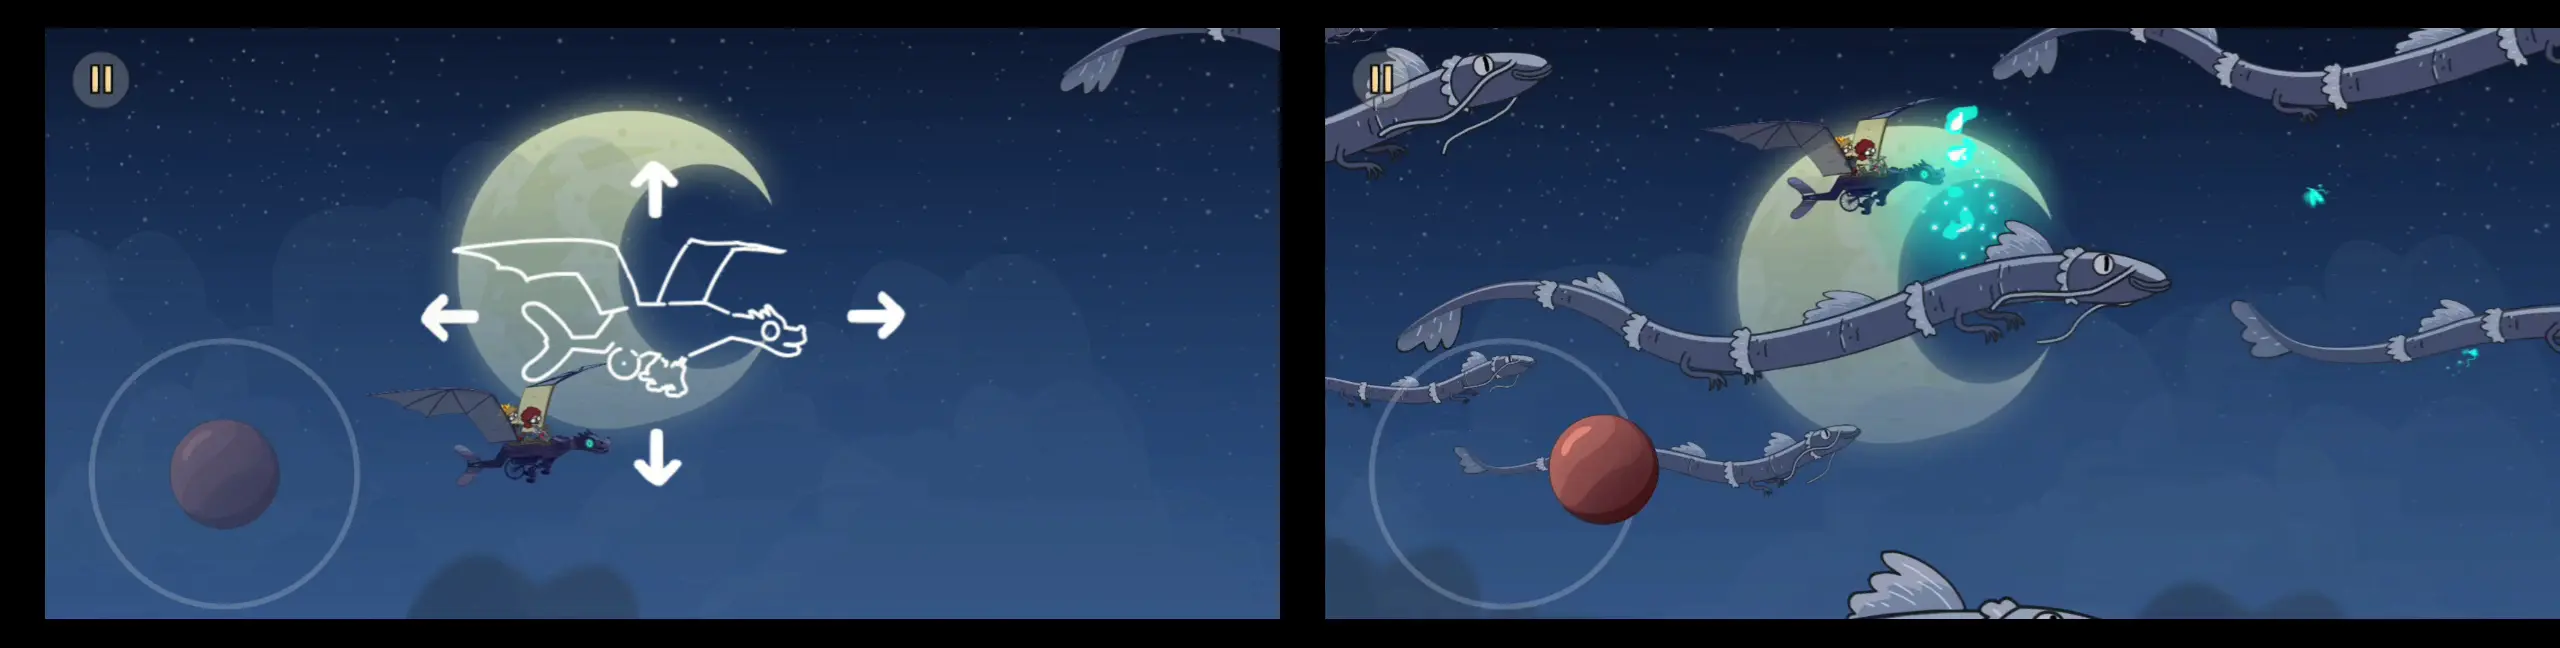
- At one point, you come across a fairy who warns you that you can’t lose the crown as you need it to get past the portal flanked by the two stone frogs. As you travel, the moon changes phase and is close to becoming a new moon.
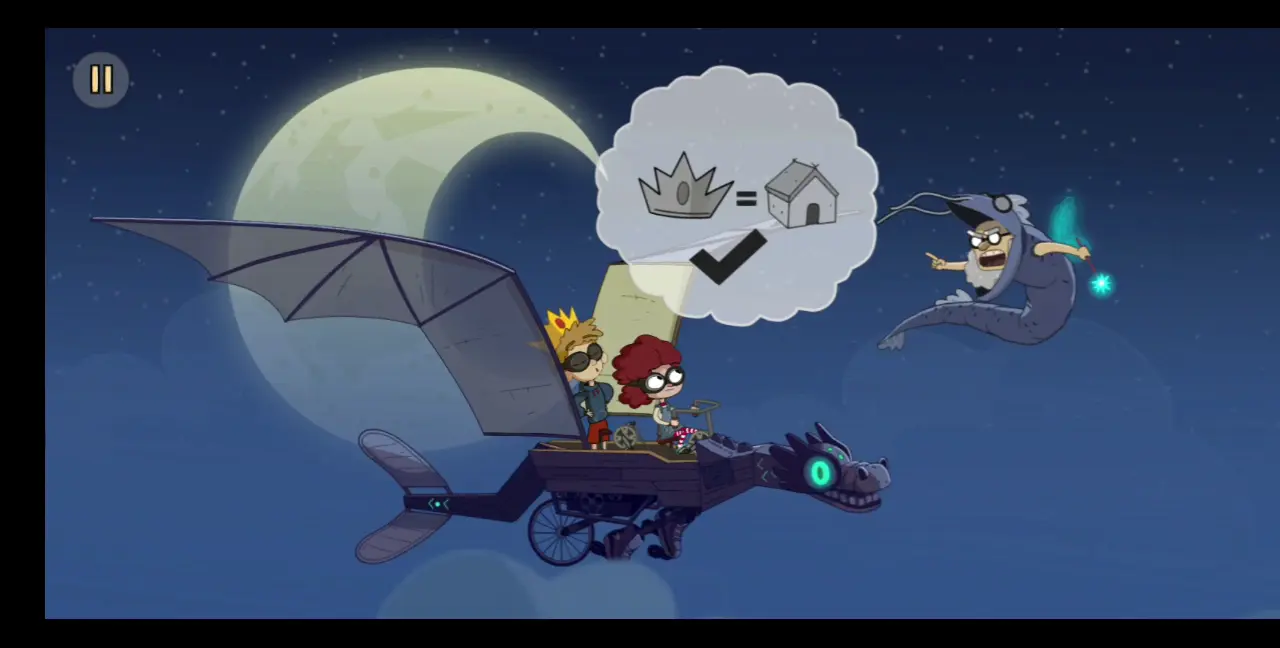
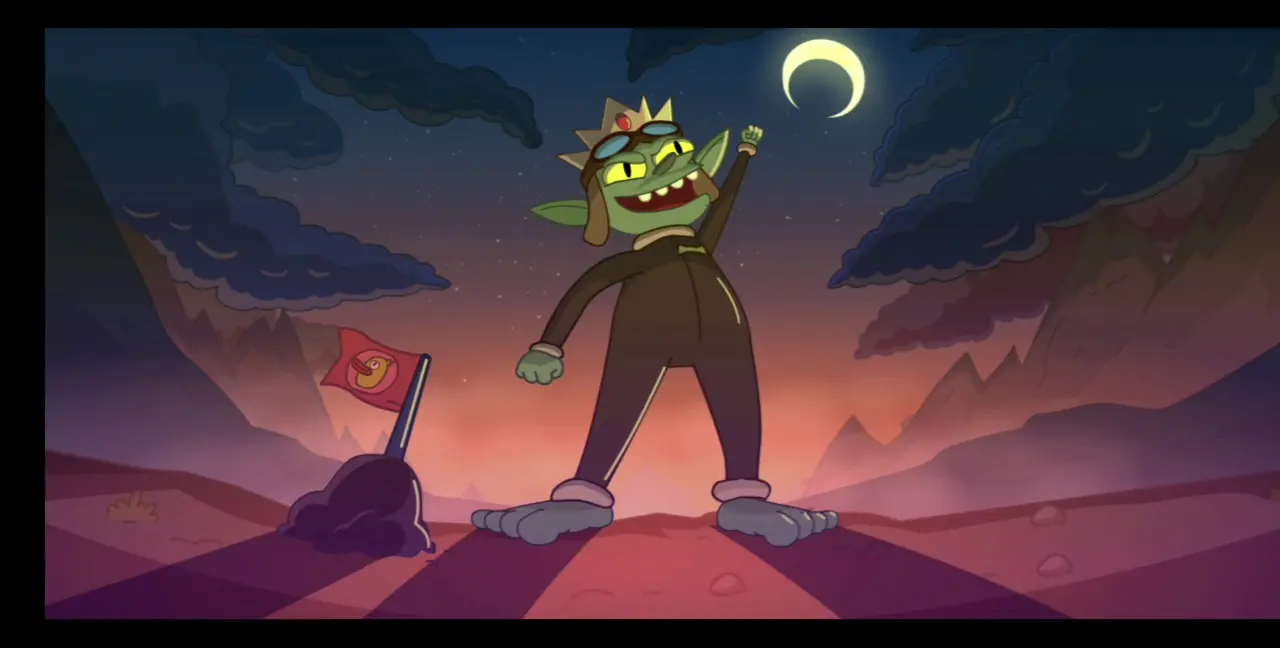
- Along the way, the crown would nearly slip from Toto’s head several times. Gal and Toto end up arguing with each other. A cloud sees this and gets angry, causing a thunderstorm that crashes the flying machine. Toto ends up crashing into a bush while Gal ends up crashing on the ground near some rocks. The crown flies out of their grasp and is taken by the goblin you beat in the rubber duck game. This concludes Chapter 10.
Chapter 11
Main Player: Toto
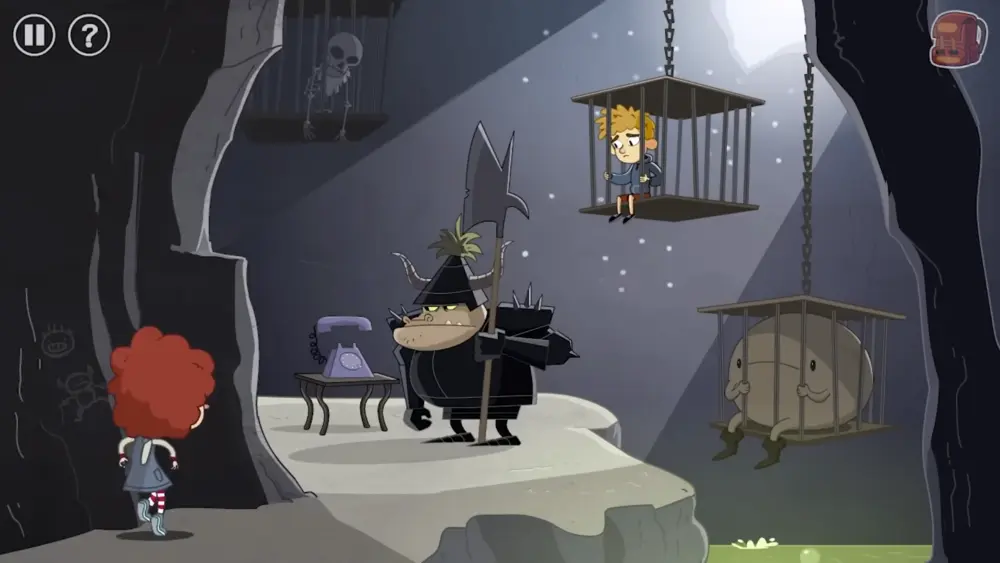
- You, as Toto, wake up to the sight of three unfamiliar goblins looking at you. It appears that you were injured from the crash and they were the ones who found you and helped you out. You’re in a room with various trinkets and whatnot inside. When you ask the goblins where Gal is, they point you to a periscope-like object in the room. Approach this object and look through it.
- You’ll see a large, menacing-looking castle that looks like an evil lair. If you click on different points of the castle, you’ll be able to zoom into some important places: at the top of the castle shows Gal in a prison; below it is a room where you can see the goblin with the crown playing with rubber ducks in a bathtub. Further down, just above the gates, is a guard watering a flower pot, and just a little below it to the left is a small, irate-looking duck that acts as the castle’s doorman. Stationed at the bridge connecting the castle to where you are is a guard.

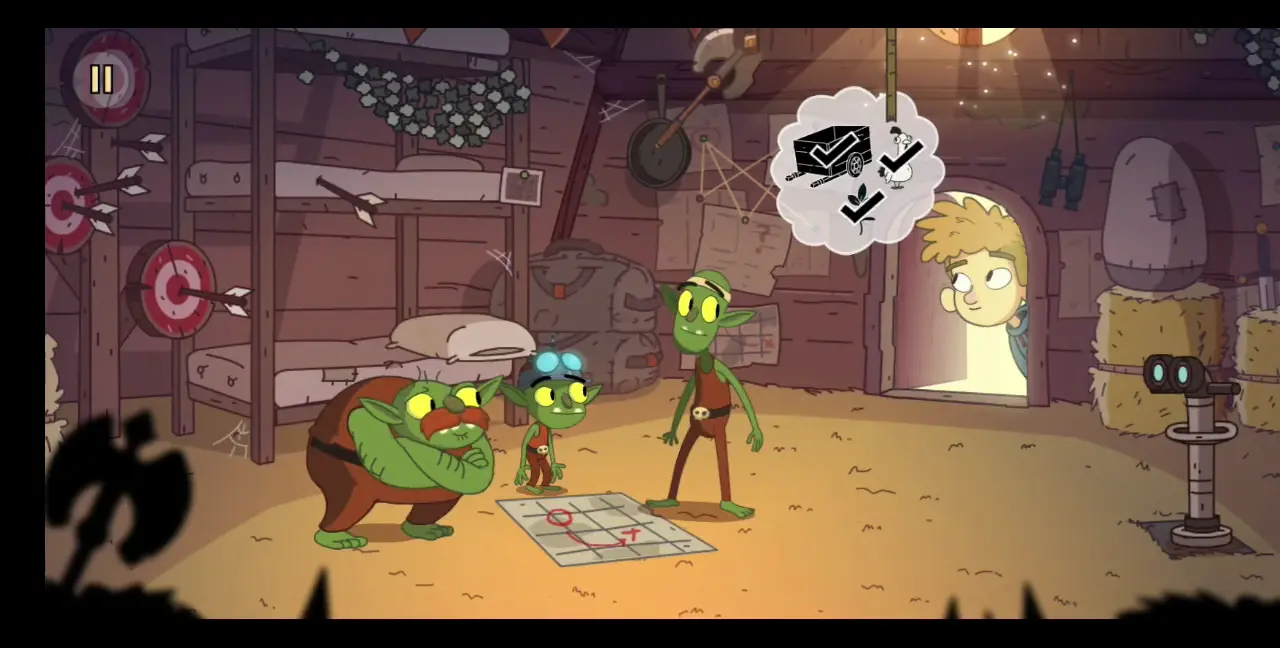
- After you’ve looked through the periscope, you ask the three goblins what you can do to rescue your sister. They huddle and come up with a plan, and explain it to you. For the plan to work, you need to find three items: a cart, a chicken, and a flower.
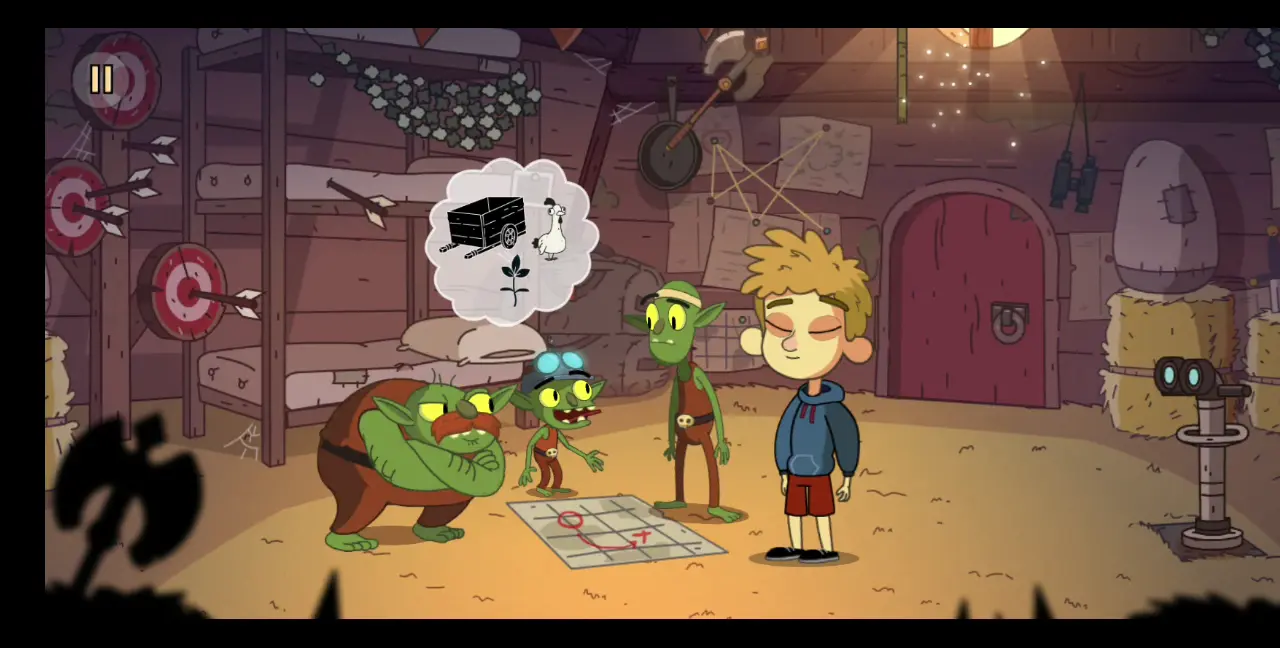
- You head for the door but are given by one of the goblins a piece of paper with three animal faces on it. Exit from the door.
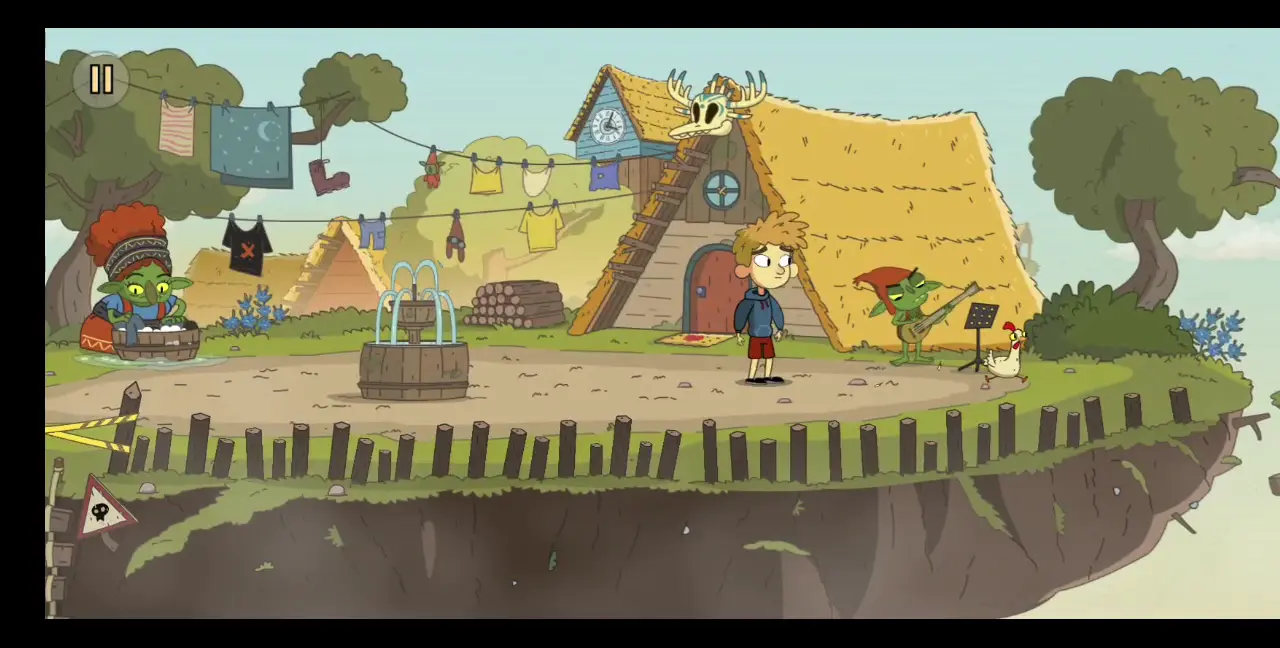
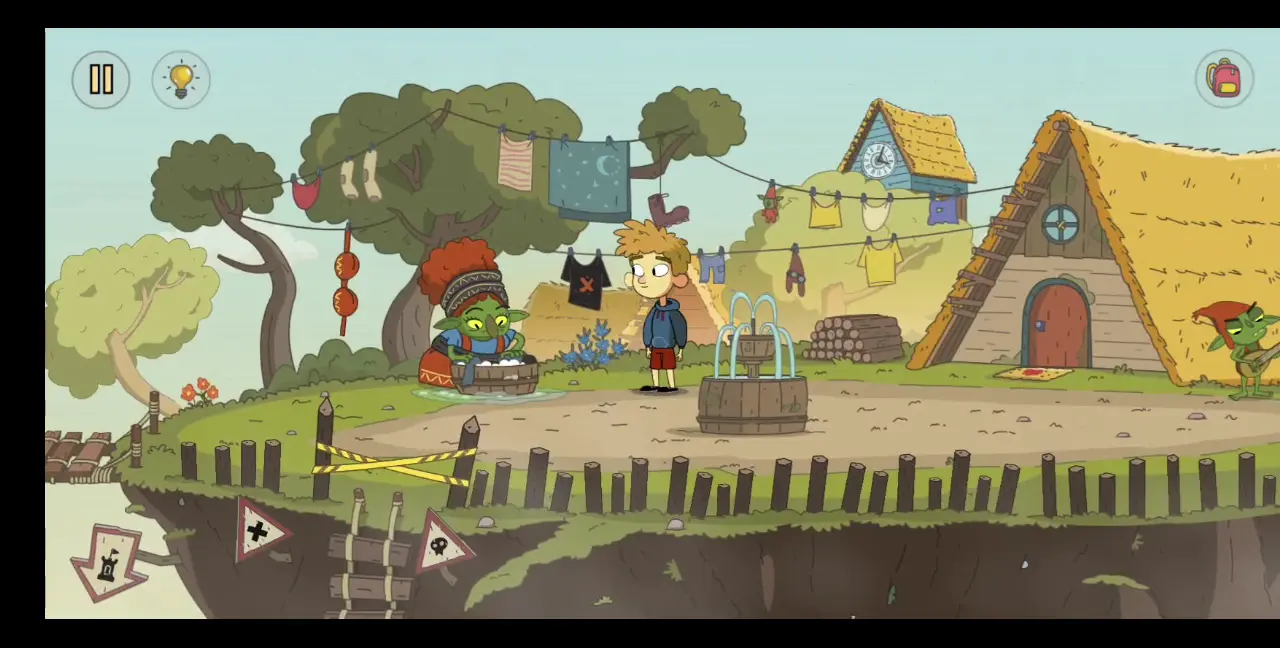
- Outside the hut are several places you can explore. Let’s begin with the one immediately fronting the hut. Some of the notable things you’ll see here are the fountain, the goblin lady washing clothes, the clothesline, a goblin trying to play a guitar, and the chicken.
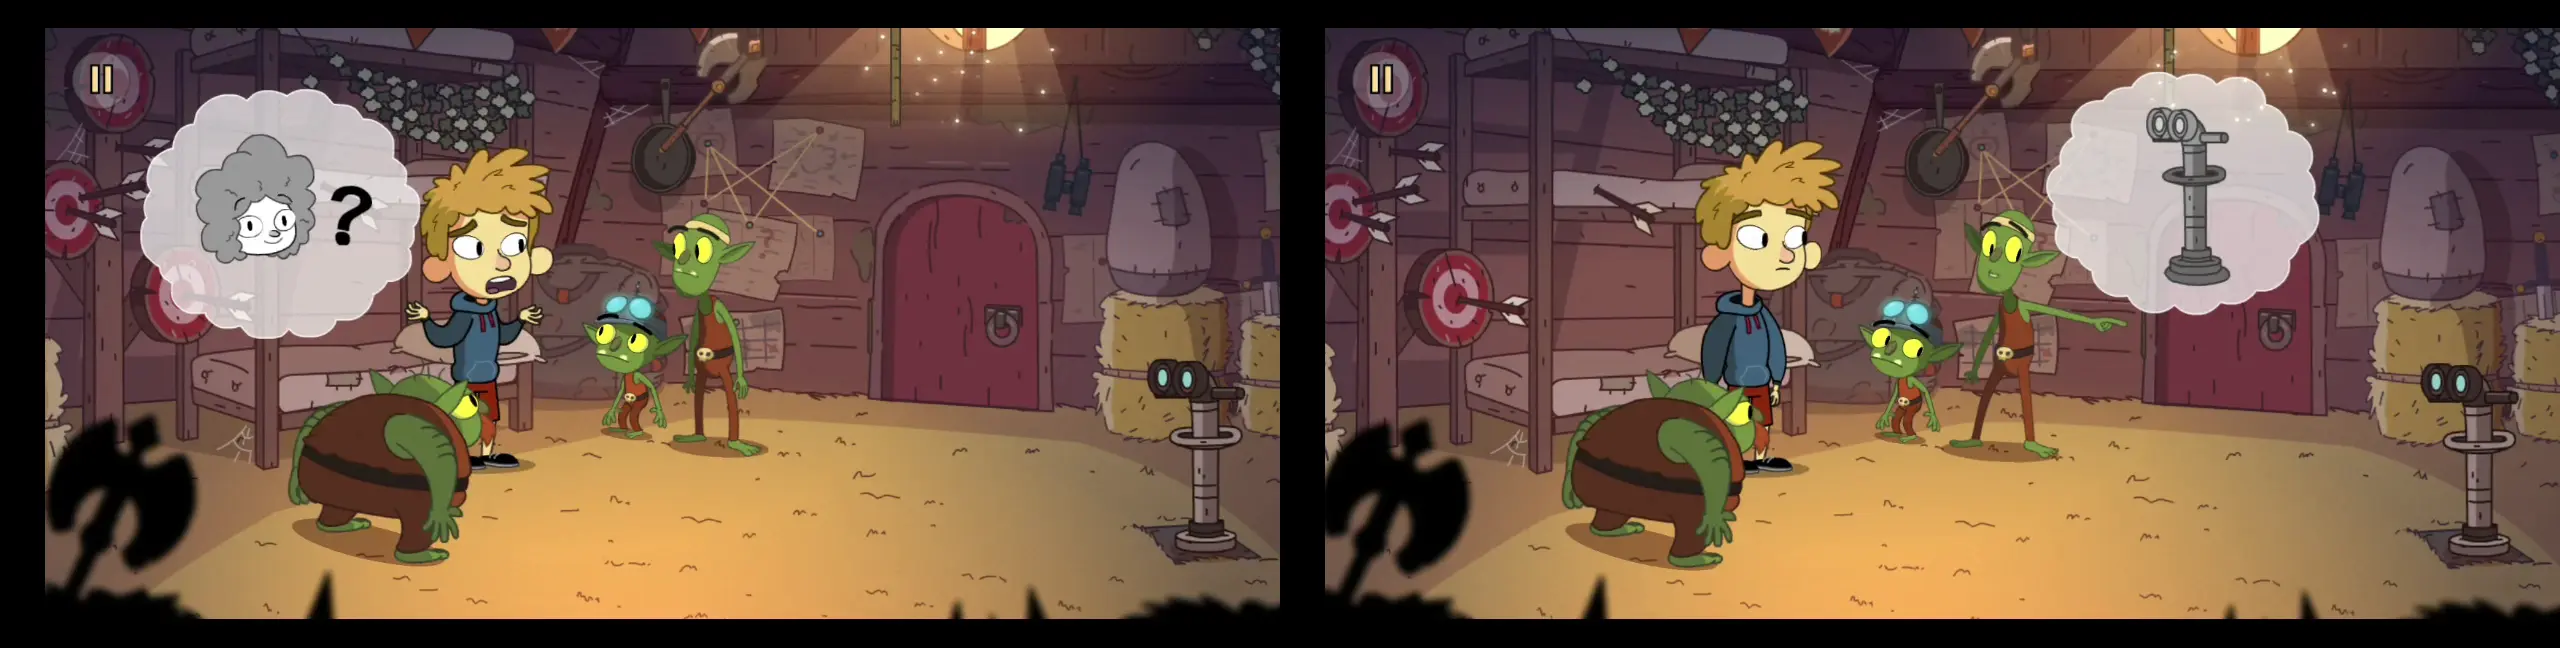
- If you try to grab the chicken, it will run off. Instead of chasing after it, first click on the hut’s window. Above it is the skull of a horned animal. One of the goblins will peek out the window and ask you to pick from a selection of animals. What you need to do is click on your chosen animal three times, and the goblin will get mad at you. When the goblin gets mad, he shuts the window and the skull above it is shaken, and will come close to falling off until it does. To choose the right animals, refer to the piece of paper you’ve been given previously, so your choices should be the cat, the owl, and the pig. Click one type of animal three times and you will imitate its sound. The goblin will get mad so do the same process all over again, but click a different animal. You will need to do this three times. When the skull of the horned animal falls, take it.

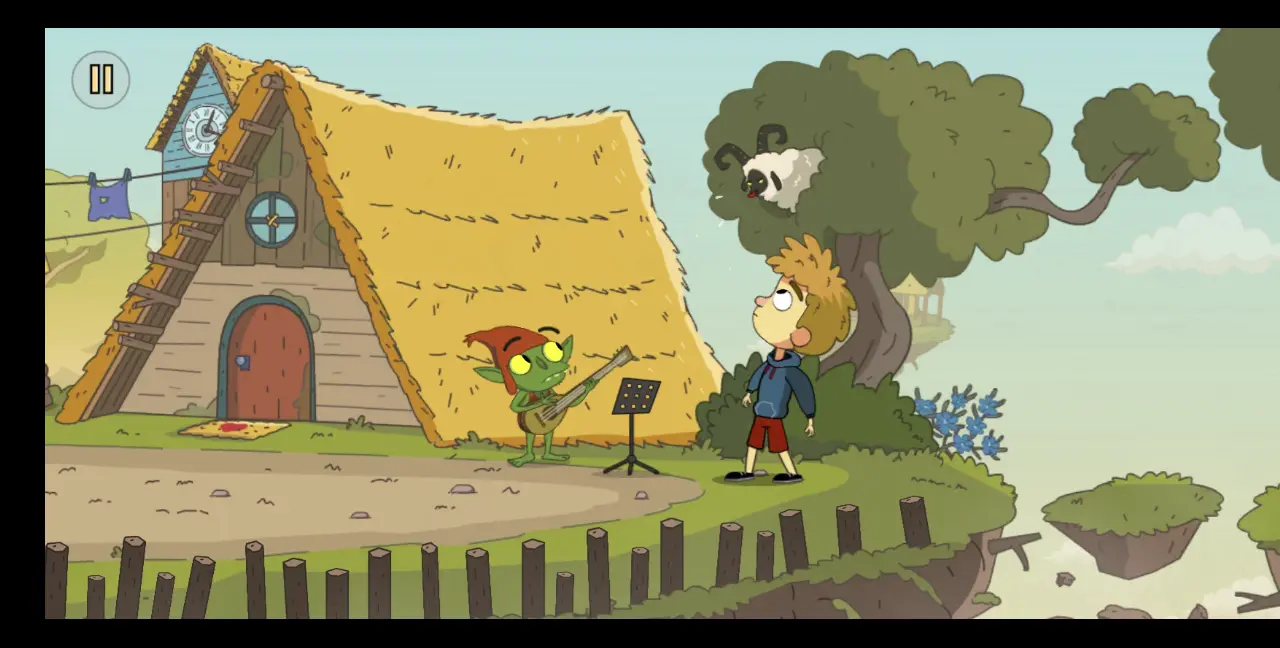
- Next, talk to the goblin playing a guitar. Apparently, he is trying to get a sheep to come down from the tree, but he doesn’t succeed. We have to get an item later for the sheep to come down.
- For now, go to the fountain in the middle. You’ll find a purple coin here. You will need 10 coins for a mini puzzle later.
- Next, talk to the lady goblin washing clothes. You’ll try to get the black shirt with a red X on it hanging from the clothesline, but the lady will berate you. If you go behind her, you will pull down the orange bra hanging from the clothesline and distract the lady. However, she has a baby in a carrier behind her and the baby will cry upon seeing you get the black shirt. The lady will berate you again. You’ll have to come back for the black shirt later.
- If you head all the way to the left, you’ll see a cliff with a straw mat at the edge, implying that someone is sitting there. You won’t see this individual yet until you trigger another event.
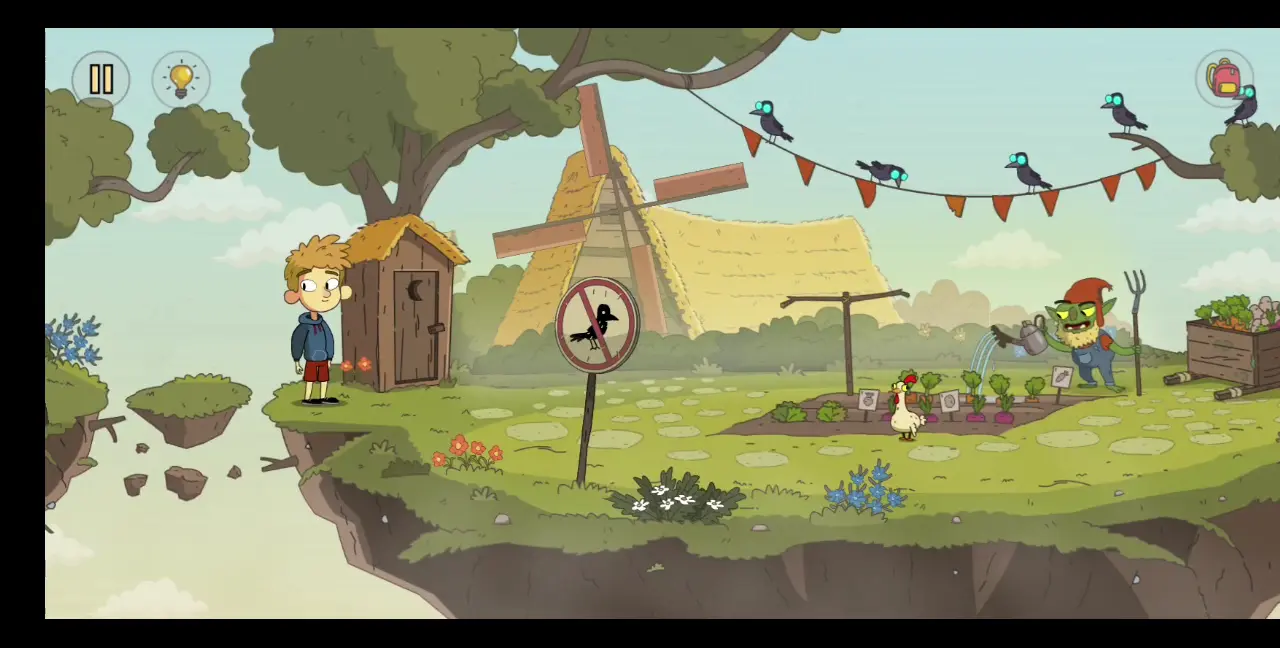
- That said, walk to the right side of the map, past the hut and the guitar-playing goblin. You’ll jump over a small island and reach an area where a farmer goblin is watering his vegetables. There are black birds surrounding the vegetable patch despite the area having a sign that indicates they shouldn’t be there. Also in this area is an outhouse. You’ll also see two of the three things you need for your rescue plan: the cart and the chicken.
- Click on the chicken and you’ll run after it. Once more, it will escape into the next area to the right.
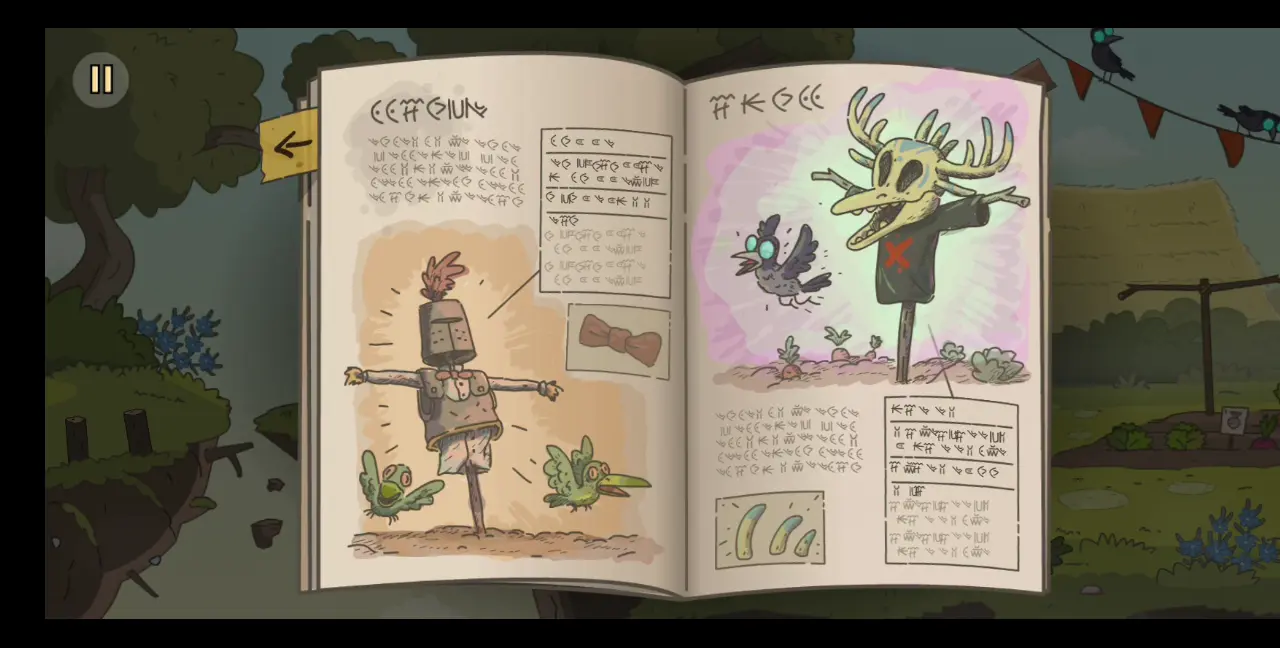
- Since you can’t catch it, go to the outhouse. Inside it is a book. Flip the pages and you’ll see different types of scarecrows scaring various types of birds. On one of the pages is a scarecrow with a black shirt with a red X and a horned skull scaring the same black birds around the vegetable patch.
- Place the horned skull on the stick close to the vegetable patch. Since you don’t have the black shirt yet, the birds will remain. If you talk to the vegetable farmer, he’ll tell you that you can have the cart if you drive the black birds away.
- Walk right, to the next area, which comes after a hanging bridge. This area is a bit more extended and, here, you’ll see a shepherdess goblin, her sheep, a tree that you can climb, a hut with a shopkeeper selling a drink, goblins playing a card game, and the chicken at the edge of a broken wooden bridge. If you try to grab the chicken, it will fly to the roof of the drink shop.

- If you talk to the shepherdess, she will tell you that she needs two of her sheep to come back. If you talk to the shopkeeper, you’ll try to grab a bottle, for which he will berate you and try to drive you away. If you talk to the goblins playing cards, they will tell you that you need 10 purple coins to join their card game.
- Beyond the edge of the broken bridge is one of the missing sheep stranded on a small floating island. You’re going to have to get this sheep later.
- Now that you’ve explored this area, go to the side of the drink shop where you can see some posters on the wall. Click on the posters and the camera will zoom into it. Remove the posters of the goblin king and take the poster depicting a rock band composed of sheep. Underneath this rock band are musical notes.
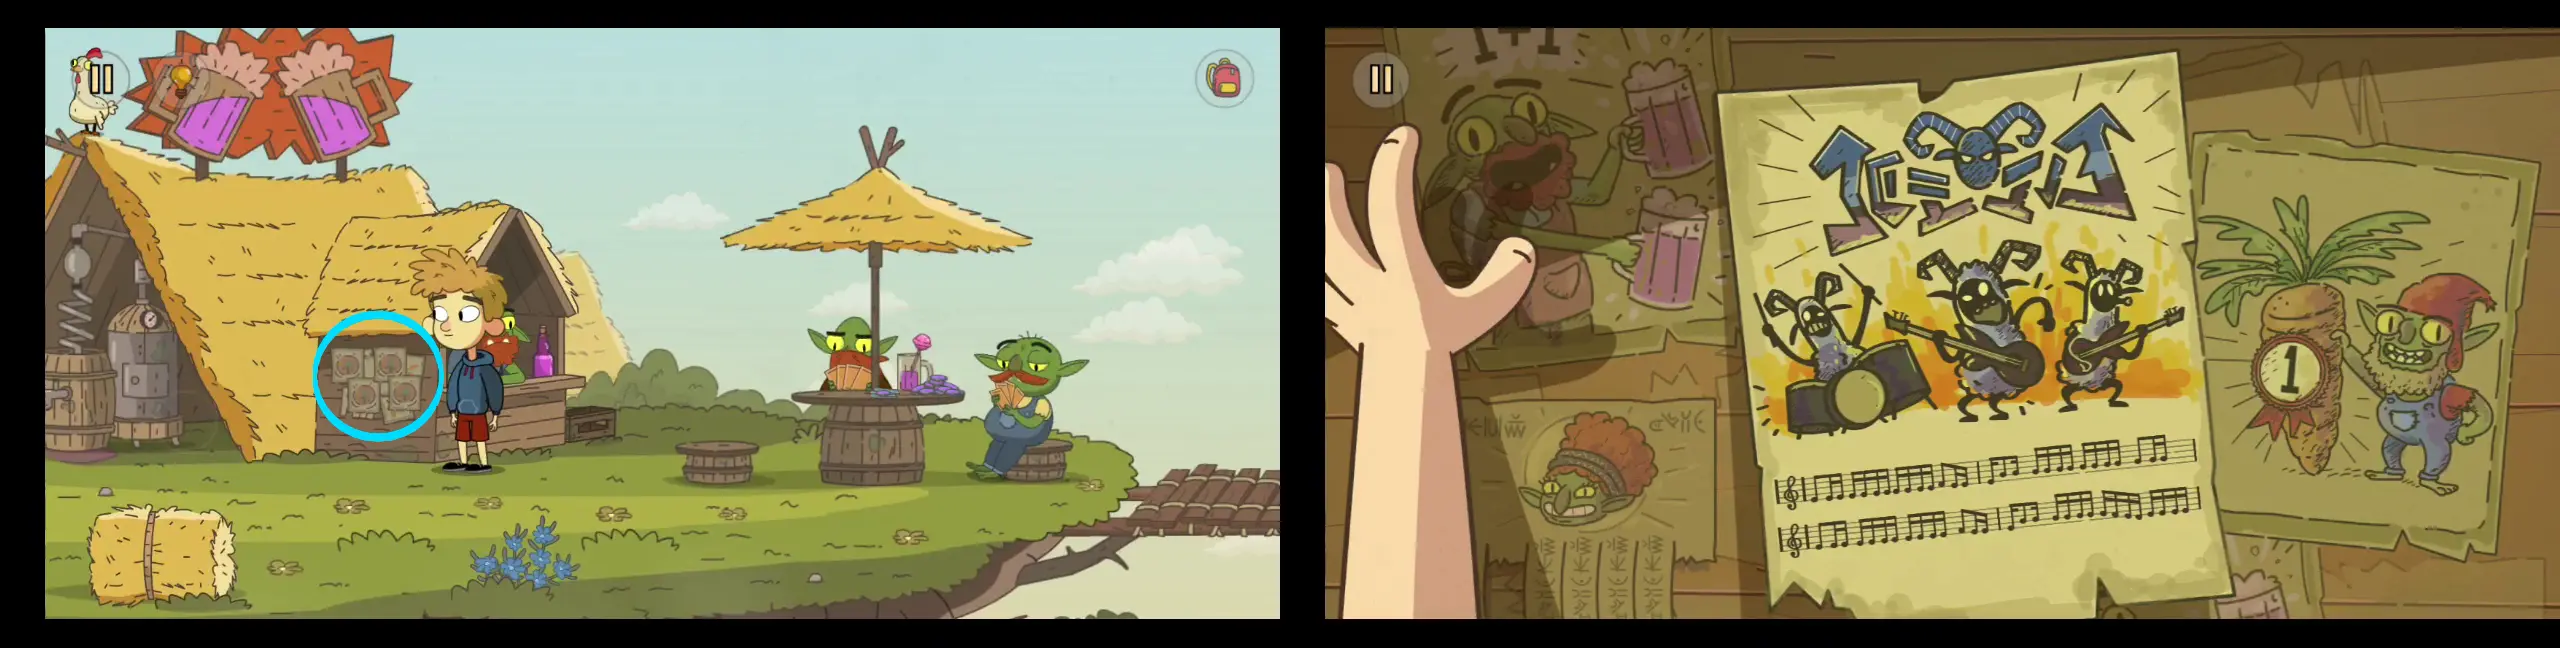
- With this on hand, go back to the goblin with the guitar and give him this poster. He will start playing a rock song and the sheep on the tree will come down. Click on the sheep and you’ll ask it to go to the shepherdess. The sheep will stick its tongue out at you but it will still run off to the shepherdess. That’s one of the two sheep that she needs.
- Go all the way to the left, to the edge of the cliff, and you’ll see a goblin sitting on the mat. He’s using a fishing rod. Hiding in the tree beside him is a purple bird.
- Click on the purple bird, who will turn out to be a fairy. You ask the fairy how you can save your sister. He gives you the bird mask he’s wearing. This will come in handy later.
- Next, talk to the goblin with the fishing rod. He will tell you that he needs a magnet.
- Return to the area with the shepherdess. Next to her is a tree whose trunk has planks that you can use as stairs. Drag the bird mask from the fairy to the tree. You’ll wear the bird mask then climb up the tree. As you go up, you’ll see a bunch of stuff hanging from the tree, one of which is the magnet that the goblin fisherman needs. You won’t be able to reach the magnet for now, but you’ll be able to get the faucet valve next to you.
- Head all the way up the tree. At the very top is a huge black bird with a flower pot on its head. Since the flower is one of the things you need for your rescue plan, you ask the black bird for it. It tells you that in exchange for the flower, you’ll have to prove your intellect.
- The four smaller birds on the branches will then stand on top of each other and display different symbols on different shapes. Clicking on a shape will change the symbol displayed. Clearly, you need to choose the right symbols for each shape. What these shapes and symbols represent are actually items hanging from the tree. Pictured below are the items representing the correct answer, as well as the solution to the mini puzzle.
- Once you’ve solved this puzzle, the bird will give you the flower.
- Climb down the tree for now (we’ll come back for the magnet later) and go to the drink shop. Drag the faucet valve on the tap of the dripping barrel. You’ll open the tap and spill pink liquid on the grass, which one of the sheep will drink. You’ll discover that, thanks to this drink, that sheep can jump off the ground after farting pink gas.
- The shopkeeper will get mad and argue with the sheep for farting on him. Take this chance to grab the bottle of pink liquid at the shop’s window. Then, give this bottle to the sheep stranded on the island. The sheep will drink the liquid and catapult itself to the area you’re in using its fart. You’ve now returned two sheep to the shepherdess.
- Go to the shepherdess, who’s playing a flute while the sheep dance. You ask her for help so you can get the chicken on top of the drink shop. She plays music to get the sheep to stack up on top of each other. Climb up the sheep to get the chicken from the roof of the drink shop. After a brief struggle, you’ll finally manage to get the chicken.
- On the ground next to the dancing sheep is the shepherdess’ cane. Take it.
- Wear the bird mask and climb up the tree once more. Use the cane to grab the magnet hanging from the tree.
- Walk all the way to the left and give the goblin fisherman the magnet. He fishes a whole bunch of purple coins and walks away. He drops one of the coins on the wooden bridge. Collect it.
- Use the fishing pole with the magnet. This will prompt a mini puzzle where you control a magnet to transfer metal junk to a cart until it reaches the appropriate weight. Once it does, the cart will enter some kind of recycling container, which will eventually spit out a purple coin.
- There are already two purple coins on the other side of the recycling container. You will need to make three more as the barrel next to the container requires five purple coins. Keep using the magnet to recycle junk until you complete all five purple coins. Then, transfer the coins to the barrel. You’ll be able to collect all the coins by then.
- Walk right. Near the fountain is a purple coin. Take it. Keep walking right, to the veggie patch. There’s another coin near the veggie patch. You can find one more coin near the drink shop. Collect this as well. At this point, you should have 10 purple coins in your inventory.
- Join the goblins playing a card game. This segment is a mini puzzle where you’ll be playing against the three other goblins. You each begin with 10 purple coins, which will be used to bet against other players. A deck of face-down cards will be in the middle and one open card will be drawn every round. The player who bets the most coins will get to collect the open card. The goal of the puzzle is to collect cards that have a sum total of greater than or equal to 30.
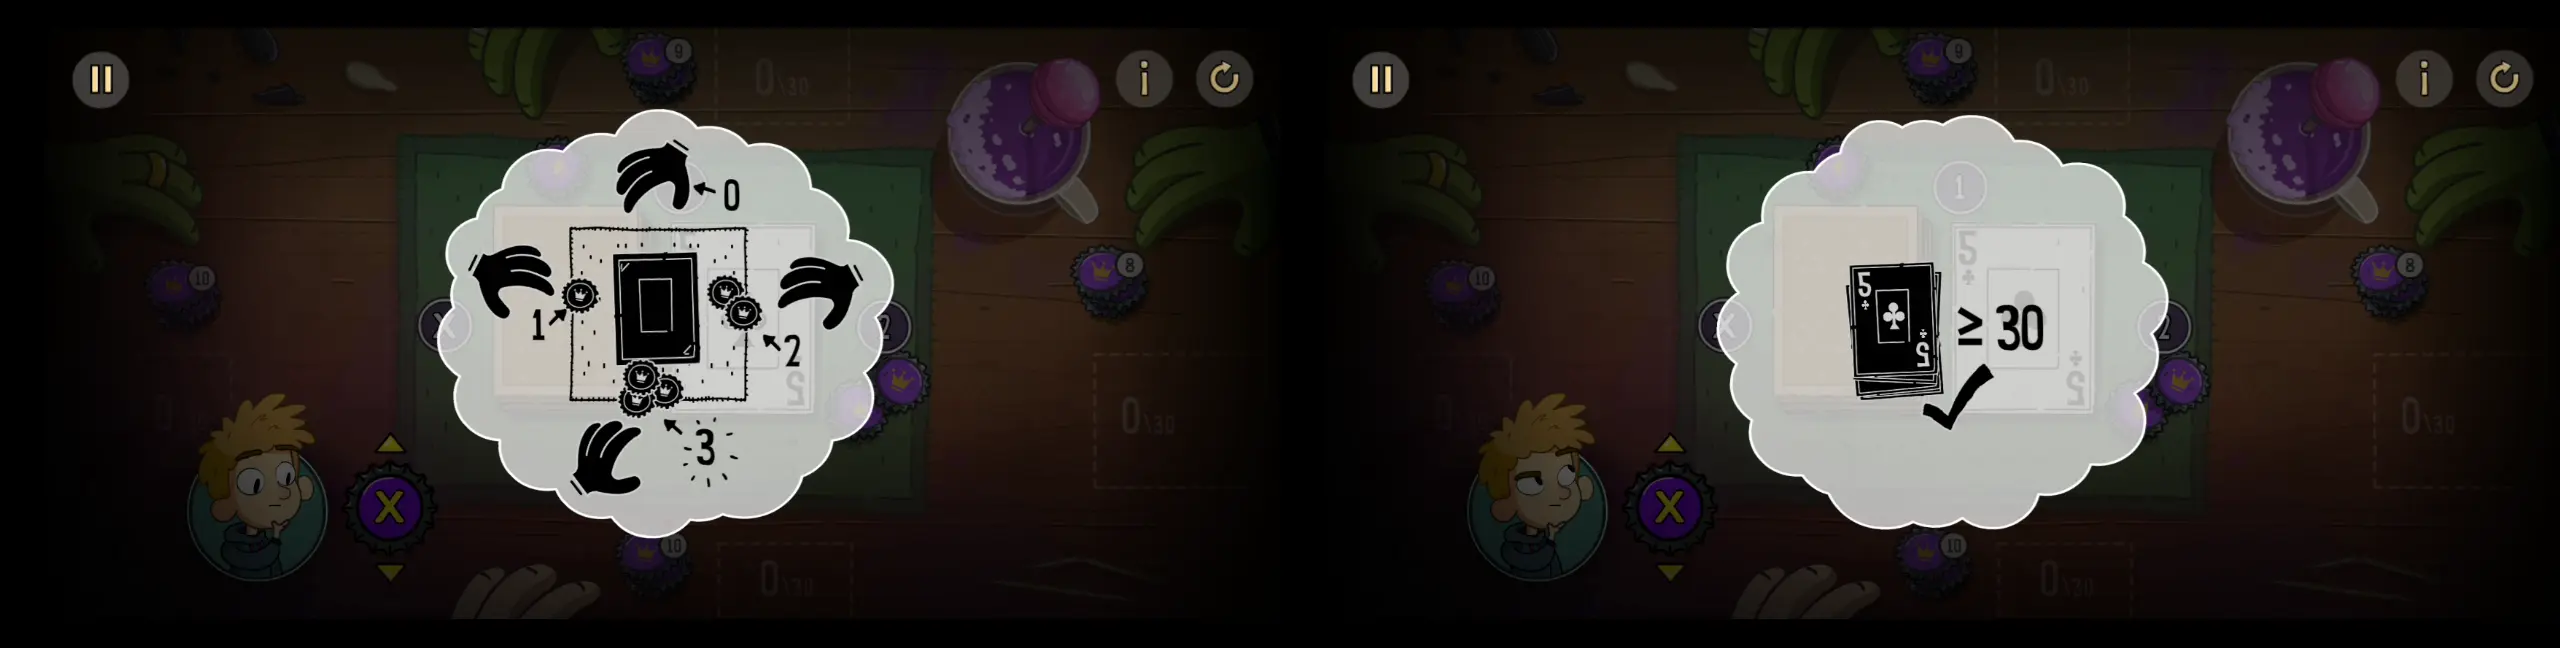
- Like other mini puzzles in this game, this one doesn’t have a one-size-fits-all solution. Basically, what you need to do is weigh your chances against the other players and spend coins particularly on high-value cards. Depending on the number of coins you have, it can be a waiting game, and waiting for the right cards, such as double-digit cards, is one good strategy. However, don’t wait too long that your opponents are close to collecting cards that total near 30 for you to place bets.
- Once you’ve achieved the goal of this mini puzzle, one of the goblins will throw a fit and knock over a glass with a lollipop inside. Take the lollipop.
- Walk left, all the way back to the lady goblin doing the laundry. Click the orange bra to distract her. When she turns around and you see the baby, give the baby the lollipop. Since the baby won’t cry, you can now get the black shirt with a red X on the clothesline.
- Walk right, toward the vegetable patch. Place the black shirt under the horned skull. This will scare not only the birds but also the vegetable farmer. With him gone, click the vegetable cart and you’ll drag it back to the area in front of the hut you came from.
- With this, you have all three items that you need to push through with your rescue plan, so return to the hut so you can tell the three goblins.
- Along with the chicken, the four of you descend from the island and attempt to infiltrate the castle. However, before you can execute any of your plans, you immediately get caught by the guards. This concludes Chapter 11.
Chapter 12
Main Player: Chicken
- Your party finds itself in jail. The chapter begins with four pairs of eyes and a lamp in the dark. Click all the pairs of eyes. The pair on the far left will shift position, gradually going down until the owner of this pair of eyes, the chicken, will knock over the lamp. Inside the lamp is a firefly, which will light up a torch nearby.
- With the torch lit, you’ll discover that the three goblins are tied inside the jail cell, Toto is chained to a weight, and the chicken is tied outside of the cell. Clicking the three goblins will change the position of the chicken. Thus, click the rightmost goblin, then the leftmost goblin to bring the chicken closer to the torch so the torch can burn the rope from which it’s hanging.
- In this chapter, you get to play as the chicken and it’ll be your job to get everyone to escape safely. As the chicken, walk all the way to the right, past the jail cell, and under the guard’s table. Pull the rope hanging from the ceiling fan. This will open up the frame of the fan and a small, black creature will roll down into the jail cell. The guard will briefly notice the fan shutting off but won’t mind it and continue reading his book.
- Go back to the jail cell and click the small black creature. It will take the flower from one of the goblin’s heads and give it to you. Since you’re the chicken, you’ll swallow it, which is how you’ll collect items for your inventory. The flower will put you to sleep.
- When you wake up, go back to the guard and use the flower to put him to sleep.
- Click on the pliers on the table to collect it. Then, click on the book behind the guard to collect it. Next, click on the circular grill to remove it, exposing a tunnel that can later be used for everyone to escape.
- As the guard is still asleep, click on the gray keypad beside him, which will prompt a mini puzzle. In the middle of the keypad is a symbol of an arch while all the other tiles are blank. Beside it is a piece of paper with different symbols. For this to make sense, click right to shift your perspective to the sleeping guard. Click on the belt on the guard’s chest, which will reveal a tattoo depicting four symbols from the piece of paper. This is the correct order of symbols that should be pressed on the keypad. Shift again to the keypad and refer to the piece of paper. Basically, use the arch symbol as a reference for the correct position of the three other symbols. Pictured below is the order in which you need to click the buttons, as well as the hints that reveal the correct answers:
- With the correct symbols inputted, the jail cell will retract upwards. Go all the way to the left and you’ll see a nail sticking out of the wall under the torch. Use the pliers to take the nail out of the wall. Then, give the nail to Toto so he can use it to unlock the chain on his foot.
- Now free, Toto also frees the goblins from being tied up. With everyone now released, go to the tunnel behind the guard and escape. This concludes Chapter 12.
Chapter 13
Main Player: Lady Knight and Man in the Tower
- Your party manages to reach some kind of main hall where the goblin king is being entertained. However, he’s not amused and sends the court jester through a trapdoor. He demands to be entertained by someone else, and you see that it’s Gal who’s now being asked to perform. She’s almost sent through the trapdoor, but Toto throws her a book, which she reads to the goblin king.
- The contents of the book are basically a mini puzzle you need to solve. This entire chapter will revolve around the two characters in the book: the lady knight and the man in the tower.
- To understand how this puzzle works, let’s first point out that there are three segments to this puzzle labeled -50 (left), 0 (center), and +50 (right).

- In each segment, you’ll notice some changes, such as the length of the man’s beard, the objects on the tower’s windows, and the presence of the rope above the water, all of which indicate the passage of time. However, in each segment, what remains constant is the well on the lower left-hand corner of the book. Anything that you place in the well and into the bucket will appear on all three segments, essentially making it some kind of time-traveling device. Your goal in this puzzle is to get the lady knight and the man in the tower to meet.
- Your first step should be to go to -50 and place the handle on the well. Once the handle is placed, the bucket will appear.
- Next, go to 0. Click the plant pot on the top window of the tower. The man will give the lady knight the plant pot. Place the plant pot in the well’s bucket.
- Go to -50. Pull up the bucket from the well and take the plant pot. Place the plant in the dug soil near the water pit.
- Go to +50. You’ll notice that the plant has grown into a tree and the water in the pit has disappeared. Jump into the pit and take the egg. Place the egg in the well’s bucket.
- Return to -50. Remove the plant from the soil.
- Go to 0. Take the egg from the well and give it to the man in the tower. He will place it on the bird’s nest.
- Go to +50. Click the egg. The man will take it from the window and the egg will crack, revealing a turtle. The turtle will walk to the water. Take the turtle and place it in the well’s bucket.
- Go to -50. Take the turtle from the well and place it back in the water.
- Return to +50. You’ll see that the turtle has grown huge, enough for it to act as a bridge in the absence of the rope. Walk over the turtle’s shell to get to the other side. As the lady knight, you’ll now be able to reach the man in the tower because of his long beard. This concludes the story from the book.
- Surprisingly, the goblin king is moved by the story and cries. Distracted, the other goblins take his crown and the guards chase after them. Gal and Toto are finally reunited. They manage to catch the crown and use the vegetable cart to escape the castle.
- A cutscene will be played out depicting Gal and Toto going on many other adventures and challenges. One thing to note is that, along the way, the fairy reappears and tells them that it’s nearly the new moon. They need to reach the frog portal just before the new moon so they can go back home. This concludes Chapter 13.
Chapter 14
Main Player: Gal/Toto
- Eventually, Gal and Toto reach the frog portal. Approach the portal and drag the crown, which is in your inventory, to the top of the portal. The problem is that even if Gal and Toto stand on top of each other, they won’t be able to reach the top of the portal.
- Walk to the right past the portal and you’ll see a frog. Try to catch the frog by clicking on it, but it will always jump away. If you drag the crown to it, it will move to the left, past the portal. You need to catch this frog so it can wear the crown and jump to the top of the portal and activate it.
- Once the frog is on the left side of the portal, drag the crown to it again, which will trigger a mini puzzle. In this mini puzzle, you can control either Gal or Toto across a board. Either of them can each move one tile, while the frog can move two tiles. Once you move either Gal or Toto, that will be considered one turn. Then it will be the frog’s turn to move. Of course, your objective is to catch the frog.
- Similar to previous puzzles, you’d have to solve this one on your own as there isn’t a cut and dry solution. One good tip is to study the movement pattern of the frog whenever either of your characters are placed in a certain tile or at a certain distance from the frog’s current position. One character would essentially have to force the frog to move to the tile right beside the other character’s position so it can be caught in the next turn.
- Once you’ve caught the frog, you’ll place the crown on it and it will jump to the top of the portal. True enough, the portal will be activated, but before Gal and Toto can enter together, the activation will be interrupted by the goblin king taking the crown from the frog. The portal will then shake and swallow everyone before disappearing. Inside the portal, everything gets jumbled up, even Gal and Toto, who will merge into one odd-looking entity. This concludes Chapter 14.
Chapter 15
Main Player: Gal+Toto
- In this final chapter, you (as the merged Gal and Toto) find yourself in a weird space-time wormhole sort of area where a myriad of items and creatures are floating around. You’ll notice that these items and creatures are like distorted versions of those you’ve encountered in your journey. Some of them floating around are important while others are merely distractions. Pictured below are just some of the things you’ll see in this space-time wormhole:

- First, click on the floating photo so you can see it better. Take note of the more colorful parts such as the tongue, glowing eyes, ice cream, the dog’s paw, and cat’s stripes.
- Then, click on the cuckoo clock nearby. You’ll see that the hands of the clock and the symbols on its face pertain to some of the colored elements in the photo. Move the hands of the clock to the appropriate symbols corresponding to them based on the photo. Pictured below are the correct position of the clock hands.
- A cuckoo bird will emerge from the clock and spit out a cup filled with water. Take this cup.
- You may have noticed that a distorted version of the tea party exists in this wormhole. Thus, you need to find three more cups, as you did in the original tea party. If you ask the bearded fairy, he will ask for those three cups in exchange for the watering can. The blue frog will ask for the crown. The green duck won’t require anything.

- The watering can from the fairy is what’s required to enter the floating door.
- Beside the floating door is a tree. Lodged into it is a coin. Take the coin then go to the phone booth. Use the coin to make a call. A delivery bird wearing the pizza delivery guy’s head as a mask will give you a pizza box with a cup. Take the cup.
- Next, open the green floating bottle. Inside it is a fairy bug. Then read the pink book. When you pan the fairy bug over the book’s pages, hidden symbols will be illuminated. Take note of the items that have numbers on them, which are pictured below. At the very last page is a bloated fish-like creature with numbers on its underbelly. Inside the fish is the third and last cup you need.

- Close the book and go to the bloated fish-like creature. On its underbelly are three heads that transform into other heads when clicked. Since the order of illuminated items on the book is 1) a card, 2) a handbag, and 3) a wheel, the corresponding heads should be 1) a card-playing goblin, 2) the grandma, and 3) the big guy playing a video game. Pictured below are the correct order of the heads on the fish’s underbelly.
- With the correct heads in place, the fish will give you the third cup. With all three cups on hand, return to the tea party and give the cups to the fairy. The water inside the cups will trickle back into the watering can. Once the watering can is filled, the fairy will give you the watering can.
- Go to the floating door and open it. Give the watering can to “Gal”. She will take it and disappear. The door will open again. Enter it and you’ll find yourself in a familiar grassy field, which you’ve seen at the beginning of the game. To your right is also the original site of the tea party. Nearby is the crown. Take it.
- Head out of the door and go back to the tea party. Give the crown to the blue frog. The crown will glow and so will the frog’s eyes. Cups filled with water will suddenly appear for everyone. Click on the frog and the four of you will share a toast.
- The crown will float and so will everything else, then suddenly, Gal and Toto are back in the real world, in the front yard of their home. From hereon, a cutscene will play, which we won’t spoil, but this marks the end of their adventure and the game itself.
This concludes our walkthrough for Lost in Play. What was your favorite chapter in the game? Was there a mini puzzle that you had trouble solving? Was there a character that made a big impression on you? Share your thoughts in our comment section below!