Have you ever wondered what it would be like to explore a dollhouse? Walking around inside, seeing miniature replicas of furniture, accessories, even utensils… Maybe some of the things in there actually work, such as stoves that light up or water pipes that have running water. The level of craftsmanship that would entail would be no less than mind-blowing, and exploring such a marvel would have definitely made for an interesting experience.
So step into Waldegrave Manor—or at least, the dollhouse replica of it.
As the fourth installment of The Room series of puzzle games, The Room: Old Sins focuses entirely on this very dollhouse shrouded in mystery.
It’s here that the story takes place, and is prompted by the disappearance of a wealthy couple: Edward and Abigail Lockwood. After searching Waldegrave Manor itself and finding nothing, you believe that the dollhouse is what holds the answers to the couple’s whereabouts—and that of the mysterious element called the Null.
And it’s your job to find them.
Compared to its predecessors, The Room: Old Sins doesn’t limit its puzzle-solving to just one room at every stage; rather, you as the player will be solving puzzles from different rooms, thus connecting these rooms to each other. From time to time, you’ll also have to head to the exterior of the dollhouse as items you find inside the rooms are meant to be placed in the dollhouse’s extensive yard.
You’re also given a special eyepiece, which you need to enter rooms, as well as reveal hidden puzzles that may be inside the mechanisms of the miniatures. Slowly, the dollhouse will open up to you, eventually unveiling its secrets—
—if you solve its puzzles first, that is.
That said, our in-depth walkthrough for The Room: Old Sins is here to help you solve all the puzzles you will encounter in the game. We provide not just detailed answers but the easiest way to solve puzzles. Since the game is rather lengthy, this document contains answers for the tutorial stage, the Foyer, and part of the Study, just before you get to unlock the Curiosity Room.
Without further ado, this is the first part of our walkthrough for The Room: Old Sins.
The Dollhouse (Tutorial)
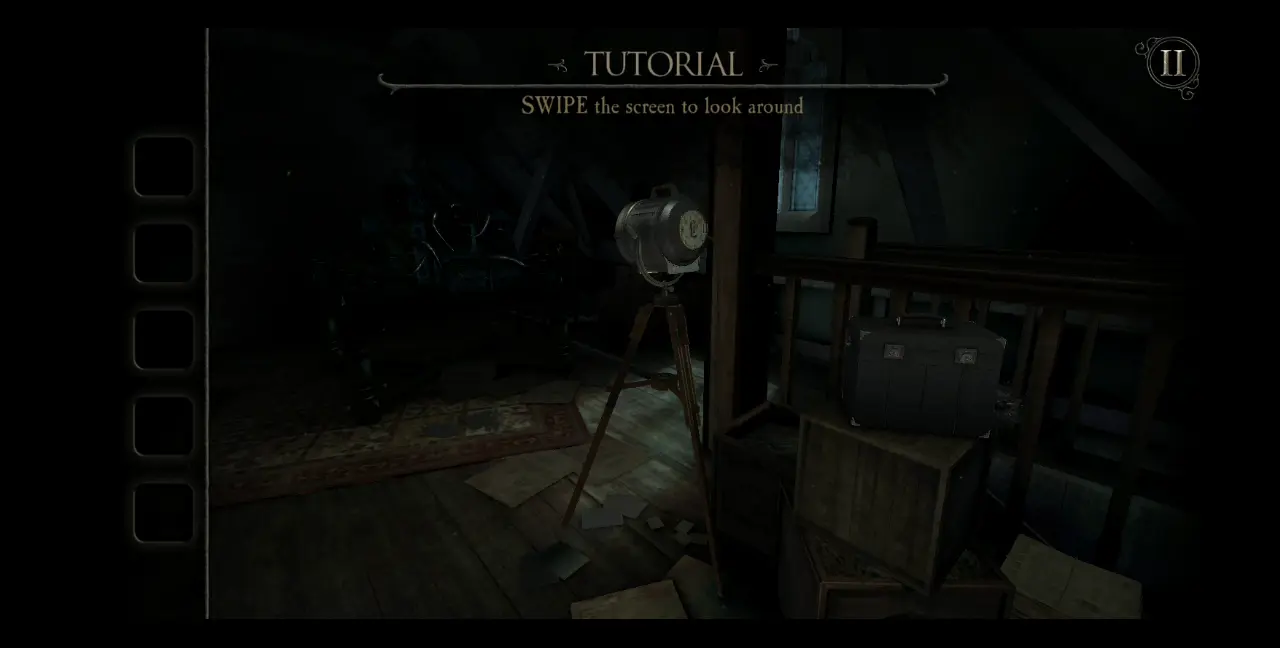
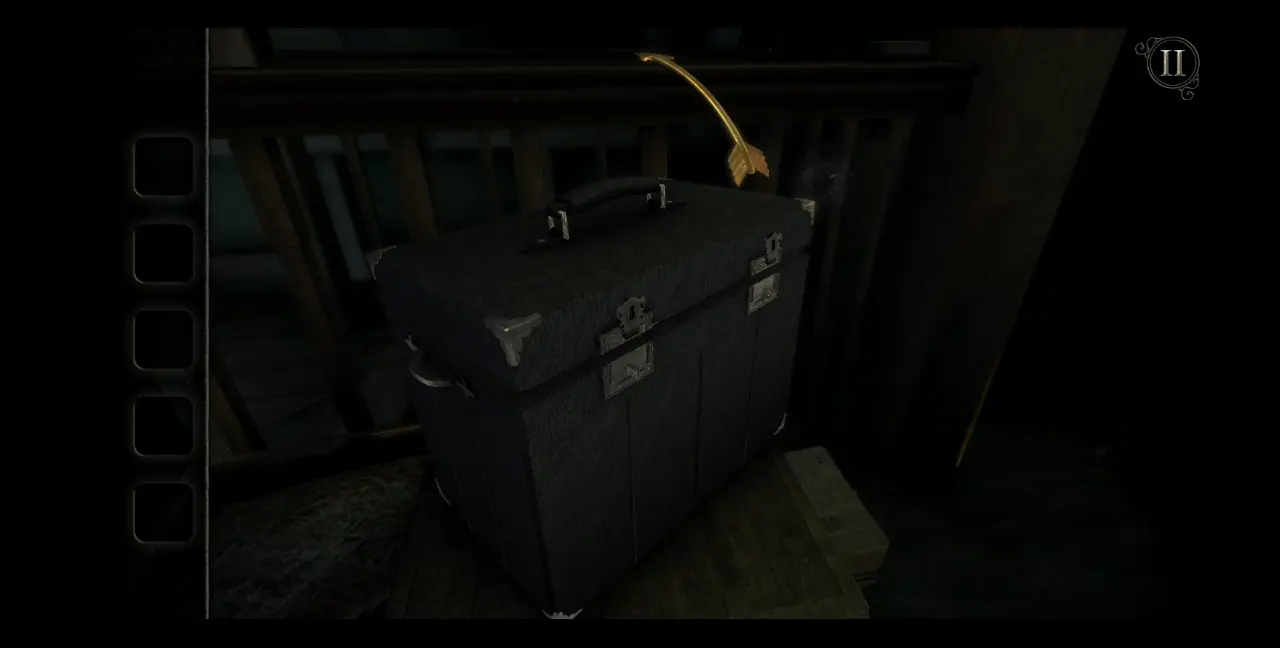
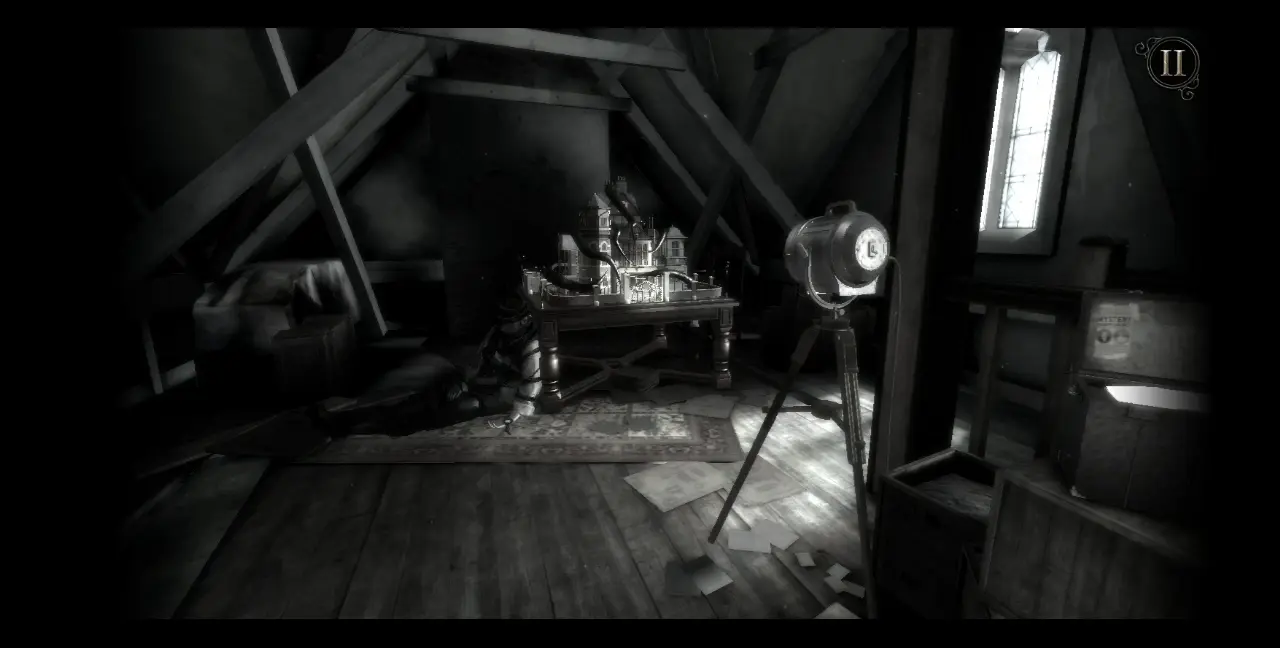
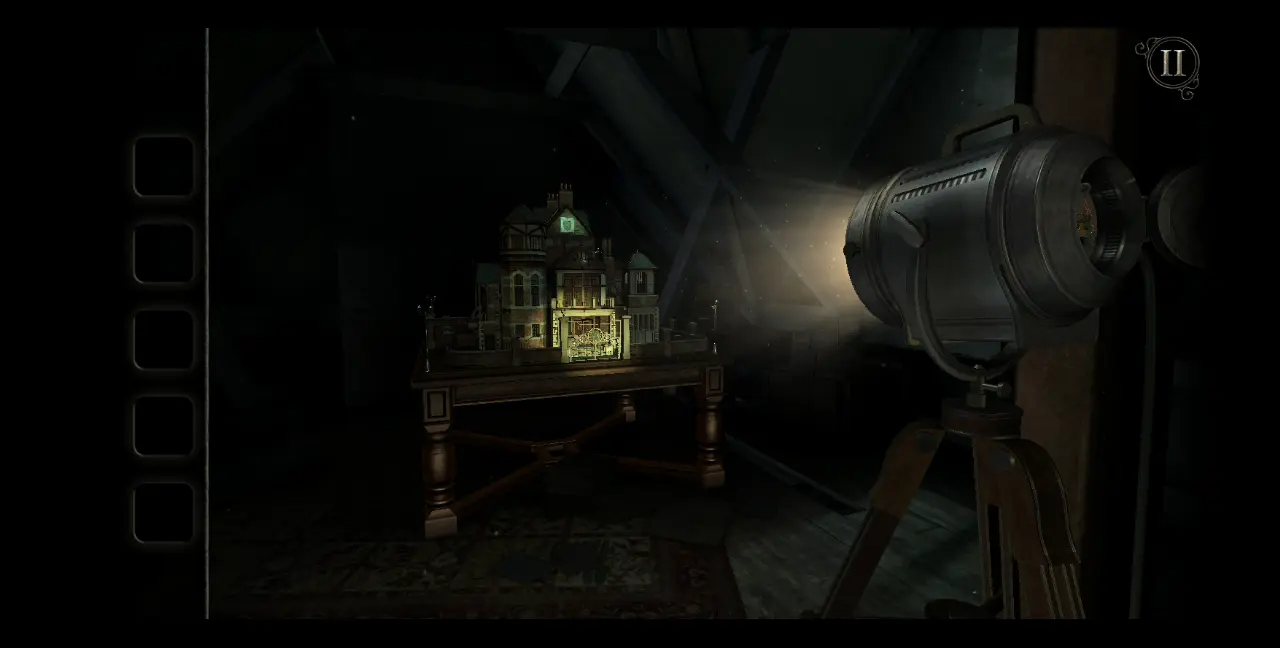
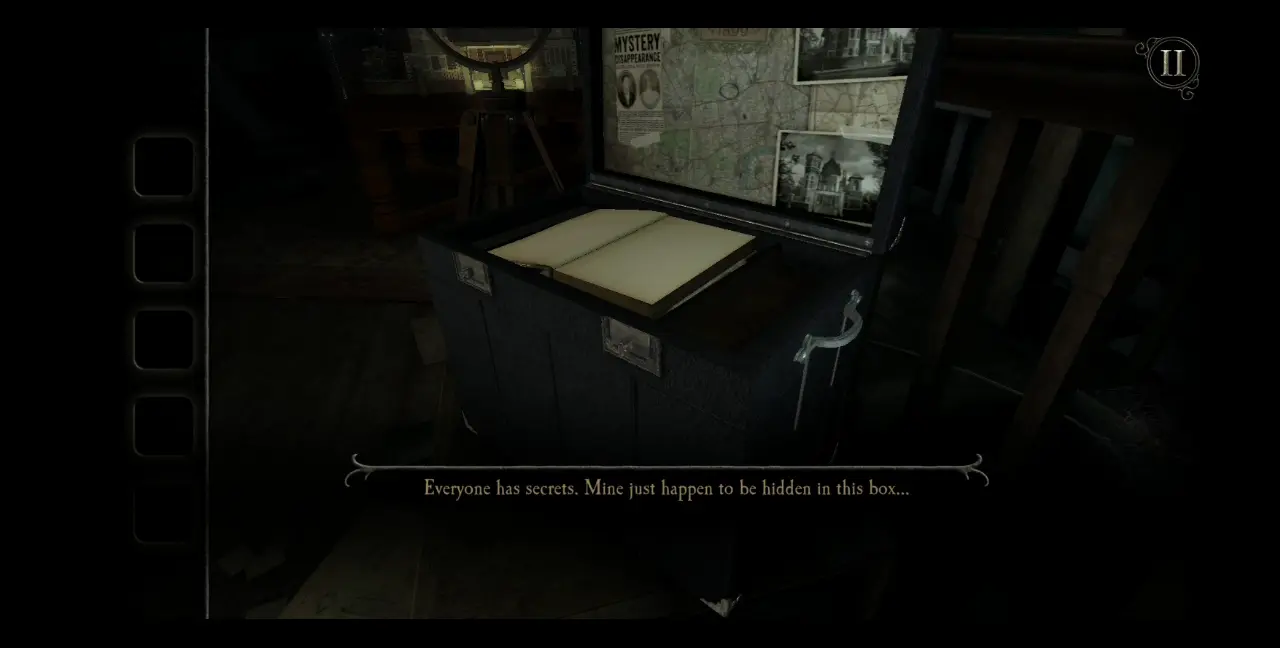
You walk up the attic amid the darkness. The sound of your footsteps are loud in the deafening silence. You put your trusty case down on some wooden crates, and it’s the first thing you see inside the dimly lit room.
The attic is the only room you haven’t searched in the house and you realize you won’t be able to investigate it properly in the dark.
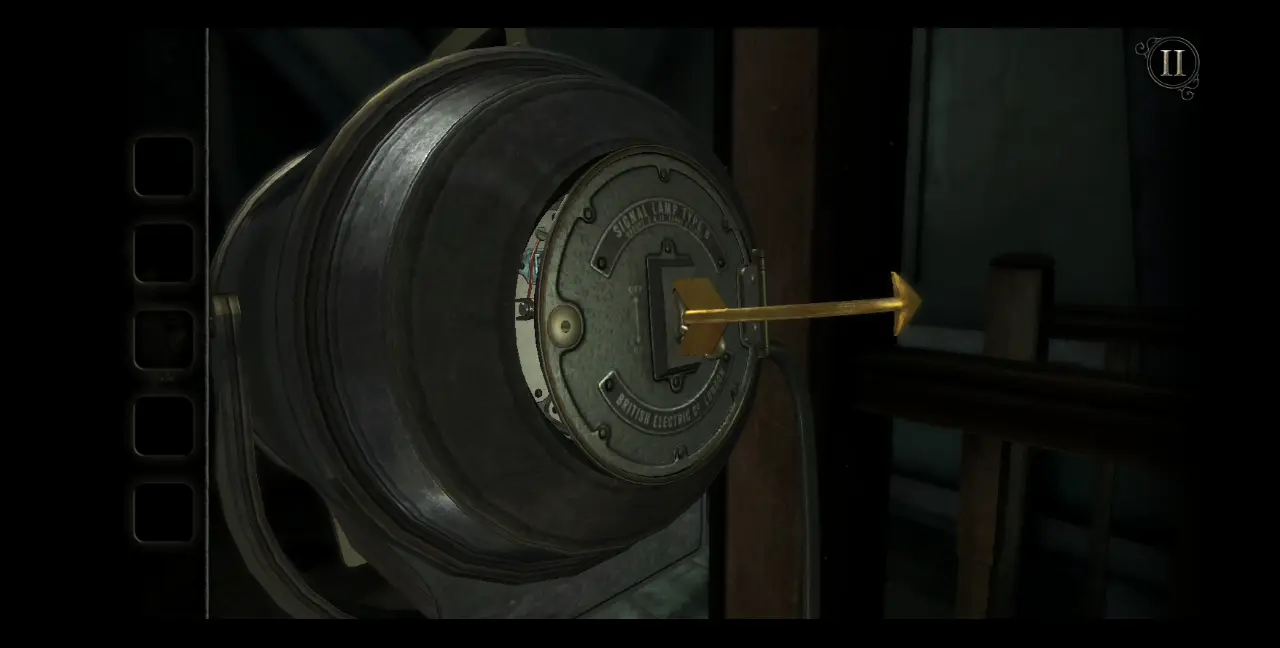
Like any good field worker, you take stock of your surroundings by swiping the screen to look around. To your right is, of course, your briefcase, and directly in front of you is a floodlight. Right across the floodlight is a dark, ominous-looking space. You need to open the floodlight to discover whatever’s in there.
Double-tap on the floodlight to focus on it. Then, flip the switch.
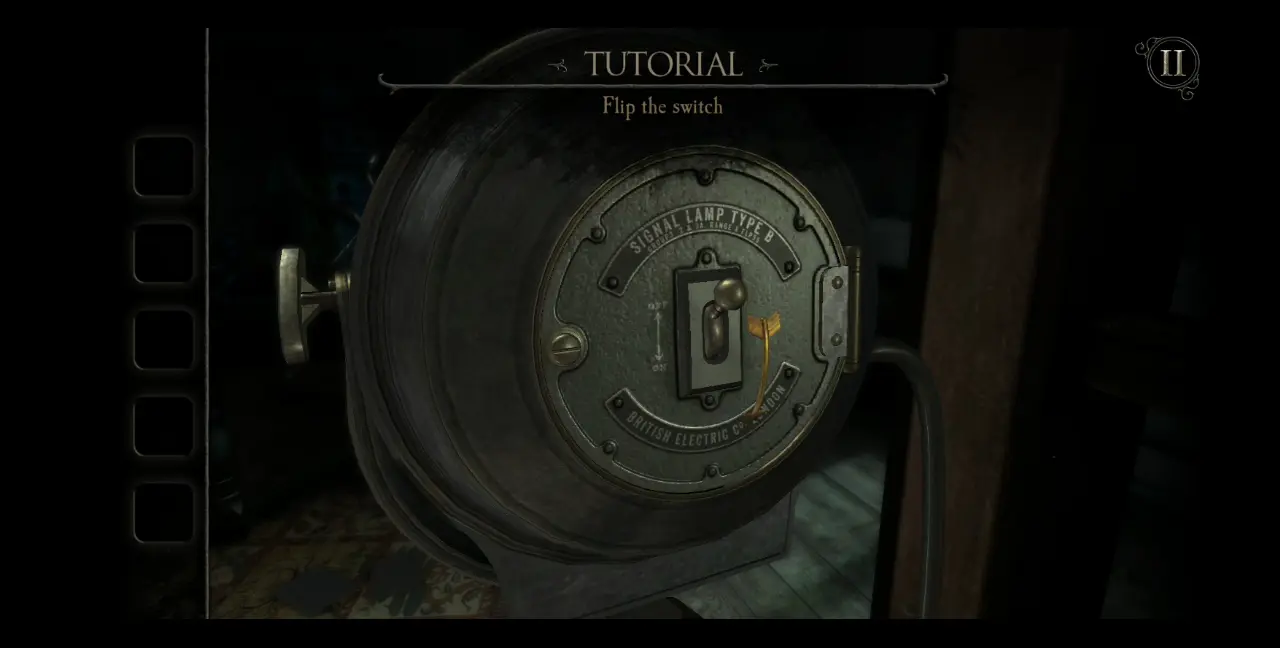
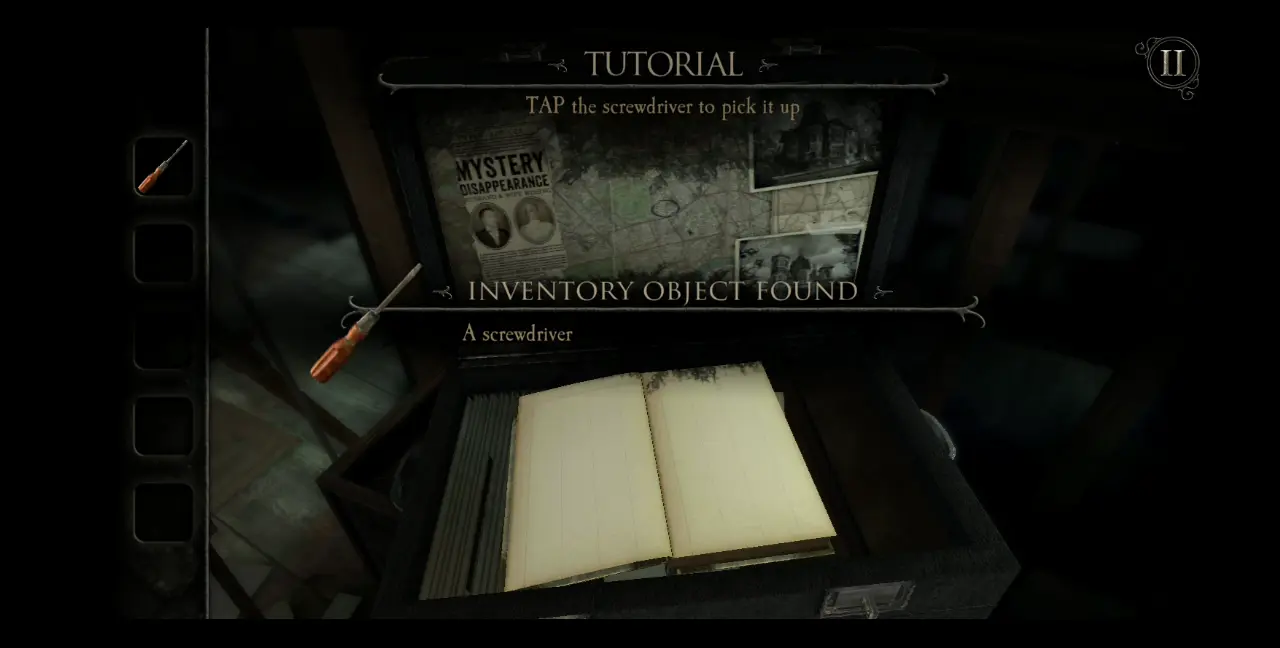
The floodlight doesn’t switch on and you conclude that it might be broken. To fix it, you’re going to need the screwdriver from your case.
Pinch the screen to zoom out of the floodlight, then double-tap on the case to focus on it. One by one, lift the latches of the case to unlock it.
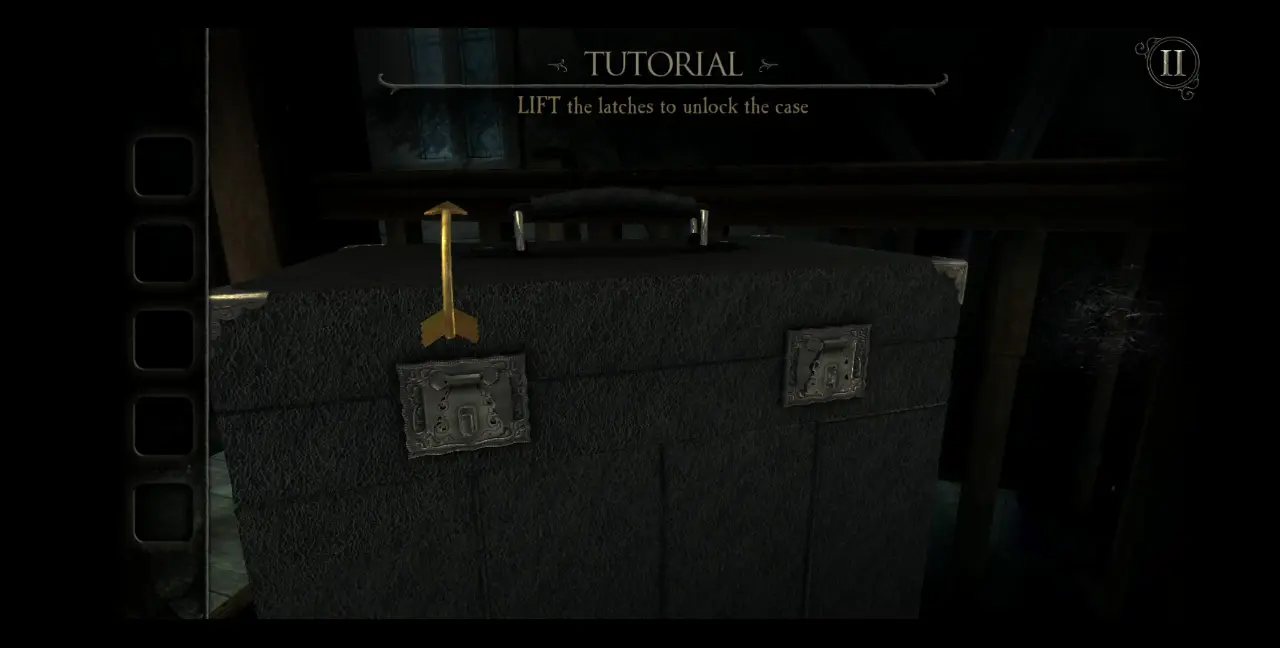
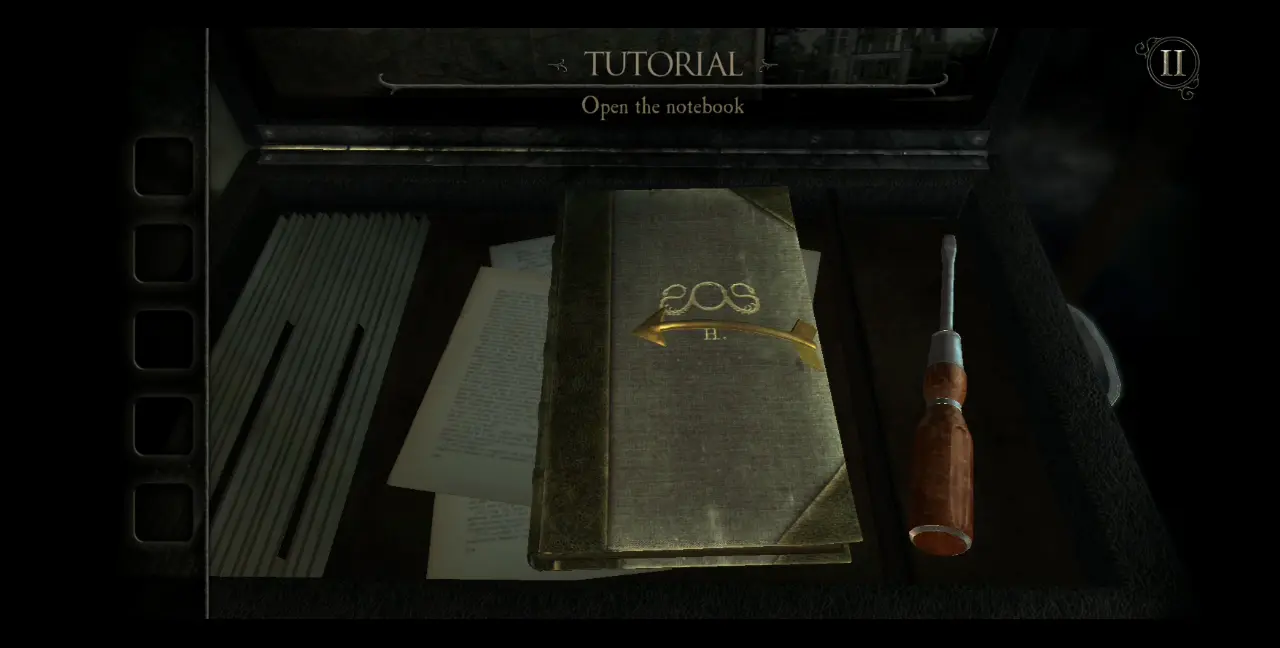
Once the case is unlocked, lift the cover to reveal its contents inside.
Inside the case are a couple of things: your trusty notebook, which contains all the information you need for this assignment; photos, a newspaper clipping, and a map tacked to the inside cover; and, of course, the screwdriver.

Double-tap the notebook to open it.
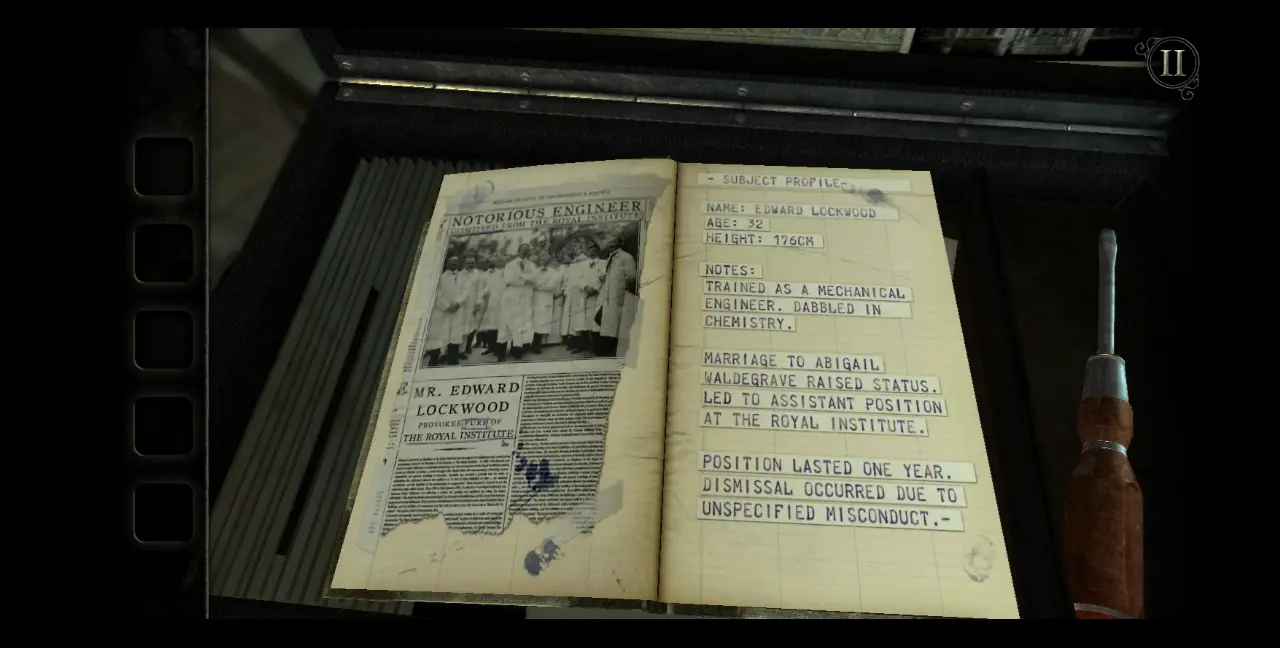
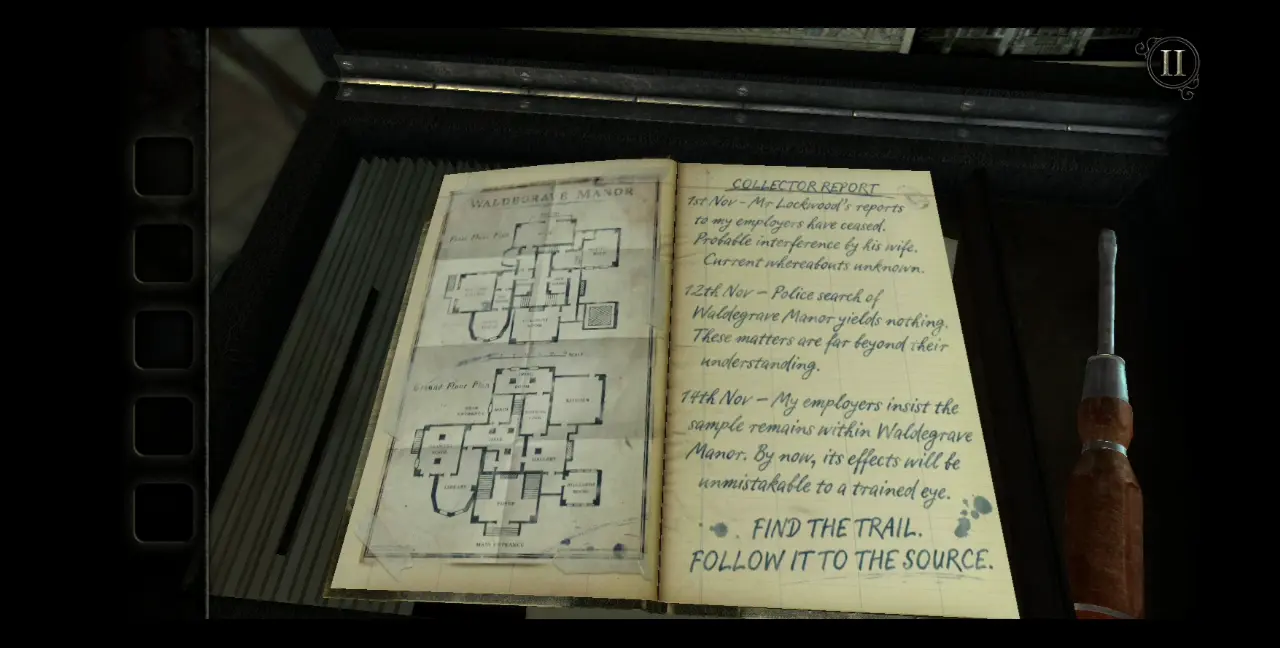
Upon flipping the page, the first thing that greets you is a newspaper article and the subject profile for Edward Lockwood, a “notorious engineer” according to the article. In the profile, you will find some basic but vital information about who he is.
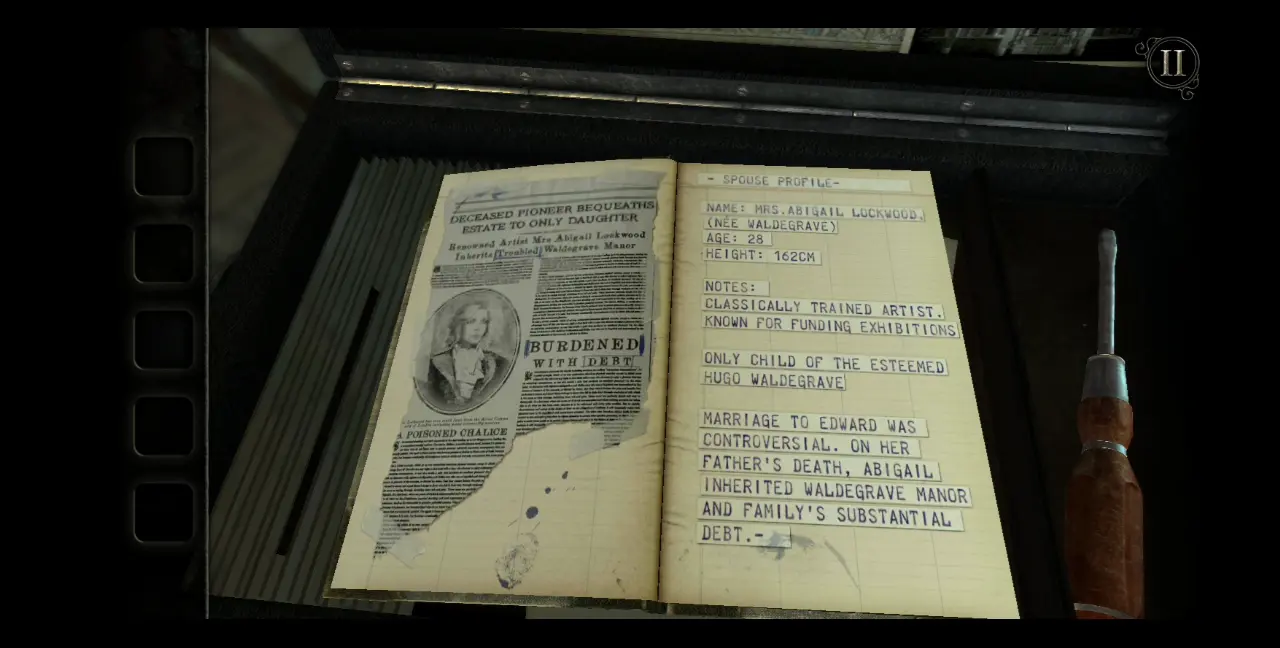
On the next page is a newspaper article and subject profile for Abigail Lockwood (nee Waldegrave), Edward’s wife and heir to the Waldegrave Manor, which you’re currently in. Her profile also reveals important information about her.
On the page after that is a blueprint of Waldegrave Manor and a Collector Report listing down a short timeline of activities, beginning with the date when Edward Lockwood ceased to communicate with your employers. The report suggests that there is an object hidden within Waldgrave Manor, and that you need to find its trail and follow it back to the source.
With nothing else following these notes, you can zoom out of the notebook. Beside it is the screwdriver you need for the floodlight. Tap it to collect it for your inventory.
You’ll notice that objects you’ve collected for your inventory occupy the five inventory slots to the left of the screen. Make a habit of checking out these objects by clicking on their slot to view them more closely inside the inventory.

With the screwdriver on hand, zoom out of the case.
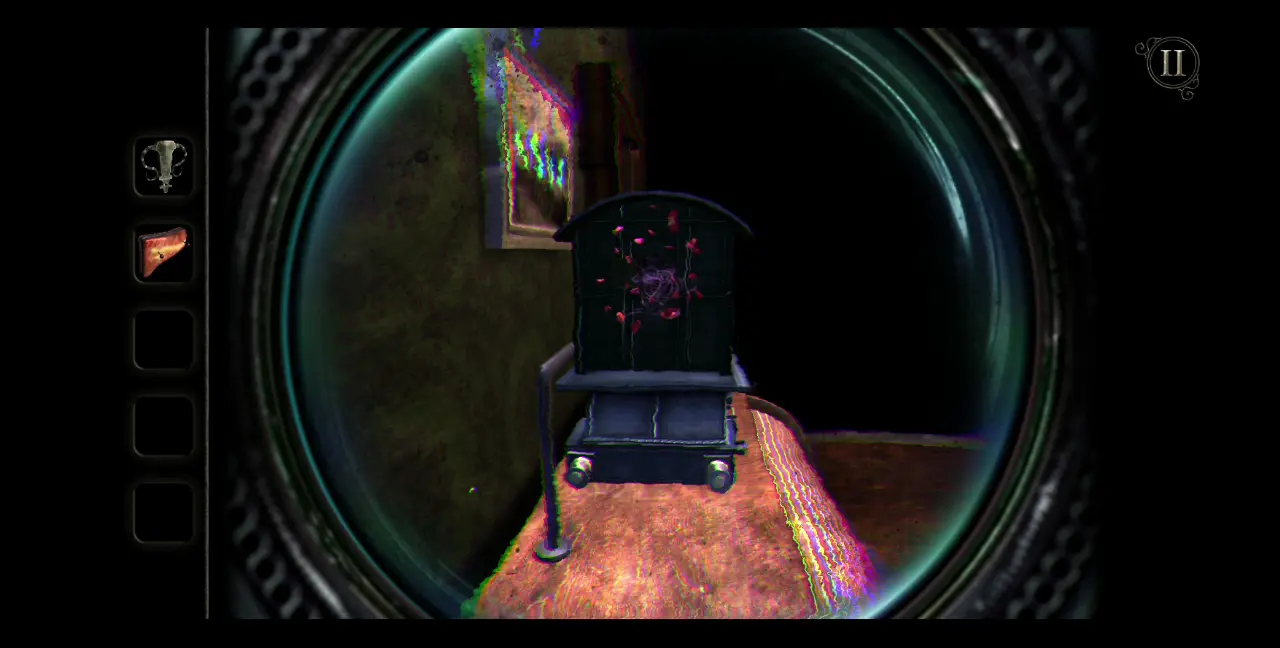
Suddenly, you notice that the silence of the dark attic has been replaced by the sounds of a thunderstorm. As you turn your head toward the floodlight, lightning rents the sky and flashes from the window to your right, revealing a glimpse of what’s in front of the floodlight when you open it: a table with a dollhouse.
Right next to the table is a corpse.
It was only for a moment, but you knew you saw what you saw—but you need to make sure. Zoom into the floodlight and drag the screwdriver from your inventory and into the screw. Turn the screwdriver to open the latch.
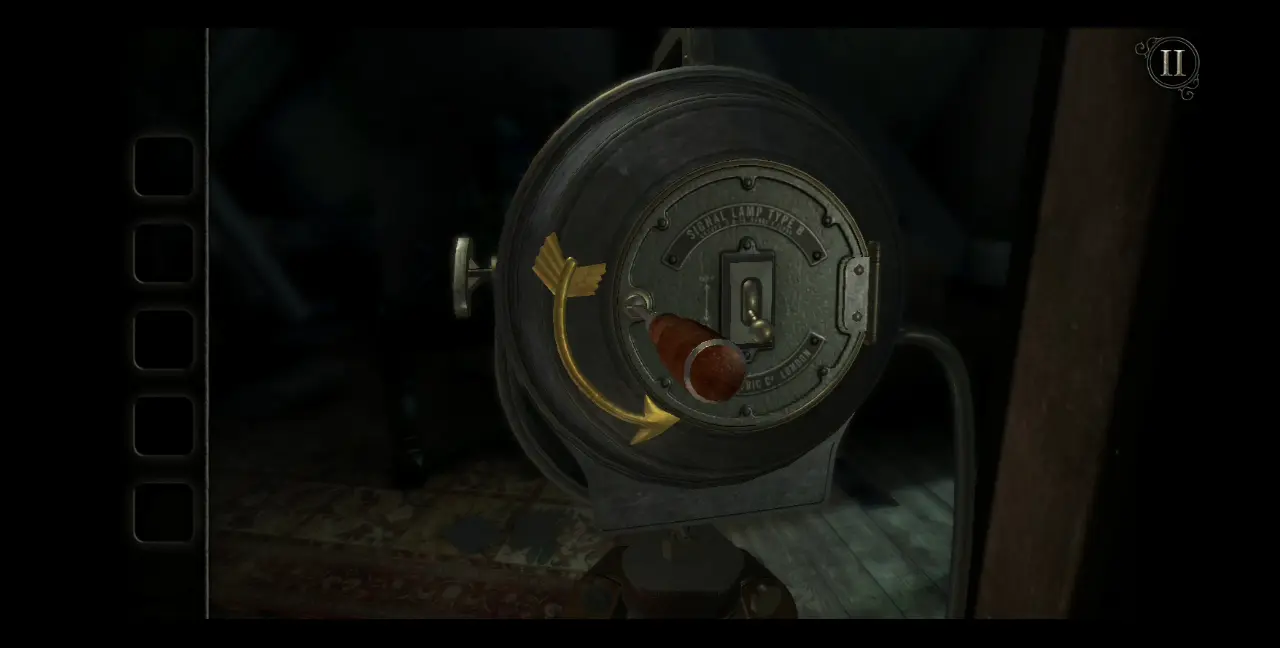
Once the screw has been removed, open the latch.
Inside it is a circuit. You can move the two gold pieces, wherein the one below can be moved up so the copper writing can connect with those to its sides, while the gold piece above can be moved to the side. First, move the top piece to the left to allow the bottom piece to be moved up.
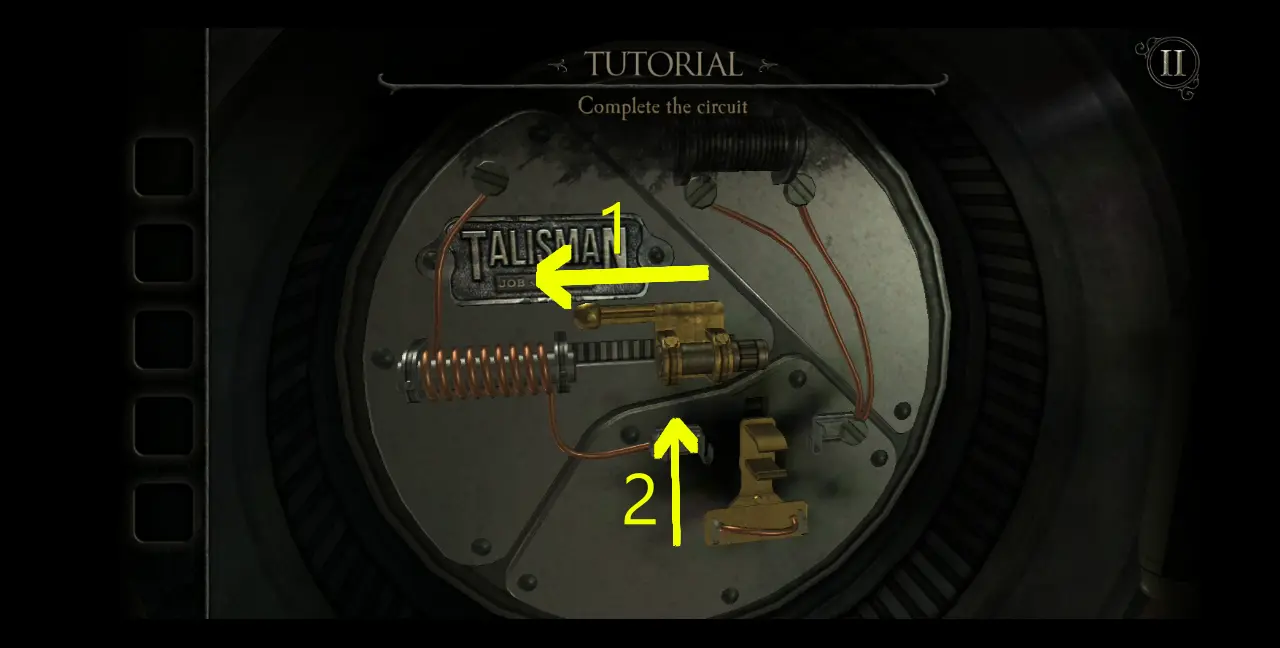
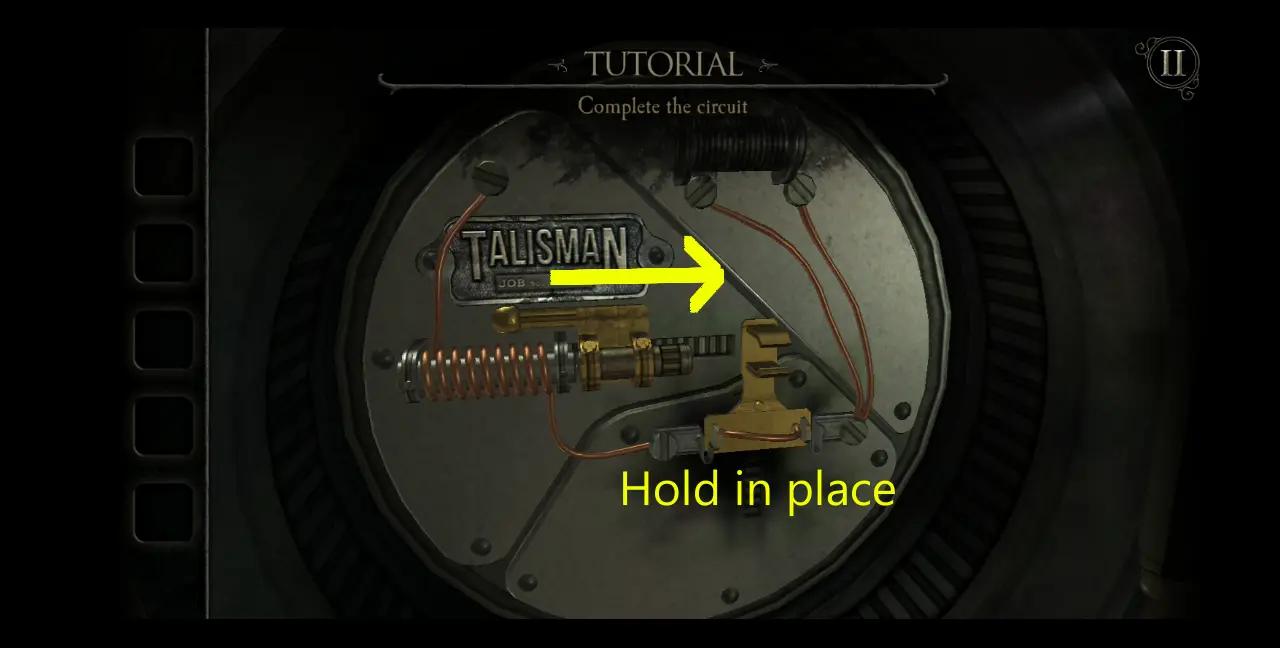
Hold the bottom piece in place then move the top piece for the bar to connect with the slot of the bottom piece.
This should be the end result:
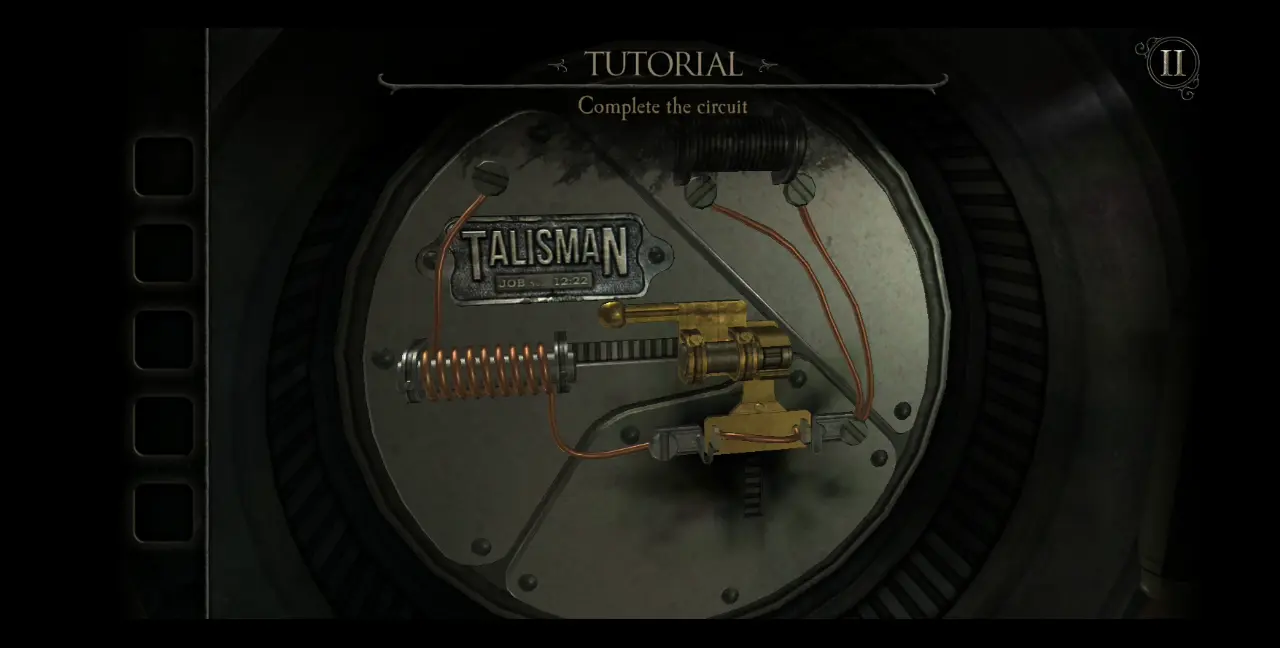
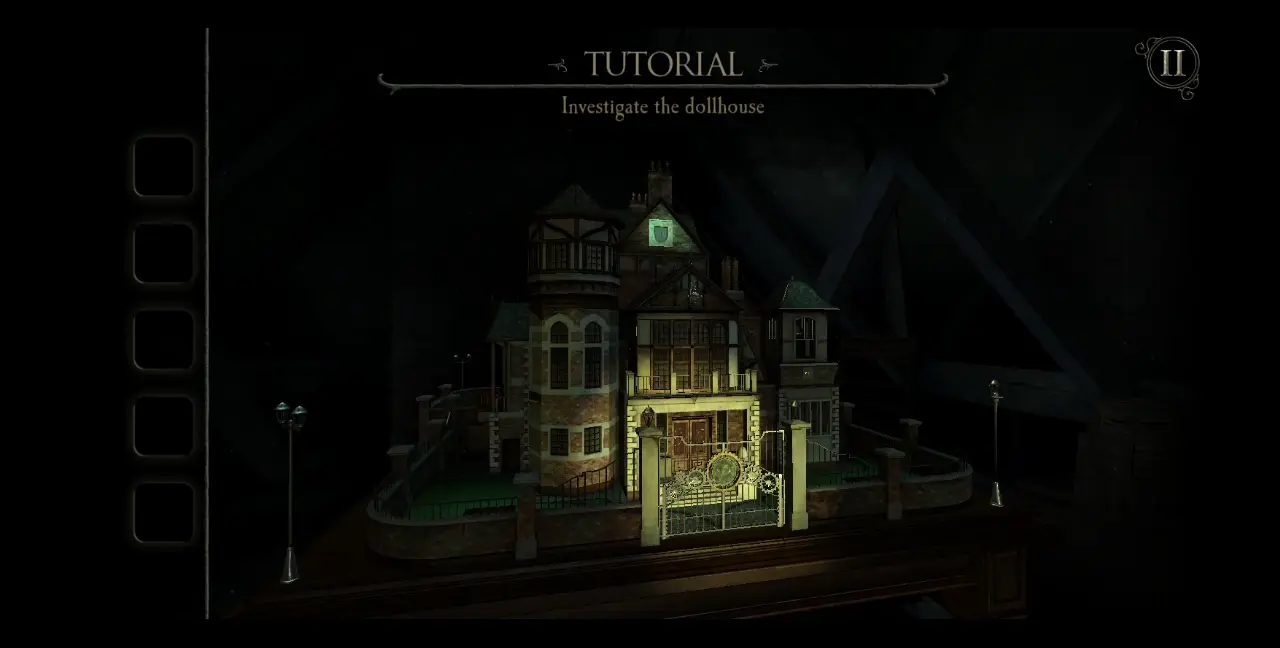
With this, the floodlight will open, flashing a light upon the dollhouse on the table. Curiously enough, the body next to the table is nowhere to be found.
Double-tap the dollhouse to come closer to it and commence with your investigation.
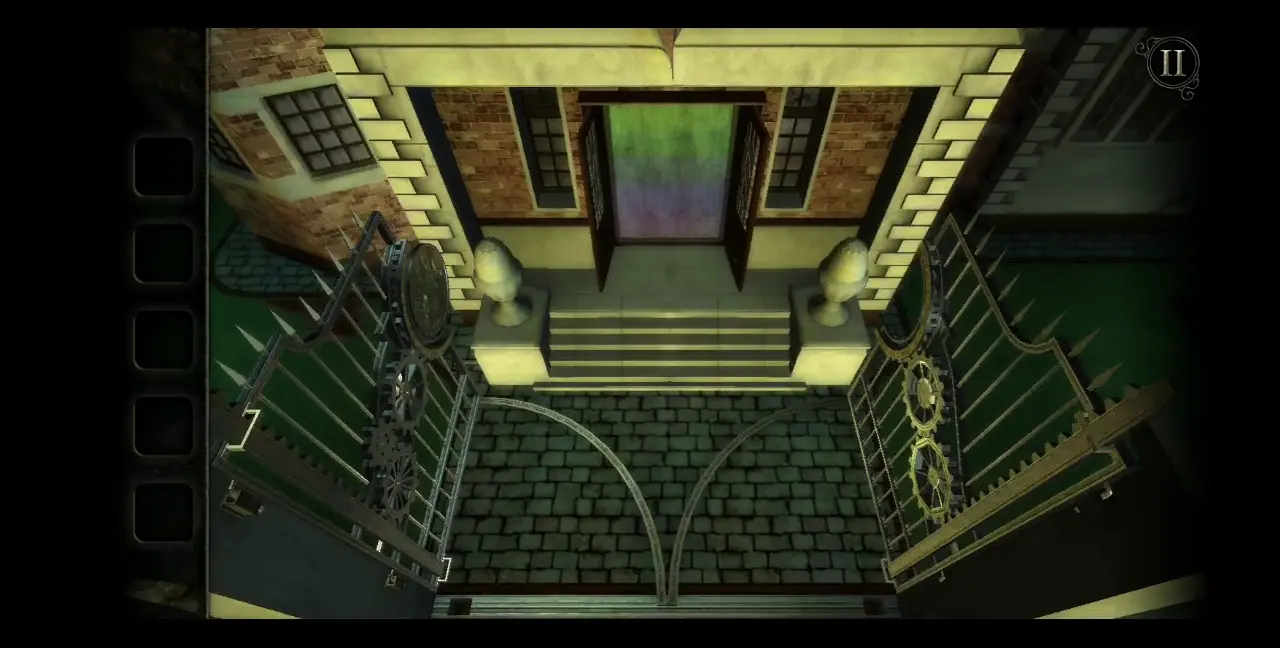
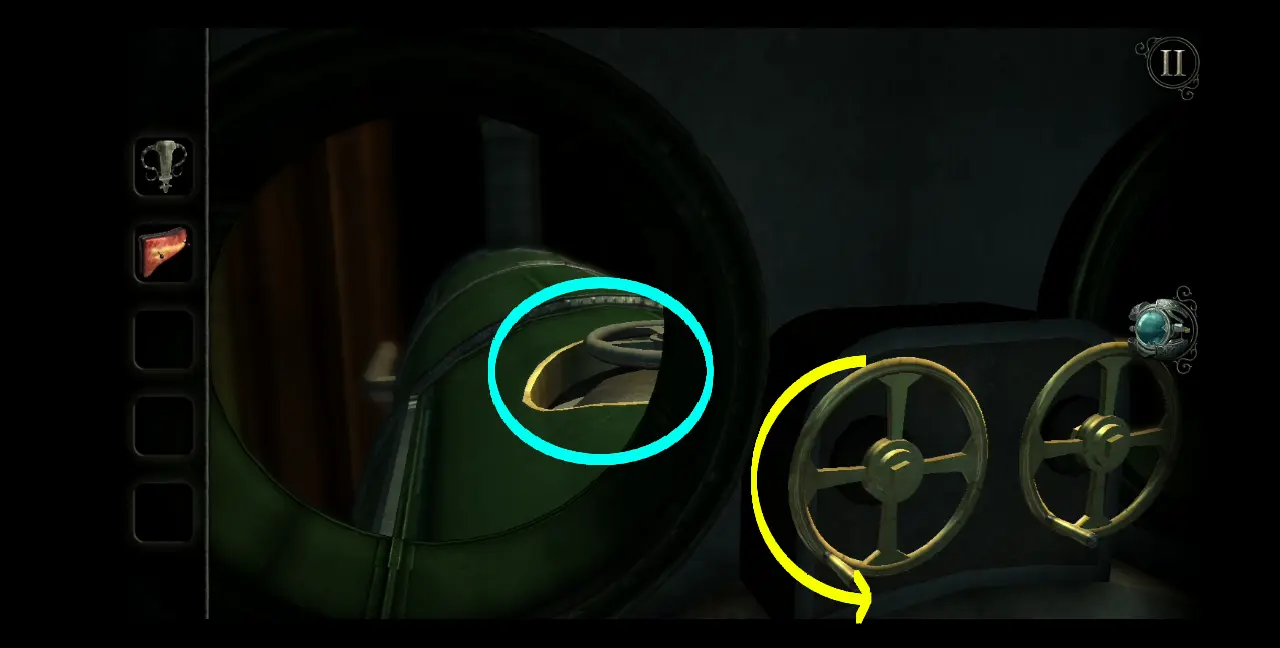
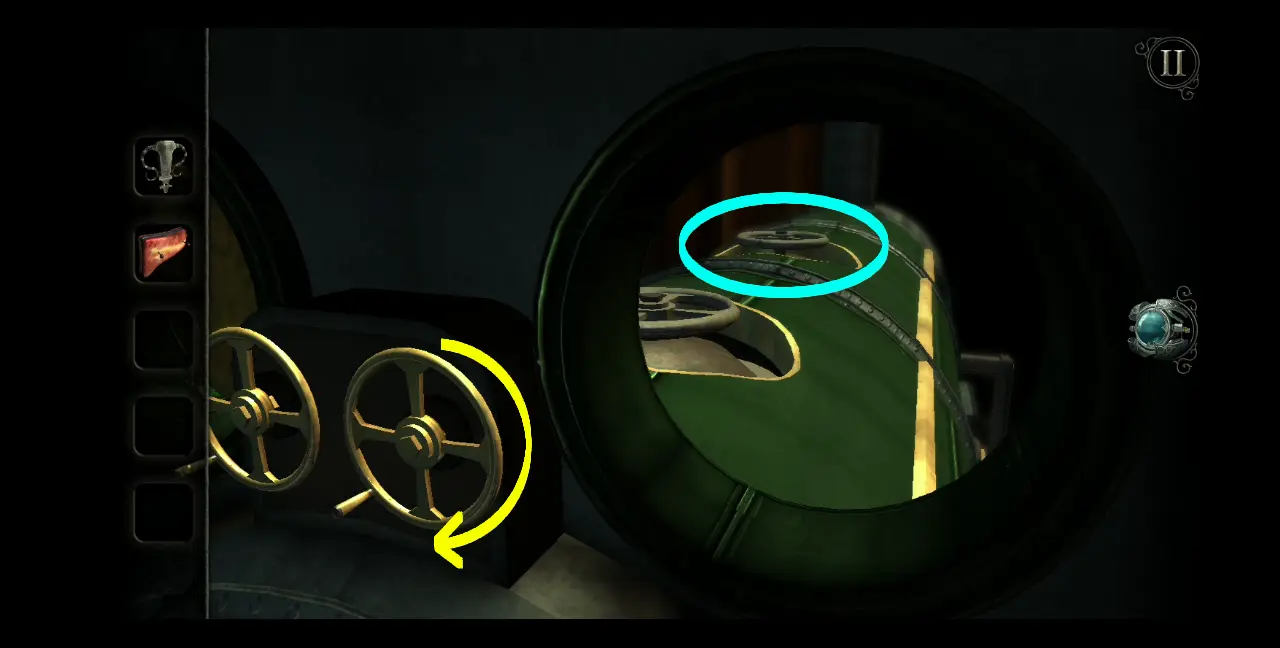
If you zoom further into the dollhouse, you’ll be led to the front gate. Turn the dial at the center of the gate, which will open its locking mechanism by raising a pair of metal notches on either side of the gate.
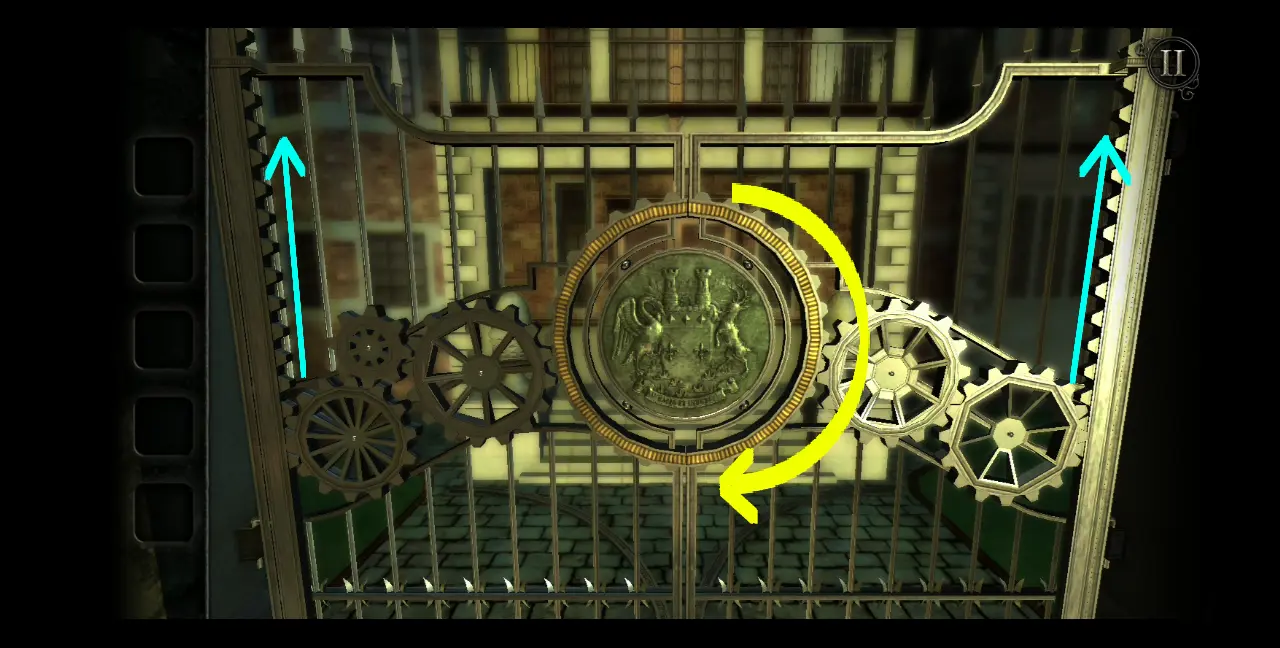
Once the gates are unlocked, move each one to the side. Each half of the gate is connected to the front door flaps of the dollhouse. Thus, opening the gates will also open the front doors.
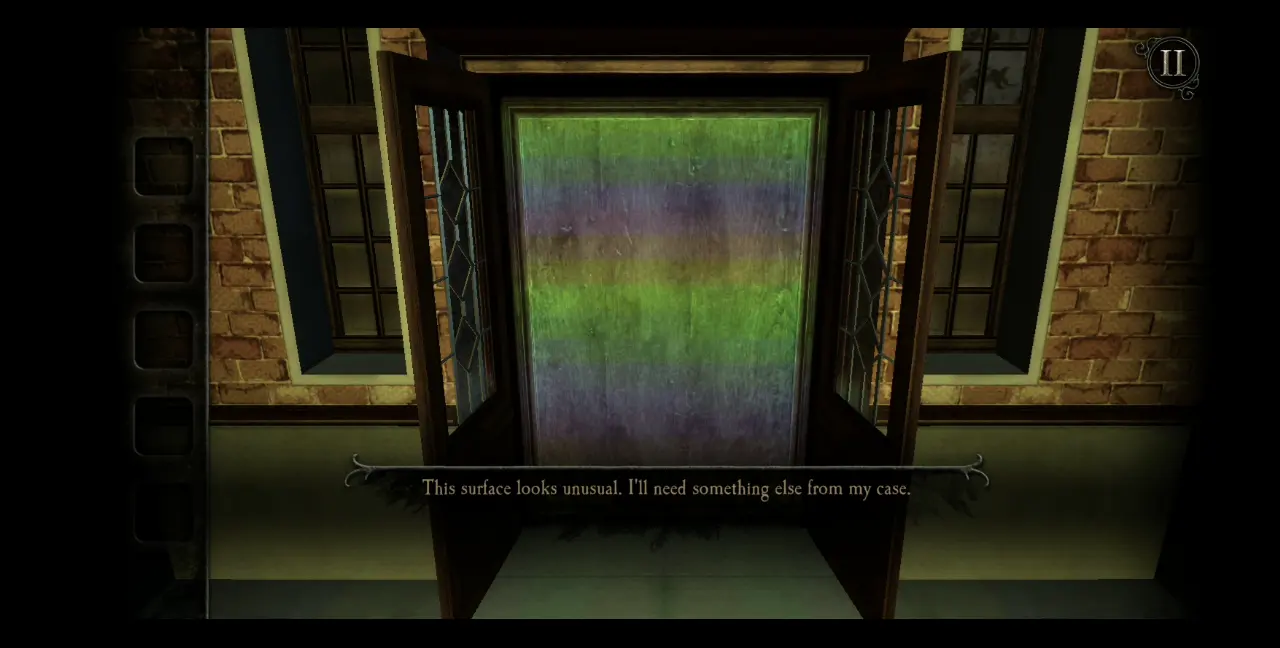
With both doors open, you will notice that the entrance is covered by a translucent, colorful film.
As you point out, this surface looks unusual and you’d need another tool from your trusty case to see past this strange veil.
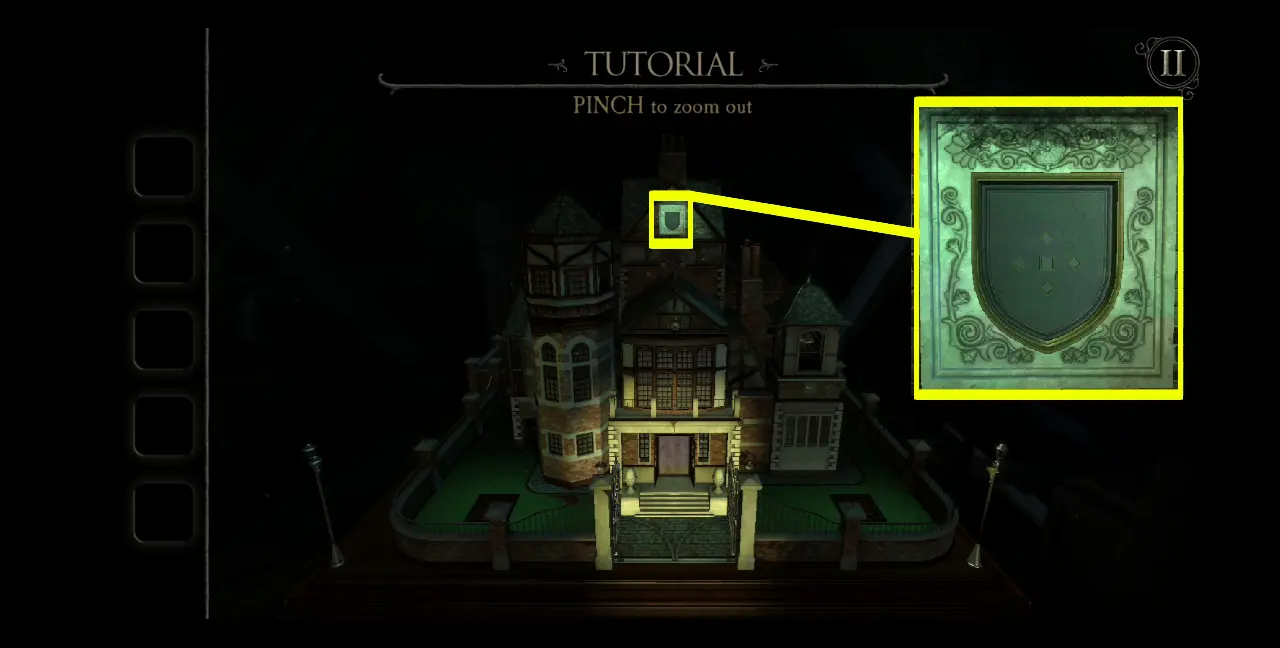
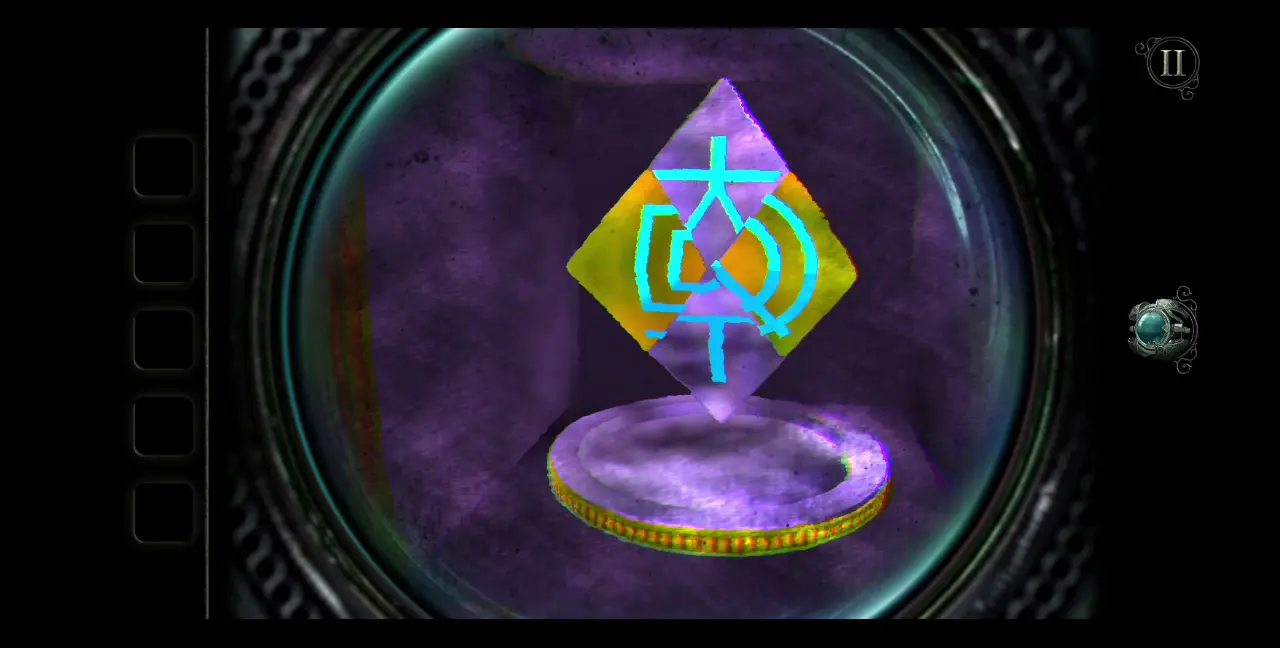
Zoom out of the dollhouse. You’ll notice that aside from the area where the entrance is, which is where the floodlight is currently shining, the top of the dollhouse is also somewhat illuminated. If you zoom into the top of the dollhouse, you’ll see that it has an ornament that seems to be missing its central piece. File this information away for later.
For now, zoom out of the dollhouse and return to where your case is. To get the tool you need, you will have to open a secret compartment.
To the side of your case is a handle. Pull it down.
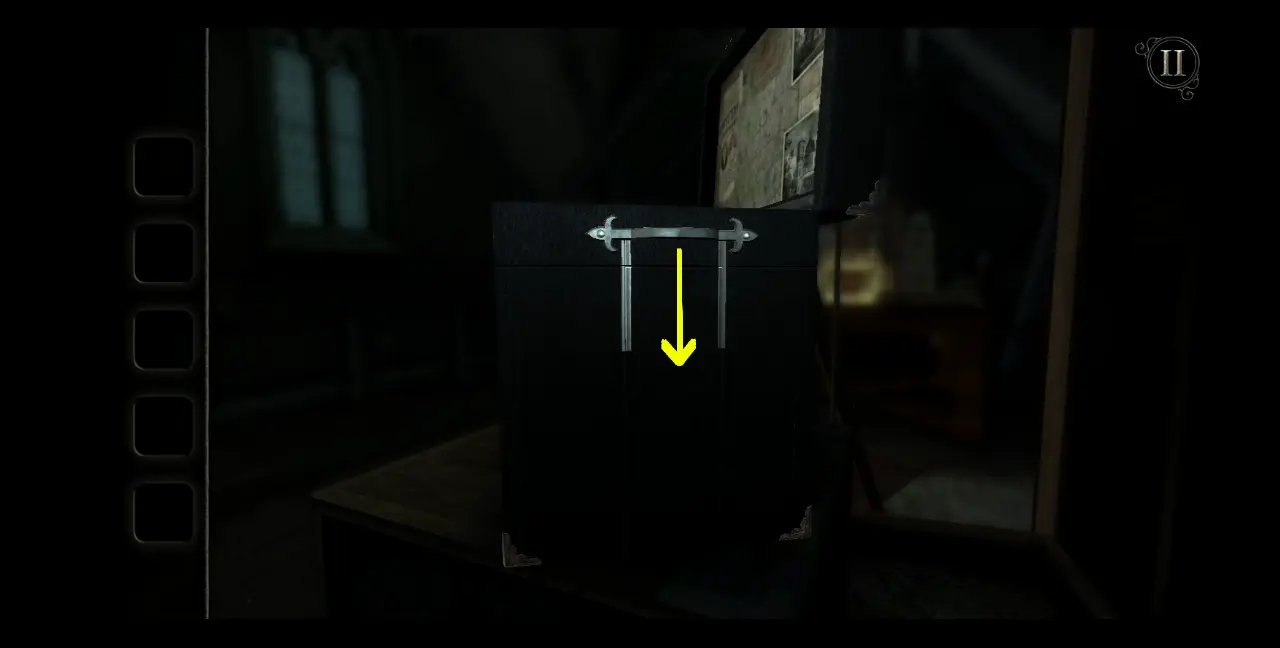
After pulling it down, you’ll hear a click and the handle will retract back up, opening a hidden compartment. There is a tool inside.
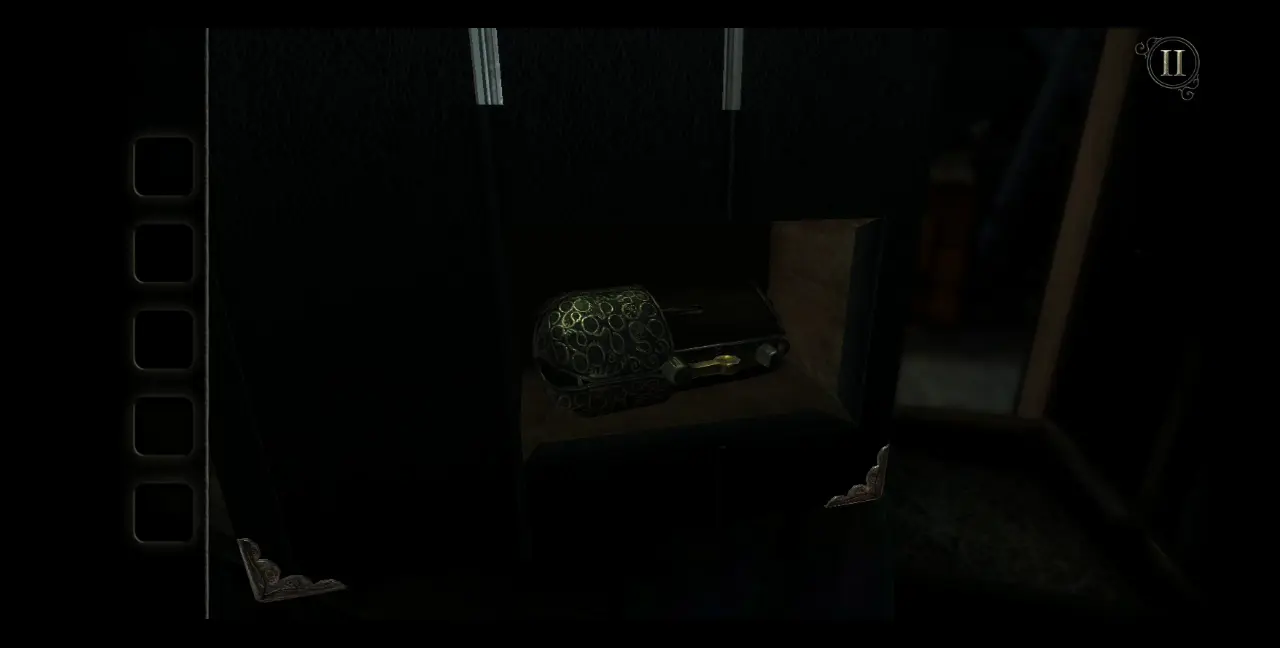
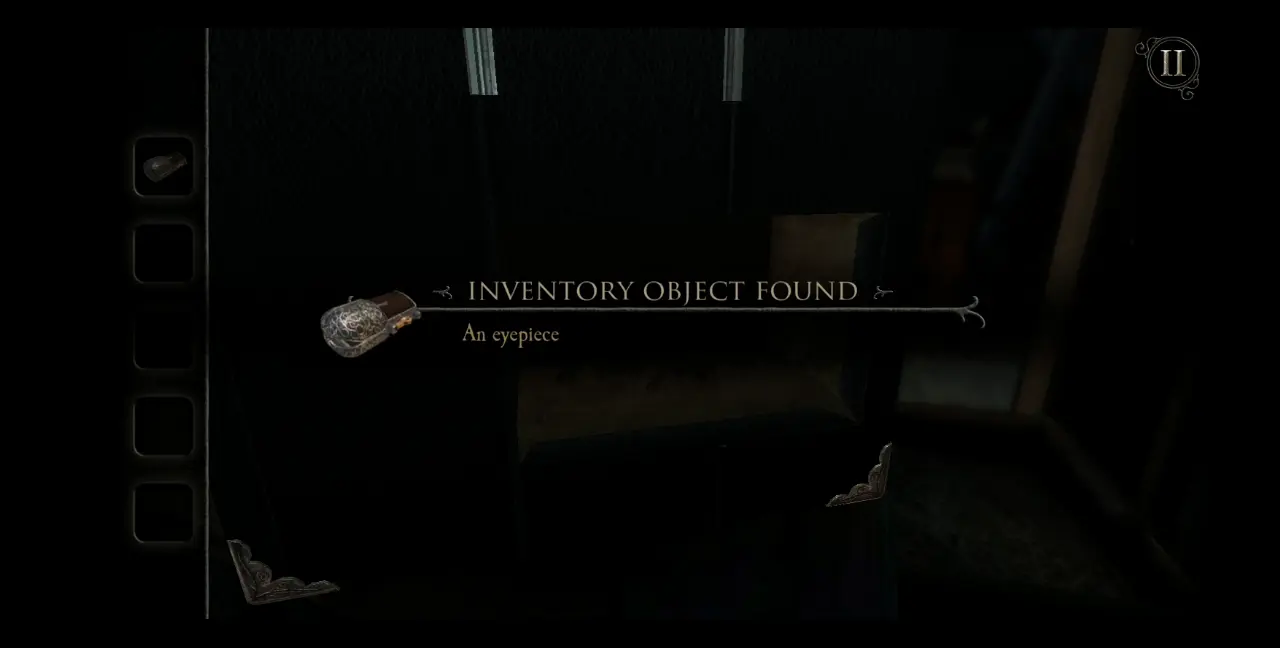
Click on the item to collect it for your inventory. This new item is an eyepiece.
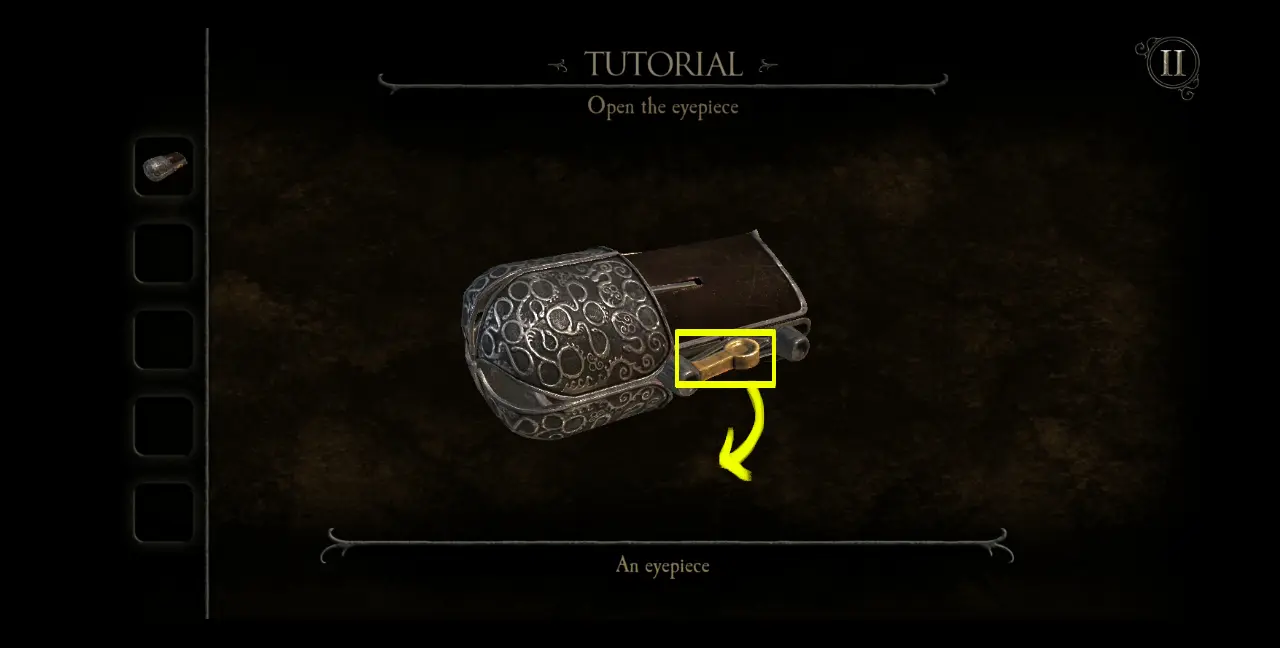
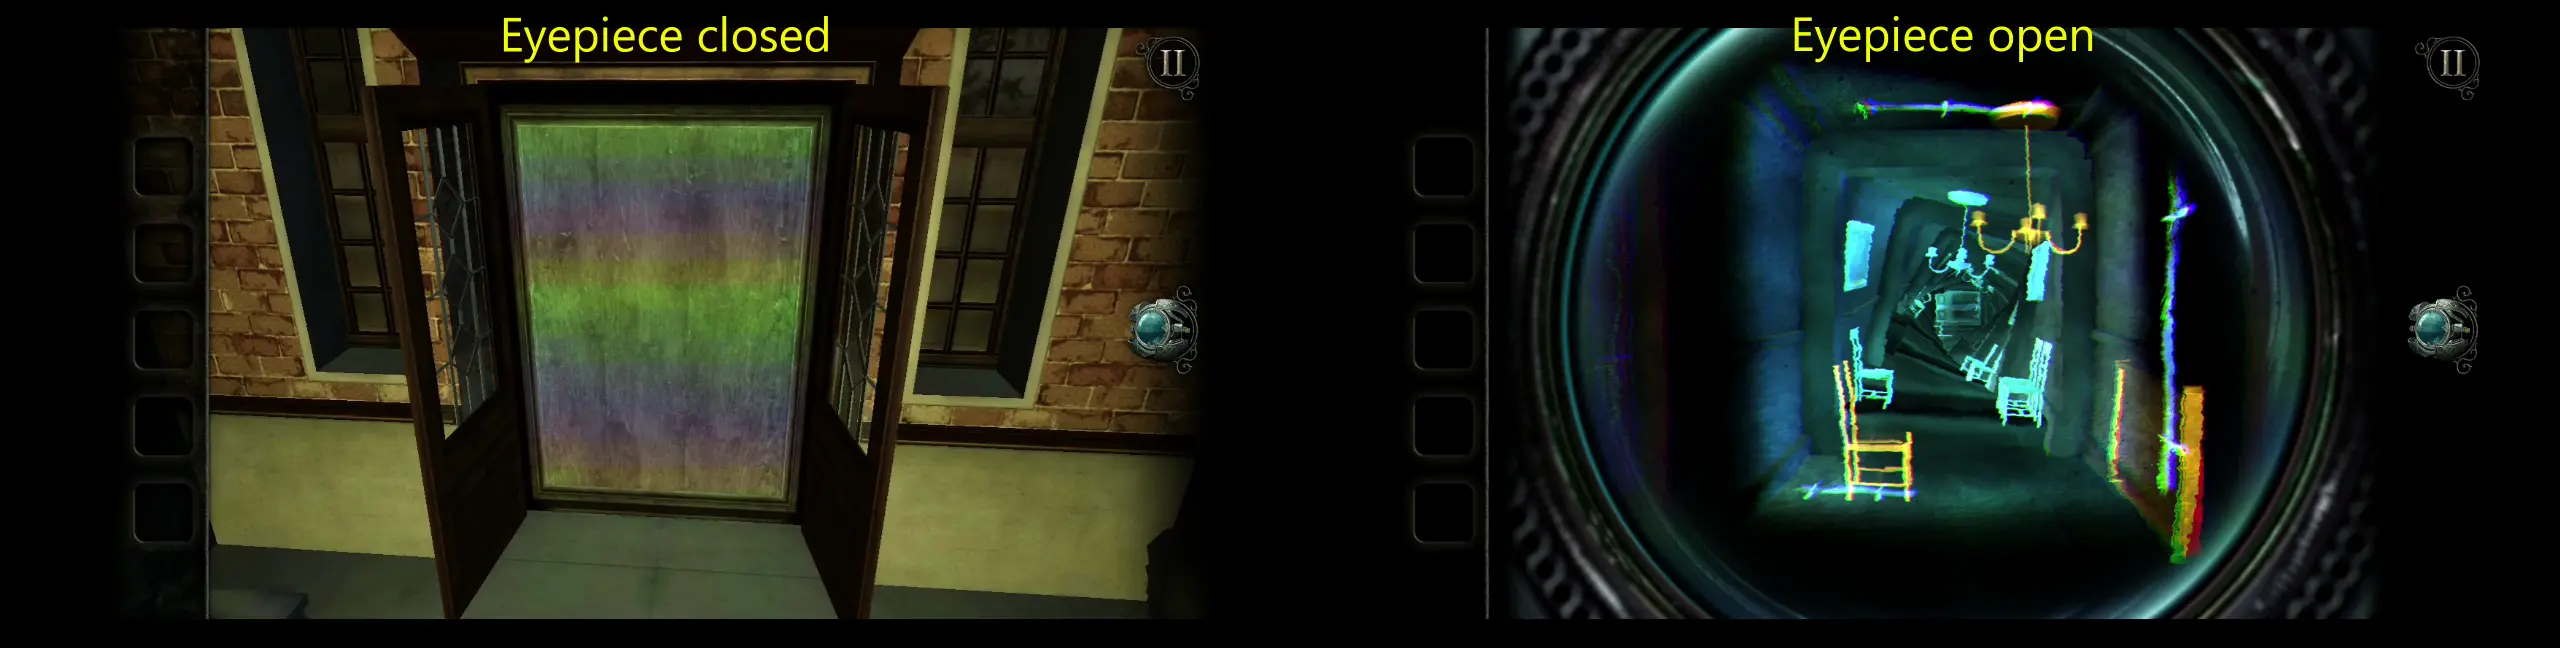
For the eyepiece to be of any use, you’ll need to open it first. Click its symbol on the left slot to access it in the inventory. Here, you can get a better look of the eyepiece and even rotate it to see what it looks like up-close. To fully open the eyepiece and make it functional, pull down the bronze knob to its side.
This is what the eyepiece should look like once opened:

You’ll get to see what the eyepiece does when you turn to your case and open the eyepiece as you look at the map, photographs, and newspaper clipping fastened to the inside cover of your case. To use the eyepiece, click on its symbol, which is found on the right side of the screen. When you look through the eyepiece, you’ll be able to see things that aren’t visible to the naked eye.
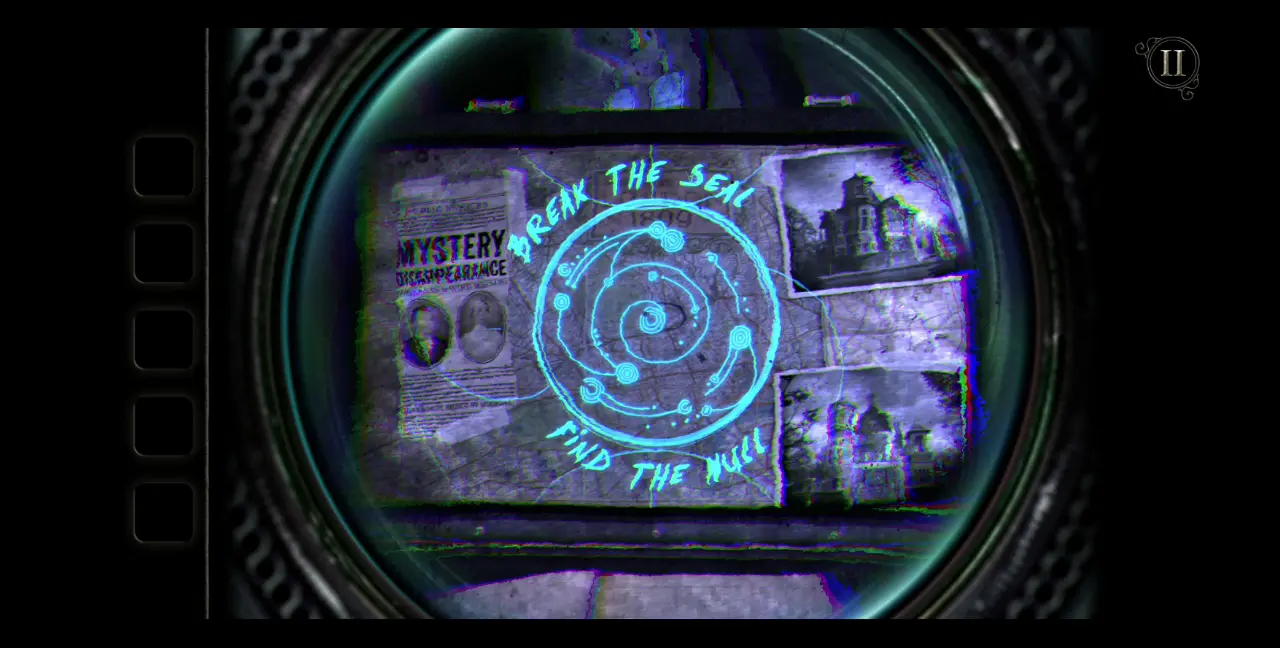
As you can see, a hidden message exists in your very own briefcase: “Break the seal; find the Null.” This is actually your main objective in the game, but at the moment, treat this simply as a mysterious message. More will be revealed as you progress through your investigation of the dollhouse.
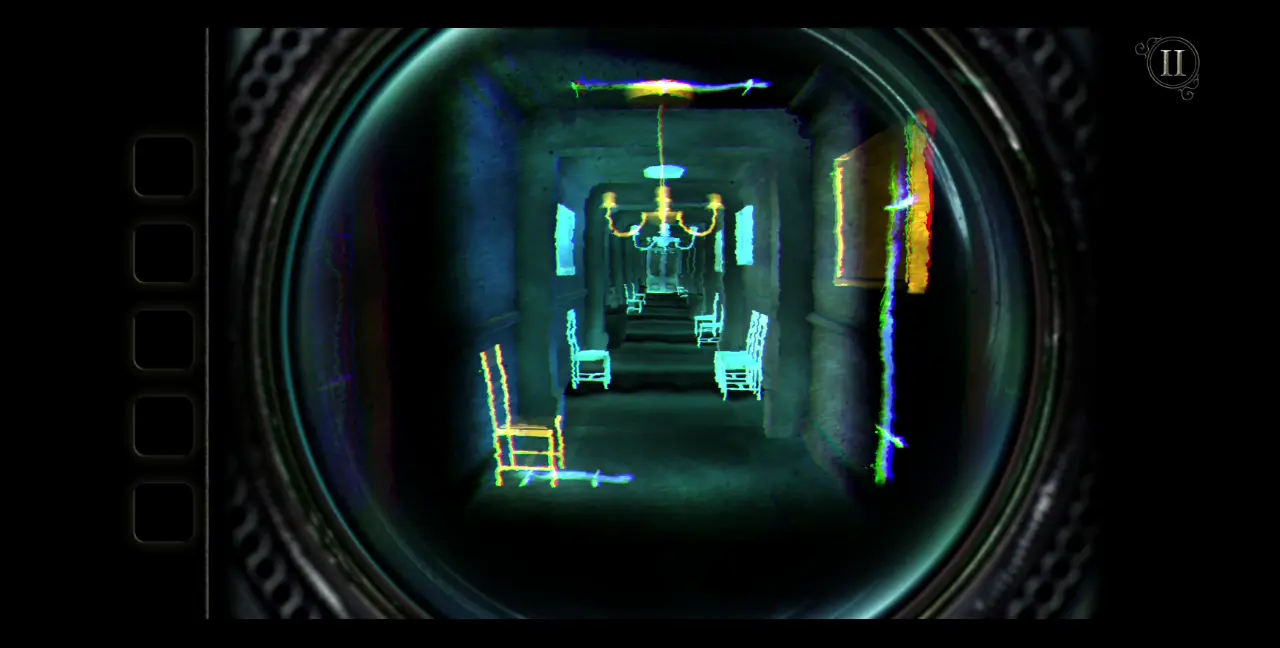
Speaking of the dollhouse, let’s return to its entrance, where a strange surface has emerged from its front door. If you use the eyepiece, you’ll see past the veil and the entrance will reveal what looks like a warped hallway.
In this hallway, you’ll notice that you’ll be able to move the furniture pieces that are colored yellow. There are three of them: a picture frame, a chair, and a chandelier. Moving each piece will cause the hallway to warp and twist in different ways. To set the hallway straight, you need to move the chair all the way to the left with its back to the wall; the picture frame all the way up; and the chandelier in the middle. There’s no particular order to which furniture pieces should be moved first, only that they need to be in the correct positions.
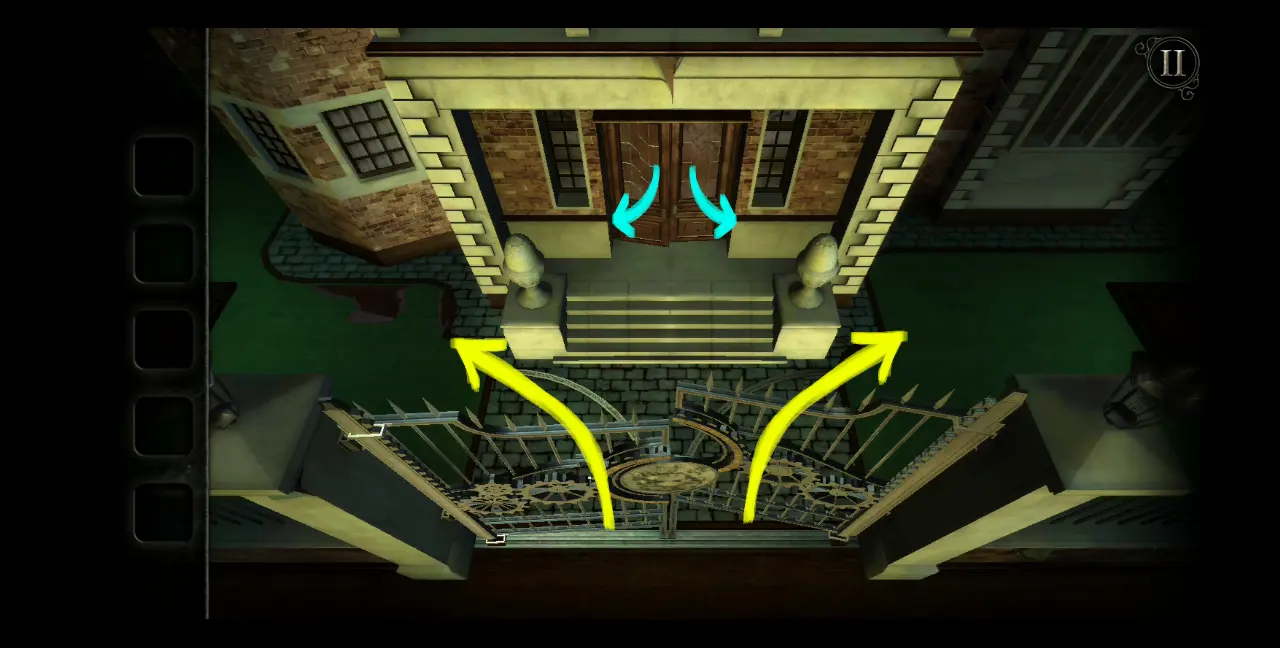
Upon properly arranging the furniture in their rightful places, you’ll be drawn further into the surreal hallway where another door will open. Then, your vision will return to the exterior of the dollhouse. The stairs and balcony at the front will be split in half, separated from each other like opening puzzle pieces.
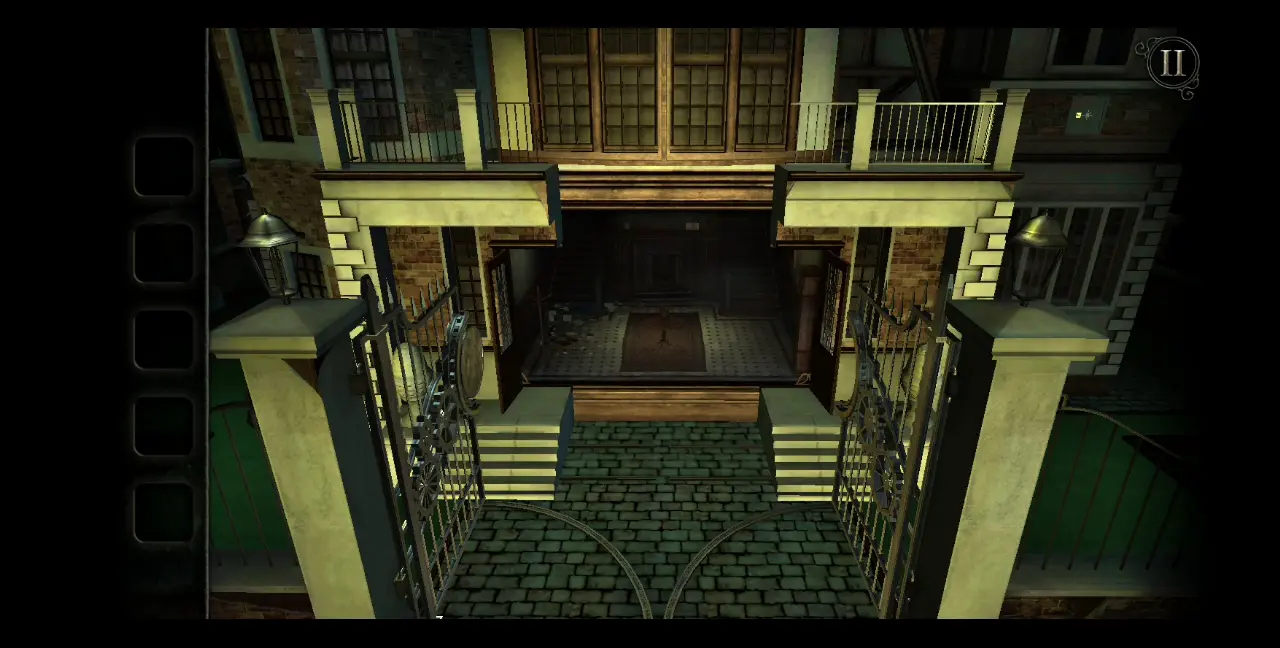
Once these halves have completely moved to the side, you’ll gain access to another room whose entrance is shrouded in a thin, colorful veil. Open the eyepiece and you’ll see a symbol on the warping surface. Double tap on the symbol to break it.

Foyer
With the symbol broken, you have now entered the Foyer.
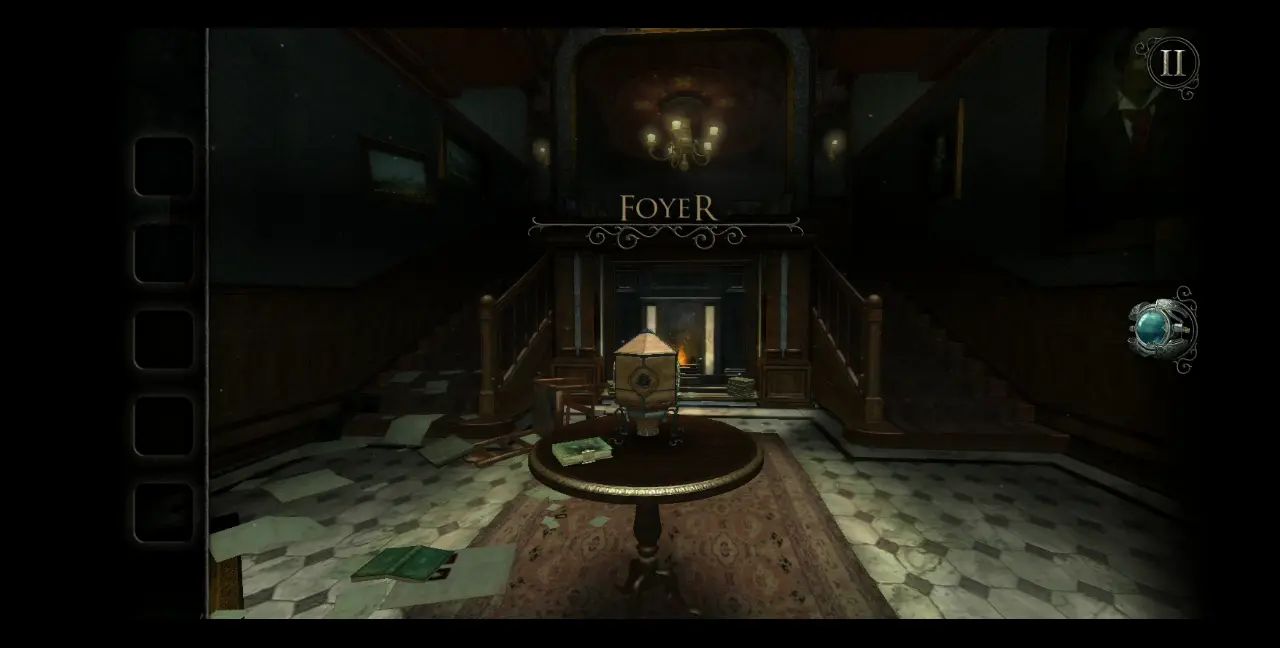
Interestingly enough, there seems to be many elements in the Foyer, such as the grandfather clock to your right, the papers scattered on the floor, the fallen portrait, the fireplace—but all you have to interact with in this room is the small coffee table in front of you, which has a book and an odd-looking box.
Approach the table, zooming into the book first. Strangely, the book—Etiquette for Husband and Wife—looks as though it has a dark stain. To open the book, pull down the small lock on the right.
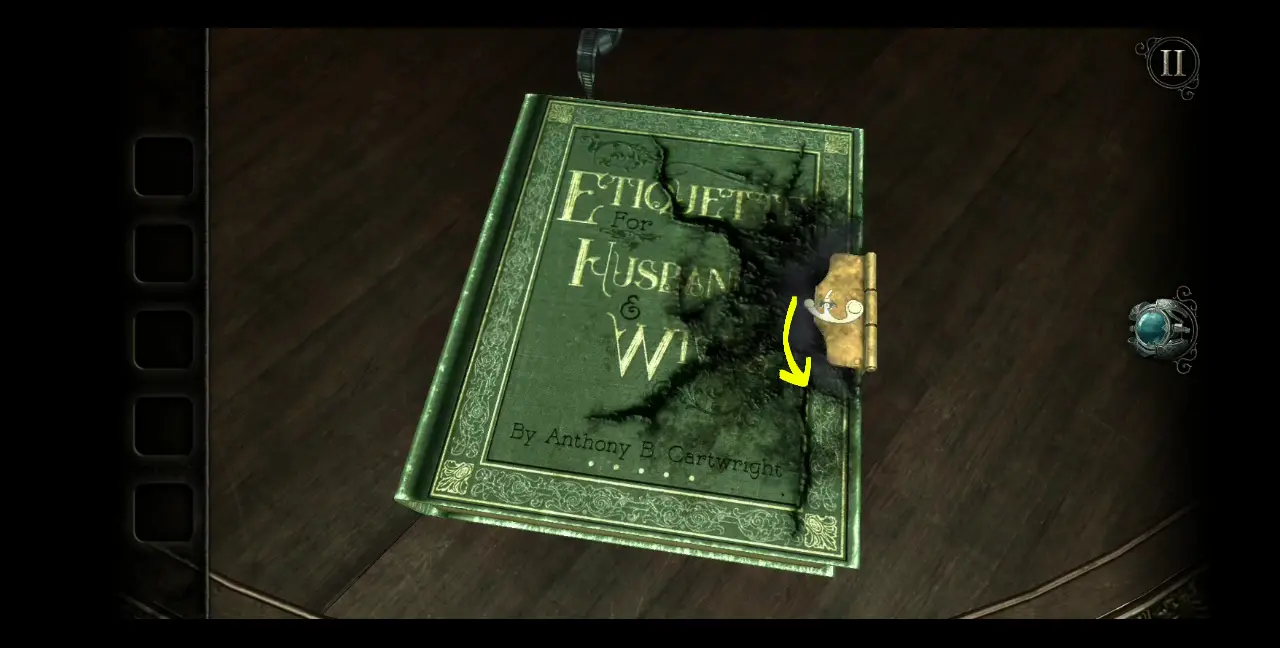
Upon unlocking the book, the dark stain will consume the entire cover and the pages will flip frantically until the stain, once more, consumes the pages. But this time, when the dark stain moves to the sides of the book, as if to make way, you’ll see what appears to be some kind of journal entry.
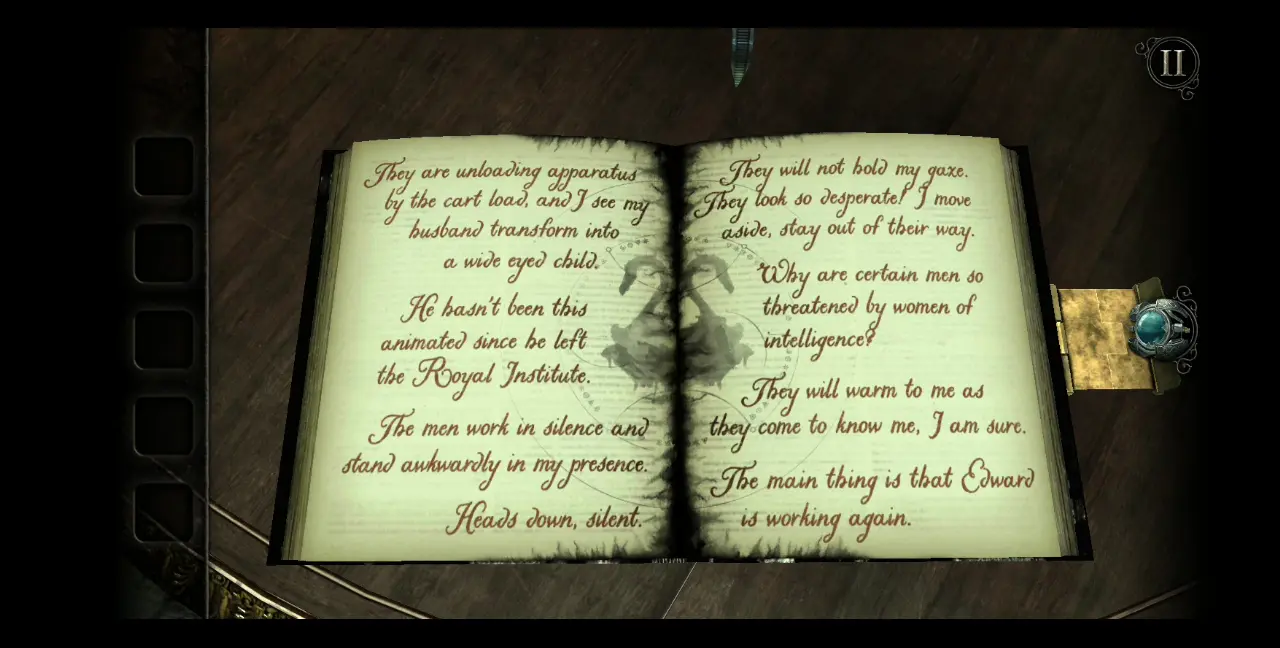
There will be other instances when you’ll find books like these, often in places where they’re generally easy to spot. These books give you an insight into the story and what happened to Edward and Abigail Lockwood, so try to look for them in every room you encounter. The entry above suggests that it came from Abigail’s perspective. It is the only entry in the book. All the other pages are blank.
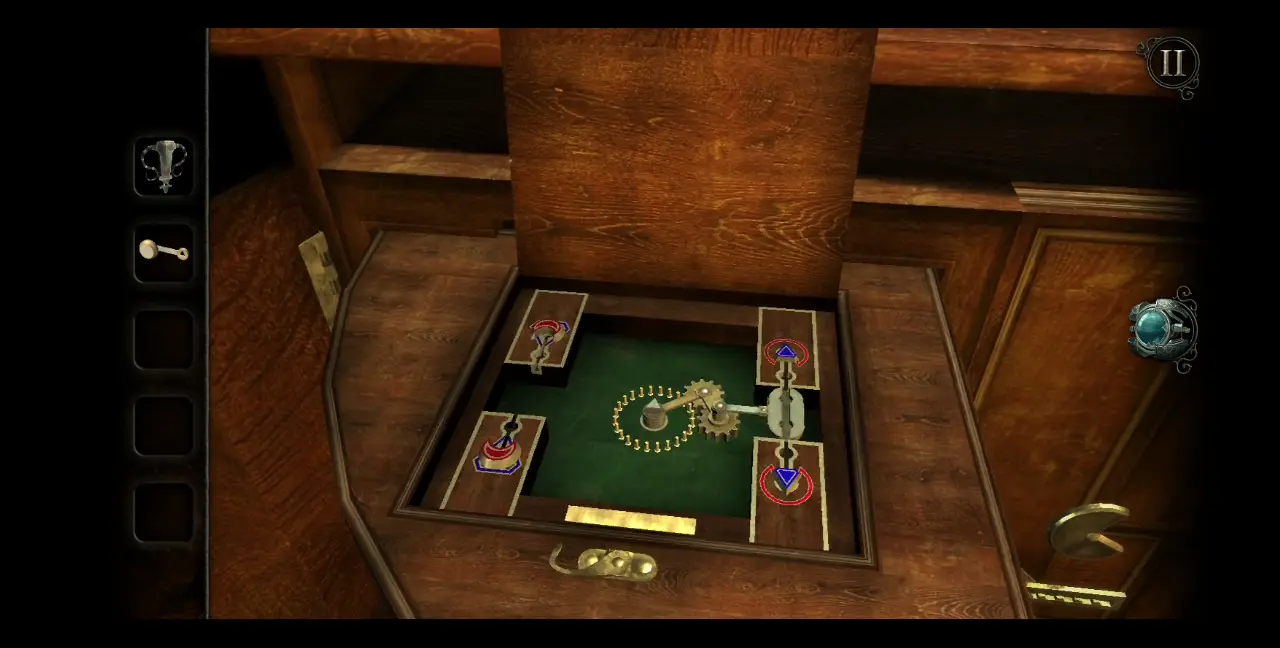
With nothing left to examine in the book, turn your attention toward the odd-looking box next to it. Zoom into the bottom of the box where you will find what looks like an indented dial. Turn the dial.
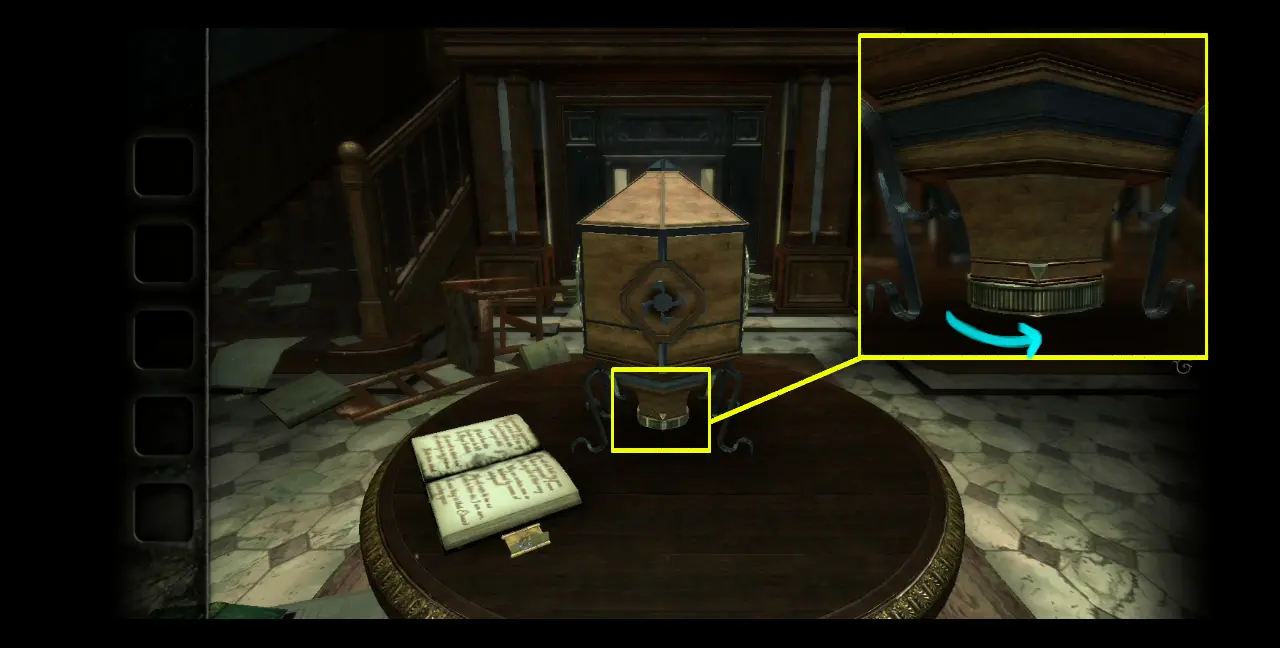
A small compartment will open and reveal an item: a brass mechanical coin.
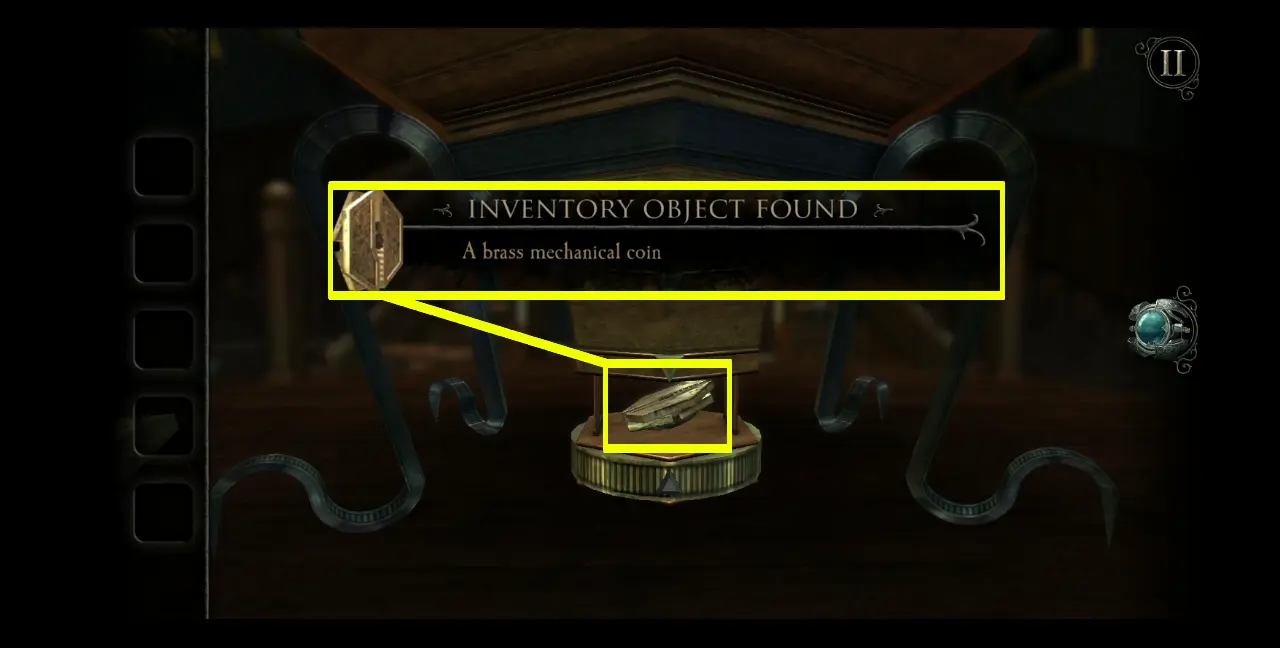
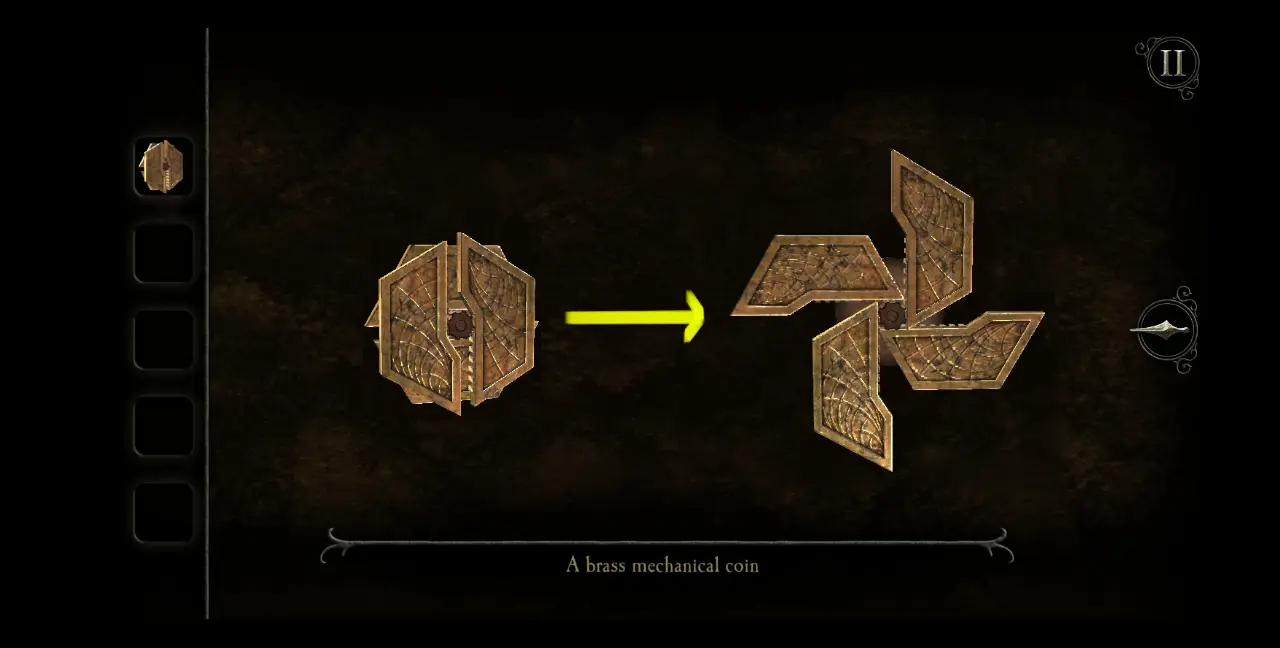
View the coin in your inventory. At first, it will look like a coin made up of a few pieces, but if you slide the pieces, it will take on another form, one that resembles a pinwheel of some sort.
If you’ve observed the odd-looking box on the table, you’ll see that this pinwheel shape matches with the same one found on two sides of the box. Drag the mechanical coin from your inventory and into one of the pinwheel-shaped latches on the box. Either will do.
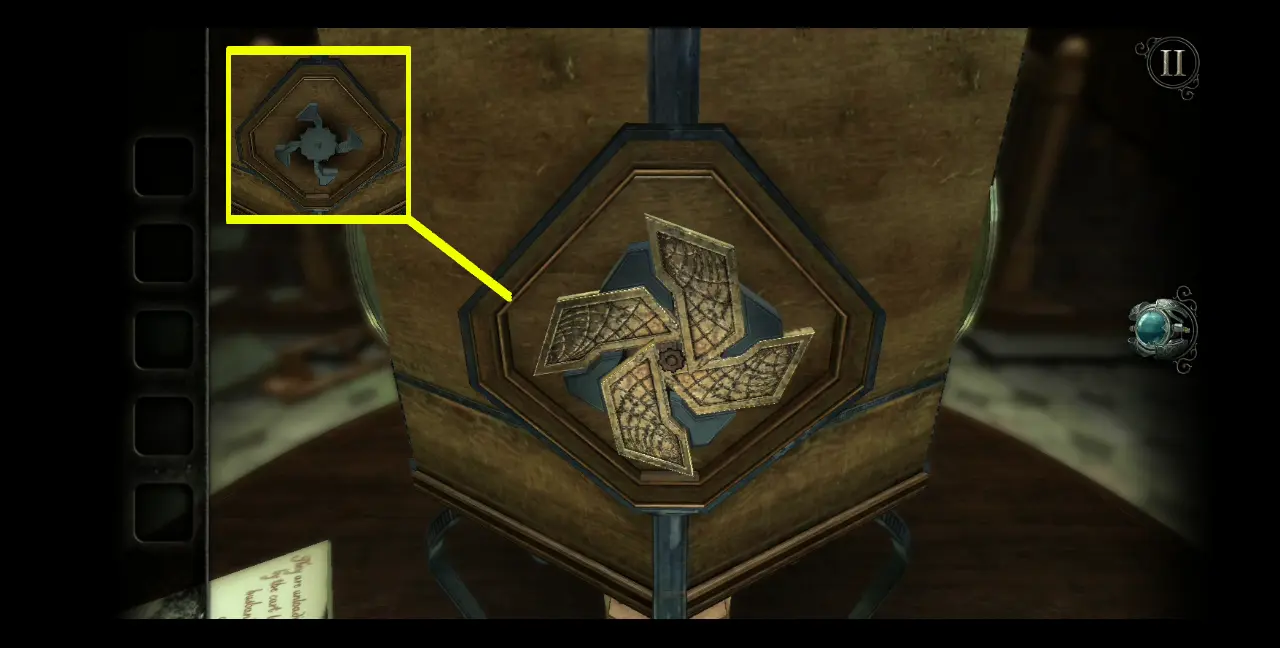
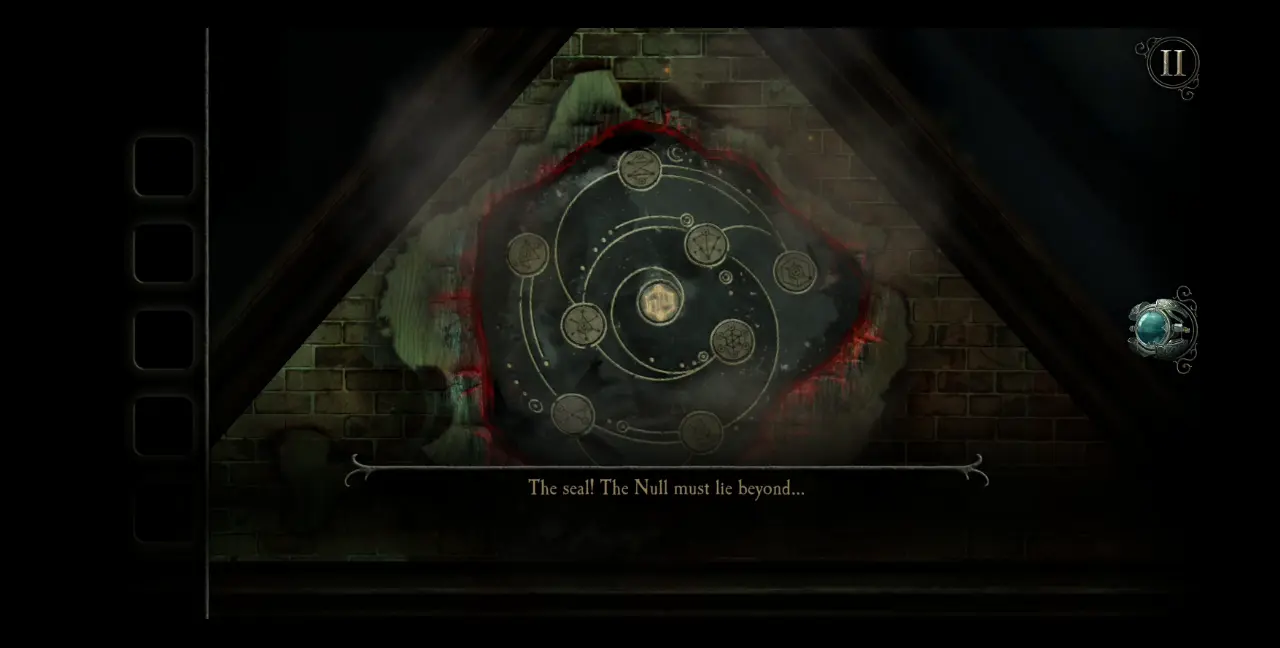
The mechanism will start to turn, causing an aperture to open on one side of the box. Like the main door of the dollhouse, this aperture’s surface is covered by a colorful film.
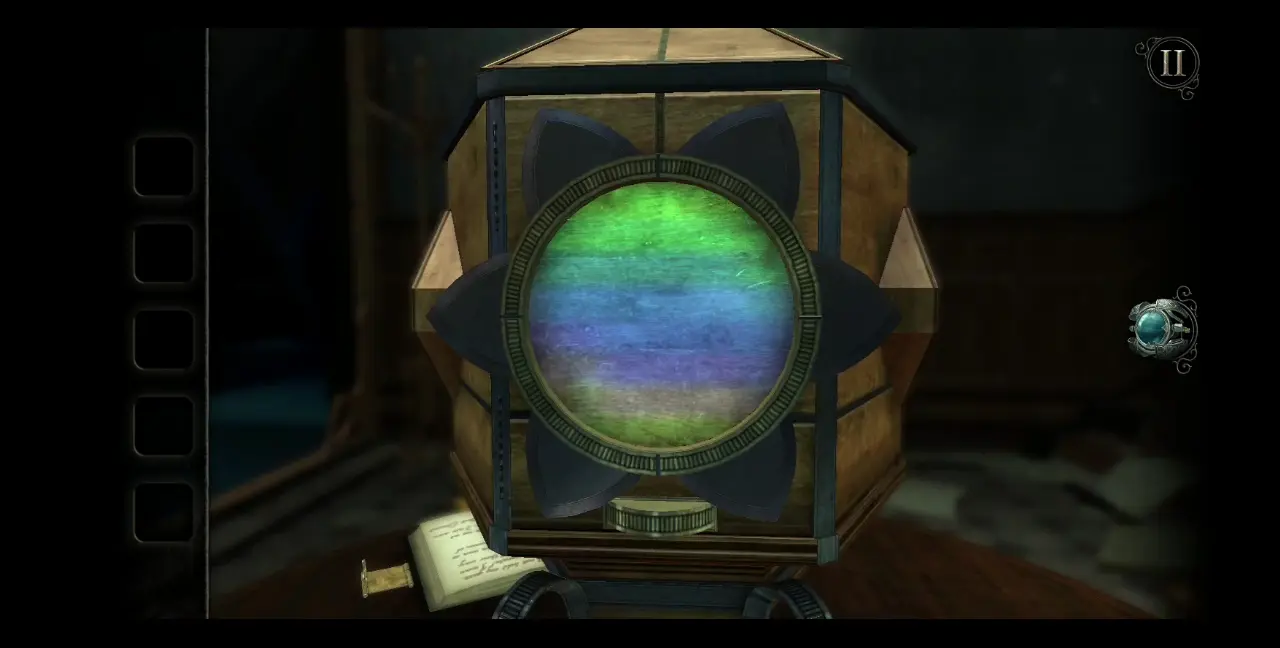
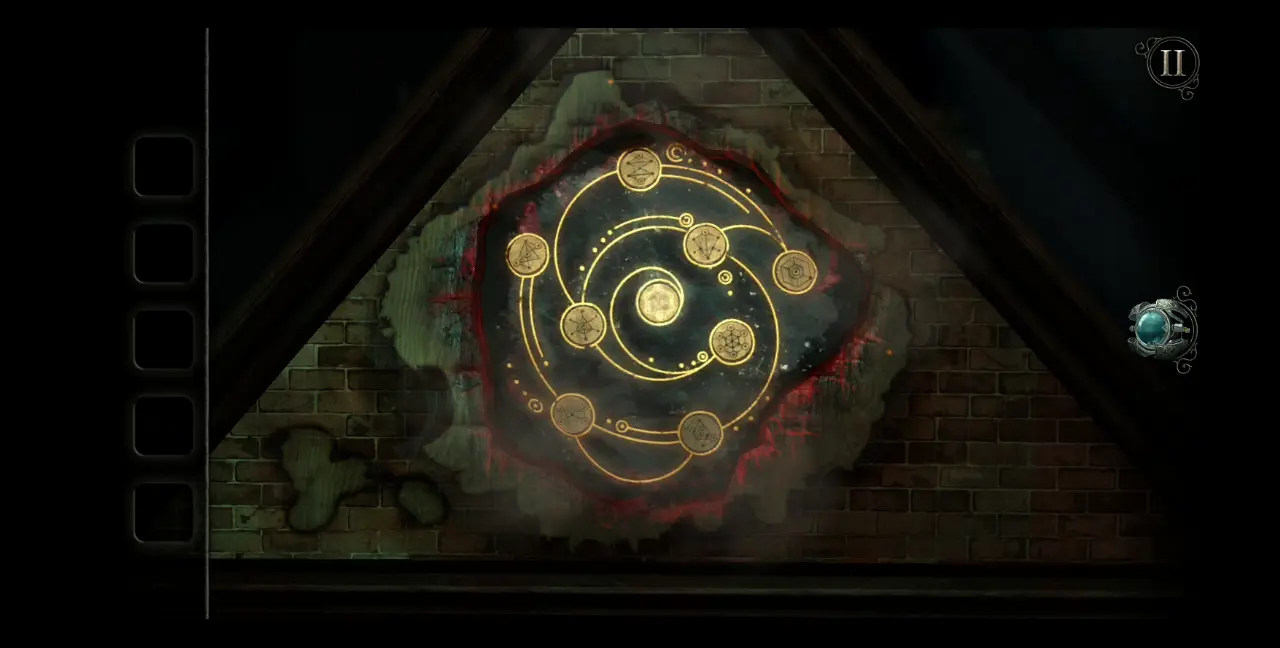
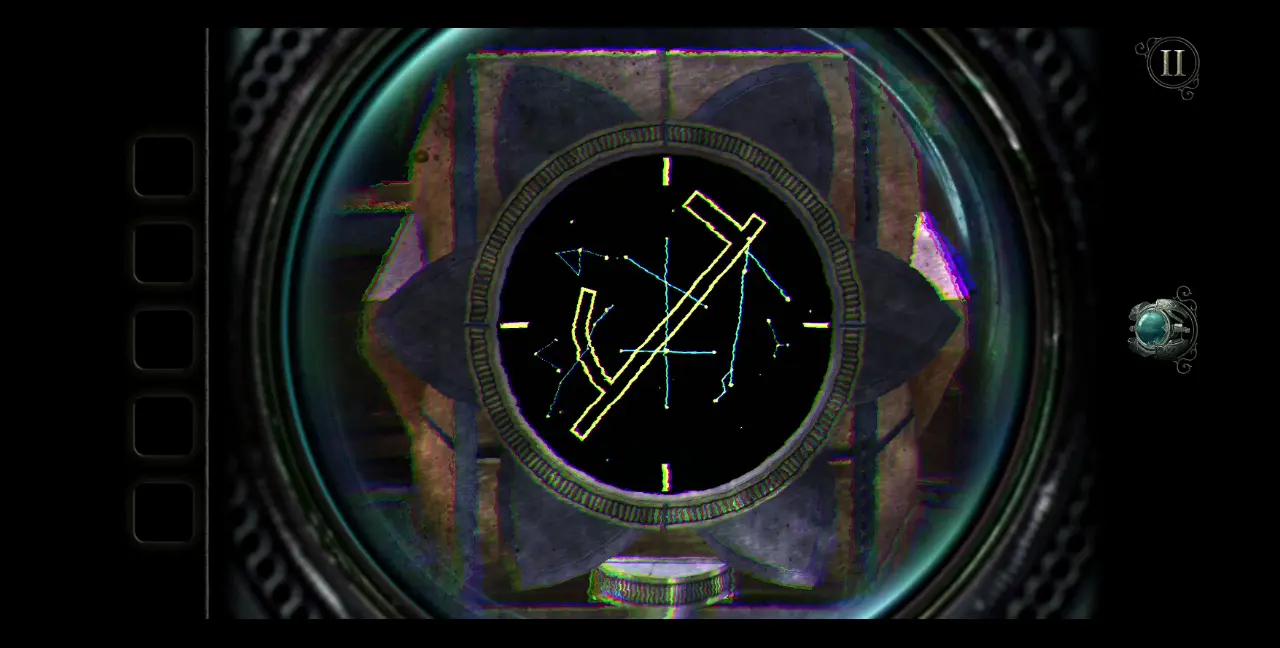
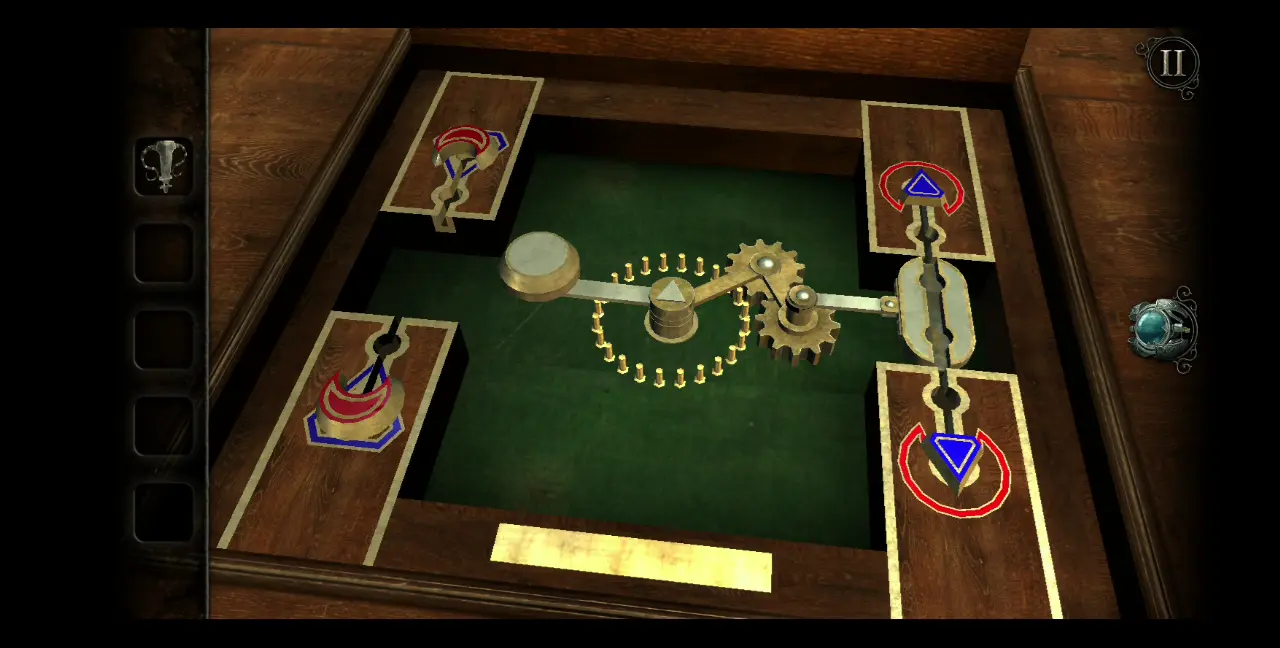
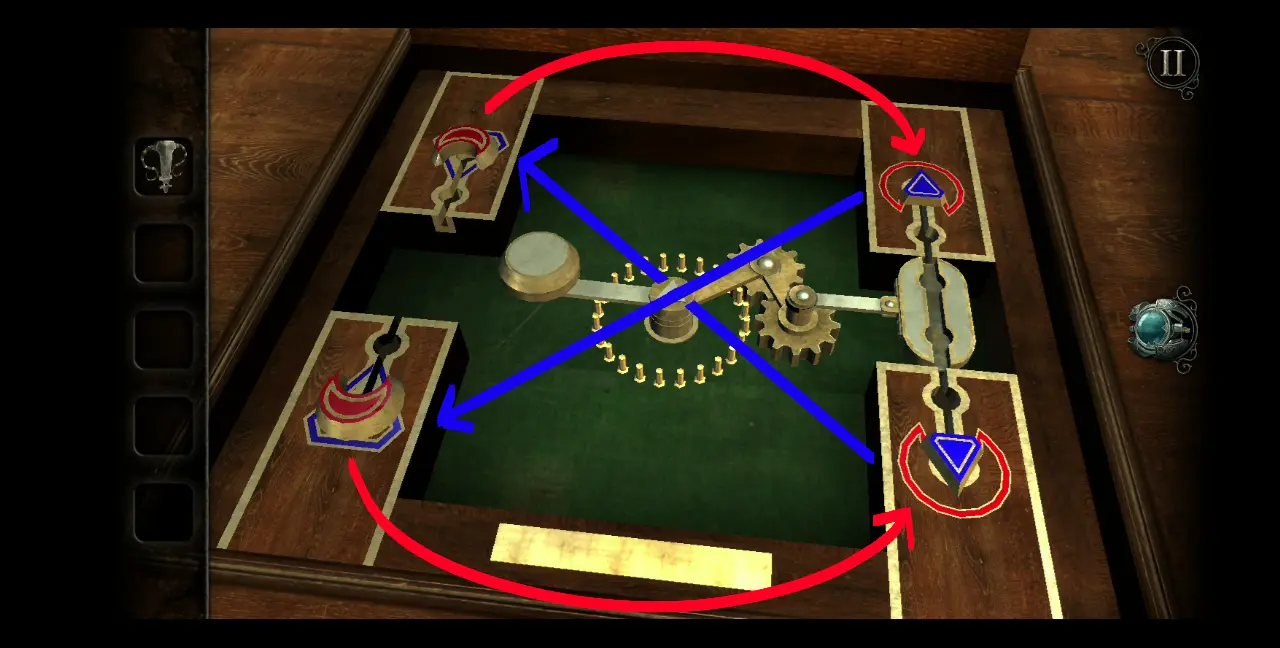
Use the eyepiece to reveal the hidden puzzle. When you activate the eyepiece, you’ll see what looks like a yellow outline in the middle of the circle. In the background are what look like constellations. You’ll notice that there’s a dial below and around the aperture. If you turn these dials, you’ll see that the constellations in the background will move within a three-dimensional space. Your objective is to find the constellation that matches with the yellow fixed outline in the foreground.
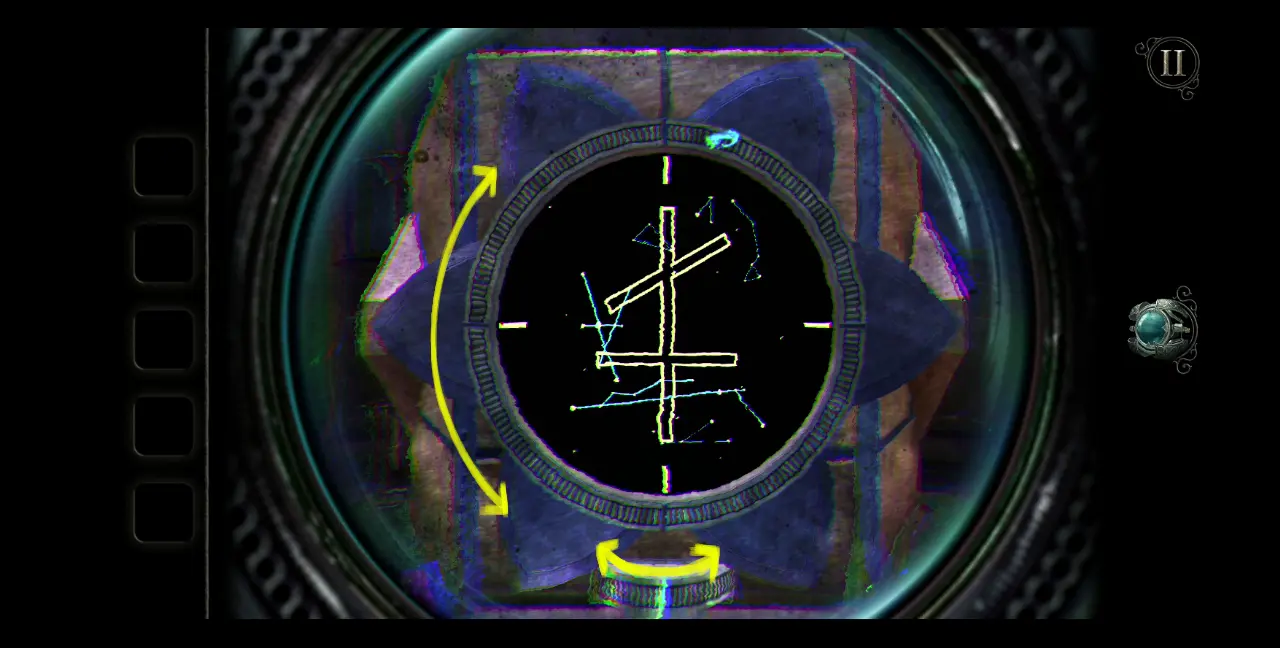
Turn the dials until you’ve found the appropriate constellation to match the yellow outline. The correct position of the constellation should look like this:
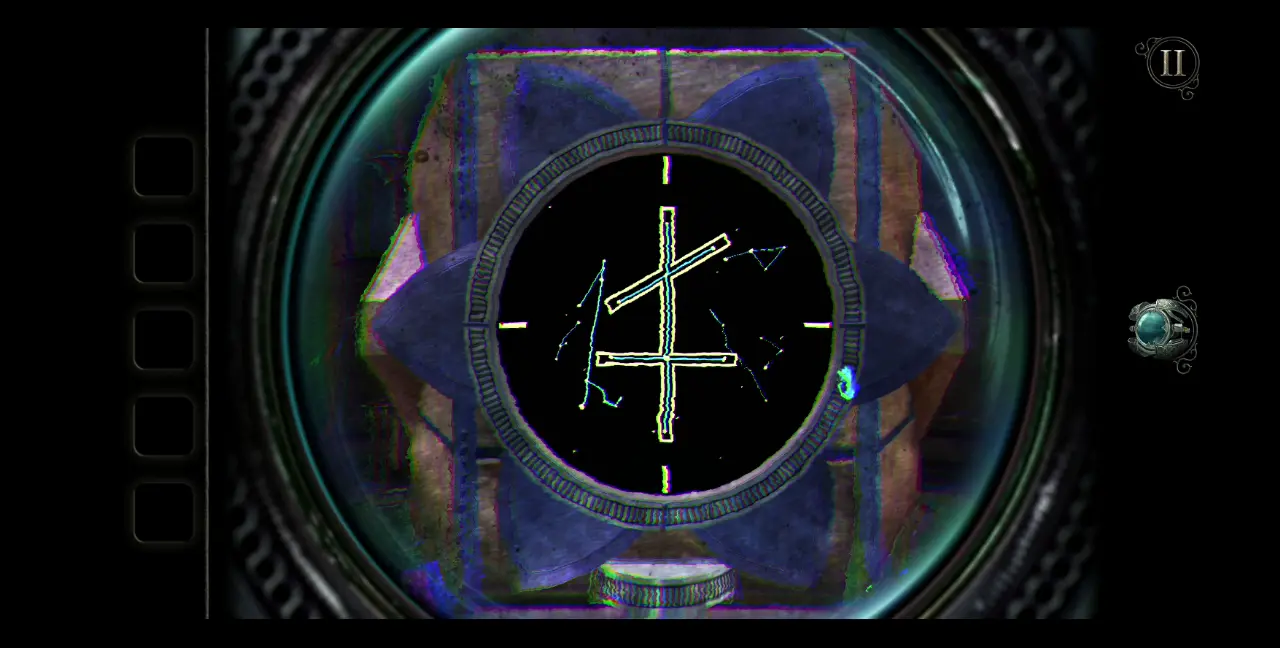
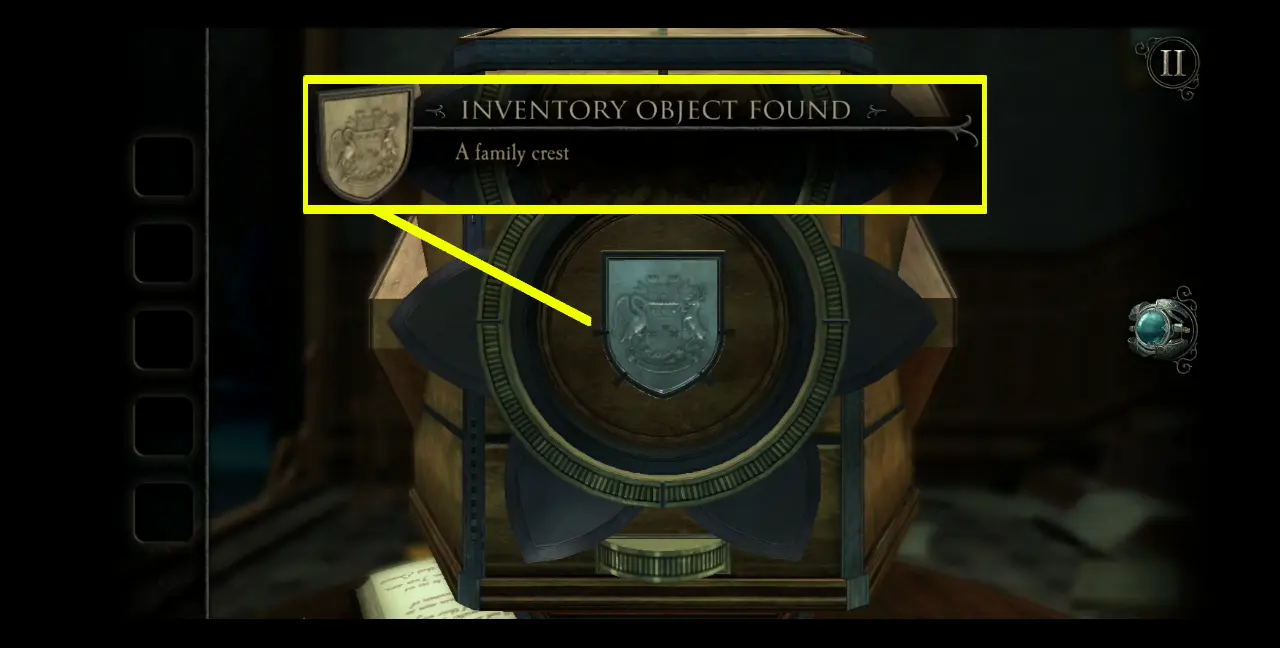
With the puzzle solved, the aperture will briefly close then open again to reveal an item you can pick up: a family crest.
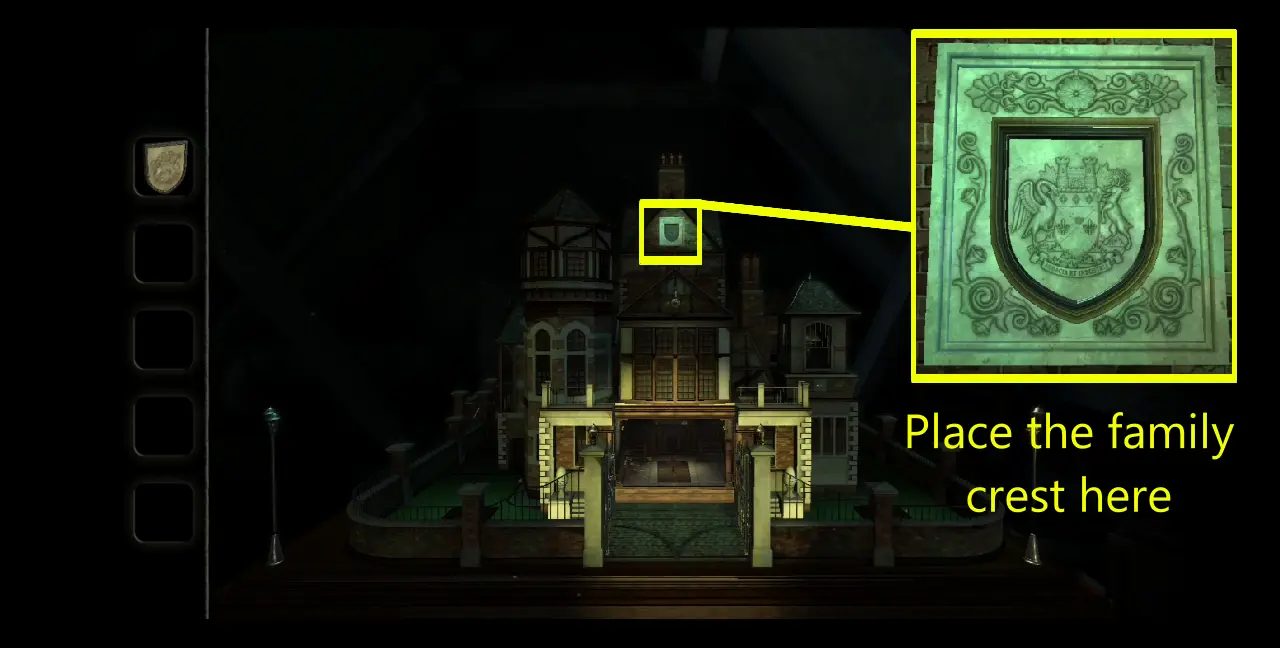
The aperture will close again and remain closed. A prompt will appear, hinting that the family crest belongs somewhere in the dollhouse. If you recall a previous observation we made, the top part of the dollhouse looked illuminated from the outside, along with the front entrance. Zoom out of the Foyer and return to the front of the dollhouse. Zoom into the top of the dollhouse, which looks like it has an empty slot in the same shape as the family crest. Place the family crest in that empty slot.
Once the family crest is in place, flames will eat up that particular area then reveal a mysterious-looking seal.
The symbols on the seal will start to light up.
This will trigger something else to open up in the dollhouse. In particular, your attention will be directed toward the sides of the dollhouse, near the front door. To the right, a small statue of a reindeer on a rectangular pedestal will emerge.
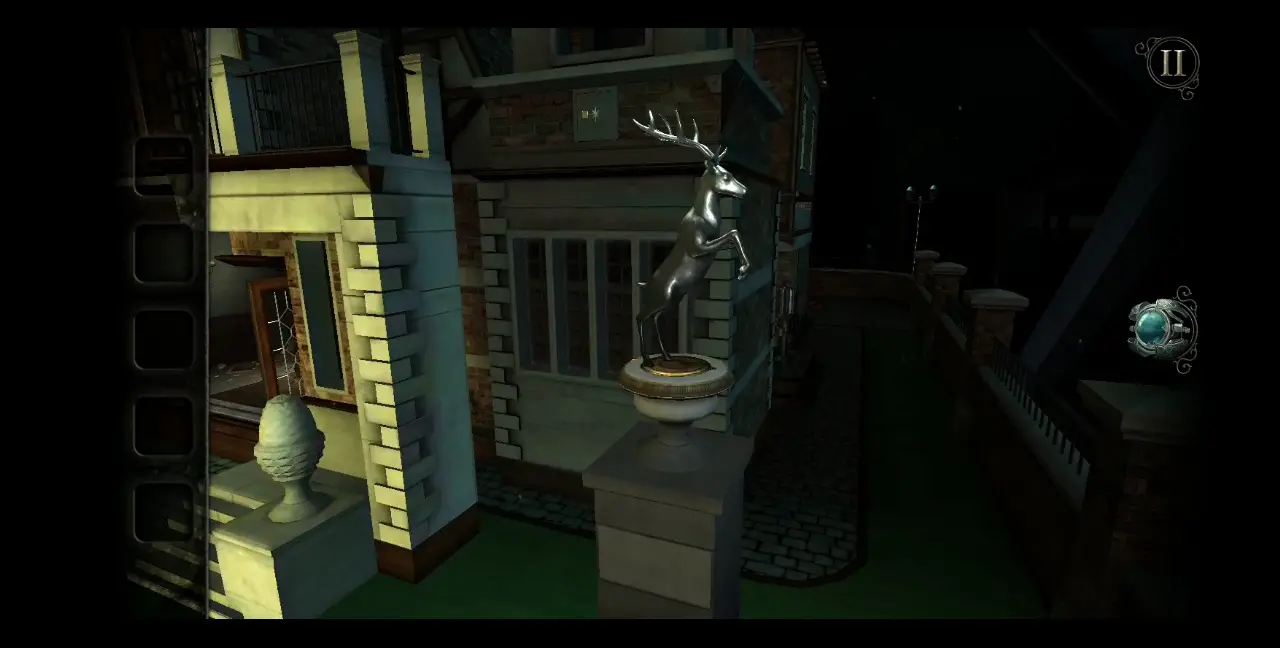
To the left, the same pedestal will emerge, but the statue on top of it seems to be missing.
Zoom into the reindeer statue on the right. You’ll notice that the statue is on a dial and that there are two small arrows on the dial. Rotate the statue 180 degrees so that the two small arrows will align with each other, as shown in the image below.
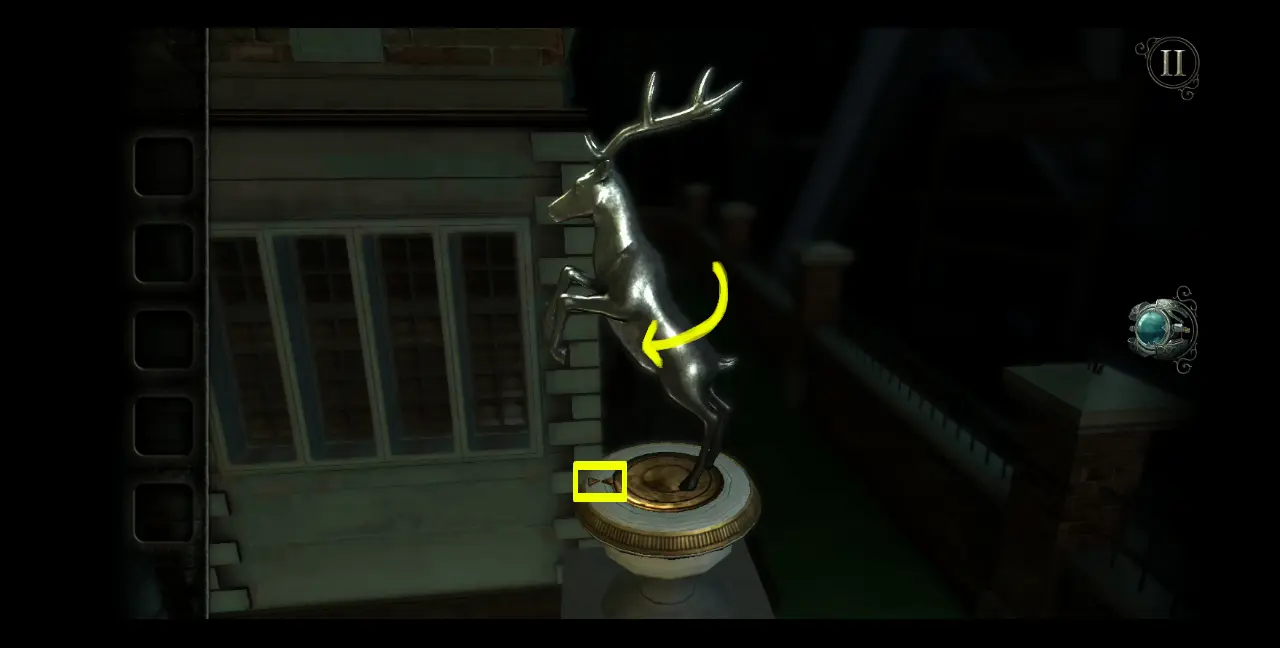
This will cause a small drawer from the pedestal to open, revealing another item to be collected: a silver mechanical coin.
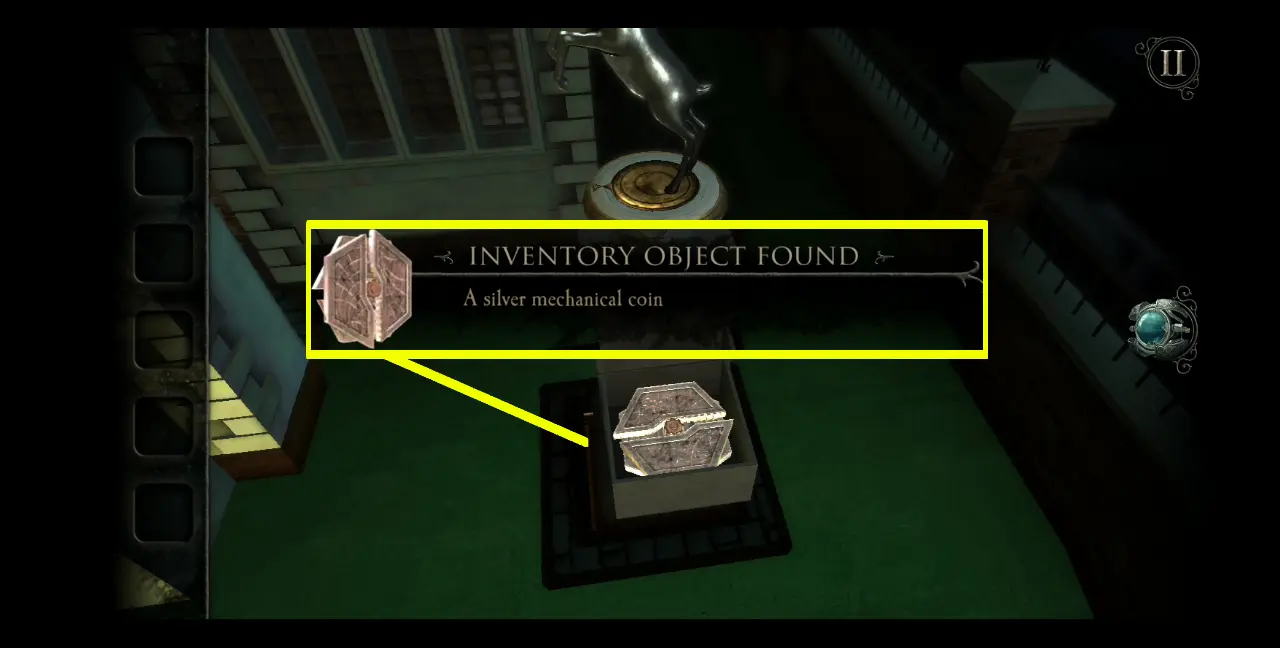
Similar to the gold mechanical coin you’ve previously found, open the silver mechanical coin in your inventory and slide the parts to change its shape into a pinwheel-looking object.
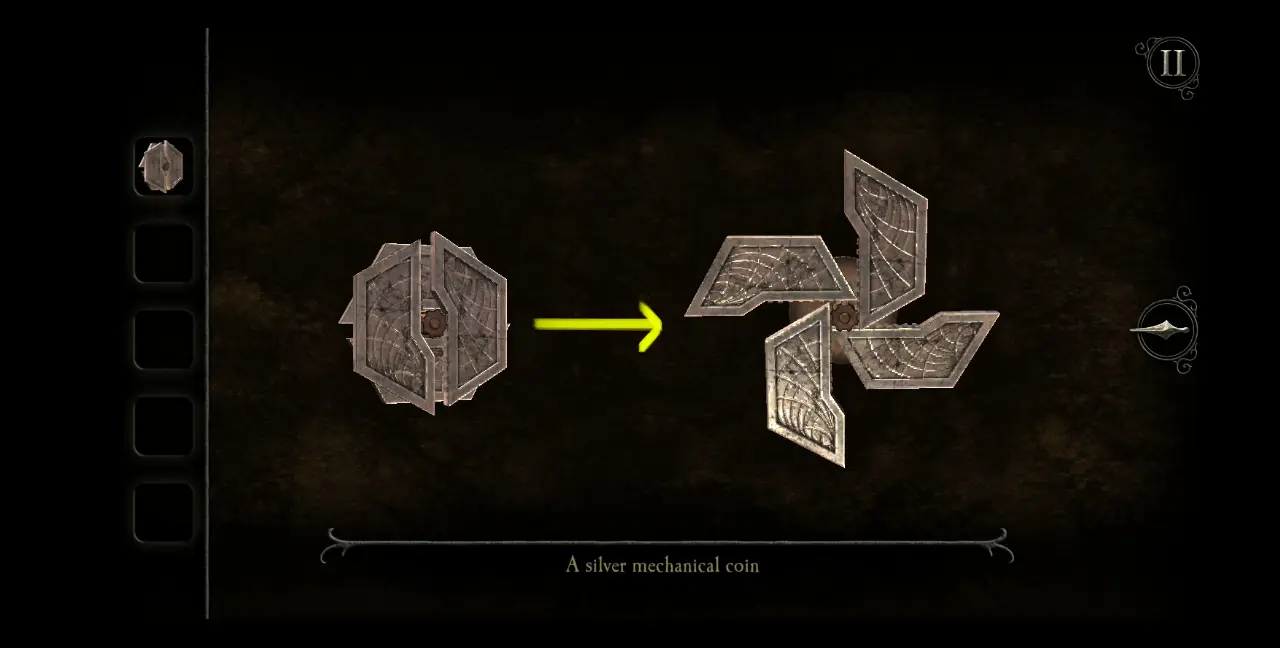
Enter the Foyer once more (don’t forget to activate your eyepiece and break the symbol to gain access to the room). Find the other slot for the silver mechanical coin and zoom into it. Drag the reshaped silver mechanical coin into the slot.
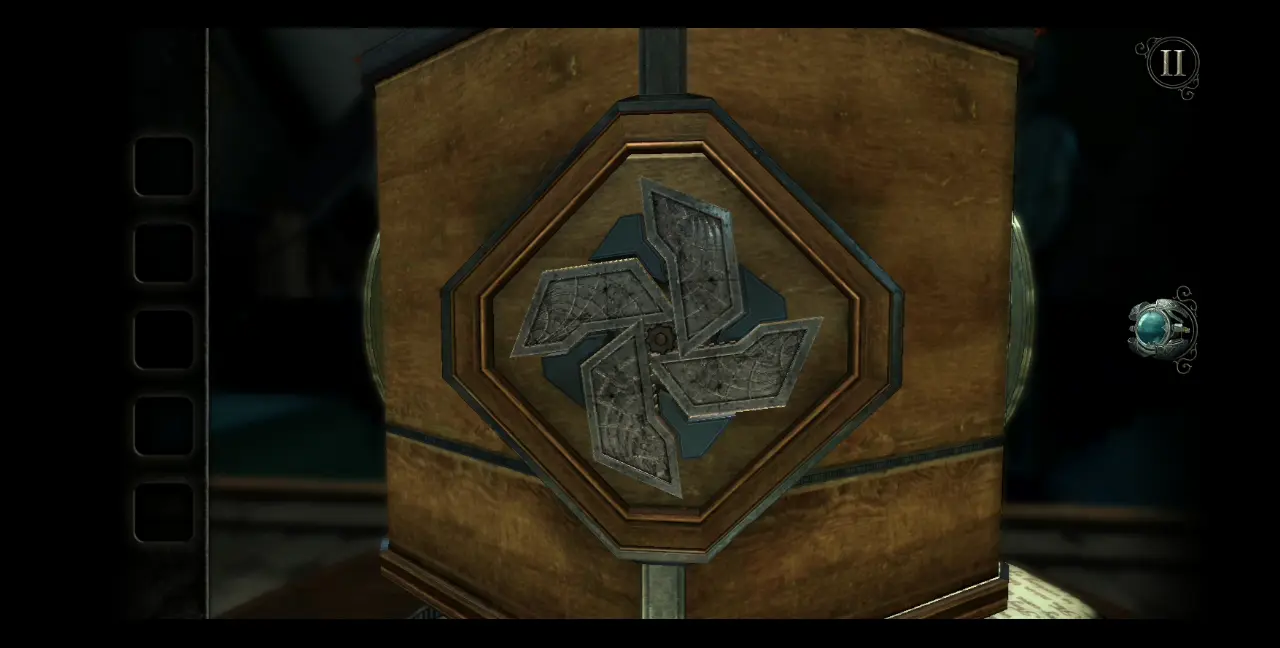
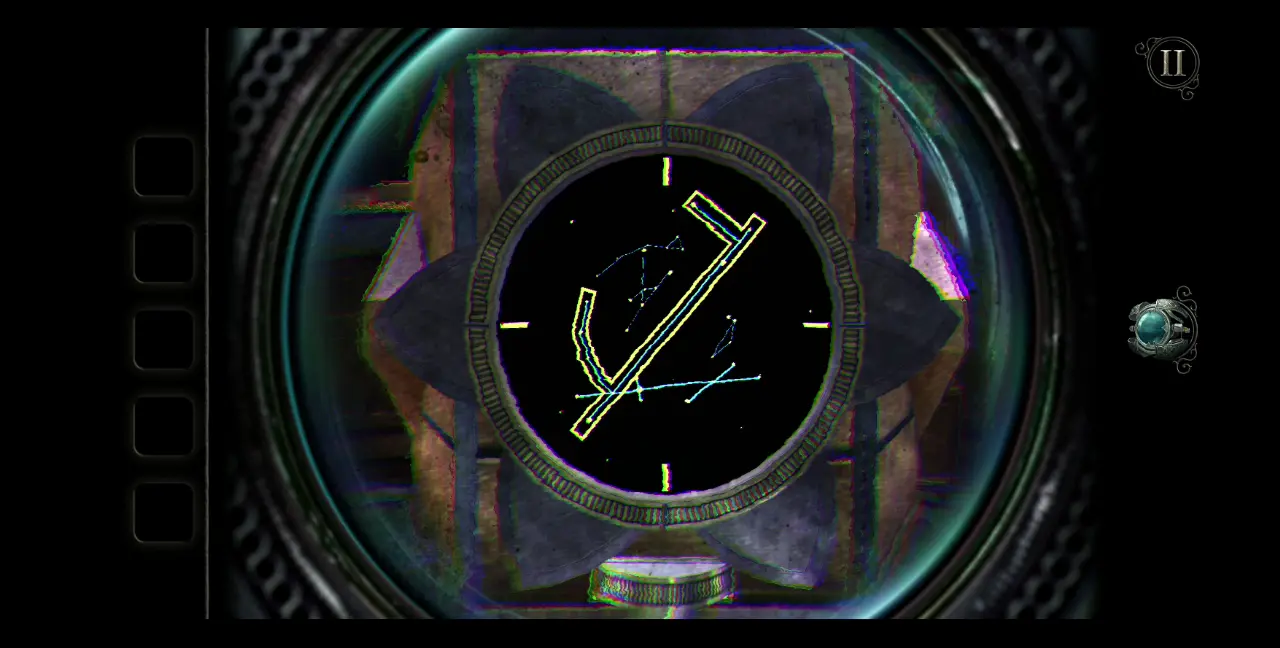
The coin will turn again and open another aperture exactly like the one you’ve previously encountered. Use your eyepiece to look into the aperture and you’ll see a similar puzzle to the one you’ve solved before, where there is a yellow outline of a shape and your objective is to find the right constellation to match this shape by turning the dials below and around the lens.
This should be the correct constellation to fit in the shape of the yellow outline:
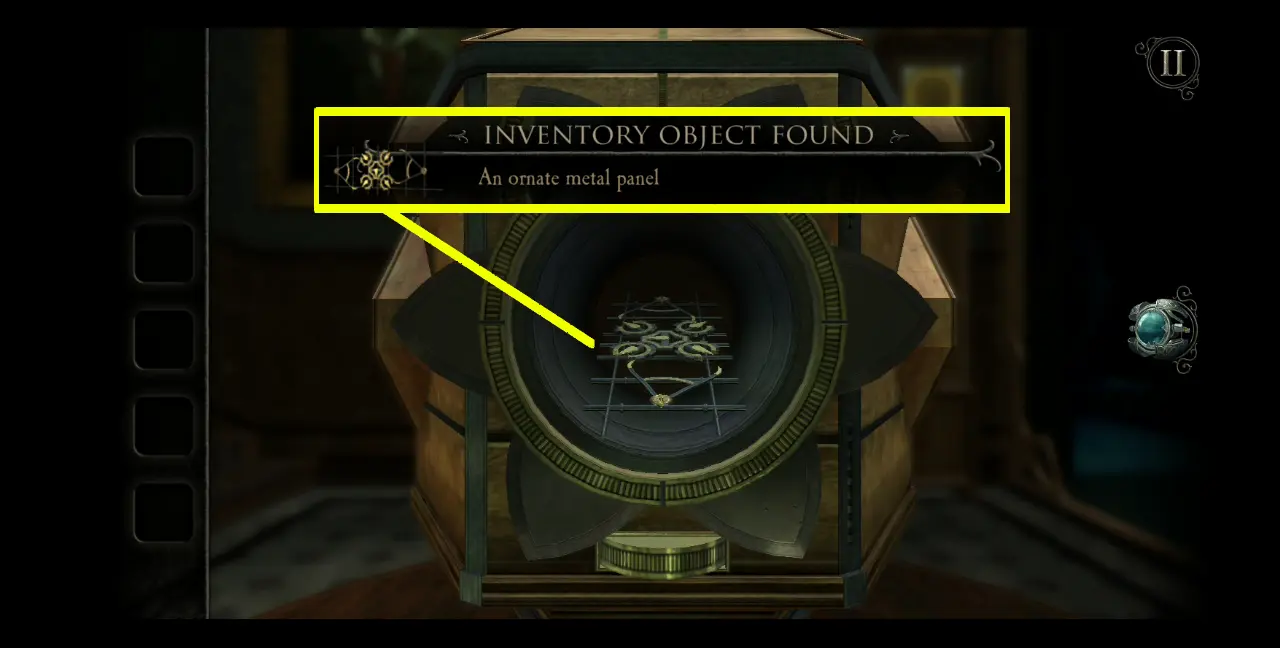
Just like the previous puzzle, once you’ve solved this one, you will be able to obtain a new item: an ornate metal panel.
The aperture will close, but this is hardly the last puzzle. As the aperture closes, the top of the box will open, revealing a new puzzle.
The image below shows the puzzle up-close. Again, you will notice an indented dial in the circular frame, indicating that this object can be turned.

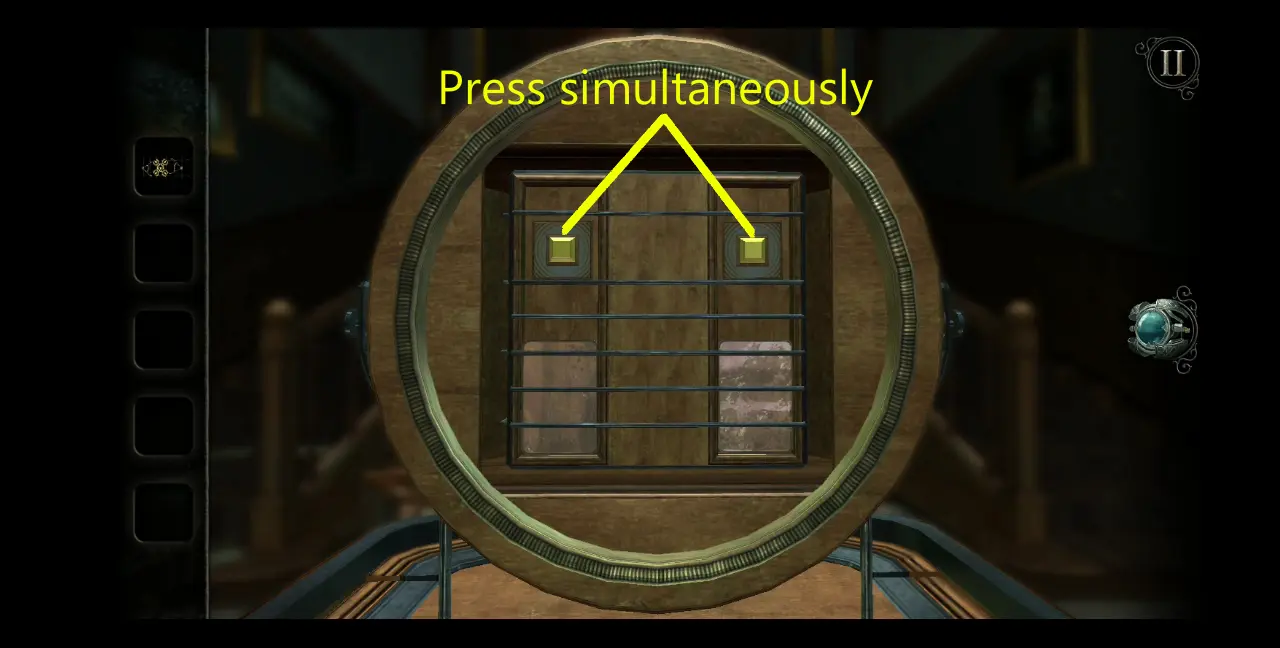
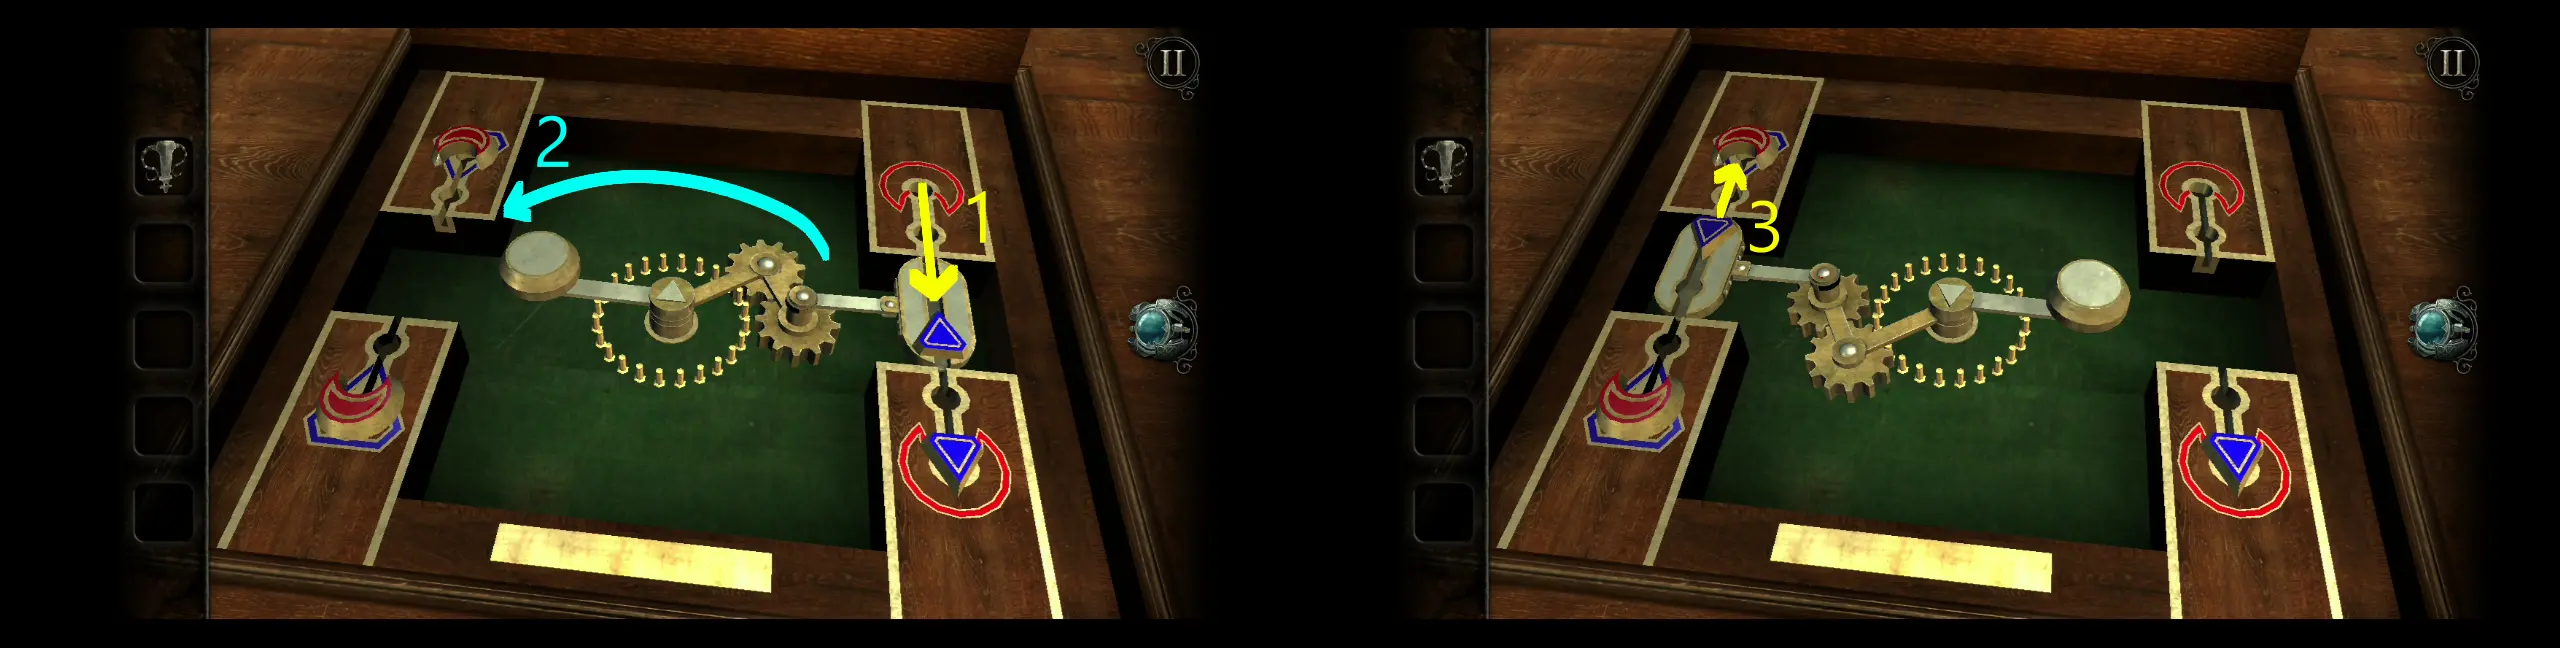
Turn the dial to make the rectangular panels fall to the other side of the slot, allowing you to access the two yellow buttons. Press both buttons simultaneously. If you press them one at a time, no reaction will be triggered.
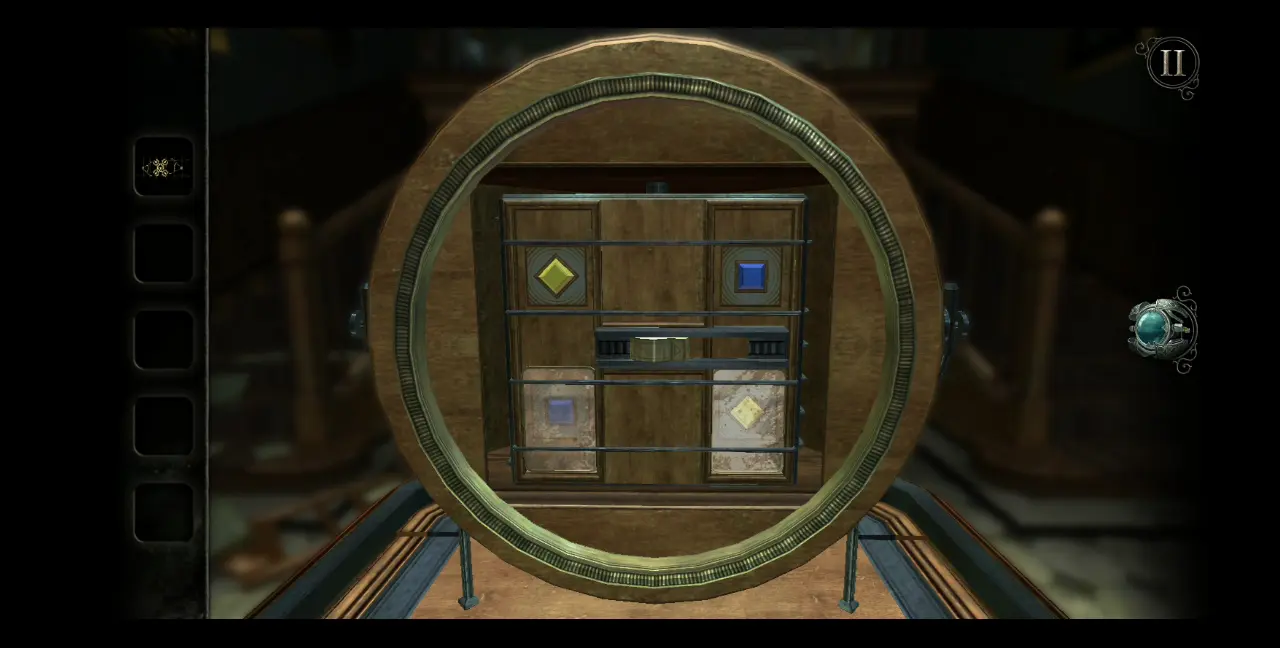
After pressing both buttons, they’ll light up and reveal a new puzzle. It’s a similar puzzle to the previous one, but with a slight modification: there’s a movable lock in the middle.
Flipping the lock to one side will cause the gray bar to move to that side, preventing the rectangular panel under it from moving.
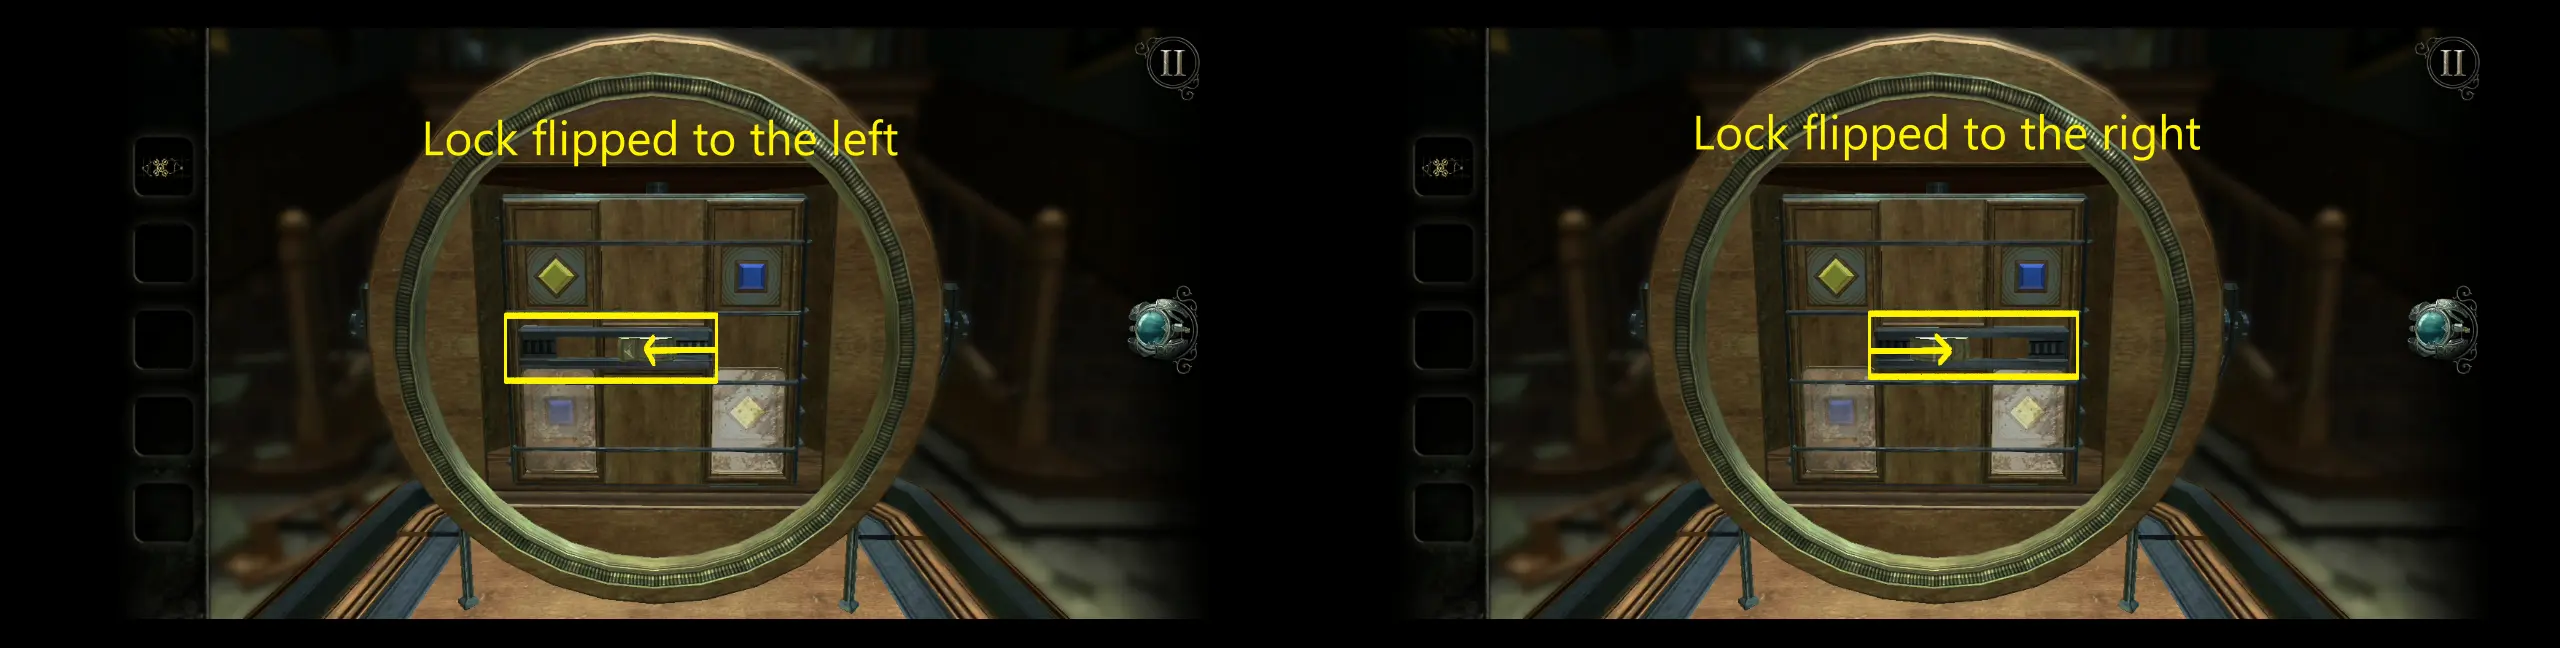
To solve the puzzle, flip the lock to the left then turn the dial 180 degrees clockwise. This should give you access to both yellow buttons. Push the yellow buttons simultaneously.
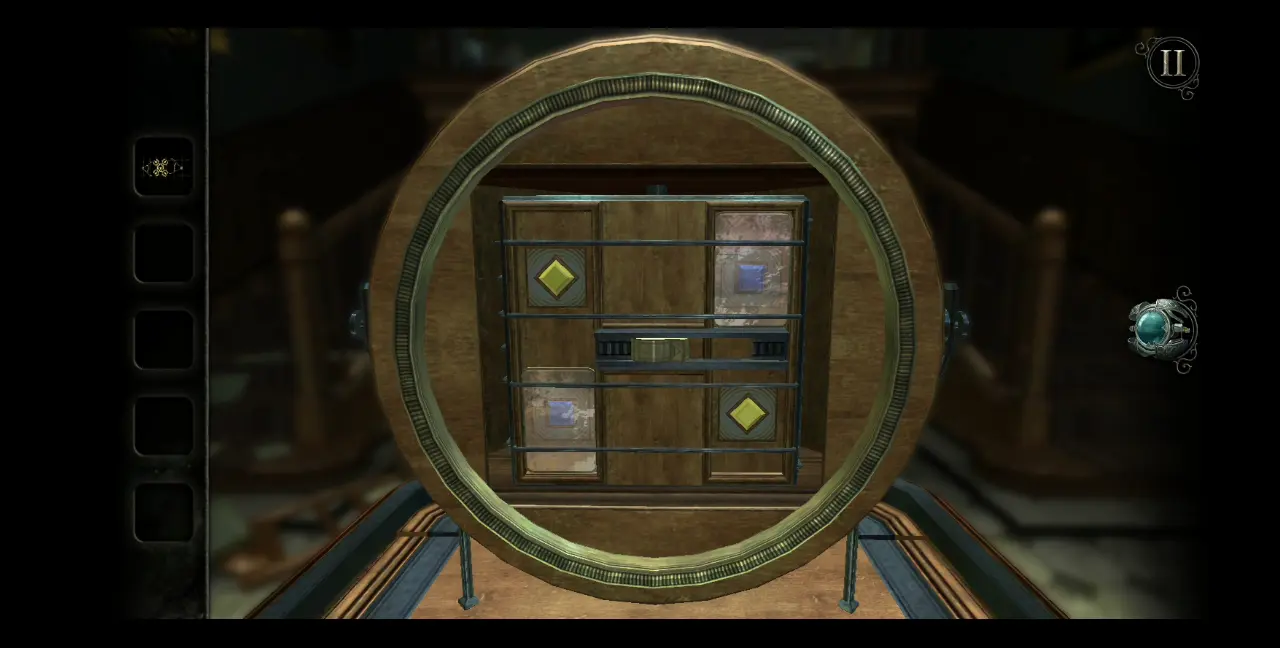
Then flip the lock to the left, allowing the rectangular panel covering the blue button to fall. Then flip the lock back to the right and turn the dial 180 degrees clockwise, releasing the other blue button. Press both blue buttons simultaneously.
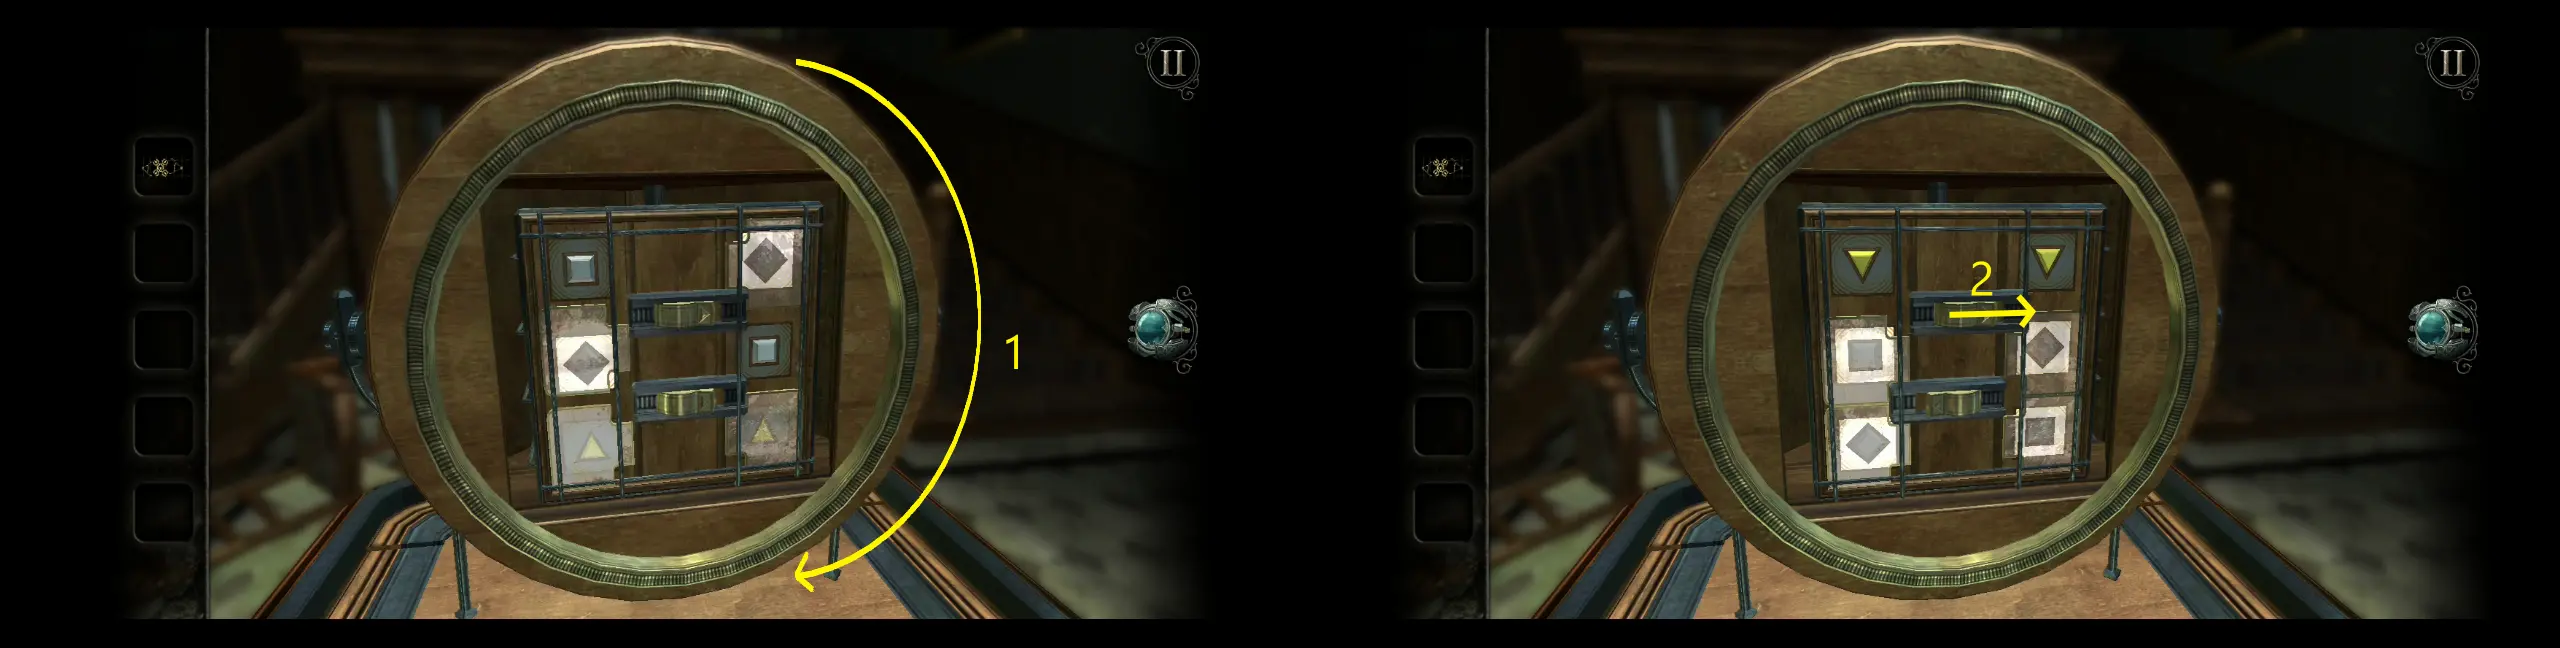
The box will rotate once more, revealing a third puzzle. This time, you have three buttons you need to press. Additionally, the locks will only affect the corners of the rectangular panels.
First, flip the top lock to the right and turn the dial 180 degrees clockwise. This should give you access to both blue buttons. Press them simultaneously.
Then, flip the top lock to the left. This should expose the yellow triangle button. Next, flip the bottom lock to the right, exposing the gray square button. Flip the bottom lock again back to the left, then rotate the dial 180 degrees counterclockwise. This will allow you to press both gray square buttons at the same time.
For the yellow triangular buttons, rotate the dial 180 degrees clockwise, then flip the top lock to the right. Now you can press the yellow buttons simultaneously.
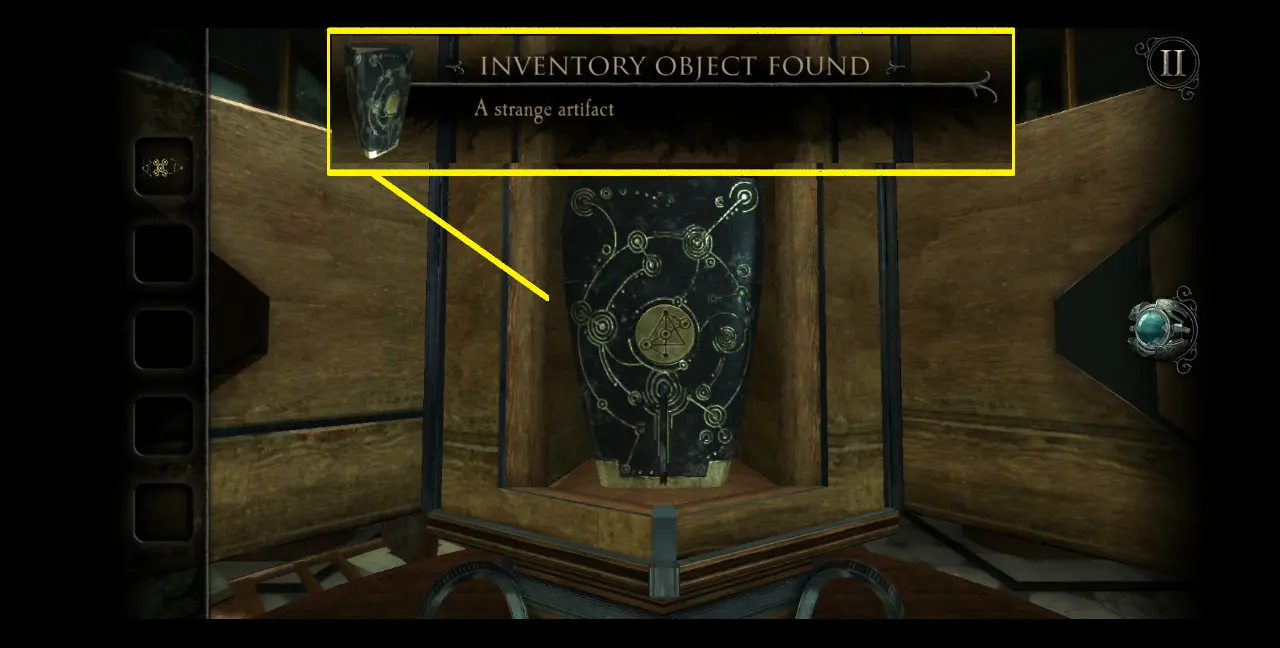
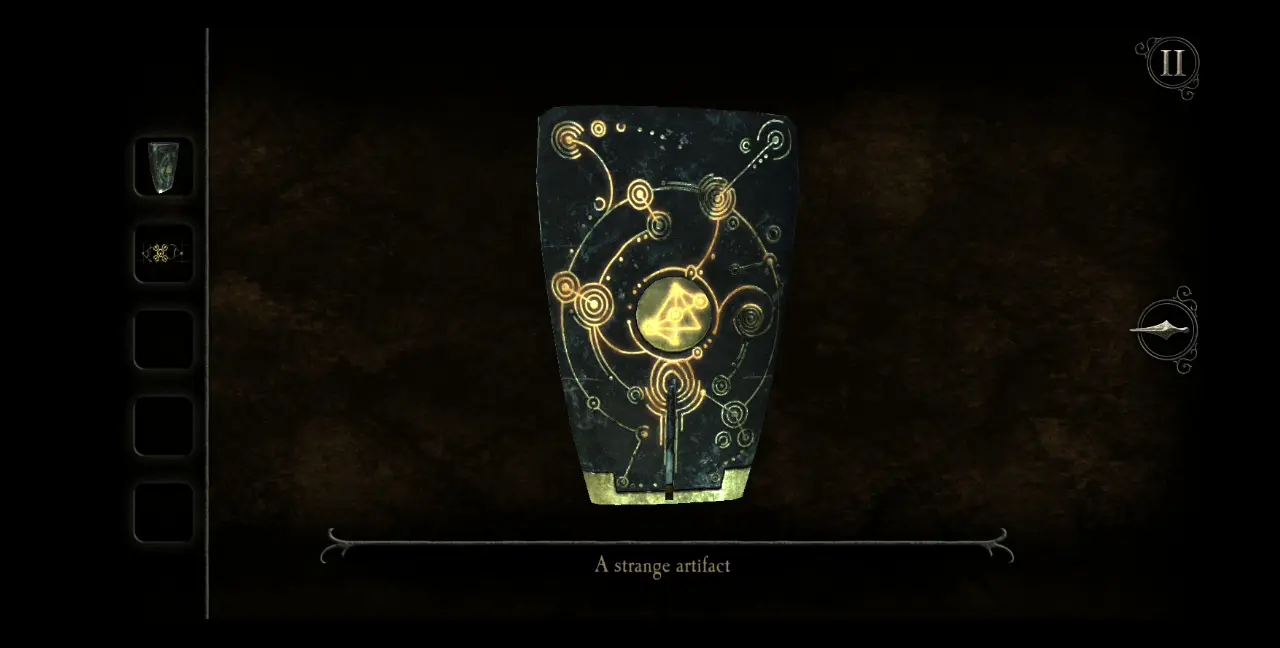
With all three button pairs now pressed, the top of the box will close, retracting the puzzle. The side of the box will then open, revealing a new item to be collected: a strange artifact. You’ll notice that it somehow resembles the seal that had appeared at the top of the dollhouse, where you’ve previously placed the family crest.
Once you’ve collected the strange artifact, black tendrils will ooze from the walls and consume the Foyer, rendering the room inaccessible.
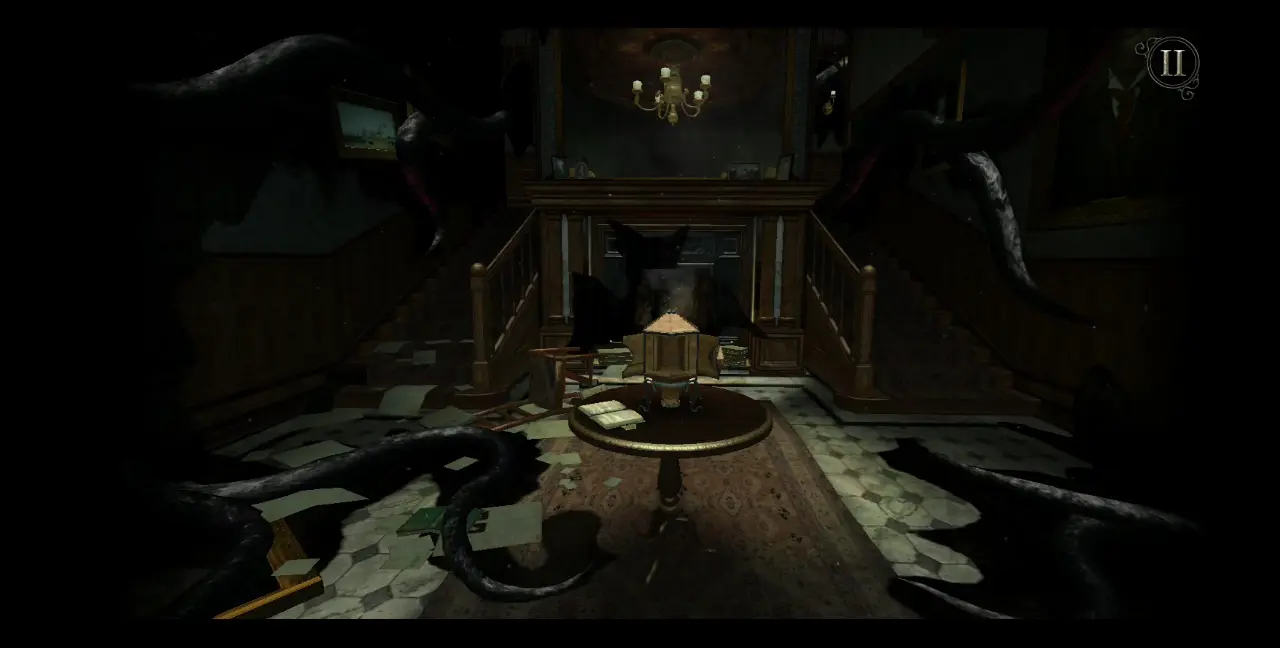
Your perspective will be drawn to the exterior of the dollhouse and, from here, you can see that the Foyer is covered in black. The game will turn your attention toward the seal at the top of the dollhouse, where one of the symbols on the left will be covered by what seems like the same black ooze that had consumed the Foyer.
With this, the stage for the dollhouse’s Foyer will now be considered complete.

Study (Part I)
During this segment of the game, you will be going back and forth between three rooms: the Study, Kitchen, and Curiosity Room. However, we have labeled this part of the walkthrough as the Study as it is the Study that you will be completing after solving the puzzles in this segment. The Kitchen and Curiosity Room will have their own sections in the walkthrough and will be completed later. In this first part of the Study segment, we’ll be able to unlock the Kitchen and the Curiosity Room, but the details for the latter will be included in the next part of our walkthrough.
With that cleared up, let us proceed to the game proper.
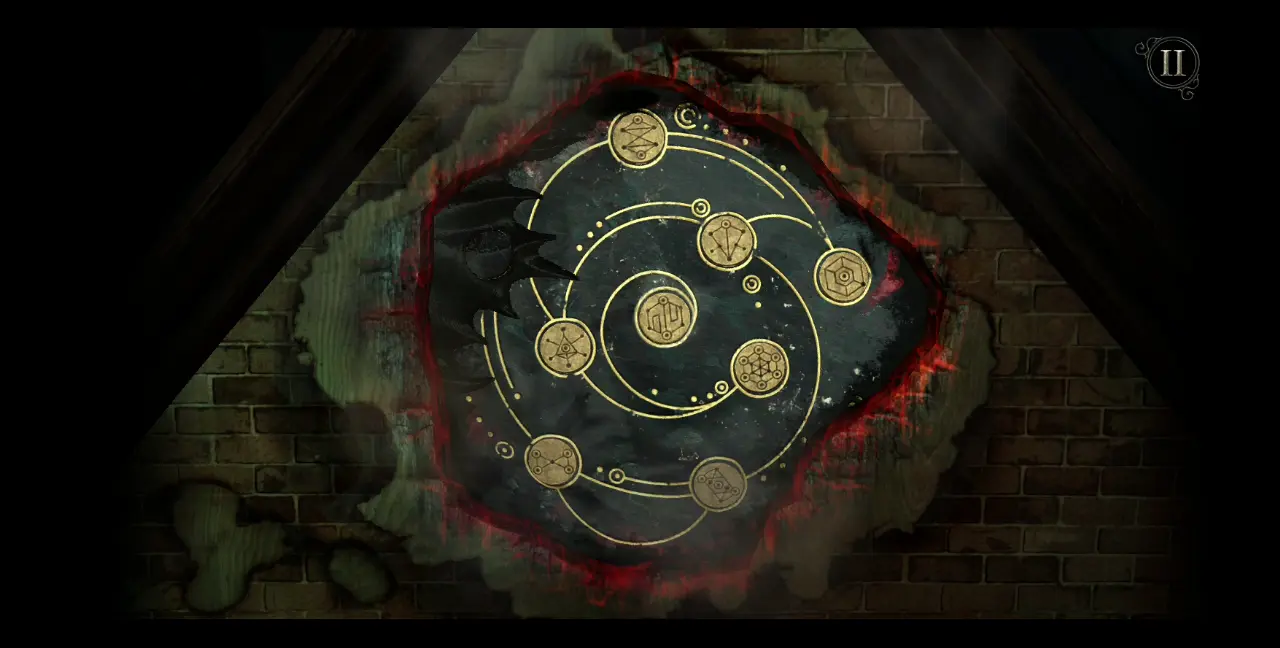
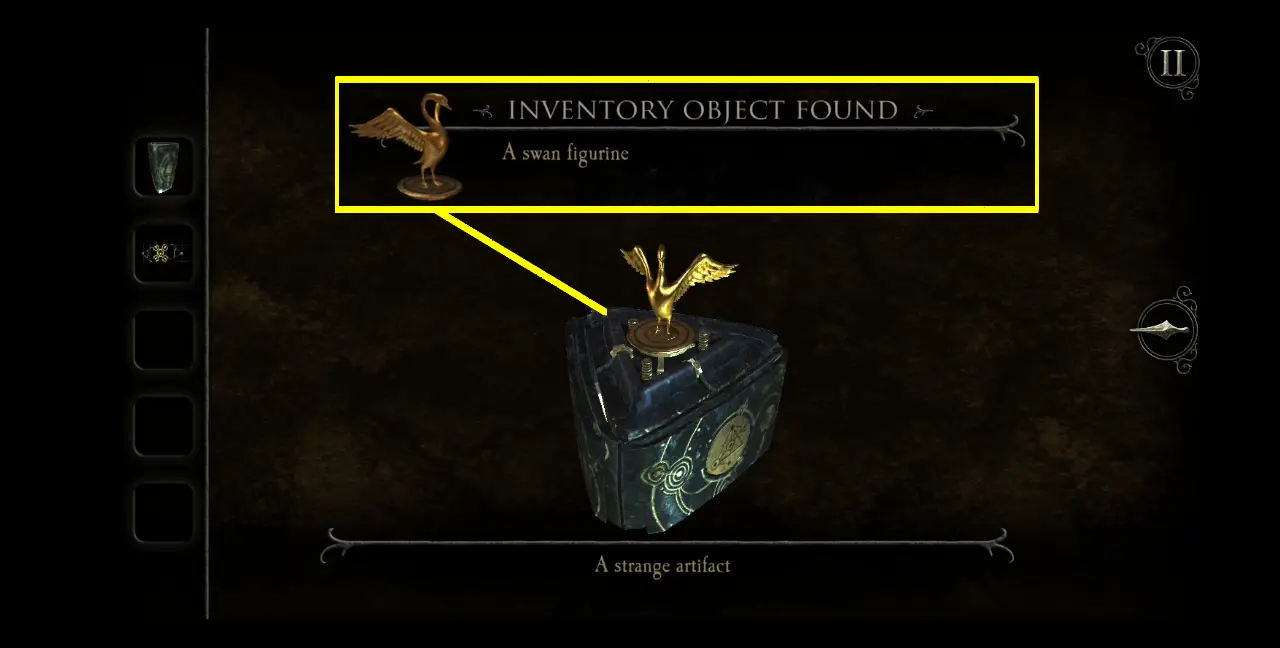
Now that the Foyer is inaccessible, you need to be able to unlock other rooms in the dollhouse. Begin by checking the strange artifact in your inventory. Press and hold the button at the center of the artifact until it begins to glow.
Once all the symbols have glowed, the artifact will open up and reveal a swan figurine.
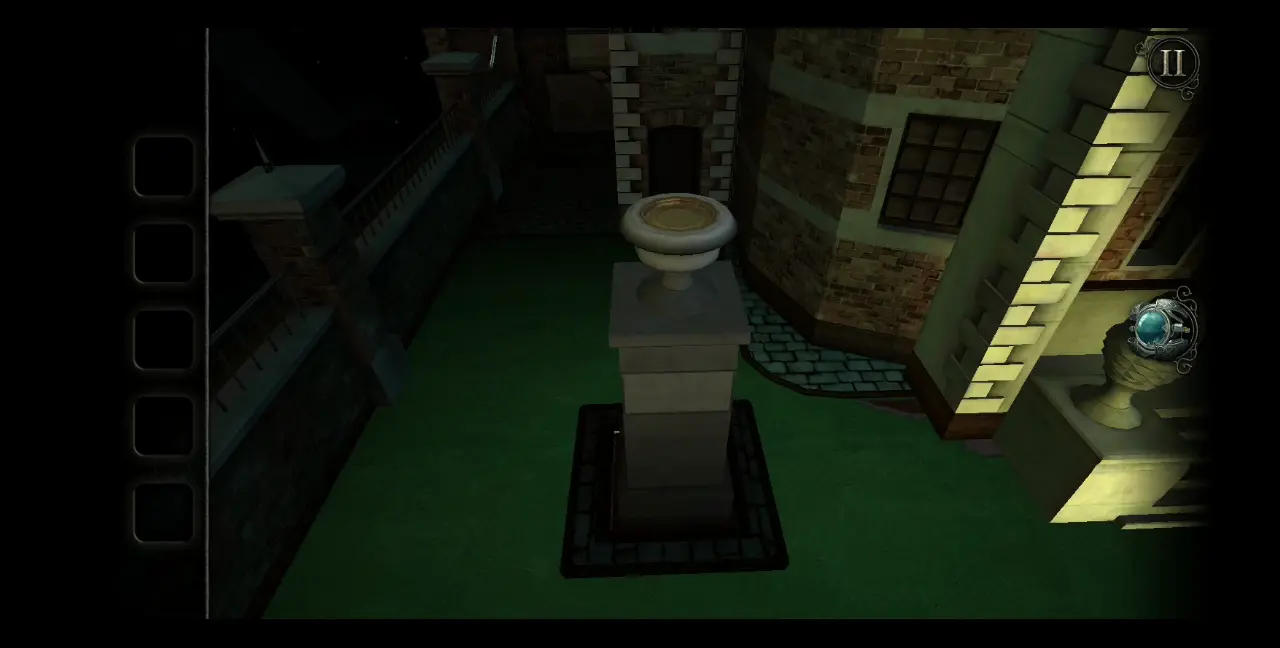
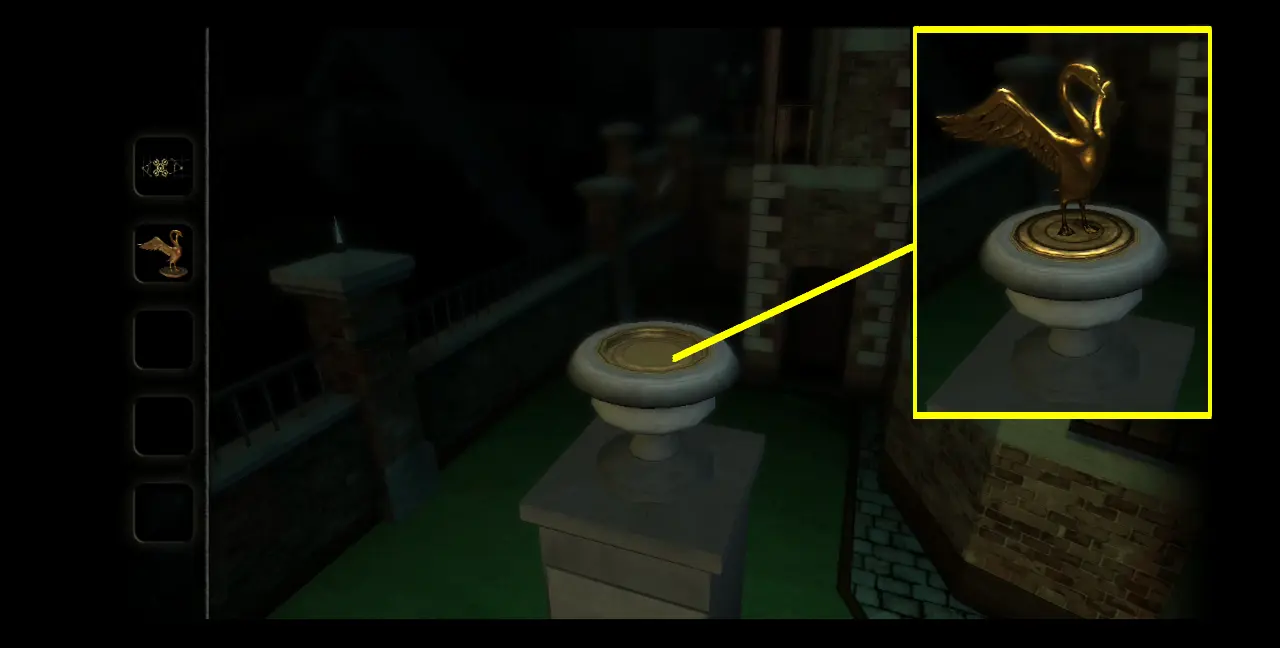
We know a place that needs a figurine, and that’s the pedestal near the gate of the house, on the opposite side of where the pedestal with the reindeer is located. Place the swan figurine above the pedestal.
This will cause a drawer below it to open. Collect the model lamp from the drawer.
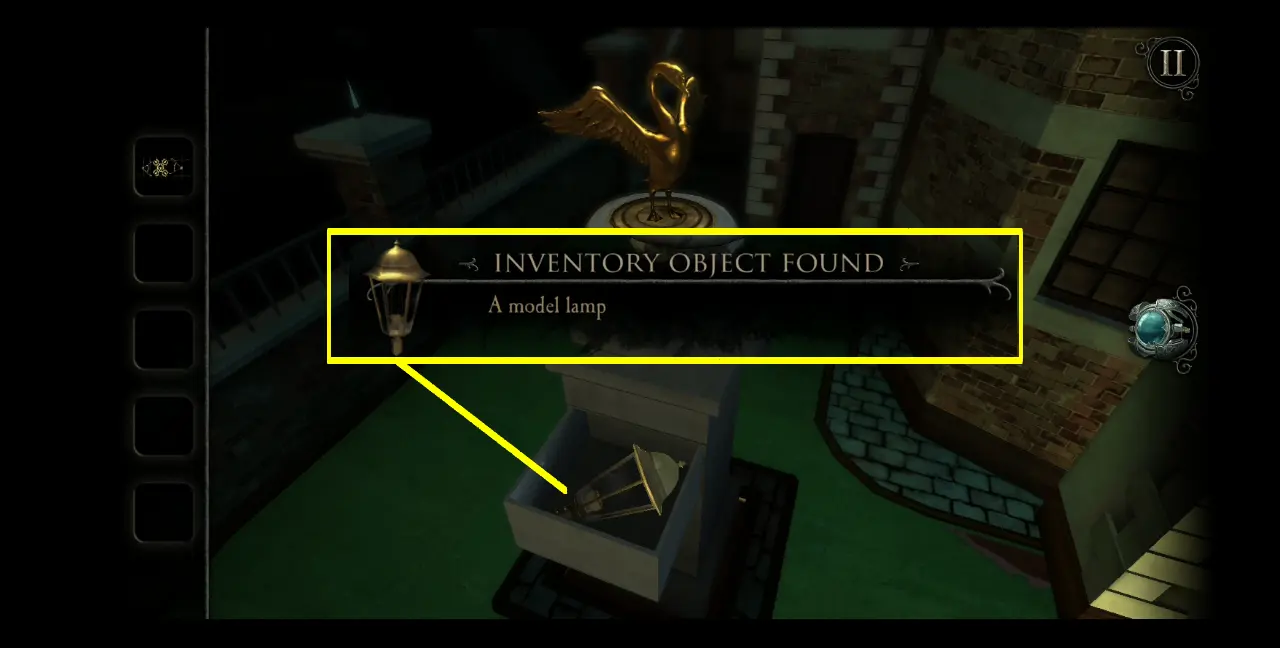
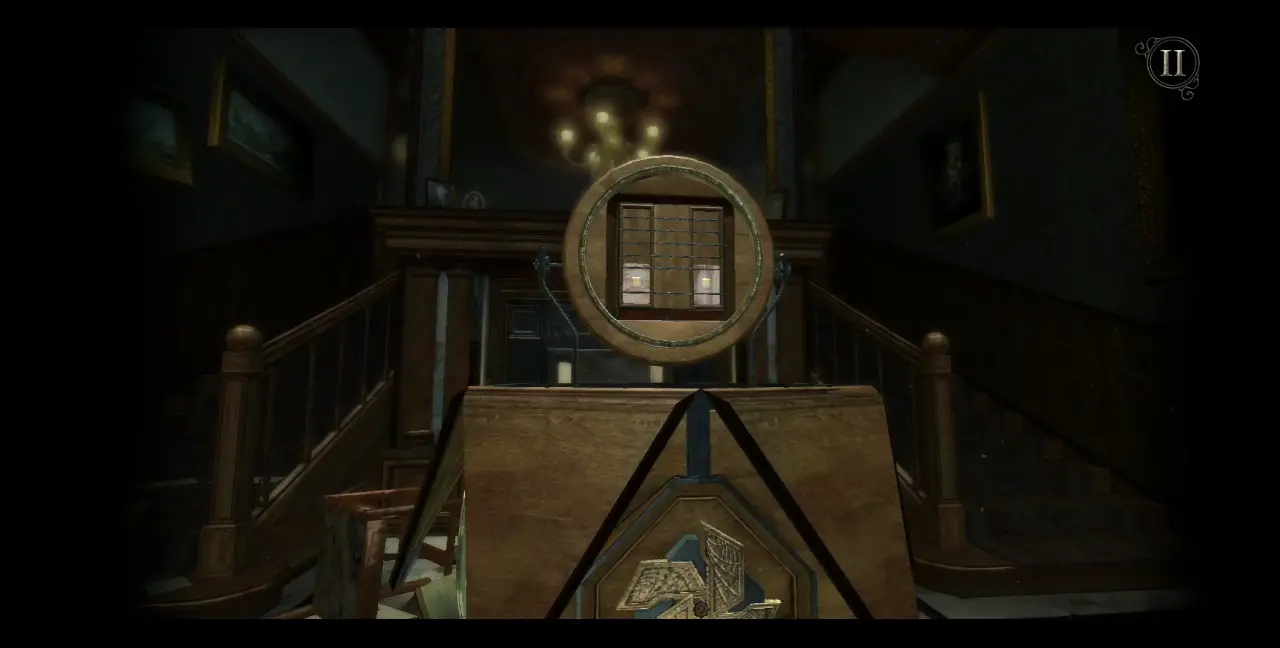
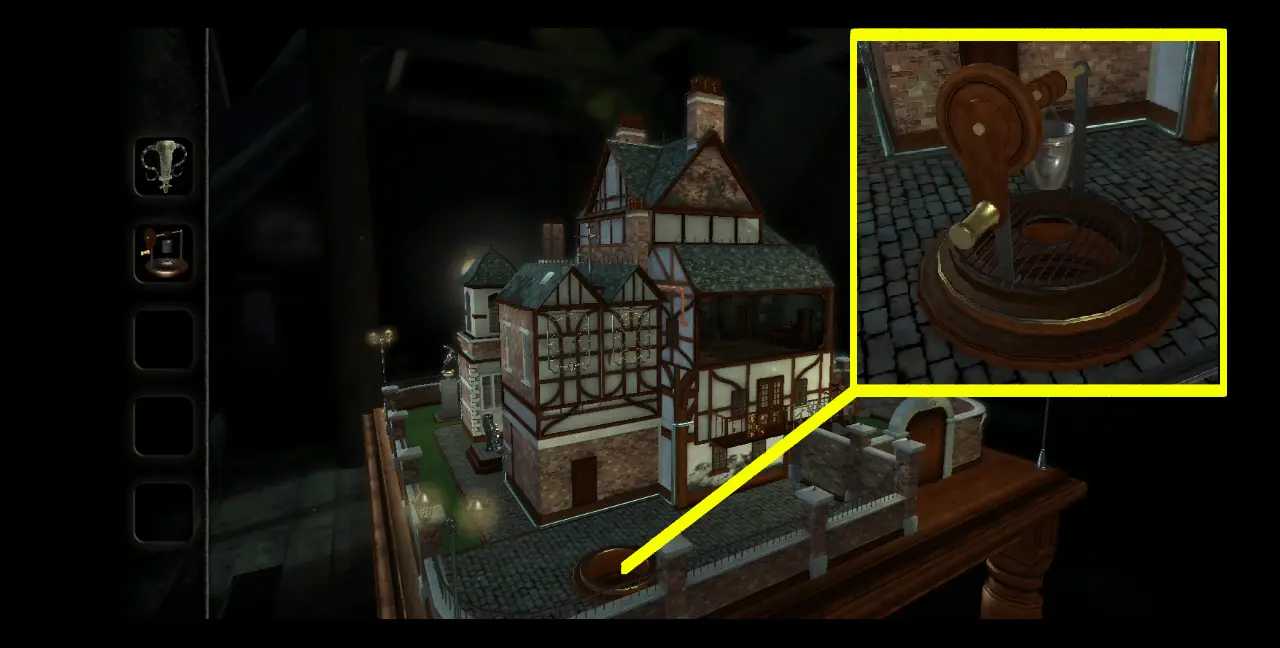
If you look at the model lamp from your inventory, you’ll see that it looks like a miniature lamp from a streetlight. Zoom out of the pedestal and this should give you an overall view of the dollhouse’s exterior. To the side, you’ll see that the right front corner of the house is slightly illuminated.
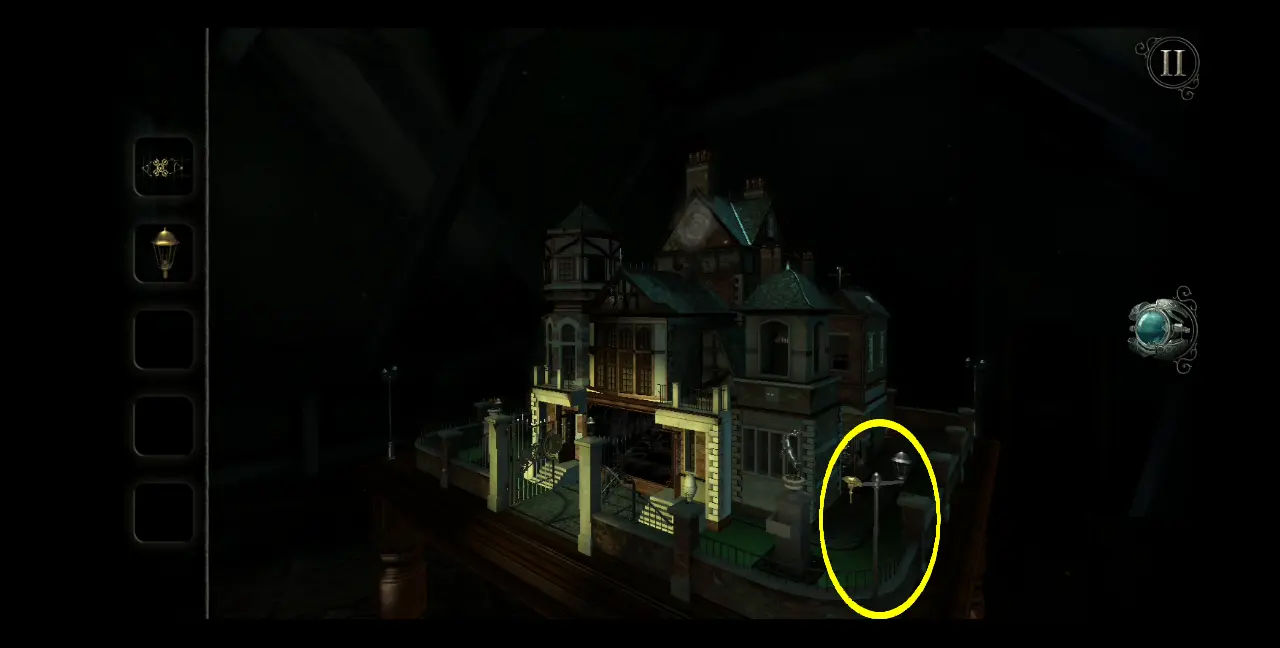
Zoom into this part, which is one of the lampposts. You’ll notice that the other lamp is missing. Place the model lamp here from your inventory.

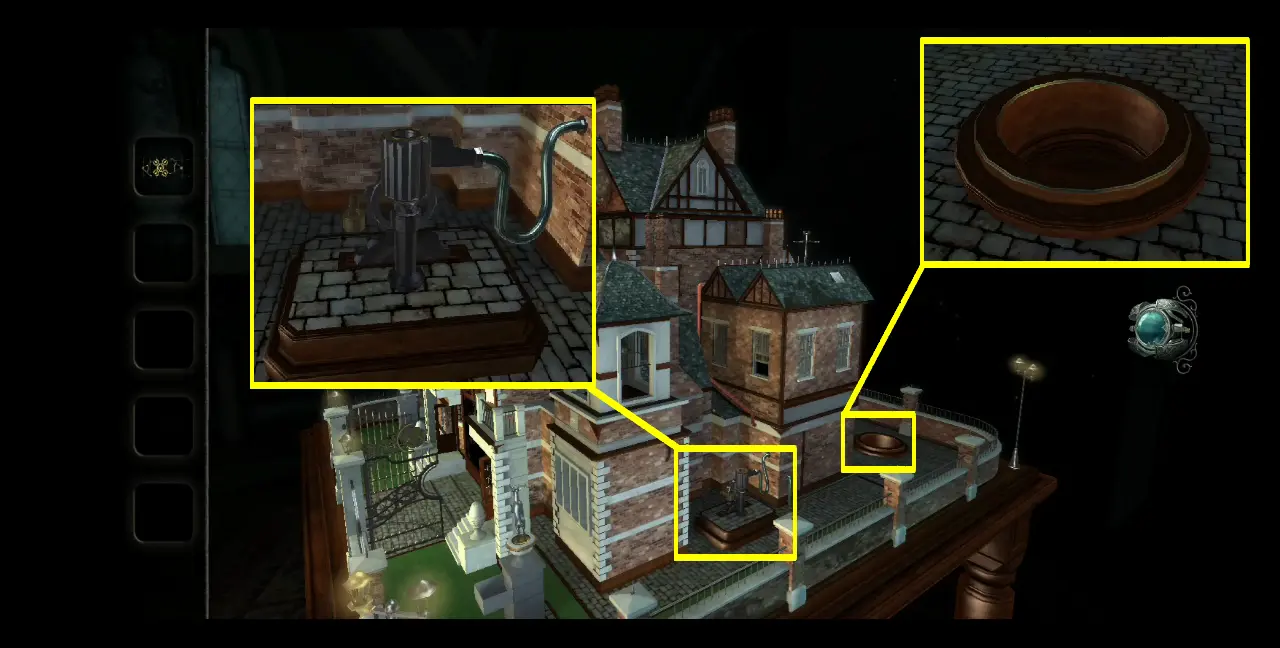
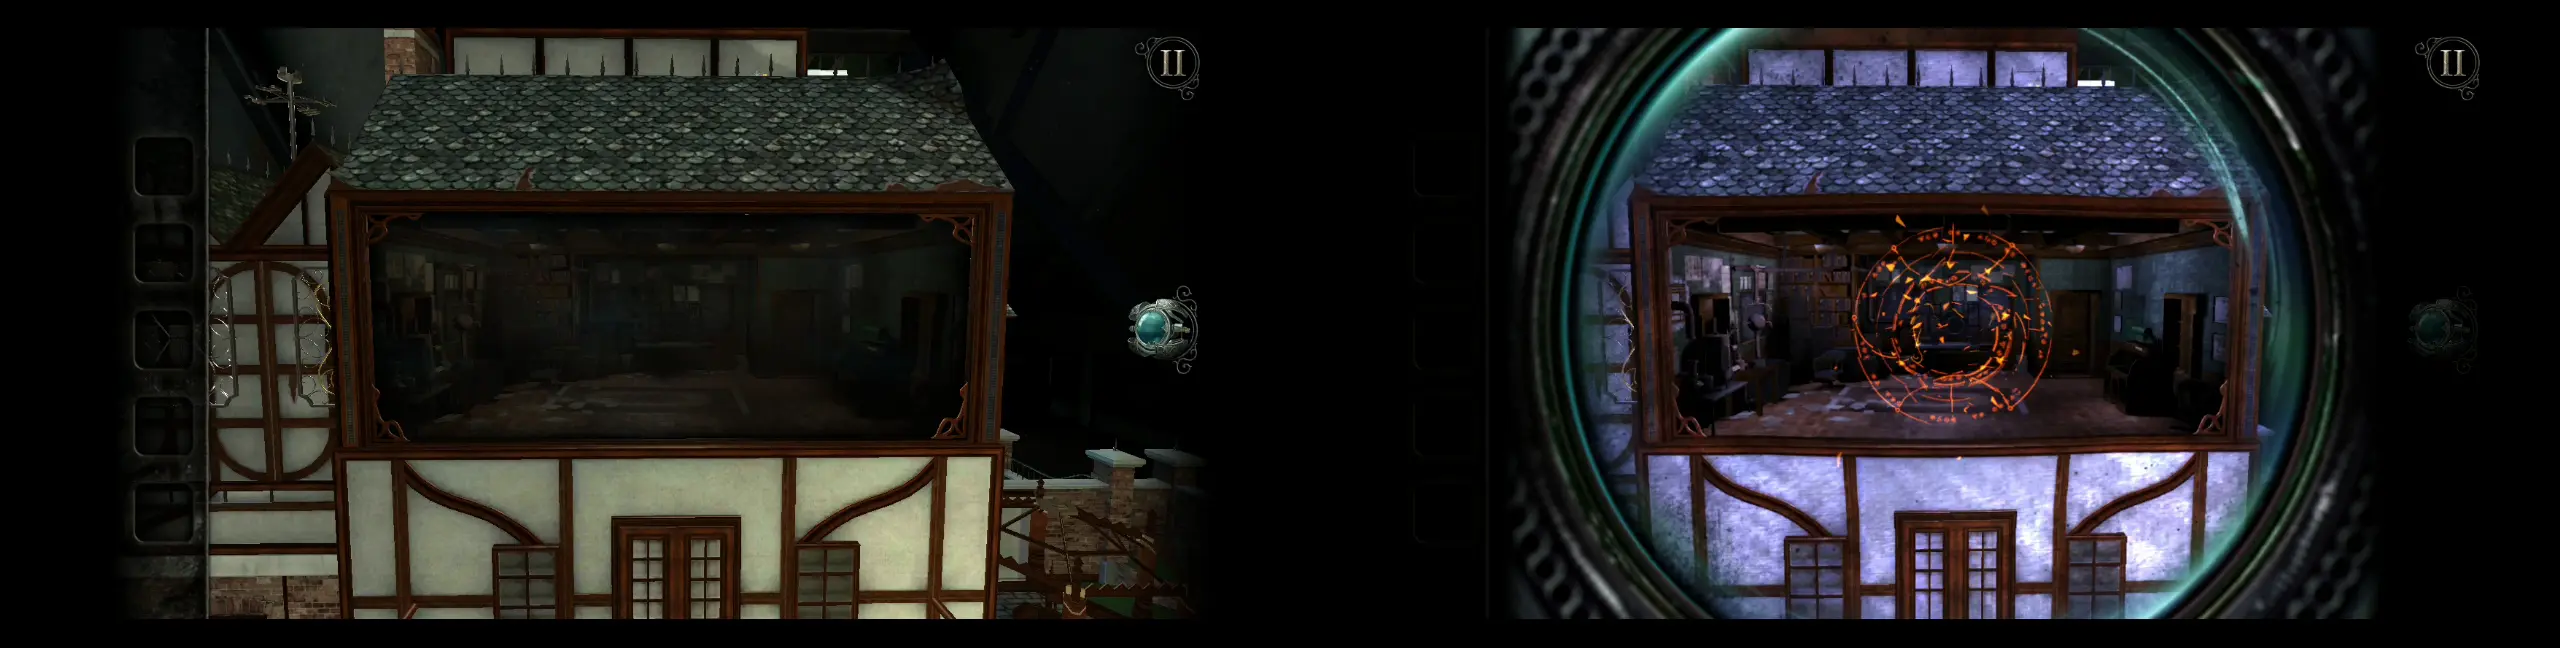
With the model lamp in place, the lights around the dollhouse will be activated. The game will also give you a 360-degree view of the entire dollhouse, which in itself is a hint as there are many things around the exterior of the dollhouse that will prove to be useful later. An example of these is the pump and the hole for a well, as highlighted in the image below.
There’s another incomplete structure at the back of the house, but that would be for later. For now, let’s turn our attention to that location. If you zoom into a room at the top portion of the back of the house, you’ll notice that one of the metal panels on the balcony is missing. This item is in your inventory, filed away as the ornate metal panel. Drag the metal panel into that empty space.
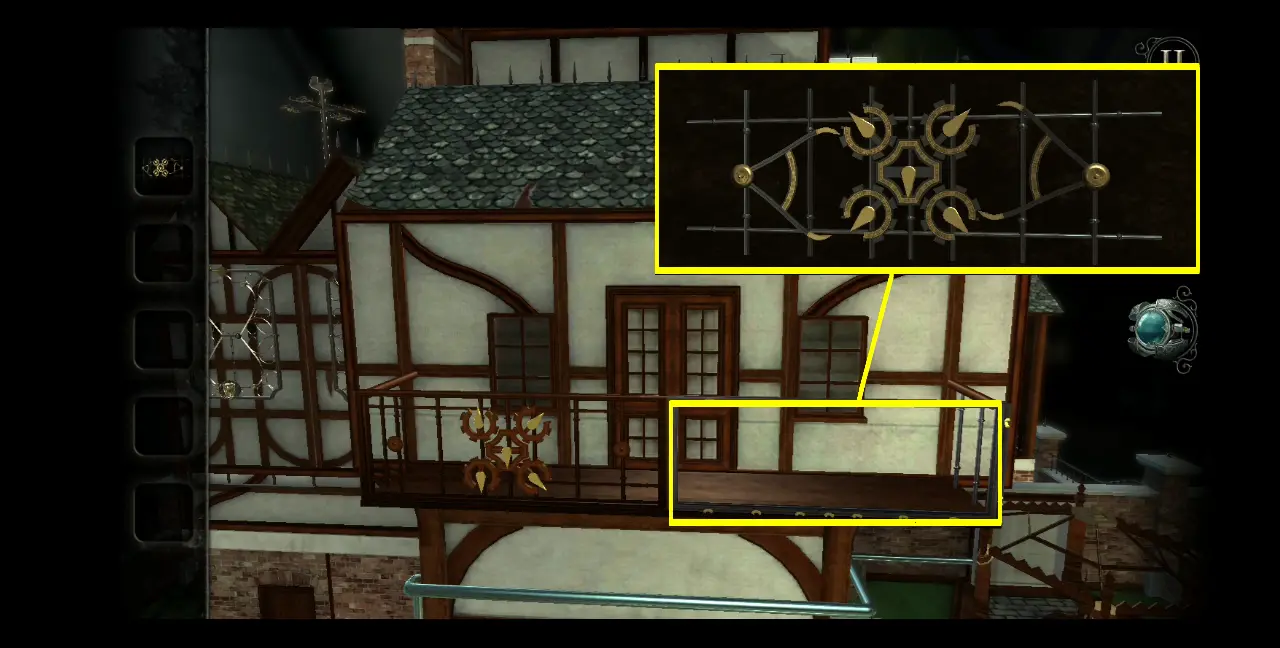
Once the metal panel is in place, you’ll see that the pattern on it is similar to the pattern on the panel to the left, but the arrows are facing in different directions. To solve this puzzle, you need to move the arrows of the metal panel on the right to match those seen on the left.
How this puzzle works is that the two compasses to the side are movable up and down, keeping the gears being touched by their tips in place. Meanwhile, the 4 gears on the corners keep the arrow in the middle in place. The corner gears can be rotated if the compass’ tip isn’t locking them in place.
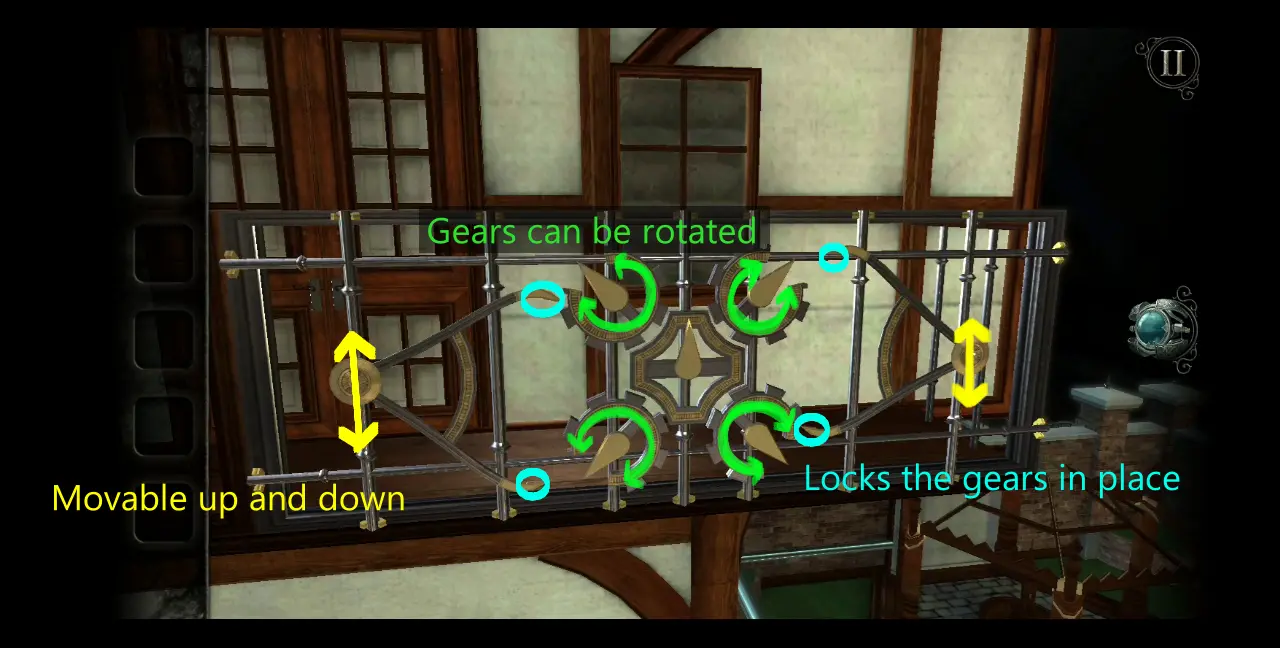
To solve this puzzle, your goal is to first move the center arrow so that it points downward. To do this, move both side compasses up to free the top gears. Rotate both top gears wherein their arrows are pointing directly at the center. Next, move the side compasses down to free the bottom gears and rotate them both wherein their arrows are directly pointing toward the center. Make sure that the part of the gears without any grooves are aligned with the curve of the shape in the center. The four gears should look like this:

Now you can rotate the middle shape so its arrow points downward.
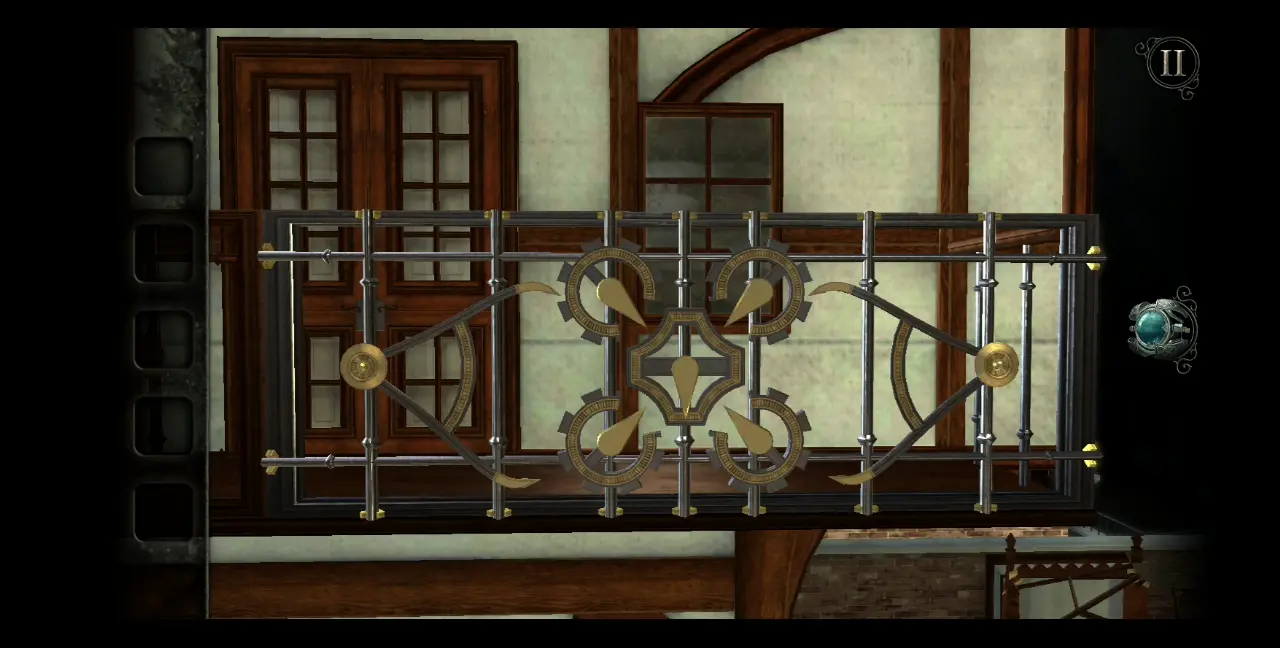
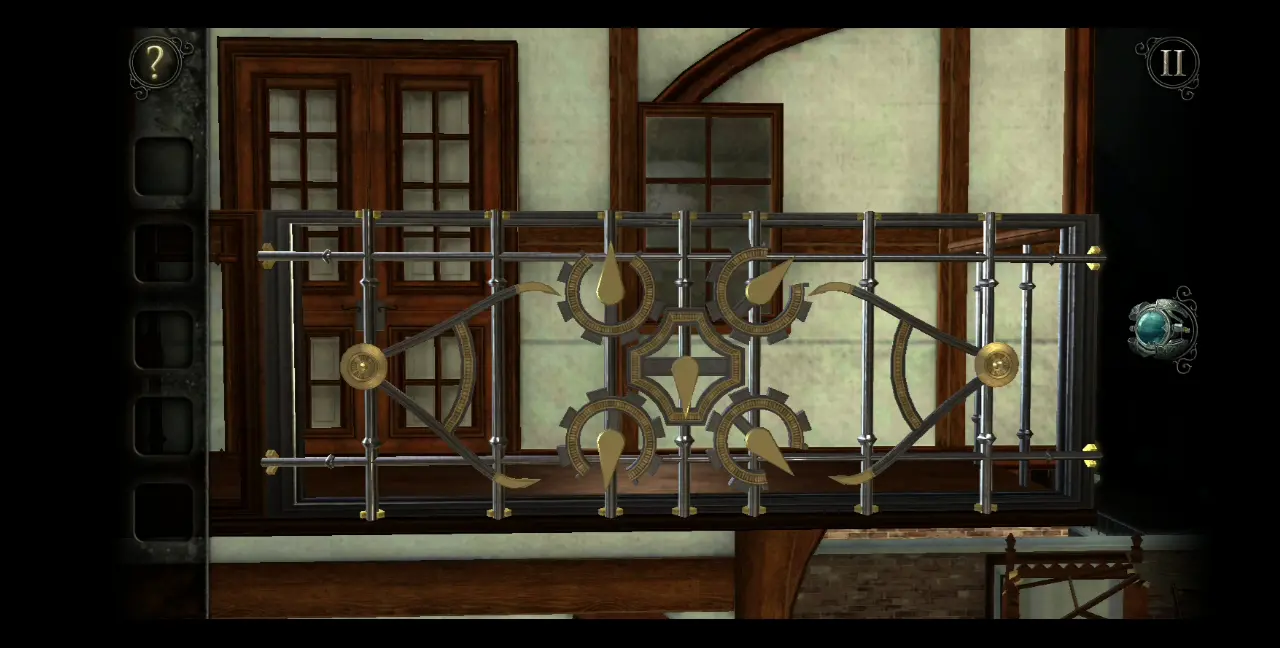
Arrange the four corner gears to mimic the same pattern shown on the left metal panel. This is where the arrow on the gears should be facing:
- Top left: North
- Top right: Northeast
- Bottom left: South
- Bottom right: Southeast
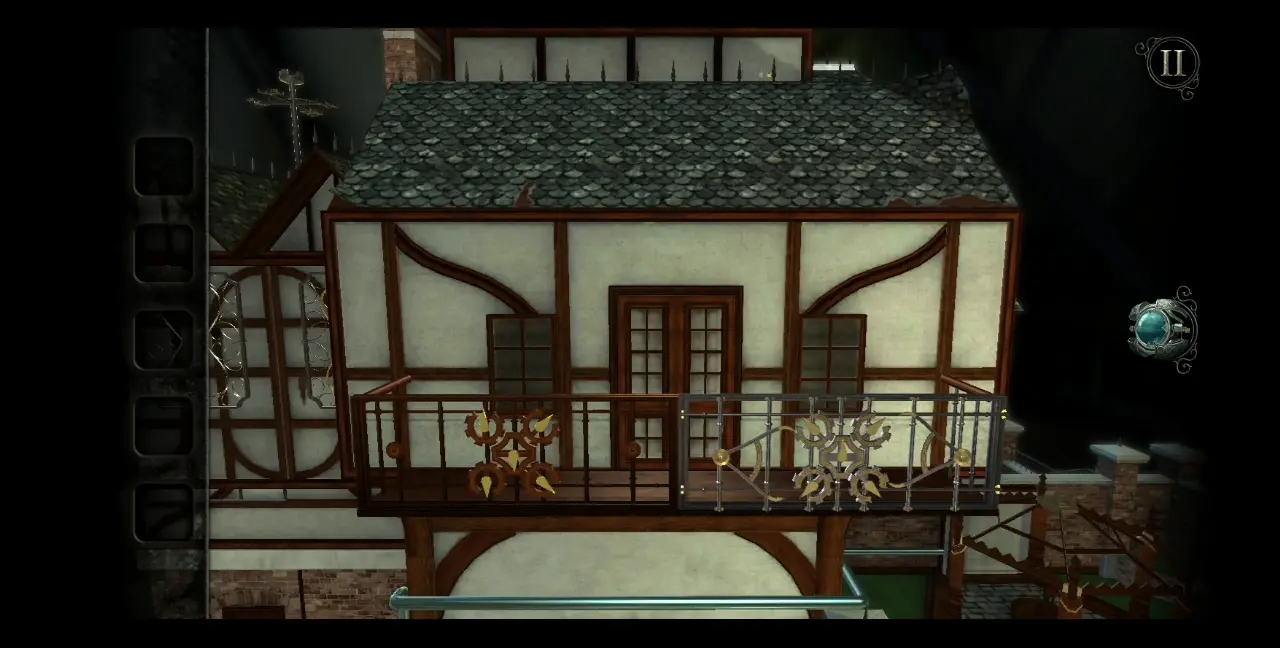
Here’s an image of the correct arrangement:
The wall will then slide down, revealing a new room you can access. Similar to the Foyer, you need to activate your eyepiece to see the symbol, break it by double-tapping, and enter the room.
With this, you’ve now gained access to the Study.

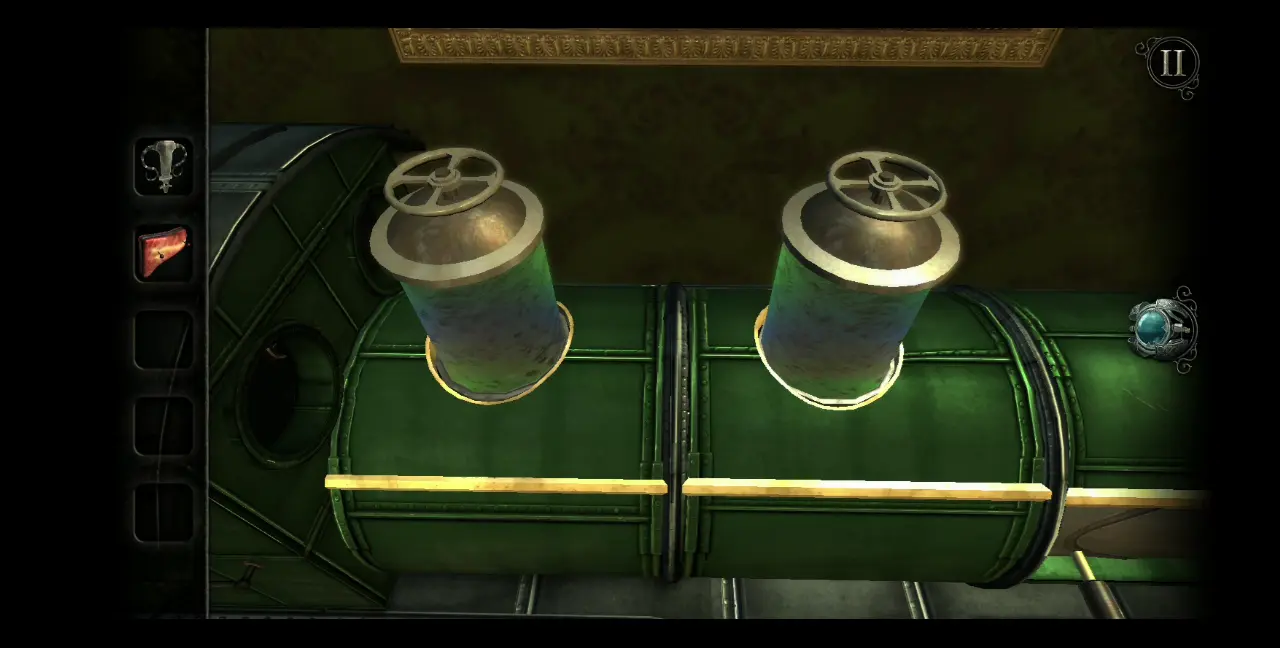
There are three significant places in the Study. The center table with a curious-looking device is the first you will see upon arriving in this room. Upon closer inspection, you’ll notice that the device looks like it’s used to generate electricity.
To the left of the room are machines and equipment that look like they deal with steam or air pressure. Take note that the equipment in this area are connected to a series of pipes.
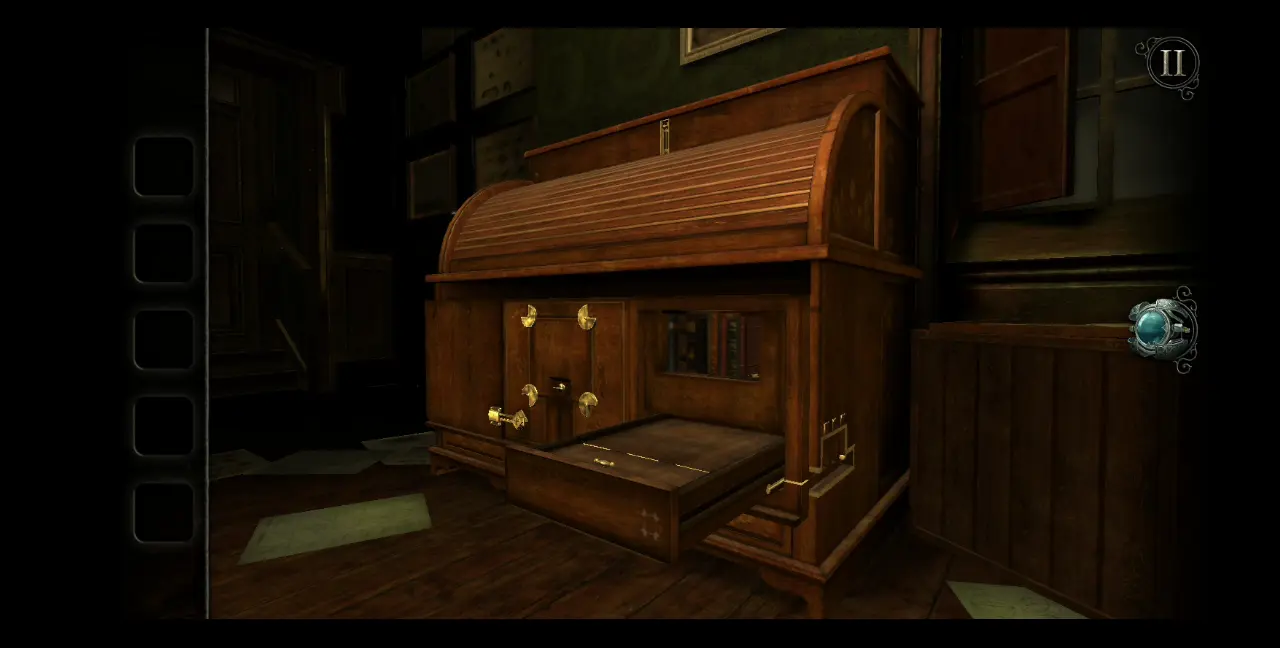
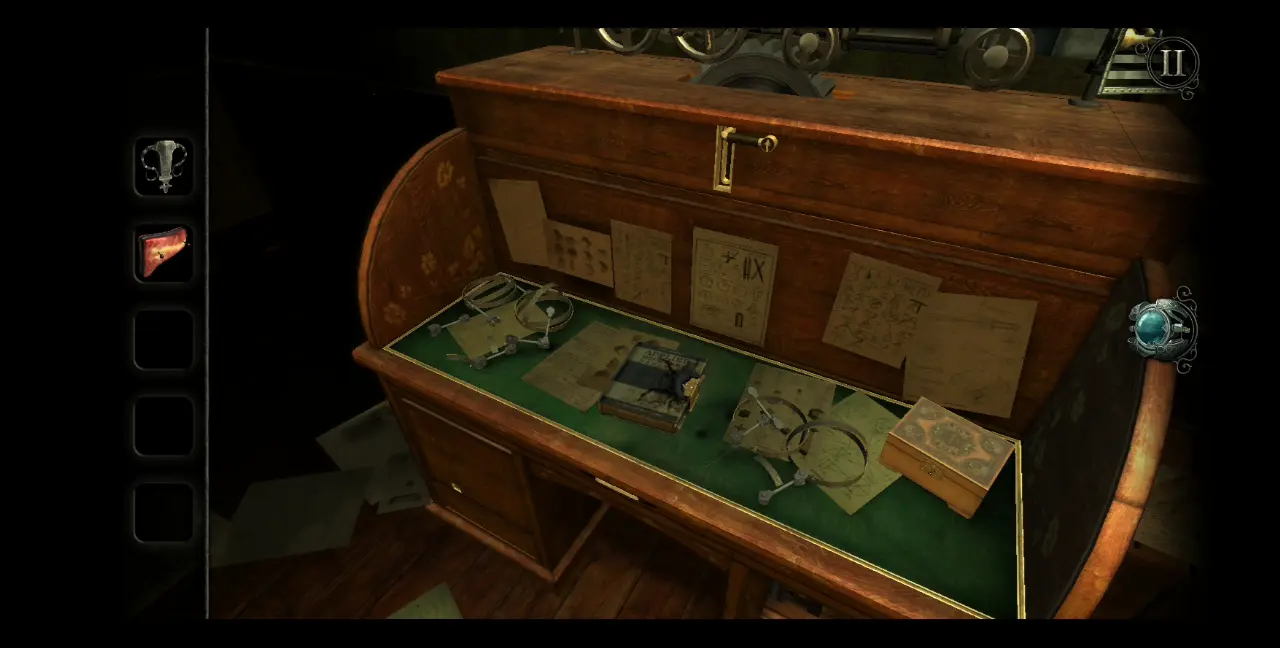
And lastly, to the right of the room is a wooden roll-top desk. On top of it is a torn photograph on a frame.

Since the center area is the most immediate, zoom into it and you’ll find a book called A Manual for the Steam Engine. Similar to the first book you found in the Foyer, pull the lock down to open it.
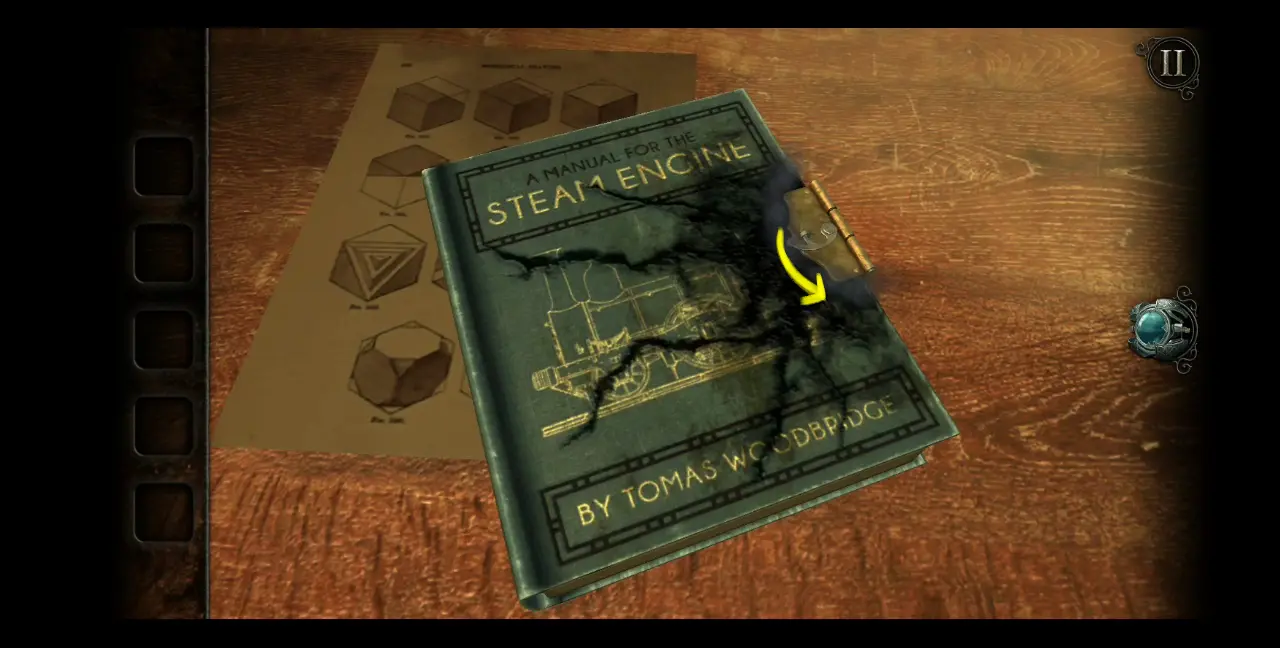
Black ooze will spread across the notebook, the pages flipped by what seems like a violent gust of wind. The black stain will consume the pages until it reveals a new entry, which appears to be from Edward’s perspective.
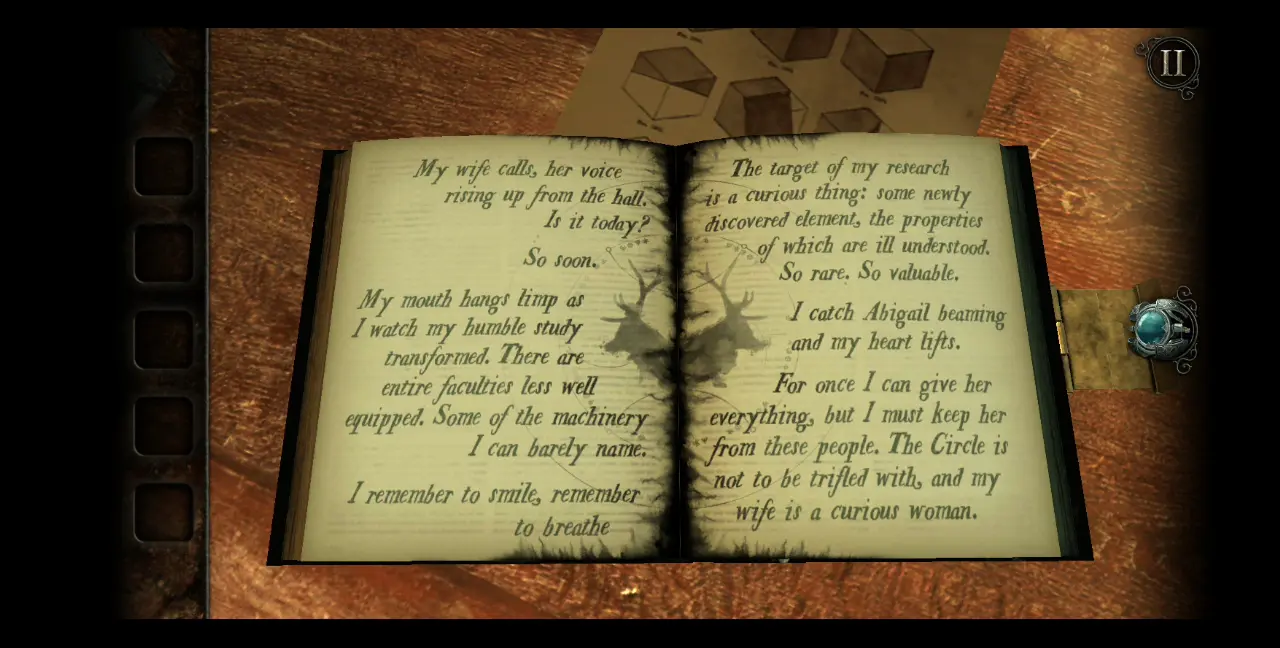
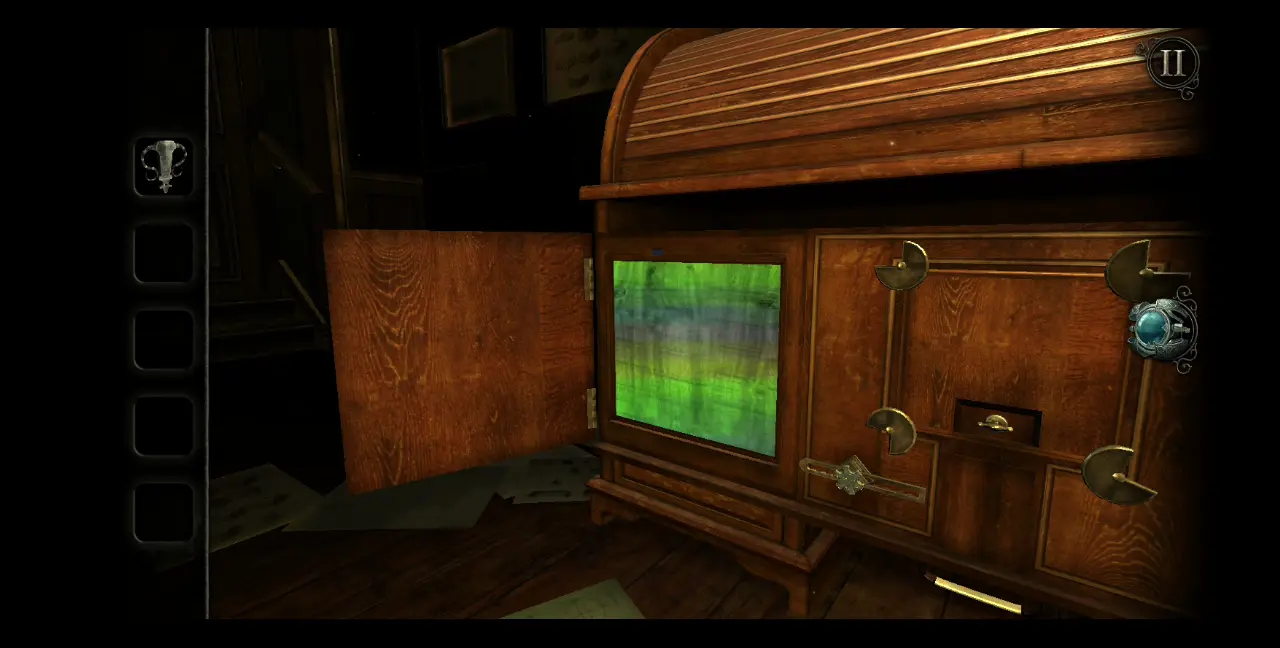
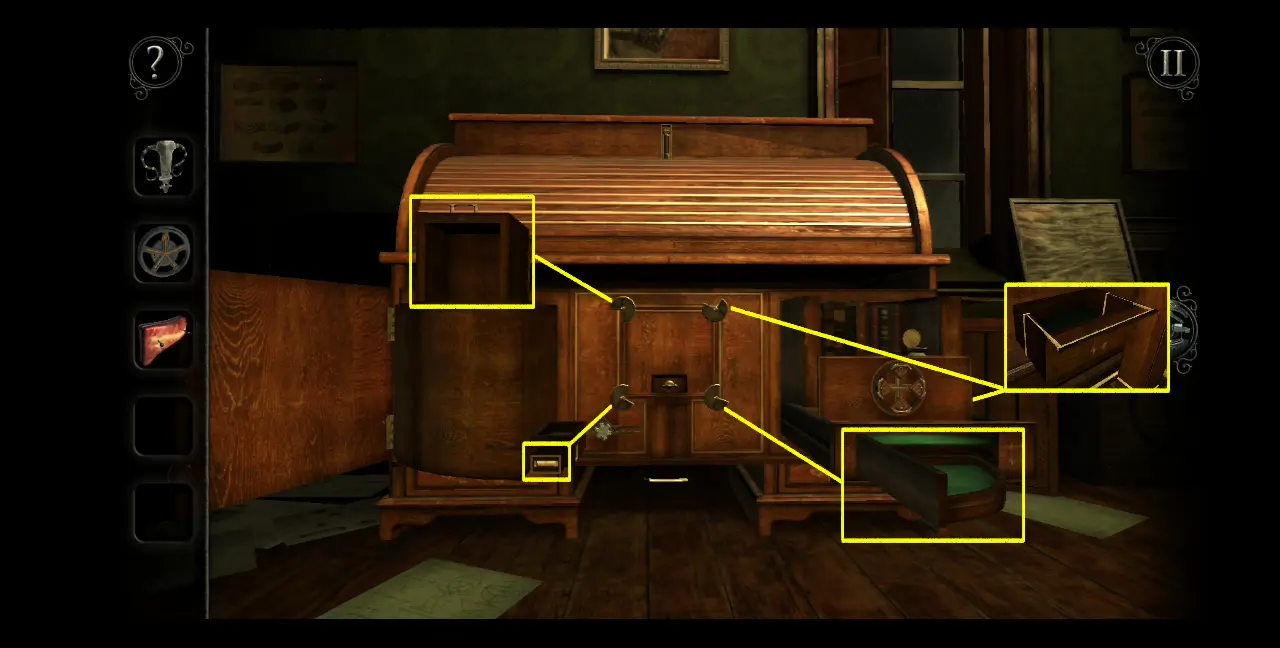
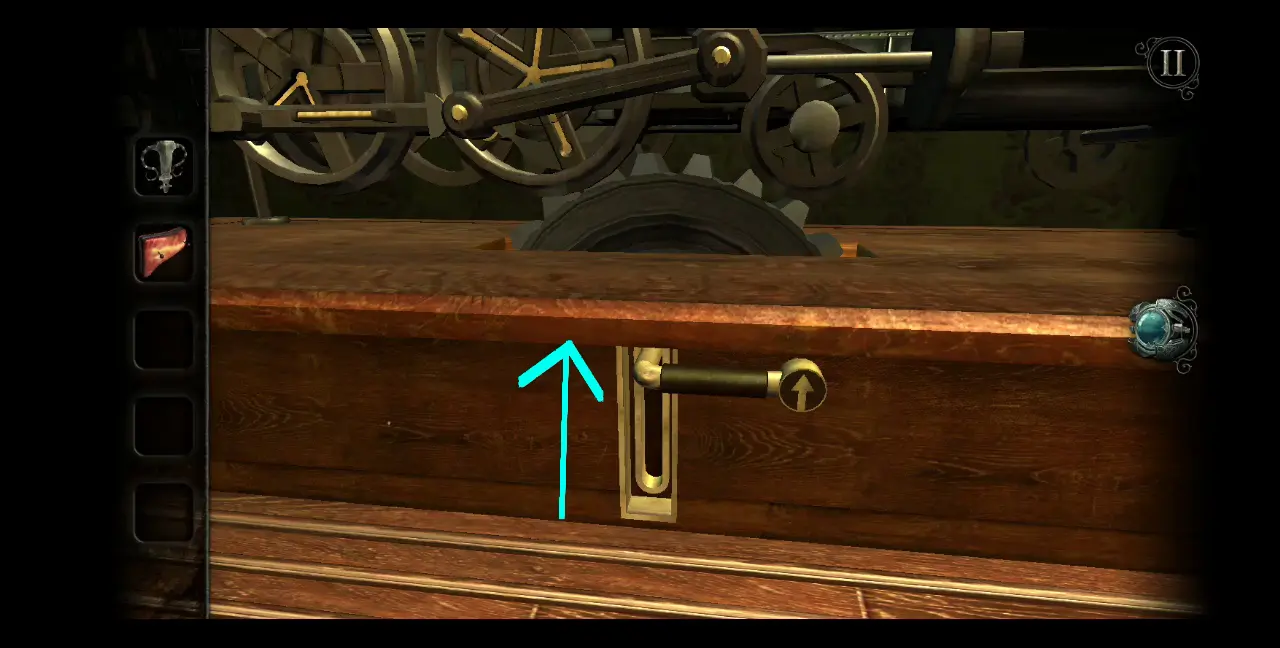
After reading the entry, zoom out of the center area as nothing in it will be useful or activated for the time being. Turn your attention instead to the right of the room, where the wooden roll-top desk is. If you zoom into the roll-top desk, you’ll notice that there’s something to the side, near the bottom.
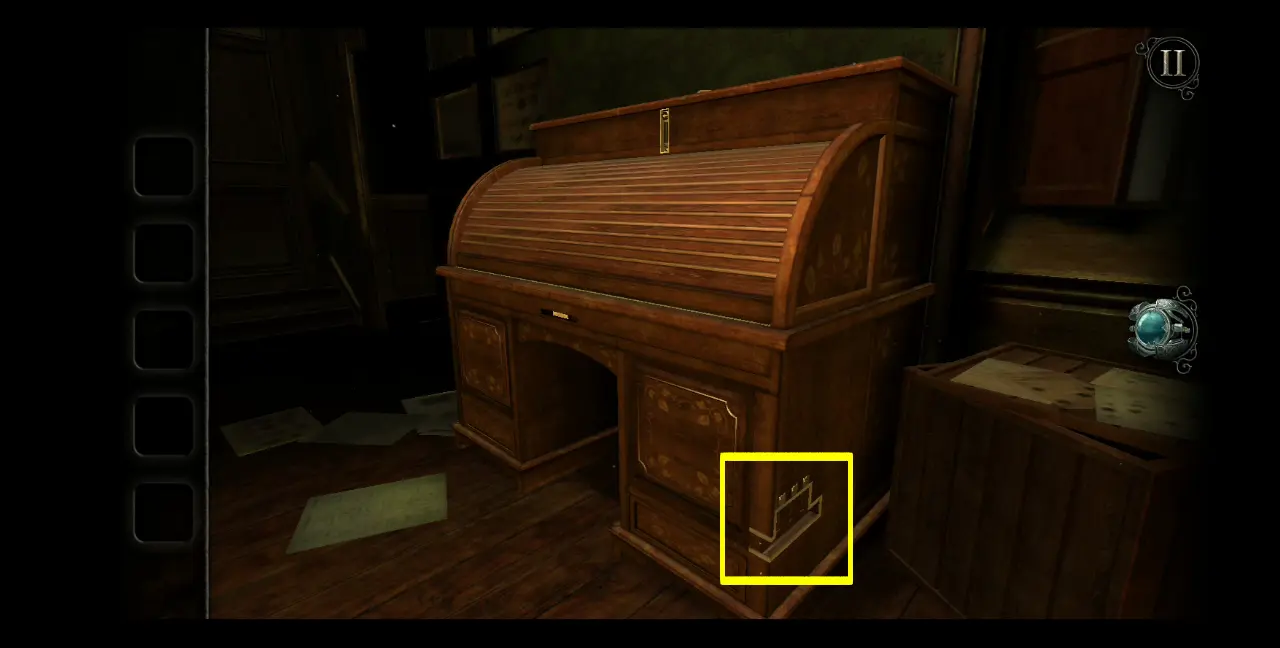
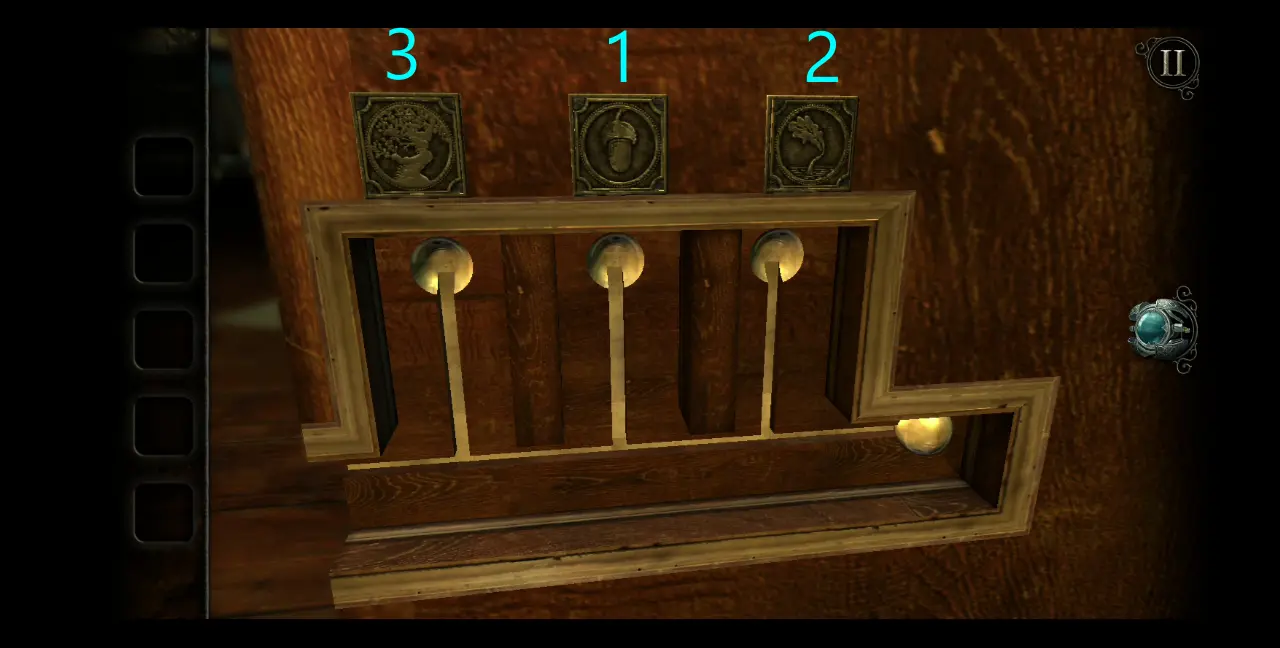
If you take a closer look at this mechanism, you’ll see that it’s a puzzle. How it works is that the circle at the very bottom can move along the lines leading to three different icons. The icon will turn when the circle is moved to it. Below are images to illustrate this.
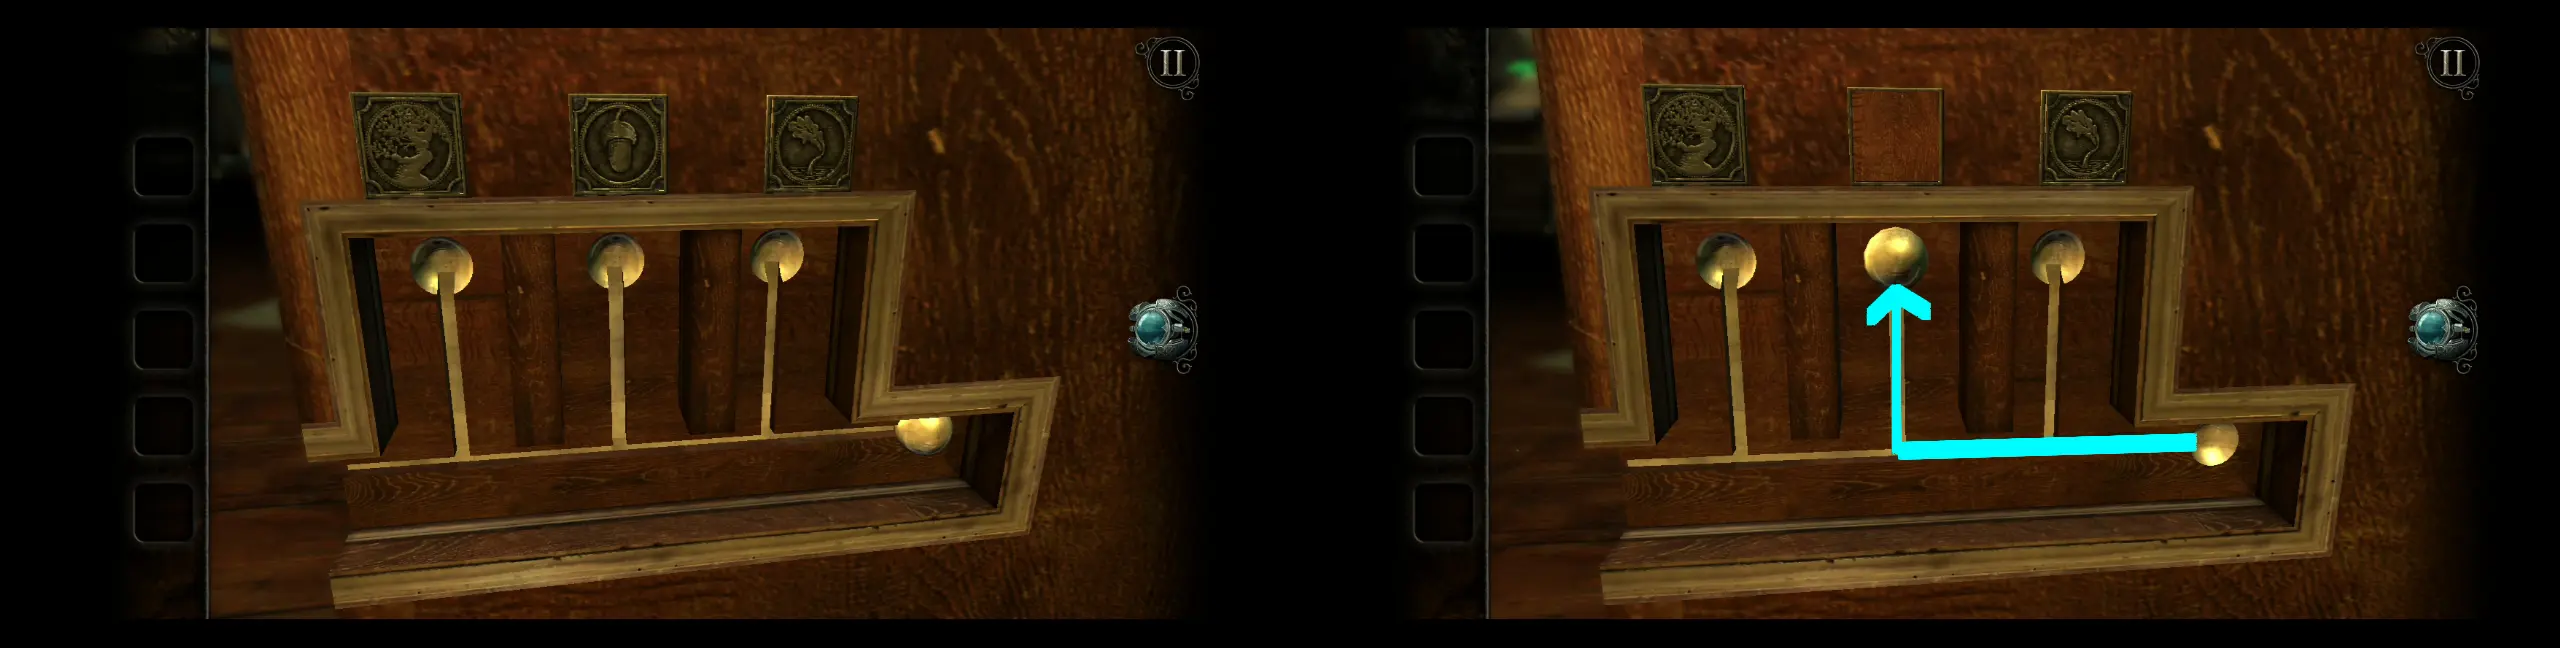
To solve this puzzle, you need to move the bottom circle to each icon in the right order. The icons are a tree, a seed, and a leaf. From here, we can deduce that all these icons pertain to how a tree grows from being a seed. Thus, you need to move the circle to the seed first, then the leaf, then the tree.
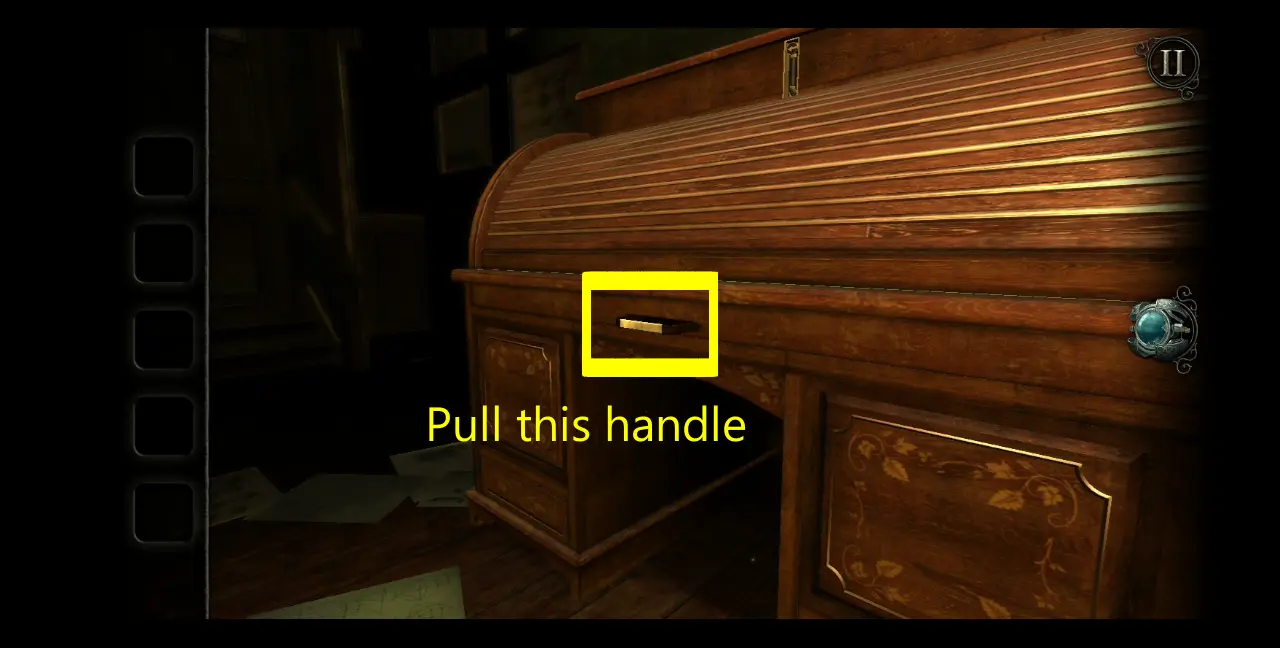
Solving this puzzle will trigger a handle to appear at the front of the roll-top desk. Pull this handle.
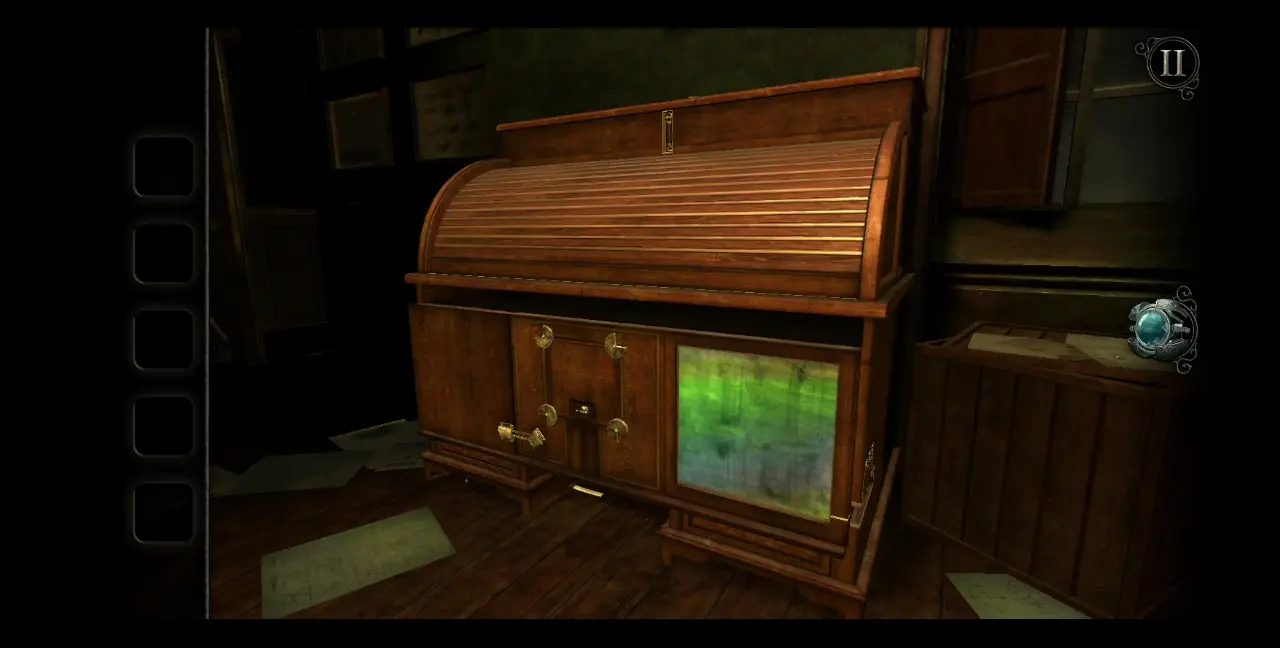
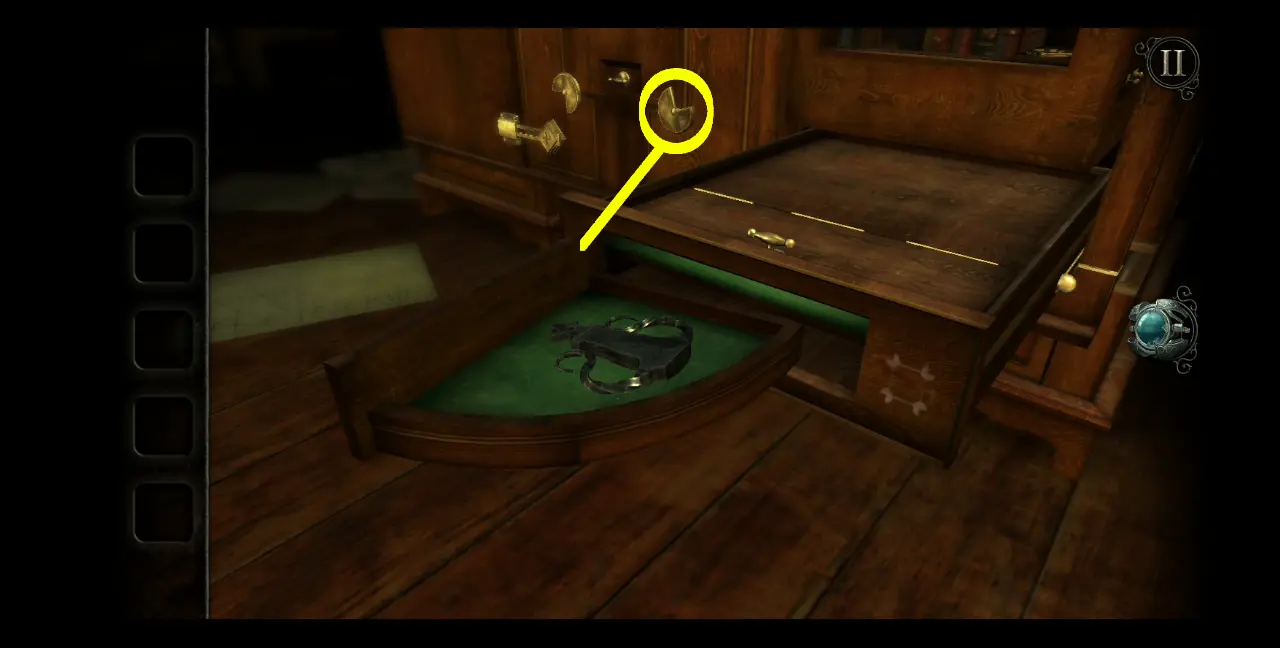
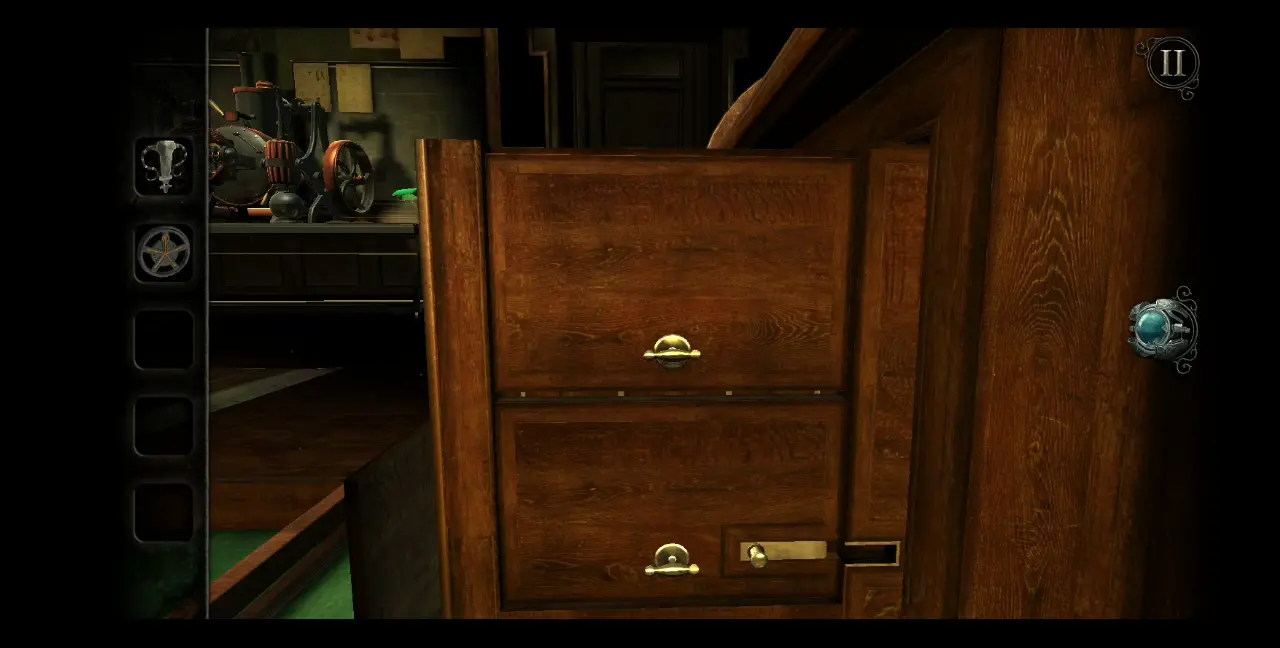
Upon pulling the handle, a hidden compartment in the desk will be revealed. From the get-go, you can see that there’s an area where you need the eyepiece to uncover what’s behind it. There also seems to be a compartment in the middle that is being kept locked by four partial circles in each corner. A bar lock is also keeping the left door of the table firmly closed.
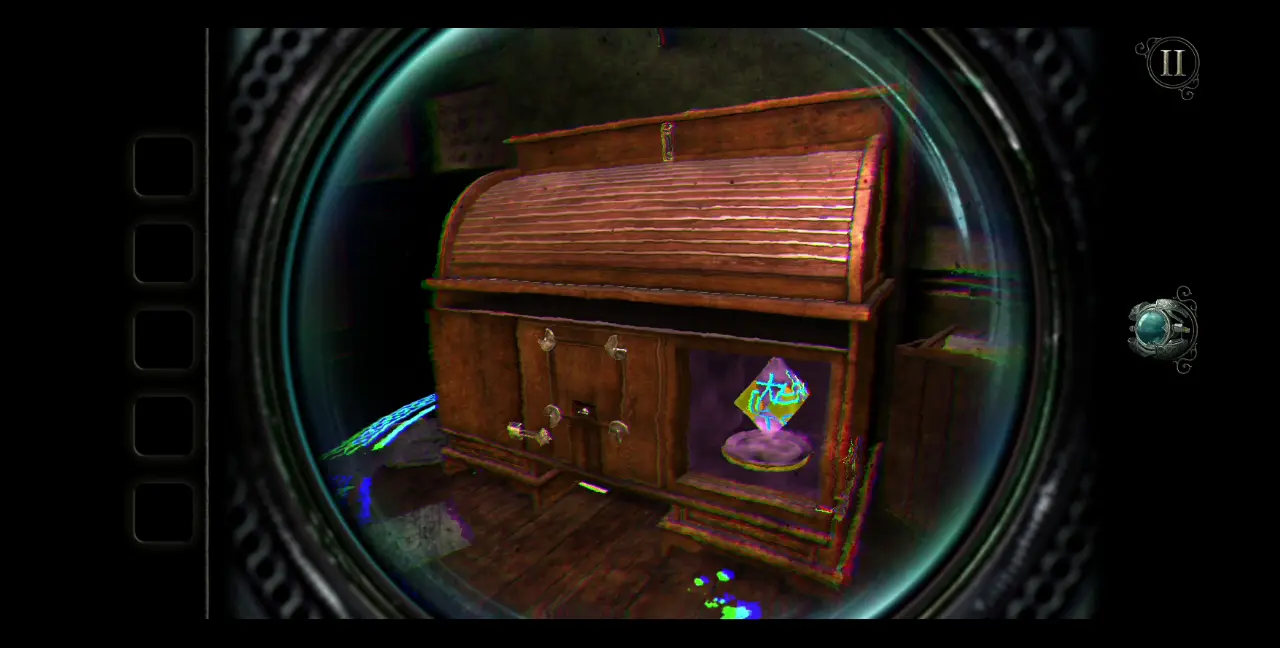
Since the area with the colorful film is the easiest to access, open your eyepiece and take a peek.
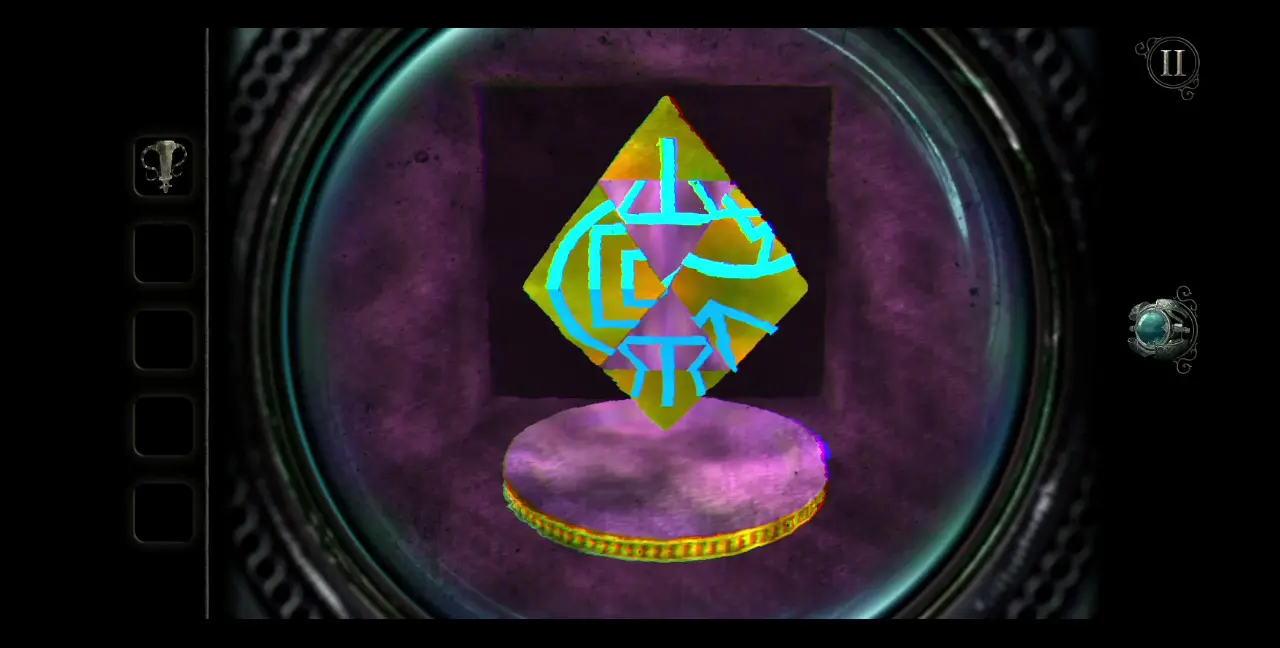
Zoom into that area and you will see what looks like a puzzle, wherein you need to match the appropriate symbols with each other. The yellow pieces are those that you can rotate when finding the right symbols. The dial below the puzzle suggests that the entire shape can be rotated as well, and that there are other symbols on the different sides of the shape.
Since the yellow pieces can be moved, it follows that the symbols on the blue pieces are constant. Thus, the correct symbol from the yellow pieces should match those in the blue ones. There are three puzzles all in all and pictured below are the correct symbols for each one:

Once this puzzle is solved, that area will return to looking like a normal compartment in the table. Consequently, a drawer will open.
If you zoom into the drawer, you’ll see that it has a knob that’s meant to open a part of the drawer.
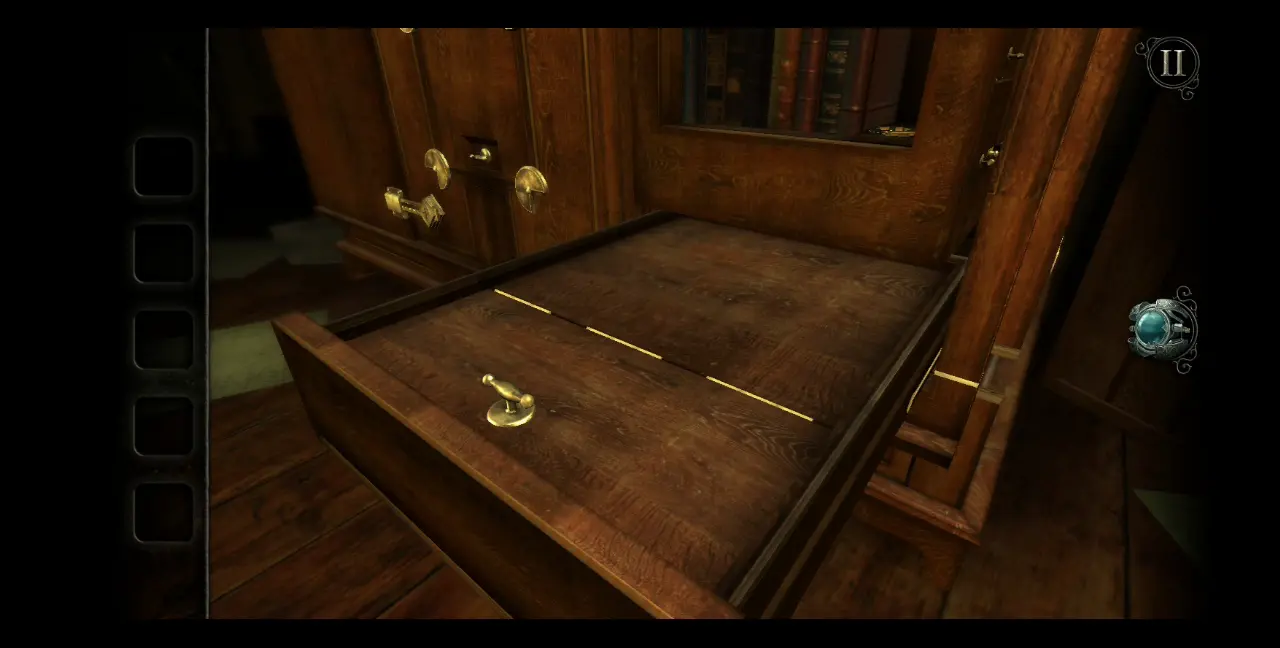
Zoom out of this area first and direct your attention toward the side of the roll-top desk, where you first solved the puzzle involving the three symbols pertaining to the growth cycle of a tree. The same circle that you used to select the three symbols can now be moved to follow the path leading to the newly opened drawer. Thus, move the circle through this path to unlock the drawer.
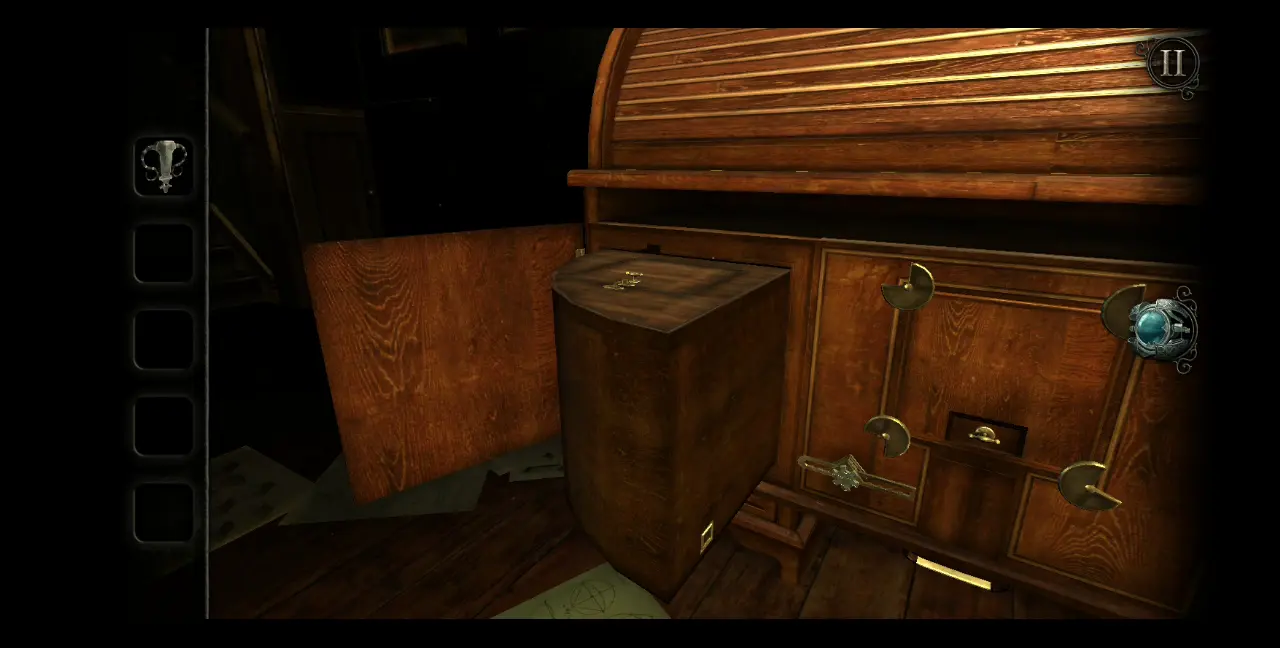
However, the part of the drawer that will be opened is another compartment in the shape of a quarter circle. One thing you will notice is that moving this quarter circle part of the drawer will also move one of the circular locks in the middle of the desk.
Additionally, there’s an item inside this compartment that you can collect: a fire steel.

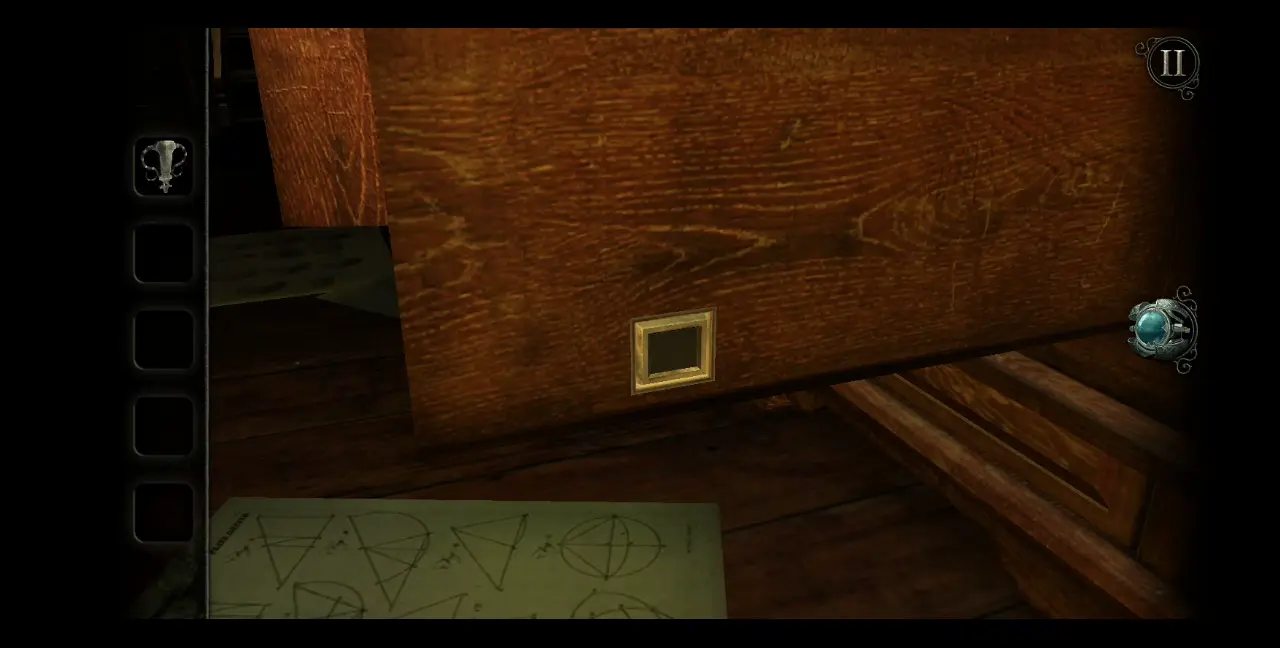
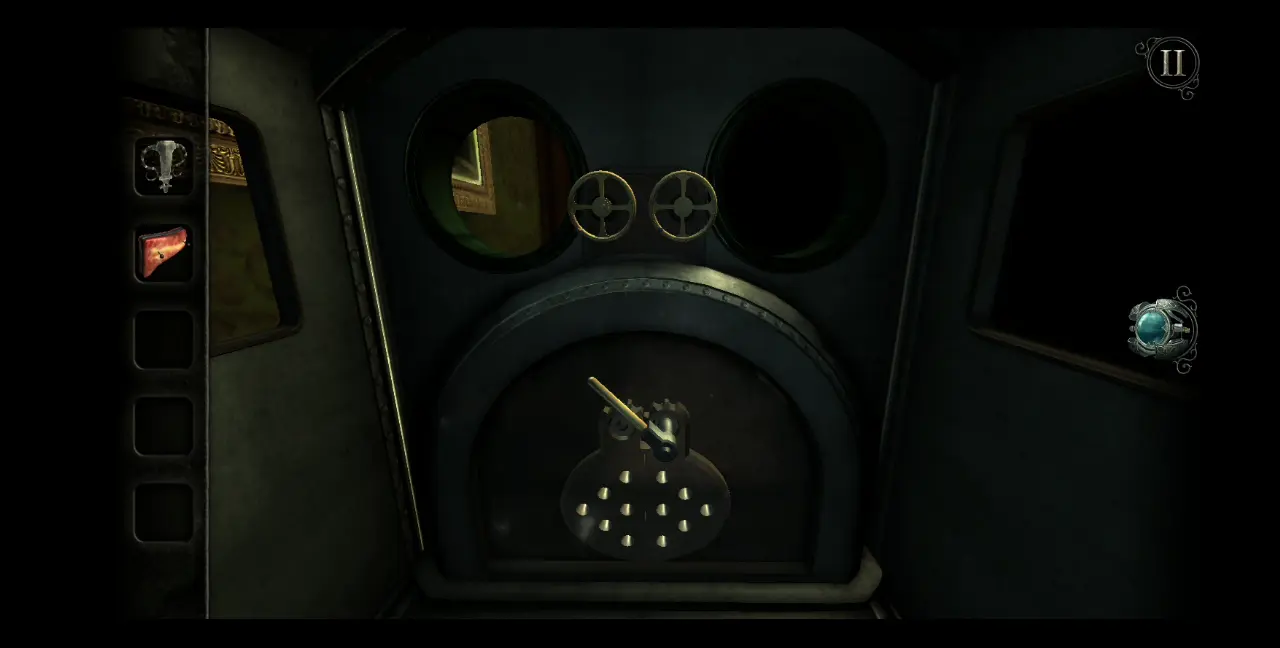
Since the only other part of the drawer you can open is the one with a knob at the top, pull the knob, which will reveal a circular dial with a cross and four protrusions. However, it looks like it’s missing an item to fit this shape.
If you look around the table, you will also find another slot with a missing item, specifically in the area just above the drawer, where several books are lined up. File this information away for later.

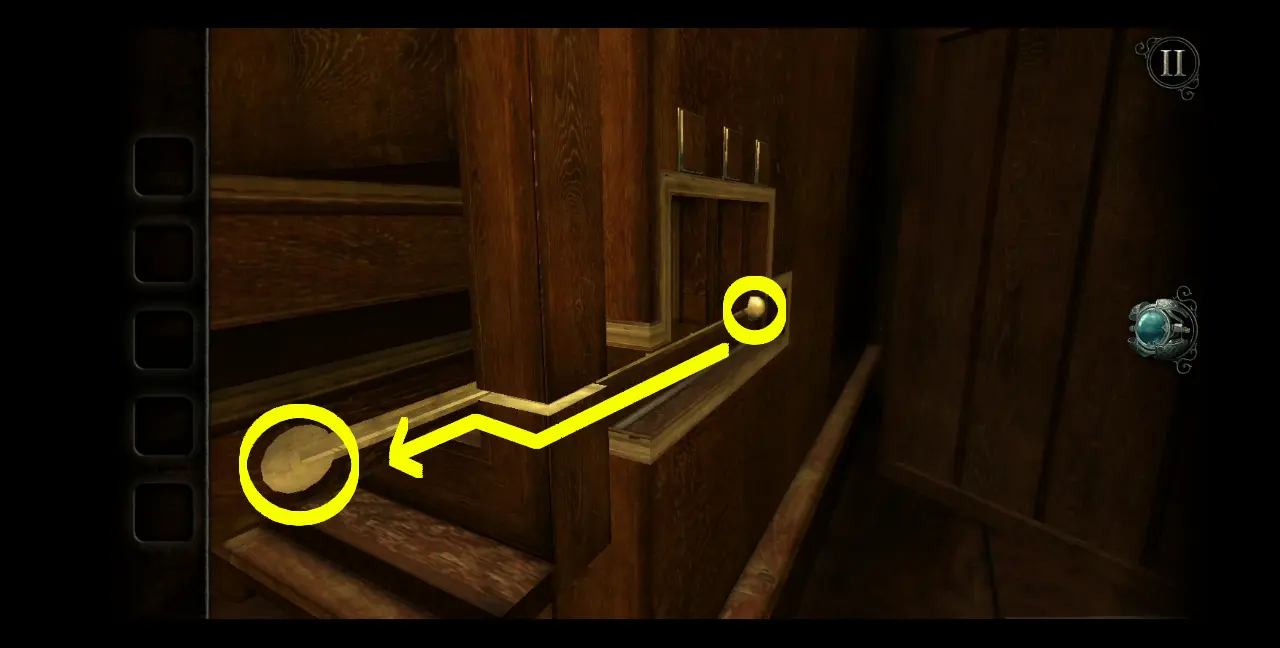
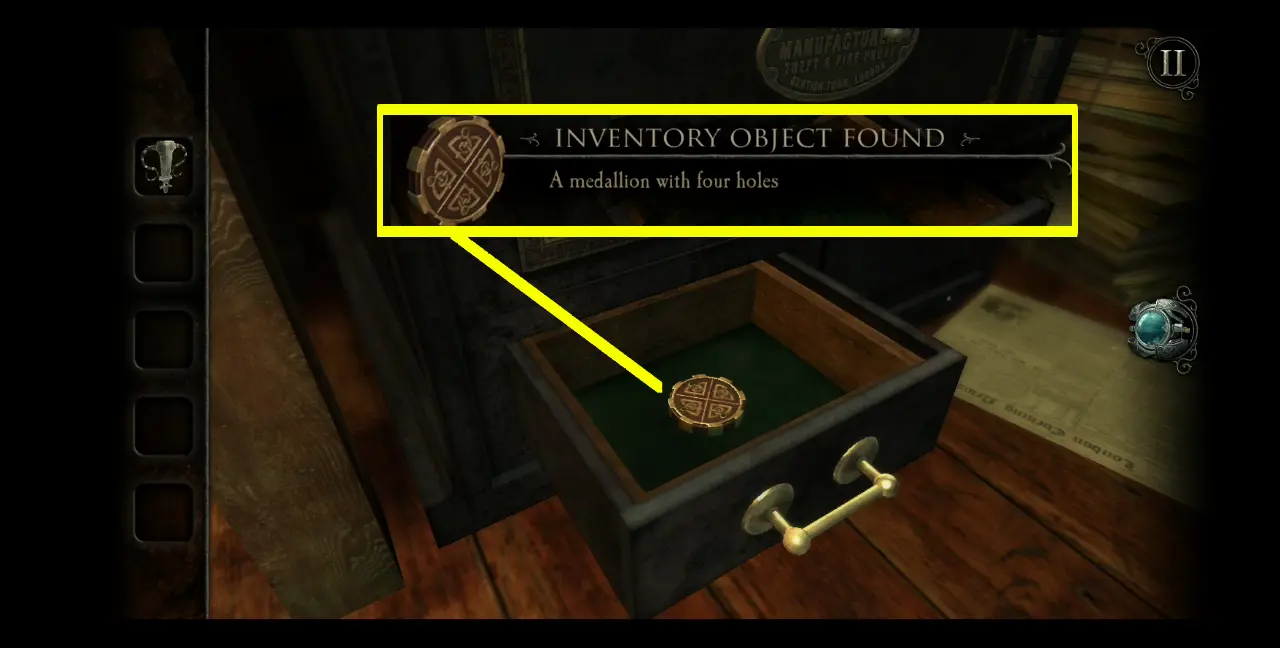
Because there’s nothing else to find within the vicinity of the roll-top desk (for now), you might have some luck further exploring the Study. This part is rather easy to miss, but if you look to the left side of the Study, which contains the devices related to air pressure, you’ll see that there’s a black safe beside the long table, near a stack of papers. On top of this black safe is a mechanism with two metal balls suspended from some kind of rotating implement. Looking closely at this black safe, you’ll notice that at the very bottom is a gold handle connected to a small drawer.
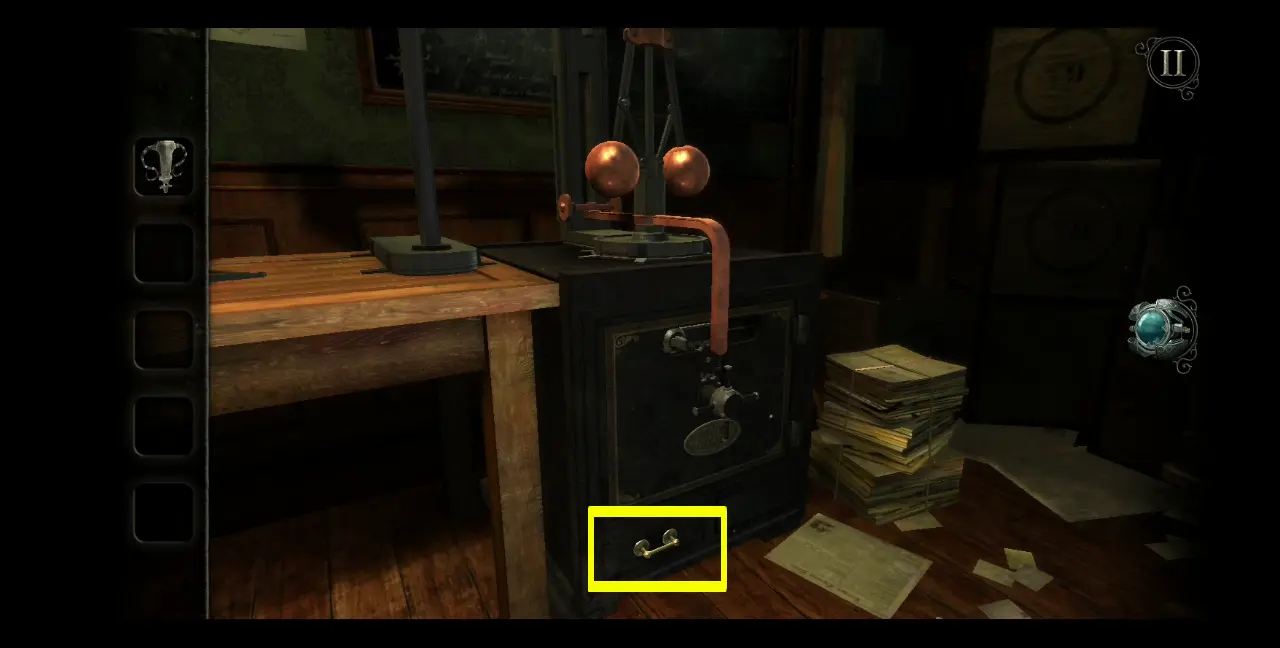
Zoom into this part and pull the handle to open the drawer. Inside, you will find a new item: a medallion with four holes.
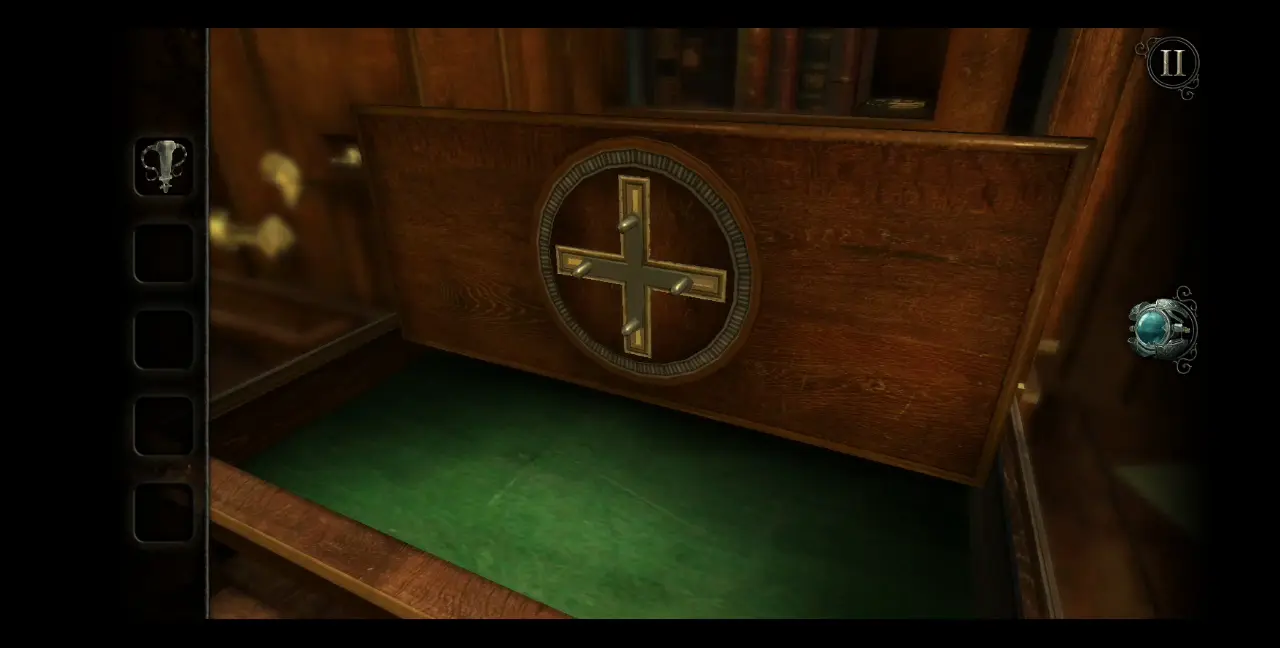
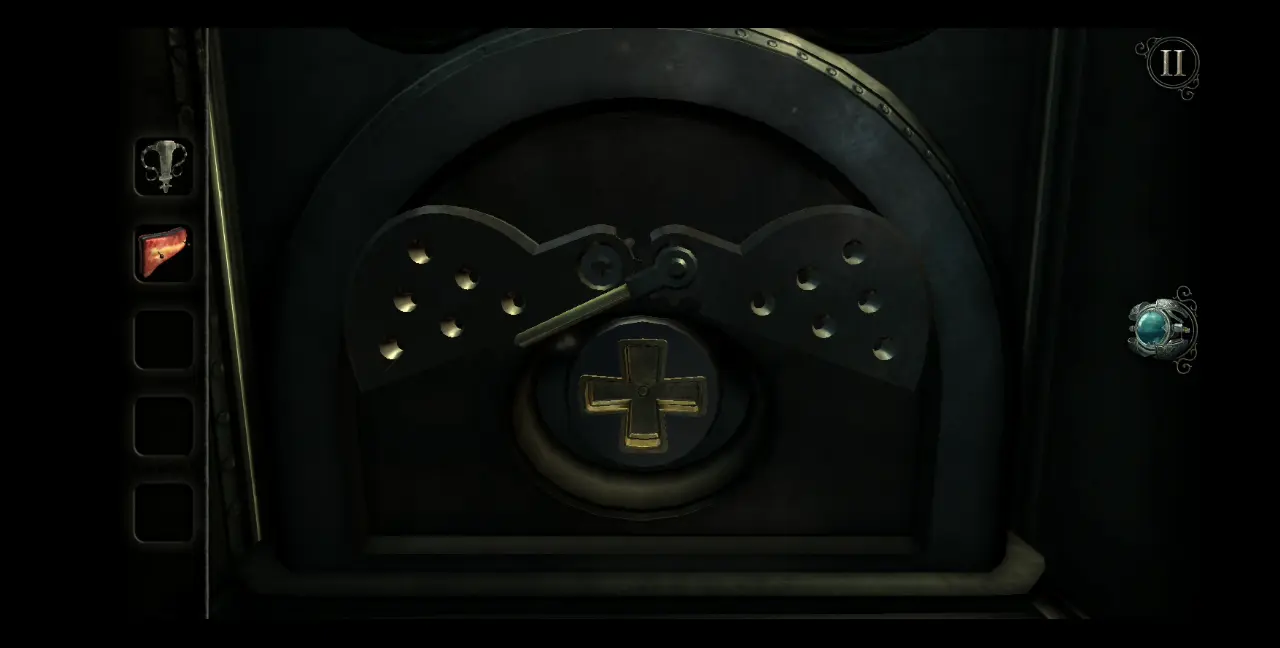
With this, we can return to the roll-top desk on the right side of the Study. Place the medallion on the cross-shaped slot with four protrusions.
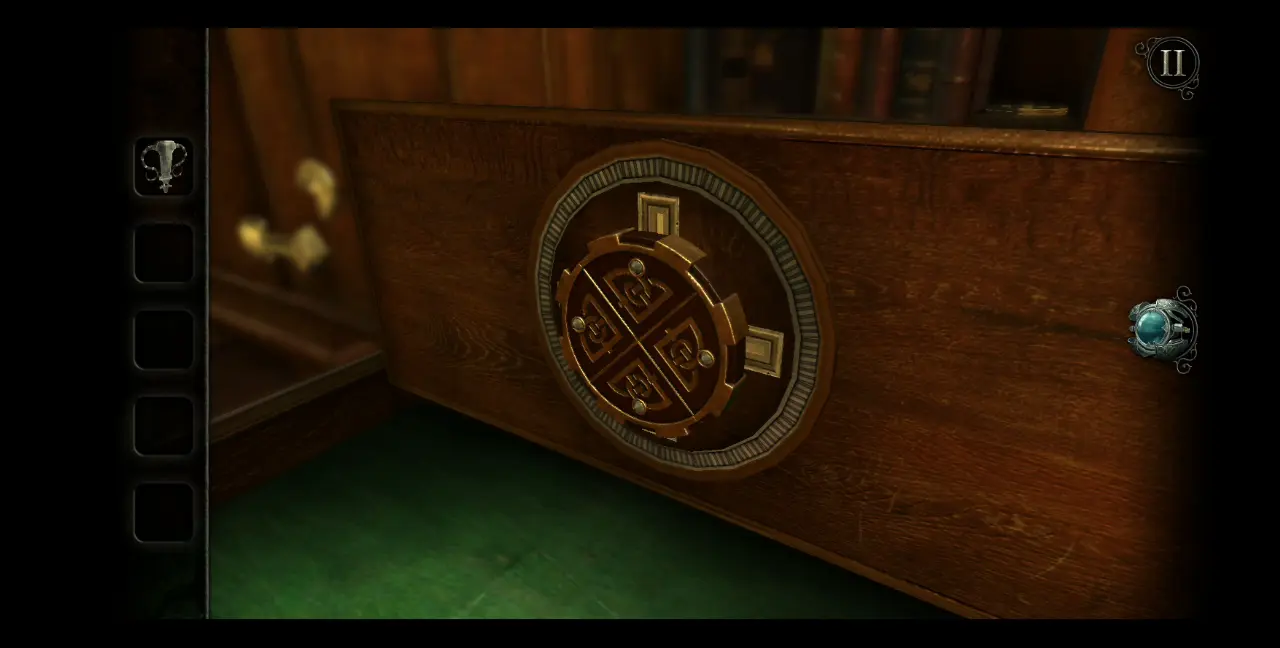
This won’t trigger a reaction yet, so turn the dial, which will cause the medallion to separate into four pieces, revealing another item inside: a shaped metal piece.
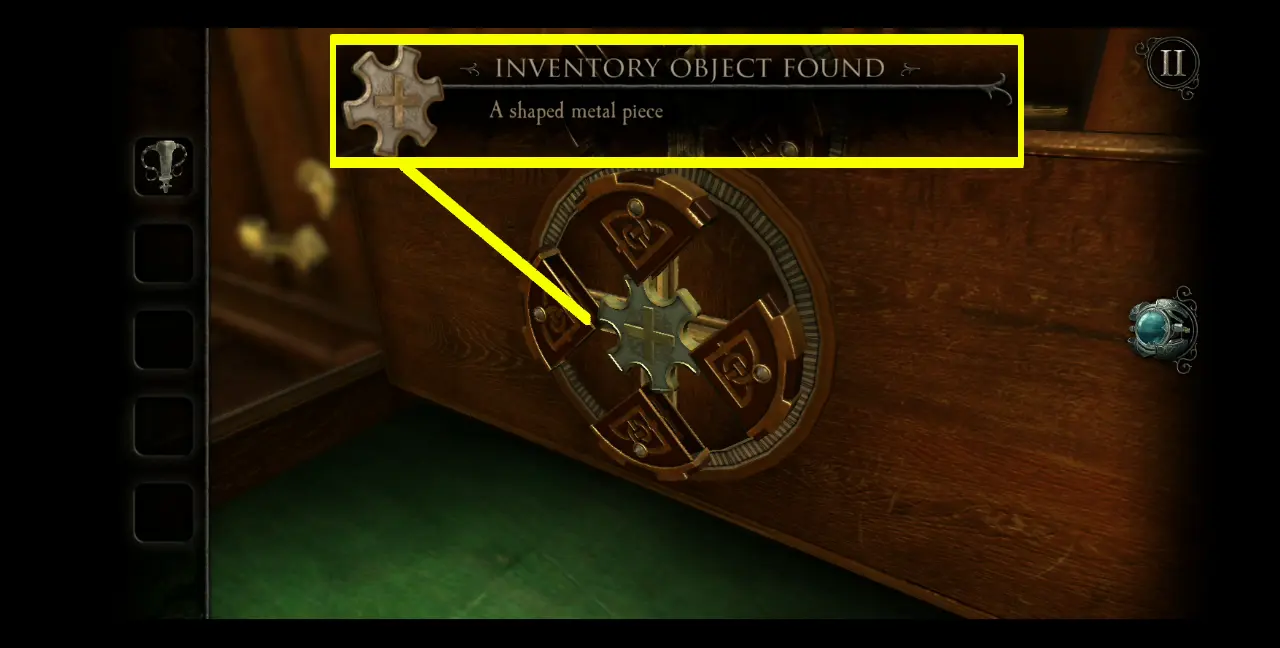
Viewing the item from your inventory, you’ll see that the back portion of the piece has a protrusion shaped like a cross. This fits perfectly with the bar lock found on the left side of the desk. Thus, place the shaped metal piece on the slot of the bar lock.
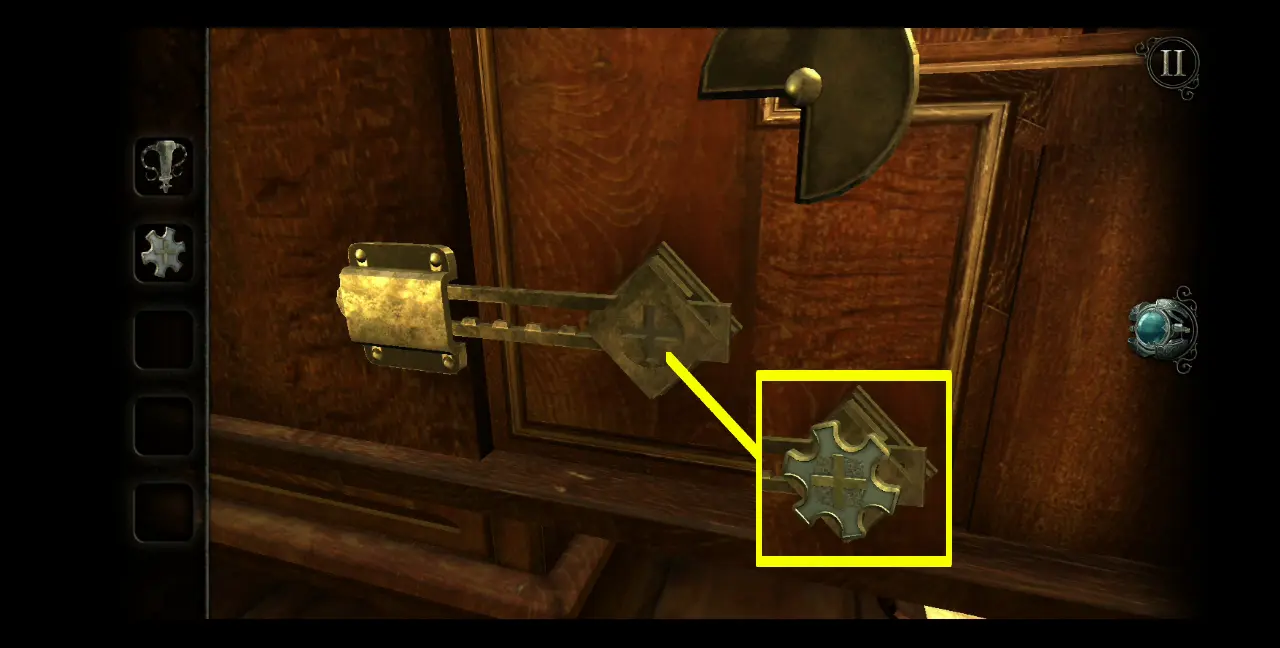
With the metal piece firmly in place, turn the lock to move the metal bar.
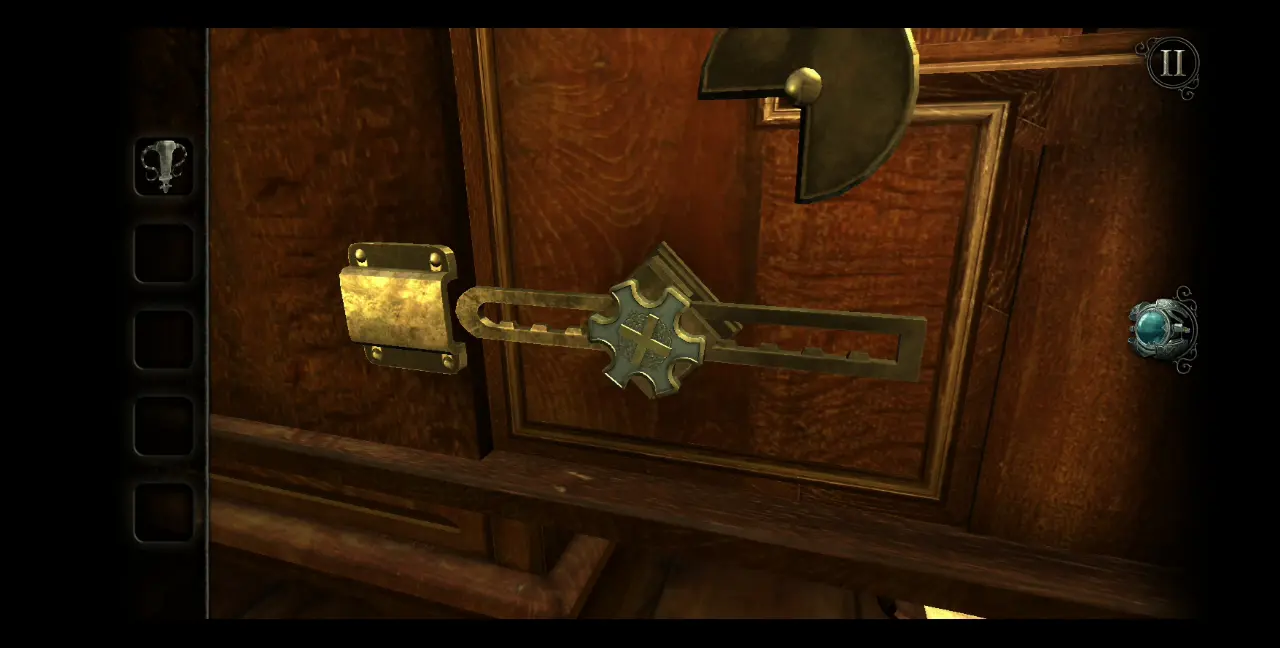
The door to the left will open slightly, allowing you to swing it open. Inside is another colorful film that requires the use of your eyepiece, similar to the puzzle you’ve solved earlier with the rotating shapes and symbols.
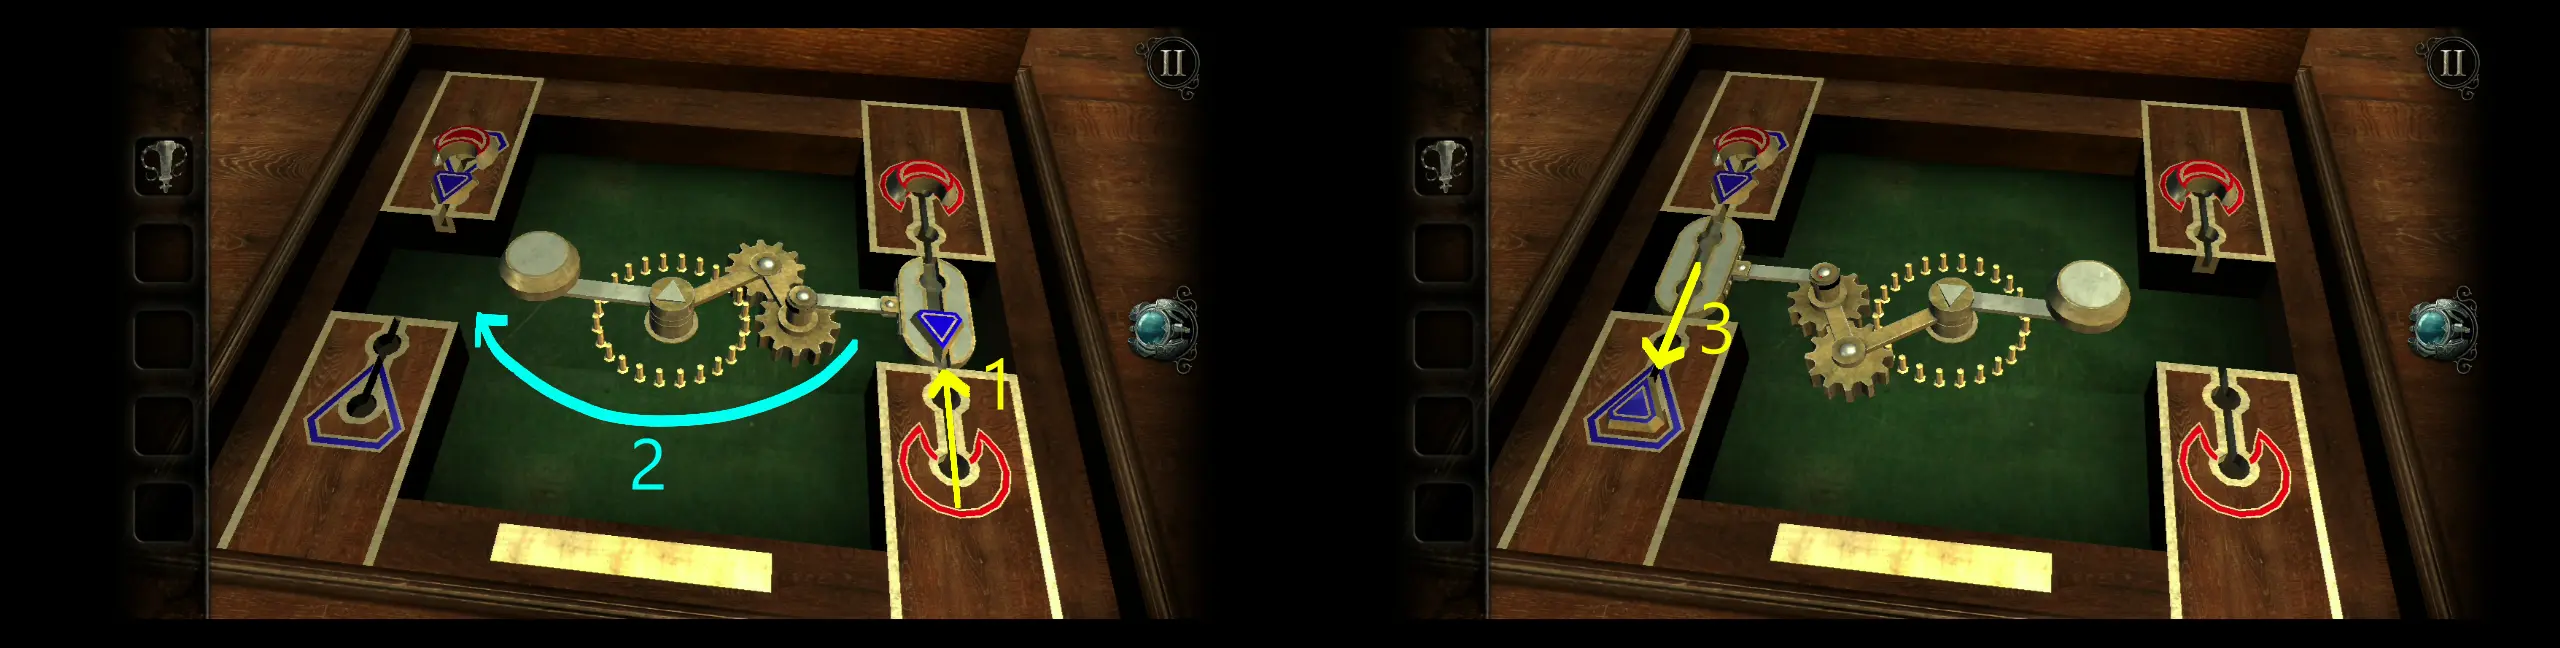
Zoom into this area and, indeed, you will find a similar puzzle, but now with 4 movable shapes instead of two.
Pictured below are the three correct symbols for the three puzzles in this area:

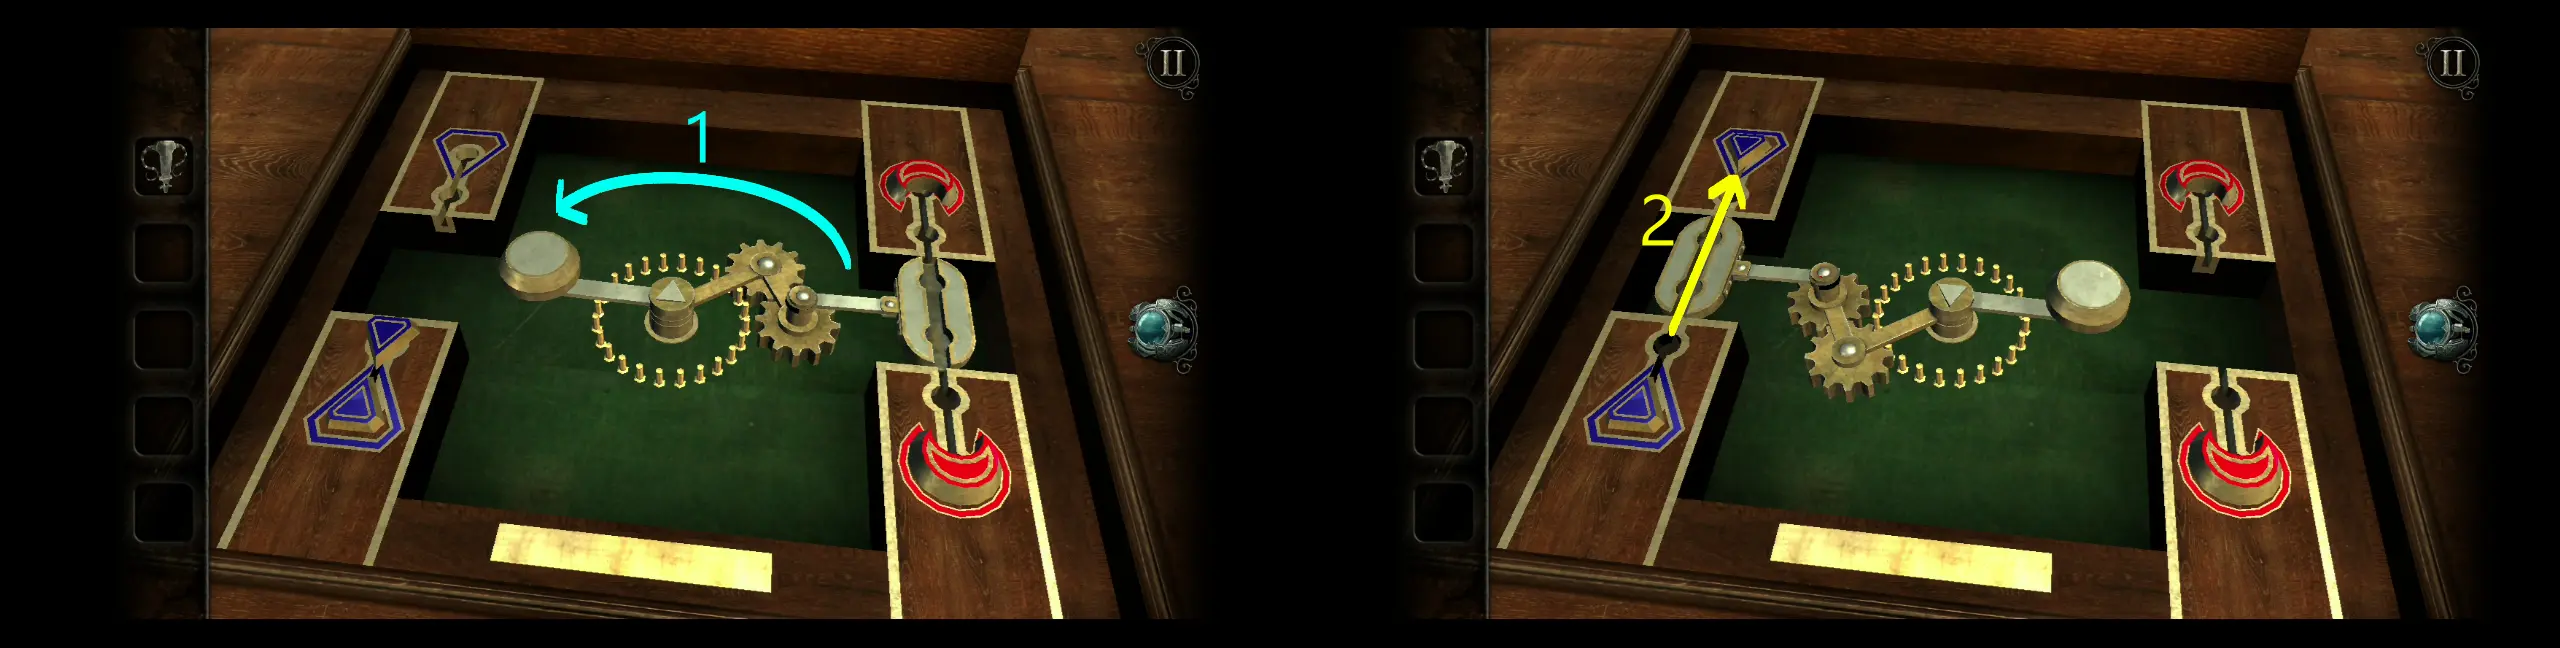
With the puzzle solved, this area of the desk will return to normal, revealing a new compartment shaped into another quarter circle.
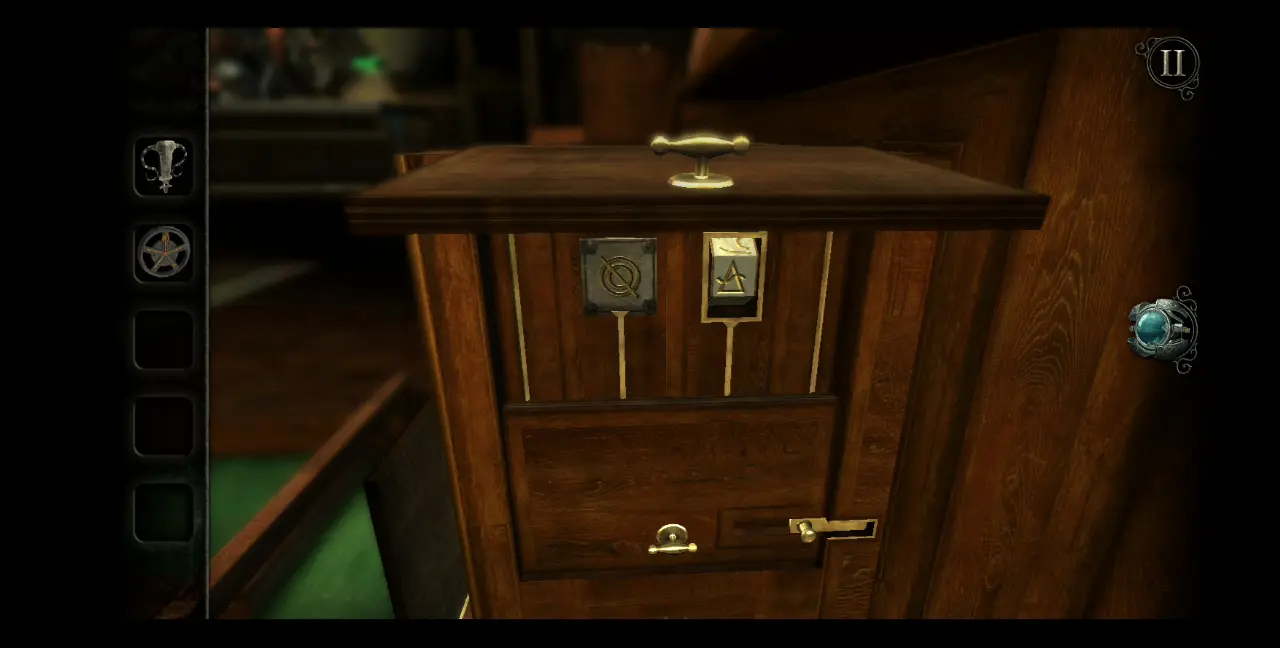
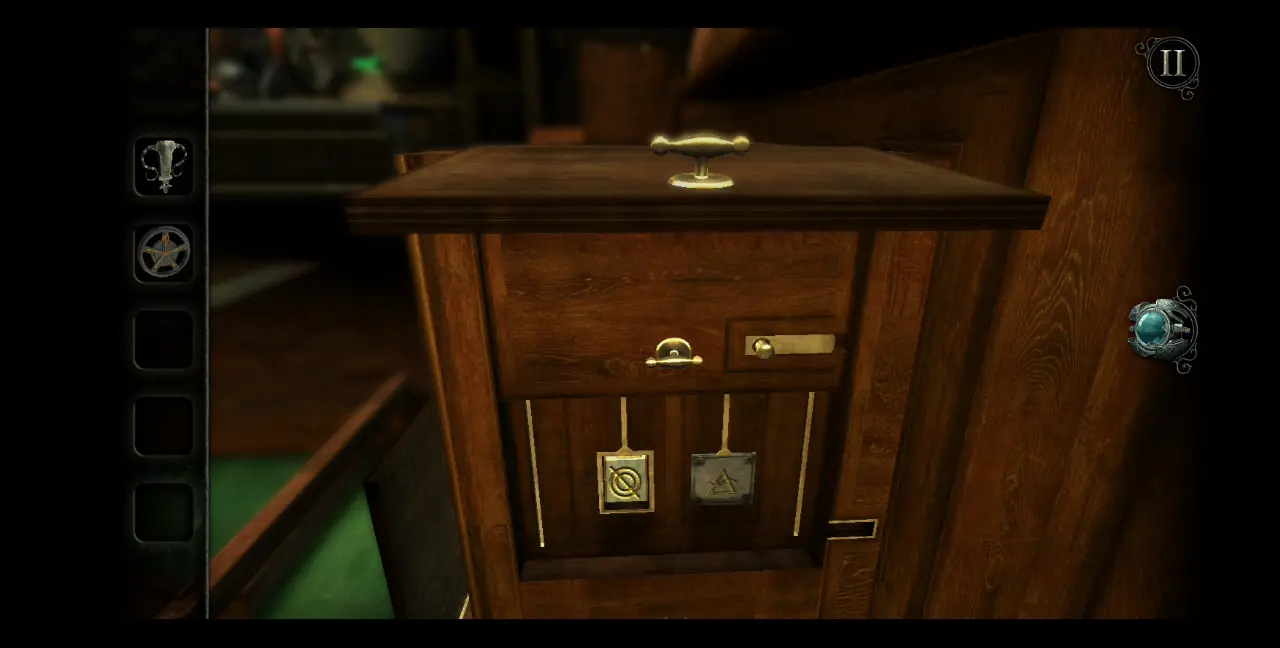
Zoom into the bottom part and click the square button.
This will open up a smaller compartment. Click the two small cylindrical buttons at the top.
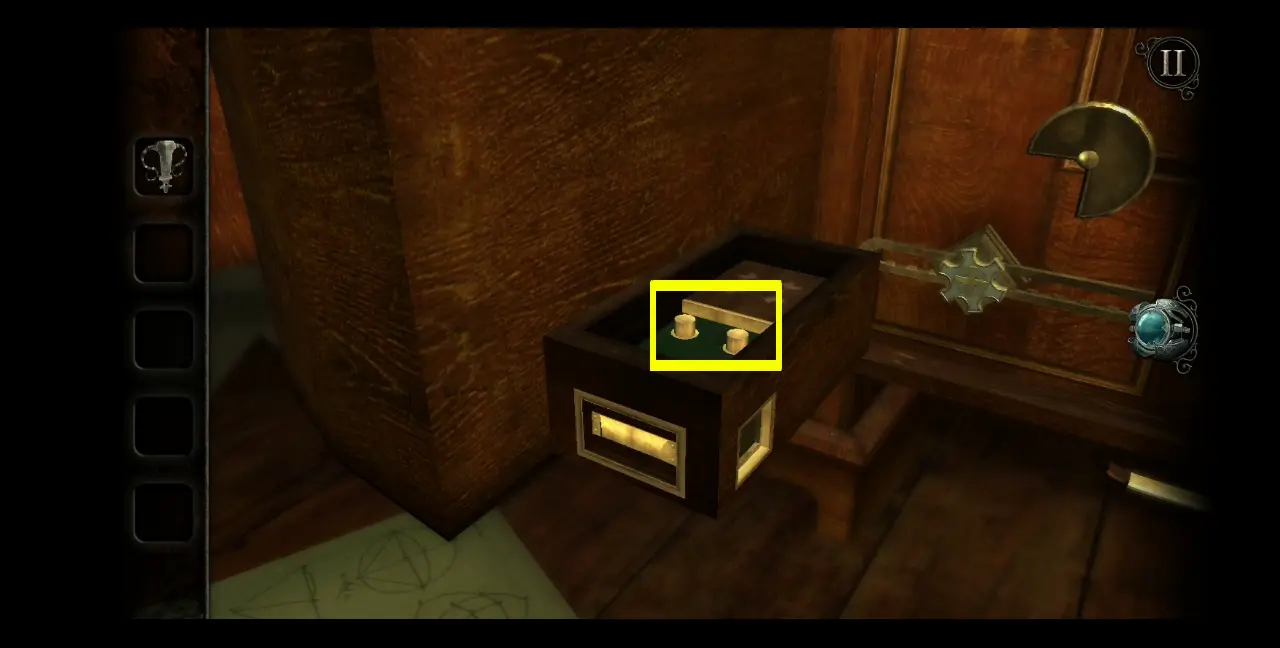
Open the smaller drawer. You’ll notice that moving this smaller drawer will also move the circular lock holding down the middle compartment.
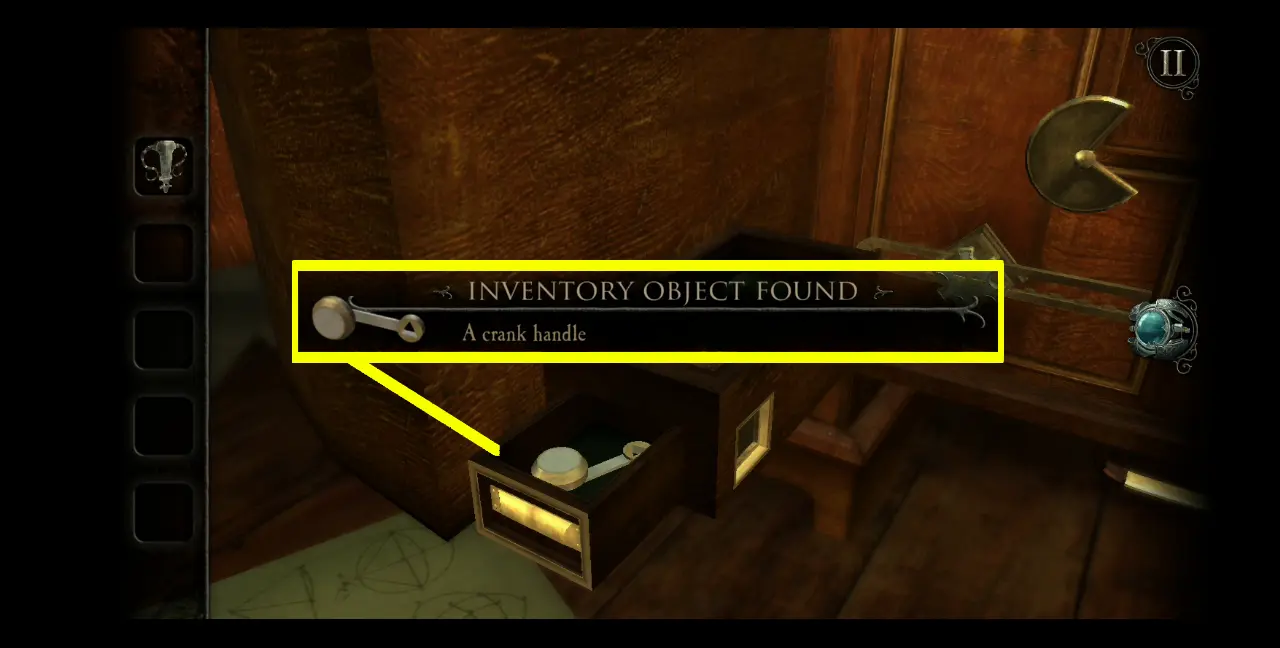
Of course, inside this small drawer is another item: a crank handle.
After collecting the item, turn your attention toward the top of the quarter circle drawer. Flip the lock down.
Open the top and you will see this new puzzle:
Place the crank handle in the middle of the puzzle. The crank handle will connect to the gray movable slot to the right.
At the four corners of this puzzle, you’ll see that there are four movable pieces: two red moons and two blue triangles. On the panels on either side of the puzzle are markings for two red moons on the right and two blue triangles on the left. What you need to do is to match the puzzle pieces with their respective markings.
To do this, you need to place pieces on the gray slot connected to the crank arm. However, keep in mind that the crank arm rotates, meaning the pieces you placed on the gray slot will turn upside-down by the time they reach the opposite side. For instance, if you place an upright triangle on the gray slot and turn the crank handle to move it to the opposite side, the upright triangle will become an upside-down triangle.
Here’s how to solve this puzzle:
First, bring the upright triangle to the gray slot, then turn the handle, placing it on the opposite side. Now, the triangle is upside-down. Move it up to the top slot, just below the arch crescent moon.
Next, move the U-shaped crescent moon up to the gray slot. Turn the handle to bring it to the opposite side. Move the piece upward, effectively setting it to its corresponding marking.
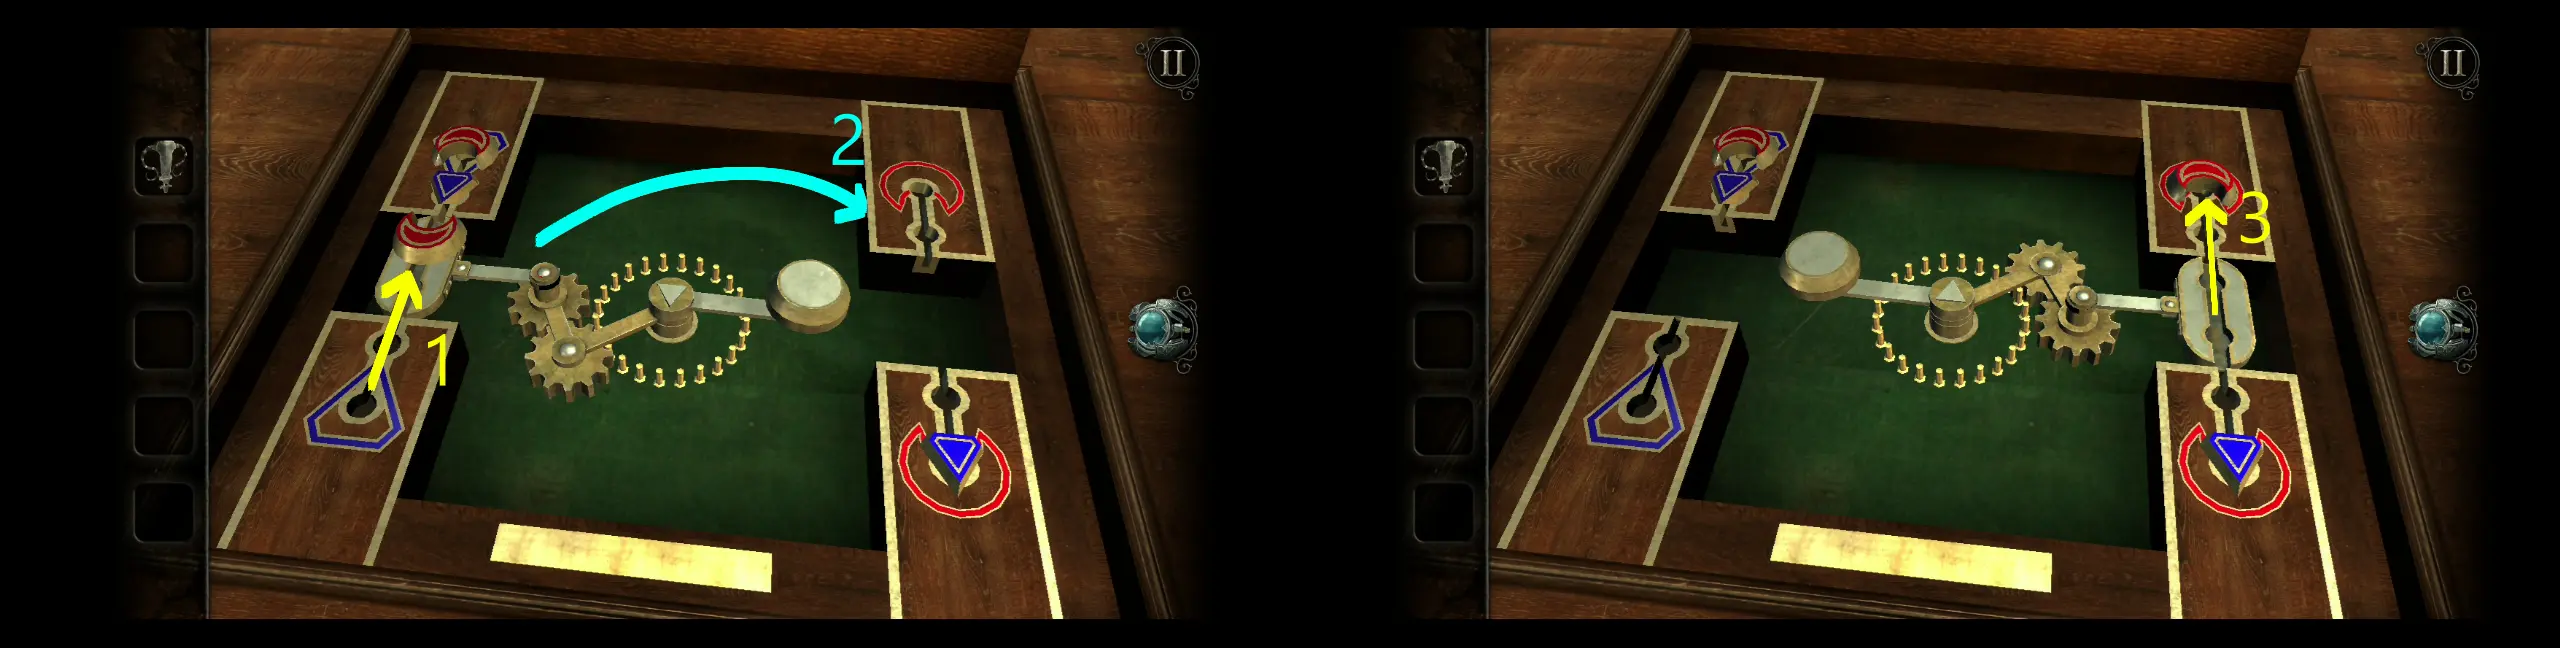
Move the upside-down triangle up the gray slot and turn the handle to bring it to the opposite side. Move the now upright triangle down, setting it on its corresponding marking.
Bring the upside-down triangle down from the top panel. The two triangles should now be facing each other on the bottom panel. Bring the arch crescent moon down the gray slot and turn the handle to bring it to the opposite side. Move the now U-shaped crescent moon downward, setting it to its corresponding marking.

Finally, turn the crank handle and bring the gray slot to the opposite side. Use this to move the upside-down triangle upward, setting it to its corresponding marking.
With this puzzle solved, a handle will spring up from the compartment. Pull the handle up to reveal another compartment, which has a new item in it: a part of a model well.
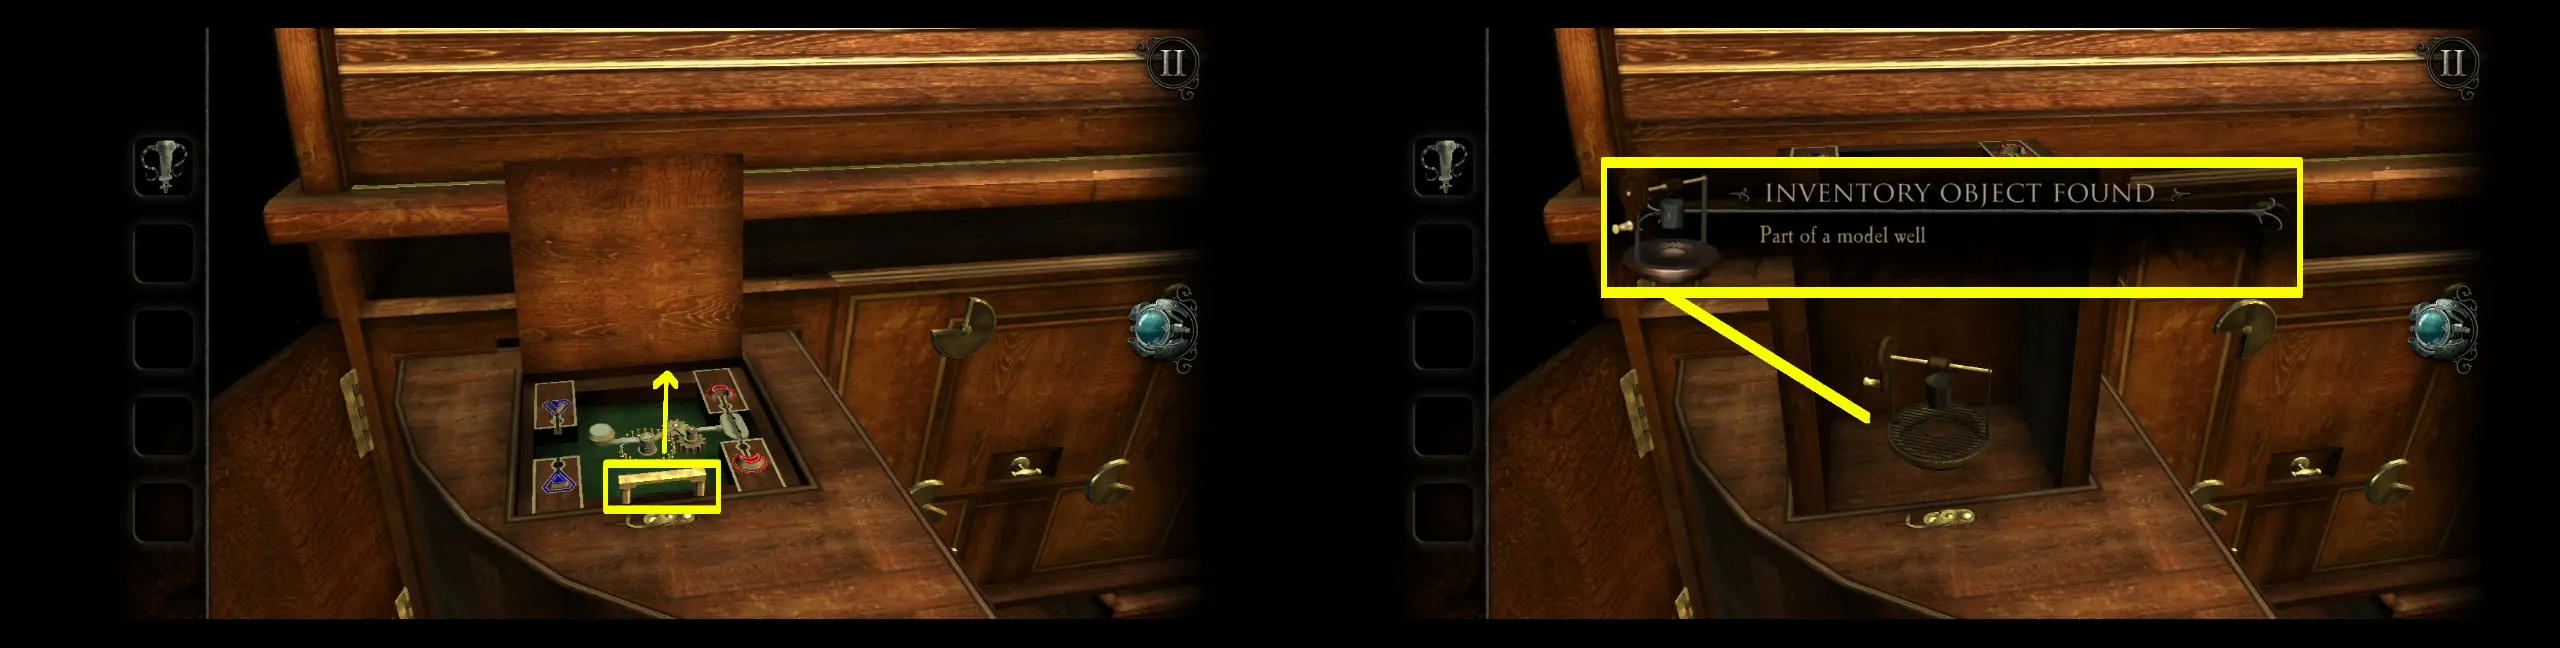
Given the name of the item, it’s easy to deduce where it should be placed. Since wells are usually found outside old houses, leave the Study first and head to the backyard. You’ll see a familiar hole there that’s the same color as the model well part. Place the model well part there.
If you turn the handle of the well, you’ll notice the wall behind it moving as the small bucket is being dipped down the well.
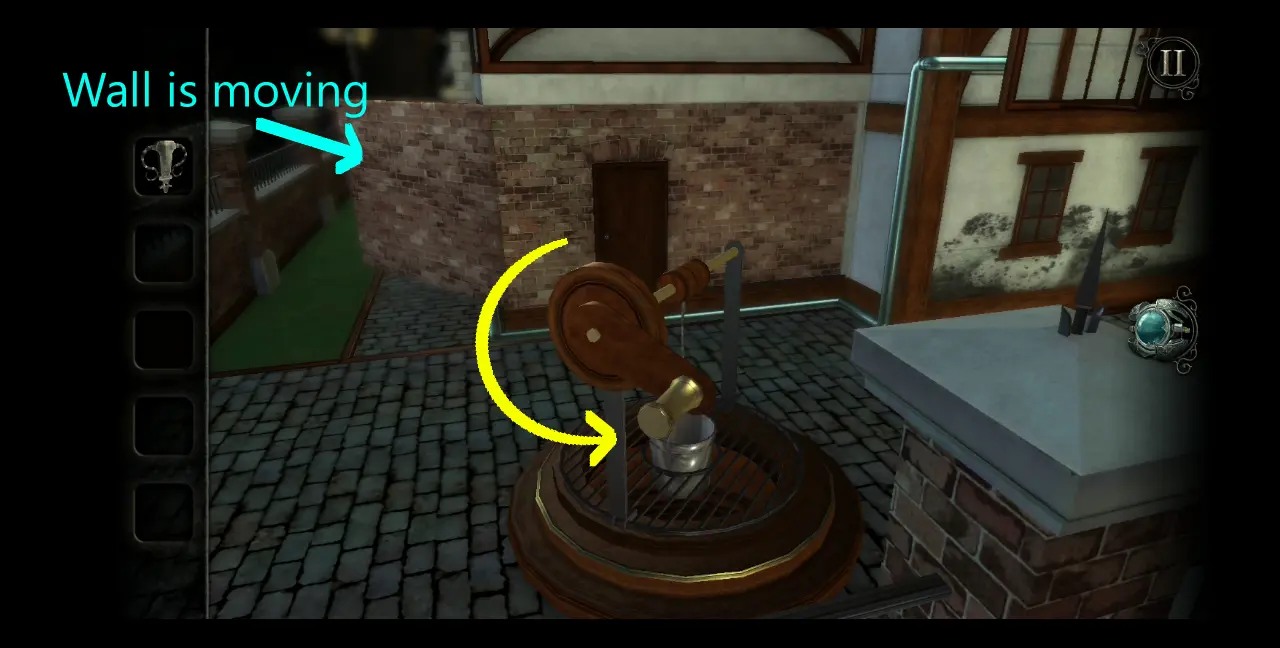
The wall will then retract, opening a new room for you to access.
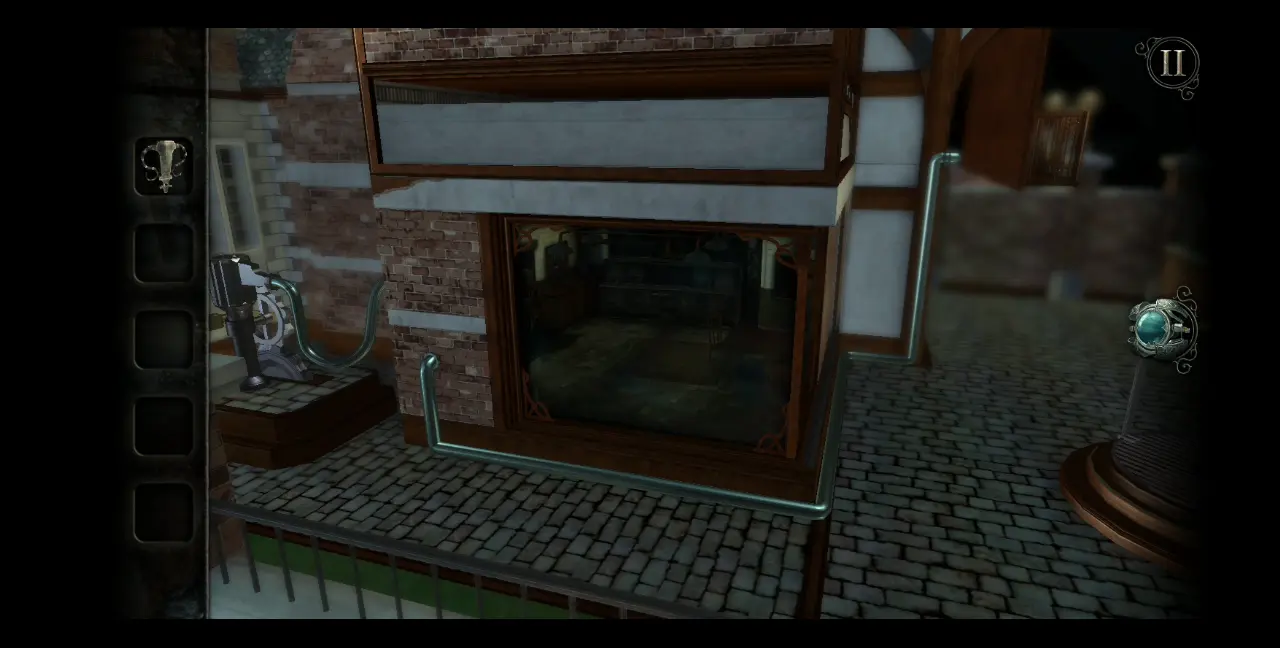
As usual, use your eyepiece to view the seal so you can enter. This new room is the Kitchen.
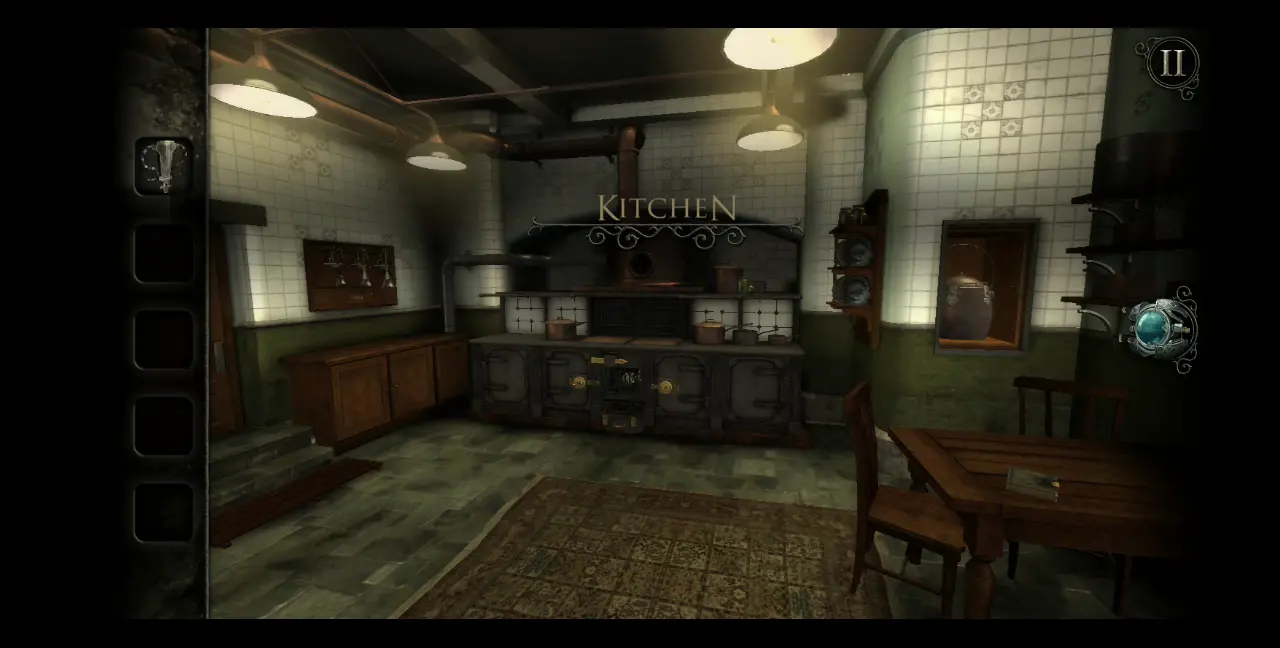
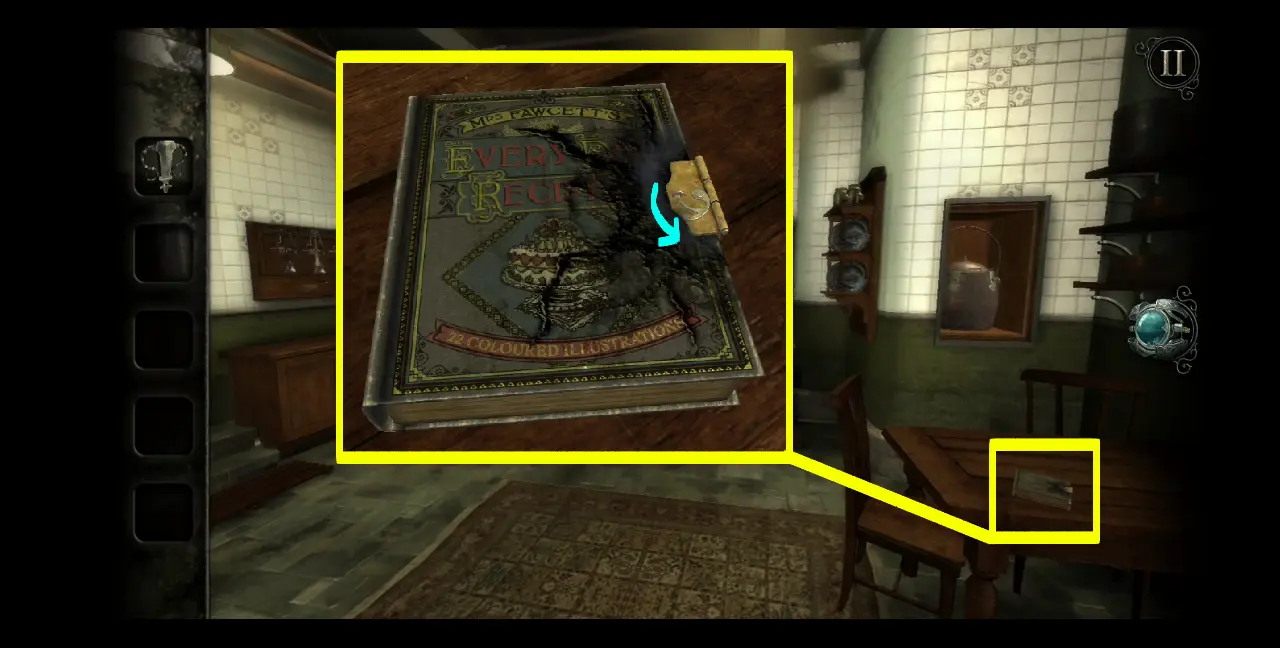
The first thing you’ll notice lying around the table to your right is a book called Mrs. Pawcett’s Every Day Recipes. As always, flip the lock to open the book.
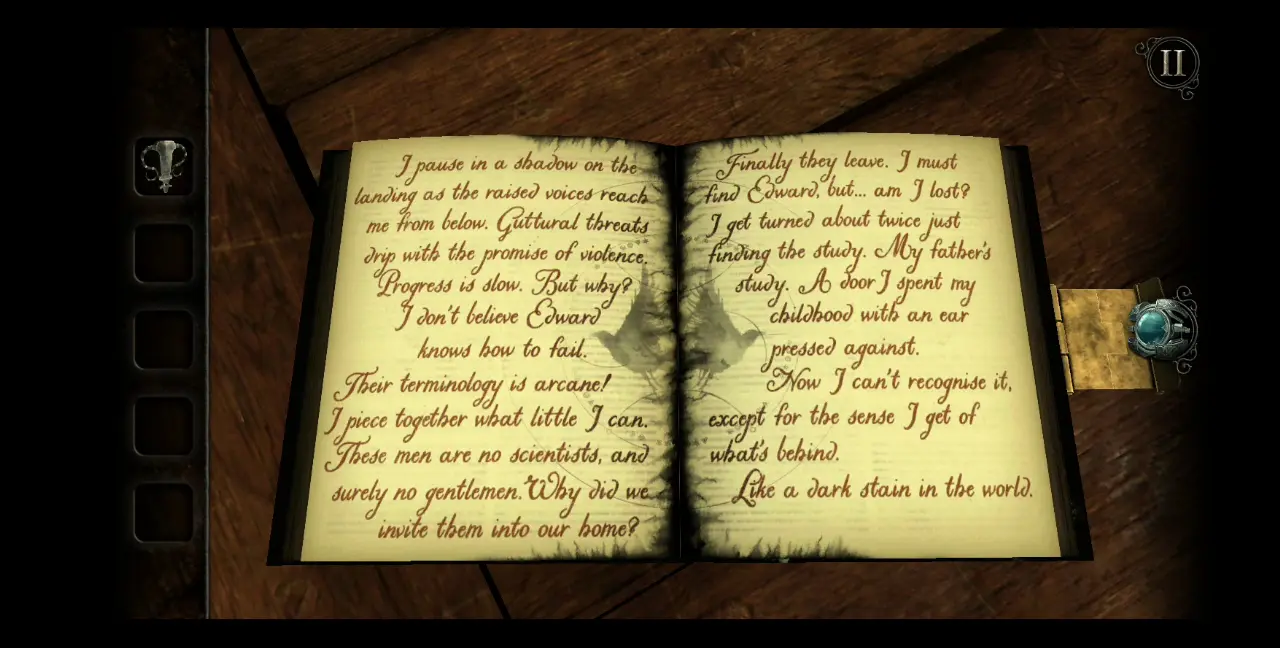
After being consumed by the black ooze, the pages will flip, revealing another entry. This time, the entry appears to be from Abigail’s perspective, where she alludes to unprecedented guests who are threatening her husband Edward for progressing slowly with his “work.” Here, Abigail also senses something strange and inexplicable happening in the Waldegrave Manor, particularly the Study.
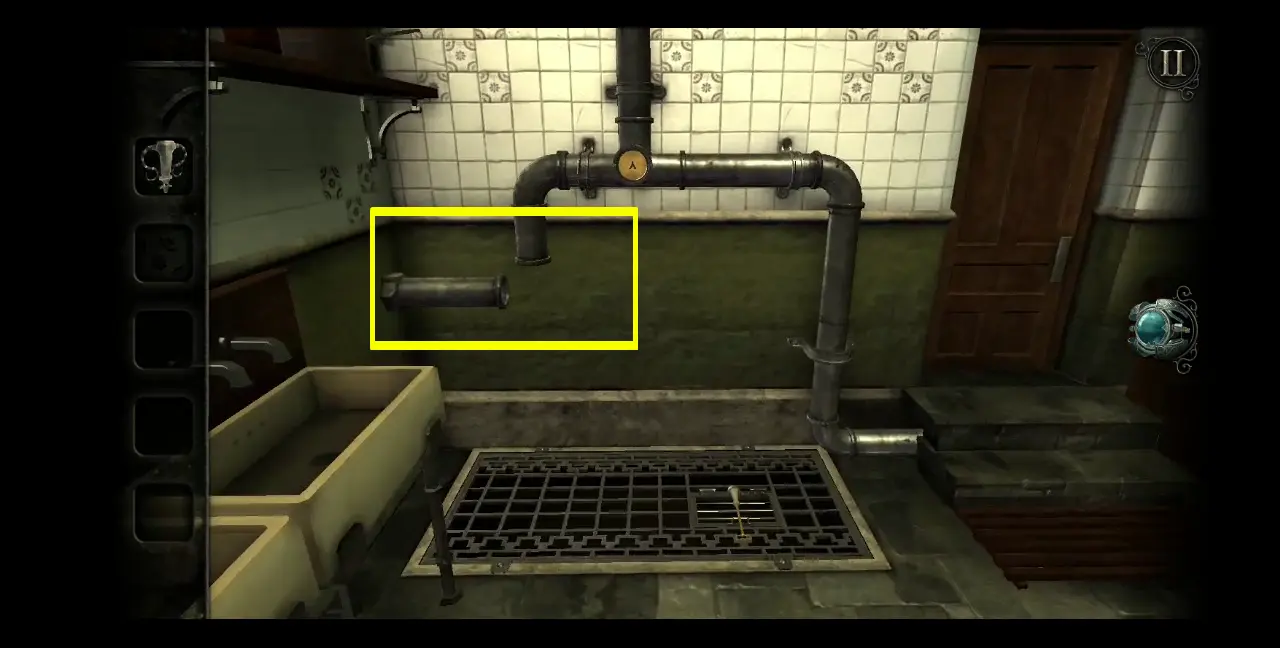
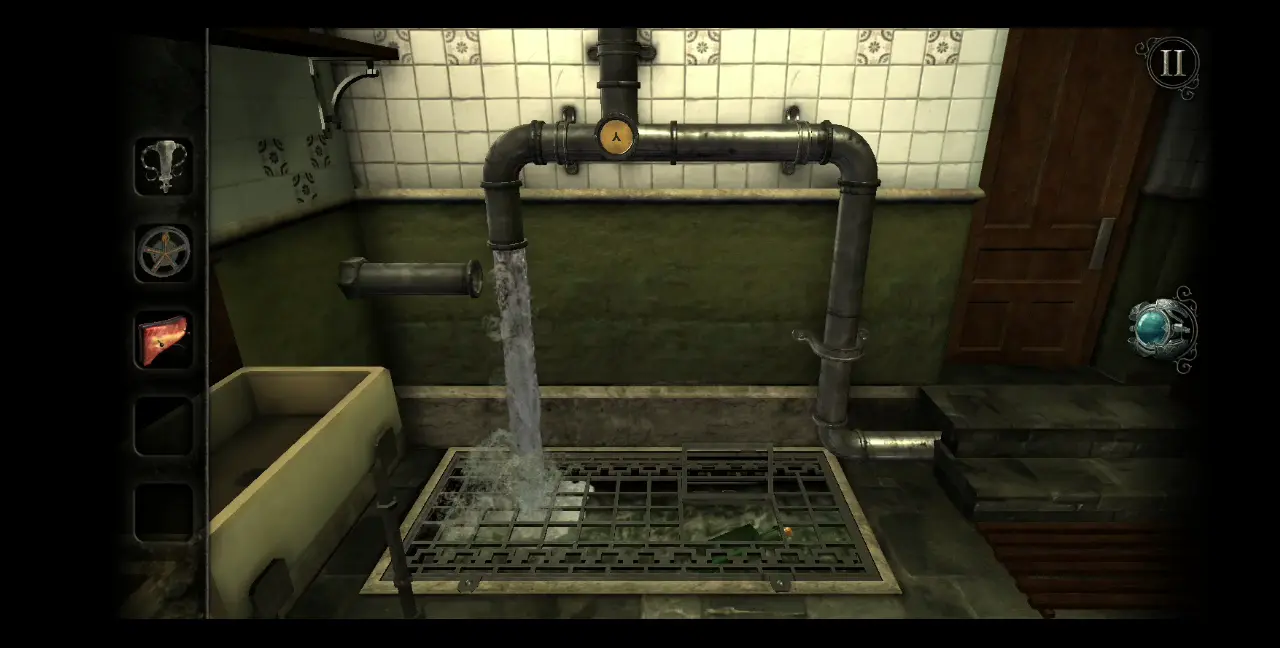
There are many things in the Kitchen but first, turn your attention to the left side of the room, wherein you’ll see some pipes over a drain. Notice that there’s a missing part of the pipe, disconnecting them. File this information away for later.
Zoom in on the drain. Pull the rod with a handle and collect it in your inventory.

Since the rod isn’t blocking the hatch anymore, open it. If you peek down the drain, you’ll see a bottle of wine floating below. At this time, you won’t be able to reach this item, but keep it in mind as well.
In the meantime, let’s turn toward the center of the Kitchen and observe the furnace. Instantly, you’ll notice two items hidden behind parts of the furnace that are barred by grills: one at the center and one at the bottom. The center part is barred by a lock at the top while the bottom part can’t be pulled all the way.
Since you can’t access these parts yet, you might have more luck with the doors. Unfortunately, the right door has no handle, but the left one does.
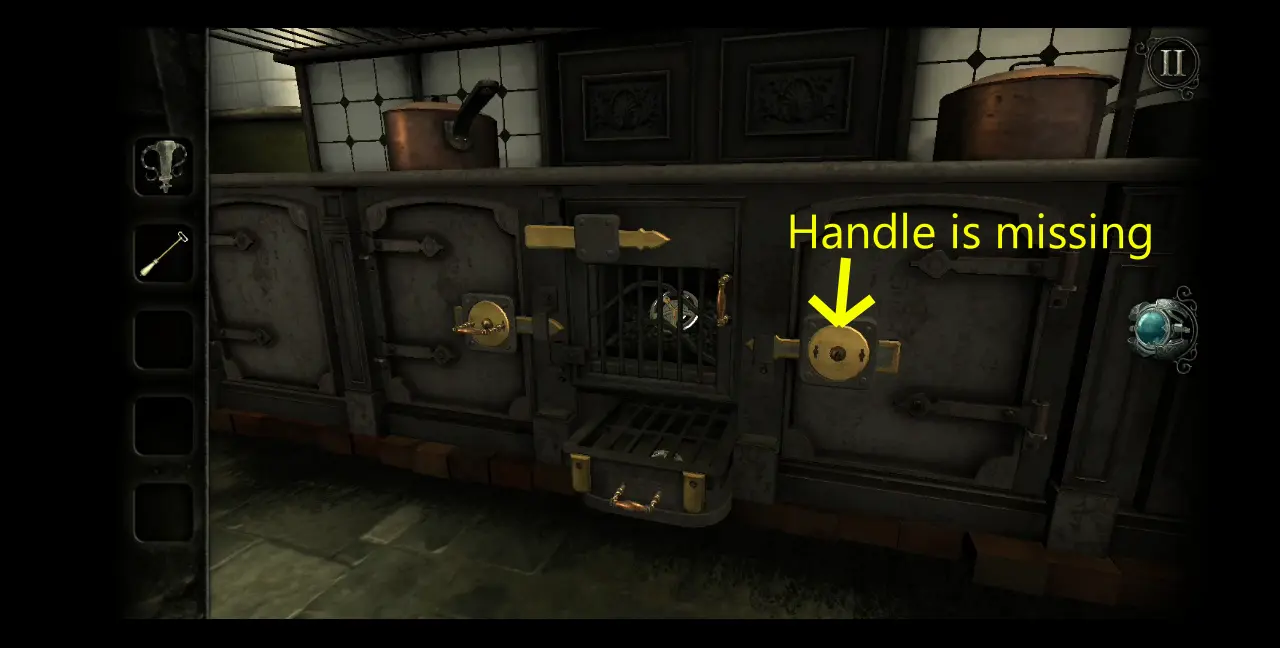
Zoom into the left door and turn the handle to retract the lock.
Once the door is ajar, swing it open and you’ll find another puzzle inside.

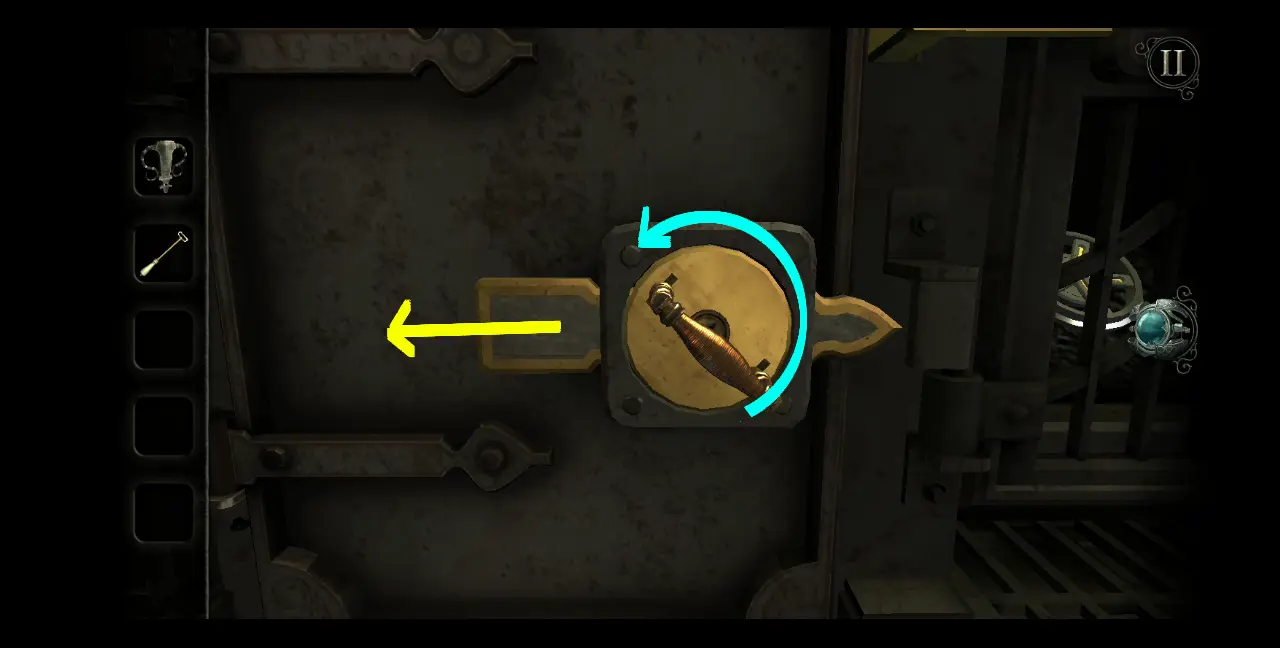
Zoom into the puzzle and use your eyepiece. How this puzzle works is that there’s a screw at the top you need to move by turning the dial at the bottom. The caveat is that there are two yellow half circles with slots barring the passage of rectangular blocks connected to the cylinder moved by the dial. Basically, every time you turn the dial, these rectangular blocks will move. To solve the puzzle, you need to move the two yellow half circles so that the empty slots will align with the rectangular blocks, thus allowing them passage. Turning the dial all the way round also turns the screw at the top.

All in all, you will need to turn the dial thrice and solve three puzzles. Pictured below are the correct positions of the the two yellow half circles to let the rectangular blocks pass:

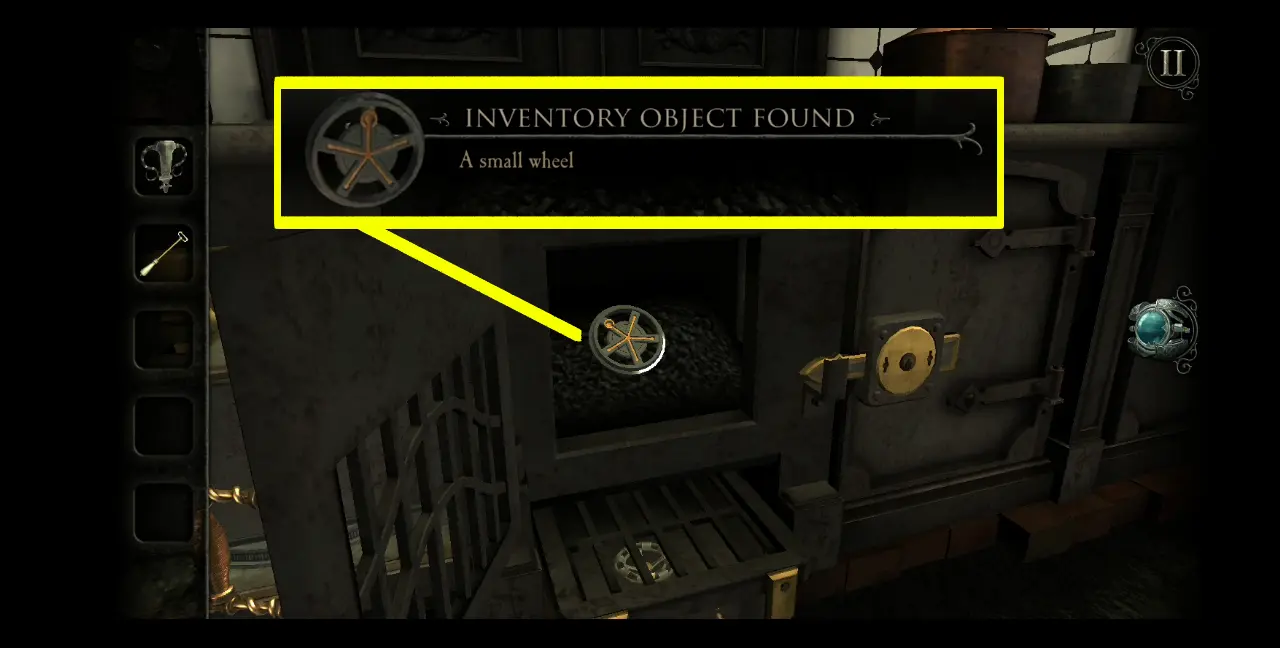
Once the screw has been moved, the door with grills at the center of the furnace will open. Zoom into it so you can collect a new item: a small wheel.
Since there’s nothing else you can open at the furnace for now, turn your attention instead to the left side of the room, where you can find three bells hanging from a wooden board.
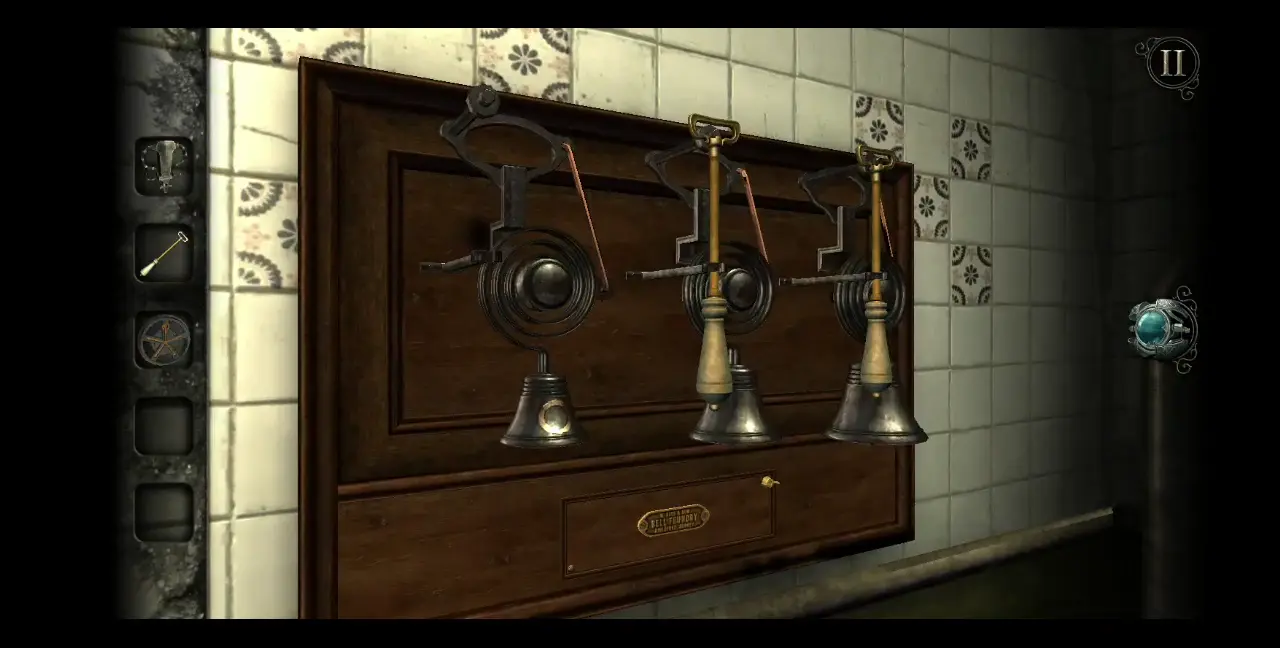
Upon closer observation, you’ll see that the handles used to ring the bells look familiar. In fact, you have one just like it in your inventory. Place the rod with a handle on the part where one bell is missing a ringer.

If you try to ring the bells at random, nothing will happen. This is because you need to ring them following a certain order. To know the correct order, zoom into the plaque at the bottom that says Bell Foundry. At the top right corner is a small lock. Loosen the lock by turning it all the way until the plaque for the Bell Foundry falls and reveals strange symbols behind it.

From the naked eye, these symbols don’t make sense. However, if you open your eyepiece, you’ll see that these symbols correspond to those found on the bells themselves. Here, you’ll notice that the first bell has a faint symbol carved into it. To solve the puzzle, ring the bells following the order of the symbols you’ve uncovered from the plaque. Two overlapping symbols means you have to ring those bells at the same time.
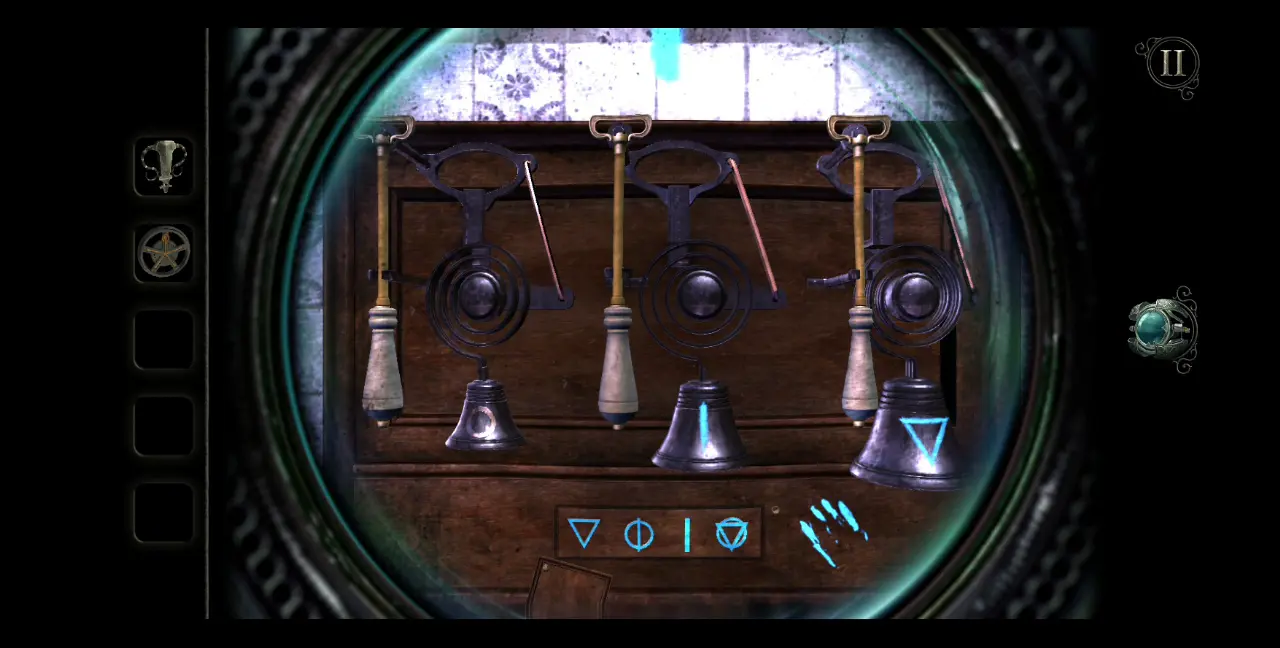
Ringing the correct bells will make the symbols at the bottom glow. Thereafter, a small drawer will open, revealing a new item inside: an inkwell.
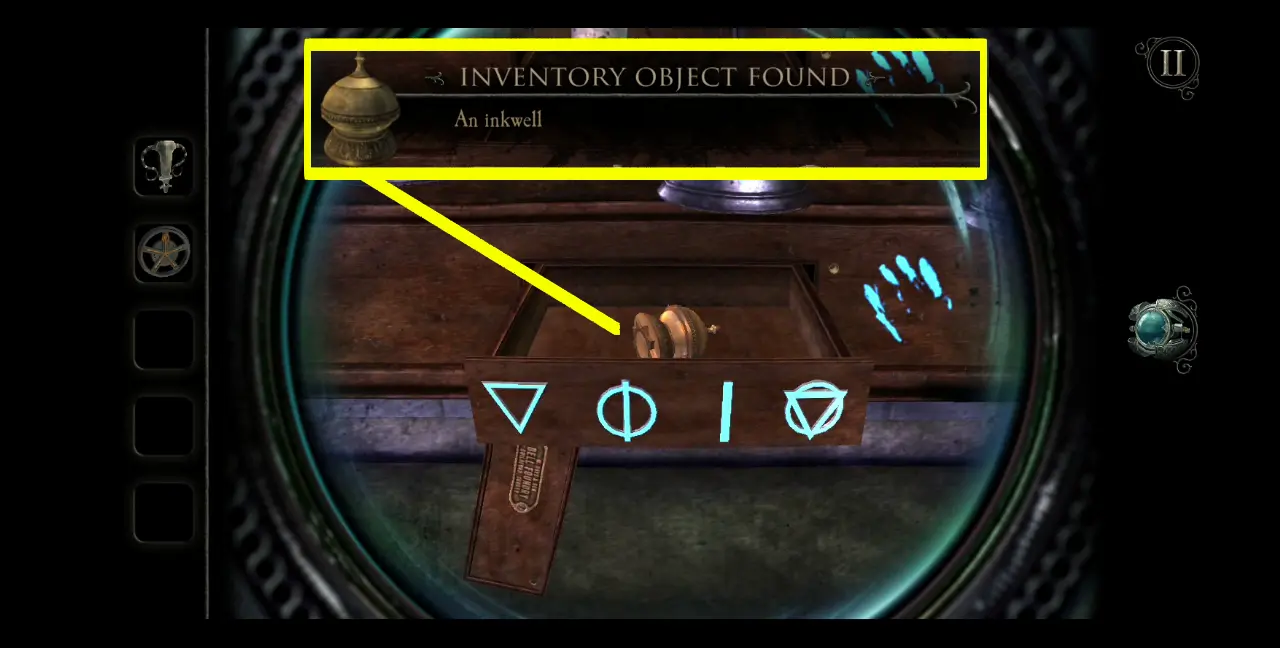
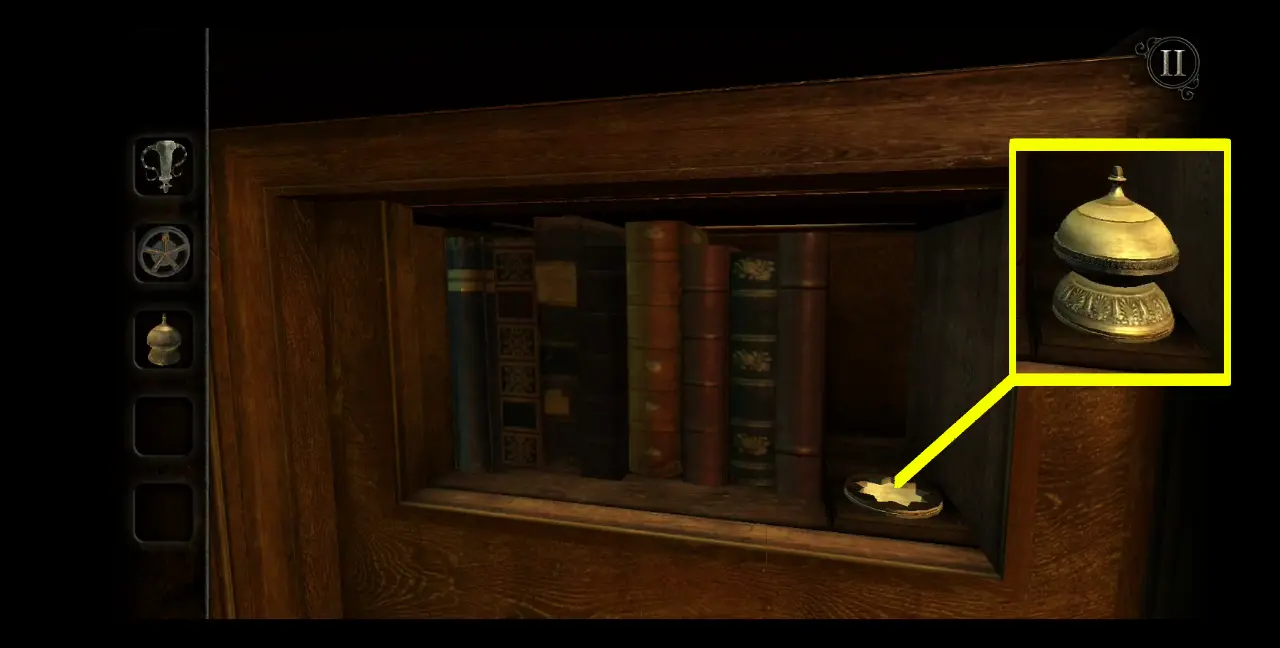
Where does an inkwell belong? The Study, of course! That said, return to the Study and focus on the part of the roll-top desk where books are lined up neatly. Here, you’ll see an empty circular slot. Place the inkwell there.
Flip the lid of the inkwell and press the silver button under it.
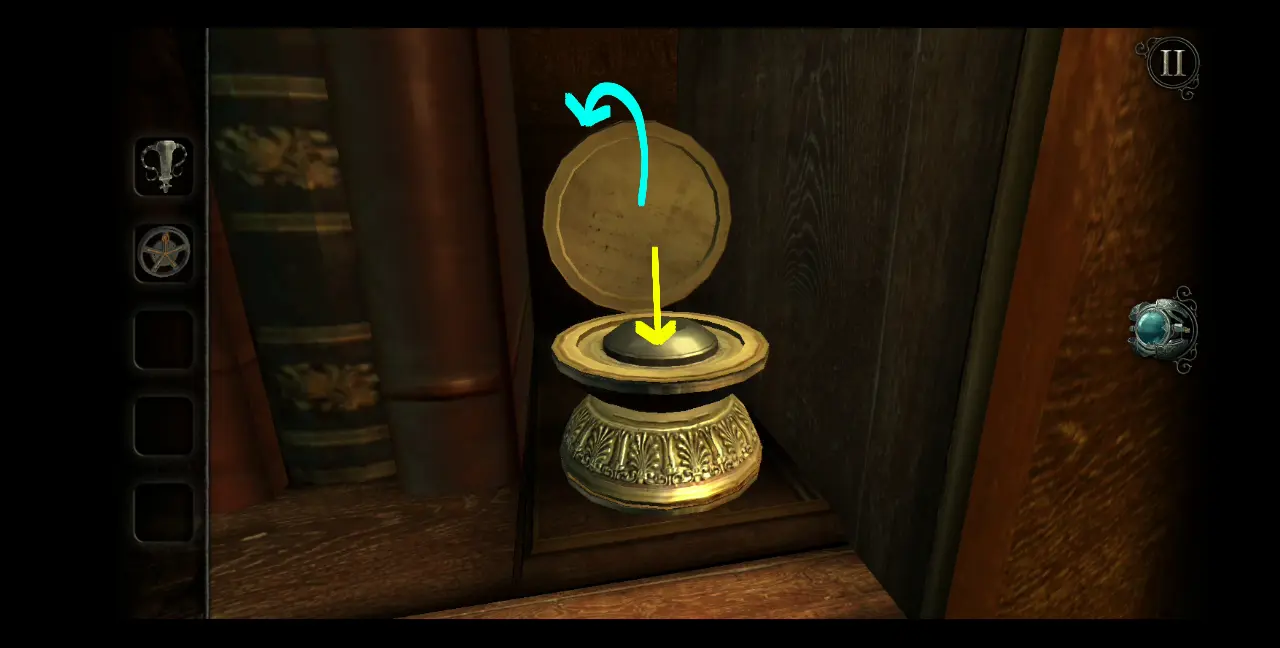
The drawer to which it belongs will be pulled forward. To the side of the drawer are two hatches with handles.
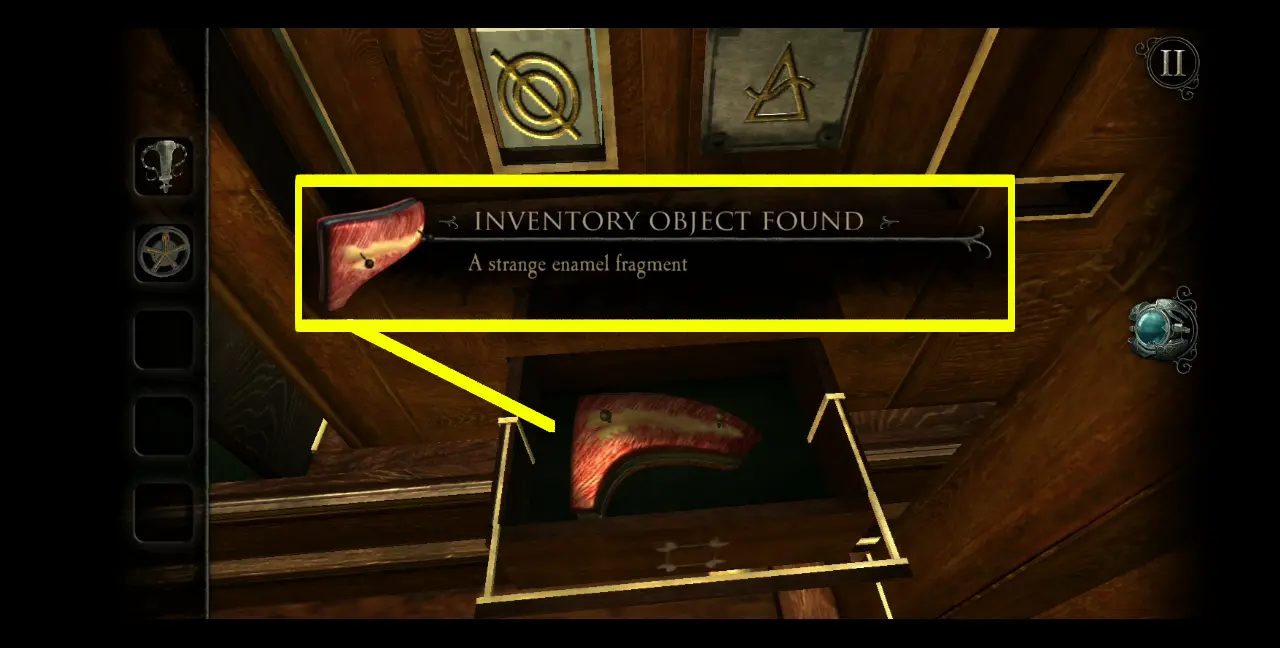
Before opening the hatches, slide the bar lock at the bottom to the right.

Open the top hatch. You’ll see two symbols inside, wherein the left symbol is fixed in place while the right symbol can be rotated. Find the symbol that looks like a triangle as that is the correct one.
Open the bottom hatch. Again, there are two symbols, but this time in reverse: the symbol to the right is fixed while the one on the left can be rotated. To correspond with the pair on the top hatch, find the symbol that looks like two circles with a line going through it.
A thin handle will spring up from the bottom of the drawer. Pull the handle and take the item inside the compartment: a strange enamel fragment.
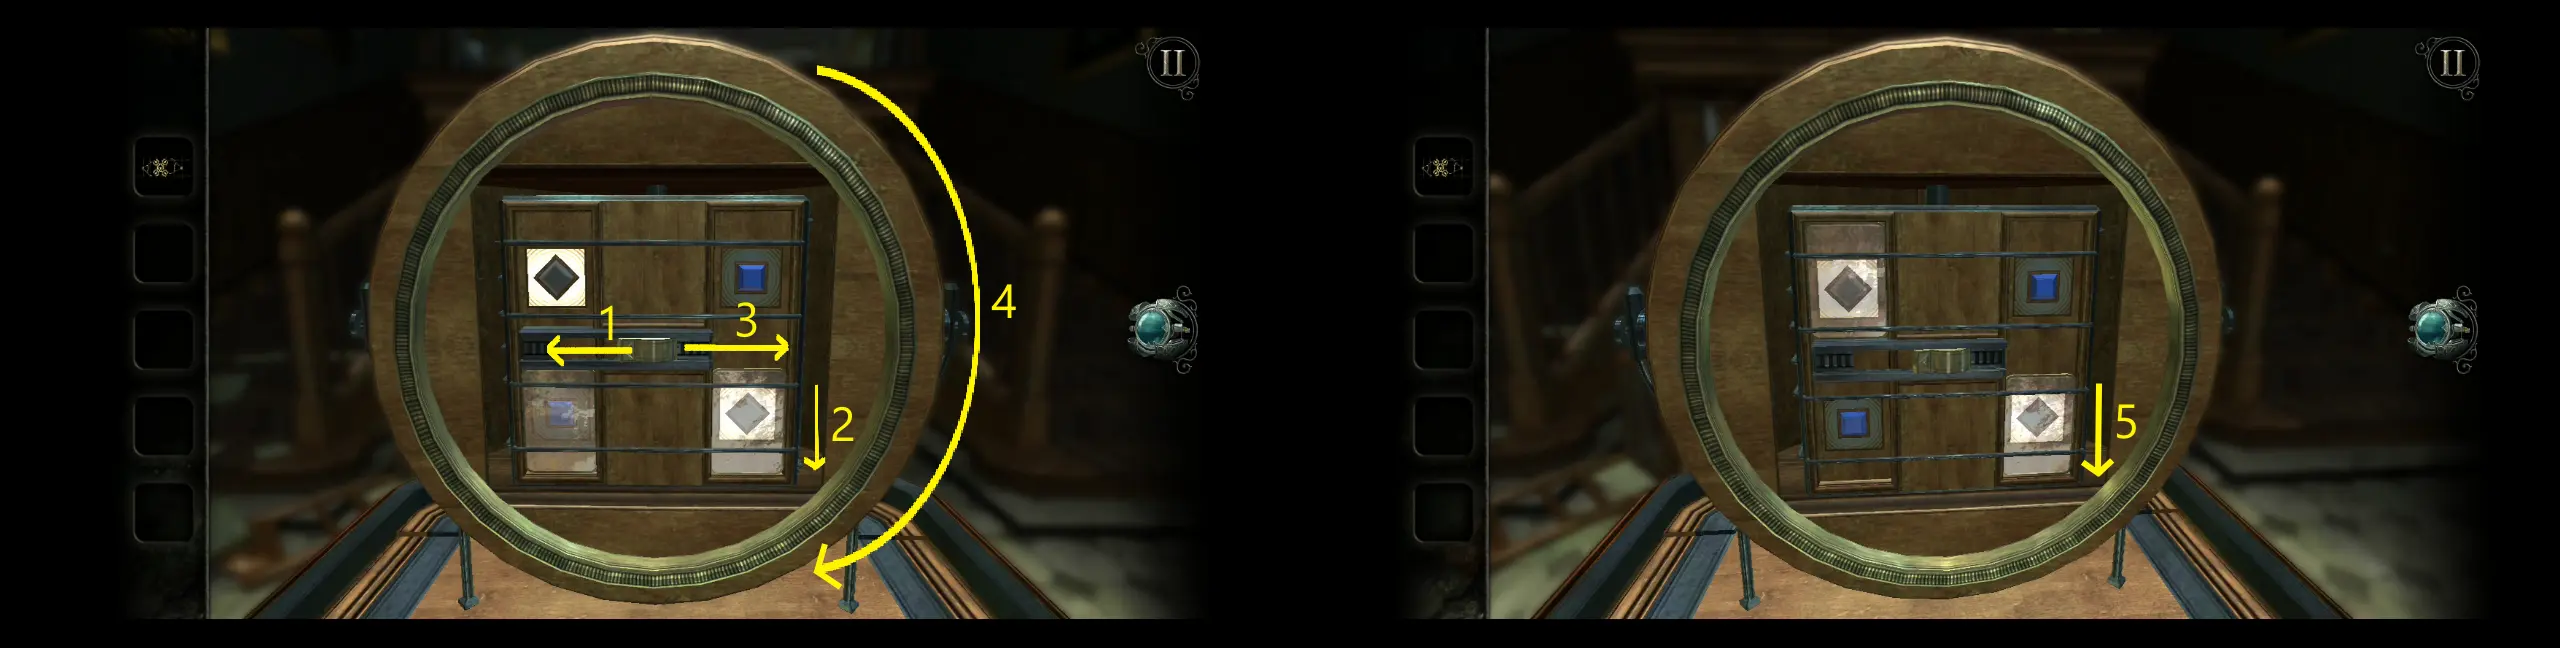
At this point, you’ve pretty much opened every drawer in the roll-top desk, except for one: the middle compartment locked by the four partial circles on its corners. The good news is that, now, you know how to make those circles rotate so you can position them properly and free the corners of the center compartment. Pictured below are the drawers you need to push or pull to move the corner circles.
Here are also the correct positions of the drawers in relation with the four corner circle locks. Keep in mind that for the last drawer pictured, all you need to do is open it halfway, with the line indicating the perfect halfway point.

After moving all the drawers in their correct positions, the four circular locks should look like this:

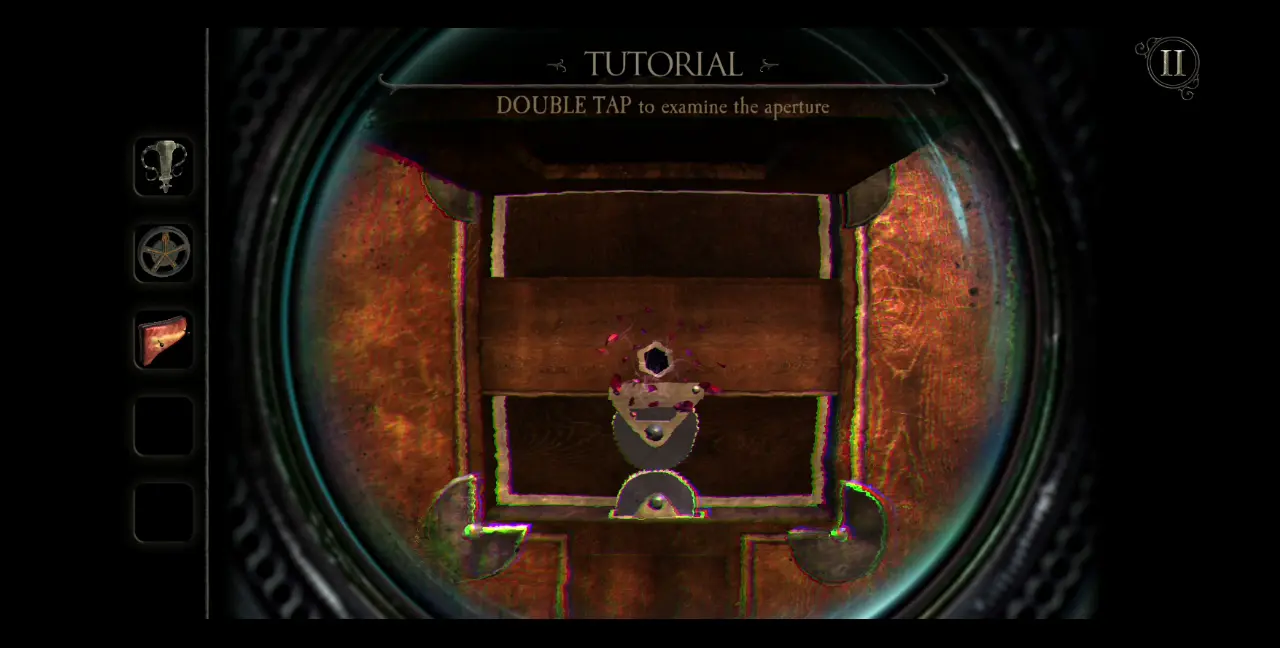
Now you can open the hatch using the handle. You’ll see a small aperture and, at first, it looks fairly normal—until bits of crystalline matter form around it.
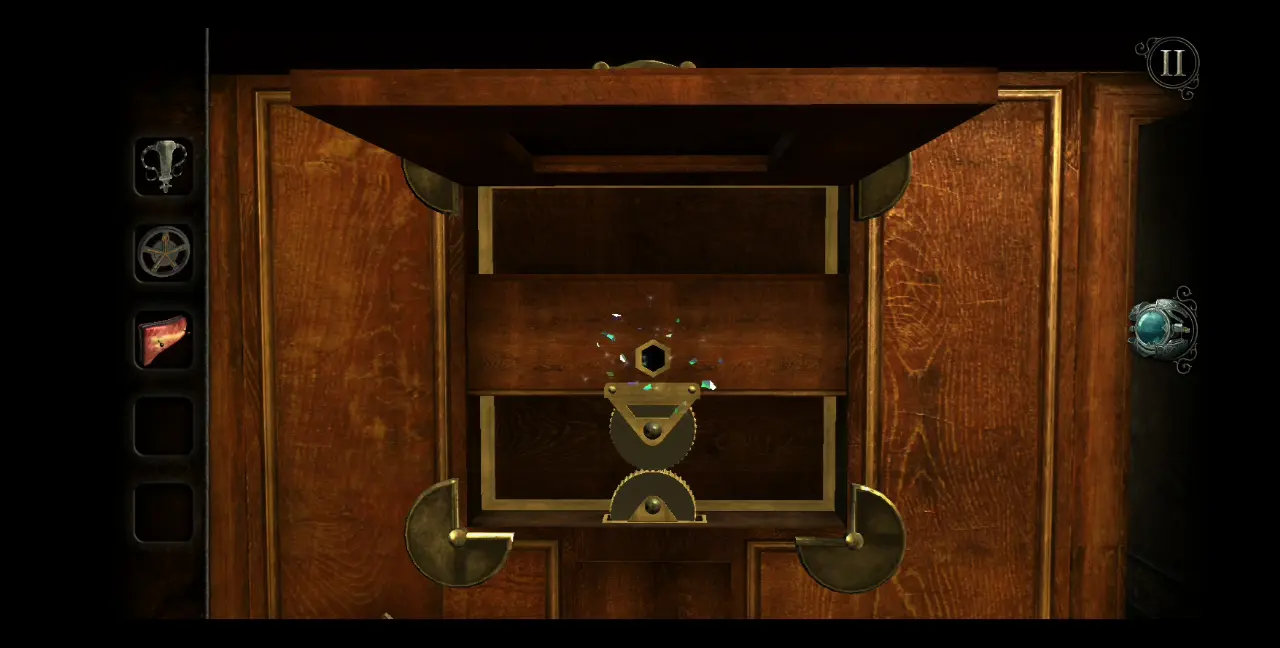
Whenever you see apertures like this one, you’ll need to wear your eyepiece. Viewing this through the eyepiece, you’ll see that the bits of crystalline matter around the aperture will turn red. This means that if you double tap the aperture, you’ll be able to gain access to what’s inside it.
After double-tapping, you’ll be greeted by another puzzle, which involves gears and handles.
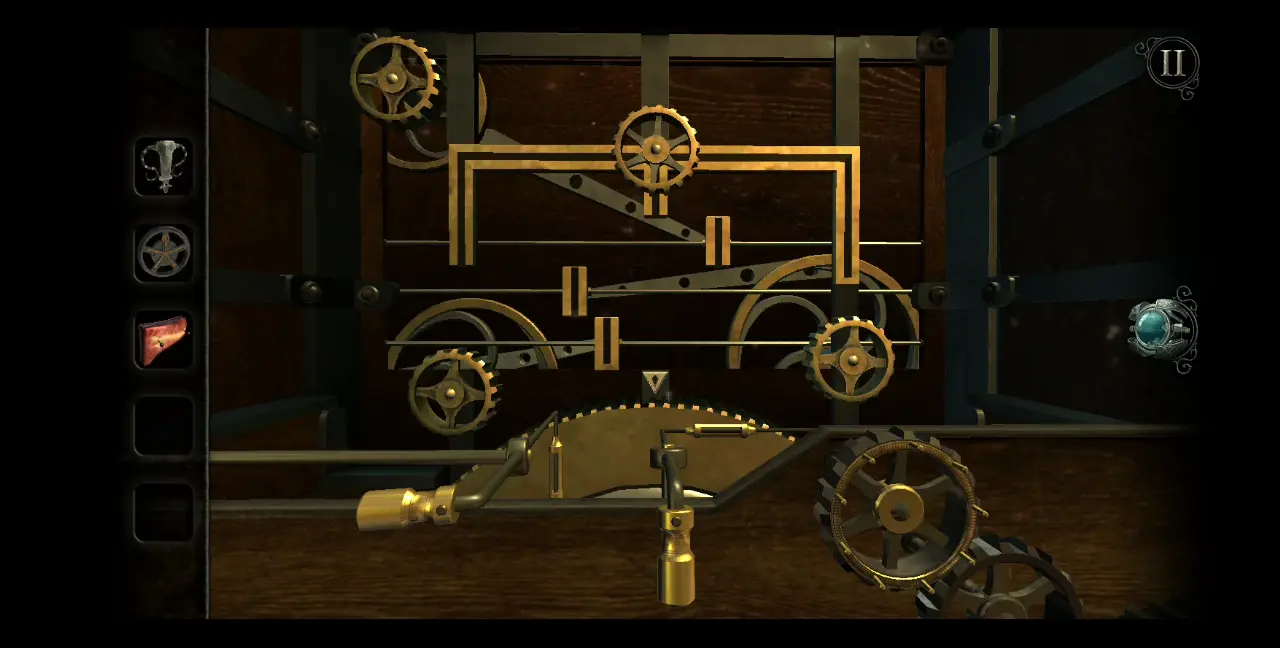
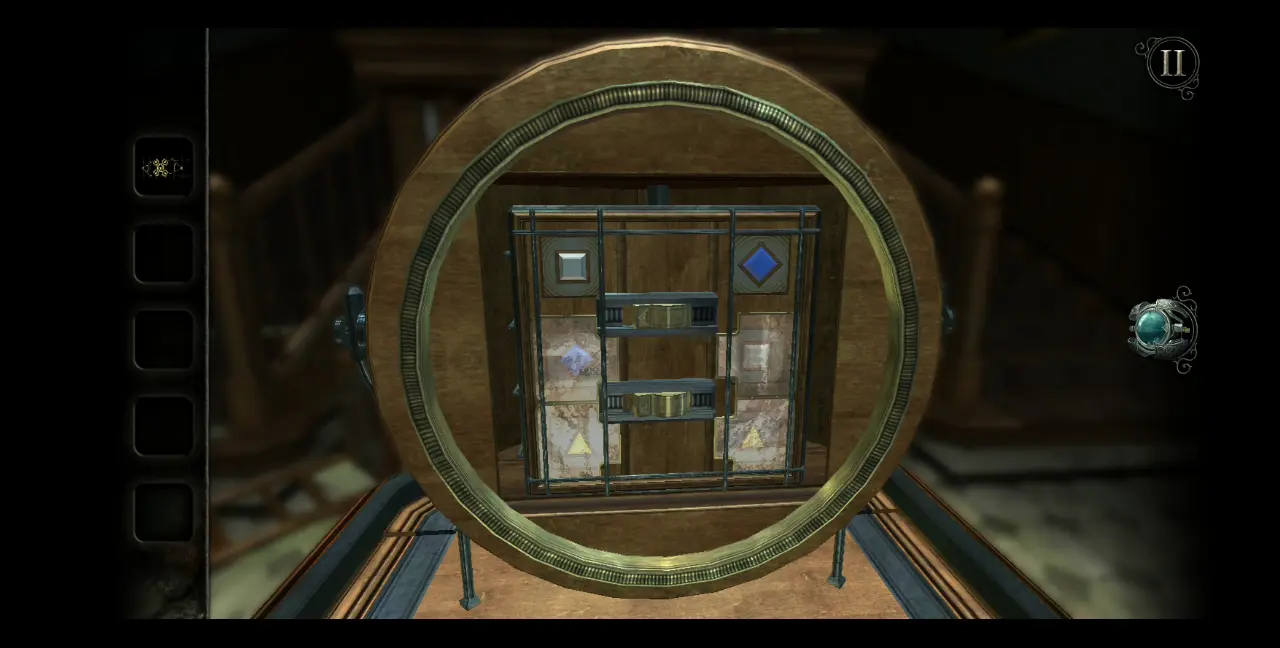
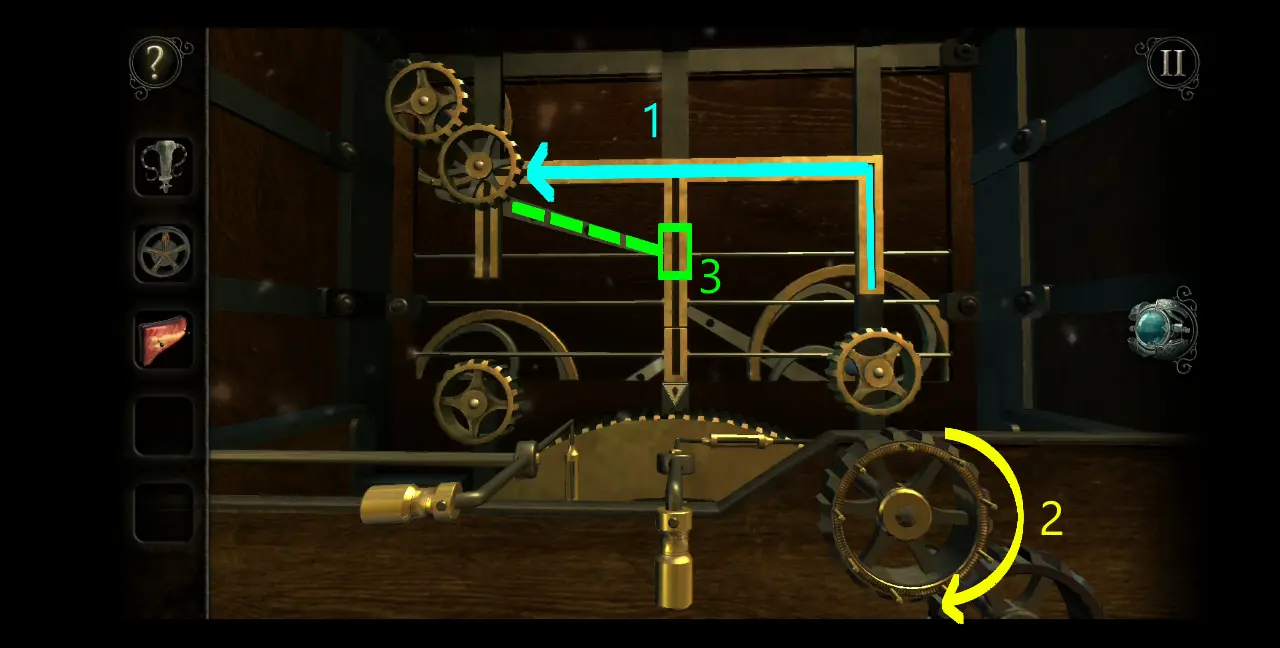
Right off the bat, you’ll notice that there are several pieces to this puzzle. At the very top of the puzzle is a movable piece, which can be moved around using two handles. This movable piece can also be spun by rotating a large gear at the bottom right-hand corner of the puzzle. Your goal is to connect the fragmented pathways so that the movable piece at the top-center can reach the bottom-center of the puzzle. In the picture below, we’ve marked the key points we’ve just mentioned.
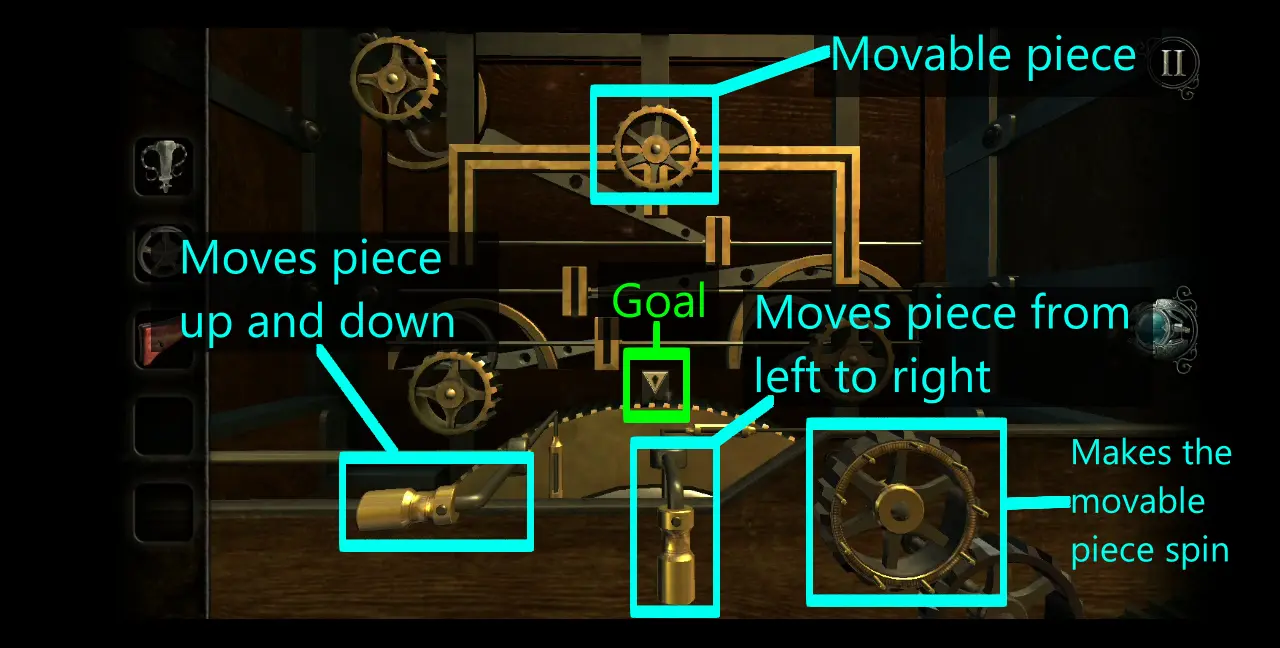
To actually move the fragmented pathways, you need to be able to connect the movable piece to the three other gears in the puzzle, which are connected to the three fragmented pathways via a crank arm. When two gears are connected, you can spin the large gear next to the handle to spin the movable piece, thus manipulating the crank arm. Pictured below is an illustration to highlight this:
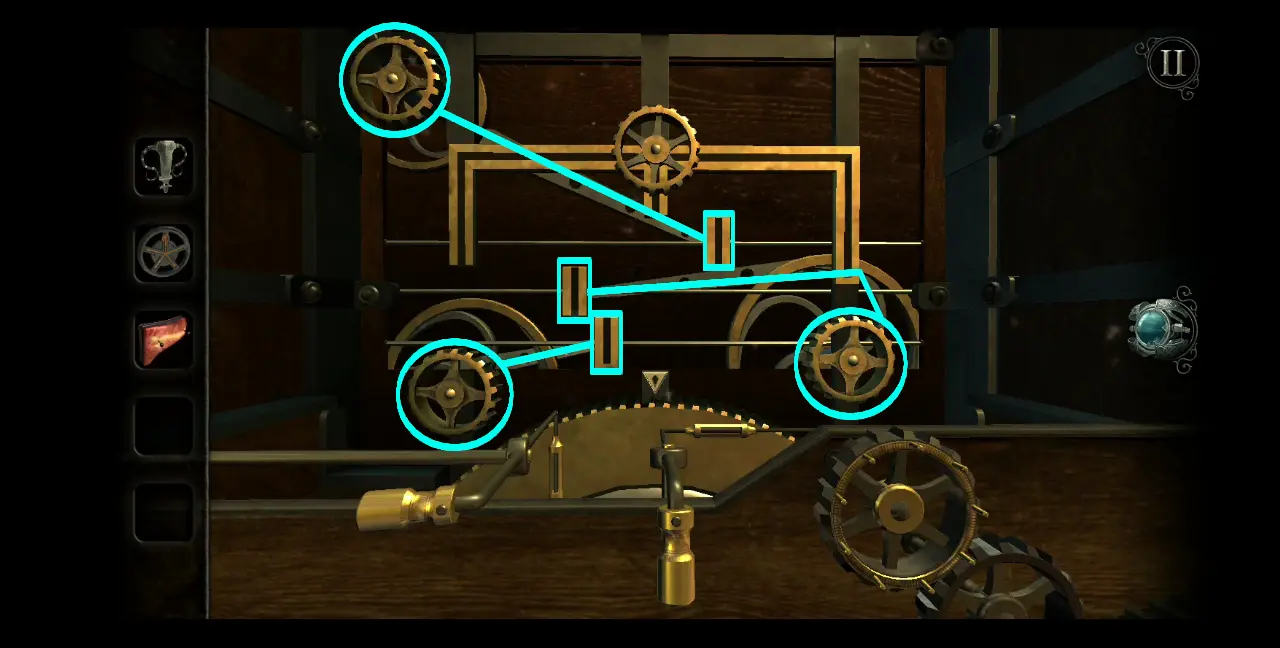
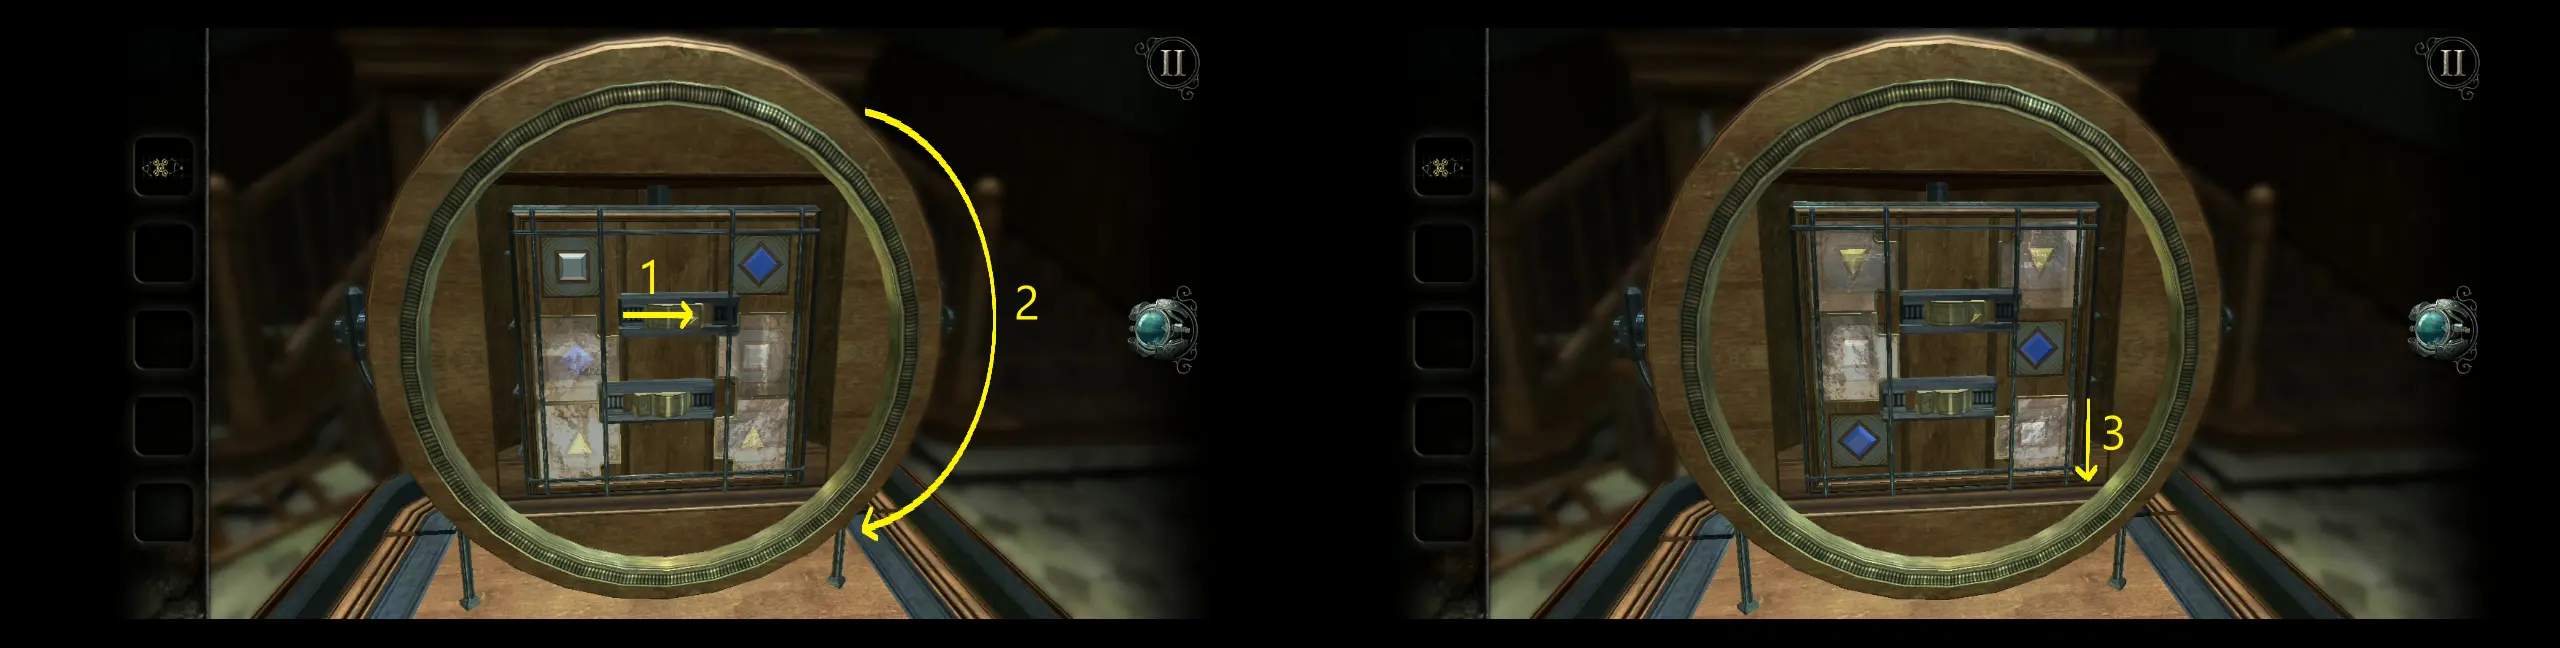
To solve the puzzle, first, use the handles to move the movable piece to the gear at the bottom right. Spin the larger gear so that the crank arm will move the middle pathway piece to connect with the path on the left.
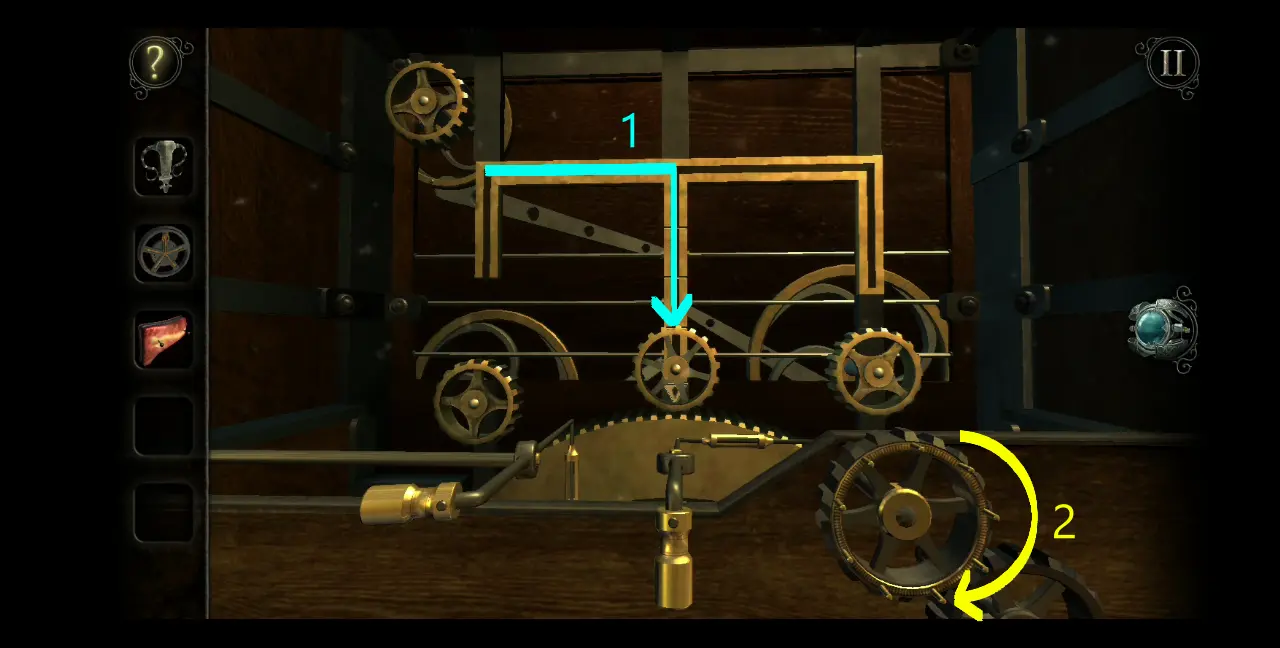
Control the movable piece to go all the way to the leftmost path, going down so it can connect to the gear on the bottom left. Spin the larger gear so the crank arm will move the bottom pathway piece to the middle.

From here, go back to your previous position by controlling the movable piece to go to the gear on the right. Spin the larger gear so that the crank arm will move the middle pathway piece to the center. At this point, you now have two pathway pieces aligned.
Lastly, bring the movable piece to the gear on the upper left corner of the puzzle. Spin the larger gear so the crank arm will move the top pathway piece to the center. You now have all three pathway pieces aligned.
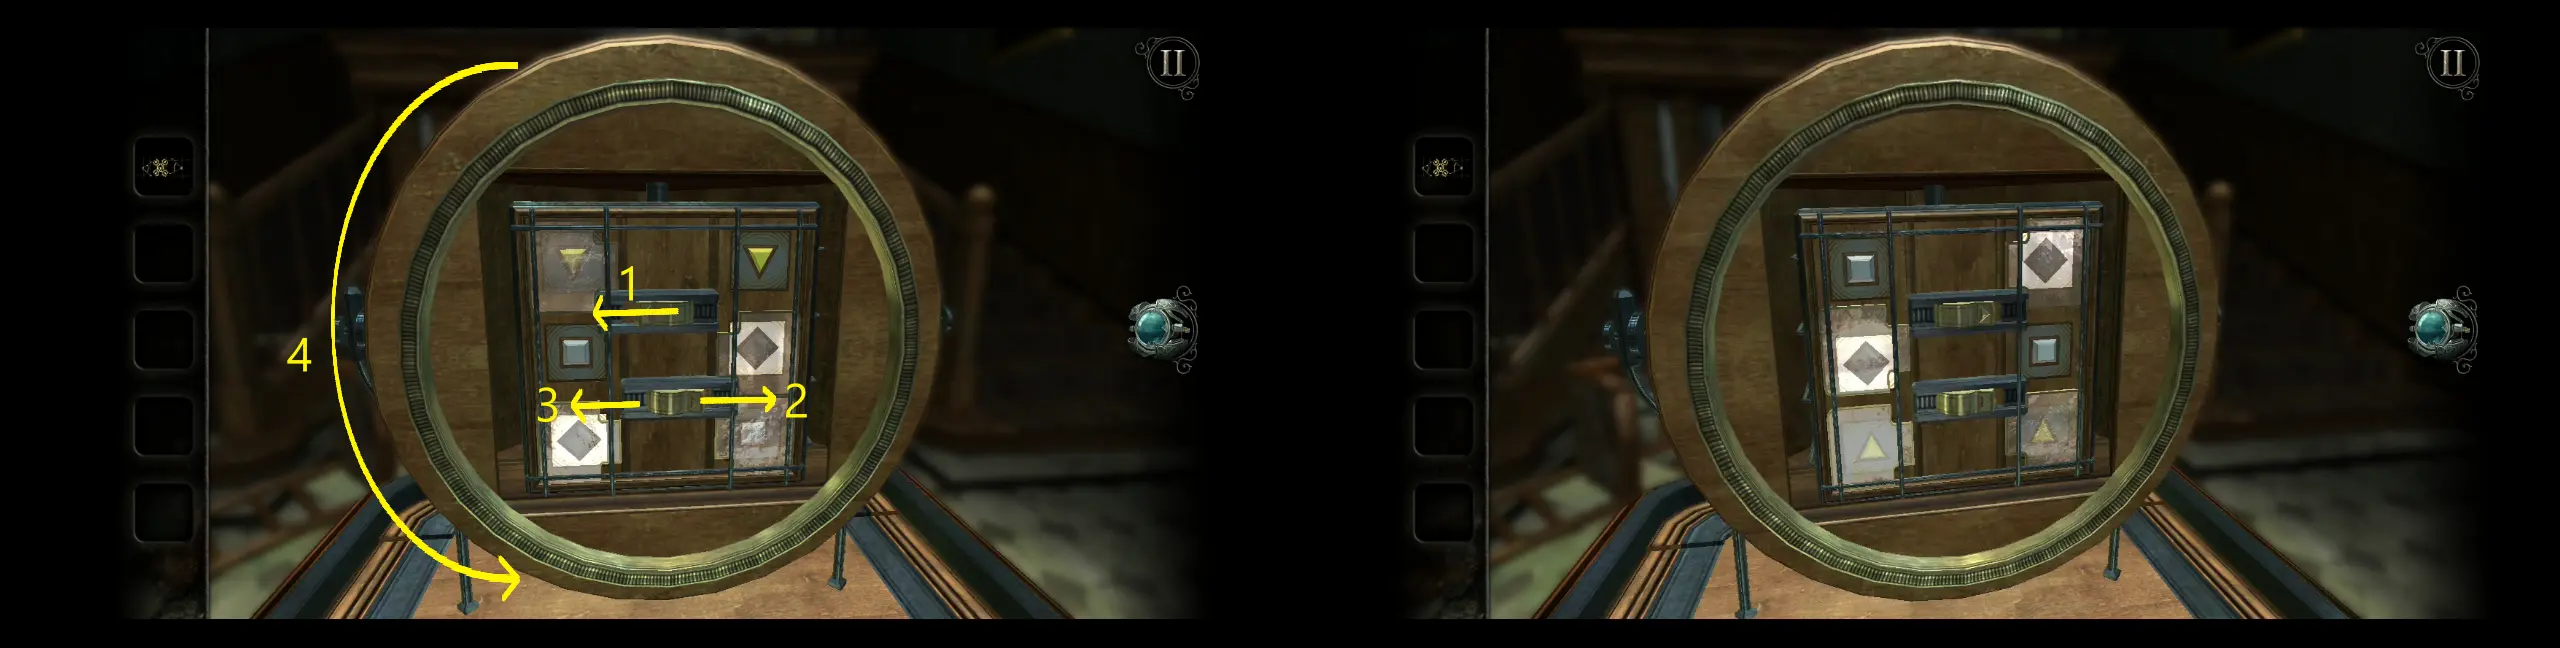
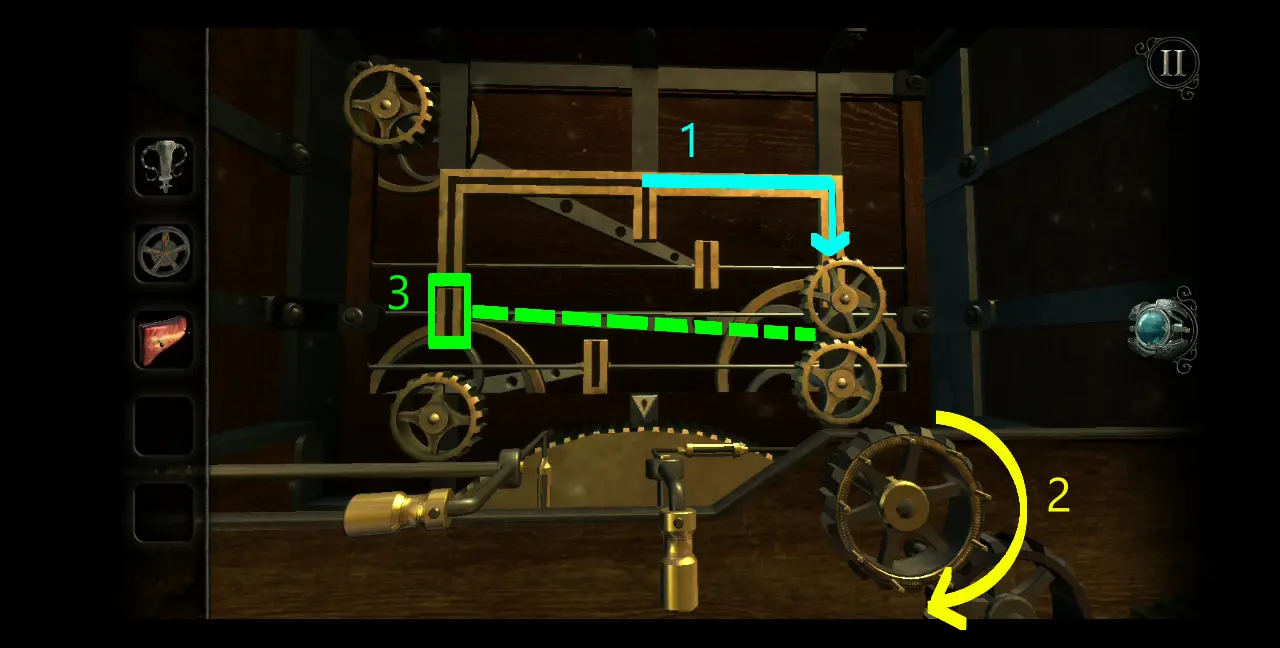
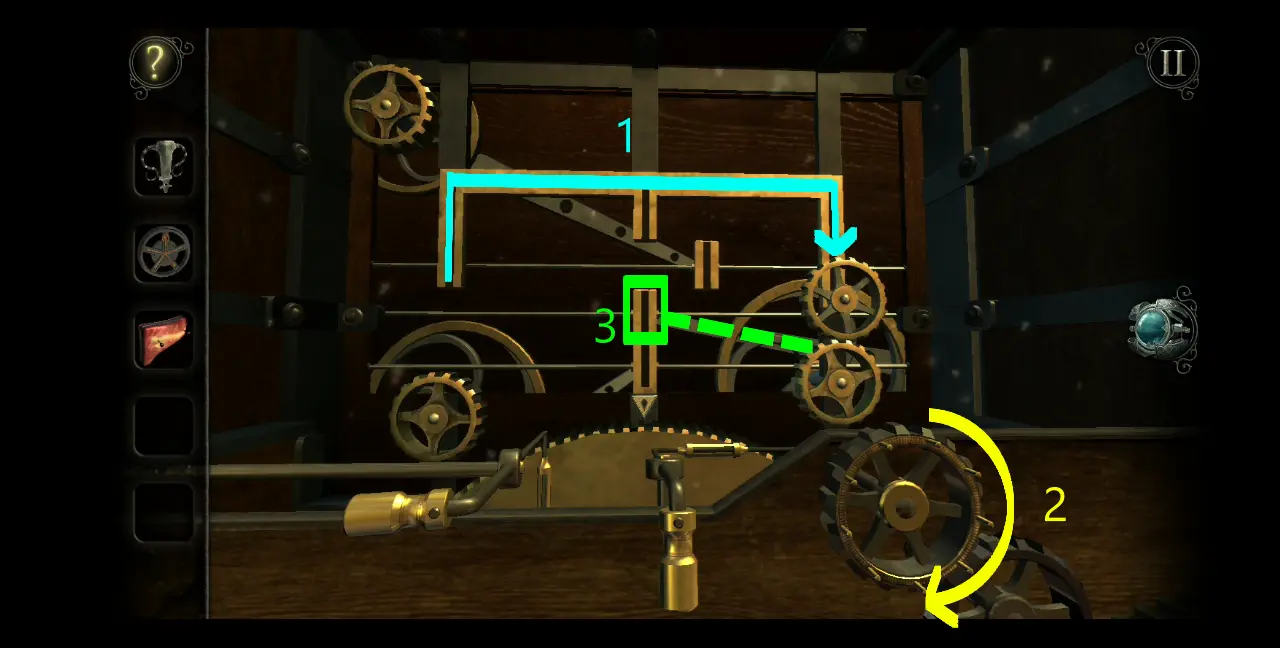
With this, bring the movable piece down the middle of the path. Spin the large gear so that the movable piece will also turn, affecting the huge gear under it.
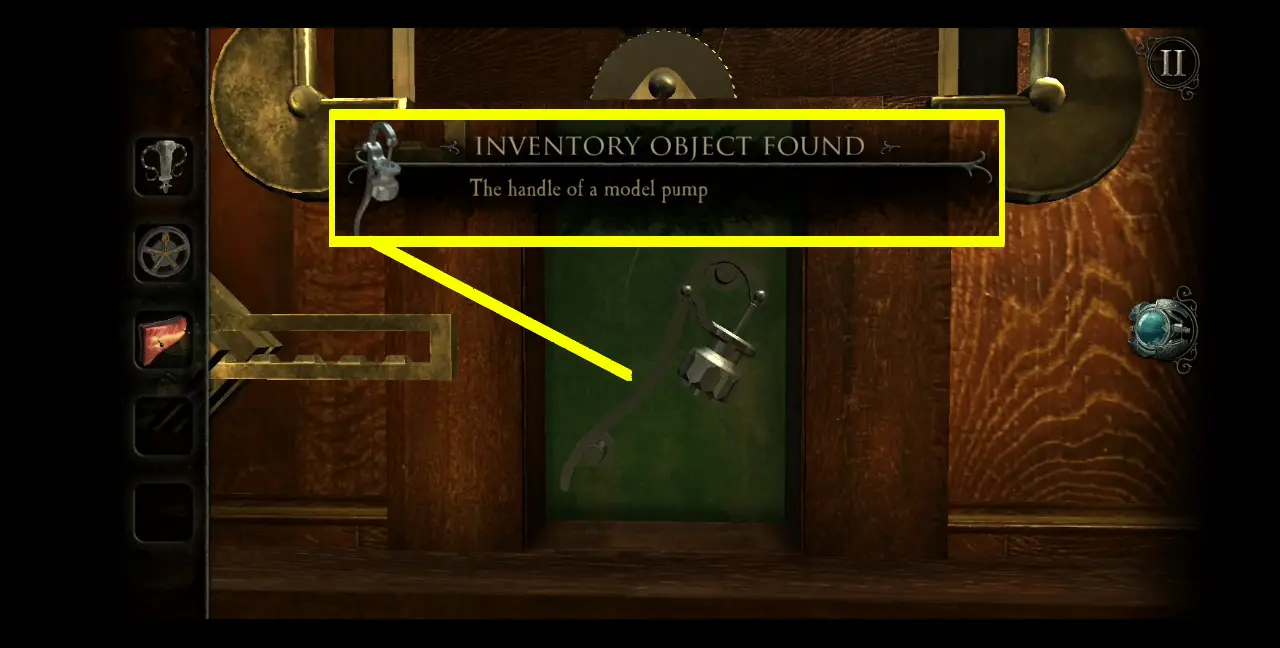
Keep turning the large gear until you’re brought out of the aperture. Once you’re facing the roll-top desk again, two sliding doors will open, revealing a new item: the handle of a model pump.
After collecting the model pump’s handle, the roll-top desk will automatically retract all its drawers and return to the way you’ve found it upon first entering the Study. However, this isn’t the last time we’ll get to interact with it.
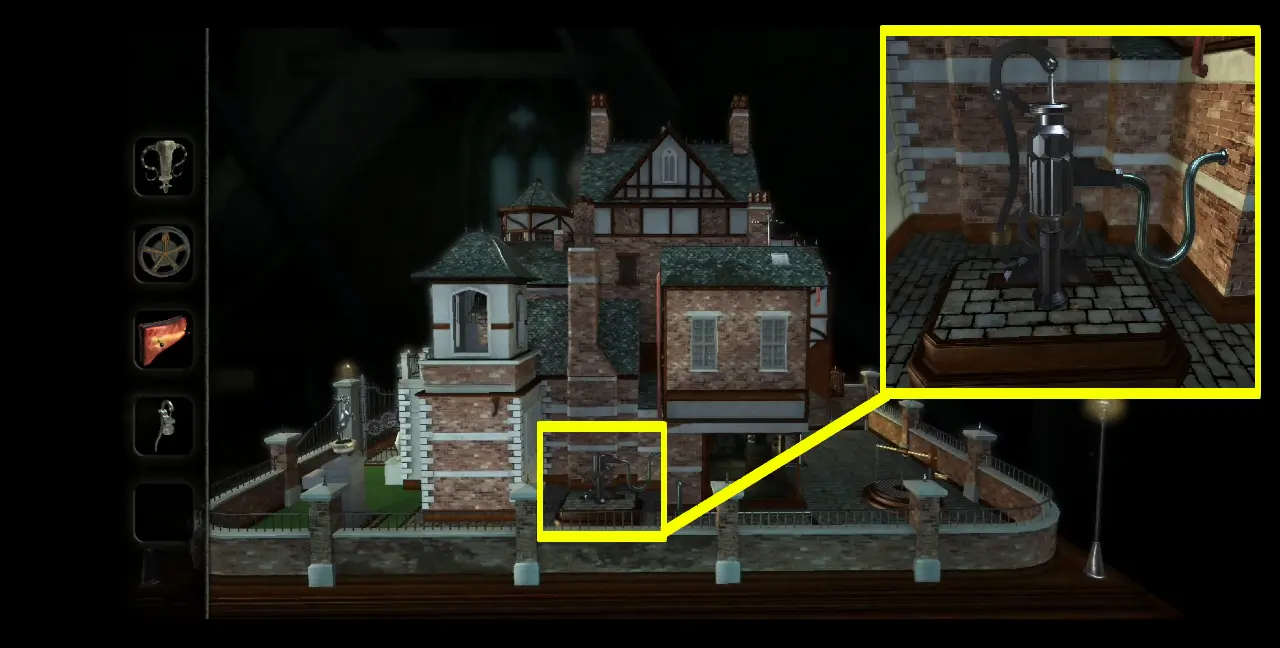
For now, head outside the room and into the dollhouse’s backyard. Remember that spot with a metal tube connected to a pipe next to the kitchen? This is where the handle of a model pump goes. Place the pump handle on top of it.
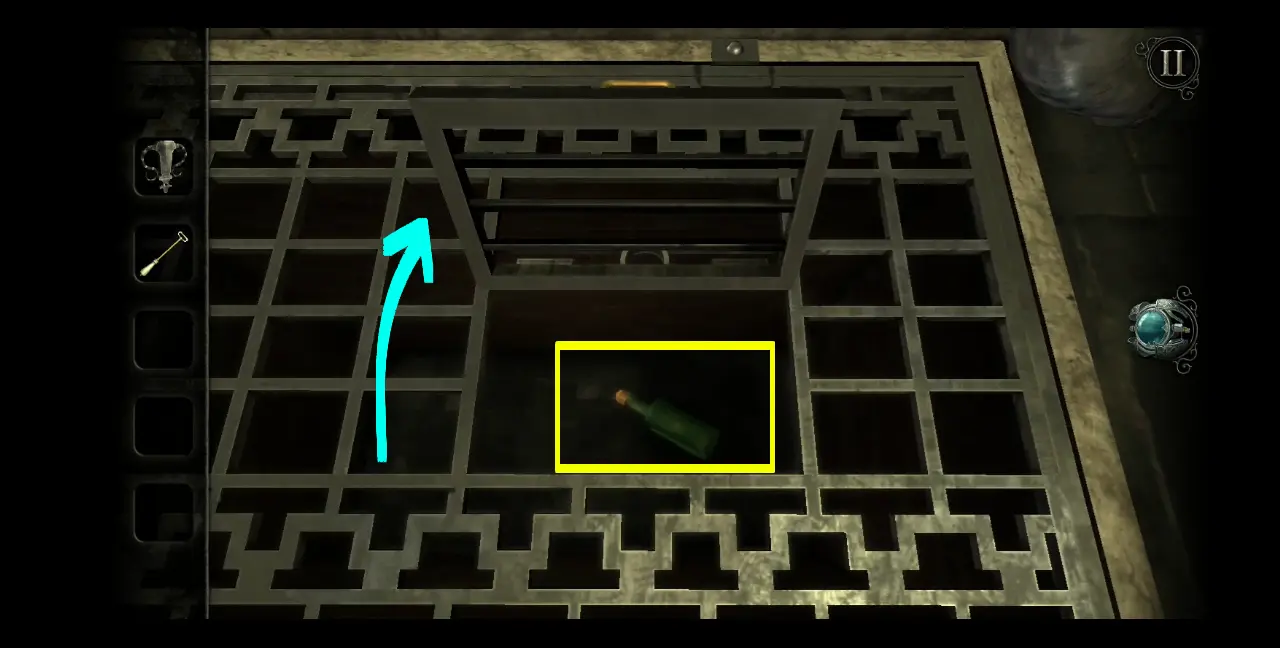
Once the pump gets going, enter the Kitchen. To your left, you’ll see that water is pouring from the pipe and into the drain. With the drain filling up, the bottle that had been stuck at the bottom of the drain has now floated up.
Zoom into the drain and collect the glass bottle.
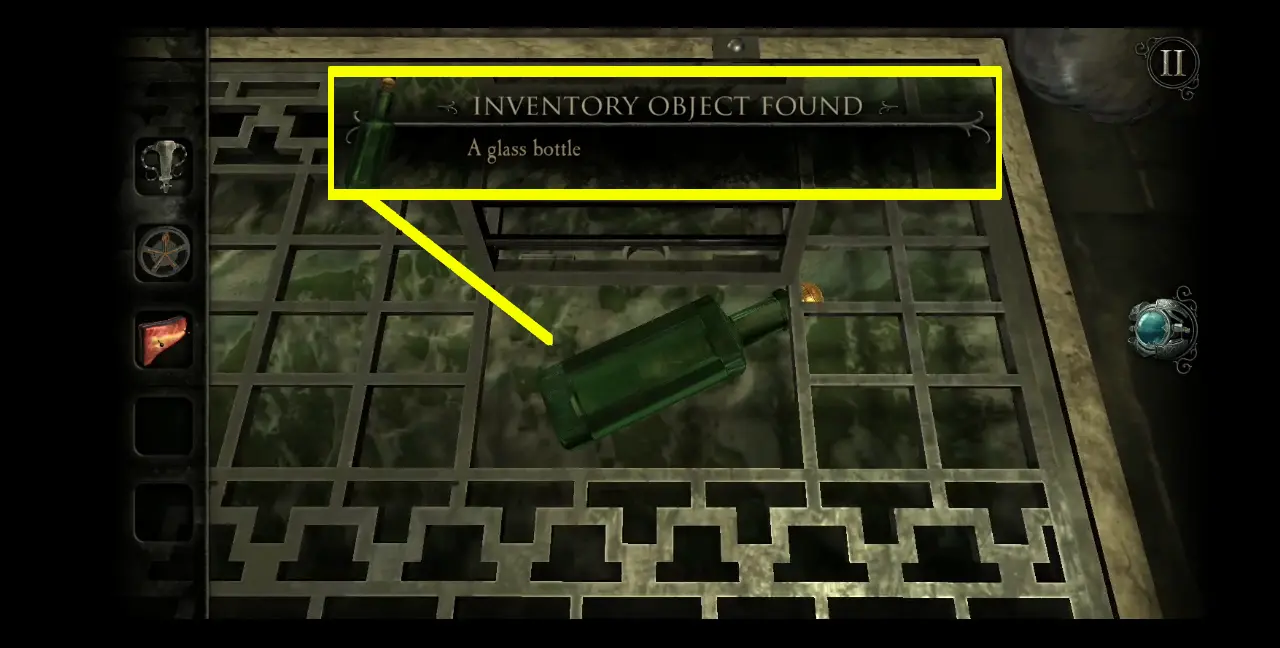
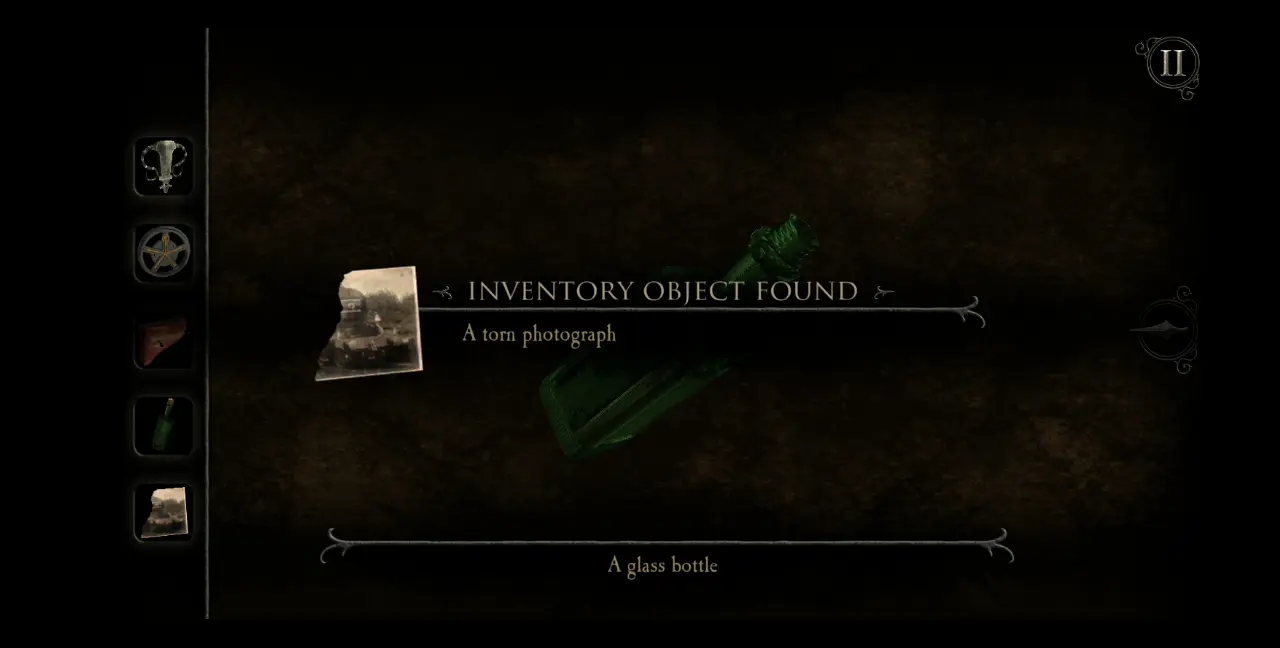
You’ll notice that something is inside the bottle so view it in your inventory. Take the bottle’s cap off by turning it. This should give you access to the item inside the bottle: a torn photograph.
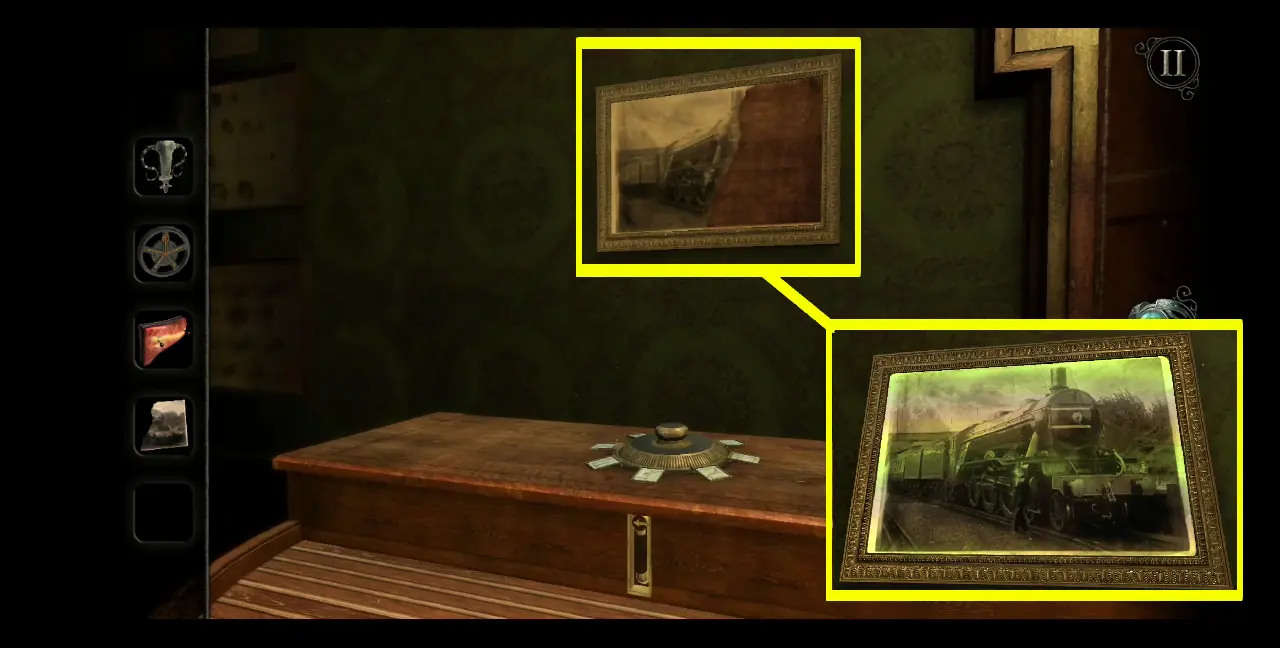
If you recall, there’s a torn photograph on a frame just above the roll-top desk, which we saw upon entering the Study. With that, return to the Study and complete the photograph of a train.
Instantly, you’ll notice that there’s a thin colorful film shining over the photograph, indicating that you need to use your eyepiece. Look through the eyepiece and you’ll see hidden symbols on the photograph.
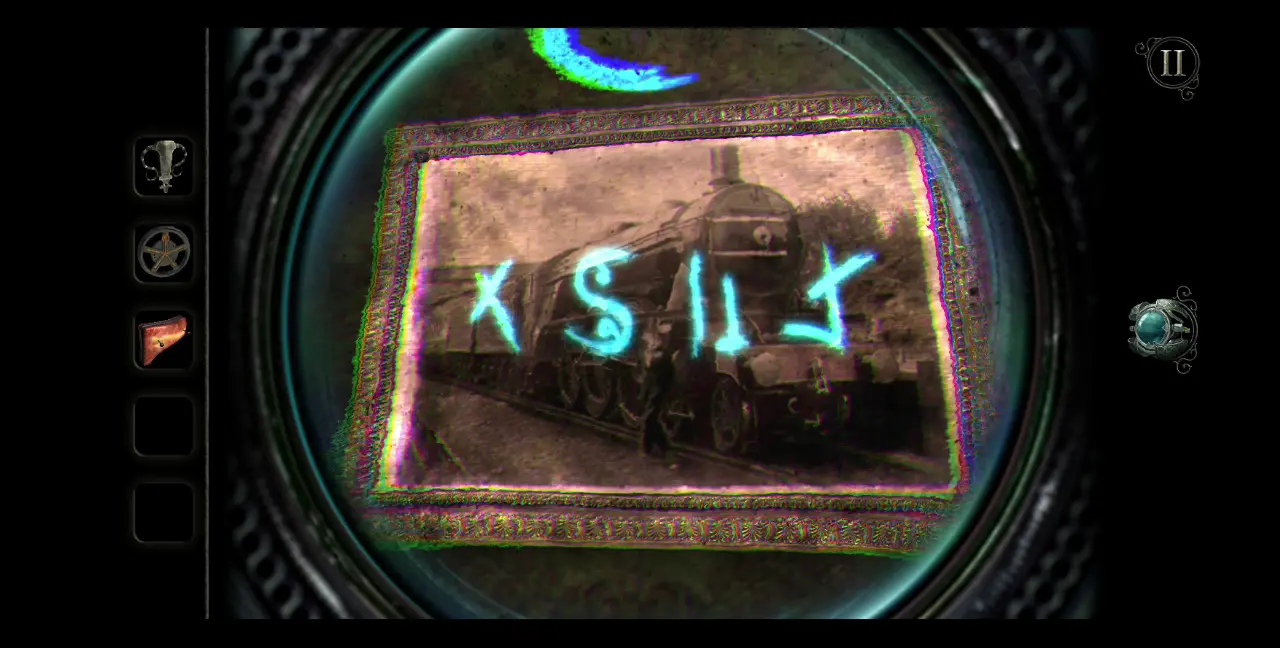
Zoom out of the photograph and turn your attention towards the top of the roll-top desk. You’ll see that it has a dial whose arrowhead can be pointed toward various symbols. As you might have guessed, follow the symbols written on the photograph by turning the dial and pointing its arrowhead toward each symbol according to the order in which they were written. You may always zoom out of the dial and check the photograph above the roll-top desk just to make sure you’re choosing the correct symbols. You can do this while still wearing the eyepiece.
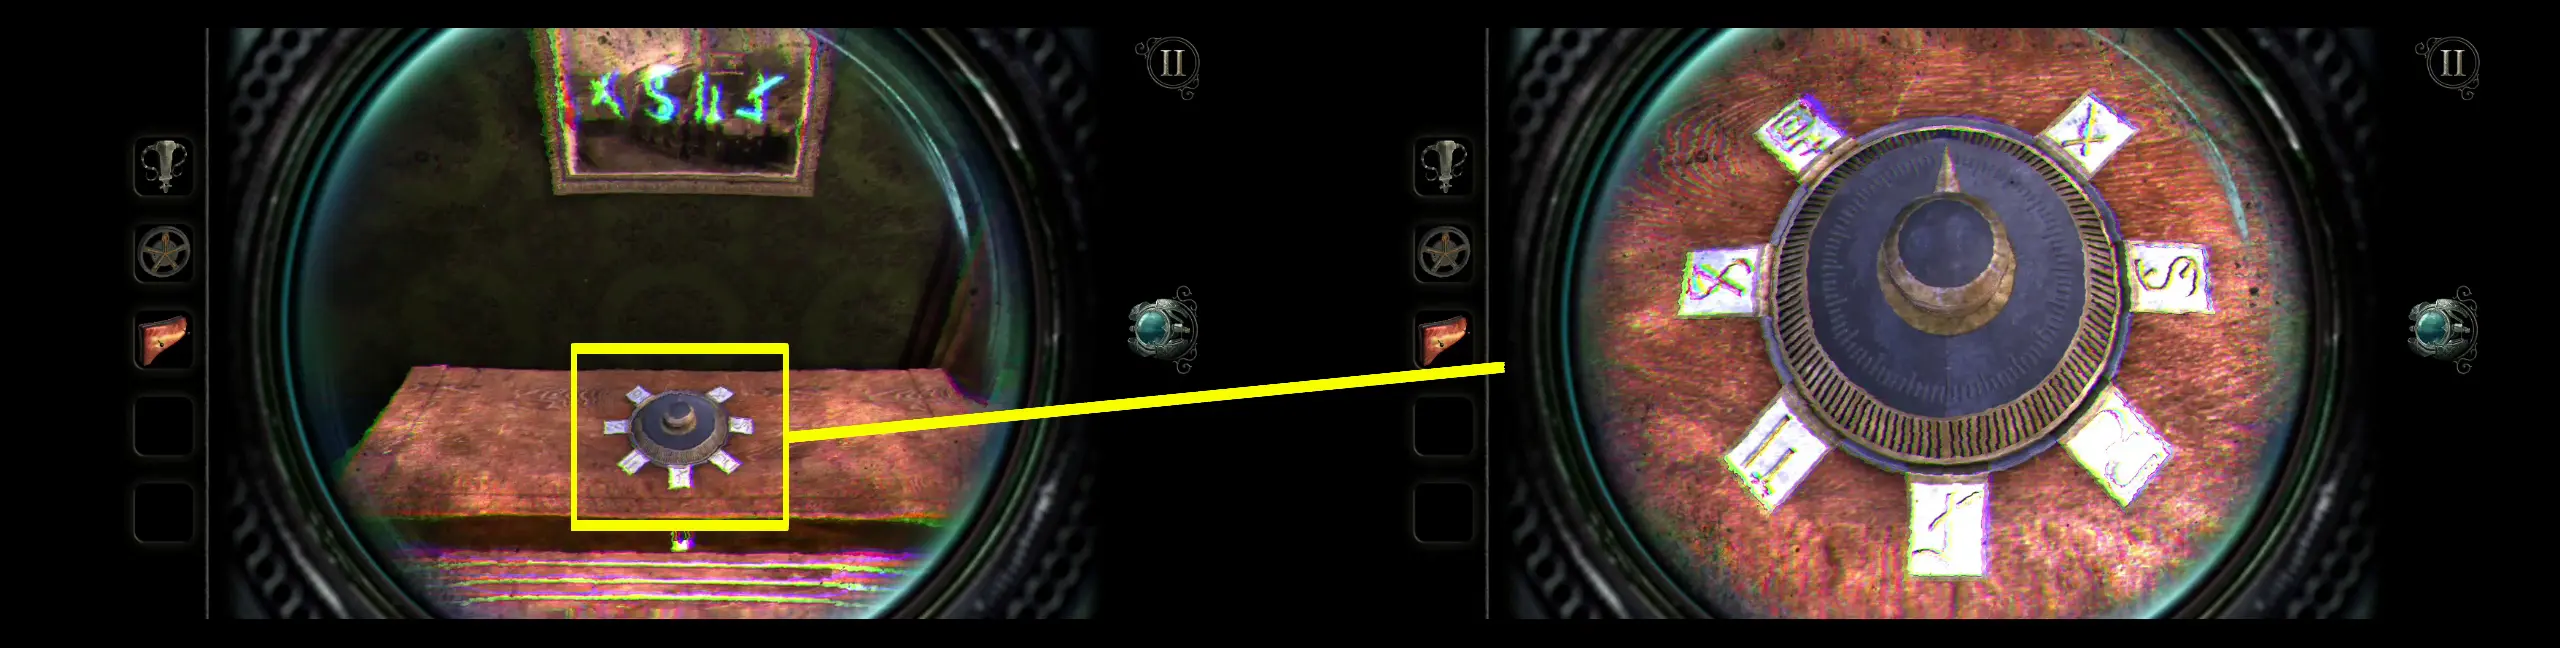
After correctly choosing all four symbols, the top of the roll-top desk will open, revealing a model train. Take note that the handle that had previously been fixed in place in this part of the desk is now movable.
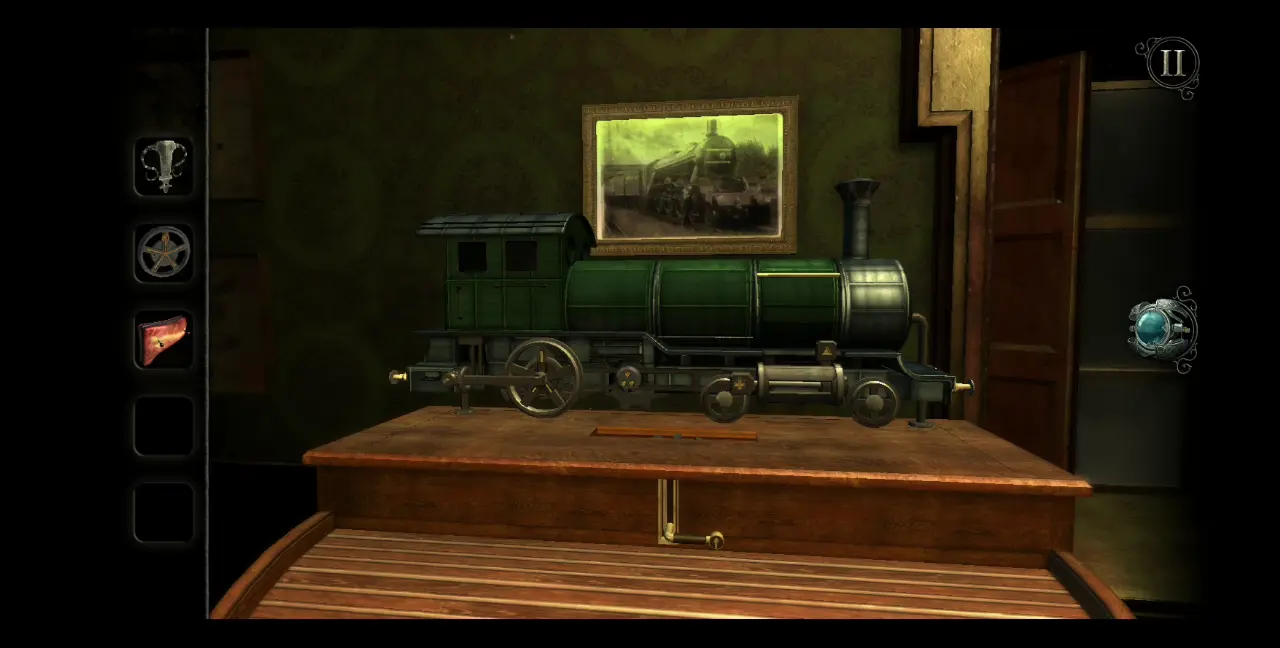
You can zoom into the train to observe it and which parts you’ll potentially be interacting with. Pictured below are just some of those parts:
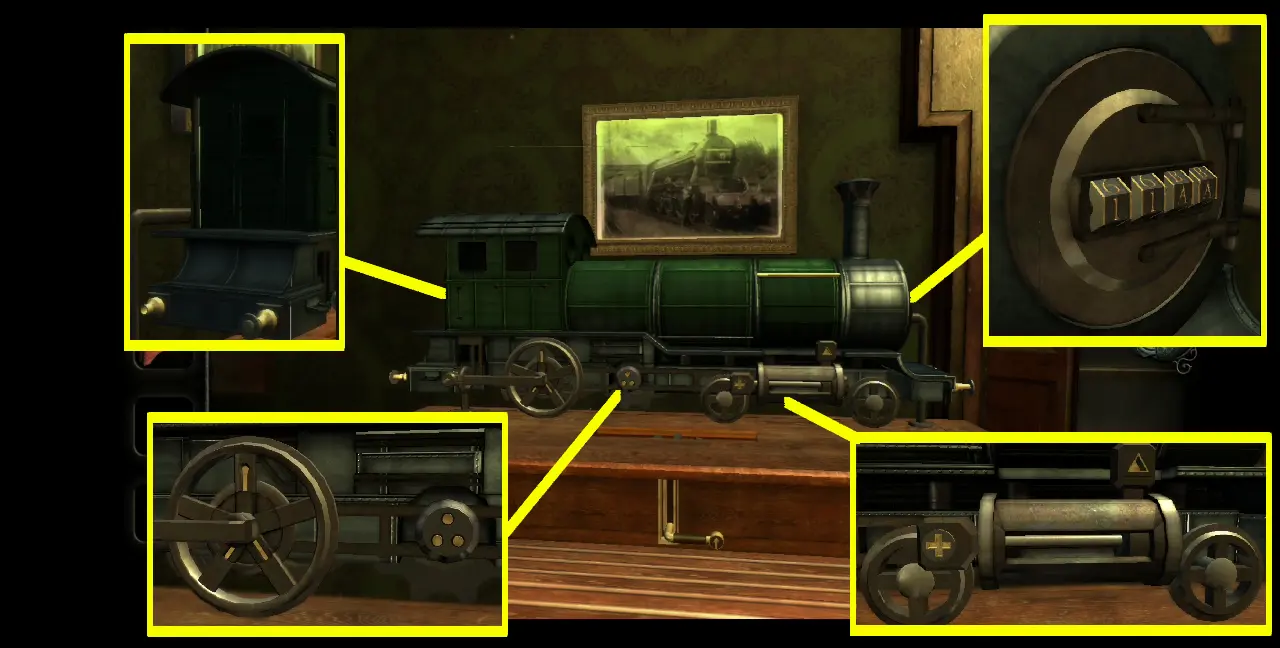
Out of all your current inventory items, the small wheel seems to be the perfect fit for the model train. Place the small wheel on the part next to another wheel of the same size.

After placing the wheel, a connector will come loose. Place the connector on the wheel you’ve just attached to the train.
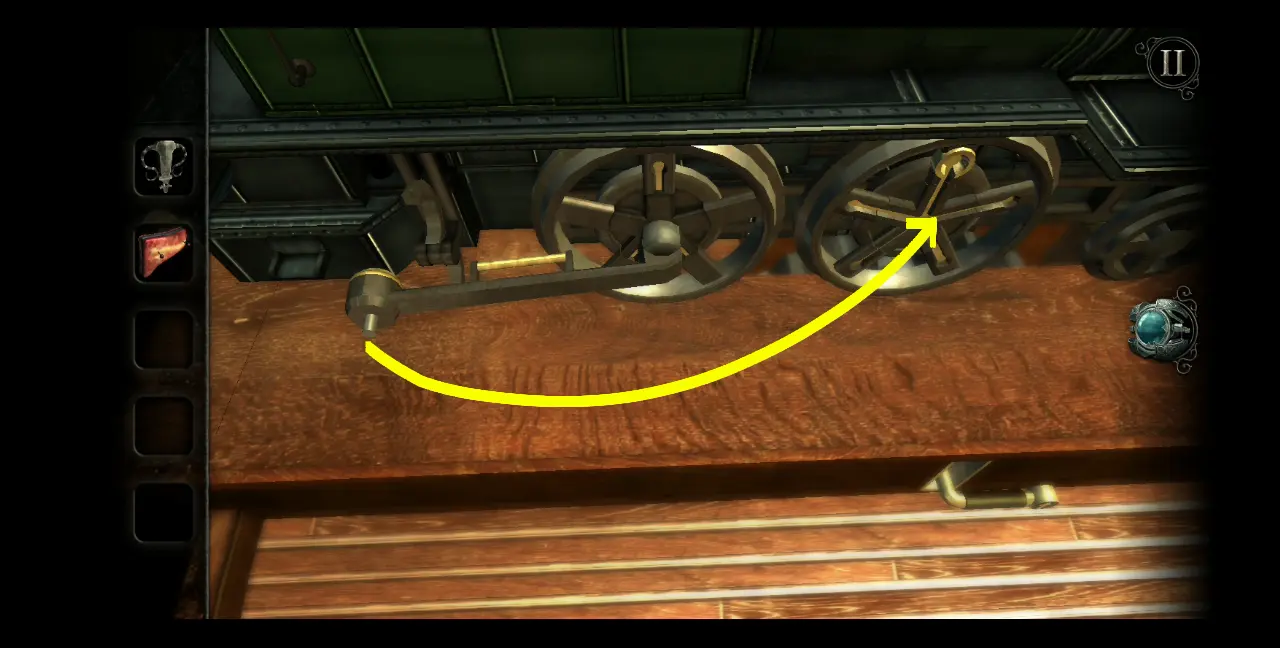
With the connector attached, rotate the left wheel so that the segment of the wheel cover with a gold strip will align with the other gold strip from the center of the wheel.
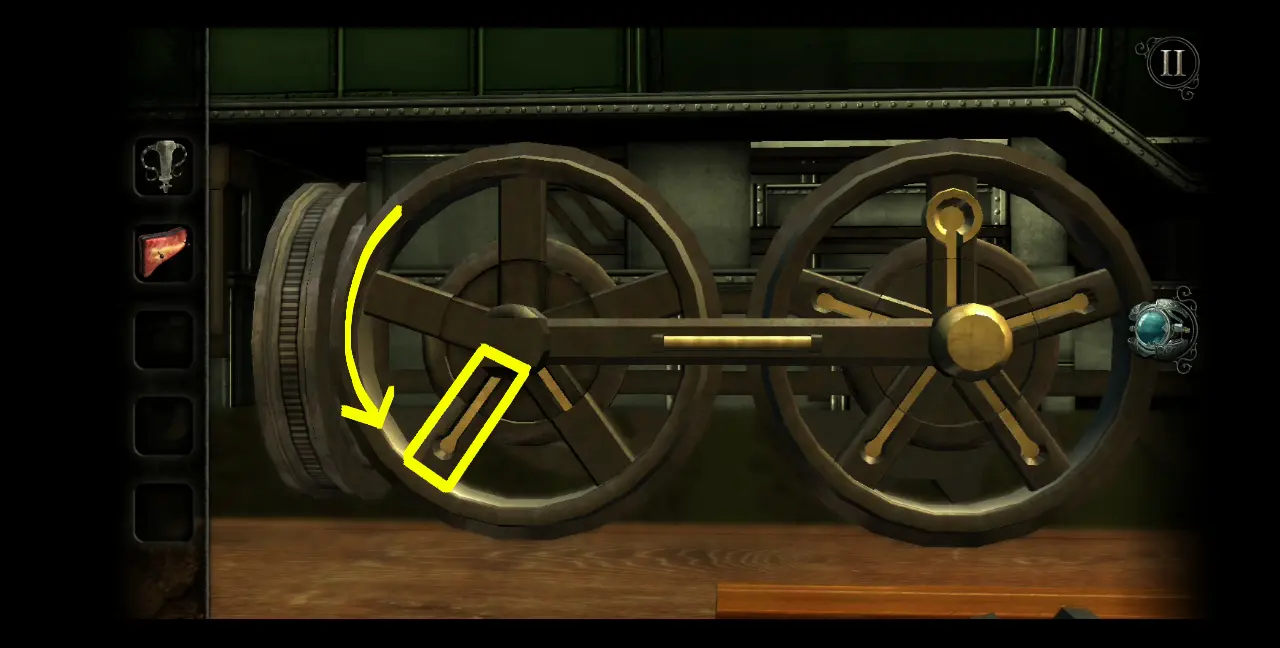
Pull the connector down, then turn the left wheel again, just enough for the gold strip to connect to the other gold strip to the right.
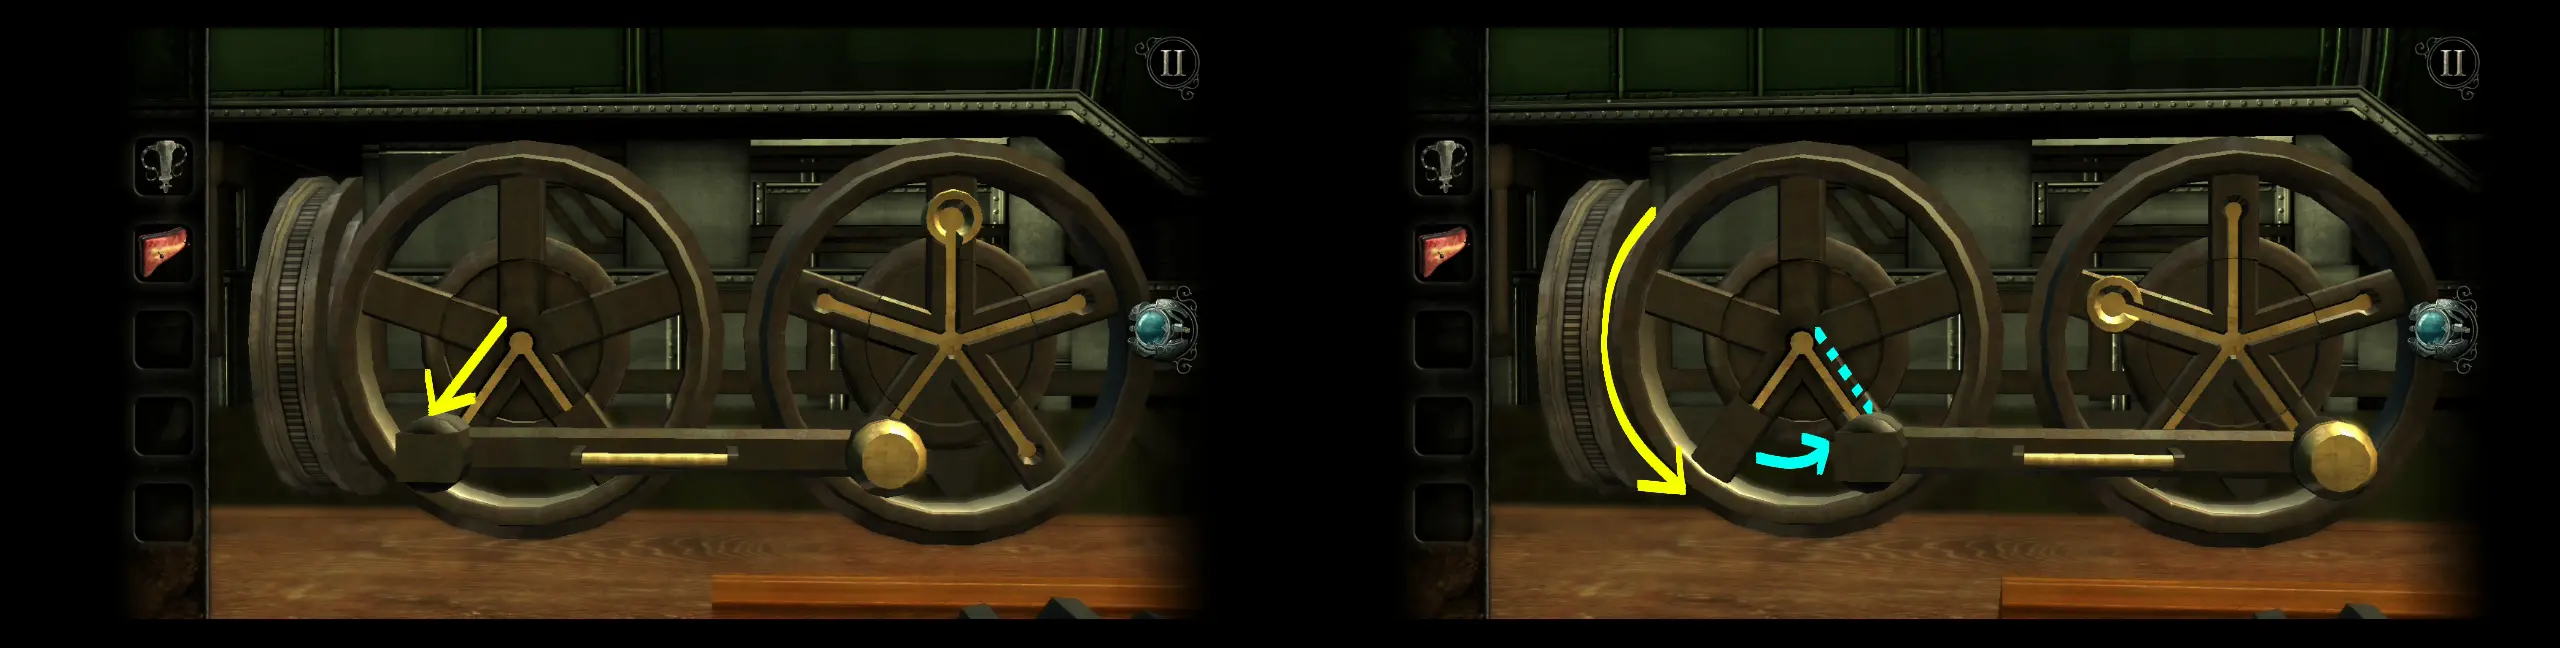
Pull the connector up to the center of both wheels. Then turn the left wheel so the gold strip from the wheel cover aligns with the gold strip on the left.
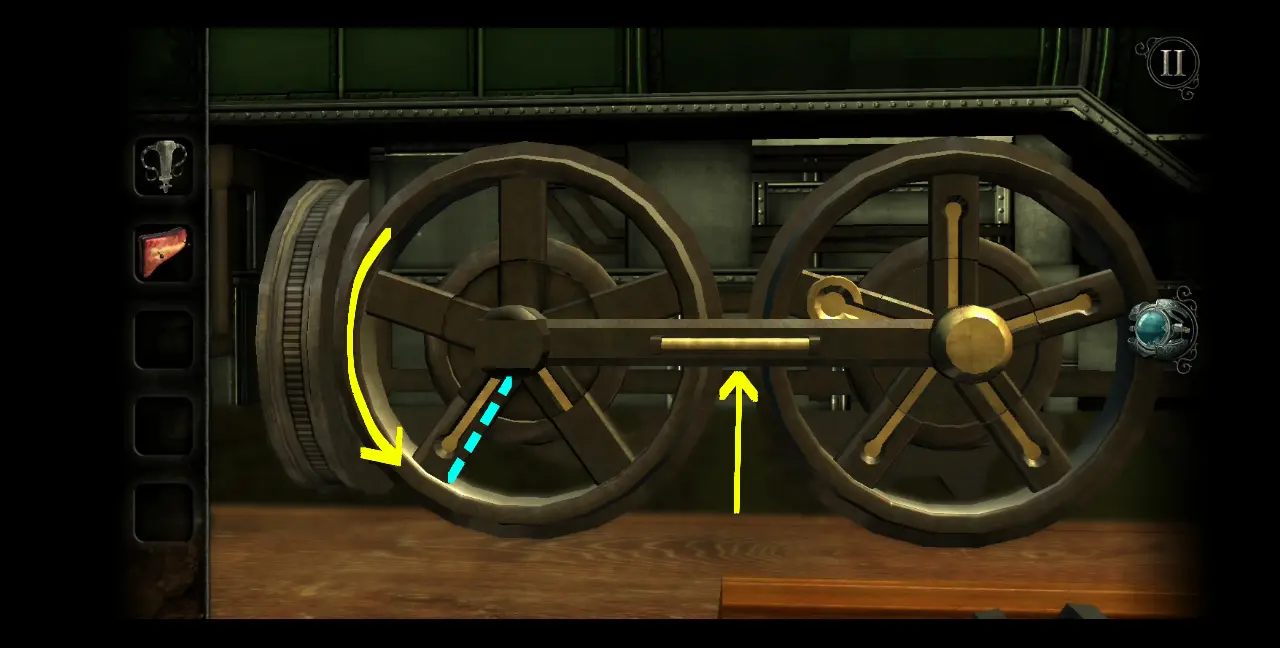
Pull the connector down, then turn the wheels so that the gold strip with the circle on the right wheel’s cover will be aligned at the 7 o’clock mark.
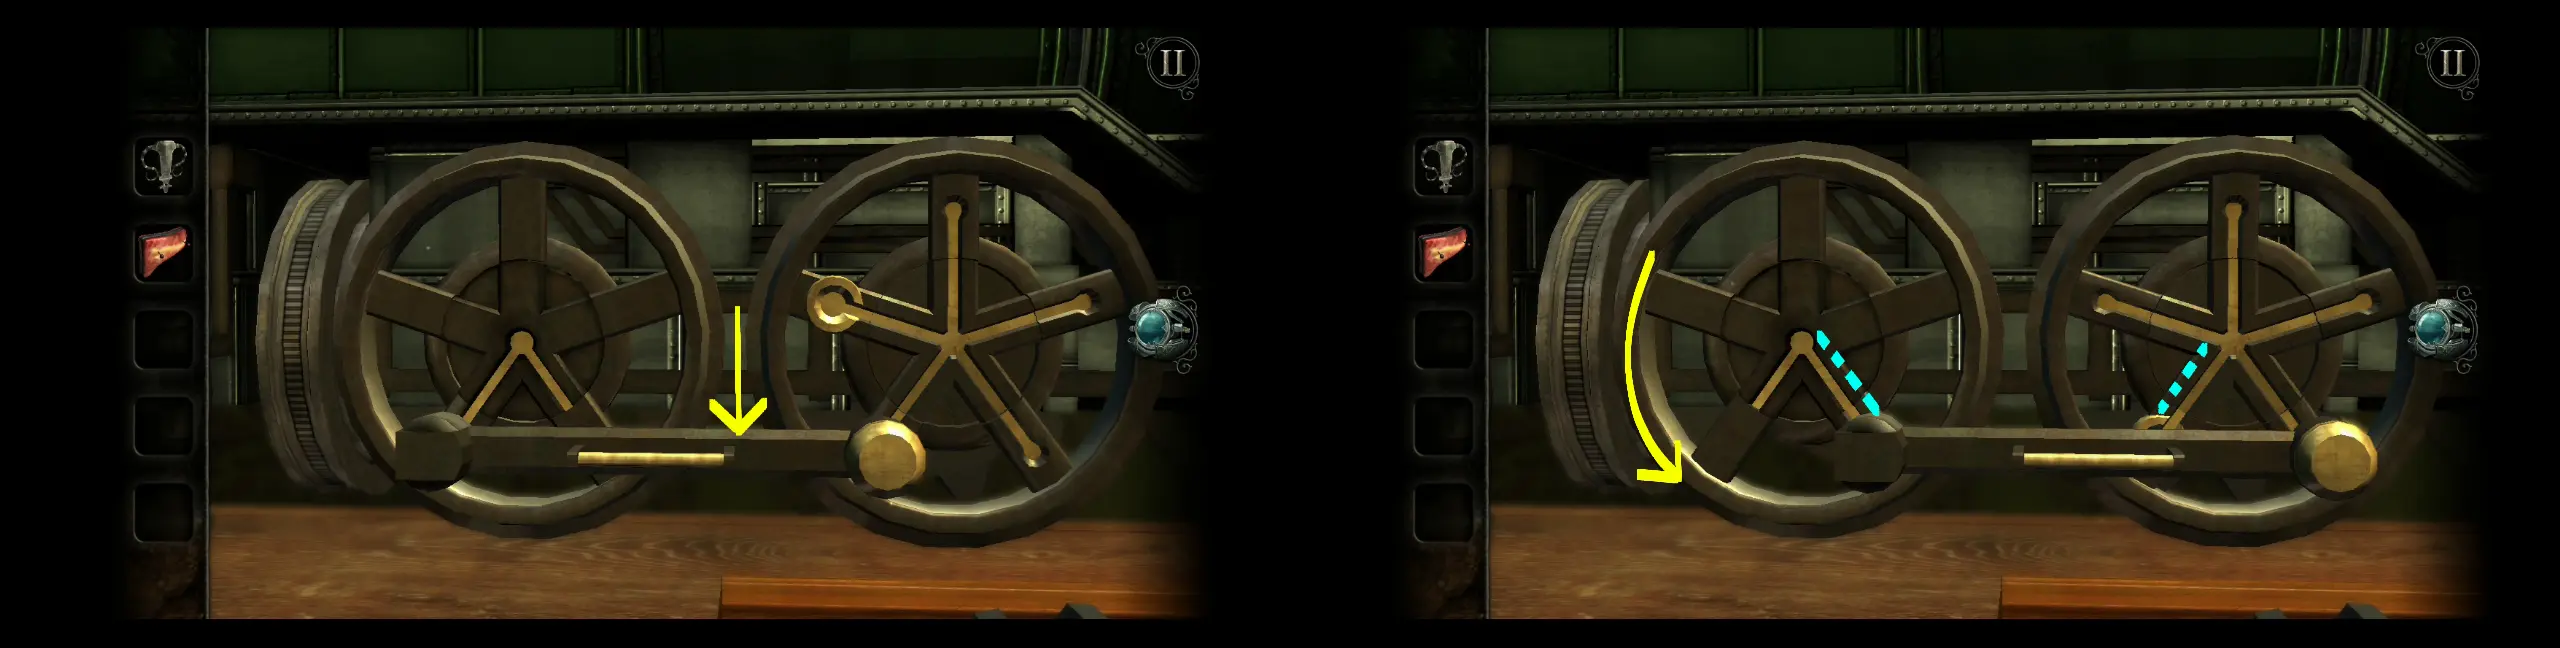
Pull the connector up again, then turn the left wheel so that the gold strip on the cover will align on the 7 o’clock mark as well.
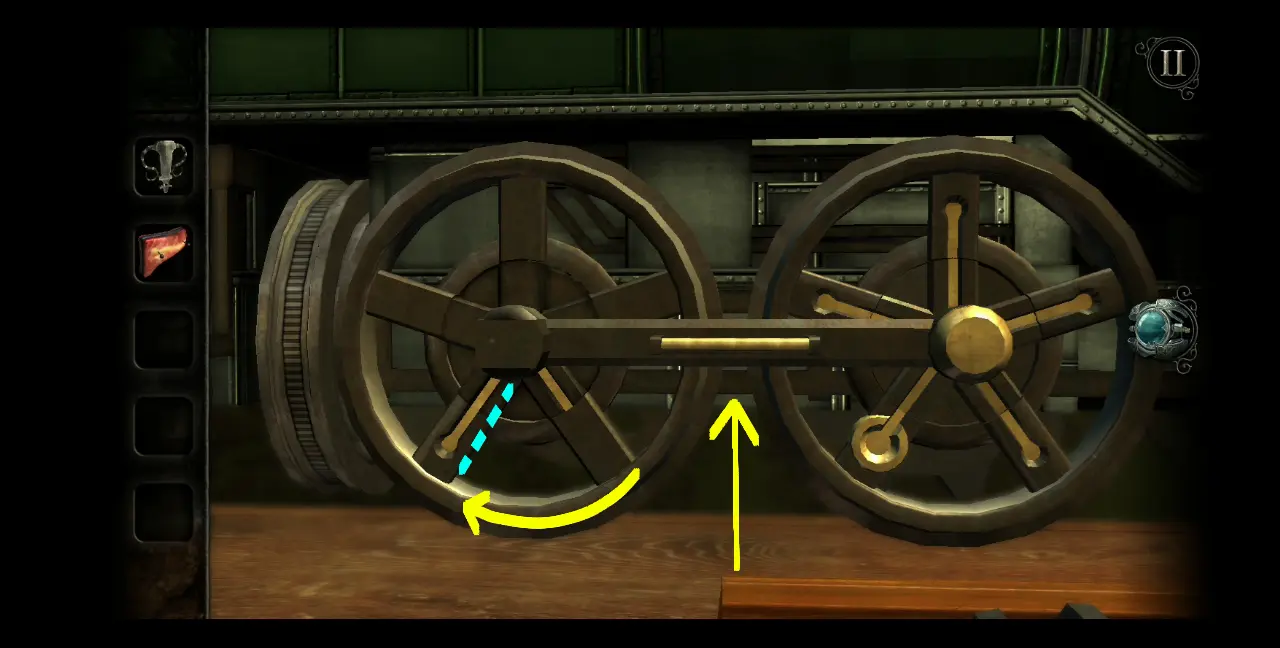
Pull the connector down, which will trigger the dial for the wheels to retract, as well as a small slot to open, revealing a cross-shaped slot. At the top of the right wheel, a hatch will also open.
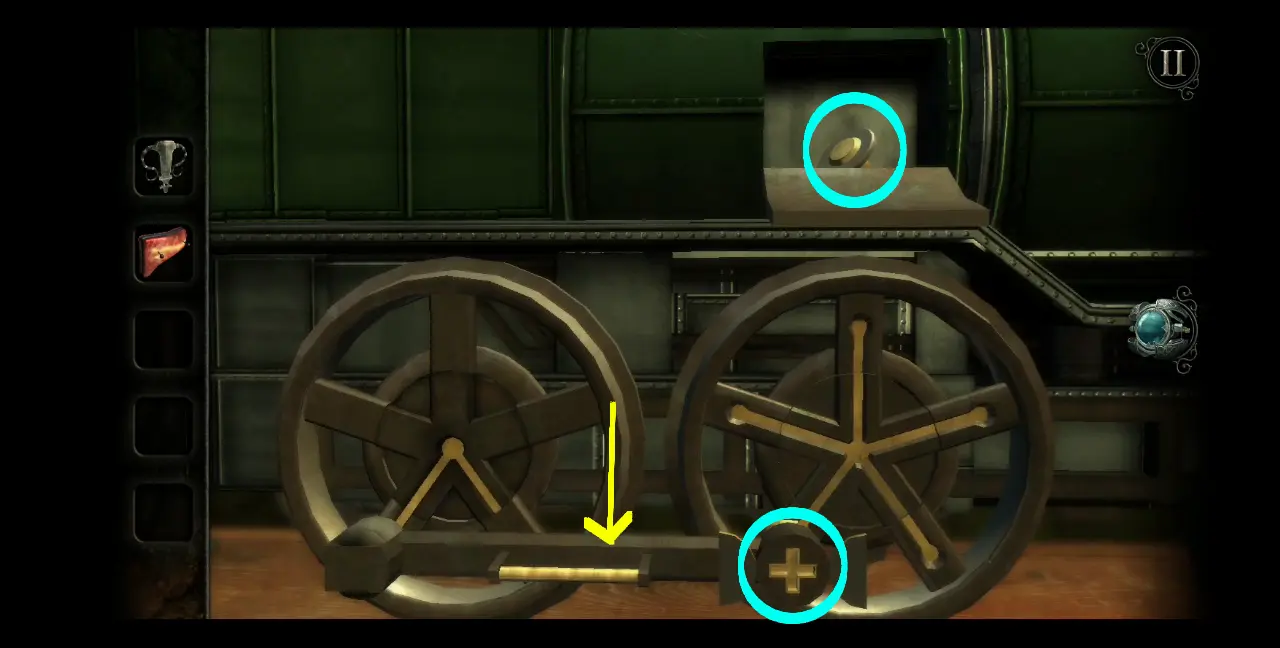
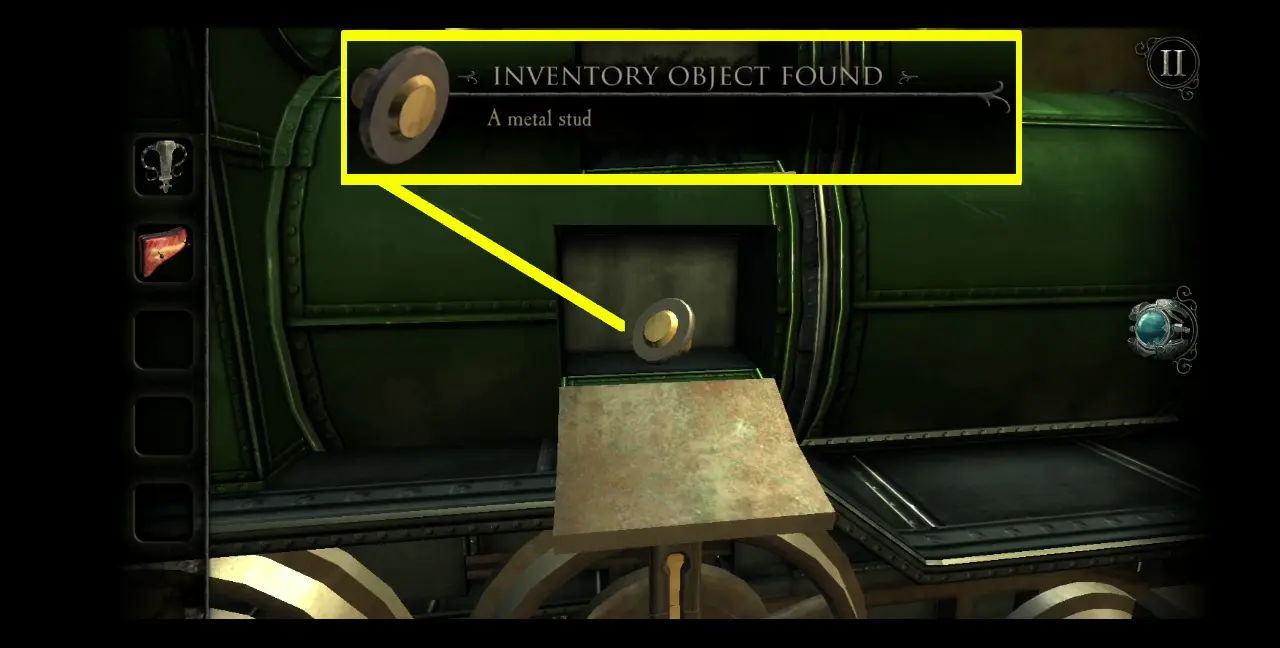
In the newly opened hatch, collect the item inside it: a metal stud.
The hatch will close again once the item has been collected. To use this item, zoom into the back of the train. You’ll see that the protrusions are asymmetrical as the left one is missing a metal stud. Drag the metal stud to this part.
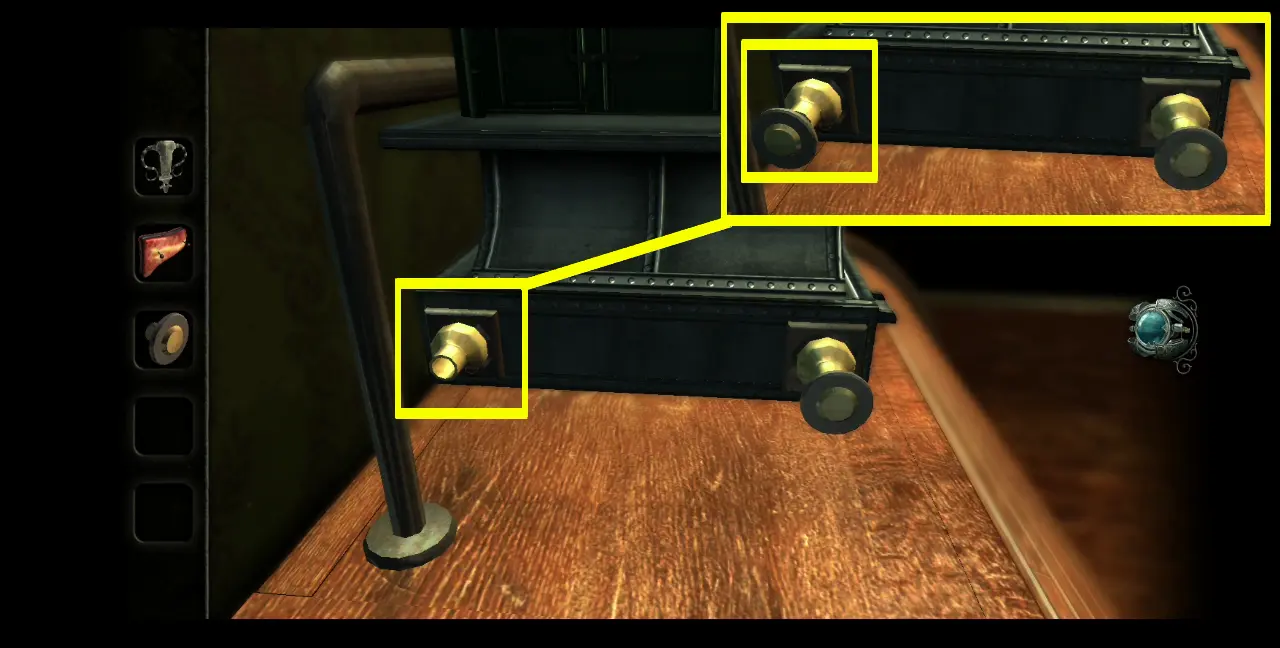
With the metal stud now in place, a small drawer will open at the back of the train. Collect the metal rod.
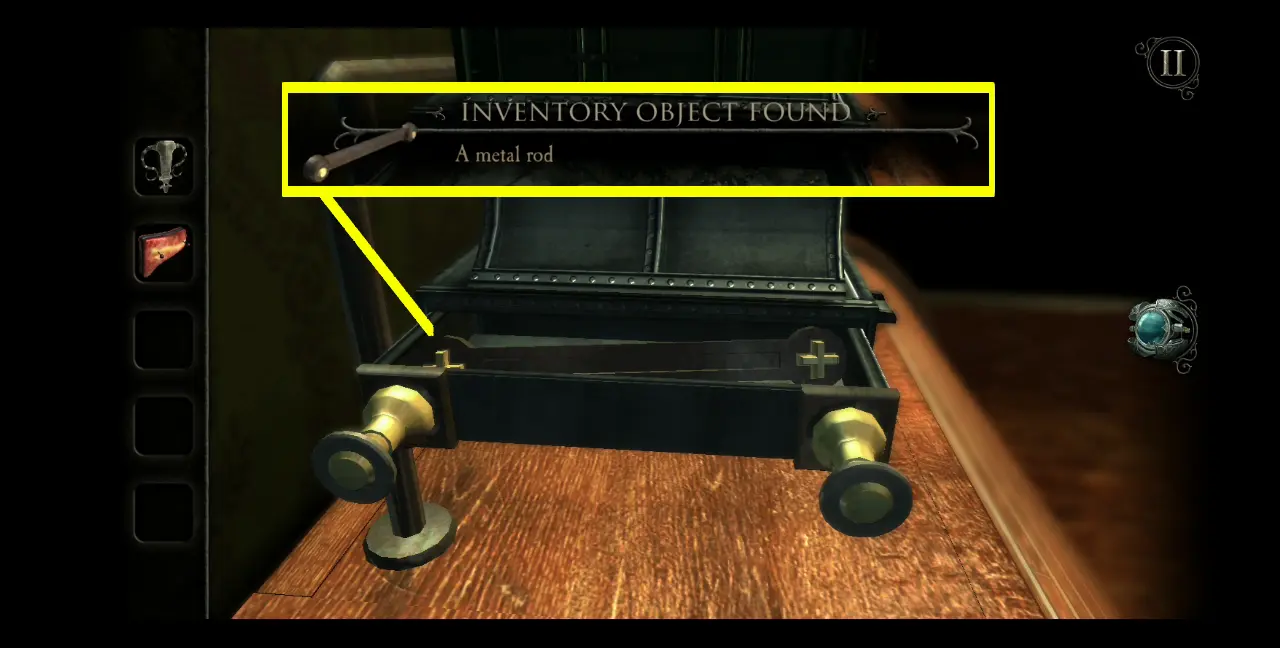
Viewing this from your inventory, you’ll see that both ends of the metal rod have cross-shaped protrusions. That said, go back to the side of the train, where you will notice two cross-shaped slots. The metal rod should fit perfectly here.
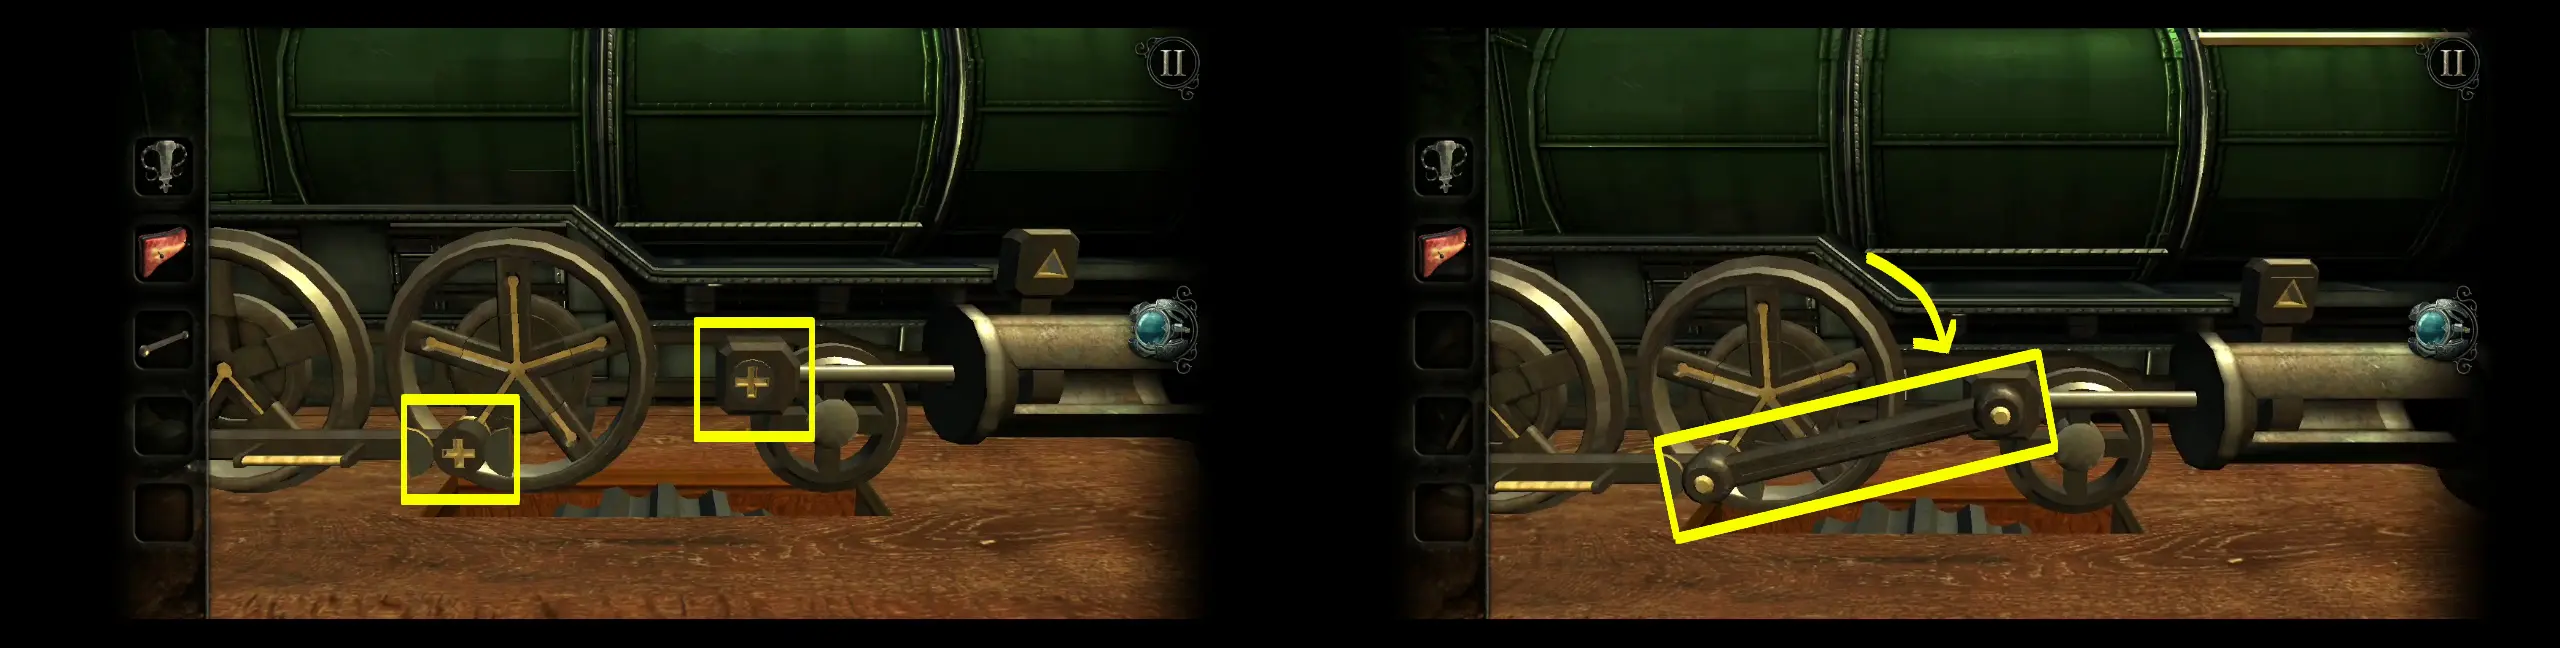
Upon placing the metal rod, two hatches will open near the front of the train. On the left compartment, you’ll find a new item you can collect: a metal grille.
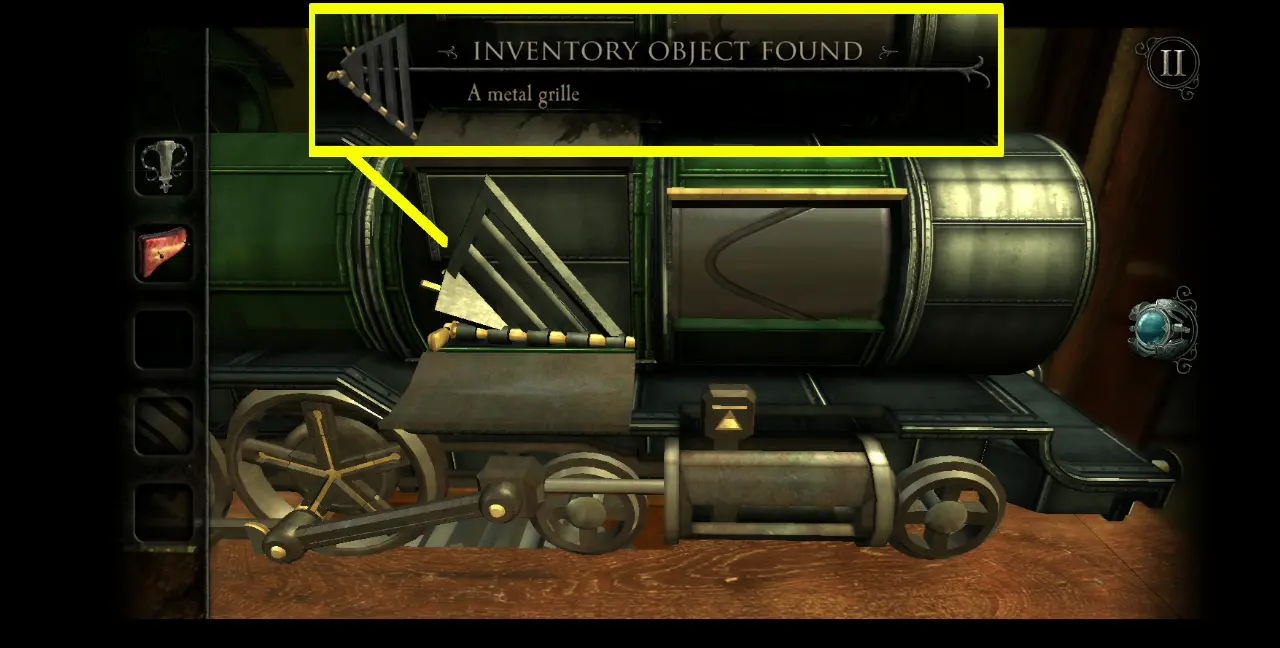
Open your inventory and view the metal grill from there. You’ll notice that it has a movable turnkey. Rotate the turnkey to change the shape of the metal grille into one resembling a triangle.

After that, zoom into the front of the train and place the metal grille there.
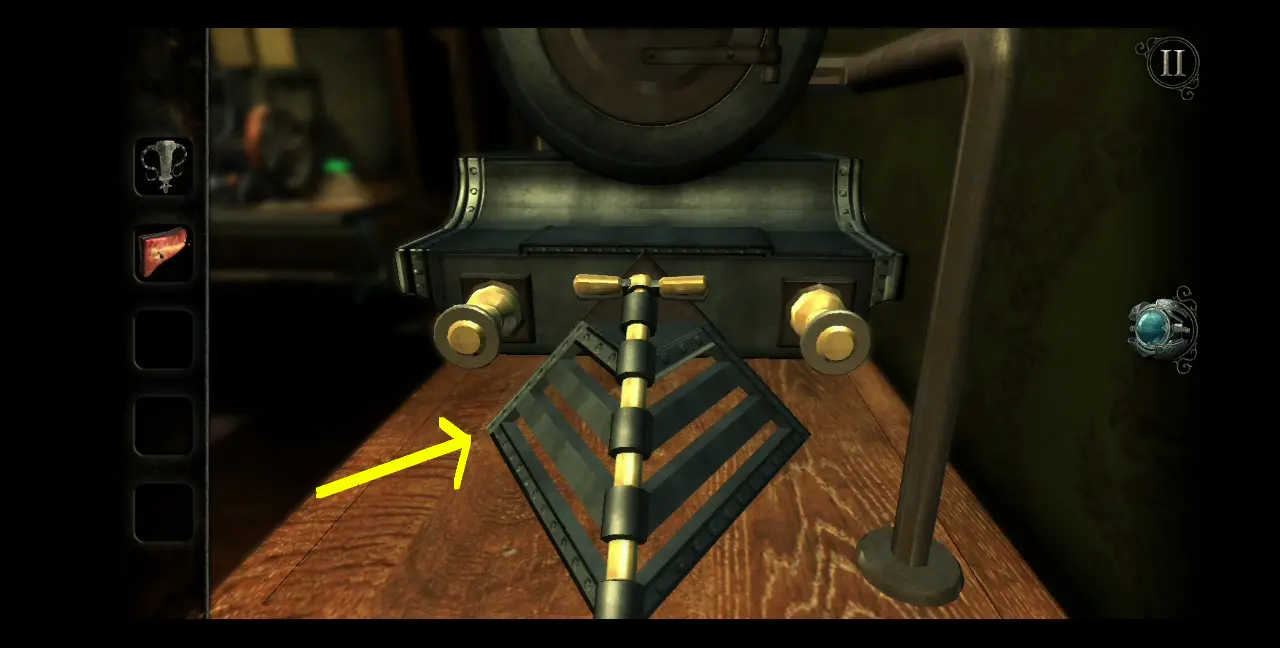
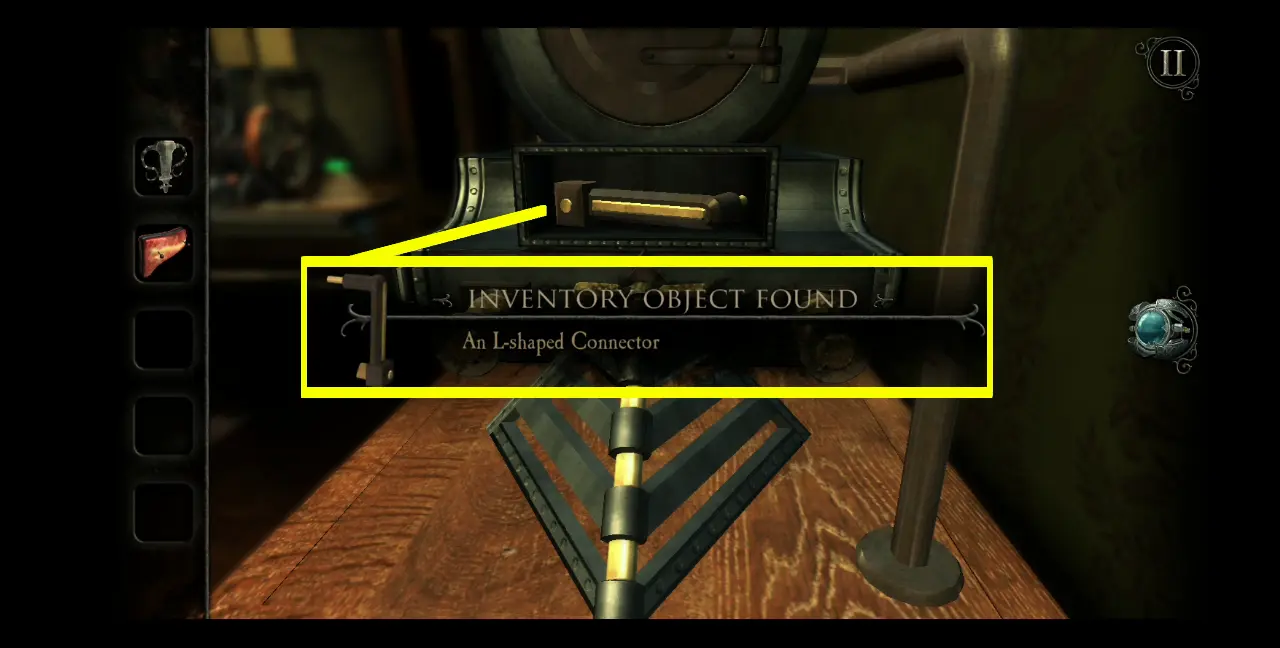
A small compartment will spring up just above the metal grille. From here, you can collect the L-shaped connector.
This L-shaped connector has a triangular protrusion. There’s a slot to accommodate exactly this shape at the side of the train. Place the L-shaped connector there.
This will cause a small hatch at the back of the train to open. Bits of crystalline material will emerge around that open hatch. Use your eyepiece to gain access to the puzzle behind it.
Entering this hatch will let you see the smaller mechanisms inside the train.
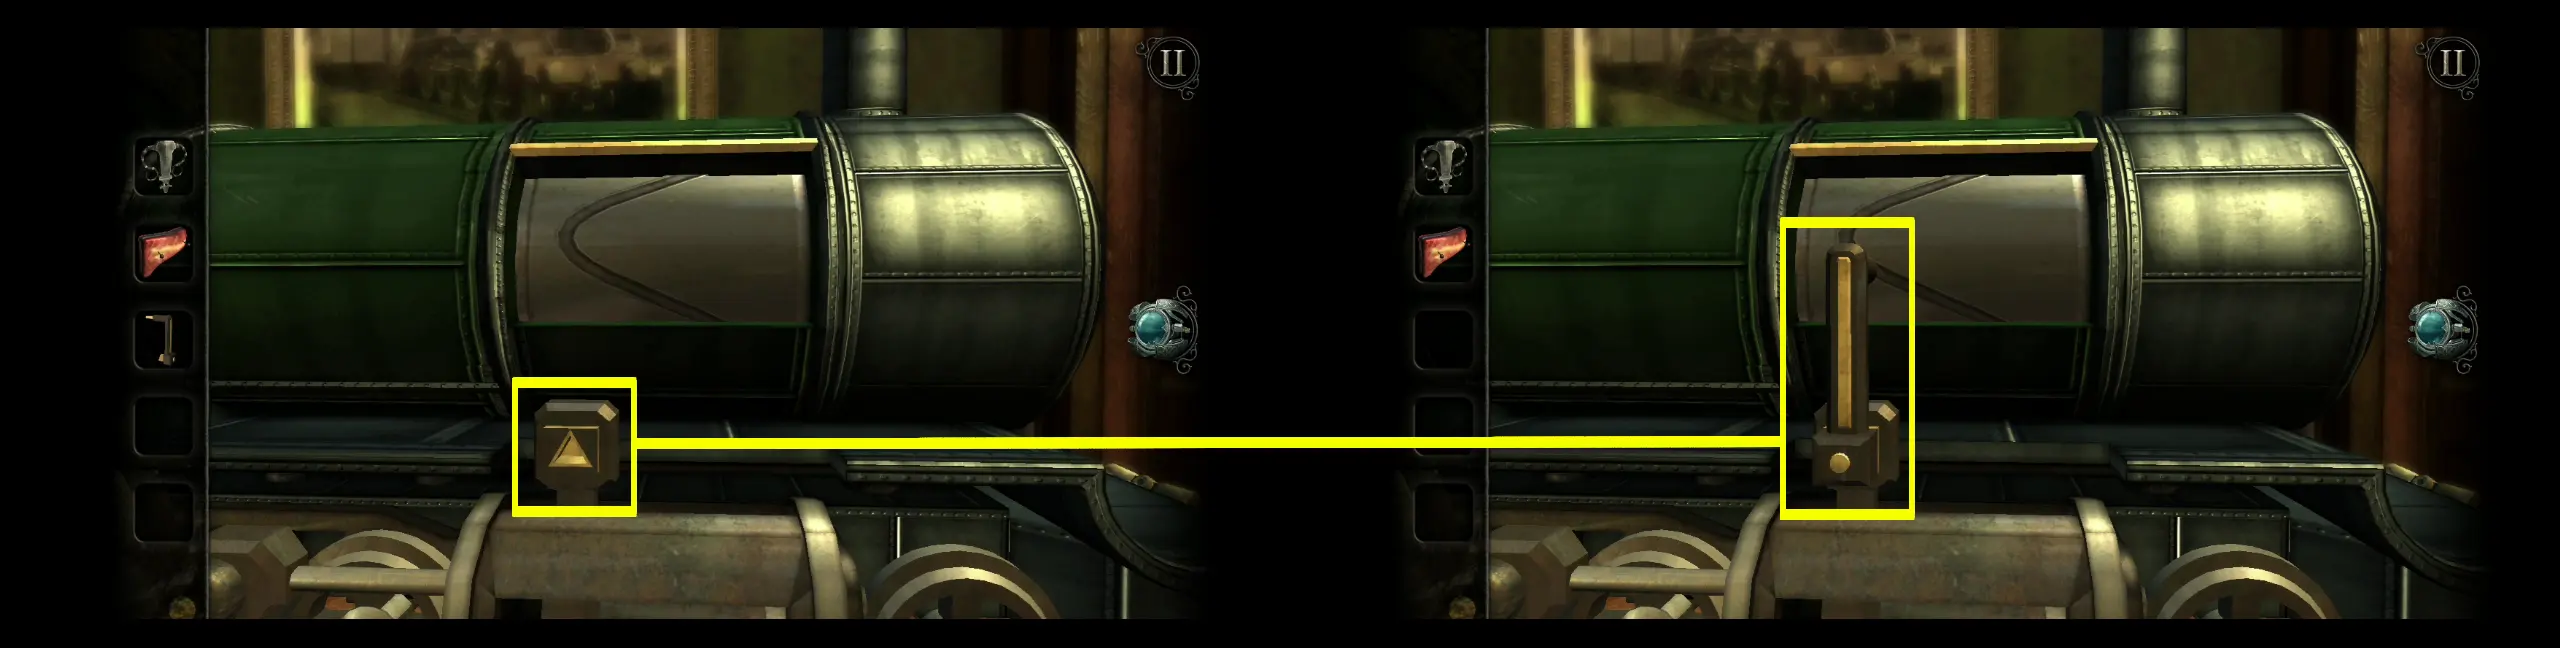
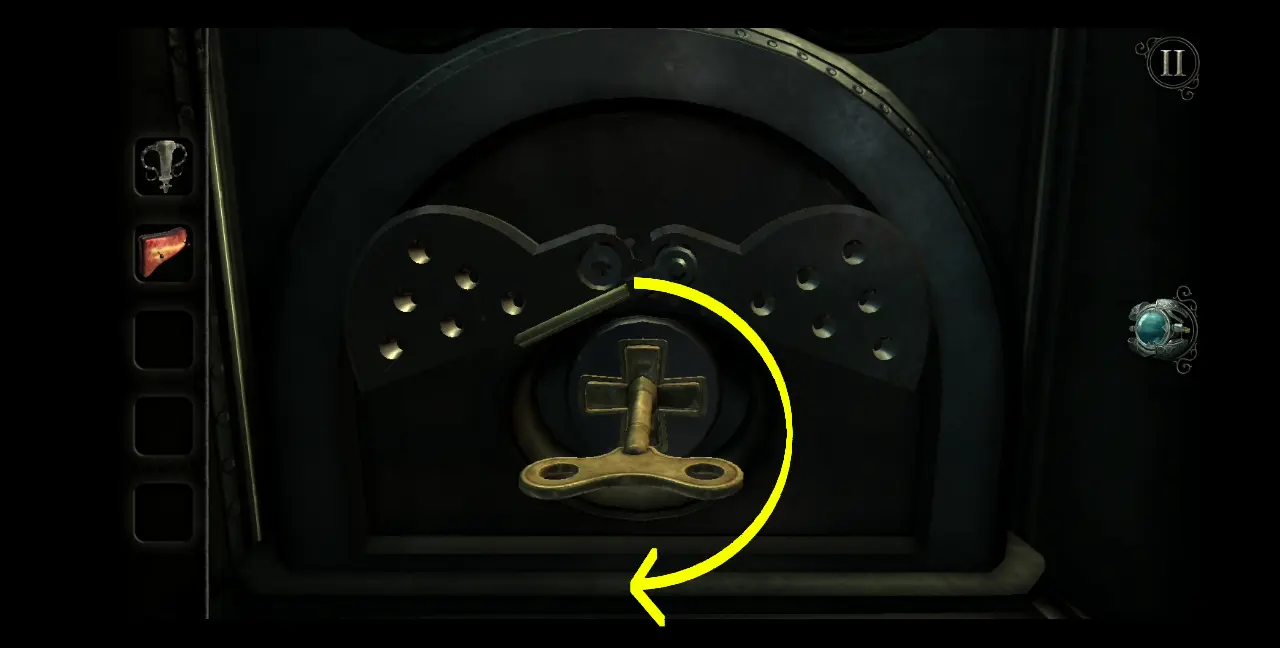
First, turn the handle above the metal circle with holes. Behind it, you will see a cross-shaped socket.
Next, peek into the left porthole. Turn the left throttle, which will move a corresponding segment of the train. Keep turning the throttle until the topside of this segment is the one with a hole and a tank peeks out from it.
Zoom out then do the same for the right porthole: turn the right throttle, moving the front segment of the train till a tank peeks from the hole.
Leave this part of the train first and head to its front. Rotate the throttles to fully pull out the tanks from the holes.
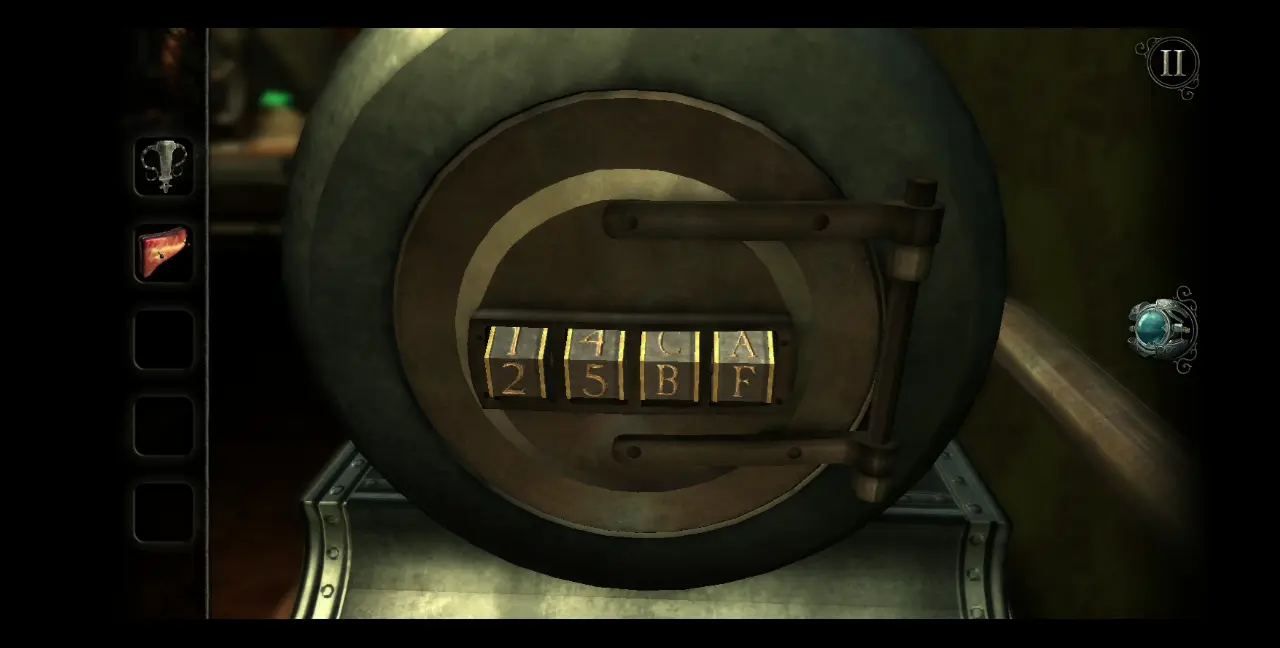
Right off the bat, you’ll see that both tanks need to be viewed through the eyepiece. However, if you do it here, you won’t see much of anything. What you need to do is return to the back of the train and access the inside. Use your eyepiece and look through each porthole. If you adjust the angle a bit, you’ll see that there are figures coming into focus. From the left porthole, you will see “25,” and from the right, you will see “BF.”

Remember this combination. Leave the back of the train again and go to the very front. Here, you’ll find four slots wherein two are numbers and the other two are letters. Rotate them to reflect the code you’ve seen from the back of the train.
With the correct code inputted, this will open the front of the train. Flip the circular hatch and take the winding key inside.
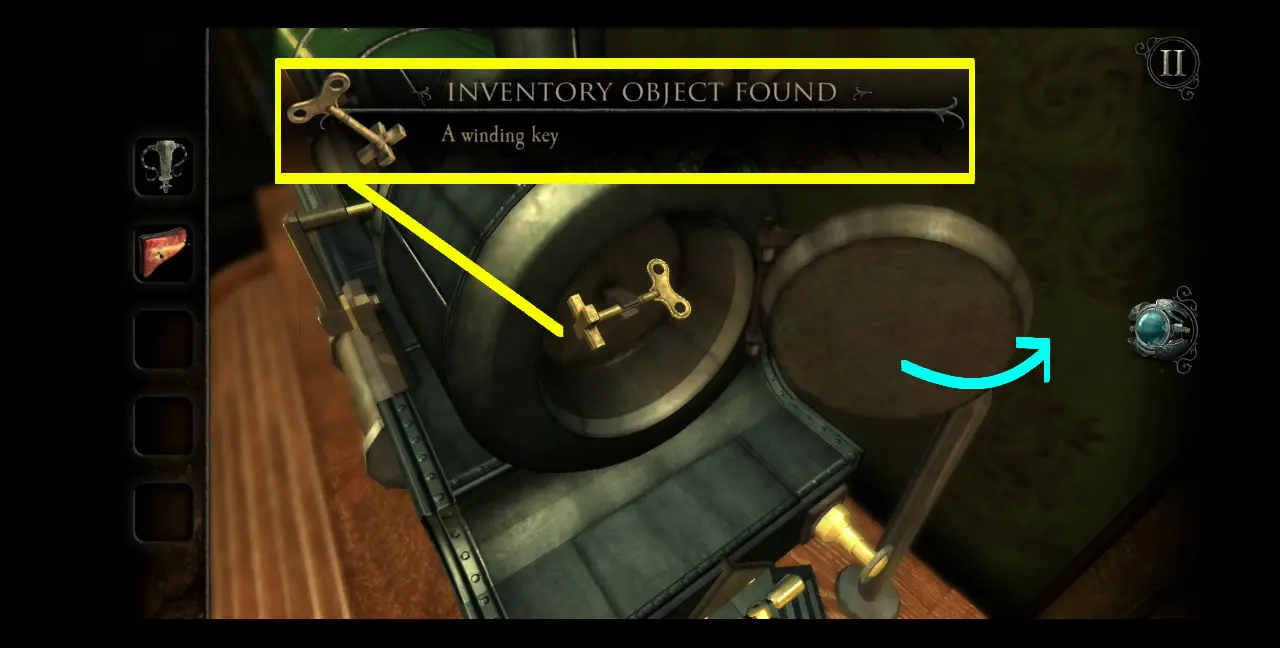
This winding key has the cross-shaped head, which will fit the cross-shaped socket inside the train. Thus, return to the back of the train again and enter. Place the winding key in the cross-shaped socket and turn it continuously.
This will cause the train’s wheels to start moving. Here, your perspective will return outside the train. Beneath the train is a handle. Pull it up to connect a gear with the moving wheels.
The train’s wheels will keep moving, causing the roll-top desk to finally open.
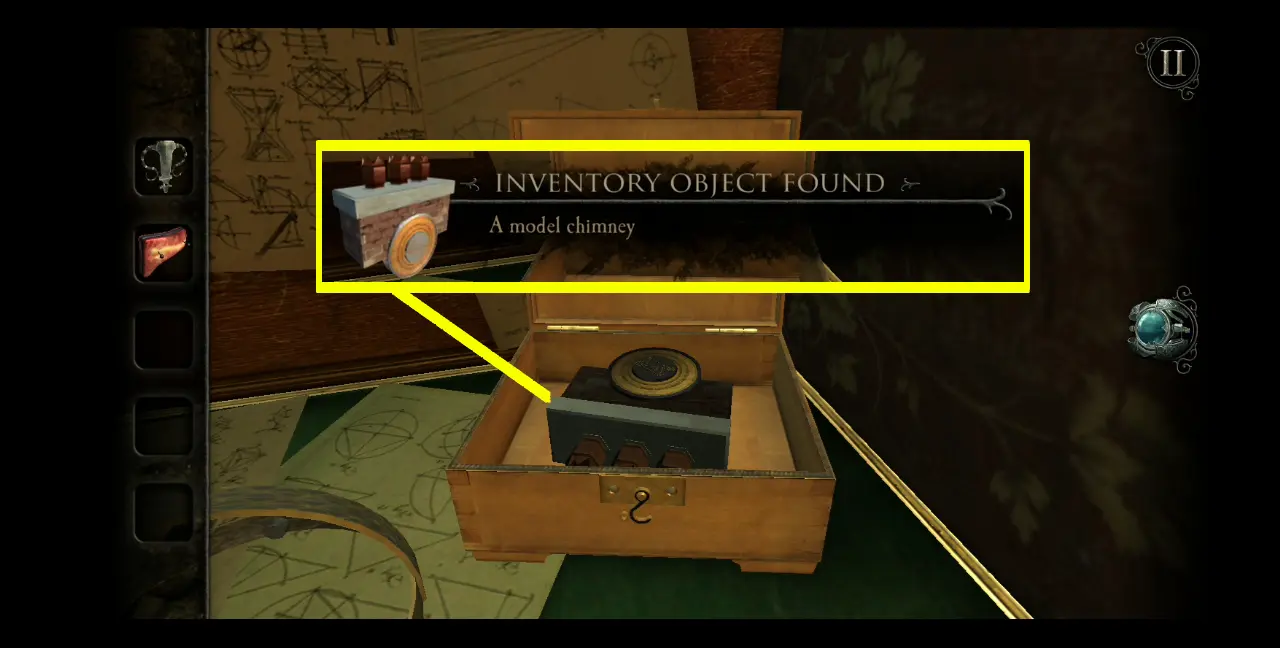
Immediately to the right of the desk, you’ll see a box. Flip the lock down, open the box, and take the model chimney inside it.
At the center of the table, you’ll also notice a book: the Applied Mechanics Handbook. Open it and this is the message you’ll find inside:
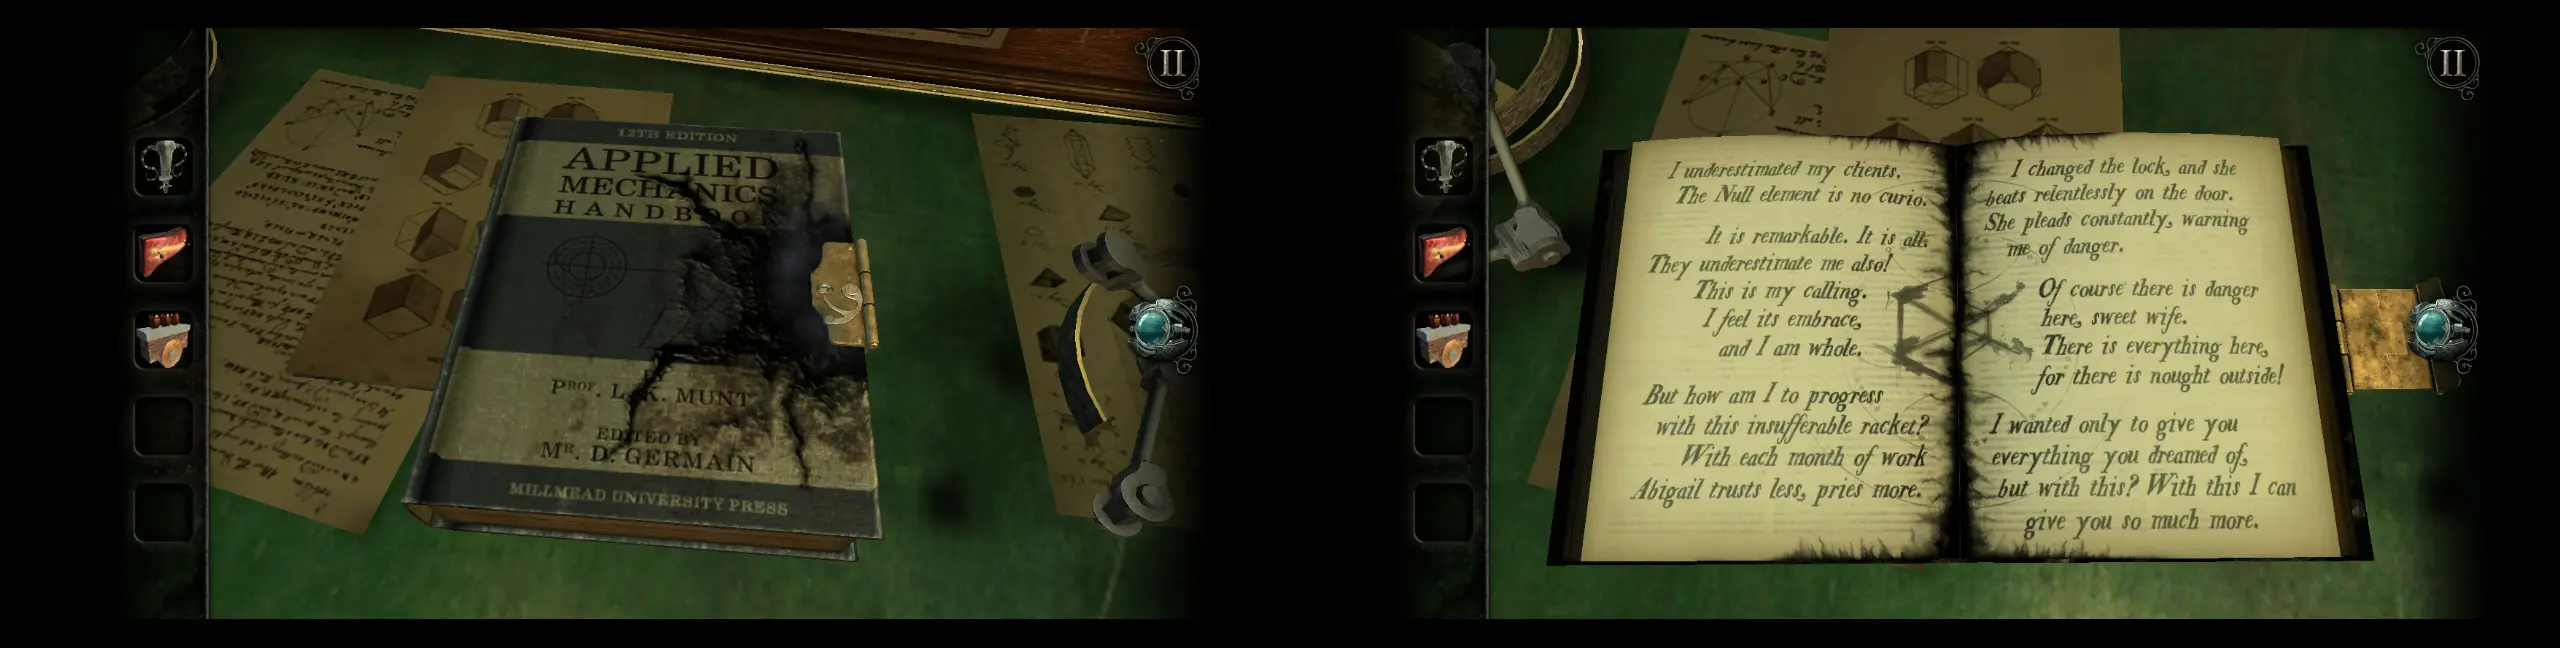
This is the first time that the Null element has been mentioned in these journal entries. This latest one appears to be written from Edward’s perspective, wherein he slowly descends into madness.
With the model chimney on hand, go back outside the dollhouse. At the front of the house, near the seal, you’ll see part of the chimney. Place the model chimney there.
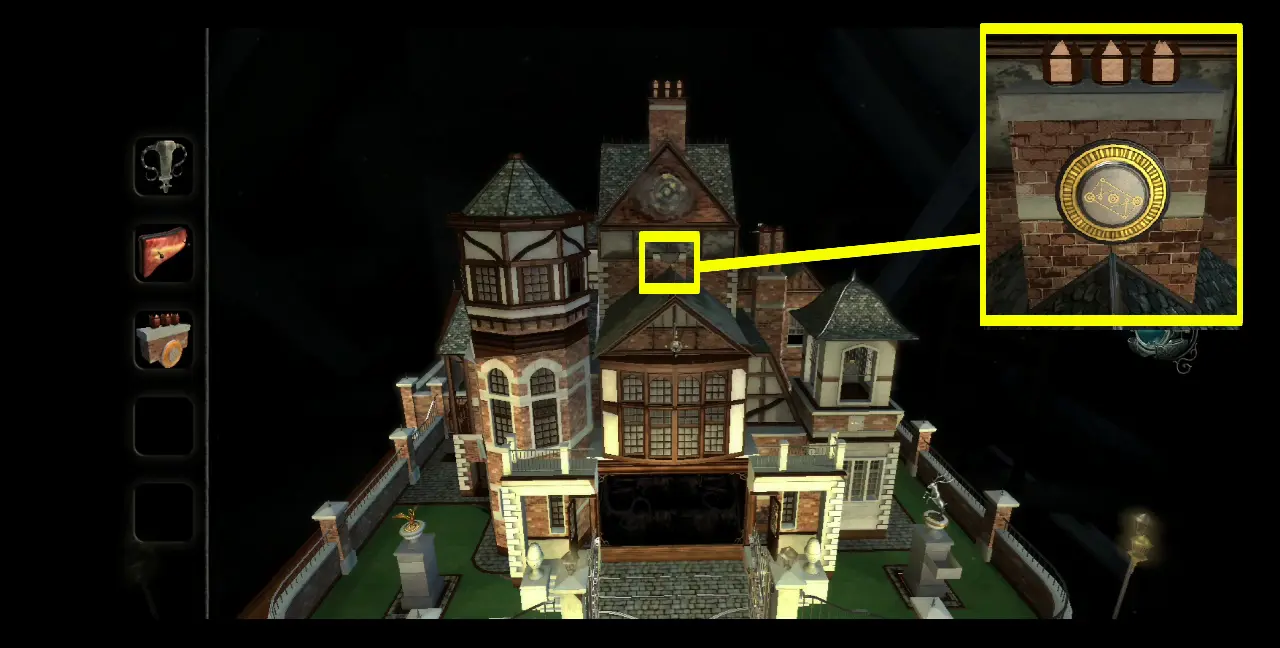
Three vials will emerge from the top of the chimney. Based on their appearance, you’re going to need the eyepiece to reveal their secrets.

But first, you need to turn the dial in the middle of the chimney to make all the vials stand at equal length. Keep turning the dial until all three vials are aligned with each other.
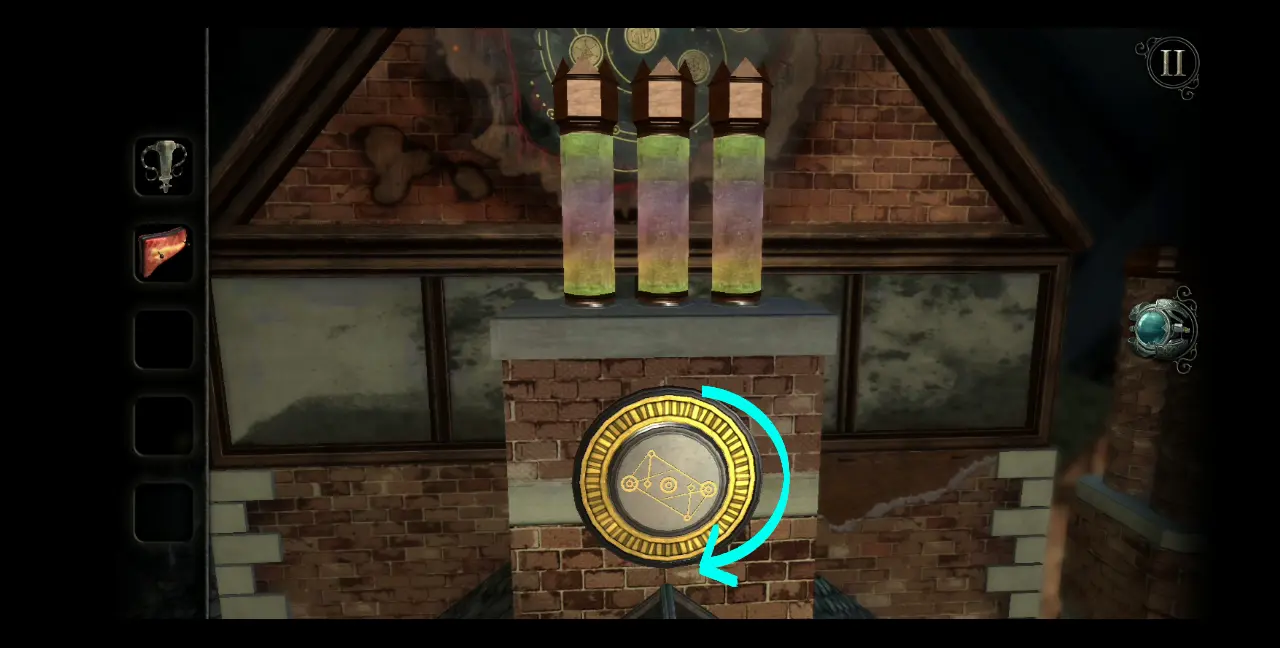
Open your eyepiece and adjust your perspective slightly to the right side of the chimney. You’ll see three different fragmented symbols in each vial. Keep adjusting your perspective until you’ve come upon the symbol pictured below:
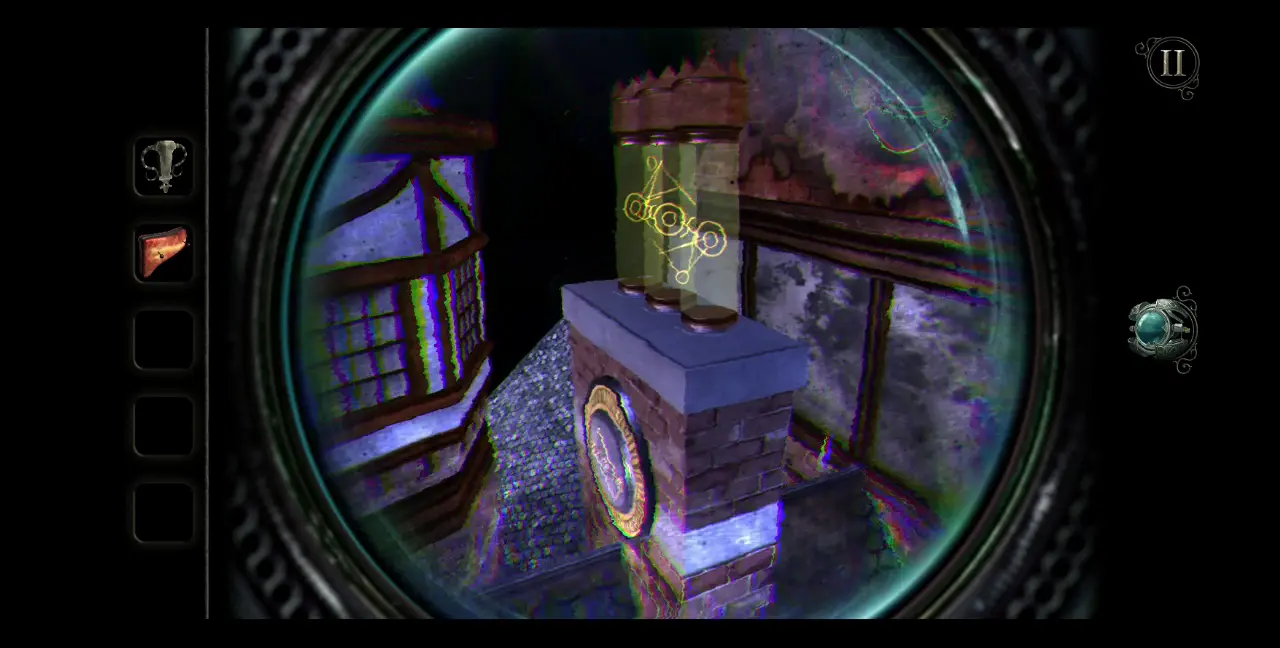
Once the symbol is aligned, you’ll hear a series of clicks, indicating that something inside the dollhouse is moving. Indeed, a new room will be available to you, one directly above the Foyer…
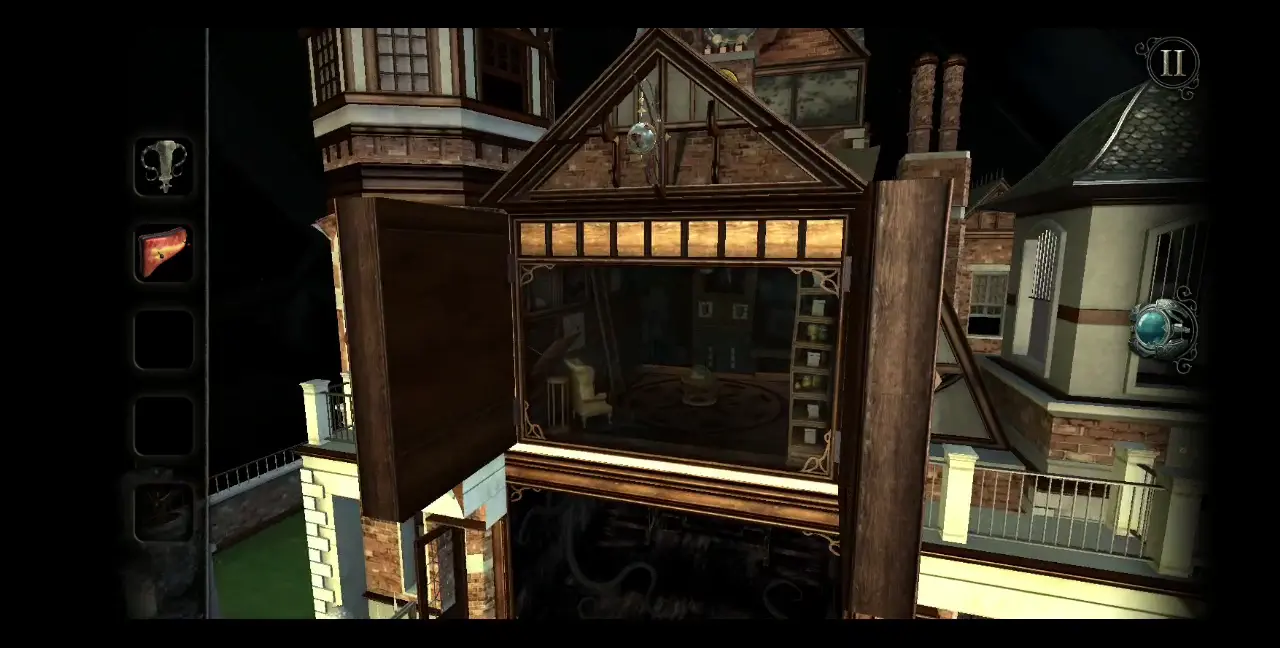
With this, we conclude the first part of our walkthrough for The Room: Old Sins. At this point, you’re now acquainted with the basic principles of how the dollhouse works, completed all the puzzles in the Foyer, and have opened up the Study as well as the Kitchen. In the next part of our walkthrough, we’ll pick up where we left off as a new room will be unlocked—and there will be several more rooms you will encounter in the future.
For now, we leave you with these questions: what do you think happened to Edward and Abigail? What, for you, is the most difficult puzzle? Of all the rooms we have encountered thus far, which one do you find most intriguing? Share your thoughts in our comment section below!