The Equipment Dungeons in RAID: Shadow Legends are the places where you’ll be spending most of your time farming. The gear which drops is both a very good source of silver and the next step to comprehensively powering up your champions when you feel the equipment from its Campaign isn’t doing much for you anymore. This is because every stage in the equipment dungeon will guarantee a rare or higher gear drop, and will give you much higher ranked equipment than the Campaign stages depending on what level of the dungeon you’re in.
Given this, the best time to run the equipment dungeons would be when you have at least one 6-star Champion with +16 Gear in every slot and either the Giant Slayer or Warmaster Mastery unlocked, as each dungeon boss has its own quirks and having at least one champion will get you close enough to at least level 7 or 8 of each dungeon.
Farming and upgrading a Diabolist from Chapter 12 of the Campaign will greatly benefit you in these dungeons as well, since as her buffs and debuffs can help you reliably clear them. Her skills are:
Torment: Attacks 1 enemy and has a 10% chance of placing a SLEEP debuff for 1 turn.
Electric Storm (4 turn Cooldown): Attacks all enemies and places a 30% INCREASE SPEED buff on all allies for 2 turns.
Positive Charge (6 turn Cooldown): Fills the Turn Meter of all allies by 15 and decreases the Turn Meter of all enemies by 15%.
Her skills specialize in speeding up your team and delaying the opposition. 6 pieces of SPEED type equipment with Speed and Accuracy substats as well as HP for survivability would work very well with her, as her main role is to use her buffs and debuffs as many times as possible before she dies.
Farming for a Warmaiden from Chapter 9 will also be a decent investment as her skillset will be useful in every dungeon as well. Her skills are as follows:
Ferocious Attack: Attacks 1 enemy. Has a 30% chance of placing a 2.5% POISON debuff for 1 turn.
Opportunity Strike (3 turn Cooldown): Attacks 1 enemy. Places a 50% INCREASE ATTACK buff on this Champion and places an extra hit if this attack is critical. The extra hit cannot be critical.
Crumbling Blast (4 turn Cooldown): Attacks all enemies. Has a 75% chance of placing a 60% DECREASE DEFENSE debuff for 2 turns.
Her offensive skillset comes with two useful debuffs: Poison, and Decrease Defense, which many bosses and champions in the game are vulnerable to. There isn’t much else to say, really. Poison helps whittle down enemies with extremely high defense or max HP and Decrease Defense does exactly what it says on the tin, plus her Opportunity Strike helps her deal a good chunk of damage. Giving her a mix of Lifesteal and either Accuracy or Speed equipment, with main or substats in Critical Rate, is a good starting point for this champion.
Related: RAID: Shadow Legends Guide: Tips, Tricks & Strategies to Rank Up Your Champions and Grind to Midgame
As a footnote, since you’ll definitely be upgrading these champions to get them up to snuff for your dungeon runs, you don’t need to have anything equipped on the fodder champions when using them as upgrade materials. Fodder champs are the 1 and 2 star base rank champions you use to rank up your higher rarity champions.
So that’s it for Dungeons in a nutshell. Now we’ll be moving on to the mechanics for each specific dungeon boss, as their individual fights are fairly unique enough to warrant specific strategies on how to deal with them, lest they body your team indiscriminately and you find yourself having war flashbacks to the beginning of the game when Hellrazor ate your entire team without them even putting up a fight.
First off, let’s start with Fyro, boss of the Fire Knight’s Castle.
Fyro, The Fire Knight
Fyro is a very tanky and tricky boss to handle because of his unique Cloak of Fire skill, which massively increases his resistance to damage and debuffs. His skills are as follows:
Searing Storm: Attacks all enemies. Decreases enemy MAX HP by 15% of damage dealt.
Dazzling Flames (4 turn Cooldown): Attacks all enemies. Inflicts a 30% DECREASE SPEED debuff for 3 turns.
Cloak of Fire [Passive]: Starts the battle with a divine shield. While active, the shield reduces the damage Fyro receives by 80% and prevents Fyro from receiving any Debuffs or being affected by other Skill effects. This shield cannot be removed by Skills that remove Debuffs. Each hit Fyro takes decreases the strength of the shield. The shield will be broken when hit enough times.
The shield regenerates every turn. If Fyro starts a turn with the shield active, Fyro will attack all enemies 1 time. The attack will decrease each enemy’s MAX HP. Fyro also heals at the start of every turn. The value of the heal and the damage dealt increases according to the strength of the shield at the time of the attack.
Fyro’s “Cloak of Fire” is his most problematic skill to deal with, as it renders him immune to debuffs and can only be removed by being hit a set number of times. This means your support champions who can remove buff effects are pretty much useless against him, and debuffers will have reduced efficacy since you’ll need to time their debuffs for when his cloak is down. Champions with multi-hit attacks, like Galek and Athel, as well as champions who can speed your team up, such as Diabolist, will be your main way to reliably farm this boss.
In summary, hit him hard, fast, and plenty of times.
The Spider Den
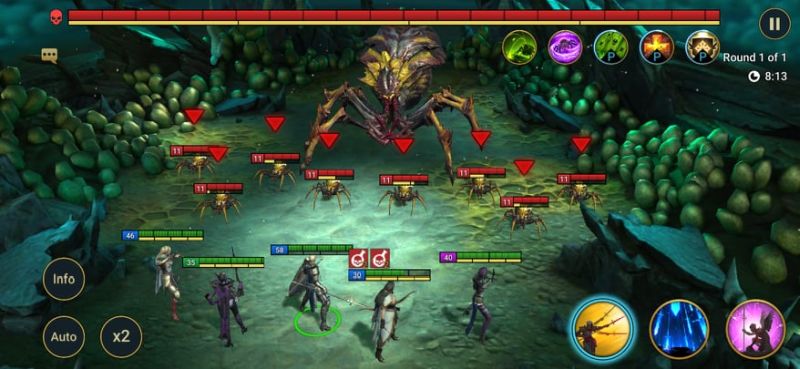
Skavag the Spider Queen is an extremely rude awakening for a significant portion of the Raid: Shadow Legends playerbase. Even stage 1 of her dungeon can catch you off-guard and wipe your party if you do not know about the synergy behind her and her spiderlings.
Her skills are as follows:
Venom Spray: Attacks all enemies. Damage increases by 15% if the target has POISON debuffs.
Enfeeble (4 turn Cooldown): Attacks all enemies. Has a 70% chance of decreasing the Turn Meter by 30%. If a target’s Turn Meter is fully depleted, places a SLEEP debuff for 1 turn.
Spiderling Horde (2 turn cooldown): Skavag spawns 6 Spiderlings at the start of the round. She also spawns 2 Spiderlings at the start of each enemy Champion’s turn. Spawns 4 Spiderlings at the end of Skavag’s turn. Skavag can have a maximum of 10 Spiderlings in battle at any time. Skavag consumes all remaining Spiderlings at the start of each turn. If Skavag consumes Spiderlings, she will not consume them on the following turn. Skavag heals by 3% of her MAX HP for each Spiderling consumed, and permanently increases her ATK by 10% for each Spiderling consumed. Heals from Lifesteal Artifacts and skills that heal based on damage inflicted will only heal Champions by 35% of the stated amount when attacking Skavag or her Spiderlings.
Healing Assured: Immune to HEAL REDUCTION debuffs.
Almighty Immunity: Skavag is immune to STUN, FREEZE, SLEEP, PROVOKE, BLOCK COOLDOWN SKILLS, FEAR, and TRUE FEAR debuffs. Also immune to HP exchange effects, HP balancing effects, and cooldown increasing effects.
Her skillset immediately raises several red flags. First, she can decrease Turn Meters by a huge chunk with her Enfeeble, possibly even inflicting Sleep on some of your champions if they get hit when their Turn Meters are low. Second, she can completely fill her side of the field with Spiderlings, which can inflict Poison debuffs on your champions. Third, if you ignore her Spiderlings and opt to attack her instead, she can heal the damage you inflict on her by eating her spiderlings at the end of her turn, though she can only do this once every other turn.
Related: RAID: Shadow Legends Team Guide: Tips, Cheats & Strategies to Form the Best All-Around Teams
Did I mention you can’t reduce the amount she heals from eating said Spiderlings because she’s immune to Heal Reduction?
The cherry on top is she’s practically immune to almost every debuff in the game, though notably she can get Poisoned or HP Burned, which is kind of ironic since you’d think a giant spider would at least be immune to poison.
Luckily for us, though Skavag is a giant, menacing tank of a boss, her freshly birthed children are not so much. The Spiderlings can be afflicted with debuffs and status effects as normal.
Klyssus The Ice Golem From The Ice Golem’s Peak

Klyssus is the type who will happily punish champions who do not know how his Frigid Vengeance skill works, resulting in your team of champions lying frostbitten and broken on the ground not knowing what the heck just happened. To prevent this, here are the Ice Knight’s skills:
Frost Nova: AoE damage attack.
Numbing Chill: Applies 50% accuracy decrease debuff on the enemies. Cooldown: 4 turns.
Frigid Vengeance (Passive): Once Klyssus’s HP drops to certain points, trigger the attack that revives all of the dead minions and ignore 50% of defense for every alive minion. Has a 20% chance of freezing the enemies (increased by 40% for each alive minion).
The thresholds for his Frigid Vengeance are as follows:
Stages 1-6: 75%, 50%, and 25% max HP
Stages 7-15: 80%, 60%, 45%, 30% and 15% max HP.
Klyssus the Ice Golem is one of the intermediate bosses to deal with when you’re dungeon grinding. This is because he will counter your tried and true strategy of hitting things really hard by hitting YOU really hard every time he reaches a certain HP threshold. His signature skill, Frigid Vengeance, makes your life miserable by punishing you for not fighting him the way he wants to be fought, and the best way to mitigate this troublesome passive is to make the effort to kill his two minion friends before damaging Klyssus himself.
Unfortunately, his Frigid Vengeance will revive them so you’ll have to kill them again before hitting Klyssus… again. Rinse and repeat until this boss dies, with your team of champions hopefully winning the endurance race against your adversary’s team of oddly persistent minion buddies and himself.
Serendipitously, there is a very specific way to make this fight less of a pain to deal with, and that is by farming a Conquerer from Chapter 1 and using his skill to make it so his minions do not revive when Klyssus triggers his passive. This saves you time and effort since you give your team more breathing room to take damage or use their skills on the Ice Knight instead of his supposed-to-be-alive buddies.
Related: RAID: Shadow Legends Champions Guide: The Best Legendary, Epic and Rare Heroes in the Game
All in all, your Starter, the recommended supports, and a Conquerer should reliably be able to farm this dungeon with a stable amount of reliability. Spirithost can also be of some use here. Her skills are as follows:
Reap: Attacks 1 enemy. Heals by 50% of the damage inflicted.
Strengthen (4 turn Cooldown): Places a 50% INCREASE ATTACK buff on allies for 2 turns.
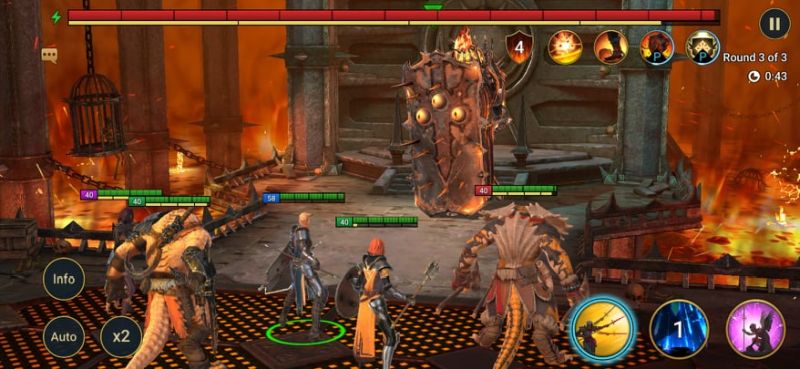
Hellrazor

Ah, Hellrazor. Our first happy introduction to Raid Shadow Legends, the spiny boy who looks like Satan’s pet dog and muncher of champions. Going into his dungeon allows us to dish out vengeance against the injustices he wrought against our beloved starter champs in the beginning of the game. His skills are as follows:
Swipe: AoE damage, applies a 50% DECREASE ATTACK debuff on the enemies.
Wall of Fire (3 turn Cooldown): AoE damage. Applies a 2 5% POISON debuff and a 25% WEAKEN DEBUFF.
Inhale (3 turn Cooldown): Activates the hidden ability SCORCH.
S C O R C H: Once Inhale is triggered, Hellrazor takes a massive breath to prepare to burp out the biggest fireball he can muster. Everyone’s turn meters will be set to 50% at first, and your champions can attack only ONCE before Scorch triggers and he lets the big palooka loose.
An absurd chunk of purple HP is added to his HP bar when he uses Scorch, and luckily the attack gets cancelled and Hellrazor is debuffed if your attacks can completely reduce it in time. If not, prepare to take defense-piercing damage which will stun the entire team. As his HP gets lower, the purple bar gets bigger, so the fight becomes quite a clutch when he’s about to die.
Fighting Hellrazor is a simple endeavor of hitting it really, really hard until it dies, lest you watch your team burn in his flames and die. The fight is a race to see who can outdamage each other, basically. Either you deal enough damage for him to kick the bucket before your team does, or he hits you enough times with Scorch to end the lives of your champions. Tanking him isn’t exactly a good idea since Scorch will both stun your team and ignore your defense values, so even the meatiest of champions will have quite a bit of trouble surviving the attack. As for the other champions in your team, might as well consider them dead after one or two Scorches.
And that would be all for now as far as our RAID: Shadow Legends dungeon boss guide is concerned. In case you have come up with additional tips for the game, feel free to drop us a line!