The last time we talked about Otherworld Legends here on Level Winner, we provided a detailed overview of how you can easily win the game. We talked about how breaking objects can save your life, how patience can turn the tide of battle, and how strategy can make your run a breeze. If you have just started playing the game, be sure to check out our Otherworld Legends beginner’s guide, as it contains loads of useful information to get you started on the right foot.
Now, in this new Otherworld Legends guide we will discuss the combination of gears and the ways you can use it to your advantage. However, we should warn you: if you’re looking for that one, almighty build that could beat everything, there is no such build. Instead, what we can tell you here are builds that actually work.
These are not character-specific builds, however, as each character plays differently. And because RNG plays a major factor in this game, consider yourself lucky if you’re able to complete any of these builds.
Stay with us and read our in-depth Otherworld Legends items builds guide and see which of these builds work for you!
Item Categories
Before we go straight to the builds, we have to first explain how each item works in Otherworld Legends. Almost every item in the game is unique and when put together with other items, they may make your character nigh unstoppable. Do note that this is purely RNG and some of these items may even appear to be infused with the very weapon you wield meaning, there is no way of extracting them from the weapon.
Below is a list of every item in Otherworld Legends. For your convenience, we have made categories for each item so you can find them more easily.
Offense
As the name implies, these are items that assist in making your character produce higher or more constant amounts of damage when any of these have been equipped.
a. Afterimage Mirror – Allows your character to produce an afterimage that doubles your last action. That said, your character will attack twice. For some characters, it also affects their skills, allowing them to perform their skills twice in succession. This is one of the ingredients for Shadow Warrior.
b. Boxing Gloves – This item gives your character the chance to stun enemies on hit. This can be quite useful in a fight as it allows them to continuously pile damage onto the enemy; even bosses and elites but with a lower chance. This is one of the ingredients for Burning Glove.
c. Button Bomb – After attacking an enemy, you will notice that they twinkle with white dots. Those dots then explode after a short delay, causing damage and stunning enemies. If the dots are left on the enemy’s corpse, any enemy that happens to walk on the corpse while the dots detonate also take damage.
d. Channeling Monkey – Your character will shoot fireworks whenever you attack, use a skill, or dodge. The fireworks cover a large area and may stun enemies. This is one of the ingredients for Fire Support.
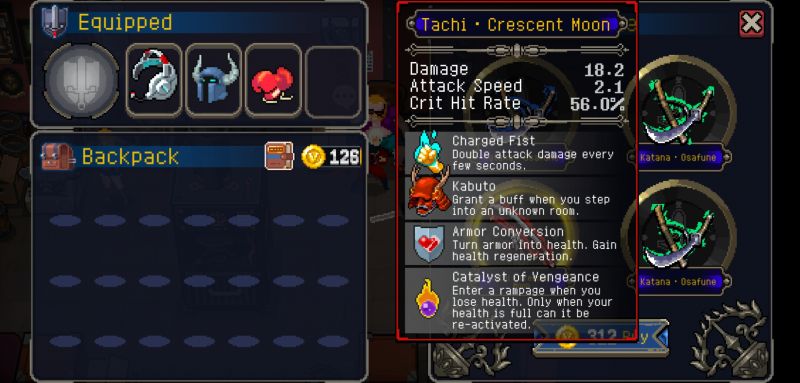
e. Charged Fist – Your character’s fist will begin to glow after a short delay. When this happens, your character’s next attack will deal more damage.
f. Crowbar – This item allows your character to deal higher amounts of damage toward enemies with more than one lifebar. This is especially useful against elites and bosses.
g. Ferocious Ghost Dog – Your character will conjure a trio of ghost dogs that rip through the enemy with every other attack, skill use, and dodge. Do note that they will not stay to fight, but instead cause damage to anything they charge through. This is one of the ingredients for Husky.
h. Fire Elf – A red elf will hover next to your character, granting you the chance to set enemies alight and deal more damage. This is one of the ingredients for Elf King and Burning Glove.
i. Fireball – Each attack will release a straight-traveling fireball. However, it cannot travel through objects. This is one of the ingredients for Mega Fireball.
j. Firebolt Scarf – Your character will appear to have a glowing scarf tied to their head. This scarf will greatly boost all your damage output with every critical hit landed, but any critical hit you land will not have bonus damage.
k. Ice Elf – A sky-blue elf will be hovering next to your character. This will give your character a chance to freeze the enemy. Coupled with items that can stun, the Ice Elf can be made quite deadly. This is one of the ingredients for Elf King and La Lune.
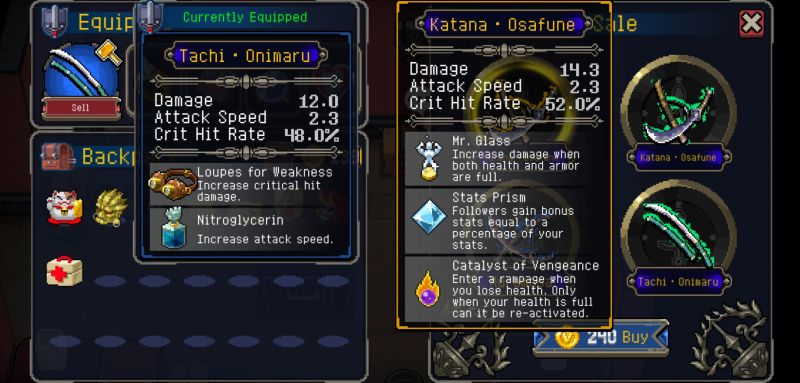
l. Loupes for Weakness – Your character will be able to deal increased amounts of critical damage. This can be nicely paired with items like the Skull Ring or the Tiger Tusk Necklace.
m. Nitroglycerin – This item simply boosts your character’s attack speed. This is one of the ingredients for Crowned Engine.
n. Onimusha Mask – This item will allow your character to increase the speed of their attacks with each succeeding attack. Do note that your attacks have to hit something to increase your attack speed. This boost is also temporary, so it’s best to move out of the way after a fight. This is one of the ingredients for Shadow Warrior.
o. Red Mushroom – All of your character’s stats increase and they also increase in size. With the size increase making for wider melee attacks at the cost of being a bigger target, this item may be more useful to melee characters and less useful to ranged characters. This is one of the ingredients for Mega Fireball.
p. Skull Ring – This item increases your character’s critical hit rate. This item can be nicely coupled with Loupes for Weakness or Vitality Magatama.
q. Thunder Elf – A blue elf will appear next to your character. This elf will produce a lightning chain with every enemy you strike. This is one of the ingredients for Elf King.
r. Tiger Tusk Necklace – Your character will get the chance to trigger an effect called the Critical Hit Rune. When the Critical Hit Rune is active, you will see a circle with points on its curves below your character and each successful attack you perform results in a critical hit. This effect lasts only for 10 seconds. Recommended to be in use with items like Loupes for Weakness or Vitality Magatama.
s. Toxic Potion – Your character will get the chance to poison the enemy with any successful attack. The poison stacks with fire damage, so equipping this with the likes of Fireball, Fire Elf, or Rolling Fire Wheel will deal tons of damage to the enemy over time.
Defense
These items, when equipped, not only make your character withstand anything the enemy dishes out, but also allow you to give you room to breathe when things get hairy.
a. Ashen Skull – Killing an enemy will result in the enemy fleeing the vicinity of their dead comrade. This allows you to also regroup and rethink your strategy if you are caught in a bind. This is one of the ingredients for The Last Offering.
b. Beak of Plague – Your character will have a small poison cloud around them. Running around the room while poisoning the enemies is a good way to pass time while your armor regenerates. After coming back to fight them, they should be softened up. This is one of the ingredients for Lucky Fat Cat.
c. Golden Armor – This item will allow your character to enter an Unflinching State. The Unflinching State is signaled by your character glowing gold and red. In this state, they cannot be interrupted while they are attacking or using their skill. This is one of the ingredients for Mighty Armor.
d. Heavenly Horse Boots – Your character’s movement speed will increase drastically, allowing for speedy escapes. If you want those escapes to be speedier, you may use this item alongside Adrenaline or Totem Spirit. This is one of the ingredients for Owlbat.
e. Hot-Blooded Heart – This item increases your character’s max health. Can be stacked with items like Armor Conversion and Gene Sickle. This is one of the ingredients for Crowned Engine.
f. Jack – This item will allow your character to knock the enemy back further. If you are often pushed into a corner, this item will definitely come in handy. This item is especially useful to ranged characters.
g. Pioneer Armor – Your character’s maximum armor increases. This effect stacks with Hearted Shroud.
h. Rolling Fire Wheel – Your character will create flames wherever they walk. This can be quite useful if you run around and wait for your armor to regenerate.
i. Stasis Grenade – This item will allow your character to leave a small explosive on the ground whenever they dodge. The explosion from this tiny grenade will slow enemies down drastically, allowing you to recuperate from a difficult fight.
j. Tactical Armor – This item will allow your character to take less damage when hit from behind. This is one of the ingredients for Mighty Armor.
k. Tengu Meteorite – Your character will generate a meteor that will block any incoming attack and debuffs that may come your way. In other words, you are given temporary invincibility. When the meteor shatters, it will regenerate after a few seconds.
l. Totem Spirit – A tribal shaman follows you around and blesses you with a totem that increases your movement speed. Additionally, if any of your followers are within the totem’s range, they also gain an increase in movement speed.
Survivability
The items that follow will ensure your survival. These include healing, life leech, and regeneration of armor and/or health.
a. Armor Conversion – This item will convert what armor you have into HP. You will no longer have armor, but your HP will now regenerate slowly.
b. Bionic Armor – This item will allow your character to pick up potions to “heal” your armor aside from your health.
c. Dracula’s Dentures – Your character will recover 1HP per strike.

d. Emergency Kit – Your character will be able to take healing potions from the chest that drops after clearing a room.
e. Hearted Shroud – Similar to but unlike the Armor Conversion item, this item converts any health your character has into armor. They will gain a quicker armor regeneration, but they will not be able to heal using Dracula’s Dentures or the Vitality Magatama. However, they can still be healed if you have the Bionic Armor equipped.
f. Vitality Magatama – This item will allow your character to recover 1HP after every critical hit. Especially useful to characters with high crit rate like Ginzo.
Follower
When these items are equipped or upon triggering their special effect, your character gains temporary or even permanent followers.
a. Bat – Your character will be accompanied by a friendly Red Bat. This creature has a respawn time of 1 minute when it dies. This is one of the ingredients for Owlbat.
b. Beating Jelly – Your character will be followed by a red jelly cube. If you are not in battle, the cube will down the nearest health potion and transform into a random monster to fight alongside you. The red jelly cube does not fight if it hasn’t transformed yet.
c. Bell of Souls – Every opponent slain will temporarily revive as a ghost that fights for you. They will not leave the room they died in and they will disappear after a short span of time.
d. Generic Care Bot – A tiny robot follows your character. As you fight, the robot charges up some energy and then releases a health potion at full energy, resetting its energy as it does this. This follower cannot be targeted by enemies nor can it fight.
e. Gum – You have a chance to gain a slime for a follower for every object you break in a room. The slimes only stay in the room you found them, unfortunately.
f. Rebellious – You summon the knight you fight at the tutorial, Rebellious. This follower can slash an enemy twice and has rather high health. This creature has a respawn time of 1 minute when it dies.
This is one of the ingredients for Saint Rebellious.
g. Schrödinger’s Cat – A black cat with a red collar will follow your character around. It has a 50% chance to be alive to do this and a 50% chance to be dead in any room you enter. While alive, it calls lightning down on the enemy.
h. Tek – Your character summons a Tek to fight by their side. This creature has a respawn time of 1 minute when it dies. This is one of the ingredients for Husky.
i. Veela Mask – This item gives your character the chance to charm enemies with every attack. Charmed enemies will fight among themselves for a few seconds before becoming hostile again.
Money
These items involve the increase in your monetary gains while equipped. They also assist in helping you buy better weapons or more items.
a. Gold Touch – Your character makes enemies drop gold whenever they are struck.
b. Lucky Cat – You gain more money from every gold pickup possible. This is one of the ingredients for Lucky Fat Cat.
c. Membership – With this item, the prices in the Item Shop are considerably lower. This does not work with the Blacksmith, unfortunately. This item does not need to be equipped to take effect.
d. Piggy Bank – Breaking any object in the room drops gold.
Utility
The items in this list are situational items that only follow certain conditions. When used properly, they can be quite powerful.
a. Adrenaline – When your character’s armor drops, their movement speed rises, allowing them to move through enemies more quicky.
b. Banner of Glory – Clearing a room (or entering the next chapter) allows your character greater attack power for 10 seconds. This effect also makes them Unflinching.
c. Berserker Totem – When your character’s health drops, their attack power drastically increases. This is a high-risk, high-reward item.
d. Catalyst of Vengeance – When you take damage from full health, your character’s face becomes a ghostly wisp with glowing eyes, greatly boosting attack power and movement speed. This effect can be triggered again if you bring your life back up to maximum value.
e. Commando Emblem – This item greatly boosts your character’s attack power when your armor is empty but at the cost of your armor no longer regenerating. This can be called the Commando State.
f. Compass – This item points out special rooms on your minimap. Using this makes it easier for you to find the Item Shop, the Blacksmith, the Item Combiner, or the Secret Room. You can equip this once, unpause the game, and then swap it out for a more combat-related item in each stage you visit.
g. Gene Sickle – With every kill you make, your character’s HP bar increases. This is especially useful in the early levels and absolutely useless if you’re nearing Asura.
h. Green Mushroom – If this item is put in your equip bar, it can save your character once from death. However, this item cannot be used to enhance weapons and its effects are void if it is sitting in your inventory.
i. Handprint – Enemies that have attacked your character will receive double damage when you retaliate at them. They will be marked with a red, glowing hand print. This is one of the ingredients for Fire Support.
j. Holy Cross – Killing enemies will cause the floor where they fell on to be sanctified with holy energies. Enemies that tread there will take damage. This is one of the ingredients for Saint Rebellious.
k. Kabuto – When entering a room for the first time, a samurai spirit will hover behind your character, granting them an attack boost for 10 seconds and an Unflinching State. This is one of the ingredients for Shadow Warrior.
l. Le Soleil – Upon slaying an enemy, lightning is called down from the sky to smite the enemy’s corpse, causing great area damage. This is especially useful against groups of small, low-HP mobs. This is an ingredient for La Lune.
m. Mr. Glass – This item grants your character a massive damage boost if both their HP and armor are full.
n. Optical Camouflage – Staying in place for a few seconds will allow your character to become invisible. This item will allow you to skip fights.
o. Sacrificial Katana – After killing an enemy, five soul missiles will fly out and seek the nearest enemy, dealing damage. This is one of the ingredients for The Last Offering.
p. Share Machine – Any followers that fight for you will shrink in size, reducing their range and likelihood to be hit but they will be able to benefit from some of the items you have equipped like Offense items.
q. Spike Ring – Striking an enemy with their health still full will guarantee a critical hit.
r. Stats Prism – This item grants your followers better stats the higher your health is.
More health means more power. However, losing health means your allies get weaker, so use this one wisely.
s. Three Wishes – This item is only gained by talking to the Genie that appears when you defeat Iblis. Ask the Genie for “Three more wishes” and he will deny you the first time.
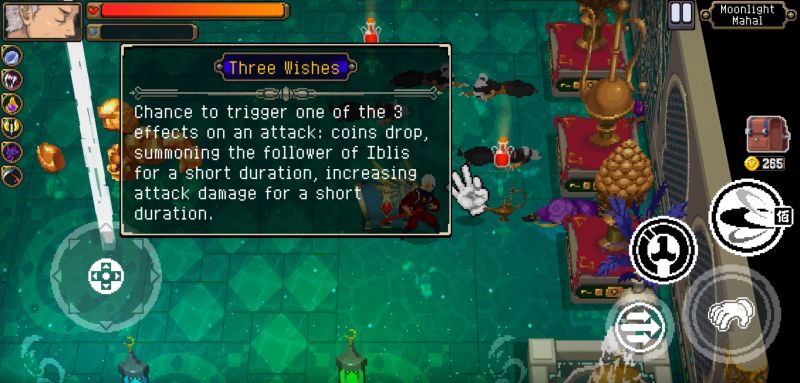
Doing this a second time will grant you the item. This item may trigger one of the three effects, after hitting an enemy, based on how many fingers shown:
- One. Coins drop around your character.
- Two. Iblis’ minions come to assist you in battle for a short time.
- Three. Your character gains a temporary attack boost.
t. Twinkling Sandglass – With each critical hit you score, any ongoing skill cooldown will be reduced. This makes for deadly combos if used right.
Miscellaneous
These items are unclassified and are the wildcards of the game. While not directly effective, there may be items that can bring out their potential. If you have no use for them, you may save them for item combination.
a. Angry Pufferfish – A small, angry pufferfish will float around your character in a slow, circular motion. The puffer will deal 5 damage to anything it may come in contact with.
b. Leprechaun Top Hat – Your character becomes smaller.
c. Shrinking Charm – Your character becomes bigger. Unlike the Red Mushroom, it doesn’t boost your stats.
d. Soul Shackles – Whenever you strike an enemy, some enemies adjacent to it will receive damage instead. This will happen until you have one enemy left where the Soul Shackles will not have any effect.
e. WM-D6C – The soundtrack of the game will change and all sounds in the background will be muffled. While this may keep you more focused and level-headed, you may be caught off-guard by some of the enemy’s audio cues if they have any. TRIVIA: This is a Walkman!
Combined
These items can only be obtained through the Item Combiner found very rarely in Chapter 1 and anywhere in Chapter 2 onwards. These require three items to make, so only attempt to make these if you have items to spare. Some of them follow a specific recipe while others are obtained completely at random.
a. Amber Mongkon – (Comb.: Any Three Items) After waiting a short time without attacking, your character builds up energy that will greatly add to the damage of your next attack. This item is similar to the Charged Fist but with the exception that you should not attack if you want to store energy.
b. Anti-Pay-to-Win – (Comb.: Any Three Items) The gold you collect will tremendously add to the attack power of your character. This will cap at 300 gold.
c. Black Humor – (Comb.: Any Three Items) After reaching a certain threshold of damage to health, your character produces a pool of ice by their feet that may slow and ultimately freeze enemies.
d. Booby Trap Coin – (Comb.: Any Three Items) Your character throws money at the enemy. These coins can be detonated for massive damage by pressing the dodge button.
e. Burning Glove – (Comb.: Boxing Gloves + Fire Elf + Any Item) Your character is given the chance to stun and explode enemies with every strike.
f. Butcher’s Knife – (Comb.: Any Three Items) Scoring critical hits on the enemy gives them the Pressure debuff which is indicated by a transparent bone hovering above their heads. When the bone is fully opaque, the next critical hit’s damage will be much greater.
g. Crowned Engine – (Comb.: Hot-Blooded Heart + Nitroglycerin + Any Item) Pressing the dodge button will add to your character’s attack speed and skill animation. This effect can stack and can be quite useful for characters with slow windup attacks like Gerard.
h. Elf King – (Comb.: Fire Elf + Ice Elf + Thunder Elf) This item rains heavy elemental damage onto the enemy. Lighting shoots out and zaps any enemy in sight, fire whittles down their HP quite rapidly, and ice freezes them much longer than usual.
i. Evil Mask – (Comb.: Any Three Items) When your character receives damage that would otherwise kill them, you will enter what is called a Fearless State. This state will keep your character from dying and will apply an Unflinching State to them. In addition, you can score massive amounts of damage while Fearless. You cannot heal using Dracula’s Dentures or the Vitality Magatama but you can still pickup health potions while Fearless. Unlike the Green Mushroom, this item does not get consumed after it saves you from dying. Its effects are nullified if used with Hearted Shroud.
j. Fire Support – (Comb.: Channeling Monkey + Handprint + Any Item) After taking a hit from the enemy, a targeting reticle appears on the enemy that struck you. Using a skill or an attack at any other enemy will fire a missile that will home in on the targeted enemy, causing a large explosion. This explosion may damage multiple enemies and if more than one enemy attacked you, they may all have the reticle. Unlike the Channeling Monkey and the Handprint, this item neither dazes nor directly increases your damage.
k. Husky – (Comb.: Ferocious Ghost Dog + Tek + Any Item) Your character summons a friendly Husky by your side. It is an improved version of the Tek and can shoot out ghost dogs with some of its attacks.
l. La Lune – (Comb.: Ice Elf + Le Soleil + Any Item) After killing an enemy, a set of icicles erupt from the ground, chilling and slowing enemies down whilst giving damage. Unfortunately, it does not provide the same amount of burst damage that Le Soleil provides.
m. Lucky Fat Cat – (Comb.: Lucky Cat + Beak of Plague + Any Item) Your character gains a shining aura. Any enemy slain in the aura will drop an extra amount of coins. This item is especially useful for melee characters.
n. Mega Fireball (Comb.: Fireball + Red Mushroom + Any Item) Using a skill or attacking will allow your character to unleash a massive fireball that will drag the enemy in its path and cause damage. It causes large amounts of damage when it explodes. This item is not as quick as the vanilla Fireball but is great for burst damage builds.
o. Micro Planet – (Comb.: Any Three Items) Using a skill will pull all enemies within a certain radius toward your character.
p. Mighty Armor – (Comb.: Gold Armor + Tactical Armor + Any Item) This item protects your character from rear attacks. Getting attacked from behind triggers the Unflinching State which can be quite useful versus some enemies and bosses.
q. Owlbat – (Comb.: Bat + Heavenly Horse Boots + Any Item) Compared to the Bat, this follower pecks at enemies with consistent DPS. If it cannot reach enemies in time, it teleports at them immediately.
r. Pocket Watch – (Comb.: Any Three Items) This item greatly reduces skill cooldown.
s. Refresher – (Comb.: Any Three Items) After having a skill on cooldown, this item may refresh a skill completely ready to use again. This allows for the use of skills with long cooldowns twice in succession. This item will cool down when used.
t. Saint Rebellious – (Comb.: Rebellious + Holy Cross + Any Item) Compared to the vanilla Rebellious, this follower produces sword waves with every swing. Each sword wave is a chain of damage that forces an enemy to the other side of the room.
u. Shadow Warrior – (Comb.: Afterimage Mirror + Onimusha Mask + Kabuto) These followers are similar to Iblis’ minions but they have higher health and deal higher damage. When either of them die, they have separate respawn times.
v. Sheer Ambition – (Comb.: Any Three Items) Striking an enemy with default attacks stores Ambition. This energy gets expelled after 8 hits through a skill. The skill, unleashing the stored Ambition will deal even more damage.
w. The Last Offering – (Comb.: Sacrificial Katana + Ashen Skull) After slaying an enemy, they produce red soul missiles whilst inflicting the enemy with the Fear debuff. If the enemy is struck by any of these soul missiles, they are also afflicted by the Fear debuff.
Sample Builds
Because there is a myriad of builds in Otherworld Legends, we will only cover a few of them here. For the sake of simplicity, we will highlight the purpose of the build in each name. Do note that some of these builds don’t always aim for efficiency, but mostly for fun.
This section of the guide will categorize the items as follows:
a. Core Items – The main items you need to make the build work.
b. Secondary Items – Items you might need to make the build work but can be swapped for other items.
c. Situational Items – Items that supplement the build as a whole but are not necessarily needed to complete the build. They are usually either rare or expensive to make.
You can only have a maximum item count of 4 in your equip slot, and 4 in your weapon, so mix and match the items we suggest here to achieve the effect of the build. With those out of the way, let’s get on with the builds!
Demolitionist
Core Items: Button Bomb, Channeling Monkey
Secondary Items: Le Soleil, Fire Elf, Sacrificial Katana
Situational Items: Fire Support, Elf King or Burning Glove or Mega Fireball
How It Works: Explosions! Explosions everywhere! Using this build will render you nigh untouchable, especially if you are using a ranged character like Akaisha or Katherine. The Channeling Monkey will home in on unsuspecting victims and if that isn’t enough, nobody will be safe from the Sacrificial Katana‘s soul missiles. If they die Le Soleil will keep the enemy from coming back. Cover your ears!
Room Sweeper
Core Items: Thunder Elf, Sacrificial Katana, Le Soleil
Secondary Items: Rolling Fire Wheel or Beak of Plague
Situational Items: Elf King and/or The Last Offering
How It Works: This is similar to the Demolitionist build but more focused on area damage. You are a walking catastrophe and the entire room will die with anything you kill. The sheer amount of area damage you will deal is absurd and will allow you to breeze through levels. The Elf King, especially, will make short work of most foes. Just be careful using this in the Bamboo Grove and onwards or on bosses like Valentine or Logan, it won’t be as effective.
Traitor Maker
Core Items: Bell of Souls, Veela Mask
Secondary Items: Stasis Grenade, Jack, Beating Jelly
Situational Items: Three Wishes
How It Works: You will turn your enemies against each other. Using the Bell of Souls will allow them to serve you from the great beyond and the Veela Mask will cause them to fight among themselves before you call their spirits forth. Do note that it has to be you that kills the enemy if you want to have their spirits fight for you. The Beating Jelly will add insult to injury as it mimics enemies. To keep the enemy at bay you use the Stasis Grenade and the Jack, allowing for your new army to crush the foe.
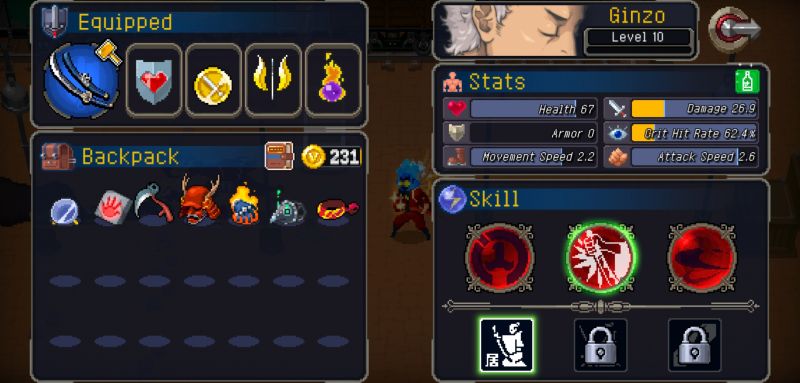
Vampire
Core Items: Armor Conversion, Dracula’s Dentures or Vitality Magatama
Secondary Items: Thunder Elf or Soul Shackles, Fireball
Situational Items: Elf King, Support Fire, Mega Fireball, Tiger Tusk Necklace, Skull Ring
How It Works: You sap the enemy of their vitality with every strike (unless you are using the Vitality Magatama which may require the Tiger Tusk Necklace or the Skull Ring). With any form of damage you inflict, near or far (wherever you are), you will keep yourself alive. If there are no enemies around, the Armor Conversion should be able to heal you over time. Adding to the effect that your character is a powerful vampire, throw some Fireballs or Mega Fireballs at your would-be vampire hunters. Enough talk, have at them!
Hotshot
Core Items: Fireball or Mega Fireball, Fire Elf
Secondary Items: Rolling Fire Wheel
Situational Items: Burning Glove, Fire Support, Firebolt Scarf
How It Works: You set everything and everyone alight with your slightest movements. Aside from cooking everything to a cinder using your impressive arsenal of fire items, you have a Firebolt Scarf to look as flashy as possible. Now that’s show cooking!
Coldsnap
Core Items: Ice Elf, Le Soleil
Secondary Items: La Lune, Black Humor, Bell of Souls
Situational Items: Charged Fist, Sacrificial Katana
How It Works: You command the cold and master the chilling grasp of death itself. With La Lune, directly upgraded from both the Ice Elf and Le Soleil, you hurry the enemy to their demise by slowly freezing them to death. When the enemy dies out, the Bell of Souls causes their souls rise from their frozen corpses only to be trapped on the mortal plane again to serve you one last time. Cold.
Giant Killer
Core Items: Crowbar, Charged Fist
Secondary Items: Tiger Tusk Necklace, Spike Ring, Loupes for Weakness, Afterimage Mirror
Situational Items: Sheer Ambition, Amber Mongkon, Anti-Pay-to-Win
How It Works: You will easily subdue enemies much bigger than you and bosses, like Logan, who have high amounts of health. The goal of this build is to deal as much burst damage as possible whilst taking enemies down one at a time. Be careful not to get swarmed, however, as this build excels only on fights against elite enemies and bosses only. The Crowbar is necessary for larger foes to fall faster, and the Charged Fist allows you that easy damage burst so you can quickly gain the upper hand in a fight. Supporting your damage would be items like the Anti-Pay-to-Win or the Amber Mongkon, allowing you to assess a situation before delivering that game-changing strike.
Richer Than You
Core Items: Piggy Bank, Lucky Cat, and/or Golden Touch
Secondary Items: Anti-Pay-To-Win or Booby Trapped Coin
Situational Items: Charged Fist, Firebolt Scarf, Lucky Fat Cat
How It Works: Money is power, and you will exercise this power by collecting coins. Using the Anti-Pay-To-Win grants you immense strength with every attack. Adding to this will be any offense items you have with you, so this is to be taken advantage of. The Booby Trapped Coins would be extremely useful with Golden Touch since you can gain coins every other time you land an attack.
Soul Shackler
Core Items: Soul Shackles
Secondary Items: Handprint, Charged Fist, Crowbar, Thunder Elf, Le Soleil, Sacrificial Katana
Situational Items: Dracula’s Dentures or Vitality Magatama, Elf King, The Last Offering, Anti-Pay-to-Win
How It Works: The Soul Shackles are a tricky item to work with. Often times, they are ignored or used for combining fodder because their purpose is misunderstood. With them being able to make short work of enemies adjacent to your primary target, taking advantage of that is important. Giving your character items like Elf King, Charged Fist, Crowbar, or Anti-Pay-to-Win should improve the shackles’ efficacy as you will be easily mowing down enemy wave by enemy wave. The catch here is that you may have to slay your primary target last. If things get too difficult, having Dracula’s Dentures or Vitality Magatama equipped should be able to keep you alive for much longer. Lastly, the Handprint transfers the damage your primary target was supposed to receive to those who got shackled to it. How about that?
Golden Commando
Core Items: Commando Emblem, Armor Conversion
Secondary Items: Charged Fist, Mr. Glass, Golden Armor
Situational Items: Dracula’s Dentures or Vitality Magatama, Anti-Pay-to-Win and Lucky Fat Cat or Piggy Bank or Golden Touch, Mighty Armor
How It Works: Your character is golden and unstoppable. With the Commando Emblem combined with Armor Conversion, you will have the Commando State permanently activated. Adding to your damage is Mr. Glass which only remains active when both your health and armor are full. To augment Mr. Glass and speed up the Armor Conversion‘s regeneration, having Dracula’s Dentures or Vitality Magatama is a must. Lastly, you also weaponize gold and thus Anti-Pay-to-Win is recommended if you want crazy amounts of damage. Keeping you nice and wealthy are the gold-boosting items present in this build.
Bizarre Adventurer
Core Items: Rebellious or Bat or Tek or Husky or Saint Rebellious or Shadow Warrior or Owlbat and Stats Prism
Secondary Items: Armor Conversion and/or Gene Sickle, Hot-Blooded Heart
Situational Items: Share Machine, Dracula’s Dentures or Vitality Magatama
How It Works: Yes, this is a Jojo reference. In other words, this build focuses on your character having a powerful ally by their side. Keeping your character’s health high will ensure higher damage output from your Stand… er… follower, making for a fun way to clear rooms. Additionally, it will take much longer for your ally to perish. The Gene Sickle should be acquired at an early level, however.
True Berserker
Core Items: Berserker’s Totem, Armor Conversion
Secondary Items: Catalyst of Vengeance, Commando Emblem, Dracula’s Dentures
Situational Items: Evil Mask, Afterimage Mirror, Crowned Engine
How It Works: Get in the fray and fight to the death. When your character reaches that point where they might part from the world, a resurgence of violent strength overflows their body and they make their last hurrah… only to recover their health and do it all over again. This build combines high risk with high reward and high damage output. Mainly, the Berserker’s Totem and Evil Mask combo allows for dangerous scores of damage while the Catalyst of Vengeance applies an opening burst strong enough to cripple or even outright kill your enemies. The Commando Emblem keeps your damage high thanks to Armor Conversion and while your bloodlust rages on, you can still recover your lost health using Dracula’s Dentures.
Extra Tips You Should Know About
● If you are in a bind with gold and there’s this one item you need from the Peddler, hit him. If you continuously do that, he will proceed to fight you.Beating the Peddler will allow you to take the items in his current stock for free. But do not underestimate this simple merchant; he’s a pretty skilled boxer and he will go down swinging. Be prepared!
However, do this only when you have completed the level before the last boss (3-3). That way, you won’t have to kill him prematurely. Killing him in an earlier stage will cause him to stop appearing every time you enter a shop room.

If this is your first time trying this, you will unlock him as a character for purchase.
● If you have beaten the boss of Scene 3-Stage 3 (3-3) and you have spare items in your inventory that you think might be more useful against Asura, swap them out before stepping into the portal. There is no way you can change your items mid-fight.
The items of Otherworld Legends are diverse in the sense that many items can be combined together to make your character unstoppable. For more information on the different items in-game, be sure to visit the Otherworld Legends wiki.
If you have additional build suggestions or if you think there is something we’ve missed, do leave a comment below!
Kiron
Saturday 13th of March 2021
These combos may be fun to play with, but unfortunately I must say almost none of them would work well as predicted while playing in the Real Mirage difficulty. Of course these are nice combos for lower difficulties. For Real Mirage I personally recommend maximizing survivability. I passed RM with no resurrection equipping Gene Sickle at 1-1, followed by Hearted Shroud which stacks a lot of armor. The most important item in this combo set would be Golem's Heart which grant damage reduction for each point of your armor. As a result I got 270 armor in Asura fight, and lost less than half of them after beating him.