Who doesn’t love ice cream? Whether you’re a kid or an adult, eating this cold confection can be a real treat, especially when the summer sun’s been beating down on you. One can suppose that, for many people, eating an ice cream can bring fond memories, especially if it’s something they shared with childhood friends on the playground. Along with the sounds of laughter comes the sound of the ice cream truck cruising by, its playful melody enticing kids to come over and have this treat, courtesy of the friendly neighborhood ice cream man.

But what if that ice cream man isn’t friendly at all and that playful tune from a familiar truck becomes the prelude to a nightmare?
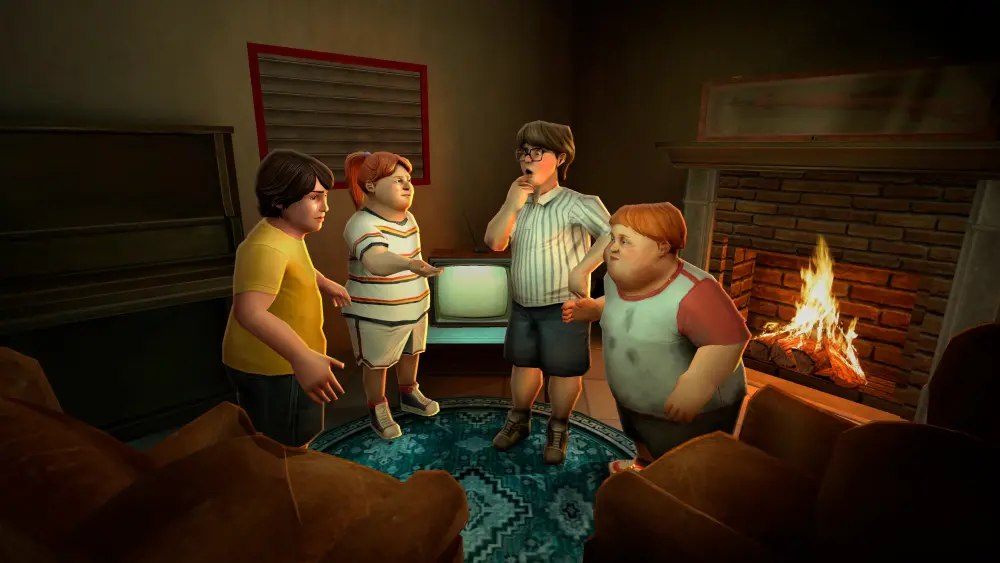
Enter the Ice Scream saga from Keplerians Horror Games. Here, we follow the story of Rod Sullivan, the terrifying ice cream man who wears a mask and kidnaps kids. Alongside other horrifying villains like Sister Madeline, Boris, and a handful of other antagonists in the series’ run, Rod is hell-bent on filling up his “chubby kid pantry.”
Foiling his plans are a group of friends who have been trapped inside Rod’s ice cream factory: J Brown, Mike Carter, and Lis and Charlie Owens. These four friends have been trying to escape Rod’s factory so they can return to their families and escape the clutches of the creepy, deranged ice cream man.
With eight installments in over four years, it seems that the Ice Scream series is coming to an end with its December 2023 release of Ice Scream 8: Final Chapter. In this installment, the kids are the closest they can get to escaping Rod’s ice cream factory, making one last push to finally get out of the nightmarish place.

Whether you’ve been following the Ice Scream series or are playing the game for the first time, it pays to know the basic controls and mechanics for Ice Scream 8: Final Chapter. Before starting the game, you may choose the difficulty in which you want to play, which ranges from Ghost, Easy, Normal, and Hard. It goes without saying that the higher the difficulty, the tougher it is to solve puzzles and run away from enemies.
Here are some rules as stated at the start of each session:
- Your enemies are fast.
- Your enemies are sensitive to noise.
- Each kid has two lives. you can escape by struggling if you are caught one time.
- The enemies are quite dangerous.
As for controls, you have a joystick on the lower left-hand side of the screen for movement; on top of it is a crouch and stand button, with crouching mainly used to enter small vents or for keeping a low profile behind objects. When trying to open or pick up items, a hand icon will appear on the right side of the screen.
If the item you’ve picked up is any type of firearm, a crosshairs icon will appear, alongside a number that indicates how many bullets you have left until you need to reload. Reloading will be automatic. Keep in mind that you can only carry one item at a time, and a discard button will appear in the lower middle section of the screen once you’ve picked up an item. Last but not least is a trap button, which you can use to set up traps. Each segment in the game will provide you with different traps.

While exploring Rod’s ice cream factory, you will be going through three major areas, namely the Laboratory, the Museum, and Joseph’s Cottage. You get to play as one of the four kids depending on the area you’re working through. In some cases, you’ll be switching between characters mid-game depending on the plot and mission objectives.
Unlike more linear horror games like The Room: Old Sins or other mystery puzzle games like The House of Da Vinci III, Ice Scream 8: Final Chapter doesn’t really have fixed locations for items likely because there are different difficulty levels, so you need to explore and run around to find where some things are hidden.
The key to completing your mission objectives and successfully escaping the factory is, of course, survival. Even on Easy mode, your enemies aren’t joking around: they will try to kill you when they catch you. Thus, as a quick briefer before we get into the walkthrough for Ice Scream 8: Final Chapter, we’ve prepared a few survival tips that will keep you from getting caught and having to replay an area from the beginning.
Surviving Rod’s Nightmarish Ice Cream Factory
- Be alert. This is a game that requires you to be completely focused and mindful of in-game surroundings as audio cues will help you determine whether or not there’s an enemy nearby. Therefore, when playing this game, especially in a high difficulty level, be alert and listen and observe everything around you. We recommend playing with earphones to not only immerse yourself in the game but also to better pick up auditory cues that will help you survive.
- Lock and load. As you will discover in this walkthrough, you will have the opportunity to pick up a few firearms that can help you knock out enemies or stun them. These firearms are namely the electro-plasmatic gun, the microwave gun, and the rifle. If you’ve pre-registered to the game, you’ll also be able to pick up the Rod gun, which freezes enemies. However, some enemies like Franken-Boris will only be stunned and not knocked out when a firearm is used against them.
- Use and abuse traps. Traps can be used to defend yourself from enemies. Enemies that step on these traps will be knocked out for a short while. However, some enemies are immune to traps, namely Franken-Boris and the crocodile. Scatter traps around areas to knock out enemies like Rod or Sister Madeline, who are pretty fast runners. Traps will be extremely useful as well when set up in dead ends as you’ll be able to at least get a slim chance of escaping when you’re cornered.
- Don’t panic. This is your worst enemy aside from those who are actively chasing you in the game. Keep your head above your shoulders and try to find an escape route when you feel like you’re cornered. Be observant so you don’t get yourself in a sticky situation—and when you do, calmly see if there’s any avenue you can pursue to stun, knock out, or just straight up slip from the enemy’s deadly grasp.
With that, let’s get into our walkthrough for Ice Scream 8: Final Chapter and escape Rod’s factory! For the beginning of every segment after the introductory one, we will provide a checklist of items you need to collect in their designated areas. The walkthrough will explain how to get these items.
Introduction: The Control Room and the Garage
The game starts with a call made to the police department by Mrs. Brown, J’s mother. She explains that she and her husband haven’t seen J for more than a day, and his two best friends, Lis and Charlie Owen, have also disappeared. Unmentioned in the call is that another kid, Mike Carter, is also missing.
Apparently, the police have received other calls reporting missing children and they reassure Mrs. Brown that they’re on top of the case. When asked to give more information that may help in locating the missing children, Mrs. Brown says that she’s been hearing a “strange ice cream man’s melody.”
This cuts to the four missing kids trying to hold off the door to prevent Rod from entering what appears to be a control room.
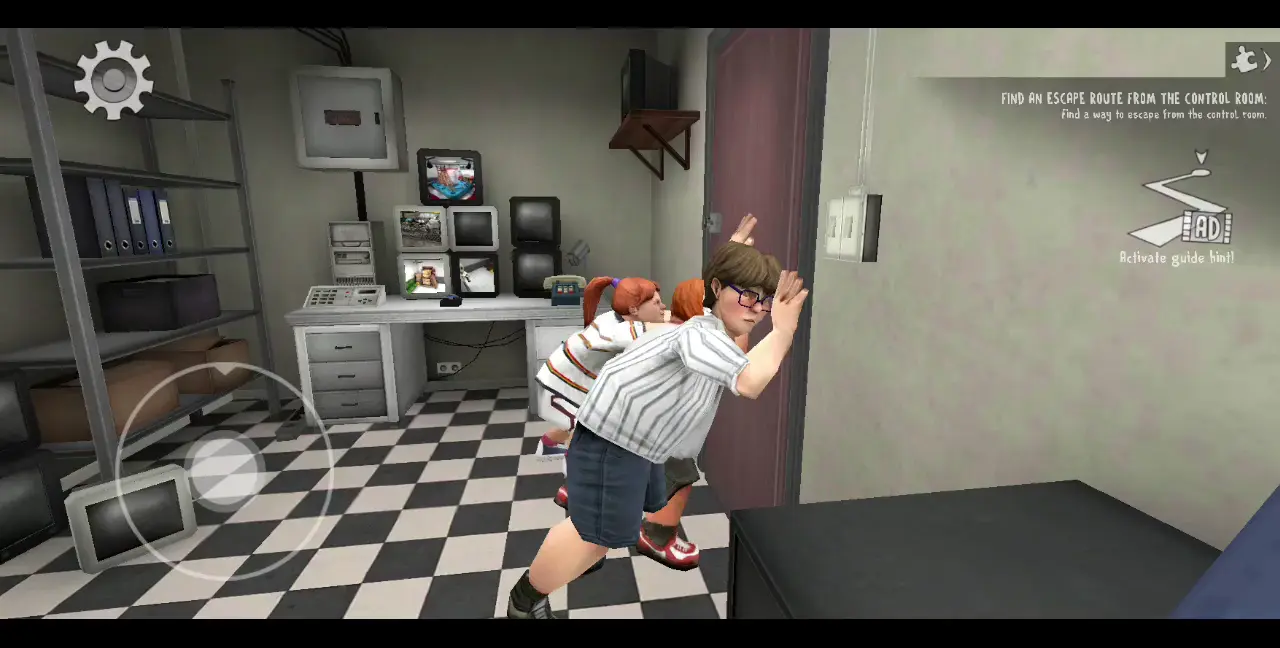
Realizing that they won’t be able to escape with all four of them holding down the door, you will first play as J so you can find a way to escape the control room with your friends, which is the objective of this first puzzle.
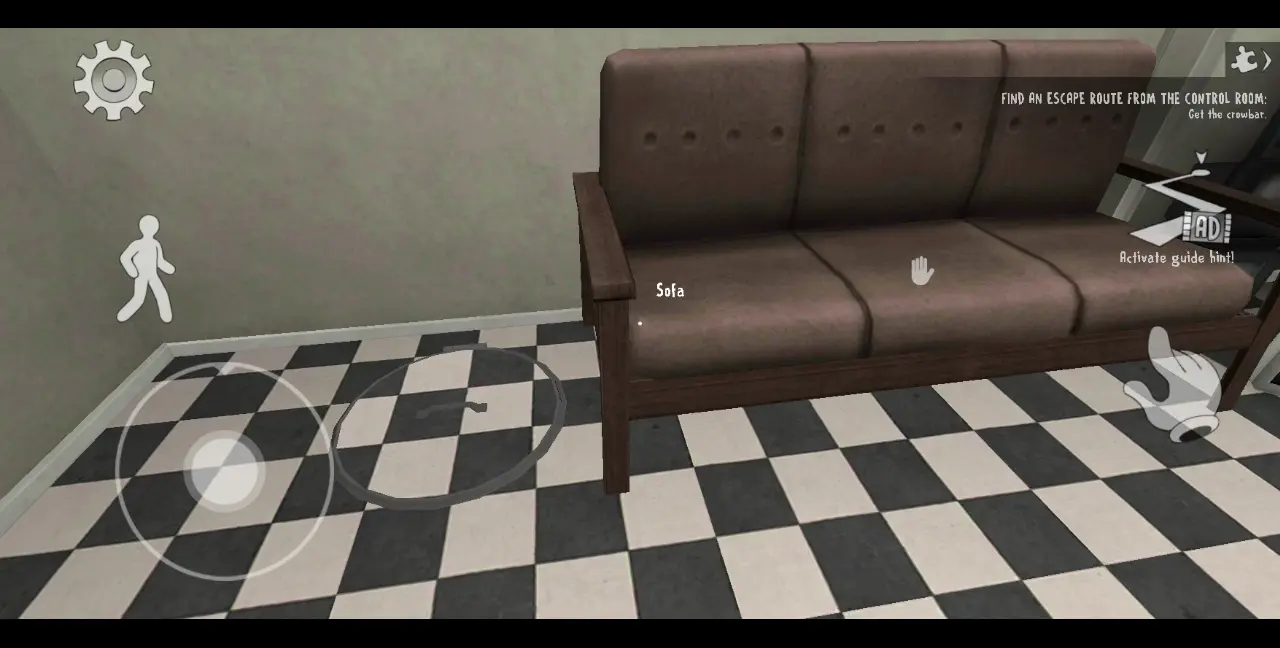
To do this, go to the table at the end of the room. It has a crowbar on top so take it.

Next to the table is a sofa. Look under the sofa and you’ll find a hidden lid covering a vent. Push the sofa aside to access the lid.
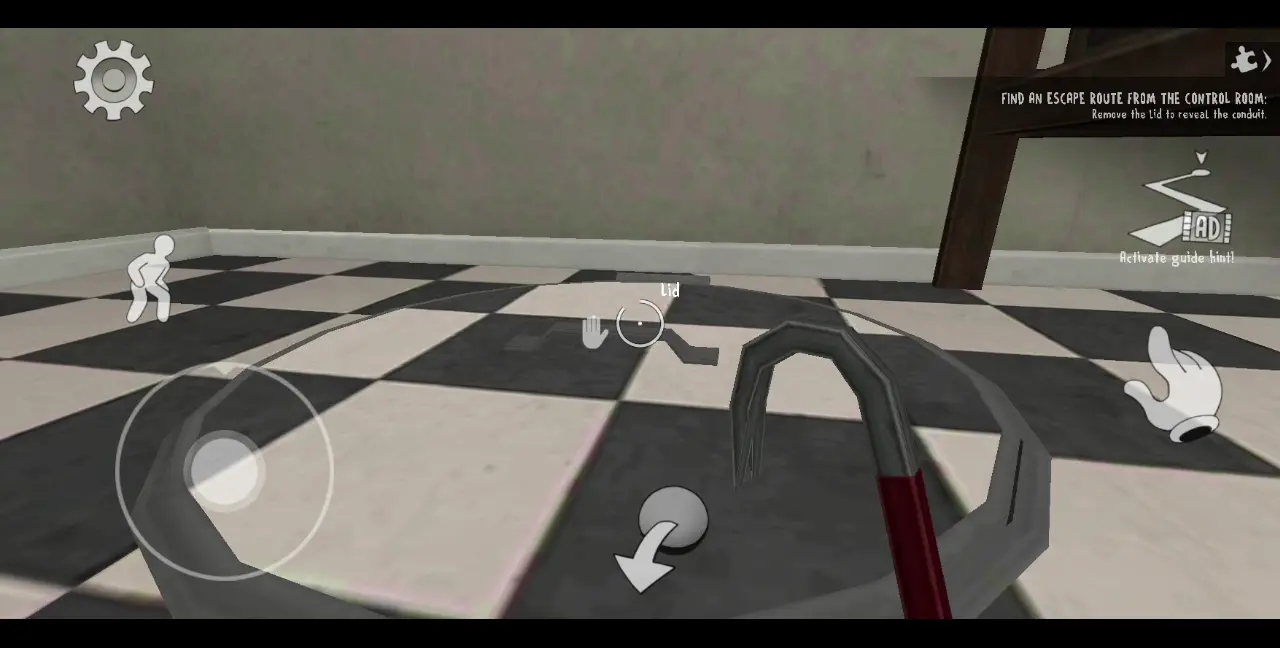
Use the crowbar to open the lid and head down the vent.
Lis, Mike, and Charlie will follow. With no one to hold down the door, Rod eventually manages to enter the control room but discovers that the kids have escaped—again.
Enraged by being constantly bested by the children, Rod the creepy ice cream man decides that he no longer wants to use the kids as ingredients for his special ice cream. Instead, he locks down the ice cream factory, trapping the kids inside.
After going through the vent, the kids find themselves inside an ice cream truck and take refuge there. Mike correctly guesses that Rod has activated all the security systems and sealed all the exits. Fortunately, he was able to previously grab what looks like a map marking three power generators supplying the security system. Your goal now is to disable these three generators, which are found in different locations.
Mike also tells his friends that he has a walkie-talkie, which will be carried by the person leading the exploration of each area and will be used to call the rest of the group once they find a generator.
After this cut scene, you’ll be briefly playing as J and you’ll all still be in the ice cream truck. The map is on the wall to your left. Also to your left is a shelf. If you’ve pre-registered for the game, you’ll see the Rod gun on the shelf, which you may collect.
When you view the map from the wall, you’ll see that the generators are located in the Museum, Laboratory, and Joseph’s Cottage. The Control Room has been crossed out.
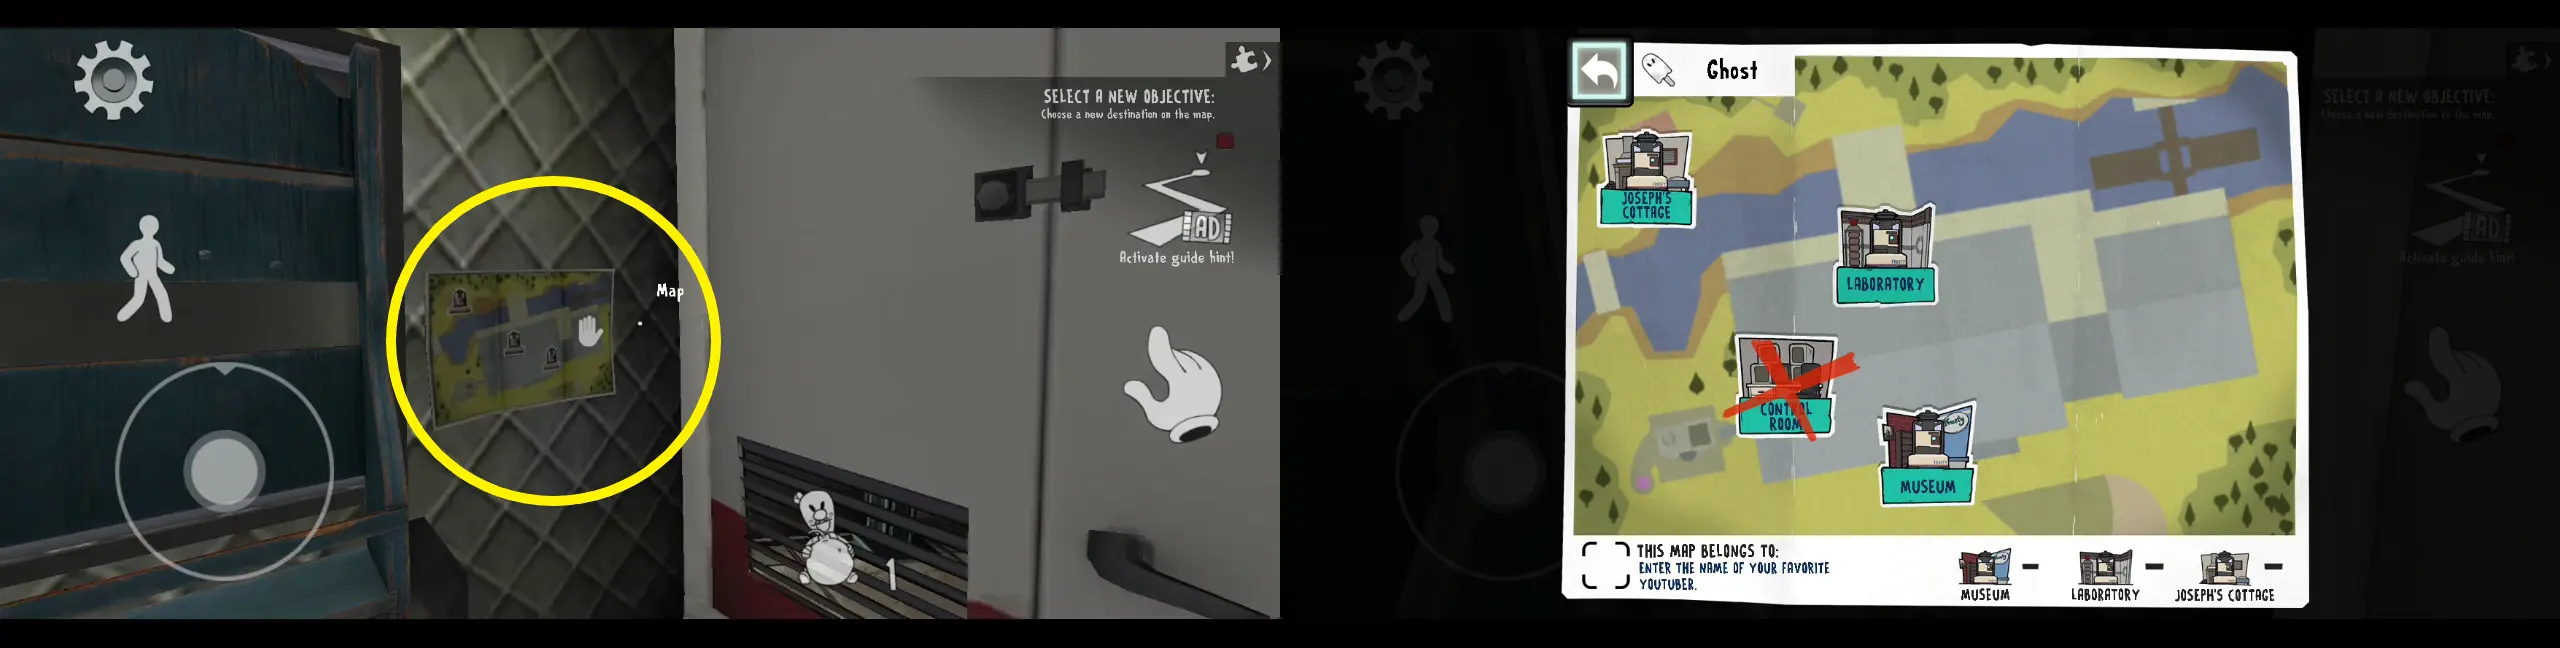
Before you can leave the ice cream truck, you need to select your goal on the map. Picking any of the locations in any order doesn’t really affect your gameplay, it will simply affect which weapons you’ll acquire first during your playthrough.
Depending on the location you choose, you’ll be playing as different characters leading the exploration party. If you choose the Museum, you’ll be playing as Lis; if you choose the Laboratory, you’ll be playing as Charlie; and if you choose Joseph’s Cottage, you’ll be playing as Mike.
Once you’ve chosen your objective on the map, head out of the ice cream truck. To your right, under a flight of stairs, is a vent. Exiting the vent will send you outside.
A cutscene will play, wherein Sister Madeline, the evil nun, will spot you and try to chase you down with a hammer. This happens for any location you choose after the introductory sequence.
Disabling the Laboratory Generator
Checklist of things to get:
- IS8 Bottle: Talk to J using the walkie-talkie inside the safe room.
- Dishwashing liquid: Found inside the kitchen, where Mati the robot is.
- Cable reel: Found inside any of the blue piece boxes you come across.
- Cooking blowtorch: Inside cabinets or lockers that have a rectangular lock that you need to disable using the electro-plasmatic gun.
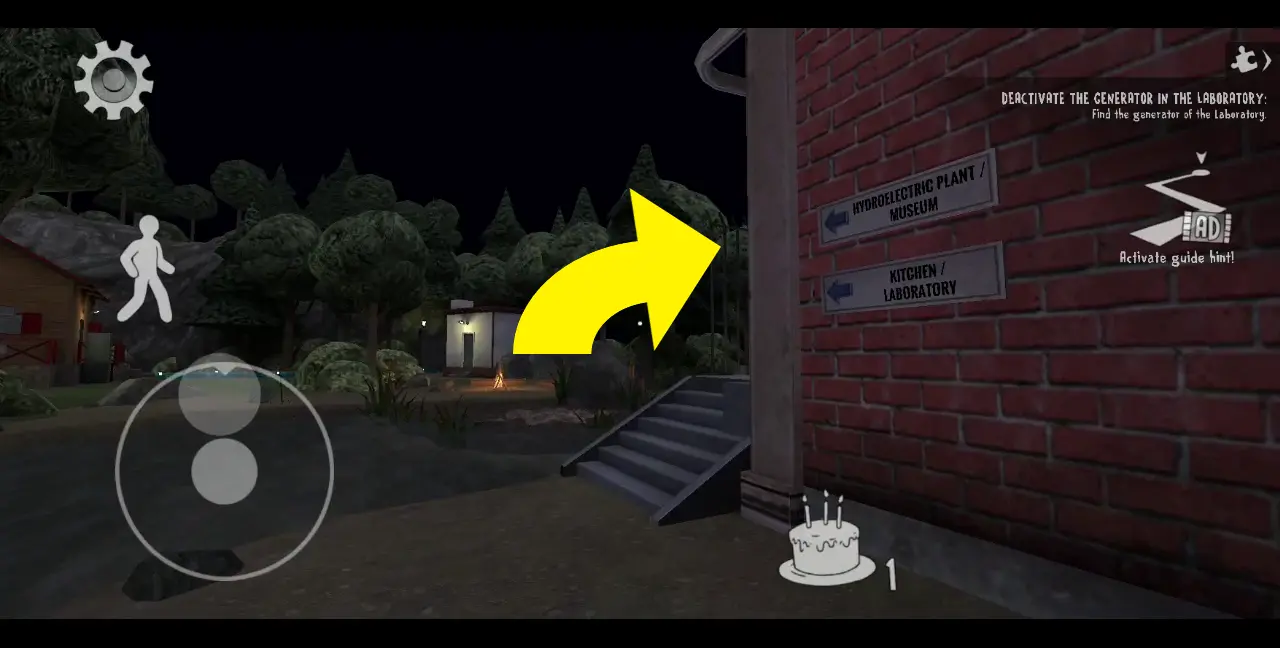
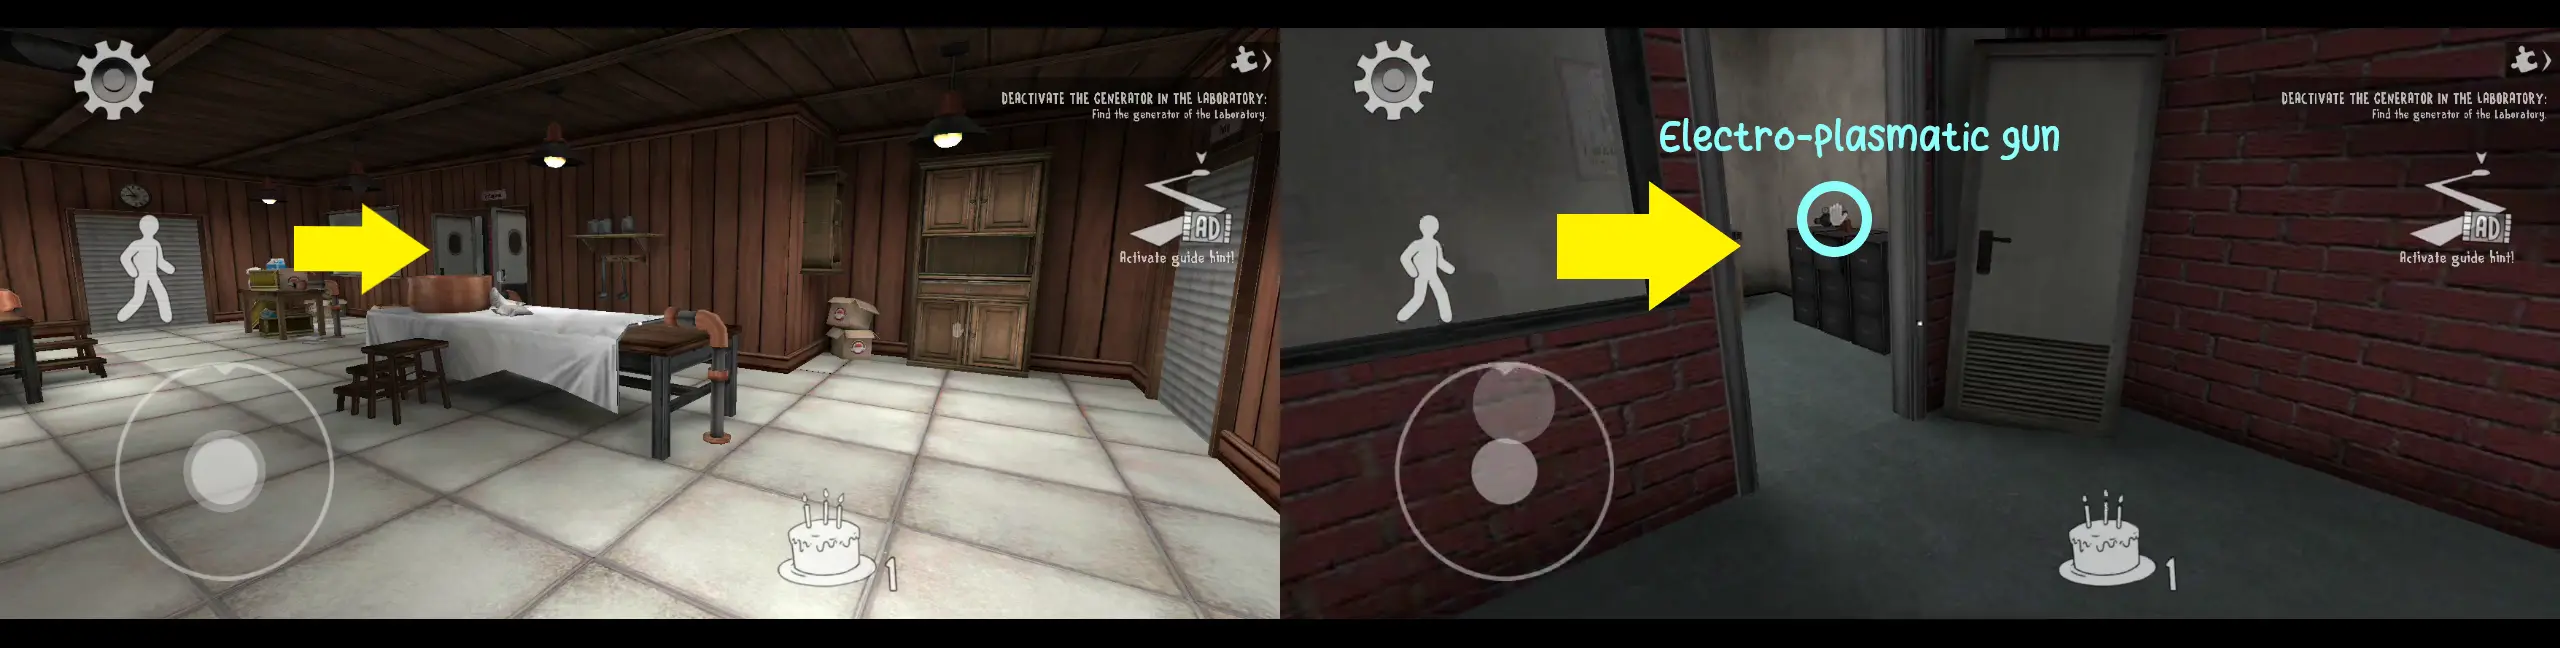
For this playthrough, we’ve chosen the Laboratory first, so you’ll be playing as Charlie. From the vent, run to the right (don’t forget to un-crouch!) until you see a red-brick building marked with signs leading to the Museum and Laboratory.
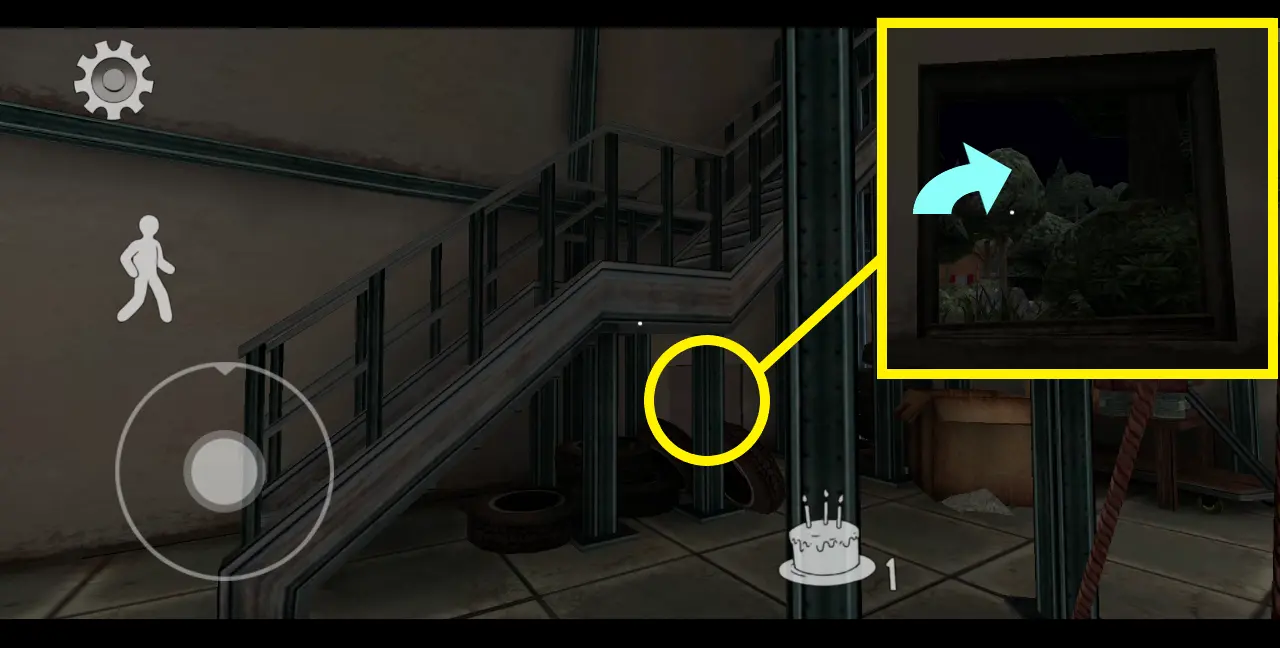
Keep going straight until you find a ladder situated in the middle of the path. Climb the ladder. At the top of the ladder to your left is a broken window. Enter the hole and you will find yourself in the kitchen.

A short cutscene will play showing Mati the robot chef coming to life and noticing that someone has entered her kitchen. Avoid getting noticed by her as she will try to alert other enemies. The good news is that she’s affixed to a seat in front of an ice cream machine and will only spot you within a certain distance even if you walk past her while she’s looking in your direction.
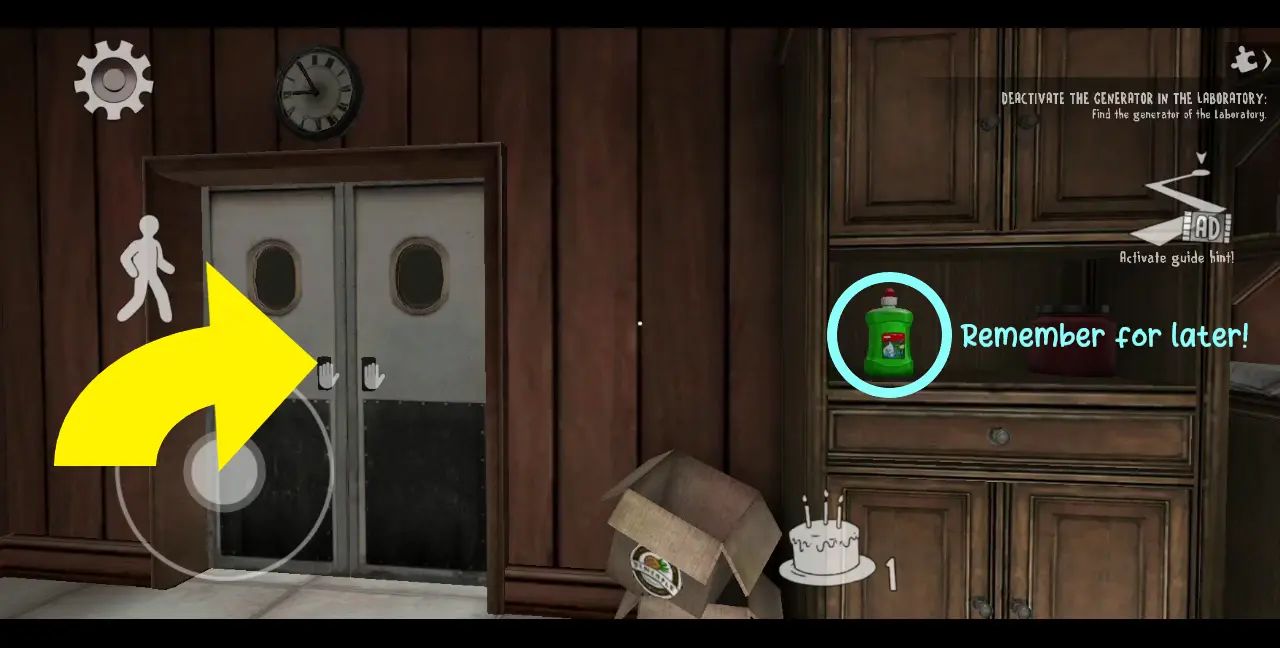
While here, try to spot the location of a green bottle. You won’t be able to pick it up until later, but it pays to know where it is as you’ll need it eventually. In some playthroughs, the green bottle may be on the table or a shelf, but generally speaking the green bottle should be in this area.
To get out of the kitchen, try to go around the area until you reach the door, which is behind where Mati is sitting. This should lead you to the pantry.
Exit the pantry and head left to a room with an open door where some kind of recruitment poster is plastered on the wall. On top of some black drawers is an electro-plasmatic gun. Take it and fire it at incoming enemies, which should knock them out for 60 seconds.
Immediately outside a green door. Slide it open and head left. Before the end of the hall is some kind of space to your left. In this space is a ladder. Climb it.

Follow the corridor and keep going straight. Don’t turn left in the corner at the center of two rooms just yet. You’ll come across another door, inside of which is a short hallway leading to a blue door. Behind the blue door is a dimly lit room, on the wall of which is a cardboard panel on the lower right-hand side. Slide this cardboard panel open, revealing a gap through which you may enter the next room.
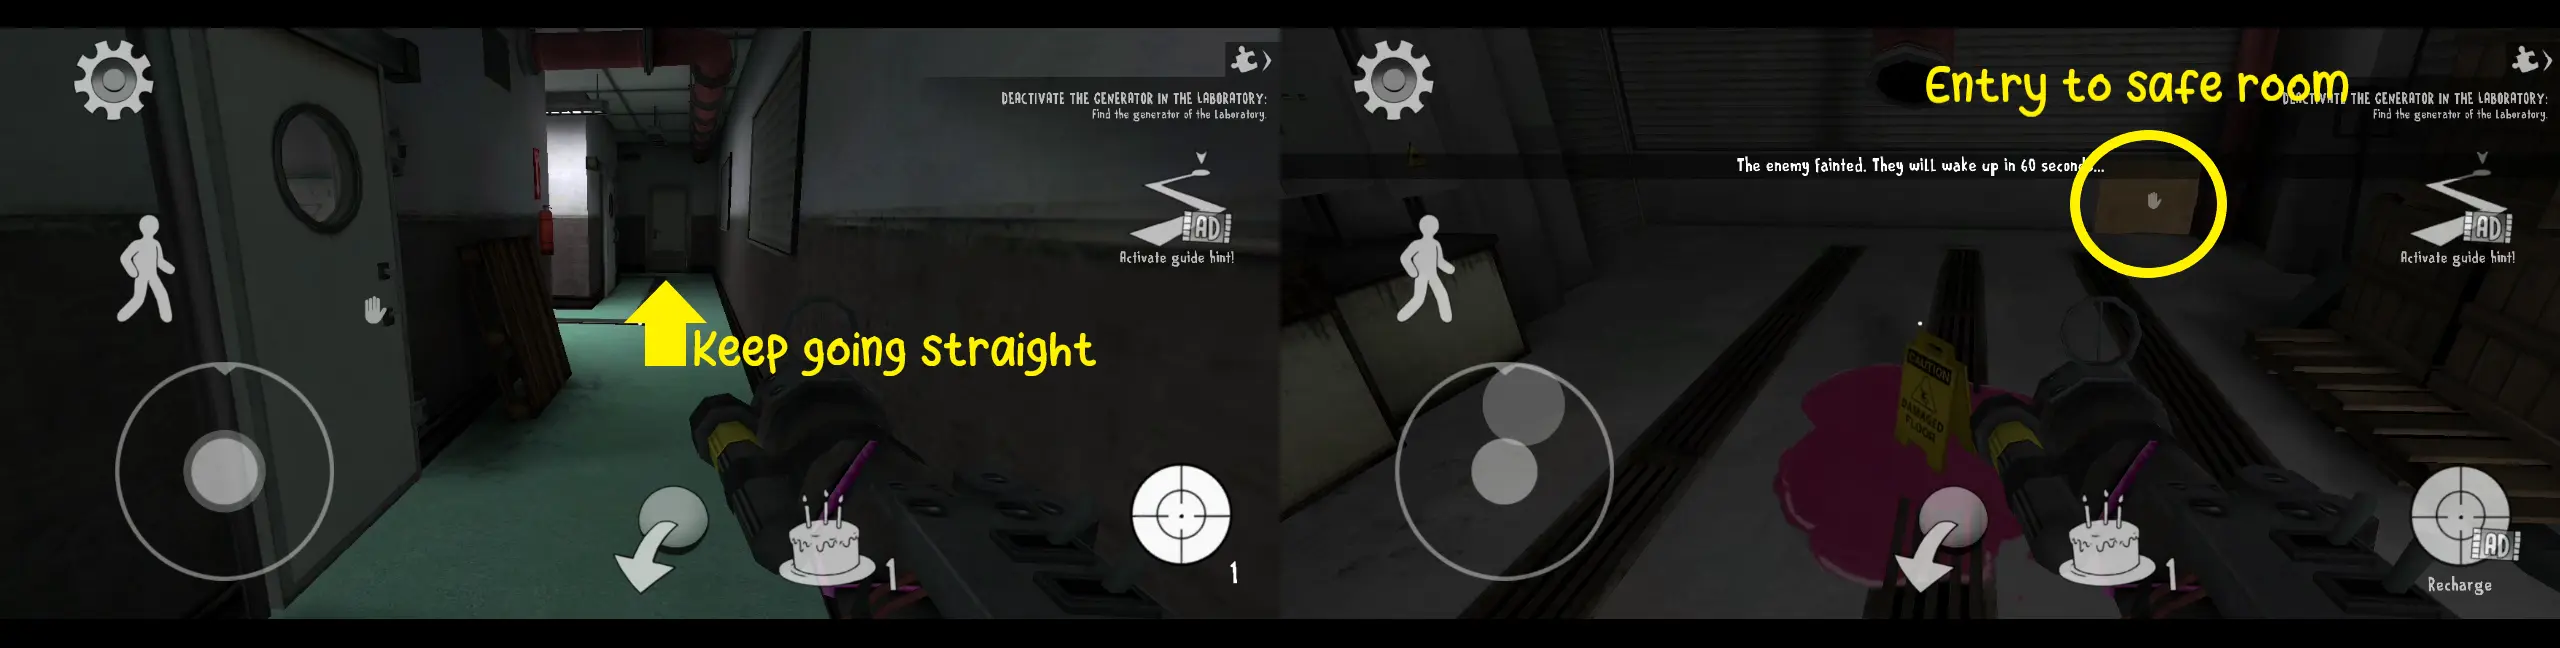
Once you’ve crawled through the gap, you’ve successfully found the generator in the Laboratory and will contact the rest of your crew through the walkie-talkie. A prompt will appear telling you to hack into the generator’s system to deactivate it.
After reading the prompt, you’ll see that the rest of your friends are now in the Laboratory. However, Mike won’t start hacking the generator until you solve Lis’ problem first, which is to get a bubble bath. Since the game only allows you to hold onto one item at a time, drop the electro-plasmatic gun first and take the piece of cardboard from Lis, which has two bottles drawn on them. Once is a green bottle and the other is a pink bottle marked with an 8.
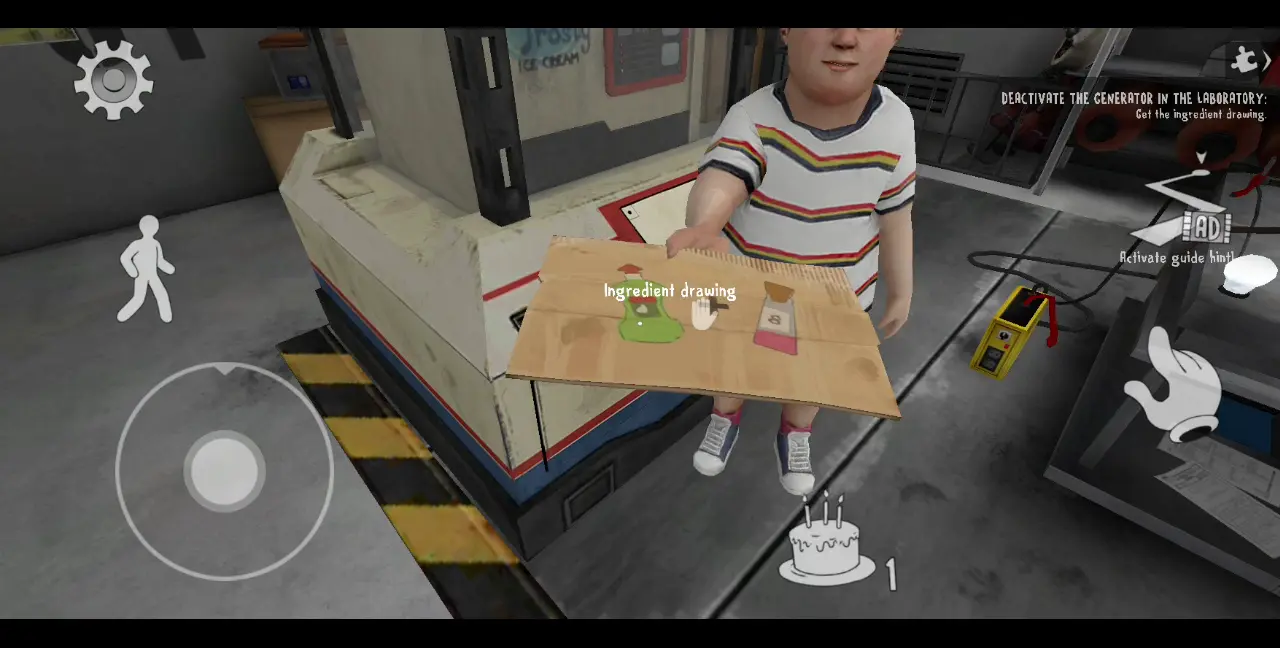
There is a table near the exit where a walkie-talkie is. If you use the walkie-talkie, you’ll ask J for help in getting the pink bottle. He will ask you a few questions about what the bottle looks like and you’ll get three choices for answers. To describe the shape of the bottle, choose “Cylindrical”; when asked about the cap, choose “Plane”; when asked about the label, choose “A hand-drawn 8.”

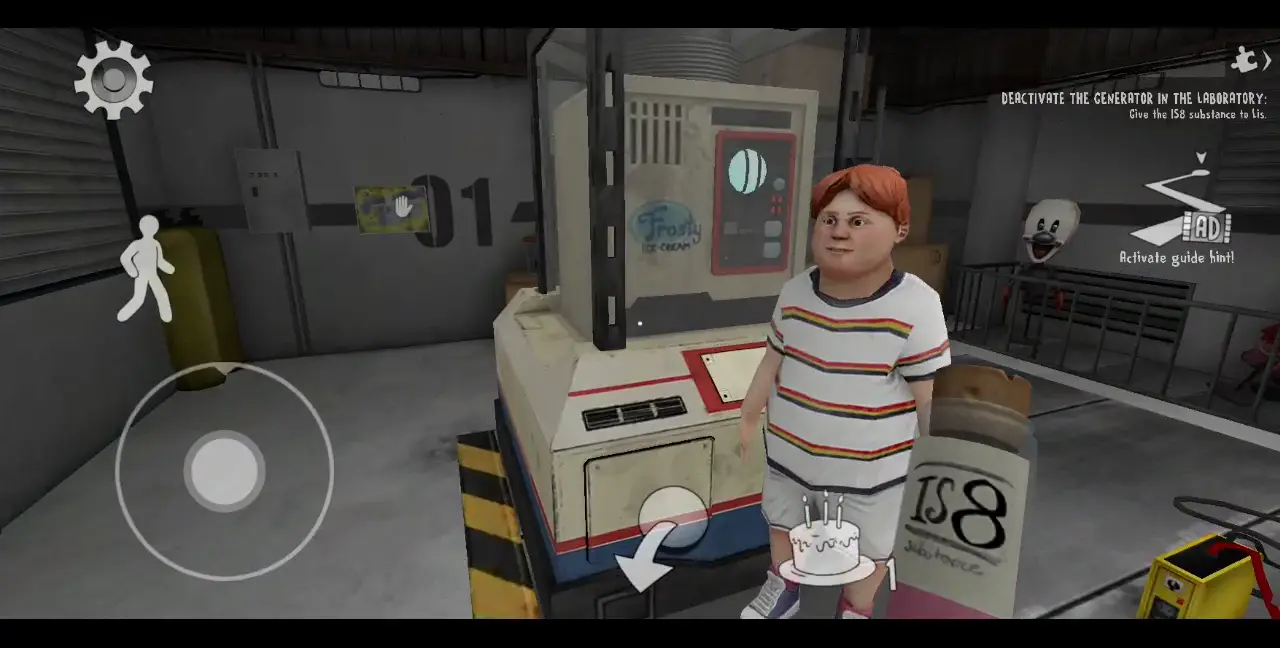
Once all these questions have been answered correctly, J will appear in the safe room with the pink IS8 bottle. Give this pink bottle to Lis.
Next, pick up the electro-plasmatic gun and exit the safe room. Keep going straight until you reach the area with the ladder. Head down and make your way back to the kitchen, where Mati the robot is. Locate the green dishwashing liquid bottle and take it. You’ll leave the gun though, so remember where it is so you can pick it up again later.
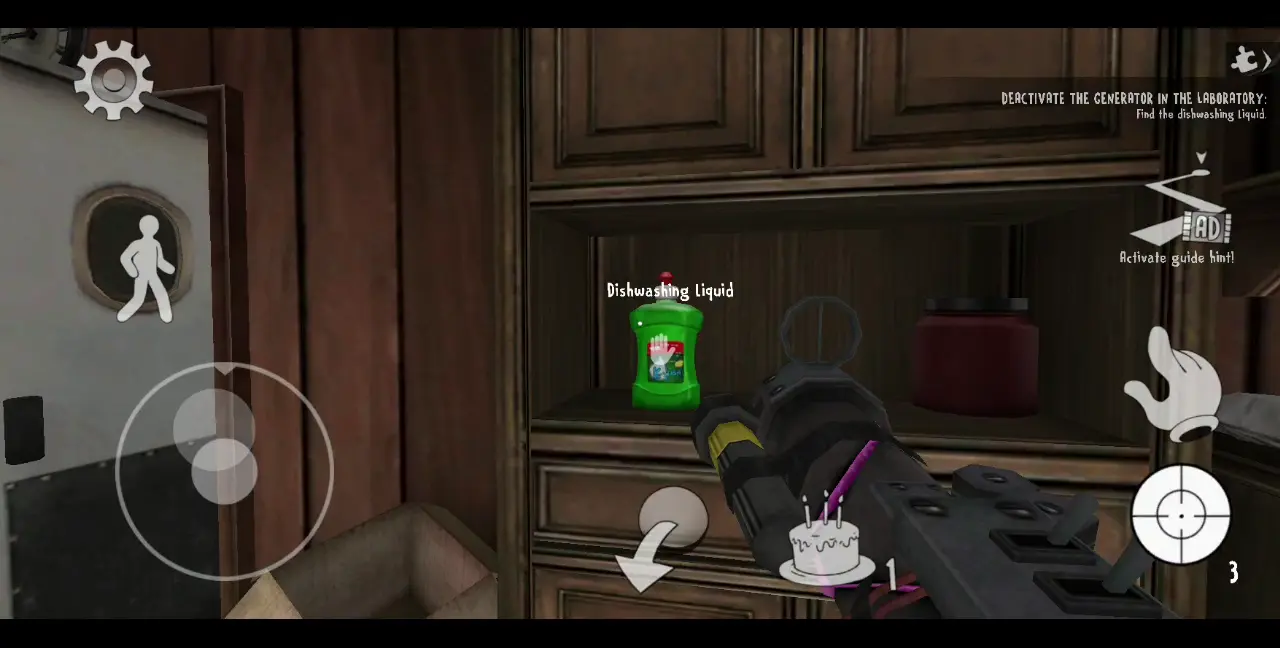
Take the green liquid dishwashing bottle back to the safe room and hand it over to Lis. Then, you can talk to Mike, who will tell you that he needs a cable reel and a blowtorch to hack into the computer. This will be your next objective.
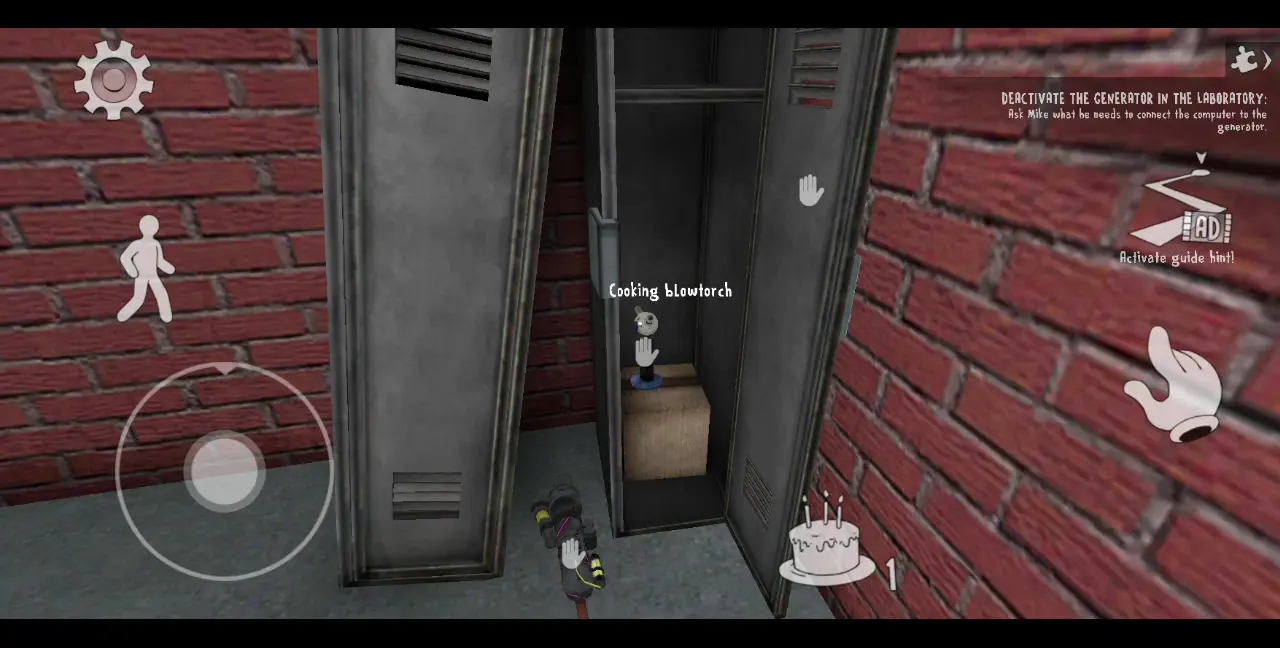
Exit the safe room and pick up the electro-plasmatic gun where you’ve left it, which is the kitchen. To find the blowtorch, you need to check the pantry and the halls within this area for any locker or cabinet that has what looks like a rectangular silver lock with a red light on it. If you find the lock, shoot it with the electro-plasmatic gun.
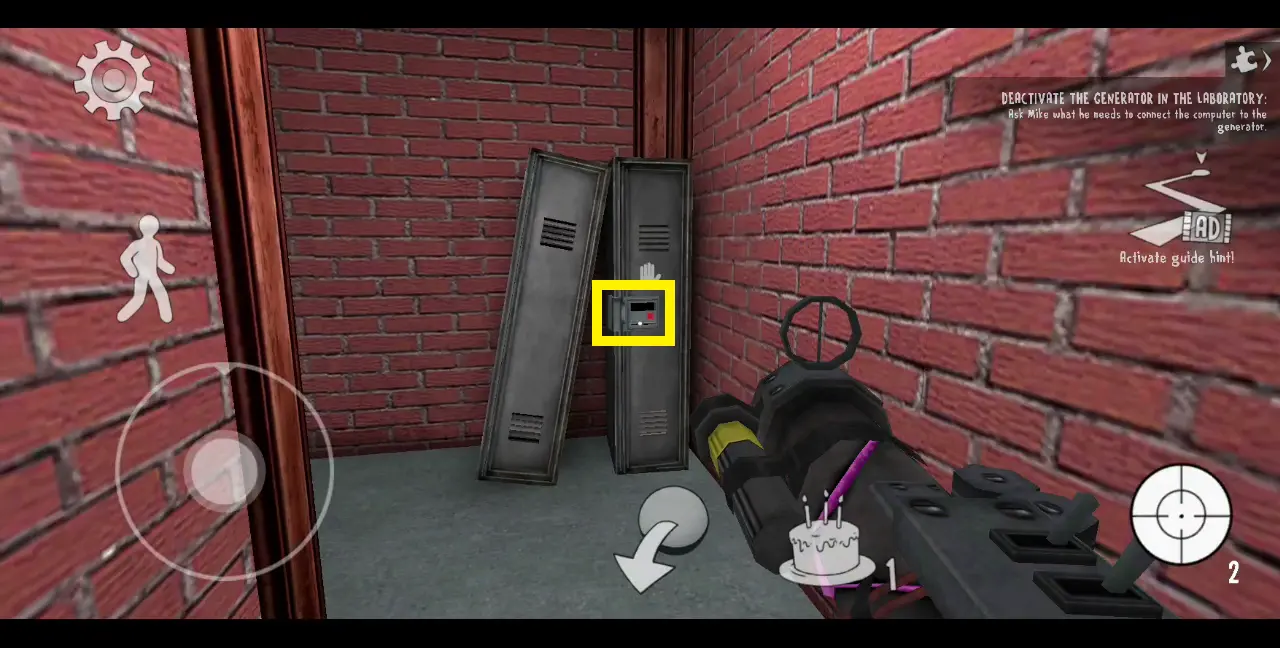
The lock will be disabled, with its light turning green. Behind the compartment, you’ll find a cooking blowtorch. You can bring this back to Mike in the safe room or leave it first at the foot of the ladder so you can proceed finding the cable reel.
To find the cable reel, head up the ladder and go down the hall, taking the corner you’ve avoided a while ago. This should lead you to some kind of small dimly lit office. Open the door and enter the next room, then open another door. To your right should be a shelf with a blue piece box.

Blue piece boxes are scattered all over shelves and under tables within this area, including smaller rooms you have yet to explore. Take note that they’re not found in the area downstairs. You need to check every blue piece box you see until you find the cable reel. Here are some of the other locations of the blue piece boxes aside from the one mentioned previously:

Once you’ve found the cable reel, take it back to Mike in the safe room, along with the blowtorch, and he will begin hacking the computer.
You’ll have to accomplish a mini-game to successfully hack the computer by stacking moving lines of code, making sure that they all remain within the center of the board. Take note that as the codes stack up, the speed in which they move across the board becomes faster. The stacked lines of code should look like this:

Once you’ve hacked the computer, this will be considered a checkpoint in the game. This happens every time you destroy a generator. Before leaving the safe room, you’ll be asked to select another goal on the map.
Disabling the Museum Generator
Checklist of things to get:
- Motorized hydraulic jack: Found in the museum area.
- Mini-Rod costume: Collected from any of the junk piles in the factory area.
- Microwave gun: Can be found anywhere in either the museum or factory areas, including the second level of the factory.
- Child sign: Found in the museum area.
For this playthrough, we selected the Museum next on the map. You’ll be playing as Lis. Leave the safe room. Once you’re out, head straight until you go back down the ladder. Look for the room where Mati the robot is and leave through the hole in the window, which is where you entered the Laboratory in the first place.
Move down the ladder and head straight, passing through blue canvases until you reach the end marked by a gate. Go through the gate and if you move right, you’ll see more blue canvases stretched across squares made of wire fences. Walk to the end and enter the square to your left. Here, you’ll see a vent you can enter.

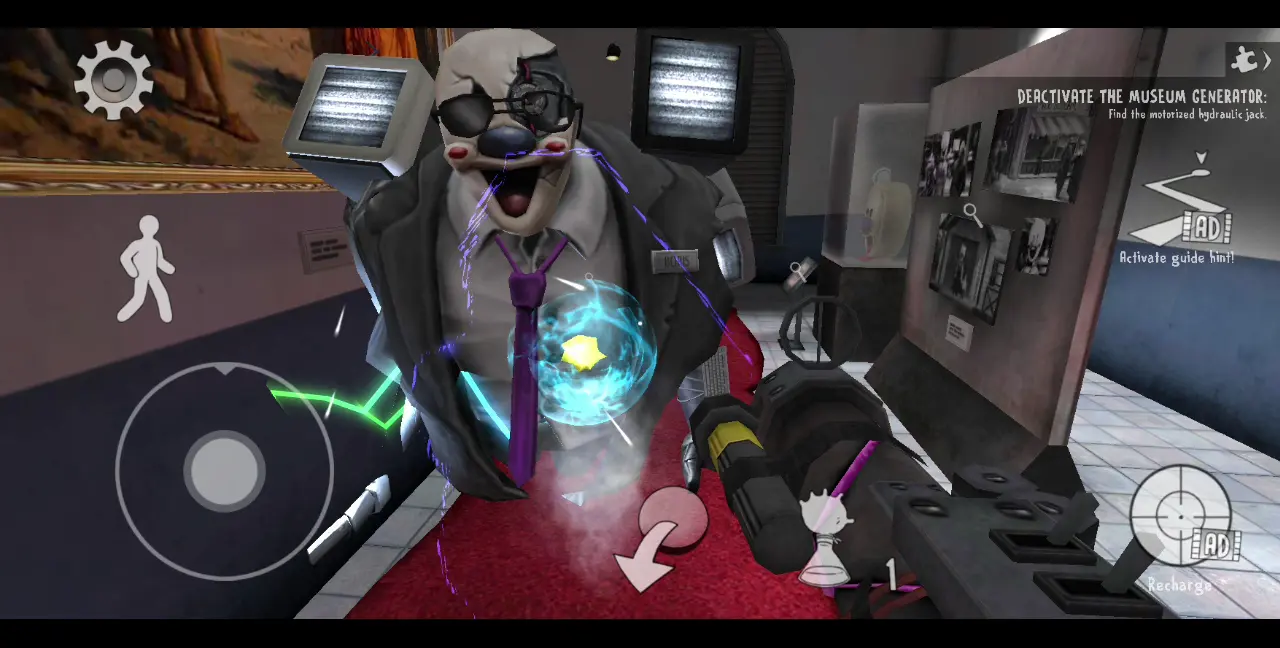
Follow the short path and a cutscene will be triggered, which will show a few Mini Rods repairing Boris. Franken-Boris wakes up and is very angry. You need to stay away from him as he is marked as one of the more powerful enemies aside from Rod’s crocodile. These two can defeat you in one hit. You’ll encounter the crocodile later, during the segment for Joseph’s Cottage, though you might have seen it roaming the large pond next to the Laboratory.
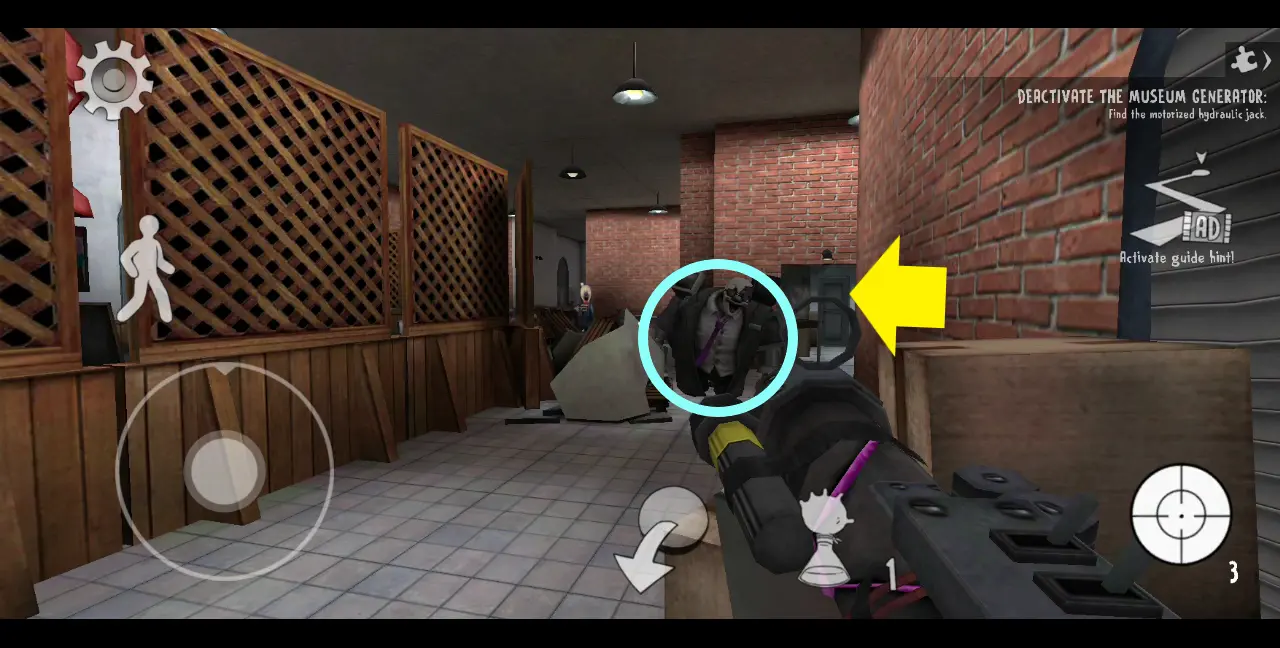
For now, this Museum area looks more like a factory of sorts from the get-go. Walk past the grills, but be careful! Franken-Boris will immediately come at you from the right. You need to avoid him by going up the platform in the middle of the factory and going around it to reach the door behind him.
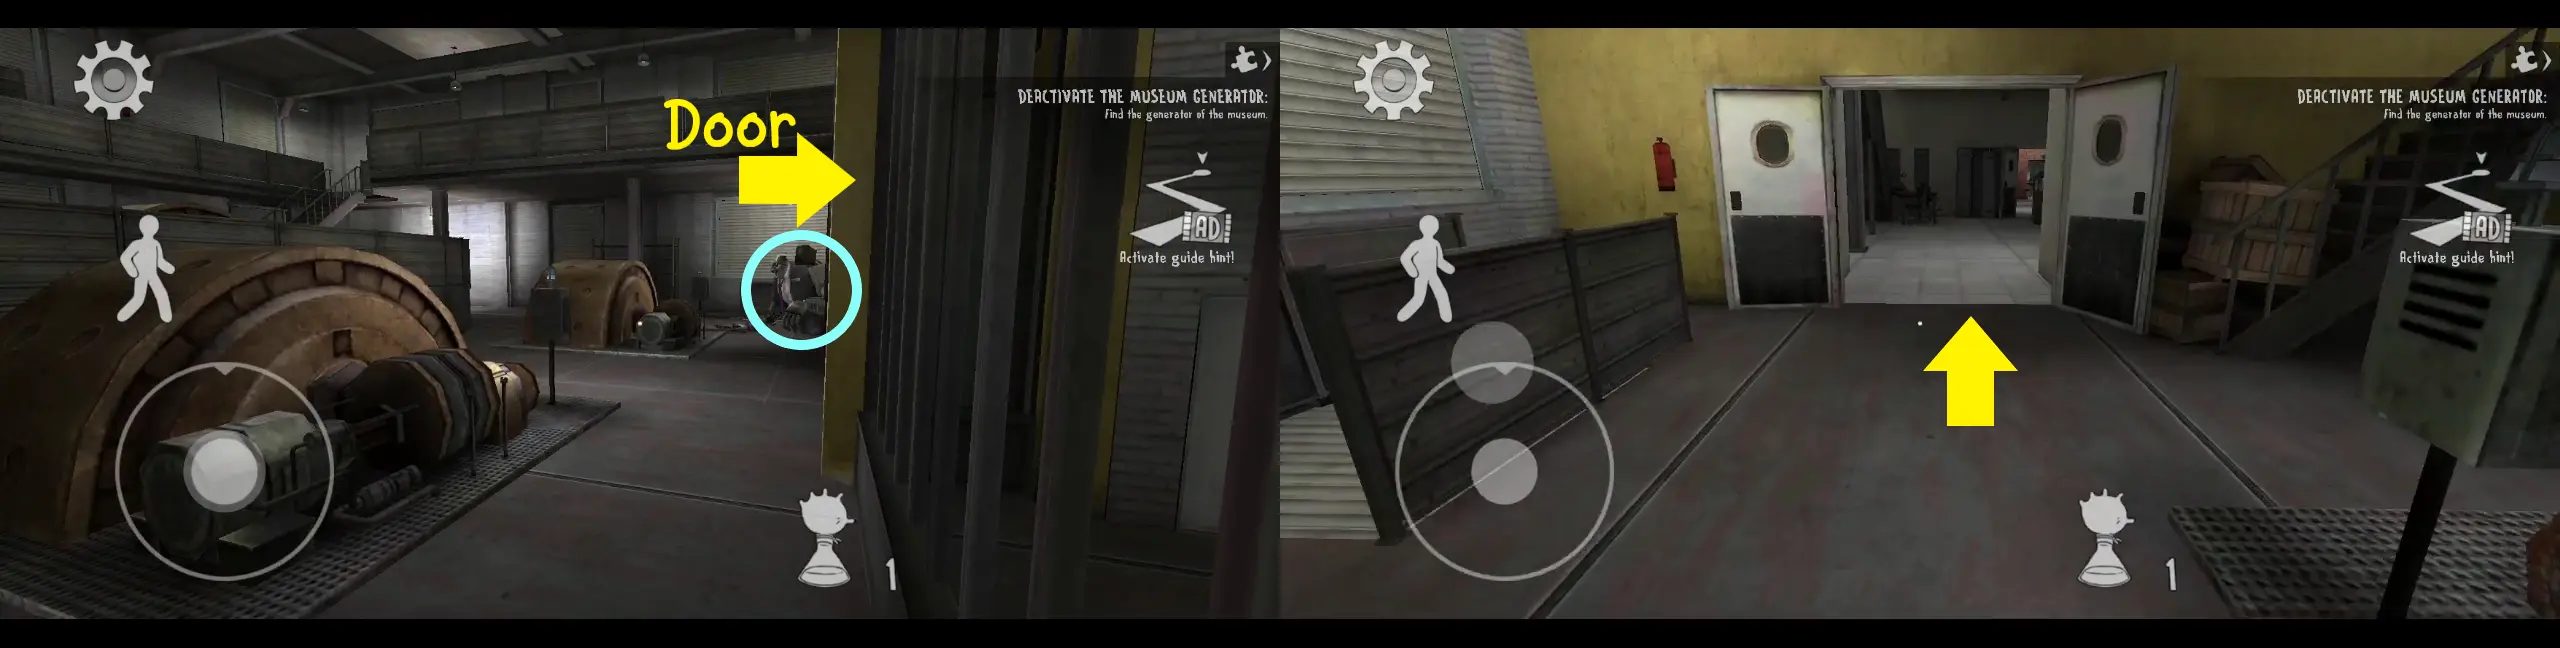
Go past the door, which should lead to a hallway with cabinets to your right and a staircase to your left. Past this is another room, where there is a gap to your right, just below a metal roll-up door or shutter. The gap is covered by a piece of cardboard. Slide the gap and enter the room, which is the gift shop. This should contain the Museum’s generator.

Lis will alert the other kids of her location with her walkie-talkie. You’ll get a prompt that states your overall objective for this area, which is to trick Franken-Boris into destroying the generator as it’s protected by armored glass.
Similar to the Laboratory area, the other kids will automatically appear at the gift shop after Lis tells them where she is. There is a shelf in the gift shop where you can obtain the electro-plasmatic gun regardless of where you’ve left it in the Laboratory. Take the gun for protection. Keep in mind that you can shoot Franken-Boris from afar, but unlike Rod or other enemies, he won’t be knocked unconscious for 60 seconds. Instead, he will simply get stunned.
In the gift shop, talk to Mike. He’ll tell you that he needs a charged motorized tool to help him lift the shutter quickly so Franken-Boris can enter the gift shop. If you talk to Charlie, he will tell you that he won’t follow you until you bring him a disguise. You will need this so that Charlie will follow you later.
The layout of the Museum is pretty straightforward: there’s the area of the museum proper to the right and then there’s the factory to the left, which is where you began this segment. The museum proper is connected to some other smaller rooms and nooks that you can take advantage of to escape Franken-Boris as he won’t be able to fit through narrow doors.
Since there are no fixed locations of the items you need to find, you’re going to be doing a lot of exploring and running around in the Museum. Fortunately, this is the smallest or most contained area of the game so you just need to be on the lookout for where items are.
Exit the gift shop and head right. If Boris is there, shoot him multiple times with the electro-plasmatic gun until he is stunned. Unlike Rod, he won’t be knocked unconscious. Remember to keep your distance from him.
At the end of the corridor is what looks like some kind of storage area full of boxes. Amid them is a gray door. Open the door, which should lead you to an area with a red table and chairs. Go left, past the threshold, then enter the open door to the right. This should lead you to the Museum area where there are museum displays and a red carpet path. The red carpet leads left, which is a wide enough space for Boris to chase after you. Shoot him to stun him when you see him.
This should give you some time to survey the museum proper but be very quick as it takes only a few seconds until Franken-Boris starts chasing after you again. The museum proper mostly has old photos on display. Check the walls and the bins for any item you can pick up.
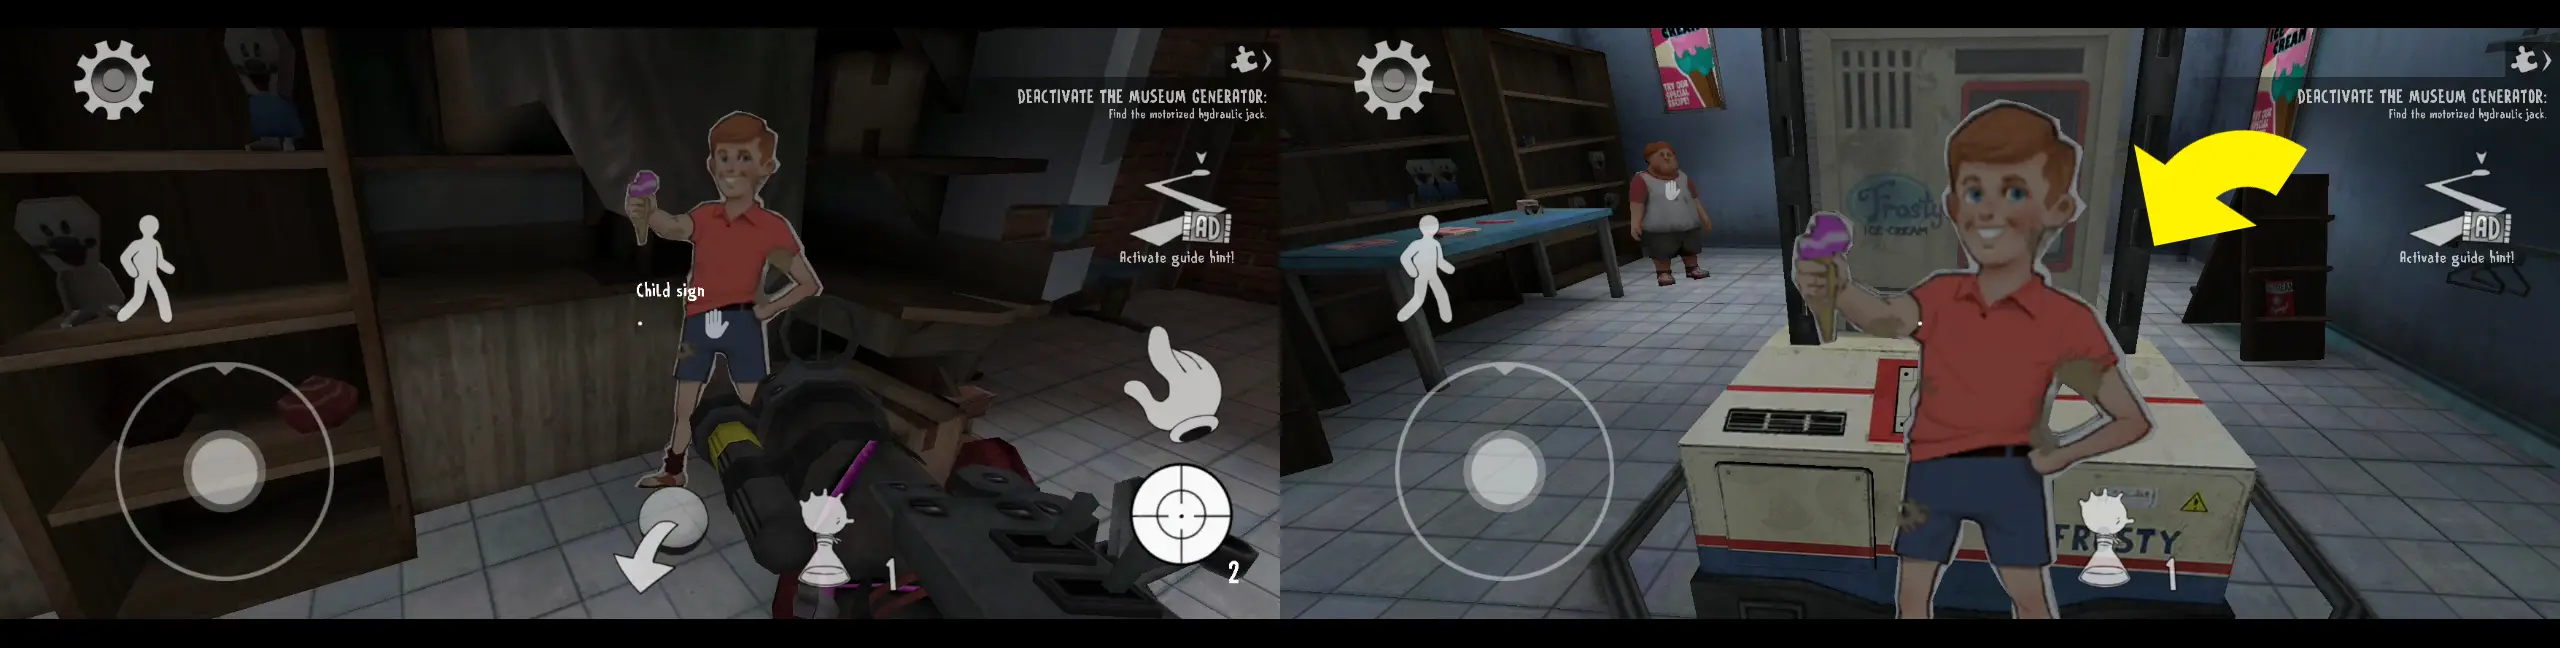
Connected to the museum is also an ice cream parlor. Nearby is another space that looks like it had been used for storage. This is where we found one of the items, which is the Child sign. Again, take note that item locations may vary. Take the child sign back to the gift shop and place it in front of the generator.
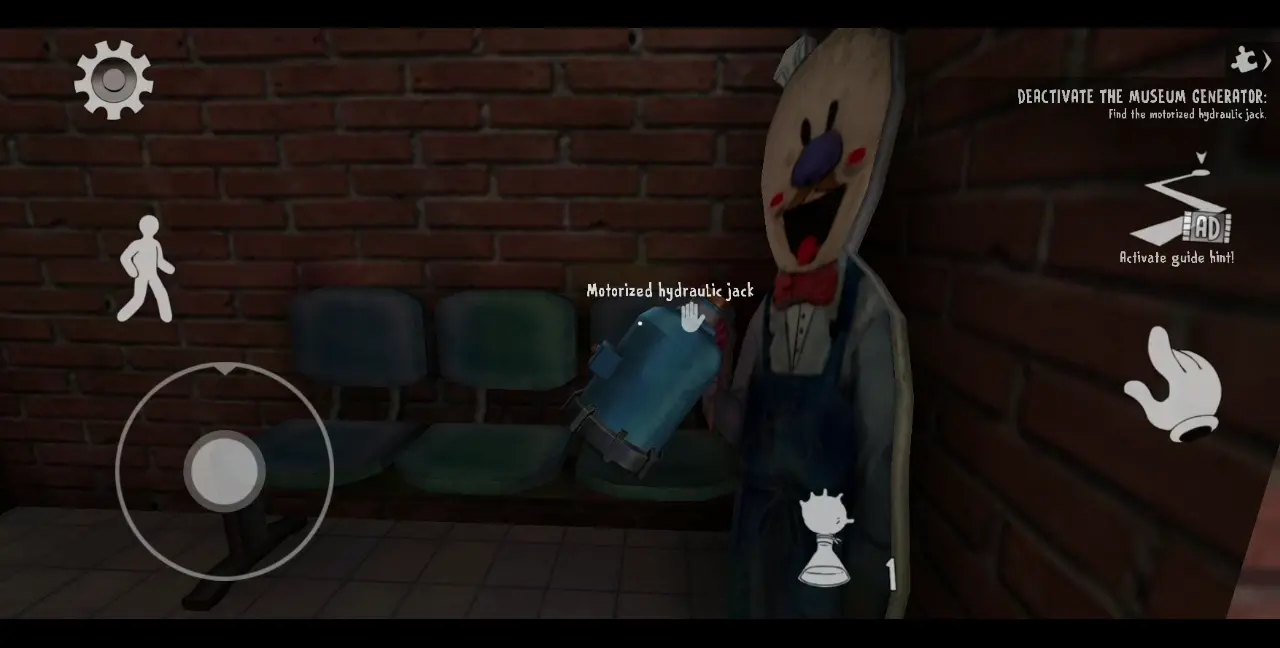
While at the museum proper, try to find either the motorized hydraulic jack or the microwave gun. Check bins, lockers, and dark spots, like chairs. For the motorized hydraulic jack, we found it resting on some chairs in an innocuous corner near the room that looks like a storage area.
Once you’ve found the motorized hydraulic jack, don’t head back to the gift shop just yet. Instead, go to the factory area and climb the flight of stairs closest to the door. This should lead you to the second level where you can access a control panel. Place the motorized hydraulic jack on the spot marked as the charging base.

Since you’re already in the factory area, try to find the Mini-Rod costume here. To do this, you need to check out the junk piles scattered in the factory. Illustrated below are some of the locations of the junk piles:

Keep in mind that it takes a few seconds for you to rummage the junk pile, making you vulnerable to being caught by Franken-Boris. We suggest checking out the junk piles on the second level first as Franken-Boris can’t climb up the stairs. For this playthrough, we found the Mini-Rod mask in a junk pile on the second level, next to another control panel.
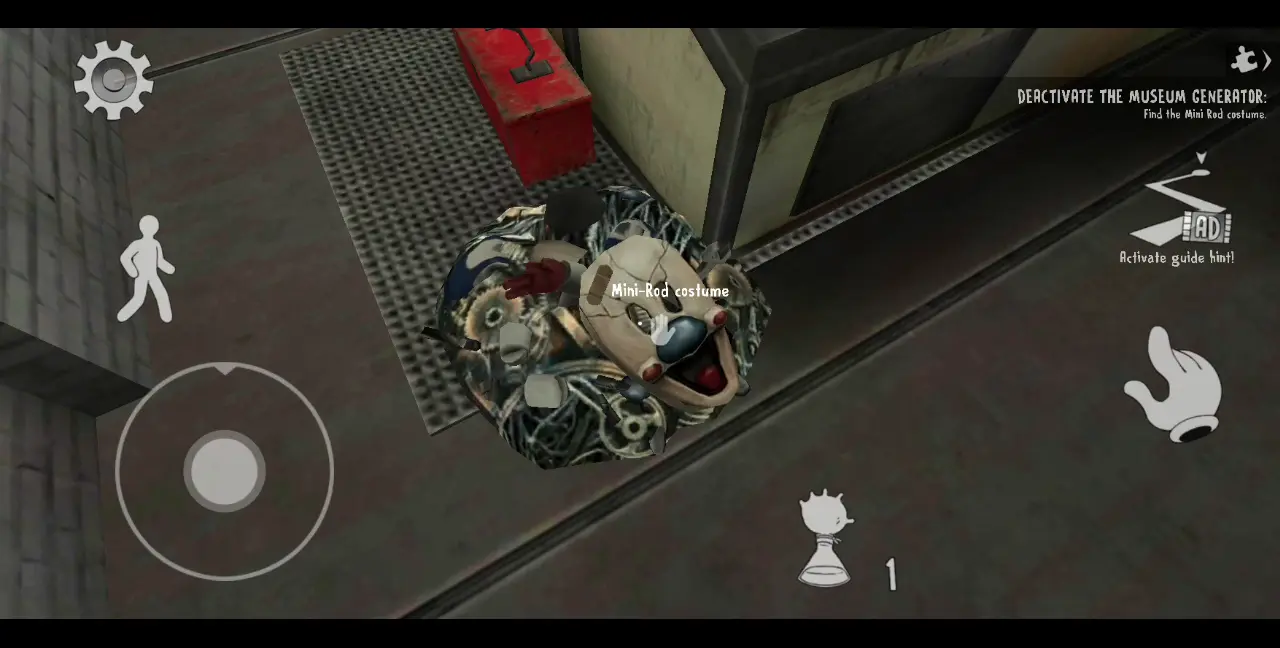
Upon collecting the Mini-Rod costume, you can wear it as a disguise. This will make enemies think that you’re one of them, allowing you to freely roam areas without being chased. You may decide to get this item first for easier area exploration, but remember that you can only carry one item at a time, so if you find the other items, you’ll have to leave the Mini-Rod costume anyway.
In any case, you may use this time to find the last remaining item, which is the microwave gun. Fortunately for our playthrough, we found the microwave gun just across the junk pile from which we collected the Mini-Rod costume.
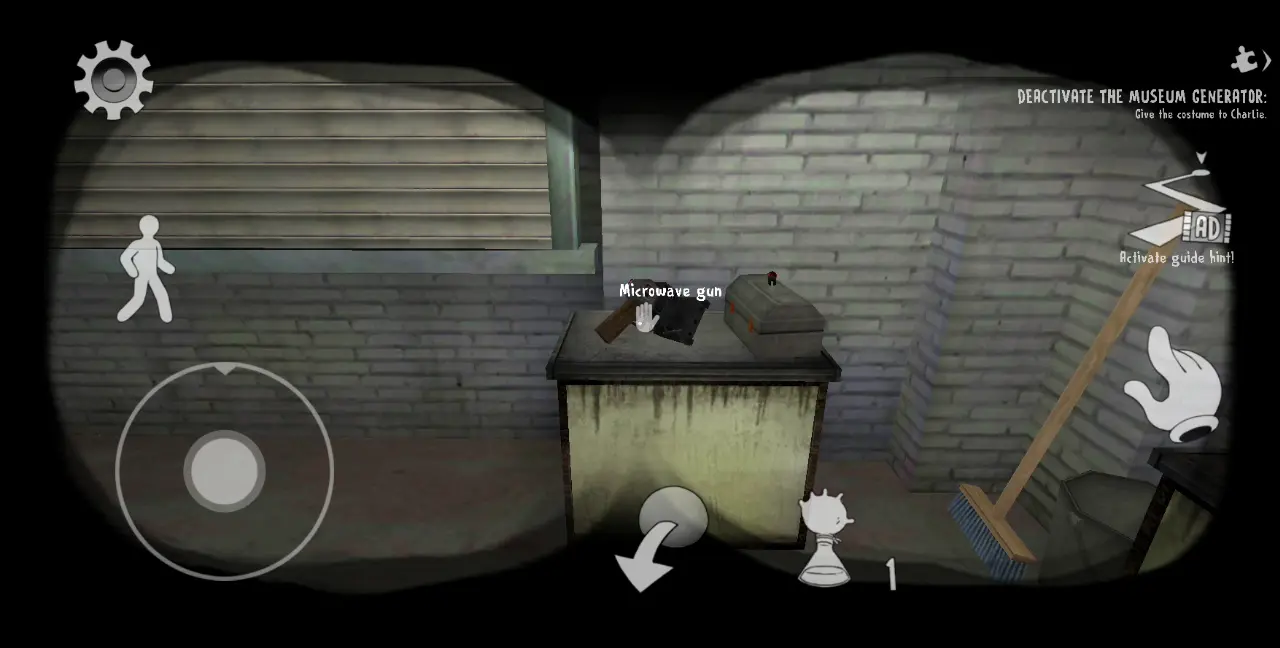
In this case, we returned to the gift shop and gave Charlie the Mini-Rod costume. You may choose to do the alternative, which is to return the microwave gun first to the gift shop and give it to Mike, then come back for the Mini-Rod costume. The microwave gun can also be used to temporarily stun Franken-Boris or destroy Mini-Rods.
Either way, once Charlie is wearing the Mini-Rod costume, he will follow you once you exit the gift shop. Watch your back just to make sure Charlie is right behind you, or else you might have to return to the gift shop and exit again to get him to follow you closely.
Now that you’re being followed by Charlie, head up to the second level of the factory using the flight of stairs closest to the door. Go to the control panel where you’ve placed the motorized hydraulic jack. Lead Charlie to one of the two breakers on either side of the charging base, then go to the other breaker. Pull the breaker and Charlie will do the same. This will take a few seconds to accomplish.
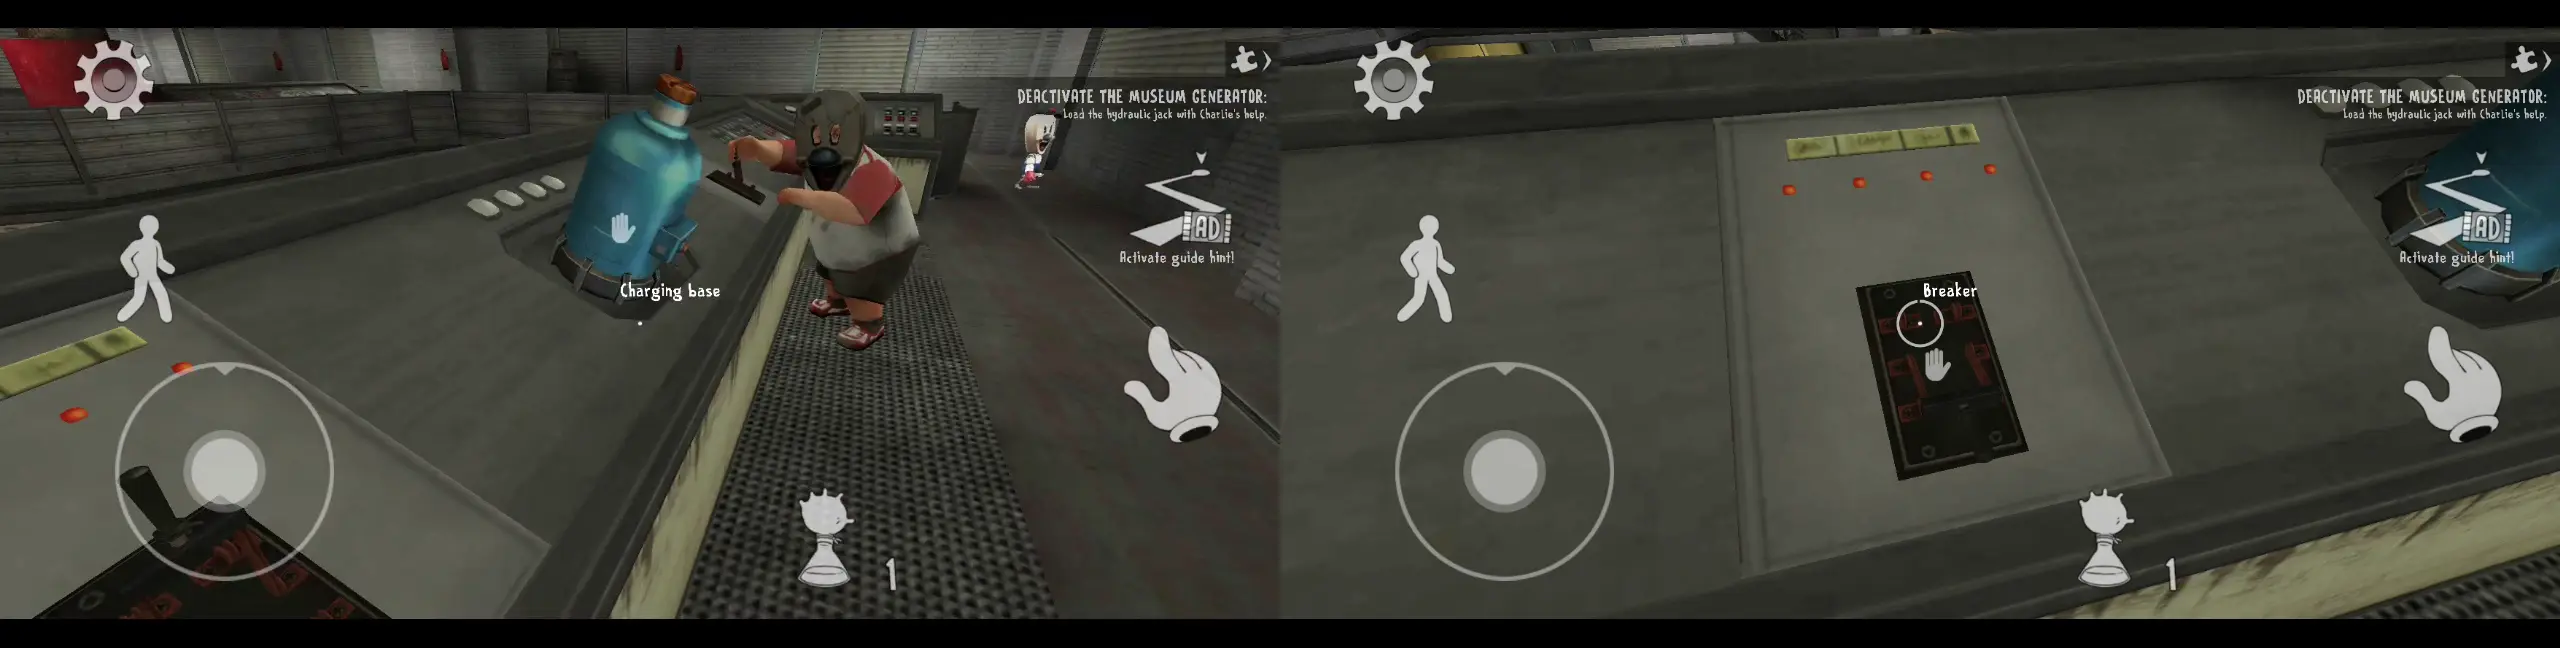
Once done, Charlie will say he’ll go back to the shop and disappear. Meanwhile, you will remain where you are.
Take the motorized hydraulic jack from the control panel and head back to the gift shop. Give this to Mike. With all the items found and given to their corresponding characters in the gift shop, it’s time to put the plan into action.
When you step out of the gift shop, a red X will mark the spot right in front of the gift shop’s hidden entrance. Lure Franken-Boris there.
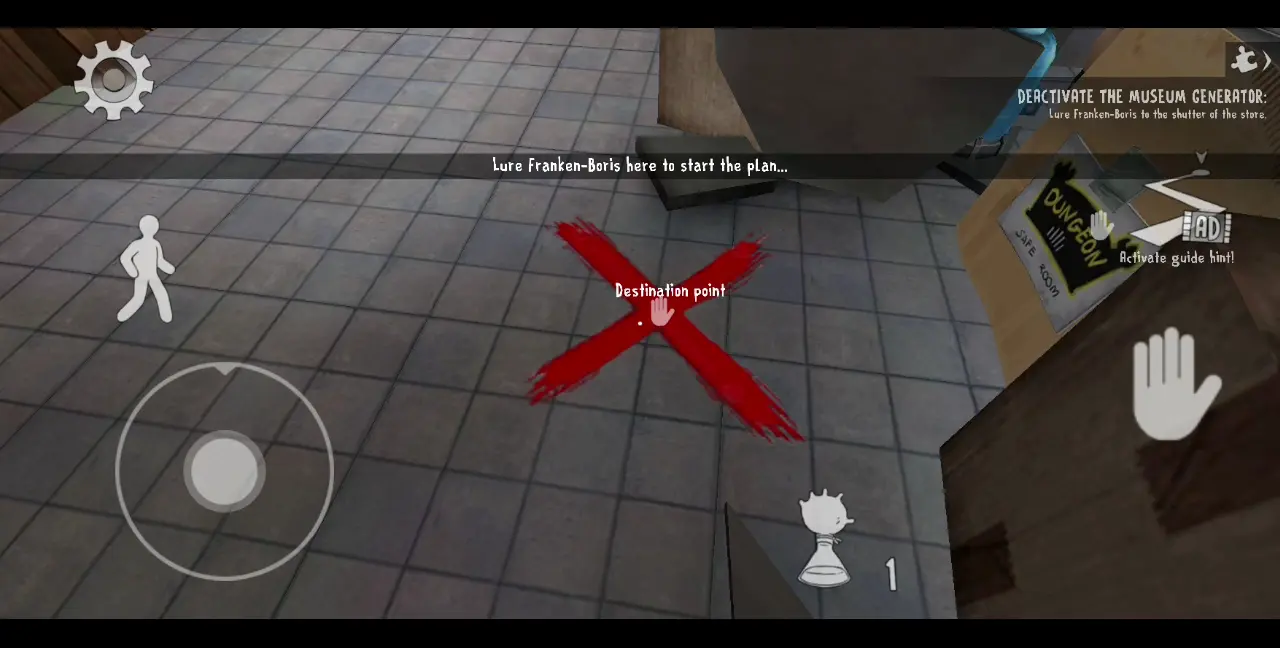
Once Franken-Boris is sufficiently close, a cutscene will play wherein the kids enact their plan of tricking the angry robot into destroying the Museum’s generator. Franken-Boris will crash himself into the generator, destroying both himself and the machine.
Similar to the Laboratory, this will mark the checkpoint of the game. Before leaving the area, you need to select a goal on the map, which is the last location: Joseph’s Cottage.
Disabling the Generator in Joseph’s Cottage
Checklist of Things to Get:
- 3/3 Crocodile eggs: One is from Lis, when you find the cottage safehouse; one is hidden in any of the water closets near the pond; one is from any of the tree stumps in the forest area across the pond’s bridge.
- Forest key: Found hanging on a wood branch sticking out of the pond.
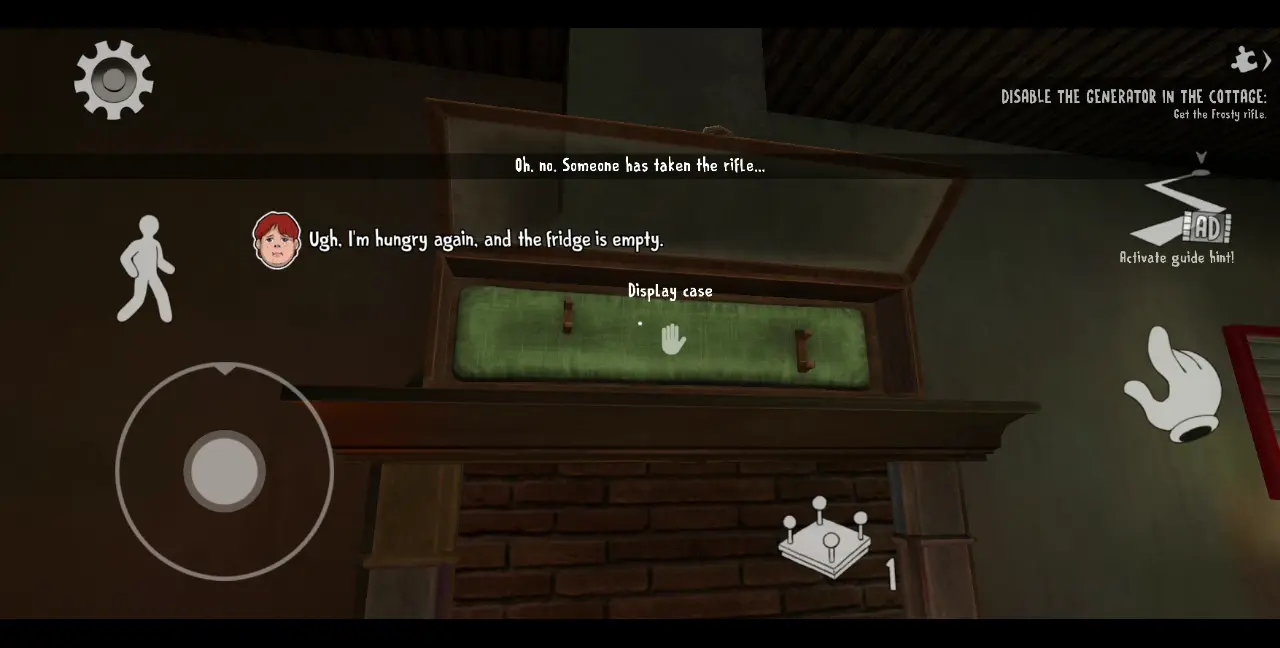
- Rifle: Obtained from J, after he takes it from the cottage’s display case.
- Rod’s van: Inside the garage, which was the designated safe room in the intro.
Exit the Museum area by going through the factory and leaving through the vent from which you originally came. You’ll be playing as Mike. Keep in mind that even if you leave with the electro-plasmatic gun, it will disappear once you get out of the vent. Don’t worry, though, as you’ll be able to get it again once you get to Joseph’s Cottage.
From the vent, go past the blue canvases and take a left, passing through more blue canvases, until you come across a large blue canvas opposite the ladder to the Laboratory. On this blue canvas is a sign that says “Joseph’s Cottage.”
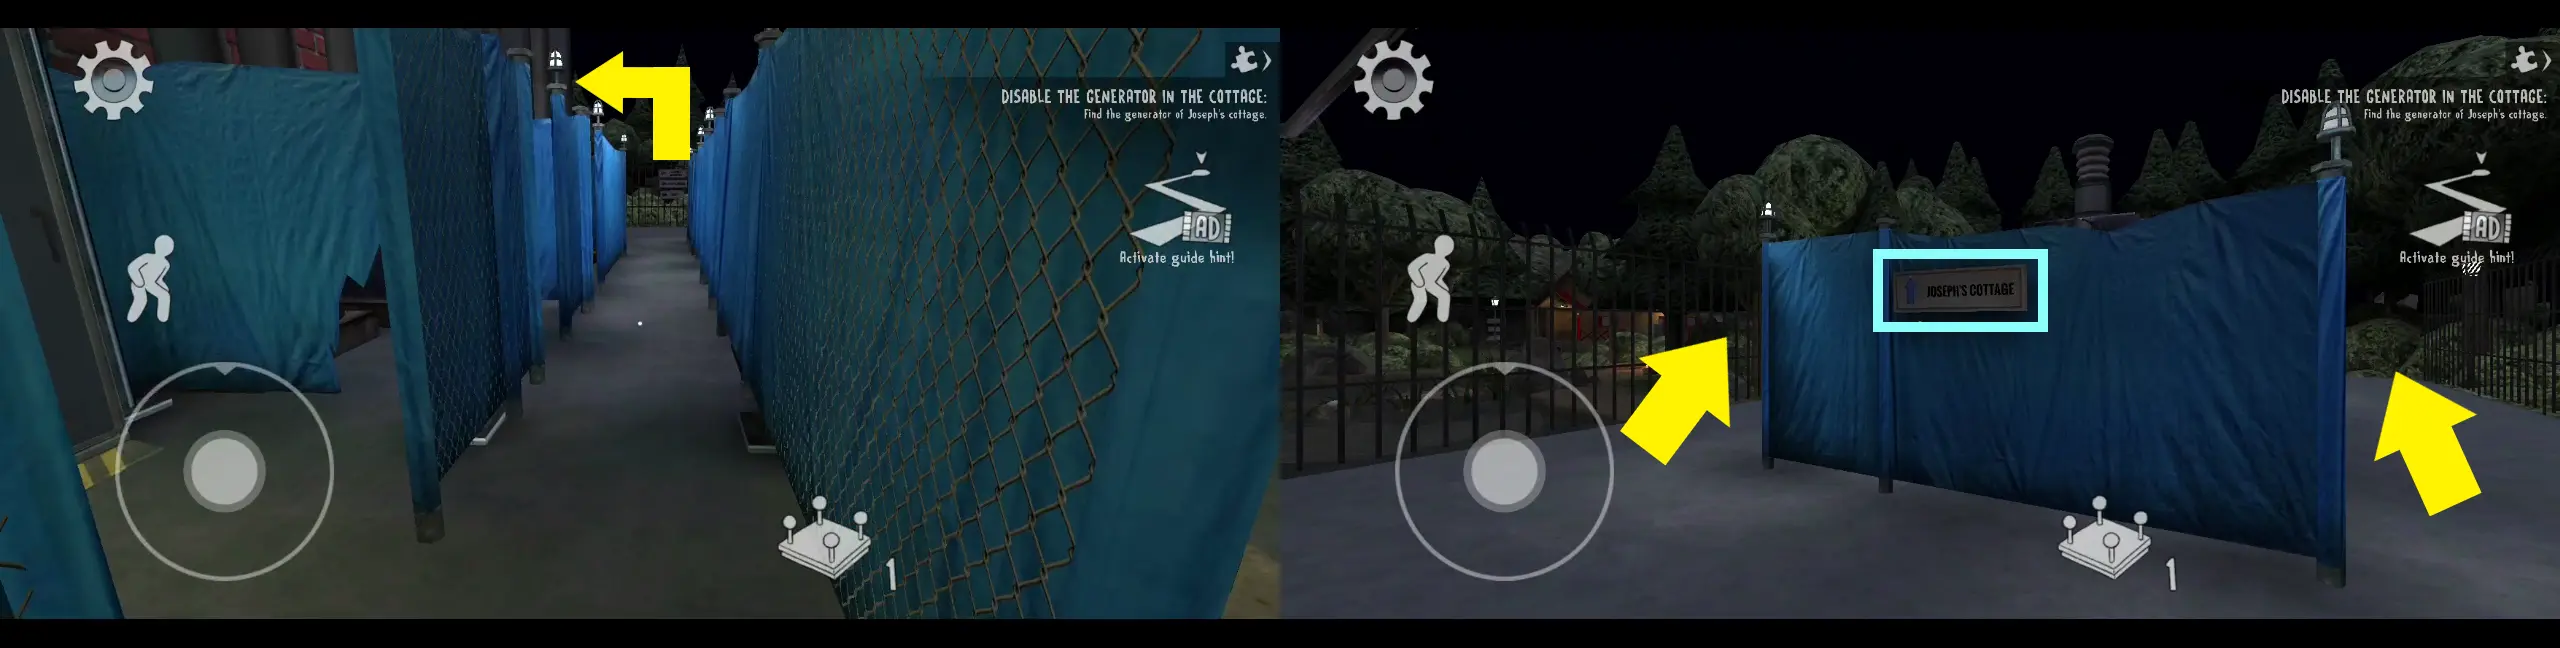
Go past this area, which should lead you to a forest. On the way, you’ll see some other buildings and a water closet, as well as a bonfire. Right next to the bonfire is the pond. Keep going until you see a house with yellow walls and a red roof. This is Joseph’s Cottage, which would also act as the new safehouse and the location of the final generator.

For this segment, your mission objectives would flash, stating that you need to get the key being guarded by the crocodile, as well as to destroy the tower in the forest, which feeds the generator.
Inside the cottage, talk to Lis. She will give you a crocodile egg and ask you to return it to its mother.
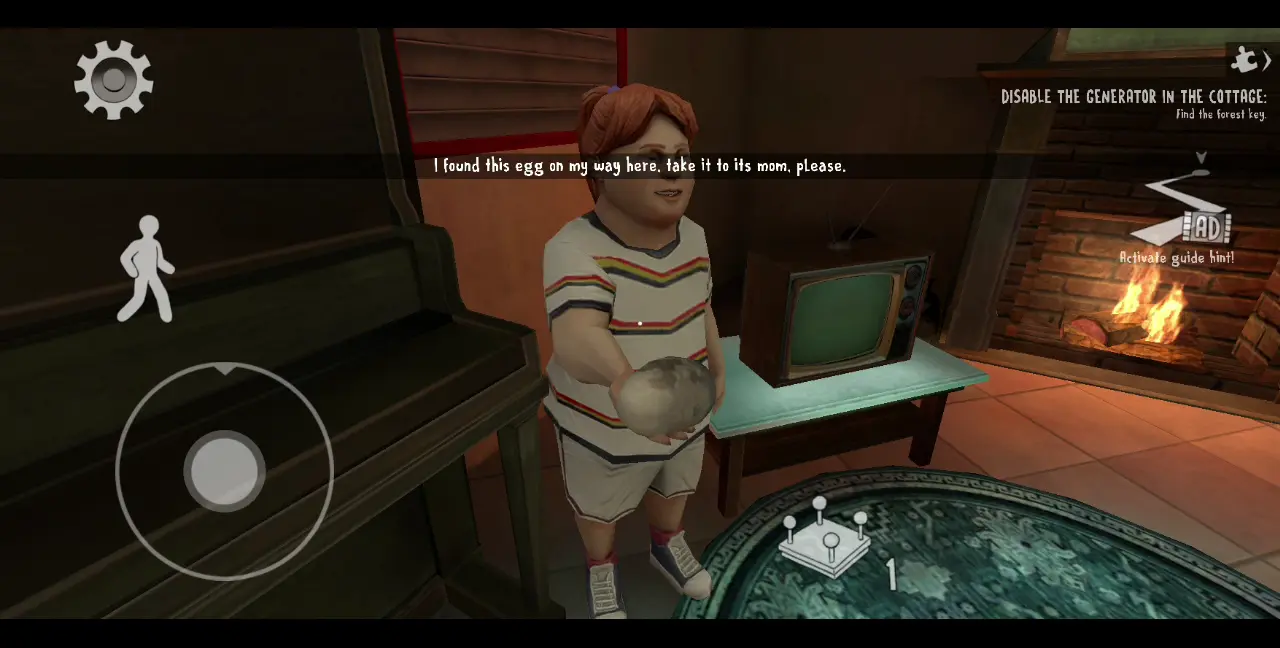
There will be two more crocodile eggs that you need to find. One is located inside any of the water closets in the area, while the other is on a tree stump in the forest area across the pond’s bridge.
You may approach this challenge in two ways:
- Go around the area to find the location of the two other crocodile eggs in advance. Keep in mind that you can only carry one egg at a time so you can choose to leave the first egg near the pond, then roam the area to find the second egg. Once you’ve found the second egg, leave it with the first egg and find the last egg. Once you’ve gathered all three eggs, you can proceed to return them one by one in the crocodile’s nest on the pond.
- Return the first egg to the crocodile nest before finding the two other eggs. Once you’ve found the second egg, return it to the nest, then find the last one and return it.
Keep in mind that Sister Madeline will be walking around this area and will chase you when she spots you. Additionally, returning eggs to the crocodile nest is also a challenge in and of itself as every time you approach the nest, the crocodile will detect you and go near you. If she catches you, she will kill you in one hit.
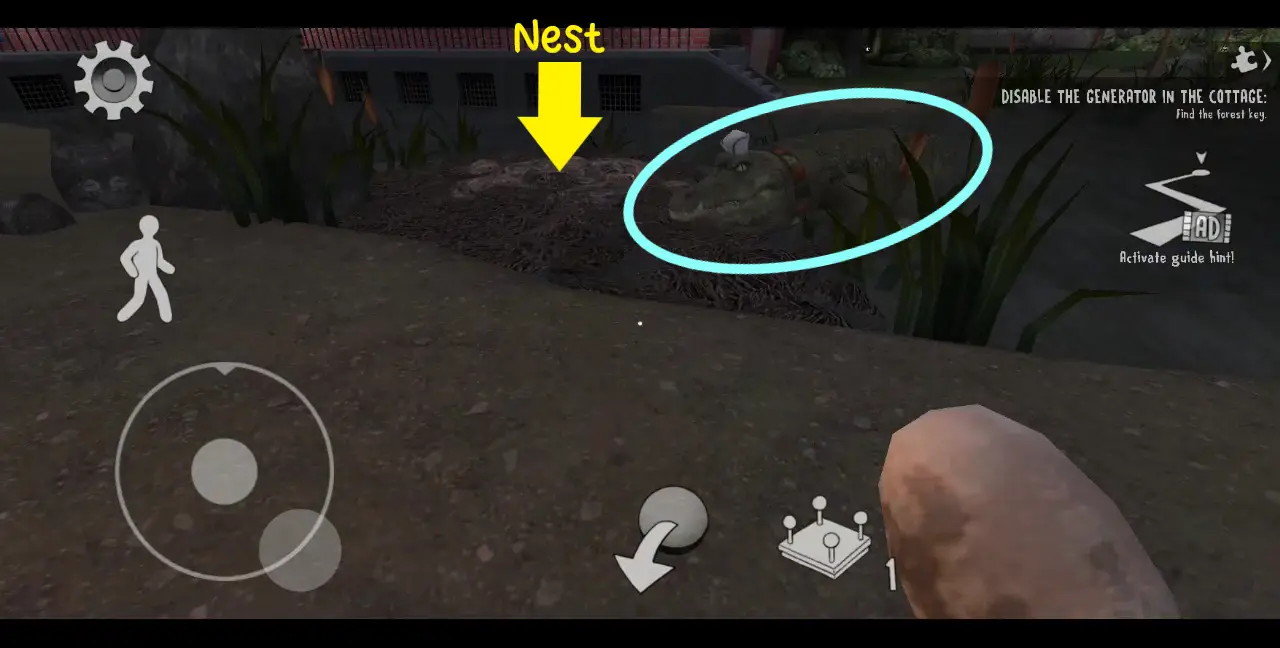
To get close to the nest, you need to hide behind the bushes until the crocodile swims away, or actively lure it from the nest by running to the bridge so it would follow you, then making a beeline for the nest to quickly return the egg before the crocodile comes back.
The bottom line is that you need to return all three eggs to the nest without the crocodile catching you. The good news is that she can only catch you when you’re near or at the nest, but she can’t travel beyond the borders of the pond. This challenge can take up a lot of time and patience, so focus and be alert, especially since you need to elude not just the crocodile but also the roaming Sister Madeline.
To make it easier for you, here are the locations of the water closets in the area:

And here are the locations of the tree stumps from which you may find a crocodile egg:

Again, the locations of the crocodile eggs may vary depending on your playthrough.
Once you’ve found and returned all the crocodile eggs to the nest, cross the pond bridge and you’ll see a piece of wood sticking out of the edge of the pond’s water. On it is a forest key fastened to a pine-scented car freshener.
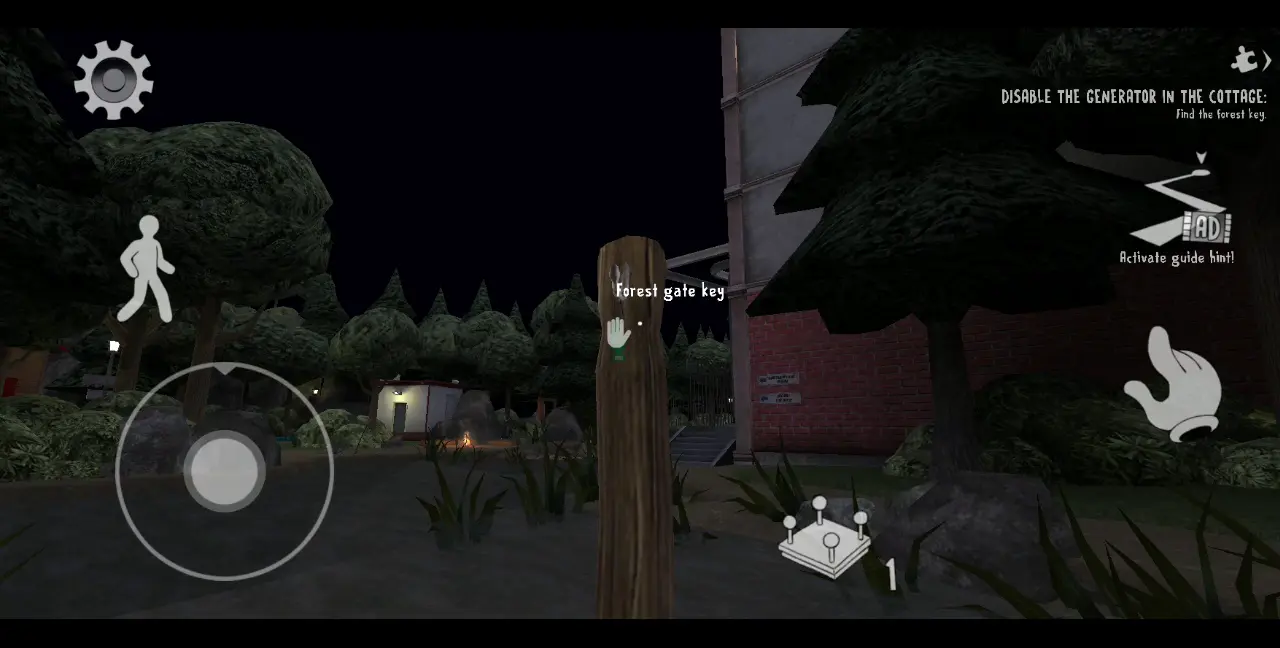
Take the key and make sure you’re not being followed by Sister Madeline. Don’t worry about the crocodile following you as she’ll be in the nest, protecting her eggs. It’s important to ensure that no enemy will come up behind you as it takes at least 10 to 15 seconds to collect the forest key.
Once you have the forest gate key, head to the small building near Joseph’s Cottage. It should have white walls and a red roof. Enter the building and place the forest gate key into the keyhole on the control panel.
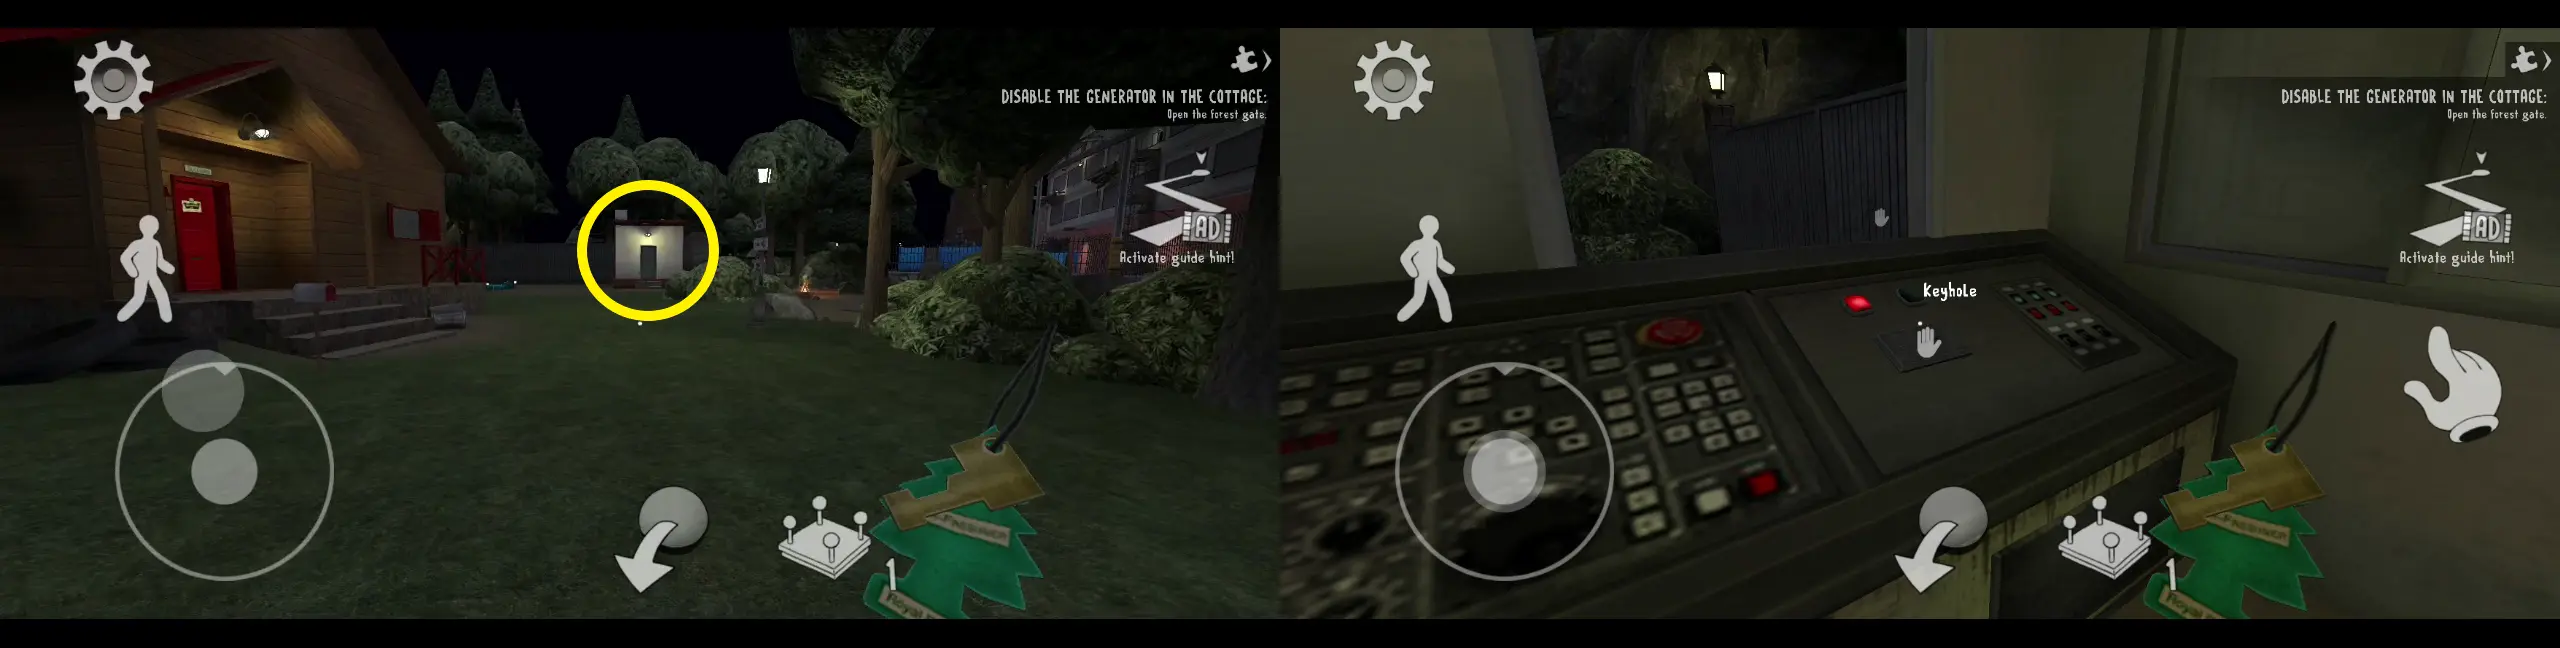
This will trigger the forest gate to open. If you return to the safehouse, you’ll notice that the rifle on the green display case is missing as someone has taken it.
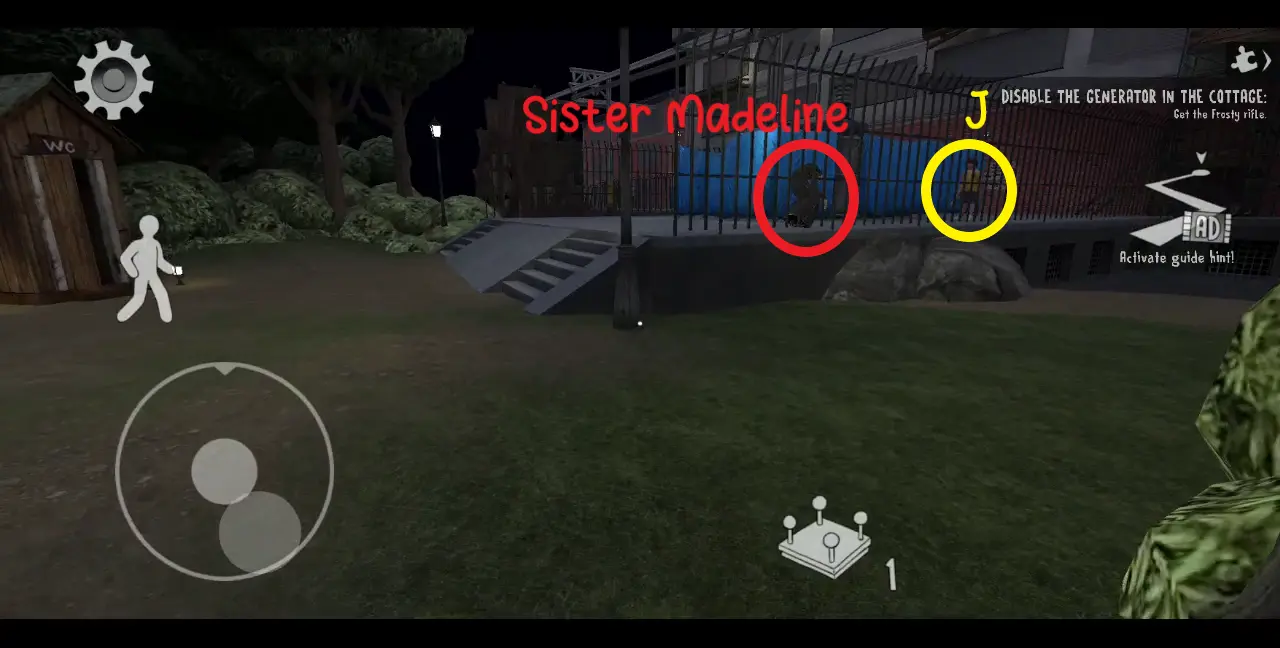
Since you’re going to need the rifle, head to the area with the blue canvas displaying the “Joseph’s Cottage” sign. There, you’ll find J with the rifle. If Sister Madeline comes close, he will shoot her, rendering her unconscious for 60 seconds.
Once Sister Madeline is knocked out, quickly take the rifle from J and he will return to the safehouse. Meanwhile, make a beeline for the garage, which contains Rod’s ice cream van inside. At the back of the garage is a vent, near one of the tree stumps we pointed out previously. Climb inside the vent and enter the garage.
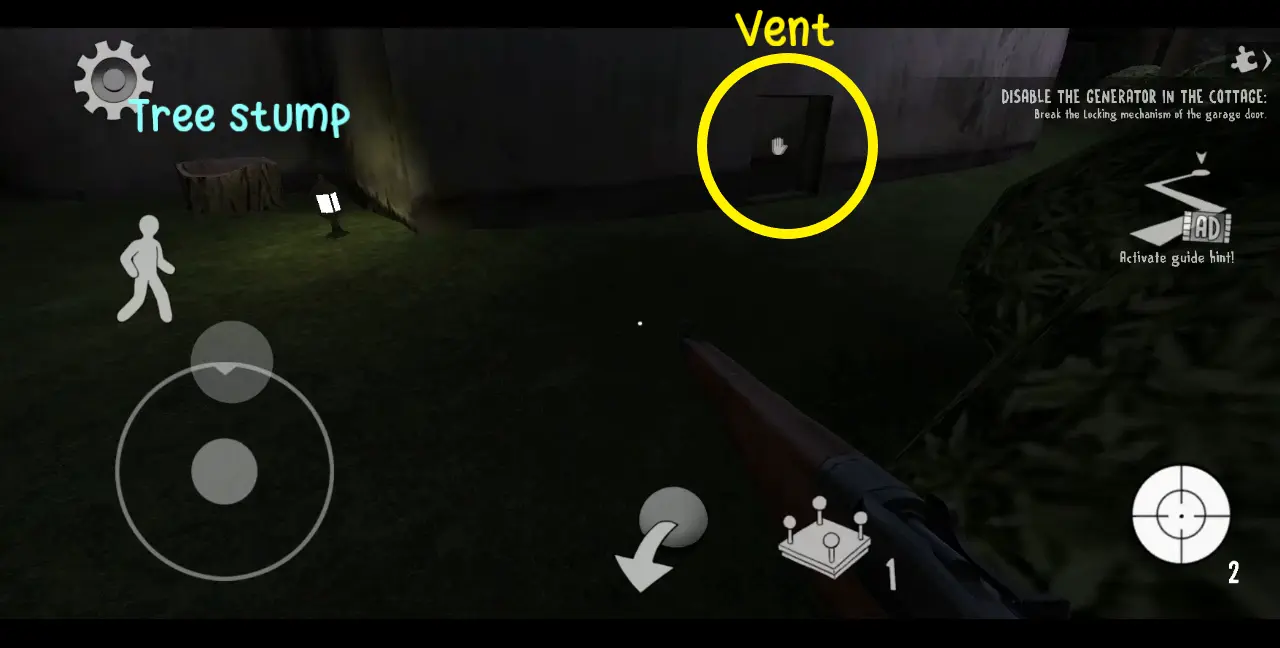
High on the wall is a garage door locking mechanism. But since you can’t reach it, use the rifle to shoot it. With the door now open, get inside the ice cream truck, which is marked as Rod’s van.
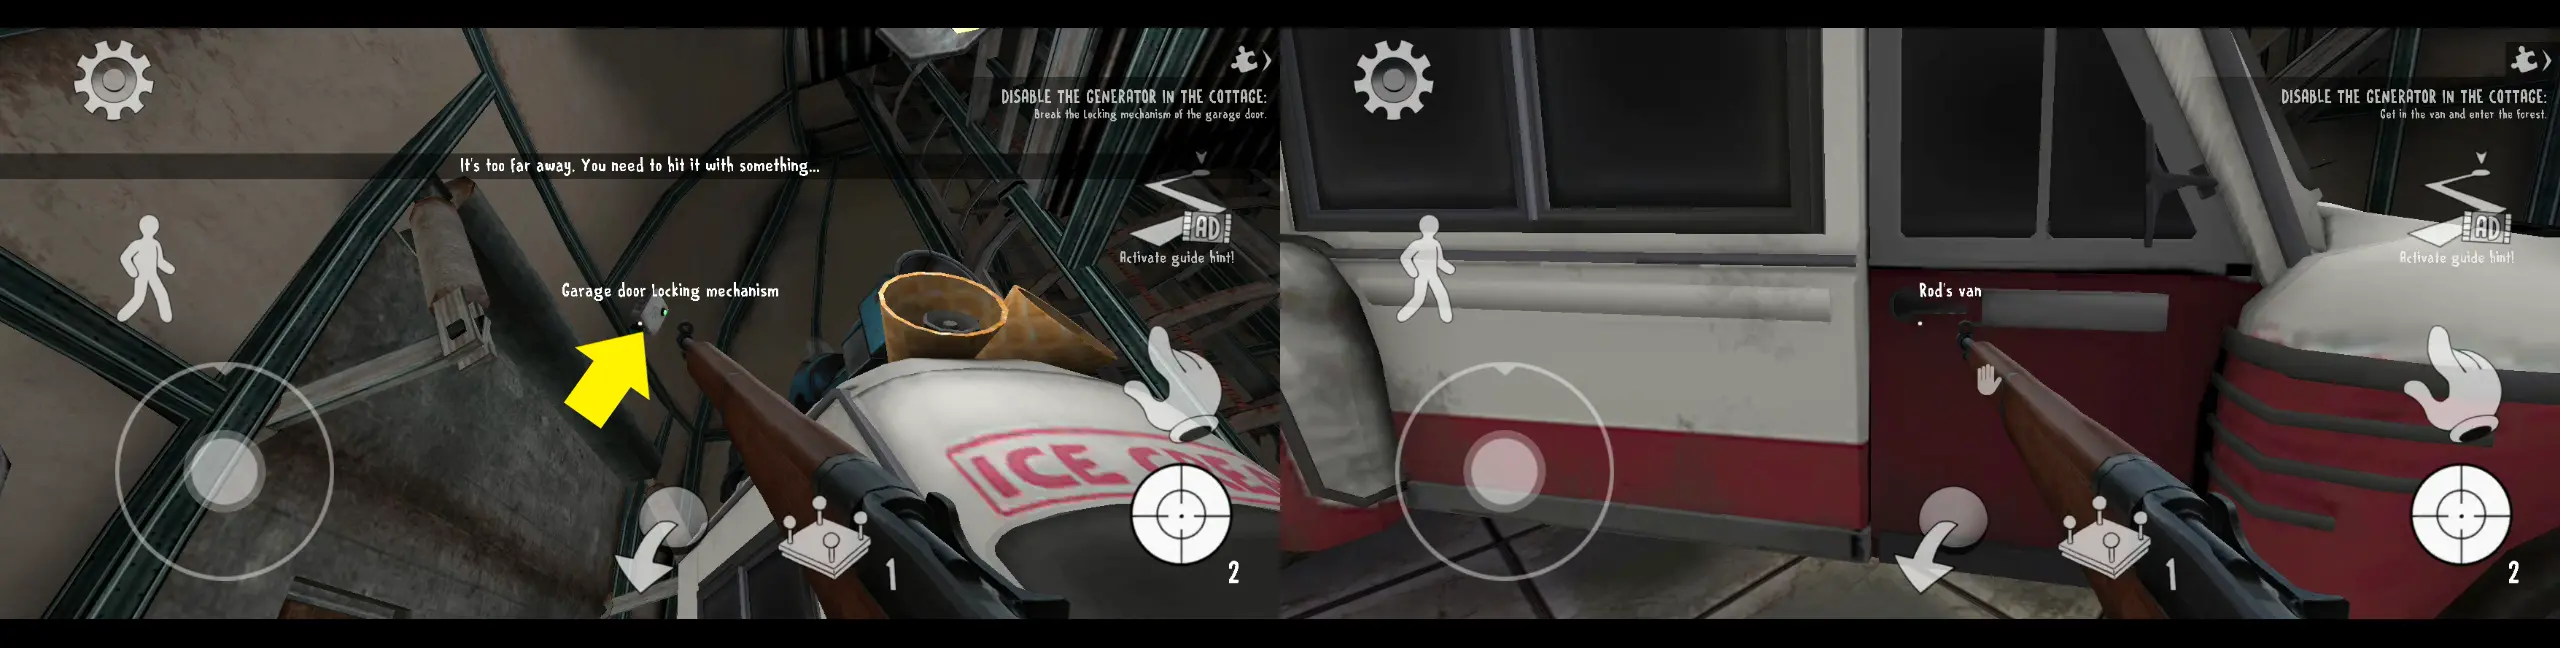
Once you’re inside, a cutscene will be triggered and you’ll be able to take control of Rod’s van for one final segment.
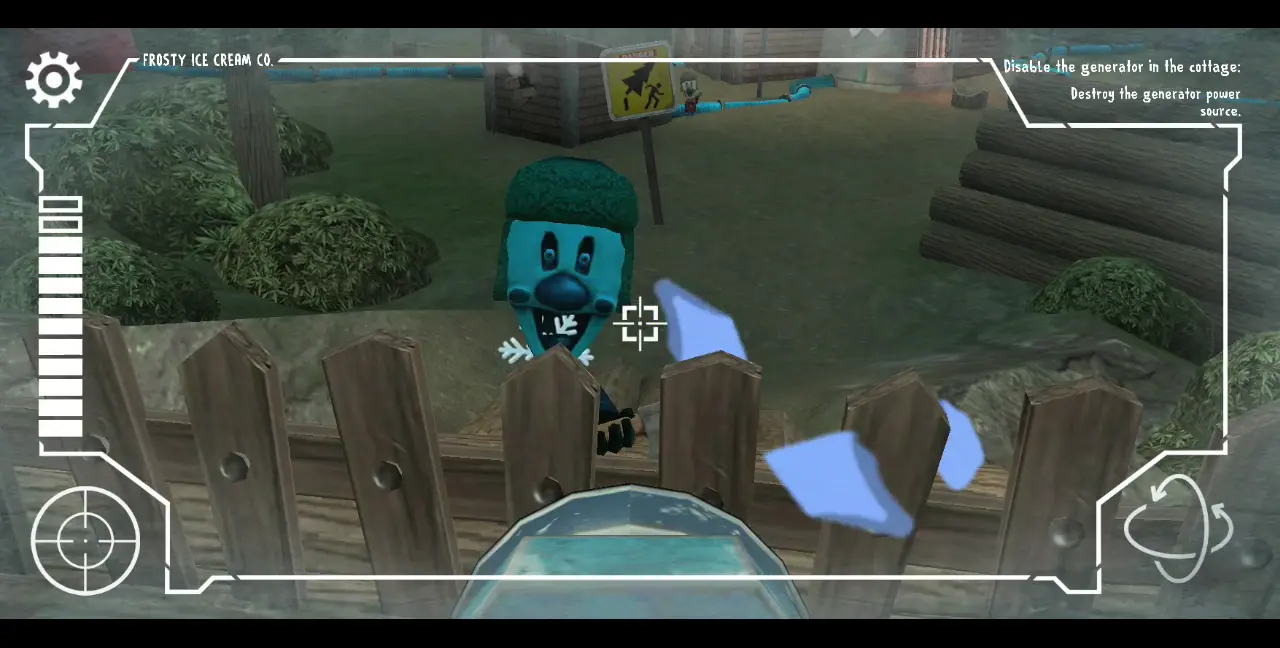
After the cutscene, your new objective will be flashed on screen, which is to destroy all the weak points of the tower while keeping enemies from damaging Rod’s van. Here, you will switch to playing as Charlie and are in control of the van’s ice cannon. Enemies you will face in this segment are the Lumberjack Mini Rods, who will try to attack the ice cannon. Keep shooting at them to fulfill your mission objective.
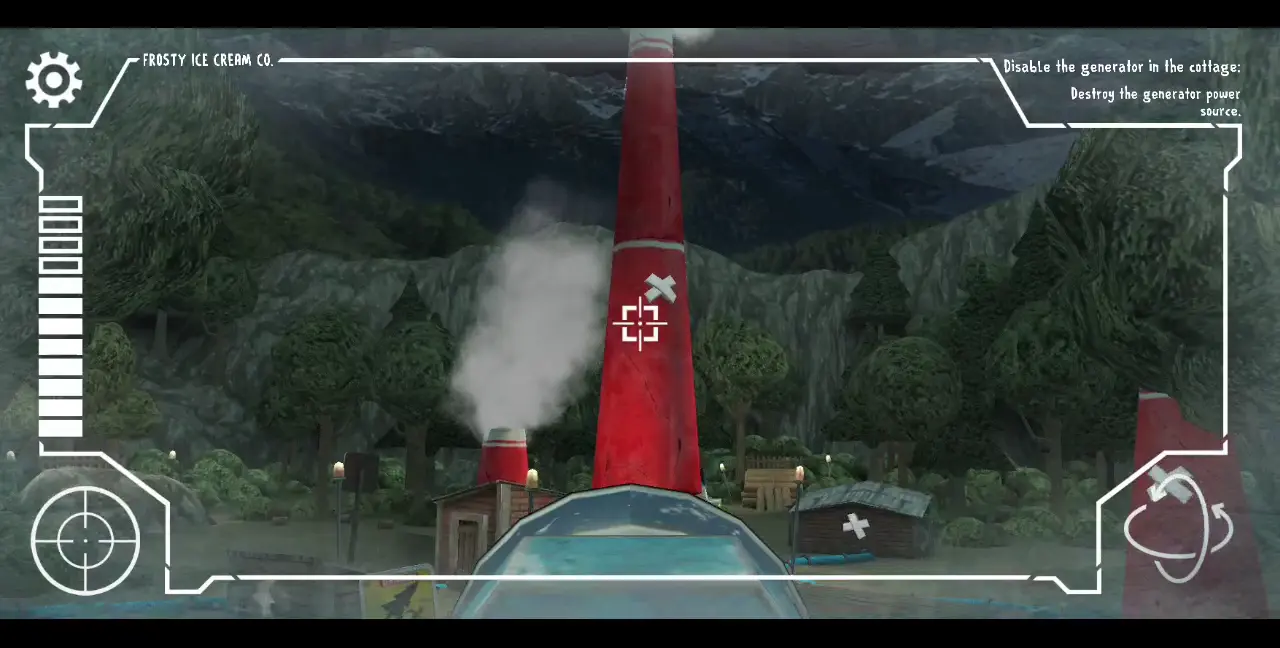
Keep in mind that the van drives slowly. Once the tower is within range, you’ll see that its weak points are marked by white Xs. Depending on the difficulty you’ve chosen, it may take more than one hit to completely destroy a weak point. Additionally, the game’s difficulty will also affect how many bullets the ice cannon will have per round. The higher the difficulty you’ve chosen, the less bullets you’ll get per round and the more hits it will take to completely destroy a weak point.
When you’re out of bullets, the ice cannon will recharge after a brief waiting period. Keep on the lookout for Lumberjack Mini Rods approaching you by the fence.

Once the points that are within range have been destroyed, the van will move again to another location, giving you another vantage point to destroy all the other weak points. This will happen a few more times, with the van stalling at convenient vantage points until all the weak points of the tower have been destroyed.
With the mission objectives complete and the generators rendered powerless, you’ll find yourself briefly back in the garage. You’ll be asked to select a new goal on the map, so click “Van Escape.” A cutscene will ensue, wherein the kids drive away from the ice cream factory.
But is this really the end of Rod?
It doesn’t look like it…
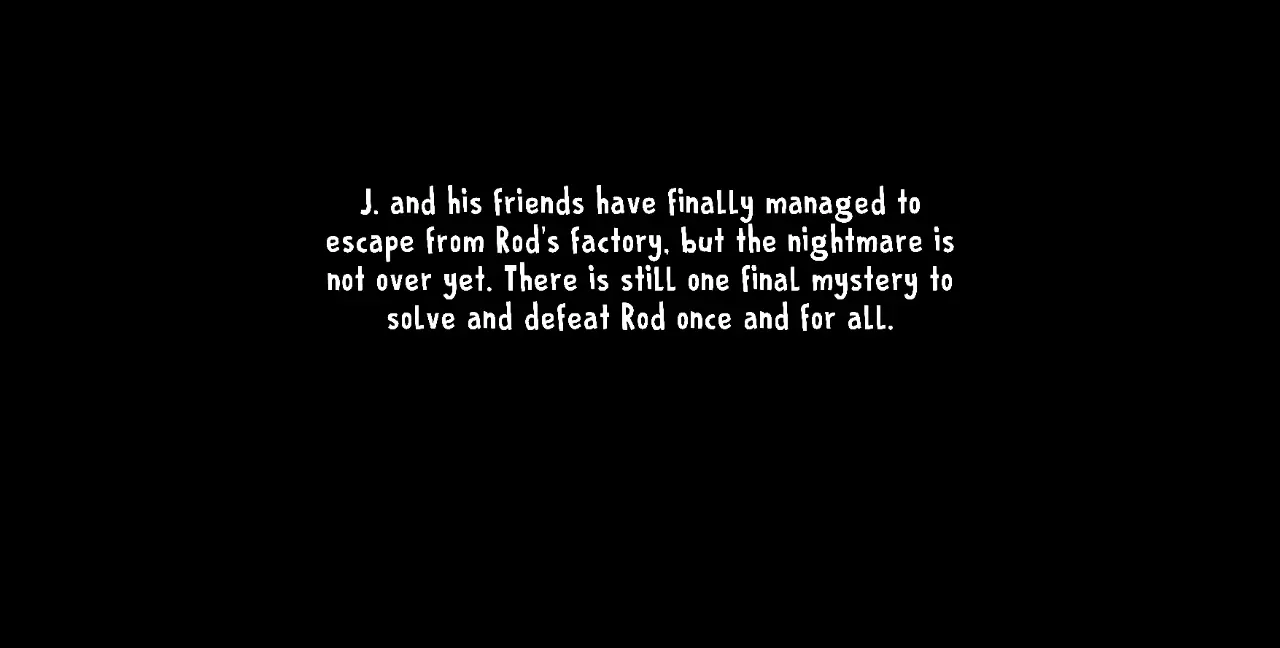
As of this writing, we have yet to access the final mystery, whether this is an upcoming update or a sequel to the game. Either way, it seems the story of Rod Sullivan isn’t quite finished yet and there’ll be more to come for this series in the future.
With that, we conclude our walkthrough for Ice Scream 8: Final Chapter. What was the hardest puzzle or challenge you’ve had to solve? How many tries did it take for you to complete a puzzle or an entire area? Which villain made you run for your life like there’s no tomorrow? Feel free to share your thoughts in our comment section below!