I’ll be honest: I don’t know much about coffee. Terms like “cold brew”, “light roast”, “brewing methods” or “medium roast” fly over my head; I just dump instant coffee in hot water. But if you’re one of those who are a little more passionate about hot bean water, Good Coffee, Great Coffee will let you play out your barista fantasies.
Good Coffee, Great Coffee is developer Tapblaze’s successor to Good Pizza, Great Pizza. As with that game, you’ll be in charge of making artisanal coffee, which means pressing a lot of buttons, completing a lot of minigames, and inevitably messing up the order. There’s also an overarching story in the game, but really, it’s secondary to the brewing part. Good Coffee, Great Coffee is available on both the Google Play Store and the App Store.
While Good Coffee, Great Coffee can be relaxing and incredibly rewarding once you get into the groove, it’s also quite difficult. We’re not (yet) at the level where you can select from coffee beans, like Arabica or Robusta beans, or select a roasting process, but what content the game has is complex enough to keep you busy and will require a ton of practice and getting used to. Hopefully, this beginner’s guide will help you get over the game’s admittedly frustrating initial learning curve,
In this beginner’s guide for Good Coffee, Great Coffee, we’ll be going over the following topics:
- Workstation Basics – getting used to your brewing setup and things you need to know to make the learning curve as painless as possible.
- Customer Basics – from happiness and patience to sorting out obscure orders, learning how to handle customers is an essential skill in Good Coffee, Great Coffee.
- Brewing Techniques – some tips and tricks for making individual drinks.
- Meta Progression – once you’re used to juggling brewing and customer service, let’s talk about how to get ahead in the game.
Lastly, if you’re just looking for a quick read, feel free to jump to the “Quick Tips” subsections.
Foreword

Before we get started with this beginner’s guide, here are two very important things you need to do before opening up Good Coffee, Great Coffee:
- First, play this game on a phone or tablet. The smaller the screen, the less space you’ll have to navigate during brewing – meaning you’ll save time, and saved time means saved money.
- Second, you can optionally install an adblocker. While Good Coffee, Great Coffee does allow you to watch ads for more cash and gems (premium currency), the sheer amount of ads it throws at you – one at the end of each day, so that’s around one per four minutes – gets really old really fast. If you like the game and want to support the developers, you can buy cosmetic packs instead.
Workstation Basics
As with all jobs, one of the first things you need to do is to get familiar with your workstation. We won’t touch on brewing yet – you can let the game do that for now. Instead, let’s go through the work process and the things you need to know to create a smooth and efficient workflow.
Quick Tips
- Familiarize yourself with each section of your workstation.
- Leftmost are the espresso machine, small glasses, and cups.
- Don’t forget to reload the machine if you run out of coffee.
- A bit to the right is milk, ice, and the steam wand.
- Milk must be processed in a jug.
- To put ice, tap the scoop, then tap the container. One scoop = 2 pieces of ice.
- Further to the right are large glasses, hot water, and cold water containers.
- Rightmost are toppings and syrup.
- Leftmost are the espresso machine, small glasses, and cups.
- The drink container you use matters.
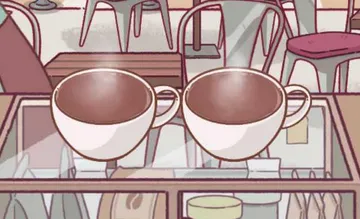
- Small glasses can only hold espresso. These can be combined with a cup or large glass.
- The cup is for hot drinks.
- The large glass is for iced or complex drinks.
- You cannot switch from a cup to a large glass, and vice versa.
- If unsure, you can brew the espresso in a small glass. You can always transfer espresso in a small glass to a bigger container.
- You can tap on the tablet on your counter to review recipes.
- You can also tap on the phone on the lower left of the screen to review recipes while at the brewing station.
- Recipes will also tell you what container type to use.
- Proportions matter, order does not. It’s a good idea to add ingredients with small parts first before mixing a big one; for example, if a drink needs 2 parts espresso, 2 parts ice, and 5 parts cold water, add the espresso and ice first.
- A small glass of espresso is two parts, each scoop of ice is 1 part. Completed drinks are 9 parts.
- Any excess parts added to a drink will not count. You can’t make a drink overflow.
- Machines break down with use. Broken machines perform worse and can lead to refunds.
- Machines can only be repaired at the end of an in-game day. Try to perform maintenance every 2-3 days.
- The higher a machine’s level, the less expensive it becomes to repair it.
Basic Layout
Welcome to your first day, brewist! Let’s start by going over the layout of your brewing station.
First up is your espresso station, in red:
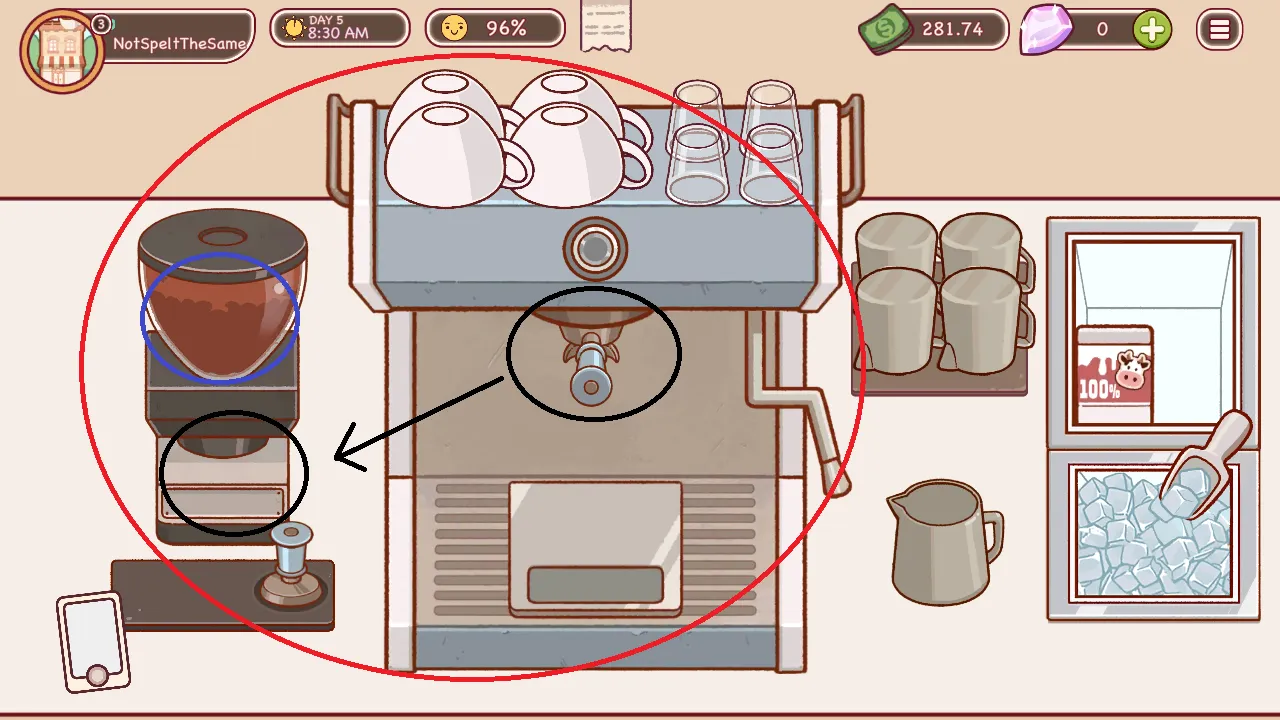
There are two machines here: your coffee grinder and your espresso machine.
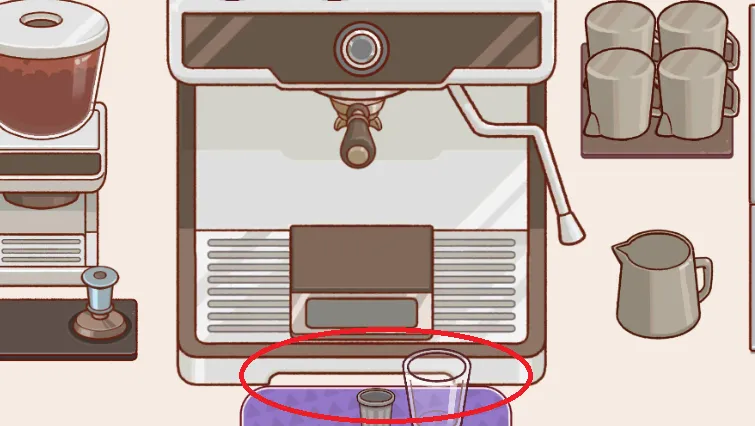
To start a drink, drag the portafilter (right device, in black) to the grinder (left device, in black). Tap on the hold button to grind the coffee beans, and release once you have enough. Stamp the filled filter then drag it back to the espresso machine.
No fancy brewing methods here: all you need to do is press the button, which will start a minigame. Tap on the button again when the red arrow is in the green zone, and presto – espresso. Yes, it really is that simple. No roasting, no cold brew, no nothing. Just tap a button.
Note that you can see how many coffee beans you have left in your coffee grinder – it’s the encircled blue part in the image above. If you’re out of coffee beans, there will be an exclamation mark on it. Tap on the exclamation mark to refill the coffee grinder automatically.
Above the espresso station are cups and small glasses. To brew coffee, there must be either one of those two containers below the brewer. We’ll talk about those in more depth in a bit.
Head to the right a bit.
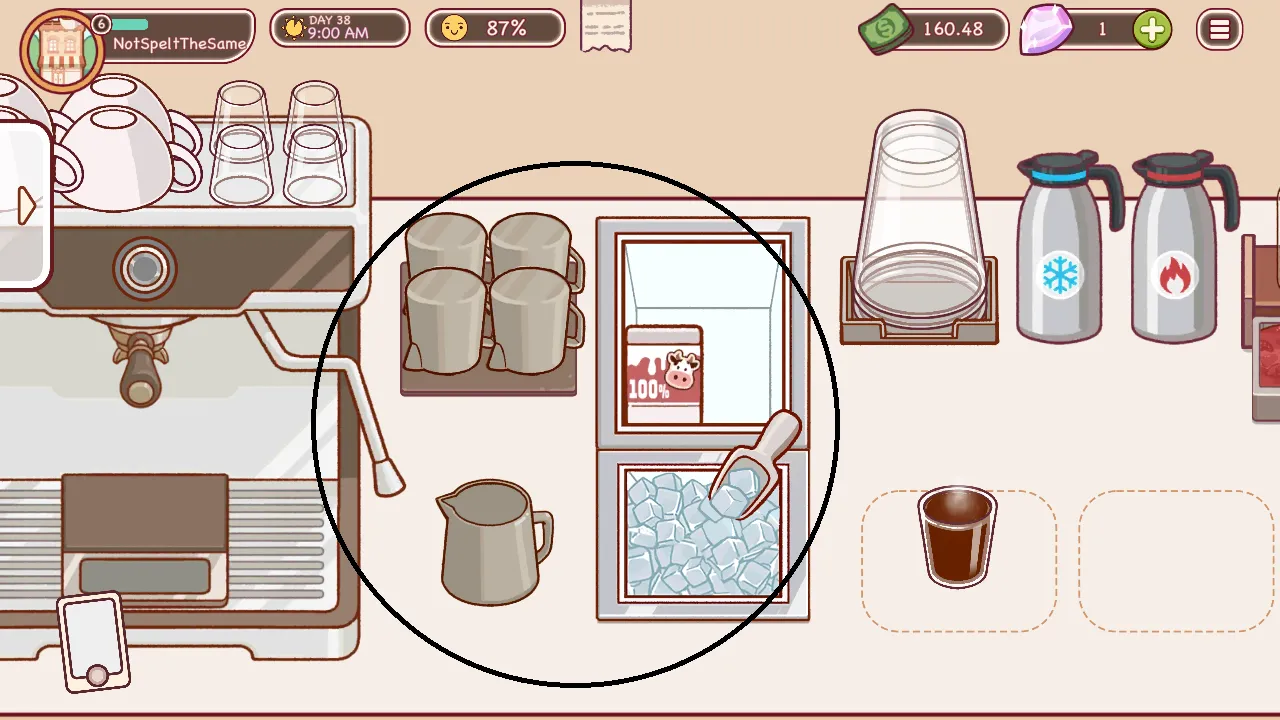
This middle-left section is where milk, ice, and the steam wand are kept. To process milk, tap the milk carton, then hold on the jug near the wand. To steam milk for hot lattes, grab the jug (the hitbox is a little weird, but I find it responds best by the handle) then drag it to the steam wand. Keep the wand’s tip at surface level until steaming is done, then submerge the whole thing until the temperature is right. We’ll talk more about this in the “Brewing Techniques – Latte Tips” section.
Ice is easy to use – tap on it, then tap on the container you want to put ice in. One tap is one scoop; one scoop is two pieces of ice. You can only put ice in a large glass; more on container types later.
A little bit more to the right, you’ll find your large glasses and water.
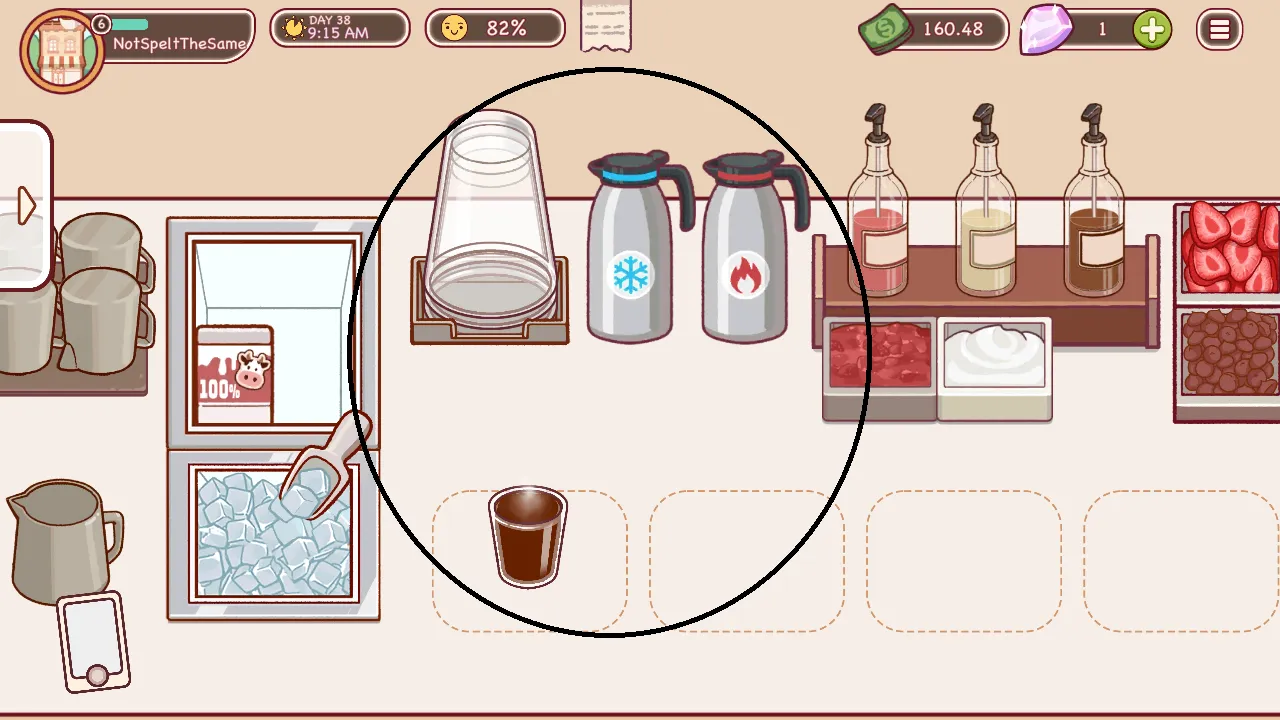
We’ll talk about the difference between containers in a bit, but keep in mind that only large glasses can hold ice and cold drinks. You can’t brew espresso into a large glass, either!
The two metal containers beside the large glasses are filled with cold and hot water, respectively. Tap on them, then tap hold on a container to pour some of the liquid out.
Now for the last part:
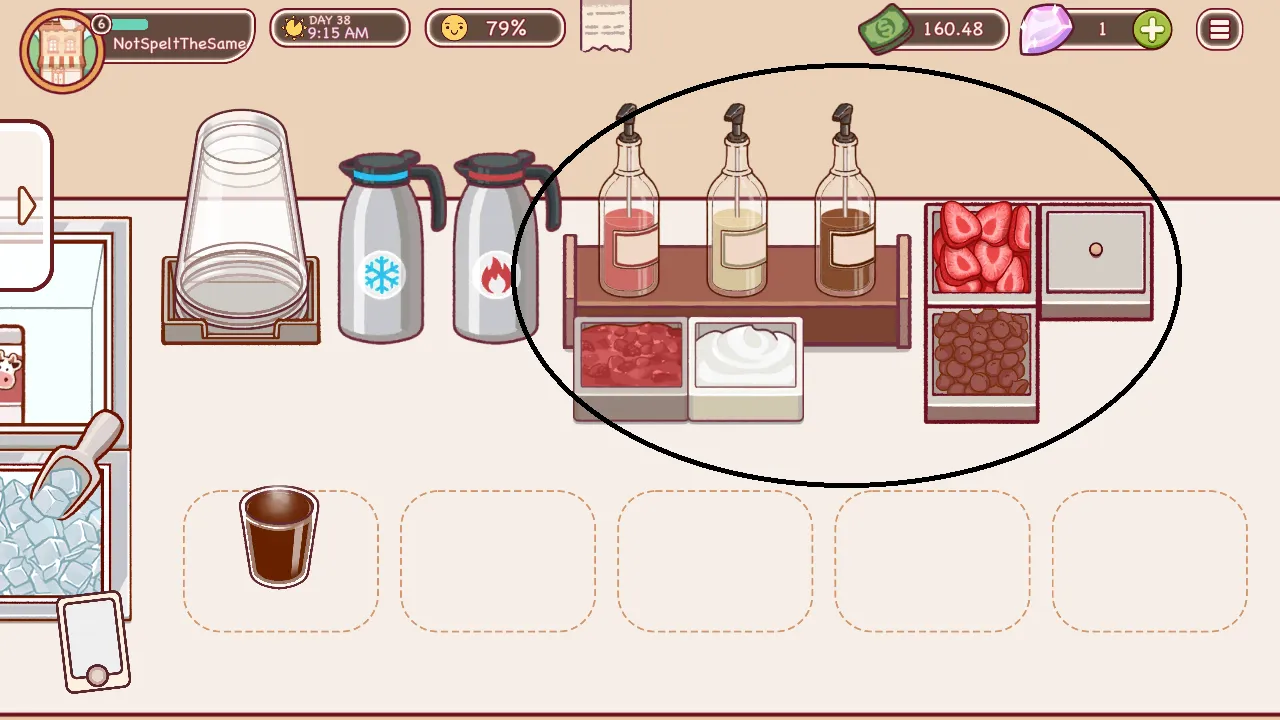
The rightmost part of your workstation is for syrups and toppings, which you’ll unlock as you progress.
- On the top row, left to right: strawberry syrup, vanilla syrup, chocolate syrup, strawberry slices.
- On the bottom row, left to right: strawberry puree, whipped cream, chocolate chips.
To apply syrup or topping to a drink, simply tap on the extra in question, then tap on the drink. Note that syrups always require four pumps.
Choosing A Container
Now, let’s talk about the type of drink containers you have at your disposal. Before you begin brewing, you should keep in mind the type of glass you need. There are three drink containers in Good Coffee, Great Coffee – small glass, cup, and large glass. Each of these can only hold specific types of drinks:
- Small glasses are found above your espresso machine. These can hold espressos and can be served as-is. They can also be used to pour an espresso into a larger container.
- Cups can be found beside small glasses. These are for hot drinks that are more complex than espressos. Most hot drinks are served in cups.
- Large glasses are found to the far right of your workstation, alongside water. These are usually for iced beverages or more complex ones that won’t fit in a cup.
Different recipes will require different containers, but by keeping temperature distinctions in mind, you can ease the learning curve a bit.
Next, keep in mind that you cannot transfer liquids between large containers. It’s very important to know what container to use from the get-go: a regular latte requires a cup, while an iced latte requires a large glass. In general, if it uses hot water or a hot brew, it’s a cup; if it’s an iced coffee or drink, it’s a glass. If you’re unsure of what the final container a drink should go in, you can always start the espresso brew in a small glass.
Reviewing Recipes
The game will hold your hand the first few times you make a drink. Later on, however, you’ll be expected to have memorized the combinations required for each drink. Unless you’ve got an absolutely ironclad memory, you’re going to need reminders from time to time.
Thankfully, you can review recipes at any time while in your store. Simply tap on your tablet here…
…to bring up a list of drinks you’ve made, as well as a short blurb on how to make them.
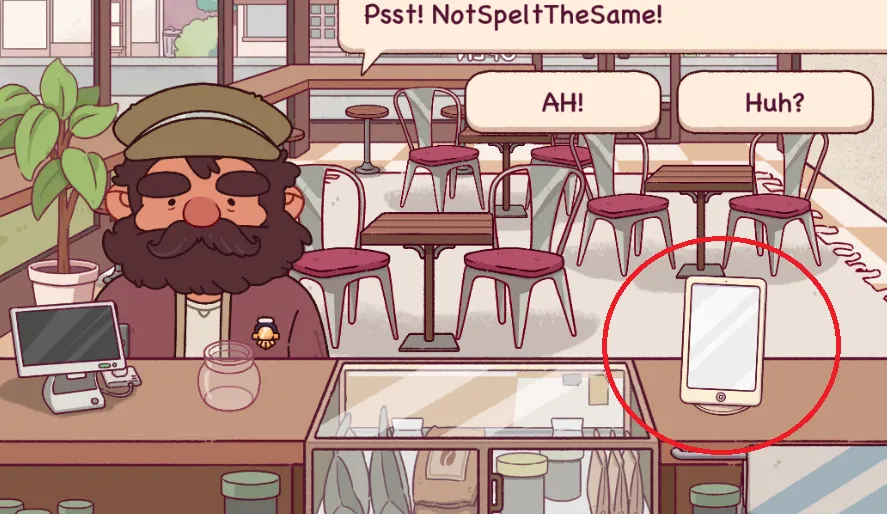
If you’re already in the brewing station, don’t fret. You can access the recipe menu by tapping on your phone here:

This is especially handy when you’ve forgotten how to make a drink, especially since you can review a recipe before taking an order – meaning customer happiness won’t decrease. However, try to at least keep basic drinks memorized to make your shop more efficient!
Recipes won’t just tell you what ingredients go into a drink, but also how many parts of each ingredient you need, as well as the container you need. However, you don’t have to follow recipes to the exact letter, as you’ll see in the next section.
Proportions Matter, Order Does Not
“Proportions matter, order does not” may as well be the mantra of Good Coffee, Great Coffee. In real life, order absolutely would matter – but then again, brewing in real life is probably much easier than in the game!
There are many different methods for brewing the perfect drink, but I find that the best way to avoid messing up proportions is to start with ingredients that require the least parts. Let’s take the iced americano, for example:
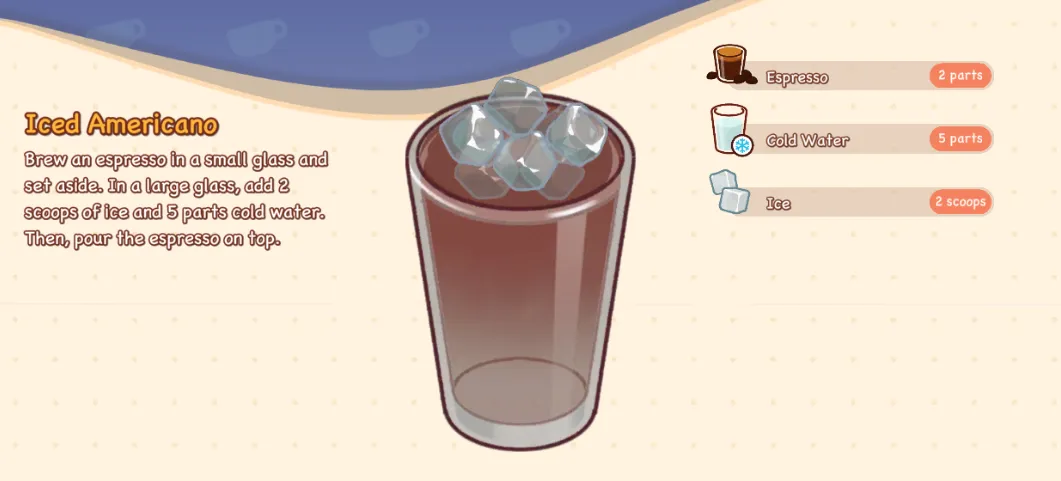
An iced americano is 2 parts espresso, 2 parts ice, and 5 parts cold water. This means that it’s better to add the smaller parts first (espresso, ice) as if you start with cold water, you run the risk of overshooting the required amount and ruining the drink. Thus, you should prepare the espresso and add the ice to the glass, then pour the cold water. This ensures that you’re following the 2-2-5 ratio correctly.
Even if your drinks don’t look like the ones in the recipe book, as long as the proportions are correct, the game will count it as a “good” drink.

For reference, a small glass of espresso is always 2 parts, each scoop of ice is 1 part, and a completed drink is 9 parts. You also cannot cause overflow – if you add 7 parts of milk to a glass with 4 parts, only 5 parts will be transferred in.
Machine Repairs
Last but not least are machine repairs. As with all things, your equipment in Good Coffee, Great Coffee breaks down. If you find customers loudly (and rudely) complaining about what you serve them, check your equipment for any damage. This can only be done in the day end menu – broken machines will have a red wrench icon above them.
Annoyingly, there’s no indication in the game that your machines are broken other than customers complaining (which they do a lot anyway, so this isn’t a good indicator). It’s good practice to check on your machines every two to three days to ensure that they’re running at maximum efficiency.
Customer Basics
“Manage your café, make coffee creations, and keep your customers happy.” Sounds simple, but in practice, it’s not. Thanks to how obscure or infuriating customers are, learning to manage your clients is in itself an essential skill in Good Coffee, Great Coffee. It’s starting to sound a lot like retail, huh?
Quick Tips
- Your coffee shop operates from 8:00am to 8:00pm.
- Time will pass even when you’re brewing.
- If you’ve accepted an order and it hits 8:00pm, the customer will remain until the order is complete.
- Customer happiness ticks down as they wait.
- The higher happiness is when a customer is served, the bigger your tip. The first big happiness drop is when patience hits 50%.
- More complex or bigger orders tick down slower.
- Do not ever sacrifice precision for speed. It’s better to get a low tip than a refund, since a refund is a 100% loss.
- If you need to pause, you can open the settings menu in the upper right or bring up the recipes menu.
- By asking a customer “what?”, they’ll give you a more precise version of what they’re asking for. This is very useful for clarifying obscure orders.
- Some customers will ask for deviations of recipes, such as iced lattes with no ice. Be sure to ask them “what?” if you’re not sure, and unless you’ve already taken that order, don’t assume that they’re talking about a particular drink.
- Drinks made differently tend to be more generous with their proportions. For example, iced lattes are fine with substituting the ice parts with more milk.
- Asking “what?” will start the customer timer.
- Tapping on the order ticket while you’re brewing will show you the customer’s order, if you forget it. Always double-check that you’re making the correct drink!
- Don’t be afraid to chuck a drink if something goes wrong with its creation. You can throw drinks by dragging them to the bottom of the screen.
Open Hours
Your café is only open for 12 hours per day, from 8:00am to 8:00pm. You can see the time of day at the top of the screen.
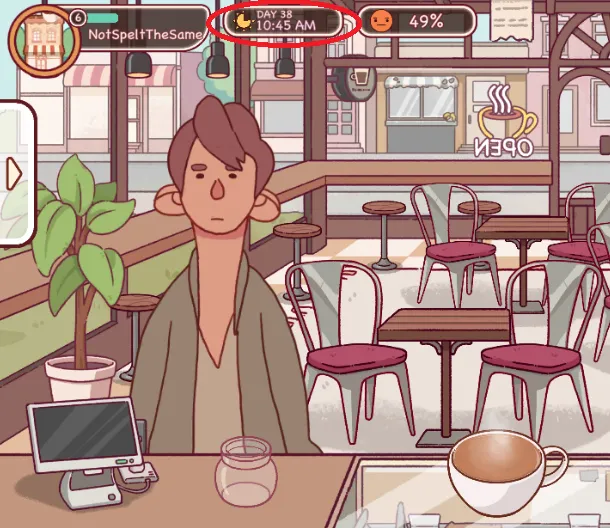
This means that, ideally, you should provide quick service to fit in as many customers as you can in those 12 hours.
Do note that while the shop closes at 8:00pm, you can still complete any ongoing order at that time.
The Clock is Ticking
As with any real refreshment place, customers will get upset as they wait. You can view a customer’s happiness here:

Customer happiness affects how much of a tip you’ll get if an order is successfully completed. These tips will drop largely once you get below 50% patience, reflected by how the happy yellow face becomes a more impatient orange one. Thankfully, bigger or more complex orders scale down more slowly than single orders.
While speed is important, precision is paramount. Do not ever sacrifice precision for speed, as serving a bad order will hit you with a refund, which is a 100% loss. Instead, just keep practicing making drinks, and speed will come to you in time. Precision ensures that each cup is delicious and meets customer expectations.
Note that the only way to pause the game once an order starts is to open any new tab. This includes the settings (three bars in the upper right) or the recipe menu (tap on the tablet or your phone).
Clarifying Orders
Asking your customers “what?” isn’t being rude. When you press this button, they’ll clarify their order – which is great if you’ve forgotten how to make the drink they’re asking for, or if they ask for something obscure.
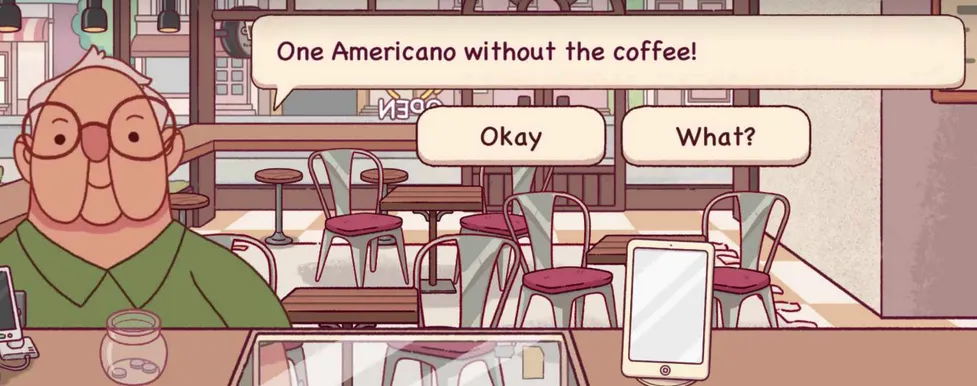
Apart from obscure orders like “I want a cup of coffee but without coffee” or just “MOO”, some customers will want deviations of usual orders, such as iced americanos or iced lattes without ice. These recipes aren’t too complex – just make them as usual and omit the part the customer requests. Proportion-wise, these are also more forgiving; iced lattes without ice, for example, are fine with using milk to replace the 2 parts of ice. Unless you’re already familiar with that specific order, don’t assume to know what it is. Make sure you ask “what” if you see an unfamiliar order.
Lastly, keep in mind that asking “what?” will start the customer timer. Be sure you’re ready before you reply!
Order Tickets
Sometimes you get so caught up in the creation process that you forget what the customer’s order was to begin with. Don’t worry, all isn’t lost. If that happens, you can tap on the ticket at the top of the screen:
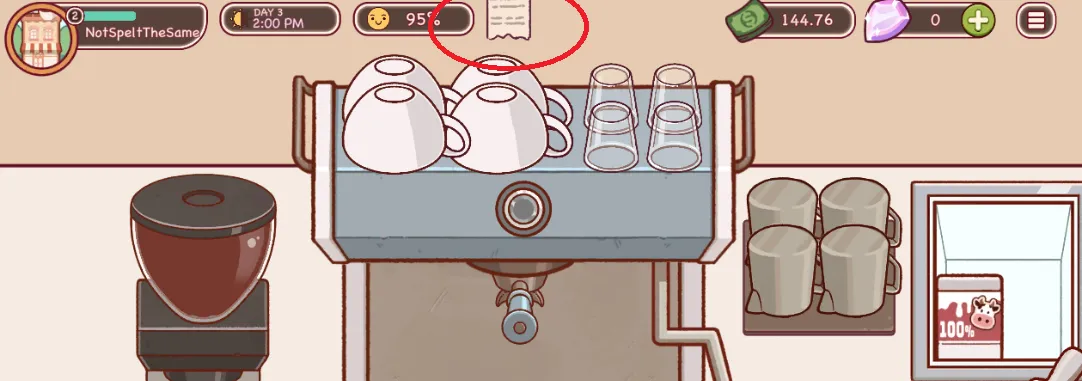
This will give you a transcript of your dialogue with the customer, including their order. The “what?” button is once again your friend here, as asking that will make the ticket more precise. Reviewing order tickets ensures that each coffee is brewed to the customer’s specifications.
Throwing Drinks
All of us make mistakes, veteran brewists included. And when you do make a mistake, don’t be afraid to throw it away and start again.
To throw drinks, drag them to the bottom of the screen, then release them.
Oftentimes, it’s better to just start a drink again if you make a mistake; even a small miscalculation in proportions leads to a big hit in satisfaction. Remember – a delayed drink will get you a lower tip, but a bad drink will result in a refund!
Brewing Techniques
While learning how to brew great coffee can be boiled down to practice, there are a lot of tricks you can use to make your brewing methods more efficient.
Quick Tips
- Play with audio on, as there’s a lot of sound cues.
- Espresso:
- Release the hold button at the 6th animation frame of the container filling up.
- Be sure to tap down hard to secure the coffee.
- If you’re unsure, brew in a small glass. You can always transfer.
- Americano:
- This is a hot drink, so use a cup.
- Proportions matter, so brew and dunk the espresso first. Do not add the water first; it’s easy to overshoot.
- Iced Americano:
- Iced, so use a large glass.
- Iced drinks are always two scoops of ice. No more, no less.
- It’s a good idea to scoop the ice first so you don’t mess up the proportions.
- Don’t forget to use cold water!
- Latte:
- You can prepare the espresso straight in a cup.
- If you’re handy, you can fill the milk jug as the espresso brews.
- To make steamed milk: drag jug into the steam wand until the top icon becomes steam. Once it’s at the yellow zone, drag it up further until it becomes a stirring icon.
- Try to end on the yellow zone in both the horizontal and vertical bars.
- Latte art doesn’t matter if you’re done with Max’s part of the story. You can skip it with no penalty.
- You can use mirroring tools to make better latte art.
- Time freezes during this step.
- Iced Latte
- Prepare the espresso in a small glass – this is an iced drink.
- Do not steam the milk at all.
- I assemble iced lattes like this: glass -> 2 scoops ice -> espresso -> full jug of milk.
- Do the milk last so your proportions don’t get thrown off.
- Toppings
- Toppings are always the last step.
- You can’t remove toppings, so it’s good practice to double-check the order rather than mess up the toppings and have to redo the whole drink.
- Syrupy Drinks
- Except for one endgame drink that requires two different syrups, all syrupy drinks require four pumps of their respective syrup.
- Syrups are a small-part ingredient, so add them alongside other small parts.
- Miscellaneous drinks:
- “Hot water”: pour straight from the container into a cup.
- “Cold water”: pour straight from the container into a glass.
- “Iced water”: two scoops ice in a glass, then fill with cold water container
- “Milk”/”Cold Milk”: fill a glass/cup (check what container they ask for) with the milk carton.
Play with Audio On
Before we begin, turn up the volume on your device. This isn’t just for the smooth ambience, no. There are a lot of very useful audio cues in Good Coffee, Great Coffee that will help you keep track of what’s going on. From the clinking of ice in a large glass for every scoop you put into the thump of the syrup dispensers, these sounds will help you remember what steps you’ve already performed for the current order!
Espresso Tips
Espressos are one of the simplest drinks – grind and go. It’s hard to mess this up.

Espresso shots are very easy to do perfectly, with a little practice. There are two steps to the process: grinding beans and packing them. When grinding the beans, pay attention to how the container is filling up. There are six frames of fill-up animation; at the sixth frame, let go of the button to easily earn a perfect rating.
Next, be sure to tap down firmly when packing the ground coffee. Light taps won’t register and will cost you some time!
Lastly, if you’re not yet confident with making a recipe from memory, you can always brew espresso in a small glass. Remember – you can always transfer from a small glass to a larger container, but never vice-versa!
Americano Tips
Americanos are the next step up from espressos and only involve one extra step.
To make an Americano in Good Coffee, Great Coffee, start with an espresso. Since this is a hot drink, you can start the drink in a cup to save time (though you can also just transfer from an espresso glass).
Once your espresso is done, bring the cup to the side, pick up the hot water, and pour until it’s completely filled up. The brewing method for Americano involves combining espresso with hot water to achieve the desired strength and flavor.
Remember – order doesn’t matter, but proportions do. Americanos are 2 parts espresso, 7 parts hot water. Without a measuring cup upgrade (and even with), it’s very easy to overshoot liquid proportions, so always start with smaller liquids first. In this case, always prepare the espresso first.
Iced Americano Tips
Iced Americanos are a little more involved.
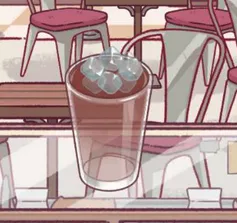
To make an iced americano in Good Coffee, Great Coffee, start with an espresso. This time, it *has* to be in a small glass, as the final product is in a large glass.
When your espresso is done, bring it to the side table. Next, grab a large glass. Add your espresso into it, then add two scoops of ice (anything that needs ice is always two scoops). Fill the rest of the drink with cold water straight from the container, then serve.
Once again, order is unimportant, but proportions are. By doing it this way (espresso -> ice -> water), we eliminate the possibility of adding too much water, thus giving us a perfect (or at least good) score for precision!
Latte Tips
Despite being the third type of drink you unlock, lattes are a very involved process.


These will probably be your mainstay, so you better get used to making them.
To make a latte in Good Coffee, Great Coffee, start with an espresso; you can do it in a cup to save time. If you’re handy, you can also fill the milk jug while the espresso is brewing. Once it’s done, set the espresso cup aside.
Next, we’ll need steamed milk. To make steamed milk in Good Coffee, Great Coffee, grab the filled milk jug (by the handle, the hitbox is finicky), then drag it to the steam wand. Gently lift the jug up until the steam wand’s tip is just above the milk – if the icon changes to a steam cloud, you’re doing it right. It should look like this:
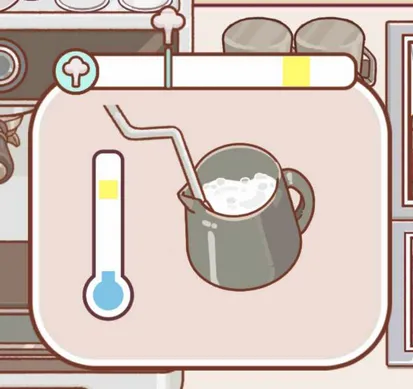
Let the milk steam until the top bar hits the yellow zone. When that happens, drag the jug further up; the idea is to submerge the wand tip. You’ll know you’re doing it right when the steam icon changes to a stirring icon:

Going to stir mode will also raise the temperature much faster. Once the temperature hits the yellow zone (you can’t over-stir), drag the jug down. Ta-da, steamed milk!
Pour the steamed milk into the espresso cup to start the optional latte art minigame.
Latte Art Tips
Latte art is one of Good Coffee, Great Coffee’s more in-depth mechanics. While making latte art isn’t strictly necessary (outside of Max’s story quest), you can have a bit of fun with it.
Making your own designs isn’t hard. To make latte art in Good Coffee, Great Coffee, simply select a brush and stroke size, then drag around the top of the cup. To make good latte art, however, you need to understand your tools.
Let’s use this image to outline your tools:

- The red circle shows how big your lines will be. In general, you want to select the smallest one (the rightmost) for more precision.
- The yellow circle shows the stroke type. You can have strokes that taper at the beginning and end, only at the beginning, or even throughout. I prefer even strokes throughout.
- The blue circle shows the most important tool – the mirroring tool. Tap on this to add mirroring lines (vertical, horizontal, or both) to your latte. I prefer using just the vertical tool.
Once again, latte art is optional. You can skip it by tapping on the bell immediately, and you won’t get penalized for serving drinks without latte art. If you want to indulge your inner artist, worry not as time is frozen during the latte art step.
Iced Latte Tips
Iced lattes are my favorite drink because of how much cash they bring in and how easy they are to make. They can, however, throw you for a loop since they’re sneakily added to your menu around the same time that normal lattes are.

To make an iced latte in Good Coffee, Great Coffee, start with an espresso in a small glass – remember, this is an iced drink, so we can’t start in a cup. Fill the milk jug if you can, while the espresso is brewing. However, don’t turn it into steamed milk. You just dunk cold milk into the latte. See why I love making this drink?
Once again, order is unimportant, so we do the small parts first: add the espresso to a large glass along with 2 scoops of ice, then add the milk. Voila – iced latte!
Toppings Tips
Drinks with toppings are super easy: just add the topping to the finished drink.
Do be careful though, as for some reason, we can’t remove stuff like whipped cream or chocolate chips without throwing out the whole drink, no matter if it’s a small amount. For this reason, it’s good practice to double-check the order ticket before adding toppings.
Syrup Drinks
Syrupy drinks usually add one extra step to the creation process, which is pumping syrup. Keep in mind that apart from one endgame drink, all syrup drinks require four pumps of their respective syrup – chocolate syrup, vanilla syrup, or strawberry syrup.


Small parts go together, so add syrup after the espresso.
Order doesn’t matter, so I find that the best time to do the four syrup pumps is after adding the espresso.
Other Drinks
Lastly, there are a bunch of drinks that fall outside the menu, because customers in Good Coffee, Great Coffee can’t order like normal people. Let’s just go over them quickly:
- To make hot water: pour hot water straight from the hot water container into a cup.
- To make cold water: pour cold water from the container into a glass.
- To make iced water: two scoops of ice in a large glass, then fill it from the cold water container.
- To make milk or cold milk: pour milk straight from the carton into a container (cup or glass, whatever the person is asking for). Yes, it really shouldn’t be called “cold”.
Meta Progression
By now, you’ve probably realized that there’s a lot more to Good Coffee, Great Coffee than just cooking in the back of your shop. To cap off this guide, let’s talk about meta progression, namely how to progress in the story as well as how to upgrade your shop.
Quick Tips
- It costs 10 stamina to play each day. Stamina caps at 120, so try not to let it overflow.
- Stamina recharges at the rate of 1 stamina per 6 minutes. That means you can play another day for every hour.
- Leveling up gives you back 120 stamina.
- Stamina is deducted as soon as you start a new day. The stamina will be lost whether you finish the day, crash, or quit out.
- You can buy upgrades for both your store and your machines.
- Longer days is an all-around useful upgrade that lets you get more mileage out of your stamina.
- Patient Customers is a useful upgrade but requires 20 gems.
- Machines can be upgraded by spending cash, badges, and gems. Each level improves a machine’s stats.
- You can also buy new models of both the coffee maker and grinder.
- Certain upgrade levels give machines passive perks and may give it a cosmetic overhaul.
- You’ll sometimes get random challenges at the start of an in-game day. Completing these challenges nets you extra cash and experience.
- Daily quests can be completed for more exp; this is the primary way of boosting yourself to the next level.
- Chapter quests show you what you need to do to progress in the story. These also come with rewards, most often badges and gems.
Stamina
Stamina is very much a thing in Good Coffee, Great Coffee – you might not have realized this as early levels often give you stamina refills. Your stamina can be seen in the upper part of the screen as the cup of coffee with a lightning bolt, alongside your money and gems:

It costs 10 stamina to go through one day, and it caps at 120 stamina. Stamina regenerates at the rate of 1 every 6 minutes, meaning that you’ll need to wait a real-life hour to play an in-game day. Lastly, leveling up always gives you 120 stamina, letting you play another series of 12 days.
Note that stamina is depleted as soon as you start a new day. Regardless of what happens then – finish the day, crash, or quit out – the stamina will be lost.
Upgrades
By buying better equipment, you can go from serving good coffee to great coffee.
To upgrade your equipment, you’ll first need to end a day. Next, go to either the Upgrades or Equipment tabs. Both of these tabs offer different ways to upgrade your shop and your machines – in particular, your coffee grinder and your espresso machine.
Let’s start with the Upgrades tab.

- Longer Days extends shop hours, allowing you to earn more per in-game day.
- A Mascot boosts the number of customers you get per day. Until you have machine upgrades, are used to the brewing methods, and have the Longer Days upgrade, you won’t get as much mileage out of this upgrade.
- Patient Customers extends customer waiting time, netting higher tips overall. However, this upgrade costs gems. Hope you’re prepared to watch ads.
- The Cup Guide adds markers to large glasses, which supposedly helps with drinks that require “x parts”. In my experience, this wasn’t helpful at all – not only can you not transfer the liquid from large glasses anyway, but the markers aren’t even that precise.
In my experience, the only upgrade worth purchasing is Longer Days. More time means more customers, and more customers means more money. Patient Customers is also nice for the extra tips, if you’re willing to sit through the gigantic number of ads to grind out the gems.
Next, let’s talk about upgrading your machines. In the same screen where you can repair machines, you can also choose to upgrade them.

Upgrading a machine costs cash, badges (from quests) and gems (from ads, quests, and can be bought). Each upgrade level increases a machine’s stats and lowers its repair cost – which alone makes upgrades worth it. Certain levels may also change a machine’s appearance, though that’s purely cosmetic.
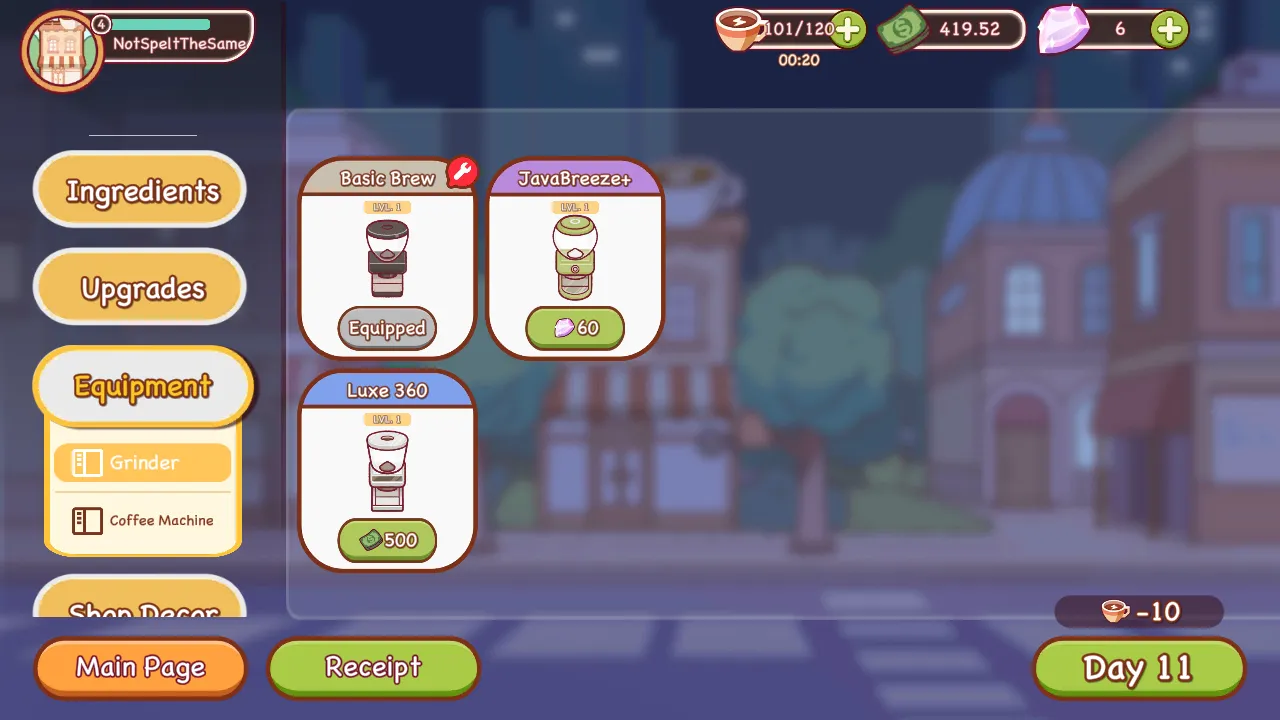
You may also have noticed that you can buy new machines here. As of writing, you can purchase the Luxe 360 and JavaBreeze+ grinders and coffee machines. Anything from the Luxe 360 series requires cash to buy, while the JavaBreeze+ machines need gems. The more expensive the machine, the better its stats.
But wait, there’s more!

At certain levels, machines gain passive perks that allow them to significantly improve their performance. Note that each machine has its own perk tree, so be sure to equip and level up the right machine for the perks you want!
Random Challenges
When starting a day, you’ll occasionally receive a set of challenges that you can optionally complete for extra cash and experience.

These challenges can range from simple to very hard, with more difficult challenges also imposing a restriction on you, such as “do not ask ‘what’” or “customers lose patience faster”. It’s your prerogative whether you want to gun for these or not, but keep in mind that your priority should always be fast, efficient, and most importantly correct service!
Daily Quests
Good Coffee, Great Coffee also offers four daily quests to help you along with progression. These can be accessed at the end of a day via MyPad -> Quest.
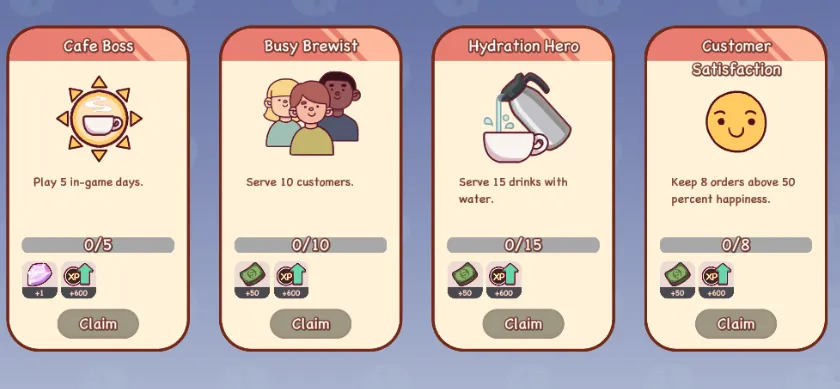
The main thing you’ll want to get from these quests is experience. On average, you’ll earn about 100 experience per day, but each daily quest nets you around 600 experience. This means that daily quests are pivotal to leveling up quickly and progressing the story – a full round of daily quests is the equivalent of 24 in-game days’ worth of experience!
Chapter Quests
Last but not least are chapter quests. As I mentioned at the start of this guide, the game does have an overarching story, but you’ll need to fulfill specific requirements to continue it. If you’re wondering why Max and Judy haven’t shown up yet, you’ve probably skipped a step here.

As with daily quests, you can check your current chapter quest at the end of the day via MyPad -> Quest.
All In a Day’s Work
Being a brewist is tough, no question. But watching all the bits and pieces of your workstation come together – grinding beans, packing, brewing, steaming milk, and so on – is very satisfying once you get into the groove of things. Mastering the game can help create a coffee shop experience at home, enhancing the enjoyment of brewing coffee.

That’s it for this guide to Good Coffee, Great Coffee, and I hope you were able to pick up some tips and tricks for your coffee journey. If you have any suggestions on how to make this guide better or spotted something that needs correcting, please let us know!