I’ll admit that I’m not really a follower of the MonsterVerse. However, it’s hard to find anyone who hasn’t heard of Godzilla or King Kong. These two are superstars of the monster/kaiju genre, and with the unification of these names under the MonsterVerse label, we’ve got a whole bunch of games featuring their biggest names.
Including, of all things, an empire builder.
Godzilla X Kong: Titan Chasers is a traditional mobile empire builder in the same vein as older titles like Evony: The King’s Return, though with some improved visuals (and do note you’ll need a strong device to take advantage of said improved visuals). As an explorer of savage, uncharted lands, it’s your job to build a base, form alliances with other players, find opportunities, and defeat fearsome monstrosities. Godzilla X Kong: Titan Chasers is available for download on both the Google Play Store and the App Store.
There’s no shortage of empire builders on the mobile game market; if you’ve already played one of these before, you’ll have no problem navigating the many systems. New players, however, are in for a ride, as there’s quite a bit to go through.
This beginner’s guide to Godzilla X Kong: Titan Chasers will walk you through a number of topics:
- Your Shield – empire builders always give new players shields to protect them from enemy attacks. This section will outline what we’ll aim to complete before your starter shield collapses.
- Establishing A Base Camp – base basics, from construction queues to upgrades and the incredible importance of upgrading your HQ.
- Army Basics – training, unit stats, marches, healing, and so on.
- Hero Basics – despite there being no playable titans (yet), knowing how to upgrade and use both your Chasers and monster heroes is vital to success.
- For The Alliance – solo players don’t get far in empire builders. We’ll quickly go over the multiple benefits that you can gain from joining an alliance.
- Amassing Resources – there are other ways to get resources apart from generators and harvesting nodes, if you know where to look.
Lastly, feel free to jump to the “Quick Tips” subsections if you’re looking for a quick read.
A Foreword: Your Shield
Before we begin, I should reiterate that Godzilla X Kong: Titan Chasers is closer to a traditional empire builder. Improved visuals it may have, but the core gameplay loop is still the same. This means that conflict with other players is a question of when, not if. Whether you like PVP or not, you’ll be drawn into the many wars and skirmishes on your server – which can be pretty fun. However, to prevent veterans from using newbies as resource piñatas, each new player is given a shield.
The beginner shield will protect your base and armies from enemy attacks and even scouts from other players, as long as it’s up. While a shield is active, your outpost will be protected by a blue bubble. You can also see the amount of shield time you have left here:

However, there are limits to this protection:
- The beginner shield only lasts for 4 days (96 hours) from when you first log into Godzilla X Kong: Titan Chasers.
- Performing an offensive action, such as scouting, attacking another player, joining a rally march, or starting a rally against any target will immediately break your shield.
Four days isn’t a lot of time, but it’s enough to learn the basics and get you familiar with the many systems needed not just to survive but thrive. By the end of these four days – and this beginner’s guide – you’ll be able to manage your base, develop your heroes, train units, and work with alliance mates to hunt big monsters.
Establishing A Base Camp
The lands you find yourself in are untamed and dangerous. To have even a chance at survival, you’ll need to establish a running base as quickly as possible, which involves constructing buildings and knowing how to keep things running. Here’s a rundown of the things you need to know about your base.
Quick Tips
- I’ve included a breakdown of what each early game building does.
- You can only construct/upgrade one building at a time. To remedy this, you can buy (as in with real money) a second construction queue.
- This also gives you a second research queue.
- You can use speed-ups or Hollow Earth Crystals (premium currency) to cut down timers on upgrades/construction. Hollow Earth Crystals will instantly complete construction and don’t need a queue. I strongly recommend saving speed ups for the Headquarters.
- Speed ups come in several types (generic, training, research, etc.) so try to use the matching speed up type to save your generic speed ups until you really need them.
- You can instantly finish any construction or upgrade if the timer is almost complete. I haven’t figured out the rules for this, but it seems to be roughly at the last 10 minutes.
- This also means that you can get a lot of free, instant upgrades for new buildings.
- The Headquarters is very important as it gates progress and tech levels.
- Prioritize upgrading your HQ as it gates everything else.
- Once again, HQ upgrade timers are very long, so try to save your speed ups for it.
- You can also craft items at the HQ.
- Crafted items are equipped on your character/ruler. You have six slots for equipment.
- Equipment…
- …requires monster drops and resources to craft. Higher HQ levels give more blueprints.
- …can be upgraded (increase tier level) to improve its base stats.
- …belongs to different sets. Wear enough items from the same set to get more passive boosts.
- You can assign skill points to your ruler that provide small passive boosts.
- You can level up your ruler (account) by getting player exp. Many activities (particularly fighting) will give you this resource, so don’t worry about it too much.
- Resource generators produce different types of resources over time. Higher level = more resources produced and bigger cap until full.
- Don’t forget to use the free upgrades on new buildings to make your resource generators more effective.
- Warehouses store your resources, where they can then be spent. Higher level = more resource capacity and more “safe” resources that are preserved even when you’re attacked, and are not spent on troop upkeep.
- As a new player, you’ll get a lot of resource bundles. DO NOT POP THESE until absolutely necessary – anything above your “safe” resource cap can be stolen by other players, while bundles can’t be touched at all.
- The Research Laboratory allows you to complete research tasks across 5 trees. These projects provide small passive bonuses.
- Like construction queues, you can spend speed ups or Hollow Earth Crystals to boost research projects. You can also buy a second research queue (it’s in the same cash shop bundle as the 2nd construction queue).
- Your Research Lab should always have a research task running. A constantly running research center is important in every empire builder!
Early Building List
Empire builders have multiple buildings to keep in mind, but in general, they all do the same thing no matter what game you’re playing. Here’s a list of Godzilla X Kong: Titan Chasers’ buildings, and what they do. Note that buildings that do roughly the same thing are clumped together:
- Headquarters: gates tech and progression, allows you to craft items for your character/ruler
- Warehouse: stores resources, controls resource cap and “safe” resource limit
- Farm/Lumberyard/Steel Works/Geothermal Plant/Factory: resource production buildings that produce food/wood/metal/energy/tech (resource), respectively
- Research Lab: allows you to research techs, which give passive upgrades; your research center should always be researching something
- Barracks/Training Camp: trains units; higher barracks levels unlock higher unit tiers
- Garrison: affects how many allied units can be stationed (as defense) in your outpost
- Bunker: affects maximum level of survivor camps in the overworld, keeps stored units safe from attacks
- Guard Post: ensures more defense troops survive if your outpost is attacked
- Radar Tower: increases scan range in the overworld, provides intel on incoming enemy armies
- Walls: trains defensive units, holds defensive units, gives defensive units a power boost
- Recovery Center: heals units, affects unit healing speed
- Chasers Quarters: affects march size (number of units you can deploy on the overworld)
- Monster Biodome: passively improves your monsters’ stats on expeditions
- Alliance Hall: affects how many resources can be sent to allies, as well as how many allied units can be rallied at your base – this second one is only important for alliance leaders/officers
- Salvage Drop: periodically generates random resources (can include stuff like speed up timers), allows more alliance members to assist with timers
Again, this is a lot. We’ll cover each of these in turn in their respective sections later on, such as barracks in the combat section. For now, let’s focus on the basics.
Building and Upgrading
Naturally, any base will require construction and upgrades. To build a building, tap on “Build” in the lower right, then select a building. This will require a short amount of time and some resources.

A number will appear if you have any new buildables; if you see it, that’s your cue to open your build menu and build everything that’s available. Don’t make the mistake of thinking multiple buildings of the same type are useless – they’re there for a reason.
Upgrading buildings is similarly simple. To upgrade a building, tap on it, then tap the “Upgrade” button, pay resources, and run down the timer. Voila, upgraded building.

Note that upgrades can be dependent on other buildings’ levels.
Construction Queues and Speed Ups
One of the first things you need to know about empire builders is that you can only build or upgrade one thing at a time. You can see this in your construction queues:

You can remedy this by spending real money; by buying a special pack from the store, you permanently gain access to a second construction and research queue, allowing you to build/upgrade and research two things at once. I’d only suggest doing this if you see yourself playing the game for a long time.
Any construction queue can be sped up in two ways: spending Hollow Earth Crystals (premium currency) or spending speed ups. If you choose to spend Hollow Earth Crystals, the project will instantly be completed – but note that gem cost is proportional to how much time is left on the timer. Speed ups, on the other hand, reduce the timer by a certain amount of time depending on the speed up. Note that there are several types of speed ups (generic, training, healing, etc.), so try to spend construction speed ups on construction before dipping into your pool of generic speed ups.

Prioritize upgrading your Headquarters as it gates basically everything, and save your speed ups for Headquarters upgrades as those have the longest timer out of everything.
Finally, you can instantly complete any building – for free – as long as its timer is almost done. From my observations, this happens roughly when a timer has 10 minutes left. Don’t take this as hard truth; I haven’t figured out the exact rules.

When this happens, tap on the “Free” button to instantly complete the project.
While the rules are sketchy, what this does mean is that you can get a lot of free, instant upgrades on new buildings. Don’t forget to use this to bring your new buildings up to speed!
The Headquarters
Now, to individual buildings. Let’s start with your Headquarters, which is the core of your base.

In the early game, the Headquarters doesn’t do anything by itself apart from giving you access to Crafting (which we’ll get to in a bit). However, the level of your headquarters determines your progression and is very important for unlocking new features. Prioritize upgrading this building as much as possible.
Note that compared to other buildings, the Headquarters has a ridiculously slow upgrade timer; where some buildings will take 5 minutes to hit level 6, the Headquarters upgrade timer will quickly spill into double-digit minutes and hours. Allow me to reiterate what I said earlier: saving your speed-ups for Headquarters upgrades is strongly advised – especially if the next tech level would grant you a big advantage, such as by unlocking new troop types.
Crafting and Ruler Skills
Your character, or ruler, can equip six different items that provide passive bonuses to a lot of things. Tap on your account portrait in the upper left most corner and you’ll see what I mean.

Each item you equip gives a boost to a certain aspect of the game, whether that’s resource generation, army strength, hero power, or so on. To craft items, you’ll need to upgrade your Headquarters and spend resources – mostly monster drops from fighting on the world map.

The crafting process is self-explanatory, but there’s a few things to keep in mind:
- Items can be upgraded (tier level). The higher the tier, the stronger the item.
- Increasing the Headquarters’ level gives you new items to craft.
- Items belong to sets; equipping enough items from a set gives extra bonuses.
As a new player, just focus on filling out your gear slots – you can always come back and craft later.
Since we’re already on the topic of your ruler’s passive boosts, I’ll quickly mention ruler skills. These skills can be accessed to the right of your equipment menu. They’re divided into both Core and Specialist skills.

Just like equipment, both of these skill trees provide minor but very useful bonuses to a lot of things. You get skill points as you level up, so make sure to go to this menu and spend your skill points whenever you gain a player level. You can get player levels by getting player exp – don’t worry about this too much, as you get it from a lot of activities, most especially fighting.
Managing Resources
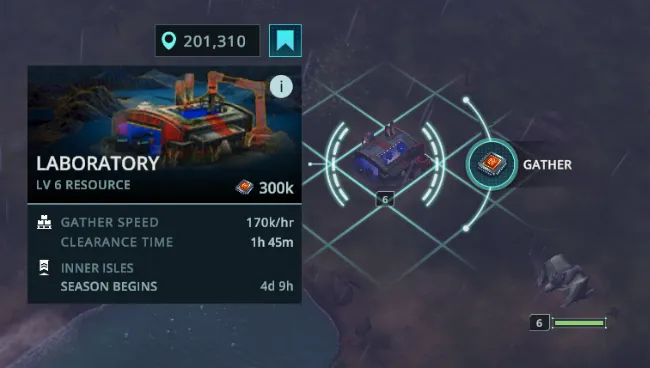
Every base needs resources to function, and yours is no different. The primary way of acquiring resources after your newbie period is via your resource production buildings. These are the Farm, Lumberyard, Steel Works, Geothermal Plant, and Factory, which produce food, wood, metal, energy and tech resources, respectively.
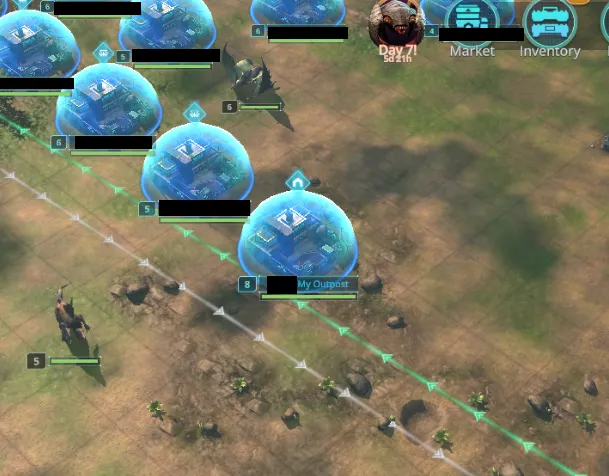
To collect produced resources, tap on the bubble above the resource production building. For organization’s sake, it’s a good idea to put multiple buildings of the same type together to make running your base easier. I like grouping my resource production buildings together, like so:

Keep in mind that the higher the level of your resource production buildings, the better they’ll be at gathering resources, and they’ll also be able to hold more resources. Be sure you’re upgrading your resource production buildings (remember, the first few levels can be rushed for free) to ensure better resource production from the get-go. You’ll also want to check your available buildings when your HQ levels up, as you’ll occasionally get permission to put more production buildings, and more production buildings means you’ll be able to gather more resources faster.
Resources you claim will go to your Warehouses, where they can now be spent on whatever you want. Note that Warehouses have a limit to the resources they can hold, which is affected by their level. Higher level Warehouses also give you more “safe” resources – materials that will be preserved even if you’re attacked and won’t be spent on upkeep. This way, you can’t get stuck in a corner with no resources.
There are also some other ways to get resources that don’t involve your research production buildings:
- Clearing debris around your base gives a one-time bundle of resources.
- You can gather resources from world map nodes.
- You can open resource bundles to get a bulk amount of resources.
Resource bundles deserve special mention, since it’s very easy to waste them. You can view your bundles in your inventory.

When you use a bundle, you’ll instantly gain a number of resources depending on the bundle. As a new player, it’s very easy to fall into the trap of popping all your bundles at once. DO NOT DO THIS as anything above your “safe” resource cap can be stolen by other players, but bundles themselves cannot – in other words, more resources than what you strictly need are a liability, not an asset.
It’s a good idea to save these bundles for crucial events down the path, such as vital HQ upgrades!
The Research Laboratory
The Research Laboratory is where you unlock new technologies that give you passive upgrades. These technologies run the gamut from increasing your resource production, to unit strength, and even increase building efficiency.

Researching a tech is simple – just go to your Research Lab, select a tree to research, then select which of the available new technologies you’d like to invest in, and finally, pay the resource cost. Research tasks cost food, metal, wood, energy, and time. Techs are also gated by prerequisites and Research Lab level, so be sure to pick up early tech nodes and keep upgrading your Research Lab alongside the rest of your base.
Once you’ve got a research progress underway, you may notice a few similarities to construction queues:
- You can spend Hollow Earth Crystals or speed ups to accelerate research. Spending Hollow Earth Crystals completes a research task instantly; the cost is proportional to how much time it would take.
- You can only research one thing at a time. You can also pay (again, real money) to unlock a second research queue – this is the same bundle as the 2nd builder queue, so no need to spend again if you bought it.
Lastly, make sure your research center always has a research task running; Research Lab downtime is wasted research time, and you can be sure that your rivals will be attempting to get every edge they can over you!
Army Basics
That’s it for base basics. By now, you should be constantly building new stuff, upgrading them, collecting resources, and researching tech. Now for the second core aspect of empire builders: battles. We’ll cover both PVP and PVE here, as well as the different game modes in Godzilla X Kong: Titan Chasers.
Quick Tips
- Units can be trained at your Barracks and Training Camps.
- Training is also a queue, so you can speed these up.
- All units have stats. The higher a unit’s tier, the better its stats.
- Speed = movement speed on the world map
- Load = how many resources this unit can carry. Only important if you want to farm more resources on the world map
- The higher your Barracks level, the higher the tier of troops you can train.
- Tech level is only from the Barracks; you do not need to upgrade your Training Camp to train higher tier units there.
- Units have types and counters. This is more important in PVP than PVE.
- To move units, you’ll need to start a march. A march is a collection of heroes and regular units.
- Each march must have at least 1 hero and 1 unit.
- On the world map, you can march to resource nodes or monster lairs to gather more resources and fight for prizes.
- Resource nodes do not cost stamina. You can withdraw from a resource node at any time.
- Fighting monsters costs 10 fuel per attempt (green stamina)
- You have 2 march slots by default.
- Units that run out of health are either wounded or killed.
- Wounded units can be restored to fighting form at the Recovery Center. It’s cheaper and faster to heal wounded units than replace them.
Training Units
The grunt is the core of any army. Without nameless mooks fighting both monsters, defending against enemy attacks, or even raiding enemy outposts, nothing would get done.
To train generic units, you’ll need to queue units at the Barracks and the Training Camp. Select a unit type, tier, pay the resources, then hit the button to start training new guys for your army.

Since this is a queue, the usual queue mechanics apply: you can speed up training them up with Crystals or speed ups. Once again, try to spend training speed ups before anything else.
Unit Tiers and Stats
All non-expedition combat in Godzilla X Kong: Titan Chasers is automated, but for auto-combat to resolve, there need to be unit stats.

There’s no explanation of these stats in-game, but we can reasonably say damage is done per attack, armor is damage reduction, and health is how much damage a unit can take before it dies. Speed and load are unique to empire builders, though:
- Speed is a measure of how fast this unit moves in the world map, when part of a march (squad).
- Load measures how many resources a unit of this type can carry. 30 units with a load of 30 would be able to carry 900 resources. This stat is only important if you intend to gather resources with an army.
Higher-tier units are superior in terms of stats (and cost), so you’ll always want to train the highest tier of troops available to you. If you want to unlock new troop types ASAP, prioritize upgrading your Barracks, not your Training Camp. Don’t worry as the Training Camp inherits the Barracks’ tech level.
Unit Types and Counters
Empire builders almost always have a unit type weakness system. In Godzilla X Kong: Titan Chasers, the types and weaknesses can be seen here:

There’s a lot of weaknesses and resistances going on, so let’s just focus on what not to use against what. In general:
- Infantry: weak vs. Anti-Infantry Defenses, Ground Assault Vehicles
- Vehicles: weak vs. Anti-Vehicles Defenses. Anti-air vehicles also weak vs. Armored Infantry
- Air: Bombers good vs. vehicles, Attack Aircraft good vs. infantry
You typically don’t have to pay attention to these until later on in Godzilla X Kong: Titan Chasers, when you’re deep in PVP. There are no type matchups in PVE (as far as I know) so you don’t need to train different types of units for your gathering and monster hunting armies.
The World Map, Marches, and Lairs
Now that you’ve got a bunch of new units, it’s time to take them out on a stroll. This is done by going to the world map view. Tap on “Map” in the lower right to view the overworld of Godzilla X Kong: Titan Chasers.
As a new player, there are two options for you on the world map:
- Gather resources from nodes. There are resource nodes for all the different types – food, wood, steel, energy, and tech resources.
- Fight PVE opponents for prizes
Let’s start with gathering from a resource node. You can look for these manually on your own by dragging around the screen, or you can use the scan function in the lower right to find different types of resource nodes.
Once you find one, you’ll need to deploy a march to that node. A march is a group of units – heroes, tame monsters, and regular units – that move together as a single army on the world map. Your cap on the number of deployable units depends on your building upgrades (Chasers Quarters, in particular) and tech. You have been improving those, yes?

When you’re happy with the unit and hero composition, you can deploy your march. The march will take some time depending on the speed of units (remember the Speed stat?) and how far the node is from your base. Once they get to the resource node, they’ll start harvesting resources until they’re full (and now the Load stat) – then they’ll come home, give you your goodies, and disassemble the unit. You can then redeploy those heroes and units on another march.
By default, marches will gather until they’re full. In case you need the units back, you can always tap on a node your units are on, then issue a Recall order to tell them to stop and go home with whatever they currently have.
Fighting with marches is similarly simple. Just like before, you can use the scan function to find targets – this time, select “Lair”. Lairs with higher difficulty (or random monsters) yield better rewards.

As before, you’ll need to deploy a march to battle with your target monster lair. This time, you’ll need to pay attention to the combat power of your march. The higher your power compared to the foe, the stronger the chance of success. Combat power is always visible as a number beside a bullets icon, but Godzilla X Kong: Titan Chasers will also show you your odds before you set out, depending on your march’s strength:

Once your army arrives, they’ll duke it out with the monsters. When the fight ends, they’ll have to march back to your base and hopefully bring the spoils of victory with them.
Easy, right? Just a few more things you need to know about marches:
- Each march must have at least 1 hero and 1 unit.
- Marches to resource nodes are free but marching to attack lairs costs 10 fuel (green stamina) per attempt.
- You have two march slots by default, meaning you can deploy two armies at once – if you have the units. You can see the status of your march slots by tapping this button:

Casualties
There can be no conflict without casualties, and that’s what your Recovery Center is for.

When a unit runs out of health in combat, it is either wounded or killed. Killed units are pretty much gone forever, but wounded units can be nursed back to health at your Recovery Center. By paying some resources and running down a timer, you’ll be able to get your wounded units back to fighting shape. Note that wounded units do not contribute to combat power at all!
Make sure to heal your wounded units as quickly and as often as possible – it’s way cheaper to heal than replace them, after all!
Hero Basics
That’s all you need to know about units in the early game. Let’s turn our attention to heroes and their roles within a team, as these guys – both human and monster – are front and center in both overworld combat and Godzilla X Kong: Titan Chasers’ campaign.
Quick Tips
- Heroes come in both human and monster form.
- Heroes have stats and march bonuses, when assigned as a leader in a march.
- Always try to match heroes with the intent of your army, i.e., if you’re just going to a gathering node, pick someone who gives bonus Load to your guys
- Heroes can be leveled up, which increases their stats.
- Stats only matter in Expedition mode.
- Experience mostly comes from Expedition mode.
- You need to rank up heroes to uncap their level limit. This requires dupes.
- A hero’s rank also determines how good their march bonuses are. This means you don’t really have a choice but to do Expedition mode if you want your heroes to be worth anything.
- Dupes come from Expedition mode, quests, and can be bought from some stores.
- Having 10 of a hero’s shards allows you to recruit them. This is done via the Roster menu.
- Passive ways to boost your heroes include:
- Upgrading the Chasers Quarters (can yield shards and improves march size)
- Ruler equipment and skills
- Technology at the Research Lab
- Upgrading the Monster Biodome (only monsters)
- Improving the ORCA-M at the Monster Biodome (only monsters)
- Expedition mode is Godzilla X Kong: Titan Chasers’ campaign. There are two modes: Story (humans only) and Wilderness (monsters only).
- Each stage requires 10 red stamina to attempt.
- Clearing a stage gives you some resources, as well as a first-time bonus.
- Each stage has 3 stars, the conditions of which can be found in the “Target” menu.
- Stages can be replayed up to 5 times a day. Each completion drops resources, depending on the stage.
- Earning stars also nets you a chapter prize. Don’t forget you can also do this in hard mode.
Hero Basics
There are two types of heroes: humans (Chasers) and monsters. Both of them serve roughly the same purpose in that they’re used to lead marches and explore in expedition mode.

To illustrate that point, let’s take a deeper look at Kenzo, one of our starter heroes:

As you can see, heroes are divided into both expedition and march modes. Expedition mode is a turn-based RPG where heroes use their stats and skills to square off against both human and monstrous threats. Their stats are pretty self-explanatory, and we’ll talk about
March perks, on the other hand, refer to the bonuses that a hero grants their army during a march. When assigning heroes to a march, you can see the bonuses that they grant to their army in the hero screen:

You can also tap on the icons below your heroes to see what bonuses they grant your army.
Powerful squads require the right heroes, so make sure that the hero you’re deploying matches the march’s objective. Resource marches, for example, will appreciate heroes that grant more Load to their units, while marches that attack monster lairs will benefit from heroes that boost attack power – or better yet, heroes that give a combat boost against that particular enemy. Powe
Hero Growth
There are two ways to make your heroes stronger: leveling them up or feeding them duplicates.
Levels increase a hero’s stats, which only matter in expedition mode. The higher a hero’s level, the higher their stats – so make sure to feed them Chaser or Monster experience (which come from expedition mode) to make sure they’re capable of fending for themselves in the campaign.
At certain levels, heroes will need to rank up to break their level cap. This is done by getting enough hero shards, then sacrificing them. Hero shards mostly come from expedition mode but can also come from quests and can be bought in some stores.

Ranking up a hero grants them an additional star and lets them attain a higher level. Most importantly, ranking up a hero improves their march bonuses. So yes, as the main source of hero experience (and some shards) is the campaign, you can’t avoid doing it.
Note that you can also recruit a hero if you have at least 10 of their shards. You can do this in the Roster menu.
Passive Hero Boosts
While levels and ranks are the most direct ways of improving your heroes, there are also other ways of doing so:
- Upgrading the Chasers Quarters can yield shards for rank ups. Higher level Chasers Quarters also affects maximum march size.
- Equip ruler items and learn ruler skills.
- Research tech under the Expertise tree in the Research Lab
- Upgrading the Monster Biodome structure gives all of your monster heroes passive stat boosts. The higher the Biodome’s level, the bigger the boost.
- The Monster Biodome also holds the ORCA-M device, which can be upgraded to further boost monster stats.
Expedition Mode
Expedition mode is a single-player campaign that allows you to play through the story of Godzilla X Kong: Titan Chasers. You can access expedition mode by tapping “Campaign” in the upper right corner. Tap on that, and you’ll see that there are two campaigns: Story and Wilderness.

In both of these modes, you’ll need to deploy heroes against enemy teams in turn-based combat. The only difference here is that Story mode uses exclusively human heroes, while Wilderness mode uses only monster heroes.
Once you select a campaign stage, you’ll be pulled into a fight after some talking. Combat here is turn-based and reliant on Action Points which regenerate per turn and are used on stronger skills. It’s not that hard – I recommend just turning on auto-combat and faster animations here:

The entire point of doing the campaign is to get resources. Not just basic stuff like food, wood, metal, tech, and even (sometimes) Hollow Earth Crystals, but also new heroes and shards to make them more useful to you during marches.

Each attempt at a campaign stage costs 10 stamina (red stamina) – which is different from fuel for marches. You might be asking, “why is campaign mode gated by a resource?” The answer to that is that campaign stages give you resources whenever you clear them. Stages can also be auto-cleared if you’ve achieved all 3 stars for them; you can see the requirements for doing so in the “Target” menu. Each clear of a stage drops more resources but can only be cleared five times per day. Make sure you’re also burning all your red stamina whenever you log in!
You can also get chapter completion shards for both normal and hard modes, which you can claim here:

You’ll need to earn every star in a chapter to get this prize, but you’re going to be doing that anyway.
For The Alliance
The next thing new players need to know about is the Alliance system. While empire builder servers tend to have rules of engagement (that are followed on an honor system), it never hurts to have friends. By joining an active alliance, you’ll not only have the aid of other players to back you up, but you’ll also gain access to a lot of extra systems you wouldn’t be able to reach solo!
Quick Tips
- Alliance members can help each other out with most timed projects. Tap on the help icon when starting a project to request assistance.
- Help requests from allies appear in the lower left. Tap on the help icon (above the alliance icon) to help your alliance mates complete tasks.
- Helping allies costs nothing.
- Joining an alliance will prompt you to teleport your outpost nearer to your alliance mates.
- Alliances cluster together to make rallies/defending each other easier.
- Alliance leaders/officers can spend alliance coins in the alliance coffers to build structures. These provide various benefits to alliance members.
- Alliance assignments are difficult tasks that provide all alliance members with buffs upon their completion.
- Try to check your alliance to chat to see if your alliance is serious about completing these – they’re more than a single player can manage.
- You get chests with small rewards whenever an alliance member completes their daily tasks, finishes a challenge, or buys a cash shop bundle.
- Rallies allow alliances to band marches together to take down mighty foes.
- The maximum size of a rally depends on the Alliance Hall level of whoever started the rally.
- Assisting allies and doing other alliance stuff nets you alliance coins, which can be spent in the alliance store.
- The alliance store stocks some neat items like buffs, hero shards, and more.
- You can also opt to donate your alliance coins to your guild coffers, which can then be used by alliance leaders and officers to construct buildings.
- Note that there’s no bonus for doing this, but it’s necessary for an alliance to grow.
Alliance Assistance
The first thing that you need to know about being in an alliance is that it can cut timers. Most things that have a timer – building, research, etc. – can be boosted by your alliance. If you have a boostable project, a help icon will appear:
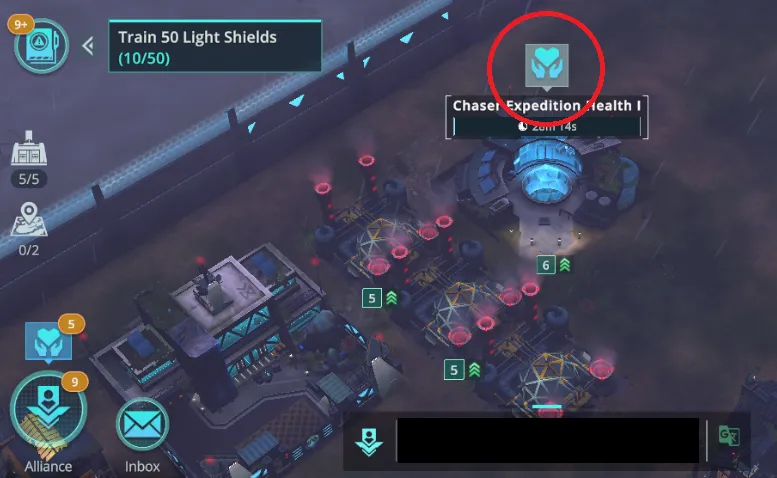
Tapping on this will forward your request to your alliance, at which point anyone can assist. For each person that assists, you’ll get a minor cut to the timer.
Just as you can ask for help, you can also offer it. Ally requests for assistance will appear over the alliance button on the lower left:

Tap on it, then tap on the ally you want to help – or just tap “Assist All”. Note that this costs you nothing but a tap, and you’ll get some alliance coins for helping out!
Alliance Territory
There are two layers to alliance territory.
First is actual territory. When you join an alliance, you’ll be asked if you want to teleport closer to your alliance mates. In most empire builders, alliances tend to cluster around a particular part of the map, essentially soft-claiming it as their own.

This has the added advantage of being able to form rallies quicker and making allied outposts easier to defend.
The second layer of territory involves actually building structures on the world map. These buildings offer various benefits, from granting alliance members buffs while within its territory to granting points for the current territory season.

Only guild leaders and their appointed officers can start a construction – you can do your part by amassing guild coins via assistance!
Alliance Assignments
Each alliance is given a set of tasks that will require everyone’s cooperation to complete.

Completing these tasks will reward every alliance member with powerful, long-lasting buffs such as increased gather speed, faster march speed, faster training, and more.
As you might have seen, some of these tasks are very difficult, so try to coordinate with your alliance via chat to see if they want to make a serious effort at completing these challenges.
Alliance Rewards
Joining an alliance also gives you rewards when your alliance mates do their daily tasks, complete challenges, or buy stuff from the cash shop.

They’re not much, but more resources are always welcome!
Rallies
Alliances allow you to more effectively form and join rallies.

As a new player, you might have seen raid enemies on the world map too tough to take on your own. That’s where rallies come in. Rallies are a collection of marches turned into a single mega march led by the rally leader – thus giving them massively increased combat power that allows them to face down powerful foes.
When a rally is initiated, alliance members will be given a notification on the rally board. By tapping on an open rally, they can choose to send marches to support and strengthen that rally. Note that the size of a rally is dependent on the Alliance Hall level of the person who started it. As I mentioned in the building breakdown, this is only really important for alliance leaders, officers, or marshals trusted with leading the alliance’s armies.
Alliance Store
Helping out your alliance members not only fosters goodwill and camaraderie but also nets you alliance coins. These can be spent at the alliance store for some nifty items, such as timed buffs (production, damage, or gathering boosts), speed ups, special items such as skill resets for your ruler, and even hero shards.

Don’t forget to spend your alliance coins regularly; they can’t be spent anywhere else but the alliance store.
Alliance Donation
Alternatively, you can choose to donate your alliance coins to your alliance. This will fill the alliance coffers, allowing your alliance leader and officers to spend them on stuff like alliance buildings.

While this is very important for upgrading your alliance, note that you do *not* get anything in return for doing this, other than the gratitude of your alliance mates.
Amassing Resources
We’re almost done. The last thing you need to know about is how to effectively farm resources, from beginner bonuses to regular quests that will give you a slow but steady supply of resources to help you in your Godzilla X Kong: Titan Chasers journey.
Quick Tips
- Events give out tons of resources. You can access events on the right side of the main menu.
- The events menu shows you past, present, and future events, as well as the requirements for each.
- You can also visit the event store here; some events give out event currency that can only be spent in this store.
- Daily login bonuses grant you small amounts of resources.
- New players also get the Magma Jackal and Rockclaw Grub heroes (via shards) from their first 7-day login.
- Missions give you big one-time rewards for completing certain objectives.
- You can complete these retroactively.
- Don’t forget to claim your big reward chests!
- Progress quests give you minor handouts for reaching certain milestones.
- Be sure to complete daily tasks as they not only give a small amount of resources., but also give experience for the battle pass.
- Daily tasks give activity points; the chest for 160 points (full bar) will give you hero shards, some Hollow Earth Crystals, and some Titanium.
- Operations let you dispatch a hero to get resources.
- There are three types of ops – Chaser, monster, or either. You can only have 1 of each running at once (meaning you can have up to 3 running)
- Op quests will reroll after some time.
- Dispatched heroes can still perform as usual – marches, etc.
- The cash shop hands out free resources, fuel, and stamina via the “Gifts” menu.
- There are two types of premium currency: Hollow Earth Crystals and Titanium.
- Hollow Earth Crystals: used to boost stuff, speed up timers, and buy bundles from the cash shop.
- Titanium: used to shop in the Titanium Store, accessible via your Salvage Drop building.
- The Titanium Store contains useful items like buffs and hero shards. It rerolls over time, and can be forced to reroll by watching an ad.
Events
Events are a great way to earn resources in any live service game. You can access the events menu on the right side of the main screen.

The events screen will show current, past, and upcoming events. You’ll be able to see your placement in these events, as well as what you need to do to score points and what rewards you’ll get at certain point milestones. You can also claim any event rewards here, even for events you didn’t know you were participating in.
The events tab also has a shortcut to the event store. Specific events (usually raids) dole out special event currency – the event store is where to spend this currency.
Daily Login
All live service games incentivize players to show up every day, and Godzilla X Kong: Titan Chasers is no different. You’ll get a small amount of resources just for logging in. Nothing amazing, but hey, free is free.
New players, however, get a little extra in the form of two monster heroes – the Magma Jackal and the Rockclaw Grub.
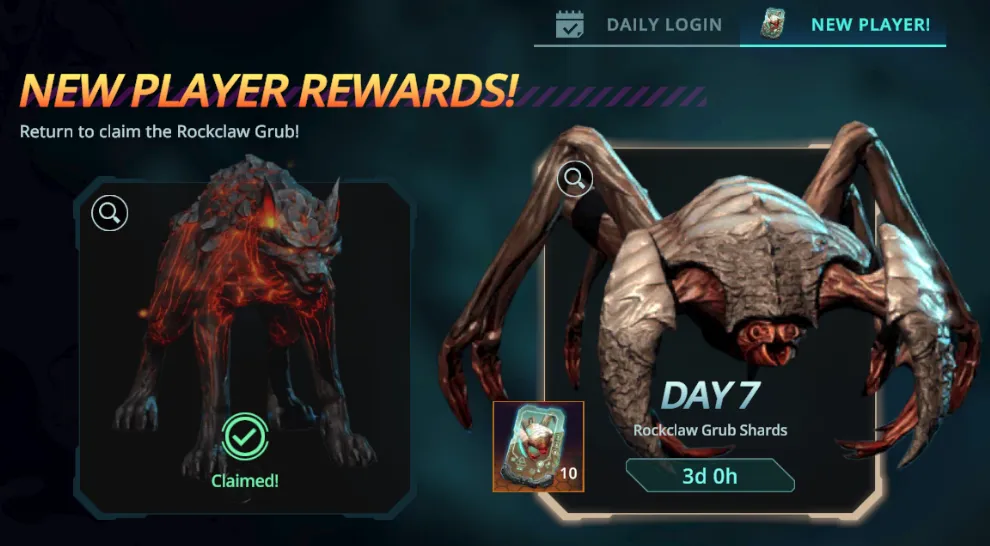
Be sure to claim these heroes (via shards in the roster) once you hit the 1st and 7th day login rewards!
Mission and Quests
Godzilla X Kong: Titan Chasers has a series of quests made for new players – you’ve probably already done some without realizing it. These are what Godzilla X Kong: Titan Chasers calls missions, and you can access them – and your other quests – by tapping on the folder on the left side of the screen.

In the mission screen, you’ll see the objectives you need to complete to access the next series of mission quests. Note that these can be completed retroactively (meaning you can finish objectives in advance, which you’ll probably do by just playing Godzilla X Kong: Titan Chasers), and you can tap on the “Go” button to skip to where you can do the objective. Be sure to claim the chests for completing each chapter as well.
In the same menu, you can access your progress quests.

These quests give you tiny (and I mean really tiny) rewards for achieving milestones. The good news is that these milestones are super easy to complete, and you’ll probably have a whole bunch of prizes already waiting for you here with how easy it is to complete these quests.
Finally, you’ll occasionally find extra quests in this menu, such as the Outpost Rush.
Dailies and The Battle Pass
The same menu also shows you your daily quests.

Completing daily quests nets you activity points, which are added to the meter at the top of the screen. At certain point thresholds, you’ll be able to open a chest with some resources. The big prize, however, is at the end – the big chest contains some hero shards, a few Hollow Earth Crystals, even more resources, and some Titanium, making it a reliable if slow way to earn premium currency for free.
You’ll also get Explorer Pass Points for doing dailies and redeeming chests. These go towards the battle pass, or Explorer Pass. You can access the Explorer Pass from the dailies menu.

As with all battle passes, there’s both a paid and free version. Make sure to tap on each battle pass item to claim them!
Operations
Heroes can be dispatched to earn you some extra resources. To do this, go to the Operations menu in the quest screen.

Operations are special quests that will send your heroes off to do stuff. Once a hero has been dispatched, all you need to do is wait the timer down; when the timer runs out, you’ll get free stuff (not good stuff). Most importantly, this is a great way to earn hero exp – both Chaser and monster – especially if you have no more stamina for expedition mode.
There are three types of Operations: Chaser, Monster, and Joint. These determine the type of hero that you can dispatch: Chaser Operations require Chasers, Monster Operations only take monsters, and Joint Ops take either. You can only have one of each op running at once.
When you visit the Operations screen, you’ll see the list of currently available operations. Completing an op removes it from that list, but the ops list will refresh every so often. Try to finish all your ops before the reroll happens to get the most rewards.
Note that dispatched heroes can still be sent on marches.
The Cash Shop
Next, let’s talk about the cash shop. You can access the cash shop via this button on the upper right:

The most important things to nab from here as a F2P are the free bundles. These are found under the “Gifts” tab, and consist of a free resource crate, a free stamina crate, and a free fuel crate. More resources are good resources, right?
Premium Currencies and The Titanium Store
There are two kinds of premium currency in Godzilla X Kong: Titan Chasers: Hollow Earth Crystals and Titanium. Both can slowly be earned via in-game means
Hollow Earth Crystals are currency in their purest form; if you buy currency from the cash shop, you’ll get Hollow Earth Crystals. Hollow Earth Crystals are used for a lot of things, but mostly for boosts and bundles from the cash shop. Titanium, on the other hand, is used exclusively to shop in the Titanium Store.
You can access the Titanium Store by tapping on the Salvage Drop building, then “Titanium Store”.

At the Titanium Store, you can trade your Titanium for various buffs, items, and even hero shards. The stock here is always useful, but keep in mind that it rotates every so often. If the Titanium Store has nothing you want and you’re itching to spend, you can watch an ad to reroll the stock.
Redeem Codes
Last but not least are redemption codes. Inputting redeem codes nets you a small amount of resources. More resources, no matter how tiny, are always welcome.
To input a redeem code, you’ll need to go to the Godzilla X Kong: Titan Chasers redemption website at https://gxktitanchasers.com/redeem. Next, you’ll need to input your Web Store ID, which you can find in your profile:
Once you’ve logged in, you can input redeem codes on the webpage.
Here’s a list of working codes as of May 4, 2025:
- JOINTHECHASE
- GXKTCDISCORD
- GXKTCLAUNCHD2
- GXKTCLAUNCHD3
- GXKTCLAUNCHD4
- GXKTCLAUNCHD5
- GXKTCLAUNCHD6
- GXKTCLAUNCHD7
Keep in mind that these redeem codes are time-sensitive and will expire in the future.
Into The Mists!
Whether it’s other players or giant monsters that stand in your way, you’re now more than ready to step out into the wild lands of Godzilla X Kong: Titan Chasers.

That wraps up this beginner’s guide to Godzilla x Kong: Titan Chasers. If you have any corrections to make or have any suggestions on how to make this guide better (especially for players new to the genre), please let us know!