Genshin Impact leaves players with a huge world to explore and a wide variety of challenges to engage in. Despite the initial availability of only 2 regions at launch, there is already a plethora of content to keep everyone playing for hours discovering new things and grinding for resources. As there is a constant need for a lot of materials and experience to stay at par with the increasing level of challenges, an efficient method of farming and grinding through each repeatable challenge in Genshin Impact becomes necessary.
There are, of course, numerous challenges to partake in with each one offering plenty of rewards. While domains, commissions, and other quests each have their own variety of fun and excitement to revel in, we feel that boss battles are the most strategically enticing, whether you play on your own or with other adventurers.
If you have just discovered Genshin Impact and have just recently dived into its fantasy world, we highly recommend checking out our Genshin Impact beginner’s guide first. Our beginner’s guide provides the most basic tips and strategies to help you get started right in your adventure. Along with it, we have an advanced guide with more tips and strategies to help you progress fast and efficiently in the game.
One of Genshin Impact’s biggest source of fun and excitement lies with the massive roster of heroes you can recruit to join you in your adventure. Being able to instantly switch across 4 unique heroes in a party of 4 and initiate a variety of elemental combinations makes each battle a unique experience. Despite each hero being able to offer something new to the table, though, some simply stand out over others and if you are inclined to know which heroes are top tier and which ones are not, in our opinion at least, you can check out our Genshin Impact tier list.

Each hero in Genshin Impact is unique from others beyond their elemental affinity and weapon used. The set of active and passive skills each hero possesses give each one a different utility within and outside of combat. Though roles are not readily assigned to each hero, they can be built to more suitably fit their main purpose in the team and with the right weapon and artifacts, each one can become a lot more efficient. If you are looking for some ideas on how to build your favorite heroes, then we suggest heading over to our character builds guide.
Provided that you have already read our previous guides or have played Genshin Impact extensively enough, then you should already have your fair share of boss encounters. Bosses scattered across the different locations in Genshin Impact offer a diverse level of challenges and experiences. On the initial world level, it can be fairly easy to beat even the toughest bosses but as you reach higher adventure ranks and raise your world’s level, enemies, including bosses size up in difficulty as well.
Bosses in Genshin Impact can be categorized into 3 types: normal bosses, elite bosses, and weekly bosses. Normal bosses are the easiest of the bunch and are typically encountered in random missions or locations with a treasure chest under its guard. Claiming rewards from these bosses do not consume original resin. Elite Bosses are consistently located in a specific spot on the map and have their own icons on the map as well for easier navigation. After beating an elite boss, you need to spend 40 original resin to claim the rewards from their chests. Weekly bosses are the most difficult of the bunch and also require 60 original resins for you to claim rewards after beating them. For both normal and elite bosses, simply teleporting to a different location will instantly respawn them. Weekly bosses have a 1-hour cooldown period that needs to be observed prior to challenging them again.

Repeatedly engaging bosses can be a good source of artifacts and both elite bosses and weekly bosses will earn you ascension materials for your heroes. As each ascension level will require higher grades of each ascension material, the need to continuously farm it and craft its higher level versions of each material becomes a necessary grind. Though some rewards can earn you these materials as well, knowing exactly which of the bosses to engage to farm the ones you need more than others is an important knowledge to have.
To be honest, patience and repetition will eventually lead you to beat any boss you encounter. However, if you are farming specific materials and want more out of your gaming time, efficiency in each undertaking becomes important. As such, knowing the right strategies and the best heroes to bring along for each boss battle becomes an important adventuring component, especially in the case of the elite bosses and the weekly bosses.
In this Genshin Impact boss guide, we will be focusing on all six of the elite bosses in the game to give you an idea of what each one can potentially earn you for rewards as well as the most important tips and strategies to dominate them in battle.
Anemo Hypostasis [Stormbearer Mountains, Mondstadt]
Unique Drops: Vayuda Turquoise Sliver / Fragment / Chunk / Gemstone, Hurricane Seed
Possible Artifact Drops: Blood-Soaked, Instructor, Lucky Dog, Gladiator’s Finale, Wanderer’s Troupe

Anemo Hypostasis is just one of 3 elite bosses that all look the same, save for their different elemental affinities, which determines the type of damage they can deal and their vulnerabilities, as well as a unique set of moves you need to familiarize yourself with to raise your chances of surviving through their attacks and defeating them in a shorter span of time. The vulnerable part is actually the diamond-shaped crystal guarded by 8 cubes and, for starters, you should know that each of the hypostasis bosses are invulnerable when these cubes surround them.
Regardless of which hypostasis you battle, each one utilizes the 8 cubes that surround them to attack. The general strategy is to keep a safe distance and avoid these attacks while at the same time prepping for a counter-attack, as these instances will shortly after leave them vulnerable. Knowing each of its attack patterns well enough should tell you when to start closing the gap, as you would want to chip in as much damage as you can when it becomes vulnerable.
One of Anemo Hypostasis’ common attacks is utilizing cubes to generate a vacuum and sucks you in closer to its eye to inflict damage. Once you see the wind swirling around you within the area, you can easily dash away from it. There is an explosive effect at the end of it that can still damage you but you can immediately dash in after it to start squeezing in some damage.
Once you see Anemo Hypostasis levitate and wings appear on each side, a small whirlwind also appear on the ground directly beneath you. You have a fraction of a second to dash away from it as getting caught in its wind will keep you afloat and unable to dodge from the anemo attack that follows. After the attack, Anemo Hypostasis will drop down to the ground and you will be able to attack it as well.
Towards the middle of the fight, Anemo Hypostasis will summon numerous small tornadoes that move about on the ground. There are gaps in-between the tornadoes that you can stay safe in, though, so simply keeping a god distance from each one will be okay. The attack lasts for about 4 seconds, so close to the end of it you can start moving closer to Anemo Hypostasis to deal some damage afterwards.
Once Anemo Hypostasis’ HP goes down to about 25%, it will start charging up, and a strong anemo pulse will cover a wide area fast, dealing heavy damage to you if it hits. It is possible to jump over it but leaving the platform also works. A secondary pulse is emitted after 3 seconds or so and once the anemo aura subsides, you can start attacking again.
Anemo Hypostasis can heal itself when it is close to expiring and floating orbs can be seen hovering above wind gusts that you can ride as well. Grabbing these orbs can heal your heroes and take away some of its healing so be ready to ride each one as much as you can and start a barrage of attacks once the gusts of wind subsides.
Cryo Regisvine [Thousand Winds Temple, Mondstadt]
Unique Drops: Shivada Jade Sliver / Fragment / Chunk / Gemstone, Hoarfrost Core
Possible Artifact Drops: Blood-Soaked, Legacy, Lucky Dog, Gladiator’s Finale, Wanderer’s Troupe, Prayers to Springtime

Regisvines actually look like gigantic versions of whopperflowers. While having different elemental affinities and sets of moves, both of these elite bosses share some characteristics. For starters, regisvines always have a weak spot at the base of their bodies that can stun them if hit with enough damage. These weak spots can be vividly seen as it continuously glows. Initially, when their heads fall into the ground, their weak spots are on their heads but on subsequent stuns, their weak points will be randomly place on other spots that can only be clearly hit with bows.
Fire and lightning are powerful elements against ice elemental creatures and Cryo Regisvine is no exception. The melt elemental reaction as well as overloaded will render it more susceptible to damage and any pyro or electro elemental attack can deal more damage to it. It is best to save elemental skills and elemental bursts for when regisvines are stunned but using either ensuring that it hits the regisivne’s weak spot works best.
One of Cryo Regisvines most basic attacks is launching a trio of cryo spikes that burst from the ground towards you. Simply moving to the side will dodge the attack but the important note to keep in mind is that it can launch this attack 3 times. You will notice a glimmer of light shine across the regisvine’s leaves indicating it is about to attack so in-between these shots, you can squeeze in some damage and move out of the way once the leaves start to shine.
If Cryo Regisvine’s stems move to its side and start to glow, it will unleash twin ice beams that will cross on your exact location. These can deal huge damage but otherwise easy to avoid by running sideways away from the attack.
As ice crystals begin to form around Cryo Regisvine, you should know that what happens next is that homing cryo darts will soon appear to start chasing you around. With 4 darts appearing on each of its sides, 8 darts will pursue you in one attack and Cryo Regisvine will do this 3 times, one after another. It will be difficult to dodge this attack through walking so it is best to save some stamina for running while it launches this attack. Once you are cleared after the 3 shots, you can close in and chip in some attacks.
When Cryo Regisvine starts to charge up its ice powers as ice particles form around it, blue pillars of frost appear within the battle arena. The falling glimmer of ice will not deal any damage to you but once they hit the ground, an explosive burst of cryo shards can deal a lot of damage within a small AoE. Once you see the AoE, it will be easy to steer clear of the rest and these showers of ice also follow you to some extent so constantly moving around will help you avoid being hit by them.
At around 50% HP, Cryo Regisvine will unleash a powerful ice beam around the entire arena, freezing its outer radius. Beyond the initial damage of the ice beam itself, stepping on the frozen grounds will cause continuous damage. It takes about a full second for ryo Regisvine to charge up for this attack and you will notice the spectacular glow in its head before it unleashes the ice beam. Moving a bit towards its left side and following its head around as it freezes the field clockwise will help you avoid the beam. Staying close to Cryo Regisvine in this situation, likewise saves you from the ground’s freeze damage.
Electro Hypostasis [Cape Oath, Mondstadt]
Unique Drops: Vajrada Amethyst Sliver / Fragment / Chunk / Gemstone
Possible Artifact Drops: Instructor, Legacy, Prayers of Wisdom, Curative, Lightning Prism

Just like Anemo Hypostasis, Electro Hypostasis is invulnerable when the 8 cubes surround it. For the most part, the only opportunities to deal damage to it comes after it has launched an attack. Any form of attack is useful against the hypostasis itself but once it summons electro barriers to heal itself, only elemental attacks will work on it. Further, using a cryo skill to inflict a supercharged status can boost its damage intake.
One of Electro Hypostasis’ creative attack skill is the “rock-paper-scissors” move where it takes the form of a rock-shaped fist first to try and punch you out. Constantly moving around makes it easy enough to dodge it, but be sure to always stay ready for the other 2 attacks that follow. There will be a short period of time afterwards to give you some opportunity to attack.
Another common attack from Electro Hypostasis makes use of the cubes to spin fast and form a drill construct that does a straight dash towards you. It is fairly easy to dodge as well and what follows is a continuous barrage from each cube that shoot themselves towards you. Continuously moving until the last cube hits the ground works well so be ready to move in closer as the hypostasis lowers itself to the ground for some beating immediately after.
Once the 8 cubes form a circular pattern on the side of Electro Hypostasis, you shoul know that it is ready to unleash a continuous beam of electro rays in a counter-clockwise direction. Note that only 4 of the 8 cubes will be firing so there is ample space in-between the lasers where you can move in. The closer you are to the center, the shorter the distance you need to walk or run in. Once the beams extinguish, you can start pounding on Electro Hypostasis.
Electro Hypostasis has a visually confusing attack that seemingly spray cubes along the ground randomly. Once the cubes start rotating below the hypostasis, you should move farther from it and more easily be able to dodge the cubes by moving left and right. Electro hypostasis will be spraying cubes in a clockwise pattern for about 10 seconds and if you can manage to count in your head for the duration of the attack, you can identify the right time to close in as the attack ends.
When Electro Hypostasis is close to expiring, it will lock you in an area with an electro barrier. Within it, bolts of lightning will randomly drop down from the sky and as intimidating as it looks, especially in an enclosed space, keeping your eyes on the ground makes the series of attacks easy to predict and dodge.
With its health at around 20% or below, Electro Hypostasis will summon a trio of electro prisms as a last ditch effort to heal itself. These constructs are invulnerable to normal attacks and can only be damaged by elemental attacks. Saving up your elemental skill or elemental burst for this is a surefire way of winning and, if you can afford to, switching around all characters to deploy available skills will be greatly helpful.
Geo Hypostasis [Guyun Stone Forest, Liyue]
Unique Drops: Prithiva Topaz Sliver / Fragment / Chunk / Gemstone, Basalt Pillar
Possible Artifact Drops: Instructor, Legacy, Curative, Gladiator’s Finale, Wanderers Troupe
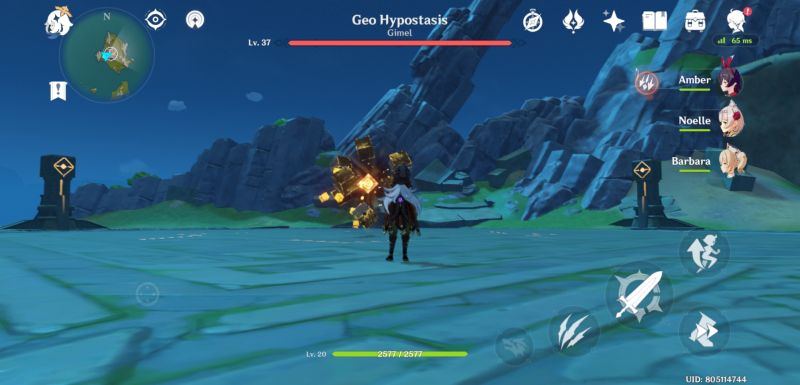
Geo Hypostasis is perhaps the most defensive of the elite bosses in that it uses a lot of constructs that you need to destroy on top dealing damage to it at every opportunity. The rock pillars are tough to destroy but like most obstacles is largely susceptible to attacks from a claymore-wielding unit. The geo cubes that appear near it should always be disposed of first as these cubes can render Geo Hypostasis invulnerable or help it unleash powerful attacks.
Geo Hypostasis’ basic attack will have it spit geo bullets towards you but you can easily dodge it in an open field. As there may be rock pillars in the area, you can hide behind one while also taking it down. Note as well that while Geo Hypostasis is atop the geo pillar that you destroy, it will be staggered and be vulnerable to attack. While you want to consistently be working on destroying the rock pillars, take opportunities to do so as well while Geo Hypostasis in on top of one.
As Geo Hypostasis floats atop one of the stone pillars, you will notice a stream of light flow down to the pillar. When a change in the pattern appears and light quickly moves down across the rock pillar, a pulse will be unleashed that will knock you away from it and dealing a bit of damage. Instead of moving away from it, though, it is best to squeeze in as many attacks as you can especially if you are close to destroying the pillar while the hypostasis in on top of it.
Geo Hypostasis will emit a stronger, more dangerous pulse from each of the pillars in the battlefield. You will know that it will come when a geo cube appears beside the stone pillar at the center of the ring. It will be very difficult to steer clear of the pulses unless you step off the arena but once you destroy the geo cube, the attack ends.
Geo Hypostasis can also cast a rain of rocks just like Electro Hypostasis’ lightning storm. In the same manner as well, checking the ground for marks as to where each attack will land greatly helps to avoid getting hit. You can still squeeze in bits of damage to the pillars or to the hypostasis but it will be challenging.
Once Geo Stasis only has bits of HP left, it will summon 3 geo pillars that you need to destroy quickly. If you fail to do so, Geo Stasis will replenish some health but if you destroy all 3 fast enough, then it will only take a couple of hits to finish off this elite boss.
Oceanid [Qingce Village, Liyue]
Unique Drops: Varunada Lazurite Sliver / Fragment / Chunk / Gemstone, Cleansing Heart
Possible Artifact Drops: Blood-Soaked, Legacy, Prayers of Destiny, Adventurer, Gladiator’s Finale, Wanderer’s Troupe
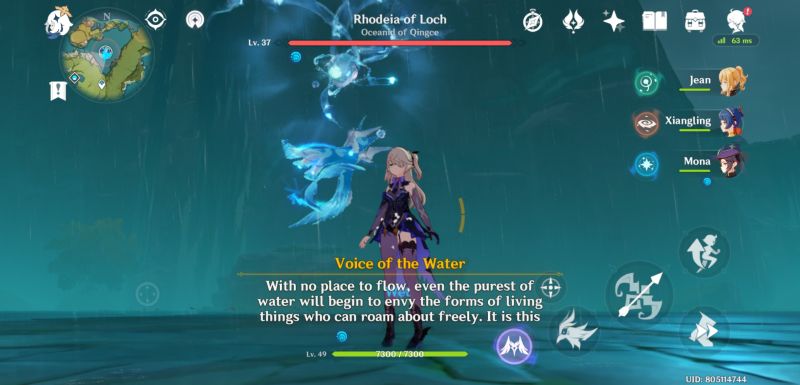
From this elite boss’ name, you can already tell that it is going be a battle that involves water and as you close in on Oceanid’s location, the pouring rain that keeps the area and everyone within it wet, will be the final confirmation that it is a hydro elemental battle. Oceanid’s appearance may initially look like that it can be hurt, but Oceanid is actually invulnerable to attacks and the only way to beat it is through defeating the elemental creatures that it summons at random.
There are 5 different elemental animals that Oceanid can summon, and some of them come in pairs or in groups, with each one packing its own unique attacks that can hurt you severely. After summoning 2 sets of water elementals, Oceanid will sink 2 platforms in the arena, making it difficult for you to move around the longer the battle stretches, unless you have Lisa who can walk on water.
Although each of Oceanid’s summons can be hurt with any type of attack, electro element users can deal the most damage to each of them. Likewise, water elementals just like the hydro slimes can easily be frozen, so having both an electro and cryo user in your team will help make the battle easier. Some of the summoned elemental animals are difficult or impossible to damage with melee attacks, so being ready with a ranged attacker is also important.
To start off, the water elemental frog can be the most annoying summon from Oceanid, and the most damaging. It can splash water on you from a medium distance and leap right to where you are. For the most part, having a hero who can summon a companion as an agro taker helps in this situation as it is much easier to deal damage to water froggy when its attention is away from you. In any case, there are pauses in-between its attacks so you can always squeeze in some hits. Just stay away from its face as much as possible and attack on its side or back instead.
The water elemental hawks that Oceanid summons work just like flying archers and can damage you with their spit from a certain distance. As they are flying, it is difficult to hit them with melee attacks so eliminating them with a bow user or catalyst user is important.
The hydro crabs continuously spray bubbles at mid range and will be hard to deal with close-ranged attacks unless their attention is not on you. These crabs may not deal as much damage but the rate of fire each one has can be very troublesome. For these elementals, a ranged attacker is also important.
The cranes, on the other hand, seems a lot easier to deal with. Cranes will attack you with water waves directed towards you, and dodging it leaves you time to squeeze in some hits on them. There are a few seconds in-between each of their attacks so after some time, you will be able to easily work with a pattern to attack them intermittently between their hydro attacks.
The water elemental squirrels can move fast but only have short-ranged attacks. It can be hard to dodge their attacks and at the same time counter-attack with a melee attack but they are fairly easy to deal with if you keep your distance with a bow or catalyst user.
The water boars seem to be the toughest of the bunch but move the slowest. Their only way of dealing damage to you is with their charge attack, which can only go forward. They have this typical gesture of real-life or cartoon animals that are about to charge, so it is very easy to predict when they will start charging at you.
Note that there is an invisible time limit within which you must dispose of Oceanid’s minions once they are summoned. If you fail to eliminate the water elementals fast enough, Oceanid will launch a fast moving water sphere that travels the ground and hits you like a train. Likewise, avoid letting any of the water elementals fall into the water around or within the arena, in case some platforms have been sunk by Oceanid, as they will respawn back in the battlefield with full health.
Pyro Regisvine [Cuijue Slope, Liyue]
Unique Drops: Agnidus Agate Sliver / Fragment / Chunk / Gemstone, Everflame Seed
Possible Artifact Drops: Blood-Soaked, Instructor, Prayers for Illumination, Adventurer, Gladiator’s Finale, Wanderer’s Troupe
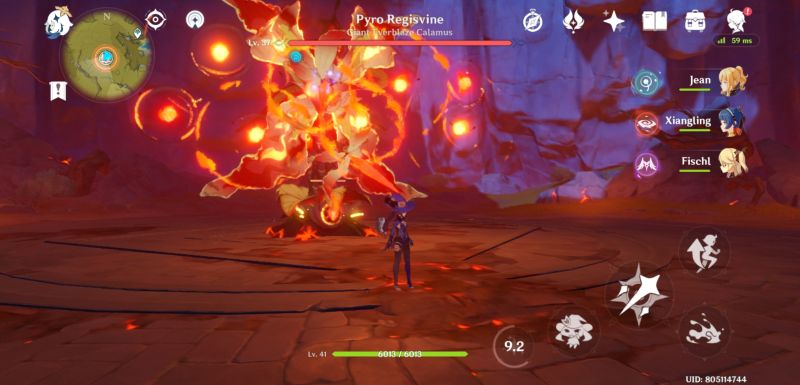
Like Cryo Regisvine, Pyro Regisvine’s elemental affinity makes it vulnerable to a certain element and in this case, hydro elemental heroes are on the spotlight. Anything wet becomes more susceptible to elemental reactions like being frozen or electro-charged, so having a cryo user and an electro user in your party will help as well.
One of Pyro Regisvine’s attacks combine homing fire missiles with flame spikes that run on the ground. The fire orbs that appear on the regisvine’s sides stay afloat for a while before they home in on your location, giving you a head start to start dashing to the sides. Pyro Regisvine will unleash two sets of homing fireballs, before finally sending a trio of fire spikes from the ground to strike at your location. All these can be easily avoided if you move around Pyro Regisvine and once you make it past the final stretch of this attack, you can chip in some of your own attacks until you see it ready to strike once more.
Once Pyro Regisvine’s leaves start straightening to its side and glow brighter than usual, it means that it is ready to let a rain of fire strike down on you and the entire arena. Each strike’s area of effect can be seen with its obvious glow, although it is fast enough that simply walking about will not be enough to avaoid it. It is best to keep running once you see the the flame-lit circles pop up while keeping an eye as well on the area where you are running to. Once the rain of fire comes to a halt, there will be a brief moment when you can hit Pyro Regisvine with some attacks.
If you see Pyro Regisvine with its head staring on the ground, the next thing to expect is a quick fire spike attack that travels through the ground to where you are. A quick side step will dodge this attack but if Pyro Regisvine is still staring at the floor afterwards, it means he will do it again, and up to a third time. You can attack in-between each shot but have very little time to do so. Once it finishes with a trio of attacks, there will be a bit more time to deal it some damage.
With Pyro Regisvine’s stems or arms stretching a bit to each side, it will barrage you with a machine gun-like series of fireballs that home in on your location. Constantly moving will help you to easily avoid it and running towards one side works best. A total of 16 shots will be made, 2 at a time, which means that if you run on either side, you can swoop in a bit closer towards the end of the barrage to start with a counterattack sooner.
Similar to the homing missile and fire spike combo we mentioned earlier, Pyro Regisvine can also follow up the homing fire missiles with an exploding plant bomb that can deal damage as well as knock you away. The plant bomb will cause an AoE damage when it hits the ground and will explode a second time after a short while. You will know that he is going to throw one with the charge animation so it is best to continue running to the sides once he does.
These 6 elite bosses sufficiently cover each hero’s needs as far as ascension materials go but it doesn’t mean that no new elite bosses will be added in future updates. We may yet cover the other bosses in a future guide as well but for now, though, this is where our Genshin Impact boss guide ends. We certainly hope that every bit of tip and strategy we shared with you in this guide will level up your performance in your succeeding bouts with each of them. If you have some additional tips, tricks, or strategies you would like to share in addition to what we have provided, you are very much welcomed to lodge them down in the comment area!