Well, heck. Your starship’s engines are burnt out, the wings are in pieces and the hull looks like a cola can after meeting someone’s foot. It’s worth it though: You are on a quest to find the most magnificent being you have ever laid eyes on; Omar, the grandest war machine in the universe, on his way to evolving into that perfected form the Terrans call The Crab! Glimmering red armor, handsome crustaceous looks, and an arsenal to make a battleship blush, Omar’s only minor flaw is that he is yet merely a mechanical lobster as opposed to a crab.
As you go on your adventures to find Omar, you find new heroes to join you, either as mercenaries or as friends. Slowly your ship is repaired, and the hostile local denizens are made non-hostile through various non-verbal yet incredibly coercive means. You fly across the world, and finally, Omar is found. You take a second to bask in his beauty. Afterward, the real fun begins. Evolution is eternal, but it always seems to end in crabs.

Welcome to our Eternal Evolution beginner’s guide! Eternal Evolution is a team-building gacha game similar to Figure Fantasy and Lords Mobile’s hero mode where you assemble a team of Heroes and use them to beat the tar out of all the hostiles who live on the planet you crashed your ship in. Of special note is how Eternal Evolution allows you to consume lower-tier Heroes to upgrade higher-tier Heroes like in Figure Fantasy, and the ability to manually aim Ultimate Skills in combat ala Lords Mobile.
Grinding is especially important in this game, to the point they even added an auto-challenge button so your heroes can immediately go to the next battle without your input if they win a fight. We hope this Eternal Evolution beginner’s guide helps you get a good run with this game.
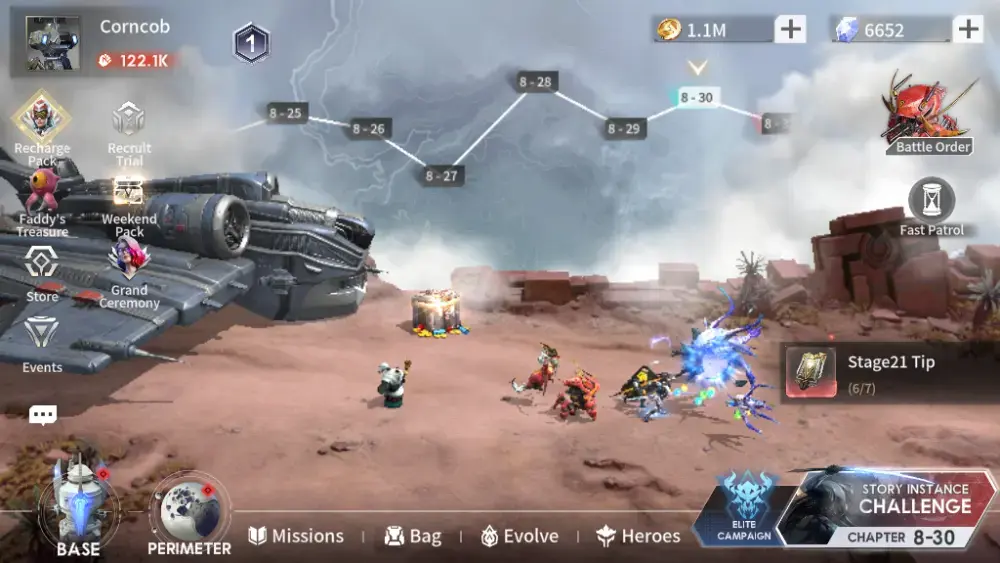
COMBAT BASICS

Eternal Evolution’s combat is pretty similar to that of the hero stages of Lords Mobile in that you can aim your hero’s ultimate skills. That being said, you are unable to control where they move, and unit positioning is highly important, especially for units that don’t do melee attacks as all heroes have a limited range with their ultimate skills. You can get away with using Auto-combat most of the time, but good use of manual aim, especially with AOE attacks, can help your team punch above their weight.
Unit Positioning
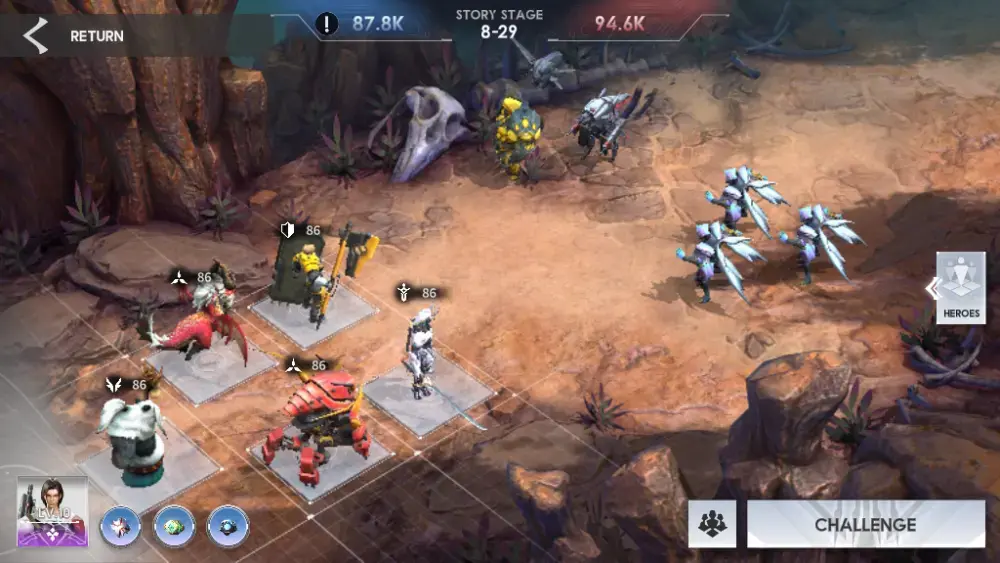
Before every fight, you must position your heroes across your side of the battlefield. Normally, you want the melee heroes, especially tanks, to go in front, and damage dealers behind. Note though that most skills have a maximum range, This means you may want to put some of your attack heroes in the middle so they’re close enough to the enemy to hit them with their ultimate skills and put the ones with the longest range, support units, or healing units in the rear.
Related: Eternal Evolution Elite Heroes Tier List: A Complete Ranking of the Elite Units
That way, they’re close enough to the fight to reach out and touch their targets, while still letting the beefy tanky guys take all the hits for them like the loyal meatshields they are.
Aimable Attacks
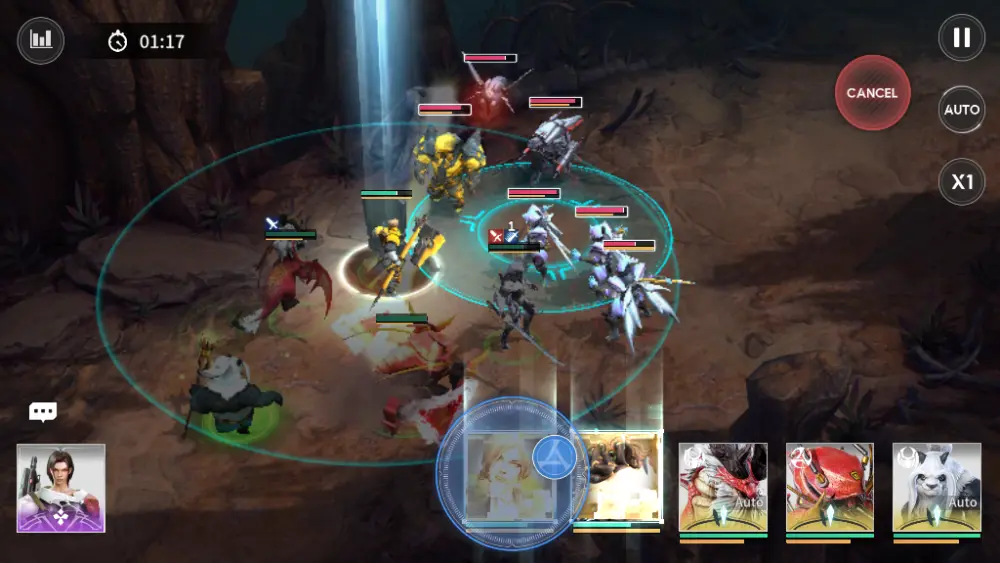
The main mechanic of the game’s combat system is your ability to aim when using your Heroes’ Ultimate skills. To aim an Ultimate Skill, hold down your Hero’s glowing portrait icon, then drag your finger toward where or who you want the attack to hit. There are many different kinds of attacks, such as linear attacks, attacks that hit in a cone or circle, or attacks that pick specific targets.
How an attack is aimed, along with how spammable it is, typically determines whether or not you set that hero to Auto Combat. This mechanic also allows the enemy to do things that would be considered complete nonsense in other games without it being unfair, such as spawning enemies behind your team in the middle of battle. So watch out for that!
Auto Combat
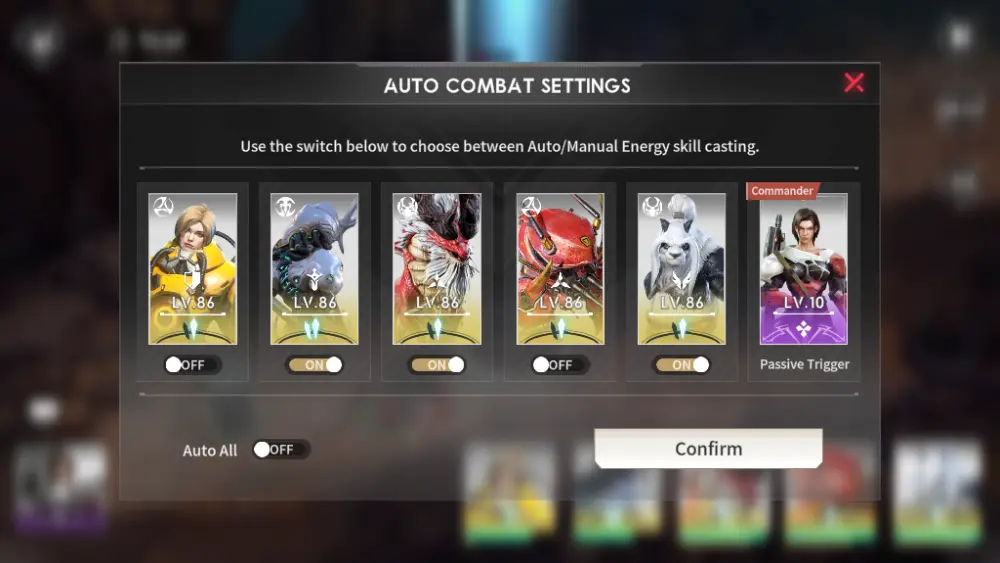
Auto Combat in this gamer is markedly different from most other auto-combat systems in other games similar to Eternal Evolution: You have the option to set certain Heroes on your team to Auto while keeping others manually controlled.
Knowing who to set to auto makes it a lot easier to manage ult usage. You will normally want spammy Heroes or Heroes with attacks that tend not to be worth aiming set to Auto while setting AOE units or single target nukers to Manual so they can either use their AOE strikes efficiently or snipe targets you deem to be top priority.
Healers are also a good choice to set to Auto so they can keep the team topped up without your say-so. This way, you aren’t overwhelmed by a heavy micromanagement workload.
Of course, setting any Hero to auto has its downside: They will always attempt to center their Ultimate skill on a single, specific target. This means they’re much more likely to hit a suboptimal number of targets with their AOEs than, say, if you had manually aimed the shot in the empty ground between multiple foes.
If you’re using Auto, you may want to find a Hero who can cram enemies tighter together. Note in some modes you may be given mercenaries to borrow for the duration of a run: They start out in Auto, but you can set them to Manual like any other Hero.
HERO ANATOMY
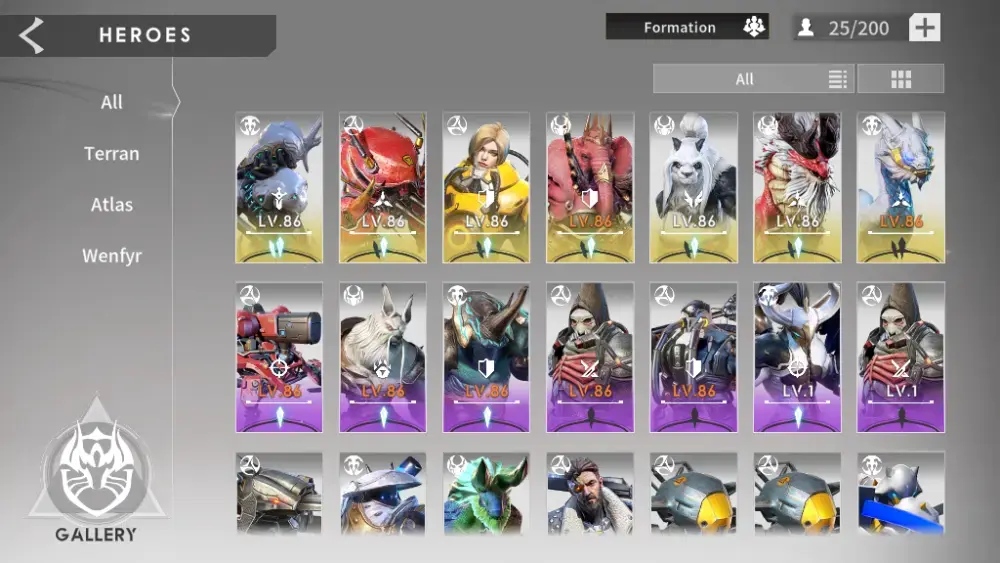
How heroes work in this game isn’t just with their combat skills, as the lower tier heroes are useful for upgrading the higher tier heroes. Each hero has multiple skills and a single ultimate, though all the smaller skills are used automatically through the fight whether or not you set them to manual controls. When building your individual Heroes and their team, have a plan in mind!
Hero Rarities
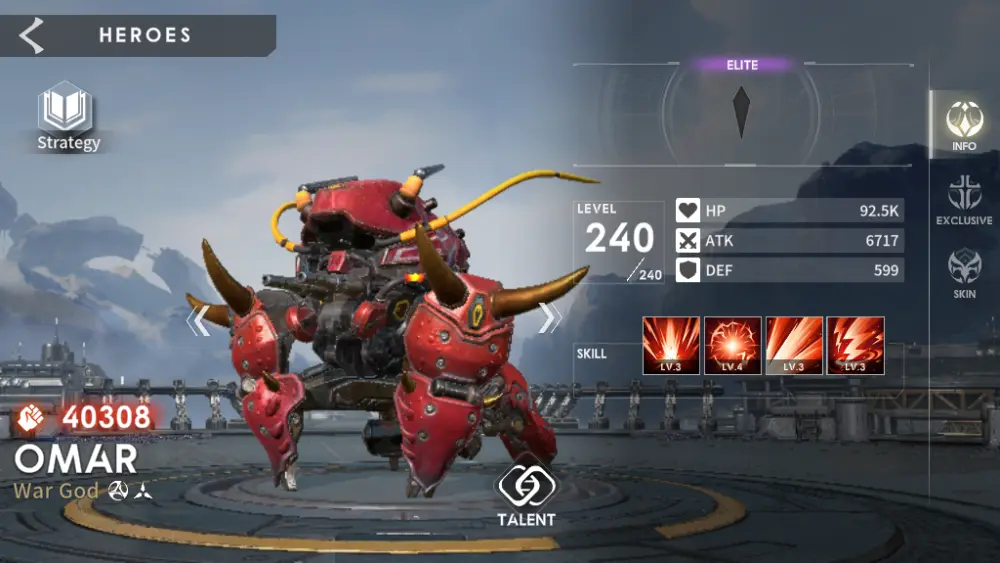
We’ll be perfectly honest, there is no such thing as “Waifu over Meta” in this game, and it is heavily enforced by how character tiers are designed to be used. And, as a personal sore point for our sentimental old writer, the agonizing lack of a Lock Hero button for collectors. While there are up to 6 tiers, you can only draw 3 tiers of heroes: Purple Elites, Blue Rares, and Green Commons.
The rarities work similarly to how Figure Fantasy handles them minus the part where mid-tier units are long-term viable choices there: You can fuse Rares together into Elites, which then allow you to fuse them with real Elites to turn those into Epics (Gold, which you can’t get by dumping diamonds into the Recruitment gacha) or better. Commons have it even worse, being sold off for Dismissal coins to get more Rares to power up Elites.
You will also notice how short-term lower-tier units in this game are meant to be by taking a peek at the Gallery: All units start off with just their Ultimate and one auto-firing Common skill, but Elites get a maximum of 4 skills, Rares get 3 skills, and Commons only get 2 skills tops.
That being said, don’t be afraid to use Rares to fill a slot for a job you need early on: The game allows you to reset a Hero, gaining back everything you used to level them up, though not any dupes you used to evolve them. If you need a healer badly and the game just doesn’t want to hand you any Elite ones, use a Rare one first then give all their stuff to any Elite healers you find later. Commons on the other hand are a hopeless cause.
Team Building
When making a team, it is usually good practice to have a varied roster of damage dealers, front units, and support or healer units, with the type of damage dealer you use being dependent on the task at hand. Speaking of damage dealers, Assassins and Rangers tend to work well on singular targets, while Energy heroes tend to be a mixed bag: Some do good single-target burst damage, while some have AOE attacks.
Make sure also to try and get the team to help each other out: Check the skills of your heroes to see what stat they use to deal damage, and have support or any other sort of buffers raise those stats accordingly. The game also has a useful Strategy button on the upper left of the Hero’s screen, which gives you armor and teammate recommendations.
Skills and Gear
Each Hero has 2-4 skills depending on their initial Rarity, with Commons having a maximum of 2 skills, Rares with 3, and Elites with 4 max skills. Usually, one of them is their Ultimate skill, while they may have 2 types of common skill (basically special attacks they automatically do in the middle of their basic strikes) and a passive.
Reading their skills allows you to more easily prioritize their equipment builds and who to pair with them: the ATK stat doesn’t always determine how hard their skills hit, with characters such as Oisa’s ultimate and common skills getting their damage from her DEF stat instead.
While you may want to build your heroes’ equipment in a unique way as to fit a task you have in mind, the game is nice enough to point out items that might be a common-sense choice for a hero: Any equipment piece that fits a hero’s skill or class gets a Thumbs Up icon when equipped. This usually applies to Epic (IE, shiny Gold) tier or better equipment since that’s when gear starts to branch out into different types.
THE WAY TO CRAB: POWERING UP YOUR HEROES AND EVOLVING THEM
Perfectly crafted teams are all well and good, but even the most well-thought-out battle strategy still needs a measure of raw punch to make it work. After all, the greatest general on the planet won’t be able to do much if their soldiers are all sickly, wear wet cardboard armor, and are armed with nothing but pool noodles and squirt guns. There are many ways to make your Heroes and their gear stronger.
Leveling Up
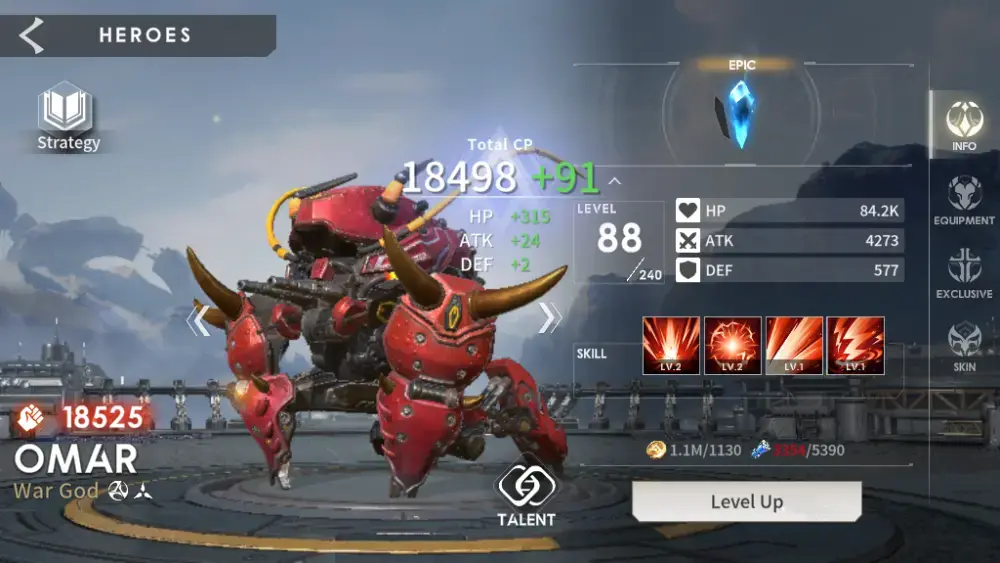
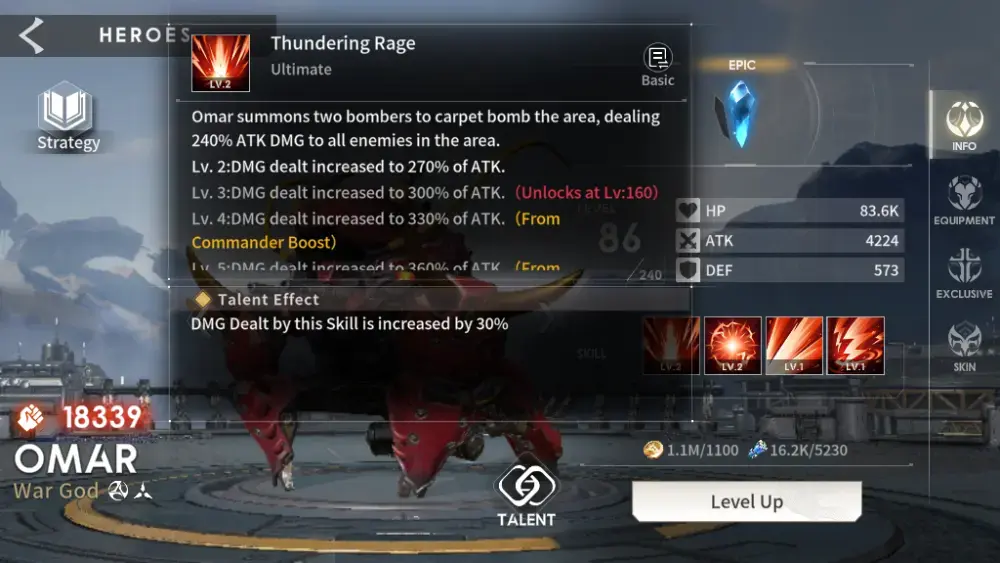
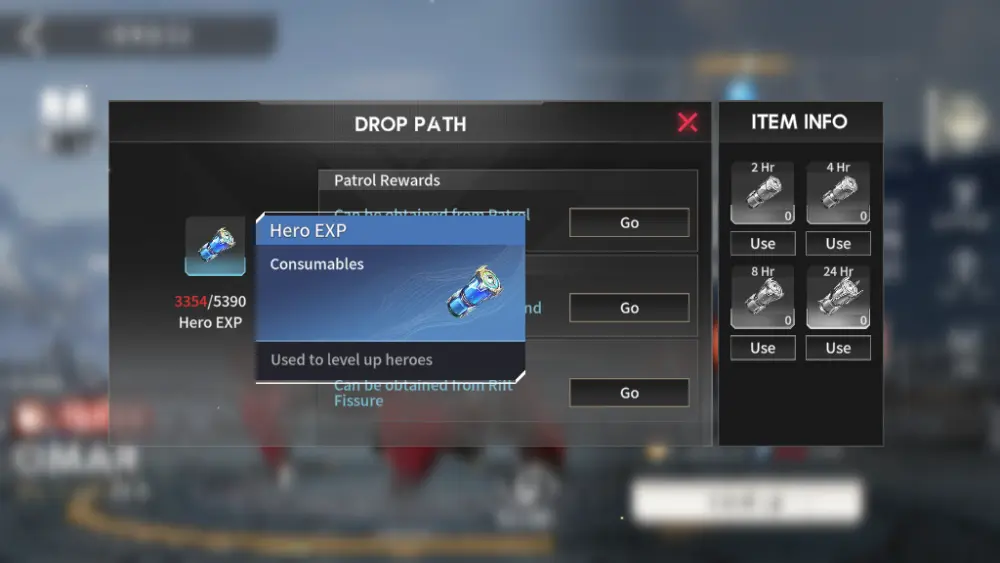
Leveling your heroes up is both the simplest and most important way to make them stronger. All it takes to level a Hero up is Gold, Hero EXP, and every several levels or so, and Soul Rubellites. Dump ’em in, watch the numbers go up, and now your Hero hits harder and can take a hit back.
Once you hit the level thresholds where the Level up button is replaced with the Advance button, your Hero will ask for Soul Rubellites. Advancing a hero will either unlock a new skill or upgrade an existing skill, which is why leveling up is so badly needed to make the most of your heroes.
Hero Evolution

Did the Gacha ruin your day? Did it build your hopes up for a new Elite hero only to dash them against the rocks by handing you a bucket of dupes? Don’t worry, the duplicates can be used to evolve Heroes you own.
Depending on the Evolution rank that happens to be next in line, you will either have the choice of using duplicate heroes of the same rank, or merely heroes from the same faction and with the same rank. This allows you to often use Rares to evolve Elites and higher-ranking heroes since you can evolve those Rares to Elites or higher ranks as evolution fodder. At least, the Rares you don’t like anyway.
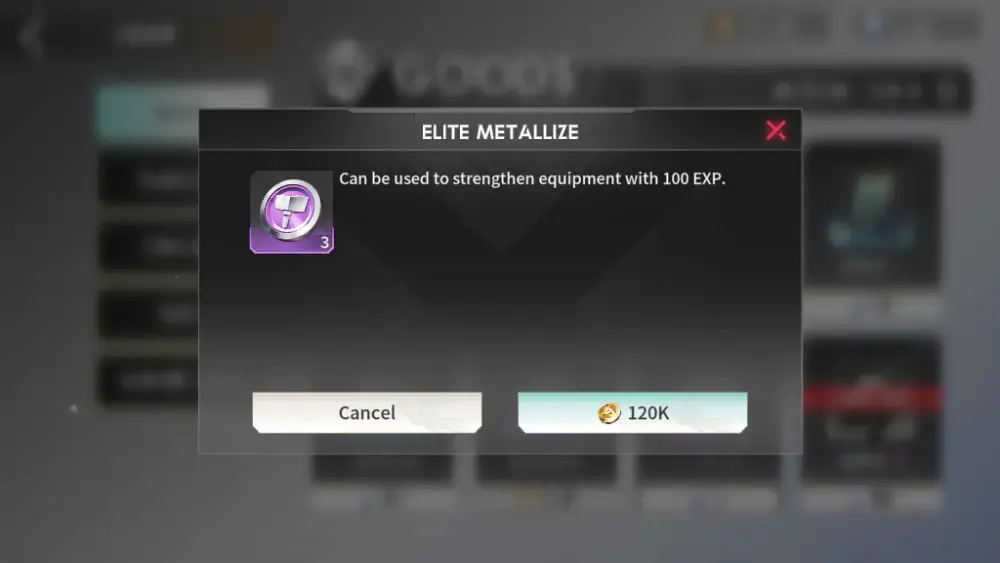
Equipment Forging
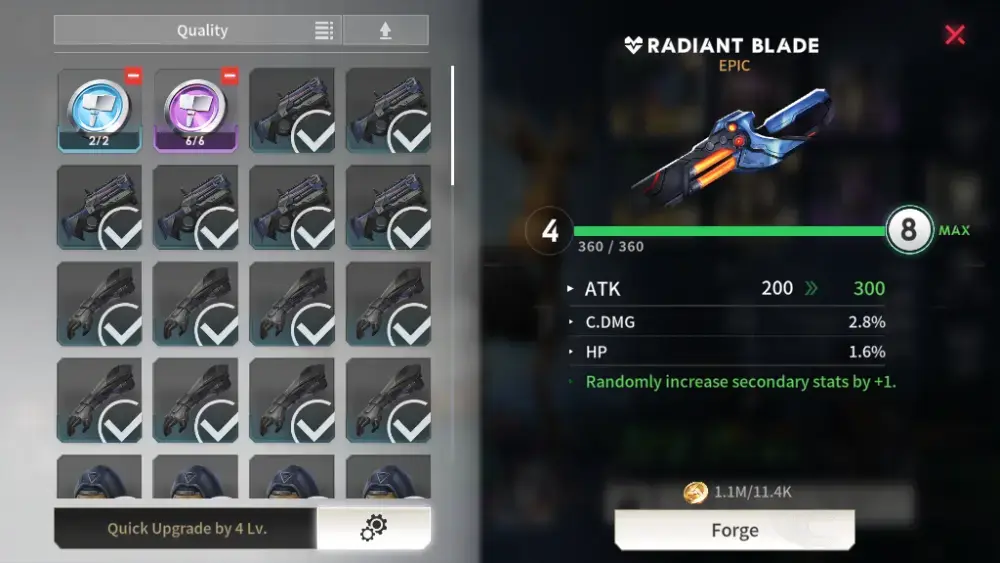
Heroes can be given Equipment. To be precise, 1 weapon and 5 differing pieces of armor. Eventually, you’ll find yourself with a surplus of old junk that you don’t want to equip on any of your main hero squads. You can use that obsolescent gear as material to upgrade the good stuff via Forging.
Go to your Hero’s equipment screen, select a piece of their gear you want to hammer up, and select Forge. Then you can select materials or press the Quick Upgrade button to bring it to a certain level. You can also use Metallize tokens (Little tokens with a hammer symbol on them, with different colors depending on their rarity and effectiveness) to do the same job as old gear.
Make sure you upgrade gear as they offer bonuses hefty enough to outstrip a certain degree of overleveling. In other words, it doesn’t matter that you’re a bit higher level than your opponent if you’re fighting naked!
Common Mooks

Commons are, oddly enough, one of your tickets to Evolving your characters. Common units can be Dismissed, which gives you Soul Rubellites and Dismissal Coins. You already know Soul Rubellites are used to Advance past certain Hero level thresholds, but Dismissal Coins can be used in the Shop to buy Rare heroes. Rare heroes can be evolved to Elites, which can then be used to evolve true Elite heroes who have 4 skills instead of just the Rares’ 3.
Level Inheritance

Early on, you’ll unlock the Inherit structure in your Central Hub. This structure allows you to match the level of new Heroes to that of your 5th highest-level Hero. This is a good reason to distribute levels equally among your main 5-hero band: If those newbies are on par with the rest of your team, this gives you much more leeway to experiment with different squad compositions.
Commanders
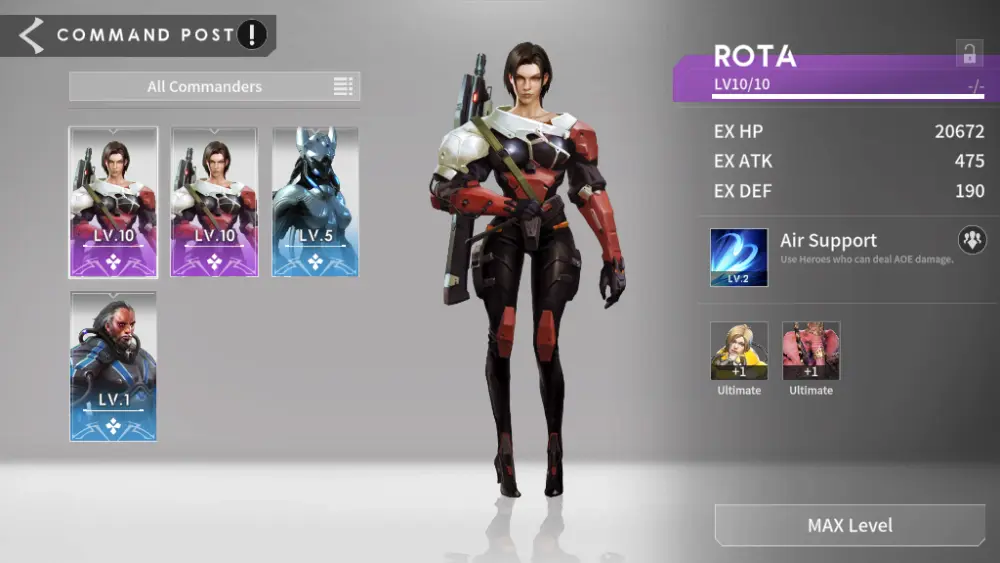
Commanders are essentially an extra Ultimate skill you can equip, which require the use of certain hero types and their Ultimates before the Commander themselves can do anything other than their passive boosts.
You’ll know a Commander is good for your team if you equip them, and a bunch of speech bubbles with the Commander’s face pops up on top of some of your units. That means the Commander can fire off their skill if those guys do! You can access your Commanders through the Command Post in the Central Hub.
Divine Prototypes
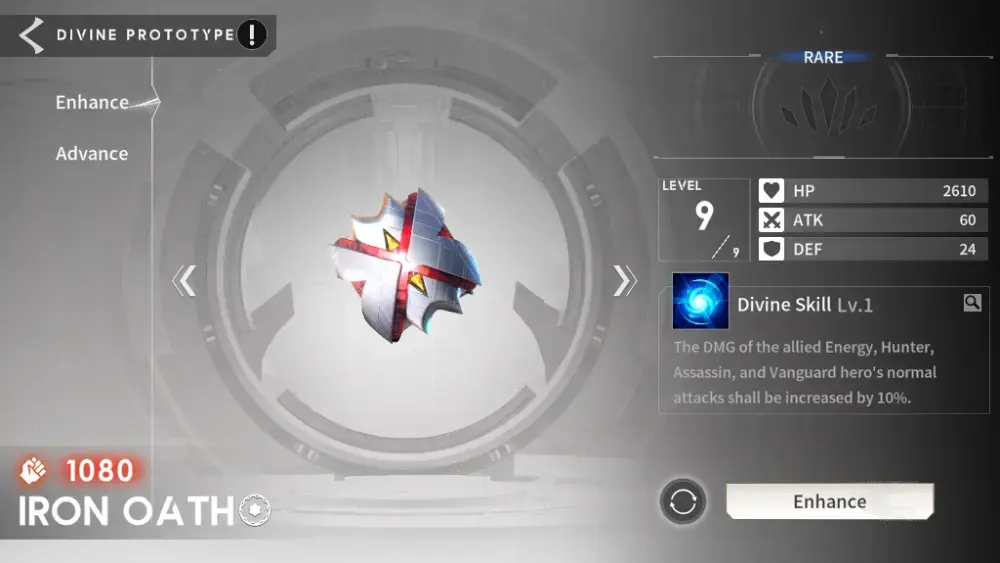
Divine Prototypes are devices you can equip before every battle, up to a maximum of 1 of each of the 3 types, Dominator, Tenacity, and Enlightenment. They each provide some form of passive buff to your team and can be evolved and leveled up much like Heroes using duplicates. You can get them by beating up Guardian Argo from the Tara Dome. You can upgrade them through the Divine Prototype structure in the Central Hub once you have them unlocked.
GENERAL TIPS
There are a few quirks with this game that don’t quite fit into the other categories. Here are the tips for those tips without a home anywhere else in this article.
In The Regular Arena, Be A Bully
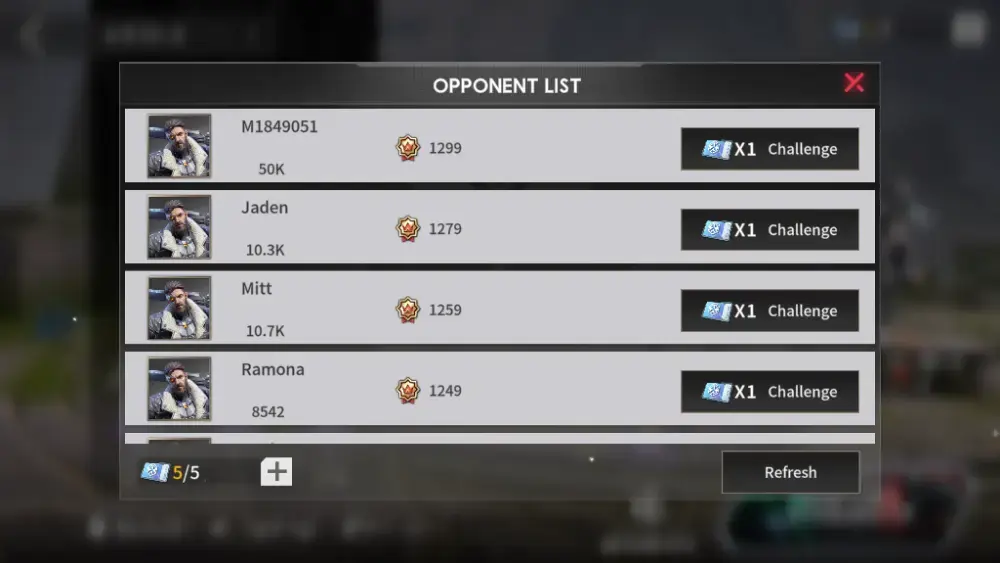
Early on, your priority in the Arena isn’t glory, it’s getting loot. Each win carries a decent reward for minimal effort since you can pick your fights: In the Opponent List, you’re given a handy power level indicator for your enemies, located directly under their name.
Going for numbers markedly lower than yours means you can simply auto-win the match by pressing the fast-forward button. Besides, the game matches you based not on your power level, but on your medal count: You will likely get the same amount of medals by picking on weak teams that are given to you compared to honorably risking your butt on the stronger players!
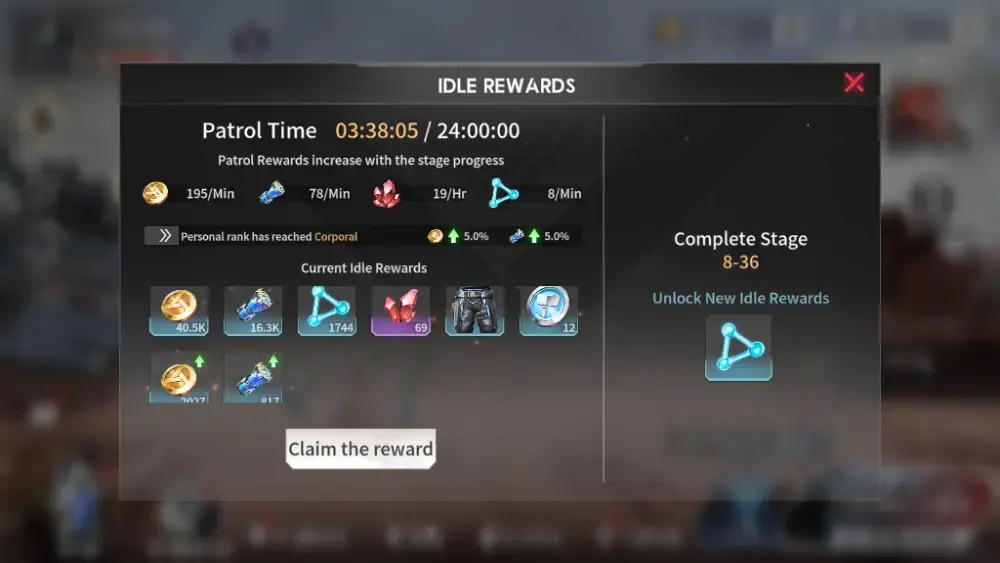
Open Resource Packs Later
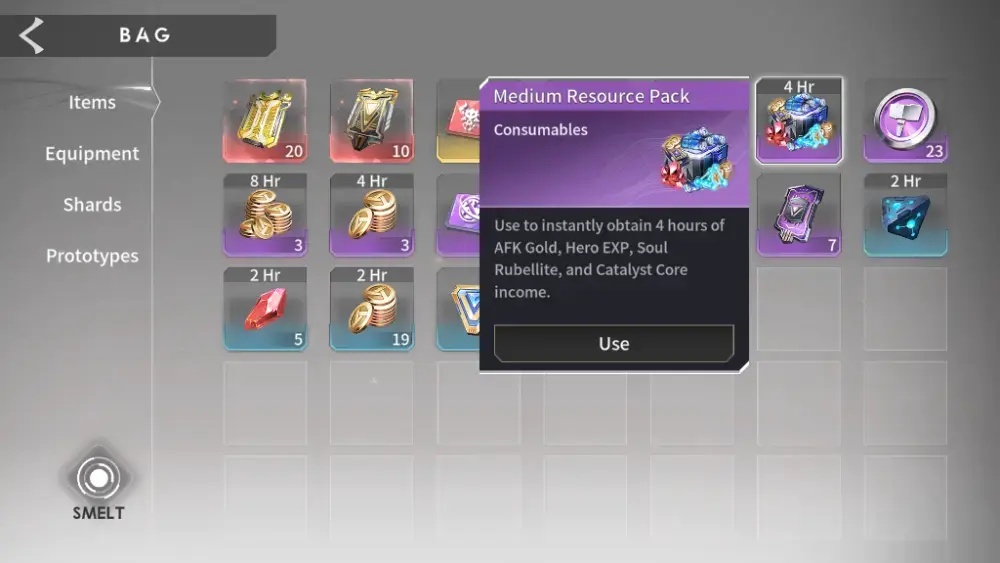
You’ll notice that every time you get a Resource Pack put inside your Bag, the item has a listed number of hours on it rather than a fixed amount of loot. That’s because it’s based on the Idle Rewards chest on the main screen: As an example, an 8-hour Gold pack gives you 8 hours’ worth of Idle Rewards Gold. You will also notice that as you progress through the Main Campaign, your Idle Rewards chest’s payout improves over time.
This means those resource packs are worth more the further you are in the main campaign. Unless you’ve got a deadline of some sort, or you just really want to upgrade your Heroes ASAP and worry about a supply drought later, take your time before opening those resource packs to get the most of them. At the very least, open them at the end of your day after you’ve drilled through some Main Campaign levels, and not right as you log in.
SHOPPING TRIP
Eventually, you’ll unlock the Shop in your Central Hub area. It has several types of shops, one for each currency you unlock, along with the basic shop which accepts Gold and Diamonds. While you will unlock newer shops in the future, here are the ones most important to keep in mind as a new player.
Goods Shop
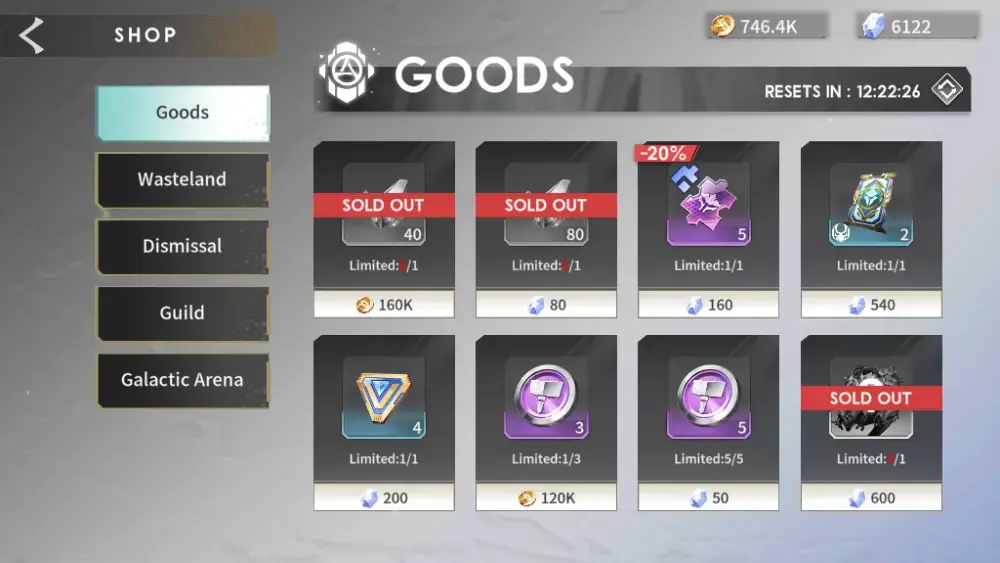
The Goods shop is the first one you’ll see, selling various odds and ends for both Diamonds and Gold. We have a few tips for this one. First, buy everything that costs Gold, since Gold is in great abundance and you will rarely ever run out of the stuff.
Second, buy Soul Rubellites whenever they pop out, even if they cost Diamonds. Soul Rubellite shortages are often what stop you from leveling your Heroes up, and you’ll need as many of them as you can get.
Wasteland Shop
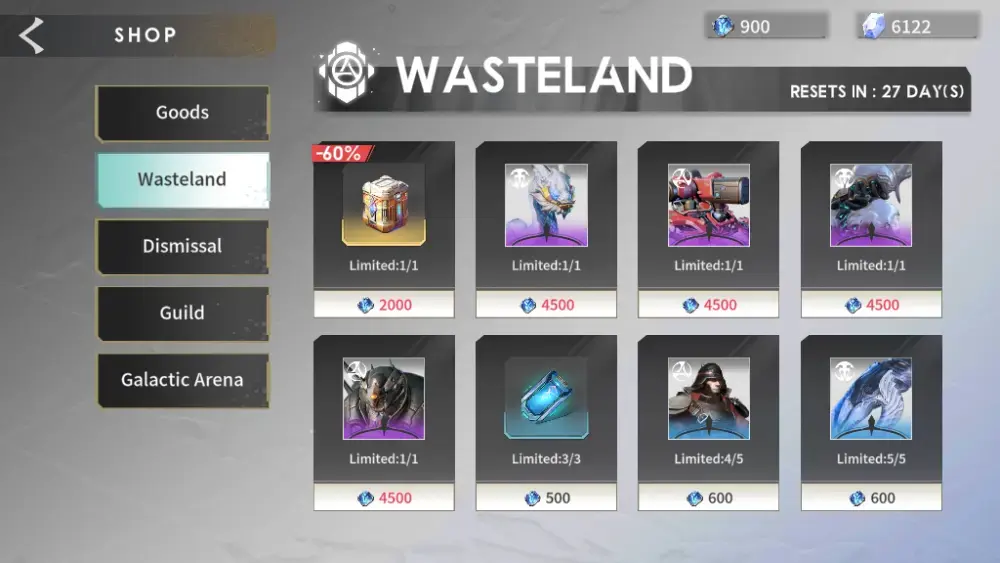
The Wasteland Shop lets you spend the Wasteland Coins you earn after doing Wasteland missions in the Perimeter. This shop sells random Rare hero shards, Rare heroes, and Elite heroes, along with Format Chips to refund core energy from Divine Prototypes. It’s usually best to save your Wasteland Coins for the Elite heroes since the next shop is a very easy way to get Rares to use as Evolution fodder.
Dismissal Shop
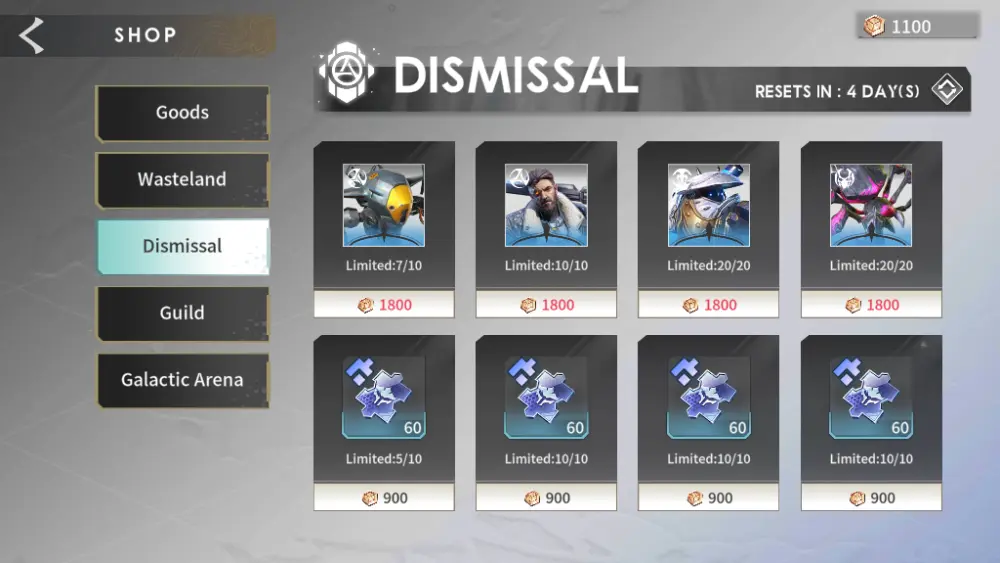
The Dismissal Shop sells Rare Heroes and randomized Rare Hero shards. You buy them with Dismissal Coins, which you get when you tell your Common heroes to cry home to their mommies via the Dismissal Screen in the Evolve tab. This is one of the easier ways to evolve your true Elites, since Dismissal coins are fairly common, just like the Heroes you get them from.
Guild Shop
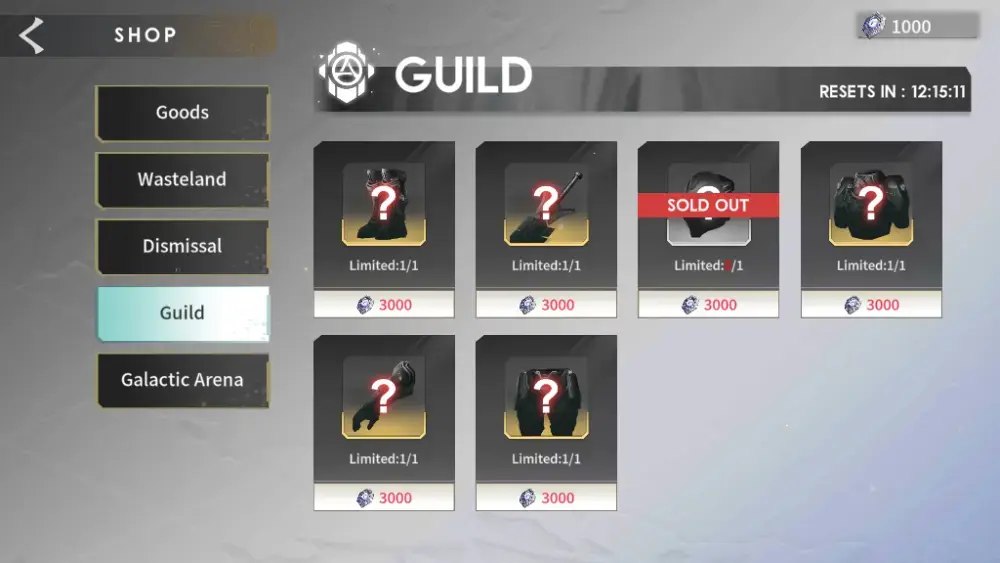
The Guild Shop is your main reason to join a Guild: A Guild gives you access to both this shop and Guild Coins, the currency used to buy things here. Those things are randomized Armor pieces, typically of Epic tier. Before shopping here, check which of your Heroes needs an armor piece so you can buy one for the right slot. Of course, you’ll have to pray you get something that works well with the Hero it’s going to!
Galactic Arena Shop
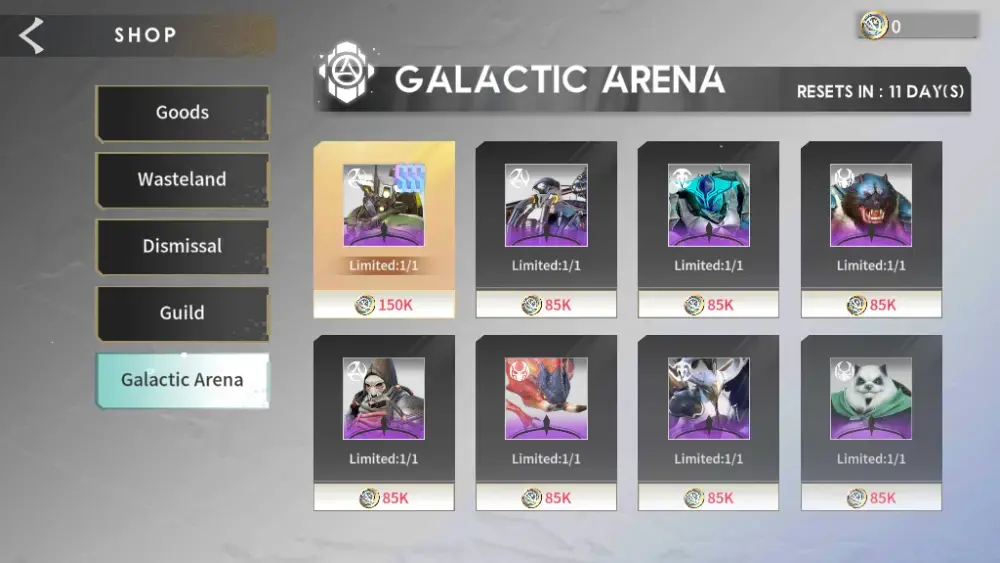
We wouldn’t call this a newbie shop because of its big ol’ price tags and how the Galactic Arena works, but the Galactic Arena Shop is worth a mention. You pay with Star Coins, rewards from the Galactic Arena, to buy its wares. And its wares are all about high-tier heroes and the gacha. Recruitment Cards and Elite Heroes are the name of the game here, which explains the high cost: This is where you go to finally evolve that one guy who’s been waiting for it forever.
THE DAILY GRIND
Once you start playing this game for the long haul, you’ll notice a few daily habits form. Most of these habits involve preparing for another run through the Main Campaign since that’s where the main progression is.
Collecting Dailies
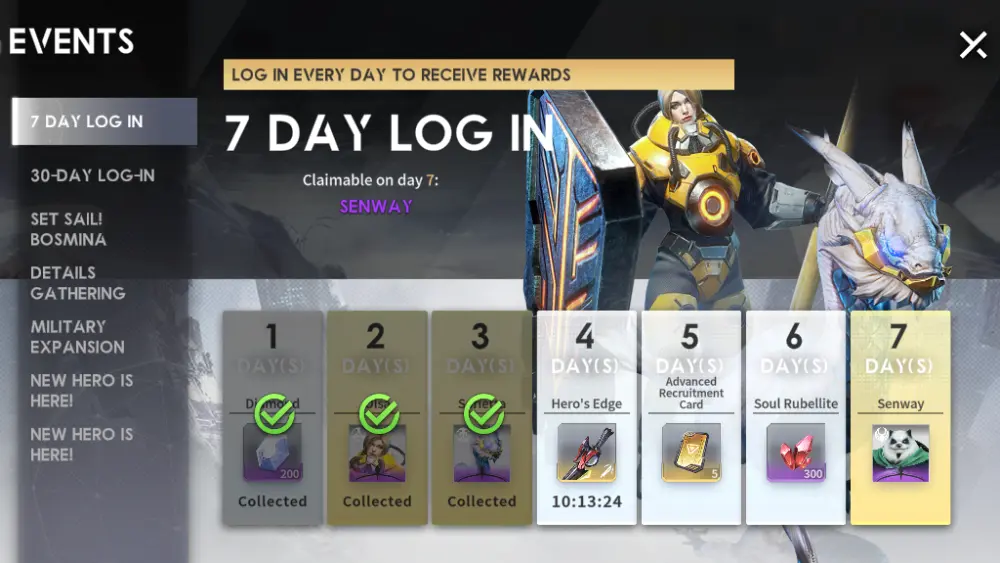
Every time you log in, you should see a bunch of red notification dots everywhere. This means it’s time to check your login rewards for the day, which tend to be scattered haphazardly across your screen. Snap ’em up, because saying no to free stuff is one of the dumbest things you can do in life, much less Eternal Evolution!
Outpost Dispatch
The Outpost is a way to get free stuff, almost exactly like Azur Lane’s Commissions but with more lenient hero requirements that allow you to continue using already dispatched heroes in combat. You take a mission, dispatch a hero to it, and wait until they pry free stuff out of that mission. Having Epic tier heroes maxes out the potential reward for these dispatches.
Friend Tokens and Mail
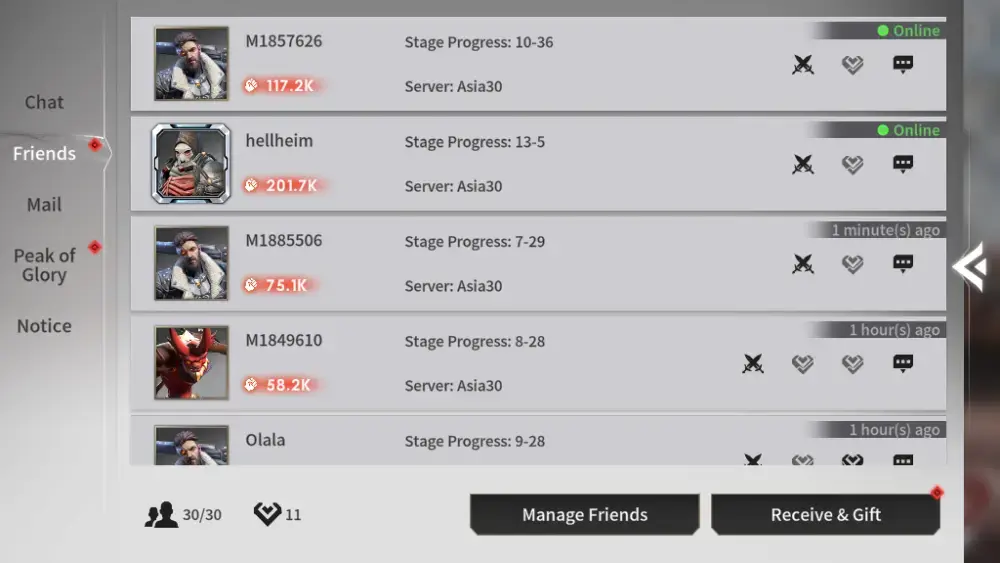
There is one reason to build up a friend list in this game: The Friendship Recruitment gacha. Friends can give each other Friendship tokens, which can in turn be used to recruit in the Friendship gacha. A player can give one token to each of their friends every day, so you receive one token from each friend you have every day provided they are active players.
Every day, check that little speech bubble on the lower left of your screen: That’s the Social tab, where you manage Chat, Mail, and your Friend list. Check both the Mail and your Friend list every day. The Friend List for tokens, and the Mail in case the devs gave you free stuff and maintenance apologems.
Daily Quests
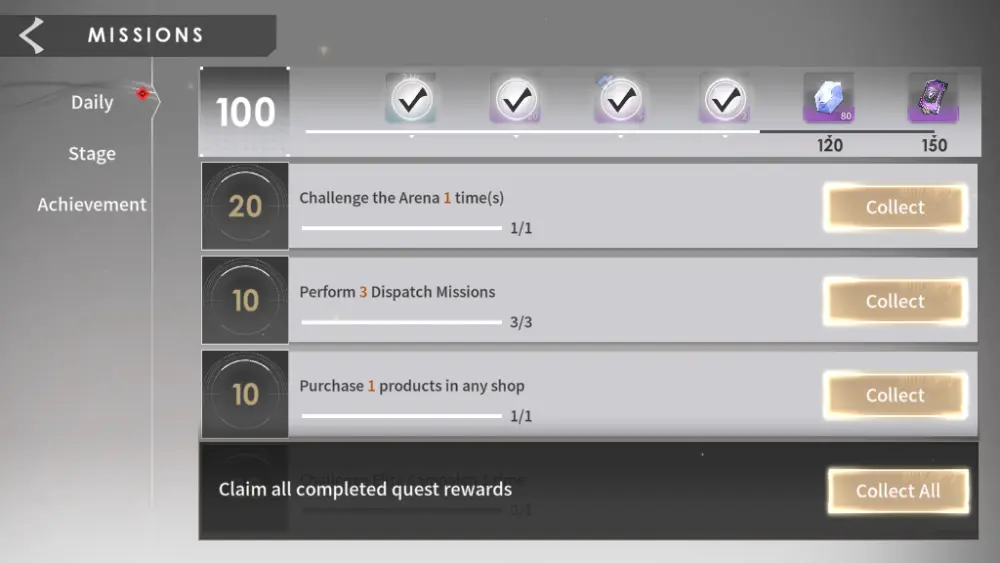
If you aren’t sure what to do, checking your Missions tab’s Daily screen is a good start to the day. It offers you various rewards for finishing tasks such as Diamonds, Recruitment Cards, and Soul Rubellite. Do these every day since they’re often quite easy and often just require you to attempt something rather than win a fight.
Another Round Against The Main Campaign
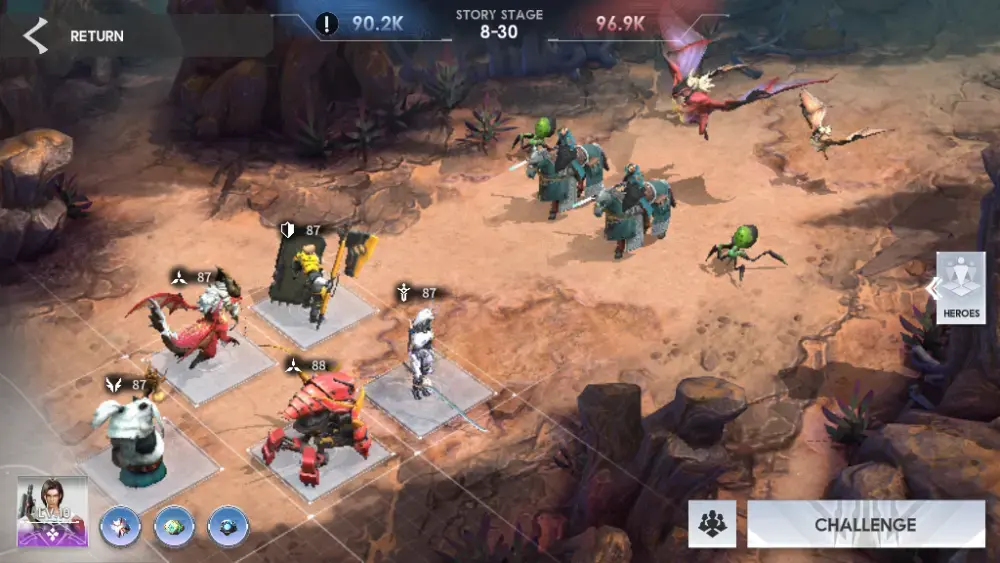
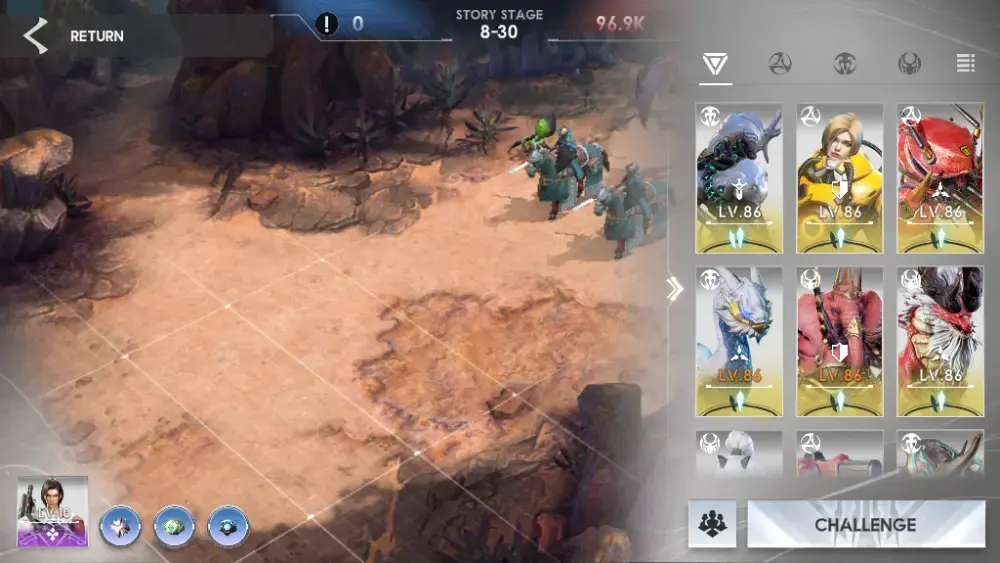
Once all is said and done, give the Main Campaign another go at it. After all the grinding you did for the day, you’ll notice your team can overwhelm the enemy, especially early on when powering up is fast and easy. Grind this out until your team runs into a brick wall you can’t even manual-aim through. Once they reach a point they can’t handle, that’s usually a good time to log off for the day!
Elite Campaign, Elite Pain
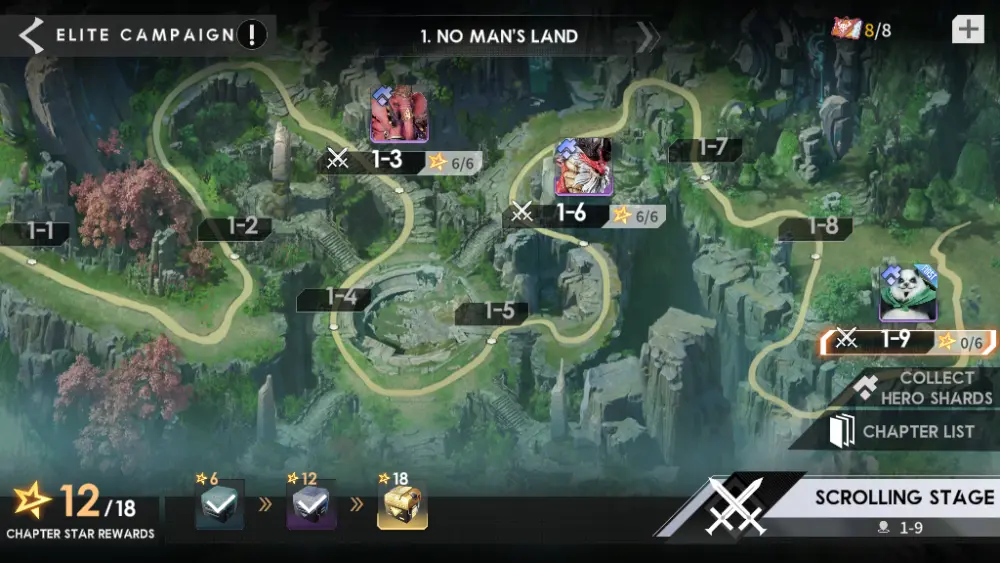
The Elite Campaign is one of the several reasons the Level Inherit system is so useful: To finish one of its missions usually requires two teams at a time since they consist of two fights each. Oddly enough, unlike the Main Campaign, its mission layout is more similar to other gacha games of this type, having a star system dependent on keeping your team members alive to be graded for your wins. This is a good source of Elite hero shards, so use your daily allotment of Elite Campaign tickets.
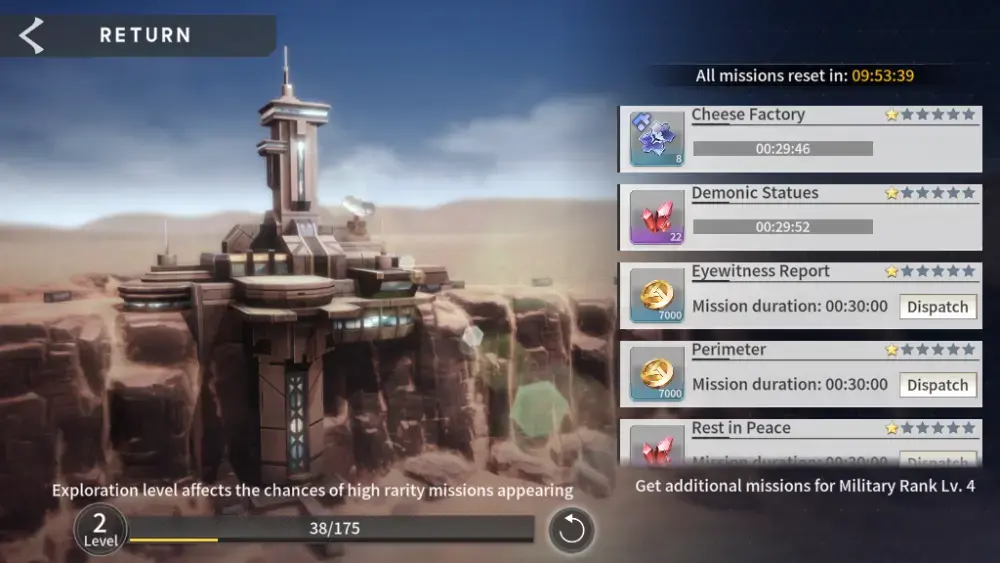
PERIMETER PATROL
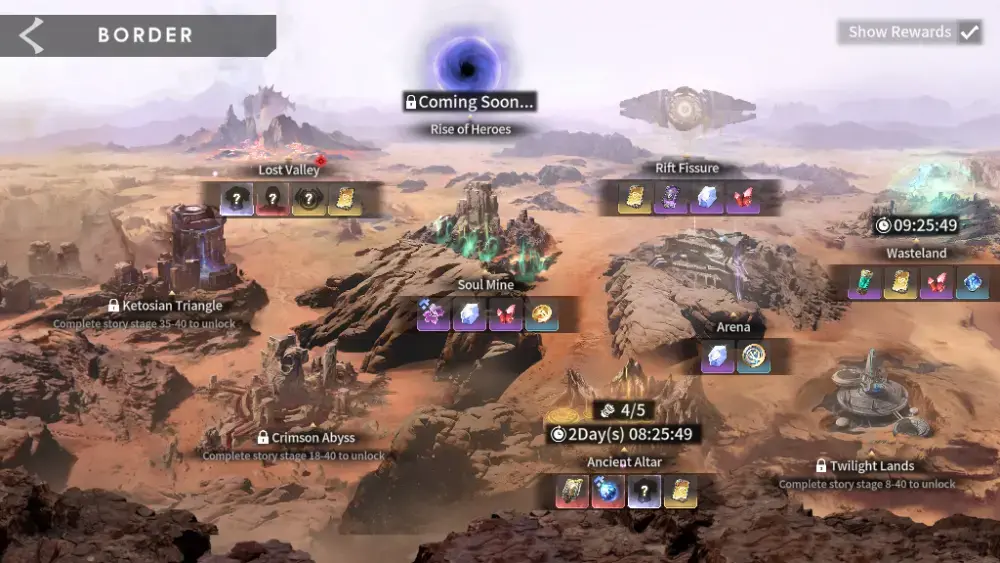
The Perimeter is where you go for your daily grinding needs. Each place in the Perimeter offers either a limited number of tries or a progressing grinding area which gets more and more difficult but offers ever greater rewards. Make sure you visit this screen every day, use up all your daily attempts for the limited missions and go as far as you can in the endless ones.
Soul Mine
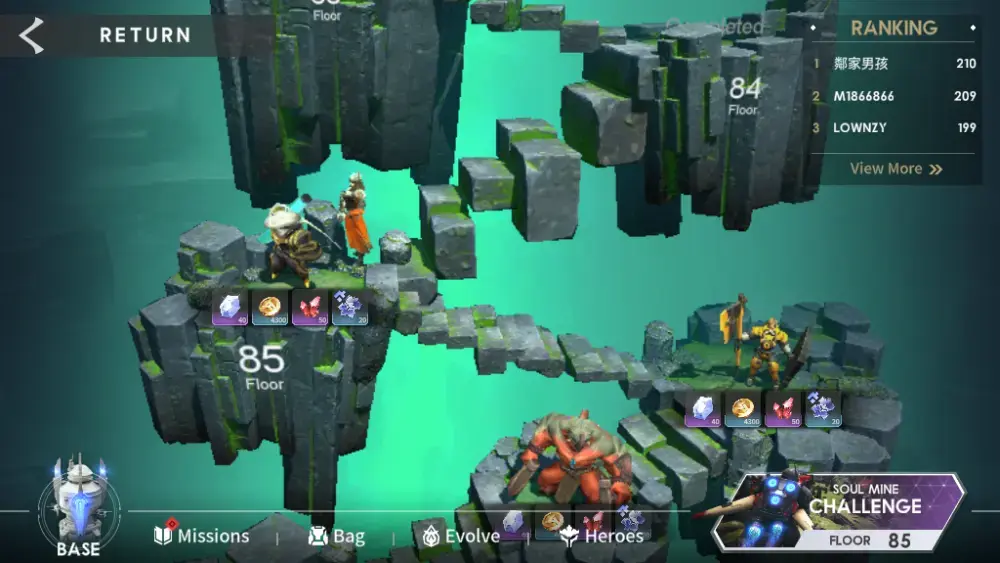
The Soul Mine is your one-stop grind for Soul Rubellite. It’s a towering set of floating rock islands with tougher enemies as you go deeper, similar to many other Tower-type grinding areas in games such as Cookie Run Kingdom’s Tower of Sweet Chaos, except it goes down rather than up.
It isn’t just Soul Rubellite that drops up here though: A lot of the floors also drop Random Rare Shards in packs of 10, meaning you get a Rare hero every 6 floors you climb! This is also a good way to tell how strong your team is since eventually, you will run into some bad guys you can’t beat until you level up again.
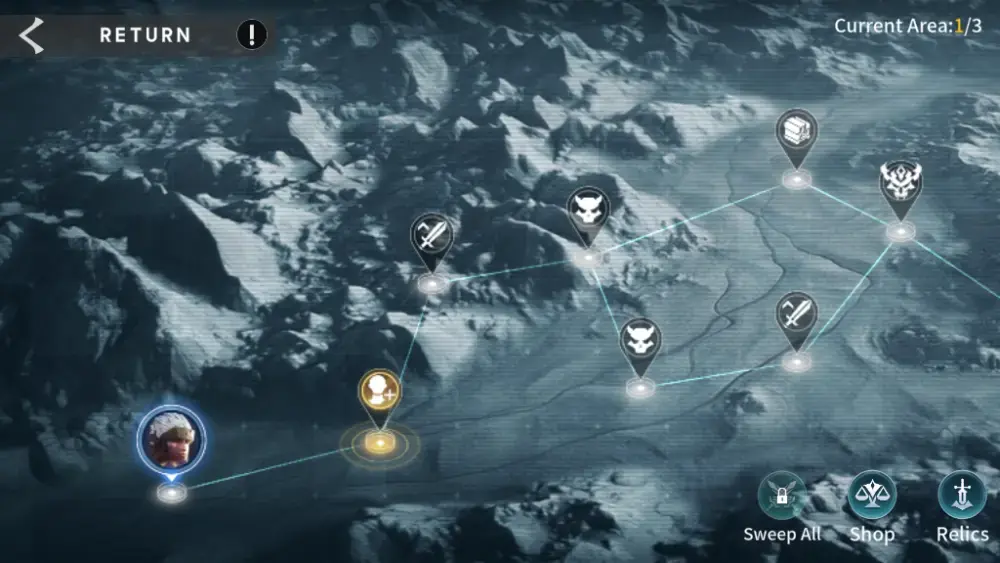
Rift Fissure
One of the tougher places to go especially for beginners, the Rift Fissure is an exploration-type mode where you fight enemies on a hex-grid map while playing out a small side-story as you progress through the level. Beyond just looting the local treasure boxes and committing multiple acts of unprovoked violence toward the many residents of the map, you will also solve puzzles to get past obstacles you can’t just murder your way through.
The gaps of strength between different levels are fairly high, so this is usually one of the last places you go through, usually after you’ve done your grinding. It’s worth it though: While it isn’t exactly grindable, you can treat it as an entirely separate campaign and play it for its juicy fixed rewards, which tend to be high-tier equipment. It’s probably gonna be here where you find your first or second piece of Epic gear.
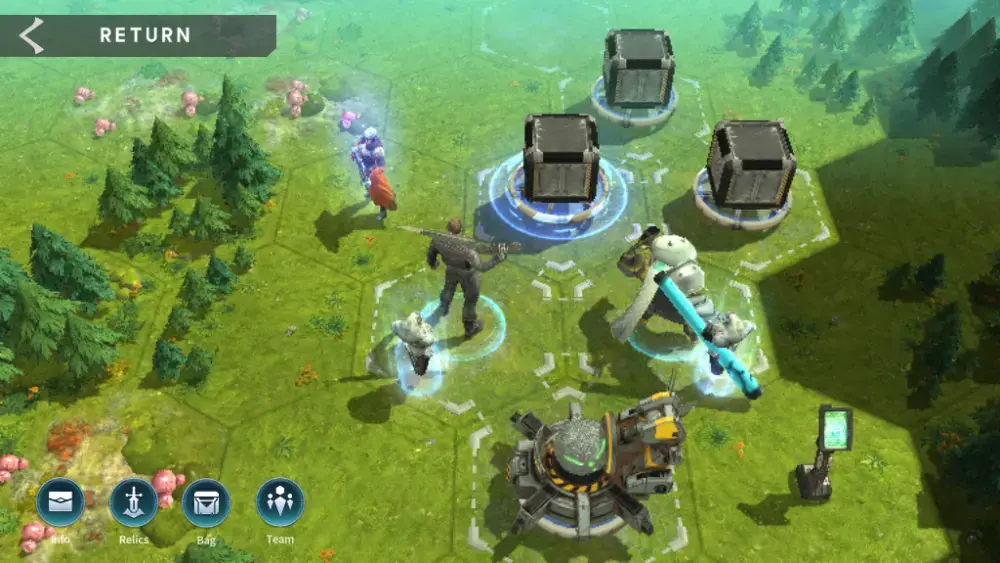
Wasteland
The Wasteland is a once-a-day challenge where you go through a map, choosing between paths that take you to fights, buffs, or free loot. The matches are typically tailored to be slightly higher than your current power level, but not enough to be overwhelmingly difficult. Sometimes, you can even run into mercenary Heroes you can borrow for the duration of your daily Wasteland run, useful if you have some underleveled units in your team.
Ancient Altar
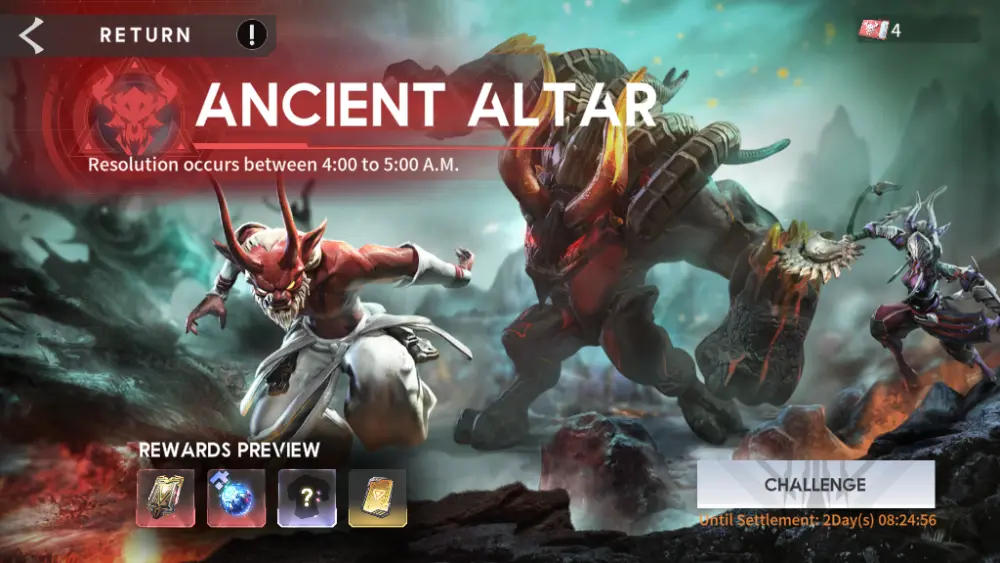
The Ancient Altar is a three-stage boss fight against the boss and two of its mooks, with a large variety of random rewards based on how much damage you deal to the boss at the end. The boss has one skill per mook under it, and if you blow out a mook stage’s HP bars, each bar contributes to the boss’ skills getting weakened.
You will need 3 teams total, 1 for each of the 2 mooks and one for the boss. Ideally, you’ll save your strongest team for the final boss. As a newbie, you’re not expected to win, but doing damage will get you rewards anyway so have at it!
Arena
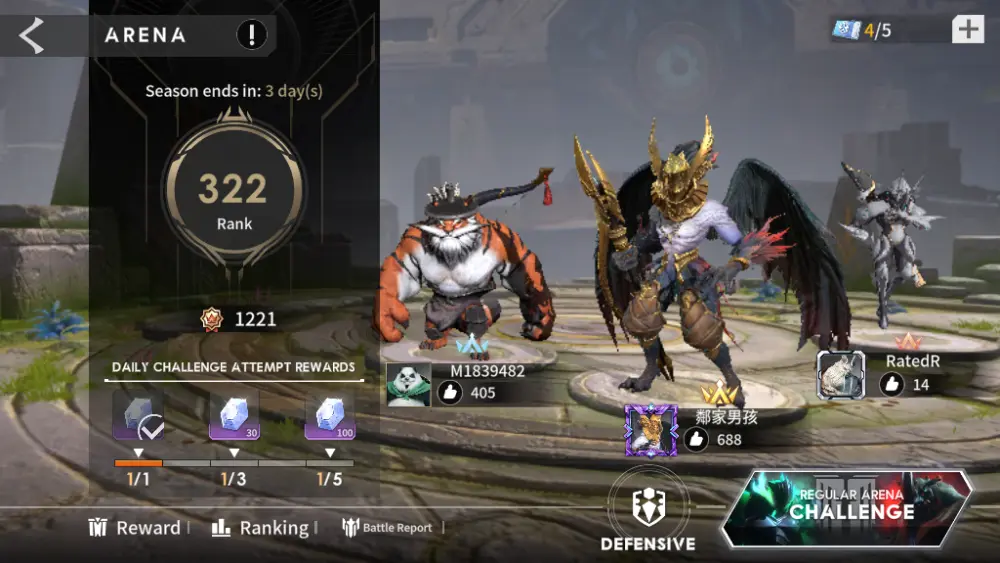
The Arena is where you go to fight other players in what is essentially a multinational training exercise between the three factions. You set up a defense team and fight other teams with your own. To keep things fair, both you and the opponent you picked, who may be offline, fight in full auto combat, making the Arena a true test of your team-building strategies as opposed to a testament to your good aim.
Far more important than bragging rights and that feeling of victory is a purely material reward! Getting a higher ranking typically rewards you with Diamonds early on, then with Advanced Recruitment Cards later on. Win or lose, make sure to burn through all your Arena tickets every day to get those tasty, tasty gacha rolls, whether it be from the diamond rewards or the Star Coins from the Galactic Arena.
Lost Valley
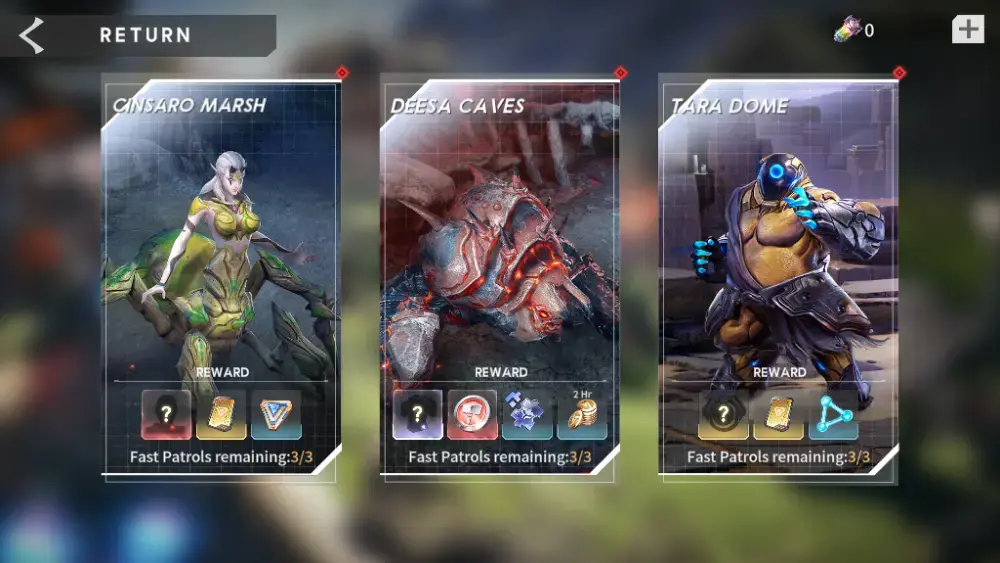
The Lost Valley is where raid bosses reside. There are three areas with their respective bosses. You have three attempts to beat each boss, and you can use these attempts to immediately get several fights’ worth of rewards from a single battle if you use them on difficulties you’ve beaten before. Make sure to use them all up every day!
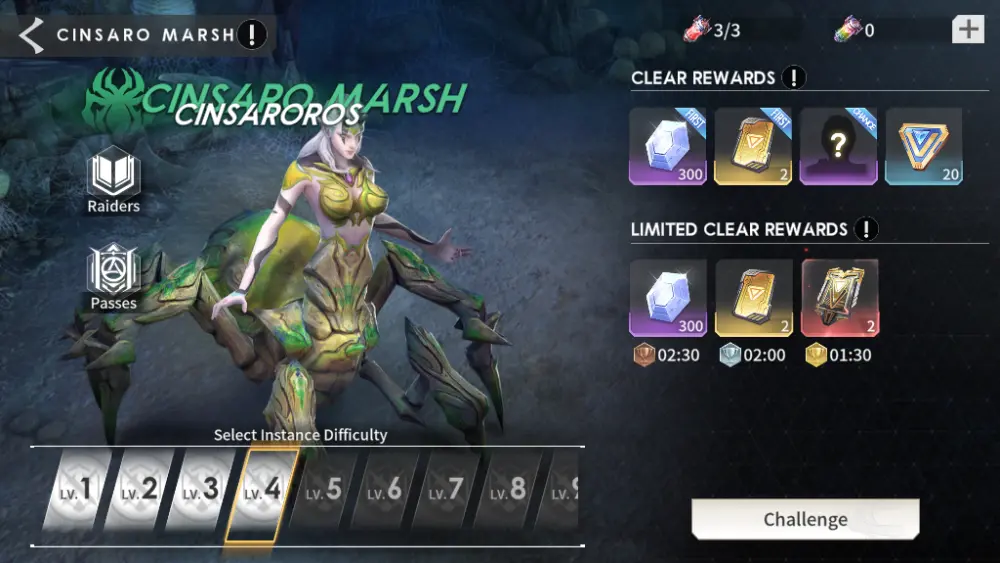
Cinsaro Marsh has Cinsaroros, a spider mama who sics exploding spider babies at you. Those little spiders have two tasks, either explode in your face or make it to a circle in the middle of the map. Don’t let either of those happen, and bring AOE units to deal with them. Cinsaroros’ drops are meant for Commander units: Basically, an extra skill slot that gives you passive buffs and typically follows up your Heroes’ ultimate skills with some form of attack of their own.
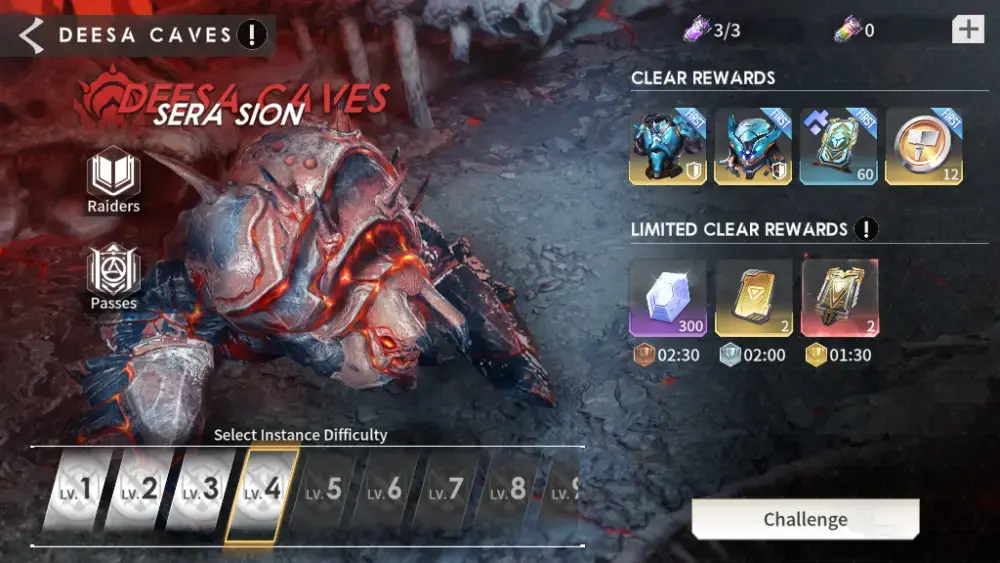
Deesa Caves has a giant ugly space beetle thing with the lovely name Sera Sion. They come with loads of defense and what most games call a hit shield; A shield that does not care about damage, only the number of hits it takes. If you manage to break the hit shield, it explodes on the boss, stunning them and lowering their defenses massively, allowing you to rack up damage in the time it spends down.
If you fail to kill the hit shield in time, the shield explodes all over your team, dealing painful amounts of damage. It helps to bring heroes with both rapid-fire ults, normal attacks, or summons to shatter the hit shield quickly, and a healer to keep them alive since the beetle hits rather hard. Sera’s tough exoskelly makes for tough plating, and as such the big guy drops high-tier Equipment and Metallize tokens to upgrade that gear with.
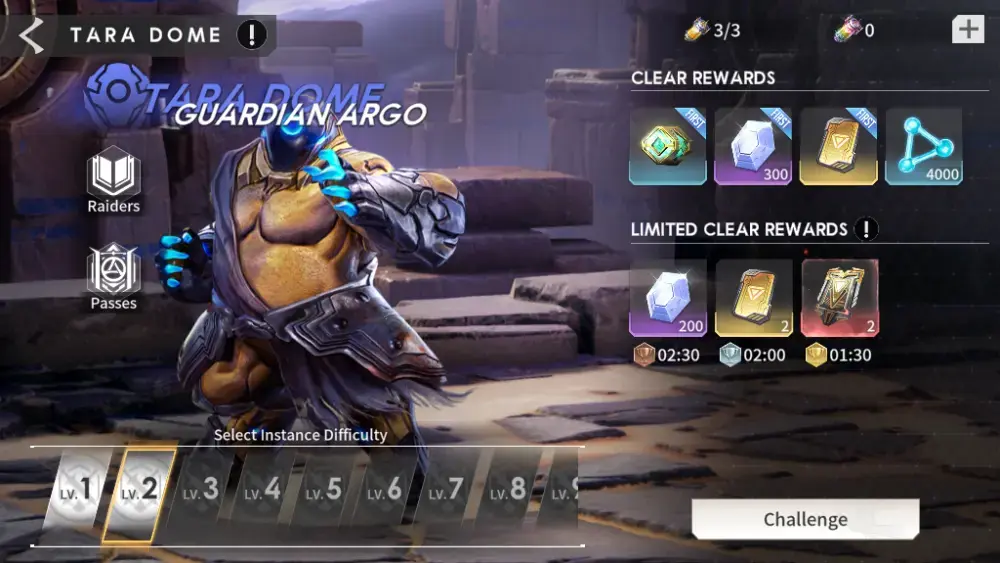
The guy in Tara Dome may look flabby, but make no mistake: This big chunky martial artist is all muscle, and he doesn’t take disrespect from wimps who need guns! Guardian Argo wants a fair fisticuffs beatdown and has a wide shield that dampens attacks coming from outside it.
This means ranged attackers deal little damage to him, and you’ll have to send melee fighters to bludgeon this guy into the ground. He drops Divine Prototypes, equipment slotted before a battle that gives out passive buffs to the team, and the means to upgrade them.
And this is the end of our Eternal Evolution Beginner’s Guide. We hope this helps on your quest to evolve into the perfection that is crab, and if you have your own tips, don’t hesitate to send them in the comments below!