If you’re into casual games that come with “endless” mechanics and, as is often the case, descriptions that come with some variation of “easy to learn, hard to master,” you may be familiar with Voodoo, which has released titles such as Helix Jump, Snake VS Block, and a number of “.io” games that all fall under this category. The French company’s latest release for iOS and Android is a game called Woodturning 3D, which, we would say, is one of the more unusual games in the genre we’ve seen so far. But that’s not a bad thing, as you may soon find yourself getting hooked as you carve beautiful wooden sculptures, one after another, polishing and painting them and submitting them to see how much your masterpiece could sell for.
Usually, when it comes to these games, there’s really not that much to say when talking about the how-tos and what-to-dos. As such, we’re going to make this quicker than usual in this Woodturning 3D guide, but not without telling you everything you need to know about increasing your chances of getting a perfect 100 percent score and maximizing your earnings, while also improving the quality of your sculptures on a more consistent basis. So stay with us and check out our Woodturning 3D guide for some useful tips, cheats and tricks!
1. The Basics Of Woodturning 3D
There’s no tutorial stage or anything that specifically tells you what to do and how to play Woodturning 3D for the first few rounds. However, it’s fairly easy to figure things out if you come to think of it and get a few tries at operating the chisels and cutting the wood as it turns.
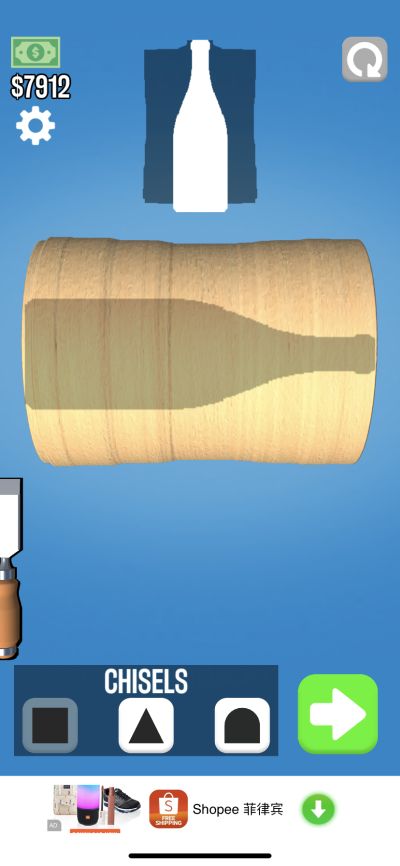
Basically, the gist of the game is that you are given a large piece of wood at the start of the round as you watch it turning and choose which of the three chisels you want to use to cut the shape depicted on the wood. This shape appears as a black silhouette or outline of sorts on the wood, while you can view a mock-up of how the woodwork in progress looks like on the upper part of the screen, in relation to how it’s supposed to look like. You should choose the right chisel to properly carve through the outline, but since the wood is turning, you only need to cut the bottom part — the top part will automatically be cut in the same way.

Once you’ve cut through the outline and hit the green arrow button, you’ll be taken to the next screen, where you will use a sponge to polish whatever rough edges need to be smoothed out. In here, you can choose the size of the sponge, with larger sizes working best for large portions of the wood that need a smoother finish.
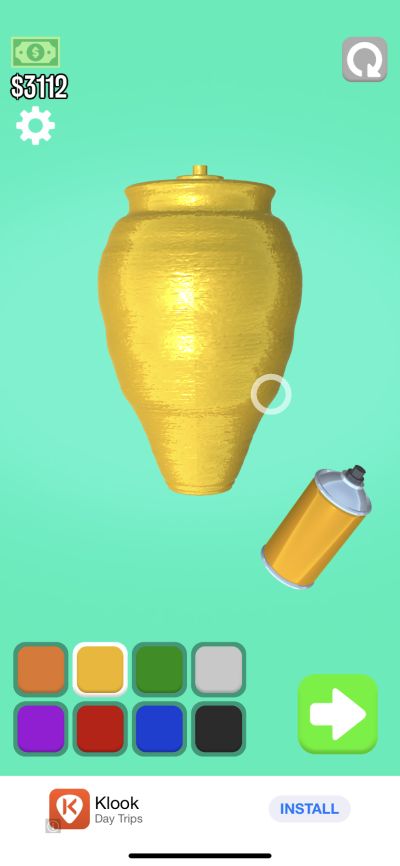
Tap on the green arrow once again and you’ll be asked to paint your creation, with eight different colors to choose from. Hit the green arrow one last time and the game will show how accurate your woodwork was, as compared to the model on the top part of the screen. You can earn up to $500 worth of in-game currency for a perfect creation, and if you get score of less than 100 percent, whatever your score is will be multiplied by $500 for your base reward — for example, you’ll get $350 for a score of 70 percent. You do, however, have the option to watch an ad video to triple your earnings.
In addition, the game will also give you the choice of restarting a round if you make a mistake or, once your woodwork is complete, replaying the round from the start if you aren’t contented with your score/earnings. Your earnings for the round will always be added to your total, regardless whether you choose to replay or not, or whether you choose to triple your earnings or not, just as long as you’ve finished everything and submitted your wooden sculpture for grading.
As a bonus piece of information for this tip, it appears that you can no longer redo a level after you’ve completed it and fully committed to moving on to the next. But since this game has an endless mechanic, we figure that some old outlines will return once you’ve completed so many levels.
2. Which Chisel Should You Use And When Should You Use It?
We did mention that each round of Woodturning 3D gives you a choice of three different chisels to use at any point of the first stage. One chisel comes with a square tip, another features a triangular tip, and the last includes a dull, circular tip. Which one, however, should you be using and when should you switch from one chisel type to another?
Based on our experience, the square tip is the best one to use if you’re trying to break off a rather large amount of wood, or if you’re trying to chip away at a long, straight line. The first level (the rocket) is a classic example of this, as you can use the square chisel all throughout the first stage due to the long lines that make up the rocket’s outline. Just make sure you’re cutting more gingerly as you get closer to the outline — you don’t want to cut wood beyond the outline, as that’s certainly going to affect your grade once you submit your artwork!
The other two chisel types will generally come in handy during the later rounds/levels, as the triangle tip works best when chipping away at shorter straight lines, while the rounded tip is, naturally, the most logical option if you’re trying to cut along curves, say, if you’re trying to carve a beer bottle or a wine glass, as you will get to do later on in the game. Again, you don’t want to be cutting too much once you get near the outline — this is arguably more true with the triangle and rounded chisel than it is with the square one!
3. The Polishing Stage Is Arguably More Crucial Than The Carving Stage
Although polishing your creation may seem like routine, unimportant work that doesn’t really add to your score, it’s important that you take this stage of each round very seriously, as this is your chance to get rid of any imperfections in the wood’s finish. Any lines or streaks that are visible on the wooden surface need to be eliminated, and if there are a lot of them, that’s going to affect your final grade more so than an imperfect cut! We’ve experienced it multiple times before getting it right — carving a design that’s fairly close to the one being asked for, but getting a low grade because we didn’t make sure to get all the blemishes out through the polishing stage.
Expounding on what we mentioned in the first tip, you can use the slider on the bottom left of the screen to make the sponge smaller or larger. As stated, use a smaller sponge when polishing a small stretch of wood and a larger one for a longer stretch. But make sure that the sponge fits through the portion of the wood you want to be polished or smoothed out — if the sponge is bigger, then you may end up removing an edge or corner or any other design element that was originally supposed to be there!
4. There’s No Such Thing As A Right Or Wrong Color To Use
For the painting stage, you can let your creativity run wild and free without worrying about how your final grade may be impacted. We haven’t seen obvious imperfections in the paint job — such as a largely missed spot or wild splotches of one color interfering with another — have much of an impact on the grade, so you’ll still want to be careful that the paint job isn’t sloppy (if you’re using more than one color) and that the entire sculpture is painted.
However, when it comes to your actual color choice, we haven’t seen any situation where choosing an unusual color — say, blue for a Christmas tree or red for the blade of a sword — would result in a lower score/grade.
Also, there’s no need to match the background color of a round when painting your object — you may choose to paint your sculpture gold even if the background is green or purple, and it still won’t make a difference on your grade. The key thing is to carve and polish as accurately as possible, and not make much of a fuss regarding your choice of color. The only limit here is your creativity, and again, it’s not a thing here to be penalized for being “too creative” for your own good.
5. There’s No Time Limit, So Feel Free To Take Your Time
Not only is Woodturning 3D a casual, easy-to-learn game — it’s also quite relaxing, in the sense that you do not have any time limit when crafting your masterpieces. That means you can take as long as you want to make sure you’ve carved as accurately as possible across the outline, and take as long as you want while polishing your sculpture and painting it. Rushing your way through things oftentimes results in substandard creations and low grades — of course, you can replay the level if you aren’t satisfied, but rework and repetition of any kind eventually gets tedious. If you want to get things done in one try, it’s best to take things slow and easy.

One other reason why you should ideally take the slow and steady approach is the fact that there is no “undo” button in the game! If you make a big mistake that can normally be undone with one tap of the screen, you won’t have that particular option in Woodturning 3D — instead, you’ll have to hit the button on the upper right and redo everything from square one. It may be a big inconvenience for many, but we understand why the game’s makers didn’t include an undo button — adding one would arguably make things too easy!
6. If You Don’t Like The Ads, You’ll Have To Pay
As you may have noticed, the game loads advertisement videos after each stage in each level. In other words, that’s a total of three per video — one after carving, one after polishing, and one after painting — plus another one if you want to triple your earnings. Unfortunately, there’s no way to make those ads stop showing up so often, and we do understand that many players may find this very intrusive or cloying.

At the moment, there is only one way to get rid of the ads, and that’s by tapping on the Settings icon on the upper left, and tapping on the button that says “Remove Ads.” This will lead to a prompt where you can choose to pay $3 in order to get the game’s paid version, which won’t come with any videos interrupting your gameplay and disrupting your flow. Of course, the option to watch an ad to triple your earnings will remain, as that’s a voluntary prompt which you may or may not opt for.
7. Currently, There’s Nothing You Can Use Your Earnings For
This isn’t really a tip per se, but more of something you may want to keep in mind if you’re wondering about your earnings and curious about what you can use that in-game currency for. Sadly, Woodturning 3D does not come with a virtual shop where you can buy new chisels or new sponges, or improved versions of the chisels and sponges you already have.
Whether they improve actual gameplay or only add to the aesthetics, there are no add-ons or power-ups. However, the game is being constantly updated, so we’re naturally holding out hope that the developers will include this feature in future versions.
And that would be all for now as far as our Woodturning 3D tips and tricks are concerned. If you happen to know more tips for the game, feel free to let us know in the comments!
Khole
Wednesday 19th of July 2023
Is there a way to save the sculptures they I create ? Maybe I’m blind but i don’t see the save icon if there is any .
Henrietta
Sunday 7th of February 2021
We can’t buy the colors red or blue! The ads won’t run to get them with.
Miemiecarter
Tuesday 22nd of September 2020
Exact same issue here!
Whitney
Sunday 20th of September 2020
The way you have to buy them is weird. Click the cart and then click the price button. It randomly chooses a chisel for you. You can’t pick. I thought they were all locked for a long time until my son accidentally hit the money button and started choosing one for me. Same way with the sponges.
Ike
Monday 13th of July 2020
I have the latest update installed and I still can’t purchase any new chisels or sanding tools. They all still have the lock on them. I also reached level 27 and the next upgrade says TBD. I was hoping that once I reached a certain level The tools for purchase would be unlocked, but not yet. Thinking of deleting this game.