As you play Tower of Fantasy and explore the vast world of Aida, you’ll soon realize that it is not just a regular role-playing game focused on just following linear quests and grinding enemies for hours. Hotta, the developer of this charming open world action RPG, made sure that their players can be entertained or challenged with various fun activities and mini-games once they’ve had their fill of adventure through the main questline. One place to access such activities are the Training Facilities which we will be discussing in this guide.
What Are Training Facilities?
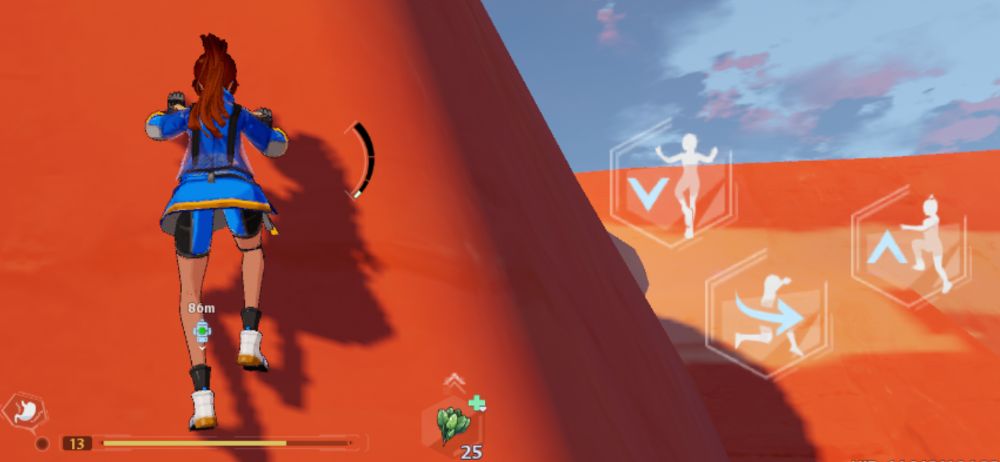
Training Facilities are designed to challenge a Wanderer’s skillfulness with various challenges in exchange for Training Points. Even if you fail the challenge, you will still earn points but it will be significantly less than if you were successful. These facilities can be accessed through these rusty metal pillars. Two random types of facilities will be available each day but you can only do one training per Training Type per day.
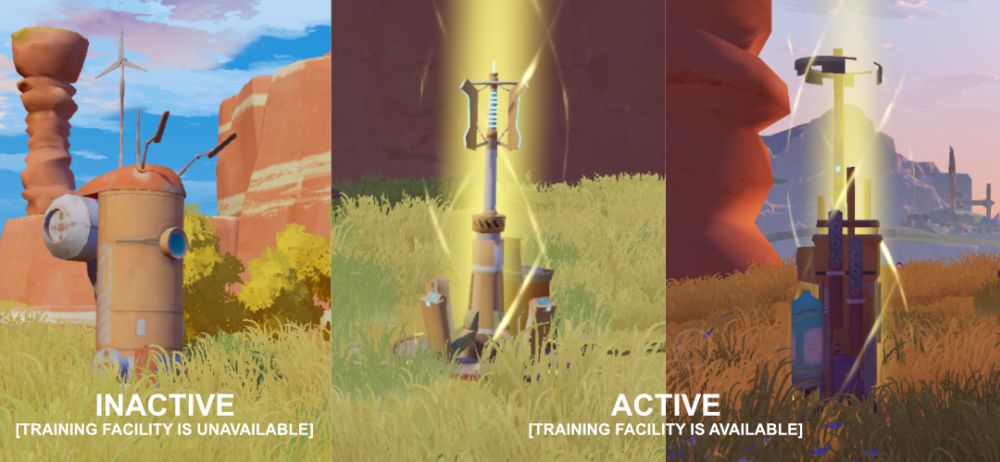
If a bright yellow light shines from inside these pillars, it indicates that training is currently available on that facility. If you are having difficulty finding which facilities are available, you can walk to the nearest pillar, open up the Training Facilities menu and check the list.
Related: Tower of Fantasy Beginner’s Guide: Everything You Need to Know
You can also open up your map and check which Training Facility Icons are lit up. Clicking the icon and pressing “Go” will display a path of blue diamonds on the ground to help guide you to the location. The available Training Facilities per day varies for each server.
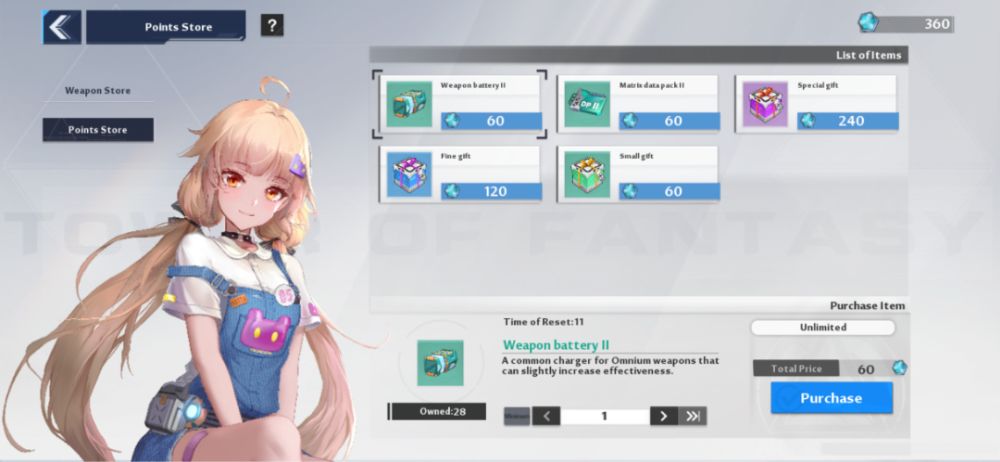
Training Points that you earn from accomplishing challenges can be exchanged in the Points Shop for Weapon Batteries, Matrix Data Packs, Special Gifts, Fine Gifts and Small Gifts. You can access the rewards shop for your points by clicking on “Points Shop” next to the training points in the Training Facility window or you can open up your menu and click “Commissary.”
Types of Training Challenges
Challenges in Training Facilities vary and some will only be available once your character reaches a certain level. The higher the level you choose for your training, the more points you can potentially earn. There are currently 14 types of training challenges in the game and we’ve compiled all that we’ve learned about them along with some tips and tricks that you can use:
1. Agility Training

Challenge Difficulty: Easy – Normal
Found in: Astra, Banges, Navia
This activity functions similarly to Whack-A-Mole type of games where you have to attack the projected blue otter to gain points. There are 9 plates where the otters can potentially appear. These otters will only be projected for a few seconds before disappearing and reappearing in a different platform.
| Training | Difficulty | Lvl Requirement | Training Points |
| Astra Agility Training I | Normal | — | 100-200 |
| Astra Agility Training II | Normal | — | 100-300 |
| Banges Agility Training I | Normal | 19 | 100-360 |
| Banges Agility Training II | Normal | 19 | 100-400 |
| Banges Agility Training III | Normal | 19 | 100-400 |
| Navia Agility Training I | Hard | 28 | 100-400 |
Pay special attention to the color of each otter that appears. You will only earn points from striking the blue otter. Striking the red otter will deduct points from your score. There are two approaches you can apply to this game:
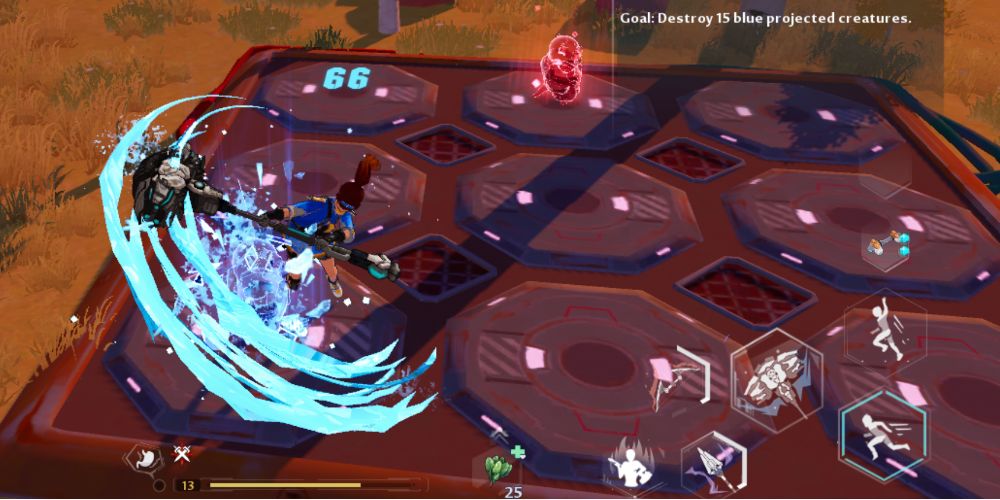
- When using a melee weapon, stay at the middle of the platform so it is easier to move around and reach all the plates. Use melee weapons that can strike fast and if you feel that an otter is about to disappear, don’t waste your time and come after it. Instead, wait in the middle and anticipate the next one. Don’t dash to the location of the otters because this will make it harder to go back or change positions once you need to go to the next one.
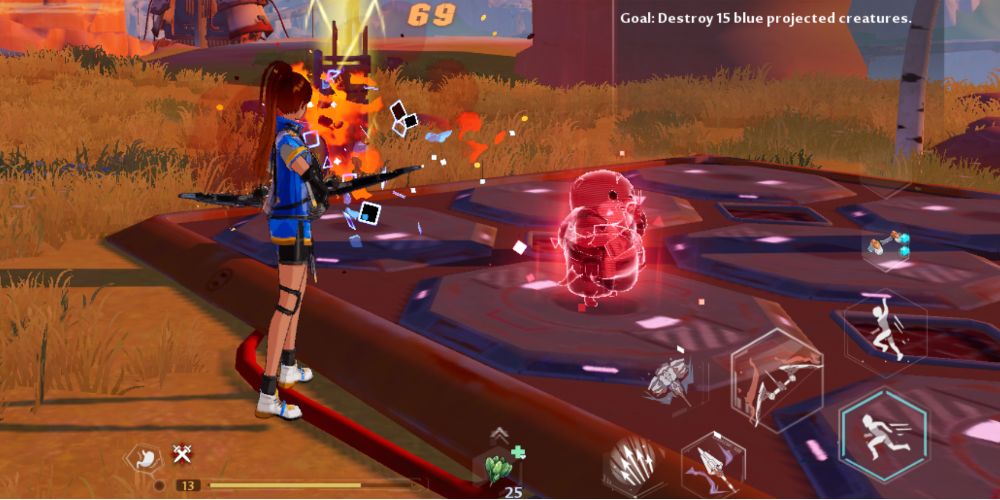
- When using a ranged weapon, stay outside of the platform so you can have a good view of all of the plates. Don’t move around too much and focus on aiming for the correct otter. In order to avoid spending too much time aiming, charge your shot before the otter appears. If using a weapon that constantly shoots, let it shoot then aim when the otter appears.
With both weapons, it is not advisable to do combo attacks since you may accidentally hit the red otter.
2. Balance Training
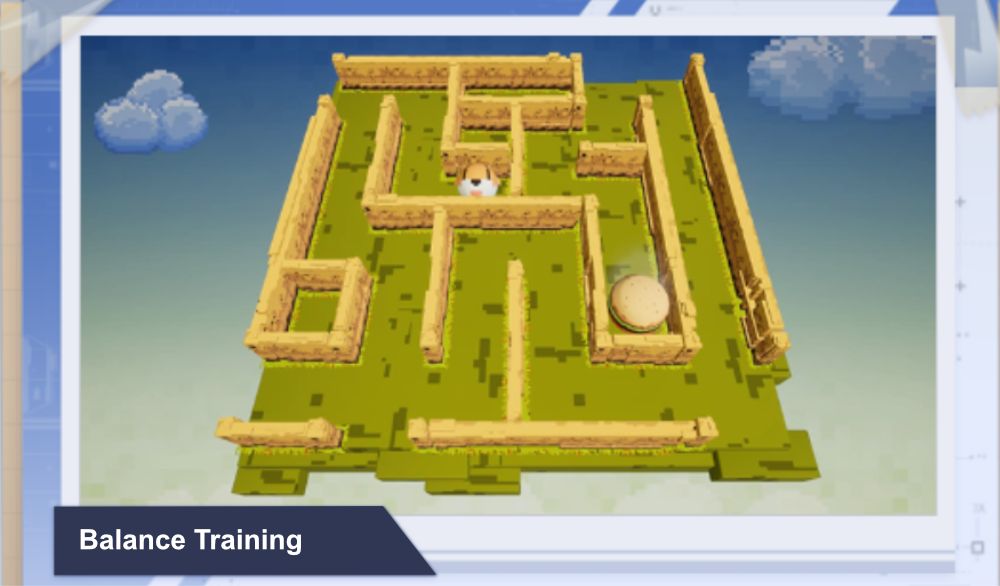
Challenge Difficulty: Hard
Found in: Banges, Navia, Crown
This activity challenges you to move your dog ball towards the hamburger at the end of the maze by tilting the panel. The mazes that appear vary each time you play.
| Training | Difficulty | Lvl Requirement | Training Points |
| Banges Balance Training I | Hard | 19 | 160-300 |
| Navia Balance Training I | Hard | 19 | 160-300 |
| Crown Balance Training I | Hard | 19 | 160-300 |
When playing this mini-game, tilt the panel slowly and in small increments to move the ball. Tilting it too far may cause the ball to lose its balance and potentially fall out of the maze. When approaching corners, you should maneuver the ball close to the wall towards one direction until it reaches a corner. Only then should you attempt to move it in a different direction.
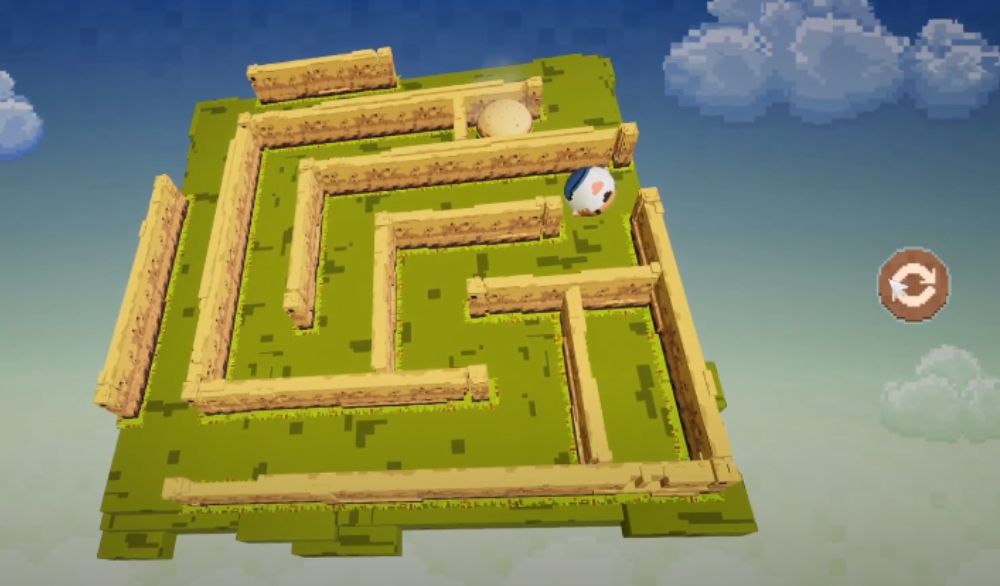
For segments of the maze where you need to move the ball to a direction that leads to an open wall, like the one in the image above, move it towards that direction slowly, then tilt your board to the opposite direction to stop it from falling out. Once the ball is at the right position, move it down to the next corner.
3. Climbing Training
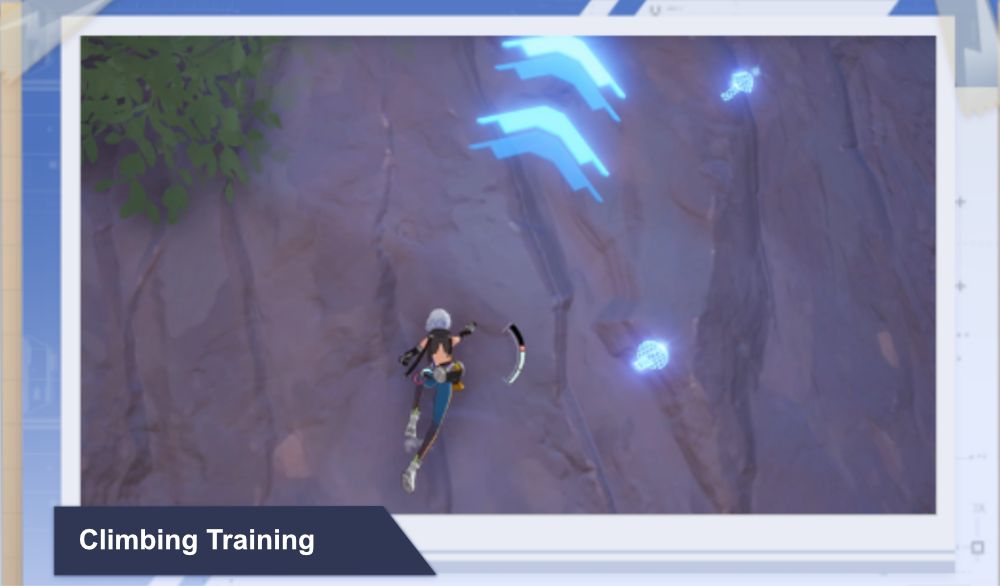
Challenge Difficulty: Hard (Mighty Mushrooms can make this challenge easier.)
Found in: Crown, Warren
This activity challenges you to climb a mountain until you reach the top. You can gain more points when you collect electro mushrooms. Green electro mushrooms can give you extra endurance.
| Training | Difficulty | Lvl Requirement | Training Points |
| Crown Climbing Training I | Hard | 33 | 100-300 |
| Crown Climbing Training II | Hard | 33 | 100-400 |
| Warren Climbing Training I | Hard | 39 | 100-400 |
You can jump up while climbing to cover more ground and get up quicker. However, you have to take care and watch your stamina and make sure it never goes too low so you can prevent yourself from falling and losing the challenge. You can also use your dash ability to move sideways and help you take bigger leaps. If you accidentally press jump or lose your grip, don’t panic.
Related: Tower of Fantasy Exploration Guide
As long as you can maneuver your character back to the wall (which is easier with the dash ability) your character will automatically hold on if you have auto-climb on (which is the default setting) as long as they have even just a bit of stamina.
You can also try to do the infinite climbing technique to conserve stamina. The way to do this is to let go of the wall, do a double jump, latch onto the wall and repeat the cycle until you reach your goal.
4. Combat Training
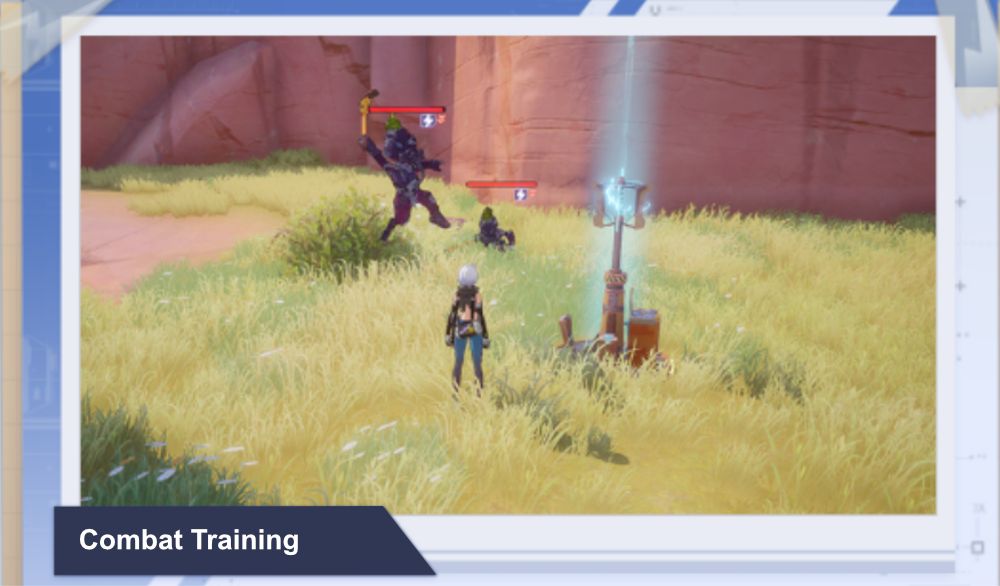
Challenge Difficulty: Normal – Hard
Found in: Astra, Banges, Crown, Warren
This activity challenges you to fight through three waves of enemies in a limited time. The last wave is always the strongest batch.
| Training | Difficulty | Lvl Requirement | Training Points |
| Astra Battle Training I | Normal | – | 100-160 |
| Astra Battle Training II | Hard | – | 160-200 |
| Banges Battle Training I | Normal | 19 | 100-160 |
| Banges Battle Training II | Hard | 19 | 160-200 |
| Crown Battle Training I | Normal | 33 | 180-300 |
| Crown Battle Training II | Normal | 33 | 180-300 |
| Crown Battle Training III | Hard | 33 | 180-360 |
| Warren Battle Training I | Normal | 39 | 280-360 |
| Warren Battle Training II | Hard | 39 | 280-400 |
| Warren Battle Training III | Hard | 39 | 280-400 |
We highly recommend attempting this challenge with upgraded weapons so it will be easier to fight these enemies. Spam the skill button and have at least two weapons equipped so you can use Discharge when switching between the two of them once it’s fully charged up.
Having all enemies in range is a must so that they will all be targeted when you use your skills. If you have Simulacra and have unlocked their special traits, consider using them for this challenge to give yourself an extra boost.
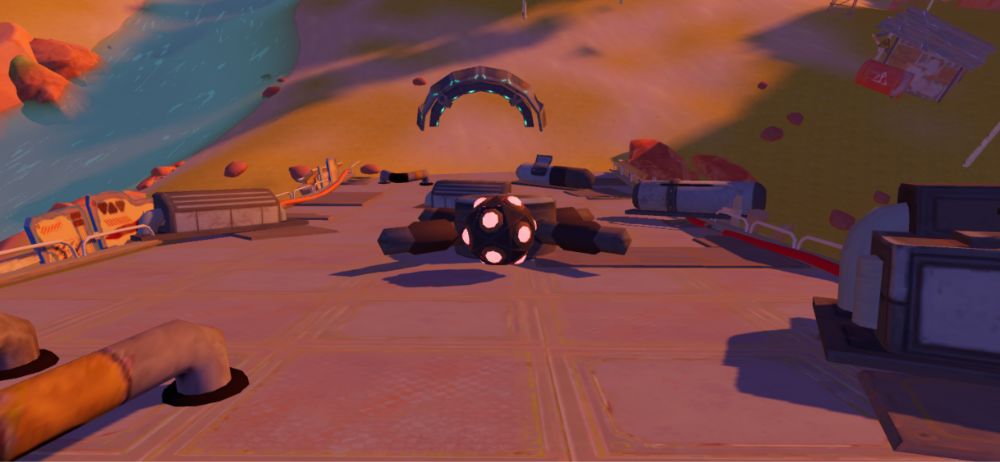
5. Coordination Training
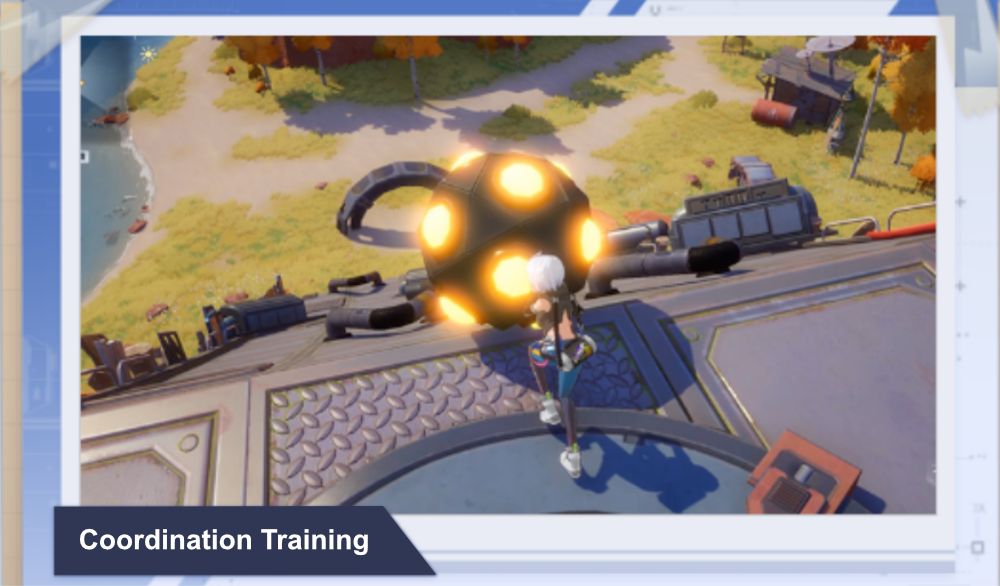
Challenge Difficulty: Hard
Found in: Astra
This activity functions similarly to Pachinko where you have to drop a ball down an obstacle course. The objective is to reach the arch at the end of the course.
| Training | Difficulty | Lvl Requirement | Training Points |
| Astra Coordination Training I | Hard | – | 100-300 |
When playing, there are a few restrictions:
- You can only roll one ball at a time.
- The ball cannot be pushed with a dash or attacked with a weapon.
- If you walk into the obstacle, the game will respawn you and your ball to your original positions.
The obstacle never changes no matter how many times you play and the wheel at the center always spins clockwise. However, it is not really possible to time the drop of the ball along with the spinning wheel since you can’t really get a good peek of it.
While the game is a bit dependent on luck, there are certain techniques that can help you get your ball to the goal. It is generally a good idea to push the ball towards the center or to the right with the way the obstacle is constructed. There is a bigger gap at the bottom left side of the obstacle so it is best to avoid angling your ball drop to the left.
6. Dodge Training
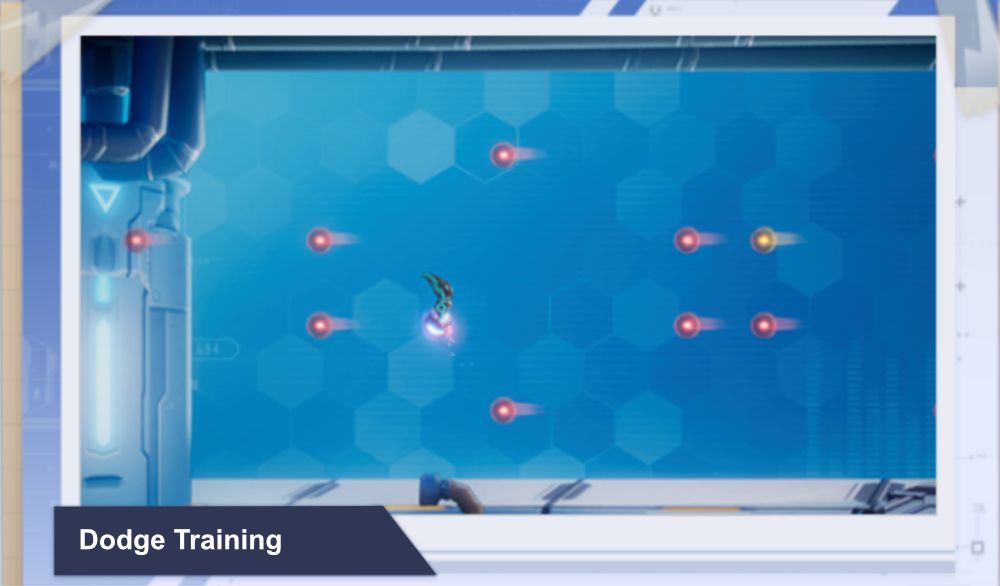
Challenge Difficulty: Normal
Found in: Banges
This activity challenges you to avoid red balls while trying to obtain the golden balls. Golden balls will earn you training points.
| Training | Difficulty | Lvl Requirement | Training Points |
| Banges Dodge Training I | Normal | 19 | 100-400 |
Anticipate the path of the red balls by moving away from the direction they are going to before it reaches you. The hit box of your character is a little bigger than them so you have to make sure that you’re as far from the balls as possible. If the golden ball has already passed and there’s another red ball coming your way, don’t risk getting hit by forcing yourself to obtain it.
7. Flight Training
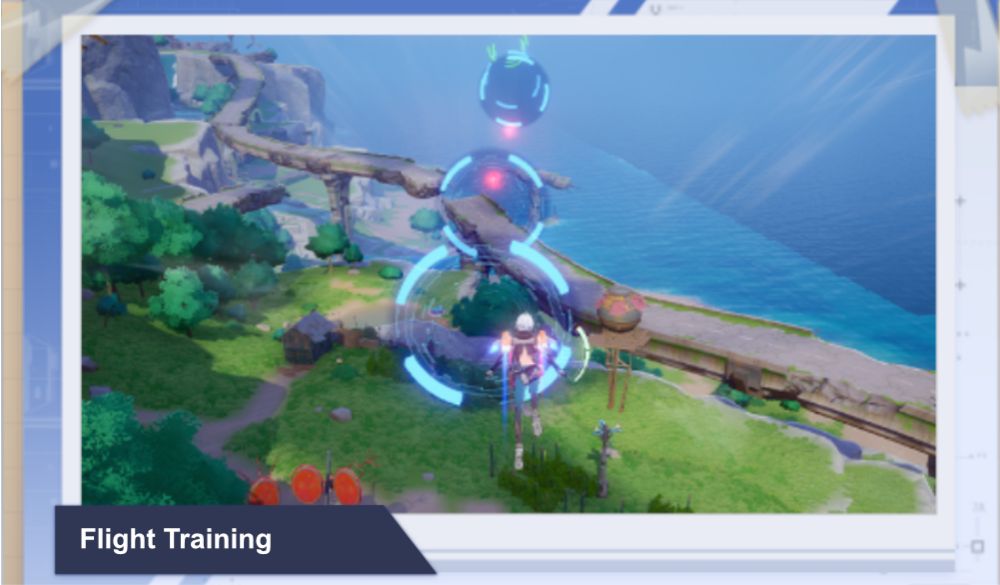
Challenge Difficulty: Normal – Hard (Mighty Mushrooms can make this challenge easier.)
Found in: Banges, Navia, Crown
This activity challenges you to fly around and collect red balls of light to gain points. The more you collect, the more points you will be rewarded. Going through the blue power rings will allow you to gain momentum.
| Training | Difficulty | Lvl Requirement | Training Points |
| Banges Flight Training I | Normal | 19 | 100-300 |
| Banges Flight Training II | Hard | 19 | 120-320 |
| Banges Flight Training III | Hard | 19 | 120-320 |
| Navia Flight Training I | Normal | 28 | 100-280 |
| Navia Flight Training II | Hard | 28 | 100-400 |
| Navia Flight Training III | Hard | 28 | 100-400 |
| Crown Flight Training I | Hard | 33 | 100-400 |
For this activity, though flying through all power rings gives you a small movement boost, it is not a requirement. The important ones you have to obtain to complete the challenge are the red orbs.
There will be parts of the challenges where the rings seem to suddenly be lower than the previous rings that you went through. You will have to turn off your jetpack to fall to the correct level before dashing or turning on your jetpack again.
Be careful not to fall too far down since this game will only allow you to fly up from the ground once before going on cooldown. You can press jump while flying to slightly move yourself upward, but this comes at a cost to your flight stamina so only use it when necessary as there is no way to recover stamina in this mode. If you reach the ground when you fall, the training mode will automatically end in 2 seconds.
8. Gliding Training
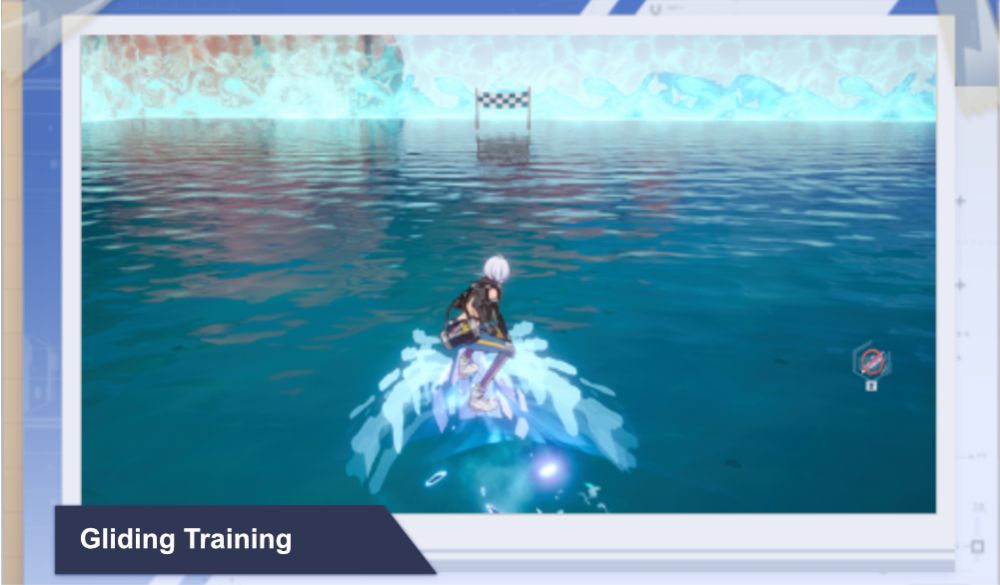
Challenge Difficulty: Hard
Found in: Banges, Navia, Crown
This activity challenges you to move through obstacles and reach the finish line while gliding on a jetboard on the water before the timer ends. Collecting red balls will earn you extra points while touching blue boost pads will accelerate your speed
| Training | Difficulty | Lvl Requirement | Training Points |
| Banges Gliding Training I | Hard | 19 | 100-200 |
| Navia Gliding Training I | Hard | 28 | 100-300 |
| Crown Gliding Training I | Hard | 33 | 100-400 |
Avoid running into walls as much as possible as it will dismount you from your board. You can get back onto your board at any time as long as you are deep enough in water to swim. However, there are some Gliding Training Facilities where the starting location’s water is too shallow so once you activate it and end up hitting a wall, the jetboard will go into cooldown and there is no other way to get back into your jetboard. By the time the cooldown finishes, the challenge’s timer had already ended. So to be on the safe side, summon your jetboard as you face the water.
Since time is limited for this challenge, always prioritize getting to the finish line rather than getting extra points. The red orbs are not required to be obtained for you to complete the challenge.
9. Hunting Training
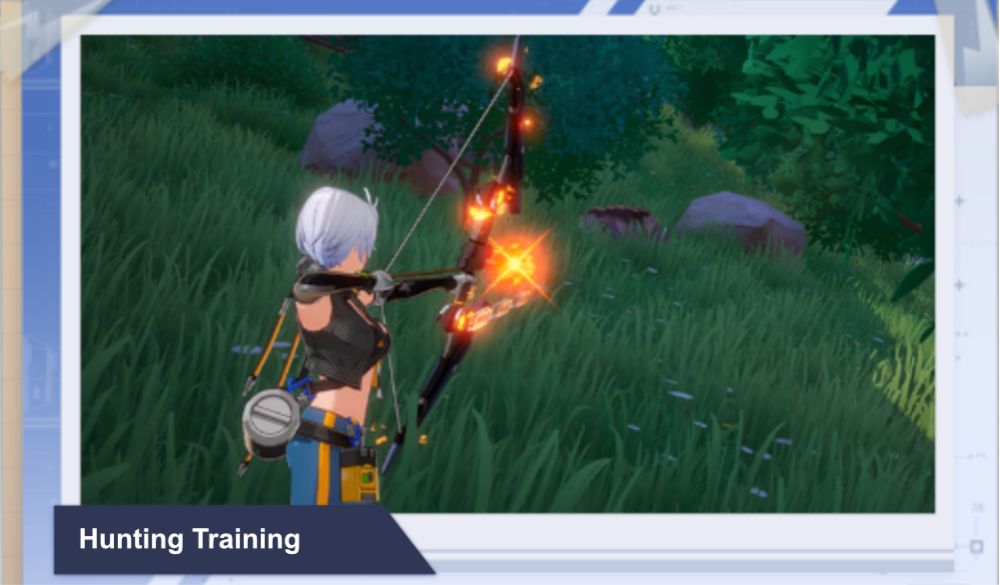
Challenge Difficulty: Normal
Found in: Banges
This activity challenges you to kill 15 beasts that you can find around the training area in Banges.
| Training | Difficulty | Lvl Requirement | Training Points |
| Banges Hunting Training I | Normal | 19 | 80-300 |
This challenge is not particularly difficult since all you need to do to accomplish it is to kill beasts that do not really fight back unlike other monsters and enemies. You can use any weapon for this challenge, but we recommend using a melee weapon instead of a long ranged weapon if your weapon is not strong enough to kill beasts with one shot. This is because beasts will run away once they are hit and if you’re using a long ranged weapon, it can be difficult to catch up to them.
Be sure to take advantage of your sprinting and dashing abilities as it will help you move around the area to find beasts to hunt. The area where the challenge is held is enclosed so you won’t have to worry about having to go too far away to find them. You can even use your flight to see a bird’s eye view of the place to make it easier to spot your prey.
10. Logic Training
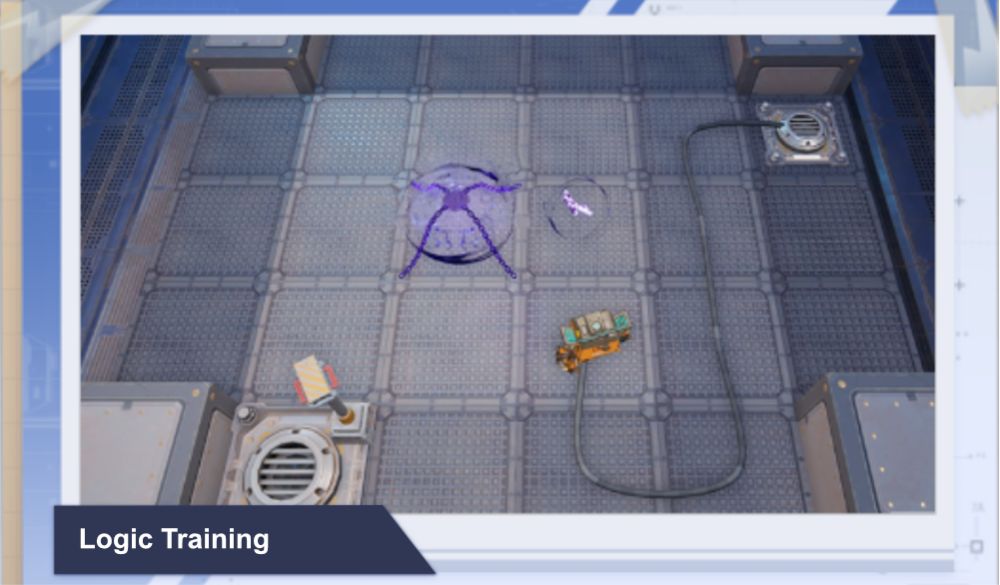
Challenge Difficulty: Easy – Normal
Found in: Hykros, Navia, Crown, Warren
This activity challenges you to move your droid from one point to another to complete the training. The droid leaves behind a cable that marks the path you’ve already taken. Once you’ve passed through a square, you can no longer pass through it again. The longer the route you take, the more points you get. Obtaining the key and opening the locked box will also get you extra points.
| Training | Difficulty | Lvl Requirement | Training Points |
| Hykros Logic Training I | Easy | 19 | 60-200 |
| Navia Logic Training I | Easy | 28 | 60-200 |
| Navia Logic Training II | Easy | 28 | 60-200 |
| Crown Logic Training I | Normal | 33 | 80-300 |
| Crown Logic Training II | Normal | 33 | 80-300 |
| Warren Logic Training I | Normal | 39 | 100-400 |
| Warren Logic Training II | Normal | 39 | 100-400 |
The best way to go about this challenge is to do a lot of zigzag lines in order to take up as much space as you can. This challenge doesn’t appear to have a timer for it so we recommend taking your time and really think about which routes you can take.
You can even sketch the obstacle on paper and trace a line through it to figure out the best way to accomplish it. You may have to play the challenge a few times before you solve it since you cannot see the whole puzzle at the start. If you make a mistake and cannot get all squares, it’s better to complete the puzzle by reaching the other point than making sure you get the lock and key since they are optional.
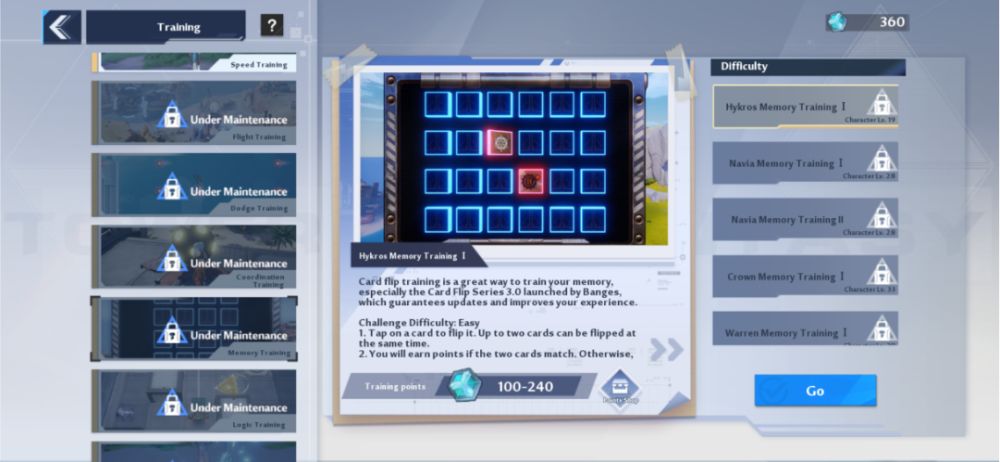
11. Memory Training
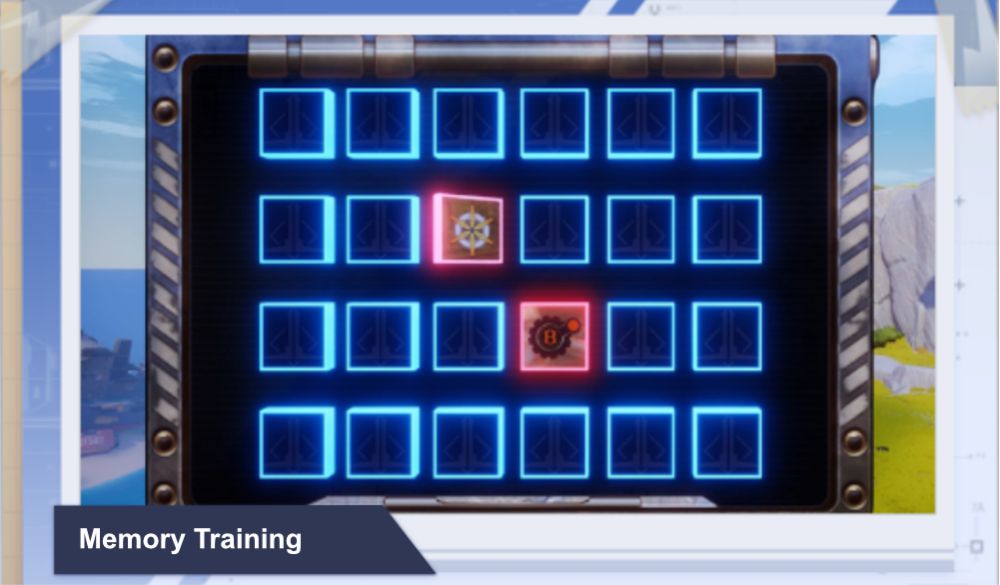
Challenge Difficulty: Easy – Normal
Found in: Hykros, Navia, Crown, Warren
This activity functions like the Concentration or Matching Card game and challenges you to find the matches of all the cards. You can tap up to two cards at a time to flip it and check their design. You will earn points for every card you match.
| Training | Difficulty | Lvl Requirement | Training Points |
| Hykros Memory Training I | Easy | 19 | 100-240 |
| Navia Memory Training I | Easy | 28 | 100-240 |
| Navia Memory Training II | Easy | 28 | 100-240 |
| Crown Memory Training I | Normal | 33 | 100-300 |
| Warren Memory Training I | Normal | 39 | 100-400 |
There doesn’t appear to be a limit on how many pairs of cards you can open up throughout the game but there is a time limit. A good way to easily keep track of the cards that you’ve flipped is by going through one row at a time from left to right. Flipping cards randomly tends to make it confusing and easier to forget which cards are which.
Don’t wait too long in between flips to check the next pair of cards. If you spot a pairing, flip them immediately then check the next pair. You don’t have to wait for the cards to finish flipping before checking another pair.
12. Rhythm Training
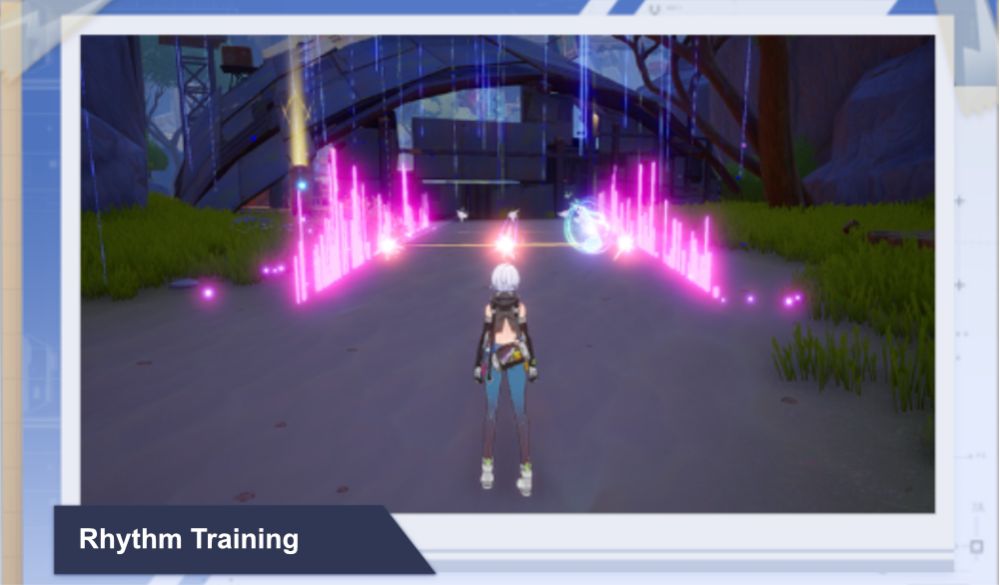
Challenge Difficulty: Normal
Found in: Crown
This activity is similar to most classic rhythm games and challenges you to hit incoming notes. While it is possible to hit the notes as they appear before they reach the end of the staff, it is not recommended since you can only get one point for each note this way. You can get double the amount of points if you hit the notes just as it reaches the line. Missed notes will disappear after leaving the staff.
| Training | Difficulty | Lvl Requirement | Training Points |
| Crown Rhythm Training I | Normal | 33 | 100-400 |
This game is best played with long range weapons because there are times where you will need to hit notes that are far away from each other in quick succession. Position yourself at the center but not too close to the line so you have a good view of the whole staff. With a bow, charge your shot before the note reaches the line. If using a weapon that constantly shoots, let it shoot then aim at the note once it hits the line.
13. Speed Training
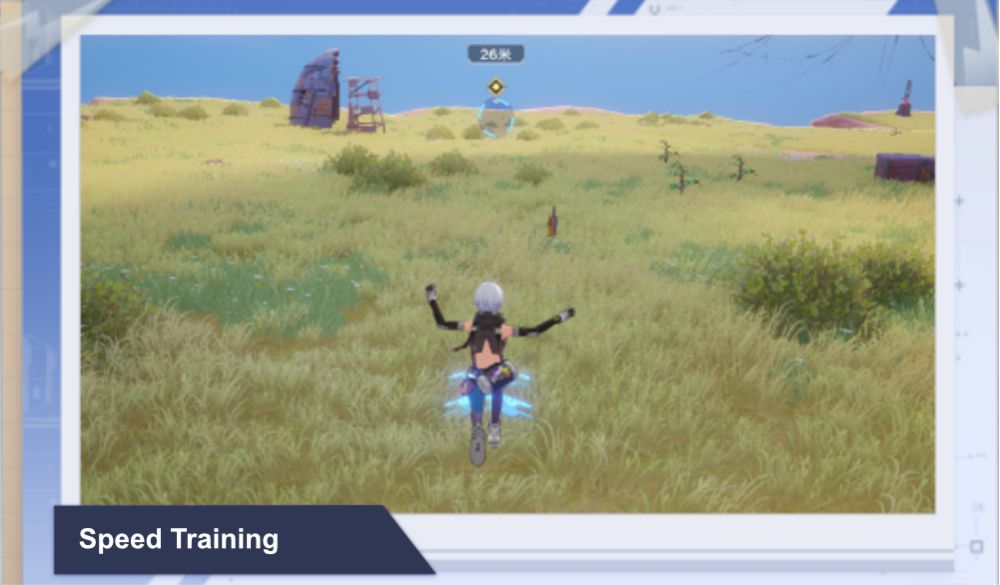
Challenge Difficulty: Normal – Hard
Found in: Astra, Banges, Navia, Crown, Warren
This activity challenges you to run, jump, fly and climb to go through power rings to score points. Blue arrows can guide you to the path while blue power rings can give you a speed boost. The next power ring will only appear once you go through the most recent one that appeared. The activity ends once you reach the green power ring checkpoint.
| Training Type | Difficulty | Lvl Requirement | Training Points |
| Astra Speed Training I | Normal | — | 160-200 |
| Astra Speed Training II | Normal | — | 160-200 |
| Banges Speed Training I | Normal | 19 | 200-240 |
| Banges Speed Training II | Normal | 19 | 200-240 |
| Banges Speed Training III | Normal | 19 | 200-240 |
| Navia Speed Training I | Hard | 28 | 300-360 |
| Crown Speed Training I | Hard | 33 | 300-360 |
| Warren Speed Training I | Hard | 39 | 300-400 |
We recommend setting your auto-sprinting on for this activity so that you won’t need to press dash everytime you want to sprint. When climbing walls, you can use the infinite jump trick, which we described under Climbing Training, to get to the top faster without losing too much stamina.
There are some floating power rings that cannot be reached just by jumping. It could be because the power ring is too high or the ground below it is covered in water, making it difficult to jump high enough.
In these cases you can use this technique: jump (from higher ground if necessary), activate flight, deactivate it, then dash at just the right time in order to position yourself at just the right height. These jumps that require you to get to a certain height level to reach a power ring are usually the toughest part of the challenge, but once you overcome it, the rest is easier.
14. Technique Training
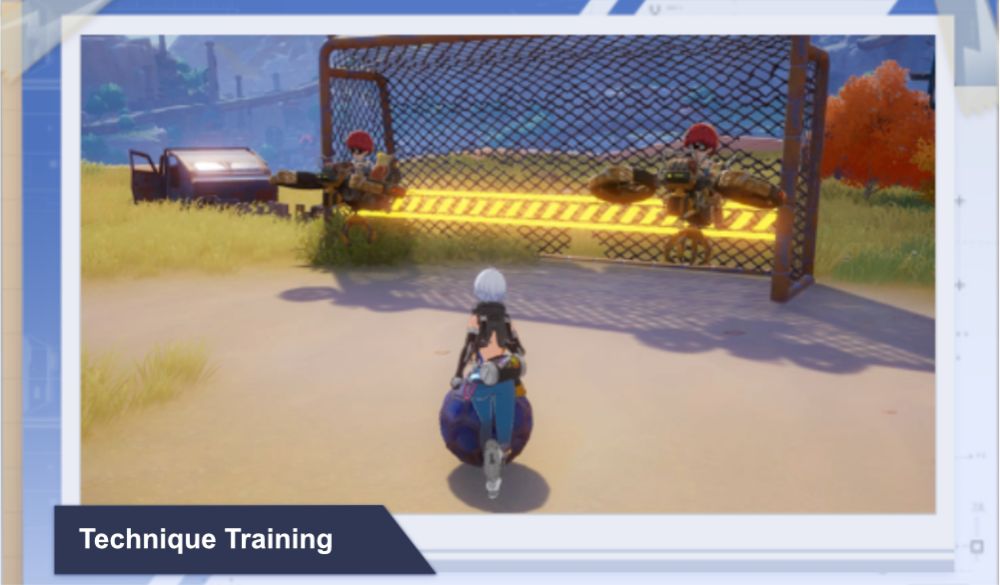
Challenge Difficulty: Easy
Found in: Astra
This activity functions like a mini soccer game and challenges you to kick the ball into the goal to score points within a limited time. There will be two drones moving in front of the goal that will try to block your ball and keep you from scoring.
| Training Type | Difficulty | Lvl Requirement | Training Points |
| Astra Technique Training I | Easy | — | 100-200 |
You can push the ball by running against it while dashing will put enough force to make the ball fly towards a direction. Running will give you more control in moving the ball and is better than dashing when positioning it. Once it is close enough and the drones are far apart, giving you enough space, dash against the ball to kick it straight into the net.
Avoid dashing against the ball when you are too far away from the net because your ball may not reach the goal. You should also avoid trying to kick the ball when the drones are at the center and close together because they will only wind up blocking your ball and bouncing it back.
And this marks the end of our guide for Tower of Fantasy’s Training Facilities. We hope that this article provided you with helpful information in solving the puzzles and accomplishing the challenges in these series of mini-games. If you found any other useful tips for fellow Wanderers, feel free to share them down in the comment section!