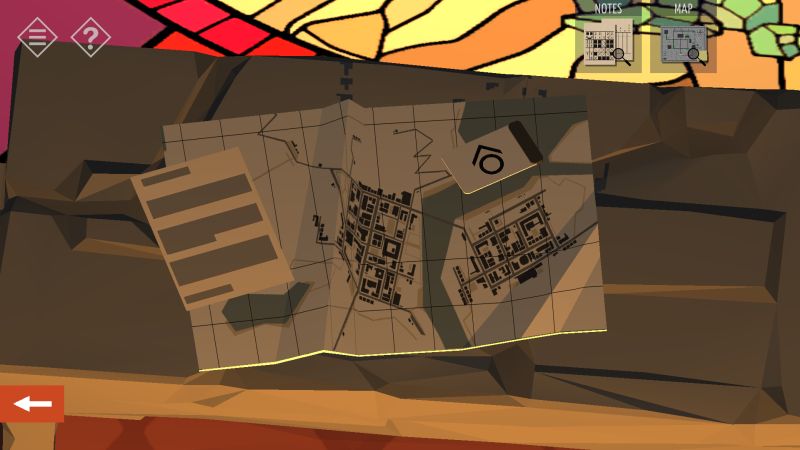
When we last left Tiny Room Stories: Town Mystery, our father’s invitation led us to the town church, where there appears to be a ruin sealed off by an unknown party. Hoping to find answers, you break open a nearby wall and find yourself in the maintenance tunnels beneath the streets, carrying a map that shows an alternate path to the closed-off ruin. Your exploration continues in the hopes of finding answers and potentially the location of your father.
The second part of our Tiny Room Stories walkthrough guide covers the last three chapters of Act One. Will you find out what is happening in Redcliff? Will you find your father? You might find answers as you read onward, and the puzzles are no less difficult.
Chapter 4: The Tunnels Below
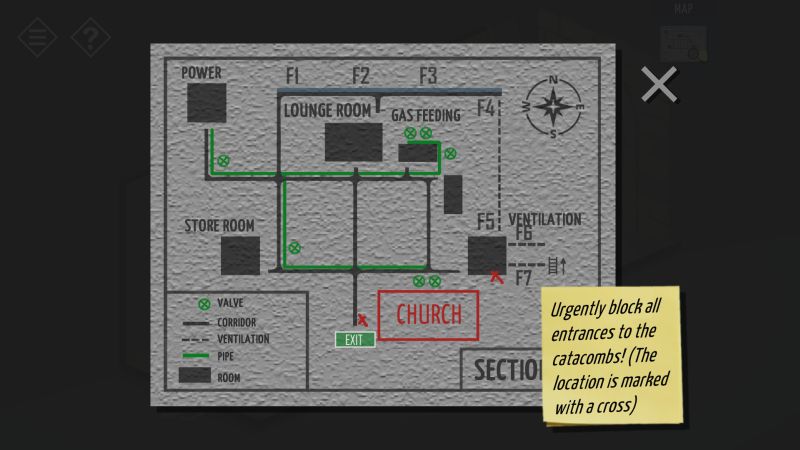
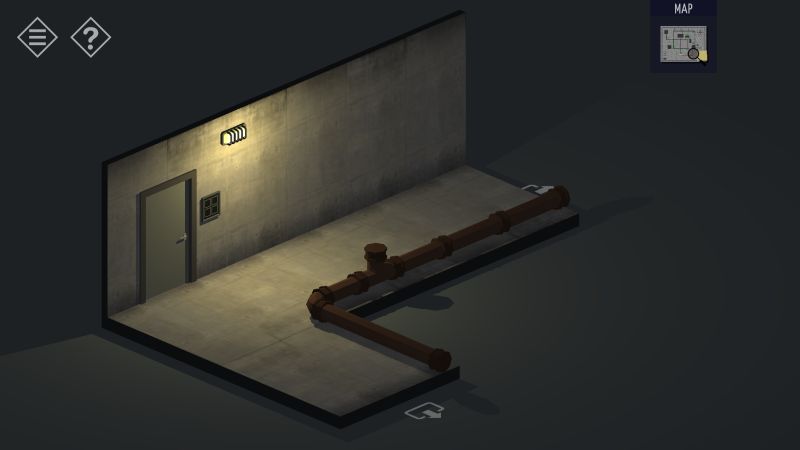
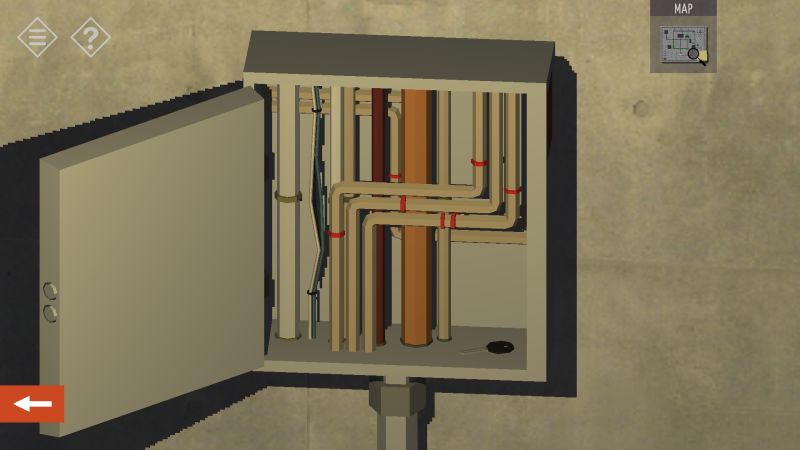
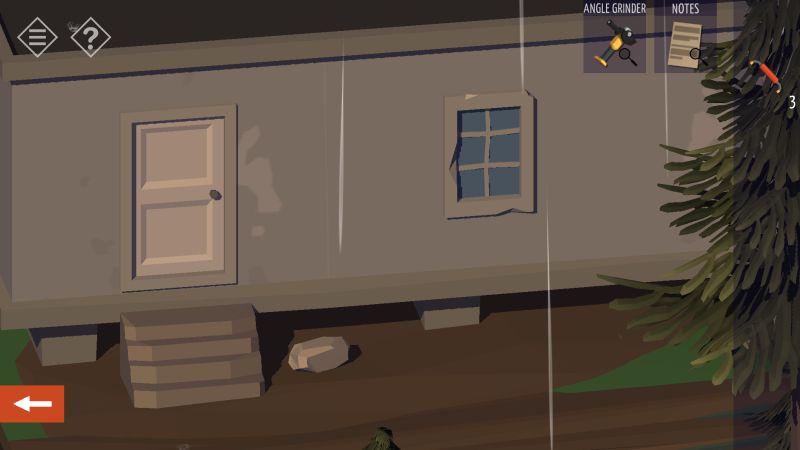
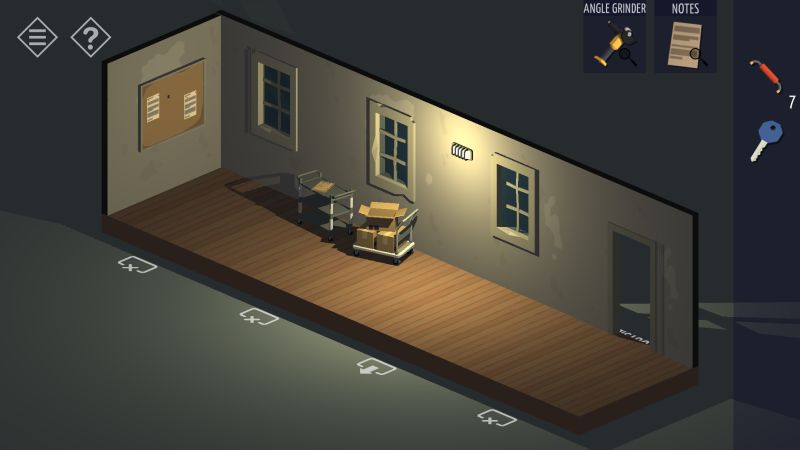
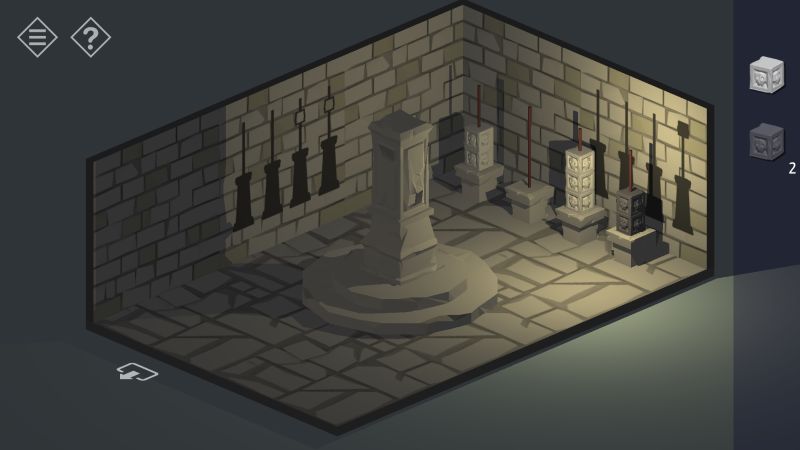
The map you picked up from the room under the church will be very important for this chapter, so do consult it from time to time. You start this chapter in a hallway with a locked door on the far end, as well as a pinned message mentioning the use of riddles to keep the doors shut. Move the doormat to uncover the key to the door, and enter the maintenance tunnels. Your main goal is to enter the room marked with a red “X,” however the only door leading to it is locked up tight.
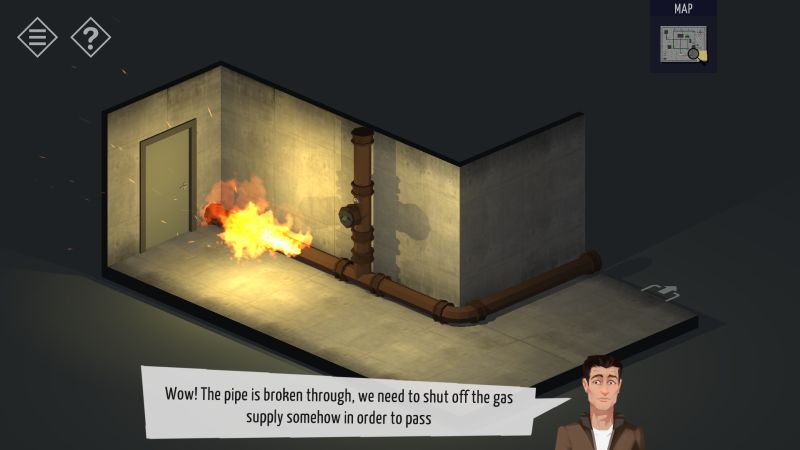
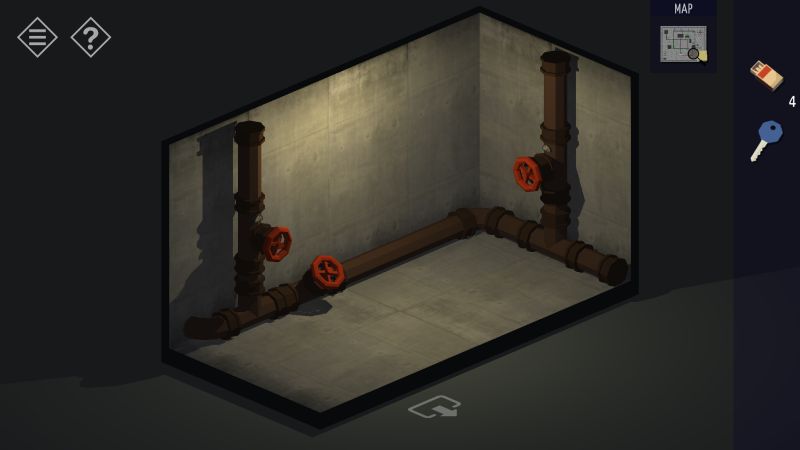
On viewing the map, you will notice that the gas valves are specifically marked. This is because the valve closest to the power room has a ruptured gas line and is currently burning. This will prevent access to the power room until the gas has been shut off, and the valve near the power room is missing a handle.
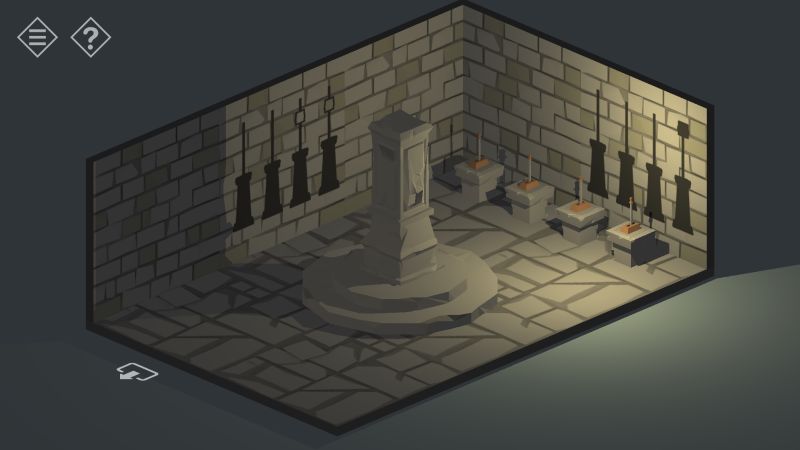
There are seven gas valves in total, counting the one we mentioned earlier, but three of these valves cannot be accessed right away as they are all locked in the Gas Feeding room, which is sealed with an odd keypad on the door. The fire will not be your main concern for the time being, but shut off the gas valves that are within reach.
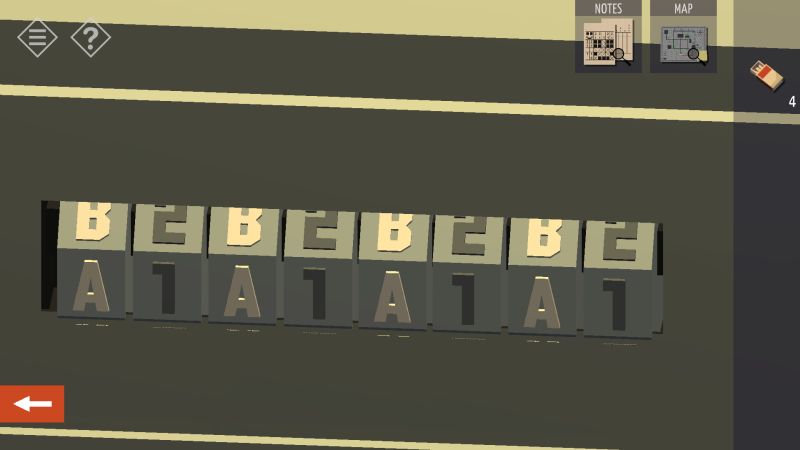
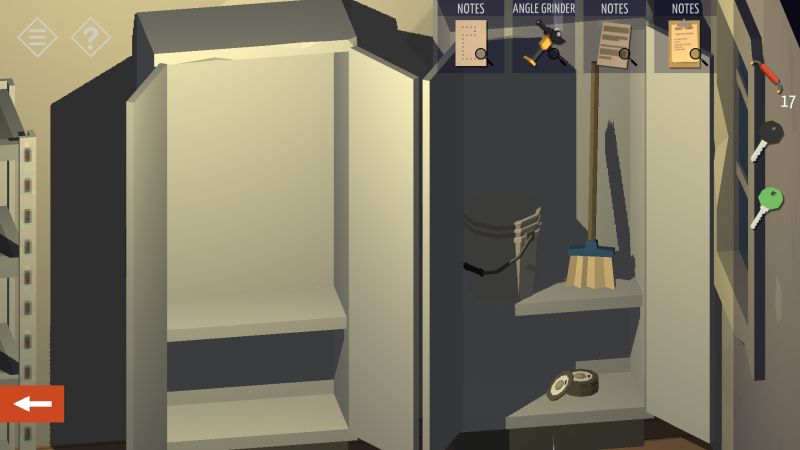
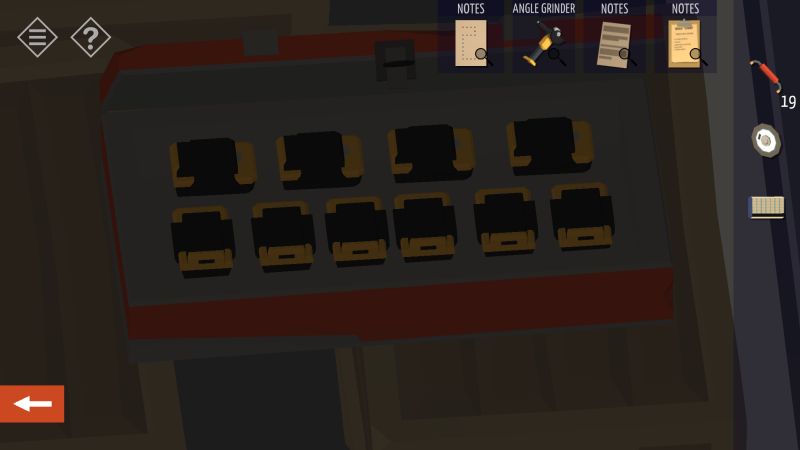
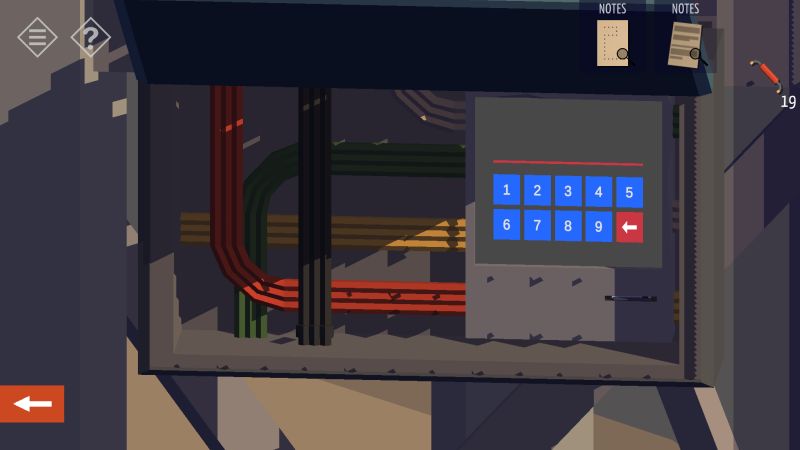
To the left of the maintenance door is a storeroom that is locked with a four-button keypad and a gas valve across the hall. The keypad requires you to hit the buttons in the correct order to unlock the storeroom. If you press the wrong button, the keypad resets. As it is difficult to get the solution in pictures, the order is Lower Right, Upper Left, Lower Left, and Upper Right.
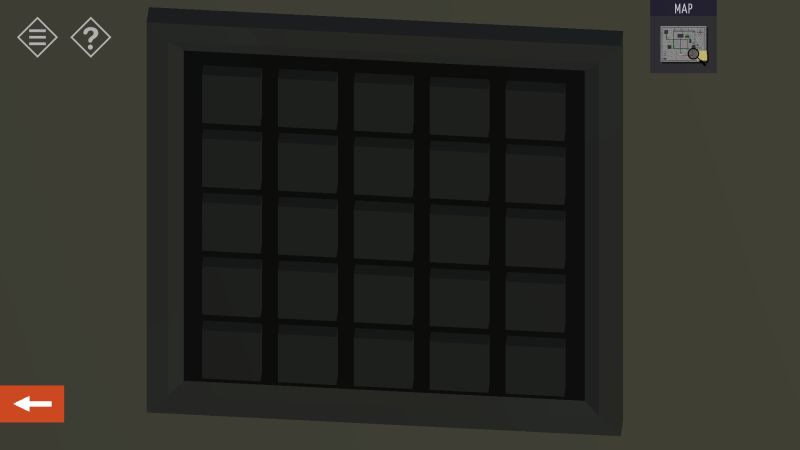
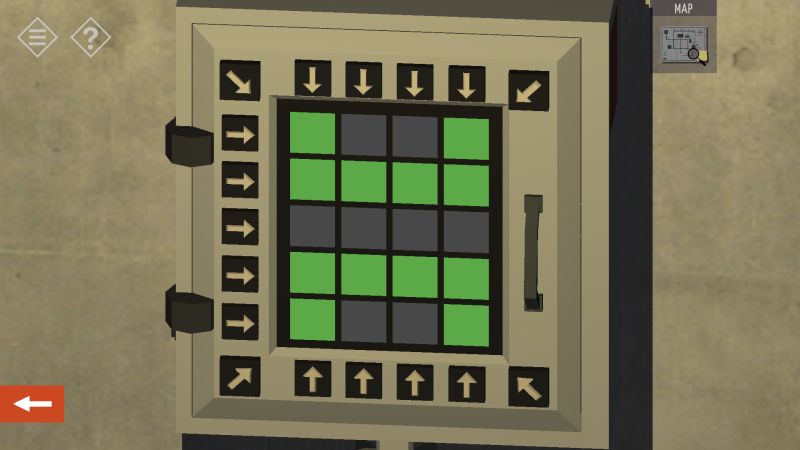
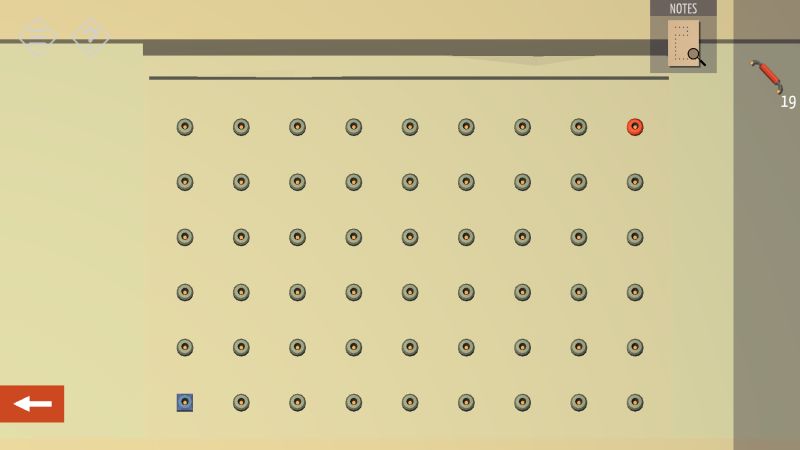
The storeroom has a large wire box at the far end of the room, locked with a switch puzzle involving a grid. Pressing the buttons surrounding the grid will turn on any inactive lights and vice versa. The objective here is to turn on all the lights, but keep in mind that the grid is a 4×5 rectangle, so the diagonal buttons will not be able to go directly to their opposite corners. Once all the lights have been turned on, the wire box will open revealing a black key.
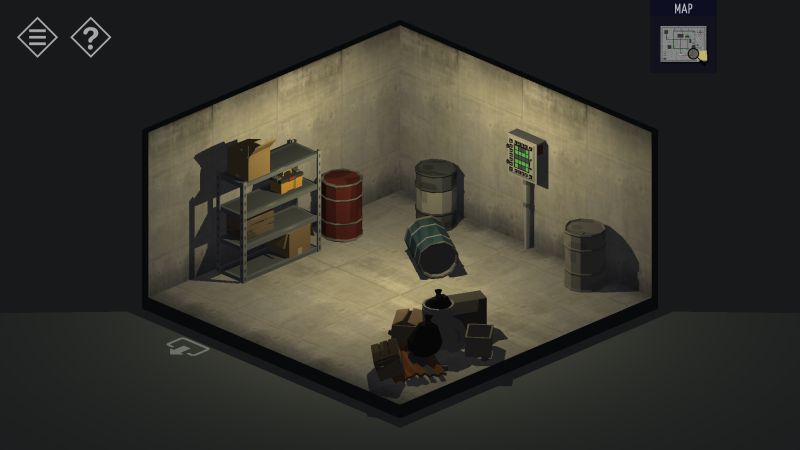
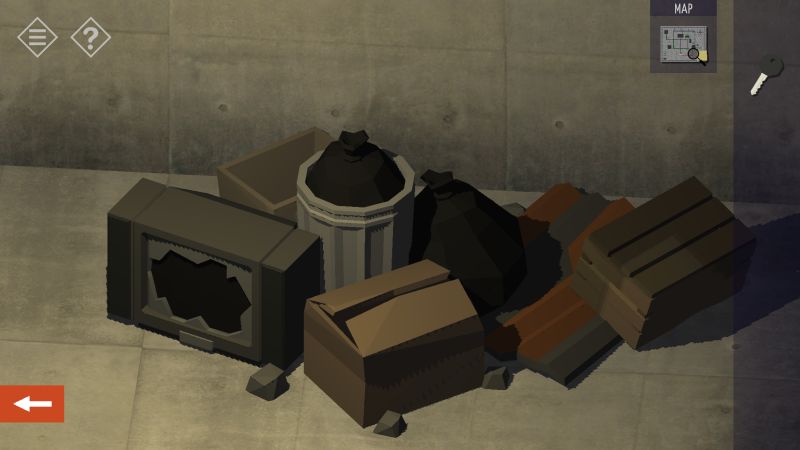
Take the key but before you leave the storeroom, there are some matches that you will use later. The matches will spawn either in one of the boxes on the metal shelf, or under the pile of junk in a corner of the room.
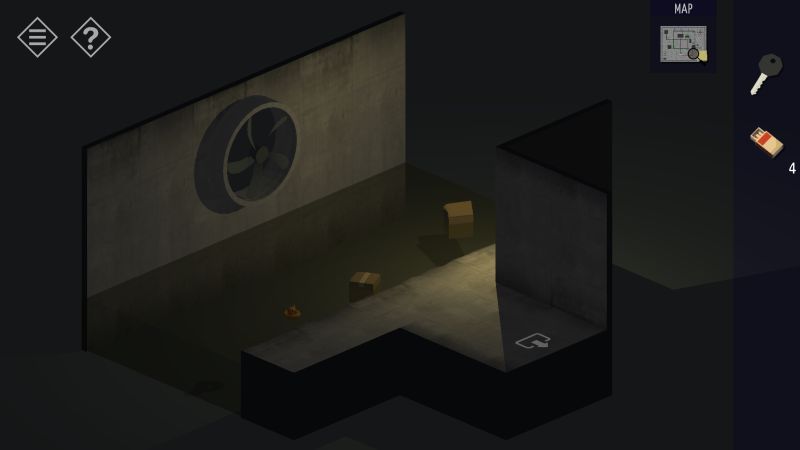
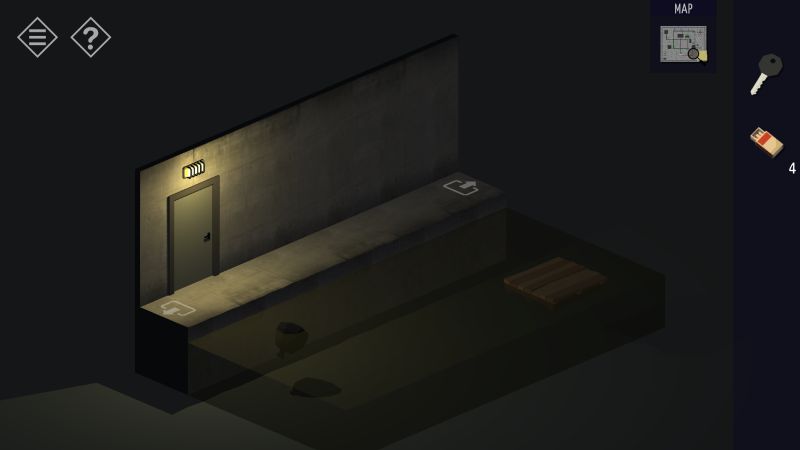
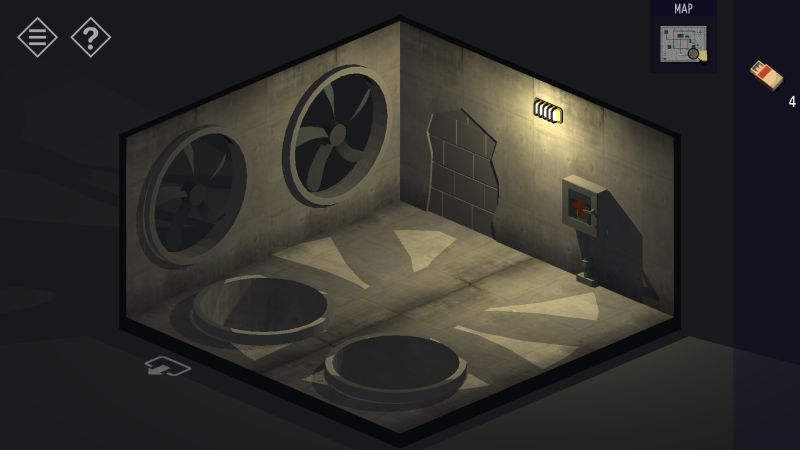
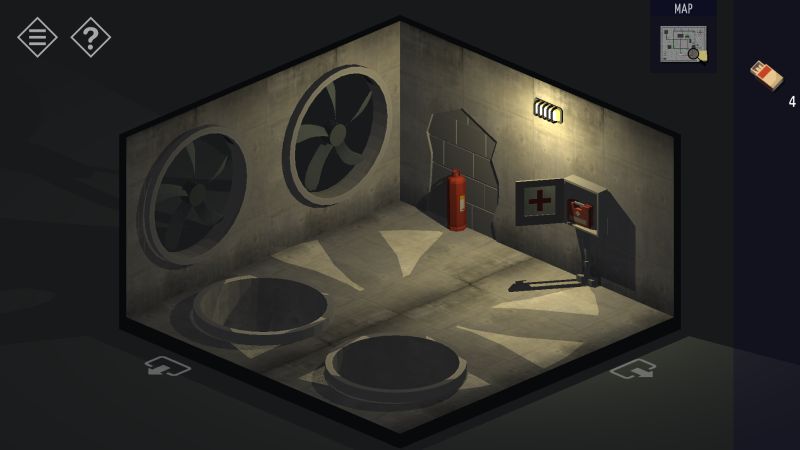
Make your way to the area labelled “F1” or “Fan 1”, which is separated by a sewer, and proceed down the sewer to Fan 2. You might notice a red bar behind Fan 2 that you cannot reach, and all the lights from Fan 3 onwards are switched off. For now, the transition between Fans 2 and 3 has a locked door leading to the lounge room, which you can unlock with the black key you found in the storeroom.
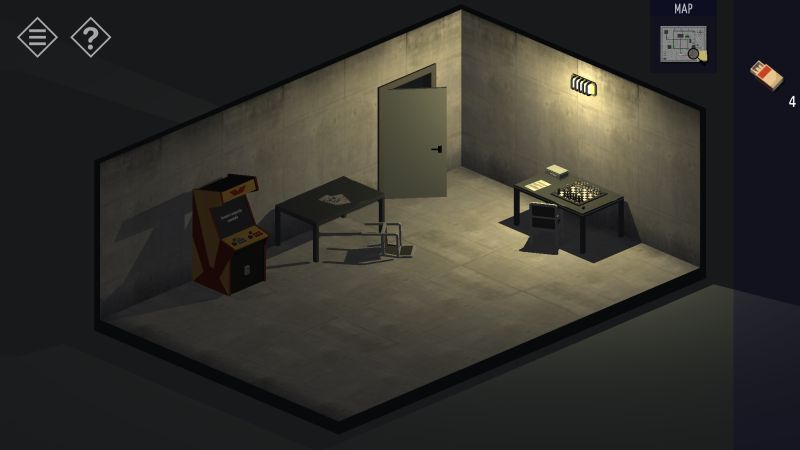
In the lounge room is a crude barricade preventing you from entering the lounge room from the maintenance area. Undo the barricade so that you do not have to travel all the way around. One desk has a chess set, that was abandoned mid-game, and a locked box. Another desk has a drawing puzzle and a pencil. We will do the drawing puzzle first.
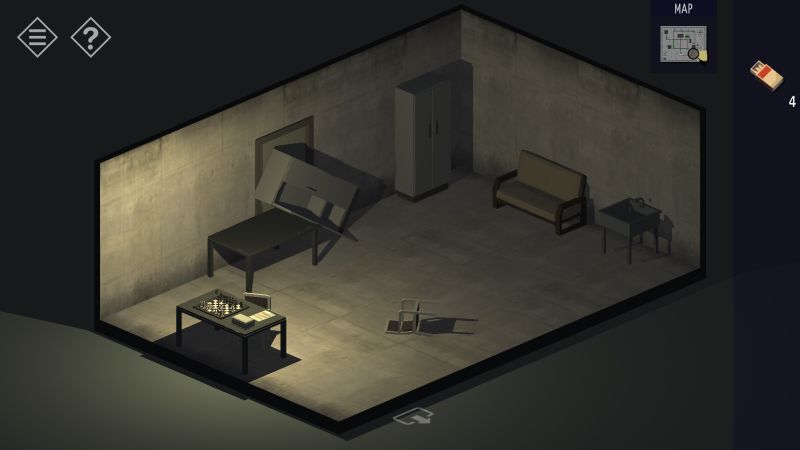
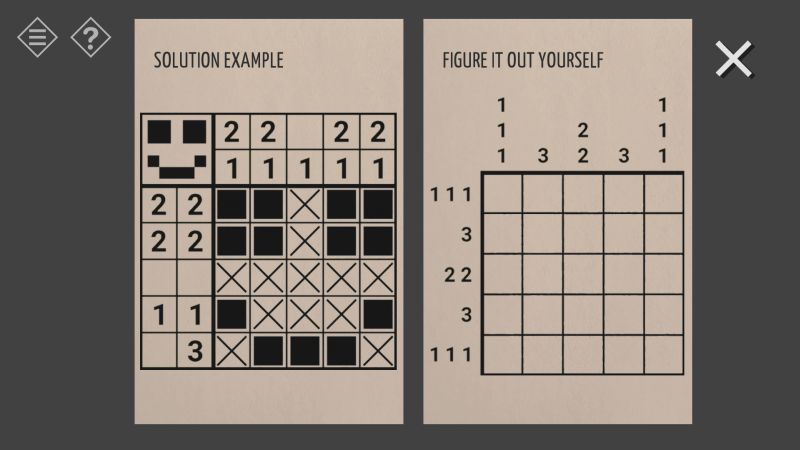
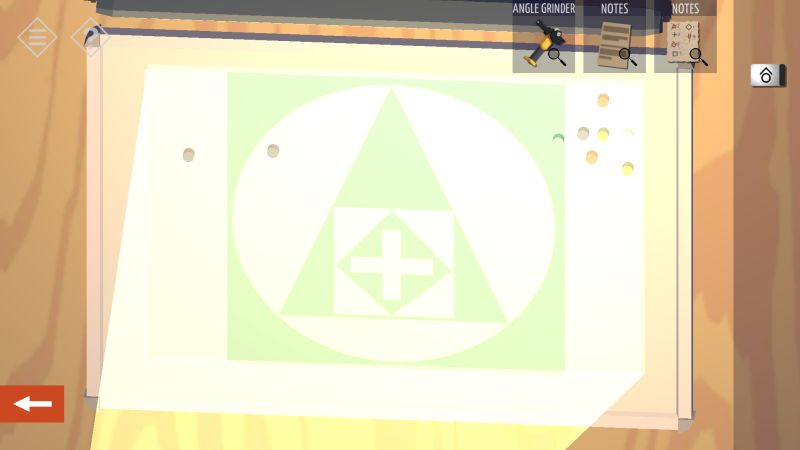
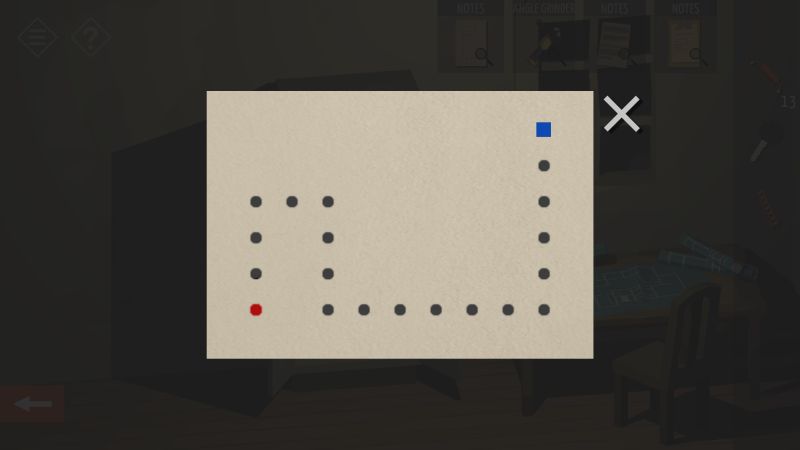
The drawing puzzle gives you a solved example and a blank one that you will have to solve. The numbers on the edges of each grid indicate which squares have to be shaded in order to reveal the image on the blank puzzle. It was quite tough for us to solve the puzzle by ourselves, and decrypting how the numbers work was just as difficult. That is why we have provided the solution to the puzzle below.

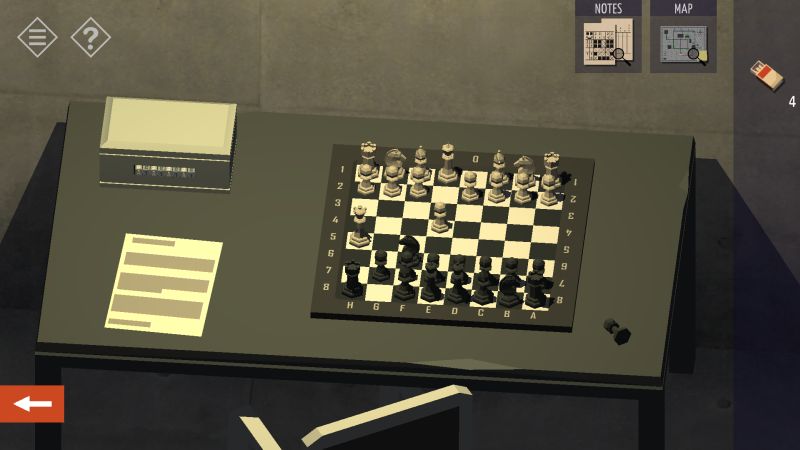
Going to the chess table, you will find a box that uses a code of alternating letters and numbers, a paper with a brief outline on the rules of chess, and some chess pieces that have been moved. The chessboard itself has its grid marked with letters and numbers; these match up with the letters and numbers seen on the box.
The box code is essentially the positions where the chess pieces were moved to before the game was interrupted. You can turn the chessboard clockwise by tapping it. Make sure that the white pieces are “facing” you as this will make it easier for you to decipher the code. As a hint, the first two pieces that moved were both pawns.
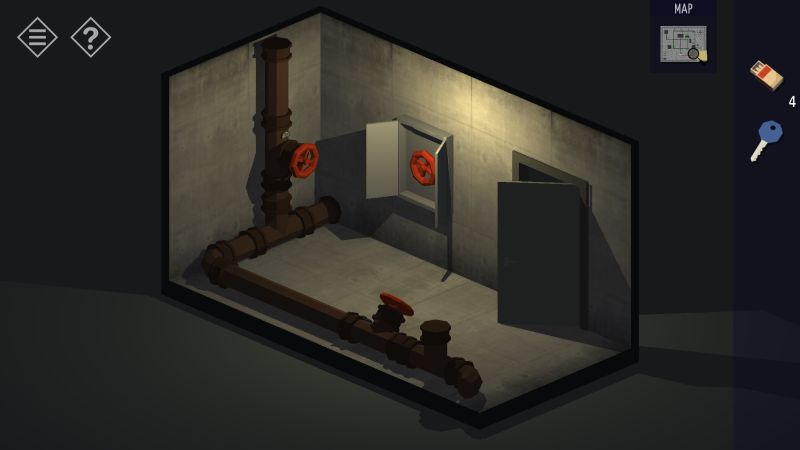
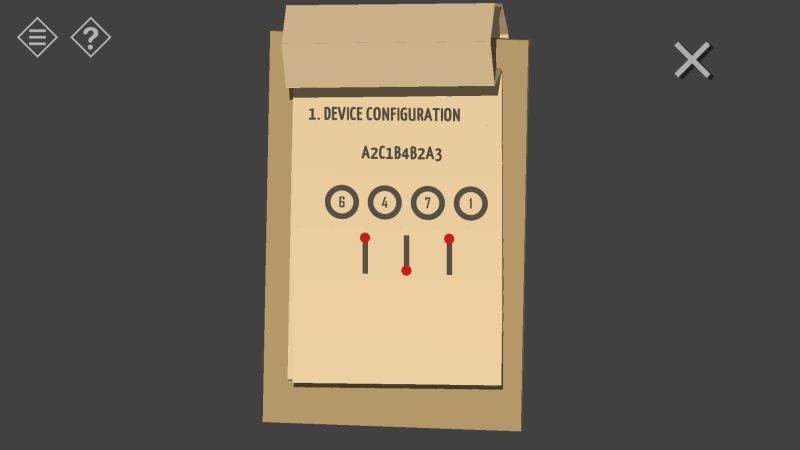
Entering the right code unlocks the box which contains a blue key. That should complete all tasks involving the lounge room, so head outside. The solution you have on the drawing puzzle is the code that unlocks the Gas Feeding Room; input the code and get in. Switch off the remaining three gas valves, and look for a cabinet near the door which has a spare valve handle. Now head to the power room to install the valve handle and extinguish the fire, allowing you safe entry.
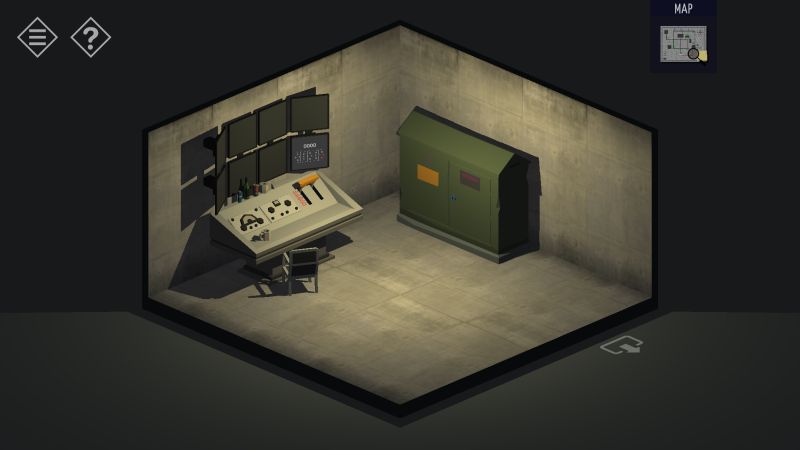
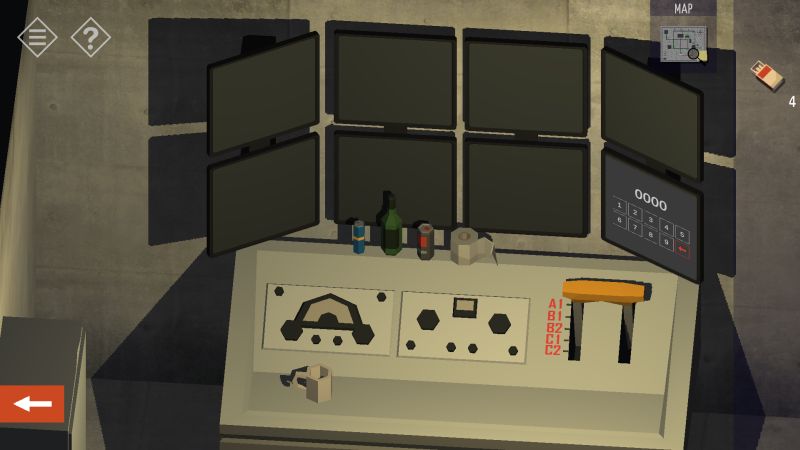
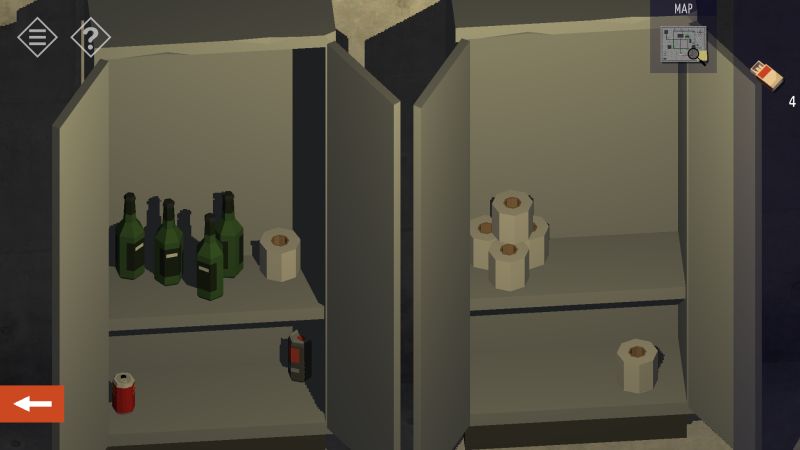
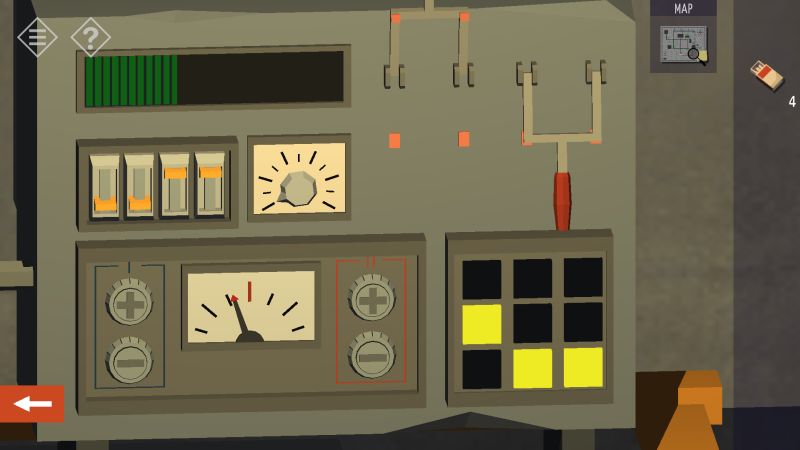
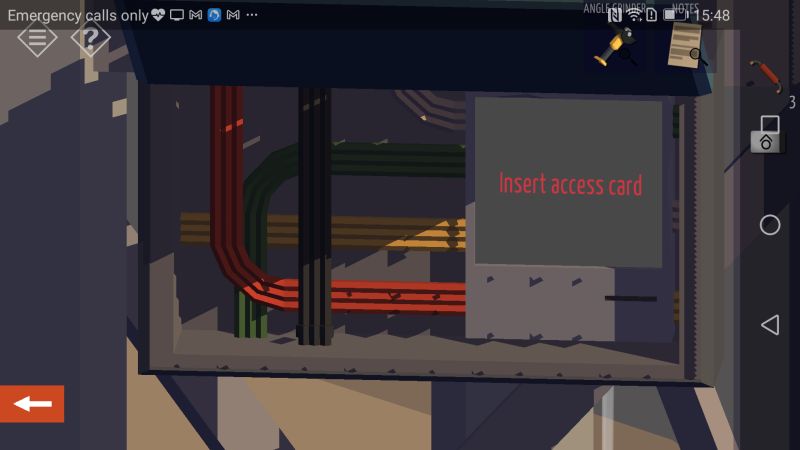
The power room has a console protected by a password and a large switch box that is unlocked with the blue key from the lounge room. The switch box has three switches and one switch is missing its handle; it happens to be behind Fan 2. To turn off Fan 2, we will need to unlock the console. The console has a four-digit password and four items lined up on top. The items include (1) a blue soda can, (2) a wine bottle, (3) a black soda can, and (4) a roll of toilet paper.
Close to the console are four cabinets with various items inside. The password is effectively the number of items you find in all four cabinets, including the ones already lined up on the console. For instance, if you find five rolls of tissue paper in all the cabinets, and add the one already on the console, then the fourth digit of the password is six. The blue can might get a bit misleading as there are similar-looking cans stored in the cabinets. The blue cans relevant to the password are thin.
Tiny Room Stories Walkthrough Part 2: Our Investigation into Redcliff Continues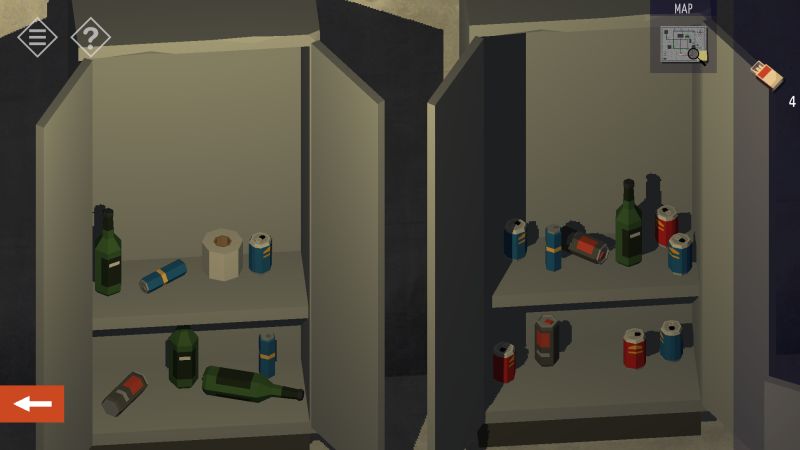
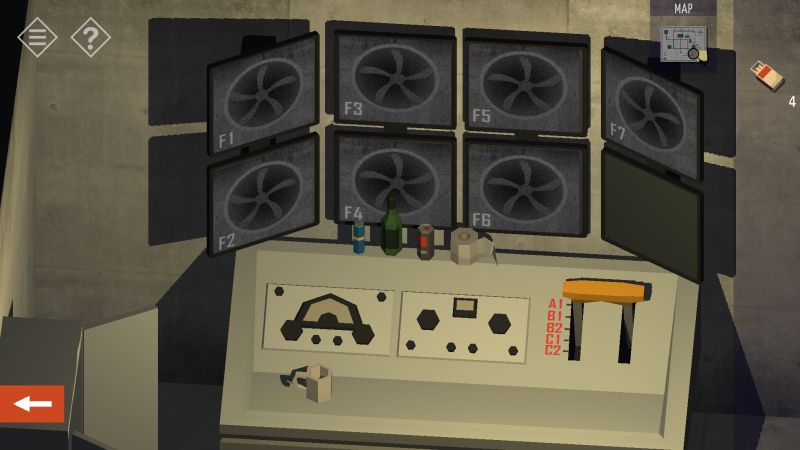
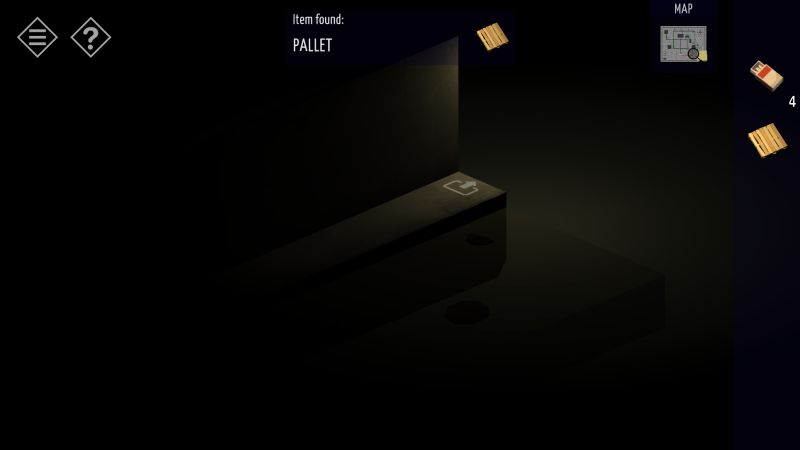
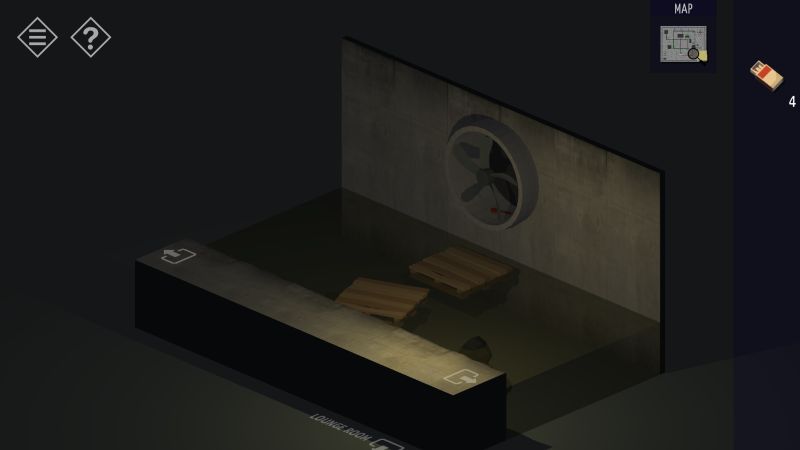
Unlocking the console gives you access to cameras aimed at all seven fans in the maintenance tunnels, as well as a lever that shuts off certain fans depending on its position. Tap the lever until Fan 2 is switched off, and go back to the sewer. To reach Fan 2, head to the darkened portion of the sewer to find a pallet lying against the wall and pick the pallet up. Return to Fan 2 and place the pallet in the sewer. Move another pallet that was floating in the water into position so you can get the handle. Return to the power room and install the handle on the switch and flip it on, restoring light to the rest of the sewer.
According to your map, Fans 4 and 5 are connected via a shaft, with Fan 5 leading directly into the room with the red X. Go back to the power room if you are not there already and flip the lever until those fans are off; head back down to the sewer and travel to the blocked off room via the shaft.
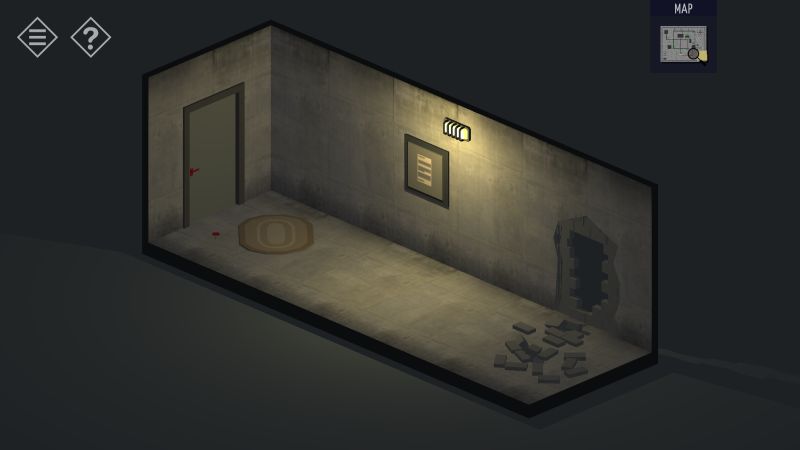
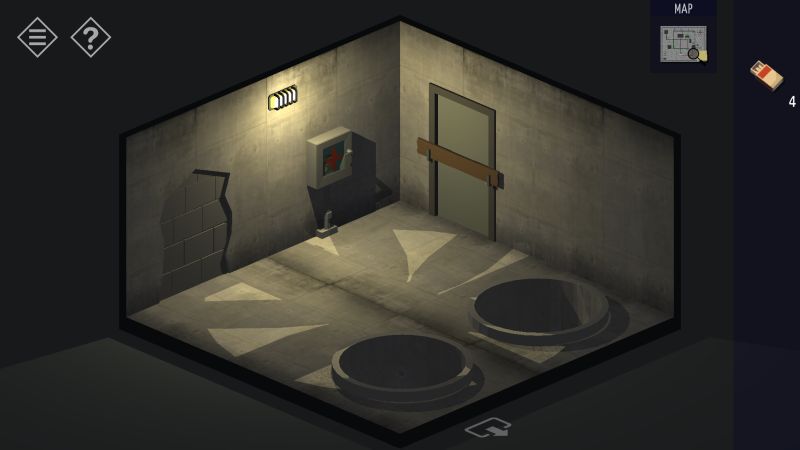
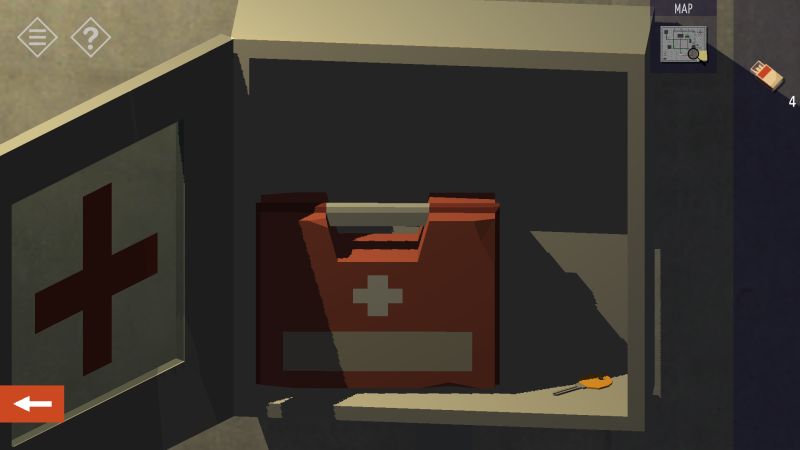
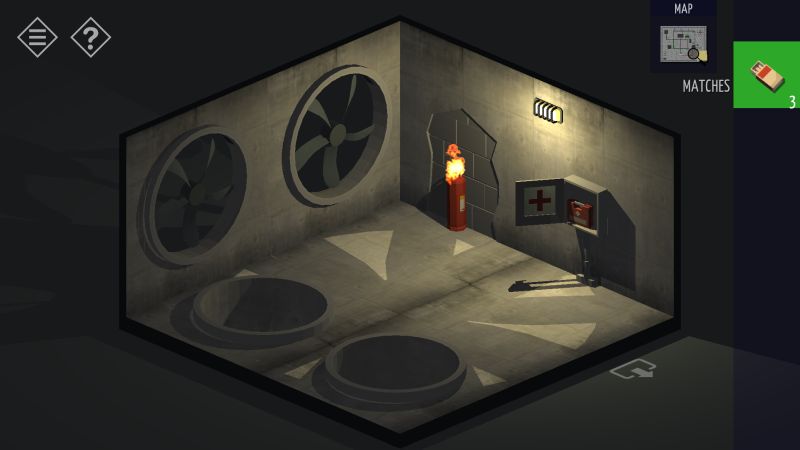
In the locked room, there is another exposed wall, a first aid cabinet, and a board that is keeping the door from opening. Remove the board to open the door, and open the first aid cabinet to find a yellow key. That yellow key opens the room close to the Gas Feeding Room, which contains several empty gas cylinders. Move the camera to find a full propane cylinder behind a large tank, distinguished by its red color.
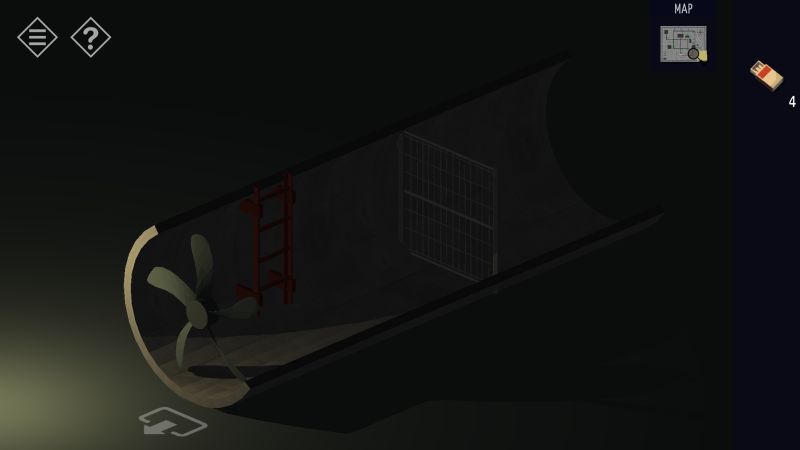
If you have the matches, you might think about igniting the propane cylinder to blow up the wall. However, there is a large fan suspended from the ceiling that puts out the flame every time. Head back to the power room once more and tap the lever until Fan 7 switches off. Inside Fan 7 there should be a ladder leading up to the aforementioned ceiling fan.
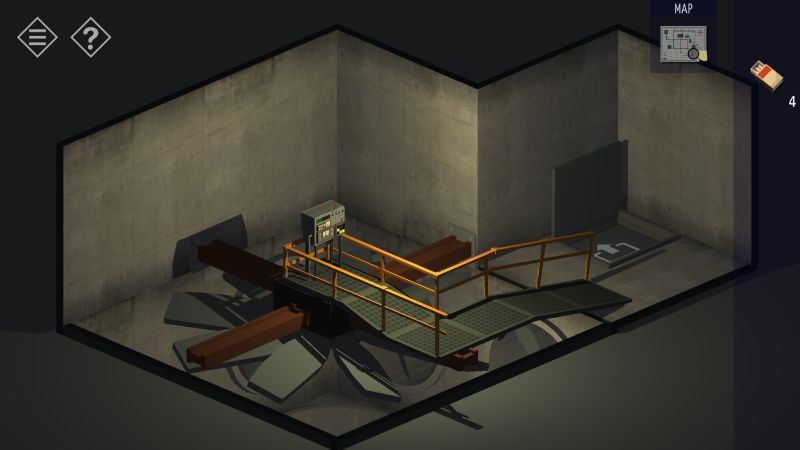
The large fan has controls to power it on or off. Unfortunately someone welded one of the switches in place, so your only option is to overload the fan. The fan controls have a power gauge that must move to red in order to overload the fan, as well as a myriad of switches involved:
– Next to the welded switch is another switch that you just have to flip down;
– In the center of the control console is a dial, and you have to find the right position to deliver the most power;
– To the left of the dial are four switches that must be turned on or off in the right pattern;
– Below the dial and the switches is a voltmeter and two pairs of buttons that adjust how much power is being transferred; and
– The last set of switches is a keypad in the lower right corner of the console, where you have to figure out which keys must be turned on or off to overload the fan.
Once you have overloaded the fan it will explode, allowing you to ignite the propane cylinder without interruption and blow a hole in the wall.
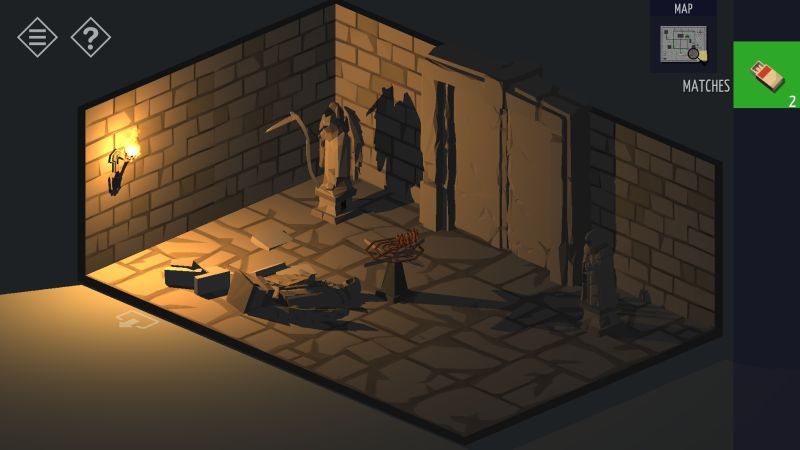
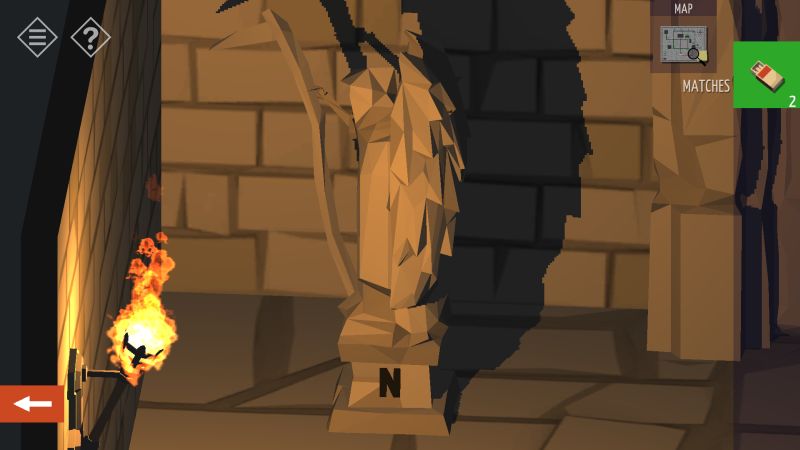
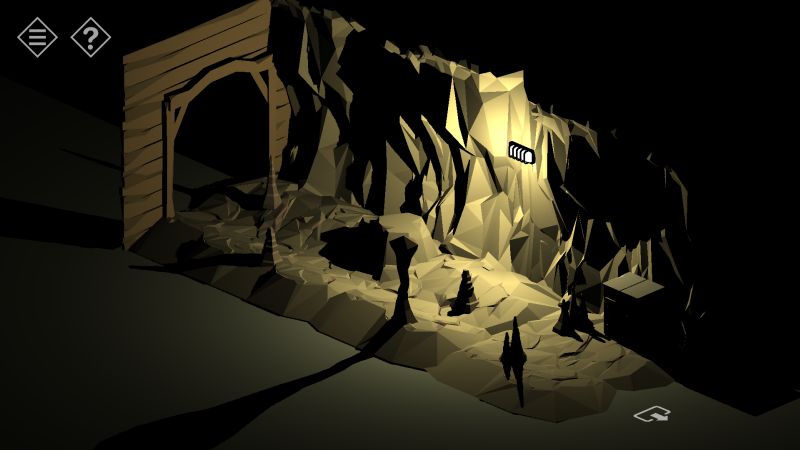
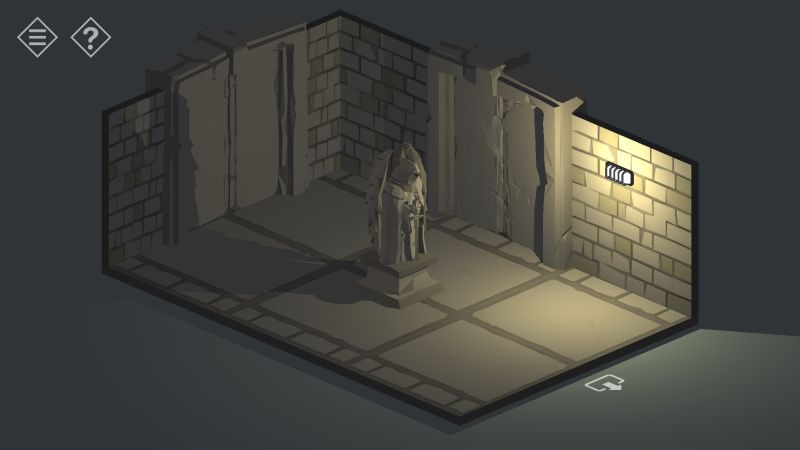
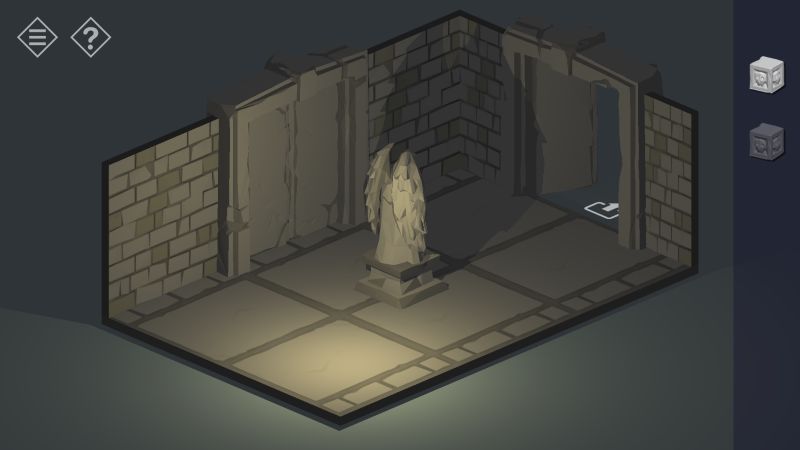
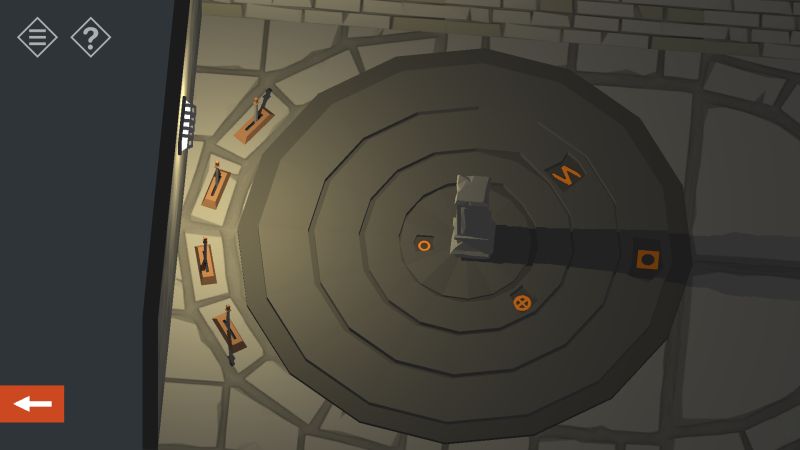
The hole will lead to the ruins. After you light up the nearby torch with one of your matches, you will find four statues decorating the room and another stone door blocking your path. Two statues were broken during the explosion. In the middle of the room is a series of four rings. Tapping the two surviving statues will reveal cardinal or ordinal directions written on their bases, such as S (south) or NW (northwest).
The four rings also have miniature versions of these statues. Rotate the rings so that miniatures are facing in the directions written on the statue bases, with “North” corresponding to the stone door. Focus on the surviving statues first so that the broken statues just leave you with two possible combinations. If you get their positions right, the stone door will open, leading to another room.
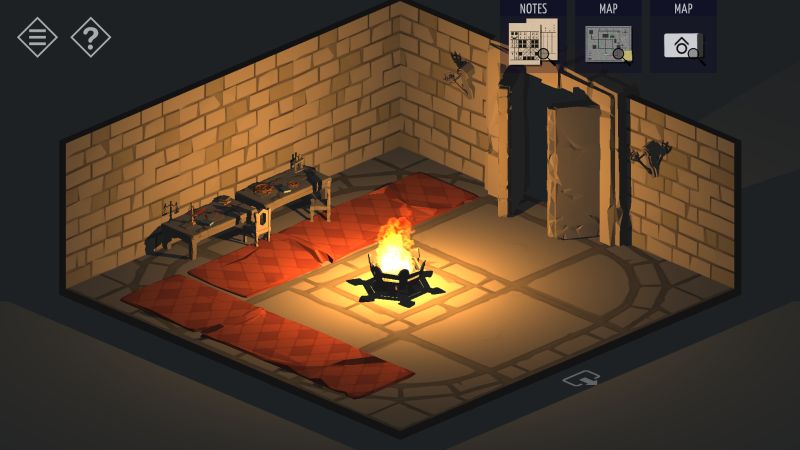
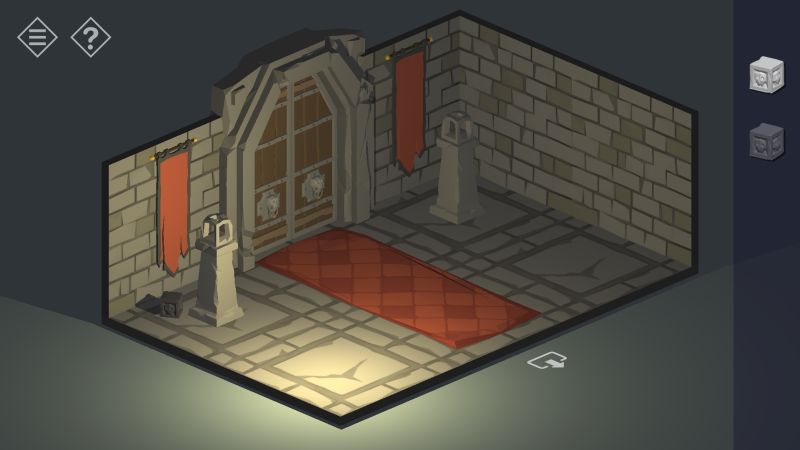
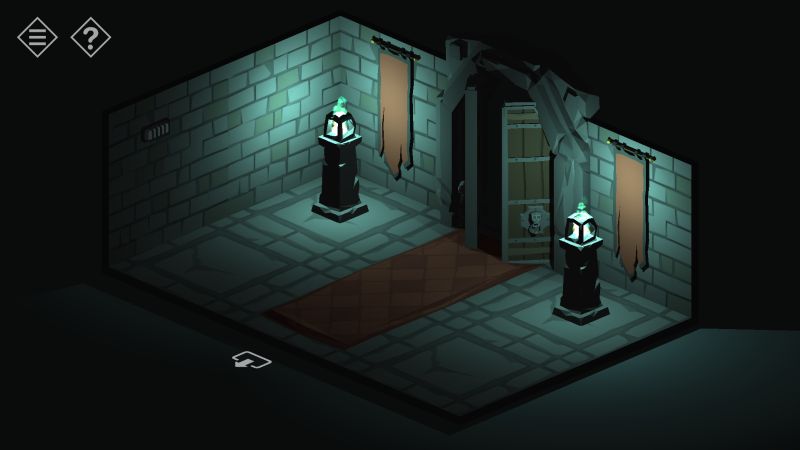
Just like before, this new room is dark, but chances are you still have one more match to light up the brazier in the center of the room. This reveals a stained-glass window depicting the nearby mountain, and tables full of unknown components.
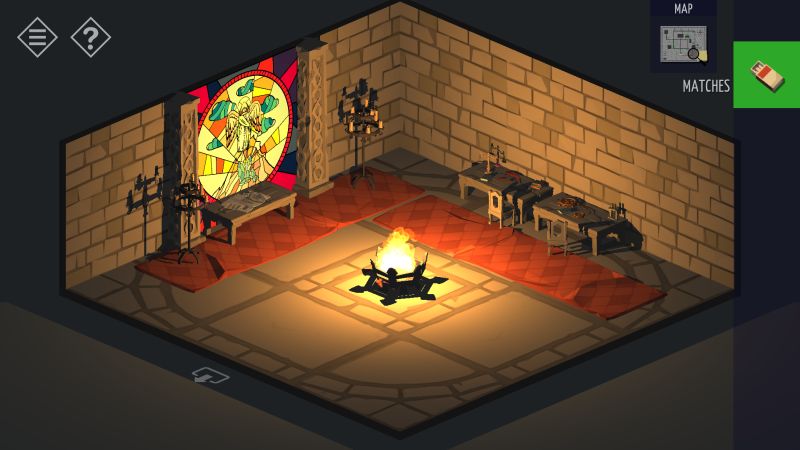
Next to that window should be a table with a keycard and a map with a specific area of the mountain clearly marked, and mentions of an “OLYMPUS Project.” After picking up the keycard and investigating the map, your final puzzle for this chapter is finding a way out of this room. Turn the camera until you find the stone door connecting to the church and pull down one of the torches. This opens the stone door and leads you back to your car. It is time for a trip to the mountains, and it looks like some rain has rolled into the town.
Chapter 5: Secrets In The Mountain
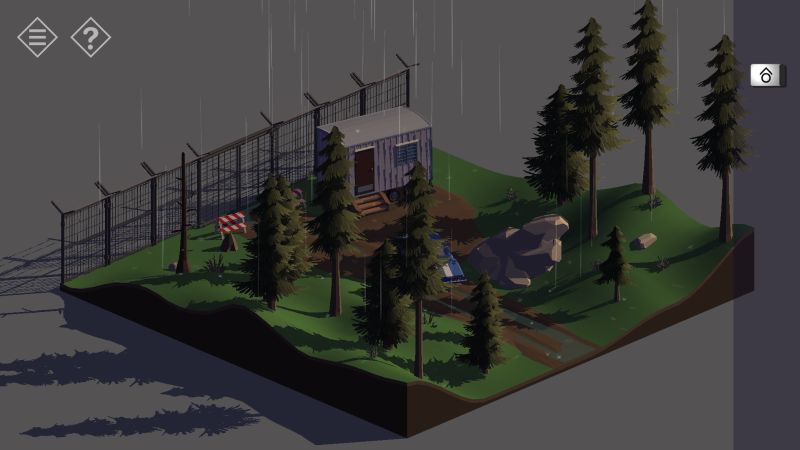
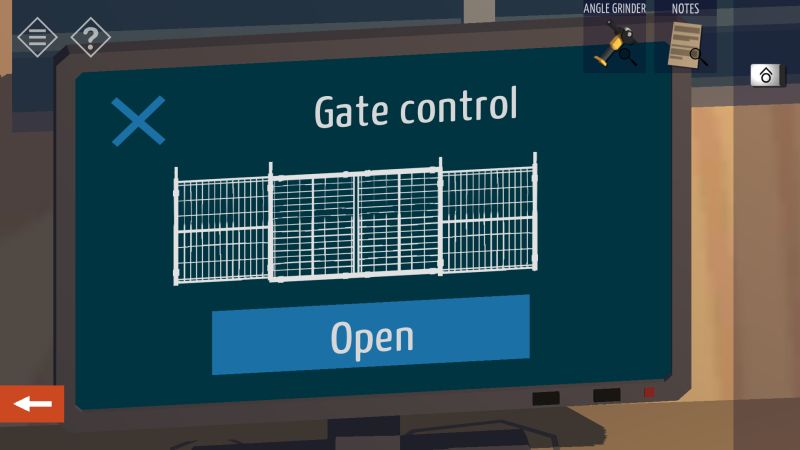
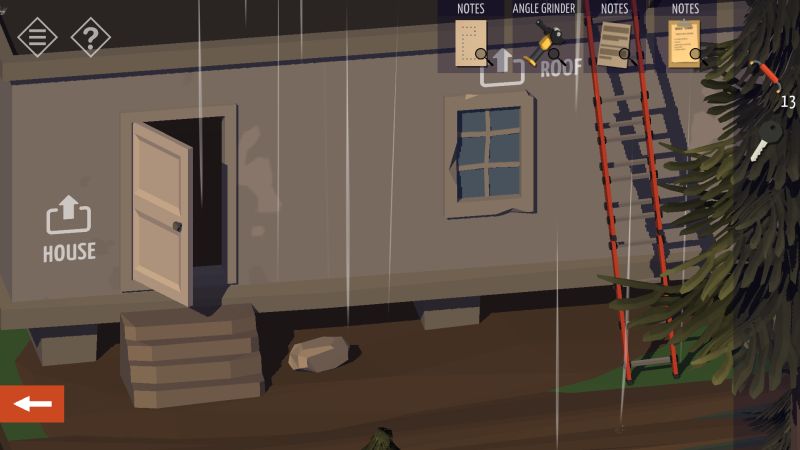
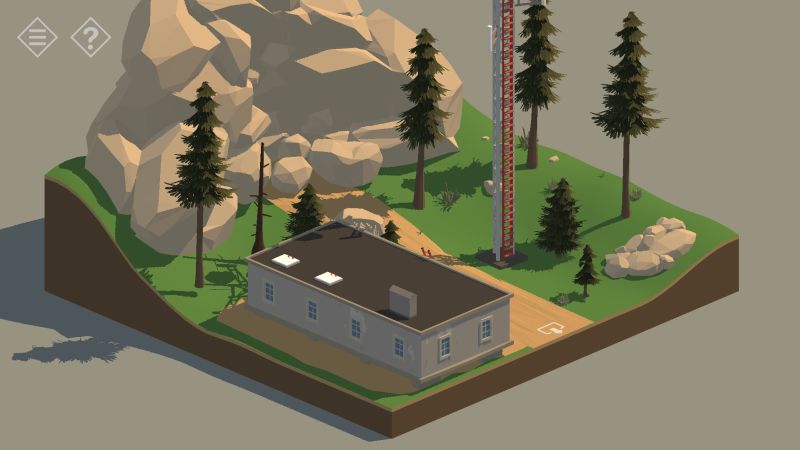
You drive to the mountain, finding that the road is blocked off by a gate. The small shack close by might have some way to open the gate, so head inside.
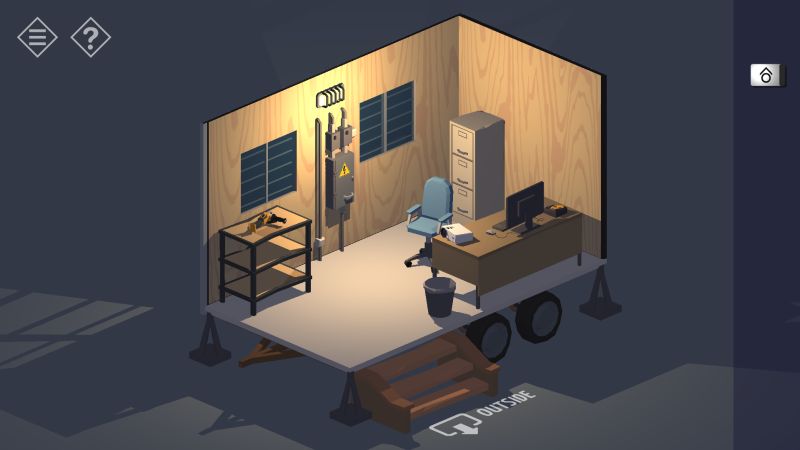
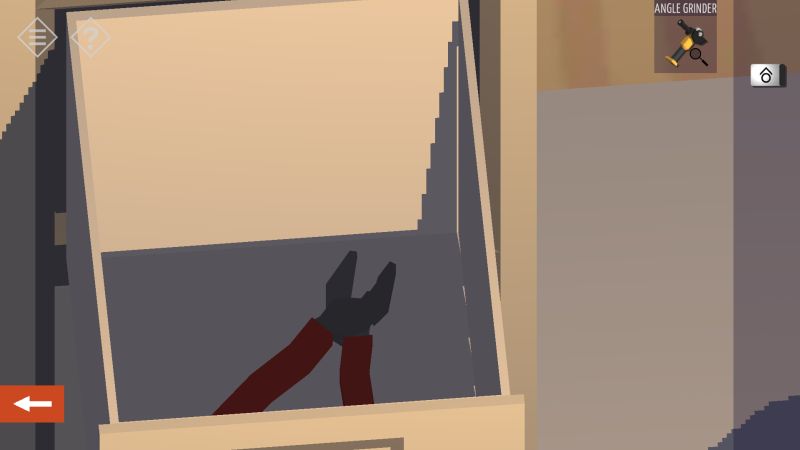
You will come across an angle grinder sitting on a nearby shelf. However, it is missing a cutting disc and a battery, so you cannot use that to simply cut through the fence. Zoom in on the file cabinets in the opposite corner and open the one in the middle to find a pair of pliers.
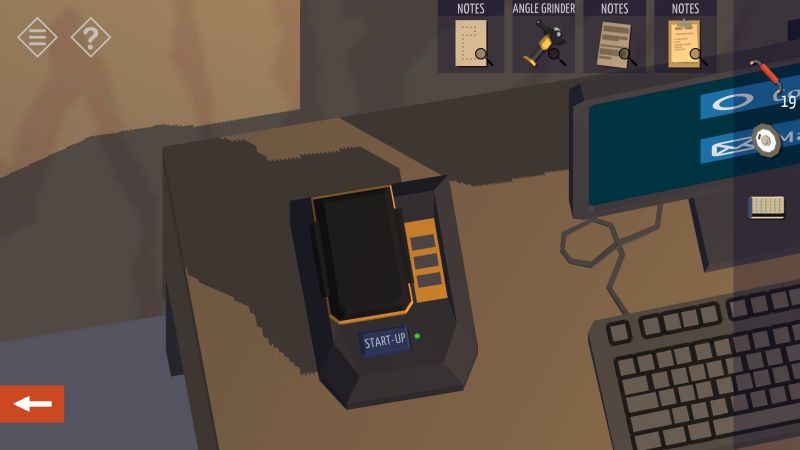
The nearby desk has a computer, a projector, and a charging station; all unpowered. The control box in the middle of the room is locked, but you can just use the pliers on the hinges to remove the cover.
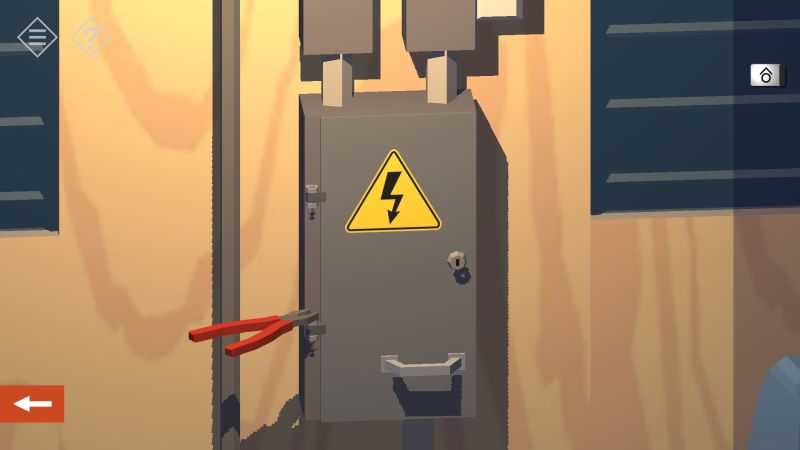
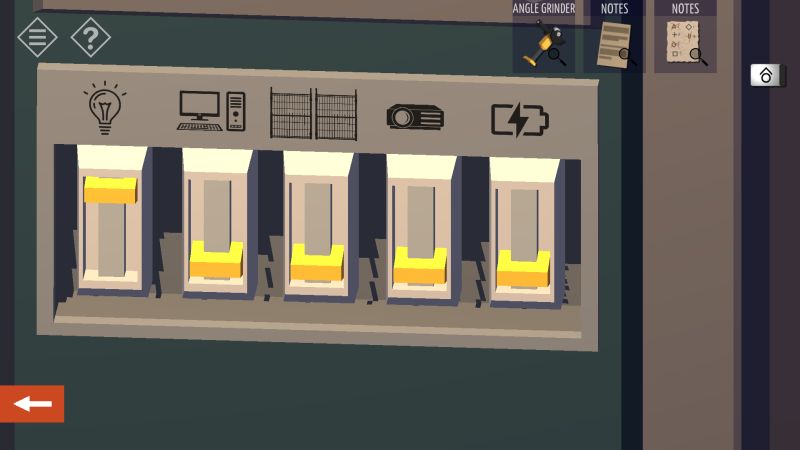
The uncovered control box has five switches that control power to certain things in this area. The lights are currently on, while the computer, the gate, the projector, and the charging station are all off.
Flipping on one switch may cause up to two other switches to turn on or off depending on their positions, so you will have to figure out how to turn on all five switches. Once all the switches are on, you can turn on the projector, which displays an image on a whiteboard nearby.
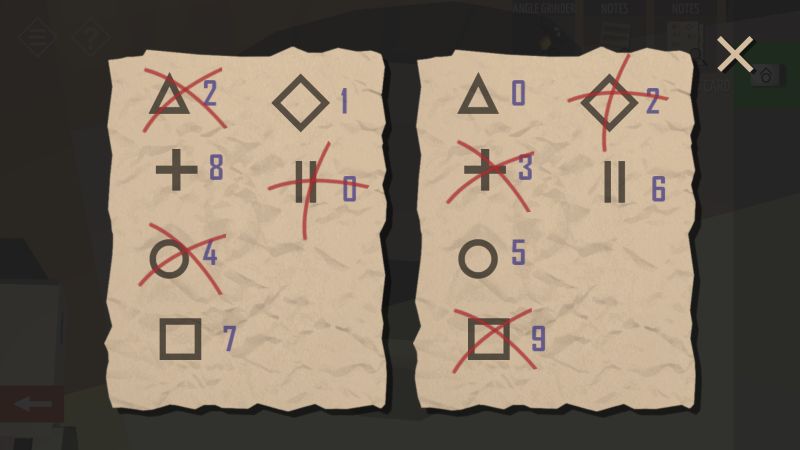
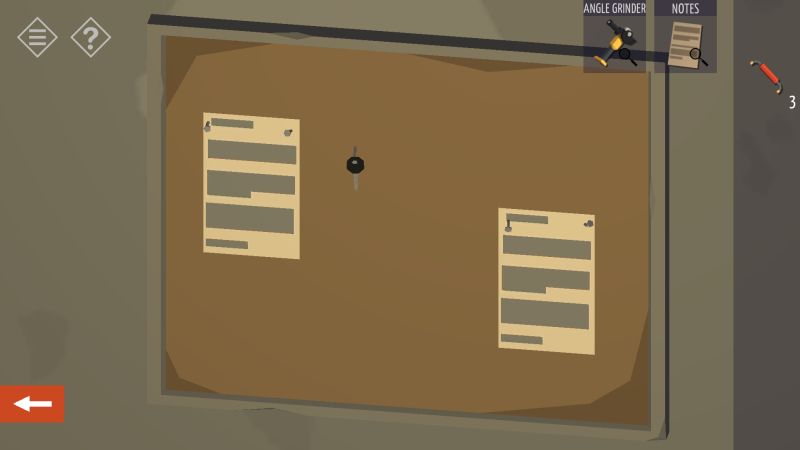
The whiteboard itself has a letter reminding people not to use obvious passwords. The image from the projector depicts six shapes nested in each another. To figure out the computer’s password, search the nearby trashcan for two crumpled notes. The notes have shapes similar to those from the projector, as well as corresponding numbers, some of them crossed out.
The uncrossed shape-number combinations are the numbers used for the computer’s password. Unlocking the computer will allow you to open the gate, provided you have it powered up. Remember to pick up the angle grinder on the way up.
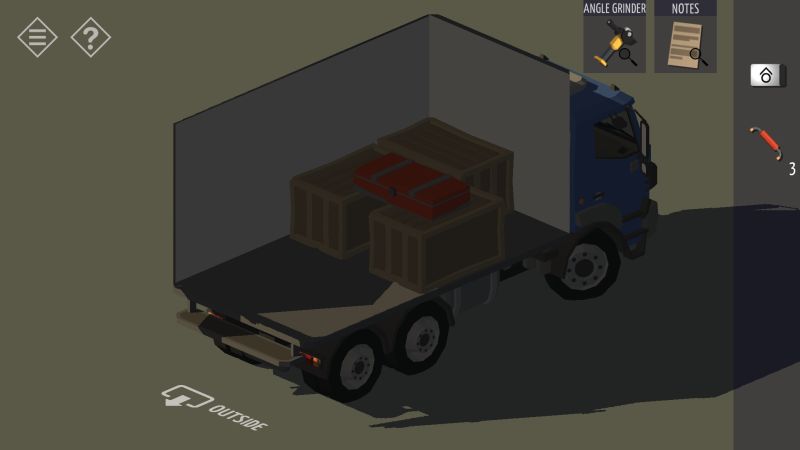
Upon entering the mountain, there should be some blueprints lying in the rain and an open truck belonging to “Next Lab”. The blueprints are too washed out to read, but there should be three jumpers inside a nearby toolbox that you should collect. The truck has a locked case atop some crates, and nothing else for now. Continue deeper into the mountain.
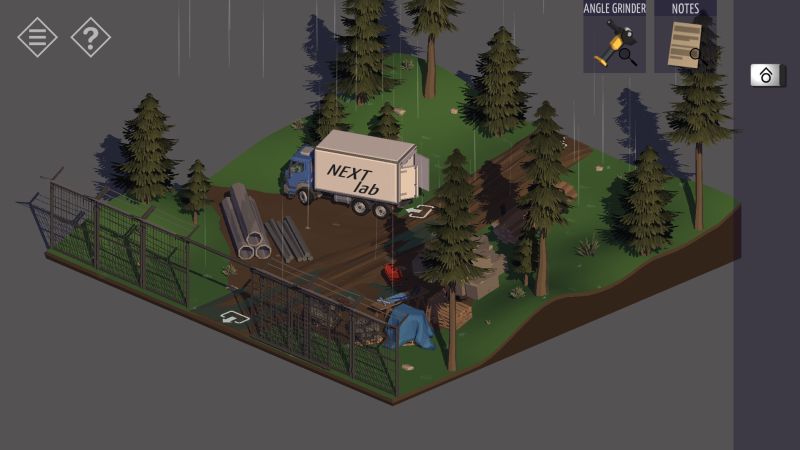
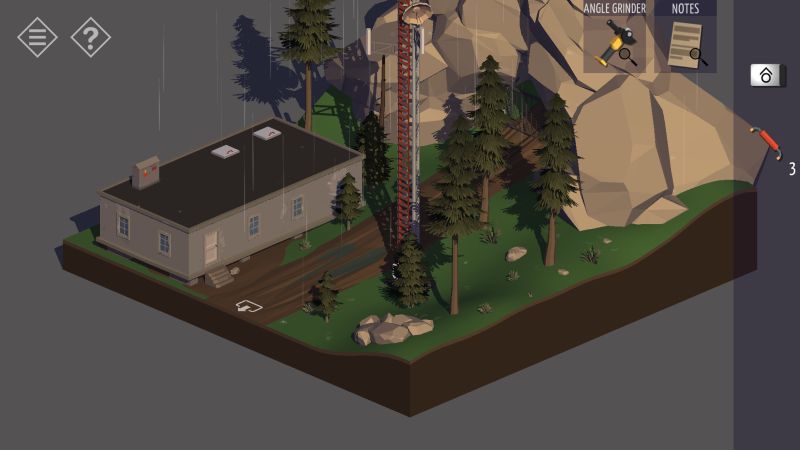
At the foot of the mountain there is a cave, a radio tower, and a building. The keycard from the ruins will unlock access to the caves, so you are free to use it right now. However, the lights in the cave are unpowered no matter how many times you flip the switch inside so you cannot go further. The building just outside the cave is locked, but someone thought it would be a good idea to hide the key under the nearby rock.

The radio tower has a similar slot for a keycard, but it will not accept the ruins keycard.
Inside the building are four doors that use different colored keys to unlock them. A bulletin board on the opposite end of the hall has a key hanging from it and a note discussing unloading something from the truck. The second door from the entrance is unlocked, leading to a control panel warning about four inactive systems which are preventing you from venturing into the mountain.
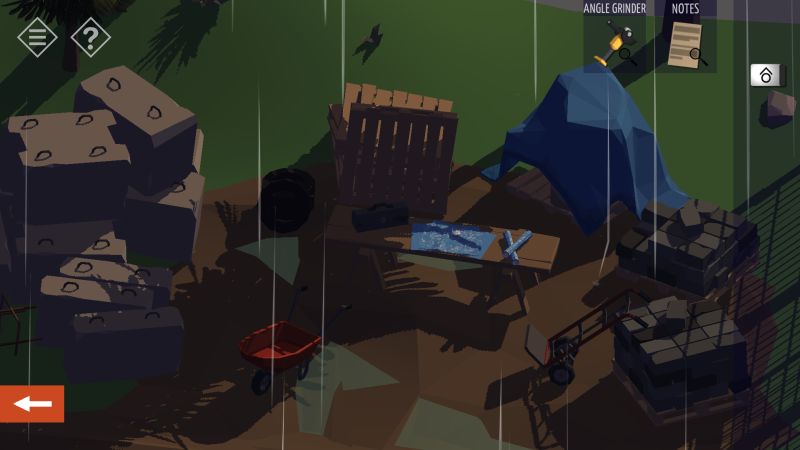
The panel itself has a blue key on it and the other side of the room should have shelves with boxes. These boxes contain four jumpers in total. Back outside, there are two pushcarts nearby: one pushcart has a clipboard and the other pushcart has some boxes.
The clipboard has a solution to activate one of the inactive systems, namely “device configuration.” The boxes should have three additional jumpers. Activate the device configuration using the solution on the clipboard first so that there is one less thing to deal with going forward.
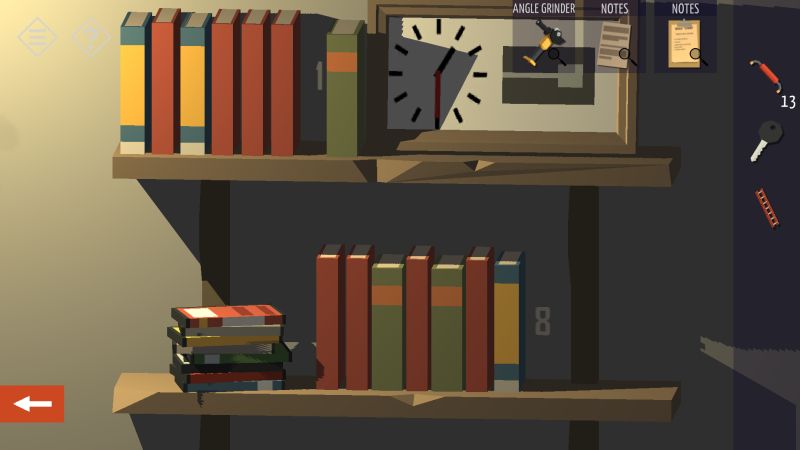
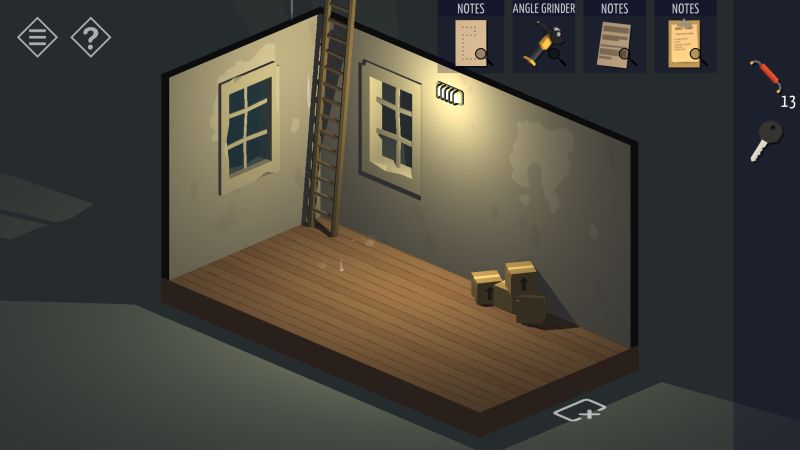
The blue key unlocks the room closest to the entrance. The room has some bookshelves, a locked cabinet, and a ladder lying next to the cabinet. Pick up the ladder for later use and search the bookshelves for three more jumpers. You can slide the books around, which should reveal a number written on the wall for each bookshelf layer. These numbers line up with the cabinet on the opposite wall, unlocking it and revealing a schematic for a circuit.

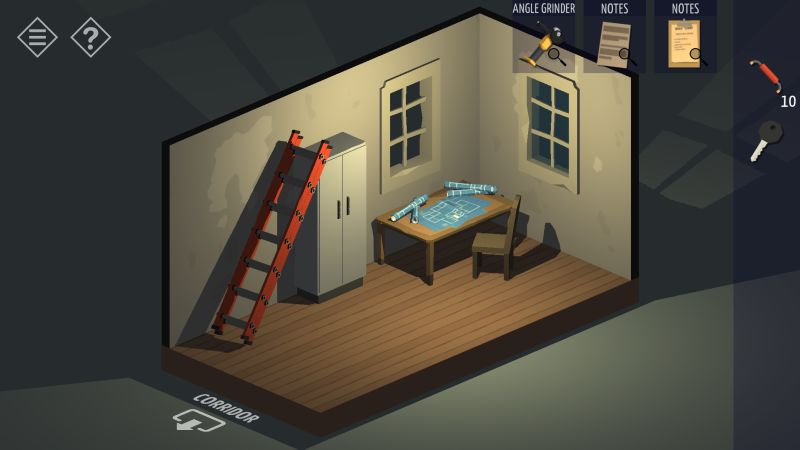
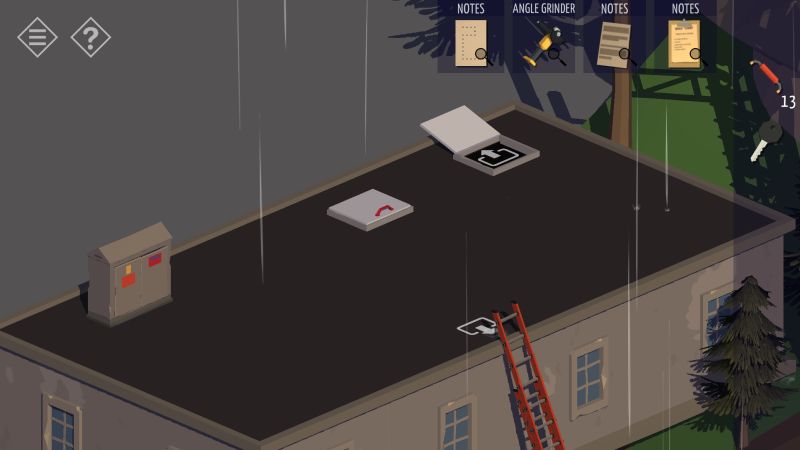
This schematic is related to the jumpers you have been collecting throughout this chapter, but the schematic requires 19 jumpers while you currently have only 13 of them. That leaves six jumpers unaccounted for. Exit the building and use the ladder to gain access to the roof.
The roof has a locked electrical enclosure and two trapdoors; the furthest trapdoor leads back into the building. Inside that room is a stack of boxes with a green key underneath, some shelves, and cabinets. The shelves hold four jumpers scattered in its boxes, while one of the cabinets has a replacement disc for the angle grinder. Make sure to collect everything in the room before leaving it, installing the disc on the angle grinder as well.
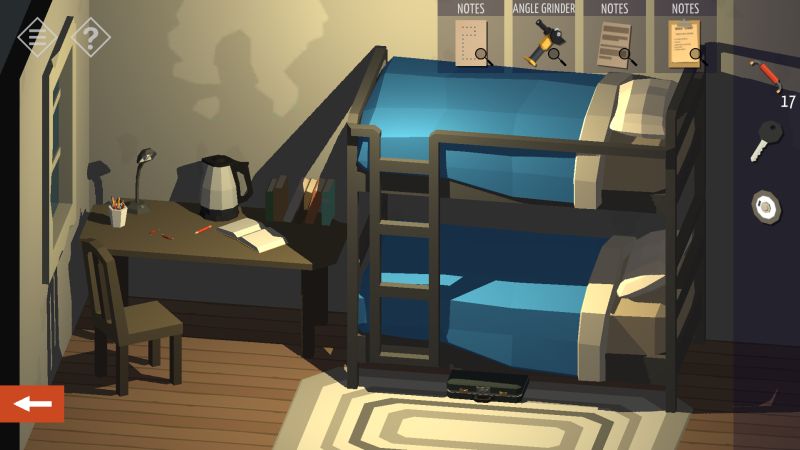
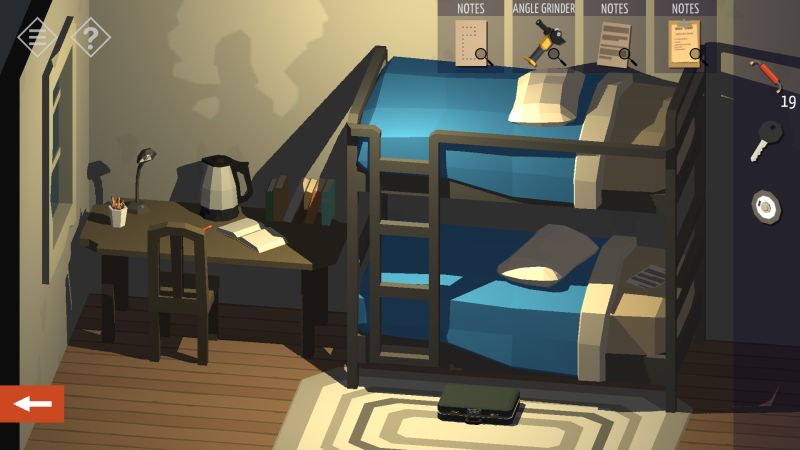
Back inside the building you can use the green key to unlock the final room, which contains a desk and a bunk bed. The desk has the last two jumpers, while underneath the bunk bed there is a locked suitcase with a four-digit password. Search the pillows for a sheet of paper with four rectangles drawn on it; these rectangles represent the doors of the building itself.
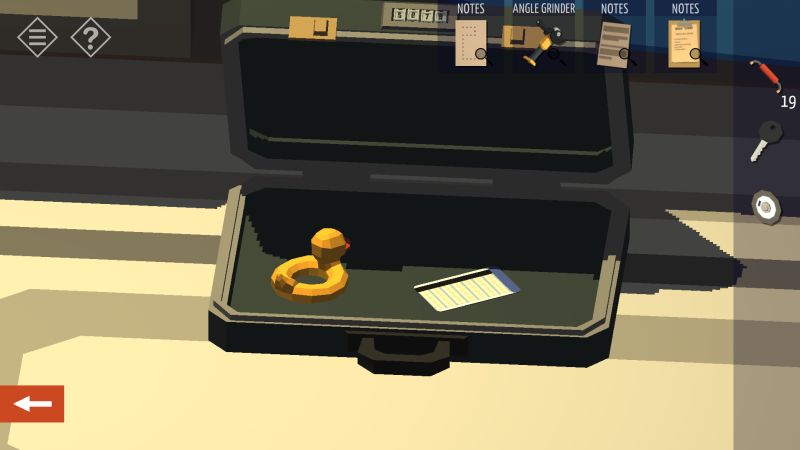
You might have noticed a number written on the inside of each door, and the rectangles resemble these doors and whether or not they have windows and/or vents. In case you are having trouble reading the door numbers, enter their respective room and rotate the camera until you can see the number clearly. Put these numbers in order and unlock the suitcase, giving you the radio tower keycard.
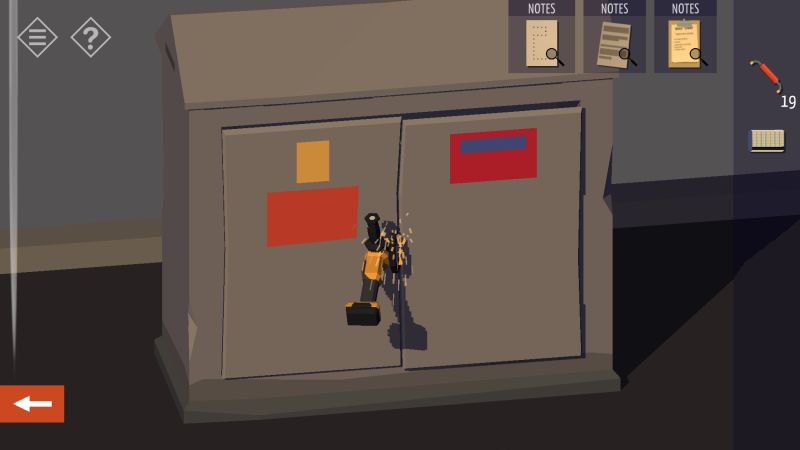
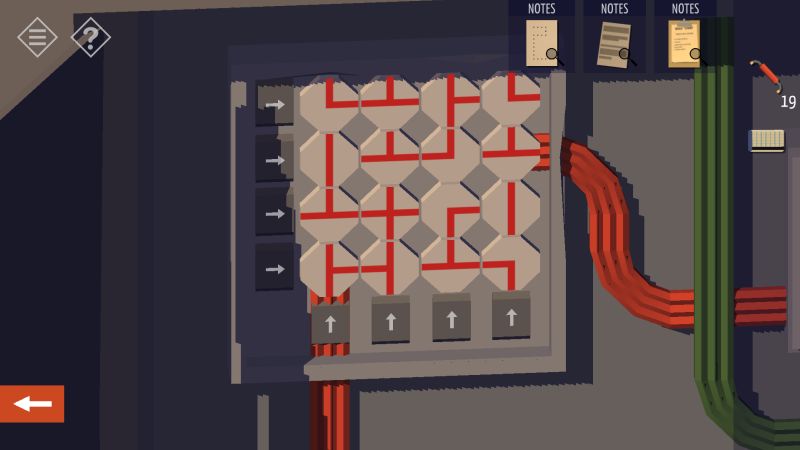
As you might have guessed from the notes, the key that you picked up from the bulletin board unlocks the case inside the truck. This contains batteries that fit the angle grinder. Pick up one battery, head back to the shack at the entrance, and use the charger on the desk to power up the battery. When the battery is charged up, install it onto the angle grinder and use it to cut open the enclosure doors on the roof, revealing another wire puzzle.
The wire puzzle here is similar to the one found back at the bank (orange wires), but you turn the tiles by pressing buttons lining the grid. These rotate their selected row or column. There is only one pair of wires for you to join up, but the different method of rotating them can take some time to master.
Once you have arranged the wires, climb back up to the radio tower and use the keycard you found in the bedroom. The tower then asks for a password, which happens to be 123456789. This was hinted at by the notice back at the shack, as well as a copy of said notice in the building.
However, nowhere in this chapter does it specify that particular password, which is why we are giving it to you now. This should activate the radio tower, leaving one more system to start up. Return to the control room.
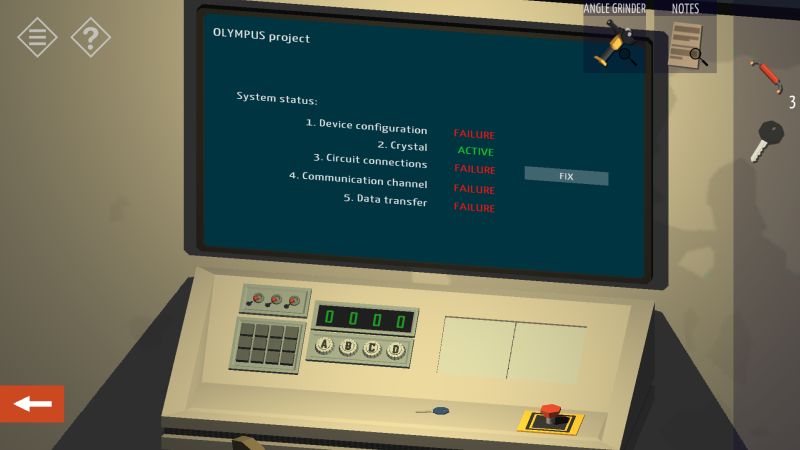
The last system to fix is Circuit Connections, so tap the “Fix” button to uncover the circuit board. Following the schematic you found in the first room, place all 19 jumpers in the provided pattern. Unfortunately, you cannot rotate the schematic in-game to get a better angle.
Once the jumpers are in place, you can press the button to activate the OLYMPUS Project, restoring power to the cave. Return there and activate the switch, turning on the lights and letting you continue down the cave to wrap up Act One.
Chapter 6: The OLYMPUS Project
Entering the cave will lead you to another ruin similar to the one under the church. The entrance to the ruin has a door on each wall and a statue in the center of the room. Whatever door the statue faces will remain open and you can tap the statue to rotate it clockwise and change which door is open.
There should be a white stone cube at the base of the statue. Pick it up and tap on the statue once to access the room to the left of the entrance.
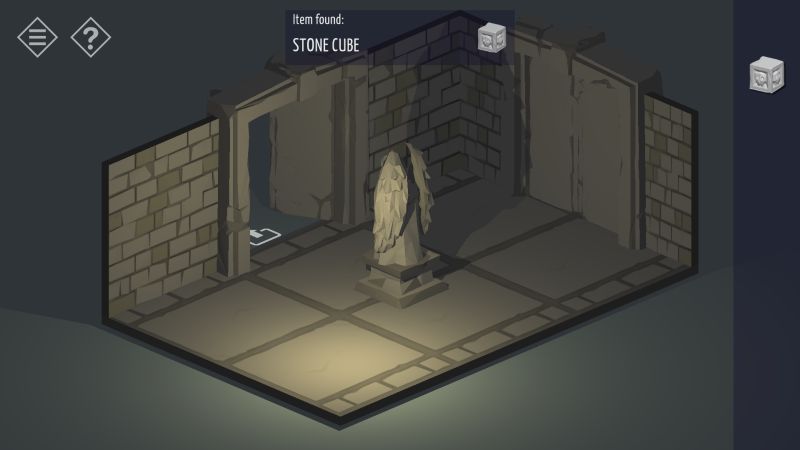
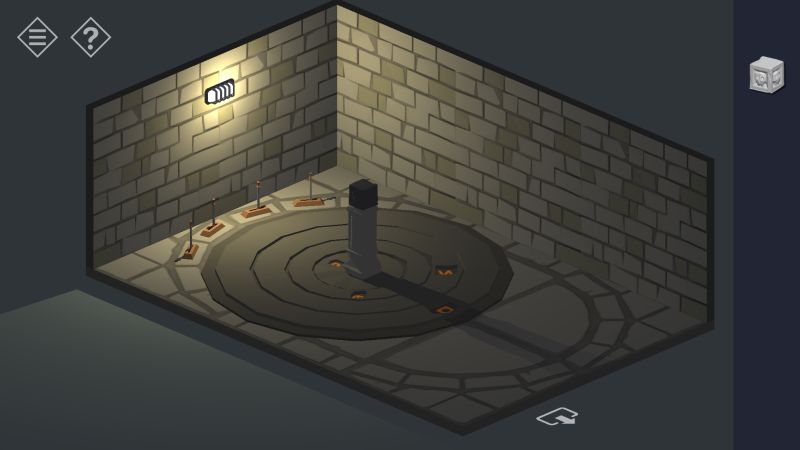
The first room should have a set of stone rings with each ring having a hole showing a different shape. Each ring has a corresponding lever that turns these rings and changes the shape seen in the hole. In the center of the rings is a pillar with a gray stone cube on top. Take the cube and leave the room, then turn the statue to face the door across the entrance.
The second room has two pillars and another locked door, with one gray cube leaning on one of the pillars. You need to solve the puzzles in the adjacent rooms to unlock the door, but for now there is nothing to do aside from collecting the cube.
After turning the statue to the right, the third room will unlock revealing four poles on the other side of the room and a pillar much taller than the ones seen in the second room. Some of the poles have cubes in place, and each wall in that room shows the correct order of gray and white cube(s) that must be placed on the poles.
Take all the remaining cubes and follow the directions written on the walls, where the correct pattern of cube(s) results in the pole sinking into the ground and being replaced by a lever. Solve all four poles.

Now, the central pillar is hollow on each side and the levers rotate at least one “section” to show a blue dot. You have to make each side of the pillar show its own dot. But because some of the levers can affect more than one section, this is not as easy as it appears.
Once all the dots are lined up with the hollow portions, the lights in the room will break, and the dots will be replaced with symbols matching the ones shown on the stone rings in the first room.

Back in the first room, use the levers to turn the rings and match them with the symbols you found in the third room, in descending order. Sometimes the symbol currently shown on the ring might get obstructed by the pillar in the middle, so turn the camera around in case that happens.
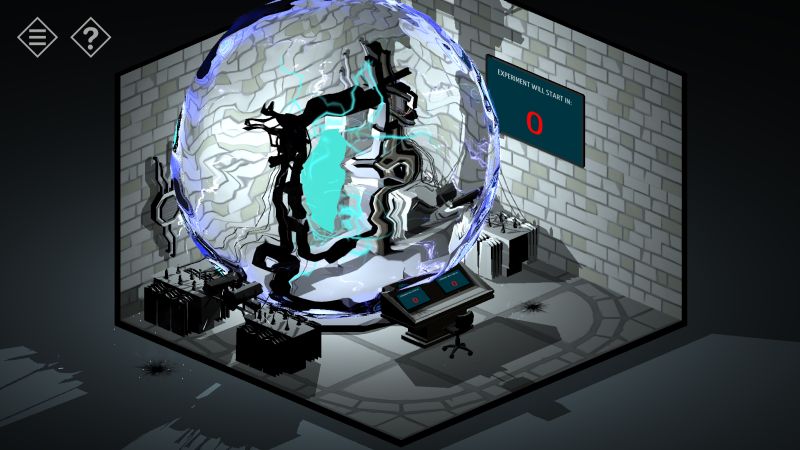
Once all the rings are showing the right symbols, the door in the second room will open, and the pillars with be lit up with blue flames. The now-unlocked door leads to a device with a crystal suspended in the middle, which activates and locks you inside. This part of the chapter is essentially a cut-scene so you will just have to survive the activation.
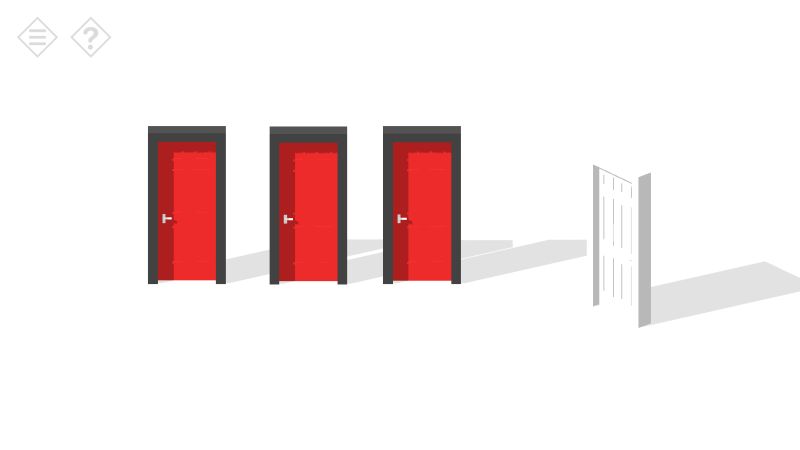
After the device activates, you will find yourself in a white void with only red doors to enter new areas. One of these areas has three doors, each with a different puzzle, and a fourth door that will only open after you have solved all three puzzles. We will break down each puzzle from left to right.
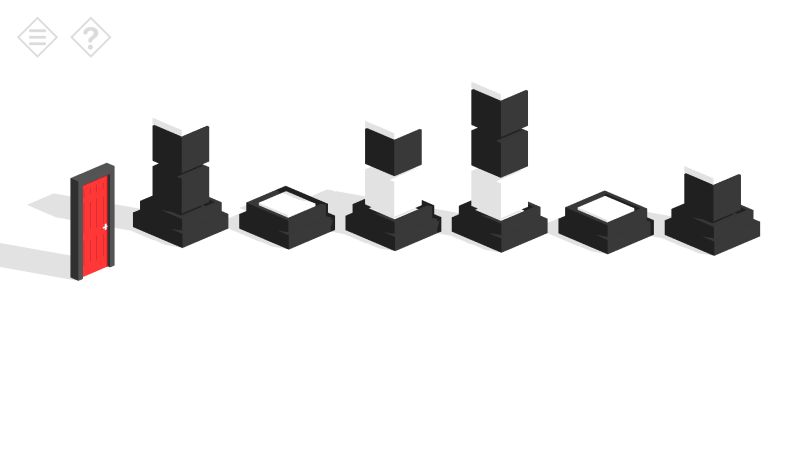
The first puzzle has six pillars that are constantly going up and down, with a varying combination of black and white cubes. The goal here is to tap the base of each pillar when it shows only the black cubes, effectively stopping the movement. You can tap the base again to make the pillar move in case you miss your mark. The puzzle is solved once all pillars show black cubes only.
The second puzzle has multiple doors that you have to open by tapping, but one of these doors is hidden behind a white pillar. You can uncover that door by turning the camera.

The third and final puzzle has you reassembling the door by locating its missing “pieces.” At first, it appears that you have two pieces to work with, but just like the previous puzzle, the rest of the pieces are hidden behind white pillars that blend in with the background. Make sure you turn the camera to find the remaining pieces.

Once all puzzles are completed, the fourth door will open, returning you to the foot of the mountain just as a landslide buries the cave.
Your only clue now is Next Lab, so you head on back to your car and…
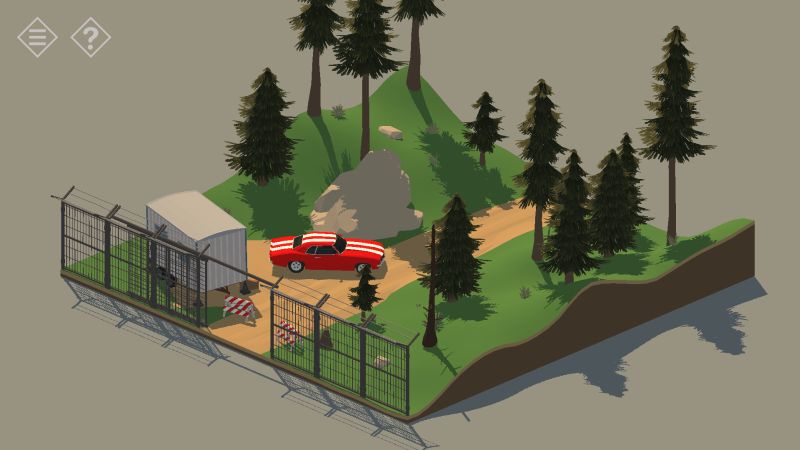
…wait, your car was painted blue when you left it, right?
And that concludes our guide to Tiny Room Stories’ first act. If the game’s story has peaked your interest, consider buying the next two acts to find out what is going on in Redcliff. If you have any secrets to share with us, or if there are any solutions we may have missed, please let us know in the comment section. Have fun and game on!
Rosemary
Wednesday 5th of October 2022
Hi, just wondering if you have passed the under sea theme. I'm stucked on the chest with octopus shape inside the room.. Thanks!