In the last chapter, you, as Giacomo, have narrowly escaped the clutches of Césare Borgia, a man hell-bent on changing his destiny with the use of a time machine so he can take revenge on those who have wronged him.
In Chapter 4, you managed to infiltrate Borgia’s hideout in Rome, which resided just across the Bald Lady Inn, where your friend and maestro Leonardo da Vinci and the friar Luca Pacioli had agreed to meet up with you beforehand. Locked up in Borgia’s fortified hideout is a special glove vital to your collective plan of destroying the original time machine dubbed by the Ordo Iustitialis as the Gate to the Temple of Wisdom. You outwit the hideout’s traps, solve the puzzles, and eventually find the glove’s location.
However, moments away from a successful escape, Borgia launches a trap on you and, in exchange for the glove, coerces you into doing his bidding. In allowing you to take the glove and leave his hideout unscathed, Borgia tells you to retrieve an amulet from Pope Julius II, with whom he has an ax to grind, having been the catalyst of Borgia’s misfortune.
With no choice but to agree to Borgia’s terms, Chapter 5 of the House of Da Vinci 3 sets you off to meet the Pope, with Luca Pacioli acting as a decoy to distract the Holy Father while you secretly raid his study to find the amulet demanded by Borgia.
Alongside creative and elaborate puzzles, Chapter 5 of The House of Da Vinci 3 also reveals more story-related secrets, specifically those involving the Ordo Iustitialis. As you discreetly enter the Pope’s study, you will soon encounter a large and mysterious underground chamber where you will discover more than just the location of the amulet.
As with the previous chapters, Chapter 5 has more than a handful of sophisticated brain teasers that will test your wits and powers of observation. This walkthrough will guide you through the completion of each puzzle so you can unlock the secrets to the Pope’s chambers.
Chapter 5: Pope’s Chambers (Vatican)
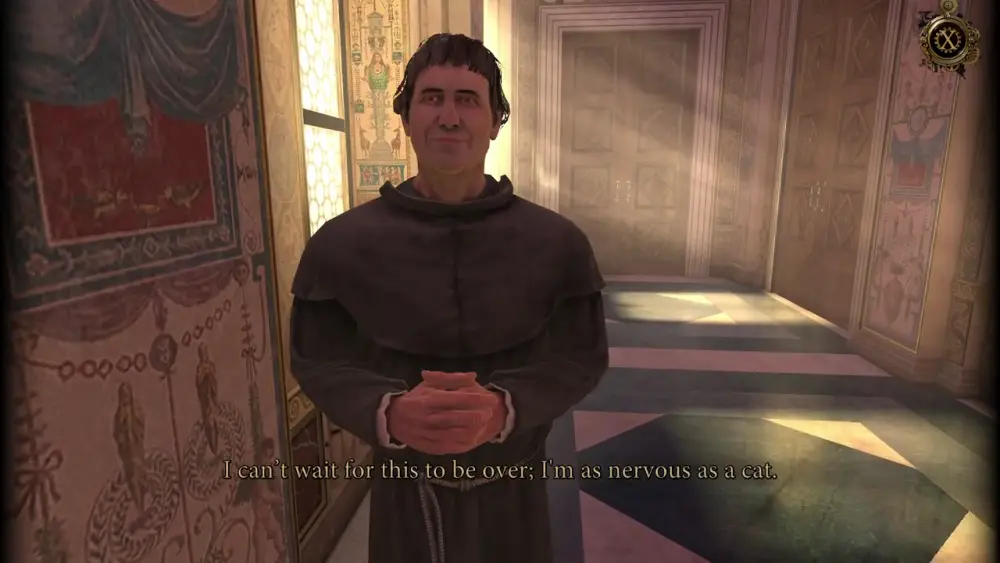
Your mission begins with Luca explaining why Leonardo wasn’t there, as he was familiar to the members of the Ordo Iustitialis (Order of Justice), who happen to be beholden to the Pope—or at least, that was what Borgia had revealed.
Luca also gives a brief backgrounder to when he knew Pope Julius II, when the latter was still just a cardinal. Luca even lets you in on a little trivia that Pope Julius II chose his name not in honor of St. Julius, as people thought, but because of Julius Caesar.
In the beginning, this information can seem like a trifle, but when you finally manage to enter the Pope’s study, it will make sense. Pope Julius II’s fascination for the notorious ancient Roman emperor doesn’t sound at all surprising since Luca refers to Pope Julius II as a brilliant and good man who, had the circumstances been different, would have made a remarkable ally instead of a dangerous enemy.
Just before commencing with your plan, Luca goes over it one more time, saying that once he tells the Pope why he had made an appearance, the Pope will want to talk to him, hopefully outside his study.
When Luca and the Pope leave together to speak in private, it’ll be your chance to secretly enter the Pope’s study and find the passage leading to the amulet. Luca promises to distract the Pope for as long as possible, but reminds you, as Giacomo, to return to the audience room before they come back.
Eventually, you and Luca are called by a guard to see the Pope. You both enter his audience room and Luca, being his friend, was welcomed warmly by the Pope. Luca introduces you to the Holy Father as his pupil and protégé.
After some friendly banter with Luca, the Pope says he can make time for the friar only until the bells toll for the evening Angelus. This gives you an idea of when you ought to return. Fortunately, the game doesn’t really apply this time pressure and it’s only mentioned for the purpose of the narrative.
After Luca reveals to the Pope that he wished to talk about the latter’s “righteous struggle against the Borgia family” and expressed his desire to help turn the “proverbial wheel of justice,” the Pope recognizes the sensitivity of the topic and invites Luca to walk with him to the garden so they can talk freely in private.
As Luca and the Pope walk out the door, so does the guard as he closes the door behind them. This leaves you completely alone in the Pope’s receiving room—now is your chance to find the amulet.
If you open your notebook, you will see that the place is called Palazzo Apostolico.
With no one in sight, let us now observe the area before you. You will find several interesting things inside the Pope’s audience room as you turn and survey the scene at hand.
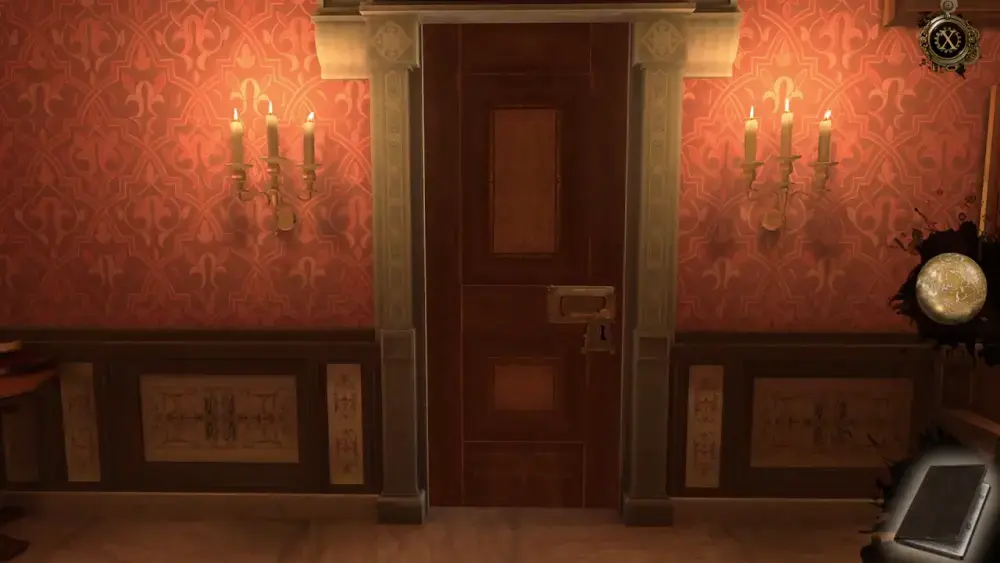
Most notable is this door to your left illuminated by two candelabras on the wall.
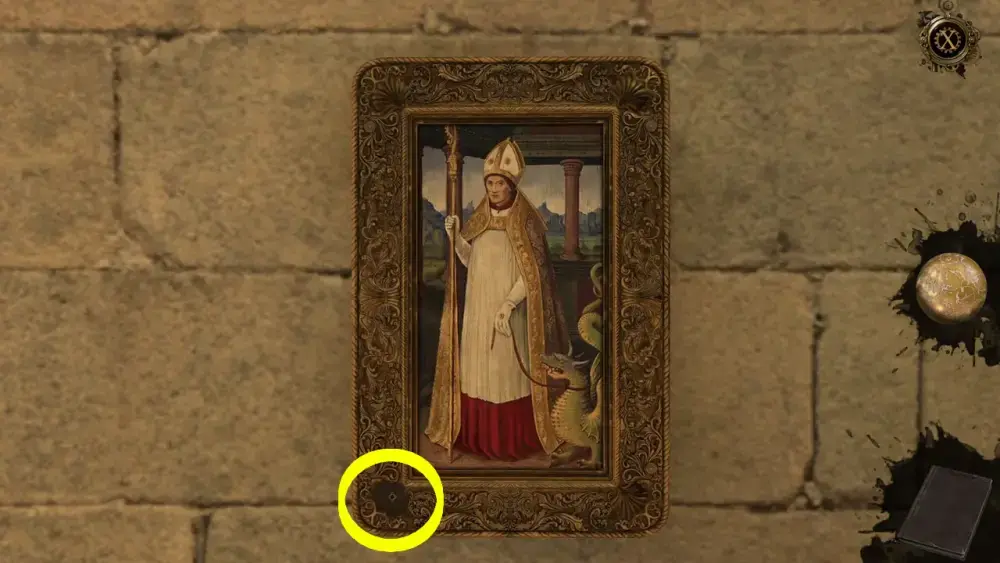
Up ahead is an unlit fireplace flanked by sofas on either side. The walls are also mottled with different portraits.

To your right, we see one of the sofas next to a desk with some books, more portraits, and another door that’s lit only by one candelabra.
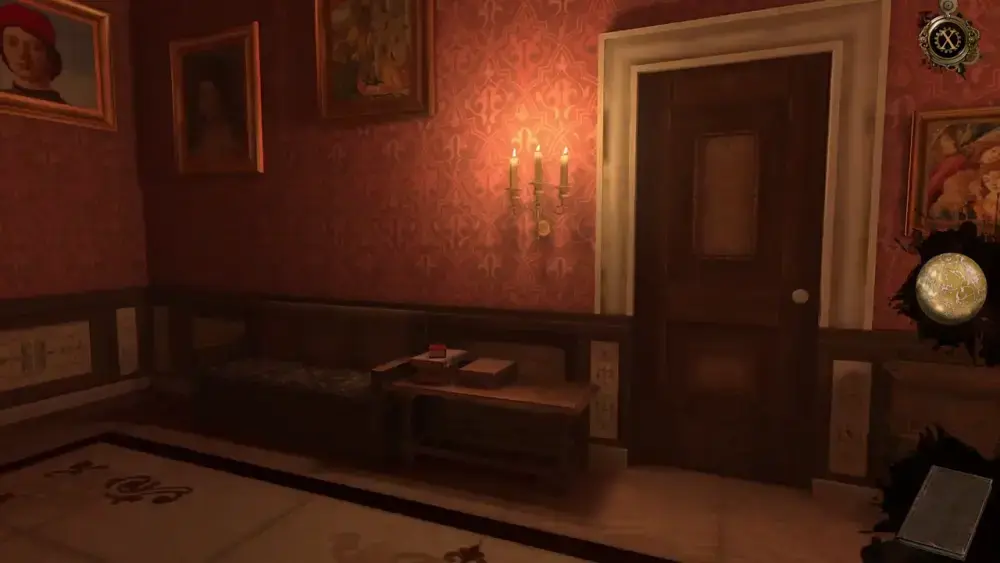
Turning some more to the right, we see a small desk next to a bigger desk, another portrait, and a candelabra lighting the main entrance behind you.
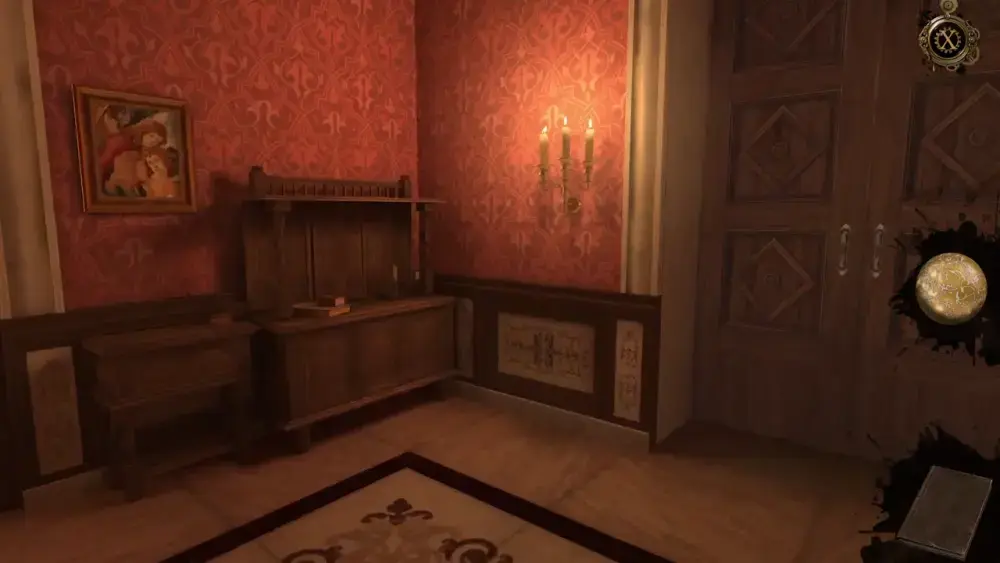
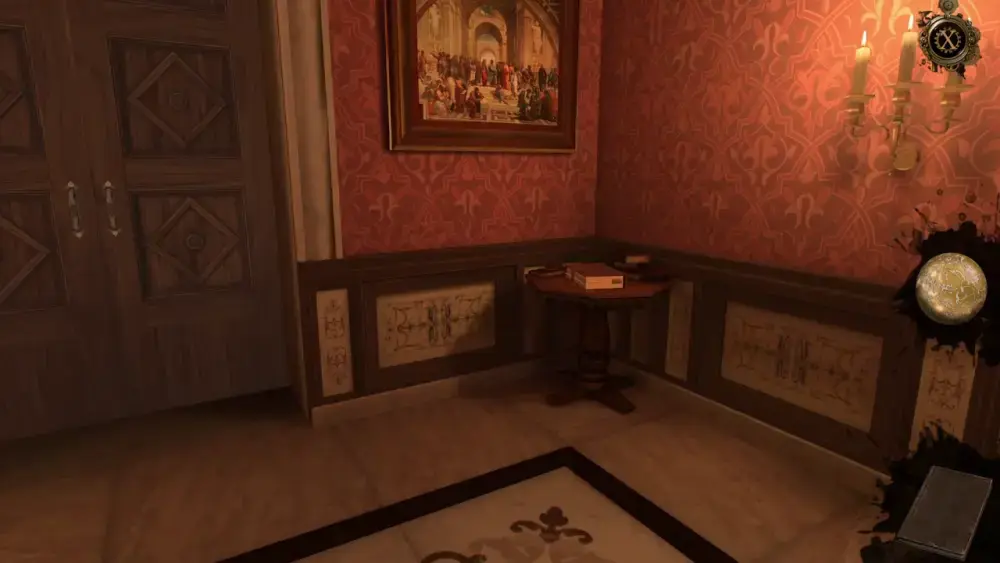
Just left of the first door, at the corner, is a small roundtable with a bible and a few books, with the bible in the middle seemingly sticking out from the rest. Right above the small roundtable is another painting.
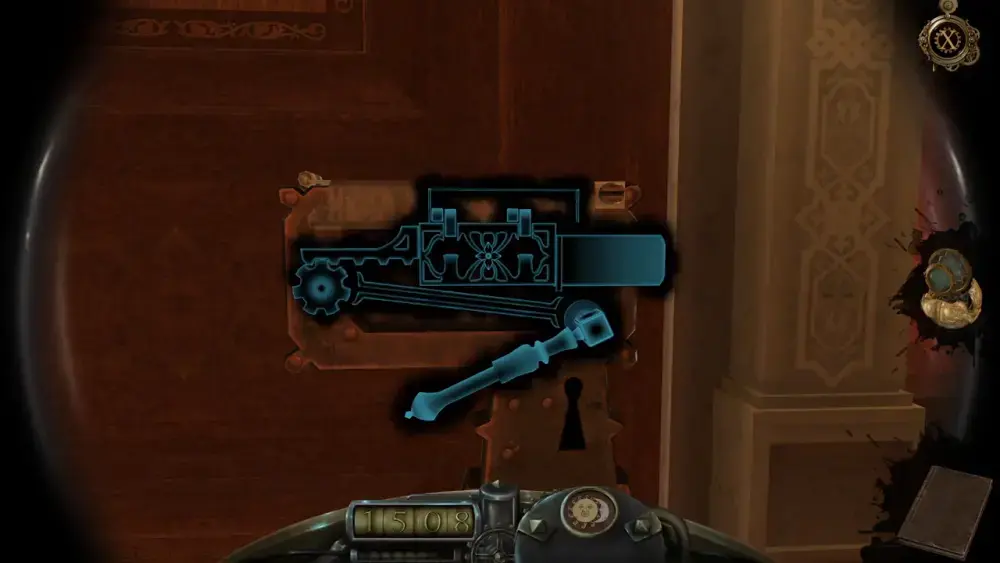
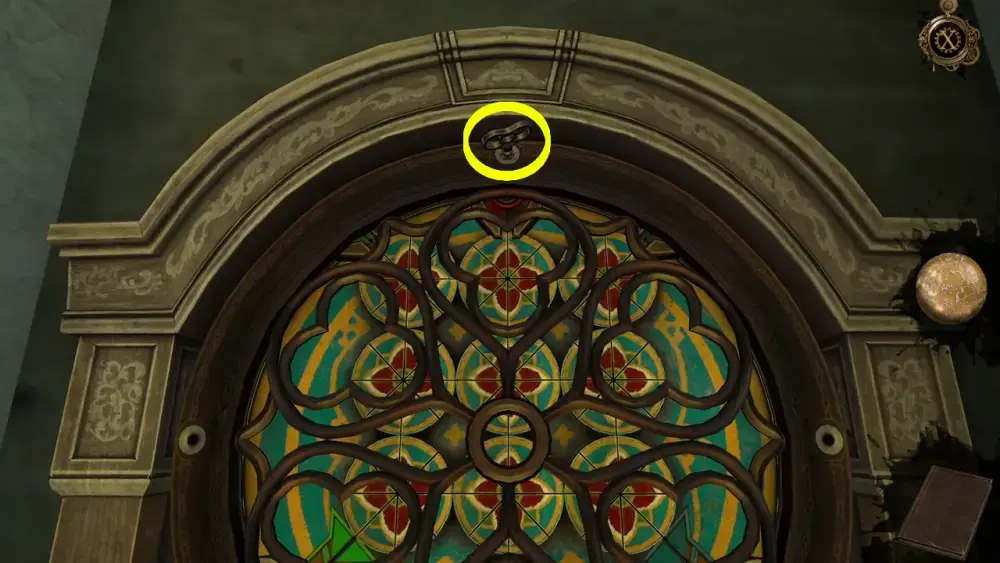
First, let’s try the door to your left. Unsurprisingly, it is locked. However, if you open the Oculus Perpetua, you can see the locking mechanism slide a little to the side when you try to pull down the knob.
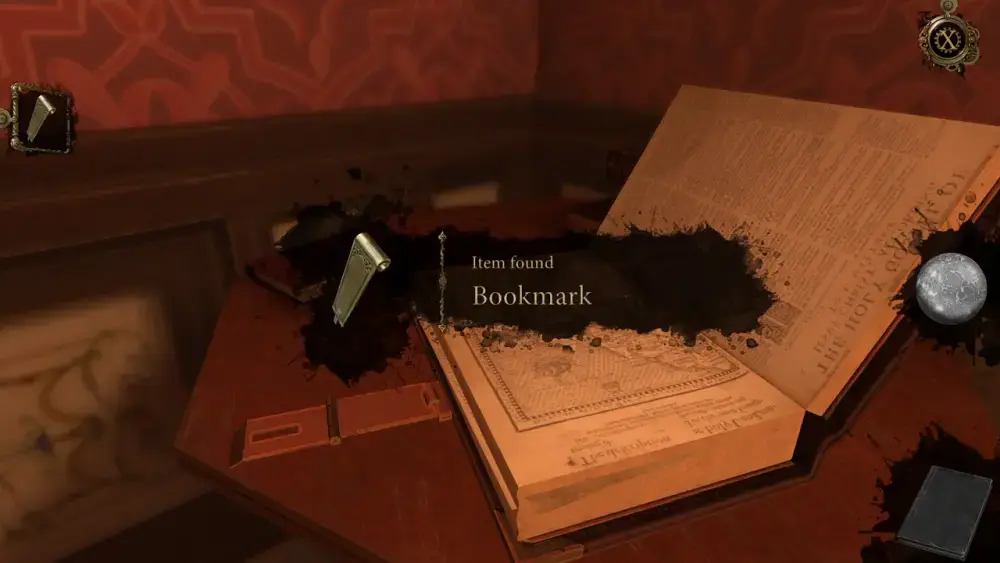
Now, where would the key be hidden? It must be somewhere nearby to be accessed easily. If you try the small roundtable to your left, you would have the answer. Unlock the bible on the roundtable and open it.

Upon flipping the page, you will notice a flat, bronze bookmark inserted between the pages. Take this Bookmark to place it in your inventory.
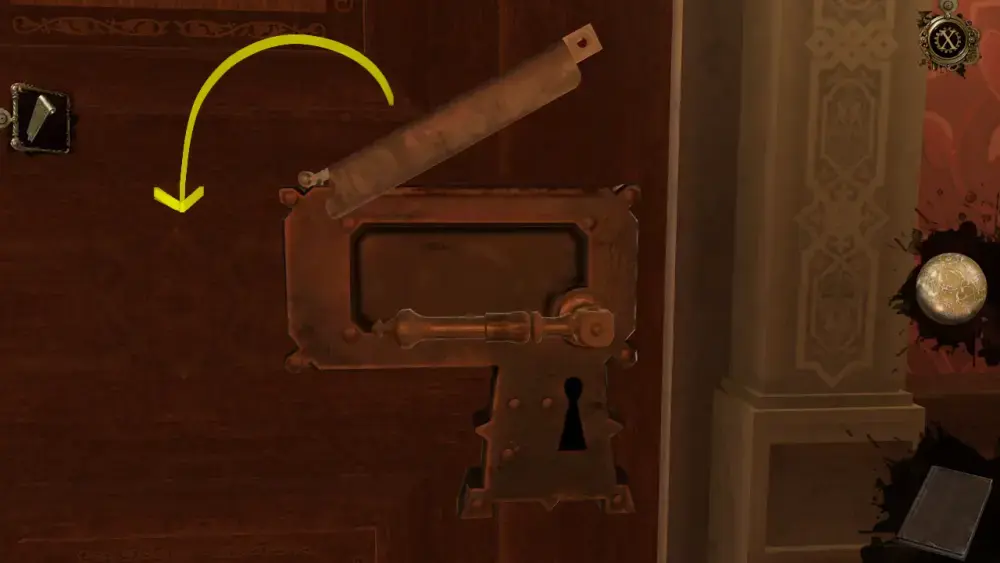
Now you have the key to the door, but unlocking it isn’t as simple as sliding the Bookmark into the lock. First, you have to place the tip of the Bookmark on the small screw at the upper right-hand corner of the lock. Turn it until the bolt is loose. Afterwards, the Bookmark will return to your inventory.
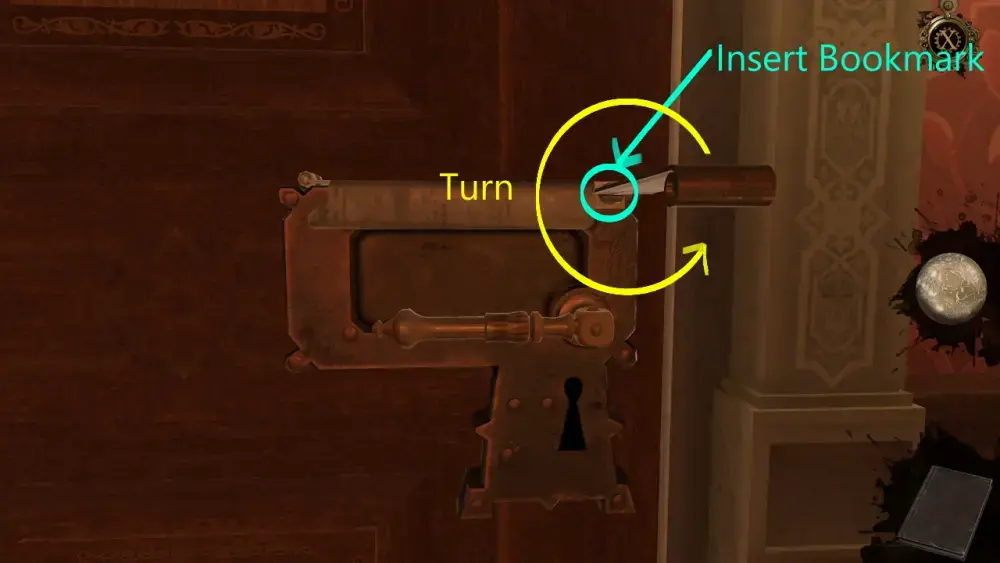
Once done, flip the bolt at the top all the way to the left so you can access the locking mechanism inside.
Open the Oculus Perpetua. Insert the tip of the Bookmark on the left side of the lock. The part of the Bookmark inside the lock will look like a T-shape when viewed with the Oculus Perpetua.

You will observe two small protrusions sticking out. Use the tip of the Bookmark to push them both down.
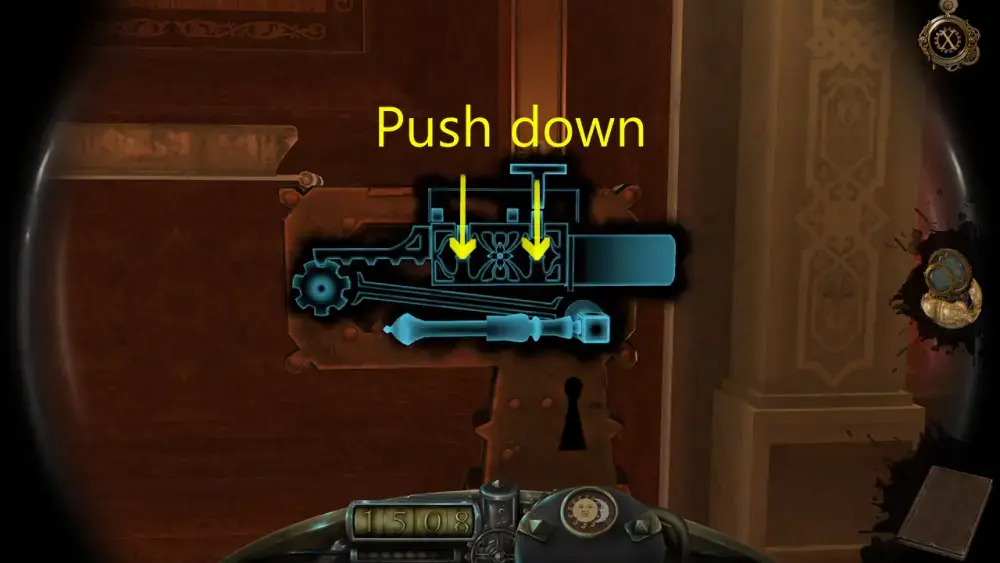
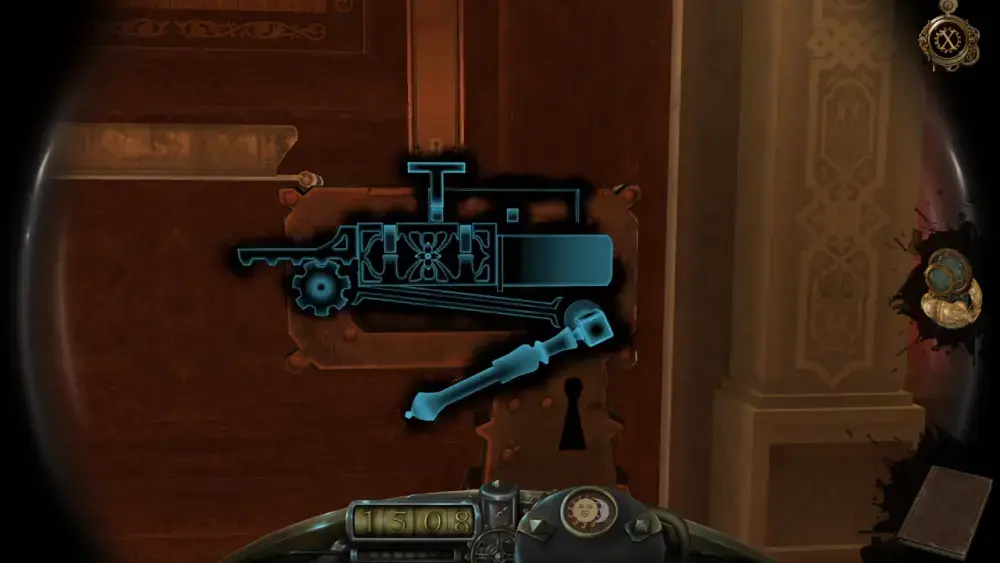
Place the tip of the Bookmark back in its original position upon inserting it then push down the knob. The door will now slide open.
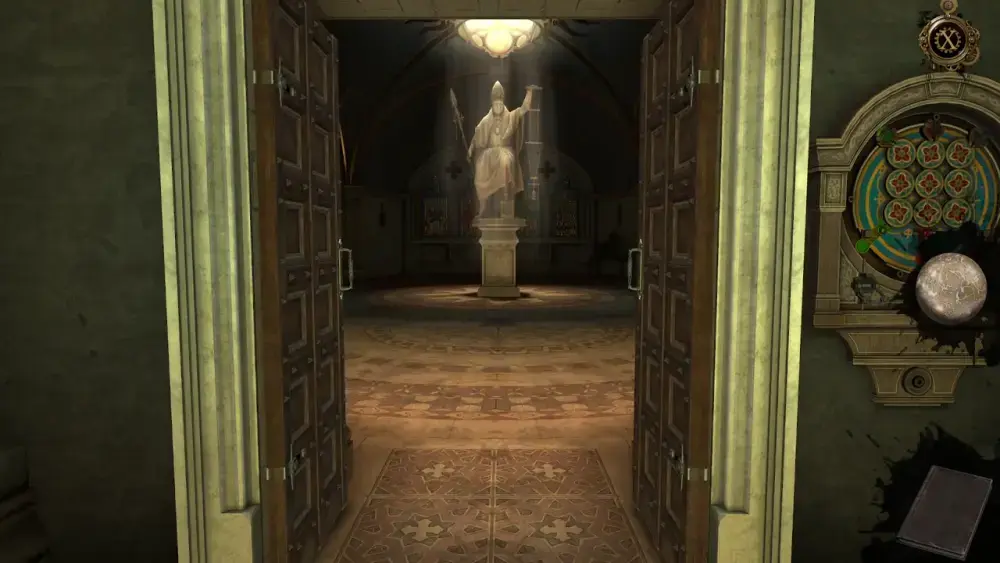
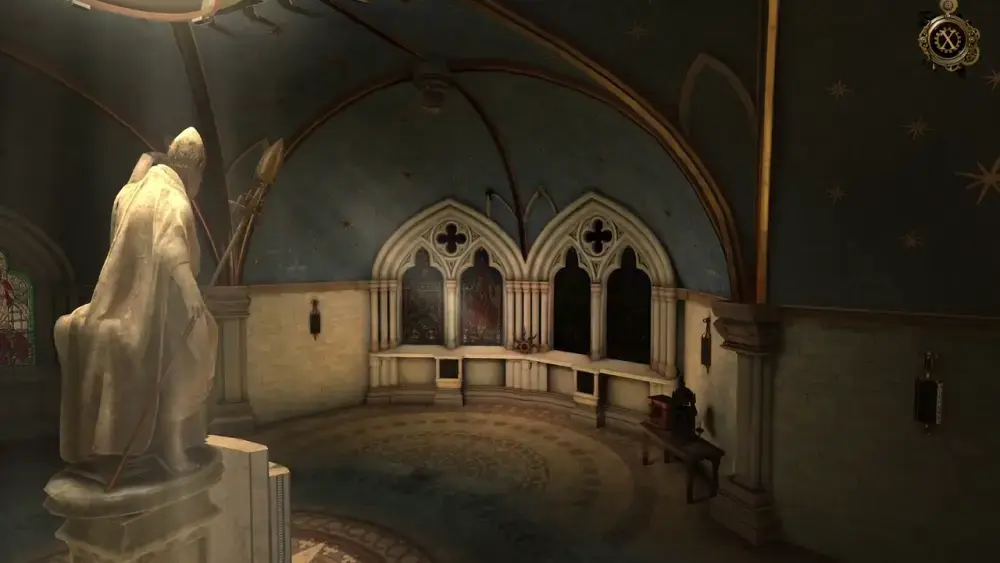
Open the door wider and you will have a view of the Pope’s study room. From the get-go, you can see a beautiful bookcase, stairs leading further up a top landing of the bookcase, checkered floors, and a desk with a stone bust.
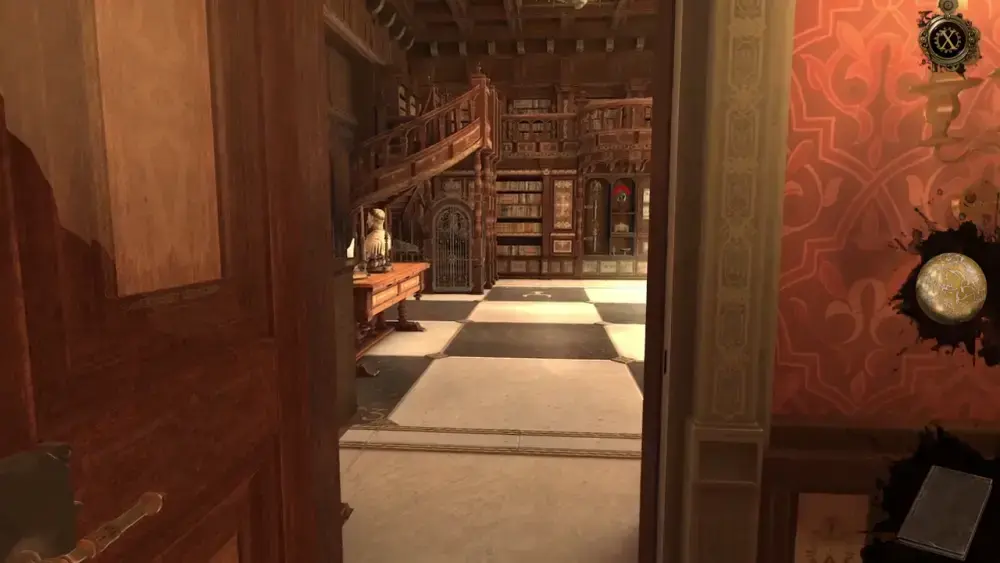
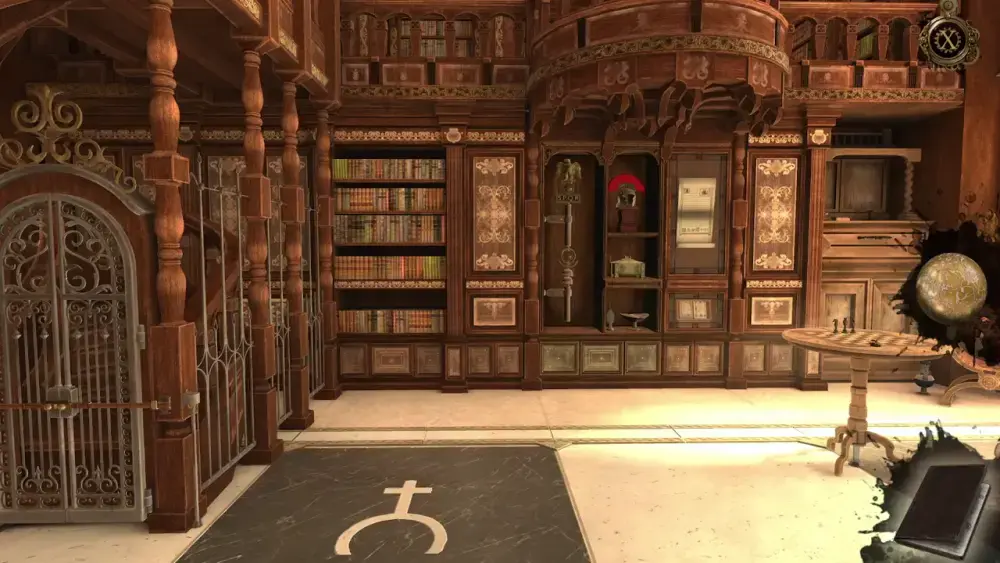
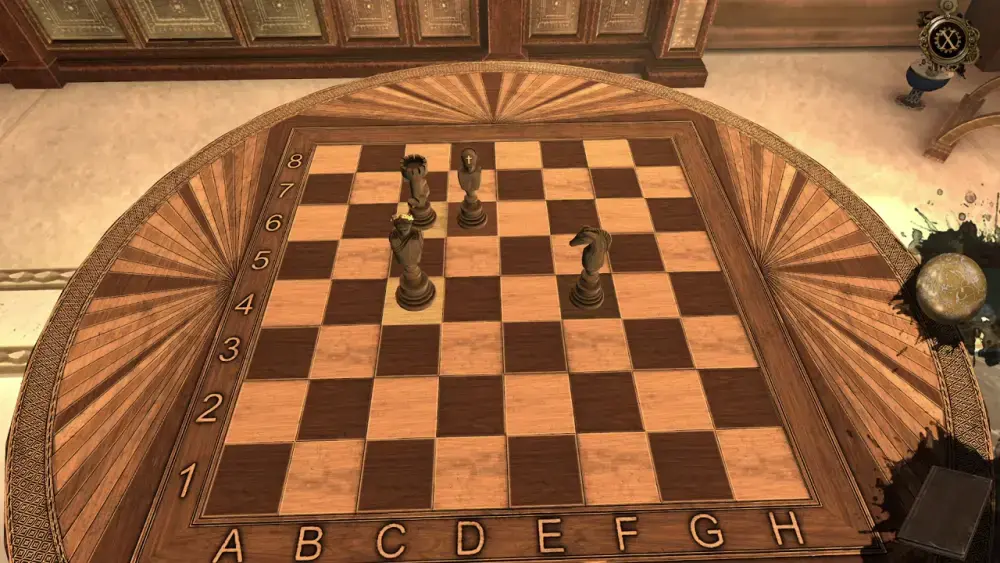
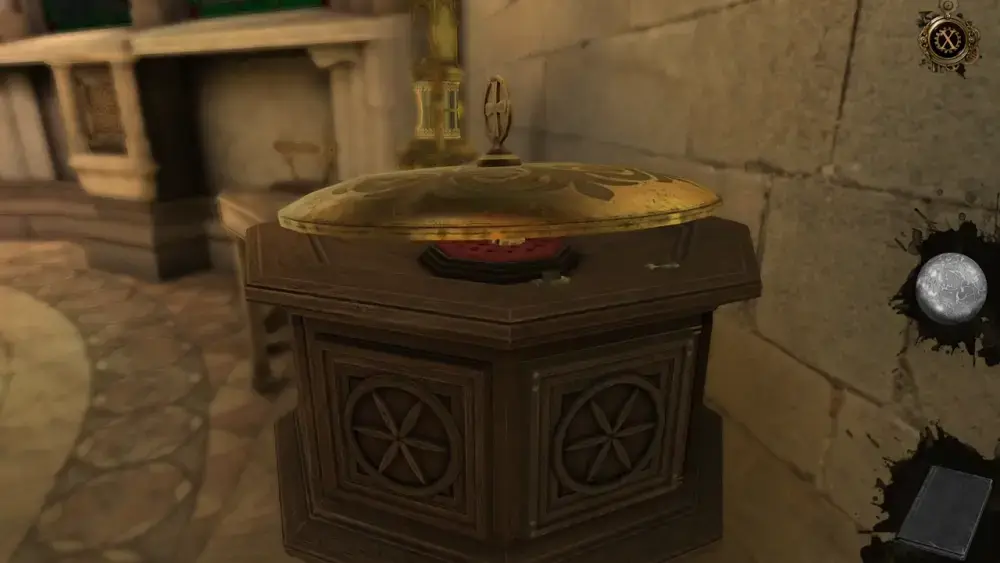
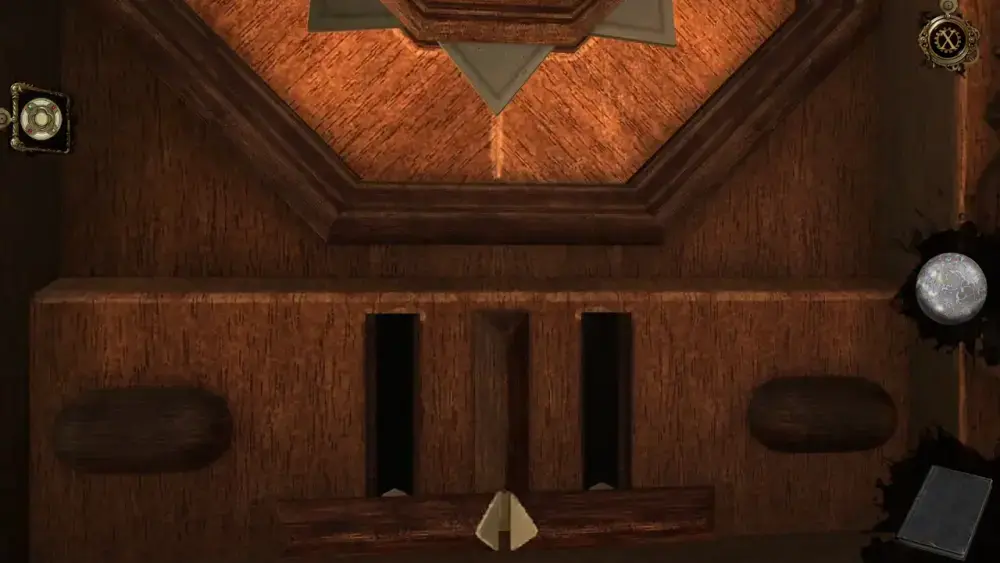
Moving into the room, you see more things up-close straight ahead: a symbol on the floor reminiscent of the bishop piece in chess, a scepter with the letters S.P.Q.R. on it, a helmet with a bright red plume, a strange-looking box, and what looks like some kind of elevated shallow bowl next to what looks like a candle. To the right is also a roundtable with a chessboard. To the left is an ornamental gate.
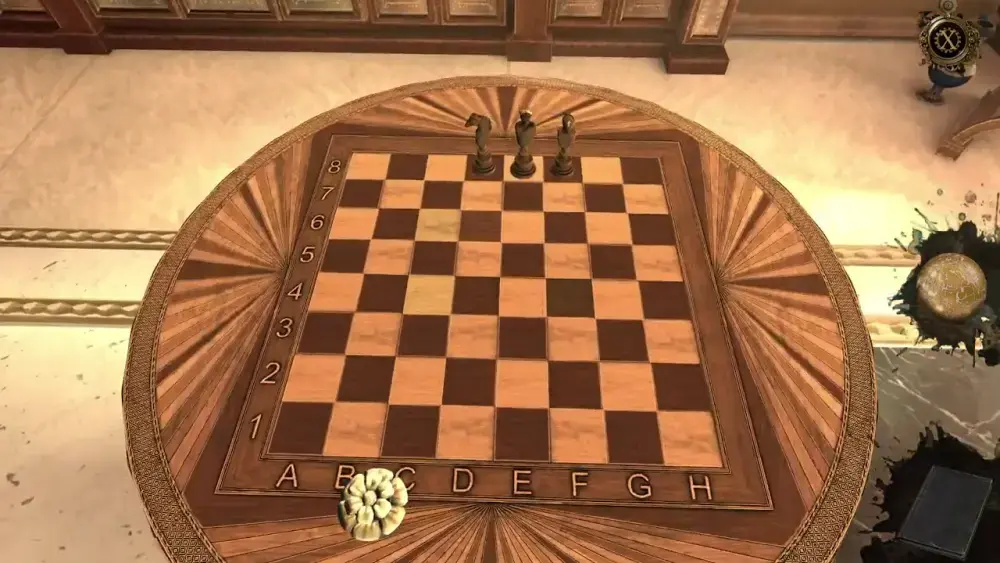
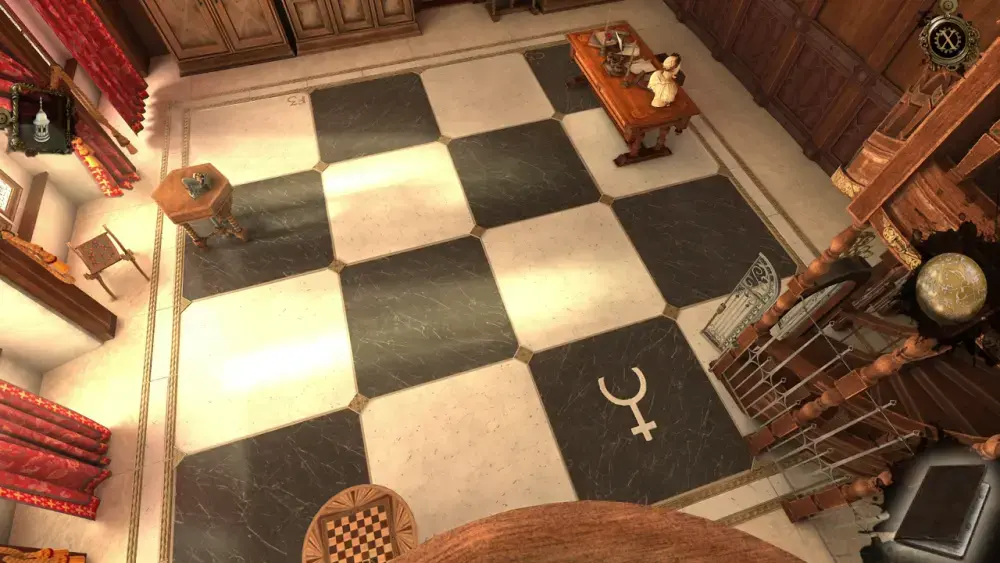
Seemingly the most accessible among these is the chessboard. Upon approaching it, you will see that the board is marked by numbers and letters. There are also only three black pieces lined up: a knight, a king, and a bishop. It’s not very visible in the image below, but if you look very closely, you will see that C6 and C4 have a slightly different color than the other “white” squares on the board. At the lower part of the board is also a white flower made of stone.
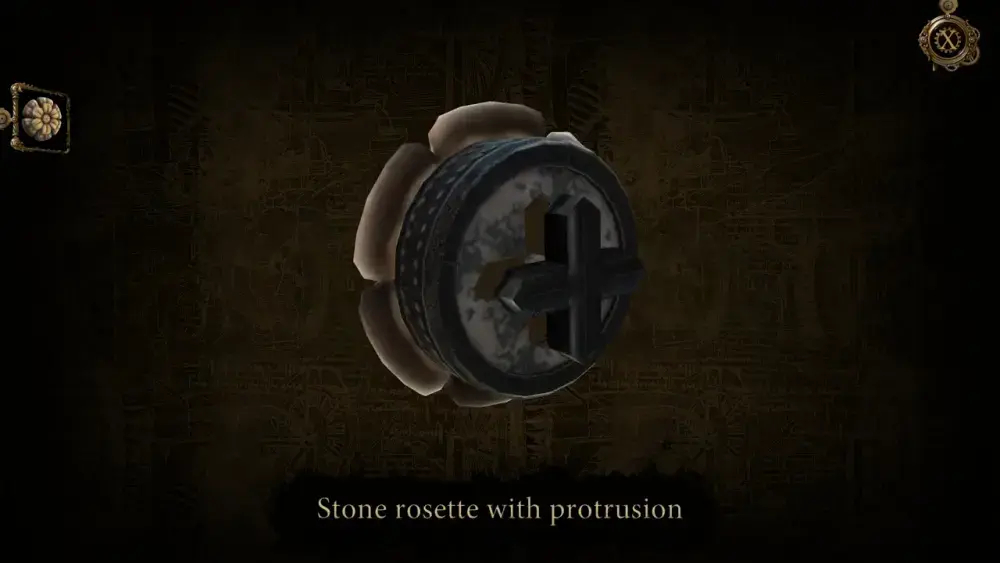
If you take the flower, it will be collected in your inventory as a Stone Rosette.
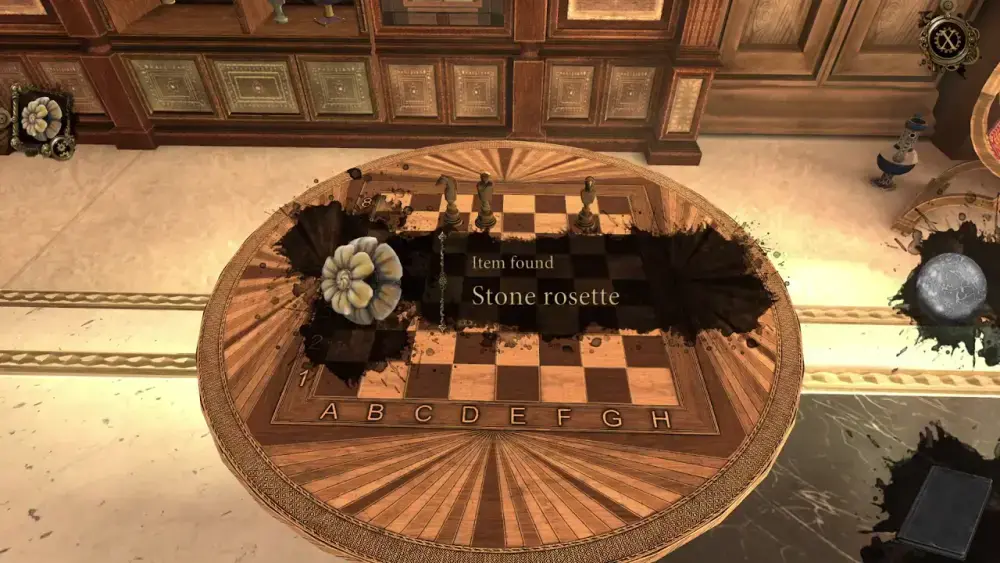
You’ll notice that upon collecting the Stone Rosette, it is marked by gears on its icon. This means you need to view the item via your inventory to adjust it to its completed form. Thus, open your inventory and slide the top flower into the rosette. This will give you the completed item Stone Rosette with Protrusion. The notable change in this item is that the protrusion at the back is shaped like a cross. Clearly, it has a place somewhere.
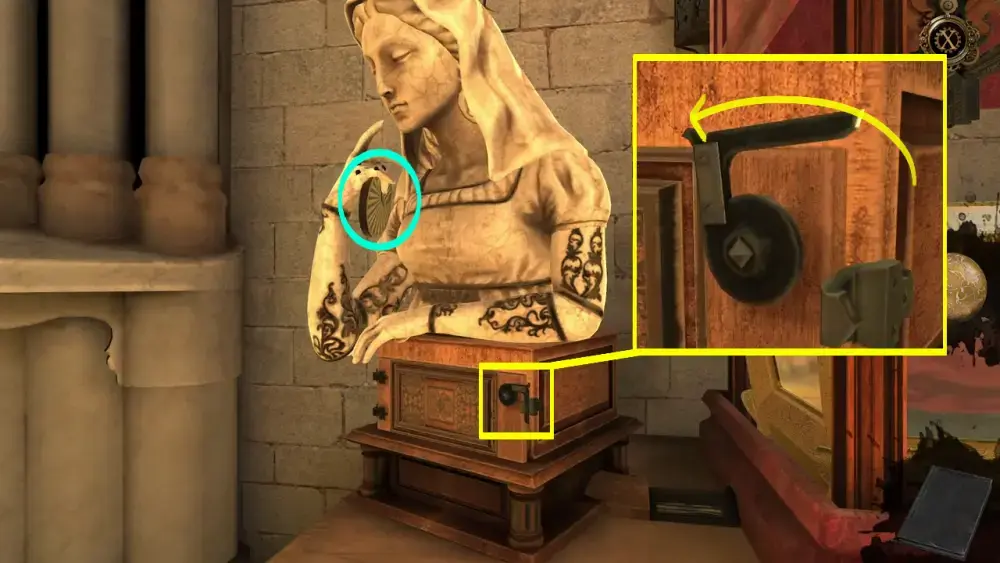
With the completed Stone Rosette with Protrusion in your inventory, you may try to move around the chess pieces, but it won’t make sense just yet. It’s better to observe the room as there are more things of note. One of these is a horse statue on top of a round table. When facing the entrance to the study, this statue can be found to your left. If you look closely, you’ll see that there are human legs mounted on the horse, but the rider’s torso is missing. You will find this soon enough.

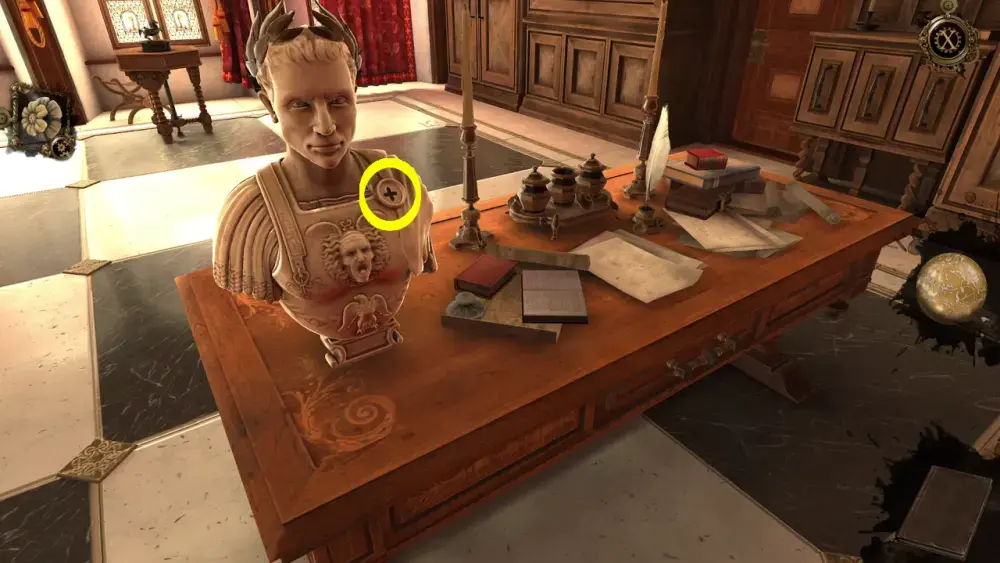
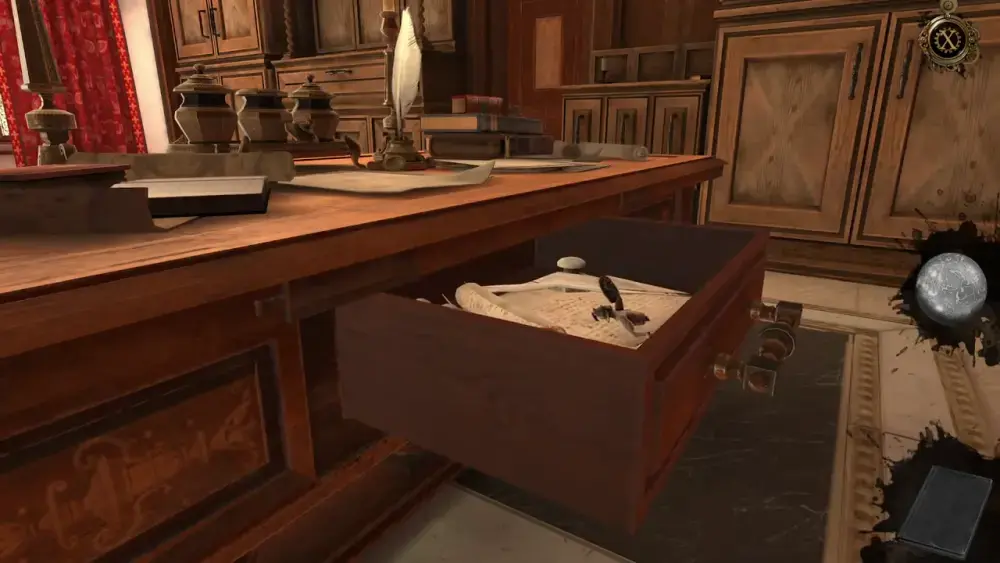
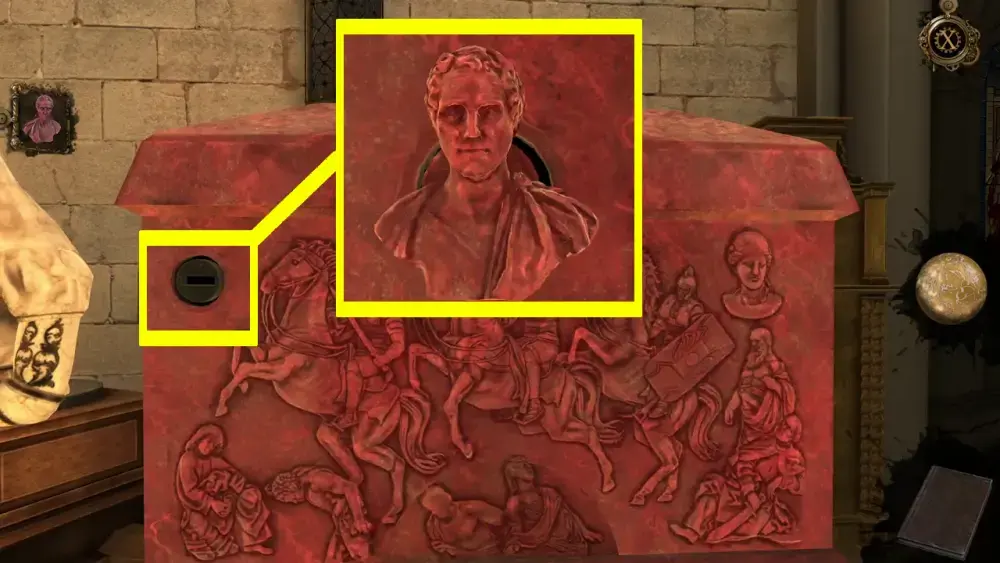
If you pan to your right, you will see the desk you’ve initially seen at the entrance. Upon further observation, you will see some writing implements on the desk like a quill and ink containers, some books, papers, two long candles, and, most notable of all, the back of Julius Caesar’s bust.
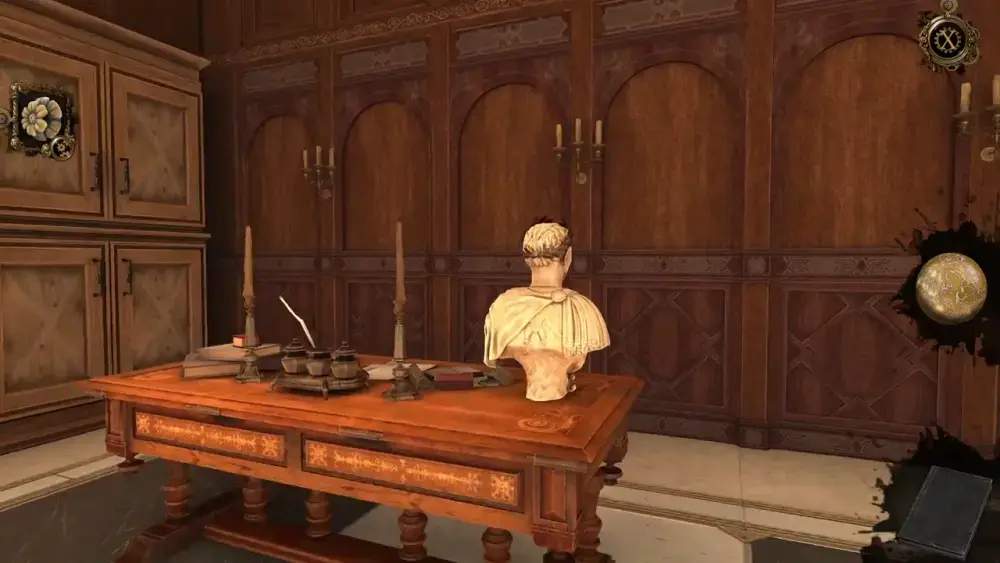
Since the Stone Rosette and the Caesar bust are both made of stone, it’s easy to put two and two together. Approach the bust and you will see that it, indeed, has a cross-shaped slot where the rosette can fit.
Place the Stone Rosette with Protrusion on the slot then turn it around.
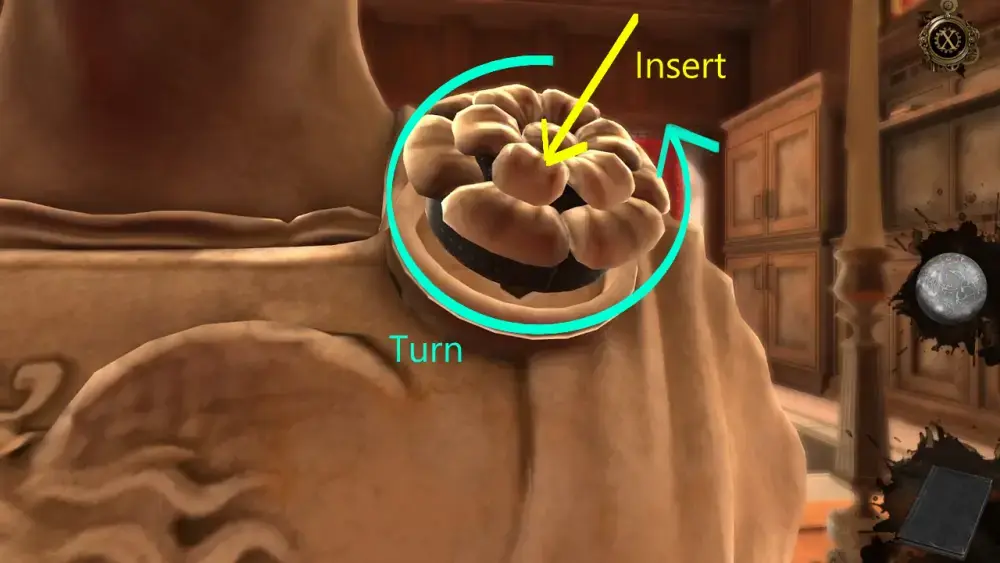
Turning the rosette all the way will trigger a drawer on the desk to open.
When you look inside the open drawer, you will find the item Part of Rider Figurine.
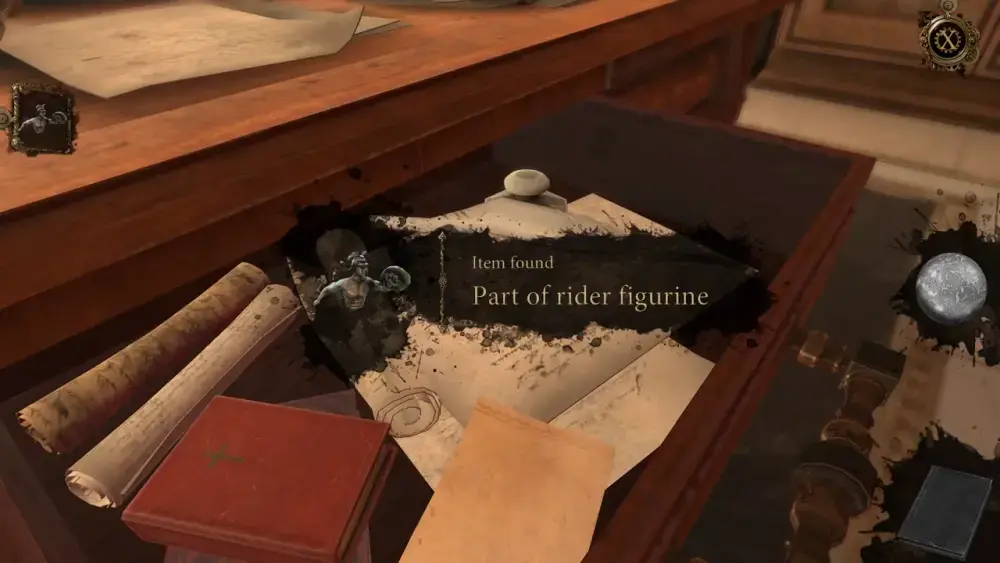
Remember that horse statue we mentioned earlier? Approach it again to complete the figurine by placing this newly acquired item on top of the horse.
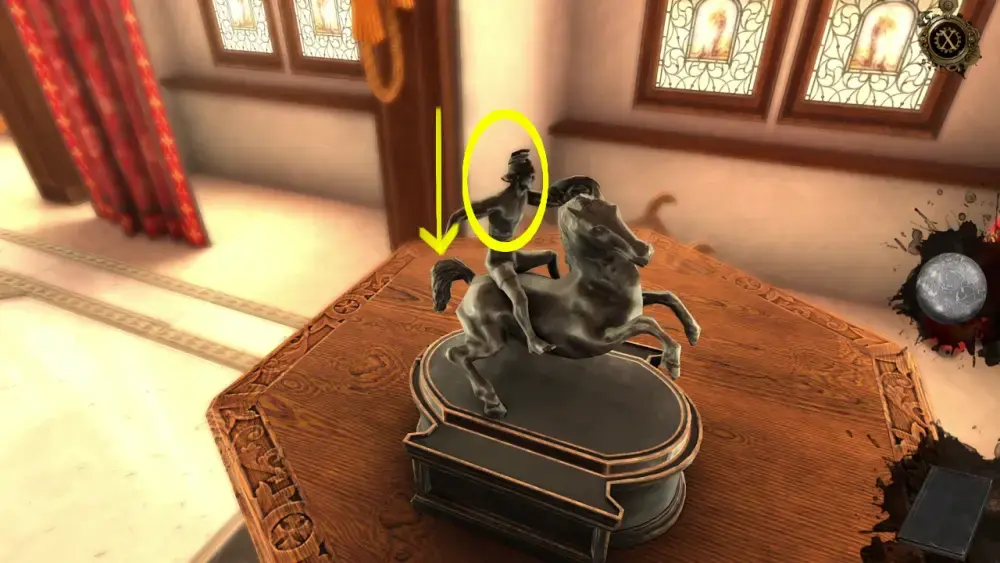
With the rider now in its rightful place, the compartment under the figurine will open. If you flip the cover all the way, a small wooden wheel will emerge. Rotate the wheel until it triggers a mechanism under the table.
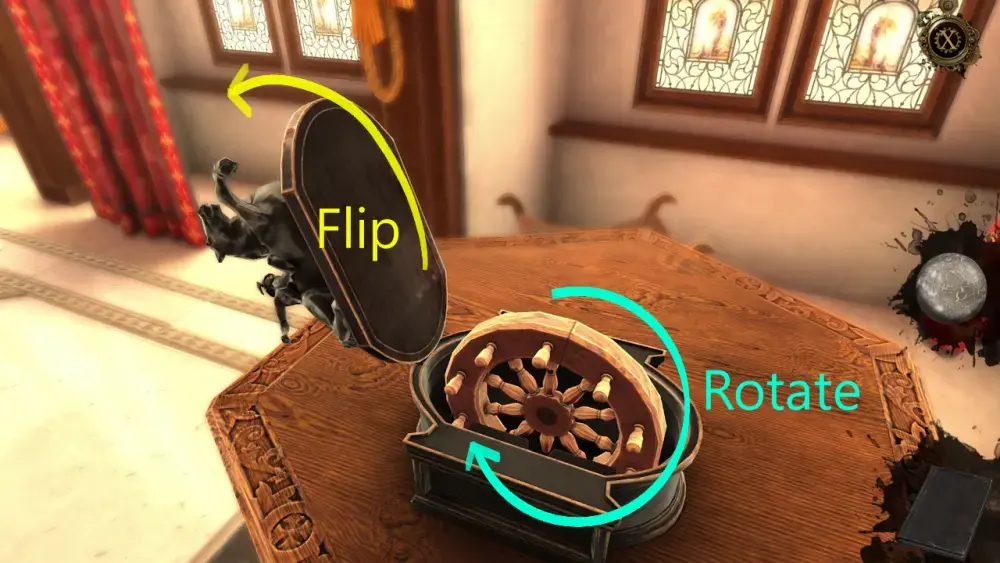
Upon triggering this mechanism, the gate leading to the staircase will be unlocked and opened.

Open the gate’s doors and head up the staircase. Immediately, you will notice what looks like a bird cage to your left. Rotate the lower portion of the cage and open the small gate. Take the item inside, which is a Model Tower.
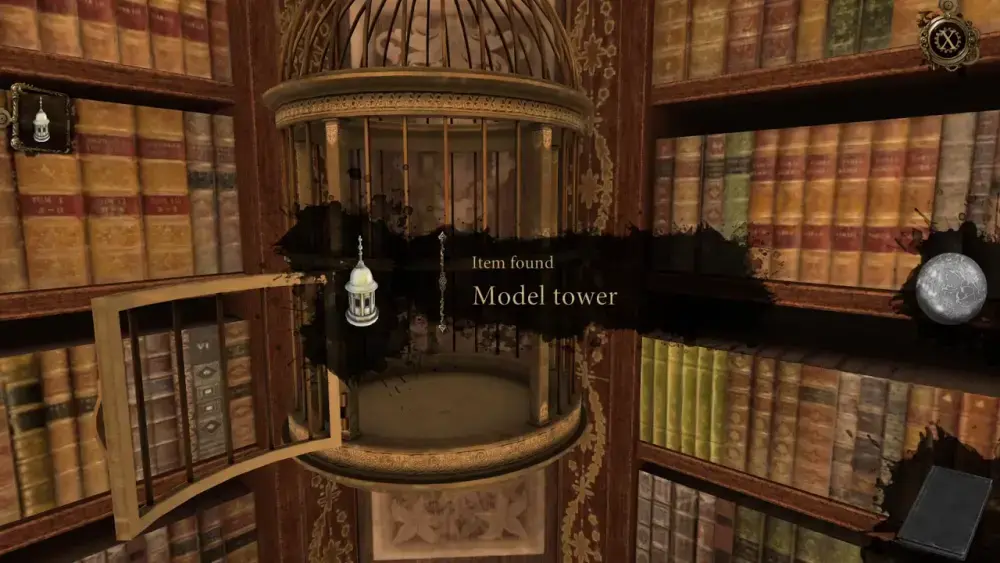
Like the rider figurine, this will fit somewhere—a model building, which you can find at the far right.
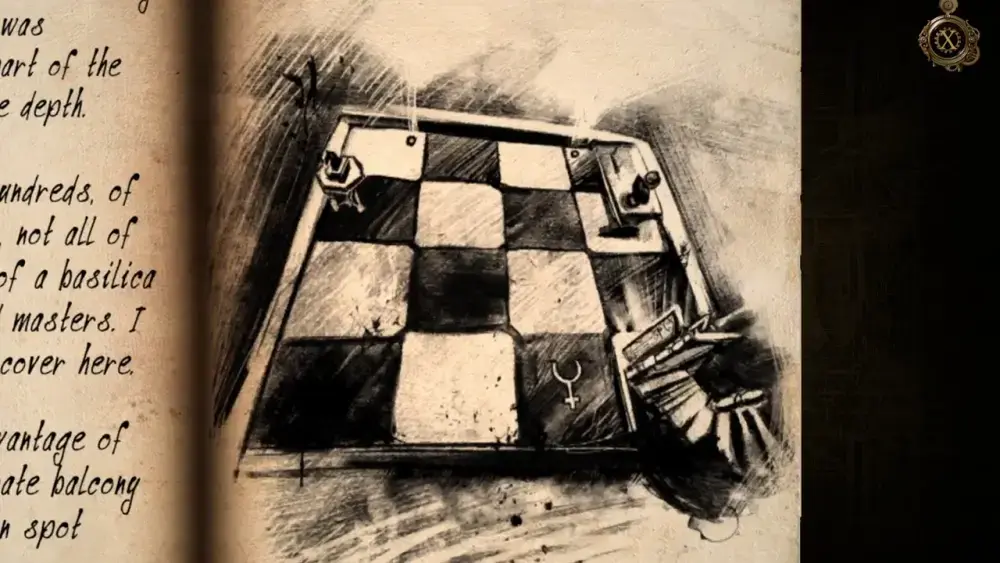
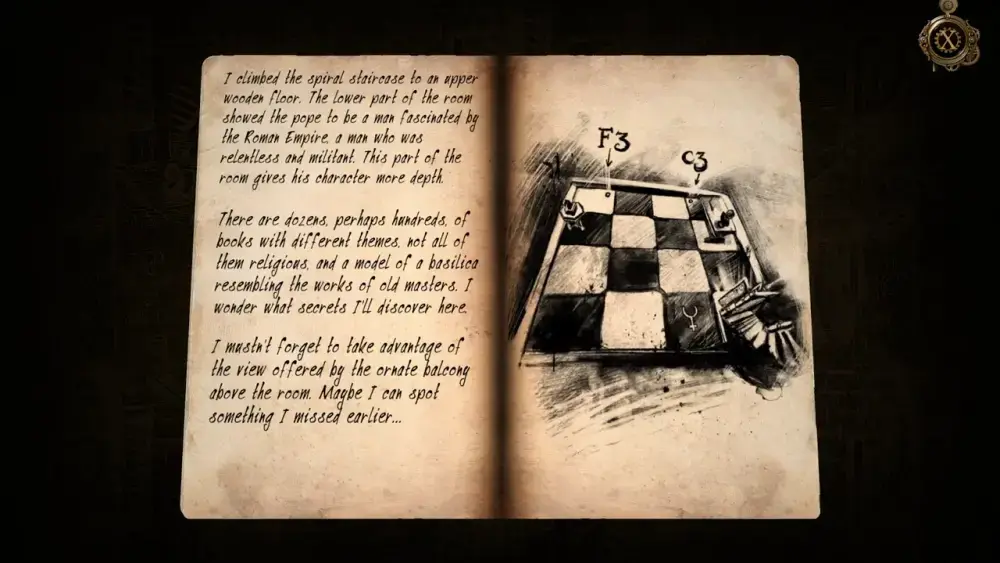
As you walk to the model building, you will see that there’s a balcony in the middle of the path. You may approach the balcony to have a better view of the checkered floor below.
If you open your journal, you will find that a sketch of the checkered floor has been recreated on one of the pages. Keep this in mind as you will have to refer to it later when you return to the chessboard on the small round table.
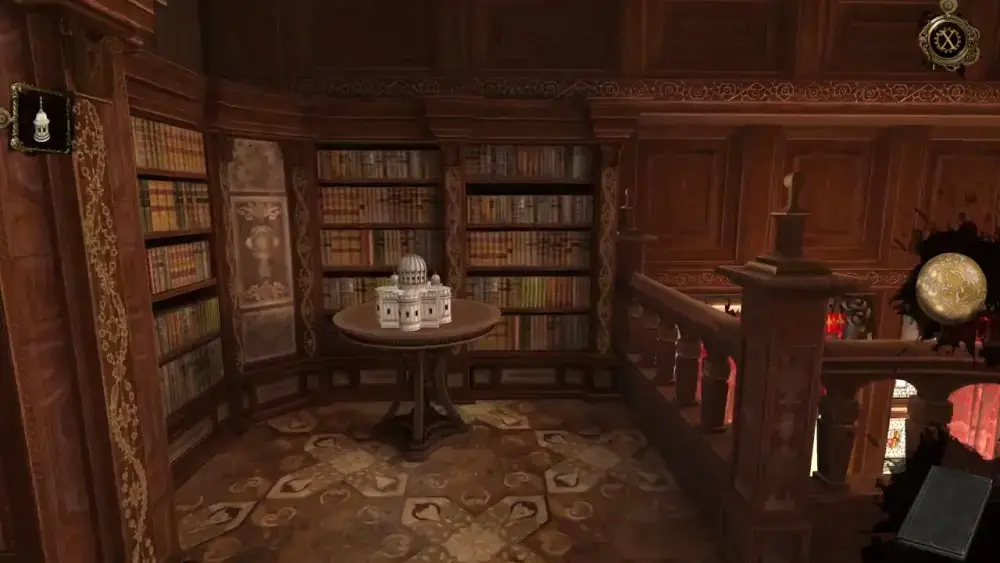
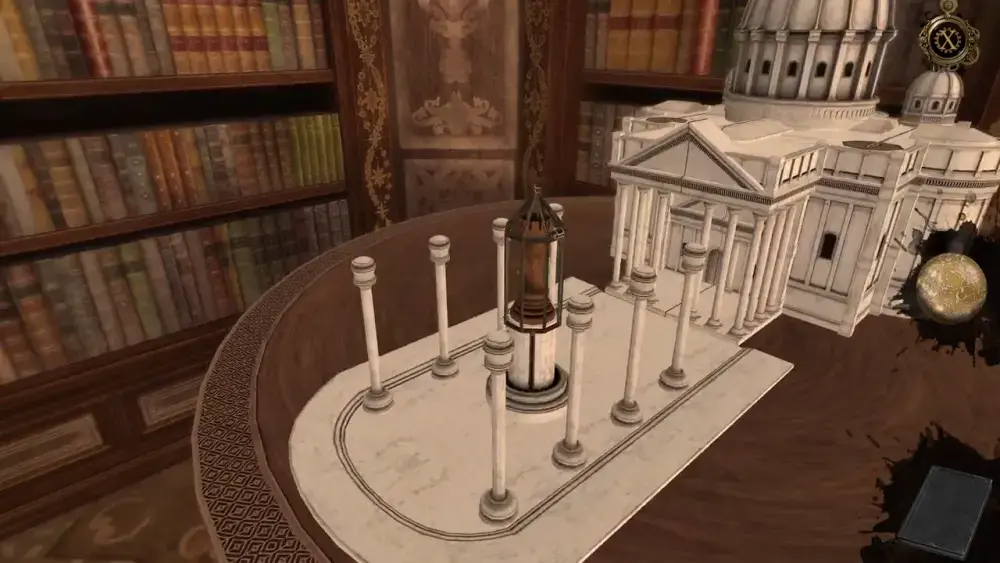
For now, let’s head to the model building. Place the Model Tower on top of the dome roof.
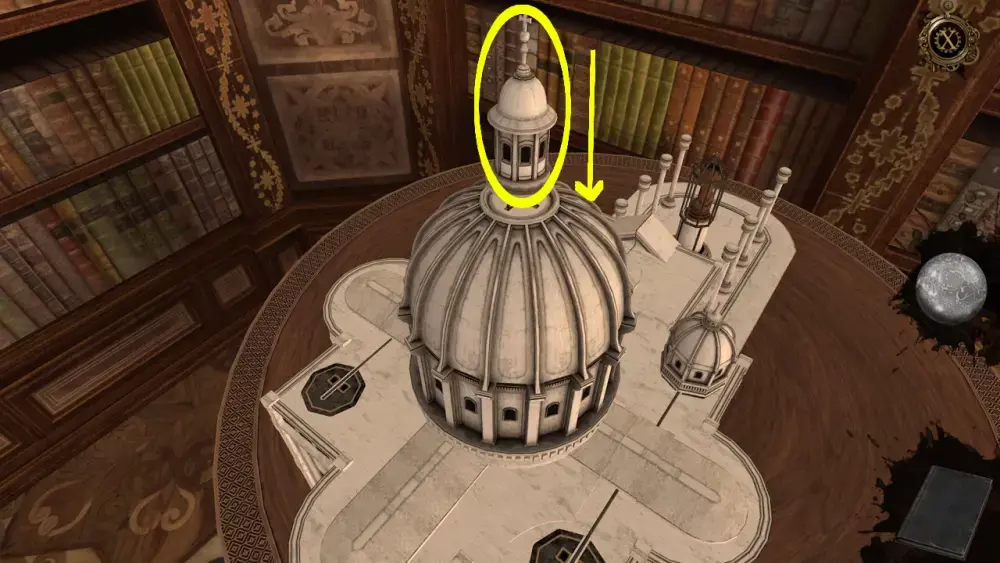
This action will let you slide the two smaller domes on the circular markers right in front of each one. The model building will then be split in the middle, revealing a new puzzle hidden at the center.

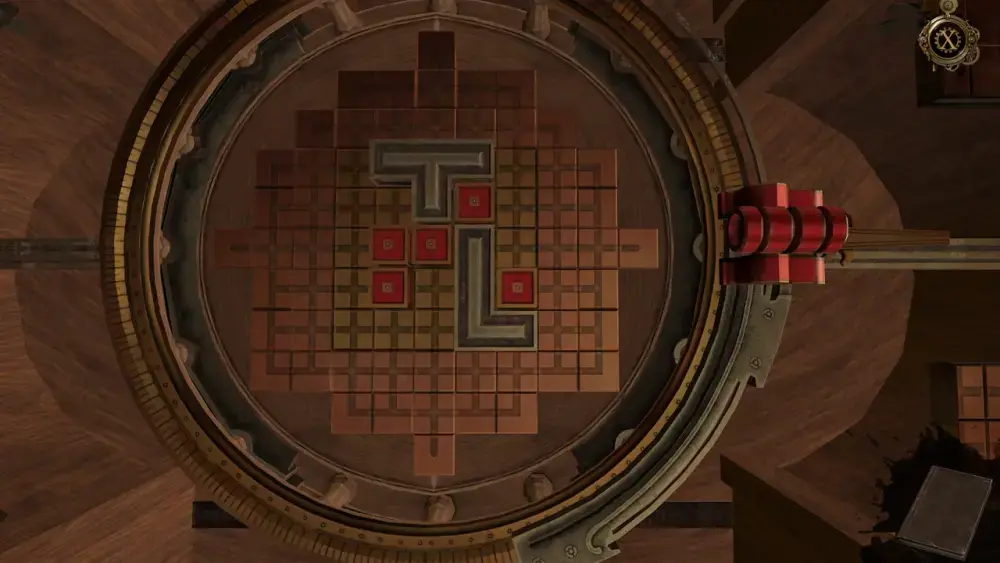
A close up of the new puzzle looks like this:
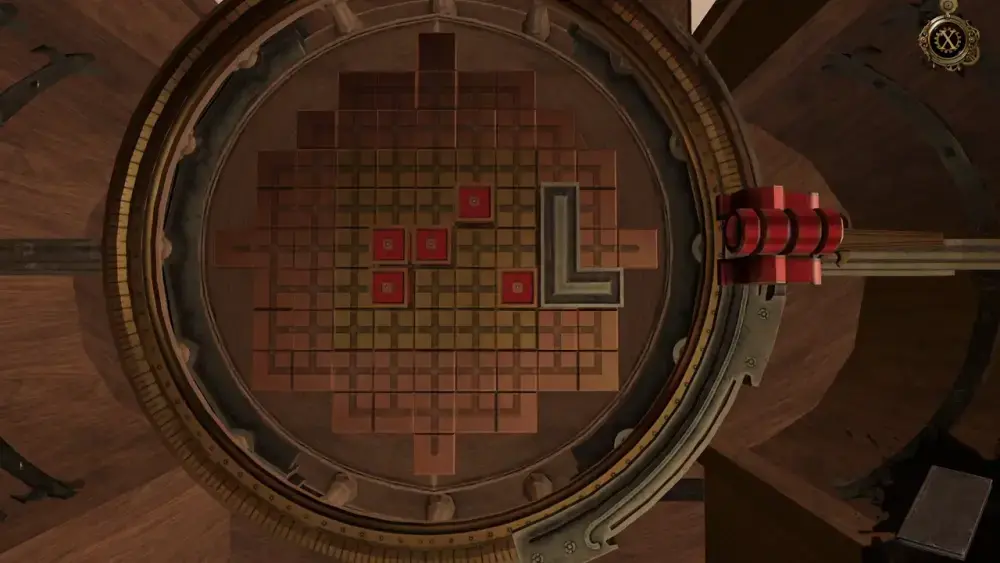
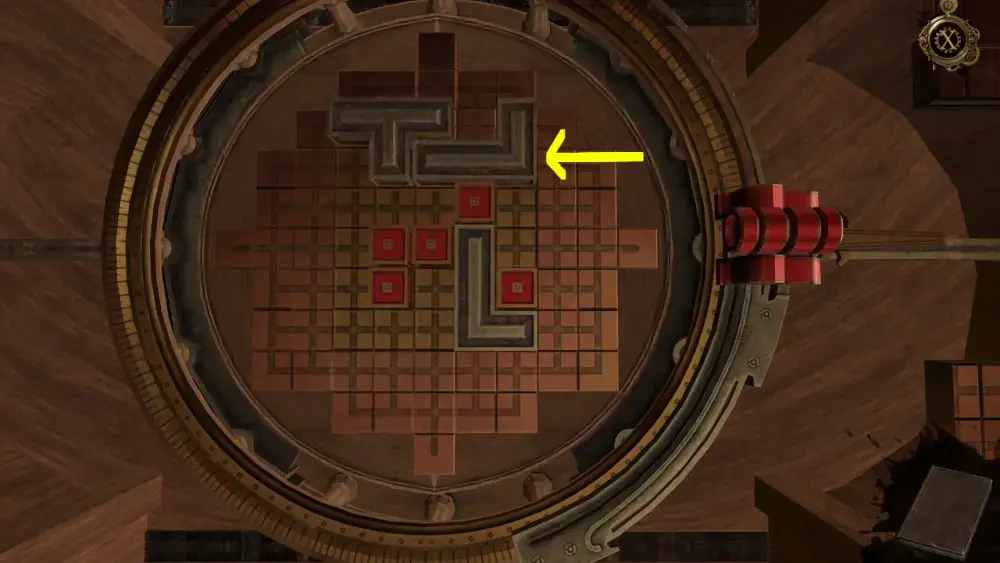
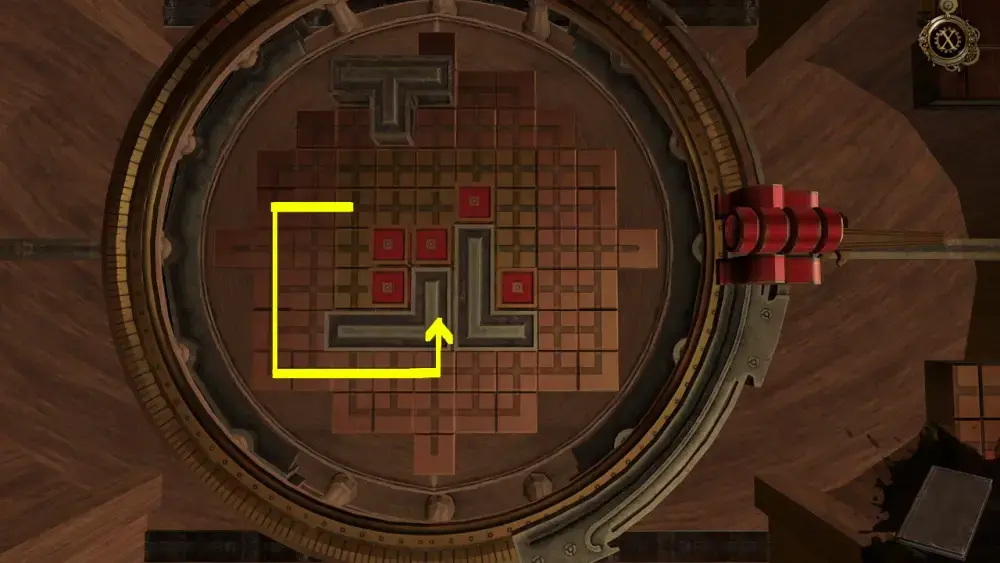
Right off the bat, you will see that there is an upright L, and that the board upon which it is situated has tiles in two colors: bronze and gold. Red tiles are also arranged in a strange way down the middle.To the right is a red lever that can be moved down in a quarter circle. Apart from the red lever, only the upright L shape can be moved around the tiles.
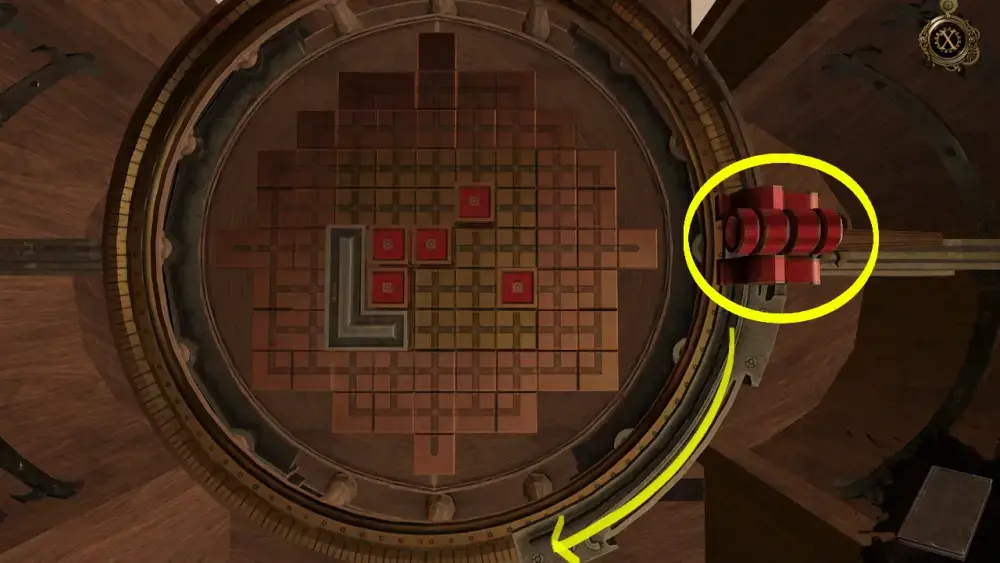
The overall goal of this puzzle is to move the silver shapes toward the golden tiles in such a way that they would fit with the red squares. The first shape is the upright L, which you need to move to the left to fit perfectly with the two red tiles. When you’ve done this, slide the lever down.
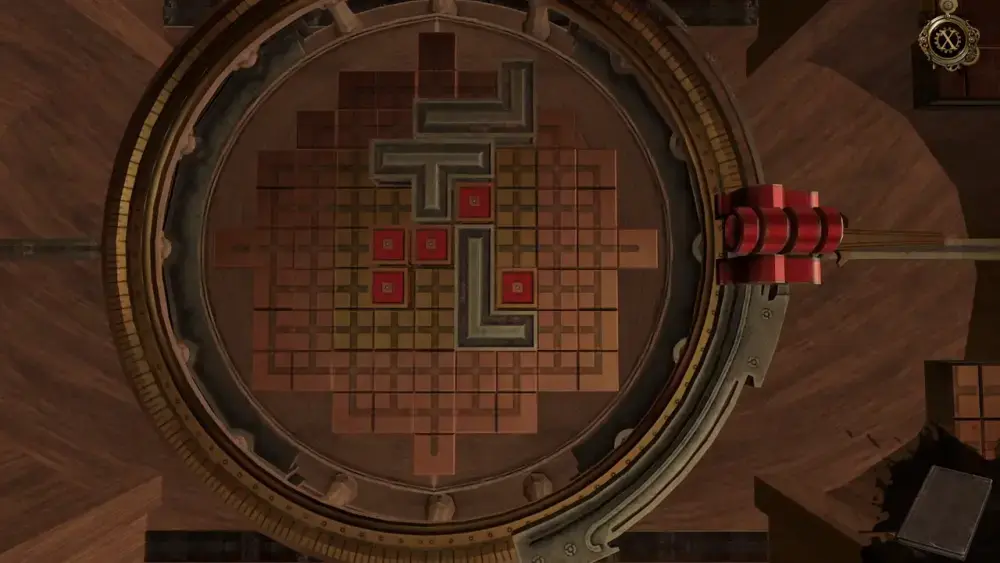
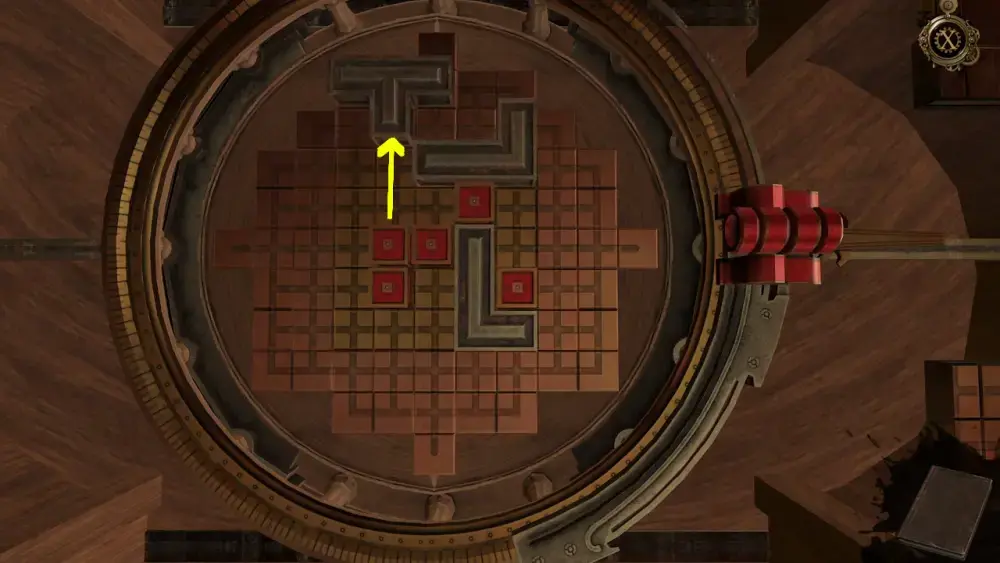
Upon sliding the lever (provided the position of the silver shape is correct), this will open another layer of the puzzle. This is the second layer of the puzzle:
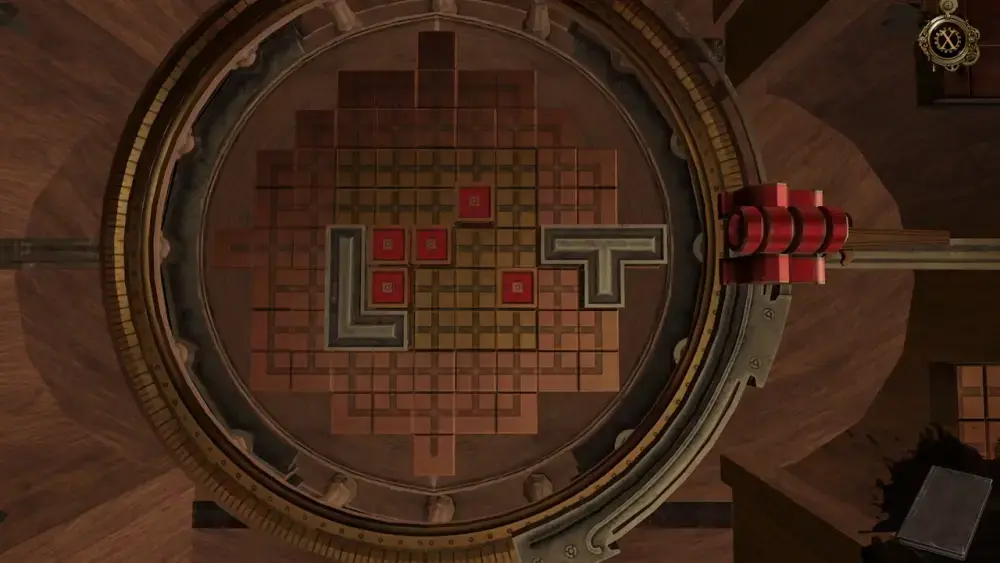
As you can see, a T shape has been added. What you need to do is move the upright L to the right and move the T shape to the top, as pictured below:
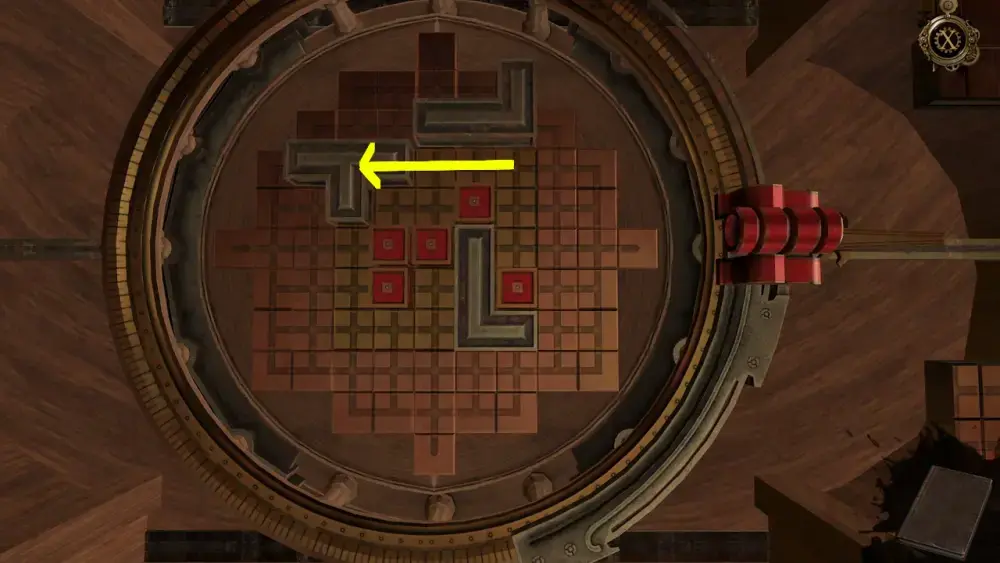
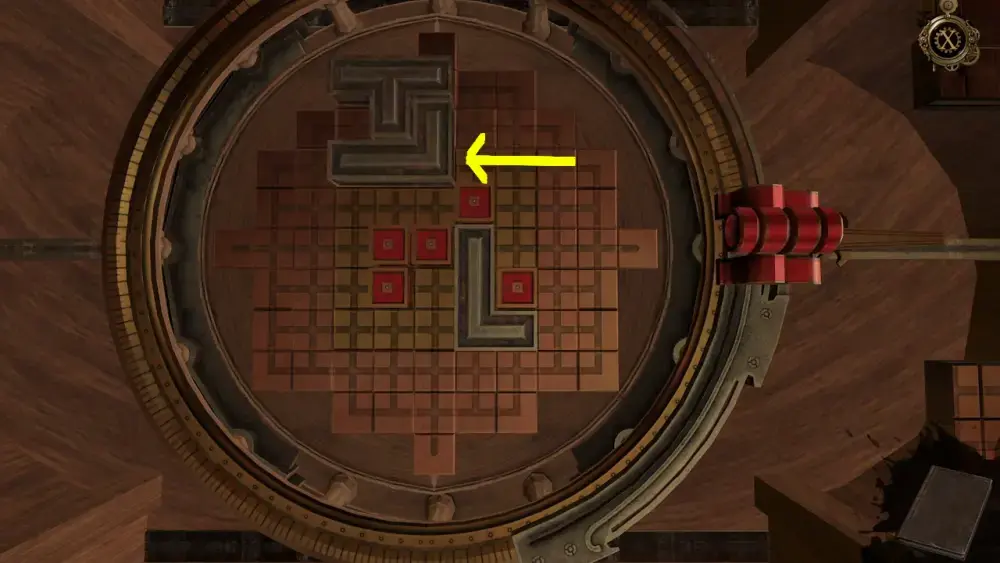
Slide the lever to open up the third and final layer of the puzzle, which looks like this:
A sideways L has now been added to the shapes you need to move. Now this is the tricky part as the sideways L and the upright L need to be beside each other. However, the T shape seems to be blocking the way. What you need to do is get the T shape to move to the top to free up some space for the sideways L to move down. The following pictures detail how this can be done:
First, move the T shape to the left.
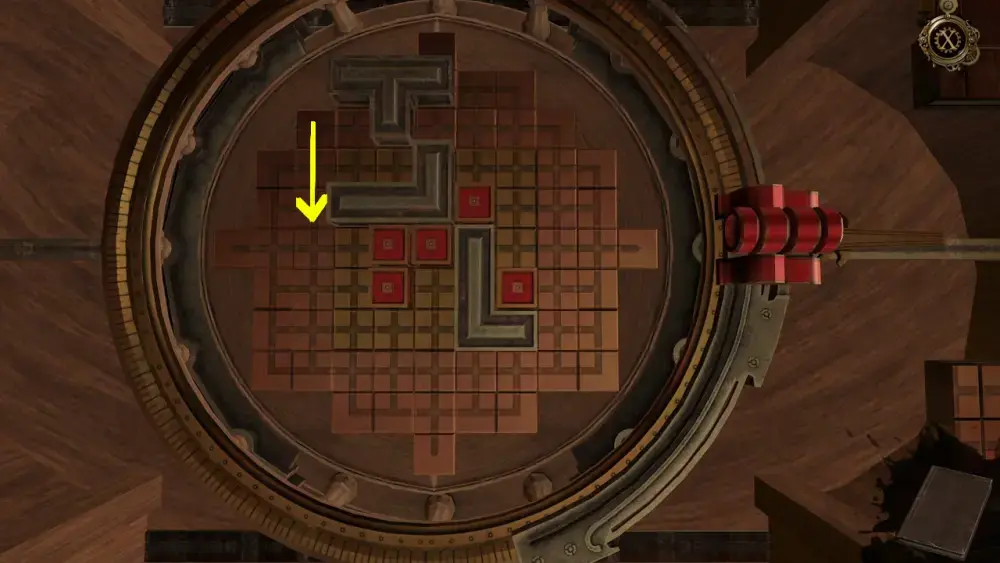
Second, move the T shape up and the sideways L down.
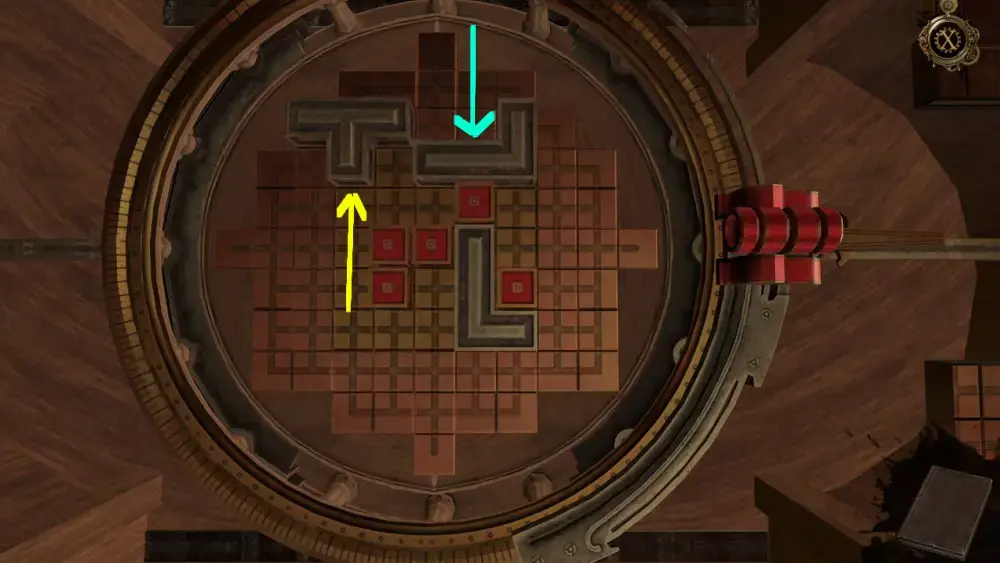
Next, move the sideways L to the left so that it touches the T shape.
Then, move the T shape all the way up.
Next, move the sideways L to the left until it touches the T shape.
Then, move the sideways L down, which provides just enough space for it to move freely afterwards.
Now you can move the sideways L next to the upright L.
With that in place, move the T shape back down next to the topmost red tile. The shapes should look as pictured below to complete the puzzle.
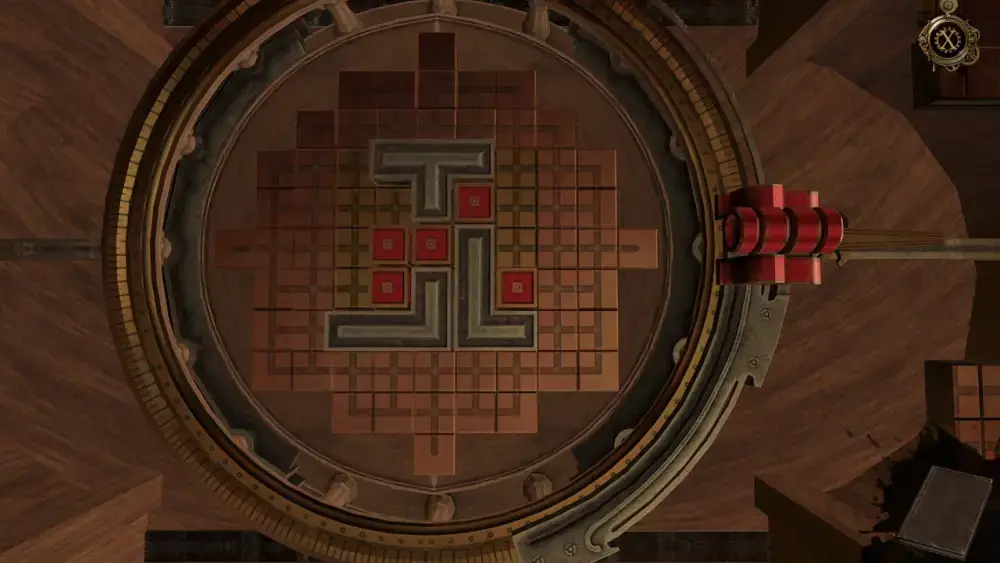
Pull the lever. The rest of the board will disappear, leaving only the part with the gold tiles and the shapes arranged in their rightful places.
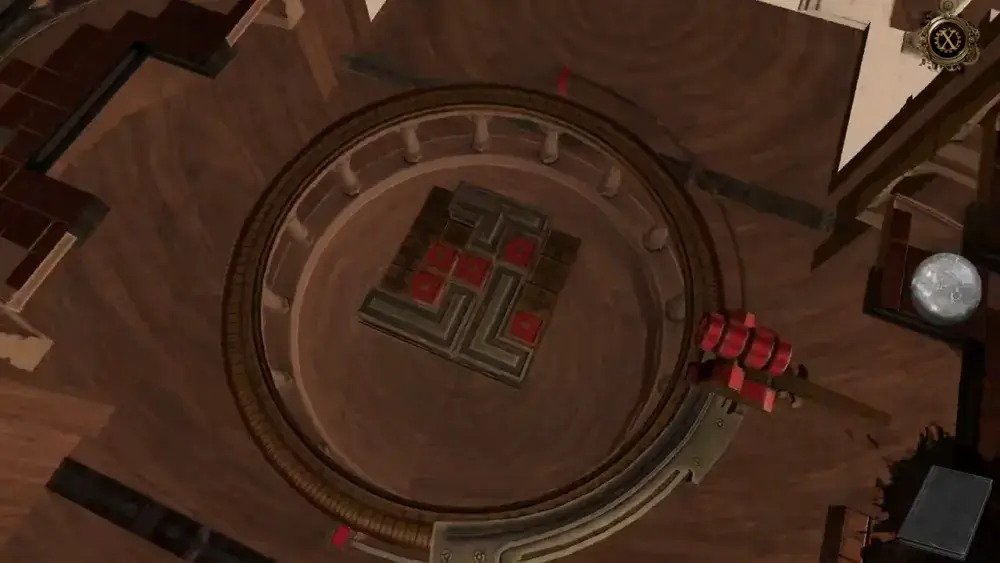
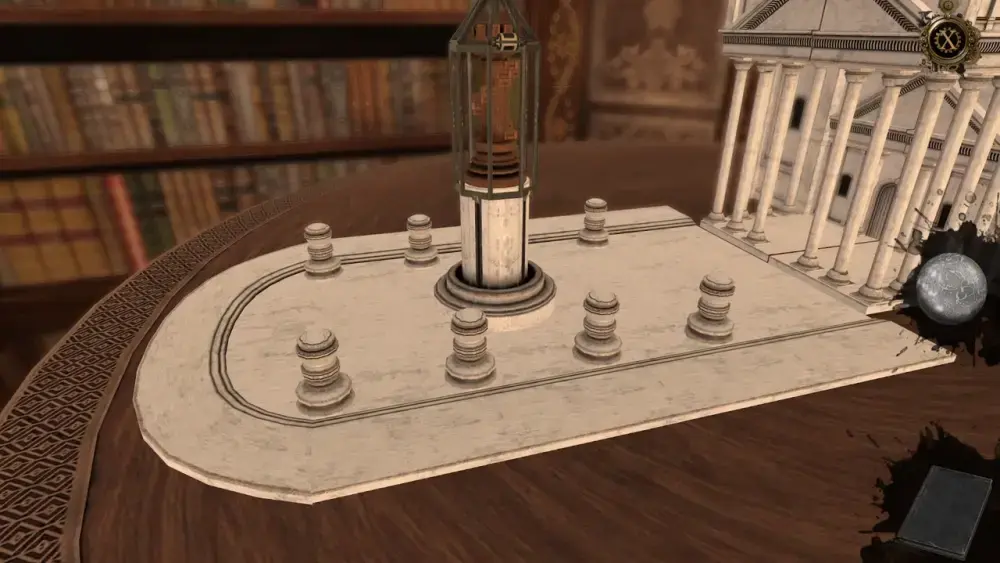
The puzzle will then retract into the center of the model building and its two halves will once again come together. The table will then turn, giving you now a view of what was at the back of the model building, which are four pairs of miniature lamp posts with a strange looking tower in the middle.
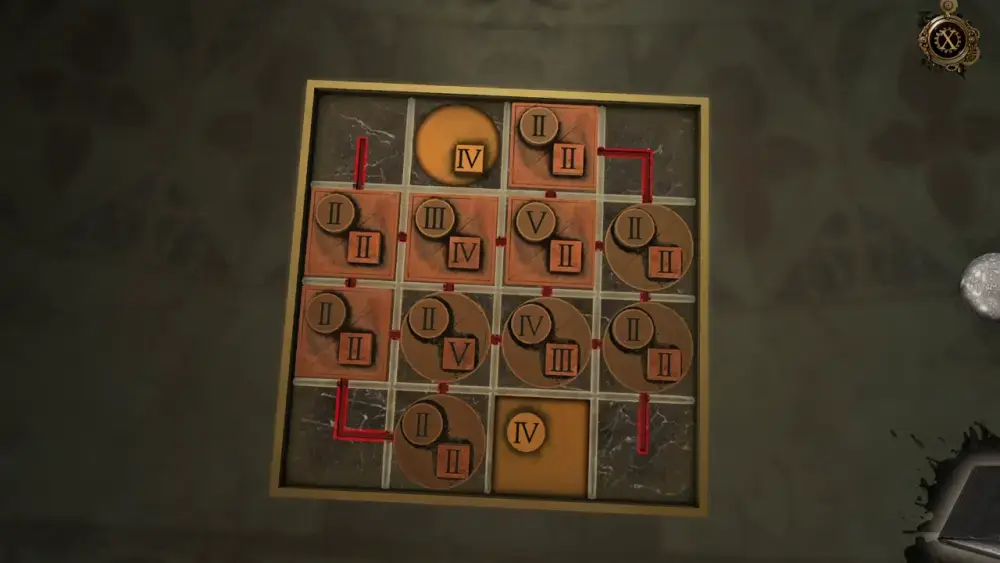
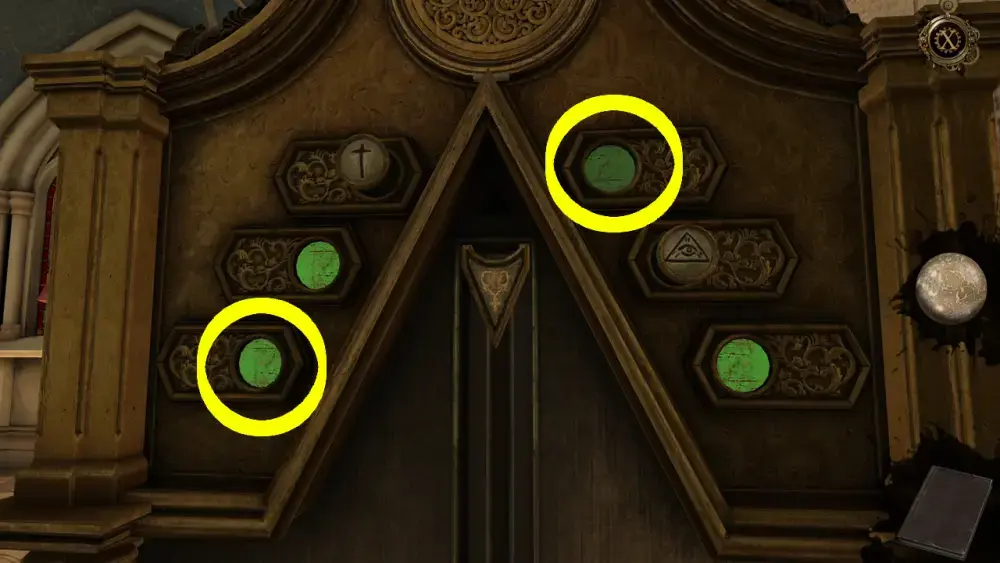
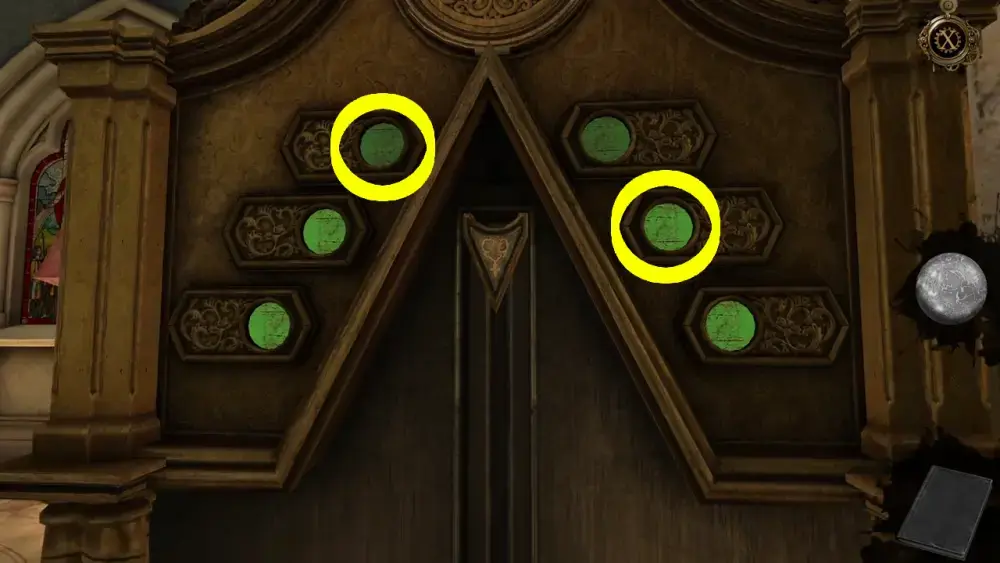
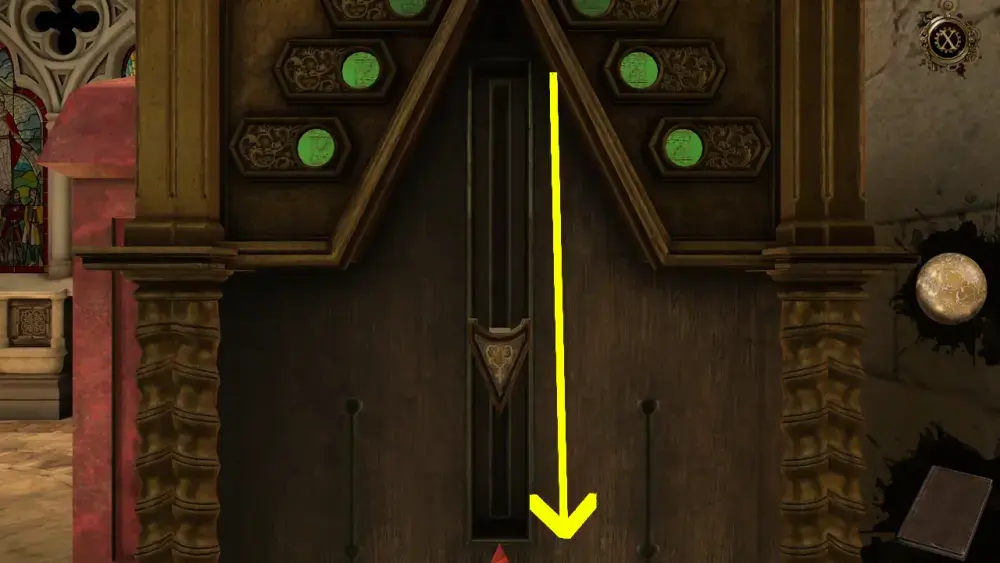
If you touch the lamp posts, you will see that you can push each pair down, but they will spring back up and nothing happens. This is because each pair must be pushed down in the right order. For this, open your Oculus Perpetua. When you do, you will see that each pair of lamp posts has a corresponding Roman numeral. Push each pair down in ascending order.
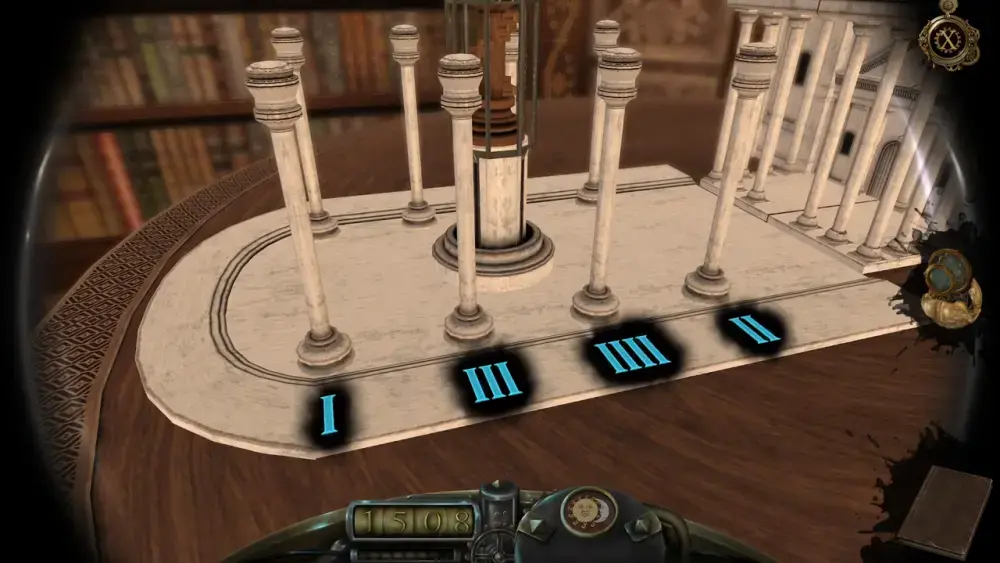
If you’ve pushed the right pairs correctly and in order, they will not spring back up.
With this done, you’ve now unlocked the tiny cage containing a Chess Piece. Take the piece to be placed in your inventory. Upon closer inspection, you will see that this piece is, rather fittingly, a rook (also known as a tower).
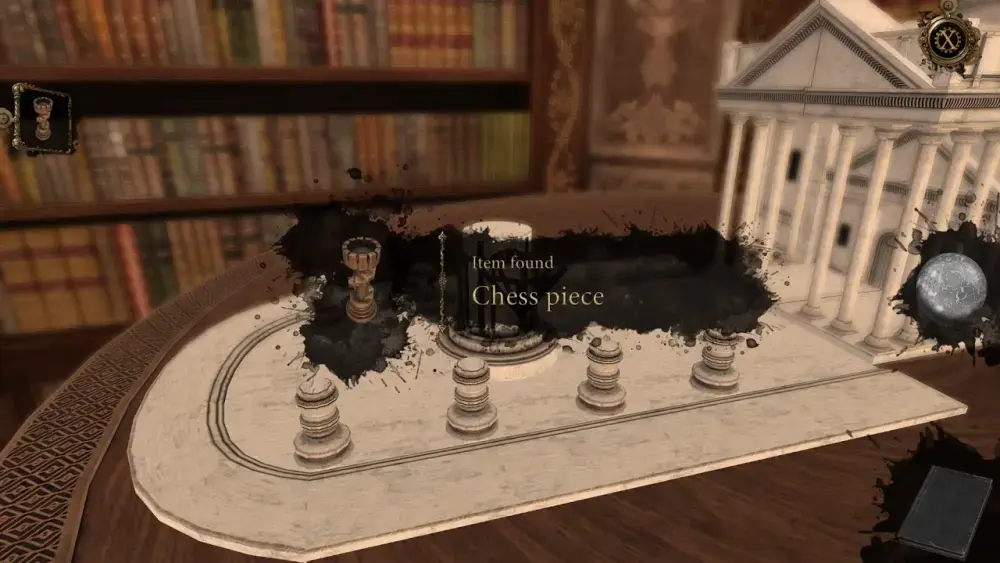
With four available chess pieces, it’s time to go back to the chessboard. Head down the flight of stairs and approach the small roundtable with the chessboard on it. Place the rook on the board.
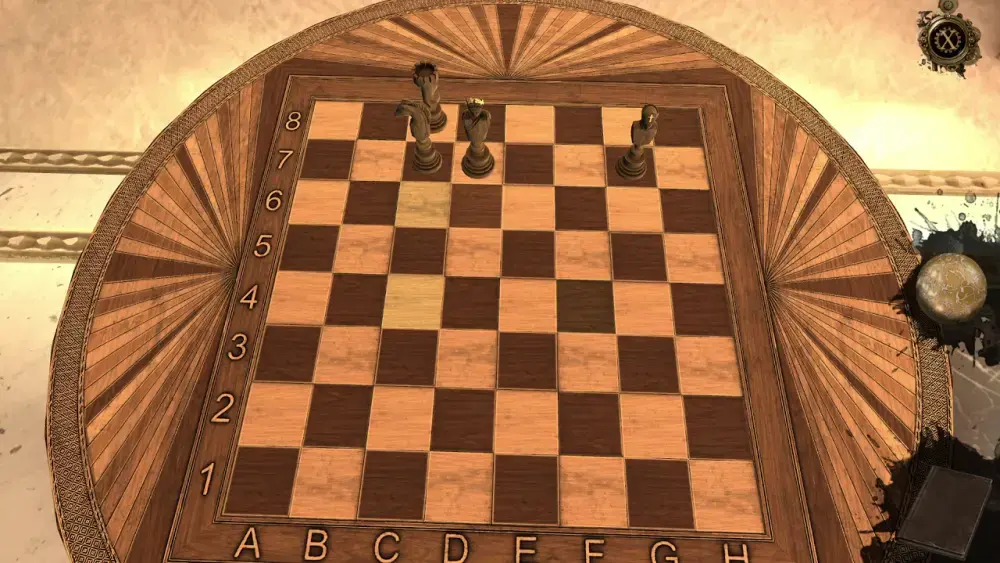
This is where your sketch from the balcony will come in handy. But before that, let’s establish again that two white tiles on the chessboard look slightly different from the rest. The color isn’t very noticeable in the photo above, but if you really look closely, C6 and C4 look somewhat different from the rest of the other white tiles.
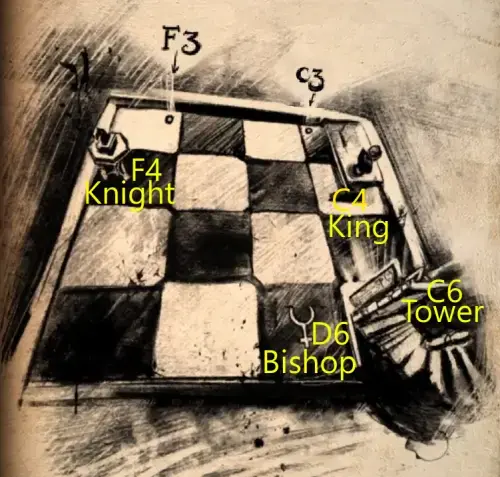
Now, let’s analyze the sketch you made from the balcony. If you look closely, the arrangement of the objects as seen from the balcony correspond to each of the chess pieces you have.
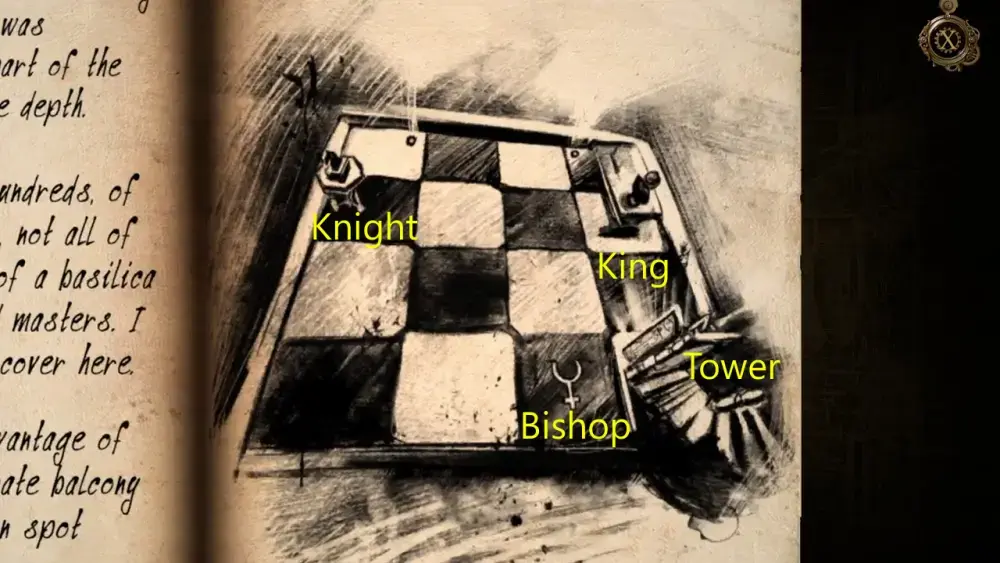
Basically, the “knight” piece is the table where you’ve completed the horse statue, the “king” piece is the table where a bust of Julius Caesar is located, and the “tower” represents the entrance to the second floor, where you obtained the actual tower chess piece. Of course, the “bishop” piece is marked by a symbol on the floor tile.
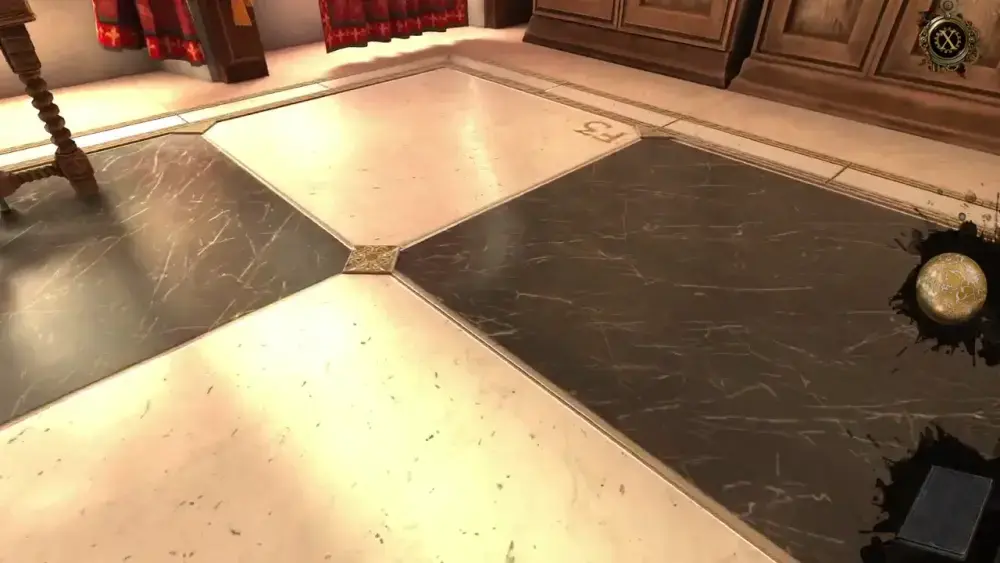
Now you have somewhat of an idea of where to put the chess pieces. Having observed that C6 and C4 look slightly different from the rest, we can hazard that it might be worth a shot to place the tower piece on C6 and the king piece on C4. You can actually further confirm your suspicion by observing the floor as you will find a small F3 embossed on one of the floor tiles.
If you check the opposite side, you will also find C3 embossed on the floor tile. These will also be added into your journal sketch once you view it again.
With these two markers confirming the proper locations of the pieces on the chessboard, you can now clearly tell where each piece must go:
All you need to do now is move the actual chess pieces in the right places. This is how they should look like on the board when you’ve completed this puzzle:
You’ll know that you did it right as the pieces will automatically push down their corresponding tiles, triggering the shelf with the scepter and helmet to move backward.

If it has space to move backward, then it must mean that it’s hiding a possible entrance. Approach the shelf, particularly the scepter. If you zoom into it, you’ll see that it is locked in place. Move the lock to the side.
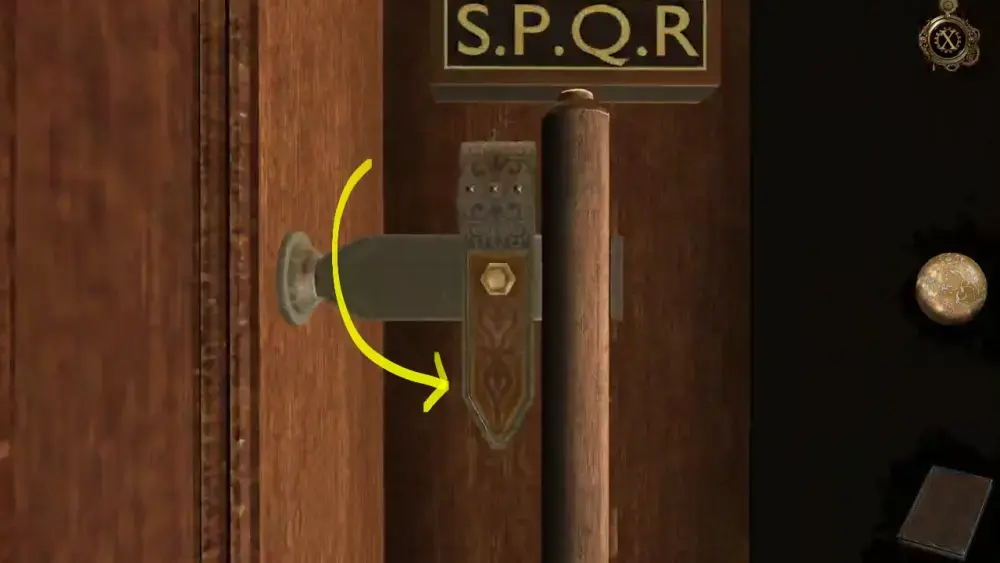
The scepter will fall and a prompt will flash, asking you to push it so the shelf can be moved to the side.

Push the shelf all the way. Once done, you will have discovered a narrow passageway going down another room.
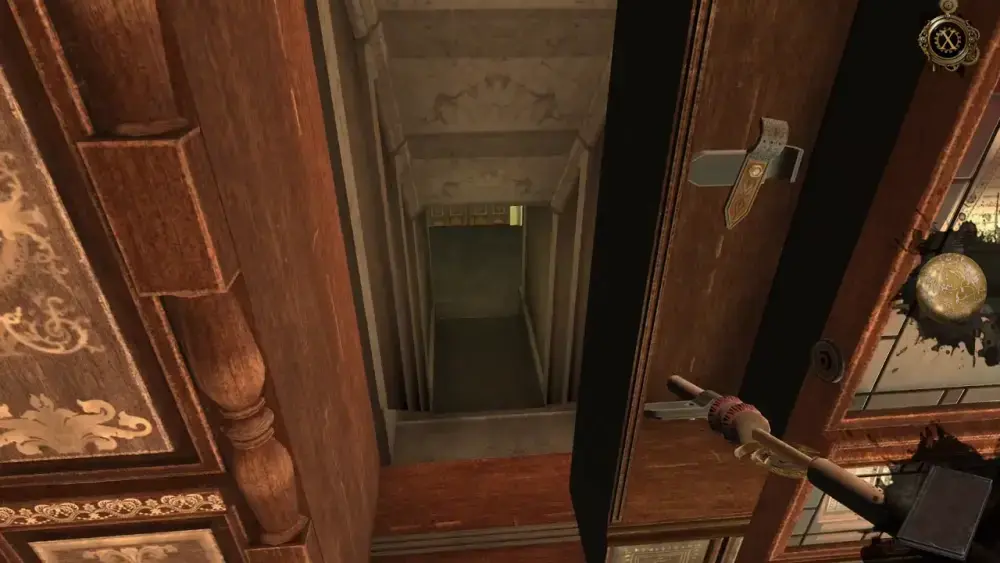
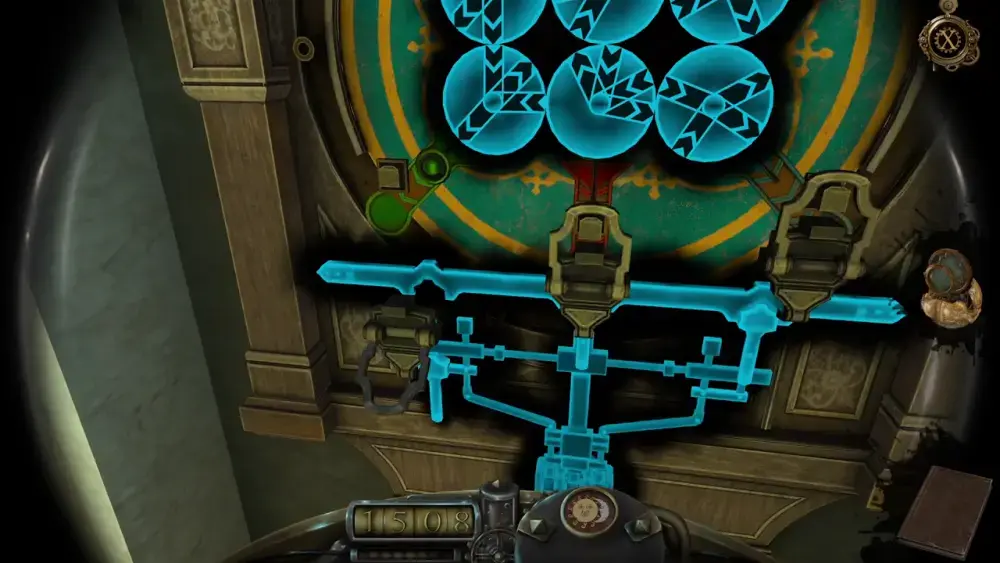
Head down the flight of stairs and you will be greeted by another door and a curious-looking fixture to its right.
There doesn’t seem to be any way forward as you are flanked by dark hallways. It’s obvious that the door is locked, and the fixture beside it is likely a puzzle. Approach it and look up—you will see a small key-shaped screw at the top.
Zoom into the screw and rotate it until it comes loose. This will cause the golden frame to fall, revealing the puzzle underneath it.
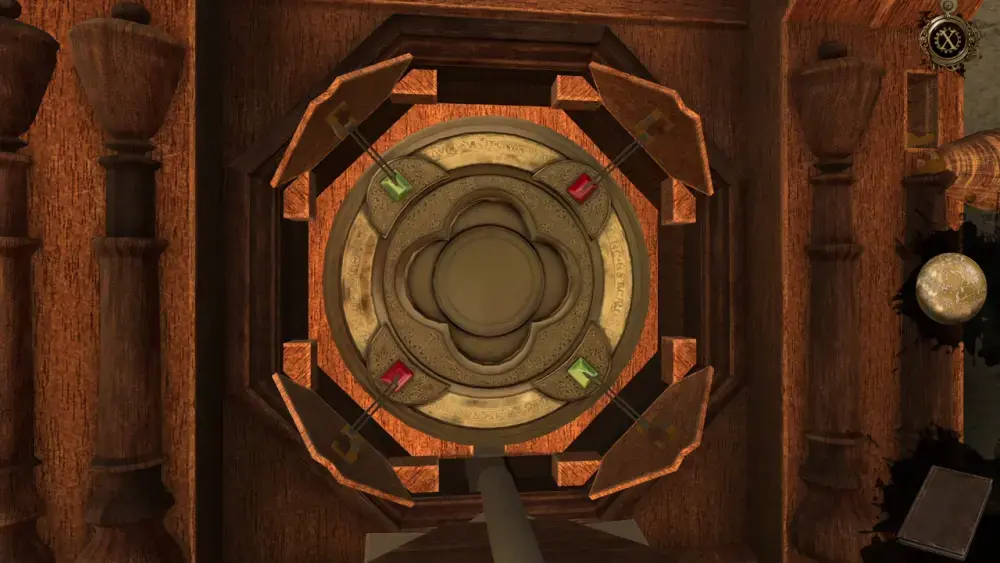
If you try to touch any of the dials, you will discover that they can be rotated. The layout of the puzzle gives you an idea of what you need to do: at the top are three beads of different colors: green, red, and blue. At the bottom are holes with the same colors as the beads. The goal is to get the beads to fall into the hole that corresponds to their color.
What are the dials in the middle for, then?
Open your Oculus Perpetua and you will see that these dials are actually rails that have arrows.
Basically, you need to connect the rails toward the hole a bead must fall into, starting with the green bead. When rotating and connecting dials, take note of how the arrows are positioned. The bead will not fall if you did not connect the railings properly.
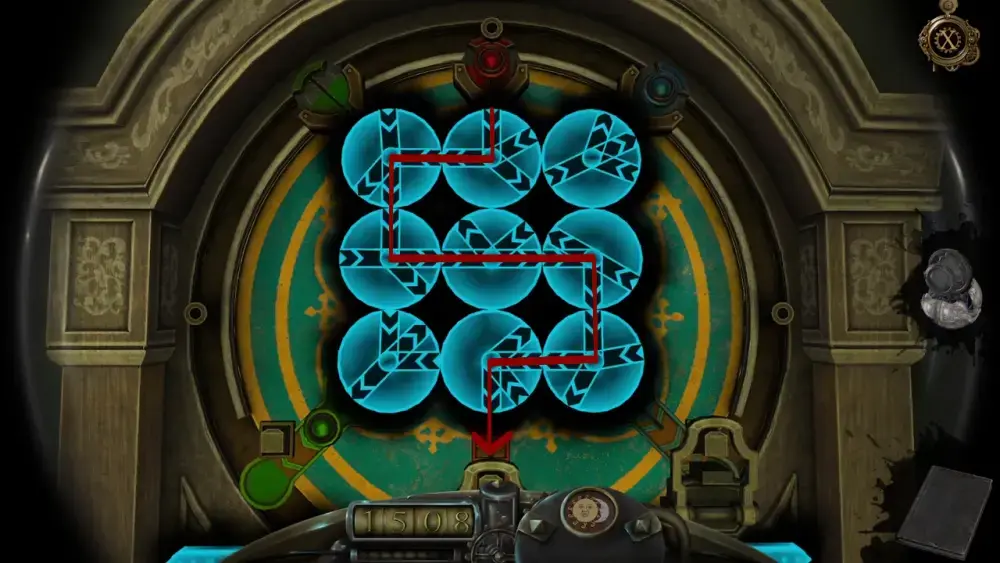
For the green bead, this is how you should arrange the three dials on the left:
For every bead that goes into the right hole, a locking mechanism will be pushed down and unbolted.
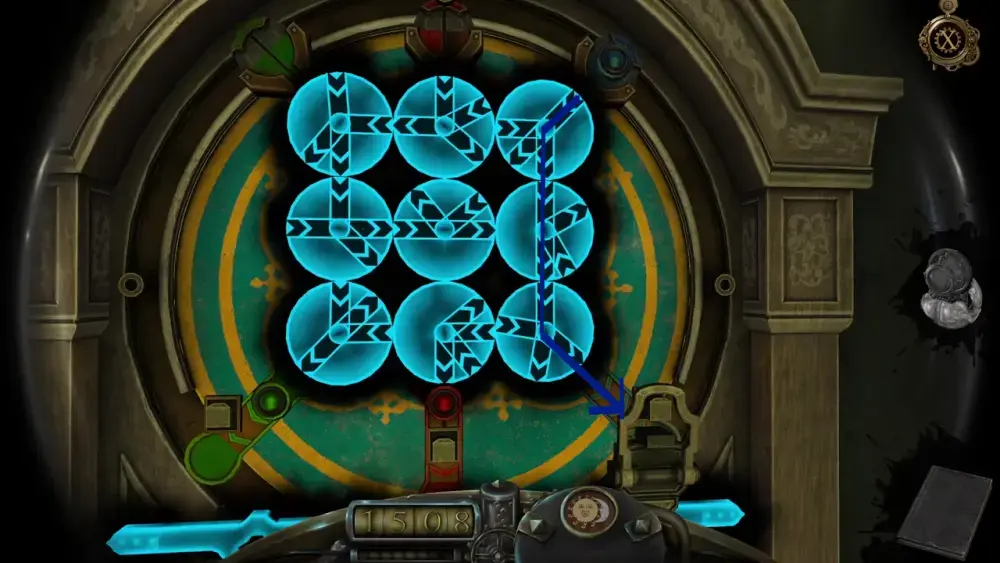
For the red bead, you need to move the dials from all three columns. Arrange them in this way to get the red bead to move down its corresponding hole:
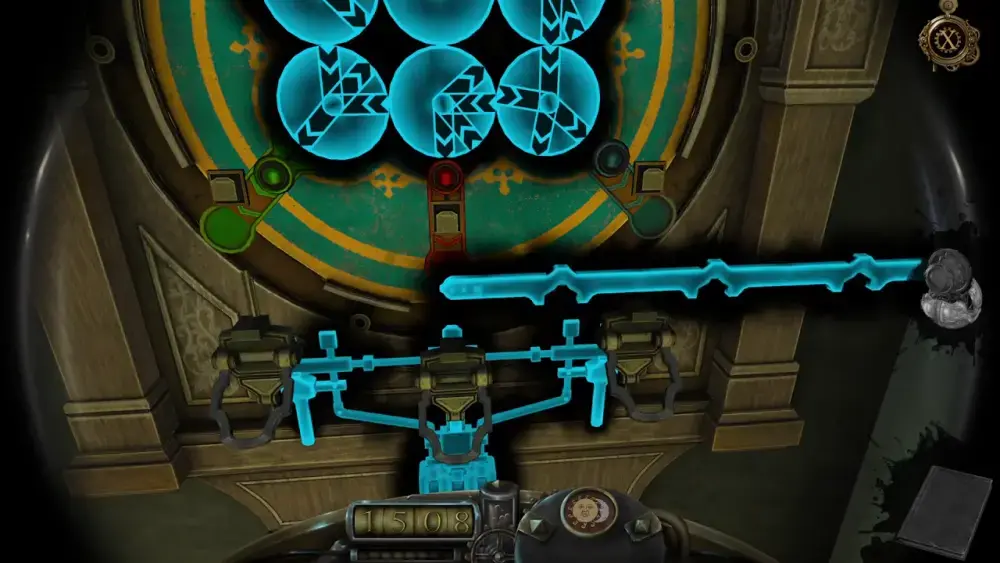
For the blue bead, all you need to move are the dials in the right column. Arrange them like this:
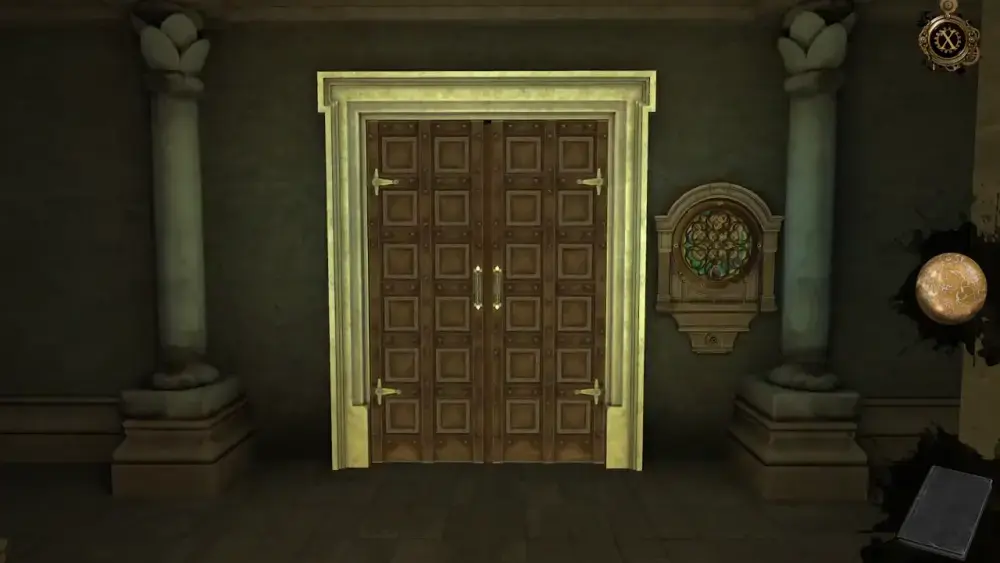
With all three beads in their proper places and the three corresponding locks unbolted, the main bolt will slide to the side, thus opening the door.
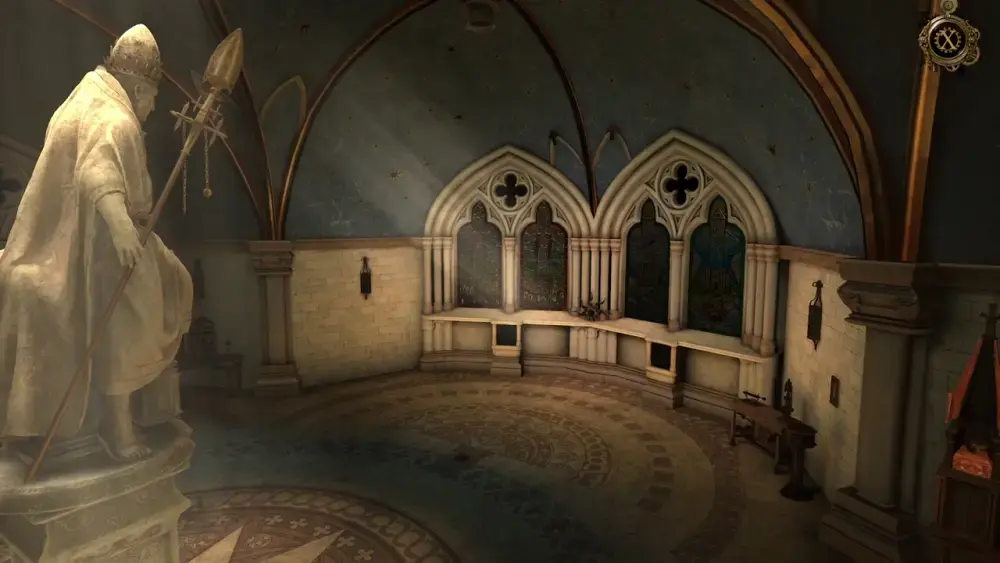
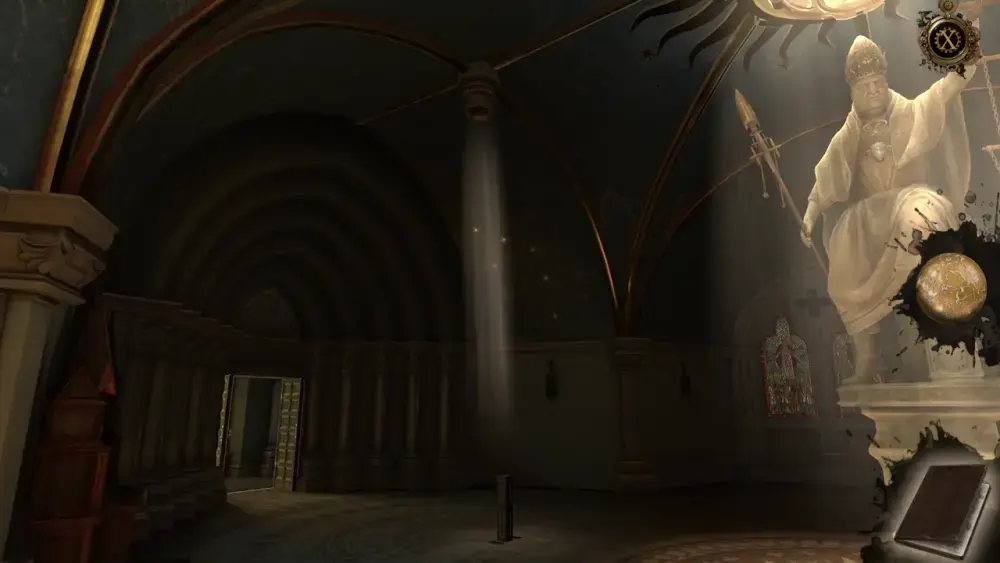
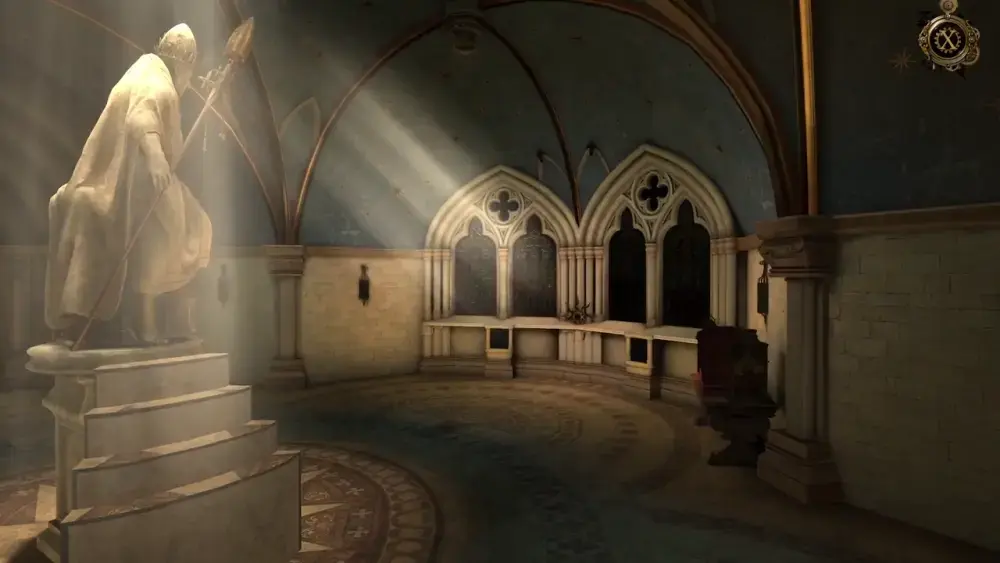
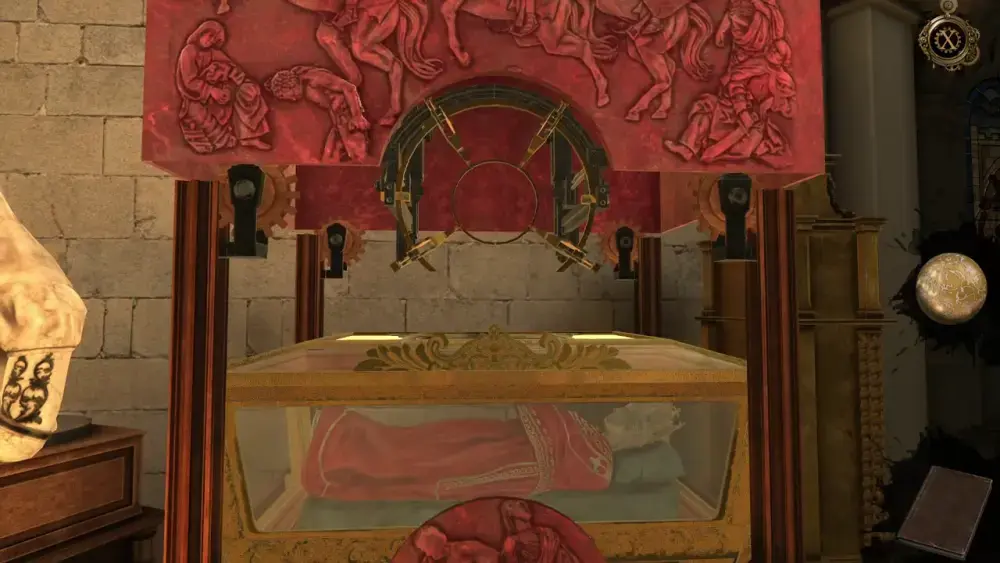
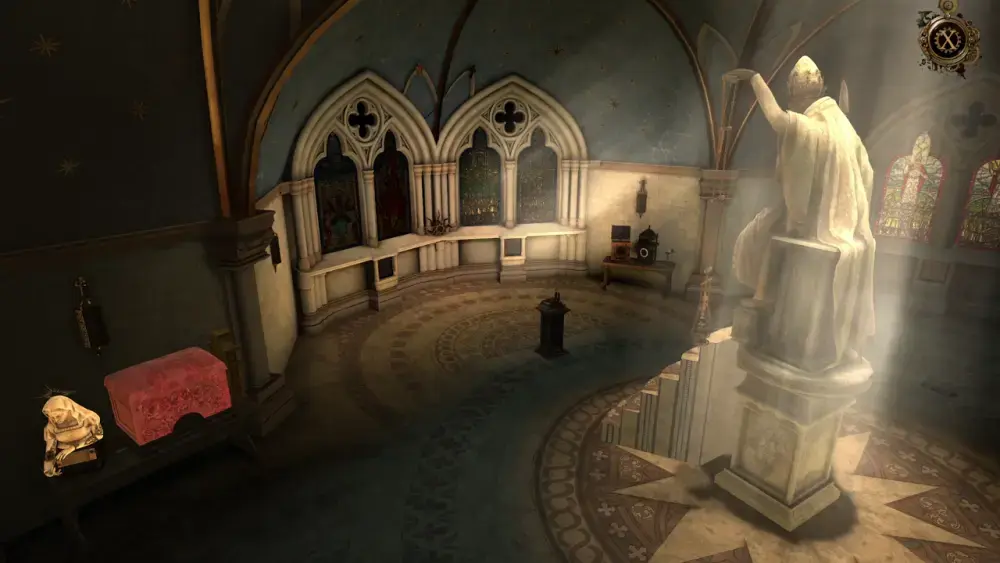
Here, you are greeted by an astounding yet imposing sight: a statue of the Pope underneath a bright light.
Upon entering, the game will allow you a brief view of what is surprisingly a huge chamber mostly cloaked in darkness. However, there are places nearby that are illuminated by the chandelier above the Pope’s statue.
To your left, you can see a little further into the chamber, but it’s obscured by shadows…

To your right is what looks like an elaborate desk…
And farther down, in the distance, are more stained glass windows on either side of the room.

Then, your view goes back to the Pope’s statue, facing it straight ahead in its monolithic glory.

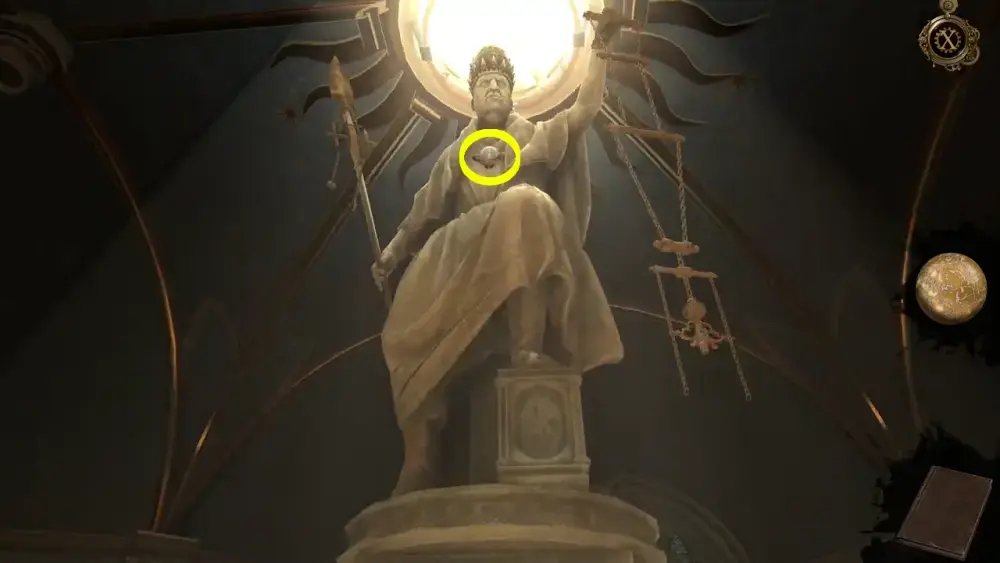
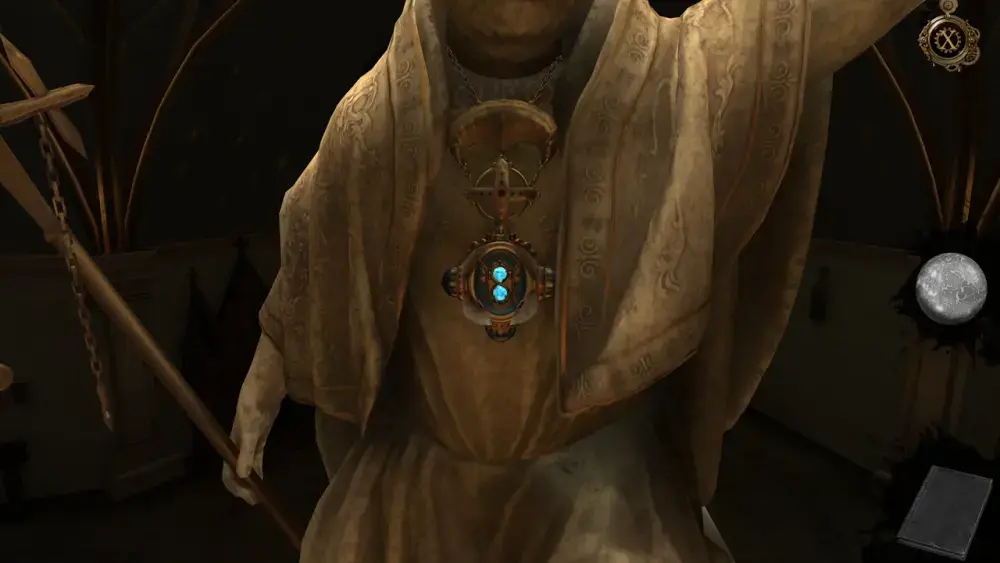
If you approach the statue and try to zoom into it, you will see that it’s wearing the amulet you seek! The goal now is to figure out how you can get up there and reach the amulet.
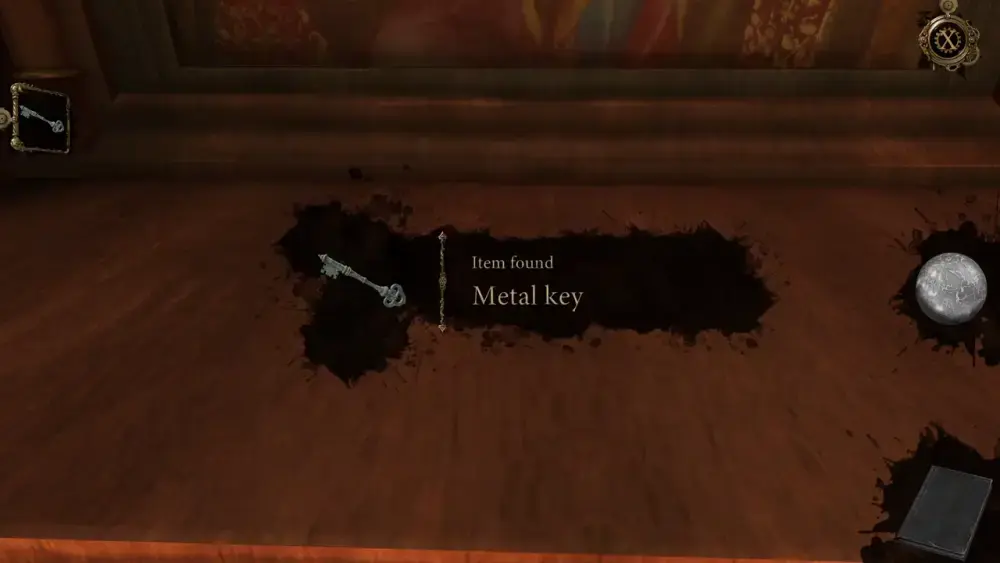
One of the easiest (and most obvious) places to approach is the elaborate-looking desk to your right. True enough, there are two things left on top of it. One is a letter…
And another is a Metal Key.
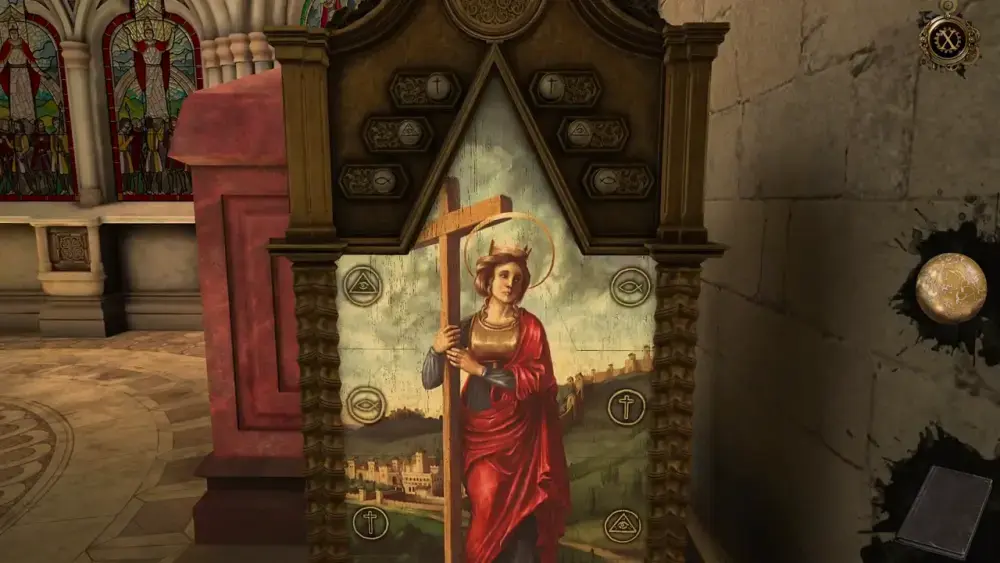
But don’t just leave yet. At the bottom part of the desk is a crest surrounded by different symbols. If you look closely, the four symbols around the crest make up the individual parts of the crest itself.
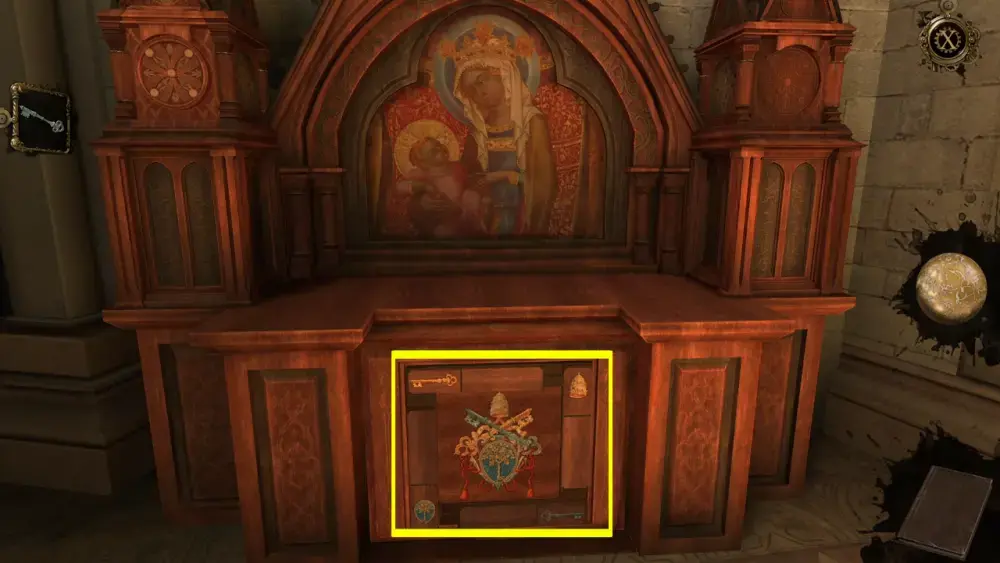
Zoom into this part to see it better. You’ll notice that each symbol is on a wooden slat that can be moved. Move the slats clockwise starting from the slat with the silver key at the bottom.
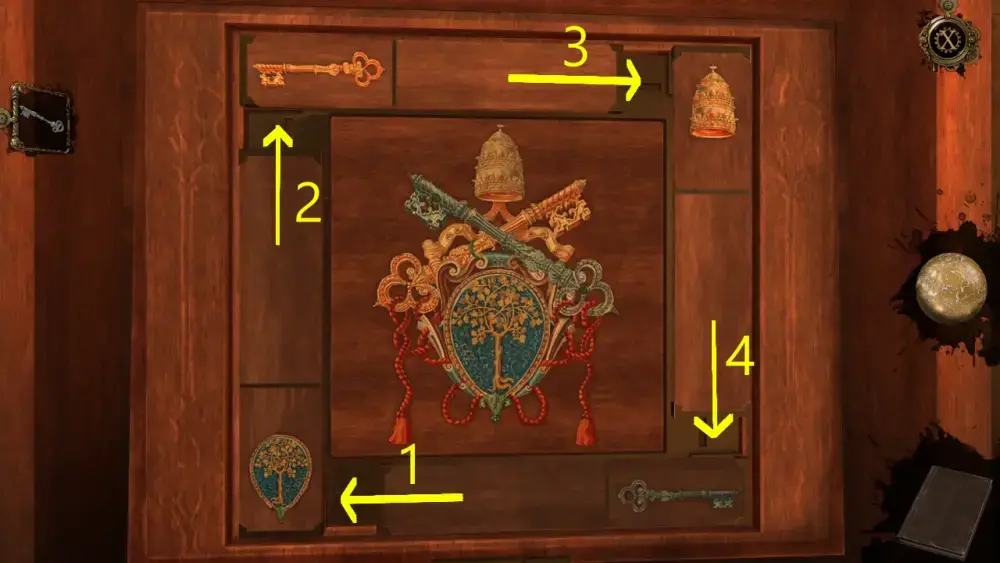
When all the slats are moved, the image of the silver key on the crest will become a slot on which you can insert the Metal Key from your inventory.
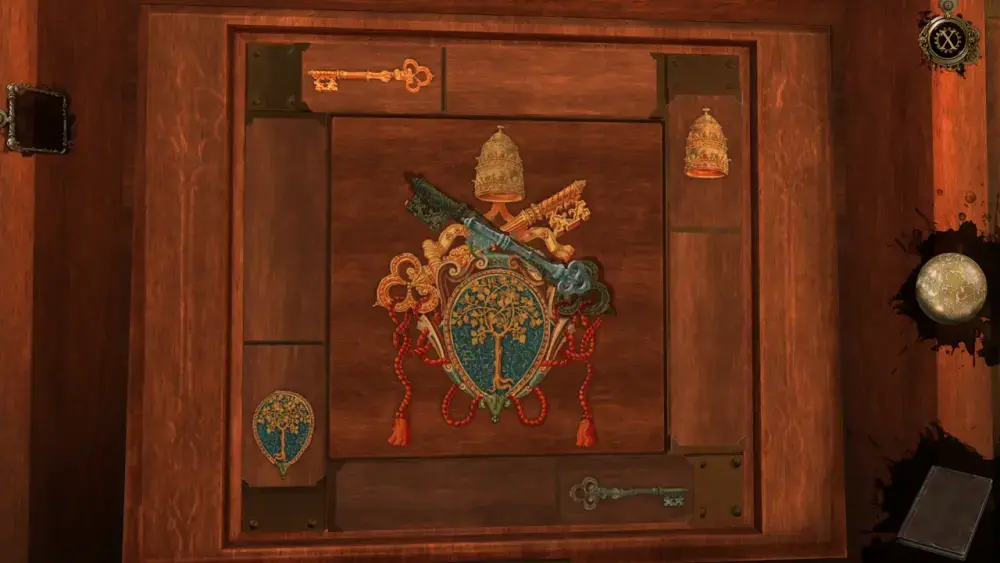
This will open a hatch and, inside, you will find a Metal Cylinder with Arms.
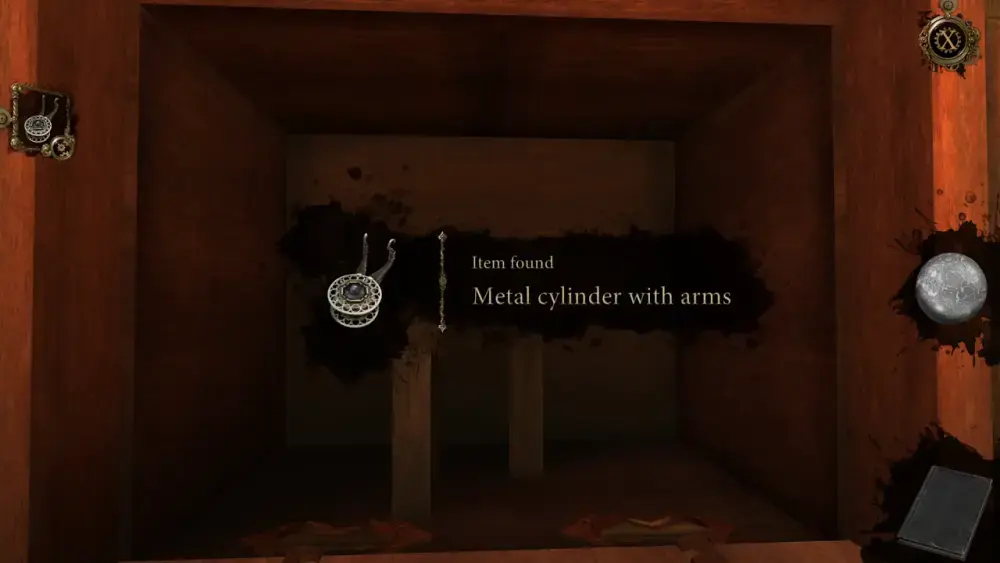
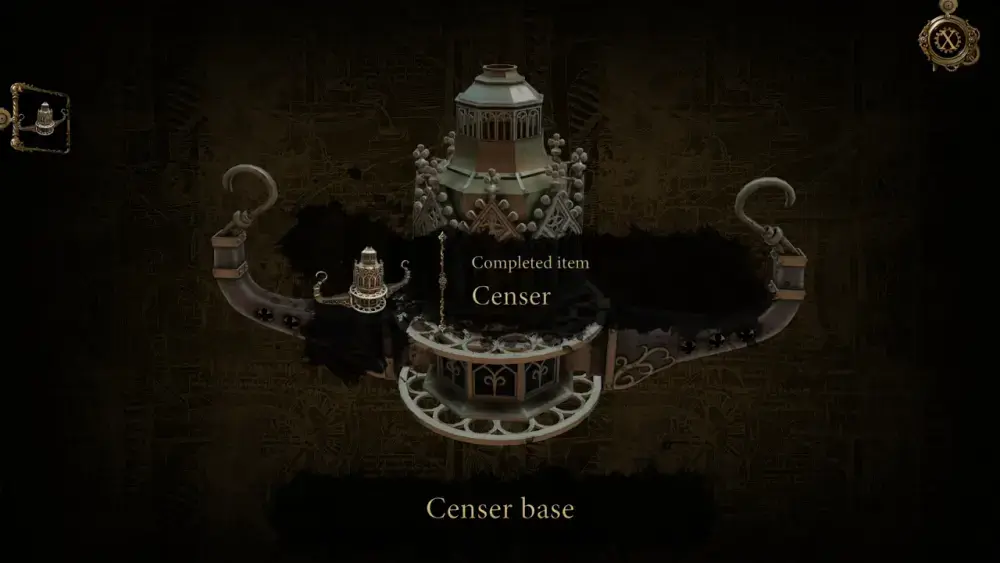
Since this item is marked by a gear symbol in its icon, open it via your inventory so you can adjust it. If you move one of the metal arms all the way to the left, you will have a completed Censer Base.
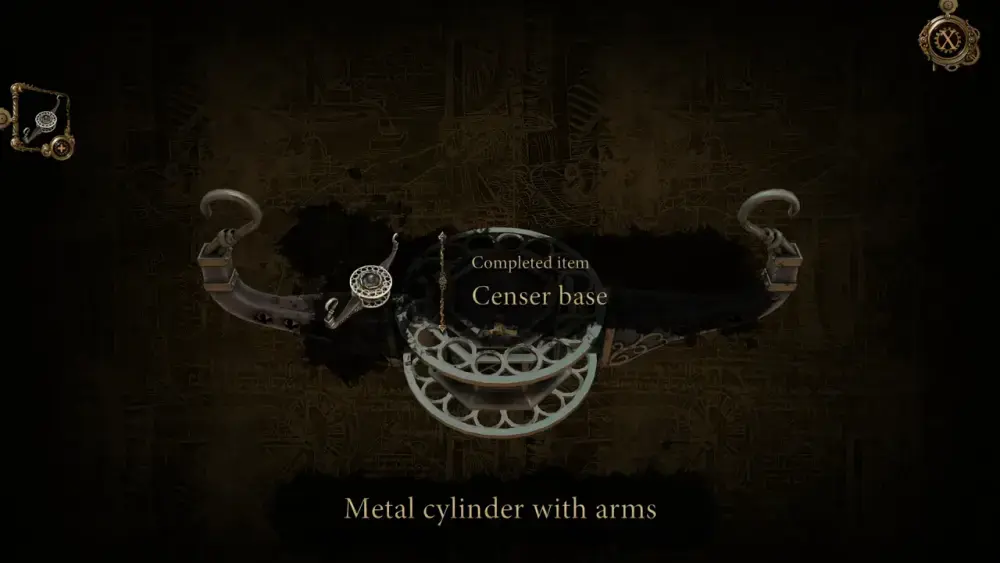
If you recall, the statue at the center of the room is holding a chain, which may likely be for a censer. Since we have the base, the rest must be here somewhere. The item itself is now marked by a + symbol in its icon, which means that it needs another part to be completed.
Since we’re still here at the desk, you might as well open your Oculus Perpetua to see if it has any more secrets. And true enough, something appears on the left tower.
Zoom into this part to see it better, then turn it 180 degrees clockwise.
This action will open the tower’s roof. Move the flaps aside and pull down the part covering the rest of the interior. You can then collect the Metal Shrine Model.
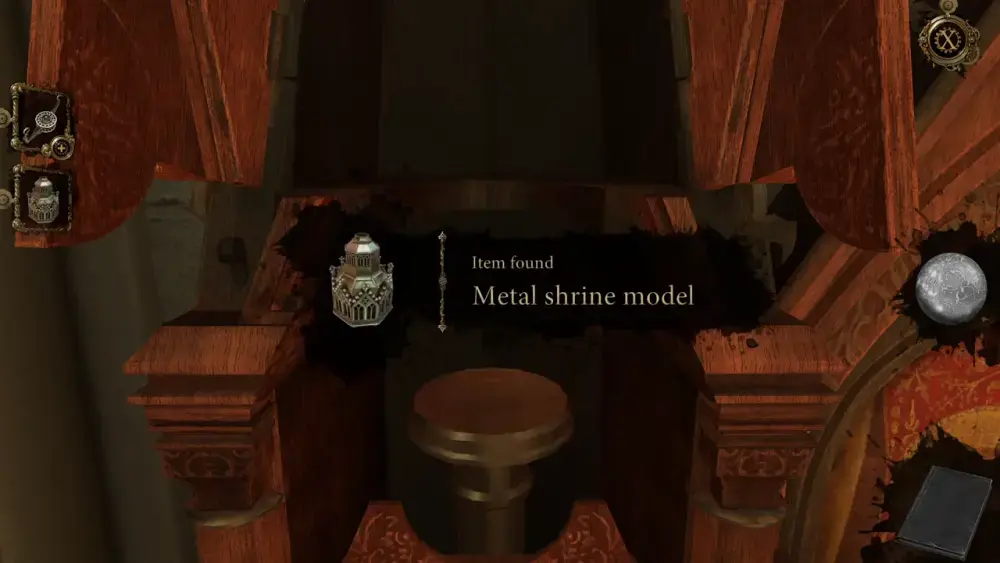
If you look at this item via your inventory, you will notice that it seems to be made of the same material as the Censer Base. Thus, view the Censer Base via your inventory and drag the Metal Shrine Model on top of it. With that, you will gain the completed form of the Censer.
Now that you have a completed Censer, go back to the statue and hang it on the chains.
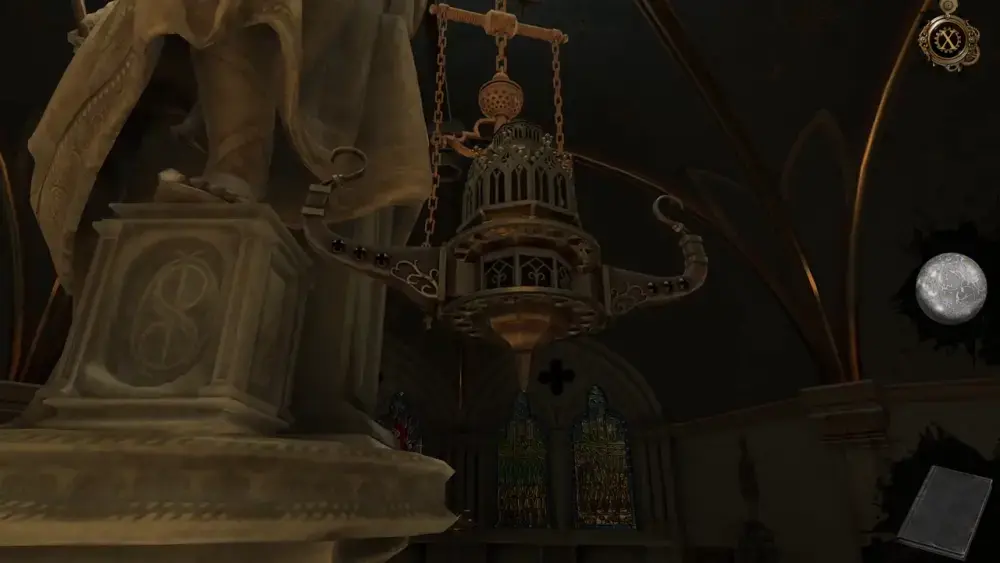
With the censer in place, the statue will turn and the light in the room will shift, directing your attention towards huge arching windows with stained glass designs.
In front of the windows, you’ll notice an object in the middle that resembles stars and sunbeams with a hole at the center.

If you pan to the right, you’ll see an ornate table with two objects on top next to a font. A small portrait can also be seen on the wall above the font.

As is customary in this game, we recommend observing the objects around you just to see what they look like up-close or if they have anything missing on them. Take for example this portrait of St. John: if you zoom into it, you can see that it’s missing a shell ornament on the lower left corner of the frame. It’s a small detail but remember this for later.
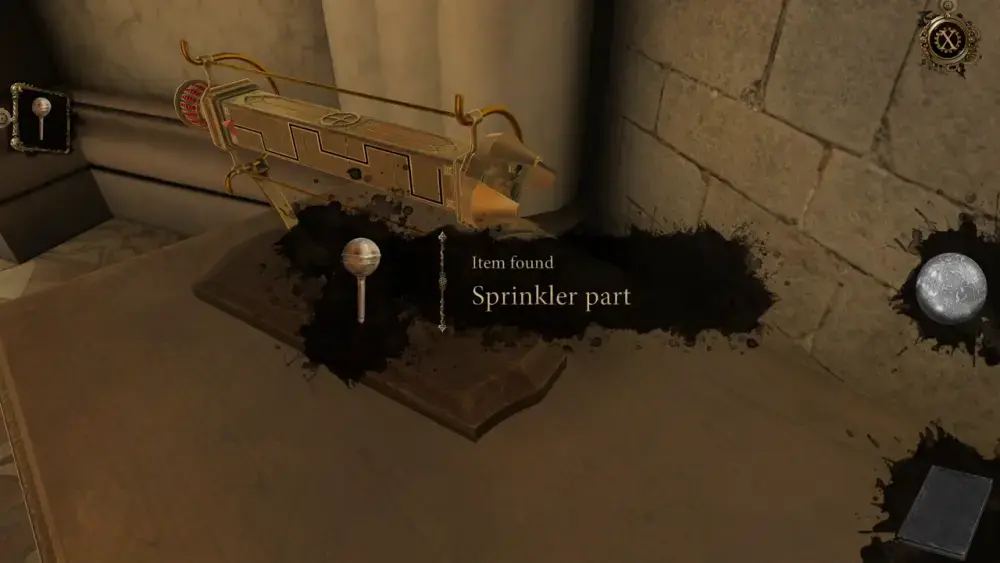
After you’re done with cursory observations, approach the table, particularly the sprinkler to the left. Turn it around and the backside will reveal grooves and a red ornament that looks like an arrow.
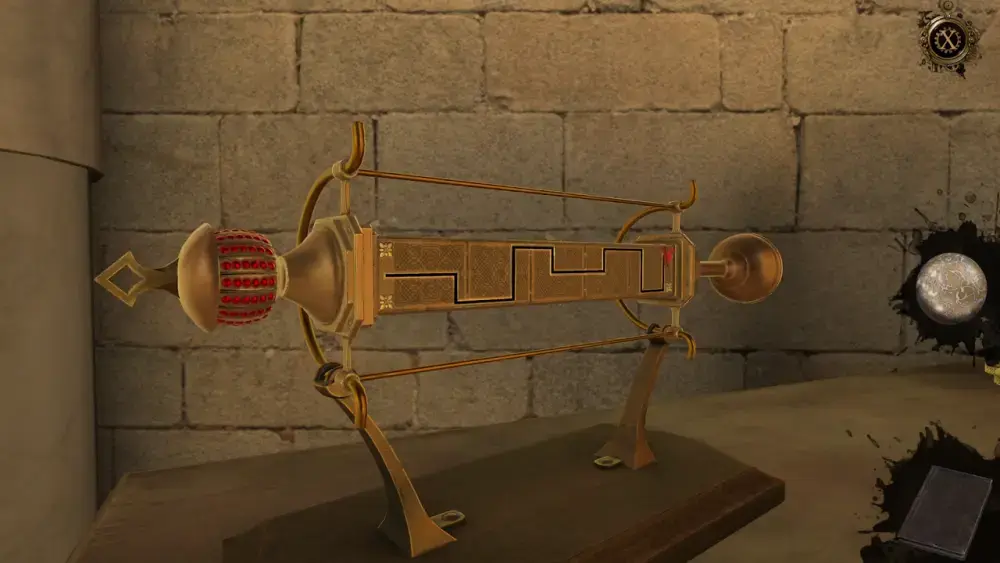
If you turn the red sphere on the left of the sprinkler, the arrowhead will change its direction. On the other hand, pulling the red sphere will cause the arrow to move forward provided that it’s facing the right way. Keep turning and pulling the red sphere to set the arrowhead and move it across the grooves on the sprinkler.
Once the arrowhead reaches the end, the golden sphere on the right of the sprinkler will fall.
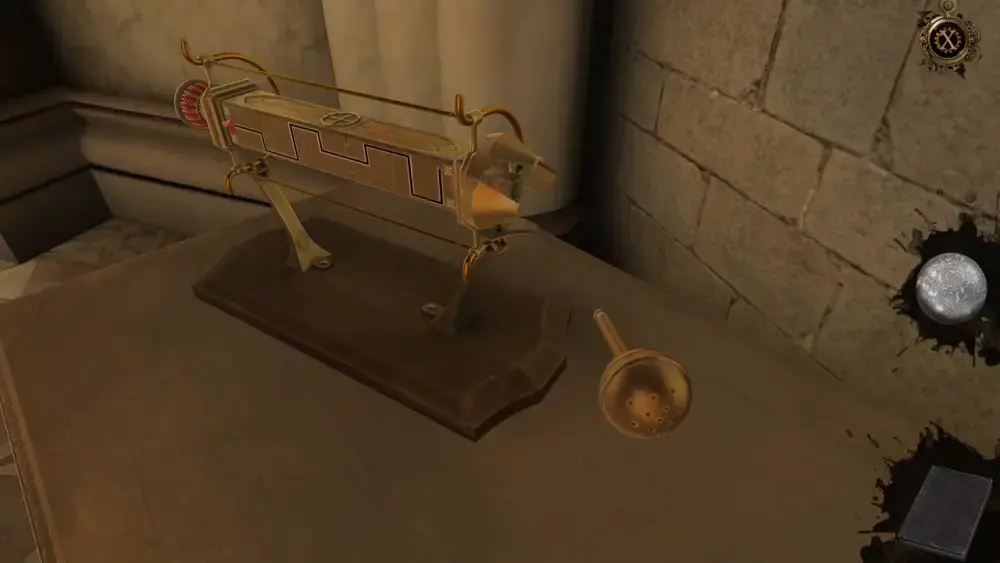
You can collect this item as a Sprinkler Part.
Beside the sprinkler is a reliquary. If you zoom into the center, you’ll see a vial behind the glass. Clearly, this vial must be used somewhere, but you first need to unlock it.

This is where the Sprinkler Part will come in handy: at the top of the reliquary is a tower. Zoom into it and you will see that there’s a tiny hole where you can insert the Sprinkler Part. Push the Sprinkler Part down.

Doing this will trigger the angel statue below to rotate and the spires next to it to move sideways. Bring the spires back upright and turn the angel to face you again.
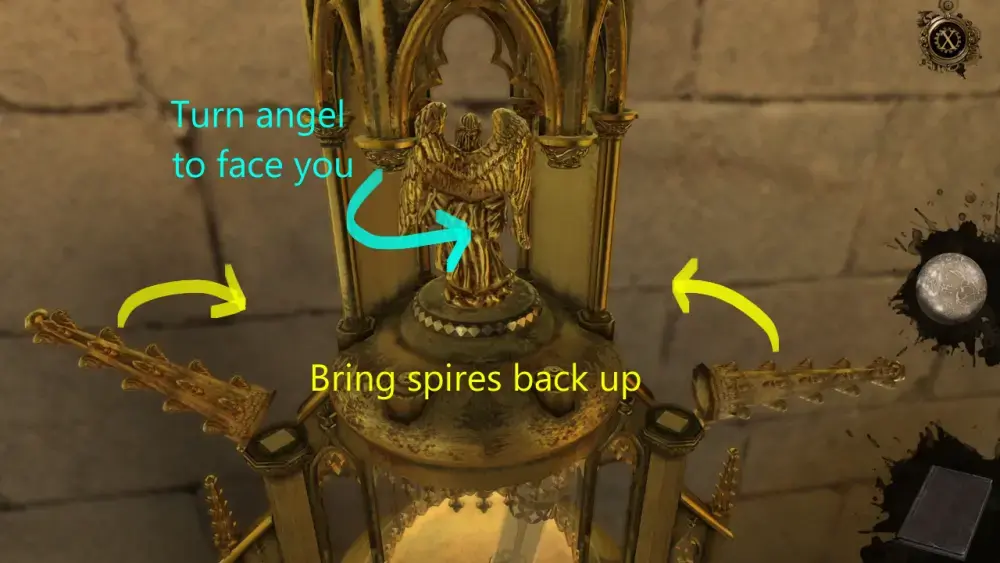
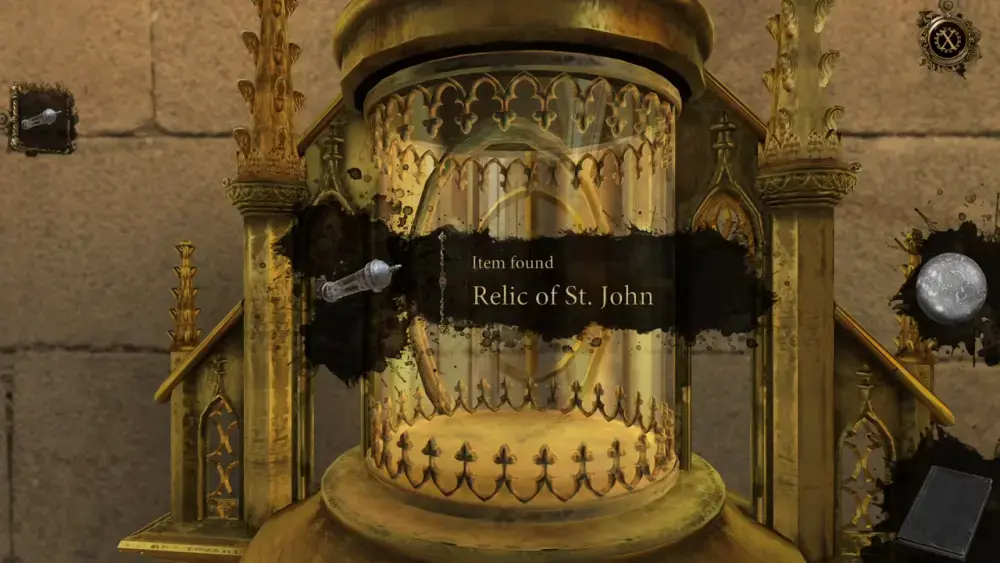
This will cause the glass case below to turn by itself, allowing you to collect the vial containing the Relic of St. John.
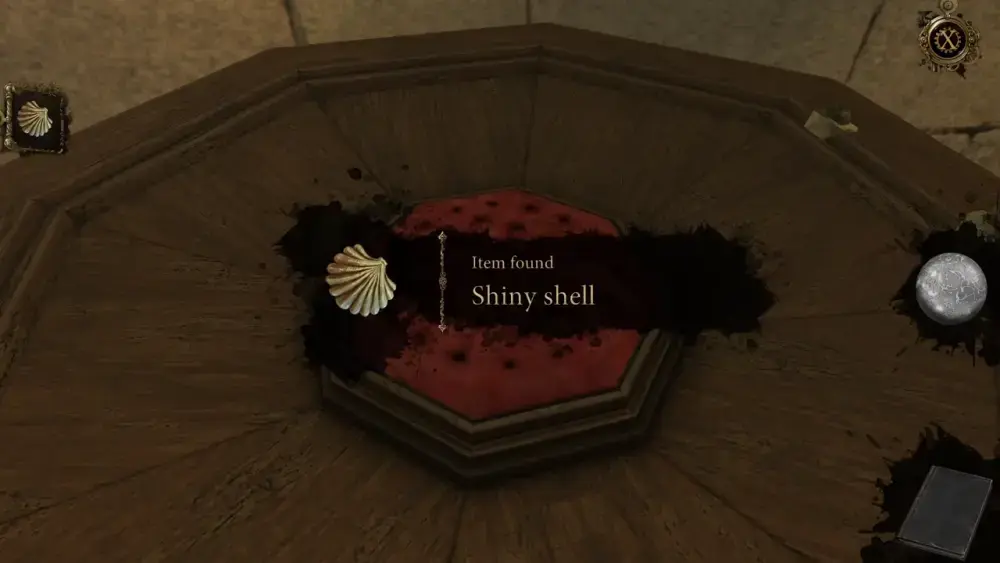
With that, you can now move onto the font to the right of the table. You can try to lift the lid but it won’t budge. There must be another way to open it.
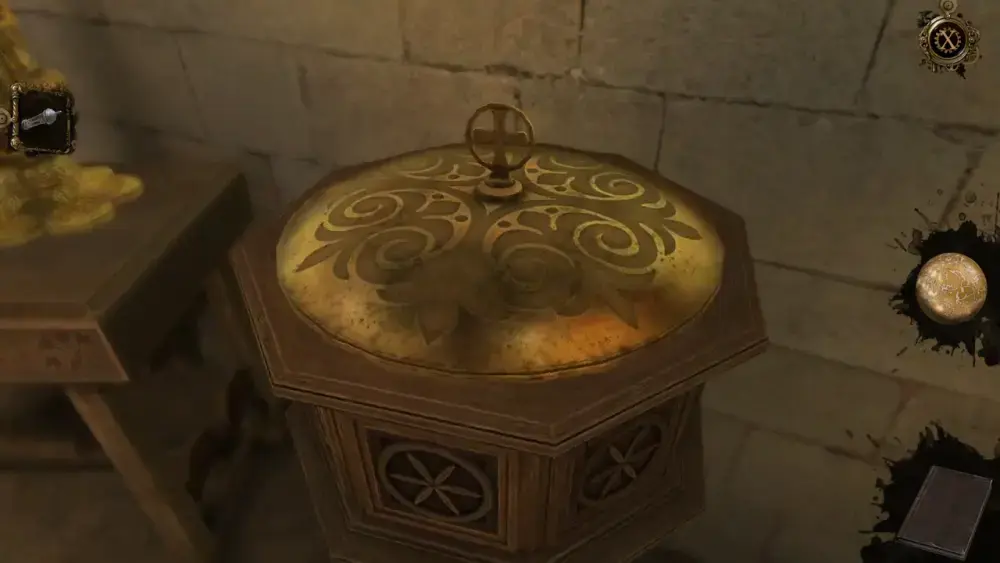
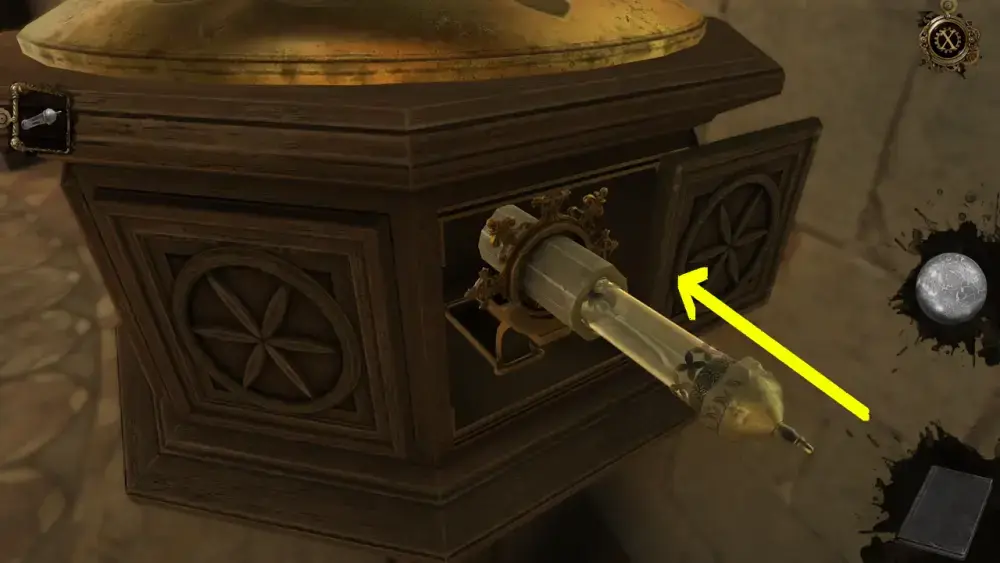
From here, you can see that there are wooden boards on the font. If you look to the right, you’ll see a wooden board with railings at the top and bottom. Slide this particular wooden board to the right to open it.

A circular holder will spring out of the hatch. This is where you can insert the Relic of St. John.
Once the relic has been inserted, the circular holder will retract into the font and the board will close. However, the lid at the top of the font can now be opened.
Lift the lid all the way. Inside, you will find a Shiny Shell and can collect it for your inventory.
Remember St. John’s portrait on the wall? Undoubtedly, this Shiny Shell is the ornament missing from the lower left corner of the frame.
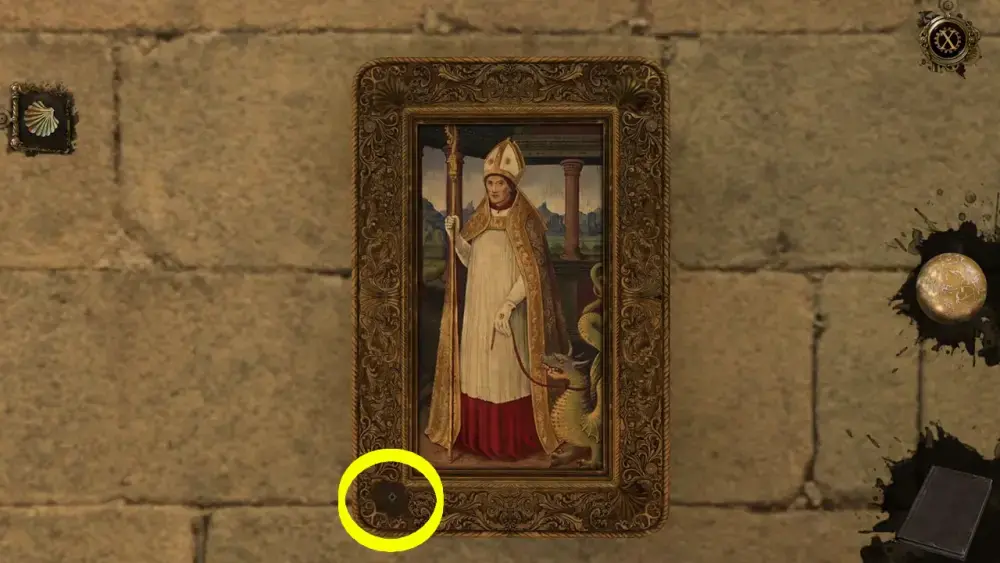
Zoom into the frame and place the Shiny Shell on the space allotted for it. With the shell in place, you can flip the portrait to the side and reveal a compartment behind it. Inside is the Medallion of Dawn.

If you look at the medallion in your inventory, you’ll notice that it has the Roman numeral I on it, implying that there are other medallions hidden in the secret chamber.
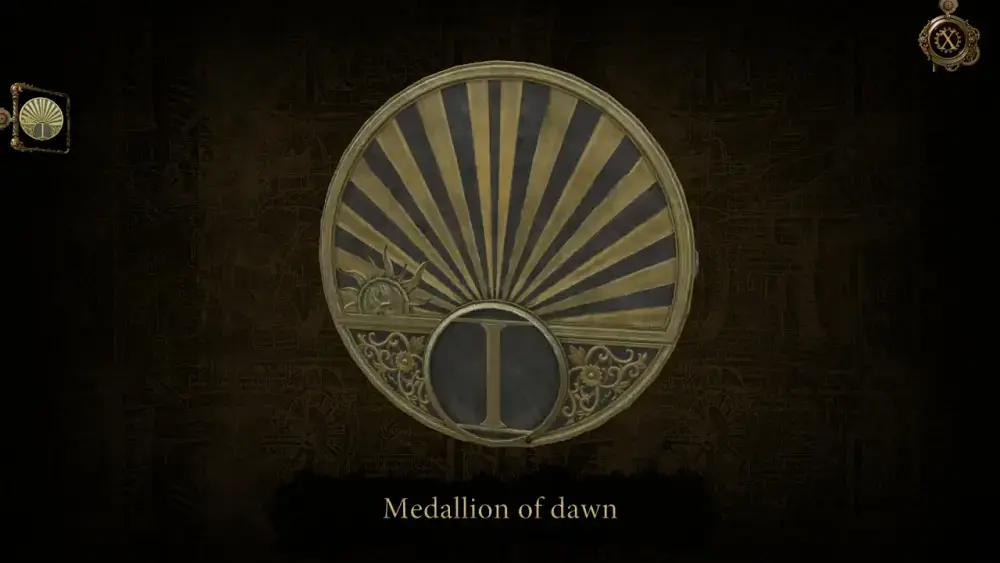
Among the objects we have encountered thus far, the Medallion of Dawn will fit perfectly with the ornament at the center of the stained glass windows. Approach this ornament and place the Medallion of Dawn into the hole.
A beam of light will then begin to illuminate the stained glass windows.
The censer from the Pope statue will also begin to emit smoke and show you a reflection of the stained glass windows through the smoke. A voice will resound within the chamber and narrate important scenes involving the history of the Ordo Iustitialis from the perspective of Paul II.
This will happen twice, as there are two pairs of stained glass windows on this side of the chamber. Each time the windows are illuminated by a beam of light, the ornamental squares on either side of where the medallion has been placed will flip and reveal symbols. For the Medallion of Dawn, the first symbol to be revealed is a triangle with an eye in the middle, then three figures that look as though they are kneeling.
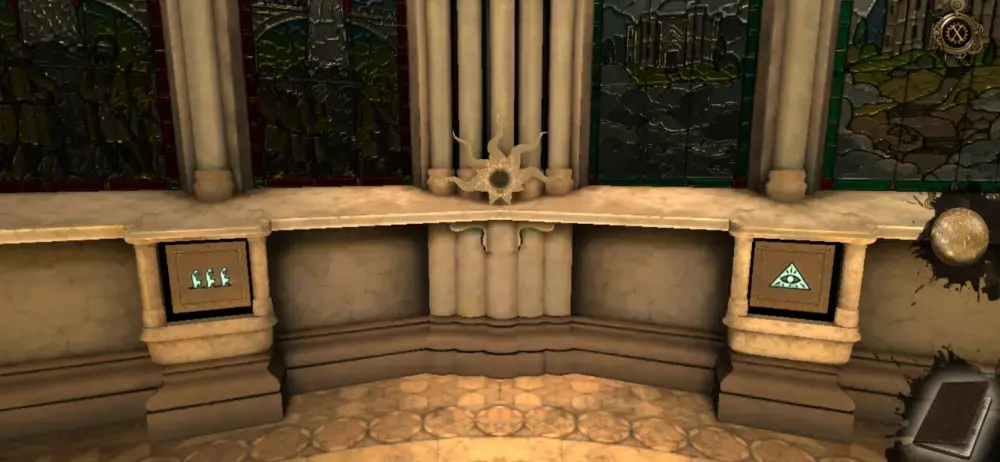
The two scenes you have witnessed will also be recorded in your journal. They seem to correspond with the two symbols mentioned above, which can be interpreted as having a vision (triangle with eye) and the devoted answering the call (three figures kneeling).

After the story is done and the smoke from the censer dissipates, two stone slabs descending in height appear next to the statue. A column also emerges from the floor.
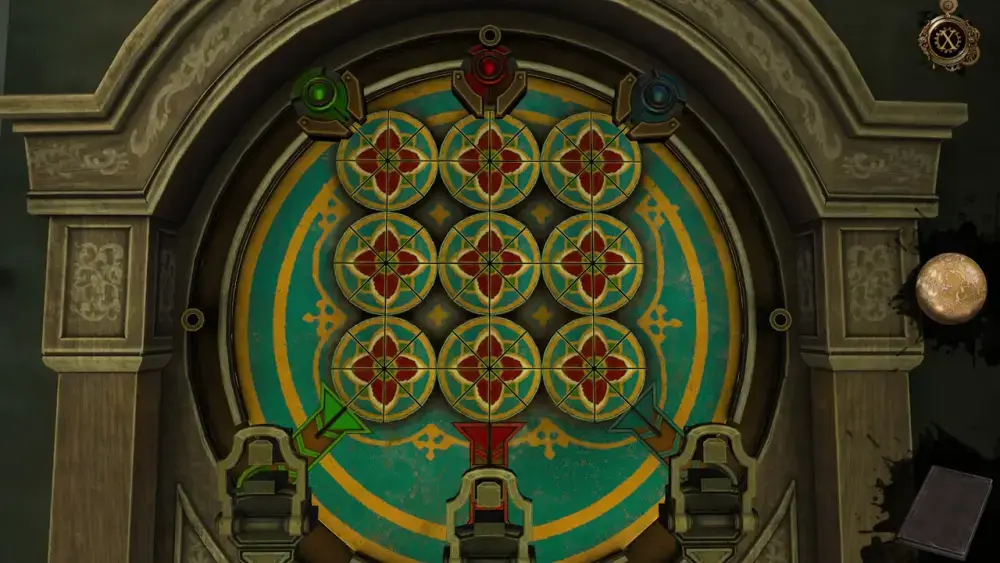
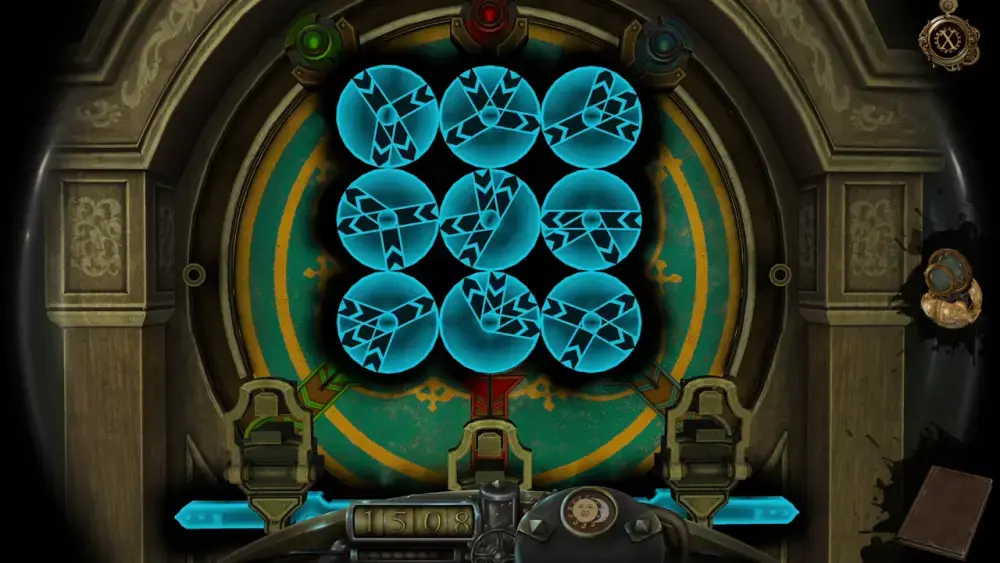
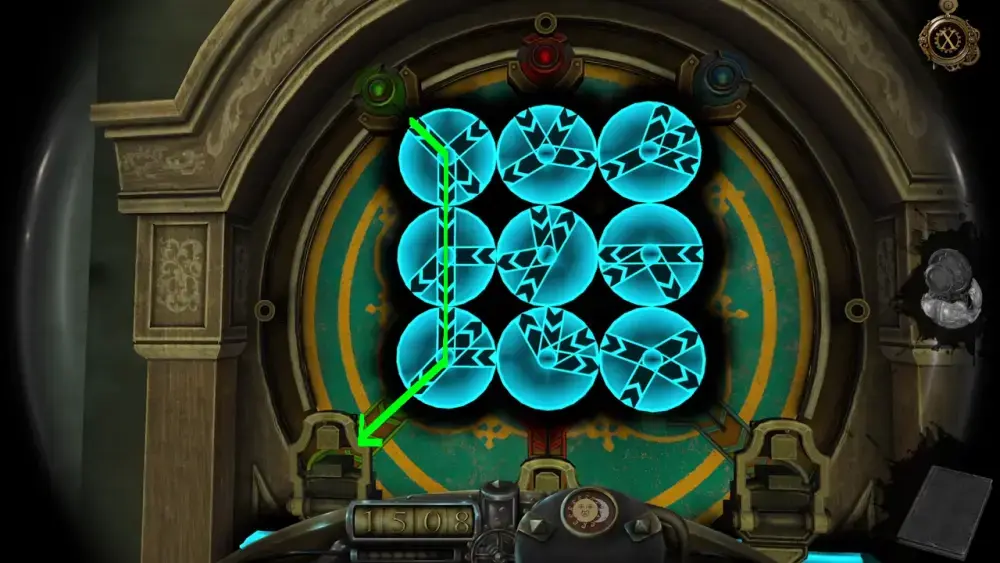
If you approach the column, you will see a board with circular tiles and grooves upon which they can be moved. There are also raised tiles with Roman numerals on them.
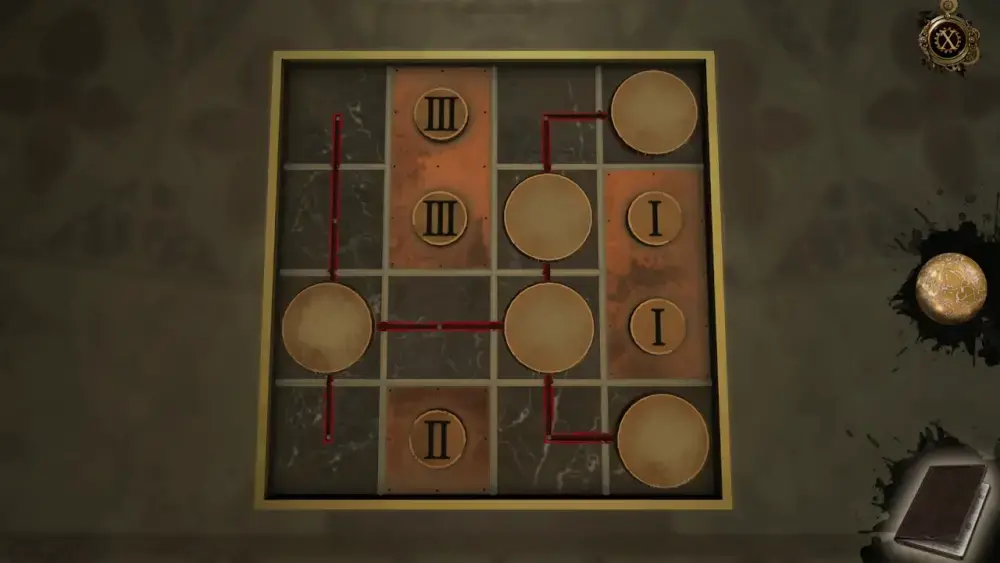
Taking it at face value, the puzzle doesn’t seem to make sense, but if you open the Oculus Perpetua, you’ll see blue numbers on top of the tiles with Roman numerals. Moving any of the circles across the groove lines will cause the numbers to change.
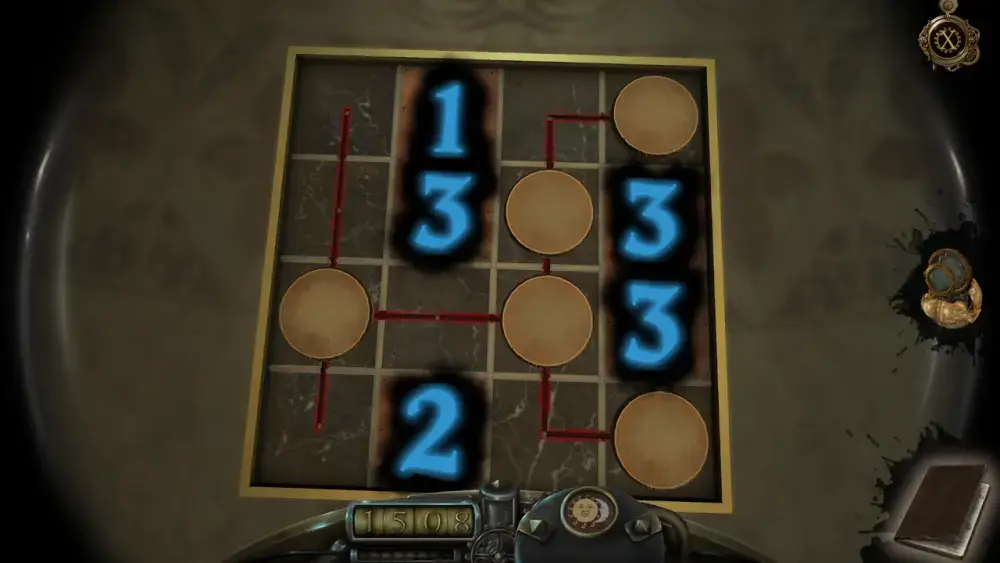
The goal then here is to match the blue numbers with the Roman numerals underneath them. Thus, the circular tiles must be arranged as pictured below:
With this puzzle completed, the statue will turn once again, making another part of the chamber accessible. It looks very similar to the last area as it also has stained glass windows and an ornament where another medallion must be placed. To the right is also a table with objects that are likely to trigger the statue later.
When you approach the table, you will find four things on top of it: a carved cupboard, a clock, a white plate, and a slender holder.
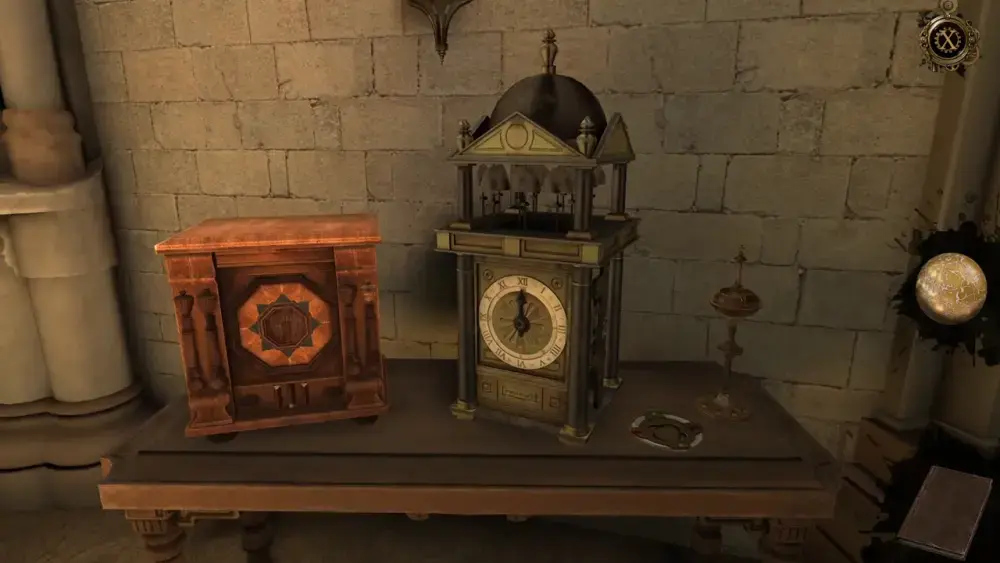
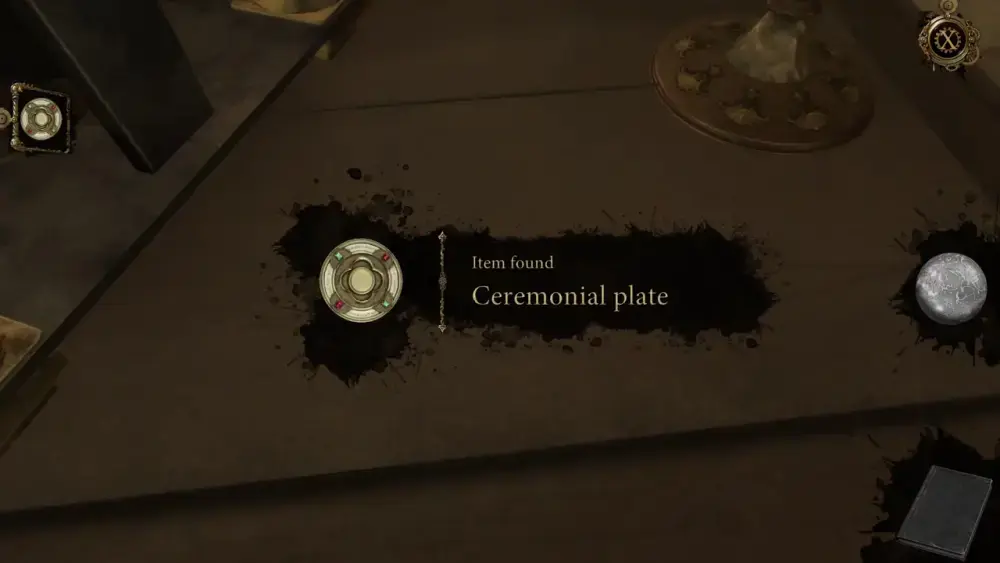
Take the Ceremonial Plate first.
Next, approach the carved cupboard. You’ll see that one of its pieces has scratches, indicating that it may be movable. Zoom into this piece and turn it to its side. Behind it is a tiny switch you can slide down.
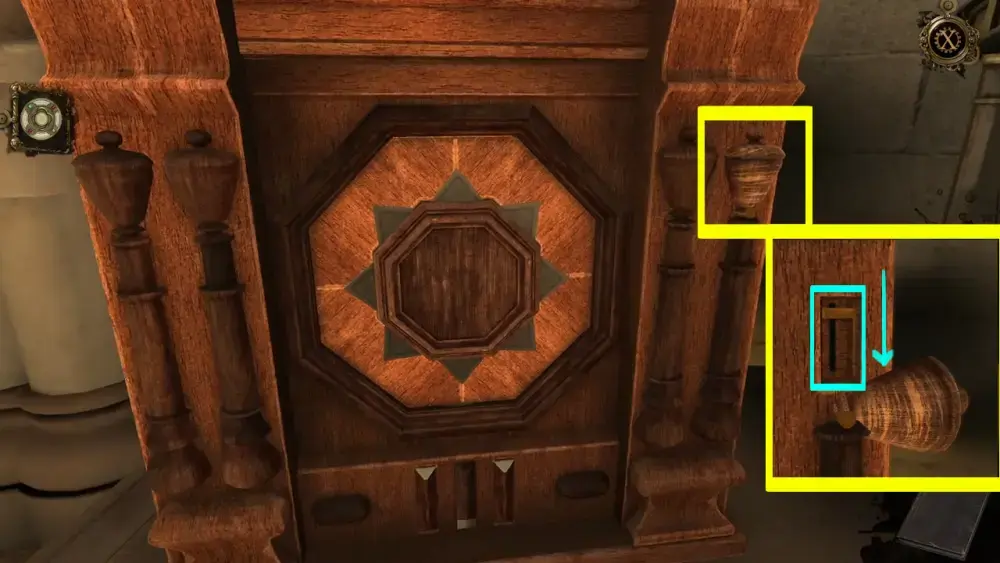
This action will trigger two of the three wooden cylinders at the bottom to protrude. Turn these sideways and pull them down.
The octagon surrounded by triangles at the front of the carved cupboard will then jut out. Turning it will reveal a slot behind it.

In this slot, insert the Ceremonial Plate. A mechanism will hold it in place and take it back inside.
The pieces you’ve moved on the carved cupboard will automatically return to their original positions, as if you didn’t touch it at all, but the lid will finally open. Flip the lid to see what’s inside.
It’s another reliquary, but this time, it’s shaped like an arm. You will notice two red squares on golden rails flanking what looks like a bracelet in the middle. Slide the two red squares down on the rails to move both halves of the bracelet. Do this until the bracelet displays the red stone on top. This will cause the disc on the hand to be lifted for collection.

Upon taking this item, it will register as a Disc with Red Stone.
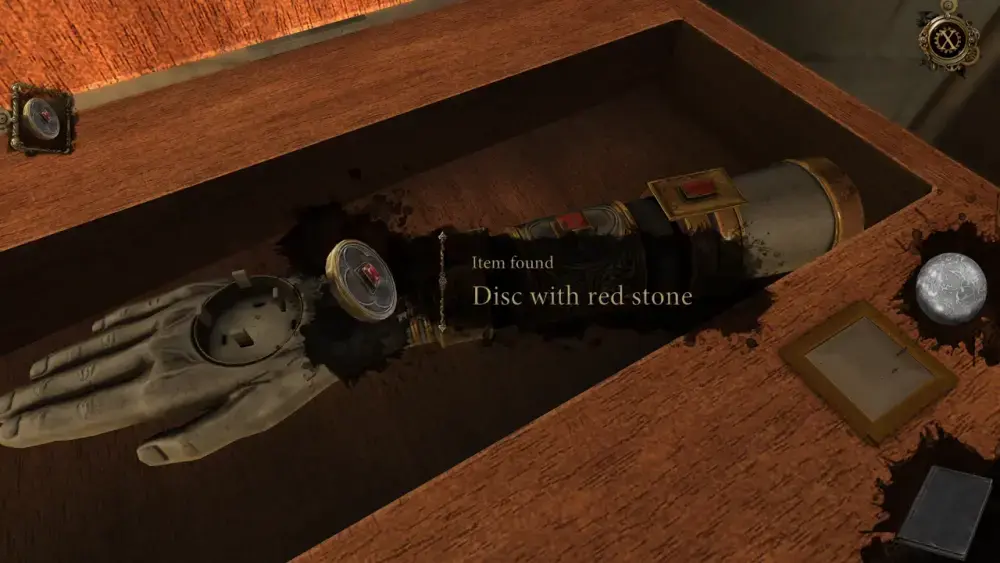
If you look at the disc in your inventory, you will see that it has a protrusion at the back that looks like a gear.

Turn your attention now to the clock on the right. The lone hand on its face can be moved, but this won’t trigger anything until later. In the meantime, check the side of the clock and you’ll see a tiny nub beneath the small gear. This is where your Disc with Red Stone can fit.
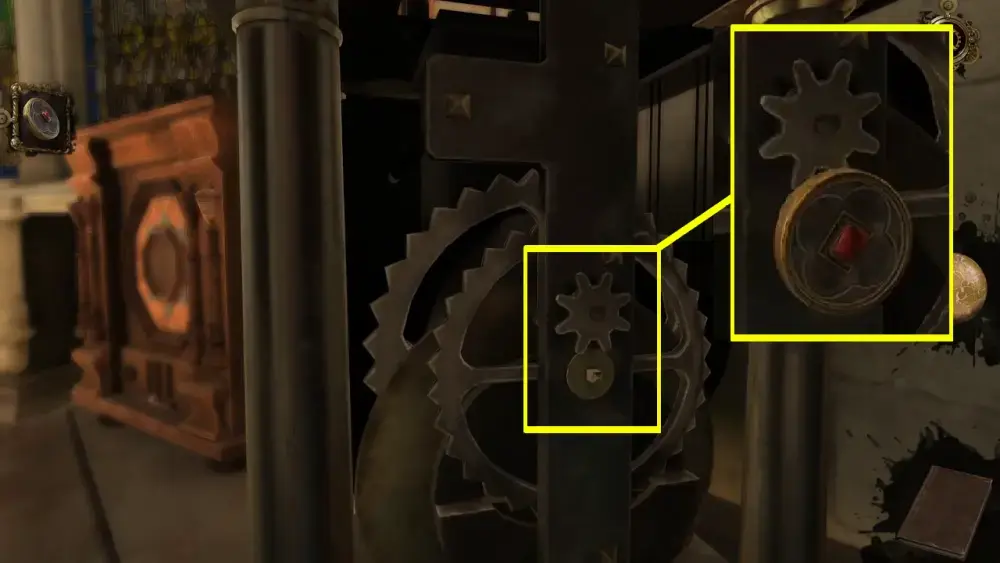
Once in place, move the clock hand clockwise as this will cause the gears on the side to move as well. The bells at the top of the clock will ring, and the container to its right will open. Lift the lid to see what’s inside.
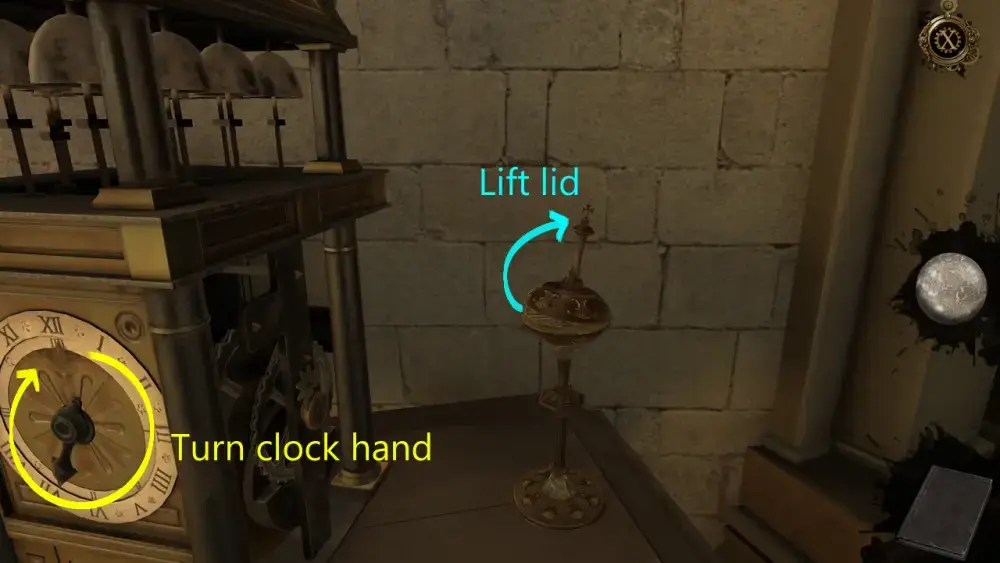
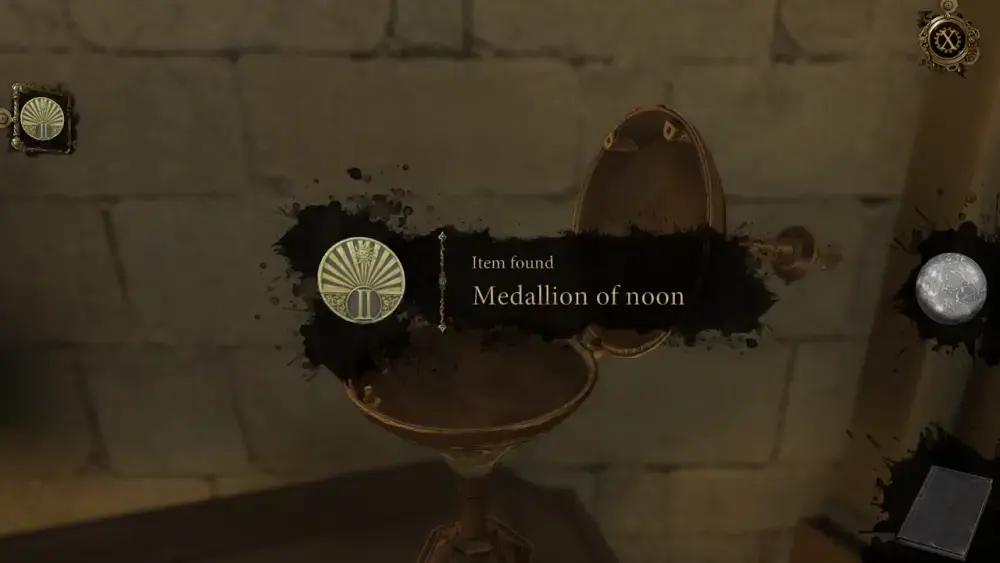
You’ll discover that it’s the Medallion of Noon.
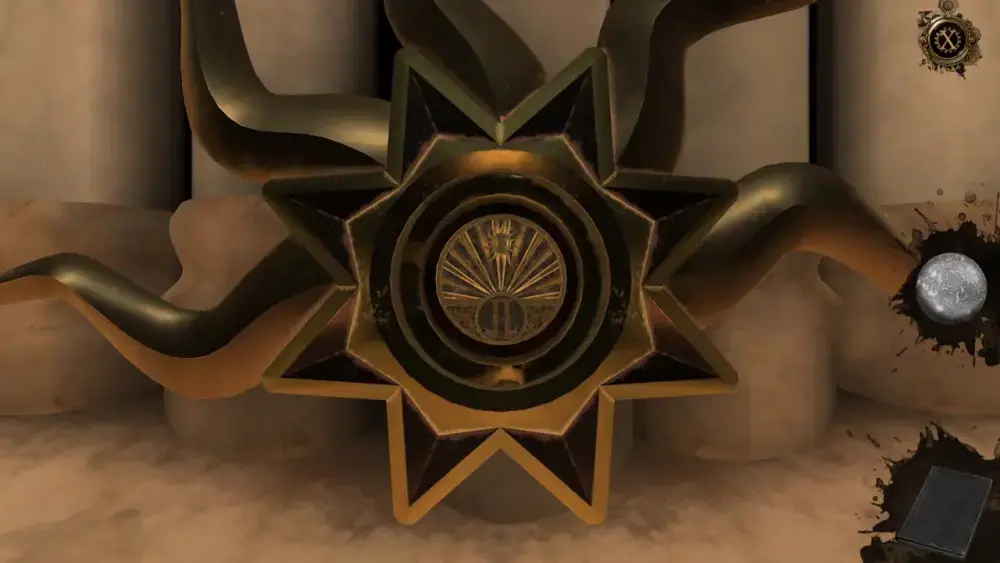
Similar to the Medallion of Dawn, place the Medallion of Noon on the ornament at the bottom of the stained glass windows. If you’ll notice, the Medallion of Noon has the Roman numeral II on it.
The medallion will, as we have seen, cause beams of light to illuminate the scenes on the stained glass windows, which will be reflected on the smoke emitted by the censer. Like before, the Medallion of Noon will trigger two scenes over which a voice will narrate what has taken place. If you check your journal later, these two scenes are marked as the 3rd and 4th scenes.
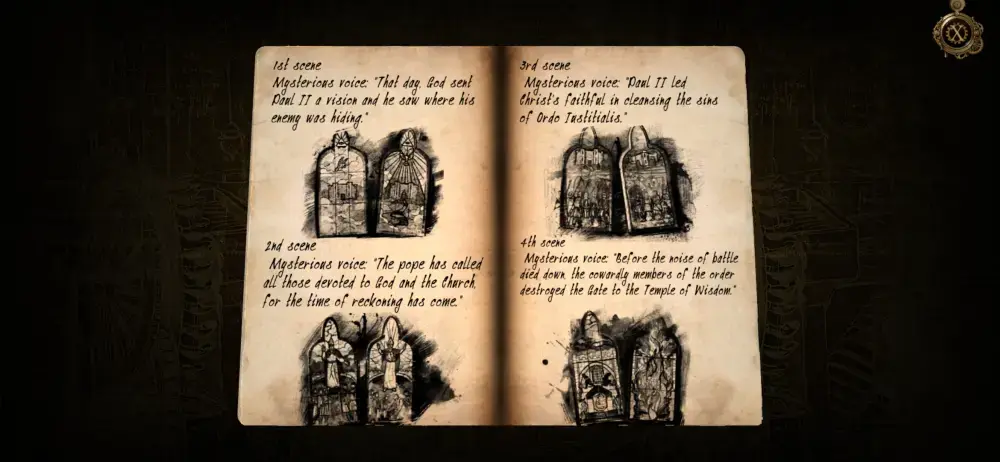
As these scenes play out, the blank squares at the bottom of the stained glass windows will also flip and reveal two more symbols: first is the hand holding a sword (referring to the 3rd scene) and a broken temple (referring to the 4th scene).

After the scenes play out and the voice quiets down, more stone slabs will emerge next to the Pope’s statue, but now they look more like stone steps.
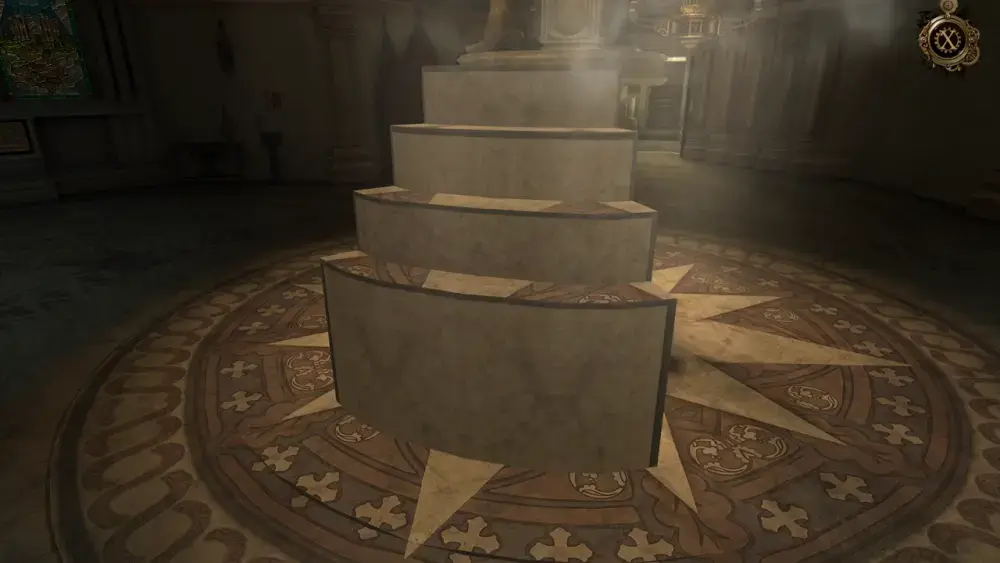
To the side, another column will also spring from the floor.

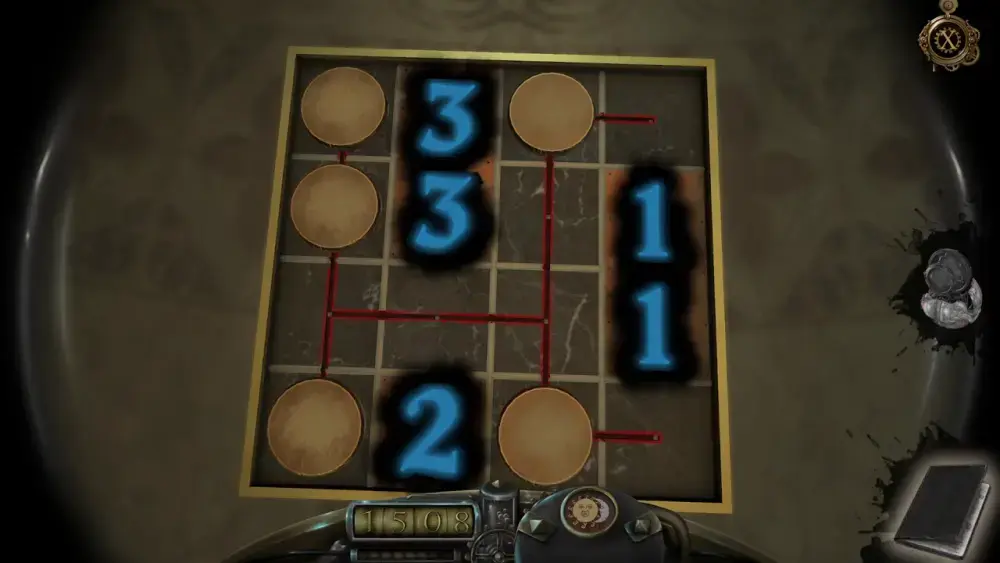
Approach the column and you will see a puzzle similar to the one you encountered in the first column, although this looks more complicated.
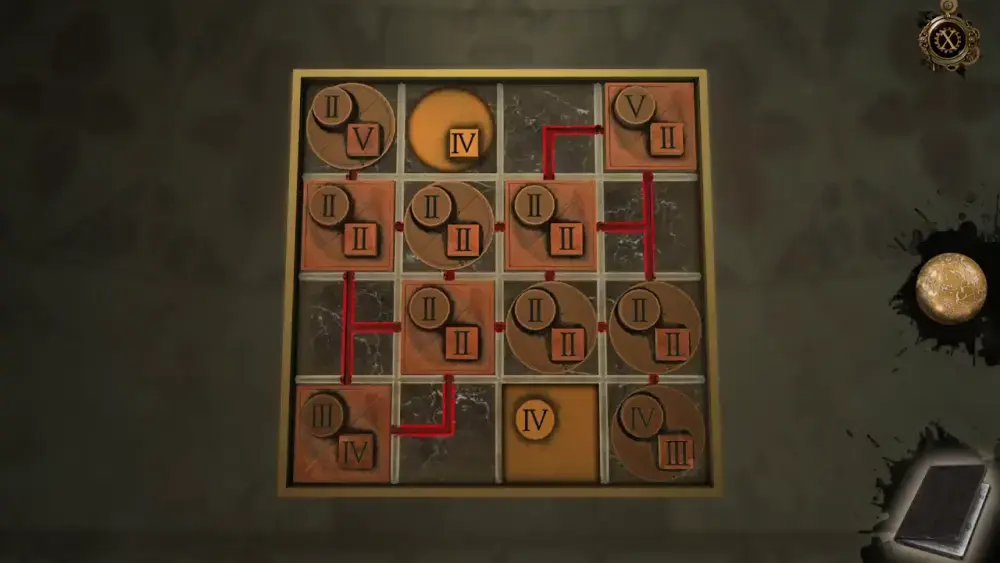
If you open the Oculus Perpetua, you will see an arrangement of blue squares and circles over the board.
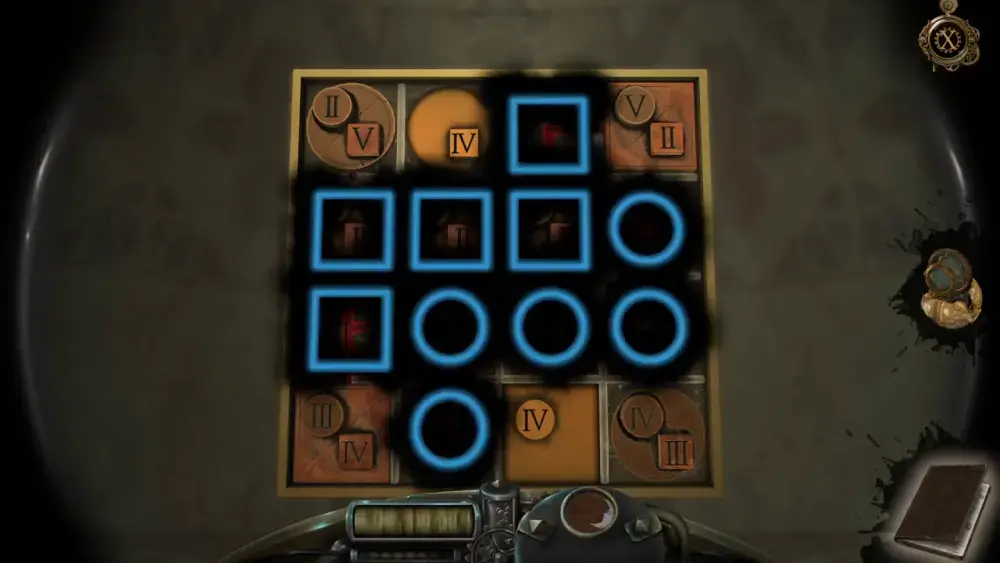
To solve the puzzle, you need to move the tiles with the higher numbers closest to the center of the grid. Take note as well that as the blue symbols indicate, there are movable square tiles and movable circular tiles. That said, below is the correct arrangement of the tiles.
The statue will turn again, shining its light on another accessible part of the chamber that looks exactly like the last two. We can then infer that at the end of the puzzles for this segment, you will gain another medallion.
As expected, there is a table next to the stained glass windows. It has three objects on top of it: a female stone bust, a red sarcophagus, and a gilded container.

If you look to the side of the gilded container, you’ll see the painting of a saint with six different symbols on each side. At the top of the painting, if you zoom in, you will see the same symbols on buttons.
Press the buttons at the top according to the order of the symbols on the painting. For instance, for the first pair, you need to push the middle button on the left and the bottom button on the right.
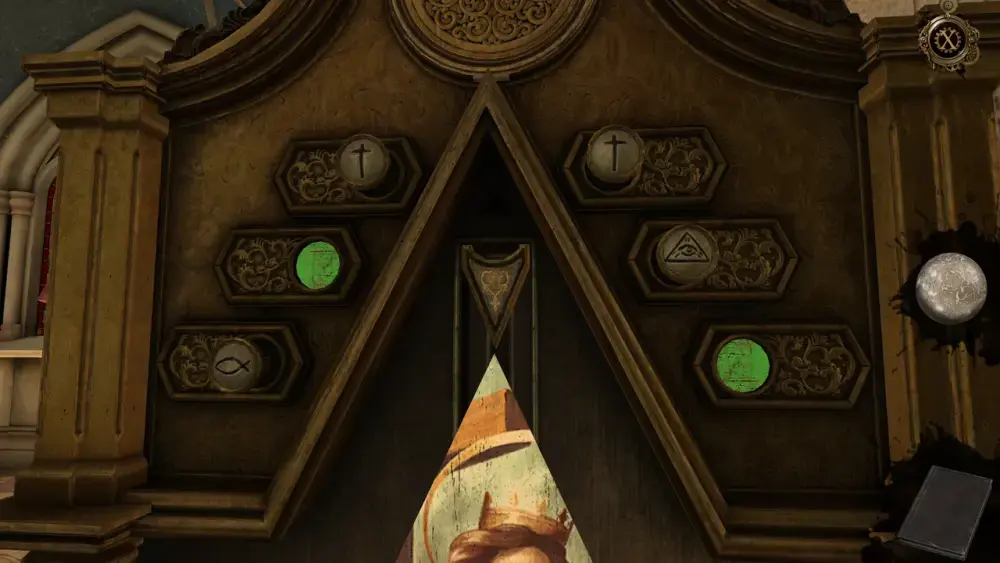
As you can see from the image above, both buttons are marked green, indicating that you have chosen correctly. Pushing the correct buttons also triggers a part of the painting to move down and reveal a piece of something hidden behind it. If you make a mistake, one button will be marked red and all the other buttons will reset. Part of the painting will also go back up.
For the second pair, press the bottom button on the left and the top button on the right.
This leaves us with the last pair, which is the top button on the left and the middle button on the right.
With all the correct buttons pushed, you can move the arrowhead all the way down the rail in the middle.
This will open a circular lid at the top from which you can collect a Red Stone Bust.
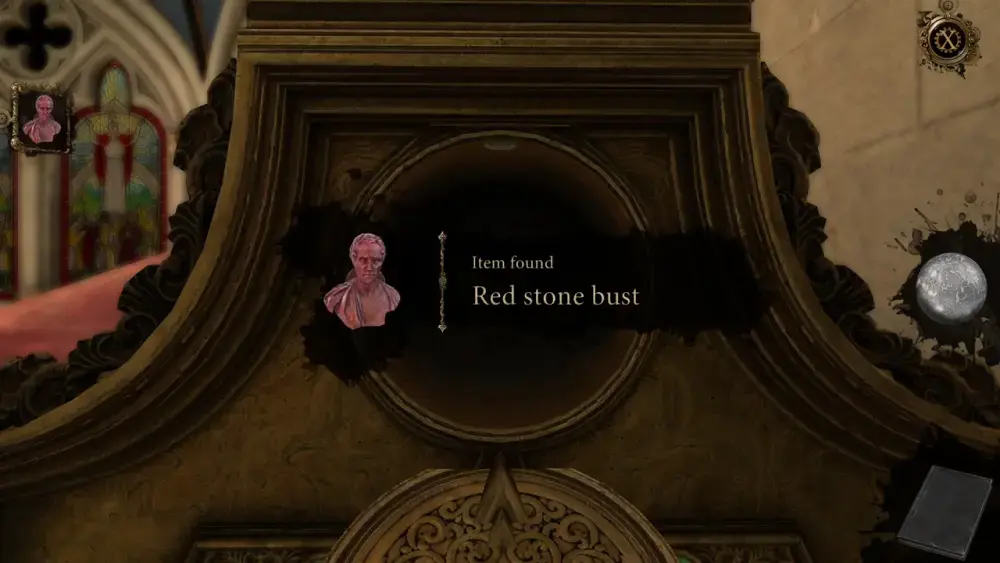
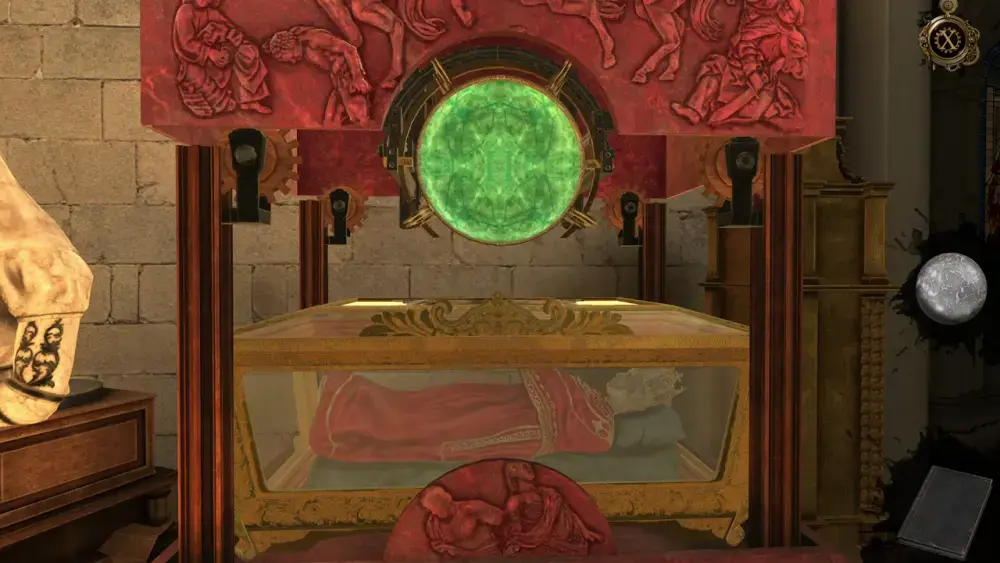
Clearly, because of its color and size, the Red Stone Bust goes into the red sarcophagus at the center of the table. At the upper lefthand corner of the sarcophagus is a black socket where you can mount the Red Stone Bust. Place the item there and turn it upright.
This will cause the sarcophagus to open, revealing a glass coffin with a mummy inside. At the top, you can see a circular device where a round or circular object may fit in later.
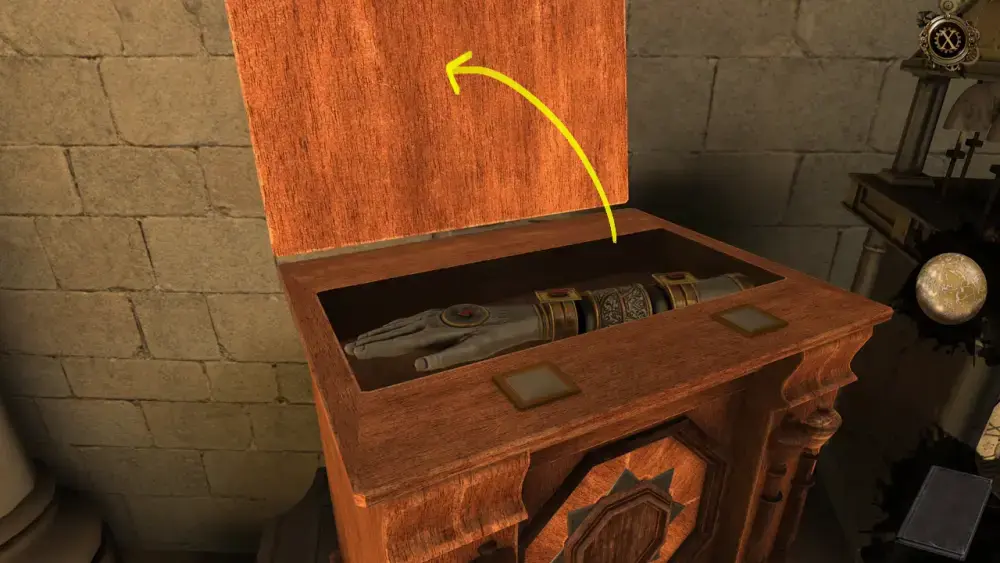
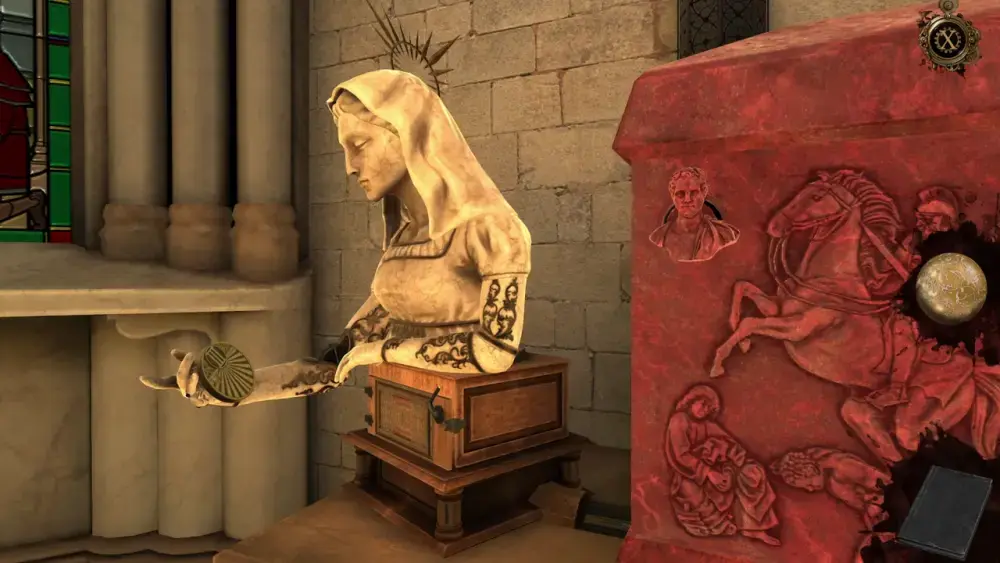
At the moment, there’s nothing you can trigger or access from the sarcophagus yet so turn your attention to the female stone bust on top of a wooden box. If you look closely, you’ll see that the woman is holding onto the last medallion, but you aren’t able to take it yet. For now, focus on the box under the bust and turn the lock to the side.
Open the box all the way and you will find two items inside. One of them is a green Stone Bowl.

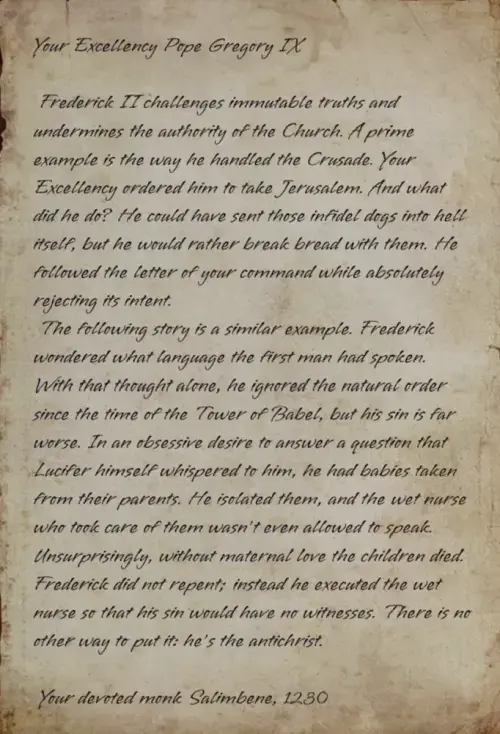
The other one is a letter written by Pope Paul II detailing his thoughts about his predecessor, Gregory IX, and the impending attack in 1465 against the Ordo Iustitialis’ fortress. He noted a hidden supply corridor situated at a blind spot from the guards’ sight, which he intended to use to enter the fort in his planned attack.
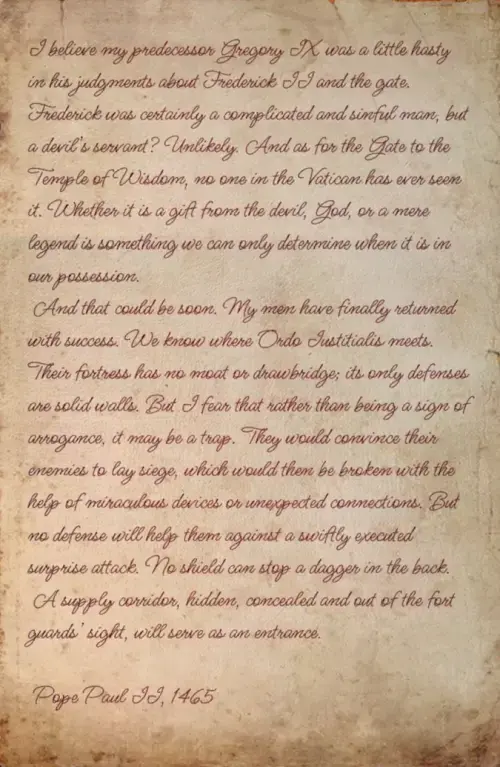
Accompanying the letter is a sketch of this supply corridor.
Since you have yet to trigger anything that will loosen the female bust’s grip over the medallion, go back to the red sarcophagus. Place the green Stone Bowl on the gilded circular part of the sarcophagus.
The bowl will retract and be placed on top of the mummy inside the glass. This will cause the red sarcophagus to close and finally give you access to the medallion as the female bust’s arm moves down and her fingers uncurl.
Now you can take the Medallion of Dusk, which has the Roman numeral III on it.
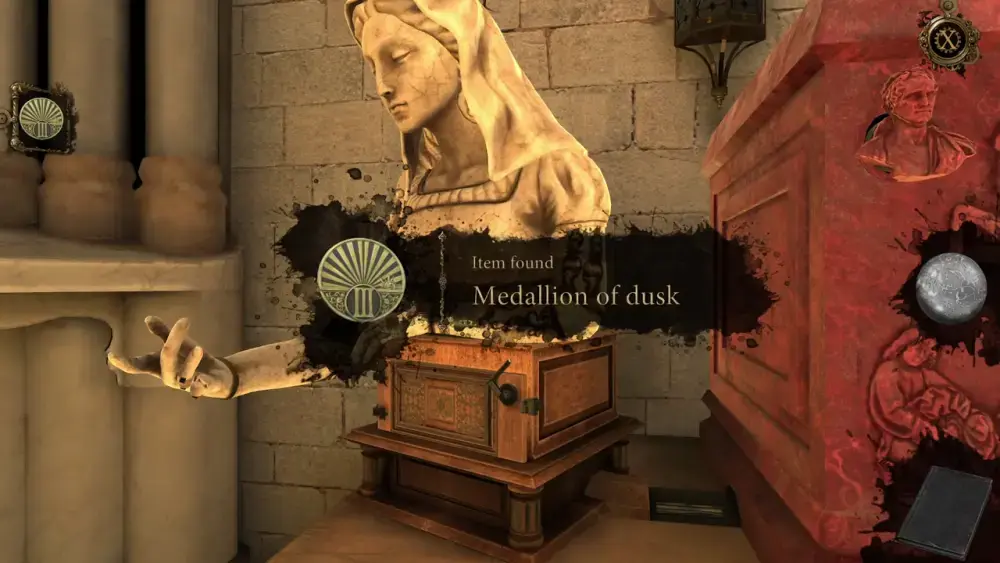
Place it into the ornament below the stained glass windows.

Just like the previous medallions, two scenes will be depicted by the stained glass windows and reflected by the smoke from the censer. These two scenes will be recorded into your journal as the 5th and 6th scenes.
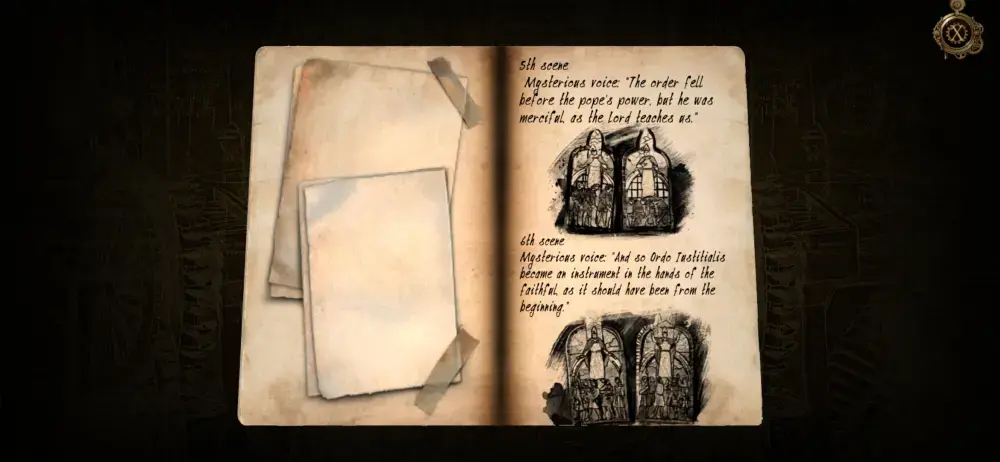
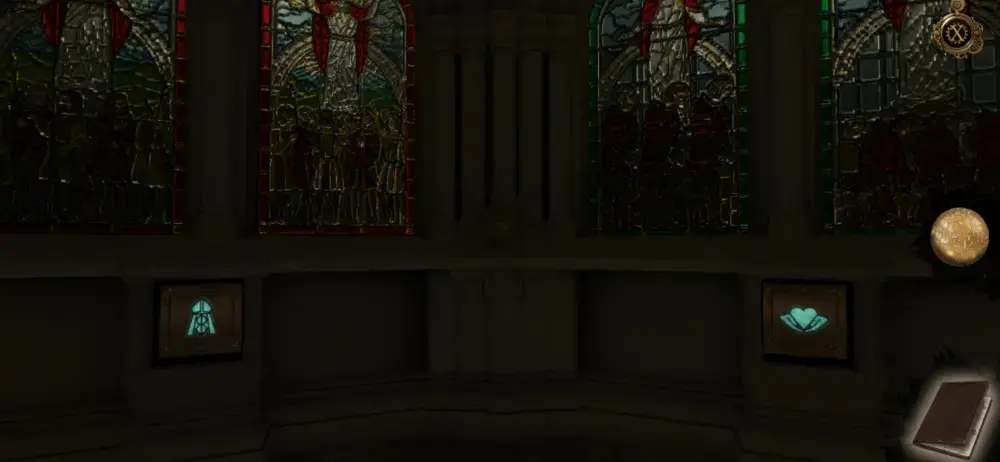
Two symbols will also appear on the squares beneath the ornament holding the medallion. The first symbol is the heart cupped by hands (referring to the 5th scene) and the second symbol is the Pope’s hat on a stand (referring to the 6th scene).
The Pope’s statue will turn once more and a column will emerge from the floor.
Approach the column for another puzzle. On this particular puzzle, you will see that there are tiles bearing the six symbols you’ve encountered upon setting the three medallions in place. Each symbol, of course, corresponds to a scene that tells the history of the Ordo Iustitialis from the Pope’s point of view.
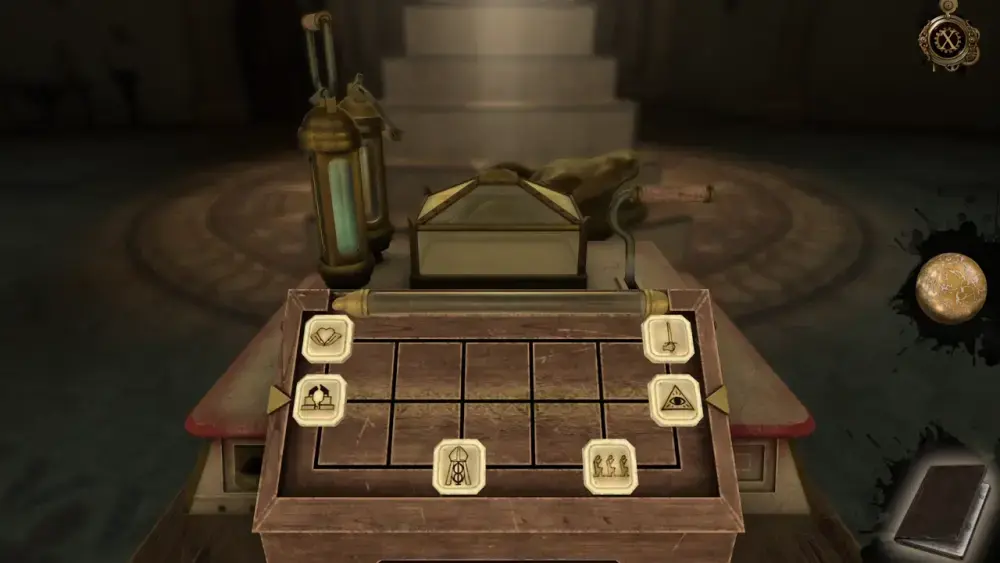
First, pull down the switch on the glass vials on the left. This will release what looks like water (or blue liquid) into the glass box. Then, arrange the tiles in the order according to how the scenes have been presented.
As we’ve mentioned, each symbol represents a scene. You may refer to your journal to see how the scenes have played out in order. Pictured below is the correct arrangement. Upon lining up all the symbols, pull down the lever on the right to set the mechanism in motion.
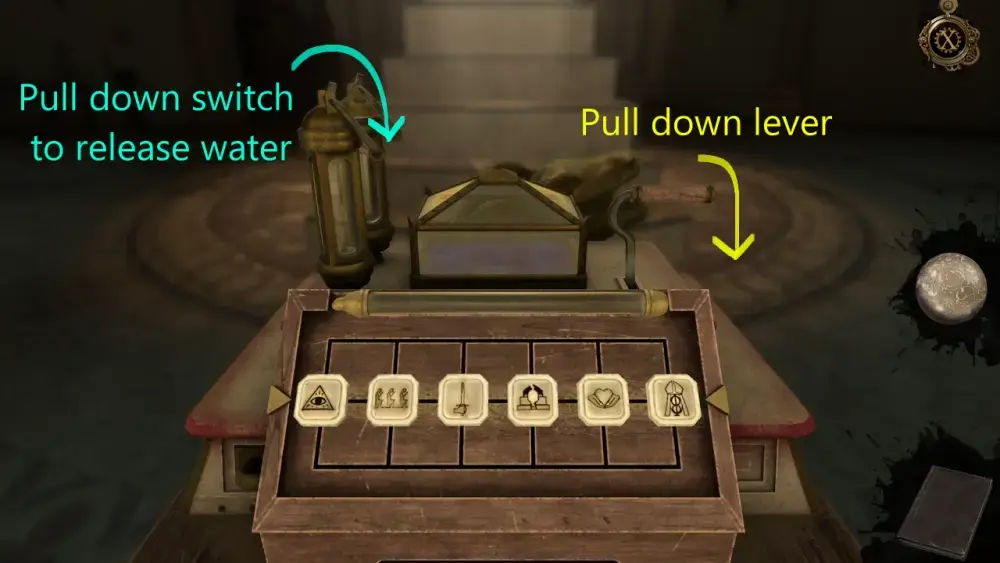
After pulling down the lever, the same voice that has been narrating the presentation of scenes will describe each symbol with a single word as if listing them down: Vision, Congregation, Siege, Destruction, Mercy, Fulfillment.
Simultaneously, the water inside the glass box will ebb in tune with the reverberation of the mysterious voice. Light blue liquid will also begin to fill up the vial in front of the box. Thereafter, the column will retract into the ground. A short cutscene will play out, showing you that the locks keeping the amulet in place have opened.
As if on cue, the sound of a bell echoes throughout the chamber, signaling that the evening Angelus will soon begin. This means that Pope Julius II and Luca Pacioli will return to the audience room any minute now.
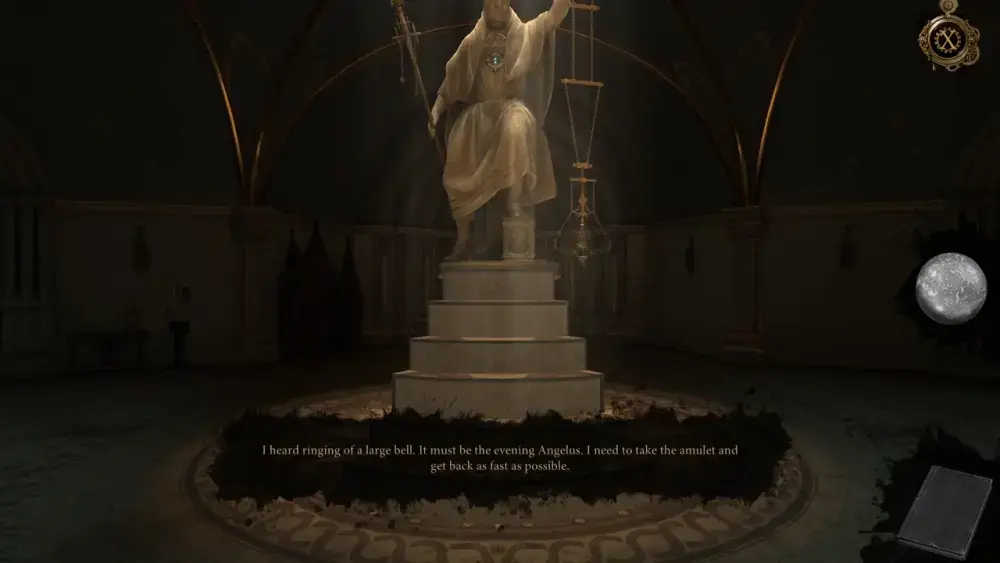
With that, quickly walk up the stone steps in front of the statue and grab the Grandmaster’s Amulet.

With the amulet in your hands, you can now run back to the Pope’s audience room without further incident.
This concludes Chapter 5 of The House of Da Vinci 3. What was the most difficult puzzle you’ve had to solve? Which puzzle did you find the most interesting? What do you think will happen next and where could this adventure lead our small band of heroes? Will they be able to stop Borgia and destroy the time machine for the good of mankind? Share your thoughts in our comment section below. Certainly, more will be revealed in the next chapters of The House of Da Vinci 3.