Wouldn’t it be nice to be a king or queen for a day? After all, who doesn’t want the royal treatment? Not only do you get to be pampered, you also receive extravagant attention. When you’re royalty, all eyes are on you. You command the fear and respect of your subjects, plus you get to wear fancy clothes to boot. You can even have all the food you want and your kingdom is as far as the eye could see.
Sounds like a pretty good deal, doesn’t it?
But the truth is, being a king or a queen, at least what it really meant in the old days, wasn’t all that it’s cut out to be. Running a kingdom back then wasn’t a walk in the park, and it can be a royal pain in the behind to take responsibility for an entire nation and its well-being. You have the economy to worry about, finances to maintain, armies to build, troops to train, subjects to appease, enemies to fight off, and a host of other factors that would make you wonder why anyone would want to be royalty in the first place. After all, nobody wants to end up like Louis XVI.
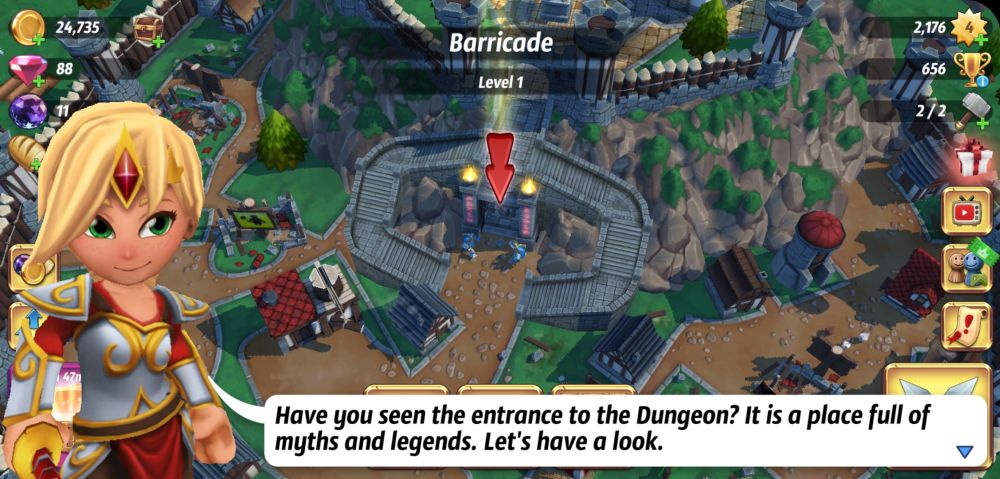
Much about being royalty has been rather romanticized in many stories that most are under the impression that being a king or queen is a fairy tale come true. Of course, running a kingdom is a different matter altogether. Fortunately, you don’t have to go back in time to catch a glimpse of how to manage your own kingdom. If you want to do it in a fun yet challenging way, Royal Revolt 2 is the game to play.

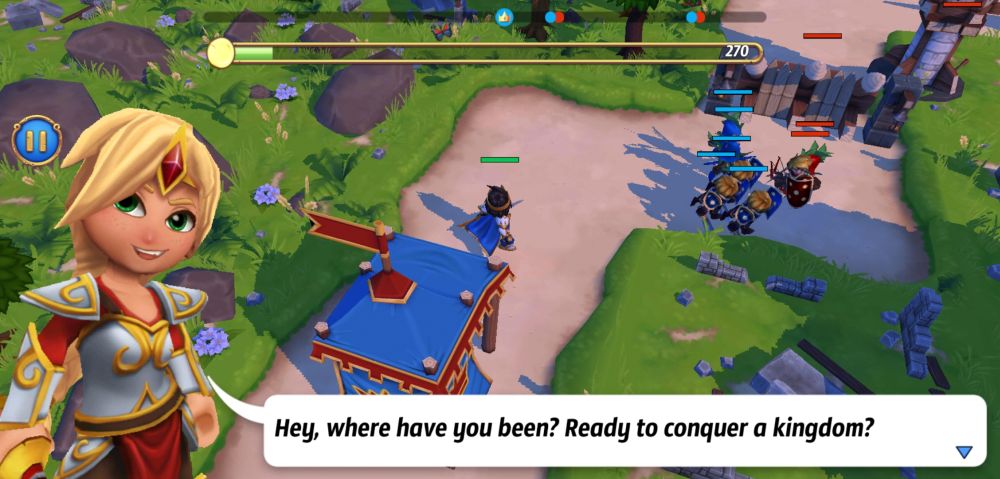
Published by Flaregames, the folks behind titles such as Nonstop Knight 2 and Olympus Rising, in Royal Revolt 2 you play as a king or queen whose goal is to build your castle, conquer your enemies, and defend your kingdom. As a tower defense real-time strategy (RTS), you’ll need to gather resources to strengthen your units, fortify your kingdom, and defeat enemies in time-limited raids. With each successful campaign and defense of your territory, you stand to gain treasure and rewards that can further reinforce your armies and domain.
You yourself will be playing as your own individual unit when you decide to raid other kingdoms or go on campaigns. This means you can level up your character by gaining more experience; acquire armor, weapons, and accessories; and obtain scrolls and spells that will help you lead your troops to victory.
If you happen to be playing Royal Revolt 2, you know there’s more to being royalty than sitting pretty on a throne. But don’t worry, our beginner’s guide for Royal Revolt 2 will act as your most loyal adviser so you can have the mightiest kingdom, the strongest troops, and the wealthiest coffers, as well as become the wisest leader!
A Quick Preface from Your Royal Adviser
Before we get into the guide proper itself, allow us to preface this guide by saying that for the purposes of being more organized, we decided to separate it into three major sections:
- Gaining and spending resources: These focus on upgrades for your buildings, your individual character, and your troops. This section also discusses the different ways you can obtain free rewards, as well as the best way to spend your in-game resources and treasure. Here, we will also talk about the advantages of joining an Alliance.

- Winning campaigns and battles: This section, as its name suggests, is dedicated to sorties or campaigns. In Royal Revolt 2, you get to raid other kingdoms, dungeon chambers, and even other event-related maps in limited-time battles, which can lead to greater rewards and treasure. Here, we talk about some basic battle tactics that can lead your troops to victory.
- Fortifying your kingdom’s defenses: This last section discusses the best way to ward off other kingdoms from looting your treasure by beefing up your defenses. Just as you can raid other kingdoms, other players will also try to beat your defenses so they can get part of your treasure. In this section, we talk about strategies for the most effective defense placements so enemy forces will either be decimated or run out of time before they can loot your castle.
Although these three major sections seem like separate tasks, it’s important to remember that your royal duties are all connected to each other. To neglect one puts you at risk of losing your hard-earned treasure. It also makes your kingdom vulnerable to raids and sieges while delaying necessary upgrades for your troops.
That said, it’s crucial to make an effort in becoming a well-rounded leader who can manage, strategize, and mobilize at a moment’s notice, which is what this beginner’s guide for Royal Revolt 2 is all about.
Let’s get right into it!
Gaining and Spending Resources
Upgrade Buildings Every Chance You Get
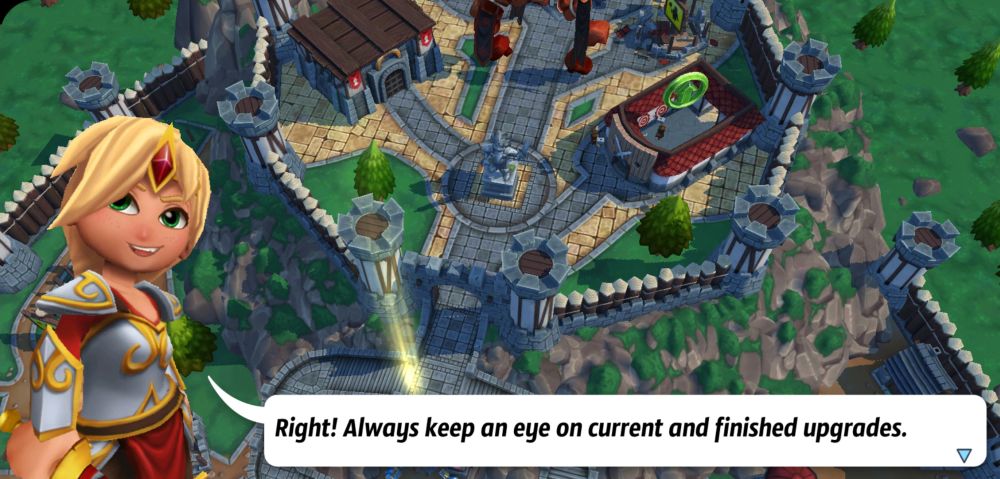
As the leader of your own domain, the game presents you with your very own territory even in the beginning. Your kingdom is composed of various buildings, all of which have a specific function to help you fulfill different tasks and objectives.
Generally speaking, you will have to diligently upgrade your buildings every chance you get as they are all connected to each other. Simply put, this means that some buildings must be upgraded to a certain level before another can be unlocked. Additionally, certain buildings can upskill your character, as well as enhance your troops and defenses.
Because of how buildings are laid out in the game proper, it can be a bit confusing to remember which buildings serve which function or purpose. Here’s a quick summary of the buildings you will encounter based on their function:
Buildings for Upskilling
- Throne Room: This is the center of your kingdom’s power. Unlocking other buildings will require you to continuously upgrade the Throne Room. This is also the building where you can equip your character with better armor and increase your individual stats.
- Wizard’s Tower: Upgrading this building will unlock a variety of spells you can use during sorties.
- Blacksmith: This is where you can improve your armor and further boost your character’s stats.
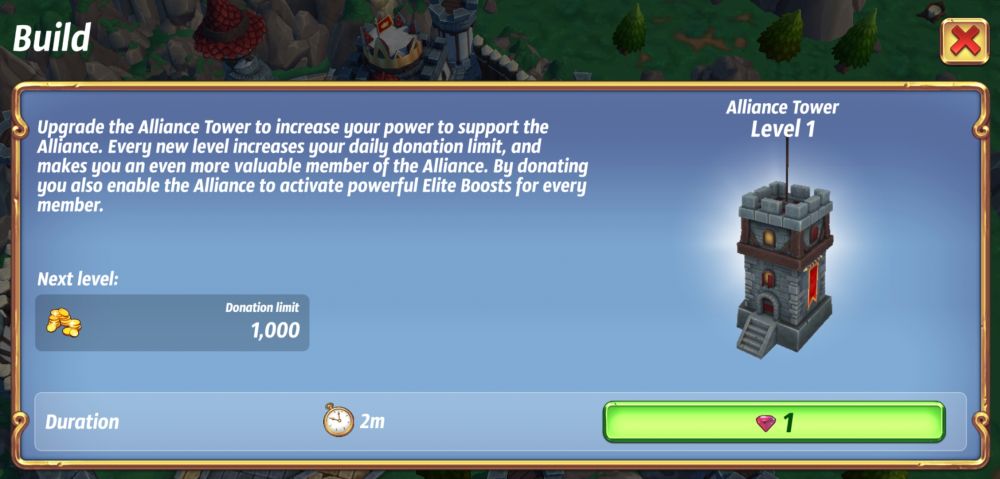
- Alliance Tower: This building allows you to join an Alliance. Upgrading your Alliance Tower will let you donate a bigger amount to your group. Joining an Alliance forges a give-and-take partnership wherein you can unlock certain aspects of the game that will be otherwise unavailable if you don’t join.
Buildings for Battle and Defense
- Troop Academy: This building lets you upgrade your troops and unlock more unit types that you can take to battle or use to defend your castle.
- Castle Guard: This is where you can train recruits, boost their morale, and create defensive waves that can keep other players from looting your treasure.
- Castle Gate: This building is similar to the Throne Room, except its upgrades are more geared toward your kingdom’s defenses. By upgrading the Castle Gate, you can forge longer paths, add more obstacles, and erect more towers that will serve as your line of defense against enemies.
- Inventor’s Workshop: Here, you can upgrade towers and obstacles so they can become more durable and deal more damage.
Buildings for Resources
- Treasure Chamber: As its name suggests, this building is where you keep your kingdom’s treasure, specifically your gold. Upgrading this building will increase your kingdom’s capacity to store gold.
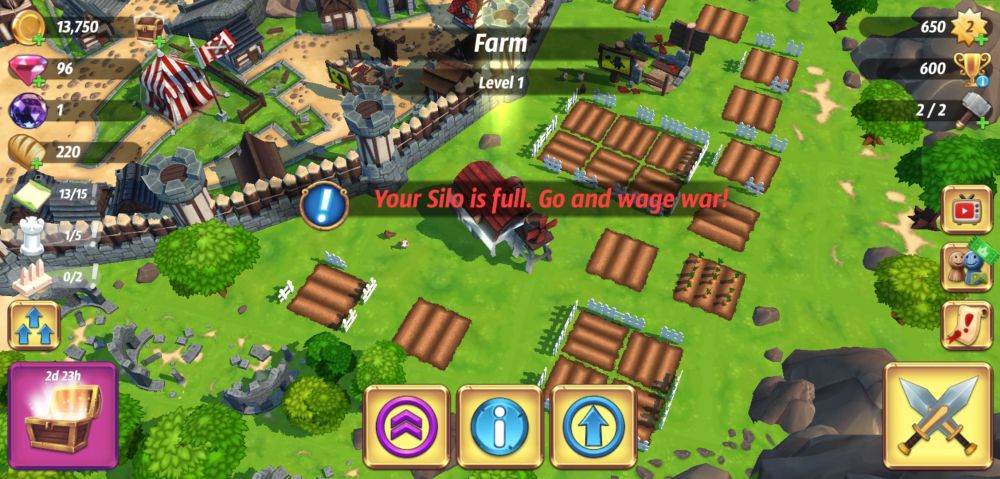
- Farm: This is where you produce food for troops. Without food, your army won’t be able to wage war against enemy kingdoms, or go on campaigns in the dungeon or similar in-game events.
Upgrading this building will increase your food production capacity. - Silo: This is where you store your food. Upgrading this building will increase its storage capacity.
- Tavern: This building allows you to passively gain gold, which you can collect after a certain amount of time has passed.
Since resources tend to heavily depend on battle success, it’s recommended to prioritize upgrading buildings that will aid you in this regard. These include the Throne Room, Wizard’s Tower, Troop Academy, and the Farm. Wage war until you get enough gold to upgrade other buildings.
Enhance Your Own Gear

As mentioned, you play as an individual unit when you head out to battle. This means you can command your character to attack and move while fighting. While there are no directional buttons per se, you can simply click the screen to tell your character where to go. Getting them close to enemy soldier units or towers will automatically prompt them to use their basic attack.
That said, it pays to upgrade your gear and equip the best armor, weapons, and accessories at your disposal. You can get new or better equipment through some of these methods:
- Accessing them as free chest rewards.
- Getting them in the Chamber of Fortune after you’ve won a raid.
- Getting special items when you’ve won at a Cave of the Grave Goods in the dungeon.
- Purchasing equipment from the shop or from the merchant Granny (more on this later).
When you’ve managed to obtain new gear, head to the Throne Room to check and compare the stats of your current equipment to the new ones you’ve obtained. Take note that some equipment may give you bonuses such as elemental attacks or cooldown for specific skills like the Scream Boost (more on this later).
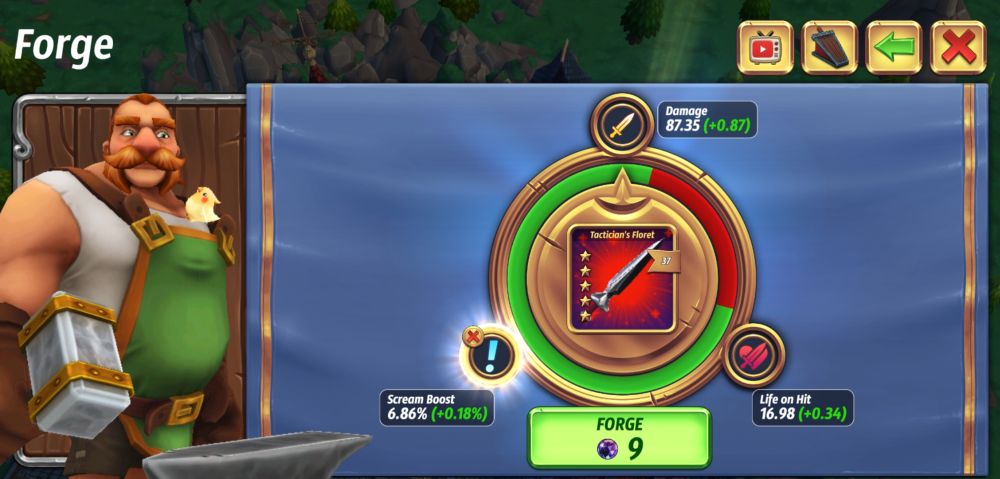
When you’ve unlocked the Blacksmith, you will be able to upgrade your gear in exchange for pearls. You can specify which aspect of your equipment you want to enhance. For instance, you may choose to upgrade an equipment’s cooldown reduction bonus for a skill instead of its damage capacity.
Learn New Spells
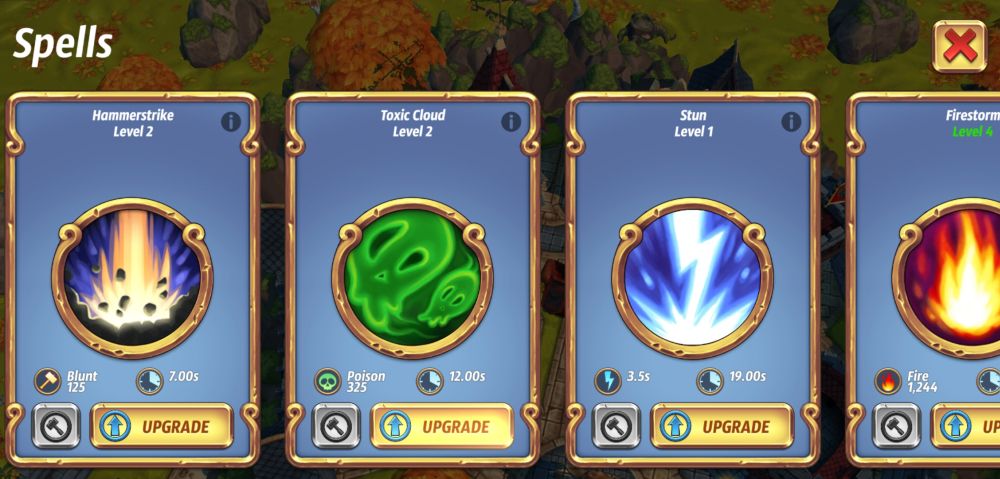
Aside from investing in your equipment, learning new spells will come in handy during battles, especially if you’re faced with waves and waves of enemy soldiers. In upgrading the Wizard’s Tower, you get to unlock new spells that you can use during battle. Each spell has a specific advantage that can be useful against enemy soldiers or defenses. Make it a point to learn new spells and upgrade them.
As you progress into the game, you will be faced with stronger soldier units operating in bigger waves, as well as different types of tower defenses that may even cause elemental damage. You will also encounter beasts that will pose a greater challenge in sorties.
With a variety of spells at your beck and call, it will be much easier to push through waves of soldiers and deal more damage to Beasts (more on this later). For instance, using a Toxic Cloud spell can consistently deal damage while a Stun spell can immobilize enemy troops and Beasts, enough to buy you time to wait for your own soldier units to catch up to you on the map.
Strengthen and Unlock Troops
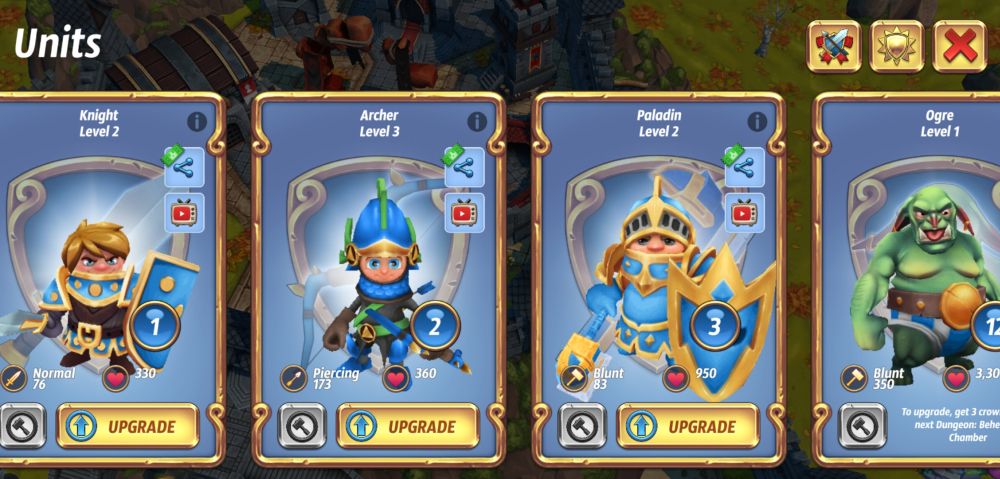
Although you may have the best equipment and the strongest spells, you can’t be a one-man (or one-woman) army. Your battle success can be heavily affected by the level and type of your troops. This applies to both campaigns and defense. In upgrading the Troop Academy, not only can you increase the level of your troops but also unlock new troop classifications.
In the beginning of the game, you have access to Level 1 Knights, which are your most basic soldier unit. Knights deal normal melee damage. Upgrading the Troop Academy Building will allow you to access other soldier units such as the Archer, Paladin, Froster, Arblaster, Viking, Monk, Necromancer, Cultist, and even non-human units such as the Ogre, Werewolf, Mortar, Mummy, Cannon, Gargoyle, and the like.
Non-human units may be unlocked by winning in specific dungeon chambers (more on this later). With more units unlocked, you have a better chance of choosing the best soldiers you can take to each campaign, as well as strategizing which ones have the best advantage in protecting your castle. As a beginner, you can go far by unlocking at least the Archer and the Paladin units, but this will still depend on your battle tactics, which we will delve more into later.
The bottom line is that the stronger your soldiers are and the more types you can choose from, the better your chances of winning wars and defending your territory.
Safeguard Your Treasure
Similar to other games, Royal Revolt 2 has different in-game currencies that you can save and spend. Generally speaking, you will encounter the following:
- Gold: Consider this your most basic and common currency as this is the one you can earn in bulk, as well as spend in bulk. Gold can be earned when you go on battles or as rewards.
- Diamonds: This is the game’s premium currency. Diamonds (which actually look like pink gems) are typically used to purchase extra slots and speed up upgrades. These can be earned by purchasing them with real money, as rewards, or by going to the dungeon.
- Pearls: Pearls (which look more like circular purple gems) are mostly used for smelting to upgrade weapons. This can come in handy a little later, when you’ve already unlocked the Blacksmith. Pearls can be earned as after-battle spoils or as random rewards.
- Food: Consider food as currency as well since this is what you spend in exchange for going into battle. The more you progress into the game, the more food you need to head out into campaigns. Food can be obtained through the Farms and are kept in your Silo.
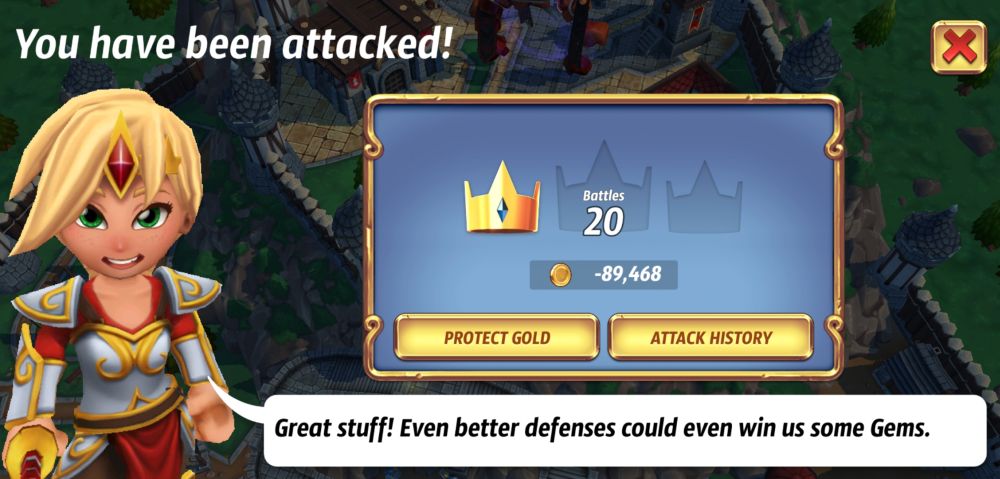
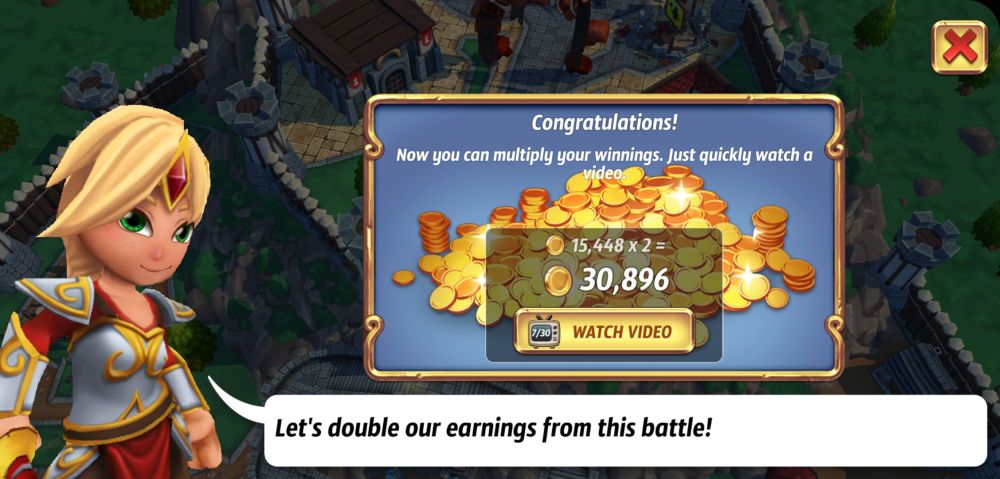
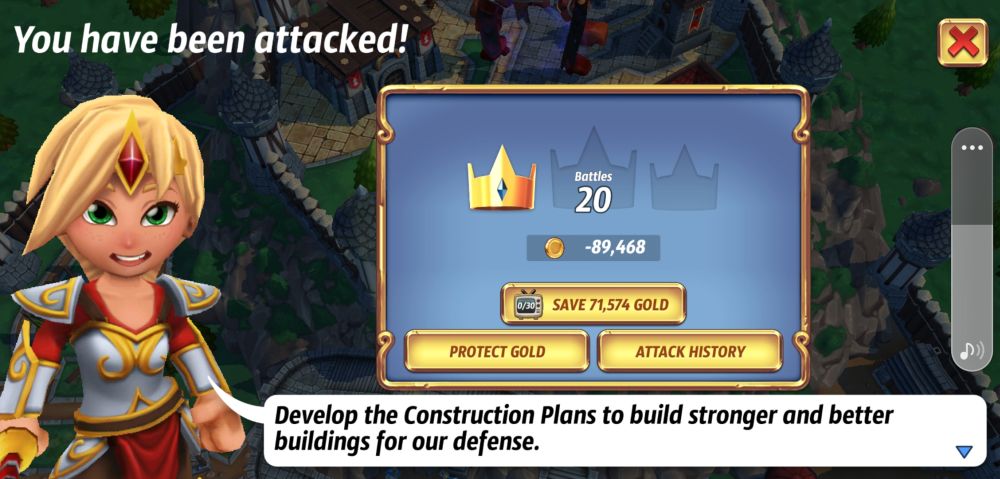
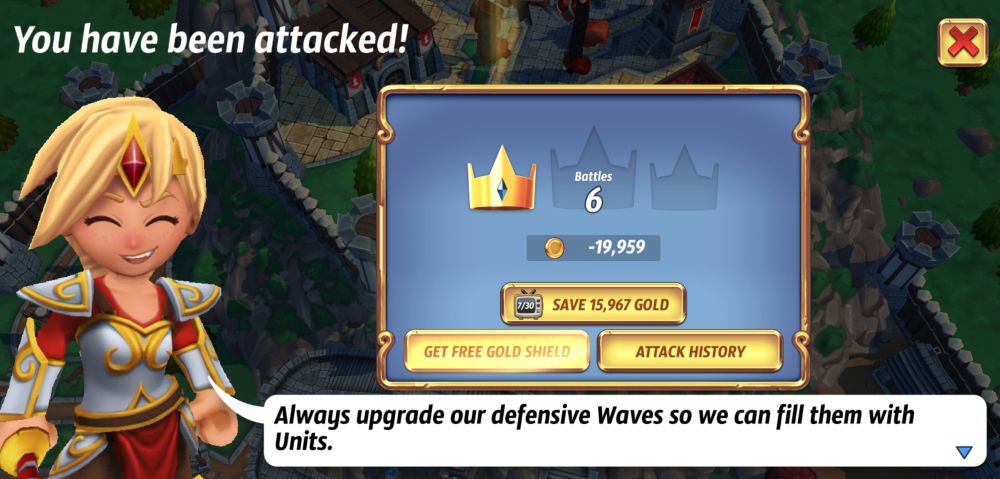
Among these in-game currencies, you will have to safeguard your gold. You can lose gold to other players when your castle’s defenses have been breached. Fortunately, the game will offer you an option to keep part of the gold you’ve lost when you watch an ad after viewing your attack history.
Similarly, you may also be offered a free chest that will let you protect your gold for at least three hours. Take advantage of these options to minimize the loss of gold, especially if you have yet to focus on fortifying your castle’s defenses.
Be Wise with Spending
Now that you know the type of in-game currencies you will encounter, it goes without saying that you should be wise with your spending. Let’s put aside pearls and food for just a minute since it’s clear that they have more specific uses. Between gold and diamonds, gold can be easily recouped, but diamonds are a lot harder to earn since they appear to be the game’s premium currency. That said, what should and shouldn’t you spend on when it comes to diamonds? Here are our recommendations:
DON’T spend diamonds on:
- Fast-tracking upgrades and digging through the dungeon. Watch ads instead if the game presents this option. Watching ads may complete your progress or cut down a significant amount of waiting time.
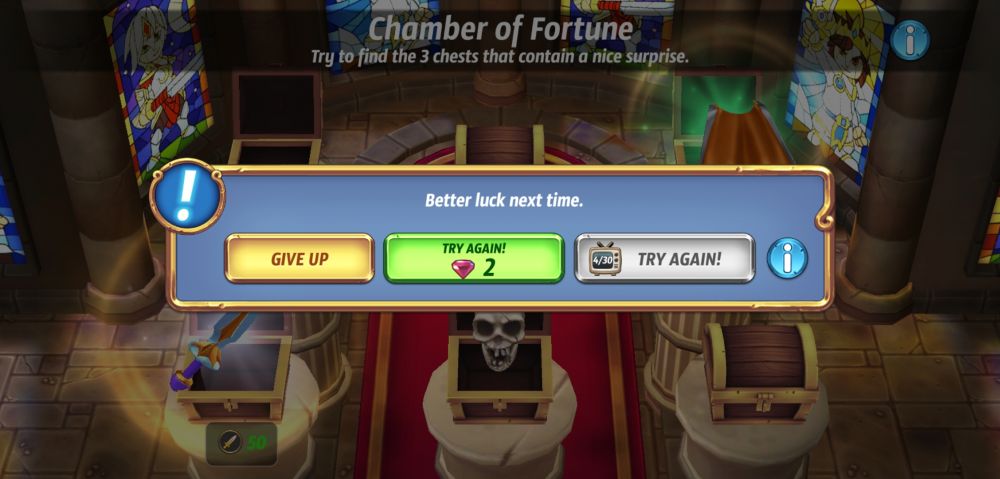
- “Try Again” at the Chamber of Fortune. Watch the ads instead when you fail to open a chest with a reward. If you fail the second time, consider whether you have enough diamonds to spare. Though the Chamber of Fortune may give you new gear, keep in mind that some gear you obtain from this method may not be as good as your current gear. The Chamber of Fortune may also simply give you gold, which may not be an advantageous tradeoff when you’ve spent diamonds to take a crack at opening another chest.
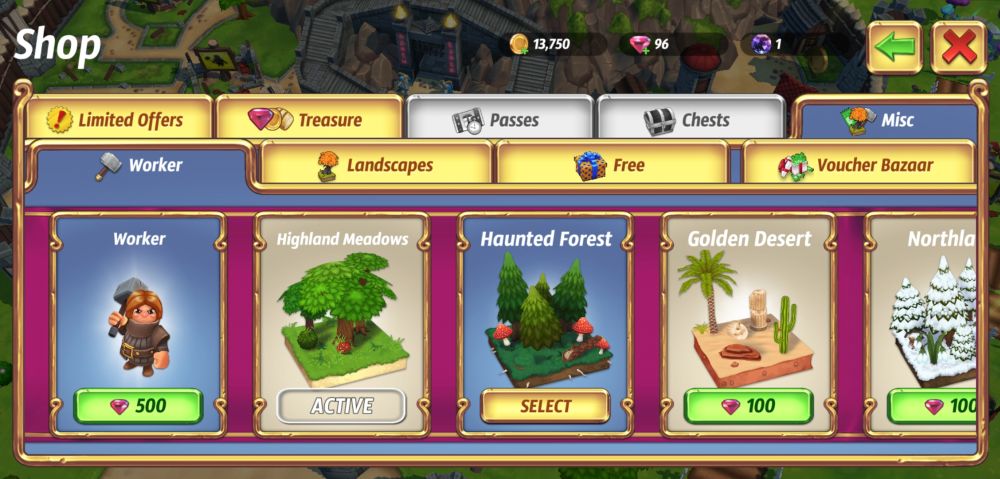
- Landscapes and decor. You can hold off on aesthetics until much later. From time to time, the game will be generous enough to give you free decor.
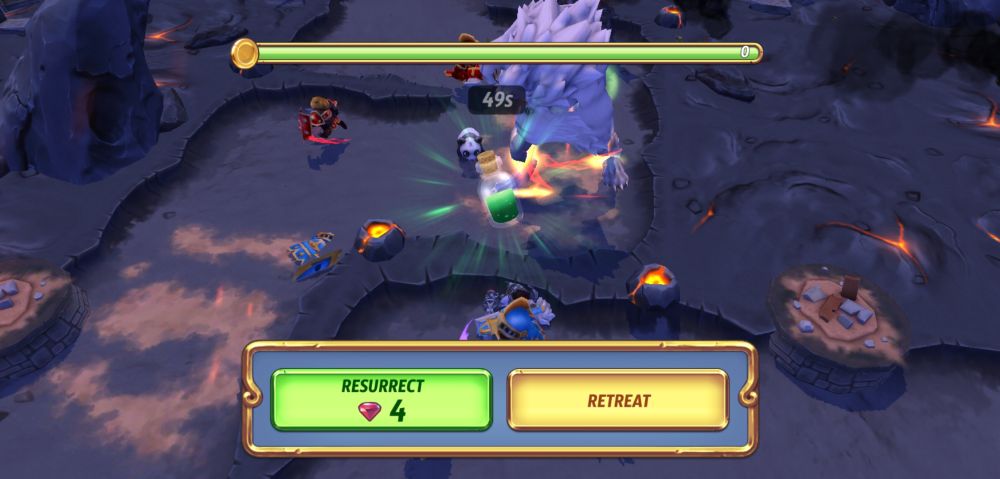
- Resurrecting in battle. Unless you’re sure that you can emerge successfully from the raid, it may be better to retreat and spend food fighting another enemy or repeating the round with a better set of units behind you.
DO spend diamonds on:
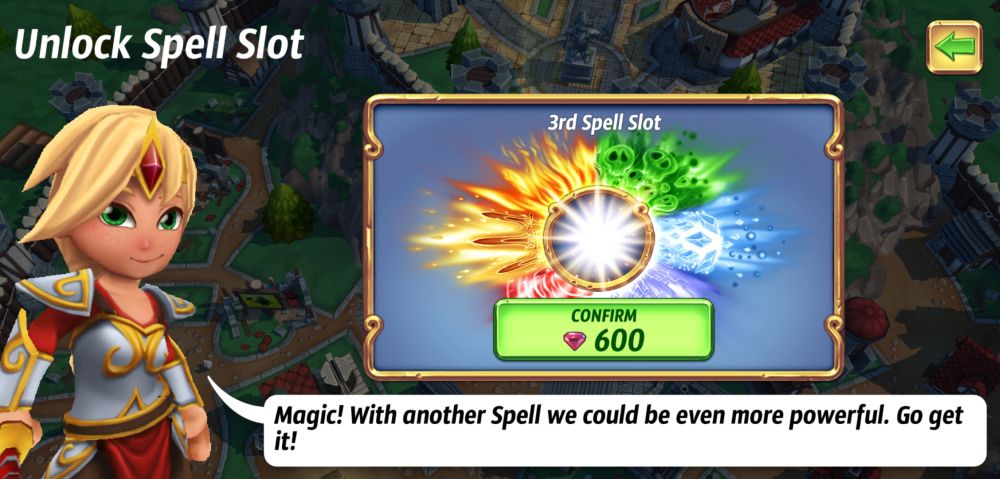
- Extra slots for troops, spells, and equipment upgrades. The price can be extremely high but more spells and troop types you can use in battle will definitely increase your chances of winning raids, thus earning more rewards in the process. More slots for equipment upgrades at the Blacksmith will also mean stronger stats for multiple weapons, armor, and accessories.
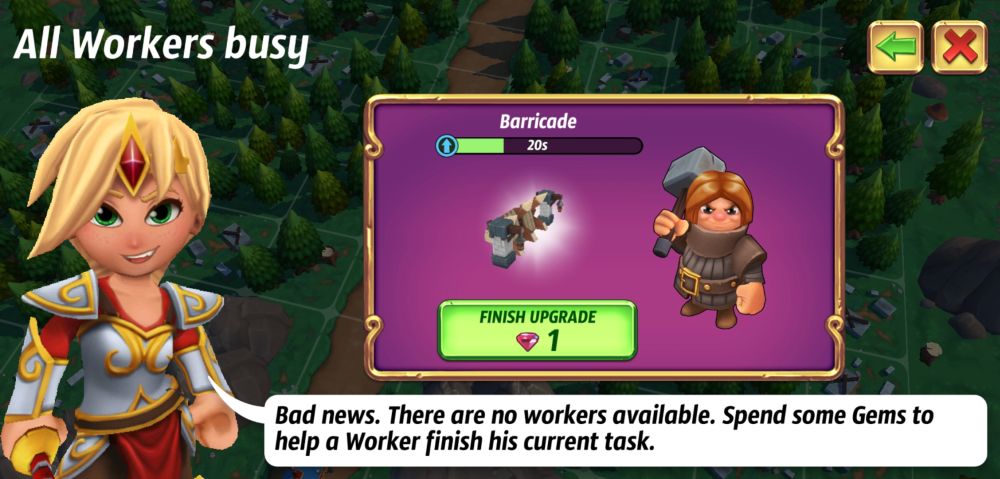
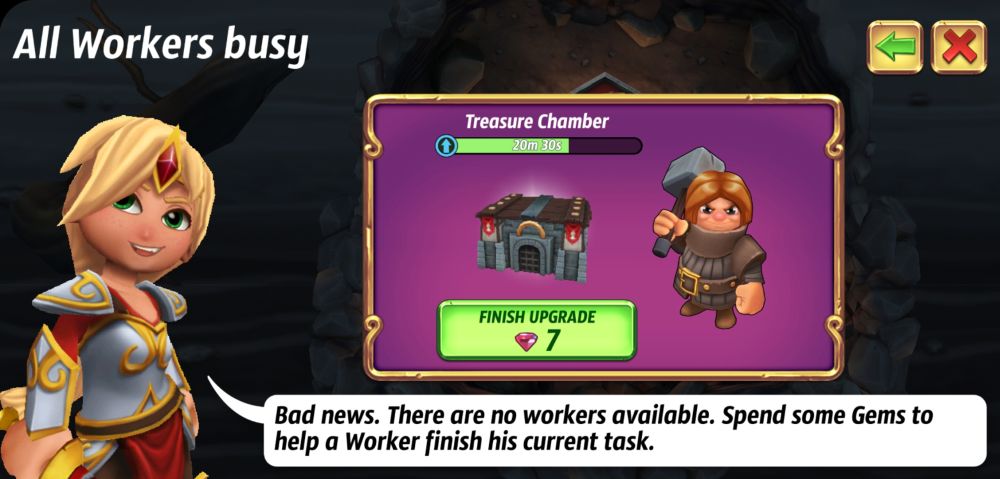
- An extra worker. Workers aren’t just used to upgrade buildings but also to progress from one dungeon chamber to another. Removing patches of ruins from your castle’s defensive path also necessitates the help of a worker. By default, you are given two workers, but you can purchase an extra worker for 500 diamonds. This is a steep price, but an extra hand will definitely, well, come in handy. Instead of constantly spending diamonds to speed up upgrades, consider saving up for an extra worker.
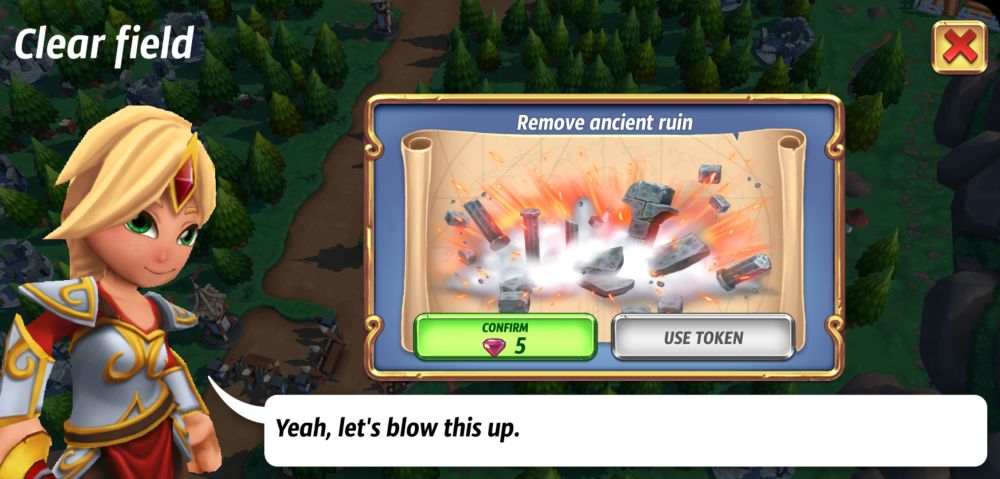
- Clearing ruins. There will be ruins scattered in front of your castle’s gates. Clearing these away will give you more space to lengthen your defensive path and place towers or obstacles.

- Donations to Granny. Granny offers rarer items compared to what you may potentially get from battle rewards. You also increase your chances of accessing rarer items with exponentially better stats when you give her diamonds. However, take note that Granny sells these new gear at really high prices so consider your options before clicking the buy button. Overall, though, it will be a worthy investment.
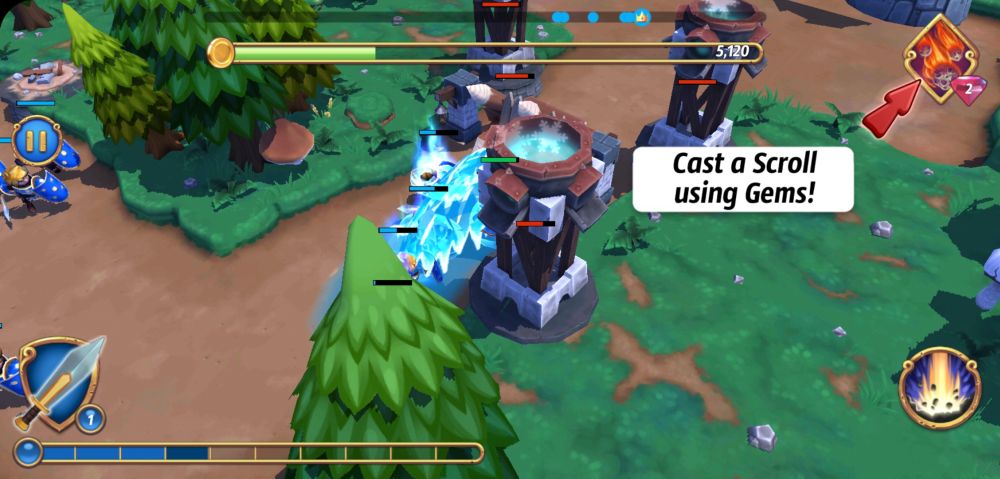
- Scrolls. Keep in mind that scrolls and spells are different. Spells don’t cost anything when used in battle, but they do have a short waiting time before they can be activated again. Scrolls, on the other hand, cost diamonds to activate. So as not to waste this treasure, we recommend using your scrolls only when you’ve already reached the enemy’s castle gates and are running out of time.
Take Advantage of Freebies
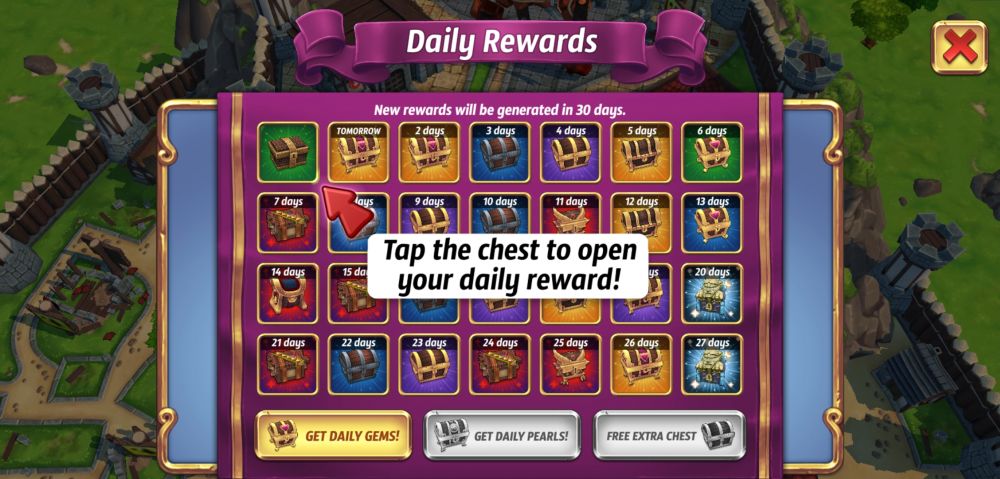
Although continuously going on campaigns may be the most effective way to earn rewards and treasure, the game is also generous enough to occasionally offer freebies along the way. Aside from getting rewards, items, and treasure after battle, you may also take advantage of freebies by:
- Logging in to claim your daily rewards.
- Completing Quests, which are daily or long-term tasks.
- Watching ads to get some free extra chests, free gold protection for a few hours, double gold rewards, free food for one battle, production boost for food, and the like.
- Checking the shop for free chests or even decor.
The game itself will tell you if you’ve managed to get a hold of some freebies for the day so check in as much as possible.
Join an Alliance
If you’re a follower of history, you will know that many kingdoms have forged alliances with other nearby kingdoms to gain mutual benefits. After all, gaining allies can help secure your kingdom’s strength and influence. The same is true when you play Royal Revolt 2: joining an Alliance will let you access a variety of other features, units, and bonuses. Here are just a few things you stand to gain when you ally with a group of other kingdoms:
- Bonus rewards after successful raids.
- More Pals and Beasts (more on these later) that you can bring to battle or use for defense, respectively.
- Instant Troops that you can request from other Alliance members. Unlike the troops you bring to battle, Instant Troops don’t need to be summoned.
- Elite Boosts, War Boosts, Pro Boosts, and Conquest Boosts that can give you stronger units and defenses when activated using Alliance gold and other resources.
Since joining an Alliance is a partnership, donating to your group—whether it’s gold, Pals, or something else—will be mutually beneficial. If you’ve requested for Instant Troops, you may return the favor by letting other Alliance members request for Instant Troops from you. Basically, you get to access more stuff in the game if you team up with an Alliance so take advantage of this partnership.
Winning Campaigns and Battles
Lead the Charge
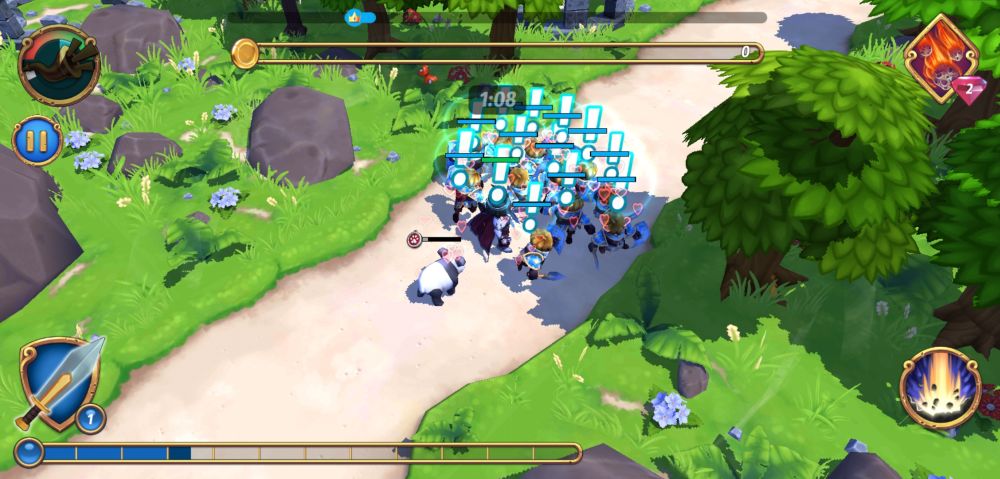
Unlike other games where you only command your troops, your individual character will have to actively participate in battle when playing Royal Revolt 2. As the king or queen, you will have to actively lead the charge by attacking other enemy forces, destroying buildings, getting rid of obstacles, and defeating Beasts. At the very least, you will have to move your own character along the enemy’s defense path, which will be fraught with danger.
That said, it’s highly disadvantageous to be a passive spectator during battle. Since you tend to have better equipment than your troops, not to mention you have scrolls and spells as extra ammunition, you may go ahead of your platoon to deliver the first salvo of attacks against enemy troops and defenses while waiting for your summoned troops to catch up to your position.
However, keep in mind that this strategy’s effectiveness will generally depend on your enemy’s defensive layout. If you’re taking heavy damage, back off for a little bit to let your troops catch up or lead enemy waves to their location.
You may also use your spells to give yourself an advantage. Study which spells work well for which enemy or structure. For instance, the Stun spell is best used to immobilize stronger enemy units, while the Firestorm spell works great against enemy units and towers, but not so much when used against blockades.
On the other hand, you may also rally your troops to your position by pressing the Scream Boost icon, which looks like a bullhorn.
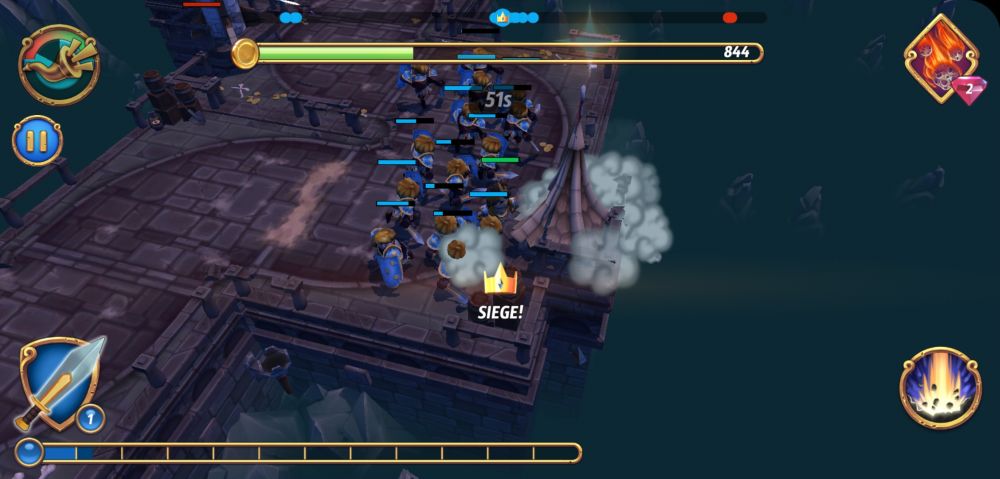
This will cause your troops to move at a faster pace until they reach your location. Remember that every battle is timed so moving quickly to reach the enemy’s castle gate is crucial. However, this doesn’t necessarily mean that you can forgo destroying the enemy’s defensive towers. Total annihilation of the enemy’s defenses will give you 100% of the spoils. Failing to destroy towers will decrease your rewards percentage.
Further to being an active participant in battle, you may also protect your troops not just by using spells but also by playing a more supportive role when necessary. One example is that when you encounter Bomb Towers, you can kick bombs away from your soldiers, preventing them from being damaged.
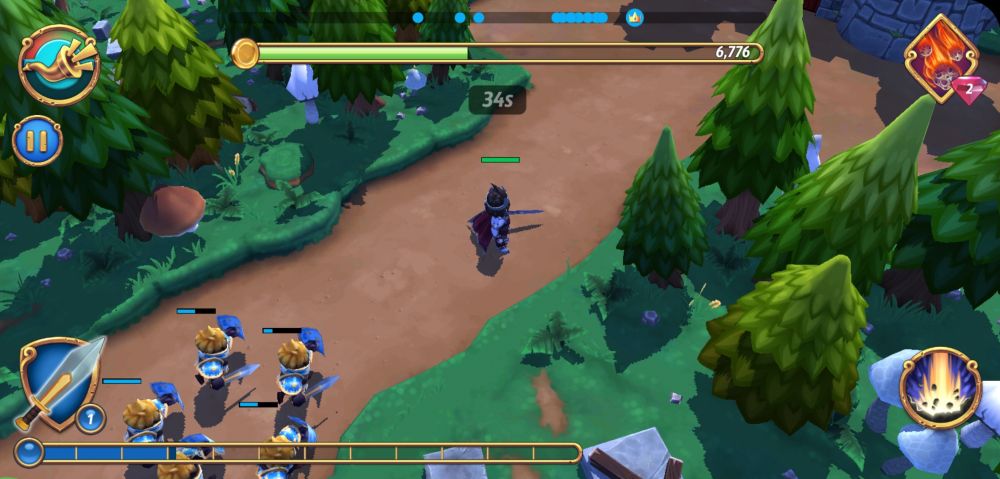
Have a Mix of Ranged and Melee Troops
Before engaging in battle, the game will let you choose two to three troop types to take with you. When you’ve managed to unlock different troop types, it’s always a good strategy to have a mix of both ranged and melee troops. Ranged troops can provide cover fire while melee troops can directly engage enemy soldiers and defenses.
One of the most basic defensive buildings you will encounter are Arrow Towers and Bomb Towers, which can damage your platoon from a distance. With ranged troops, you can deal damage to these structures while your own melee units focus on other enemy units. You will also encounter Archers and other ranged units from the enemy side so having your own ranged units can help level the playing field.
Not only does this apply to pre-battle preparations, but also during the battle itself. Since you only have a limited number of units to summon depending on the progress of the summon bar, you can choose to alternate between summoning melee and ranged units. However, the more advanced a troop type, the more slots it would cost on your progress bar to summon them.
For instance, you would consume 3 slots to summon a Paladin and only 2 slots to summon an Archer. If you’ve unlocked the Ogre unit and decide to bring it to battle, you will have to wait until the summon bar reaches 12 slots so the Ogre can be brought into the battlefield. Take into consideration these numbers when choosing which troops also go well together. While bringing along stronger units can be a plus, also remember that this will take extra time, which is limited in every raid.
Our general recommendation is to start summoning a group of ranged units first then melee units when possible. You may also alternately summon them individually depending on the defensive layout you have to face. You can review the type of path, defenses, and enemy units you will face before entering battle.
Bring Along Pals and Guardians
When your character reaches a certain level, you will be able to unlock Pals that can accompany you to battle. Think of these Pals as an extra soldier unit with their own abilities that will certainly be useful during a fight.
For instance, the very adorable Tammy the panda can heal your units while the Pal-a-Din can cause considerable blunt damage to enemy troops. Check out which Pals you’ve unlocked in your Throne Room. When accessing your individual character, you will see a small red icon with a pawprint on it. This is where you can see your Pals.
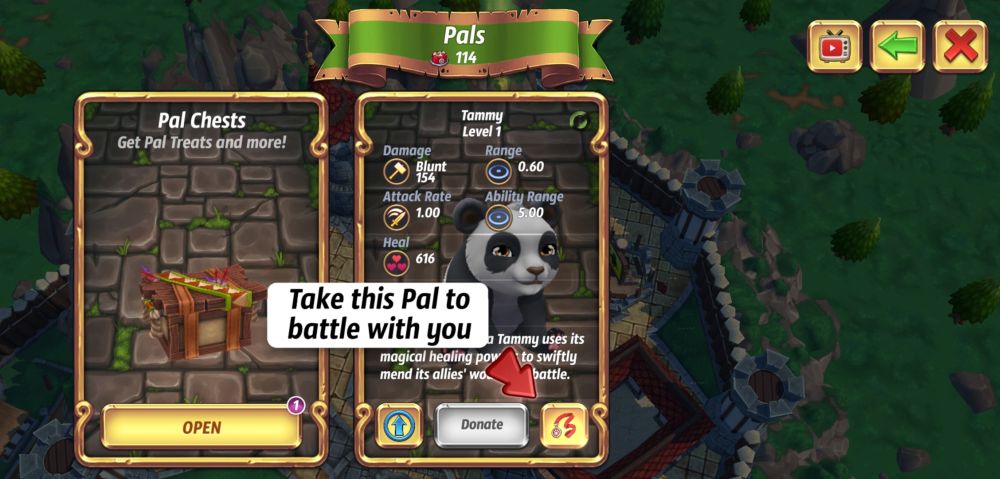
To equip a Pal, use the icon that looks like a leash. You can upgrade your Pals by feeding them treats, which you get from Pal Chests. Usually, the game will offer treats as freebies. Joining an Alliance will also give you access to more Pals that you can take with you to battle.
On the other hand, you may also acquire a Royal Guardian, which you can mount during battle. There are a variety of Guardians you may acquire throughout the game, with each one having their own abilities. For instance, using the Donkey’s ability will boost your troop’s morale during battle. Mounting the Donkey will also let you travel the enemy’s defensive path faster. But like spells, Guardians can only be used within a limited time and will have a cooldown interval before they can be activated once more. Pals, on the other hand, have no time limit.
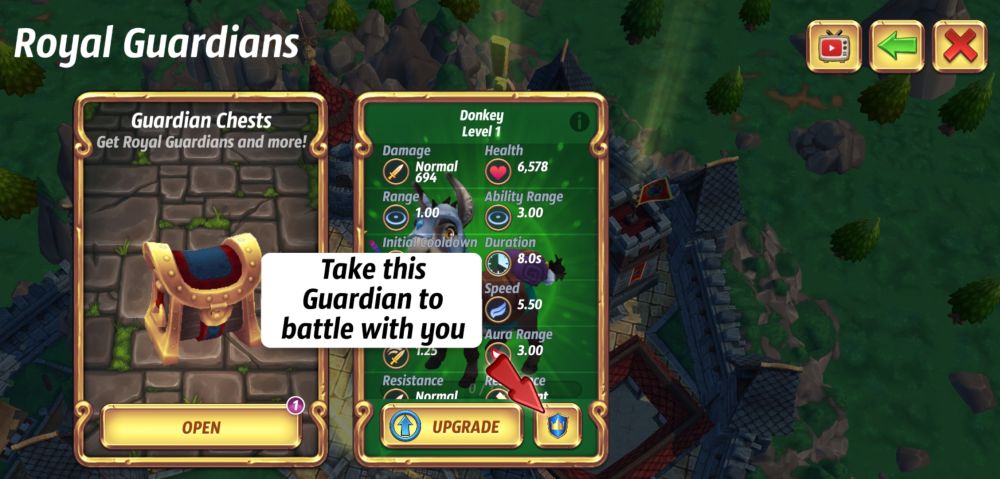
Guardians can be acquired by purchasing Guardian Chests from the shop, but the game will be generous enough to at least provide you with one Guardian for free after reaching a certain level.
When they’re available, take a Pal and Guardian with you each time you sortie out. While waiting to summon more troops to your side, a Pal and a Guardian can provide you with the extra hands you need to forge your way through the enemy’s defensive path.
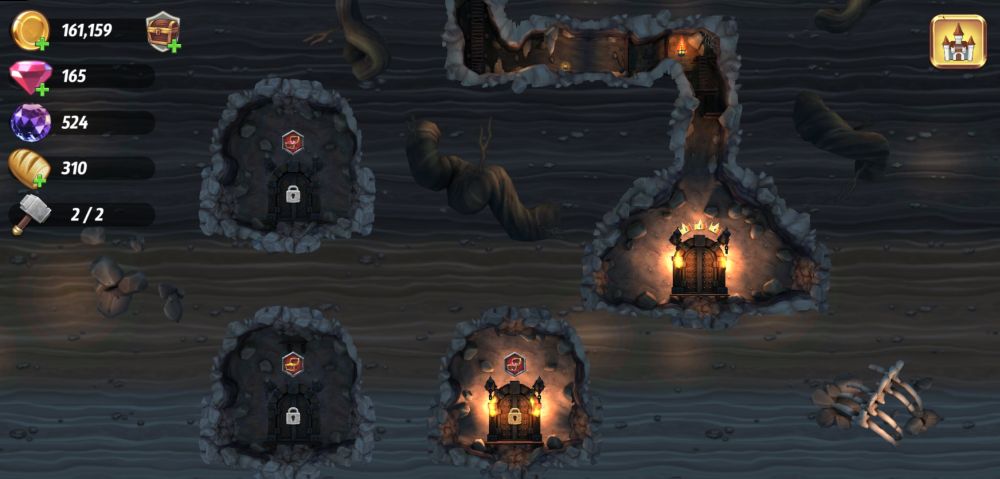
Head to the Dungeon
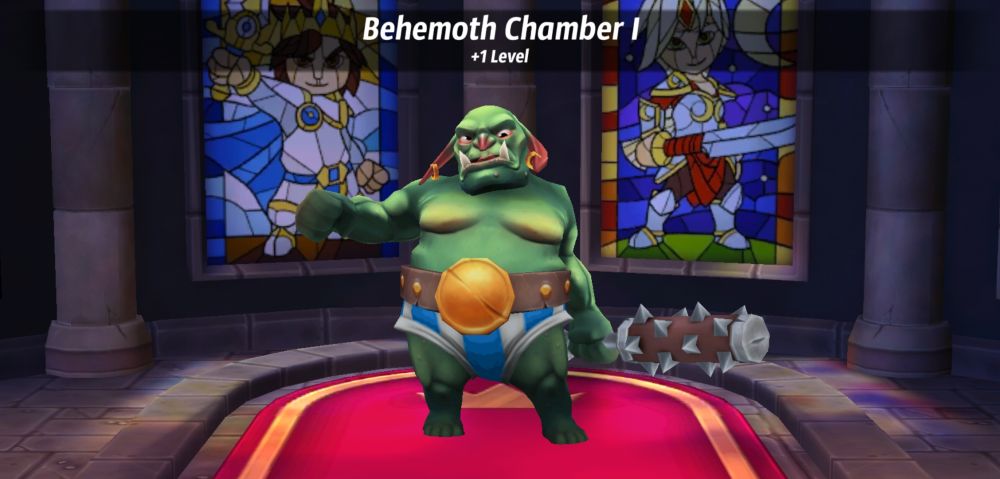
Aside from waging war with other kingdoms, you may also enter the dungeon to primarily win gold and diamonds alongside other rewards. In the dungeon, which can be found within your castle grounds, you can enter chambers such as the Diamond Vault and the Vein of Gold. As suggested by their names, the Diamond Vaults will give you diamonds for rewards while the Vein of Gold chambers will yield more gold with each successful dungeon run. You will also encounter other chambers like the Cave of Grave Goods, Behemoth Chamber, and many others as you go deeper underground.
Raiding dungeon chambers is similar to waging war against other kingdoms: you will face enemy units and defensive structures that will try to keep you from winning any loot. One difference is the rewards you can get as the dungeon chamber itself will declare potential rewards as opposed to gaining them at random from the Chamber of Fortune.
You may apply the same tactics mentioned above when battling in the dungeon chambers. We recommend heading to the dungeon when you want to increase your gold and diamond resources as a beginner. You may also get special items, as well as unlock non-human troop types like the Ogre, Mummy, Werewolf, and others.
One other thing about going to the dungeon is that you may unlock different chambers depending on which ones you’ve gone through already. For instance, if you want to unlock another Diamond Vault, you may have to first finish a Vein of Gold chamber with 3 crowns before you get to do so.
Moreover, when you’re headed to the dungeon, make sure that you have at least one available worker to lend you a hand. Opening dungeon chambers will require a worker to dig through the underground path. This can take between a few seconds to several minutes depending on where the chamber is located.
To enter a chamber, you will also have to spend food and the deeper you go, the more food is needed so be sure to stock up on this resource. Unlike normal battles, you won’t be able to access the Chamber of Fortune when you go on dungeon runs since dungeon rewards are typically specified, unless you go to a Cave of Grave Goods, which only reveals the reward as a “special item.”
Keep Fighting
With your battle tactics in place, keep fighting! It’s one thing to passively gain rewards from free chests and the Taverns, but quite another when you head into battle and claim the spoils for your kingdom yourself. Fighting continuously, whether against enemy kingdoms, in the dungeon, or other events, will exponentially increase your treasure and rewards.
Thus, you will have a much faster time upgrading buildings, strengthening troops, and fortifying your defenses. Even if you lose, you may still gain some experience and level up your character. Always view defeat as a minor setback and a lesson, for all you know, the defensive strategy you’ve been defeated by is something you may want to consider applying to your castle in the future.
Fortifying Your Kingdom’s Defenses
Boost Troop Morale
The troop units you unlock as you progress into the game aren’t just useful when deployed to battle, they are also available to use when fortifying your castle’s defenses. As mentioned, other players will wage war with your kingdom to try and loot your gold. You can give the enemy hell by creating defensive waves that will stop them from pushing past your defenses.
Access your Castle Guard to see which enemy units you’ve thus far unlocked and how many waves you can create. This building works hand in hand with the Troop Academy since this is where you can unlock more unit types through upgrades. What the Castle Guard building does is let you choose which unit types and how many of them will be summoned for each defensive wave.
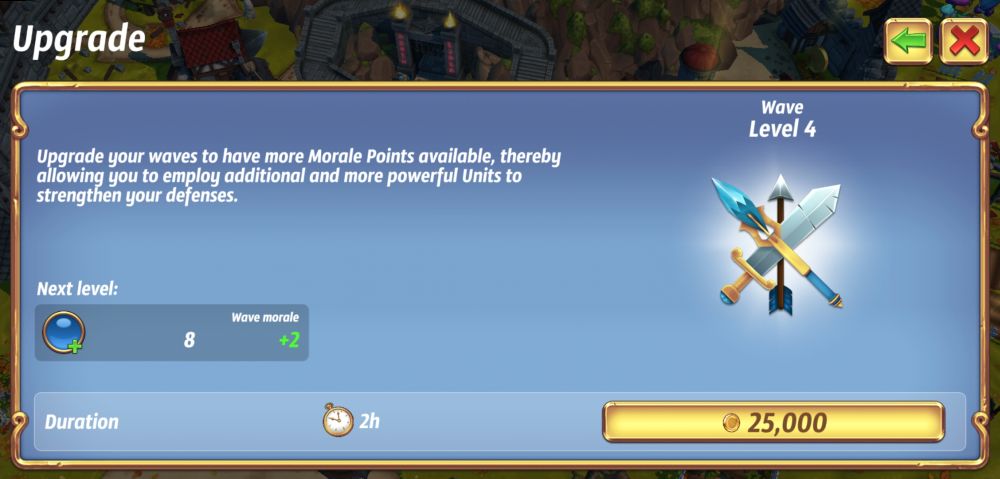
You start with three defensive waves that will emerge from your path after a specific time frame. Upgrading the Castle Guard reduces the time your defensive waves need to be summoned and increases the number of waves you can deploy. On the other hand, you may individually upgrade each defensive wave and boost Troop Morale. Boosting Troop Morale will let you increase the number of individual units that comprise each defensive wave.
Keep in mind that, other than the basic Knight, certain unit types take up more than 1 slot. For instance, Archers take up 2 slots, Paladins and Frosters each take up 3 slots, Cannons take up 5 slots, the Ogre takes up as many as 12 slots, and so on. Keep boosting the Troop Morale points for each wave so you can maximize the number of units deployed.

When creating defensive waves, try to choose units that compliment your defensive layout (more on this in the following sections). Here are some general tips to consider when trying to mix and match your available units for each defensive wave:
- Have melee units for direct attack alongside ranged units for distant cover fire.
- Put your strongest or most hard-hitting units in the first wave. Since succeeding waves will take some time before they are summoned, your first wave has the potential to buffer the enemy and buy your second, third, and other waves some time to emerge and traverse your path. Similarly, you can put units that consume the most slots in your first wave.
- You can choose between summoning a mob of units that have lower stats and just a handful of units with much higher stats or damage. Basically, choose between quality versus quantity.
Of course, there are no set rules when trying to mix and match your defensive troops since you will also have to consider how your path is laid out and what towers and obstacles you use.
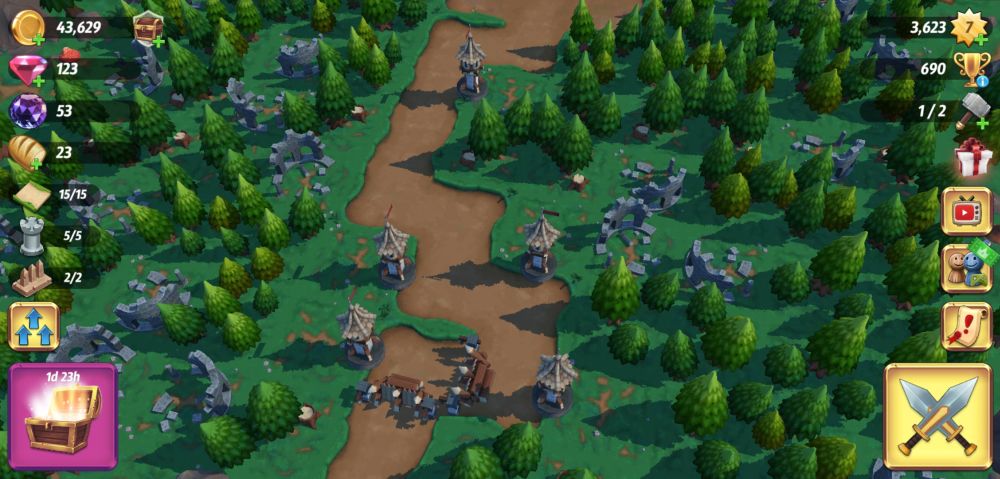
Turn Your Path into a Winding Maze
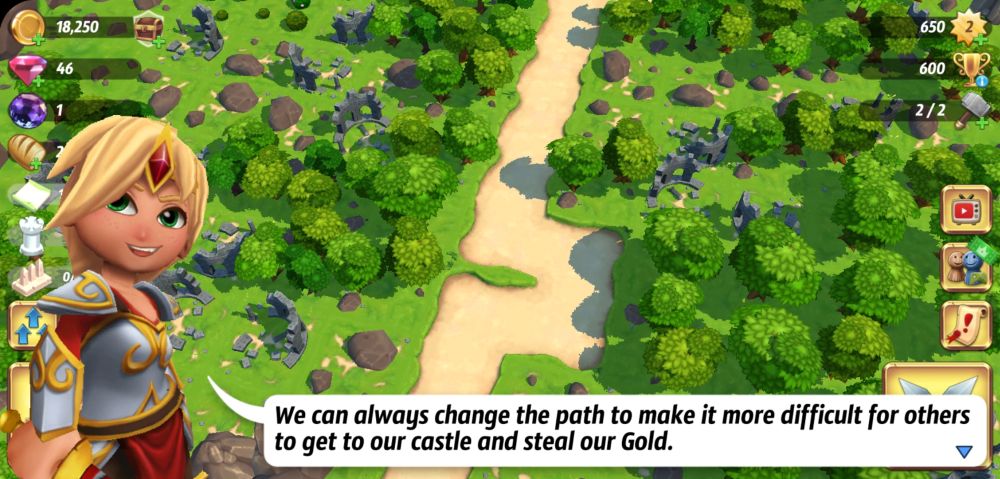
Another important aspect of successfully defending your kingdom is how your defenses are laid out. In the beginning, you will have a limited number of paths, structures, and obstacles that you can place for defense. But as you continue to upgrade the Castle Gate, you can lengthen your path and use more obstructions to fortify your defenses.
When planning your defensive layout, an extremely effective strategy is to make your path winding with as many corners and turns as you can possibly make. This is because each battle must be completed within a time limit, and having a long, winding path will definitely slow down the travel speed of enemy troops.
With a straightforward path, enemies may have an easier time demolishing defensive structures and obstacles, whereas a winding path can give your towers a bit of a head start when damaging enemy troops en route. Having more corners and turns also means better places with which to place towers and obstacles, which will be discussed in the succeeding section.
Basically, the point of lengthy winding paths is to slow down your enemies, enough to significantly cut off a chunk of their time trying to navigate your defensive layout. With the proper tower and obstacle placements, this will be even more effective.
Bunch Up Towers Together
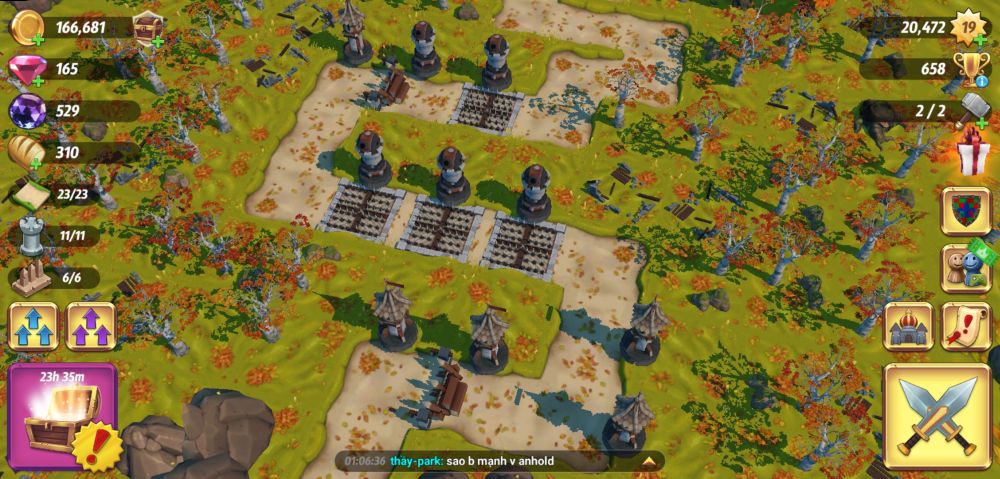
Along with a winding path, it’s also a good idea to line up towers close to each other. This will reinforce your defenses and can do considerable damage from a distance. Although enemy troops will rally through your path, they can only focus their attack on one tower at a time.
With multiple towers to keep them at bay, you can shave off enemy troops before they can regroup with reinforcements. Of course, a king or queen may try to demolish another tower by themselves so our recommendation is to line up towers in threes.
Depending on how much you’ve upgraded your Castle Gate and Inventor’s Workshop, you can have access to a variety of defensive structures that cause different types of damage.
For instance, you can have a mix of Arrow Towers and Bomb Towers lined up on your path. Bomb Towers are paritcularly helpful in that bombs can blow up an entire troop of enemies as opposed to just hitting one unit at a time, so lining them up in threes can definitely put your enemies back significantly.
Don’t forget to individually upgrade each tower to increase their durability and damage. This will also give your own troops enough time to engage enemy units while the latter is busy trying to survive the onslaught of your defensive structures.
One other small but helpful tip about towers is to place one tower specifically to the left side of the map, just as enemies are about to reach your castle’s gate. The way the game works is that the AI for enemy units will detect and attack that tower instead of making a beeline for your gate. If this tower is adequately reinforced, this can also waste your enemy’s time while buying time for your own defensive wave to pop up right at the castle’s gate.
An overzealous enemy player may also miss this tower, since it can be situated at a blind spot, and head straight for the castle gate. If they fail to demolish this tower, the enemy will not be able to get 100% of the spoils at the very least.
Place Obstacles in Every Corner
To further increase the effectiveness of your towers, make it a point to place obstacles in every corner or at a spot that will force enemy troops to stay put while your towers attack simultaneously. Basically, think of obstacles as a means to trap enemy troops in a position that will give your towers the best advantage. If you’re lining up towers in threes, try to place an obstacle right in front of the middle tower so your two other towers can attack while enemies are held off in position by the obstacle.
If you have considerable leeway with the defenses you can place on your path, you may even put obstacles like Spikes directly in front of each tower. This can deal double damage to melee units since they have to step on the Spikes to damage the towers. Ranged units may have a slight advantage but it’s likely the case that your designated defensive platoon will reach that position to make it more challenging for your foes.
Take Advantage of Beasts
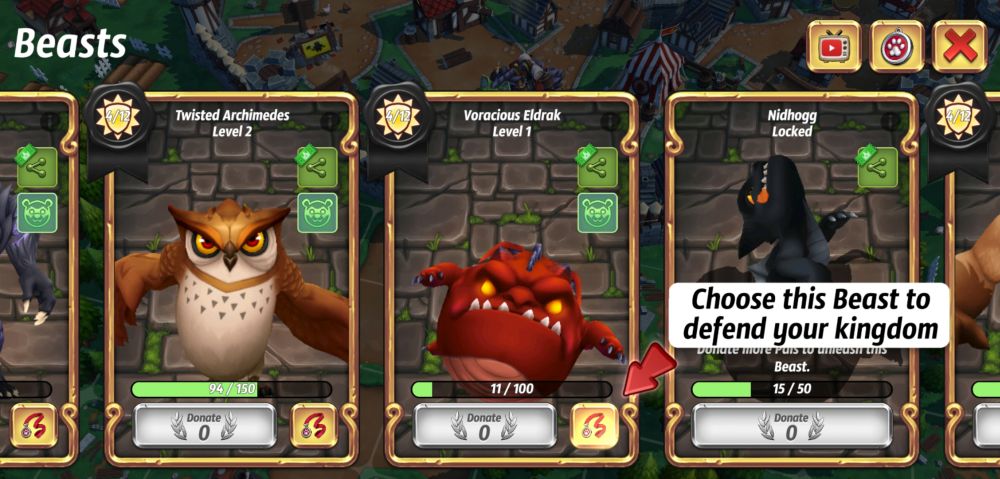
One of the most useful benefits of joining an Alliance is having access to Beasts. Beasts are like the monstrous counterparts of your Pals. However, unlike Pals, which you take as battle companions, Beasts can be used instead to defend your castle.
Beasts can deal adequate damage and significantly aid your defensive troops. The higher the Beast’s level, the more challenging it is to fight and defeat them. In some cases, Beasts can even turn the tide of battle, especially if a reckless king or queen takes them on without an adequate number of troops or with the inappropriate gear.
Take advantage of these humongous and powerful creatures by equipping them as part of your defensive wave. You can do this by clicking the icon that looks like scratch marks from a paw in the Castle Guard building. If you’ve joined an Alliance, you get access to higher-level Beasts that have the potential to subdue even enemy kings and queens.
Test Your Defenses
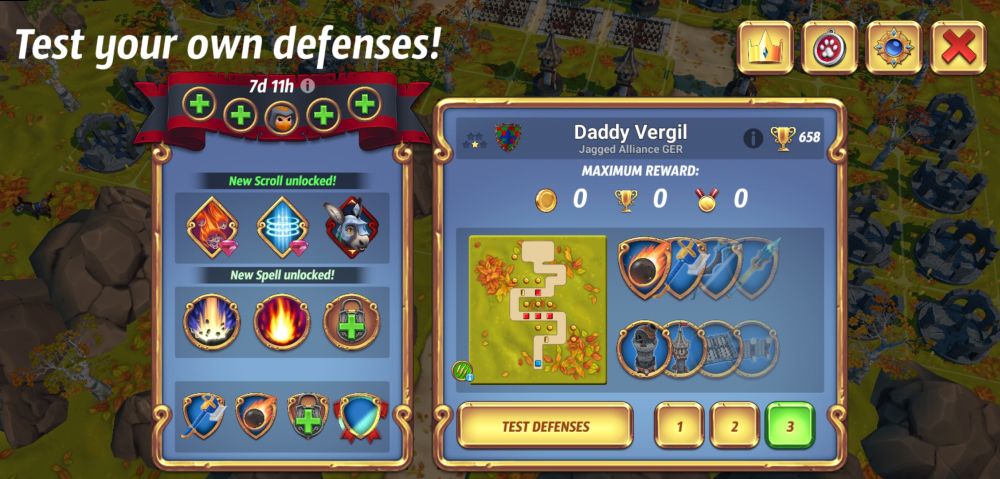
After you’ve sufficiently put up defenses along your path, the game offers you a chance to put them to the test. Battle your own defenses to see how effective (or ineffective) they are. Testing out your own defenses gives you the chance to make the appropriate adjustments in terms of placement or upgrades. You can also see how much time it could potentially take an enemy to fight through these defenses before they reach your castle’s gates.
Moreover, you can determine when your troops will pop up and how long it would take before each defensive wave can get to an enemy’s position. This will let you assess whether you’ve chosen the right troop types to compliment your defenses. There is no hard-and-fast formula when choosing the right defensive strategies as this will highly depend on what’s available to you.
You will likely lose more than a handful of defensive battles as a beginner, but as you progress into the game, as well as diligently fight and upgrade buildings and enemy troops during raids, you’ll be able to access more ally troops and structures that can give your enemies a run for their money.
Make an effort to always test your defenses and improve your fortification strategy. Battling other players will also broaden your perspective, allowing you to learn from those whose defenses have challenged or even beaten your troops in battle.
With this, we conclude our beginner’s guide for Royal Revolt 2. In covering the basics of resource gathering and spending, battle tactics, and defensive strategies, you’re ready to explore even more advanced aspects of the game, as well as defeat more enemy kingdoms, win more rewards, and fortify your domain into an unconquerable fortress! If you have more tips and tricks to share, head on to our comment section below and let us know all about them. Be the one true king or queen, you were always meant to be!
James Cooperer
Thursday 10th of October 2024
I would like to know the control buttons for this game. Thank you.
Miegrat Sammri
Tuesday 23rd of August 2022
Very well written. All valid points.