Despite only being active in the mobile gaming industry for only 9 months, Ohayoo has already accomplished a lot with its app portfolio of 5 games. If you played and enjoyed the hyper-casual hit game, Wobble Man, or the unique action game, Combat of Hero, then you should at the very least be intrigued by any of Ohayoo’s releases.
Rooster Defense is that latest title from Ohayoo, and is a tower defense game unlike any other. At face, it may seem just like any typical tower defense game, but Rooster Defense deviates from the conventional tower defense games in that it is fast-paced, despite the idle aspect, and offers continuity in progression.
The usual tower defense game makes it so that how many towers you can deploy and how many upgrades you can purchase depends on the amount of resources you gain from killing enemies, and the same will reset on the next stage, having you start all over with the basic low level towers. Rooster Defense makes it so that you have a clearer sense of ownership to all the power-ups and resources you have and every piece of tower you create and deploy, along with each upgrade you purchase, continues on to the next stage, and even the next areas.
The game’s mechanics, features, and interface are very simple to understand and given the progressive tutorial you will go through as you dive into Rooster Defense, players of all ages will surely find it easy enough to pick up and play. There are increasing levels of challenges ahead of you and boss battles can make you experience defeat.
Just the same, the progress you make in your adventure is essentially faster than in most other tower defense games. While there are plenty of ways to go about building your towers and progressing from one stage to the next one, some ways are definitely more efficient. If you are in the lookout for tips and strategies to beat every stage, then read on as our Rooster Defense beginner’s guide has everything you need to dominate each stage!
1. Keep The Multipliers Active
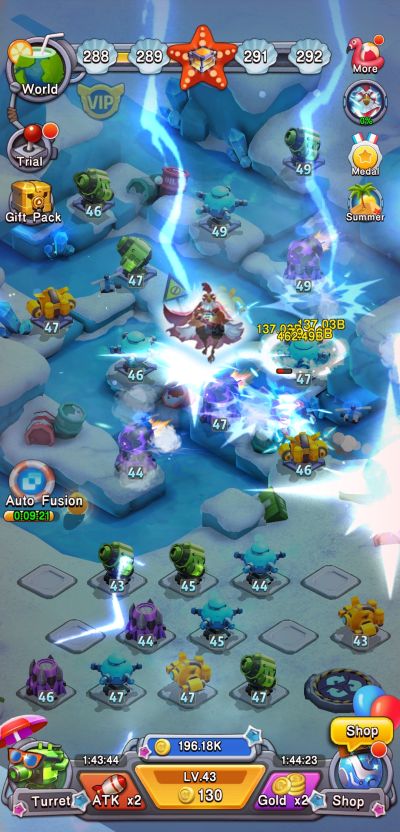
Rooster Defense makes it so that once you start generating and merging towers, it becomes a bit of a challenge to stop continuously doing so. As wave after wave of enemies spawn from the top of the field, your attention will most likely stick with where the action is. As fast as progression is especially on the earlier stages or the entire first area, you can actually speed it up even more with a few clicks here and there and a few idle seconds or so.
One of the first multipliers you should activate as soon as you are able to is the damage multiplier, which you can access via the bottom left side of the screen. The “ATK x2” button will boost all your turrets’ attack power by x2 for a whole hour at the cheap cost of watching a 15 to 25-second video ad. On the bottom right side just across the attack multiplier, you should also activate the gold booster, which also doubles the amount of gold you receive per enemy unit killed for one hour. Like the attack booster, it works the same way and will have you go through a short video ad to obtain the perks.

What is good about these multipliers, on top of both being free, is that you can stack each one to 5 hours. These buffs stay on even if you are offline and away from the game, which means that you should keep it at maximum duration as much as you can if you are about the leave the game. As an added bonus as well, every 5 hours of multipliers you activate for each feature will reward you with 50 gems. While the gem bonus may have its limits, we have yet to reach it after playing long hours in a day with both multipliers active.
Relative to both multipliers, another perk you should take advantage of is the auto fusion feature, which is also activated by playing a short video ad and will stay active for 10 minutes. With this feature active, you will no longer need to manually drag and drop towers of the same type and level together and will exclusively be spending coins to generate new ones as the A.I. takes care of all the merging for you.
2. Upgrade Tools Immediately, Upgrade Weapons Selectively
As you deploy more towers and merge them together, both your offensive and defensive strength grow. Naturally, however, the increase in your power will not be enough if you rely on merging alone. As one of Rooster Defense’s key features is the amount and pacing of upgrades you can do to each individual type of tower in your arsenal, Upgrading each available option indiscriminately will still work well for you. However, as parts are a needed resource for each upgrade attempt, you will have to strategize a bit around every upgrade opportunity that comes your way.
When it comes to upgrades classified as tools, such as the turret builder and turret slot, upgrading them is priority one. Every upgrade level for the turret builder ups the level of every turret you generate in the game. Turret slots give you more slots not just on the turrets deployed on the field, but those on standby as well in the area where you merge them together. You will easily max out turret slots as the level cap is only at seven stars.
When it comes to turrets, you should know that you can only deploy one for each type of turret available. Turrets are classified into gun turrets, toxic turrets, ice turrets, and bomb turrets. While there are many variations within each type of turret, all those belonging to same type practically have the same intrinsic function and, as such, you can only deploy one for each type.
Gun turrets are your single target DPS turrets and are most especially important for boss battles. Toxic turrets focus on damage over time (DoT) and are mostly best place ahead of the trail along with ice turrets. Ice turrets slow enemies down and will work well on mobs and bosses. Last, but definitely not the least, are bomb turrets that focus on dealing AoE damage.
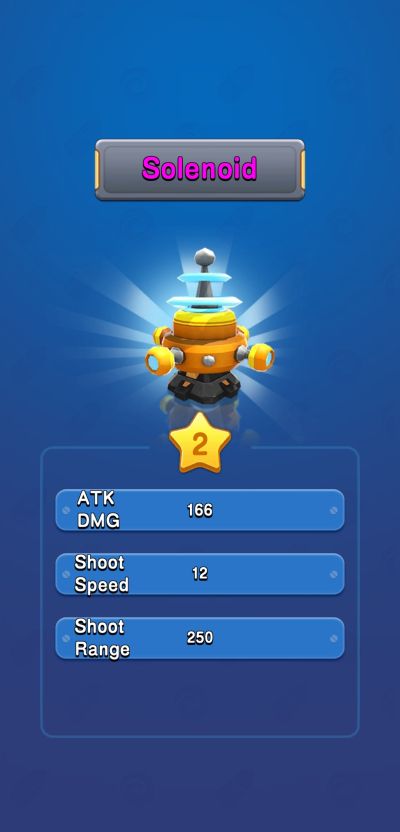
Turrets within each type come in different rarities and stats as well. Higher grade turrets naturally outclass lower-grade ones but depending on your luck of draw and each one’s respective upgrade level, some lower quality turrets may reach higher power levels. With this, you should carefully look into each turret’s details by tapping on them. Some turrets within the same type vary in range so even if they deal less damage, they may prove more useful for you.
Despite earning a plethora of parts that you need to upgrade tools and turrets, you will still find yourself running out of it in certain points, especially if you purchase upgrades for every turret in your collection. You should begin to prioritize upgrades on only one for each type of turret you have. As an example, you can continue upgrading the machine gun if you have not unlocked any other turret for that type. Once you obtain the sniping turret, and it has proven to be more efficient in terms of range and power, then you should consider focusing on it instead.
Choosing only one turret for each type to focus upgrades on will leave you with more than enough parts for other upgrades. In this case, you can begin spending on the other turrets as doing so will still earn you some extra benefits. This relates to the tower mastery feature and the chip feature that comes with upgrading turrets.
On the turret page, which you can access via the aptly named icon at the bottom left side of your screen, you will notice the tower master button on each group of turrets. If you tap on it, you will see added attack damage and range upgrades you can unlock once you meet certain conditions. For example, your gun turrets will have an extra 25% attack boost if you manage to upgrade 3 of them to 3 stars. With that, you should consider investing a bit in other turrets for that extra attack buff.
Just to the left of the tower master button, you will notice 4 slots that you can equip with chips to customize how each turret type performs. These chip slots will take a while to unlock as each one requires you to meet a certain number of upgrade stars across all turrets within the same type. Like the tower master feature as well, you will have to consider upgrading other towers besides your priority to meet the required number of stars.
Considering everything, your approach to performing upgrades should be to focus on one turret per type, but then spend extra parts on other turrets within each type to obtain the perks you are close to unlocking. In any case, just be sure to save some extra parts in the event that you obtain extra pieces of the towers you want to focus on upgrading.
3. Experiment With Different Deployment Schemes
The number of available slots in the battlefield will continuously grow early on but, at some point, will leave you with a maximum of 12 slots to deploy your towers on. Given that you have 4 types of towers to deploy, one of the basic strategies to set is keep a perfectly balanced number of towers for each type. That would give you 3 gun turrets, 3 toxic turrets, 3 ice turrets, and 3 bomb turrets.
With a perfectly balanced deployment of turrets, you can be certain that you will perform good defense against mobs and bosses. Beyond that, you should consider as well that with the random nature of generating turrets, spreading out turrets in balance means that you will be able to level them up equally as well. Although this spread of turrets will work well against all enemy types, it will not be the best across different areas and will work differently against mobs and bosses.

If you are up for more active playing, therefore, you should consider experimenting with different ratios of turrets deployed. There can be a number of factors to impact your decision on how to do so, but what works for one person may work differently for others. One point of consideration is the raw power of each turret you have. With a gacha approach on securing pieces of turrets from chests, you are certainly bound to have some turrets grow more powerful than the others. Consequently, it becomes better to consider the stronger turrets while keeping the more supportive types in on the action as well.
On top of merely balancing out turret deployments by type, strategy and planning will likewise be a necessity when it comes to the layout of turrets in the field. As a basic guide, consider the turrets function as to where you will deploy each of them in the battlefield. Toxic turrets, for example, deal damage over time, which means that they may work best on the entry point or anywhere so long as they are paired with an ice turret.
An ice turret, on the other hand, will work best with some good distance from one another. There will hardly be any point in freezing enemies in place if no other turrets are causing damage to them. Gun and bomb turrets ought to be deployed where they can make the most damage, which means that they may consider range and the trail close to them as well depending on how much longer they will be able to keep firing at the marching enemies.
Note that some turrets like the nuclear turret can fire at enemies anywhere, so they can be the last priority in placement as their efficiency stays the same regardless of where you put them.
4. Manage Your Techs And Chips
Chips that you can attach to each turret type are one way of customizing your turrets’ performance in the field. Another way to do so comes from Rooster Defense’s tech feature, which you can access by clicking on the more button at the upper right side of the screen and choosing the “Tech” icon.
While the whole layout may seem intimidating at first, note that most of the available tech slots will be locked when you access this feature. Progressing through the stages and areas will be your key to unlocking the other slots, which could mean that you will already have a firm grasp of the feature by the time you unlock the second or third slot. You can identify the type of tech you can place in each slot based on its color.
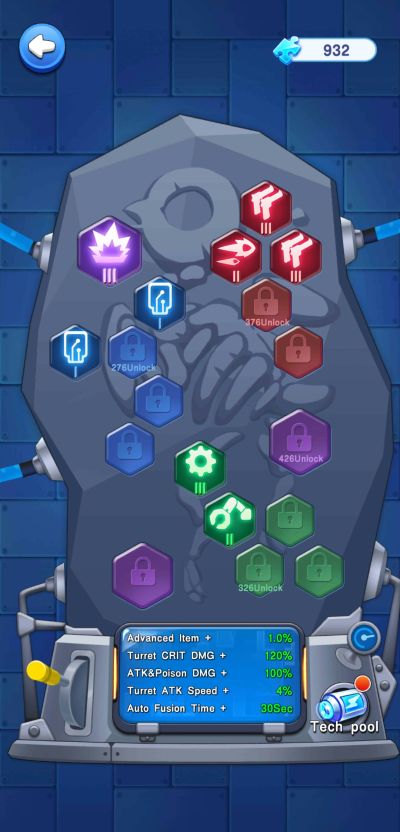
Red tech pieces focus on attack and can enhance the turrets base attack and poison damage, critical rate, or attack speed. Blue tech pieces focus on defense, or rather, reducing the defense of enemy units and bosses. Green tech pieces are assist types and can help you with boosts such as an increase in the duration of the auto fusion, increase in turret level when you shop, or even reduce parts consumption when upgrading. Purple tech pieces provide a variety of effects that may or may not have an effect on combat efficiency. This may include a boost in offline earnings, critical damage, or turret range.
Given the unique perks techs can provide you, it should be considered based on your current activity plans and play style. Suppose if you will be spending a lot of time away from the game, then banking on boosts that impact offline income is the way to go. If you will be expending parts on massive upgrade sessions, then make sure you equip an assist tech piece for that. You can freely swap tech pieces in and out of the grid so you may want to consider doing so from time to time.
Tech pieces have levels as well and you can upgrade each of them using tech shards. If you have extra copies of some tech that you are certain will no longer be useful, feel free to dismantle them to obtain more tech shards.
As far as chips go, they also work much like the tech pieces except they all focus on improving the turrets performance. Like tech pieces, chips also have 4 different types and you can only use one of each type per turret group. It will be more challenging to upgrade chips as you will need to sacrifice other chips for each upgrade and will often require more than 1 sacrificial chip to reach the next level. Chips have rarities as well so it is best to start upgrading them once you have secured higher grade ones.
5. Accomplish Daily Quests And Achievements
Rooster Defense is certainly brimming with rewards that contribute to a speedy progression. Beyond coins you earn per enemy unit killed and chests you obtain for each boss you defeat, there are extra rewards you can earn through the daily quests and achievements.

For the most part, actively playing in just a few minutes or so will ensure that you clear all daily quest objectives. Each one will earn you 10 gems, which is a premium currency that you should always strive to collect as much as you can.
Achievements, on the other hand, serve as milestones that determine your overall progression in the game. Some of the achievement objectives may take a while for you to accomplish so be sure to check each of the objectives and strive to clear the ones you are close to accomplishing.
6. Take Advantage Of Other Freebies
Early on, we mentioned some valuable perks you can obtain thru watching some video ads. The attack multiplier, gold multiplier, and auto fusion features, are each fundamental to your progression in Rooster Defense. Beyond these features, however, there are still more freebies and perks you can obtain by playing or watching some more video ads.
One of the most beneficial perks, especially if you spend a lot of time offline and away from the game, is the offline rewards multiplier. By watching another short video ad as you log back in, you can get 3x as many coins as offline rewards. As you will constantly have a need for more coins to purchase more turrets and merge them together, coins are an indispensable need.
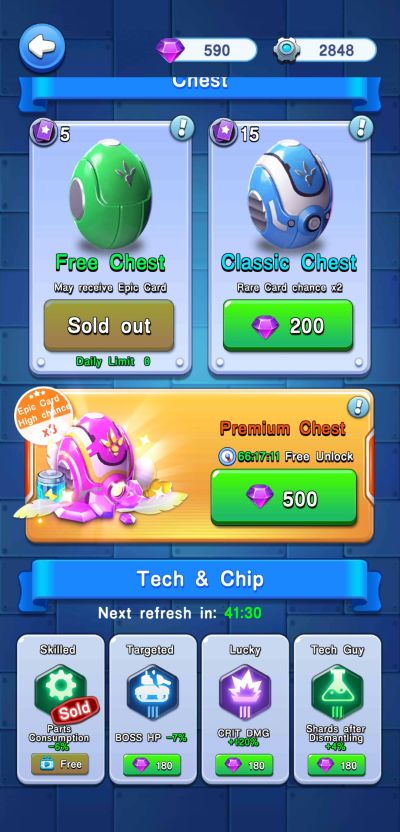
A lot of the other freebies can be found at the shop, which you can access through its icon at the lower right side of the screen. To start off, you claim 50 gems five times at the shop for watching a video ad each time. There is also a free chest you can claim twice at five minute intervals. Note that the free chests come with at least 1 epic card. You can also claim a free premium chest, worth 500 gems, once in a while. Lastly, there is a free tech or chip you can claim each day.
7. Spend Your Gems Wisely
As a premium currency in Rooster Defense, gems can help you obtain a lot of the resources you need outside of the usual grind. However, given that gems are very challenging to earn, it should be noted that extra care should be taken before spending even some bits of it.
At some point, you may run out of parts needed to upgrade your turrets especially if you initially upgraded each one as soon as you are able to. These instances may tempt you to spend your hard-earned gems for parts at the shop. As critical as that may seem, you should never spend gems on parts and instead, hold on to it until you have enough for purchasing chests.
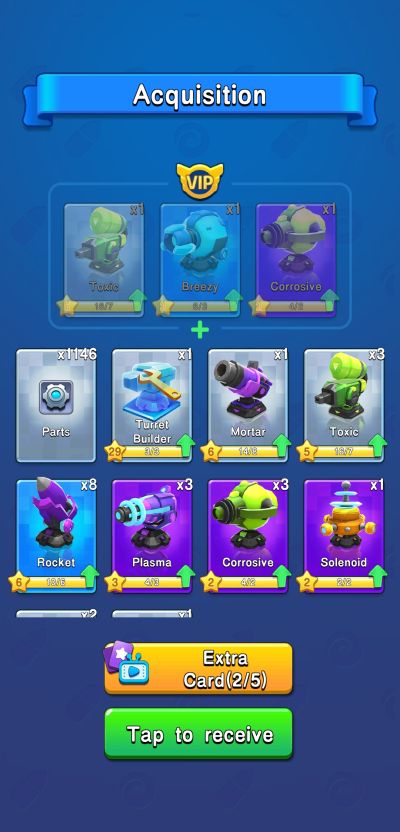
Although you will have tons of opportunities to earn chests that contain cards to upgrade tools and turrets, some parts, and even chips and techs, you will never run out of needing more of its contents, especially the higher rarity items. You can either spend gems on a classic chest, which costs 200 gems, or a premium chest that is worth 500 gems. We would recommend saving for the premium chests as each one at least 3 epic grade turrets in contrast with the classic chest that only guarantees 2 rare turrets.
Another thing you may want to consider investing in can be found under the Tech & Chip section of the shop. Keep an eye out for legendary or epic grade items sold here as it will be very difficult to obtain these. Legendary (yellow) grade chips will typically cost around 600 gems but each one is definitely worth having.
8. Expend Attempts At The Trial
A unique game mode becomes available to you once you have cleared enough stages in Rooster defense. You can test your mettle in these elite stages once you have stepped into the game’s fifth area and can be accessed through the trial icon at the upper left side o the screen. Expectedly, these elite stages are separate and distinct from the regular ones so your progress, as far as turret strength and levels are concerned will not apply on these stages.
The stages are similar to previously conquered areas in the normal mode except you will already have some deployed turrets at your disposal. Earning coins will be limited and you have to work fast and strategically to ensure that you win each round. Every stage conquered unlocks a chest reward and clearing all 5 stages within an area earns you an epic chest.
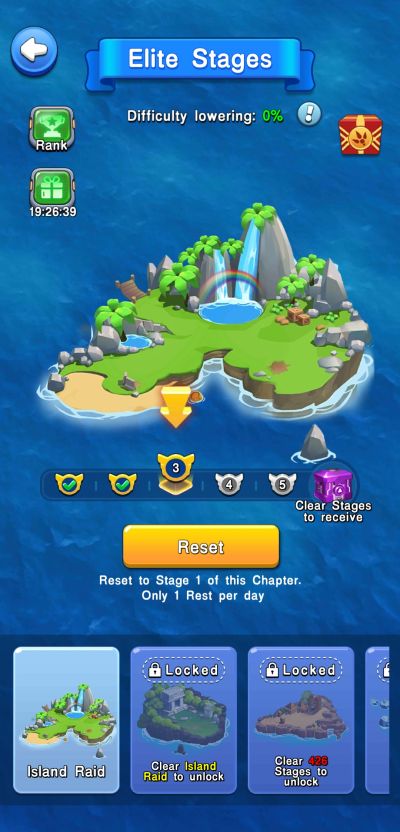
It is a given that these raid challenges are hard and to ease down the difficulty a bit, you can clear stages in the normal mode to reduce the difficulty by up to 15%. As an added tip, you should consider moving some of the stronger turrets down the line and make it so that they follow where the enemy minions march to. With limited coins, it will be difficult to obtain higher level turrets so instead of placing low level turrets on empty spaces, a good strategy may involve fusing available turrets and moving them around instead.
Note that you can obtain elite medals from the gift box in the elite stages page. Beyond that, medals are also a typical reward from the chests you earn after each successful raid. Through the reward redeem icon at the upper right side of the elite stages window, you can exchange elite medals for chips that you need for your turrets.
And that’s it for our Rooster Defense beginner’s guide. We hope that you have learned a great deal from the simple tips and strategies we shared in this article. Again, we would like to stress out that while Rooster Defense provides for progression while you are offline and away from the game, staying active from time to time will greatly boost your progression. If you somehow got hooked into Rooster Defense as much as we did and stumbled upon some unique tips, trick, or strategies we have not mentioned in our guide, share your discoveries with us and drop us a note in the comment area!
Conrad
Wednesday 16th of September 2020
Why do I feel like that the Tier 6 of turrets are not worth it? Such as the N-Bio Gun, N-Particle etc. Their damage are waaay lower than their predecessors
Unknown
Friday 31st of May 2024
@Conrad, because it needs to be either upgraded more and more or by making them more stronger