Gravity Co., Ltd, the masterminds behind RO: Idle Poring, has decided to cook up another idle clicker mobile game in the form of Ragnarok: Click H5 (RO: Click H5), which is based on the hugely popular characters of Ragnarok Online. Now, this may seem like some pretty straightforward stuff. Since this one is based on Ragnarok Online, don’t start thinking it’s that straightforward! Chances are, you’ll see a lot of questions in the built-in global chat that would also leave you wondering as a beginner. That’s the bad news! The good news is, you’re in the right place to find a lot of those answers, as we present you our RO: Click H5 beginner’s guide, that’s packed with loads of tips, cheats and strategies!
1. The Important First Moves
With most idle clickers, the initial idea is to set it and forget it for a couple of hours/days. That’s not entirely the case with RO: Click H5. You still have a lot of setting up to do to get it to “the sweet spot” before exiting it for a while/overnight. That’s the first part. The next part is that you have to run the game for at least 2 hours per day to gain the maximum benefits. So let’s start with the initial setups.
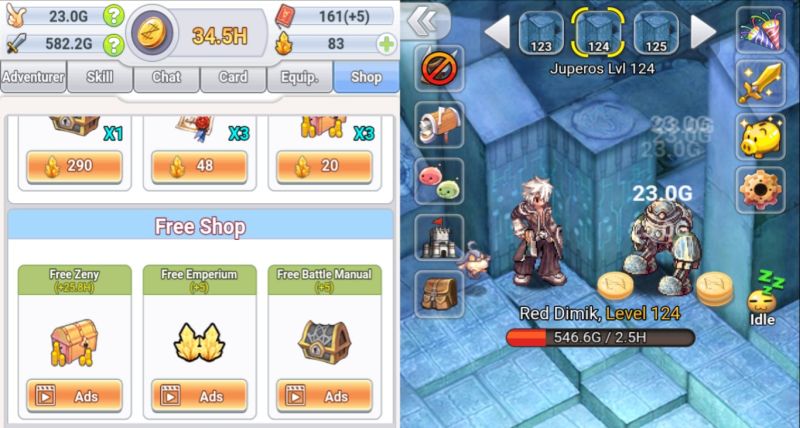
Where you want to start things off is found on the upper right of the above screen shot. RO: Click H5 gives you bonus buffs which last 30 minutes. So watch the ads and gain the buffs to increase your damage and zeny gains. Next is at the bottom of the Shop tab. There will be 3 more bonuses to gain after watching those ads. This can also be used to help track how long you’ve been in game so you’d know if you spent at least 2 hours a day playing. In spending at least 2 hours a day in game you’ll gain various rewards including 15 Emperium and Battle Manuals.
It’s when you’re first starting out in RO: Click H5 is when you decide where you’ll spend your Emperium. Two of your main targets are also in the Shop. Scroll down the Shop until you reach the Item Shop section. There you’ll find 2 more buffs you can buy. One is the Damage Booster and the other is the Ads Booster. In total it’ll cost you 800 Emperium. Gaining either one is great but having them both because you saved up your Emperium is better.
The recommendation is to go after the Damage Booster first because it’s the more costly of the two. Just note that while playing as a F2P player, you’ll spend 1 week building up Emperium. That 7-day login reward setup has up to 250 Emperium!
Also part of your first moves for the day in RO: Click H5 is in your Inventory (Backpack icon). You’ll want to use at least 1 Zeny Box and 1 Hyper Attack item each day. The Hyper Attack items last for the specified time amount up to 30 seconds. Press and hold your screen to auto attack 10 clicks per second when you use the Hyper Attack item. It’ll also boost your crit rate.
Your best bet with using the Hyper Attack is to do so with your main skills (Skills tab). You can get some seriously devastating results! Lastly for your first moves, set the character upgrade level to x25. Look just under the Adventure tab itself to find it. Doing this will help you to control your character’s upgrades and not make them crazy expensive!
2. The Main Screen And Your Character Levels
The main screen of RO: Click H5 has a wide variety of goodies for you to play around with. It’s in knowing how it all works which helps you not spend too much for useless things. For example, in overdoing the leveling of your characters, you’re pretty much spending too much zeny. But if done properly, you’ll blaze through a lot of the levels.

The idea is to not overdo it and save your zeny for higher level character buying and their upgrades. Take a look at RO: Click H5’s Zeal the Gunslinger in the above screen shot. If you check him (click on a character), you’ll notice his skills max out at level 100. So why is he at level 150?! That’s because of overspending and testing a theory!
Always check the damage increase you’ll gain by upgrading a hero (under “Level up” blue colored button). At the time, the damage gain (DPS) was worth the cost. But if done again, the damage increase would not be worth it (mid ranged F gain compared to low H so you’ll barely notice a damage increase).
When you click on a character you’ll see its skills. This is a lot different compared to the Skills tab. You buy the skills which will increase your damages, increase your zeny gains, or unlock a Main Skill.
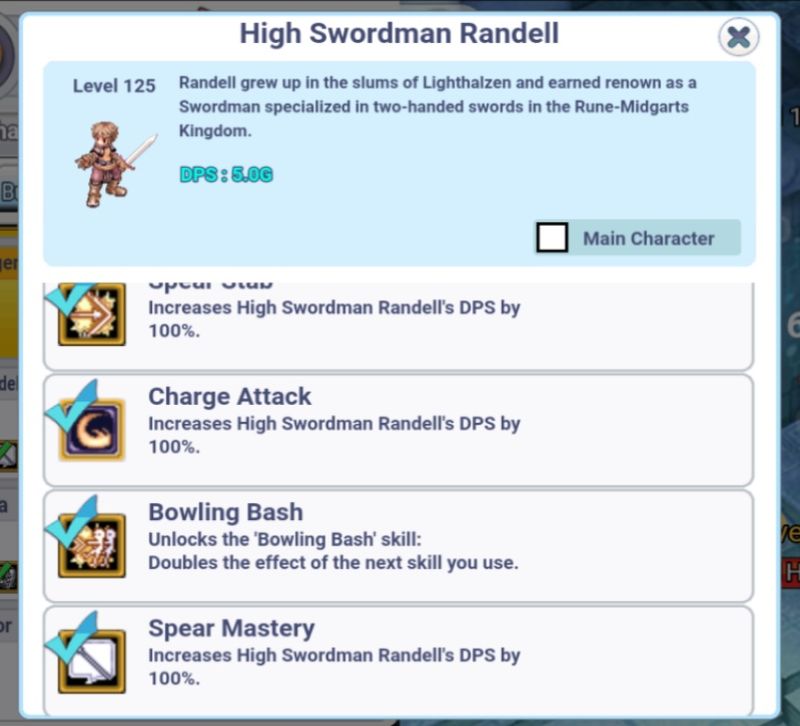
Here we have RO: Click H5’s High Swordman Randell in the above screen shot. Notice the Bowling Bash skill? Once you buy it, you can find it in the Skills tab. You just have to remember to unlock the skills for the Skills tab found in different characters. All the damage numbers you see for each character stack up with each other. It all shows in the upper left corner of the main screen. You’ll see a lot of your click damage (the one on top in the upper left corner) showing on the screen when you have a pet.
Many of the various skills each character has will add to those damages. So don’t skimp out on buying all the skills. Besides, buying as many skills as you can unlocks rewards in the Achievements section (Rewards button in the upper right corner of the main screen). Use the Buy All Skills button when you’ve upgraded the character(s). It’ll save you some time and scrolling!
Take a look at your click damage and idle damage in the upper left corner. The click damage is included with the use of a pet. The idle damage kicks in when you see the sleeping icon in the bottom right corner of the main screen. Without a pet, you’re doing the idle damage (standard DPS). When you click on the target on the right side of the screen (no sleeping icon) for whatever reason, it switches to the click damage entirely. This is why you’ll eventually notice a slowdown in your damage being done if you click something. After getting through the tenth map level after map level 100, you can gain Transcendent characters randomly.
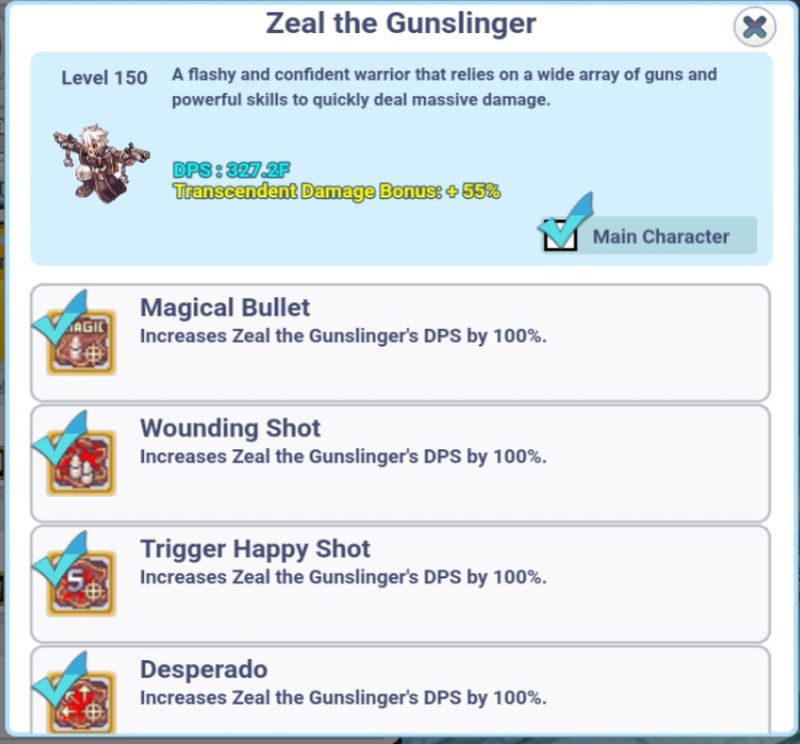
Check the main screen above. Notice how Zeal the Gunslinger is golden colored while the other characters are not? This means he has a Transcendent Damage Bonus (upper middle of the above screen shot). There is a Card that does boost this. However, you can gain Transcendent for the same character (it’s random!). If you use the Transcend button, you can try to adjust which characters have Transcendence.
The trick is to demote a level 2 or higher Transcendence from a lower level character while at the same time adding it to a higher level character. Unfortunately it does this at random so you might end up with another lower level character with Transcendence! The recommendation is to not use the Promote button because it’s a lot more costly. That and it works the same way as demote (random selection)!
Here’s a strategy if you get stuck using the maps in the upper middle of the main screen. This is for when you’re stuck (can’t defeat a boss) or when you’re killing mobs too slowly. First you have to disable the Auto-Advance button. Just click it and it’ll be crossed out. Look at the map level you’re on. Click down some levels and stick with the lower level map until you can upgrade. Try your best to stay within -10 (non-boss) map levels of your highest map level. What you’re aiming for is to be able to kill at least 3 mobs before the zeny is auto-collected. Slower than this means you won’t gain zeny fast enough. Faster than this means too little zeny gains to be worth it.
For example, if you can’t defeat the boss at map level 120. Try to stay at map levels 111 to 114 and 116 to 119. With this, you can gain a decent amount of zeny to level up your characters fairly quickly. Once you see mobs die in 1 or 2 hits, you can unlock the Auto-Advance button and continue.
Lastly while you’re still playing, keep a close eye open for a blue colored box to randomly appear somewhere on the right side of the screen. This is a bonus box. Click on it to gain either Emperium or more zeny. You have to collect 3 of these boxes each day to gain the daily quest reward.
3. The Rebirth Mystery / Misery
It seems RO: Click H5 managed to put in quite the puzzle which caused a lot of questions in the global chat! Initially, Rebirth is used to unlock the Card and Equipment tabs. However, you can also gain Battle Manuals and even Emperium (via rewards)! You’ll need Battle Manuals to buy and upgrade Cards.
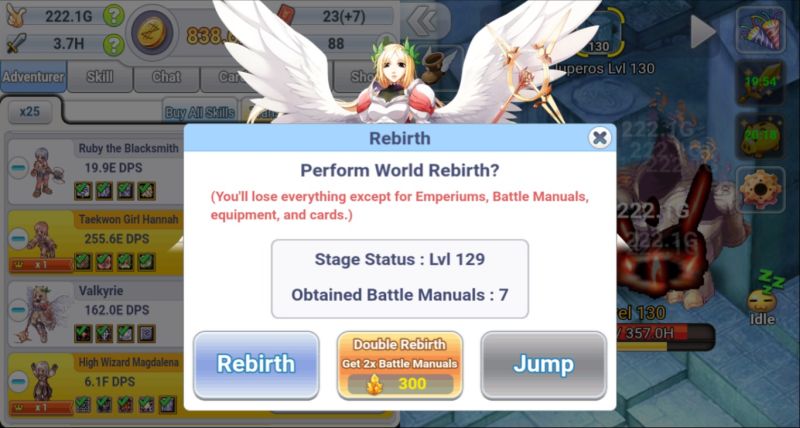
If you haven’t done so already, you’ll need the character Valkyrie leveled to 150. Take a look at the mid lower left of the above screen shot. It’s not like the Pets where you have to get to map 50 to unlock them. You need that specific character at level 150. Be sure to read and understand the part in red! The tricky part here is to remember that this doesn’t work like a Rebirth System in other games where you’ll get stronger each time you do so. Here, you’ll gain Battle Manuals.
The rest pretty much stays the same! The idea is that when you’re stuck somewhere (can’t defeat a boss), start over and gain Battle Manuals at the same time. The main trick to the Rebirth System here is to get at least to map 100 to 105. What you’re looking for is new Equipment before using the Rebirth. The Jump button is for those who made it beyond map level 200. It’ll cost so it’s not recommended!
4. The Card Trick
Sounds pretty magical, huh?! RO: Click H5 sure did put in a lot of thought to the Cards. You should do the same because there’s a nasty catch to them.
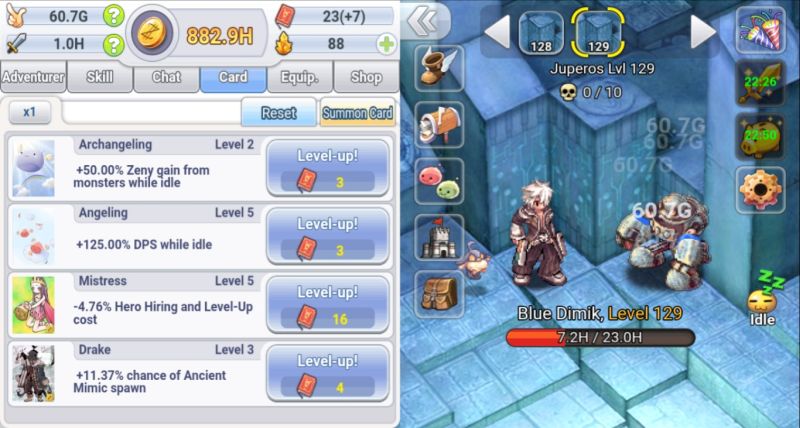
The trick in the RO: Click H5 Cards is trying to get just the right combination of them so you don’t BBQ your damages. It’s pretty easy to BBQ your damages this way! From there it’s a matter of getting the Equipment to work with your Cards. When you Rebirth, you’ll gain Battle Manuals.
See the +7 in the top middle of the above screen shot? That’s how many Battle Manuals will be added to your collection after you Rebirth. That number goes up every tenth level you defeat after level 100. It’s also affected by a Card! Each Card you buy after the first one will cost more and more. So do choose very carefully before buying a Card. Free tip: Doppelganger and Baphomet are good choices!
Initially anyone would think that this is a “no brainer”! Buy the Cards and upgrade like crazy, right?! Unfortunately, that’s not the case here. With certain Cards, the more you upgrade them, the further your damage decreases.
For example, try upgrading the Archangeling and/or the Angeling cards. Do keep an eye on your damages. You’ll get the bonuses from the Cards just fine. You’ll also notice how you’re getting slower to get through levels! Fortunately there’s a Reset button. Unfortunately you’ll only regain 75% of the Battle Manuals you’ve spent. So don’t use this button often.
5. Equipment Gaining, Breaking, And Matching
The Equipment of RO: Click H5, thankfully, is a lot more straightforward compared to the Cards! Every 100 map levels you defeat will gain you 1 piece of Equipment.
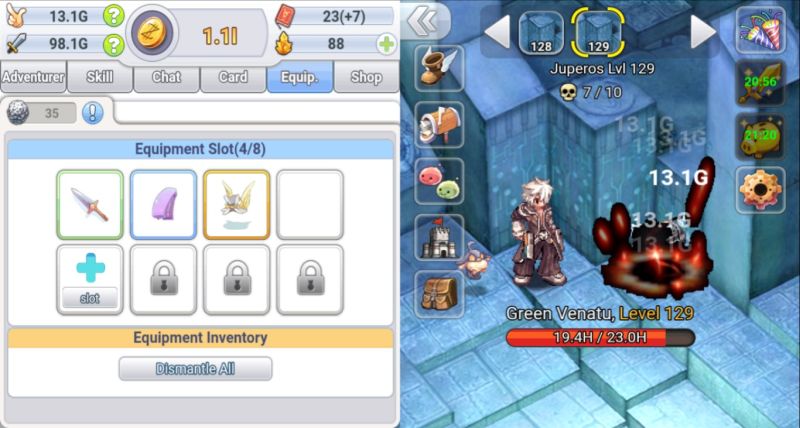
The bad news is trying to get to higher 100 map levels. Thankfully the Rebirth System allows you to get to level 100 over and over so you can keep getting Equipment. Your aim now is to get the Equipment that matches your Cards. If you can get at least 1 Card match to your Equipment, that’s all it takes to boost that Card. Beyond that, you can break unused Equipment to gain Elunium which is used to upgrade your Equipment.
6. The Very Nifty Pets
RO: Click H5 has a Pet system! Starting at map level 50, you can buy a pet. The good news is that each Pet has unique skills which boost you in some ways. The bad news is trying to decide which Pet to stick with!
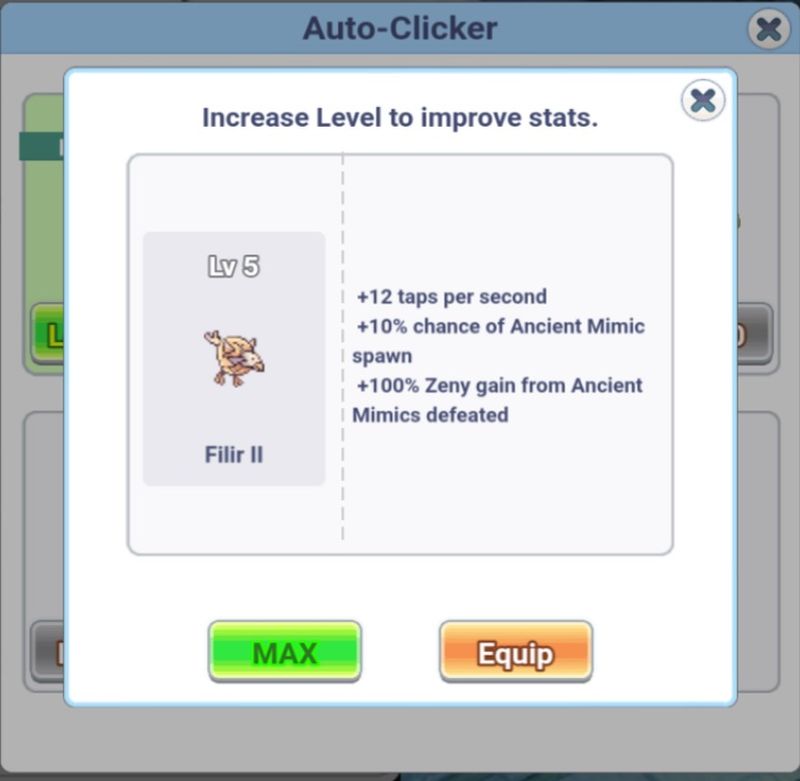
Each Pet will cost Emperium to buy and more Emperium to upgrade. You can freely switch between the Pet in use at any time. This comes in handy depending on your situation. For example in the above screen shot, Filir II increases your chances to make an Ancient Mimic show up at random. Then it will boost the zeny gain you get from killing the Ancient Mimic.
Also note that killing Ancient Mimics is part of your daily quests. Compared to Filir I, you can get more click damage per second. The downside would be the lack of a constant zeny boost. You’ll see all the effects of each pet as you unlock them. The cool part is that the Pets are Auto-Clickers. Your idle damage (standard DPS) will also apply because it’s not really you clicking.
7. The Incredibly Powerful Main Skills
The Main Skills of RO: Click H5 refer to the Skills tab. You’ll gain these when you unlock them via buying specific character skills.
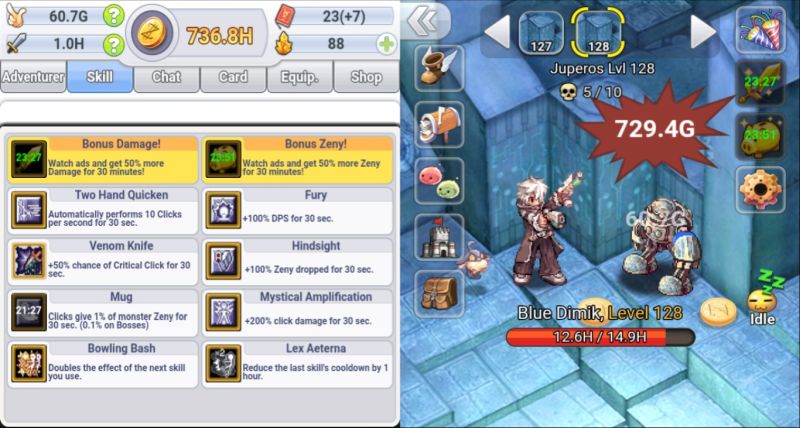
Believe it or not, there is a nice click order to the Main Skills. This will really pack a brutal punch and keep it going for another 30 seconds. Make note of the Reset scrolls in your inventory. They’ll reset the cool downs for the Main Skills instantly. Think of this as your extra devastating bonus! With the use of these skills you can certainly hammer your way through several levels in no time flat! In combination with the right Cards, Equipment and Pet, you’ll have way fewer map levels to be stuck on!
Again, use a Hyper Attack before starting this and press and hold your screen while it’s all active. Keep an eye on Mystical Amplification to be able to click it again. Use the Main Skills in this order from left to right. Start with Two Hand Quicken. Then use Fury, Venom Knife, Hindsight, and up to Mug. Use Bowling Bash followed by Mystical Amplification and lastly, Lex Aeterna.
Of course the question of “Why this order?” quickly comes to mind! Firstly you have to note that your Pet is still clicking when the sleeper icon vanishes. It will vanish the second you click Two Hand Quicken. So which skill would you like to keep clicking on?! If you guessed the one with 200% click damage boost, you guessed correctly! That’s why you use Bowling Bash to boost it the first time and Lex Aeterna to reset Mystical Amplification’s cool down instantly (1 hour). Remember that you need High Priest Eliza at level 100 with all skills in order to do this.
8. The Guild Gains
Just like many other clicker RPGs, RO: Click H5 has a Guild setup! And this Guild setup also has bonuses for you! Thankfully the Guild setup in RO: Click H5 is very straightforward. You can make a guild for 50 Emperium or join one. The Today’s Raid is a Raid setup where you’ll do battle against the boss. No, it’s not hard at all to do. Just keep clicking on your screen as fast as you can and hope for the best! That’s literally all there is to it. From there just collect your reward. Using the Today’s and Yesterday’s Raid you can see the damage done by you and your other guild members.
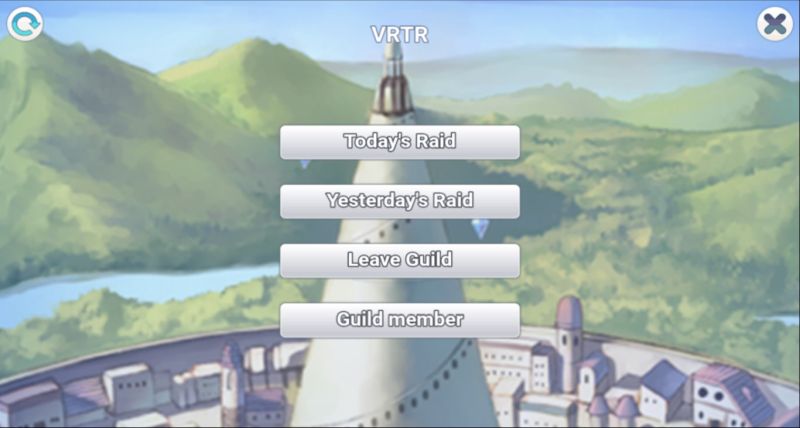
The Guild Member button is to see some various details about your guild members! Not too complex, huh?! That Leave Guild button has a catch to it. Of course you can use it at any time. The downside is that you’ll have to wait 24 hours before you can join another guild. You might get a little bored while waiting to join another guild! Don’t get any funny ideas about “guild jumping” in hopes of getting the rewards from the Raid. That’s why the waiting time is there.
And that pretty much sums up our beginner’s guide for RO:Click H5. If you have anything to add to our list of tips and tricks, don’t hesitate to let us know in the comments below!