Welcome back to Magrasea, Professor. Has your vacation been well? Did you not take a vacation at all?
Regardless, your presence here graces us once more because a certain mode of operations has been made itself known to other Professors through its sheer difficulty and unpredictability, much unlike the battles that you’ve fought thus far through the different sectors of this megaserver we all call a home (for most of us, anyway). These operations only reward the most brilliant of Professors as its battles are brutal as they are unforgiving. Do you think you have what it takes to conquer Exception Protocol?

To any fledgling Professor reading this guide, do know that this is not the beginner’s guide to making it through Neural Cloud. That guide can be found here, whereas the game’s complete tier list of Dolls can be found here. We assume that you’re here because you’d like to learn how to play this mode. Well then, without further ado, let’s get those thoughts a-flowing. You’ll need them to be!
What is Exception Protocol?

Strap yourself in, Professor, Exception Protocol is a combat mode unlike you’ve ever seen. You’ll be punished for each wrong step you make and greatly rewarded for the right ones. But before we talk about its nuances, let us first talk about Exception Protocol, or EP for short, as a whole.
Unlike the campaign which has Dark Realm, Endless Exploration, and the like, Exception Protocol is somewhat of a simulation where only the most cunning and calculating of tacticians from all corners of Magrasea congregate to test their wits against one another. EP comes with a total of 3 difficulties: Basic Protocols, Advanced Protocols, and Special Protocols. These 3 difficulties each have their own score multipliers wherein Basic has the lowest and Special has the highest. Basic Protocols allows the Professor to practice and perfect their strategy with relatively low difficulty without sacrificing challenge.
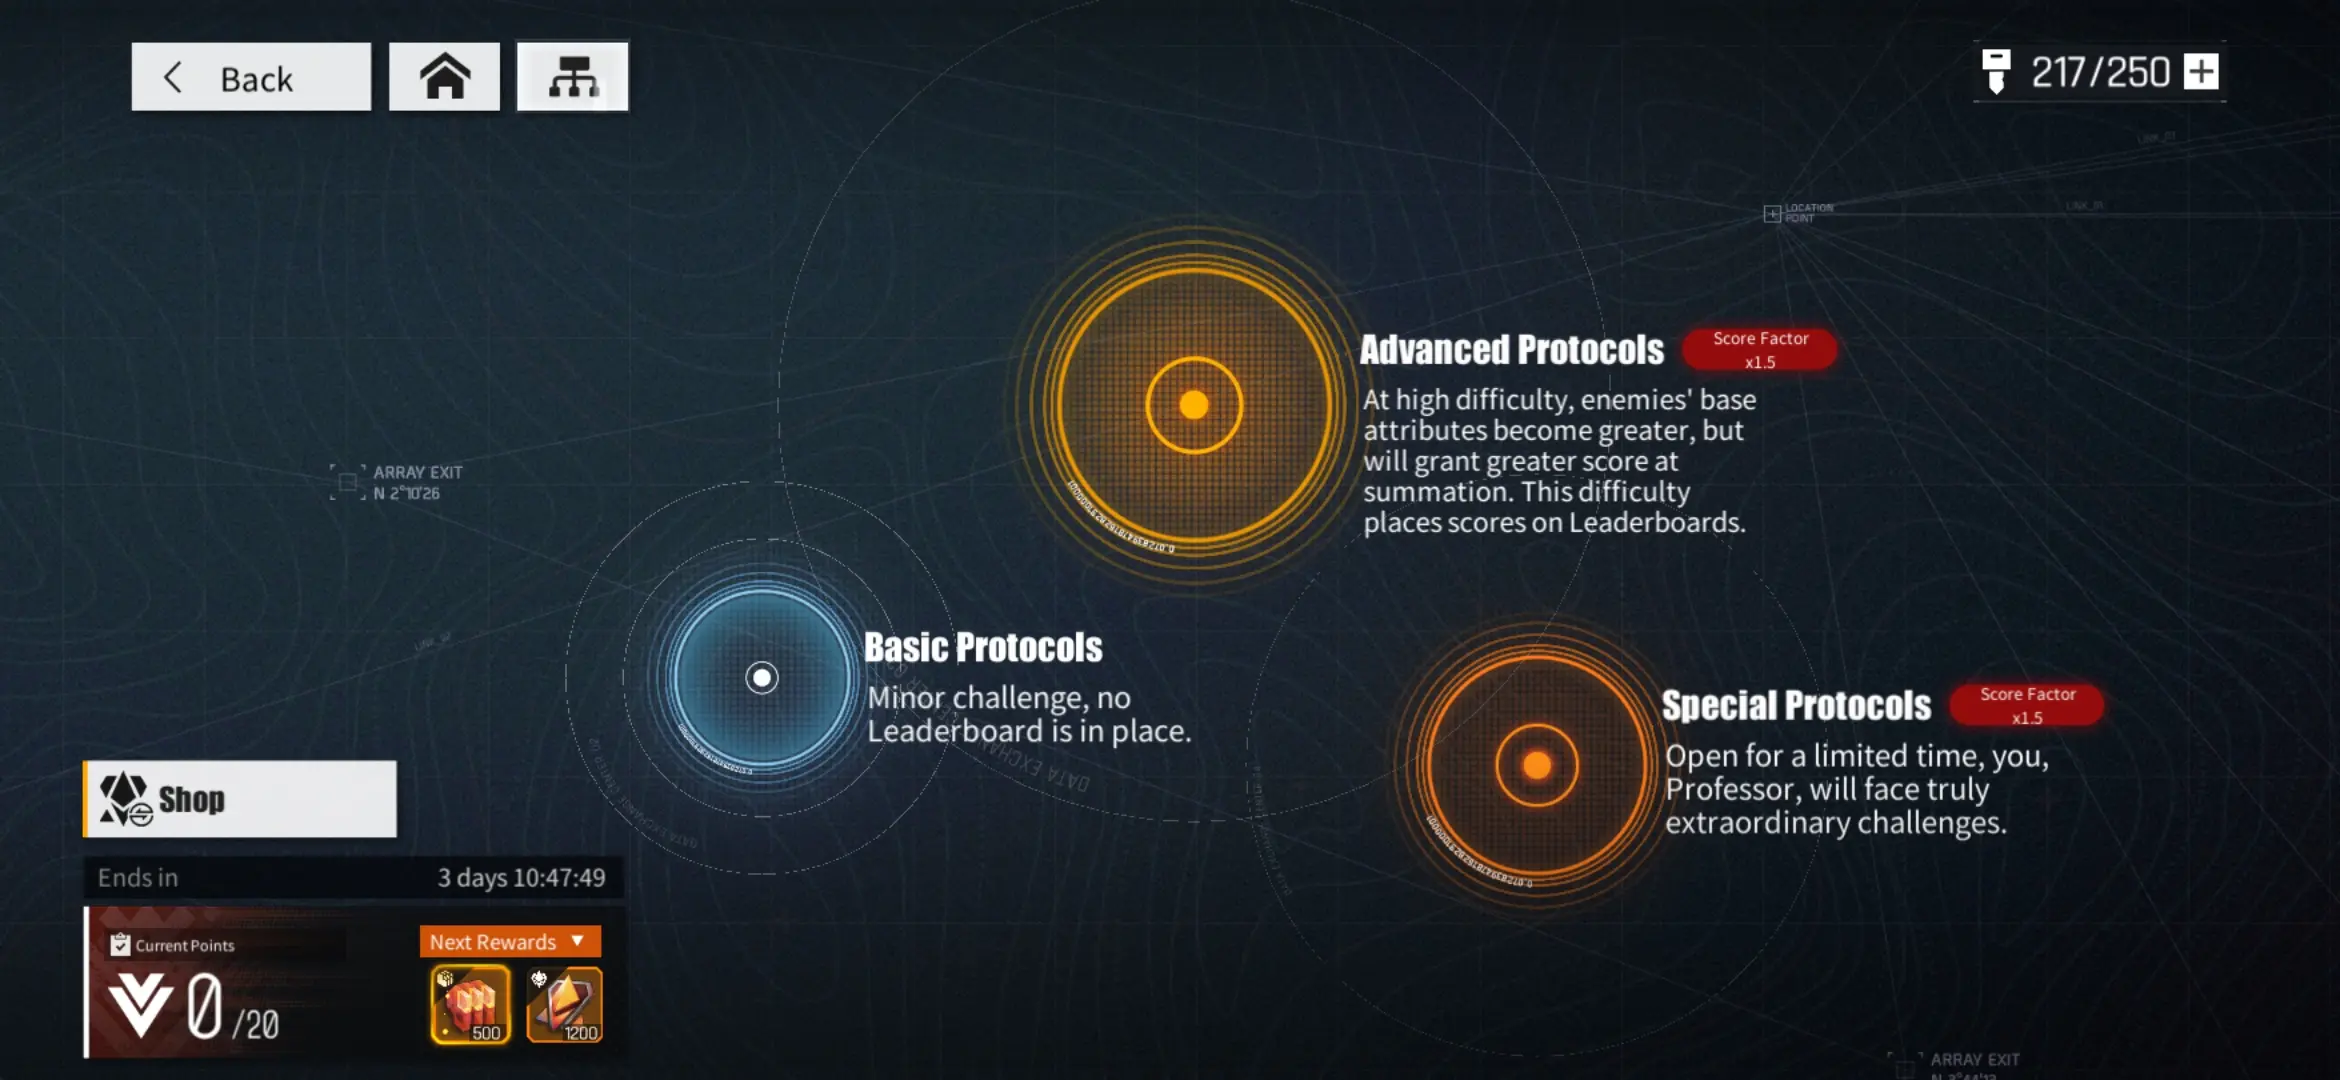
Advanced Protocols is a more commonly performed difficulty and should the Professor score high enough, their scores will be posted in the server’s leaderboard. Lastly, Special Protocols are the most difficult where the Professor may employ certain Dolls from their own roster; such Dolls are significantly powered up, but all other enemies are at their most powerful as well. For the sake of this guide, we will only cover Basic and Advanced Protocols.
There are a couple of things you need to know about EP as a whole. In regular battles, we’re sure you’ve noticed that your Dolls’ Algorithm builds come in clutch, especially if you’ve built your Dolls to fight in a way contrary to how they’re intended. To add to their performance would be their levels, their rarities reflected by their star levels, and their skill levels. All of these drastically play a part in a Doll’s overall efficacy in a fight.
Unfortunately, in EP, your Dolls’ levels, rarity, and skills will be balanced out to a certain degree (more on this soon). The hardest part about this is that any and all Algorithm sets you’ve invested into your Doll will be completely unusable. The Dolls in the EP roster will solely rely on the raw stats they have. That said, majority of the Dolls’ survival in EP hinges on the Professor’s decisions.
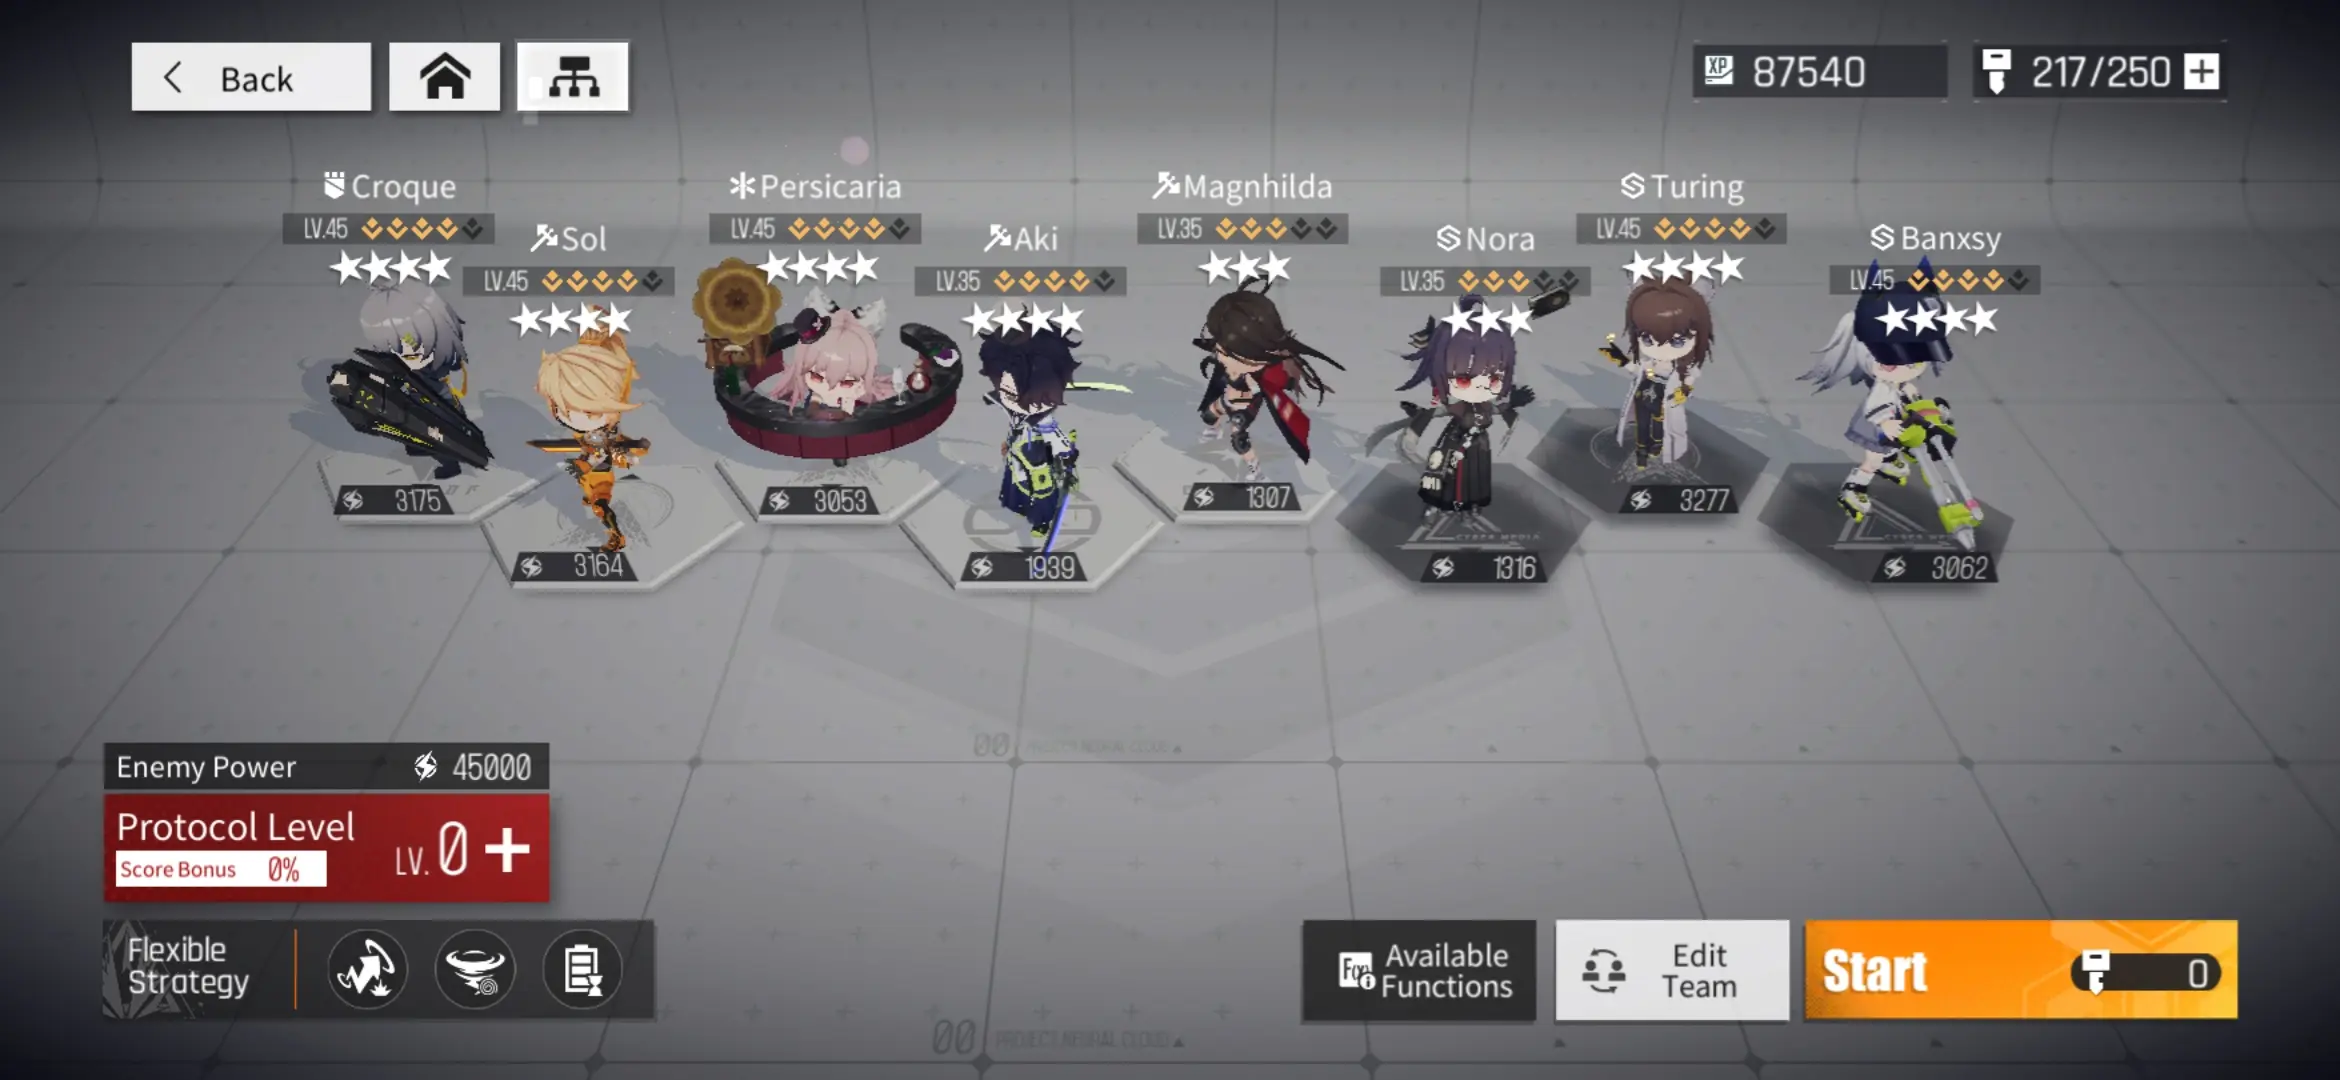
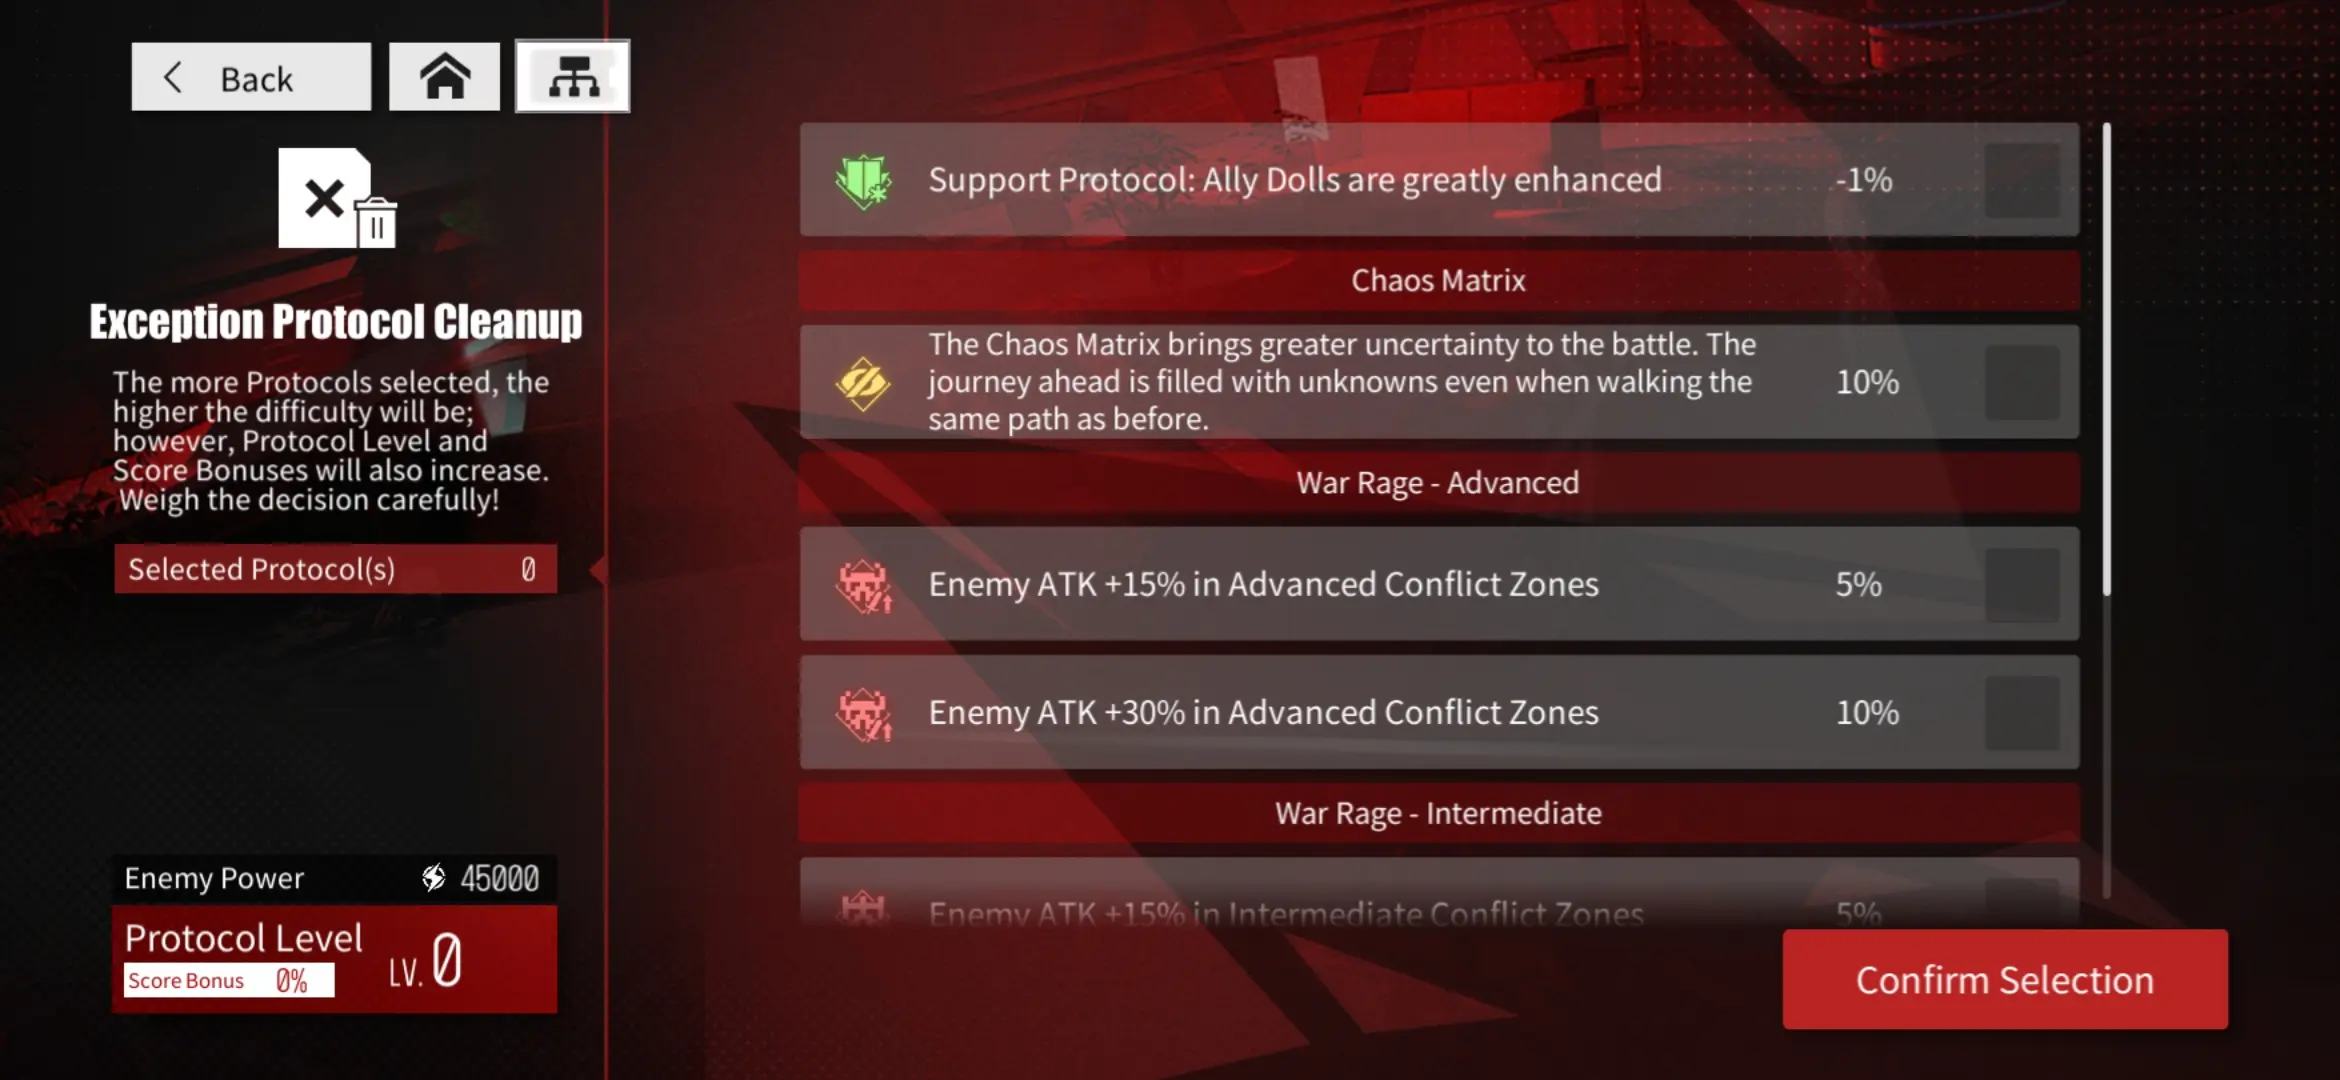
One thing the Professor has to do before composing a team is to choose the difficulty of their run. This involves having to tick certain boxes that increase the enemy’s overall strength in their respective Conflict Zones (e.g. 10% stronger in Elementary Conflict Zones, 10% stronger in Intermediate Conflict Zones, etc.), as well as activating a Protocol that will not allow the player to see which functions drop from each Conflict Zone.
Conversely, if the player is merely practicing for this mode, they may tick a box that significantly boosts the performance of all their Dolls. Though, this won’t stop the player from choosing more difficult Protocols to ramp up the difficulty as they move alone. More on this later.
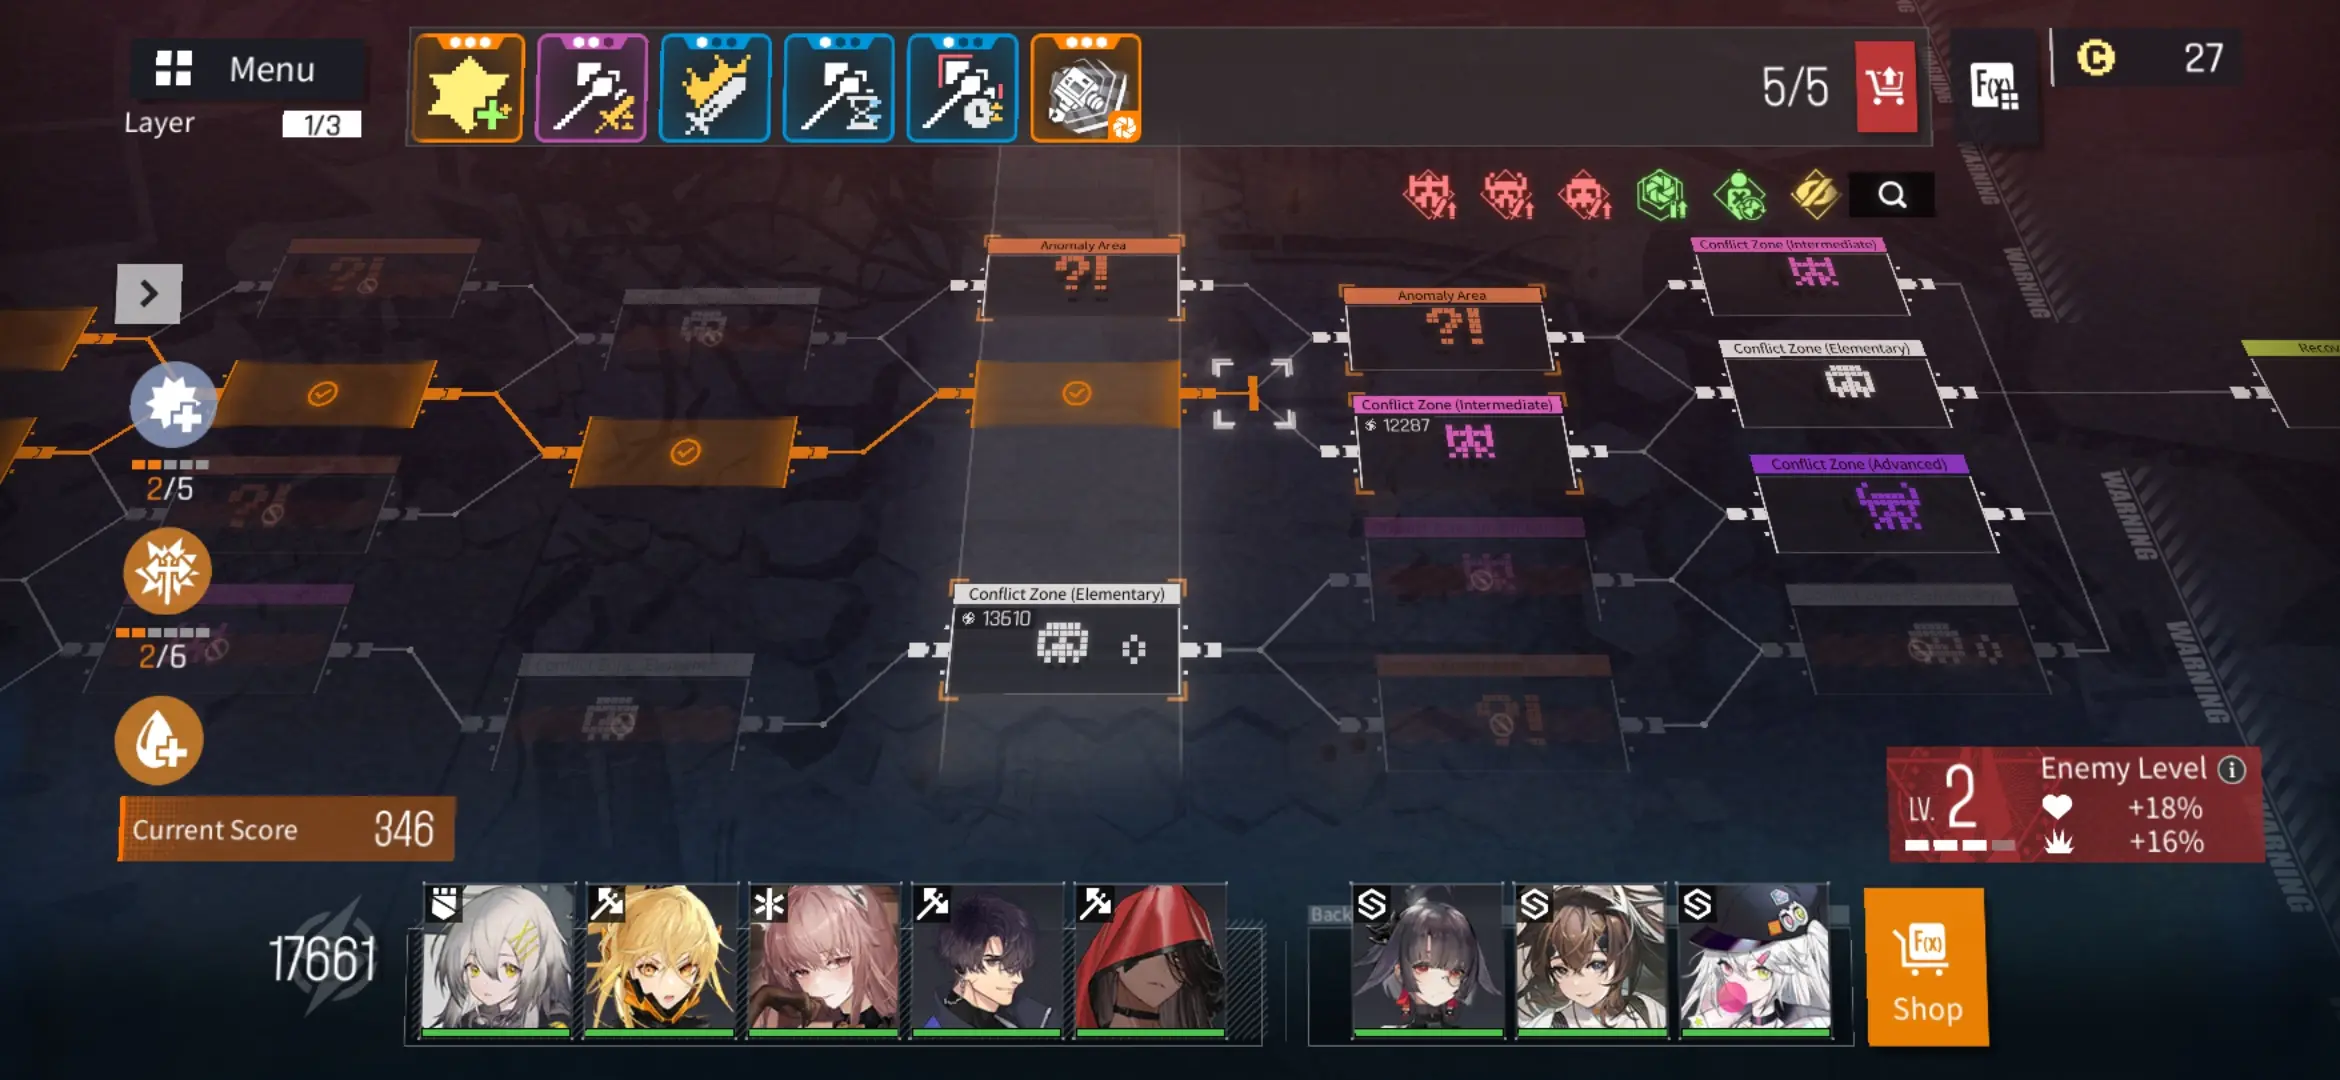
When the Professor begins their advance into EP, they will be situated in a 3-layer session called a Cleanup. One of the first things they will be prompted to do is to select a Function Card from 3 randomly-presented ones. This is your primary means of gaining Function Cards. This deck can be shuffled at the cost of some Cache Coins, but the probabilities of lowering the appearance of all these cards won’t be in effect.
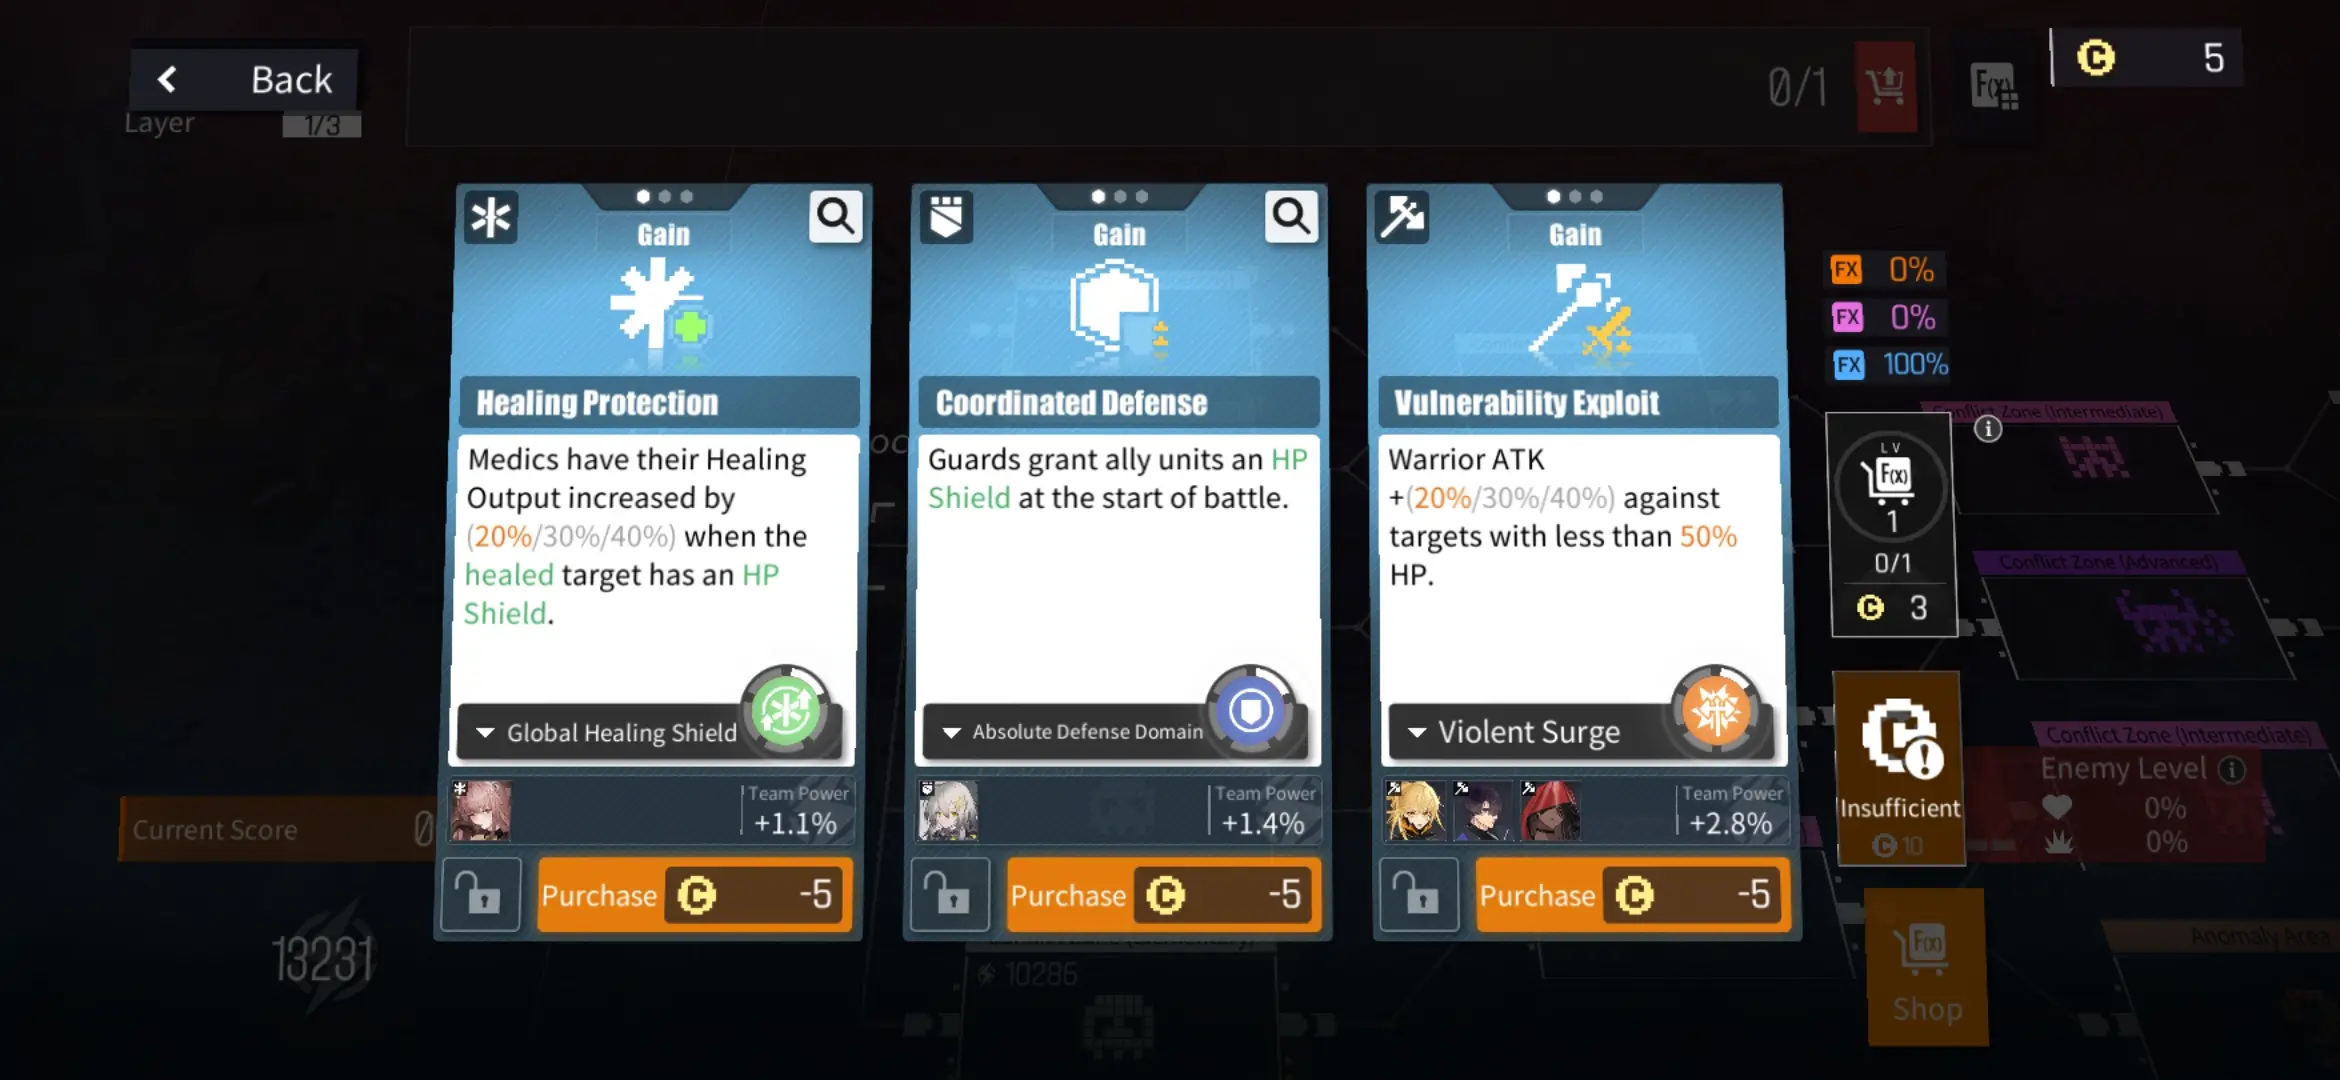
The deck size is also limited wherein the Professor may only hold a maximum of 2 Function Cards at the beginning. This can be expanded via Anomaly Nodes (if given the chance) or through spending Cache Coins at the Function Card selection screen. Be warned that the amount of Cache Coins needed for deck expansion rises greatly with each purchase.
At the end of each layer will have a final battle wherein the player will be rewarded with a choice among a few orange Function Cards, completely free of charge. To add to this, a new slot in the deck will be added to accommodate the new orange Function Card. This will continue for all 3 layers up until the final boss of EP wherein your entire strategy will be tested.
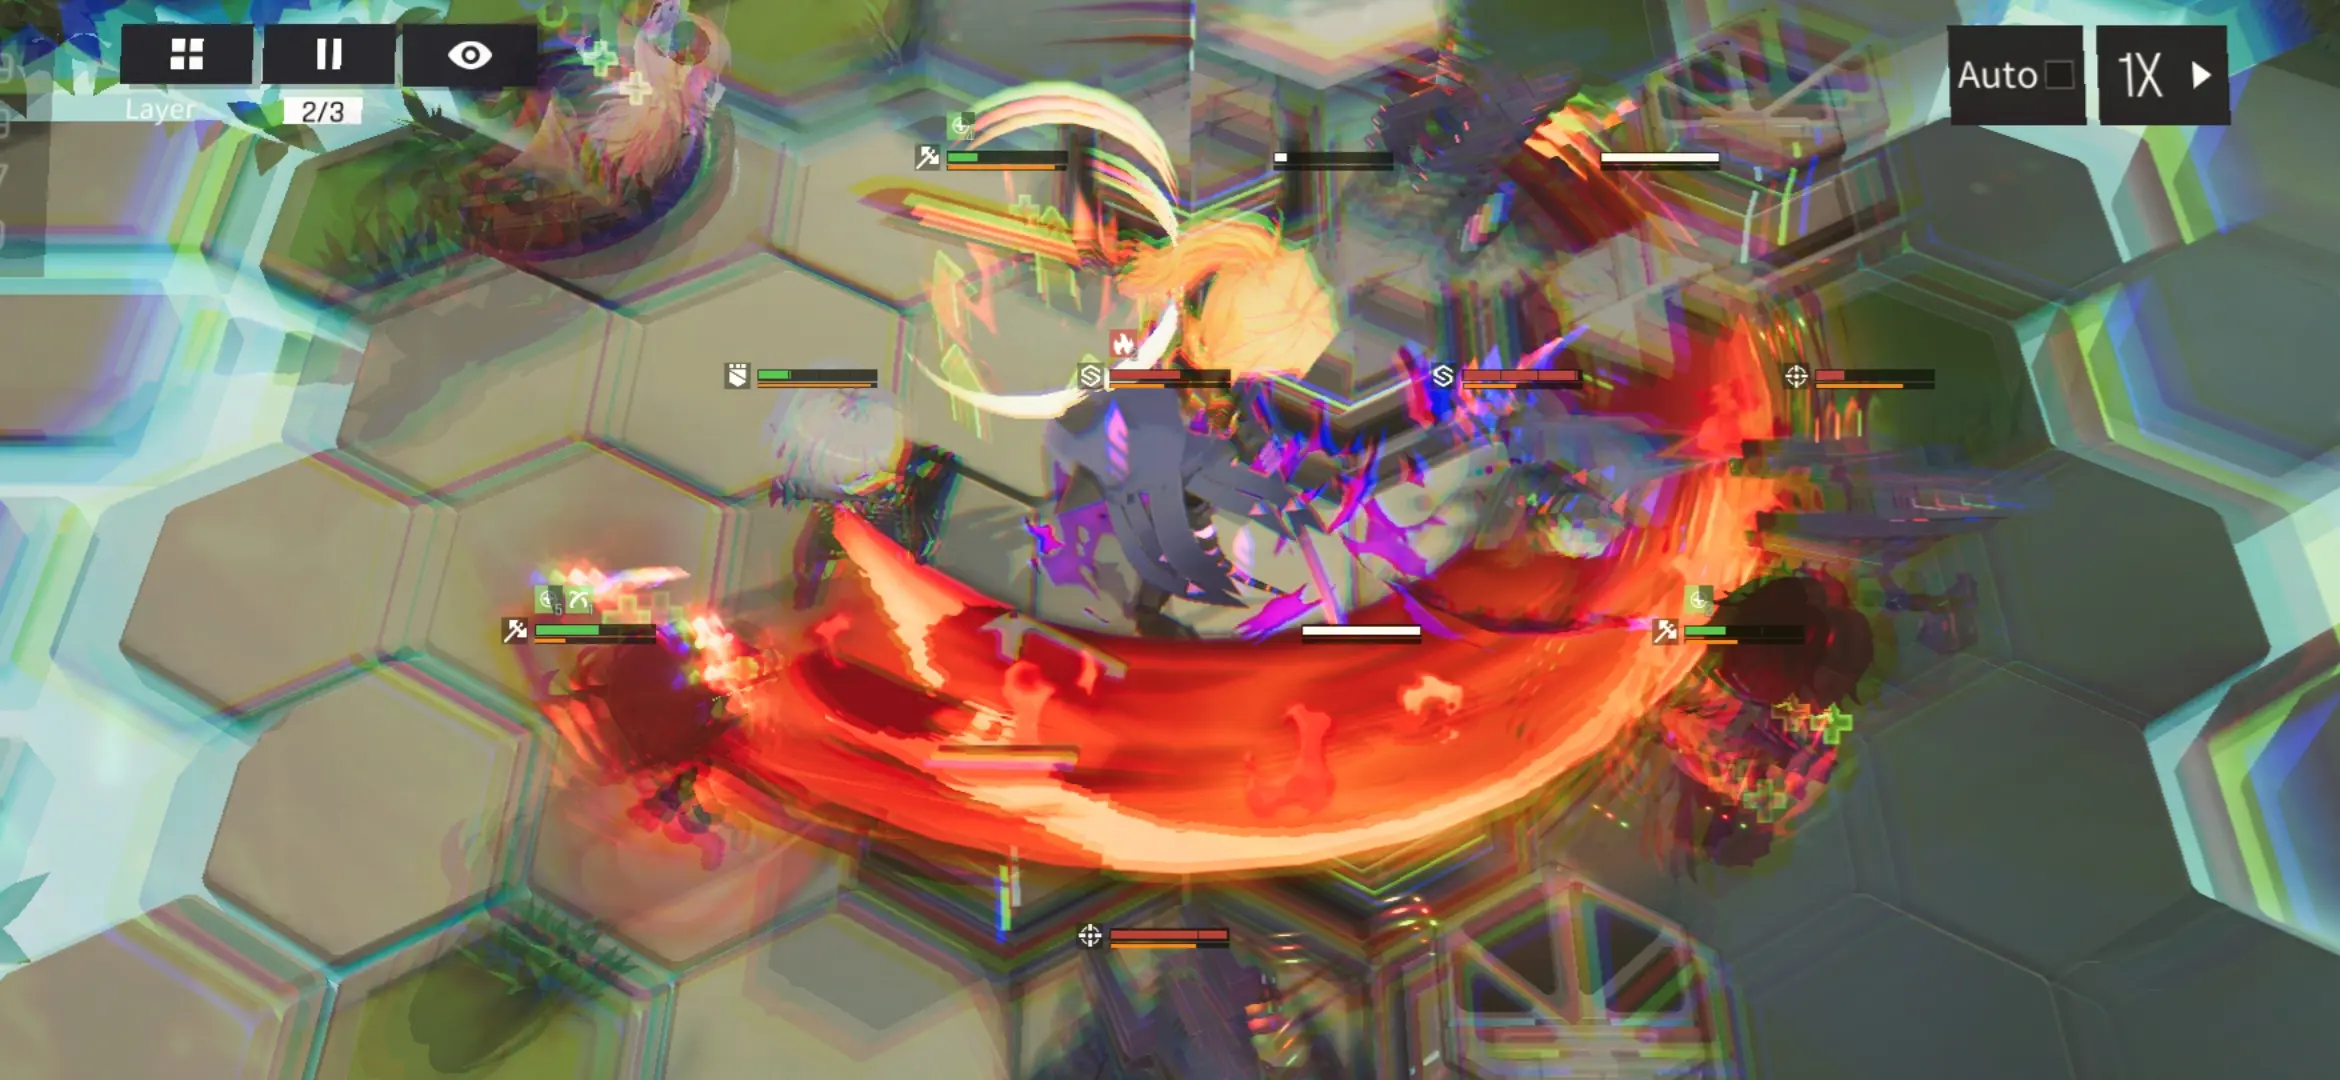
Unlike most battles in the main story as well as events, EP allows an unlimited amount of retries. This will allow the Professor to reassess their strategy mid-battle by repositioning their Dolls or even picking out the right Tactical Skillset for the fight. However, this does not mean that with each retry, the battle gets easier. It’s always easy to get cornered or arrive at a node where it’s impossible to advance, especially at a boss fight. Though, defeating the boss quickly does grant its due rewards.
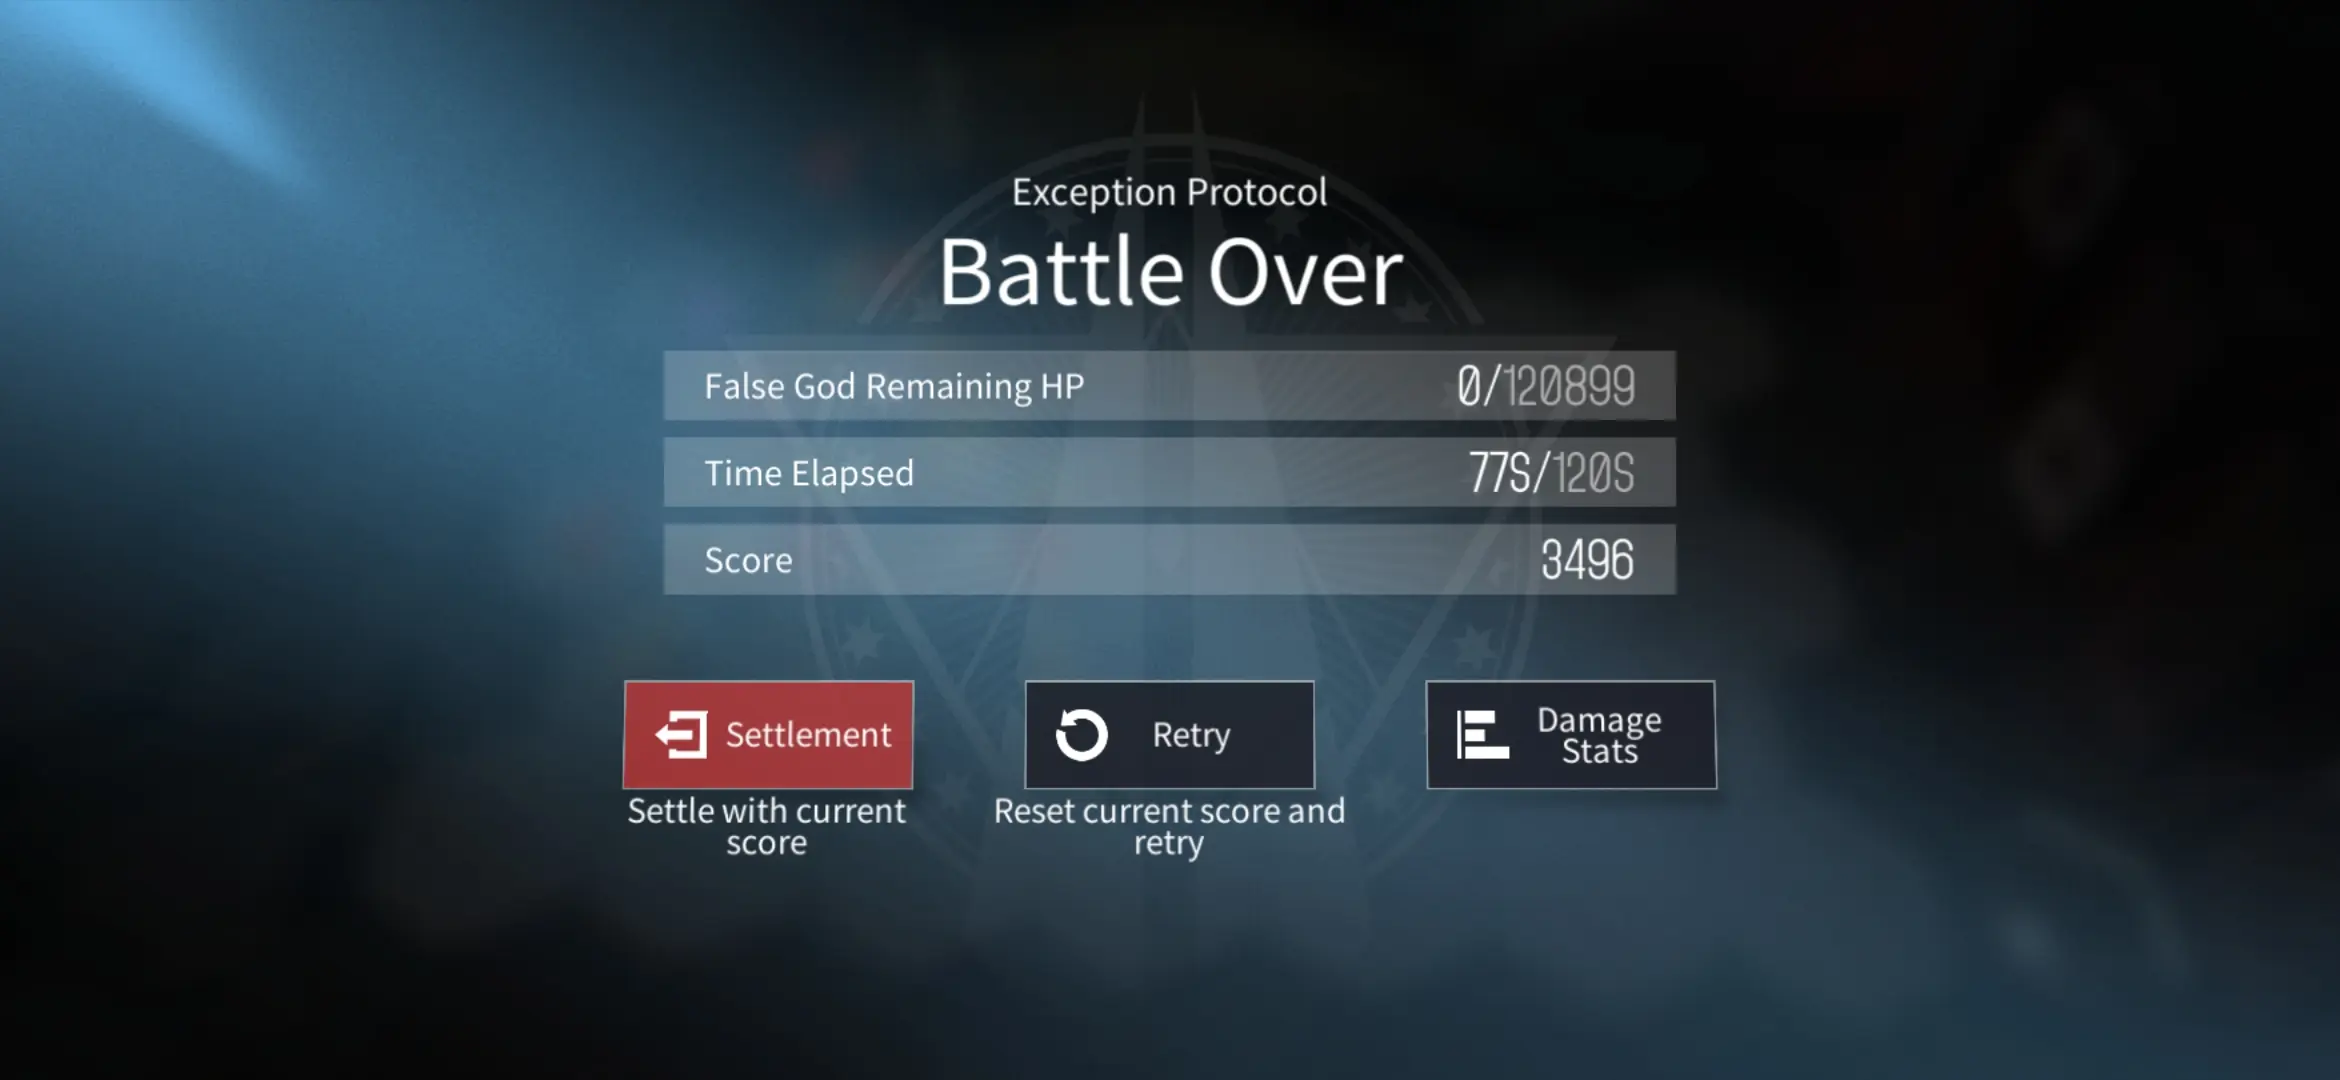
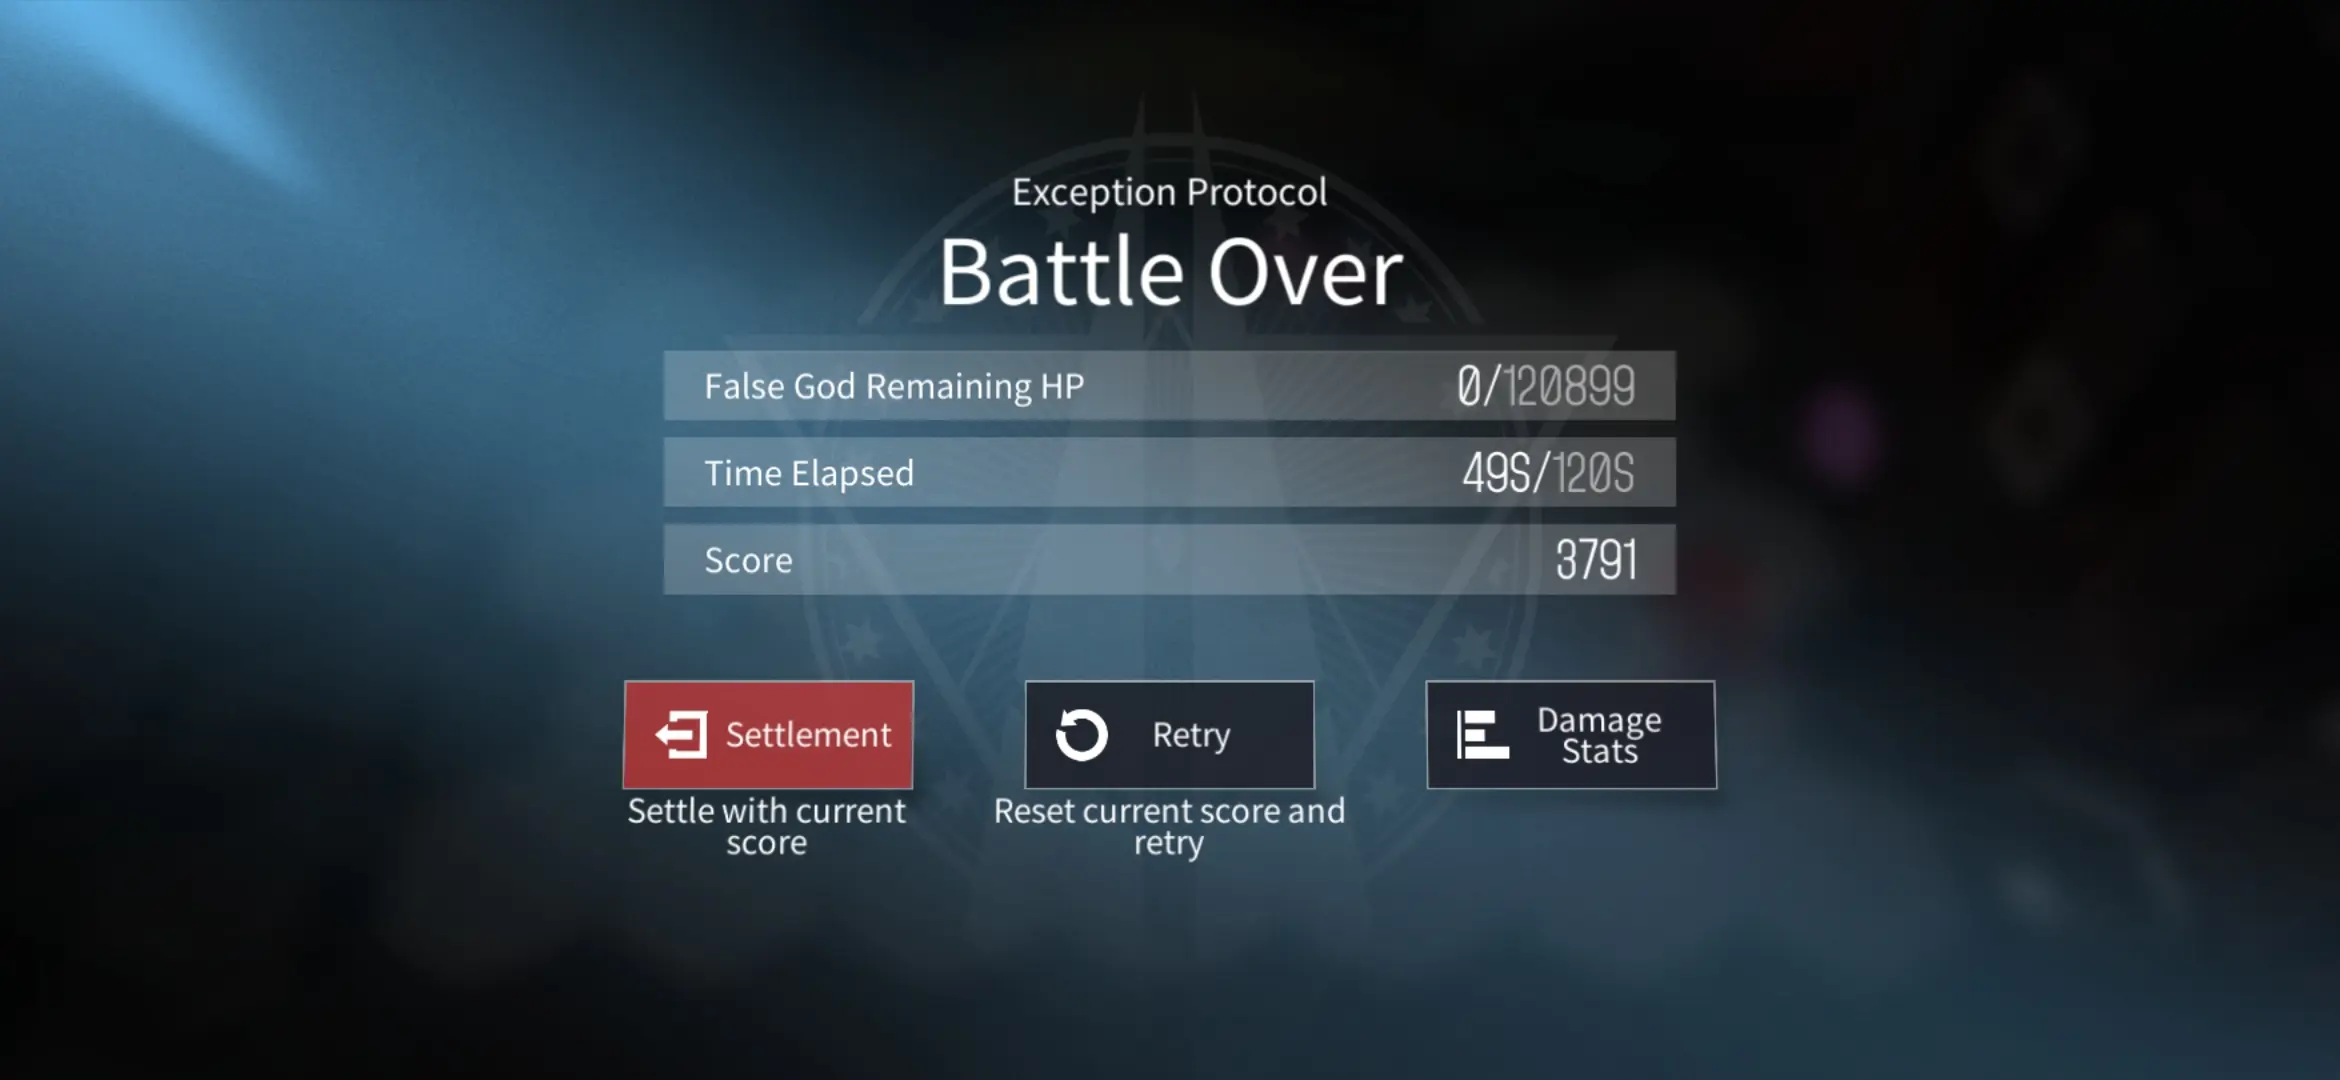
Should you defeat the boss in time or abort the Cleanup, your score in total will be tallied to the factors below at the final screen. Do note that these factors also derive their bonuses from the multiplier you have based on the difficulty of your run as well as the type of EP difficulty you’ve chosen:
- Boss’ Remaining HP — The amount of HP remaining by the time the timer ends. You get a higher score if the boss has been slain. Showed at the end of the endboss fight.
- Time Elapsed — The amount of time remaining when the boss has been slain. If time is up, you get no points from this. Showed at the end of the endboss fight.
- Score — This is the score you will see after defeating the endboss. Showed at the end of the endboss fight.
- Damage Dealt — Your overall damage dealt during your run. It caps at 100% if you finish the run.
- Cleared Intermediate Zones — The total amount of Intermediate Conflict Zones you’ve successfully conquered.
- Cleared Advanced Zones — The total amount of Advanced Conflict Zones you’ve bested. These give much higher points than the Intermediate Zones.
- Boss Kills — This tallies the number of bosses you’ve killed throughout the run. The endboss counts as an extra point.
- Blue Function Balance — The points derived from here come from the amount of blue Function Cards you’ve owned up until the very end of the run.
- Purple Function Balance — The points derived from here come from the amount of purple Function Cards you’ve owned up until the very end of the run. These give a higher number of points than blue Function Cards.
- Orange Function Balance — The points derived from here come from the amount of orange Function Cards you’ve owned up until the very end of the run. These give the highest amount of points.
- Bonus Boss Kill — You get a ton of points from here if you’ve successfully defeated the endboss.
- Protocol Level Percentage — This reflects the current level of your Protocols for this Cleanup.
The above factors are not tallied in any order. Each score overlaps with the other and it’s up to you to try and score as high as possible. There’s also no shame in bowing out and quitting early on, because this will prepare you for another try wherein, hopefully, you’ll make better decisions.
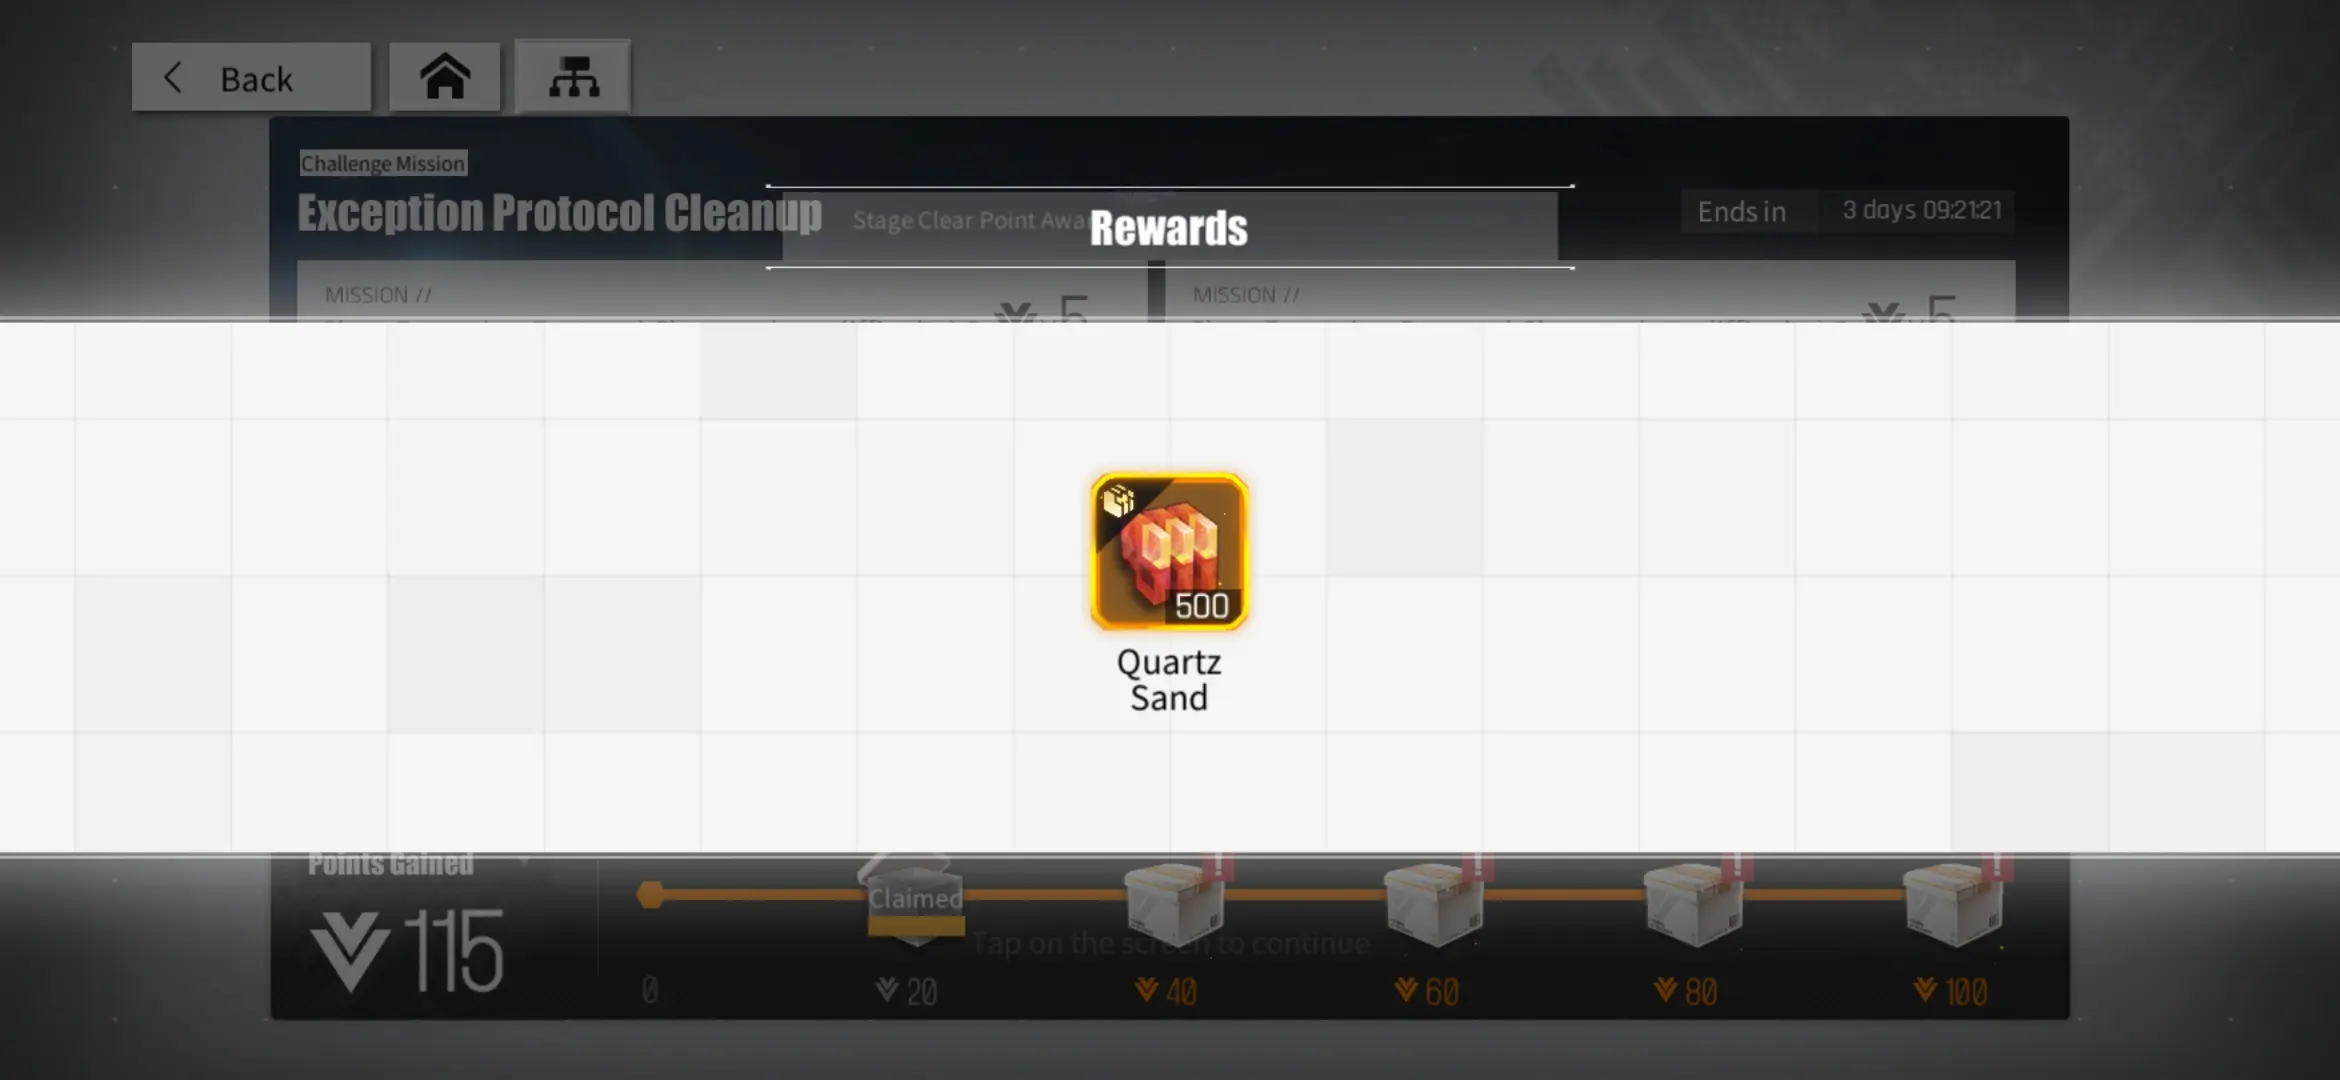
We’re pretty sure you’re wondering at this point: “Why try EP at all if it’s so difficult?” The rationale behind giving this challenging mode a try is that you can be rewarded up to 1200 Quartz Sand as well as 3000 Ether Tokens—both of which are precious commodities for your journeys across Magrasea. The Quartz Sand, especially, is useful for if you’d like to spend it on Keys or Search Commands.
The Ether Tokens can be used to purchase special items in the Exception Protocol Shop, particularly widgets needed to increase a Dolls’ level cap. If you read on, we might be able to help you score well without having to grind so hard to complete all the goals needed to win these hefty amounts of Quartz Sand and Ether Tokens.
Because Exception Protocol is an extremely challenging mode wherein only the best players rack up the most amount of points with the above factors multiplying their score, it also comes with a stringent set of rules that each player needs to bear in mind.
Exception Protocol Rules
While EP may seem quite confusing at first, all you need to know is that it has a rather stringent set of rules which the player must abide by at all times. These rules can’t be broken by any means, but they exist rather to guide the player toward the challenge that awaits them.
The rules are as follows:
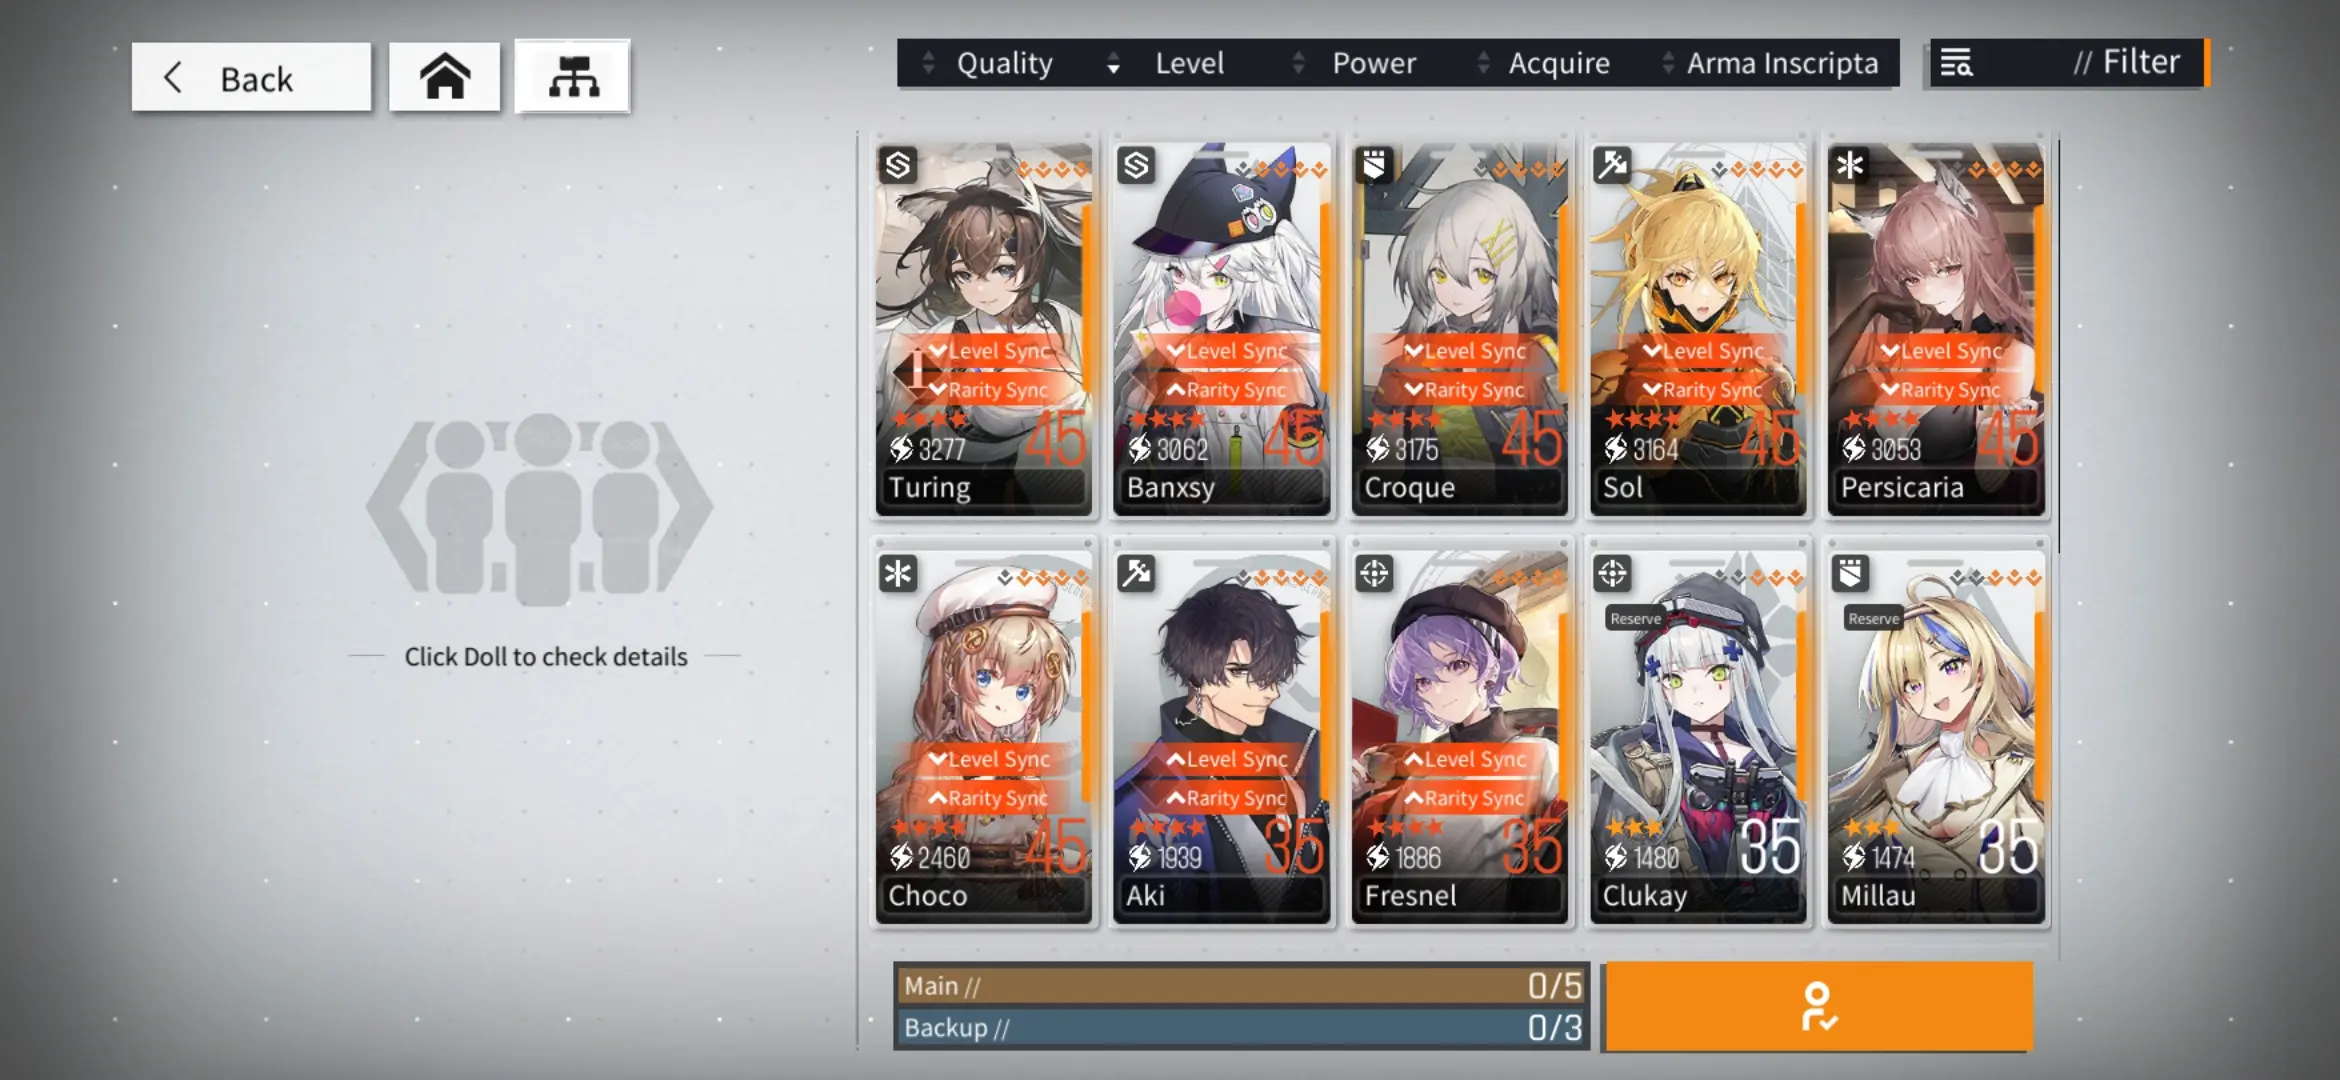
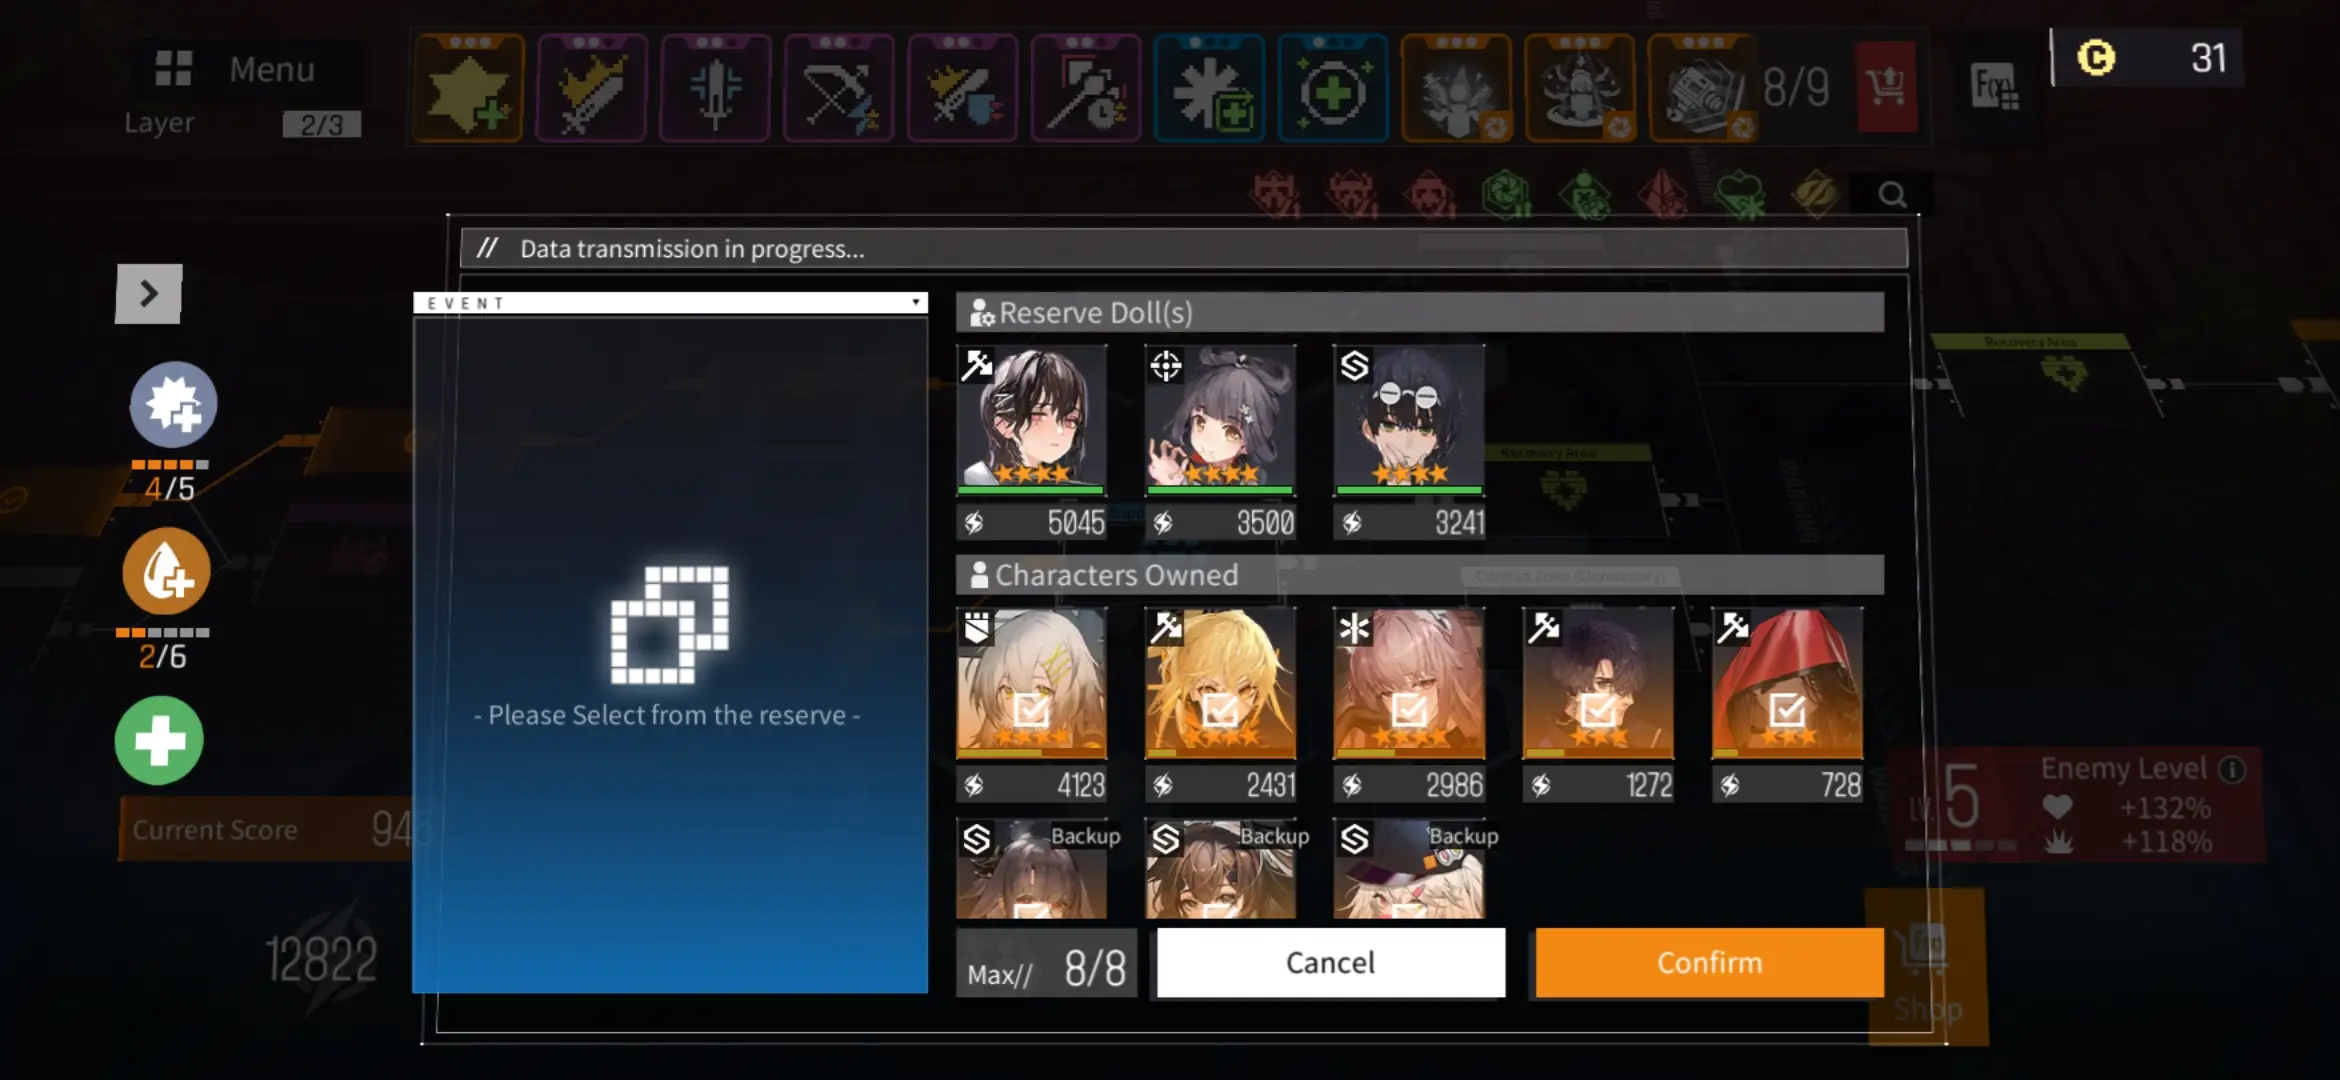
- The Dolls presented in the EP roster cannot be changed unless the EP season is over. It is until then that a random roster of Dolls replaces the previous one. You will be forced to use the presented Dolls for the duration of the EP season.
- You can have a total of 5 fielded Dolls and 3 standby Dolls as per each regular battle. However, any Doll on your team may be replaced by a Support Doll at a Support Node during the second layer of your run.
- Friends’ Dolls cannot be borrowed for EP. This ties into rule number 1.
- No matter what Algorithms you’ve put in your Dolls, they will not be in effect during EP. However, they can still be used outside of this mode. The Dolls’ raw stats will be used instead. All Dolls’ levels will be brought to at least 25-35 for Basic, 35-45 for Advanced, and 45-65 for Special. Star levels will be brought from 2-3 stars for Basic, 3-4 stars for Advanced, and 4-5 stars for Special. Skill levels will be at Lv1 for Basic, Lv1-5 for Advanced, and Lv1-10 for Special.
- Unlike campaign battles wherein the Professor has a fixed Function Deck size, this size needs to be expanded regularly to accommodate more Function Cards. This is automatically expanded after every other battle, however.
- Trading Areas are non-existent in this mode. Instead, the Professor may choose to buy and sell their Function Cards at will so long as they aren’t currently in combat. The amount of Cache Coins gained is relative to the difficulty of the Conflict Zone completed.
- The Professor cannot Overclock their Dolls. They will need to think on their feet at all times.
- With every other battle completed, the enemy will grow stronger. Each time the enemy strengthens, the Professor is given a chance to add another negative, or occasionally, a neutral, Protocol in exchange for a higher score. However, they may also opt not to pick any of these and keep their current score multiplier.
- The tileset of each of EP’s 3 layers, Doll rosters, and endboss varies per season. At the start of every new season, these will all be reset completely. Your progress, if left incomplete, will also be reset.
- An EP season equals 12 days. Each Professor has this long to complete runs and claim all EP prizes.
It’s good to know these rules, but after playing EP repeatedly, you’ll eventually understand this more clearly and improve your technique in most areas. Without further ado, let’s now talk about some ways you can possibly gain a high score in EP.
Getting a High Score in EP
EP is regarded as one of the most difficult modes in the game barring the Enigma Black Hole mode and the challenge modes during events. What makes it so difficult, mostly, would be the list of rules we’ve posted above. That said, this doesn’t mean that it’s impossible to beat. If you’re a fledgling Professor looking to succeed in EP and reap its fruits, then read our tips and tricks below!
1. Pick Out a High-Damage Team
As we’ve implied so far, defeating the endboss should net you a lot of points by the end of the EP run.
Overall, each boss in EP varies per season, but one thing they have in common is that there will always be a way to get them to die out early. The best strategy to counter almost any boss faced in EP would be to assemble a team of hard-hitting Dolls that are sure to whittle down a boss’ health in no time.
It’s important to ensure the survival of your Dolls, sure, but to simply complete a Cleanup would require some swiftness in clearing out any battlefield. Your first choices would be your Guard and your Medic. That’s right, at least one of each. The rest of which you’ll need to make room for Snipers, Warriors, and Specialists, all of whom are guaranteed to unleash fury unto the enemy ranks.
It may be tricky at first seeing as Guards and Medics are quite essential in any team, but don’t have too many of them or your team’s overall DPS (damage per second) will suffer.
Some Warriors may double as Guards if given the right Functions except they most certainly hit harder than Guards whereas some Specialists may double as Snipers with extra steps. However, the latter only applies to Specialists that focus greatly on dealing damage such as Nora, Sueyoi, or Banxsy.
Though, if you have any Specialists on the roster that inflict debuffs, certain Function Sets may assist in drastically increasing the Specialists’ DPS output overall. The presence of Snipers on the team should be self-explanatory, however, they shouldn’t overstep their bounds with the Warriors—one class should not be stronger than the other. We’ll talk more about that when it comes to Function Set completion.
If your team seems incomplete or that some Dolls don’t exactly fit, pick them to fill out your slots anyway. What we mean is if you’re missing a Warrior or a Sniper for your damage output, consider fielding someone unlikely for now. When you get to the second layer of the Cleanup, you’ll be able to land on Support Nodes where powerful Dolls who are not on the roster may be put in your team to replace your placeholder Doll.
Now that you’ve got yourself a nice team, it’s time to get dangerous.
2. Tick Off All Protocol Boxes
What’s a high score without risk?
Instead of dreading the impending pain that is the Exception Protocol Cleanup, it’s actually a great idea to tick off all the boxes in the Protocol Level screen. This is what will initially dictate the multiplier of your total score for EP.
If you’ve ticked off the Chaos Matrix Protocol and stuck to keeping your enemies’ strength levels at a 5% instead of a 10%, you’ll be left at a solid Lv3 Protocol which should be fine for anyone starting this mode. However, it’s even more preferred if you’ve put your enemies at a 10% since the first layer should be easy to complete. It’s here where you’ll get your feet wet.
Though, if this is your first time trying out either Basic or Advanced, you may try ticking off the very first box which will give you a score multiplier of -1%. While it may sound like a big deal, it’s small enough that you could still get a high score if you manage to complete the Cleanup flawlessly. Though, again, this is going to greatly depend on the overall skill of the Professor.
After setting your difficulty, it’s time to tap that start button and prepare for an adventure.
3. Lock Function Cards for Later
Function Cards—the very items that may make or break your team.
You find them virtually everywhere each time you venture out into the different sectors of Magrasea. Whether they be for your Medics, Guards, Specialists, Snipers, or Warriors, Function Cards exist to empower every Doll on your team and ensure their survival through the trials that await them. They cost Cache Coins to purchase, albeit at a fair price, but in EP, the shop sells these for a lowered value. Although, this doesn’t mean that the efficacy of such cards are diminished.
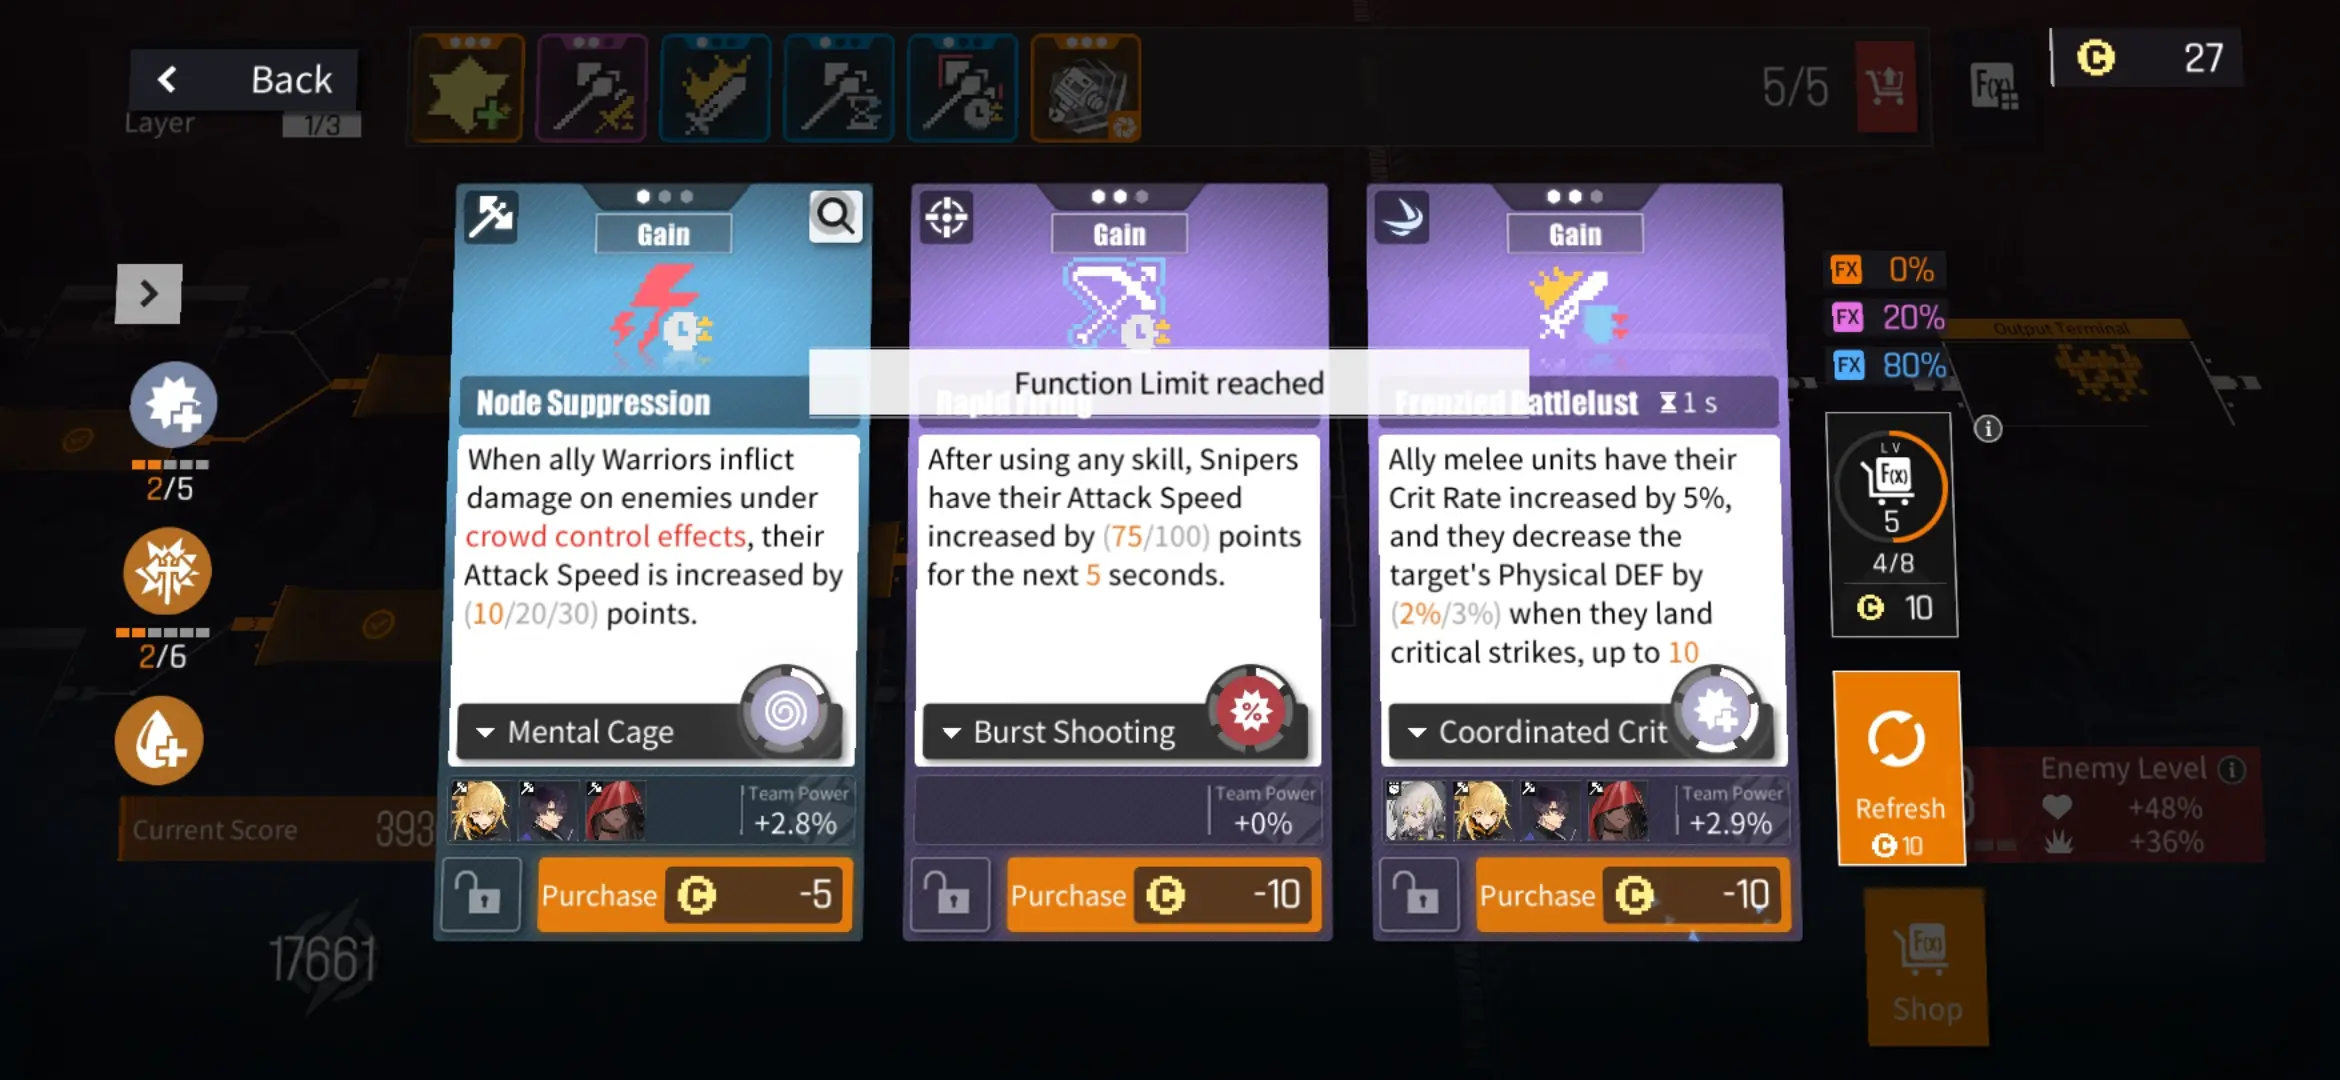
The EP’s Function Card shop is much different from the Trading Areas you encounter during any standard mode. Instead of Function Cards being sold to you at the price of 20 Cache Coins a pop, they’re sold here for half the price. More importantly, unlike shopping in a regular exploration, the EP shop allows you to lock cards in place so they don’t vanish whenever you choose to refresh the lineup. Why is this so important, you ask? Allow us to explain.
Locking Function Cards will keep them around indefinitely. This means that even if you’ve refreshed the lineup or completed a Conflict Zone which also causes it to refresh the lineup, the locked cards will remain. This will allow you to save up for certain cards of your choice if you didn’t have the Cache Coins or Function Deck space to purchase them with initially.
Adding to this, you’ll also be able to upgrade cards that you already have by preserving duplicates of these that you found with the shop. This is especially if they’re cards that you need. For example, you found the Warrior’s card called Incremental Pursuit from the Desperate Raze set and you want this one—lock the card if you can’t purchase it or lack space in your deck.
Once you meet the requirements to purchase it, take it and then refresh the deck again to see if you can land another Incremental Pursuit (unless the RNG decides to screw you over and make you run out of Cache Coins).
That said, completing a set entirely—not getting the strongest Function Cards—is tantamount in this mode.
4. Aim to Complete Function Sets
Completing a Function Set in itself is quite a difficult task.
Other than these being costly, they are all at the mercy of the RNG, and you’ll always be the hapless victim to the fallout. But who knows? Maybe there are higher entities in Magrasea that could grant you their blessings, if you tried (or believed) hard enough.
The reason why set completion in EP is an extremely important discipline is because the bonuses offered by many Function Sets may help you greatly through the Cleanup. They’re so powerful, they are often overlooked by the smaller bonuses that Function Pairs or even singular Function Cards offer your team. We strongly recommend taking the time to complete any Function Set.
Though, the caveat here is that each Function Set differs in value depending on the team. Since we’ve recommended earlier that you should build a team primarily of hard-hitting Dolls, it’s important to at least build up the Function Set of at least one of the classes of your primary damage dealers—Warriors or Snipers. The rest may follow.
Conversely, we do recommend also completing a Function Set that applies to your team as a whole. While a pair of Function Cards can stand on their own and not all sets have to be complete to be effective, it’s best for those starting out with EP to complete sets instead to fully understand what they’re capable of.
Below is a list of Function Sets that we suggest completing during your run. Though, don’t try to aim for all of them; only the ones that will apply to your team of choice:
(DISCLAIMER: The values of the effects of the examples below may vary in-game.)
LEGEND:
(G) — Guard
(W) — Warrior
(Sn) — Sniper
(Sp) — Specialist
(M) — Medic
(All) — Entire Team
Absolute Defense Domain (G)

(2 Cards) Guards automatically recover HP. The amount of HP recovered increases when they have an HP Shield.
(3 Cards) The Guards’ HP Shields heal them when subjected to attacks.
Cards Under This Set:
- Residue Extraction — When an enemy falls, Guards gain an HP Shield.
- Bastion Building — Guards gain an HP Shield equal to a percentage of their Hashrate every 5 seconds.
- Coordinated Defense — Guards grant ally units an HP Shield at the start of battle.
- Multi-End Repair — When Guards recover HP, all ally units will gain an HP Shield.
Notes:
This Function Set goes very well with any of your Medics’ Functions, but it becomes particularly strong when paired with Global Healing Shield since Medics will be stacking shields on top of the shields that the Guards presently have. Great to have at just 2 cards; particularly Bastion Building and Multi-End Repair.
- Overlapping Reflections (G)

(2 Cards) Guards Taunt all units within 1 tile every 10 seconds, during which their Backlash effect is doubled.
(3 Cards) Guards reflect the damage they have taken every 8 seconds.
*Taunt: Debuff. Forces the target to attack the taunting unit. Unit cannot release skills during Taunt. This is a control effect.
Cards Under This Set:
- Taunt Target — Guards Taunt the enemy farthest away whenever they use any skill.
- Crisis Response — Guards recover HP and enhance Backlash when they use any skill.
- Impasse Retaliation — Guards have their Backlash enhanced as they take more damage.
- Structural Reinforcement — Guard Backlash is enhanced by a percentage every 4 seconds.
Notes:
Great to have if you’ve built your team for all-out offense. The Guards will draw the attention of the enemy whilst also providing a solid offense of their own through the use of the Backlash effect. This is essentially a return of the enemy’s damage to them and more as True Damage based on the amount of max HP the Guard has when activated.
- Desperate Raze (W)

(2 Cards) Every Normal Attack Warriors perform has a 30% chance to turn the next Normal Attack into a double strike.
(4 Cards) Warriors deal True Damage at the cost of HP every 3 Normal Attacks. The effect cannot be triggered by Normal Attack skills.
Cards Under This Set:
- Pain Resistance — Warriors gain a percentage of Damage Reduction when their HP is below 30%.
- Incremental Pursuit — Warriors inflict additional True Damage when they deal damage.
- Dire Tactics — Warriors’ ATK grows as their HP drops.
- Double Compilation — Warriors heal a percentage of the damage they deal. True Damage provides three times as much healing.
Notes:
An excellent addition for any situation. Desperate Raze covers all bases for any Warrior Doll on your team. The best part about Desperate Raze is that it somehow turns your Warriors into pseudo-Guards thanks to the Pain Resistance card. Do not miss the chance to build this set, especially because of the massive amounts of True Damage it dishes out.
- Violent Surge (W)

(2 Cards) Warriors deal massive True Damage to targets below 10% HP. (Ineffective against bosses)
(4 Cards) Warriors gain a 100 Attack Speed boost for 6 seconds every time they eliminate a non-neutral enemy target.
Cards Under This Set:
- Lethal Shock — For every 1 enemy fallen, Warriors recover a percentage of their Max HP.
- Lethal Chain — After eliminating any enemy units, Warriors are teleported near the enemy with the lowest HP percentage, dealing Physical Damage to them.
- Vulnerability Exploit — Warrior ATK is increased by a percentage against targets with less than 50% HP.
- Efficiency Surge — When Warriors perform Normal Attacks, their Auto Skill recharge is sped up if their target’s HP is below 50%.
Notes:
This set is perfect for most occasions, but specifically maps that have the Modesty-type Sanctifier as well as Hope and Mercy. Since those types of enemies are quite reliant on the numbers of their forces, the bonuses of Violent Surge could be a boon for your team since it’ll keep the enemy’s ranks in check. Violent Surge is a set that puts emphasis on speed, so consider this if you’re looking to clear Conflict Zones more quickly.
- Burst Shooting (Sn)

(2 Cards) For every 3 Normal Attacks, the next one Snipers perform is guaranteed to be a Critical Hit. The effect cannot be triggered by Normal Attack skills.
(4 Cards) The Crit Damage boost provided by Lethal Increment no longer wears off.
Cards Under This Set:
- Penetration Streak — Snipers’ Normal Attack hits have a chance to turn the next Normal Attack into a double strike.
- Accumulated Recycling — Ally Snipers have their Crit Damage increased by a large percentage for every unit that falls in battle, up to 5 stacks.
- Rapid Firing — After using any skill, Snipers have their Attack Speed increased by a large amount for the next 5 seconds.
- Lethal Increment — When Snipers land their Normal Attacks, increase their Crit Damage by a percentage. This effect disappears after landing a Critical Hit.
Notes:
A scarily powerful build that utilizes the Snipers’ ability to deal tons of damage from afar. This makes everything even more dangerous for the enemy since high-damage snipers like Lam or Simo could score greater numbers in short periods of time. Aim to complete this one for its 4-Card bonus since the Lethal Increment Function is powerful on its own. Having the Crit Damage boost no longer wear off means the enemy ranks will be in shambles before they know it.
- Lethal Combo (Sn)

(2 Cards) Snipers have a 10% chance to fire a missile at the target, dealing Physical Damage when ally units inflict damage with their Normal Attacks.
(4 Cards) Snipers’ Depleted Uranium Rounds effect will no longer dissipate.
Cards Under This Set:
- Lethal Transference — For every 5 attack(s), Snipers deal an additional instance of True Damage with their next strike.
- Chain-Breaking Shot — Snipers will attack the enemy with the lowest HP after using any skill, and boost their own Normal Attack PEN.
- Hunting Signal — Snipers fire missiles at their target after using their Auto Skill, dealing Physical Damage.
- Depleted Uranium Rounds — Snipers have their ATK increased by a percentage. This effect wears off when any enemy falls in battle.
Notes:
Another exemplary set that promises tons of damage. This is especially because of the 2-Card bonus that Lethal Combo has to offer. All the Function Cards in this set are also quite powerful on their own, so there’s no reason not to try completing this set, especially if you want to pin the boss down swiftly.
- Malignant Interference (Sp)

(2 Cards) For every type of debuffs the enemies have, Operand DEF is reduced by 10%.
(4 Cards) Specialists have their Attack Speed increased against targets with more debuff types.
Cards Under This Set:
- High-Frequency Calculation — After using any skill, Specialists have their Attack Speed increased by 50 points for 4 seconds.
- Beacon Boost — When Specialists land a Normal Attack, they have a chance to inflict 1 stack of Bleed on the target.
- Total Suppression — Specialists deal Operand Damage to the target every time they inflict debuffs.
- Deterrence — Specialists deal an additional instance of Operand Damage equal to a percentage of their Hashrate multiplied by the number of debuffs on the target with every Normal Attack.
Notes:
While Specialists in general don’t hit as hard as their Warrior and Sniper companions, they can contribute in providing a steady amount of DPS using this set. This is especially useful against bosses because of the Beacon Boost card as well as the 2-Card bonus it offers since it may greatly wither the enemy’s Operand Def outright. Bleed will base its damage on the target’s Max HP, so the higher the target’s Max HP, the greater the Bleed damage. The Specialists on your team may also receive a massive Attack Speed boost if they debuff an enemy multiple times thanks to the 4-Card bonus.
- Swift Crackdown (Sp)

(2 Cards) When any ally unit dodges an attack, non-Specialist allies deal Physical Damage to whomever attacked them.
(4 Cards) Vulnerability Fix now takes effect on 1 additional ally unit with the next lowest HP percentage.
Cards Under This Set:
- Shadowy Evasion — Specialists max out the Dodge Rate of all ally units for 5 seconds at the start of battle.
- Fast Preparation — Specialists have their Skill Haste increased by a percentage every time an ally unit dodges an attack, up to 10 stacks. Max Increase: 50%.
- Floating Shot — When an ally unit dodges an attack, Specialists deal Physical Damage to the attacker.
- Vulnerability Fix — When Specialists use any skill, they enhance the Dodge Rate of the ally unit with the lowest current HP by a percentage.
Notes:
A great generalist build that somehow brings out the spirit of teamwork from your formation. As it relies on dodging, consider using this set if the likes of Groove or Mai are present on the roster since this will greatly cause a lot of damage to enemies who have failed to make their attacks land.
- Substance Reversal (M)

(2 Cards) When Medics deal damage, they heal the ally unit with the lowest current HP.
(3 Cards) The range of Allergy Attack is increased to 2 tiles. This damage gains a 20% damage boost.
*Allergy Attack — Deals Operand Damage based on Hashrate to enemies within 7 tiles.
Cards Under This Set:
- Neighboring Overflow — Medics perform an Allergy Attack in the most densely packed area every 5 seconds.
- Sanguine Plundering — The next Normal Attack Medics perform after using any skill will inflict Allergy Damage.
- Allergic Reaction — Medics inflict Allergy Damage to enemies within 1 tile of their target when they Heal. Cooldown: 1s.
- Extra Compensation — When Medics Heal, they increase the Hashrate of ally units and themselves by 5% for a few seconds.
Notes:
This is an example of a good defense being a good offense. If you need even more area damage, give this set to your Medics and watch them contribute to your team’s effort to annihilate the enemy. The fact that this will allow Dolls like Imhotep to become even more powerful should be considered when she is on the roster.
- Enhanced Healing (M)

(2 Cards) When healing a target with Revitalize, Medics will remove a Revitalize stack to restore 15% of their Max HP. This effect only triggers 30 time(s) per battle for every Medic.
(3 Cards) Every stack of Revitalize on the battlefield additionally provides a 5% Healing Output boost for the Medics.
Cards Under This Set:
- Health Insurance — When Medics use any skill, they grant Revitalize to the healed unit and speed up their Auto Skill recharge by 20%.
- Advanced Practice — Every stack of Revitalize on the battlefield additionally provides a percentage of Skill Haste boost for Medics.
- Efficient Recovery — Medics grant the target Revitalize when they Heal.
- Healing Hands — Medics heal the ally with the lowest HP percentage and grants them Revitalize at the start of battle.
Notes:
Possibly the most important Medic set this game has to offer. While it would seem quite useful in EP, we recommend at least just getting up to 2 Cards of this since you’ll need all the space you can get for other sets. Medics spamming the Revitalize status alone should be enough to keep your Guards and Warriors alive.
- Coordinated Crit (All)

(2 Cards) The next Normal Attack ally units perform after using any skill is guaranteed to be a Critical Hit.
(4 Cards) All ally units have their Crit Rate increased by 10%, and will recover HP according to the amount of damage dealt when landing a Critical Hit.
Cards Under This Set
- No Kill Like Overkill — Ally long-range units have their Crit Rate increased by 5%, and deal an additional instance of True Damage when they deal a Critical Hit.
- Frenzied Battlelust — Ally melee units have their Crit Rate increased by 5% and they decrease the target’s Physical DEF by a percentage when they land Critical Hits up, up to 10 stacks.
- Inspirational Shot — Snipers have their Crit Rate increased by 5%, and they enhance ally units’ Hashrate when they land a critical strike.
- Power First — Guards have their Crit Rate increased by 5%, and recover HP when an ally unit lands a Critical Hit.
- Swift Strike — Warriors have their Crit Rate increased by 5% and Attack Speed increased by 10 points whenever they land Critical Hits. Stackable.
Notes:
A powerful set to give all of your Dolls. This set in particular not only assists in making your Dolls hit much harder, but each time they score Critical Hits, especially if you’ve successfully gathered at least 4 Cards belonging to the set, they’ll be healing each other. Getting the Power First card and another card early on will carry you forward since the team Medic may slack off a little with healing the Guard since you’ll be healing the Guard after each time your Dolls use their skills.
- Deadly Blow (All)

(2 Cards) Deals extra Physical Damage to enemy units when an ally lands a critical strike.
(4 Cards) When ally units use their Auto Skill, they gain Bloodthirst Sigil and have their Crit Damage increased.
*Bloodthirst Sigil — Buff: Normal Attacks are guaranteed to Crit and deal an extra 30% Life Steal. 1 stack of this buff is consumed every time this effect is triggered.
Cards Under This Set
- Bloodthirsty Rhythm — Ranged Dolls gain 1 Bloodlust Sigil(s) after dealing damage 3 times with Normal Attacks.
- Bloodthirsty March — Ally melee units gain stacks of Bloodthirst Sigil every time they move.
- Solemn Dignity — Doll Crit Rate -20%, Crit Damage upgraded by a large percentage.
- Anger Feedback — Ally units have their Auto Skill recharge sped up by a small percentage after landing a Critical Hit with Normal Attacks.
- Radical Therapy — Medics boost target’s Crit Damage when they Heal.
Notes:
As a counterpart to Coordinated Crit, Deadly Blow instead brings out the potential of harder hits from your Dolls, especially thanks to it upping Crit Damage as opposed to Crit Rate. This set may work well with the Sniper class’ Lethal Combo set. Consider building this as well if you’ve decided firsthand to build Lethal Combo.
- Blazing Matrix (All)

(2 Cards) When an ally unit uses a skill, their next Normal Attack summons a fireball from the heavens, dealing [Derivative] Operand Damage equal to 100% of their Hashrate. For every stack of Nixflame on the target, the fireball’s damage is increased by 10%.
(4 Cards) When an ally unit deals damage, the damage dealt is increased by 3% for every stack of Nixflame the target is afflicted with.
*Derivative Damage — A type of damage that affects the target’s Physical and Operand DEF, but cannot trigger Backlash, Life Steal, Function-related effects, or similar mechanics.
*Nixflame — Debuff: Each stack causes the target to lose HP equal to 10% of the highest Hashrate on the field per second. Stacks up to 10 times, duration of 6 seconds.
Cards Under This Set
- Infernal Robe — When a melee unit receives damage, their attacker has a chance of gaining 1 stack of Nixflame.
- Cybernetic Scorch — When a ranged unit deals damage with a Normal Attack a few times, apply 1 stack of Nixflame to their target.
- Igneous Boundary — Guards take a percentage less damage from enemies with Nixflame stacks. This effect is additive for every stack of Nixflame that the enemy has.
- Purgatorial Cinders — When a Sniper deals damage with a Normal Attack to an enemy with the Nixflame status effect, deal additional [Derivative] Operand Damage equal to a percentage of their Hashrate.
- Ashen Computations — When a Specialist uses a skill, they deal [Derivative] Operand Damage equal to 100% of their Hashrate to all enemies with the Nixflame status effect.
Notes:
This set prides itself in being able to slowly destroy the enemy en masse. While its mass-damage over time is an incredible thing to wield, it’d be imperative to have other Functions that would quickly extinguish the lives of the burning enemy. Consider building Violent Surge or Burst Shooting with this set if you’re after a relatively clean run through each layer.
Do note that these aren’t all the Function Card Sets that appear in every EP season. We’ve only decided to list down here the ones that would be most convenient for anyone attempting to practice a run or would like to get their feet wet with the nuances of EP. Of course, trying to complete any of these is up to chance, as we’ve mentioned earlier. Lock the Function Cards you need when you can’t purchase them and experiment with which combos you observe to be best together.
Because EP requires a lot of patience and understanding, it’s imperative to not make any hasty decisions before advancing anywhere.
5. Never Make Hasty Decisions
You’ve found a Function Card that belongs to a set that you aren’t exactly aiming for, but it’ll boost your team significantly.
You purchase it, proceed to the next Conflict Zone and win, and the Function Card you need finally arrives but you’re now in a predicament where you’re out of Cache Coins and your next zone is an Advanced Conflict Zone that greatly overpowers your team. What must you do now? Do you abort the Cleanup or do you take a risk going forward? There’s always the choice of risking the wrath of your opponents, but this is a situation that should’ve been avoided in the first place and that’s through careful decision-making.
We’re not just talking about getting the right Function Cards, mind you; we’re talking about everything you do in EP. This covers which Dolls you put into your team at the very start to the final move you make at the final battle (if you make it that far). Making any hasty decisions could easily spell doom for your entire team because your unpreparedness could be what catches you off guard and not the enemy team’s formation. One way you can avoid hasty decision-making is to observe the situation at hand.
Specifically, we’d like to use navigation of the layer maps as an example. Take advantage of forking routes since these could help you rake in more points if you happen to conquer the Conflict Zones that come with it. Take your time to study the map and plan out an imaginary route in your head of where you want to go. Once that is decided, follow that route and try not to deviate from it. The only time a deviation from the route should be done is if it’s necessary (e.g. choosing to heal your Dolls instead of heading for an Advanced Conflict Zone). One false move could cost you the entire run, so it pays to be patient!
Another reason why you can’t make hasty decisions anywhere in EP is because everything will have its consequences. To be perfectly clear about this, we encourage you to make decisions that will carry you up until the very end of the Cleanup. We don’t mean to not explore your options, but we recommend that you choose Function Cards that you know will put a dent in the endboss’ life. This should be the most important aspect of your run. If you succeed, maybe you’ll even defeat the boss in record time and you’ll only get better from there.
That all said, sometimes, it’s good to replace certain Dolls on your team with one of the Dolls that show up at the Support Areas.
6. Swap Out Some Dolls for Support Dolls
In battle, armies need their reinforcements every now and then.
This is to keep the main fighting force from becoming exhausted and out of supplies. The same can be done in the virtual battlegrounds of Magrasea, especially here in EP. Aside from trying to keep your Dolls alive by overworking your Medics or sacrificing Positive Protocols for healing, there’s always the idea of having to swap out some weak links in your team for powerful Dolls that you may come across at Support Areas.
Below is a list of Dolls that are quite powerful if put in the right formation:
- Aki —A high-damage Warrior with an Ultimate Skill that can clean rooms quite easily. Though he makes rather short work of enemies with whittled lifebars, Aki is reliable in most situations.
- Banxsy — A mobile, area-damage Specialist, Banxsy can scout ahead and cause some significant amounts of hurt in the enemy’s backline. Consider fielding her if your current lineup lacks anyone who can leap behind walls and whittle the enemy’s ranks from within.
- Chanzhi — A powerful Sniper who can inflict widespread damage through the use of her needles and her Quilting debuff. Her Quilting, especially, are akin to timebombs that accumulate damage the more the enemy receives them. Consider getting Chanzhi if you seem to be encountering more enemies per Conflict Zone as you should.
- Sueyoi — A Specialist that racks up damage the more he lingers on a target. Sueyoi is dangerous towards bosses in particular but may require some backup when faced against multiple enemies at a time. A valuable asset to any team regardless.
- Hatsuchiri — An assassin-type Warrior who always infiltrates the backlines. Take Hatsuchiri with you if there are particular enemies that need some swift destruction (e.g. Modesty or Mercy). Her Ultimate Skill is what makes her kill singular targets quickly.
Be warned that when you’ve come to a Support Area, you may only swap out 1 Doll currently on your team for any of the Support Dolls available. The Dolls that appear in every Support Area are completely random, so there’s a chance that some of the Dolls we’ve mentioned here (or all of them) might not appear. Be prepared to make a decision regardless. If you aren’t familiar with what other Dolls do, you may want to do some research beforehand so you’ll know who to pick when the time comes.
Dolls and Functions aren’t the only things you’ll be picking here. It also starts with which Tactical Skillset you’ll be using per battle.
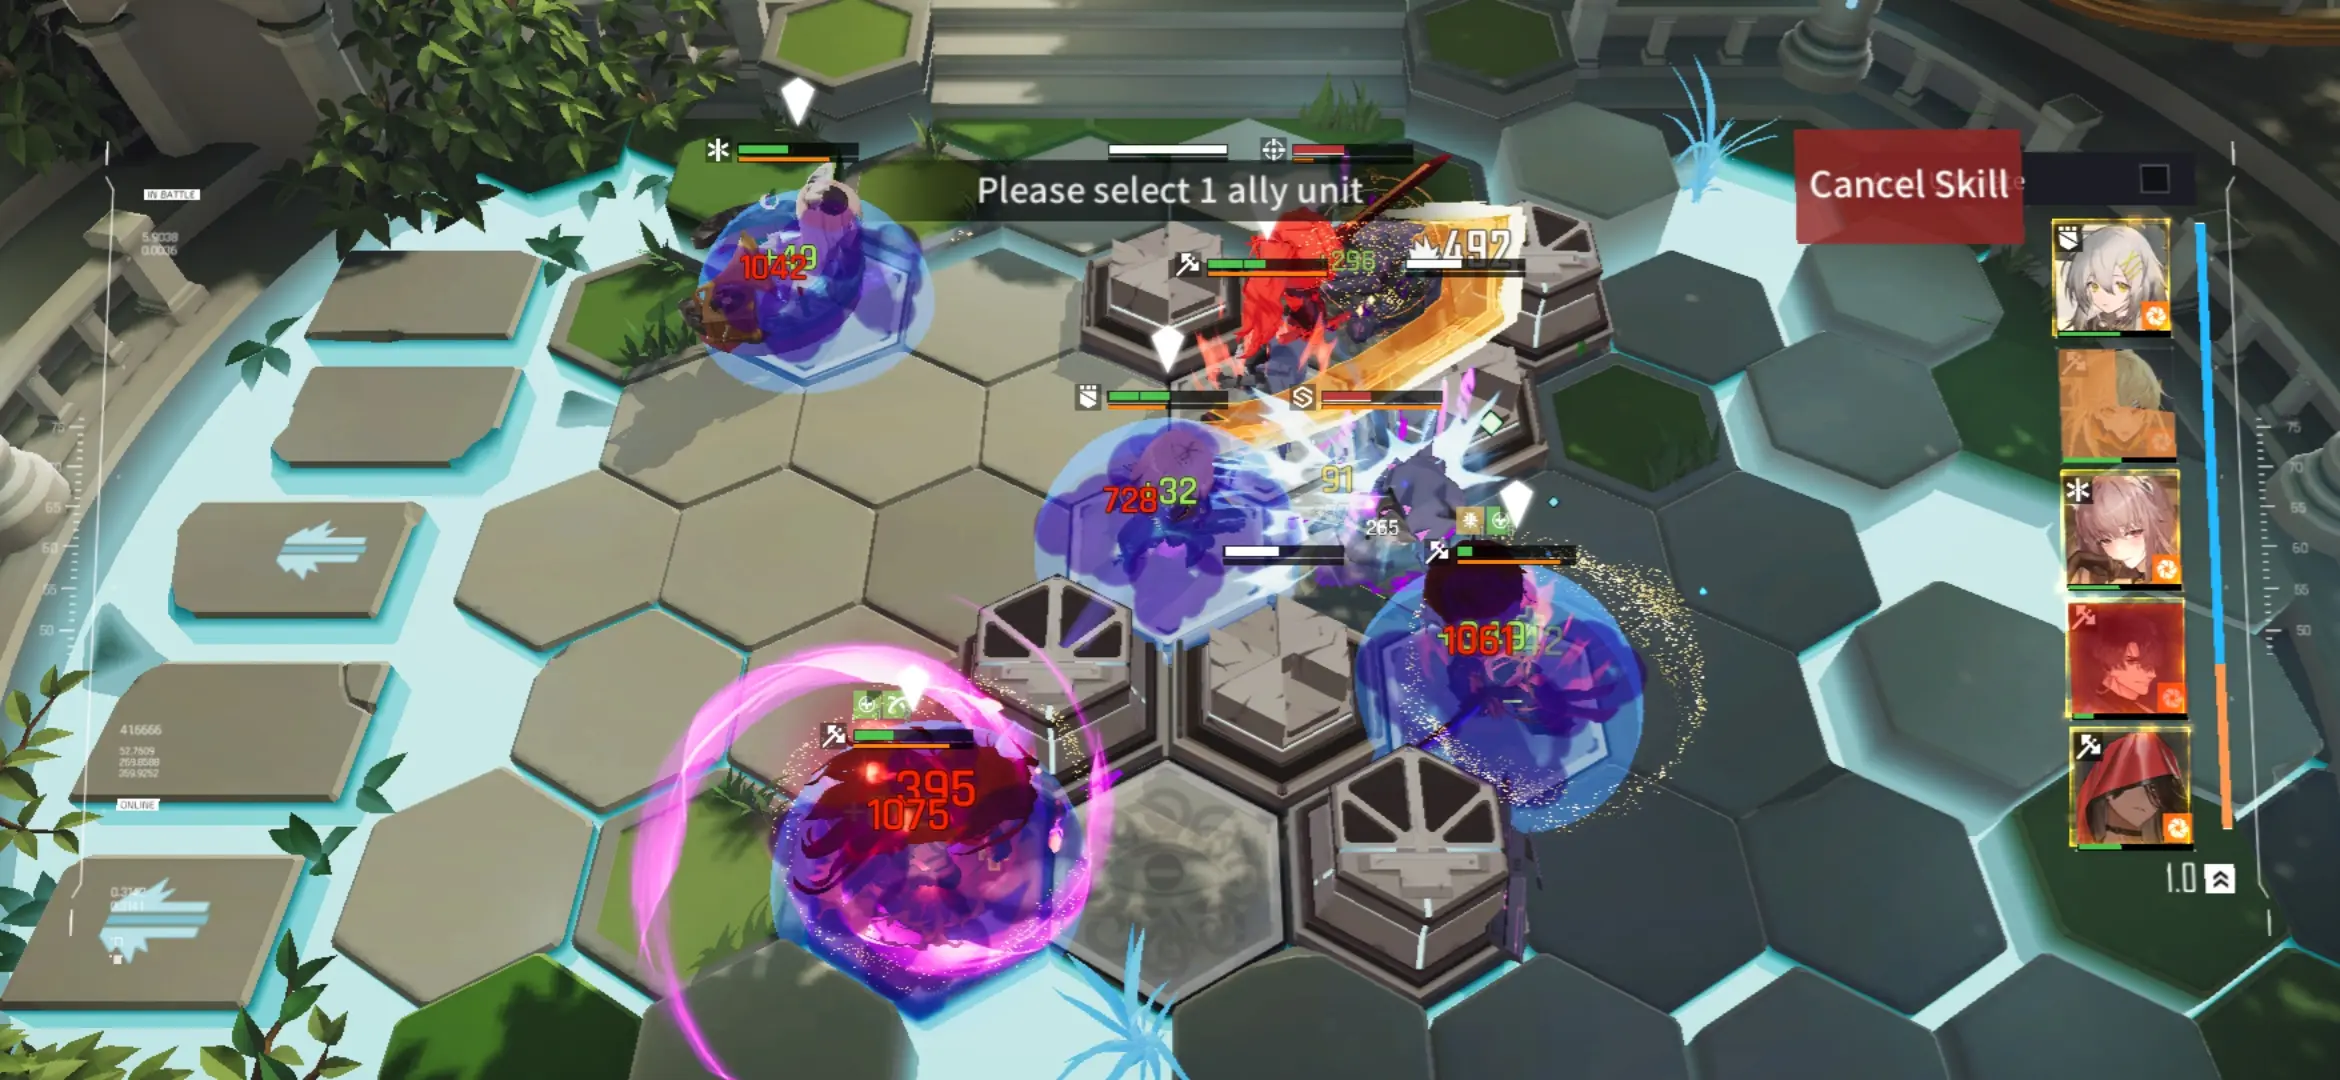
7. Pick Your Tactical Skillset

One of Neural Cloud’s most interesting mechanics is how it involves the player in actively nudging the battle in their favor. This comes in the form of Tactical Skills.
Since your introduction to the game, you’ve been familiarized with the Flexible Strategy and then given the Offensive Build when you’ve reached Cyclopes. Both types of Tactical Skills can be switched right before a fight starts and both are quite powerful in their own right. In EP, either or should be used to your advantage when it comes to getting through Conflict Zones.
If in case you’re not sure when to use either, here are some suggestions:
- Flexible Strategy — This can be used in most situations because it allows the Professor to relocate Dolls around the map one at a time, momentarily disable enemies or keep friendlies safe, or even recharge the Auto Skills of important Dolls. For instance, we highly encourage you to use this skillset if you’re trying to spam healing from a particular Medic (e.g. Persicaria, Gin, etc.) or a wide-ranged control ability from Dolls like Croque.
- Offensive Build — This build is better used as a means to get the upper hand in a fight. Thanks to the Orbital Strike and Coordinated Fire skills, you’ll be able to assist in damaging the enemy forces. One standout skill in this set would be FC Illumination which will allow the Professor to pinpoint a target to their Dolls so they can focus on it; perfect if you don’t have Dolls that can deal with isolated enemies. While not as versatile as Flexible Strategy, Offensive Build has its moments.
Picking out a skillset for the right battle should be considered. If you happen to be in a map wherein Dolls may require some mobility, take Flexible Strategy. If the enemy’s got a strong offensive wherein they employ Modesty or Mercy, try Offensive Build. In the end, it all depends on the tactical acumen of the Professor wielding these skills.
With regards to maps, another way one can perform well in EP is to familiarize themselves with specific tilesets.
8. Familiarize Yourself with the Tilesets
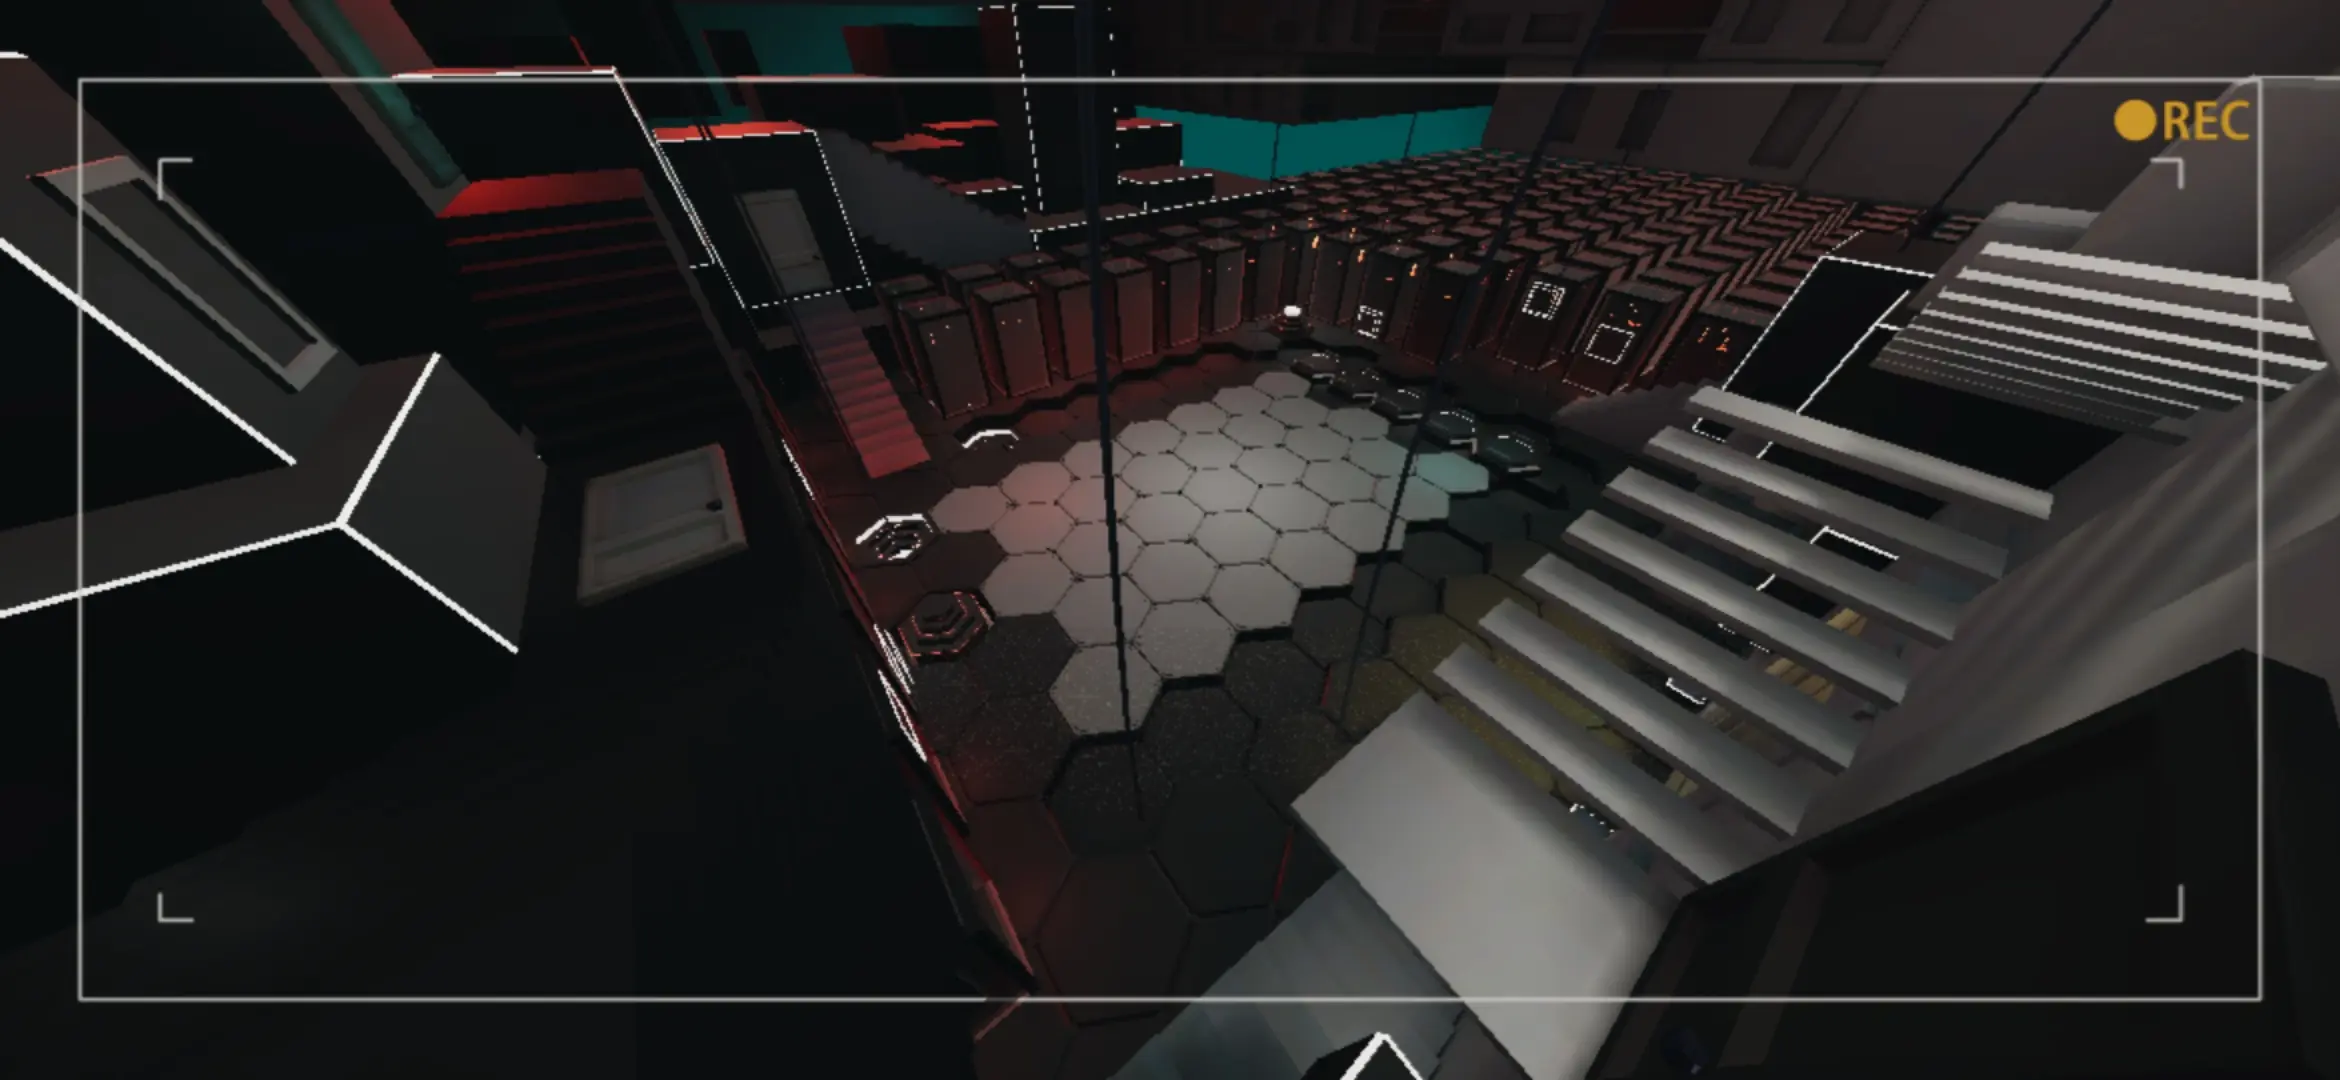
For any seasoned Professor, they’ll surely be familiar with the different tilesets of each sector they’ve traversed.
The sectors of Magrasea each have their own specialties—Rossum is a sector for AI learning thus it has the most simple of layouts when it comes to a battle there; Cyclopes is an all-out battlefield, therefore it comes with radiation generators that slowly inflict damage onto all units on the map; so on and so forth. That said, these very same specialties exist in the different tilesets that frequently appear in EP.
Below are a few examples of tilesets that you are likely to encounter when doing a Cleanup:
- Helios — One of Svarog HI’s sectors. This map has Energy Herb tiles scattered about wherein any unit, be they friend or foe, can fully or partially receive Auto Skill energy from them. Of course, this only happens if the unit is standing right on top of such a tile. Energy Herb tiles can be used to the advantage of many Dolls, specifically Medics, Guards, and Specialists. Consider using the likes of Persicaria, Gin, Mai, Angela, Croque, Nora, or Sueyoi on any of these tiles.
- Enigma — The home of ENIAC and the area wherein the Operand Black Hole originated from. This is where it can get difficult since Trojan Pillars litter the battlefield. Granted that there are such pillars which momentarily stun your Dolls (or any unit afflicted with Trojan), there are certain tiles that render these units immune to such a status.
However, Enigma maps are also areas wherein you’ll encounter a most dreaded boss at the end of a layer: Hope and Mercy. Hope is an intermediate Sanctifier that can clone herself with a tether of unstable energies linking her true self with her clones, and Mercy is the almighty frog that everyone loves to hate since it constantly produces healing units all across the map. In fights like these, it’s either one or the other that dies first, but you’ll be needing a ton of DPS to do so. Consider having Dolls like Hatsuchiri on your team if she’s available on the EP roster or the Support Area. Good luck!
- Pierides — Ground zero for the Entropy virus. Every step you make through this forsaken sector will have you watching your back since the ground sprawls with Liquid Entropy that slowly saps the life out of Dolls that tread upon it. However, in exchange, they will hit much harder, so this may be used to your advantage in a pinch. Just try not to leave your Medics on such tiles, or you’ll be out of a healer early on in the fight.
- Copley — The vacation spot from hell. The sunny weather and sandy beaches of Copley belie its difficulty since your Dolls and the enemy will be thrashed about by the waves that arrive every so often. The only way you can deal with these waves is to position your Dolls behind any available barrier that goes against the waves’ directions. In doing so, you may be able to have an uninterrupted stream of healing or DPS all over. Otherwise, relocate your important Dolls in places where they won’t be thrown about by the ocean’s wrath.
- Ascension — The dark, creepy sector where AI made the attempt to create life. This tileset is just as dangerous as the others since some of the enemies may come with prosthetics that will drastically change their behavior in a fight. These Roboarms, as they’re called, may sometimes throw your Dolls, stun them with a radial swipe, or even a reckless rush toward your backline which may displace the target Doll. Be on your toes here; your formation will always be in shambles and it’s up to you to pick up where your Dolls falter.
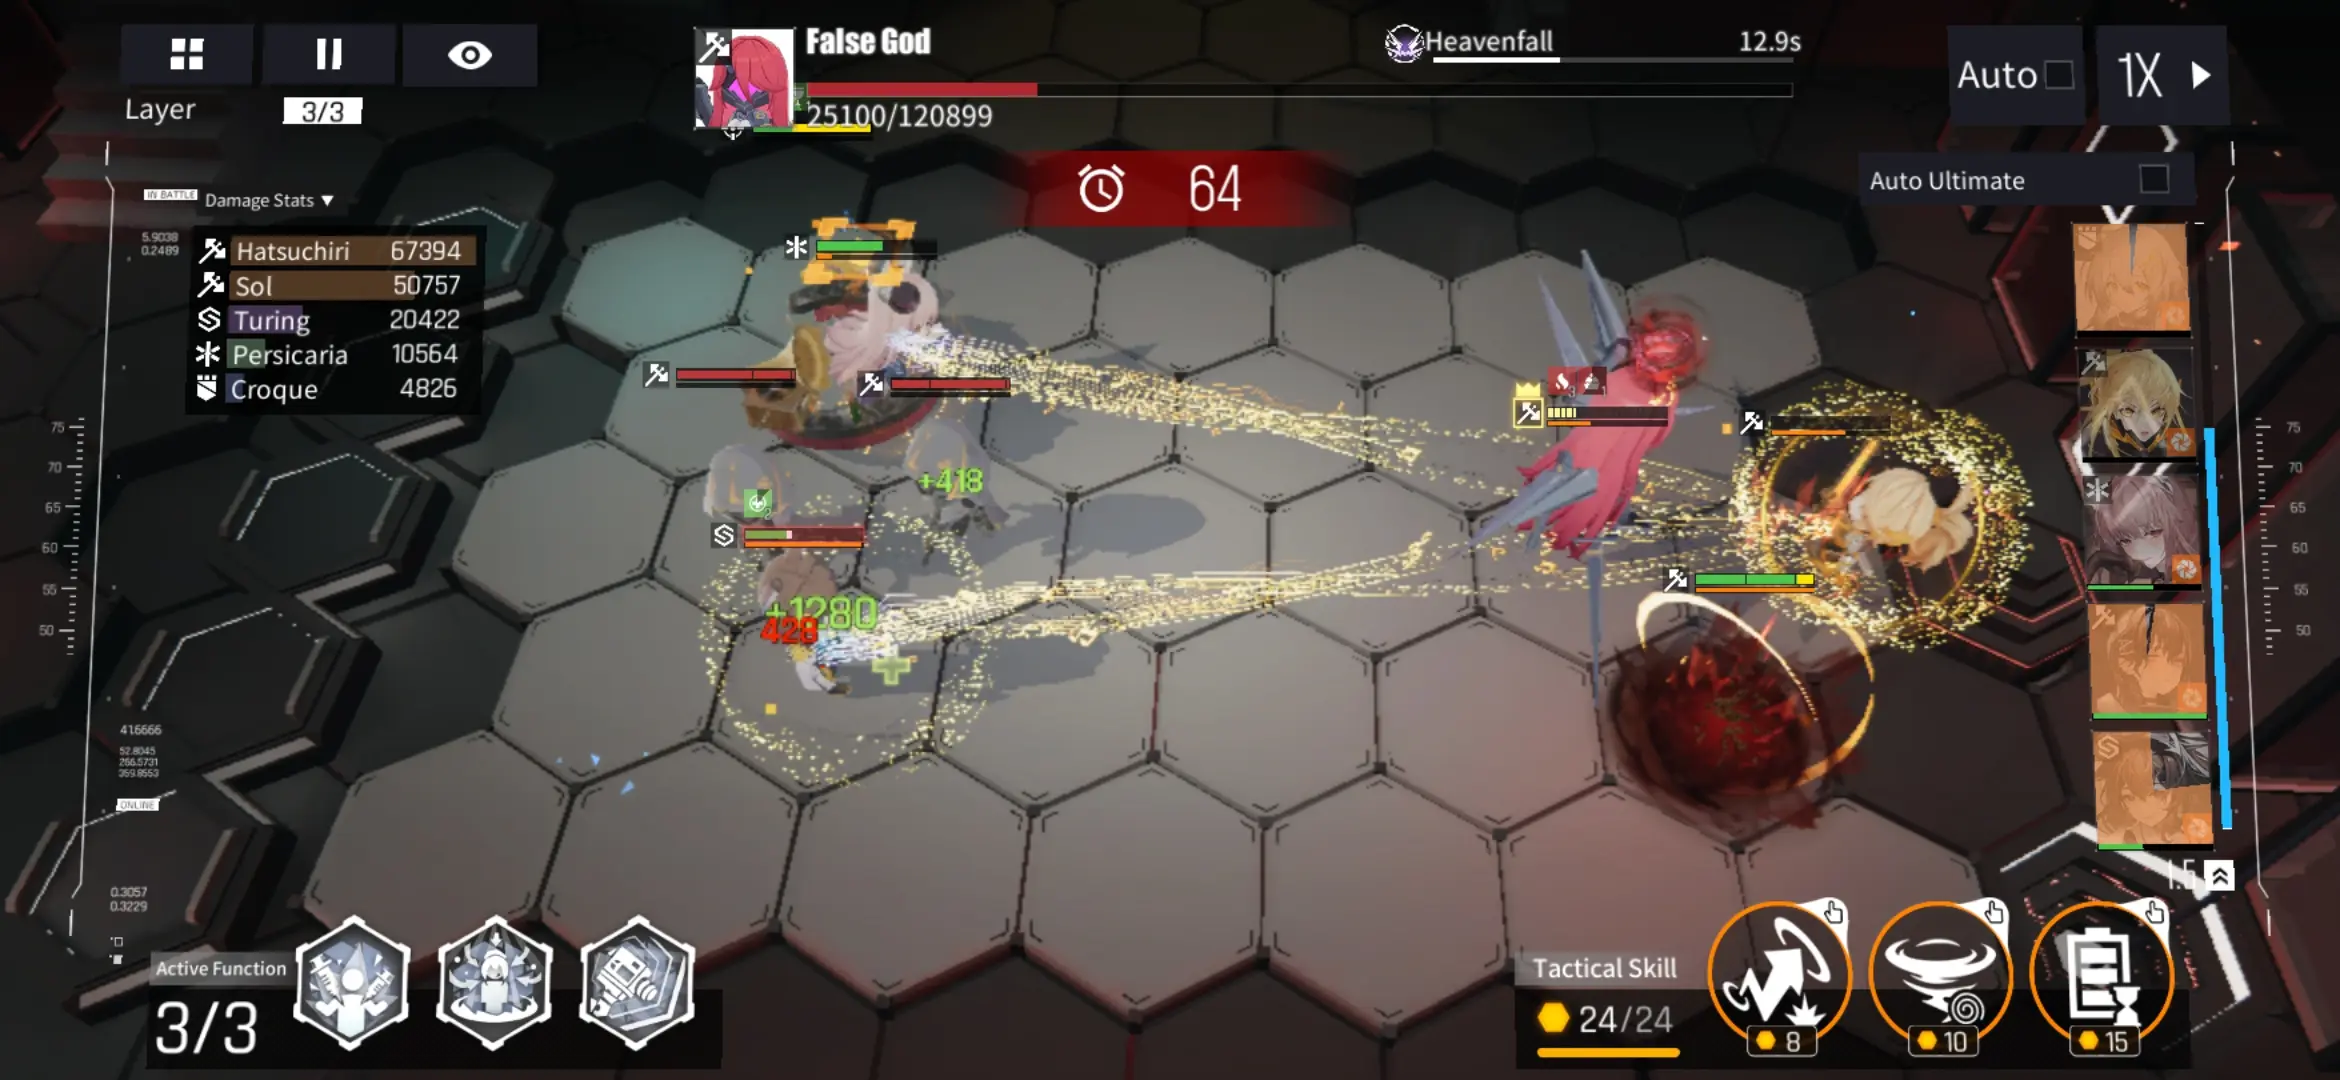
After clearing a layer of its goons, the final layer has a true challenge waiting for you should you best the last battle: the endboss.
9. Learn the Boss’ Tactics
NOTE: The bosses that appear in this mode are going to require some familiarization on the player’s part, since many of them will have been encountered in the campaign. For any player who is invested in the game’s lore, we at least recommend finishing the Pierides sector first.
You’ve bested this uphill battle so far, but the biggest hurdle in this path of pain is the endboss.
The endboss is the biggest baddie in the Cleanup—they’re usually a boss you’ve already fought or encountered during an event. In any Cleanup, the endboss will be the moment that will either make or break your score. The reason behind this is because they give a massive point bonus if you manage to defeat them as early as possible, but they also won’t go down without a fight. Getting a boss’ patterns correctly won’t happen the first time, so be prepared to fight them repeatedly.
Here are a few of the bosses you may encounter in EP. Though there are more, these are prominent examples that could hinder a player from succeeding as well as a few hints on how to defeat them:
- Eucharist — At any point during the fight, she will activate her Ontogenesis Shield which will render her immobile. If you break this shield, you’ll be able to inflict a substantial amount of damage unto her right after. Otherwise, she will sweep her trident at all Dolls within a 1-tile range. Be on your toes when you fight her because she also likes to teleport around the map while slowing your Dolls down.
- Angelus — A nuisance to fight if you don’t have the likes of Simo on your team. Usually, Angelus’ arena will have two Trojan pillars opposite from each other. Try to keep your Medic as far as possible from Angelus and keep important allies away from her primary target (which should be the Doll with the highest Max HP); her arrows have an attack area of 1-tile.
As far as the Doll with the highest Max HP goes, she would primarily focus on them due to her Angelic Embrace skill wherein she will drain HP from said ally and briefly increase her dodge rate after successfully doing so. Should the ally die, Angelus won’t increase her dodge rate anymore, but an ally’s death should be something avoided entirely. The reason why Simo could be an important Doll in this fight is because his Ult will allow him to cloak all allies, thus forcing Angelus to drain one of the Trojan pillars instead.
- Entropic Wisdom — An insanely hard-hitting boss that can easily tear through the armor of your Dolls that should be fought using the Flexible Strategy skillset. Pay attention whenever she uses her Calamitous Outburst; you should see a dark purple aura around the afflicted Doll as well as a timer above their head.
If you keep them alone when the timer hits 0, they will take double damage from the skill but if you put them near friendly dolls when the skill detonates, both the friendly and the target Doll will get hurt. Take a third option: whirlwind the target Doll right before the timer hits 0 so they incur no damage at all.
Fighting Entropic Wisdom is like a race against time since, after she uses her Calamitous Outburst twice, her Extinct Depravity will refresh and allow her to fire a ruinous amount of damage onto her current target, killing them if their life is low enough. Strike her hard and fast.
- Judgment — A newcomer hailing from the Ascension sector. This monstrous fusion of two Sanctifiers is a force to be reckoned with thanks to their repetitive use of the Gallow Synthesis skill. One very important strategy we’d like to note here is to keep a Doll sturdy enough right in their face (preferably a member of the Guard class), and locate all your Snipers, Specialists, and Medics to the top and bottom edges of the map.
Whenever Judgment uses their Gallow Synthesis, they will teleport to the center right of the map, swing their scythe in a 1-tile radius while moving to the leftmost side of the map, and then return with the same spin all the way to the right. This skill in particular is the most devastating since it can easily kill all of your Dolls if you don’t have them carefully placed or if you don’t kill them quickly enough that your sturdy Doll dies immediately. Arm your Snipers and Specialists well for this one.
It always pays to be observant while fighting any boss. If you happen to see a moment where they are open, consider getting the jump on them with a hard-hitting skill or an Ult that you think will shave off a chunk of their HP. Just try not to get greedy; some bosses are trickier than they look!
If you aren’t exactly sure of which boss you might fight in the Cleanup, try to keep in mind what you’ve seen whenever the enemy levels up. Occasionally, the name of the boss will pop up when choosing another negative Protocol to up the difficulty multiplier, so try to always remember who you’ll be up against. This should also give you an idea of which Dolls to build for the final battle.
In the end, EP is a game for the mind. Therefore, you will only find yourself trying again and again. This is perfectly normal.
10. Practice Makes Perfect
It’s an old adage and it’s corny for us to say this, but really, practice does make perfect.
If you didn’t do well this season, try to learn from the mistakes you’ve made in the last run or take note of any that you’re making in the current one. What’s important here is you need to be consistent in your decision-making. As we’ve stated in the very beginning of this guide, the decisions that the Professor makes during Exception Protocol is what hinges on their success in the Cleanup.
Just remember that if you feel like Advanced Protocol might be too tough for you, there’s no shame in trying to get used to the mode first by playing through Basic Protocol. This should give you an idea of what to expect each time you attempt a run in Advanced Protocol and, eventually, Special Protocol. The best part about Basic Protocol is that the risks are low, so you have little to worry about.
This isn’t to say that certain things will be constant apart from the Doll roster and the endboss. The layers will change, the enemy formations will vary, and the Function Cards that the Professor will encounter at any given time may be better or worse than their last try. It’s all about repetition and it should not deter you from trying. In fact, the prize at stake alone should be a signal for the Professor to not give up at any cost. Go for the gold and learn as you stumble. You can do it.

We assure you that after playing through several Cleanups, your playstyle will drastically change as you may favor less quantities of Function Cards over completing Function Card Sets or even create powerful teams with minimal effort.
Exception Protocol may seem confusing at first, but it’s a mode that requires patience, practice, and a lot of familiarization. Rookie Professors will always struggle to grasp its meaning at first since most of the time, things won’t go the way they want them to. In any case, it will always help to pay attention to the things we’ve covered in the above guide:
- High damage teams often prevail. Try to pick out Dolls that excel in making the enemy dead, but don’t squander on the chance to keep your team alive and/or protected with Medics or Guards.
- Tick off all the Protocol Boxes. Risk and reward will always go hand-in-hand and EP is no different. More danger means a higher score, but be careful not to overstep!
- Keep an eye out for Function Cards that you may want to purchase for later. Lock them instead of buying them if you’re looking to complete a set or just lock them if you can’t buy them yet.
- Speaking of set completion, Function Card Sets will carry you if you manage to complete a few of them. Consider completing 1 for your damage dealers and a whole set for your entire team. These make all the difference thanks to the massive bonuses they provide.
- Look before you leap. Each time you’re presented with a decision you need to make, always consider the possibilities that could happen if you made the wrong decision. It certainly helps if you’re careful with anything and everything you do in EP, and that includes the things you do during a fight!
- Team needing a little “oomph!”? How about swapping out the odd Doll on your team for a Support Doll? Never miss this node as it will always give you an opportunity to choose a powerful Doll that may or may not have been on the present roster. This move in particular could win or cost you the entire run.
- Juggle between Flexible Strategy and Offensive Build. Using either or during the right battle could change the outcome. If you’ve chosen correctly, you might even get out of the battle unscathed!
- Always keep in mind what to expect in certain tilesets. Helios has Energy Herb tiles, Pierides has Liquid Entropy tiles, Enigma has Trojan Pillars, Copley’s got waves that want to kill you, and Ascension has enemies with Roboarms. Of course, these aren’t all the tilesets available, but it’s best to always be aware of the map you’re in and the hazards they come with. You might even be able to use them to your advantage.
- Each boss has a tactic. Observe their attack patterns and try to strike them when they are at their most vulnerable. This is the very moment of the Cleanup that matters the most, so do your best and try to beat the boss on time!
- Never give up trying EP. It’s a mode that will challenge you each time and in completing it fully, you’ll be handsomely rewarded—not just with Quartz Sand and Ether Tokens, but with insight and wisdom (and we don’t mean the Sanctifier).
And this wraps up our guide to Neural Cloud’s Exception Protocol mode. Practice it, try it, win it, and you’ll be an even better Professor than before. Keep your head up!
Are you a seasoned Professor that’s done many Cleanups? Do you have any solid advice of your own? Are there any Function Cards or Function Card Sets that you’ve combined and would like to share? Leave your thoughts in the comment box below this article!