Meridian 157 is the first game series of NovaSoft Interactive. A passion project conceptualized while they were studying in university, this point-and-click, puzzle adventure game is one well-thought-out mystery with engaging puzzles and an even more engaging storyline. The gameplay is reminiscent of Blue Brain Games’ The House of Da Vinci and Pine Studio’s Escape Simulator but has a creepy vibe that spices it up without feeling too scary to ward off players who may not be good with scares.

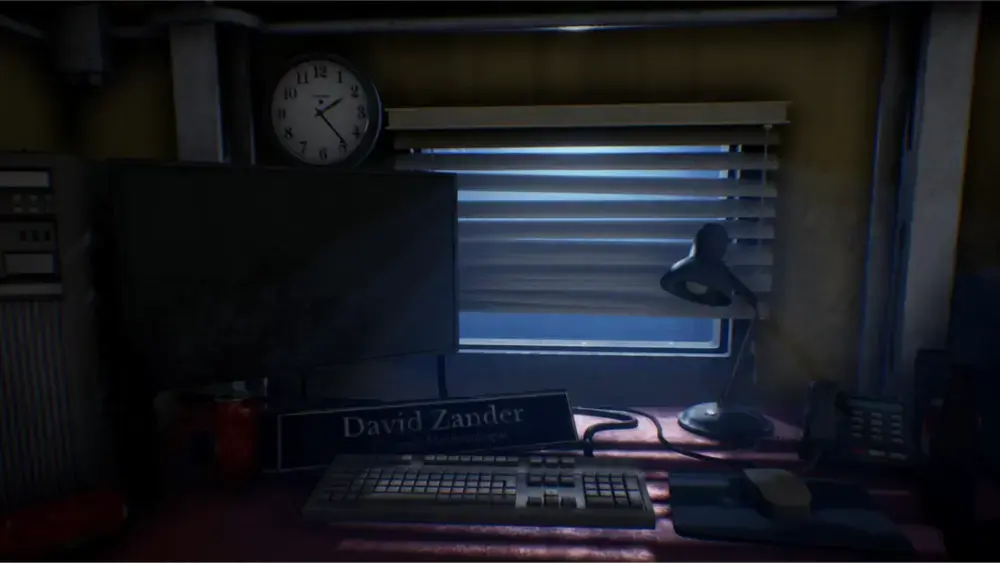
You play as David Zander, a forensic meteorologist, waking up in the middle of the night at your desk to see that the power has gone out. After fixing the fuse box and getting the power to return, you find that your computer has detected an anomaly to the south of your office on a small island out at sea. Curious, you get on a boat to investigate. However, there seems to be more to this anomaly than meets the eye as you discover clues that seem to point at a top-secret scientific project that may be paranormal in nature.
This game is filled to the brim with challenges that will really make you think. It is not unheard of to get stuck in a certain puzzle for a long time. For some players, this fuels their determination to solve it. For others, it could soil their interest in the game.

We created this walkthrough for players who want to thread forward and see where the story leads but need a little bit of help getting where they need to go. This is the first part of a series of walkthroughs and covers the Prologue and Chapter 1 of Meridian 157. The screenshots for these are taken from the PC version so the UI may look different in the mobile versions but the game plays the same.
Difficulty and Controls

Before the game starts, it will ask you to choose your difficulty between Normal and Hard. The only difference between the two of them is that the Normal difficulty has hints enabled while hard has it disabled. The actual puzzles do not change.
The game automatically saves its progress so there is no need to pause and save.
Controls
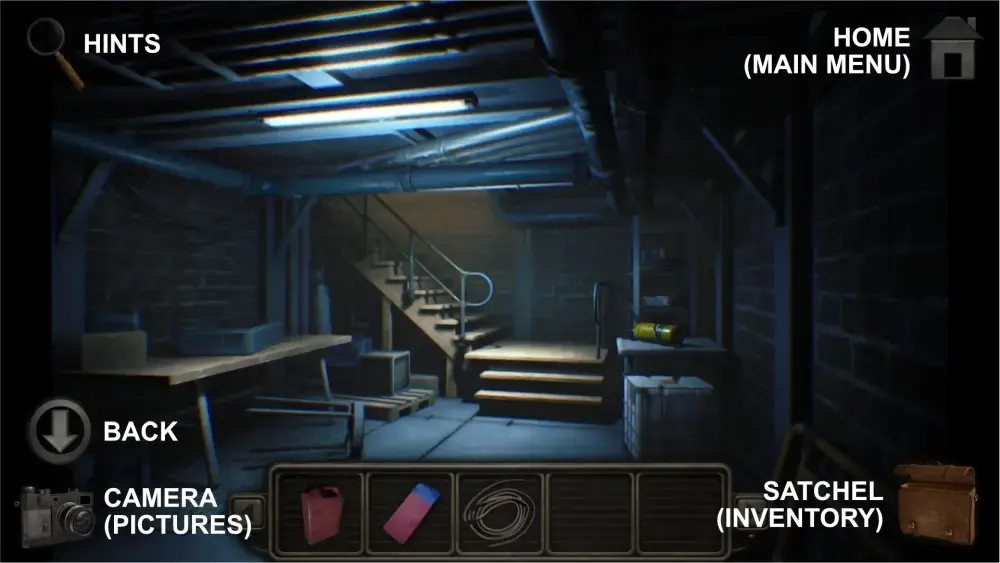
Back Arrow – This takes you to the previous scene.
Magnifying Glass – Gives you hints. Very helpful for times when you are stuck in a puzzle. In hard mode, this is absent.
Home – Takes you to the Main Menu.
Satchel – Tapping on this brings up your inventory which shows 5 slots at a time but can hold more than 5 items. Each item that has served its purpose will be automatically discarded from the bag.
Camera – Takes screenshots by tapping on it and then tapping on the camera icon. This is helpful for referencing clues for puzzles. You have a limited amount of pictures you can take, so if you’re done with one image, you should delete it with the trash can icon. One image takes up 5% of your Memory Usage.
This means that your camera can only hold 20 images at a time. Tapping the arrows will allow you to browse through the images. Tapping the rotate icon will allow you to flip it upside down and vice versa. You can also zoom in and out of images with a zooming gesture with your fingers.
You can move from place to place and collect items by tapping on them. To use items you’ve collected, open up your satchel and drag the item towards another item on the screen.
Meridian 157 Prologue

Investigating the Anomaly

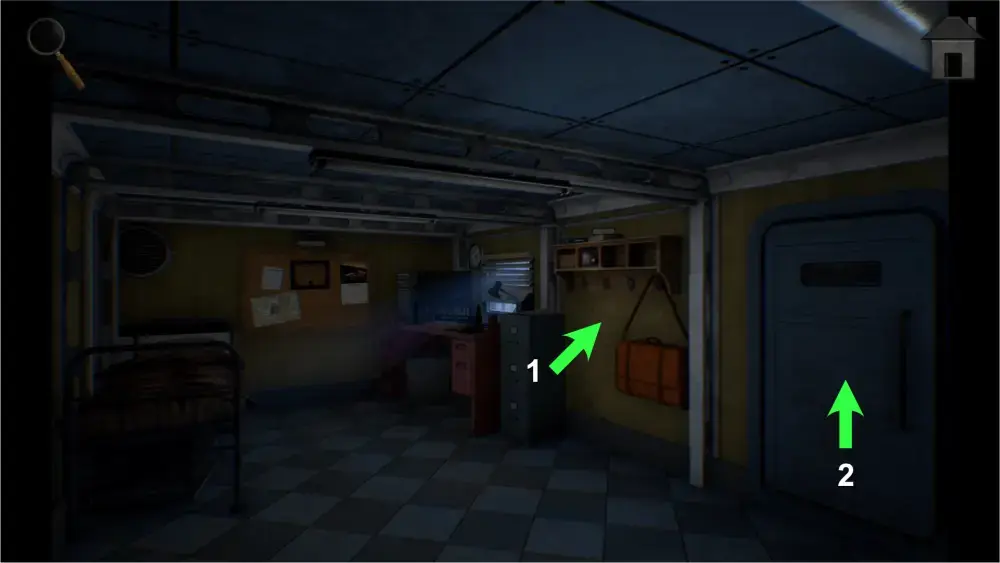
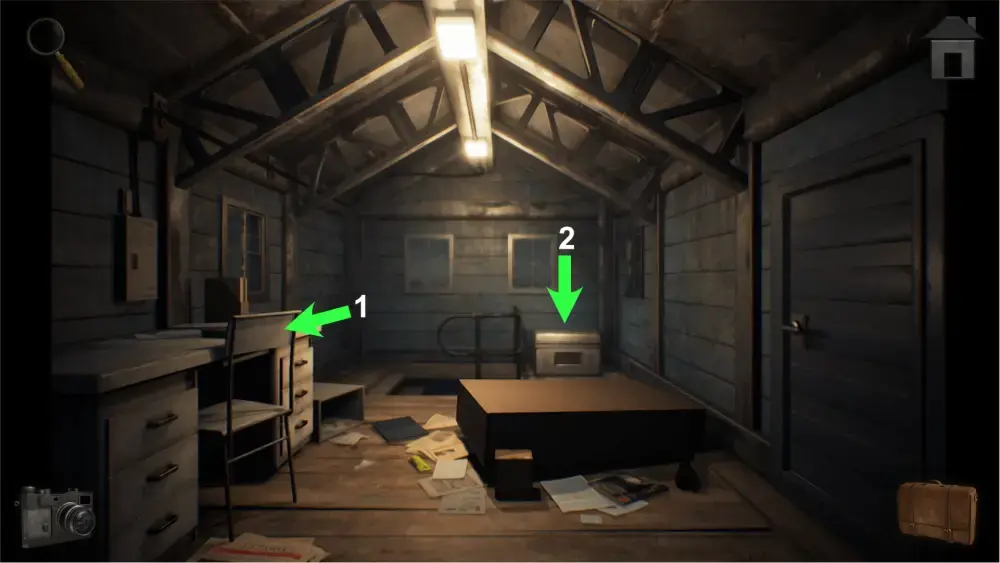
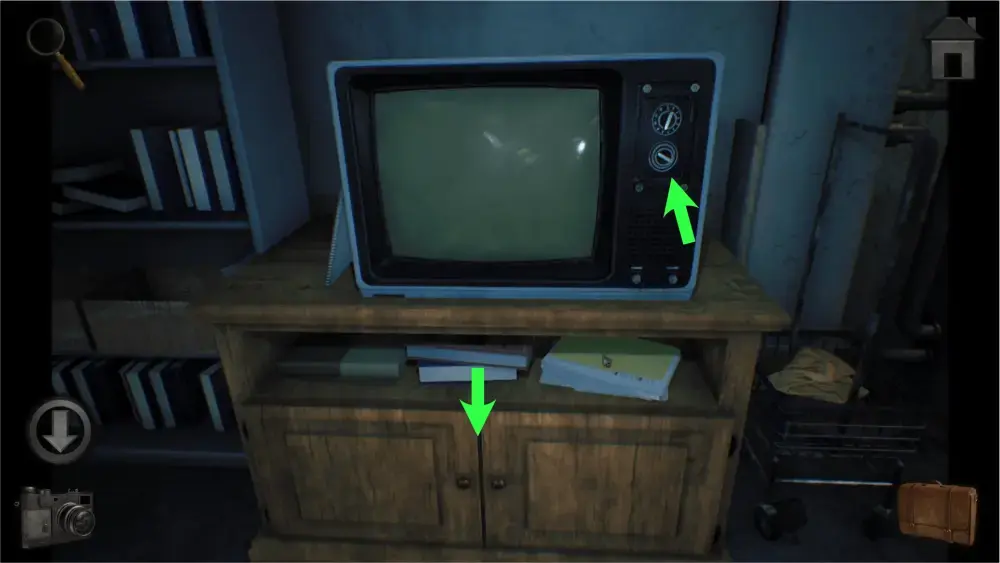
You wake up from your sleep and realize that the power is gone. Turning it back on would be your first task. Before you leave your office, take two steps back and check your shelf. Take the satchel and camera then use the back button and exit the office.
After leaving, you will notice that the fuse box by the upper left part of the screen is blown. You will need a ladder to help you reach it and a screwdriver to open it so that you can repair it. You will have to search your car and the shed for items that may be useful. However, the car is locked and the inside of the shed is too dark so you’ll have to find your car keys and a way to light up your shed without power.
To get the car keys, you will need to go to your boat. Tap the back button until you get a bigger view of the site then tap on the sign that leads to the beach.

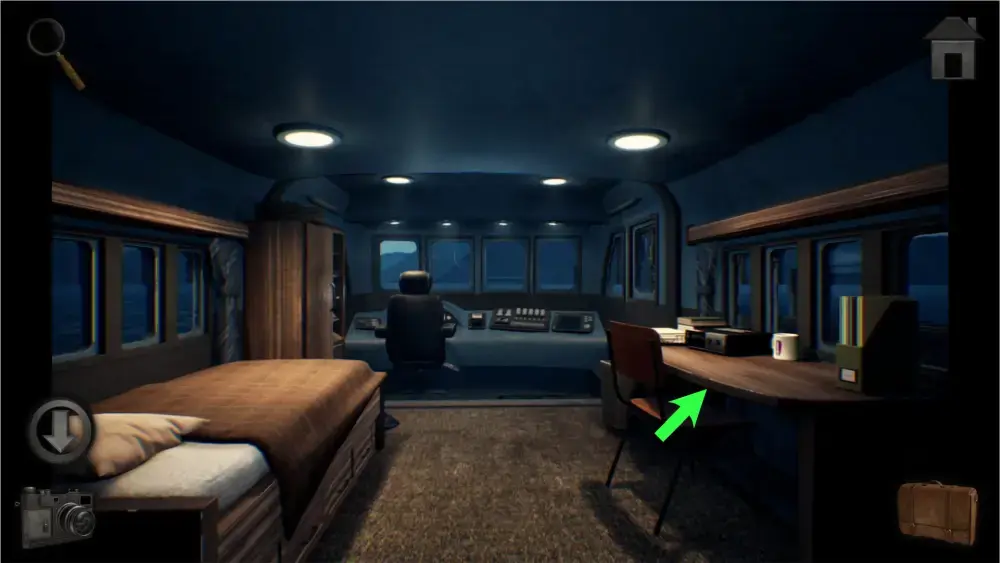
Keep tapping forward until you enter the boat. Check your desk, take the car keys, and go back to the site where your car is. Use the keys to unlock the car and enter it.
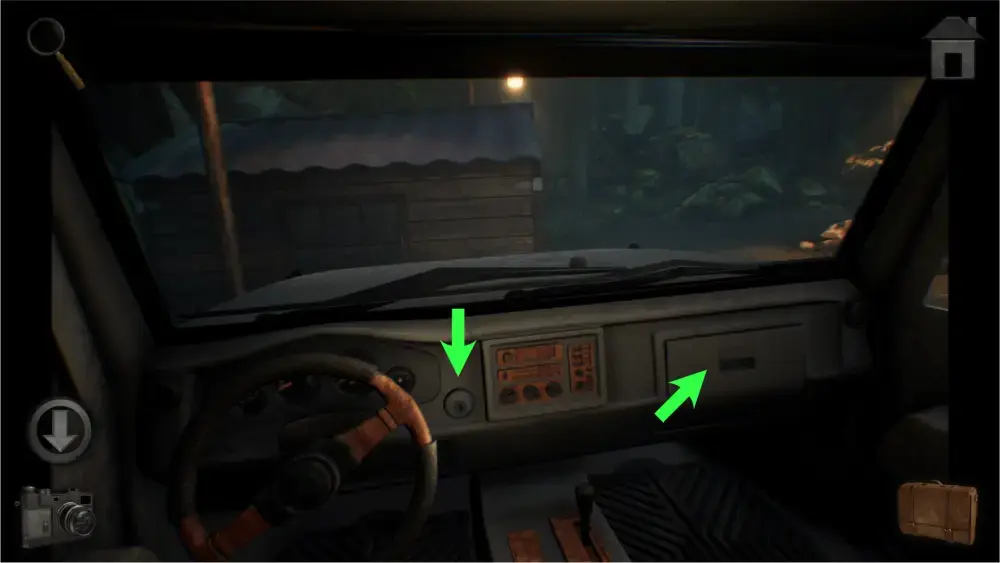
Upon entering the car, open the compartment and take the screwdriver inside. Place the keys in the ignition to turn on the car’s headlights, lighting up the inside of the shed.
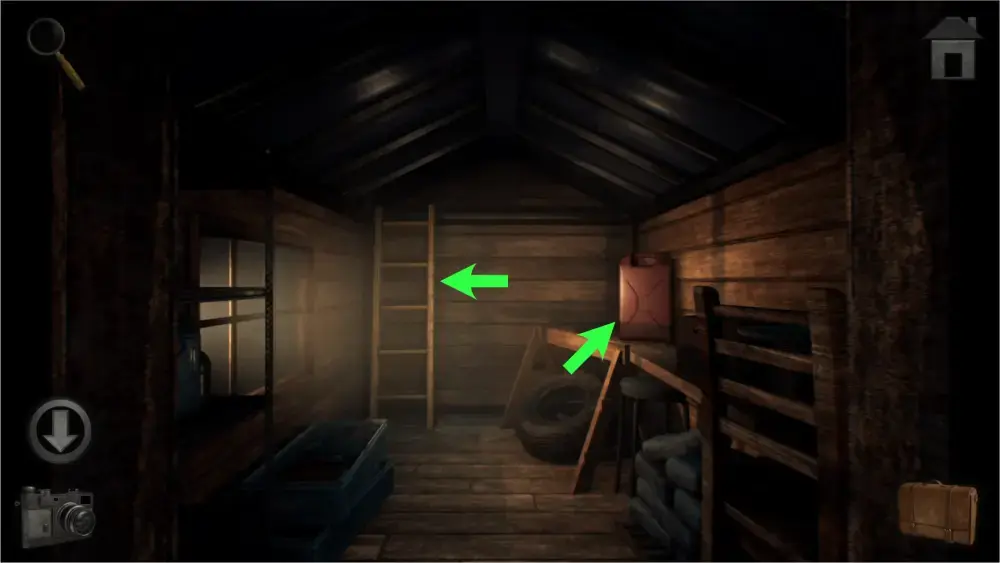
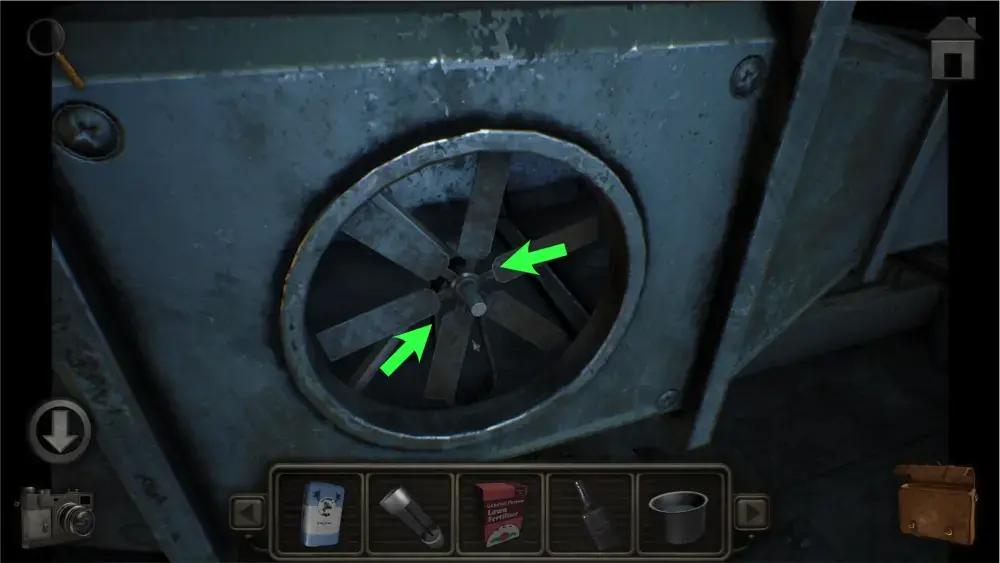
Inside the shed, take the ladder and the filled jerry can.
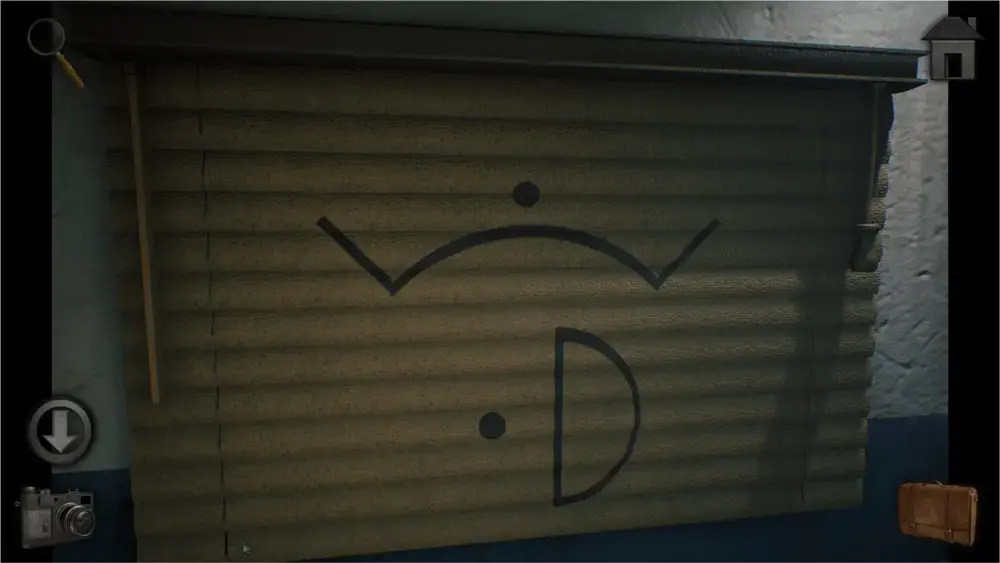
Go back to the front of your office where the fuse box is and place the ladder below it. Once the ladder is placed, tap on the fuse box to get closer and use the screwdriver on it.
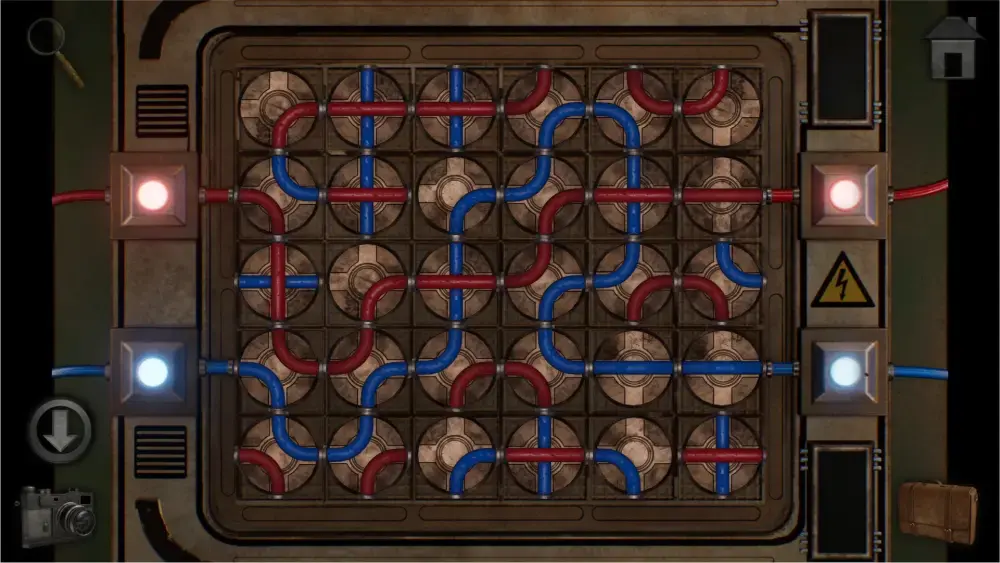
Open the fuse box. This will start a puzzle mini-game where the objective is to rotate the wires by tapping them to connect the start and end of the red wires and the blue wires. You can only connect blue to blue and red to red. There is more than one way to connect just the red wires but only one way to truly connect the blue wires in our experience. Once you get the blue wires connected, finding a solution where it intersects but also connects the red wire will be a lot easier.
The solution should look like this:
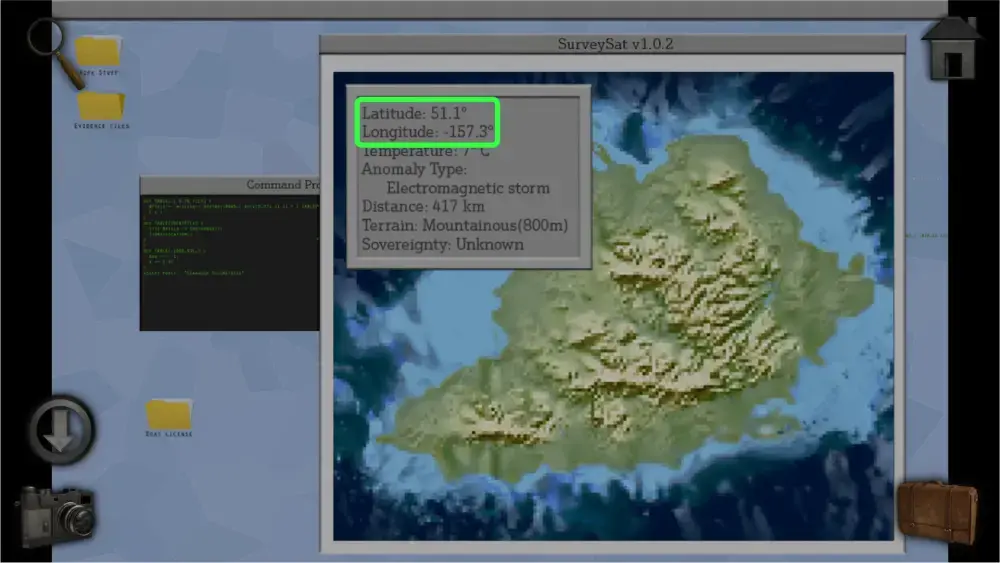
Once the fuse box is fixed and the power comes back, go back to your office and tap on your computer screen. It will display a map and tell you that an anomaly has been detected on a small island far away from Anchorage, your current location. Tap on the small island to zoom in on it and get the details. Write down the latitude (51.1°) and longitude (-157.3°) or take a picture of it and go to your boat.
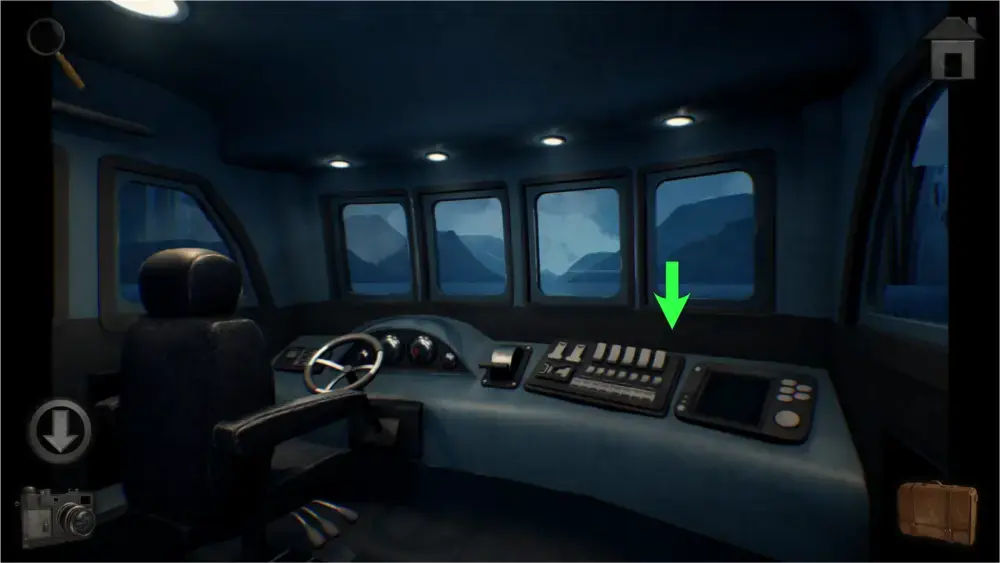
Go to the control panel of your boat and tap on the controls on the right side of the steering wheel. Type the latitude and longitude from before and tap “Plot Course.”
After 11 hours of sailing, you will eventually arrive at the mysterious island. Tap on the bed and you will go to sleep and play a short cutscene.
Unlocking the Metal Door
After the cutscene, check the cabinet at the edge of the bed. Open the cabinet door and take the eraser.

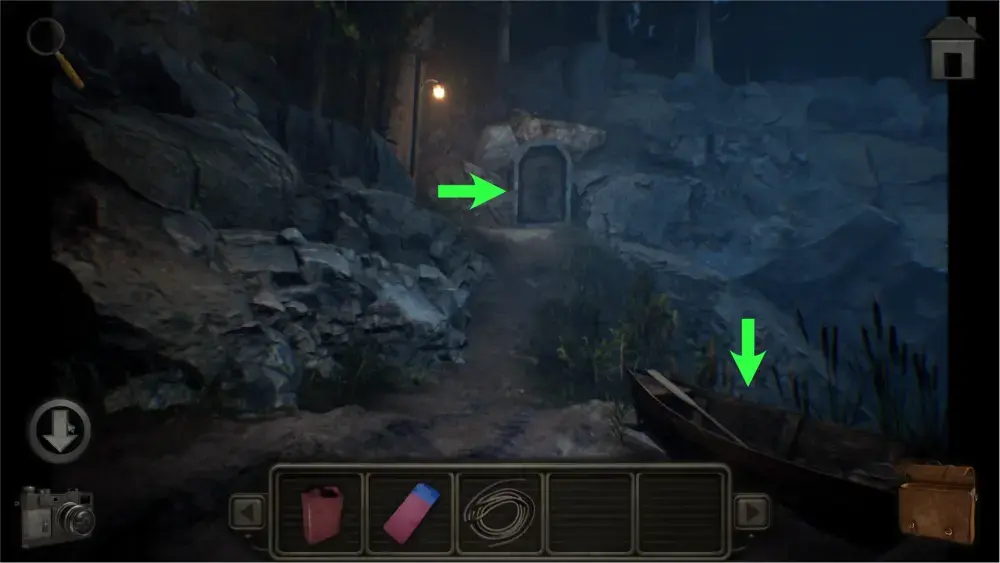
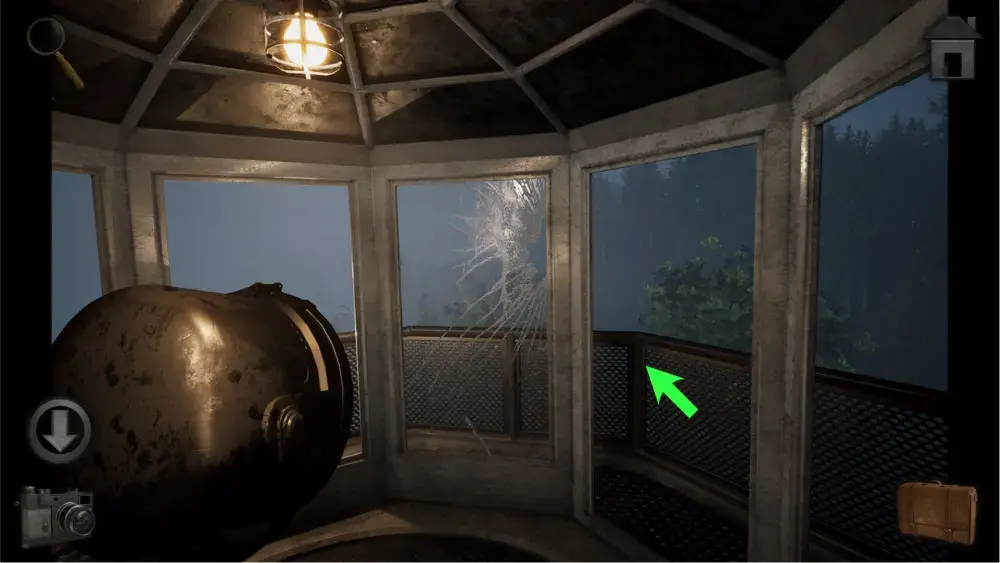
Leave the boat and go to the island. Moving forward, you will see a small rowboat to the right. Inspect it and take the rope. Moving one more step forward, you will see a mysterious metal door. You will need to find 3 rings to insert in those slots in order to open it.
As you follow the path, you will encounter a fork in the road. The right path leads to a drawbridge while the left path leads to a site somewhat similar to the one where you started the game. The drawbridge cannot be lowered and passed at this time so go to the left path for now.
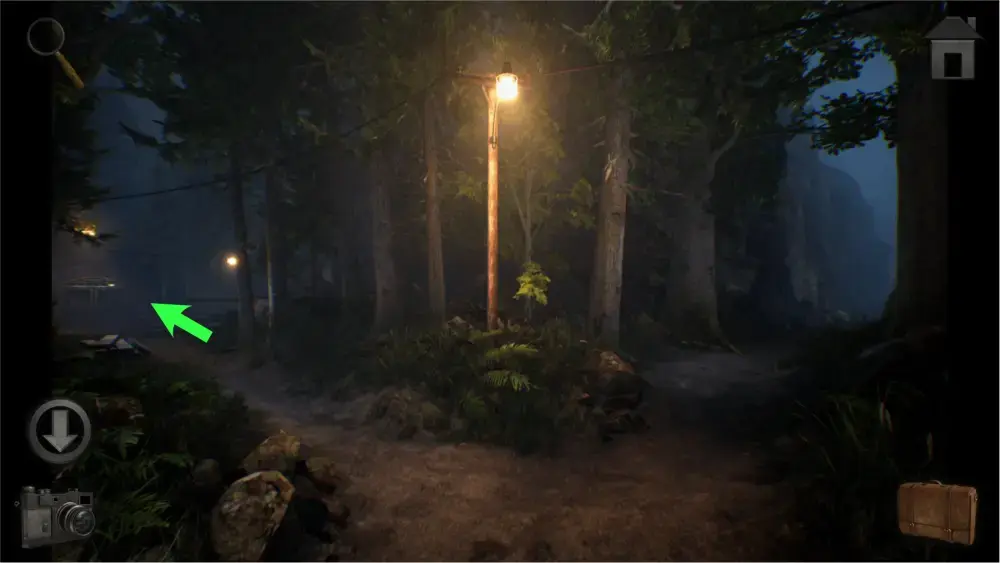
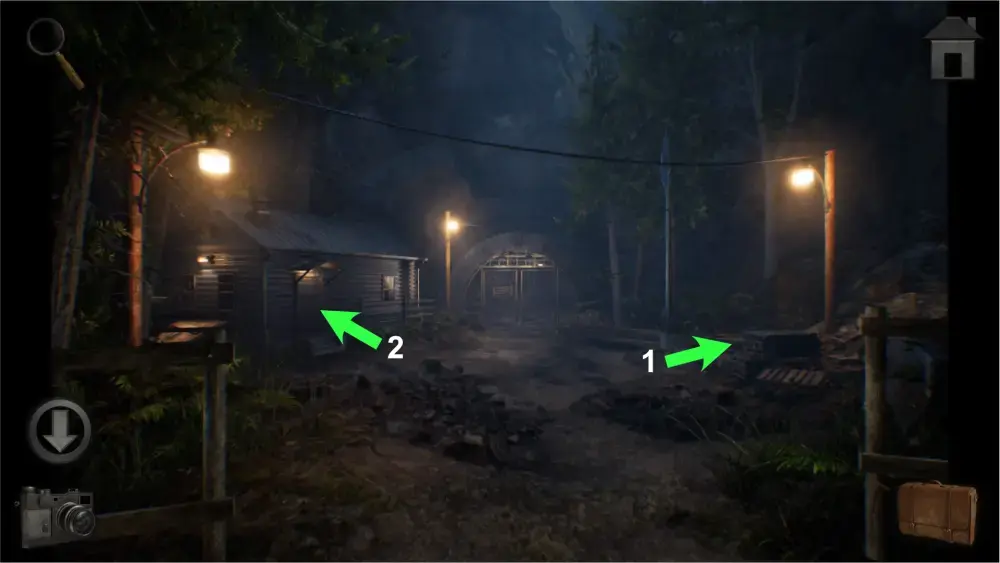
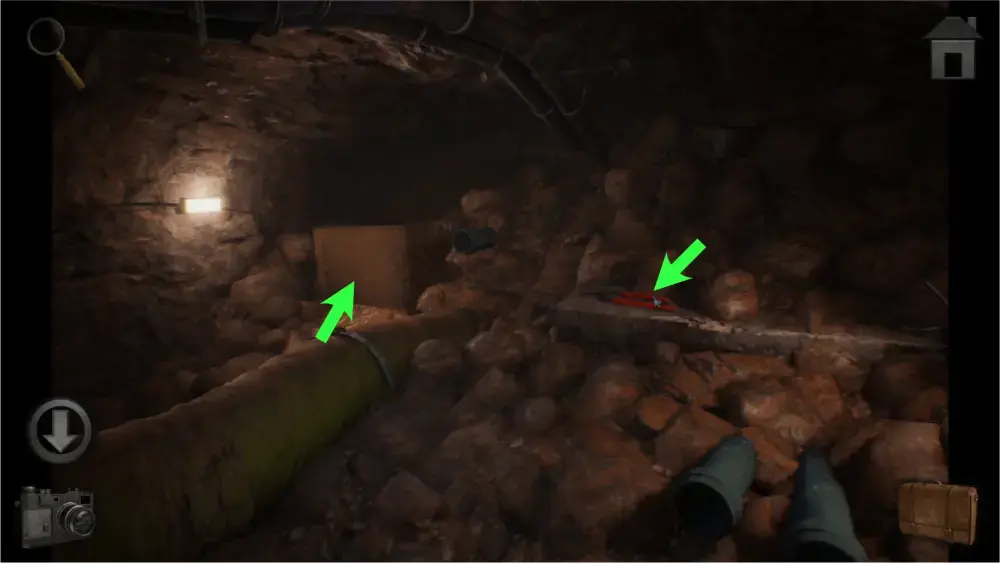
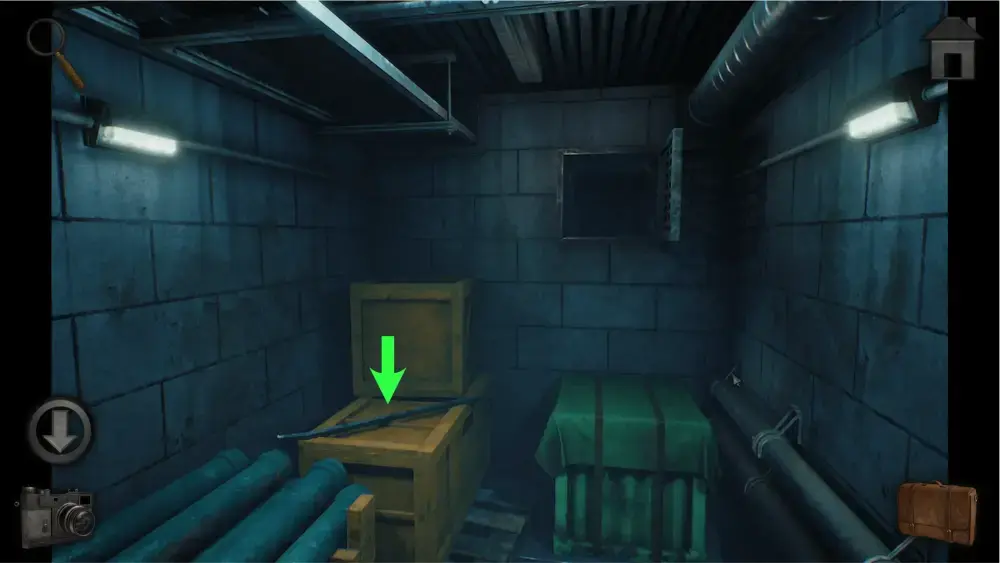
At the site, tap on the area to the right with the wooden crates and take the crowbar. If you investigate the pole, you will notice that it is missing something. You will need to find a crank to put on it to pull down the flag attached to it.
Leave the area for now and approach the house on the left. The door is locked and the only way for you to enter is through the doors that lead to the basement.
Use the crowbar to remove the wooden planks then enter the basement. Take the yellow scuba tank and go upstairs.
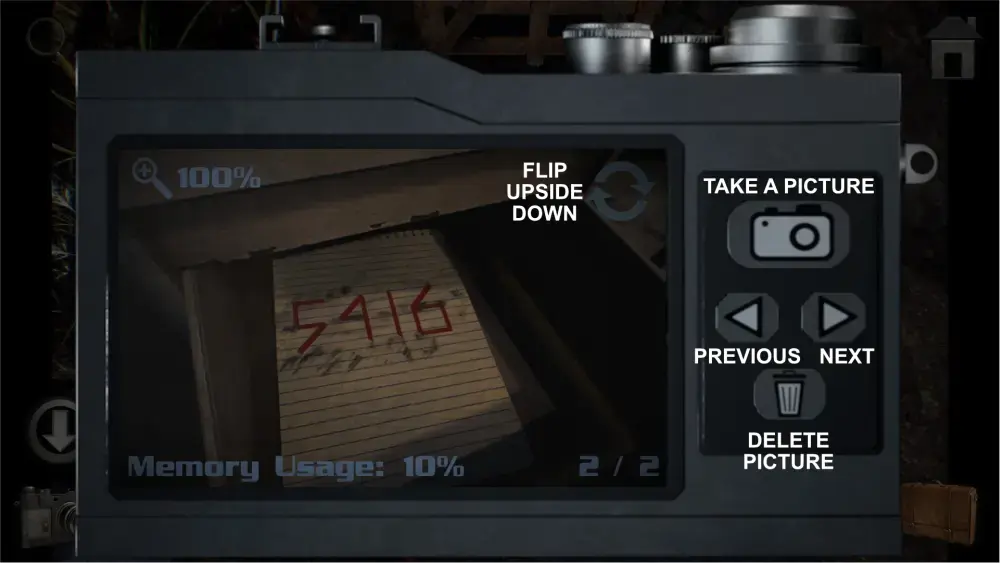
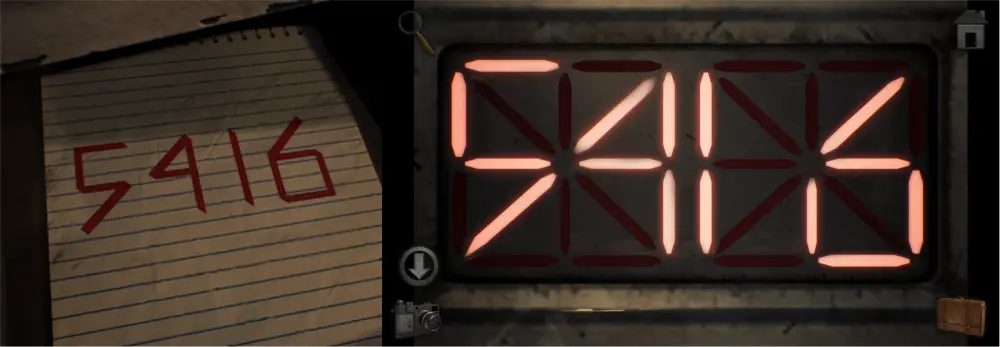
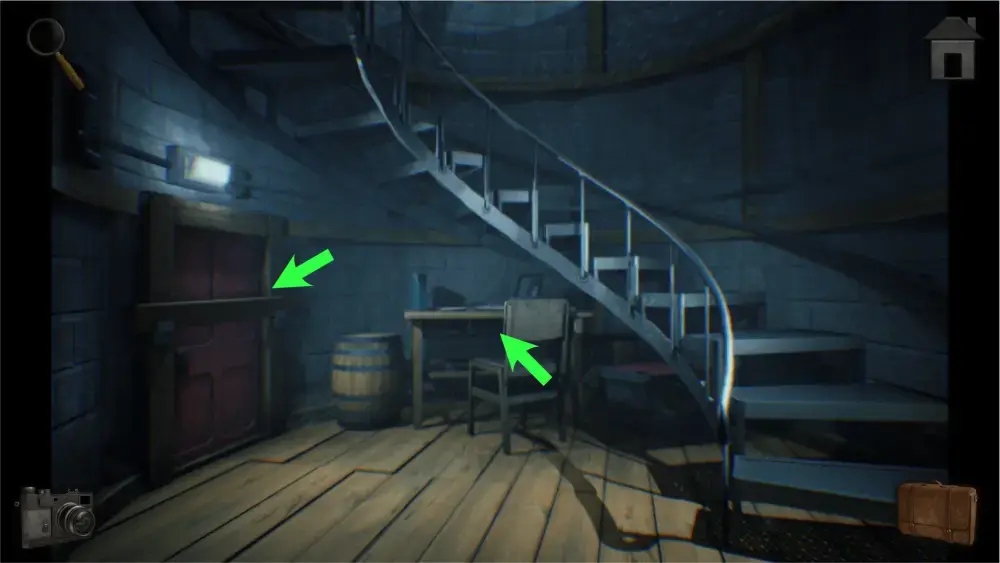
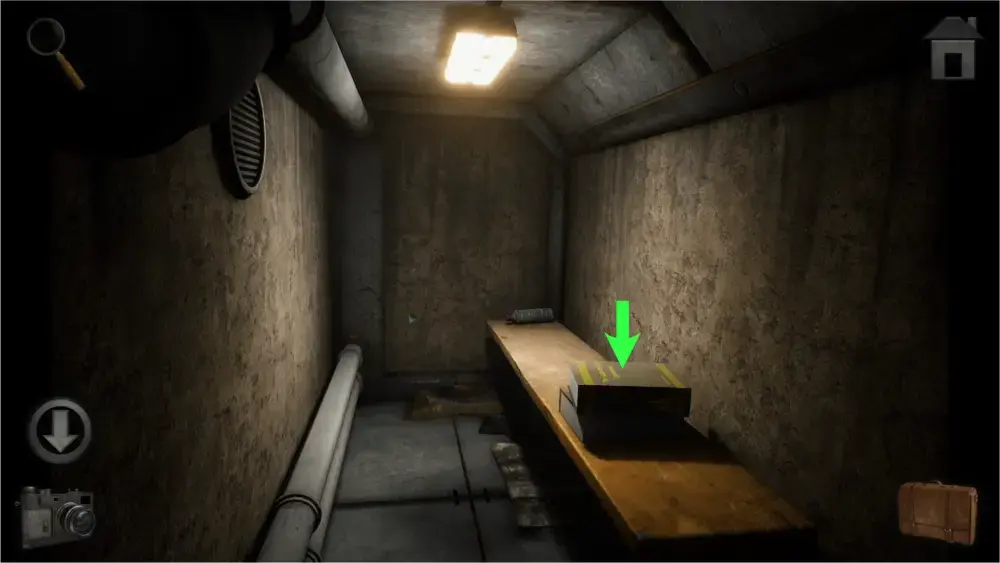
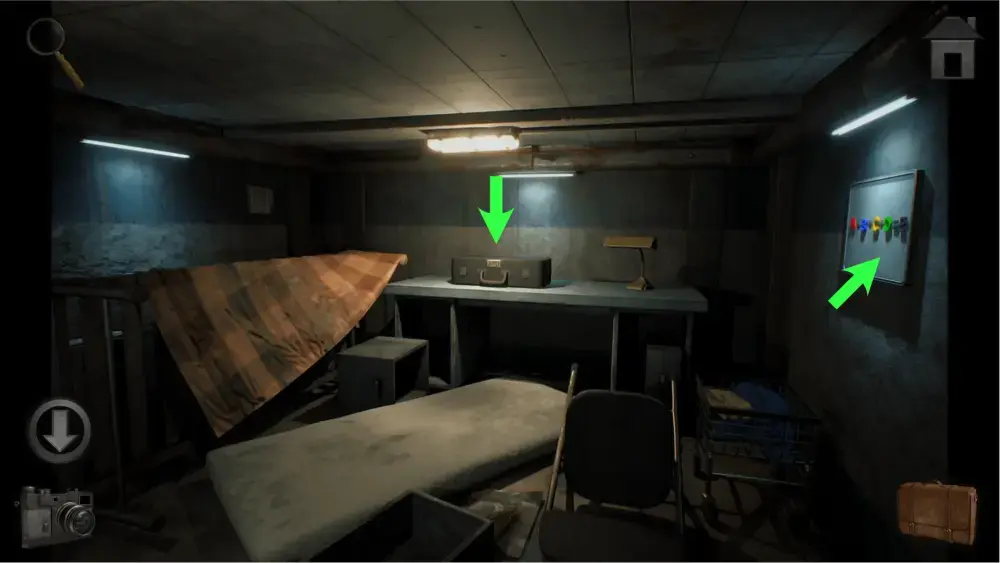
Once you’re upstairs, you will notice a desk and a white box to the far right. Tap on the desk and open the drawer. Inside you will see a notepad with an area blacked out by a pencil. Take out your eraser and use it on the notepad to reveal a number code. This number code will be used to open the metal box from before. Pay attention to the lines used to create the numbers as it will be important.
Exit the drawer and approach the metal box. Upon tapping the box, you must input the number code from before with the exact lines. Upon opening the metal box, take the bolt cutters inside it. You can exit the house through the door at this point.
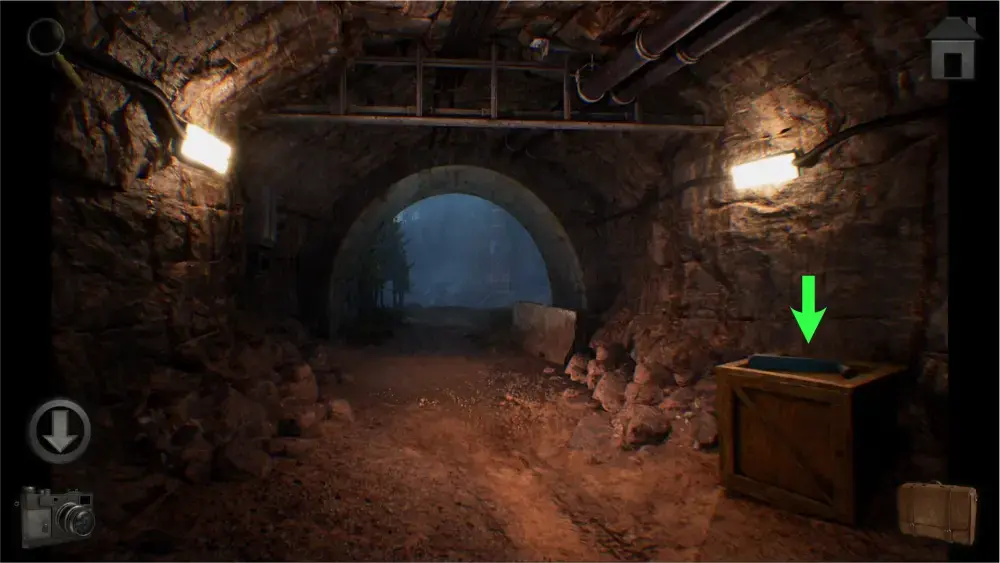
Back at the site, approach the barbed wire doors in the middle. Use the bolt cutters on the chains binding the doors together. Open them and enter the tunnel.
Inside the tunnel, you’ll see an oil drum to the right. Approach it and place the jerry can next to it for now. You will need a hand drill to pierce the barrel and a hose to transfer the oil to the can.

Move forward until you see the end of the tunnel. Take the blue crank sitting on top of a wooden crate to the right. If you move forward, you will eventually get to the lighthouse but you won’t be able to enter yet because something is blocking the door from the other side. You will have to find another way later.
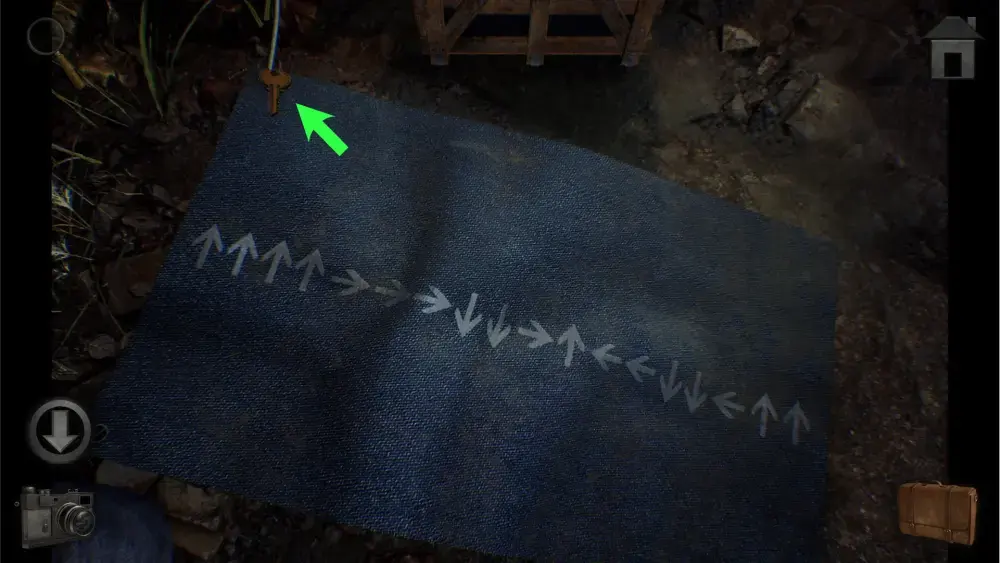
Go back to the site and approach the pole. Use the crank on the pole to bring the flag down. The flag will have a series of arrows which is a clue to a puzzle in the Control Room. Don’t forget to take the key at the upper right corner of the flag.
Go back into the tunnel and enter the Control Room to the right. Inside you will see a series of levers on the far right side of the room. This is the control panel that will lower the drawbridge.
To understand how the arrows in the map relate to the drawbridge puzzle, we’ve drawn a diagram below. Each arrow is used to draw a pattern that shows which lever should be at what level.
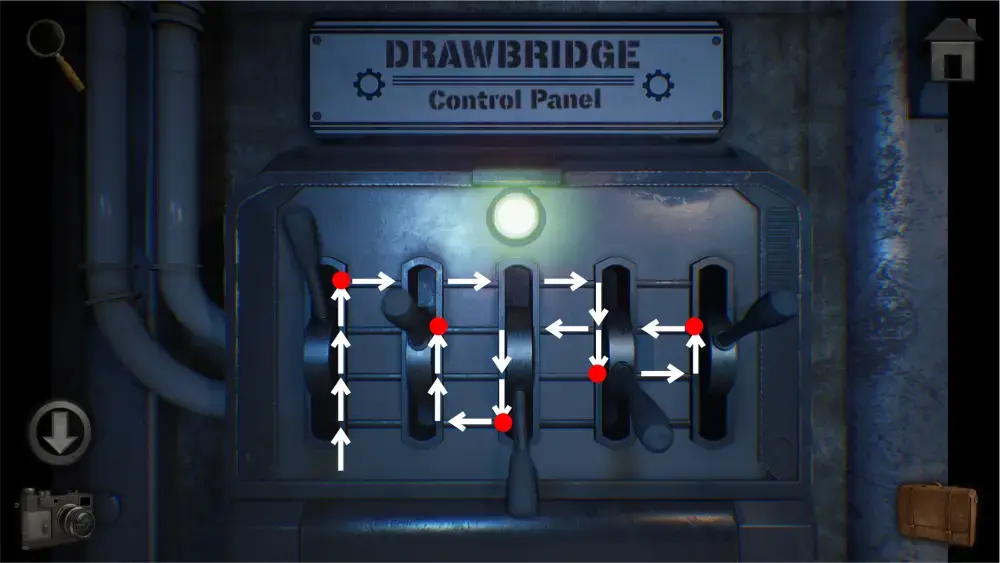
To simplify things, with the lowest level as 1 and highest level as 4:
- First Lever – Level 4 (all the way up)
- Second Lever – Level 3
- Third Lever – Level 1 (all the way down)
- Fourth Lever – Level 2
- Fifth Lever – Level 3
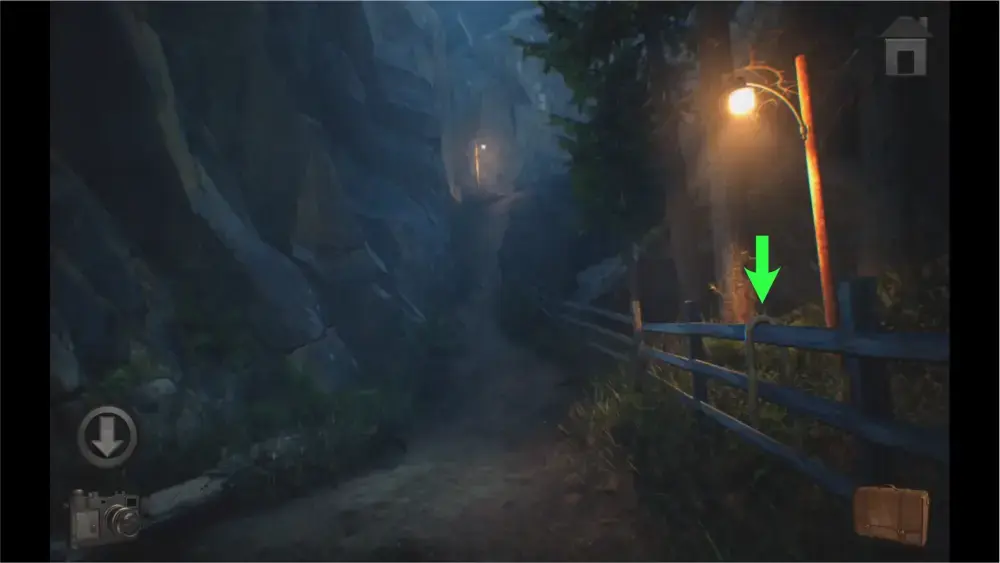
The light on the control panel will turn green signifying that the drawbridge has been lowered. Exit the cave and go back to the fork in the road. Turn right this time and cross the drawbridge. As soon as you do, take the hose hanging from the fence at the right, underneath the lamp post.
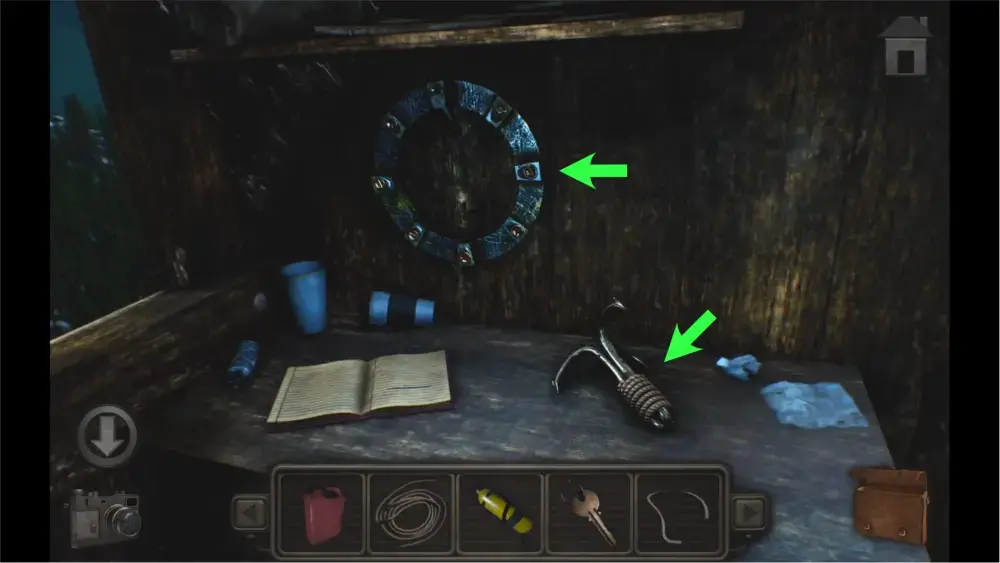
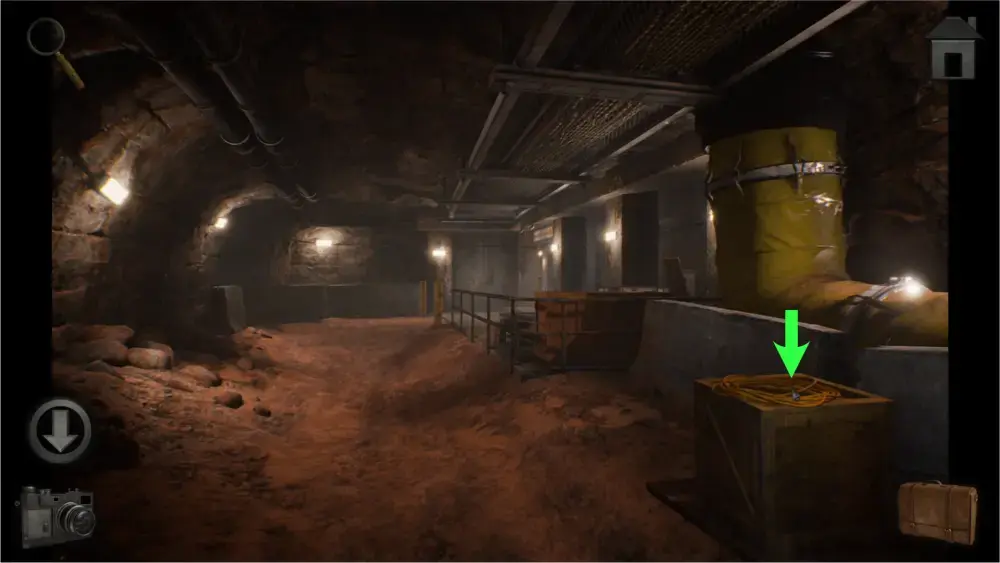
Keep moving forward and enter the tree house. Upon entering, inspect the table to the right and take the medium-sized ring. Use your rope on the hook to turn it into a grappling hook and take it.
You can inspect the notebook on the desk to read a bit of lore about the man who got stranded on the island. Nothing in this notebook is useful for any of the puzzles except for the hint about looking into the telescope. However, if you try to look into the telescope at this point, you won’t be able to see anything. This is because it is missing its lens. You’ll have to find it elsewhere.
Leave the treehouse and go back to the lighthouse by going through the tunnel. Once you’re at the lighthouse, use the grappling hook on the window above and climb up. If you go upstairs, you can use the key you found on the flag on the locked hatch. Exit through the hatch and tap outside the window. Take the large ring by the terrace.
Afterward, go downstairs, inspect the table, and take the old lens. Remove the wooden plank on the door so you can enter and exit through it.
Go back to the treehouse and place the old lens on the telescope. Use the telescope and look around. You will see three numbers in different colors. A red 9 found to the left, a blue 3 found at the middle and a yellow 2 found at the right. This code is a hint to opening the locked box in the Control Room which is found on the table to the left.
Use the left and right arrows to shift the colors of the numbers then use the up and down arrows to change the numbers. Once you’ve input them and it opens, take the scuba mask and the small ring.

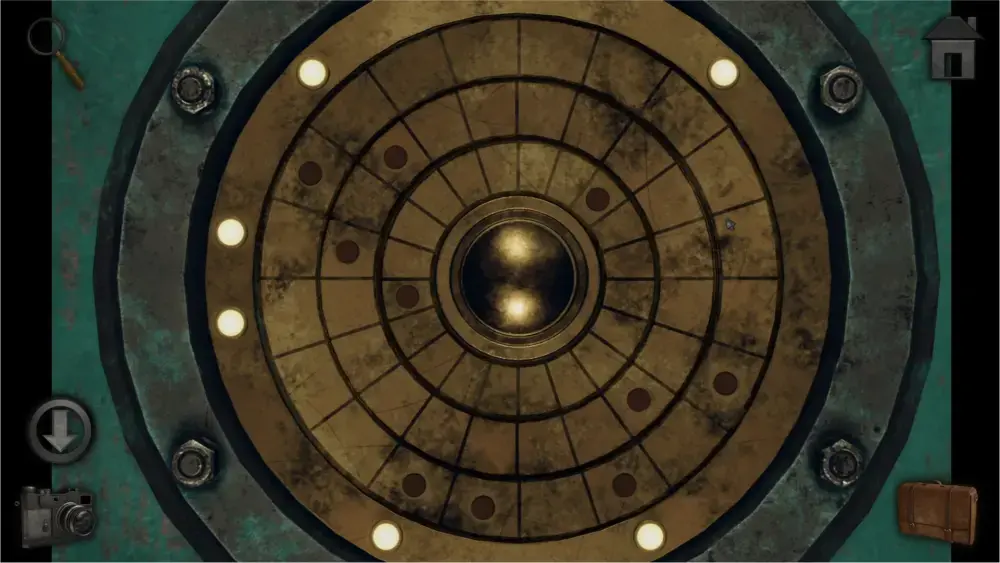
Tap the back button several times until you get to the metal door with the odd mechanism that is close to your boat at the beginning of the game. Use the small, medium, and large rings on the door to open it.
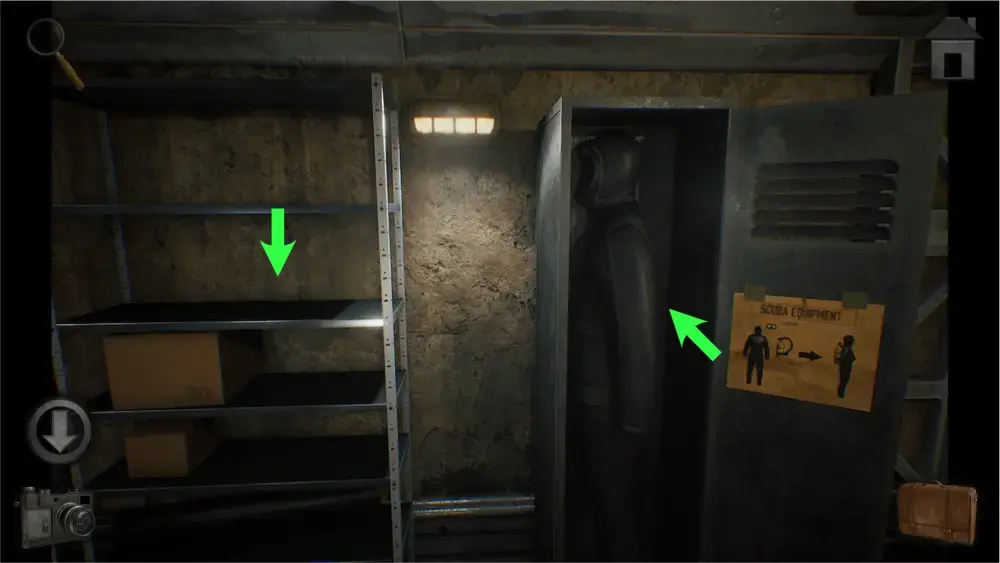
Once inside, investigate the shelf at the right. Take the flashlight on the shelf then open the locker. You’ll find a scuba suit but you’ll need to place the scuba mask and scuba tank on it before you can take it.
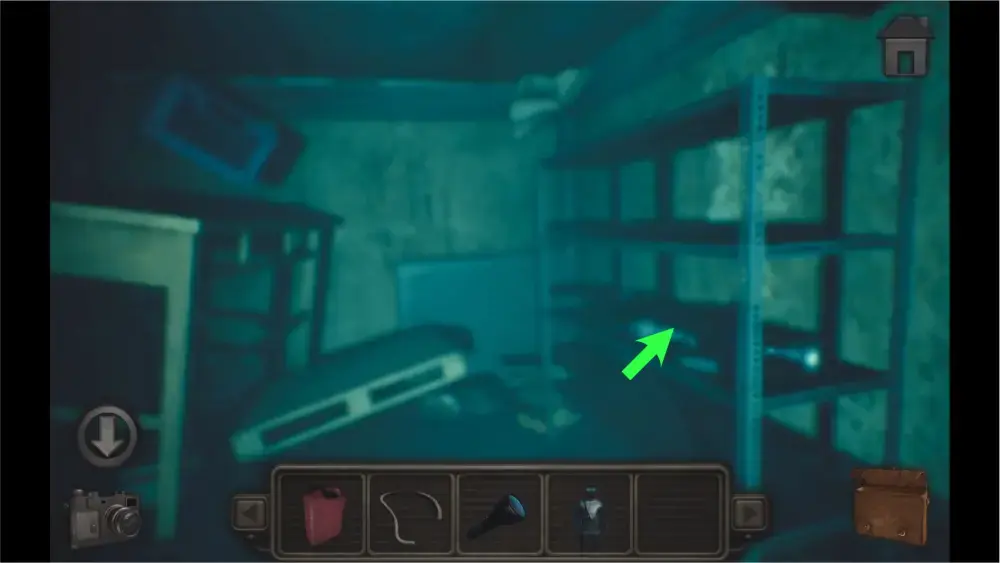
Leave the area and move forward. Swim into the water and take the left path. Take the hand drill on the shelf and go back to the tunnel area just before the Control Room.
Tap on the oil drum where you deposited your jerry can before and use your hand drill on the opening and then the hose on it. Once you do, take the oil-filled jerry can.
Leave the area, and go back through the metal door and through the water. This time go to the right path. You’ll see an elevator at the center of the room but it won’t activate. Approach the hatch to the right of the room and use the oil-filled jerry can on it in order to open it.
Upon opening the hatch, you’ll face a mini-game where the objective is to bring the c-shaped block from the upper left corner to the two green blocks on the right side. The way this puzzle works is the vertical blocks can only move vertically and the horizontal blocks can only move horizontally. Only the c-shaped block can move both vertically and horizontally. If you make a mistake, you can click on the reset icon to the left to start over.
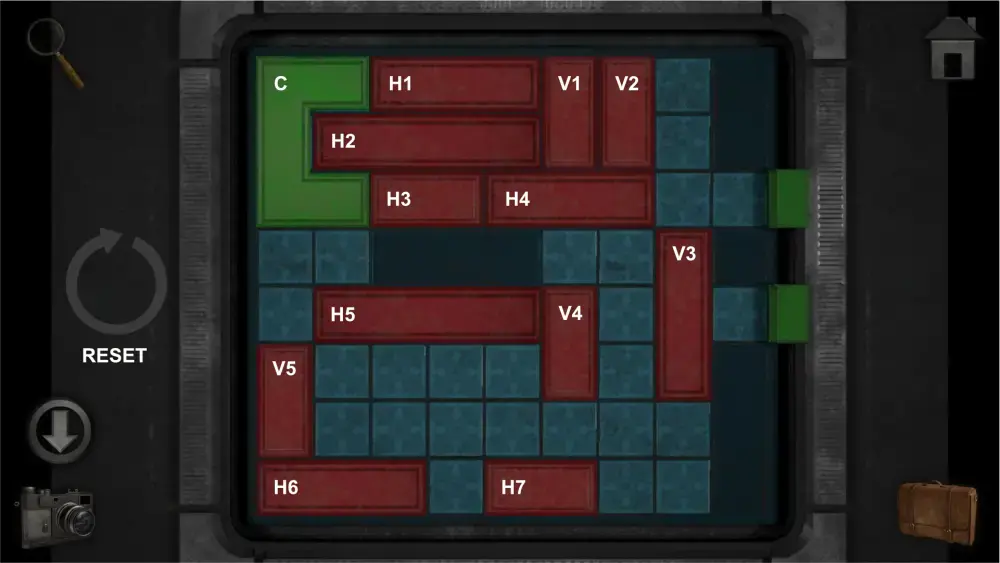
To make things simple, we’ve broken down the step-by-step process in solving it using the codes we named for each block:
- Drag V3 2 squares down
- Drag H4 2 squares to the right
- Drag V1 2 squares down
- Drag H2 1 square to the right
- Drag V4 1 square down
- Drag H5 4 squares to the right
- Drag C 2 squares down
- Drag H3 1 square to the right
- Drag C 1 square to the right
- Drag V5 5 squares up
- Drag C 1 square to the left
- Drag C 2 squares down
- Drag C 3 squares to the right
- Drag V5 5 squares down
- Drag H1 2 squares to the left
- Drag H2 2 squares to the left
- Drag H3 3 squares to the left
- Drag V1 2 squares up
- Drag H4 4 squares to the left
- Drag H7 1 square to the right
- Drag C 1 square down
- Drag H5 5 squares to the left
- Drag V3 5 squares up
- Drag H7 1 square to the right
- Drag V4 3 squares up
- Drag C 1 square to the right
- Drag C 1 square up
- Drag C 2 squares to the right
- Drag H7 3 squares to the left
- Drag V4 4 squares down
- Drag C 1 square up
- Drag C 1 square to the left
- Drag V3 5 squares down
- Drag C 1 square up
- Drag C 2 squares to the right
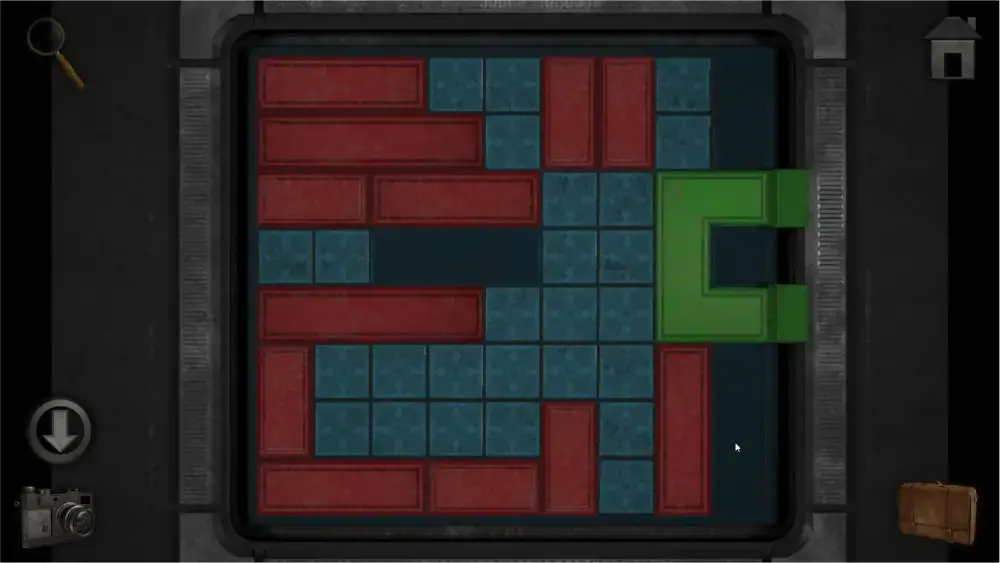
The puzzle should look something like this once it’s been solved:
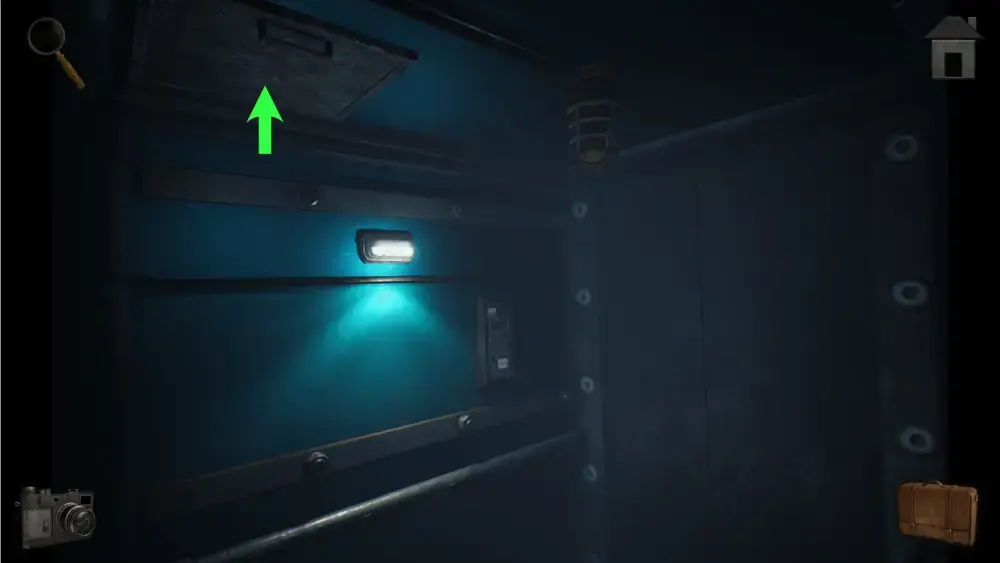
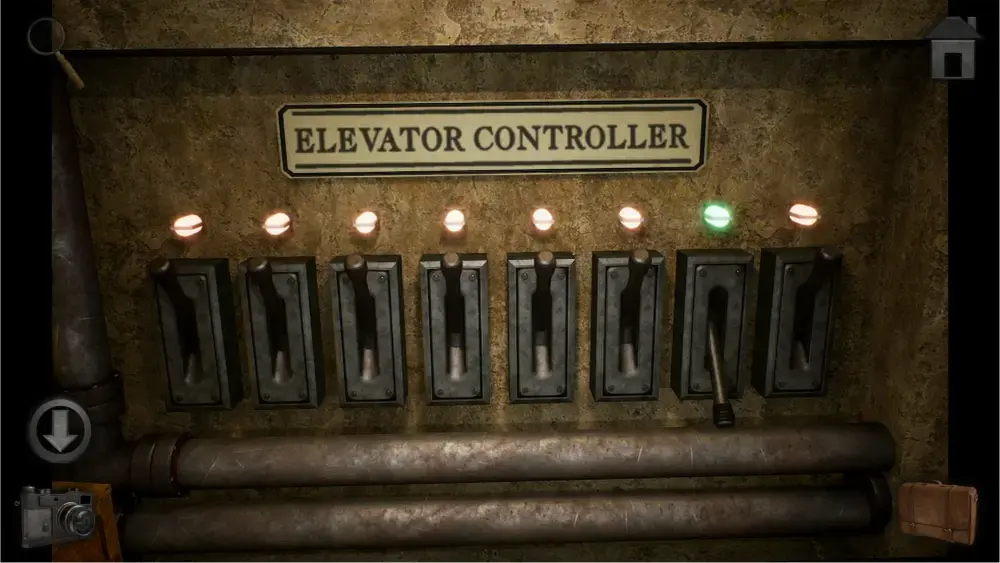
Upon solving the puzzle, enter the elevator and activate it using the lever to finish the game.
Meridian 157 Chapter 1

Getting out of the Elevator
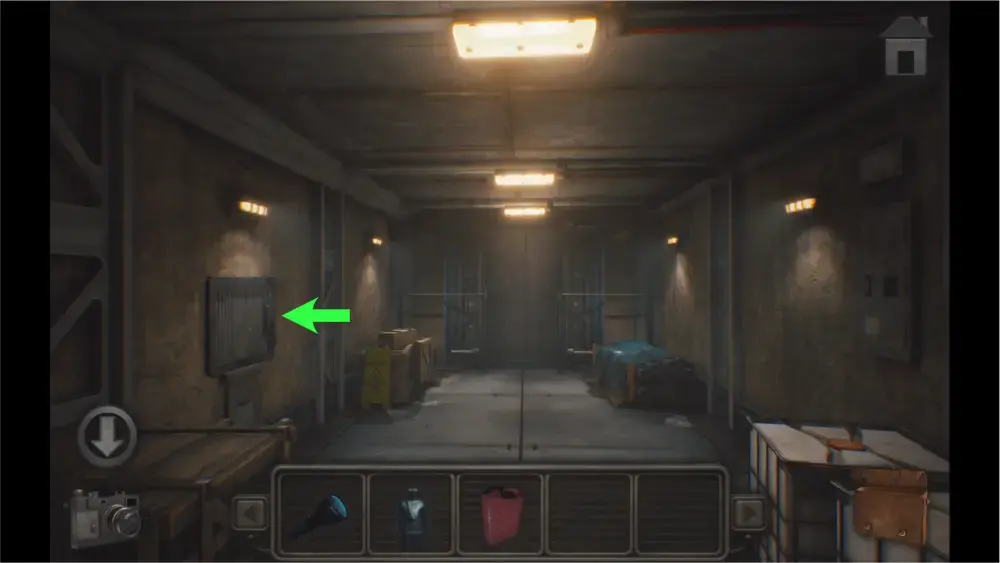
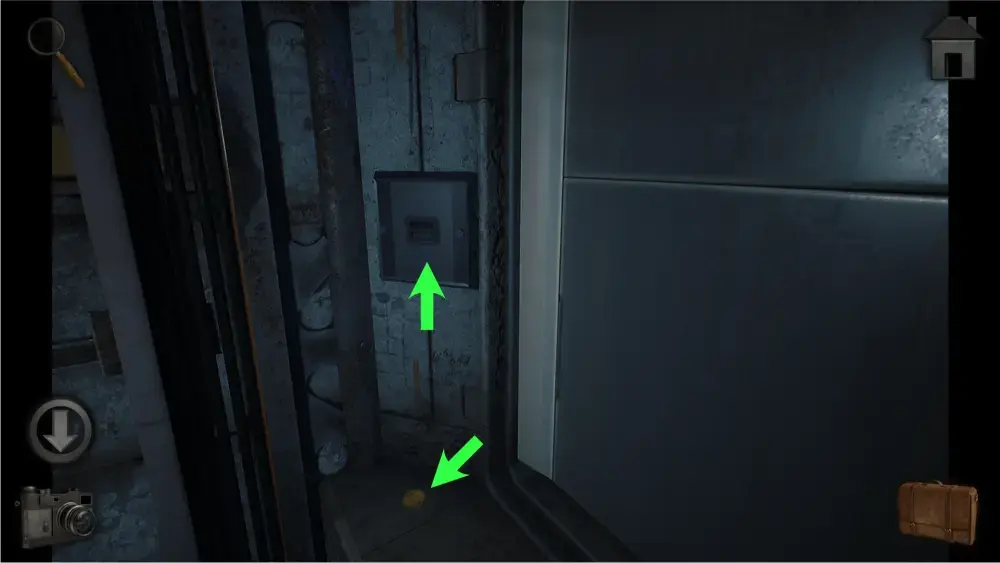
The game starts where you left off in the Prologue: inside the elevator. The power had died, leaving you stuck inside. Open the hatch at the upper left side of the screen and exit the elevator.
Looking up, you’ll find the elevator doors just above you. Approach it and pick up the small coin just below a hatch. Approach the hatch and use the penny to unscrew the two screws that are holding it in place.
Upon opening the hatch, you’ll be presented with a puzzle a little similar to the last puzzle in the Prologue but a lot simpler. Horizontal bars only move horizontally and vertical bars only move vertically. This time, the goal is not to place a certain piece from one point to another. For this puzzle, you have to move the 4 bolts inwards to unfasten them.
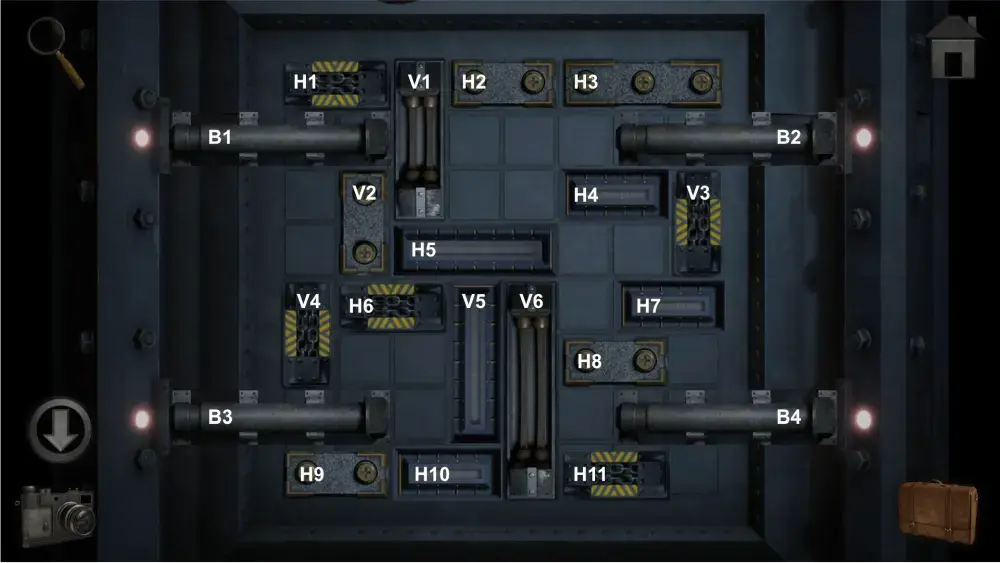
To make things simple, just like last time, we’ve broken down the step-by-step process in solving it using the codes we named for each block:
- Drag B2 2 squares to the left
- Drag H5 2 squares to the left
- Drag V5 3 squares up
- Drag B3 2 squares to the right
- Drag H7 1 square to the left
- Drag V3 2 squares down
- Drag H4 1 square to the right
- Drag H5 1 square to the right
- Drag V6 2 squares up
- Drag B4 2 squares to the left
- Drag V5 2 squares down
- Drag V4 2 squares up
- Drag H6 1 square to the left
- Drag V1 3 squares down
- Drag B1 2 squares to the right
The puzzle should look something like this once it’s been solved:
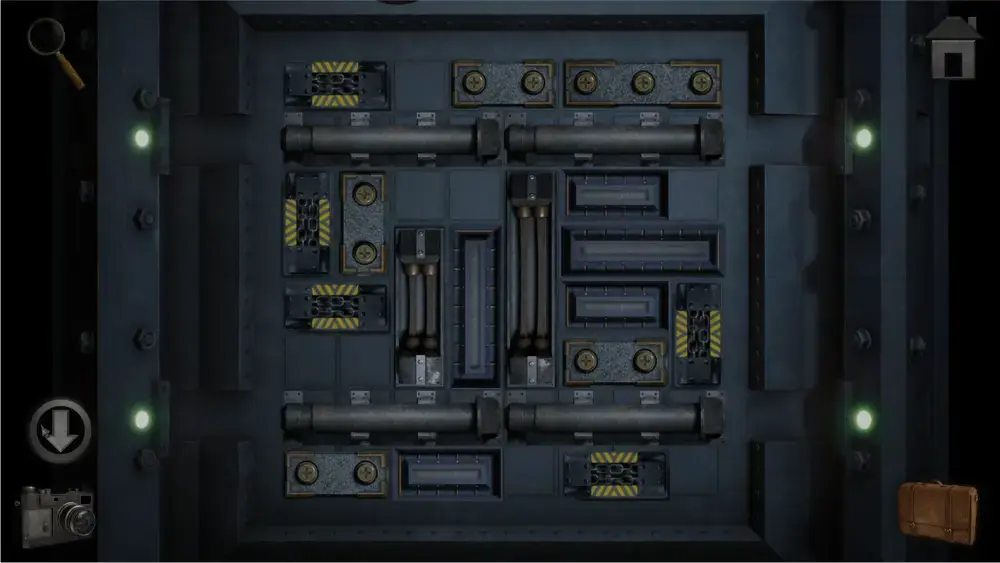
Upon solving the puzzle, exit the shaft through the elevator doors.
Unlocking the Residence Area
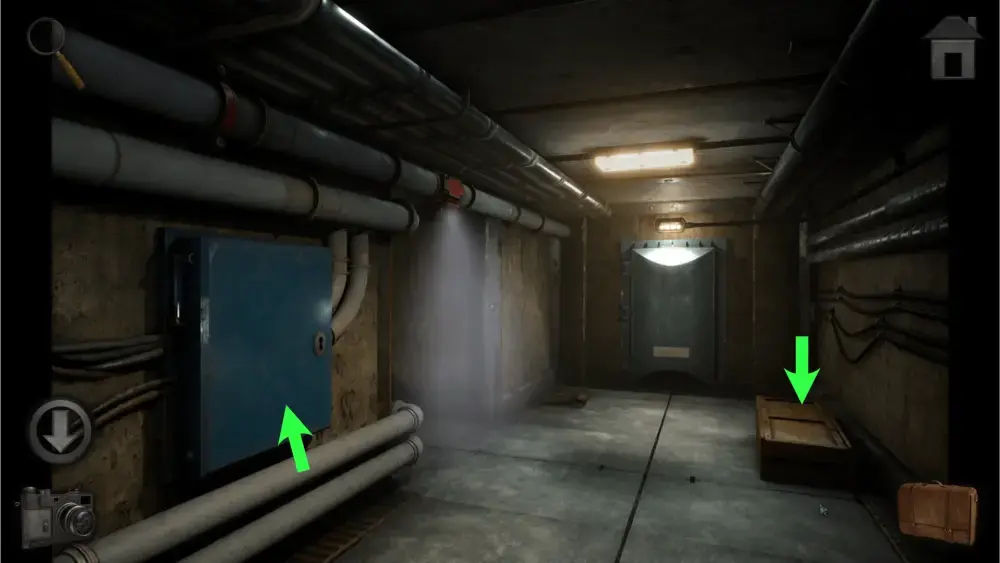
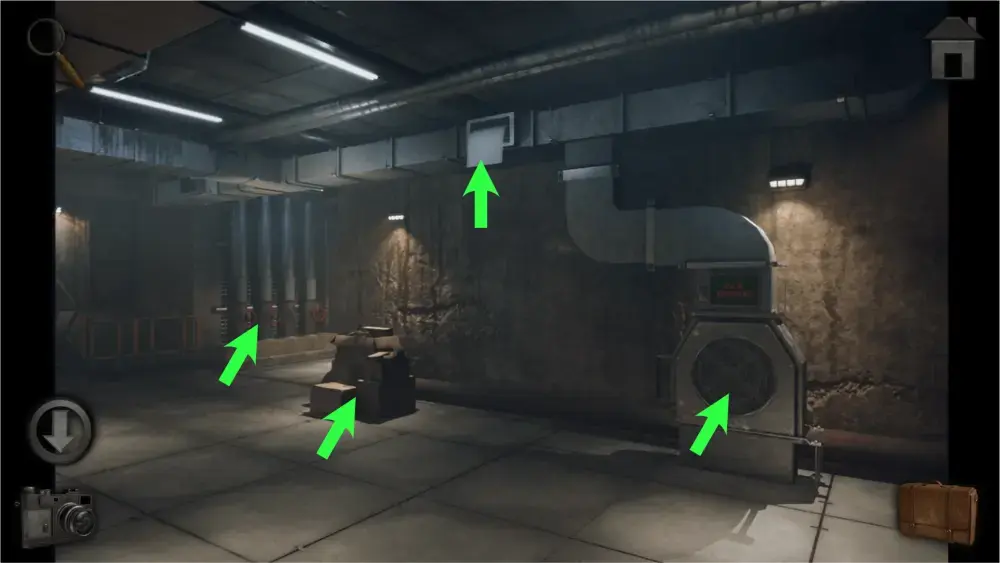
Move forward twice and you will see a wooden crate to the right, a metal box to the left with some steam coming out of a pipe and a metal door at the end of the hall. The wooden crate is nailed shut and will need pliers to open it. The mechanism in the metal box controls the steam but you must first find the key that opens it along with the clues to solve the mechanism inside. Enter the metal door for now.
Inside, you will be met with three signs pointing to the Machine Room to the right and the Power Room and Residence Area to the left.
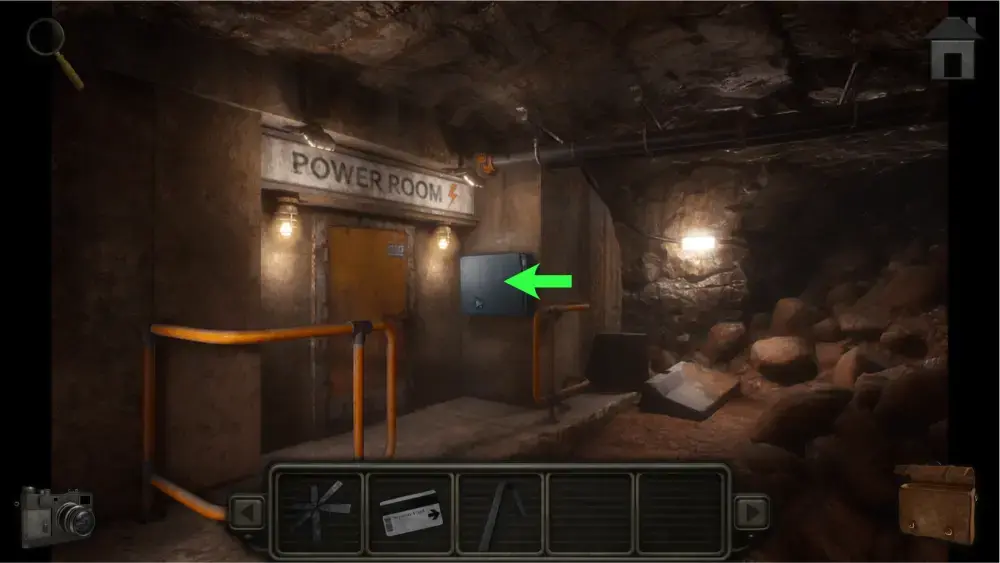
Go to the left side and you’ll encounter a forked path. Go to the right where the Power Room sign points. The Power Room has been blocked by rocks and you will need to find another way to enter it. Inspect the box to the right and it’ll tell you that you’ll need something to dust it off. You’ll need to come back later once you’ve obtained a brush. Take the red pliers to the right and leave the area.
Go back to the forked path and go to the left side this time where the Residence Area is supposed to be. Once there, take the extension cable sitting on top of a wooden crate at the right.
Moving forward, you’ll find the Residence Area which is currently locked. If you inspect the metal grates, you’ll see a drawstring sitting on top of the wooden crate inside. You’ll need tweezers to take them later. Leave the area for now and go back to where the 3 signs were.
Go to the right this time where the sign points to the Machine Room. Like the left side, there is another forked path. The left side leads you to the Machine Room while the right leads you to the Control Room.
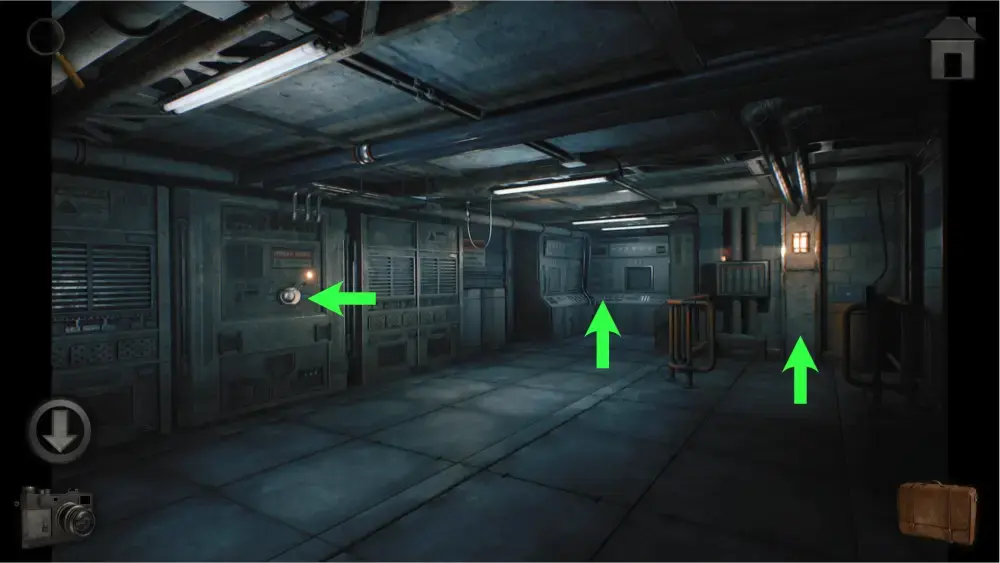
There is nothing to take on the left side at this time. The only thing you can find there is an empty lampshade that needs a light bulb and a blue metal door that is locked and can only be opened by inserting a keycard and inputting a code. Go to the Control Room for now.
In the Control Room, there are several points of interest: the corkboard, the computer table, and the shelves. Approach the left side where the area where the corkboard is for now.
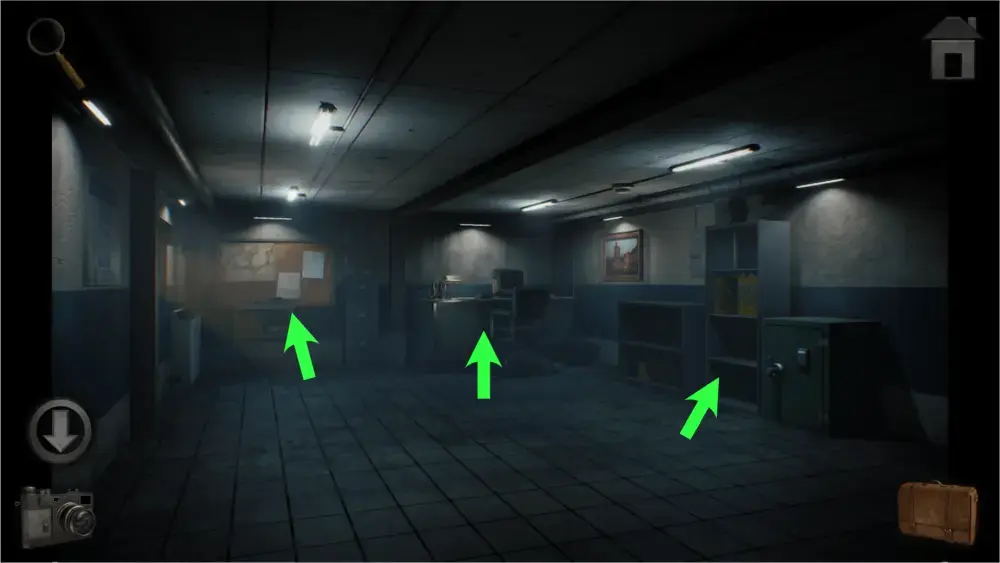
To the left of the corkboard is a window with blinds that seem to have some sort of pattern on it. You will need to get the drawstring by the Residence Area for this. To the right of the corkboard is a safe which also has a code that you’ll need to get from the wooden crate by the Power Room.
Approach the corkboard, take the brush on the table, then inspect the map.
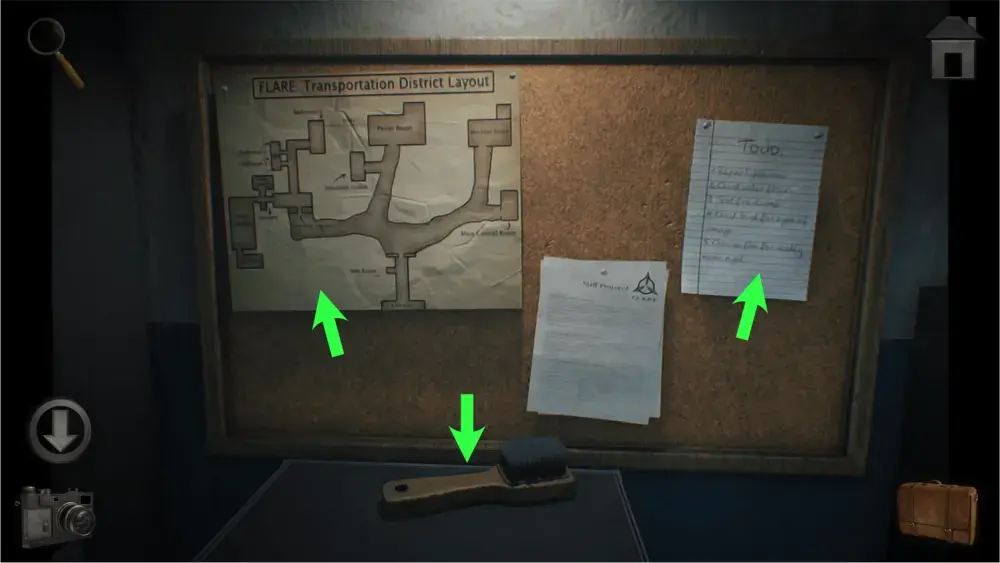
The map is very important and you are most likely to refer to it throughout the entire game. We highly recommend taking a screenshot of it with your camera.

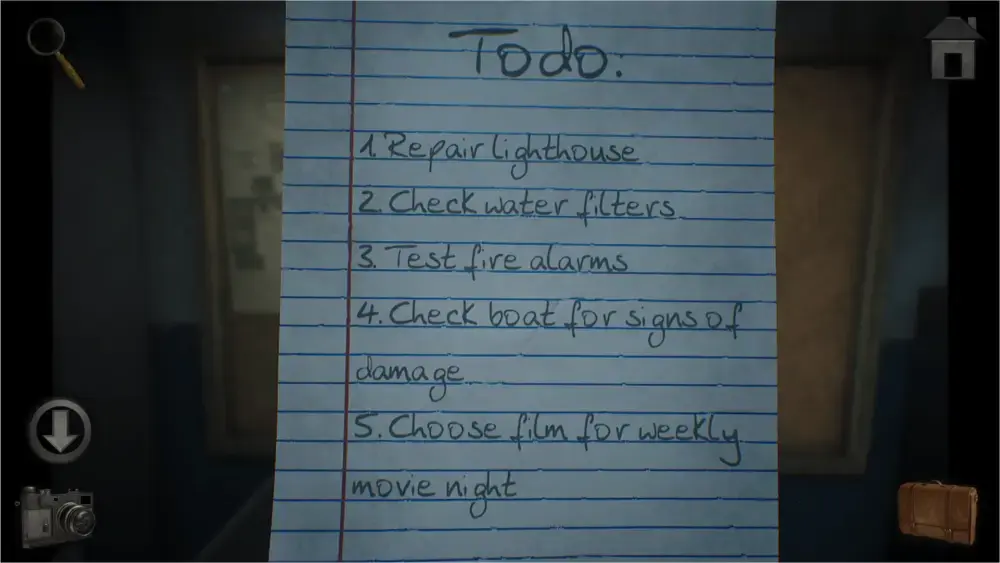
Aside from the map, you’ll also find the staff protocol, which provides a bit of lore but doesn’t really give any hints for solving any puzzles, and a to-do list. This list is a lot more important than it seems so keep that in mind for later.
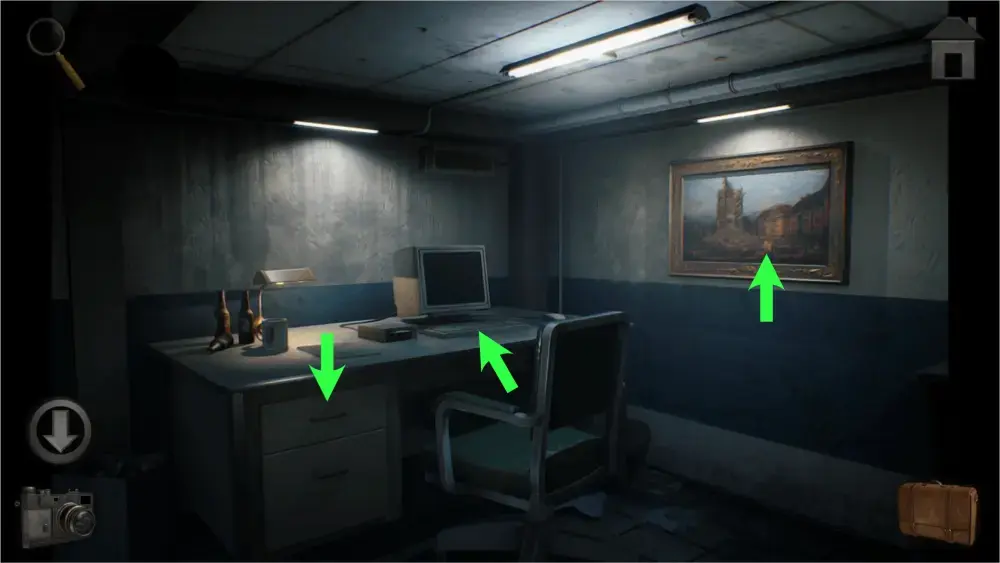
At the computer table, you can inspect the painting, the drawer, and the computer itself. Something is hiding behind the painting and you’ll need a knife to open it up. The drawer contains a rounded metal case with symbols that needs to be opened by solving a puzzle with a certain code which you’ll have to find elsewhere. The computer can’t be used at this time as there is no power yet.
At the shelves area, you can inspect the metal box on the wall, the shelves and the safe. The metal box can only be opened with the computer. The shelves are missing two books which you’ll need to know the code for the safe. Leave the area for now and go back to the area of the Power Room.
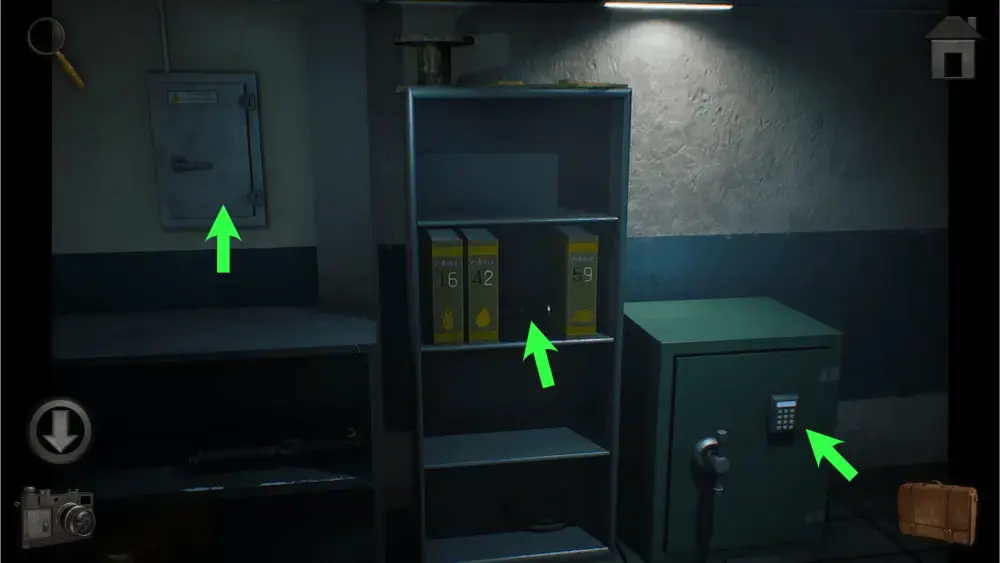
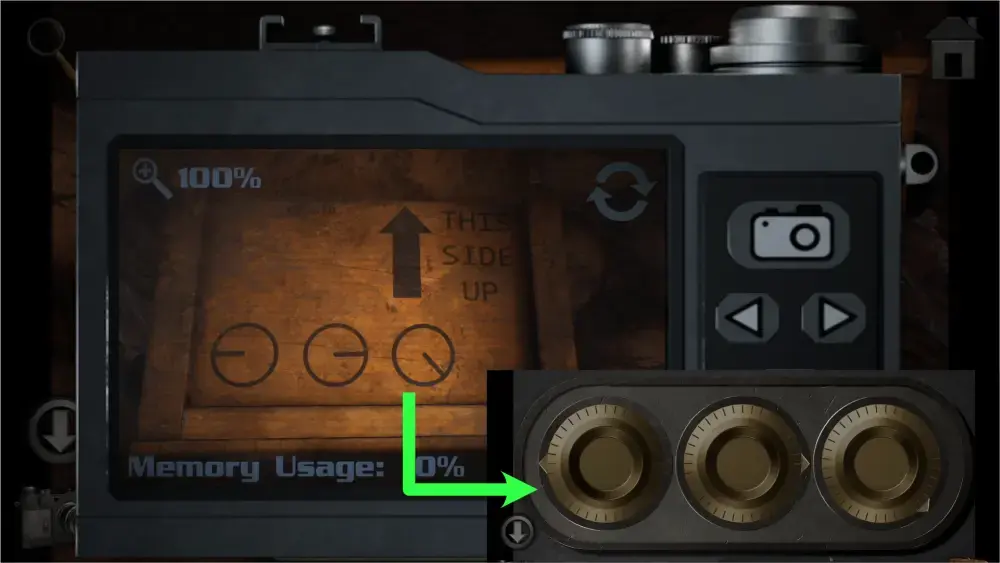
Approach the dirty crate and use the brush on it. This will reveal 3 circles with lines on them. This is the code that unlocks one of the safes in the Control Room. However, the most important detail to take note of here is the sign that says “THIS SIDE UP.”
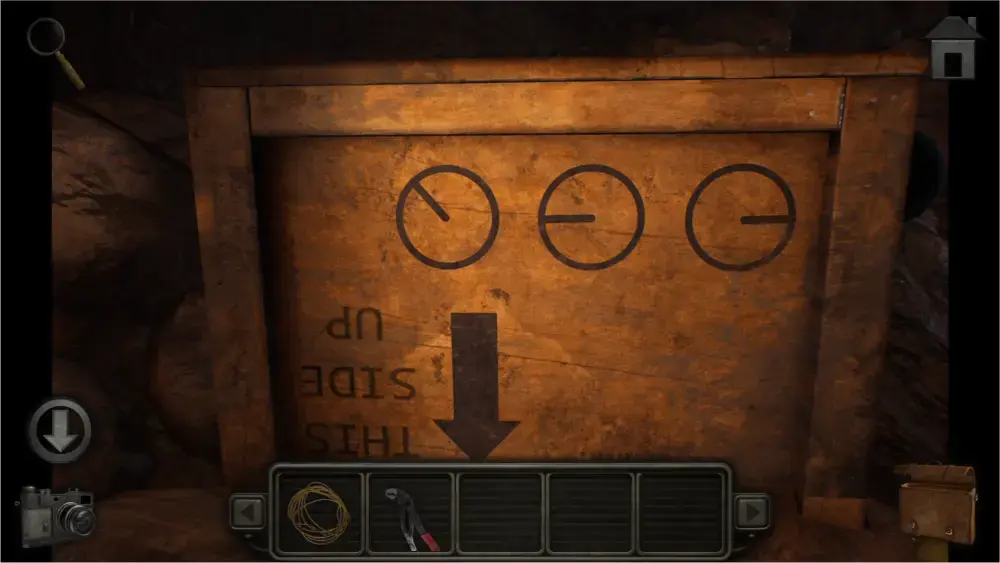
If you take a picture of the crate and flip it upside down, you’ll get the correct code for the safe.
Leave the area and go back to the Control Room and approach the corkboard area where the safe with the 3 circles is and input the code by rotating the dials at the correct angle.
Upon opening, take the tweezers and search the yellow folder.
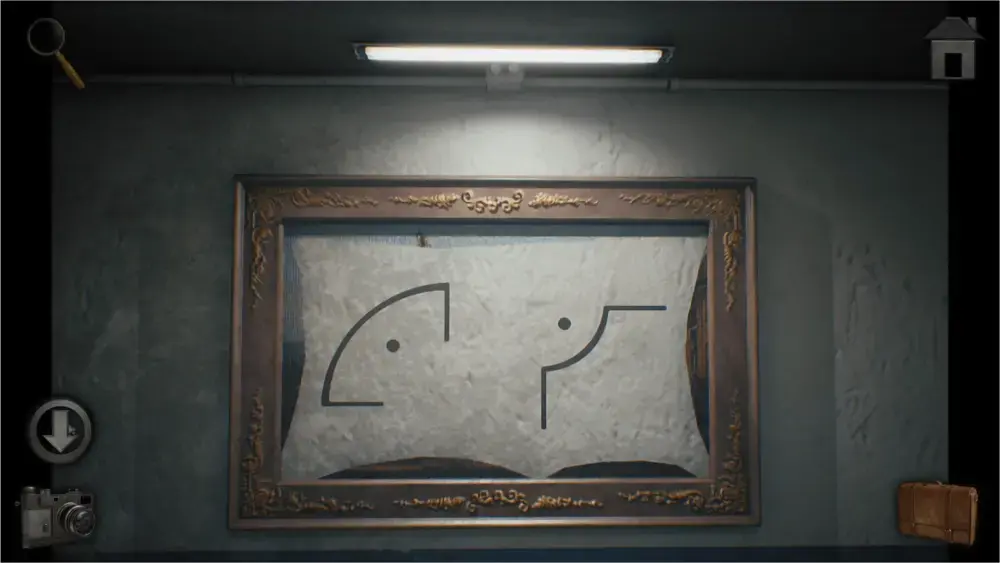
This folder not only contains a bit of lore regarding the employees at F.L.A.R.E., but it also includes valuable hints. Each file has two light gray symbols on them which are similar to the one in the rounded metal case found inside the computer table drawer. This is one of those instances where the camera comes in handy since you will need to flip one of the files upside down.
Go back to the computer table drawer and inspect the rounded metal case inside. Move the parts to line them up with the symbols that are paired together in the files. The completed puzzle should look like this:
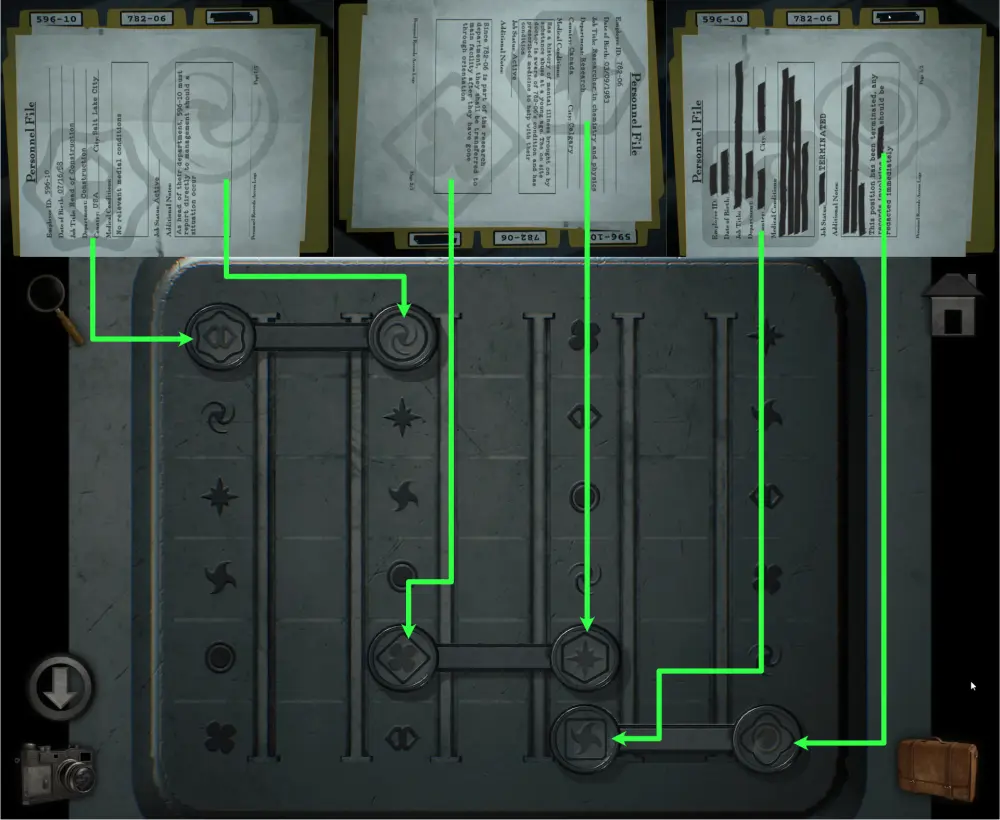
Upon solving the puzzle, take the key inside the case.
Go back to the entrance and inspect the wooden crate by the door. Open it up using the pliers and take the lightbulb.
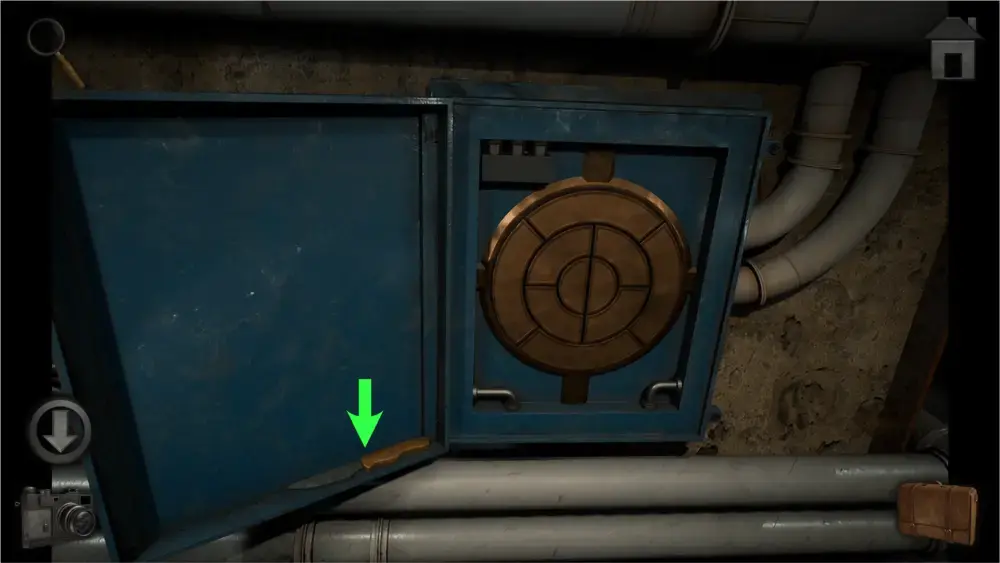
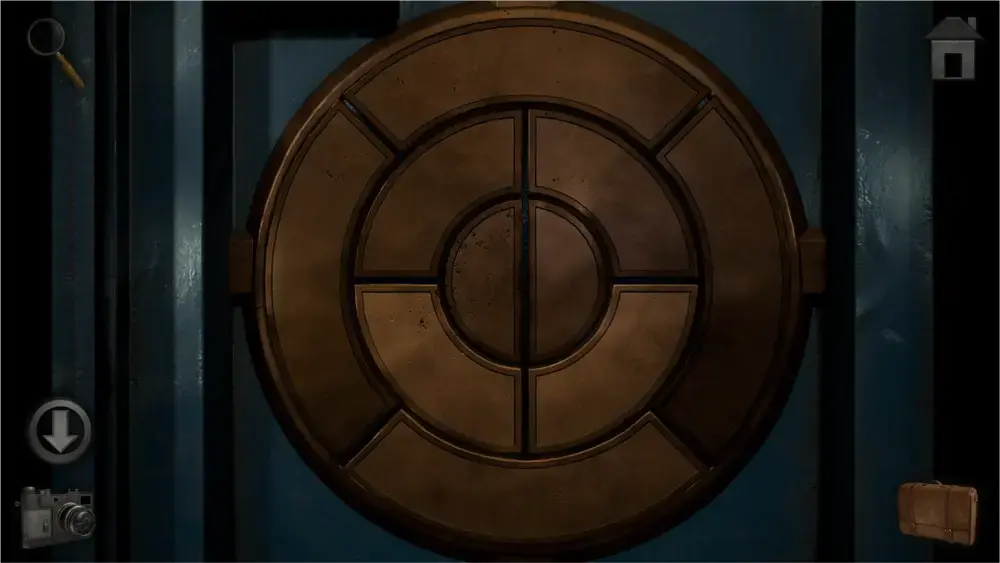
Approach the blue metal box by the steaming pipes and use the key on it to open it. You will find a circular mechanism that controls the steaming pipes. However, you will need to find hints to learn the code and these are divided into 3 different locations. Don’t forget to take the knife before leaving the area.
Go back to the Residence Area and inspect the metal grates. Use the tweezers to take the drawstring inside it.
Go back to the Control Room and attach the drawstring on the blinds. Lower the blinds with the drawstring to the right and rotate them with the wand to the left and you will find your first set of symbols.
After that, approach the painting by the computer table and use the knife on it. A second set of symbols will appear.
Go back to the Machine Room and approach the lampshade. Tap the lampshade and insert the light bulb. Tap the back button and you’ll get your third set of symbols.
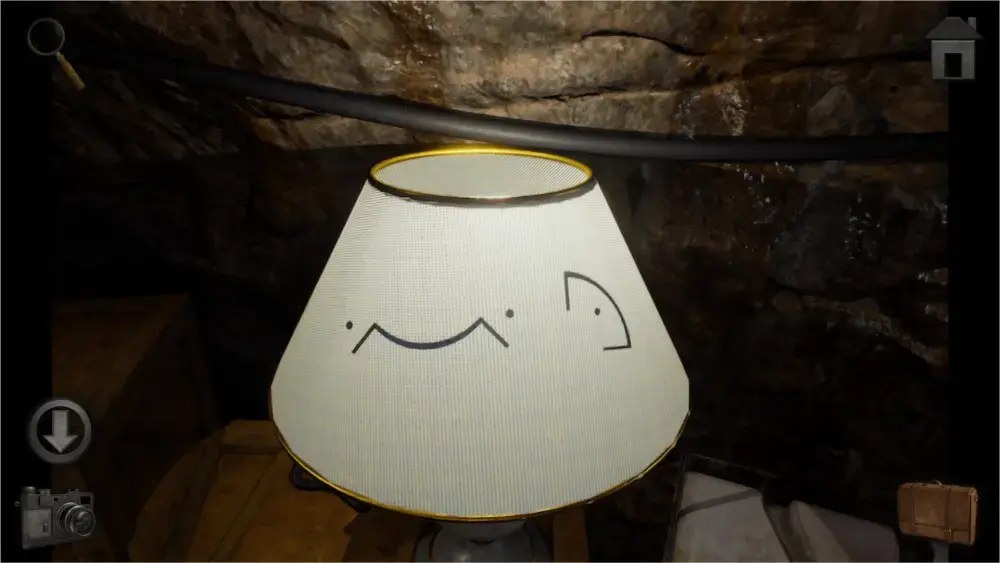
At this point, you have all the clues you need for the mechanism by the entrance. Let’s review the symbols that you found and compare them with the mechanism:
These symbols represent parts of the mechanism. The dots represent the parts that need to be pressed. Putting them all together, the solved puzzle should look like this:
Upon solving it, the steam will turn off and you will be able to pass through. Take the books that you find on the bench and go back to the Control Room.
Investigate the shelves and place the missing books inside them. This is where the to-do list becomes important. Each item on the list refers to the symbols at the bottom of the books. Arrange these books accordingly by tapping two of them at a time and they should look something like this:
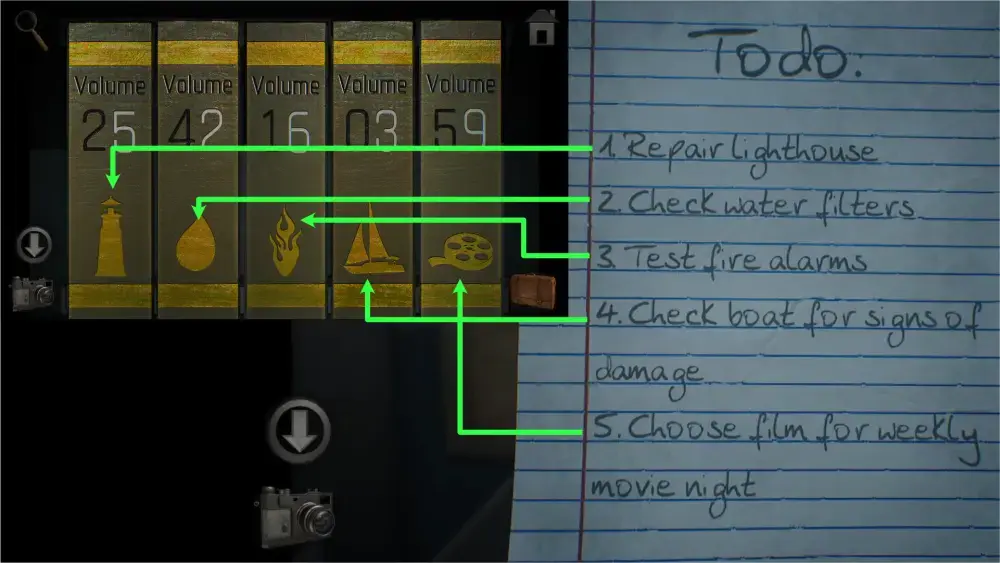
These books hold the key to solving the code for the safe right next to it. Notice that each number in the book has black and white numbers while the safe blinks in white and black squares when you enter numbers.
The square colors that appear in the safe in order are black, black, white, black, and white. With that in mind, take the numbers with the corresponding colors from the books and you will get 24609.
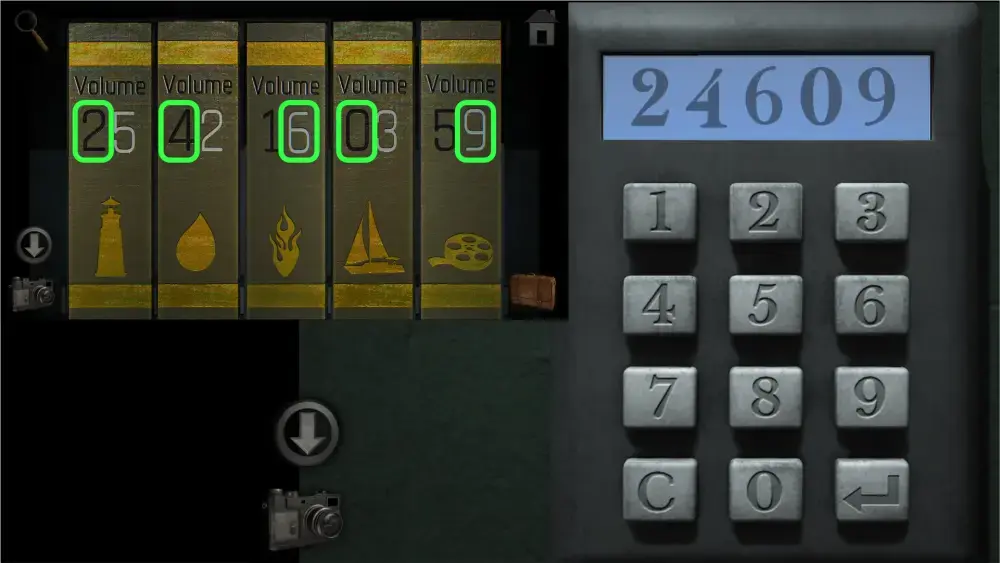
Input the code and tap enter and it will open. Take the Residence Key inside. At this point, all current puzzles in this room have been solved except for the computer and the computer access-only box which we will come back to later down the line.
Unflooding the Bedroom Area
Go to the Residence Area and use the key to open the door. Inside, there are three points you can interact with: the vent, the door in the middle, and the door to the right. The vent’s grate is fastened tightly and must be opened with a wrench. The room to the right is flooded and cannot be entered. However, the water in it will be useful for a later puzzle. Enter the middle door for now.
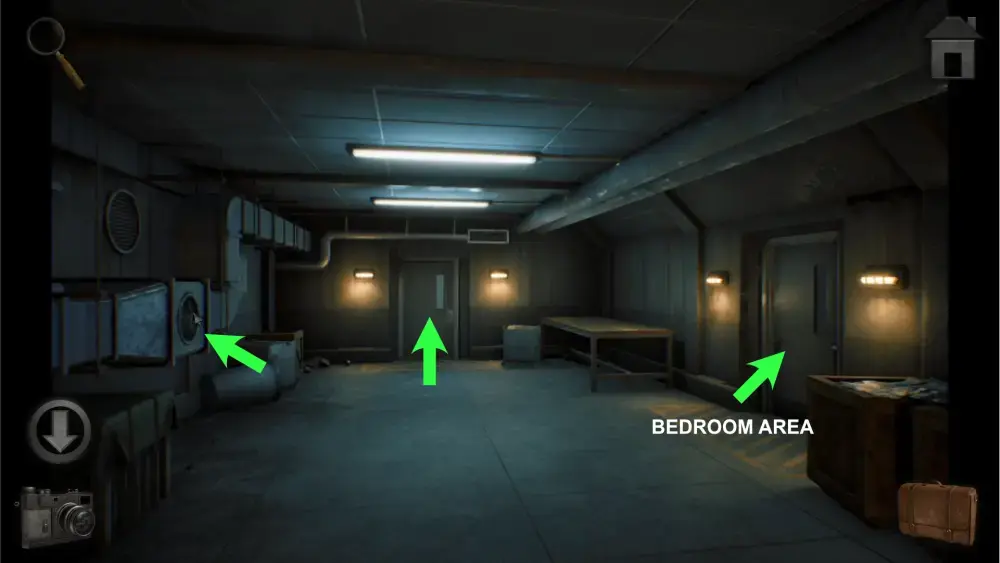
The middle door leads to a hallway leading to three areas: the basement, the Game Room, and the main lobby which leads to the kitchen. Enter the basement for now.
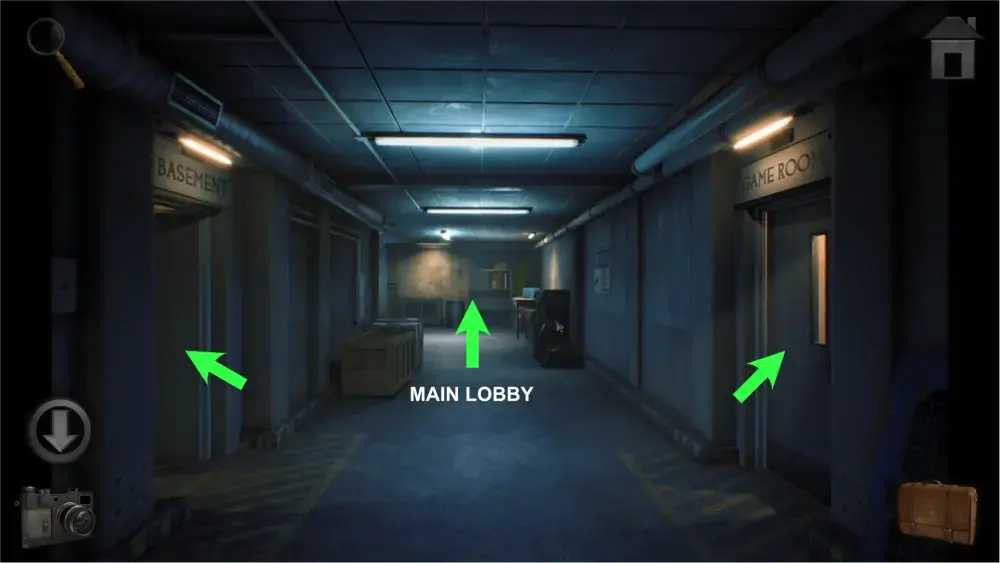
Upon entering, you’ll find a blue metal door with something drawn with green spray paint. This is a clue for figuring out the code for the door. However, you will need to solve a few other puzzles before you’ll be able to enter.

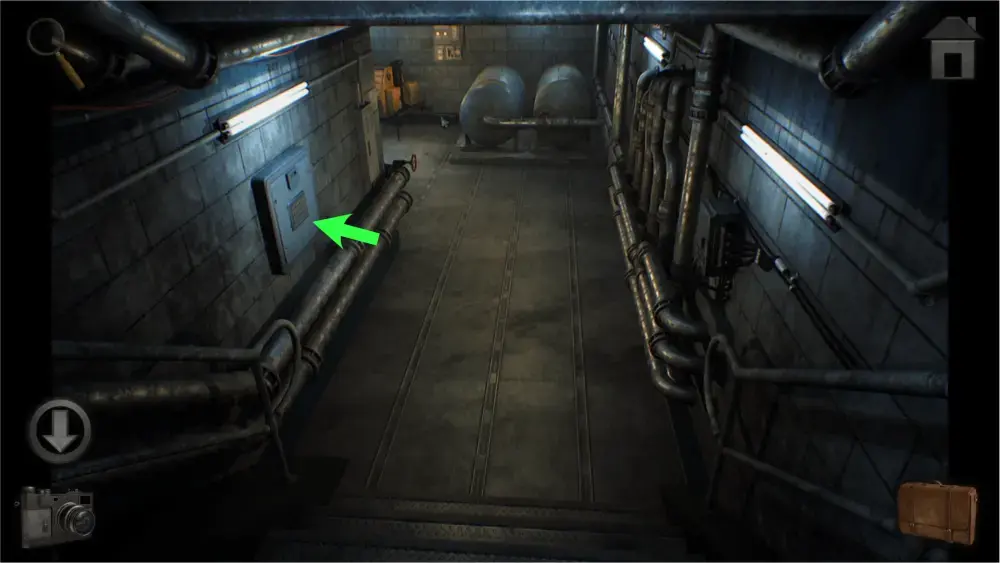
Go to the right of the door for now where the barrels are. There, you’ll find a metal box on the wall to the right with another puzzle to solve.
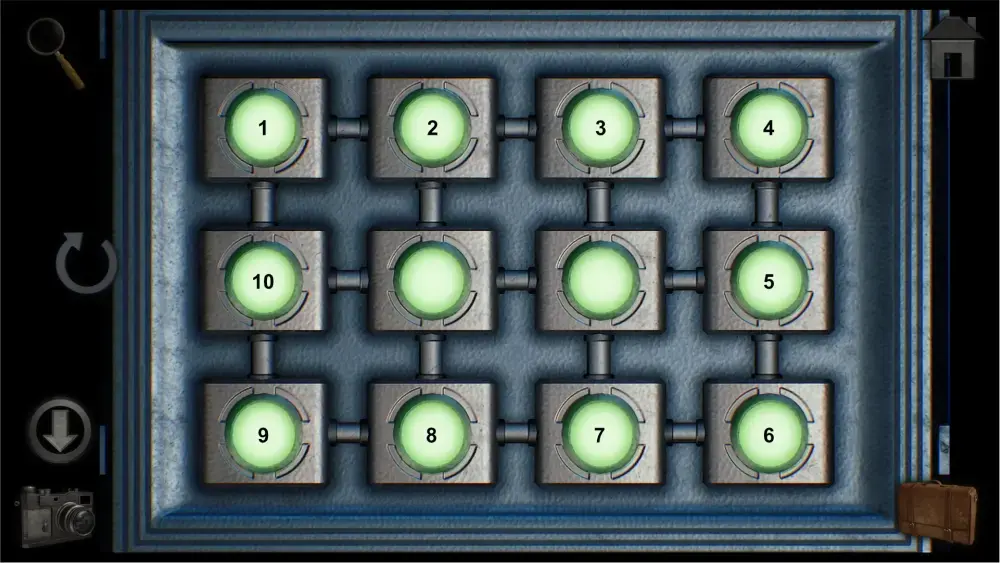
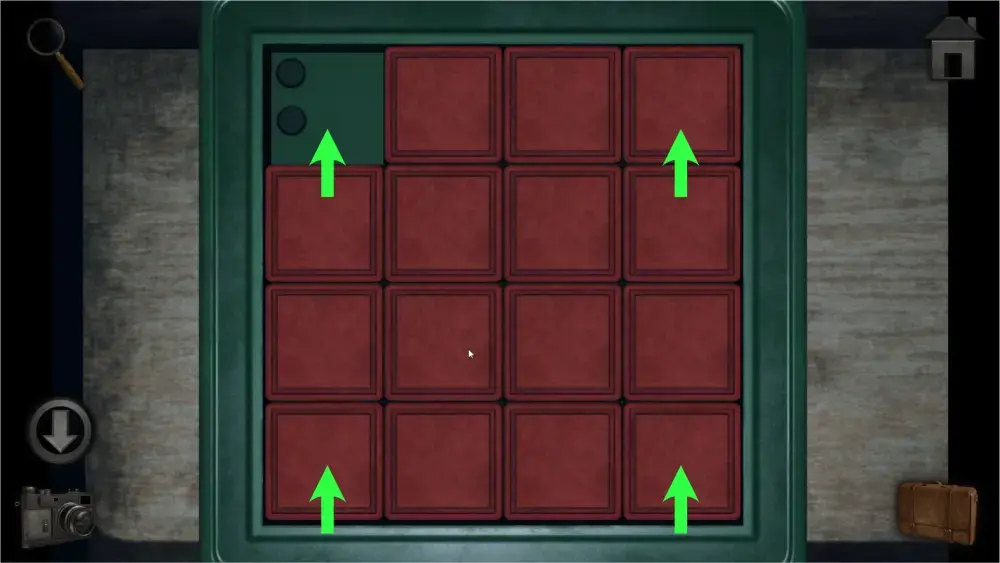
This puzzle has 12 inactive nodes. Activating 1 node will activate all its adjacent nodes. The objective is to activate all nodes. While it may seem complicated and a bit intimidating, this is actually one of the simplest puzzles in the game.
Simply activate each node in a circular order and you will be able to solve it. After you do, take the mallet inside it.
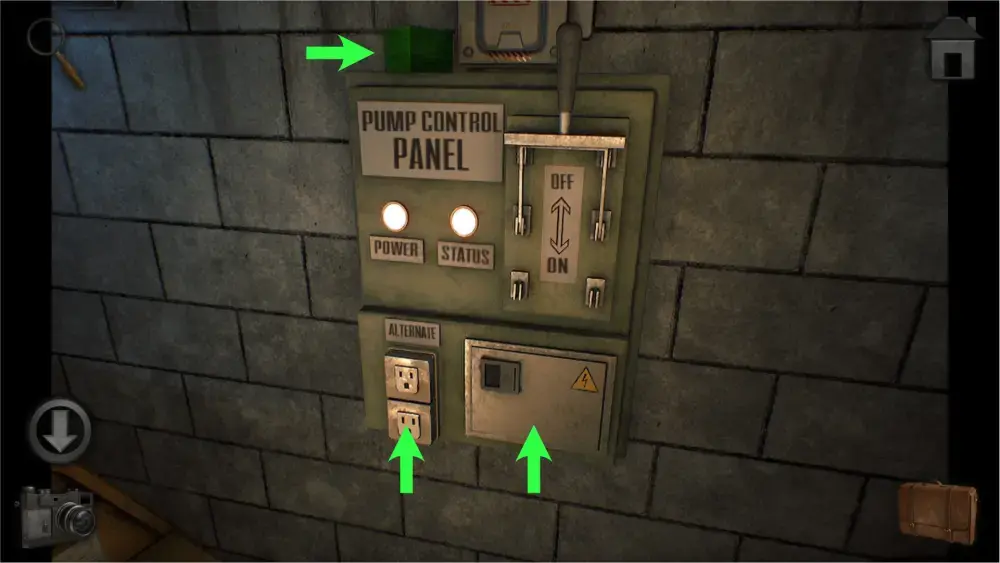
If you move forward, you’ll be able to interact with the machine’s pump and the area where the generator and the pump control panel are. Place the extension chord on the generator. It’s still missing some fuel so you will have to come back later.
If you investigate the pump control panel and tap on the small box below the pump control panel’s lever, you’ll see that it is also missing a fuse. Don’t forget to take the green triangle toy sitting on top of it.
If you investigate the machine’s pump, you’ll notice that it is missing a part. You will have to get a ??? for it. Leave the area for now and go to the Game Room.
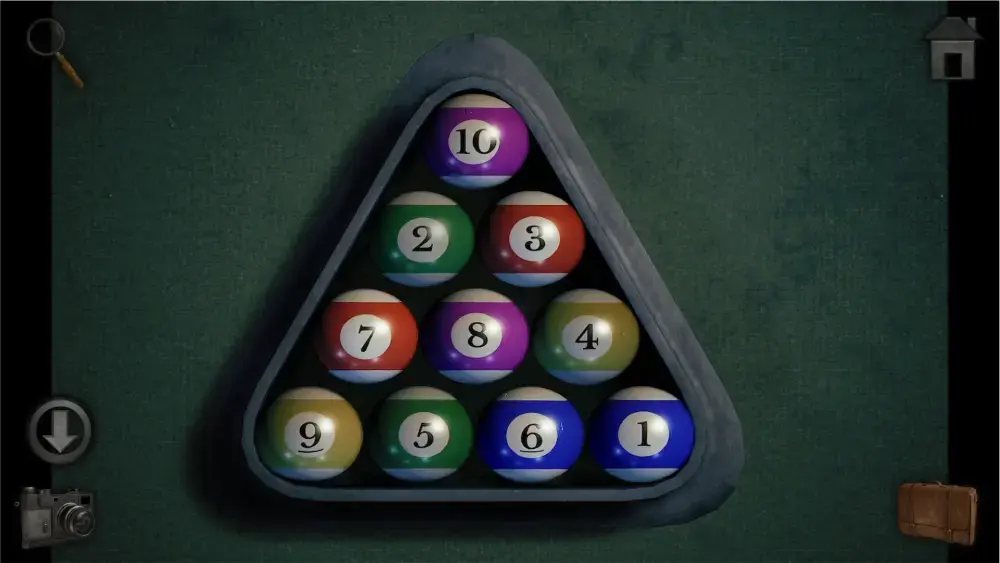
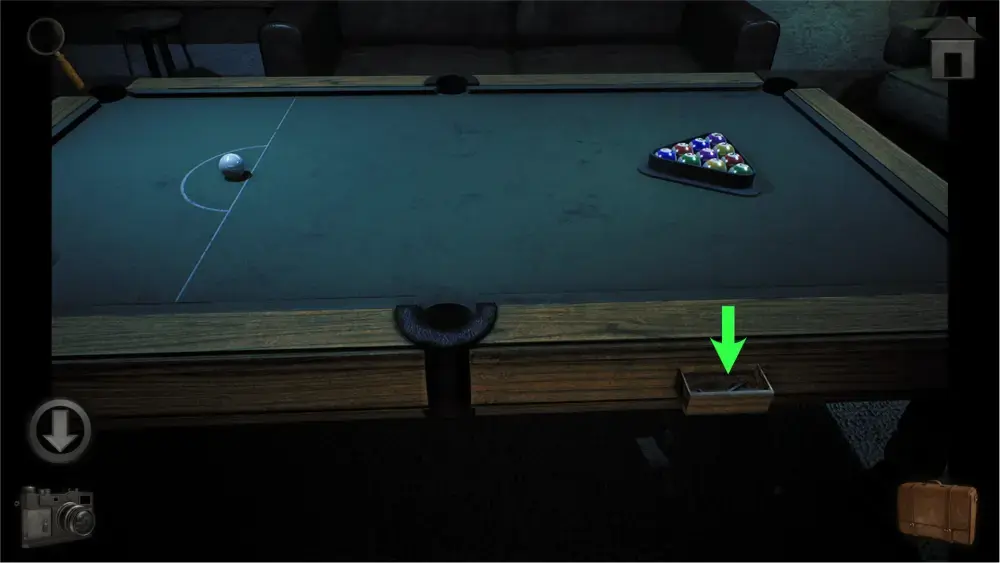
Inside the Game Room, take the pool triangle from underneath the pool table. You can interact with the pool poster, the wooden panel on the wall, and the pool table.
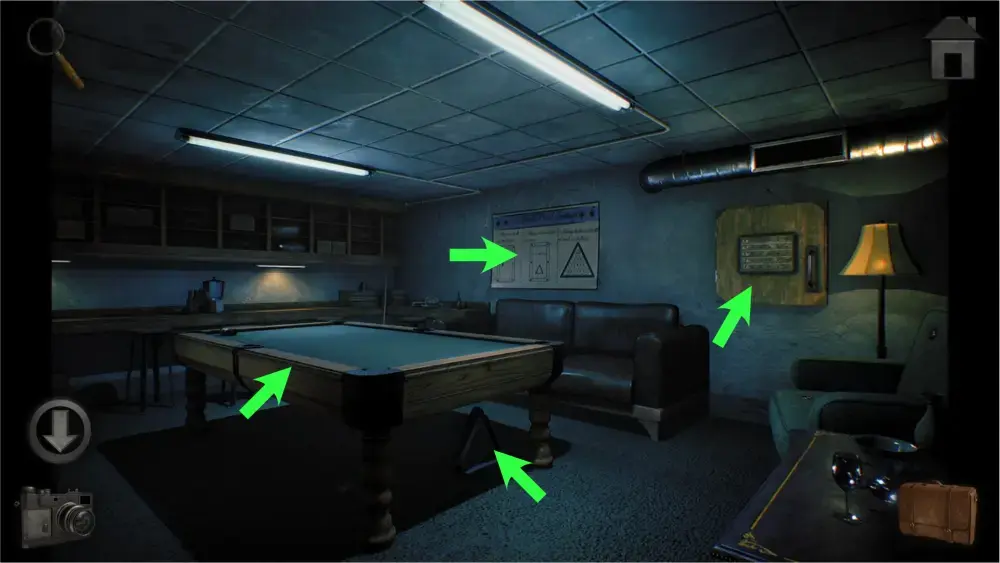
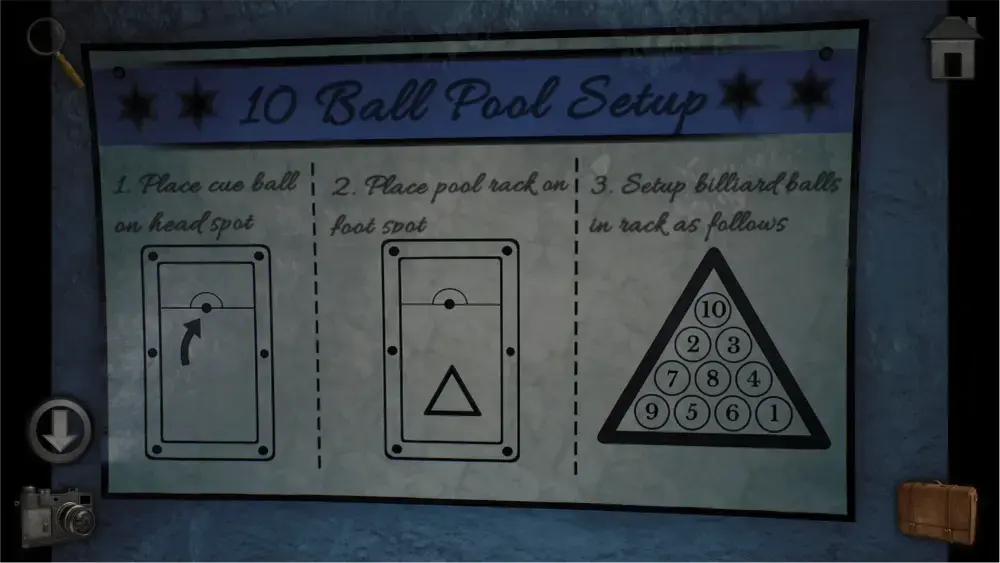
The pool poster contains a short tutorial on how to properly set up a 10-Ball Pool setup which is accurate except for the third step. Keep a screenshot of this for later since it will come in handy for a puzzle with the pool table. You will need to get a cue ball, a pool triangle (that you’ve already picked up), and a set of billiard balls. You won’t need to inspect the pool table for now since it doesn’t have anything you can take yet.
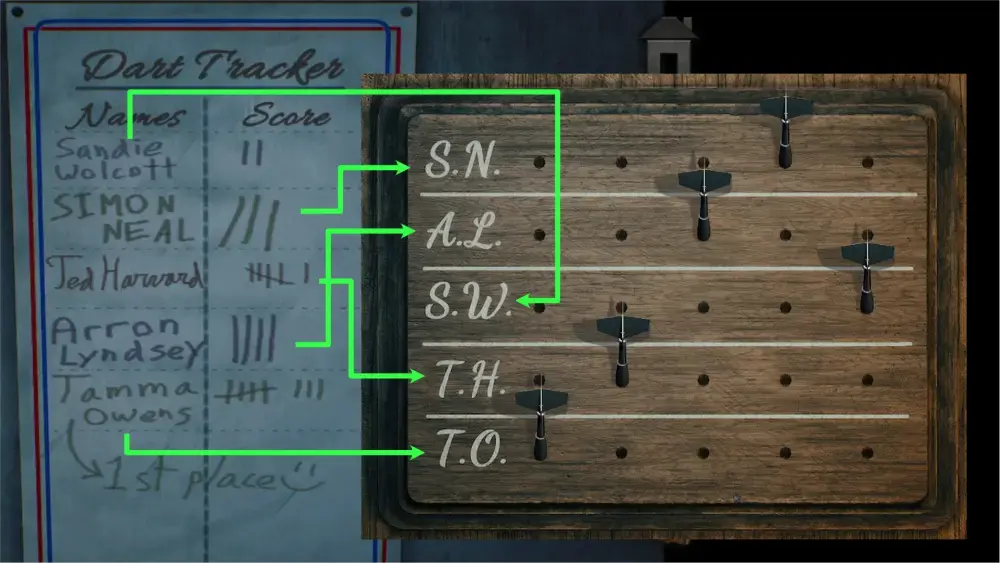
The wooden panel contains initials and 25 small holes. You will need to get darts and a list of names with scores for this particular puzzle.
Go to the main lobby. You can tap on the left side to see the living room and bar or the right side to inspect a few items.
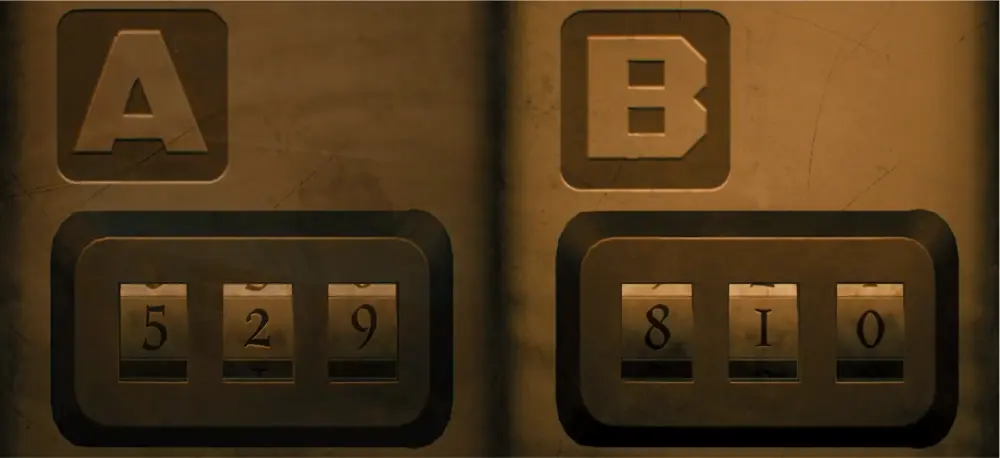
On the right side, you can inspect the locked blue box or the shelves. The blue locked box has two padlocks that require you to input 3 numbers each. These numbers can be obtained from a clue elsewhere.
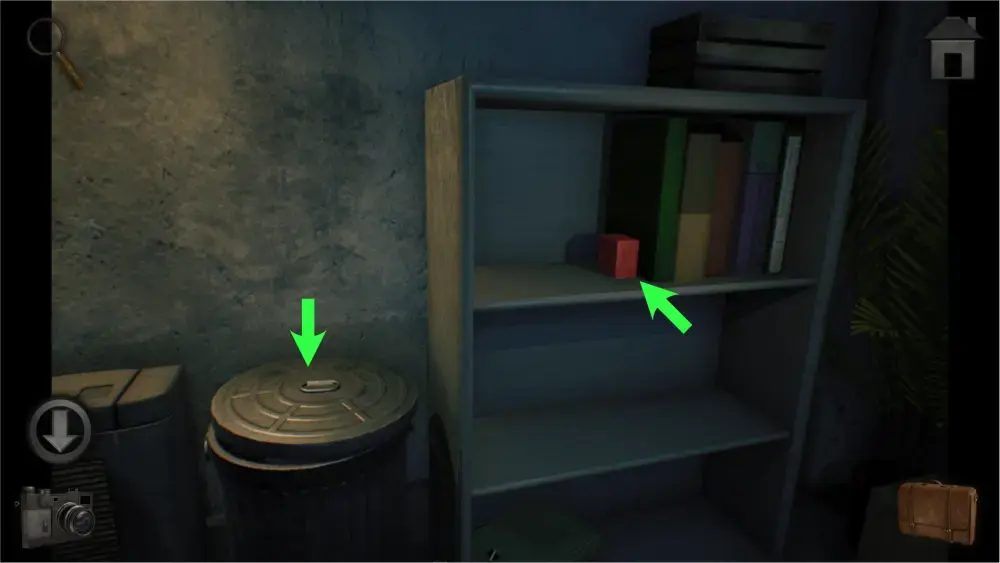
Take the red toy cube from the shelf and inspect the trash can. It will contain a recipe for DIY Fuel which will come in handy for making fuel for the generator in the basement.
At the left side of the lobby, you can inspect the couch and the television or move forward to inspect the bar and the kitchen.
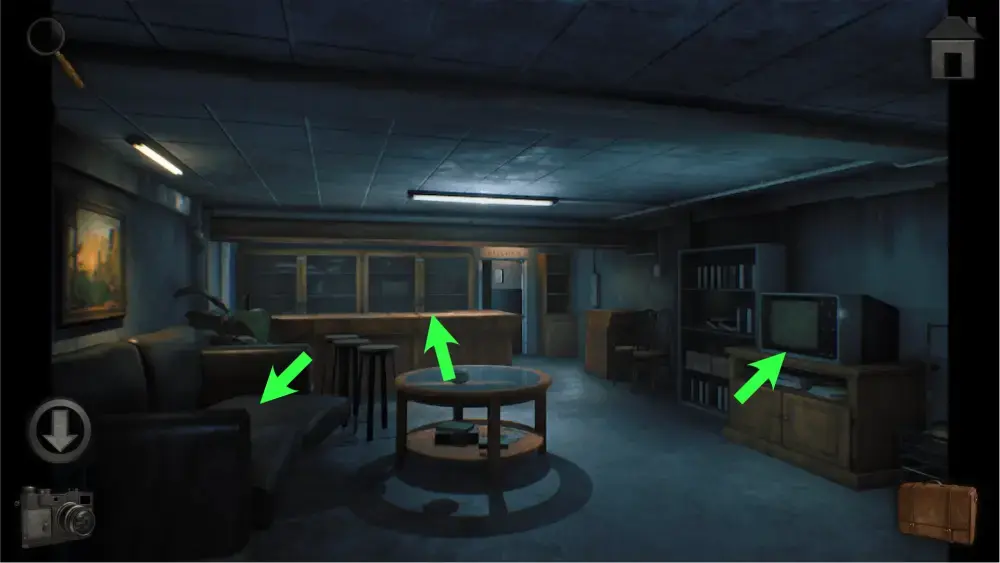
You can open the cabinet underneath the television and take the darts. You can move closer to the television and notice that the dials are not working. You will need a hex key to open it later.
At the bar, you can investigate the 12-square grid on the bar’s table, the cabinets behind it, and the scoreboard to the left. You will need to get hints elsewhere for the 12-square grid so you can just come back for it later.

The scoreboard has valuable clues for the wooden panel in the Game Room. Take a picture of it for later.
The bar’s cabinet contains the billiard balls. However, these cabinets are closed shut and you’ll need to use your mallet to take them. Leave the area for now and enter the kitchen.
In the kitchen, take the cooking pot on the table to the right. Tap the metal shelves and take the blue cylinder among the cans.
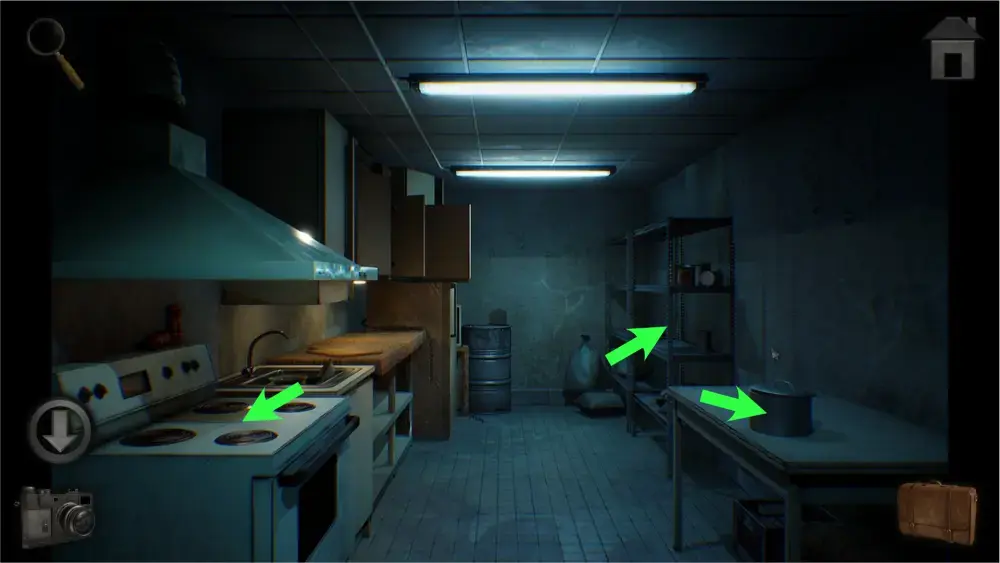
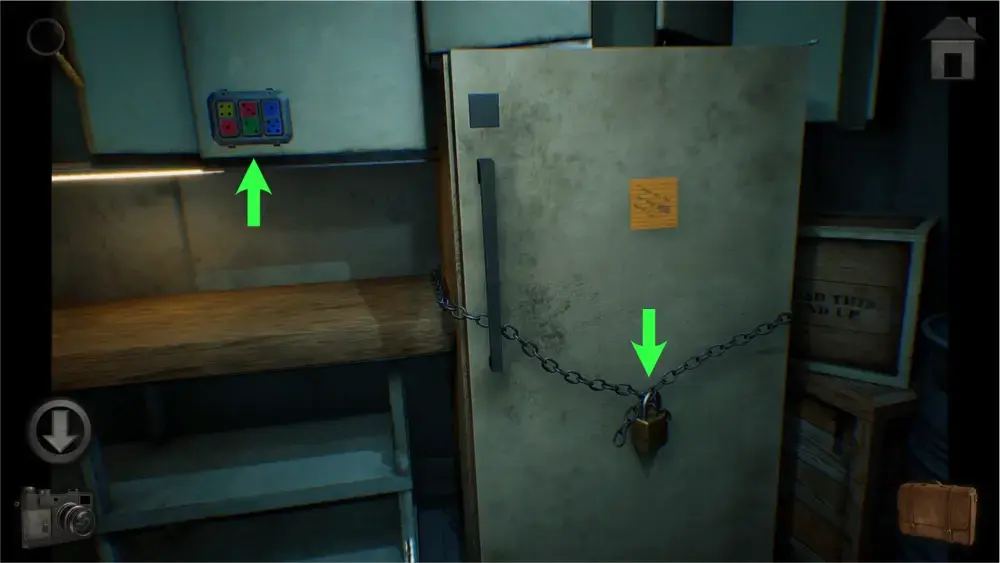
To the left, you’ll find the stove. This is where you can make your own fuel for the generator. You’ll need to fill your pot with water, and mix it with alcohol, fertilizer, and sugar. Further back are the refrigerator and cupboards. You’ll need a key to unlock the fridge. The note on the fridge is not too important. There is another puzzle involving dominos on the cupboard but you’ll have to come back later once you have the solution for it.
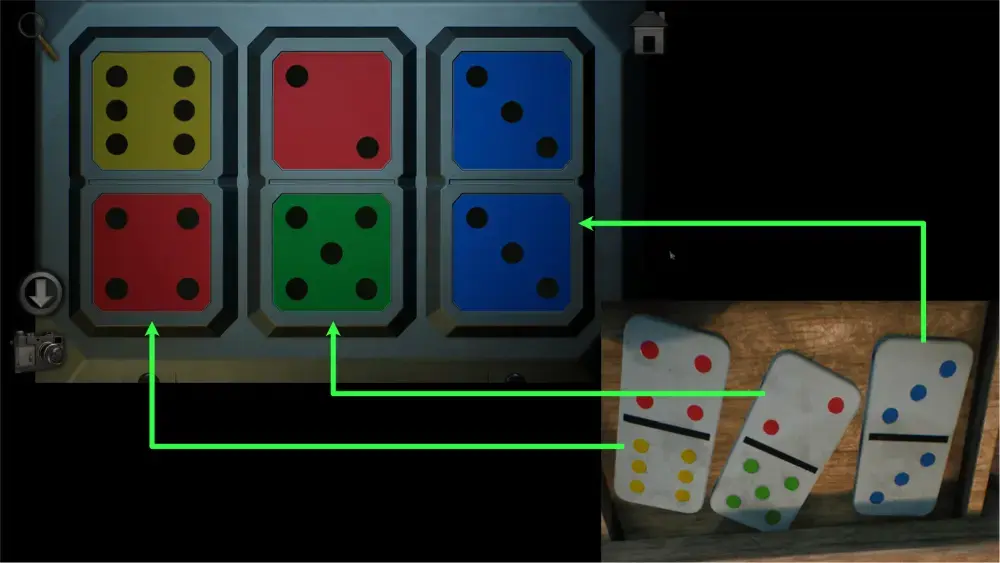
Go back to the lobby and check the couch. Underneath the couch cushion is a wooden shape sorter box. You can place the red cube, green triangle, and blue cylinder toys on it to open it. It will reveal dominos in different colors with numbers. Take a picture of it and go back into the kitchen.
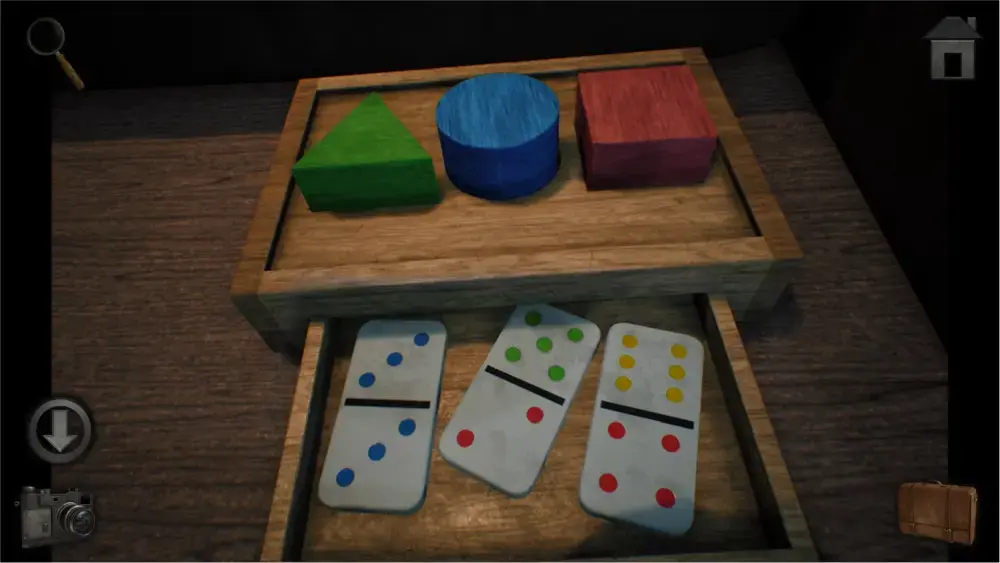
Investigate the domino puzzle on the cupboards. Look at the picture of the shape sorter you took before and copy the numbers of the dominos according to their color to unlock it. Take the bag of sugar from the cupboard.
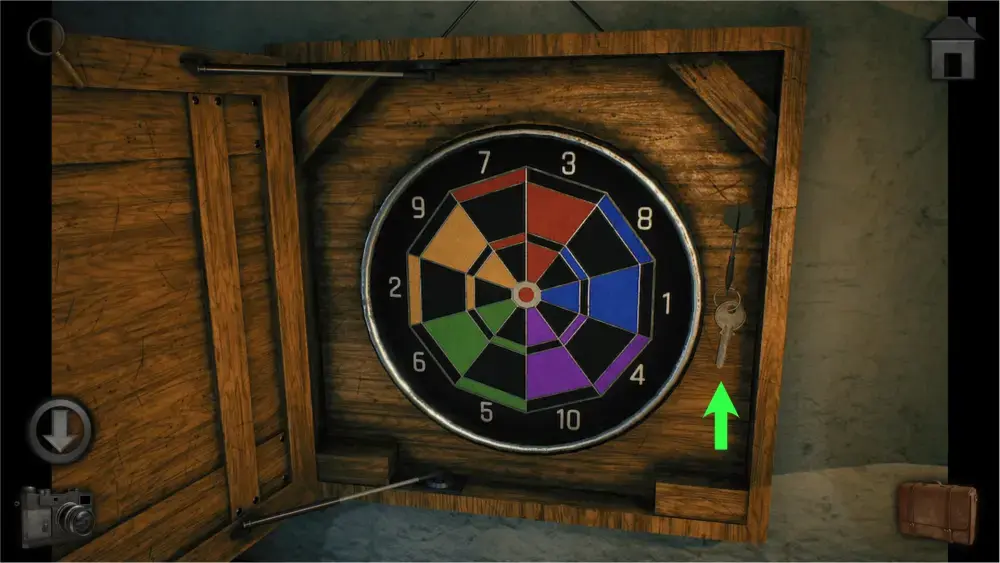
Go back to the Game Room, approach the wooden panel, and place the darts. You will have to arrange these darts in a certain order. If you look at the scoreboard from before and compare it to the wooden panel, you’ll notice that they have the same initials. Arrange the darts according to the one with the highest score to the lowest and the wooden panel will open.
The wooden panel has a key and a colorful dartboard with numbers inside. Take the key and take a picture of the dartboard as a reference for later.
Go back to the kitchen and use the key you found in the dartboard on the fridge’s padlock to open it. Take the cue ball from the egg carton.
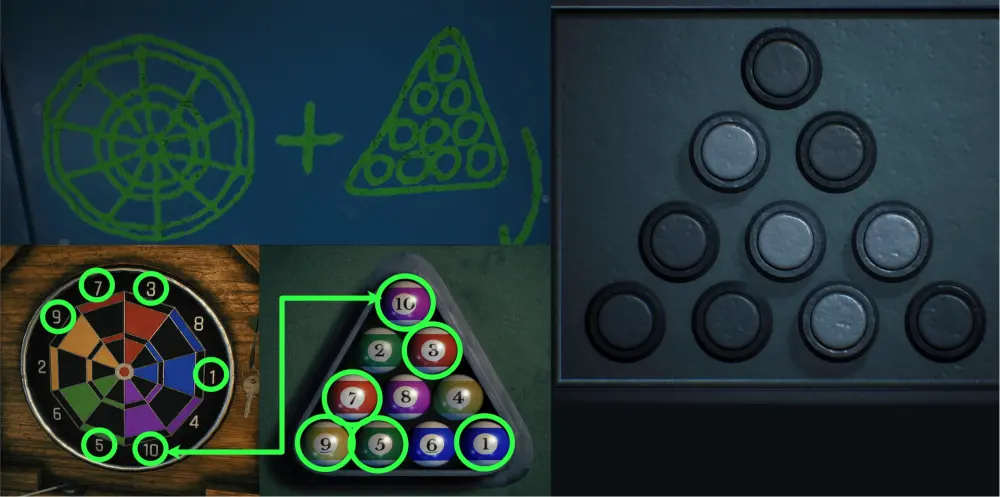
Go back to the Game Room and investigate the pool table. Place the cue ball, pool triangle, and billiard balls on it according to the billiard poster. Make sure that the billiard balls’ numbers are arranged correctly. You can switch them around by tapping them. Once you get the right order, take a picture of it since it will be important for another puzzle. The right order should look like this:
Tap the back button to get a better view of the whole table. You’ll notice that the small drawer on the table has opened. Take the hex key from it.
Go back to the television in the lobby. Use the hex key on the dials and take the fuse.
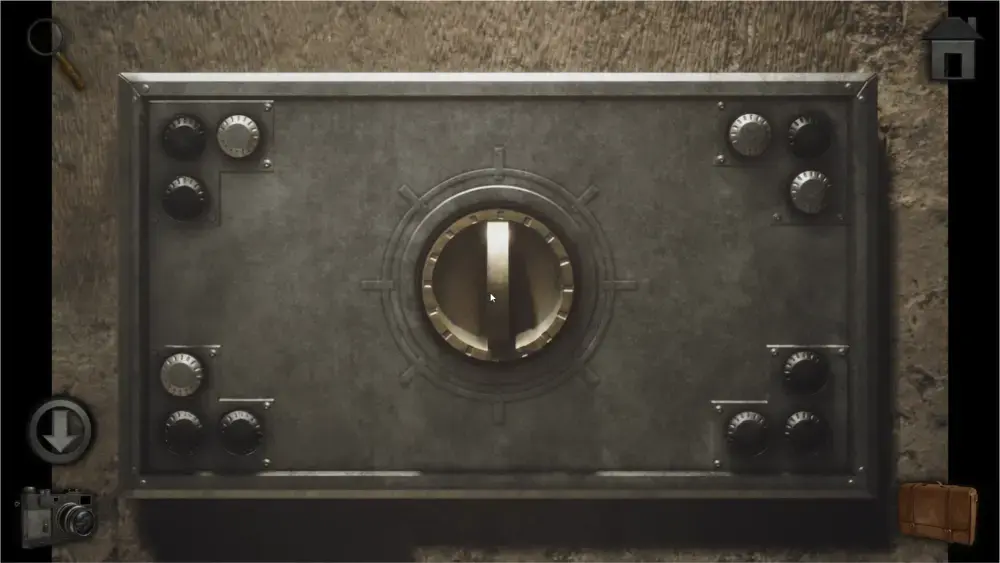
Go back to the basement and inspect the blue metal door with green drawings. Tap on the lock and you’ll notice that there are 10 buttons arranged in a triangle, just like the billiard balls. Tapping on these buttons will darken them, just like the mechanism for the steaming pipes.
To know what buttons must be pushed and not, you have to refer to both the dartboard and the billiard balls. If the balls match with the colors corresponding to the ones in the dart board, push the button. For example: the ball at the very top, 10, is purple. If you look at the dart board, the color of the section with the number 10 is also purple. Because they match, the button must be pressed. The solution to the puzzle should look like this:
Once inside, take the fertilizer from the shelf to the left and the wrench at the table at the far end of the room. There is a vice clamp holding a hacksaw which you’ll have to return to later once you get the clamp handle for it. Afterward, investigate the whiteboard.
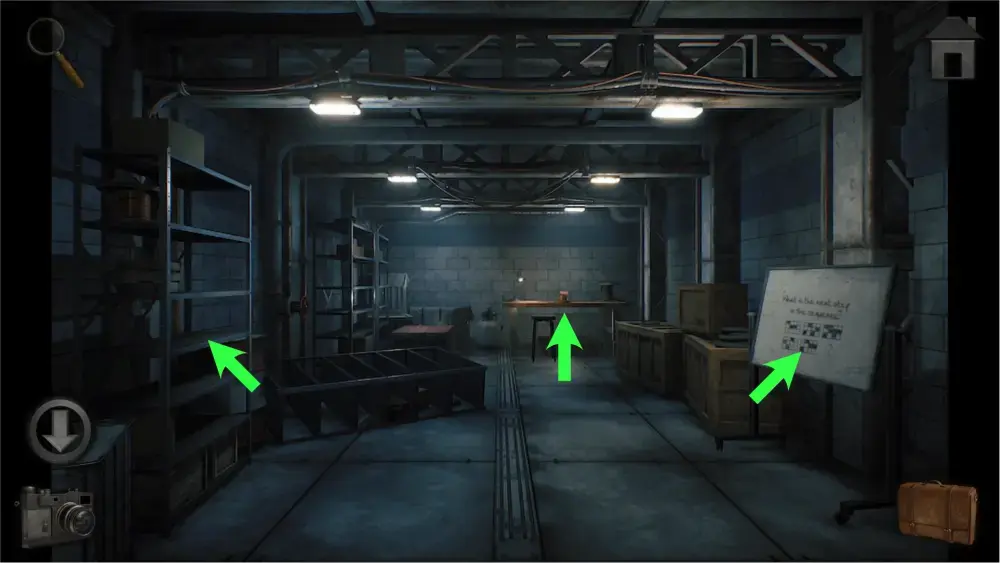
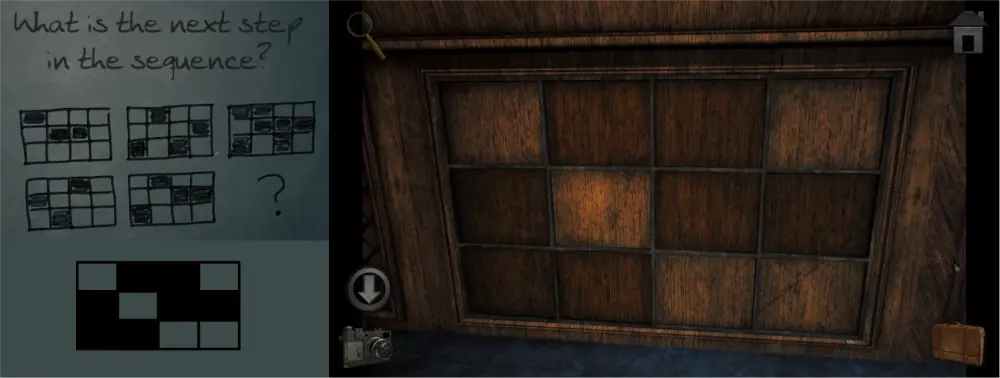
This whiteboard holds the key to solving the puzzle for the grid at the bar’s counter. The third box is the combination of all the black squares of the first and second grids. So to solve the problem, all you have to do is combine all the black squares of the fourth and fifth grids together. Go back to the bar’s counter and tap on the squares to darken them. The solution would look like this:
Upon solving the puzzle, the panel will open and reveal a bottle of hard liquor.
Go back to the very first room after entering the residence area and enter the right door. Collect the water from the room using your kitchen pot.
Tap the back button and investigate the vent. Use the wrench on it and take the fan blade and the timing belt.
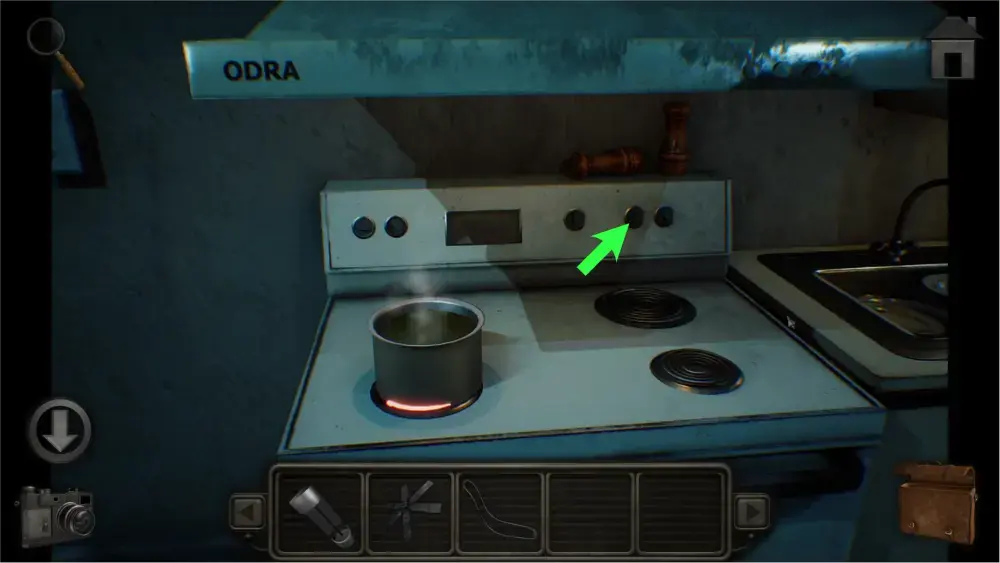
Go to the kitchen and approach the stove. First, place the kitchen pot with water. Next, mix in the sugar, fertilizer, and alcohol. Then, turn on the stove to cook it and turn it into DIY fuel. The stove will turn off when it’s done and safe to take.
Go to the basement and put the DIY fuel into the generator, the timing belt on the pump, and the fuse into the pump control panel. Once it’s all set up, pull the lever. This will unflood the room to the right that leads to the bedrooms.
Turning the Power on
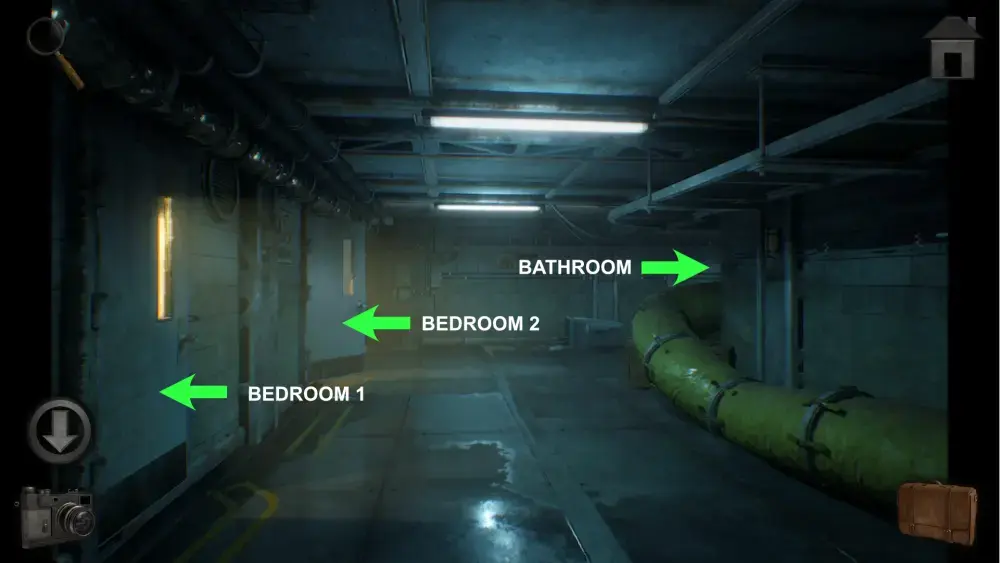
Upon entering the door leading to the bedrooms, you’ll come across three areas: bedroom 1 and bedroom 2 to the left and the bathroom to the right.
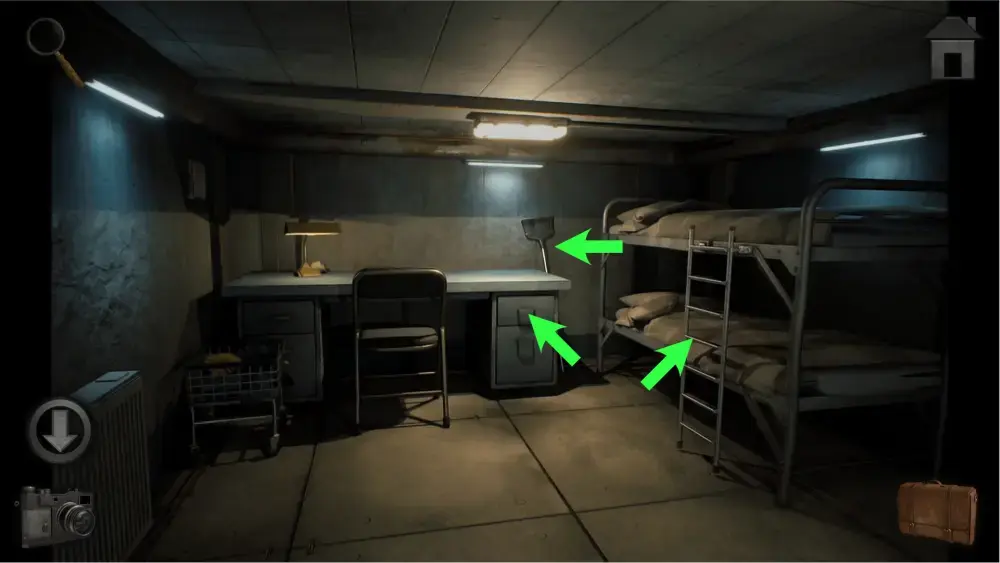
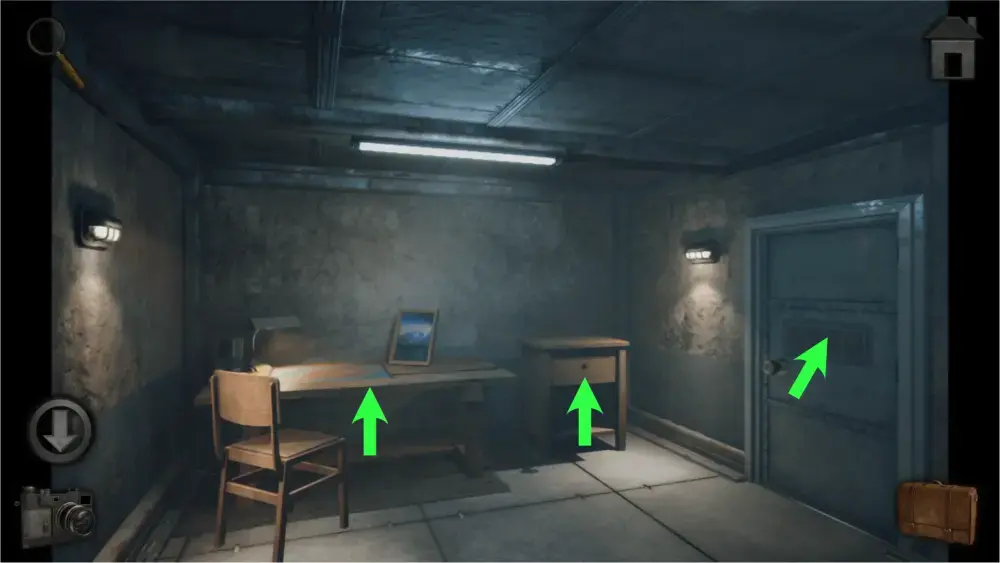
Enter the first bedroom and approach the desk. Take the metal broom by the desk and the flashlight in the drawer. You’ll also find Sandie W’s diary on the table that talks a bit about the story but doesn’t have any important clues for puzzles. The only important item by the bed is the ladder but you’ll need a hacksaw to take it later.
Enter the second bedroom and approach the board. You’ll see “A + B + C + D = E” in different colors. Take a picture of it as it will be important later on. In the middle of the room is a black case with a puzzle lock which you’ll have to go back to once you find the clues for it elsewhere.
Walk towards the bathroom and use the metal broom on the door to unjam it.
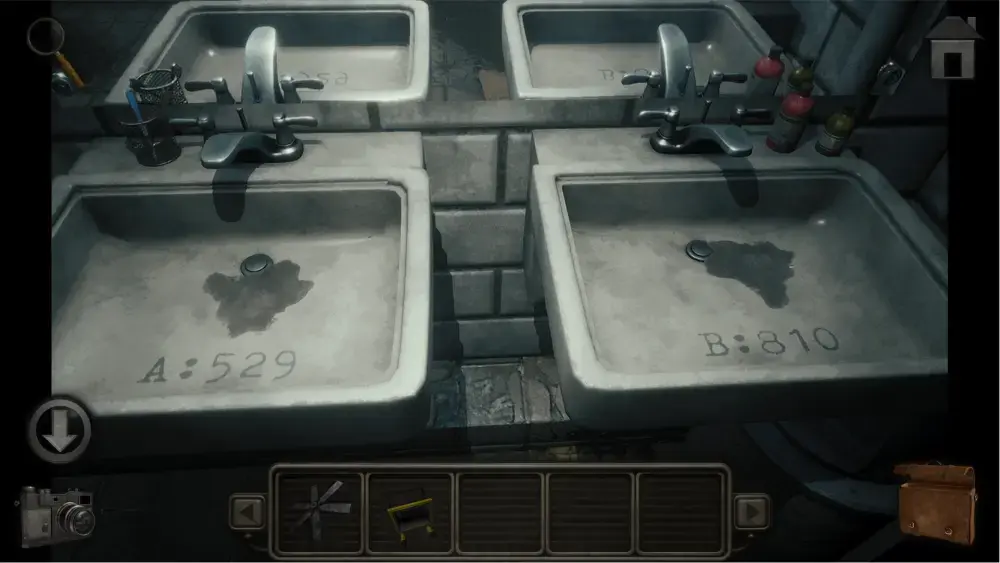
Once inside, you can investigate 3 points: the mirror, the cubicles, and the shower.
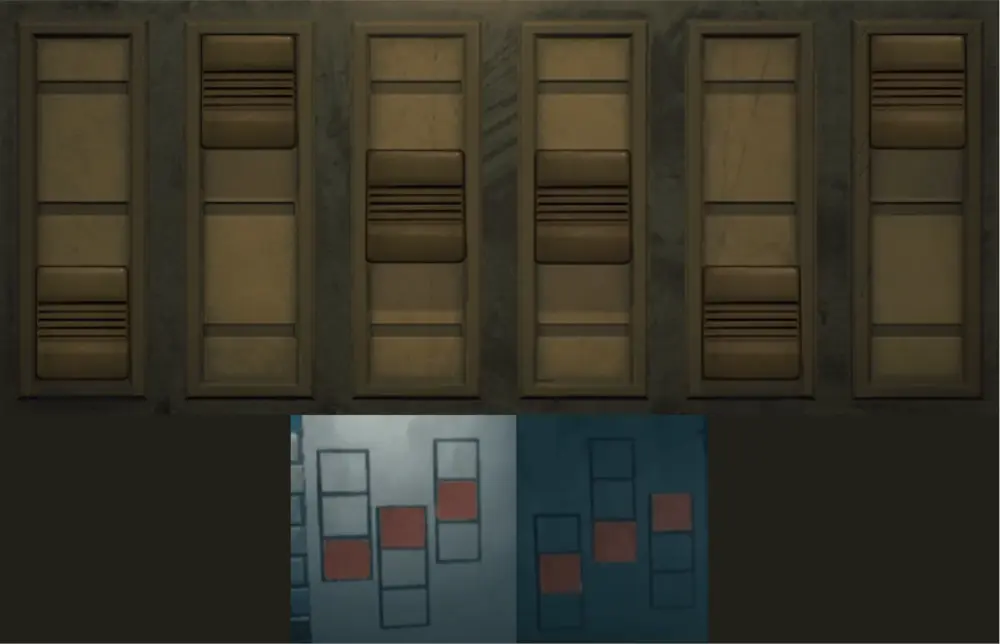
The shower doesn’t have anything you can interact with at the moment, but there is a vent you can reach once you get a ladder and a metal handle underneath the floor grate that you can take once you get a magnet. Walk towards the cubicles and open both doors. Take the plunger from the second cubicle. Then approach the mirror and use the plunger on the second sink. The codes on both of these sinks are the codes for the padlocks of the rounded blue metal box in the lobby. Take a picture of them or jot them down.
Tap the back button and approach the mirrors. You’ll notice that the red squares perfectly line up with the rectangles on the cubicle door. Take a picture of it, close the first door then take another picture of the second door in the mirror. The first image represents the first three parts of a code and the second image represents the last three parts of a code. This code is what opens the black case in the second bedroom.
Go to the second bedroom, unlock the black case, and take a picture of the paper inside it. It contains a clue for another puzzle.
Go to the lobby and unlock the rounded blue metal box with the numbers you got from the sink. Take the magnet inside.
Go to the shower and use the magnet on the metal handle under the floor grate to take it. Next, go to the room in the basement and use the metal handle on the vice clamp to loosen it up and take the hacksaw. Then, go to the first bedroom and use the hacksaw on the ladder on the bed to take it. After that, go back to the shower and place the ladder under the vent. Use the flashlight on the vent and enter it.
Move forward in the vent and go past the fan. There are two paths in the vents. If you look at your map, you’ll see that the path to the left leads to the Power Room while the path to the right leads to the Ventilation Control Room. Take the right for now and open the vent door to enter the room.
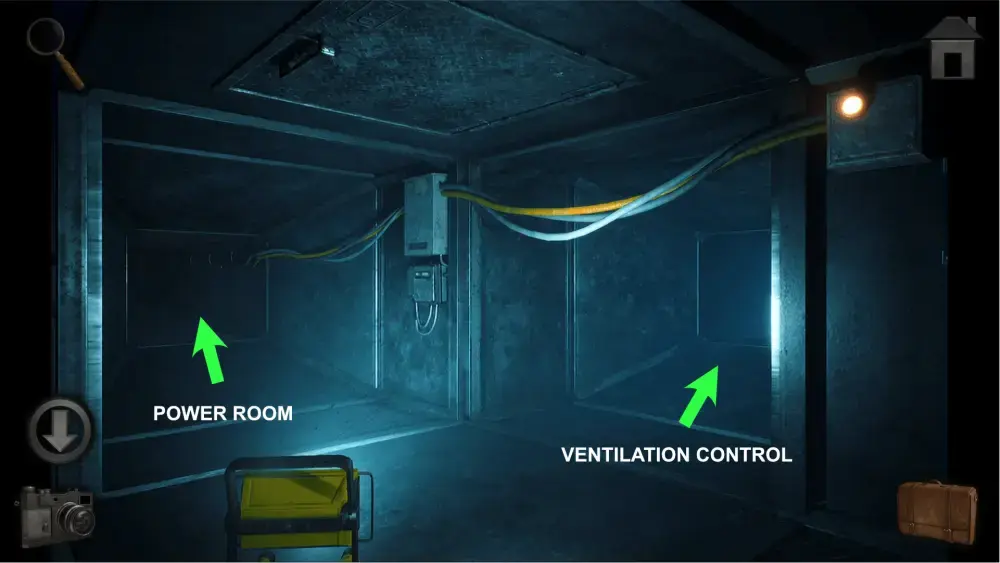
Take the battery on the left table. Move forward and take the keycard on the door on the floor. Move one more step forward and you’ll see a console. This turns on the fan in the vents which you will need to come back to later.
Tap the back button until you get back to the vent area. Take the crowbar on the wooden crate and enter the vent.
When you enter, your flashlight will run out of power. You will have to tap it to take out the battery and replace it.
Keep going to the right (which would be the left path from before) to exit the Power Room through the door to the right.
Exit through the door and investigate the blue hatch on the wall. Use the crowbar on it and take the four colored wires.
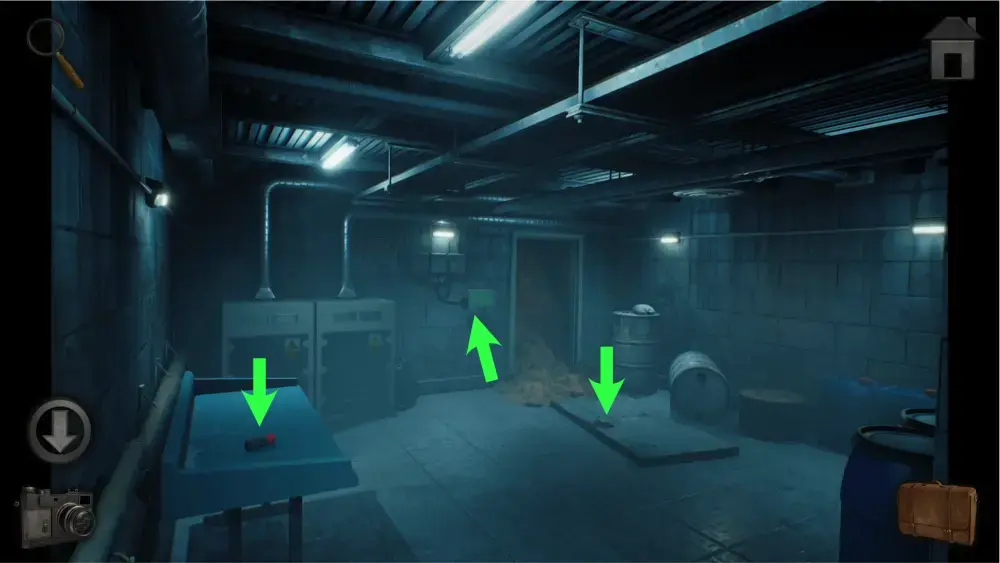
Go back inside the Power Room, walk to the left side, then move forward. There are three interactable points: the primary power control unit (left), the wire puzzle area (middle), and the lever puzzle area (right).
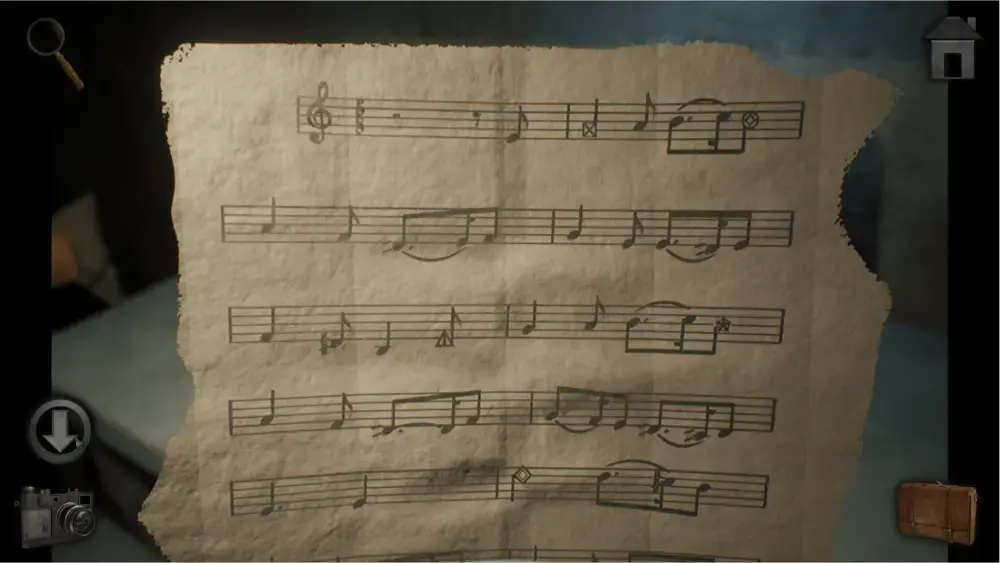
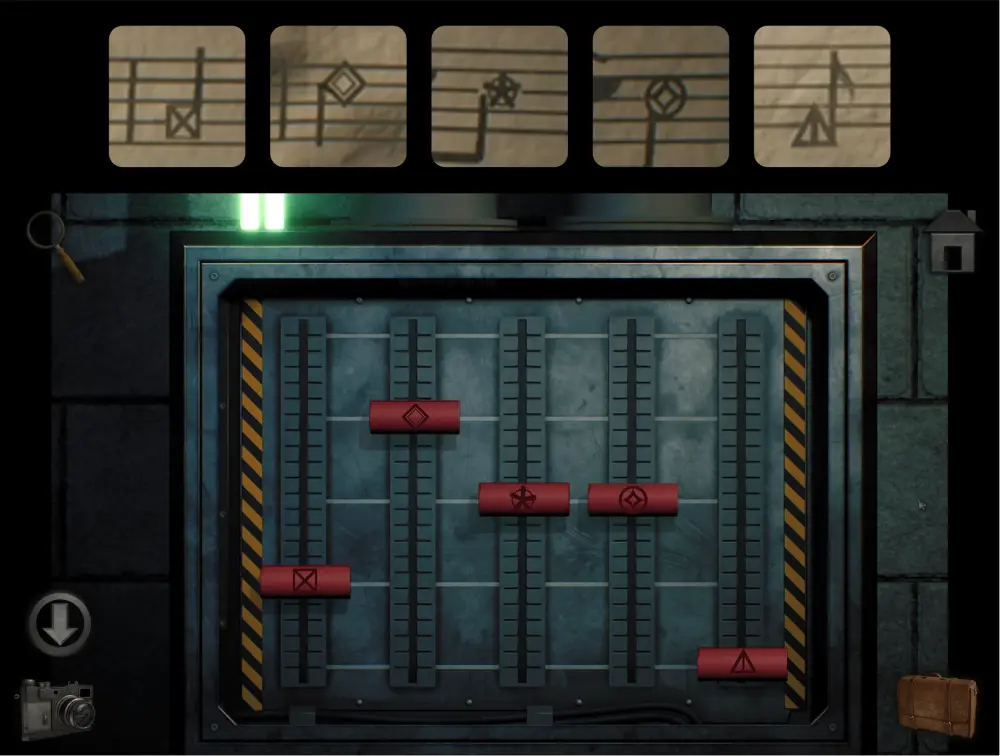
Go to the lever puzzle first and take out the image of the paper with musical notes and symbols. Comparing the two, you’ll notice that the lever puzzle has 5 horizontal lines across it like the musical staff in the paper. The levers also have the same symbol as the one on the paper.
Take note of the position of each symbol on the staff and move the levers of the same symbol accordingly. If done right, the bulb on it will light up green. The solution should look like this:
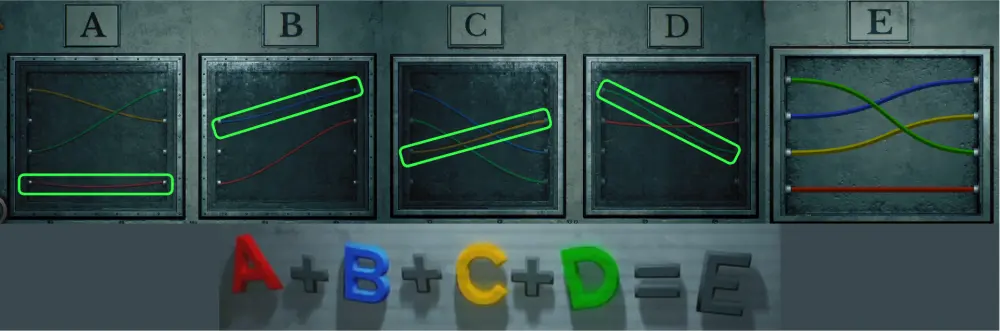
Go to the wire puzzle screen next and place the colored wires on the E box. The solution to this puzzle lies in the clue that was found on the whiteboard in the second bedroom. Take note of the colors of the letters from A to D. This tells you which wire you should imitate in the E box. The solution should look like this:
Upon completing both puzzles, move to the primary power control unit and pull the lever. This will turn the power back on and open the safe in the area of the lever puzzle. Take wire cutters inside the safe and go back into the vent. You’ll notice that you can no longer go past the fan. You have to go back to the Ventilation Control Room and cut the wire of the console to turn it off. Once you do, go back into the vent, go past the fan, and exit through the bathroom.
Leaving F.L.A.R.E.
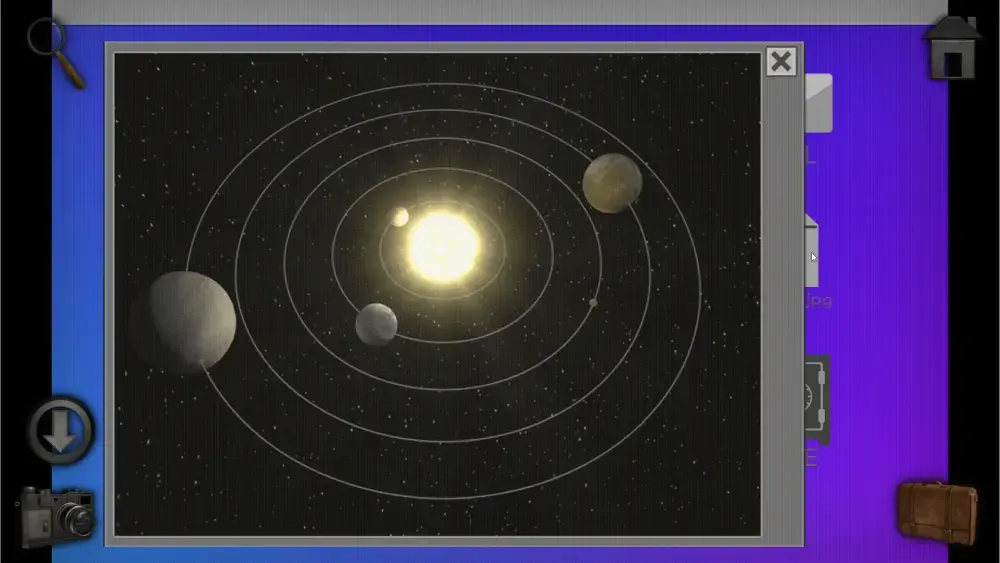
Go back to the control room and you’ll notice that the computer is now on. Tap it and inspect planets.jpg. Take a picture of this image as it will serve as a clue to a later puzzle.
Tap on the safe and unlock it. This will unlock the metal box on the wall by the shelves. Take the floppy disk and go back to the computer.
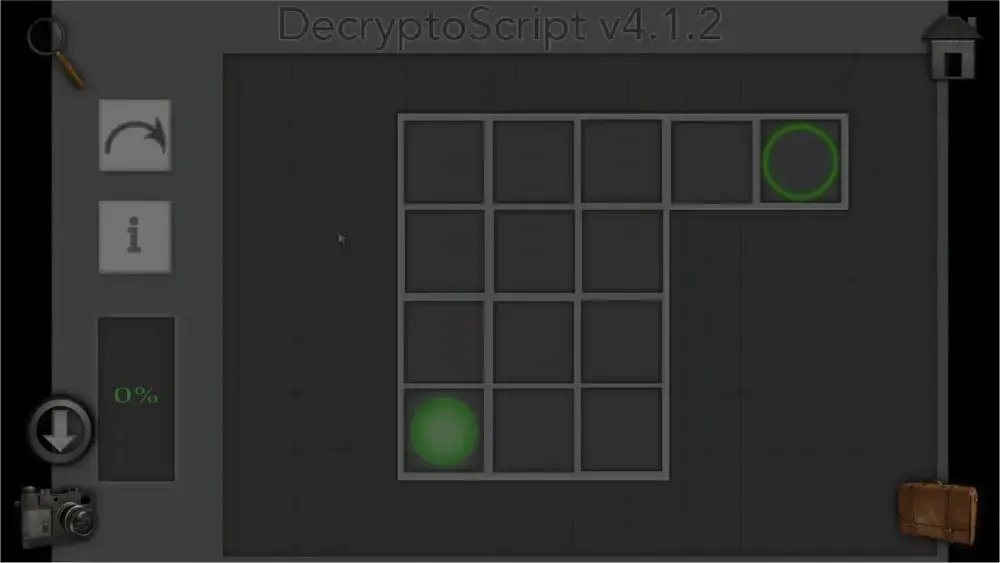
Insert the floppy disk in the floppy disk reader. Tap on the computer, tap on the disk icon, and decrypt mail messages. This will open up a mini-game made of 5 levels.
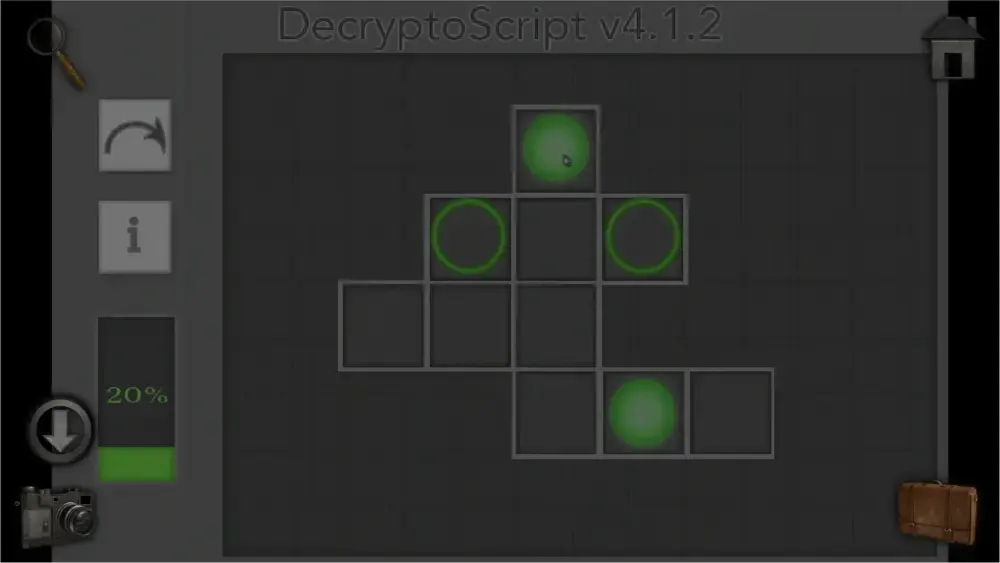
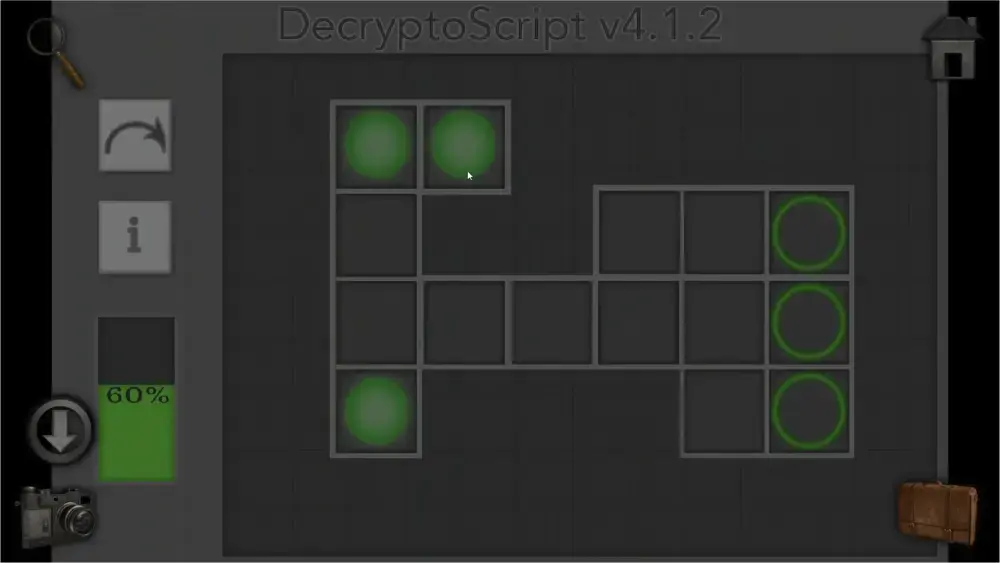
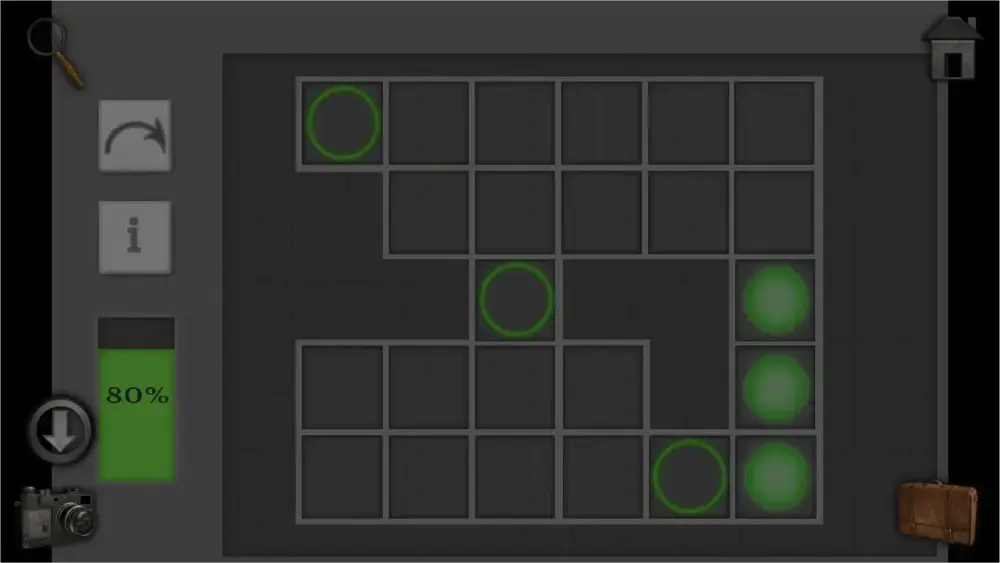
The goal of the mini-game is to move the green ball into the green rings by swiping up, down, left, or right. The levels get progressively harder, with more balls added to the mix. All of these balls move at the same time so you’ll have to move them in a way that will allow all the balls to enter all the circles.
To make it easier for you to solve these puzzles, we’ve written down what movements to take to solve them:
Level 1
- Move 3 squares up
- Move 4 squares to the right
Level 2
- Move 1 square down
- Move 1 square to the left
- Move 1 square down
- Move 1 square to the left
- Move 2 squares up
- Move 1 square to the right
- Move 1 square up
Level 3

- Move 1 square to the left
- Move 2 squares up
- Move 1 square to the right
- Move 1 square up
- Move 1 square to the right
- Move 1 square up
- Move 1 square to the left
Level 4
- Move 1 square down
- Move 1 square to the left
- Move 1 square down
- Move 1 square to the right
- Move 1 square down
- Move 1 square to the right
- Move 1 square up
- Move 3 squares to the right
- Move 1 square down
- Move 1 square to the right
- Move 1 square up
- Move 1 square to the left
- Move 1 square down
- Move 2 squares to the right
Level 5
- Move 1 square up
- Move 3 squares to the left
- Move 1 square up
- Move 2 squares to the left
- Move 2 squares down
- Move 1 square to the left
- Move 1 square down
Once the decryption process is complete, you’ll gain access to the emails which gives you a bit more background to what’s been happening at F.L.A.R.E. Jot down the password for the Machine Room which is 51413.
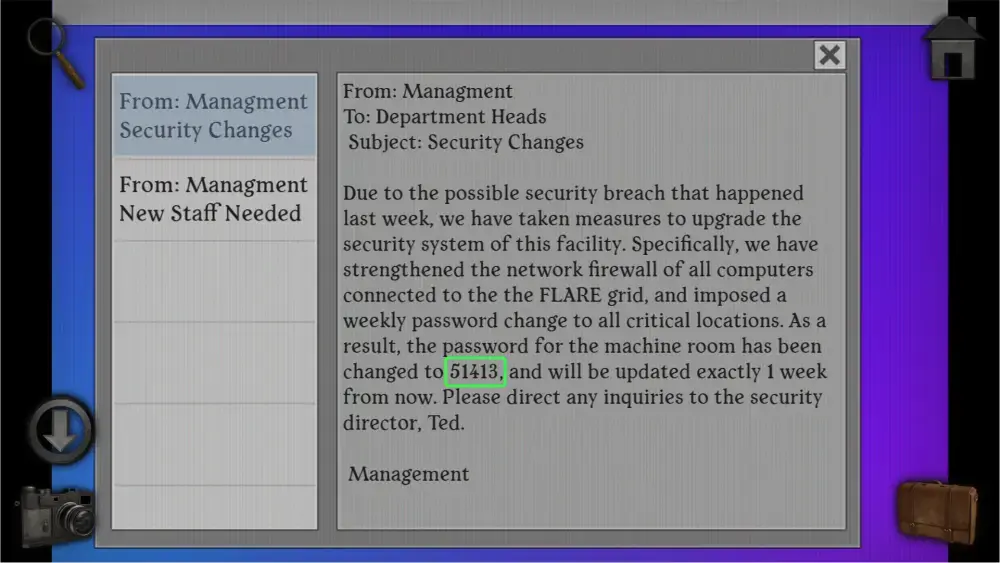
Go to the Machine Room and approach the keypad. Insert the keycard and enter the password you just got from the e-mail and hit enter.
Once inside, approach the locker next to the machinery. It will have a circular lock with 5 moveable, coin-like pieces. Take out the picture you took of the planets and arrange the coins based on the positions of the planets. The solution should look like this:

Take the spigot inside the locker and go upstairs. You’ll find a barrel blocking the way. Approach the barrel and use the spigot on the barrel to release the oil inside. This will make it easier for you to move the barrel to the side and get inside the high-voltage room.
Inside, you are faced with another puzzle with levers. This one does not have a clue you need to find to figure out the sequence. It is a matter of trial and error. Pulling the correct lever will turn the light above it green while pulling the wrong lever will reset the puzzle.
To make it simpler for you, follow this sequence:
- 7th lever (pulled down from the start)
- 2nd lever
- 3rd lever
- 4th lever
- 1st lever
- 8th lever
- 5th lever
- 6th lever
Upon solving the puzzle, the elevator will become operational again. Go back to the elevator and enter it. Use the lever and it will start moving downward. Exit the elevator when it stops.
Inside, you’ll find three points of interest: the vent with a missing fan, the sheet of paper hanging from the vent window, and the area to the right. You’ll need to find a screwdriver for the vent and you won’t be able to take the paper until you fix it. Go to the right area for now.
To the right, there are four points of interest: the room to the left, the room at the end of the hall, the valves to the right, and the boxes on the floor. Approach the boxes on the floor and move them around to obtain a small metal knob.
Go to the left room and you’ll see a desk, a side table, and a metal door.
Use the small metal knob on the drawer of the side table. Take the screwdriver and inspect the square sliding toy. This toy itself is not a puzzle but serves as a clue to one. Move the squares to see the corners. Take a picture of each corner or jot them down for later. Leave the room for now and go to the area with the valves.
Approach the hatch next to the valves and solve the puzzle for it using the clues you got from the square sliding toy. The dots tell you which buttons should be pressed. Once you’ve pressed the right buttons, tap on the dial to open it and take the pipe wrench.
Go back to the vent and use the screwdriver on the screws to the right of it. Pull the handle to open the slider, insert the fan blade, and close it again.

Upon doing so, the paper will drop to the ground and you can pick it up.
Go back to the left room and place the paper on the map on the desk. You have to align the paper on the map in a way where it highlights certain words. Follow the angle of the words to find where it lines up to. You should end up with this:
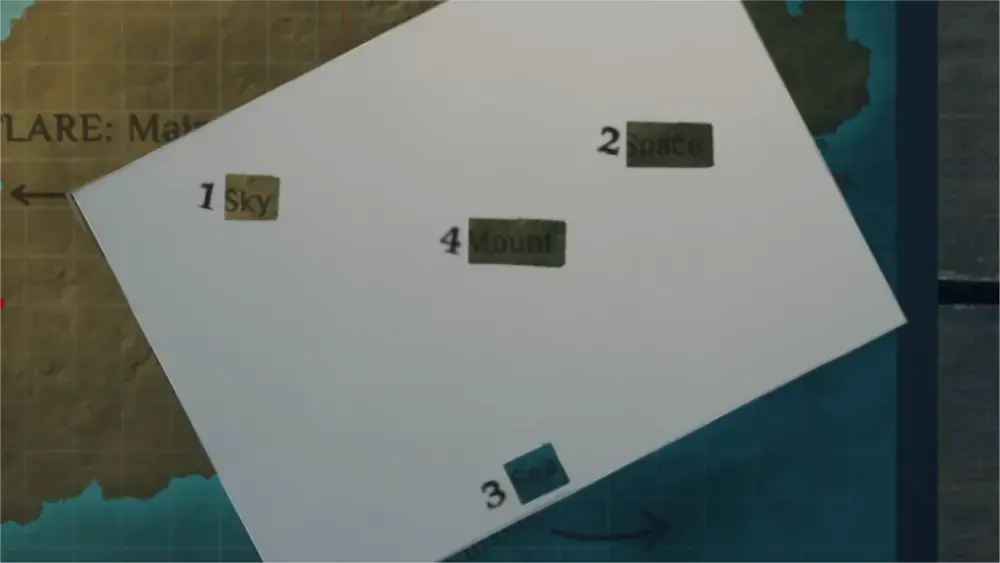
Jot it down:
- 1 – Sky
- 2 – Space
- 3 – Sea
- 4 – Mount
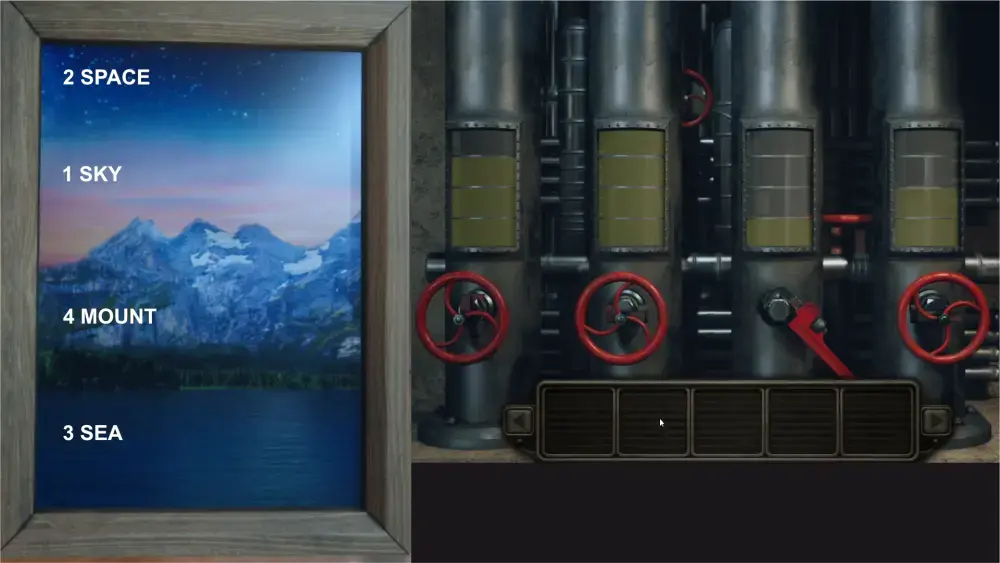
These words and numbers, combined with the painting on the desk are clues to the solution for the valves. However, if you go to the valves, it’s missing one valve.
Use the pipe wrench on the pipe with the missing valve. Take out the clues you had gotten from the desk before. There are four pipes and four levels. Each pipe is represented by a number and each level is represented by a word. The bottom level is sea, followed by mount, followed by sky with space as the top. The solution should look like this:
Upon solving the puzzle, you’ll gain access to the door at the end of the hall. Move forward and you’ll see a red train car to the right and a path to the left. At this time, you won’t be able to enter the train car because the door is jammed. You’ll need a jack to open it wide enough to enter. Go to the left path for now.
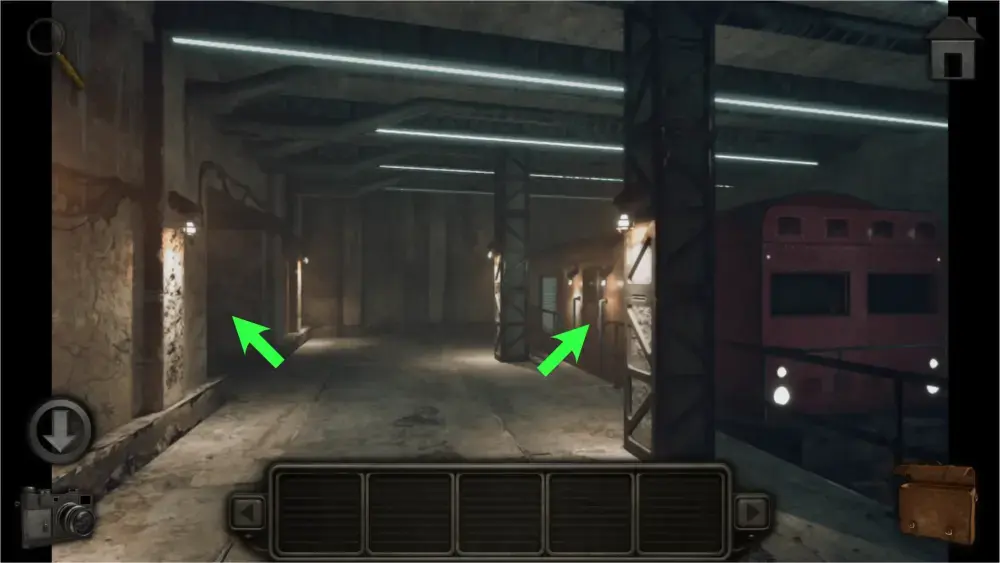
On the left path, there are two doors: one leading to the furnace room and another leading to the Train Room. Go to the furnace room for now.
The furnace room has a furnace filled with burning coal. You’ll need to come back to this later once you’ve gotten a fire extinguisher to cool it off and a spade to take it. Go downstairs for now and approach the white table.
Take the remote control and take a picture or jot down the note on the piece of paper. It is a clue for another puzzle. Leave the room and go to the Train Room.
The Train Room has a circular puzzle lock which can be solved by rotating the 3 inner circles so that the nodes on them line up with the nodes on the outside circle to light them up. There are no hints to look for in this particular puzzle and is solved through trial and error. The solution should look like this:
Inside the Train Room, you’ll see a wall clock to the left and four blinking monitors. The clue from the furnace room will come in handy for those monitors. Approach each monitor and use the remote control to change their channels to 8, 3, 9, and 2 respectively.
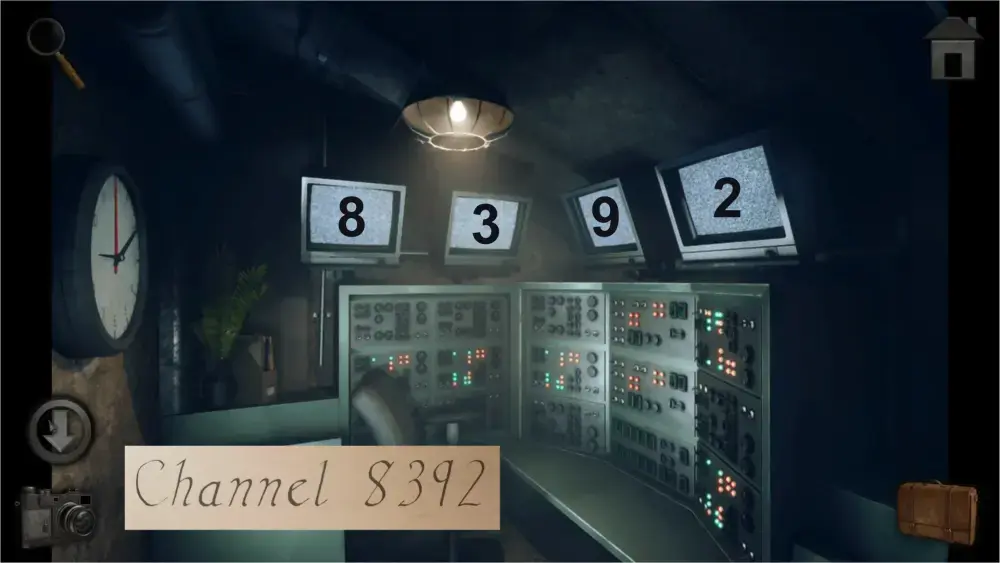
Once you do, the monitors will start blinking in a consistent pattern. This pattern is the pattern that must be applied to the blue metal door inside the room with the desk with a painting. Take note of this pattern and return to that blue metal door. Tap the 4 boxes according to that pattern and it should open it. To make it easier for you, tap the squares in this pattern: 3,4,3,2,3,1.
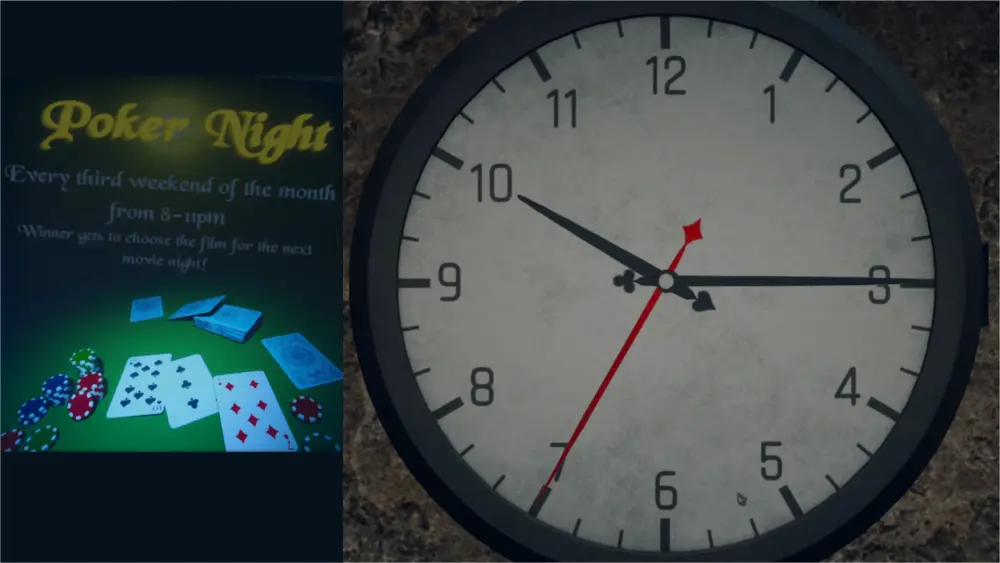
Upon opening the door, take the key and the jack from the right side of the room. Move forward and inspect the poker poster. This poster serves as the clue for the clock in the Train Room. Take note of the cards on the poster: 10 of spades, 3 of clubs, and 7 of diamonds.
Go back to the Train Room and inspect the wall clock. There are three arms on this clock with a diamond, a spade, and a club at their ends. Move the arms according to the number associated with them from the poker poster from before. The solution should look like this:
Upon solving the puzzle, the clock will open. Take the large gear inside of it.
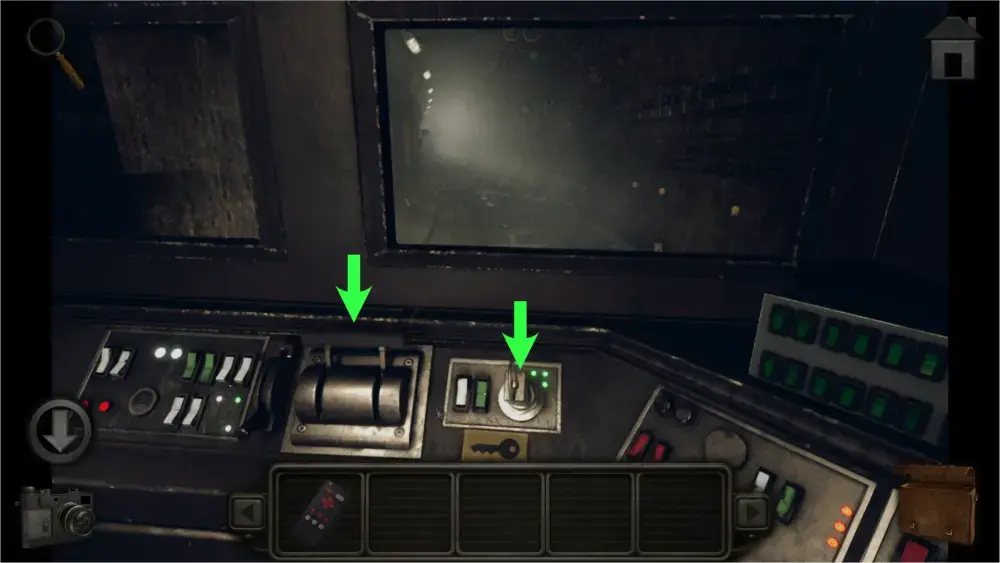
Leave the Train Room and approach the train car. Use the jack on the door and enter it. Once inside, approach the firebox to the left and take the spade next to it.
Afterward, move forward and take the fire extinguisher to the right. Approach the metal frame to the left and place the large gear inside it. Approach the control panel and place the key in the ignition. You’ll still need coal for the fuel so leave the train car for now and go to the furnace room.
Use the fire extinguisher on the furnace to cool it down then use the spade to collect it. Go back to the train, open the firebox, and place the coal inside. Move towards the control panel again and pull the lever to start the train and end the game.
And this marks the end of our walkthrough for Meridian 157: Prologue and Meridian 157: Chapter 1! We hope that our guide can help you solve those difficult puzzles and learn the secrets of F.L.A.R.E.! Is there anything that we might have missed? Let us know in the comment section!
Also, be sure to read our Meridian 157: Chapter 2 walkthrough!