We last left Chapter 1 of Meridian 157 hopping on a train, optimistic about our escape from this nightmarish place. However, our ride is cut short with an unexplainable train accident, leaving us unconscious inside a broken train cart. There doesn’t seem to be a clear cause for it, but the last image that haunts us is a dark silhouette peeking through one of the glass windows before we lose consciousness. These shadow entities seem to always be lurking nearby when disaster strikes. What are they and what role do they play in F.L.A.R.E.’s top secret project? Are they friends or foes? Are they aliens, monsters, mutants or something else entirely?
As we continue our journey to escape from this eerie and terrifying island, our disastrous train ride leads us to an unfinished mining excavation operation; a very unexpected discovery. What can we find in these dark tunnels? Will we finally find answers to our lingering questions? Or will more mysteries and unexplainable oddities greet us within? It’s time to find out in Chapter 2 of Meridian 157!
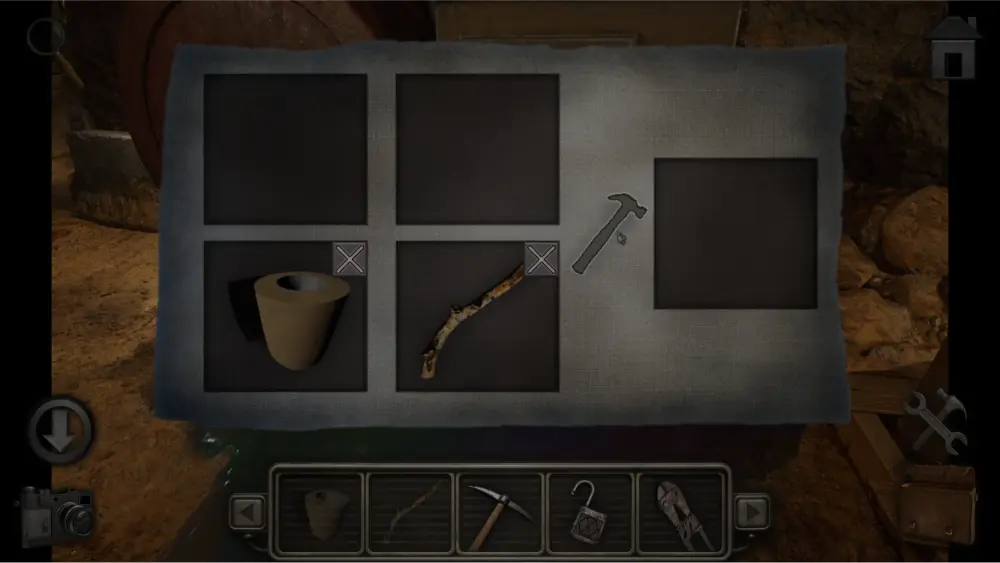
In the previous chapters, you had to combine items by placing them on a table first, but in Chapter 2, a new tool is introduced which allows you to combine up to four items in a special window. Keep this tool in mind whenever you get stuck since there are a few puzzles that will require you to use a tool that can only be obtained in this way. The button for it will only appear when you open your satchel.
This chapter contains puzzles that are similar to the previous ones with a few that are very different and may need some careful thought. A few of them also require you to pick up items that are well hidden and sometimes seem to blend into the scenery so be sure to keep an eye out and search every nook and cranny before moving on to the next area.
Now, without further ado, let’s dive into the walkthrough for Chapter 2 of Meridian 157!
Exploring the Mines
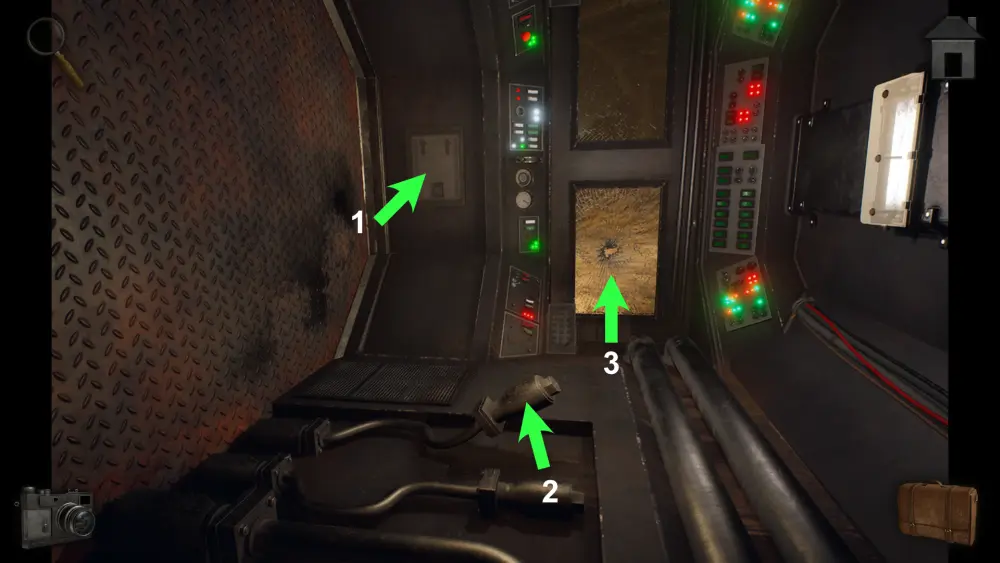
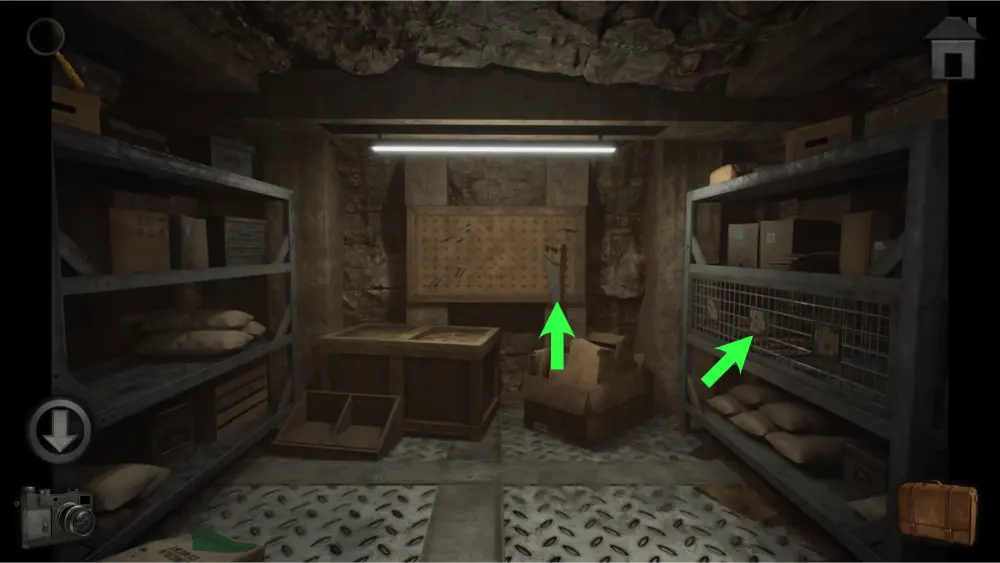
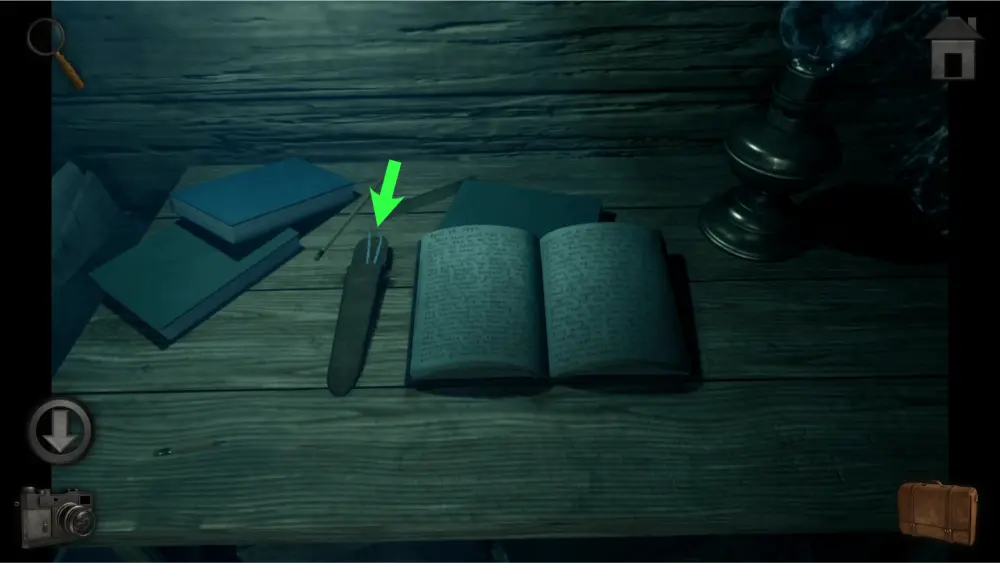
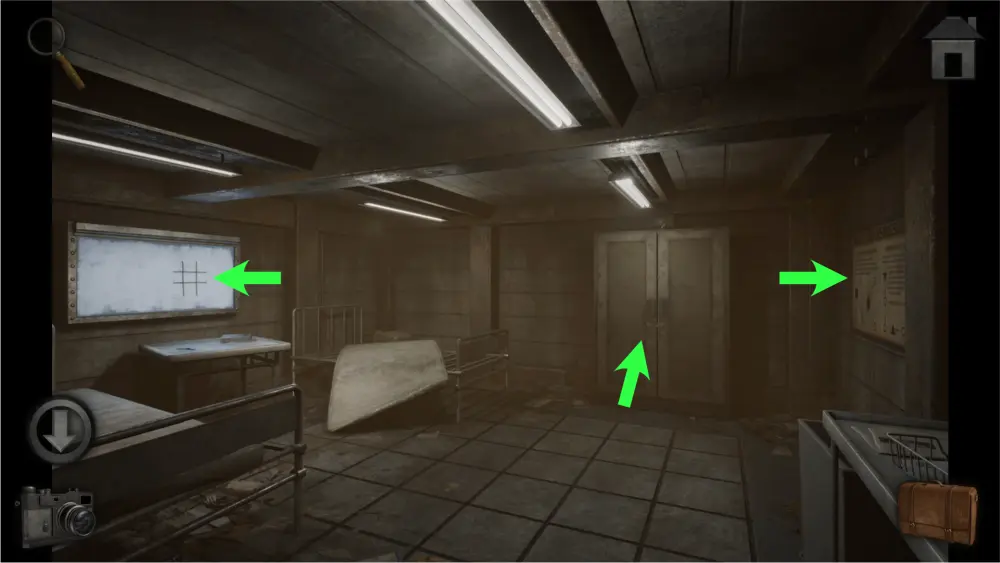
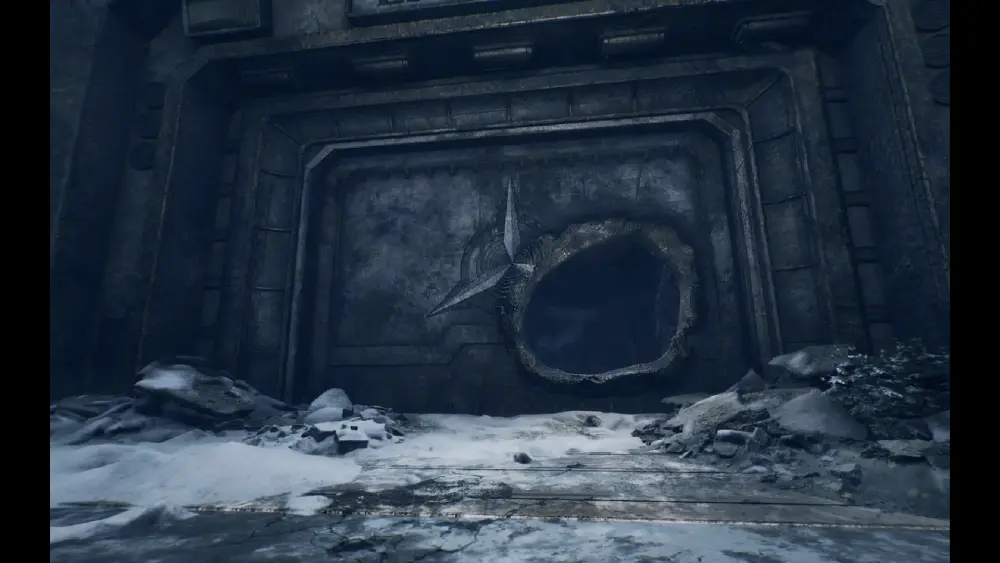
The game starts inside a broken train cart that seems to be lying on its side. The first thing you should do is approach the light gray hatch with two up arrows found next to the controls. Drag it upwards to open it and you’ll find a red first aid kit. Open the box and take the bandage and hand saw inside it. Next, investigate the pipes at the bottom center of the screen. Use the hacksaw on it and take the metal pipe. Then, approach the broken window and use the metal pipe on it to further break it, giving you a way to exit the train.
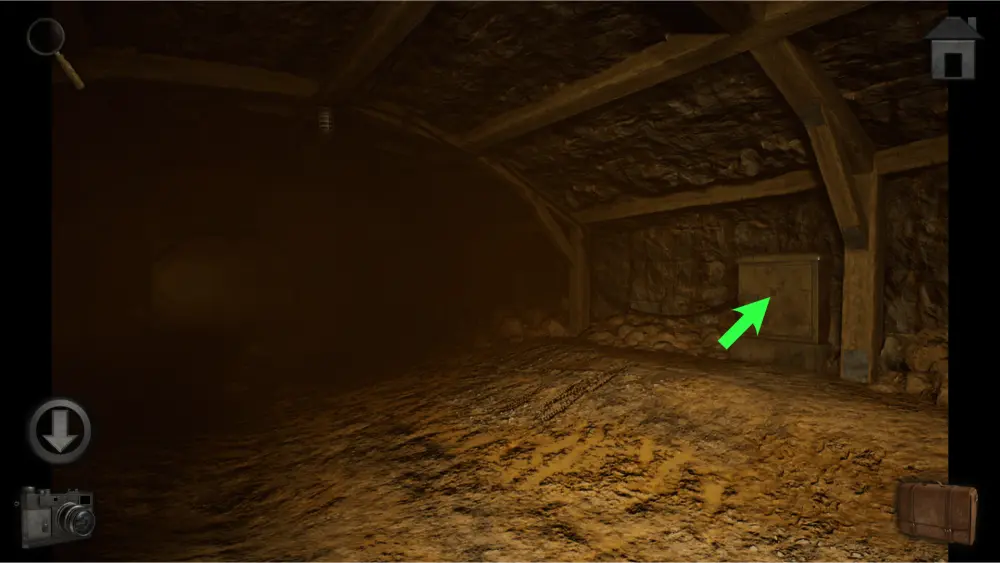
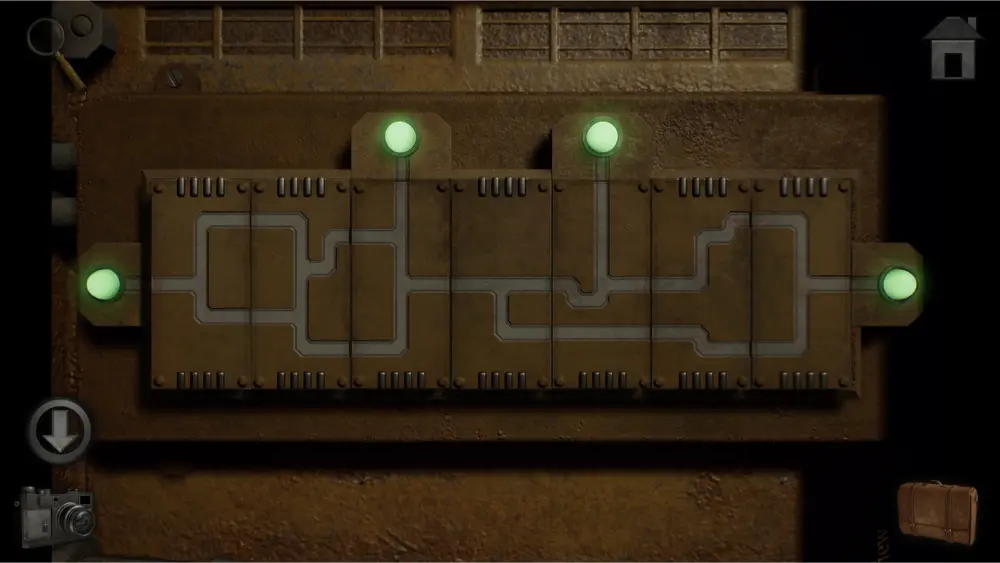
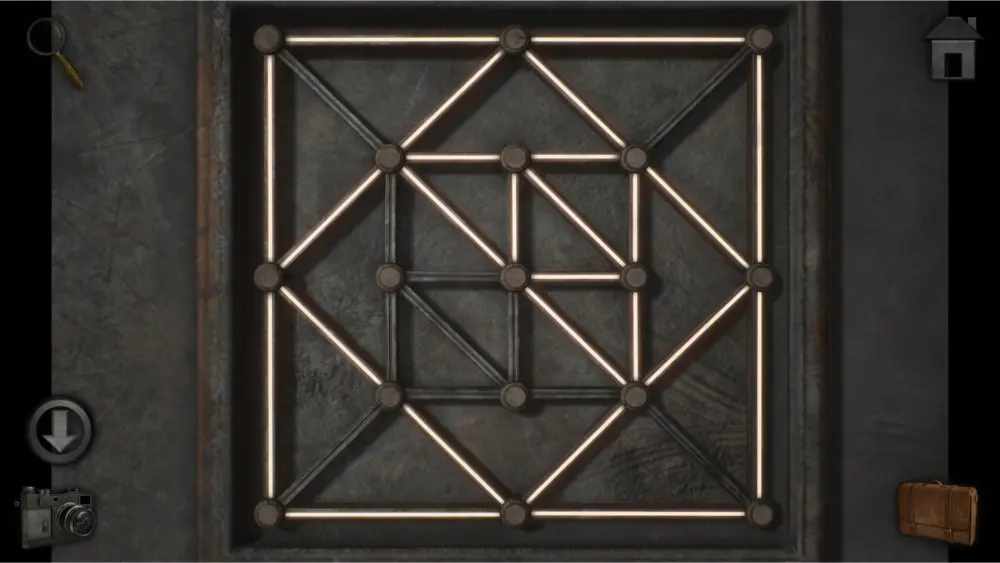
After exiting the train, you’ll find yourself in a dark adit, an entrance to an underground mine. It is too dark to explore so approach the metal box at the right side of the screen and open it. You will encounter a puzzle mini-game that you must solve to light up the tunnel.
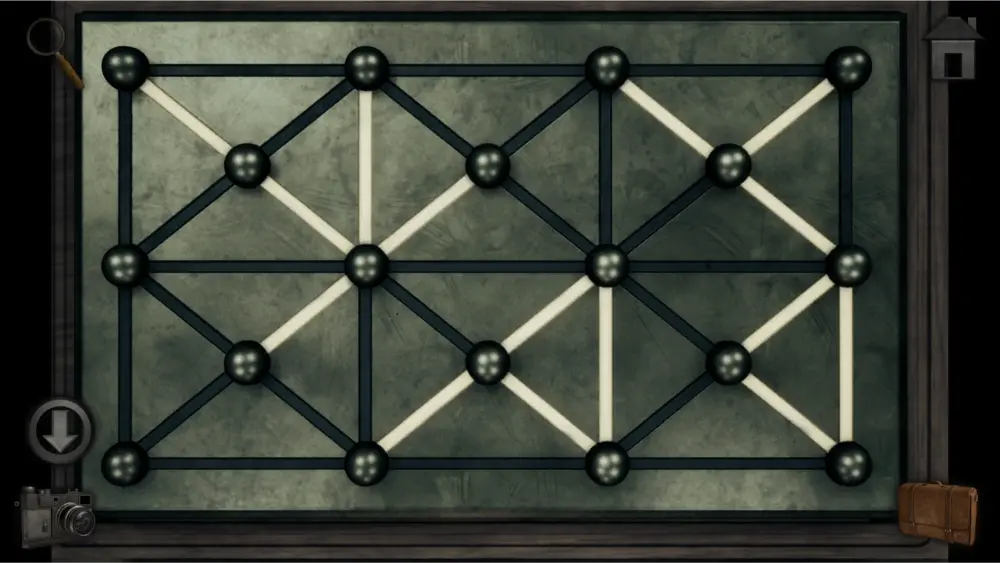
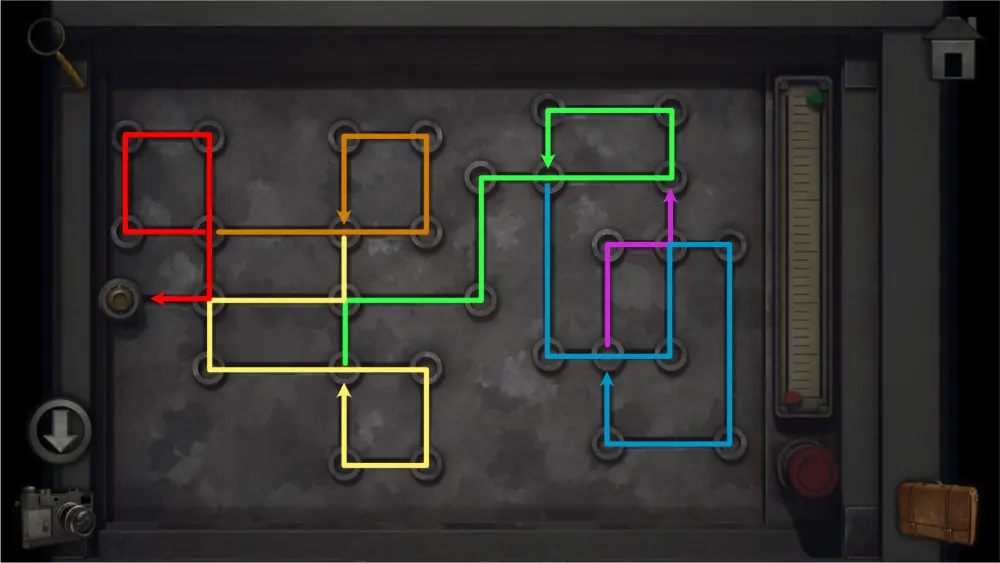
For this puzzle, you have to arrange the rectangular blocks for the white path to connect all four points. These points will light up if done correctly. You can move these blocks by tapping two of them to exchange them. The trick is to first identify the blocks that can connect to the top lights. Once you’ve done that, find the blocks that only have one path that connects to the left and right.
The solution should look like this:
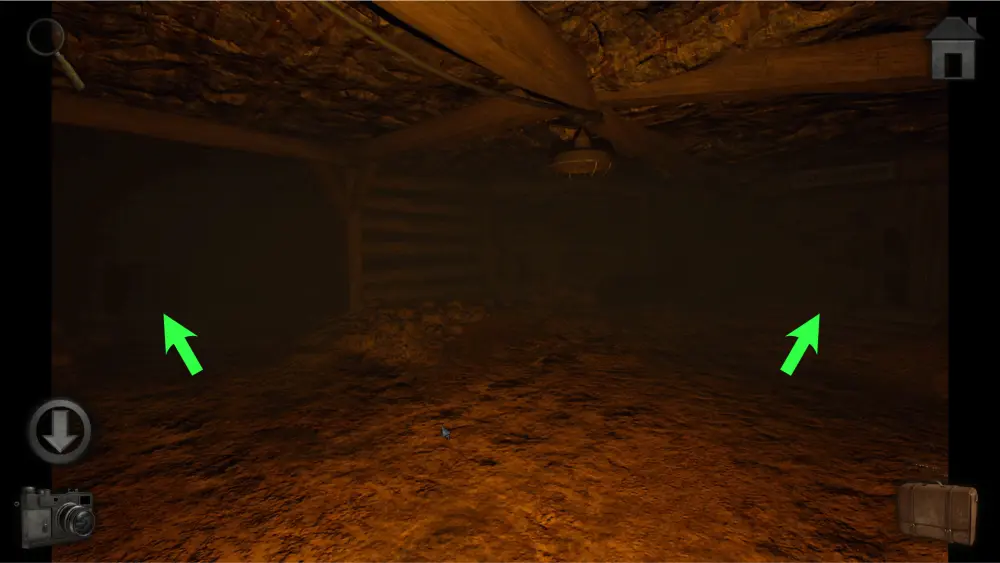
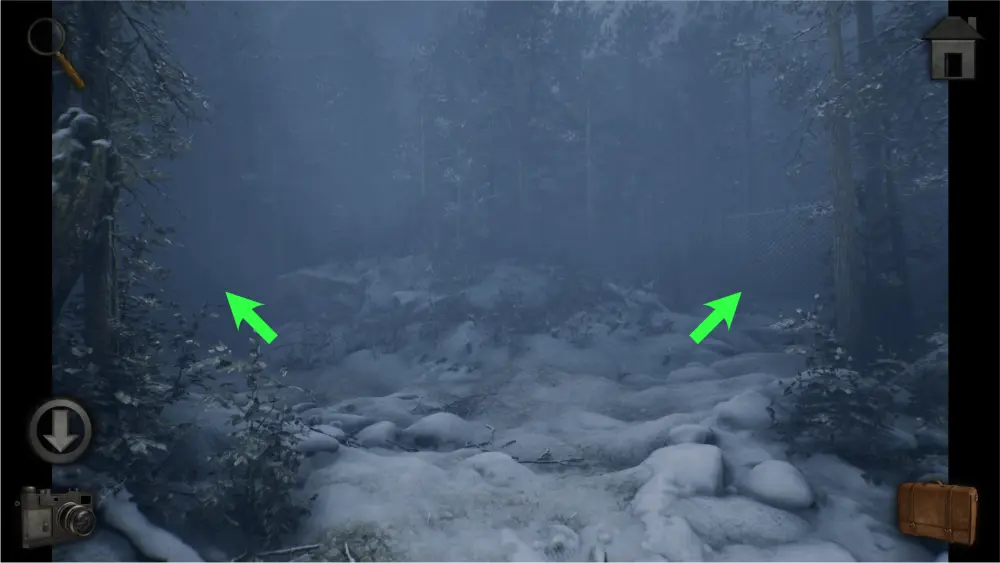
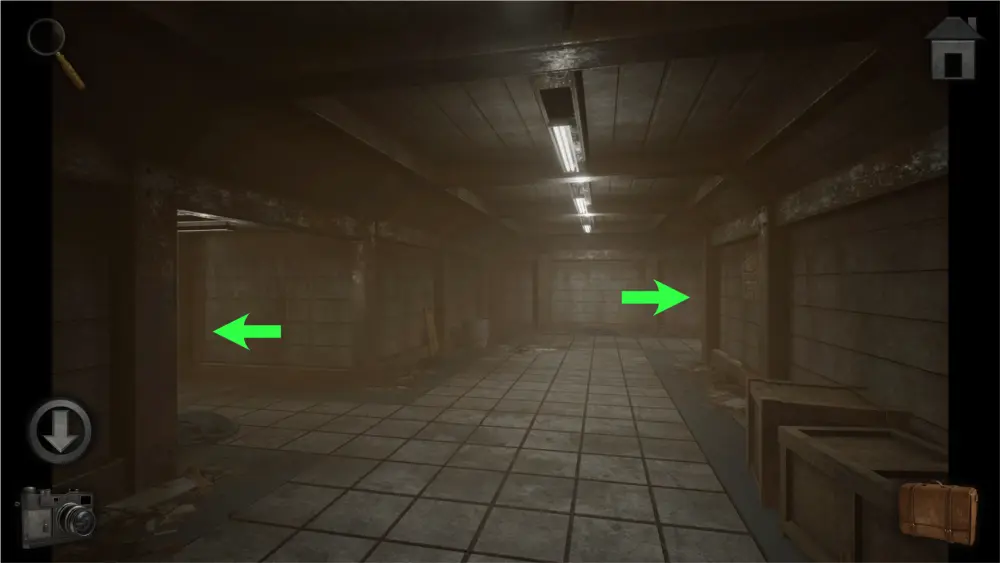
Upon solving the puzzle, the mines will be lit up and become explorable. Move one step forward and you’ll encounter a forked path.
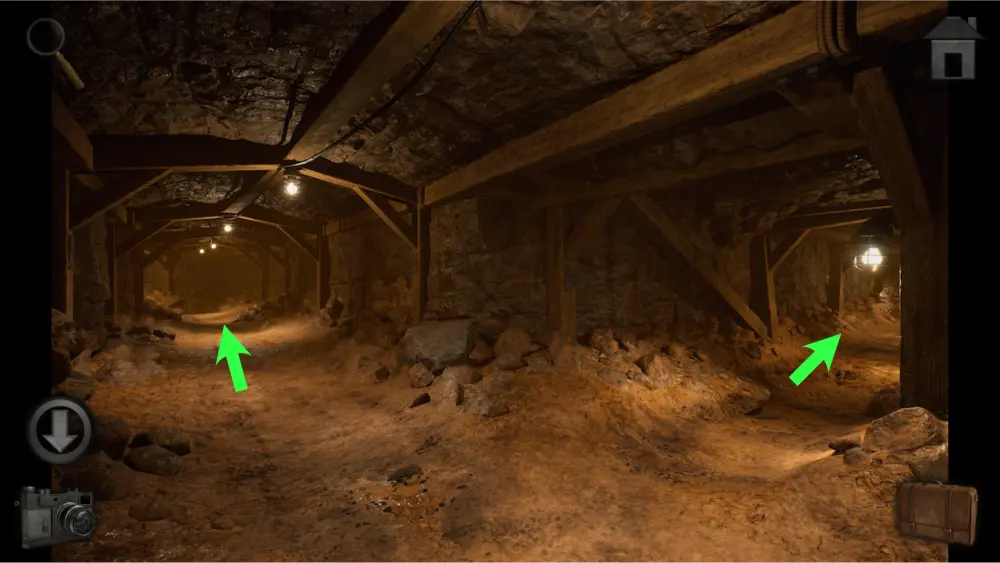
Let’s explore the right side for now and move 2 steps forward. You’ll find two more paths once more.
Approach the giant gear on the right side and take a picture of the symbols on it. It will be important for a future puzzle.
On the left path, you’ll discover that it is covered with noxious gas and you’ll have to find a gas mask before you’ll be able to explore it. Move one step forward for now.
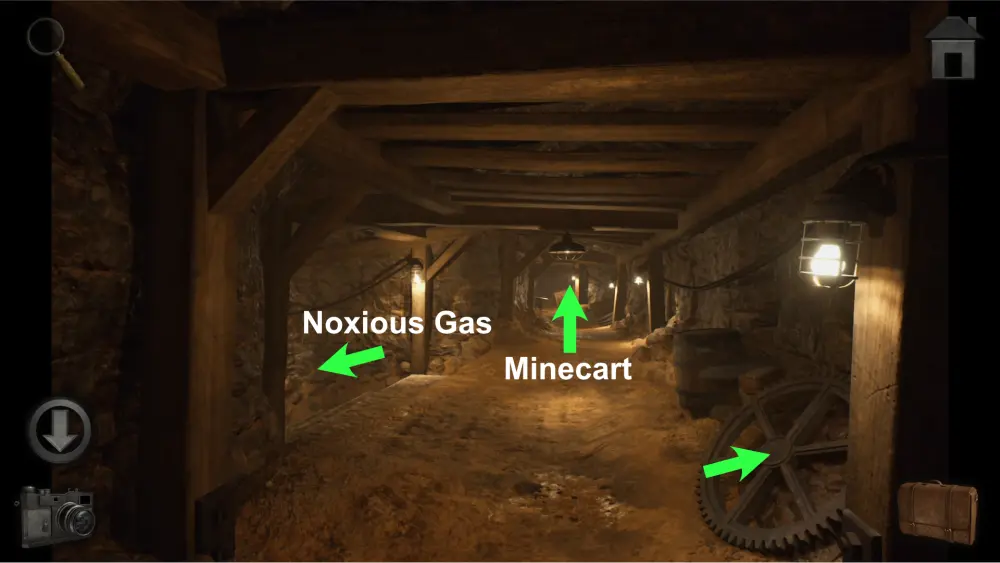
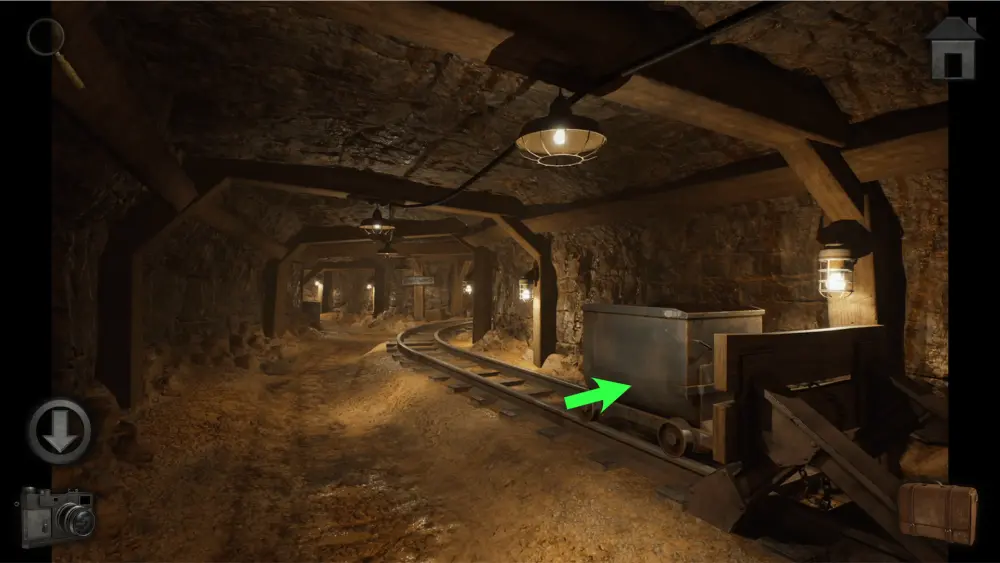
In the next scene, you’ll see a minecart chained to the end of the minecart tracks. You’ll need to come back to it once you get bolt cutters to break the chain.
Move one step forward and you’ll encounter another forked path. The right side that should lead to the inner mine has collapsed while the left side is blocked with large stone blocks. You’ll have to come back to it once you get explosives, rope, and fire to destroy it.
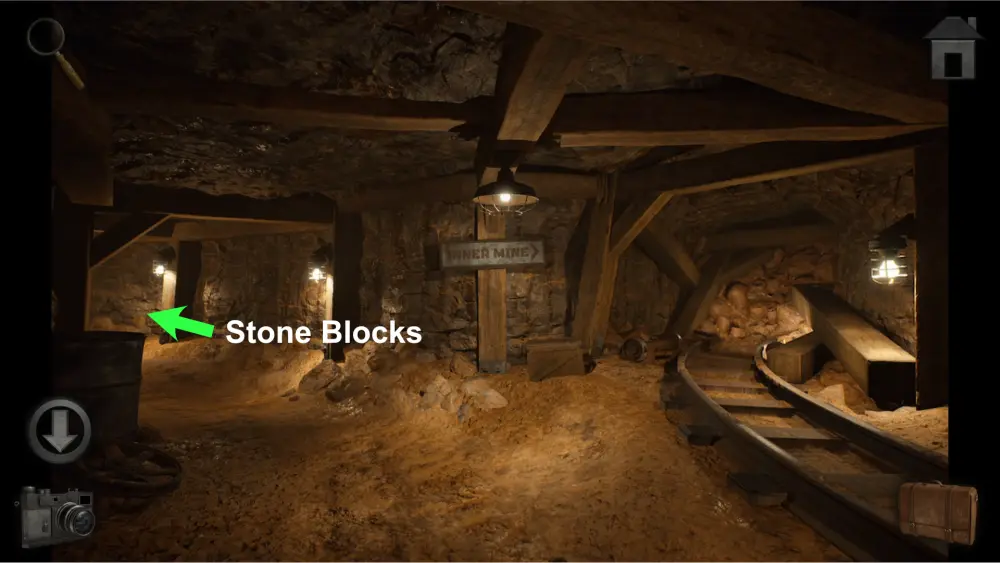
Go back to the first forked path and take the left path this time. You’ll find two more paths with a sign that points to the left as “Storage 2”.
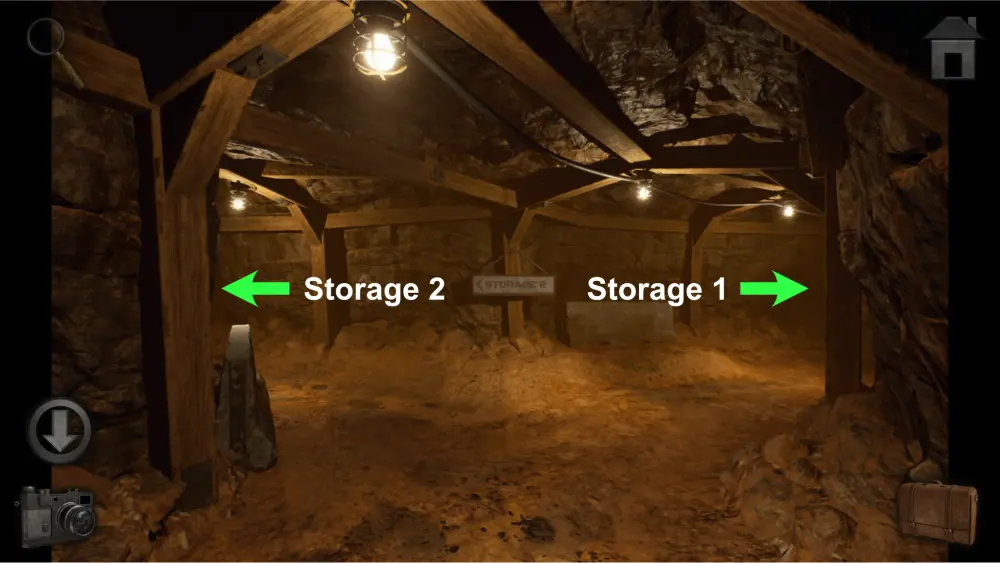
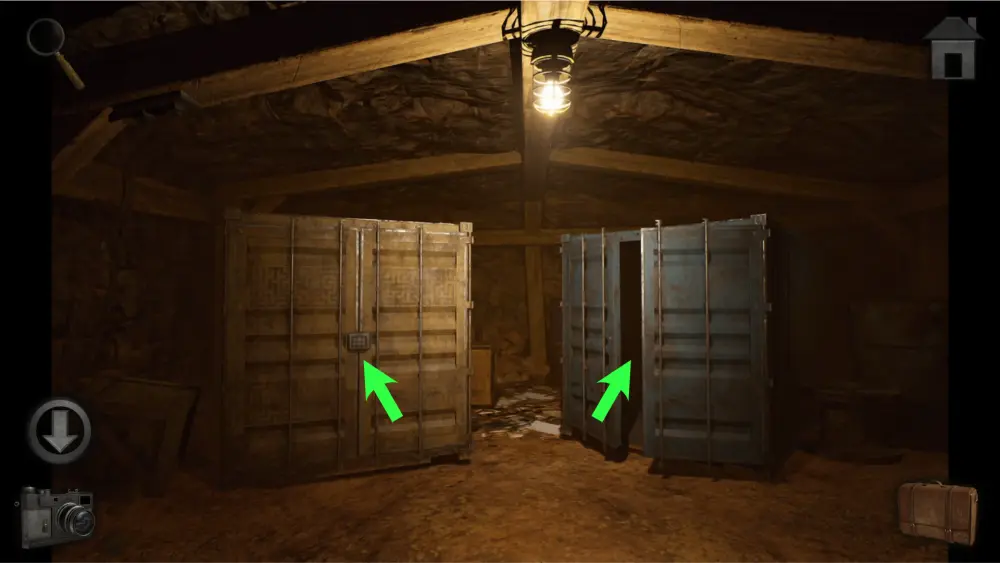
As you move to the left path, you’ll see two storage units: a yellow one that is locked by a puzzle and a blue one that is opened. Since you won’t have the clues needed to solve the puzzle yet, enter the blue one for now and take the stick inside.
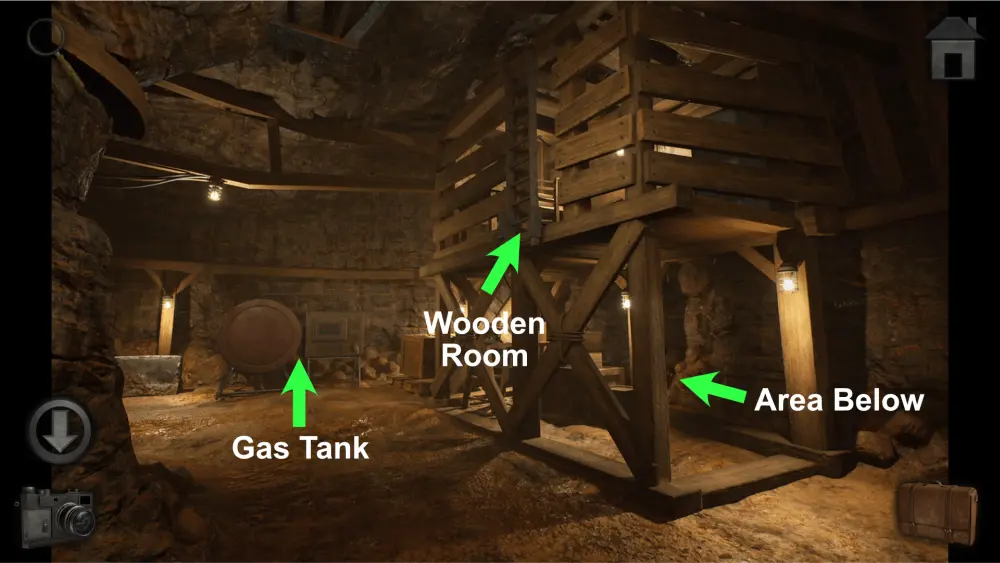
Move to the right path and you’ll find a large area with three points of interest: the room at the left labeled as “Storage 1”, another path forward, and a wooden structure to the right.
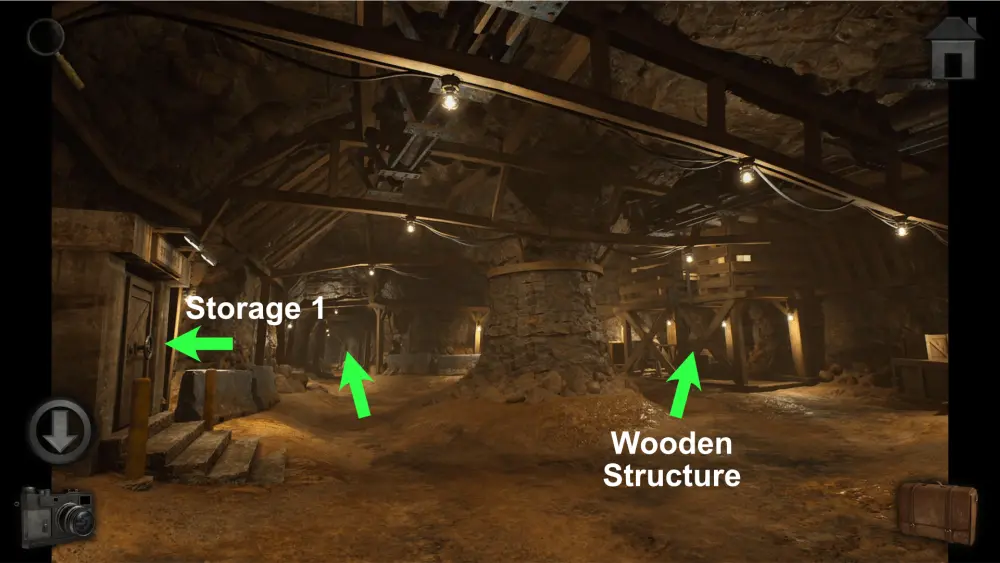
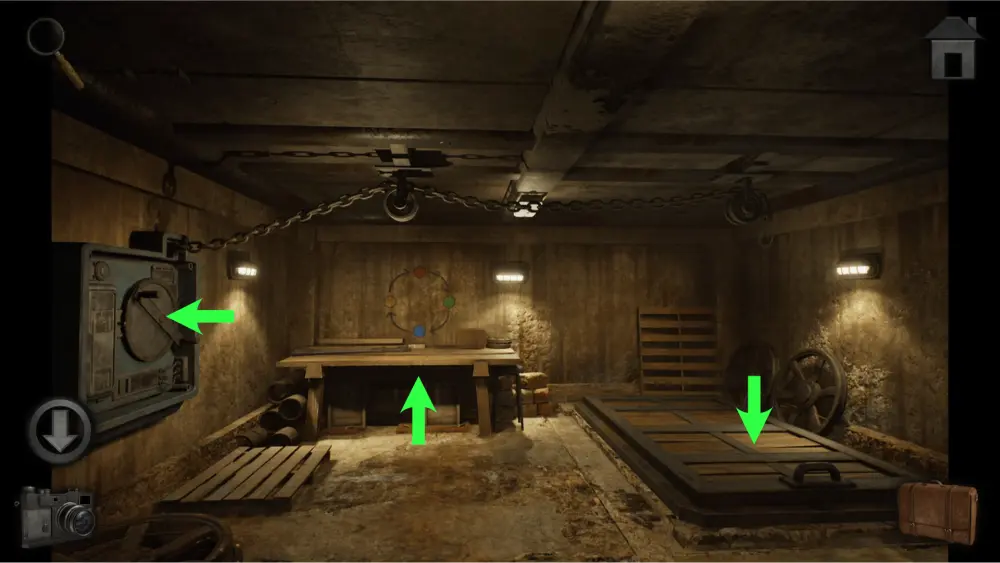
At this time, Storage 1 is locked and you’ll have to come back later once you’ve found the key for it. Move towards the area of the wooden structure for now. In this area, there are also three points of interest: the gas tank to the left, the wooden room above, and the area below it. The gas tank has a puzzle that involves red, blue, green, and yellow colors in hexagonal shapes that can only be solved once you get a clue for it elsewhere while the wooden room is only accessible once you lower the ladder. Explore the area below it for now.
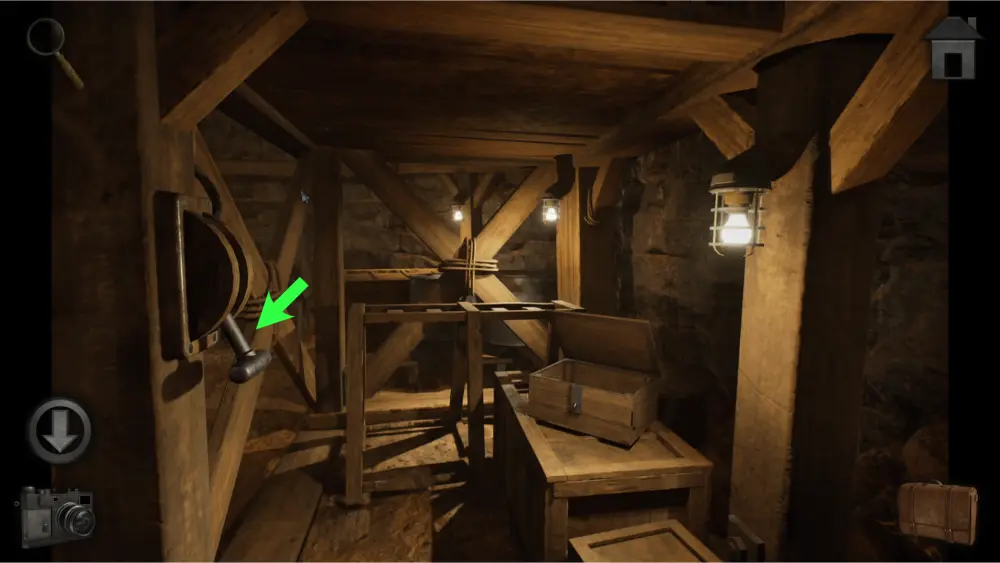
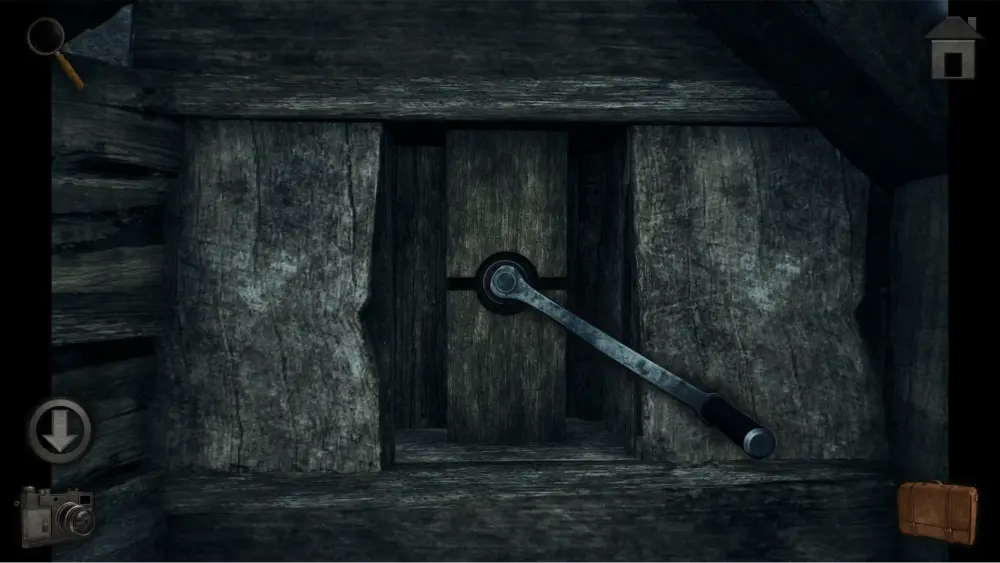
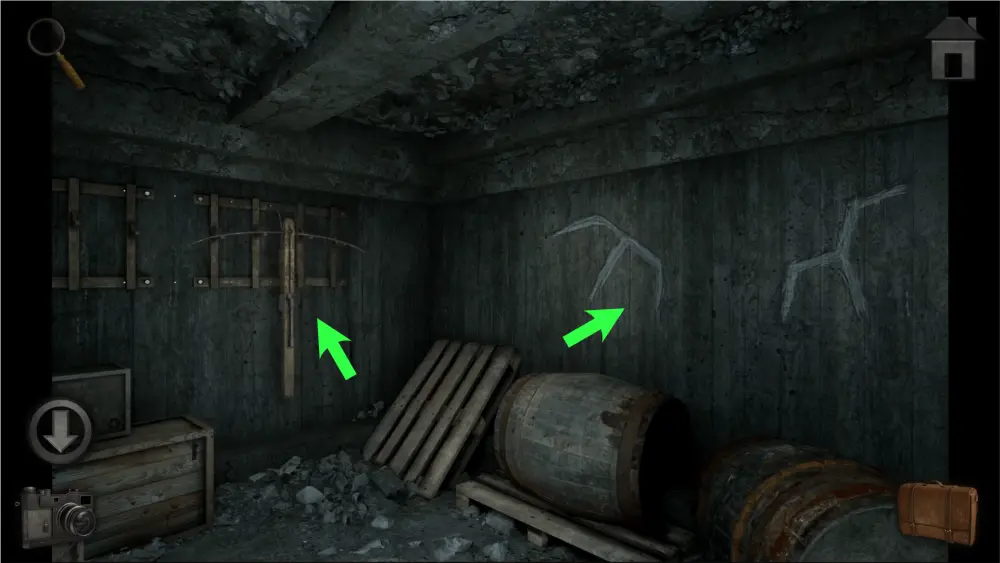
Once there, take the pickaxe from the wooden rack. The locked wooden box at the right has a puzzle that also needs a clue to be solved so you’ll have to come back later for it along with the mechanism at the left that needs a lever. This lever is the key to lowering the ladder for the room above.

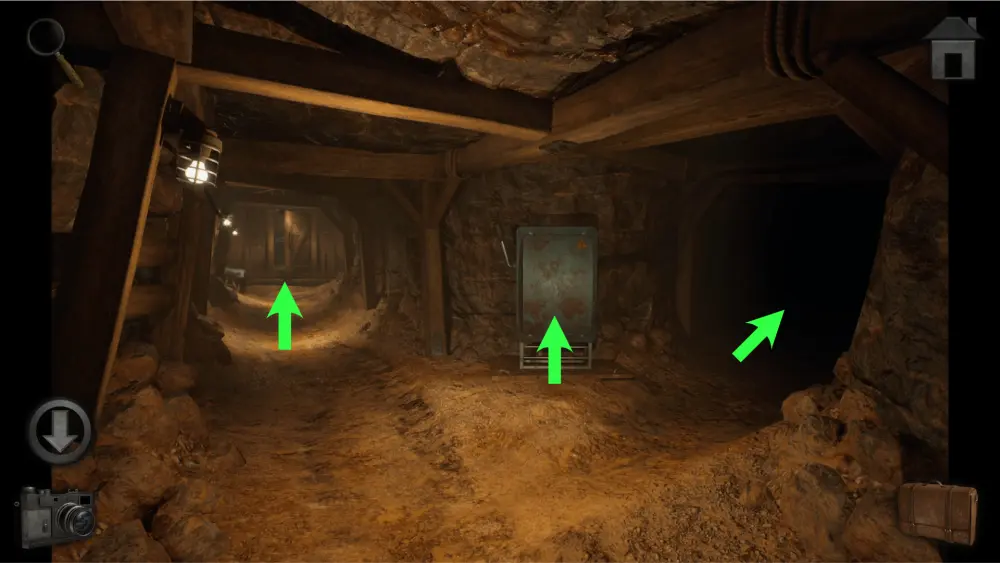
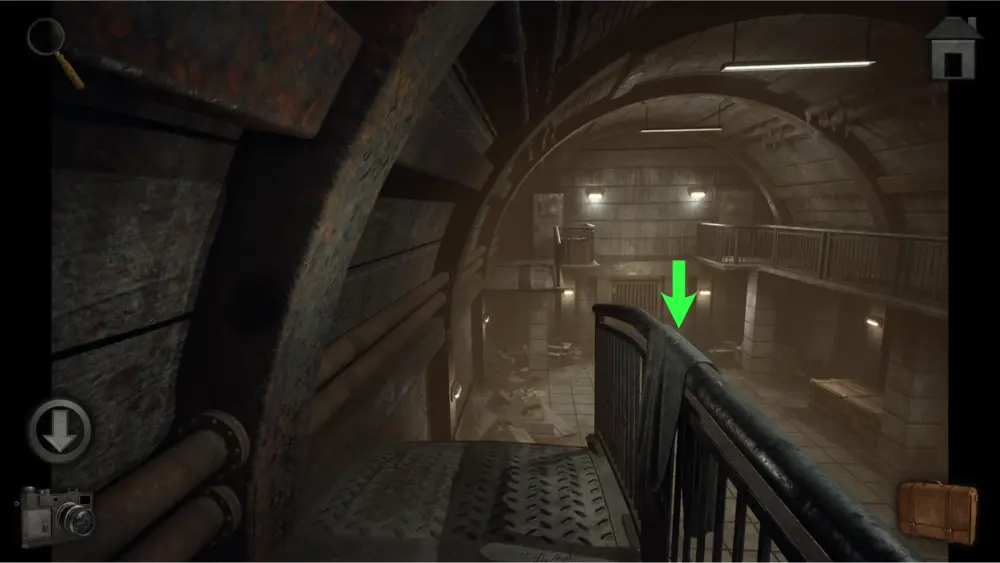
Leave the area for now and move 2 steps forward towards the path at the back. You’ll encounter another forked path. You’ll find an electric box in the middle which you’ll have to come back to once you’ve found a screwdriver to open it.
The path to the right is covered in darkness and you’ll have to come back once you’ve found a torch for it. Move towards the room to the left for now.
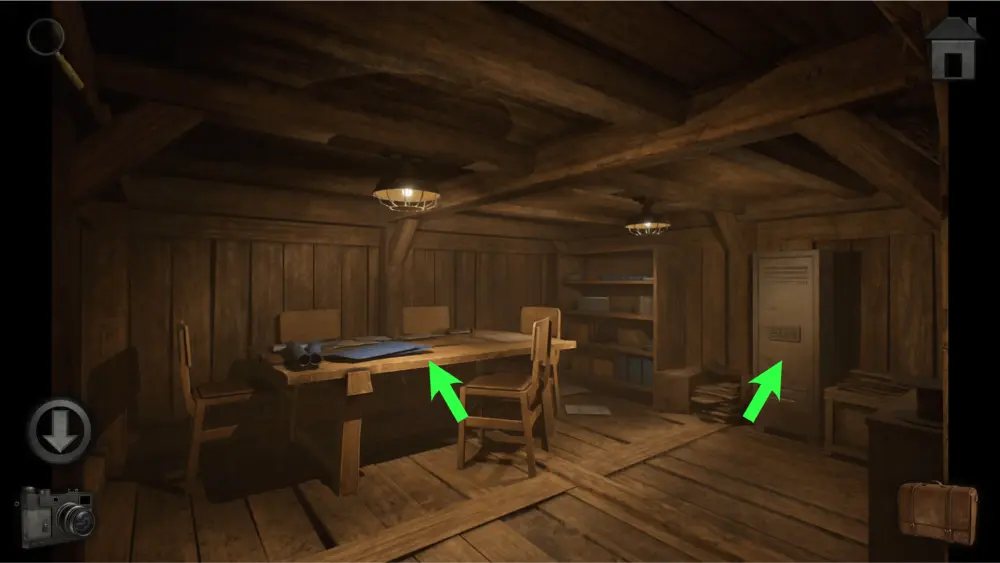
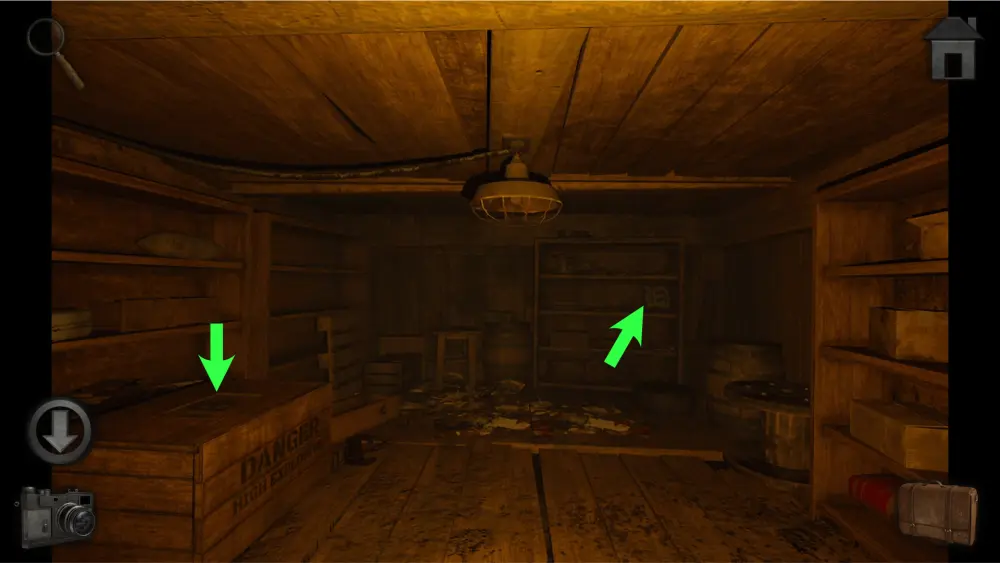
Inside the room, you’ll notice a wooden table with blueprints to the left and a gray metal locker to the right.
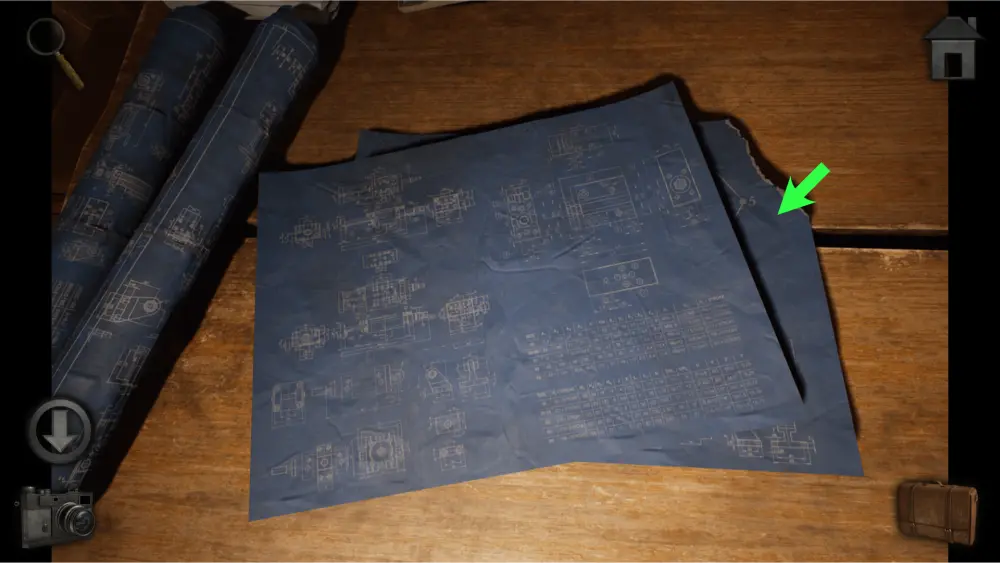
Approach the table and inspect the blueprints. Tap the page behind it and take a picture. This is an important clue for the locked wooden box puzzle found under the wooden room.
The maze to the right is not a puzzle but a clue to one which you’ll have to come back to later once you’ve found the item that goes with it.
Afterward, inspect the gray metal locker. You’ll find that this locker also has a puzzle of its own with the clue to its code based on the symbols below it. Take a picture of it for later reference.
Passing Through the Noxious Gas
From this point forward, you will be going back and forth between different locations in the mines until you solve all of the puzzles in the area. Since there are many rooms and paths, it may become confusing to many players so we made a simple map to guide you:
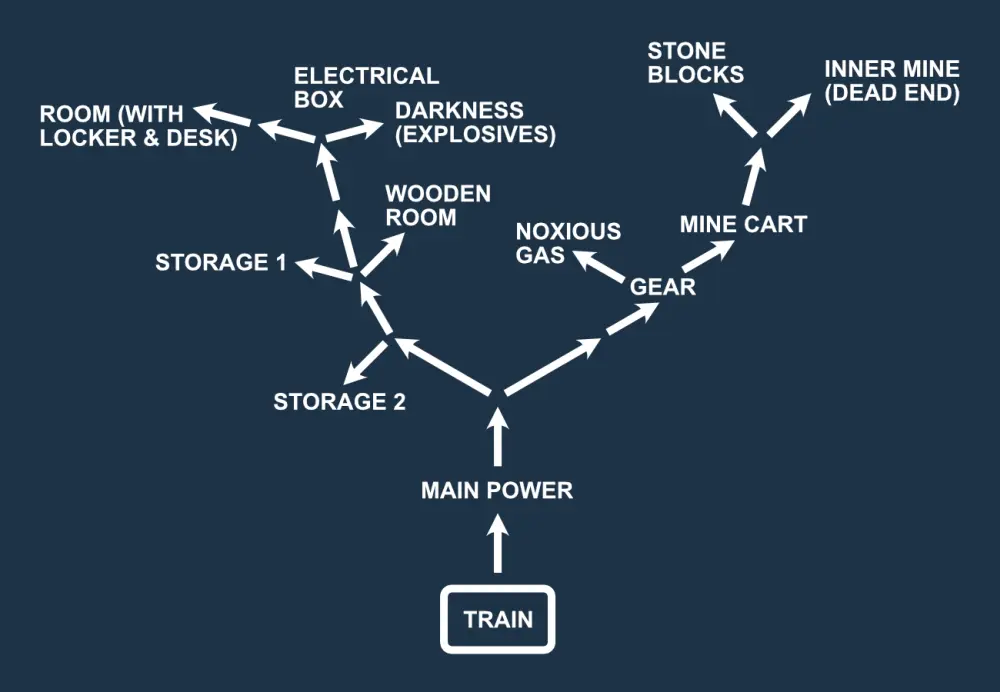
Go back to the locked wooden box and inspect the lock puzzle. Take out the picture you had of the blueprint. Notice that they both have the same shape and lines. The numbers in the puzzle show where the positions of the numbers in the lock should be for it to be unlocked.
The solution should look like this:
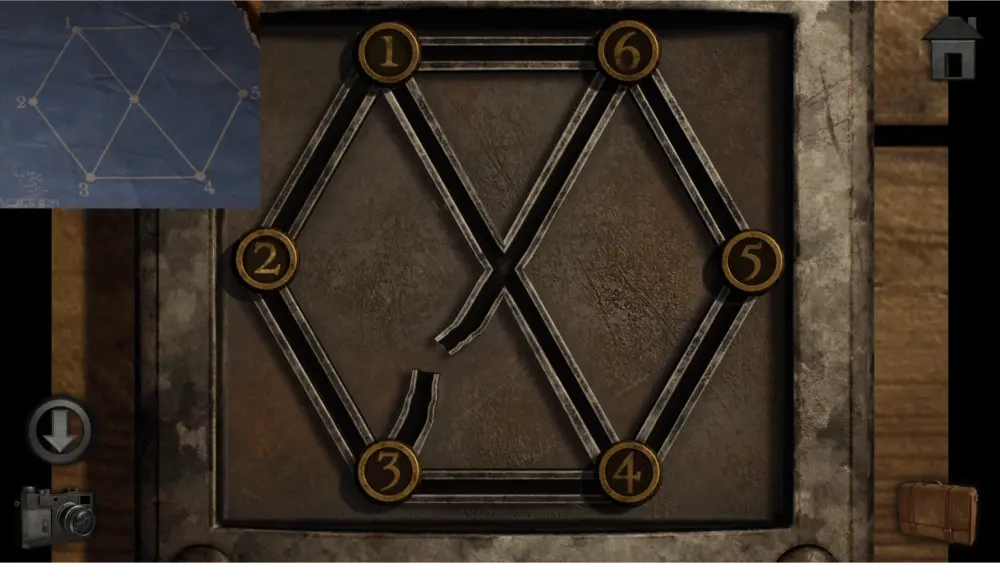
To solve this puzzle, you need to make sure that the puzzle is in its original state before you begin. There is no reset button for this puzzle but you can reset it by leaving the lock screen and going back in. It should look like this:
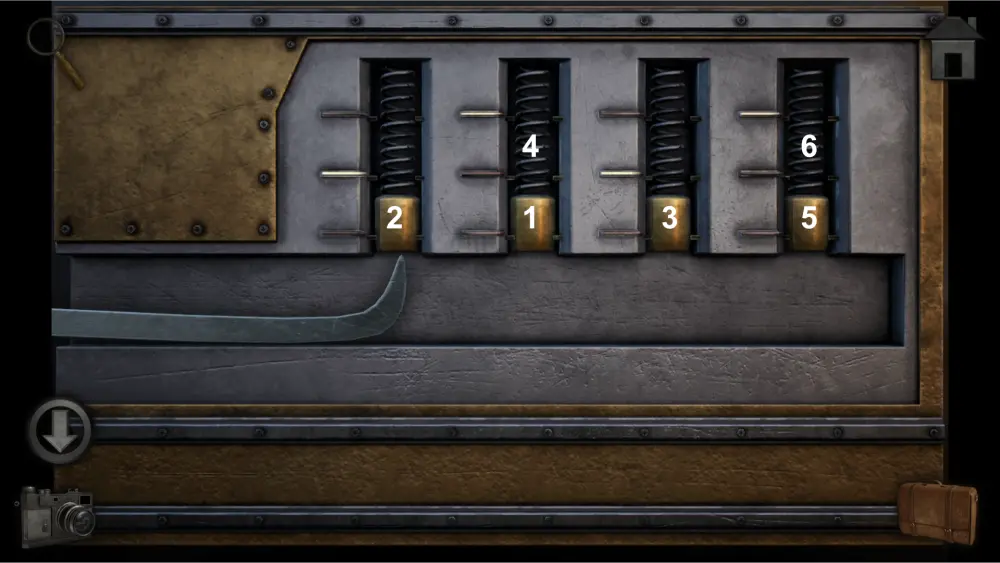
What you should do is first arrange the numbers in the correct order from 1-6 then arrange them according to the blueprint:
- Move 4 to the center
- Move 1 up, followed by 5, 6, 3 and 2
- Move 1 to the left, followed by 5 and 6
- Move 4 down
- Move 5 to the center
- Move 6 up, followed by 4, 3, 2 and 1
- Move 6 to the left
- Move 5 up
- Move 6 to the center
- Move 1 up followed by 2, 3, 4 and 5
- Move 6 up
Upon opening the wooden chest, take the padlock next to it and the key inside it.
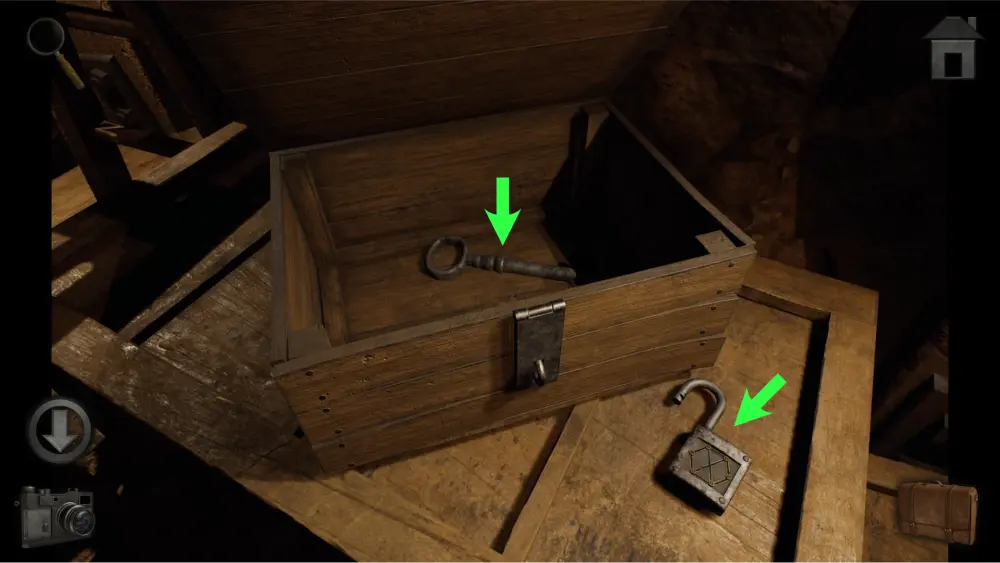
Go to Storage 1 and use the key you just found to open it. Inside you will find three points of interest: the pulley at the left that is connected to a hook and chain, a desk at the back, and a trapdoor at the right.
The pulley is instrumental in opening the trapdoor, but if you try to lower the chain, it is not long enough for the hook to reach the handle. You will have to come back later once you find an extra chain. The padlock will also come in handy for this.
Approach the desk, take the bolt cutters, and take a picture of the diagram on the wall. This is a clue for the puzzle by the gas tank near the wooden room. Go to that area after you’re done.
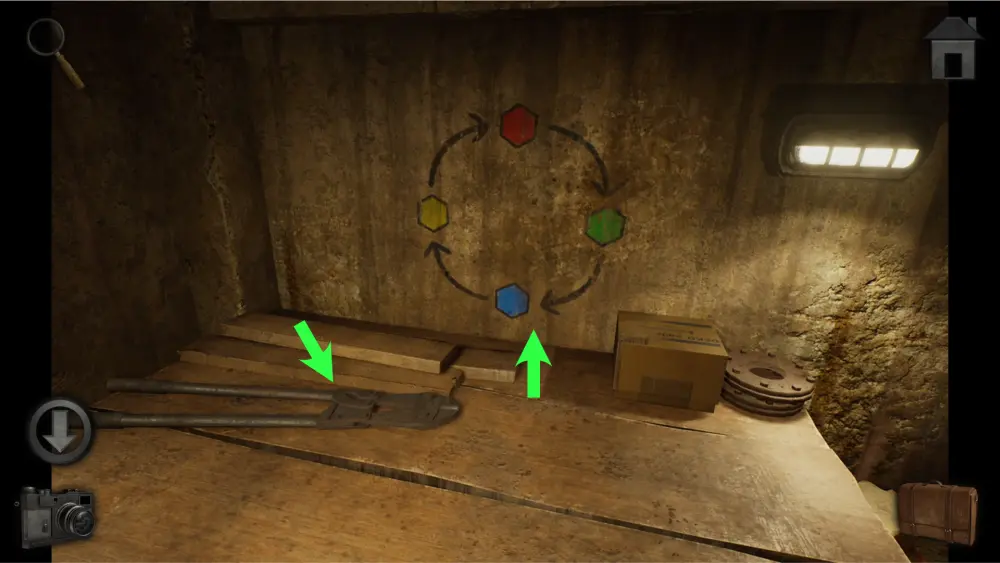
The diagram will tell you the order of colors that must be pressed to go from start to end. Since the start is red, you have to tap a green hexagon, then a blue one, and then a yellow one, and so on until you reach the end.
The solution should look like this:
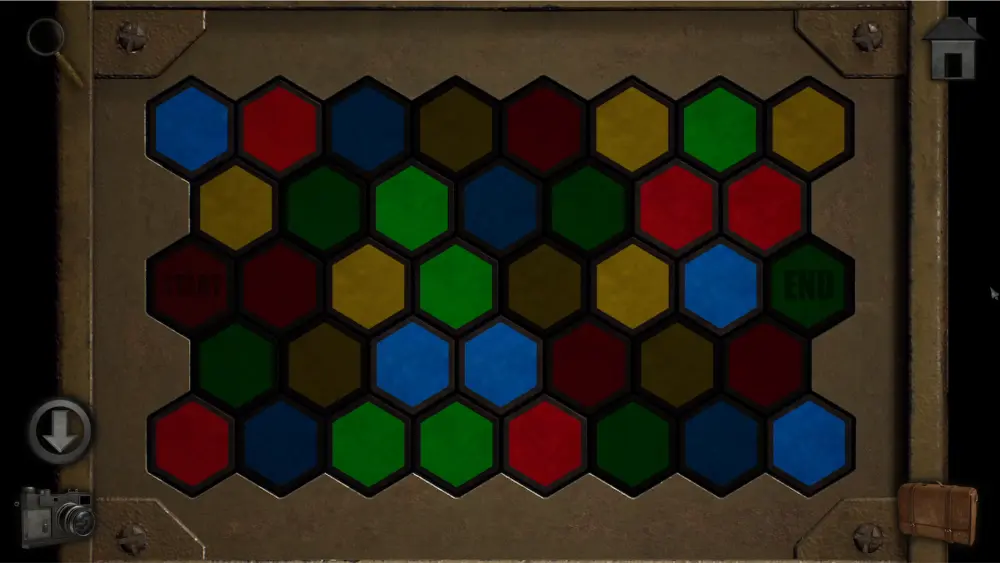
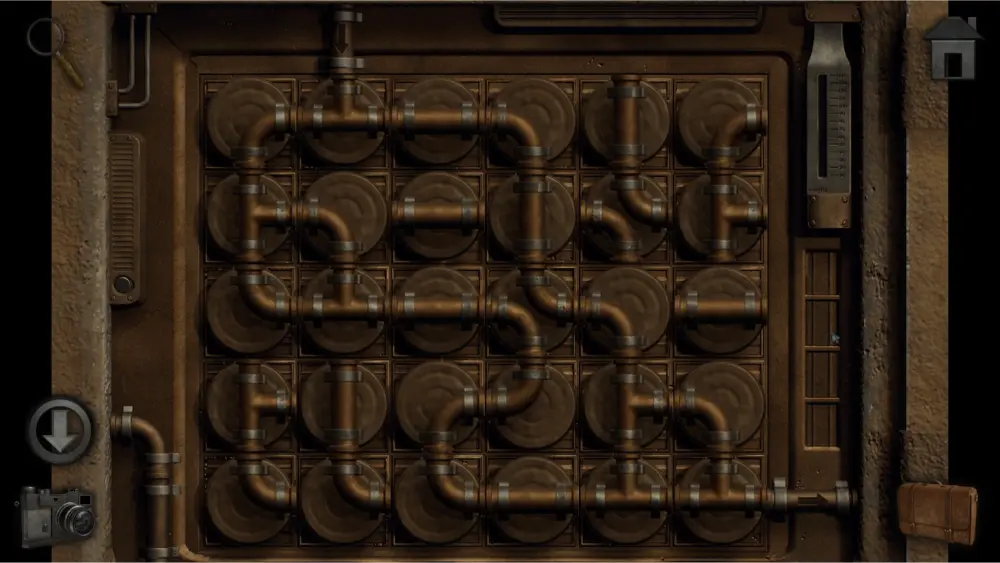
Once you’re done, it will open the inside which has a pipe puzzle. The objective of this puzzle is to connect all pipes by tapping them to rotate them. However, you will have to do it in a way that will not have any open pipes in the connection.
The solution should look like this:
Once you’ve solved the puzzle, gasoline will spill on the floor. Open your satchel (inventory) and with the new tool, combine the bandage and the stick to make a torch. Dip it in the gasoline.
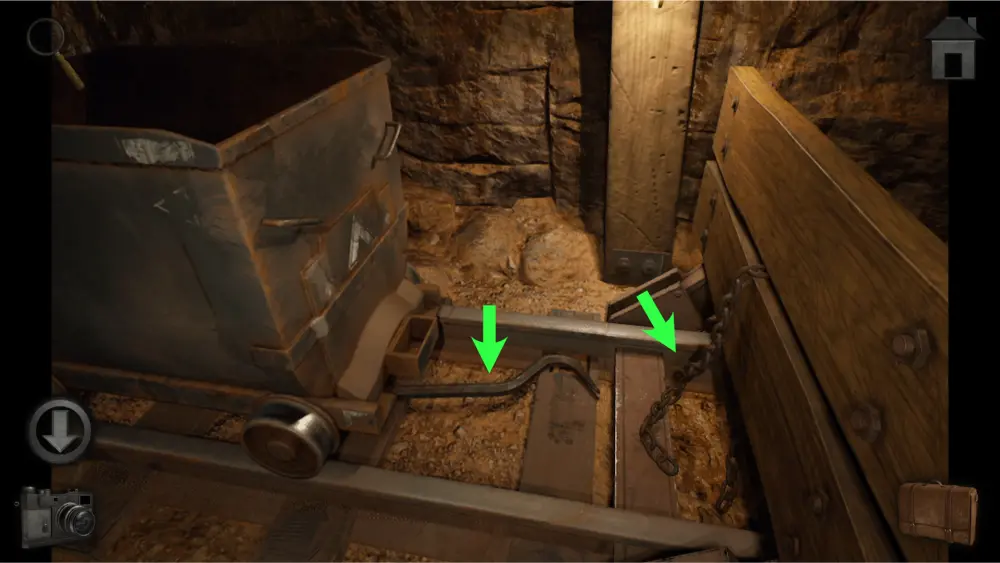
Go back to the right path of the mines where the minecart was (refer to map). Approach it and use the bolt cutters on it. The minecart will slide to the left, revealing a crowbar. Take the crowbar and the chains.
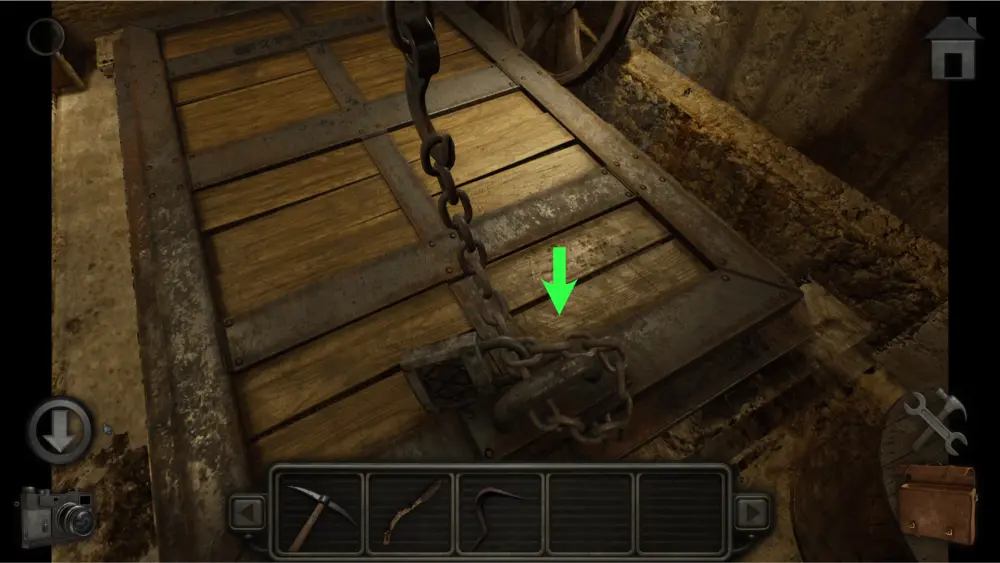
Go to Storage 1 and lower the pulley by rotating the circular mechanism clockwise to the lowest that it can. Next, approach the trap door and attach the chain to the hook and the handle. Then, use the padlock on the chain to fasten it.
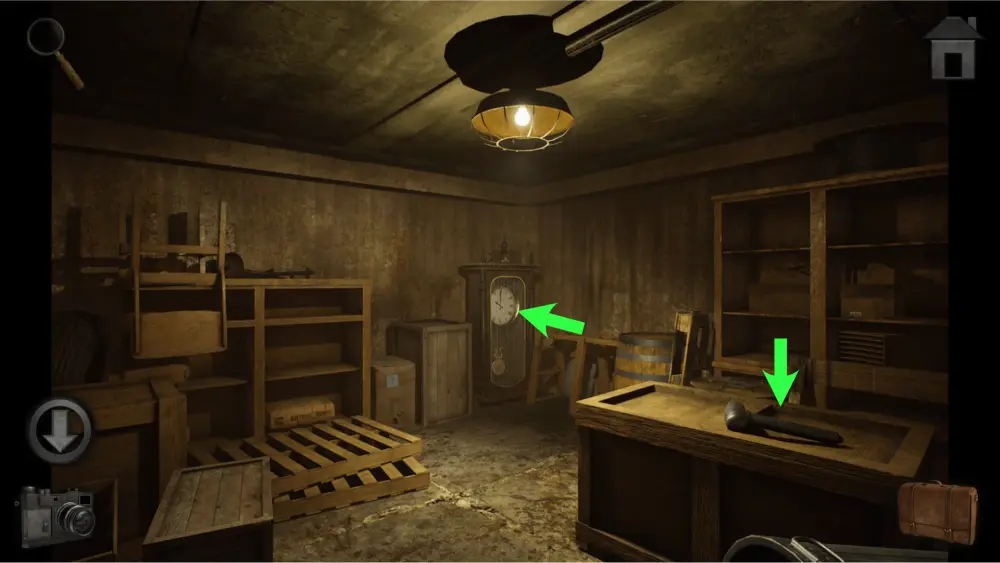
Go back to the pulley and rotate the circular mechanism counter-clockwise to the highest that it can. The trap door will now be open and can be entered. Inside, take the lever on the wooden crate and approach the clock at the back of the room. Take a picture of it as it is a clue for a puzzle.
Go to the area under the wooden room and use the lever handle on the lever mechanism to lower the ladder.
Enter the wooden room and approach the corkboard. Take a picture of the Babylonian Numerals and the moon chart as these are clues for a puzzle. Afterward, approach the desk and take the blue card in between the journal. The journal contains some interesting lore but does not have any important clues for any puzzles.

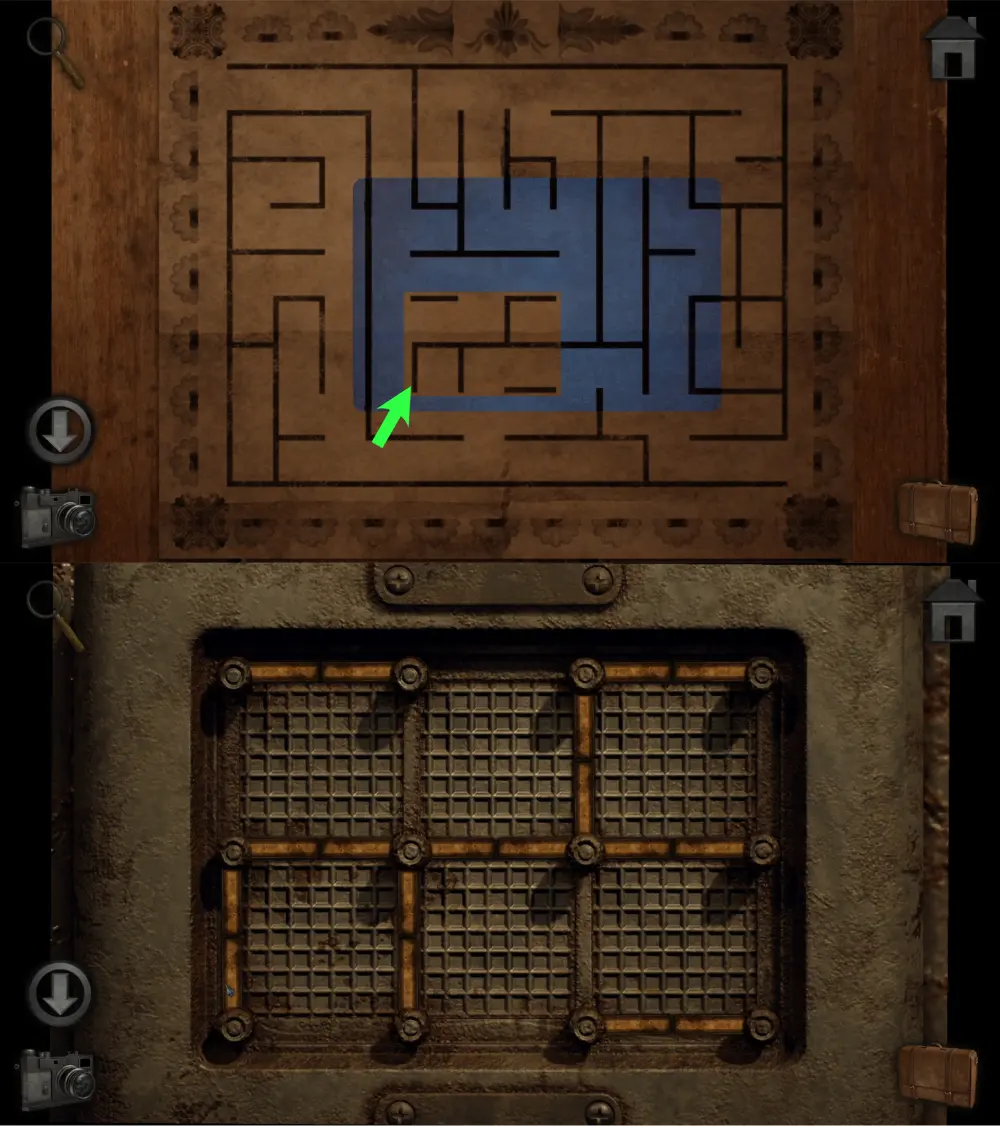
Go to the room at the end of the left path and inspect the maze at the desk. Take out the blue card and position it so that it lines up with the maze. Take a picture of it as this is a clue for the puzzle at the locked unit at Storage 2. Align the bars in the same pattern as the highlighted area in the maze by dragging them to rotate them.
The solution should look like this:
Once the storage unit is unlocked, take the screwdriver inside it.
Go to the electrical box on the left path next to the dark area and use the screwdriver to open it. Place your torch at the bottom and pull the lever to ignite it before taking it. You can now use this torch in the dark area to explore it.

After moving 2 steps forward, you will encounter a forked path. Go to the left path first and take the rope. Afterward, go to the right and use your crowbar on the planks blocking the door to open it.
Inside the Explosives Room, there is a high-explosive box on the left that you need to unlock but you’ll have to come back for it once you’ve obtained the missing pieces for it. Approach the shelf at the back of the room and take a picture of the small shield emblem as it is a clue for another puzzle.
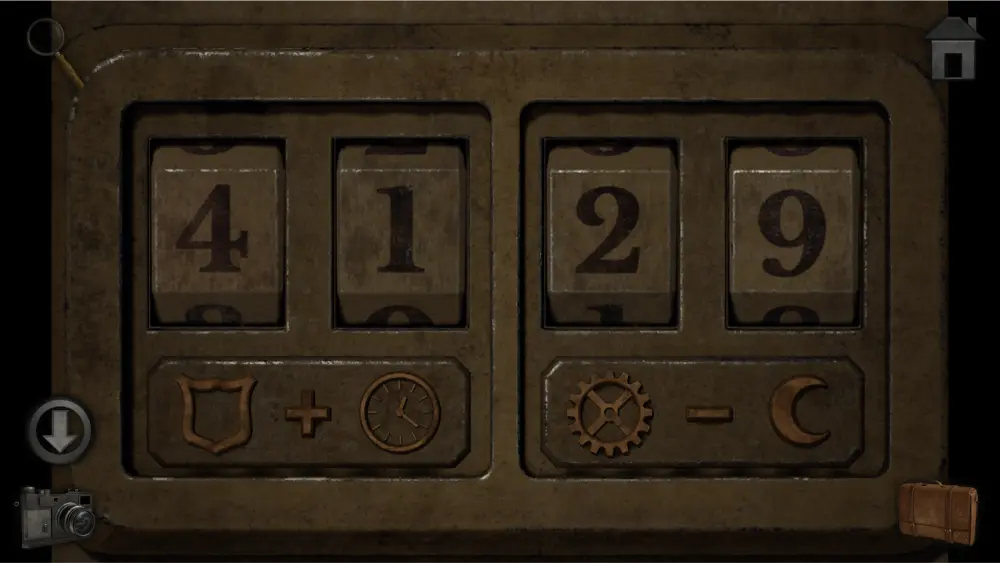
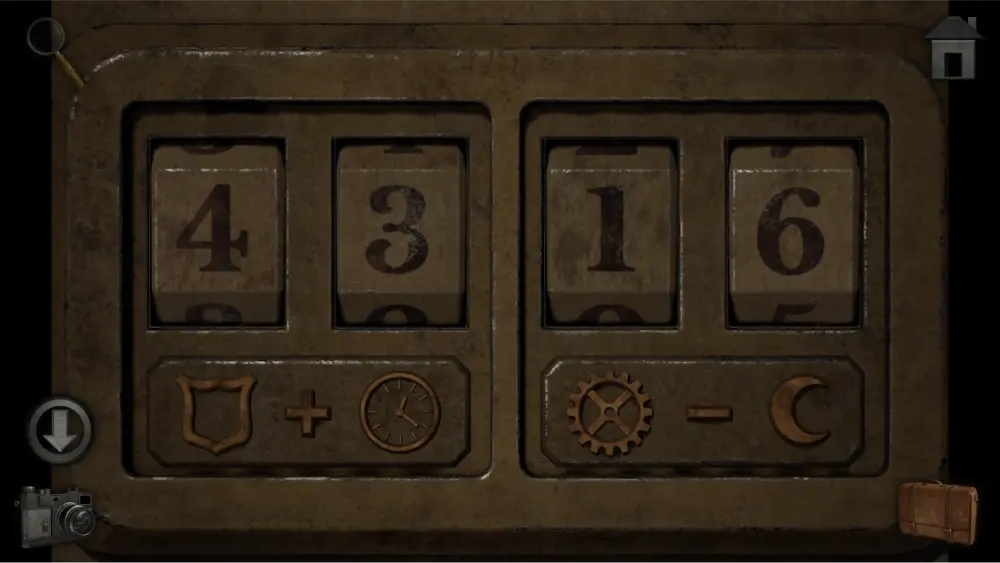
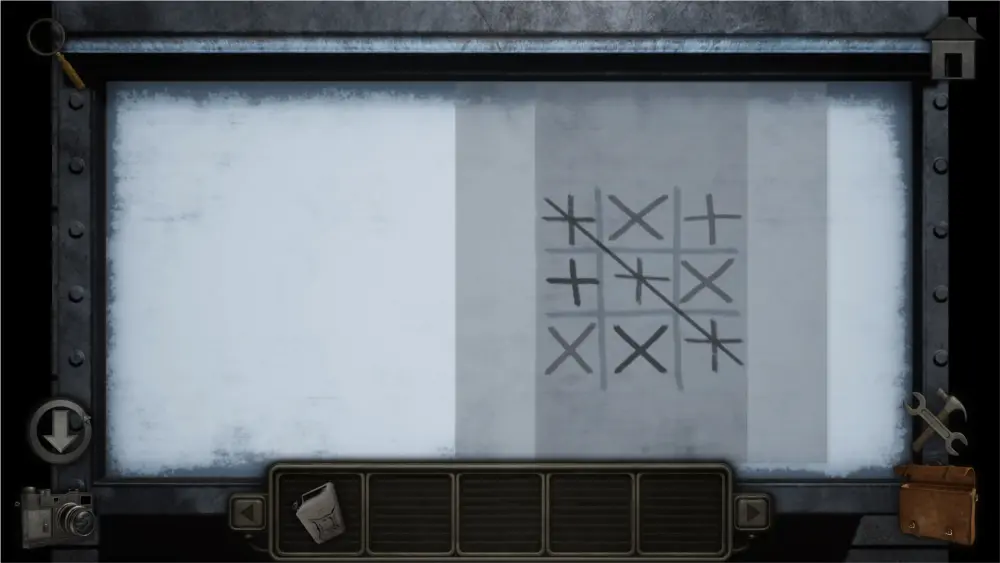
Go back to the area where the electrical box is, go to the room on the left side, and approach the gray metal locker to the right. At this time, if you’ve followed the walkthrough to the letter and taken pictures of the shield at the explosive room, the clock in the trapdoor, the gear by the right path, the Babylonian Numerals, and the moon chart in the wooden room, you’ll have all the clues you need to solve the puzzle for the locker. Each clue represents a number that will be part of the equation that will reveal the number code.
For the first two numbers, which have the shield + clock as their clue, you have the shield with the number “33” and the clock which is positioned at “10” o’clock. Adding “33” and “10” will give you “43.”
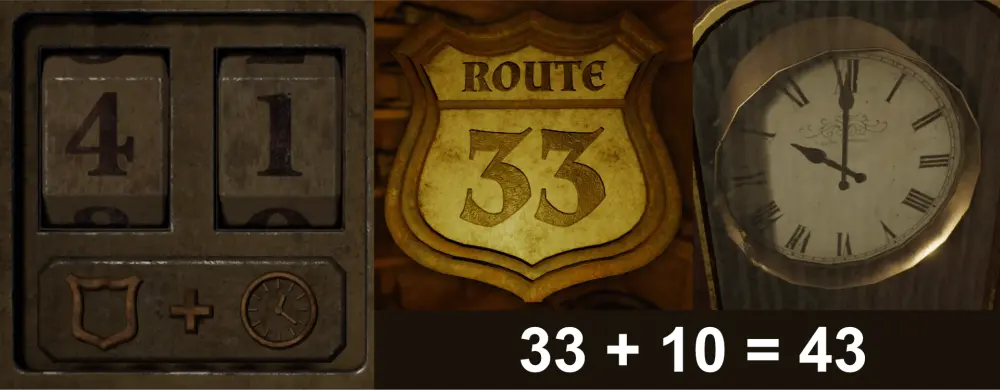
For the last two numbers, which have the gear – moon as its clue, you have to first calculate the number on the gear. Using the Babylonian Numerals, the symbols on the gear translate to “18 + 5” which is equal to “23.” As for the moon, since the symbol is a waning crescent, take the number that is similar to the symbol which is “7” Subtracting the two numbers, you’ll get “16.”

The solution should look like this:
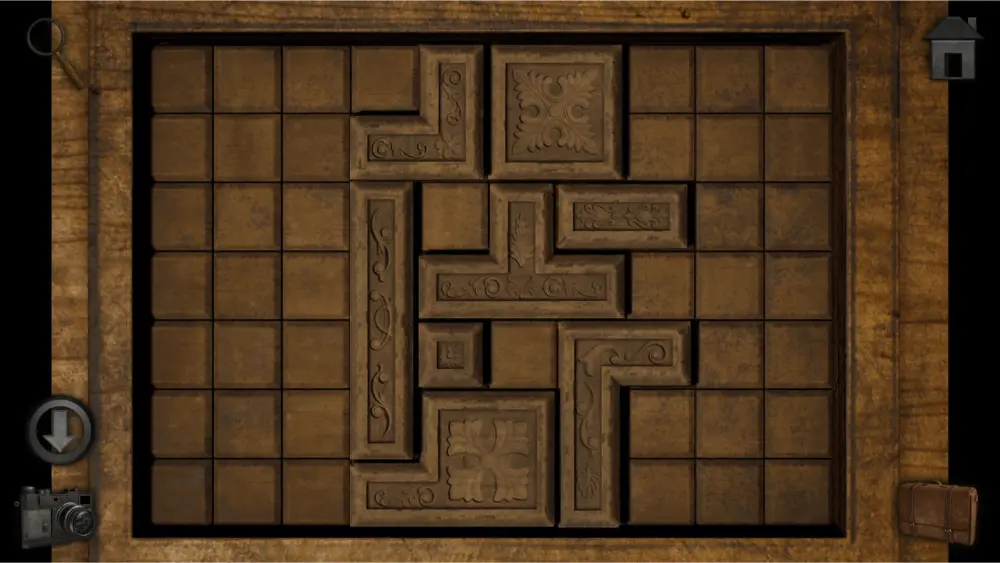
Upon opening the locker, take the wooden pieces from the top shelf and go back to the explosive room. These are the missing pieces for the high explosive crate and by placing them there, you’ll now be able to solve it. The goal is to place all the pieces in the black squares.
The solution should look like this:
Once opened, take the barrel of TNT and go back to the right path where the stone blocks are. Place the TNT in front of it along with the rope and take one step backward. Use the torch on the rope’s end to ignite it and destroy the stone blocks.
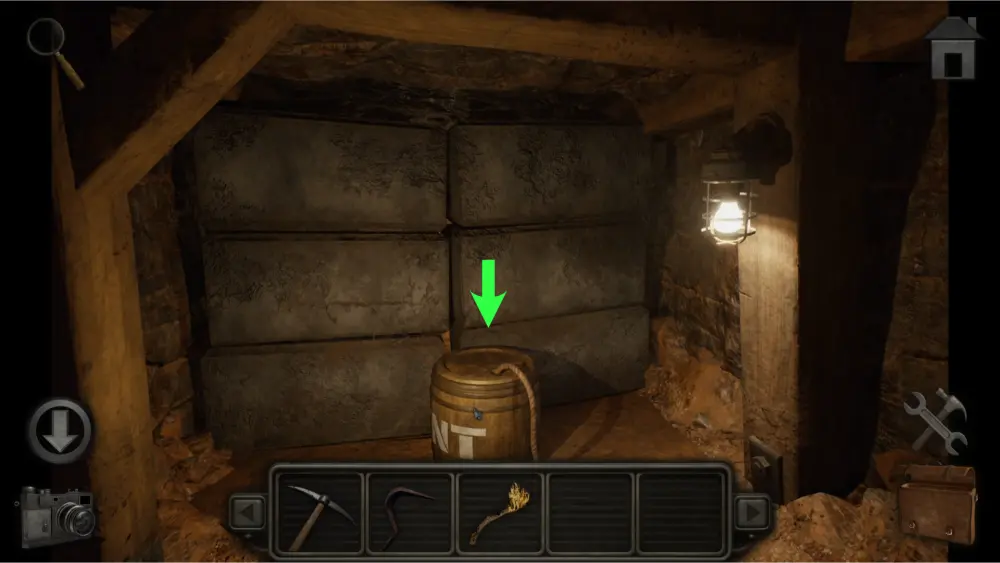
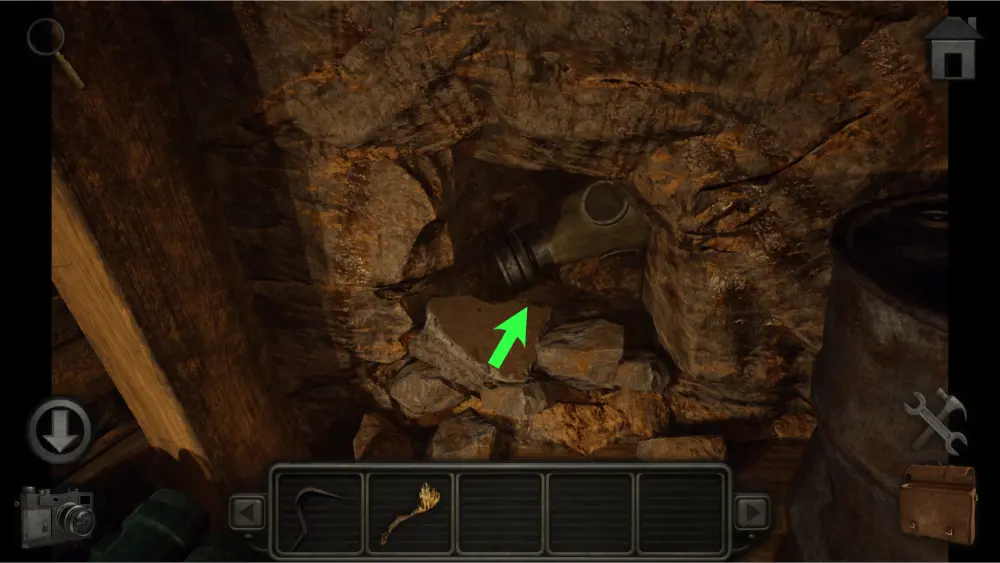
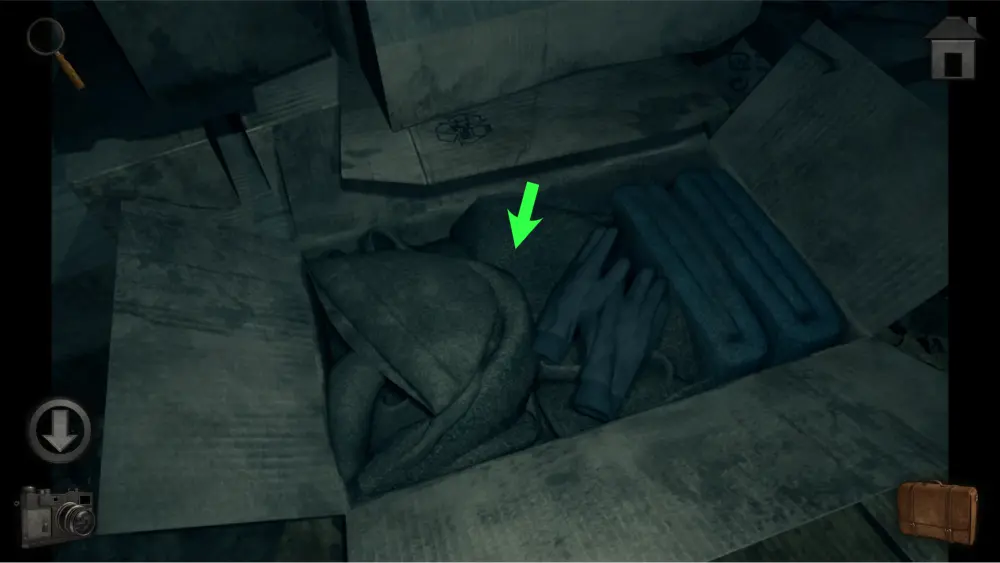
The path that has opened will lead you to a new room. Move forward three times, use the pickaxe on the stones on the wall two times, and take the gas mask.
Go to the area with the noxious green gas. Use the gas mask on the area so that you can pass through. Move two steps forward and you’ll reach a new area. The mines will no longer be accessible at this point.
Opening the Sliding Door
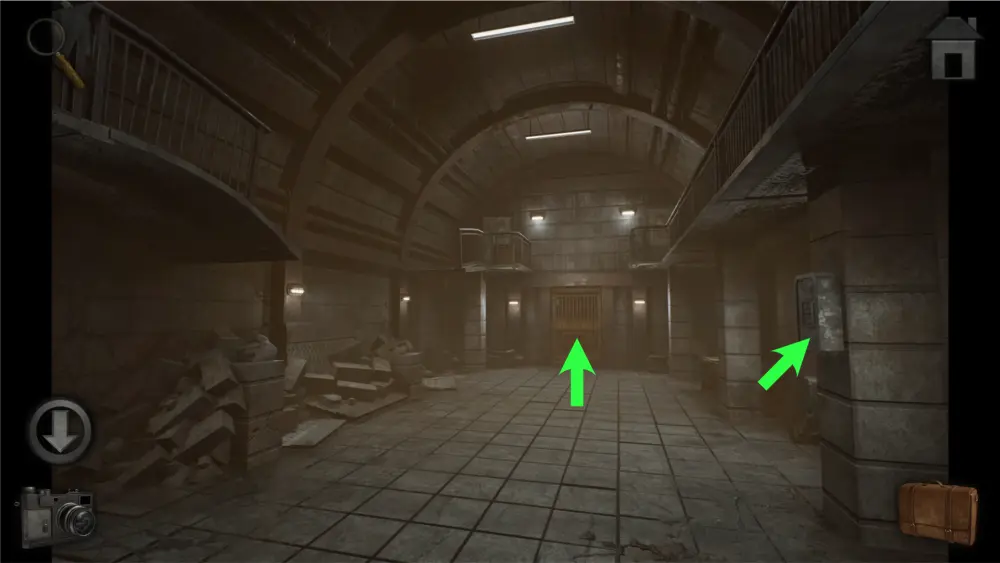
Move 1 step forward and you’ll see a large metal door to the left with a 4×3 grid of buttons. At this time, it is not possible to solve the puzzle because you need to find a clue for it elsewhere first.
Move 1 more step forward and you’ll find a room to the right of the staircase. Once inside, take the wood saw from the board in the back of the room. There is also a wrench inside a locked shelf to the right.
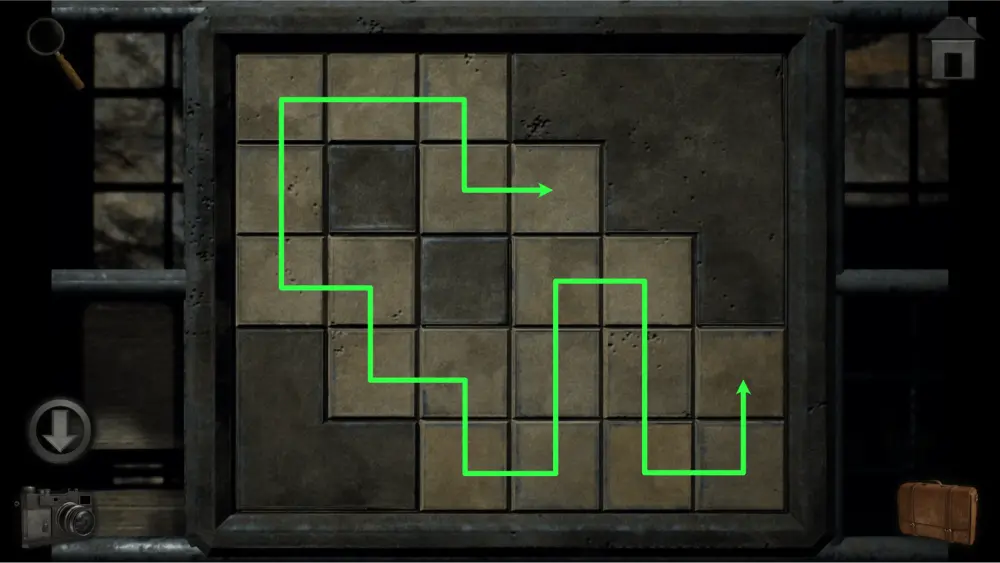
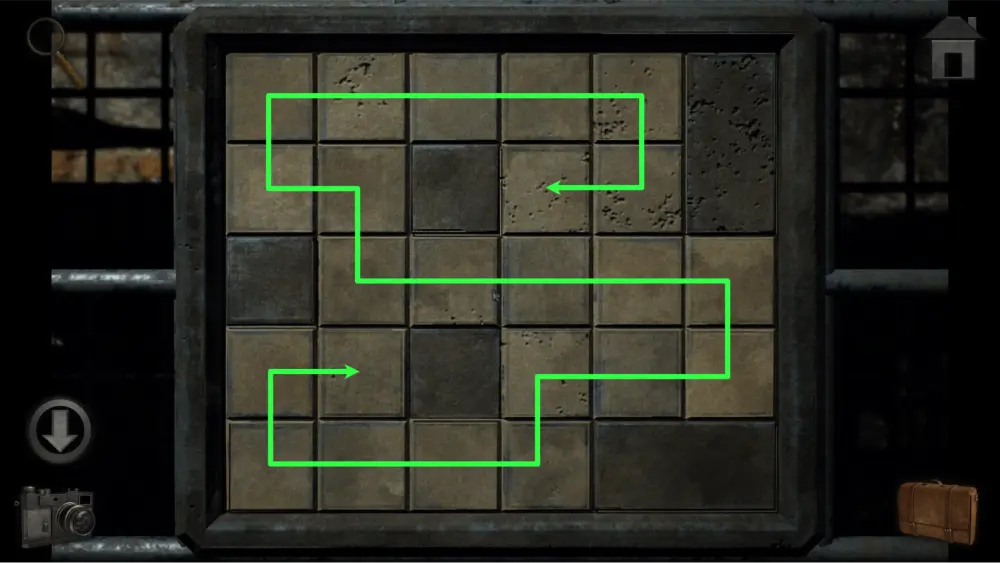
This shelf has three puzzles that need to be solved before it can be opened. These three puzzles require you to press and drag through all squares, darkening them, without going over another square twice. Squares that are already darkened cannot be passed through. There are no clues in the game that will help you solve it. You have to find the solution through trial and error.
There are possibly multiple ways to solve it but to make things simple, we’re showing the solutions we came up with below:
Puzzle 1:
Puzzle 2:
Puzzle 3:
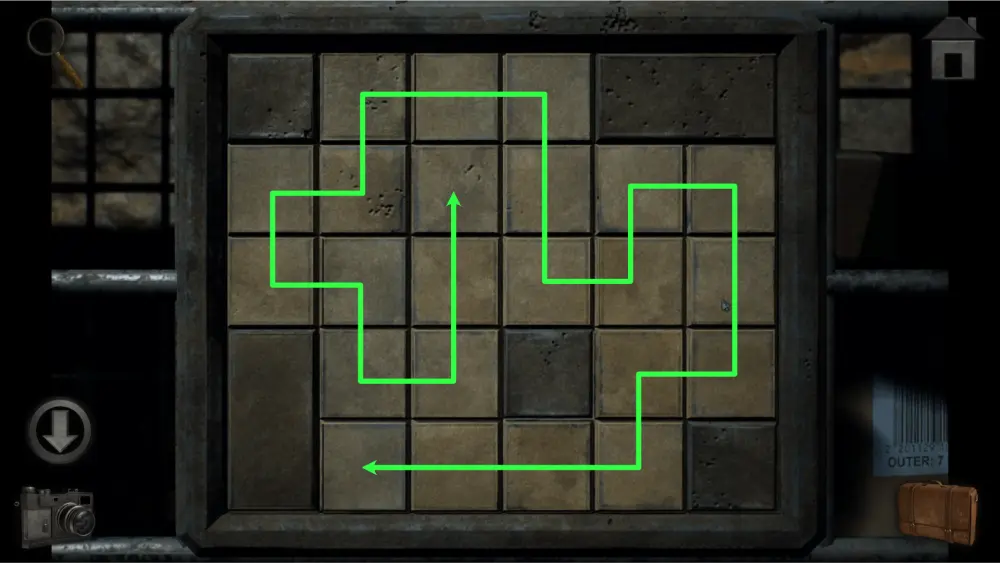
Once the puzzles are solved, take the wrench inside.
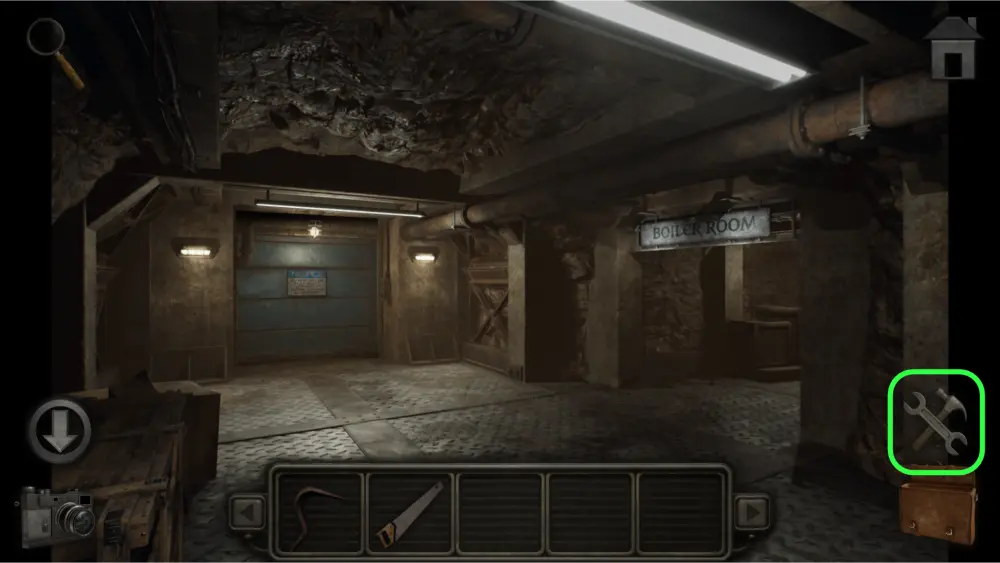
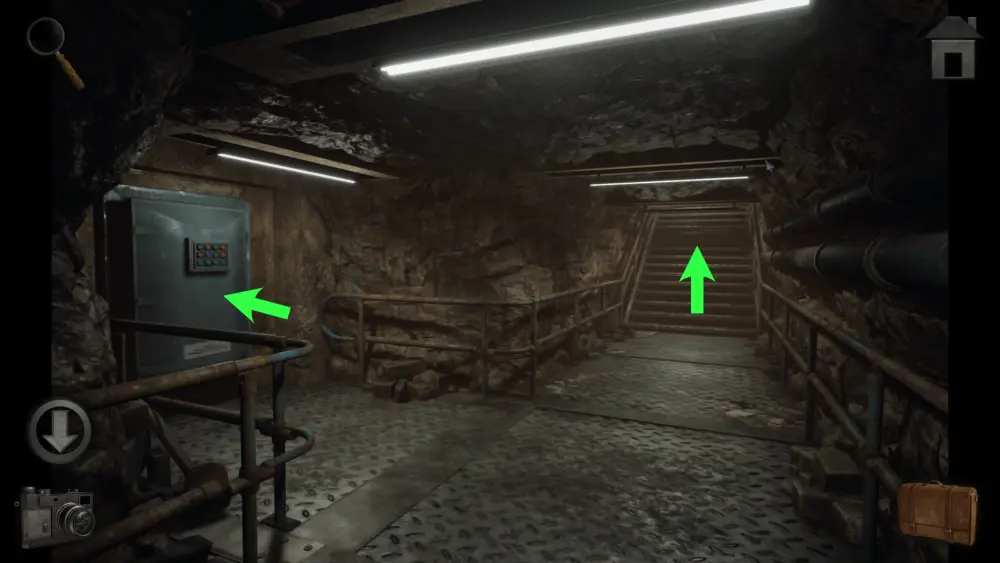
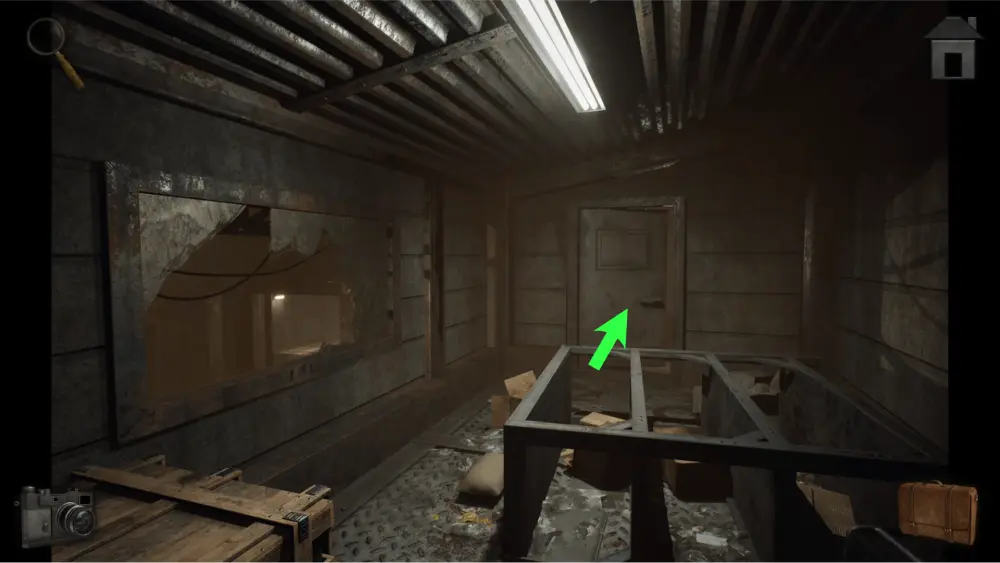
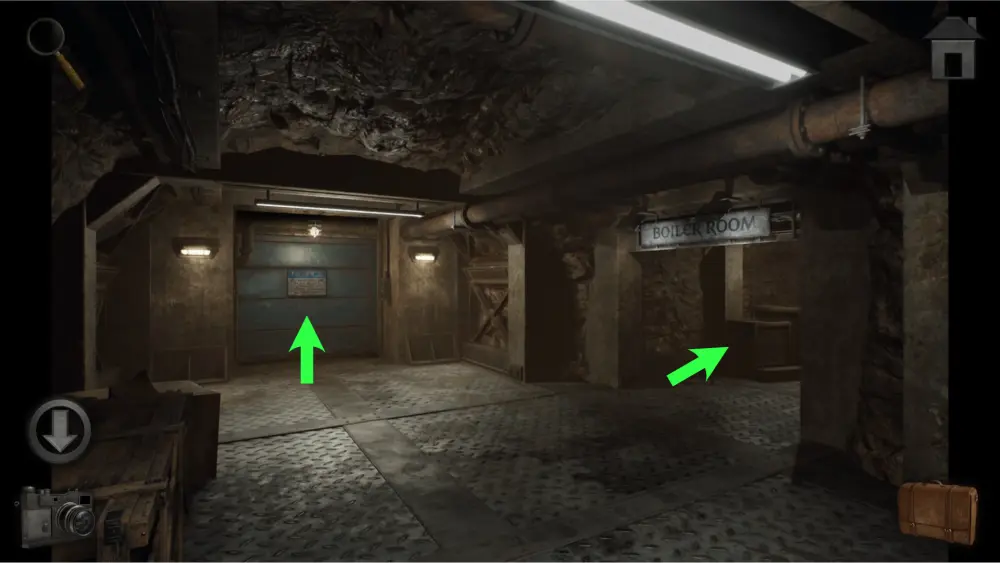
Leave the area and go upstairs. To the left is a metal sliding door with a notice that reads: “NOTICE: FLOW PRESSURE MUST BE SET CORRECTLY BEFORE OPENING SLIDING DOOR.” You’ll need to adjust the pressure room in the boiler room to the right first.

Inside the boiler room, there are three points of interest: the valves, the broken pipe, and the wooden drawer. Approach the broken pipe first and use the wrench to remove it. Take the ornamental key that you find inside it.
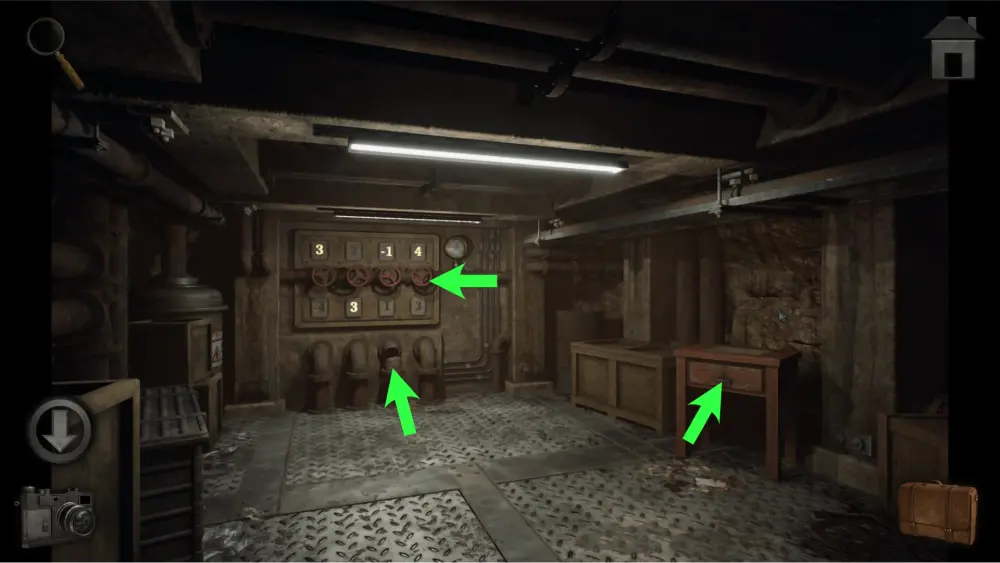
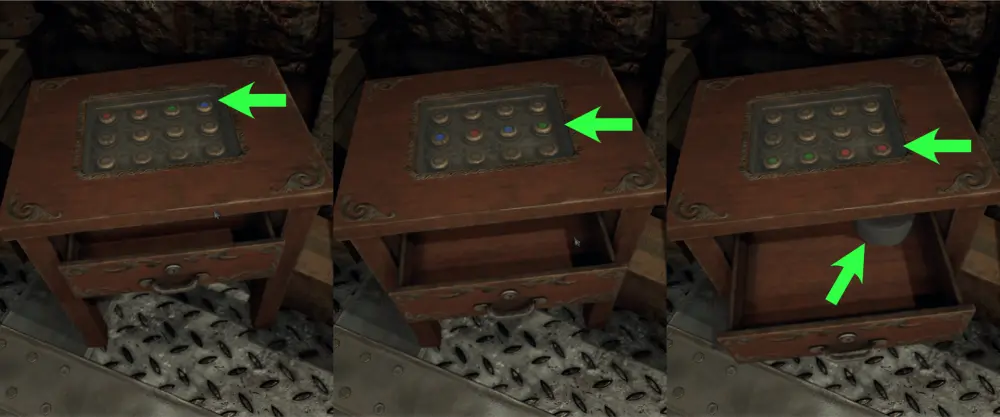
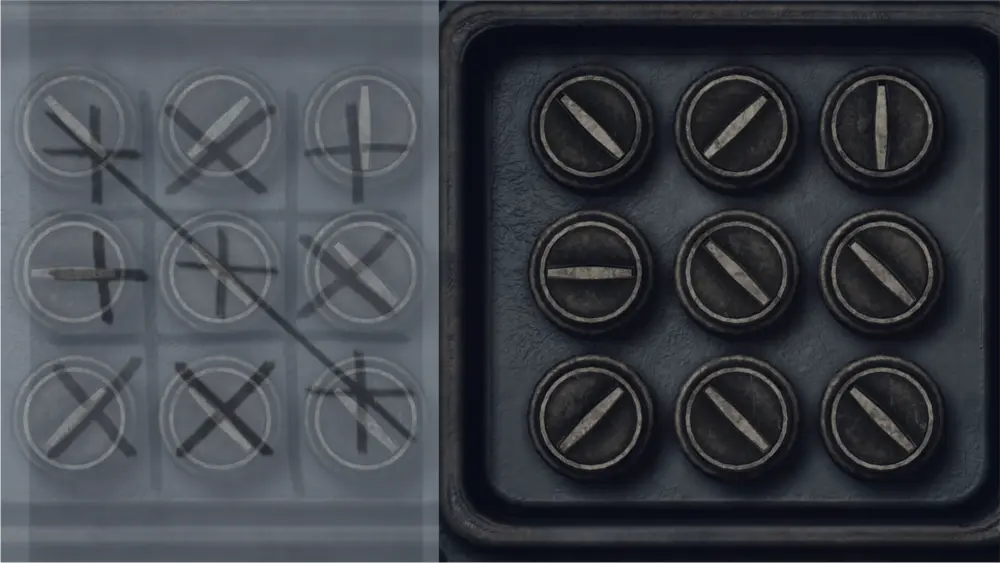
Approach the wooden drawer and use the key on it. Unlike other unlockable items in the game, you’ll have to slide the drawer downwards to open it. When you do, you’ll notice that the dials above it will start changing color depending on the position of the drawer. Take note of these colors as they are the solution for the blue metal box you saw before. Don’t forget to take the duct tape inside the drawer!
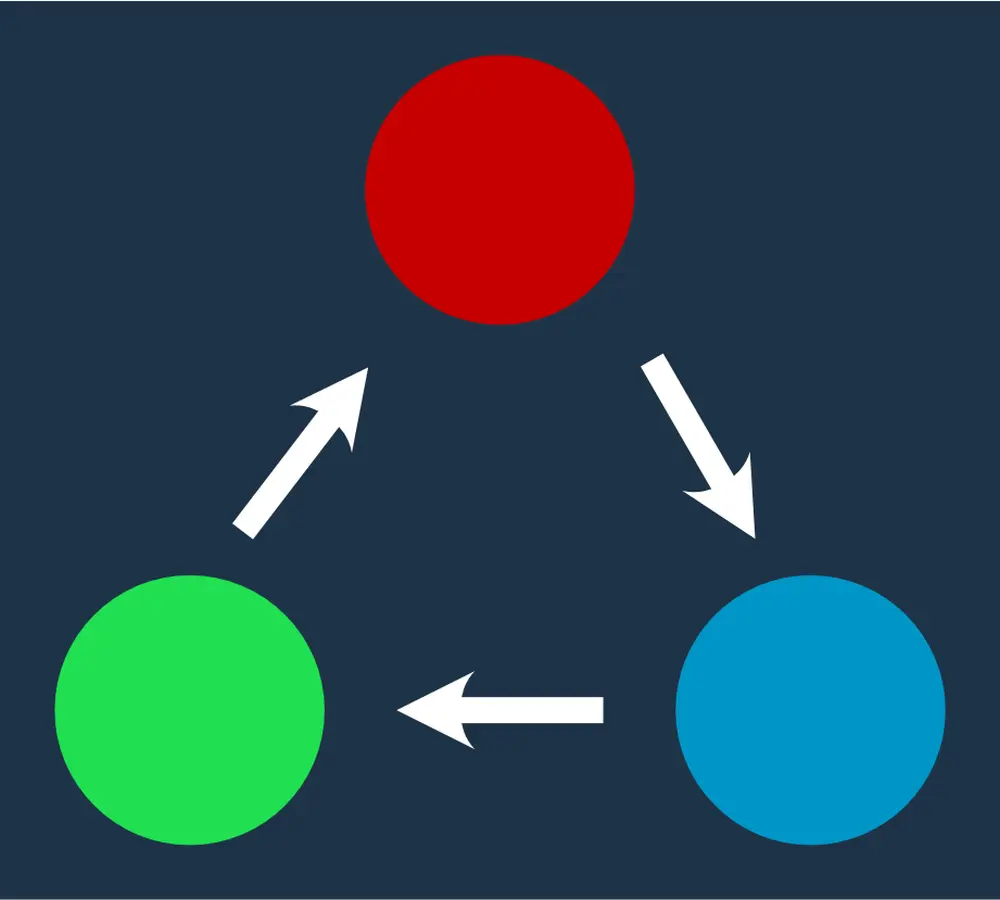
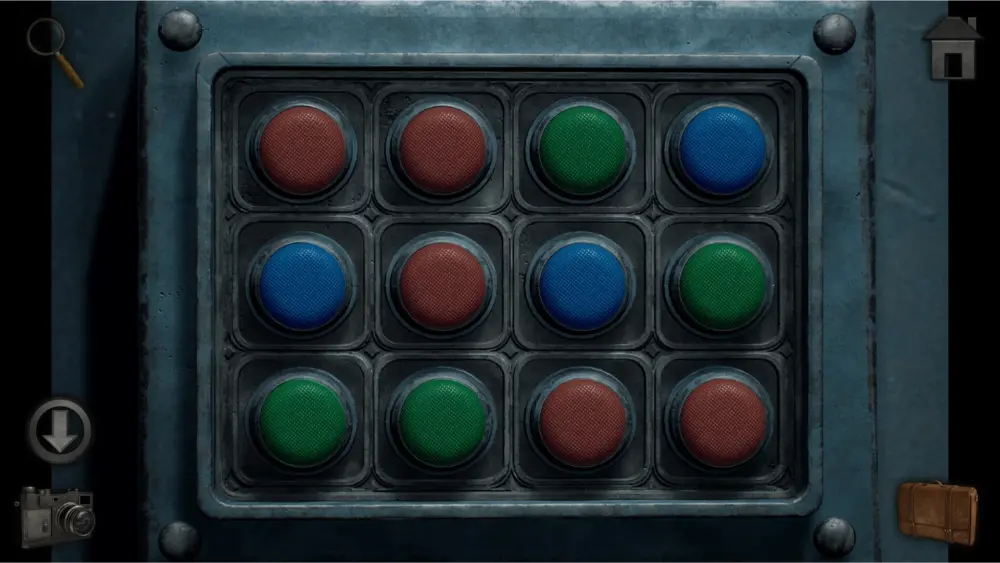
The valves won’t work without a replacement for the pipe. For now, go back to the metal door near the start of the map and change the colors of the buttons to match the colors of the dials from the wooden drawer. Pressing a button will change it to a different color. Green turns to red, red turns to blue and blue turns to green.
The solution should look like this:
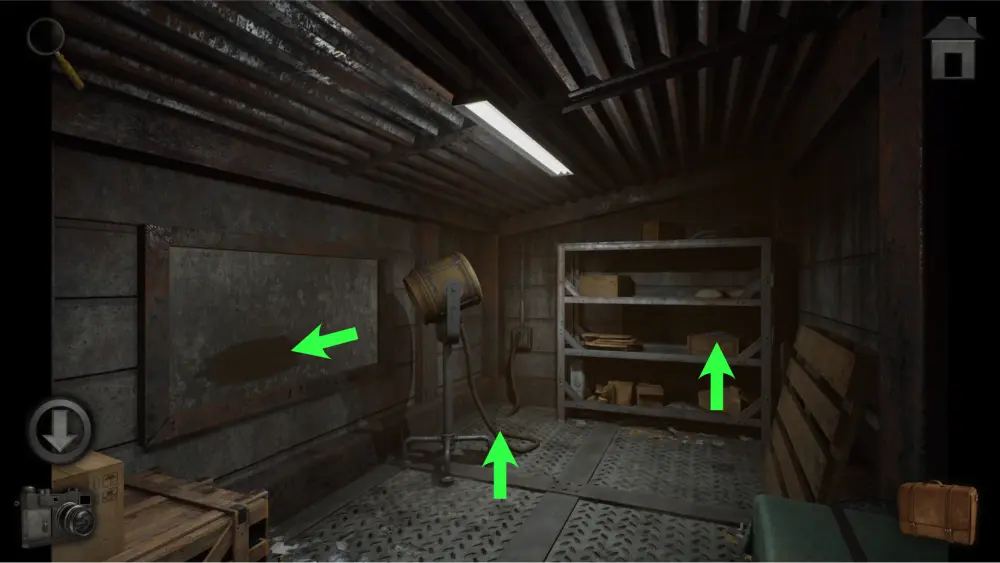
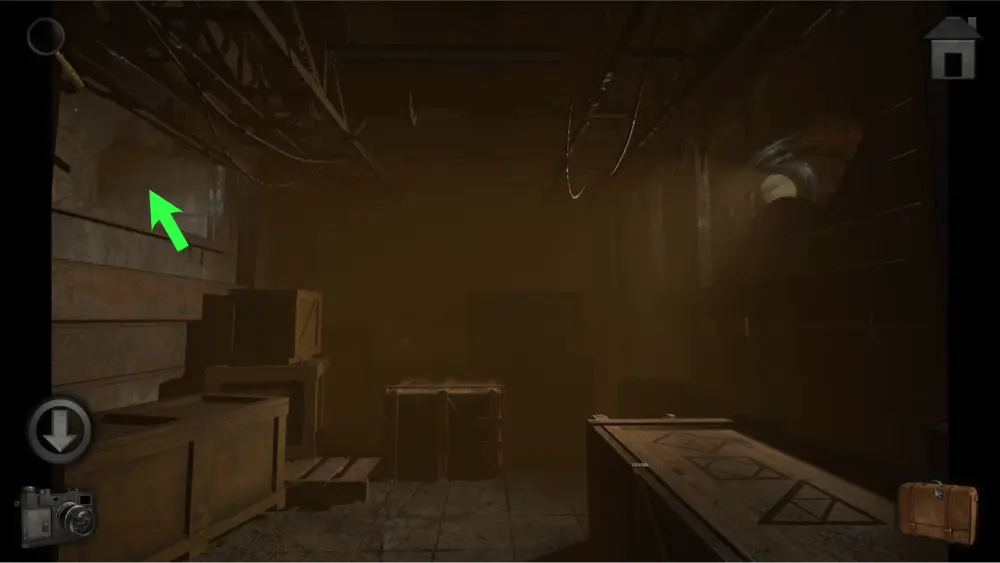
Entering the room, you’ll find three points of interest: the broken path, the ladder, and the room to the right.

Go to the broken path and take the old rag resting on the handle.
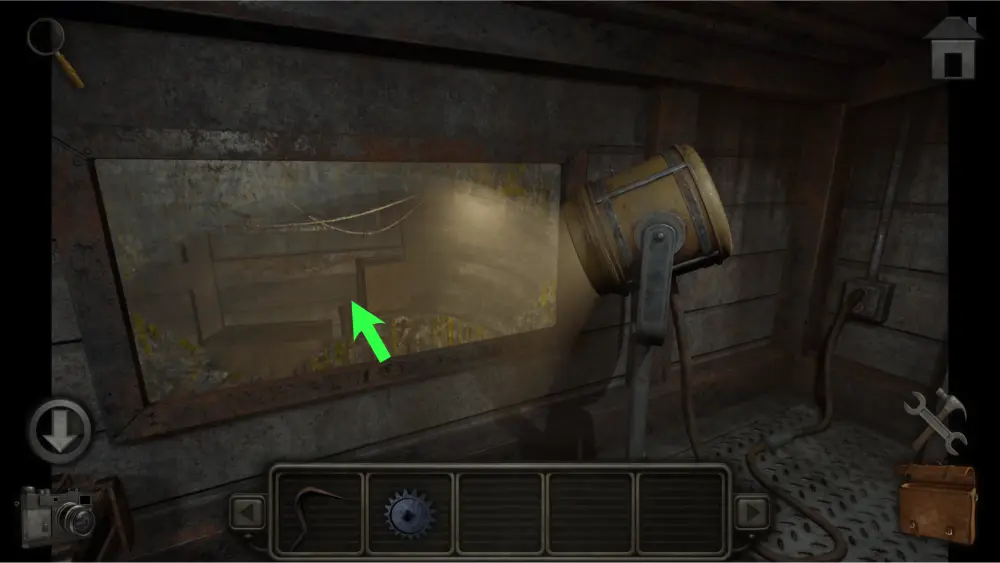
Go to the right room and upon entering you’ll find three points of interest: the dirty window, the broken cable, and the shelf.
Take the small blue gear from the shelf. This is a missing piece for a future puzzle.
Use duct tape on the broken cable. This will get the spotlight to work again.
For the dirty window, you’ll need your old rag and a cleaning solution for it so you’ll have to come back later.
Go down the ladder and you’ll find a box with a puzzle to the right and a door to the back of the room. You’ll need to find a clue for the box puzzle first to solve it so you’ll have to come back to it later. Approach the door for now and use your wood saw on the plank that is blocking it so you can enter it.
Inside, the room is engulfed in darkness and the crate to the right is the only thing that is illuminated thanks to the spotlight you fixed earlier. Take a picture of the patterns on that crate as it is a clue to solve the box puzzle in the previous room.
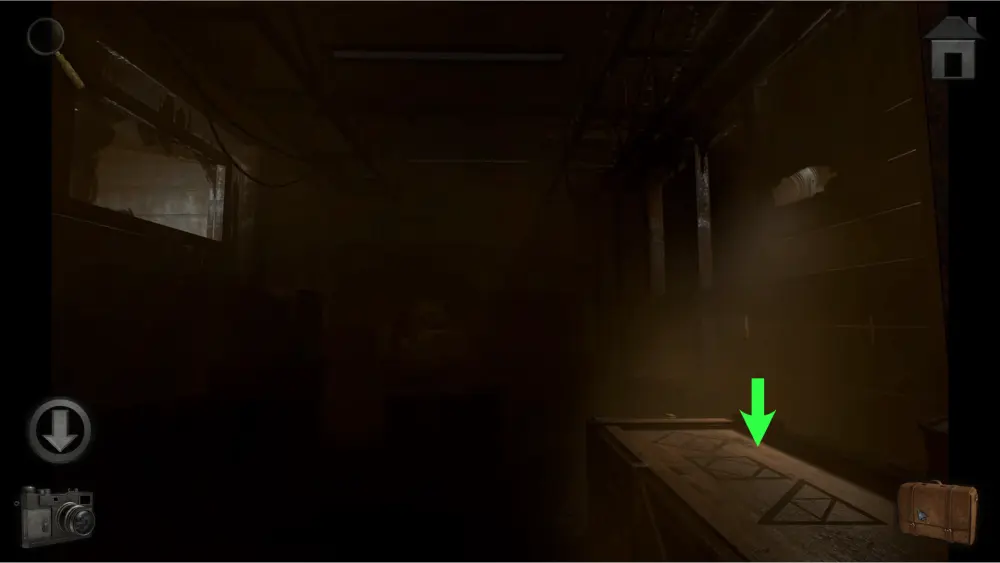
To solve the box puzzle, you’ll have to copy the patterns on the crate and illustrate them on the lock together.
The solution should look like this:
Once the puzzle is solved and the box is opened, take the cleaning solution inside of it. Go back up the ladder and into the right room. Use the cleaning solution on the window first then use the old rag to clean it and shine more light on the room below.
Go back to the room below and approach the broken window to the left. You’ll be able to enter the left room this way.
Inside the left room, there isn’t anything worth taking. Exit the left room through the door. You’ll find a pipe sitting on a wooden crate that you can take. This can be used in place of the broken pipe in the boiler room.
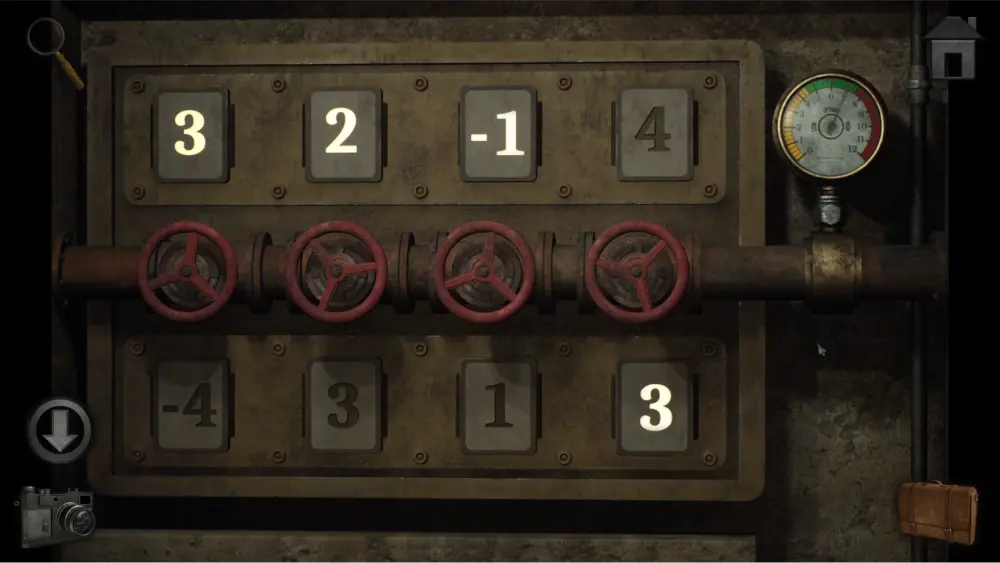
Go back to the boiler room and place the new pipe piece in the empty slot. After that, approach the valves and adjust the numbers so that the total would sit comfortably in the green zone which is 5 to 7. Adjusting just the second and fourth valves would be enough to get the right pressure.
The solution should look like this:
Go to the sliding door and open it by pressing the green button. This will lead you to the underground roads. If you’ve followed the walkthrough to the letter and obtained every item that can be taken, there won’t be any need to come back to the previous area from here.
Leaving the Underground Roads
Upon opening the sliding door, you can go to the left or right side.
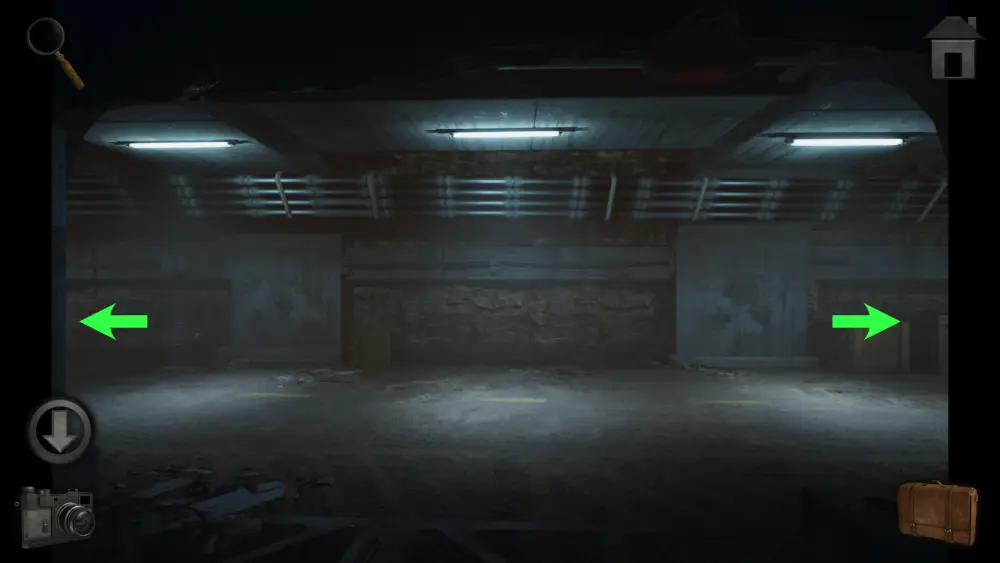
Go to the left side for now. Take one more step forward and you’ll encounter a forked road with a traffic light in the middle.
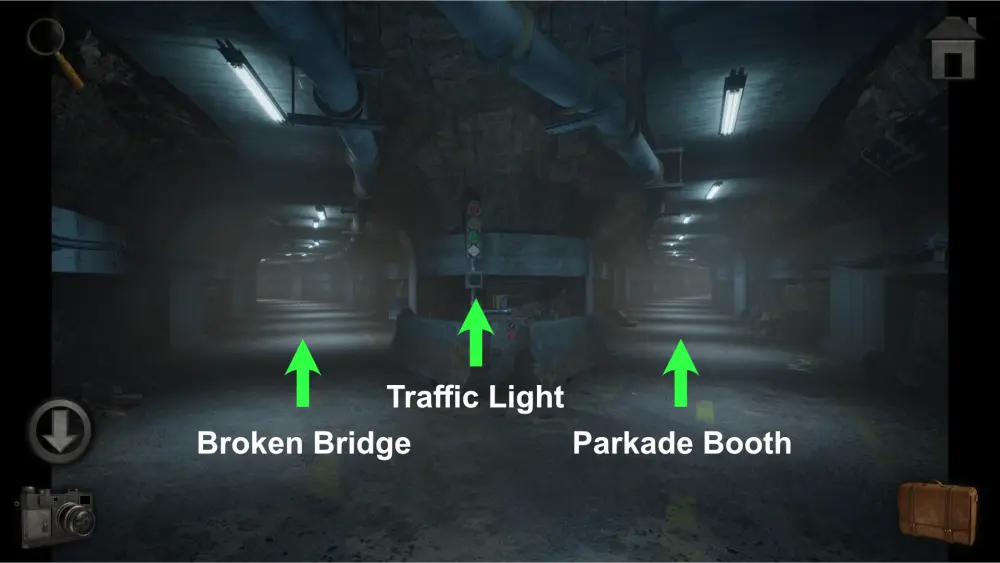
Take the right road for now. You’ll notice that there is oil pouring from a pipe. Remember this location as this will be important for another puzzle.
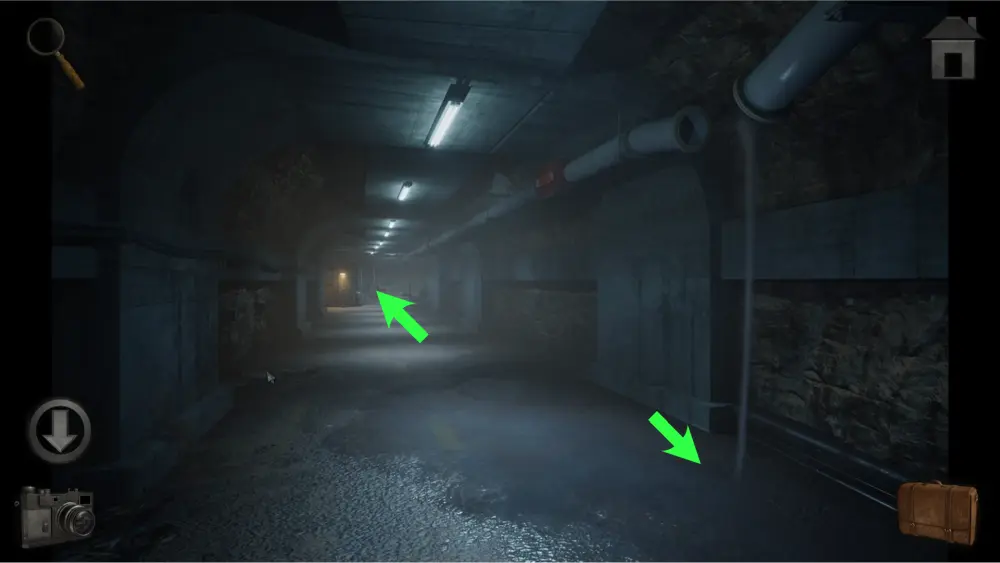
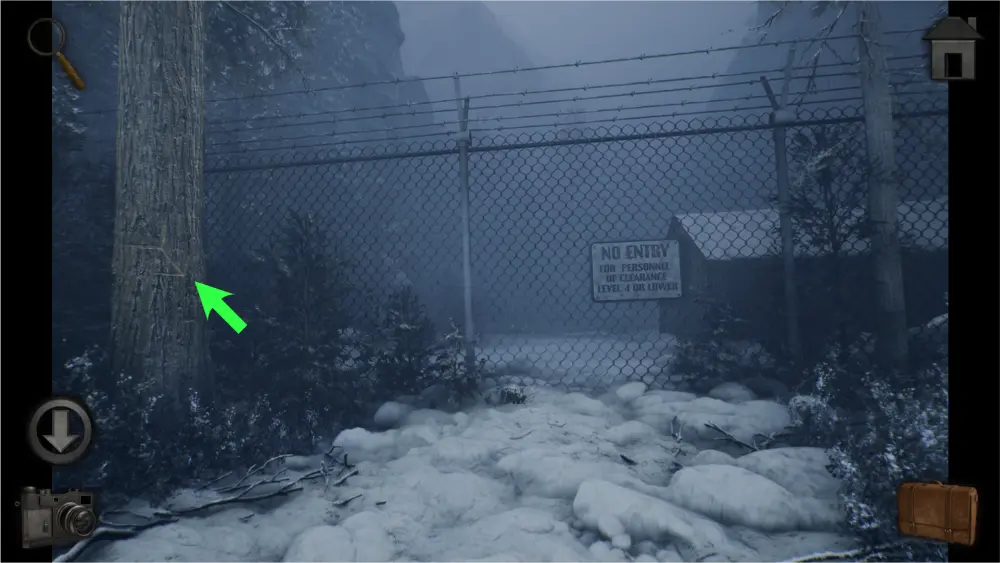
Move one more step forward and you’ll reach a parkade booth next to a wire mesh gate. Enter the guard house for now.
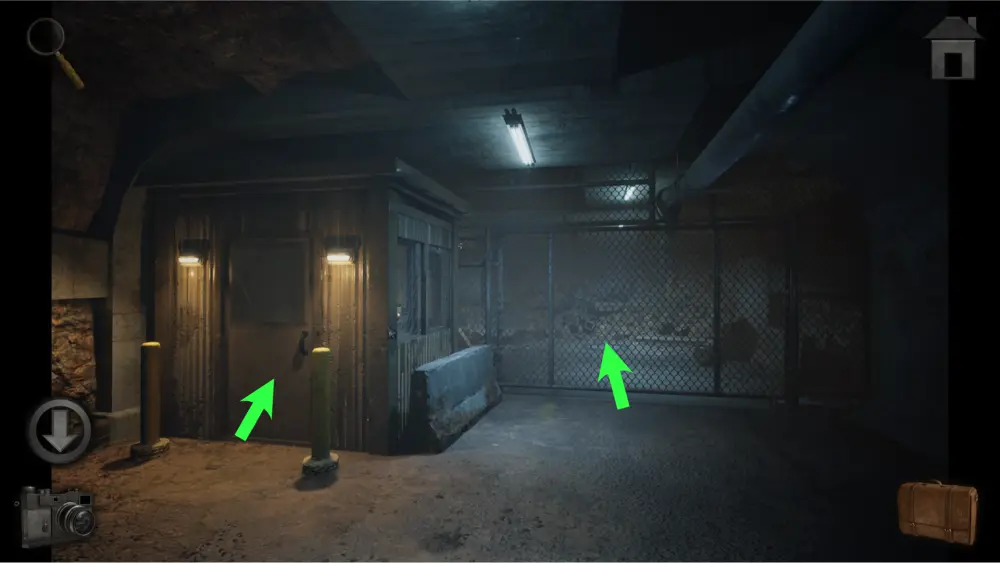
Inside, there is a box with gears that controls the wire mesh gate and a mechanism next to it that controls the traffic lights. The blue gear you picked up before is part of the gate controller’s puzzle, but you will need to collect 3 more gears for it. Approach the traffic light controller for now.
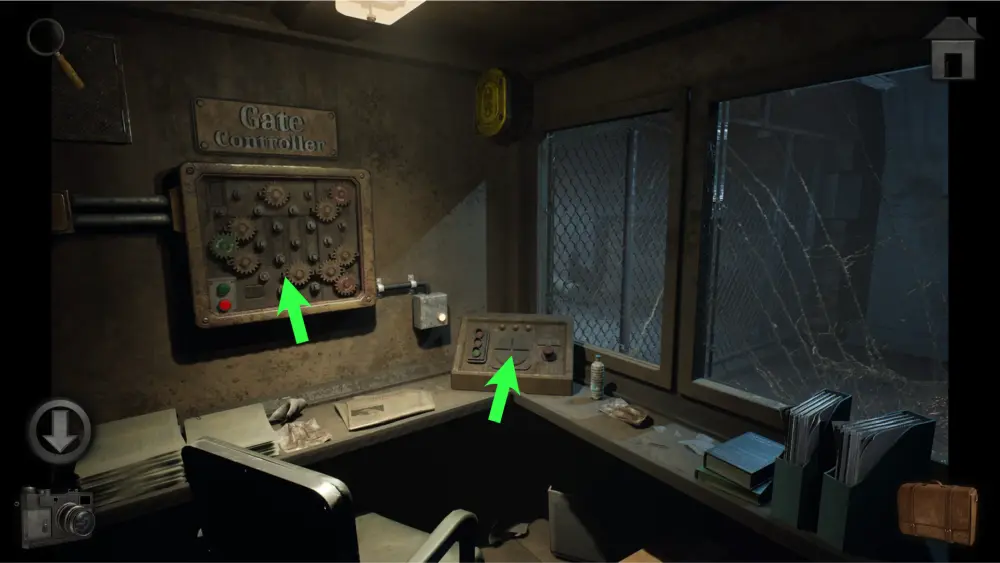
Upon pressing the sequence button, you will see the 4 buttons blink in a sequence. To solve this puzzle, you have to press the buttons in the same sequence. You’ll have to play the game 3 times until all lights above the buttons light up and make the traffic lights functional.
To make things simple, we’ve made a graph showing the sequence of each round of the puzzles:
Sequence 1:

Sequence 2:

Sequence 3:

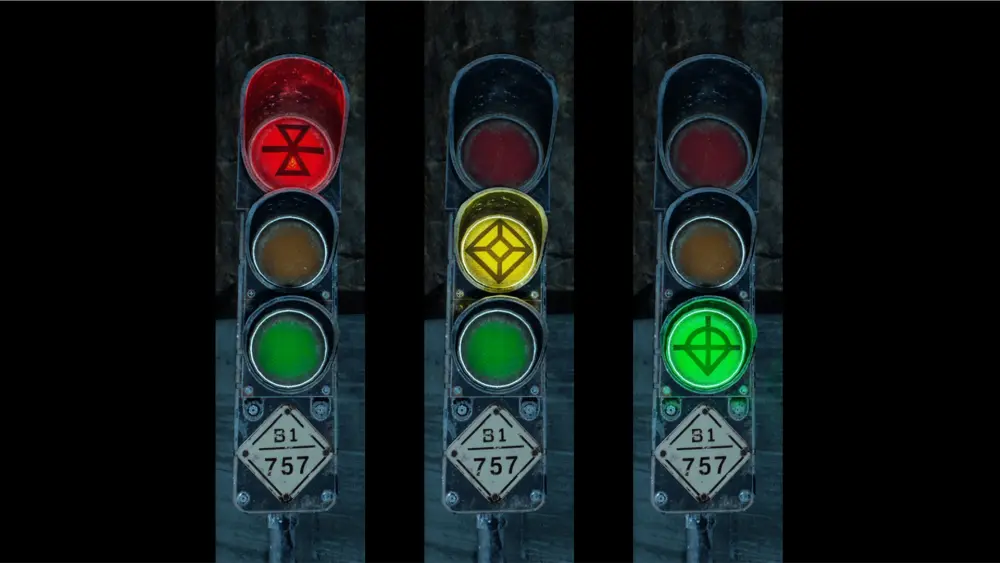
Inspect the traffic lights back at the forked road. You’ll notice that every time each light turns on, a pattern appears. Take a picture of each pattern as it will be important for another puzzle.
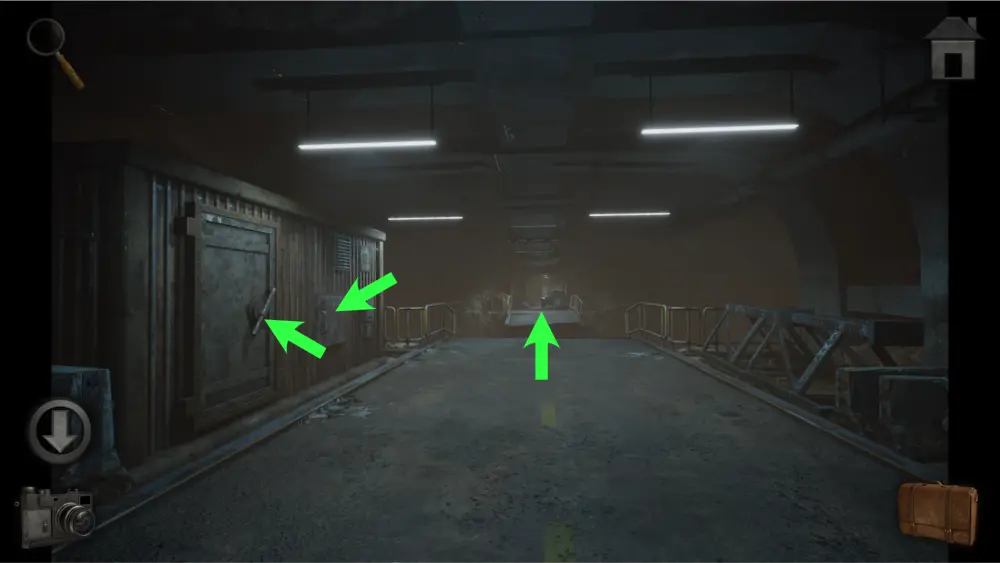
Go to the left road this time and take one more step forward after that. There isn’t much you can do here at this moment but it’s still worth visiting so you’ll know what you can find in this area later. There are three points of interest: the metal door, the metal hatch, and the collapsed bridge.
The metal door is stuck and cannot be opened. You’ll need to find oil to loosen it up.
The metal hatch needs a magnet to move the metal bar inside to unlock it.
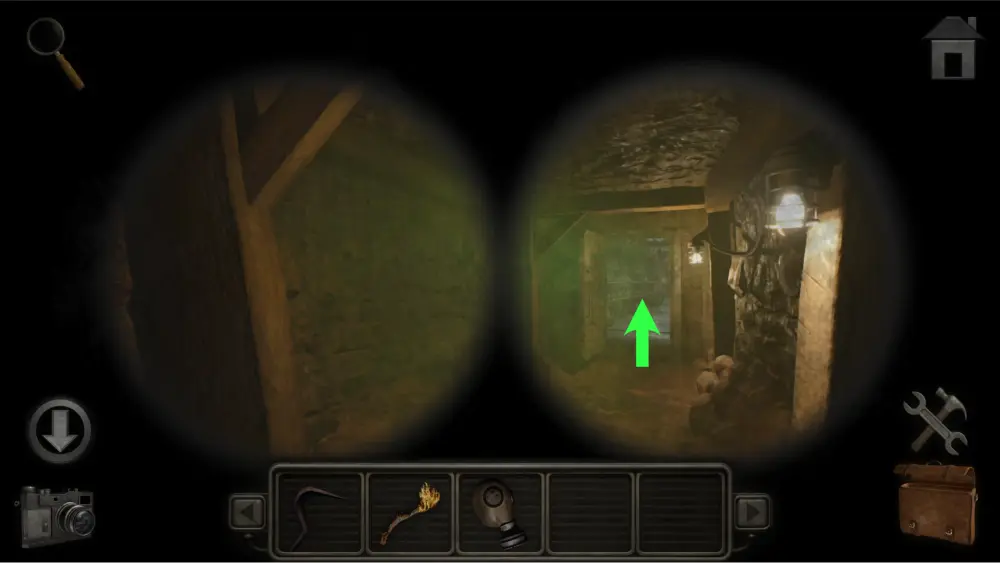
The broken bridge cannot be fixed or passed. Instead, the car on the other side contains a special clue that can only be seen by using a pair of binoculars.
Go back to where you started (after entering through the sliding door) and go to the right path this time. You’ll see a locked grilled box that needs a key to open. This is where you’ll get the binoculars but you’ll have to come back later once you’ve found the key.
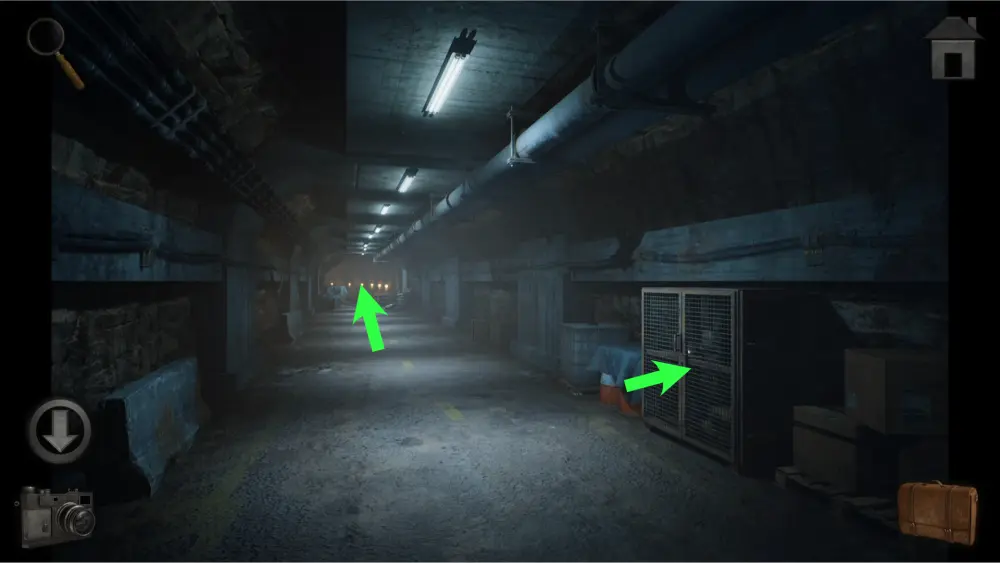
Move one step forward and you’ll see a mechanism on the wall to the left.
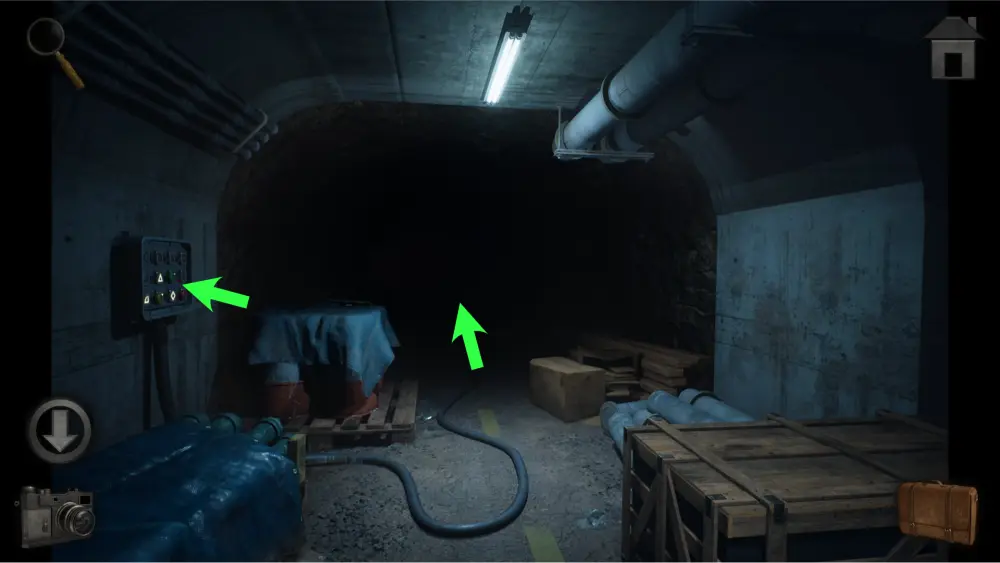
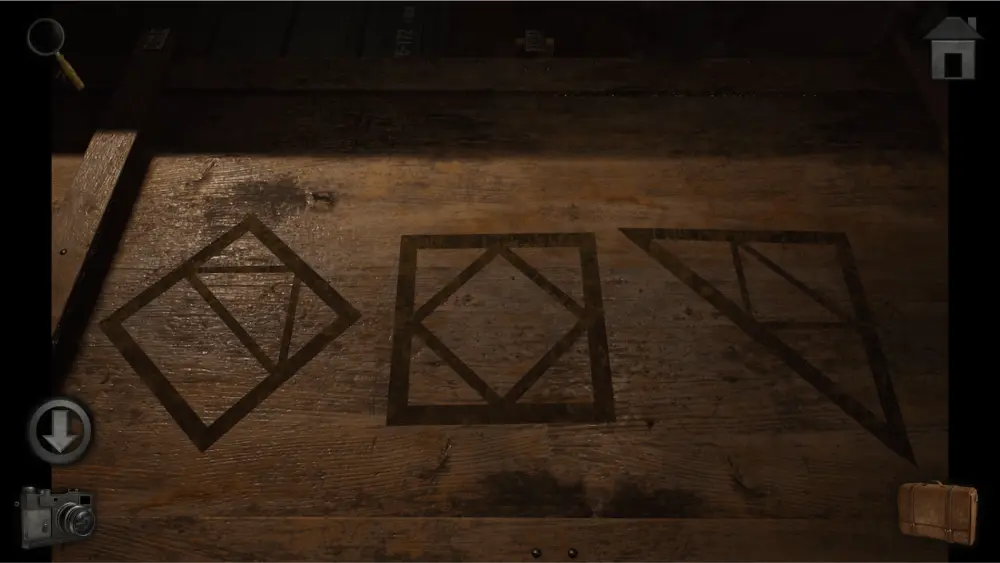
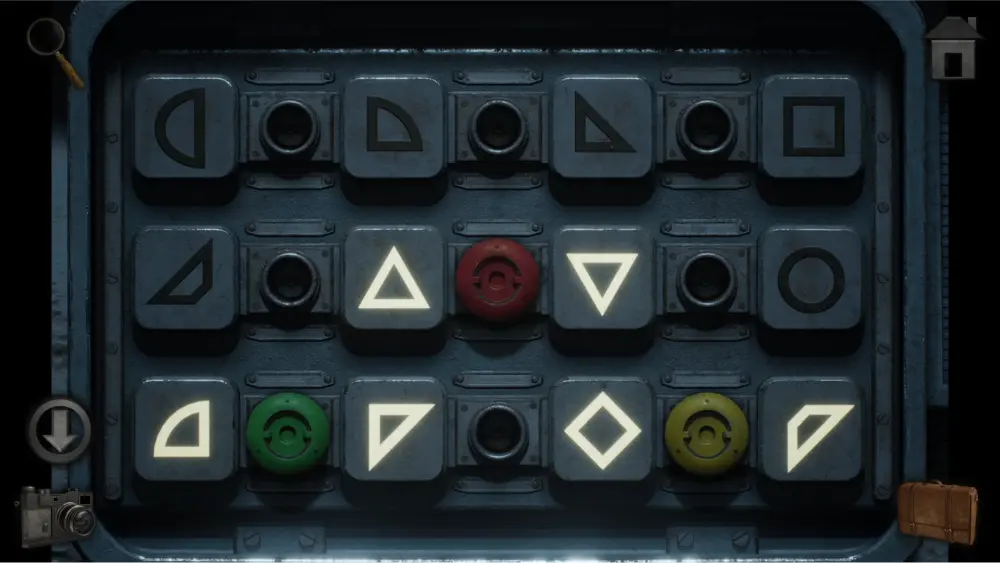
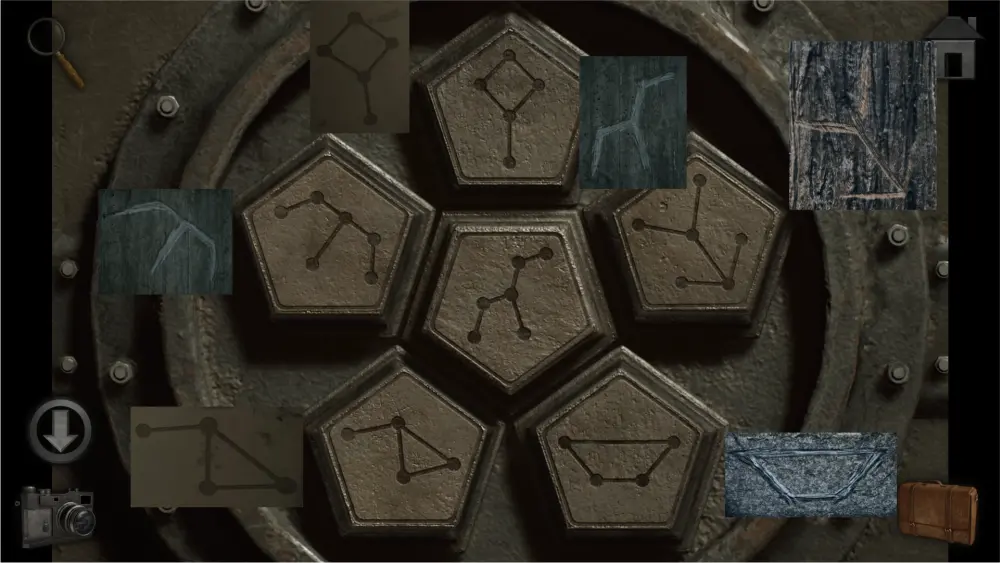
This mechanism is a puzzle that can be solved using the clues you got from the traffic light. The symbols that flashed show you the shapes that should be on the left and right sides of the colored metal knobs.
The red knob should be in between the two triangles at the center of the board.
The yellow knob should be in between the diamond and trapezoid at the lower right corner of the board.
The green knob should be in between the one-fourth circle and triangle at the lower left corner of the board.
The solution should look like this:
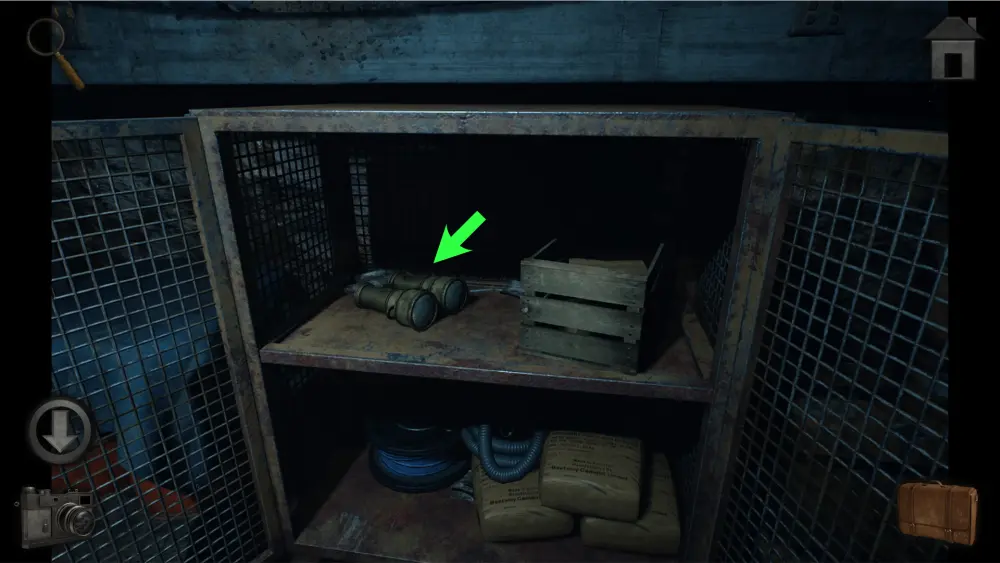
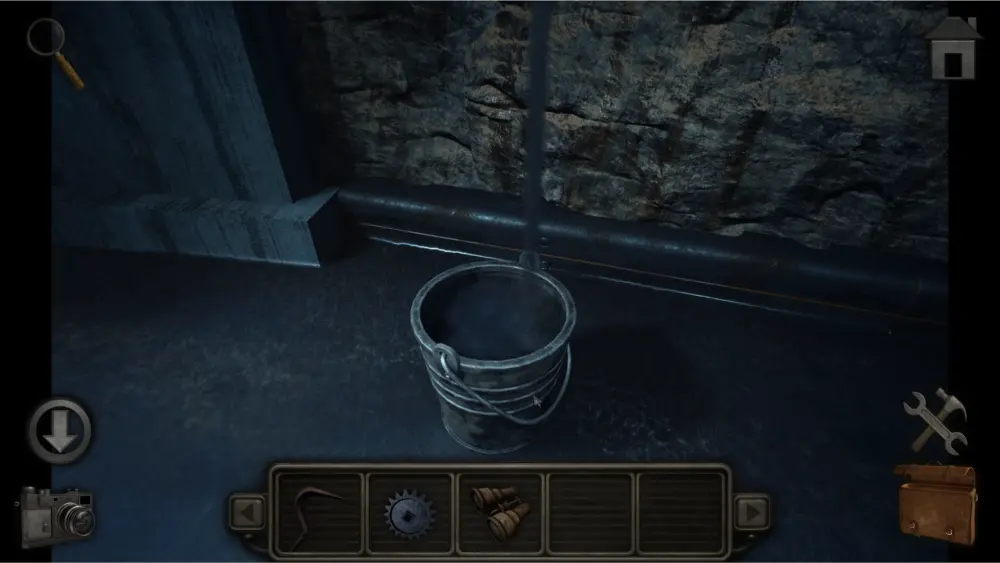
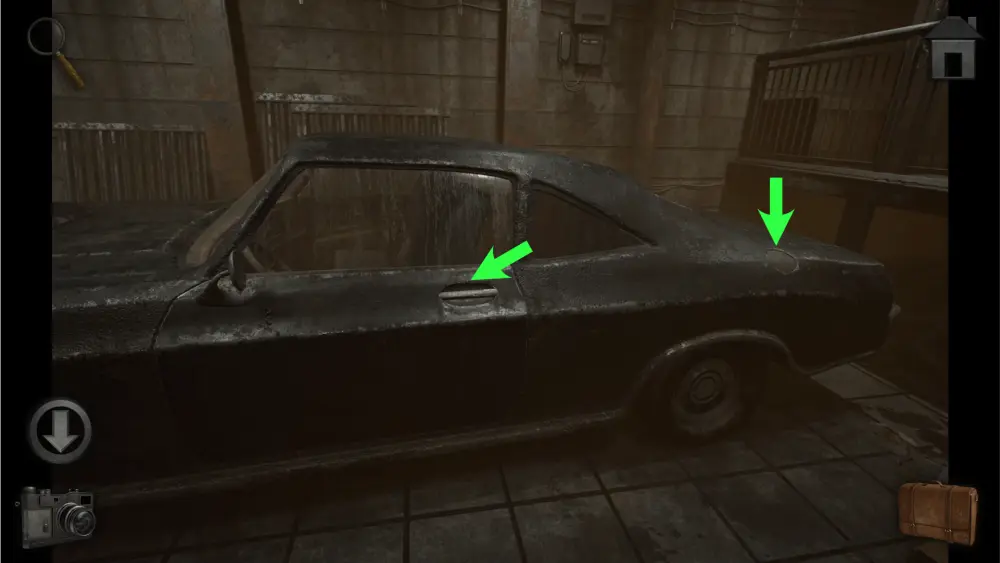
After solving the puzzle, it will light up the dark path. Move forward two times and you’ll find another dead end with an old vehicle used for excavating. Take the rusty bucket and approach the vehicle.
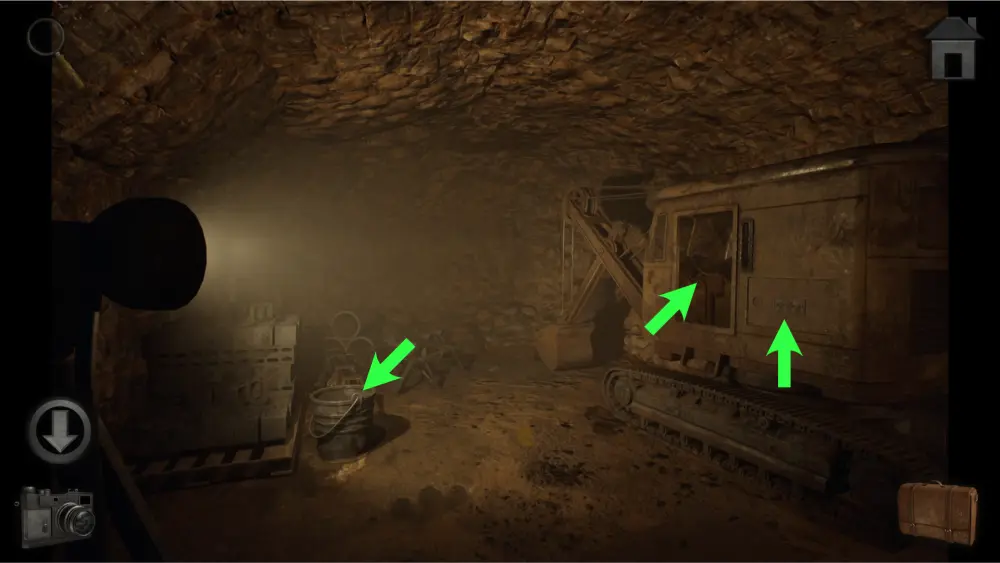
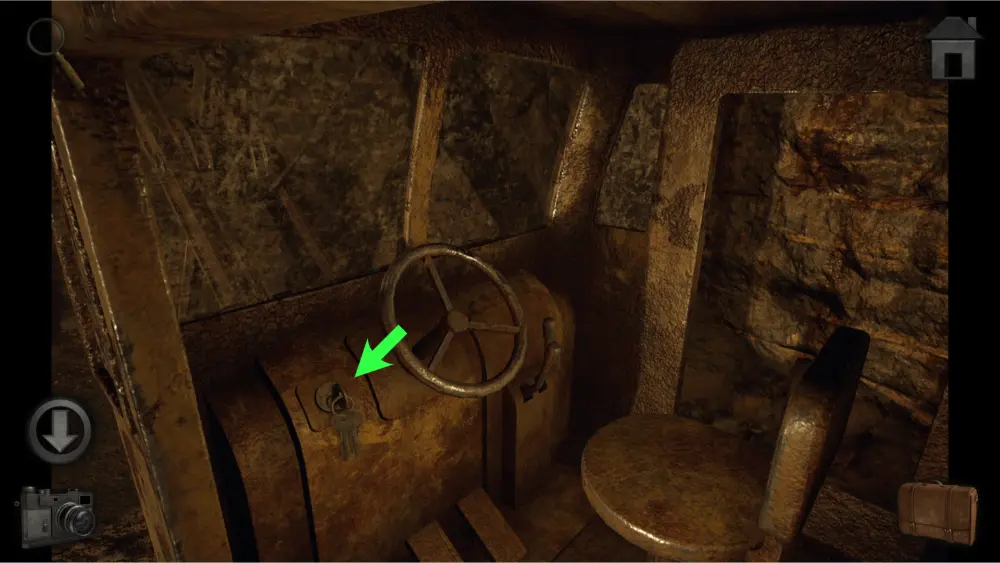
The hatch on the right side of the excavator contains a puzzle involving dice but you’ll need to find a clue for it elsewhere. Enter the vehicle for now and take the keys from the ignition.
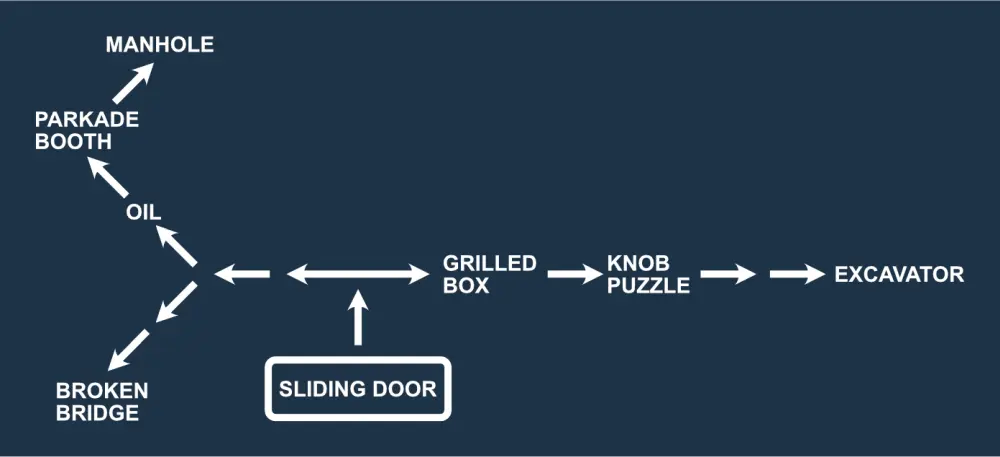
From this point forward, you’ll be going back and forth to the previous locations to solve the puzzles in the area. To make things simple, we made a map to guide you:
Go back to the locked grilled box and use the keys on the lock to open it. Take the binoculars.
Go back to the right side and to the right fork where oil is pouring from the pipe. Put your bucket underneath it to collect some.
Go to the left of the forked road and approach the unit’s metal door. Use the bucket of oil on it to loosen it up and enter it.
Once inside, you’ll find a metal cabinet to the right with the clue “What nickname was given to the old pickup? BLUE _____.”
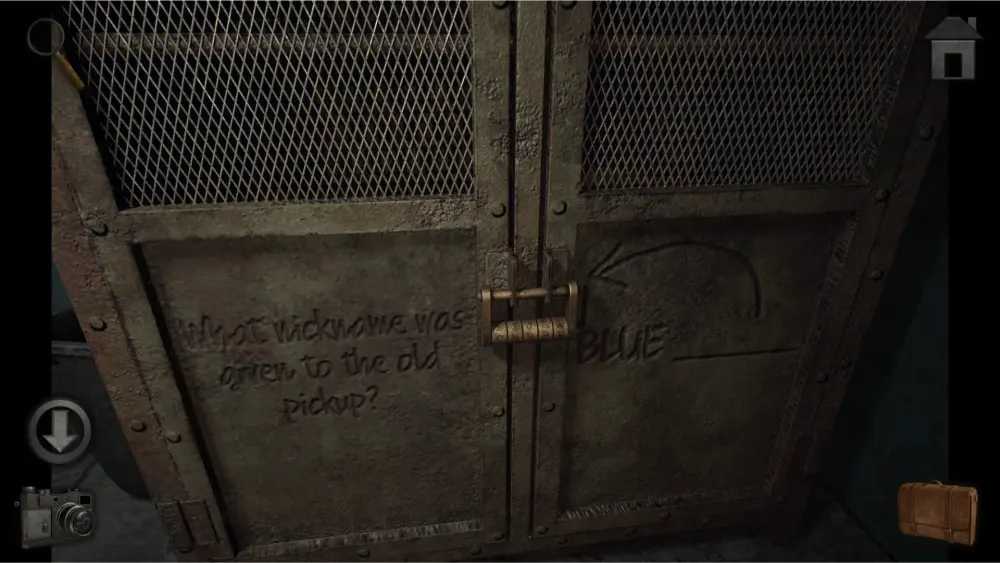
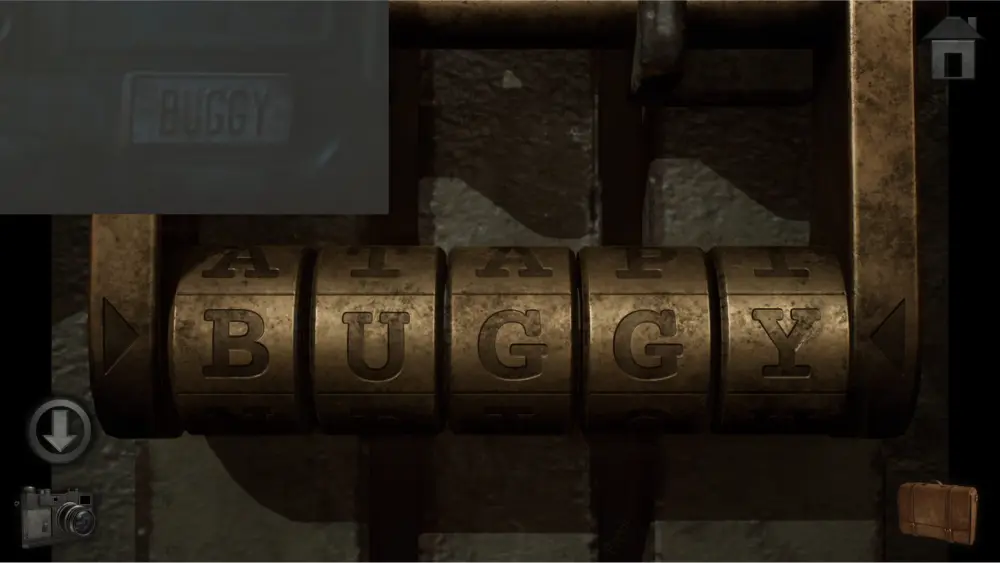
Exit the room and approach the edge of the broken bridge. You’ll notice that there is a blue pickup truck on the other side. Using your binoculars, you’ll be able to see its plate number which reads: “BUGGY.”
Go back inside and spell out “BUGGY” on the lock to open it.
Take the black light bulb from the box and the small blue gear from the shelf.
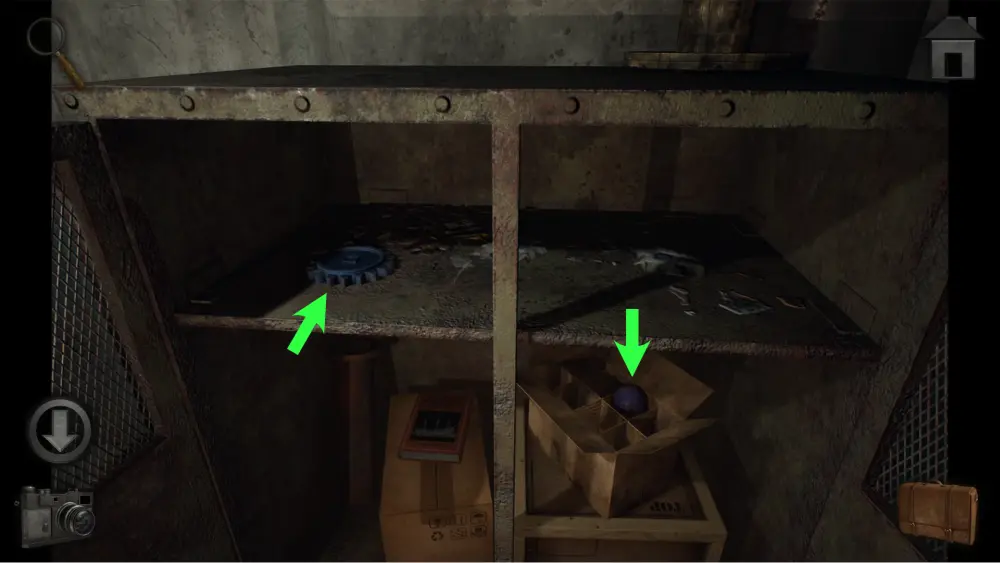
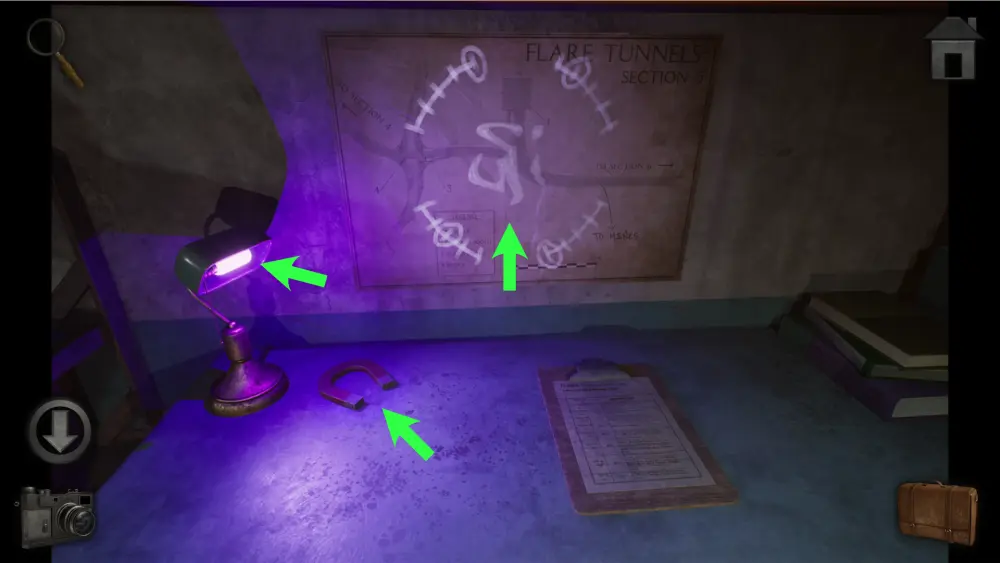
Next, investigate the table on the left. The clipboard provides some lore but is not an essential clue for any puzzle. The map is not particularly important until you take the bulb from the lamp and replace it with the black light bulb. A symbol will appear which is a clue for another puzzle later so make sure to take a picture of it. Make sure to take the magnet before you leave.
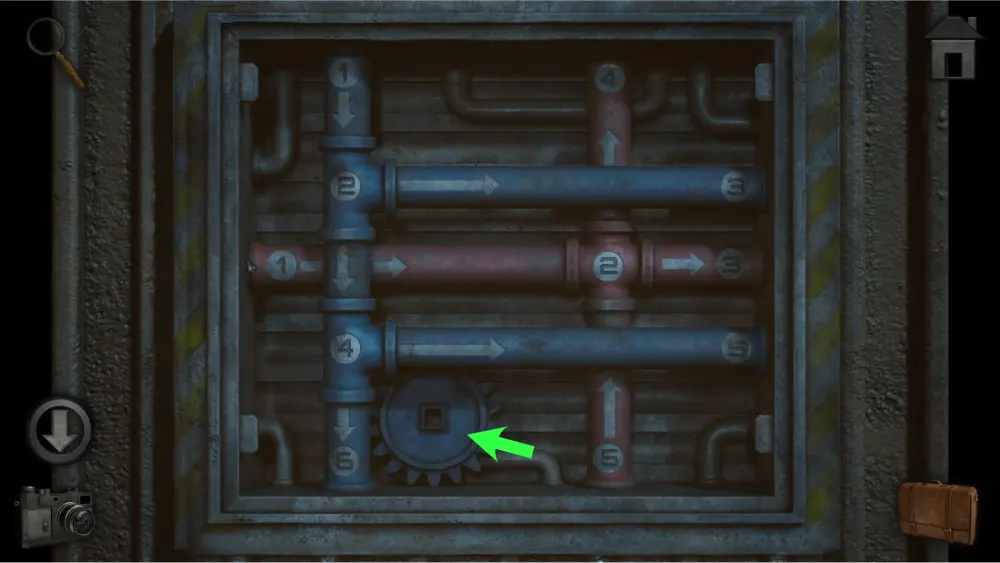
Outside the unit, approach the metal hatch next to the door. Use the magnet to slide the metal bar upwards then tap the handle to open it. Take the gear underneath one of the blue pipes and take a picture of it. These pipes are clues for the dice puzzle on the hatch at the side of the excavator on the right side.
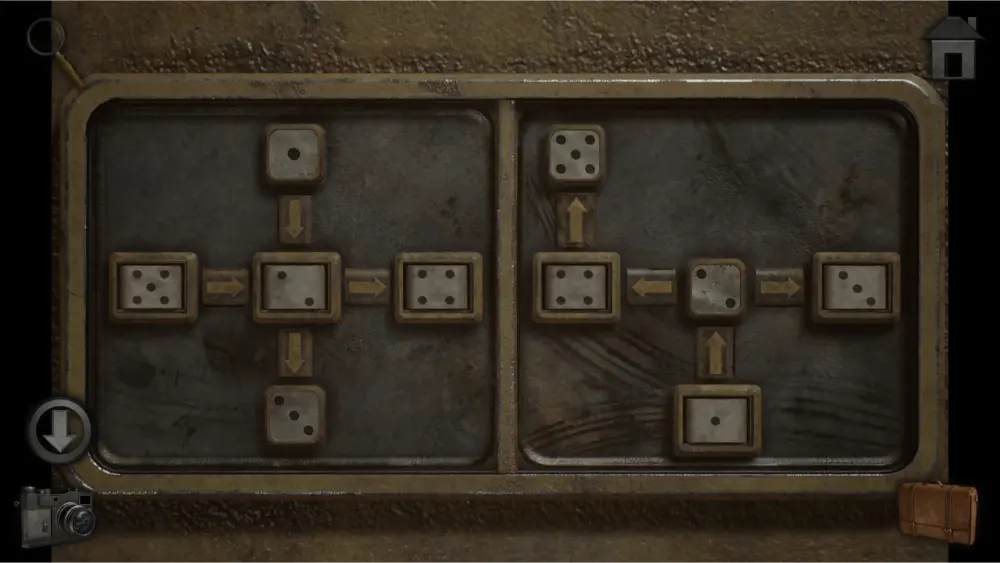
To solve the dice puzzle, pay attention to the dice that cannot be changed and compare them to the number on the pipes. The direction of the arrows is very important as it will determine which numbers should be on the changeable dice.
To make things easier to understand, we’ll be using X, Y, and Z to represent missing numbers.
On the left box, X→ Y→ Z, with 1 → X → 3.
Looking at the red pipes, 1 points to 2 which points to 3. Therefore, Y=2; 1 → 2 → 3.
Now we have X → 2 → Z left.
The number that points to 2 is 5 and the number that 2 points to is 4. Therefore, X=5 and Z=4; 5 → 2 → 4.
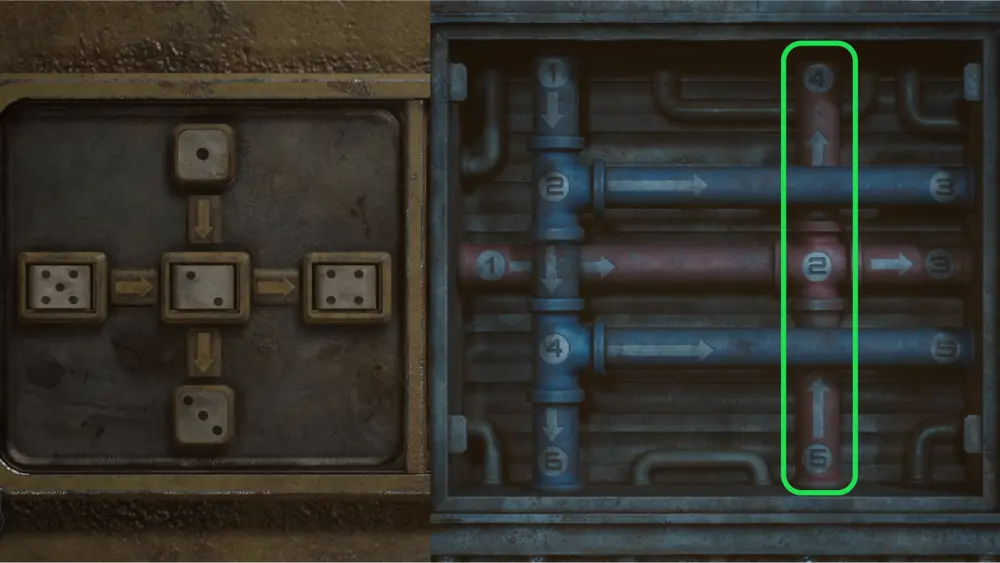
On the right box, X → 2 → Y → 5, with 2 → Z.
Looking at the blue pipes, 1 points to 2 which points to 4 then 5. Therefore, X=1 and Y=4; 1 → 2 → 4 → 5.
Now we have 2 → Z left.
The other number that 2 points to is 3. Therefore, Z=3; 2 → 3.
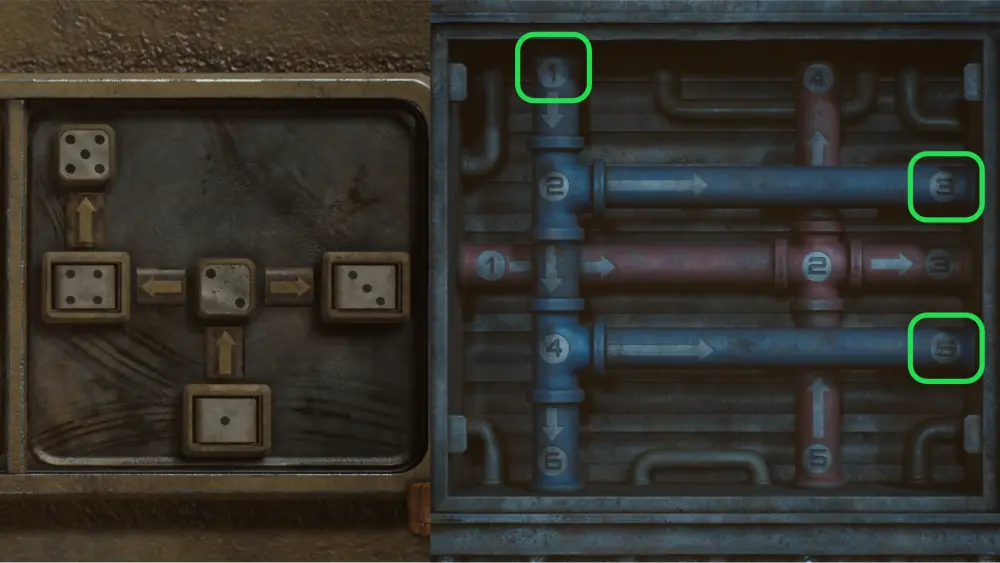
The full solution should look like this:
Once the hatch is opened, take the small blue gear inside.
Go back to the parkade booth and inspect the gate controller mechanism. The goal of this puzzle is to position all 4 gears in a way that will move the two red gears at the upper and lower right corners of the box.
The solution should look like this:
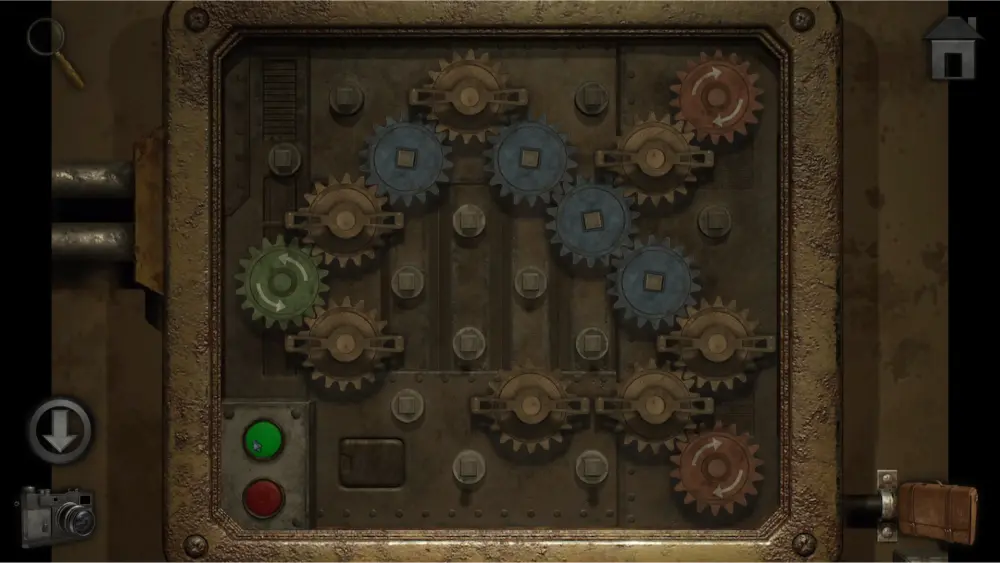
Once in place, press the green button at the lower left corner to activate it and it will open the wire mesh gate to the right of the booth.
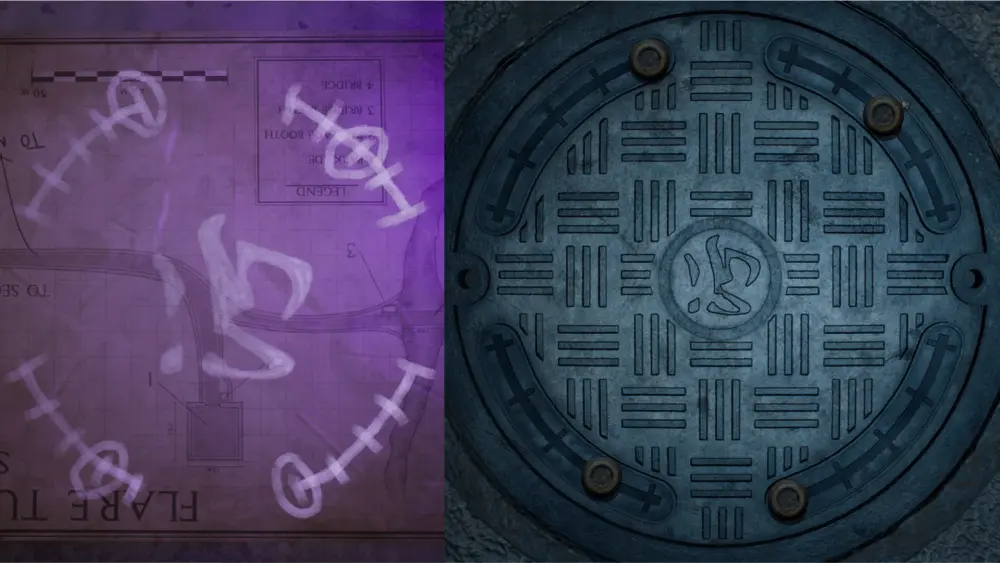
Enter the gate and inspect the manhole. You’ll notice that there is a symbol in the middle that looks similar to the symbols that appeared on the map at the unit next to the broken bridge. If you take out a picture of it, you’ll notice that the symbol is upside down. You’ll have to flip it in your camera before attempting to unlock it by copying the positions of the metal knobs.
The solution should look like this:
Once you open the manhole, enter it and you will be taken to the sewers. At this point, you will no longer be able to come back to the previous area.
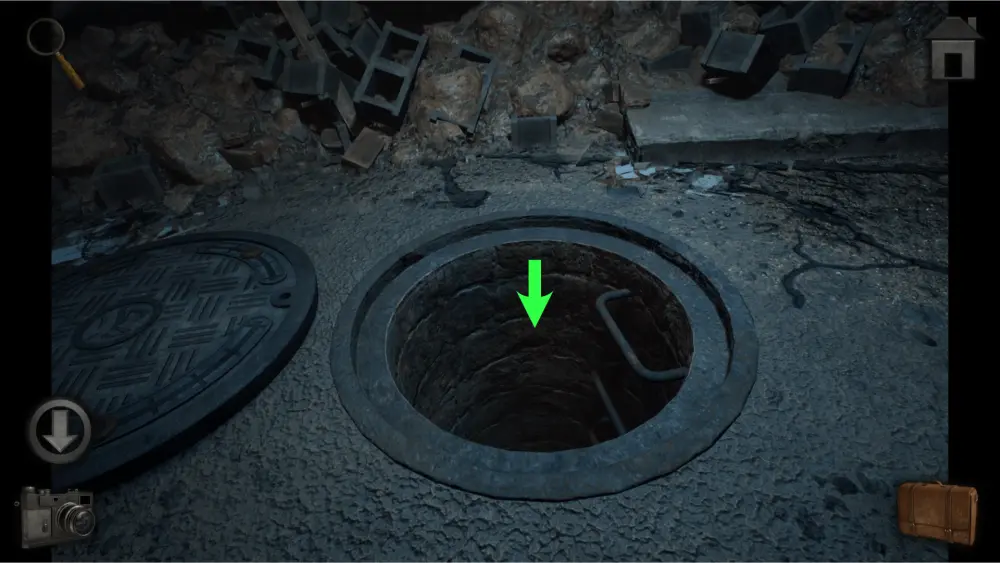
Exiting the Sewers
Once inside the sewers, move one step forward and you’ll encounter a door with a rusty padlock. You’ll need to find a key for it.
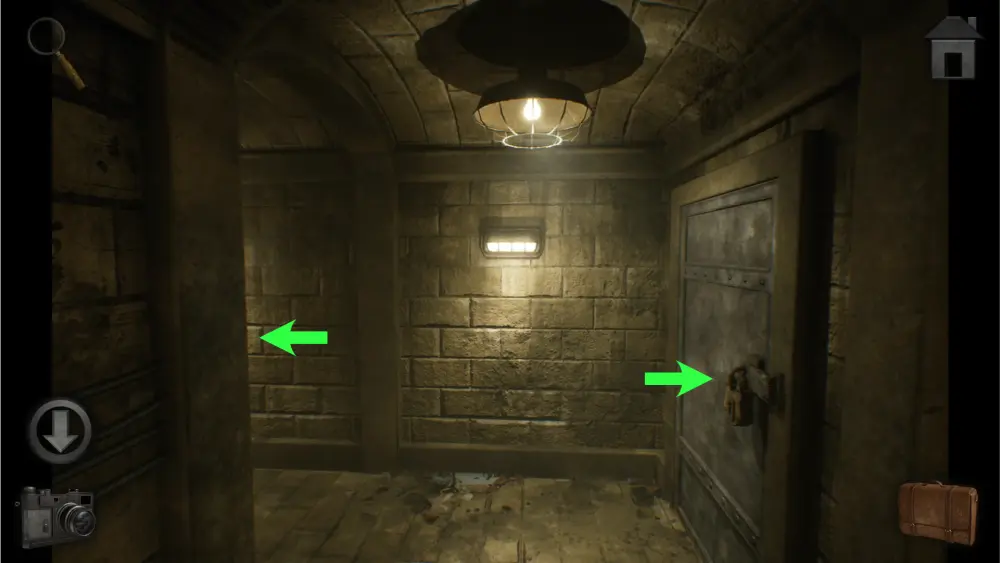
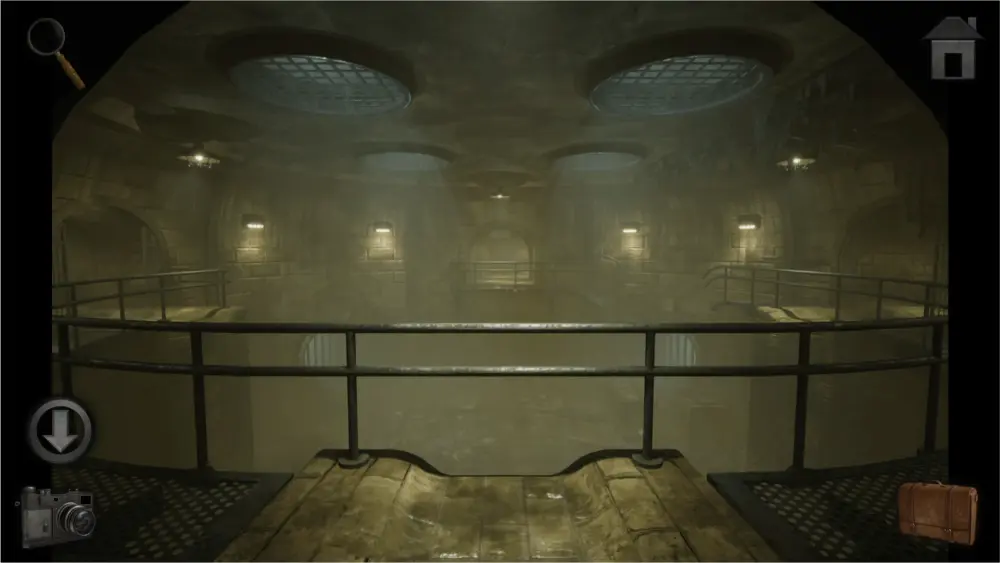
Turn right, move one step forward, go down the stairs to the opened gate, then move another step forward. You’ll find yourself at the center of the sewers with a view of a water reservoir or cistern and three tunnels at the left, middle, and right. The middle tunnel is inaccessible at this time.
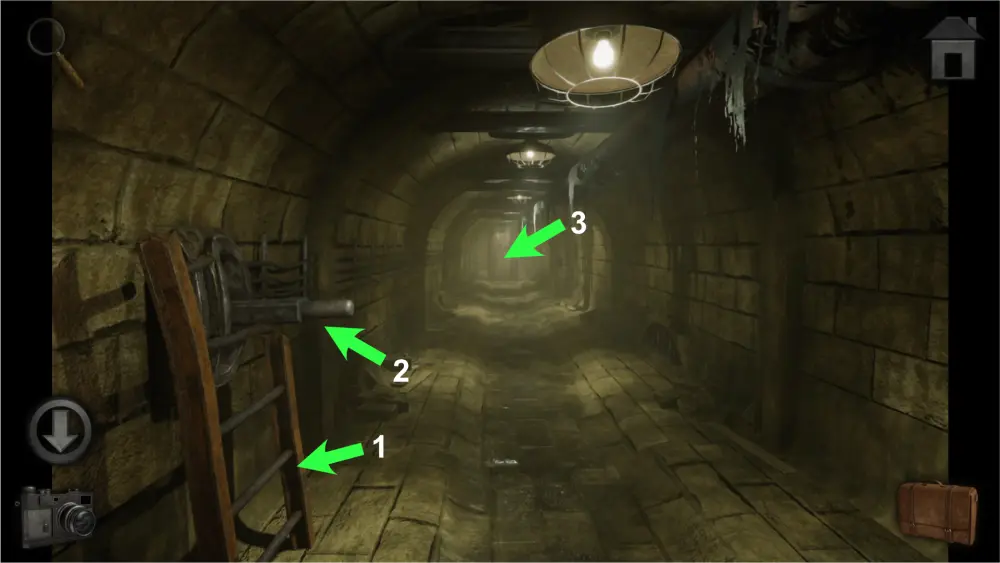
Go to the left tunnel for now. Inside, you’ll find a lever attached to the left wall. Sliding it upward will open the door to the end of the tunnel. However, if you release it, the door will close again. You’ll need a ladder to keep it in place so you can enter.
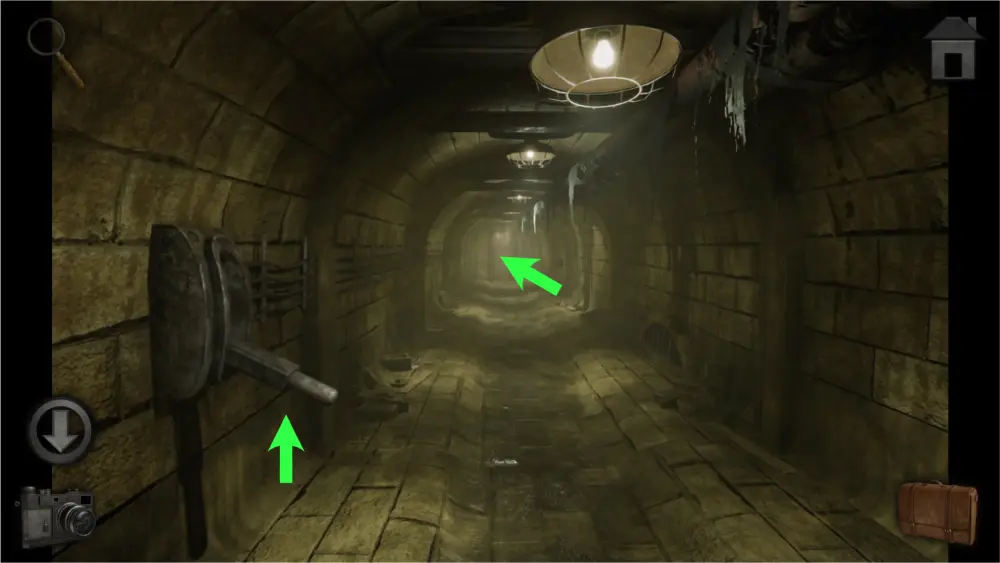
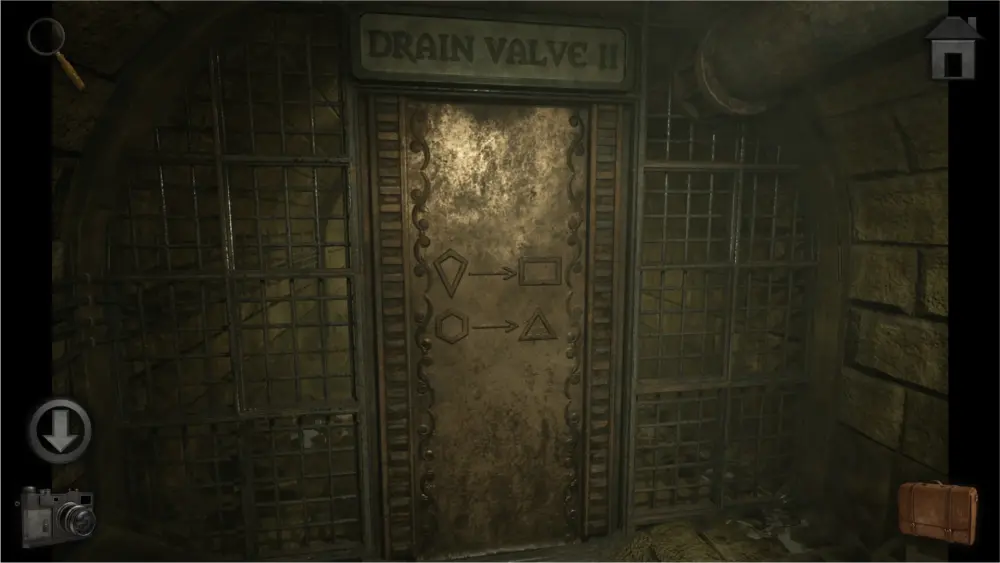
Move two steps forward and you’ll reach the door. Take a picture of the shapes embossed on it as it is a clue for the Drain Valve I door puzzle.
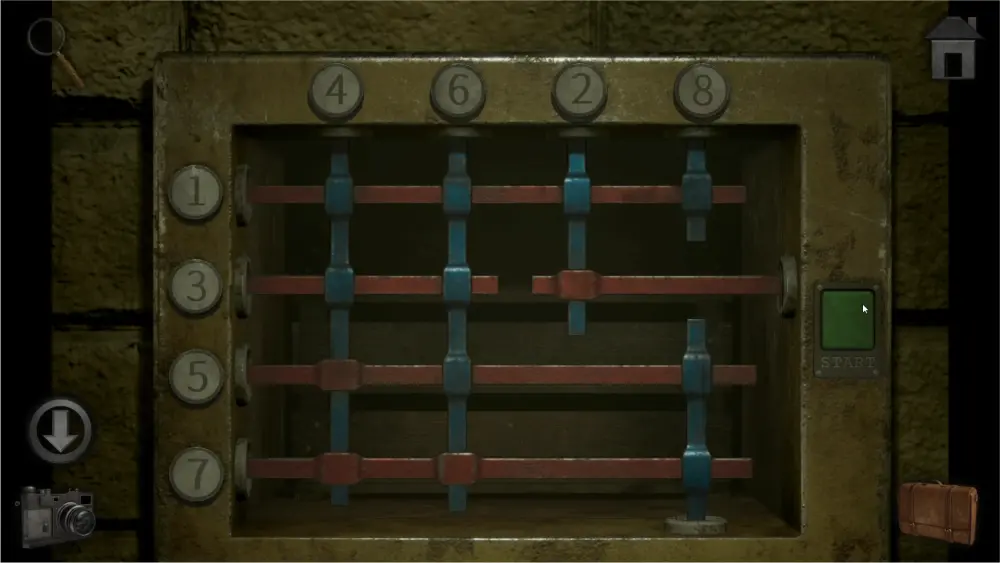
Go to the right tunnel and you’ll find a hatch with a metal bar puzzle at the right wall. This puzzle can be solved on its own without any clues. The goal is to retract the bars in the correct order to unlock them. Certain bars need to be retracted before others. Bars with thick parts mean that they intersect with the bar below them and won’t be able to move unless that bar is removed first. You can change the order they retract by moving the numbers around.
The solution should look like this:
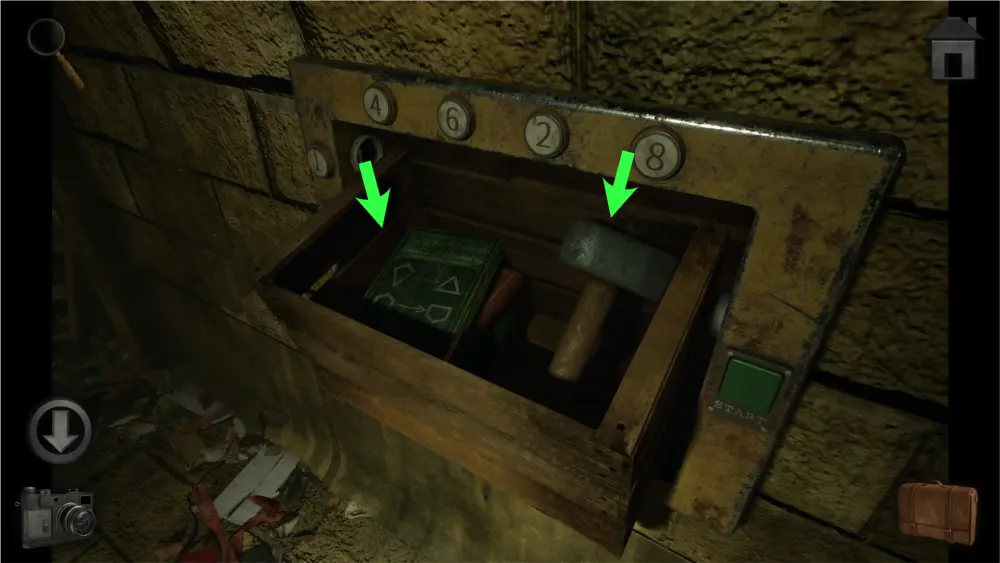
Upon opening the hatch, take the hammer and take a picture of the cover of the “Intro to Advanced Basics in Geometry.” The shapes on the book cover are clues for the Drain Valve I door puzzle.
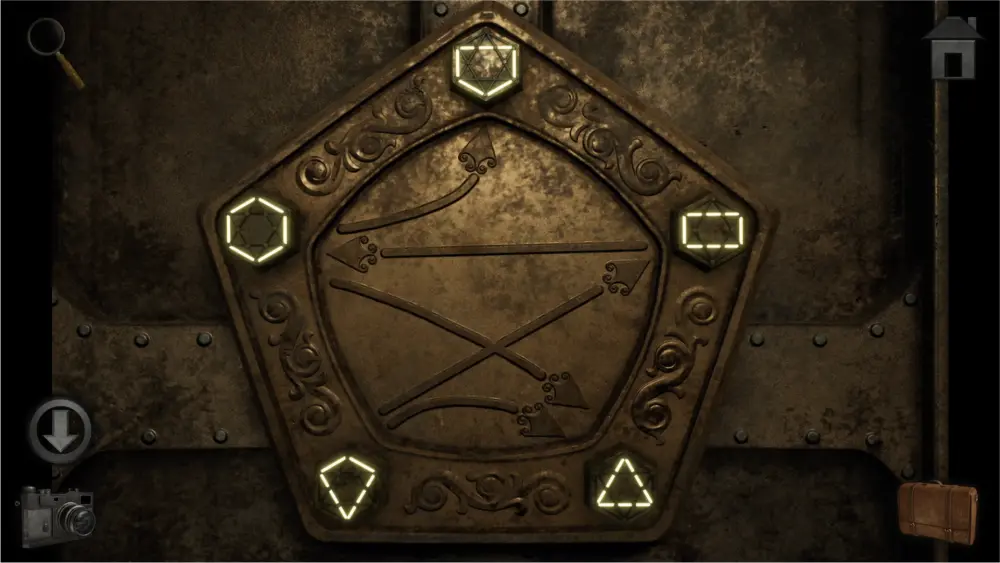
Move one step forward to get to the Drain Valve 1 door. Tapping on the 5 glowing shapes will make them change their shapes. Take out the clues you obtained previously and use them to determine which shapes will end up where.
The solution should look like this:
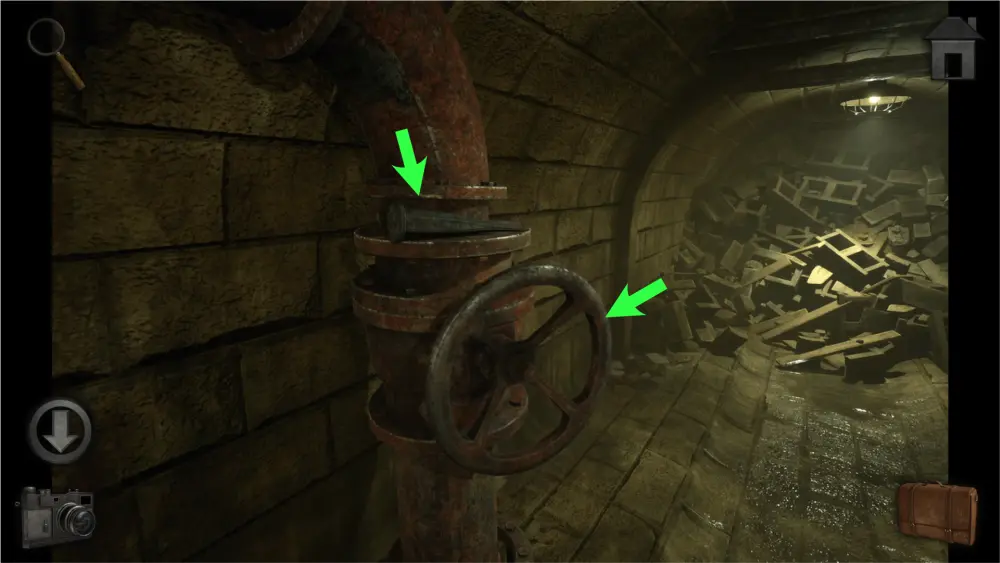
Enter the door and approach the valve. Take the chisel on top of the pipe and rotate the valve to turn it on.
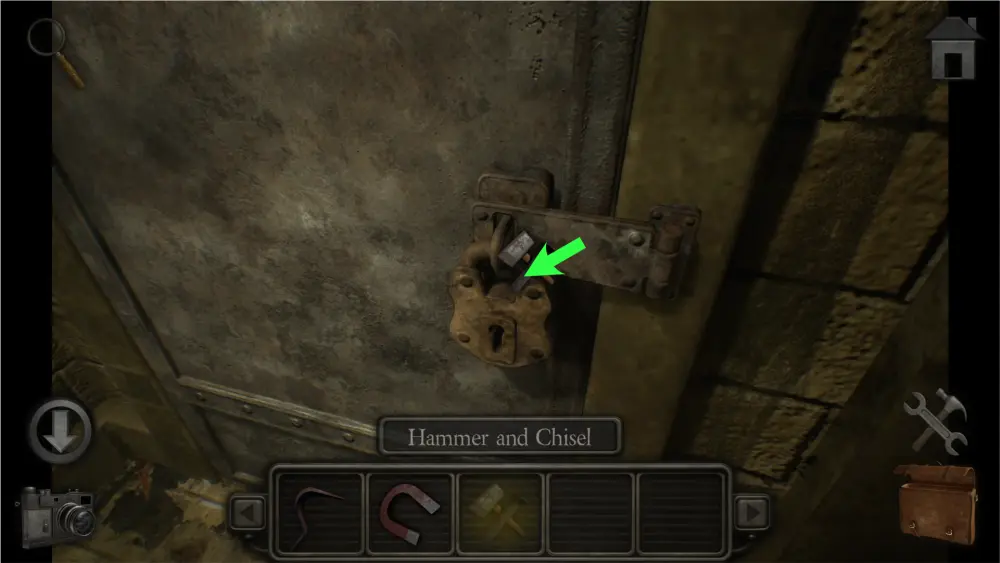
Go back to the door with the rusty padlock. Combine the hammer and chisel then use them on the lock to open the door.
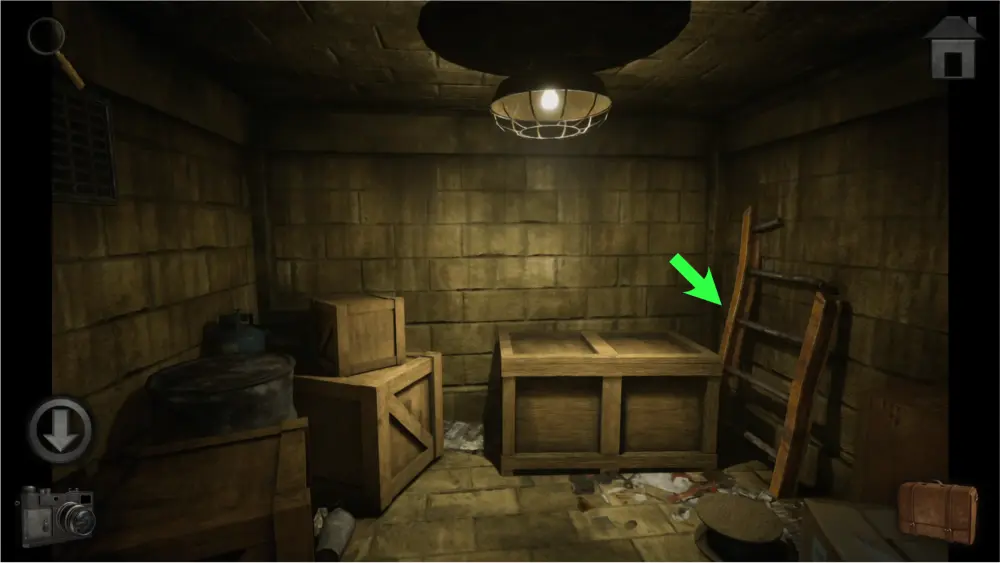
Once inside, take the broken ladder on the right side of the room and go back to the left tunnel.
Use the ladder on the lever then slide it up. This will keep it high enough to keep the door open.
Enter the door and rotate the valve to turn it on. When you go back to the center of the sewers, the water reservoir or cistern will be filled with water. If you look at the broken path from the right tunnel to the middle tunnel, there are floating crates that serve as a connection between the two.
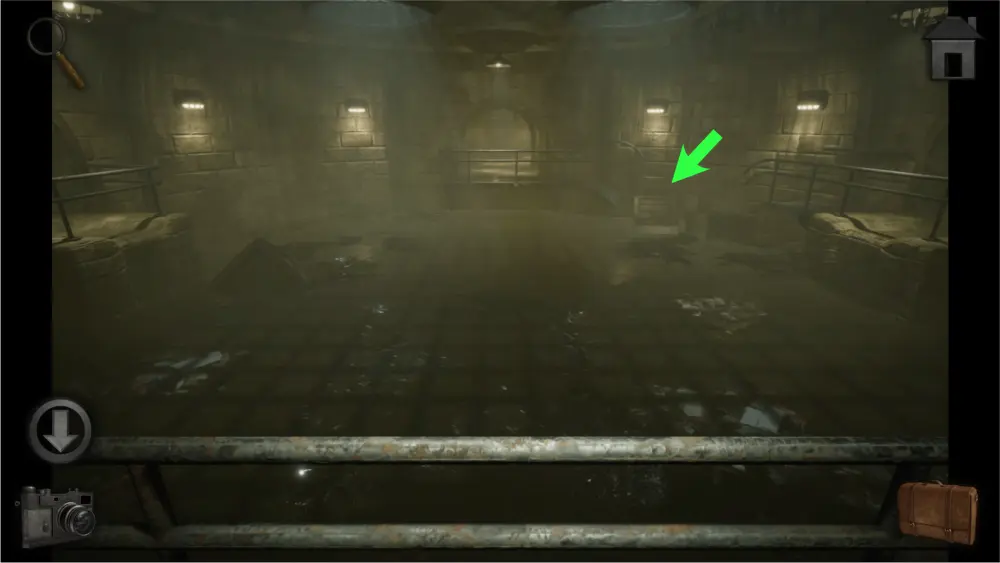
Enter the middle tunnel and you’ll leave the sewers and enter the woods. There won’t be any need to come back to the sewers from this point on.
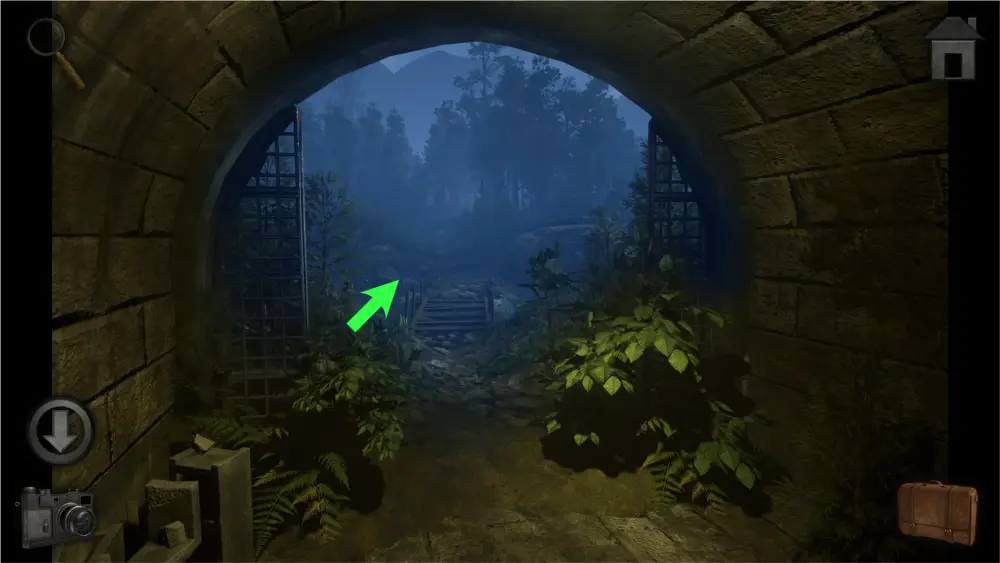
Riding the Gondola in the Woods
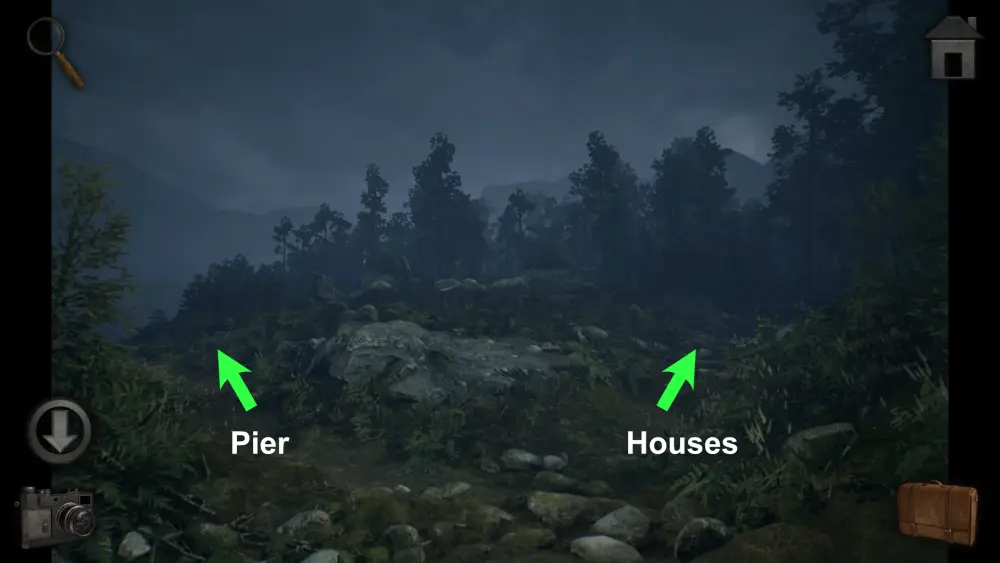
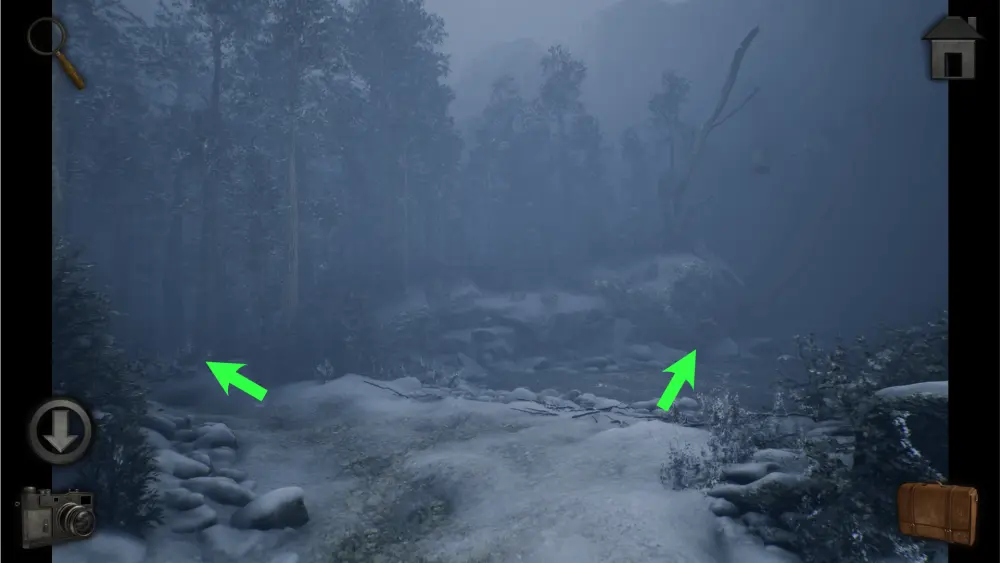
Once you’re outside of the sewers, move one step forward and you’ll encounter a forked path. The left side leads to the lake while the right side leads to wooden houses.
Take the left path for now, move two steps forward, and approach the edge of the pier. You’ll see a key submerged in the water and a blue fisherman’s box. You’ll need a combination of a fishing rod, a fishing line, and a magnet to fish out the key.
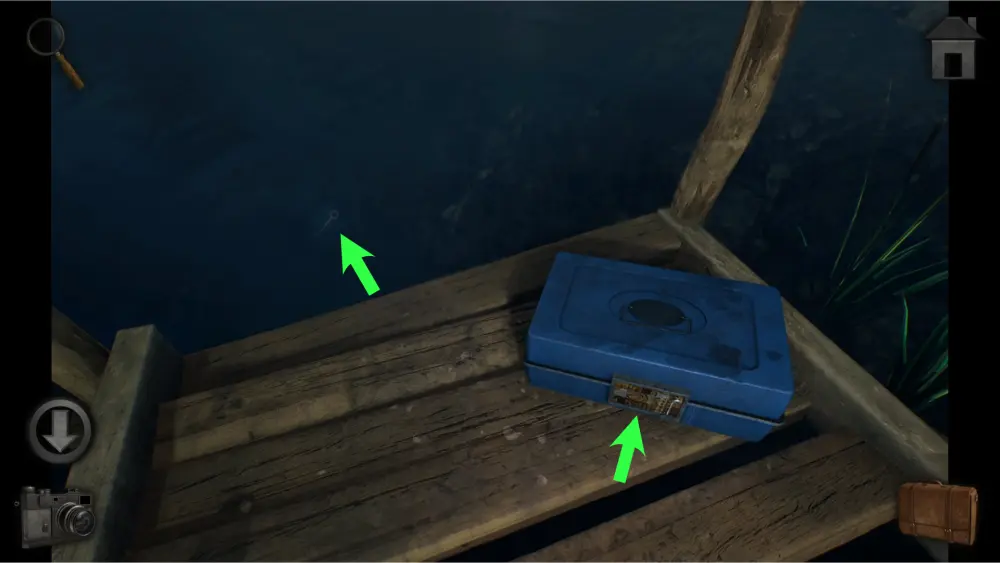
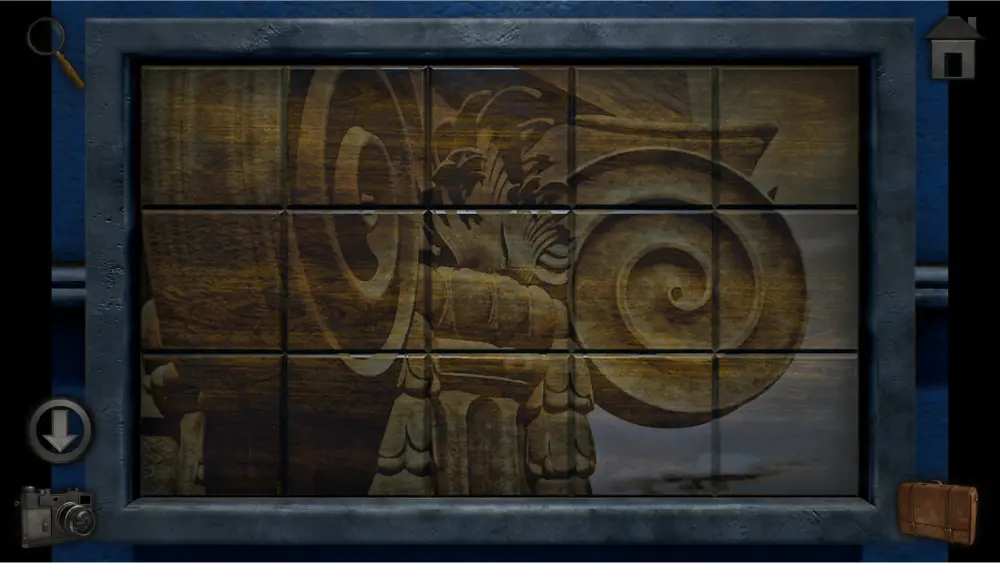
The blue fisherman’s box has a puzzle that requires you to switch pieces around until it forms the complete image. The image is an ornate column.
The solution should look like this:
Once it’s been opened, take the fishing line inside of it.
Go to the right path and take one step forward. Take the shovel by the crates.
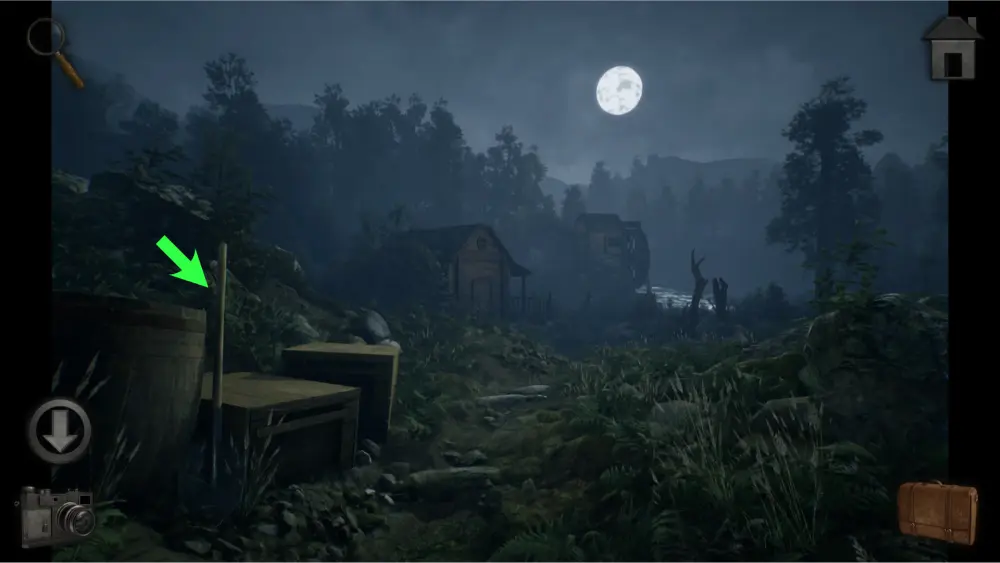
Take one more step forward and you’ll see one house to the left and another to the right. Approach the left house for now.
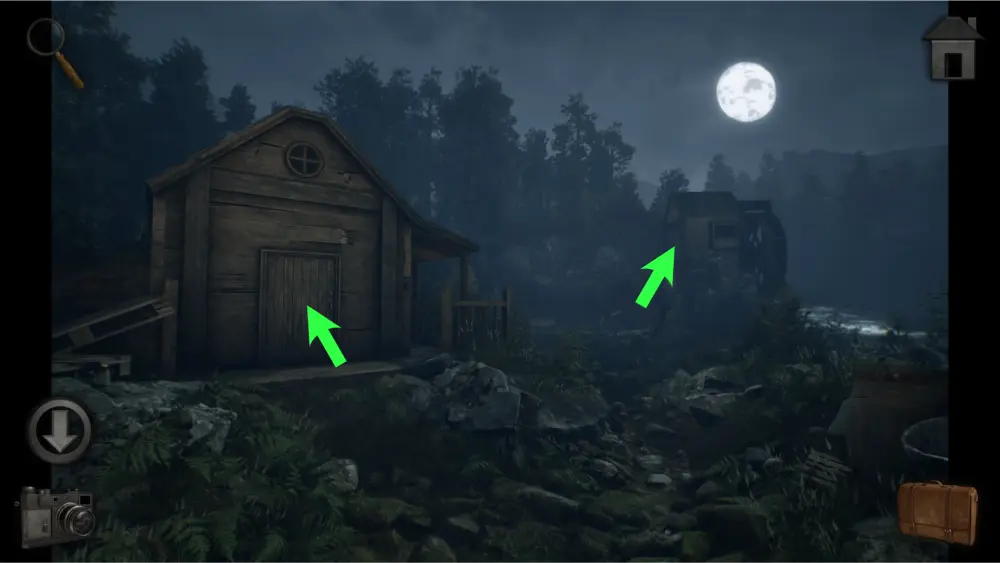
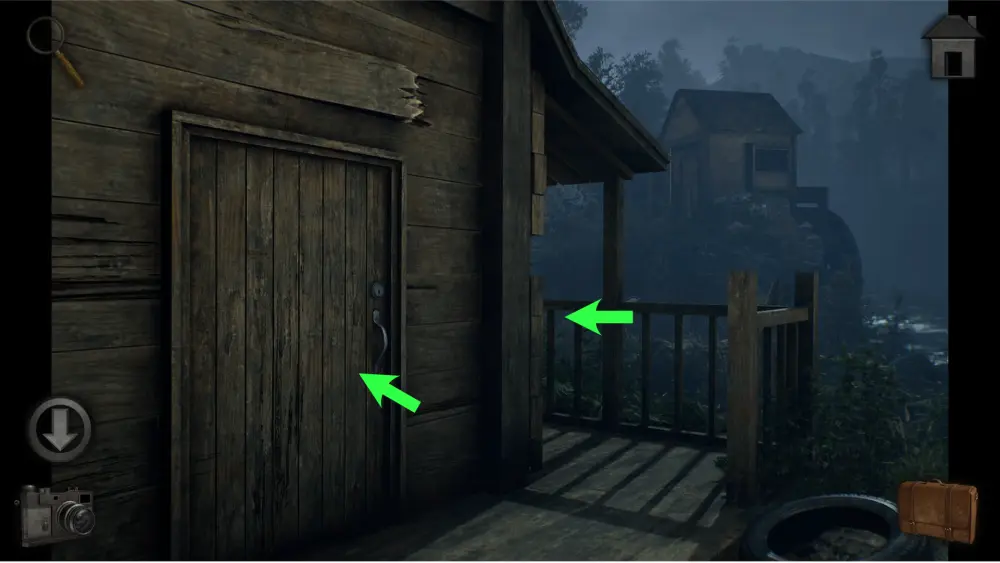
The door is locked and needs a key. Investigate the side of the house and take the fishing rod next to the rocking chair.
Go back to the pier and combine the fishing rod, the fishing line, and the magnet. Use the resulting combination to fish out the key in the lake. Take the key, use it on the left house and go inside. You will be prompted to sleep. Tap on the bed and you’ll go into a dream sequence.
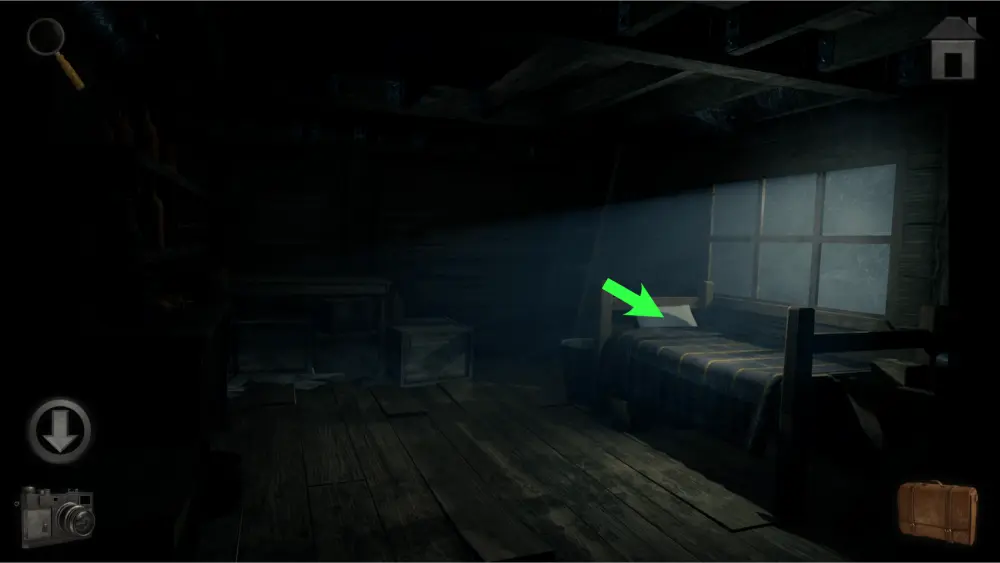
The dream sequence is a short one and all you need to do is to approach the mirror by the wall at the edge of your bed. The scene will play itself out and the next day will begin.
Now that it’s daytime, the rest of the house is illuminated and you can approach the desk and the ladder.
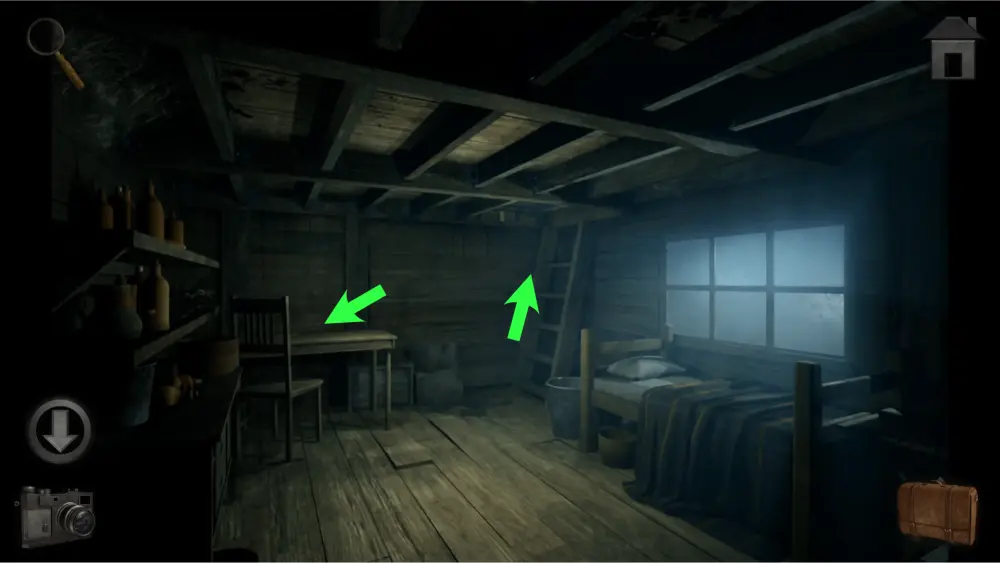
Go up the ladder to get to the attic. There are three points of interest: the clothesline, the table at the back of the room, and the box of clothes on the floor.

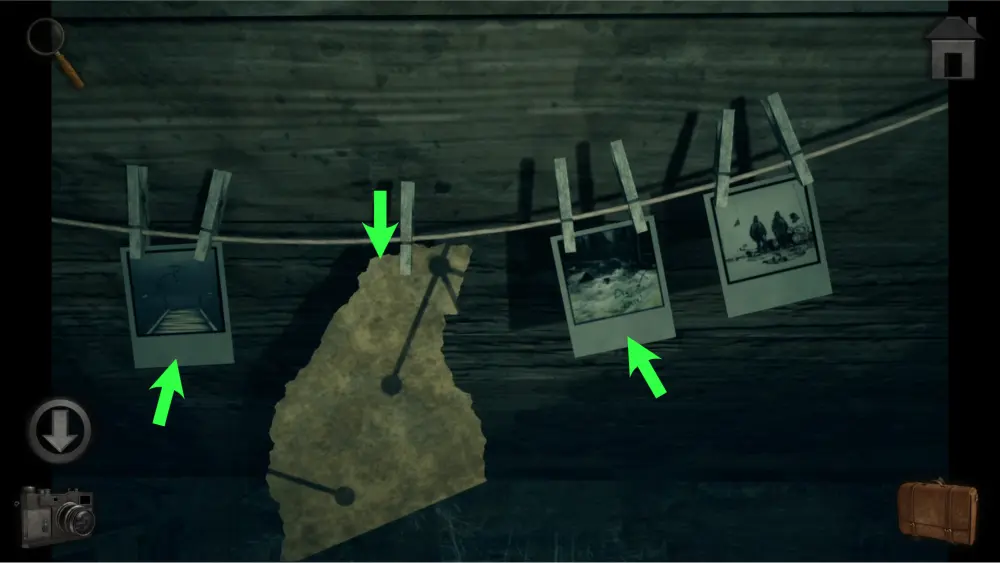
Approach the clothesline and take the piece of yellowish-brown paper. The 1st and second pictures are important clues. The first one is prompting you to search the area past the lake, and since the island froze overnight, you’ll now be able to cross it. The second one shows you a location for a locked box. Take a picture of that one as a reference for later. This can also be found across the lake. The third one is just a picture of the two men who stayed in the two houses and aren’t particularly important to any of the puzzles.
Approach the table and take the lockpick next to the journal. This will be used to open the house to the right. The journal can be read for the lore but does not have any important clues that can help with puzzles.
Approach the box of clothes on the floor and take the coat and gloves. These items will not appear in your inventory but must be collected for you to be able to go outside the house.
Go back downstairs and approach the table by the ladder. Place the piece of paper on the desk and you’ll notice that they seem to connect to the piece of paper nailed to the desk. You’ll need to come back to it later once you’ve got the other pieces.

Once outside of the house, move one step forward. Use the crowbar on the crate to the left to open it and take the firewood inside of it.
Approach the left house and use the lockpick on the keyhole. You’ll be taken to a lockpicking puzzle. You just need to use the lock pick to push the bars upward to the position of the highlighted lines. However, you have to push them up in a certain order. There is no clue that can lead you to the answer. This puzzle is solved through trial and error.
The solution should look like this:
Once inside, take the lighter fluid by the window sill. After that, approach the mechanism at the desk and take the piece of paper. At this point, you don’t have enough clues to solve the mechanism so you’ll have to come back later once you’ve got all the pieces of paper. Solving this mechanism is the only way to open the door to the left.
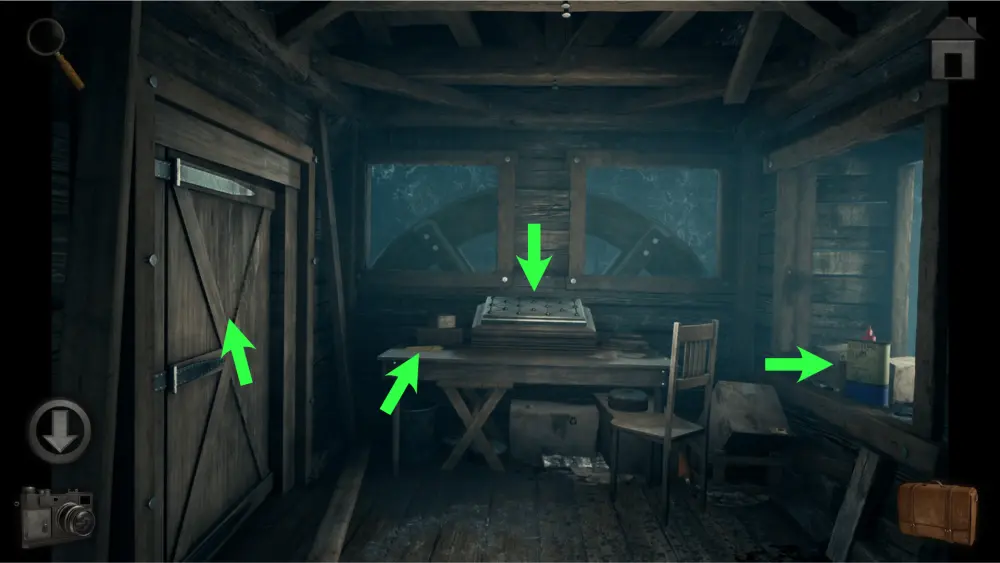
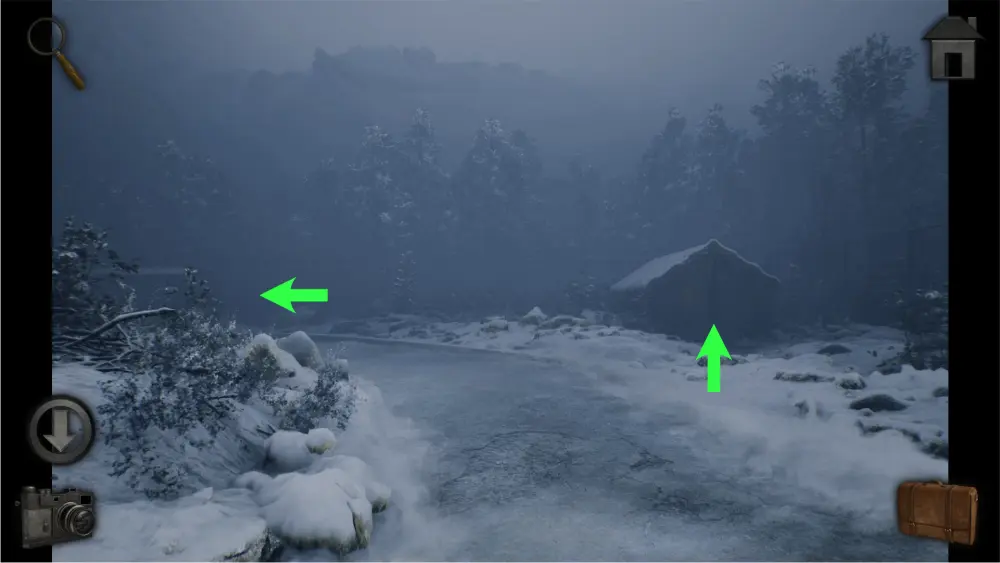
Go back to the pier and you’ll find that the lake is frozen solid. Move two steps forward to cross to the other side then take one more step forward to find a path to the left and an abandoned campsite to the right.
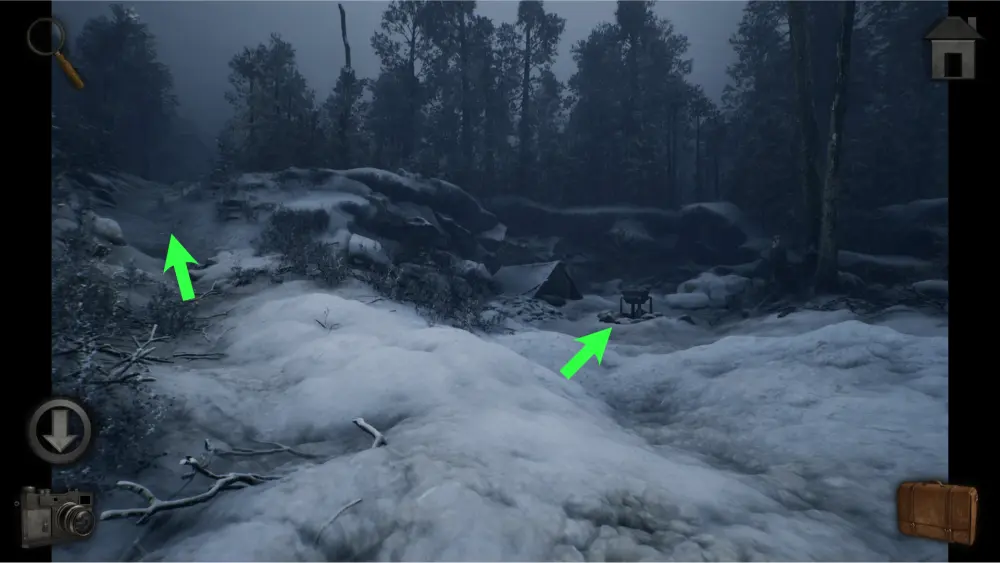
Approach the campsite and you’ll see three points of interest: the tent, the pot, and the spot the picture from the clothesline was pointing at.

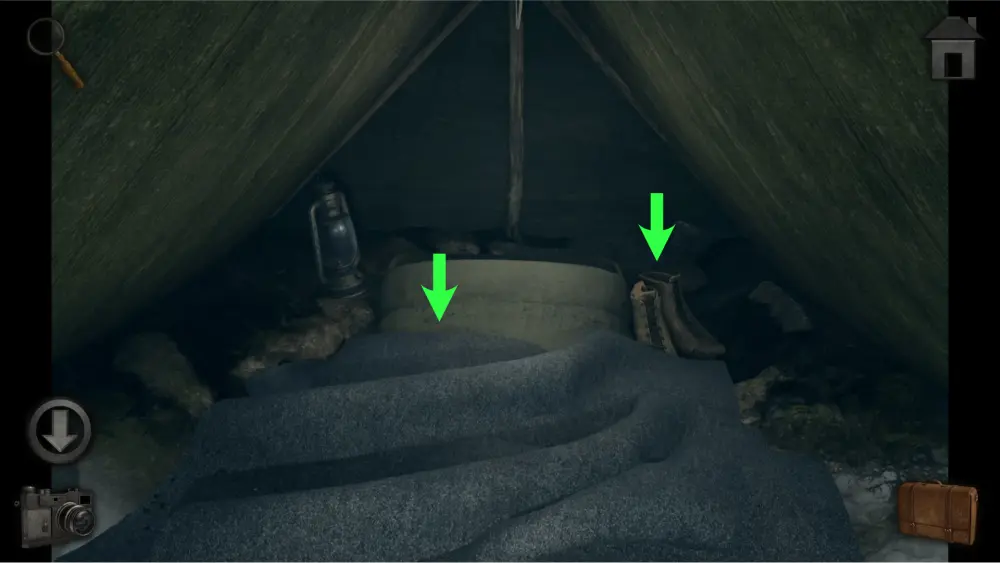
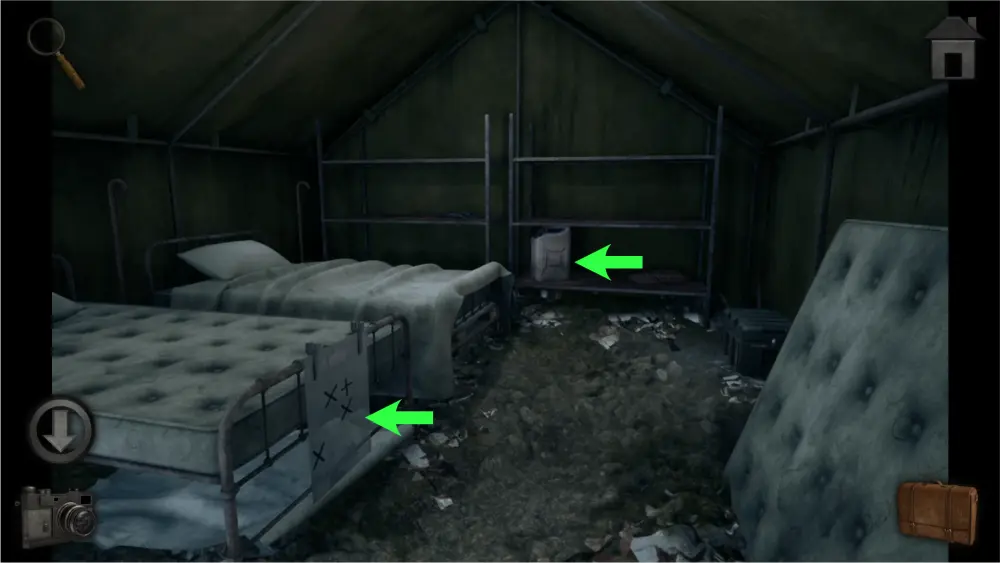
Enter the tent. Investigate the boots and take the matches inside of them. Lower the sheets and take the piece of paper underneath.
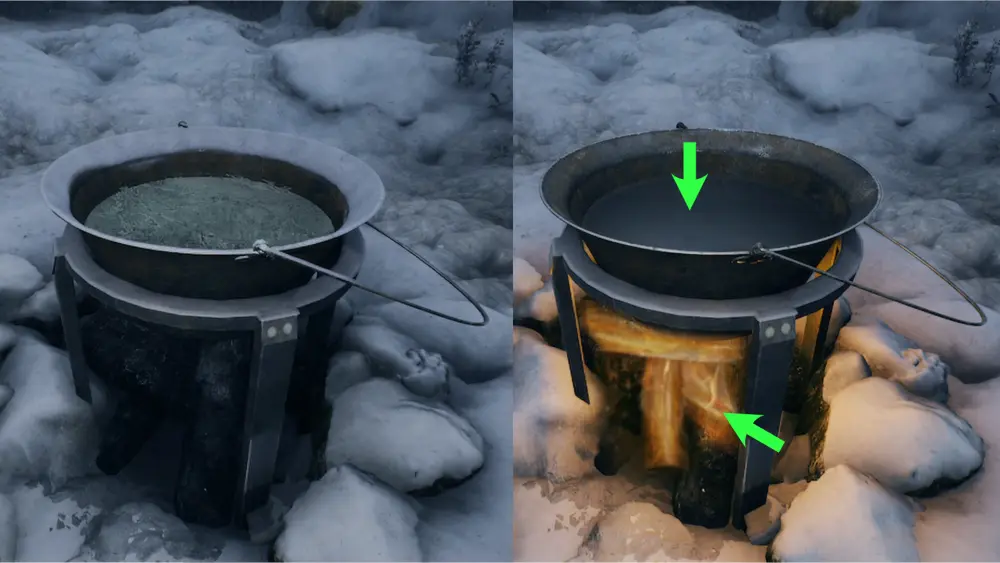
Approach the pot, place the firewood underneath it, and use the lighter fluid and matches to light it up. This will slowly melt the water in the pot. Take a peek inside the pot and take the knob inside of it.
Approach the spot to the right and use the shovel on the ground. This will reveal a locked box with a puzzle. Place the knob on the empty slot.
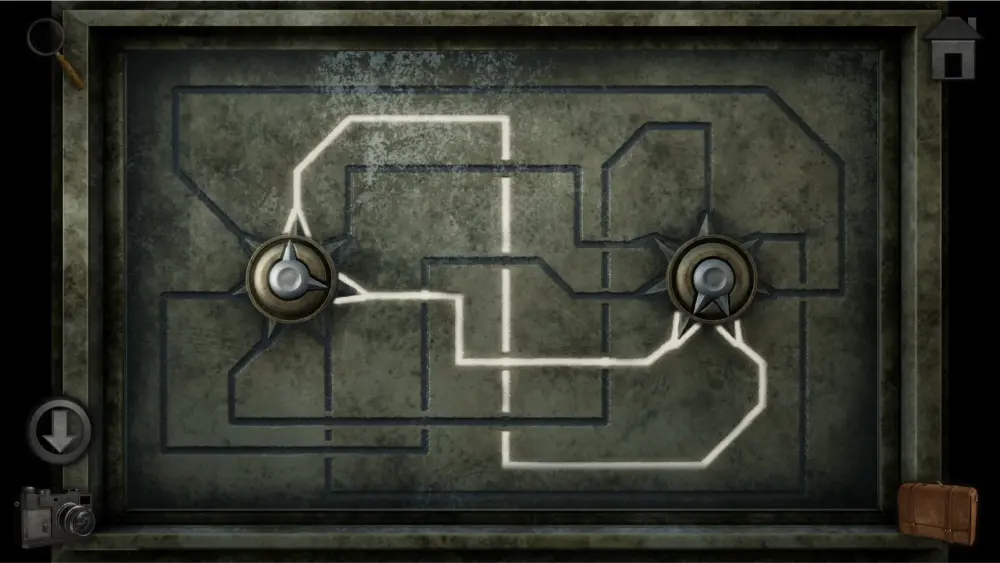
The goal of this puzzle is to activate the lines that will connect the two spikes of one knob to the two spikes of the other knob. There cannot be more than 2 spikes that are lit up in this puzzle. There are no clues you need to find for this puzzle and it can be solved through trial and error.
To explain how this puzzle is solved, we’ll break it down step by step.
The image above shows you its default position. The spike from the inner part of the knob (the silver part) is responsible for lighting up a spike, the line connected to it, and the spike at the other end. To find the two knob’s common lines, we assigned colors to each line and listed down what lines they can activate at a time.
| Left Knob | Right Knob |
| Green & Light Blue Yellow & Blue Light Blue & Pink Blue & Red Pink & Orange Red & Green Orange & Yellow | Orange & Red Red & Yellow Yellow & Light Blue Light Blue & Pink Pink & Green Green & Blue Blue & Orange |
Comparing the two tables, we found that their common pairing is the Light Blue & Pink lines.
The solution should look like this:
Once opened, take the piece of paper inside the box. At this time, there is nothing you can take from the left path and you’ll need a hand crank to activate the gondola across the cliff. Go back to the right house for now and arrange the torn pieces of paper together. They don’t need to be perfectly connected. You just need the image on it to be clear enough to understand the pattern. Take a picture of the completed paper and go to the left house.
Inside the house, approach the mechanism and copy the pattern of the lines from the torn paper by tapping on the lines.
The solution should look like this:
Upon solving the puzzle, the wheel outside the window will lower and the door will open. Enter the room and take the hand crank on the crate to the right.
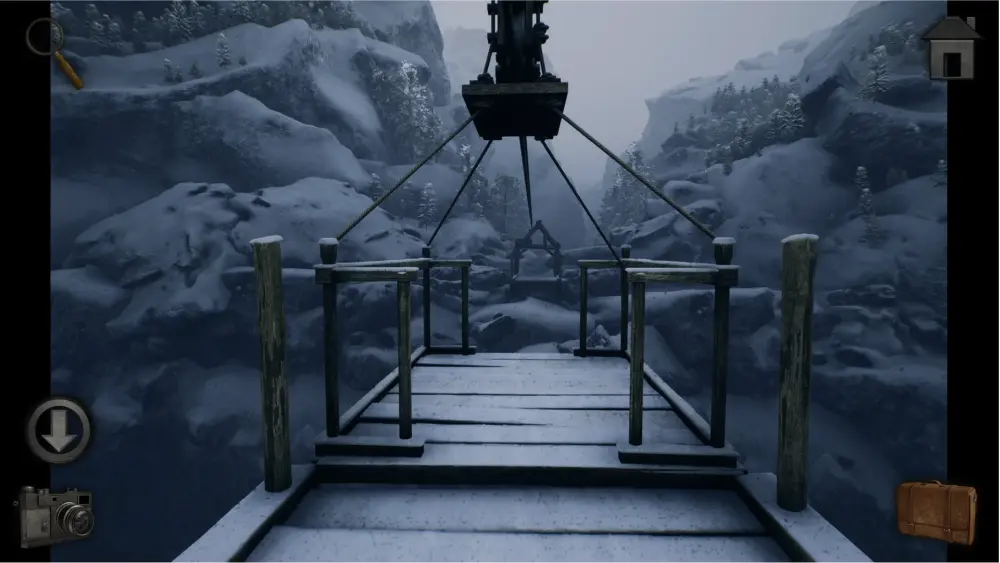
Go back to the path to the left of the campsite and use the hand crank on the slot that controls the gondola. Once inserted, drag the hand crank around clockwise until it stops. The gondola will be right next to the platform. Enter the gondola to go to the other side. Once you’ve reached the other side, you won’t be able to go back to this area.
Driving out of Sector C
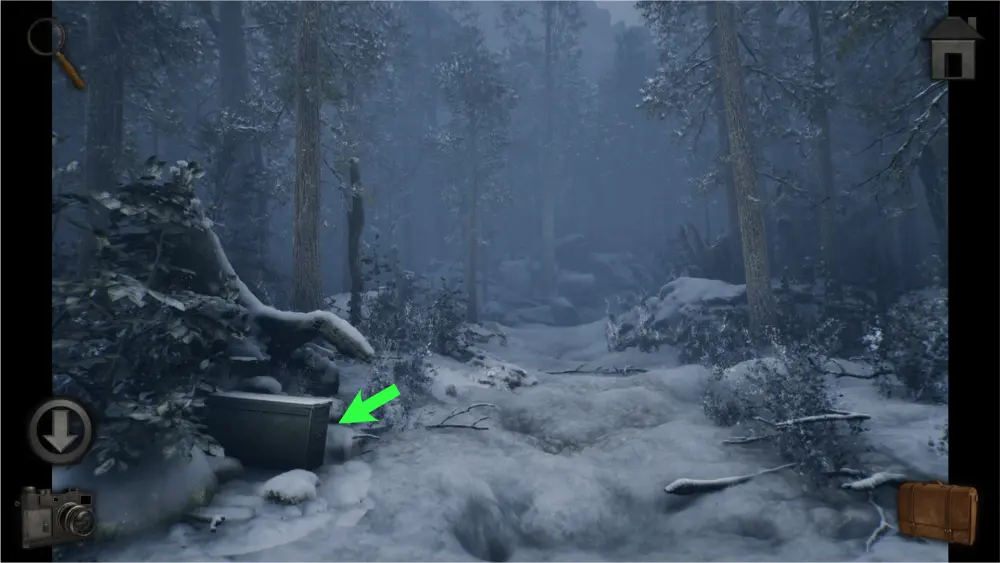
Move two steps forward from the gondola and you’ll find a path to the left and a suspicious bag tied to a tree above a frozen lake. You’ll need a crossbow and some arrows to break the rope the bag is tied to.
Take the left path for now. You’ll find a locked hunter’s box to the left. You’ll need to come back to it once you’ve found its key.
Move one more step forward and you’ll encounter a forked path.
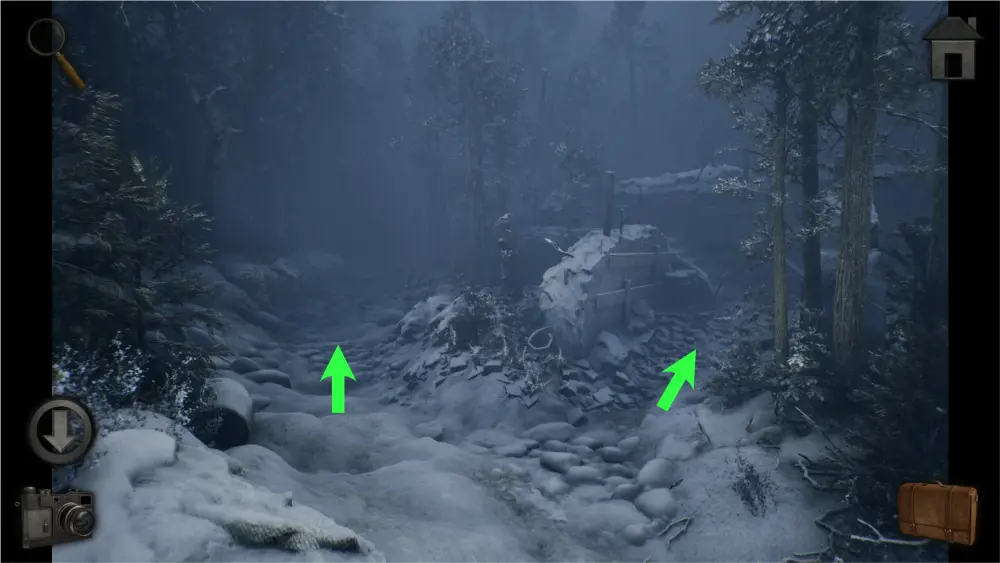
Take the right path and you’ll find a bunker on the floor with a puzzle. You’ll need to find clues for it before you can solve it.
Go upstairs and you’ll find a symbol on the left wall, which you should take a picture of, and a box with a hex key inside, which you should take.
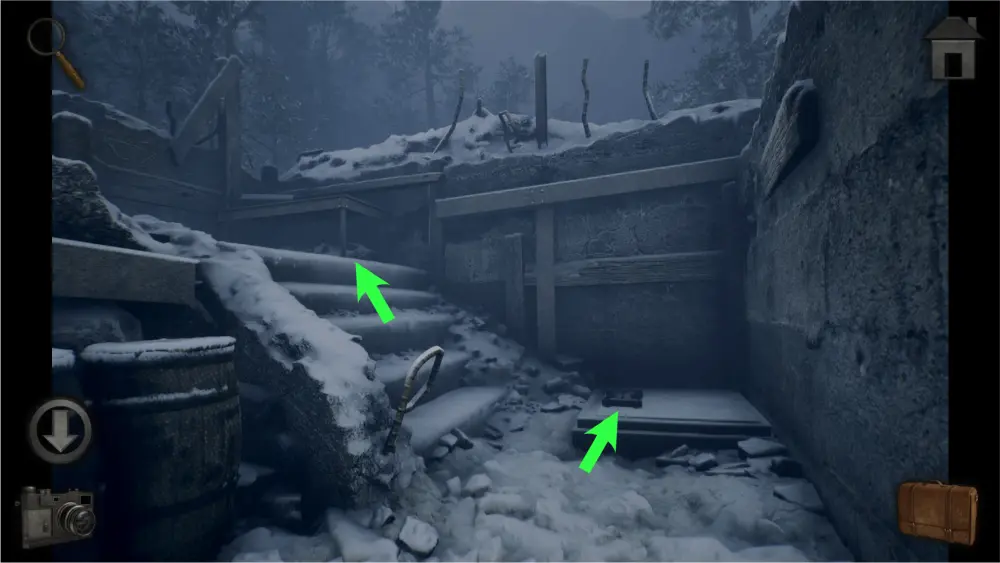
Take the left path next and move two steps forward. You’ll encounter another forked path.
Go to the right and you’ll see a tree with a symbol etched onto it which is a clue to another puzzle. Take a picture of it for later reference.
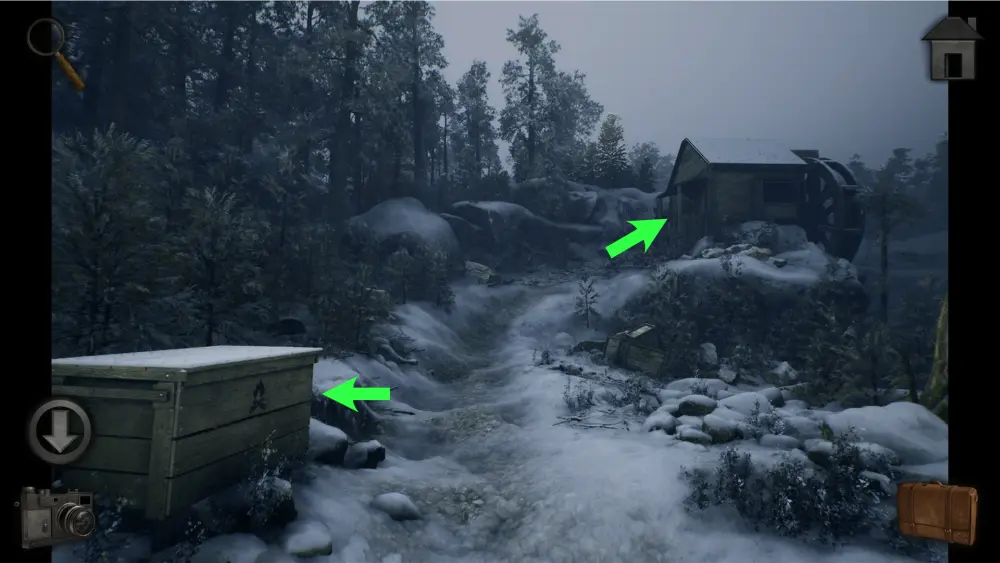
Take the path to the left and you’ll find the building for Sector C. Approach the hatch on the wall to the left of the door and use the hex key on it. This will open it, revealing another puzzle to solve.

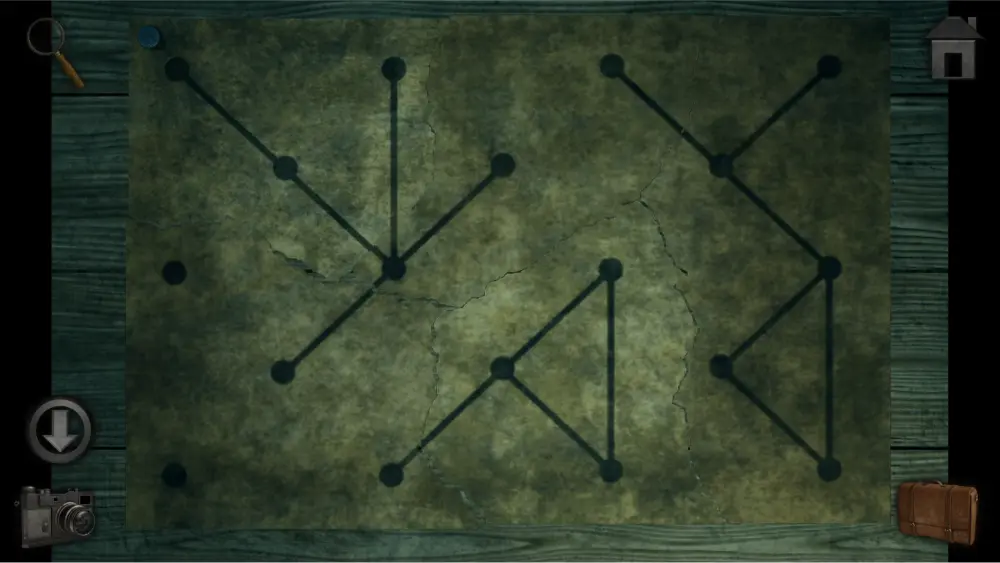
This puzzle requires no clues to solve and will rely on trial and error. The goal is to move the knob in an order where each line is crossed without crossing the same line twice. The red button lets you reset the puzzle when you need to.
There are many different ways to complete this puzzle, but if you’d like to follow our solution, we’ve illustrated it below:
Once the puzzle has been solved, the door will open. Inside, you will find a path to the left and the right.
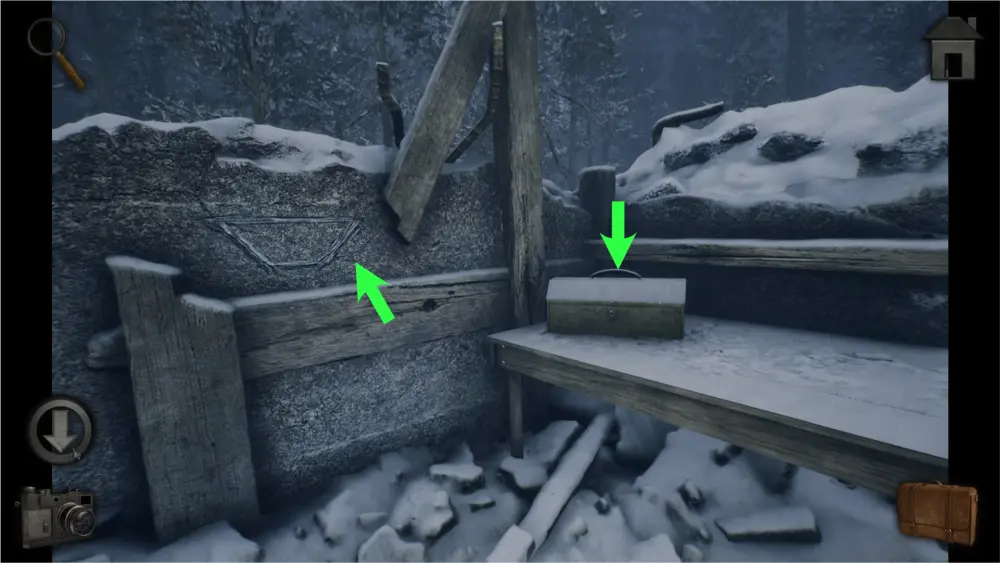
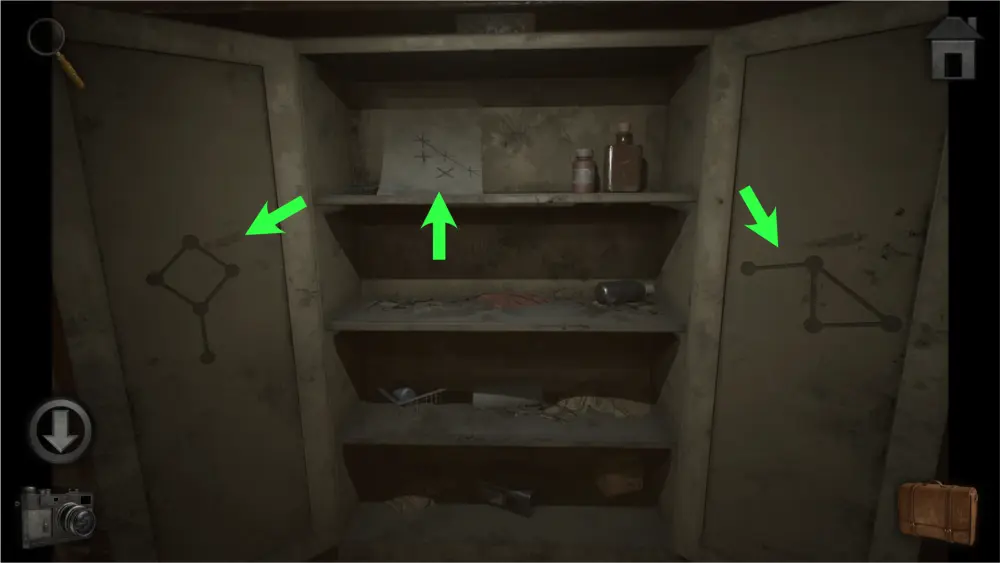
Take the left path and you’ll find a room with three points of interest: the lightbox, the cabinet, and a diagram with shapes.
Approach the lightbox and take the key from the table in front of it. It will open the old hunter’s box. The lightbox itself will come into play later once you’ve collected the two clues associated with it.
The cabinet is locked with a 4-digit padlock. You’ll have to come back later for it once you’ve discovered its number code.
Approach the diagram with shapes and take a picture of it as it is a clue to opening the bunker outside.
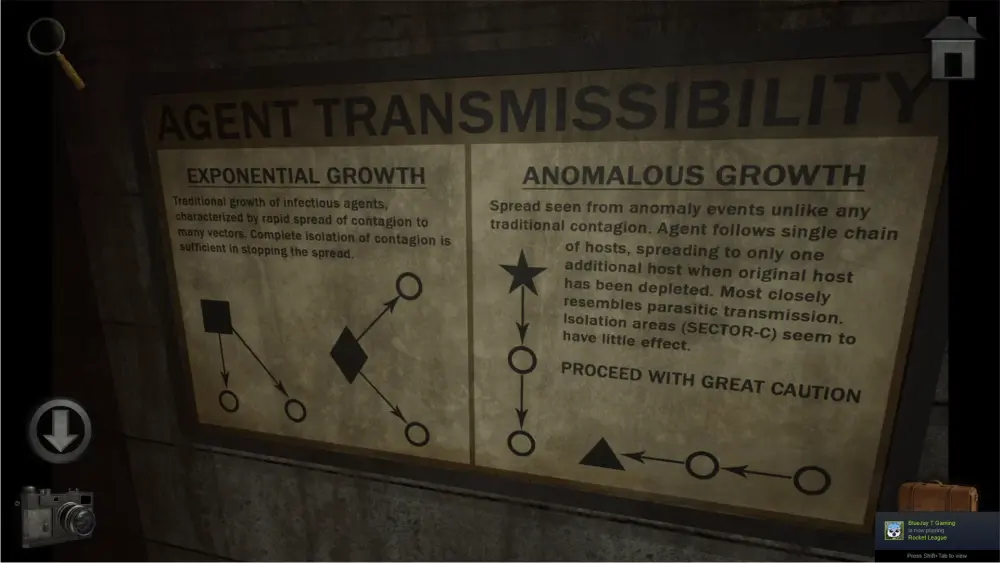
Go back and take the right path and you’ll find a door with 6 symbols. These symbols must be rotated a certain way and the only way to know their correct position is to find the clues all over the place. You’ll have to come back later to solve it.
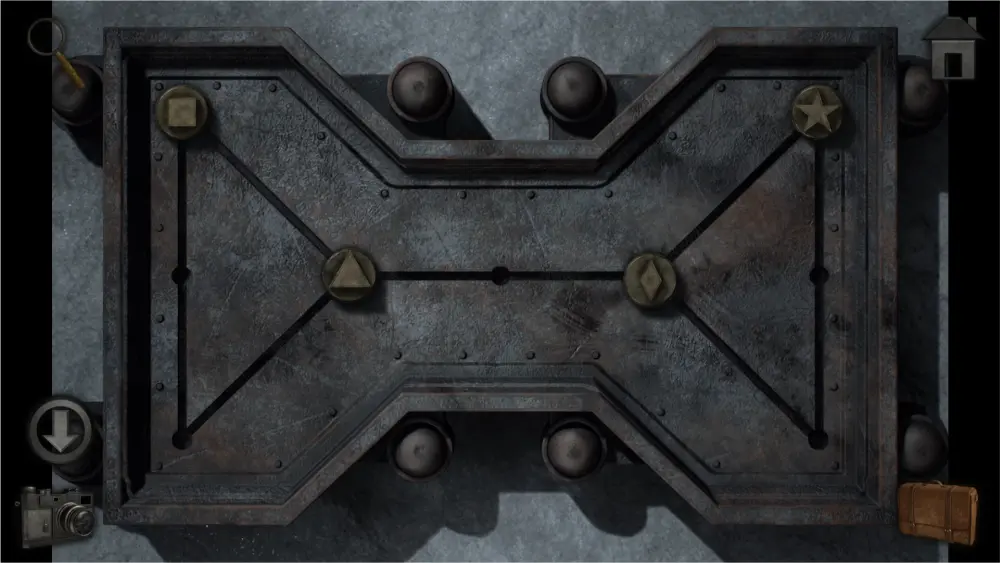
Leave Sector C for now and go back to the bunker. Using the clue from the agent transmissibility diagram, you’ll be able to deduce the positions of the shapes:
- The square points down and to the bottom right. Therefore, it should be placed in the upper left corner.
- The diamond points to the upper right and bottom right. Therefore, it should be placed to the right of the central node.
- The star has two arrows below it. Since the square already occupies the upper left side, the star should be placed on the upper right side.
- The triangle has two arrows to the right of it. Therefore, it should be placed to the left of the central node.
The solution should look like this:
Inside the bunker, take the crossbow on the left wall and take a picture of the symbols on the right wall.
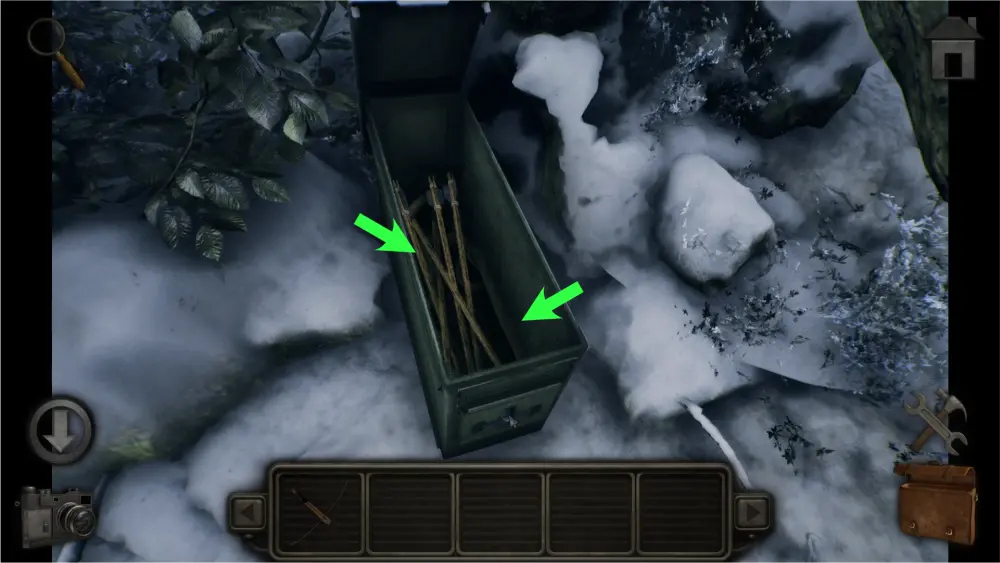
Go back three times from inside the bunker to get back to the old hunter’s box. Use the key on it then take the arrows and the elastic band.
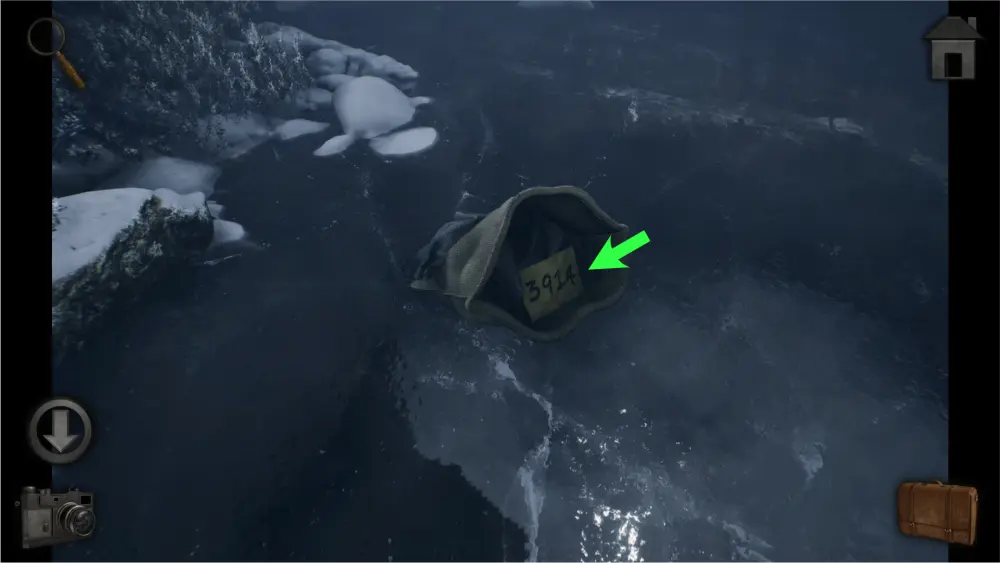
Go back one space and approach the frozen lake to the right. Combine the crossbow, elastic band, and arrows. Tap it then tap the sky and a crosshair will appear on the screen. Aim your crosshair on the rope above the bag and shoot. This should make it fall into the frozen lake.

Exit the crosshair screen and approach the bag that fell. You’ll find a 4-digit number inside the bag. Remember this code as it will unlock the cabinet in the left room of Sector C.
Go back to the left room’s cabinet and input the code to open it. Inside, take the piece of paper on the top shelf and take a picture of the two symbols on the cabinet’s doors.
Go to the right path and rotate the symbols according to their orientation in the clues you’ve found.
The solution should look like this:
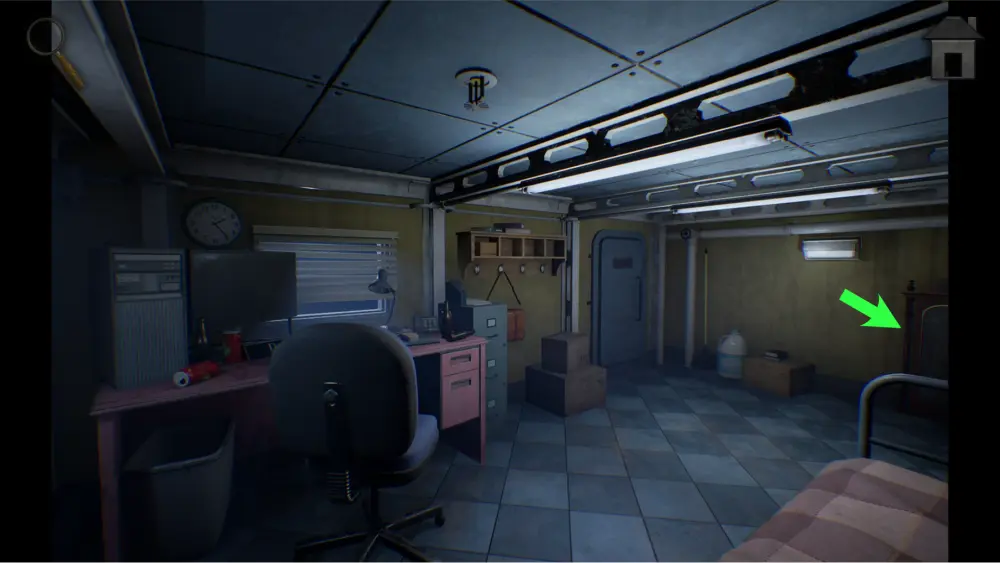
Enter the room and you’ll find yourself in a garage with four points of interest: the door, the garage door, the garage controls, and the car. At this time, the car and the garage are locked and you’ll need to find clues to know what code should be used for the garage’s controls. For now, open the door and go outside.
Once outside, you’ll find a path leading to the left and a tent to the right.
Enter the tent and take the paper clipped onto the edge of the bed to the left and the gas canister on the shelf at the back of the room.
Leave the tent and go back to the left room. Place the two see-through papers on top of each other on the lightbox and take a picture of them. You’ll need to reference this clue later.
Go back outside and go to the left path this time. You won’t be able to go any further from the area at this time. Approach the unit to the right and take out the clue from the lightbox.
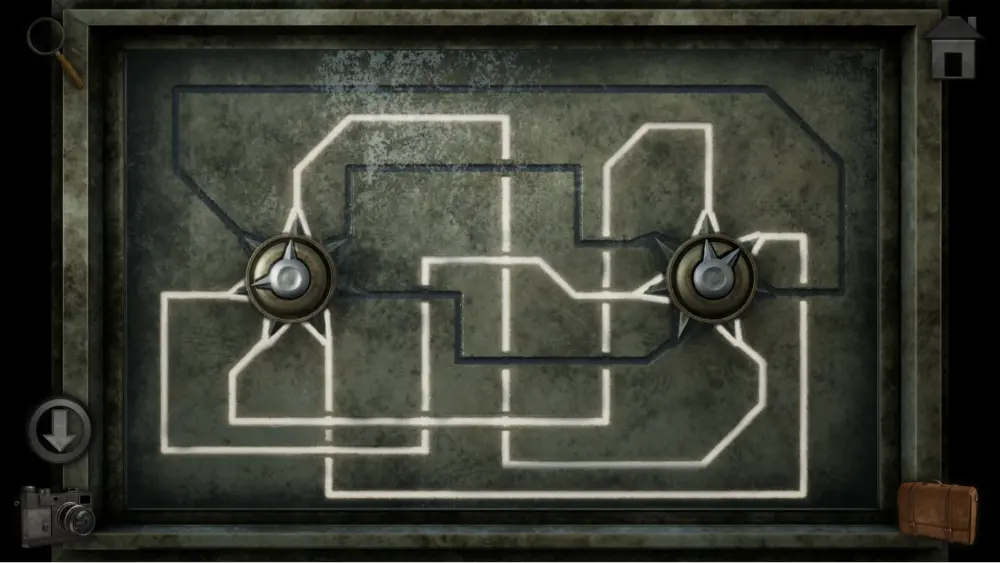
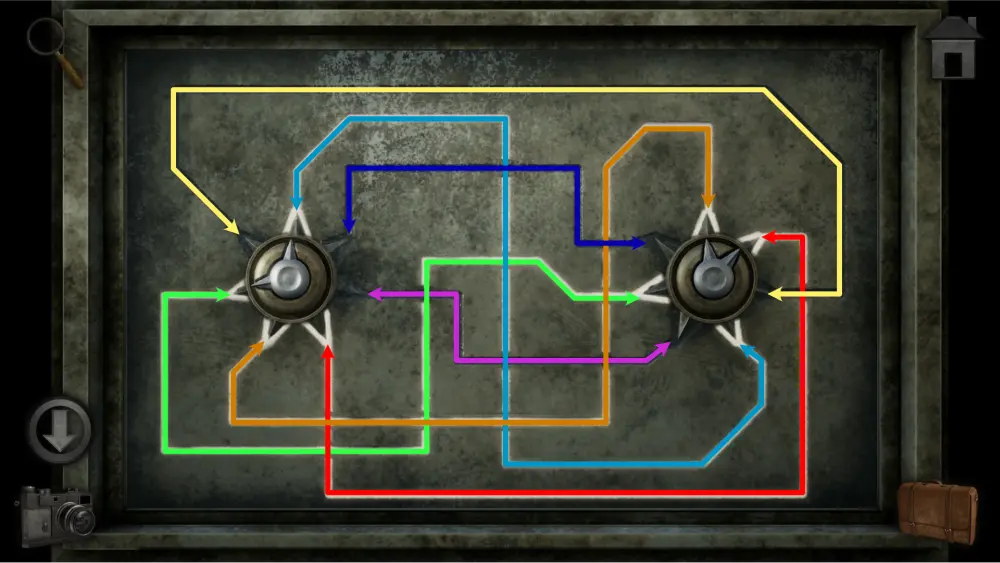
In this puzzle, each knob has lines and can only be rotated in 2-3 ways. You’ll need to rotate them in a way that will comply with the lines on the clue you got from the lightbox.
The solution should look like this:
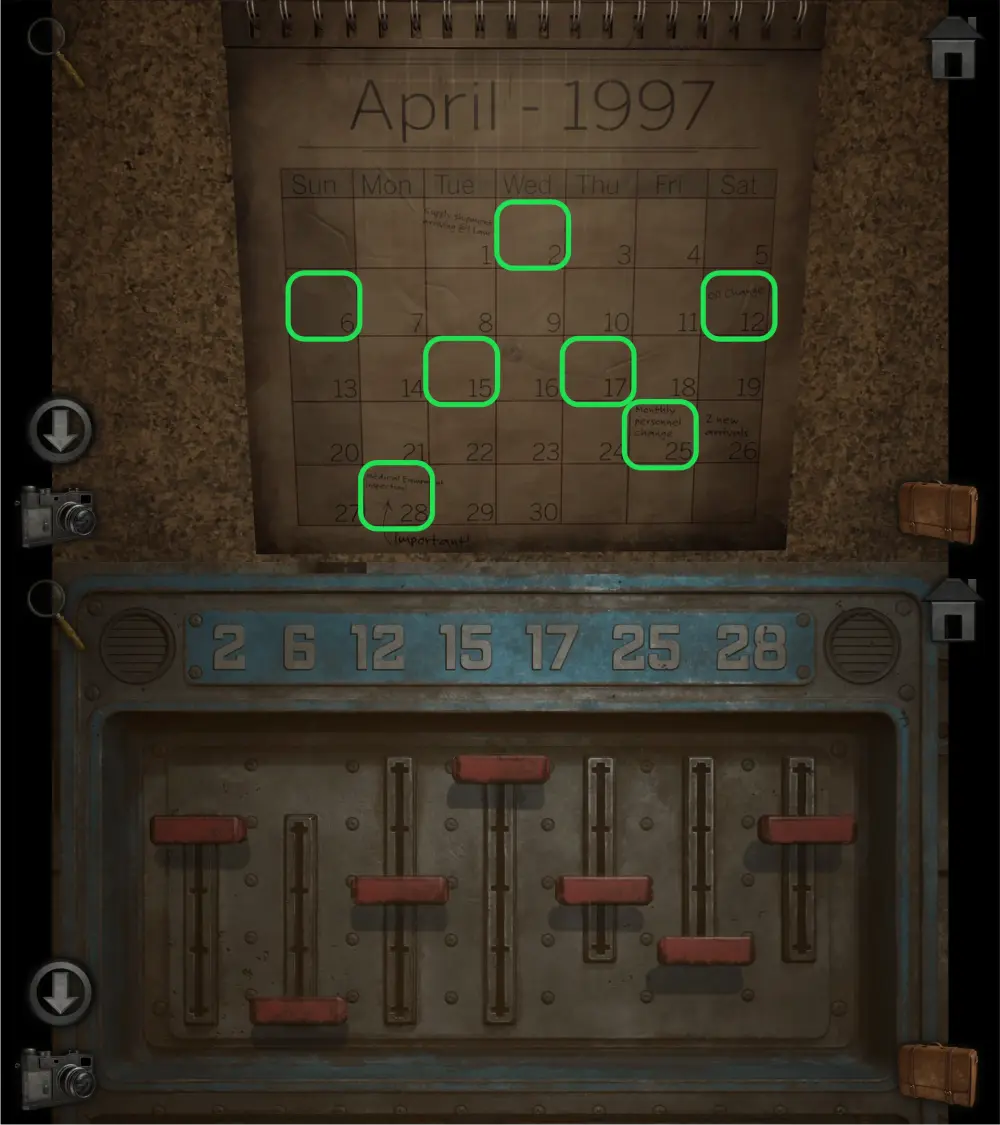
Inside, take the car keys hanging on the key rack and take a picture of the calendar on the corkboard. This calendar serves as a clue for the garage door’s controls.

Go back to the garage and approach the garage door controls. To solve this puzzle, look at the numbers at the top of the controls and look at those numbers’ positions on the calendar. There are 7 columns and 5 rows which is the same as the controls that have 7 levers with 5 levels. For the step-by-step direction below, level 1 is the topmost position while level 5 is the lowest position.
- 2 is at the 4th column and 1st row. Move the 4th lever to level 1.
- 6 is at the 1st column and 2nd row. Move the 1st lever to level 2.
- 12 is at the 7th column and the 2nd row. Move the 7th lever to level 2.
- 15 is at the 3rd column and the 3rd row. Move the 3rd lever to level 3.
- 17 is at the 5th column and the 3rd row. Move the 5th lever to level 3.
- 25 is at the 6th column and the 4th row. Move the 6th lever to level 4.
- 28 is at the 2nd column and the 5th row. Move the 2nd lever to level 5.
The solution should look like this:
Approach the car, open the fuel filler, and pour the gas in. Afterward, use the key on the car door and enter it, ending the game with you driving to F.L.A.R.E’s Lambda building.
And this ends our walkthrough for Meridian 157: Chapter 2. We hope that this article served you well in figuring out the tricky puzzles and helping you move forward in the story. While many questions still remain unanswered, and as our journey to uncovering the truth about F.L.A.R.E.’s project continues, we hope that you check out the next part of our walkthrough which covers Meridian 157 Chapter 3! Did we miss anything? Do you find any of the puzzles too confusing? Do you have any questions about a specific puzzle? Let us know in the comment section below!
Sharon
Monday 24th of July 2023
Playing on MacBook Pro. Cannot combine fishing line with rod or magnet.