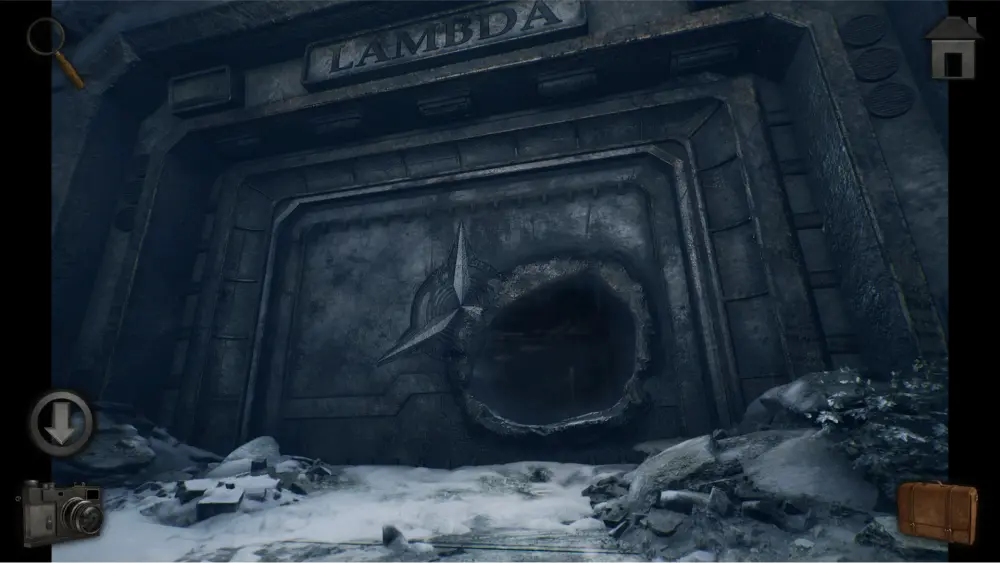
We ended Chapter 2 of Meridian 157 with a car ride on a road through the cold mountains. This road eventually led us to the Lambda building. Aside from the silence and unsettling atmosphere, the eeriness of the place is magnified by the large hole at the entrance. What could have caused this hole and what secrets can we find inside? Is there an evil entity or dangerous monster lurking within? Or will we come out of this place empty-handed? Can we get out of it at all?
Chapter 3 plays the same way as Chapter 2 with mostly the same puzzle concepts shown in previous chapters. However, many of these puzzle concepts have either been combined with others or evolved into a much more complex version. Many items that you can obtain will be used more than once and it is not uncommon to spend a huge chunk of time trying to solve a particular puzzle.
This chapter is the hardest and longest game from the series which is also why our walkthrough is also a lot lengthier than usual. This chapter also has many journals, papers, and documents that can be read which reveal so much more about F.L.A.R.E.’s history and lore.

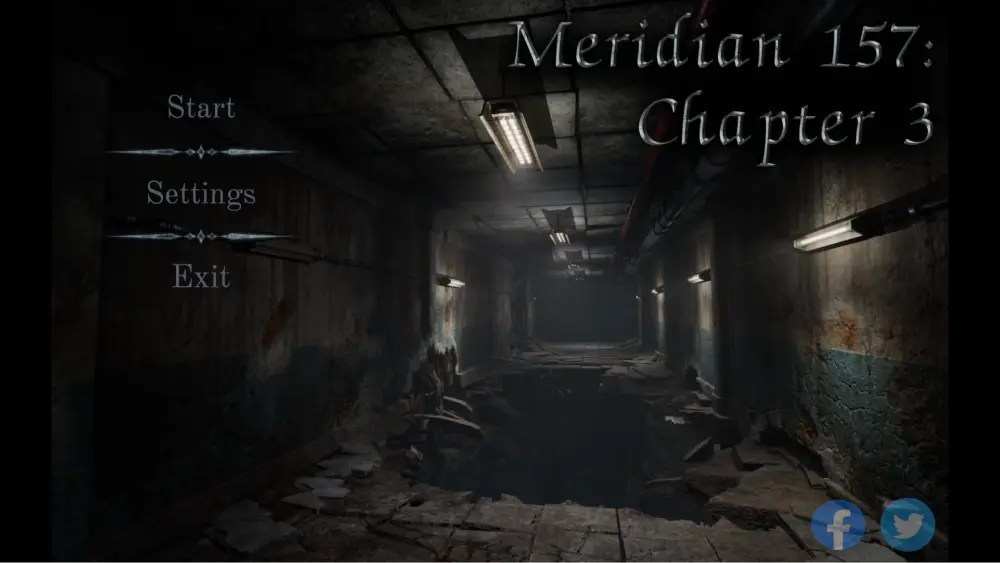
Now, without further ado, let’s dive into the walkthrough for Chapter 3 of Meridian 157!
Unlocking the Main Entrance
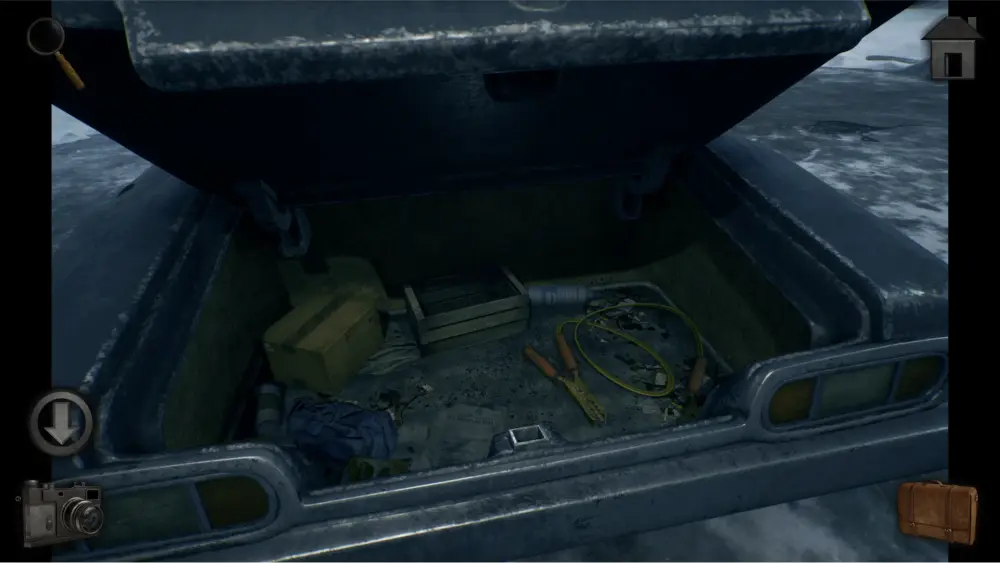
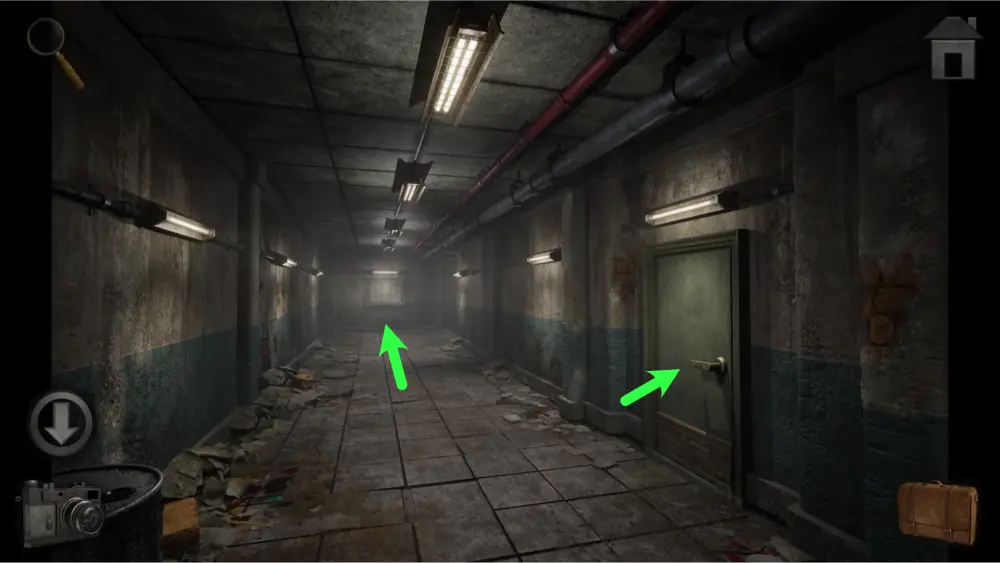
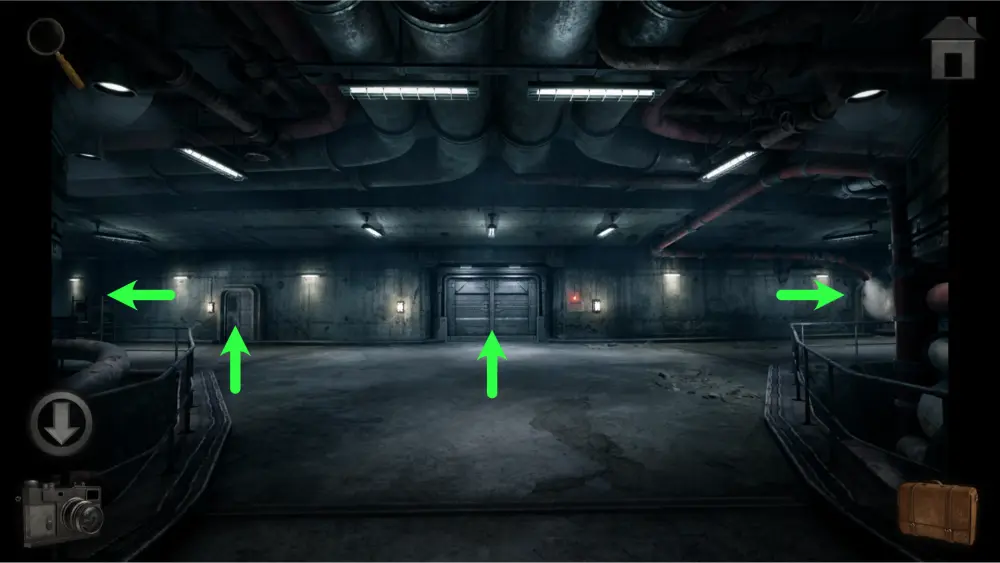
The game starts where you last left off in the previous chapter in front of the Lambda building. Before you step inside, tap the back button, open the trunk of your car, and take the jumper cables.
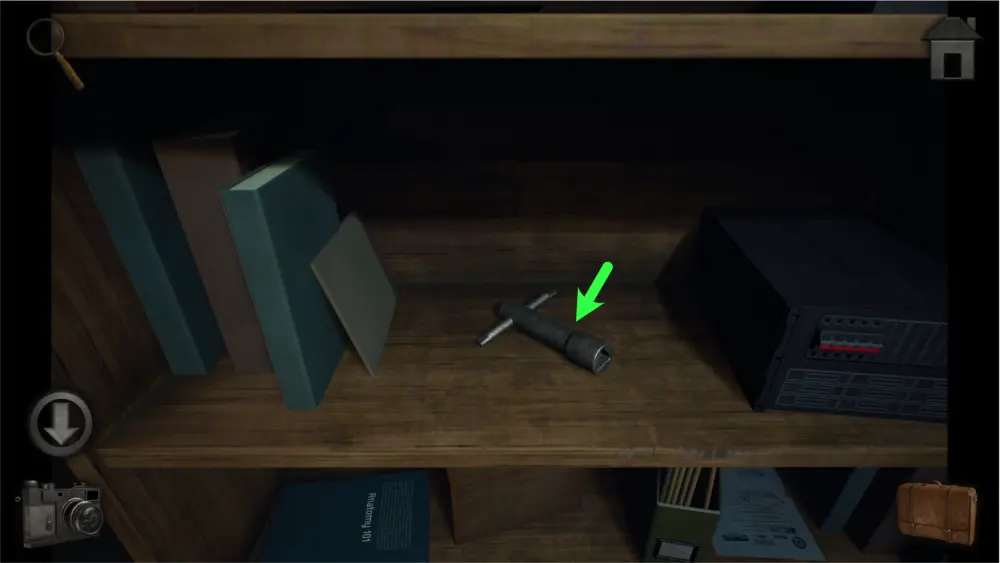
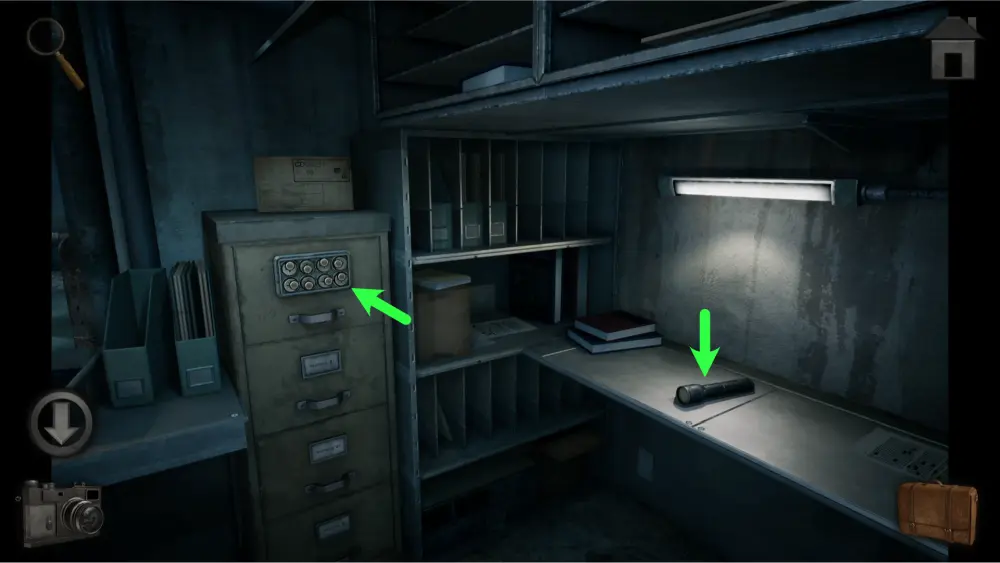
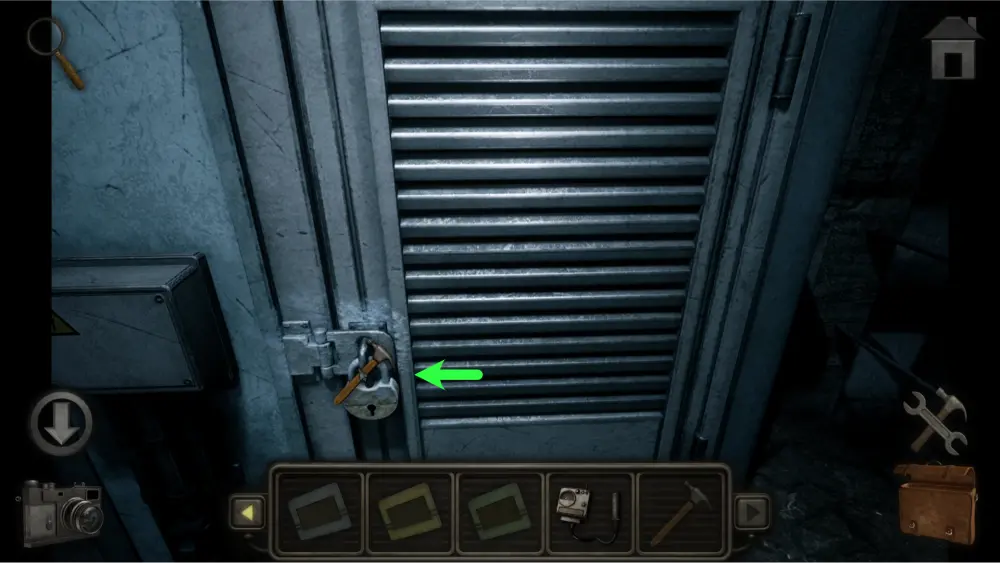
Enter the building and approach the power supply to the right. Take the red wrench on top of it then use the jumper cables to connect the broken cables together. This will light up the building.
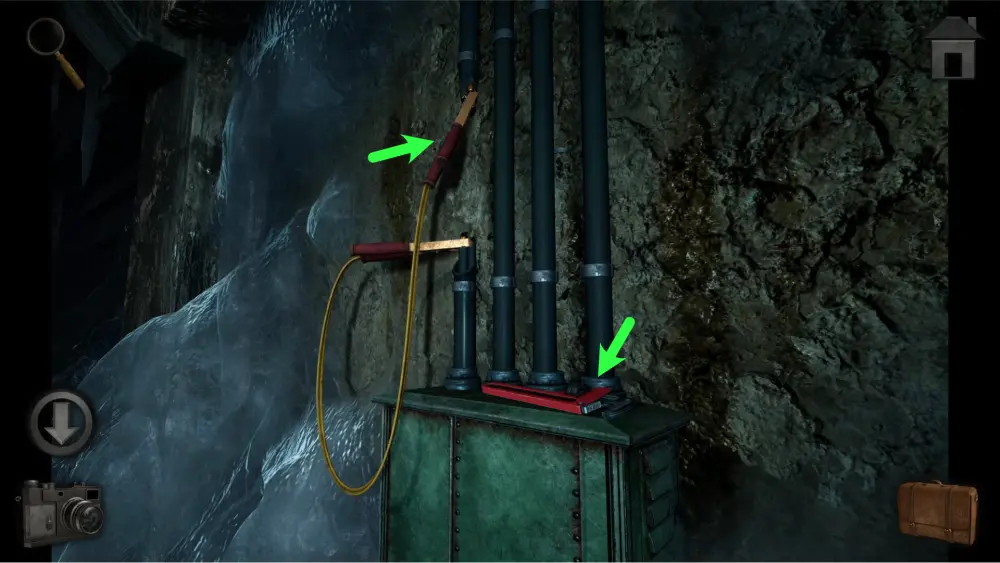
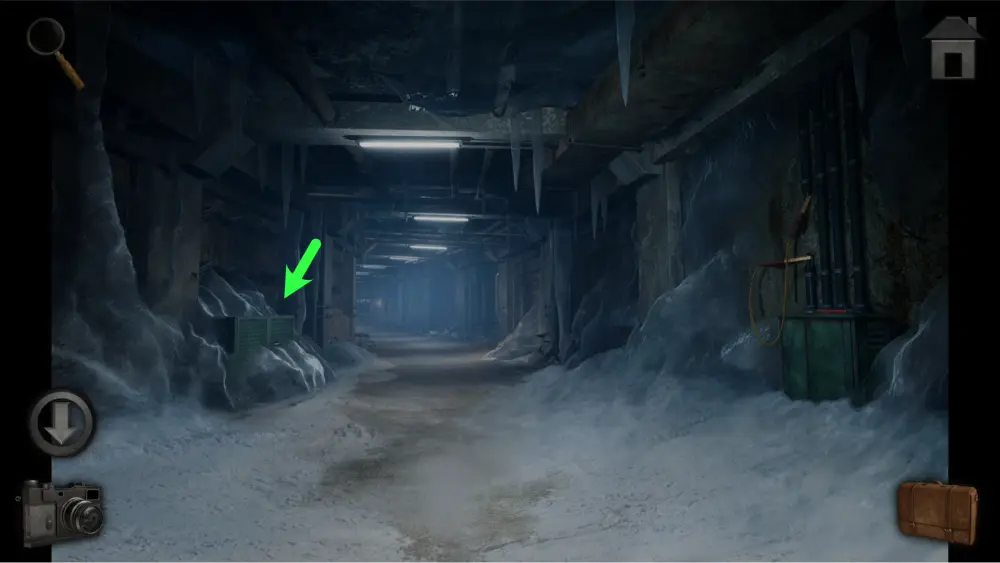
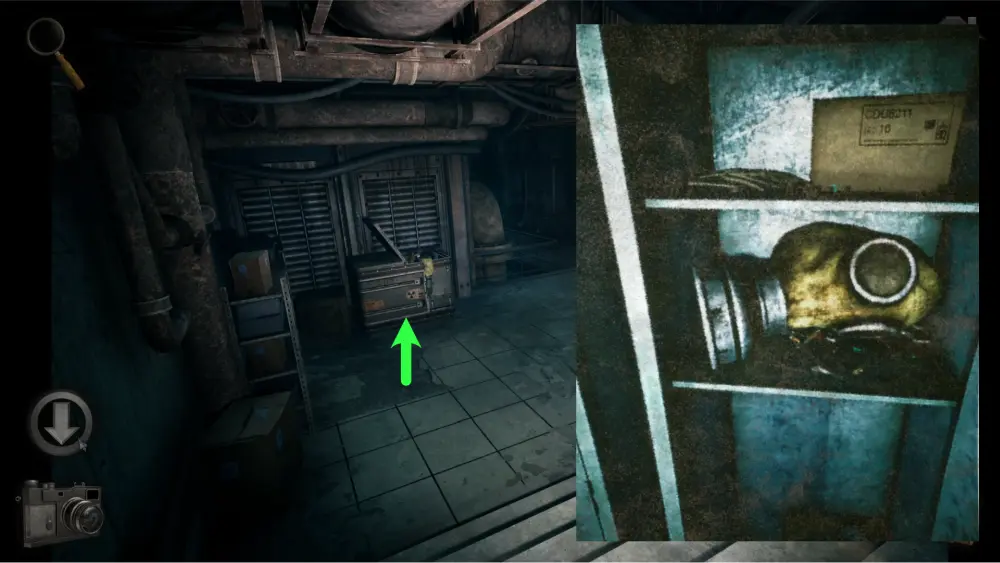
Tap back and you’ll notice a cabinet encased in ice to the left side. You’ll need to come back for this later once you find a blowtorch to melt the ice.
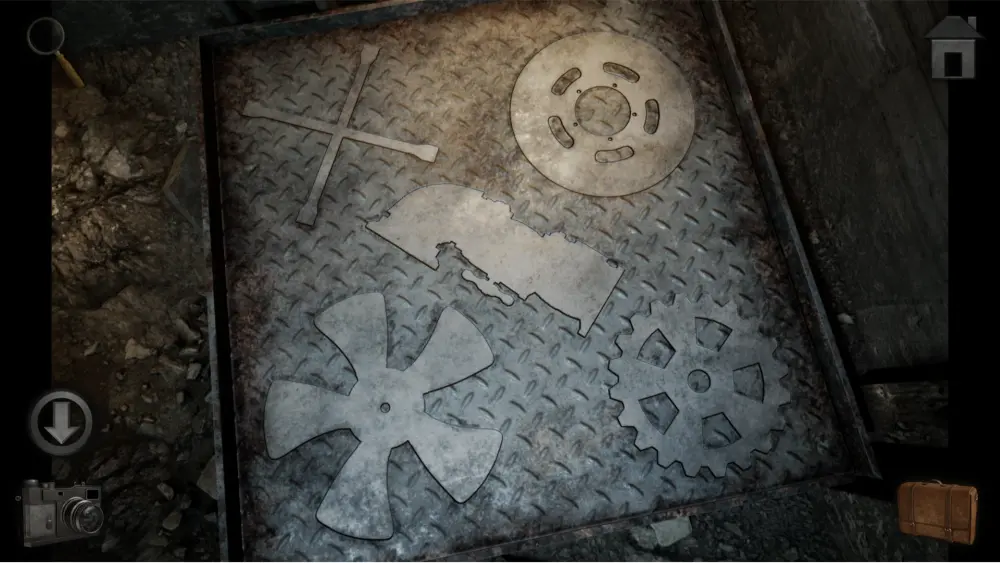
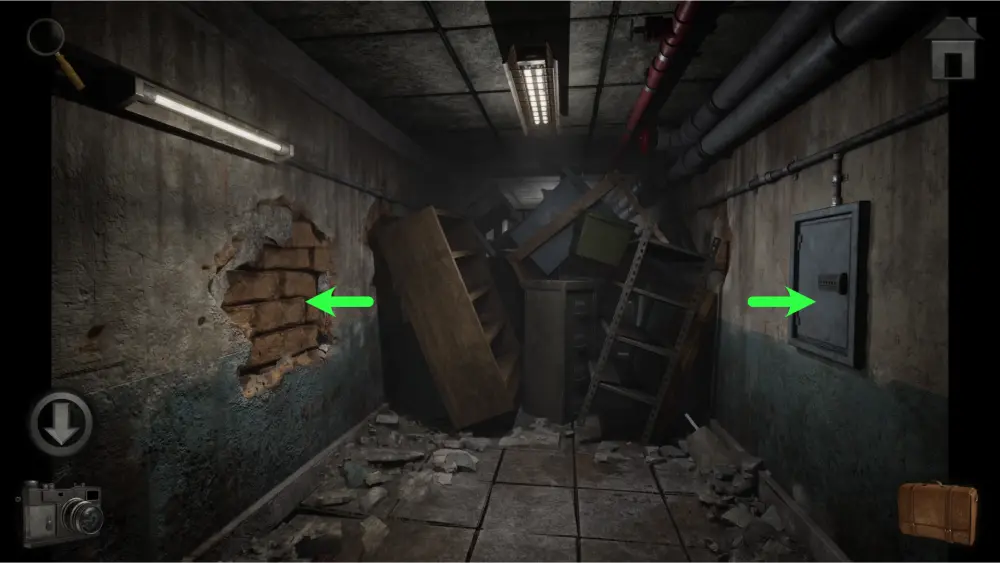
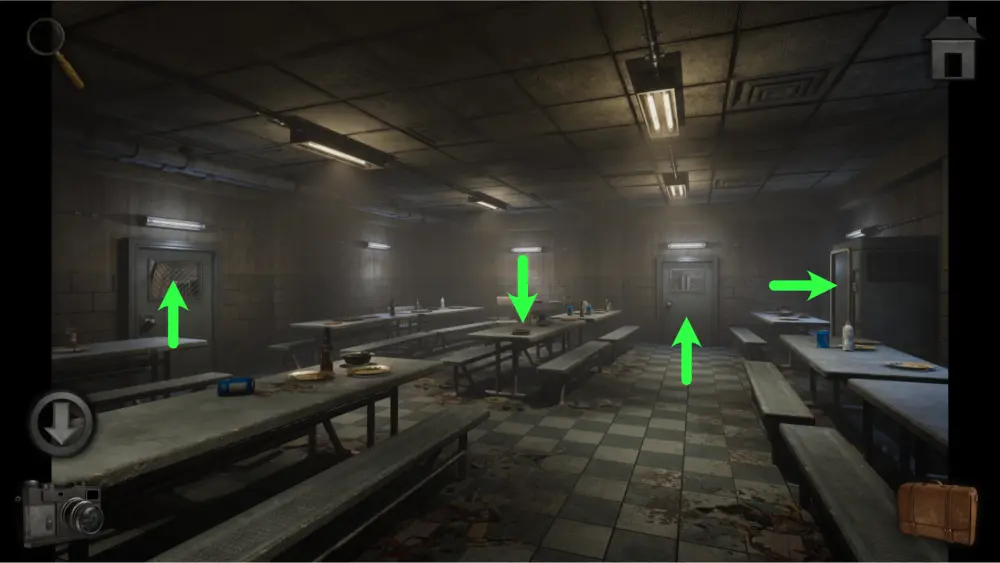
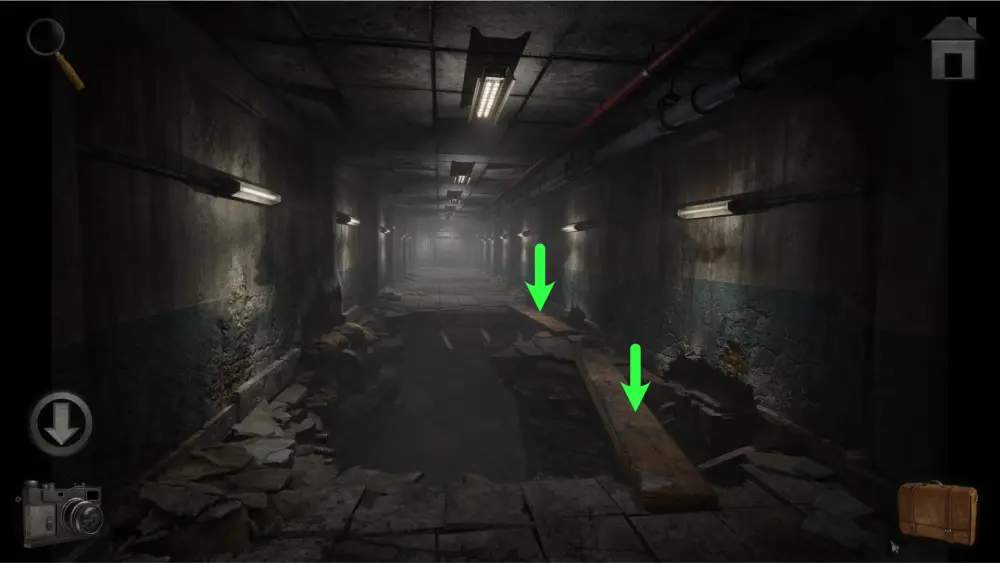
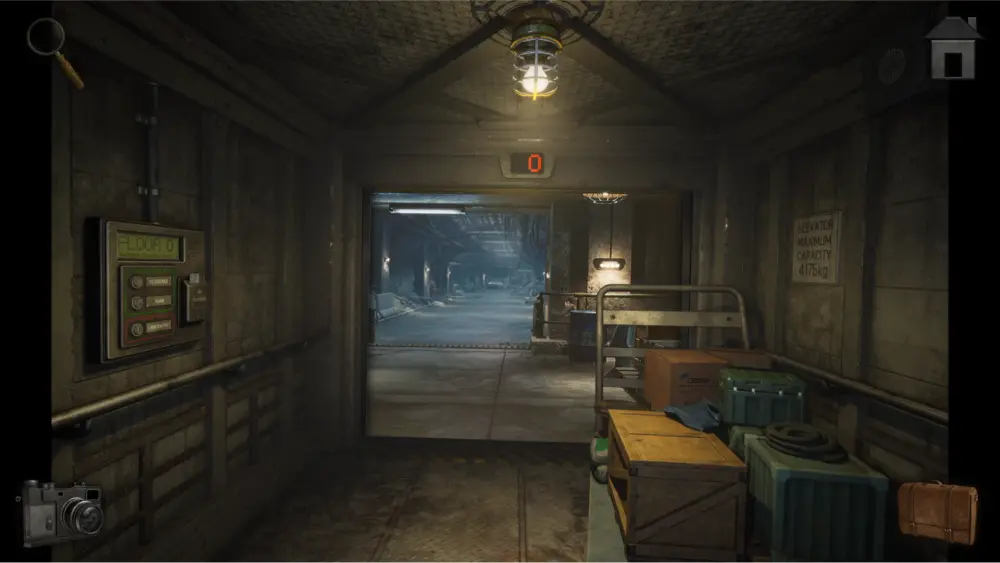
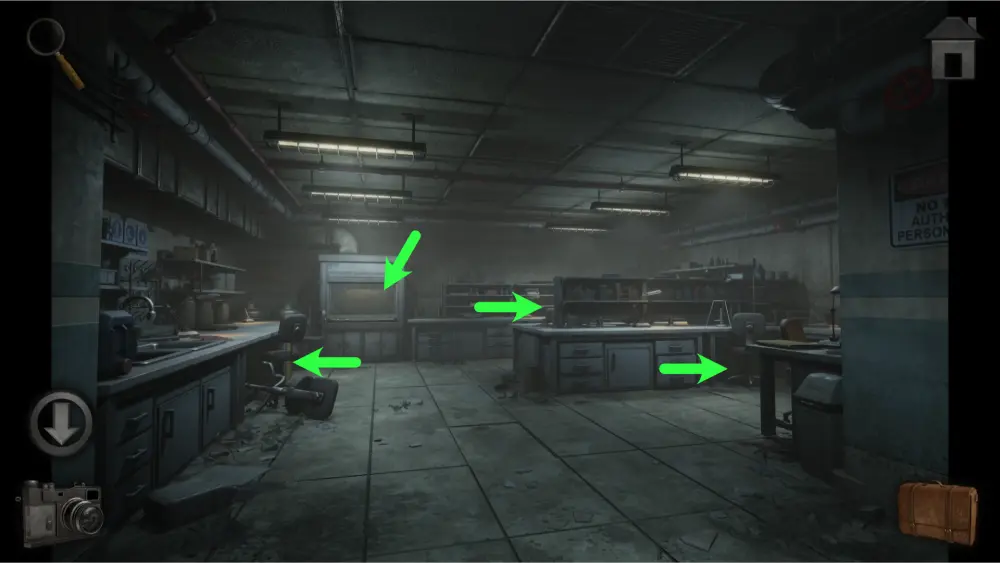
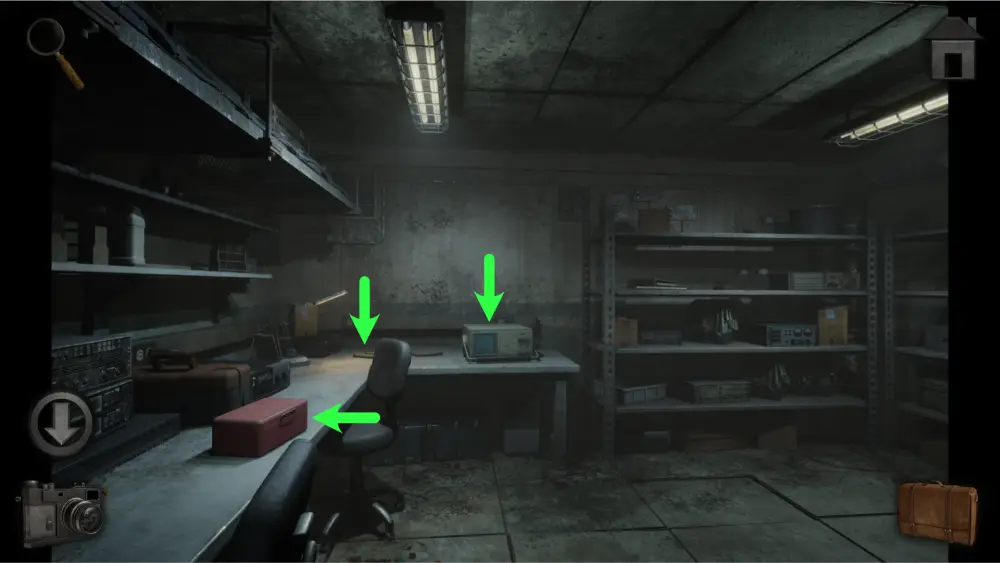
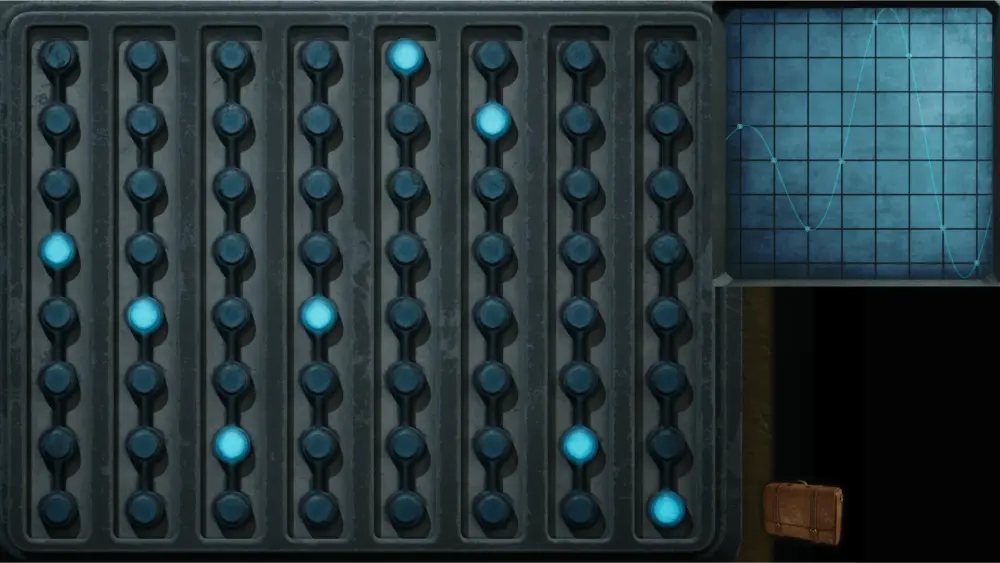
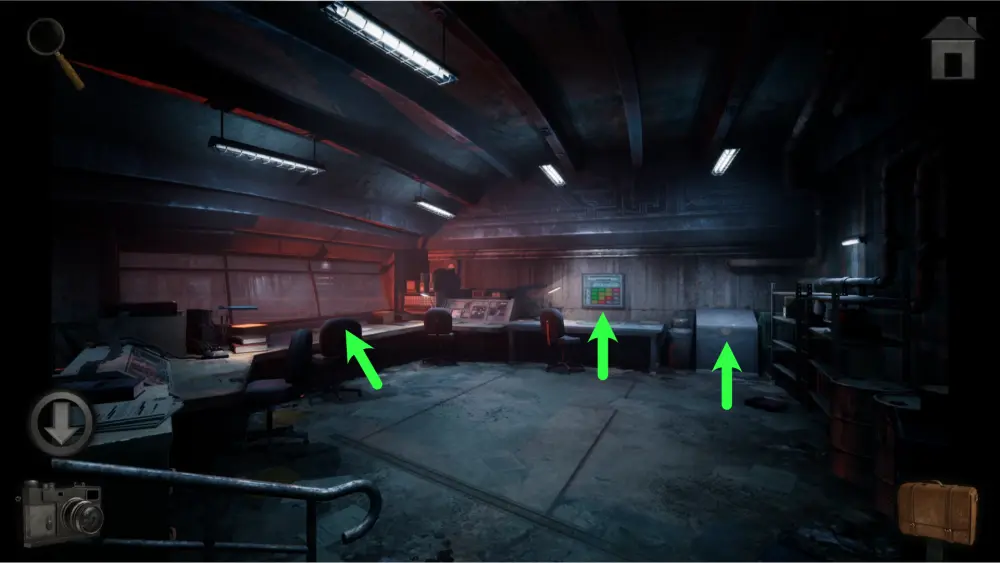
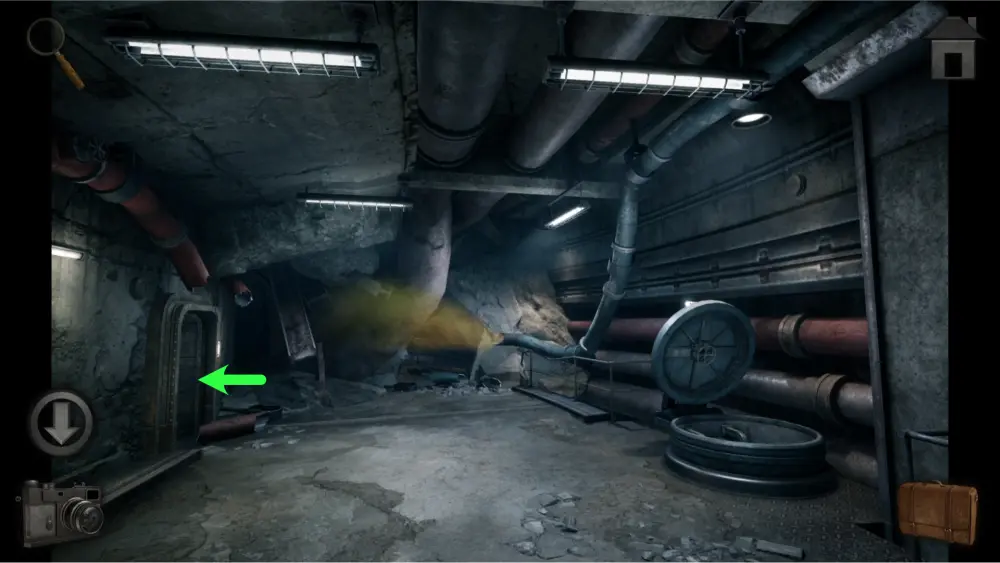
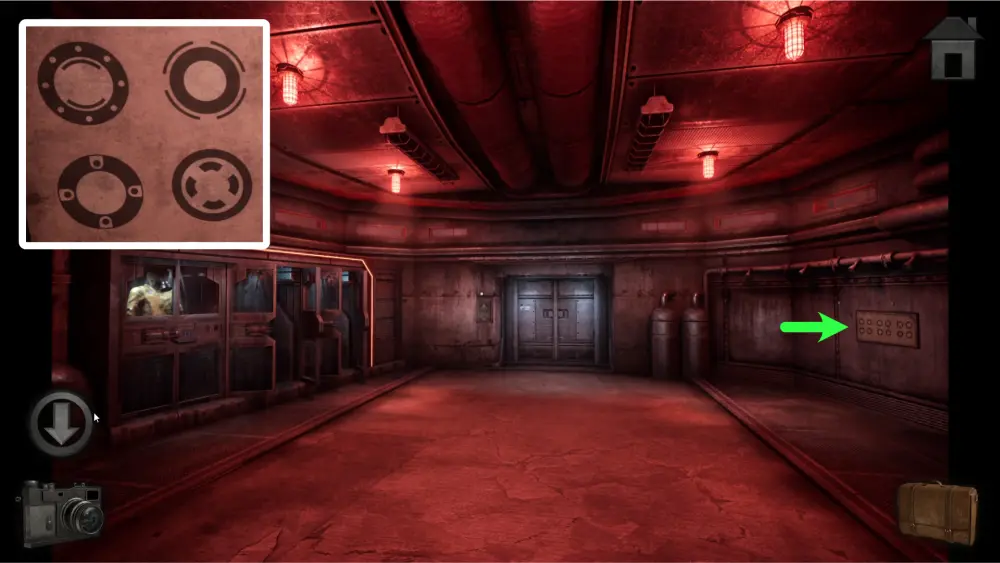
Move two steps forward and you’ll find three points of interest: an area to the right, a room to the left, and a giant weighing scale next to it.
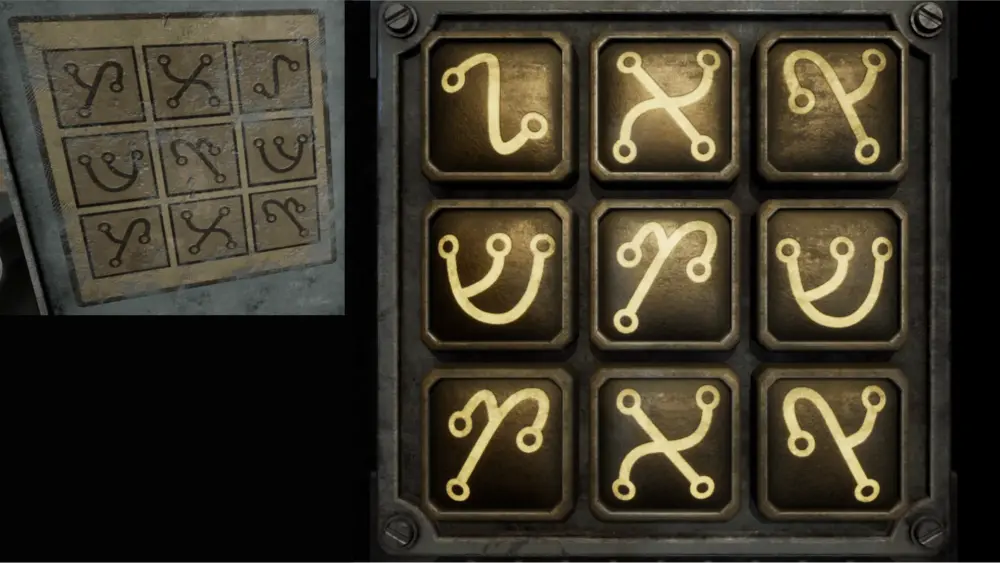
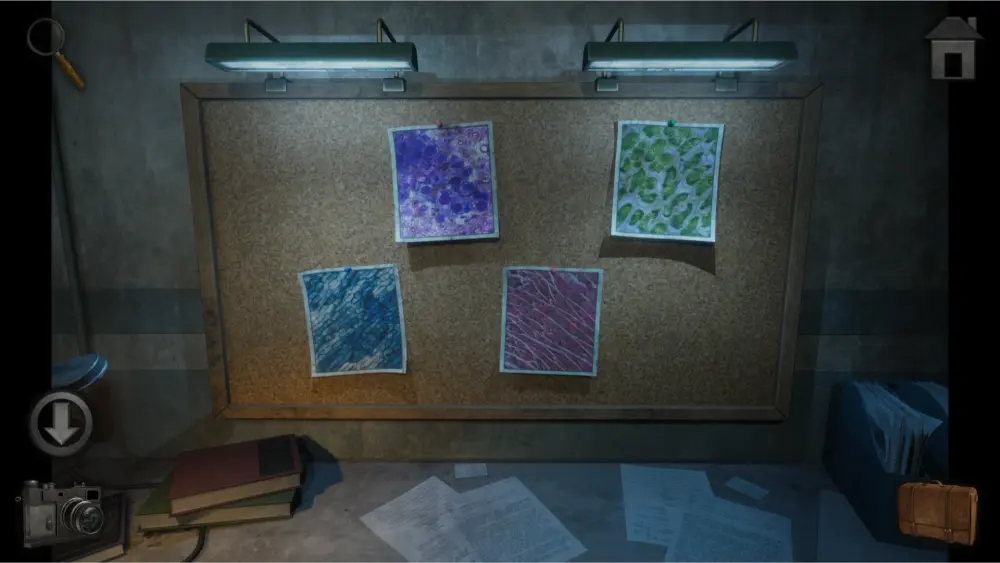
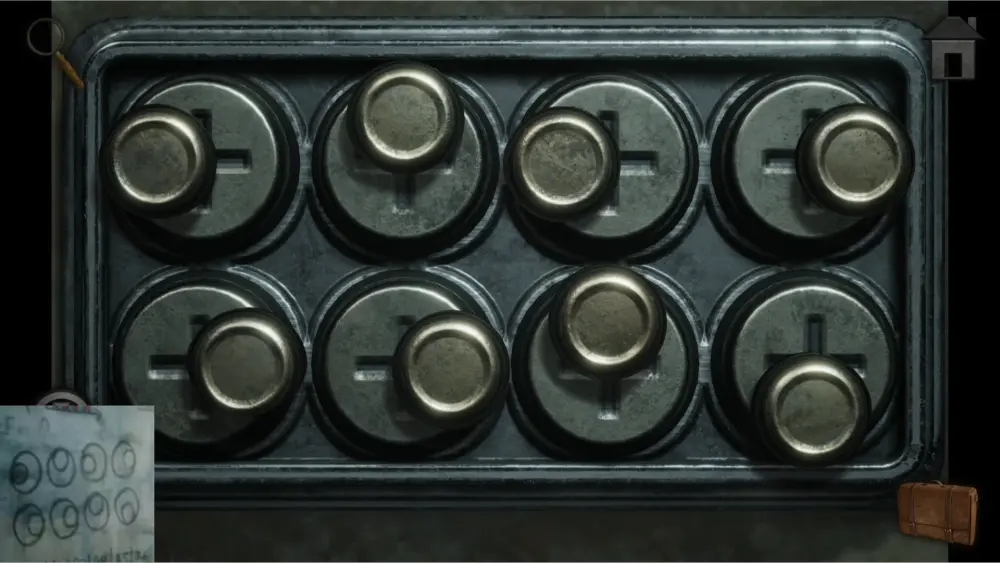
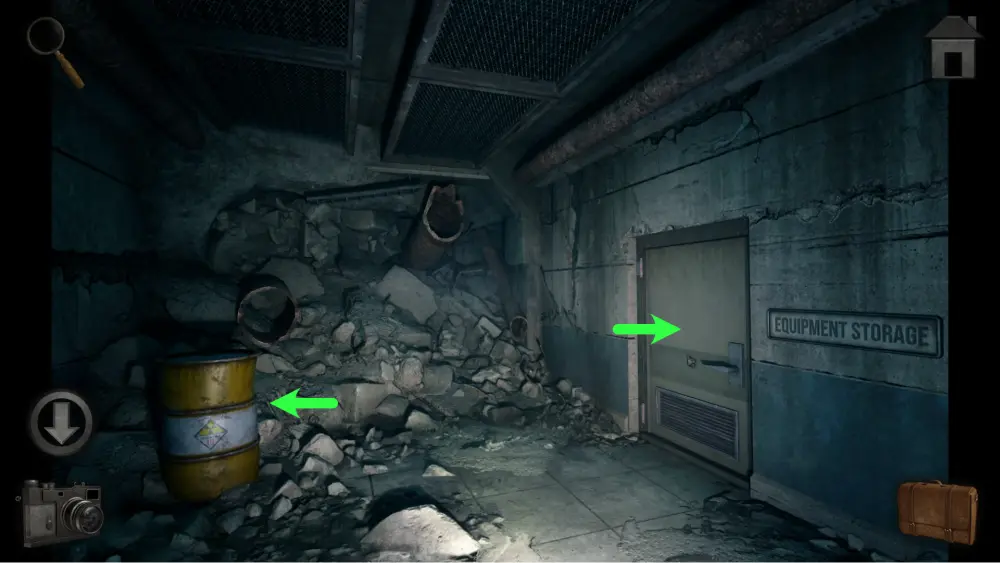
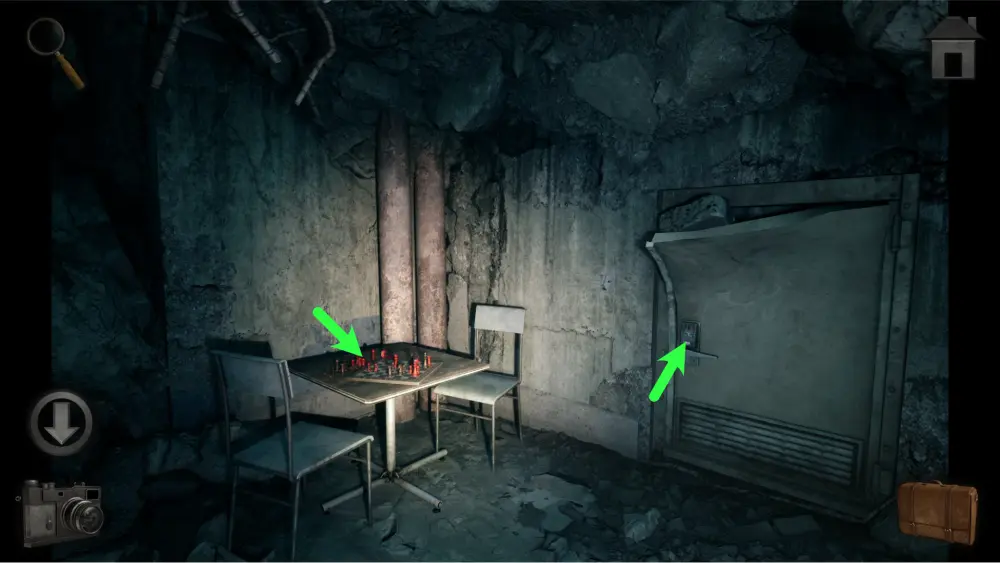
The room to the left is locked at this time so investigate the giant weighing scale for now. You’ll notice that it has various shapes. You’ll need to find items that will fit into those shapes. The middle item consists of 3 items so you’ll need to combine it. At this time, you won’t be able to enter the left room since it’s locked and you’ll need to find its key. Go to the area to the right for now.
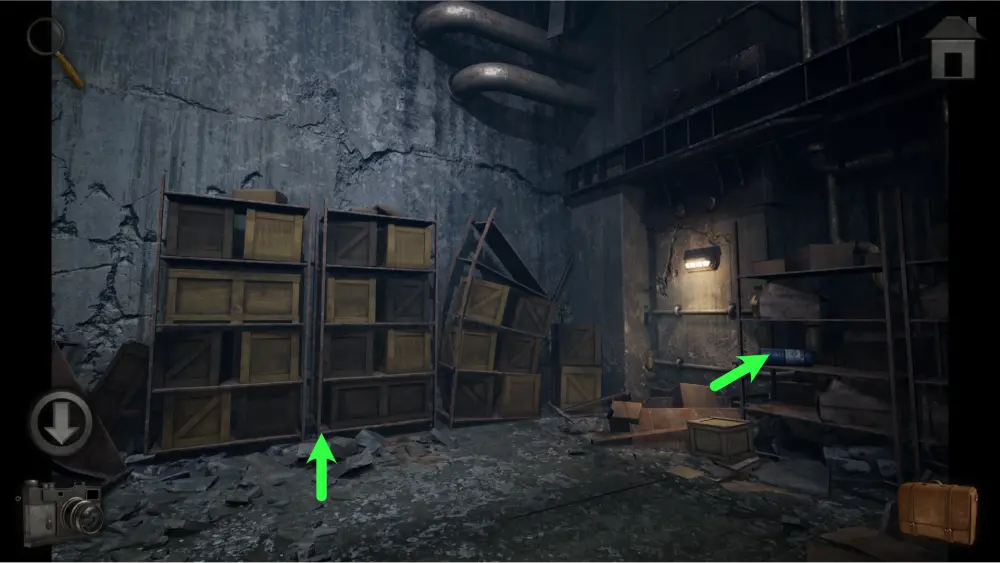
Once there, you’ll find four points of interest: a train car, a train station door, a main entrance gate, and a shelf with crates.
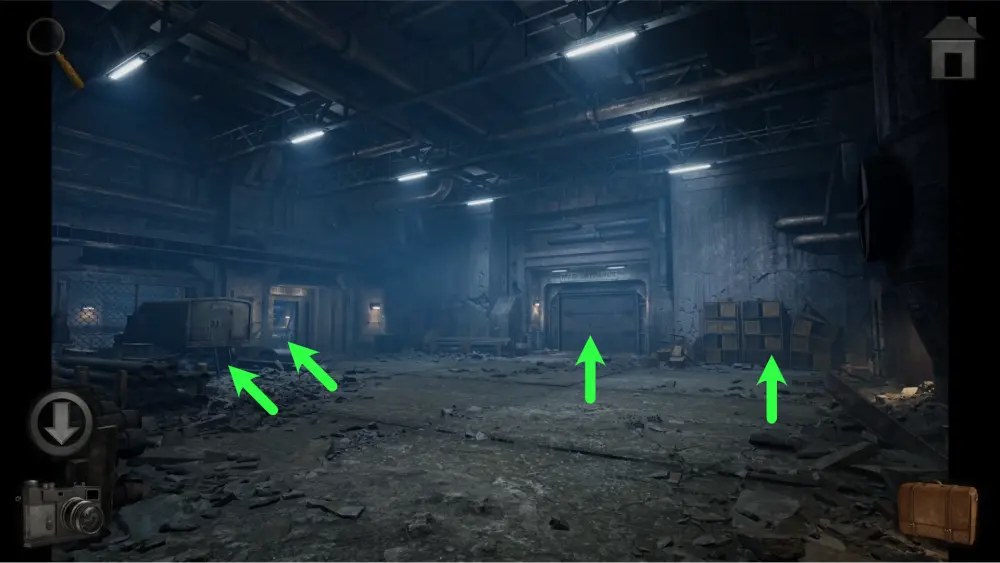
Approach the crates and take a picture of them. This will be a valuable clue for a puzzle. Next, approach the shelf to the right of it and take the blue propane tank.
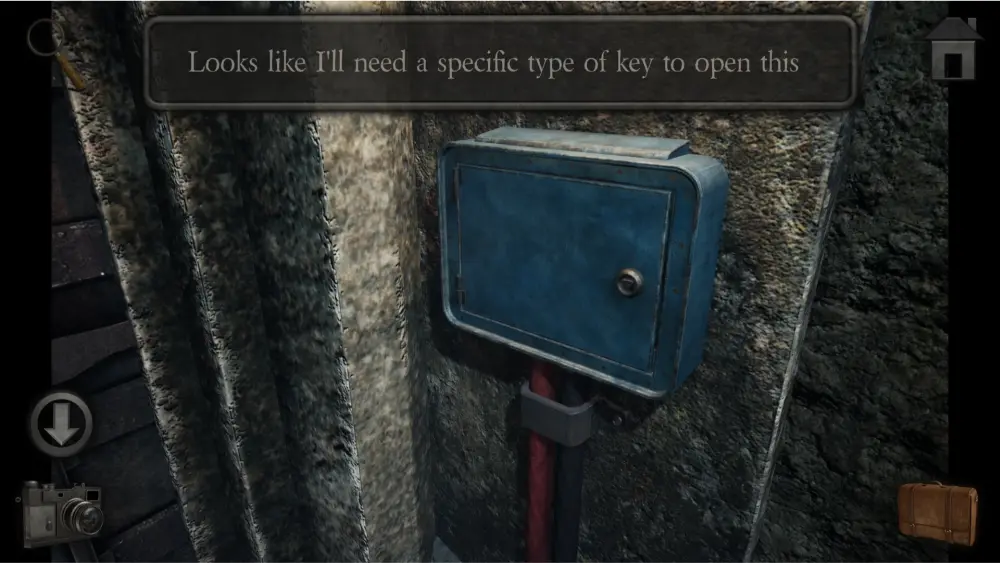
Approach the main entrance gate. Investigate the blue box to the right and you’ll notice that it has an inverted triangle shape on its keyhole. Keep a lookout for keys you might pick up that will have that shape.
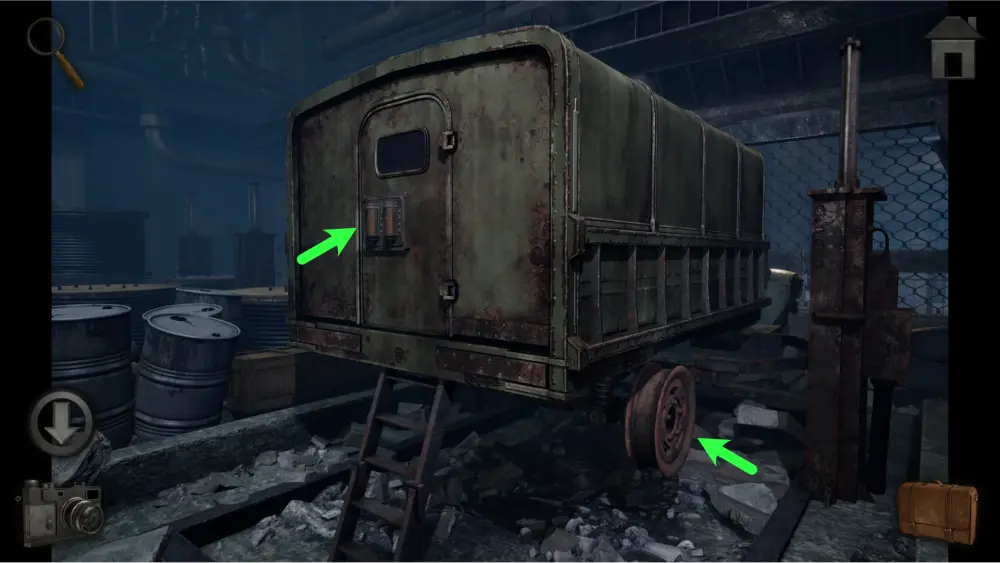
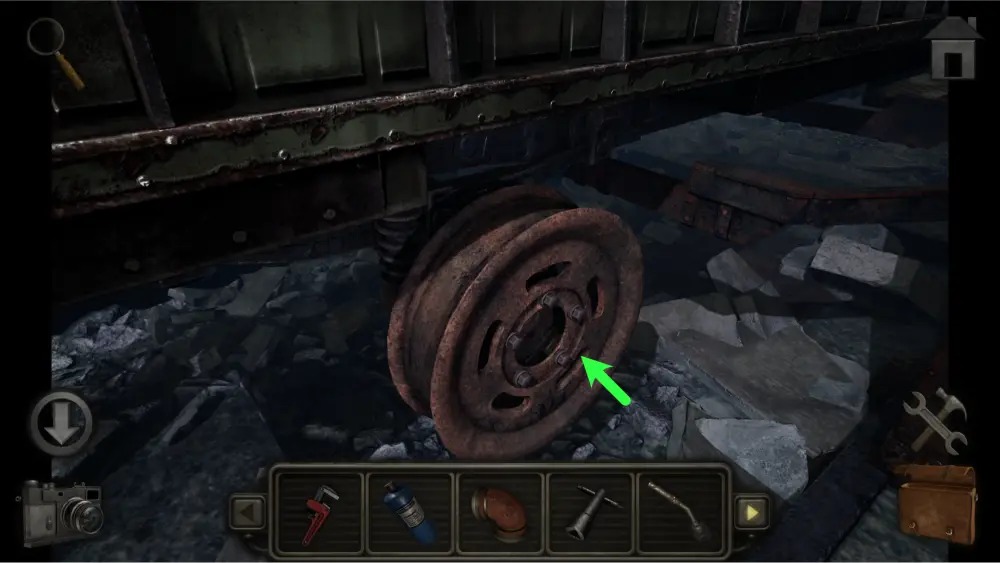
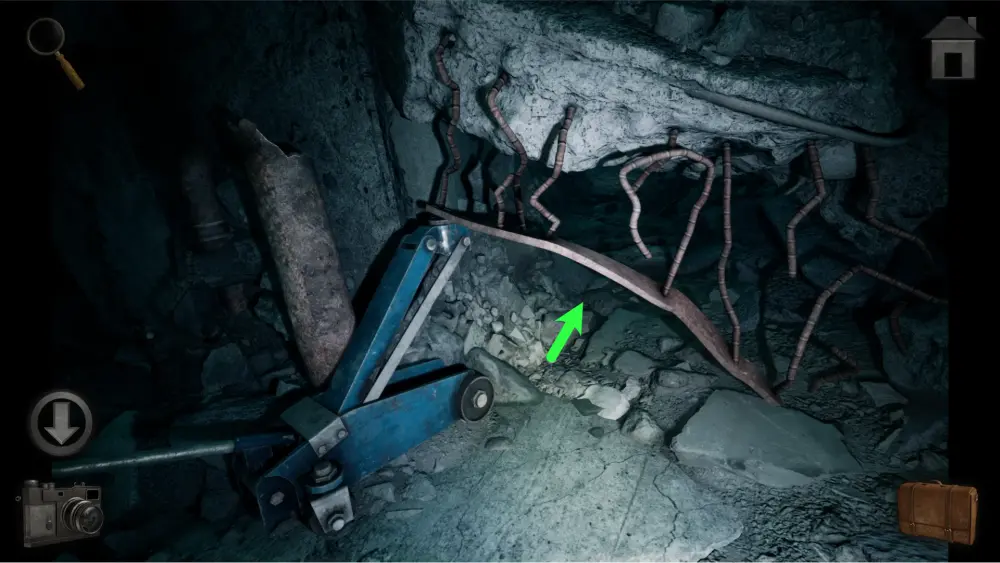
Approach the train car to the right next. The wheel rim is exactly the right shape for the weighing scale but you’ll need to find a lug wrench first to remove it. The door to the train car is locked by a mechanism and you’ll have to find a clue elsewhere before you can solve it.
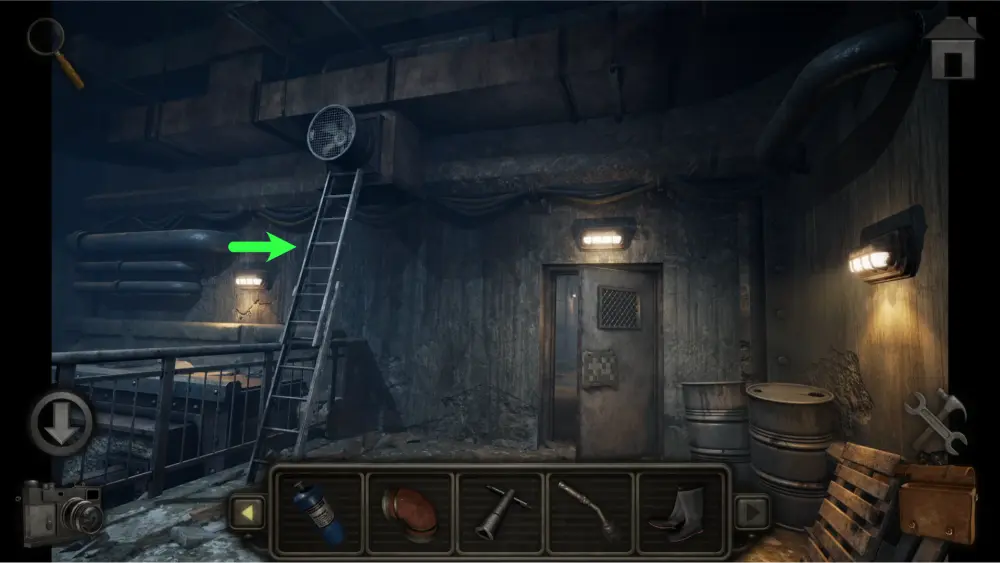
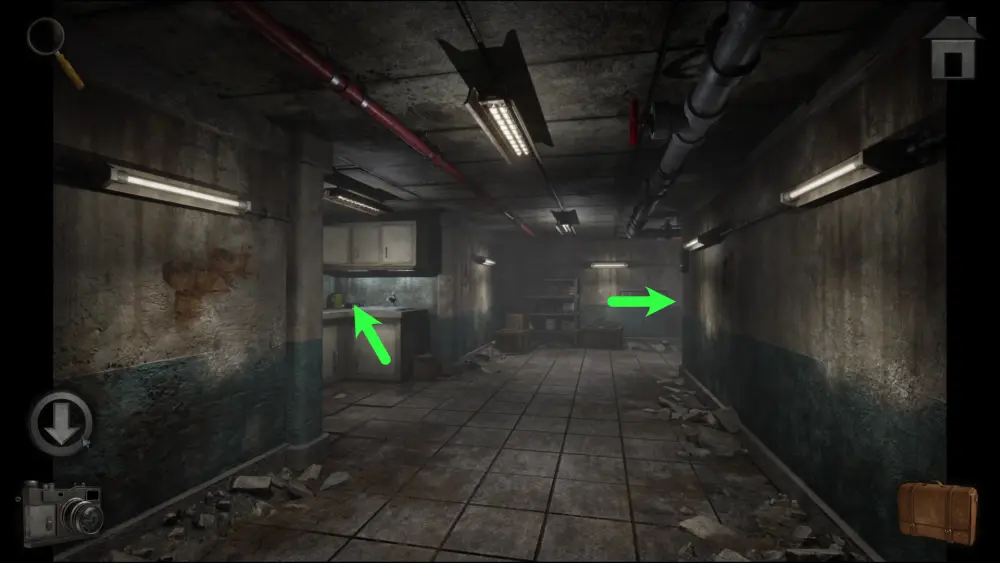
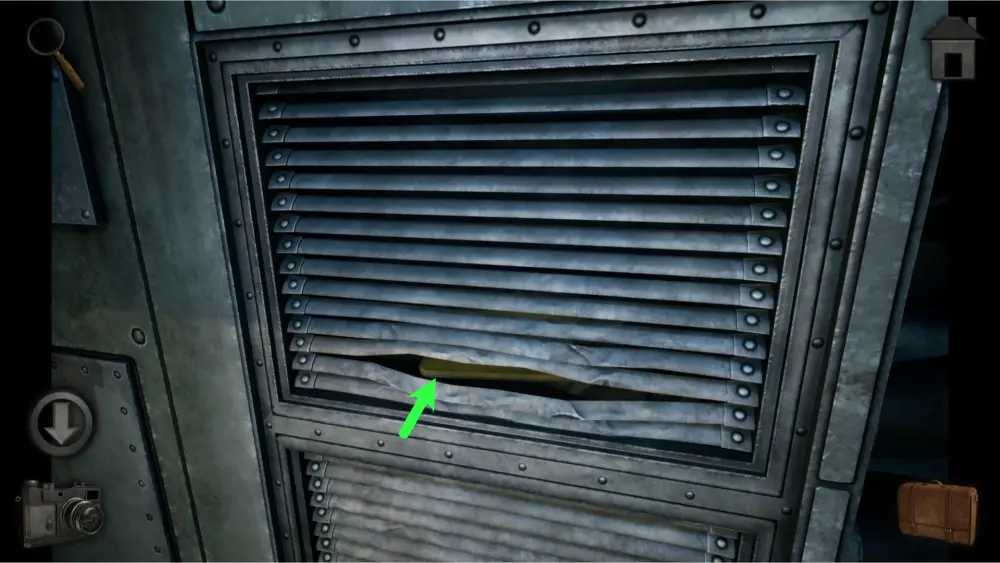
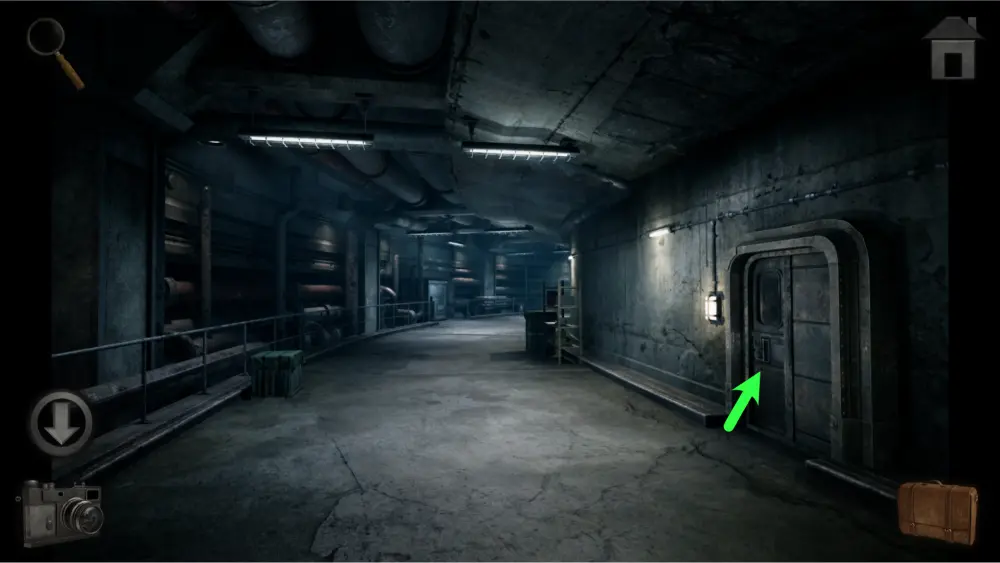
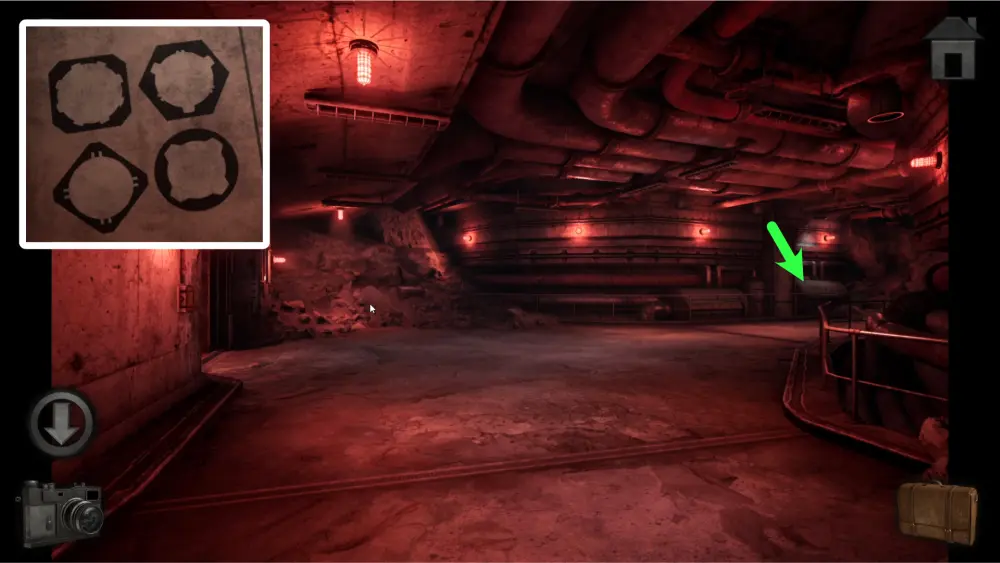
Enter the train station and you’ll see three points of interest: a ladder to the left, an air vent in the middle, and a door to the right.
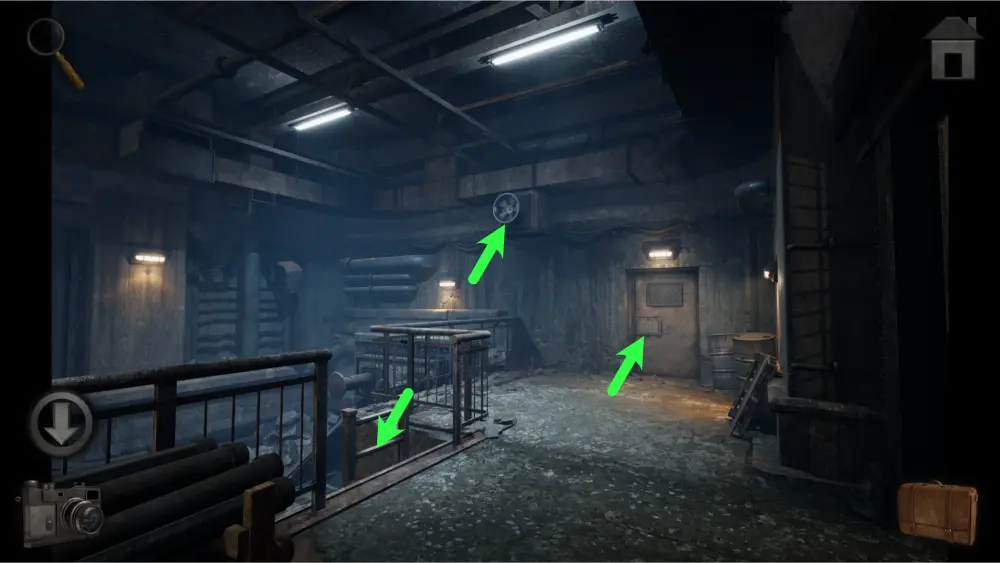
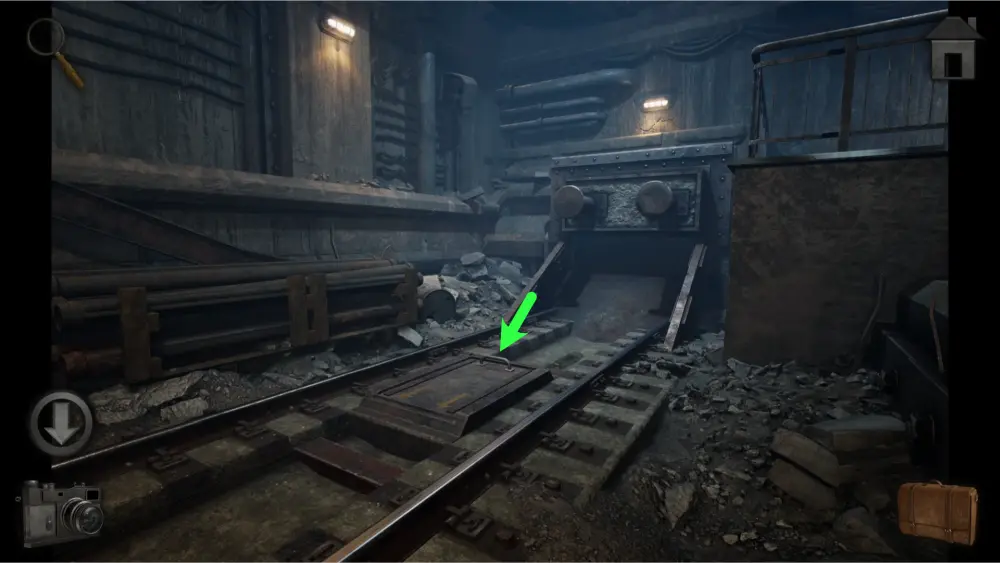
Go down the ladder and you’ll find a hatch on the rails. It’s rusty and cannot be opened at this time. You’ll need to find grease first to loosen it up.
At this time, you won’t be able to reach the air vent without a ladder. Approach the door to the right for now.
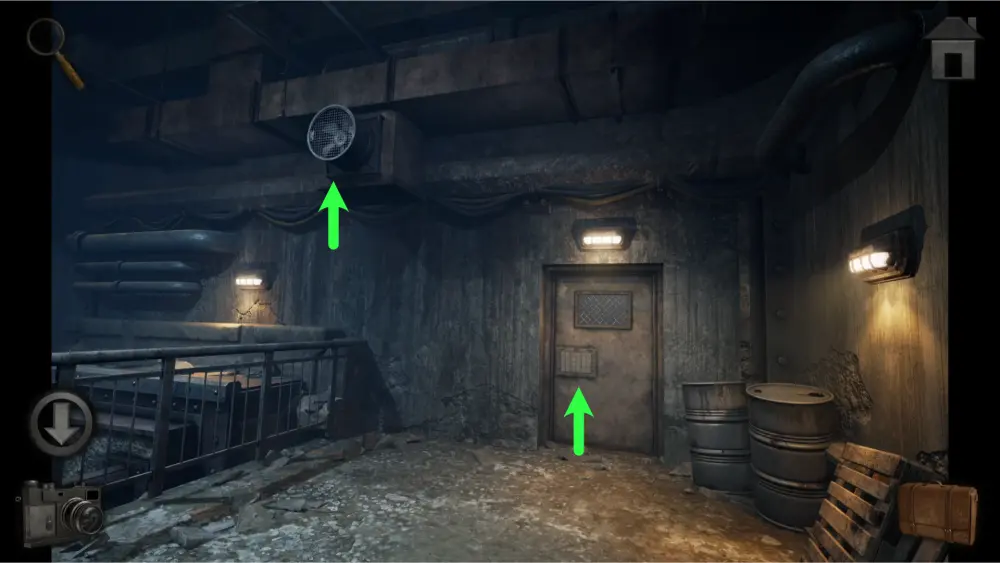
The crates are your clue for the door. The squares must have the same shades as the crates. For the third shelf, since the most logical position of those two fallen crates is with the bottom one to the left and the top one to the right, copy that order.
The end result should look like this:
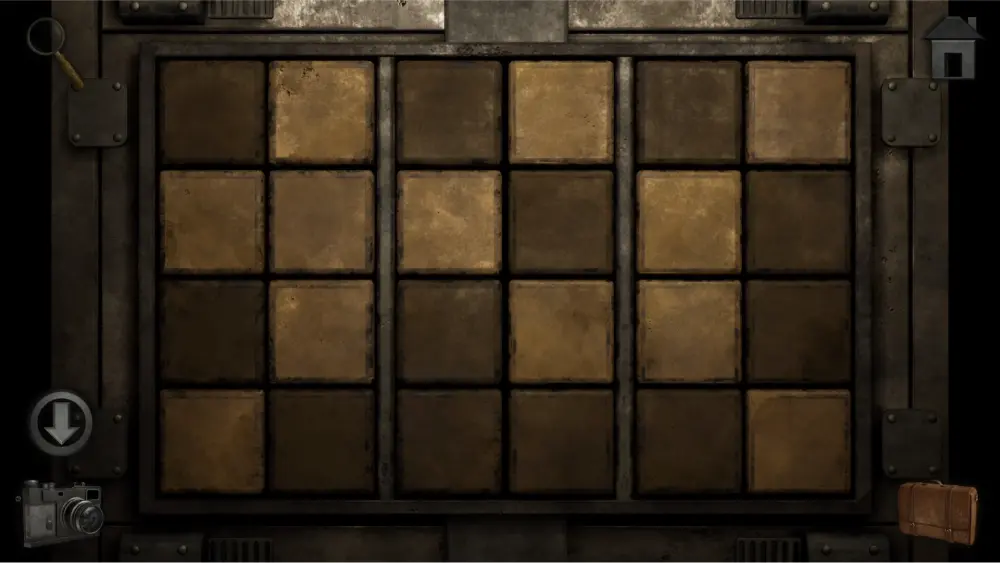
However, this puzzle is a lot more complicated than just simply pressing the squares. You’ll need to hold down and drag the squares to change their color in an order that will result in the same shades as the crates. There may be several solutions to these three puzzles, but this is how we solved them:
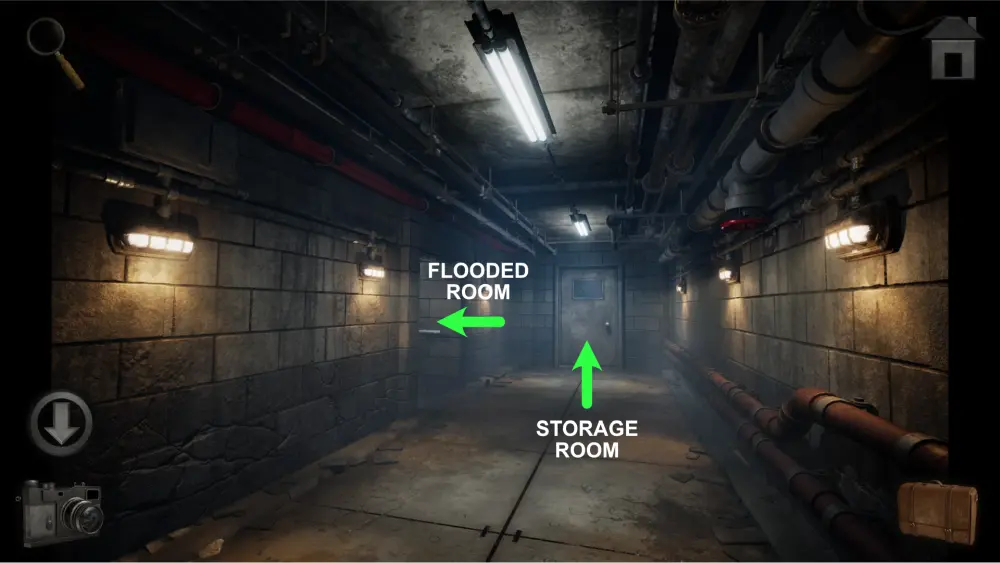
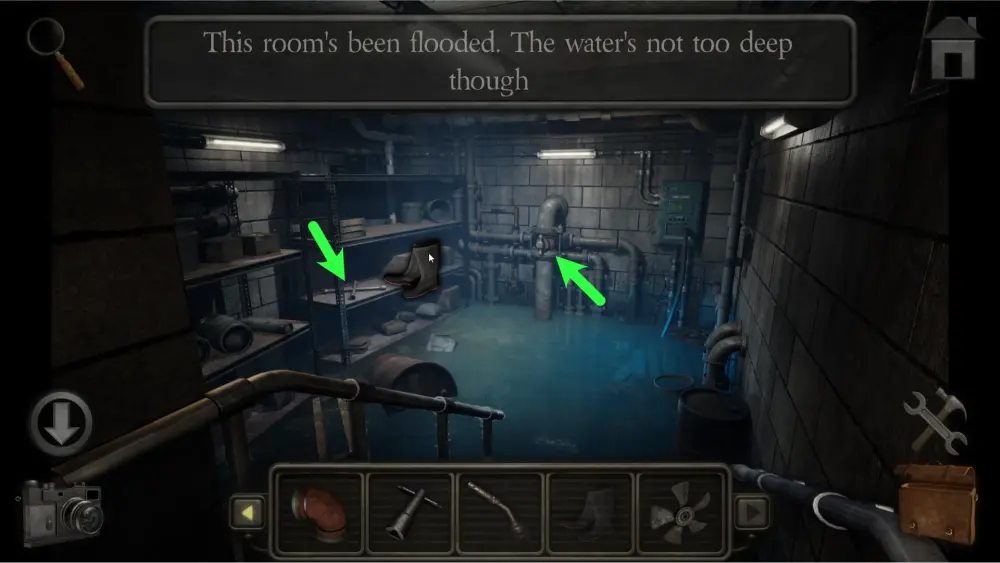
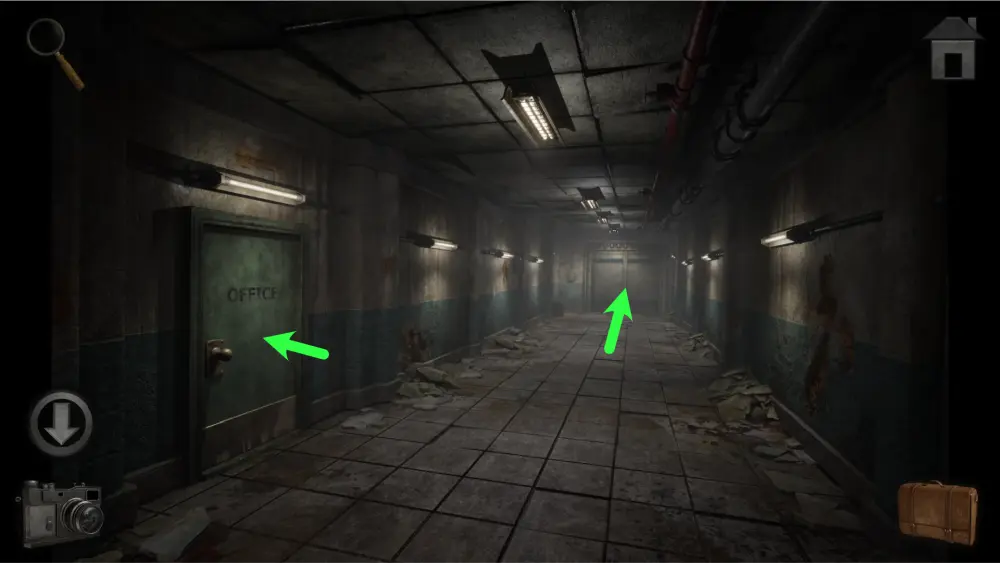
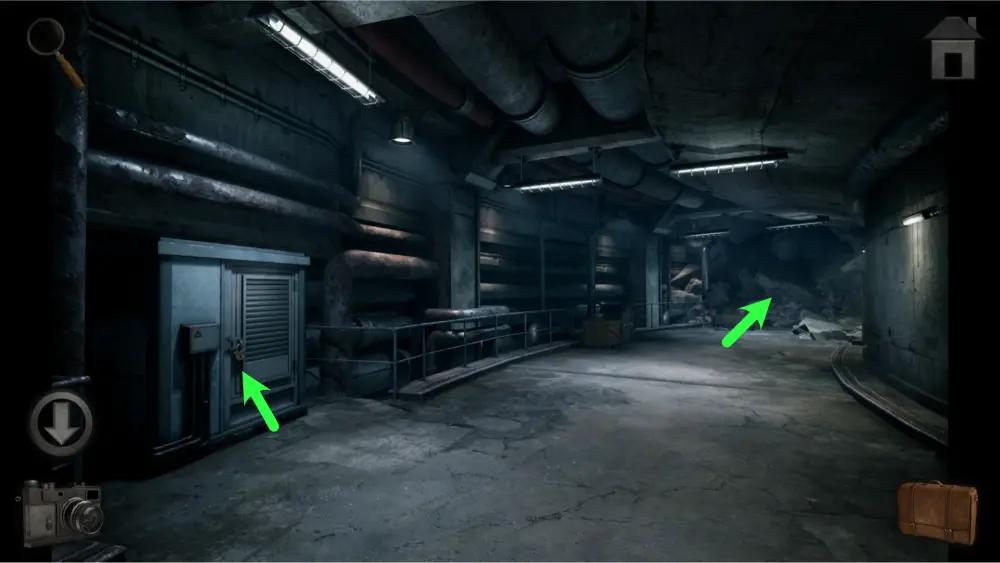
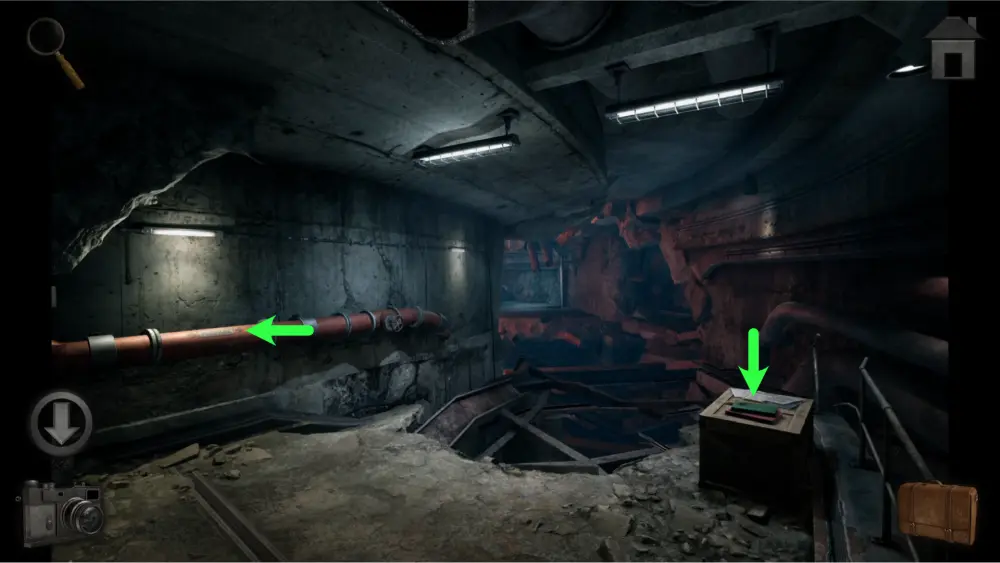
Enter the door and you’ll find a hallway to the left and a door straight ahead. The hallway leads to a flooded room charged with electricity. You’ll need a pair of rubber boots before you can safely investigate the area. Enter the door for now.
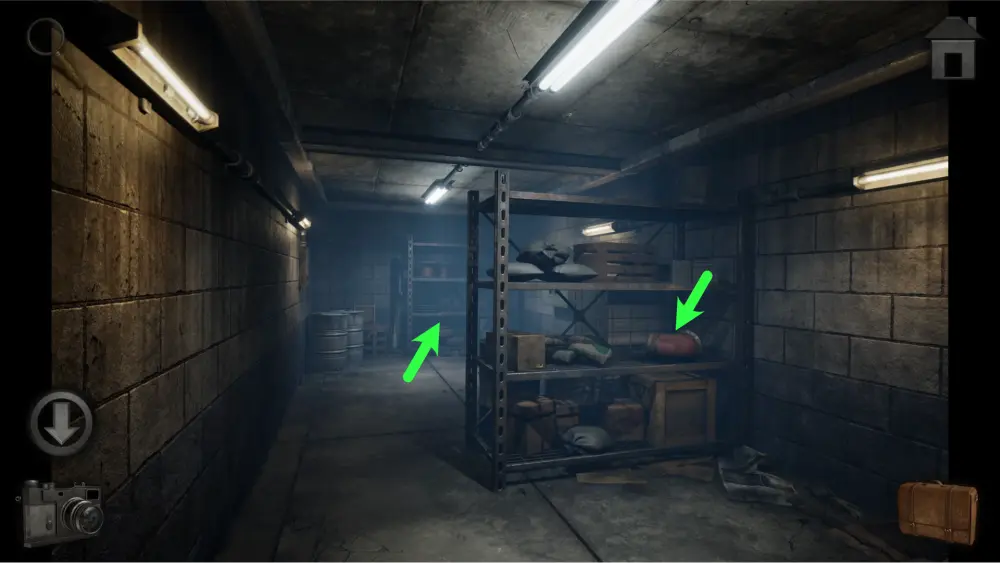
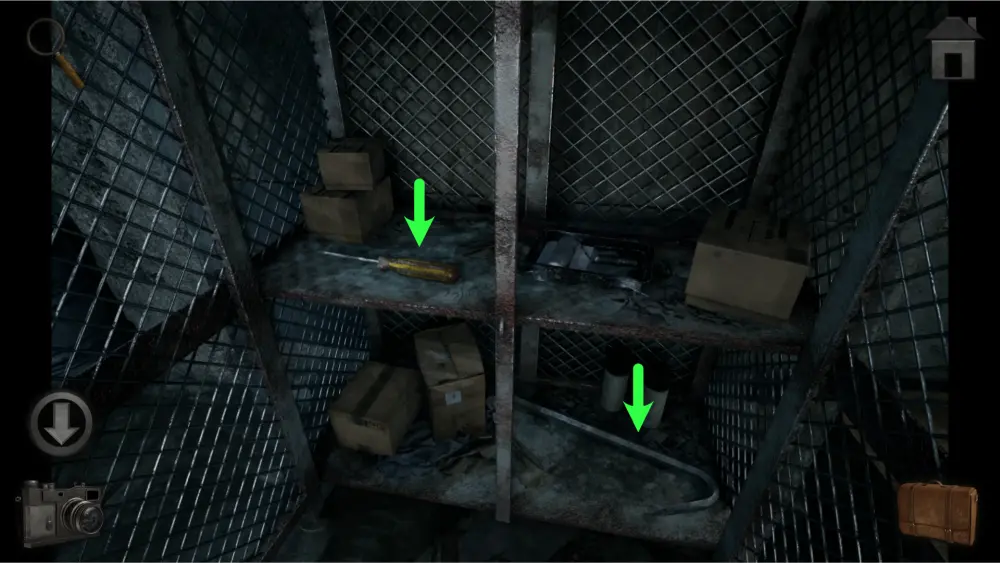
Once inside, take the pipe on the shelf.
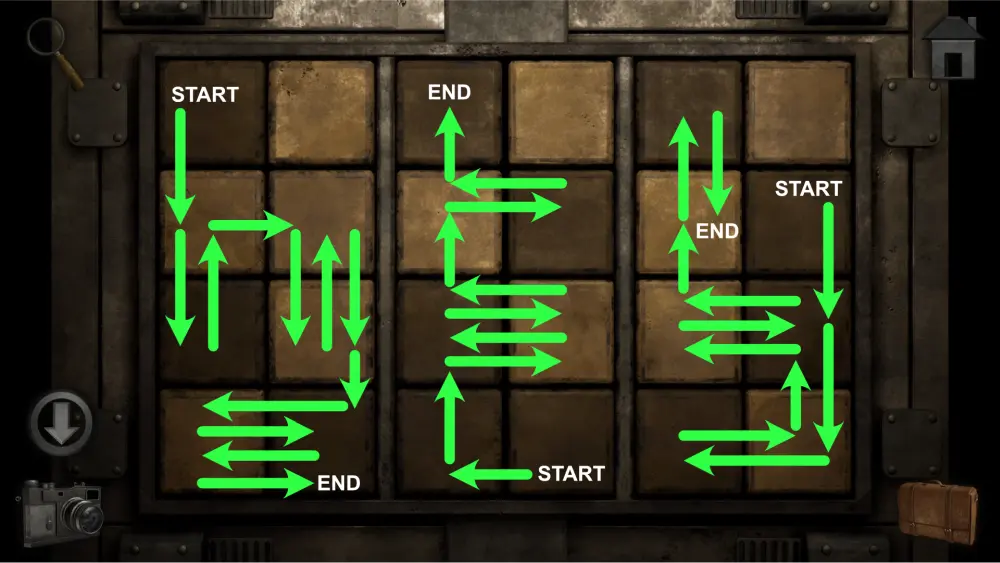
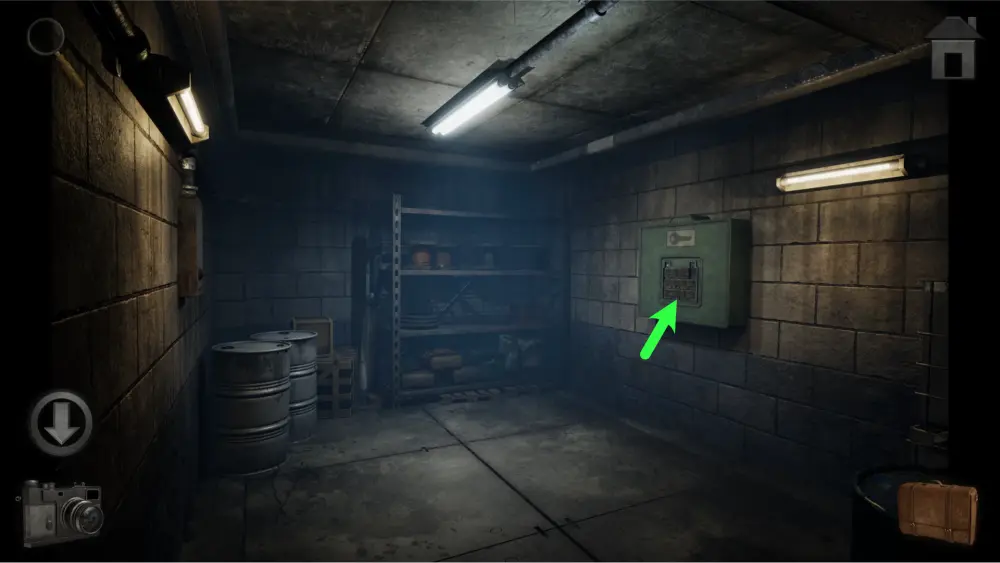
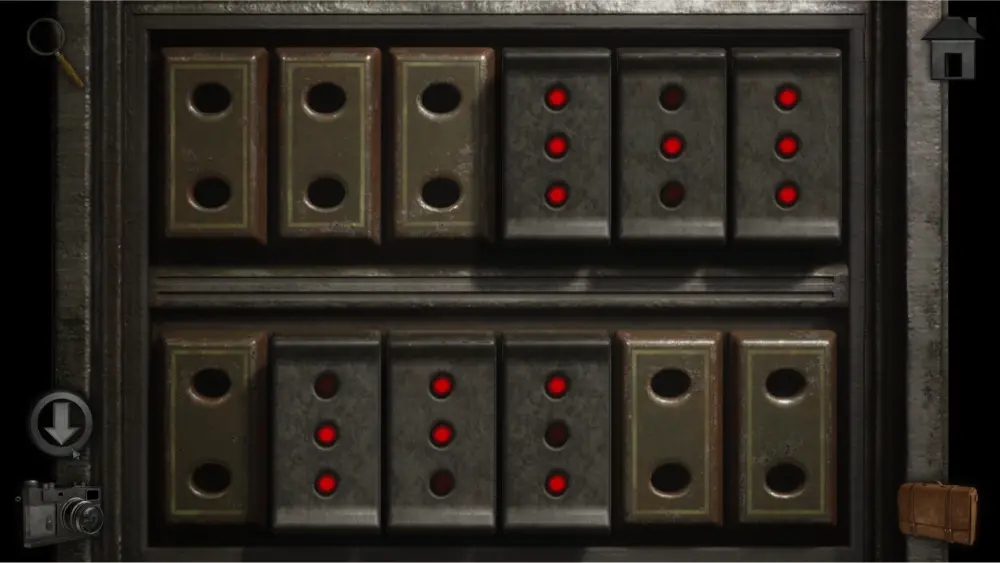
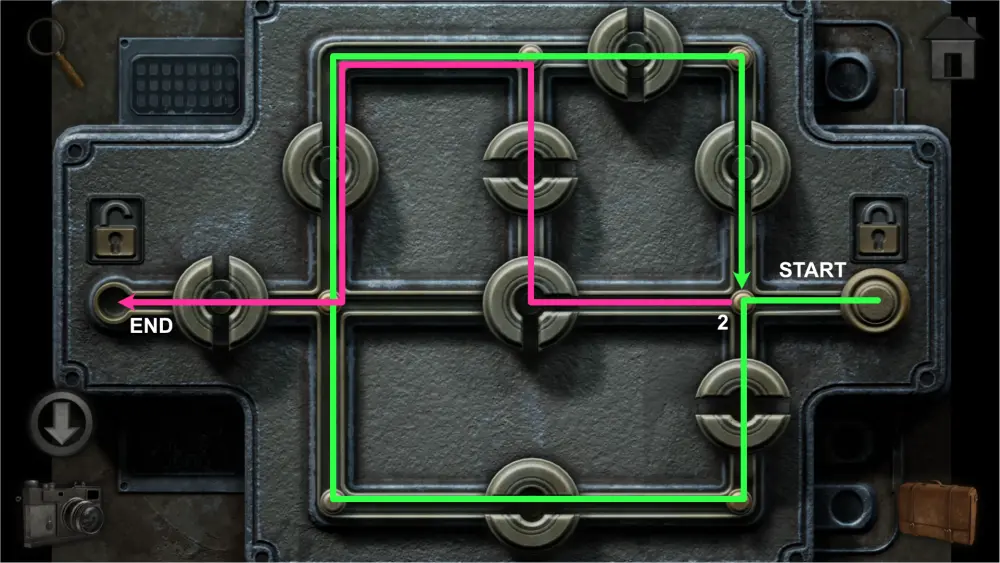
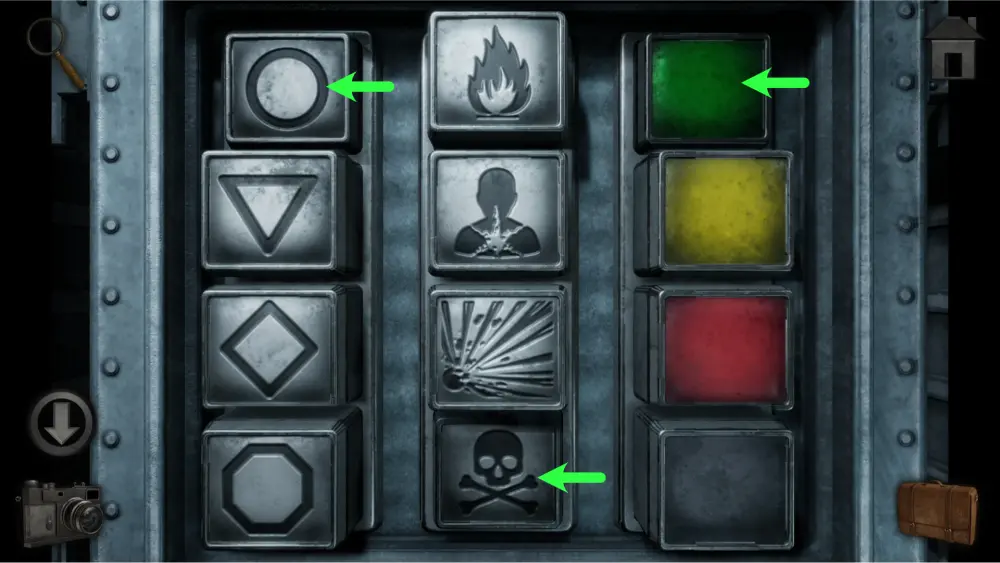
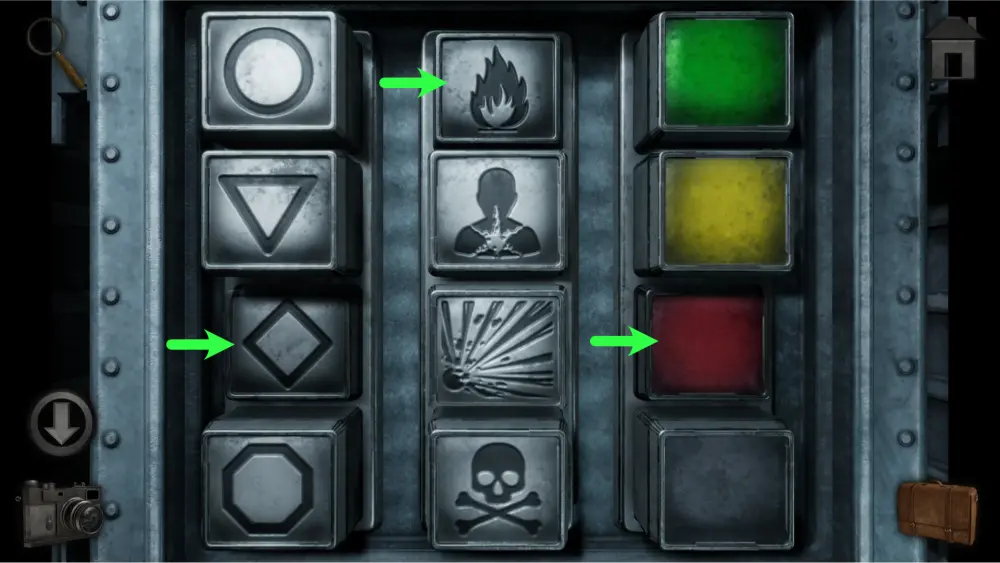
Take one step forward and approach the green box on the wall. To open it, you’ll need to solve another puzzle.
The objective is to move the blue and gold knob from the left padlock to the right padlock by moving the pieces around to make a path for it. You can place the knob on the squares as you move them in order to get them to their destination. Take note that the red pieces are screwed tight and are immovable.
To solve the puzzle, refer to the letters we wrote in the image below and take the following steps:
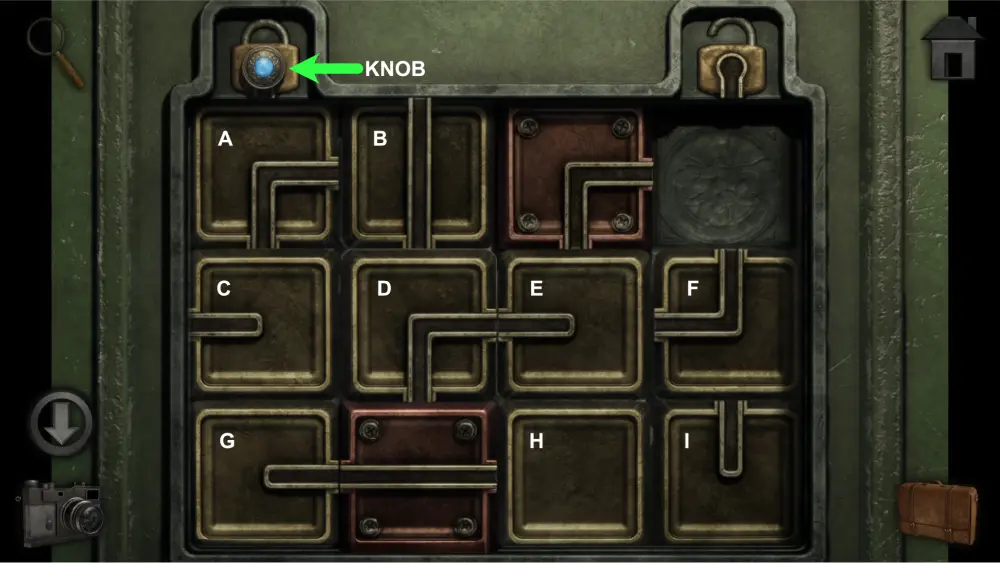
- Move F up
- Move E, D and C to the right
- Move A down
- Move B to the left
- Transfer Knob from Start to B
- Move C up
- Move A to the right
- Move B down (with Knob)
- Move C to the left
- Move A up
- Move B to the right (with Knob)
- Transfer Knob from B to A
- Move C down
- Move A to the left (with Knob)
- Move B up
- Move C to the right
- Move A down (with Knob)
- Transfer Knob from A to C
- Move A and G up
- Transfer Knob from C to G
- Move G down (with Knob)
- Move C and D to the left
- Move H up
- Move I to the left
- Move E down
- Move H to the right
- Move I up
- Move E to the left
- Transfer Knob from G to E, using the red piece as a bridge
- Move H down
- Move I to the right
- Move E up (with Knob)
- Transfer knob from E to D
- Move E down
- Move I to the left
- Move H up
- Move E to the right
- Move I down
- Move D to the right (with Knob)
- Transfer Knob from D to I
- Move D to the left
- Move I up (with Knob)
- Transfer the Knob from I to the red piece to F to the End
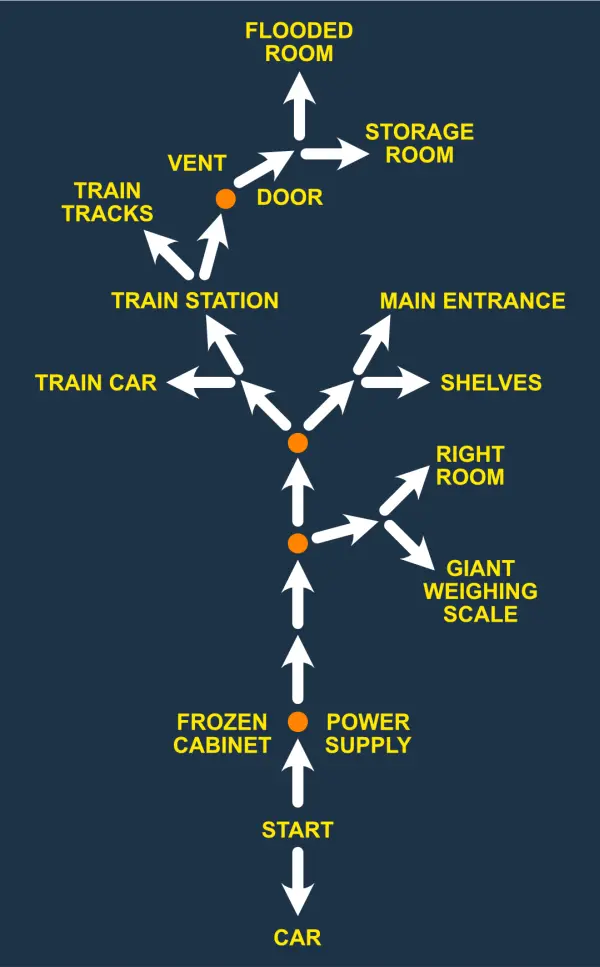
Once the box has been opened, take the key inside. From this point forward, you’ll be going back and forth between the same areas so we’ve created a map to make it easier for you to navigate from place to place:
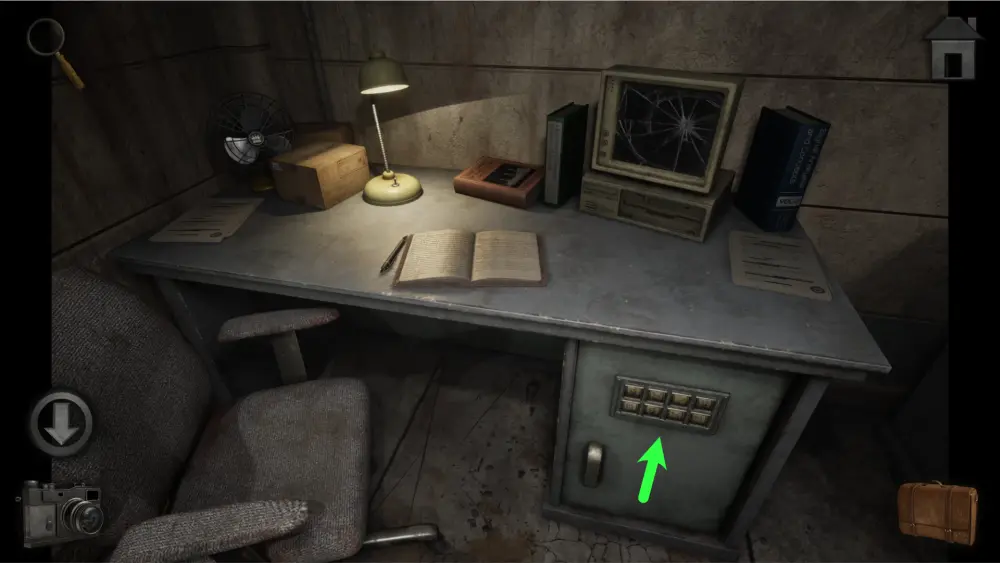
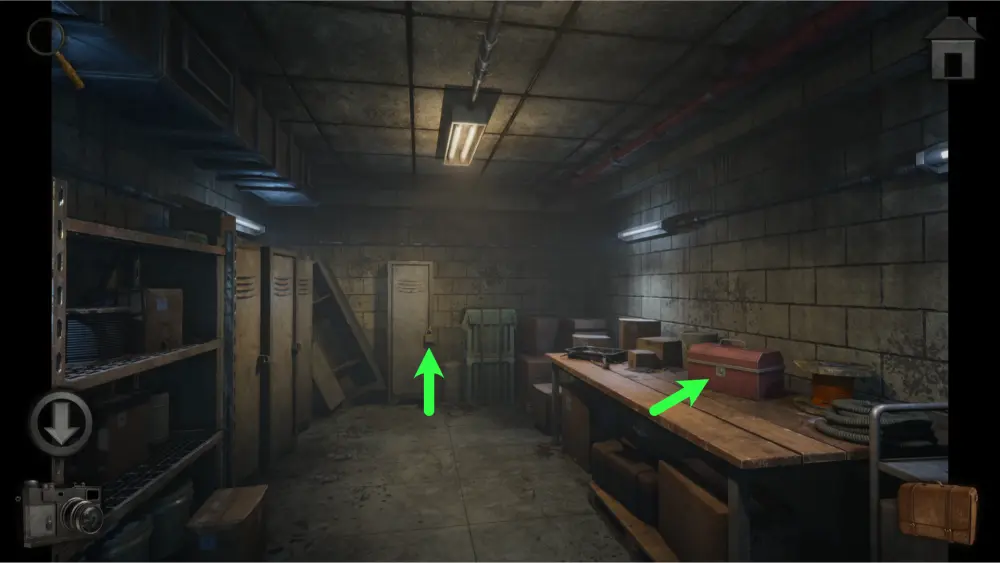
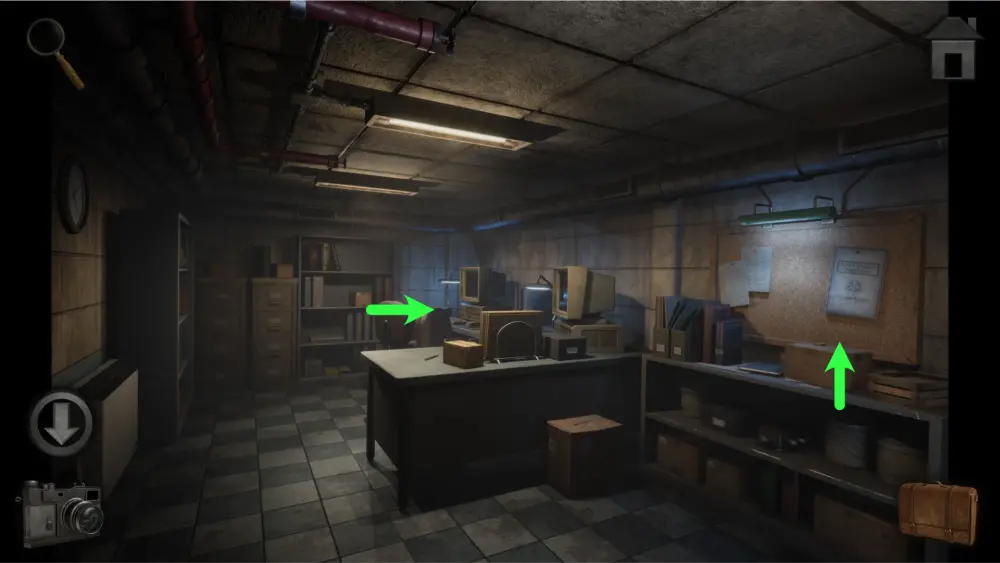
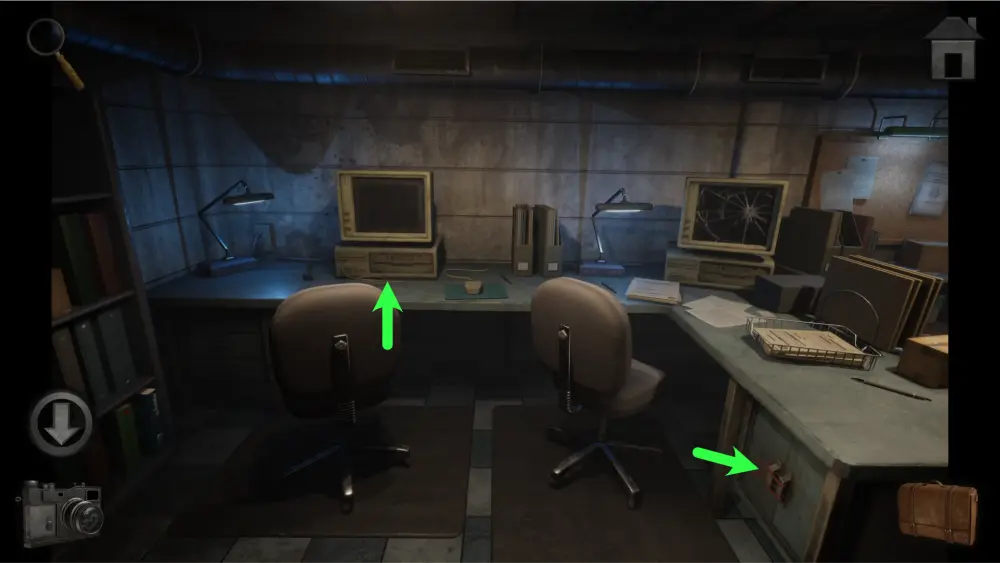
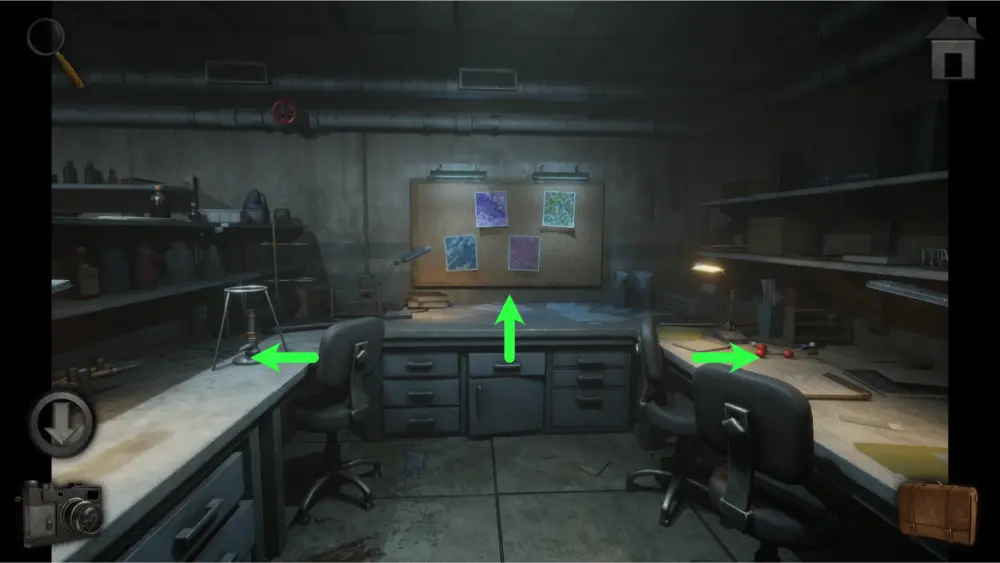
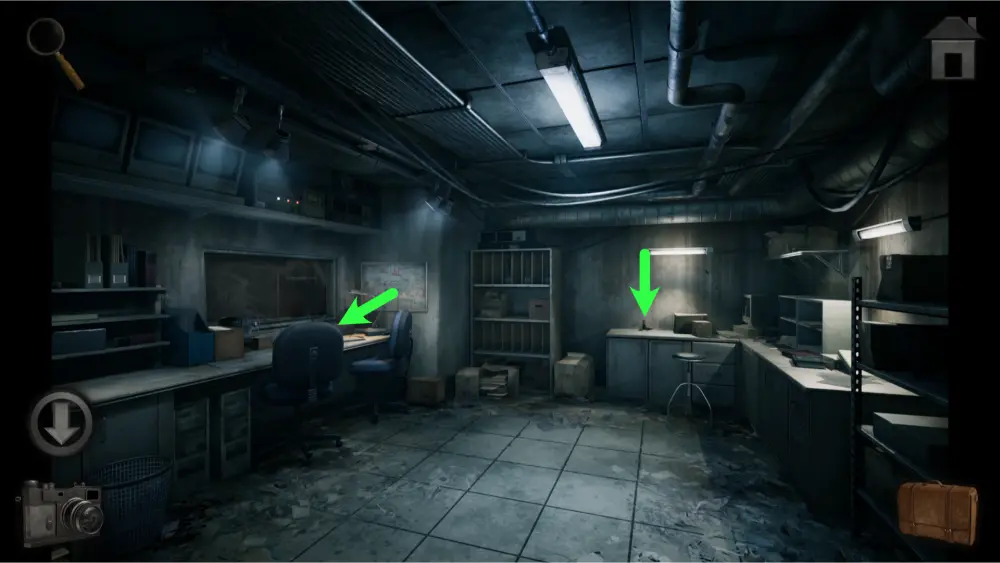
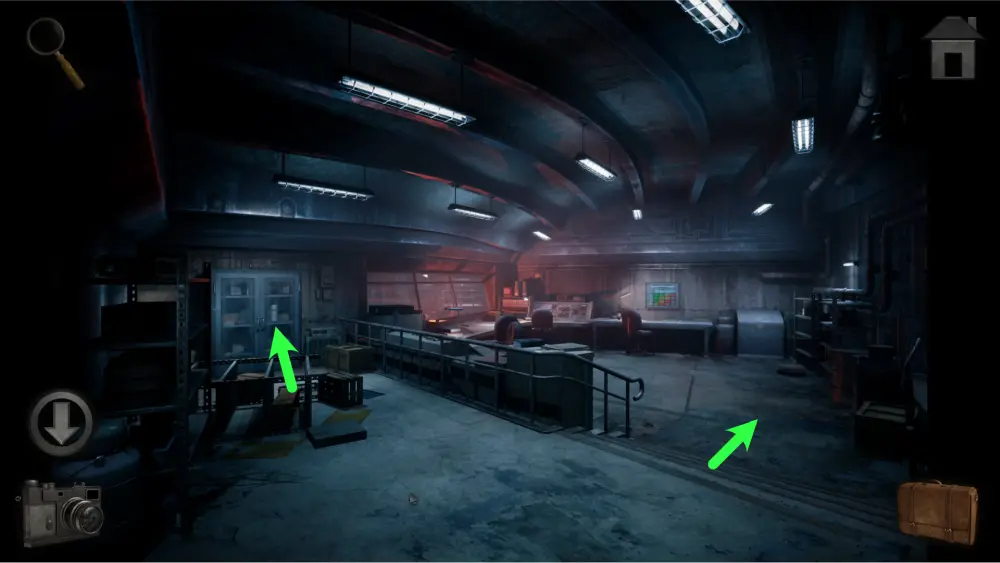
Go back to the right room next to the weighing scale and use the key on it. Once inside, you’ll find three points of interest: the shelves, the desk, and the cabinet.
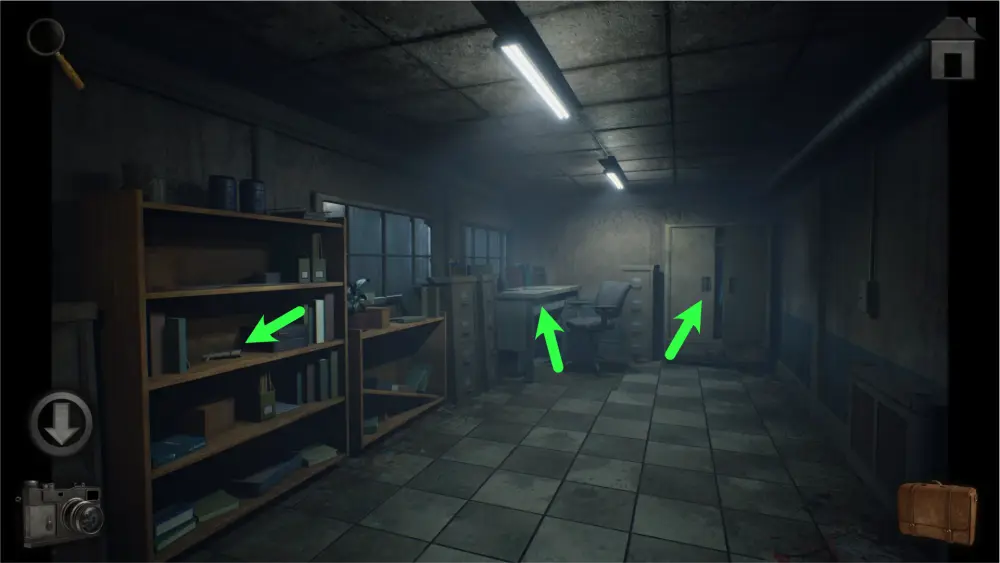
Investigate the shelf and take the triangular key.
Next, open the cabinet and move the clothes to the left and right sides to see the symbol behind it. Take a picture of this symbol as it is a clue for the train car door puzzle.
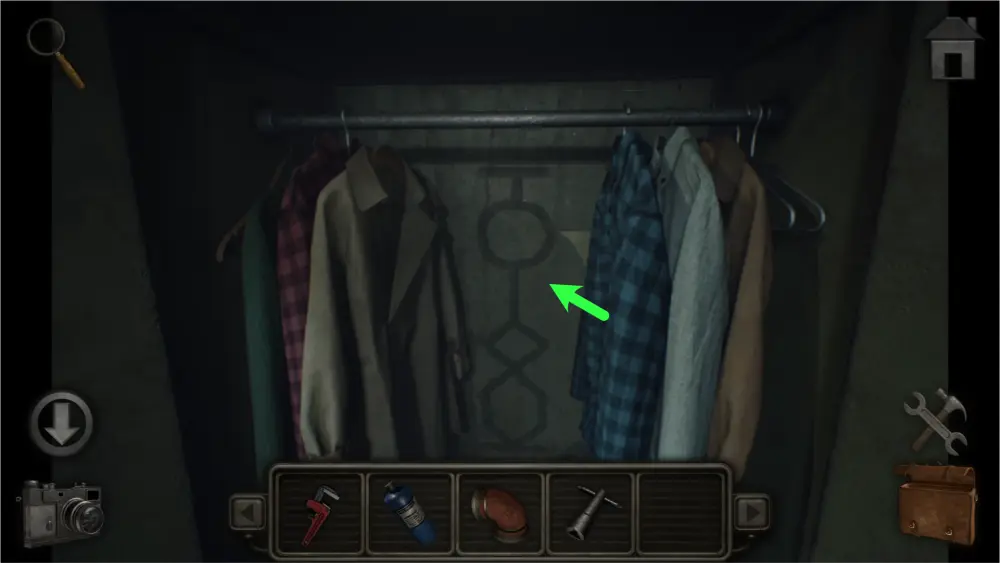
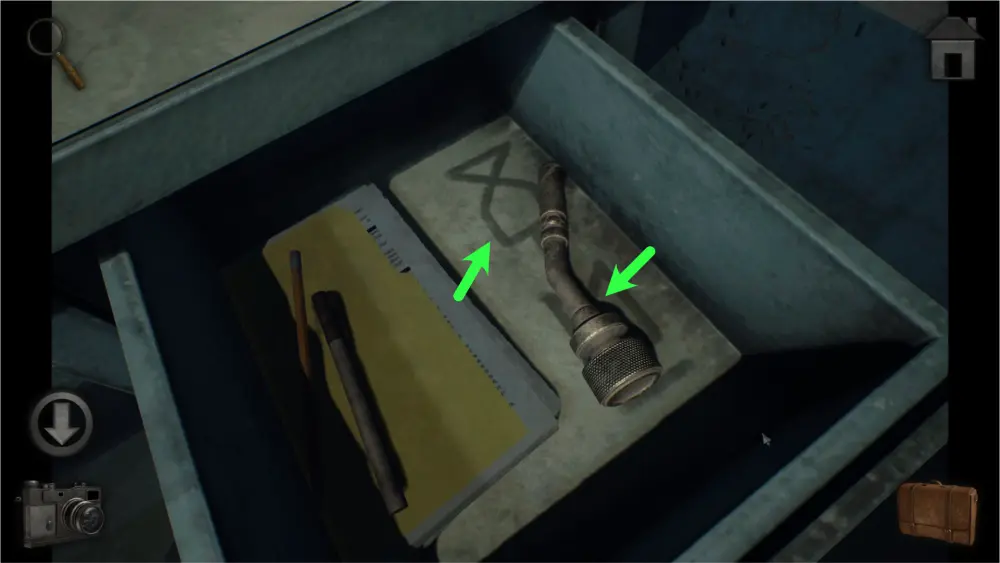
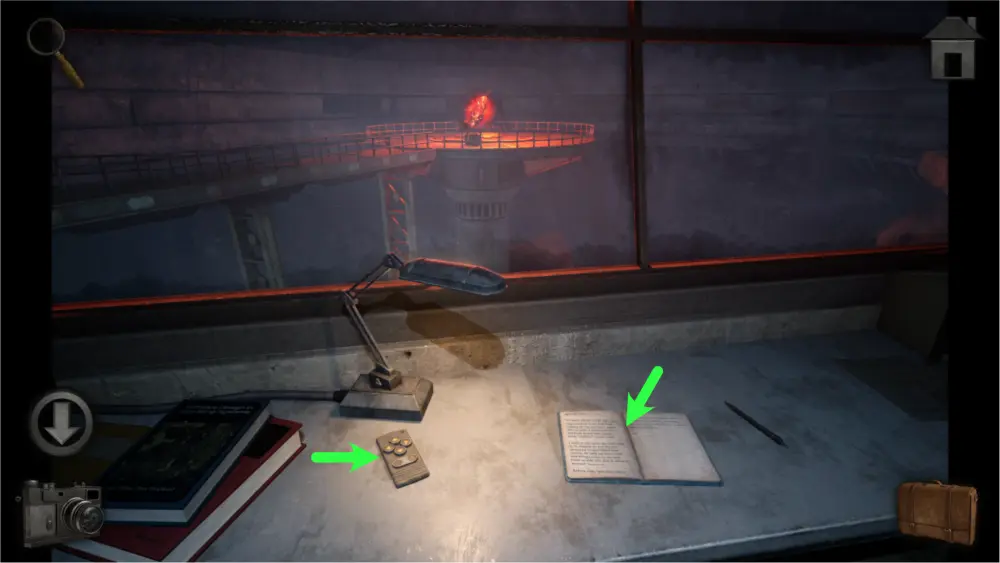
Approach the desk and open the drawer. Take the nozzle and take a picture of the symbol on the drawer as it is also connected to the train car door puzzle.
You can read the clipboard on the desk for lore but it won’t have any clues for any puzzles.
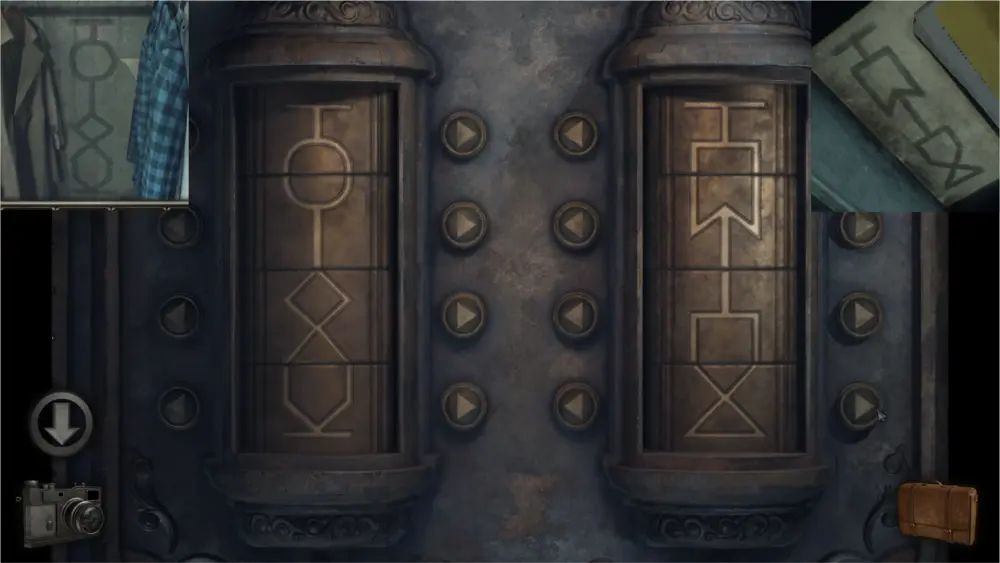
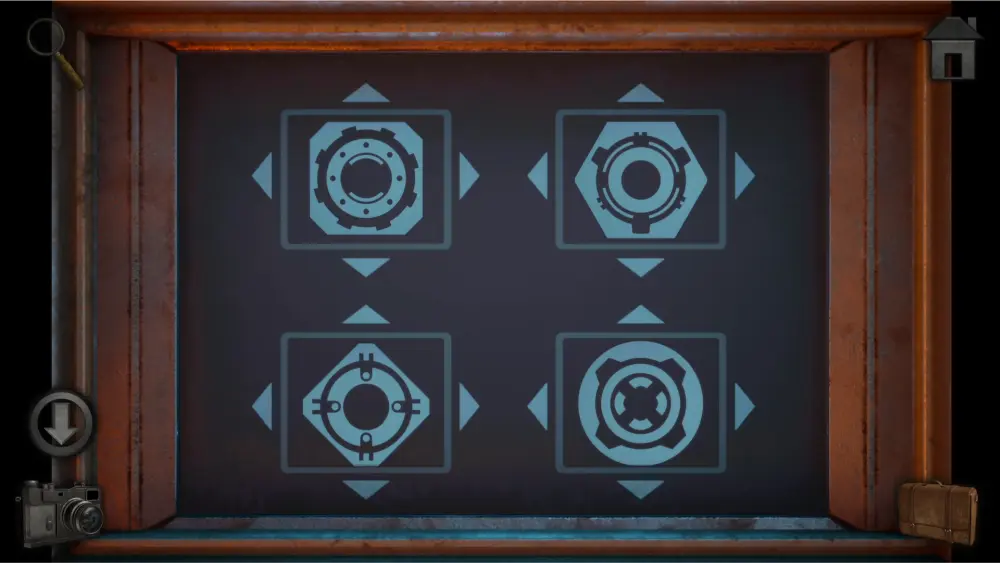
Go back to the train car and unlock the door by copying the symbols you found in the previous rooms. The symbol in the cabinet should be on the left and the symbol in the drawer should be on the right but inverted.
The solution should look like this:
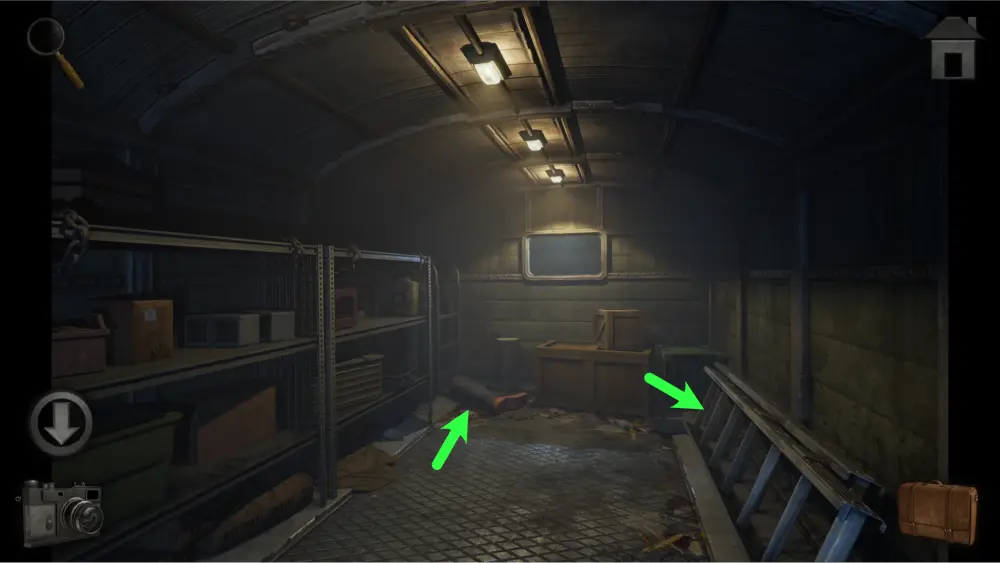
Once inside, take the ladder and the rubber boots.
Go back to the train station area and use the ladder by the air vent. Climb the ladder and take the fan blade.
Go to the flooded room and drag the rubber boots on the shelves to cross the water using them. Take the lug wrench from the shelf. From this point on, the boots will disappear from your inventory but you’ll still be able to walk around the room. Approach the pipe in the middle of the room and use the wrench on it to remove it and take it.
Go back to the train car and use the lug wrench on its wheel rim then take it.
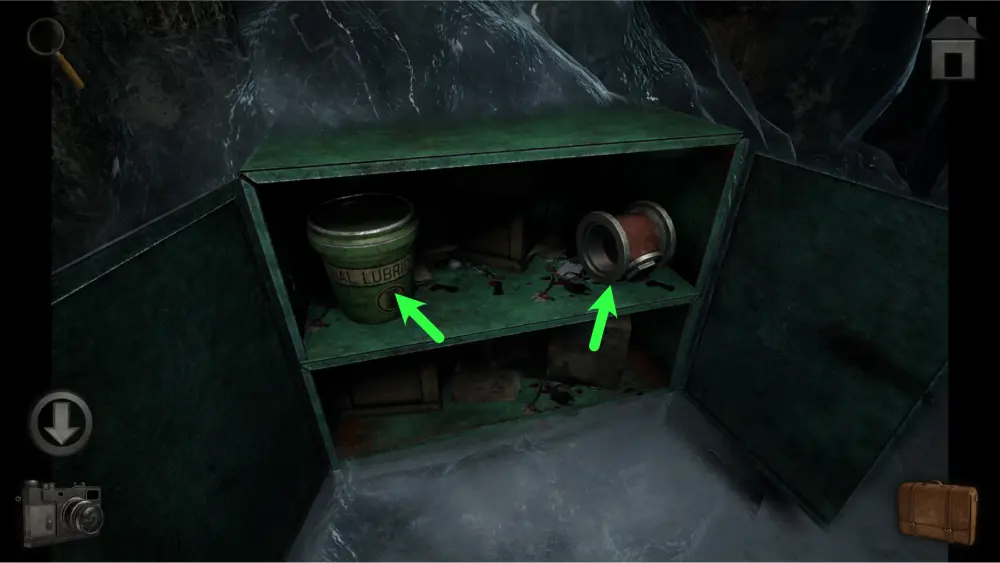
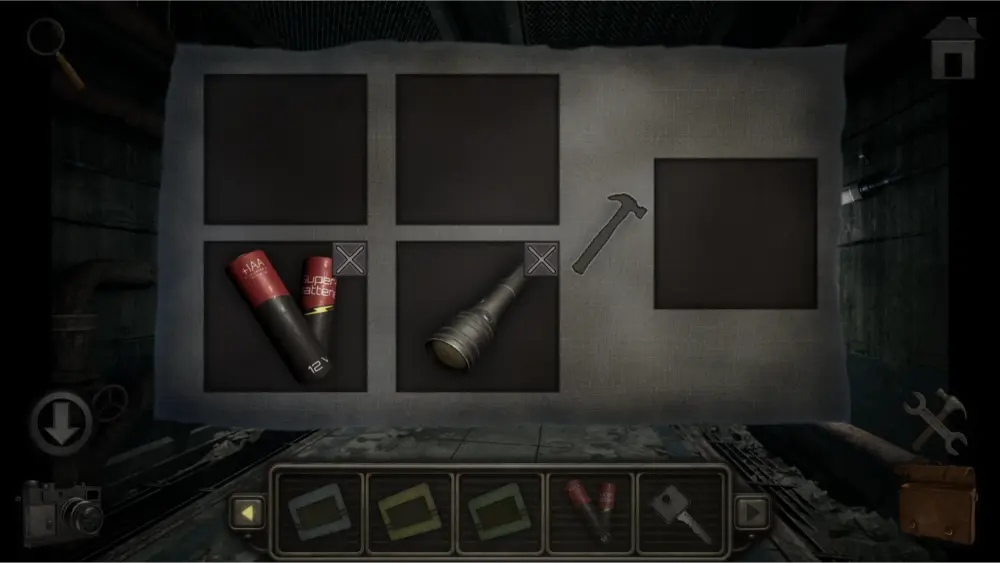
Combine the propane tank and the nozzle then use it on the frozen cabinet by the entrance of the Lambda building. Take the tub of grease and the pipe piece inside of it.
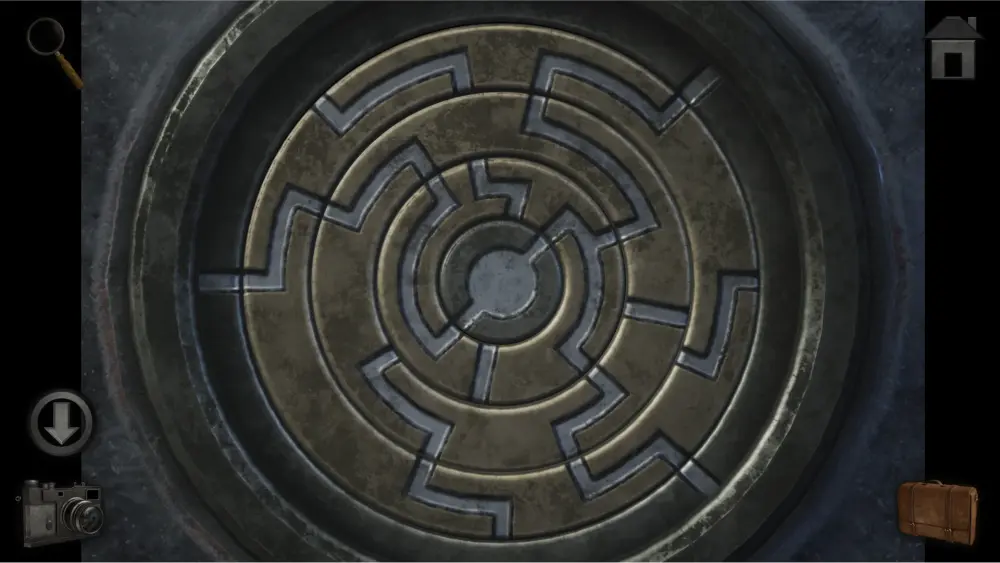
Go back to the train tracks at the train station and use the tub of grease on the hatch. Slide it open and you’ll face a puzzle.
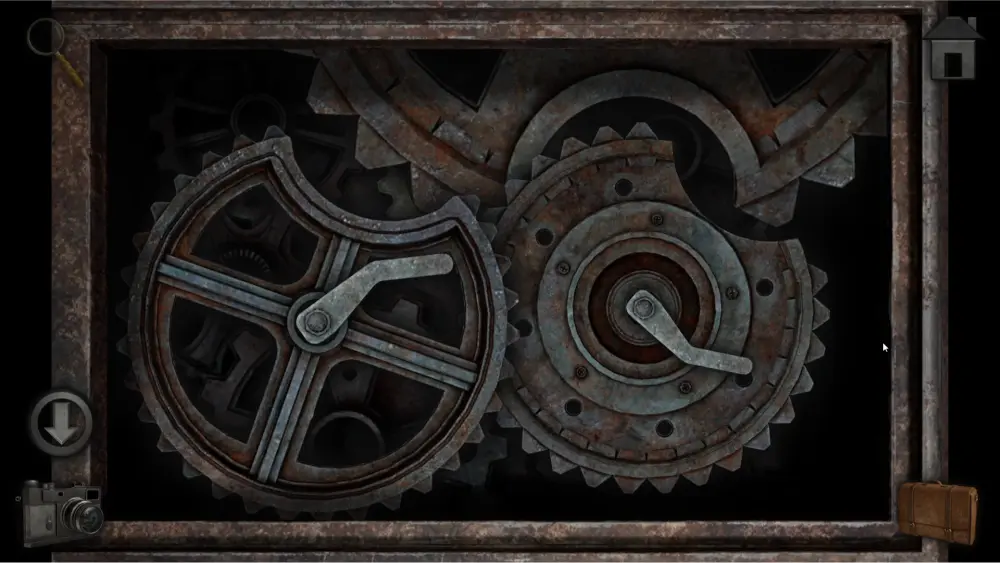
The objective of this puzzle is to perfectly align them to form a circle so that you can take out the gear underneath. There are many ways to get to the solution and below is a step-by-step process of how we did ours. Refer to the images for the position and the description below for the direction of the rotation.
Step 1: Rotate the right gear counter-clockwise.
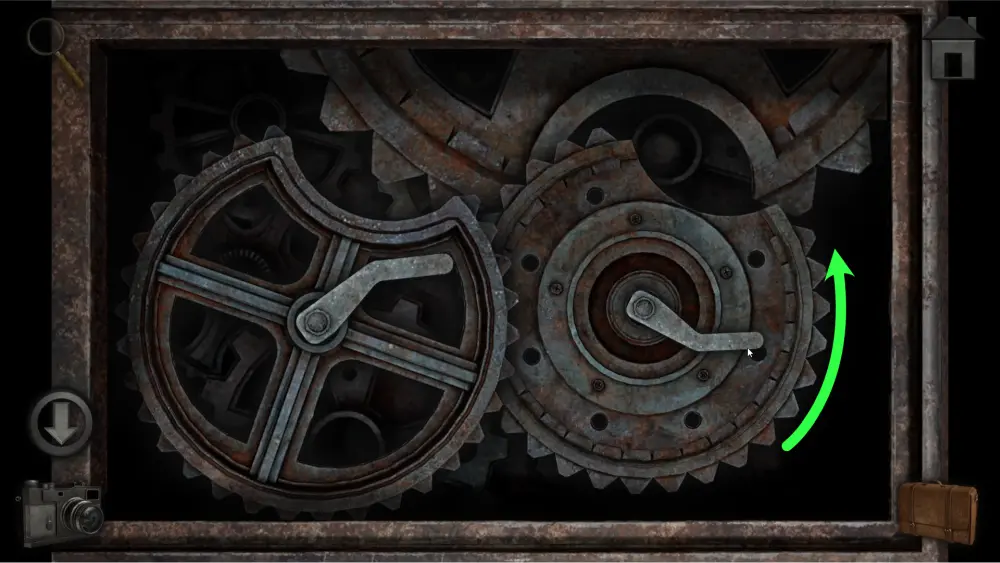
Step 2: Rotate the left gear clockwise.
Step 3: Rotate the right gear counter-clockwise.
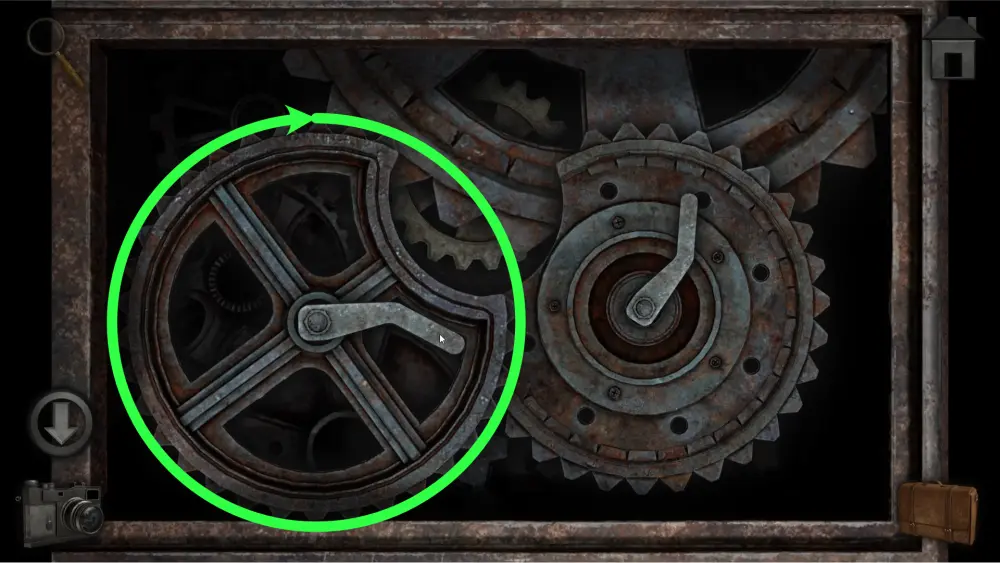
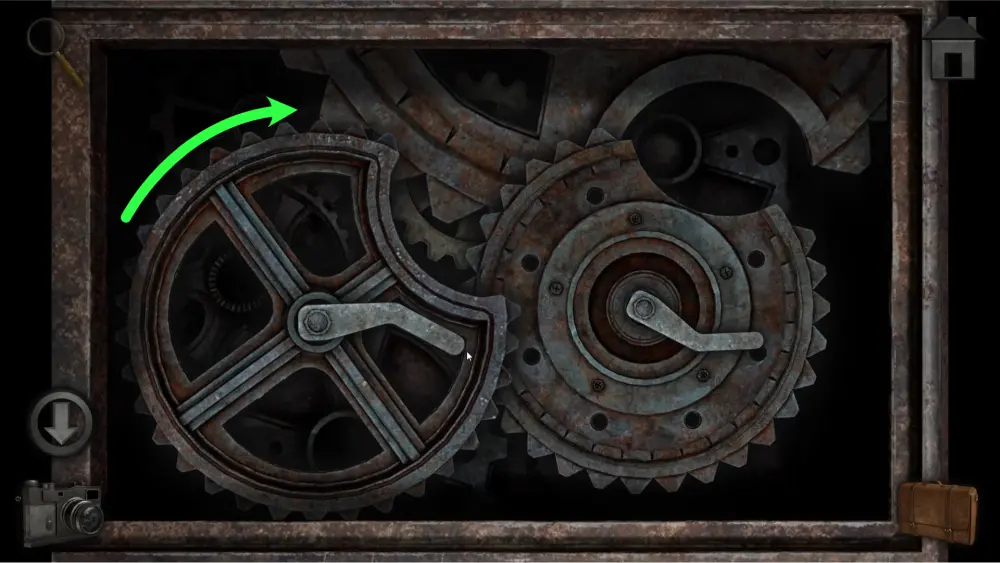
Step 4: Rotate the left gear 1 full rotation clockwise.
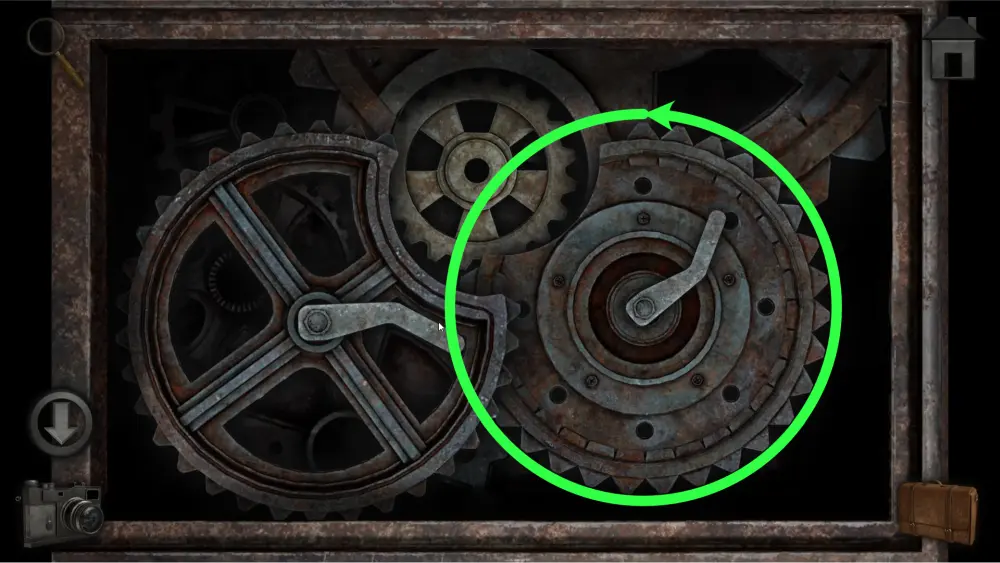
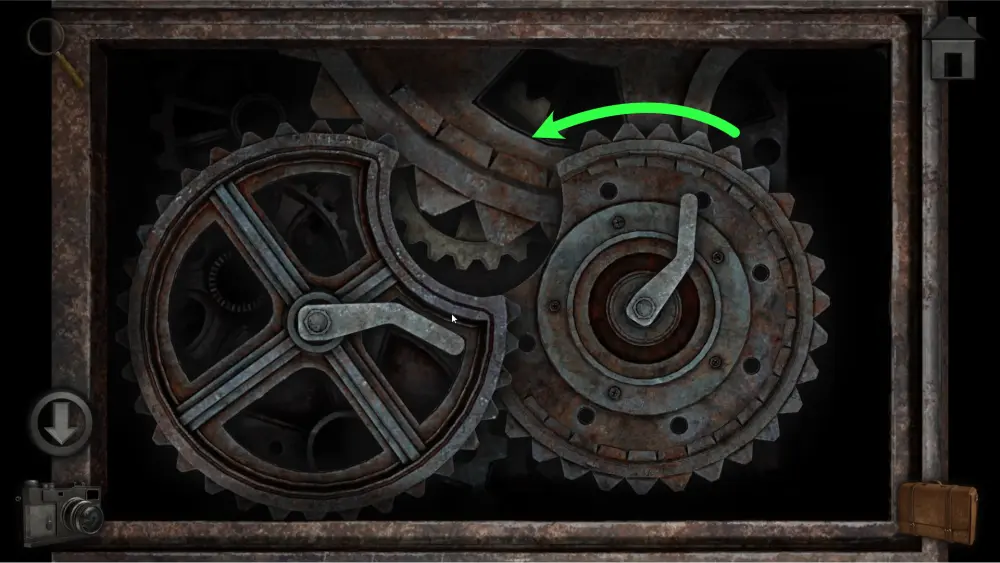
Step 5: Rotate the right gear 1 full rotation counter-clockwise and another 1 almost full rotation counter-clockwise.
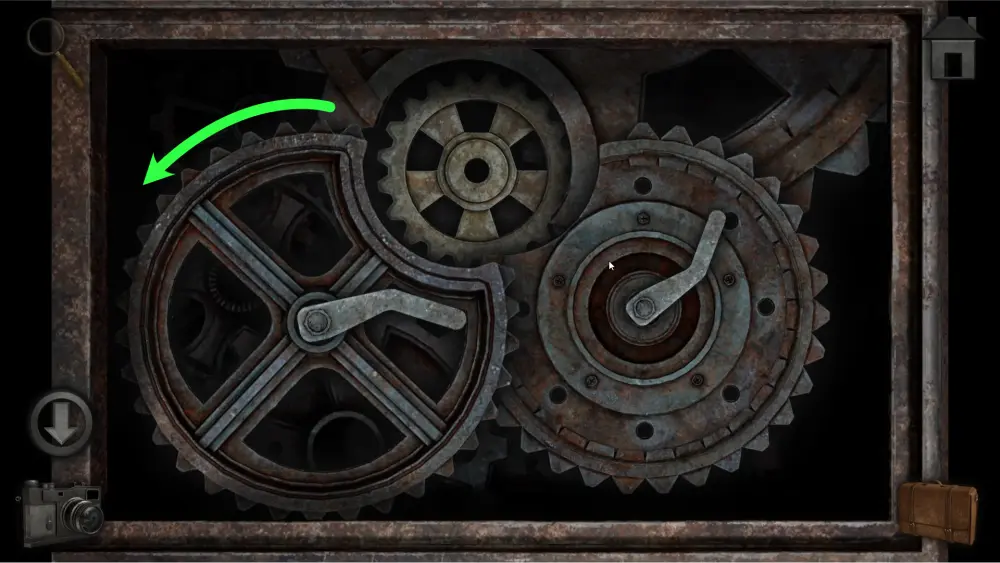
Step 6: Adjust the left gear counter-clockwise close to the inside gear.
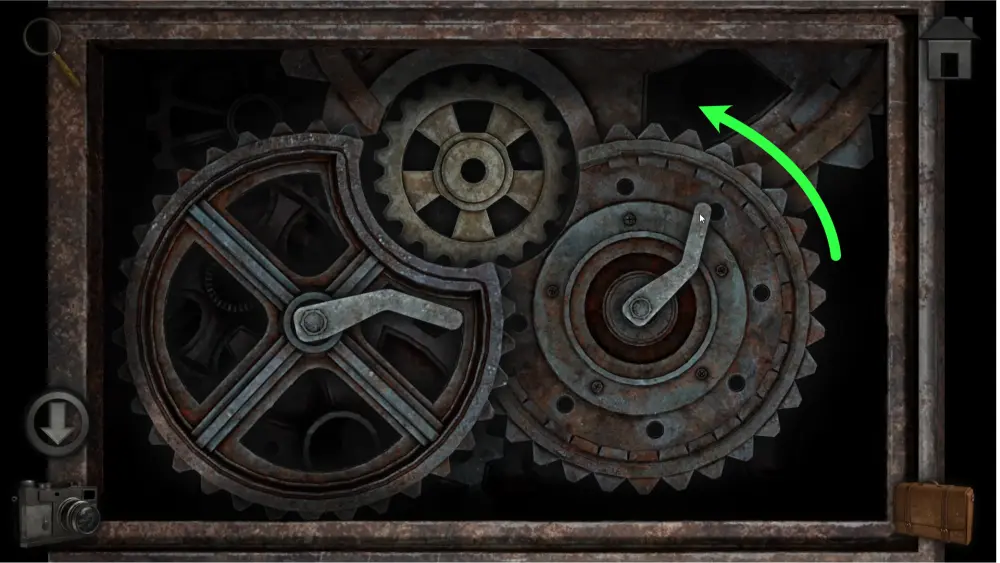
Step 7: Adjust the right gear counter-clockwise close to the inside gear.
You should be able to take the inside gear even if it’s not a perfect circle. If you cannot take it out, make small adjustments until you can.
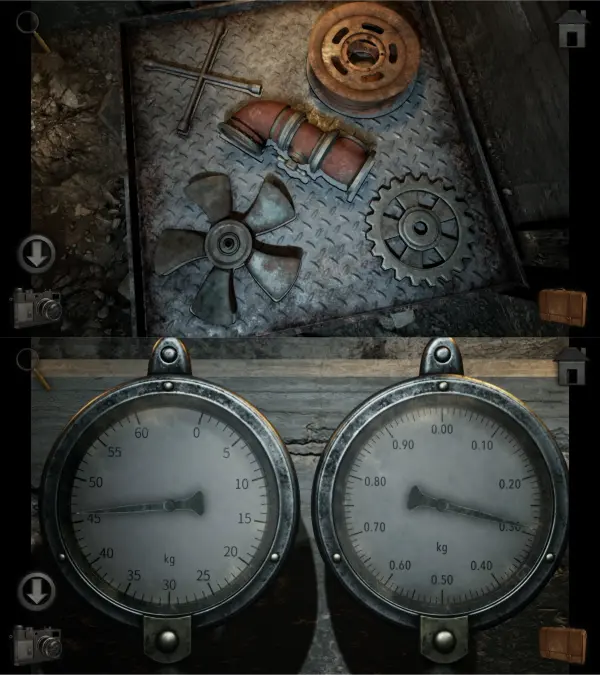
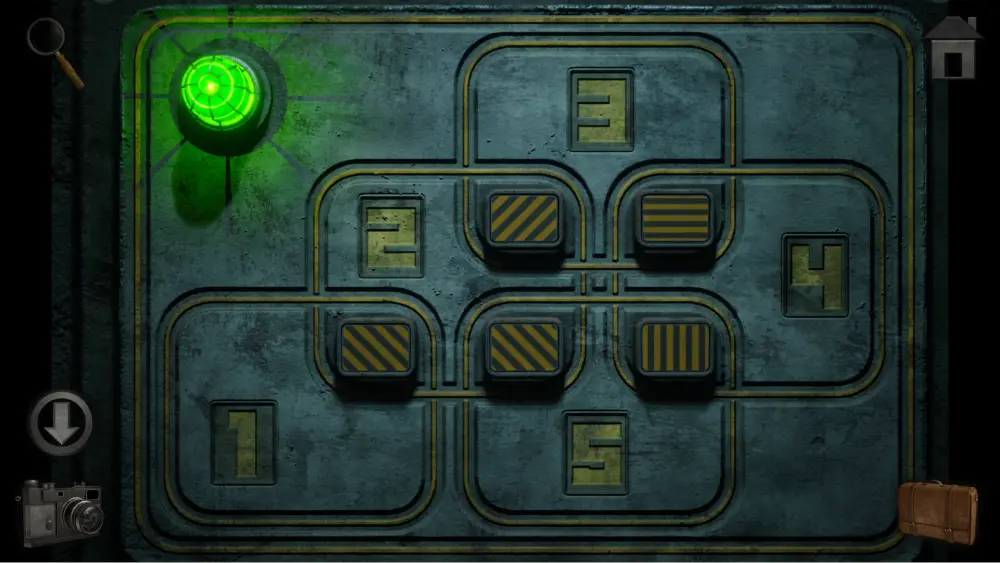
Combine the 3 pipe pieces in the crafting menu then go back to the giant weighing scale.
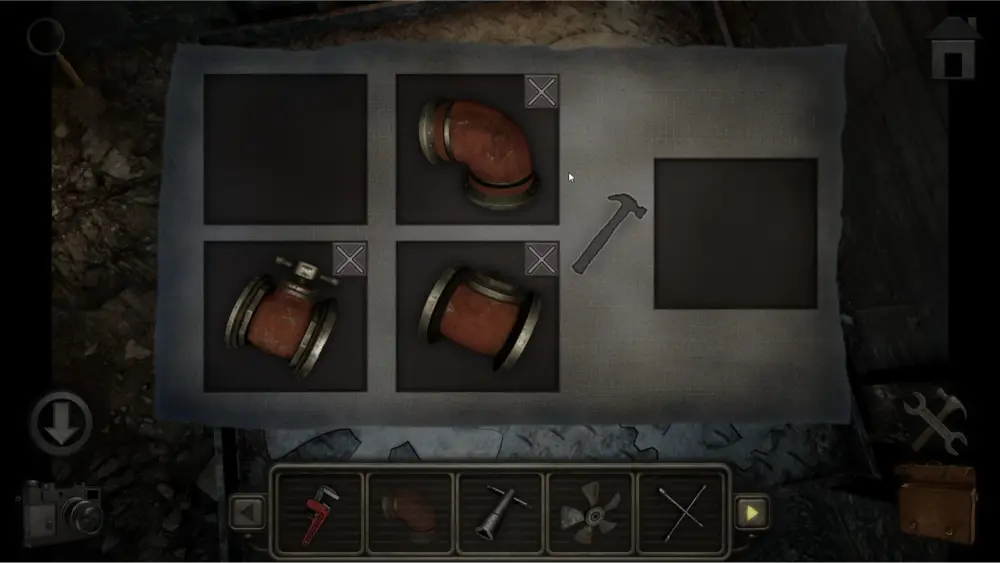
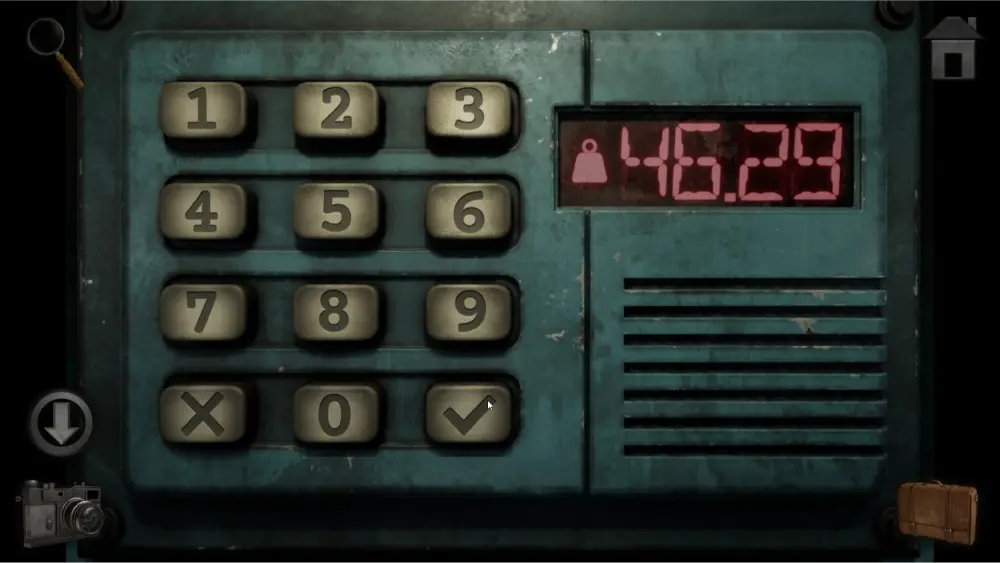
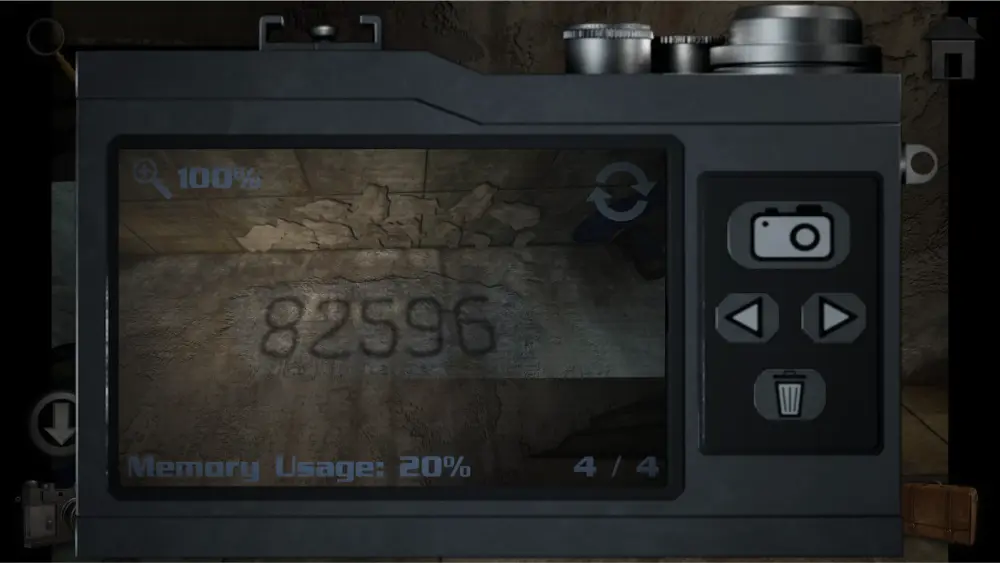
Once there, place all 5 items on the scale. Take a step back and look at the scale’s meter. Remember the number 46.29 since it will be important for opening the main entrance. Make sure to take the 3-piece pipe from the scale after you’re done as it will be used for a later puzzle in the second section of this guide.
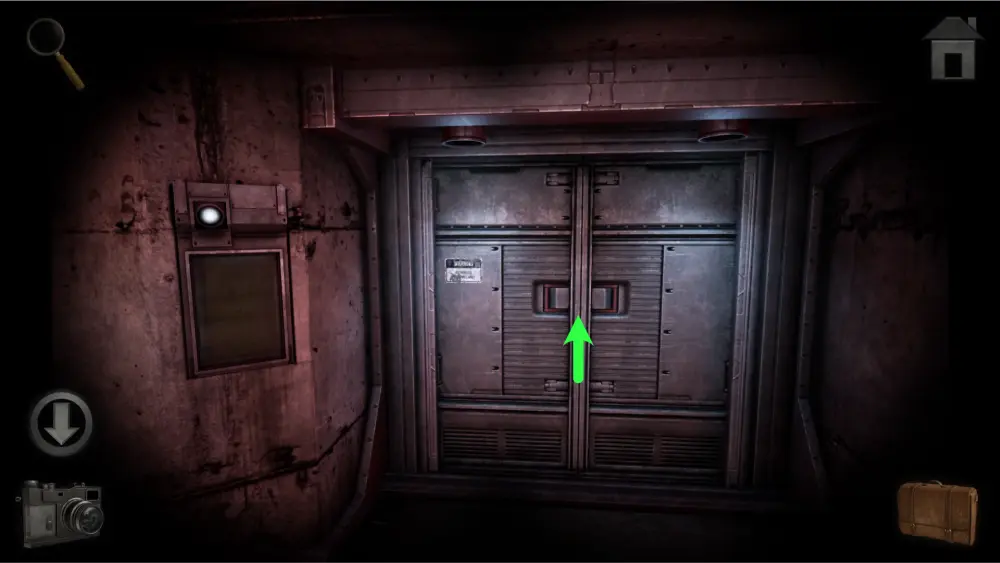
Go back to the main entrance and use the triangular key on the blue box next to the gate. Input 46.29 and tap the checkmark to open the gate.
Unlocking the Fire Exit
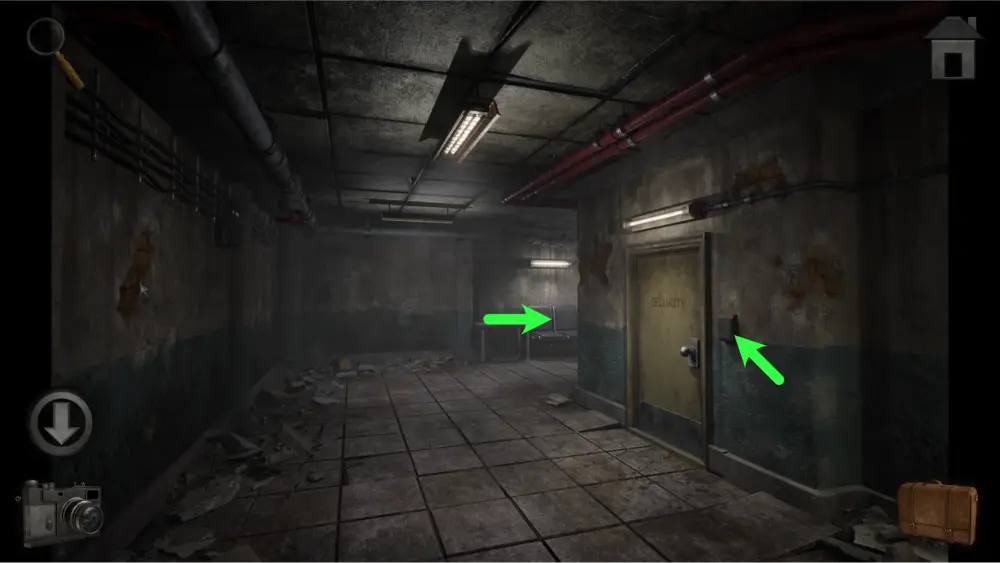
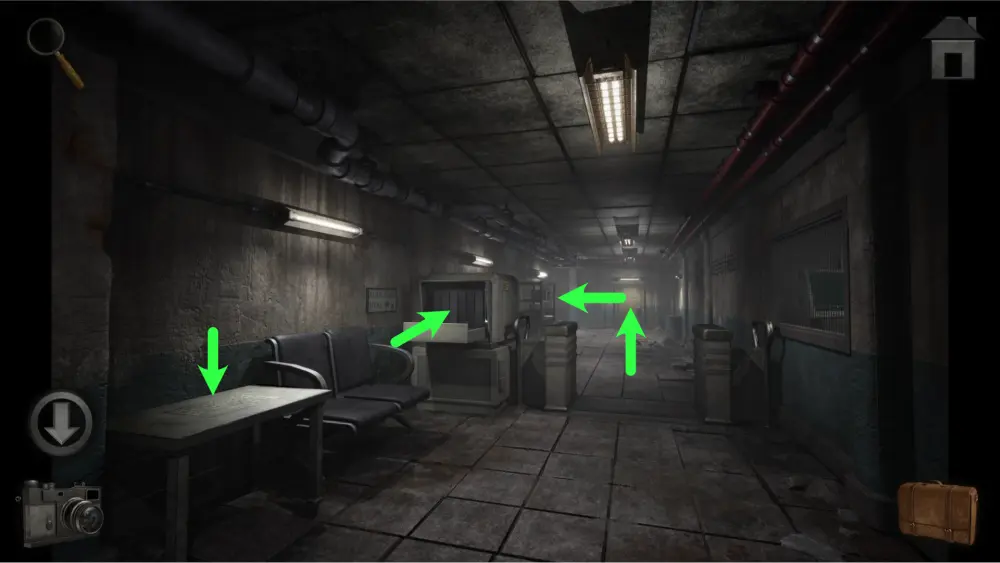
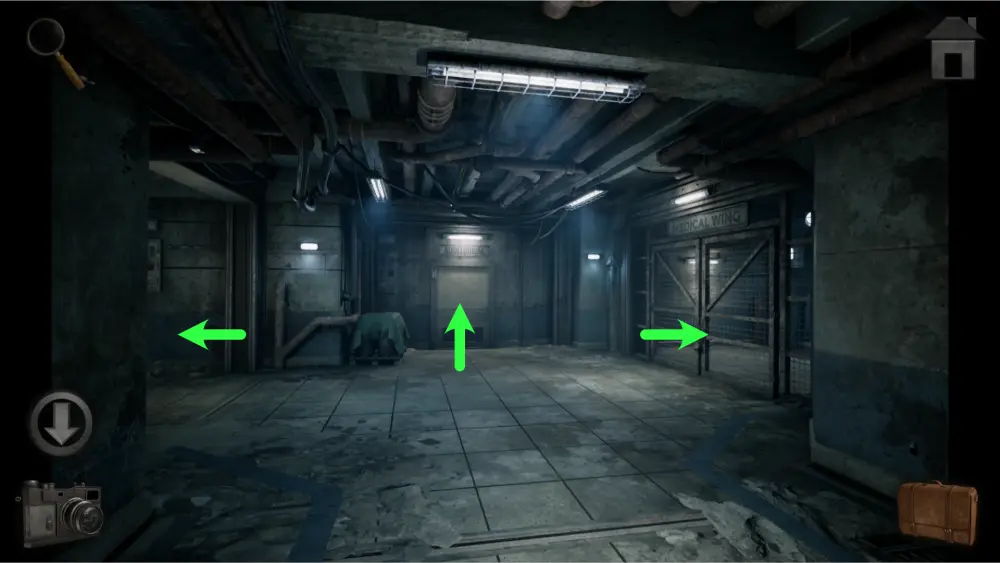
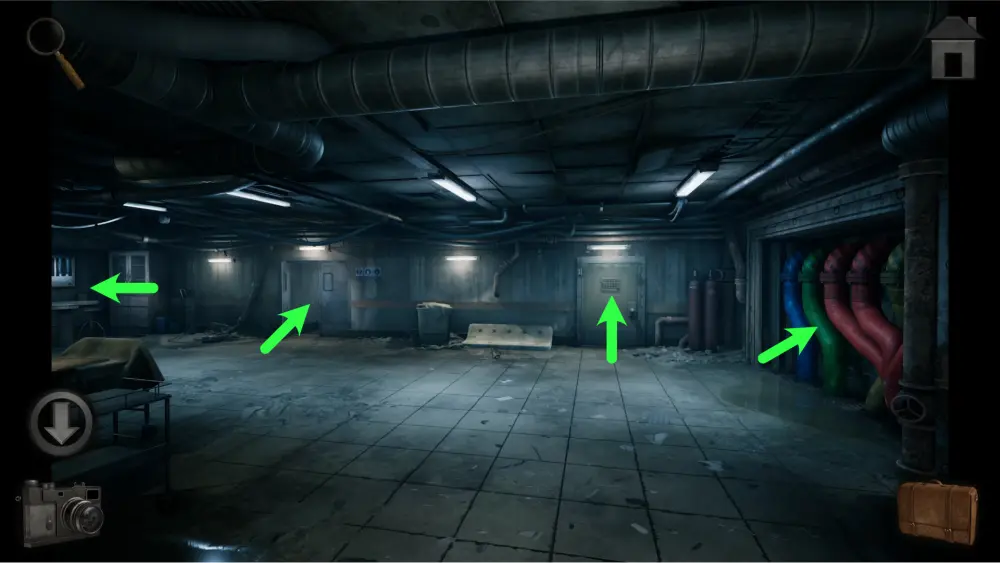
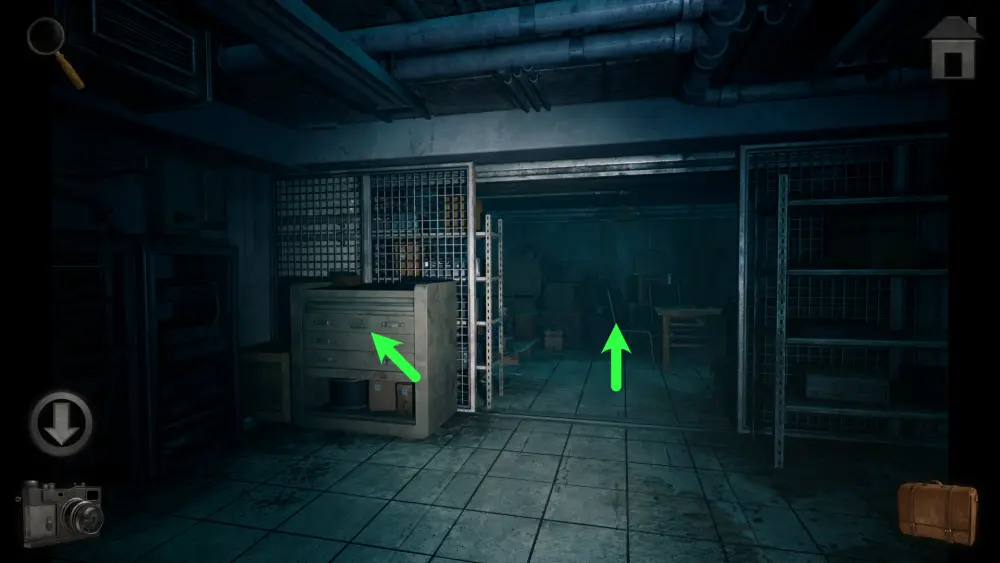
Once inside, take one step forward and you will find the security room and a hallway going to the right. You’ll need to find a card for the security room’s scanner first before you can enter it. Go to the hallway to the right first.
As you turn a corner, you’ll find three points of interest: a table, a bag scanner, the supply room to the far end of the hall, and another hallway leading to the left.
There are symbols on the table that will serve as a clue, but only once you find the items needed to uncover it: a jigsaw puzzle.
There is nothing in the bag scanner that you can use at this time, but there are three bags you can find in the game which you’ll need to bring back here later.
The supply room is currently locked and needs a key.
For now, go to the hallway to the left.
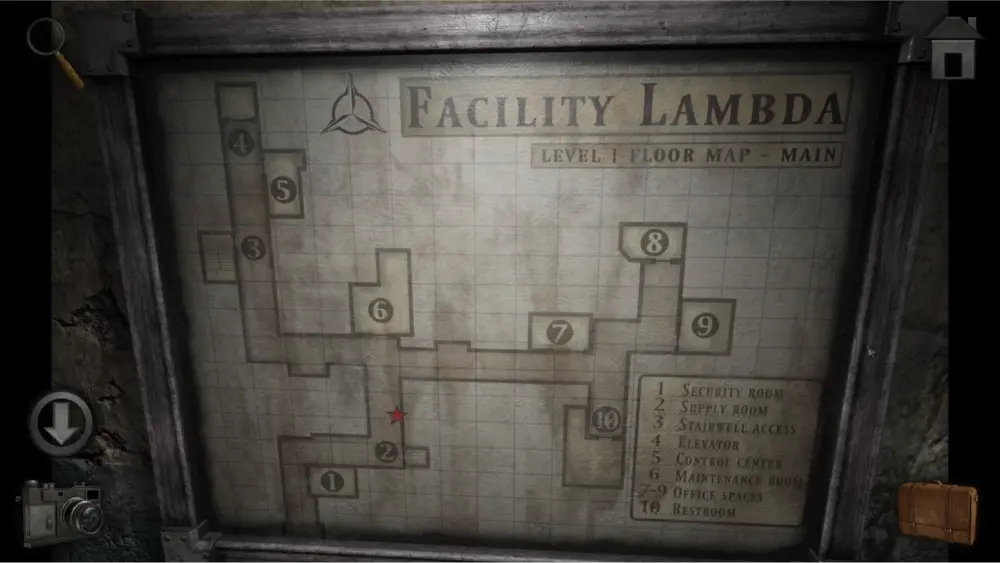
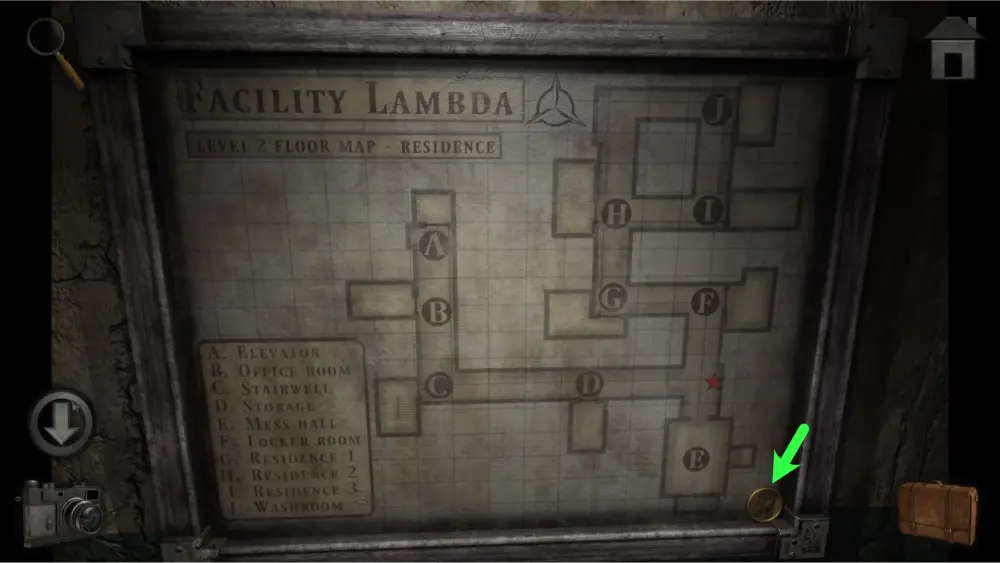
On the left wall of the hall, you’ll find the Level 1 Floor Map of Facility Lambda. Take a picture of it as it will be helpful for when you need to backtrack to certain areas later.
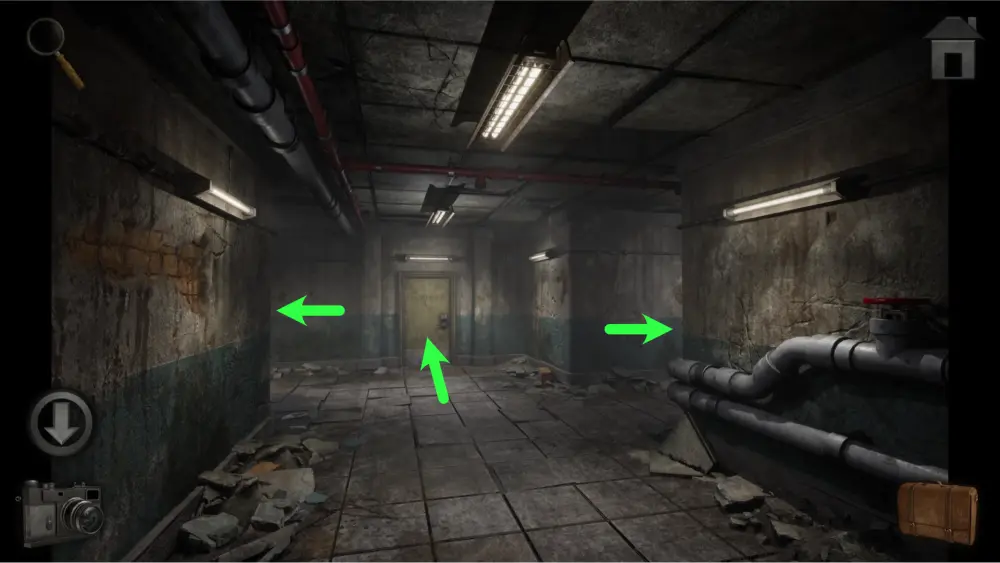
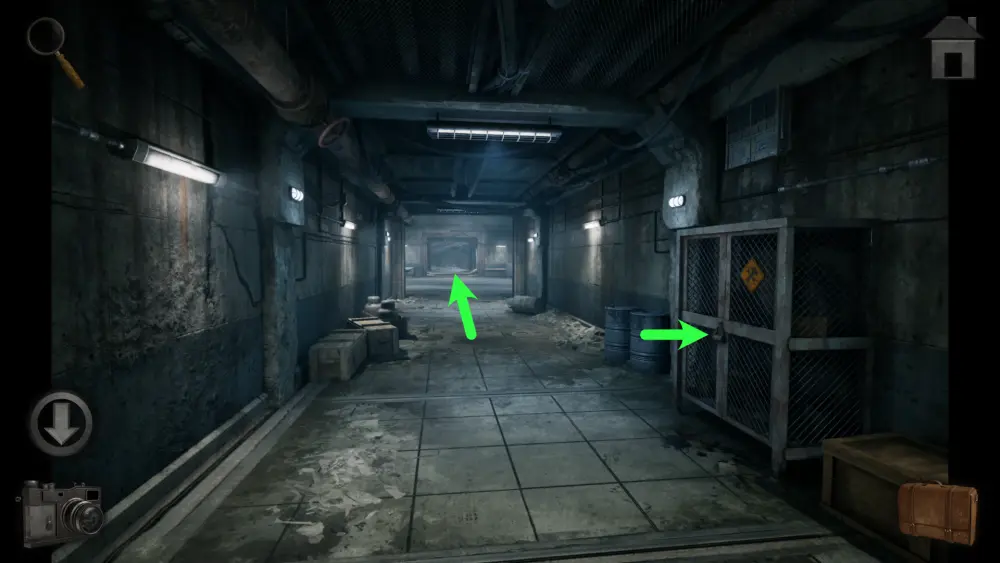
Take one step forward and you’ll see hallways to the left and the right and the maintenance room in the middle. You’ll need to find the code for the maintenance room before you can enter it. Go to the right hall for now.
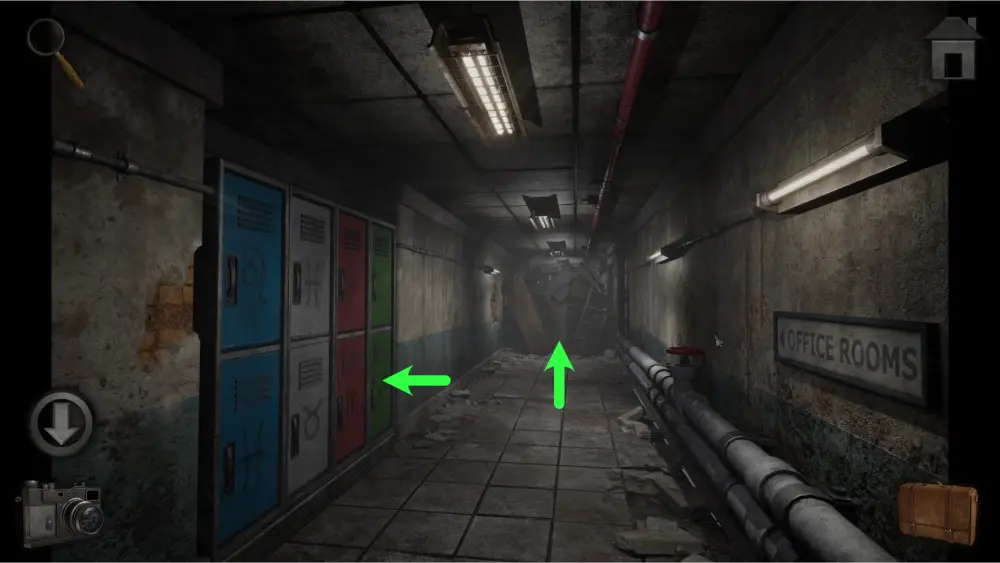
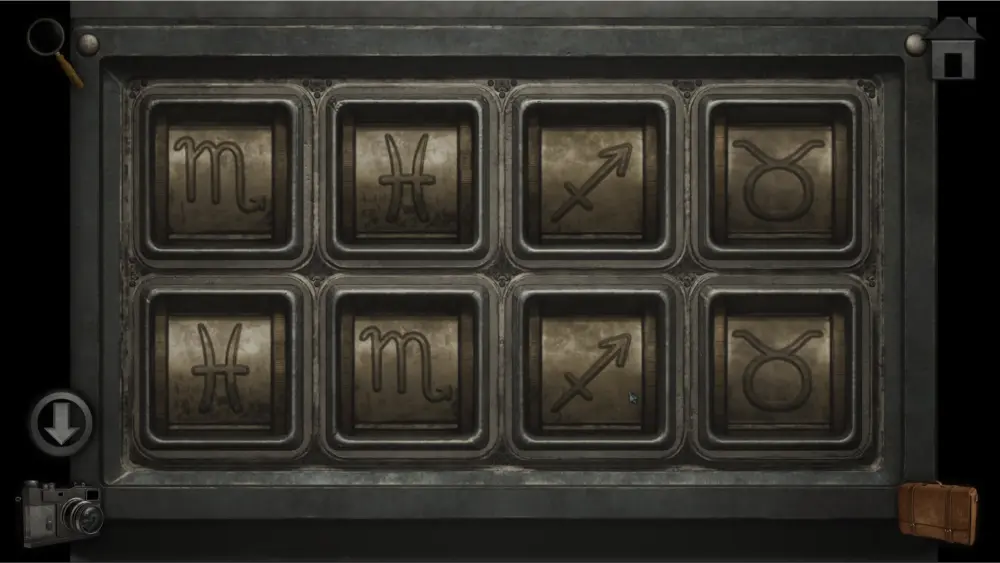
As you head there, you’ll find 8 locker doors in 4 colors with zodiac symbols. Opening all the lockers, you’ll find that there are also zodiac symbols inside and a bag inside the 8th locker. Take the bag. You’ll need to come back here later once you find a clue that has something to do with the lockers.
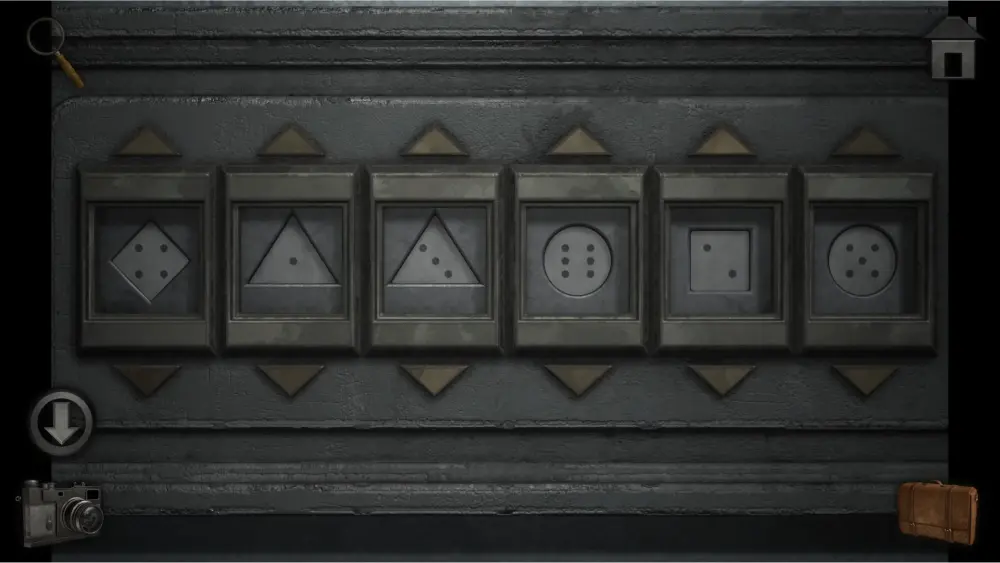
Take one step forward and you’ll find a damaged wall section and a blue metal hatch with a lock mechanism involving shapes and dice. You’ll have to come back here later when you have other items and clues for them. Go to the left hall from the maintenance room for now.
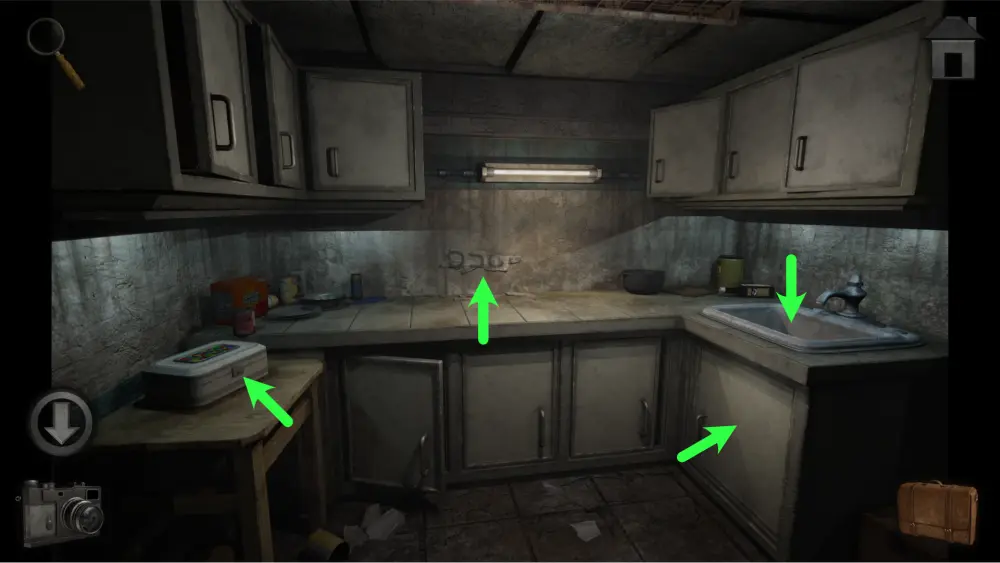
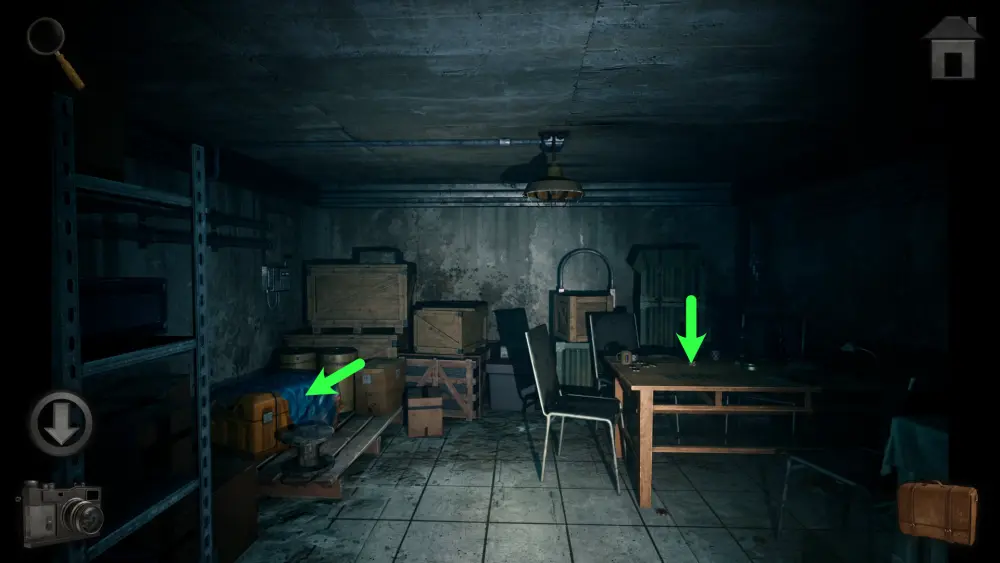
To the left, you’ll find a pantry to the left and a hall to the right leading to the elevator. Investigate the pantry for now.
At the pantry, you will find four points of interest: A white box with a colorful puzzle, a wall plaster that seems to have a secret message, a sink that has a key stuck in the drainage, and a cabinet underneath it where the pipes are. There’s nothing to take here for now so go to the right hall leading to the elevator.
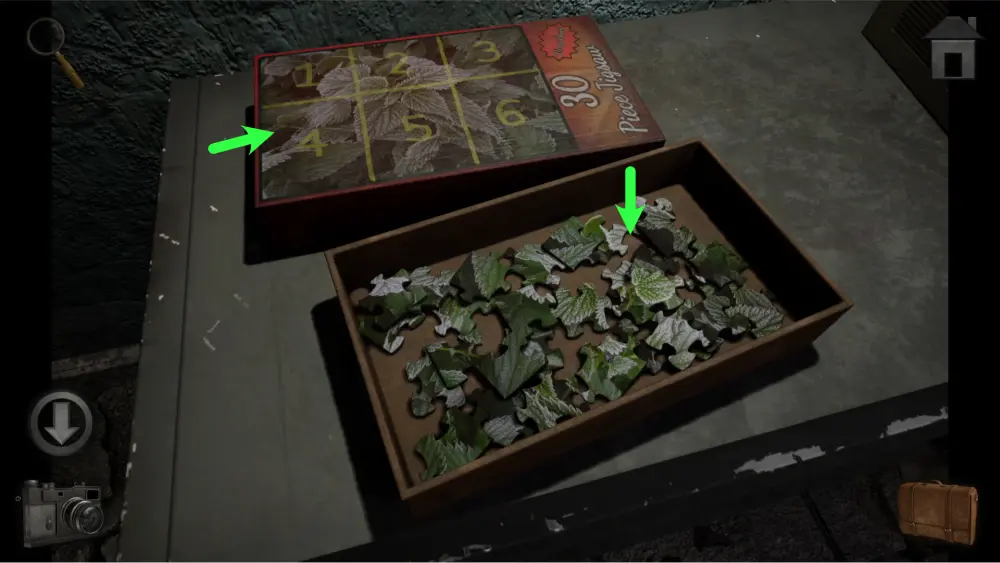
Once you turn a corner, take one step forward and approach the box on the shelf to the left.
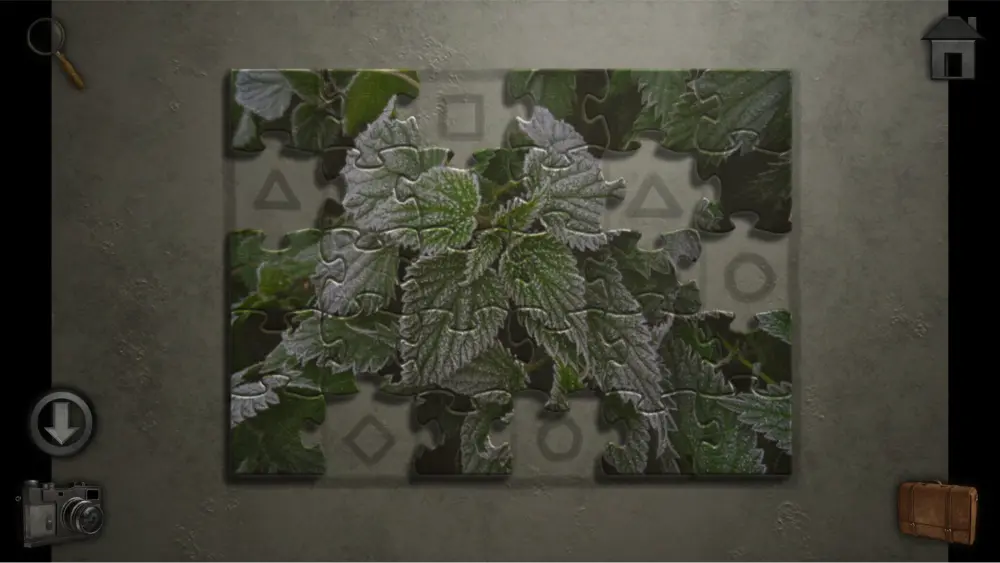
Open the box and take the jigsaw puzzle pieces. Don’t forget to take a picture of the box cover as it will also be important later.
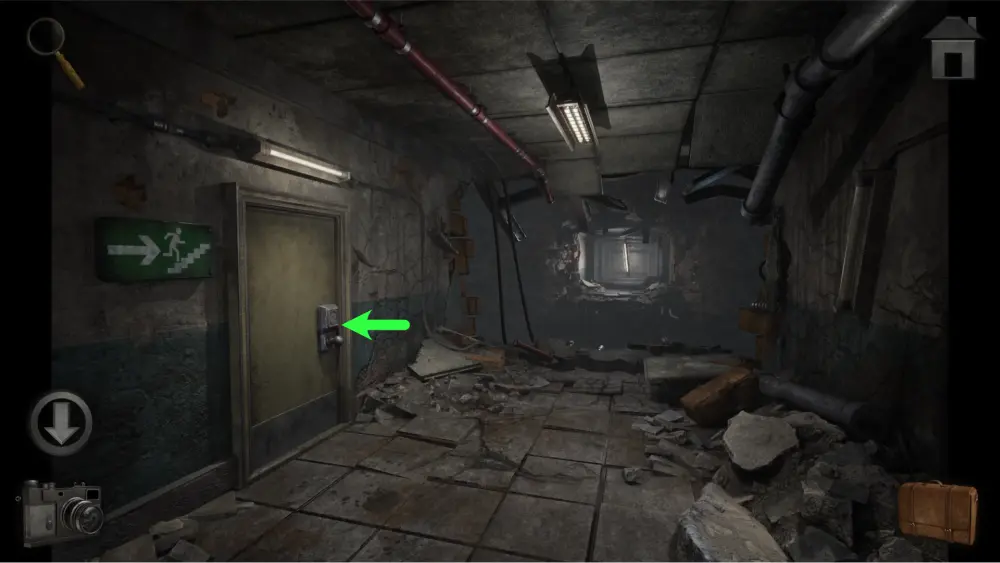
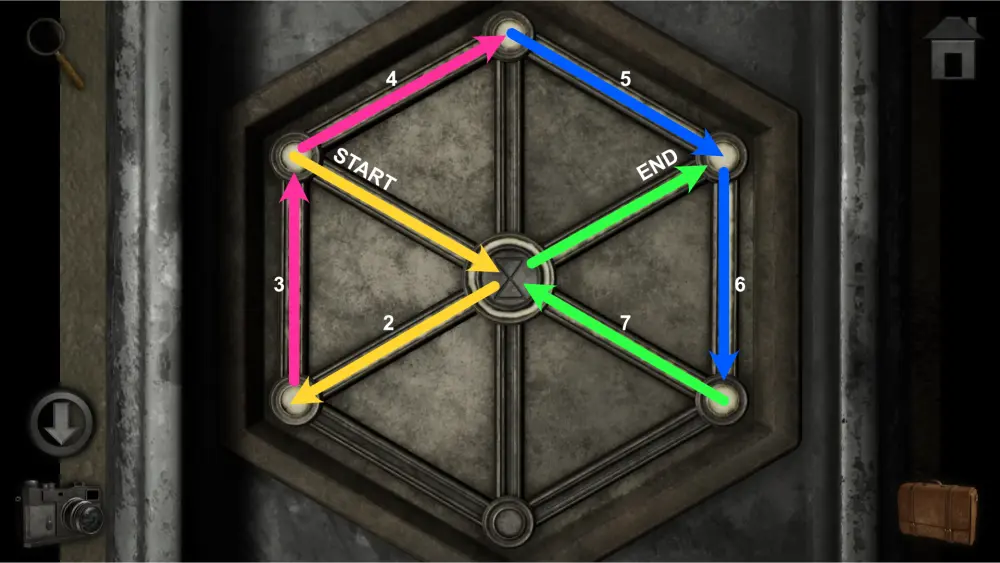
Take one more step forward and you’ll find a door leading to the fire escape. It has a hexagon lock mechanism and in order to unlock it, you’ll need to first find the pattern for it.
Go back to the table with shapes next to the bag scanner by the security room. Place the jigsaw puzzle on the table and begin putting them together on top of the drawing. The best way to solve jigsaw puzzles is to start with the corners and then the sides before doing the middle part.
The solution should look like this:
Take out your picture of the box cover and take note of the shapes and the number associated with the section.
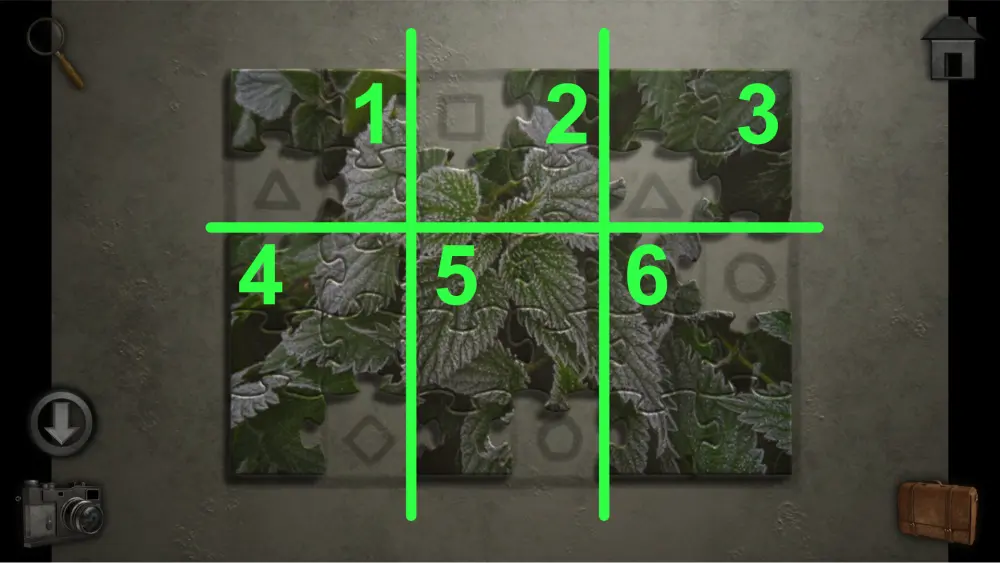
You should get these combinations:
- 1 – Triangle
- 2 – Square
- 3 – Triangle
- 4 – Diamond
- 5 – Circle
- 6 – Circle
Go back to the right hall from the maintenance room and approach the blue hatch. Apply the combinations from the jigsaw and box cover in the mechanism and the hatch will open. Since only the shapes can be changed, apply the shapes to their corresponding number.
The solution should look like this:
Once opened, take the access card inside. After that, use the card on the scanner next to the security room’s door to open it.
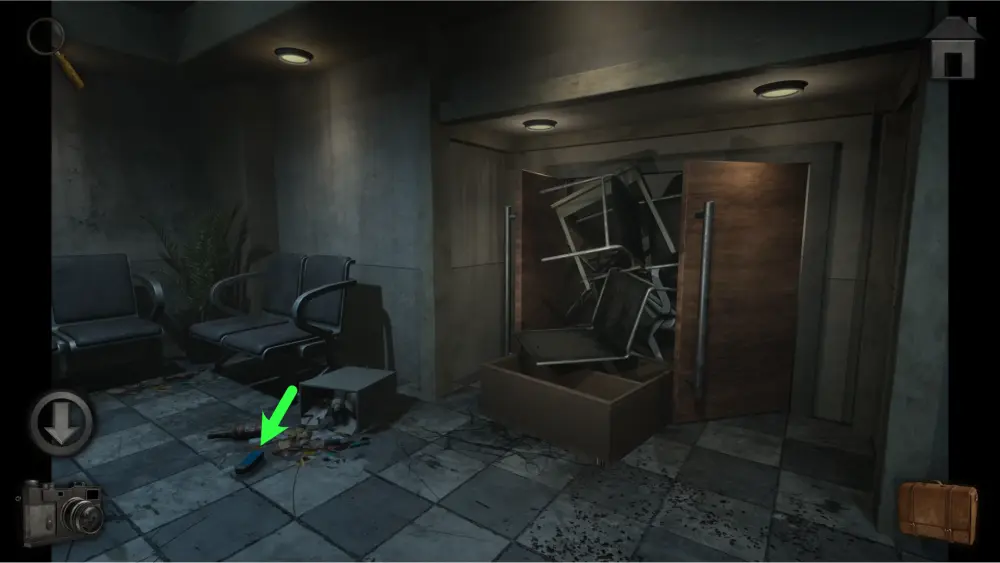
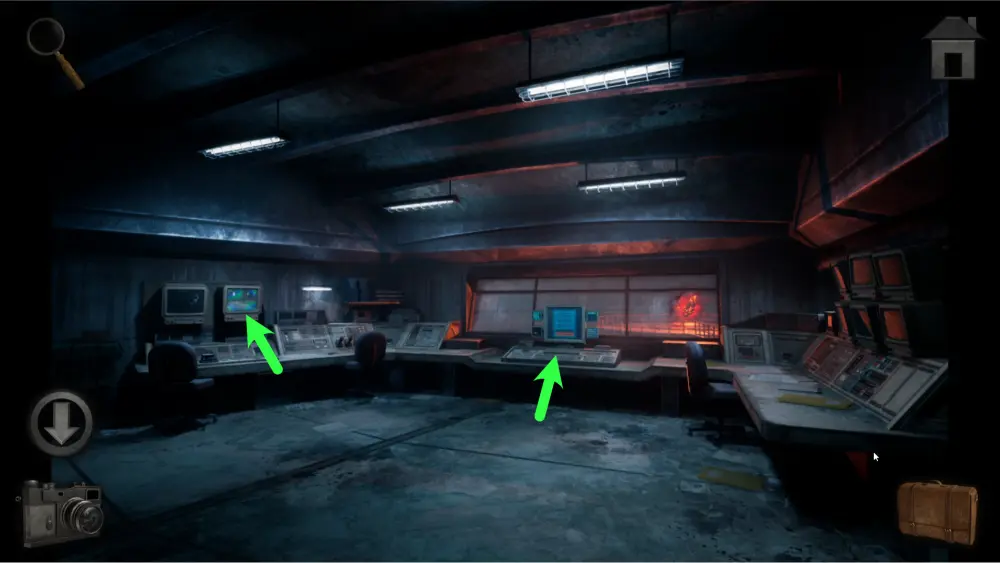
Inside the security room, you’ll find four points of interest: the bag sitting on the drawers to the right, a shelf next to it, a long board with four sections at the back, and a computer on a desk. Take the bag sitting on the drawers then approach the desk.
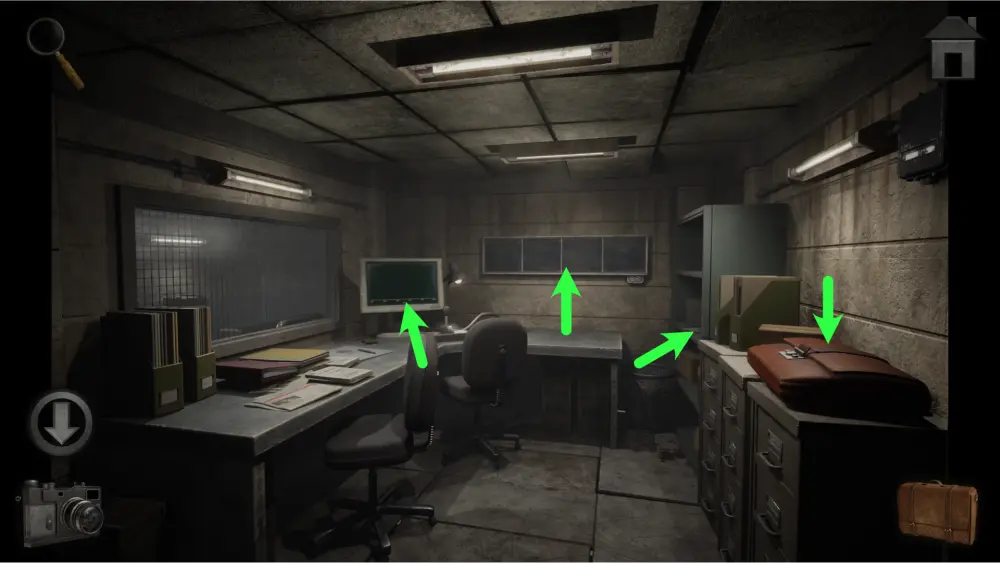
Take the scraper on the shelf to the right then go one step closer to the computer monitor.
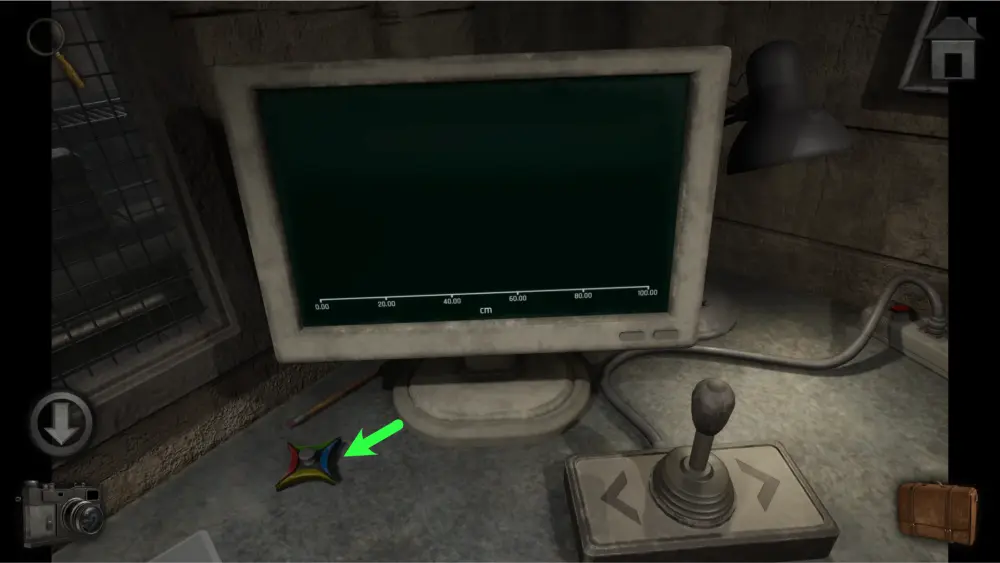
Take the colorful dial to the left of the monitor. The monitor itself and the boards to the right won’t be of use to you yet so leave the room for now.
Go back to the pantry to the left of the maintenance room and use the scraper on the wall. Take a picture of it and flip it around. Use these numbers to open the maintenance room.
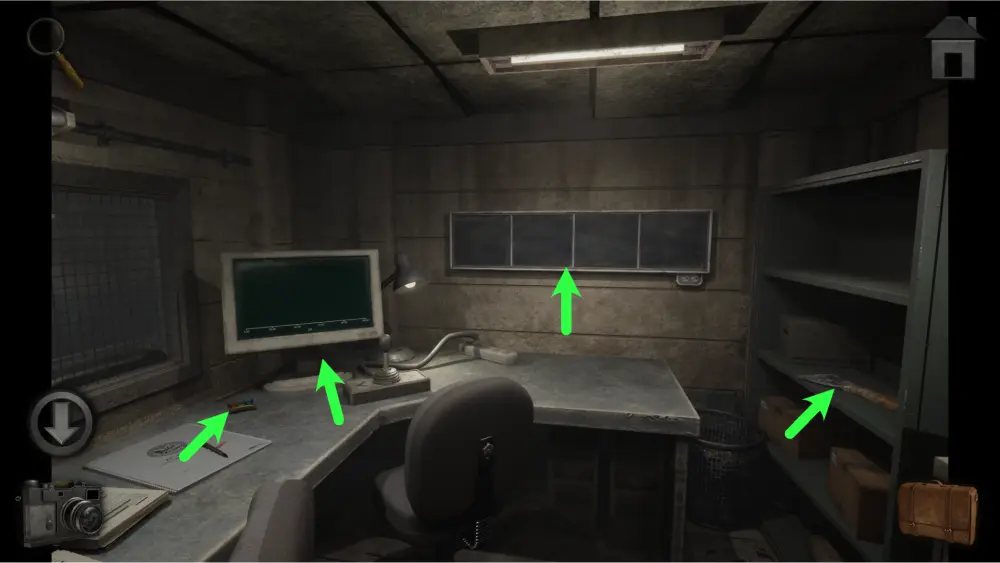
Inside, take the extension cable sitting on the table to the left before moving one step forward.
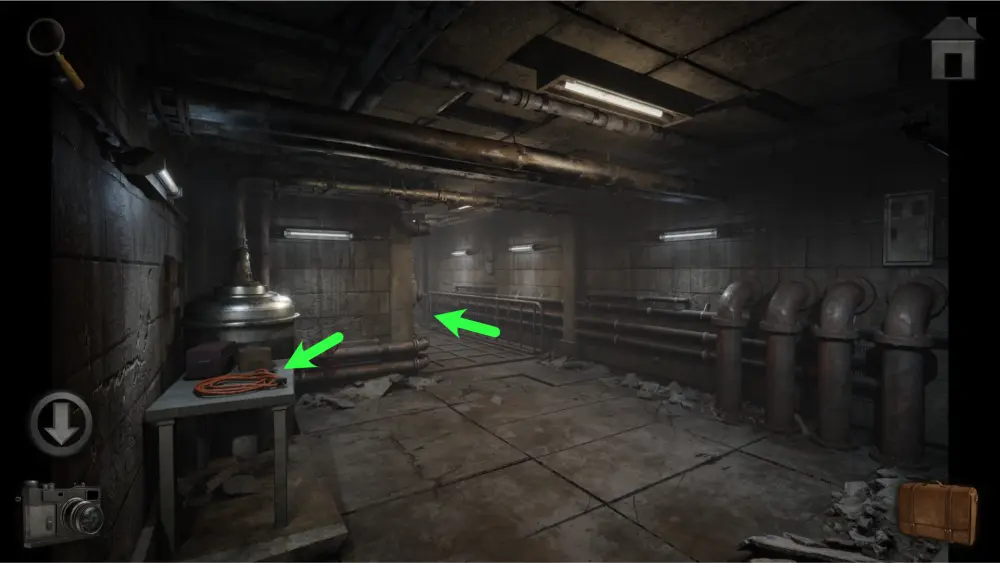
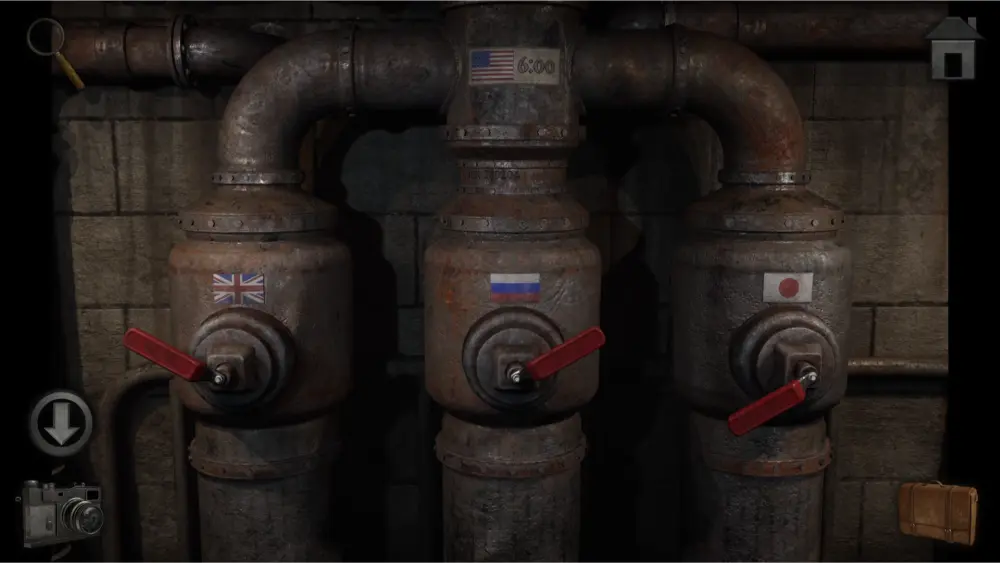
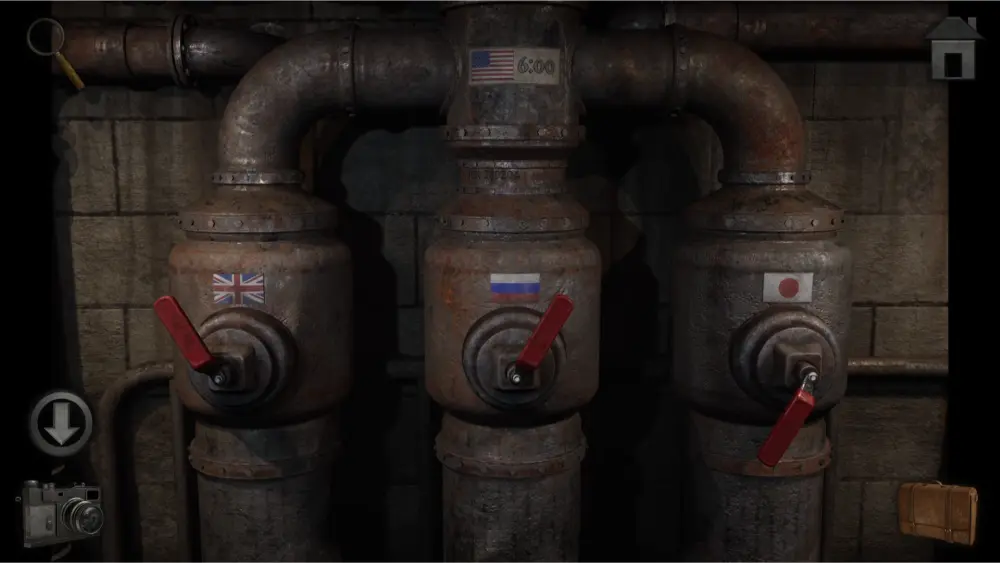
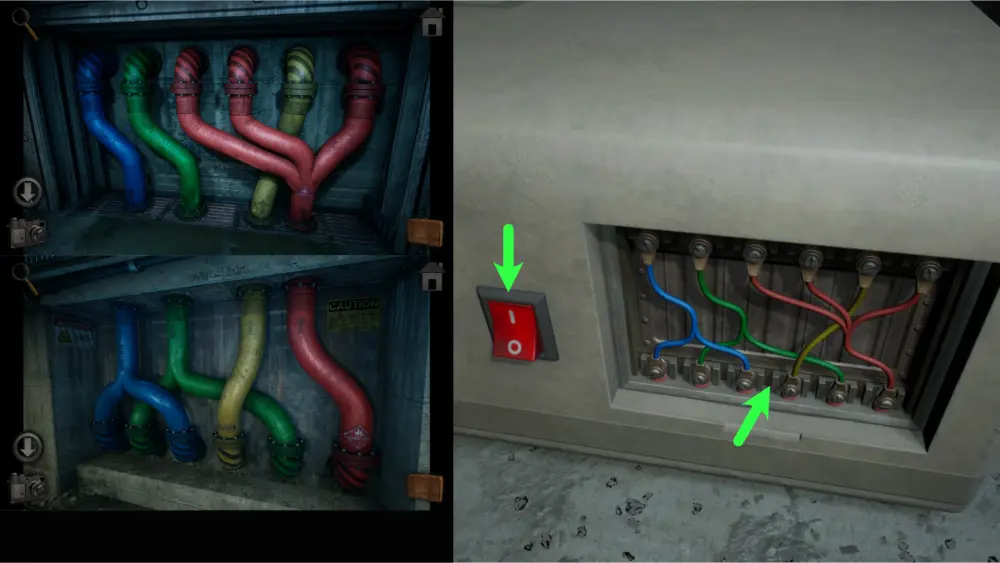
You’ll find pipe valves with country flags to your left and some sort of pipe puzzle at the back of the room.

The pipe valves have Great Britain, Russia, and Japan flags on three valves and an American flag that connects to all three with the time “6:00”. You can take a picture of this as a reference for later. Approach the pipes for now.
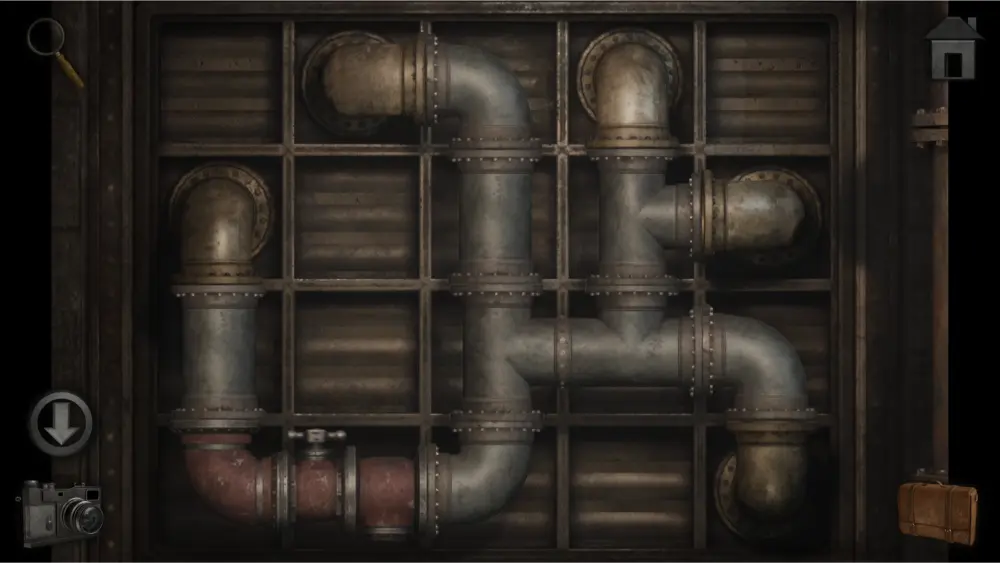
Place the 3-piece pipe that you used on the weighing scale from the first part of the puzzle in the pipe grid. Once you do, you’ll be able to solve this puzzle by connecting all pipes in a way where no pipe will be left open. Only the red and silver pipes can be moved.
The solution should look like this:
Go back to the security room, approach the long board with four sections, and use the extension cable on it. This will light up the board to display time conversions for New York (America), Tokyo (Japan), London (Great Britain), and Moscow (Russia).
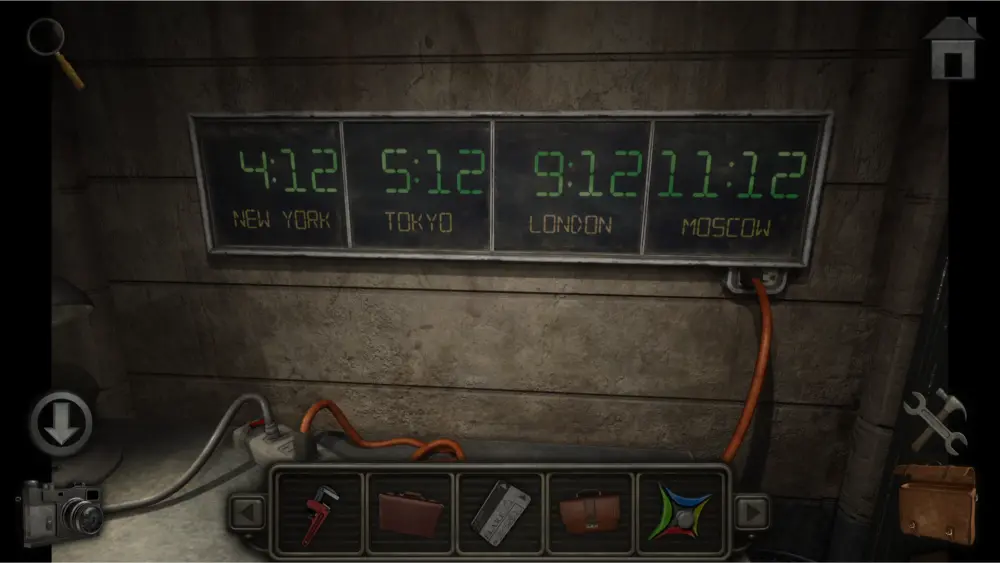
Using 6:00 as your time for New York, convert the time for the other countries. You should get the following conversions:
7:00 – Tokyo
11:00 – London
1:00 – Moscow
Go back to the pipe valves and rotate the angle of the valves according to the time that corresponds to the countries as if they are a clock. You’ll hear water rushing once you get it right.
The solution should look like this:
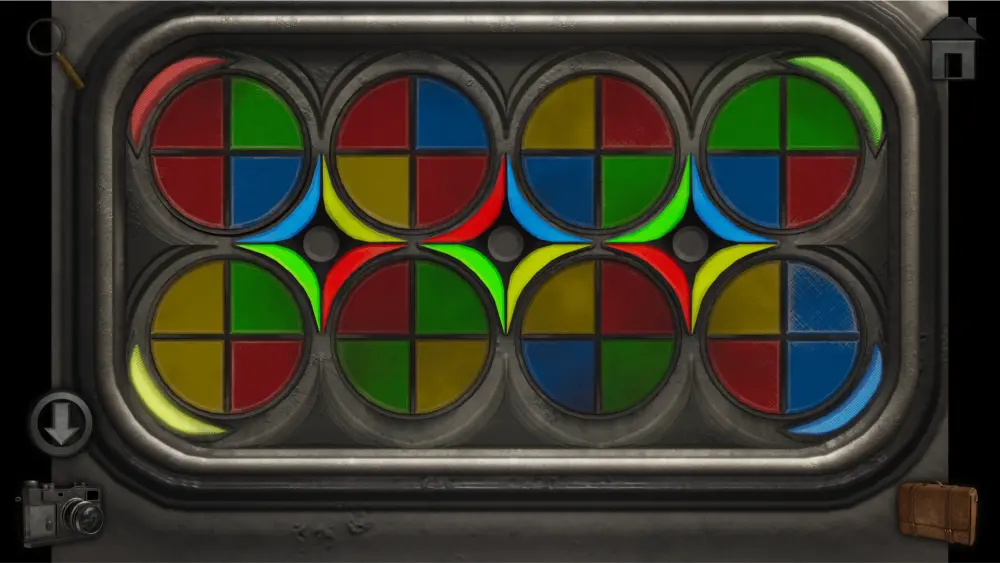
Go back to the pantry and place the colorful dial on the mechanism on the white box on the left table.
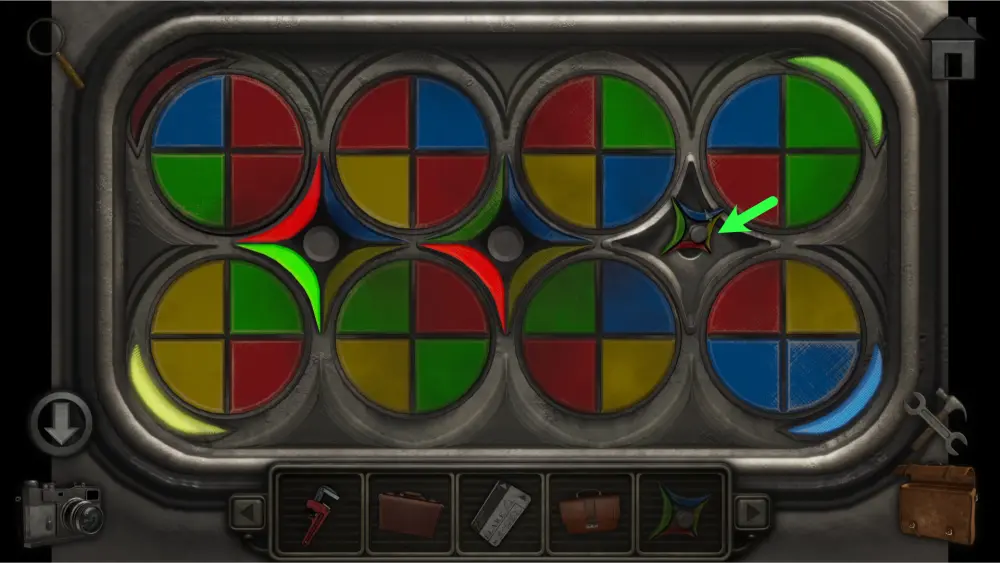
Once you’ve done that, rotate the circles and move the dials until you get all four lights in the corners and all dials to light up. The best way to start solving this puzzle is by getting the four lights in the corner to activate with the four outer circles before moving the four inner circles and the dials. You’ll have to adjust the outer circles again after finishing the inside circles and dials.
The solution should look like this:
Once the box is opened, take the faucet handle inside and use it on the faucet by the sink. This will make the water flow and sink the key down the drain.
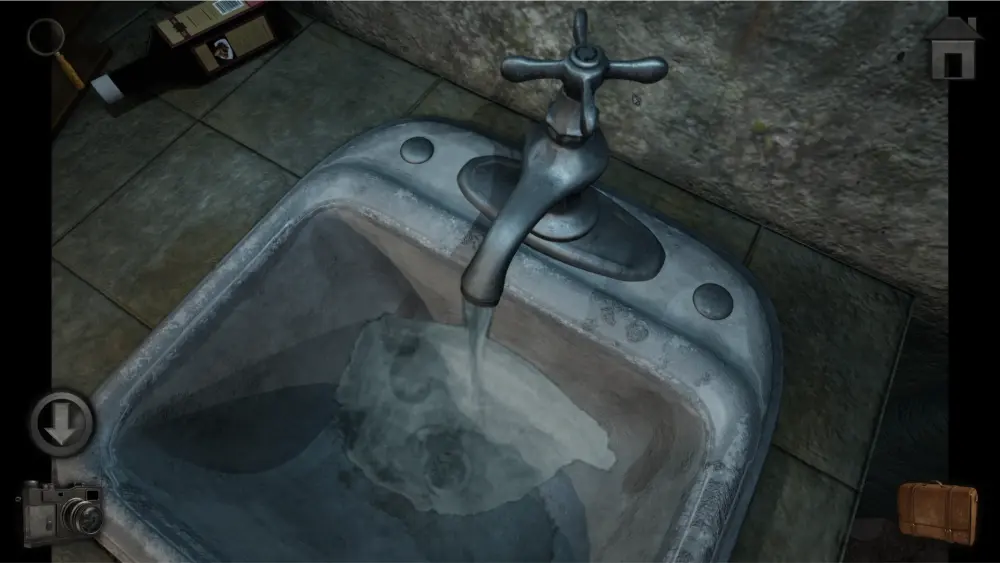
Take a peek in the cabinet underneath and use the wrench on the pipe. This will open it up and release the key.
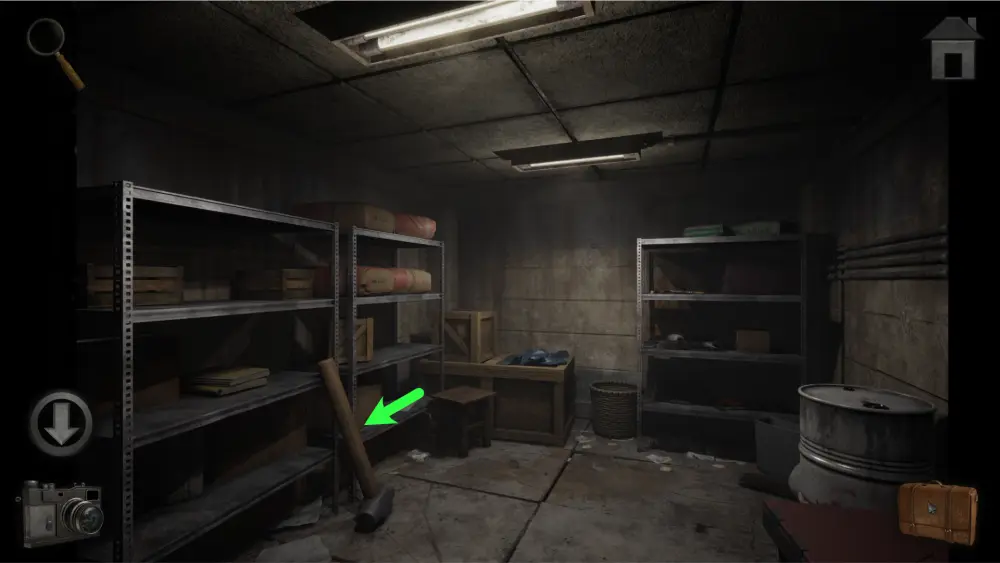
Go back to the supply room and use the key to open it. Take the sledgehammer leaning on the shelf.
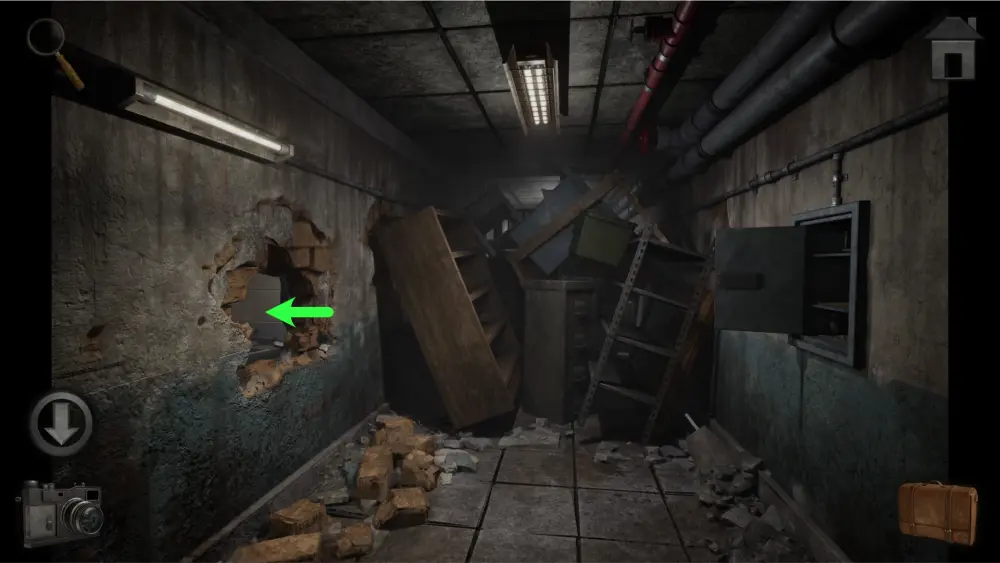
Go back to the left hall from the maintenance room and approach the damaged wall. Use the sledgehammer on it to create an opening to allow you to go inside the next room: Room 7 – Office Space (as labeled on the map).
Once inside, investigate the computer desk to the left. You’ll see a hatch with a locking mechanism consisting of zodiac signs similar to the lockers you saw in the hall. You will need to come back to it later once you have all the clues to open it. You can read the notebook on the desk for some lore but it will not have clues to any puzzles.
Move to the right side of the room and you’ll find a poster on the right wall and a dumbwaiter on the left wall.
Approach the dumbwaiter, open the control box next to it, and take a picture of the symbols on the back of the cover. This will be important later down the line.
Approach the poster and also take a picture of it for later as it will reveal how to find the combination of the hatch.
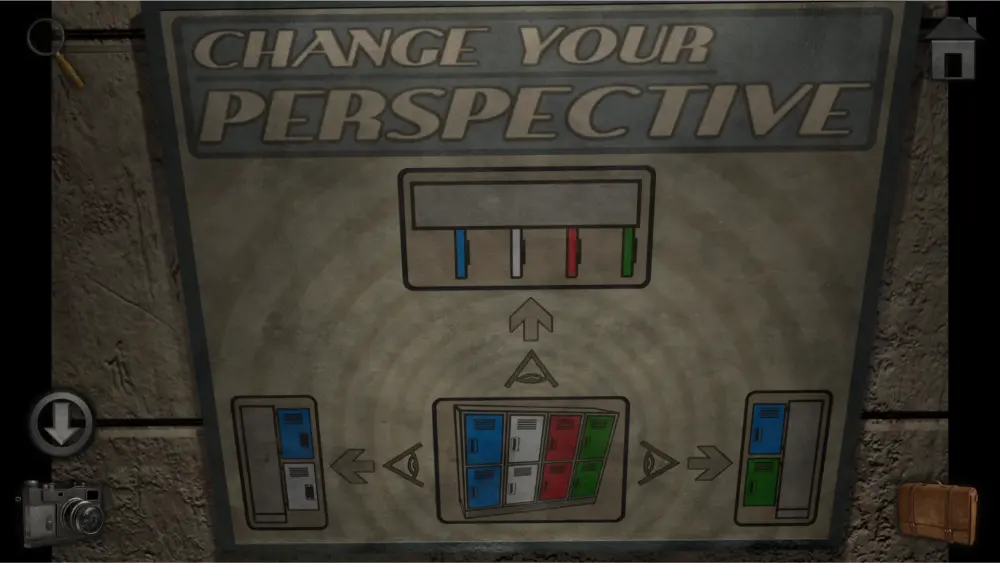
Go back to the lockers and follow the diagram of the poster you found:
- First, open the 1st and 6th lockers so they will align with the image on the left part of the poster when you look at the lockers from the left side.
- Next, open the 8th locker so it will align with the image on the right part of the poster when you look at the lockers from the right side.
- Finally, open the 7th locker so it will align with the image on the upper part of the poster when you look at the lockers from the top side.
The solution should look like this:

Take a picture of this and refer to it when opening the safe in the office.
Once opened, take the bag inside and go back to the bag scanner by the security room. Place all 3 bags you’ve found there then go to the security room and approach the computer. Move the joystick until the lines inside the bags align to form a hexagon shape. Take a picture of each one as it will determine the pattern for unlocking the fire exit door.
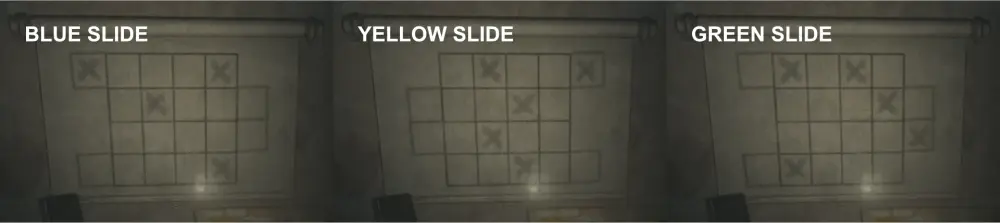
Go back to the fire exit (which is next to where the elevator should be if you look at the Facility Lambda map) and use the patterns you found in the bags to open the lock. You’ll need to draw the pattern without going over the same line twice. This puzzle may have several solutions, but the images below illustrate how we did it:
Fire Exit Lock 1:
Fire Exit Lock 2:
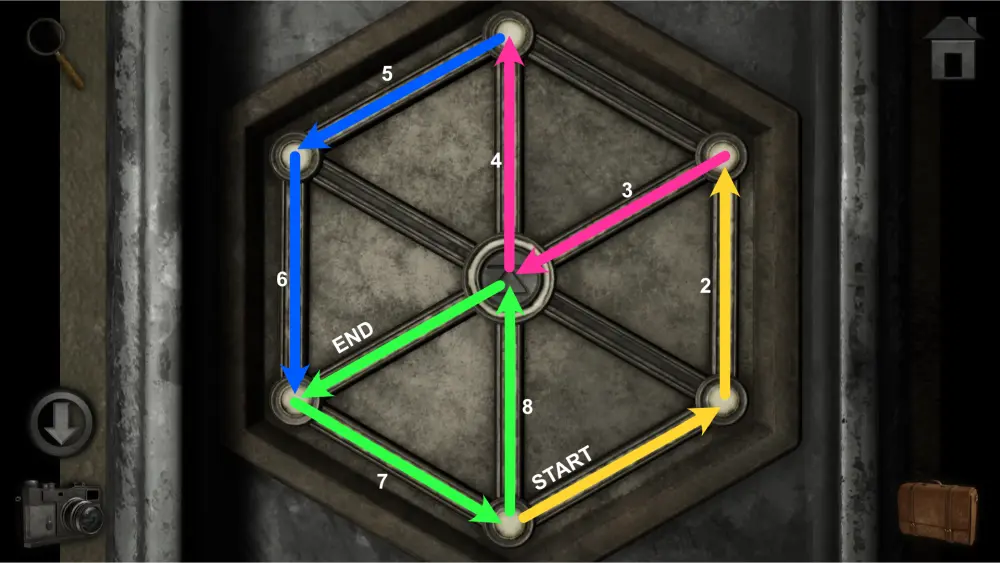
Fire Exit Lock 3:

Reaching Floor 0
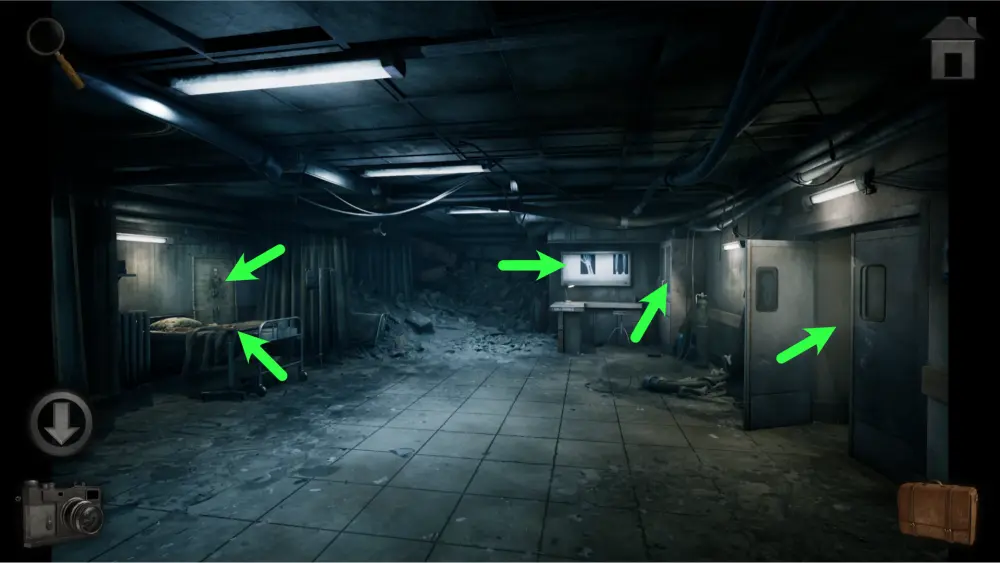
Enter the fire exit and go up the stairs until you reach the second floor. When you open the door, you’ll find a hall to the left and a hall to the right. The left hall is inaccessible at this time as you’ll need to find planks first in order to cross it. For now, take the hall to the right.

At the right hall, you’ll find a door to your right and a map at the end of the hall which leads to two more halls to the left and right of it.
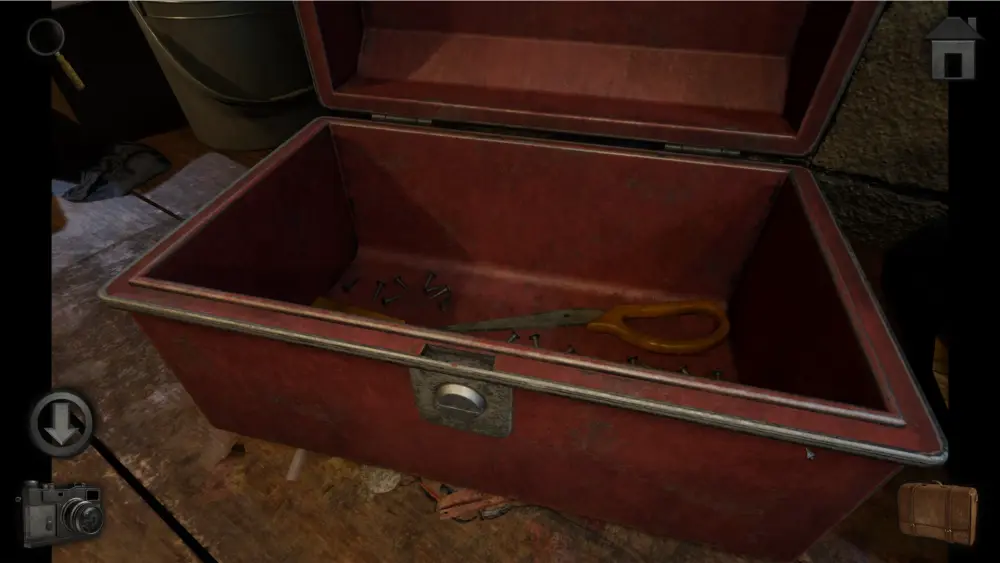
If you enter the door now, You’ll find a locker with a padlock that needs a key to open and a locked toolbox that needs a small coin to open. There’s nothing that you can take in this room at the moment so take one step forward for now.
The hall to the left is dark and cannot be explored at this time. You’ll need to find a glowstick before you can enter it. Approach the map for now.
Take the coin at the lower right corner of the map. If you try to use this coin on the locked toolbox, it will tell you that it’s too big for it and you’ll need a smaller coin. Hold onto it for now.
Take a picture of the map as it will not only help you navigate through the 2nd floor, but it will also help you with a puzzle.
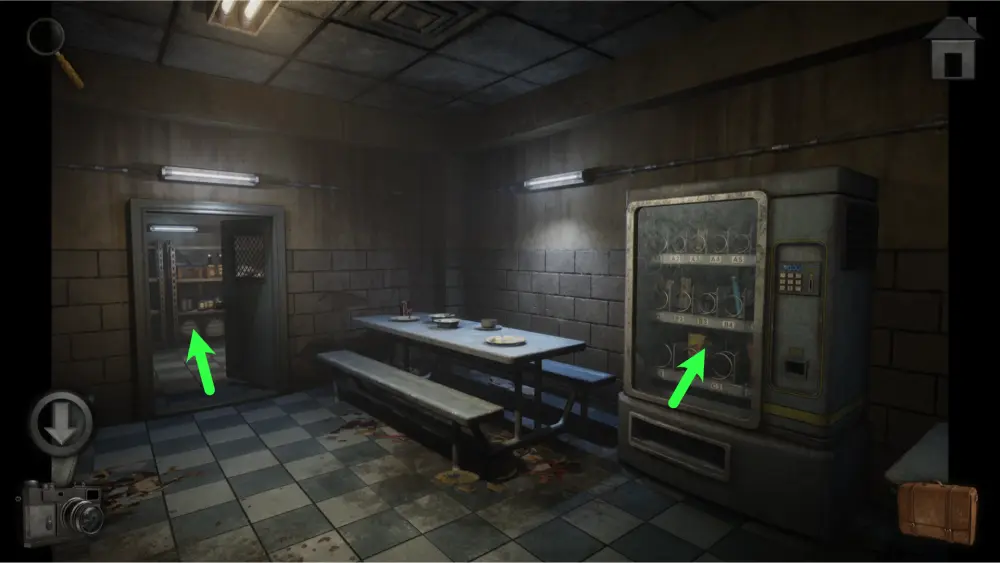
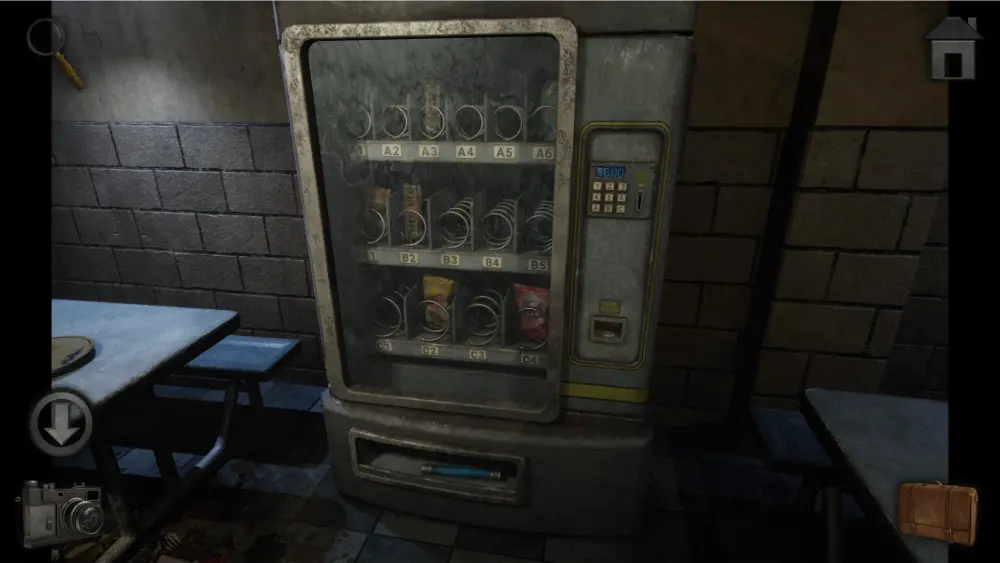
Go to the right and you’ll find the mess hall. Once you enter, you’ll find four points of interest: the door to the left, the wallet on the table, the door to the right, and a vending machine close to it.
At this time, you won’t be able to enter the door to the left and you’ll have to come back to it once you’ve found locking pliers to peel the grate. For now, approach the wallet, take the dollar coin inside it, and approach the vending machine.
You’ll notice a blue glow stick in B4. If you try inserting your 2 dollar coins, it will tell you that you need 75 more cents. You’ll need to come back to this once you get an extra coin. Enter the room next to the vending machine for now. It will lead you to the kitchen.
Once inside, take the scissor piece on the table to the right then approach the dumbwaiter to the left.
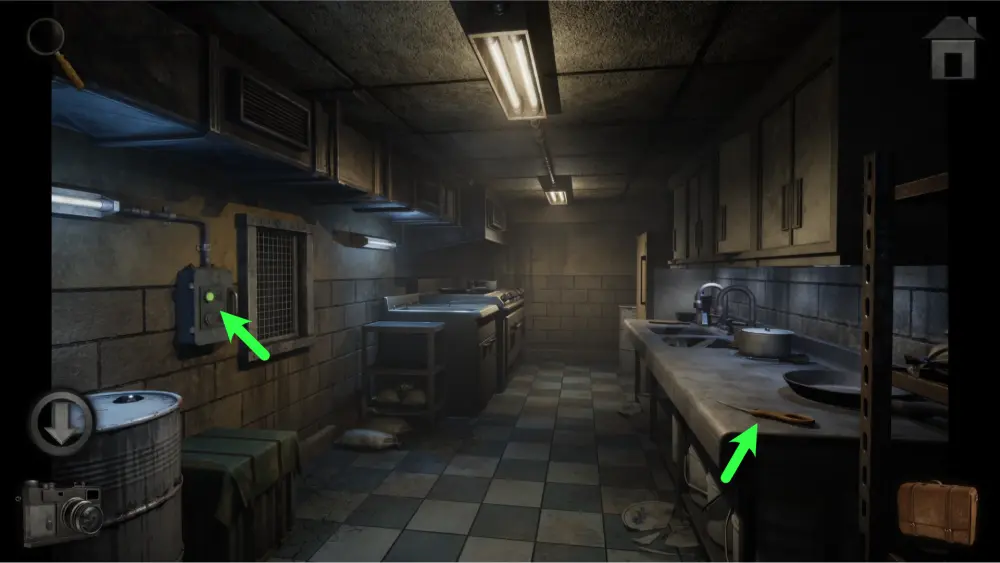
Investigate the control box to the left of it. If you open it, you’ll find some symbols that can be switched by tapping and a scratched-up image of it on the cover.
If you’ve taken a picture of the back of the cover of the dumbwaiter control box in the office room on the first floor, take it out and copy the arrangement of symbols. Take note that the image on the back of the cover is flipped horizontally.
The solution should look like this:
Once you’re done, close the cover and press the button below to unlock it, and call the dumbwaiter. Take the key from the tray.
Go back to the storage room, the first door you encountered on the second floor, use the key on the locker’s padlock to open it, and take the locking pliers inside.
Go back to the mess hall and use the locking pliers on the grate of the left room to remove it, letting you enter.

Once inside, take the large plank sitting on the shelf to the left and the other one leaning on the wall to the right.
Go back to where you started on the 2nd floor and go to the hall to the left with the giant hole. Place a plank on the floor, take one step, place another plank, then take another step forward to fully cross it.
After crossing, you’ll see an office room to the left and an elevator at the end of the hall.
Inside the office, you’ll find two points of interest: the corkboard and the computer desks.
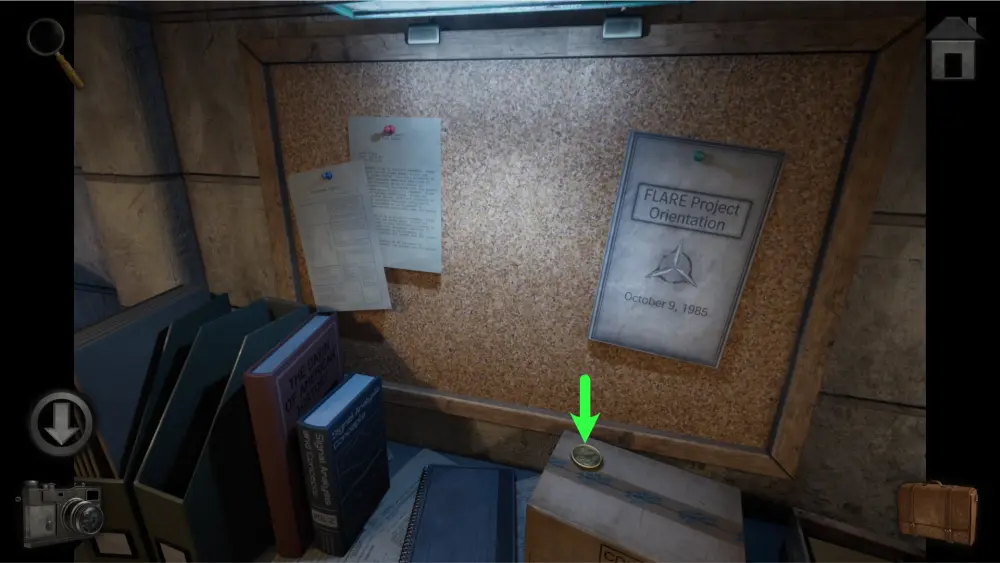
Approach the corkboard and take the dollar coin resting on top of a box. You can also read the FLARE Project Orientation for some lore but it won’t have any clues for any puzzle.
Approach the computer desks and you’ll find two more points of interest: a cabinet locked by red zip ties and a working computer to the left. You’ll have to complete your scissors before you can use them to cut the zip ties. If you investigate the computer, it will tell you that you’ll need to connect a keyboard to it before you can use it.
Now that you’ve found all 3 dollar coins, go back to the mess hall and insert them into the vending machine. After that, input B4 to get the blue glow stick. Don’t forget to take your change from the coin return!
Go back to the supply room, use the 25-cent coin on the red toolbox to open it, and take the other half of your scissors.
Combine the two half scissors using your crafting menu and use them on the zip ties on the cabinet inside the office room. Take the keyboard inside and connect them to the computer.
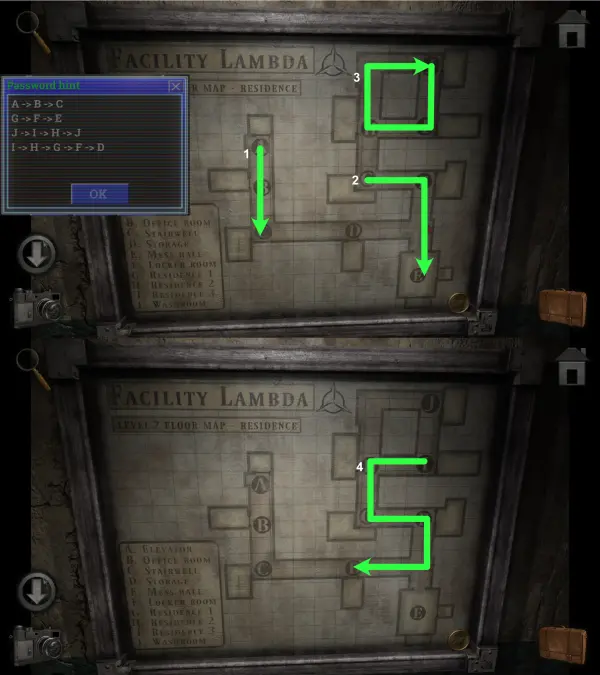
Once you’re on the computer, it will ask you for a password. Tap on the button “Get password hint” and you’ll get a combination of letters and arrows. To solve this puzzle, take out a picture of your map and connect the letters to each other.
The solution should look like this:
Input 1705 and it will give you access to the computer. On the desktop, you’ll see four icons: Emails, inventory.txt, pop.jpg, and dice.jpg.
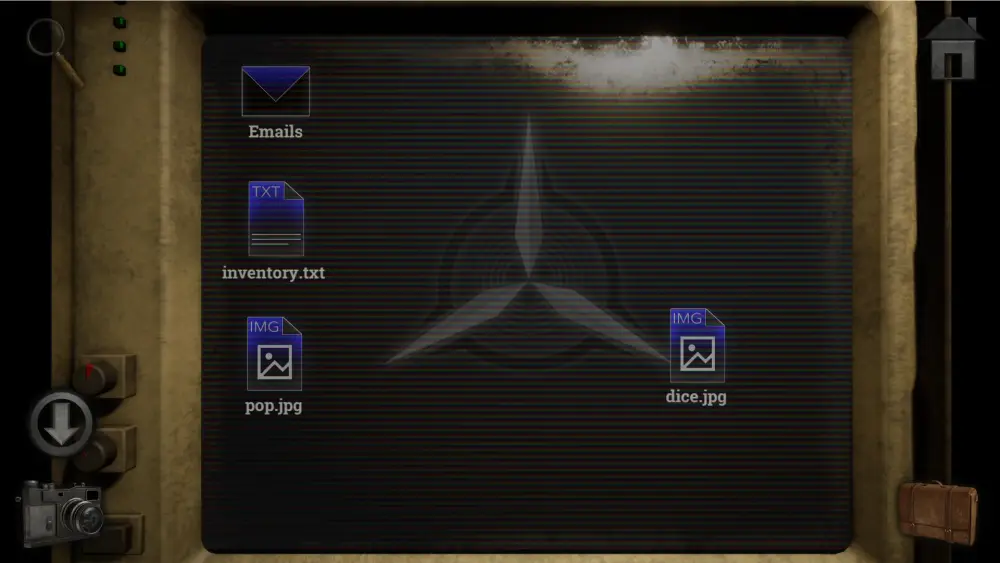
Emails have two messages that have a bit of lore but no clues for any puzzles.
pop.jpg shows you a graph of the facility’s population over the years while inventory.txt has a list of Perishable and Non-Perishable food items. Neither of them has an impact on later puzzles so feel free to ignore them.
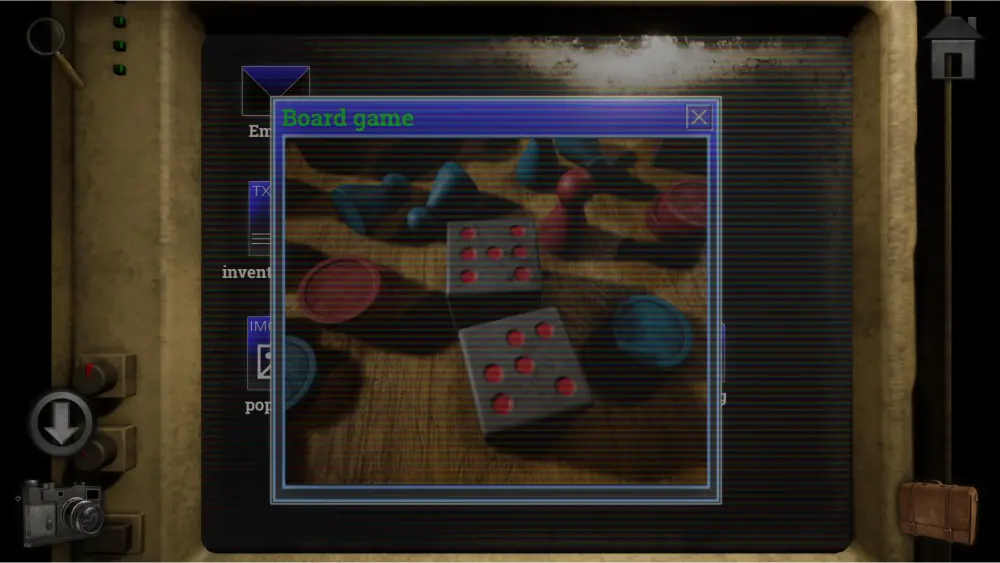
dice.jpg is also a clue for a puzzle so make sure to take a picture of it.
Go back to the location of the Facility Lambda map on the second floor and investigate the left hall. Now that you have a glowstick, you’ll be able to explore it.
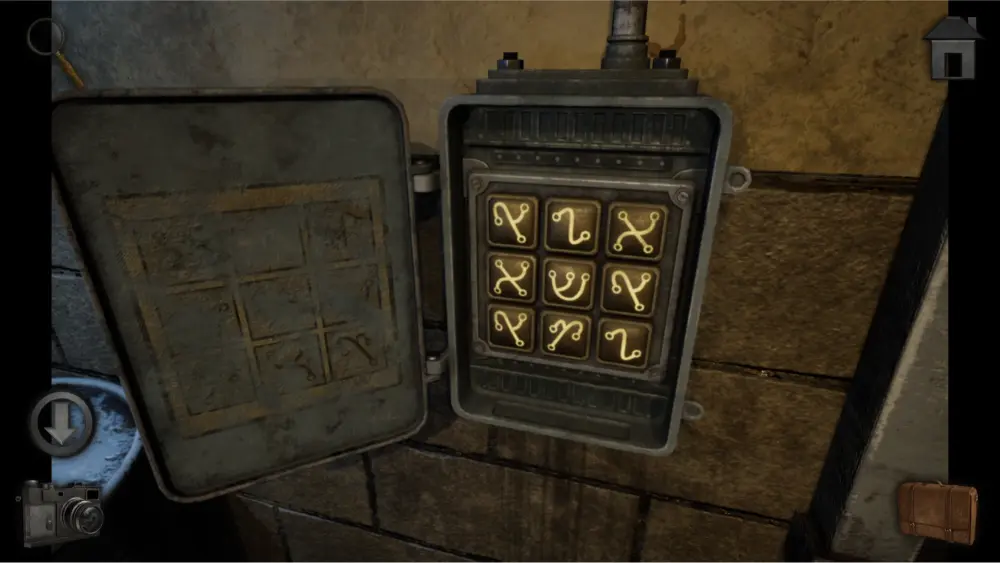
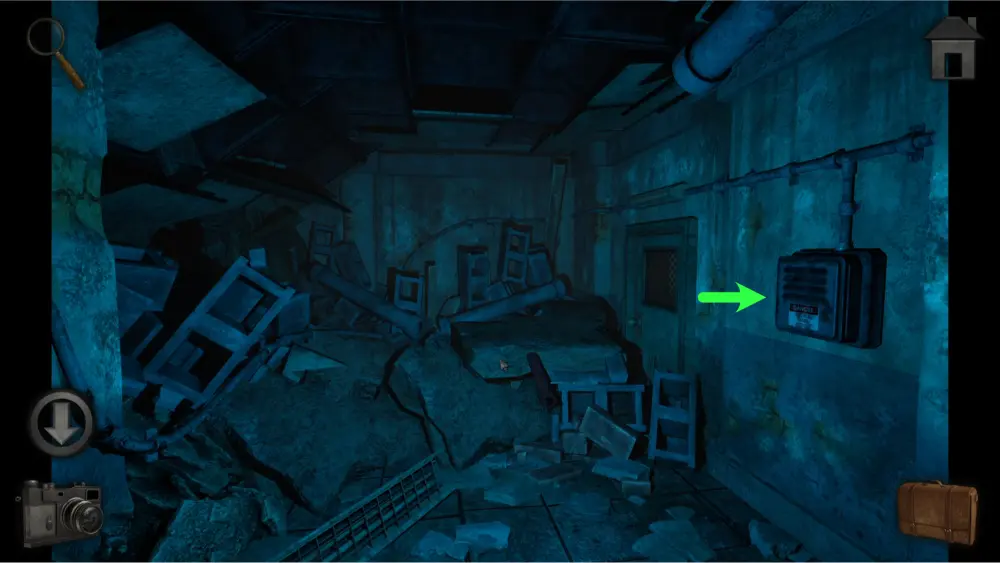
Take 2 steps forward and you’ll find a power box. Open it up and take the fuse from it.
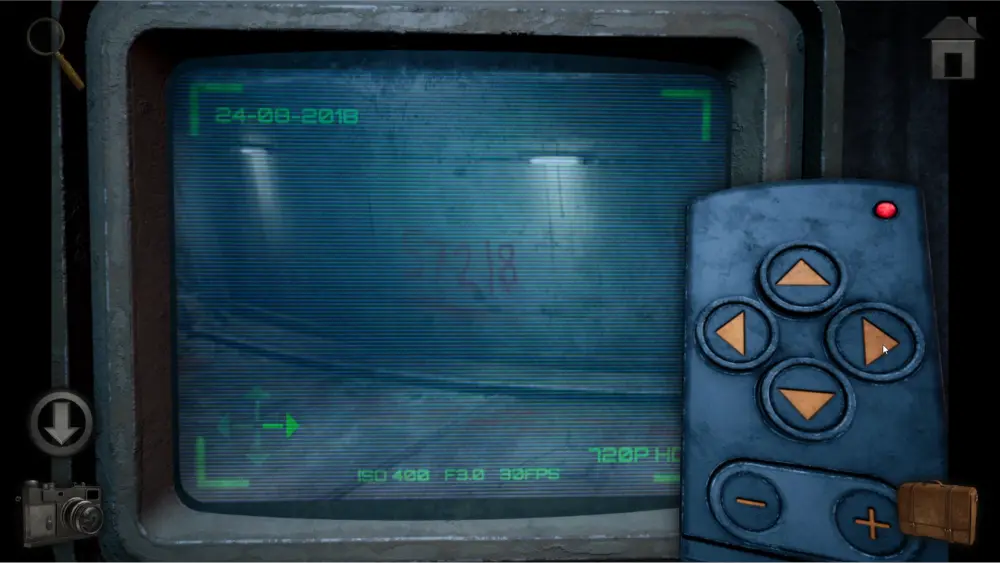
Go back to the left hall and approach the elevator. Open up the power box and place the fuse you found inside. Each slot will change the red dots that light up when a fuse is placed on it. Take out the picture of the dice you found and arrange the fuse in the same order as the red dots on the dice.
The solution should look like this:
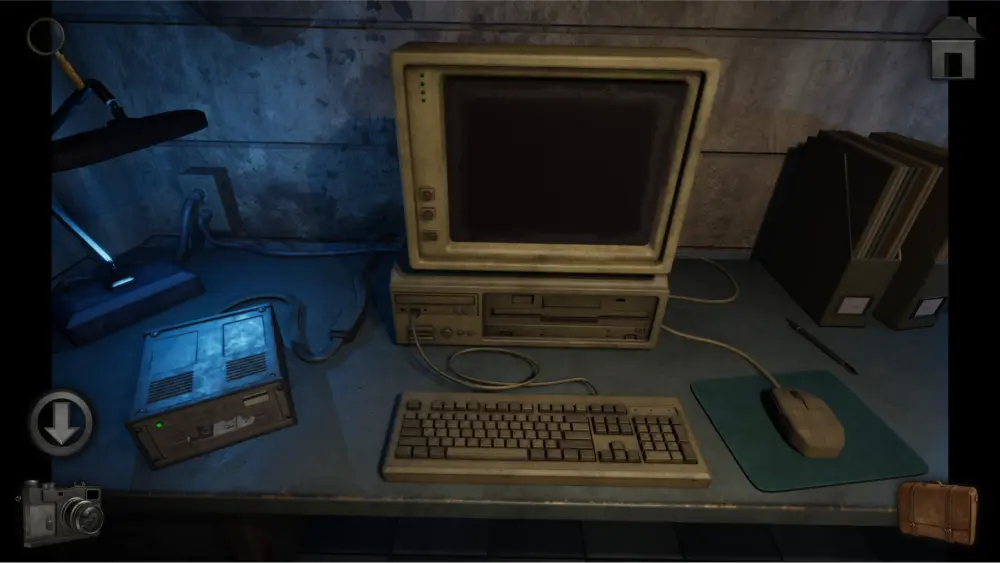
Press the elevator button to open its doors and step inside. You’ll notice that the elevator controls on the left side will tell you that you’ll need access to level 5 to get to the laboratory. Take the old card reader sitting on the wooden crate on the cart and go back to the office.
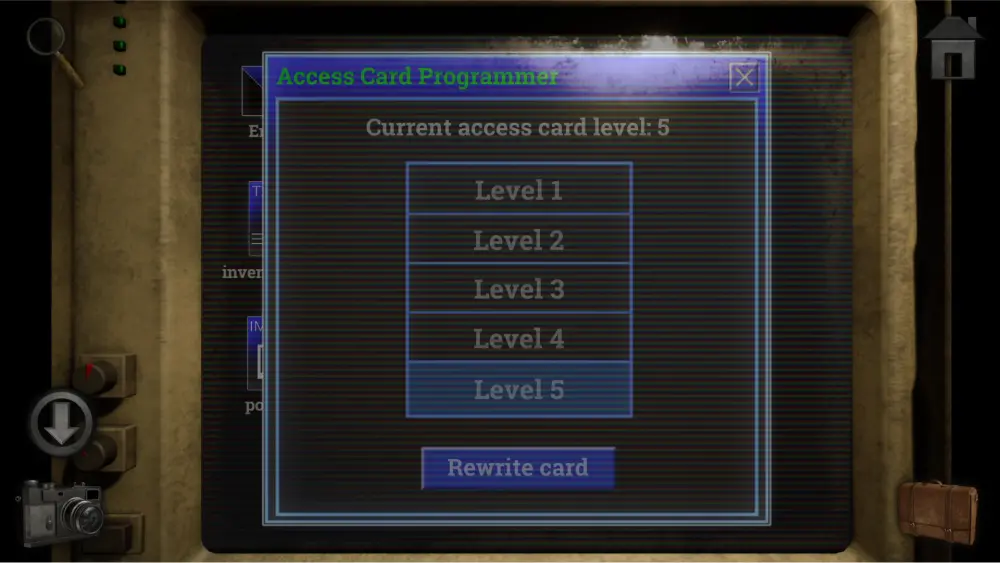
Plug in the old card reader to your computer and insert your keycard.
Keycard Reader.exe will appear on the computer’s desktop. Tap it and change the access card level to 5 then tap rewrite card. Take the keycard from the keycard reader and go back to the elevator.
Insert the keycard in the elevator controls and press 0 to get to the Laboratory.
Unlocking the Medical Wing
Take 3 steps forward, outside of the elevator, and you’ll find a door leading to section 1 and a path leading forward. The door is locked and you’ll come back later once you find a clue somewhere to solve the puzzle.

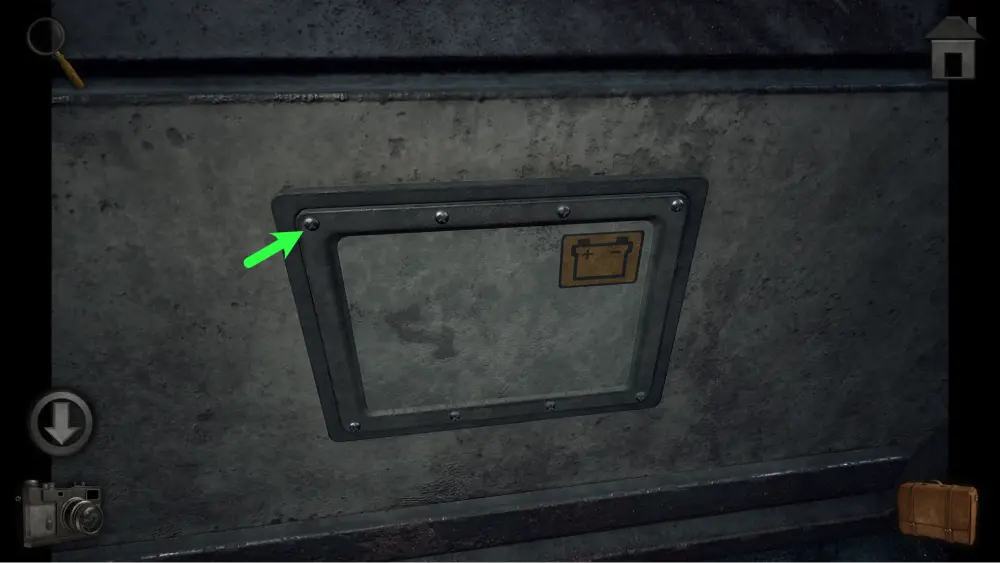
Take 1 step forward and you’ll find a vehicle on the side of the road.
If you approach it, you’ll notice a hatch on its side which contains its battery. This item may come in handy later so you’ll have to return to it once you get your hands on a screwdriver.
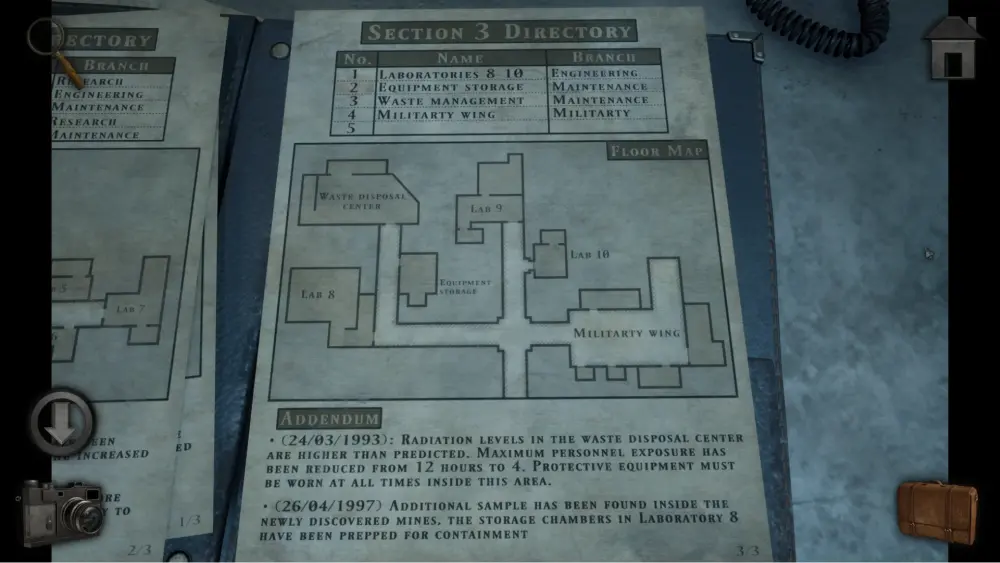
Take 1 more step forward and you’ll arrive at this spacious area with four points of interest: the parking space, the room to the left, the giant gate, and a door leading to Section 3.
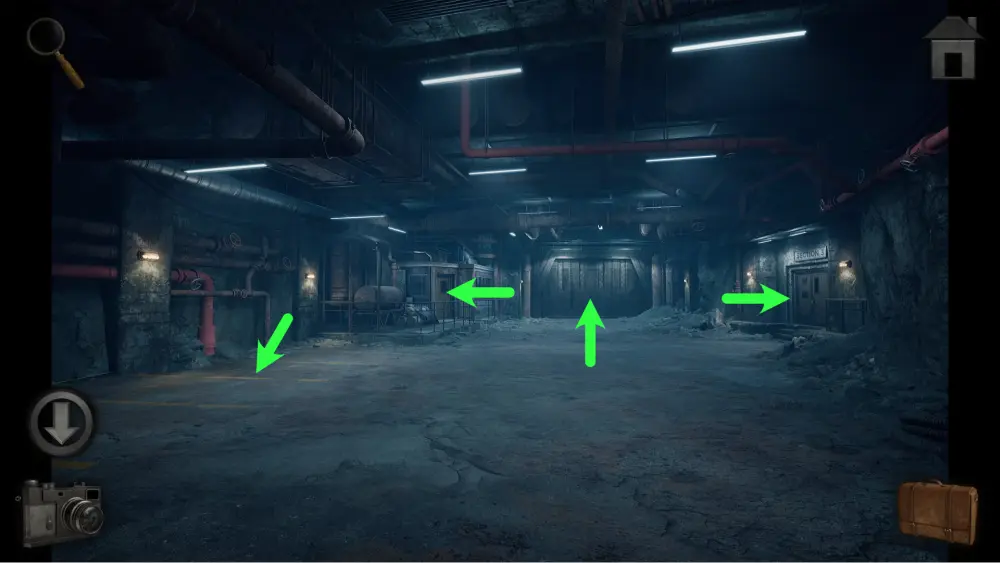
Enter the room to the left first. Take the broom at the back then approach the controls.
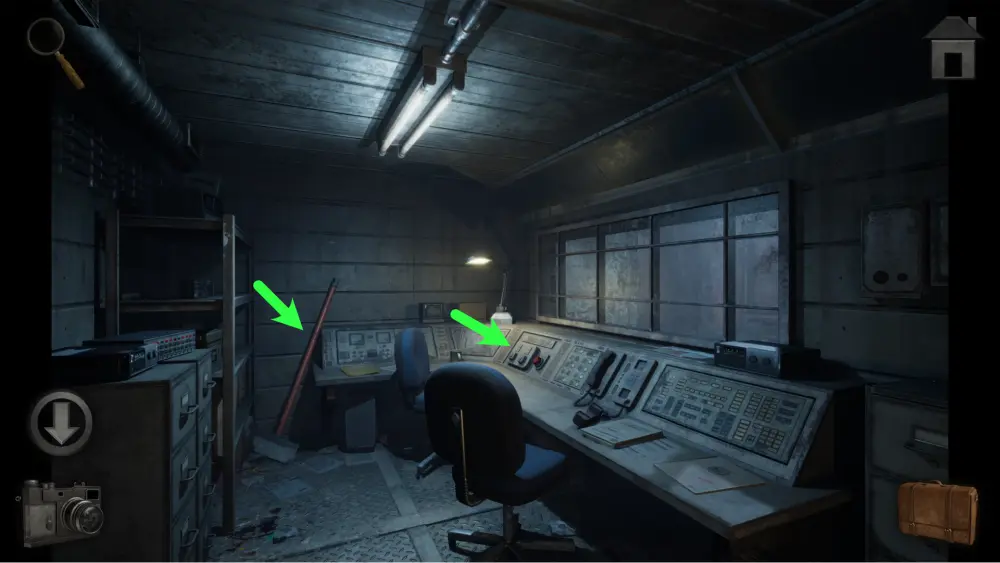
Here, you’ll find the controls for the door that require 2 keys to activate. You’ll need to look for them elsewhere.
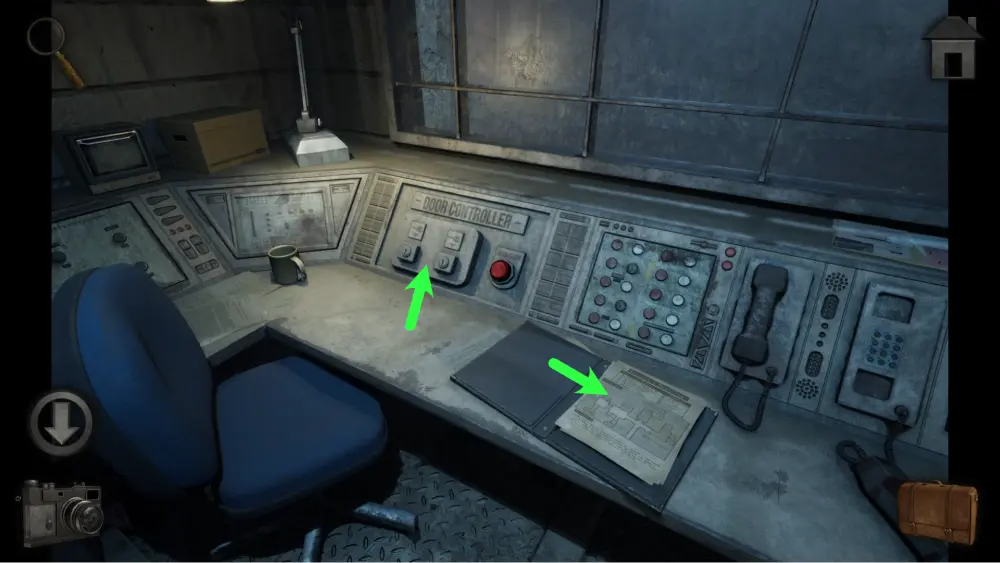
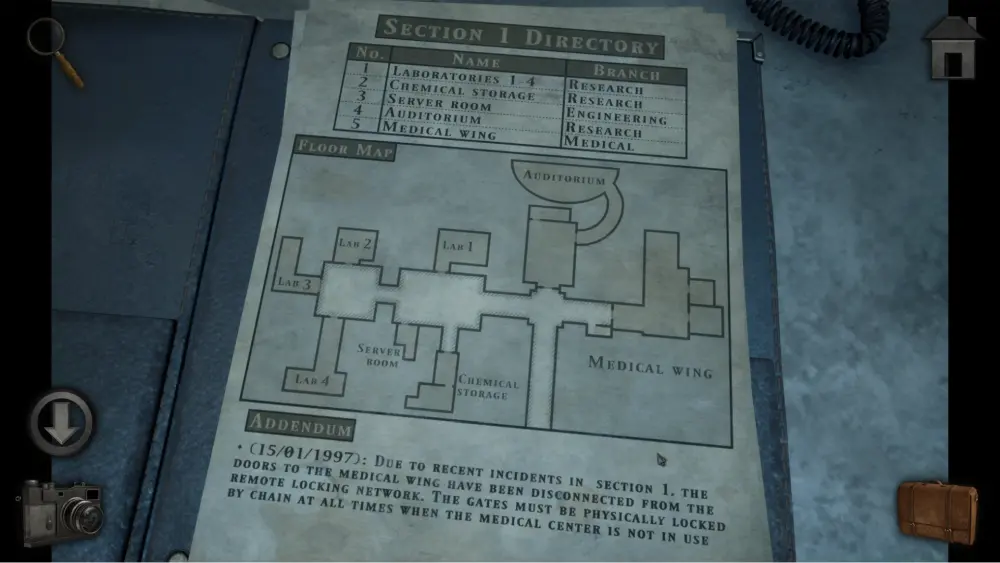
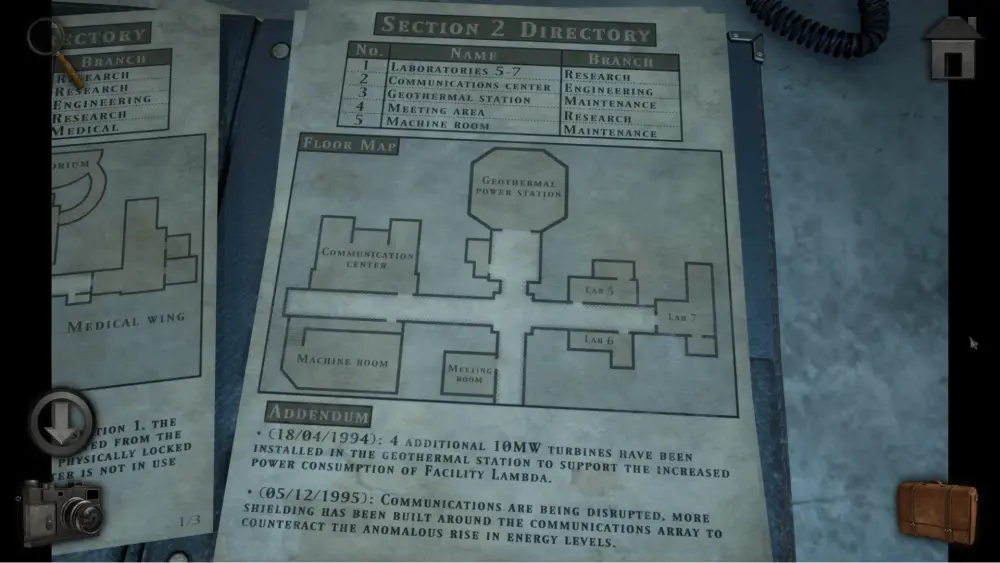
You’ll also find a folder with maps for each section. Take a picture of each page as it will be useful when navigating through them.
Section 1:
Section 2:
Section 3:
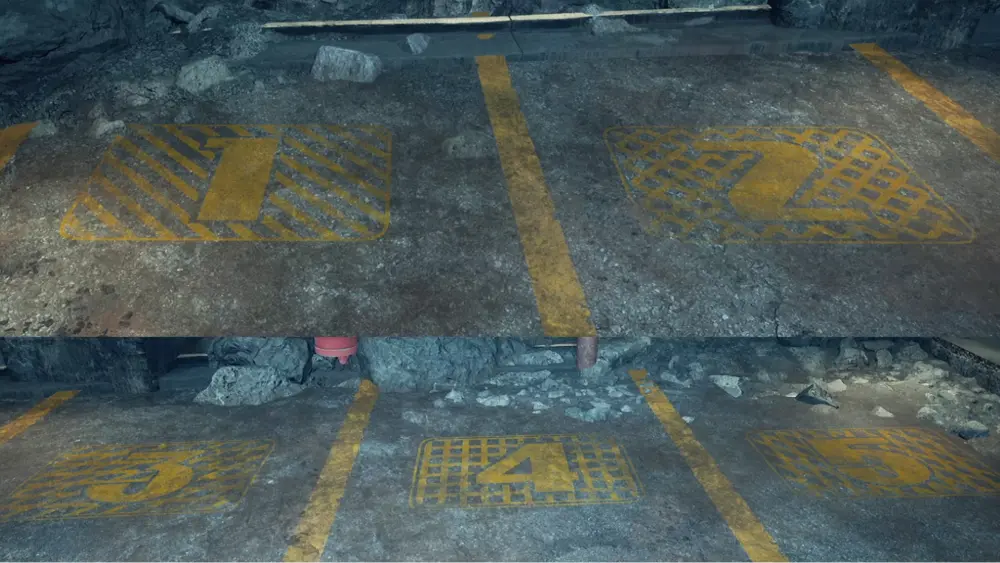
Exit the room and approach the parking space. You’ll notice that there seem to be patterns on the ground covered with dirt. Use the broom to unveil it and take pictures of each pattern. This will come in handy for the puzzle of opening Section 1’s door.
At this time, while Section 3’s door may be unlocked, it will be impossible to explore since it’s pitch black. You’ll have to come back later once you find a light source to use.
Go back to Section 1 and take a look at its lock. For this puzzle, you’ll have to tap the buttons to change its lines and use the parking space pictures as a reference. The lines between the two boxes are the common lines between the two numbers. Below are the steps we took to get to the solution:
- Since parking spaces 1 and 2 both have diagonal lines that move from upper left to lower right, Box 1 would have to be that line direction since parking space 1 doesn’t have any other line direction.
- Parking space 2 only has 2 line directions: diagonal lines that move from upper left to lower right, and lower left to upper right. This means that among the 3 buttons inside Box 2, 2 of them would be similar.
- Parking space 3 has 2 line directions: diagonal lines that move from lower left to upper right, and horizontal lines. Seeing as there are no horizontal lines in parking space 2, boxes 2 and 3’s common line direction is lower left to the upper right.
- Parking space 4 has 2 line directions: vertical and horizontal. Since both parking spaces 3 and 4 have horizontal lines, that would be their common line direction.
- Parking space 5 has 2 line directions: vertical and diagonal lines that move from upper left to lower right. This means that boxes 4 and 5’s common line direction is vertical. On the other hand, the boxes 2 and 5’s common line direction should be diagonal lines that move from upper left to lower right.
The solution should look like this:
Go inside Section 1 and take 1 step forward. You’ll see a hall to the left, a door to the Auditorium, and a metal gate to the Medical Wing. The medical wing is locked by an old padlock and is inaccessible at this time. Enter the Auditorium for now.
Inside the Auditorium, you’ll find a door barricaded by planks and another door barricaded by chairs. You’ll need to find a crowbar to remove the planks on the first door while the second door cannot be passed at all. However, by approaching the second door, you’ll find a blue lighter on the floor next to the garbage can. Take it as it will be important for a puzzle.
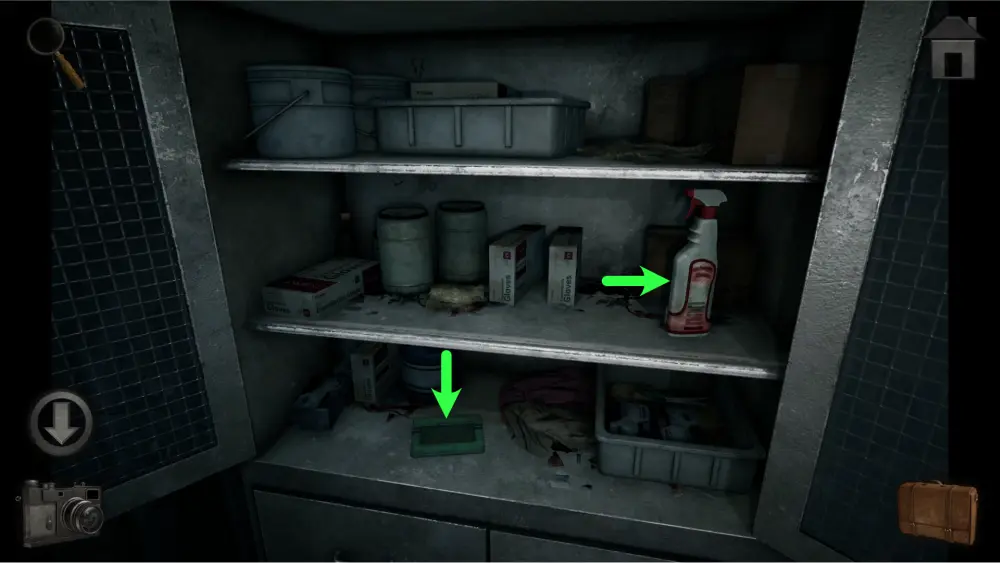
Go to the hall leading to the left this time. You’ll find a grated cabinet to your right which has a screwdriver and crowbar inside it. You’ll need to come back to this cabinet later once you find the code for its lock.
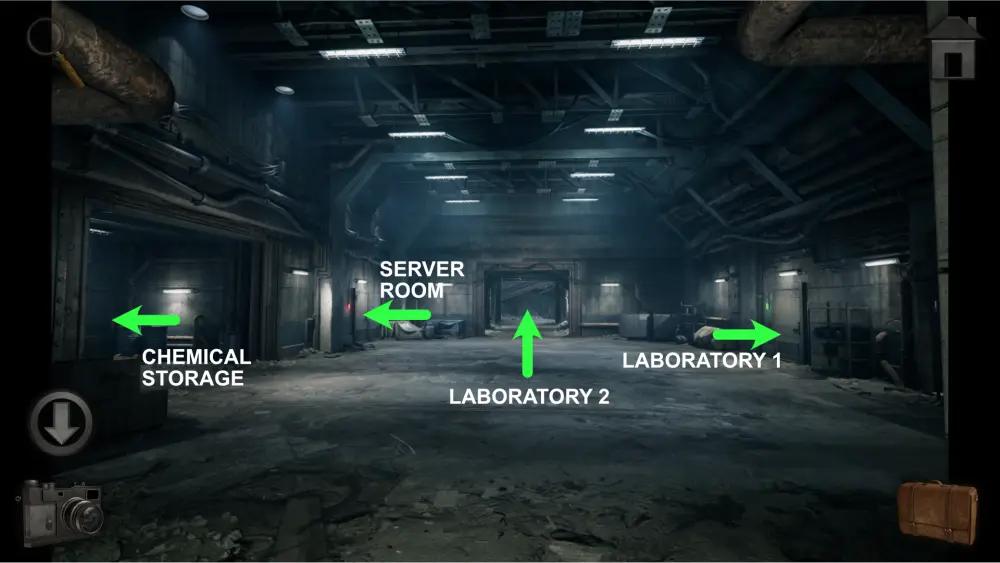
Move 1 step forward and you’ll find a spacious area with four points of interest: a large open gate to the left (leads to Chemical Storage Room) and at the center (leads to Laboratory 2), and two doors to the left (Server Room) and right (Laboratory 1). The Server Room and Laboratory 2 are locked and cannot be accessed at this time. You’ll need to find clues for Server Room’s lock somewhere while Laboratory 2 has to be opened remotely.
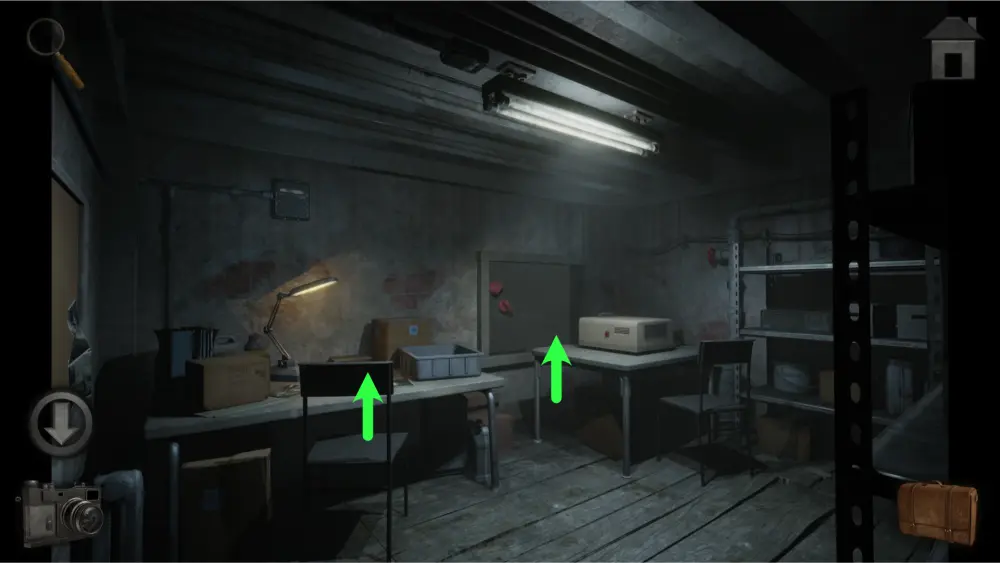
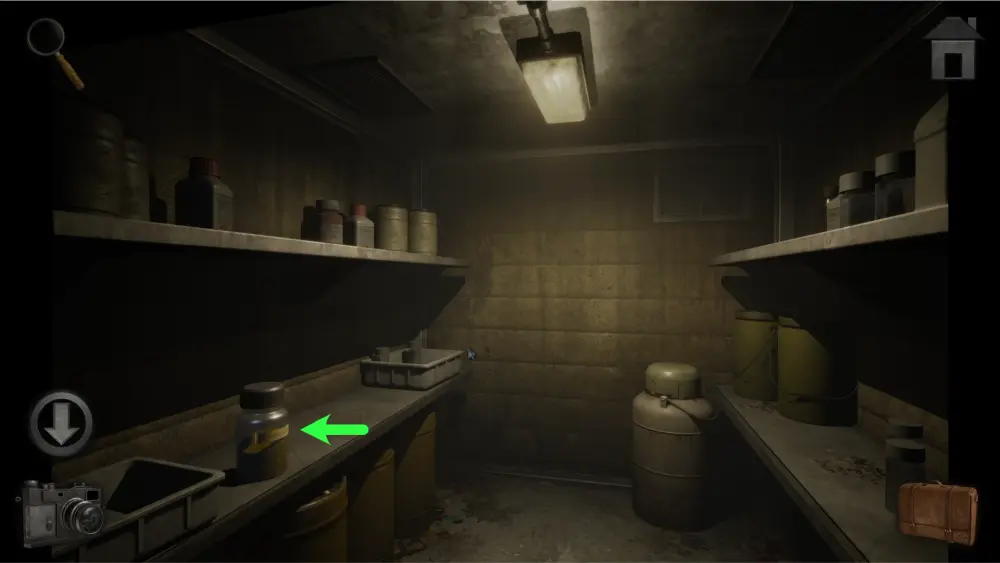
Enter the Chemical Storage Room. Inside, there are three points of interest: the desk to the left and the shelves to the right, and a doorway leading to the Chemical Storage Depot.

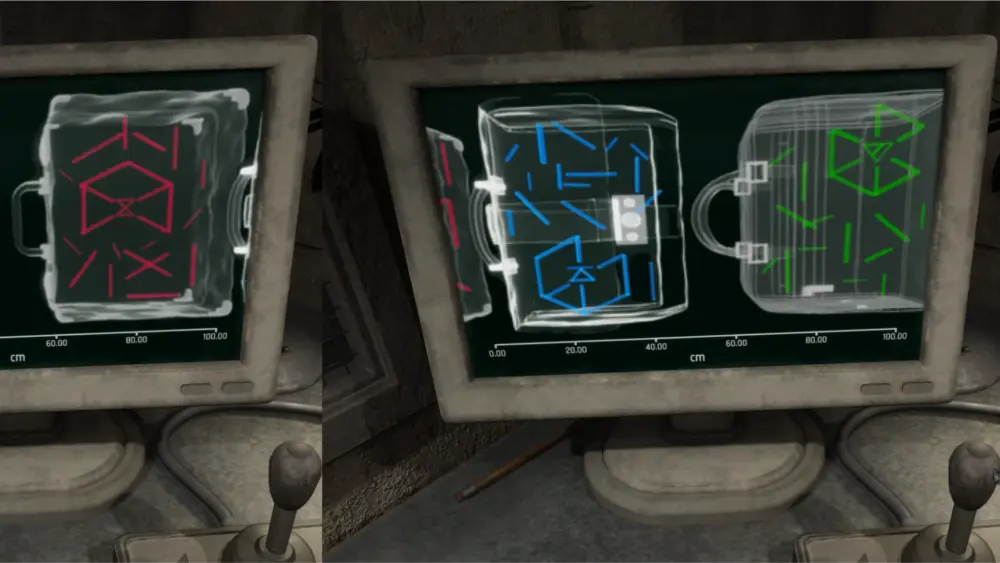
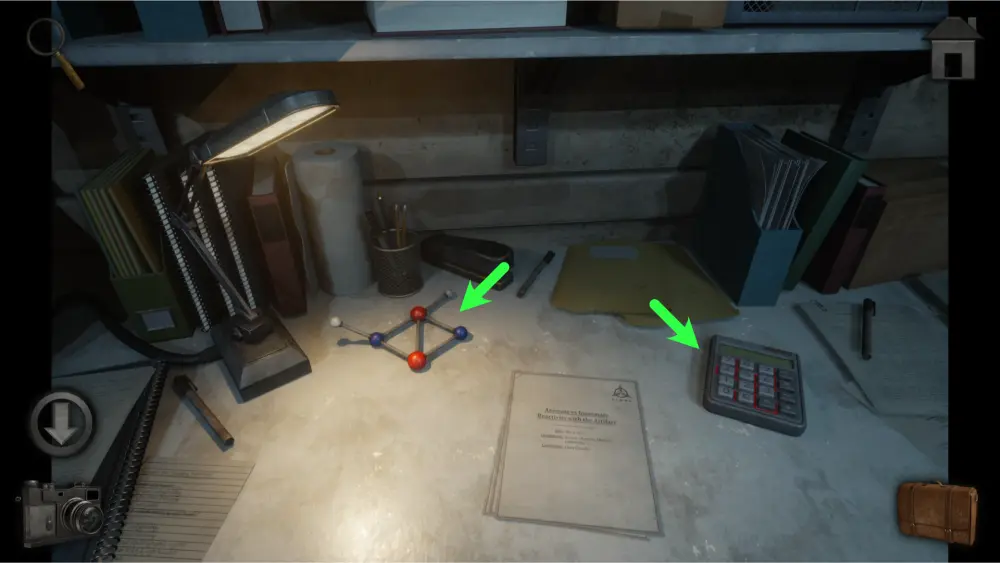
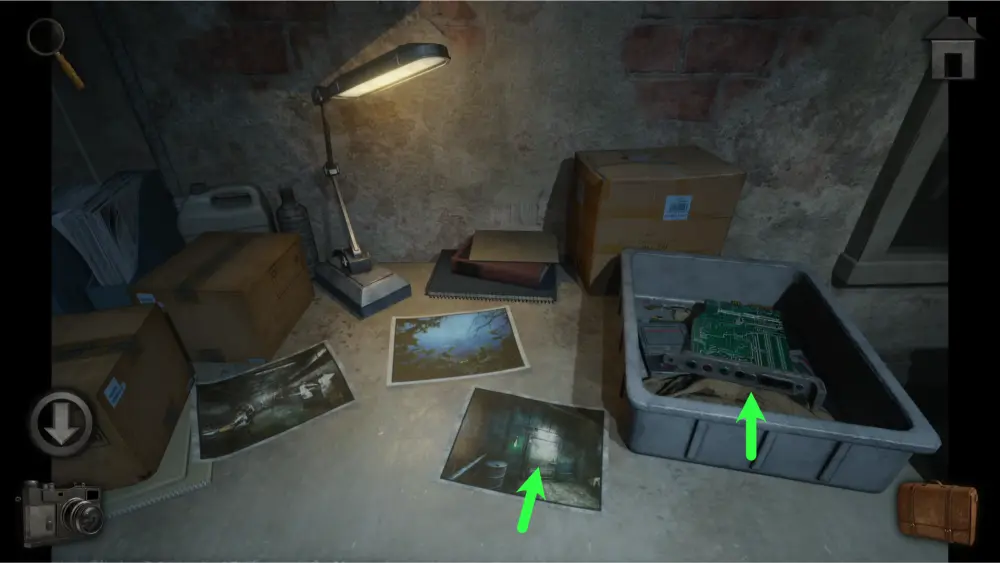
Approach the desk and take Specimen I and a picture of the DNA structure. The calculator will be important for a later puzzle so remember its location. The document contains some lore but does not contain any clues for any puzzle.
Approach the shelves and take the jar of sugar before going inside the Chemical Storage Depot.
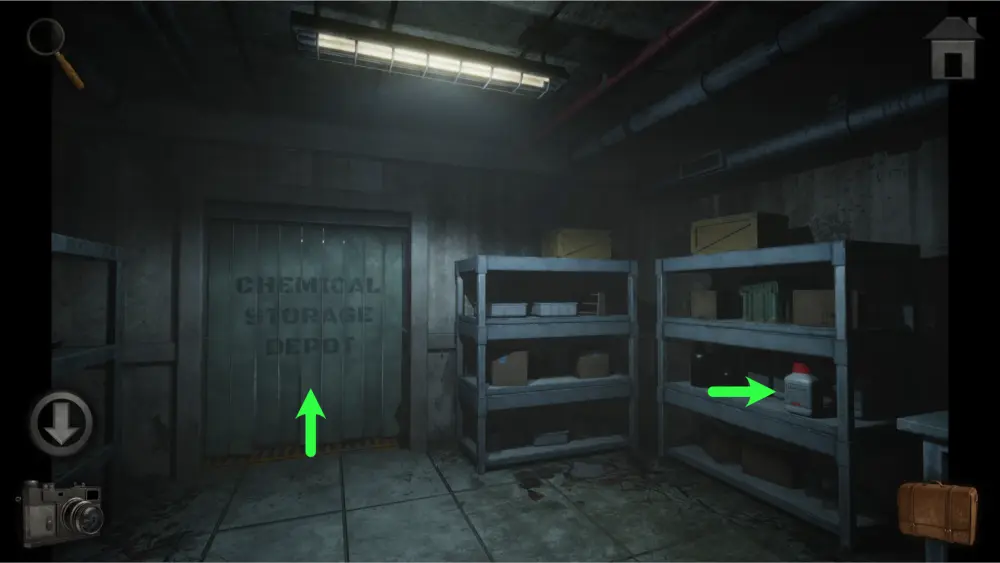
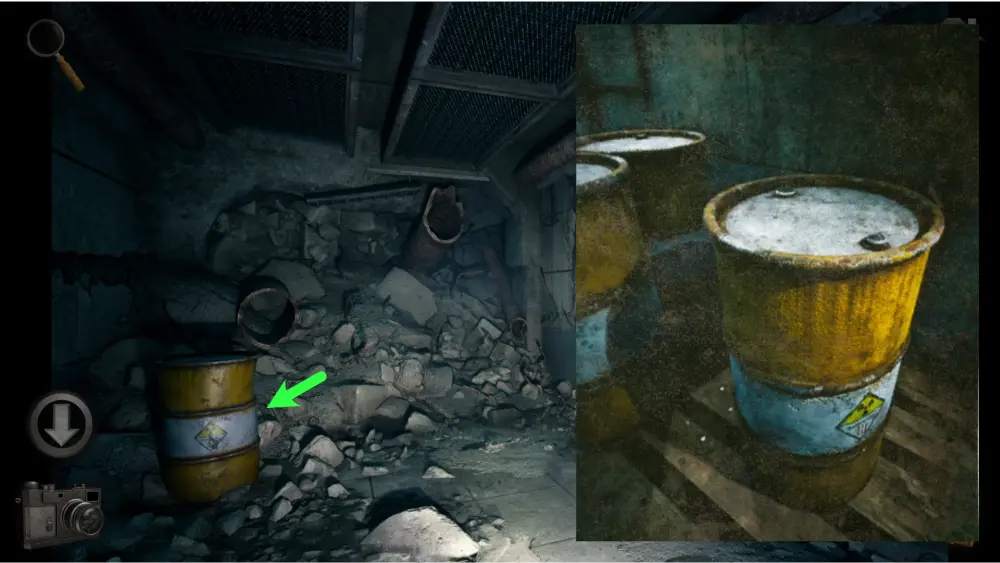
Inside, you’ll find two points of interest: two blue barrels and a door leading to the Hazardous Chemicals Room.
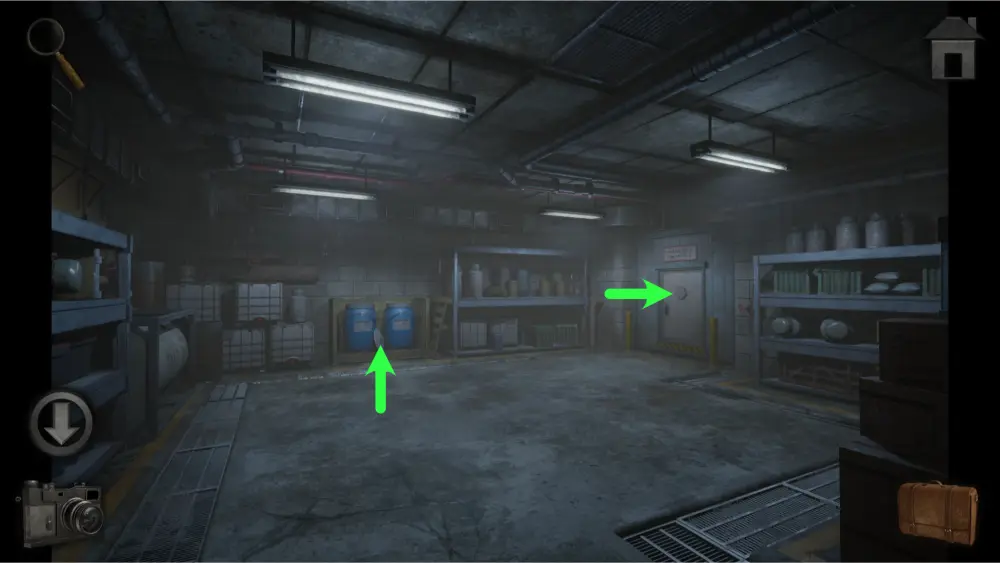
If you investigate the barrels, you’ll discover that the lid cannot be opened and you have to come back once you find suction cups to help you open it.
The door to the Hazardous Chemicals Room has a circular hatch that can only be opened once you find a hex key. Leave the room and go back to the spacious area.
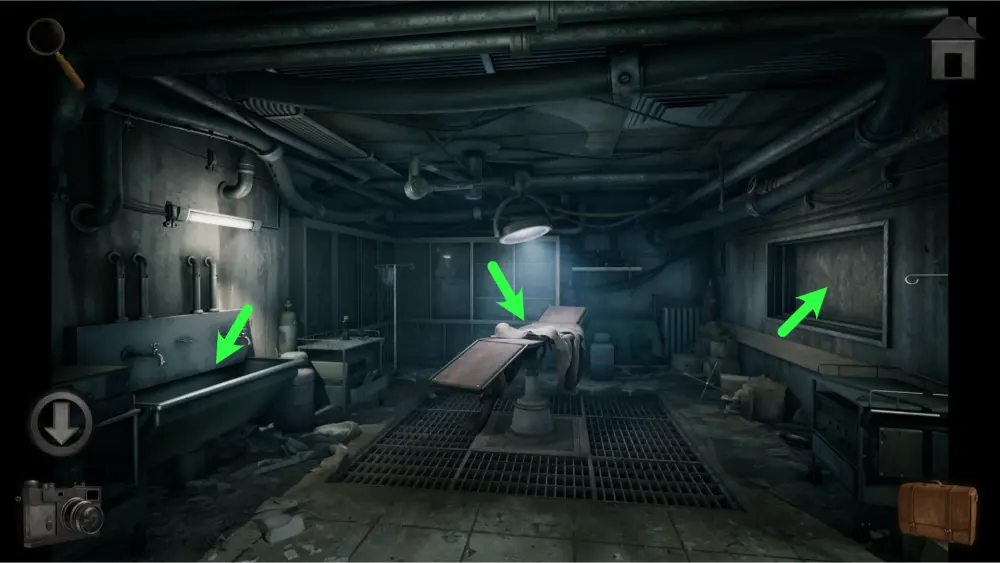
Enter Laboratory 1 and you’ll find three points of interest: the desks at the right, the desks at the back, and a fume hood.
Approach the desks to the right. You’ll find three points of interest: the desk to the left, one to the right, and a cork board at the center.
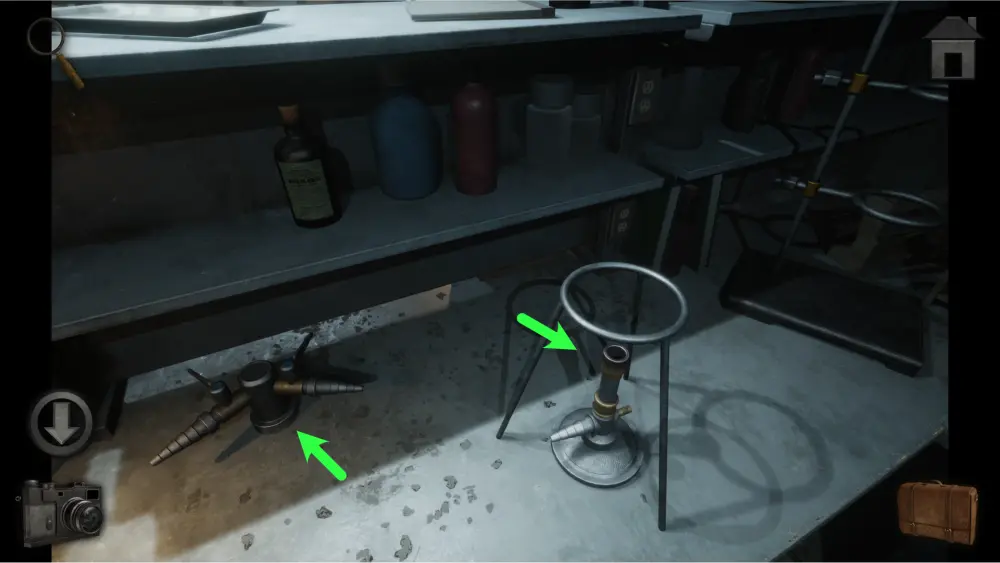
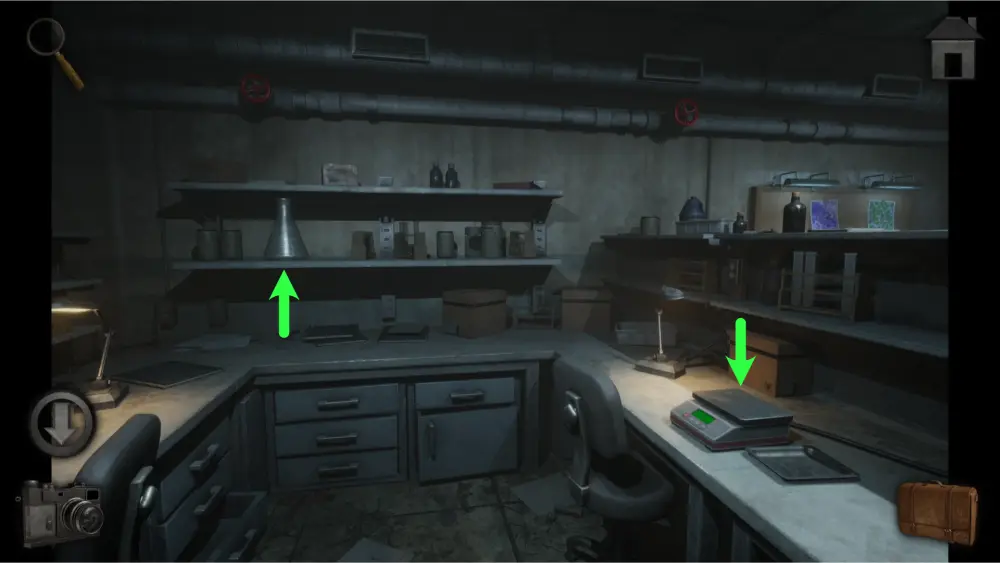
On the right desk, you’ll find a ring stand and a gas burner which will be instrumental later.
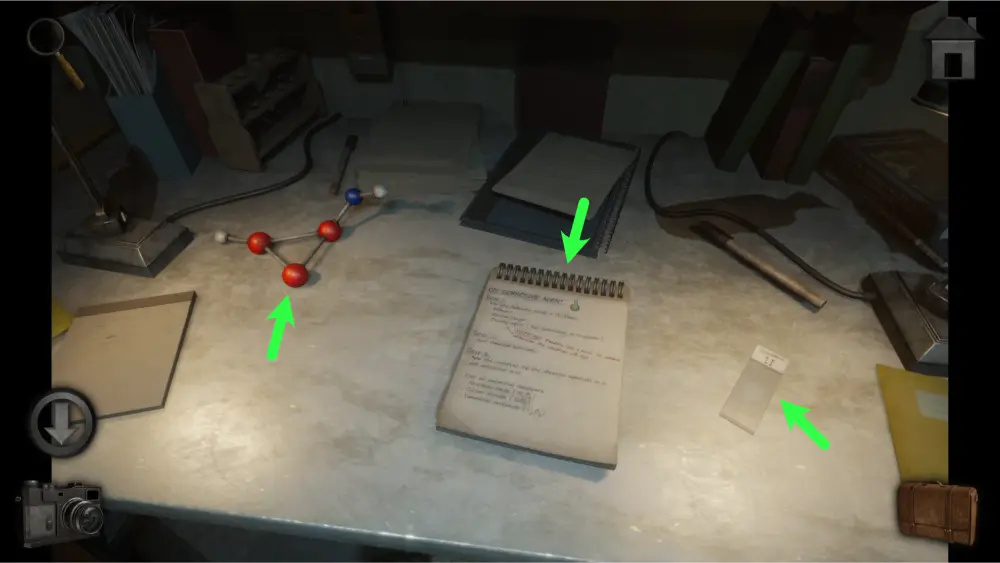
On the left desk, take Specimen II and take a picture of the DNA structure and the notepad with instructions for how to make a corrosive agent.
The corkboard at the center has pictures of specimens pinned on it. Take a picture of the whole board as it is a clue for a later puzzle.
On the desks at the back, take the large flask on the shelf. There’s a weighing scale on the right desk which will also be used for a puzzle later.
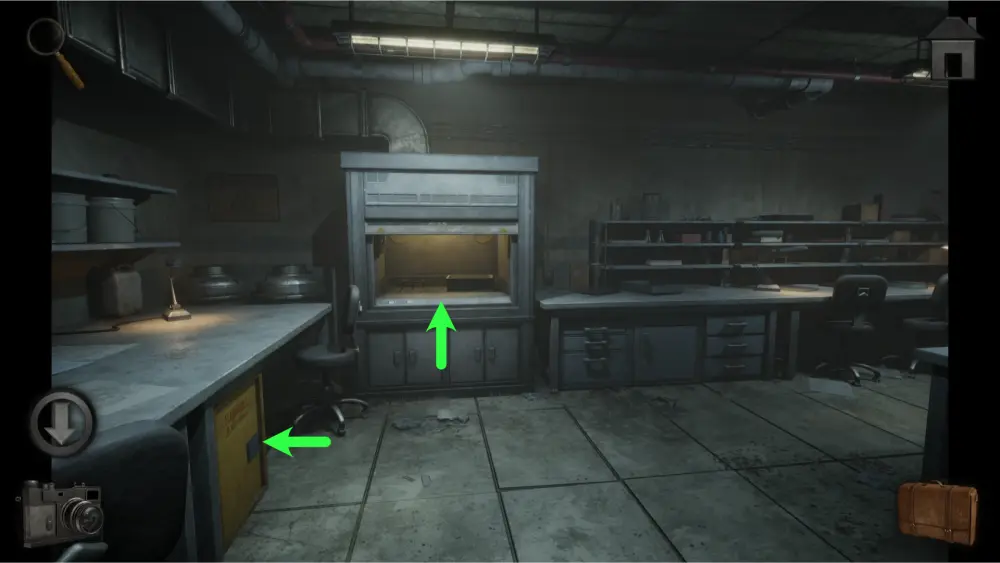
The fume hood has a ring stand but it won’t be important at this time. Right next to it, you’ll see a yellow cabinet labeled “FLAMMABLE KEEP FIRE AWAY”. To solve the puzzle to its lock, you’ll first need to find a clue elsewhere.
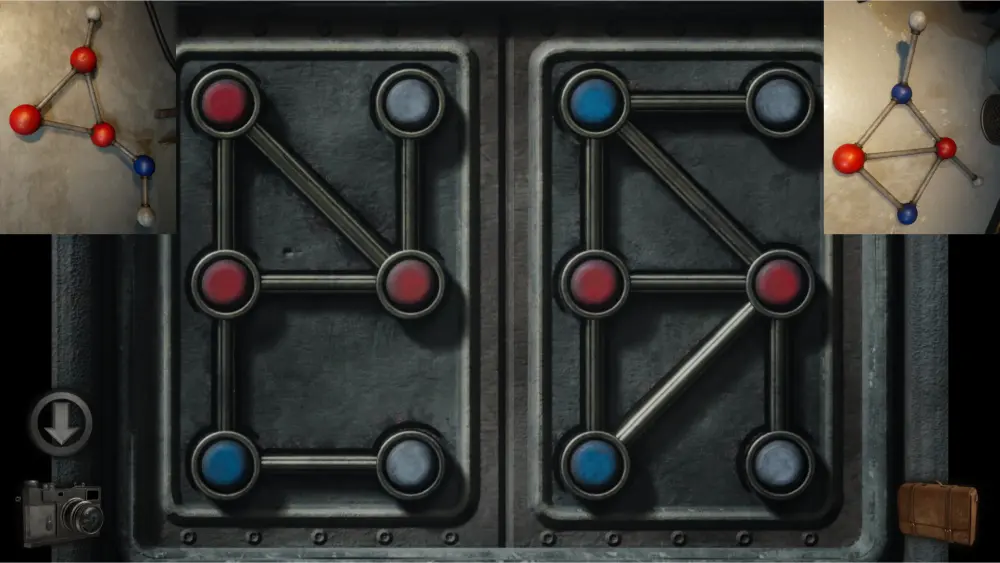
Go back to the Server Room and use the pictures you took of the DNA structures to solve the lock. The DNA structure from the Chemical Storage Room solves the puzzle on the right while the one from Laboratory 1 solves the puzzle on the left.
The solution should look like this:
Once inside the server room, you’ll find three points of interest: the cart at the center and the left and right sides of the room.
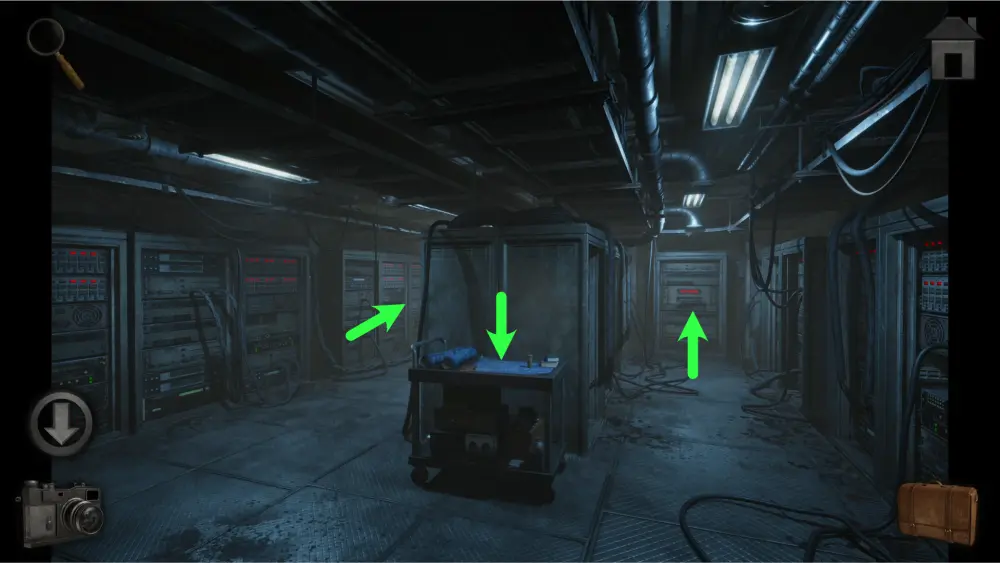
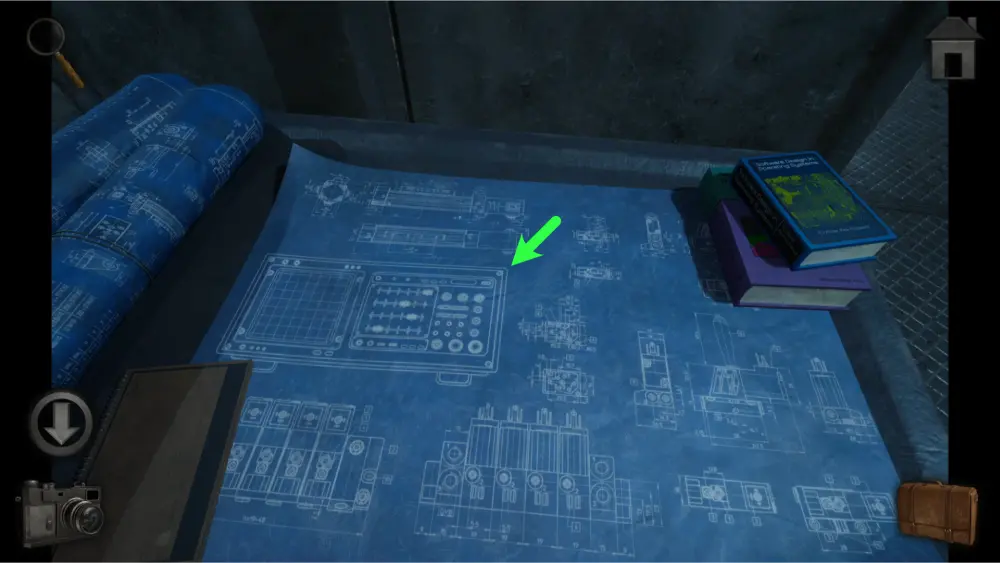
Approach the cart at the center. Take the lighter fluid and a picture of the blueprint as it is a clue for a puzzle.
On the right side, you’ll find that the router has a broken network card that needs to be replaced.
On the left side and you’ll find a panel at the right and a desk at the end. Take a picture of the panel as it is a clue for a puzzle before approaching the desk.
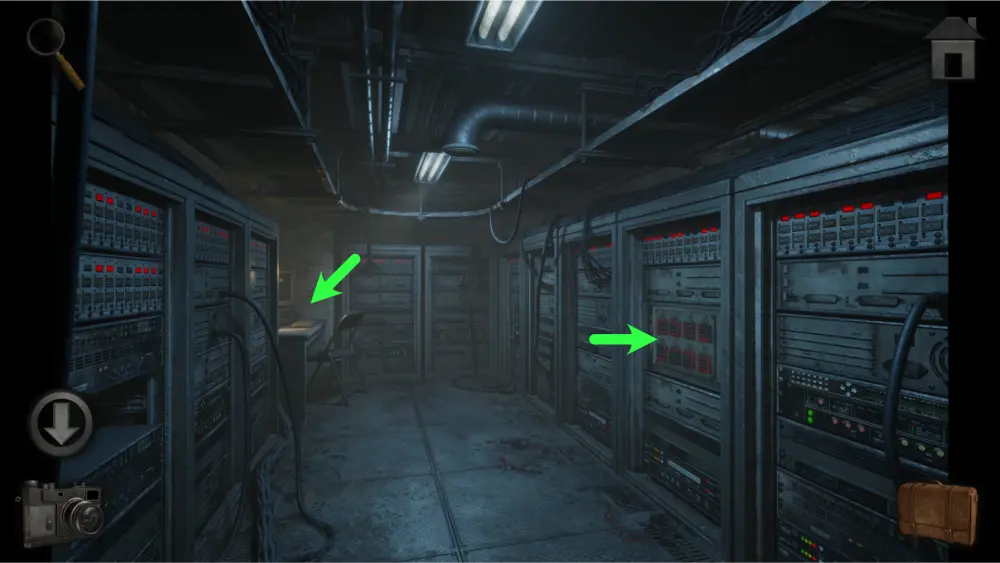
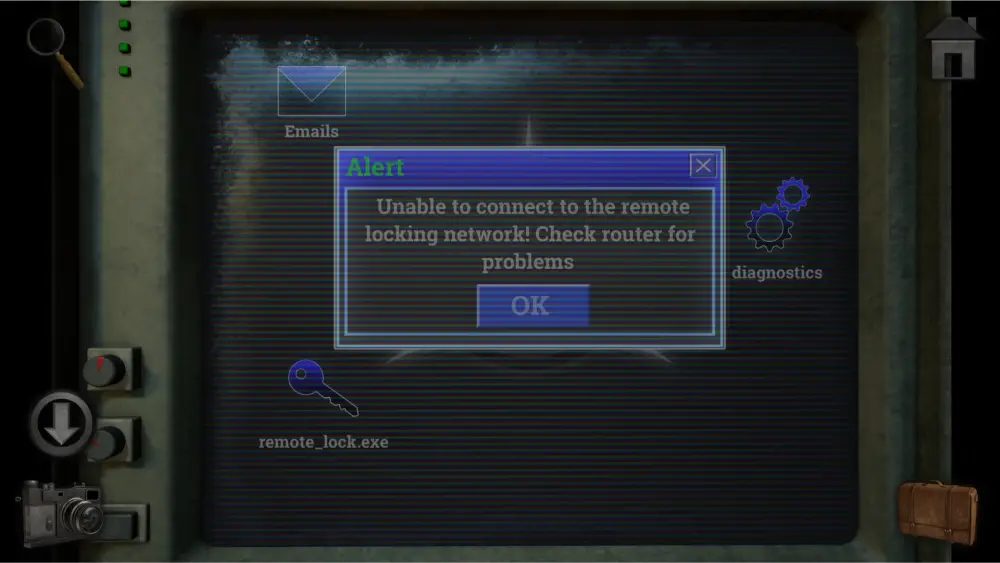
The desk has a computer with three icons: Emails, diagnostics, and remote_lock.exe. The first two indicate a bit of lore info but do not have any clues for any puzzles. The remote_lock.exe will open the door to Laboratory 2 but you’ll need to first replace the router on the right side of the room.
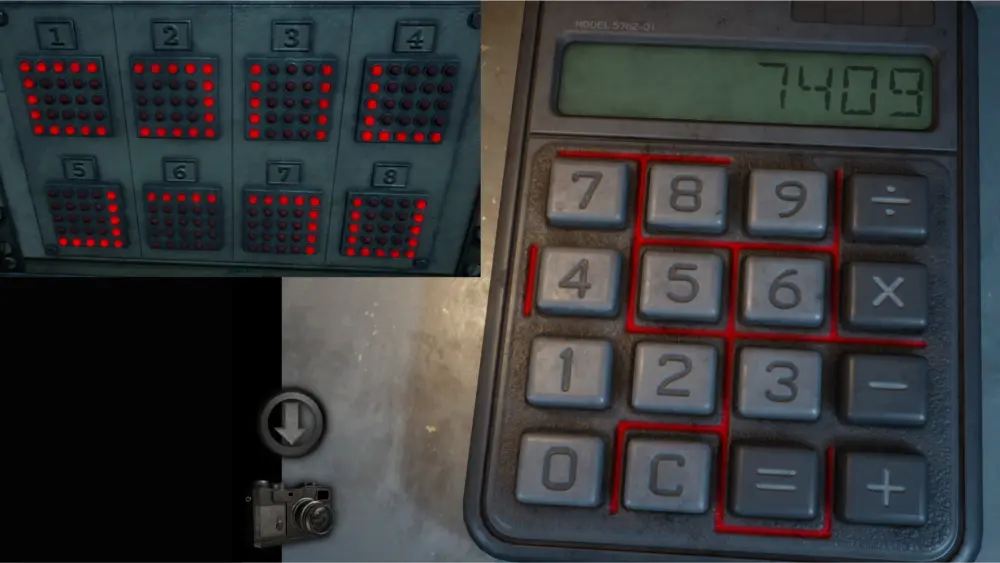
Go back to the Chemical Storage Room and inspect the calculator. Take out the picture of the panel from the server room. You’ll notice that the lines on the calculator and the panel are similar. Press the buttons of the calculator that have similar lines in the order of the ones in the panel. Below are the buttons that are represented by the panels:
| Panel | Calculator |
| 1 | 8 |
| 2 | 2 |
| 3 | 4 |
| 4 | x |
| 5 | 9 |
| 6 | – |
| 7 | 7 |
| 8 | = |
After pressing the buttons in order, you should get 7409 as a result.
Go back to the grated cabinet in the hall to the left of the Auditorium and input the numbers on the lock to open it. Take the screwdriver and the crowbar.
Go to the Auditorium, use the crowbar on the wooden planks blocking the door, and go inside.
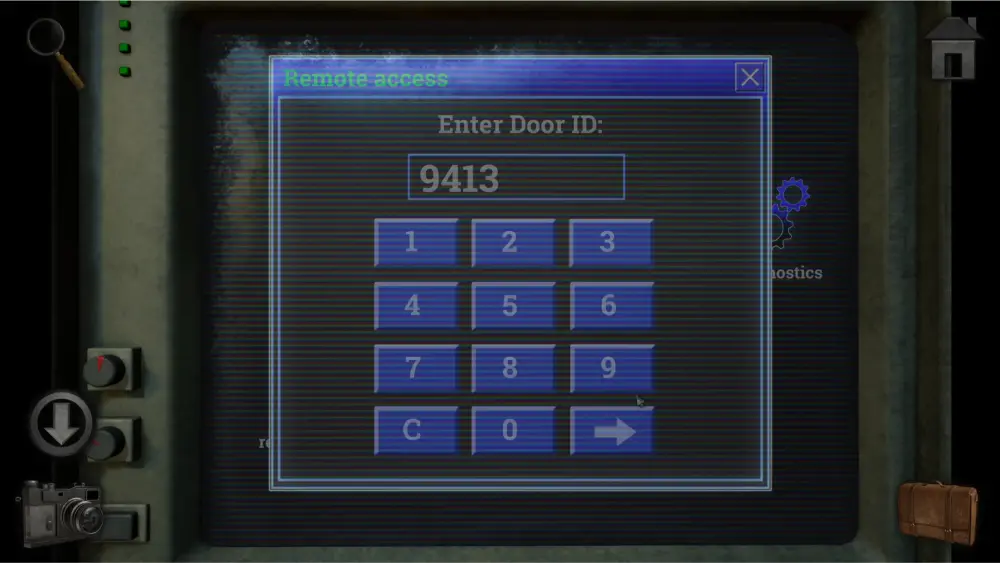
Once inside, approach the left table, take the network card on the tray, and look at the third picture. It is a picture of door 9413, Laboratory 2. Remember that number as it will be important later.
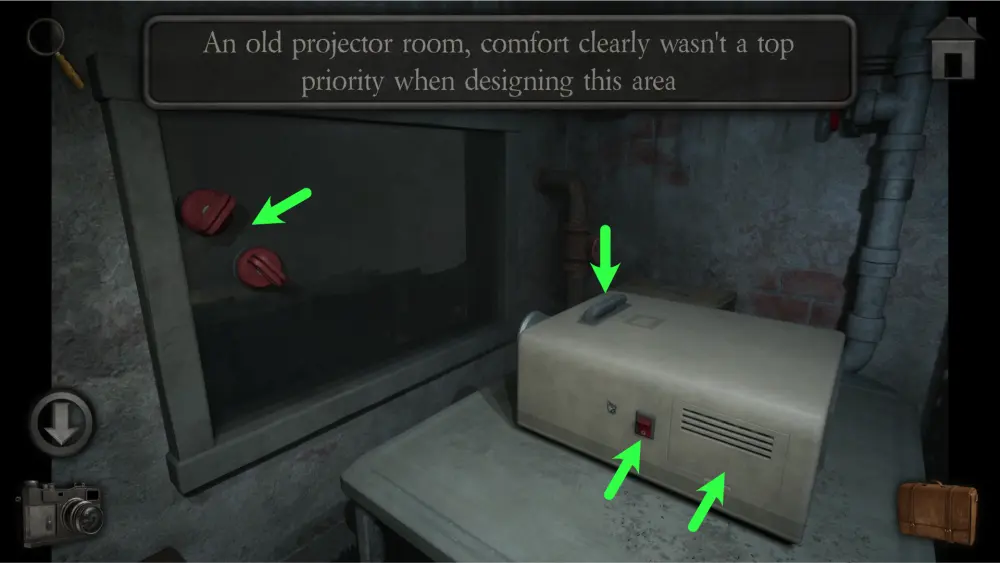
Approach the right table and take the suction cups on the window. The projector to your right can have slides inserted in it so keep an eye out for slides.
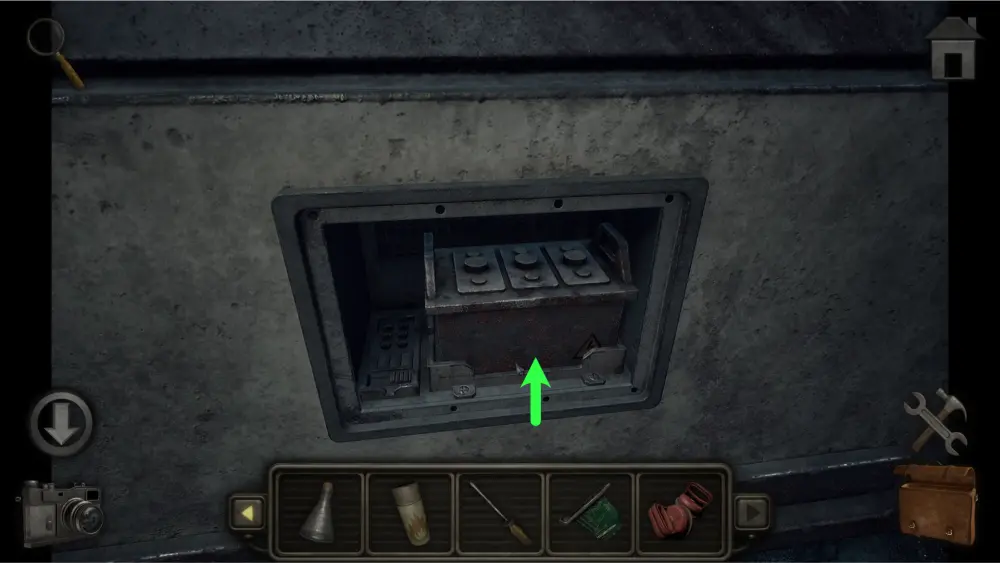
If you investigate the side of the projector and open the hatch, you’ll find 4 different colored wires inside. You’ll need to come back later to rearrange them once you find a clue that will tell you what the proper arrangement is to make the projector work.
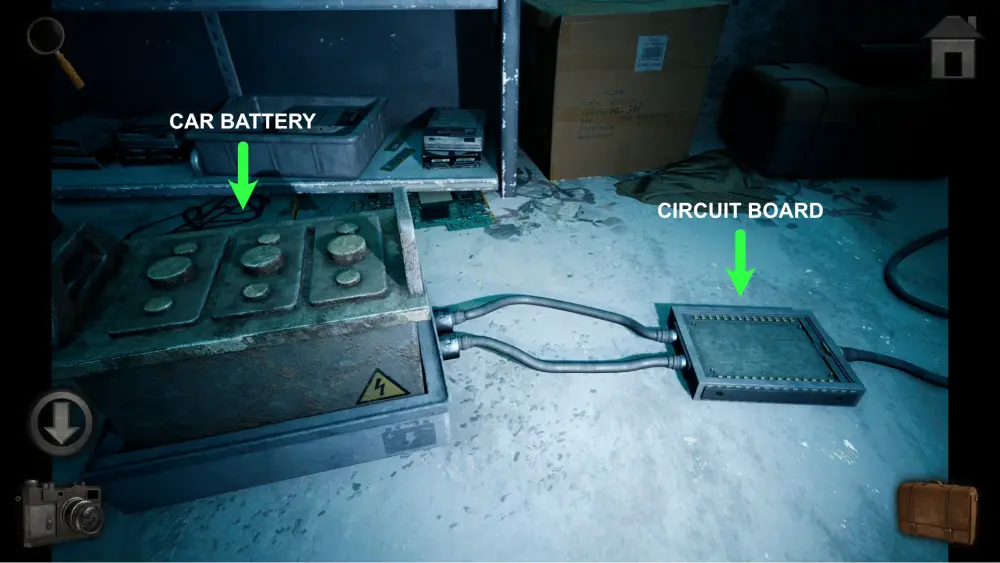
Go back to the vehicle outside and use the screwdriver on the hatch at its side. Take the car battery.
Go back to the Server Room and install the new network card on the right side of the room. After that, go to the computer and tap on remote_lock.exe. Enter 9413, the number you saw in the picture from the room at the auditorium, and Laboratory 2 will be unlocked.
Inside Laboratory 2, you’ll find three points of interest: the red box to the left, the power box at the center, and the microscope to the right.
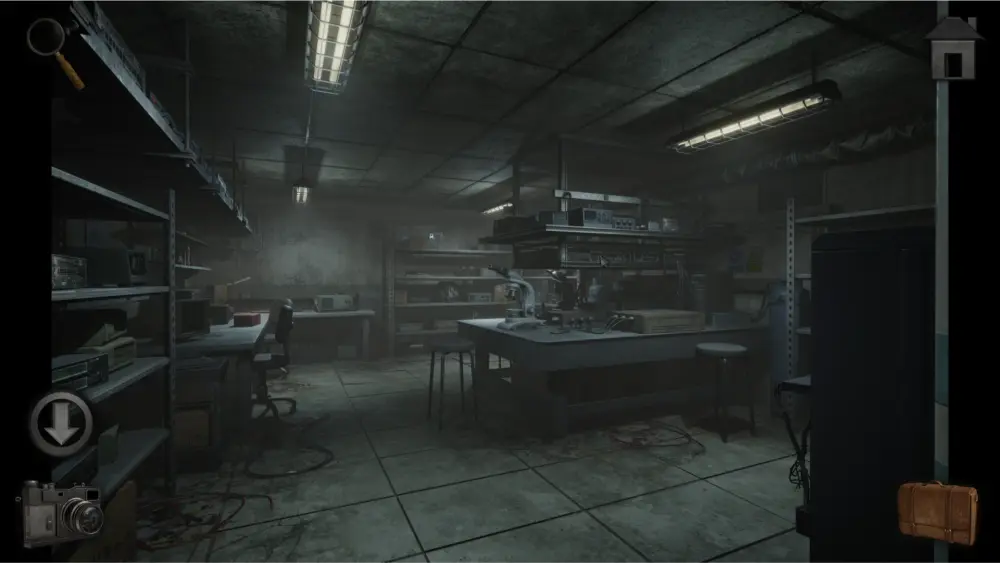
Approach the table, open the red box, and take Specimen III and IV. After that, approach the power box at the center and take the rubber hose next to it.
Investigate the power box and take out the picture of the blueprint you found in the server room. Copy the positions of the knobs and it will produce a line graph. Take a picture of that line graph as it is the clue for opening the flammable box in Laboratory 1.
Take a step back and approach the microscope. Take the hex key next to it then approach the larger metal box to the right of the brown box.
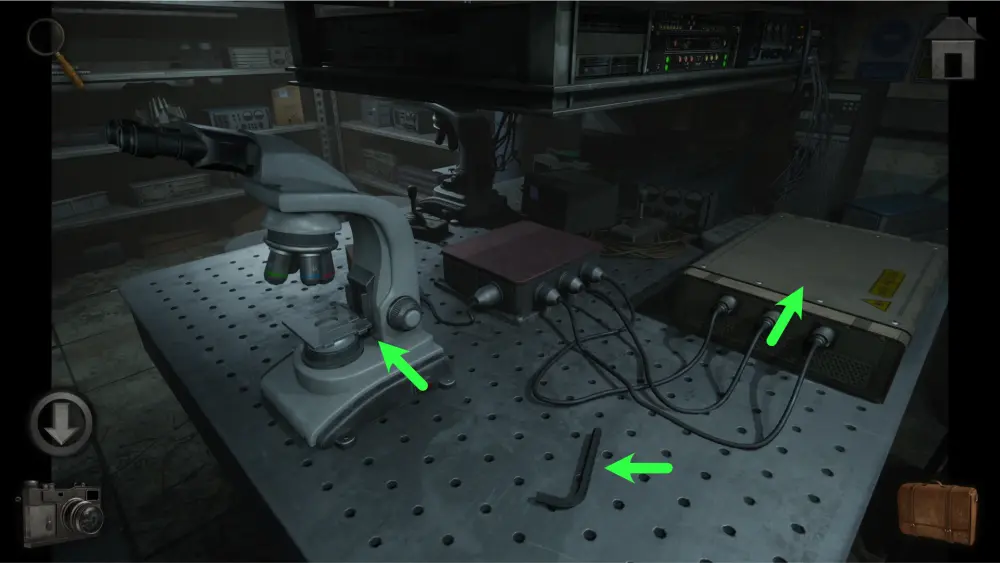
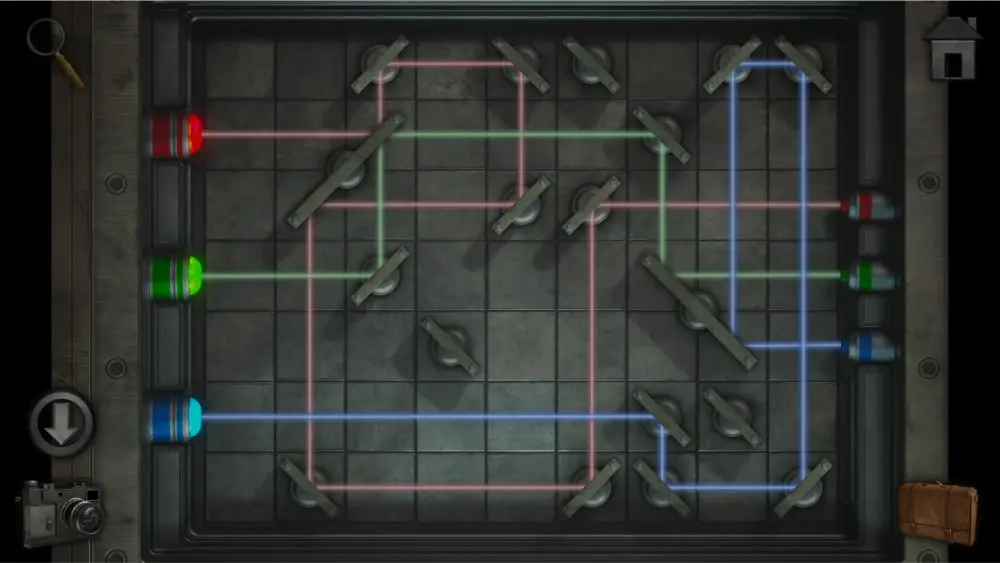
Use your screwdriver to open it and you’ll be faced with a laser puzzle. The goal of this puzzle is to connect all three lasers to the other end of the same color by flipping the mirrors.
The solution should look like this:
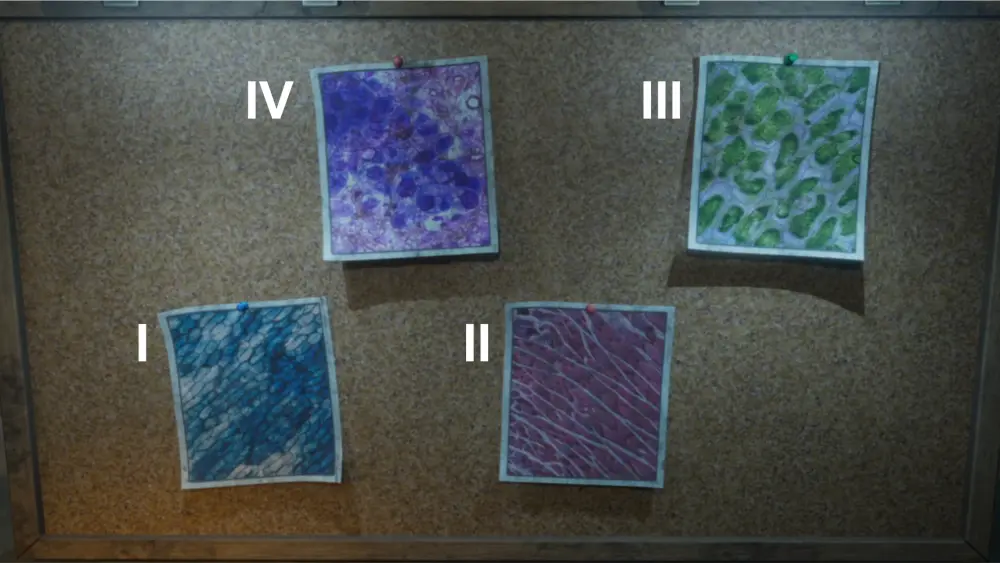
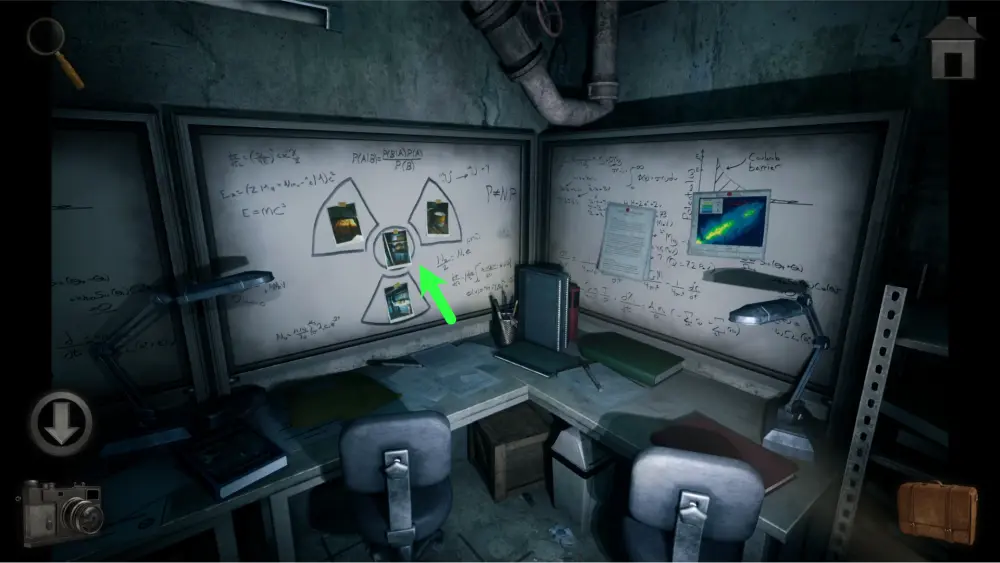
The microscope will be functional at this point so use it to take a peek at all four specimens you currently have and remember which one is which number. Take out the picture you took of the four specimens on the corkboard and note down their numbers as it will be used as a clue for a puzzle.
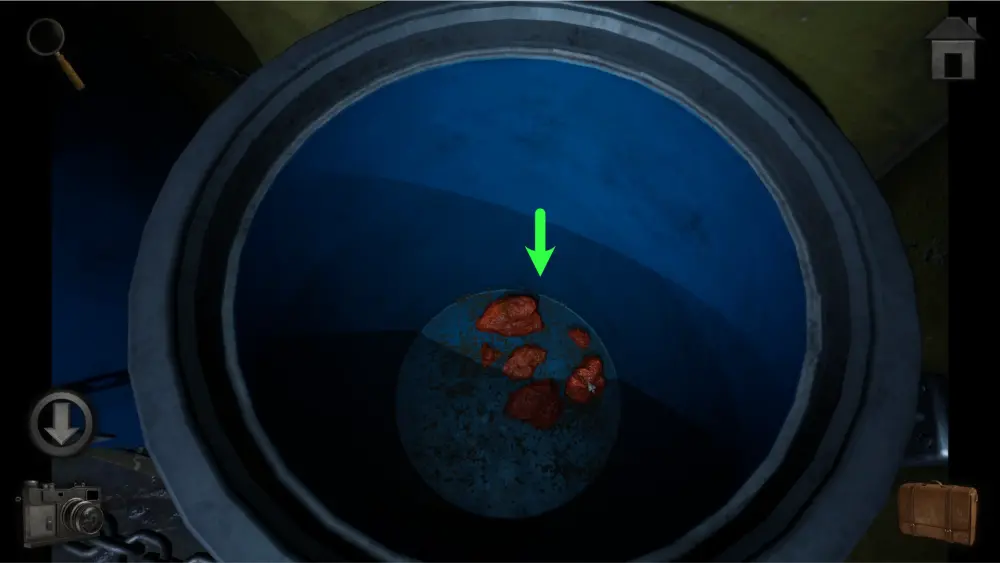
Go to the Chemical Storage Depot and use your suction cups to pull the cover off of the blue barrel. Take the granules of Potassium Dichromate inside.
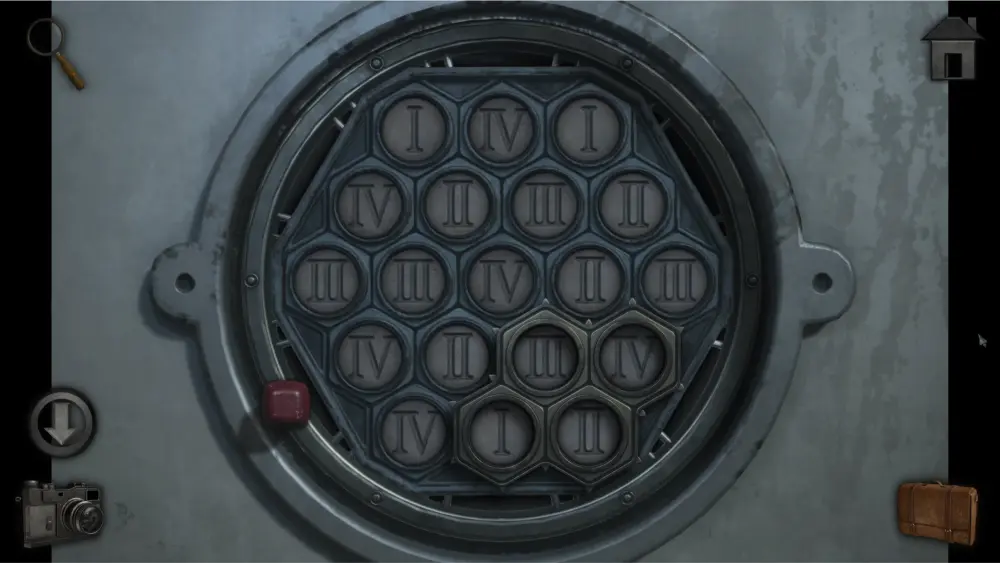
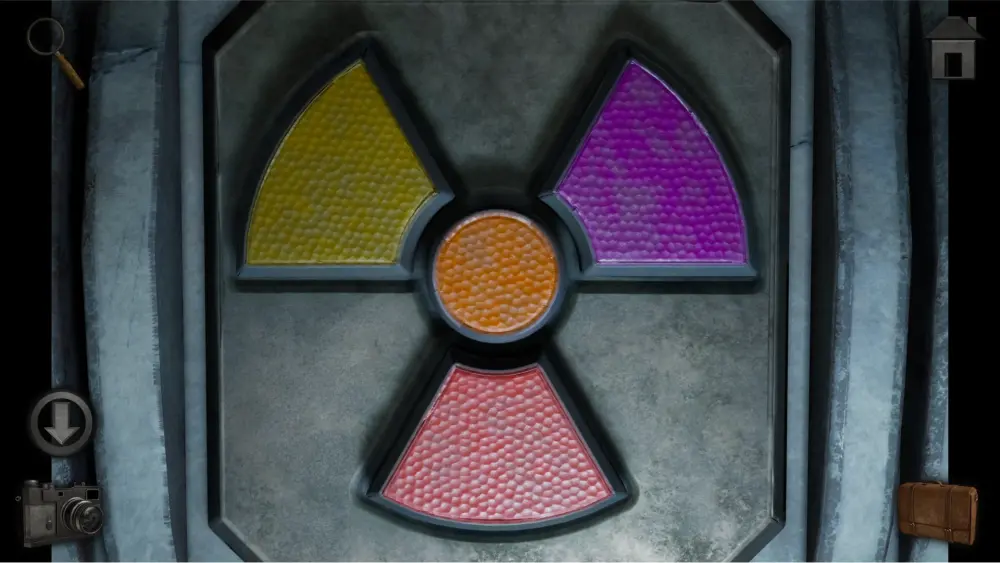
Approach the door to the Hazardous Chemicals Room and use the hex key on the two screws of the circular hatch. Once opened, you’ll encounter a puzzle. Using the numbers of the four specimens from earlier, you’ll get a pattern of III and IV above and I and II below. You’ll need to move the piece and rotate the frame using the red knob until you find the pattern.
The solution should look like this:
Once inside, take the jar of Vanadium (V) Oxide.
Go back to Laboratory 1 and approach the yellow flammable cabinet. Take out the picture of the line graph produced by the power box and use it as a reference to highlight the nodes in the proper position.
The solution should look like this:
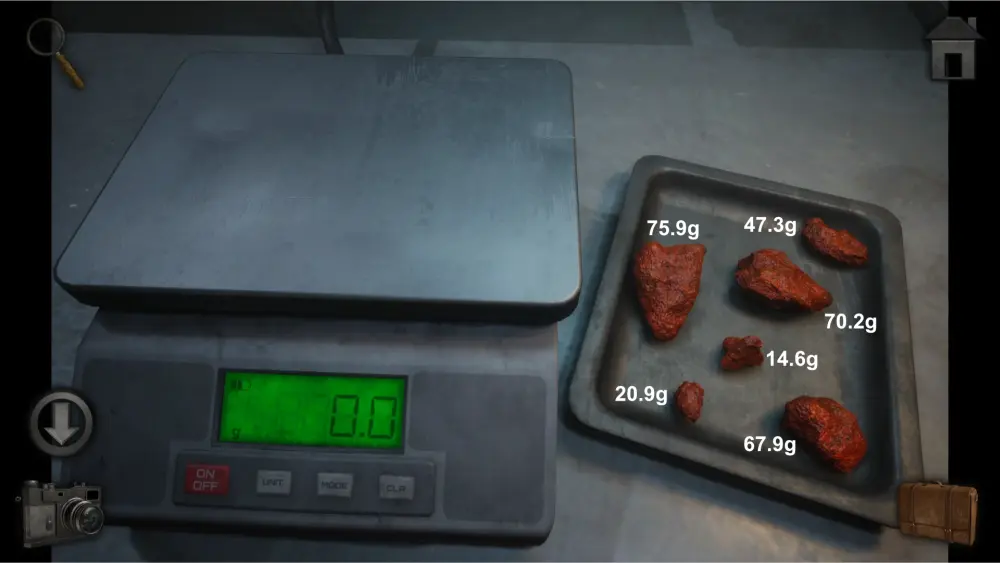
Take the Ethyl Alcohol inside then approach the weighing scale. Place the Potassium Dichromate on the tray next to it. According to the DIY corrosive agent instructions, you’ll need exactly 200g for it to work. Each chunk has a specific weight and you’ll need to figure out which ones will add up to exactly 200g. Below is the weight for each chunk:
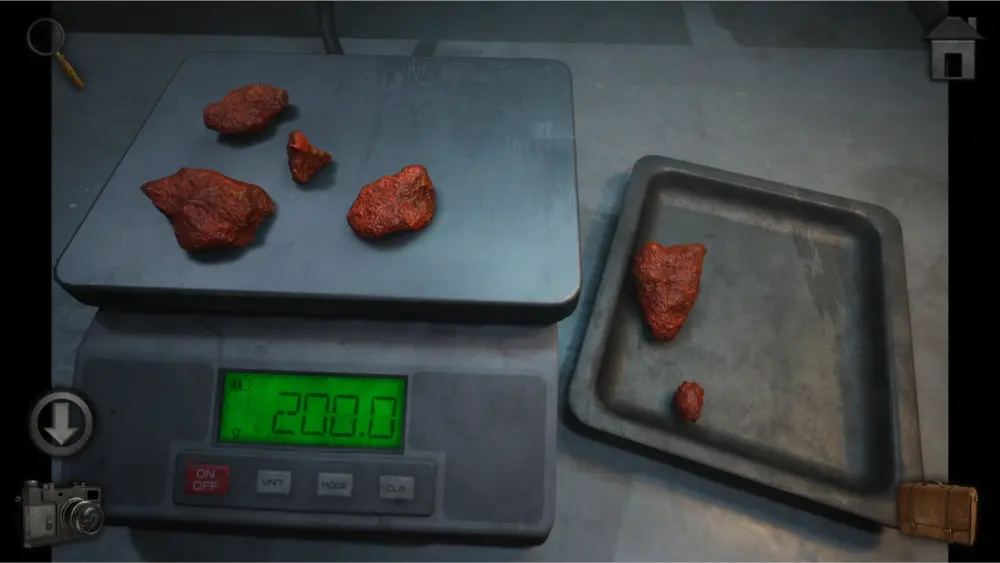
The solution should look like this:
Once you get the correct chunks, take them from the weighing scale and go to the other desk with a ring stand. Use the hose to connect the burner to the ring stand and place the flask.
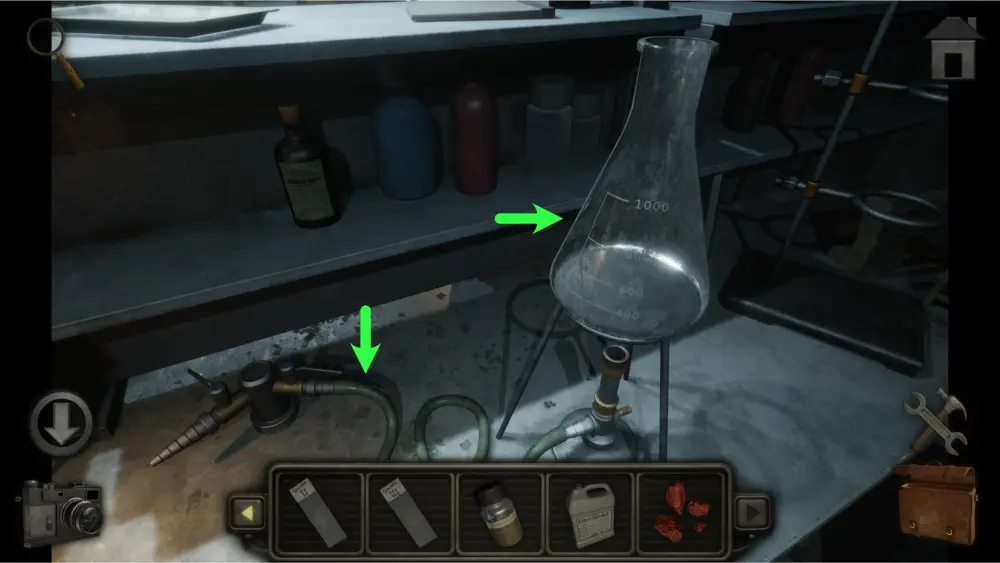
Put the Glucose, Ethanol, and Potassium Dichromate inside the flask. Combine the lighter and lighter fluid to refill it then use the lighter to light up the burner.
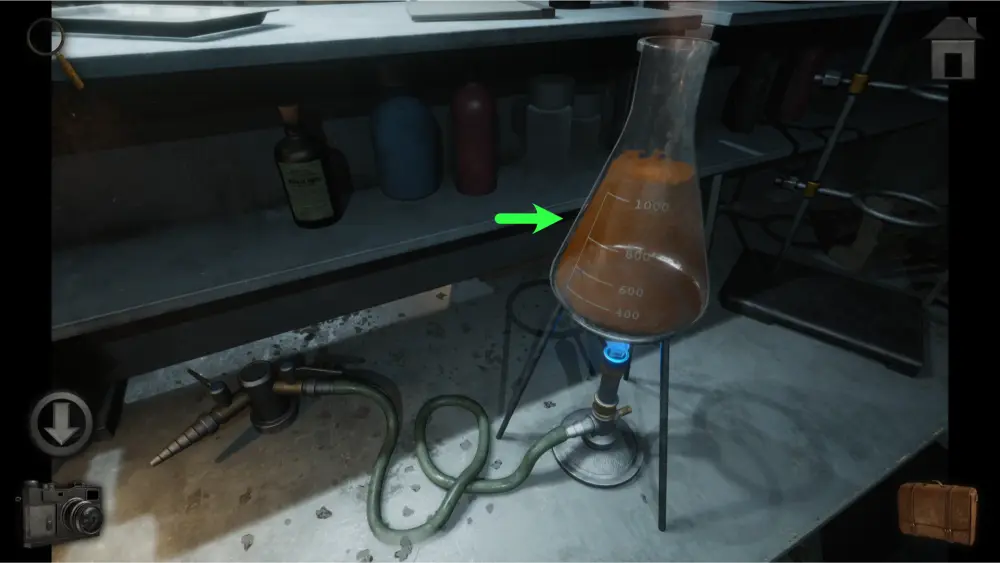
Once it boils, take the solution and bring it to the fume hood. Place it on the ring stand and put the Vanadium (V) Oxide in the flask. This will turn it into a green corrosive agent.
Take the flask of acid and use it to melt the old padlock of the Medical Wing so you can enter it.
Getting Light to Explore Section 3
Inside the Medical Wing, you’ll see double doors to the left side and a staircase leading to Ventilation.
Upon entering the double doors, you’ll reach a reception area.
Approach the front desk and take the flashlight to the right. There is a filing cabinet with an odd lock mechanism to the left but you’ll need to find a clue for it first before you can solve it.
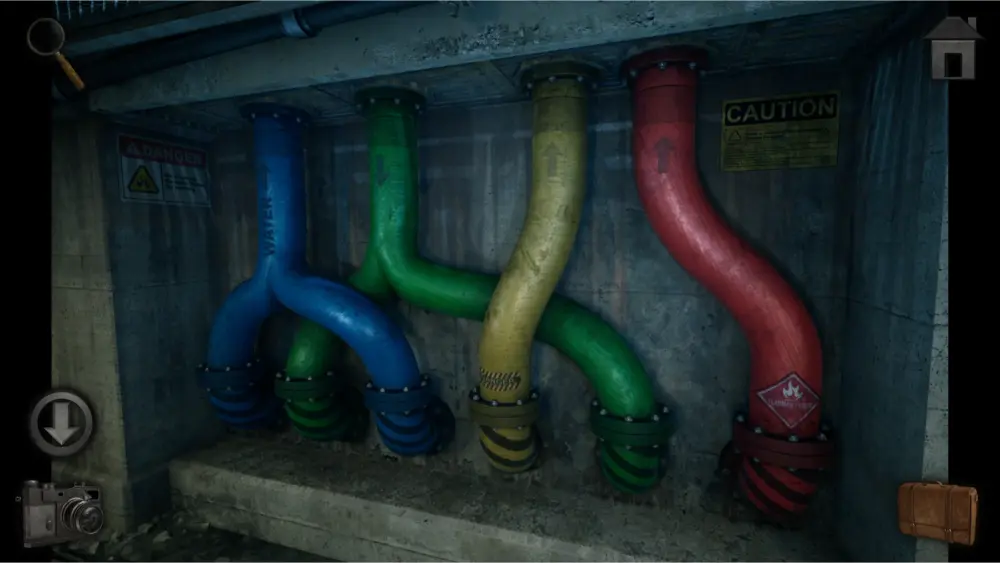
Take one step forward from the reception area and you’ll find four points of interest: colorful pipes to the right, a locked door with a panel in the middle, double doors next to it, and an x-ray area to the far left.
The colorful pipes are a clue needed for figuring out the positions of the wires to make the projector work so take a picture of it.
Unfortunately, this only shows you the upper portion of the clue and you’ll have to go downstairs later to see the rest of it.
The locked door can only be unlocked once you find the clue that will help you figure out the pattern for the odd panel on it. For now, move to the left side of the room. There, you’ll find five points of interest: a bloodied bed, a Skeletal System poster, a lightboard, a locked cabinet, and the double doors.
Approach the bloodied bed and take the blue projector slide on top of the clipboard. The clipboard has a medical report on it which contains some background lore but doesn’t have any clues for puzzles.
The Skeletal System poster will serve as a reference for a later puzzle but there is no need to take pictures if you are familiar with the bone parts.
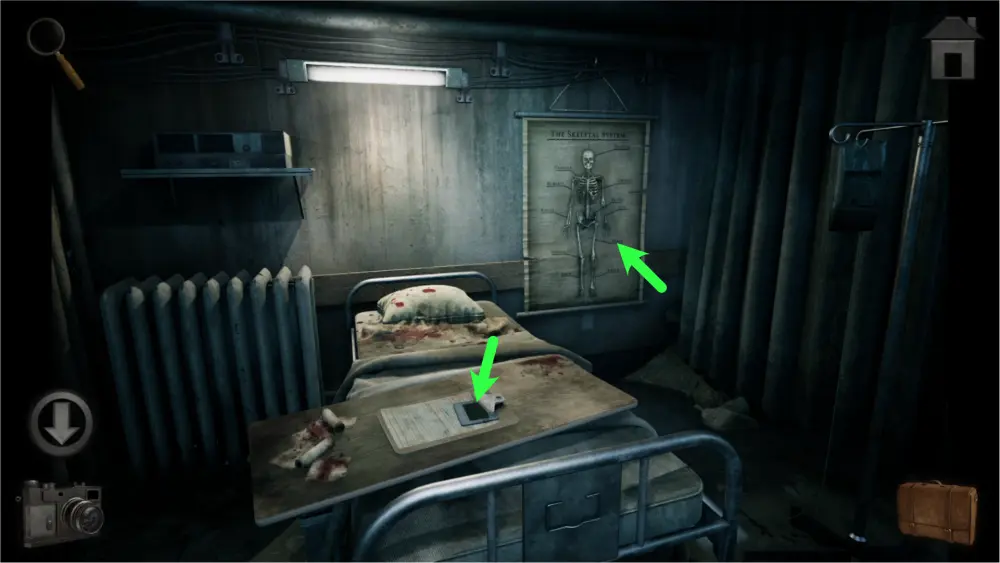
At this time, the lightboard won’t be of use to you without the two other images that you still haven’t found. The cabinet on the other hand can be solved by moving the dials until the three outside lines connect to the two inside lines. Not all lines have to connect to each other. The best way to solve this is to find the lines that can connect to the outermost dial, then connect the innermost one before adjusting the middle section. You may have to try several different combinations since both the outermost and innermost dials have two positions that let them connect to the immovable dials.
The solution should look like this:
Once you’ve opened it, take the cleaning solution and green projector slide from the cabinet.
Go inside the double doors and you’ll find three points of interest: a sink, an operating table, and a dirty window.
Approach the sink and take the sponge. Next, approach the operating table and take the medical tweezers from the tray. After that, approach the dirty window and use the cleaning solution and sponge to clean it up. From the other room, you’ll see the solution to the filing cabinet drawn on the board. Take a picture of it and return to the filing cabinet. Reference the picture to replicate the positions of the knobs on the filing cabinet to open it.
The solution should look like this:
Take the x-ray images inside and take a picture of the yellow sticky note on one of the folders. This sticky note will tell you the correct arrangement of the images.
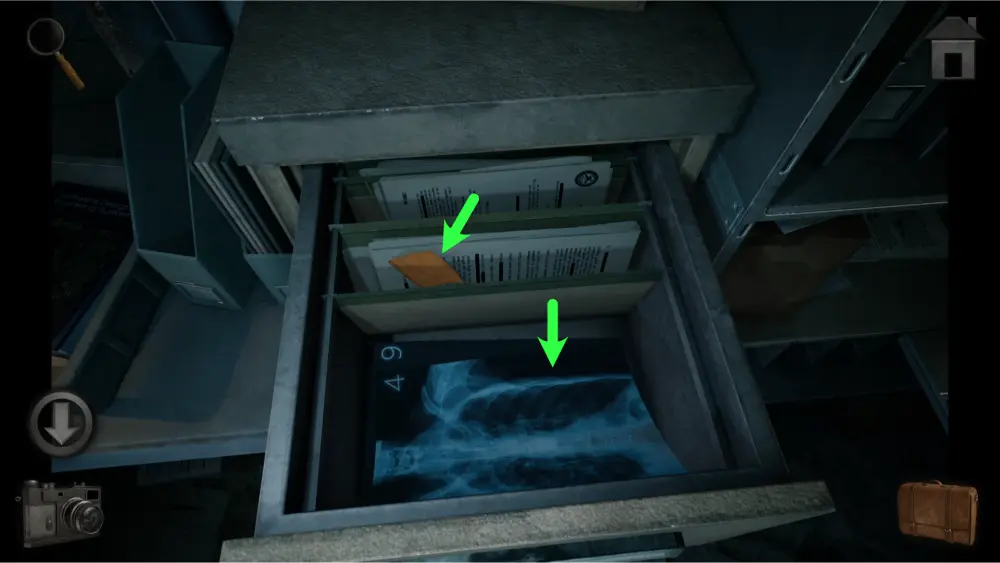
The solution should look like this:
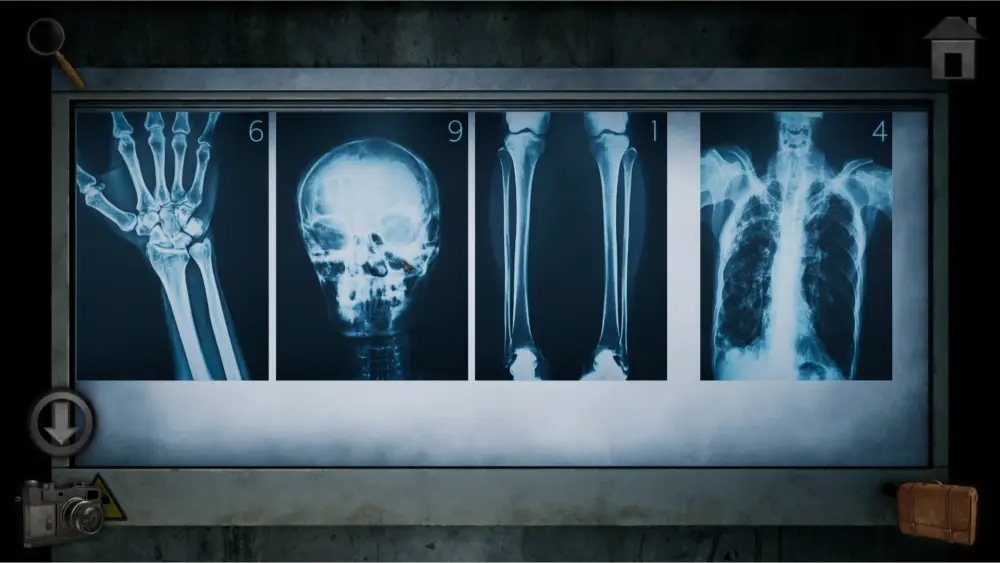
Write down the numbers from the x-ray images which are 6914. Go down to Ventilation and use these numbers to open the door. Don’t forget to press the pound sign (#) after inputting the numbers.
Once inside, take a picture of the colorful pipes before moving further inside.
Approach the vent of the ventilation unit and use your tweezers to take the yellow projector slide lodged inside.
Leave the medical wing and go back to the Projector Room inside the Auditorium. Approach the projector and reference the pictures you took of the pipes when rearranging the wires.
The solution should look like this:
Take a step back and turn on the projector’s switch.
If you view the window, you’ll see a 4×4 grid. Use the three slides you obtained on the projector and take note of the location of all the X marks. These X marks will tell you which squares from the panel on the door in the Medical Wing need to be opened.
The solution should look like this:
Once you’ve opened the door, take the batteries from the desk to the right then take the key from the desk to the left. There is a notebook on the left desk which you can read for the lore but it does not contain any clues for puzzles.
Now that you have a flashlight and some batteries, combine them using your crafting menu. You can now use your flashlight to explore Section 3.
Opening the Massive Bulkhead Door
Once inside Section 3, take one step forward and you’ll find grates blocking an entrance. You’ll have to find a large jack to lift it up before you can enter it.
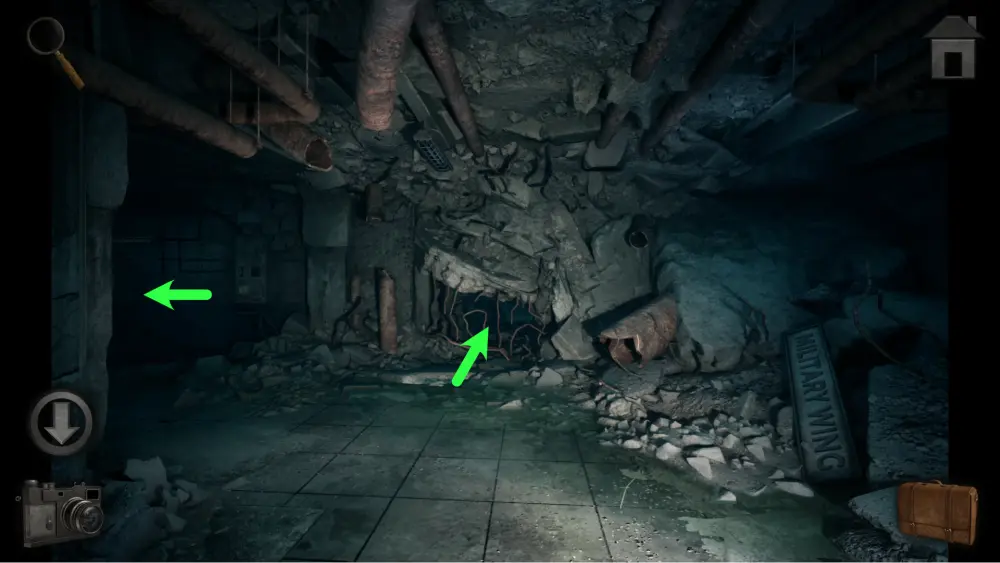
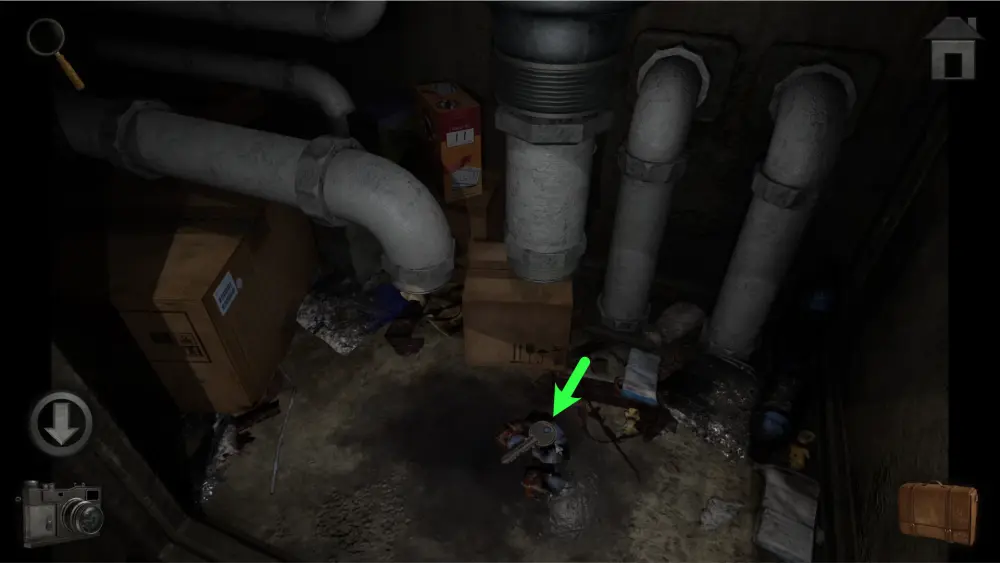
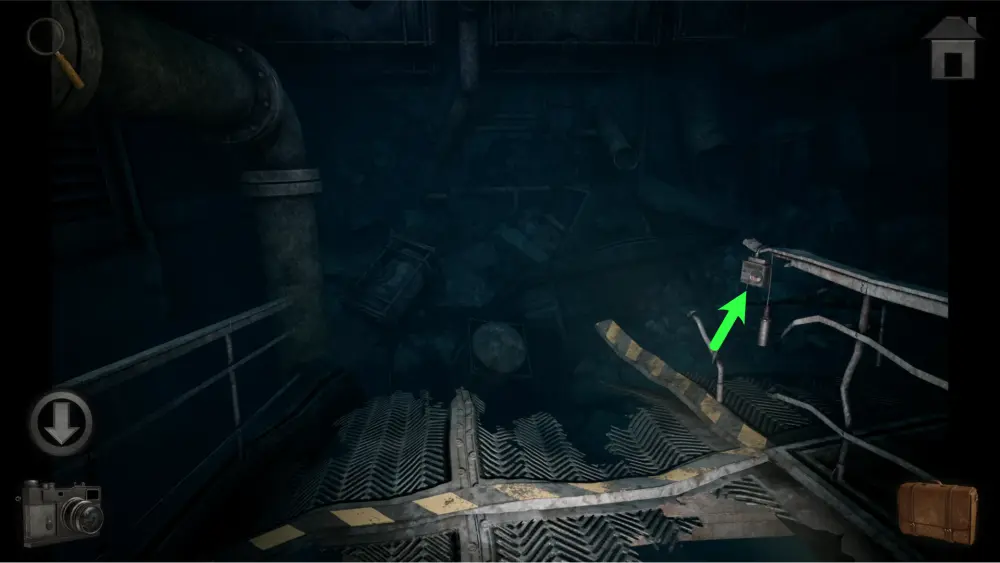
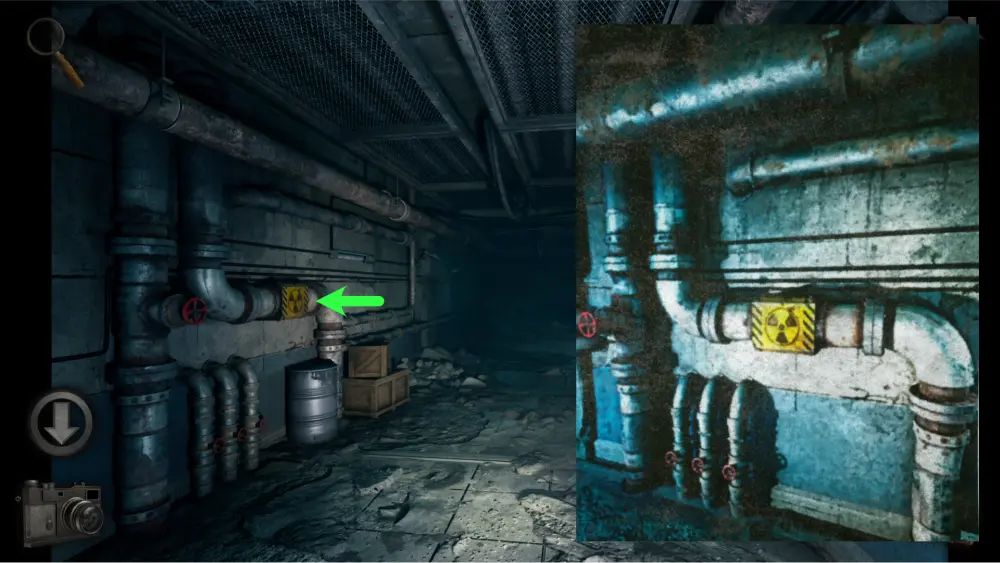
Go to the left path and you’ll find a pipe with a radioactive symbol. Remember its location as it is important for a later puzzle.
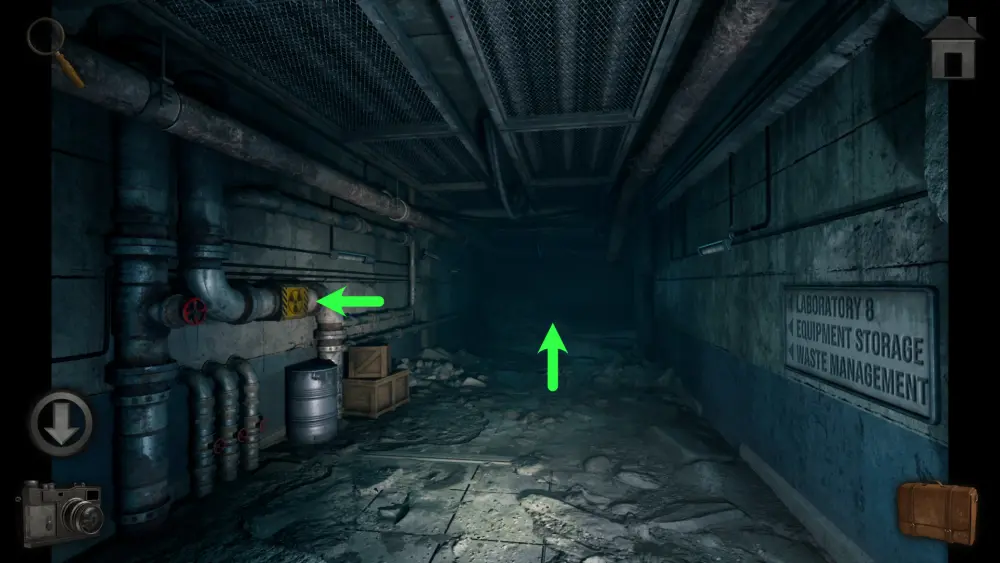
Move two steps forward, passing Laboratory 8. You’ll find a radioactive barrel to the left which will also be used for a later puzzle so be sure to remember its location.
Enter the Equipment Storage, approach the desk to the left, and place the car battery in the battery slot to the left of the safe. You’ll need to come back later once you find a circuit board to put on the slot next to it.
Go further inside and you’ll find a drawer to the right with an odd lock with numbers, letters, and card suit symbols. At this time, it won’t be possible to solve it and you’ll have to find a clue for it first.
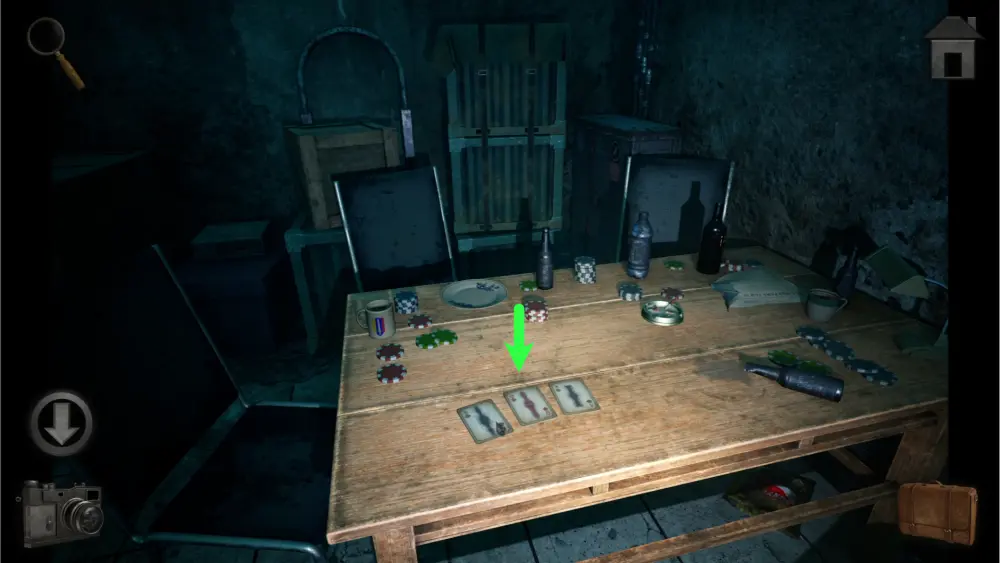
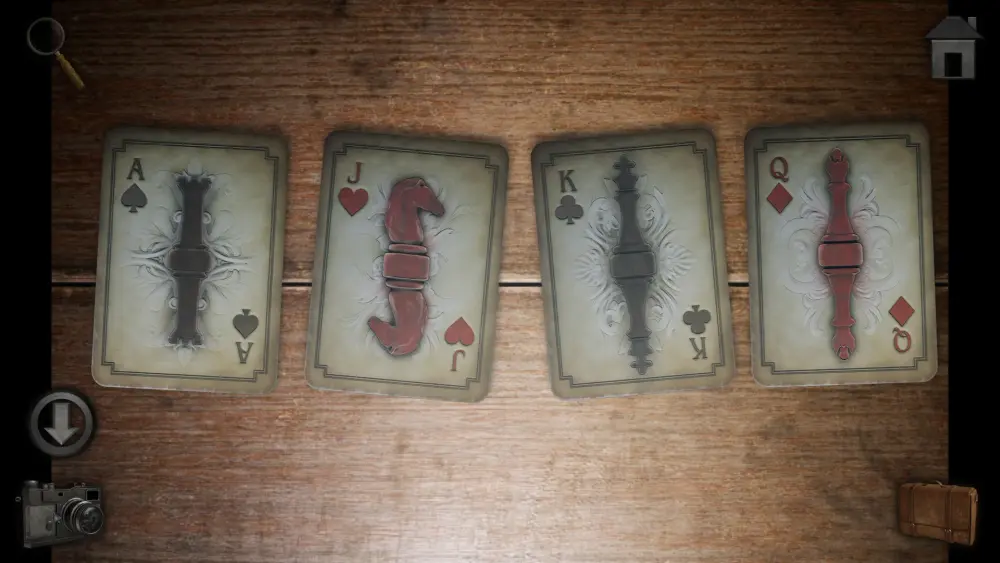
Go one more step forward and you’ll find a crate to the left and a poker table to the right. The crate cannot be opened but it will be used as a clue for later so remember its location.
The poker table on the other hand has three cards on the table but cannot be taken from it. You’ll have to come back to it once you’ve found the fourth card (heart suit) to complete the four suits.
Leave the Equipment Storage and go inside Laboratory 8. Once inside, you’ll find three points of interest: the desk to the right, the crate at the center, and the stairs to the left.
The right desk does not contain any important items or clues but does have a notebook page that contains some lore.
The crate has a locking mechanism comprising the colors red, green, yellow, and purple. You’ll need to come back to this once you find the correct colors for each shape.
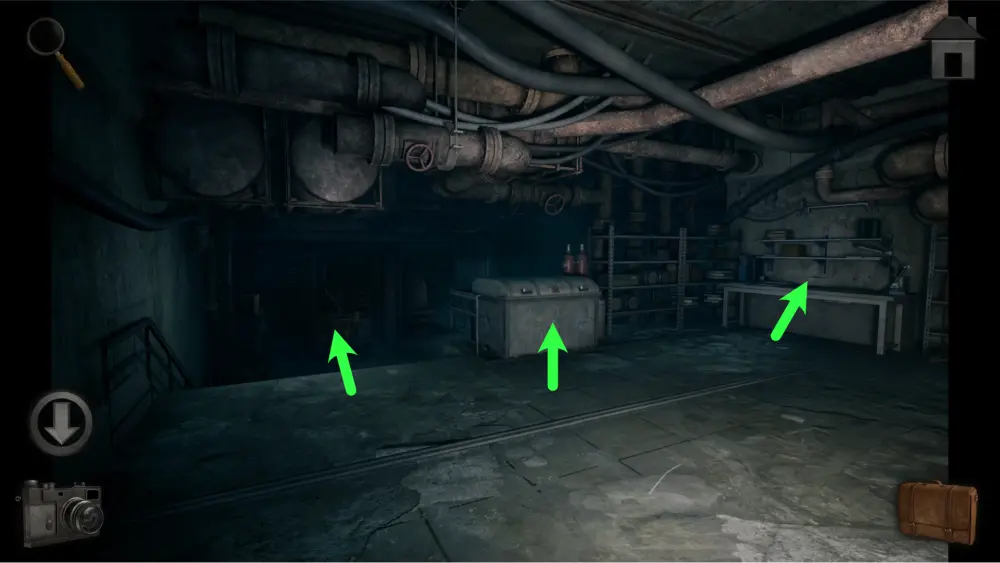
Go downstairs and approach the whiteboard to the far right. Take a picture of it as it holds clues for opening the crate you found earlier. You can also check the board next to it to read documents that contain lore about the artifact, but it will not contain any clues for puzzles.
Take two steps forward and you’ll find an old Geiger counter. This device can tell you the radiation levels on an object or area. This item is instrumental in finding the solution for the crate.
To get the solution for the crate, all you need to do is to find the locations or items similar to the objects in the images on the whiteboard you saw earlier and use the Geiger counter to determine their radiation levels. Each radiation level is represented by a color and the colors that appear will be the color for the shape of the crate’s lock. Below are the items you need to find and their locations:
Radioactive Hazmat Suit
This item can be found in Laboratory 8 when you go down the stairs before you approach the whiteboard. Open the crate and use the Geiger counter and you will get an orange reading.
Radioactive Barrel
This item can be found to the right of Laboratory 8, just outside of Equipment Storage. Using the Geiger counter on it will give you a purple reading.
Radioactive Pipes
This item can be found just after you go to the left of the grates by the entrance of Section 3. Using the Geiger counter on it will give you a red reading.
Radioactive Crate

This item can be found at the very end of the Equipment Storage Room next to the poker table. Using the Geiger counter on it will give you a yellow reading.
Assigning the colors to the shapes, the solution to the crate should look like this:
Take the large jack inside the crate and go back to the grates. Use the large jack to open up the passage so you can enter.
Keep going forward until you find a chess set on a table.
Approach it and take a picture of the chess set. This will be used as a clue for the cabinet you found in the Equipment Storage.
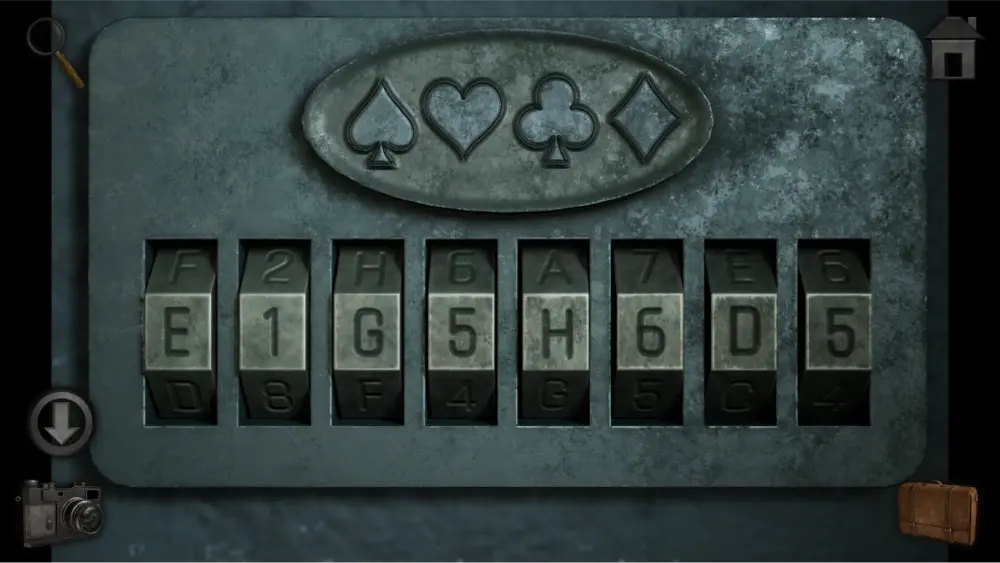
Investigate the door’s handle and you’ll find a playing card slipped inside the keycard lock. Take it and go back to the poker table inside the Equipment Storage.
Place the playing card on the table and arrange them in the same order as the one in the safe.
Using this as a reference, write down the positions of the chess pieces on the card based on the chessboard you found a while ago.
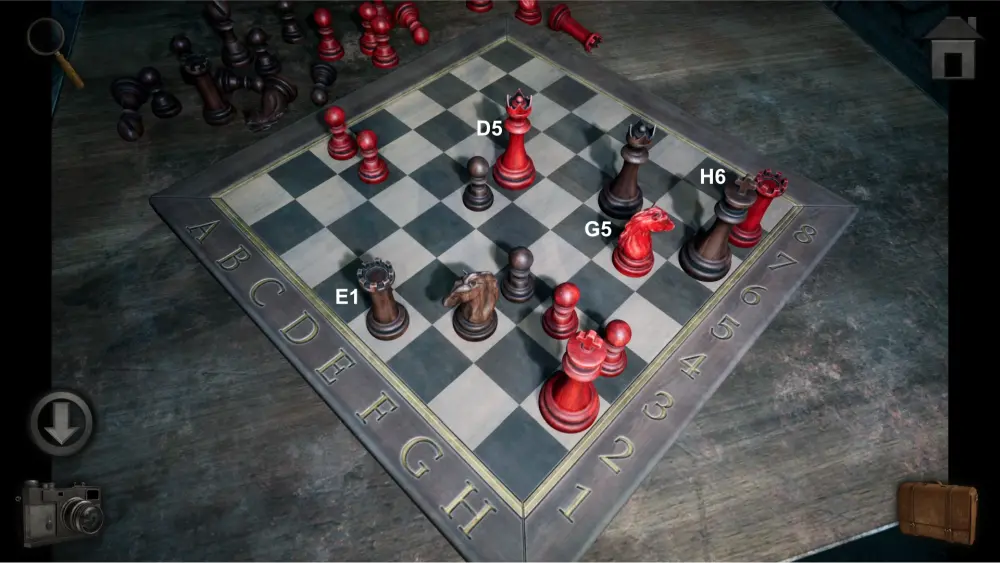
If done right, you should end up with this combination: E1G5H6D5. Use this combination on the safe.
The solution should look like this:
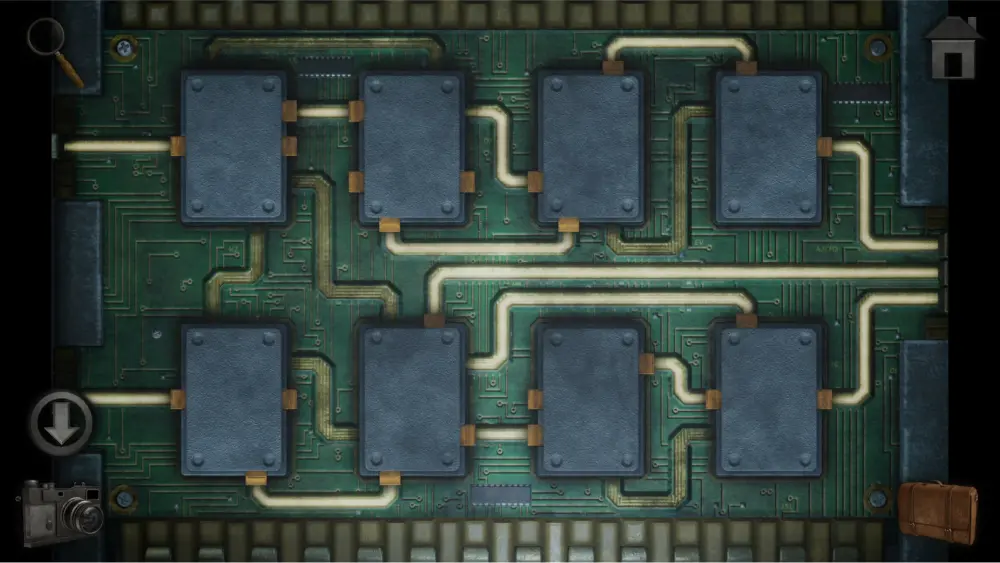
Take the circuit board inside the cabinet and approach the desk with the safe. Place the circuit board on the slot and tap it. You will enter a puzzle where you’ll have to connect the two lines of circuits from the left to the three lines of circuits to the right by rearranging the rectangles. You don’t need to connect all circuits to all rectangle slots for it to work.
The solution should look like this:
Once you’ve solved it, you’ll be able to open the safe and take the key inside.
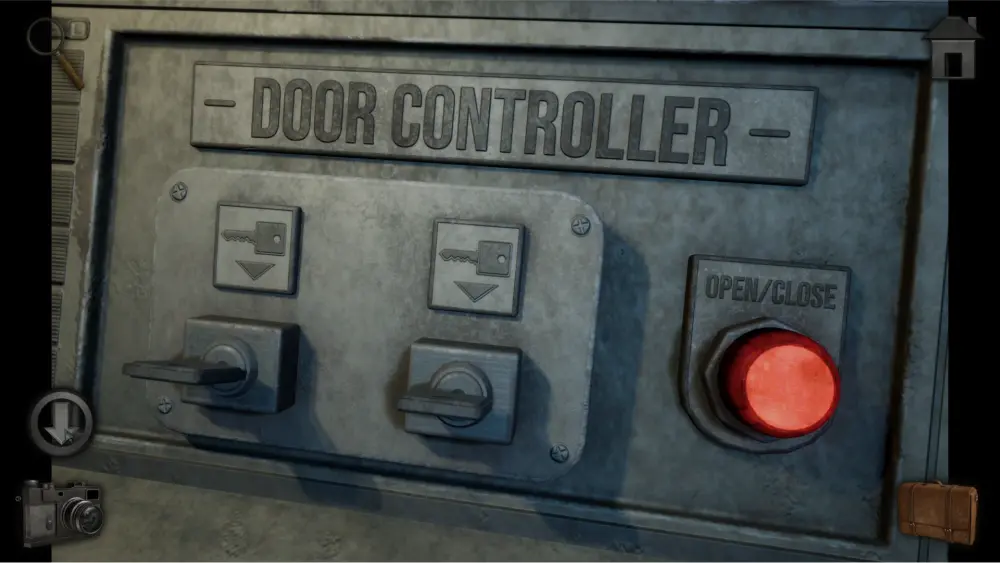
Go back to the Door Controller Room to the left of section 3 and the massive bulkhead door. Insert the two keys you’ve found in the door controller. Then, quickly tap on the two keys and then the red button to open the door.
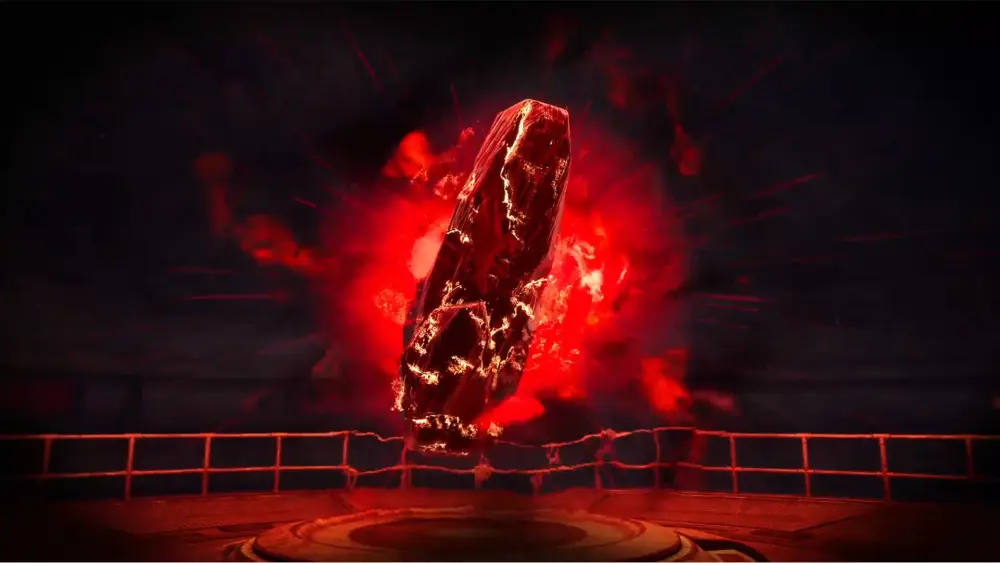
Destroying the Artifact
Enter the door and take a step forward. You’ll find a diagram to your right. Take a picture of this with your phone or anything other than your in-game camera. If you miss it at this time, it will still be there when you need it later.
Take two steps forward and you’ll find a large metal door. It will only open if there is an emergency. Go to the left side for now.
The door immediately to the left is locked and will need a key to open so keep moving forward for now.
On the next step forward, you’ll find a metal box to the left locked with a padlock. You’ll need to come back once you find something that can break the padlock.
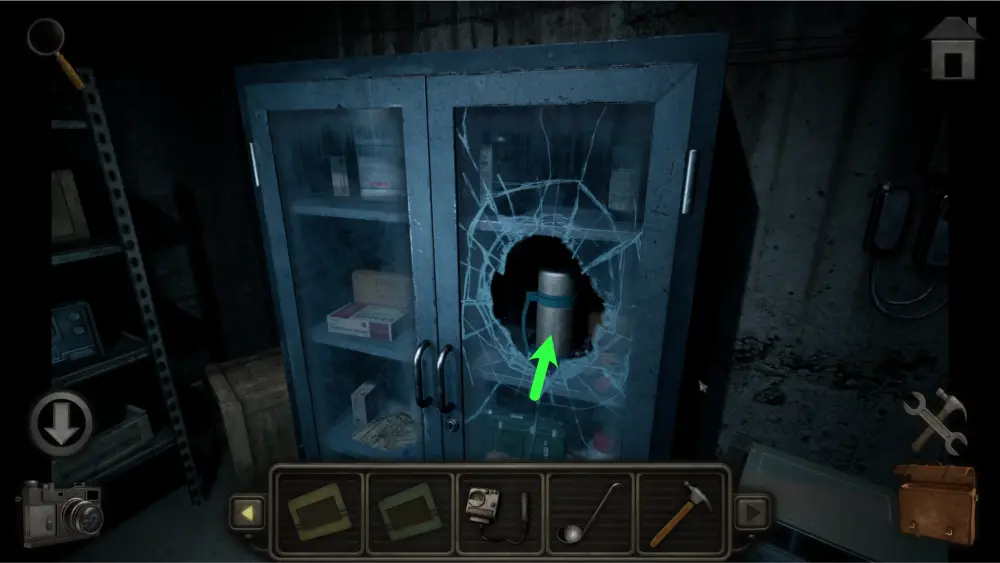
Take one more step forward and you’ll find an open door. Enter it and you’ll find a large room with a window overlooking the artifact. The glass cabinet to the left contains a thermos that you can use but you’ll need to find an item that can break the glass first.
Go downstairs for now where you’ll find three points of interest: the desk to the left, the desk to the right, and the large crate next to it.
The desk to the left only contains a document that has a bit of lore but it does not have any clues for any puzzles.
Approach the desk to the right and take the ladle. Take a picture of the poster containing Dangerous Chemicals Designation as it is an important clue for a puzzle later on. The map on the table on the other hand will also help you with a puzzle, but you’ll have to find another sheet of paper that can be placed on top of it to complete the clue.
The crate to the right has a locking mechanism that can be solved without clues. The objective is to move the node from right to left. However, the circles will rotate every time you pass through the small circular buttons on the path. If you want to start over, you can leave the puzzle and approach it again.
To solve it, follow the line we drew over the image below:
Once you’ve opened the crate, take the red cellophane paper and place it on the map on the desk. Align both the green and red cellophane paper on the map to reveal the pattern. Take a picture of it for later.
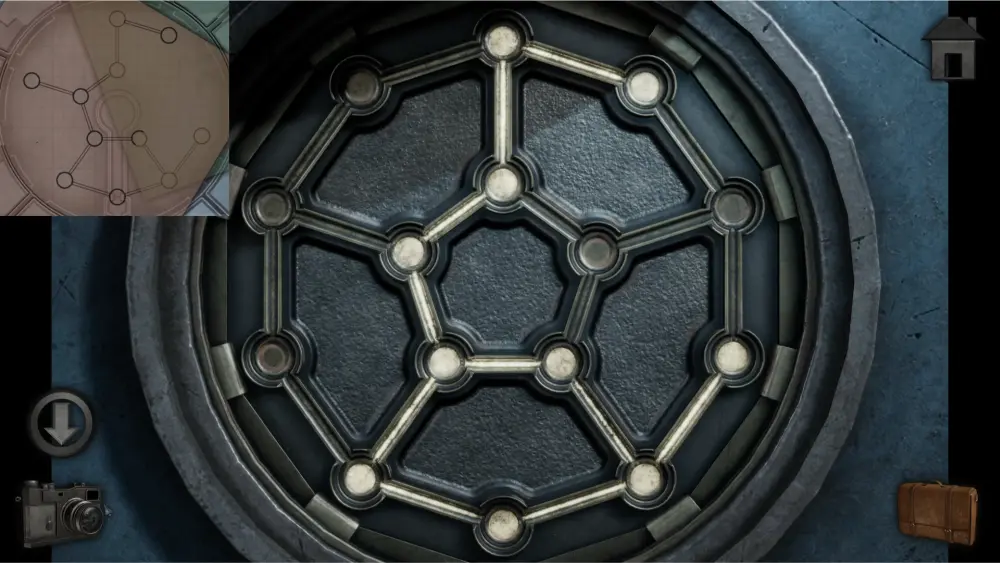
Go back to where the metal double doors are and go to the right this time. You’ll find three paths: the door to the left, the hole in the middle, and a manhole to the right. The first two paths are inaccessible at the moment because of the steam. Take note that the pipe where the green steam is coming from is labeled ‘Chloroxylenol.’ This will be important later. Approach the manhole for now.
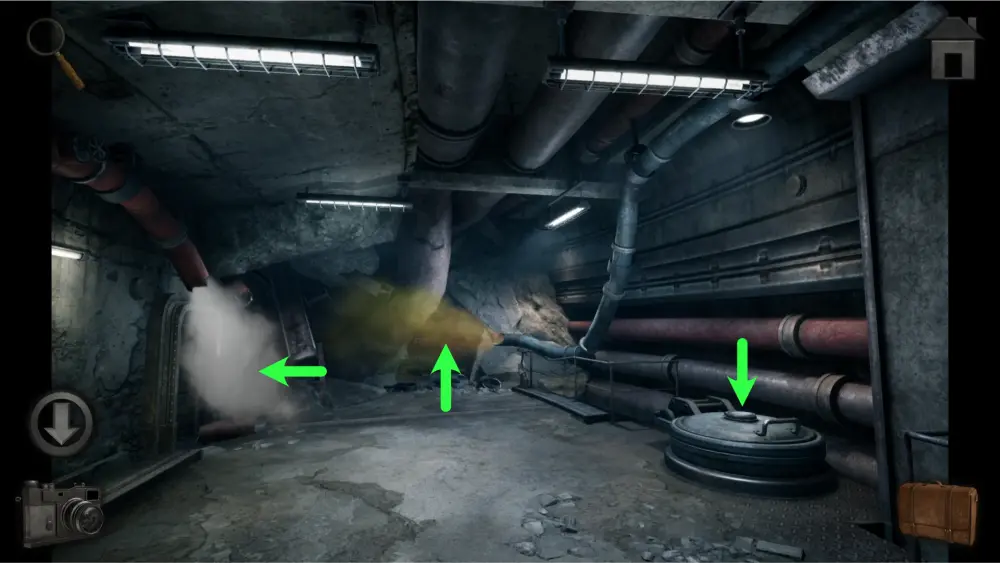
The manhole has a small circular hatch on top of it which has a puzzle. Take out the symbol you discovered when aligning the cellophane paper on the map. Copy this symbol onto the puzzle and it will unlock the manhole.
The solution should look like this:
Once inside, take the hammer on the left table. There is a white vat of liquid nitrogen to the right. You can use the ladle to scoop some up but it will evaporate quickly after moving from scene to scene. You’ll need to come back once you’ve obtained a container for it.
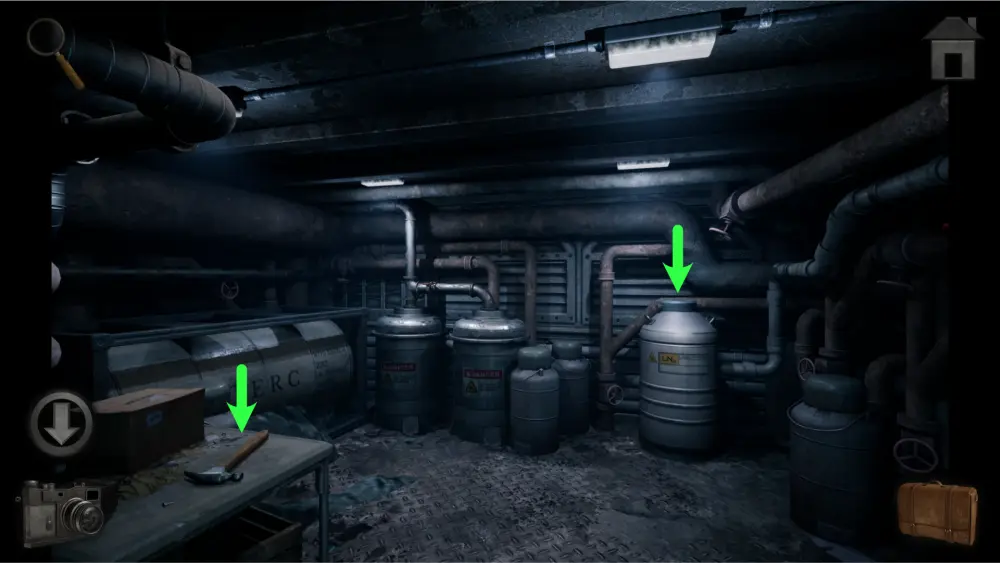
Go back to the room at the left end and use the hammer on the glass cabinet twice so you can take the thermos from it.
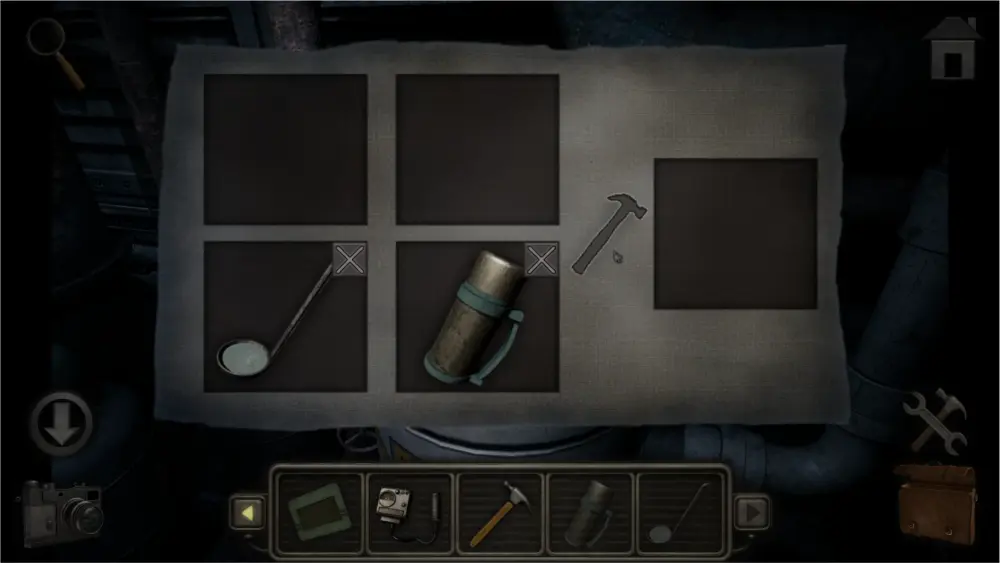
Go back to the manhole, open the white vat, scoop up some liquid nitrogen from it, and combine it with the thermos on your crafting menu to put it in.
Go back to the metal box on the left side and use the liquid nitrogen on the padlock. Once it’s frozen, use the hammer to break it.
Inside, you’ll find the controls for piping. Take out the picture of the Dangerous Chemicals Designation poster and use the combination for Chloroxylenol to turn off the green steam on the right side. Press Circle, Skull, and Green.
Go back to the right side and the green steam should be gone. Enter the hole and take the key on top of the crate to the right. Approach the red pipe to the left and you’ll see the name of the chemical that the pipe produces which is ‘Propane.’
Go back to the Piping Controls Box and input the combination for Propane which is Diamond, Fire, and Red.
Go back to the right side and the green steam should be back but the white steam is gone. Enter the room.
Approach the desk by the window and take the remote control. You can read the journal next to it for the lore but it won’t have any clues for puzzles.
Go to the locked room next to the metal double doors. Use the key to unlock it and enter the room. Once inside, approach the monitor at the left side of the room.
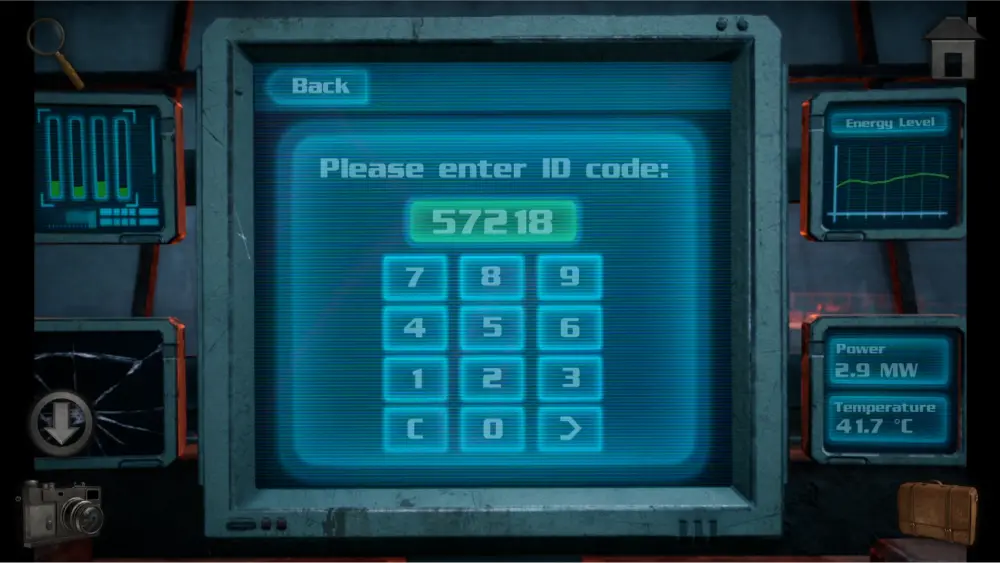
Use the remote control to move the camera around until you find a number code written on the wall. The code is somewhere on the left side. Take a picture or write it down.
Approach the computer in the middle of the room. You can read the other menus for the lore but they won’t have any clues for any puzzles. Once you’re ready, tap the red ‘Initiate Shutdown’ button and input 57218, the number you found in the camera previously.
Before the shutdown sequence starts, you’ll need to calibrate it manually. For this, you’ll need to keep the vertical line inside the green area by tapping the left or right button. The green area will gradually shrink as time passes by. For best results, do not wait before the line gets too close to the red and yellow areas to tap the left or right arrows as there is a small delay before it changes direction.
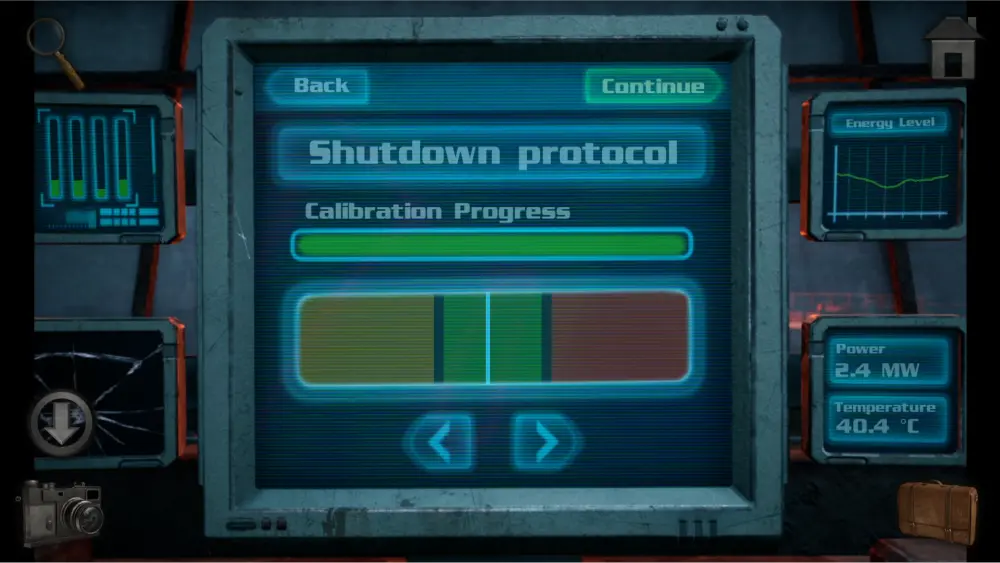
Once calibration has finished, tap yes to initiate a new shut-down sequence. As you wait, there will be a power surge and the artifact will cause an explosion, causing the shutdown to fail.
After the cutscene, approach the door and you’ll find it engulfed in flames. You’ll need to use the fire extinguisher to get rid of the flames.
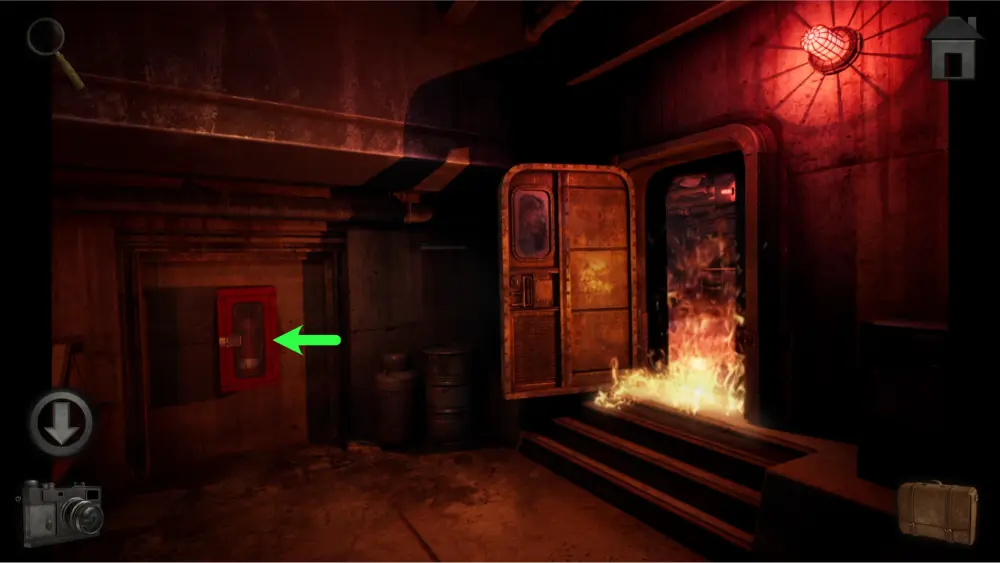
To get the fire extinguisher from inside the cabinet, you’ll need to solve a puzzle to unlock it. Below is the step-by-step process we took to solve it:
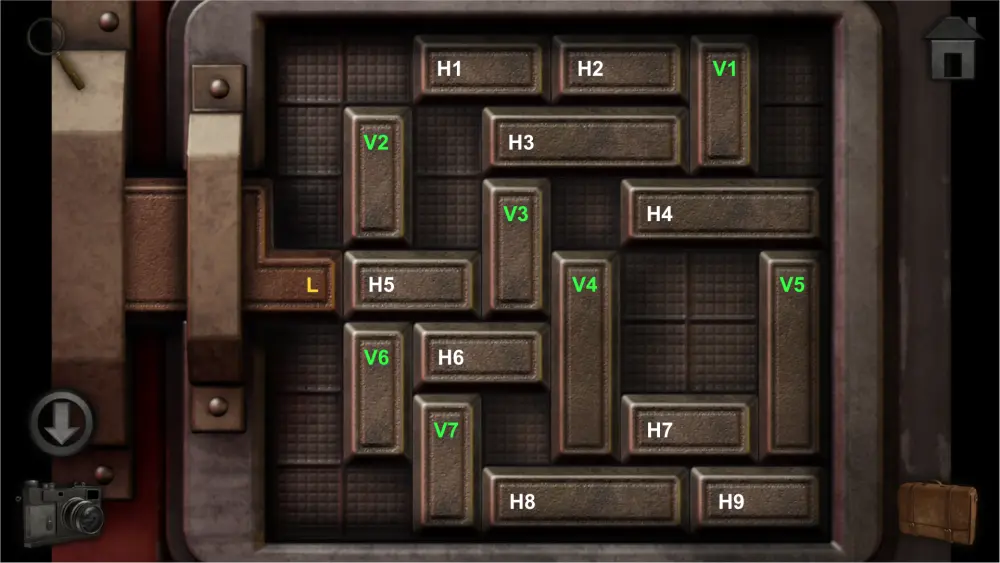
- Move V2 1 square up
- Move V6 1 square down
- Move H6 1 square to the left
- Move V3 1 square down
- Move H4 2 squares to the left
- Move V1 3 squares down
- Move H4 2 squares to the right
- Move H3 2 squares to the right
- Move H2 2 squares to the right
- Move V4 3 squares up
- Move V3 1 square down
- Move H5 3 squares to the right
- Move V3 3 squares up
- Move H6 3 squares to the right
- Move V7 4 squares up
- Move V6 1 square up
- Move H8 3 squares to the left
- Move H6 2 squares to the left
- Move H7 3 squares to the left
- Move H5 2 squares to the left
- Move V4 4 squares down
- Move H9 1 square to the left
- Move V5 1 square down
- Move V1 1 square down
- Move H5 4 squares to the right
- Move H1 2 squares to the right
- Move V7 1 square up
- Move V3 1 square up
- Move L 5 squares to the right
The result should look like this:

Take the fire extinguisher and use it on the flames to get out of the room.
At this time, the metal double doors will be opened. Inside, you’ll find metal cabinets with three doors. The first door is the only one with a hazmat suit in it. To open it, you’ll need to input the right combination of shapes and circle patterns. Tap the left and right arrows to change the shape and tap the up and down arrows to change the circle patterns.
You can find the circle patterns on the right side of the room and you can find the shapes outside by the blinking light. Your camera will no longer be functional so you must remember them or you could either use your own phone’s camera to take pictures or draw them yourself. Only the first four shapes and patterns are important.
Alternatively, you could just refer to the images in our handy guide! The solution should look like this:
Take the hazmat suit and enter through the double doors to get to the artifact.
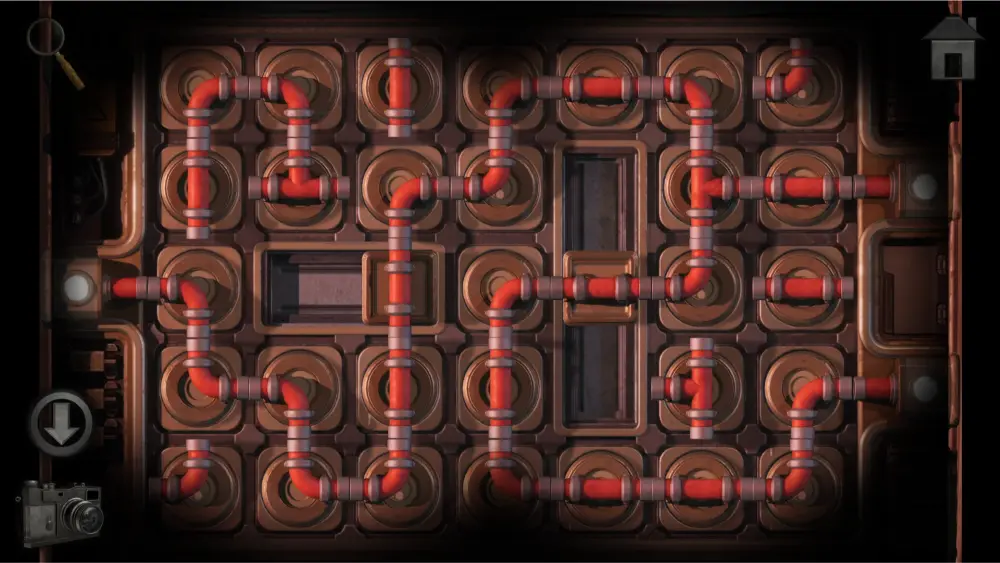
After a cutscene, approach the explosive next to the artifact. Inspect the hatch above it and solve the pipe puzzle.
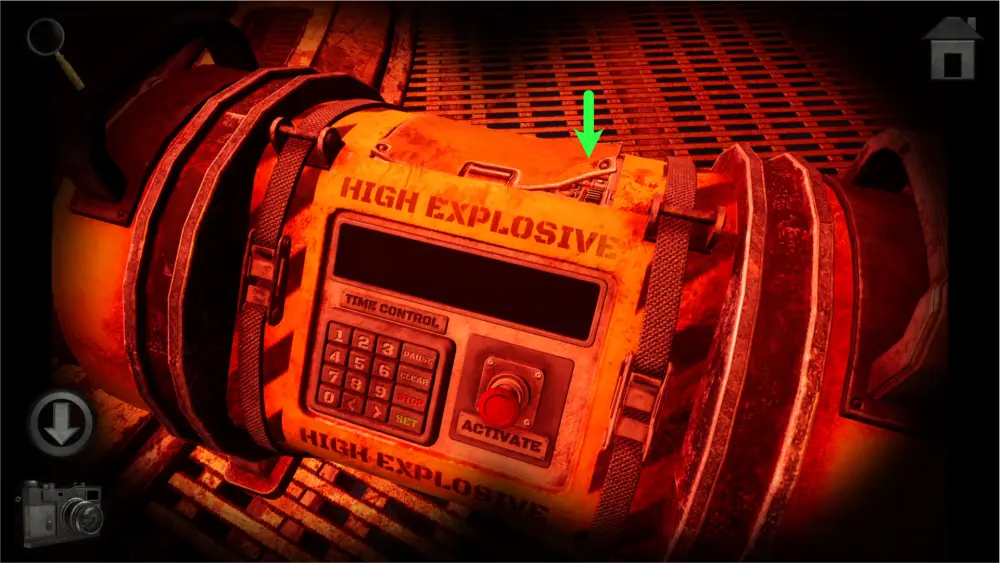
You’ll need to connect the one end at the left to the two ends at the right. This pipe puzzle is unlike the previous ones because it has two sections where the pipes can be slid.
The solution should look like this:
Tap back once you’ve finished the puzzle and press the activate button to end the game.
And this marks the end of our walkthrough of Meridian 157, Chapter 3! We hope that this guide helps you get through the challenging puzzles of the game as you continue on the path to discovering the mysteries of F.L.A.R.E. and the Artifact! Is there anything we missed? Let us know in the comments section below!
Tori
Monday 17th of March 2025
Thank you, awesome details and super helpful.
Cécile
Friday 22nd of December 2023
Thanks, this helped me get out of a bind at times!
Tania
Wednesday 27th of September 2023
Thank you guys, so helpful♥