Farm simulator games are a dime a dozen these days. Aside from the fact that many are quite enjoyable to play, growing your own farm can seem like a great respite after a long day. Most farm games are a hearty mix of fun and challenging, keeping you logged in for hours. Before you know it, you’re harvesting tons of crops, completing orders, and rolling in the dough—that is, if you’re not using it to bake pastries for sale.
That said, Golden Farm is like any other farm game, at least in the beginning. Released by Playgenes at the tail end of 2017, Golden Farm has all the familiar elements of farm simulators but with its own unique twist.
If you’ve ever played the likes of Farm Town or Homesteads, you might think that Golden Farm is just another one of those games, but that’s definitely not the case. While Golden Farm employs the same gameplay mechanics such as sowing and harvesting crops, completing orders, and creating buildings for production, there are several significant differences in the way the game functions that make it stand apart from the aforementioned titles.
For one thing, sowing crops doesn’t cost anything in Golden Farm, though it does feel like it takes a longer time to be able to increase the number of field slots you can plant in. Moreover, buying and selling items in Golden Farm works rather differently from that of Farm Town or Homesteads since other players are involved as opposed to just selling items in an in-game market.
Other than simply farming, Golden Farm also has what might be considered mini games that can get you more rewards, which can be used for building upgrades, expanding your farm area, or leveling up. Aside from being enjoyable, these mini games and limited-time events are something you can play while waiting for crops, items, and upgrades to be completed.
If you happen to be playing Golden Farm right now, then our beginner’s guide can help you build your farm, earn the most rewards, and use clever strategies not just to complete orders quickly, but also gain coins and XP without breaking a sweat!
Order Up!
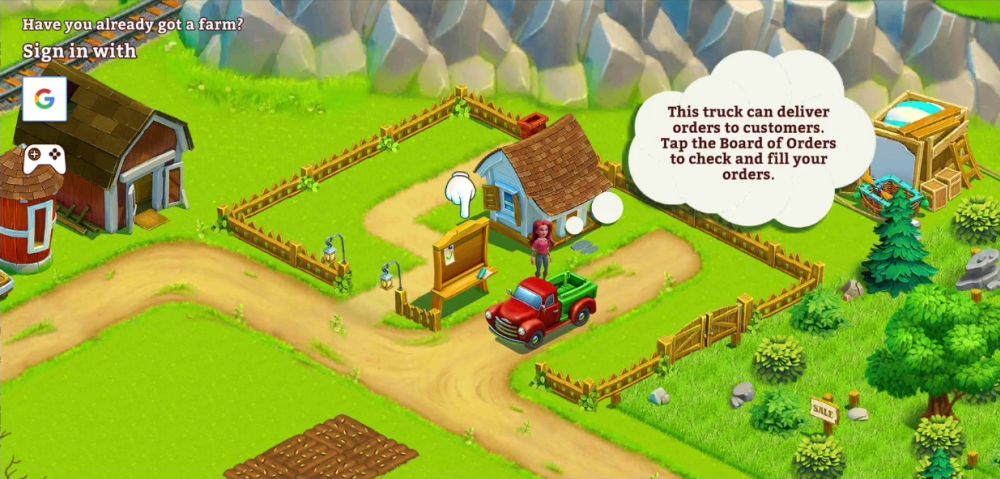
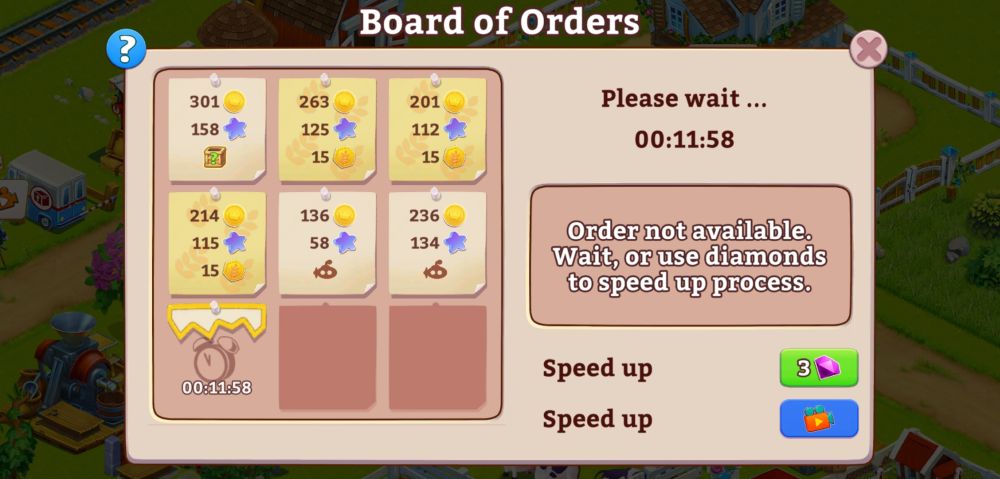
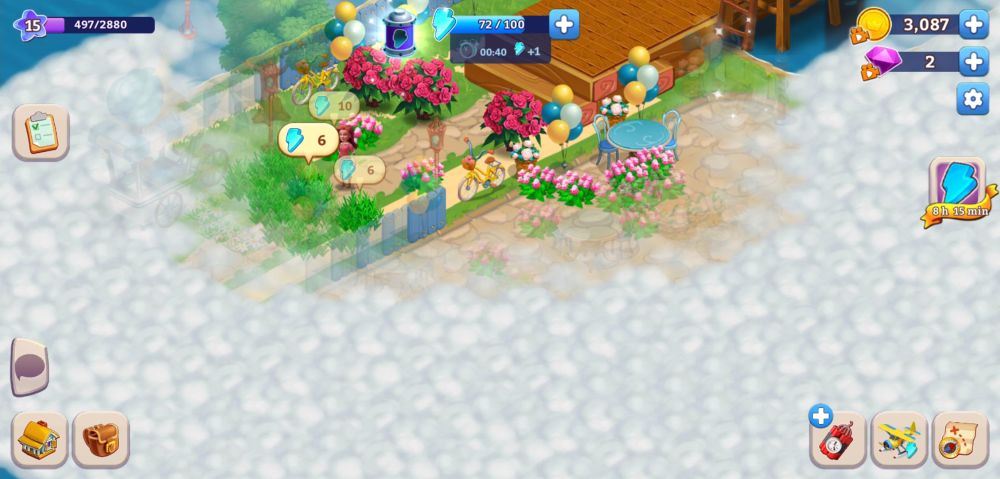
As is common in most farming games, Golden Farm has an order board that lets you know which items you need to harvest or produce so you can earn money, experience points, and other rewards. You can find your order board right next to the farm house and the truck.
In the beginning, orders will typically be easy, consisting of only one or two batches at a time, with each batch requiring about one item. But as you continuously level up, you’ll notice that the order board pins more orders, with each batch requiring more items or items that have a more complicated process for completion.
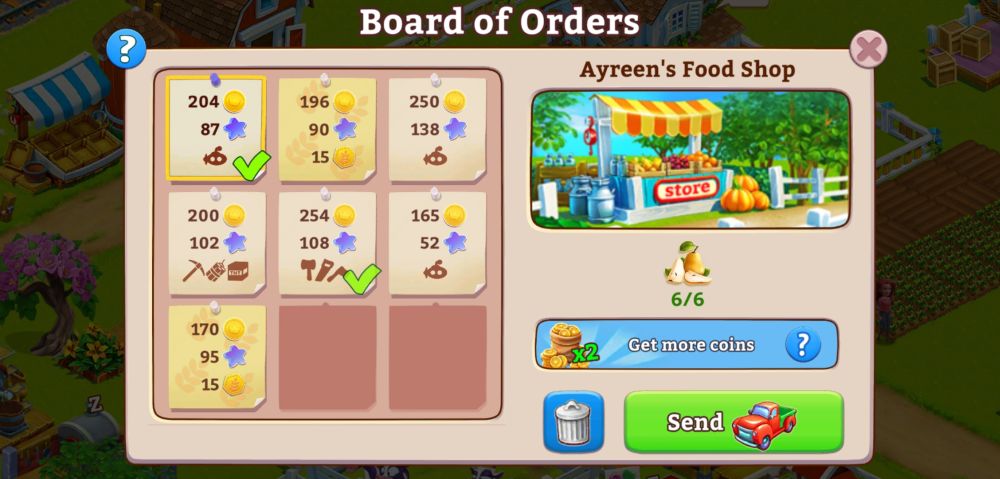
In some cases, you may find yourself making multiples of the same items in your production buildings, some of which may take a long time to finish. Other times, you might also have to wait for the required items to be produced by more natural buildings like trees and bushes. In this example image below, both orders with check marks require 6 pears, of which we only have the exact number to complete one order.
So, which one do we prioritize?
Order prioritization, in the long run, may depend on what you might need at the moment. When deciding which order to fulfill first, it pays to know what kind of rewards you stand to gain. Let’s take another look at the same order board, but with particular focus on 3 orders, as seen in the image below:
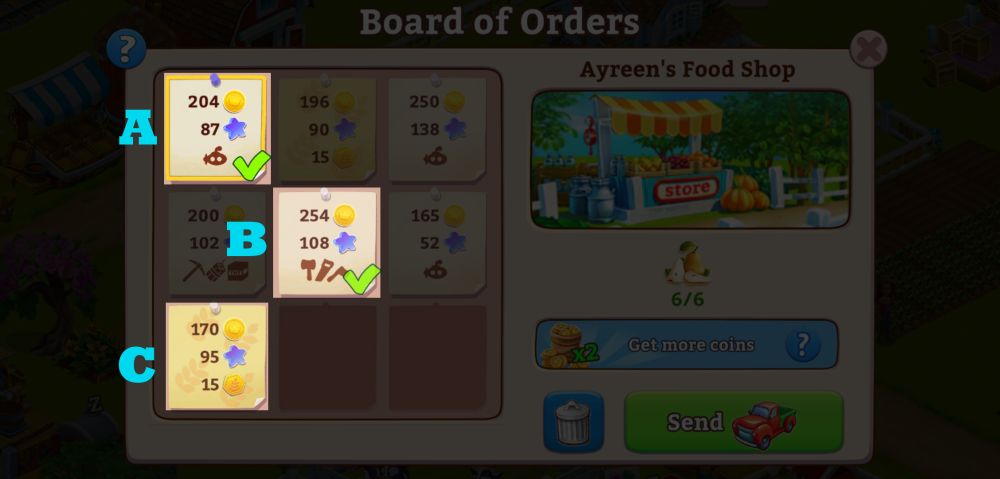
- Order A: Yields 204 gold, 87 experience points, and a Bathyscaphe ticket (which is the limited-time event we’ve caught in our run).
- Order B: Yields 254 gold, 108 experience points, and tools.
- Order C: Yields 170 gold, 95 experience points, and 15 Farmer Tokens.
As you can see, Order C isn’t really up for fulfillment yet, but it’s an example of a special order from which you can obtain Farmer Tokens. Farmer Tokens are needed for the Farmer’s Pass, which is a thematic, seasonal event where you can get other rewards that you might not normally acquire if you merely complete regular orders. As much as possible, it’s a good idea to put special orders at the top of your priority list, unless you have other objectives that will be better served by completing other orders.
This brings us to Order A and Order B, both of which have the same requirements but different rewards. Do you simply want more gold and XP, or do you need either a Bathyscaphe ticket or tools? Is it more important to get the ticket or tools than the gold and XP?
Knowing which rewards you want to get or which rewards are more important to advance your progress will guide you towards more effective order prioritization. While it’s always recommended to fulfill as many orders as you can, there are times when these can prove to be much more difficult or even counterproductive.
This can be especially true if order requirements take a long time to make, or consist of items that you might not be able to produce at the moment because you don’t have the building for it. In this case, it might be more productive to simply decline the order so it can be replaced by another. You can do this by clicking the trash bin icon next to the “Send” button. Once you decline an order, you will have to wait several minutes before it’s replaced by a new one.
However, be advised that replacement orders will be chosen by the game at random. This means you might actually end up with the same order you’ve declined. In this case, you can choose to keep it in your order board or decline it again. Review whether the rewards you may get are worth completing the order for.
Overall, regularly check your order board as this is the primary way to earn the rewards you need to advance your game.
Be a Helpful Neighbor
Aside from the order board, the game will also ask you to complete a set of tasks or orders given to you by some of the townsfolk. Specifically in Golden Farm, you can access a task list at the left-hand side of the screen that will allow you to view different tasks that, when completed, can yield rewards such as gold and experience points.
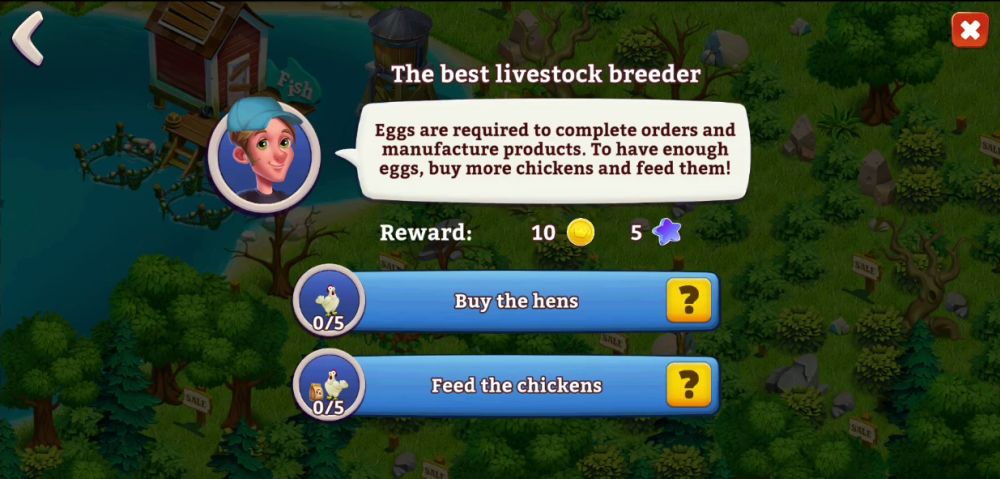
Additionally, some of the townsfolk will also visit your farm to purchase goods in exchange for the aforementioned rewards.
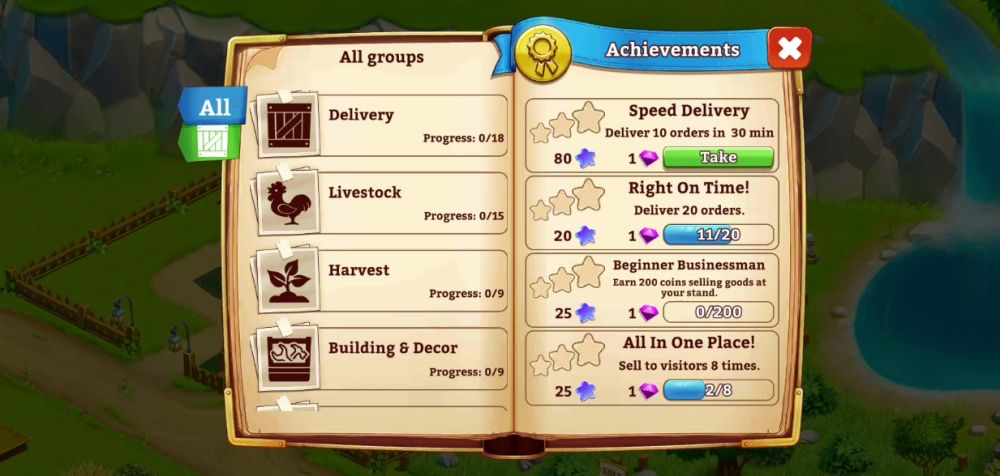
With those rewards up for the taking, it definitely pays to be a helpful neighbor. Make it a point to complete the objectives outlined in the task list, as well as accommodate orders from townsfolk visiting your farm. More often than not, these tasks and orders may also help you fulfill achievements for added rewards. You’ll know you’ve fulfilled an achievement if a yellow exclamation point appears at the top of the farm house. You can also check out your achievements tab to see which tasks you have pending.
Tasks given by townsfolk, in particular, may also serve as guides when it comes to the next buildings you might want to save up for upon leveling up your experience. Typically, completing tasks from townsfolk may require you to buy or restore certain buildings (buildings, in this sense, also include trees or field slots), as well as produce at least one item from these structures. The items you make will likely come up the order board, which can help fulfill an order batch.
Therefore, lend your neighbors a hand! You may also do this once you’re able to access the Market Stall and the Teletype (more on these later). When accessing the Teletype, you might sometimes notice that there’s a yellow exclamation point on the “To Farm” button of some players.
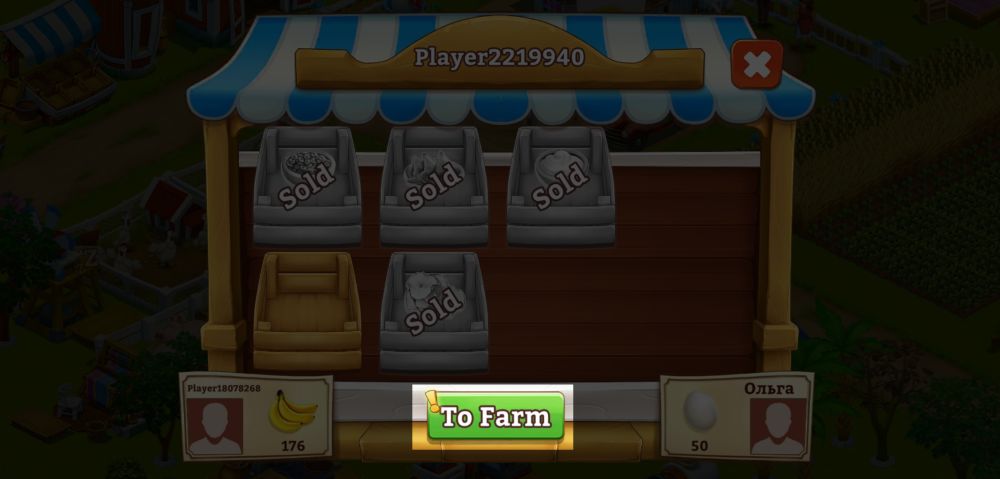
Whenever you encounter this, you can head to that player’s farm and see what they need help with, such as regrowing a tree or loading items into the train (more on this later). Lending a hand to others is a win-win situation since your neighbor will get what they need and you’ll gain a reward for helping out. Do this enough and it can become an achievement.
Plant to Your Heart’s Content
The beauty of playing Golden Farm is that planting crops doesn’t cost anything. Zero. Nada. This means you can plant and harvest to your heart’s content—except you only have a limited number of field slots.
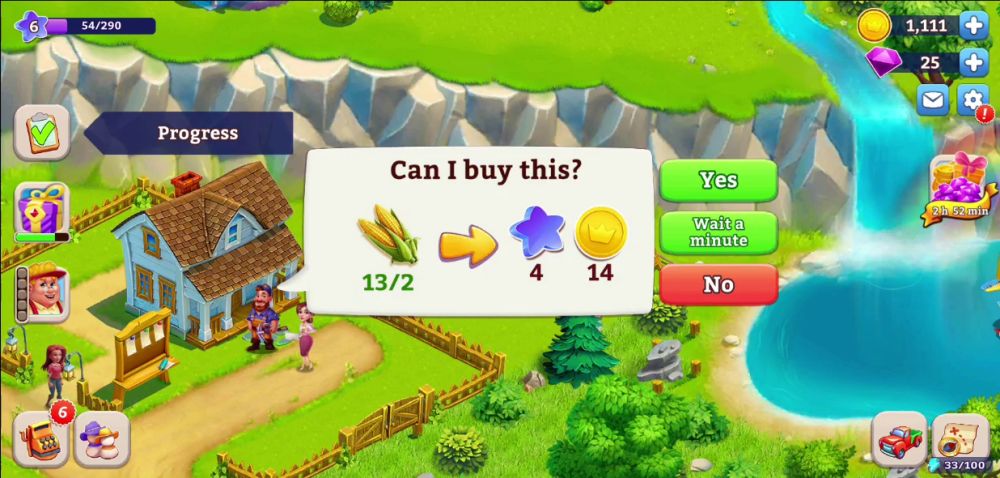
The way field slots work is that you start with 6 field slots and unlock around 3 field slots every time you level up. This might sound a bit stingy on the game’s part, but you can always view this opportunity to become a wiser farmer.
What do we mean by that?
We mean you should consider reserving at least one strip of field slots for the crop that takes the longest to produce, such as mushrooms or cotton. By doing so, you get to stock up on these crops and don’t have to wait such a long time to harvest them when you finally need them. If you aren’t going to need them and they’re clogging up your Silo, you can always sell them off in your Stall.
If you have a large area occupied by field slots, you can reserve two strips for two of the slowest crops. Even if you let the game idle, your fields continue to work and they’ll likely be ready once you return from your break.
Similarly, you can also do crop rotations: plant the fastest crops while playing then plant the slower crops when you’re about to let the game idle. This way, you maximize your field slots despite their limited number.
The Free Market Is Your Best Friend
In an earlier section, we’ve mentioned the Stall and the Teletype, which is basically Golden Farm’s version of the free market. In many similar farming simulators, players usually have the chance to buy and sell items. What’s rather unique about Golden Farm’s arrangement in terms of the free market is that, unlike other games, you can actually buy from and sell to other players as opposed to simply selling to the game itself or waiting for the game to pick random items that you can buy in the market.
Let’s discuss selling first: you can do this when you access the Stall. You’ll see that you have 5 default slots that are empty. Clicking at any empty slot will allow you to choose which item you want to put up for sale.
There are no restrictions as to the items you can sell at the Stall. As long as you have it in your Barn or Silo, you can put any of those items up for sale.
One other thing that’s great about Golden Farm’s free market is that you can actually double the price of commodities. Each item begins with a base price arbitrarily determined by the game, and if you click the plus sign on the price tab, you can max it out to as much as double the amount.
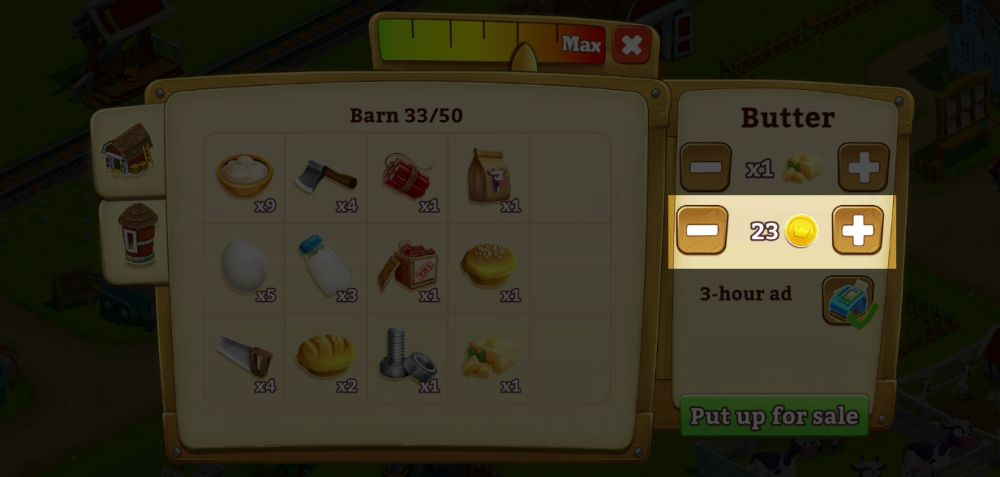
Prices apply per item so if you’re selling 1 slab of butter for a base price of 23 gold, you can sell it for as much as 46 gold when the price is maxed out. If you sell 2 slabs of butter with maxed out prices, you can gain as much as 92 gold. You can sell as many as 10 of the same item per slot.
Another unique function of selling in this game is that you may choose to have your items advertised in the market. This allows other players to see at least one of the items you’re selling when they access the market through their Teletype. Opting for the 3-hour ad is usually free and if you’ve used it at least once, you just need to wait several minutes or watch an ad to set the cost back to zero again.
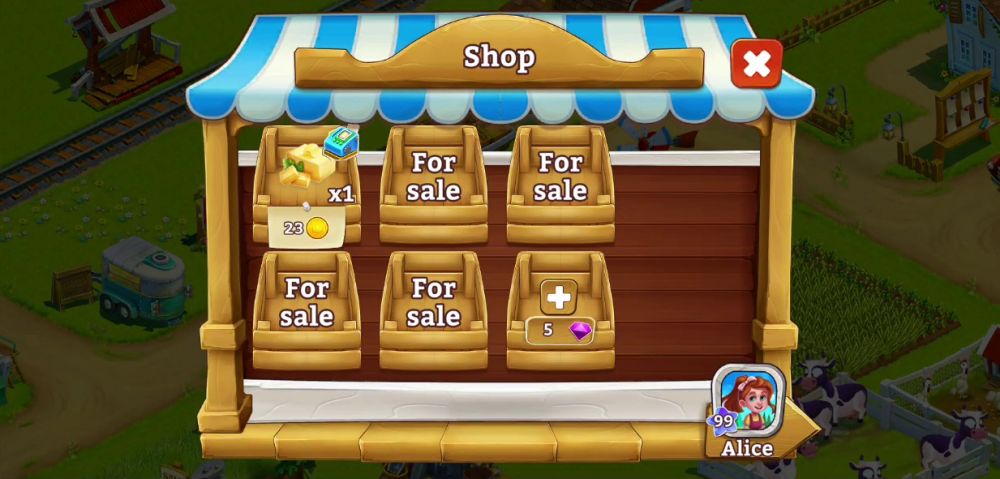
Speaking of the Teletype, this is where you can buy items from other players who are selling from their own Stalls. Accessing the market through the Teletype looks like this:
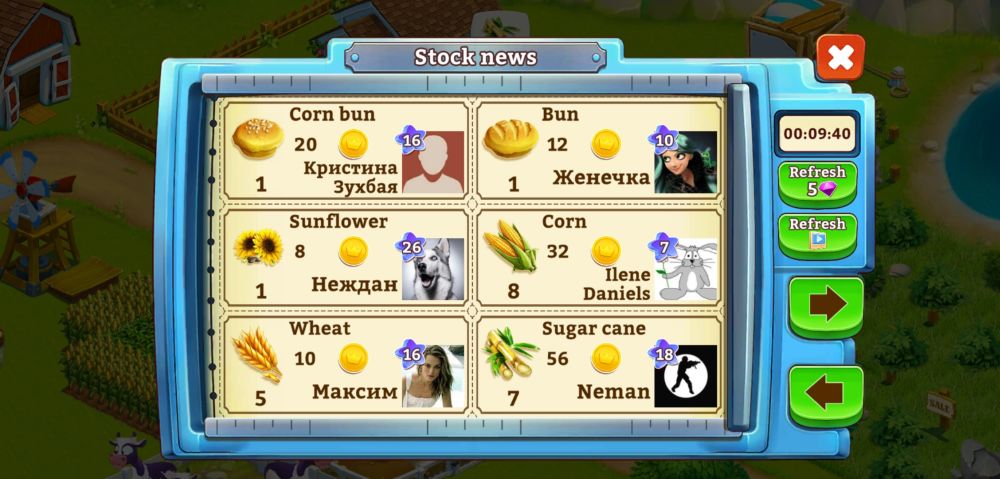
You can scroll to the right to check out more sellers. While you can only see one item beside each player, this doesn’t mean that’s all they have to sell, considering a Stall has at least 5 available slots by default. In fact, that item might not even be available anymore when you click on that specific player so check the rest of the wares in their Stall. Whatever item you see displayed in this quick list is the item that the player has chosen to advertise.
Now, buying items is a bit trickier than selling. In selling, you control all the variables. You get to choose what to sell, how many to sell, and for how much. When you’re buying, it’s a virtual free-for-all. It’s not uncommon to find players selling 10 bananas in each of their 5 available slots or more.
It’s also not uncommon to find players selling really basic commodities like wheat or corn, which you can just plant on your farm since they don’t cost anything and have the shortest waiting times till harvest. Believe it or not, though, selling both rare and basic commodities will always get you a buyer sooner or later.
When it comes to buying, you also have the option to buy from your neighbor Alice, which you can access through your Stall and not the Teletype.
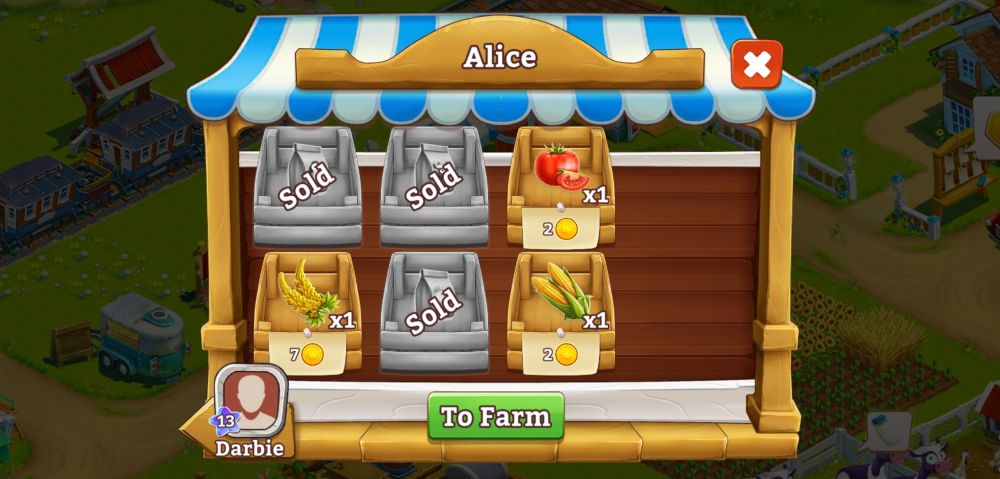
Our recommendation is to first check what items Alice is selling as she sells them for cheap. The only downside to buying from Alice is that you will usually find basic items and her selection won’t refresh for a few hours.
Aside from this, we have some specific recommendations when it comes to both buying and selling. This can help you maximize your profits, as well as get the best bang for your buck. Consider these tips below:
Tips for Selling
- Always max out the prices. There’s always someone willing to buy no matter the cost if it means fulfilling their orders without having to go through long waiting times.
- If you’re selling crops, max out the item count to 10 per slot. Crops can be fairly cheap even with maxed out prices. This is because they’re the most basic commodity and most players will be willing to buy extra as they would likely need it for succeeding orders.
- As much as possible, sell items that take a long while to produce. This applies to crops, fruits, animal products, and completed items like food or clothing. The longer they are to produce and the rarer these items are, the more likely they are to be sold. Often, they also yield higher prices.
- Animal feed as well as tools are also highly saleable items. You may choose to max out the item count for animal feed, but you don’t have to do the same for tools as the latter can be difficult to obtain. Only sell a handful of tools when you can spare them or if they’re cramming your Barn’s inventory as you will definitely need them for Barn upgrades, Silo upgrades, and territory expansion.
- Advertise the rarest or most expensive products you’re going to sell. Chances are, other players are looking to obtain these quickly.
Tips for Buying
- Browse through each player stall and try to compare prices whenever possible. The only caveat to this is that the items you’re looking to buy might no longer be available once you pass them. The thing about buying is that you will soon realize that it’s a “you snooze, you lose” kind of arrangement. That said, making quick decisions will definitely be to your advantage.
- When you chance upon a rare item and you have gold to spare, buy it! Even if you don’t need it at the moment, it’s more than likely that it will be needed sometime in the future. Stock up on these rare items and if you find that you really have no need for them anyway, then you can just resell them in your Stall. These can include food, fruits, cloths, and crops—all of which take time to make.
- Don’t just check your order board before buying from other players. You also need to take note of what you might need to load up your airship or train (more on this later). In some cases, buying these items for the airship or train instead of making them yourself can be more productive since both modes of transport operate at limited times.
- Just as other people might be looking for extra items when they buy from you, there’s also no harm in buying extra items from other players. Buying from the Teletype is the quickest way you can fulfill orders, which may recoup your gold expenditure aside from gaining you much-needed experience points.
Load It Up!
It’s a staple among many farming games to have some kind of transport system that acts as an extra order board that can help break the rather repetitive nature of the game. It also offers the player alternative avenues to obtain rewards. In Golden Farm, you may encounter the airship and the train station, both of which yield additional rewards when loaded with the required items.
Although both vehicles operate on the principle of being loaded up with six items each, there’s a slight difference as to how they work.
Loading Up the Airship
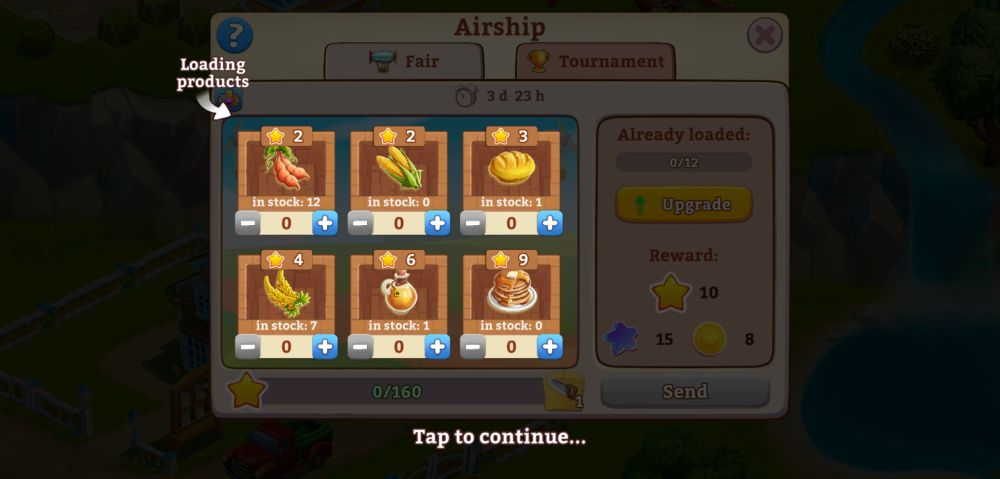
As you can see from the image above, you can choose to load any of the required items in your airship until the total number of loaded items per batch reaches 12. This means you can load 12 of the same item and you’ll be able to get a reward, which is indicated in the right-hand side of the prompt. Each item also has a corresponding star equivalent.
The rarer or the more complicated the item, the more stars it yields. To get the ultimate reward for this round, you need to fill up the star meter below, which requires 160 stars.
It goes without saying that it’s preferable to consistently load the item that has the highest start equivalent, but that’s not as easy as it looks since an item like pancakes can take a long while to produce. On the flipside, you only need to load the pancake around 18 times before filling up the star meter, as opposed to loading 2-star items 80 times.
Of course, you may mix and match which items you want to load or can load depending on their availability, as long as you’re able to give a total of 12 for each batch so you can send off the airship. When you’ve sent off an airship, you’ll need to wait a couple of minutes before it comes back.
One way you may be able to quickly fill up the load orders is by checking the market if anyone’s selling the items you need. You can harvest or make these items yourself, though this obviously takes more time compared to when you browse the market. If you’re lucky, you might just find what you need. Otherwise, you’re going to have to work your farm hard enough to continuously load up the airship.
Now, this sounds like a lot of work—are the rewards even worth it?
Based on the image above, the reward for completing 160 stars is a saw. We could definitely say that this is worth the trouble since you rarely find tools being offered as rewards unless you level up, watch an ad, or claim your dailies (more on freebies later). But even then, you might not get tools as rewards, or at least, not a specific tool, so take advantage of the opportunity whenever it presents itself.
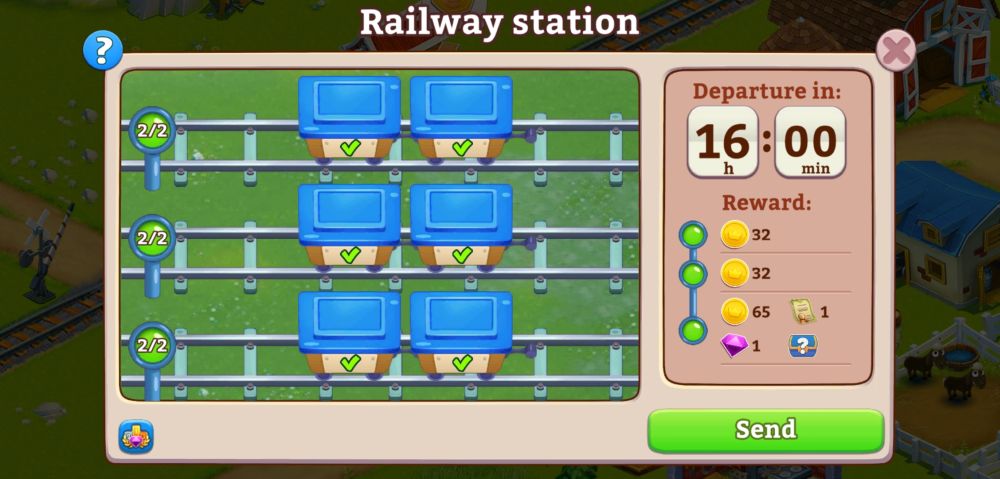
Loading Up the Train
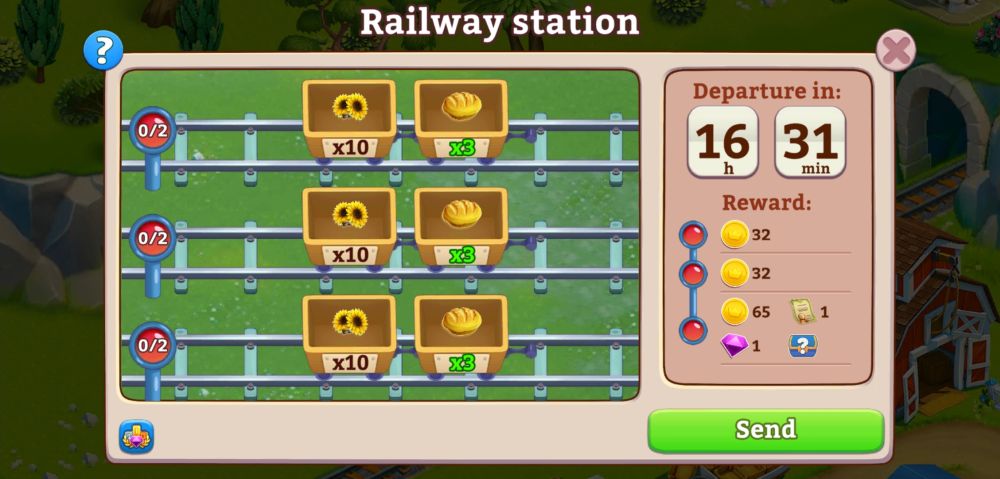
Loading up the train can seem a bit less troublesome compared to the airship. After all, you only have 2 items to think about and the train indicates exactly how much you need to load each cart. The challenge here is that each train will depart after a specific number of hours whether or not you’ve managed to load all the carts. Another thing is that you can’t load a cart unless you have the exact number of items it requires.
Still, loading up the train can be extremely useful to advance progress in your farm since this is the only way you can obtain a Land Deed. In the beginning, all you need to expand your territory is gold. However, when you reach higher levels in the game, territorial expansion will require Land Deeds (yes, more than one) and tools. Without the train, you may find yourself stuck with the area you’ve thus far unlocked, which will feel really cramped once you need to purchase trees and other more advanced buildings.
With that in mind, make it a point to load up all the train carts as this is the only way you’ll be able to get a Land Deed. As you can see from the image above, loading the train carts halfway will only get you gold.
Fortunately, since there are only two items required, there’s a big chance you can finish loading all the carts before the train departs.
The number of items required per cart may vary depending on the rarity or difficulty of the item to be obtained. For instance, you may be required to load up 10 sunflower crops each cart at one time, but only 5 bananas each cart the next time since bananas take 5 hours to produce.
The same applies to food items or clothing. It’s possible to be required to load 3 slabs of butter per cart and only 1 hamburger per cart since the latter takes longer to make. Basically, the game is reasonable enough to lower the number of rare items required per cart, which is clearly trying to give players a chance to load up all the carts for maximum rewards.
Once the train departs, you’ll have to wait a couple of hours before it arrives. Luckily, the game gives you a hint of what the next orders are, as seen in the image below.
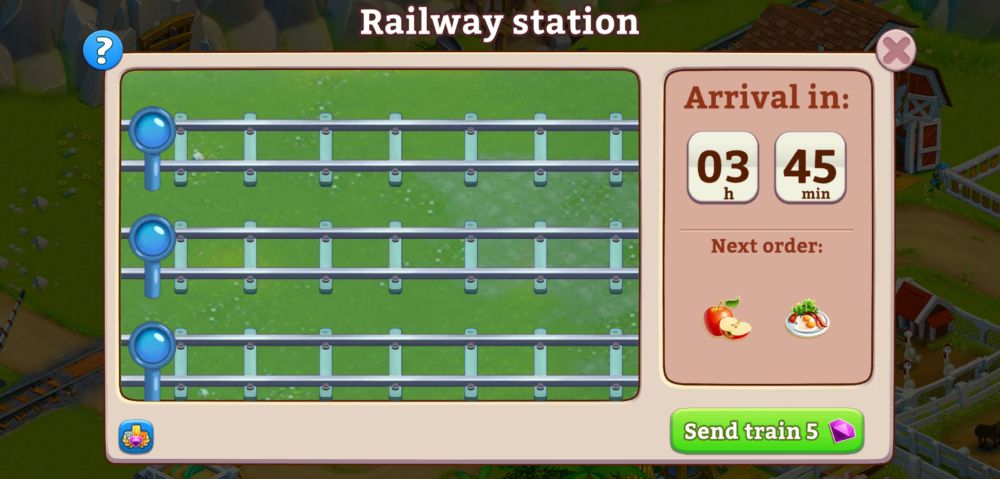
Though you won’t know how many items are required for each cart, this gives you a headstart to prepare for when the train arrives later.
Again, you may choose to produce these items yourself or try to buy them from the market.
The Busy Bee Gets All the Honey
As you know, farming games can entail long waiting times. The same is true for Golden Farm, and it’s the reason why there’s always someone willing to buy from the market even if items are double the price. Waiting can be tedious, which is why it’s important to maximize your time while playing—and even while you’re not playing.
Before letting the game idle, make sure none of your buildings are inactive, especially those that produce food or clothing. This is because the more active your production buildings are, the closer they are to getting an upgrade.
Basically, always ensuring that your building is actively producing something is tantamount to them acquiring experience points. However, these experience points are counted in hours so the more you use your buildings, the more hours they put in. Upon reaching a certain threshold, they will be able to get an upgrade.
Upgrades are different for each building in the sense that one building may have an upgrade that reduces production times while another building will have an upgrade that makes its items more valuable when submitted as orders, thus yielding more gold. Regardless of these differences, it pays to keep your buildings busy.
This means that even if you currently don’t need anything from a particular building, fill up their slots anyway and make them produce anything at all. Aside from increasing their hours, the items you make can be sold in the market for additional profit.
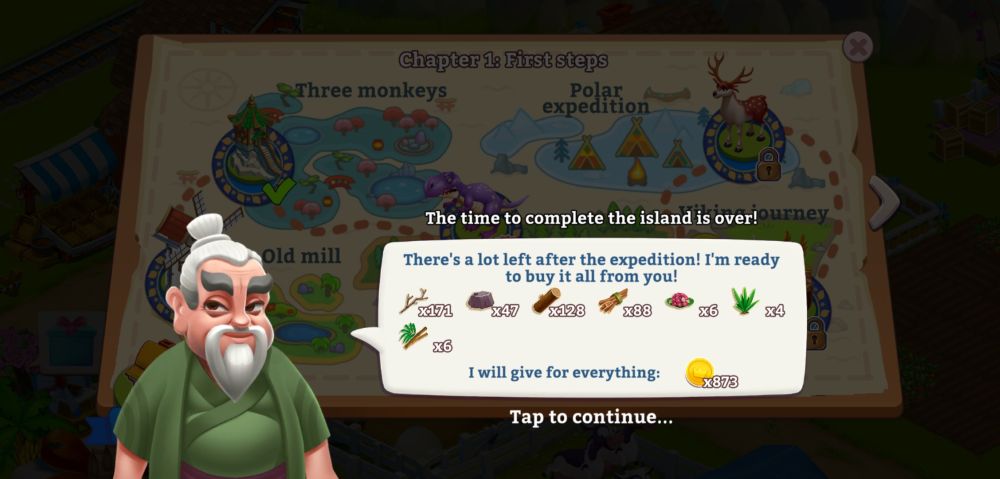
Explore the Map of the Islands
Once you’re able to access the Handicraft Workshop, you’ll be able to hop on a plane and explore the first chapter of the Map of the Islands. There are currently 6 chapters in total when you scroll to the right of the map.
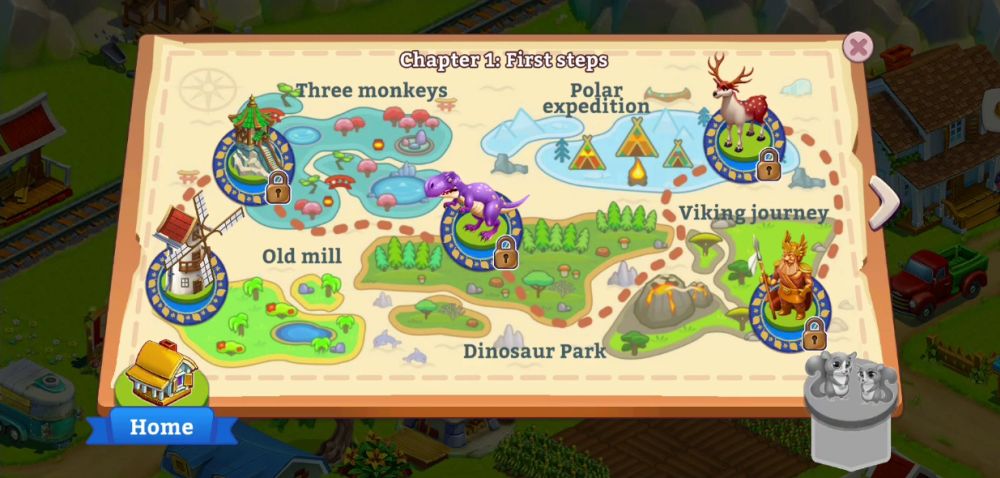
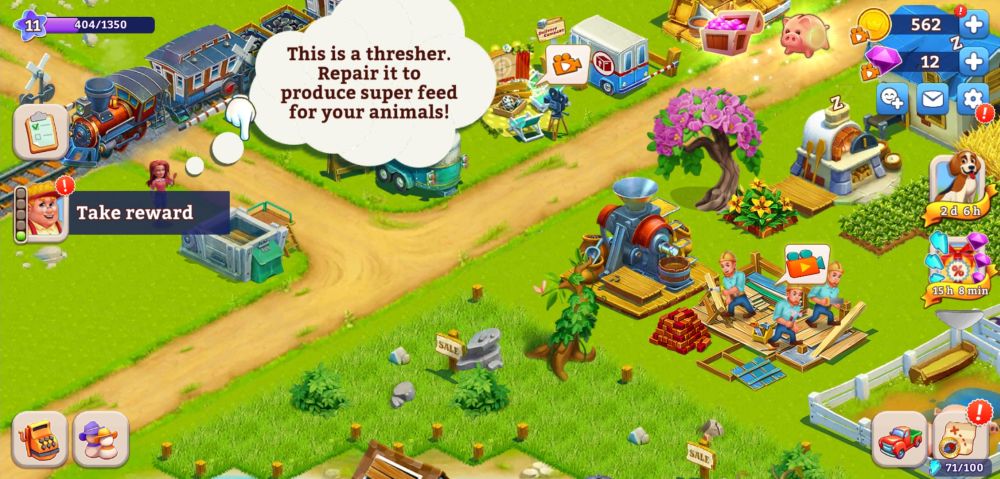
As you can see from the image above, there are 5 locations you can unlock in Chapter 1. This is also sort of a mini game but unlike the limited-time events, exploring the map will unlock certain features or buildings within the vicinity of your farm area. To give you a hint, completing the Old Mill area will reward you with a thresher, which you can use to decrease the production times for animal feed.
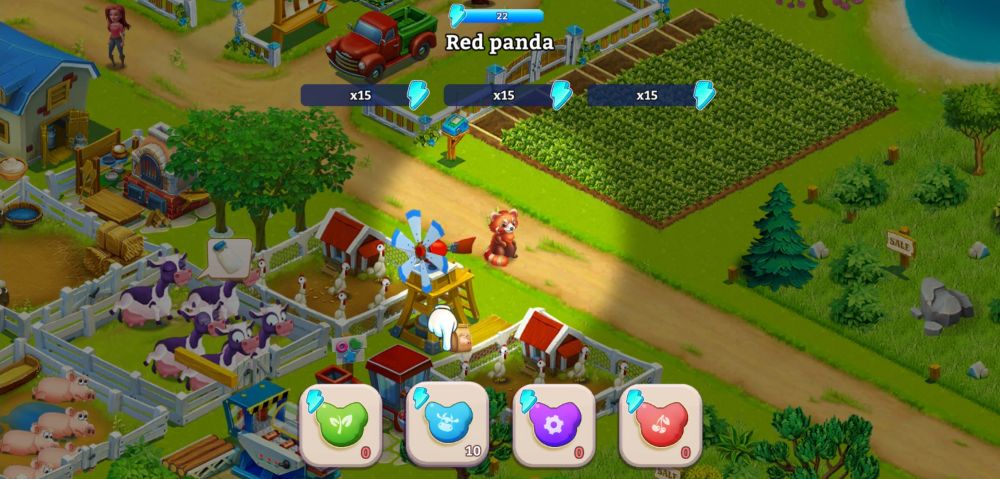
On the other hand, completing the Three Monkeys area will allow you to keep the Red Panda, which you can feed so you can gain more energy. Energy is used to clear up the obstacles in every location in the map. As for the other locations and succeeding chapters, we’ll leave them for you to explore.
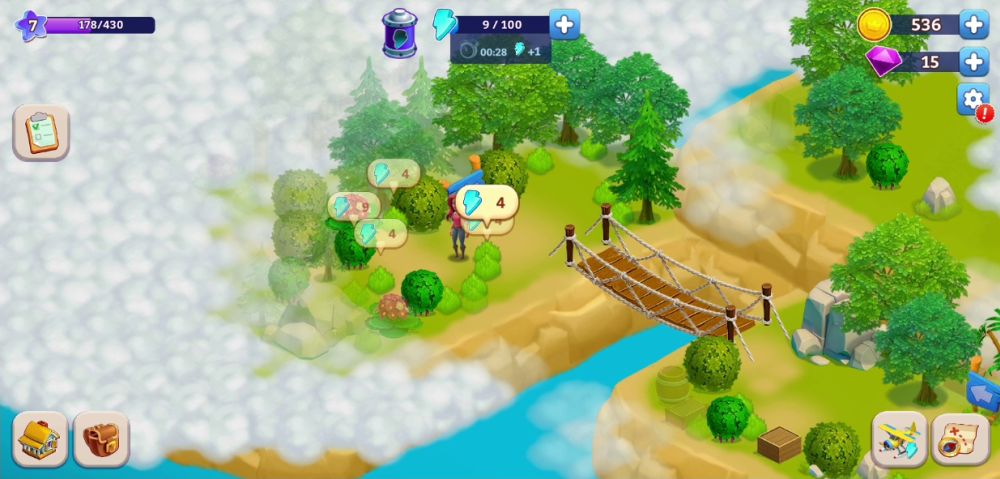
Basically, each area you will access in the Map of the Islands is surrounded by fog. You can clear part of the fog when you get rid of obstacles like trees, bushes, stones, and the like. Each obstacle varies in size, which figures into how much energy is required to eliminate them. For instance, a huge rock might take as much as 50 energy to eliminate while a small bush needs only 4 energy to be shoveled out of the way.
With each location, you will be asked to fulfill certain tasks that will allow you to uncover the majority of the area. These tasks can be viewed on the left side of the screen, which will open up a prompt.

When you click on a task that has yet to be fulfilled, the screen will zoom out a little and reveal a path towards the right direction so you can complete that particular task.

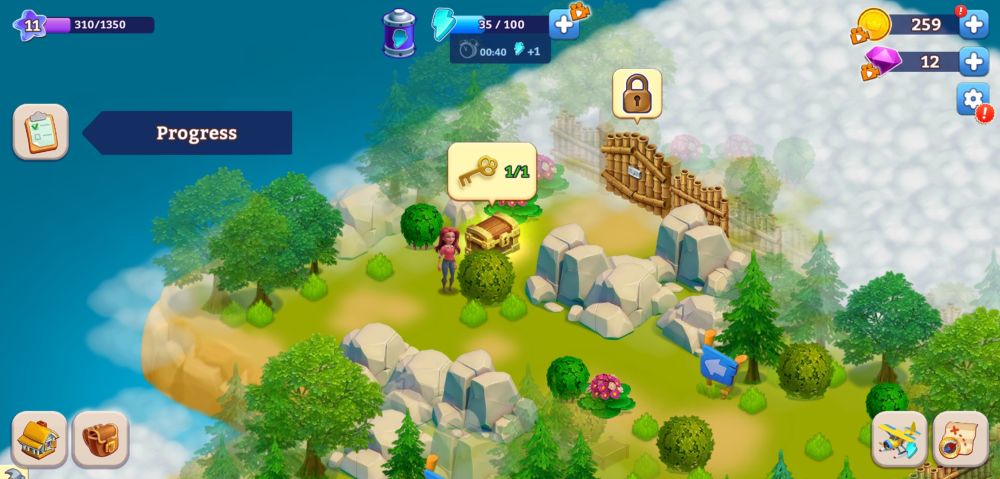
Follow that path and eliminate the obstacles along the way so you can lessen the fog and reveal more of the terrain. As you reveal more of the area, you can discover treasure chests, keys, or even additional decor items while heading to your objective.
Eliminating obstacles also lets you collect items in your backpack. For instance, as seen in the image below, getting rid of a bush can get you 2 of kindling. This will come in handy later.

Now, as you may have guessed, the biggest challenge in exploring these areas is uncovering as much of the terrain as you can while spending the least amount of energy needed. This can be rather tricky but not impossible.
Since you won’t get the Red Panda until you finish the second location in the map, here are a few ways you can maximize your energy reserves, with a bonus tip that you might want to take note of before you finish all the tasks in one area. Keep in mind that once you finish all the tasks, the area will be marked complete and inaccessible to you.
- Eliminate obstacles closest to the fog. The main objective in getting rid of obstacles like trees or stones is to clear not just the path but also the fog all around. To conserve energy, try to get rid of the obstacles closest to the edge of the fog to clear more ground.
Similarly, try to click on obstacles that require only a small amount of energy to eliminate. Of course, this is the ideal scenario and you won’t always encounter it, but this is definitely one way you can be thrifty and productive despite limited energy reserves.
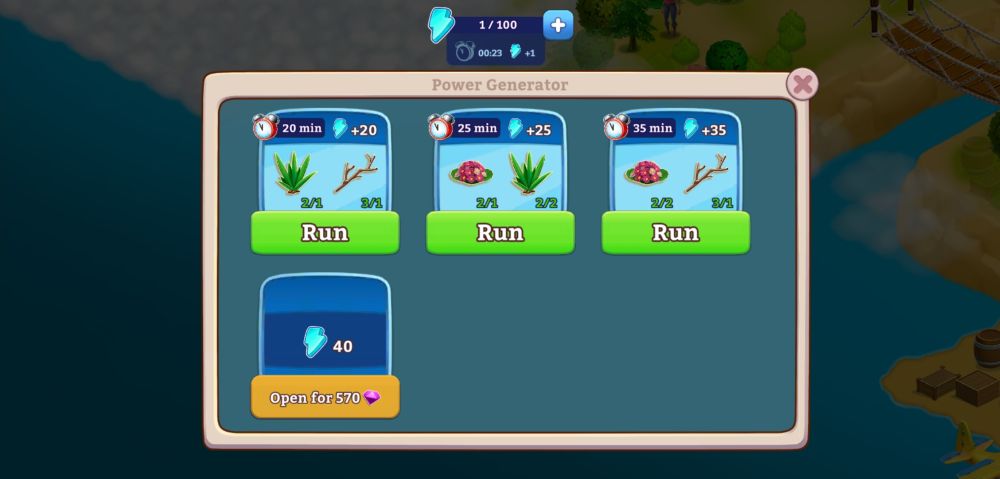
- Run the plane’s power generator. Sooner or later, you will run out of energy. Besides waiting for your energy reserves to replenish, you can also run your plane’s generator to, well, generate extra energy. The way this works is that you can run the power generator in exchange for the items you’ve picked up when you eliminate obstacles.
The power generator runs only on a small amount of items so keep collecting and keep your generators running. By default, you can run 3 power generators, with each one requiring a short waiting time. The longer the waiting time, the more extra energy you can acquire.
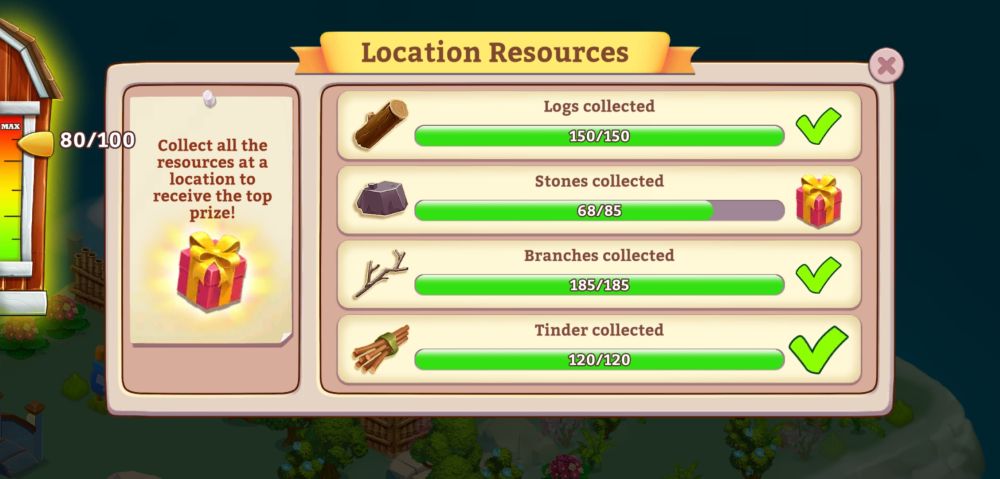
- Collect all resources before completing the island’s final task. You may be eager to unravel what lies in the foggy island and complete your tasks, but hold your horses! Before completely ticking off your task list, it’s a good idea to collect as many resources as you can to get extra rewards.
If you click the wooden crate icon on the left side of your screen, you will access the “Location Resources” tab, which lets you see how many of a particular resource you need to collect to earn extra rewards. It’s a good idea to collect these resources first before completing your final task as the island will become inaccessible once you’ve finished your main objectives. You will only be given a few hours to continue accessing the island until the game automatically renders it fully closed.
Once this happens, it will be difficult to collect these resources as you will still spend energy that you might not be able to recoup on time. When you’ve at least managed to unravel half the island, start collecting these resources first before moving on to your main objectives.
Even if you don’t collect all these resources on time, you will still be rewarded a hefty amount of gold for whatever you’ve managed to gather as the game will buy it from you.
Clutch Your Pearls—Er, Diamonds
Typical of many farm simulators, Golden Farm has two types of currency: gold and diamonds. Gold, as you can already guess, is the common in-game currency since it’s regularly used for most transactions like buying and selling, constructing buildings, and as rewards for completing orders.
Diamonds, on the other hand, are considered premium currency by the game since they’re mostly exchanged for extra slots, speed-ups, and for the purchase of missing resources or premium buildings. Compared to gold, diamonds are a little harder to earn so spending them wisely is a must!
One good thing about Golden Farm when it comes to spending diamonds is that, unlike other games, accidentally tapping on diamonds won’t make you accidentally spend them. Instead, the game will display a confirmation prompt and ask you to tap again. It’s a good way to keep unplanned purchases from happening.
Now, the game will constantly tempt you to spend diamonds. After all, tons of items or options will only ask you to spend a small amount of diamonds. Even so, don’t be so eager to spend your diamonds. They’ll be gone before you can say oops! Save them up for the most important and most productive purchases only.
Here are our dos and don’ts when spending diamonds:
DO Spend Diamonds on:
- Extra slots specifically for production buildings. This can be a bit tricky as it will likely take a long time before you can buy at least one extra slot for every production building you will construct. In this case, try to observe which building gets the most orders from the board and the townsfolk.
Similarly, try to gauge which building produces items that are needed to complete other items. For instance, sunflower oil is needed to make cookies, pancakes, and apple chips. The same building it’s made in also produces sugar cubes and flavored oil, which are used for dried bananas and samosa with coconut, respectively.
Butter, cream, and other dairy products also figure in the production of items like frosted flakes and banana pancakes. Thus, get extra slots for the Universal Press and the Dairy Processing Plant. You might also want to consider getting extra slots for the Wood Processing Factory so you can make chips for smoking and eco-fuel. Eco-fuel, in particular, takes 8 hours to make. - Resources for territorial expansion. As mentioned, expanding your territory during the early levels of the game will only require gold. However, once you access the train upon reaching Level 17, the game will require you to obtain Land Deeds and other resources to start expanding your territory.
Sending the train with fully loaded carts will let you gain these resources a little easier, but once it starts getting cramped, you should consider spending diamonds to obtain the missing resources you need for territorial expansion.
This definitely won’t be cheap, but the expense will allow you to have space for more production buildings, trees, and bushes, which are needed to fulfill orders and gain XP. It’s a bit of a steep tradeoff but well worth it in the long run. - Tools to clear the expanded area. Once you’ve unlocked a parcel of land, you still need to clear the area of bushes, trees, and stones. You can say that it’s similar to eliminating the obstacles in the foggy islands.
However, instead of spending energy to clear the land, you need to use tools like saws, shovels, and dynamite, to name a few. Again, these are items you can obtain as rewards or by sending off the train. However, you might not have enough of these tools to completely clear the unlocked area. In this case, if you’re missing about one or two tools, spending diamonds for them can be a good idea to fully maximize the available space.
DON’T Spend Diamonds on:
- Extra slots for the Stall. As mentioned above, extra slots should only be purchased specifically for production buildings. You don’t have to do this for the Stall. This is because you won’t have to wait for a slot to be vacant as it will only take a short while before buyers purchase your wares.
- Premium buildings. Premium buildings, in this regard, refer to trees and bushes that yield double the amount of fruits regular trees and bushes purchased for gold will give you. However, just like regular trees and bushes, premium buildings will have a limited lifespan and you’ll have to buy them again once they mature and wither. If you want to get additional fruits, it’s better to just check out the market.
- Premium decor. Unless you have tons of extra space, putting up decor in your farm won’t be productive other than serving aesthetic purposes.
- Speed-ups. Again, farming games entail a waiting time so be patient and don’t spend diamonds for speed-ups. As outlined in the previous sections, there are a variety of ways you can circumvent this waiting time. Explore those options first before hurrying to spend any of your hard-earned diamonds.
- Hiring the delivery truck. In the early stage of the game, you will be allowed to use the delivery truck for free. What this truck does is to find a specific type of item you want to obtain. However, you will still have to pay for that item, and the greater the number you want to get, the higher the price.
Also, hiring the delivery truck for a limited number of days will cost a huge amount of diamonds that could be better spent elsewhere. You can do away with the delivery truck altogether, especially if you can access the market and the train.
Hooray for Freebies!
Now that you know what to spend your rewards on, it’s time to know how to get more gold and diamonds, as well as energy, experience points, tools, and other items like farming vouchers. Fortunately, Golden Farm offers you a handful of avenues with which you can obtain these rewards for free. Don’t forget to check out the following methods so you can earn more rewards for virtually nothing at all!
Make a Wish at the Wishing Tree
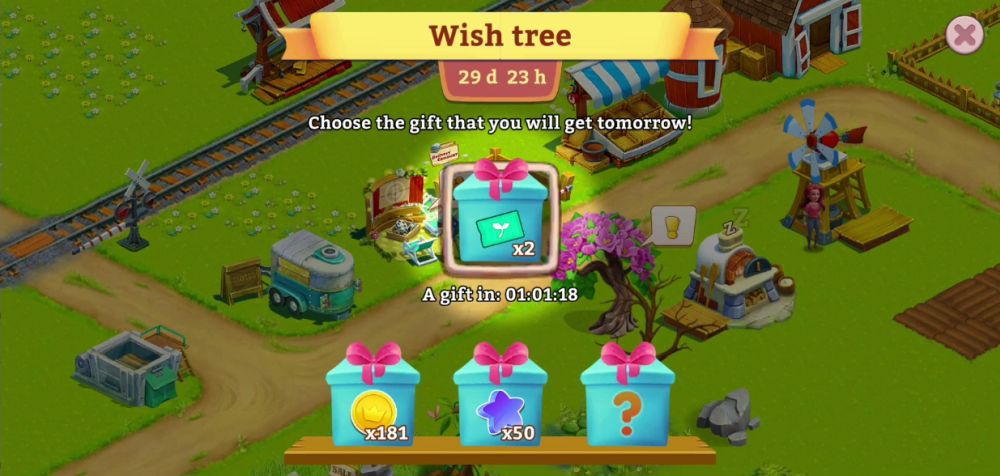
Early on in the game, you will be able to access the Wishing Tree, from which you can choose among 4 different rewards that you can get when you log in to the game the following day. These rewards will vary each day. Check the rewards options from the Wishing Tree and click the one that you need most. You can change your chosen reward anytime provided that the timer to receive the gift hasn’t run out.
If you choose the box with the mystery gift, you stand to gain some pretty good rewards like tools.
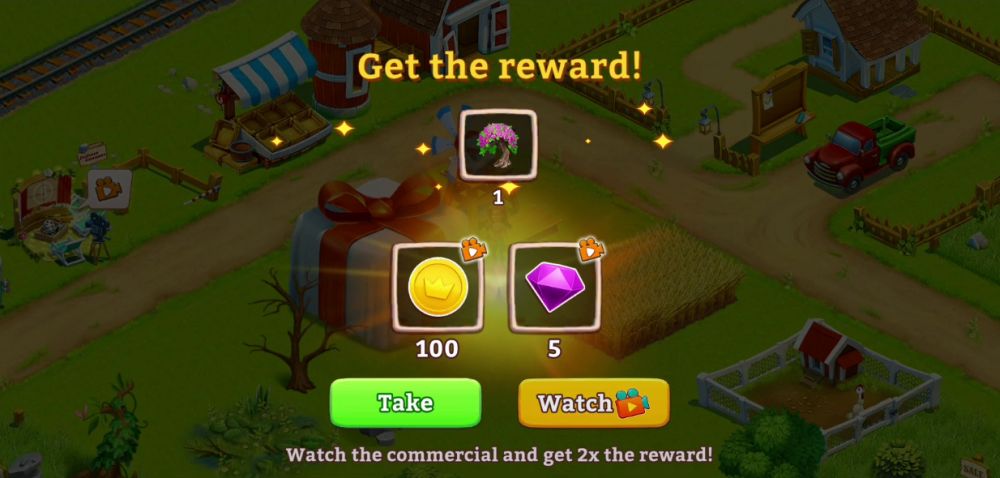
Watch Ads
Of course, what’s a mobile game without the option to watch ads? In Golden Farm, ads are frequently offered as a way to get certain rewards or even double their amount. In some cases, you may also choose to watch ads so you can speed-up the return of the airship or the train, or to remove withered trees and bushes without using tools.
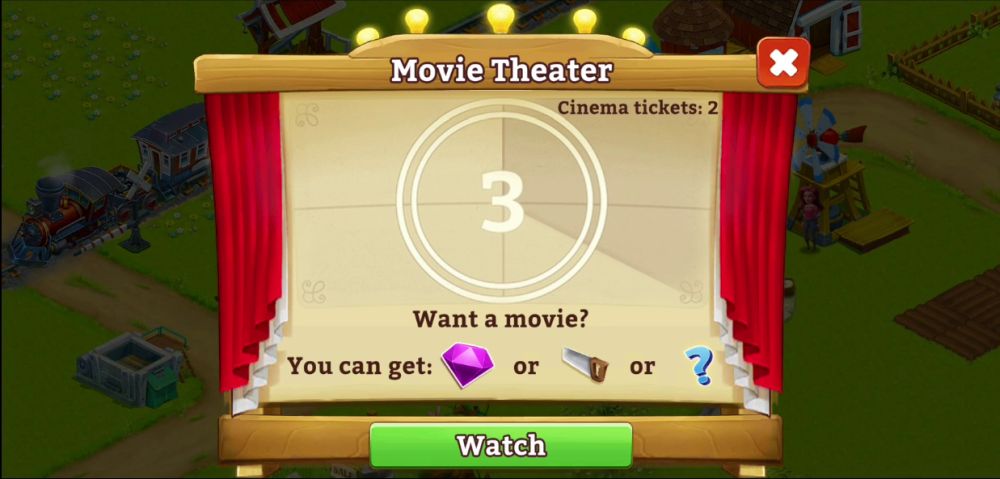
If the option to watch an ad is offered, take it! Some of the longest ads will only take around 30 to 45 seconds tops. Additionally, check out the Movie Theater in your farm so you can watch ads for additional rewards.
One specific tip we’d like to give about ads is when you’re about to collect energy from running your plane’s power generator. Make sure to first click the generator that yields the most energy as you’re likely to be presented with an option to watch an ad to double the energy amount you’ll collect. After the first click, the two other generators won’t get the same option.
Claim the Dailies
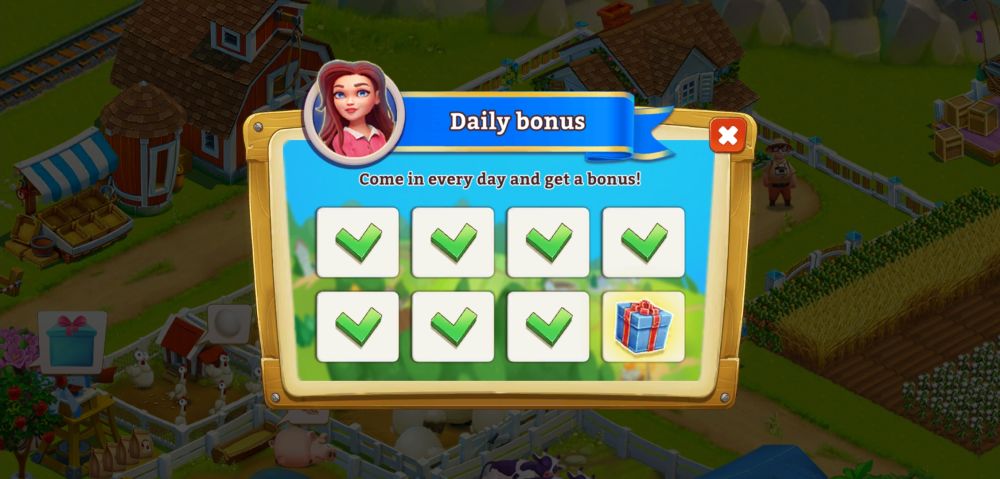
Aside from watching ads, logging in to the game every day will get you freebies. If you manage to log in straight for a week, you’ll get a bigger reward by the 7th day.
Farmer’s Bonuses
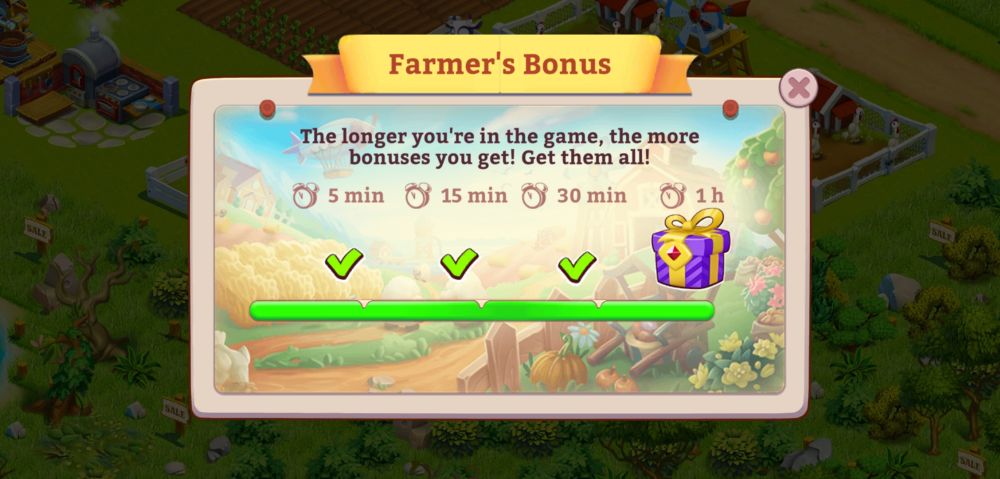
Other than claiming the dailies, you can also get freebies just by staying in the game long enough. With the Farmer’s Bonuses, you can get around 4 rewards if you manage to stay logged into the game for a certain amount of time to claim each bonus after a time interval. The longest you have to stay is an hour if you want to get all the bonuses.
With that, we conclude our in-depth beginner’s guide for Golden Farm! Hopefully, our tips and tricks have helped you get as many rewards as you can, as well as guided you in navigating the important aspects of the game, such as the market and currency spending. If you have other tricks and tips to share, head to our comment section below and let us know all about them! Here’s to turning your modest farm into a golden one!
Kayla Ermann
Tuesday 18th of June 2024
Please Update it won’t let me pick my on outfits. And put a user guide produced and a the gold bars and platinum bars are used for. Update Game. Please
Bonnie
Friday 31st of May 2024
Now that I have the panda on my farm, what do I do with him. All he does is sit and ask for food. After feeding him 16 units of food, he doesn't change. Remains seated asking for food.
Renee Turner
Friday 3rd of May 2024
How do you get animals for the zoo?
Giggiddy Goo
Saturday 23rd of March 2024
How do I get more red panda type
Jon
Tuesday 27th of February 2024
What is clay used for