The world is under the brink of collapse and the Wilder virus is spreading at an exponential rate. Can you survive the Wilder hordes and fulfill your mission?
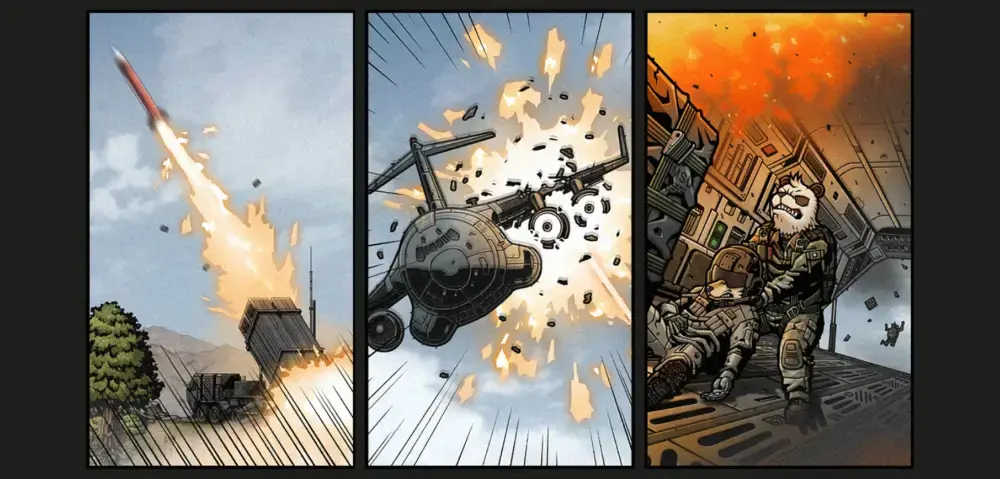
Major Pan Colman has returned after performing his sorties against the one-horned extremist Gorat Al-Lama, but this time the war he has come to know is changing as fast as the Wilder virus is spreading. The human conspiracy grows even stronger and the war for peace and coexistence among humans and humals (human-animal hybrids) is long before ending. Welcome to Bad 2 Bad: Apocalypse.
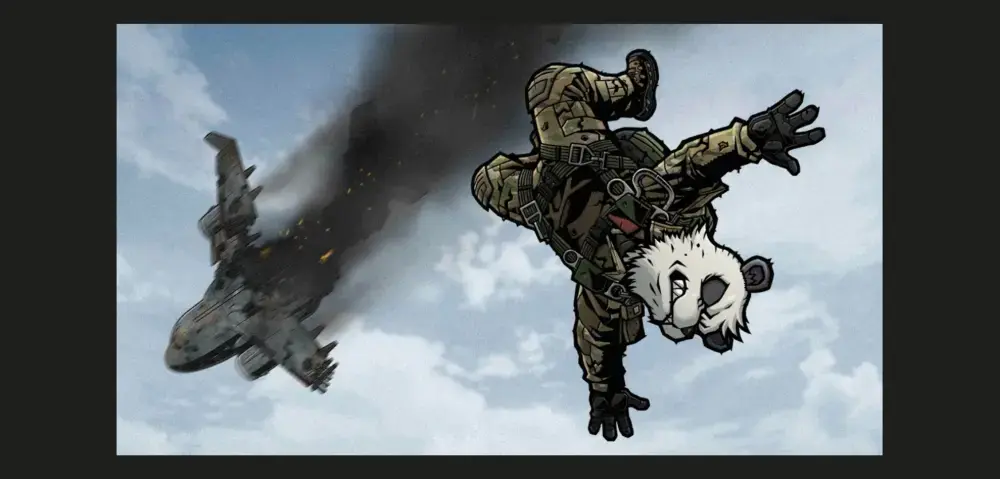
South Korean indie developer team DAWINSTONE is back with the third installment of the Bad 2 Bad trilogy. Continuing from Bad 2 Bad: Extinction, players follow the fearless panda humal Major Pan Colman and his efforts to continue Operation Bad 2 Bad. However, en route to his destination, the aircraft that he had been on board was shot down by a salvo of SAMs (surface to air missiles), stranding him in the wilderness of Kazakhstan where the Wilder virus infection is about to hit its peak.
Major Colman isn’t alone in this operation, and it’s up to you to find the rest of his platoon in order to see the mission through. Unfortunately, Wilder packs are a massive hurdle that he has to jump before carrying his mission out. It’s up to you, as Major Colman, to find his way through this living nightmare and regroup with all of his allies before it’s too late.
Have you just started Major Colman’s journey? Are you unsure of what to do so far? Read our beginner’s guide below and we will help you make sure none of your squadmates turn Wilder!
More than Just a Shooter
Bad 2 Bad: Apocalypse gets its roots from a variety of games, but predominantly bases its design from the popular PC title Don’t Starve as well as some other survival games with zombies in them like Project Zomboid, albeit far simpler.
The hunger mechanic notwithstanding, players of Bad 2 Bad: Apocalypse will have to ensure that the main character stays alive while exploring the wilderness. Shooting Wilders and other hostiles is secondary when it comes to keeping Major Colman alive; you’ll have to keep your supplies in check and seek the home base when night falls due to Wilder attacks being more dangerous at night. But let’s first start from the beginning.

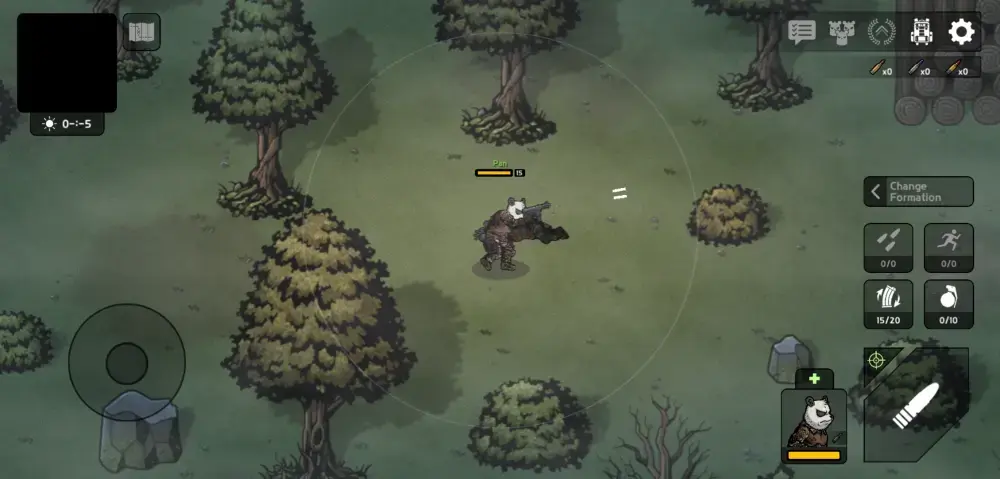
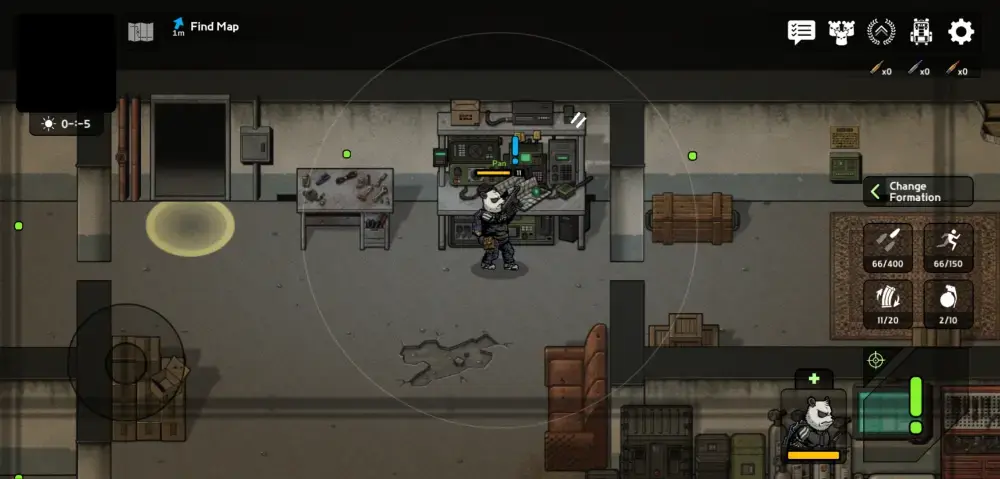
Major Colman will be alone for the majority of the beginning and will start out limping through the forest. You’ll encounter some low-level Wilders that you can shoot at by pressing the fire button on the right side of the screen. When Major Colman depletes the ammo in his magazine, he will reload. There’s also the slight chance that the weapon can jam, stopping him from shooting. A character’s aim is automatic, so you won’t have to worry too much about moving your left stick.
There are a few other mechanics important to combat, though we’ll tackle those later in the guide. You can also open a quick inventory by tapping the plus sign (+) on top of a character’s avatar so you can heal them if they are injured, equip them with a specific kind of ammunition type, etc.
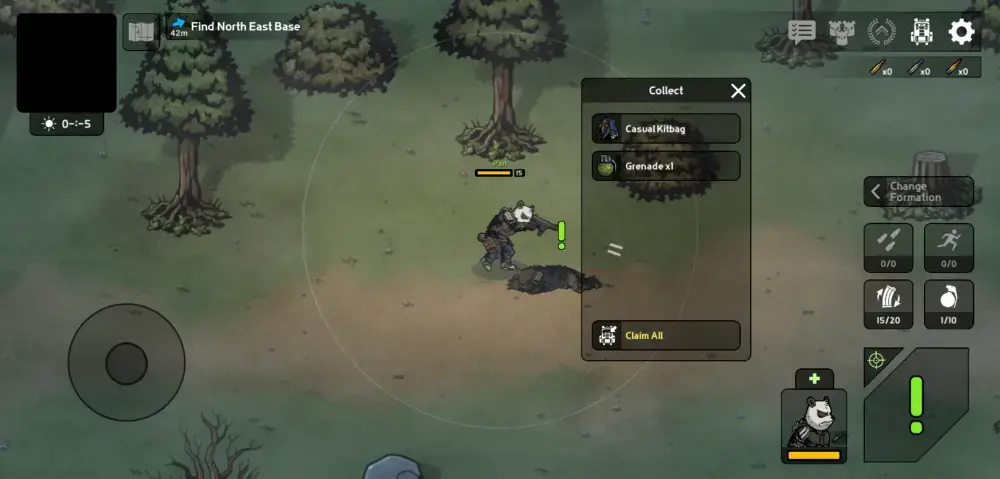
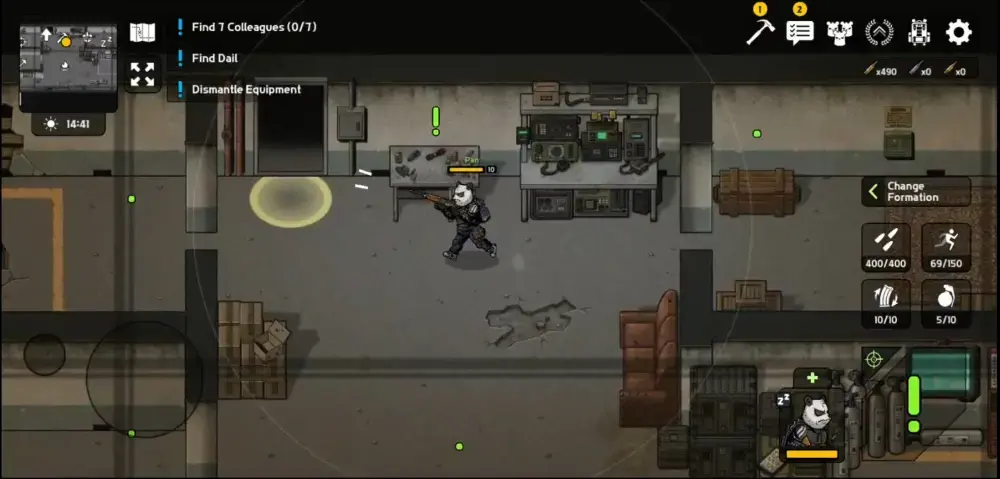
Scattered throughout an area are places or lootable objects where you can scavenge for supplies. Be sure to keep an eye out for rock piles, totalled cars, old refrigeration units, etc. Basically, lootable objects are marked with a green dot that turns into a green exclamation point when you approach them. Abandoned houses often have things you can loot from, but beware that most abandoned houses are home to Wilders and occasionally hostile survivors called Pillagers.
Speaking of which, you won’t be able to successfully loot objects if you’re currently engaged in a fight. Inside any lootable object, you’ll be able to find items like food and bandages which are essential for healing, ammunition, material for crafting, equipment, and Repair Tools for equipment. The equipment can range from clothes and armor to firearms. Eventually, as you explore, you should find a base camp which will become the temporary headquarters of Major Colman and his allies.
Your base camp is your safe haven. No hostiles can get inside, so this is why we recommend for you to bring Major Colman and his troops back here for the night so they can all sleep to let the night pass. Aside from a sleeping quarters, the base camp comes with a crafting table, a place where you can cook food, a training center, and a storage unit—though, a couple of these first need to be fixed up so they can be properly used. You’ll come to figure out how to restore these along the way.
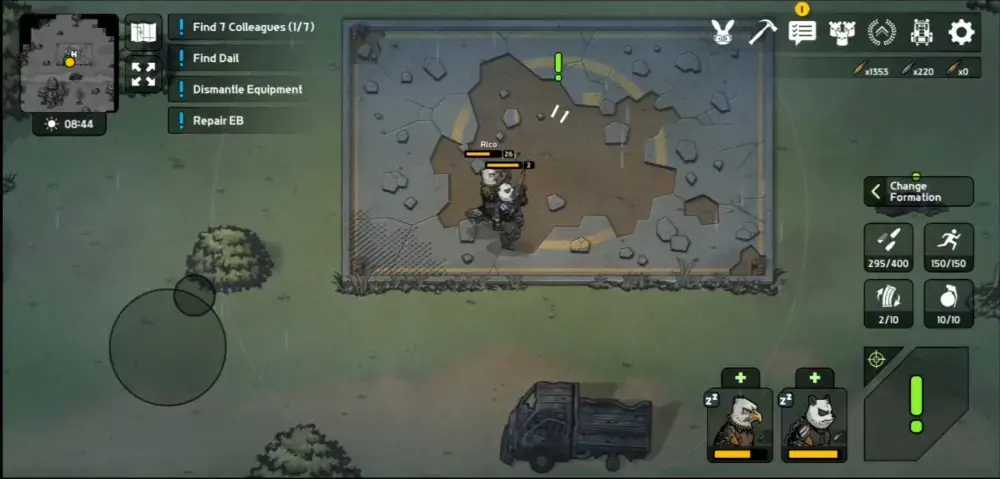
As you play, you’ll notice a small timer on the upper left corner of the screen, right below the minimap; this signifies how much daylight there is left. When the timer is about to end, Major Colman will tell the player that it’s getting dark. The reason why this is a big deal is because Wilders are more powerful at night. These feral beasts will have increased HP, damage, speed, and they’ll also spawn at increased rates.
They might even spawn in places you don’t expect them to. Regardless of where you are in the wilderness, it’s always wise to run back to the base camp and take shelter there for the night since fighting in pitch-black darkness against a horde of hungry Wilders is extremely dangerous. At least inside the base camp, you’ll be able to get the entire team to sleep it off.
This is the gist of Bad 2 Bad: Apocalypse and how to navigate the early areas of the game. But how about we delve a little deeper into this by throwing a couple of handy tips at you? Watch out!
Wilderness Survival 101 (or Wilder Combat 101)
Because Bad 2 Bad is mostly a game with lots of fighting in it, expect a lot of that and very little time for peace. In fact, the only time that you get to rest is the time you’re in the base camp—abandoned houses and sheds are not safe in the slightest. Lock n’ load, soldier, we’re going for a ride.
1. Always Craft Necessities Before Heading Out
Logistics are one of the most important things to consider before any mission. Without this, you’ll be running out of supplies in no time and you’ll end up being put on a Wilder’s dinner table.
At the northmost part of your base camp, there is a special table where you can craft items. Some of them are essential to your journey, while others aren’t as important but could still help. However, let’s focus mostly on the ones that could benefit you best:
- Bandages
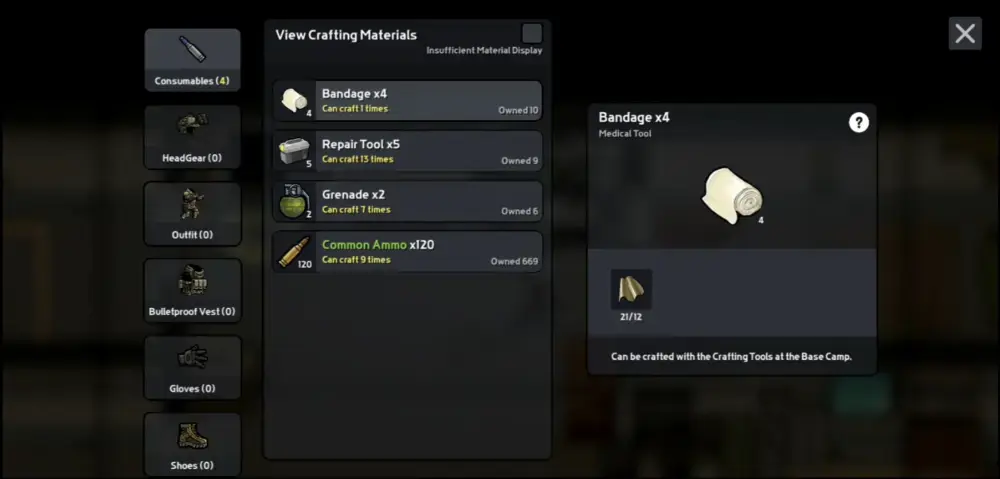
If this were a medieval RPG instead, these would be your healing potions. Bandages are needed if you’re going to go out into the wilderness. These handy strips of cloth can help you recover from bites, scratches, and, later on, gunshot wounds. Craft as many Bandages as you could before heading out. To make Bandages, you need 12 pieces of Fabric for a set of 4 Bandages.
- Repair Tool
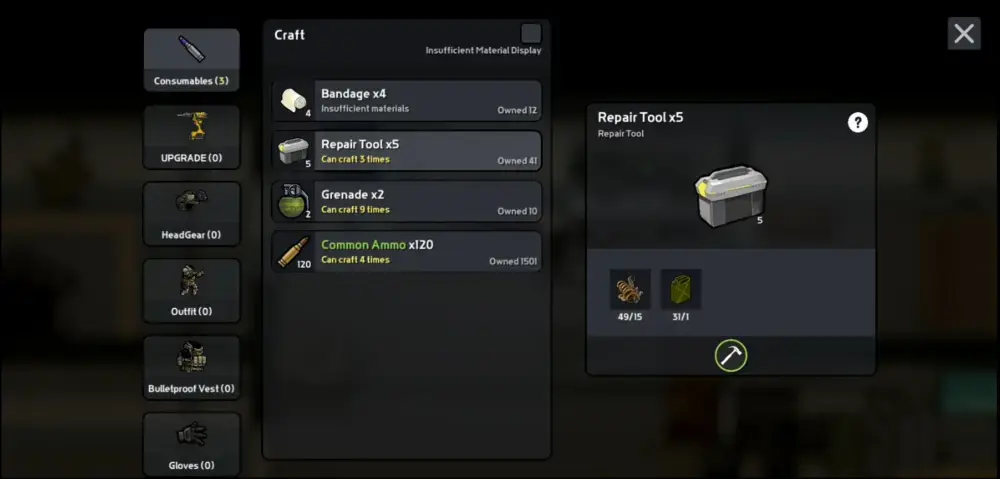
Your equipment has durability! Over time, as you shoot from your gun or take damage with your armor, wear and tear sets in. That’s why making Repair Tools is important. Take them anywhere you go and you’ll need a lot of them because you won’t just be taking into account Major Colman’s equipment; you’ll have to check out the equipment of his squadmates, too. These handy items can be made by consuming 5 pieces of Scrap and 1 jug of Gasoline. This will make a set of 5 Repair Tools.
- Grenades
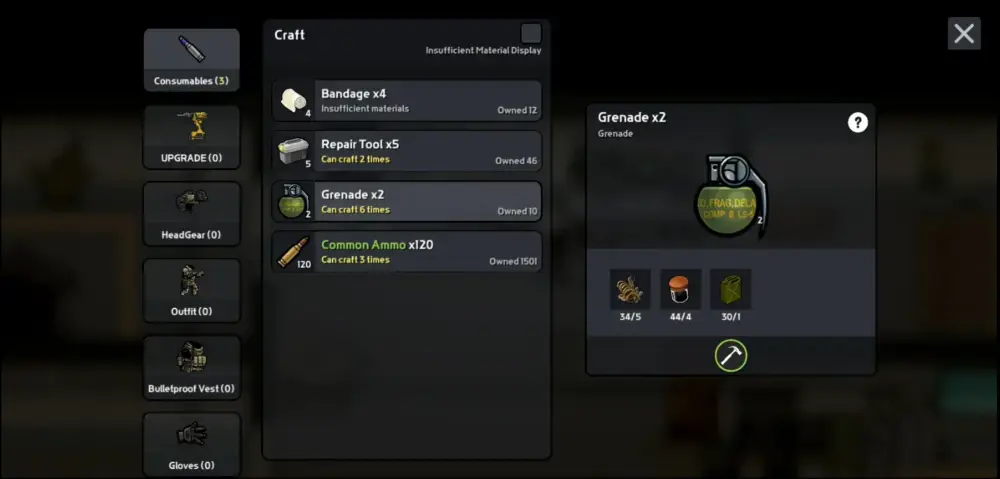
Fire in the hole! Chucking these at the enemy is the best way to start a fight. Not only will you blow off a chunk of the enemy’s HP, but you’ll also keep the fight short and conserve ammunition. You might even damage a group of enemies caught in the blast. To make a pair of Grenades, you will need 5 Scraps, 4 Gunpowder, and 1 jug of Gasoline. Be warned that you can only carry 10 Grenades at a time.
- Ammunition
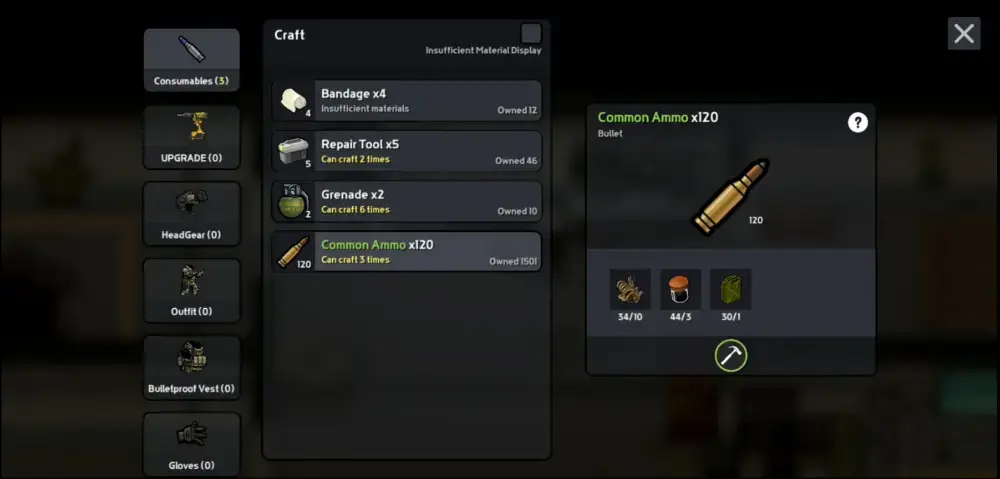
The game starts you off with low-tier ammo that’s infinite in quantity. These can cause problems since this type of ammunition has the chance to deal no damage at all. Even worse, the damage it deals compared to ordinary ammunition is abysmal. If you ever decide to make Common Ammo, you will need 10 Scraps, 5 Gunpowder, and 1 jug of Gasoline. With these materials, you’ll make a bundle of 120 Common Ammo. If you choose to make a lot, this could benefit the entire squad since everyone will get to use it. Efficiency-wise, this will kill enemies much quicker so you save on ammo the more of you are equipped with it.
Before heading out, you might also want to consider bringing Scraps wherever you go since you will need them as you travel (we’ll get to this soon). The wilderness is a huge place where you should expect the unexpected, after all.
But how can you get around without losing direction? Easy. All you need to do is…
2. Walk on Roads to Find Your Way
They say that all roads lead somewhere, and in this game, it can’t be further from the truth.
As you travel around the wilderness, you’ll notice dark patches of dirt conspicuously lined down straight paths that could go to any side of the map. These are roads and they will certainly take you places. While it’s good to occasionally stray from the path and wander through the woods, it’s walking along roads that help you get to another area of the map. In turn, this will help you get to your mission objectives better.
Conversely, the only thing that traveling along roads doesn’t do very well is reward you with loot since all of those juicy lootable areas are in the wilderness itself. Not to mention, these are places where you can find essentials like fabric for bandages or ammunition. If it isn’t things you can loot, it’s abandoned houses full of stuff and enemies to level up your characters. In other words, traveling along roads is a double-edged sword. It’ll get you to your destination quicker but you’ll miss out on a lot of stuff along the way.
One very important thing you could miss out on is a Helipad that’s present in almost any part of the map.
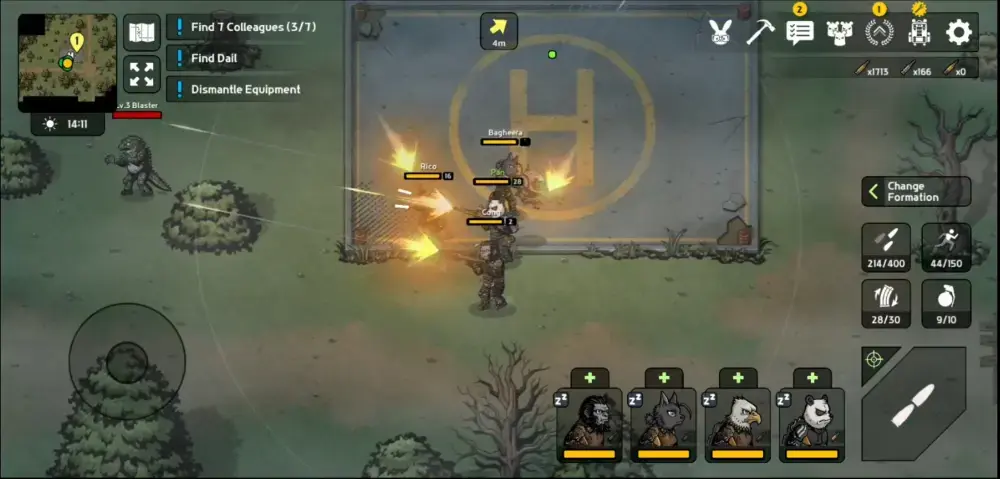
3. Prioritize Finding Helipads
Imagine getting chased around the woods by a bunch of Wilders or Pillagers and there seems to be no salvation in sight. Did you know that in almost every part of the map of the wilderness (except for town maps), there are Helipads present?
In some parts of the map, you’ll encounter some Helipads that will call over a helicopter. Repairing the helicopter first will be one of your early missions and you won’t find it too far from the base camp either. Doing this will make exploration infinitely easier and it will also keep your squad from becoming Wilder bait. Haven’t seen a Helipad yet? Don’t worry, you’ll find them soon.
Helipads are these wide, flat, paved areas with a massive H painted on them. If you haven’t seen them, there are some near the base camp and the ones out in the wilderness are mostly in ruins. Each Helipad is an important asset to your exploration and to completing your objectives. The deal behind these nifty paved squares is that you can easily get around the map with minimal effort. However, the helicopter doesn’t cover the map in the direction it goes (this is your job, after all). But this doesn’t make the Helipad itself any less reliant.
The best way to use a Helipad is when night falls. In the event that you’ve been caught in the middle of the dark, run to the nearest Helipad and make your way back to base camp. You can always make use of map markers that you can lay out on your map just in case you’ve stumbled upon a Helipad that needs fixing or if you generally want to keep it marked so you can easily run to it. To mark a part of the map, simply open your map and tap the location you’d like to go to; the marker’s distance will appear at the top of the screen.
Earlier, we mentioned that you might need to take Scraps with you whenever you head out. The sole reason why you’ll be needing Scraps is because they’re used in Helipad repair, and you’ll be needing a whopping 50 of these per Helipad. If you ever come across scraps, always keep them in your bag; you’ll never know when you’ll stumble upon that one Helipad that will save your butt.
With the convenience of Helipads now under your thumb (almost literally, even), it’s time to do what you’re meant to do.
4. Follow the Main Mission Objectives
Almost every good game has a story to tell.
In this case, the game’s story and the mission objectives follow each other. You have to help Major Colman and his squad see their mission through and uncover what diabolical plot the humans are hatching since the Wilder Virus is almost at its peak in the region you’ve crashed in. While it wouldn’t hurt to explore the wilderness and find yourself all manner of gear and goodies, it’s always better to follow the main story and finish its main objectives.
The purpose of a main questline is to keep the player on their toes. Sure, each player is given the freedom to choose what they want, but there has to be a sense of direction otherwise the game won’t be quite as memorable. In the case of Bad 2 Bad, finishing the main objectives could benefit you in several different ways.
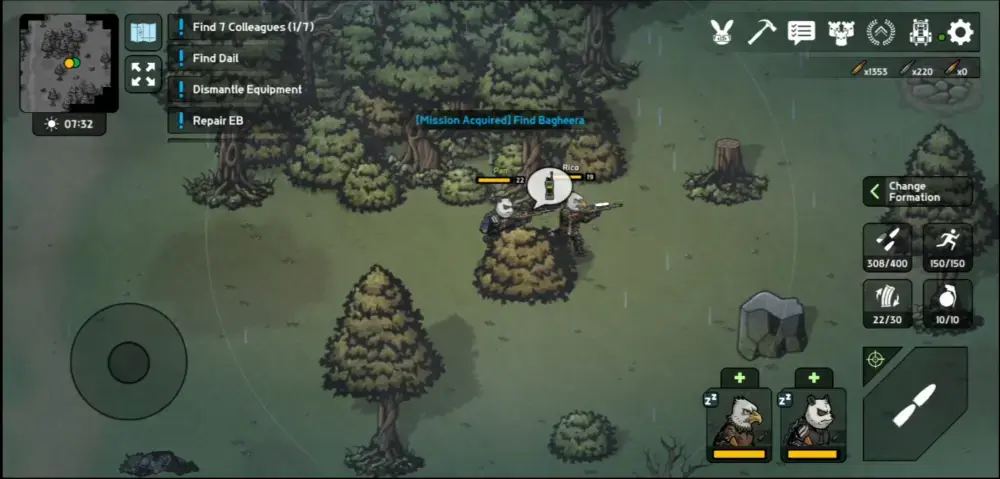
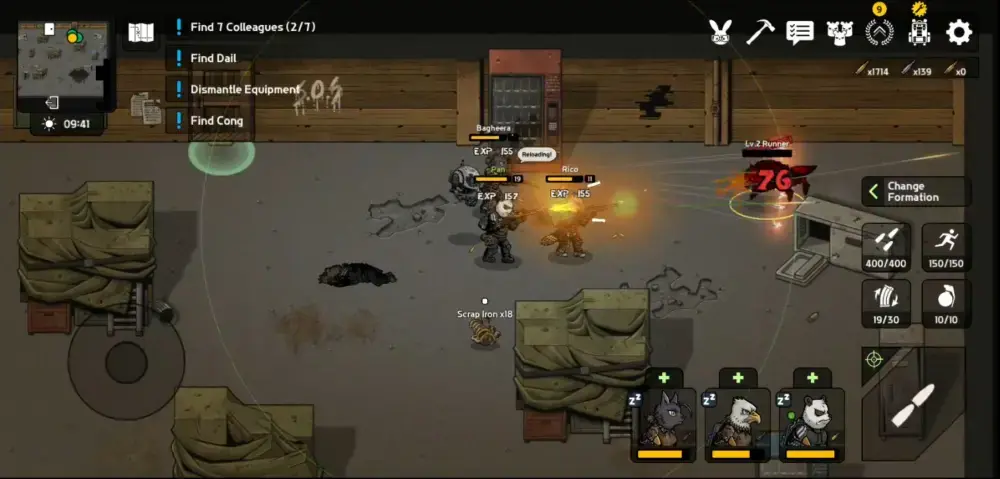
A few of these would be for Major Colman to complete his squad—a new squadmate could present themselves as a mission objective (e.g. Find Rico, Find Bagheera, Find Cong, etc.). Having more members in your squad will mean safety in numbers. That’s not all; this also means more firepower, so anyone trying to get close will have to face two or more barrels of gunfire all at once.
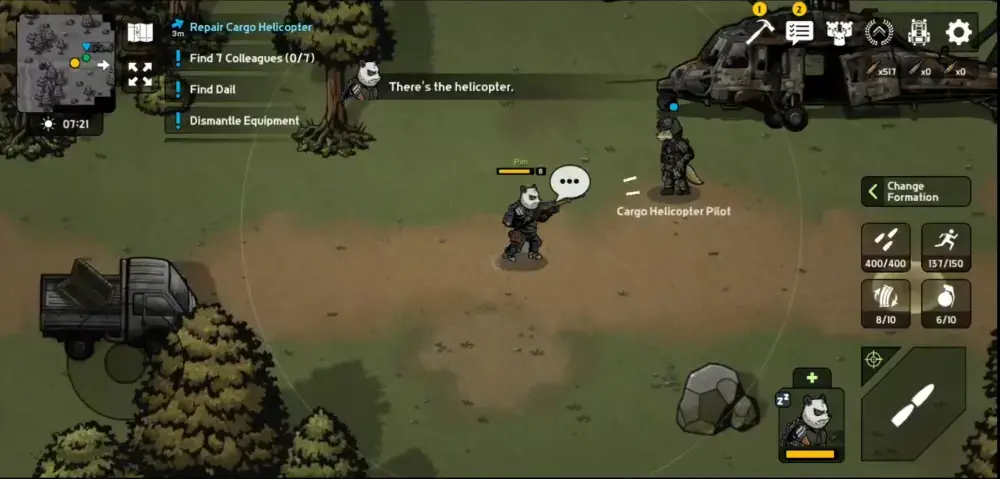
Sometimes, new mission objectives could help you improve the status of your base camp or even help you find conveniences like the aforementioned helicopter. Once you find the stranded pilot, he’ll ask you for assistance in repairing his helicopter. You’ll need a couple of materials, but once you’ve successfully completed this, you can now actively seek out all the Helipads you can find.
Navigation and crafting aside, it’s time for the juicy bit of this guide. Let’s talk about combat!
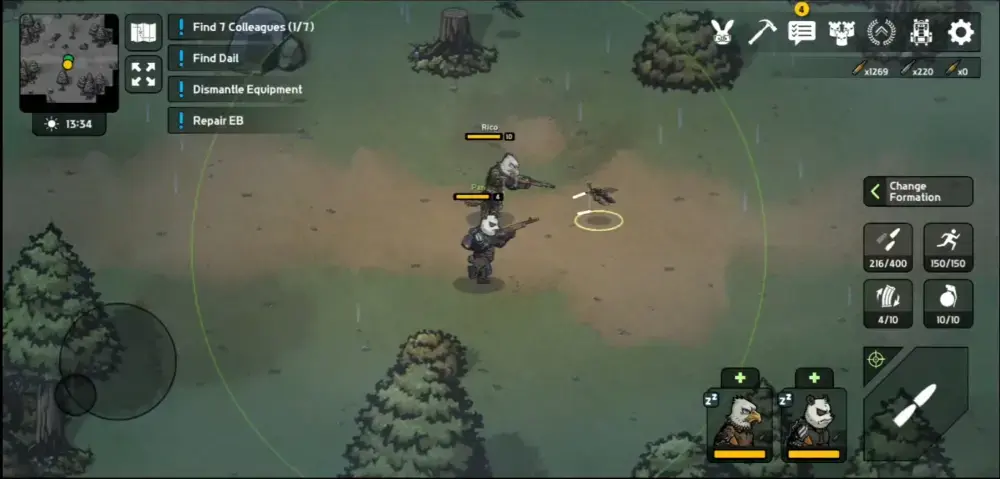
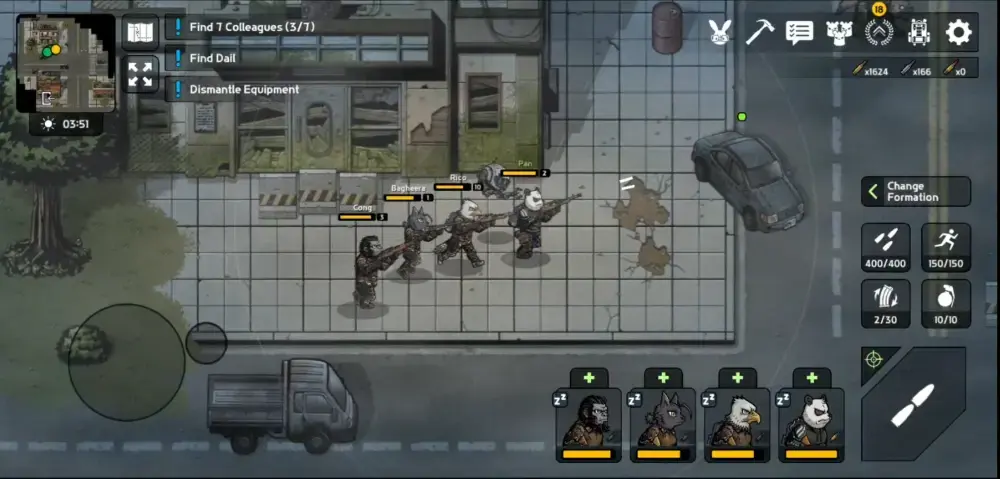
5. Formation is Important
At its core, Bad 2 Bad: Apocalypse is a shooter.
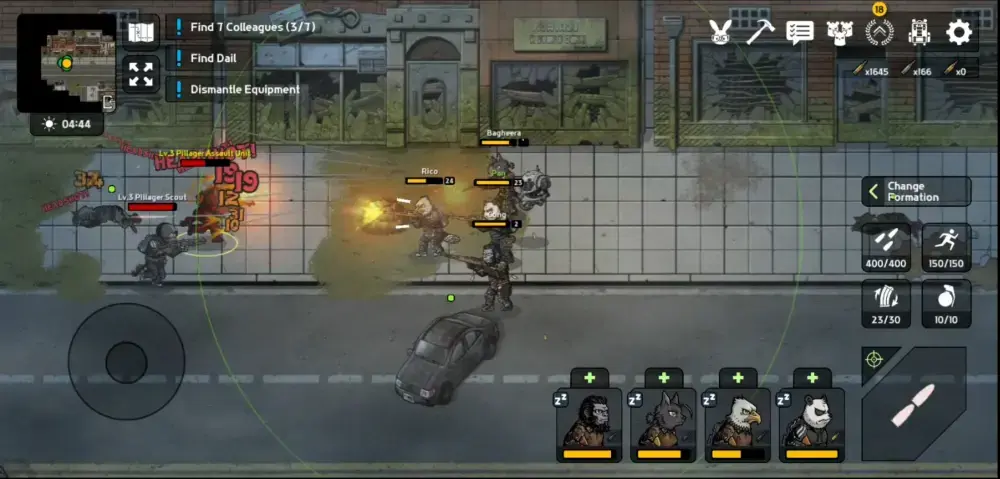
There will be guns and lots of firing them! Your targets will be primarily the Wilders as well as a rogue militia called Pillagers. The latter of which have been known to forcibly take supplies from towns and civilians. To tackle the enemy properly is to set your squad in a Formation that effectively suits the situation. That said, it’s always wise to hover your thumb over this button at all times as opposed to the firing button. Getting your squad into the appropriate Formation just in time for an encounter will put you at a great advantage.
To change Formation, tap the Formation button located on the right side of the screen. Here, you’ll be able to pick five different Formations that will directly affect the stats of your squad:
- Basic Formation
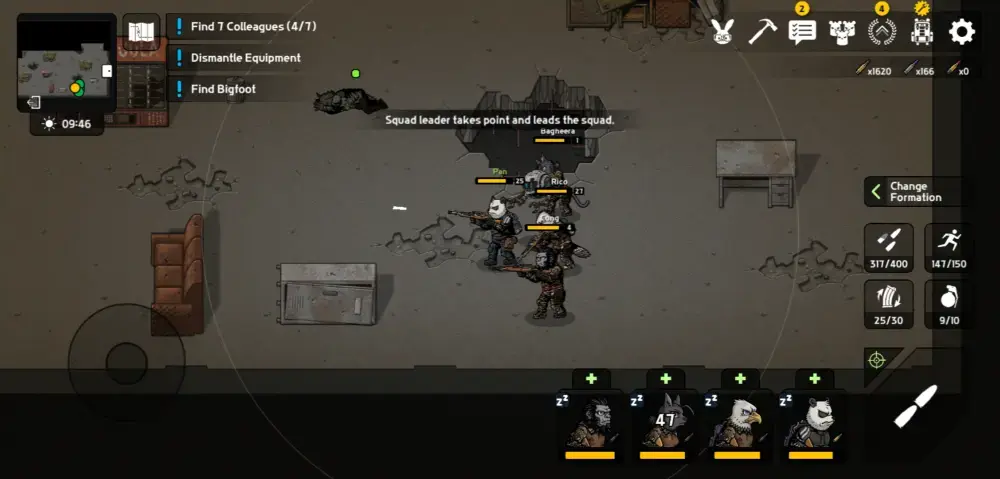
This Formation will have Major Colman take the front of the squad. While it doesn’t have any particular boosts to stats, you can use this to your advantage if you have Major Colman as your strongest squad member. For example, he has been upgraded the most, has the most advanced weapon, the best gear, etc. Otherwise, you shouldn’t default to this Formation often.
- Protective Formation
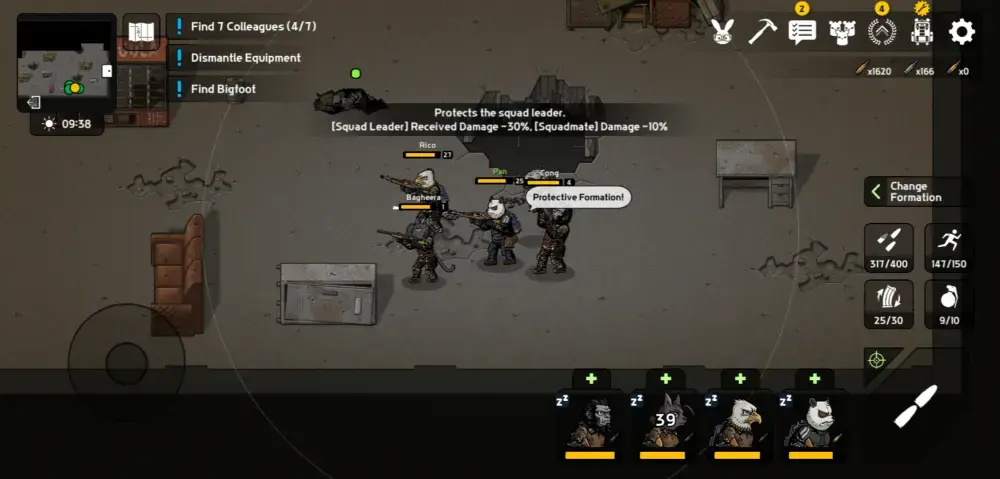
This Formation increases the squad leader’s defense at the cost of the squadmates’ overall damage output. This shouldn’t be confused with the Defensive Formation as this Formation can be used to outlast most enemy groups.
- Mobility Formation
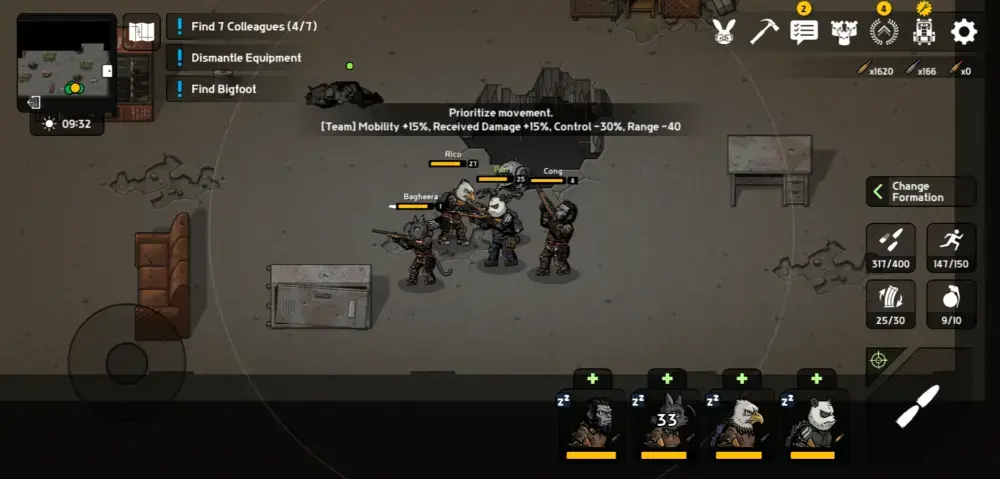
A Formation that prioritizes movement above all else. This means that defense, attack, range, and most aiming capabilities are greatly reduced in favor of the entire squad’s movement speed. This should be your main Formation if you’re out scouting for supplies, looking for Helipads, or traveling to the next zone. Default to this often if you’re on the move.
- Alert Formation
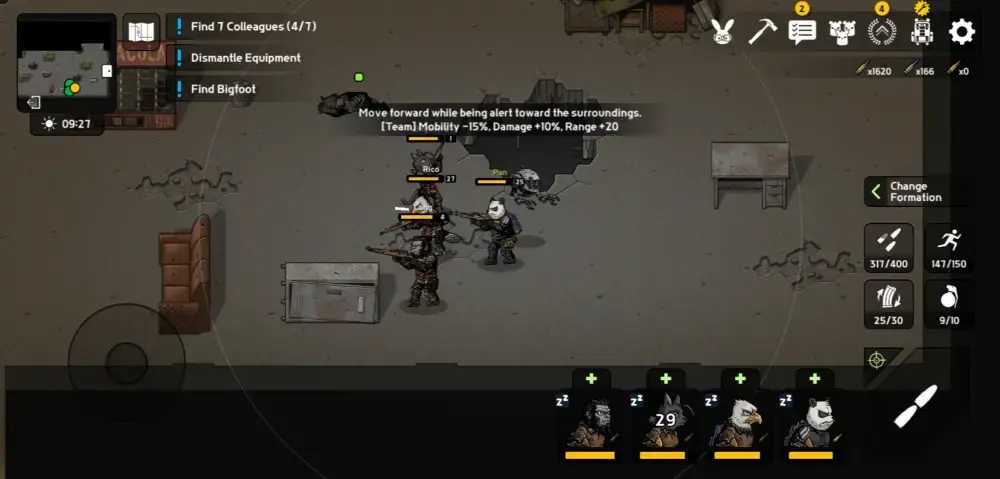
This is a Formation that drastically increases range and damage in exchange for mobility. Use this Formation if you’re surveying nearby areas or searching any abandoned structures. Firing from this Formation helps when taking out individual enemies or small groups thereof, but it’s not as great as the Firing Formation.
- Firing Formation
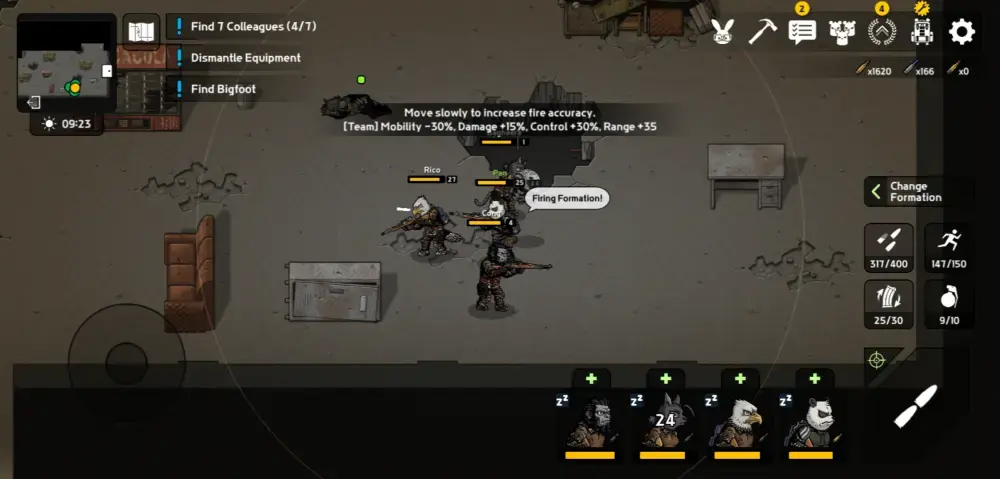
Your best friend for whenever you’re at an encounter. This Formation reduces the most amount of mobility but exchanges it for an extreme boost to damage, range, and accuracy. Always engage the enemy in this Formation and don’t settle for others. Once this is done, it’s good to swap this back to the Alert Formation or, if you’re trying to get out of the zone, the Mobility Formation.
- Defensive Formation
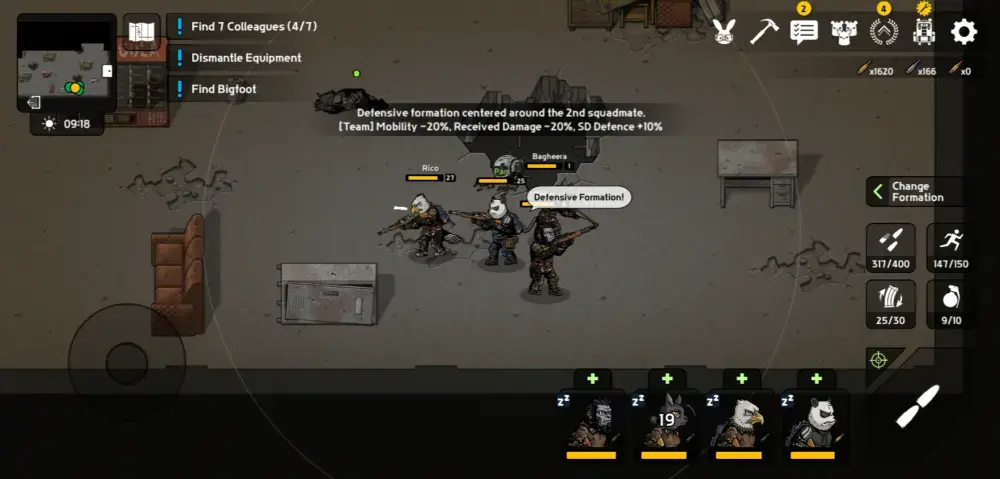
The last Formation on the list. Compared to the Protective Formation, this one centers greatly on the actions of the second squad member. Regardless, it greatly increases everyone’s overall defense in exchange for mobility. You might want to consider using this if some of your squadmates are injured and you need to heal them by using bandages while you’re in the middle of an encounter. After which, fight back using the Protective Formation or the Firing Formation.
As you can see, swapping out Formations is as simple as it looks. That said, never forget to do this before and after each fight. Once again, the advantage it puts you against your enemies is quite helpful, especially if you’re trying your hardest to survive and get to that last Helipad you visited. Try using each Formation in different situations and you’ll soon see how effective they are.
While Formation is the backbone of your combat prowess, ammo conservation is also something to take account of, especially if you’re quite far from home base.
6. Pick a Firing Mode
How does it feel to just turn your gun into a lead hose? One moment, you’re mowing down your enemies left and right, and the next moment, you’re completely out of ammo. Never fear, firing modes are here!
A firing mode is a means for you to keep Major Colman from emptying his magazine all in one go. Doing this can pose a huge challenge for you since the longer you fire, the more inaccurate the gun becomes. Additionally, you’ll also be eating through your ammo reserves like crazy. To avoid this, you can tap the button with a reticle icon on the upper-left corner of the Fire button. This will open up a submenu of firing modes for you to choose from. The firing modes are as follows:
- Full Auto
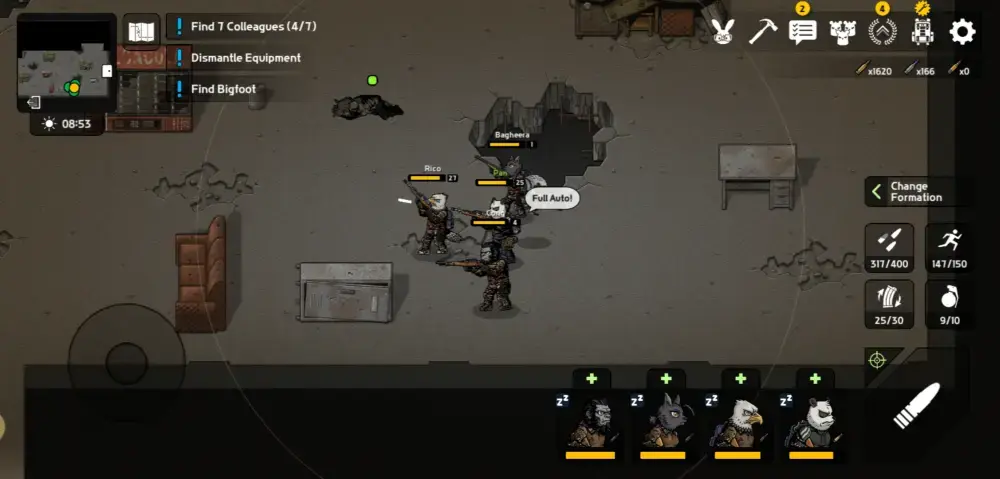
We highly advise not to use this mode at all because it makes your gun inaccurate for the most part and you’ll run out of ammo very quickly.
- 2-Round Burst
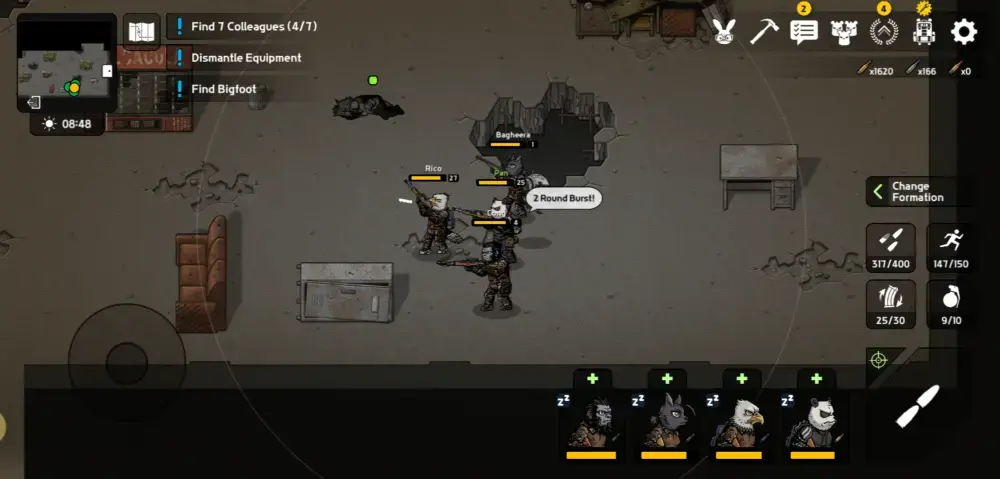
This firing mode is the most accurate one. If you’re looking to conserve ammo and pick off enemies one by one, use this one. However, the only drawback it has is its overall damage output isn’t as great as the other firing modes.
- 4-Round Burst

Compared to the 2-Round Burst, this firing mode is more aggressive. It’s still quite accurate but it depletes ammo more than usual. We only recommend using this if there are a lot of enemies nearby and you want them gone ASAP.
- Auto Shoot
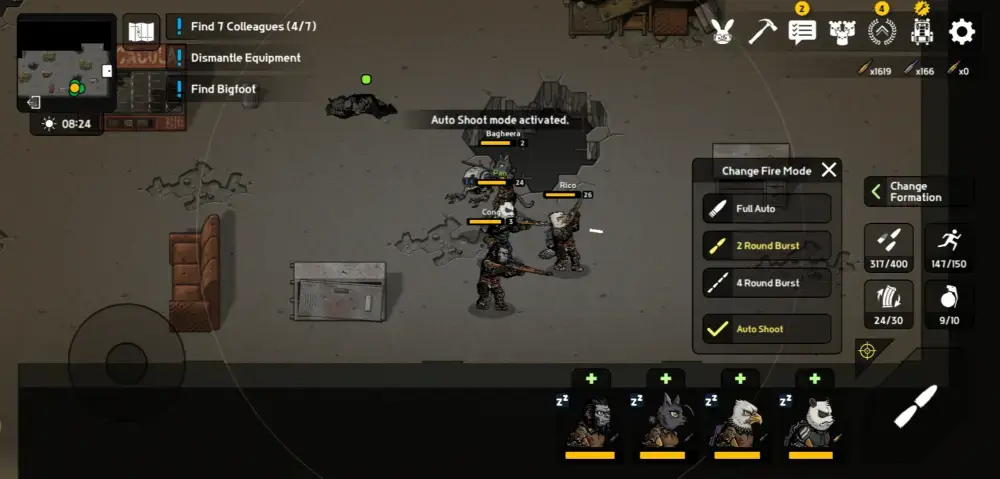
Compared to Full Auto, this mode is actually more reliable since Major Colman and the rest of his squad will fire as soon as the enemy steps into range. This is quite useful if you’re trying to hold your position and heal squadmates if they’ve been injured. You’ll have little to worry about when it comes to shooting and plenty of time to make decisions. The only caveat it has is that it can run your ammo reserves dry quickly as well since the AI’s default behavior in this game is to shoot even if the target is hiding behind something. Thankfully, this can be switched on and off at any given time.
Our next point might be quite contrary to this one, but hear us out.
7. Try to Shoot Out of Range
Wilders and Pillagers don’t play by the rules, so why should you?
As soon as any enemy shows up on the screen, your common reflex in this game is to get them into the circle of range and try to fill them with holes. Sometimes, it could be a problem because they’re quite healthy and they’ve successfully closed in on your party. A solution to this is to just fire out of range.
Ammo conservation aside, this is basically just trying to whittle down the enemy’s health before they get to you. Aiming the crosshair of your gun can be difficult since you’re using the left stick to do it. But if you can align that crosshair in the general direction of your target and open fire then with, preferably, a 2-Round Burst, you should be able to hit them. The moment they’re within actual firing range is the moment you put them down for good.
Come to think of it, this is also a good practice! Let’s talk about Kiting.
8. Practice “Kiting”
Whenever you see an enemy running towards you, do you immediately engage them head on or stand still while you fire? What if we told you that there is an effective way in which you can pick your quarry off from a safe distance and not have to worry so much about injury?
Firing and then moving away quickly (regardless of your squad’s formation) is called Kiting. To give you a rough idea of how this works, imagine yourself flying a kite; you will have to run and keep it afloat by having it soar in the distance. Kiting, in the combat context, means to keep a steady stream of gunfire on your target whilst keeping away from it. This can be quite useful especially if you’re dealing with packs of Wilders or the giant Wilders called Tankers.
While this won’t work so well on Pillagers because they have guns as well, Wilders take precedence when it comes to wandering the wilderness since they’re everywhere. In a tight spot, Kiting the Wilders at night will definitely help a lot while you retreat since they can easily swarm your party if you’re unprepared.
Speaking of preparation, how would you like to know a secret?
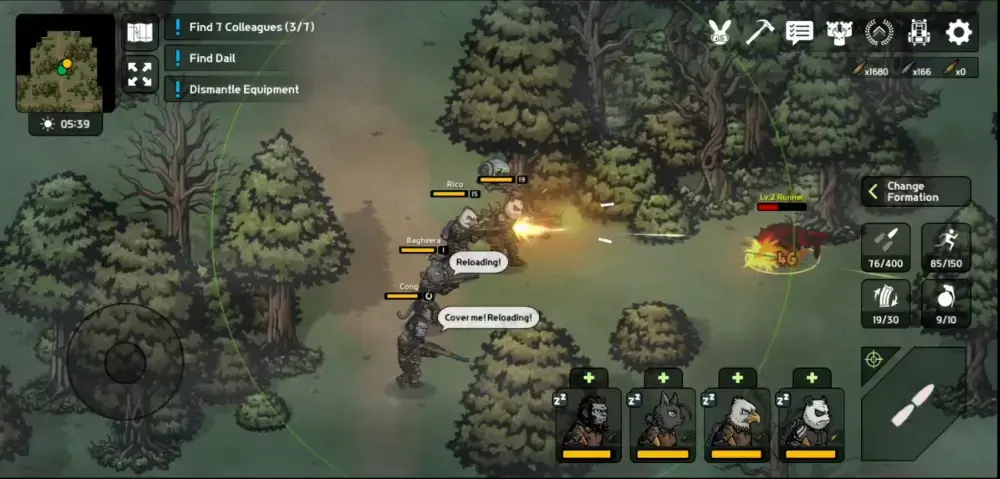
9. Reload After Each Encounter
Eventually, you’ll start to feel that each encounter gets more and more difficult.
Squad members and equipment notwithstanding, sometimes a little bit of preparation can go a long way. As we mentioned earlier, tossing a grenade immediately when engaging any enemy can save you some time and ammo, but how about times when encounters can be continuous? This is why it’s important to reload after each encounter.
Once you’re done firing at the enemy and downing their numbers, you’ll most probably have some ammo left in your magazine. Reload immediately. “But the magazine still has ammunition,” you say; dear reader, it’d be a terrible thing to happen to Major Colman’s party if you’ve got him reloading at a very crucial moment. It’s better to start any fight with a full magazine than one that’s half-empty. You’ll never know what you’ll encounter and you’ll never know how many rounds it’ll take to completely neutralize your next target.
Sometimes, all the stuff you’ve gathered isn’t enough. You’ll need to use some boosts or skills!
10. Use Skills and Boosts Sparingly
When does an ordinary person become a hero? Or when does a hero become a superhero?
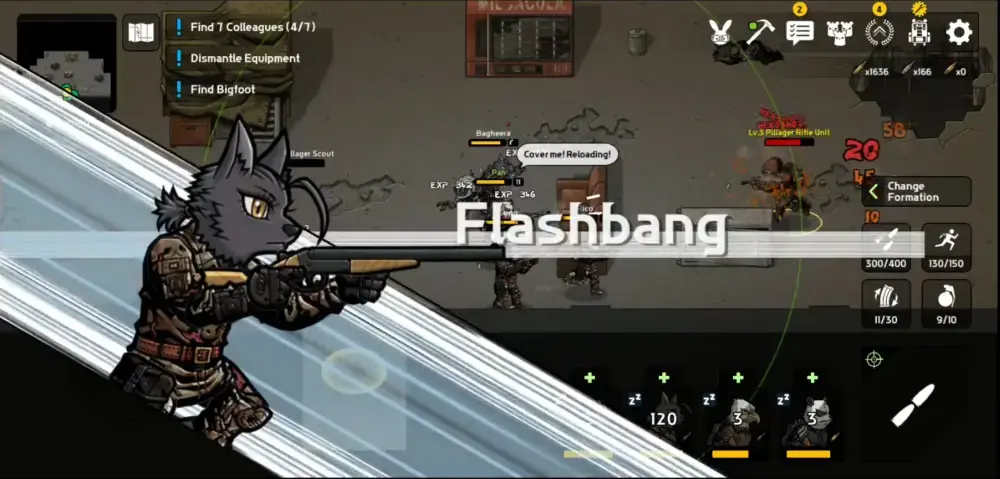
When the going gets tough and you’re caught in a crazy gunfight or amidst a massive pack of Wilders, it’s time to bust out some skills. For one, using skills can easily tilt the battle in your favor since many of Major Colman’s friends have different specialties.
Pictured above is Bagheera who used her Flash Bang skill to briefly stun nearby gunmen and keep them from firing at the player party. Each character has their own schtick, so mix and match whenever you find a new squadmate out in the wild (you can have a maximum of 3 squadmates). You might have a combination so unstoppable, you’ll probably have won the game.
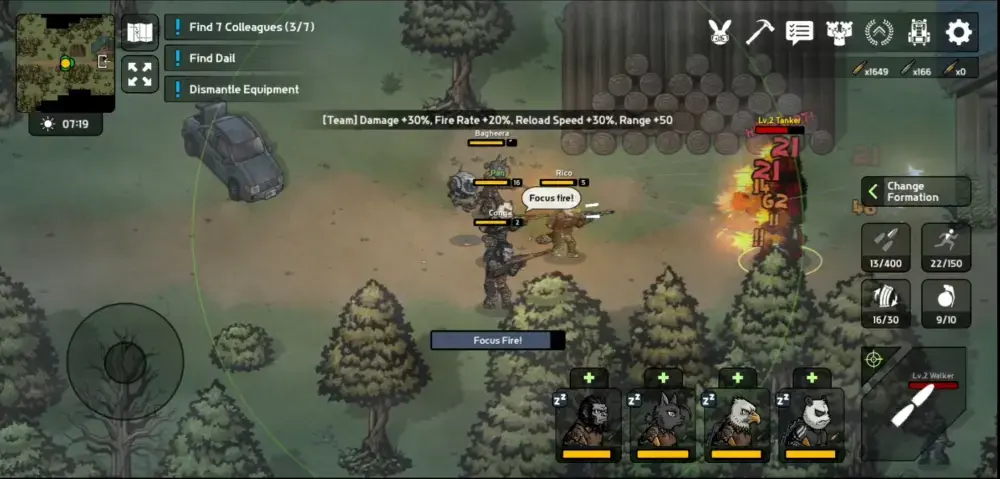
Boosts, on the other hand, are a means for you to get around the map more easily or simply just throw everything you’ve got on a single target. The two boosts available to the player are the Mobility Boost and the Focus Fire Boost. The Mobility Boost, as its name implies, briefly increases your squad’s overall mobility and it stacks while you’re in the Mobility Formation.
If you need to get to that helipad quickly, give this one a tap. The Focus Fire Boost is extremely useful if you’re trying to annihilate a particularly tough target. Once active, all of your characters will fire brazenly for a few seconds. Use this to quickly pin down a Tanker or a large group of Pillagers if you find them.
Skills have a cooldown and boosts recharge as you fight. This means you’ll be able to use a hero’s skill sooner than, say, a Mobility Boost right after a fight since the Mobility Boost will require you to have been in a fight to recharge it completely. Planning when to use your skills and boosts can greatly help you out of any sticky situation!
The wilderness is vast and you may need to constantly wander about and explore in order to get your home base completely functional. Additionally, you’ll only be able to complete Major Colman’s squad doing this, so get off the road once in a while if you’re feeling a little adventurous! Just remember the tips that you’ve learned here so far:
- Craft your necessities before heading out. This will include spare ammo, grenades, and bandages (especially these). Be sure to also keep some Scraps handy.
- Roads will bring you faster to your destination since they are often linked to the edges of the map. Travel along them if you’re trying to reach a particular part of the map.
- Finding Helipads should be your top priority! They can bring you back to home base in a pinch. This is provided that you’ve completed fixing the helicopter early on.
- Let the main mission objectives guide you through the game.
- Change your Formation often, especially if you want to suit your current situation.
- Never go Full Auto; pick a firing mode and adapt to your enemy’s movements.
- Shooting out of range can help whittle down an enemy’s HP. Use this tactic to immediately gain the upper hand in any fight.
- Kiting is a technique that you can use in most encounters. It’ll help keep your squadmates alive.
- Don’t leave your magazines half-empty. Reload after each encounter!
- Skills and boosts can save your hide when you’re in a tough situation.
And this wraps up our beginner’s guide for Bad 2 Bad: Apocalypse. Major Colman’s journey is far from over and it’s up to you to help him and his friends put an end to violence and injustice once and for all. Good luck!
Are you an avid player of Bad 2 Bad? Have you played Major Colman’s other sorties? Are there any tips that we might have missed out that you can send your fellow Bad 2 Bad players? Leave your thoughts in the comment area below this article!
Master Blaster
Wednesday 30th of August 2023
Could've been a useful tip compilation and this is exactly what I've been looking for when I started playing this game that I'm so immersed till now I don't let a day passes without playing. Anyway I got my tips in playing in the beginning mostly from YouTube players though most of them are just showing where they are currently (advanced) so I get only a preview so I stopped watching them totally and only rely on my own experience. Now all my squad is level 50 but still armed with purple guns and I'm still exploring the first world map level8. Am I strong enough to kill the wilder Queen? I guess I need to find out myself 😁
david
Thursday 17th of August 2023
It is not useful to me, it does not say anything about the petate
jer
Monday 17th of July 2023
great thanks !
Lupin
Friday 7th of July 2023
This was helpful. Many thanks