After almost a year of waiting, Techyonic has brought to us the much-anticipated Episode 2 of An Elmwood Trail! We last left off with a package that contained Zoey’s bike handlebar, broken and splattered with blood. At the bottom of the box is the mysterious symbol that had been haunting the victim before her disappearance.

An Elmwood Trail does a good job of hooking people in with its mystery. But puzzles in this episode can get a lot more challenging than in the previous installment, and many players may encounter one that they’ll have a hard time-solving.

Through this walkthrough, we hope to aid our fellow players without spoiling too much about the shocking truths Detective Adam Lane will uncover while explaining how we obtained our answers on certain puzzles.

General Gameplay Mechanics

Conversations
Elmwood Trail’s gameplay consists mainly of conversations with other characters through messages and calls. You will be prompted to choose what to say between two choices and their responses will vary based on what you pick.
There are no right or wrong answers and whichever you reply with will not change the outcome of the story. If you see any highlighted conversations in your messages, even if there are no new texts from them, it may mean that you need to talk to them to move forward with the story.
Calls
Many situations require you to call a phone number by dialing it manually. Since you cannot copy-paste these numbers, keeping a notepad ready to jot them down will be helpful. If you’ve messaged them before, tapping a person’s profile picture is the quickest way to find their number.
Pay close attention to what they say as it will provide you some important clues or ask you to press a button to proceed. Headphones are not mandatory but are recommended to make it easier to hear and keep you immersed.
Images and Text
Tap any images or text that are blinking or highlighted as they are important clues for your case and are required to move forward. However, not all important clues will be obvious or highlighted so you’ll have to keep a watchful eye for clues. As a general rule, always jot down URLs you find in images or text and check them in your browser.
Browser
Most of your investigations will require you to use your browser to gather information. Unlike real-life browsers, you cannot use it to search terms. Instead, you have to type a specific URL to access websites.
Note for BlueStacks Players
For those playing the game on a computer using BlueStacks, the game may sometimes refuse to play audio, like calls, sound effects, or recordings. To fix this problem, simply close and reopen BlueStacks.
Starting Episode 2
If you’re continuing the game right after completing Episode 1, you only need to tap “Start Episode 2” at the bottom of Adam’s phone screen. However, if you’ve played Side Trails before starting Episode 2, you’ll need to do the following:
- Use Adam’s Phone.
- Tap the Sidetrails App.
- Tap “Resume Main Story”
- Tap “Start Episode 2”.

10 Years Ago

Before you continue with your investigation on Zoey Leonard, the game brings you back 10 years into the past. Look through your message history until you get a message from Maxwell. Talk to him and he’ll send you some files for a new murder case. Tap “Brown Murder Case Files” and the flashback will end.
The Story So Far
Before the episode begins, it will show you a summary of the events that have happened in the previous episode. We took screenshots of it for your reference to make it easier to recall:
Before the Disappearance

The Day of the Disappearance


The Investigation so far

February 12, 2023

Inspecting the Package
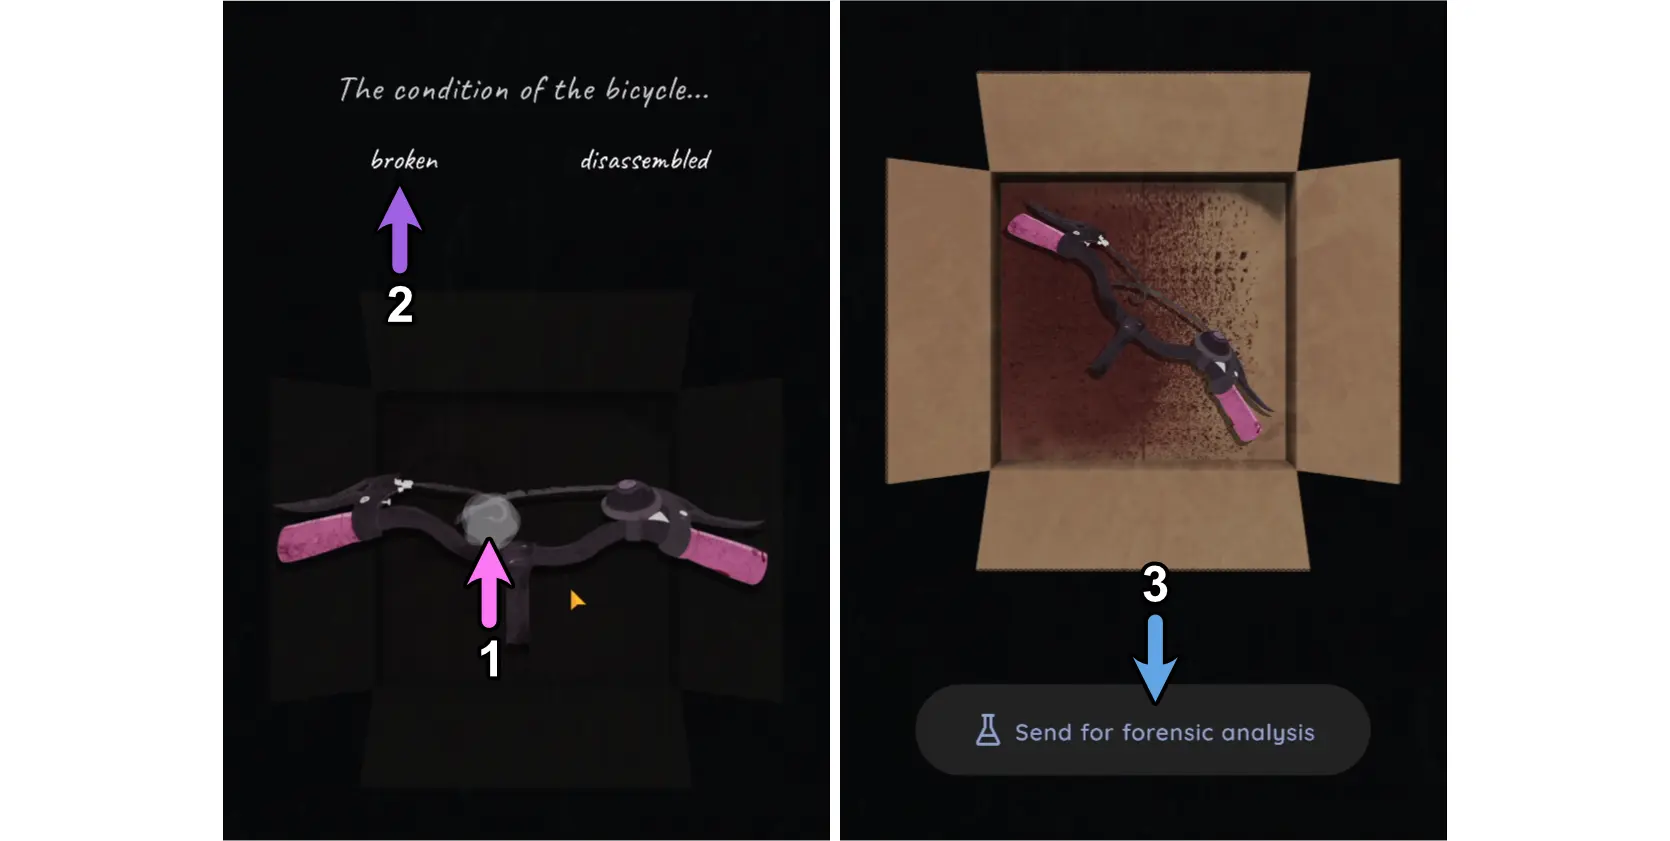
After the sequence, Adam will inspect the package. You’ll need to tap the white circle then choose the correct answers:
- The condition of the bicycle… – broken
- This mark… – Zoey’s initial Z
- Is it dirt or… blood? – dried up blood
- Whose blood is it? – Can’t say
- This symbol was also on… – Crumpled paper
- Why was it sent here? – To threaten
After the inspection, tap “Send for forensic analysis.”
Adam’s phone will light up after the inspection as he receives a message from Unknown. Talk to them and you’ll eventually get a message from Kevin. Talk to Kevin and you will later see some activity in the Chicks and Kicks chat group on Zoey’s Phone. Observe their conversation until they remove Zoey from their chat.

Tap the white circle at the bottom of the screen and connect the clues that are relevant to each other. Positions may vary per playthrough.
| Unknown is aware about others knowing that we have Zoey’s phone. | There must be a way Unknown is finding out all the information. |
| Brad, Betty, and Kyle know that we have access to Zoey’s Phone. | Zoey got removed from the group. |
| Zoey might not be safe. | Someone is trying to threaten by sending the box with the broken bicycle handle. |

After connecting the clues, tap the white circle at the bottom of the screen.
Unlocking Zoey’s Diary – Page 5 – Sep 12th, 2022

You’ll get a notification saying that Page 5 of Zoey’s diary has been recovered. Check Zoey’s Diary and you’ll be presented with a new riddle that requires a 6-letter word to answer:
A pink online journal,
by a friend famed far and wide.
Locked behind tree taps,
a word hidden in plain sight.
The only famous friend Zoey has that has a pink online journal is Betty. To find the answer, you’ll need to go to your browser and visit “bettyblogs.com.” Tap the header 3 times and a secret post will be revealed. Tap the post and you’ll see the word “change” in bold at the end of it. Enter the word in Zoey’s diary and you will unlock the page.
Solving the Riverstone Carwash Phone Riddle

After unlocking the diary page, you’ll get a call from the Riverstone Carwash. They will ominously present you with a riddle:
I dance with the wind, a flickering desire.
In the darkest of nights, I light up like a pyre.
I devour all I touch, not an ancient myth.
A wild untamed forest that you do not play with.
Many of the descriptions in the riddle allude to “fire” and is thus the answer to the riddle. But what do you do with this answer? Since Riverstone Carwash is connected to vault8.com, you’ll need to type their website in your browser and attach /fire at the end of the URL. Upon entering “vault8.com/fire”, you will be shown another text-based puzzle similar to the one in the first episode. Tap “Begin” to start.
Lighting a Fire (vault8.com Text Puzzle)

The main objective of this text puzzle is to collect 4 items that you can use to make a fire and light it up inside a house. Two choices are given to you per question and choosing the correct ones will lead you to the right path. The items can be obtained by first reaching the camp and then solving 4 sub-puzzles.
Finding the Camp
To find the camp, choose the following paths:
- Woods
- Go around it
- Blue Flag or Red Flag (For our playthrough, we picked Red Flag)
- The other way
Once you reach the camp, you’ll be given the choice between Riverside and Swamps. The Swamps lead to the Silence and Conundrum stages while the Riverside lead to the Maze and Memory stages. 3 of the stages require you to solve another stage before it is unlocked. You’ll need to solve them in this specific order: Silence, Maze, Memory, and Conundrum.
Silence Stage
To get to the Silence Stage from the camp, choose:
- Swamps
- Silence
- Enter
For this stage, you’ll need to choose the actions that will not make any noise. Once you enter the stage, pick the following answers to obtain lamp oil:
- Long route
- Crawl under it
- Stay still
- Road
- Abandoned car
- Look around
- Manually open the trunk
After obtaining lamp oil, go back to camp.
Maze Stage
To get to the Maze Stage from the camp, choose:
- Riverside
- Maze
- Enter
For this stage, you’ll need to listen to the direction of the whispering. Once you enter the stage, pick the following answers to obtain a piece of cloth:
- Left
- Right
- Right
- Left
- Right (picture of a hammer)
- Left
- Right
- Left
After obtaining a piece of cloth, go back to camp.
Memory Stage
To get to the Memory Stage from the camp, choose:
- Riverside
- Memory
- Enter
For this stage, the answers are based on objects you can find in other locations. The last question will be based on which flag color you chose. Once you enter the stage, pick the following answers to obtain a piece of wood:
- Rose
- Raven
- Snake
- Hammer
- Lightning
- Red or Blue (For our playthrough, Red is the correct answer because we chose Red Flag previously)
After obtaining a piece of wood, go back to camp.
Conundrum Stage
To get to the Conundrum Stage from the camp, choose:
- Swamps
- Conundrum
- Enter
For this stage, you’ll need to answer 7 questions correctly. Each question is connected to another question so reading and going through all of them was necessary before we obtained the correct answers. Once you enter the stage, pick the following answers to obtain matchsticks:
- Back
- Door
- Moon
- Sword
- 7163
- Air
- White
Among all of the stages, this one is the trickiest. For players who want a more in-depth explanation of how we arrived at these answers, we’ll be breaking them down below.
The Full Questions and Answers:
1. If you choose the right side here, you must choose left at number 7.
| Front | Back |
2. The higher value is the answer to number 5.
| Door | Window |
3. Front door is locked. Back door is open.
| Moon | Sun |
4. Choose Water.
| Sword | Shield |
5. The left side must be chosen in the previous 2 statements.
| 2184 | 7163 |
6. If you chose Sword, you cannot choose Window.
| Air | Water |
7. One of the previous statements is a lie.
| White | Black |
The Explanation:
Our starting point was:
Q#2: The higher value is the answer to number 5.
Since Q#5 asks you to choose between “2184” and “7163”, the answer is clearly “7163”.
Q#5: The left side must be chosen in the previous 2 statements.
The answers to Q#3 and Q#4 are then automatically “Moon” and “Sword”.
Q#3: Front door is locked. Back door is open.
The only question that has any answers alluding to the front door or back door is Q#1 with “Front” and “Back” as choices. Because the back door is open and can be entered, “Back” is the answer.
Q#1: If you choose the right side here, you must choose left at number 7.
Since “Back” is the choice on the right side, you’ll need to choose the choice on the left side answer at number 7, which is “White.”
Q#6: If you chose Sword, you cannot choose Window.
This statement refers to the choices for Q#2 which are “Door” and “Window.” Since we already answered “Sword” in Q#4, the answer is “Door.”
Q#4: Choose Water.
This statement refers to the choices in Q#6 which are “Air” and Water.” It may seem like the easiest one, but there is also another statement we need to consider:
Q#7: One of the previous statements is a lie.
Q#7 may seem tricky, but the fact that most previous statements are interconnected makes this easier to figure out. If any of the interconnected statements were incorrect, it would automatically make all the others incorrect. But Q#7 states only one is a lie. Because Q#4 does not connect to any other statements directly and cannot affect them if the answer is different, it makes sense that this is the incorrect statement. And this is why the answer for Q#6 should be “Air.”
After obtaining matchsticks, go back to camp. Once you get there, all 4 items will be replaced with a torch.
Entering the House
After going back to camp, you’ll need to go back to the very start. Choose the following to get to the house from the camp:
- Go Back
- Go Back
- Go Back
- Go Back
- Cave
- Climb down
- Yes
Once you enter the house, you’ll be presented with circles that have 4 letters and symbols each. Take note of this as you will need it to decode the next puzzle. Tap “Join the meeting” to proceed.

Exposing Your Target (stealthrizzler)

Before you join the meeting, you’ll have to enter a nickname. Any name can be used. Upon entering the chatroom, you will see 4 other people inside, namely Host, lazypoem, flamingice, and stealthrizzler. flamingice will leave soon after you arrive. A game will start wherein the Host will give you and the other two people the task of revealing each other’s personal information.
The first person who has their information leaked will be eliminated from the call. In this game, stealthrizzler is assigned as your target and his IP address will be shown to you as 94.134.248.86. In the middle of all this, you will see Amanda, Adam’s wife, message him but there are no actions that need to be taken. Adam just basically ignores it.
The first thing you’ll need to do is to decode the numbers in the quarter circles found at the top of the screen, just below your task. You’ll need to use the circles with letters and symbols that you saw before joining.
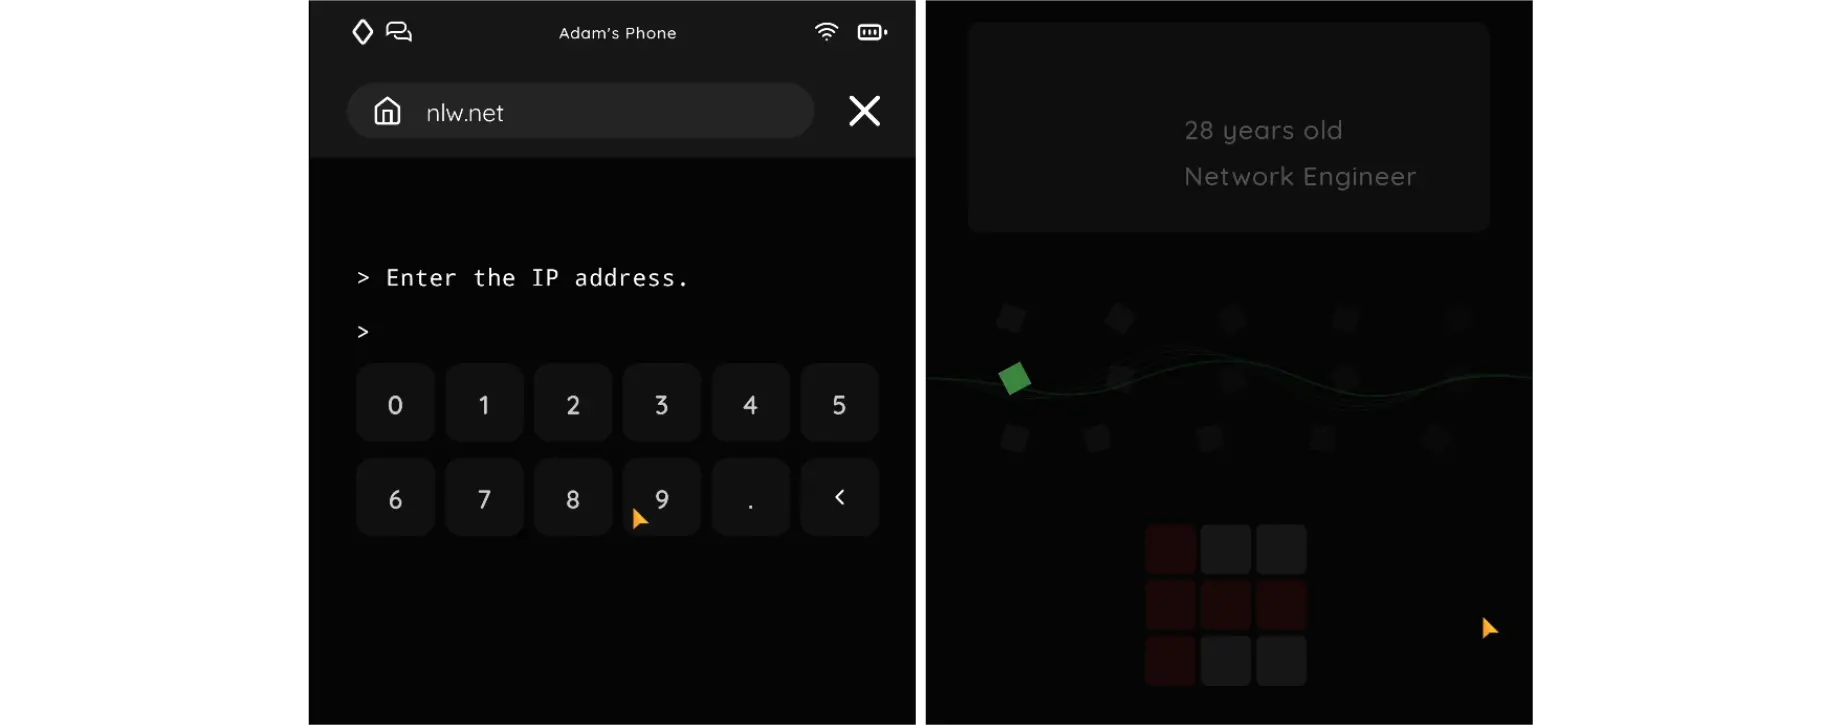
To decode this, you’ll have to consider the number and the circle part. The number determines which circle it is referring to while the circle part determines the letter or symbol it represents. Going through all 7 of the numbered quarter circles, you’ll get the URL: nlw.net.

Go to your browser and enter the URL. Enter the IP address of your target, stealthrizzler (94.134.248.86), and you’ll see a 3×3 pad at the bottom of your screen and a green square above it floating from right to left.
The 3×3 pad has gray and red squares. Every time the green square exits to the left, the pattern of the 3×3 pad changes. You’ll need to tap all the red squares before that happens in order to reveal information about your target. You’ll need to do this 4 times until you’ve revealed the target’s age, occupation, picture, and name.
Tap “Send data” and stealthrizzler will be eliminated. The meeting will end soon after.
February 13, 2023

Mass Reporting Betty’s Post
The day starts with Adam getting multiple messages from students. Reply to Helen, Reggie, and Melanie. It won’t get you new information, but you’ll need to talk to them before Trey messages you. He’ll give you the URL of a website that you can use to mass report Betty’s Pixabowl Post. He’ll also send you a picture of Zoey at her locker which shows a portion of a map that leads to an important clue.

After your conversation ends, you’ll be sent a barrage of messages from random students. There is no need to reply to any of them. Focus on taking down Betty’s post. Just go to Zoey’s phone, tap the Pixabowl App, and look for Betty’s post about you. It’s the one with the poop emoji. Once you open the post, you’ll see a code made of letters just below the image, to the right of the number of likes. Remember this code or write it down.
Go to your browser and go to pbmassrep.com. You’ll be greeted with several pop-up ads that you’ll need to close first. Type in the ID of Betty’s post and tap “Submit.” This will delete her post and stop the random messages you’ve been getting.

Go to Adam’s messages, start a conversation with Kevin, and send him the image of Zoey at her locker. He won’t respond at this time.
Tap the white circle at the bottom of the screen and connect the clues that are relevant to each other. Positions may vary per playthrough.
| Trey was the one who sent us the picture of Zoey getting in Mike’s car. | A picture of Zoey with a map in her locker. |
| Is there something Betty doesn’t want us to find? | Betty doxxed our number in a hate post. |
| Everything detailed in Vault8 must hold some significance. | We were invited to an anonymous meeting. |
After connecting the clues, tap the white circle at the bottom of the screen.

Unlocking Zoey’s Diary – Page 6 – Sep 14th, 2022

You’ll get a notification saying that Page 6 of Zoey’s diary has been recovered. Check Zoey’s Diary and you’ll be presented with a new riddle that requires a 5-letter word to answer:
I was six, he was eight,
racing the streets during fall.
My undying love for the season,
gave me a name only he would call.
The person Zoey is referring to in the riddle is her older brother Zac. Message Zac and ask him if he ever gave Zoey a nickname and he will tell you it was Maple. Enter the word in Zoey’s diary and you will unlock the page. An important piece of clue you’ll obtain from it is the doodle at the bottom of the page.
Contacting Zoey’s Counselor
You’ll get a notification that new data from Zoey’s phone has been recovered and needs your manual input. To recover the data, you’ll be playing Sudoku. You’ll need to fill up all the boxes with numbers from 1-5 and each row and column must not have any repeating numbers. To solve it, copy the numbers in the table below:
| 2 | 3 | 5 | 4 | 1 |
| 3 | 1 | 4 | 5 | 2 |
| 1 | 4 | 3 | 2 | 5 |
| 4 | 5 | 2 | 1 | 3 |
| 5 | 2 | 1 | 3 | 4 |
You’ll recover 1 chat, 2 emails, and 2 photos. Go to Zoey’s Gallery and look for her picture of Mr. Davis’ plaque. Tap the information on the plaque to start a conversation with Mr. Davis.

Finding Amanda
Jim, Adam’s son, will message him saying that Amanda, Adam’s wife, is missing. To call Amanda, you’ll need to find her number by going to Adam’s messages, tapping Amanda’s messages, and then tapping her profile. Remember her number or write it down then dial her number (5912041) manually to call her. Your call will go to voicemail.

At this time, Kevin will finally respond to your messages. He will tell you that the upper right part of the map looked like their school’s football team’s logo and that he’ll talk to a few people to gather more information.
Go to Zoey’s Mail and you’ll find an ad for a service that finds the location of a phone number. Dial the number on the ad (3561999) and the automated response will instruct you to enter Amanda’s number. You’ll be given the tracking code 4136.
Go to your browser and go to phonefinder.com. Input the tracking code and you’ll be shown a screen with icons of cell towers. The objective is to find Amanda’s location by creating triangles using the cell towers. Connect the 3 towers at the very top of the screen to get the location and the data of the 3 towers. Message Tim and send him the data.

Tap the white circle at the bottom of the screen and connect the clues that are relevant to each other. Positions may vary per playthrough.
| Davis isn’t willing to share any information. | Zoey was having multiple sessions with the school counselor, Mr. Davis. |
| The map is not fully visible but it has some markings over certain areas. | The logo on Zoey’s map is of the school’s football team. |
| Zoey loved making meaningful maps and puzzles. | Having the map in her locker must mean that it’s important to her. |
After connecting the clues, tap the white circle at the bottom of the screen.

Getting a Copy of Zoey’s Map
To get a copy of Zoey’s Map, you’ll need to look through Pixabowl for clues, specifically Kyle’s post with a brown background and the URL for Riverstone High’s website: riverstonehigh.edu. Go to your browser and enter the URL. Tap the map icon at the upper right corner of the page. Type the word “football” in the search bar and tap the search icon to reveal the map of the Football Building. Tap the map to get a copy of it and then send it to Kevin. He’ll then look for a way to get Brad’s help.

February 14, 2023

Talking to Zoey’s Online Friend
You’ll get a notification that new data from Zoey’s phone has been recovered and needs your manual input. To recover the data, the mini-game you’ll be playing will require you to tap certain circles below so that 4 of the squares above will turn green with checkmarks.
Each circle will change some squares into a green checkmark or a red checkmark. If two circles both activate the same squares, those squares will cancel each other out and turn gray. The images below show how each circle affects the squares above:
| 1 |  |
| 2 |  |
| 3 |  |
| 4 |  |
| 5 |  |
| 6 |  |
| 7 |  |
| 8 |  |
To have 4 green squares with checkmarks, tap circles 1, 3, 5, 7, and 8. You’ll recover 1 email and 3 photos.

Zoey’s recovered email shows you an invite to littlehamsters.com. Go to your browser and type in the URL to visit the website. It’ll ask you for a username and password. From the email, we can get Zoey’s username, which is sleepykiwi. To get the password, you’ll need to look at Zoey’s 6th Diary page doodle at the bottom of the screen. It shows a cat, a heart, and a fish. Since her cat’s name is Jerry (as shown in an image of Zoey’s cat in her Gallery that said “Happy Birthday Jerry”) and heart can mean love, the password is jerrylovesfish.

Once you’ve logged in, tap “Hello” and a user named crossbar_36 will appear and start a conversation. They’ll leave soon after they’ve had an inkling that they’re not talking to Zoey. You’ll then be added to a group chat with Kevin and Brad.
Sneaking Into Zoey’s School
Go to the group chat and talk to Kevin and Brad. You’ll devise a plan for Kevin to sneak into Mr. Davis’ office to obtain his report on Zoey and for Brad to sneak into the Storage Room to obtain what Zoey hid in it. While they’re on campus, you will feed them information to help them find what they’re looking for.
To help Kevin find Mr. Davis’ office, go to the Riverstone High School website (riverstonehigh.edu). On the home page, you’ll see a notice about an ongoing construction which will change the rooms of classes and offices. Tap the person icon at the upper left corner of the page to find Mr. Davis’ original room, which is 307. Go back to the home page and click the notice to see the list of replacement rooms. There, you’ll see that room 307 is replaced with room 104. Go back to the group chat and relay the room number to Kevin.

To help Brad, you’ll need to figure out which crate Zoey hid the item and which room it is in. While the game places a 3-minute timer to search for this, from our experience, the game won’t actually punish you for not getting the information within that time. You can still continue even after 3 minutes are up.
Look at the image of Zoey at her locker. The map shows 3 rooms and the squares above it spell 86. 86 is the crate number. As for the room number, whether you count the rooms from up to down, or left to right, the room at the lower right would be Room 2. Go back to the group chat and relay the room number and crate number to Brad.

Kevin will tell you that Mr. Davis is at his office and he cannot get Zoey’s report. Call Mr. Davis by manually dialing his number (7345599) which is found in Zoey’s Gallery or Mr. Davis’ Profile in Adam’s Messages.
After the call, go back to the group chat and talk to Kevin and Brad. Your phone will suddenly be remotely controlled by an unknown person who will then start going through your messages. The person will then write a threatening message in Adam’s Notes, introduce themselves as crossbar_36, and tell you to revisit the Little Hamsters website.

Go to your browser and type the URL, littlehamsters.com. Log in once more as sleepykiwi with the password jerrylovesfish. Tell them what happened to Zoey and they will agree to help you.
Unlocking Zoey’s Diary – Page 7 – Sep 17th, 2022
You’ll get a notification that new data from Zoey’s phone has been recovered and needs your manual input. In this mini-game, you’ll see 7 rounded squares. You’ll need to tap them in the correct order to turn them all green at the same time. If you tap the wrong rounded square, you’ll have to start over. The image below shows the correct sequence for this puzzle.

You’ll recover 1 email and 3 photos.
After the data recovery mini-game, you’ll get a notification saying that Page 7 of Zoey’s diary has been recovered. Check Zoey’s Diary and you’ll be presented with a new riddle that requires a 4-letter word to answer:
My disbelief in fortunes,
dwindled on this date.
As I cracked open the cookie,
it was written in my fate.

One of the newly recovered photos is a flipped image of a fortune cookie. Flip it using the mirror button to get the 4 numbers 3, 1, 18, and 5. Using these numbers to get letters from the alphabet, you’ll get:
- 3 = C
- 1 = A
- 18 = R
- 5 = E
Input the word “care” in Zoey’s Diary and you will unlock the page. The most important clue you’ll get from it is Zoey giving Brad a pendant that has the initials Z+B on it.
Analyzing Zoey’s Therapy Notes
Check your desk for the report retrieved by Kevin from Mr. Davis’ office. Tap the 3rd and 4th items to take note of it.

Tap the white circle at the bottom of the screen and connect the clues that are relevant to each other. Positions may vary per playthrough.
| crossbar_36 knows about letters Zoey used to receive. | Zoey was known to frequently communicate with someone online who goes by the name ‘crossbar_36.’ |
| Zoey was experiencing stress leading to difficulty breathing and sleeping. | Mr. Davis’s notes gave us an insight into Zoey’s mental health. |
| Brad told us that he found a pendant with ZB initials written in the box that Zoey hid. | According to crossbar_36, Zoey never hid a pendant rahter bought it as a gift for Brad on his birthday. |
After connecting the clues, tap the white circle at the bottom of the screen.

Reply to Tim’s message asking about Amanda, and then to the group chat with Kevin and Brad. Brad will refuse to tell you what was in the box he found and leaves the chat. Amanda will call you right after. No matter what choices you make, it will still end with her being upset with Adam.
February 15, 2023

Unlocking Zoey’s Diary – Page 8 – Sep 19th, 2022
Message Tim about Amanda and you’ll get a notification saying that Page 8 of Zoey’s diary has been recovered right after. Check Zoey’s Diary and you’ll be presented with a new riddle that requires a 5-letter word to answer:
In the twisted online verse,
I found a friend without a face.
This adorable world of burrows
is the only true safe space.
The riddle is referring to the Burrow Name in the Little Hamsters website where Zoey and crossbar_36 talk frequently. You can immediately find it underneath the Little Hamsters name upon going into the website and logging in. Input the word “brave” in Zoey’s Diary and you will unlock the page. The most important clue you’ll get from this is that Zoey figured out where to go to find the truth about the letters and emails she was receiving.

Decrypting Zoey’s Video
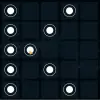
You’ll get a notification that new data from Zoey’s phone has been recovered and needs your manual input. In this mini-game, you’ll see a 5×5 grid with 10 circle outlines forming the letter K. Tapping anywhere on the grid will produce a small white circle. The objective is to fill up all 10 circles with the small white circles.
However, every time you add a new small white circle on the grid, all small white circles will move to the right except for all the small white circles on the same row as the one you just added. There are many ways to solve this puzzle and below is the method we used:
 | Tap Row 1, Square 3. |
 | Tap Row 5, Square 2. |
 | Tap Row 4, Square 2. |
 | Tap Row 1, Square 3. |
 | Tap Row 5, Square 1. |
 | Tap Row 2, Square 3. |
 | Tap Row 1, Square 1. |
 | Tap Row 2, Square 1. |
 | Tap Row 3, Square 1. |
 | Tap Row 3, Square 2. |
You’ll recover 1 email, 2 photos, and 1 app. The new app that appears is “Files.” Open it and you’ll find a video from December 2022. Play the video and you’ll see the mysterious symbol and the coordinates 1.1 N, 52.2 W.
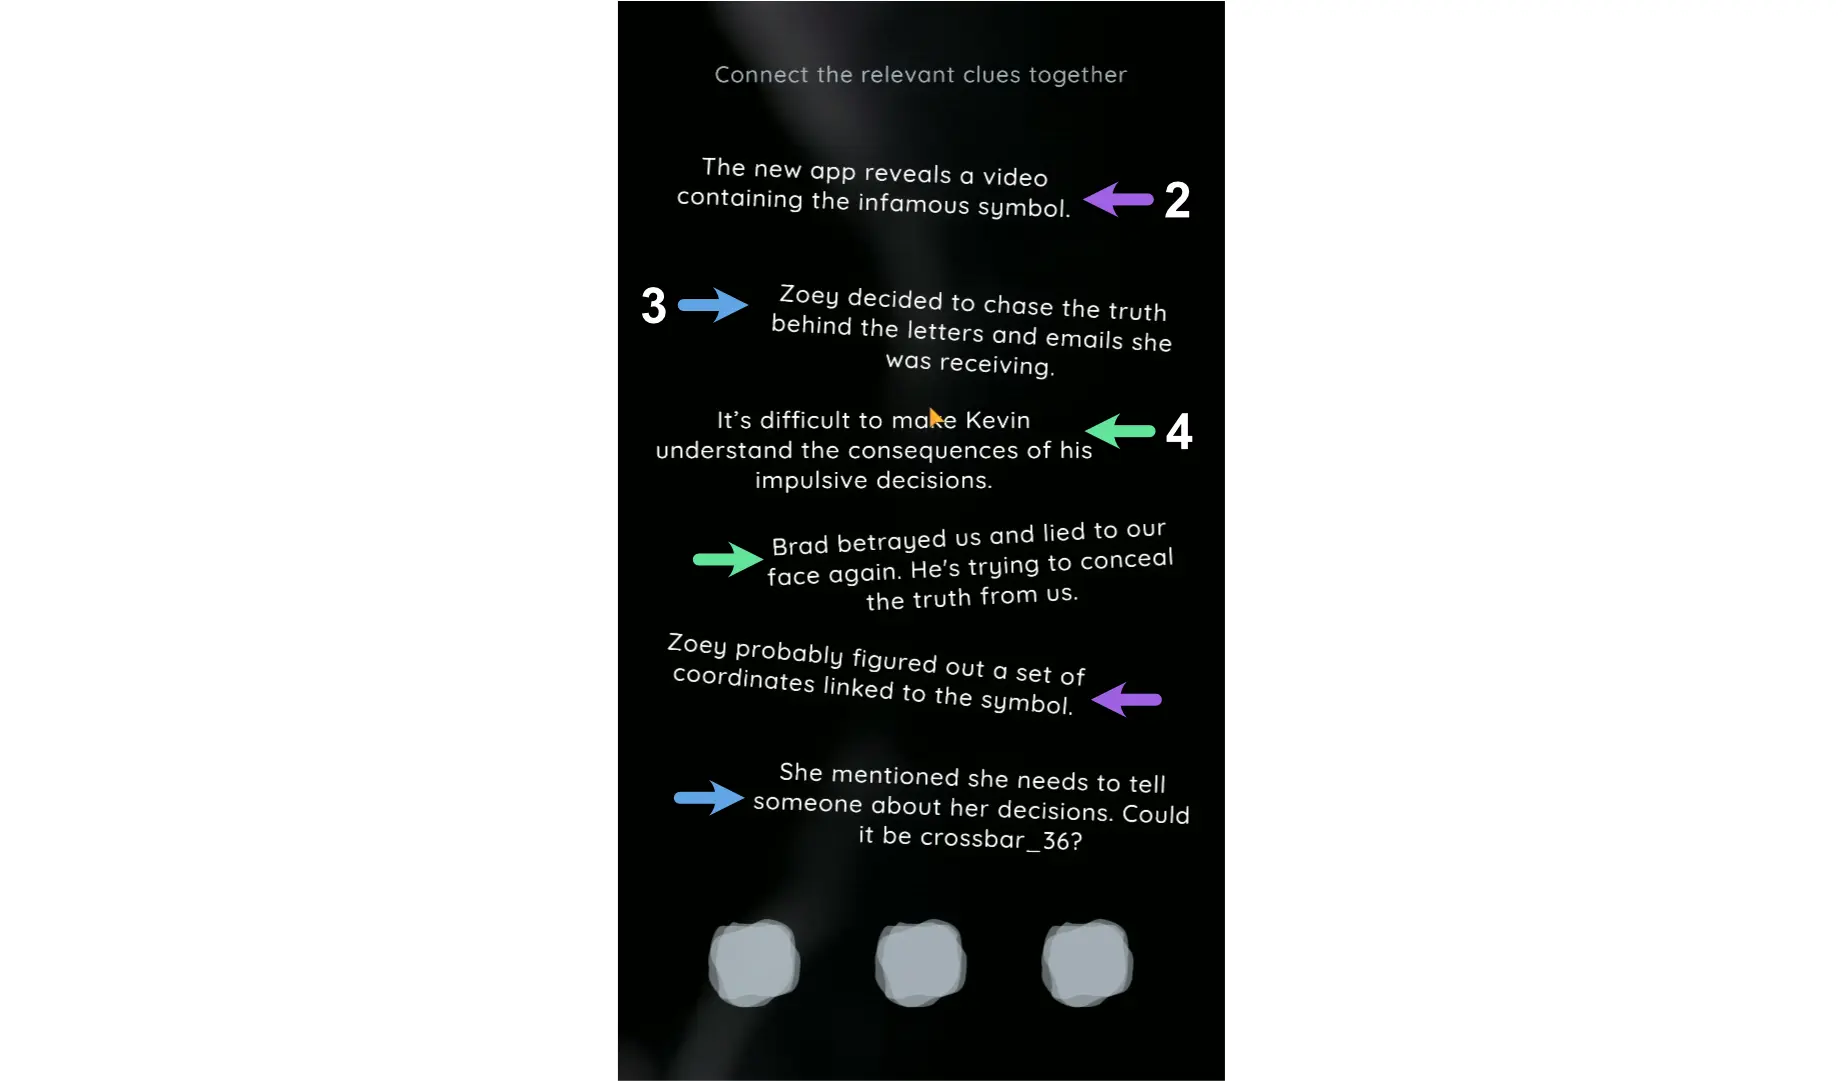
Tap the white circle at the bottom of the screen and connect the clues that are relevant to each other. Positions may vary per playthrough.
| The new app reveals a video containing the infamous symbol. | Zoey probably figured out a set of coordinates linked to the symbol. |
| It’s difficult to make Kevin understand the consequences of his impulsive decisions. | Brad betrayed us and lied to our face again. He’s trying to conceal the truth from us. |
| Zoey decided to chase the truth behind the letters and emails she was receiving. | She mentioned she needs to tell someone about her decisions. Could it be crossbar_36? |
After connecting the clues, tap the white circle at the bottom of the screen.
Assisting Kevin in the Forest
Talk to Kevin and send him an image of the symbol and the coordinates. He’ll decide to go into the forest despite your warnings. You’ll need to help him make his way around the forest as he encounters puzzles that need to be solved.
As Kevin enters a cave, he’ll see blue lines on the wall on a 4×3 grid. Combining the lines in all 3 rows as 1 will produce the word “fire.”

He will eventually find a locked door. The wall next to it has another puzzle containing a 3×3 grid with numbers, symbols, and a red arrow. Next to the grid is a line with 4 dots and an arrow at the bottom. Each dot has red numbers next to it. Solving this puzzle will tell you the 4 symbols needed to unlock the door.
To solve it, you start in the position of the red arrow. The line with dots and numbers will lead you to the symbols that you need. Tracing the lines that will add up to the number next to the dots brings you to the correct symbol. As shown in the image below:

You’ll need to tap the squares below a certain number of times to get the correct symbol:
- Lips with Finger (Silence) – 11 Taps
- Maze – 7 Taps
- Brain (Memory) – 13 Taps
- Spiral (Conundrum) – 3 Taps
Kevin will eventually find his way outside the cave and find a windowless house. He’ll start getting chased and fall down. Tap “Call emergency”.
February 16, 2023

Read the newspaper then go to your desk. Tap the light blue envelope to read the letter. Piece together the torn-up paper to form a drawing of a Lily and you’ll get another clue that may be used for the next episode.


And this marks the end of our walkthrough of An Elmwood Trail Episode 2, Playing with Fire! We hope that this article was instrumental to helping you get through difficult puzzles and getting you one step closer to unlocking the truth behind Zoey Leonard’s disappearance! Are there any other mystery games that you would love for us to make a walkthrough of? Let us know in the comment section below!
Sara
Monday 27th of October 2025
I want episode 3 solving answer
Cooper
Tuesday 10th of June 2025
Where to find episode 3?
Xx
Sunday 11th of May 2025
This game requires telepathic abilities! I watched way too many ads before coming up on this tutorial. I'm disappointed that it all pretty much goes nowhere.
Ruby
Friday 28th of March 2025
What's the three digit code?
Angi
Thursday 1st of January 2026
@Xx, it did makes sense XX is 20 in roman number and V is 5
Tempest
Saturday 8th of November 2025
@Xx, it's because of the Roman numerals on the Riverstone map, XXV.
Xx
Monday 12th of May 2025
@Ruby, "205" it makes no sense, I had to watch ads.
Rose
Monday 29th of July 2024
Kevin didn't fall down for me...
Jacint
Friday 13th of September 2024
@Rose, if he didn't fall for you, then what happened dear?