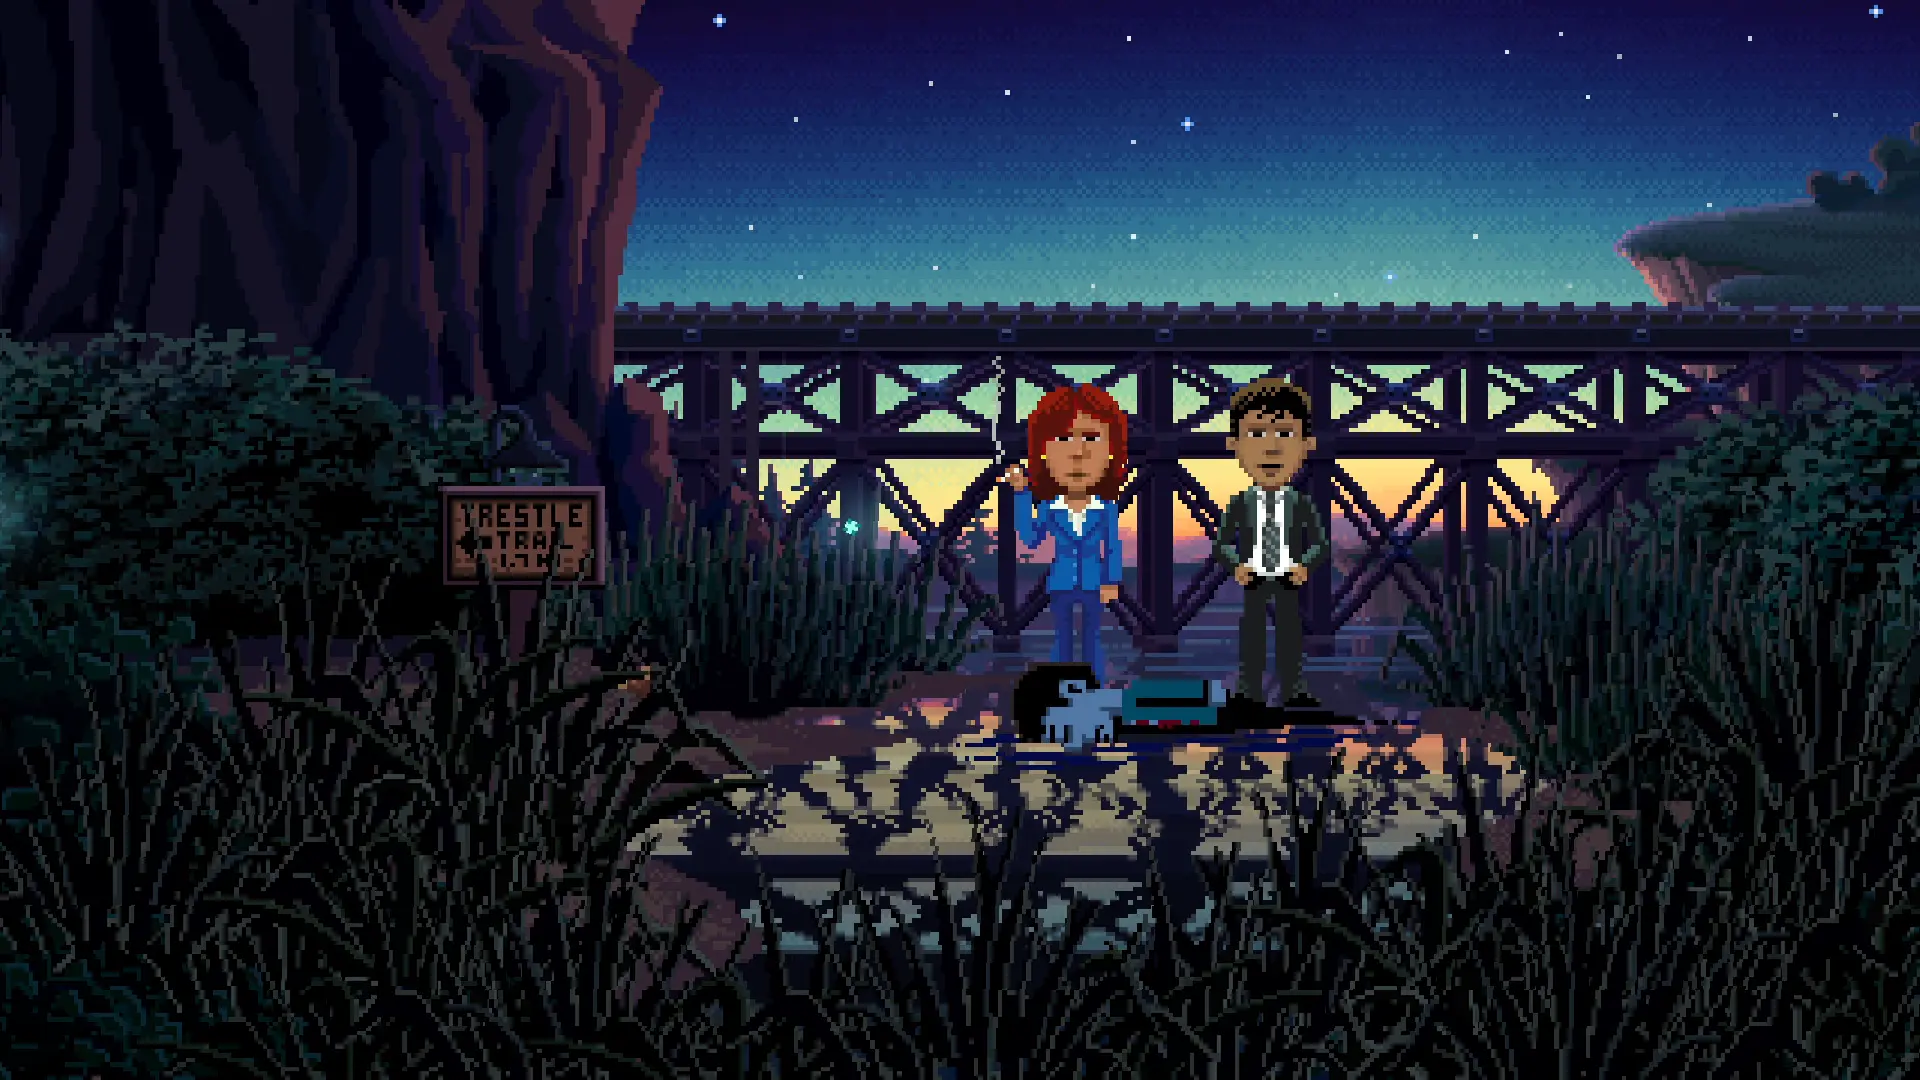
The year is 1987 and a grim murder has taken place at Thimbleweed Park, a small town with a population of 80 people. An unknown man’s corpse was found by the bridge, its body slowly pixelating and the only solid lead is a hotel keycard. Enter Agent Ray and Agent Reyes, two federal agents who were given the task of solving this gruesome crime.
One agent is determined to get a promotion, and another is determined to uncover another crime from the past. While not the best of friends, they’ll need to work together to get justice for the murdered man. The townsfolk will point fingers at various, quirky individuals while the truth lurks in the shadows, waiting to be uncovered.

But somewhere, somehow, someone seems to be watching as your motley crew of two turns to four, and things start to connect from one thing to another. But the dead body is the least of their worries once they realize that nothing is what it seems in this oddly almost empty town with a sheriff, a coroner, and a hotel manager who seems to be hiding something, and a recently departed town hero who may have left a trail for you in his wake.
Thimbleweed Park is a point-and-click adventure game designed by Ron Gilbert and Gary Winnick and developed and published by Terrible Toybox. Those names may feel familiar to adventure game enthusiasts since these two game designers were instrumental in the creation of popular titles such as Maniac Mansion and The Secret of Monkey Island. The game features beautiful pixel art and a humorous vibe somewhat reminiscent of the old Scooby Doo cartoon series.
The game can be played in Casual Mode or Hard Mode. While Casual Mode seems to be the best choice for players who are new to this game genre, we highly recommend playing in Hard Mode because a lot of content is taken out in Casual Mode to make the puzzles easier.
This walkthrough is written with Hard Mode in mind and while we try to be as specific as we can, there are certain details to puzzles that are randomized and will require players to do a bit of solving by themselves. However, we will do our best to relay any hints that can help.

The game has many hidden secrets, content and dialogues, most of which are optional and do not necessarily make any important impact on the story. For this walkthrough, we’ll only be concentrating on key actions that need to be taken to progress the game or unlock special achievements. To make our instructions concise and simple, we are only going to mention an item that must be obtained or used once the situation calls for it.
Table of Contents
General Mechanics and Useful Tips
Investigating the Corpse and Learning About Tron Machines
Getting a Shiny Nickel (5 Cents)
Getting a Map from Nickel News
Unlocking Fast Travel With Maps
Getting Ransome as a Playable Character
Attempting to Remove Ransome’s Makeup
Getting a Package from the Post Office
Retrieving the Computer Magazine
Finding Ink for PrintTron 3000™
Mailing Delores’ Job Application
Getting Delores as a Playable Character
Getting a Disguise to Check in to a Hotel Room
Obtaining Paper for Photocopying
Presenting the Prospectus to Investors
Getting Franklin as a Playable Character
Finding Faces for FaceTron 3000™
Finding Blood Samples for BloodTron 3000™
Finding Fingerprints for FingerTron 3000™
Where is Agent Ray and Agent Reyes?
Getting the Lawyer for the Will Reading
Gaining access to Uncle Chuck’s Tomb
Fixing Agent Reyes’ Pocket Watch
Getting Theremin Music for Willie
Winning the Ransome Look-A-Like Contest
Moving the Truck Blocking the 4th Station
Finding a Tube for the Factory’s Door
Getting the Computer’s Password
Clearing Colossal Dungeon Cave Quest II (Chuck Mod)
Passing Through the Lasers of Doom™
Delores and Franklin’s Good Ending
Unlocking Buried Treasure and the Arcade Games
General Mechanics and Useful Tips
- Tapping an area on the screen will make your chosen character move to that spot (or as close to that spot as possible).
- Tap your character’s picture at the upper right side of the screen to change the character you’re using or to access the settings.
- To interact with objects or people, you’ll need to choose one of the 9 verbs on the lower left side of the screen before you tap an item on your inventory or an item or person in the scene.
- Complex commands start with a verb, then an object, and end with another object or character. This is used to combine, unlock, or give objects to other characters.
- Dial the number 4468 (HINT) using Agent Ray’s cellphone or any other usable phone in the game to get hints to solve a puzzle. The hints start out subtle, but the more you ask, the more details it will give out.
- On mobile, press and hold anywhere on the screen to show hotspots. On PC, you have to press and hold the TAB key. This may not always be accurate and will not highlight some objects like Specks of Dust.
- Tap twice or double click to run.
- Doors need to be opened before you can enter the room.
- Some special items tend to be in a color that pops out from the scene or next to a light source.
- Check small objects. Some of them may be what you need.
- Sometimes repeating a command may give a different result.
- You don’t need to move all characters in one place all the time. If they need to be where the other one is, sometimes they will just end up appearing in that location later.
- Looking at items in your inventory does not require you to use the Look At command.
- Most numbers and some answers in the game are randomized.
Part One: The Meeting

Looking at the note in your inventory will show you a list of instructions that he needs to follow. The first two tasks have already been accomplished. Your next task is to turn off the light and go to the entrance of the Underground Sewers.

- Open the gate.
- Walk to the right until you reach the river.
- Pick up the rock in the middle of the river.
- Use the rock on the light above the Trestle Trail Sign.
- Walk to the right until you reach the entrance of the Underground Sewers.
Boris will be attacked by an unknown man, ending Part 1.
Part Two: The Body

Investigating the Corpse and Learning About Tron Machines
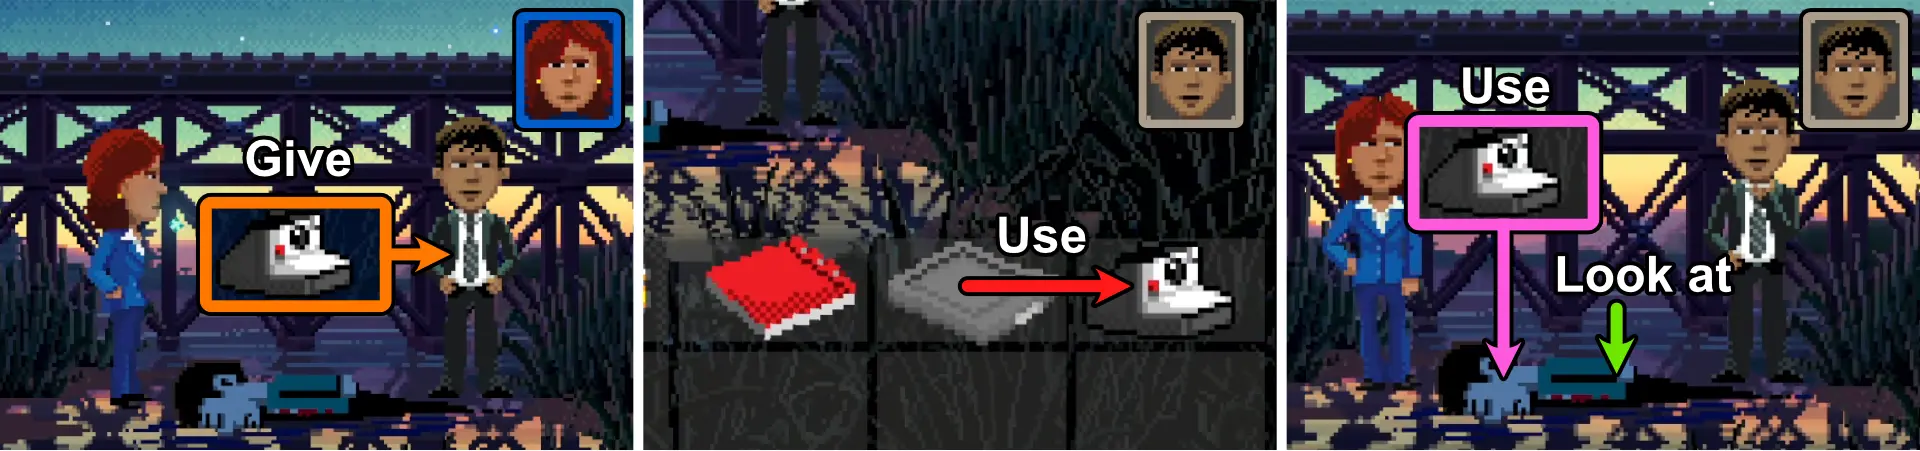
As Agent Ray:
- Give the Polaroid camera to Agent Reyes.
As Agent Reyes:
- Use the Polaroid film on the Polaroid camera.
- Use the Polaroid camera on the corpse to get a photo of the body.
- Look at the corpse to get a hotel keycard.
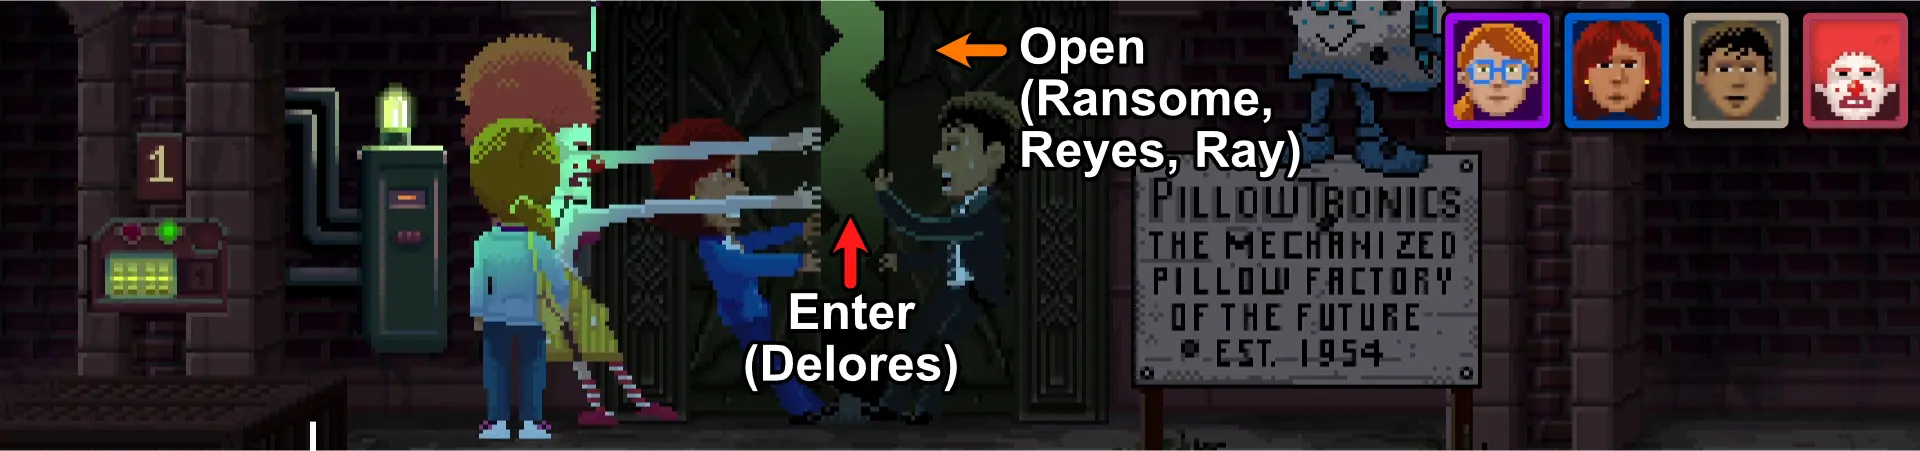
- Walk to the left and open the gate.
- Enter the gate and walk up the path to Trestle Trail.
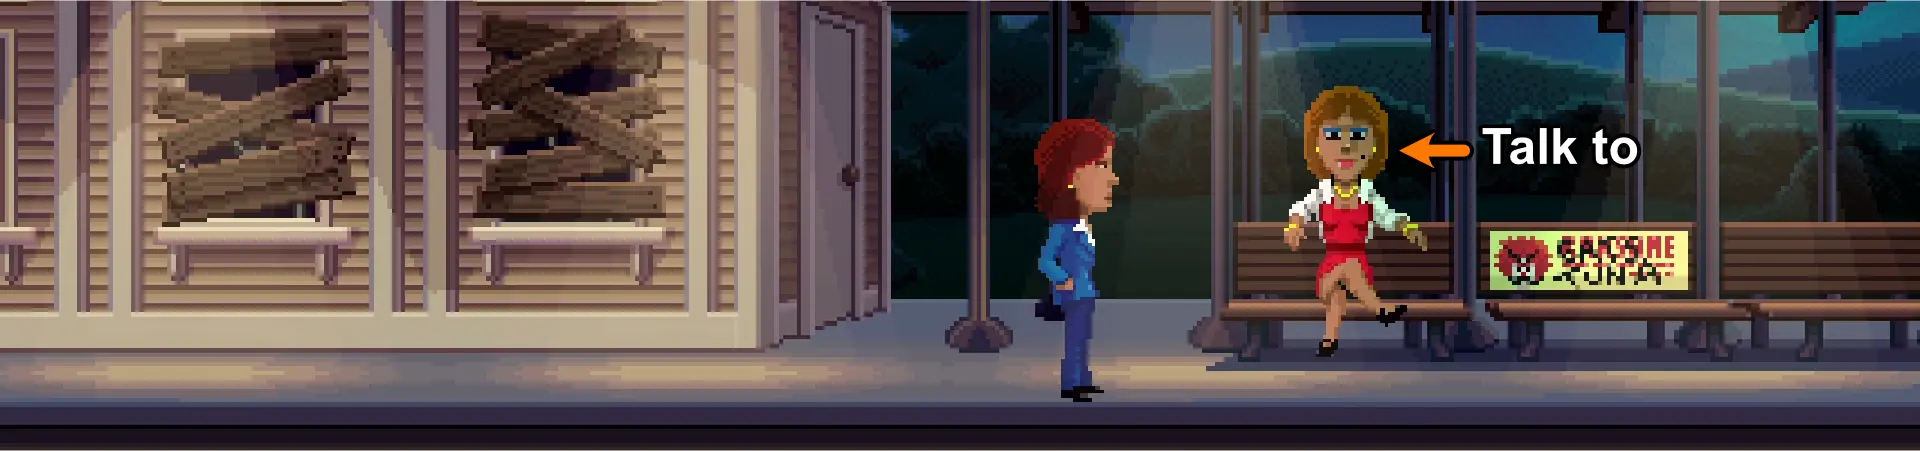
- Walk to the right and approach the Pigeon Sisters to talk to them. Choose these answers to proceed:
- What signals?
- Yes, you already said that, but what signals?
- Nice chatting with you. I need to find the sheriff and solve a murder.
- Keep walking to the right and enter the town.
- Keep walking to the right and approach the sheriff to talk to him. Choose these answers to proceed:
- How long were you going to let that body rot in the river?
- Once the sheriff brings you inside the town hall, walk to the right.
- Open the coroner’s office’s door and enter.
- The coroner will greet you and tell you about their machines. Choose these answers to proceed:
- Tell us about the BloodTron 3000™**.**
- Tell us about the FingerTron 3000™**.**
- Tell us about the FaceTron 3000™**.**
- Fascinating stuff, I think we’ve heard enough.
- Walk to the left to the archway to leave the room.
- Open the sheriff’s office’s door and enter.
- The sheriff will greet you. Choose these answers to proceed:
- You… I mean the coroner… said something about the ArrestTron?
- Should we investigate Chuck as a suspect?
Getting an Official Map

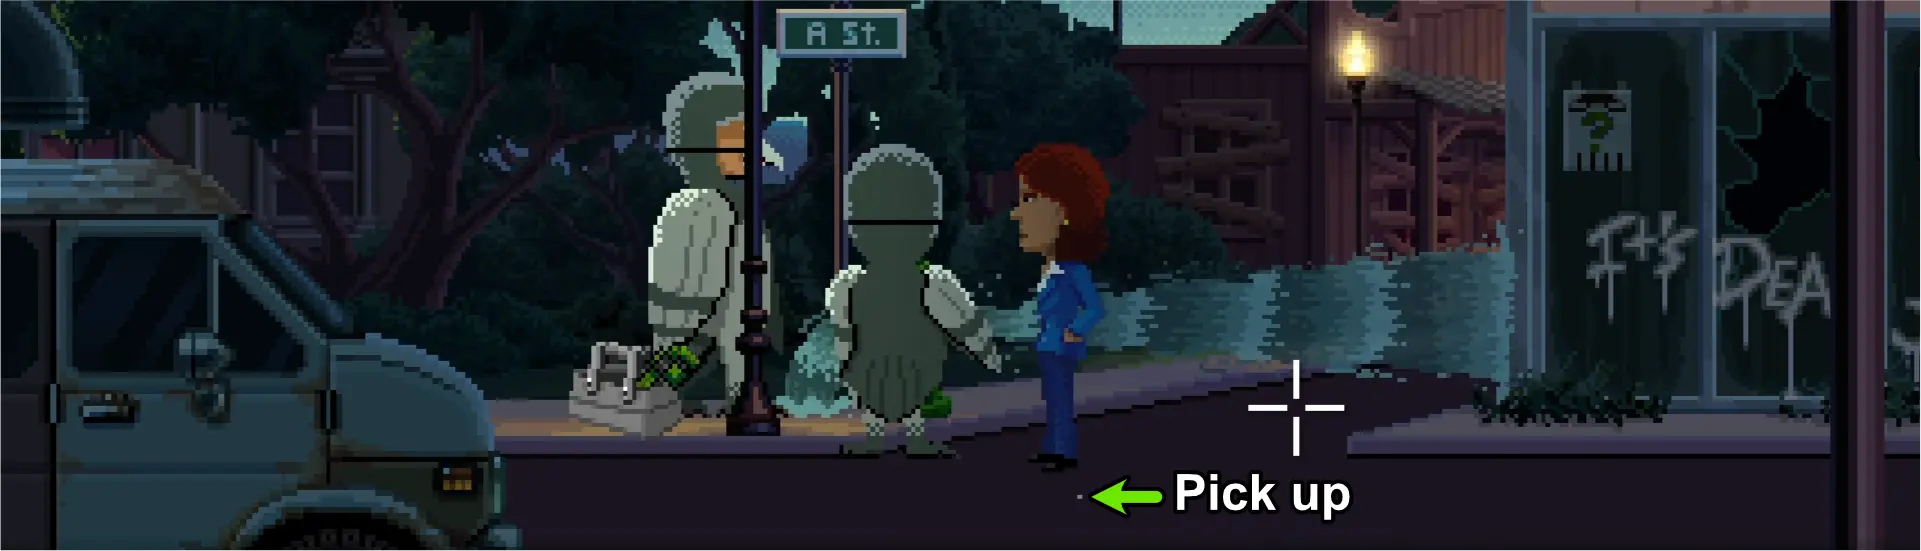
If you keep going to the right after entering town, you will eventually reach the Vista. If you walk to the county, the sheriff will tell you that you cannot go past that point unless you have an official map. While there are many other things you can do before this, we highly recommend prioritizing getting a map because this will help you get around town. With a map, you can simply tap a location to instantly get there.
To get an official map, you first need to get a shiny nickel and fix the fire hydrant leak that’s blocking A Street.
Getting a Shiny Nickel (5 Cents)
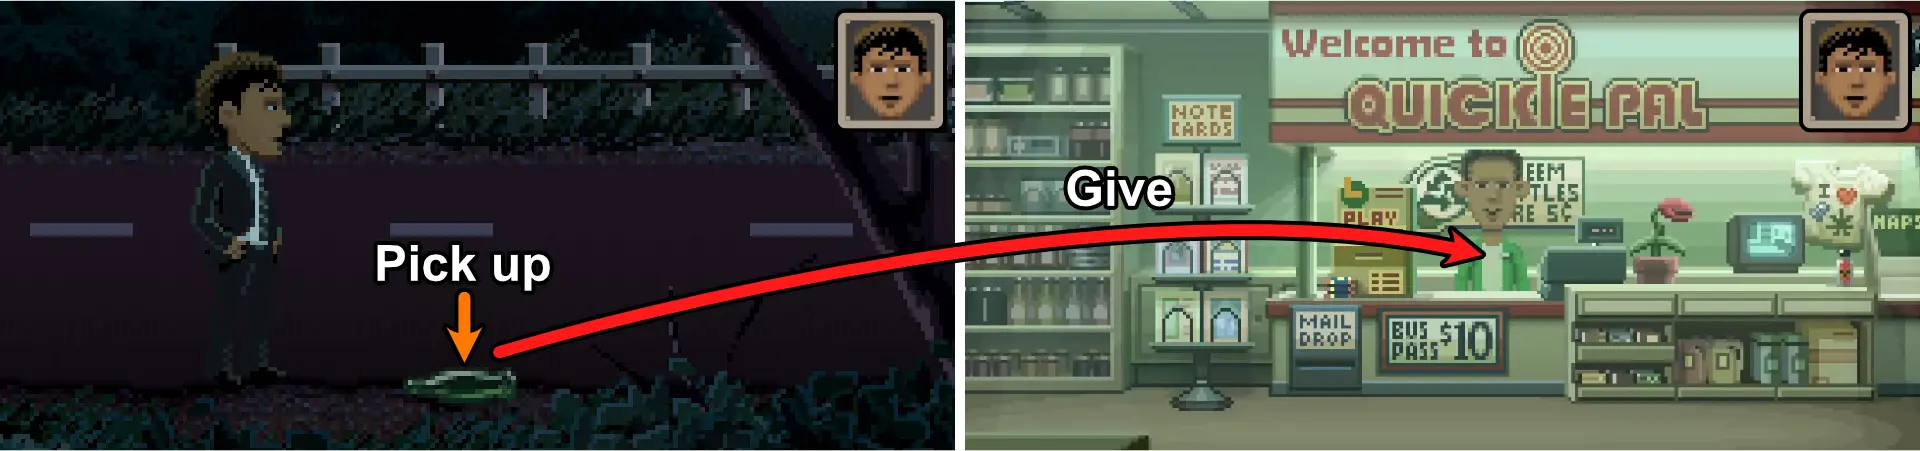
As Agent Reyes:
- Go to the highway and pick up a green bottle by the side of the road.
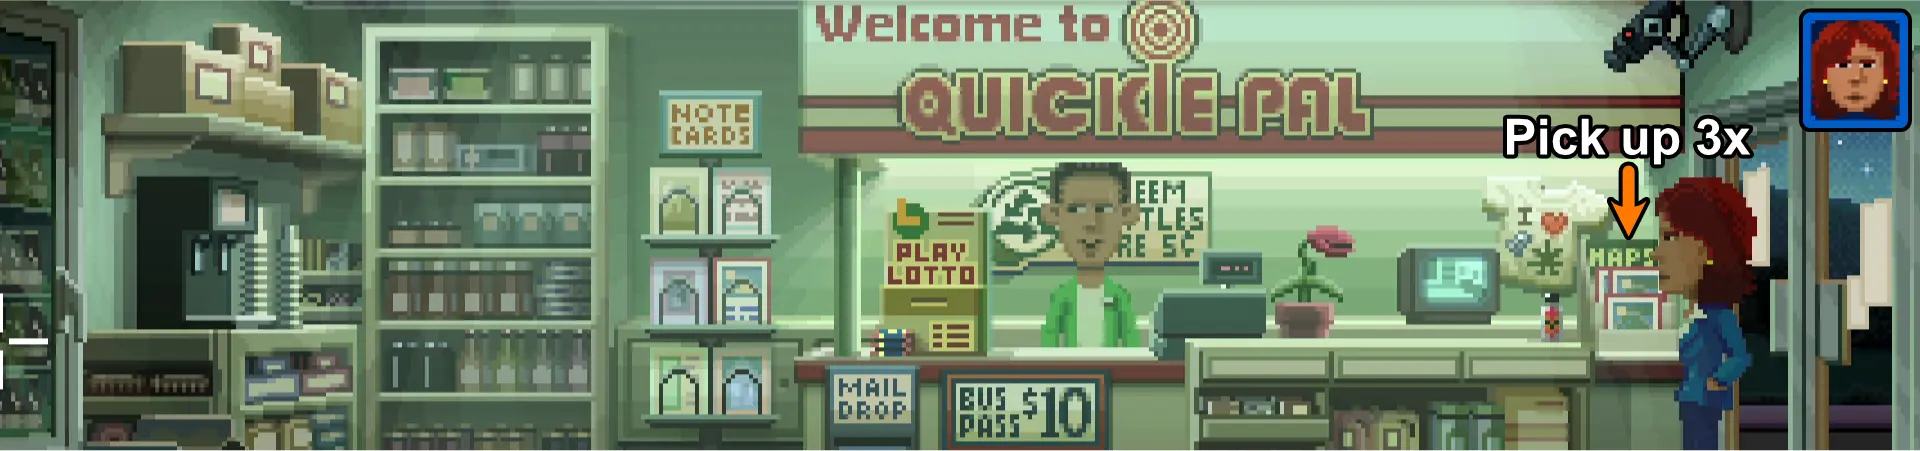
- Go to the Quickie Pal (left of the Vista, and just to the right of town).
- Open the door and enter the convenience store.
- Give the green bottle to Leonard to get a shiny nickel.
Fixing the Fire Hydrant Leak
As Agent Reyes:
- From the Quickie Pal, go to the left and talk to one of the Pigeon Sisters at the entrance of A Street. Choose these answers to proceed:
- Can I do anything to help?
- They will tell you that they need a WC-67 tube.
- Walk to the right and then enter B Street.
- Walk to the right, open the door to Ricki’s Cakes, and enter the shop.
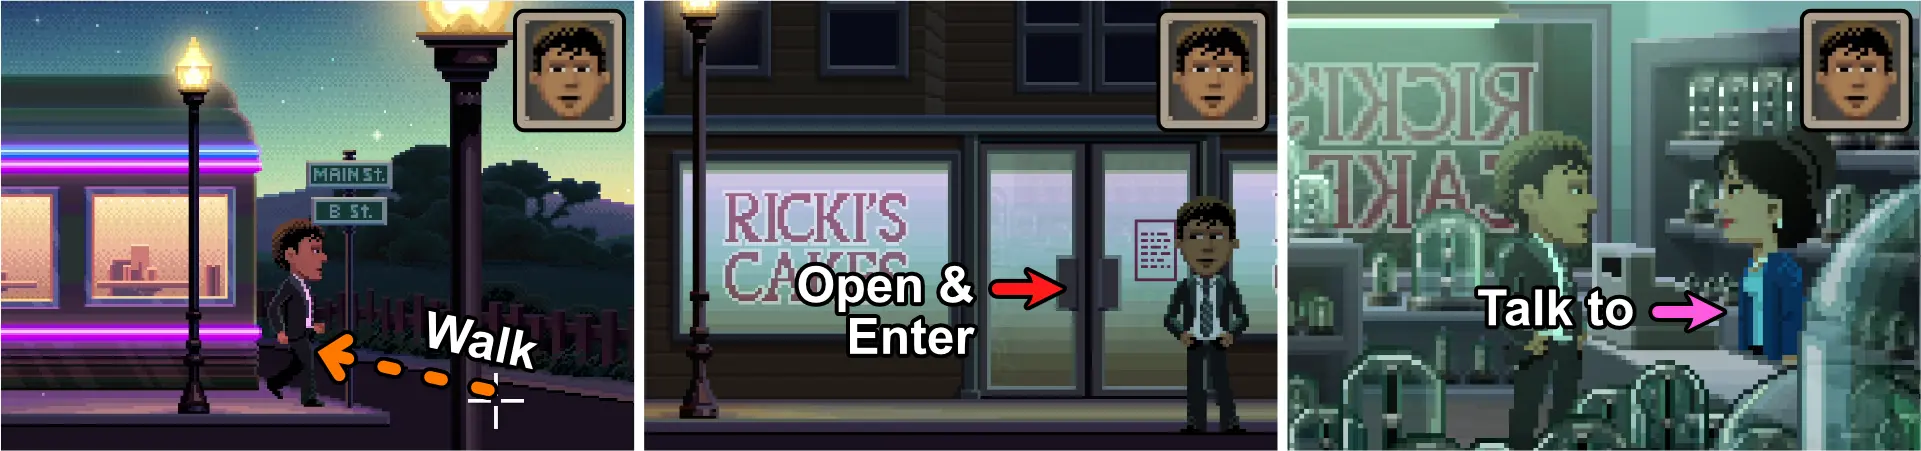
- Talk to Ricki Lee and choose these answers to proceed and get a WC-67 tube:
- Then I have something I’ll want to talk to you about.
- I’m looking for a tube.
- WC
- 67
- Go back to where the Pigeon Sisters are and give them the WC-67 tube. Once you do, they’ll fix the fire hydrant and you’ll be free to explore A street. You’ll also be given their business card.
Getting a Map from Nickel News
As Agent Reyes:
- Enter A Street and walk to the right.
- Open the door to Nickel News and enter the office.
- Walk to the left and you’ll be greeted by Natalie. Choose this answer to proceed:
- Nice chatting, got a murder to solve.
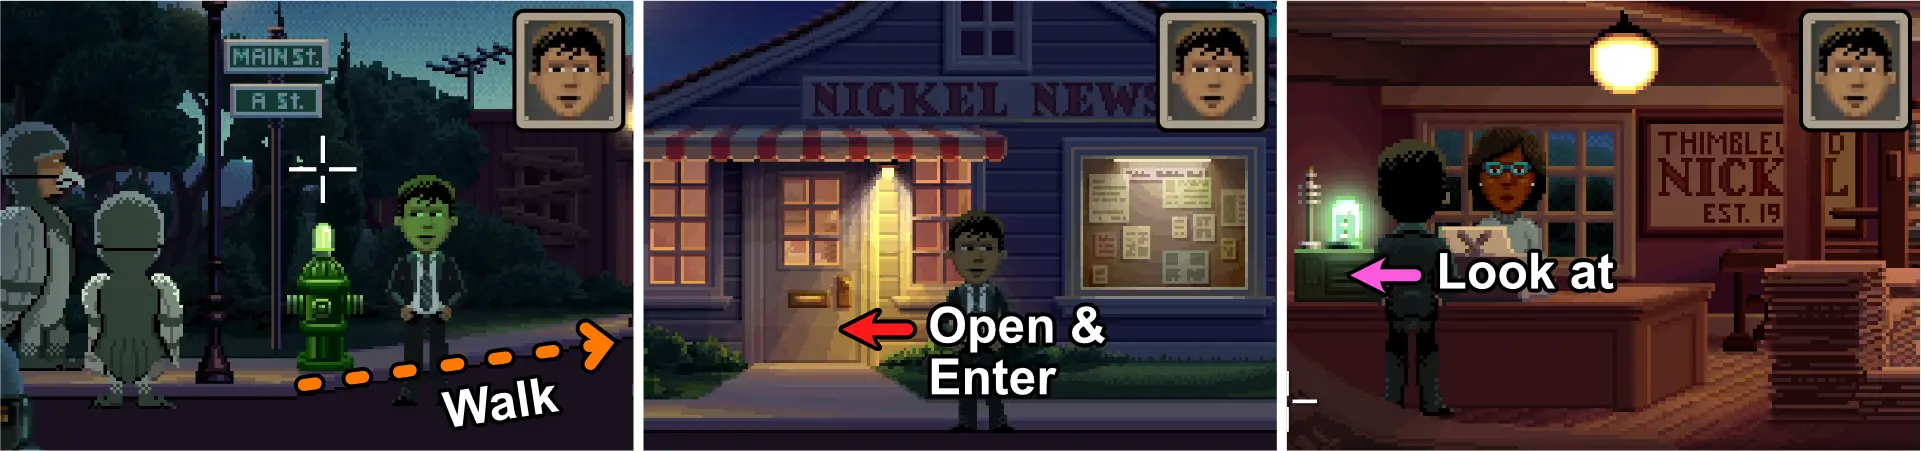
- Look at the PoliceTron 3000™ and Natalie will tell you not to touch it because she is waiting for a particular police report. The story is randomized and you’ll have to keep the following details in mind:
- Gender of the person.
- Location of the incident.
- What they’re doing.
- If you want her to repeat what she said, you’ll have to look at the PoliceTron 3000™ again.
As Agent Ray:
- Use the Town Hall’s PoliceTron 3000™ in the sheriff’s office. Choose this answer to proceed:
- Attention all units!
- Choose the 3 details that correspond to the police report Natalie was waiting for.
If you choose an incorrect answer, Agent Ray will tell you to stop screwing around and you’ll have to start over. However, the story Natalie is waiting for will not change. If you choose all the correct answers, Natalie will leave the office temporarily. You have to act quickly before she returns.
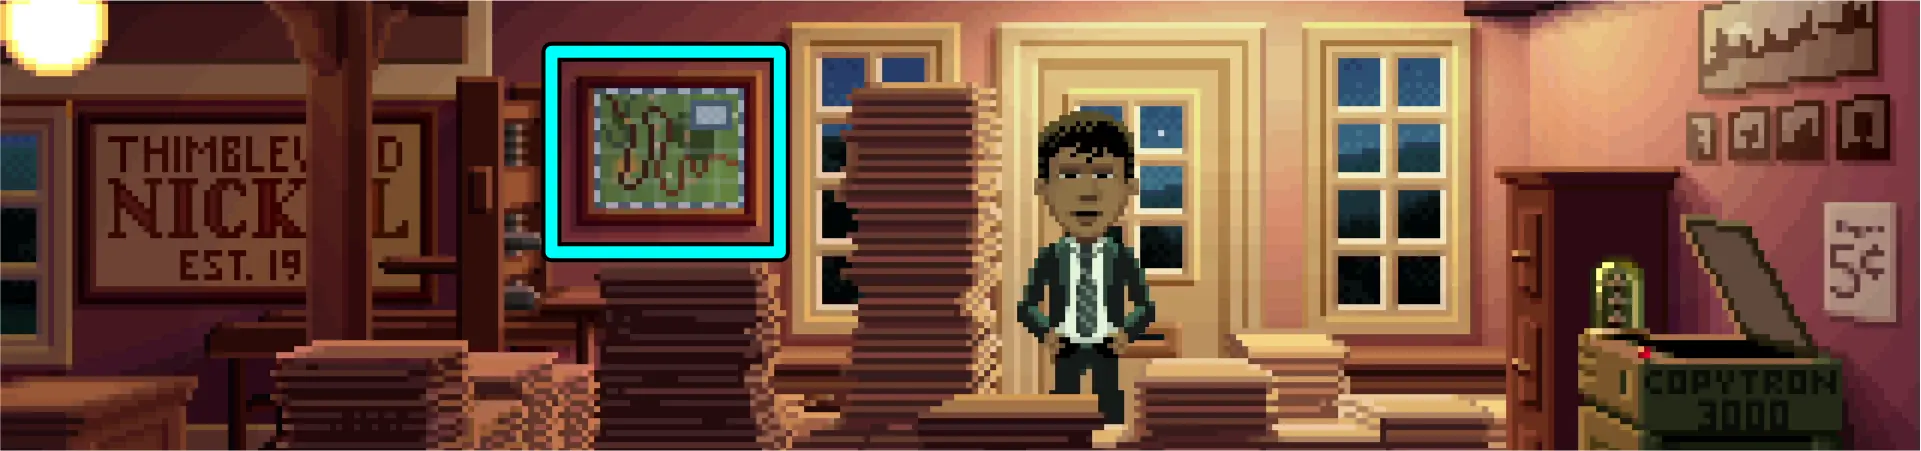
As Agent Reyes:
- Pick up the framed county map.
- Use the county map on the CopyTron 3000™.
- Use the shiny nickel on the CopyTron 3000™.
- Open the door and exit the Nickel News office. Putting the map back into the frame is optional.
If you are not able to get a copy of the map in time, you will have to start over and look at the PoliceTron 3000™ again to get the next police report Natalie is waiting for.
Unlocking Fast Travel With Maps
Once you have the official map, as Agent Reyes:
- Go back to the Vista and walk to the county.
- You’ll be confronted with the sheriff again. Choose these answers to proceed:
- I have an “official” map right here.
The sheriff will then let you pass and return all maps he took back to the Quickie Pal, ending Part 2.
Part Three: The Arrest

Before Investigating
At the start of Part 3, Agent Ray and Agent Reyes will talk. Choose this answer to proceed:
- Let’s get cracking.
As Agent Ray:
- Go to the Quickie Pal and make sure to take all 3 maps by the door. You’ll need to give the other two to Delores and Ransome later once they become usable characters.
Ransome’s Flashback
As Agent Reyes:
- Tap the map and tap Main Street (South).
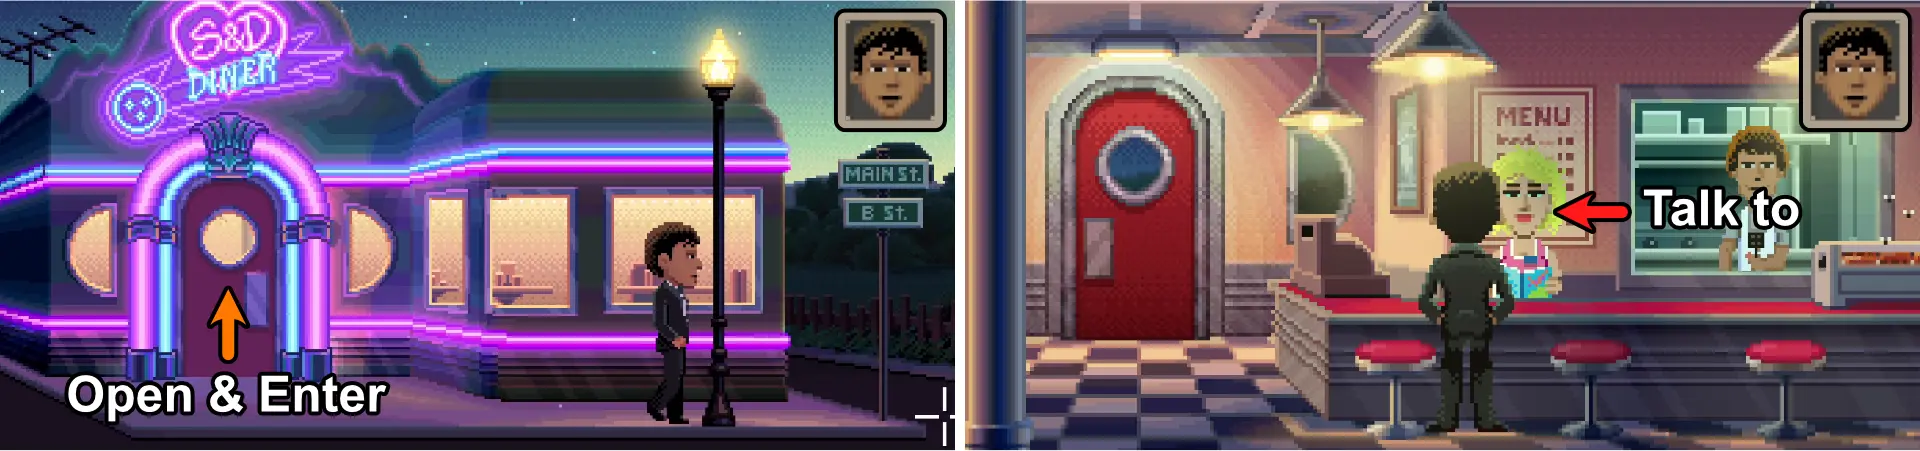
- Open the door to the S&D Diner and enter the establishment.
- Talk to Sandy. Choose these answers to proceed to Ransome’s flashback:
- I’m a federal agent, know anything about the dead body?
- We’re the feds, you can trust us. What else do you know?
The flashback starts with Ransome preparing for his show. He will be the only character you can use. He’ll need to do the following:
- Put on clown nose.
- Get joke book.
- Fix Clownfro.
- Apply makeup.
- Go on stage.
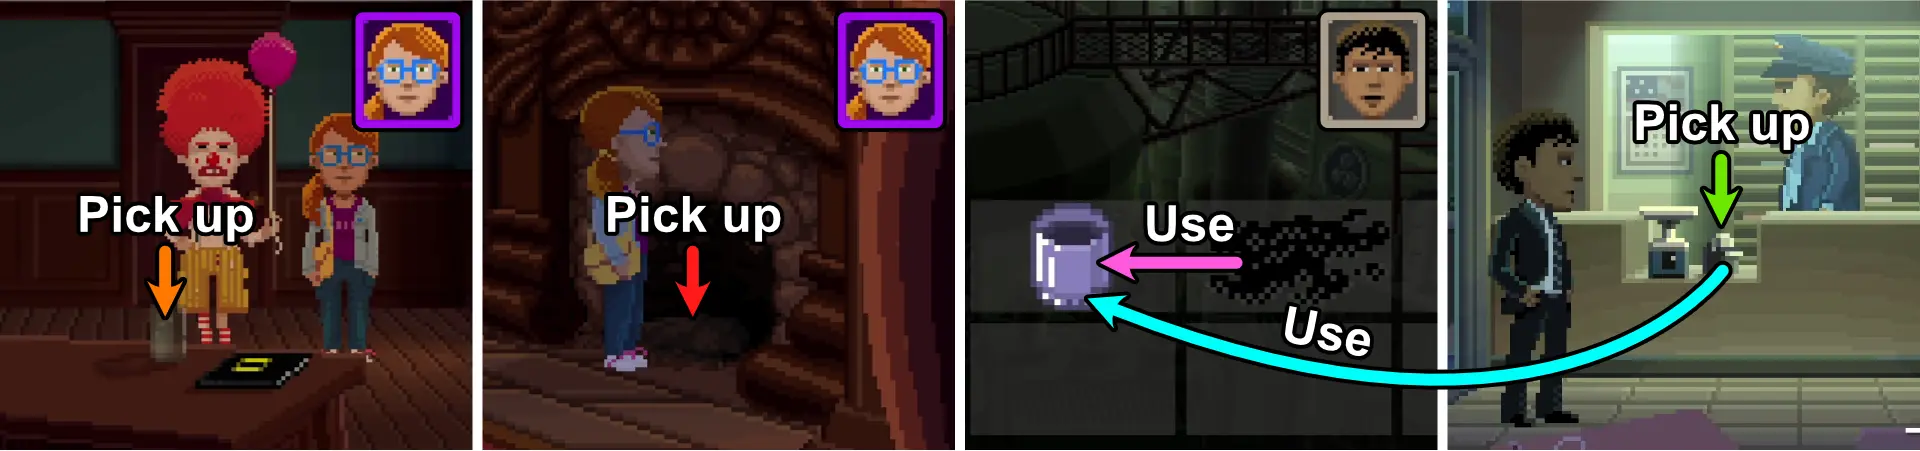
Getting Ransome’s Joke Book
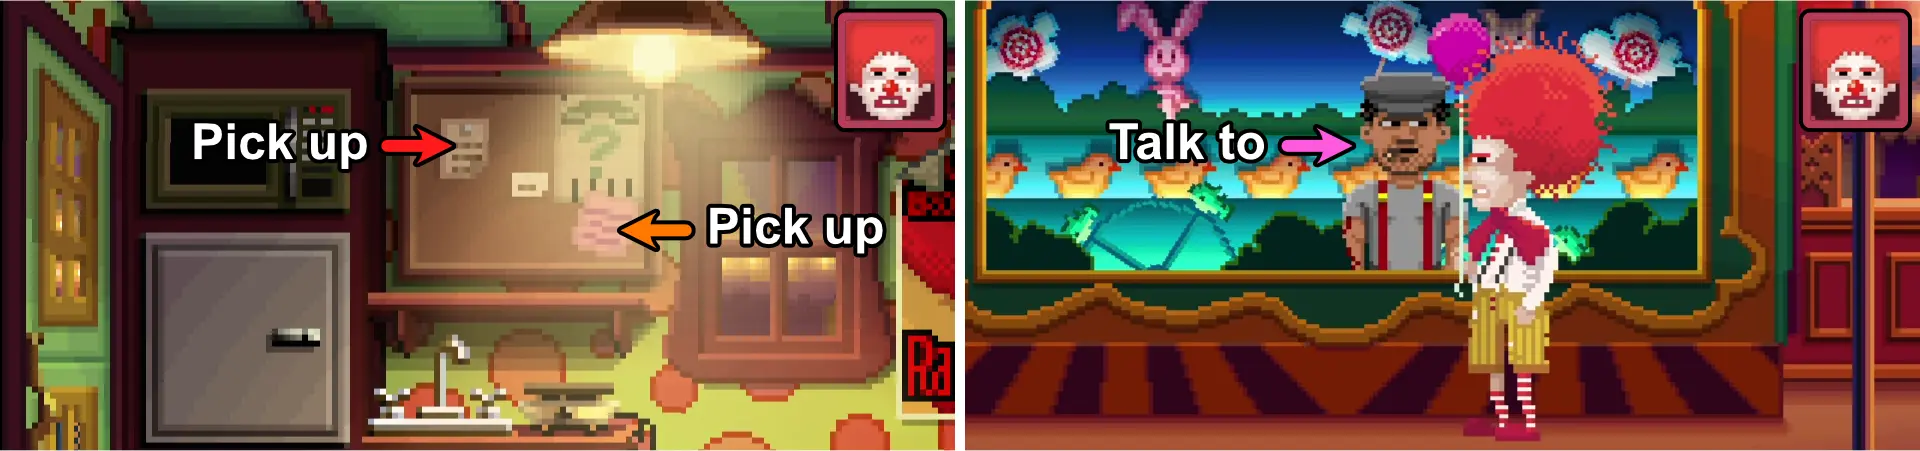
- Pick up the pink note from the board. It will tell you who has Ransome’s jokebook: Carney Joe. It says that he’ll give it back after you give him $1,000. However, after talking to him twice, he’ll reveal that he actually wants his money back with interest; a total of $1,138.
- Pick up the brown note will give you clues for the numbers you need to input in your safe to open it.
- The first two clues are randomized and will require you to count certain objects that are found around the circus. Some of the objects they’ll ask you to count are:
- Ransome’s Trailer:
- Steps / Stairs – 3
- Trophy – 2
- Trailer Area
- Number of Trailers – 3
- Circus Entrance (Circus Grounds):
- Flags – 4
- Letters of the first word – 10
- Letters of the second word – 9
- Letters of the third word – 8
- Letters of the last word – 6
- Backstage
- Stars – 2
- Masks – 2
- Midway
- Fish – 8
- Clouds – 3
- Cat – 1
- Rabbit – 1
If there is the word “squared” at the end of the clue, you’ll have to multiply the number by itself (ex: 3×3 = 9).
- The third clue will always be the number of kids Carney Joe has. To get this information (which is randomized per playthrough according to some players):
- Go to Midway (leftmost part of the circus grounds).
- Talk to Carney Joe and choose this answer:
- So, how’s the ol’ ball and chain and kids?
- In our experience playing that part multiple times, we always get 12.
- Once you get all of the numbers needed, go back to Ransome’s trailer.
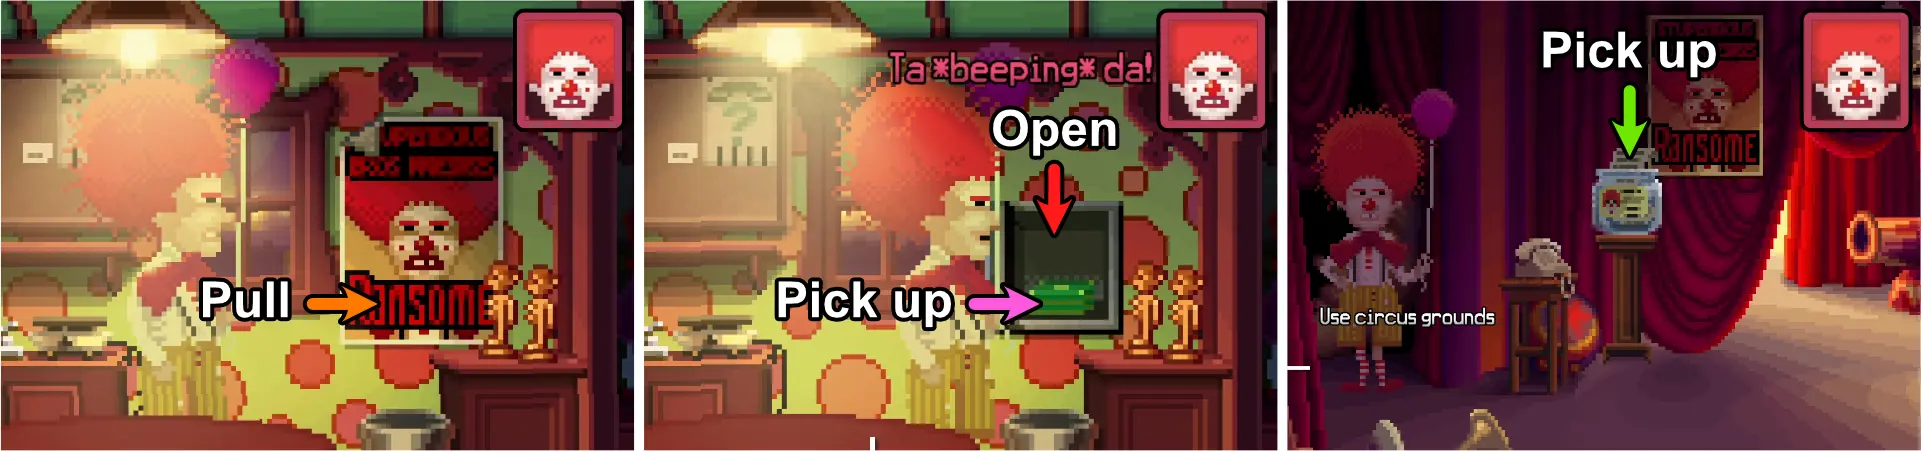
- Pick up Ransome’s poster on the wall.
- Open the safe and choose the correct answers.
- Pick up the $1,000 from the safe.
- Go backstage and pick up $138 from the swear jar.
- Go to Midway and give the money to Carney Joe to get Ransome’s Joke Book.
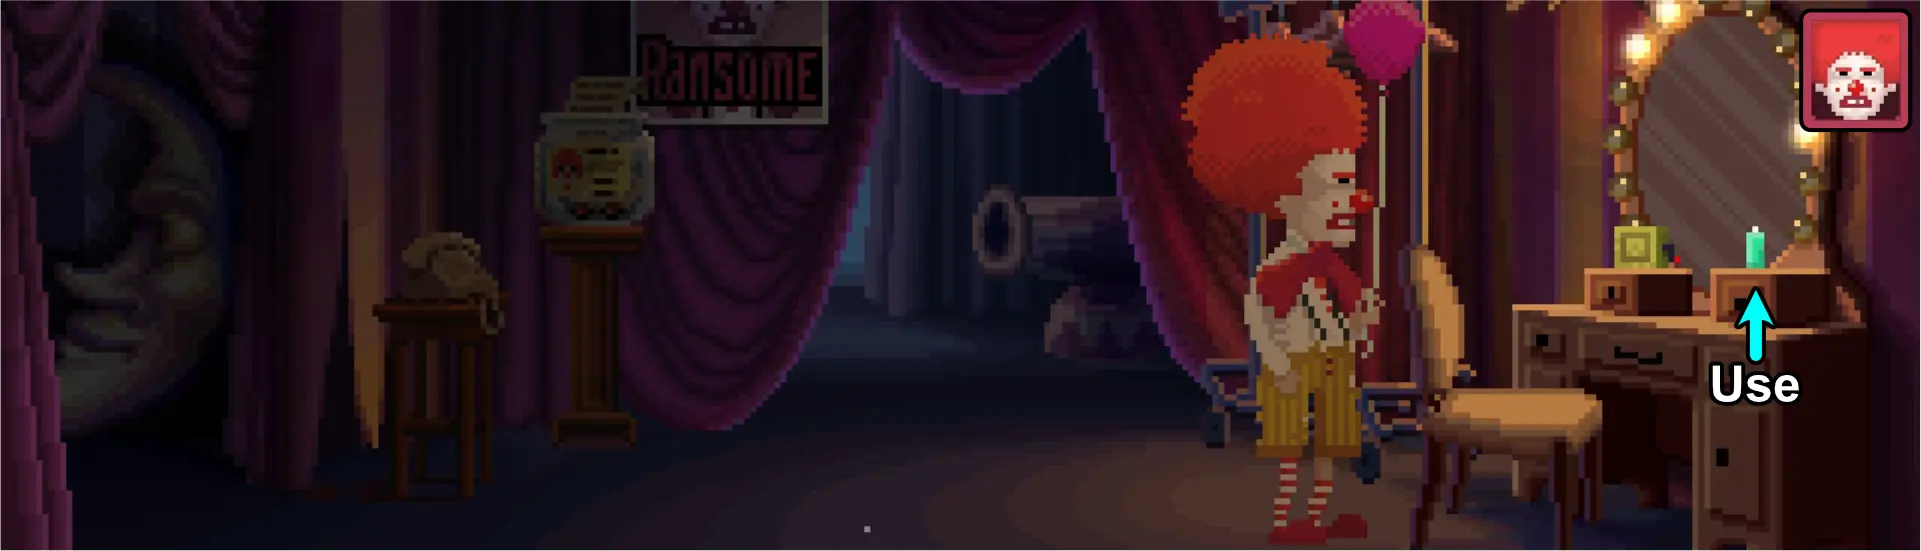
Preparing Ransome’s Look
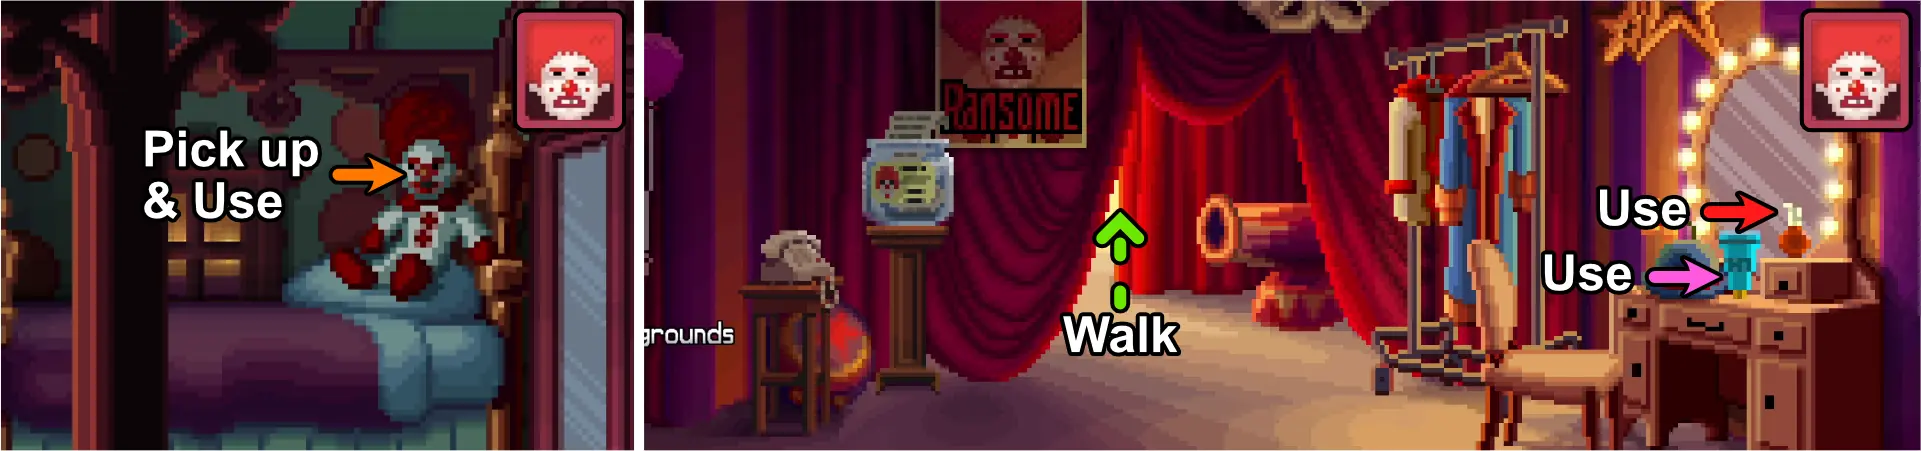
- At Ransome’s trailer:
- Pick up clown nose from the clown doll on the bed.
- Use the clown nose.
- At the backstage:
- Use the orange makeup on the vanity desk.
- Use the blue hair gel on the vanity desk.
Performing on Stage
Once all preparations are complete, go on stage from the backstage to perform. Choose any of the answers 3 times until you get the option to choose this answer:
- Hey you, ugly old lady with the hairy mole!
A cutscene follows and the flashback ends.
Getting Ransome as a Playable Character

As Agent Ray:
- Tap the map and tap old circus.
- Use the clown horn.
- Ransome will come out and start a conversation with you. Choose these answers to proceed:
- Ransome the Clown? I heard you know about a body by the bridge.
- Don’t go anywhere. I’ll be back.
After ending the conversation, Ransome will now be a playable character. He’ll have 3 tasks in his to-do list:
- Feed Li’l Beeper.
- Get a package from the post office.
- Try removing makeup again.
He will not leave the circus until Li’l Beeper is fed.
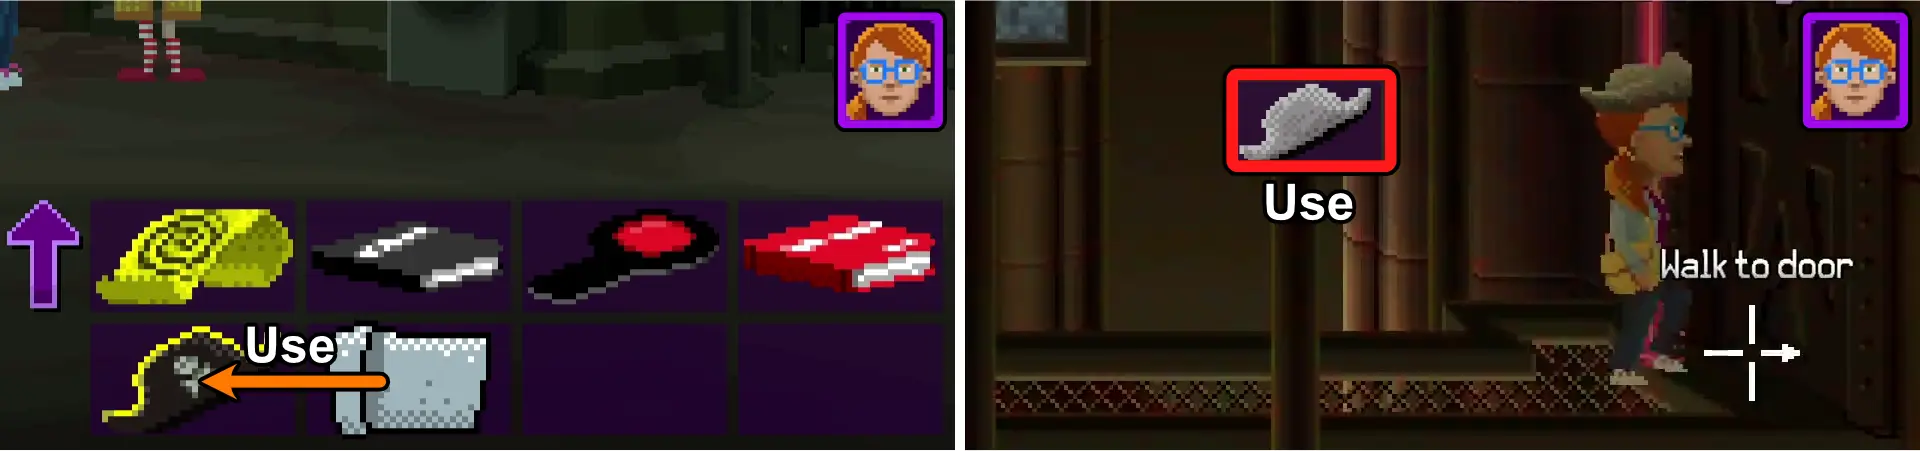
Attempting to Remove Ransome’s Makeup
As Ransome:
- Go backstage.
- Look at the mirror.
Feeding Li’l *Beeper*
As Ransome:
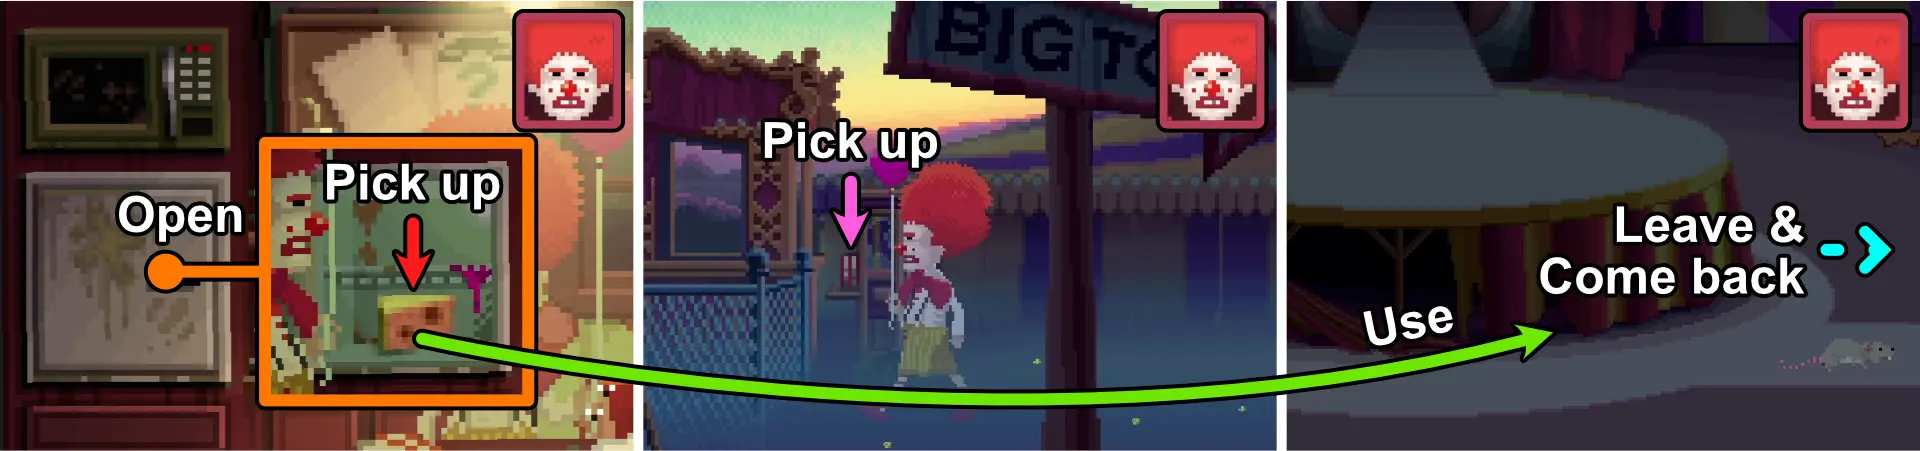
- Open the refrigerator.
- Pick up moldy cheese.
- Leave the trailer and walk to the circus grounds.
- Walk to the left and pick up the popcorn bag in the popcorn stand.
- Enter the big top entrance.
- Use moldy cheese on the hole below the stage.
- Leave the big top tent then go back in again.
- Pick up the pile of popcorn next to the moldy cheese.
- Go back to Ransome’s trailer and open the microwave.
- Give the full popcorn bag to Li’l Beeper (hamster).
After this, Ransome will now be able to leave the circus. Make sure to use Agent Ray and give Ransome one of the maps you obtained from the Quickie Pal earlier for easy travel.
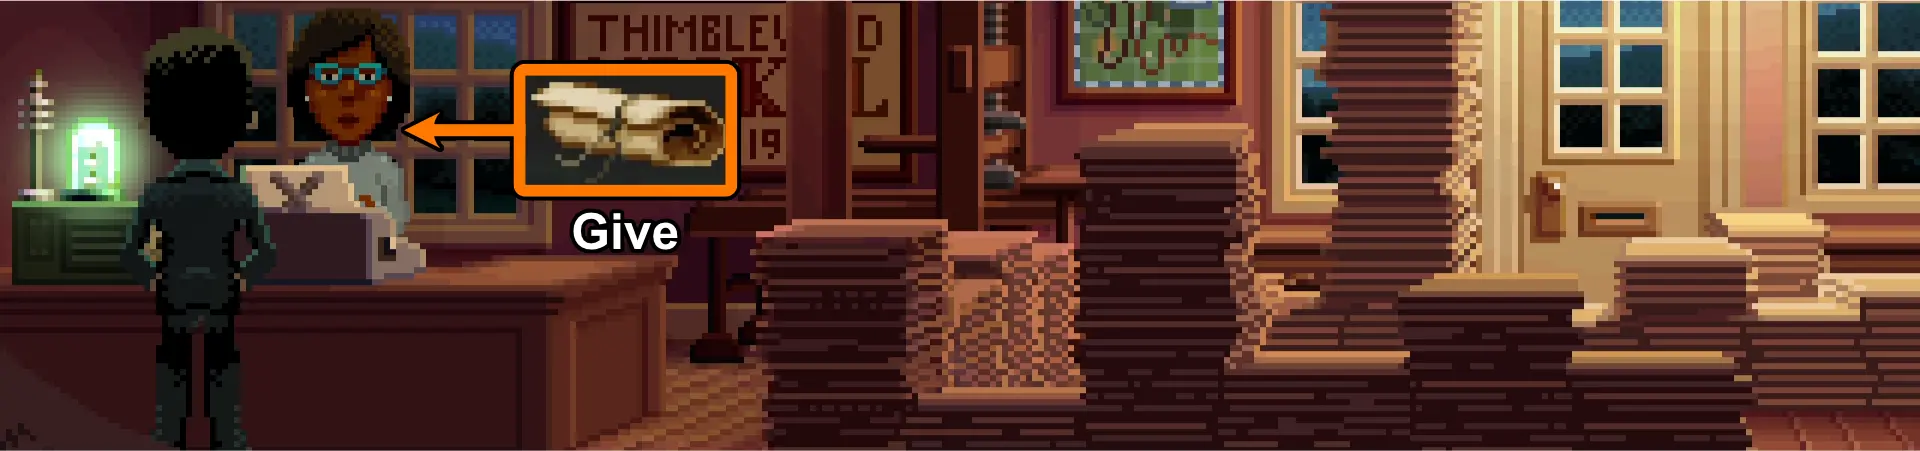
Getting a Package from the Post Office
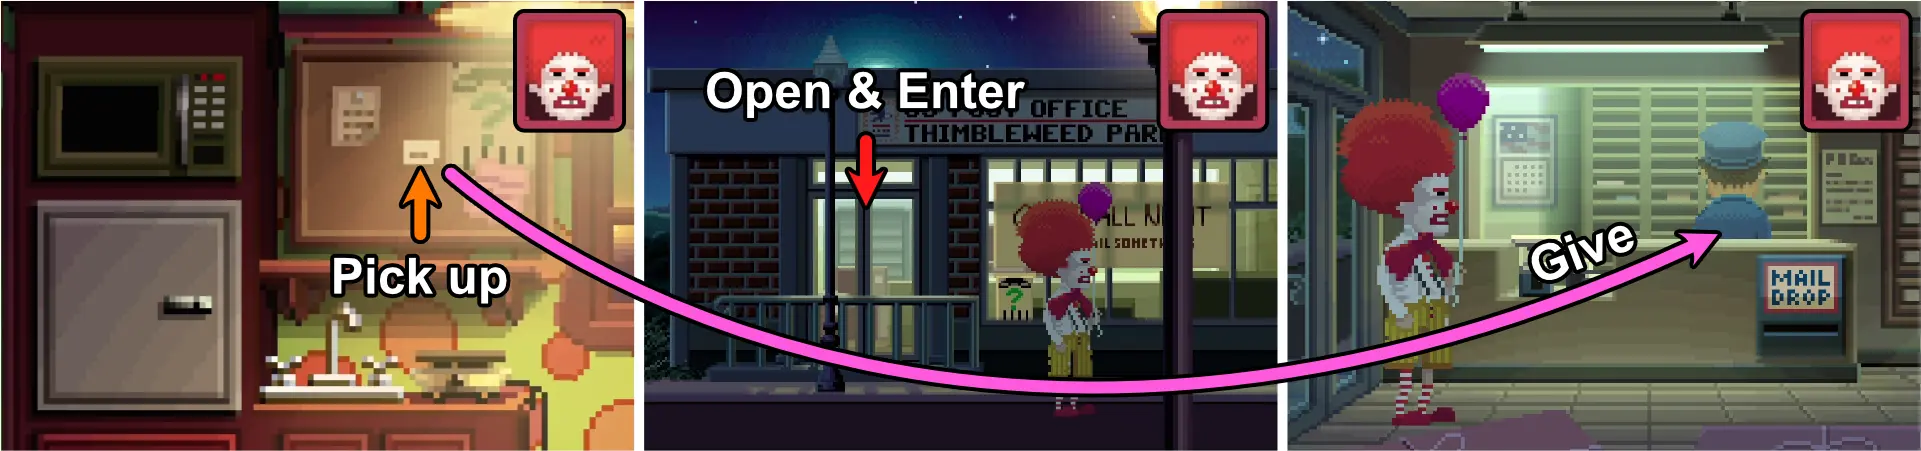
As Ransome:
- Pick up the pink postal notice on the board in Ransome’s trailer.
- Tap the map and tap A Street.
- Go to the post office.
- Give attempted delivery notice to George (Postal Worker) to obtain the package.
- Open the package and you’ll obtain a wallet and a candy dispenser.
Delores’ Flashback
As Agent Ray:
- Tap the map and tap bus station.
- Walk to the right and talk to lady of the evening. Choose these answers to proceed:
- Do you know anything about the body by the river?
- Tell me who you think is connected to the body.
- Spill the beans trust fund Barbie!
- (Choose any of the four choices.)
The flashback starts with Delores in her room, looking forward to her monthly computer magazine. She will be the only character you can use. You’ll need to do the following:
- Collect her monthly computer magazine.
- Apply for a job at MMucasFlem Games
- Tell Uncle Chuck her plans.
Retrieving the Computer Magazine
- Open the door and leave the room.
- Walk to the hall to the left.
- Walk all the way down the stairs.
- Open the front door and leave the house.
- Approach the gate and George the mailman will appear. He’ll start a conversation and give you the computer magazine.
- Look at the computer magazine.
Applying for MMucasFlem Games
- Go to Delores’ room and use her computer to start writing your job application. Choose any answer from the choices presented when asked about personal details.
- When given questions about the MMucasFlem Programming Language and you do not know how to answer it, choose:
- I’ll get back to you on this… pause application.
- Go to the front door of the mansion and receive a letter from George. The doorbell will not stop ringing until you take it.
- Go to the library by going back inside the mansion, opening the door in the middle of the staircase, and then entering it.
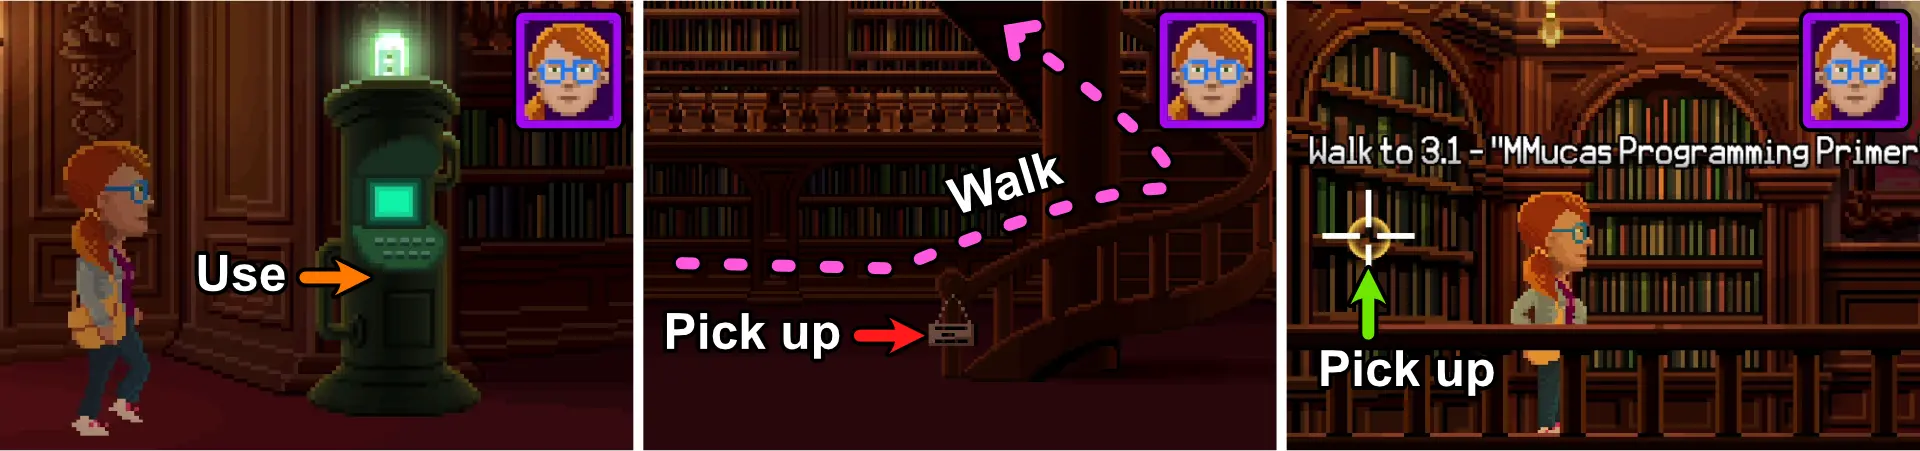
- Use the IndexTron 3000™ and it will tell you that there is a MMucasFlem book in section 3.1.
- Go to the right until you reach the spiral staircase.
- Pick up the sign on the bottom of the spiral staircase.
- Go up the spiral staircase.
- Go to the left and look at “MMucasFlem Programming Primer” at the leftmost bookshelf in section 3.1. It will automatically be put in your inventory.
- Go back to your room and use the computer to continue your application.
- The 4 questions you’ll be given about the MMucasFlem Programming Language will be randomized. Below are some of the details in the book that may come up in the questionnaire:
- MMucasFlem Copyright ©1986
- greatest adventure game scripting language ever created
- first used in Mansion Mansion
- cooperative multitasking language
- allows multiple scripts to run concurrently
- allows 256 room local variables
- functions can take up to 8 parameters
- MMucas source-level debuggers run on a separate monitor
- variables can be modified while debugging your program
- compiled scripts are packed into MFL files for distribution
- shipped games are encoded using XOR encryption
- eight actors can be displayed on the screen at one time
- room backgrounds are compressed into character sets
- When the screen scrolls, it moves by eight pixels
- 256 sounds can be defined for each game
The PrintTron 3000™ will attempt to print the application but it has run out of ink.
Finding Ink for PrintTron 3000™
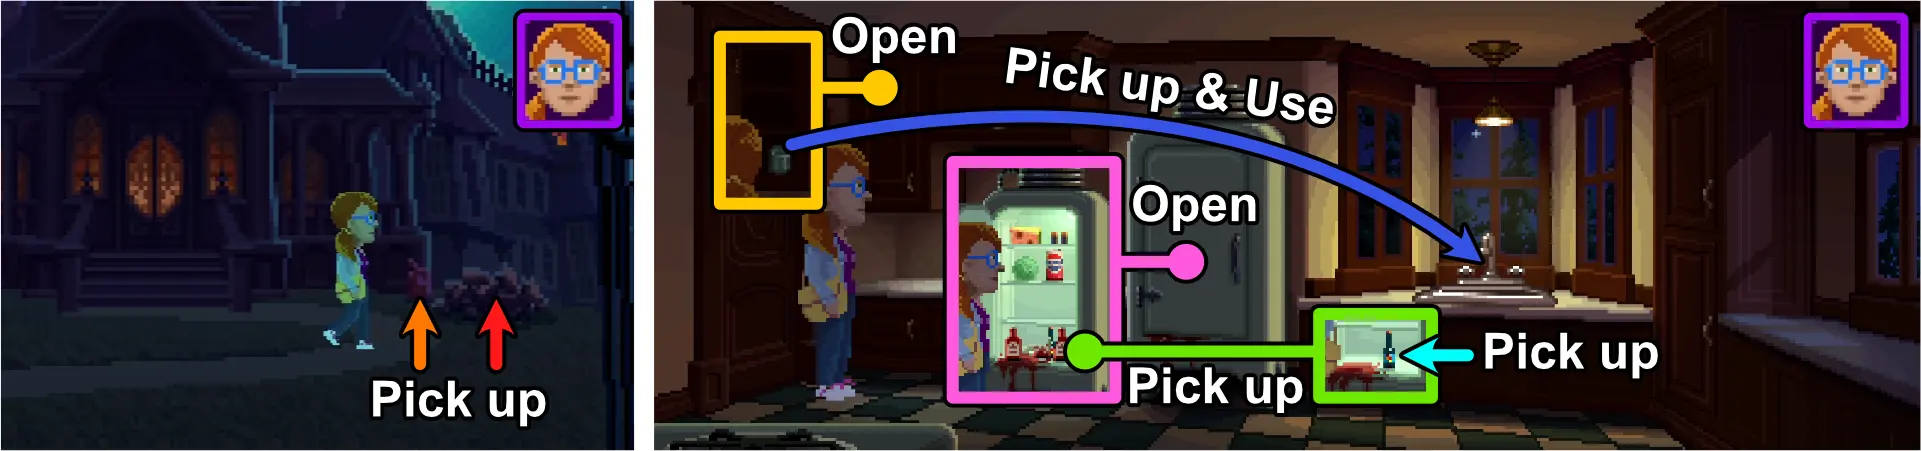
- Go to the front yard of the mansion.
- Pick up the gas can and firewood from the wood pile.
- Go to the kitchen by opening the door to the right of the staircase and entering it.
- Open the refrigerator.
- Pick up broken bottles of ketchup.
- Pick up hot sauce.
- Open the cupboard next to the door.
- Pick up glass.
- Use glass with the faucet.
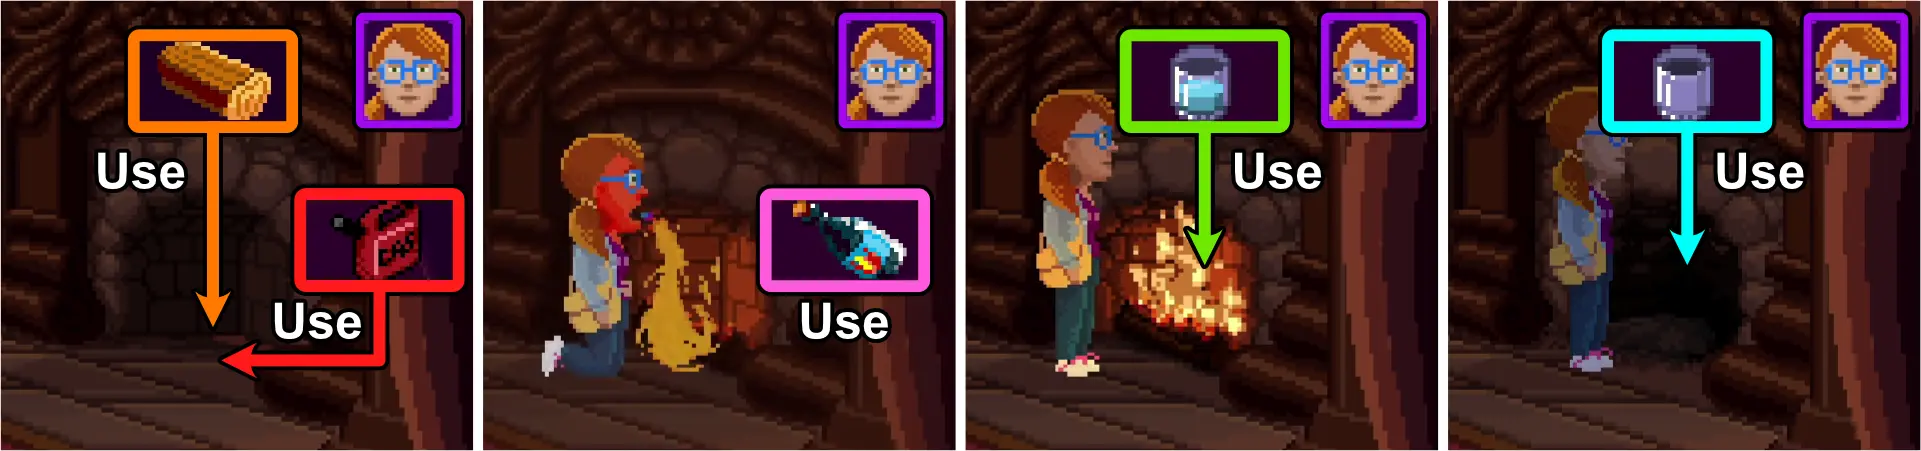
- Leave the room and approach the fireplace to the right.
- Use the firewood in the fireplace.
- Use the gas can on the log in the fireplace.
- Look at the hot sauce.
- Use hot sauce while close to the fireplace.
- Use the glass of water on the fire.
- Use glass on fireplace soot.
- Use the gas can with the glass of soot.
- Go back to Delores’ room and use the glass of ink on PrintTron 3000™.
- Use the computer to print out your application.
- Pickup envelope.
Mailing Delores’ Job Application
- Go to the kitchen.
- Use glass on the faucet.
- Open the microwave.
- Use the glass of water on the microwave.
- Use Uncle Chuck’s letter on the microwave.
- Use the microwave.
- Open the microwave.
- Pick up the letter.
- Use stamps on the letter to MMucasFlem.
- Go outside the mansion and use the letter to MMucasFlem on MailTron3000™.
A cutscene follows showing the passage of time and George coming by to give Delores a letter.
- Go to Delores’ room.
- Open the letter from MMucasFlem. Use this command 4 times.
- Leave Delores’ room.
- Open the door directly to the right of the entrance to the hall.
- Open the door to the very right and enter Uncle Chuck’s room.
A cutscene follows between Uncle Chuck, Franklin, and Delores.
- Give the letter from MMucasFlem to Uncle Chuck.
Another cutscene follows and the flashback ends.
Getting Delores as a Playable Character
As Agent Ray:
- Tap the map and tap Edmund Mansion mansion.
- Open the front door. You’ll be greeted by Delores. Choose any of the answers you’ll be told it is not a good time.
After ending the conversation, Delores will now be a playable character. As Delores, go to the Library to trigger a conversation with Lenore and she will now be able to leave the mansion. Get Agent Ray to give her one of the maps you obtained earlier for easy travel.
She will have 4 tasks in her to-do list:
- Find out what happened to Dad.
- Practice ASCII tables.
- Talk to Lenore in the Library.
- Get the lawyer to read Uncle’s will.
At this time, you can only accomplish the second and third tasks.
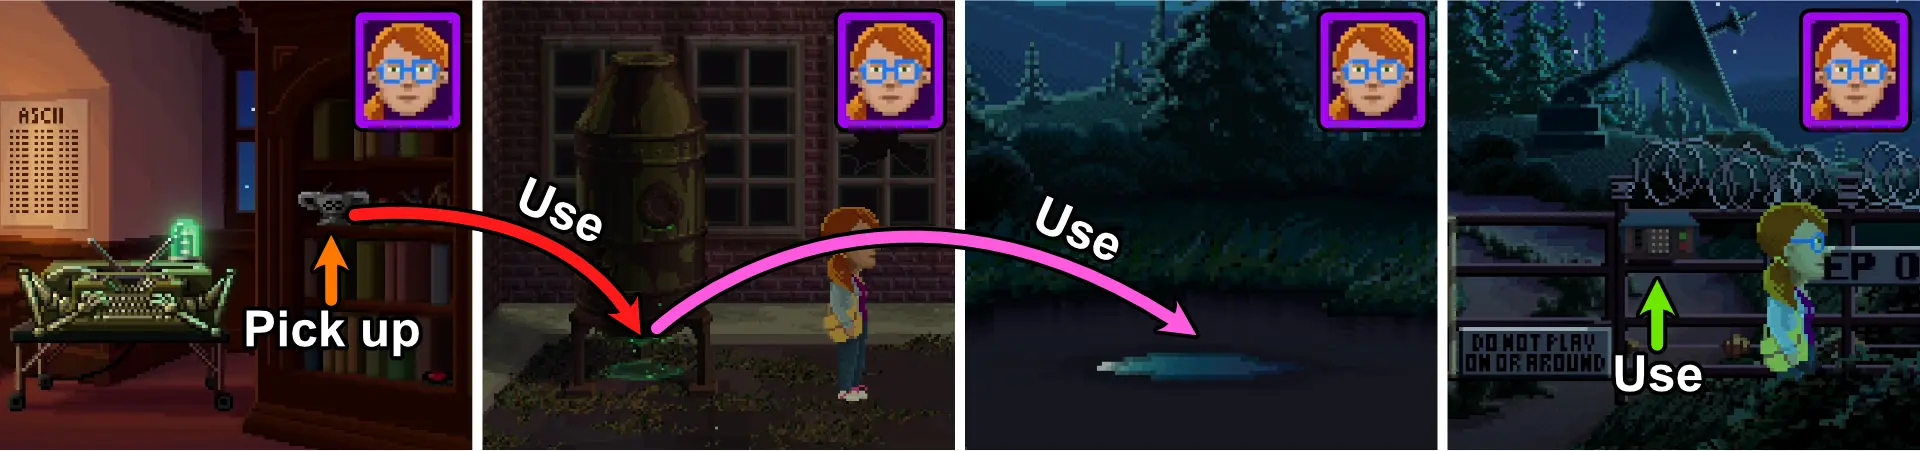
As Delores:
- Go to Delores’ room.
- Look at ASCII chart.
- Go to the library.
- Talk to Lenore. The conversation isn’t too important so you can choose any answers.
Franklin’s Flashback
As Agent Reyes:
- Tap the map and tap hotel.
- Enter the hotel and you will be greeted by Natalie. Choose these answers to proceed:
- What are you doing here?
The flashback starts with Franklin outside the Edmund Hotel. He will be the only character you can use. He’ll need to do the following:
- Disguise appearance to get a hotel room.
- Photocopy the prospectus.
- Present to investors.
Getting a Disguise to Check in to a Hotel Room
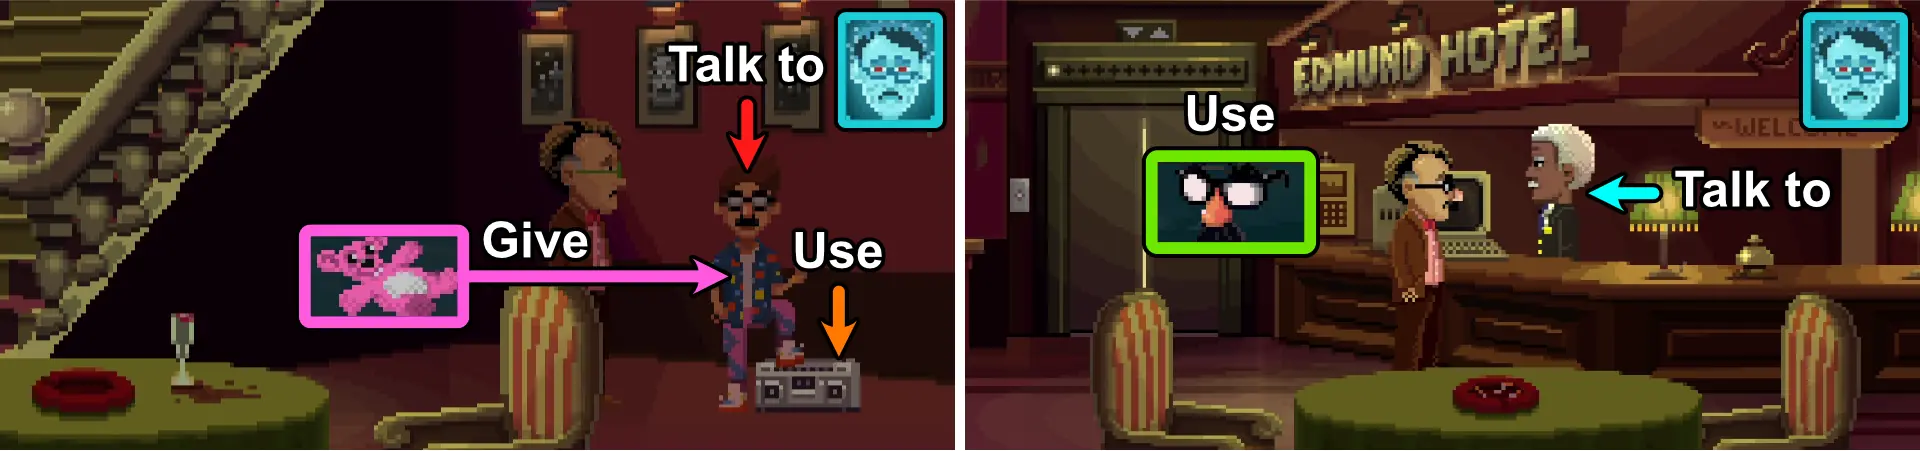
- Enter the hotel.
- Walk to the right and use the boombox.
- Talk to the annoying kid. Choose these answers to proceed:
- What’s that jacket you’re wearing?
- What’s that on your face?
- What’s on your feet?
- What’s with all the latest and greatest?
- What if I said you didn’t have the latest and greatest stuff?
- Your glasses are not the latest and greatest.
- I would totally know what was the latest and greatest.
- I know this gnarly dude who…
- was on MTV and…
- tells me what’s wicked and what’ll gag me with a spoon.
- Use the boombox again.
- Give one of the PillowBears™ to the kid. Choose this option to get the nose glasses and the used gum.
- I’ll trade you the bear for your glasses. No faking.
- Use nose glasses.
- Talk to the manager at the reception desk. Choose these answers to proceed:
- I’d like to check-in.
- (Choose any name.)
- I’m going to look at my, I mean, YOUR beautiful lobby.
You’ll be given a randomized hotel keycard.
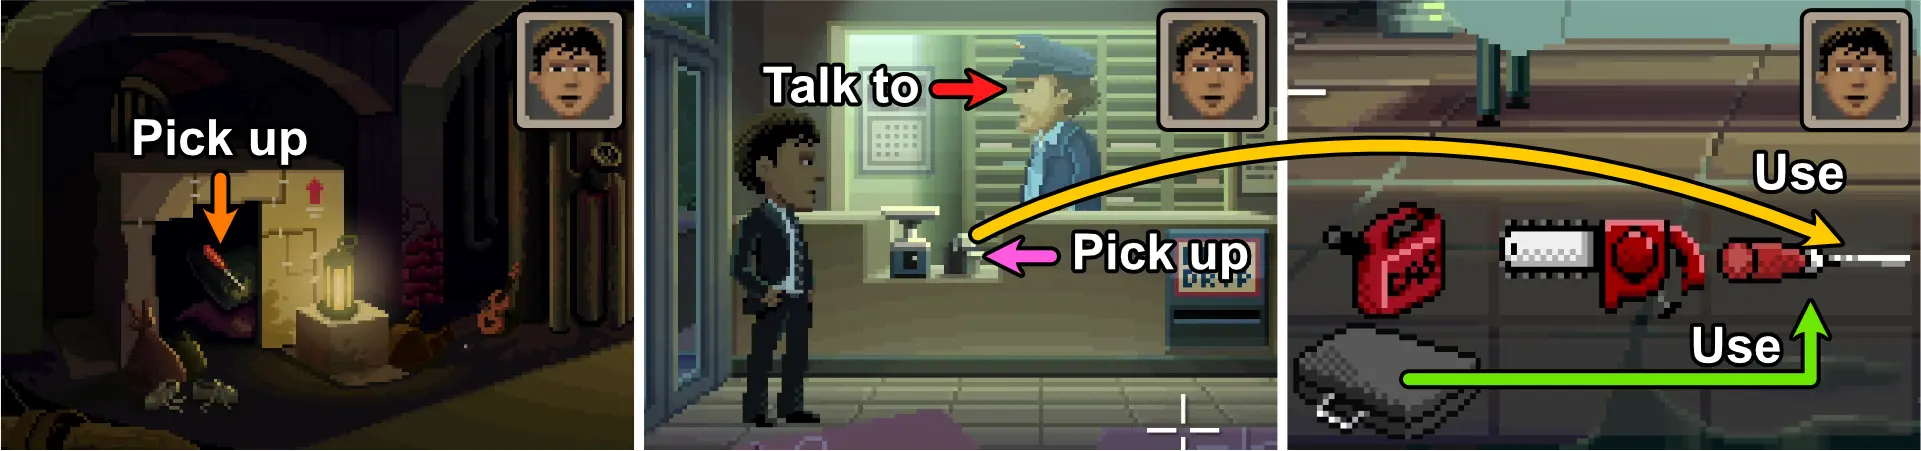
Obtaining Paper for Photocopying
If you ask the manager about photocopying, they’ll confirm that they have the service but they ran out of paper.
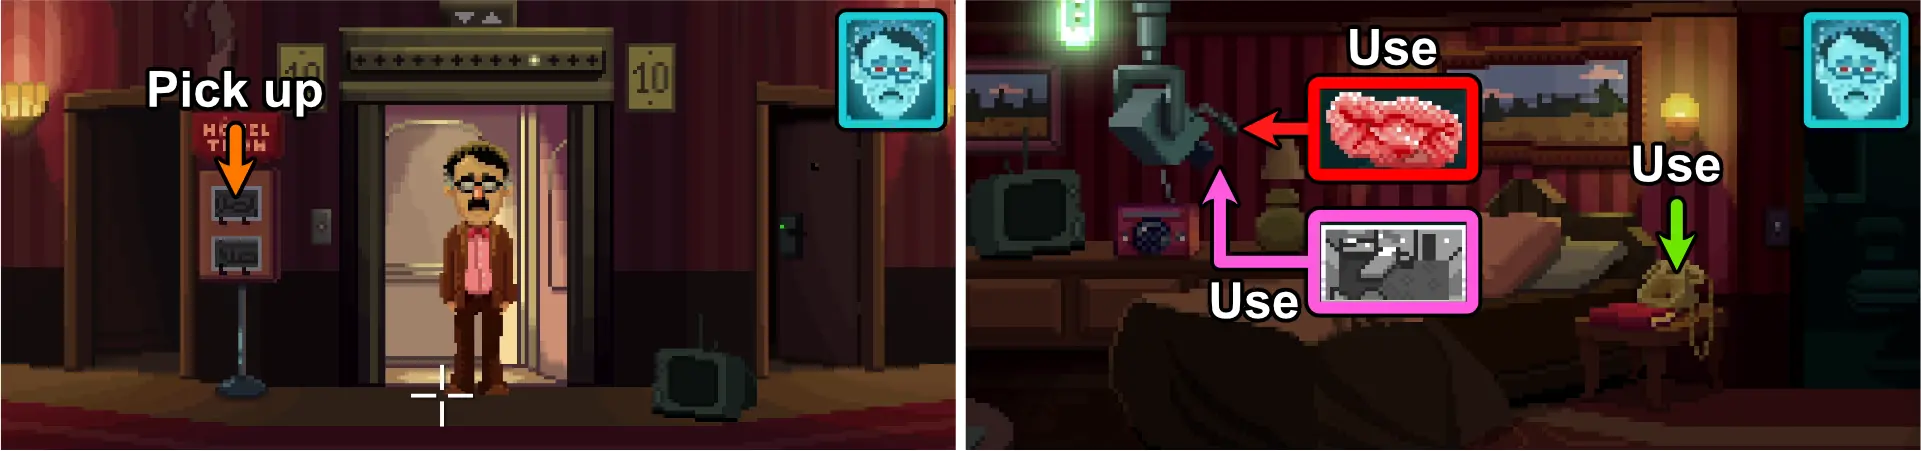
- Open the elevator doors and enter.
- Go to the 10th floor.
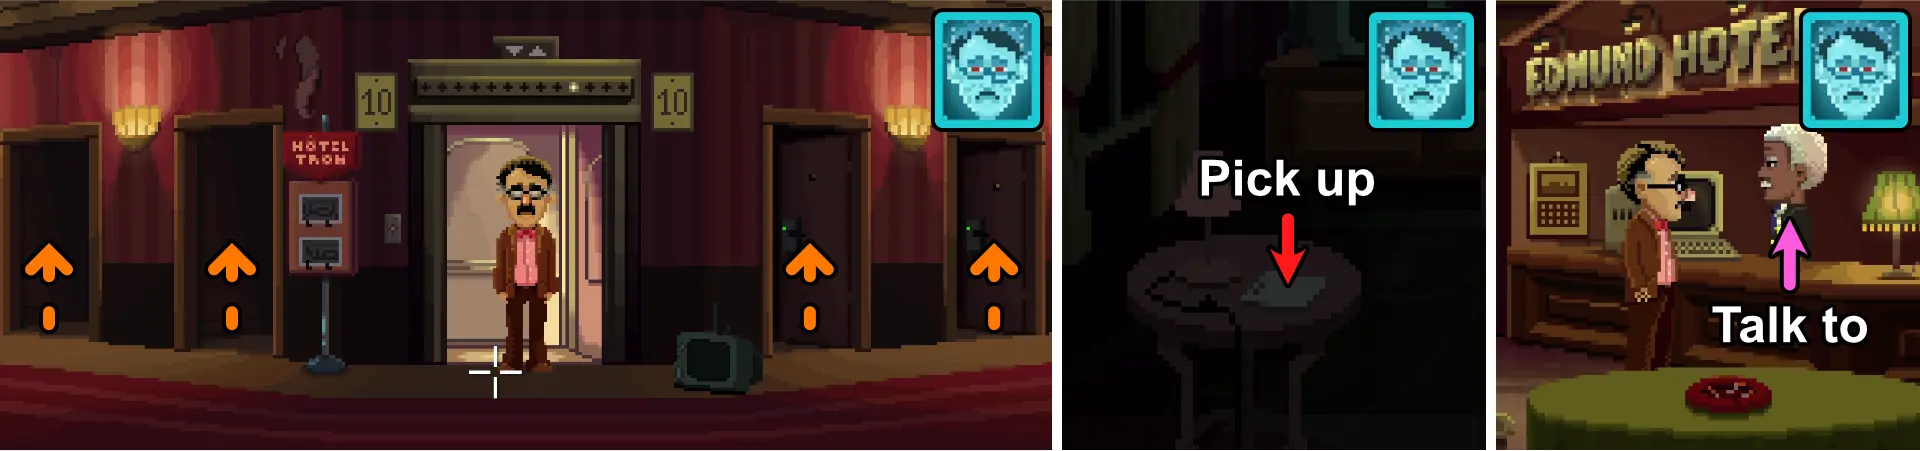
- Go to 4 rooms and pick up stationery on the side table at the left side of each room.
- Use the elevator and go to the lobby.
- Talk to the manager. Choose these answers to proceed:
- I have some stationery…
- This prospectus document.
Presenting the Prospectus to Investors
- Go to your hotel room. Look at the number of your keycard. The first number is the floor number while the last 2 numbers are the room position from left to right of the floor.
- Use the keycard on the hotel room to open the door and enter it.
Franklin will have a brief conversation with someone on the phone.
- Go to the 10th floor.
- Pick up the picture of the standard room from the stand.
- Use chewed, sticky bubble gum on the HotelTron 3000™.
- Use standard room photo on the HotelTron 3000™.
- Use the telephone by the bed to call the investors.
A cutscene will follow and the flashback ends. Back to the present, choose “Thanks for all the information. See you later” in the conversation with Natalie to proceed.
Getting Franklin as a Playable Character
As Agent Reyes:
- Tap the map and tap hotel.
- Talk to the manager. Choose these answers to proceed:
- Do you know what happened to Franklin Edmund?
- I’m going to check out your beautiful lobby!
- The manager will give you the keycard for the hotel room a disguised Franklin Edmund checked into.
- Use the elevator and go to the floor of Franklin’s hotel room.
- Use the keycard to open Franklin’s hotel room. You won’t find anything there.
- Exit the hotel room.
A cutscene follows and Franklin will now be a playable character but he cannot leave the hotel. He’ll need to do the following:
- Talk to Delores.
- Visit Chuck’s tomb.
- Scare 2 people at the drinking fountain.
- Escape to the afterlife.
At this time, Agent Reyes will also not be able to leave the hotel until Franklin meets his quota of scaring 2 people at the drinking fountain.
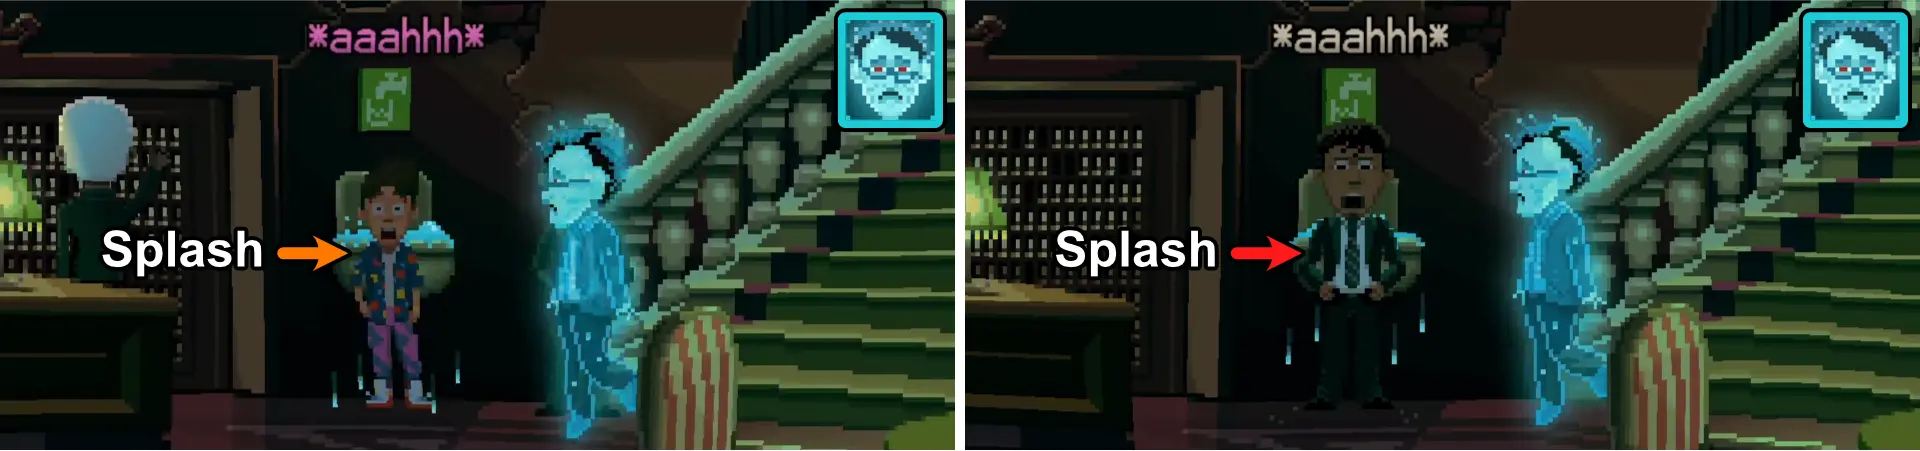
As Franklin:
- Leave the hotel room.
- Use Zap on the elevator and go to the lobby.
- Approach the drinking fountain and wait for the annoying kid to drink from it.
- Use Splash on the water fountain to scare the kid.
- One of the ghosts will talk to Franklin. Float back to the drinking fountain right after.
As Agent Reyes:
- Use the elevator and go to the lobby.
- Use the water fountain.
As Franklin:
- Use Splash on the water fountain.
A cutscene follows and Agent Reyes can now leave the hotel.
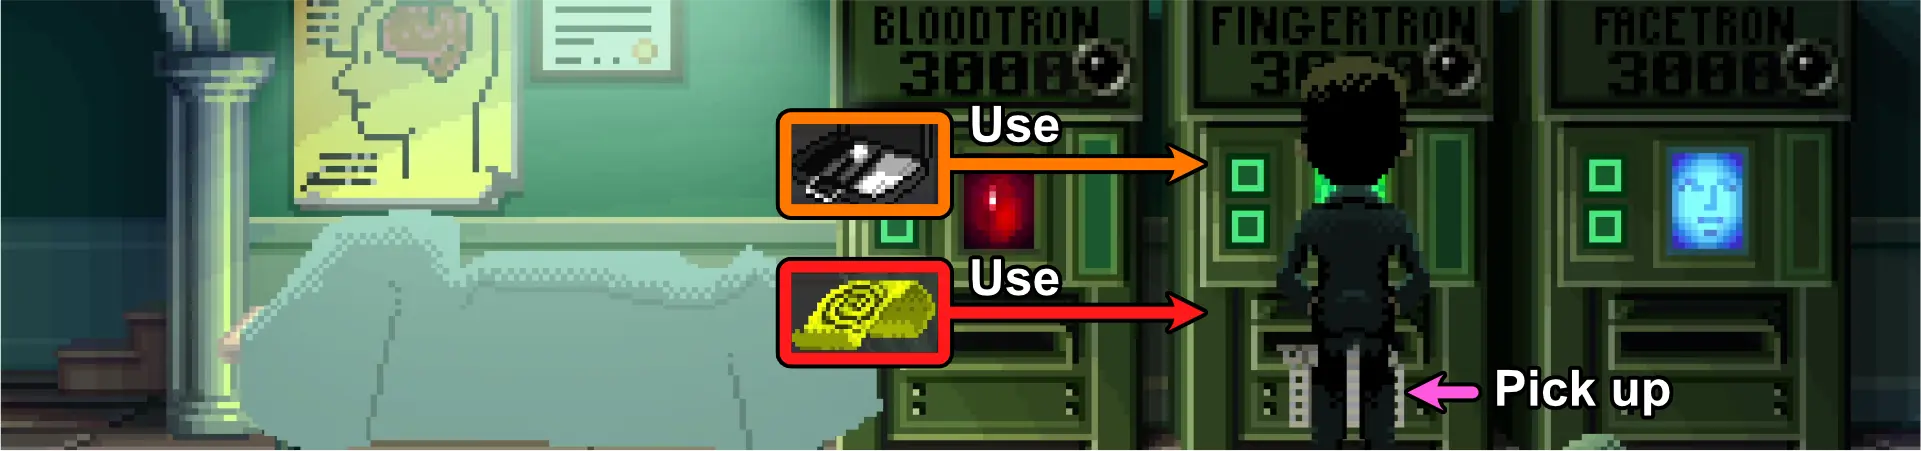
Finding Faces for FaceTron 3000™
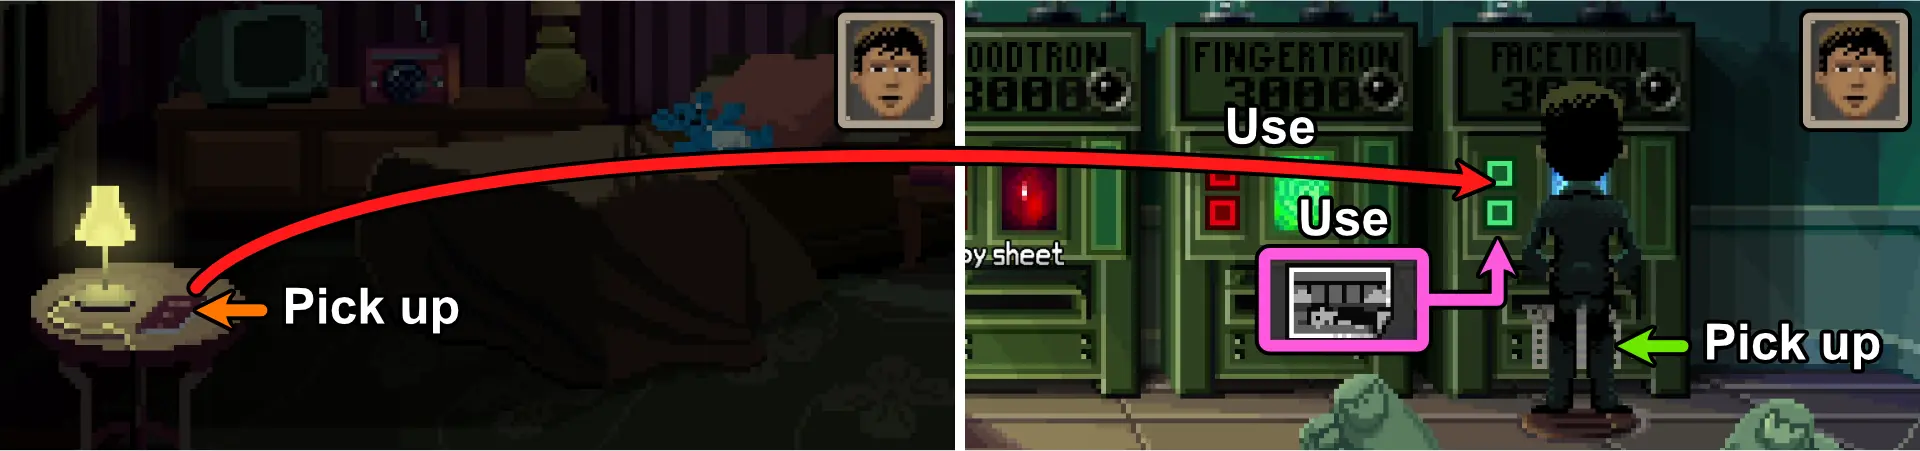
The first evidence is already obtained at the start of Part 2 by taking a photo of the body. For the second piece of evidence, you’ll have to go to the victim’s hotel room.
As Agent Reyes:
- Use the elevator and go to the floor indicated by the victim’s hotel card.
- Use the victim’s keycard in the correct room to enter it.
- Pick up the passport.
- Tap the map and tap Main Street.
- Go to the Town Hall and enter the Coroner’s office.
- Use the photo of the body (from Part 2) on the FaceTron 3000™.
- Use the passport on the FaceTron 3000™.
- Pick up the identity report produced by FaceTron 3000™.
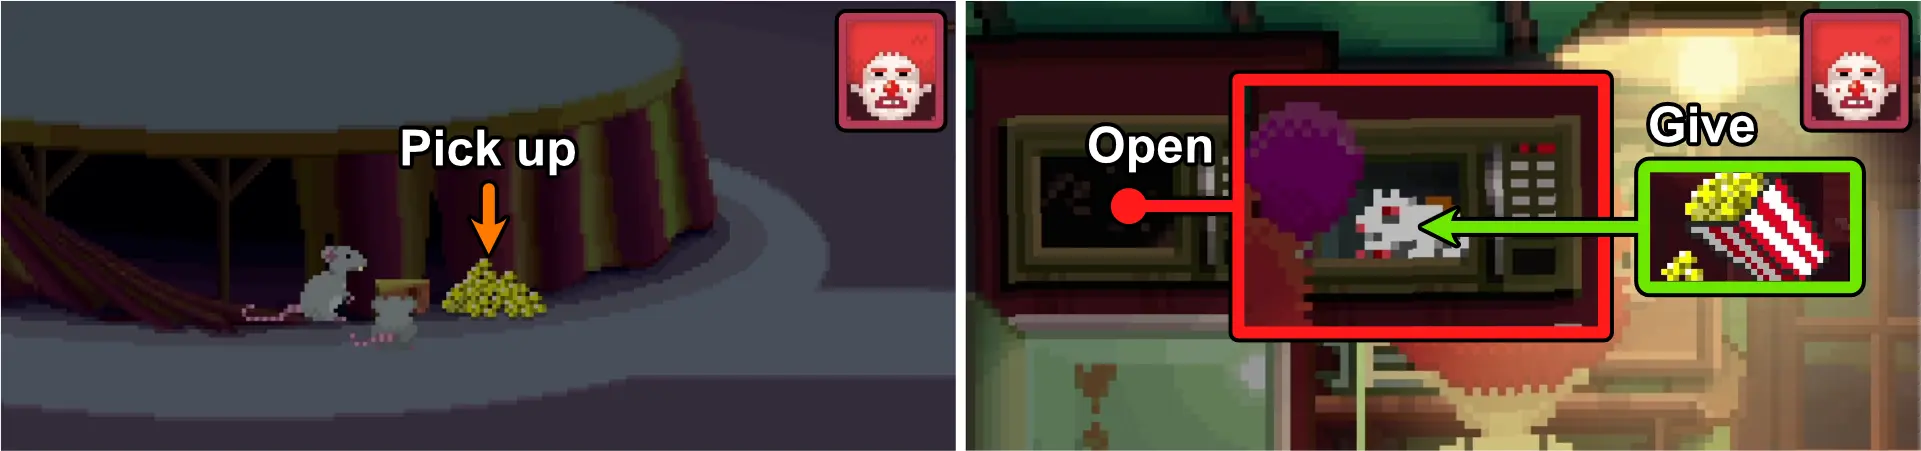
Finding Blood Samples for BloodTron 3000™
The first evidence can be obtained from the corpse of the crime scene but you’ll first need toilet paper.
As Agent Ray:
- Tap the map and tap Quickie Pal.
- Go inside the bathroom.
- Use the light switch.
- Pick up the toilet paper.
- Tap the map and tap the bridge.
- Use toilet paper on the corpse to obtain dripping bloody toilet paper.
- Go back to Quickie Pal’s bathroom.
- Use dripping bloody toilet paper on the dryer to get bloody toilet paper.
The second evidence can be obtained after Ransome gets the package from the post office (see section “Getting Ransome as a Playable Character, Getting a Package from the Post Office”).
As Agent Reyes:
- Tap the map and tap A Street.
- Talk to Willie. Choose these answers to proceed:
- What’s that in your pocket? Looks like a wallet.
- Hand it over and save us both a lot of trouble.
- It looks like something with blood on it.
- A river like the one by Trestle Trail where the body was found?
- I don’t care.
- I could arrest you for resisting a lawful search.
- We’ll talk later. Don’t leave town.
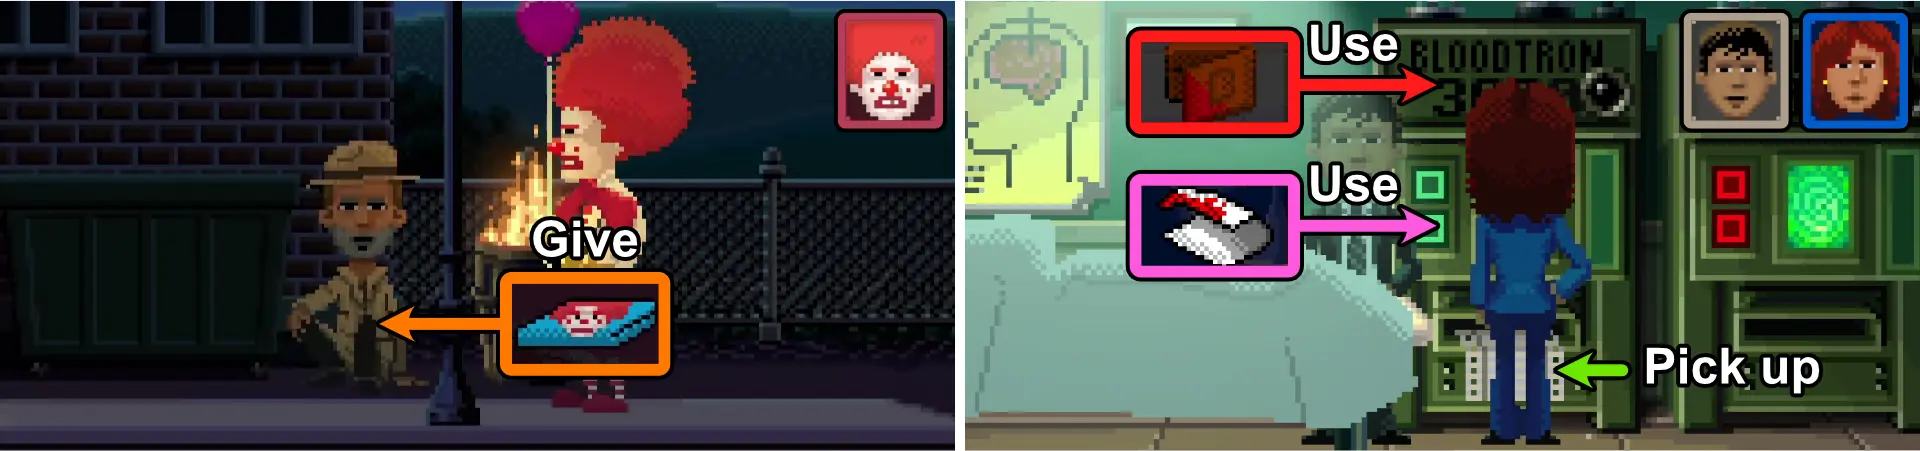
As Ransome:
- Bring Ransome to where Willie is.
- Give the wallet to Willie. Choose any of the two answers and Willie will give you the victim’s bloody wallet.
- Give the wallet to Agent Reyes.
You can also just give the wallet to Willie and skip the conversation altogether. He’ll still give you the bloody wallet.
Bring both Agent Ray and Agent Reyes to the coroner’s office.
As Agent Ray:
- Use bloody toilet paper on BloodTron 3000™.
As Agent Reyes:
- Use wallet on BloodTron 3000™.
- Pick up blood report produced by BloodTron 3000™.
Finding Fingerprints for FingerTron 3000™
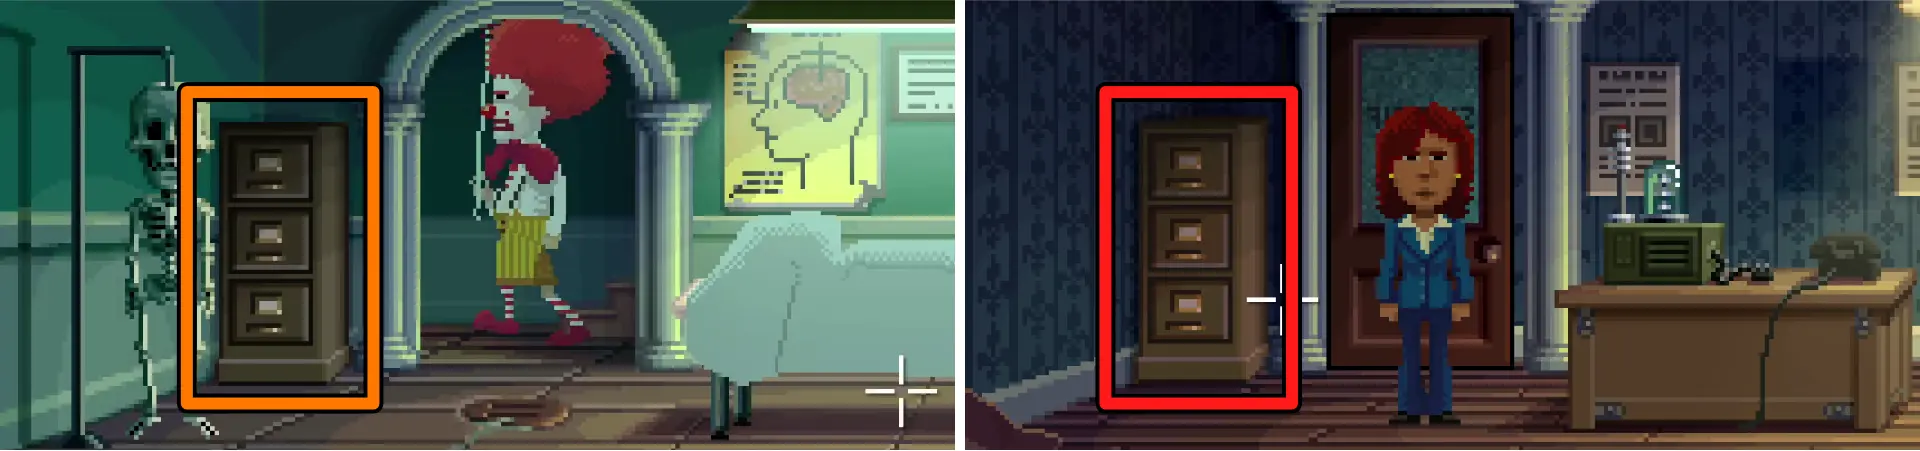
Before you start hunting for fingerprints, you’ll need to get a few items. For this, we used Agent Reyes:
- Fingerprint Kit – Open the drawers of the file cabinet behind the skeleton in the Coroner’s Office until you obtain it. The location is randomized.
- Fingerprint Book – Open the drawers of the file cabinet next to the door in the Sheriff’s Office until you obtain it. The location is randomized.
To get the fingerprints, you’ll need to find the murder weapon:
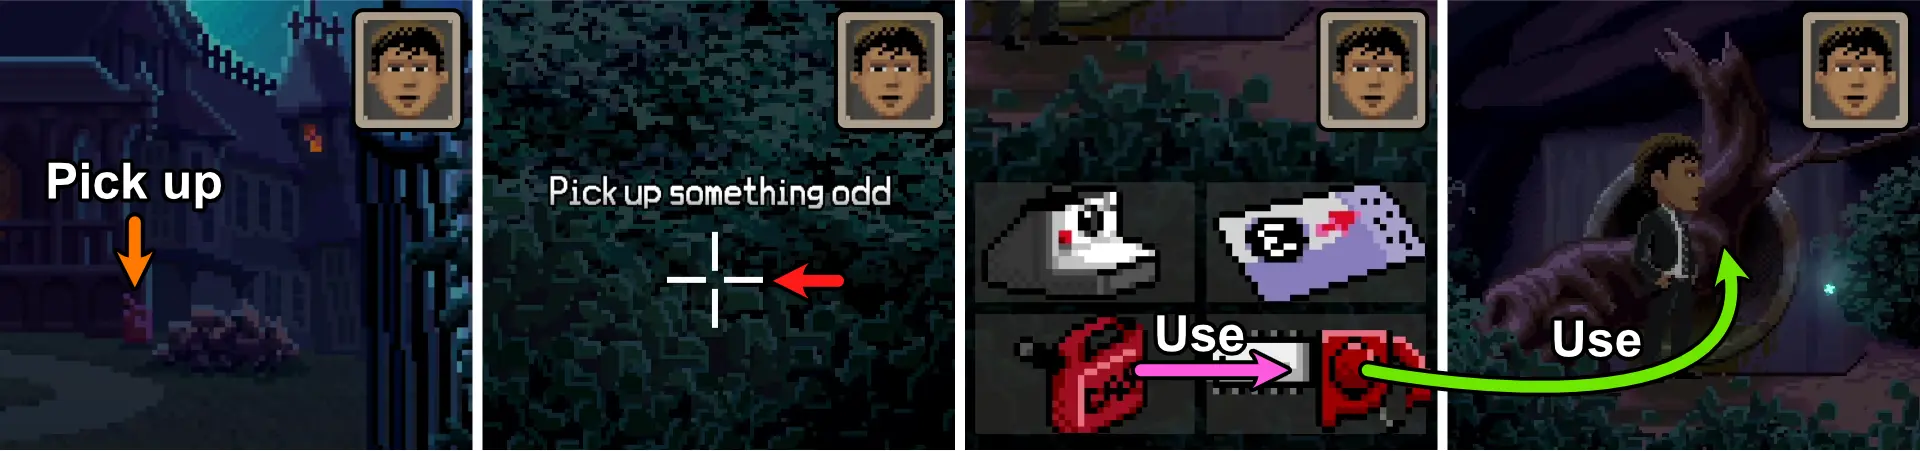
As Agent Reyes:
- Tap the map and tap Edmund Mansion mansion.
- Pick up the gas can next to the wood pile.
- Tap the map and tap the bridge.
- Walk through the bushes to the right and your cursor will say “Walk to something odd.” If you can’t find the spot, press and hold your touchscreen or press TAB on your keyboard to show hotspots.
- Pick up “something odd.” You’ll obtain a chainsaw.
- Use the gas can on the chainsaw.
- Use the chainsaw on the old tree.
- Walk to the sewer entrance.
- Use the light box.
- Use the light switch.
- Walk to the right then walk to the tunnel.
- The tunnels in the Sewers are randomized so you’ll have to look through them until you find a room with glowing mushrooms and a patched-up cardboard house.
- Pick up the ice pick inside the cardboard house.
- Use the fingerprint kit on the ice pick.
- Tap the map and tap A Street.
- Walk to the right and go to the Post Office.
- Talk to George to introduce yourself as a fed. Choose these answers to proceed:
- I’m a federal agent, know anything about the body out by the bridge?
- Thanks for your help, we’ll be back if we have any more questions.
- Pick up sticky tape on the counter, next to the postal scale.
- Use sticky tape on the ice pick.
- Tap the map and go to the Town Hall.
- Go to the Coroner’s Office and submit the tape with the fingerprint from the ice pick and the fingerprint book to the FingerTron 3000™.
- Pick up the fingerprint report.
Fixing the ArrestTron 3000™ and Arresting the Murderer

As Delores:
- Tap the map and tap Edmund Mansion mansion.
- Go to Uncle Chuck’s Room (the room to the rightmost part of the mansion).
- Pick up the large vacuum tube on top of the boxes next to the shelf.
- Tap the map and tap Main Street.
- Enter Town Hall and go to the Sheriff’s Office.
- Use the large vacuum tube on the suspiciously missing tube spot above the ArrestTron 3000™ and it should start working.
As Agent Reyes or Agent Ray:
- Use the identity report, blood report, and fingerprint report on the ArrestTron 3000™.
A cutscene will occur and Willie T. Wino will be arrested. You can pick any of the choices presented in the interrogation. Choose this answer to end the interrogation and Part 3:
- I think we have enough to lock you up for life.
Part Four: The Will

Before Investigating
Switch through Franklin, Ransome, and Delores and they will each have monologues about what they need to do.
Where is Agent Ray and Agent Reyes?
Agent Ray and Agent Reyes will be reintroduced to the game after a few minutes of playing. When this happens, you won’t be able to use Franklin, Ransome, or Delores until Agent Ray and Agent Reyes meet.
As Agent Ray:
- Use the telephone to hear the messages for her.
- Open the door to leave the room.
As Agent Reyes:
- Use the telephone to hear the messages for him.
- Open the door to leave the room.
Agent Ray and Agent Reyes will find each other in the lobby. Choose these answers to proceed:
- I’m investigating the old Pillow Factory fire that killed my father.
- (Choose any answer).
- A Japanese company is paying me for the secrets of the Pillow Factory AI.
A cutscene will play and Agent Reyes will be transported back to his hotel room. Both agents will now have a package. Agent Reyes’ package is a broken pocket watch while Agent Ray’s package is a strange tool that seems to be important near the end of the game.
Agent Reyes will disappear again at some point but he will reappear after some time.
Getting Tickets to ThimbleCon
As Delores:
- Enter the S&D Diner.
- Use the radio and they’ll announce a competition to answer trivia questions to win four ThimbleCon Tickets. To participate, you’ll need to call their number.
To find KSCUM Radio’s number, you’ll need to look at the phone book in B Street (close to Ricki’s Cakes) or the one in any of the hotel rooms.
- Tap the map and tap Edmund Mansion mansion.
- Pick up the receipt on the table.
- Tap the map and tap B Street.
- Walk to the right and enter Ricki’s Cakes.
- Give the receipt to Ricki Lee to obtain a Tube Puller.
- Tap the map and tap the radio station.
- Walk to the right and you’ll find the PhoneTron 3000™
- Use the tube puller on the vacuum tube on the PhoneTron 3000™.
- Place the vacuum tube on the PhoneTron 3000™.
- Tap the map and tap the hotel.
- Go inside the hotel and use the telephone next to the elevator doors.
- Dial the number for KSCUM Radio and answer the 3 trivia questions. You only need 2 correct answers to obtain the four tickets. The questions are randomized and the answers can be easily obtained by using Google to search for them. Below are some of the questions that we encountered from them:
- What popular weekly radio show does Casey Kasem host?
- American Top 40.
- Which volcano erupted in 1980?
- Mount Saint Helens.
- Where were the much-boycotted 1980 Summer Olympic Games held?
- Moscow.
- Who played Marty McFly in Back to the Future?
- Michael J. Fox.
- Fill in the blank: This is your brain… This is drugs… ________.
- This is your brain on drugs…
- What was ET’s favorite kind of candy?
- Reese’s pieces.
- What popular weekly radio show does Casey Kasem host?
- Choose any nickname when asked who the tickets are going to.
- Talk to the hotel manager. Choose these answers to proceed:
- There should be some ThimbleCon tickets in my nickname.
- (Choose the nickname you gave).
- I’m going to check out the beautiful lobby.
- Give a ticket to the Dragon in front of ThimbleCon. He’ll also take the other four tickets and give Ransome, Agent Reyes, and Agent Ray access to the convention.
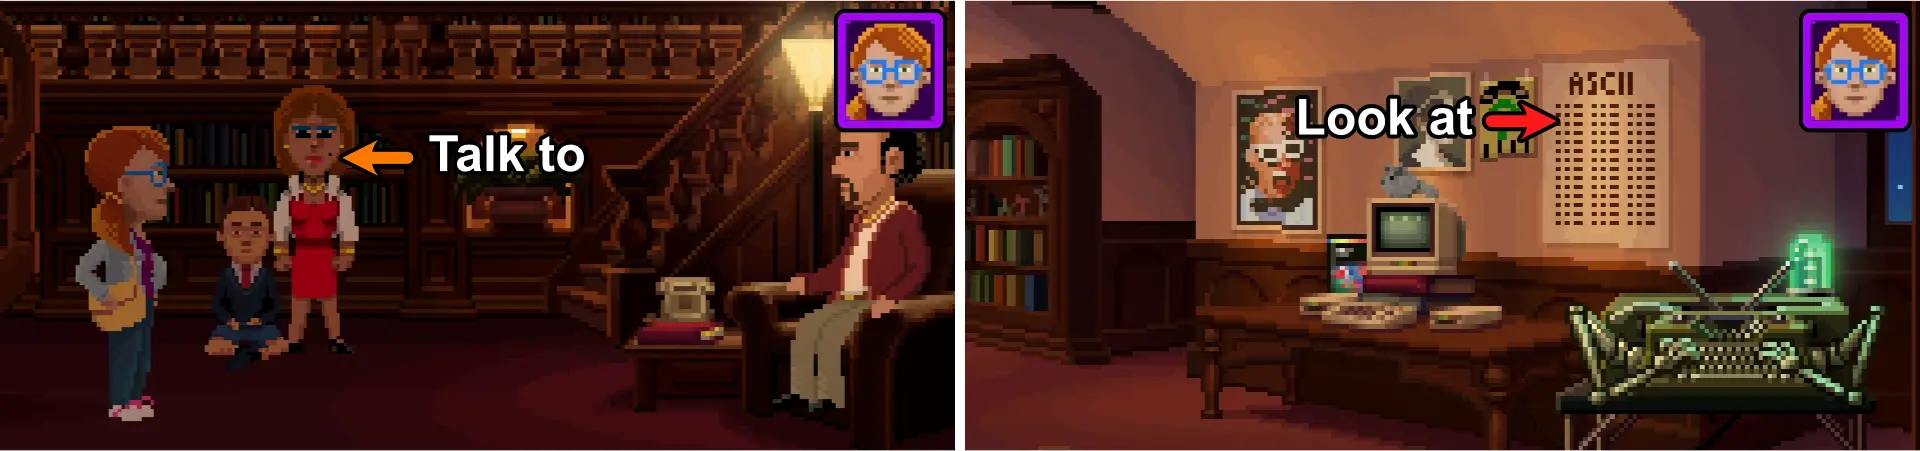
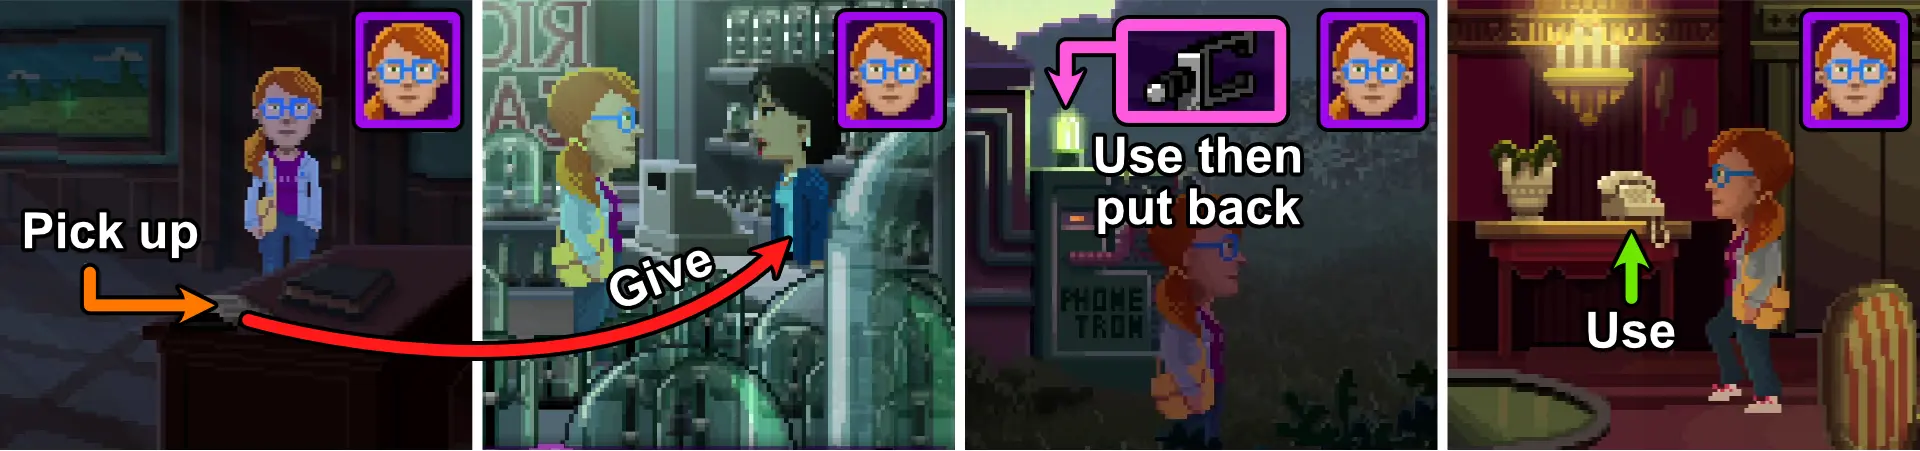
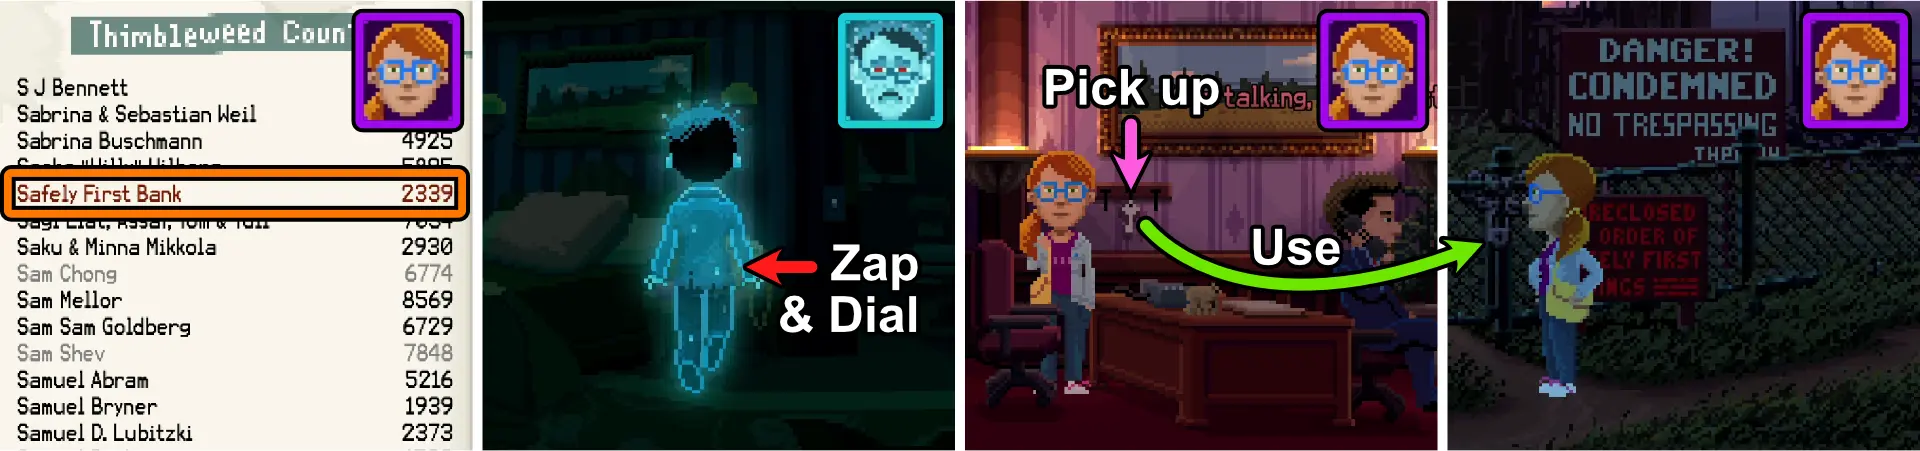
Getting the Lawyer for the Will Reading
Once inside ThimbleCon as Delores:
- Talk to Brant next to the entrance. Choose these answers to proceed:
- I need you to read Uncle Chuck’s will.
- Bye.
He wants you to show him proof that Uncle Chuck paid him for the will-reading.
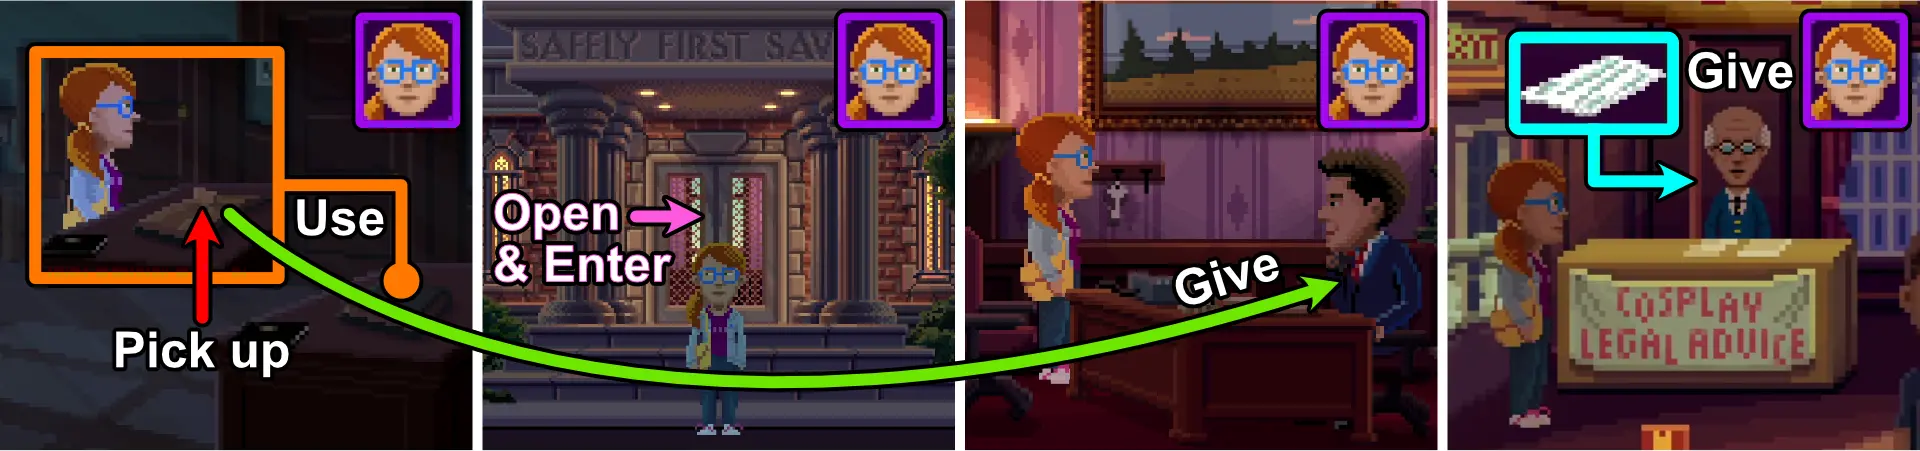
- Tap the map and tap Edmund Mansion mansion.
- Go to Uncle Chuck’s Room.
- Open the check register on the table.
- Pick up the check stub.
- Tap the map and tap Main Street.
- Enter Safely First Savings.
- Walk to the right.
- Give the check stub to Mr. El Paulo and he’ll give you a canceled check.
- Tap the map and tap hotel.
- Go back to Thimblecon.
- Give the canceled check to Brant.
- Tap the map and tap Edmund Mansion mansion.
- Go to the library.
A cutscene will occur and Brant will read Uncle Chuck’s requirements for the will reading:
- Get Thimbleberry Pie.
- Gain access to Uncle Chuck’s Tomb.
- Decrypt Uncle Chuck’s will.
Getting Thimbleberry Pie
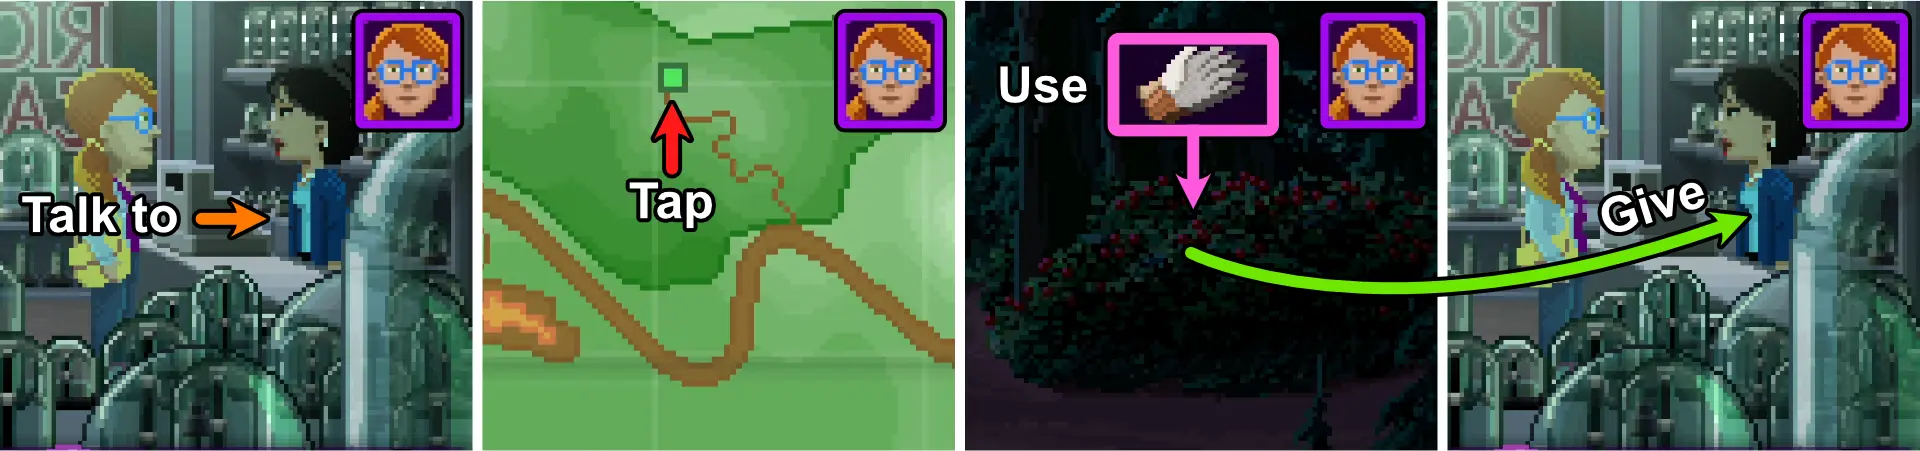
As Delores:
- Tap the map and tap B Street.
- Go to Ricki’s Cakes.
- Talk to Ricki. Choose these answers to proceed:
- Ricki, you make such great thimbleberry pie. Can I get one?
- (Choose any answer).
Ricki will give you a pair of gloves.
- Tap the map and tap trailhead.
- Enter the spooky forest trail.
- Enter random paths until you find the thimbleberry bush. If you want to get rid of the bear sounds, you can go to Quickie Pal and take the Bear Repellant.
- Use gloves on the thimbleberry bush to obtain thimbleberries.
- Enter paths to the left until you leave the forest.
- Tap the map and tap B Street.
- Go to Ricki’s Cakes.
- Give the thimbleberries to Ricki.
Delores will return the gloves to Ricki and she’ll give you a thimbleberry pie.
Gaining access to Uncle Chuck’s Tomb
As Franklin:
- Go to the elevator. Clara will start talking to you. Choose these answers to proceed:
- How come you’re so… you know… upset all the time?
- What can ghosts… you know… eat?
- Bye, Clara.
From the conversation, Clara will tell you that she wants ice cream cake.
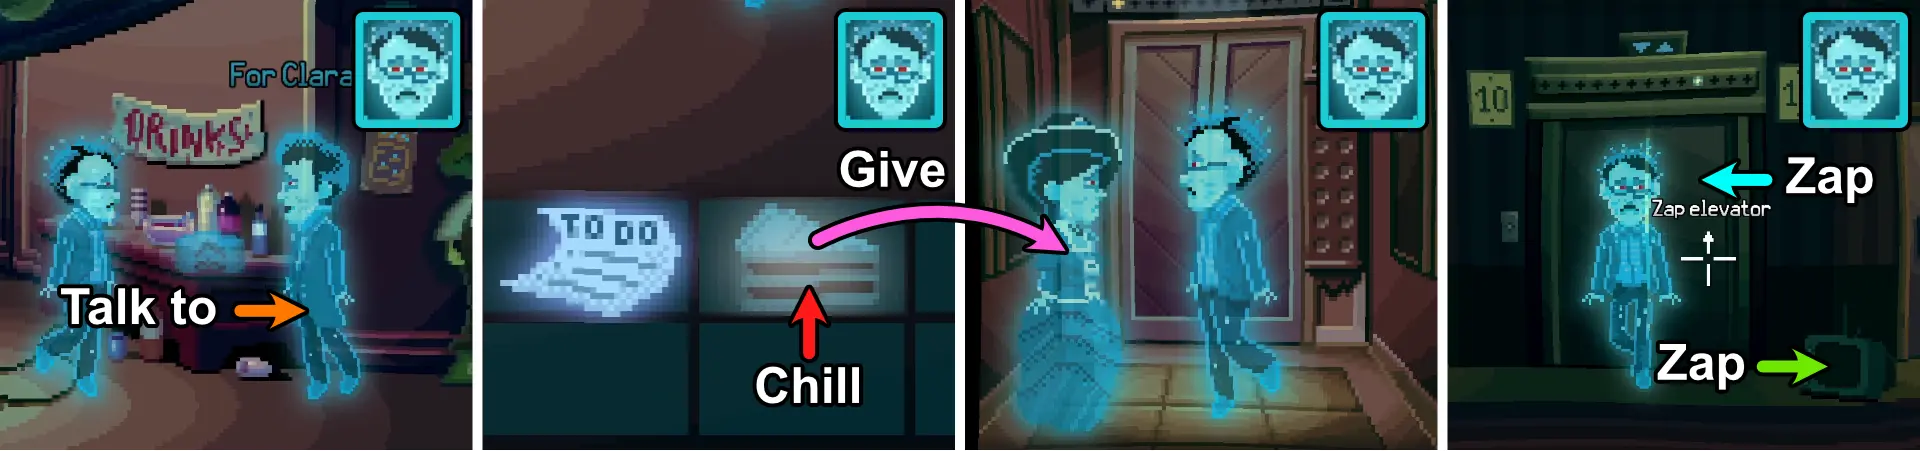
- Leave the elevator and enter ThimbleCon.
- Talk to Vergil. Choose these answers to proceed:
- Can I have some… you know.. cake?
- How about… Clara said she wants some.. you know… cake?
- See you soon, Vergil.
- Chill the ghost cake to turn it into i-scream ghost cake.
- Leave Thimblecon and enter the elevator.
- Talk to Clara. Choose these answers to proceed:
- Would you like this… you know… i-scream ghost cake?
- So, Clara… Do you know how you died?
- Don’t you get bored being stuck here for all eternity?
- Bye and good luck, Clara.
From the conversation, Clara will tell you her favorite TV show which is randomized per playthrough.
- Use the elevator to go to floor 10.
- Go into the 10th floor and zap the TV by the elevator doors. Keep zapping it until it shows Clara’s favorite TV show. You need to make sure the elevator doors are open. If they aren’t, you’ll need to zap them too.
Clara will be distracted by the TV and leave the elevator, giving you and any of your characters to use it to go to the penthouse.
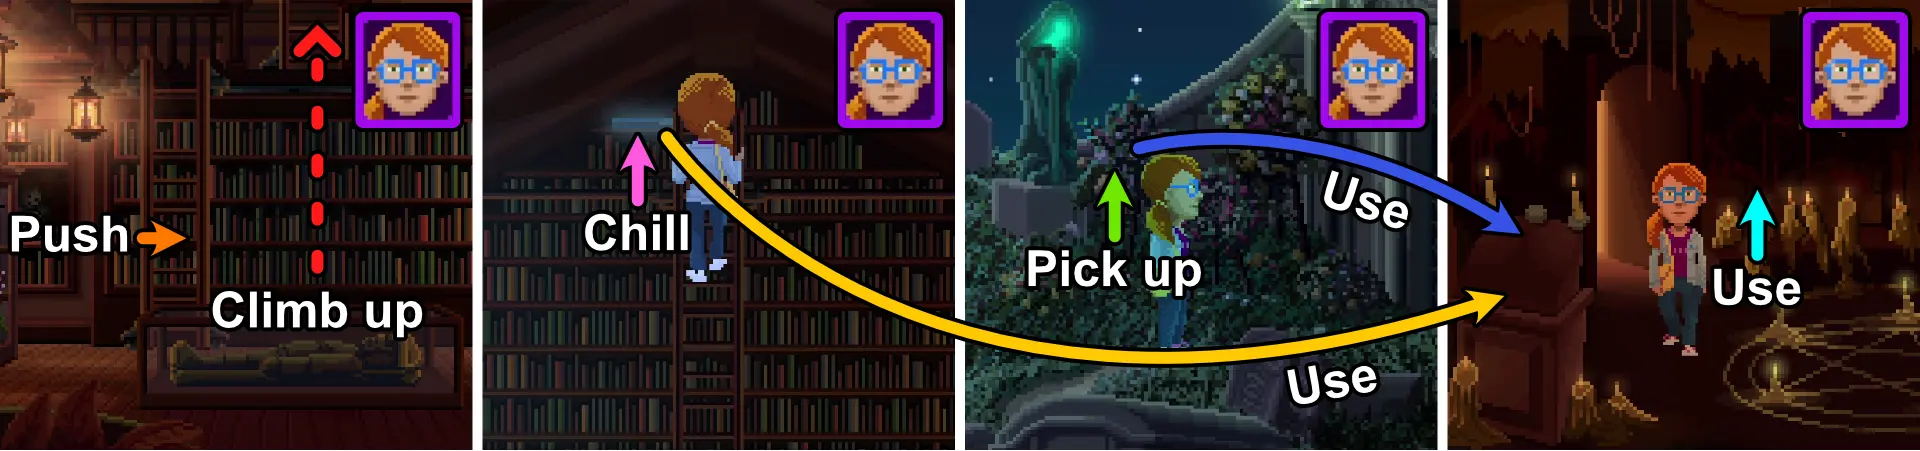
As Delores:
- Tap the map and tap A street.
- Go to the Occult Bookstore at the end of the street.
- Push the cursed ladder to the right.
- Use the cursed ladders and climb up to the top. Keep tapping above Delores to keep climbing.
- Pick up the glowing blue cursed book.
- Use the cursed ladders to climb back down.
- Tap the map and tap cemetery.
- Walk all the way to Uncle Chuck’s tomb.
- Pick up a flower from the flowers by the tomb entrance.
- Tap the map and tap the hotel.
- Use the elevator to go to the penthouse.
- Open the door to the secret entrance and enter it.
- Use the secret light switch.
- Use the Book of the Dead™ on the podium.
- Use the flower on the Book of the Dead™.
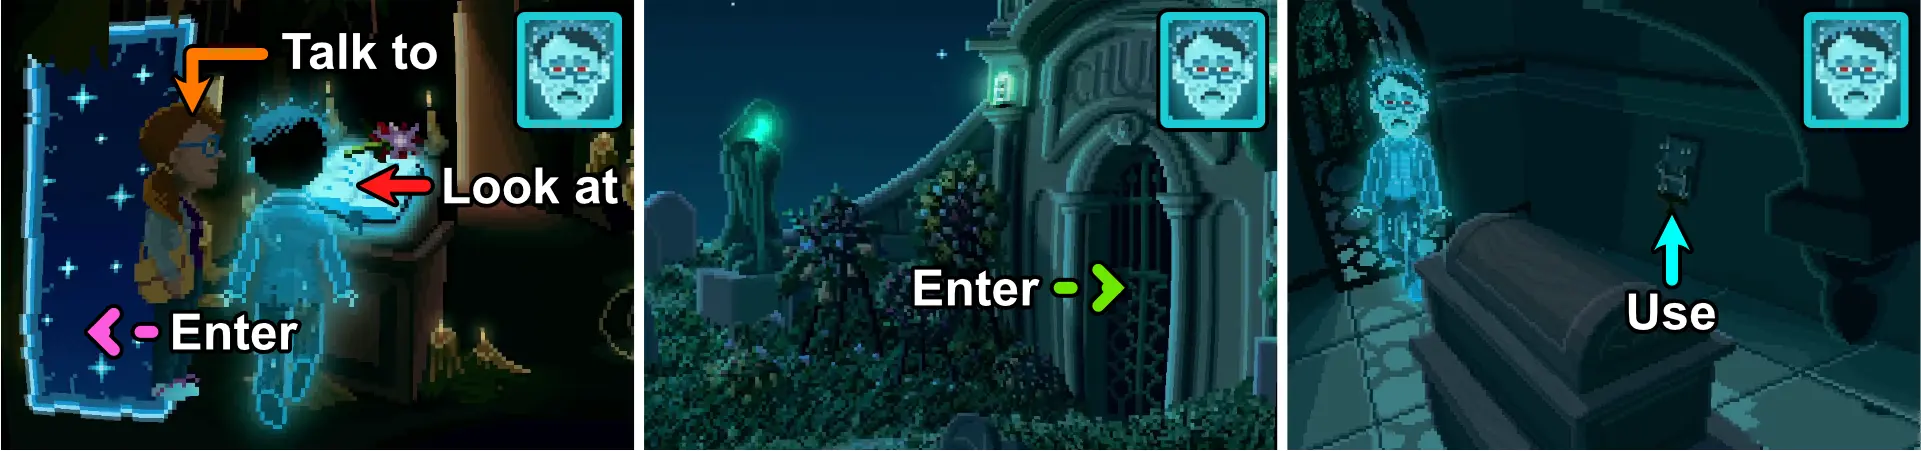
As Franklin:
- Use the elevator to go to the penthouse.
- Talk to Delores to cross out a task from his to-do list.
- Talk to the Book of the Dead™.
Franklin will then be transported to Chuck’s tomb.
- Go through the tomb door.
- Zap the switch on the right.
The tomb will now be accessible.
Decrypting Uncle Chuck’s Will
As Delores:
- Tap the map and tap Edmund Mansion mansion.
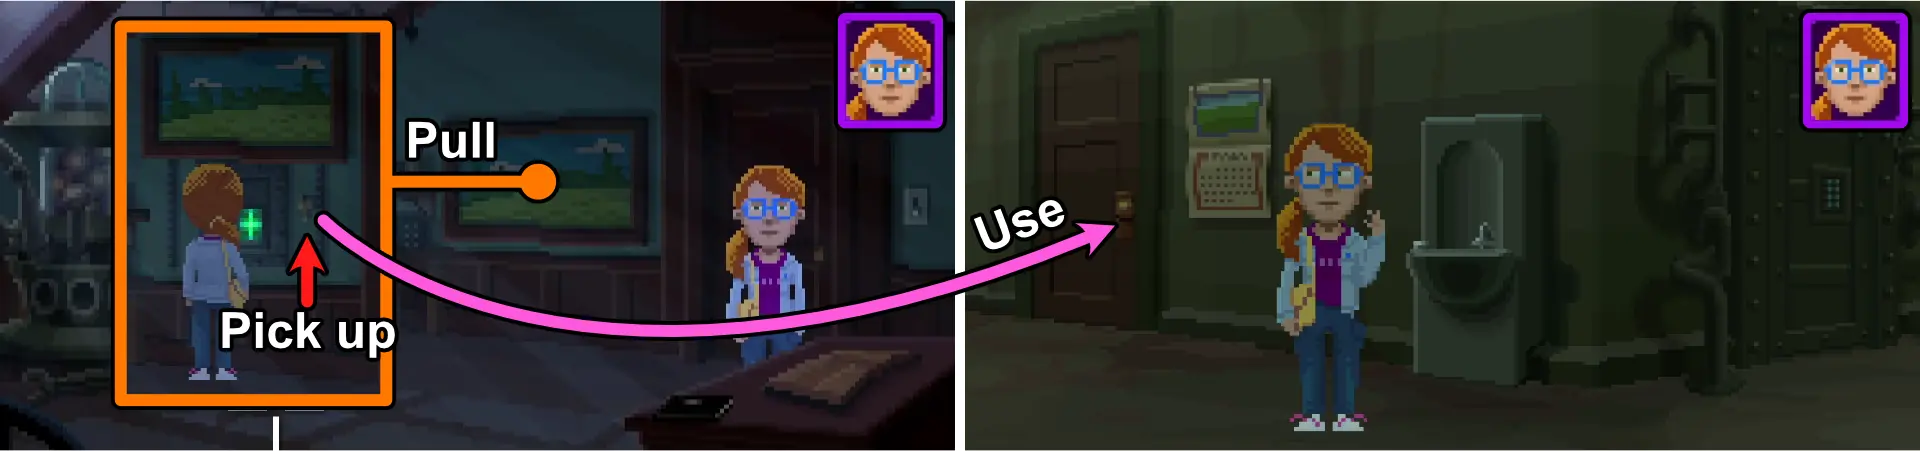
- Go to Delores’ room.
- Pick up Graphics BASIC™. It’s next to the computer monitor.
- Use Graphics BASIC™ on the computer.
- Use will on the computer.
The will will then be full of hex codes. You’ll need to find the key, which is Uncle Chuck’s lucky number. Delores will say that it is the number Uncle Chuck used to win the lottery.
- Tap the map and tap A Street.
- Go to Nickel News.
- Look at the newspaper article about Chuck winning the lottery. The number displayed will always be different per playthrough.
- Tap the map and tap Edmund Mansion mansion.
- Go to Delores’ room.
- Use will on the computer. Choose the answers based on the lucky number.
- Look at the will.
- Give the will to Brant. Choose this answer to proceed:
- Here’s a freshly baked thimbleberry pie.
Part Five: The Reading

This part contains no gameplay and will only play a cutscene where Brant will read the will to Delores, Doug, and Lenore’s family. From this, you’ll obtain a PillowTronics™ T-shirt.
Part Six: The Factory

Unlocking the Factory Gate
As Delores:
- Tap the map and tap Main Street.
- Go to Safety First Savings Bank.
The key is hanging on the wall, but Mr. El Paulo will not give it to you. You’ll notice that he’s often distracted by an obscene caller. You’ll have to call him and pose as an obscene caller.
To find the number as Agent Ray:
- Go to B Street.
- Go to the payphone and check the phone book for Safety First Savings Bank’s number.
As Franklin:
- Go to any empty hotel room.
- Zap the phone and dial the bank’s number. Choose these answers to proceed:
- Moooaannn!!!
- Moooaannn!!!
- Mmmmmm!!!
- Wooooooo!!!
As Delores:
- Pick up the factory key from the key hook.
- Tap the map and tap abandoned factory.
- Use the factory key on the padlock and chain.
Fixing Agent Reyes’ Pocket Watch
In Part four, Agent Reyes received a package containing a broken pocket watch.
As Agent Reyes:
- Tap the map and tap Main Street.
- Go to the Sheriff’s Office.
- Talk to Willie. Choose these answers to proceed:
- I’m sure this will all resolve itself at trial.
- If you didn’t do it why did you confess?
- You were a watch repairman?
- So long, Willie.
- Talk to Willie again and Agent Reyes will ask him to repair his broken pocket watch. Choose these answers to proceed:
- If you fix the watch I promise I’ll prove your innocence.
Willie will ask you to get him proper tools to fix it.
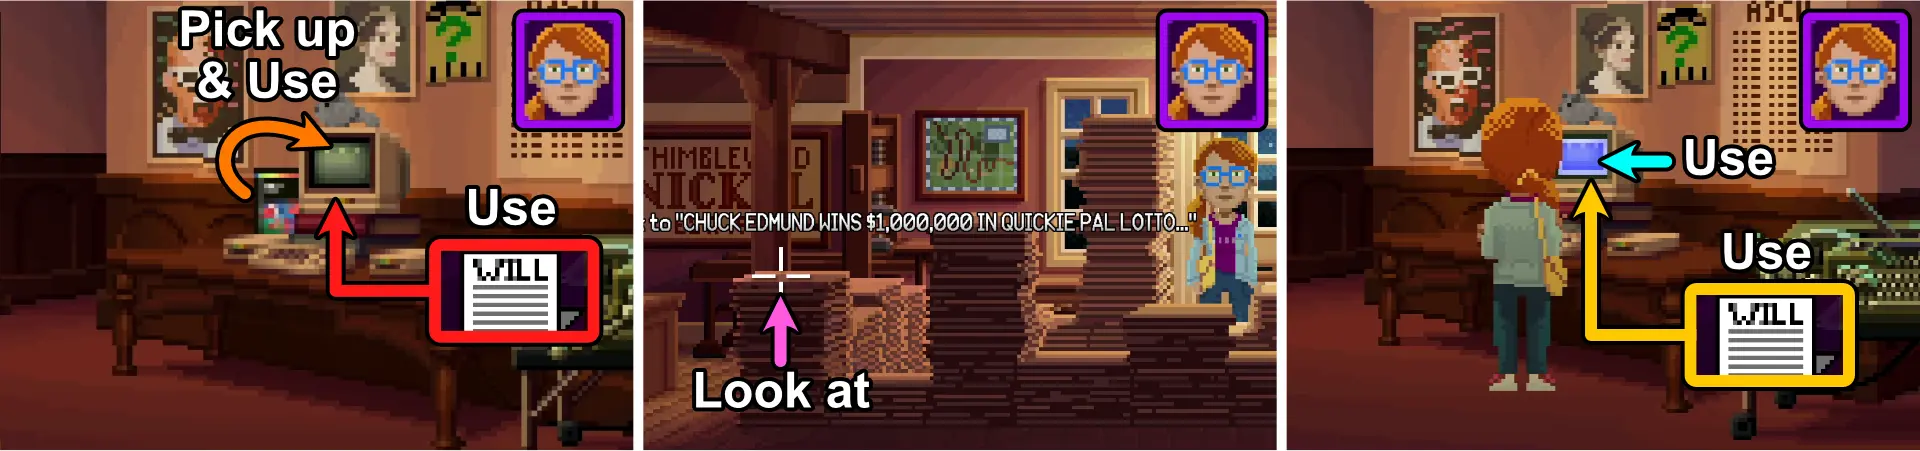
Getting Tools for Willie
- Using Agent Ray, Agent Reyes, Delores, and Ransome, go to the S&D Diner and order the hotdogs until they’re all gone. As Ransome, you’ll have to greet Dave during a conversation with Sandy before she’ll allow you to buy food.
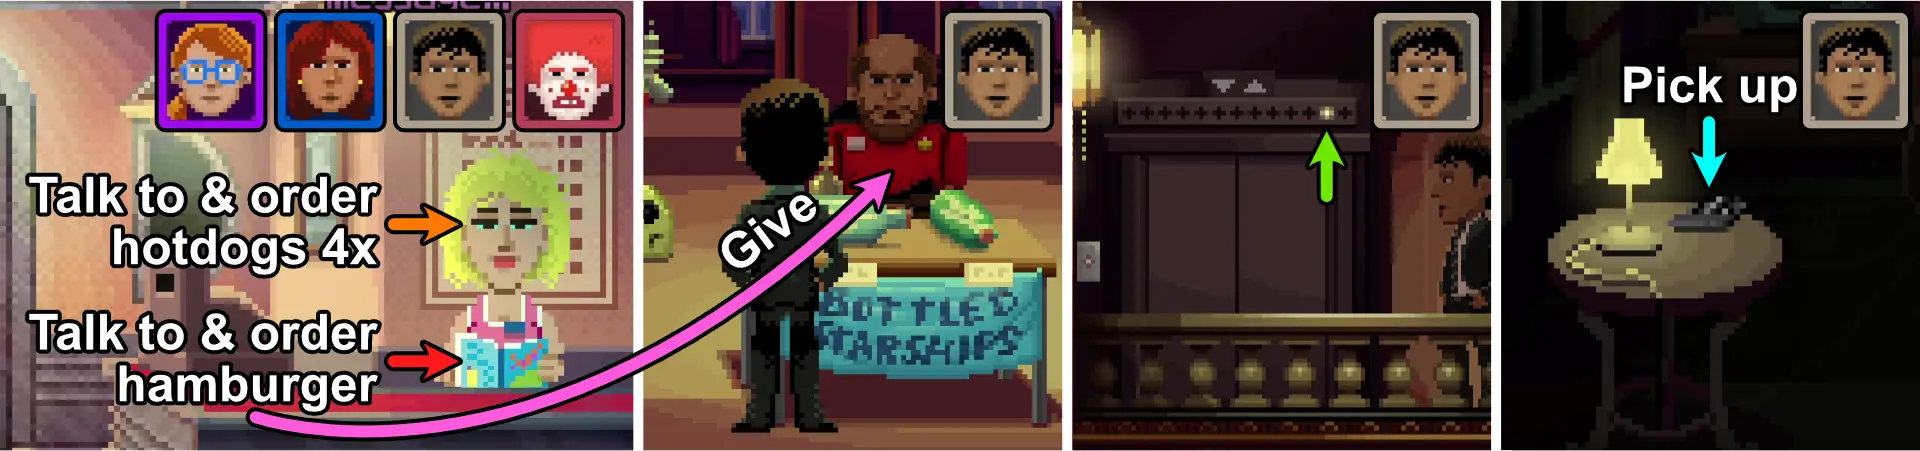
As Agent Reyes:
- Talk to Sandy.
- Order a hamburger.
- Tap the map and tap hotel.
- Go to ThimbleCon.
- Talk to Sexy Riker. Choose these answers to proceed:
- How do you make the starships so small?
- Can I mind your stand while you get me your tools?
- Would you like this hamburger?
Sexy Riker will leave ThimbleCon and use the elevator to go to his room. You can determine which floor he went to by looking at the lights above the elevator.
- Go to that floor.
As Franklin:
- Use the elevator to go to the same floor.
- Look through each room until you find one with its lamp at the left side table switched on next to the jeweler’s tools.
- Zap the door to unlock it for Agent Reyes.
As Agent Reyes:
- Enter the room.
- Pick up the jeweler’s tools.
- Tap the map and tap main street.
- Go to Town Hall.
- Enter the Sheriff’s Office.
- Give the jeweler’s tools to Willie.
If you try asking Willie to fix the broken watch, he will tell you that he can’t concentrate without Theremin music.
Getting Theremin Music for Willie
To get a theremin record, you’ll need to win a Ransome the Clown Look-A-Like Contest.
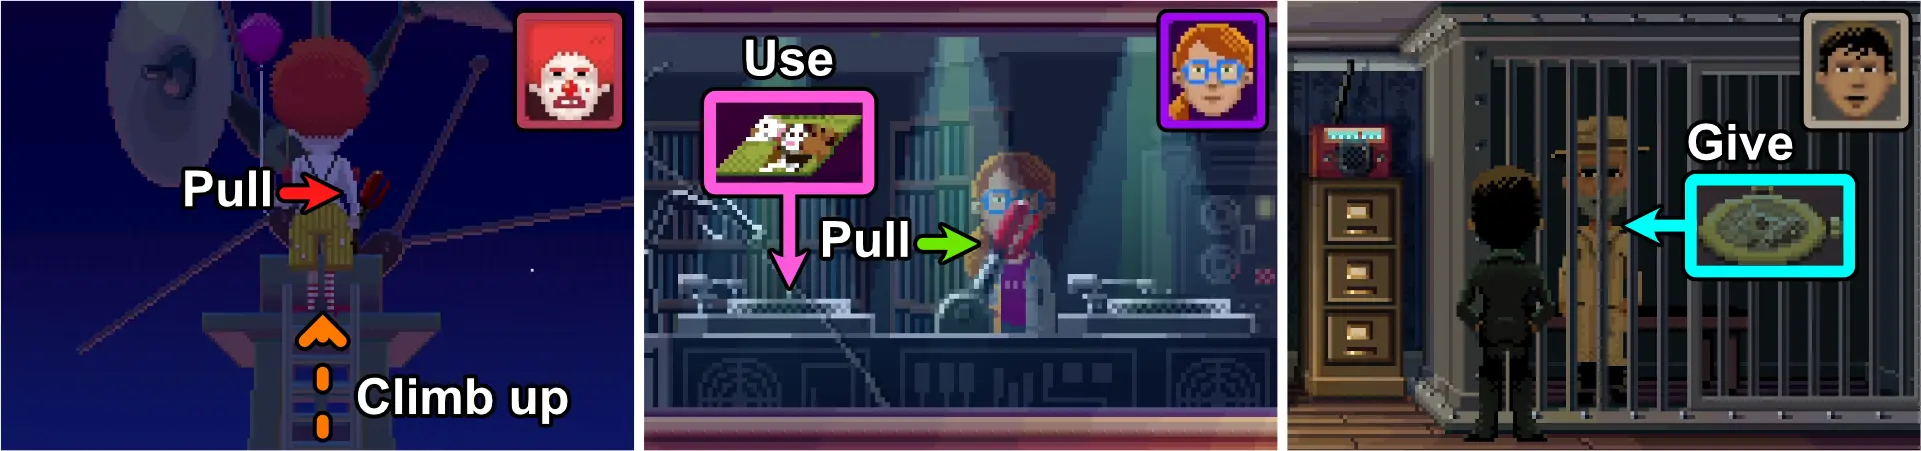
Winning the Ransome Look-A-Like Contest

As Ransome:
- Tap the map and tap old circus.
- Go to Ransome’s trailer.
- Pull the Ransome poster.
- Open the safe.
- Pick up the joke book and the four pages.
The fourth page will end up flying away.
- Go to trailers.
- Push the trampoline to the left.
- Walk up the stairs of the left trailer.
Ransome will not jump without another person to be his spotter.
As Delores:
- Tap the map and tap old circus.
- Go to trailers.
As Ransome:
- While at the stairs, use the trampoline.
- While jumping, tap the paper to pick it up.
- Use the four pages on the joke book to combine them.
- Tap the map and tap hotel.
- Go to ThimbleCon.
- Enter the Look-A-Like Contest in the room to the right.
For this contest, you can choose any of the answers presented. The contest will still end with Ransome losing and getting the theremin record as a consolation prize.
Playing Theremin Music on Air
Before starting, make sure Agent Reyes is in the Sheriff’s Office, next to Willie.
As Delores:
- Tap the map and tap the radio station.
As Ransome:
- Tap the map and tap the radio station.
- Give Delores the theremin record.
- Walk to the right and go to the radio tower.
- Climb up the ladder.
- Pull the lever.
As Delores:
- Enter the radio station.
- Enter the radio booth.
- Place the theremin record on the left turn table.
- Pull the lever.
As Agent Reyes
- Give Willie the broken pocket watch and ask him to fix it.
With all the previous requirements met, he’ll fix the watch for you.
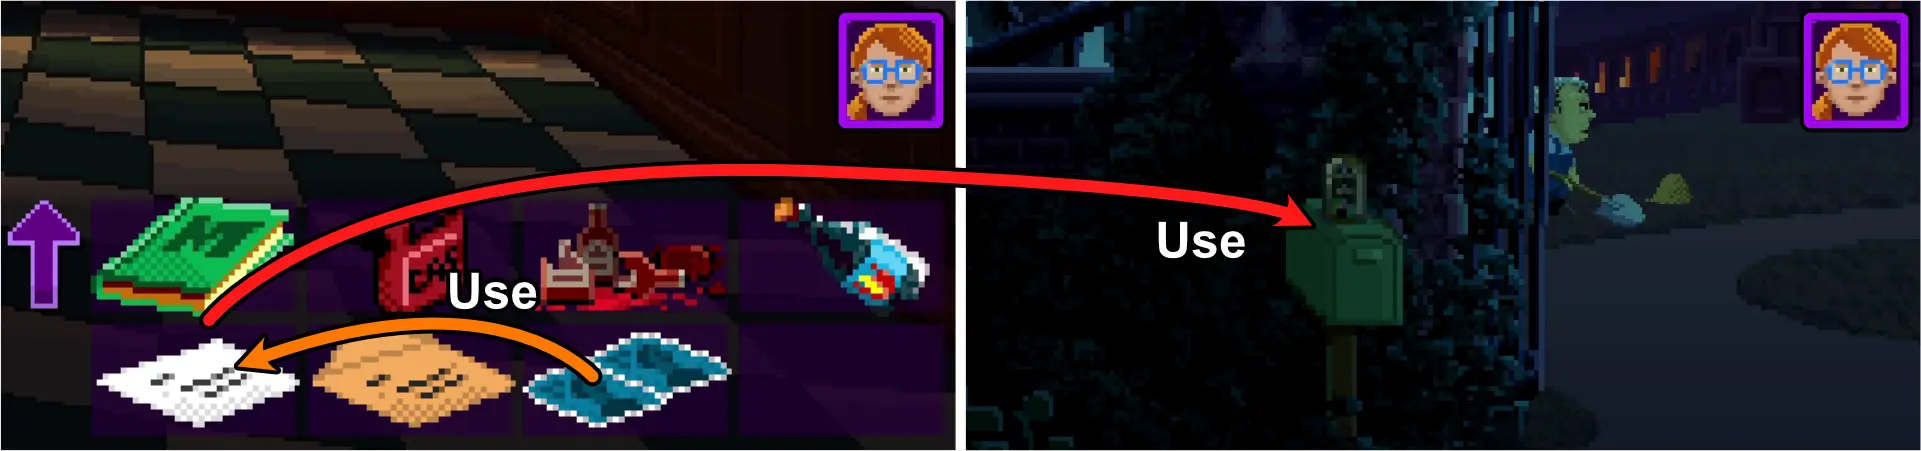
Finding the Secret Hideout
As Delores:
- Tap the map and tap Main Street (South).
- Talk to Chet the Pizza Guy. Choose these answers to proceed:
- Do we know each other?
- (Choose any answer).
- (Choose any answer).
- Pick up the pizza flyer Chet dropped. It talks about a secret meeting and contains a 6-digit code. The numbers are randomized.
- Tap the map and tap Edmund Mansion mansion.
- Go to Delores’ room.
- Take the trophy from the bookshelf on the right side of the screen.
- Tap the map and tap abandoned factory.
- Walk to the left and enter the big archway.
- Walk to the left until you see a corroding silo.
- Use the trophy on the radioactive waste dripping underneath the corroding silo to collect it.
- Tap the map and tap trailhead.
- Use the radioactive waste on the puddle on the ground.
- Leave the trailhead.
- Wait for a few seconds or go to a different area before coming back. There will now be footprints leading to the forest.
- Enter the forest and follow the footprints until you find Woody’s Pizza Shack.
- Use the keypad on the gate and enter the code from the flyer.
Delores, Agent Ray, and Agent Reyes cannot enter the hideout so you’ll have to use Ransome.
- Open the van door and enter.
- Walk to the left and participate in the meeting.
- Pick up one of the goodie bags on the table.
- Leave the hideout through the elevator.
Moving the Truck Blocking the 4th Station
As Franklin:
- Go through the different rooms of the hotel until you find one with an occupant.
- Scare the occupant by zapping lights and appliances, or splashing the toilet.
After scaring them, the hotel manager will try and call someone to fix it but they are not available.
As Reyes:
- Tap the map and tap hotel.
- Give the hotel manager the Pigeon Brothers Plumbing business card.
As Franklin:
- Scare the occupant again.
The hotel manager will now call the pigeon brothers.
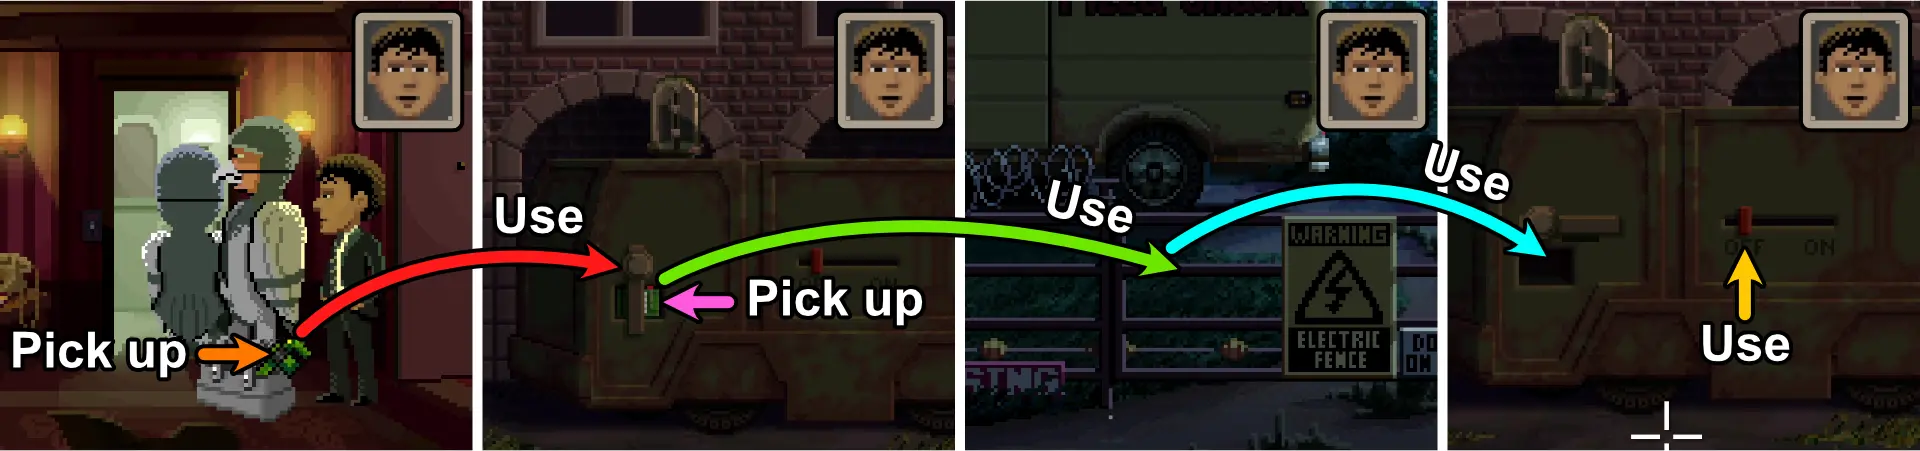
As Reyes:
- Use the elevator to go to the floor and room where the occupant Franklin scared is.
- Pick up the green wrench from the Pigeon Brothers’ toolbox.
- Tap the map and tap abandoned factory.
- Walk to the left and go through the big archway.
- Walk to the right where the truck is.
- Use the wrench on the restraining bolt.
- Pick up the battery from the truck.
- Tap the map and tap seckrit bunker.
- Use the battery on the electrified gate.
- Tap the map and tap abandoned factory.
- Go back to the truck.
- Use the car battery on the truck.
- Pull the lever on the truck.
Activating the 4 Stations
As Delores:
- Go into the factory.
- Walk to the left and enter the big archway.
- Walk to the left and enter the doorless room (Security).
- Pick up papers until you find the handbook.
- Pick up the handbook and read it.
The handbook will tell you important instructions on how to unlock the factory building. You’ll need to bring Ransome, Agent Ray, and Agent Reyes to the factory for this part.

As Agent Ray:
- Call the number in the handbook to get the proper start time.
As Agent Reyes:
- Go to the first station.
- Use the pocket watch on the time-in clock of the station by tapping the dials above and to the right of the pocket watch.
- Input the correct time indicated by the call. The green light should turn on if you do it correctly.
- Do the same for the next 3 stations, adding 5 minutes to each one. (Ex: 7:00, 7:05, 7:10, 7:15)
Finding a Tube for the Factory’s Door
As Delores:
- Look at the tube socket on top of the DoorTron 3000™ next to the factory’s door. She’ll tell you that you need Uncle Chuck’s secret PF-001 tube for it.
- Look at the PillowTronics™ shirt. She’ll tell you that it has the schematic for the PF-001 tube.
- Tap the map and tap B Street.
- Go to Ricki’s Cakes.
- Talk to Ricki. Choose these answers to proceed:
- Do you have a PF-001 tube in stock?
- Is the tube schematic on this T-shirt for a PF-001?
- Tap the map and tap abandoned factory.
- Place the PF-001 tube on the tube socket on top of the DoorTron 3000™.
Opening the Factory’s Door
You’ll need Delores, Ransome, Agent Reyes, and Agent Ray present for this one.
As Delores:
- Push the red button.
As Ransome, Agent Reyes, and Agent Ray:
- Open the door.
As Delores:
- Enter the door.
Part Seven: The Madness

As Delores:
- Walk to the right and climb down the ladder.
- Walk to the left.
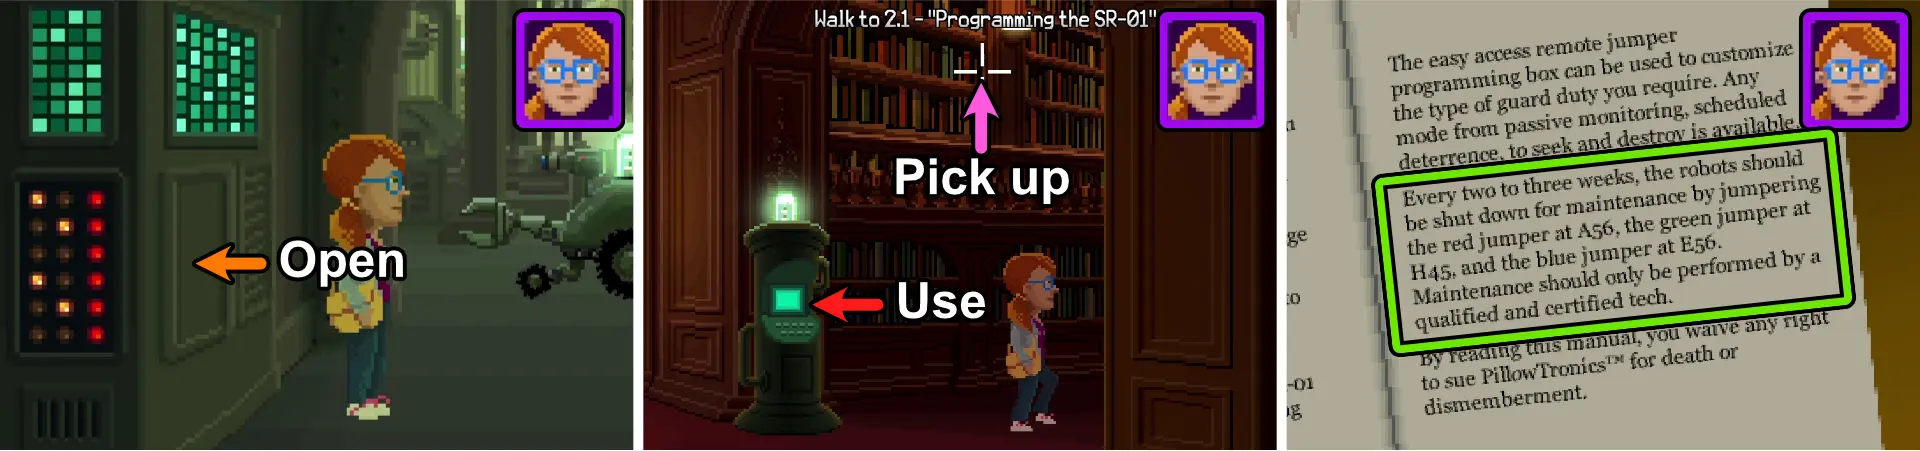
- Open the panel on the computer next to the entrance to the corridor.
Deactivating the Robots
To deactivate the robots, you’ll need a manual for SR-01 robots for this panel.
- Tap the map and tap Edmund Mansion mansion.
- Go to the library.
- Use IndexTron 3000™ to find the book.
- Go to the section and pick up the “Programming the SR-01” book.
- Tap the map and tap abandoned factory.
- Go back to the control panel and look at it.
- Look at the manual and follow the directions for shutting down the robots for maintenance on the second page.
- Move the jumpers accordingly.
- Walk to the corridor.
- Keep walking left until you enter a hallway with a blast door.
Unlocking the Office
As Delores:
- Tap the map and tap Edmund Mansion mansion.
- Go to Uncle Chuck’s room.
- Pull the painting.
- Pick up the key on the wall.
- Tap the map and tap abandoned factory.
- Use the offiss key on the brown door in the hallway at the very left end of the factory.
Using the Office Computer
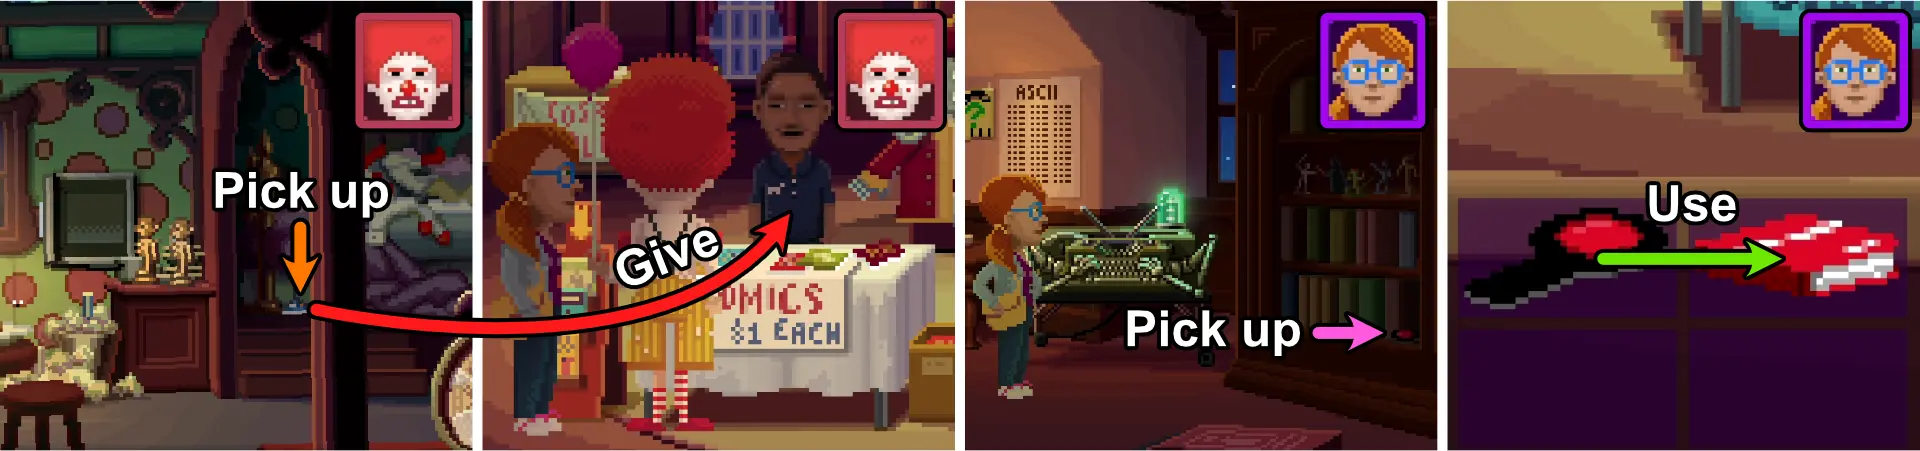
As Ransome:
- Go to the factory’s office.
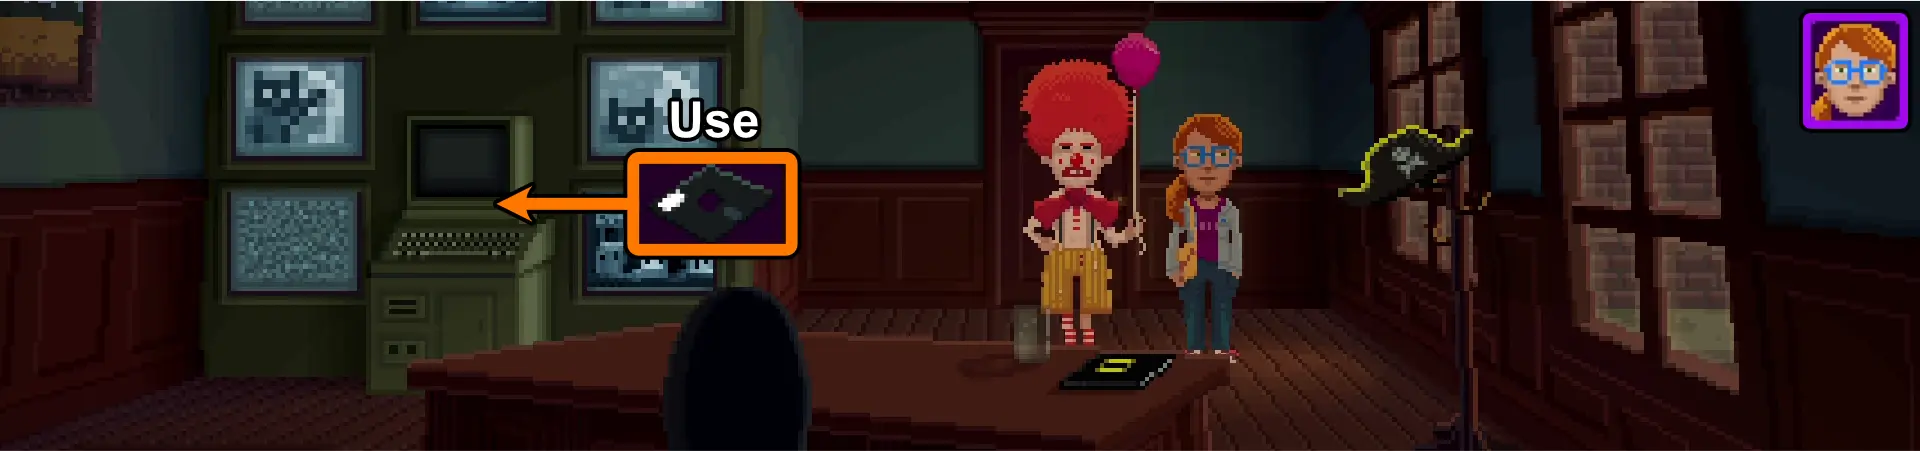
- Open the goodie bag from the seckrit meeting. You’ll obtain a floppy disk and a foil-wrapped brick.
- Give Delores the floppy disk.
As Delores:
- Use the floppy disk on the computer.
A cutscene will play between Delores and Chuck.
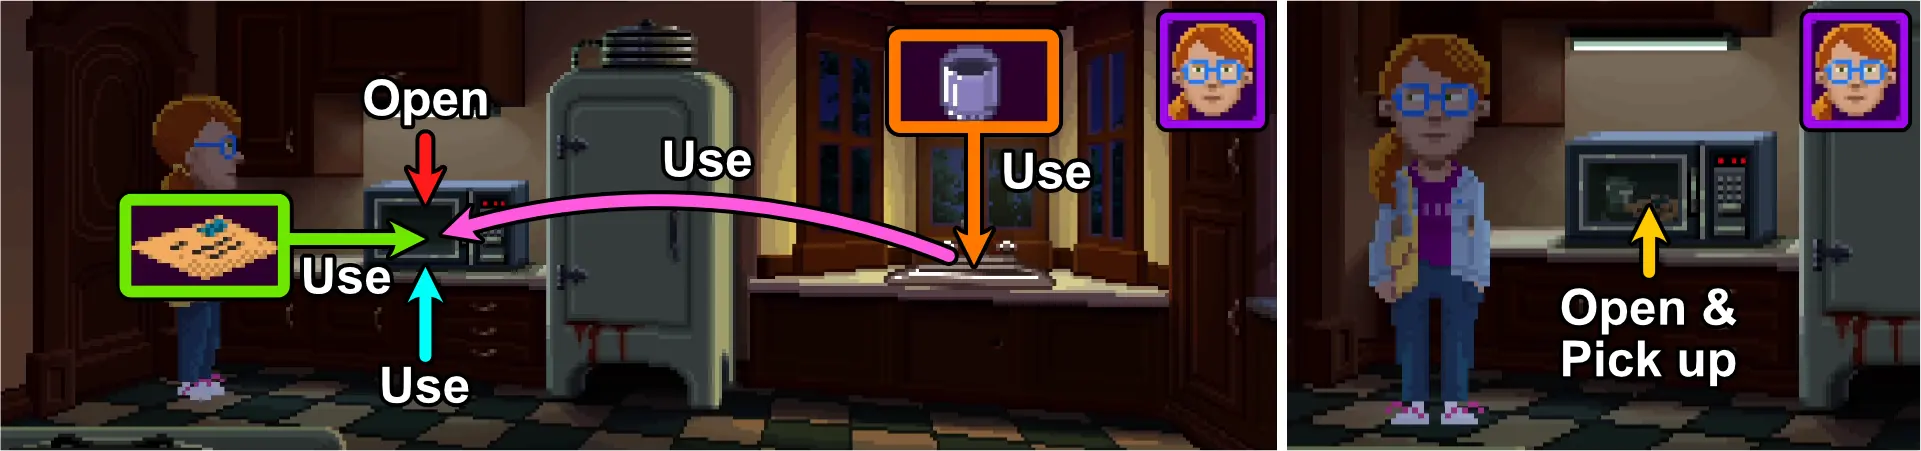
Getting the Computer’s Password
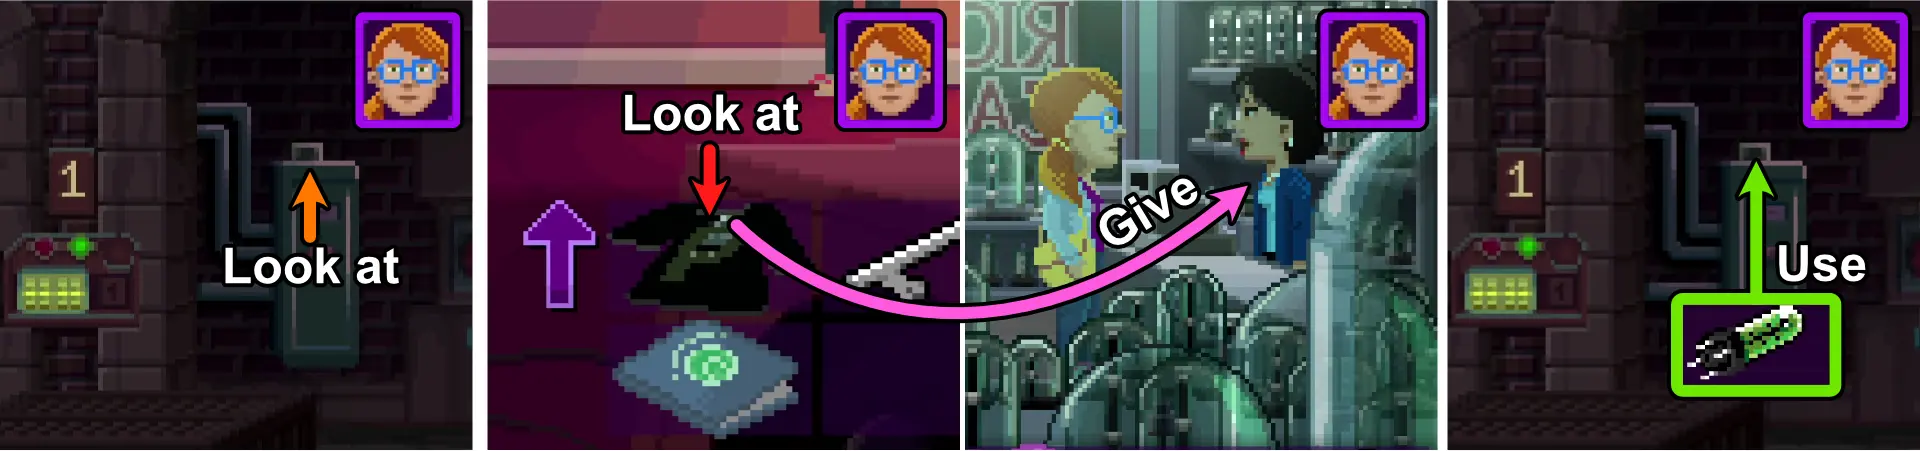
As Delores:
- Pick up the glass on the table inside the factory office.
- Tap the map and tap Edmund Mansion mansion.
- Pick up soot from the fireplace.
- Tap the map and tap abandoned factory.
- Give glass and fine black soot to Agent Reyes.
As Agent Reyes:
- Use fine black soot on the glass.
- Tap the map and tap A Street.
- Go to the post office.
- Pick up the sticky tape from the dispenser by the postal scale.
- Use sticky tape on the glass to get Chuck’s fingerprint.
- Tap the map and tap abandoned factory.
- Give the fingerprint to Delores.
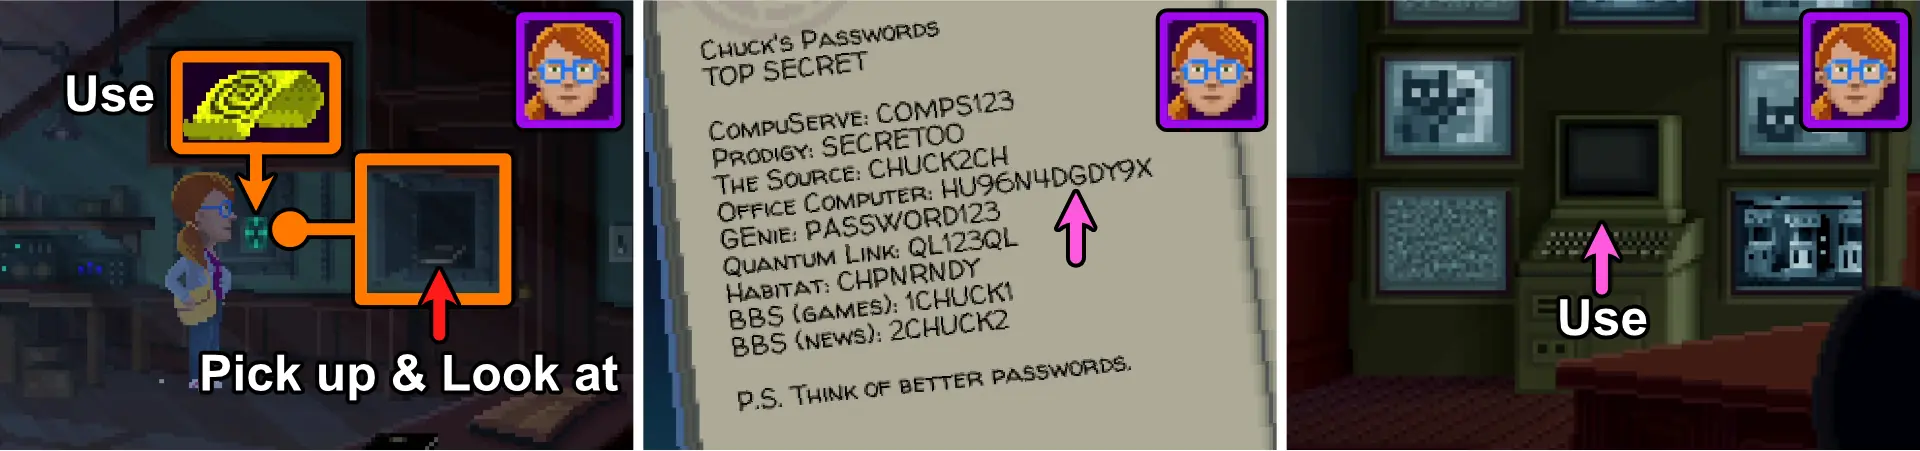
As Delores:
- Tap the map and tap Edmund Mansion mansion.
- Go to Uncle Chuck’s room.
- Pull the painting.
- Use the fingerprint on the FingerPrintReaderTron 3000™.
- Pick up the book inside it. It will have all of Chuck’s Passwords.
- Tap the map and tap abandoned factory.
- Go to the factory’s office.
- Use the computer and pick the password that appears in the book from the safe.
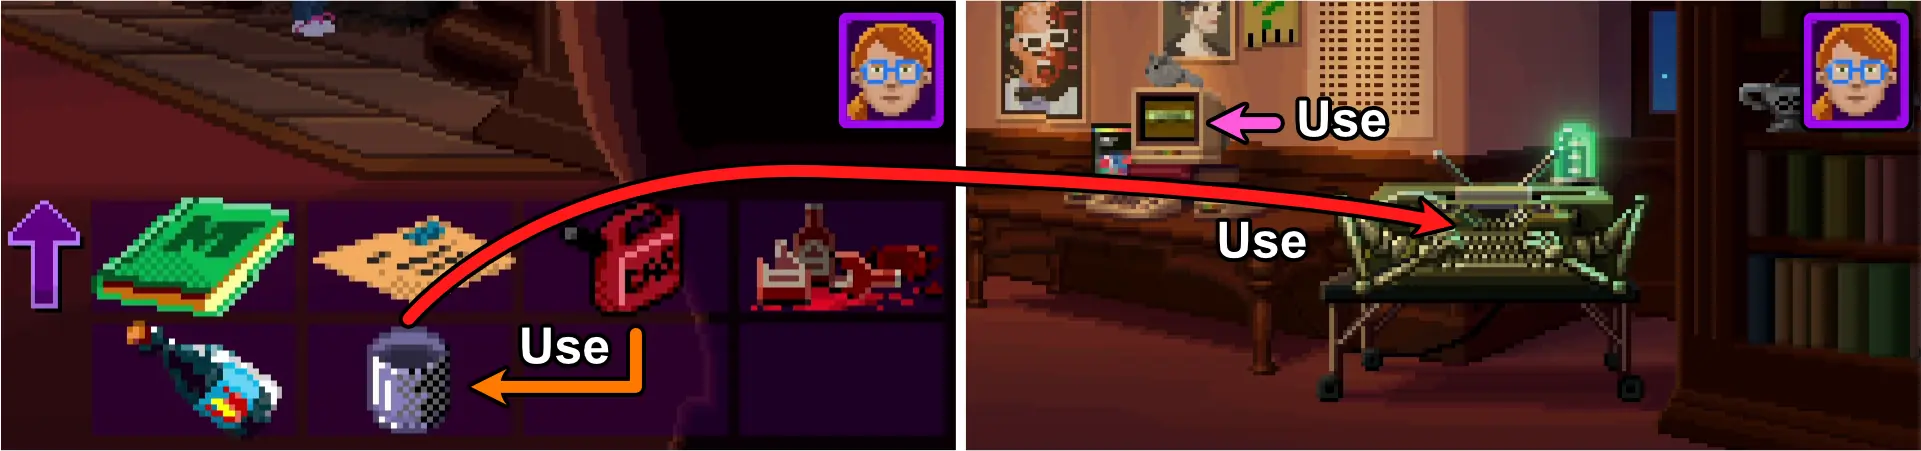
Clearing Colossal Dungeon Cave Quest II (Chuck Mod)
As Ransome:
- Tap the map and tap old circus.
- Go to Ransome’s trailer.
- Pick up comic book by the bed.
- Tap the map and tap hotel.
- Go to ThimbleCon.
- Give Ken Thien the comic book to get a hint book for Colossal Dungeon Cave Quest II.
As Delores:
- Tap the map and tap Edmund Mansion mansion.
- Go to Delores’ room.
- Pick up Susiboy’s red gel decoder from the rightmost bookshelf.
- Tap the map and tap hotel.
- Go to ThimbleCon.
- Take the hint book from Ransome.
- Use Susiboy’s red gel decoder on the hint book. This will show you the directions you need to follow while playing Adventure (Chuck mod) on the computer.
- Tap the map and tap abandoned factory.
- Go to the factory’s office.
- Use the computer.
- Choose Adventure (Chuck mod) and follow the directions from the hint book.
The computer will reboot and lock all 4 of your characters in the factory.
Part Eight: The Escape

Opening the Blast Door
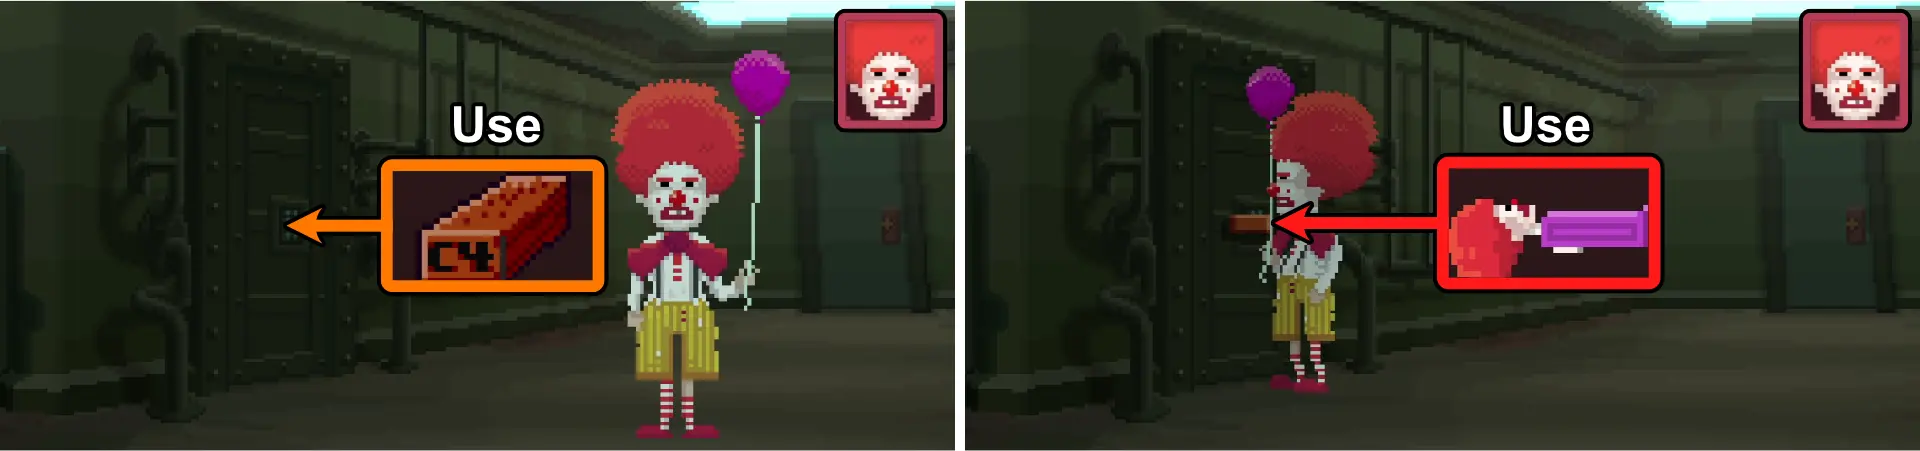
As Ransome:
- Open the foil-wrapped brick to obtain a brick of C4 explosive and aluminum foil.
- Leave the office.
- Use the brick of C4 explosive on the blast door.
- Use the candy dispenser on the C4 explosive.
Avoiding Certin Death

Going inside the room of the blast door, you’ll find robot arms blocking your way.
As Delores:
- Go to the factory office.
- Use the computer and do the same thing you did before with Adventure (Chuck mod) to reboot the computer. This will stop the robot arms that are blocking your way in the blast door room.
Chuck will activate the robot arms once more.
- Press the red button to permanently deactivate it.
- Go to the next corridor to the right.
Passing Through the Lasers of Doom™
As Delores:
- Go to the hall.
- Take the aluminum foil from Ransome.
- Go to the factory office.
- Pick up the hat from the hat rack.
- Use aluminum foil on the hat.
- Use the hat. This hat will serve as protection from lasers.
- Go back to the laser corridor.
- Walk through the corridor.
- Enter the room at the right end.
Turning the Fan Off and On

As Delores:
- Look at the sign to the lower right of the huge fan.
- Remember the service number written on the sign.
As Franklin:
- Go to any hotel room or the hotel lobby.
- Zap a telephone.
- Dial the number on the sign to turn off the fan.
As Delores:
- Walk to the Seckrit Room through the gaps of the huge fan.
The room will be bright red and overheated.
As Franklin:
- Zap the telephone again.
- Dial the number on the sign to turn the fan on.
Entering the Metal Room

As Delores:
- Go up the trap door to unlock a way to get into the factory office quickly.
As Agent Ray:
- Go down the trap door.
- Use the strange tool on the slot next to the metal door.
As Delores:
- Go down the trap door.
- Enter the metal door room.
A cutscene will occur between Delores and Chuck.
- Push 7 of the big tubes on the wall.
A conversation will occur between Delores and Chuck. Choose these answers to proceed:
- How about opening the door and letting me out?
- (Choose any answer.)
- Let’s move on Uncle Chuck.
- (Choose any answer for the next 5 options.)
- I’ve heard enough… I believe you, Uncle Chuck.
- (Choose all three answers.)
- Sure, whatever. Let’s do this thing.
Chuck will give all your characters items that are keys to getting their good endings:
- Ransome gets an I’m-sorry-for-being-a-dick card.
- Agent Reyes gets a scroll with Chuck’s confession.
- Agent Ray gets a Game of the Year award.
- Delores gets a balloon animal.
Part Nine: The Deleting

Ransome’s Good Ending

To get Ransome’s good ending, you’ll need to give the card to someone and have a last performance.
As Ransome:
- Tap the map and tap Main Street (South).
- Enter the S&D Diner.
- Give the I’m-sorry-for-being-a-dick card to Sandy.
Sandy will send Ransome to his flashback.
- Enter the stage. Choose the following answers:
- Hey you, dude with the stupid mustache!
- If you grew a hipster goatee, you wouldn’t look half-bad.
- Hey you, kid with the crappy wheelchair!
- You should contact the Ransome Foundation about getting a new one for free.
- Hey you, ugly old lady with the hairy mole!
- I went to med school and you might want to get that looked at.
Agent Reyes’ Good Ending
To get Agent Reyes’ good ending, you’ll need to give Chuck’s confession to someone that will make a big impact.
As Agent Reyes:
- Tap the map and tap A Street.
- Go to Nickel News.
- Give Chuck’s confession to Natalie. Choose these answers to proceed:
- (Choose any answer.)
- Chuck framed my father for the factory fire!
Agent Ray’s Good Ending
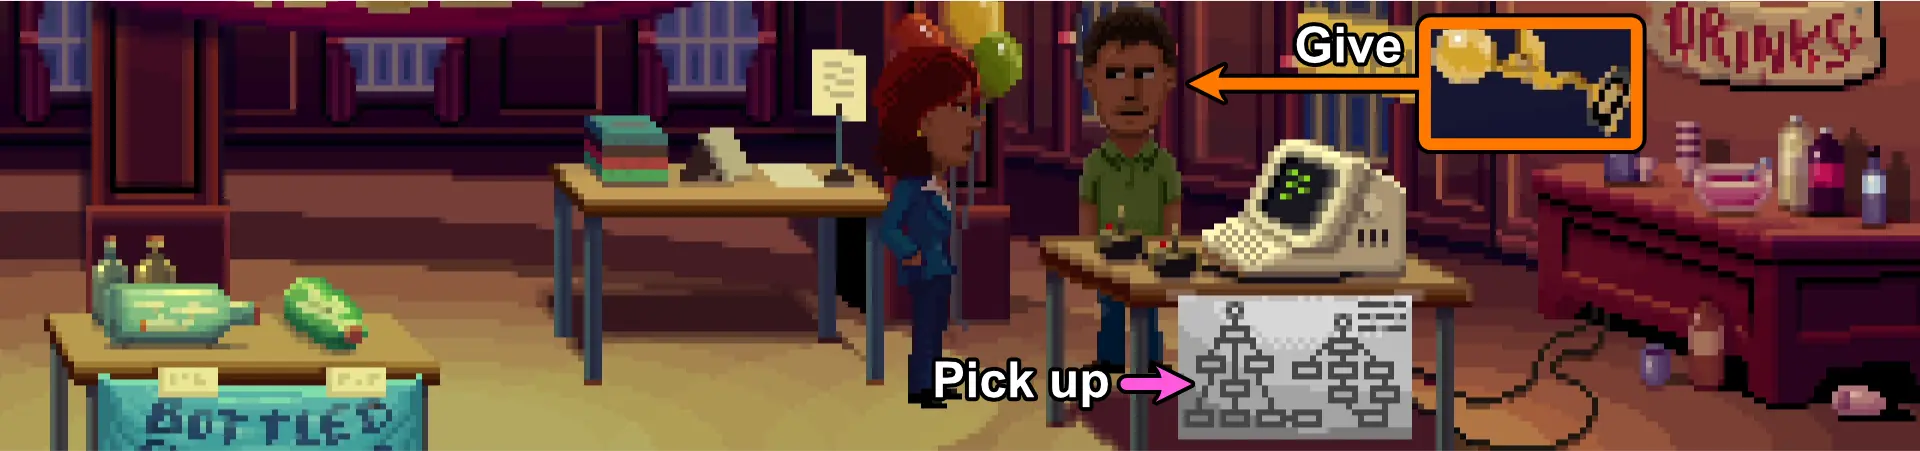
To get Agent Ray’s good ending, you’ll need to get something that can aid game developers.
As Agent Ray:
- Tap the map and tap hotel.
- Go to ThimbleCon.
- Give the Game of the Year award to the developer next to a computer with a puzzle dependency chart.
- Pick up the puzzle dependency chart.
Delores and Franklin’s Good Ending

To get Delores’ and Franklin’s good ending, you’ll need to have them talk one last time before Delores’ shuts down the game.
As Delores:
- Tap the map and tap hotel.
- Use the elevator to get to the penthouse.
- Go into the secret room.
As Franklin:
- Use the elevator to get to the penthouse.
- Talk to Xavier. Choose these answers to proceed:
- You’re a bully and a tyrant!
- (Choose any answer for the next 5 options.)
Franklin will take the ghostly crystal from the terrace.
- Go into the secret room.
- Talk to Delores. Choose these answers to proceed:
- (Choose any answer.)
- I’m so sorry for everything, Delores.
- You should get going. I love you. We’re all counting on you.
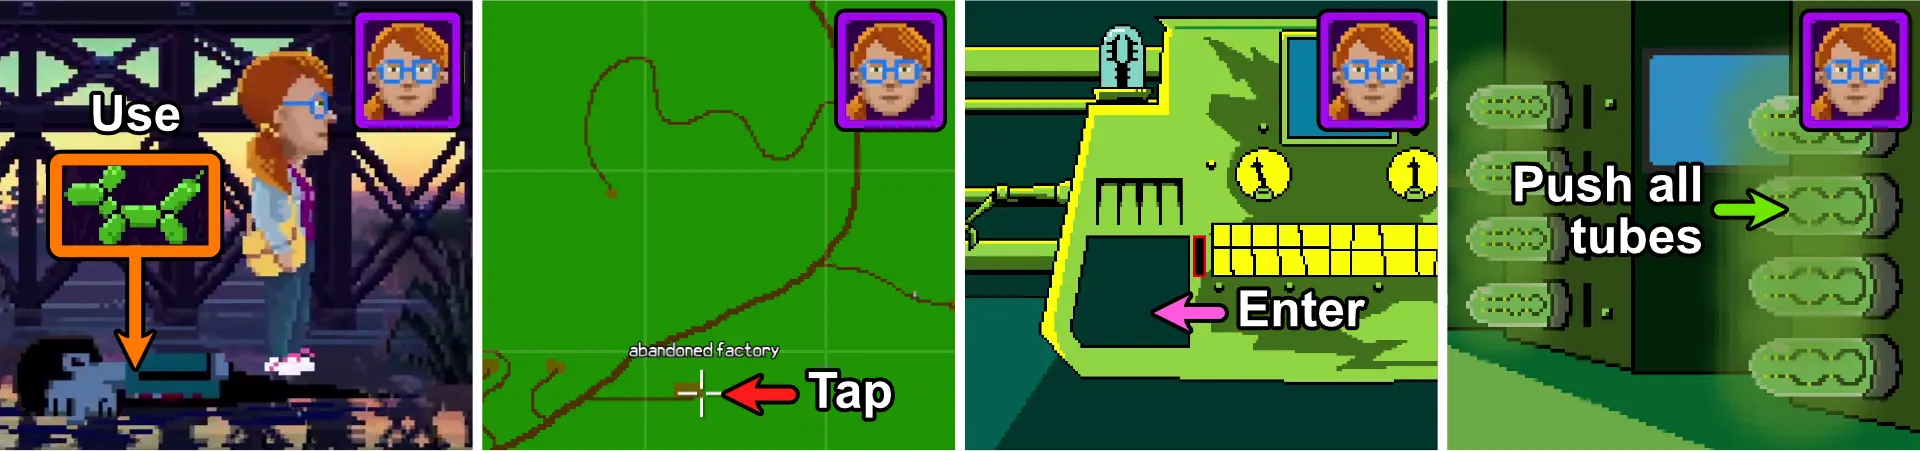
As Delores:
- Tap the map and tap bridge.
- Use the balloon animal on the corpse.
Delores will be transported to the wireframe world.
- Walk to the left to get to the highway.
- Walk to the right to get to the town.
- Walk to the right to get to the town outskirts.
- Walk to the right to get to the vista.
- Tap abandoned factory.
- Open the gate and enter it.
- Enter the factory.
- Enter the door to the right.
- Enter the blast door.
- Walk to the right and enter the door to the laser room.
- Walk to the right and enter the door to the fan room.
- Walk to the huge fan.
- Walk to the opening of the wireframe PillowTron™.
- Push all the big tubes on the wall. You’ll need to command Delores to push the last tube 5 times before she does and the game ends.
Achievements
Achievements in games are optional but can give great satisfaction to many players, especially those who have invested so much time in their favorite game and want to unlock all its secrets. There are a total of 33 Achievements for Thimbleweed Park:
Progress-Related
Many tasks are obtained simply by playing the game and progressing through the story.
Based on Difficulty Mode
 | Easy Win Complete the game in casual mode. |
 | Hard Win Complete the game in hard mode. |
Based on Part
 | Part 1 Begin Part 1. |
 | Part 2 Begin Part 2. |
 | Part 3 Begin Part 3. |
 | Part 4 Begin Part 4. |
 | Part 5 Begin Part 5. |
 | Part 6 Begin Part 6. |
 | Part 7 Begin Part 7. |
 | Part 8 Begin Part 8. |
 | Part 9 Begin Part 9. |
Based on Flashback Scenes
 | *Beephole* Complete Ransome’s Flashback. |
 | Out Of The Will Complete Delores’s Flashback. |
 | Secret Meeting Complete Frankin’s Flashback. |
Based on Story-related Tasks
 | Justice Catch the killer. |
 | Sky High Get an alive character into the Hotel penthouse. |
 | *Beephole* Redux Got Ransome’s bad ending. |
Unlocking Beephole Redux
This can be accomplished only in Part 9 once you’ve talked to Sandy as Ransome and went back to the flashback scene. Select the following choices:

- Hey you, dude with the stupid mustache!
- A 1970s pornstar called. He wants his mustache back!
- Hey you, kid with the crappy wheelchair!
- Were you a Beepler in a past life or something?
- Hey you, ugly old lady with the hairy mole!
- Or is it your parasitic twin?
Extra Tasks
Some tasks that don’t contribute to the story can also give you an achievement.
Collecting Dust
 | Messy World Didn’t pick up any specks of dust. |
 | Dust Appreciator Collect 25 specks of dust. |
 | Dust Collector Collect 50 specks of dust. |
 | Dust Hoarder Collect 75 specks of dust. |
Dust Collecting Tip
You can start collecting from the moment you start your game. Dust, tiny gray pixels, can randomly be found in any location and won’t always be in the same place twice. You’ll need to pick them up for it to count using any of your characters, except for Franklin.
Extra Information
 | Last One Out Stayed for all the credits. |
 | Hotel Tourist Visited every floor in the hotel. |
 | Well Informed Read all the Thimbleweed Nickel newspapers. |
 | Book Worm Read 100 books in the library. |
 | No One is Home Listen to 100 Voicemail messages. |
Unlocking Well Informed
This can be accomplished as early as Part 2 after you’ve fixed the fire hydrant leak that blocks A Street. Look at the top of all the newspaper stacks as indicated by the arrows in the image below:

Unlocking Book Worm
This can be accomplished as early as Part 2 during Delores’ flashback but can also be done outside the flashback:

- As Delores:
- Go to the Library at Edmund Mansion mansion.
- Look at 100 different books from any of the sections.
Players have confirmed that you do not have to open the book cover for it to count.
Unlocking No One is Home
This can be accomplished as early as Part 2 using Agent Ray’s cellphone.
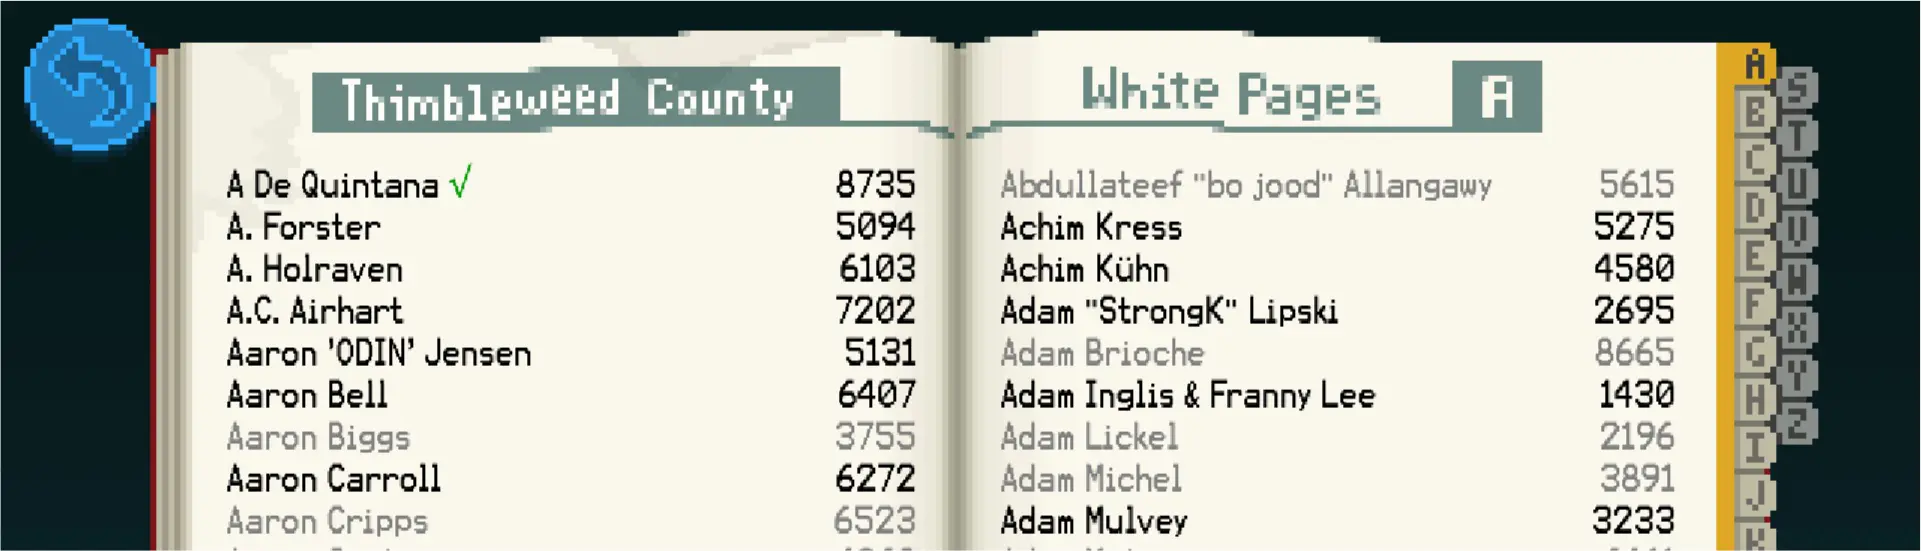
Dial 100 different phone numbers from the phone book that has voicemail messages. The ones in black font are usually the ones that have it. A green checkmark will appear next to the name of the numbers you have already called. Players have confirmed that you do not have to listen to the whole message for it to count.
Below are a few numbers you can dial that are confirmed to have voicemail messages:
| 1004 | 1786 | 2594 | 3558 | 4235 | 4785 | 5186 | 5692 | 6588 | 6948 | 8151 |
| 1184 | 1792 | 2695 | 3579 | 4249 | 4821 | 5275 | 5755 | 6594 | 7057 | 8302 |
| 1197 | 1806 | 2977 | 3597 | 4250 | 4828 | 5322 | 5797 | 6674 | 7142 | 8318 |
| 1220 | 2017 | 3078 | 3620 | 4476 | 4934 | 5368 | 5851 | 6701 | 7202 | 8425 |
| 1428 | 2062 | 3091 | 3660 | 4540 | 4939 | 5420 | 5982 | 6769 | 7283 | 8461 |
| 1430 | 2212 | 3233 | 3764 | 4580 | 4972 | 5459 | 6103 | 6841 | 7347 | 8532 |
| 1477 | 2229 | 3242 | 3836 | 4598 | 5018 | 5485 | 6147 | 6842 | 7425 | 8630 |
| 1573 | 2270 | 3259 | 3989 | 4624 | 5094 | 5506 | 6216 | 6855 | 7443 | 8670 |
| 1584 | 2461 | 3321 | 4171 | 4628 | 5131 | 5523 | 6272 | 6906 | 8004 | 8735 |
| 1659 | 2552 | 3355 | 4222 | 4636 | 5133 | 5690 | 6407 | 6928 | 8044 | 8949 |
Secret Actions and Item Uses
 | *Beephole* Mime Pushed the circus mime over. |
 | Itchy Fingers Used Ransome’s Itch Cream. |
 | Plantastic Grew Leonard’s plant to superhuman size. |
 | Nuke It Blew up the Mansion. |
 | Mean Person Make everyone cry about their life. |
Unlocking Beephole Mime
This can only be accomplished as early as Part 2 during Ransome’s Flashback:

- As Ransome:
- Go to the Circus Grounds.
- Push the mime standing on stilts.
Unlocking Itchy Fingers
This can be accomplished as early as Part 3 once you are able to use Ransome outside of the flashback scene:
- As Ransome:
- Go to the Backstage.
- Pick up the green Anti-itch Cream on the right side of the makeup table.
- Use the Anti-itch Cream from your inventory.
Unlocking Plantastic
This can be accomplished in Part 6, right after you’ve unlocked the Abandoned Factory:

- As Delores:
- Pick up Delores’ trophy from her shelf in her room at the Edmund Mansion mansion.
- Use the trophy to collect the Radioactive Waste at the back of the Abandoned Factory.
- Use the Radioactive Waste on the Man-Eating Plant in the Quickie Pal next to the cash register.
Unlocking Nuke It
This can be accomplished as early as Part 3, right after you’ve unlocked Delores as a useable character:
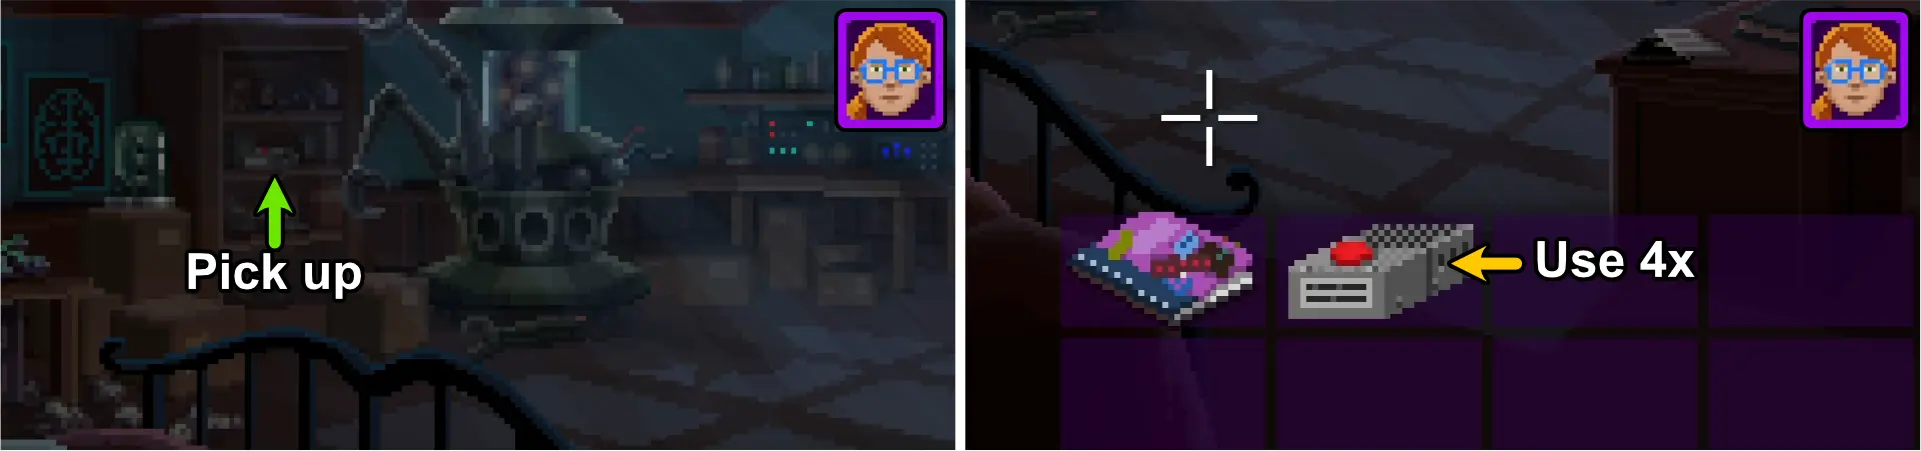
As Delores:
- Go to Uncle Chuck’s room in the Edmund Mansion mansion.
- Pick up the Strange Device on the shelf.
- Use the Strange Device 4 times.
Unlocking Mean Person
This can be accomplished as early as Part 3, once you’ve unlocked Franklin as a useable character:
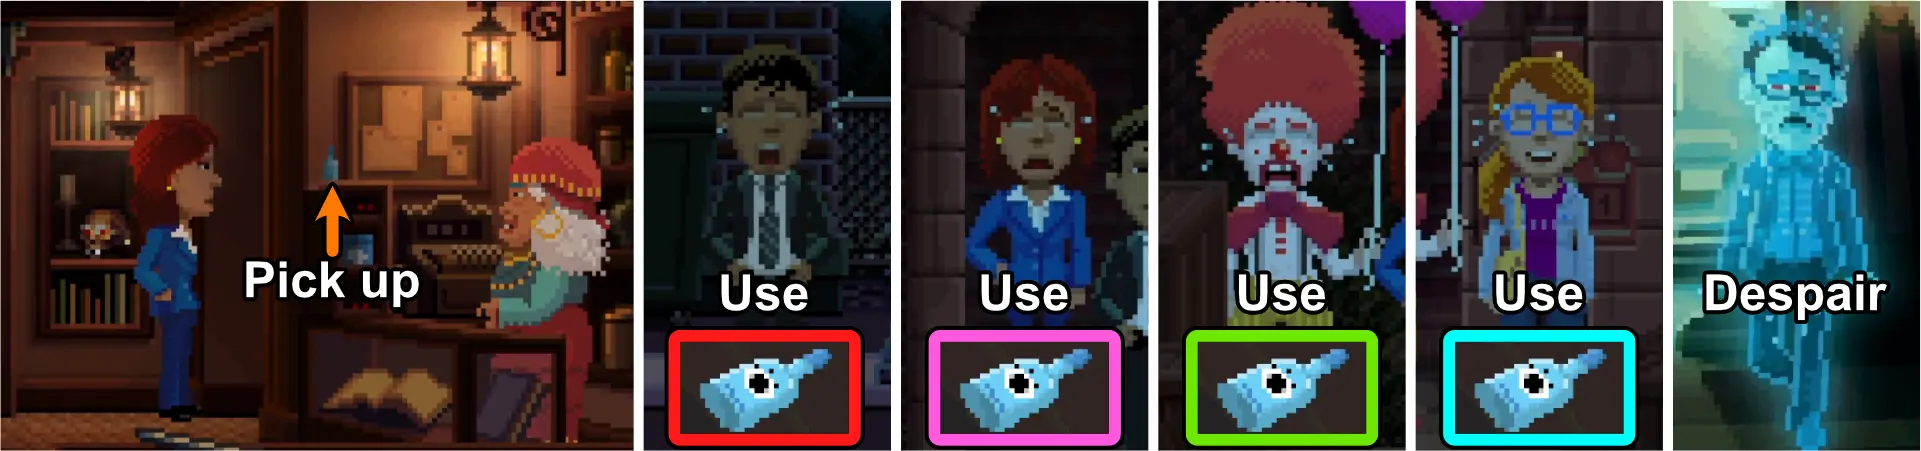
As any of the characters (except Franklin and Ransome):
- Go to Madame Morena’s Occult Bookstore and pick up the blue Cursed Eye Drops on the top of the shelf next to the counter where Madame Morena is.
- Use the Cursed Eye Drops as Agent Ray, Agent Reyes, Ransome, and Delores.
- As Franklin, use the Despair command.
Optional Quests
 | Buried Treasure Navigated to the buried treasure. |
 | Great Escape Escape from the sewers. |
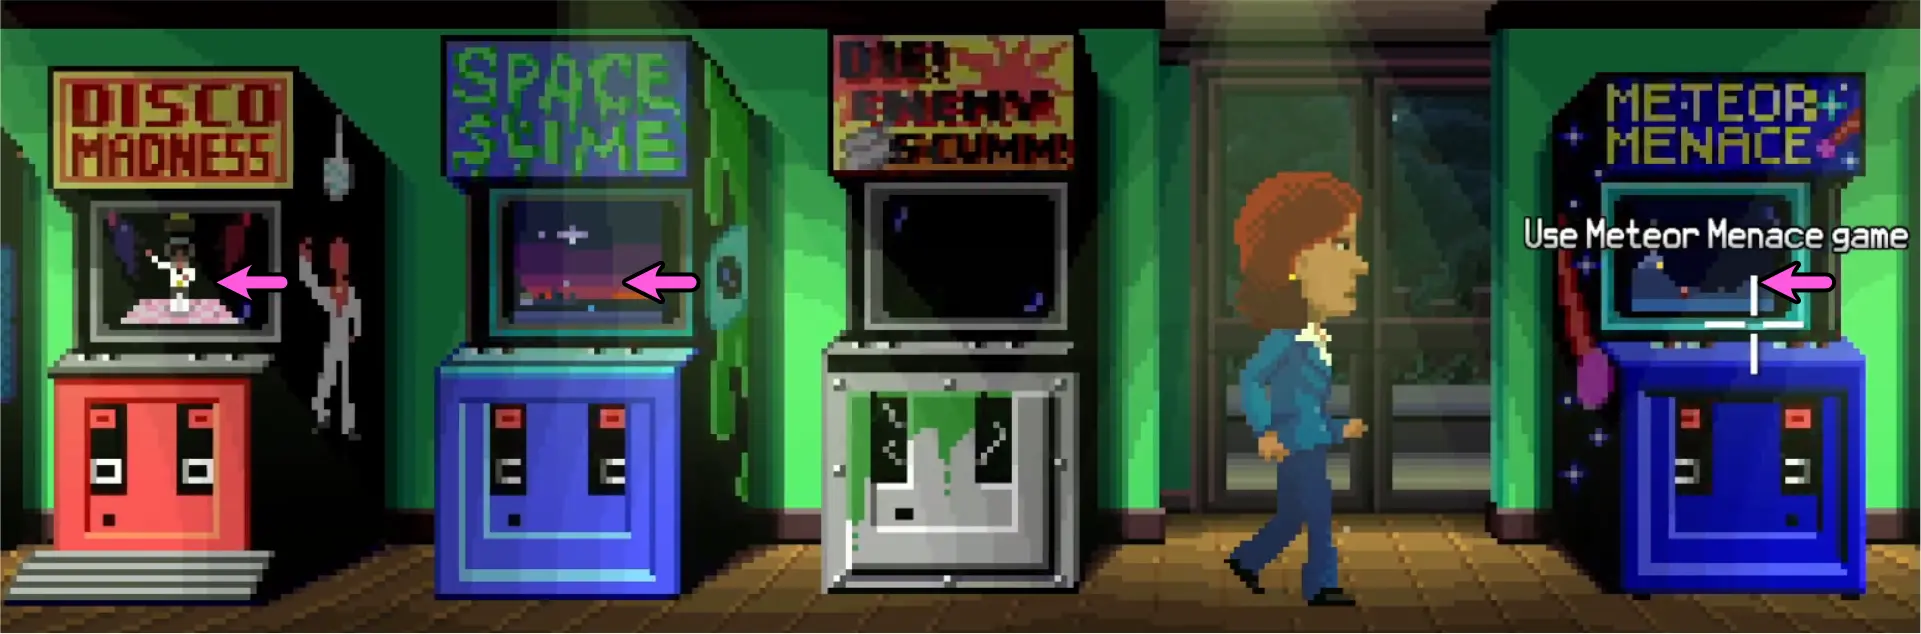
Unlocking Buried Treasure and the Arcade Games
This can be accomplished as early as Part 5 after the will reading:
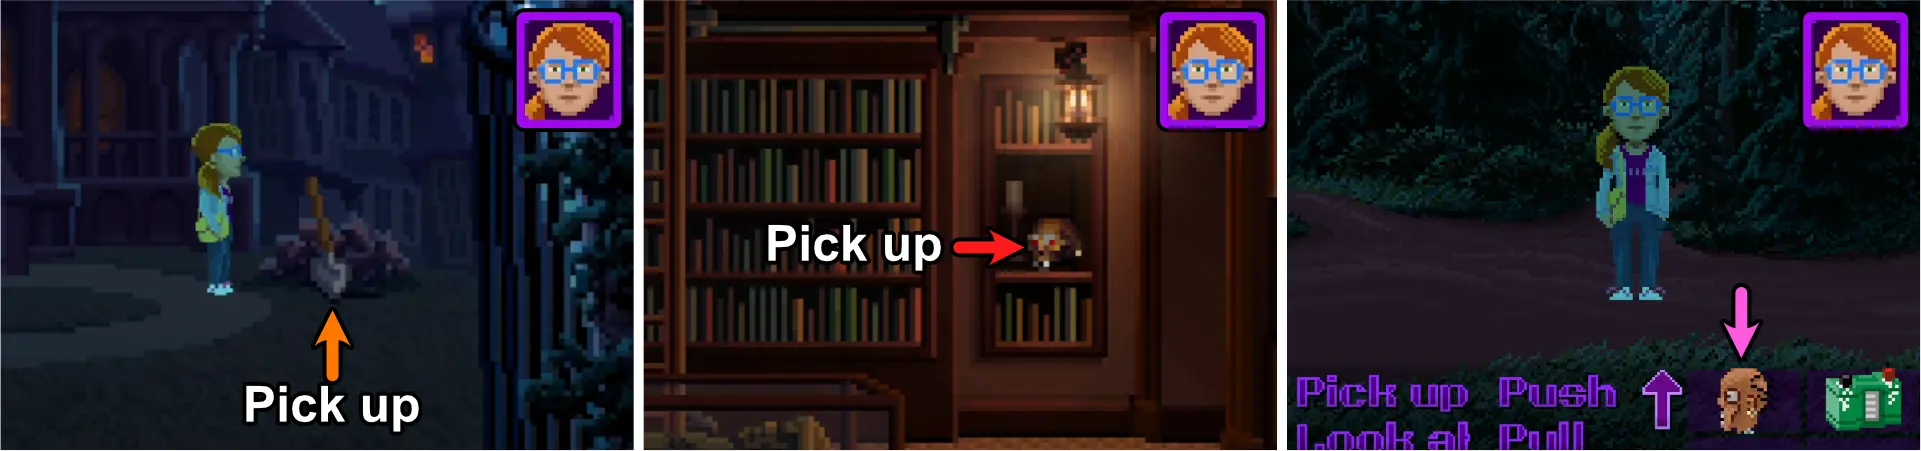
As Delores:
- Pick up the shovel sitting on the wood pile in the front yard of the Edmund Mansion mansion.
As any of the characters (except Franklin and Ransome):
- Go to Madame Morena’s Occult Bookstore and pick up the Cursed Head on the wall shelf next to the doorway by the counter where Madame Morena is.
As any of the characters (except Franklin):
- Go to the Trailhead and make sure that you can see the Cursed Head from your inventory. It will turn its head towards the path you need to go to.
- Tip 1: The Cursed Head will spin without stopping if you go the wrong path. When this happens, you’ll need to leave the forest and start from the very beginning.
- Tip 2: The Cursed Head may gradually move as you get closer or further from the path you need to take. For any of the 3 paths at the center, make sure the head is staring straight ahead before entering it.
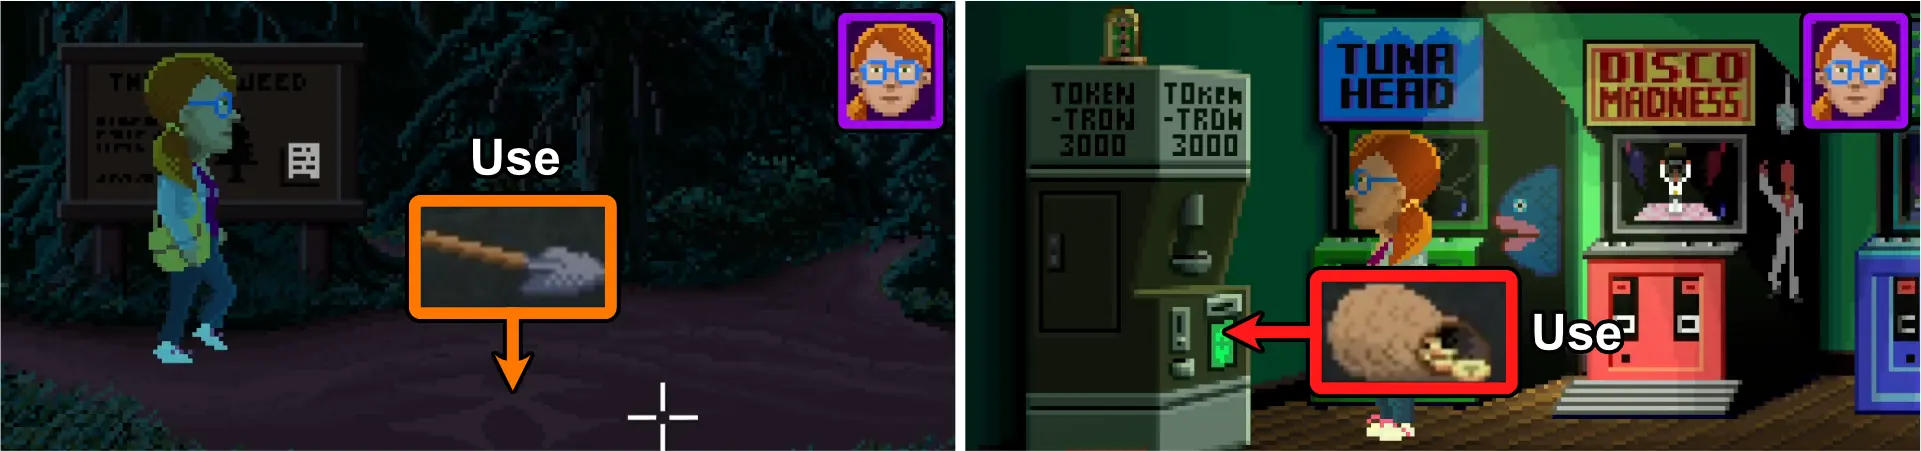
- After passing through about 8 paths, you’ll arrive at an area with an X on the ground.
- Use the Shovel on “X marks the spot” to obtain a Bag of Tokens.
- Use the Bag of Tokens on the Token-Tron 3000.
- Use the Token-Tron 3000 every time you need to use a Bright Token on the arcade games to play them. You can only play Disco Madness, Space Slime, and Meteor Menace.
Unlocking Great Escape
This can be accomplished as early as Part 2. It is an optional event that may be missed. You can use Agent Ray or Reyes for any of the two roles but for this walkthrough, we’ll use Agent Reyes as the one in the sewers and Agent Ray as the one outside.
Getting Kidnapped
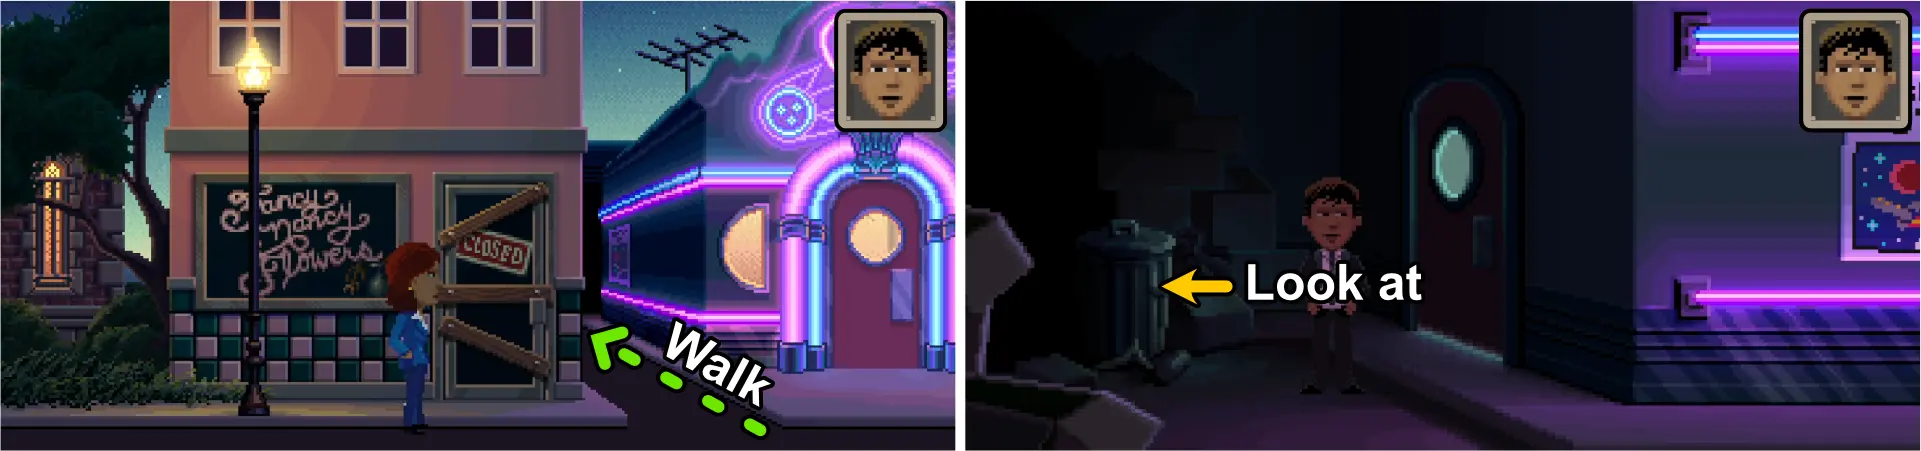
As Agent Reyes:
- Go through the dark alley between Fancy Nancy Flowers Shop and the S&D Diner.
- Look at the trash or boxes on the left side. A dark silhouette will knock him out and drag them away. The game will later show that character waking up in the sewers when you switch to them.
Getting Out
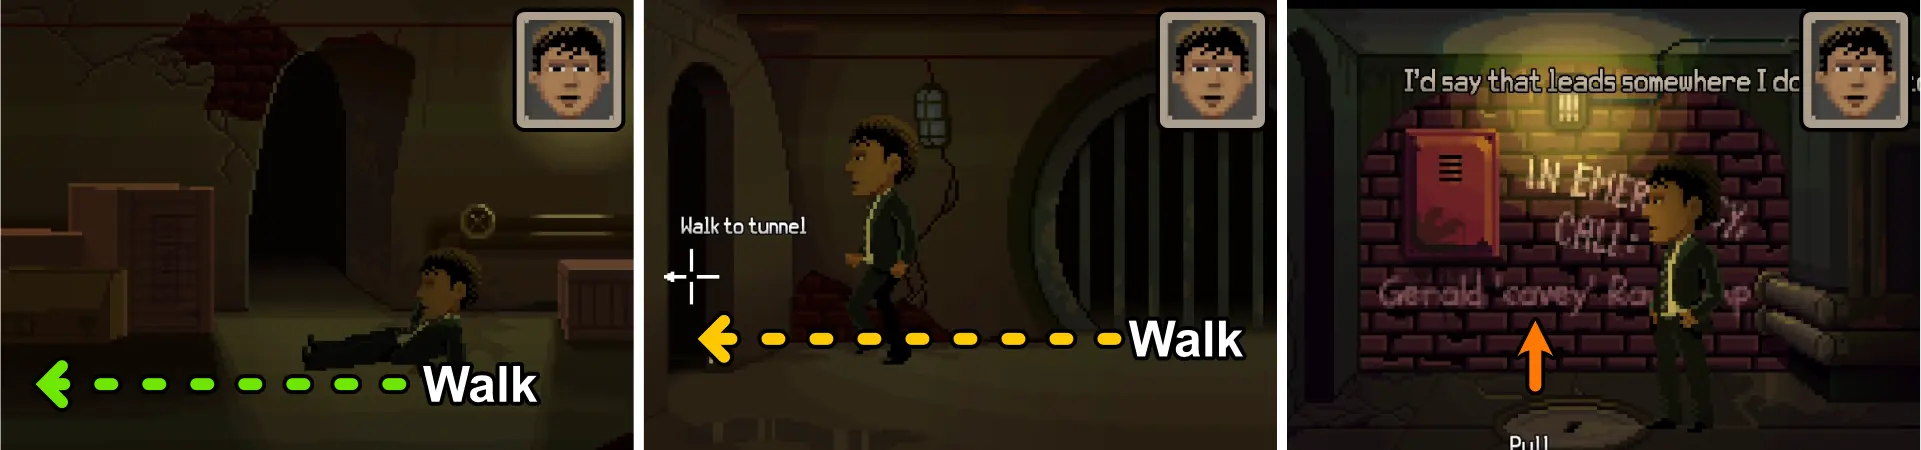
As Agent Reyes:
- Exit through the left tunnel.
- Keep walking to the next left tunnel.
- You’ll encounter a brick wall that says “IN EMERGENCY, CALL:” and a name. The name is randomized.
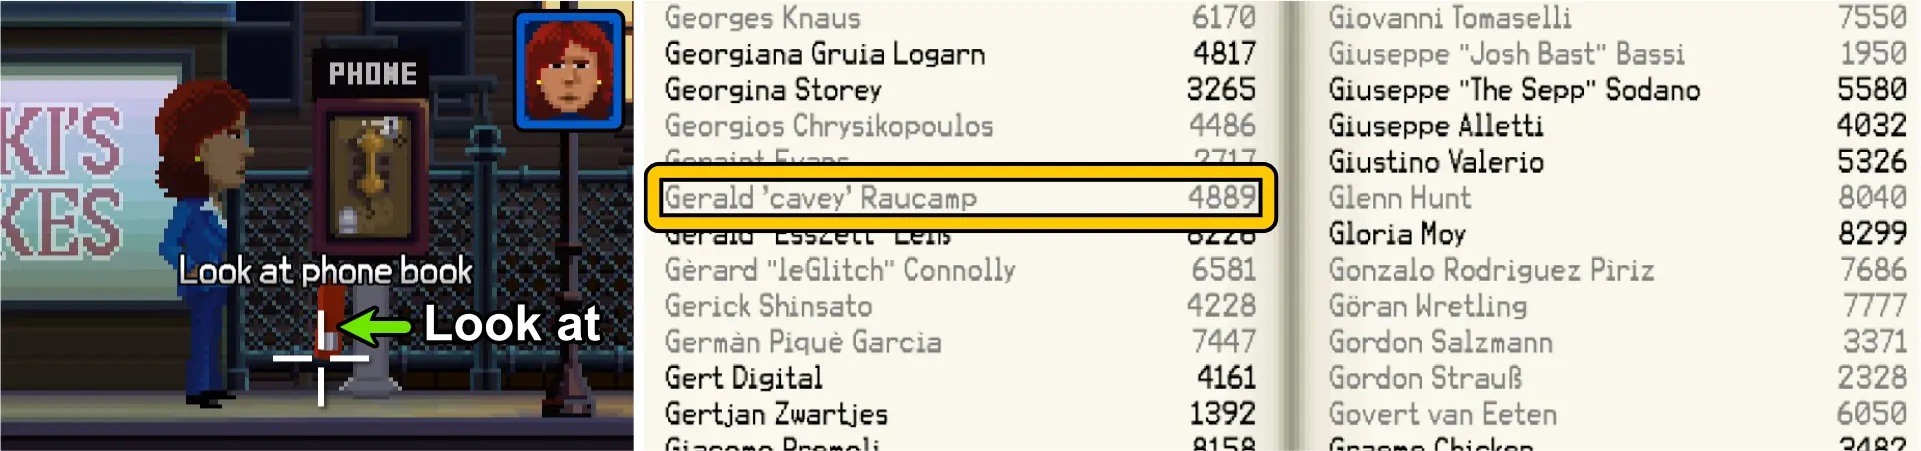
As Agent Ray:
- Go to A Street.
- Look at the phone book dangling from the Payphone next to Ricki’s Cakes.
- Look for the name from the brick wall and get their number.
Once you get their number, there are two things you can do depending on the situation:
Situation 1: Agent Ray has her cell phone in her inventory.
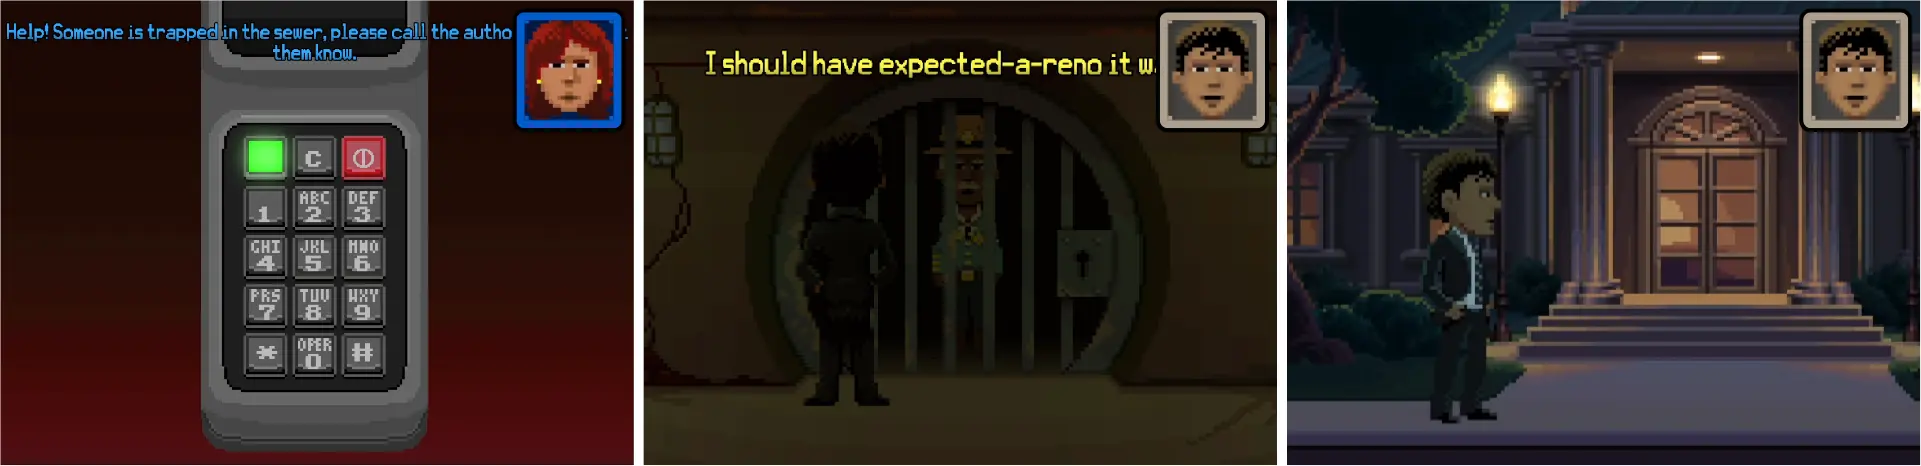
As Agent Ray:
- Call the number using her cellphone.
As Agent Reyes
- Head to the right tunnel from the area with the brick wall.
The Sheriff will open the gate and Agent Reyes will be transported in front of the Town Hall.
Situation 2: Agent Reyes has Agent Ray’s cell phone in his inventory.
Since there is no cell service in the sewers and the payphone outside Ricki’s Cakes is out of order, you’ll have to call as Agent Reyes using the payphone in the sewers:
As Agent Ray, you can get a Dime from:
- The sidewalk in front of the Safety First Savings Bank on Main Street.
- The sidewalk between Petey’s Pet Emporium and Ricki’s Cakes in B Street.
- The road on the highway.
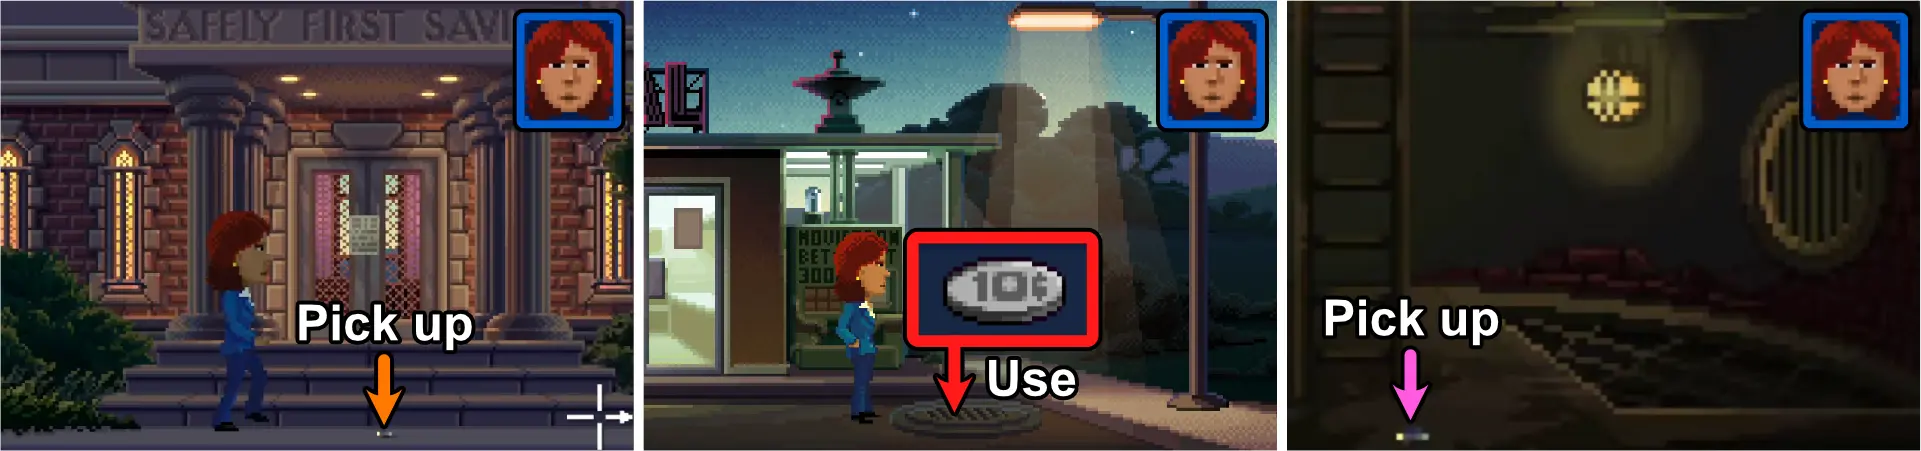
As Agent Ray:
- Go to the Quickie Pal’s parking lot.
- Use the Dime on the Sewer Grate to drop it into the sewers.
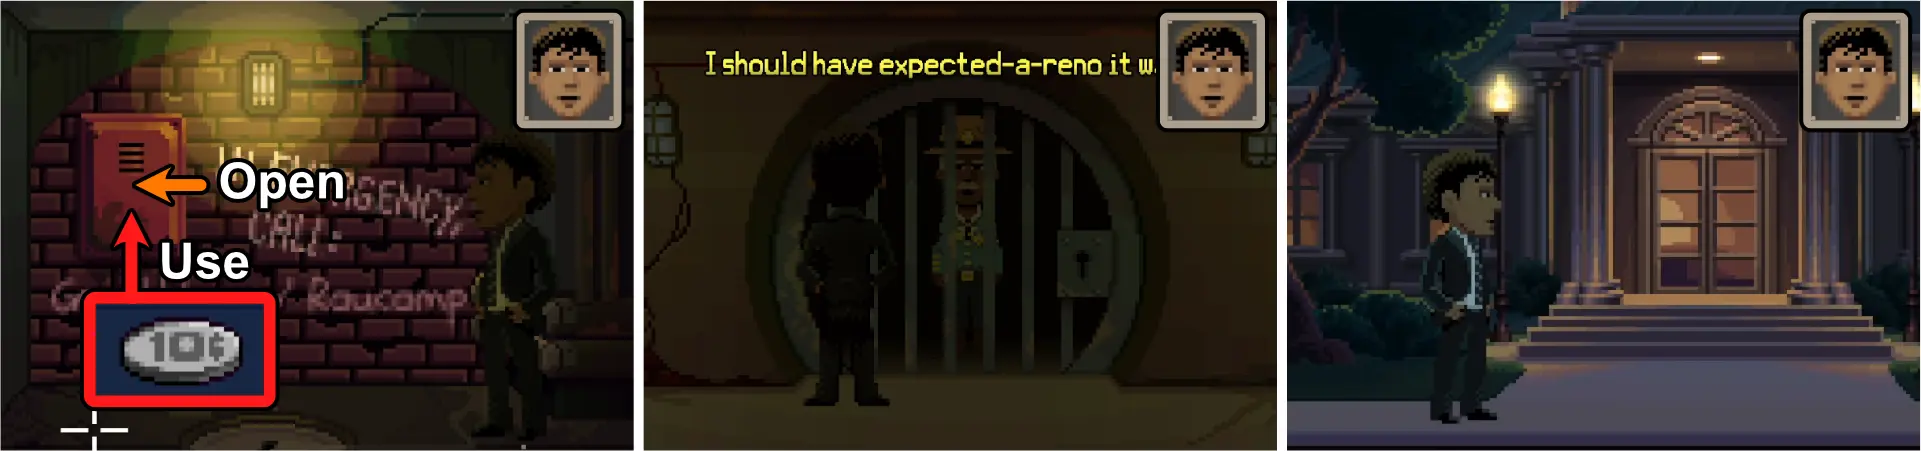
As Agent Reyes:
- Go back to the location where you first woke up.
- Enter the tunnel behind him.
- Pick up the Dime on the floor next to the ladder.
- Go back to the area with the brick wall.
- Open the Red Box on the wall.
- Use the Dime on the Payphone.
- Call the number.
- Head to the right tunnel.
The Sheriff will open the gate and Agent Reyes will be transported in front of the Town Hall.
If you dialed the wrong number, you can get your Dime back from the coin return slot. Don’t forget to pick up Agent Reyes’ notebook at the alley.
And this marks the end of our walkthrough for Thimbleweed Park! We hope that our article helped you solve the mysteries behind the unusual happenings in the small town and got you through the most complex puzzles. Which one was your favorite character? Are there other point-and-click adventure games that you would like us to cover? Or perhaps other mobile games of different genres? Let us know in the comment section below!