Zombeast is a first-person shooter developed by Long Tail Games for Android devices, that has you scavenge, shoot, and survive your way through a zombie-infested city. Equipped with only two guns, some ammo, and five grenades, you will have to fight your way through it if you want to live, upgrading your equipment along the way.
Now, if you are looking to improve to improve your odds of survival in Zombeast, then stay with us and read on as we will share with you a bunch of tips, tricks and strategies!
1. Zombie Killing 101
There are two main objectives in each level of Zombeast: kill a required number of zombies and travel a set distance. All levels have a third “challenge” objective that gives out bonus awards if completed, and are generally easy to overcome. Any given level will have obstacles that can impede the movement of both you and the zombies, even featuring alternate routes to progress.
Zombies will only become active once you wander into their aggro range, so prepare yourself before moving. It is important to note that while the bulk of movement is generally towards the objective, you can move backward for some breathing room, though you are significantly slower so zombies will eventually catch up.
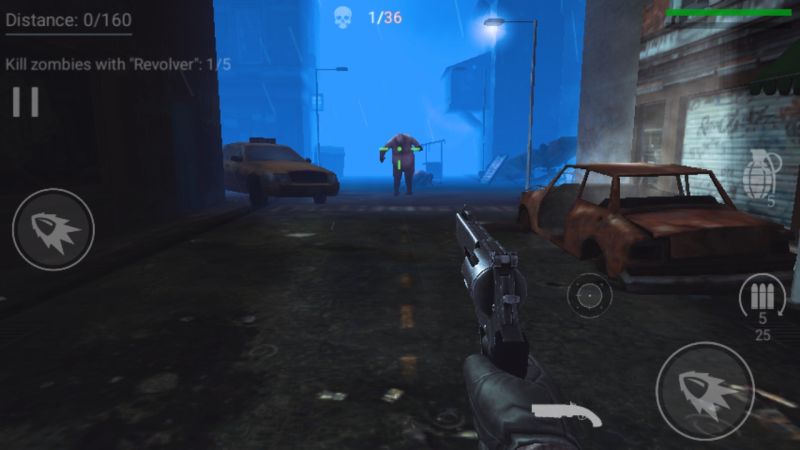
Besides zombies, you will occasionally find ammo crates scattered throughout the level to replenish your weapons’ ammo reserves, and on rare instances you can stumble upon a completely different weapon from your current loadout. Picking it up will make you unable to swap to your normal guns until you run out of ammo, but the weapon is generally well-suited to the level it is found in (especially the BFG, which will shred any zombie on the receiving end).
The second level introduces grenades to the mix. You can only carry five of them per mission, but these will generally wipe out entire hordes so consider these your panic button. You may also encounter explosive barrels that can be shot, blowing up any unfortunate zombies nearby and potentially setting off more explosive barrels, though be wary of the splash damage.
2. Know Your Weapons
At the start of the game, you are armed with a sawn-off shotgun and a revolver. All weapons have their pros and cons. Shotguns are great against clusters of basic zombies (or “Skinnies” as the game calls them), but fall short against durable targets like the aptly-named “Fatties.” In contrast, your revolver does great damage against single targets, but its fire rate makes it a poor choice against hordes. You will unlock more weapons as you progress but you will have to buy these with coins to be equipped with it. Some weapons (even a couple of melee options) can only be unlocked with gems or in-app purchases.
Your chosen weapon will lock onto a zombie once it gets into range, indicated by a white reticle. You can choose to shoot immediately, but the auto-aim function gives you the option to wait for the reticle to turn green, giving your attack bonus damage. Shotguns have a faster time transitioning to the green reticle, while more accurate guns take a little more time. There is also a manual aiming button just above the right fire button however; there is no way to adjust the sensitivity so your aim will be inaccurate if you move too suddenly.
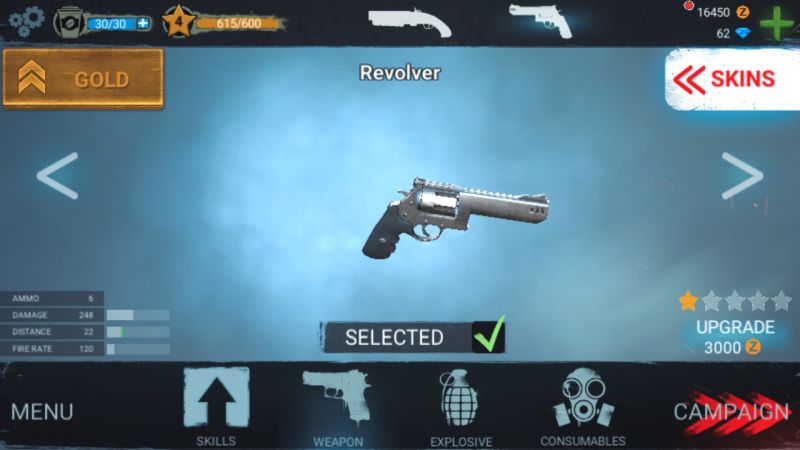
Between missions, you have the option to upgrade your weapons, spending coins to do so. All guns have four stats listed at the bottom left corner:
Ammo: how many rounds your gun can hold before it needs to be reloaded
Damage: exactly that, how much damage your gun can do per shot
Distance: the minimum distance required for the gun’s auto-aim function to lock onto a zombie
Fire Rate: how fast your gun fires; this stat’s effects are more evident on automatics and/or guns with large magazines
Additionally, shotguns have a fifth stat called Spread Angle which determines how much their projectiles spread out. This stat is not affected by the other four upgrades. Weapons also have access to purchasable skins that, aside from cosmetic differences, have no impact on a weapon’s performance.
3. The Undead Hordes
Zombeast includes a variety of zombies to deal with, and all of them can be viewed from the Bestiary available at the main menu or the Campaign Map. This section will list some of the zombies you will have to face early on:

Skinny–zombies: the basic, lumbering flesh eater. Nothing special about them besides appearing in large numbers.
Fat–fat zombies: they can take more punishment than Skinnies and shotguns are generally less effective on them. Later levels will feature Toxic Fatties that release noxious gas upon death, necessitating the use of different paths or powering through the fumes.
Dog–cursed canine cadavers: fast, but fragile. Shotguns are preferred as they can kill multiple zombies per shot.
Soldier–zombified military men: Their body armor protects them in death as it did in life, making them resistant to shotgun fire.
Zwat–former riot police: their riot shields can absorb damage before breaking apart, on top of them still wearing body armor. Use grenades to shatter their shields, though gunfire also works.
Stalker–zombies: they periodically turn invisible, preventing auto-aim. Their cloaking can be disrupted with damage however, so spray and pray if you see one coming.
4. The Campaign Map
The main campaign map also lists what the next level will be like, with a descriptor pointing towards the overall visibility of the level. Generally, foggy or dark levels can obfuscate incoming zombies and/or obstacles.
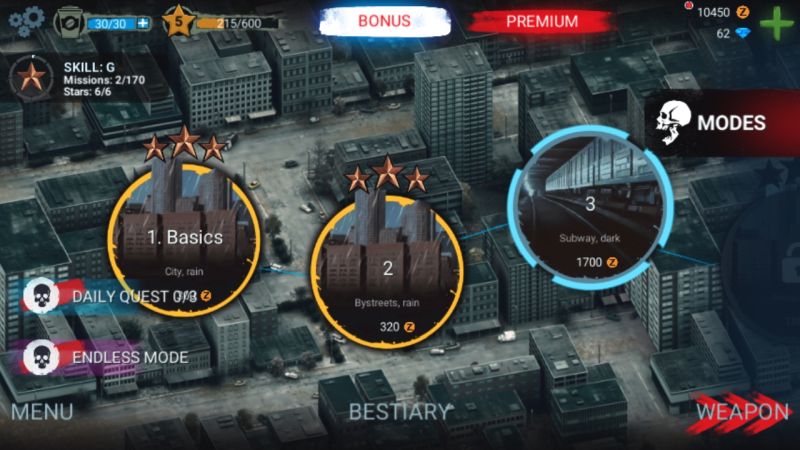
Besides the standard campaign, you also have access to daily missions after completing Level 12, which features a single objective and a large coin payout. You are given a preset loadout and more importantly, you will potentially have to face zombies you will not encounter until later in the campaign. There are three missions to complete per day, and completing all three awards you a bonus.
There is also a Modes page that alters the difficulty of the campaign with mutators, ranging from increasing the attributes of select zombies, to reducing your maximum health, to massively boosting your weapon damage. These can be activated for more coins if needed, if you prefer the challenge, or if you just want to blow off some steam and fire away.
5. How To Use Your Equipment
Besides weapons and grenades, you have access to additional equipment that can improve your odds of survival. These are found in the Equipment page. You can only use up to two unique pieces of equipment per mission and most of these can be purchased with coins when needed.
The most common piece of equipment is body armor which, when equipped, takes damage before your health is depleted. You can equip or unequip it any time before starting a mission via the box at the left side of the armor.
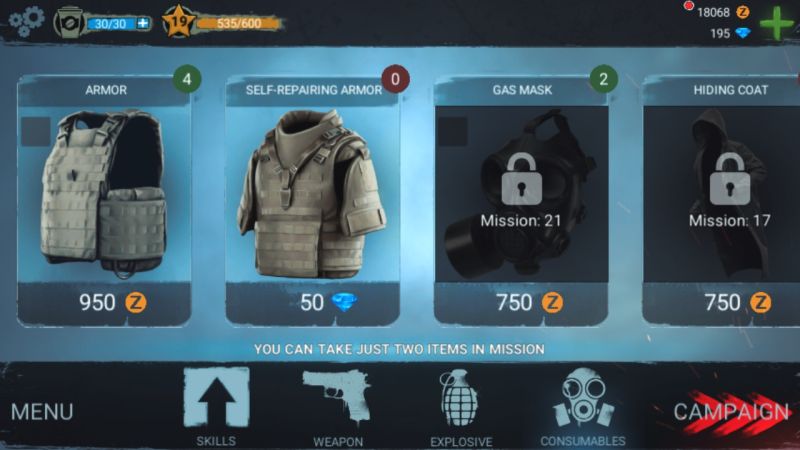
However, it is worth noting that one set of armor is used up after completing a mission regardless of how much damage has been taken, so be sure to make the most of your armor. There is also self-repairing armor that naturally regenerates when not taking damage, but requires gems to purchase. Only one type of armor can be used at any given time, so no, you cannot wear both sets to gain twice as much armor health on top of regeneration!
You also have miscellaneous equipment that has more situational uses depending on what zombies you are going to face. These include gas masks to deal with poisonous gas or hiding coats to sneak past enemies.
Remember to unequip any gear once it is no longer needed, otherwise it will be constantly used up until it runs out. You can bring equipment to daily missions, provided you equip them before heading to the campaign map.
6. Ranking Up
Every time you complete a level, you earn experience based on milestones earned during a mission. Milestones include killing a set amount of zombies, dealing high amounts of damage, or scoring multiple kills with one shot. You can collect these milestones in exchange for experience, which in turn rewards the following items in this order: a small amount of coins, some gems, explosives or equipment, and skill points (which we will get to later).
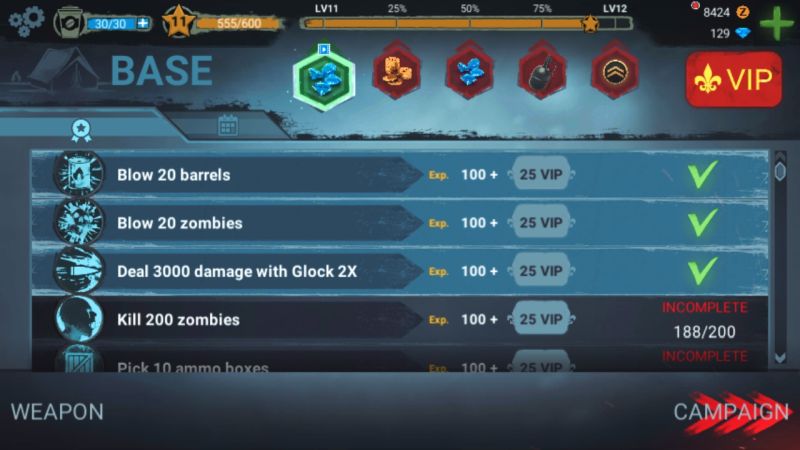
While you can freely collect these rewards at the start of the game, later on you will be required to watch an ad in order to access these rewards. Seeing as ads also reward you with a handful of gems, I recommend you watch the ads. There are also three daily milestones that reward you with less experience and feature more restrictive requirements, but are still worth achieving them, if you can.
After the fourth level, you will gain access to the Skills page, which lets you increase your stats and improve your odds of surviving a level. These stats are:
Health: how much damage you can take before failing a mission
Armor: how much damage your armor, if any, can take before it breaks
Speed: how fast you can move forward
Aim: how quickly the reticle turns green for bonus damage
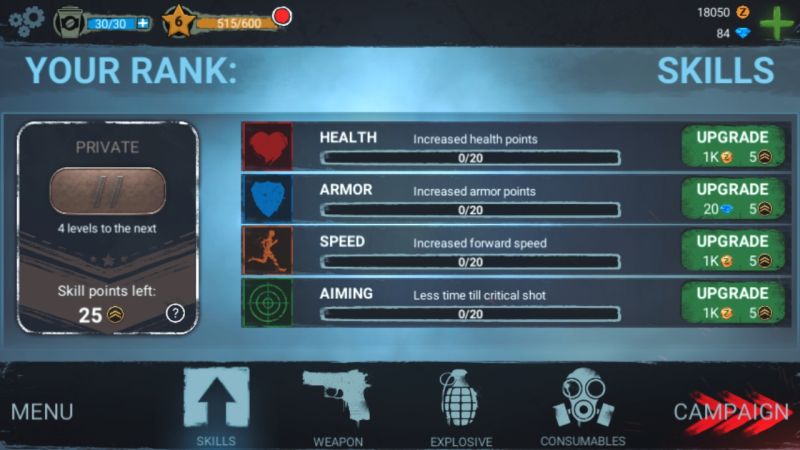
Skills can be upgraded by spending the skill points mentioned above, along with either gems or coins, with the price increasing as the chosen stat levels up.
7. Miscellaneous Tips & Tricks
Now that we have the basics out of the way, here are some pointers and tricks to beat Zombeast:

Do not aggro too many zombies at once
The bane of any would-be survivor is biting off far more than you can chew, and later levels of Zombeast will feature zombies that can take a beating and close the distance fairly quickly, sometimes in groups. Be careful.
Keep your guns loaded.
The last thing you want when facing down the hordes is to be out of ammo. Reload your weapons during periods of calm, before you press forward.
Use the level to your advantage
The zombies’ AI is (literally) straightforward: they march toward you and swipe when they get close enough. Obstacles can impede their progress or even halt them entirely, giving you opportunities.
Manual aim has its uses
What’s better: wasting all your rifle ammo on a crowd of zombies, or taking aim at those nearby barrels and starting a chain reaction with only a few shots? Auto-aim might say otherwise, so sometimes you need to take control.
Upgrade your weapons
This can improve your performance against the undead, making fights between ammo crates a less daunting challenge. When it comes to upgrading your stats, put a little focus on Aim as it cuts down the time for a bonus shot, saving ammo.
Know the right weapons for the job
Sure your grenades are great against crowds, but using one against a single skinny is a waste of resources. While your first two weapons do their jobs well, eventually their low magazine size (and thus, frequent reloading) will become a burden. That gas mask helped a lot in a previous level with Toxic Fatties but the next one will nothave any, so do not forget to unequip any gear that is unnecessary to your next level.
Ads help
After completing a mission, you have the option of watching an ad to double your reward as well as awarding two bonus gems. This is best used for daily missions (by virtue of their high coin reward) and completing a campaign mission for the first time (as it rewards more coins compared to replaying the level).
Do not forget your milestones
They provide a meager yet constant source of currencies (both coins and gems), supplies, and are your primary source of skill points for your stats. You will be surprised with how many milestones you can achieve after every mission and expect to rank up multiple times if you decide to complete multiple levels. Remember that you will need to watch an ad to collect milestone rewards.
And that covers it! This wraps up our beginner’s guide to Zombeast. We hope that this guide helps you survive the zombie apocalypse and find answers. If you guys have any tips and tricks that we missed, please let us know in the comments below. Have fun!