In 211 of the Imperial Era, a new continent was discovered which they named Antoecia. In 212, under the reign of the third Imperial prince, Ælfric Delacroix, the first wave of colonists set off to explore this continent to build a new life there. Seven years later, you find yourself alongside the 7th wave of colonists with the goal of expanding their reach and investigating the undiscovered areas of the continent. Antoecia is filled with unexplained mysteries which you and your guild will set off to find and solve while forming bonds with its citizens and your allies.

Various Daylife is an RPG that has elements similar to the expeditions in Kairosoft’s Beasty Bay, the social aspect of Natsume Inc.’s Harvest Moon, the ally-collecting feature of Konami’s Suikoden and a leveling-up feature that feels similar to Gainax’s Princess Maker. It indeed feels like an odd mix of concepts all rolled into one, but if you are interested in a casual title you can pick up and put down anytime you like, this game created by the makers of the Final Fantasy Series is sure to fill up that empty slot in your schedule.
With its cute visuals, melodic soundtrack, and simple gameplay Square Enix has created a game with such a relaxing atmosphere made to be stress-relieving. But like any other game, there are certain aspects to Various Daylife that some gamers may find difficult or challenging and may want some hints to get an advantage. If you are one of those gamers, stick around and read on for we have many tips and tricks that we’ve discovered as we played Various Daylife that will surely help you in your journey to uncover the secrets of Antoecia!
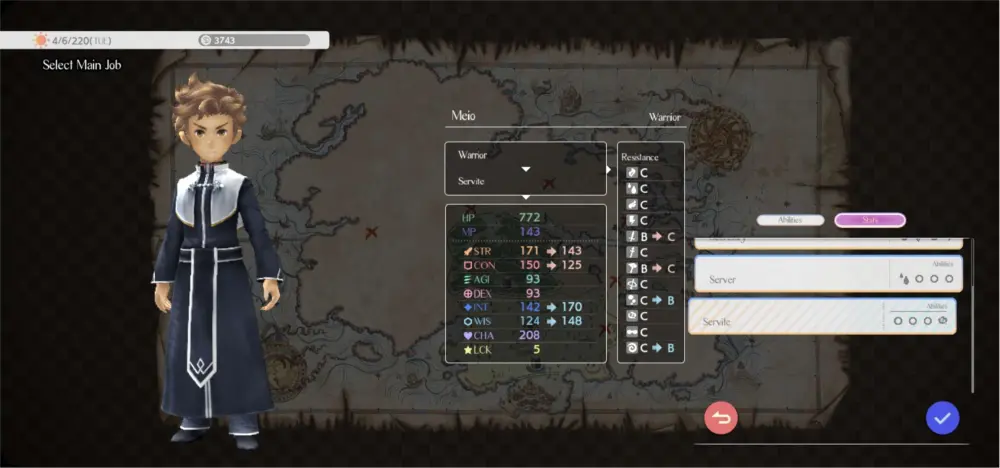
1. Rank up Your Initial Stats Through the Residency Registration

The first thing you are asked to do once you arrive at Antoecia is to complete your Residency Registration at Rothelm Palace. Walking to the left instead of the right will allow you to get to the palace faster since the map loops at this time. Inside the palace, you meet Gilda Wordsworth, the secretary for the administrative bureau who will ask you a few questions about yourself.
The answers you give to these questions do not affect the story of Various Daylife in any way so you are free to choose options based on what kind of character you want to immerse yourself in. However, if you want a more strategic advantage at the start of your game, read on as each choice gives you a specific stat bonus.
Keep in mind that these bonus points affect your stat’s experience bar and not the actual stat points themselves. The way the stat system works in Various Daylife is they gave each stat a corresponding rank and will only increase in points once you rank them up by taking on work, interacting with people, using facilities, and so on.
But before we get to what stat bonuses you can obtain for each question, let’s talk about what each stat represents:
- HP – Affects the maximum amount of health you have in battle. This determines how much damage you can take before your character faints.
- MP – Affects the maximum amount of mana you have in battle. This determines how often you can use your skills in battle. Each class has a different set of skills with varying amounts of MP consumed.
- STR – Affects the amount of damage you can deal with your Physical Attacks.
- CON – Affects the amount of damage you take from Physical Attacks.
- AGI – Affects your turn order in battle and your ability to evade Physical Attacks.
- DEX – Affects the accuracy of your Physical Attacks.
- INT – Affects the amount of damage you can deal with your Magical Attacks
- WIS – Affects the amount of damage you take from Magical Attacks and your ability to evade them.
- CHA – Affects the accuracy of your Magic Attacks and the success rate of abilities.
- LCK – Affects the drop rate of items during expeditions. This can only be seen in the status screen and cannot be increased the same way as the other stats. You can only increase this by wearing accessories or getting Tips from NPCs.
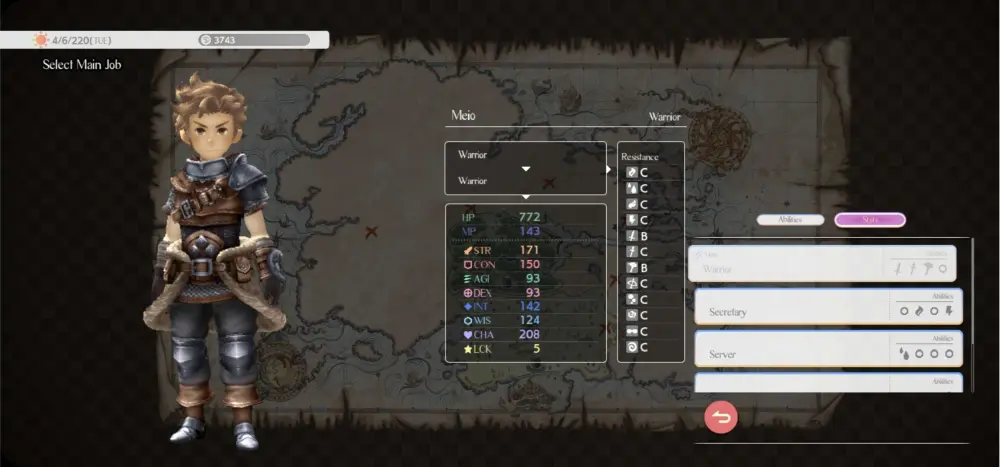
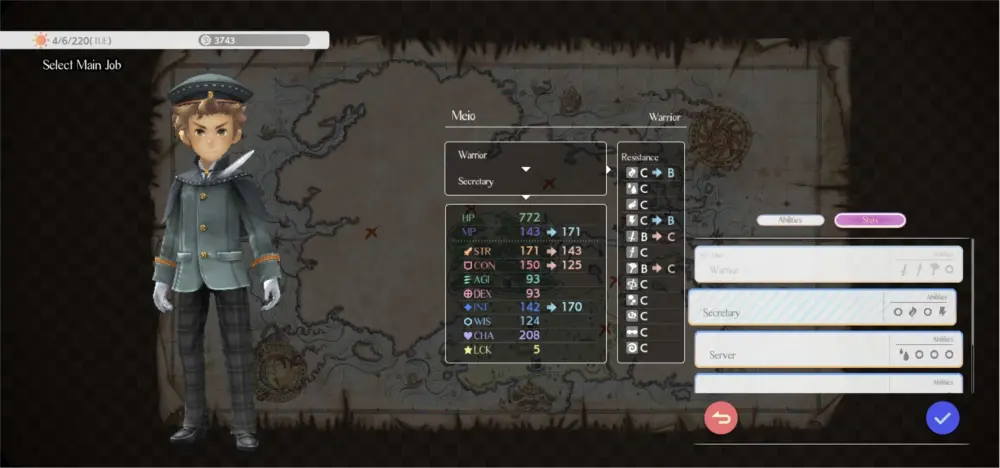
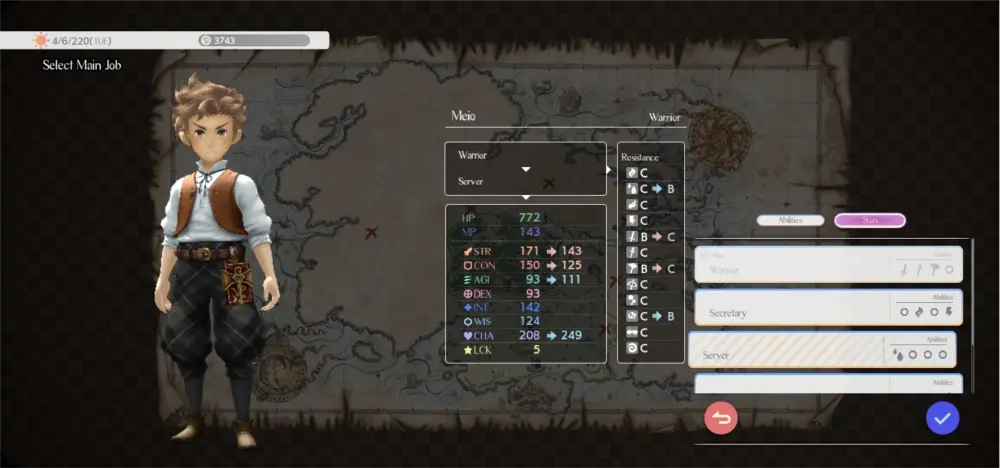
While most RPG games encourage you to put points in specific stats for specific job classes to make them more effective, Various Daylife does the opposite. It encourages you to take on various roles and be flexible as it allows you to change jobs whenever you like once you’ve unlocked them.
But if that’s the case, why would we need to worry about what stat bonuses we can get from the Residency Registration? This is to give you an initial advantage over a specific stat and get it to rank up quickly. Below are the questions Gilda will ask you and the answers you may choose along with their stat bonuses:
Back home, you were…
| A migrant. | A citizen. | A noble. |
| HP+50 STR+70 CON+180 AGI+150 | HP+150 STR+50 DEX+180 CHA+70 | MP+70 INT+150 WIS+50 CHA+180 |
How would you categorize any special skills you might have?
| I’m in good shape. | I’m an intellectual. | I have nimble fingers. |
| HP+150 STR+180 CON+70 AGI+50 | MP+150 DEX+50 INT+180 CHA+70 | MP+70 DEX+180 INT+50 CHA+150 |
What brings you to this continent?
| I’m here to make my fortune. | I want to move up in life. | Sounded interesting. |
| STR+150 CON+50 AGI+70 WIS+180 | CON+150 AGI+180 INT+70 WIS+50 | HP+180 DEX+70 WIS+150 CHA+50 |
Among all of these stats, the highest amount of points you can get is 480 in HP if you choose the options “A citizen.”, “I’m in good shape.”, and “I’m here to make my fortune.” This lines up well since the very first job you will have is a Warrior. Each job unlocked opens up work that will increase and decrease your stats.
As a Warrior, your first work is Wolf Control which gives you HP+7, STR+6, and CON+4 each time you do it. Since you only need 500 points at this time to upgrade it to rank 2, doing the work once (if there are stat multipliers) or up to 3 times (if there are no stat multipliers) will immediately rank it up.
Alternatively, you can also choose to concentrate on STR and choose “A migrant.”, “I’m in good shape.”, and “I’m here to make my fortune.” to accumulate 400 points in the stat. However, ranking this up may take a few more rounds of work than if you chose the high HP points path.
The worst path you could take is focusing on WIS by choosing “A noble.”, anything for the second question, and “I’m here to make my fortune.” This will increase your WIS to only 230 points and the first three jobs you will get will have work that will continuously decrease your WIS stat. It is only after you unlock the Servite job that the WIS stat will ever be increased which is a few hours into the game.
2. Work to Increase Level and Stat Ranks
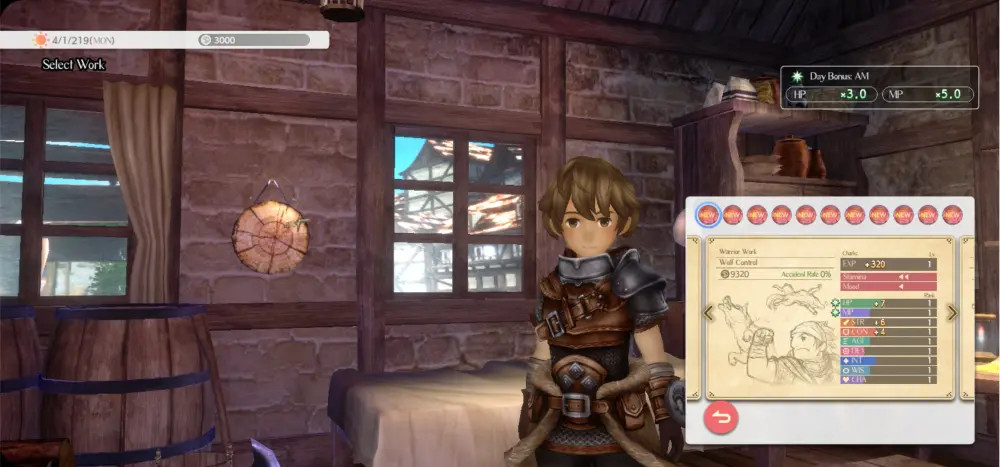
You can pick and choose what work to take up in your Home. There are pages of available work shown on the lower right side of your screen and you can flip through them by clicking the left and right edges or clicking on the circular icons above.
Identifying Work
These circular icons show you which person is giving the work and may indicate what time they are required to be done. Sun for Morning and Moon for Night. Morning jobs will be grayed out at night and vice versa. Any jobs without the Sun or Moon icon can be done at any time. Each work taken at home only takes up half a day.
Work can open up new work from the same job after doing them several times. Each job has 4 kinds of work, each varying in its reward, stat boost, EXP, and cost of Stamina and Mood. Each work also unlocks an ability the first time you do them. If you want to unlock every skill for a specific job, make sure to unlock each work!
While each work pertains to specific jobs, there is no need to change your current main job to take them.
Changing Work Options

Every Monday, a new selection of work is displayed. Only 10 work will be available to you at a time. At the start, you will not be able to change your selection and will have to wait for the next week for a fresh batch. However, after you’ve finished the “After the Leader of the Ratties” Quest, the Palace Branch Reception will become available to you and you can request new work options for a fee of 15,000 Gold. Be warned that requesting work will take up half of your day.
Work Benefits and Hazards
Working not only increases your EXP, but it also boosts up stats. Each type of job has specific stats that they typically increase. However, there are certain work that also decrease some stats. The decrease will not affect your Rank even if the bar goes all the way down to zero. Once you’ve ranked up, it is permanent so it is highly recommended to prioritize ranking up stats with bars close to completion.
Regaining Stamina and Mood
Stamina and Mood are essential for work. Stamina will always decrease per work but Mood may increase or decrease. Stamina affects your Accident Rate while Mood affects your Success Rate. Getting into an accident will force your character to rest in bed for several days until they fill up their Stamina. While they do, it will constantly decrease your stat bars until you get better. Success Rates do not matter much with normal work when it comes to stats and EXP since you will still gain them even if you fail.
However, the amount of money you acquire will be affected. Success will give you the reward that is listed on the work listing. Failure will give you only a portion of the reward. Excellent will give you up to 3 times the reward.
To avoid accidents and failed work, you must recover your Stamina and Mood. Taking time away from work when at least a fourth of your Stamina and Mood bar is empty will ensure that you work with an Accident Rate of 0% and a guaranteed Success or Excellent result. There are several ways to do this:
Rest at Home

Resting at Home will let you sleep in your bed for half a day and restore your Stamina. This is the quickest way to fill up your Stamina bar. However, this will break your Work Chain Bonus and you will have to restart the count back to 1.
Visit City Facilities and Establishments

There are many places in the city for you to spend your time in, relax and regain some Stamina and Mood. Some of these facilities and establishments could even increase your stats and give you Gossip Tips. Be careful though since some establishments may end up lowering your Stamina and Mood even more. Below are a few of these facilities, the activities you can do, and their effects:
| Location | Activity | Cost | Stamina | Mood | Stats | Gossip? |
| Public Bath | Enter the bath | 6,800 Gold | >>> | > | HP+10 CHA+10 | Yes |
| Church | Pray | 30,000 Gold | << | >> | MP+120 INT+120 WIS+180 | Yes |
| Church | Donate Money | 300,000 Gold | — | >>> | MP+120 INT+120 WIS+180 | No |
| Circus | Watch the show | 30,000 Gold | << | >> | DEX+180 CHA+240 | Yes |
| Wharf | Take a walk | 2,000 Gold | < | >>> | HP+15 AGI+15 | Yes |
| Park | Relax | 2,000 Gold | < | >>> | MP+15 CHA+15 | Yes |
| Park | Take a jog | 4,500 Gold | << | >> | HP+25 AGI+25 | No |
| Park | Throw a coin in the fountain | 500 Gold | — | >> | DEX+10 WIS+10 | No |
| Café | Study | 3,000 Gold | < | < | INT+50 | No |
| Restaurant Row | Enter the restaurant that suits your mood | 15,000 Gold | Varies | Varies | Varies | No |
| Restaurant Row | Endure | 350 Gold | < | << | MP+9 CON+9 | No |
There are also some establishments where you can order food and drinks which can affect your Stamina, Mood and stats:
| Location | Activity | Cost | Stamina | Mood | Stats | Gossip? |
| Tavern | Beer | 1,200 Gold | << | >>> | STR+12 | No |
| Tavern | Fruity liqueur | 1,800 Gold | < | >>> | INT+15 | No |
| Tavern | Honey liqueur | 2,600 Gold | << | >>>> | HP+16 | No |
| Café | Tea | 800 Gold | > | >> | CHA+10 | No |
| Café | Cake set | 2,200 Gold | >> | >>> | HP+8 | No |
| Café | Recommendation | 4,200 Gold | Varies | Varies | Varies | No |
If you’re only after the stat boosts, you can take up courses instead. Below are the courses Willa offers. You can only find her in the morning next to the Expeditionary Guild when it is not raining.
| Course | Cost | Days | Stamina | Mood | Stats |
| Magic Course | 100,000 | 3 | << | << | MP+500 DEX+200 INT+500 |
| Mental Power Course | 100,000 | 3 | << | <<< | MP+200 CON+500 INT+200 WIS+300 |
Special Event Work

There is no difference between a Failure, a Success, and an Excellent result in normal work aside from the amount of reward you get. However, for work that becomes available for an upcoming event, getting a Success will raise that work’s success rate to 15% while an Excellent will raise it to 30%.
Work for special events require you to do them several times until you raise its success rate to 100% for the best results. This usually offers high mood boosts but may not always give you a monetary reward. However, it gives good stat boosts and will even reward you extra stat boosts after the event ends.
Work Bonuses
Another thing to keep in mind before choosing what work to do are the bonuses. These come in the form of Work Chain Bonuses, Day Bonuses, and Tip Bonuses.
Work Chain Bonus

Work Chain Bonuses are the bonus you get from taking work without resting. The higher your Work Chain is, the higher your EXP multiplier will be. Take note that there is a MAX bonus multiplier which will only rise up as the story progresses.
The only action you can take which can break a chain is choosing to rest at home or being forced to rest after an accident. You can use facilities or socialize in place of resting if you want to keep your work chain but still recover Stamina.
Day Bonus

Day Bonuses are the bonus you get each half of the day. Two stats will always have multipliers. We highly recommend choosing work that aligns with these stats to quickly rank up your stats. However, avoid choosing work with negative numbers on these multipliers for it will also affect them.
If there are no work that can benefit from the multiplier, you can always choose to do an activity in one of the city’s facilities to let half a day pass and come back to different multipliers. Note that there are no multipliers for the whole day on Thursdays. That said, Thursdays would be one of the best times to rest or invite an ally out for a day-long activity.
Tip Bonus
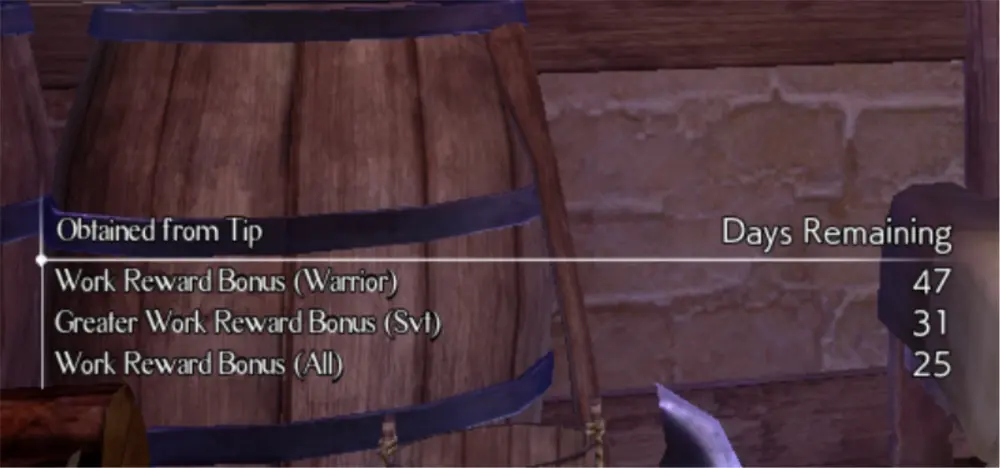
Tip Bonuses are the bonus you get from tips from rumors. You can learn rumors by using the city’s facilities such as the Tavern, Public Bath, Restaurant Row, and so on. Once you get a tip from one of them, you can approach a non-ally NPC and choose the “Talk” option. Each NPC presents different bonuses for each tip so make sure to visit different NPCs to see what they offer before talking to them about the rumor.
Some tips can affect work while others can affect expeditions. You can only get 1 bonus from each tip at a time but you can get multiple bonuses from multiple tips.
3. Socialize!

“All work and no play makes Jack a dull boy” as the saying goes. In Various Daylife, all work and no play will drain all your efforts as it can lead to your character passing out and making them bedridden for several days. As we have said previously, this negatively affects stats.
Besides, focusing on only work and expeditions will prevent you from enjoying other aspects of Various Daylife. Talking to NPCs and hanging out with your allies brings many benefits other than unlocking their stories.
Gain Benefits from Gossip

Like every RPG game, NPCs have dialogue that enriches the lore of Various Daylife. However, in Various Daylife, eavesdropping and talking to these NPCs may also give you bonuses that can improve your Stats, Affinity, Skill effects, Resistance, Rewards, and so on. You can pick up the latest gossip simply by using various facilities and establishments (as listed in the previous tip under “Regaining Stamina and Mood”).
Once a piece of Gossip is unlocked from them, you can talk to a non-party member NPC and select the Gossip. Each Tip has a special effect and a set duration of effectivity. Each NPC offers different effects and we’ve compiled a few of them in the tables below. Note that this list only includes NPCs and tips that are obtainable after finishing the “After the Leader of the Ratties” Quest. As you progress through the game, more tips and NPCs will eventually be available.
Eugie (Arms Shop)
| Gossip | Tip Effect | Effective Days |
| The Plains | Travel Ready (Plains) | 5 |
| Expeditionary Wisdom | Stat Bonus (CON) | 5 |
| Family Left Behind | Stat Bonus (STR) | 5 |
| Rocky Relationships | Stat Bonus (INT) | 5 |
| Hard Times | Stat Bonus (AGI) | 5 |
| Tiring Work | Stat Bonus (HP) | 5 |
Item Shop Keeper
| Gossip | Tip Effect | Effective Days |
| The Plains | Travel Ready (Plains) | 5 |
| Expeditionary Wisdom | Resistance Bonus (Braced) | 5 |
| Family Left Behind | Resistance Bonus (Enraged) | 5 |
| Rocky Relationships | Resistance Bonus (Dazed) | 5 |
| Hard Times | Resistance Bonus (Poisoned) | 5 |
| Tiring Work | Resistance Bonus (Asleep) | 5 |
Bathhouse Owner
| Gossip | Tip Effect | Effective Days |
| The Plains | Travel Ready (Plains) | 5 |
| Expeditionary Wisdom | Change Bonus (Soaked) | 5 |
| Family Left Behind | Resistance Bonus (Soaked) | 5 |
| Rocky Relationships | Resistance Bonus (Aflame) | 5 |
| Hard Times | Stat Bonus (LCK) | 10 |
| Tiring Work | Affinity Bonus (Gilda) | 21 |
Café Owner
| Gossip | Tip Effect | Effective Days |
| The Plains | Work Reward Bonus (Warrior) | 60 |
| Expeditionary Wisdom | Stat Bonus (MP) | 5 |
| Family Left Behind | Work Reward Bonus (Secretary) | 75 |
| Rocky Relationships | Stat Bonus (CHA) | 5 |
| Hard Times | Greater Work Reward Bonus (Svr) | 42 |
| Tiring Work | Affinity Bonus (Elif) | 21 |
Tavern Proprietress
| Gossip | Tip Effect | Effective Days |
| The Plains | Travel Ready (Plains) | 5 |
| Expeditionary Wisdom | Affinity Bonus (Efil) | 21 |
| Family Left Behind | Work Endurance (Secretary) | 21 |
| Rocky Relationships | Work Endurance (Servite) | 21 |
| Hard Times | Affinity Bonus (Melhard) | 21 |
| Tiring Work | Work Endurance (Server) | 21 |
Man in Park
| Gossip | Tip Effect | Effective Days |
| The Plains | Travel Ready (Plains) | 5 |
| Expeditionary Wisdom | — | — |
| Family Left Behind | — | — |
| Rocky Relationships | — | — |
| Hard Times | — | — |
| Tiring Work | Work Endurance (Warrior) | 21 |
Father (Church)
| Gossip | Tip Effect | Effective Days |
| The Plains | Travel Ready (Plains) | 5 |
| Expeditionary Wisdom | Work Reward Bonus (Servite) | 60 |
| Family Left Behind | Resistance Bonus (Blinded) | 5 |
| Rocky Relationships | Greater Work Reward Bonus (Svt) | 42 |
| Hard Times | Work Reward Bonus (All) | 35 |
| Tiring Work | Change Bonus (Asleep) | 5 |
Receptionist (Palace Branch Reception)
| Gossip | Tip Effect | Effective Days |
| The Plains | Travel Ready (Plains) | 5 |
| Expeditionary Wisdom | Work Reward Bonus (Warrior) | 60 |
| Family Left Behind | — | — |
| Rocky Relationships | Work Reward Bonus (Server) | 75 |
| Hard Times | Work Reward Bonus (Servite) | 60 |
| Tiring Work | Work Reward Bonus (Secretary) | 45 |
Ringmaster (Circus)
| Gossip | Tip Effect | Effective Days |
| The Plains | Travel Ready (Plains) | 5 |
| Expeditionary Wisdom | — | — |
| Family Left Behind | Change Bonus (Dazed) | 5 |
| Rocky Relationships | — | — |
| Hard Times | Stat Bonus (Dex) | 5 |
| Tiring Work | — | — |
Sailor (Wharf)
| Gossip | Tip Effect | Effective Days |
| The Plains | Travel Ready (Plains) | 5 |
| Expeditionary Wisdom | Resistance Bonus (Aloft) | 5 |
| Family Left Behind | Change Bonus (Electrified) | 5 |
| Rocky Relationships | Resistance Bonus (Electrified) | 5 |
| Hard Times | Change Bonus (Aloft) | 5 |
| Tiring Work | Change Bonus (Soaked) | 5 |
Market Shopkeeper
| Gossip | Tip Effect | Effective Days |
| The Plains | Travel Ready (Plains) | 5 |
| Expeditionary Wisdom | Change Bonus (Enraged) | 5 |
| Family Left Behind | — | — |
| Rocky Relationships | Change Bonus (Dazed) | 5 |
| Hard Times | Change Bonus (Asleep) | 5 |
| Tiring Work | Change Bonus (Electrified) | 5 |
Willa (Near Expeditionary Guild, Morning)
| Gossip | Tip Effect | Effective Days |
| The Plains | Travel Ready (Plains) | 5 |
| Expeditionary Wisdom | Work Reward Bonus (Secretary) | 75 |
| Family Left Behind | Work Reward Bonus (All) | 35 |
| Rocky Relationships | Work Reward Bonus (Warrior) | 58 |
| Hard Times | — | — |
| Tiring Work | Work Reward Bonus (Servite) | 60 |
Get to Know Your Allies

Getting to know your allies by inviting them out not only boosts your Mood but can also raise their affinity and unlock their special skill. These special skills can get even more powerful the higher your affinity with them is. There are 5 levels of affinity and maxing it out will give you a special quest related to that ally. Once you accomplish that quest (which requires you to be at around level 30), they will become your Partner and live with you at your home.
Take note that you can only have one partner at a time. Becoming partners with someone else will turn your previous partner into just an ally. If you change your mind later, you can clear the quest again to renew your partnership.
There are several places you can invite your allies out to. At the start, you will only be able to bring them to the Dining Hall, the Tavern, the Restaurant, and the Market. As the story progresses, more places will become available to you. To aid you in your start, we’ve listed down a few places that have been unlocked after the “After the Leader of the Ratties” Quest:
| Cost | Days | Stamina | |
| Dining Hall | 9,000 Gold | 1 | >> |
| Tavern | 6,000 Gold | 1 | > |
| Café | 3,500 Gold | 1 | > |
| Restaurant | 16,000 Gold | 1 | >>> |
| Market | 14,000 Gold | 1 | >>> |
| Church | 11,000 Gold | 1 | — |
| Flower Garden (Plains) | 33,000 Gold | 3 | <<< |
Each ally has their favorites and will react more positively to certain places than others. Spending time in certain places also gives your stats a boost and each ally gives you different stats. Below are your first four allies’ reactions to them along with other benefits:
Bruno
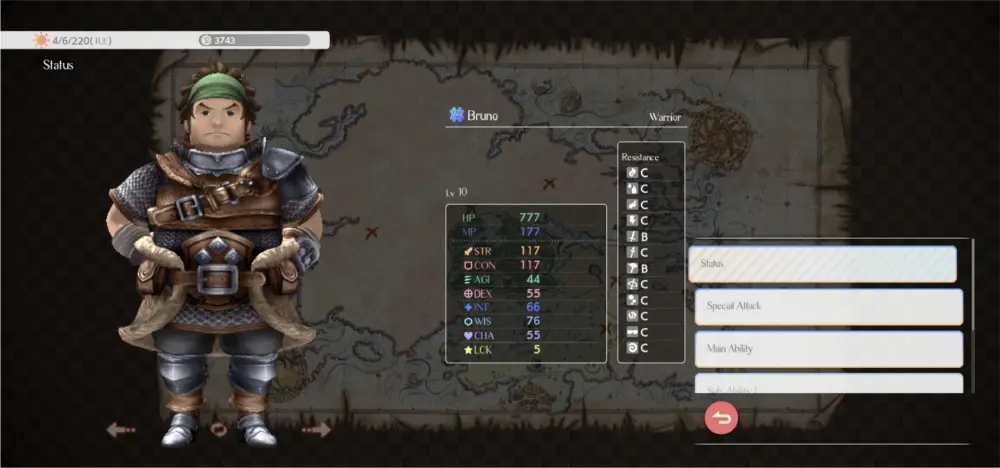
Job: Warrior
Special Attack: Big Ballista “Bruno”
Bruno’s special attack deals great Arrow Damage to all enemies while raising all allies’ Physical Attack.
| Affinity | Stat Effects | |
| Dining Hall | +++ | HP+6 CON+13 |
| Tavern | +++ | MP+13 CHA+6 |
| Café | + | HP+5 MP+10 |
| Restaurant | +++ | HP+6 CON+13 |
| Market | +++ | STR+13 AGI+6 |
| Church | +++ | MP+6 WIS+13 |
| Flower Garden (Plains) | ++ | AGI+10 CHA+5 |
Gilda
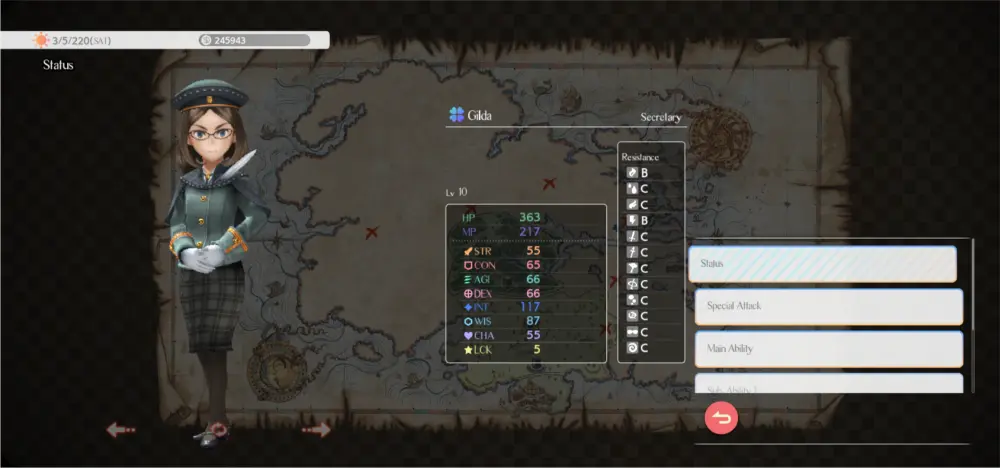
Job: Secretary
Special Attack: Heavens Bamboo Cut
Gilda’s special attack deals great damage to all enemies with a high chance to Enrage them while raising all allies’ Magic Attack.
| Affinity | Stat Effects | |
| Dining Hall | +++ | HP+6 CON+13 |
| Tavern | +++ | MP+13 CHA+6 |
| Restaurant | +++ | HP+13 CON+6 |
| Market | + | STR+10 AGI+5 |
| Café | +++ | HP+6 MP+13 |
| Flower Garden (Plains) | ++ | AGI+10 CHA+5 |
Efil
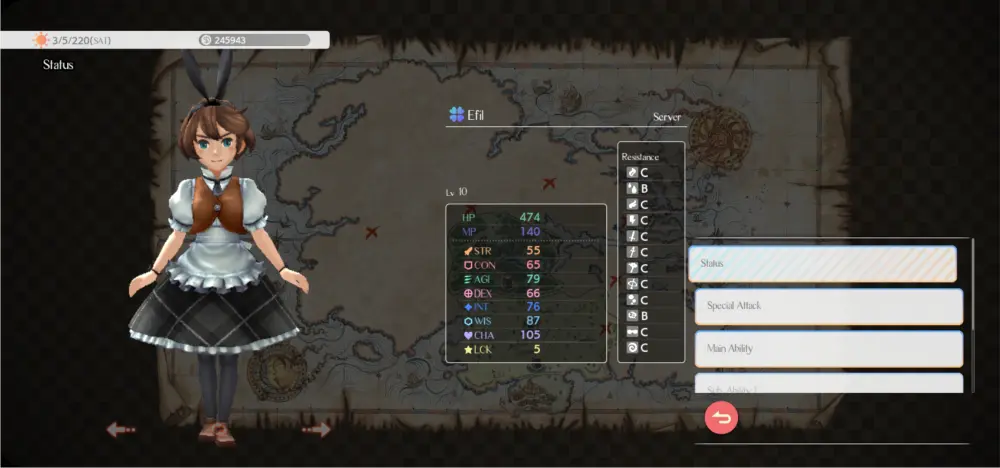
Job: Server
Special Attack: Spirit Fire!
Efil’s special attack deals great damage to all enemies with a high chance to Aflame them while raising all allies’ Magic Defense.
| Affinity | Stat Effects | |
| Dining Hall | + | HP+5 CON+10 |
| Tavern | + | MP+10 CHA+5 |
| Café | +++ | HP+6 MP+13 |
| Restaurant | +++ | HP+13 CON+6 |
| Market | +++ | STR+13 AGI+6 |
| Church | + | MP+5 WIS+10 |
| Flower Garden (Plains) | +++ | AGI+13 CHA+6 |
Melhard
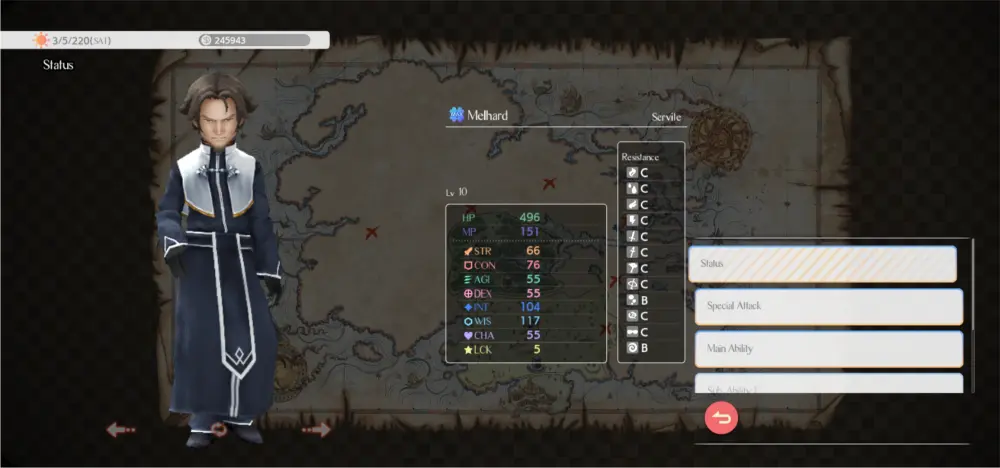
Job: Servite
Special Attack: Iron Fist Knuckles
Melhard’s special attack deals great damage to all enemies with a high chance of Dazing them while raising all allies’ Physical Defense.
| Affinity | Stat Effects | |
| Dining Hall | + | HP+5 CON+10 |
| Tavern | +++ | MP+13 CHA+6 |
| Café | + | HP+5 MP+10 |
| Restaurant | + | HP+10 CON+5 |
| Market | +++ | STR+13 AGI+6 |
| Church | +++ | MP+6 WIS+13 |
| Flower Garden (Plains) | ++ | AGI+10 CHA+5 |
Aside from inviting your allies out for an activity, there are also certain events that will open up Special Work. These events could be an ally’s birthday or a festival they are participating in. Willa will usually tell you in advance when these events are about to occur and you are given up to 2 weeks to do the Special Work.
Getting it to a 100% Success Rate by doing the work repeatedly will guarantee a high-affinity boost for that ally along with some stat boosts. Even after getting 100%, you are still free to do the work until the 2 weeks are up. That said, you can choose it as an option on days when there is no other work that has stat boosts that correspond to the day’s stat bonuses.
Willa’s reminders can be toggled on and off in the settings.
4. Focus on Your First Three to Four Jobs
After unlocking Warrior, you will eventually lock Secretary and Server sometime after doing some work. More jobs are unlocked when you recruit people to your guild. Recruitments are story-driven, meaning people will join your guild once you’ve accepted and accomplished a quest that relates to their story. As Bruno, Gilda, and Elif give you work based on their own jobs, so will the next people you recruit.
While it is exciting to discover new jobs, we recommend taking your time to build up the jobs you currently have before jumping to other ones if you want to excel in any of the first three jobs. The reason for this is that as you take up work from the same person repeatedly, more advanced work and job skills will be unlocked.
Once you’ve recruited many people in your guild, it may be more difficult to take on work from the same people as your weekly selection will vary greatly but limited to 10 at a time. If you want a different selection, you will have to wait until Monday for new work or pay a fee for it to be refreshed once the Palace Branch Reception is unlocked. Aside from this, doing more advanced work gives you the added benefit of earning more stat experience.
Once you’ve at least unlocked all the skills for those three jobs, take on your first recruit which would be Melhard the Servite. You’ll be able to recruit him once you unlock and clear the Missing Friend Quest. Once he’s joined your guild, take this opportunity to boost up your WIS since this would be your most underdeveloped stat.
The Servite job is also the only job among the first four that can heal and would be crucial for any expedition. If you cannot place Melhard in your party, taking on the role would not be difficult if you’ve unlocked all four skills by taking up Melhard’s jobs repeatedly.
To aid you in your first steps to boosting your character and unlocking skills, we’ve listed what each of these four jobs brings to the table:
Warrior
The Warrior is an offensive melee class that excels in Physical Attacks. Their Job Trait, Endure, allows them to survive a fatal attack with 1 HP which can be triggered once per quest. They have three abilities that can cause status changes such as Enrage on all targets and Braced and Dazed on single targets. They also have an ability that doubles the amount of Physical Attack Damage they can deal. While MP is still required to use their skills, they are able to deal decent damage with normal attacks.
| Ability | Target | Damage | Effect | Status Change | MP Cost |
| Level Slash | All | Small | — | Enrage (Low Chance) | 8 |
| Lunge | Single | Medium | — | Braced (Fair Chance) | 9 |
| Full Swing | Single | Large | — | Dazed (Fair Chance, Low Accuracy) | 10 |
| Boost | Single | —- | x2 Physical Attack Damage (next turn) | — | 4 |
When it comes to Resistances, Warriors have a slight edge against Enraged and Dazed status effects, making them strong against Physical Attacks.
| Status Effect | Warrior Resistance |
| Aflame | C |
| Soaked | C |
| Aloft | C |
| Electrified | C |
| Enraged | B |
| Braced | C |
| Dazed | B |
| Arrowed | C |
| Poisoned | C |
| Asleep | C |
| Blinded | C |
| Confused | C |
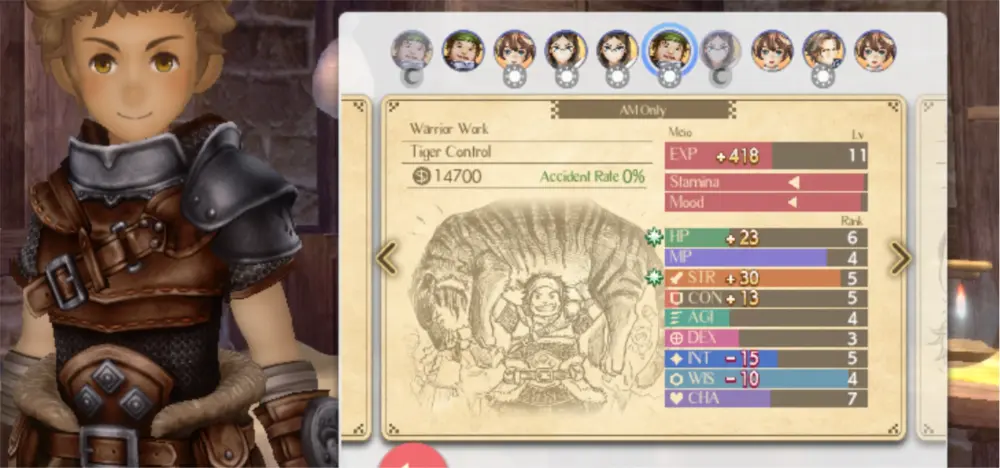
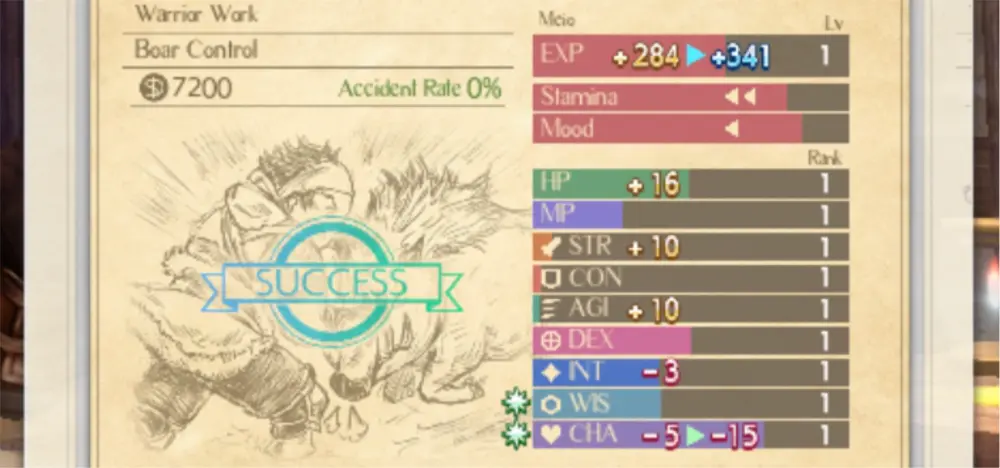
Work associated with the Warrior job typically increases HP, STR, and CON while possibly decreasing INT, CHA, and WIS. Among the four, this job also rakes in the most Gold and EXP. Tiger Control is the most rewarding work as it not only rewards you a generous amount of Gold, EXP, and stat experience, but it also takes less stamina to do so be sure to take it on when you can.
| Work | Wolf Control | Boar Control | Bear Control | Tiger Control |
| Time | Any | Night | Night | Morning |
| Reward | 9,320 Gold | 7,200 Gold | 11,600 Gold | 14,700 Gold |
| EXP | +320 | +284 | +384 | +418 |
| Stat Increase | HP+7 STR+6 CON+4 | HP+16 | HP+28 STR+17 | HP+23 STR+30 CON+13 |
| Stat Decrease | — | INT-3 CHA-5 | WIS-10 CHA-10 | INT-15 WIS-10 |
| Stamina | << | << | <<< | < |
| Mood | < | < | < | < |
| Skill Unlocked | Level Slash | Lunge | Full Swing | Boost |
Secretary
The Secretary is an offensive mage class that excels in Magic Attacks. Their Job Trait, Chance Enhance, lets them deal greater damage with CHANCE attacks. Two of their abilities are offensive, letting them deal Thunder and Fire Magic that can Aflame or Electrify their enemies.
They also have two supportive abilities, with one doubling the amount of Magical Damage they can deal, and the other giving your party a way to see the enemy’s HP and weaknesses. They are very reliant on MP to cast their magic and can hardly deal any damage with normal attacks.
| Ability | Target | Damage | Effect | Status Change | MP Cost |
| Examine | Single | —- | Reveal enemy’s HP and vulnerabilities | — | 4 |
| Fire Magic | All | Small | — | Aflame (Fair Chance) | 8 |
| Focus | Single | —- | x2 Magic Attack Damage (Next Turn) | — | 4 |
| Thunder Magic | All | Medium | — | Electrify (Low Chance, Low Accuracy) | 12 |
When it comes to Resistances, Secretaries have a slight edge against Aflame and Electrified status effects, making them strong against Fire and Thunder Magic Attacks.
| Status Effect | Secretary Resistance |
| Aflame | B |
| Soaked | C |
| Aloft | C |
| Electrified | B |
| Enraged | C |
| Braced | C |
| Dazed | C |
| Arrowed | C |
| Poisoned | C |
| Asleep | C |
| Blinded | C |
| Confused | C |
Work associated with the Secretary job typically increases MP, DEX, and INT and occasionally STR and CON. However, HP, STR, and CON may sometimes decrease. Filing Documents is the most well-rounded work, giving you 4 stat increases without the negative effects. However, Transcription (Codex II) offers the highest boost for MP, DEX, and INT with the least amount of decrease among the three that do.
| Work | Filing Documents | Transcription (Codex I) | Proofreading | Transcription (Codex II) |
| Time | Morning | Night | Morning | Night |
| Reward | 3,400 Gold | 4,450 Gold | 5,000 Gold | 5,850 Gold |
| EXP | +40 | +52 | +75 | +115 |
| Stat Increase | MP+8 STR+4 CON+4 INT+10 | MP+10 DEX+12 INT+18 | DEX+8 INT+14 | MP+15 DEX+26 INT+30 |
| Stat Decrease | — | HP-7 CON-5 | HP-10 STR-10 | HP-5 STR-5 |
| Stamina | << | << | << | << |
| Mood | < | < | > | < |
| Skill Unlocked | Examine | Fire Magic | Focus | Thunder Magic |
Server
The Server is a support class that afflicts enemies with various effects. Their Job Trait, Dessert, increases the effect of meals while camping which makes them a great addition to your party during Quests. The effectiveness of this trait increases the more party members there are.
Her abilities can Soak or Enrage enemies, prevent them from acting, and even earn you some money. While they may rely on MP to cast their strongest skill “Can I Get You Some Water?”, most of their other skills cost a lot less.
| Ability | Target | Damage | Effect | Status Change | MP Cost |
| Can I Get You Some Water? | Single | Medium | — | Soaked (High Chance) | 11 |
| Just a Moment, Please | Single | — | Prevent enemy from acting (2 turns, Fair Chance) | — | 5 |
| Here’s Your Check! | Single | — | Gain money from enemy (Chance increased when using Sword Dance, Delivery, Can I Get You Some Water?, Smile, Provoke, Cleaning, Conjure, Evoke & Call) | — | 4 |
| Smile! | Single | — | Lower Physical Defense (3 turns) | Enrage (Low Chance) | 5 |
When it comes to Resistances, Servers have a slight edge against Soaked and Asleep status effects, making them strong against Water and Sleep Magic Attacks.
| Status Effect | Server Resistance |
| Aflame | C |
| Soaked | B |
| Aloft | C |
| Electrified | C |
| Enraged | C |
| Braced | C |
| Dazed | C |
| Arrowed | C |
| Poisoned | C |
| Asleep | B |
| Blinded | C |
| Confused | C |
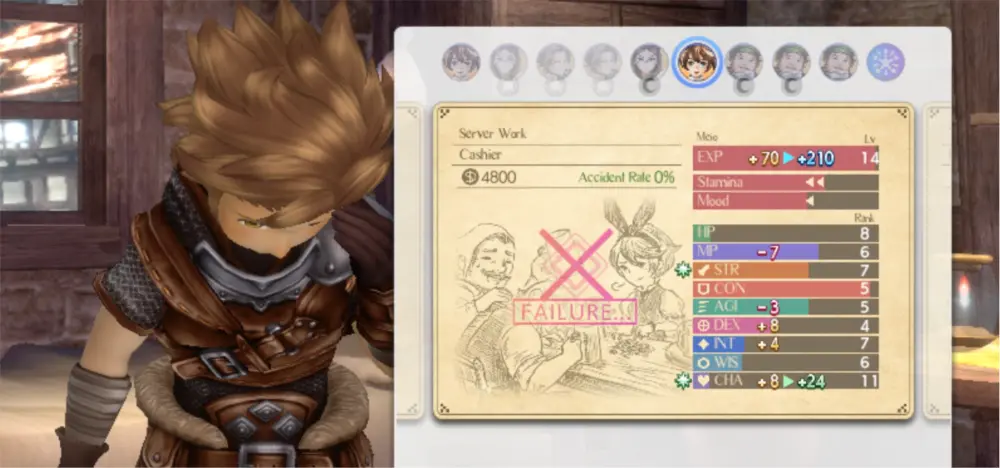
Work associated with the Server job typically increases CHA and AGI and occasionally CON, DEX and INT. However, MP and occasionally AGI and DEX may sometimes decrease. Waitlist Attendance gives you the highest AGI boost. Service with a Smile on the other hand gives you the most Gold, Experience and CON but at the cost of a large amount of Stamina. However, this work also gives you a small mood boost.
| Work | Water Service | Waitlist Attendance | Cashier | Service with a Smile |
| Time | Any | Morning | Any | Any |
| Reward | 3,000 Gold | 3,300 Gold | 4,800 Gold | 6,200 Gold |
| EXP | +100 | +62 | +70 | +180 |
| Stat Increase | AGI+8 DEX+5 CHA+10 | CON+5 AGI+20 CHA+6 | DEX+8 INT+4 CHA+8 | CON+15 AGI+15 |
| Stat Decrease | MP-5 | MP-5 DEX-5 | MP-7 AGI-3 | MP-10 DEX-5 |
| Stamina | << | << | << | <<< |
| Mood | < | < | < | > |
| Skill Unlocked | Can I Get You Some Water? | Just a Moment, Please | Here’s Your Check! | Smile! |
Servite
The Servite is a support class that excels in healing and buffing your party. Their Job Trait, Angelic Ward, gives them a moderate chance of halving the damage they take, making them survive longer. They have supportive abilities that can restore HP or MP and an ability that can raise Magic Defense.
They also have one offensive ability that can cause their enemies to fall asleep. While they are MP-reliant, their ability to restore their MP makes them self-sufficient, and can continuously heal their allies without consuming a Mind Pill. Dealing damage, however, is not their strong suit.
| Ability | Target | Damage | Effect | Status Change | MP Cost |
| Healing Magic | All | — | Restores Small HP | – | 12 |
| Pray | Single | — | Restores Small MP | – | 0 |
| Protective Veil | Single | — | Raise Magic Defense for 3 turns. Subject to Influence. | – | 8 |
| Sleep Magic | All | Small | — | Asleep (Fair Chance) | 11 |
When it comes to Resistances, Servite have a slight edge against Poisoned and Confused status effects, making them strong against Poison and Confuse Attacks.
| Status Effect | Servite Resistance |
| Aflame | C |
| Soaked | C |
| Aloft | C |
| Electrified | C |
| Enraged | C |
| Braced | C |
| Dazed | C |
| Arrowed | C |
| Poisoned | B |
| Asleep | C |
| Blinded | C |
| Confused | B |
Work associated with the Servite job typically increases MP and WIS and occasionally CON and INT. However, STR and AGI and occasionally DEX and HP are negatively affected. Intercession gives you the least amount of Gold but also costs the least amount of Stamina.
It also has the highest WIS boost among all Servite work and can give you a medium mood boost. The best work based on the amount of stat boosts you can gain would be Divine Protection. However, this takes up a large amount of Stamina.
| Work | Tending the injured | Intercession | Divine Protection | Shriving |
| Time | Anytime | Morning | Morning | Morning |
| Reward | 5,900 Gold | 700 Gold | 7,200 Gold | 9,000 Gold |
| EXP | +68 | +25 | +60 | +96 |
| Stat Increase | MP+25 CON+8 WIS+13 | MP+13 WIS+33 | MP+20 CON+12 INT+13 WIS+15 | MP+13 WIS+26 |
| Stat Decrease | HP-5 STR-5 | STR-10 AGI-7 DEX-10 | AGI-5 | STR-15 AGI-10 DEX-6 |
| Stamina | << | < | <<< | << |
| Mood | < | >> | < | > |
| Skill Unlocked | Healing Magic | Pray | Protective Veil | Sleep Magic |
5. Prepare for Expeditions
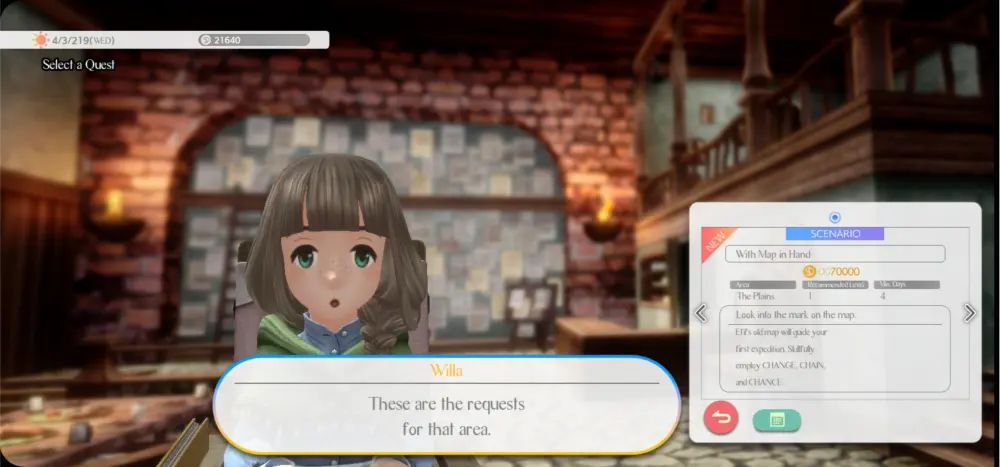
Expeditions are the primary purpose of the seventh-wave colonists like your character. You can take up Quests from the Expeditionary Guild to the right of your house next to Bruno’s. They are open day and night and will offer Gold as a reward. Each Quest also indicates the minimum number of days it will take along with the recommended level of your party members.
Quests can take several days of traveling and battling enemies to get to a specific location. If your entire party falls during a Quest, your Quest will end in failure and you will need to recuperate afterward and your character is forced to stay in bed for several days. Some battles cannot be won and it is sometimes wiser to flee. To have the best outcome possible for your quest, there are several preparations you can do before you travel:
Train Your Allies

Unlike other RPGs, your party members don’t earn any EXP from battle or clearing a Quest. Instead, you will have to work to increase your character’s stats and train your allies yourself. Training allies cost time and money which gradually increases per level. For every 5 levels, the cost would be more than twice as expensive but will return to a closer cost from the level before the fifth. To illustrate what we mean, we have listed below how training costs and how long they take for the first ten levels:
| Level | Cost | Days |
| 1 | 60,000 Gold | 2 |
| 2 | 60,800 Gold | 2 |
| 3 | 61,600 Gold | 2 |
| 4 | 62,400 Gold | 2 |
| 5 | 150,000 Gold | 2 |
| 6 | 65,000 Gold | 2 |
| 7 | 65,800 Gold | 2 |
| 8 | 66,600 Gold | 2 |
| 9 | 67,400 Gold | 2 |
| 10 | 150,000 Gold | 3 |
Fortunately, along with these price increases, the rewards from expeditions will rise as the story progresses. More allies will also be unlocked along the way. Your allies will also eventually level up to second and third jobs and have a lot of potential to be even more useful to the party so be sure not to neglect their training!
Better Save Than Sorry!
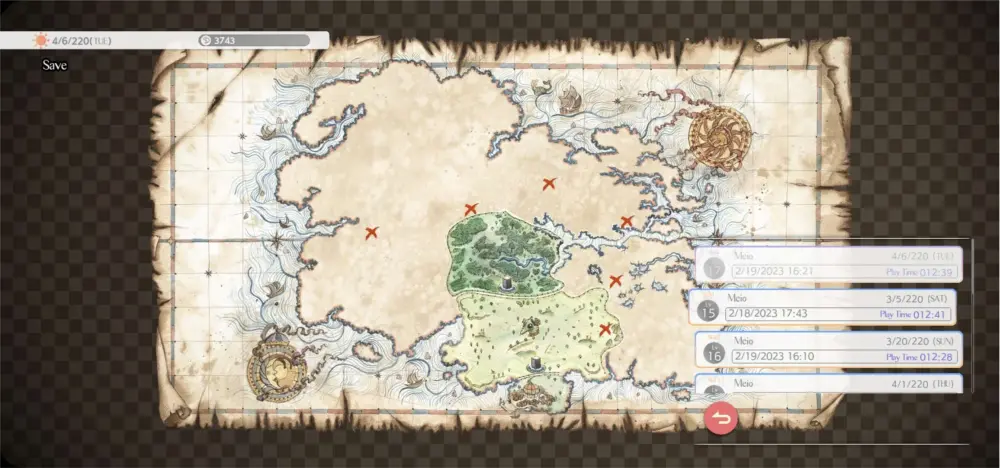
While Various Daylife has an auto-save function, there will be instances where you may want to go back a couple of days. One of these instances is before starting a Quest. Since these Quests take days and make you spend money on supplies, you could face a big loss if you fail.
To prevent that loss, backup saves are essential. We recommend having 3-5 backup saves and saving at least every month or week or at least before a big event. You can also save during a quest so if you feel that you are about to fight a formidable enemy, make sure to have that backup ready!
Backup saves aren’t only useful during Quests. They could also help you when you want to redo because you need more time to hit a 100% Success Rate on Special Work, want a better result on an event, or want to prevent wasting items, money, or days.
Gear up!

Equipping your character and your party members is a must. You can buy your first set of equipment from Eugie at the Arms shop to the right of your house. Each job has unique weapons and armor that cannot be used by other jobs. However, accessories are universal and can be switched around.
Keep in mind that whenever you change your own job, your character will automatically unequip your weapon and armor but keep accessories on. Always check to see if each party member is well-equipped before going on a Quest.
Stock up on Food and Items
Food is essential for any journey. As time goes by, your max HP depletes and cannot be recovered by healing items. This can only be recovered by eating food or sleeping in a tent when camping. Food can be purchased at the Market by the Port while Repellent Incense for sleeping can be purchased at the Item Shop to the right of your house.
While eating food is usually enough, sleeping in a tent can prove to be more beneficial in some cases as it will let the night pass by without enemy encounters. This can be useful when it rains or storms during an expedition since these will deplete your max HP at a greater rate. Battles during the rain will also automatically start the battle with all allies and enemies Soaked.
Take note that food can spoil during a quest and will change its effect when eaten. Some food will be less effective while other foods become more useful as they age. Any food that you did not eat will change back to its fresh status at the end of the Quest. Food does not spoil outside of Expeditions.
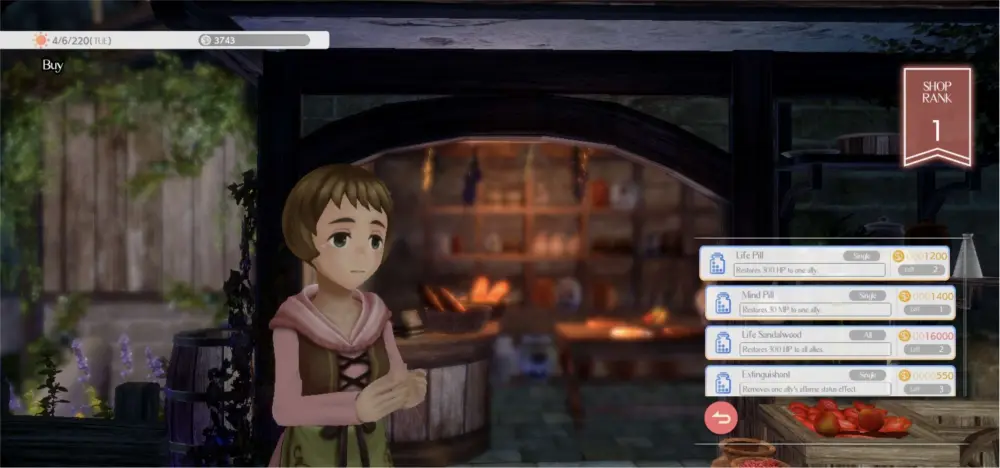
Other items that you may want to stock up on are Life Pills and Life Sandalwood which can be used to heal your party. If you have a Servite or any other class that has healing with you, you may not need as much but may instead need Mind Pills for MP recovery. The item shop also has several items that can remove status effects, raise stats temporarily and inflict damage to your enemies.
Be warned that there is a limit to how many food and items you can bring at a time. Having certain party members in the group can increase your bag capacity.
Get Tips From Gossip

As we discussed in the previous section “Socialize” under “Gain Benefits From Gossip”, you can get some tips by talking to non-ally NPCs to get various benefits. Some of these benefits can positively affect your expeditions so be sure to get those tips in order before you leave and be aware of the duration of the effect.
Learn the Battle System
The battles in Various Daylife play as a fairly straightforward turn-based system. Your party will continuously walk and will only be stopped when camping or getting an encounter.
Setup Your Party
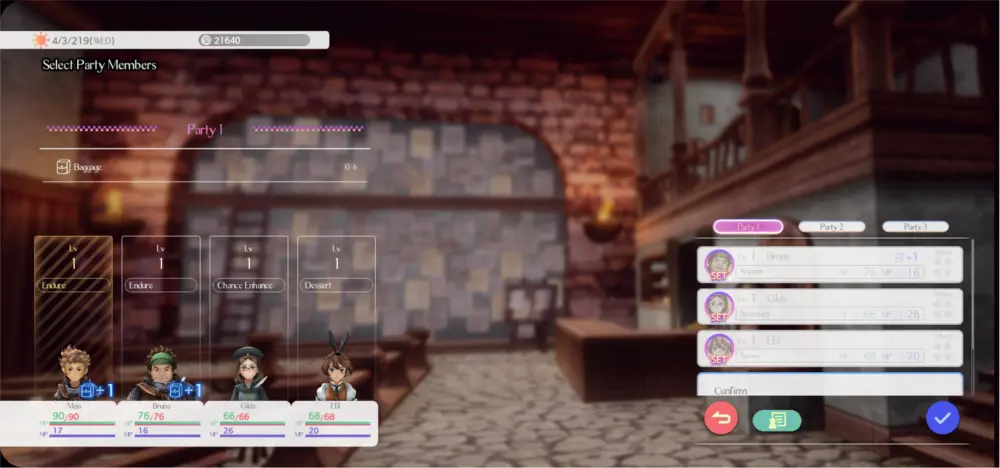
Your party can only have four members at a time: your character and 3 other allies. The page for selecting your party members allows you to have up to 3 preset parties to make picking members quick and easy. There are many combinations you can try, but since this is a beginner’s guide, we’ve written down the strengths and weaknesses of your first four allies below:
Your first four allies are well-balanced in their strengths and weaknesses and can easily complement each other. Among the four of them, Bruno is the hardiest, able to withstand some Physical Damage and has the most health, and is most likely to be the last one standing in the battle.
However, be warned: they may have difficulty dealing with Magic Attacks. You may also want to be careful when attacking enemies that are Aflamed and Electrified since these effects will surely transfer to them when they deal their melee attacks. Because of his low AGI, he is most likely to attack last.
Gilda can deal a lot of damage with two of her skills to multiple enemies and can trigger status changes such as Aflamed and Electrified. Her biggest weakness would be her low defense and evasion against Physical attacks and her low HP. Giving her armor or a Life Ring accessory is recommended to keep her alive. A Mind Ring accessory would also allow her to cast more spells per battle.
Always have Life Pills or Sandalwood just in case she would need healing. While she has high Magic Attack Damage because of her INT, her low CHA makes it a lot harder for her to inflict status effects.
Elif can deal a lot of damage and can inflict the Soaked status effect. Her other skills may not do much damage but do inflict effects that put her enemies at a disadvantage. Her Job trait makes her a handy travel companion as it improves the effect of food when camping. She has the highest AGI and CHA, making her be first to move most of the time and giving her a higher success rate at inflicting status effects. Be sure to equip her with Mind Rings for some extra MP for casting her skills.
Melhard excels in keeping the party alive with his healing and protection skills. His Pray skill serves to recover his MP, making him the least reliant ally when it comes to MP recovery. He also has a Sleep Magic skill that can affect multiple enemies but has a lower chance to inflict status changes because of his low CHA.
He is also not the best ally at dealing Physical Damage and is mostly there for support. Equipping him with extra Life Rings for extra health is ideal to make sure that he doesn’t die quickly. While he can easily heal his allies, having some extra Life Pills or Life Sandalwood is still important in those dire cases where he cannot cast his Healing Magic.
Know the 3 CHAs
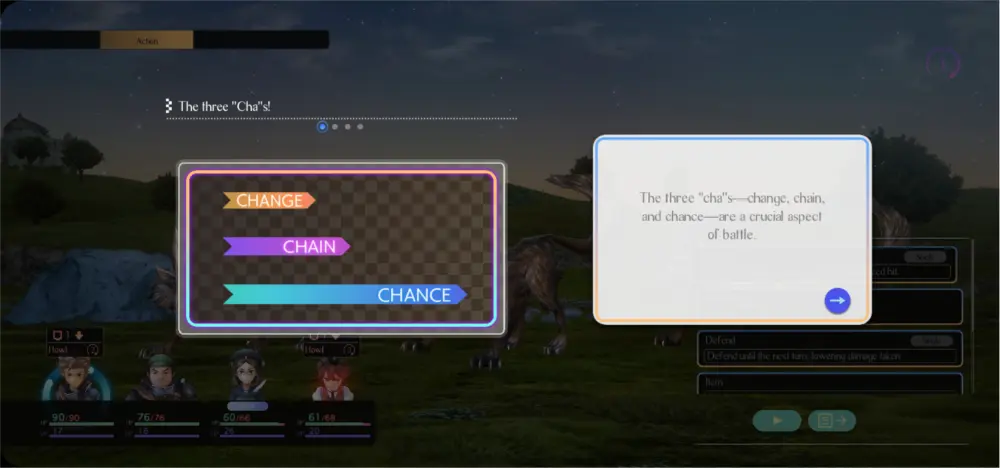
The 3 CHAs are your key to winning your battles. It increases the amount of damage you deal. The 3 CHAs are:
- CHANGE – Change the enemy’s status
- CHAIN – Change the enemy’s status multiple times (up to 10 status changes)
- CHANCE – Change the enemy’s status a final time for the finishing blow. The bigger the chain, the bigger chance for damage. You can still do chain attacks after reaching max chain but it won’t make you deal more damage in chance.
Doing different attacks or moves that do not change the enemy’s status will not break the chain. Doing a chance move is the only action that will break a chain.
To aid you in utilizing the 3 CHAs, we’ve listed the different status effects you can encounter in Various Daylife and what they do:
- Aflame – Take damage with each action based on a percentage of your max HP. Hitting a flaming target with a melee attack will cause you to also be Aflame.
- Soaked – Drops Evasion.
- Aloft – Unable to act.
- Electrified – Chance to be unable to attack. Hitting an electrified target with a melee attack will cause you to also be Electrified.
- Enraged – Increases Physical Damage dealt and received.
- Braced – Reduce Physical Damage dealt and received. Also reduces evasion.
- Dazed – Unable to act. Attacks are guaranteed to hit you.
- Arrowed – Makes you vulnerable to status effects and the 3 CHAs.
- Poisoned – Takes damage with each action.
- Asleep – Unable to act. Attacks are guaranteed to hit you. There is a chance to awaken.
- Blinded – Reduces Accuracy.
- Confused – Chance to attack an ally instead of an enemy.
Watch Out for Dangerous Enemies
Red-eyed monsters are stronger than typical monsters. As a general rule, you’d want to take these monsters out as soon as you can.
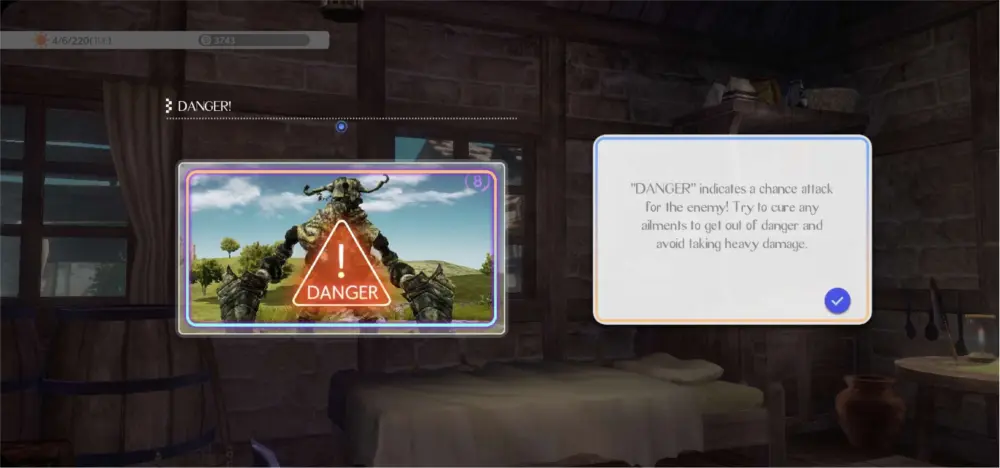
Some enemies, like boss monsters, will have skills that can be fatal and will have a DANGER warning 1 turn before they deploy it. During this turn you have two options: attack with full force or defend. Attacking with full force is only recommended if you are sure that you can kill the enemy before it attacks. Having a Secretary that can examine the enemy will be very useful in this case as this skill will reveal its health.
However, if you are far from ending the enemy’s life, you’ll want to heal, defend or cast protection skills on your weakest allies to keep your party alive. You may also want to cure ailments since DANGER attacks have the same effect as CHANCE attacks for the enemy.
If any of these dangerous enemies prove to be too strong, you can always retreat or reload to a time before you took on the expedition. You may have to train some more before you face them.
And this marks the end of our Beginner’s Guide to Various Daylife! We hope that our research into the game proved to be useful in your quest to explore and conquer the continent of Antoecia! Are there any interesting tips or tricks you discovered while playing that were not in our guide? Feel free to share them in the comment section below!