Trains are undoubtedly a part of many people’s daily lives. After all, riding a train can often prove to be more convenient than riding a car: there’s no traffic, trains (usually) arrive on time, and travel can be fairly short depending on your destination. Long journeys, on the other hand, may occasionally provide majestic sceneries to the curious traveler. However, inasmuch as trains are a fairly common mode of transportation to the point that riding one frequently can turn the experience rather mundane, that doesn’t mean there isn’t something frightening about them.
If you really think about it, there are quite a number of seemingly innocuous things that make trains and their stations rather terrifying, especially if they’re moving through a subway. Let’s put it this way: you’re essentially riding a giant metal box on wheels that can’t just stop on its tracks even if you hit the brakes. Over the course of history, train collisions and derailments have proven to cause some of the most horrible tragedies ever recorded. Even horror movies have capitalized on what could happen inside a train when passengers are trapped there with psychos, cannibals, and even zombies.
But, perhaps, the most disturbing part about trains is when you don’t exactly know where you’re going. You don’t know what to expect as the hulking vehicle moves and rattles on the tracks. And when the doors open, you’re filled with a creeping sense of dread as you alight the platform and find yourself in a station with almost no people—and no way out but another train ride.
This is what makes Underground Blossom so creepy, so mysterious, and so intriguing.
Published by Rusty Lake, which is known for their Cube Escape series, Underground Blossom is a journey unlike any other. Unlike most horror games, Underground Blossom doesn’t have jump scares or scary monsters or zombies—rather what makes it terrifying is the uncertainty of your destination and the tension greatly amplified by the seeming ordinariness of everything and everyone around you.
In this game, you start by boarding a train and going through several stations where you solve a myriad of puzzles. However, every station appears to represent the different segments of Laura Vanderboom’s life, from her infancy through adulthood. What you, as the player, will witness throughout these stations are glimpses into how Laura grows up without her mother Rose, what it has done to her, and the mysterious circumstances surrounding both women.
For those who haven’t played other Rusty Lake games, Underground Blossom can seem a bit strange, for the lack of a better term. But even though it has very limited dialogue, is rife with oddities, and possesses this uncanny slowness that almost feels disturbingly janky, you can still grasp what’s generally going on, even though some answers simply lead to more questions.
Rusty Lake horror games are an altogether unique experience so, in this walkthrough for Underground Blossom, we’re going to assume the standpoint of a player who has no idea of the deep lore that surrounds this game and its characters, particularly the Vanderboom family. Rest assured that while followers of the lore may find some references to other games here, new players can still enjoy the tense and puzzle-oriented gameplay of Underground Blossom without having any knowledge of the other stories.
That said, let’s have a brief discussion about the game’s mechanics: like most puzzle-solving games, Underground Blossom employs a point-and-click (and drag) mechanic. You have a simple inventory to the side that keeps all the items you’ve collected. You may also explore a station by going left or right, which will bring you to different areas that have various items or other characters with whom you can interact. Clicking on certain areas or items will allow you to zoom into them. If you zoom in to an object or area, you may zoom out by clicking the small downward-facing arrow beneath them.
In some cases, some characters may provide more than one dialogue box and you only need to keep clicking on them to access everything they have to say. Once you’re at a station, the end goal will often be to acquire two things: one is a metro ticket, which you can give to the conductor to board the train to the next station; the other is the time when the train to the next station arrives.
Suffice it that, to solve puzzles and unravel the narrative, you’re going to have to go back and forth the different areas of a station. After finishing the last chapter of the game, you will have the chance to unlock the underground map, which will allow you to go back and forth the different stations themselves as you will receive a new task to complete for further achievements, as well as to unlock secret areas.
Though the game, on the whole, doesn’t take up an extensive amount of time to complete, there’s still much to do to solve the puzzles herein and to discover what’s going to happen to Laura Vanderboom. Thus, without further ado, let’s get right into our in-depth walkthrough for Underground Blossom.
Chapter 1: Crib Station
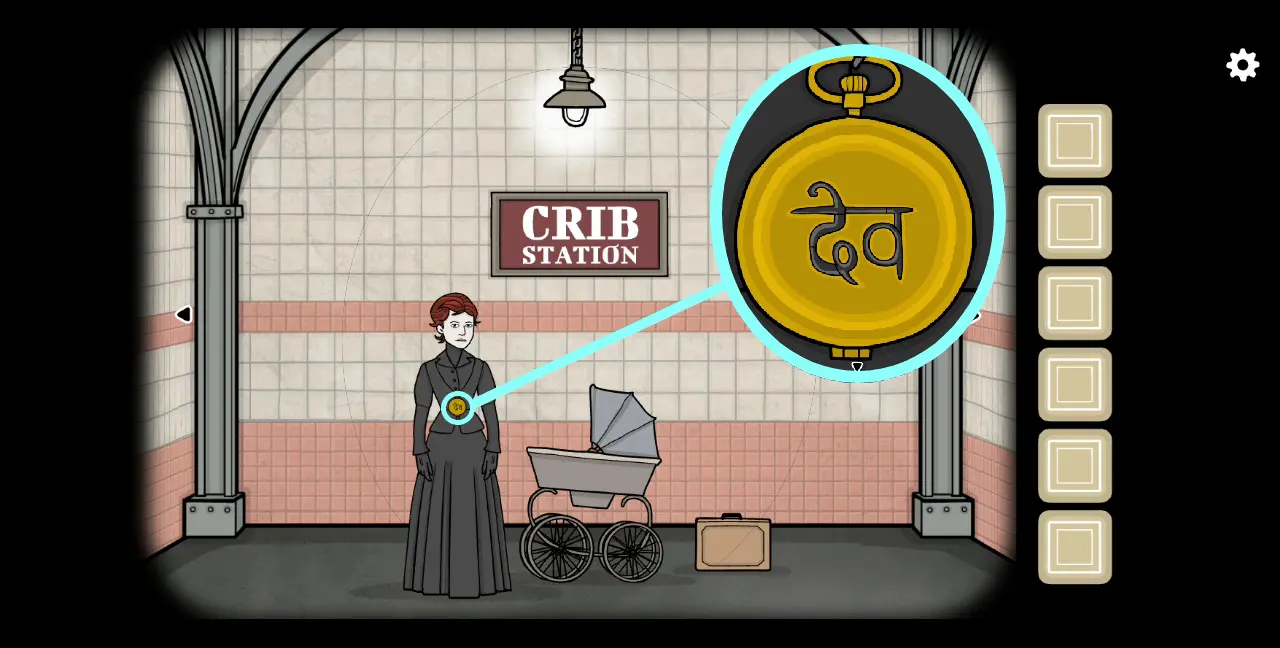
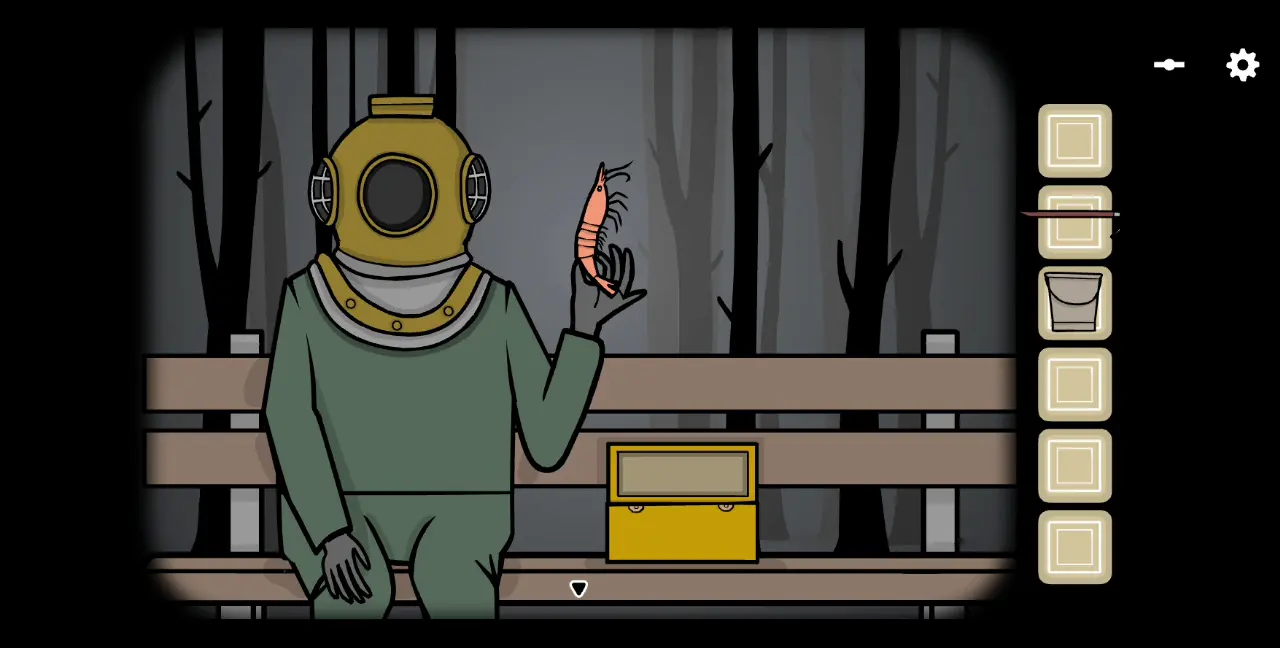
1. After going down the train, you immediately encounter a woman. To one side is a baby carriage and to the other, a suitcase. Click the woman’s timepiece, which is hanging from her neck like a pendant. You will see the symbol pictured below. Remember it for later.
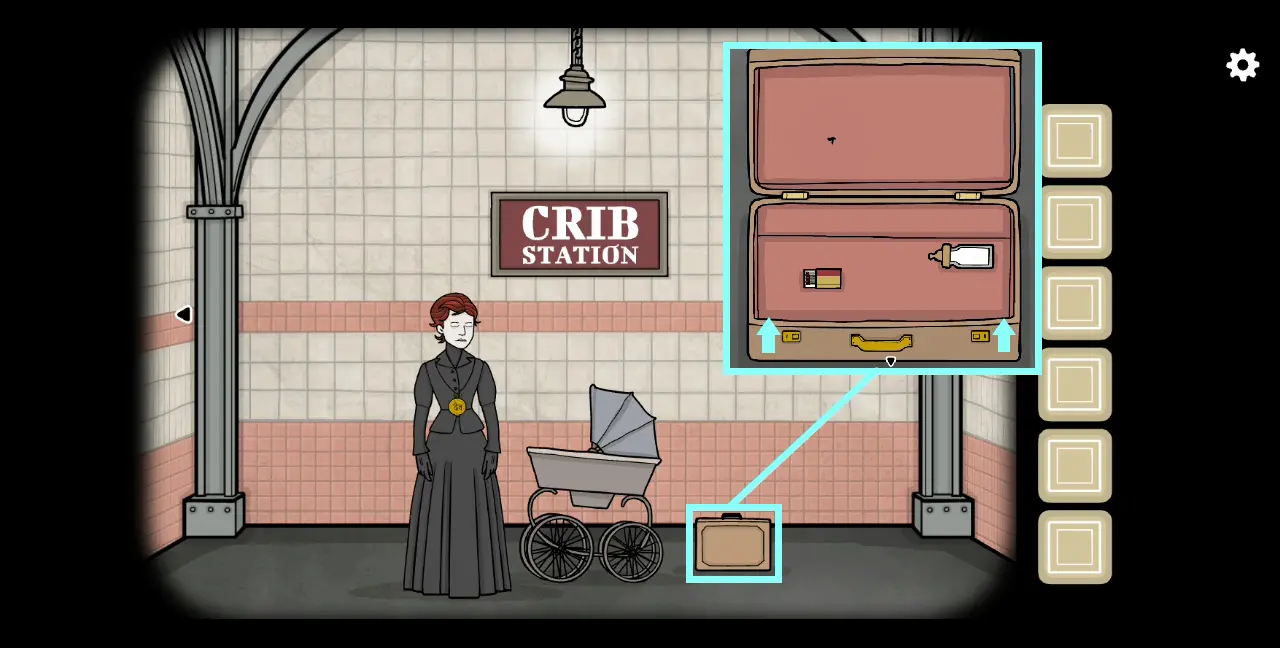
2. Click the suitcase beside the woman. Click the two locks to open it. Inside is a box of matches and a baby bottle. Collect both items.
3. Go to the part of the station where there is a poster on the wall, a drain on the left, and a metal box on the right. Click the metal box to open it. Inside is an iron saw and a crumpled piece of cloth. Collect both items.
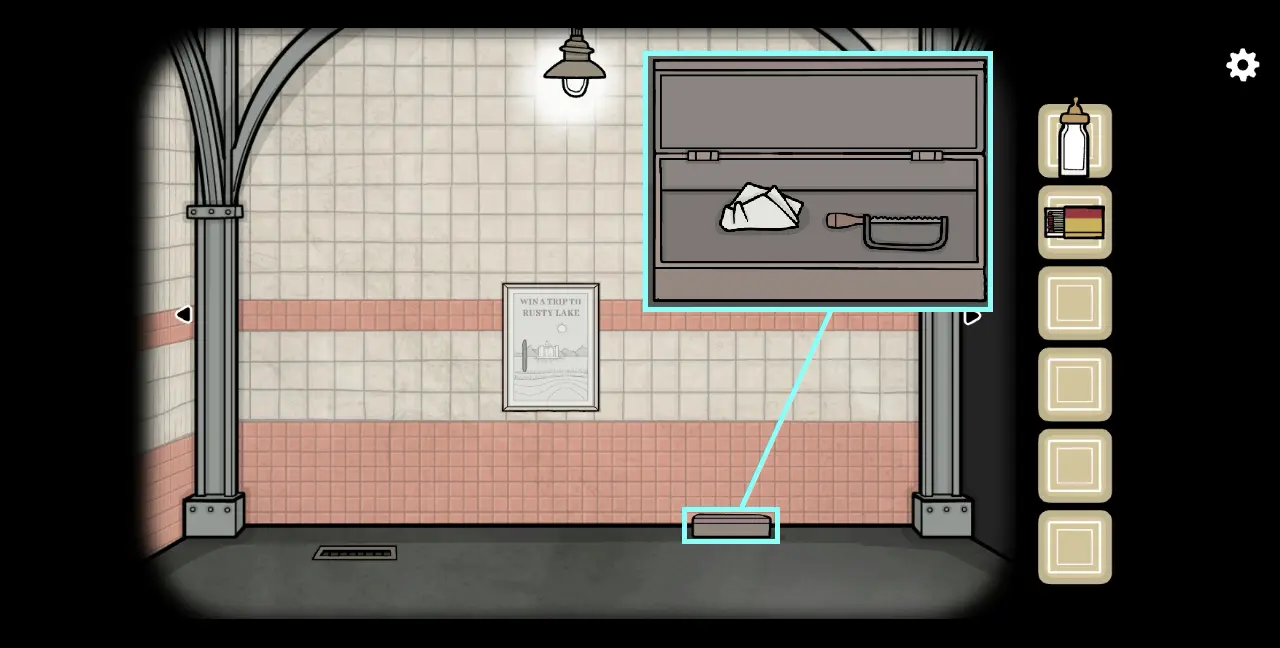
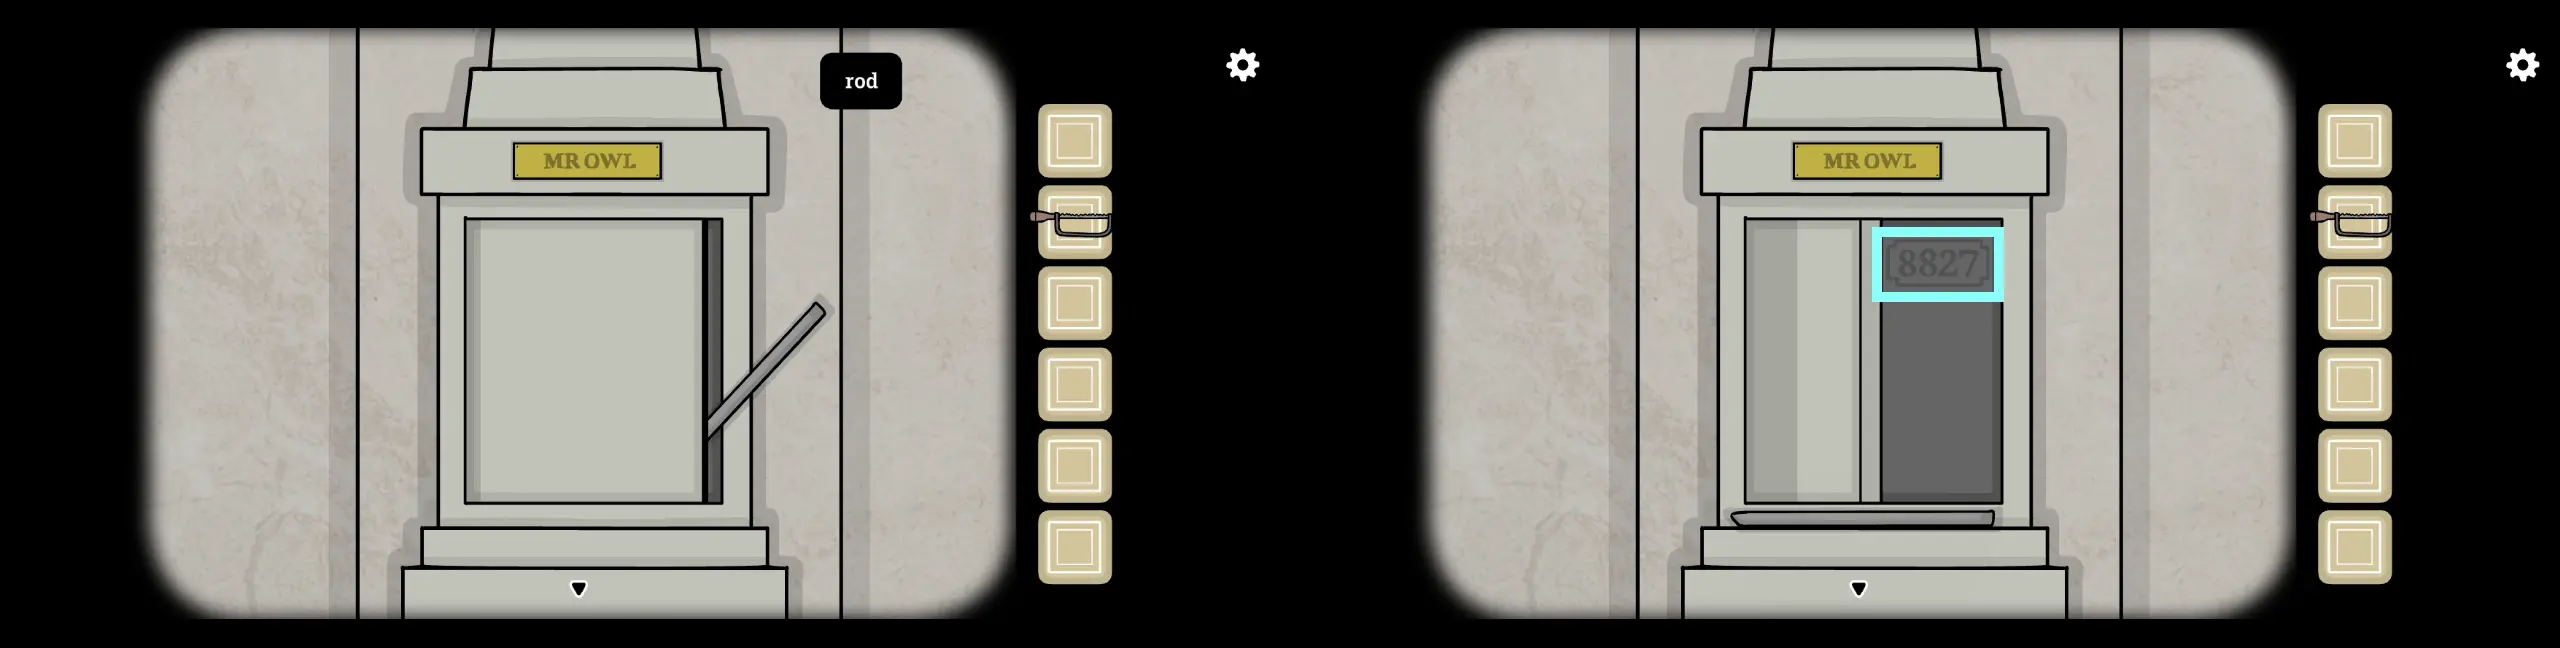
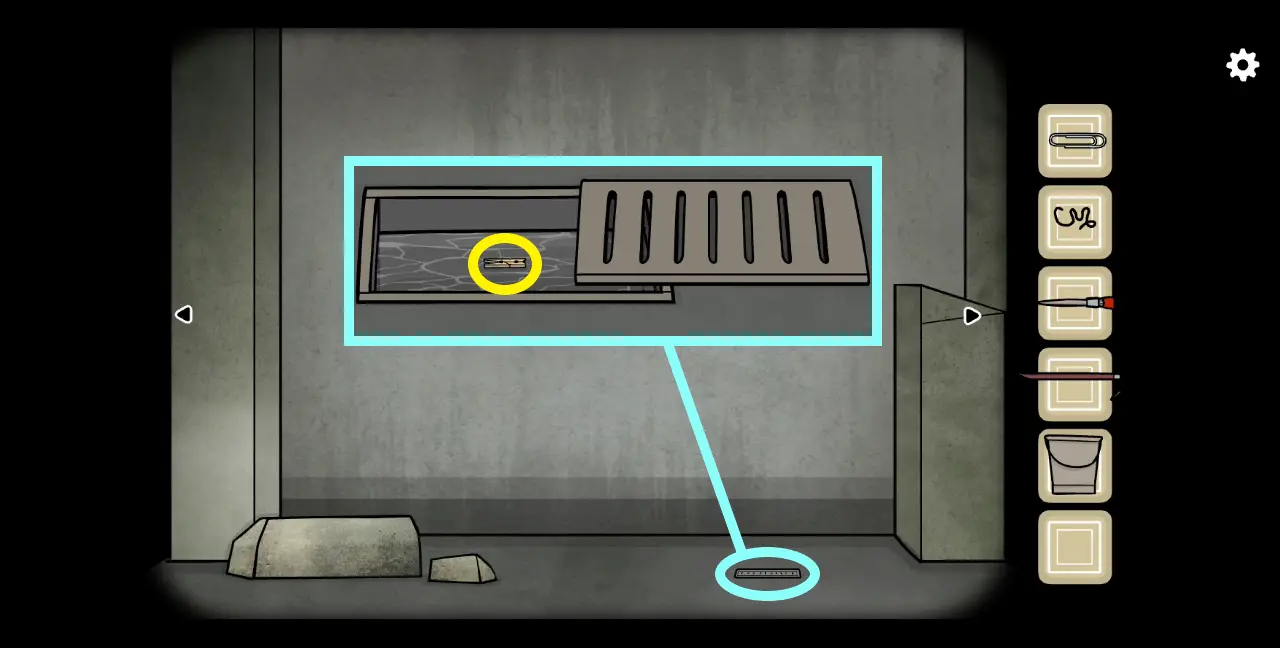
4. Click the drain on the left. You’ll see that there’s a key stuck inside the drain. One of the metal rods on the far left of the drain has a chip. Use the iron saw to cut the damaged part of the rod. Collect the rod. Then, use the rod to move the key to the left, where there is a gap left by the missing rod. Collect the key.

5. Head to the ticket booth that has both windows closed. Use the key to unlock Booth 1 and drag it upwards. Inside the ticket booth is an old lady who appears to be sleeping. Use the rod to poke her forehead until she awakens.
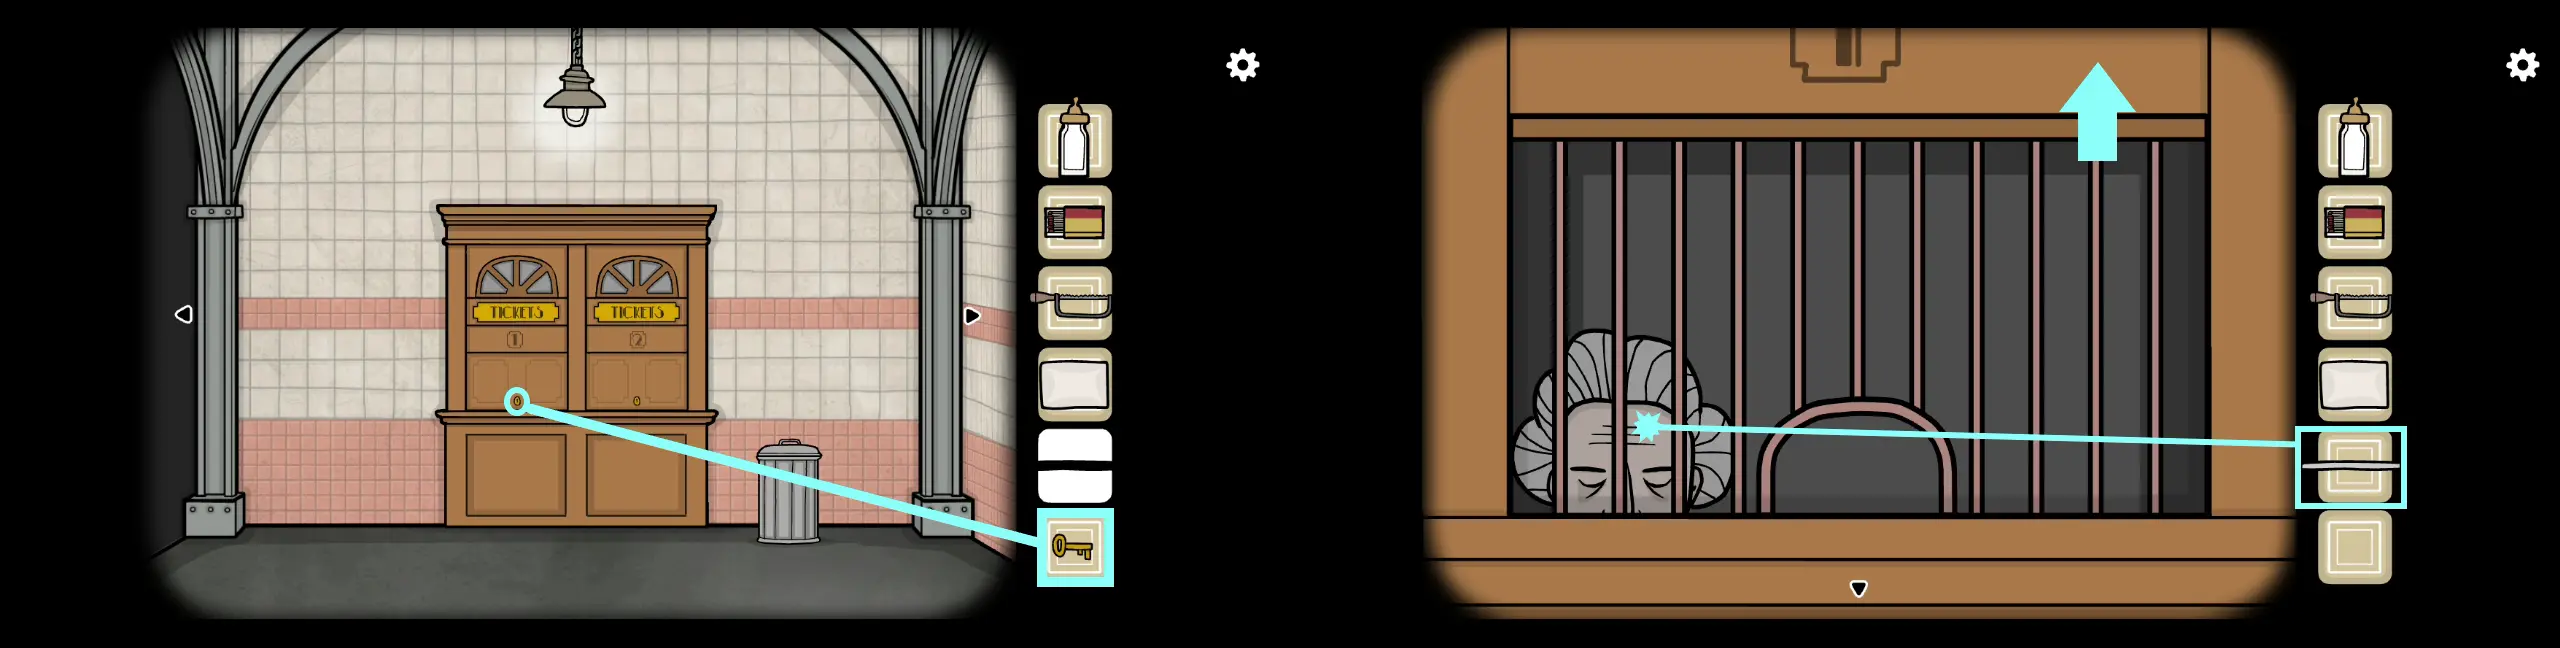
6. The old lady will ask for a coin in exchange for a ticket to the next station.
7. Since you don’t have a coin yet, go back to the lady with the baby carriage. Click on the carriage. On it is a sleeping baby whose name is Laura, as you will discover if you talk to the mother. Collect the safety pin above baby Laura’s head and drag her blanket down.
8. Use the cloth as a diaper and secure it with the safety pin. Once baby Laura has a diaper on, give her the milk bottle.
9. After finishing the milk, baby Laura will poop on the diaper. Collect the dirty diaper.
10. Return to the part with the ticket booth. Click the trash can and move the lid to the side. Throw the dirty diaper inside the trash can. Use the box of matches to light the trash can on fire. Click on it and it will break down. Amid the pile of broken trash can parts is a scraper. Collect this item.
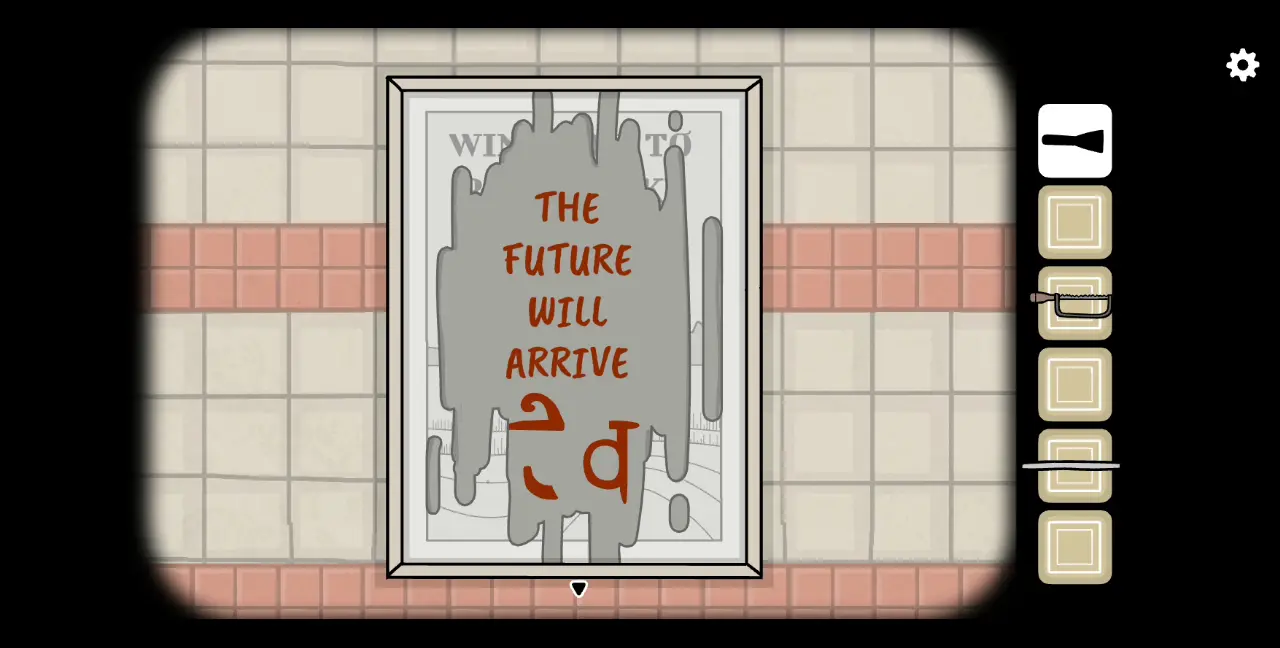
11. Return to the part with the poster on the wall. Click on the poster, which says “Win a Trip to Rusty Lake.” Use the scraper to scrape the poster off until the hidden message is revealed. You’ll see a familiar symbol under the message as you’ve seen it on the mother’s timepiece. Remember what this symbol looks like.
12. Return to the mother and click her golden timepiece. You’ll notice that the symbol on her pendant is divided into several segments. Click the segments that correspond to the appearance of the symbol on the poster. Below are the correct segments you should click:
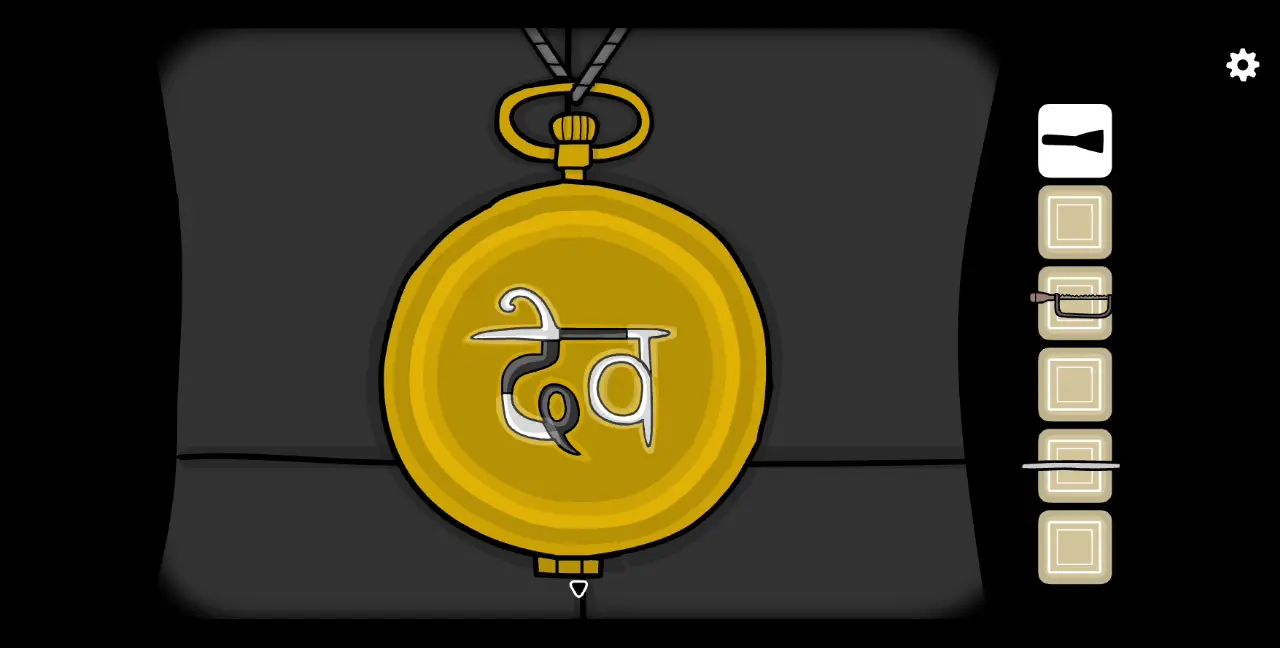
13. This will open the golden timepiece. The time inside is 10:15.
14. Go to the part of the station with a clock. Click on the clock and drag the clock hands so you can change the time to 10:15. The train will arrive and open its doors.
15. Inside the train is the conductor. He will ask for your ticket. Click on the conductor’s breast pocket. Inside it is a coin. Collect it.
16. Go back to the ticket booth. Give the old lady your coin and she will give you a ticket.
17. Leave the ticket booth and head to the train. Give the conductor your ticket. Slip it right into the ticket puncher by dragging it.
18. The conductor will thank you and wish you a nice journey. Enter the train. The doors will close and you will leave Crib Station. This concludes Chapter 1.
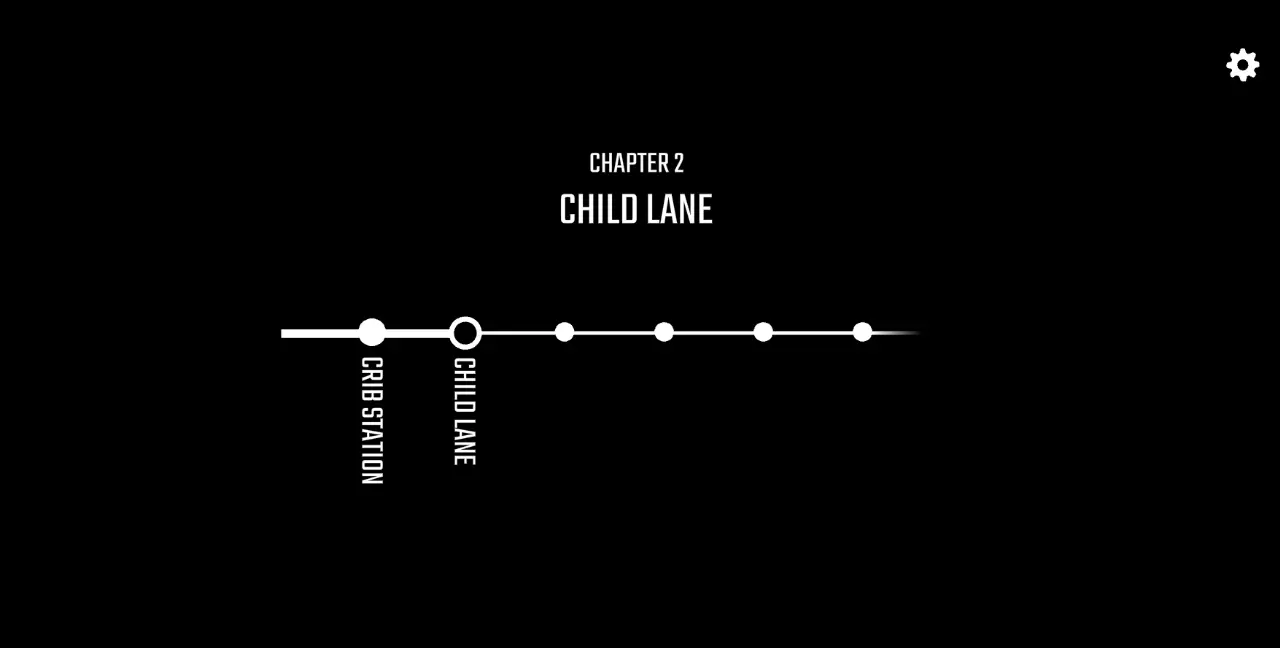
Chapter 2: Child Lane
1. In this part of the station, there is the same woman from the last station but she is with Laura who’s grown a little. The woman implies that your journey in the train represents the passage of time, noting that you made it to “this year.” She says she may have to leave her daughter and she asks that you protect her from now on.
2. If you click on Laura, she will tell you that she wants candy.
3. Approach the sealed shaft. Use the scraper to pick off the old gum from its surface. Collect the old gum.
4. Give Laura the old gum and she’ll start chewing until she blows a bubble. Get the chewed gum from her face.
5. After this, you’ll notice that Laura is no longer by her mother’s side and the mother is left alone in this part of the station.
6. Head to the part of the station with an owl statue and a man sitting on a bench. Behind the bench is Laura, hiding. Click on her and she’ll hide away again.
7. Still in this area is a ticket dispenser. Next to it on the floor is a poster. Collect this item.
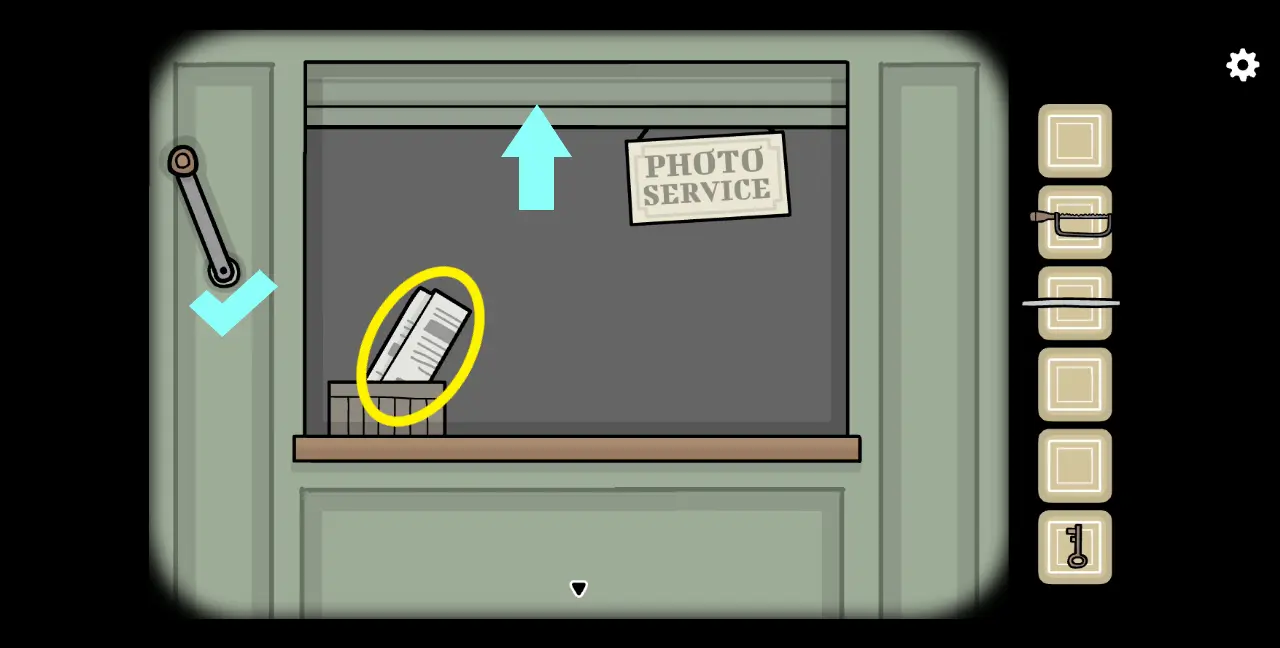
8. Go to the area with a booth labeled “Newspapers Photoservice.” You’ll see that Laura is hiding on top of the booth. Click on her and she will hide away again.
9. Go back to the area with the owl statue. Laura is now hiding behind the owl statue’s head. Click on her hair, which is about the only thing that you can see. She will hide away again.
10. Go back to the area with the Newspapers Photoservice booth and you’ll discover that Laura isn’t hiding anymore. Instead she is holding up something. If you approach her, she will show you that she found a glass panel. Take this item from her.
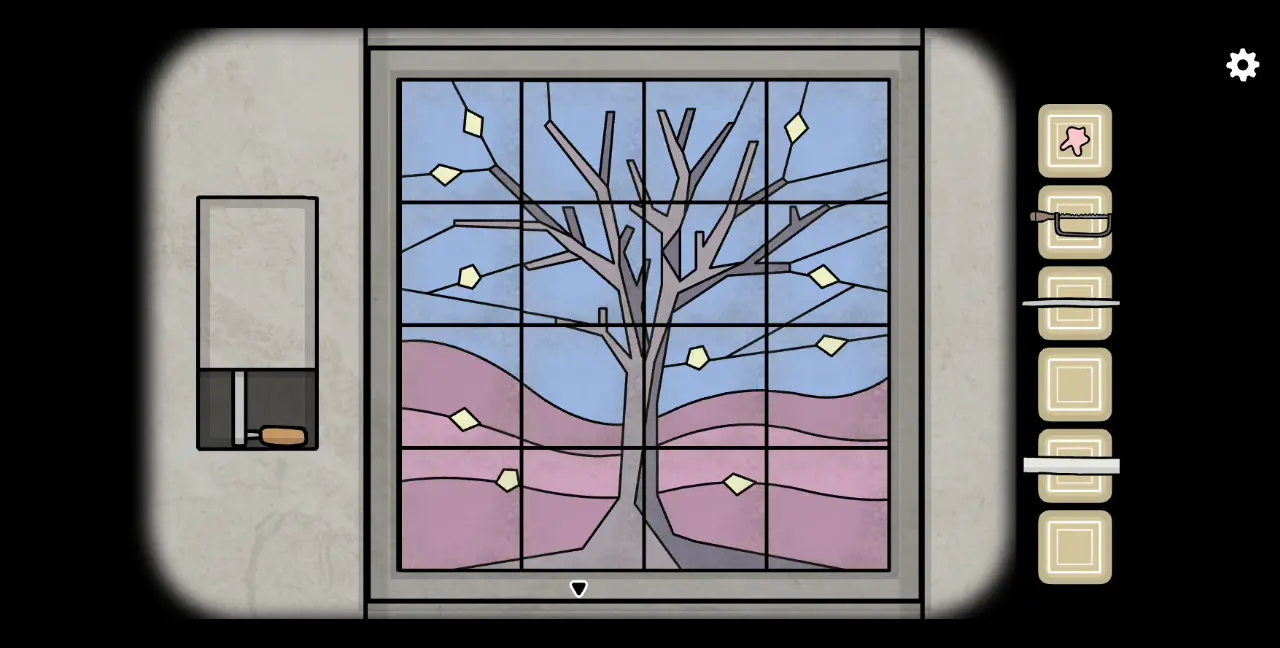
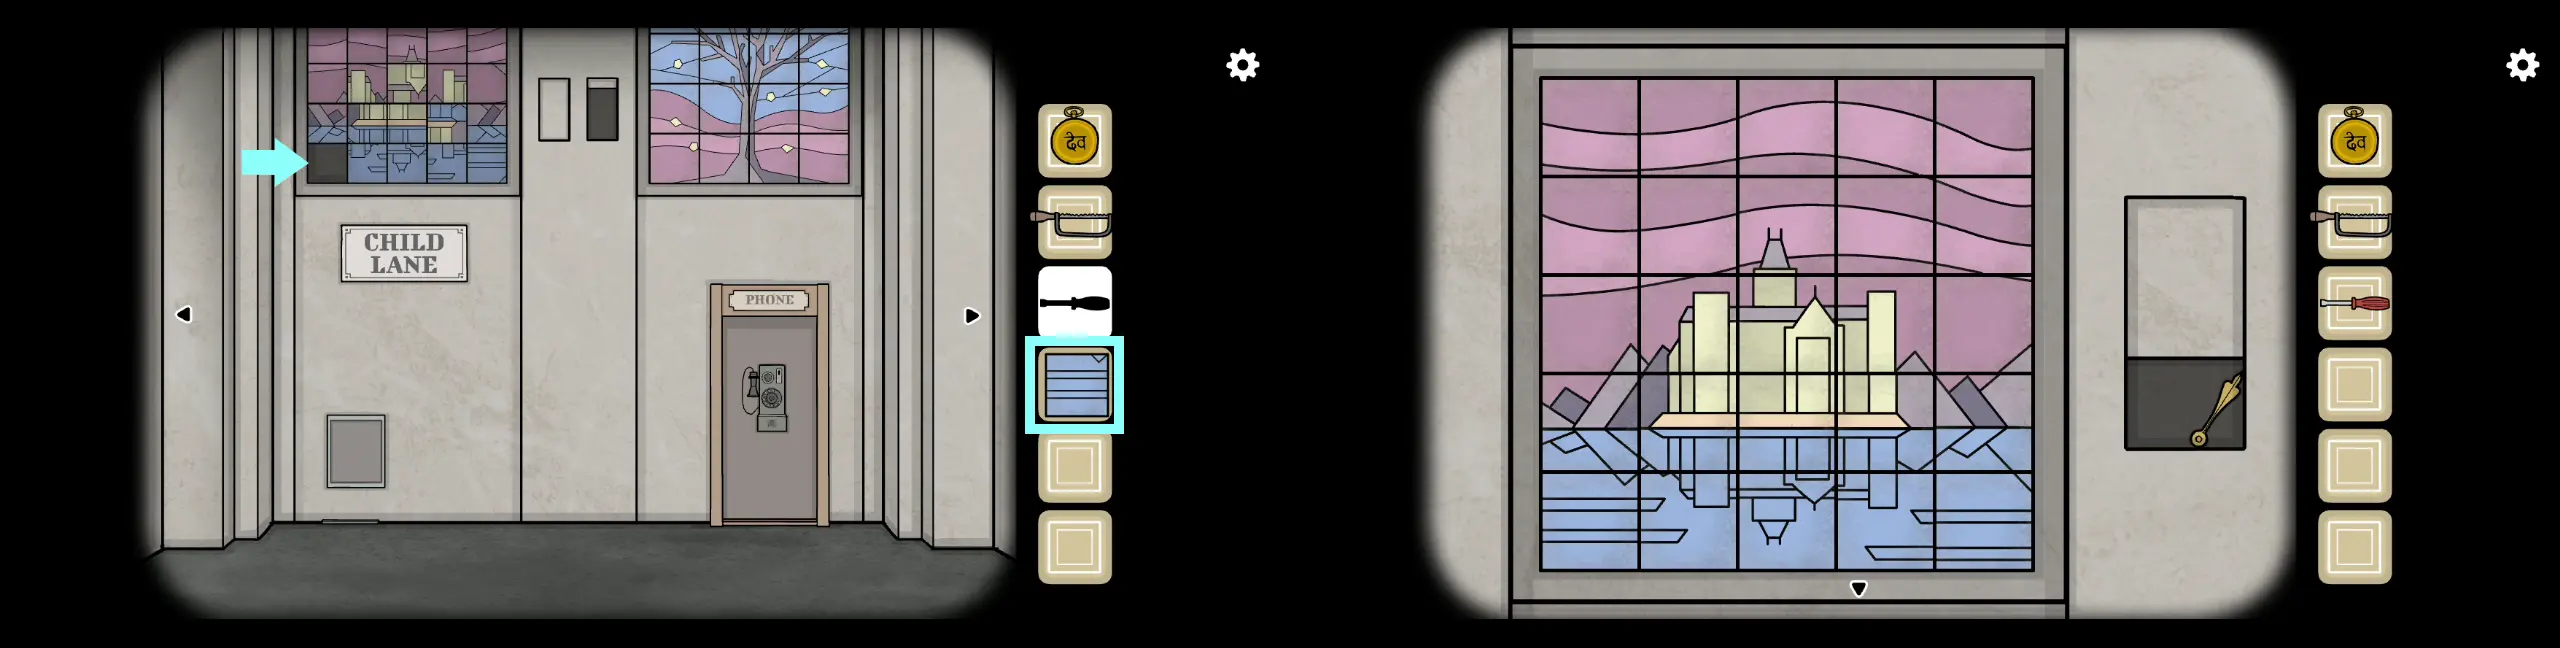
11. If you look closely at the glass panel, it fits the design of the stained glass mural in the area where the mother is standing, particularly the glass mural on the right side. Place the glass panel on the empty slot of the glass mural.
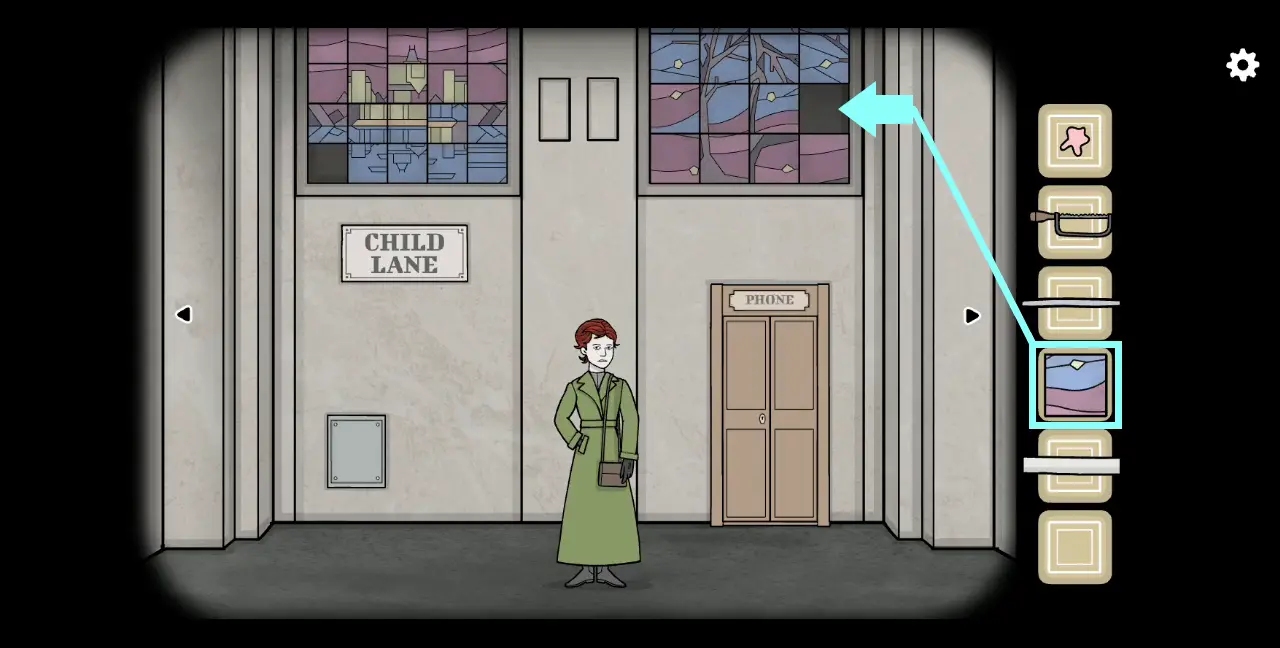
12. If you interact with the glass panels, you’ll discover that they can be flipped horizontally and vertically. Since the design of the stained glass mural looks out of sorts, your objective is to fix the design. Below is the correct design of the entire glass mural:
13. Once you have the correct image, a panel on the left will rise, revealing a small compartment with a crank inside. Collect this item.
14. Return to the area with the Newspapers Photoservice booth. Approach the poster on the right, which has the illustration of a man on a holiday. You’ll notice the words “From small to big,” which serves as a clue. Basically, you have to click all the elements in this poster from the smallest to the biggest, with the exception of the man. Thus, the correct order of things to click should be: wine glass, hat, kite, camel, airplane, pyramid, and sun.
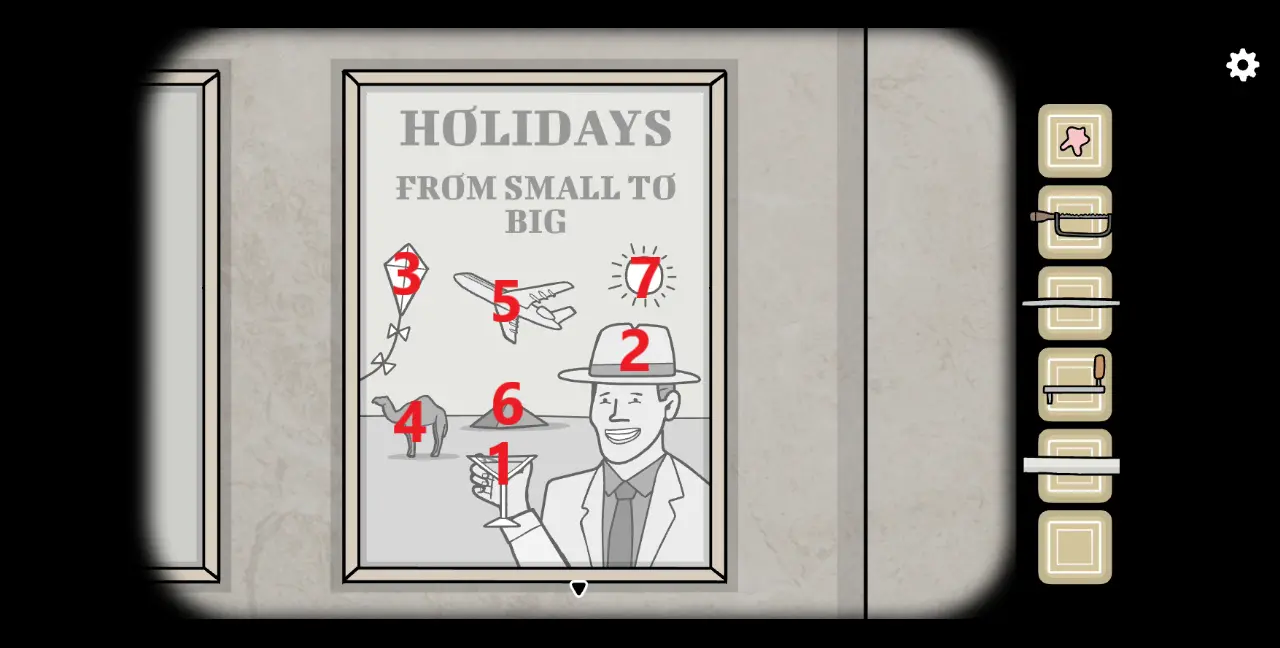
15. After clicking all the elements in the correct order, the man will have a huge grin on his face and the top left corner of the poster will reveal a key behind it. Take this key.
16. On the left side is an empty space for a poster. Place the poster you’ve collected from the owl-head statue area. Use the chewed gum as adhesive. Drag the poster downward to unroll it.
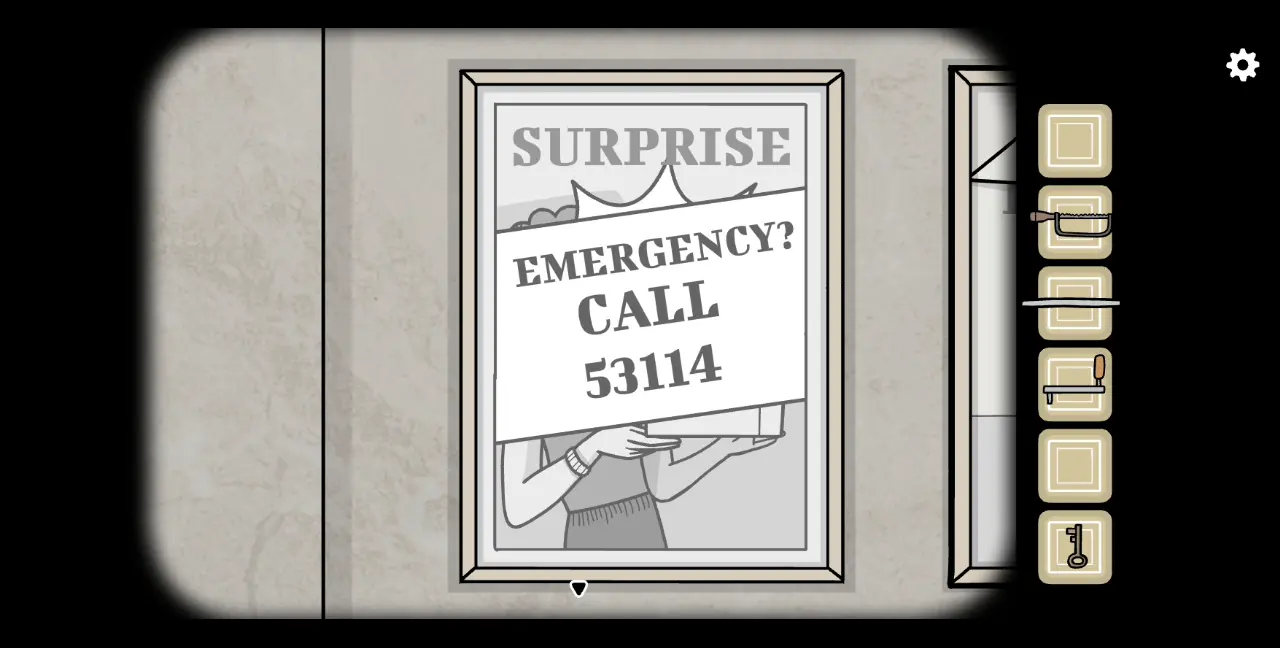
17. The poster, this time, is that of a woman holding a box with the word “Smile” on top of her. Click on the woman’s mouth and she will smile. The word on top will change to “Sparkling Eyes.” Click the womans’ eyes. The objective of this puzzle is to click elements on the poster that correspond to the word/s being flashed on top of her.
18. The last word will be “Surprise,” in which case, click the box. A hand holding a knife will pop out of the box and stab the woman, the action being censored with a comically large WHAM!! bubble.
19. An emergency number will cover the middle portion of the poster. This emergency number is 53114. Remember this for later.
20. Approach the Newspaper Photoservice booth. Place the crank on the circular slot on the left. Turn it until the metal sheet is raised, thus opening the booth. Take the newspaper from the box.
21. Return to the area with the owl-head statue and approach the man on the bench. Give him the newspaper.
22. As the man opens up the newspaper, you’ll notice that the headlines don’t correspond with the photos being displayed. Your objective is to switch up the headlines until they correctly correspond to the photos being displayed for each story. You can change the headlines by dragging them into another headline you want to replace. Here are the correct headlines for their corresponding photos:
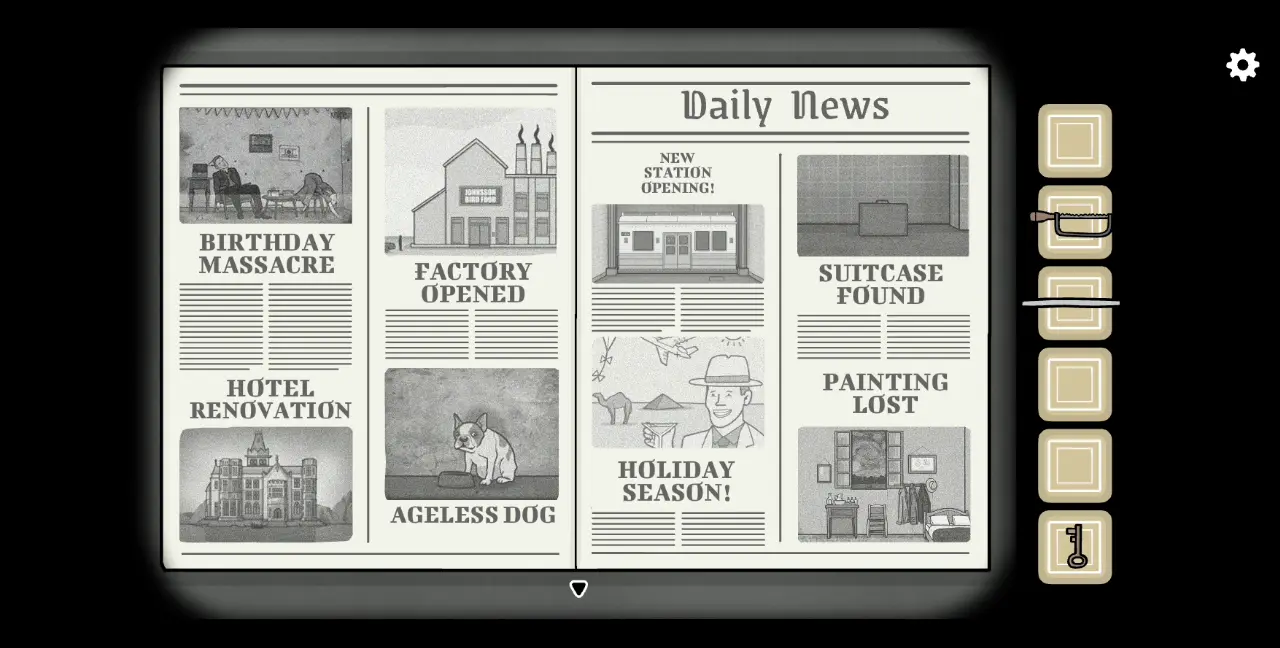
23. Once you’ve rearranged all the headlines correctly, the man will lift the newspaper to read it. Use this chance to take a coin from his breast pocket.
24. Return to the part of the station where the mother is. Approach the phone booth on the right and use the key to open it.
25. Place the coin in the phone’s coin slot. Zoom into the rotary dial and input the numbers 5-3-1-1-4, which is the emergency number from the poster. Since this is a rotary dial, you have to drag the dial to use it.
26. Click the receiver and a voice will start speaking. It will say that it’s glad you called and it will come get the mother. It also states that, “She knows. Look into the eyes of the bird.”
27. Clearly, the last statement was a hint so head to the area with the owl-head statue. Zoom into the owl-head and click on both its eyes. The statue will noticeably shake and the eyes will glow.
28. It turns out that there is a panel you’ve slightly opened on the pedestal. Use the rod to push the panel open. Inside is a set of numbers: 8827.
29. Approach the man reading the newspaper. Beside him is a bag with a lock that can be opened via a four-digit combination. Access this lock and change the digits to 8-8-2-7. Press the button beside the combination and the lock will unfasten from the bag. Open the bag and collect the camera from inside it.
30. Go to the area with the Newspapers Photoservice booth. Give Laura the camera and let her take pictures with it until the lights in the station go out.
31. Head to the area with the phone booth, where the mother is. You’ll discover that she’s no longer alone and a creature with a deer head in a black suit is standing right behind her. We can assume this is probably the person you spoke with on the phone upon calling the emergency number.
32. If you click on the woman, the deer creature will start speaking, telling you that the woman needs to come with him and that the little girl will be on her own.
33. When you zoom out, the woman and the deer creature will no longer be in that area. If you move past areas in the station, you’ll catch the woman and the deer boarding the train.
34. As the train takes them away, there’s a bag left on the floor, presumably the woman’s. Approach the bag and open it. Inside are several items: her golden timepiece, a nut driver, and a letter. From the letter, we learn that the woman’s name is Rose. You won’t be able to collect the letter.

35. Head to the area with the owl statue. Here, you’ll see Laura hiding in the space at the pedestal. If you try to approach her, she will close the panel and angrily tell you to leave her alone. A roll of film will drop from her. Collect this item.
36. Go to the Newspapers Photoservice booth and drop the roll of film on the basket. Click the sign that says “Photo Service” and a voice will tell you to come back in 20 minutes.
37. You don’t actually have to wait that long in real time—all you have to do is go to the area with the clock and move its hand 20 minutes forward.
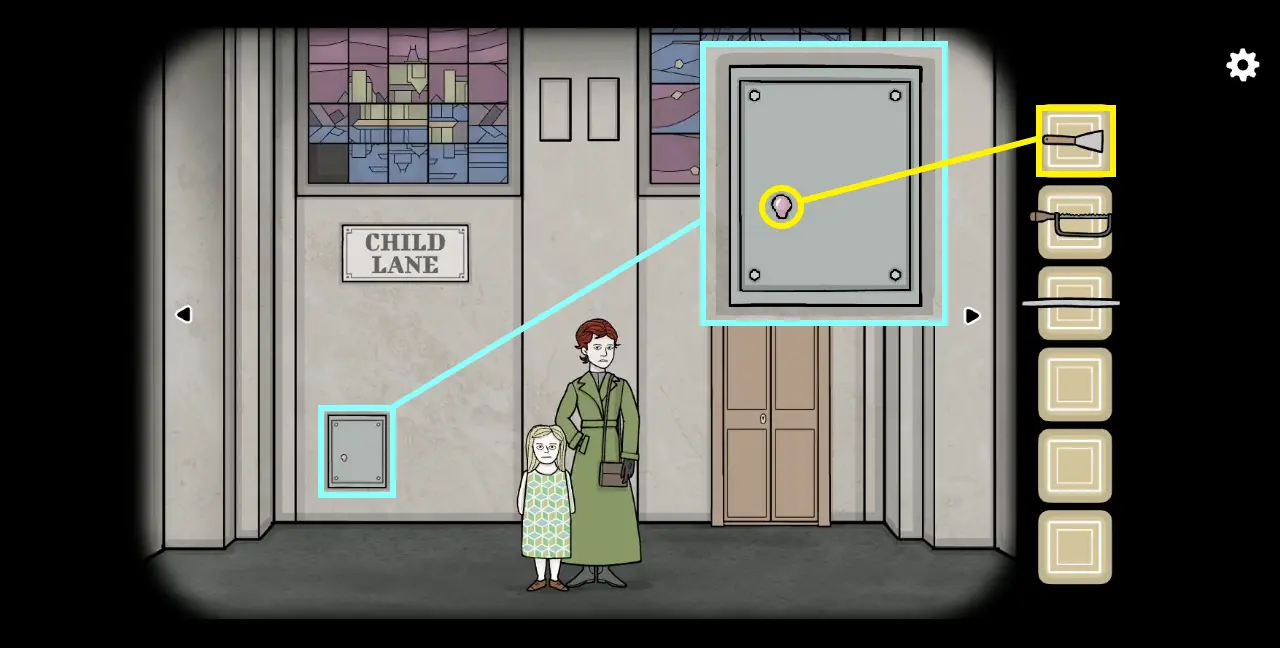
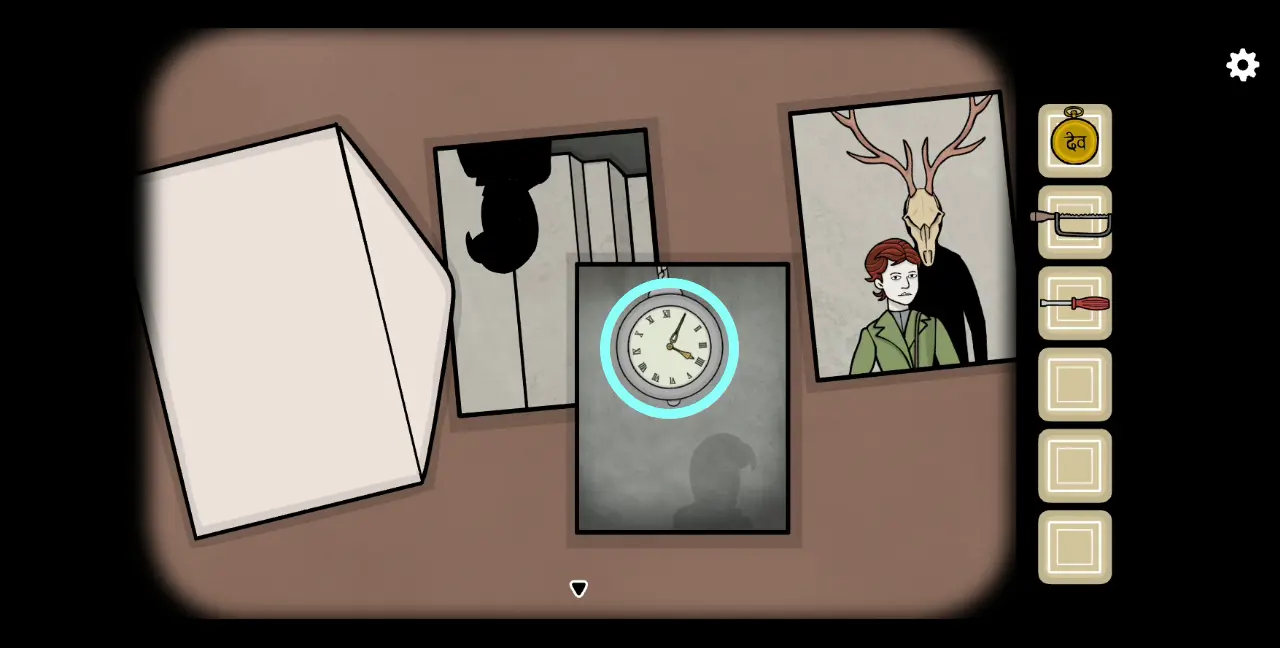
38. Return to the Newspapers Photoservice booth and an envelope will be waiting for you in the box. Open the envelope as it contains three pictures. Take note of the picture of the clock with the time set to 4:05.
39. Go to the area with the phone booth. Approach the metal panel on the left, underneath the sign that says Child Lane. Use the nut driver to remove the nuts keeping the panel in place. Once you’ve removed this, collect the glass panel inside.
40. In the same area, place the glass panel on the empty slot on the mural to the left. Like the puzzle similar to this one, your goal is to flip the glass panels until the mural bears the correct image. Below is the correct arrangement of the glass panels (right image).
41. Once the design is correct, a hatch on the right will open. Collect the clock hand inside.
42. Go to the area of the station with the clock. Install the other clock hand and set the time to 4:05. This will cause the train to arrive. Once again, the conductor will greet you and ask for your ticket.
43. Head to the area with the owl statue. On the left is a ticket dispenser. If you zoom into it, you’ll see four shapes on top of a keypad with no symbols on the keys. These four shapes are basically written in what looks like a simple math formula (△ + ⭘+ ▯ – ◇) wherein the end result should be a ticket. To solve this puzzle, you need to check and observe the four stained glass murals with shapes at the bottom. One pair is in the area with the owl statue; the other pair is in the area with the Newspapers Photoservice booth.
You’ll notice that on every glass mural is a different shape corresponding to each of the four shapes needed to produce a ticket. You’ll also notice that different yellow squares are highlighted on each mural. To understand this puzzle, the nine gray squares on each mural represent the dial pad on the ticket dispenser. The position of the yellow squares represent a specific shape when pressed on the dial pad. Thus, to achieve a ticket, you must press the buttons that correspond to △ + ⭘+ ▯ – ◇. We’ve illustrated the correct solution below:
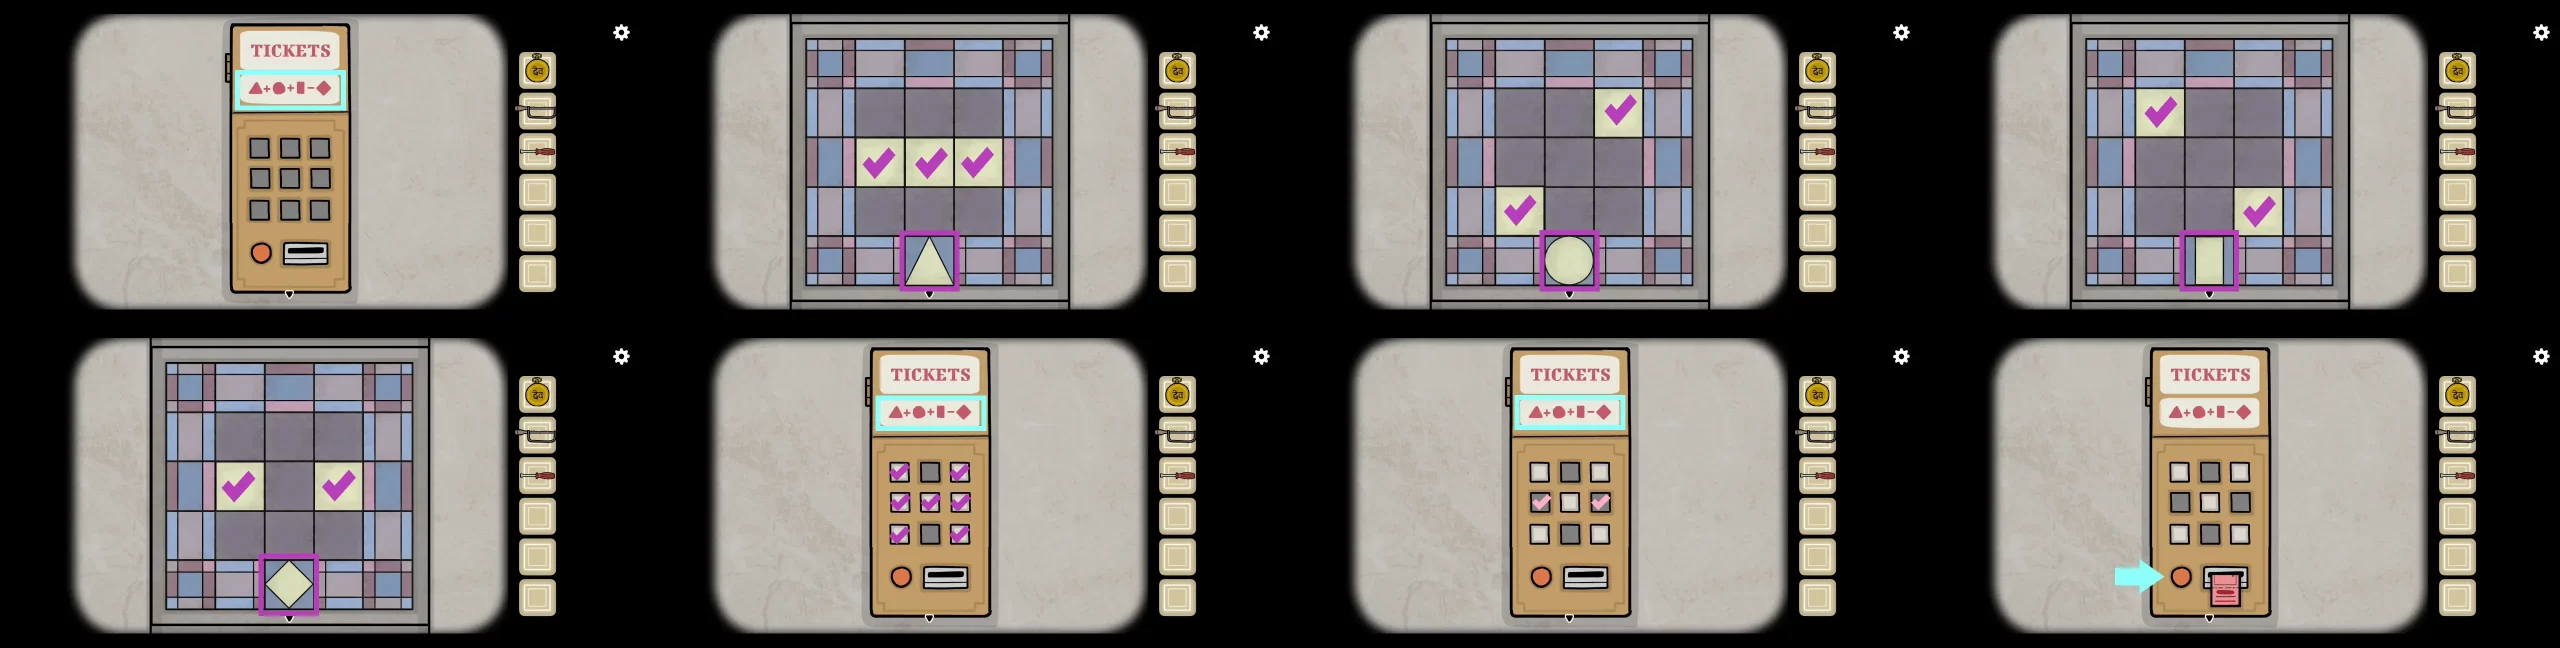
44. Once you’ve pressed the right buttons on the dial pad, press the orange button and the machine will dispense your metro ticket. Take this and give it to the conductor so it can be punched. Enter the train. This concludes Chapter 2.
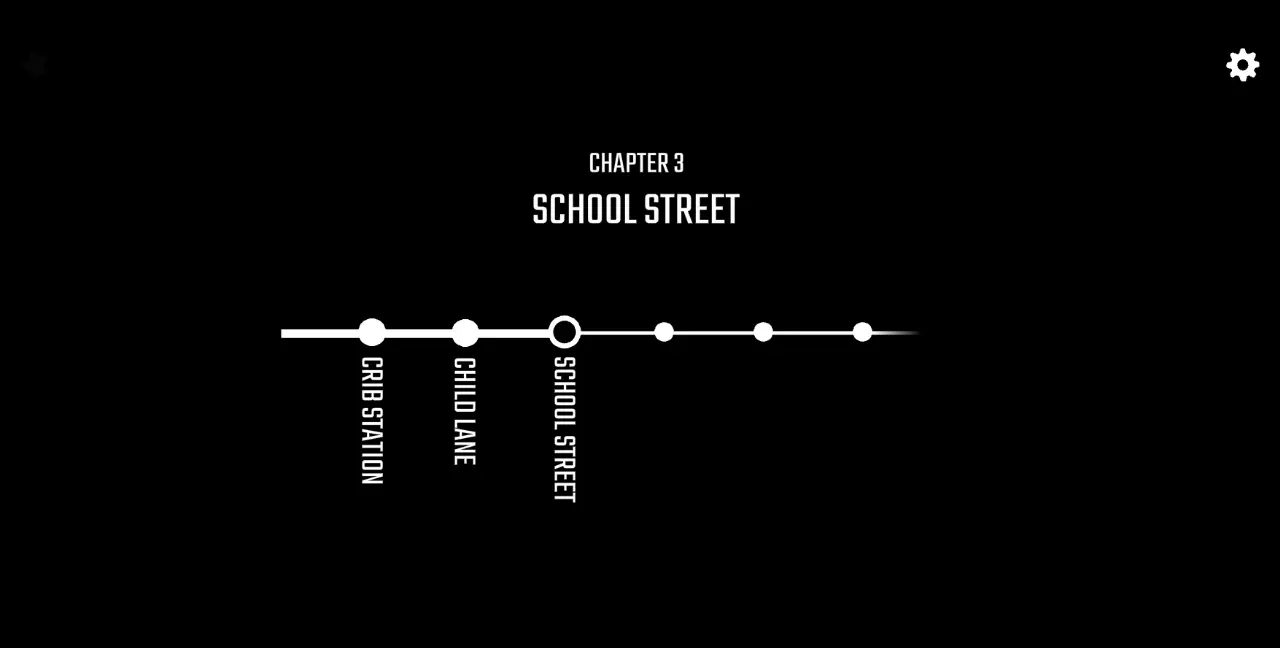
Chapter 3: School Street
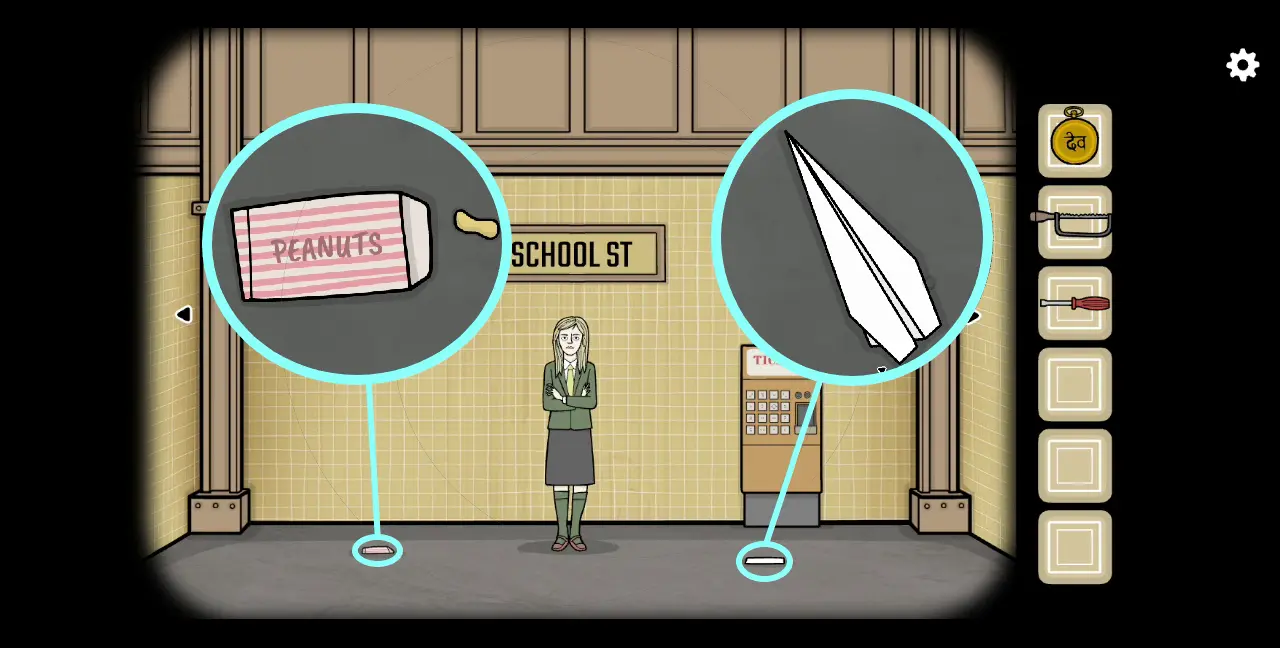
1. In this station, you see that Laura has grown a bit older and is wearing a school uniform. She doesn’t look pleased as her arms are folded. If you talk to her, she will tell you that someone stole her photos. The most noticeable item to her right is a ticket dispenser. There are also some items on the floor.
2. Like the previous stations, there are multiple sections present. First, go to the part where there are four students, wherein the student with the glasses holding an orange notebook is standing separately from the other three. If you talk to him, he will tell you that if you help him with his notebook, he will give you something.
3. Click the student’s notebook. In it, you will see the left page listing down several sentences describing names. On the right page are the names and photos of different students. However, they are mismatched. Your objective is to match the names with the correct photos. The following sequences will be in service of solving this puzzle.

4. Go back to the part of the station where Laura is. To her left is an item on the floor. If you zoom into it, you’ll see that it’s a packet of peanuts. Take a peanut from inside the packet. There’s another item to her right on the floor. If you zoom into it, you’ll see that it’s a drawing presumably of her. Fold the piece of paper and keep folding until it turns into a paper plane. Collect this item.
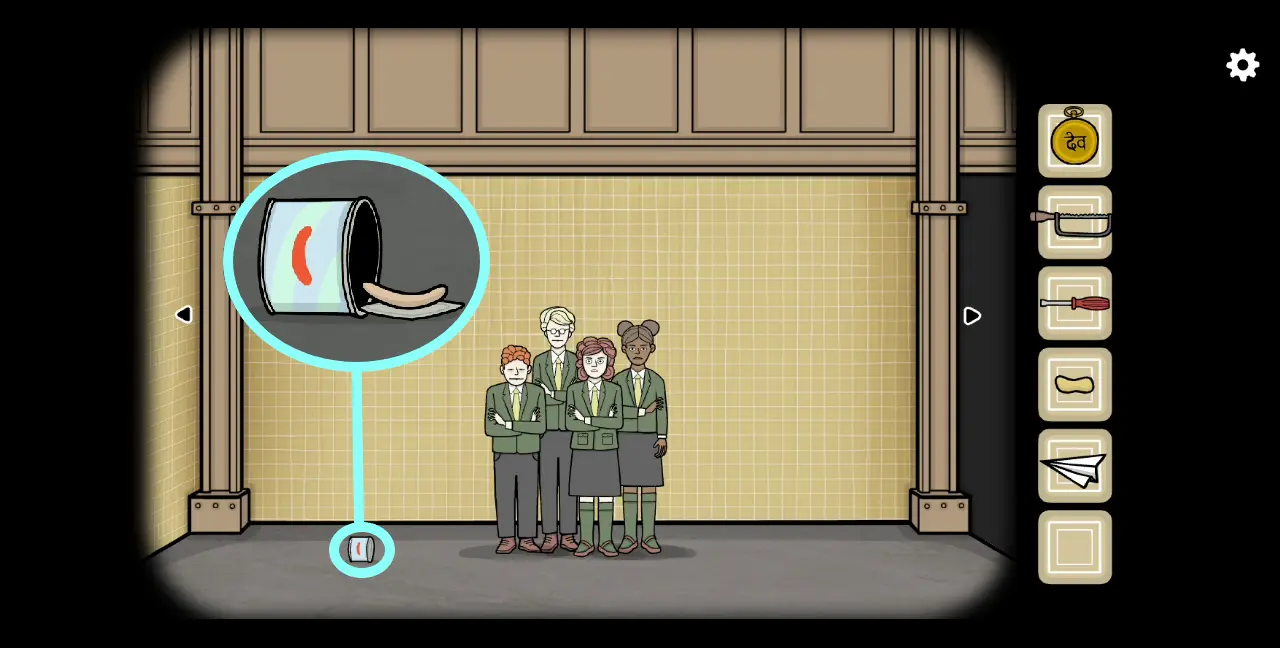
5. Next, go to the section of the station where there are four students all standing together. On the floor to their left is a can of sausages. Use the nut driver to open the can. Take the sausage from inside the can.
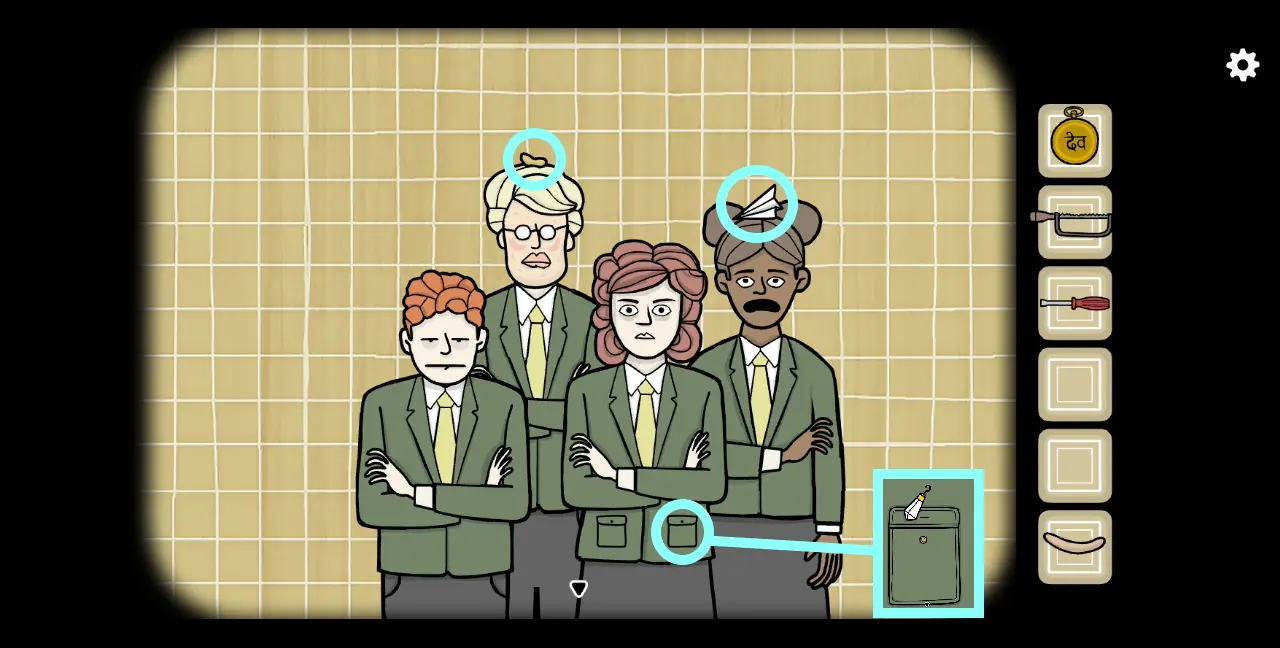
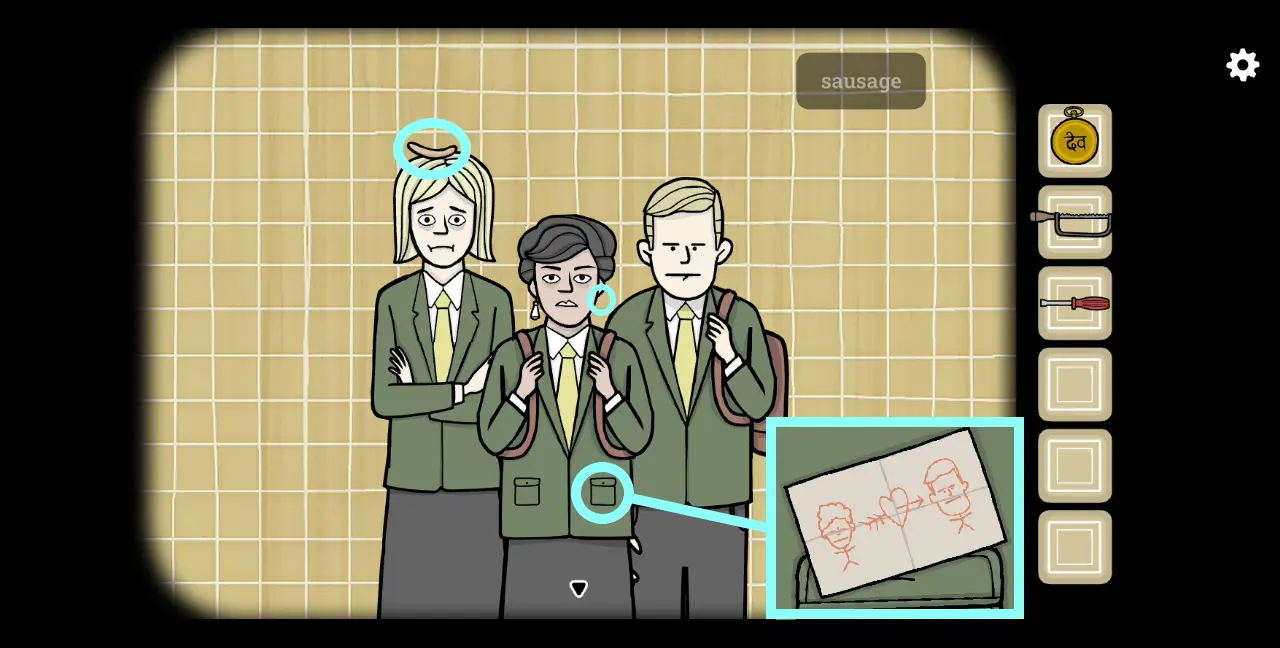
6. Click the students. Give the male blonde student the peanut. His face will puff up, as if he had an allergic reaction. Next, put the paper airplane on the head of the girl with the bun hairstyle. She will look terrified as the paper airplane lands on her head. Click on the right blouse pocket of the female student with curly mauve hair. Inside it is a crystal with a hook that looks like an earring. You won’t be able to collect this item and will simply put it back in the girl’s pocket.
7. Go back to the section where the other group of students are. Click on the group of three students standing apart from the one with the glasses. You’ll notice that the girl in the middle is missing an earring. Click her right blouse pocket and here you will find a piece of paper with a doodle depicting a curly-haired boy and a square-jawed boy with a heart in between them. You’ll recognize the square-jawed boy as the blonde male student beside the girl with the missing earring. Then, give the sausage to the third student in this group, which is the blonde girl with short hair. She will vomit and look sick.
8. With this information at hand, you can now determine which of these students fit the description in the notebook. Thus, go back to the student with the glasses and click on his notebook. Start arranging the photos using the descriptions on the left page as clues to guide you. Below is the correct arrangement of the photos.
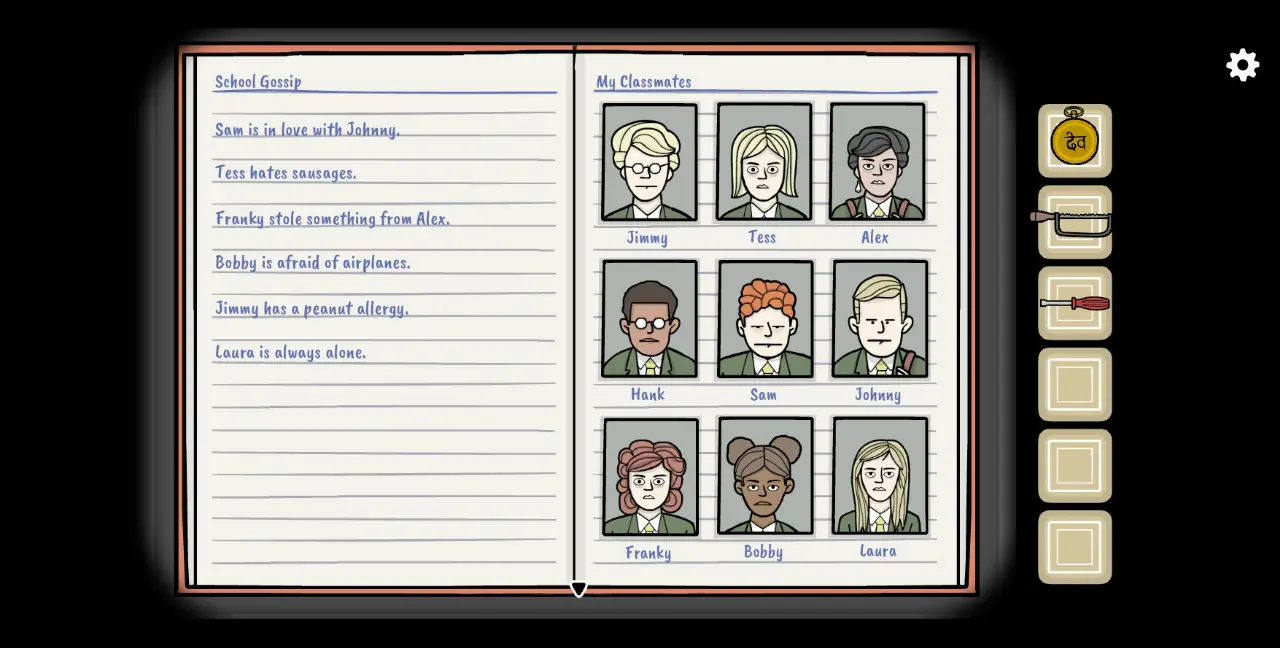
9. Once the photos have been arranged properly, the notebook will close. Talk to Hank (the student holding the notebook) and he will tell you that if you give him a peanut, he will give you something. He will be asking for more items so collect the sausage from Tess’ head, the peanut from Jimmy’s head, and the paper airplane from Bobby’s head.
10. Go back to Hank and give him the peanut. He will eat it and ask for the paper airplane. Give this to him as well. Lastly, he will ask for the sausage. Give this to him. After giving him all three items, he will give you a worm and tell you to use it wisely.
11. In this same area, you’ll notice a black bird at the window on top of the students’ heads. Give the bird the worm you just got from Hank.
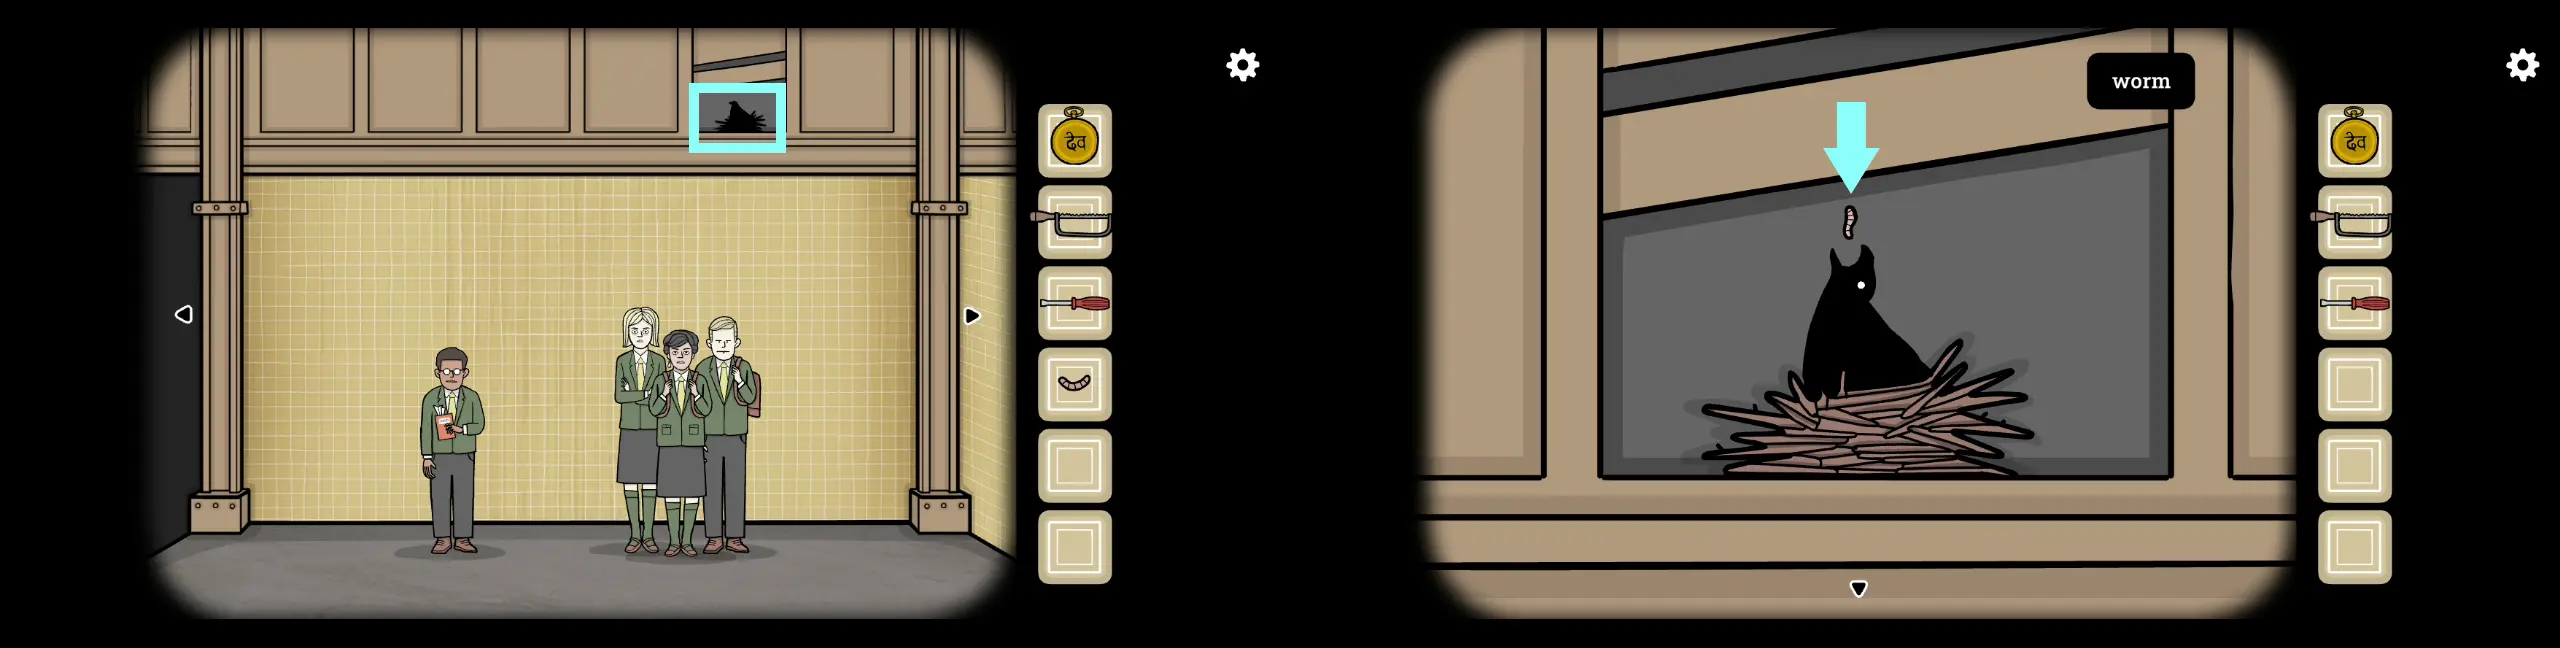
12. The black bird will eat the worm and fly away, revealing an egg on its nest. If you click the egg, it will fall to the floor. Strangely, however, you won’t see the egg on the floor (it’s on someone’s head). Instead, you will see a bag that seems to have fallen to the floor.
13. Open the bag. Inside it are several items, most notably a notebook. On the cover of this notebook are three symbols that look like the other items in the bag, namely a lollipop, a pencil sharpener, and a cigar. The only other item is a ruler. Use the ruler to measure the lollipop, pencil sharpener, and cigar in this order following how they’re written on the notebook’s cover. The measurements should be 6-3-7 respectively. Click the notebook’s lock and change the lock’s numbers to reflect 6-3-7. With this, the lock will open.

14. Open the notebook. Inside it are familiar items, particularly the three photos Laura took as a child. Take these photos. You’ll also notice doodles on the notebook. On the left side is a stick figure with a bird’s head; on the right is a girl that is presumably Laura.
15. Return to the area where Laura is standing. Give her the photos. She will thank you and tell you that these are all that’s left of her mother. She will also reveal the time the train arrives, which is 14:45 (2:45).
16. Go to the part of the station with the clock and change the time to 2:45. The lights will flicker and the train will arrive.
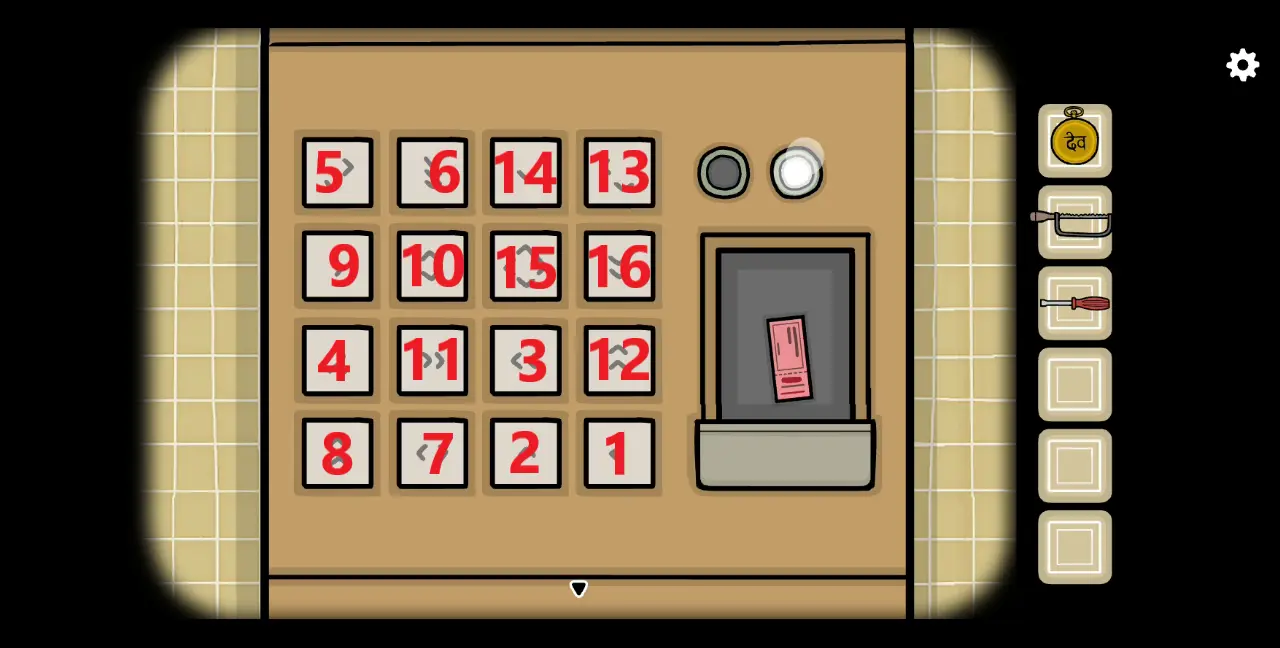
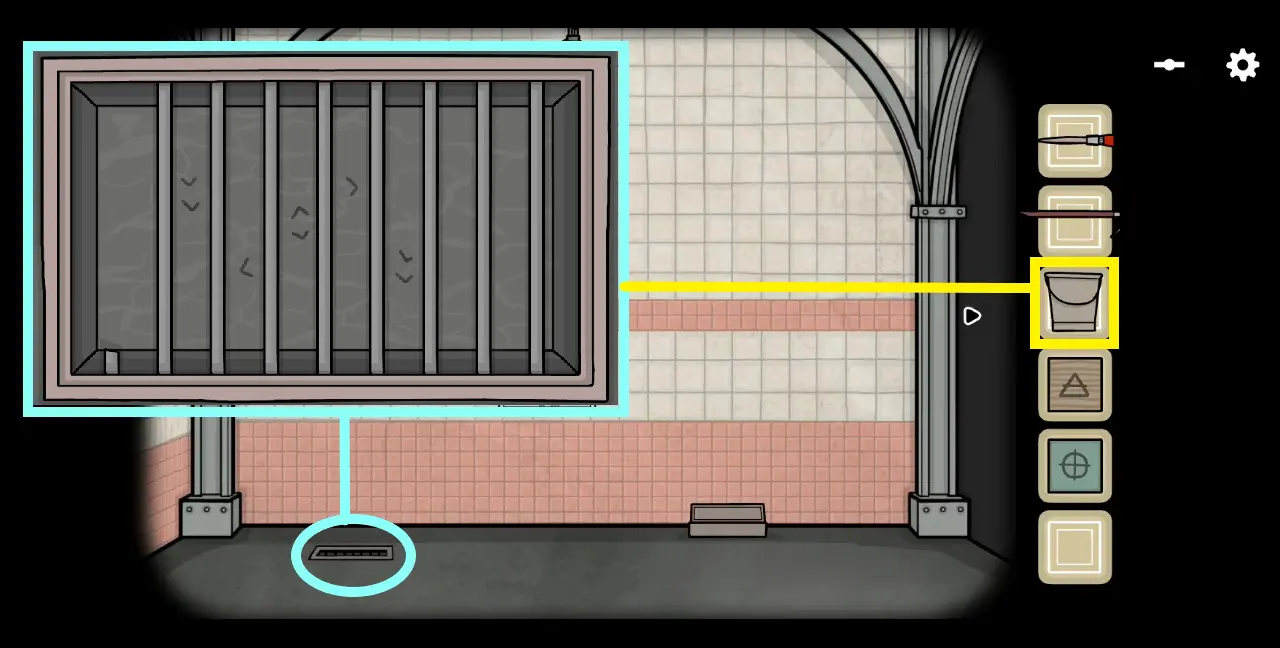
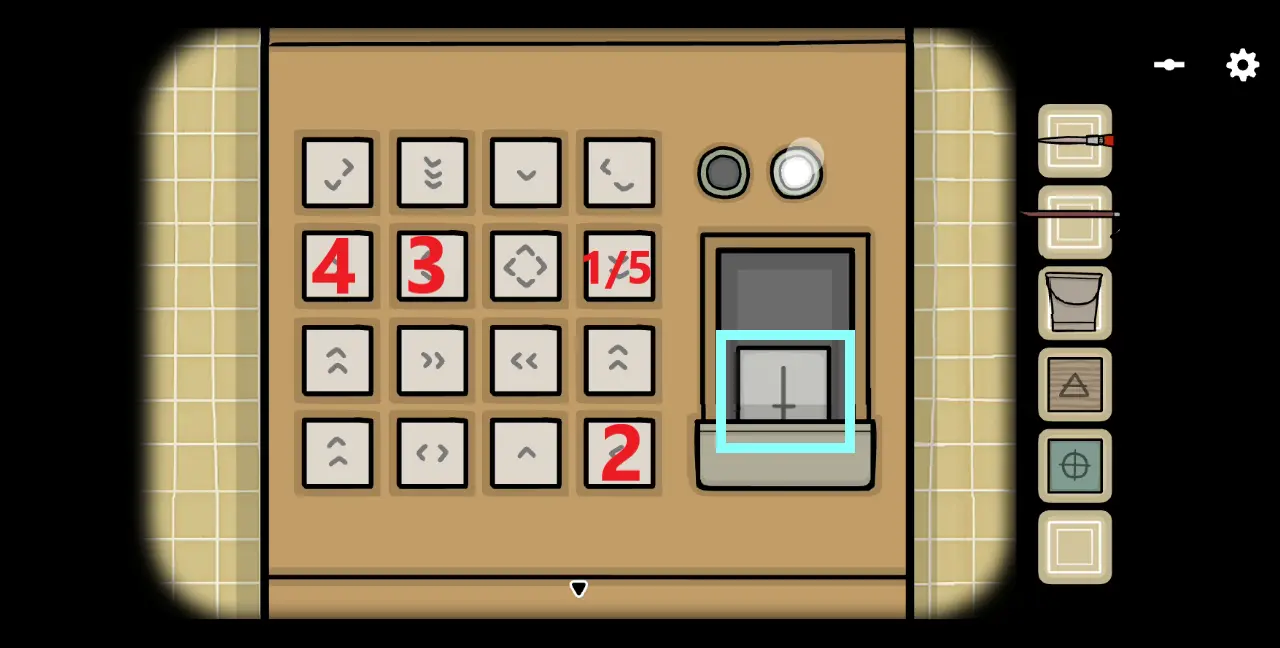
17. Go back to where Laura is and access the ticket dispenser to her right. This is similar to the ticket dispenser in the last chapter, except it doesn’t have a blank keypad. Rather, it has 16 keys with different symbols that look like variations of arrows. Now this looks a bit difficult or confusing at first, but the solution is actually fairly simple: the number of arrows in each key determines how many buttons away should move. Where they point is, of course, the direction you can move toward.
For example, if you click on a key that has a >> symbol, that means the next key you should press is two keys away going to the right. The goal is to click all the keys of the pad. The correct order of keys to be clicked is illustrated below:
18. After solving this puzzle, you’ll be able to get the metro ticket. Return to the area with the train and open the door. Hand the conductor the ticket so he can punch a hole through it. This concludes Chapter 3.
Chapter 4: Bird Bridge Station

1. At the station, you will see an older looking Laura sitting alone on the bench holding a notebook. If you talk to her, she will tell you that she needs to finish her sketch.
2. To her left is a locked case on the floor. Flip the two locks to open the case. Inside it is a pencil and a piece of sausage. Take both items.
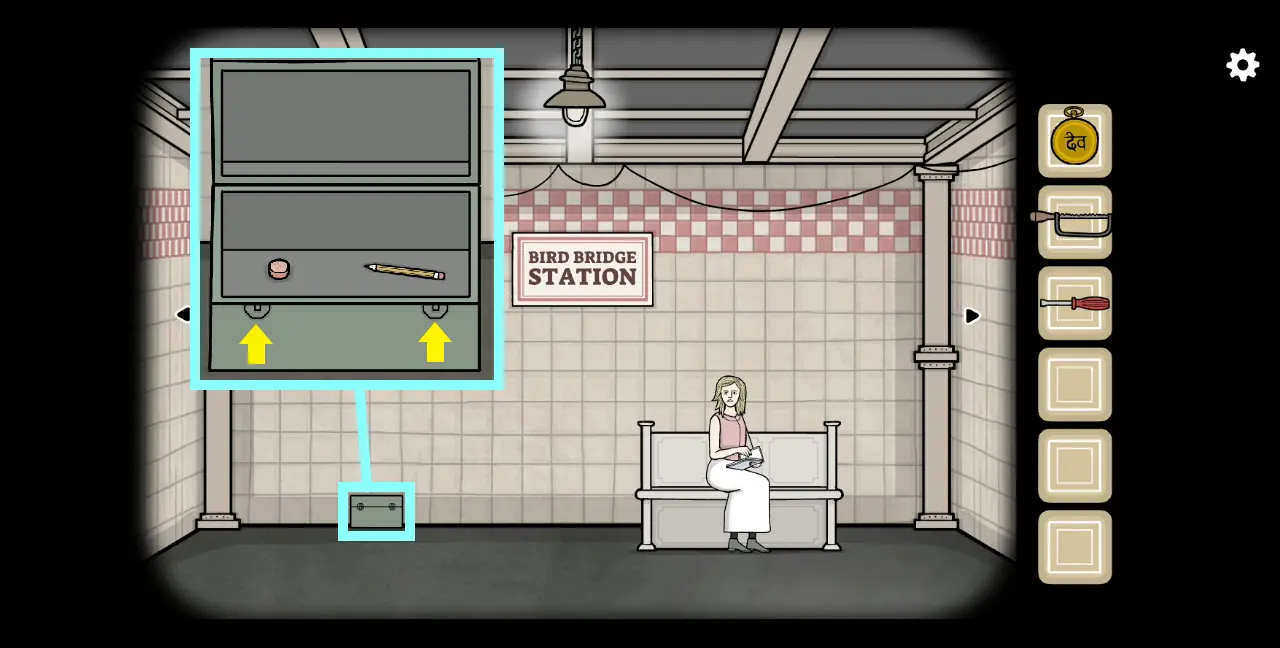
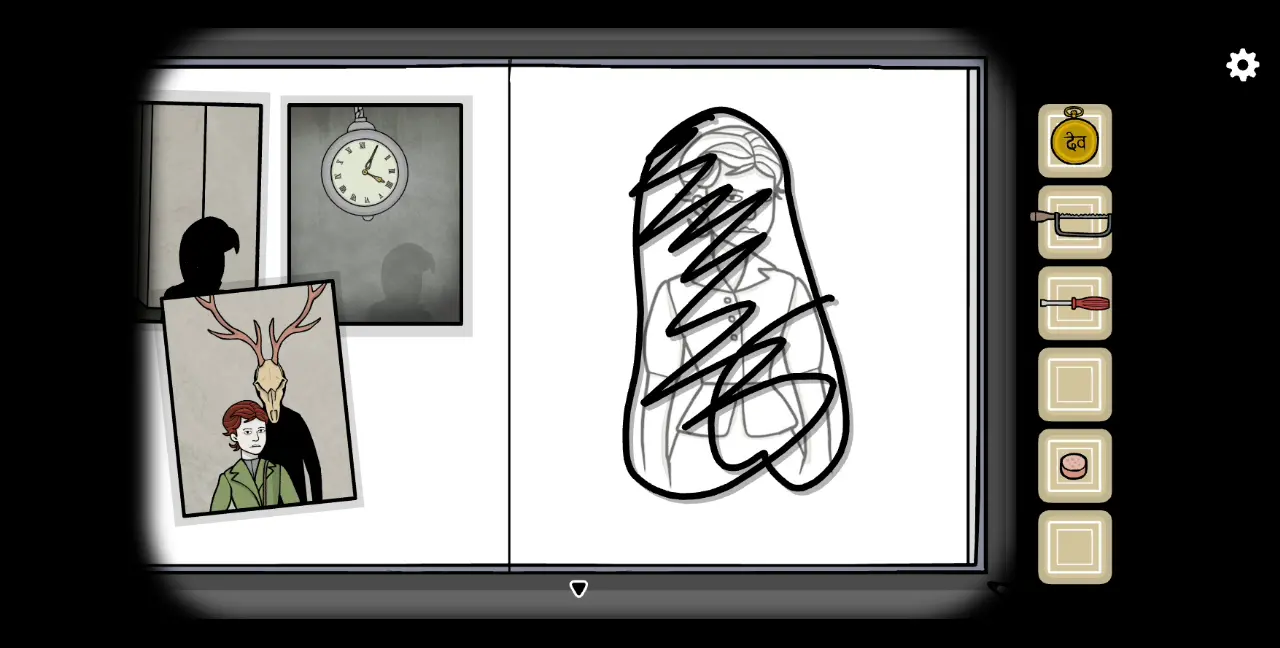
3. Click Laura’s notebook. Here, you’ll see that she’s trying to draw her mother with the three familiar photos on the left side of the sketchbook. Give Laura the pencil. Move her hands above the drawing of her mother and you’ll be able to collect the lines of the doodle as an item.
4. Next, move to the part of the station that has a Food & Drinks stand. To the right, on the floor, is a manhole. Take the wooden stick out of the manhole, then drag the “line” item from your inventory and attach it to the wooden stick, effectively creating a makeshift fishing line. We’ll go back to this later.
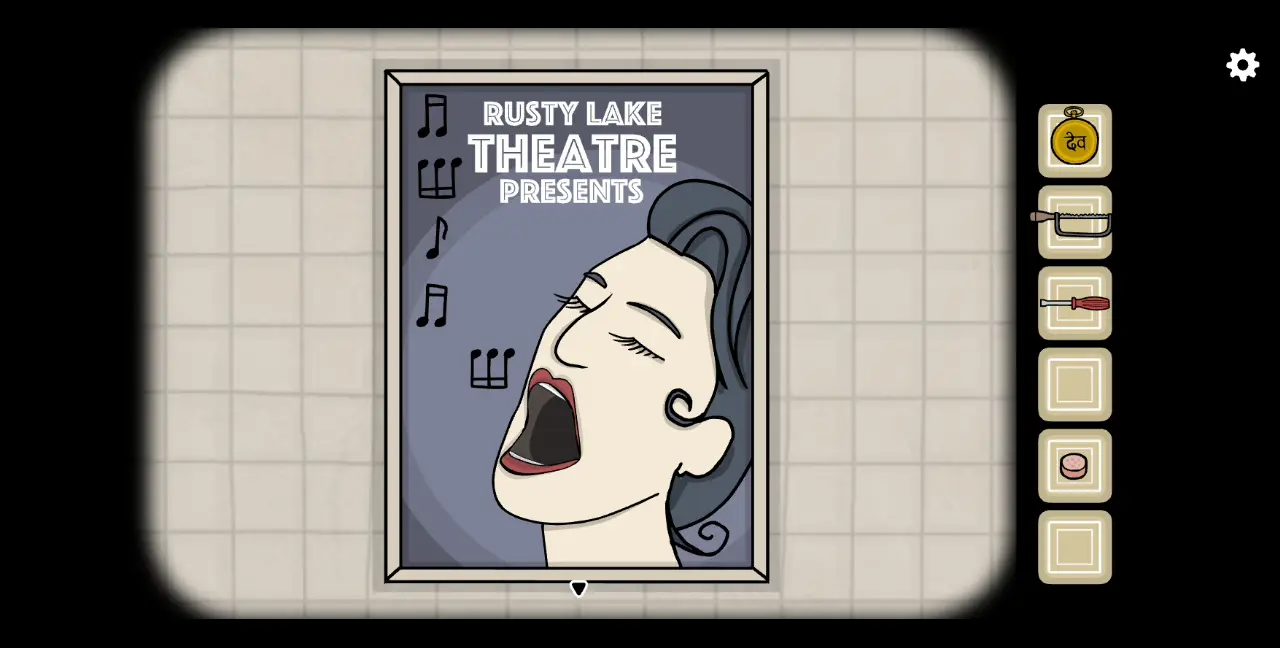
5. For now, head to the part of the station with a poster of a lady singing and a man holding a trumpet. Click on the poster of the singing lady. Six musical notes will come out of her mouth. Remember the order of these notes.
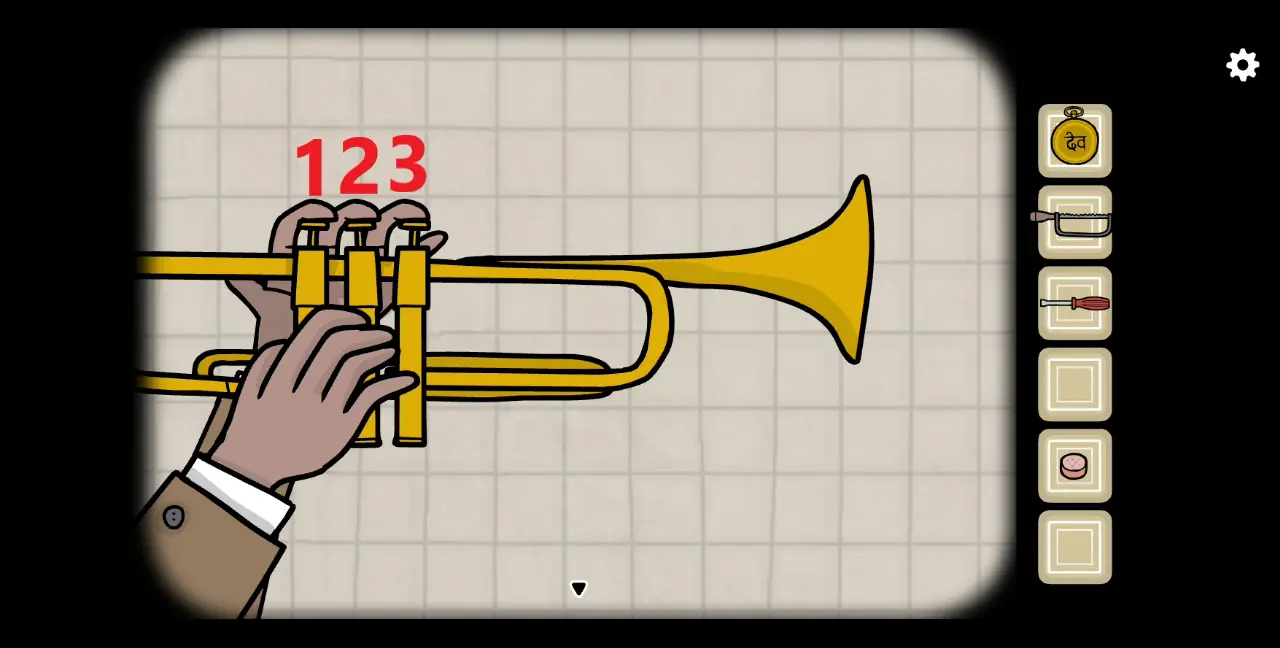
6. Next, click the man holding the trumpet. There are three finger buttons on this instrument that play three notes: the left button plays an eighth note (1), the center button plays two sixteenth notes (2), and the right button plays three upside down sixteenth notes (3). For this sequence, the correct order of notes is 1-2-3-1-2-3. Play this on the trumpet.
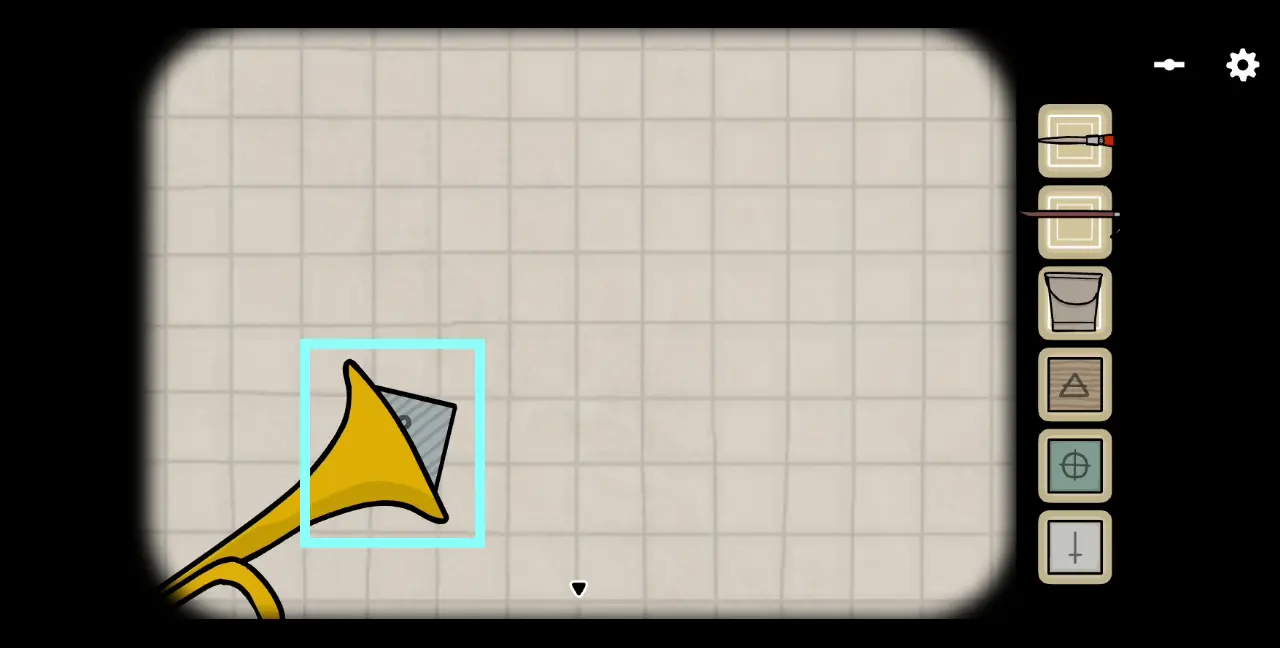
7. The jazz man will start playing music but you’ll notice that it gets a bit distorted toward the end, as if something is stuck inside the trumpet. As the man is holding his trumpet upward, click on the bell and keep clicking until a fish pops out.
8. Click the fish on the floor and it will spit out a hook. Collect the hook.
9. Return to the part of the station with the Food & Drinks stand. Approach the manhole and the makeshift fishing line. Place the hook at the end of the line and use the piece of sausage as bait.
10. Use this makeshift fishing line to fish in the manhole. You’ll end up hauling up a rat. If you click it, it will run away.
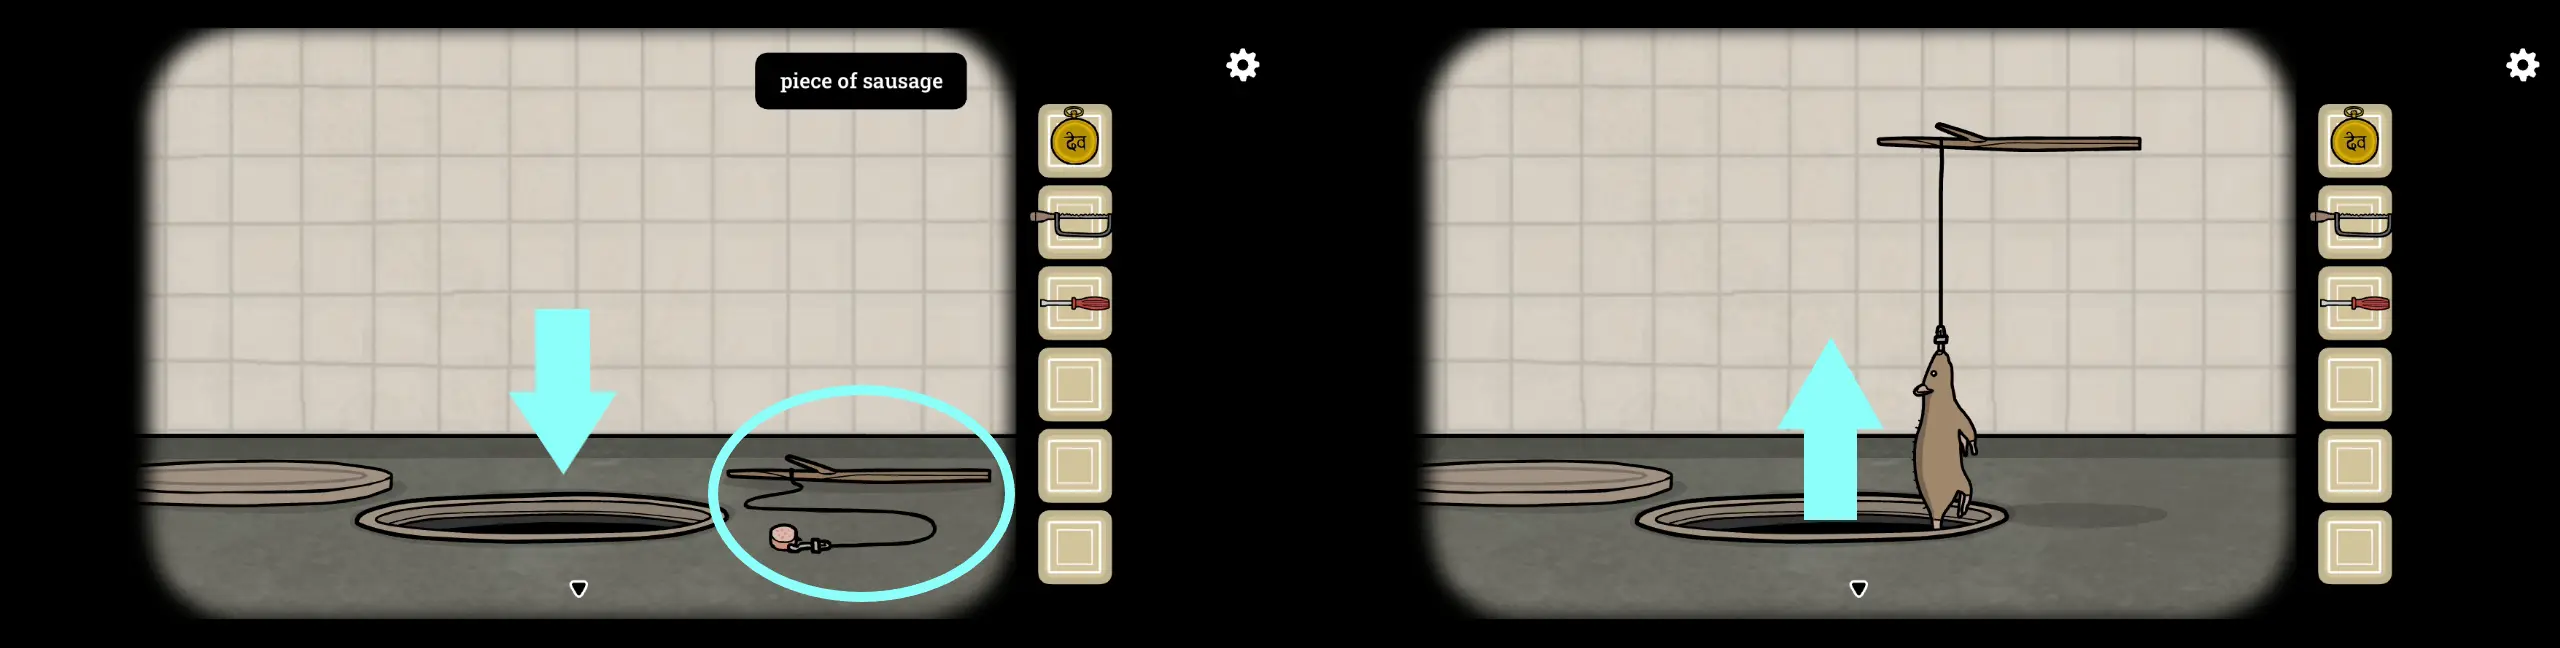
11. You’ll find the rat at the part where the trumpet man is located. You’ll see the creature as a small shadow on the upper left corner. If you click on the creature, it will enter a small open tile from the wall.
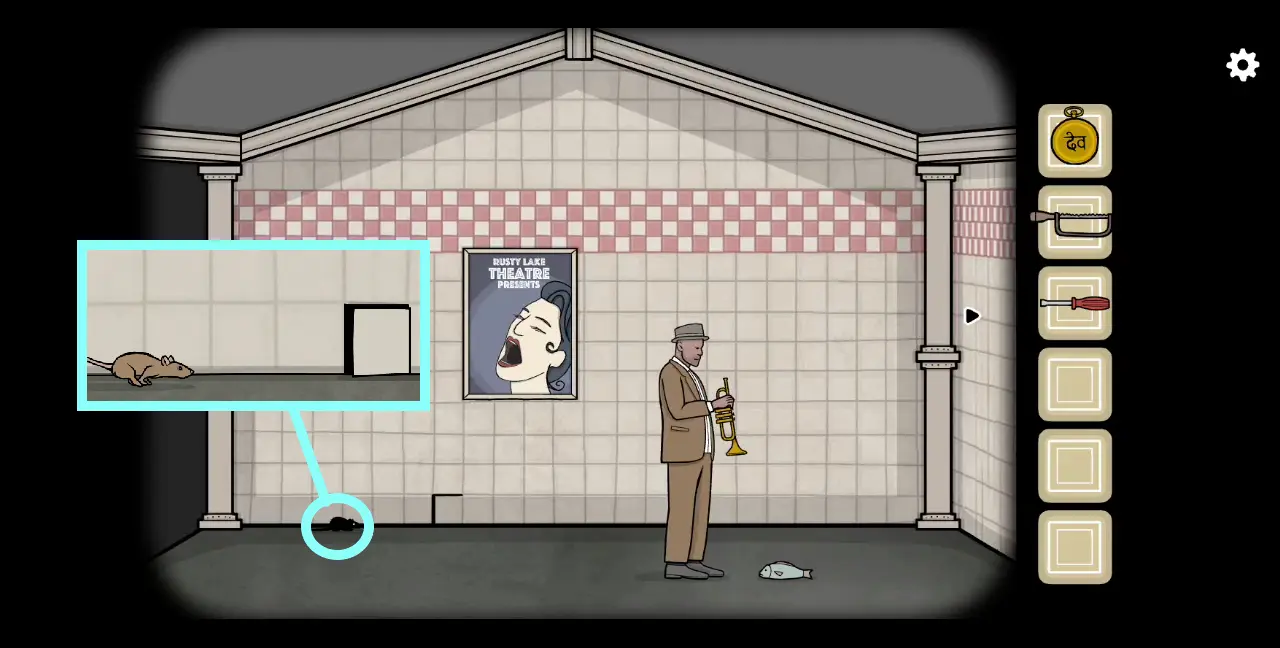
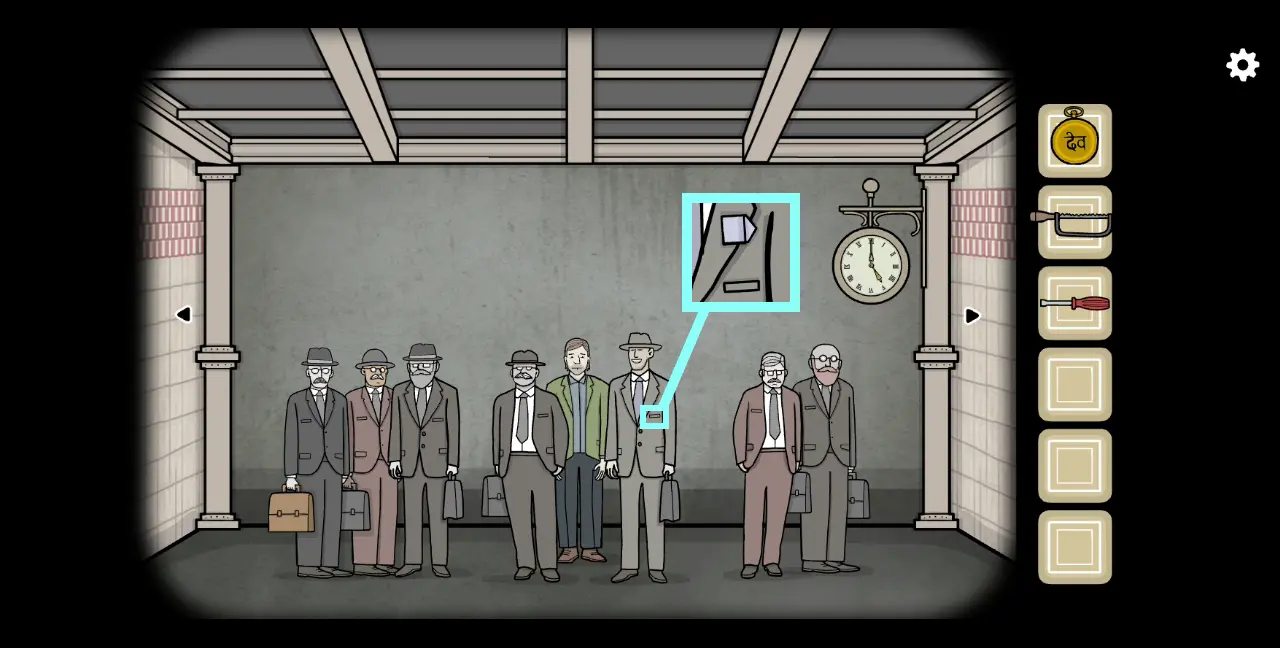
12. Click the tile and it will give you a small piece of paper. On this piece of paper are details about a certain Johnsson Bird Food Factory looking for new hires. It also mentions when the train arrives, which is 5 o’clock.
13. Go to the part of the station with a clock and change the hands to reflect 5 o’clock. The lights will flicker and the train will arrive. Noticeably, there appears to be a lot of people on board. When you open the door of the train, a bunch of passengers will come down.
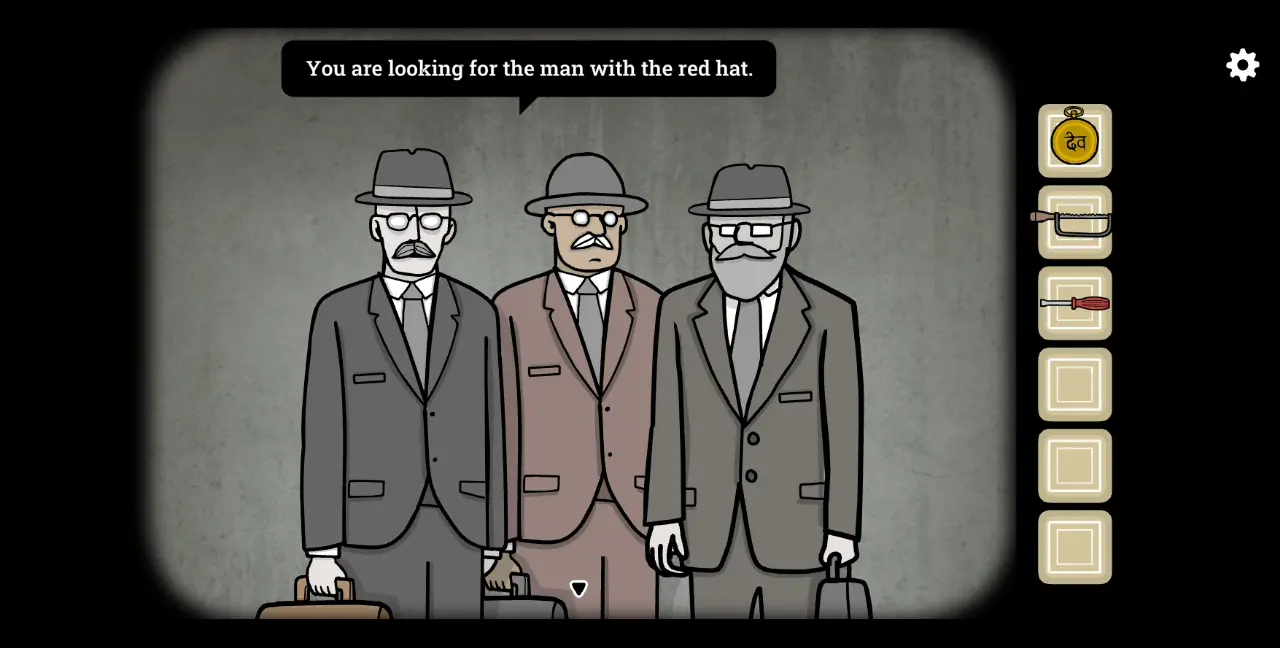
14. Click the first group of passengers to the left. The first man on the left will tell you that you’re looking for the man with the red hat.
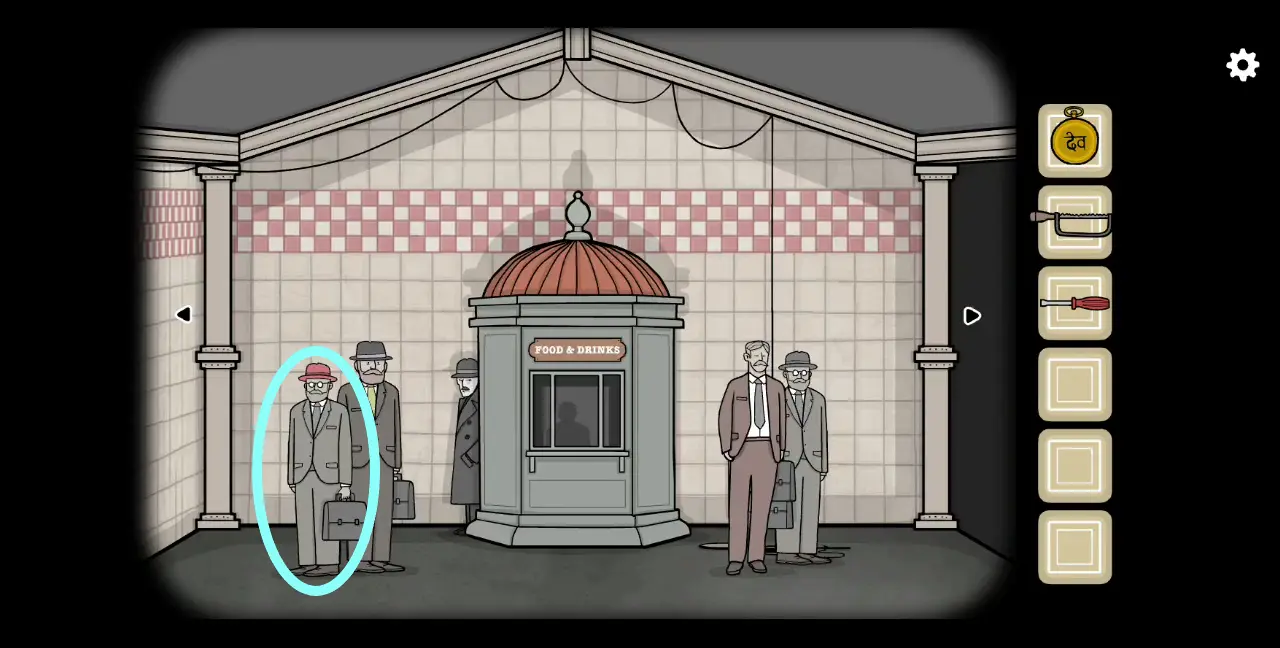
15. Go to the part of the station with the Food & Drinks stand. You’ll see that other passengers have come down here. To the very left side is a man with a red hat. He will tell you to talk to his colleague with the brown suitcase.
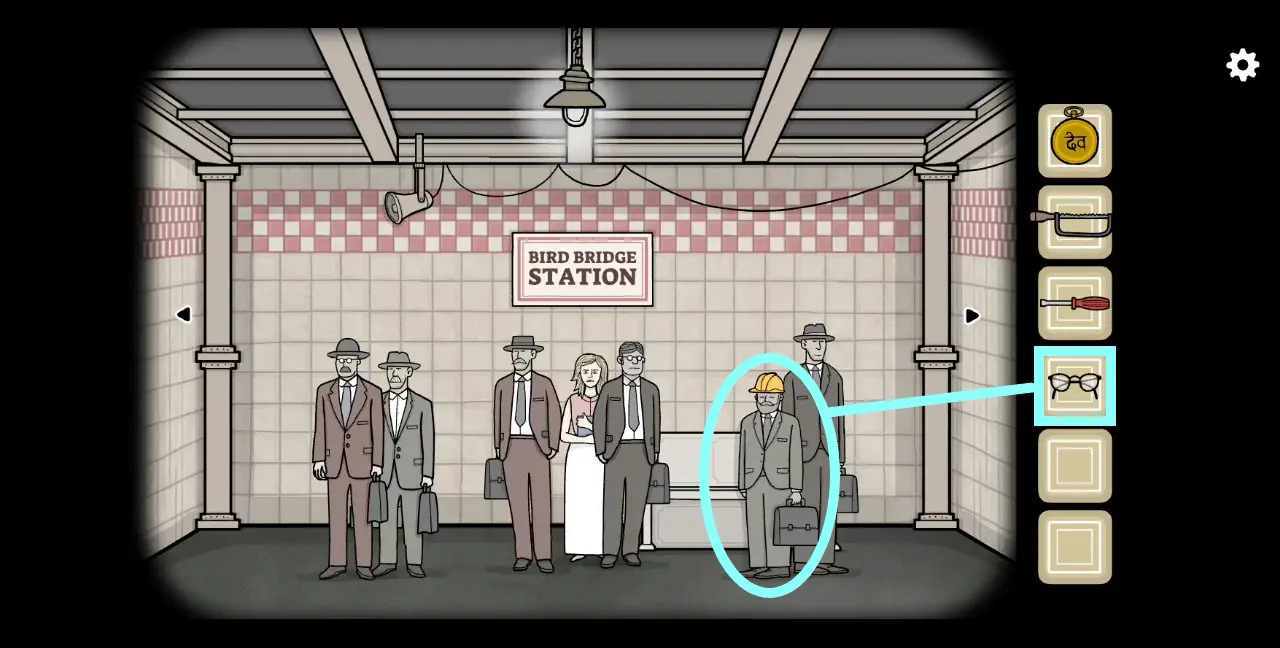
16. Return to the first man you talked to on the platform with the clock. He is the only one with a brown suitcase. He will tell you to check his breast pocket, which will yield a pair of glasses. He will let you know that the man with the hard hat wants his glasses.

17. The man in a hard hat is at the area where Laura is sitting on a bench. Click the man with the hard hat, who is to the right. Give him his glasses. He will tell you to talk to the tall smiling man.
18. The tall smiling man is on the platform with the clock. He belongs to the group of passengers in the middle. Check his breast pocket, from which you can collect a tie. He will ask you who needs a tie.
19. Return again to the area where Laura is sitting. On the left side is a man in a gray suit without a tie. Give him the tie. He will then tell you to talk to the man with the green tie.
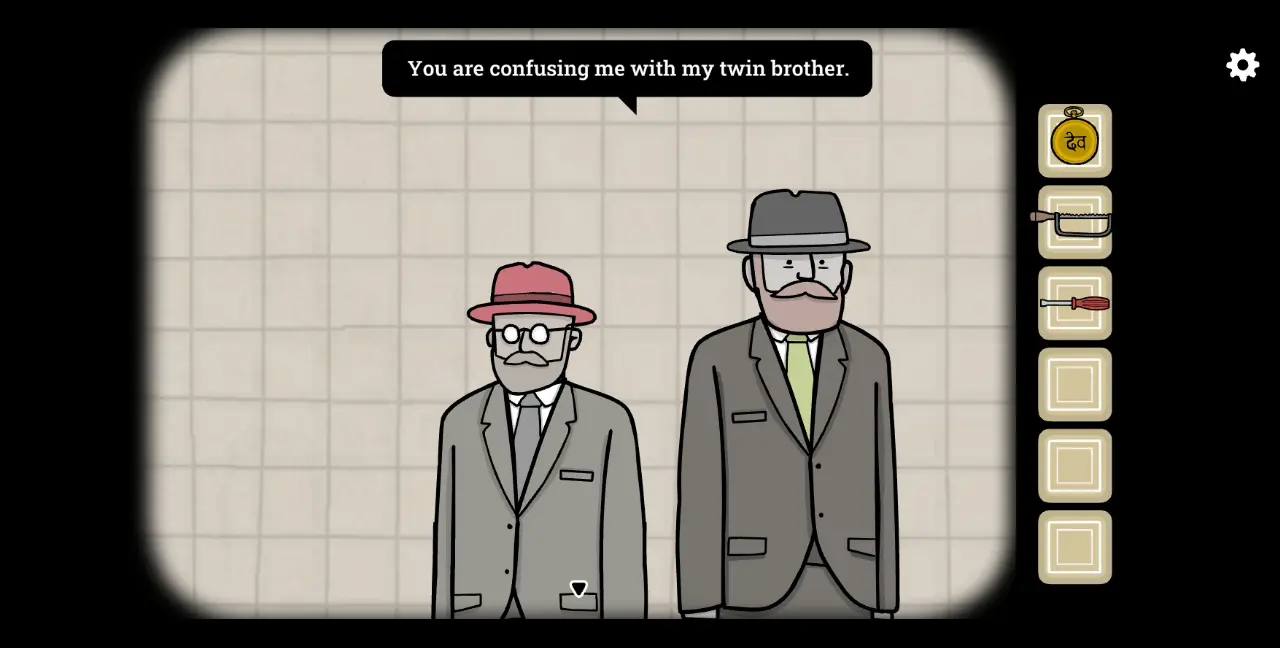
20. You’ll see a man with a green tie at the area with the Food & Drinks stand. He’s standing next to the man with the red hat. If you talk to the man with the green tie, he will tell you that you’re confusing him for his twin brother.
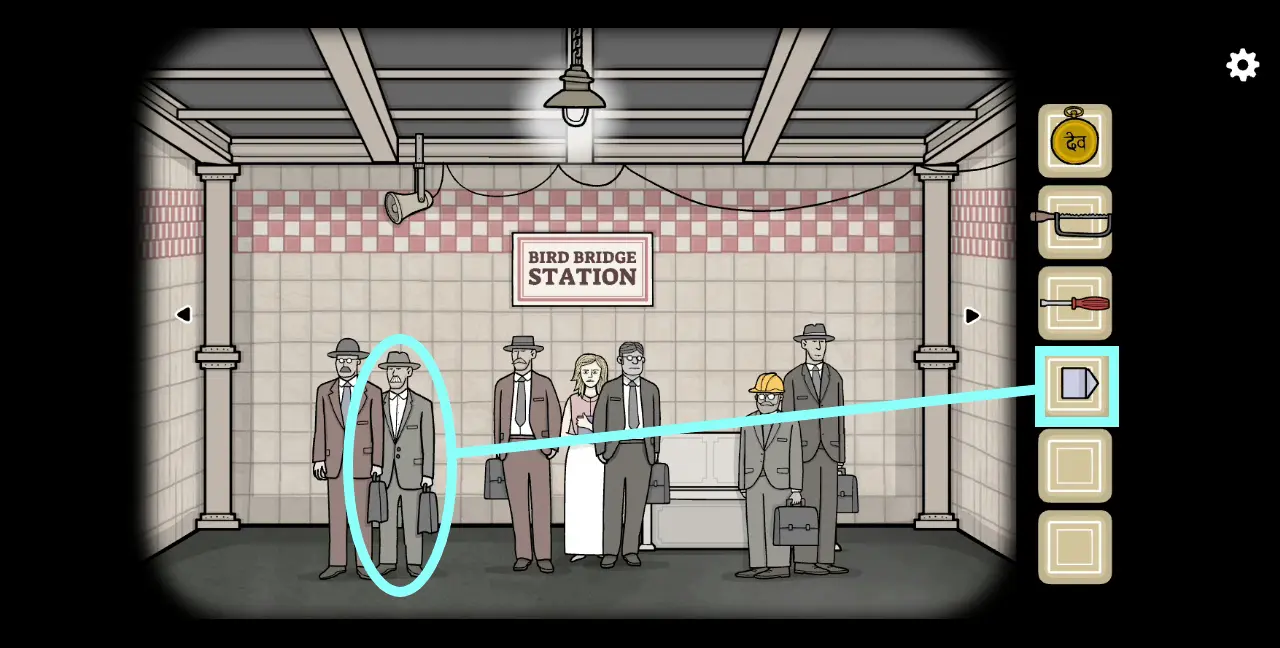
21. The man’s twin brother is in the area with the poster. You can find the twin among the group of passengers to the left. The twin will tell you to check his pocket. From his breast pocket, you can collect a golden lighter.
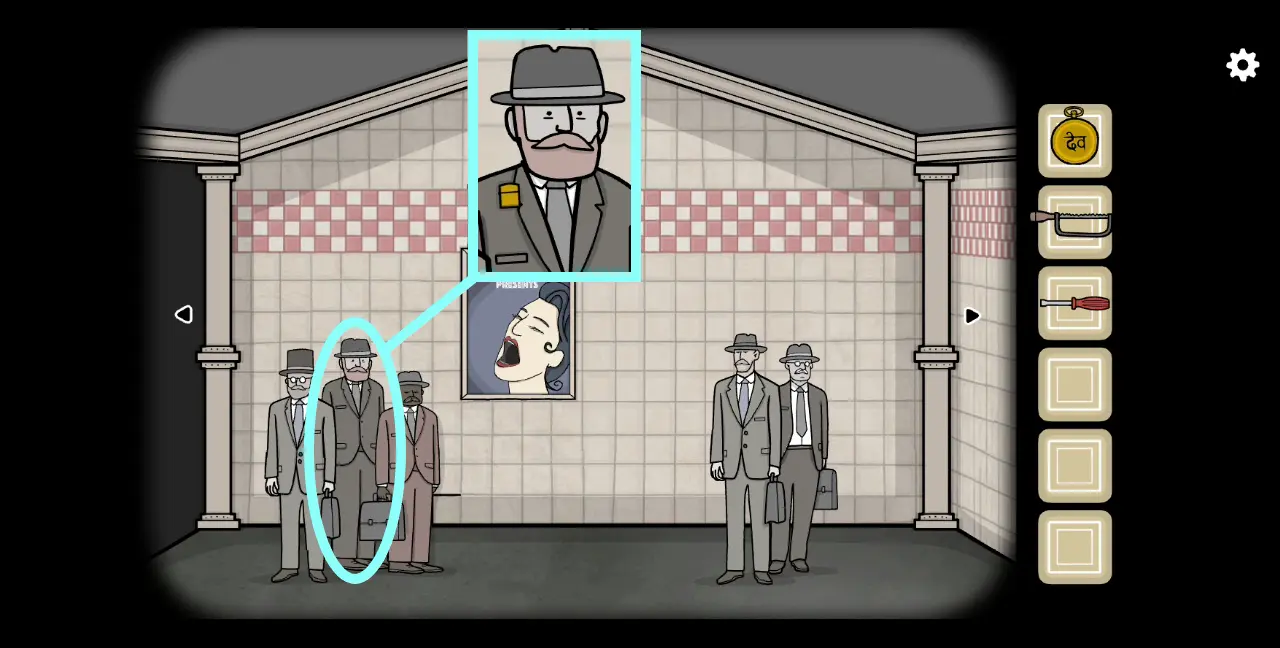
22. After this, if you check the different areas of the station, many of the passengers will walk away, though a few will remain, such as the man behind the Food & Drinks stand and one other man on the platform with the clock. Approach the man wearing a green coat under the clock and he will tell you that he’s seen “that woman” before. He will ask you to buy her a coffee and a sandwich for him. Collect the money from his hands.
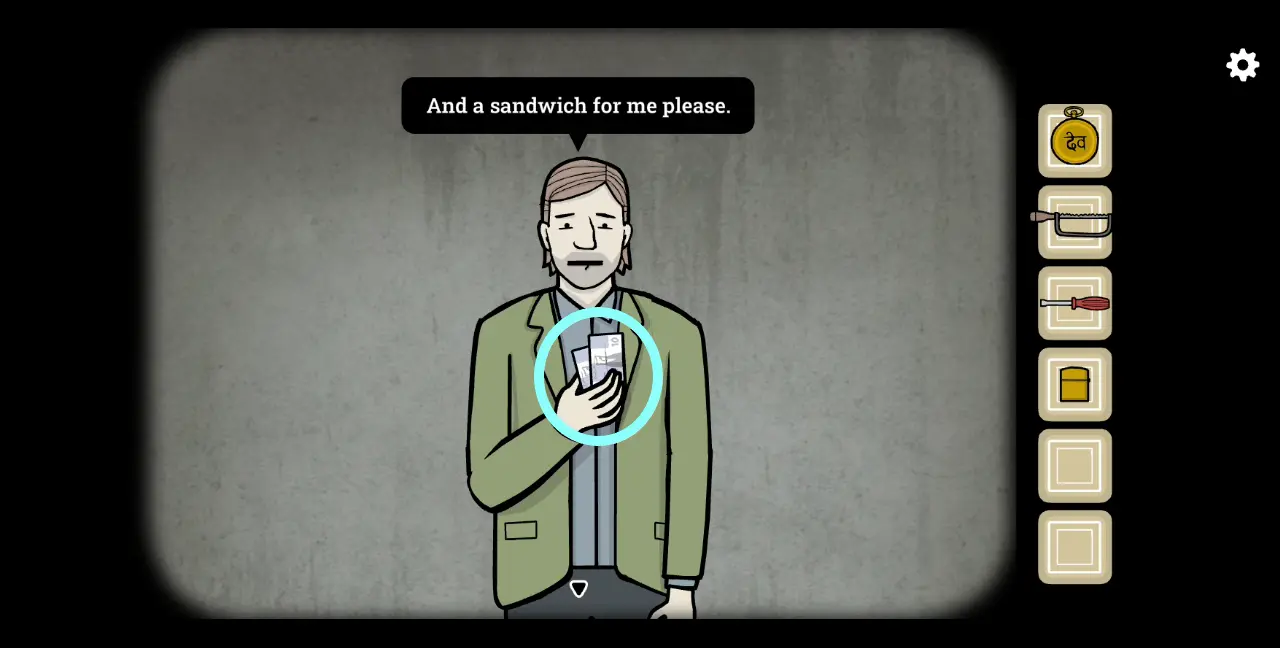
23. Go to the Food & Drinks stand. The money is counted as two items in your inventory. Use the first bill to buy coffee then the other for a sandwich. To buy items, click the sign that corresponds to the item you want to purchase.
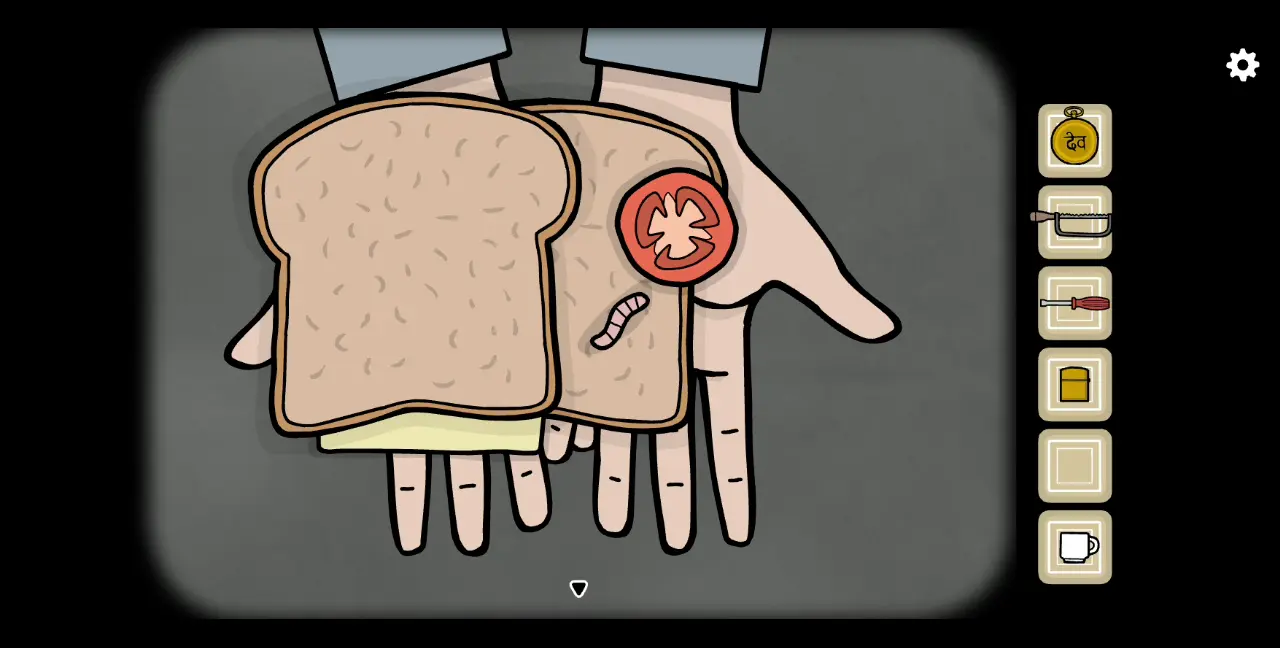
24. Return to the area with the clock and give the man the sandwich. He will refuse to eat it. Click the sandwich and start moving the bread and its contents. Underneath them are worms. Keep moving the parts and contents of the sandwich until you’ve taken away all the worms. Only then will the man eat the sandwich.
25. After eating, he will give you breadcrumbs. Take them from his hand.
26. Head to where Laura is and give her the cup of coffee. She will drink from the cup. Click it and you will find a stubbed cigarette at the bottom of the cup. Take the cigarette.
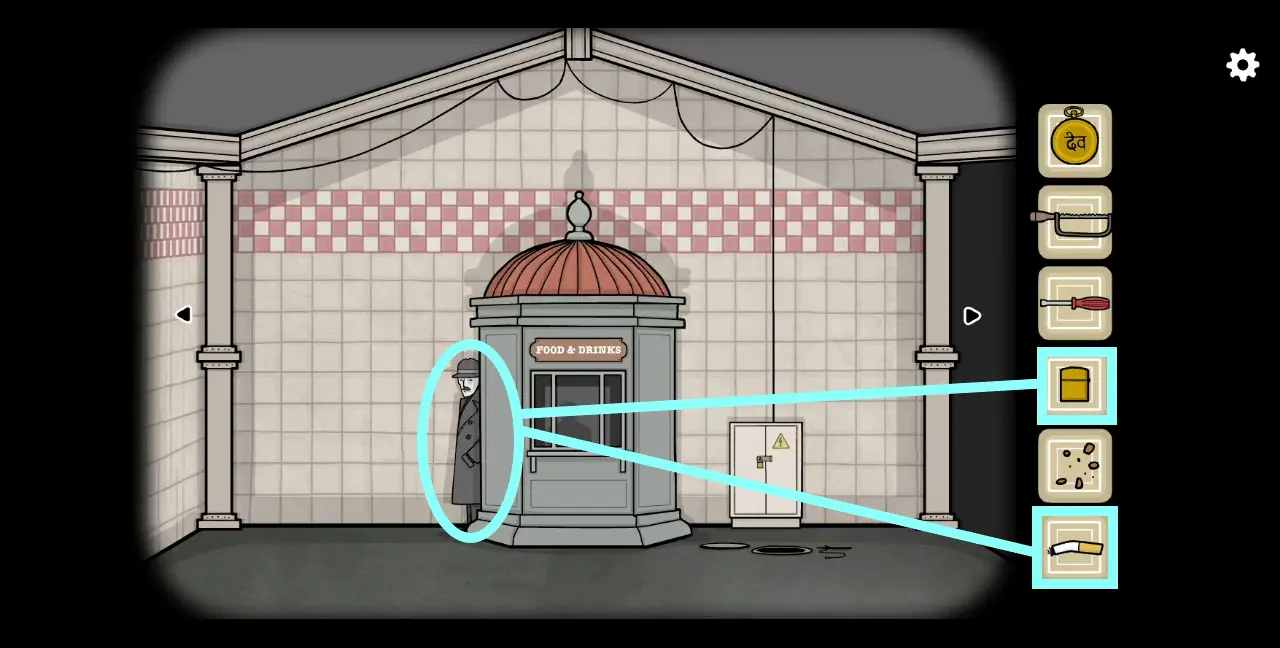
27. Return to the Food & Drinks stand and approach the man hiding to its side. He’ll ask for a cigarette and a lighter. Give him both items. Click the lighter to light the cigarette. The man will give you back the lighter.
28. Lastly, he will ask you for the time. The lights will start to flicker and you’ll notice that all the other items in your inventory have disappeared except for the lighter and the breadcrumbs. The man has also disappeared.
29. On the floor of the left of the Food & Drinks stand is a folder. Inside it is a note, presumably from the man, apologizing for robbing you, thus explaining why your inventory items are missing. Collect the paperclip next to the note.
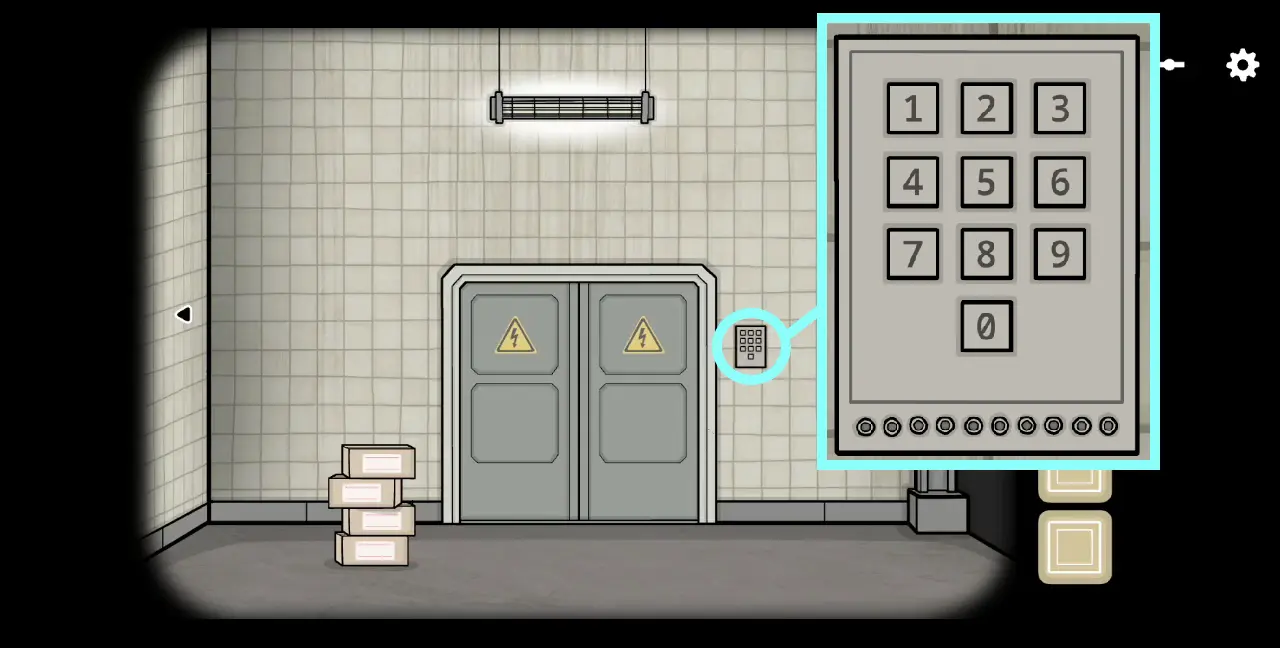
30. To the right of the Food & Drinks stand is a locked door with a yellow warning sticker for high voltage material. Use the paperclip to pick the lock.
31. Behind the high voltage door is a puzzle wherein there are three lines whose ends can be moved and placed along different circular slots. Each slot has a specific symbol next to them. On the upper left side of the puzzle are three digital numbers. What you need to do for this puzzle is to “write” the three numbers being displayed by connecting the two symbols that make a number’s shape. For instance, to write the number 5, connect the symbols ⊏ and ⊐. Don’t forget to take note of their positions, whether the symbol is at the top or bottom. There will be three sets of three numbers displayed, specifically 587, 192, and 361. Shown below are their solutions:

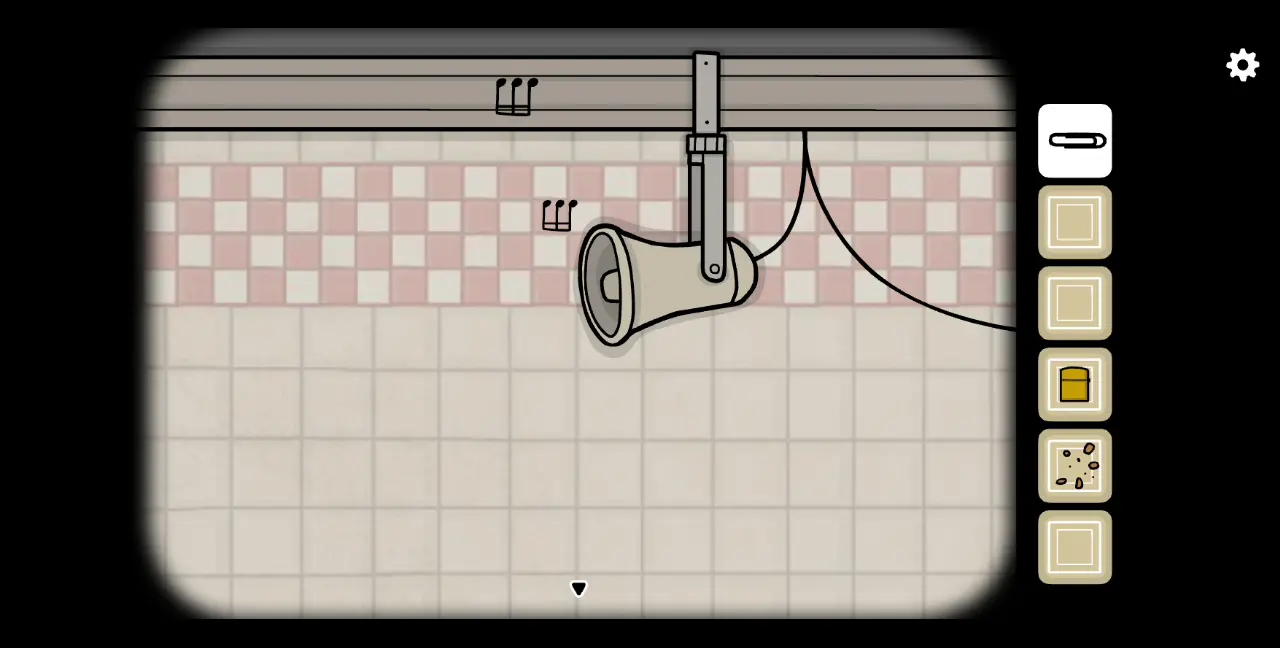
32. Once you’ve solved the puzzle, a green light on the board will switch on. Zoom out of the board and follow the direction of the electrical wires connected to the puzzle. This should lead you to the area where Laura is. At the end of the electrical wire is a megaphone just above Laura’s head. If you click on the megaphone, a voice will speak, warning you of pickpockets. Six musical notes will also appear.
33. Go to the man with the trumpet and play the notes in this order: 1-1-2-2-3-3.
34. The same thing will happen as before: the man plays music and will sound slightly distorted. Click the trumpet’s bell and a small bird will fly out of the instrument.
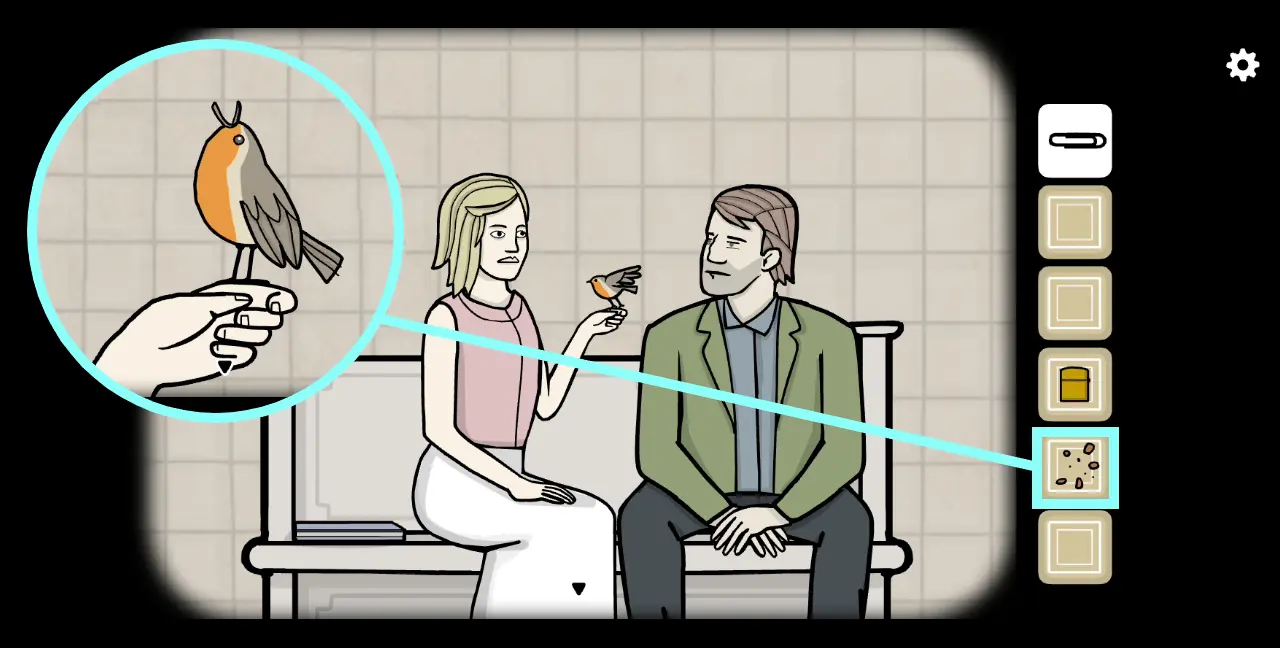
35. The bird will lead you to the area where Laura is, except she is no longer alone. She’s sitting on a bench with the man who asked you to buy Laura a cup of coffee. The bird is on his shoulder. If you click Laura, she will say, “Come here. I remember you,” though she seems to be referring to the small bird instead of the man. Click on the bird and it will hop onto Laura’s hand. Click the bird again and the camera will focus on it. Feed the bird the breadcrumbs from your inventory.
36. After eating, the bird will chirp and another set of six musical notes will emerge from its mouth.
37. Remember the musical notes and head to the man with the trumpet. Play the notes in this order: 3-3-1-3-1-1.
38. Once the music becomes distorted, click the bell and a hand holding a metro ticket will emerge. Take the ticket.
39. Return to Laura and open the notebook beside her. Here, we see the name Laura Vanderboom. Flip through the pages of the notebook and you will see a different sketch on each page, with the page numbers written on the upper right hand corner of the page. On page 12, there is a note that alludes to the correct positions of the clock hands on the platform: the long hand points to the tree while the short hand points to the dark soul. Flip back through the notebook and you’ll see that on page 9 is the sketch of a tree and on page 4 is the sketch of a creepy shadowy creature that can represent the dark soul. Thus, the correct position of the clock hands on the platform should be 4:45.

40. Go to the train clock and change the hand positions to 4:45. The lights will flicker and the train will arrive. Give the conductor the ticket to be punched. He will tell you to enjoy your ride. This concludes Chapter 4.
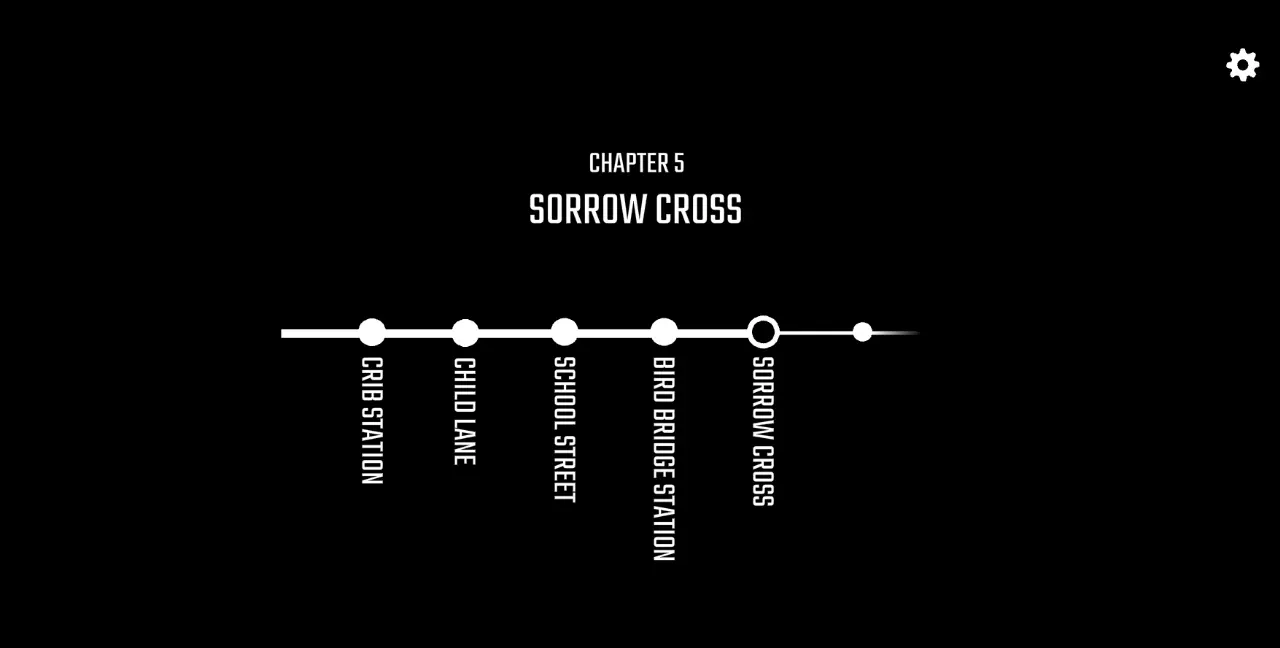
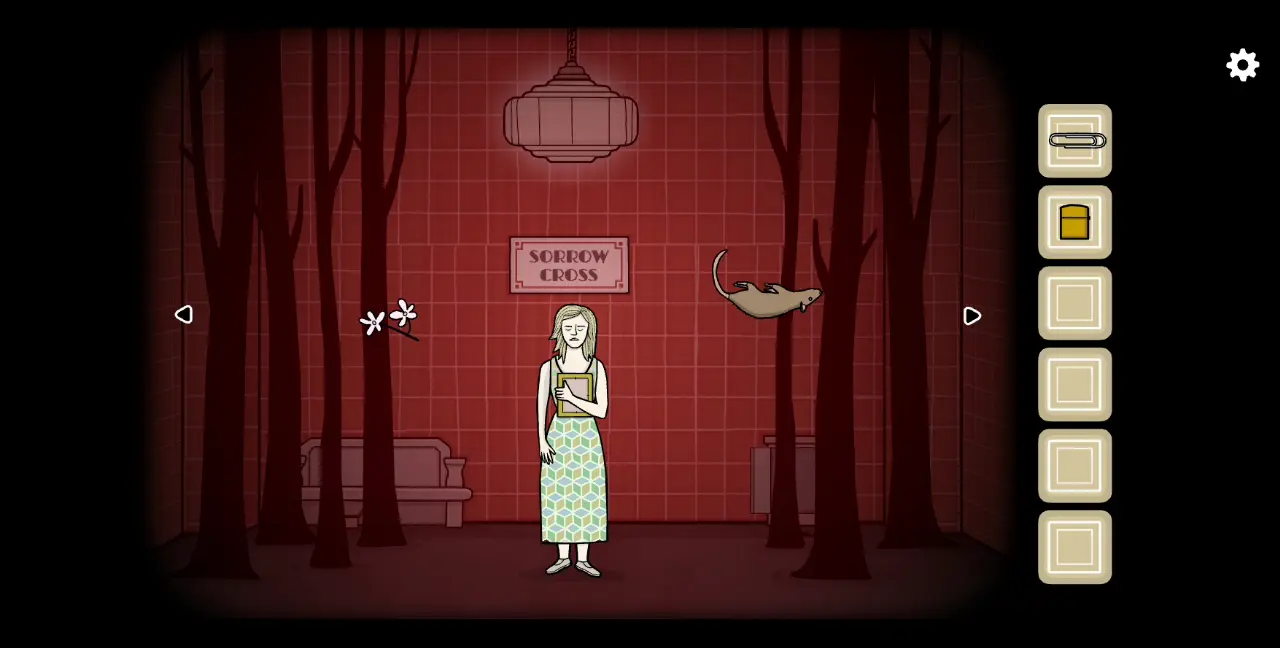
Chapter 5: Sorrow Cross
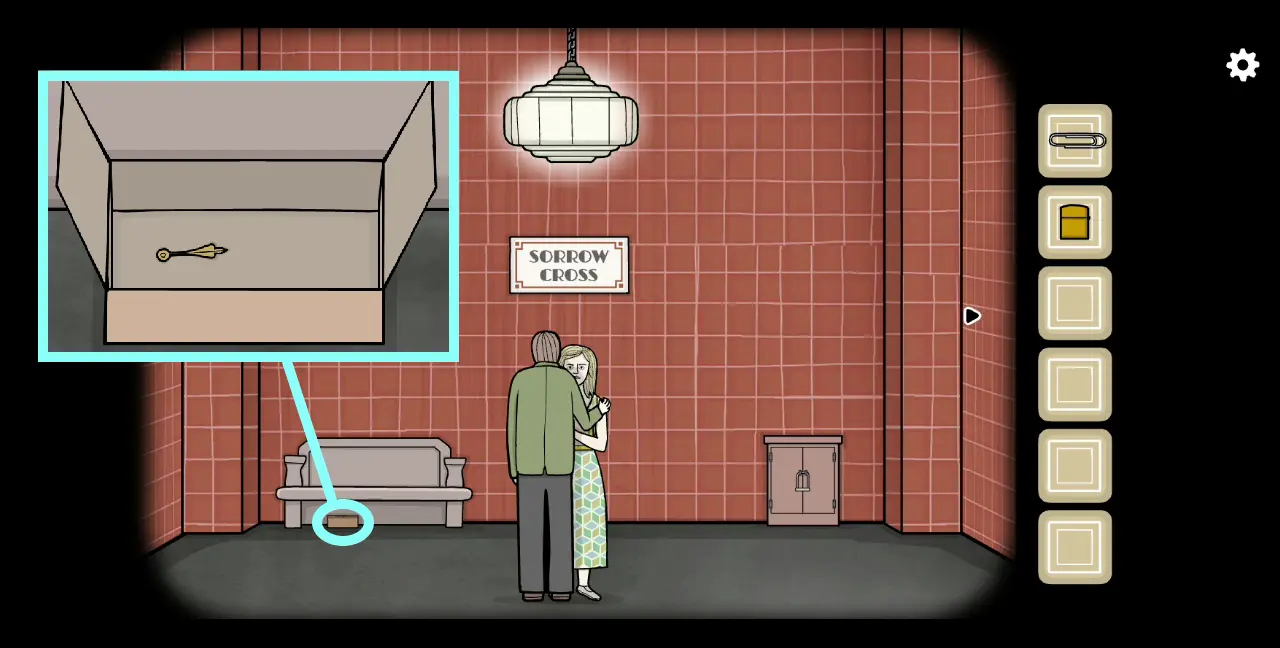
1. In Sorrow Cross station, you are greeted by the sight of Laura and the man she was talking to at the last station. The man is holding Laura and has his back turned to you. Laura’s face is visible to his side. Click on Laura and she will say that Bob, the man, has to go as they need to follow their own paths. She also mentions that Bob’s train leaves at 4.
2. Under the bench to the left is a box. Open the box and collect the clock hand inside.
3. Go to the platform with the clock. Place the clock hand on the clock and change the time to display 4 o’clock. When the train arrives, Bob is already waiting there. He asks you to take care of Laura as she isn’t well.
4. Bob boards the train but leaves behind a wallet on the floor. Open the wallet. Inside is a card for The White Door, a mental health and fishing facility. Along with it is money worth $10. Take the money and open the coin purse at the front of the wallet. Collect the coin inside.
5. Next, head to the area with the snack dispenser. Strangely enough, next to it is what looks like a jail cell. Approach the snack dispenser and use the coin, which is valued at 100. There are seven different snacks with each having a different value. Get the snacks valued at 35, 45, and 20 for a total of 100.
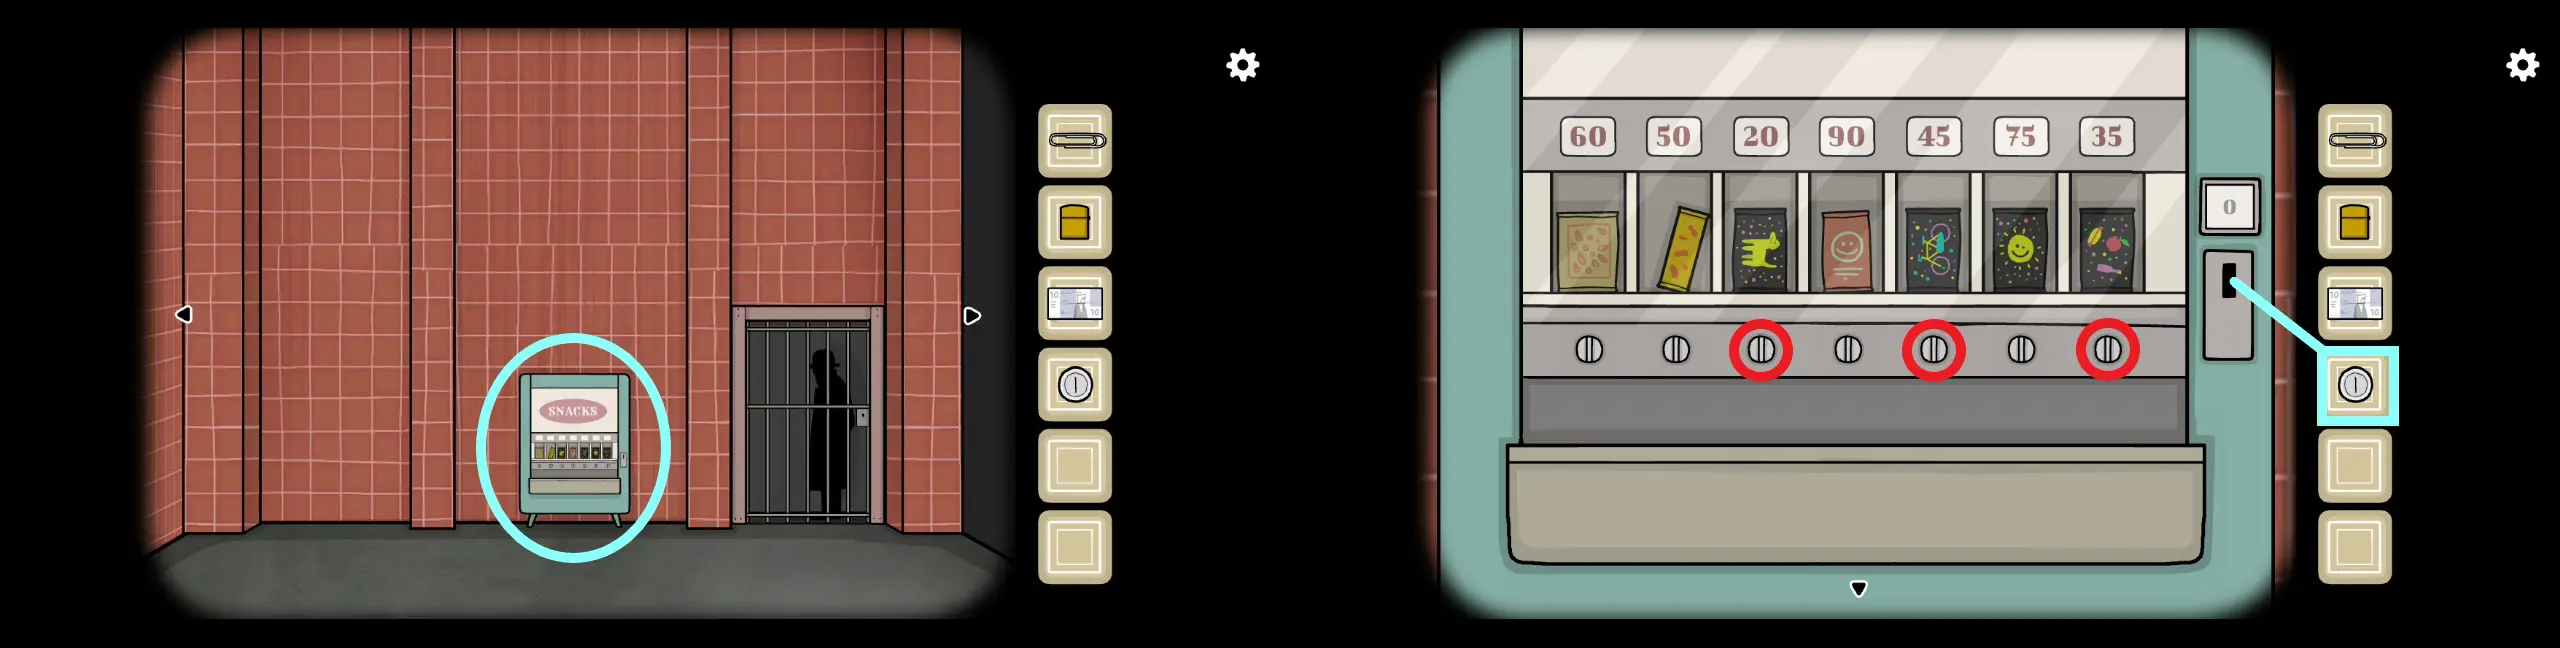
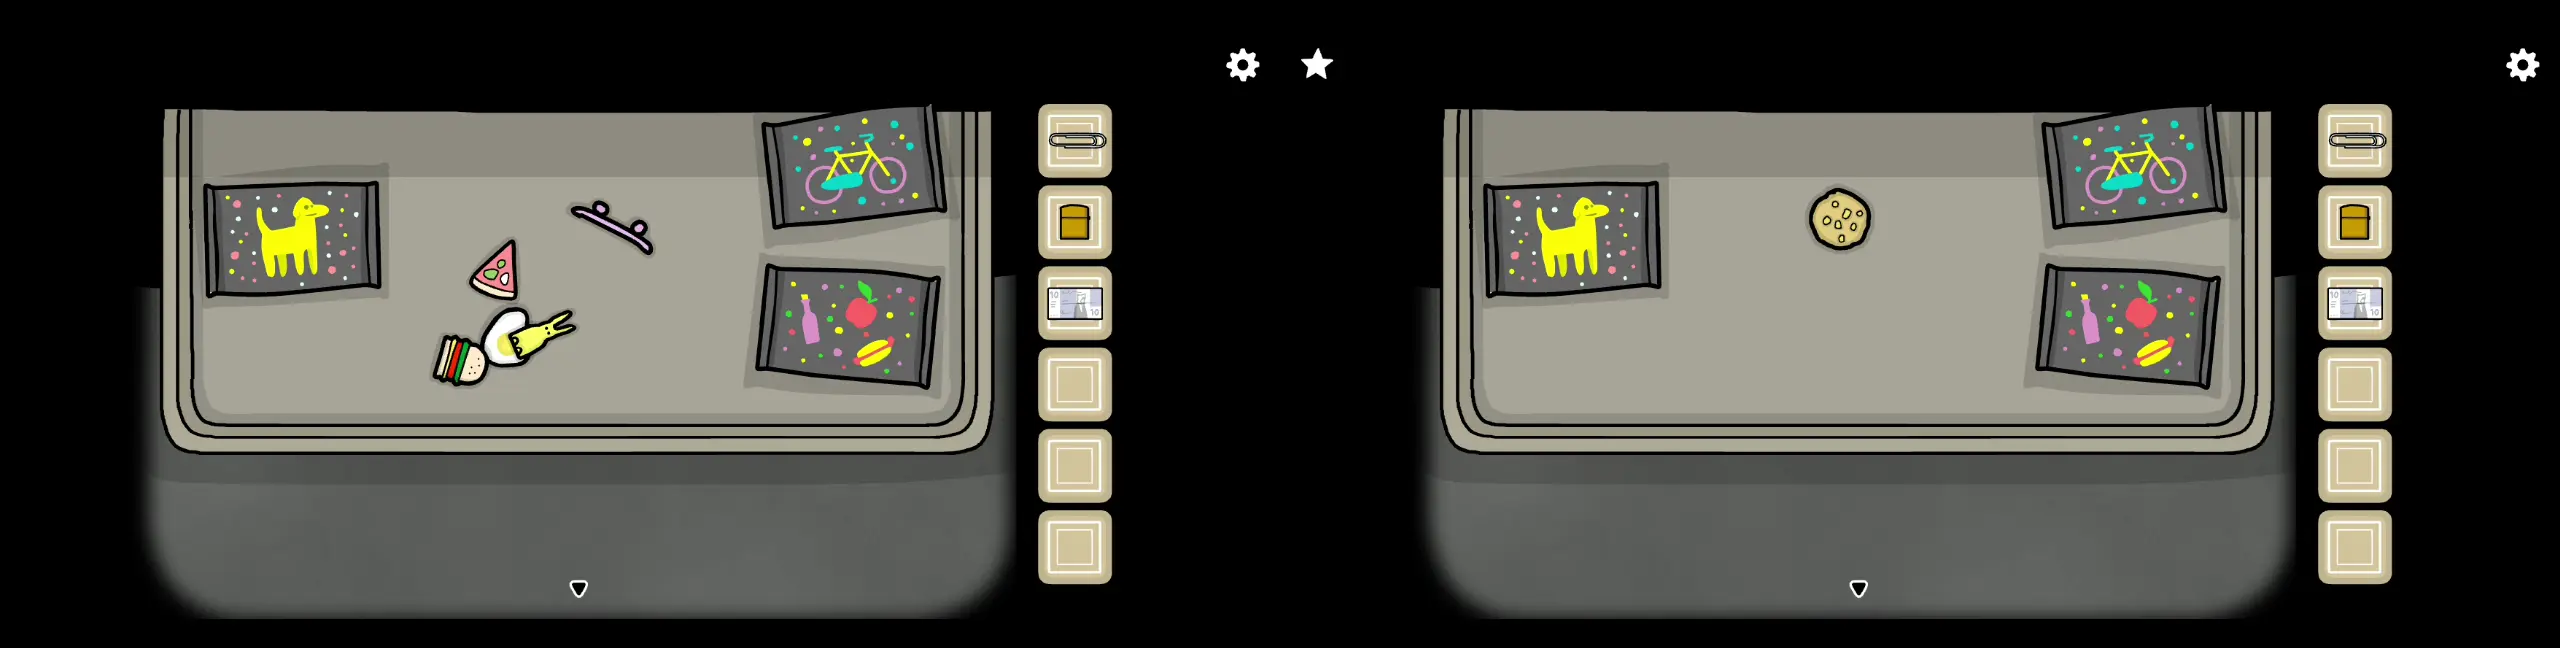
6. Click on the tray of the snack dispenser and you’ll find the three snack packets you’ve bought. This is a mini puzzle as the snacks aren’t in the right packets. Your goal is to arrange the snacks and place them in the right packets. For instance, all the animal-shaped snacks go in the packet with the dog symbol; the food-shaped snacks go in the packet with the food pictures; and the snacks that look like vehicles go in the packet with the bike picture. Keep arranging the snacks until you receive a corn cookie. Collect this item.
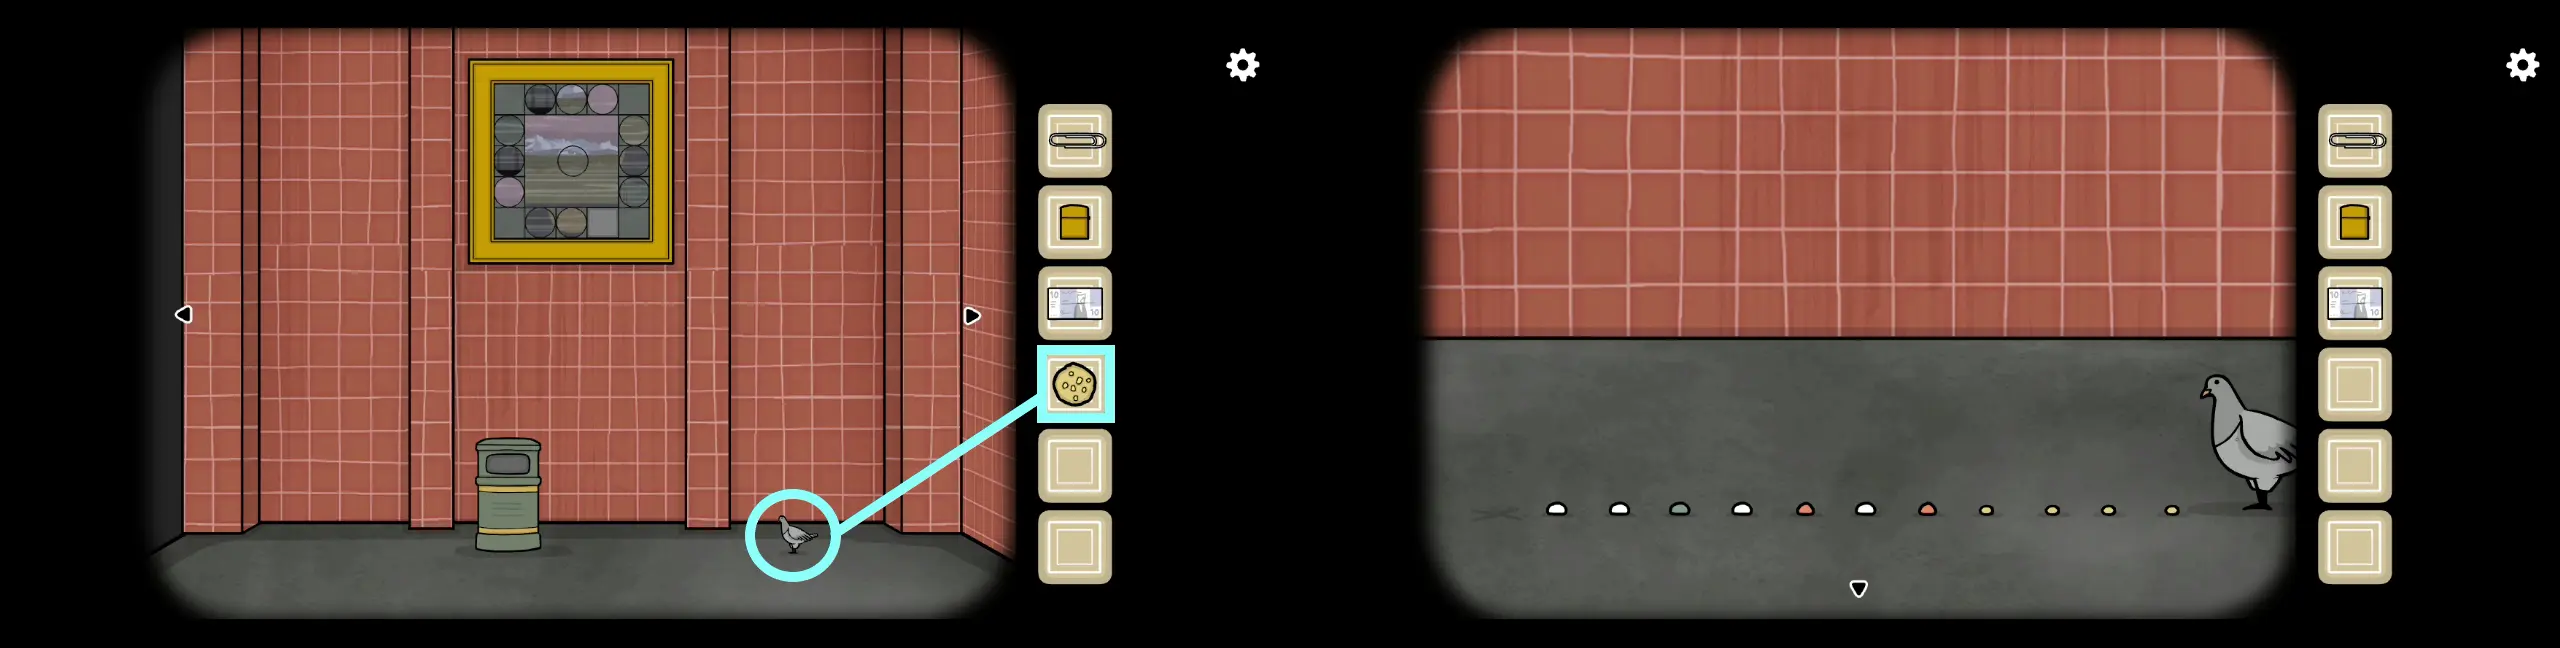
7. Next, head to the area of the station where there’s a garbage can and a framed painting on the wall. To the right, you will see the gray bird you saw inside the train. Click on the bird and feed it the corn cookie. The cookie will crumble to pieces, making a neat line of crumbs on the floor. However, before the bird decides to feed, you need to arrange the crumbs accordingly. This is because eating a certain type of crumb causes a specific reaction from the bird. For instance, the red crumb will cause it to fly off or the larger yellow crumbs will cause the bird to skip eating them and hop forward. Below is the correct arrangement of the crumbs:
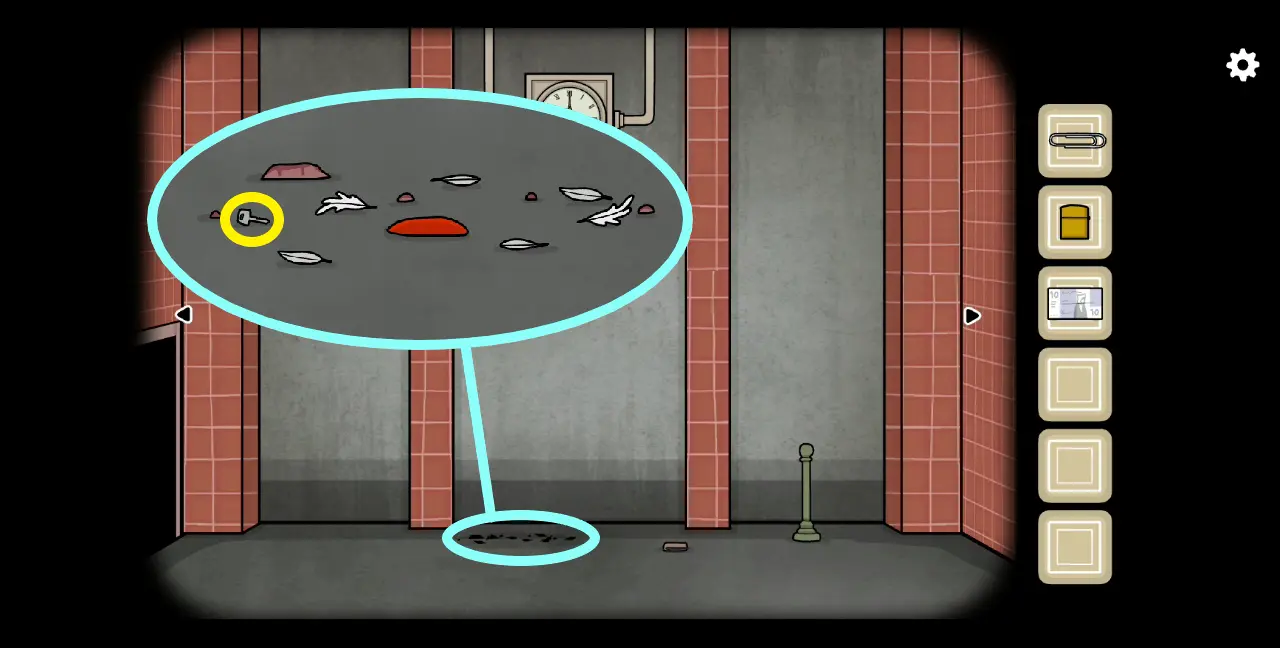
8. Once the bird has finished feeding, it will fly off to the top of the garbage can. Every time you click it, it will change locations. From the garbage can, you’ll find it perched on top of the lamp above Laura. Next, you’ll find it in the area with the clock, perched on top of a stand. Click on the bird and it will fly off—only to be suddenly hit by the train.
9. On the floor of the platform are the bird’s remains. Amid the feathers is a key. Take it.
10. Go to the area with the jail cell. Use the key to unlock the door. Behind the door is a familiar face: the man who stole your stuff from the last station. True enough, he will ask you if you want to get your items back. In exchange, he asks you to leave some money under the bench and come back at 9.
11. Go to the area where Laura is. Click the box under the bench. Leave the $10 bill here.
12. Head to the clock on the platform and move its hands for the time to reflect 9 o’clock. If you go back to the jail cell, the man is no longer there. Instead, go to the box where you left the money. Here you’ll see a small paper bag. Upon opening the paper bag, you can recollect your iron saw, but the thief hasn’t returned the time piece as the note he left says that he likes it too much.
13. To Laura’s right is a reddish door. Use the iron saw to remove the lock. Inside this compartment is a painting panel. Collect this item.
14. Head to the area with the framed painting on the wall. Place the painting panel on the empty slot.
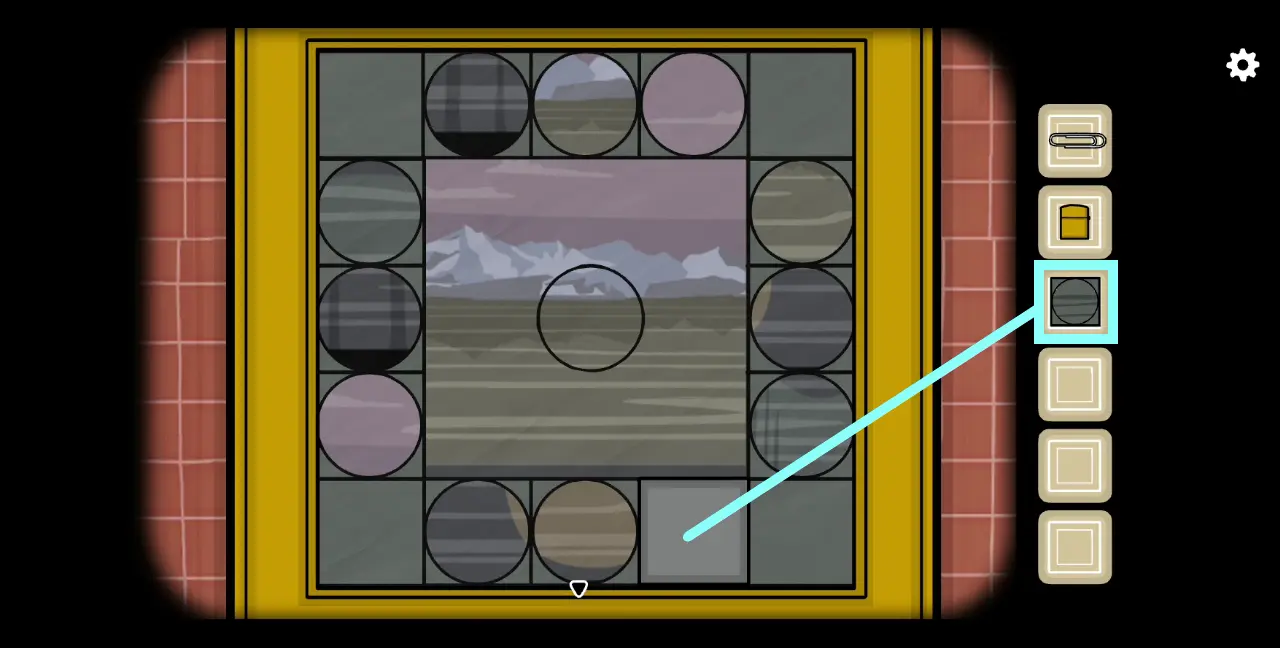
15. You’ll discover that the painting can be moved around so, first, move it all the way down. In the middle of the painting panels is a square with a circle at the center. Think of this circle as some kind of target. You’ll notice that the painting panels around the square display different images depicting parts of the overall painting.
To solve this puzzle, the circle that acts as a target should match the scenery being depicted in the painting panels. Once these match, click the painting panel and a silhouette will appear on the painting itself. Here are a series of images illustrating the correct position of the painting relative to the painting panels, as well as the silhouettes that will appear:
Bottom group:

Right group:

Left group:

Top group:

16. Upon solving the painting puzzle, you’ll see that the garbage can has toppled over, scattering items on the floor. If you click the items, you’ll be given another puzzle to solve. Here, the items are arranged in groups. Individual items can be moved. Your goal is to rearrange the items so they can make pairs, as hinted by the two cards in the puzzle itself. Below are the items with their correct matches:
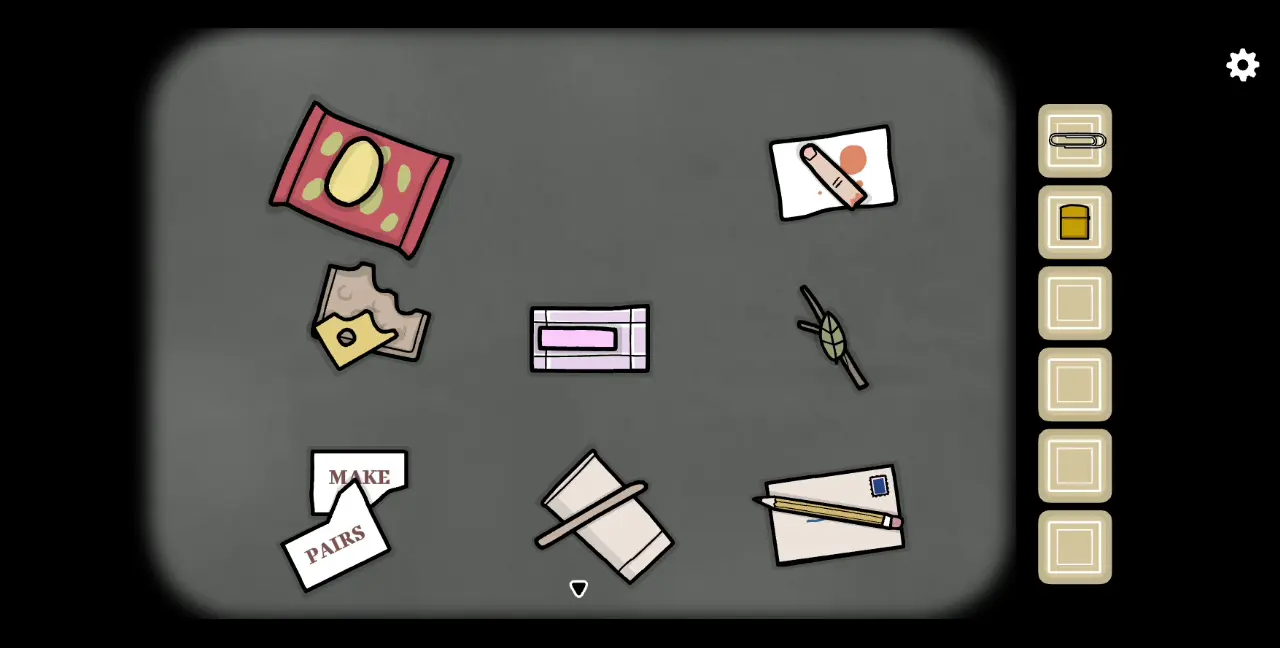
17. After making all the correct matches, you’ll see that the writing on the envelope will begin quivering. Click the envelope, which is addressed to Laura Vanderboom. Click the envelope again and a letter will pop out along with a pill. Collect the pill.
18. After collecting the pill, go back to where Laura is. Give her the pill. Upon drinking the pill, the lights will flicker and Laura will tell you that she has nightmares every night where she can “see them all.”
19. When you zoom out from talking to Laura, you’ll see that the scenery around her has changed and looks more dreamlike, if not nightmarish. If you check the entire station, all the other areas have changed as well, bearing this eerie quality with random items present or floating in the air.
In this next segment, you need to talk to Laura and find out more about her dreams. Every time she mentions a dream, you need to find the area of the station wherein you can “fulfill” this dream for her. Once a dream has been fulfilled, return to Laura to find out more about the next dream. Keep in mind that because this is a dream, the scenery and some items will change.
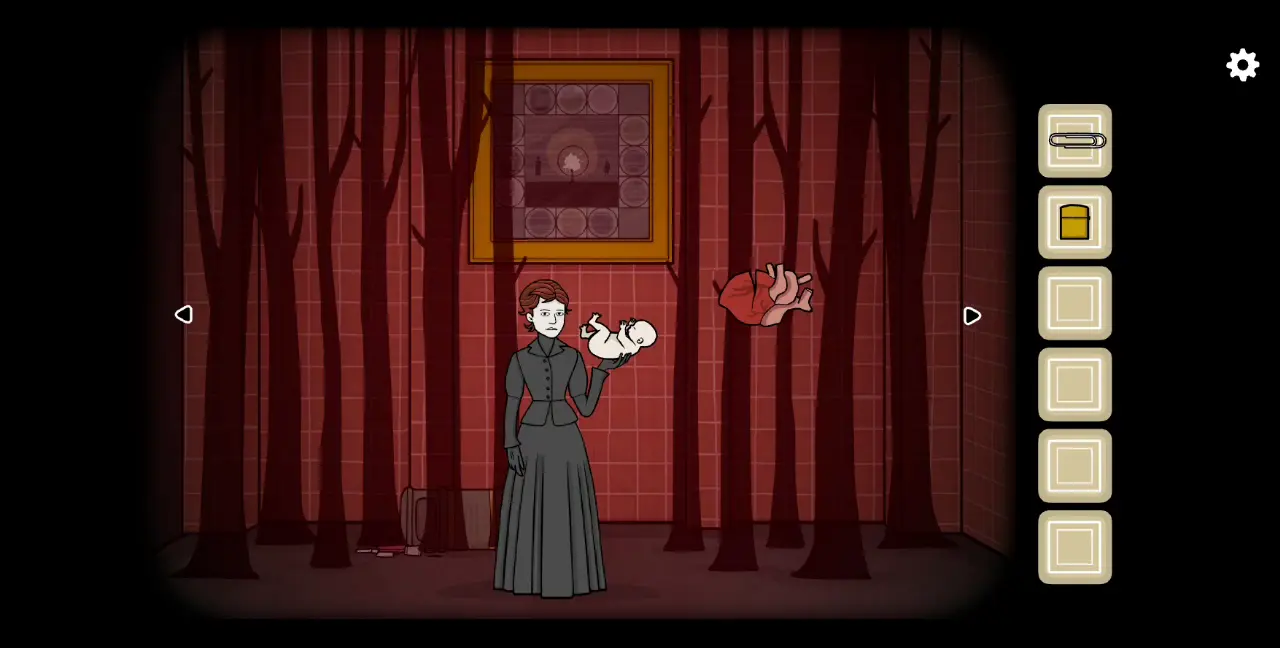
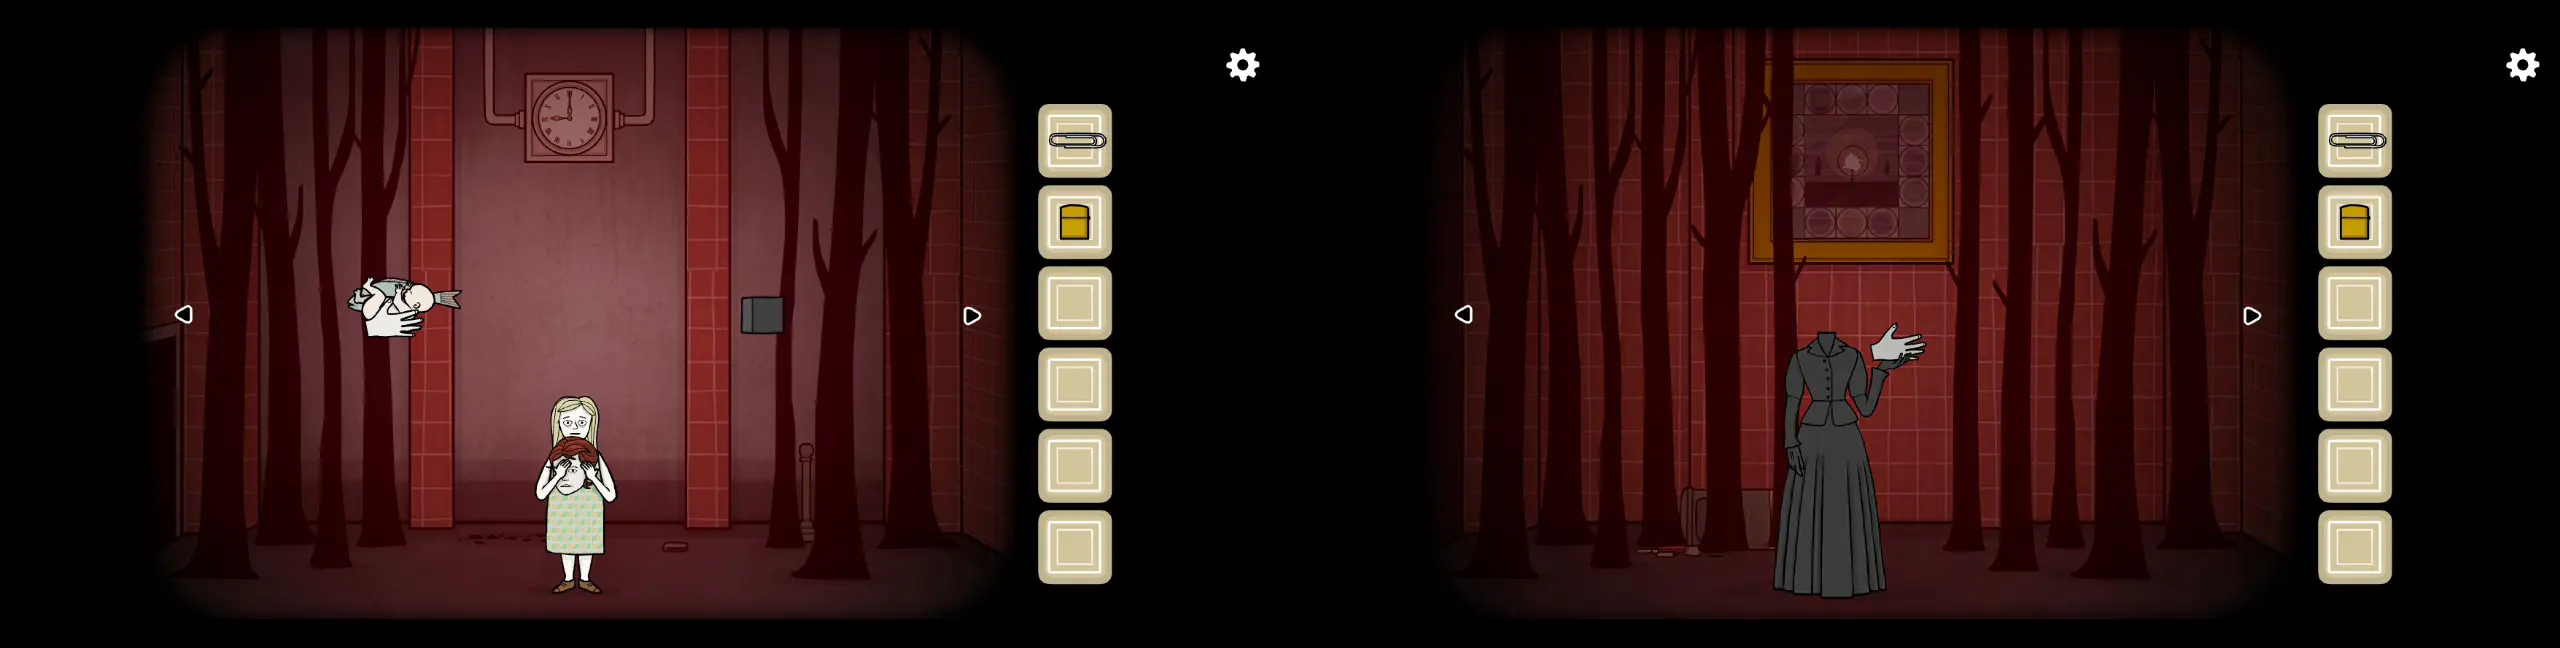
20. For the first dream, Laura mentions dreaming of her mother holding her as a baby. Go to the area where Laura’s mother is shown. Move the baby to her hand so she can hold it.
21. For the second dream, Laura mentions dreaming of Bob holding his broken heart. The heart is located where Laura’s mother is. Keep dragging the heart to the next area until it reaches the area where Bob is. Then, place the heart in Bob’s arms.
22. For the third dream, Laura dreams of herself as a little girl holding her mother’s face while her mother holds her hand. Go to the area where Bob is and drag the hand to the area where the mother is and place it on her hand. Then, drag the mother’s head to where the little girl Laura is, placing it in her arms.
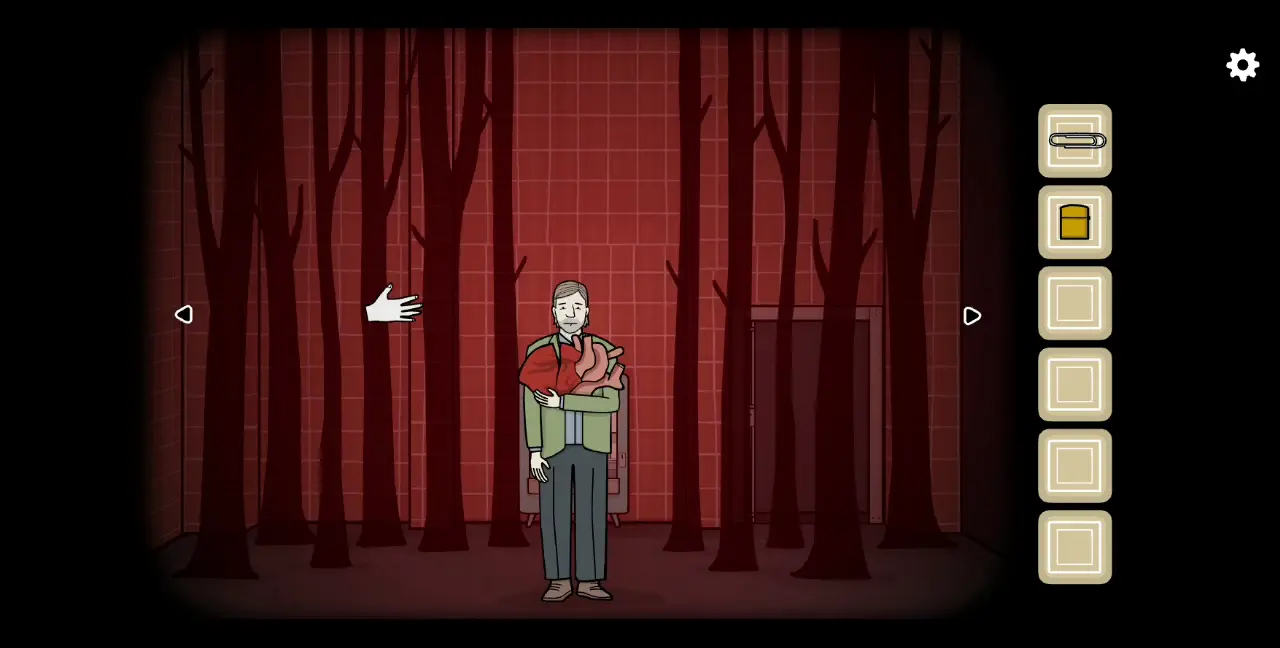
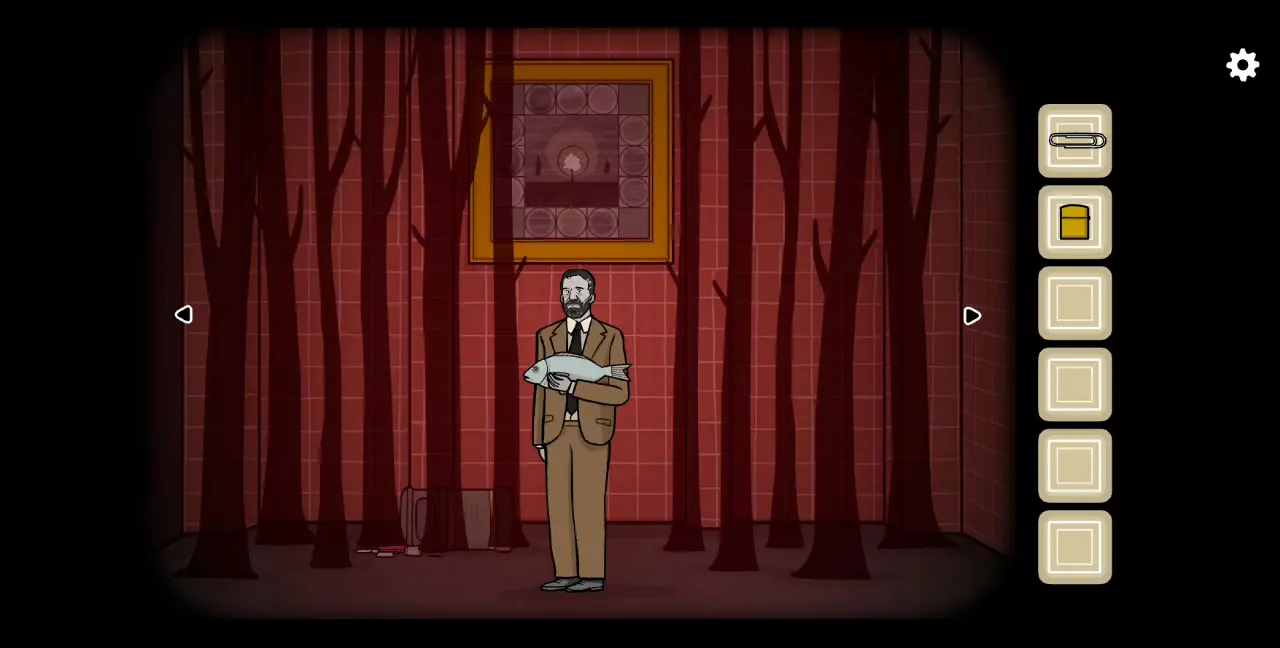
23. For the fourth dream, Laura dreams of the detective with a large fish. Drag the fish to the area where there is a man in a brown suit and place the fish in his arms.
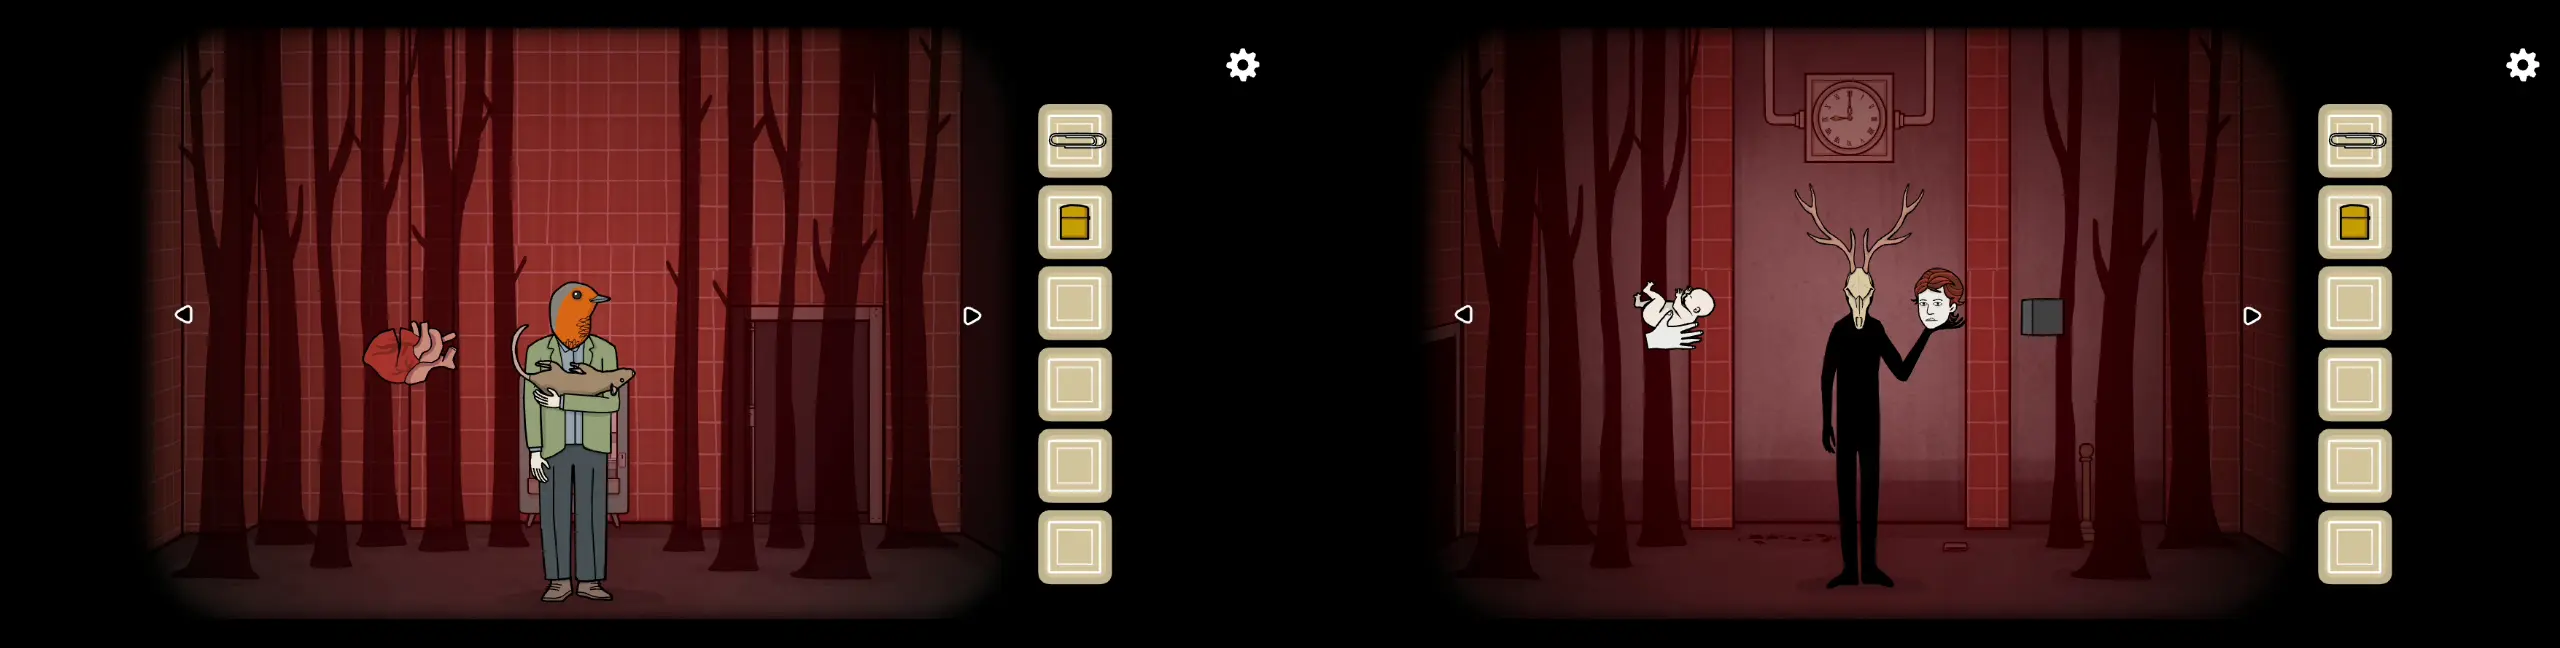
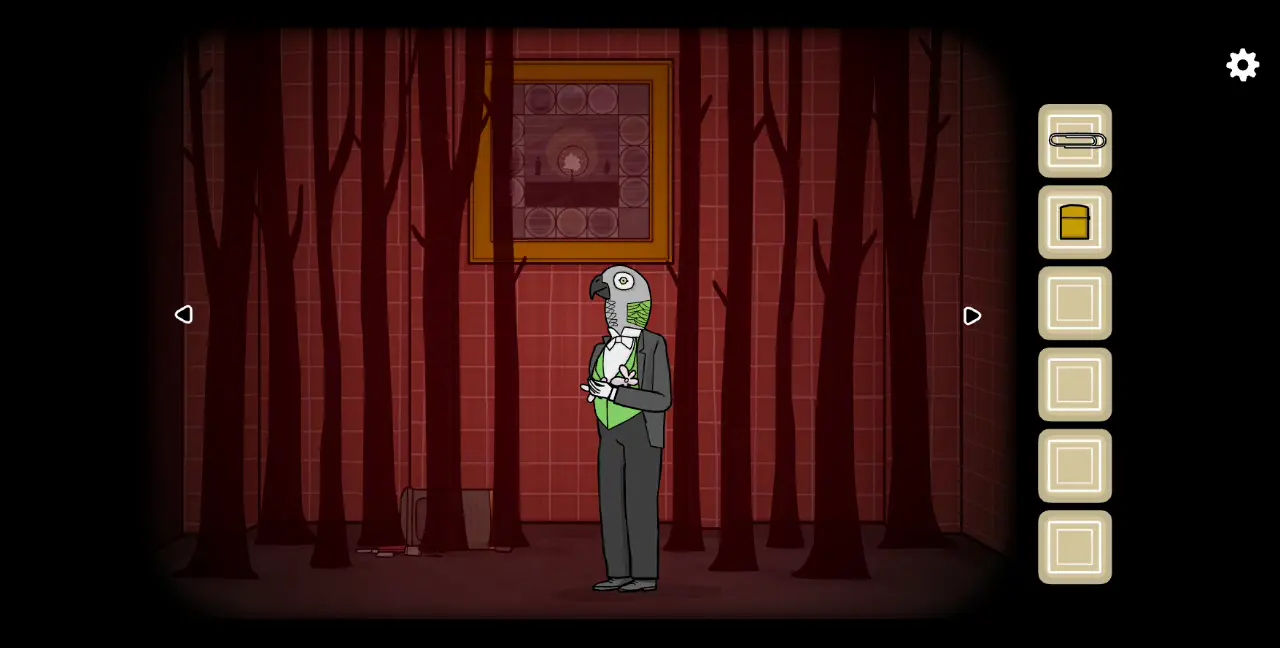
24. For the fifth dream, Laura dreams of a bird holding a rat and afterward sees the corrupted soul with the head of her mother. Drag the rat toward the area with the orange bird head in Bob’s clothes. Take the heart away from the orange bird head’s hands and replace it with the rat. Next, go to the area with the deer head creature in black. Place the mother’s head on its hand.
25. For the sixth dream, Laura dreams of her feathered friend holding a branch full of blossoms. Drag the flowers toward another bird head, but this time the bird has a gray head instead of orange. Place the flowers in the gray bird head’s arms.
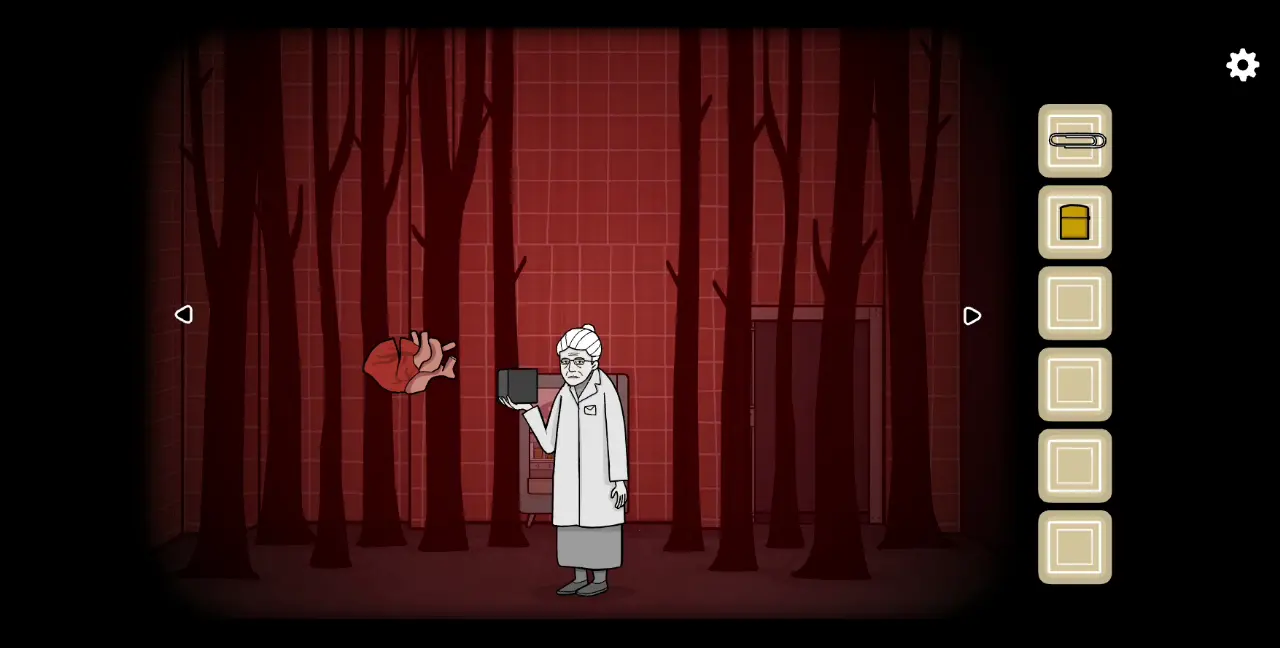
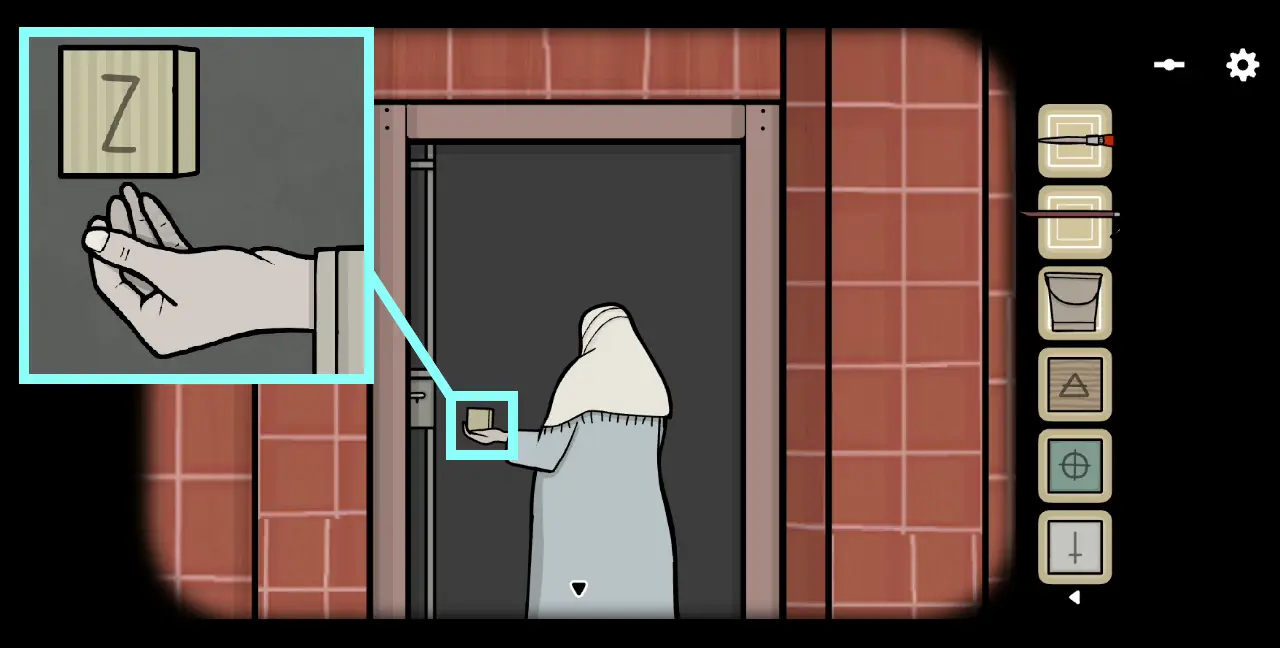
26. For the seventh dream, Laura dreams that her mother has grown old and is holding a black cube. Drag the black cube towards the old lady wearing a white coat. Place the black cube in her hands.
27. Go back to Laura and talk to her. She will start wondering about whether or not her mother is still alive and where she went. After speaking to Laura, the lights will go out briefly and you’ll find her collapsed on the floor. If you click her unconscious body, you can take the metro ticket from her hand—but she will be consumed by a shadow and end up looking like the corrupted soul in her notebook.
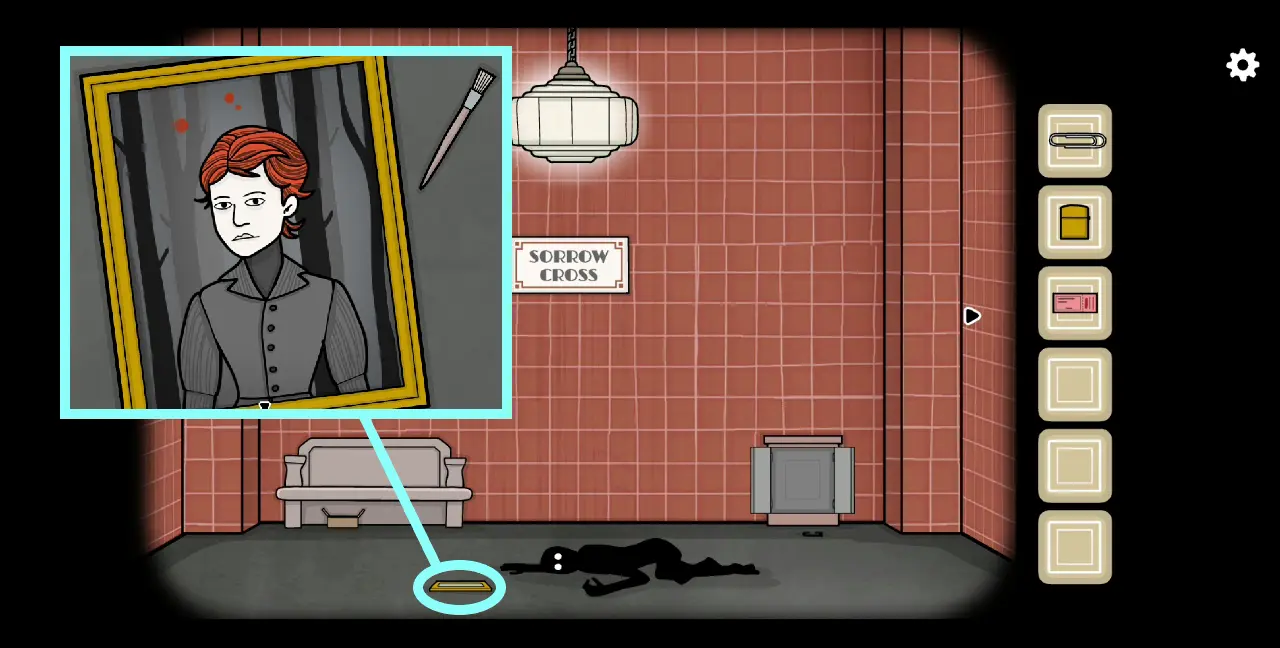
28. In front of the “corrupted” Laura is a frame. If you click it, you will see a photo of her mother. Take the brush beside it. You’ll notice some red dots spattered on the photo.
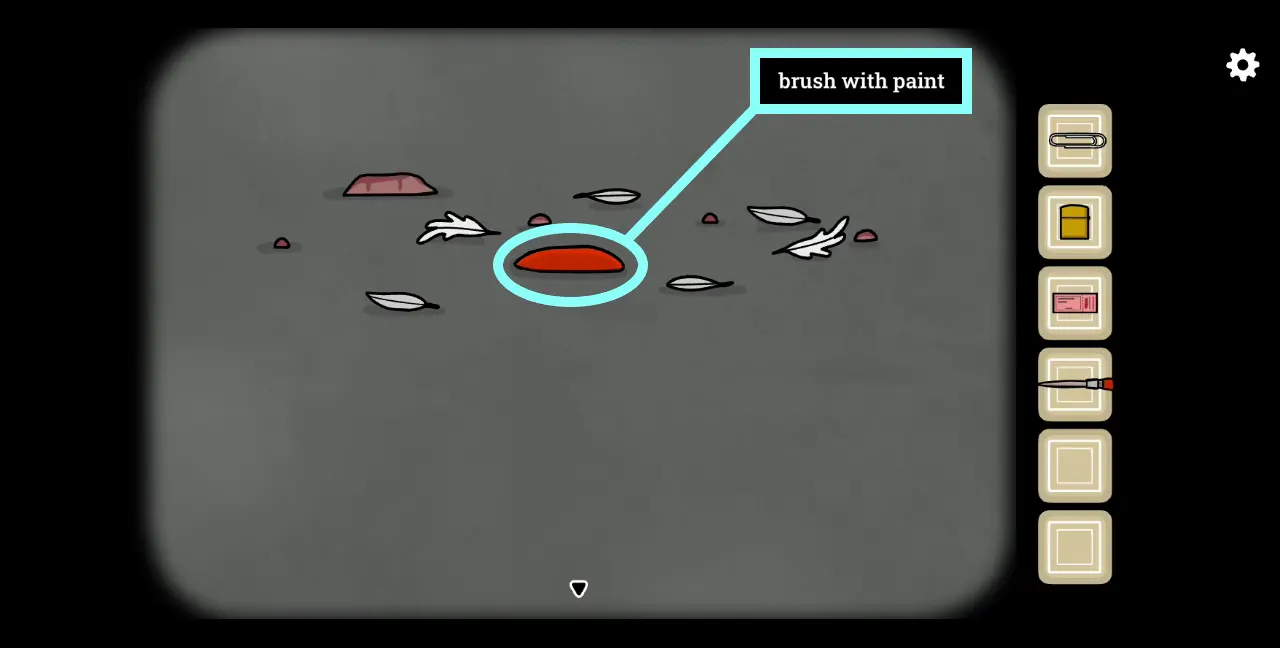
29. Go to the area with the clock and click the remains of the bird from a while ago. Click on the brush in your inventory then on the red blob. This will give you a new item, which is the brush with paint.
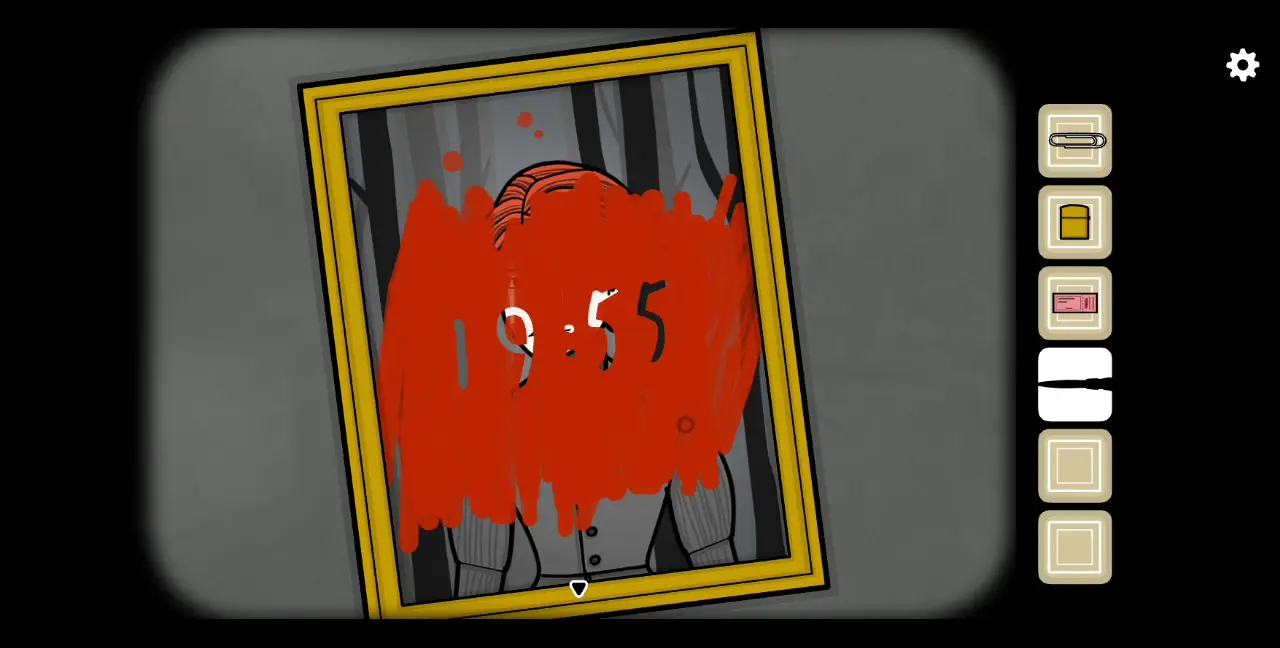
30. Return to corrupted Laura and click on the picture frame again. Use the brush with paint to paint over the mother’s photo. This will reveal the time the train arrives: 19:55 (7:55).
31. Go to the area with the clock and move the clock hands for the time to reflect 7:55. As expected, the train arrives. Get your ticket punched by the conductor. As you board the train, you’ll see the detective and a police officer standing over “corrupted” Laura’s body. This concludes Chapter 5.
Chapter 6: Soul Street
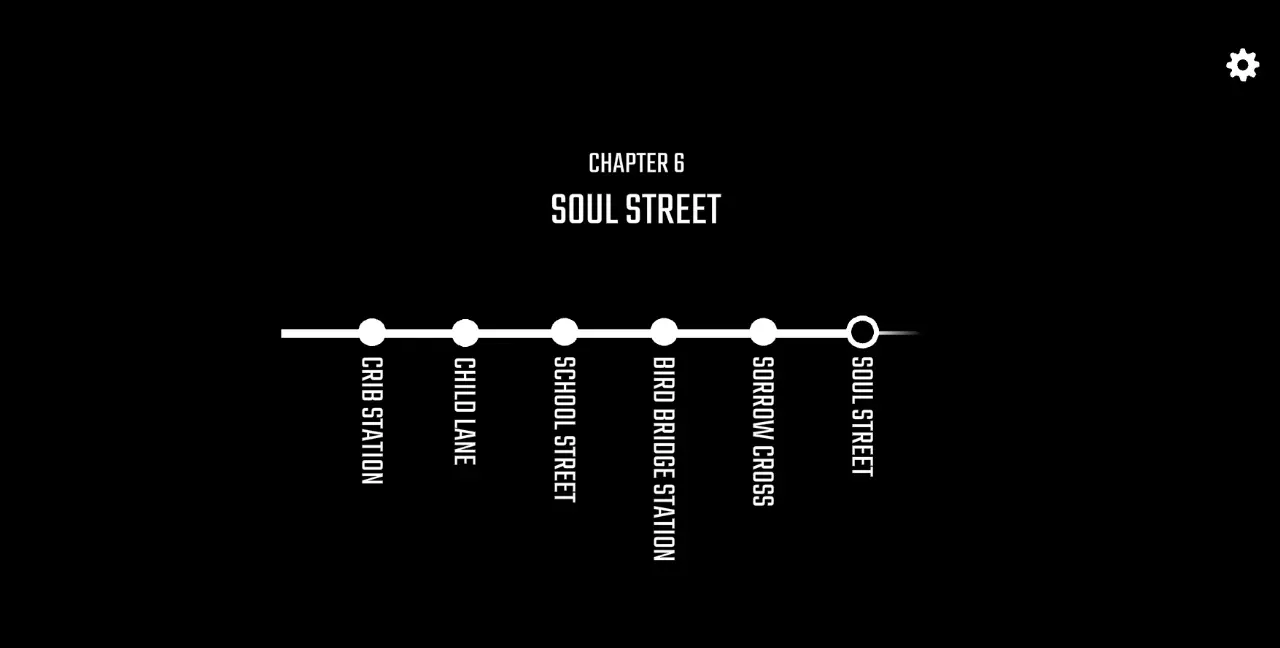
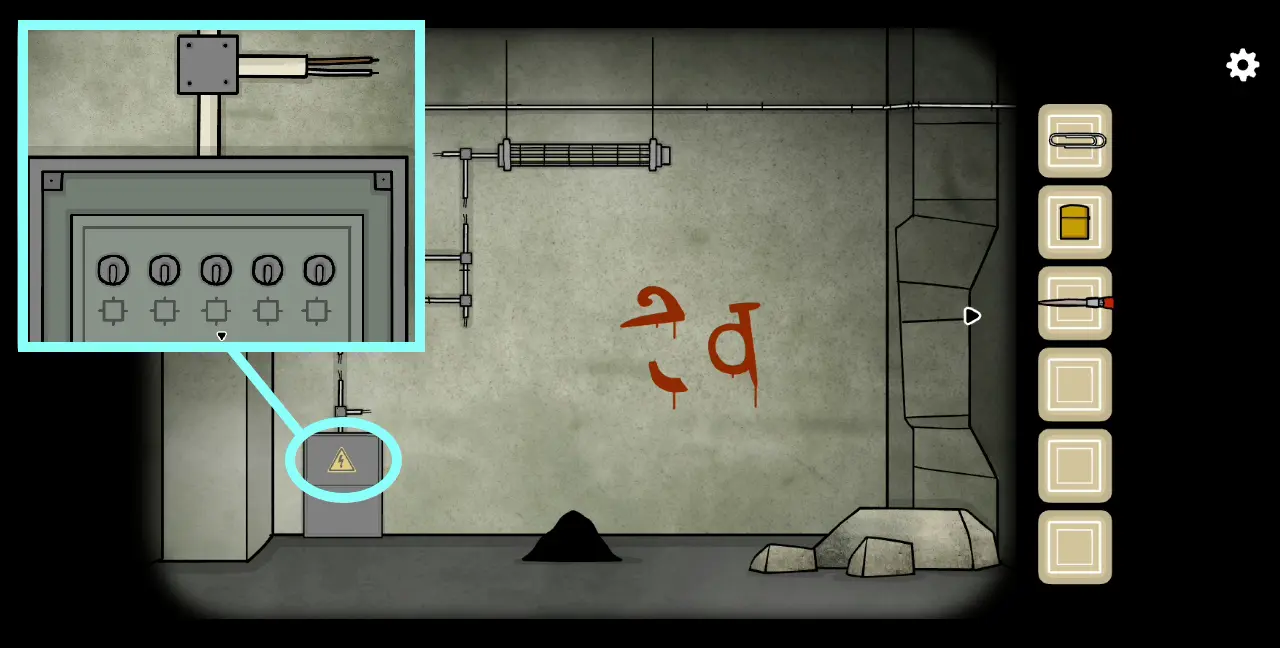
1. You arrive in Soul Street station and are greeted by a rather eerie scene: there is a black pile of ash in front of you and on the wall, written in what one could only assume as red paint or blood, is the symbol on the mother’s timepiece. Unlike the other stations, this one doesn’t look like a train station at all.
2. Still in the same area, click on the hatch with the high voltage warning sign. In it are five switches that all look the same.
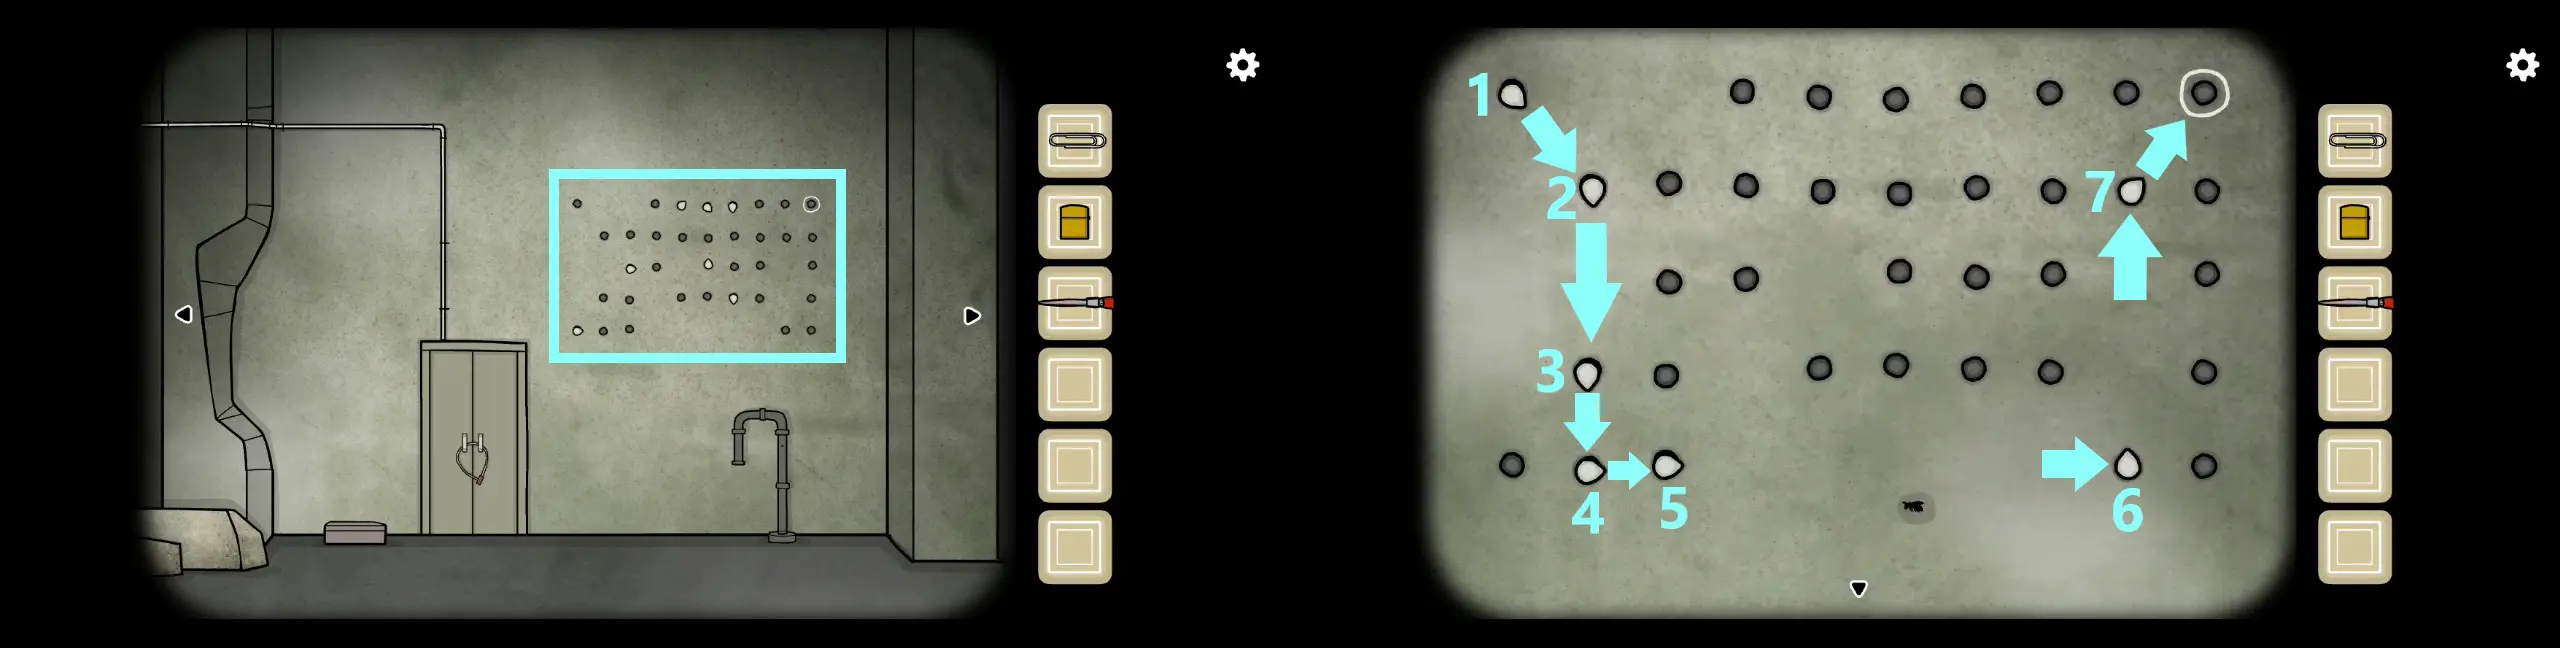
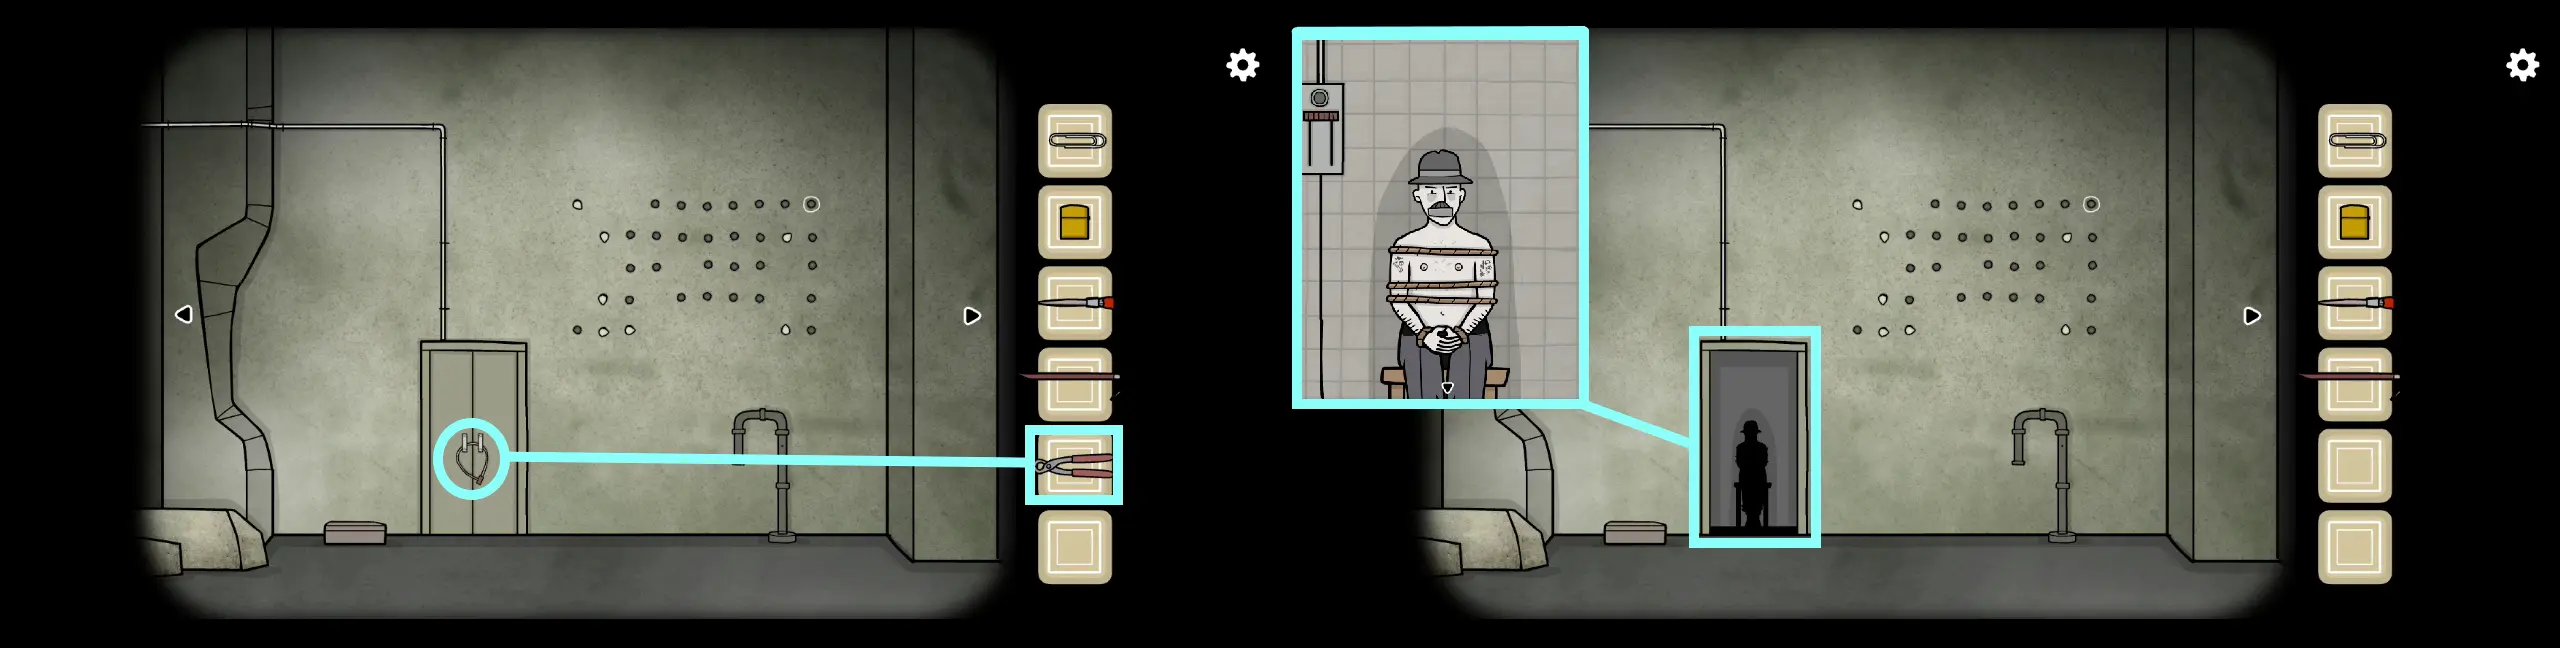
3. Go to the area with a chained door and what looks like holes and pegs on the wall. Click on the wall with the holes. Immediately, you’ll see that the white pegs are tear-shaped and point towards different directions. The hole at the upper righthand corner is encircled, marking this as the “end” or goal of the puzzle. By inference, the hole directly opposite this “end” should be the starting point of the puzzle. To solve this, you need to move the pegs into different holes.
Take note of the directions they’re pointing toward. If you move any of the pegs, a bee will flutter out of the hole closest to a peg. Your objective is to get the bee to fly toward the “end” hole by moving the pegs and using them to direct the bee to the right holes until it reaches the end hole. The screenshot on the right illustrates which pegs should be moved and where so that the bee will reach the end hole:
4. After solving the puzzle, go to the area with a poster on the wall. There are lockers to the left side marked with numbers. For now, collect the crowbar next to the lockers.
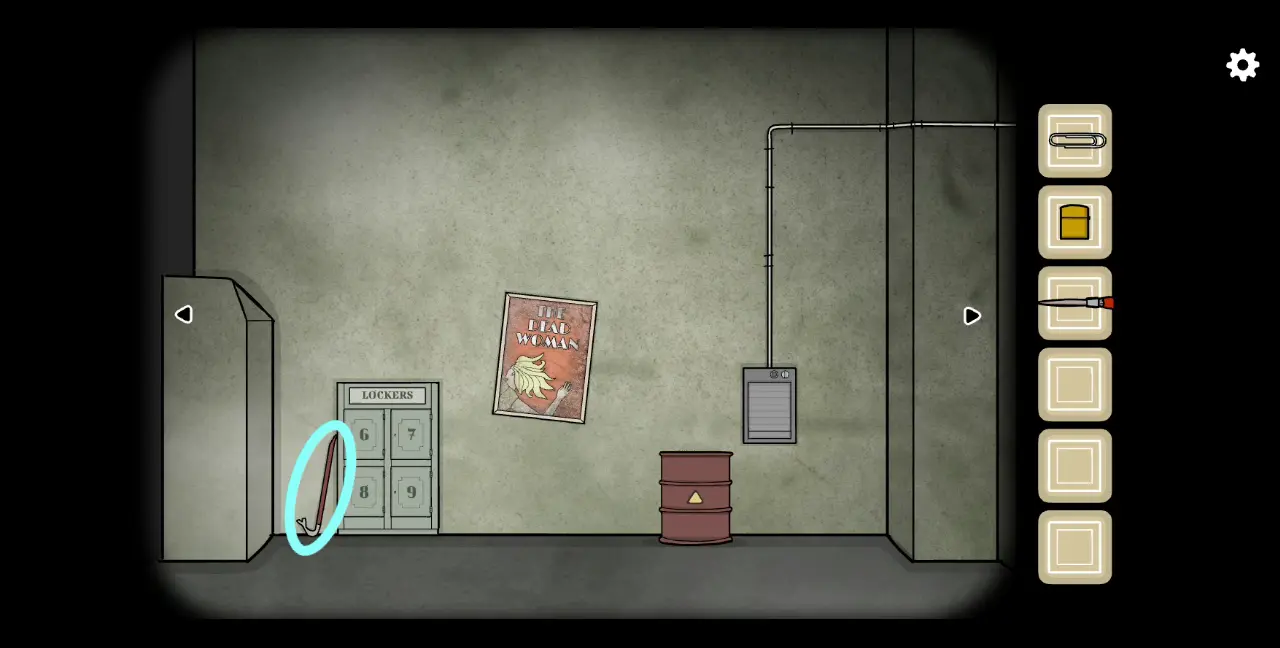
5. Return to the area with the pile of ash and click it. You’ll see that the bee has flown toward the ash heap. Click the heap. A hand will emerge from the ashes and take the bee. The black pile will then morph into a human form. It will tell you that it remembers the bee and ask for your help to find its mother’s timepiece. Thus, we can assume this is corrupted Laura. She then gives you a locker key. Take it.
6. With this, go to the area with the lockers. Use the key on locker 7. Take the pincers inside.
7. Head to the area where you solved the bee puzzle. To the left is a locked door. Use the pincers to break the lock. At first, you’ll see a silhouette of a person inside but if you click the silhouette, you’ll discover that this is the thief who stole the timepiece. He is bound and gagged on a chair.
8. Click the thief’s mouth and take off the piece of tape from his mouth, which you can collect for your inventory.
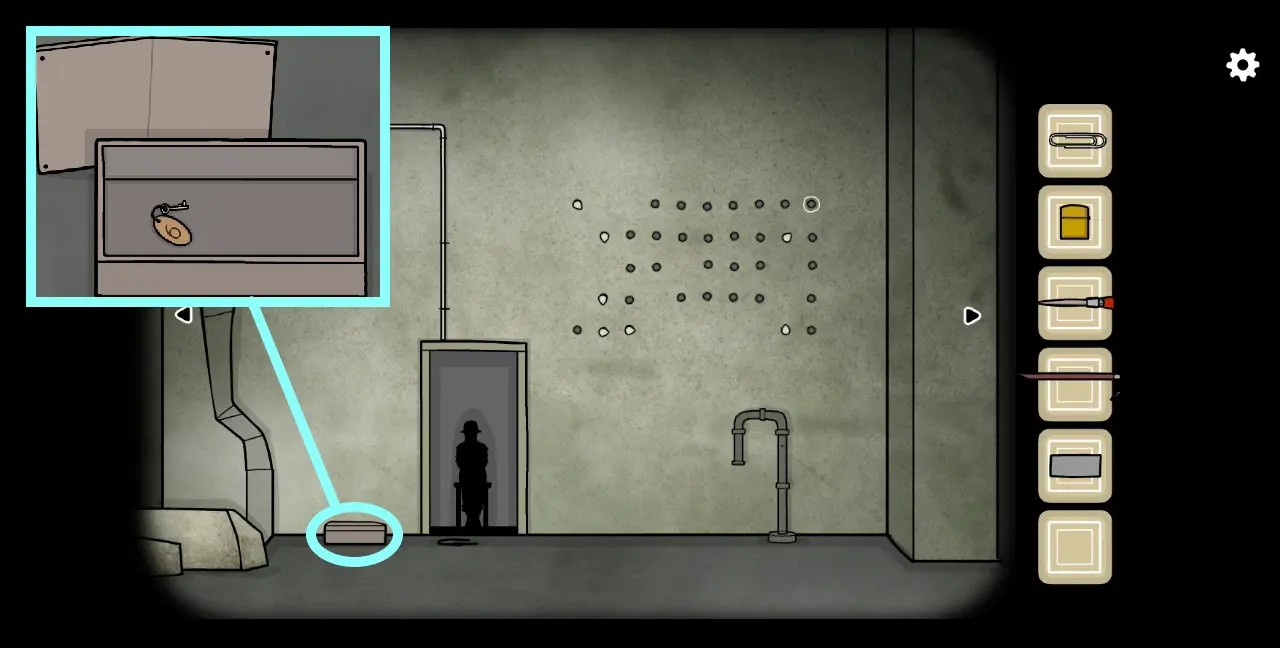
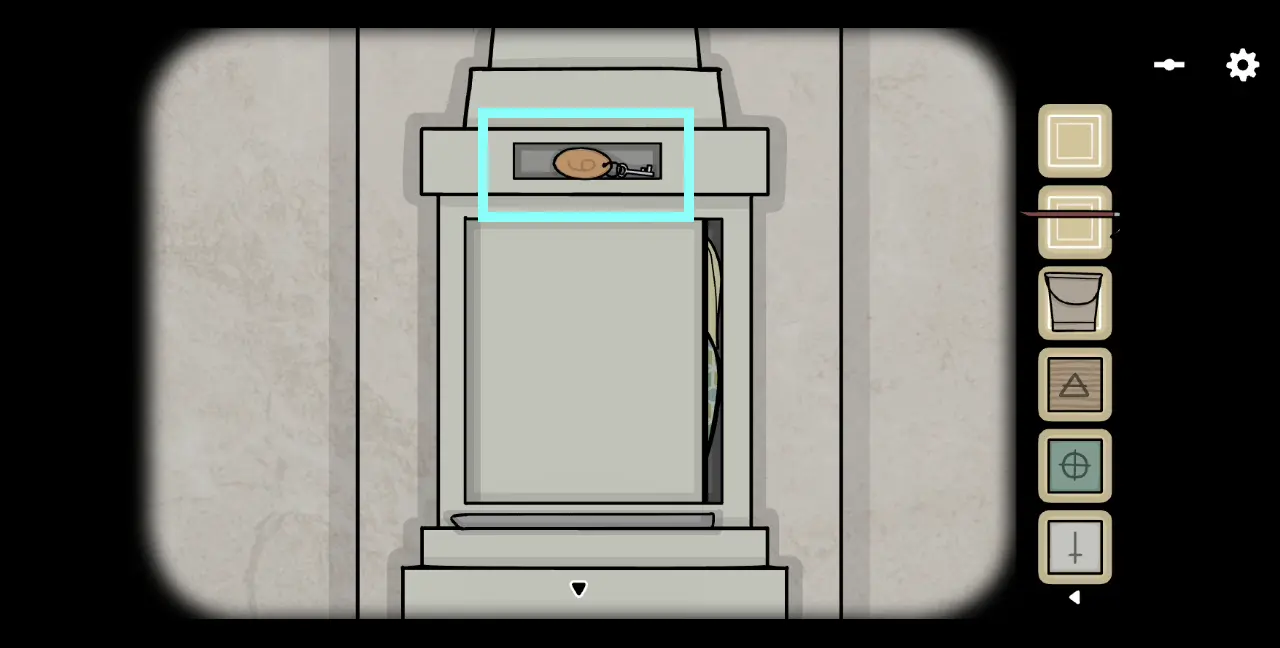
9. To the left of the thief, outside the room where he is held captive, is a metal box. Use the crowbar to open it. Take the locker key.
10. Return to the lockers and use the key on locker 6 as indicated by its keychain. Take the bucket inside.
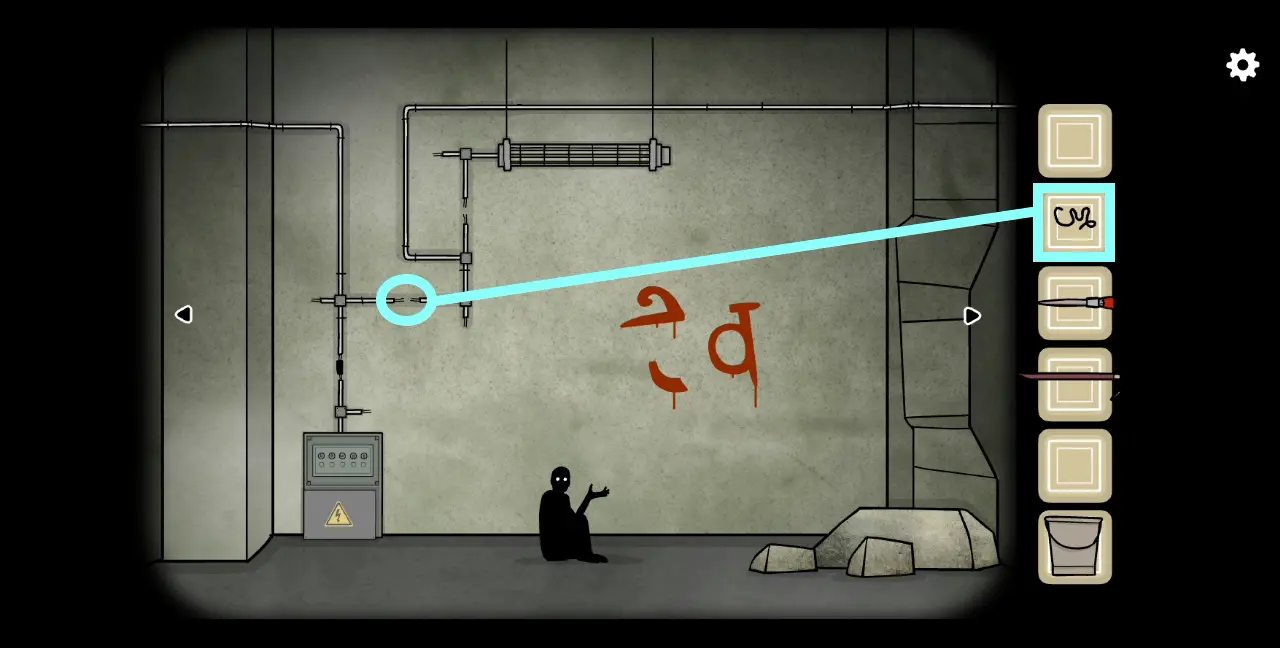
11. Before leaving this area, use the crowbar on the red metal drum with the yellow triangle sticker to poke a hole through it. A bit of oil will spill out. Use the lighter to set this drum on fire.
12. Head to the area with corrupted Laura. On top of the high-voltage box with the switches are wires. Click on the part above the box where the wires are disconnected. Use the tape to fasten them together.
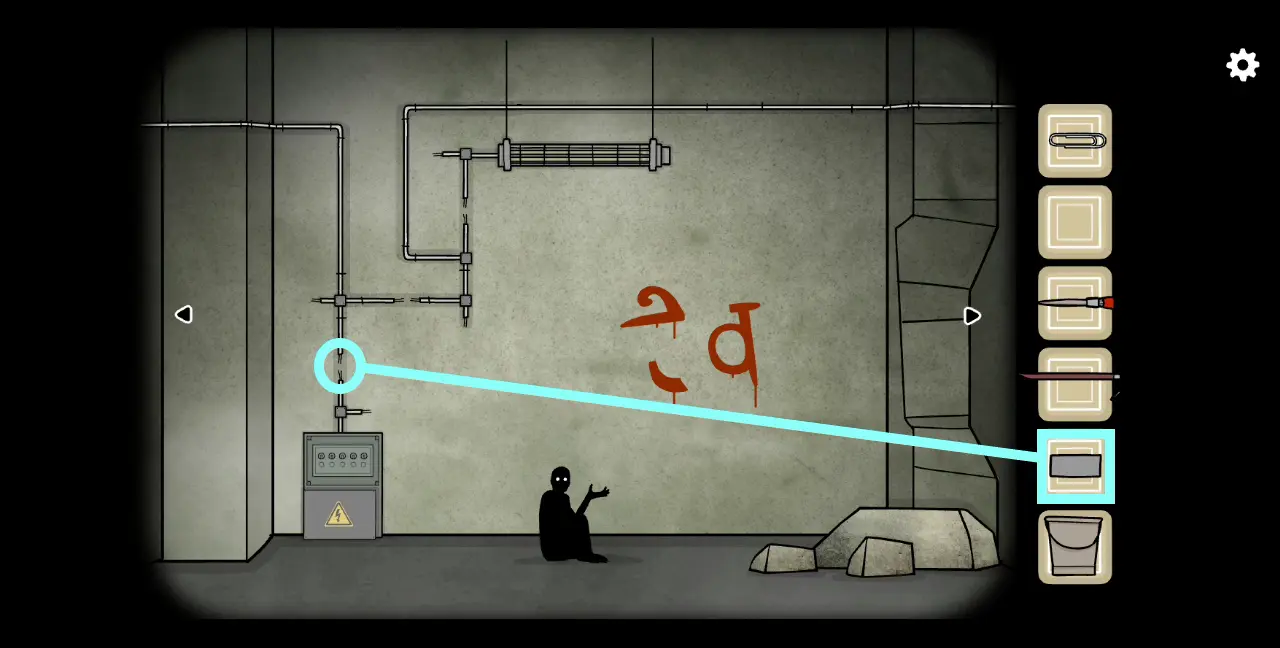
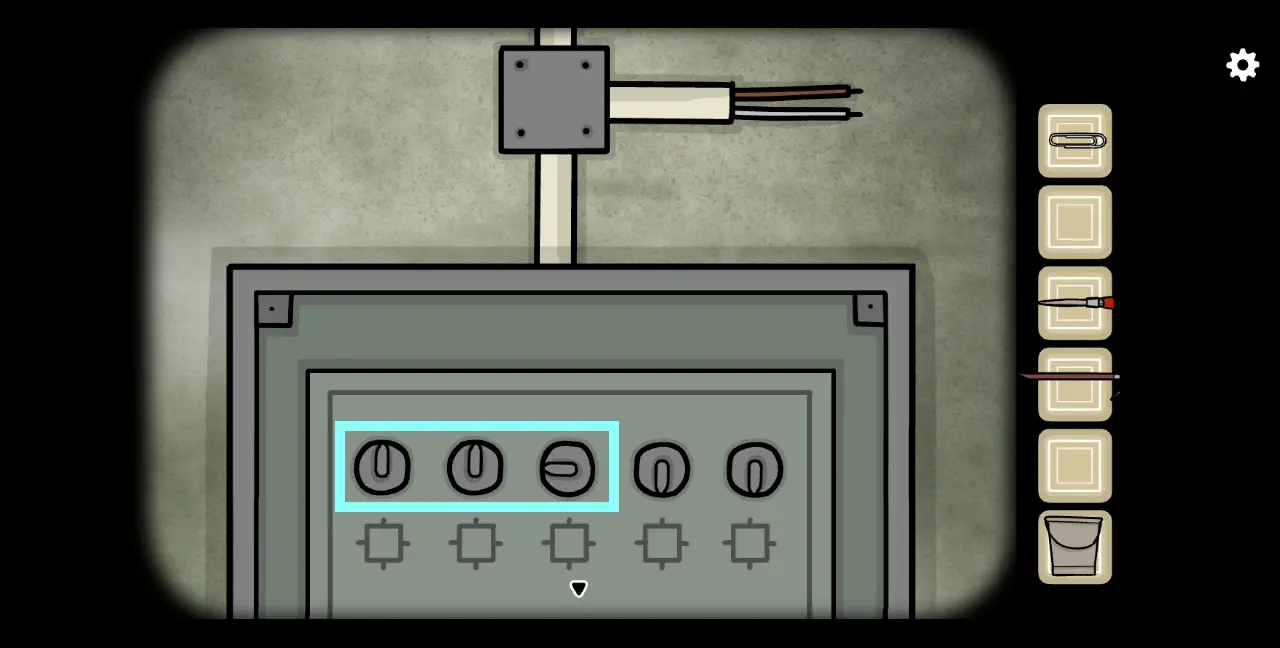
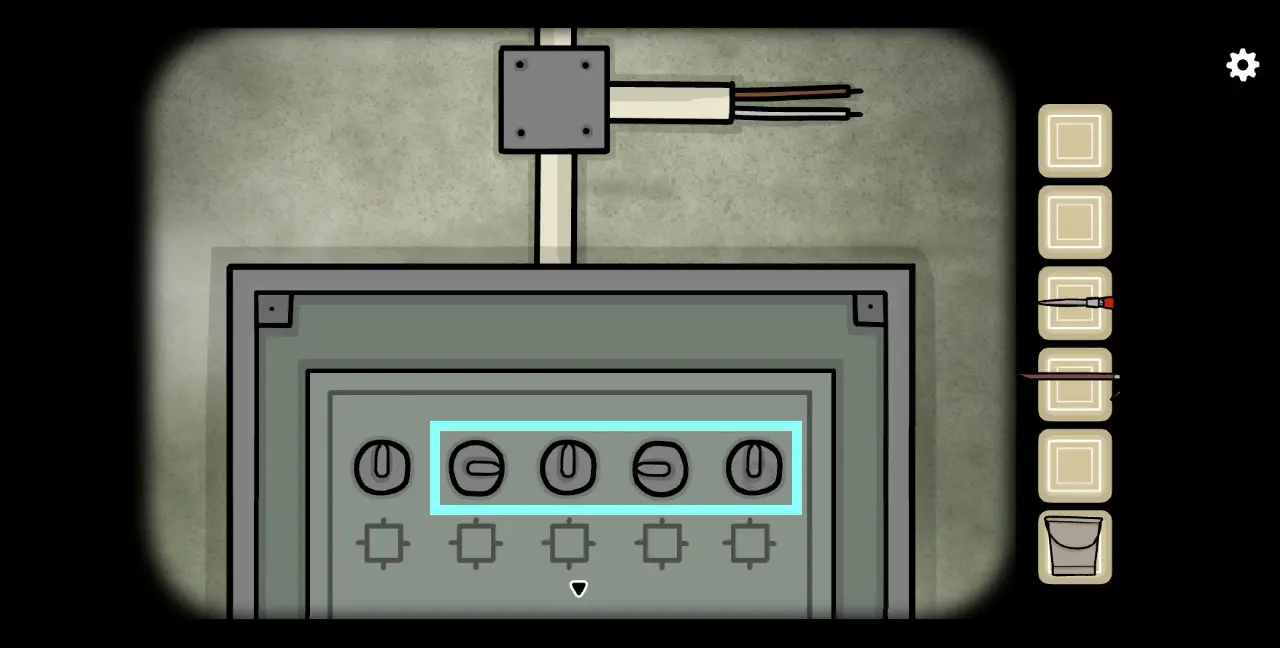
13. Access the high-voltage box. Moving the switches will send electricity towards the direction the switches are facing. The leftmost switch represents the direction towards which the high voltage box will send electricity and the succeeding switches correspond to the wiring connected to the high voltage box. For this segment, we will have to send electricity toward the wires going left. To do this, the switches should be turned as illustrated below:
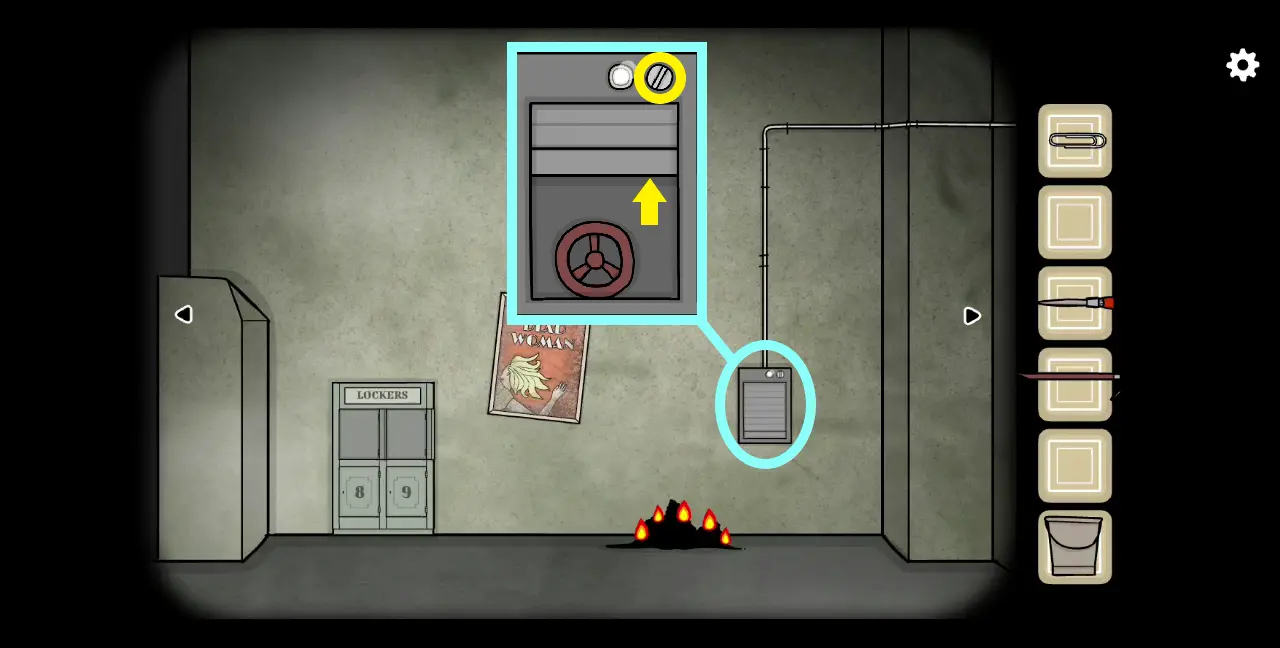
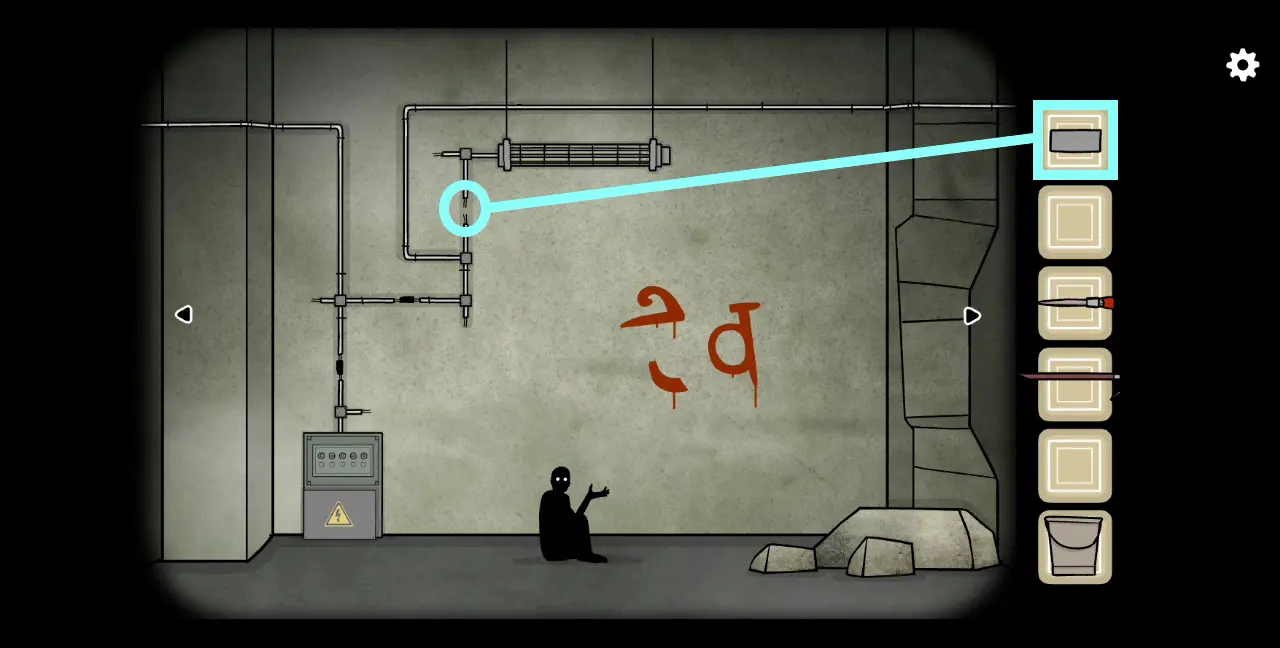
14. Follow where the wires lead, which should bring you back to the area with the red poster. To the right is a hatch. Turn the dial at the top of the hatch until the covering is raised, revealing a valve. Take the valve.
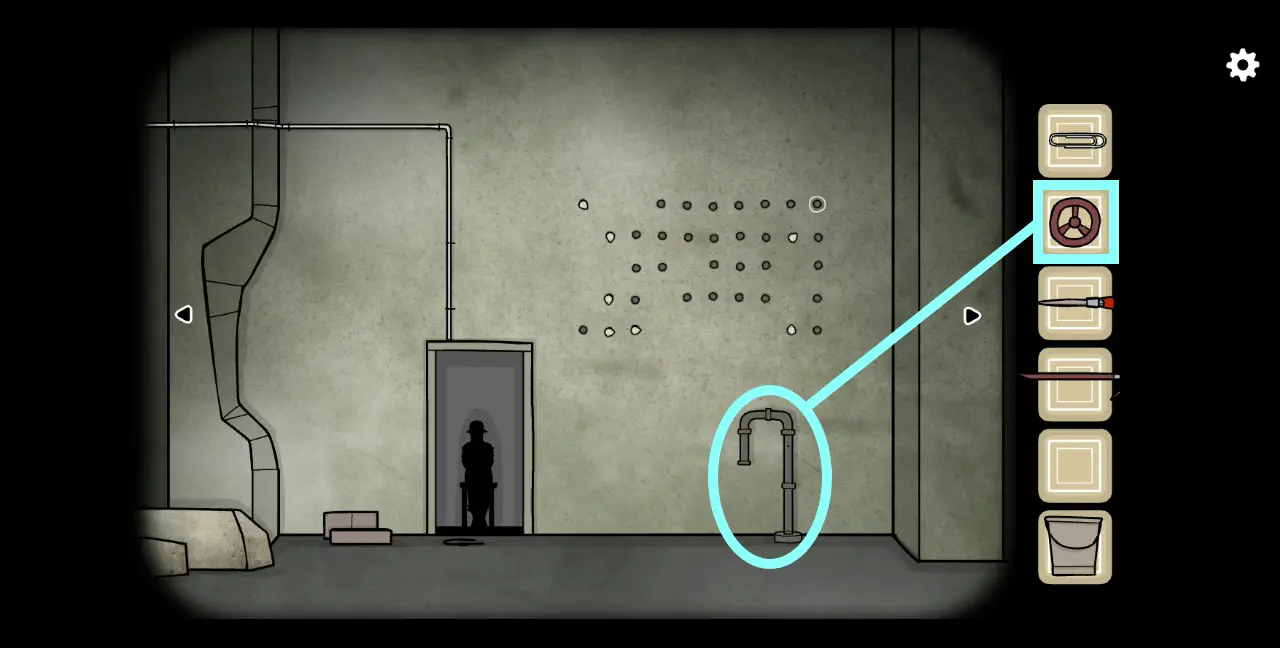
15. Head to the area with the thief. To the right is a pipe. Zoom into the pipe and place the valve on the slot. Turn the valve and water will come out.
16. On the floor is a huge puddle of water. Occasionally, you’ll see a fish jump out of the water. Use the bucket to scoop up some water.
17. Go to the thief and pour the bucket of water on him. Collect water again from the floor using the bucket.
18. Go back again to the area with the red poster. Use the bucket of water to put out the flaming pile. An iron wire is sticking out of the pile. Collect this.
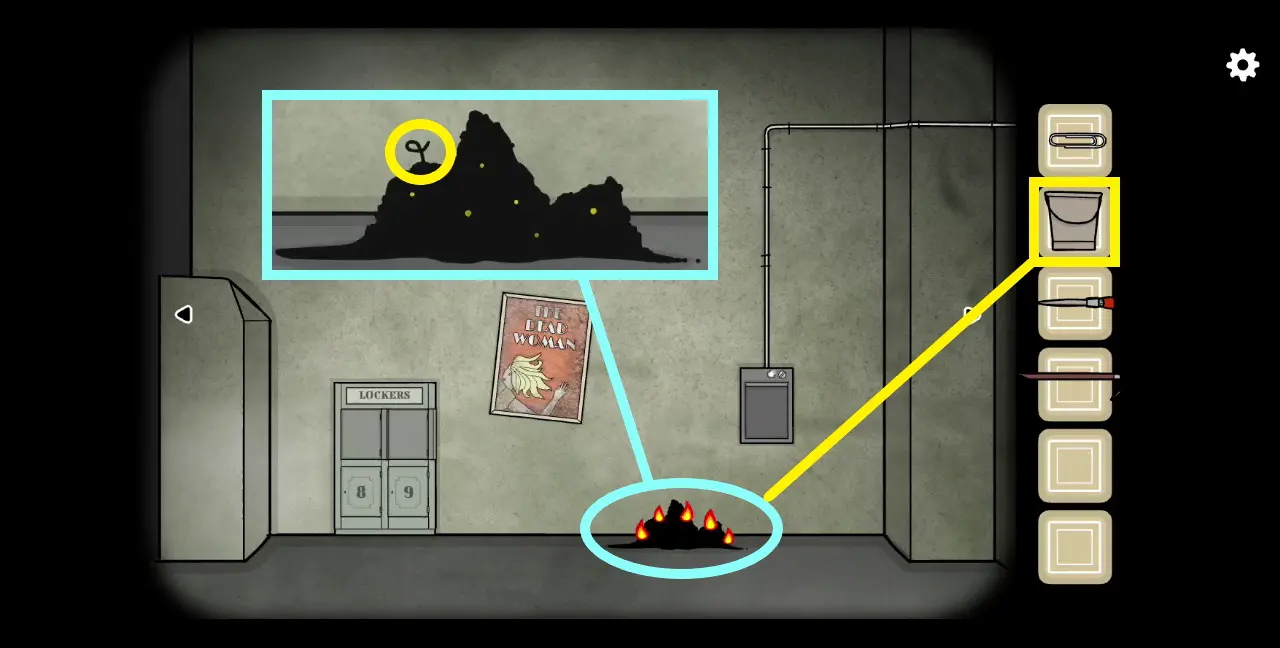
19. Head to the area with the puddle and collect more water using the bucket. Then go to the area with the broken pillar. On the floor is a drain cover. Use the crowbar to move the drain cover. Pour water on the drain, which will raise a clothespin. Collect the clothespin.
20. Return to the area with the captive thief. Fasten the clothespin on the thief’s nipple and twist it to the side. Do the same for the other nipple using the paperclip.
21. Above the room holding the thief is an electrical wire. Follow it to the left, leading to the next room. This should bring you to the place with Laura. You’ll see that the wires connected to the thief have segments that are disconnected. Use the iron wires to connect them. Pictured below are the exact location of these wires.
22. Go to the high voltage box and turn the switches to redirect electricity towards the connections leading to the thief’s location. Pictured below is the correct direction of where the switch dials should face.
23. Go back to the room where the thief is. Beside him is a lever connected to a wire on the wall. Pull the lever down. This will electrocute the thief. He will tell you that the “key is behind the hand of the dead woman.”
24. “The dead woman” actually refers to the red poster in the area with the pile of ash. Click on this poster and click the hand of the dead woman. The poster will peel off, revealing a piece of tape and a locker key underneath. Collect both items.
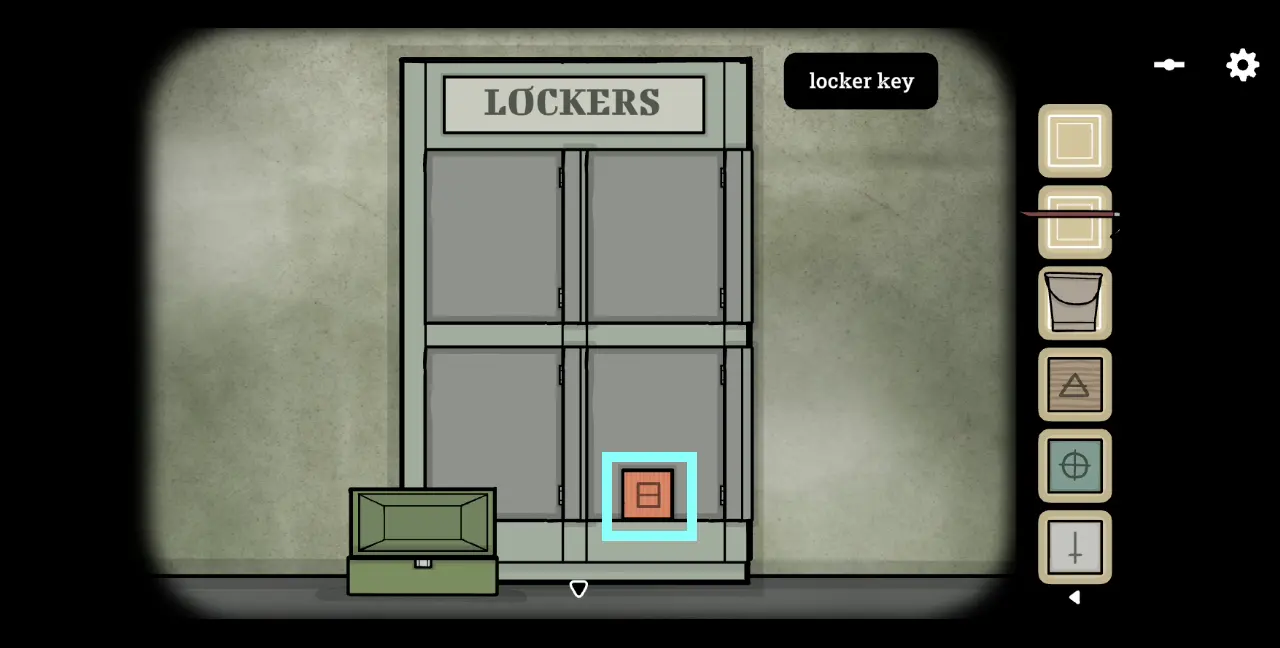
25. Go to the lockers and use the key on Locker 8. Inside Locker 8 is a green box with a four-digit lock. You don’t know what the lock code is yet so return to the thief.
26. Click both of the thief’s arms and you’ll see a cluster of tattoos with numbers on them on each arm. These tattoos still won’t make a lot of sense so go back to where Laura is. Use the piece of tape to connect the severed wires that connect to the lamp light over Laura’s head.
27. Access the high-voltage box and move the switches that connect to the lamp above Laura’s head. The light will open, revealing pictures on the wall. These pictures correspond to the thief’s tattoos.
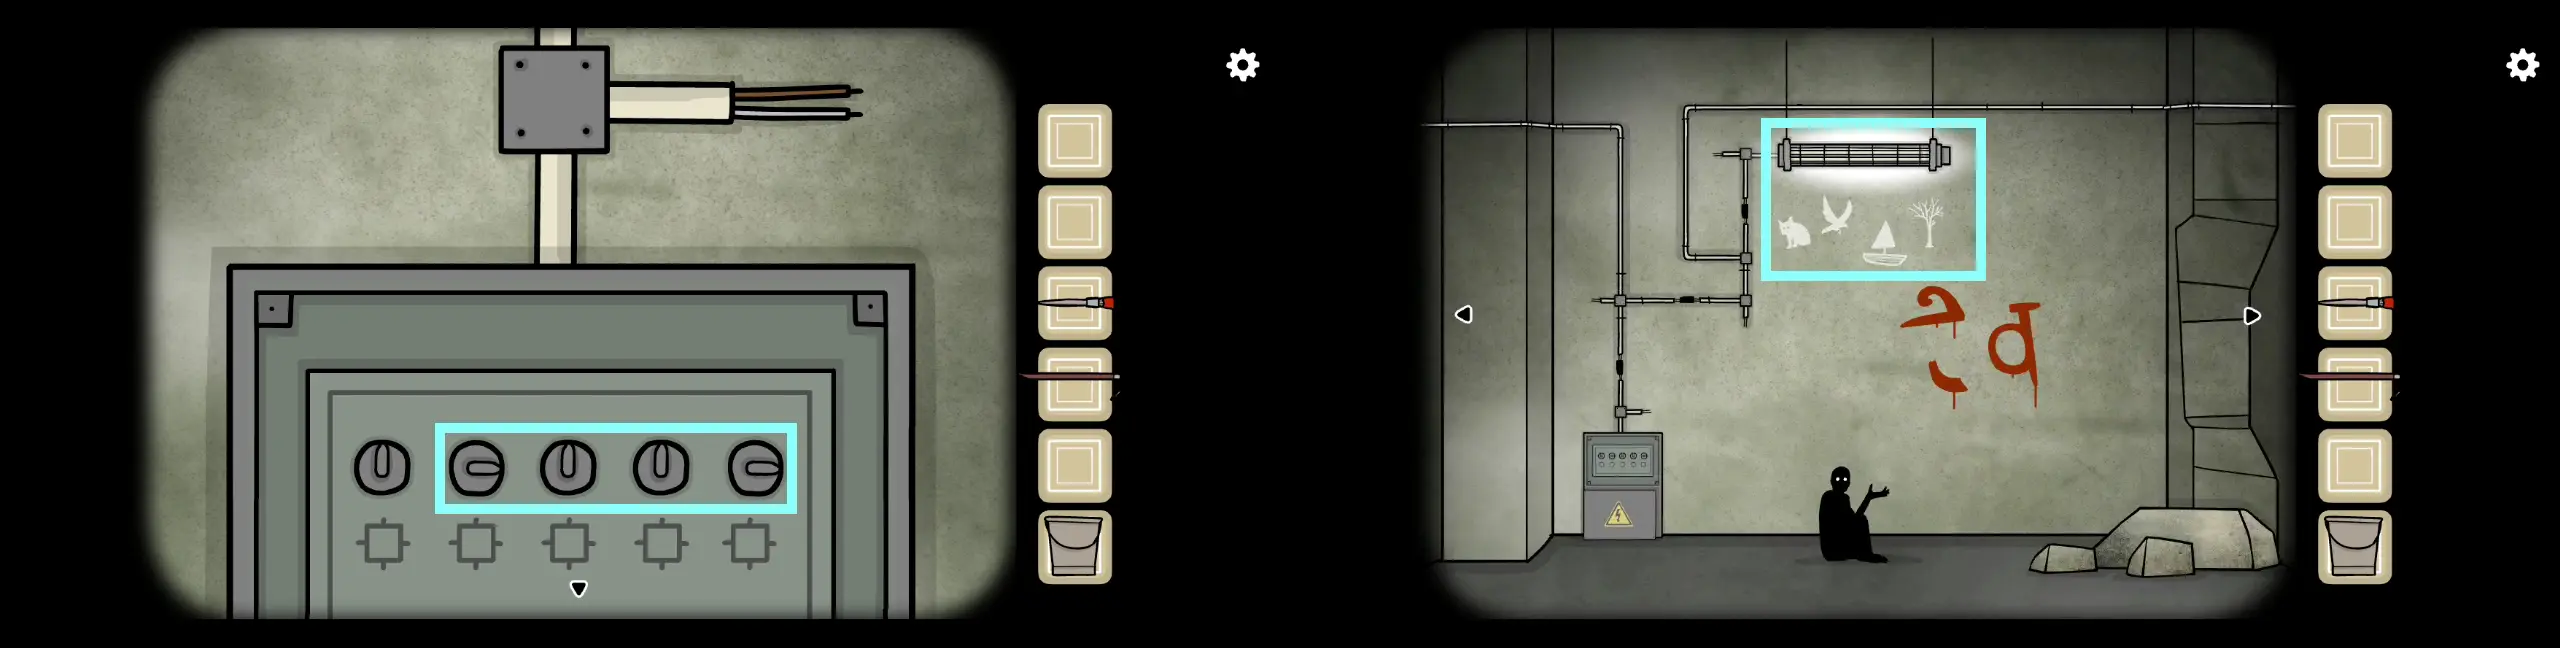
28. Go back to the green box with the four-digit lock. The order of the pictures on the wall correspond to the correct order of numbers on the lock. Since the four pictures on the wall are an animal, a bird, a boat, and a tree, the right way to interpret this is by picking tattoos that are related to these four photos. Thus, the animal = bone (4); the bird = egg (1); the boat = anchor (9); and the tree = flower (5). Hence, the correct lock code is 4-1-9-5. Inside the box is the stolen golden timepiece.

29. Return to corrupted Laura and give her the timepiece. Click the timepiece from her hand and click the segments following the symbol on the wall behind her. The clock hands will move rapidly until the timepiece breaks. The lights go out and next thing you know, Laura is gone.
30. If you search the station, you will find Laura standing in front of the train in the area where you opened a drain on the floor. If you talk to Laura, she will tell you that you’ve found the timepiece and it’s time to leave this place. You will both board the train. This concludes Chapter 6.
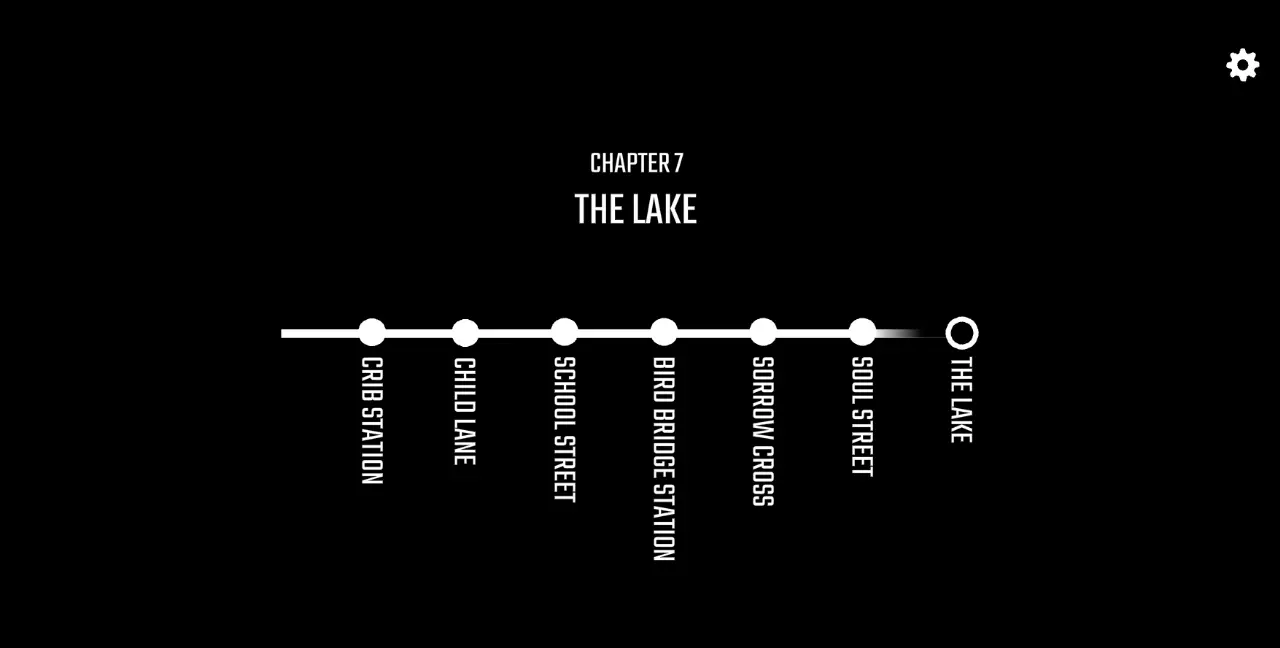
Chapter 7: The Lake
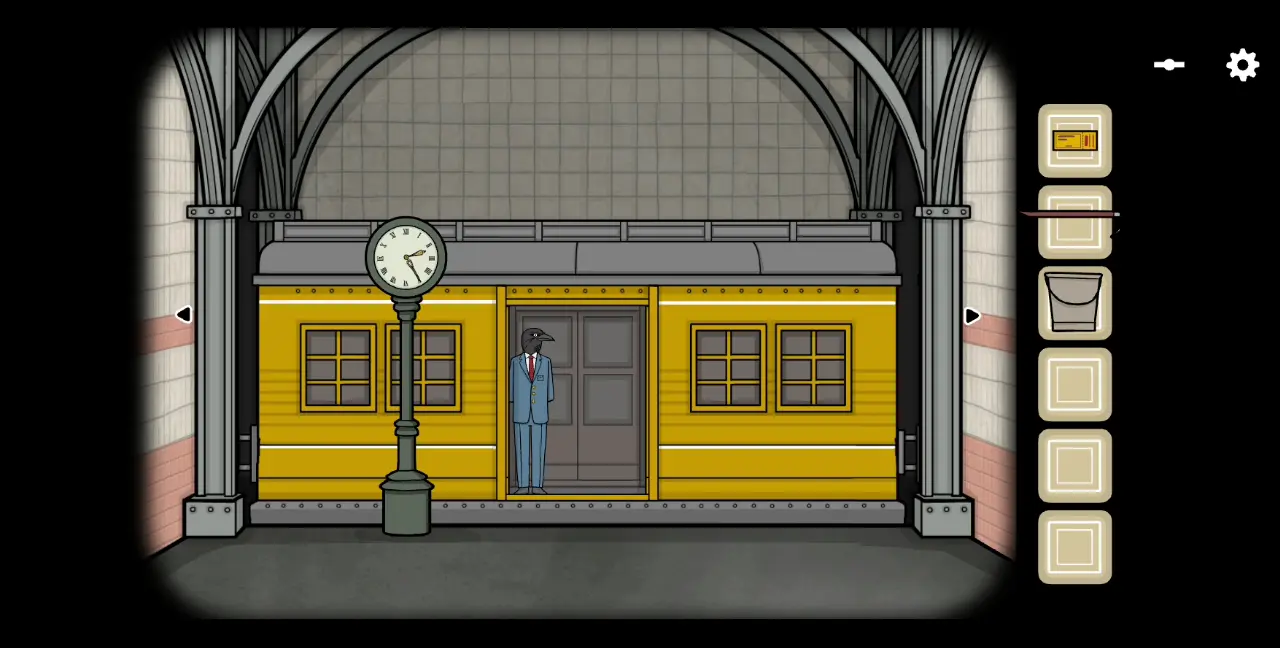
1. Laura is with you inside the train all throughout the journey to The Lake. When the doors open, you see a forest area with a bench and a lamppost. You and Laura go down from the train.
2. You’ll notice bees randomly flying out in different areas of the forest. If you manage to catch three bees by clicking on them before they disappear, you’ll earn The Future in The Past, The Past in The Future achievement.
3. Find the area of the forest where Laura is standing alone. If you talk to her, she will tell you this is where she belongs. She says she remembers the tree and that you should look behind you.
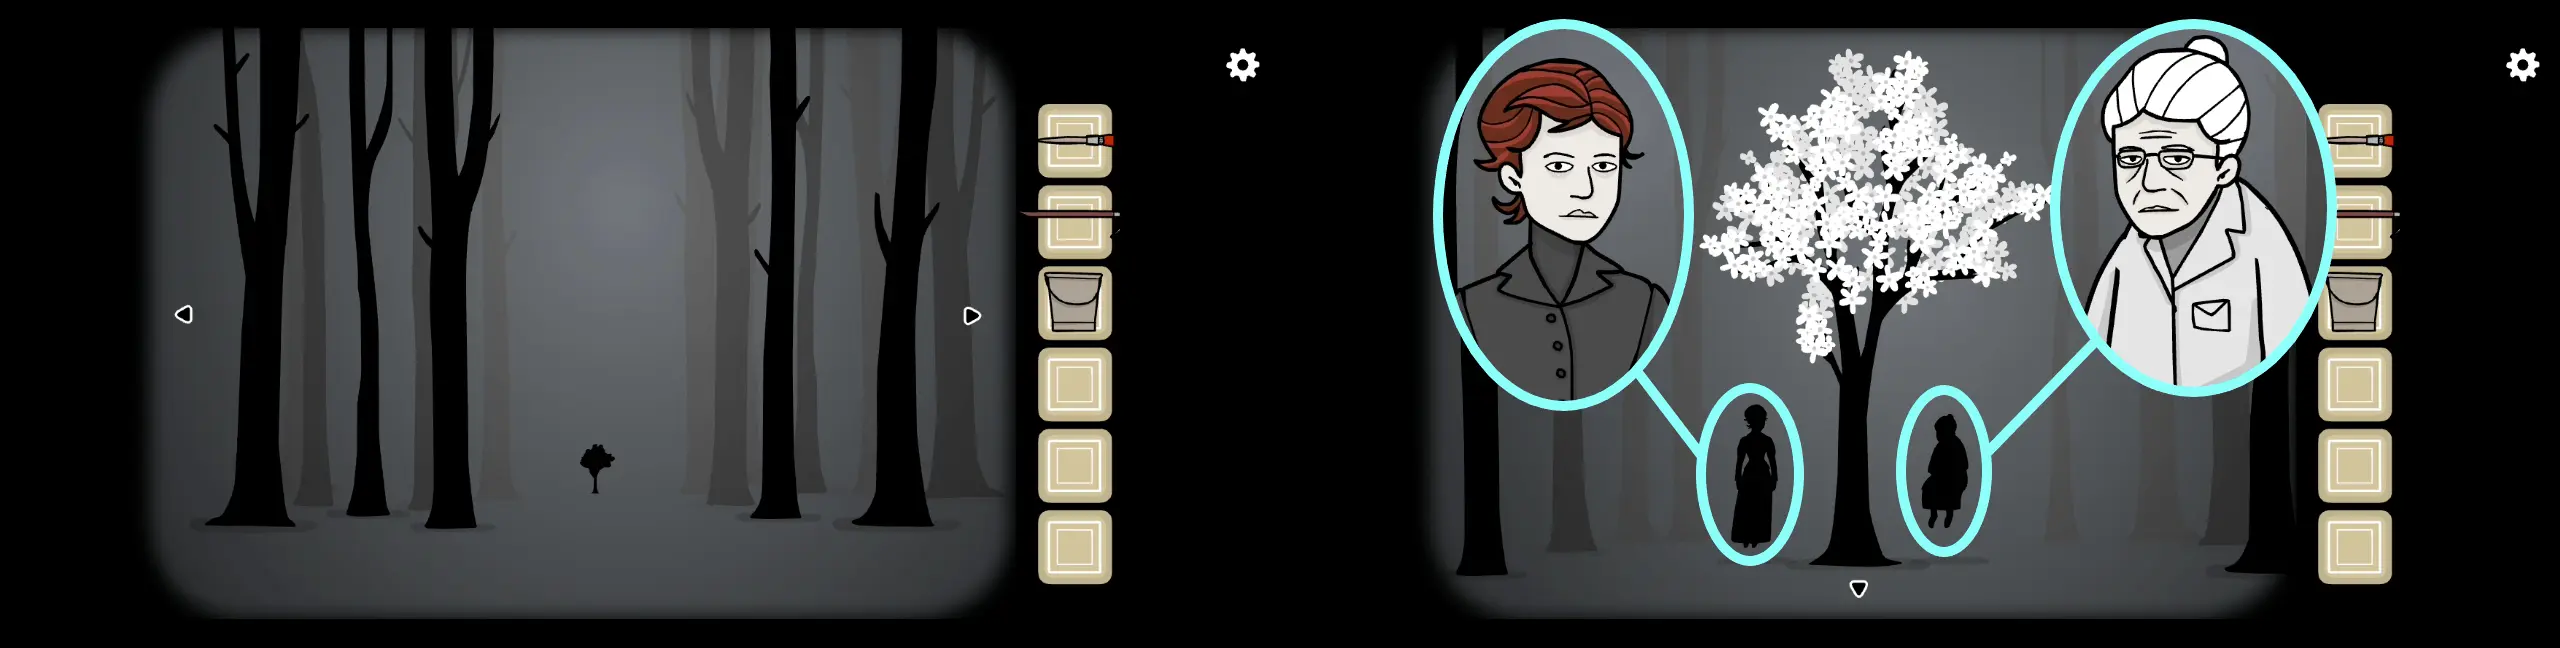
4. Go to the area where there is a tree in the distance. Keep clicking the tree until you’re close to it. Two figures will emerge from the side of the tree. On the left is Laura’s mother. Talk to her. The other figure on the right is still Laura’s mother, but much, much older. Talk to her as well.
5. Once you’re done talking to the two characters, the petals from the tree will be blown by the wind. Go to where Laura is and click on her. A brief sequence will play out but she will ultimately vanish into the forest.
6. Go to the area where the train is waiting. Open the doors and hop on board. This concludes Chapter 7.
Finding the Cubes
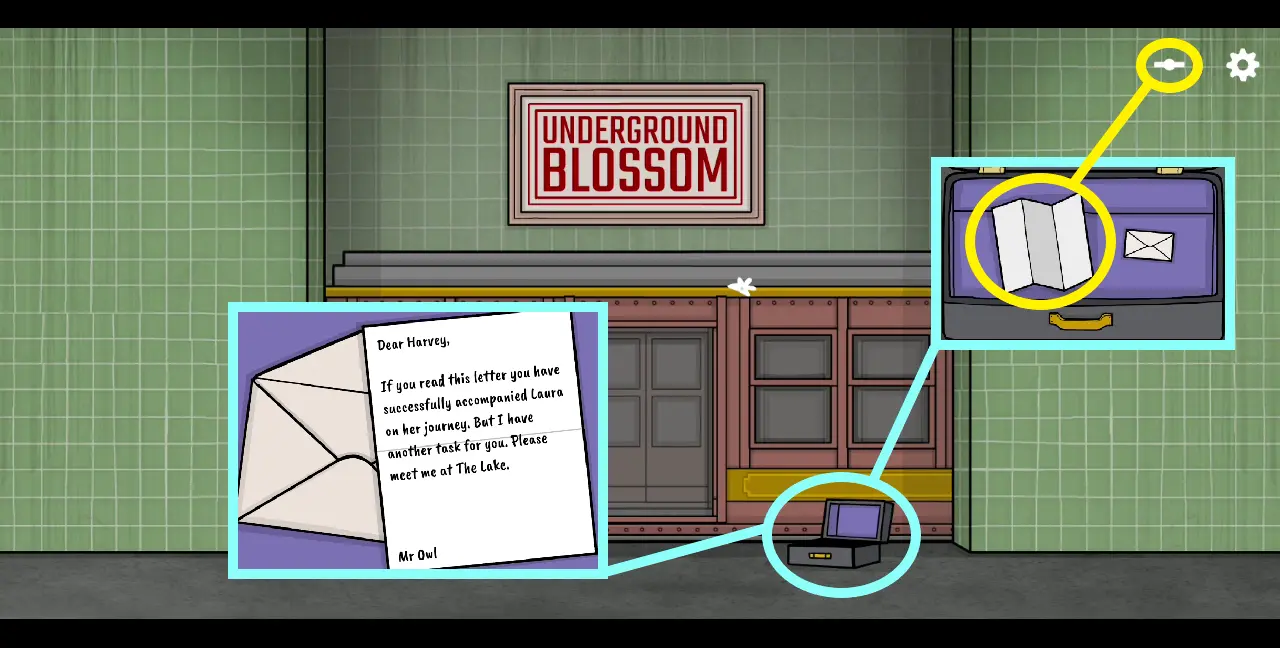
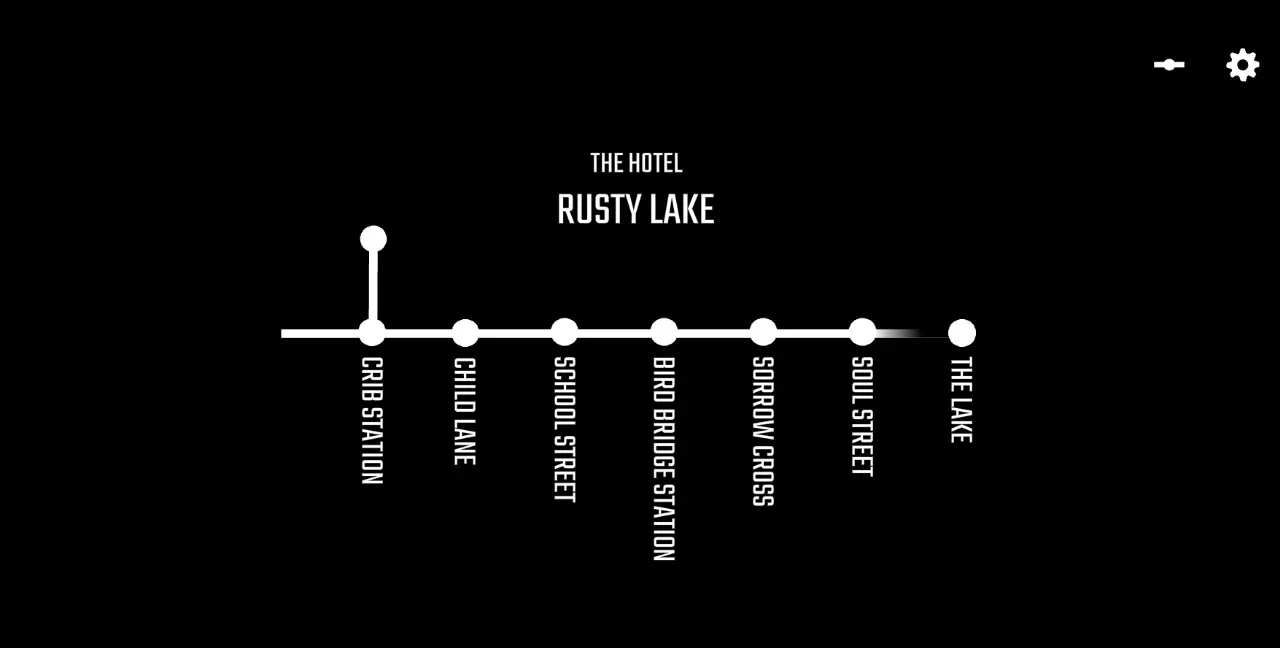
After finishing the last chapter of the game and watching the end credits, you will be brought back to the starting screen, which displays the first station with a purple suitcase on the lower right-hand corner. Inside this suitcase is a piece of paper and an envelope. The piece of paper tells you that you’ve unlocked the underground map and can now access any of the stations through a button on the upper righthand corner of the screen.
On the other hand, the envelope contains a letter from Mr. Owl asking you to meet him at The Lake as he has another task for you.
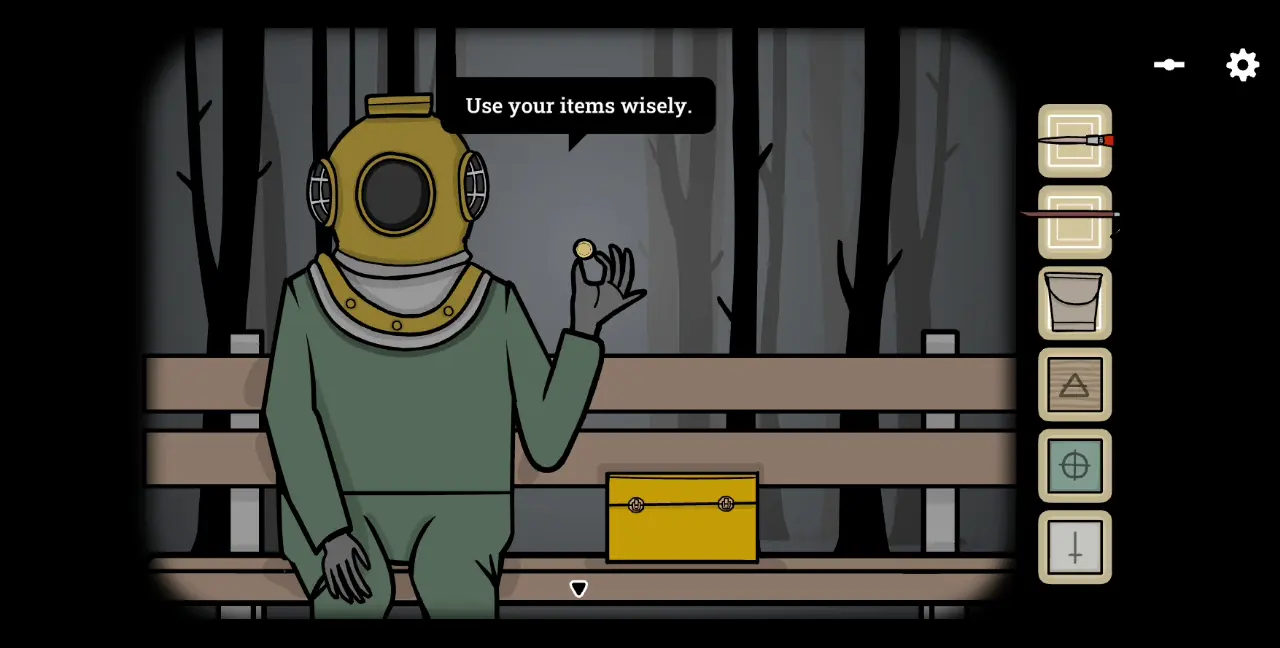
That said, go back to The Lake and talk to Mr. Owl, who is sitting on a bench. He will tell you to collect each Cube in every station. After your conversation, he will also give you a coin and tell you to use your items wisely.
As you collect Cubes, you’ll be repeatedly going back and forth the different stations. We’ve outlined below which stations you need to go to in the right order, and which items you’ll obtain and need to use so you can collect all the Cubes.
Bronze Cube
- Soul Street: Refill the bucket with water.
- Bird Bridge Station: Fill the manhole next to the Food & Drinks stand with water from the bucket. A handle will emerge from the manhole. Collect the fishing net.
- Soul Street: Use the fishing net to catch the fish from the puddle. Use the crowbar on the fish and grab the key from its carcass.
- Crib Station: Go to the ticket booth and use the key to unlock Booth 2. Drag the window upward and collect the Bronze Cube. Take note that the cat teller behind Booth 2 will ask for a shrimp in exchange for a ticket. Remember this for later.
Marble Cube
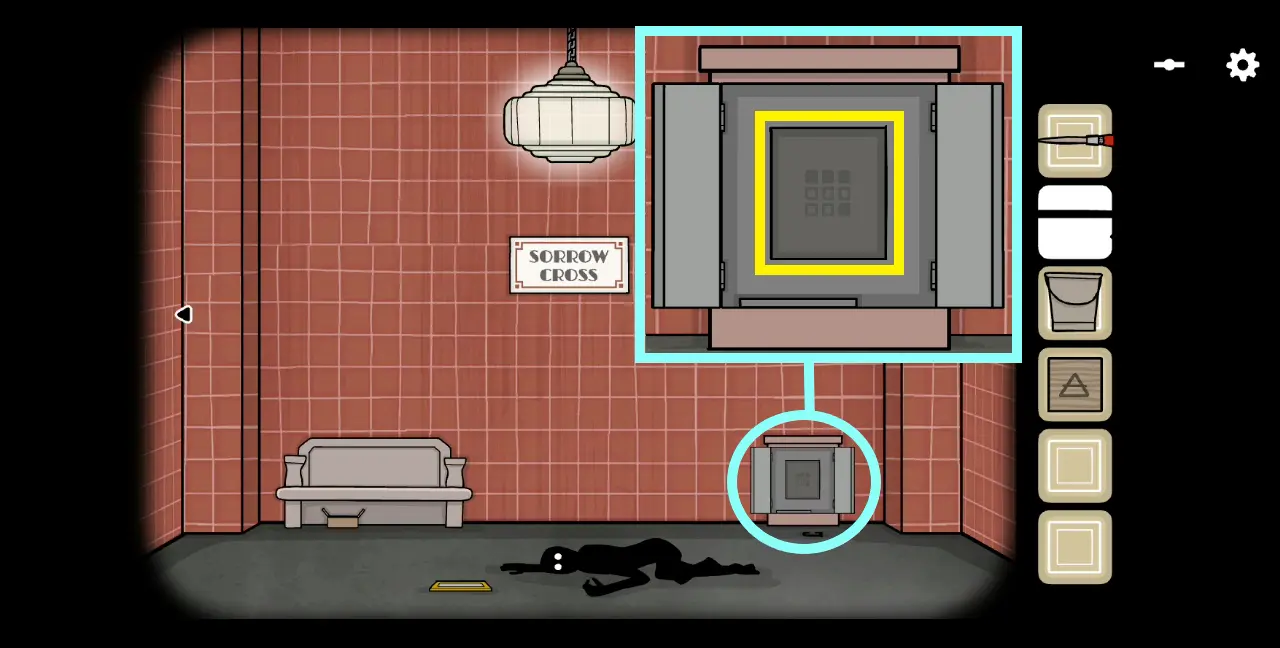
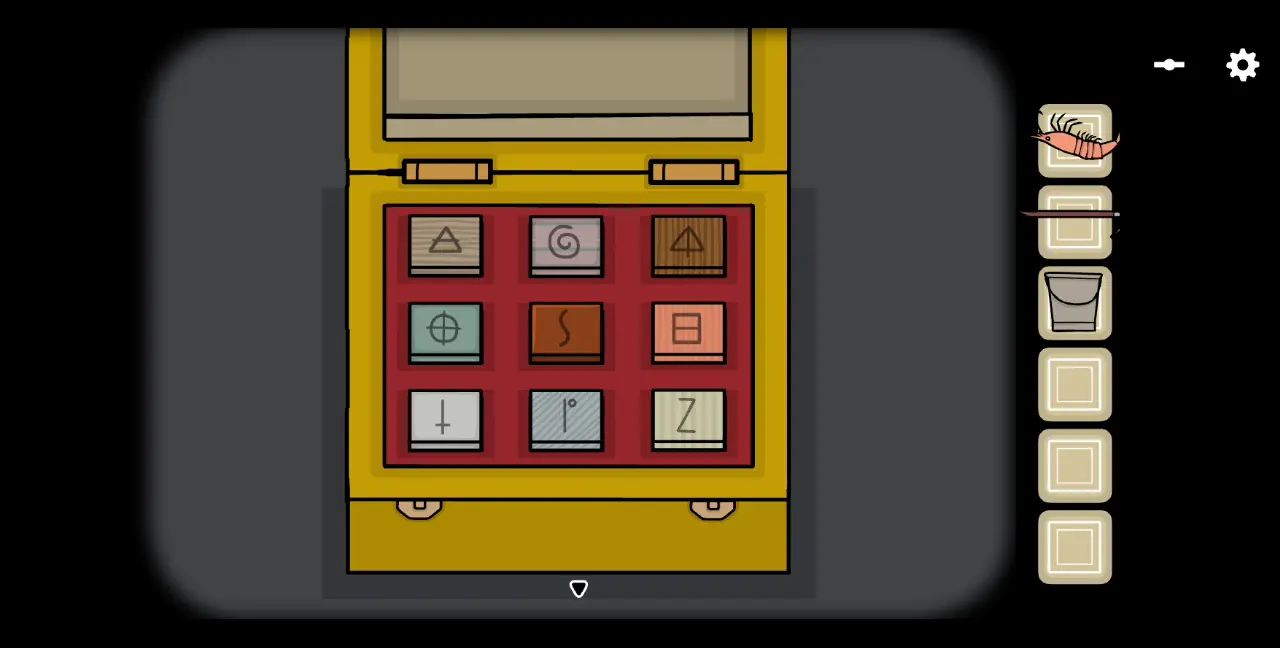
- Sorrow Cross: As you reach the first platform of this station, go to the hatch to the right of corrupted Laura. Use the crowbar on the back panel until you open it. Behind this opening is a grid that resembles the keypad of one of the ticket dispensers. Remember the pattern on the grid.
- Child Lane: Go to the ticket dispenser. Recreate the pattern you saw from the hatch. Then, click the orange button and collect the Marble Cube in the newly opened compartment.
Ice Cube
- Soul Street: Go to the area with the puddle of water and refill the bucket.
- Crib Station: Head to the part with the scraped poster and zoom into the grill on the left. Fill it with water from the bucket. A set of directional buttons will appear.
- School Street: Go to the ticket dispenser. On the keypad, input the five directional buttons that you saw from the grate. The Ice Cube will then be dispensed by the machine.
Stone Cube
- Sorrow Cross: Go to the vending machine. Use the coin Mr. Owl gave you earlier. The coin is valued at 50. Buy the nut bar, which costs exactly 50. Take it from the tray at the bottom of the vending machine.
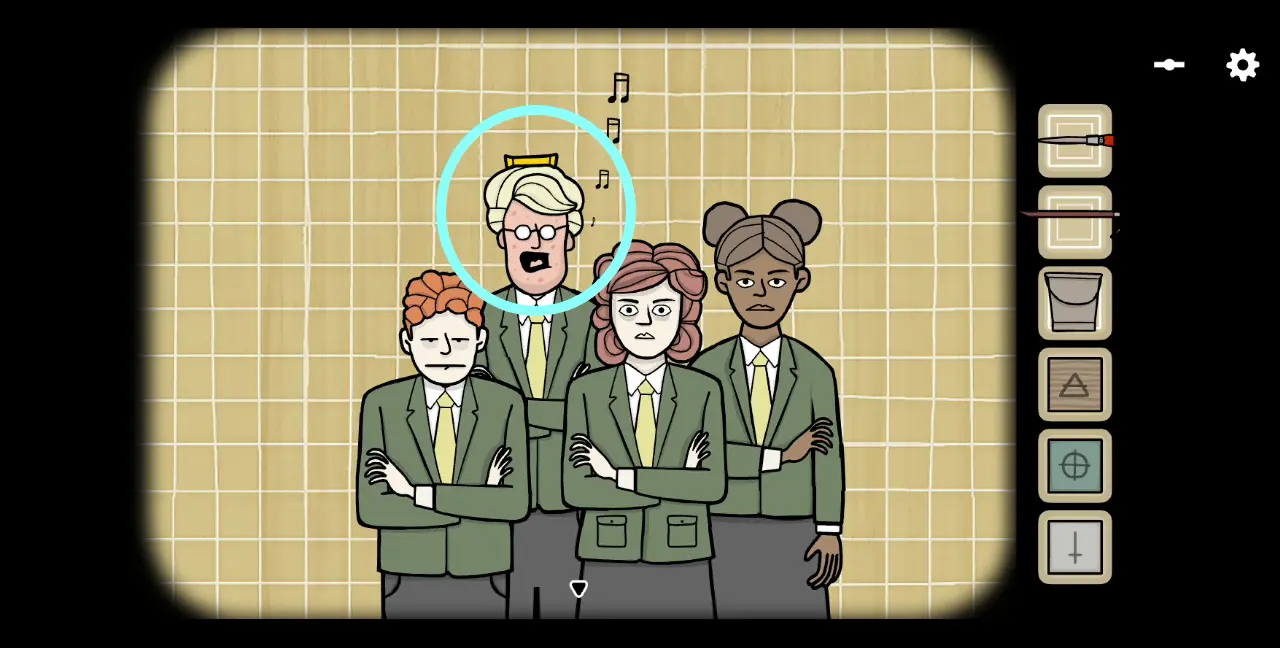
- School Street: Go to the area with the four students on one platform. Give the nut bar to Jimmy, the blonde student who has a peanut allergy. He will have an allergic reaction and musical notes will come out of his mouth.
- Bird Bridge Station: Go to the jazz musician. Make him play the trumpet, following the sequence of musical notes from Jimmy. The correct order of notes is 2-2-2-1-2-3. The Stone Cube will come out of the trumpet.
Bone Cube
- Bird Bridge Station: Still in the same area, turn your attention to the hole on the wall where the rat went in. Use the crowbar to open the wall tile and collect the $50 bill inside. Go to the Food & Drinks stand and buy a donut. Then, head to the area where Laura and Bob are sitting. Give Bob the donut and keep talking to him until he mentions a mysterious person who “visits the red tiled station at noon.”
- Sorrow Cross: The red-tiled station mentioned by Bob is this station. Thus, go to the area with the clock and move its hands to change the time to noon. Then, go to the area with the vending machine for snacks. You’ll notice that the jail cell that used to hold the thief now has a different person inside it. Click the person and collect the Bone Cube from their hand.
Copper Cube
- Child Lane: Go to the area with the owl-head statue. Paint both of the owl’s eyes using the brush with red paint. A compartment on the pedestal will open. Collect the locker key inside it.
- Soul Street: Head to the area with the lockers and use the newly obtained key on Locker 9. Collect the Copper Cube inside.
Wooden Cube
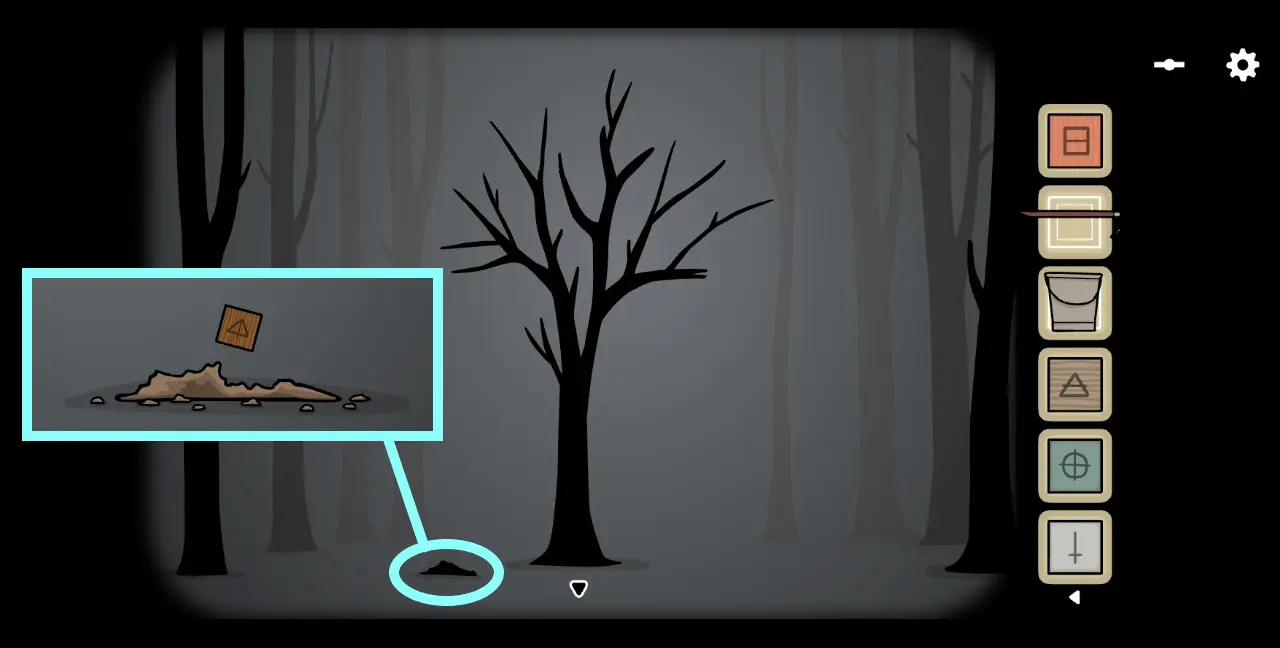
- The Lake: Go to the area with the tree. Keep clicking until you’re near the tree. If you recall, there’s a hole on the ground near the tree drawn on Laura’s sketchbook. Click the same spot on the ground to dig this hole. Collect the Wooden Cube from the ground.
With all the Cubes on hand, return to Mr. Owl on the bench. Click on the yellow Cube case beside him and unfasten both locks. Place all the Cubes inside the case and collect the shrimp from Mr. Owl’s hand.
Other Secrets and Achievements
Ascension
For those who have played Cube Escape Collection, the symbols on the Cubes will look familiar—and that’s because this segment is an easter egg. If it’s your first time seeing these symbols, don’t worry because all you need to do is rearrange the Cubes in a certain order so their symbols reflect the same solution from the puzzle in Cube Escape Collection. Keep in mind that you can’t take out any of the cubes from the case but you can swap them around by dragging them. Here’s how the Cubes inside the case should look like:
But we’re not done here yet: after arranging the Cubes correctly, the case will close. Explore the forest until you chance upon the area where a mysterious, white cube has appeared. Keep clicking on this object until you get close to it (just like what you did with the tree).
Once you are sufficiently close, souls will suddenly appear beside it. Click on all the souls until they vanish and a door emerges from the white cube. Click the door, wherein you will find Laura and Mr. Crow. Keep talking to Mr. Crow until he and Laura are lifted away by the elevator. This will earn you the Ascension achievement.

Behind the Mask
Head back to Soul Street and go to the area with the lockers. If you recall, beside it is a green box from which you obtained Rose’s timepiece. When you reach this area, the green box will still be open so you need to close it first by clicking on the lid. This will reset the four-digit lock back to 0-0-0-0.
However, the correct code to reopen the green box isn’t found anywhere in the game. It’s actually hidden in Rusty Lake’s official blog post thanking everyone for the amazing launch of Underground Blossom. The correct code is 5-3-7-2, which you can find on the short video accompanying said blog post.
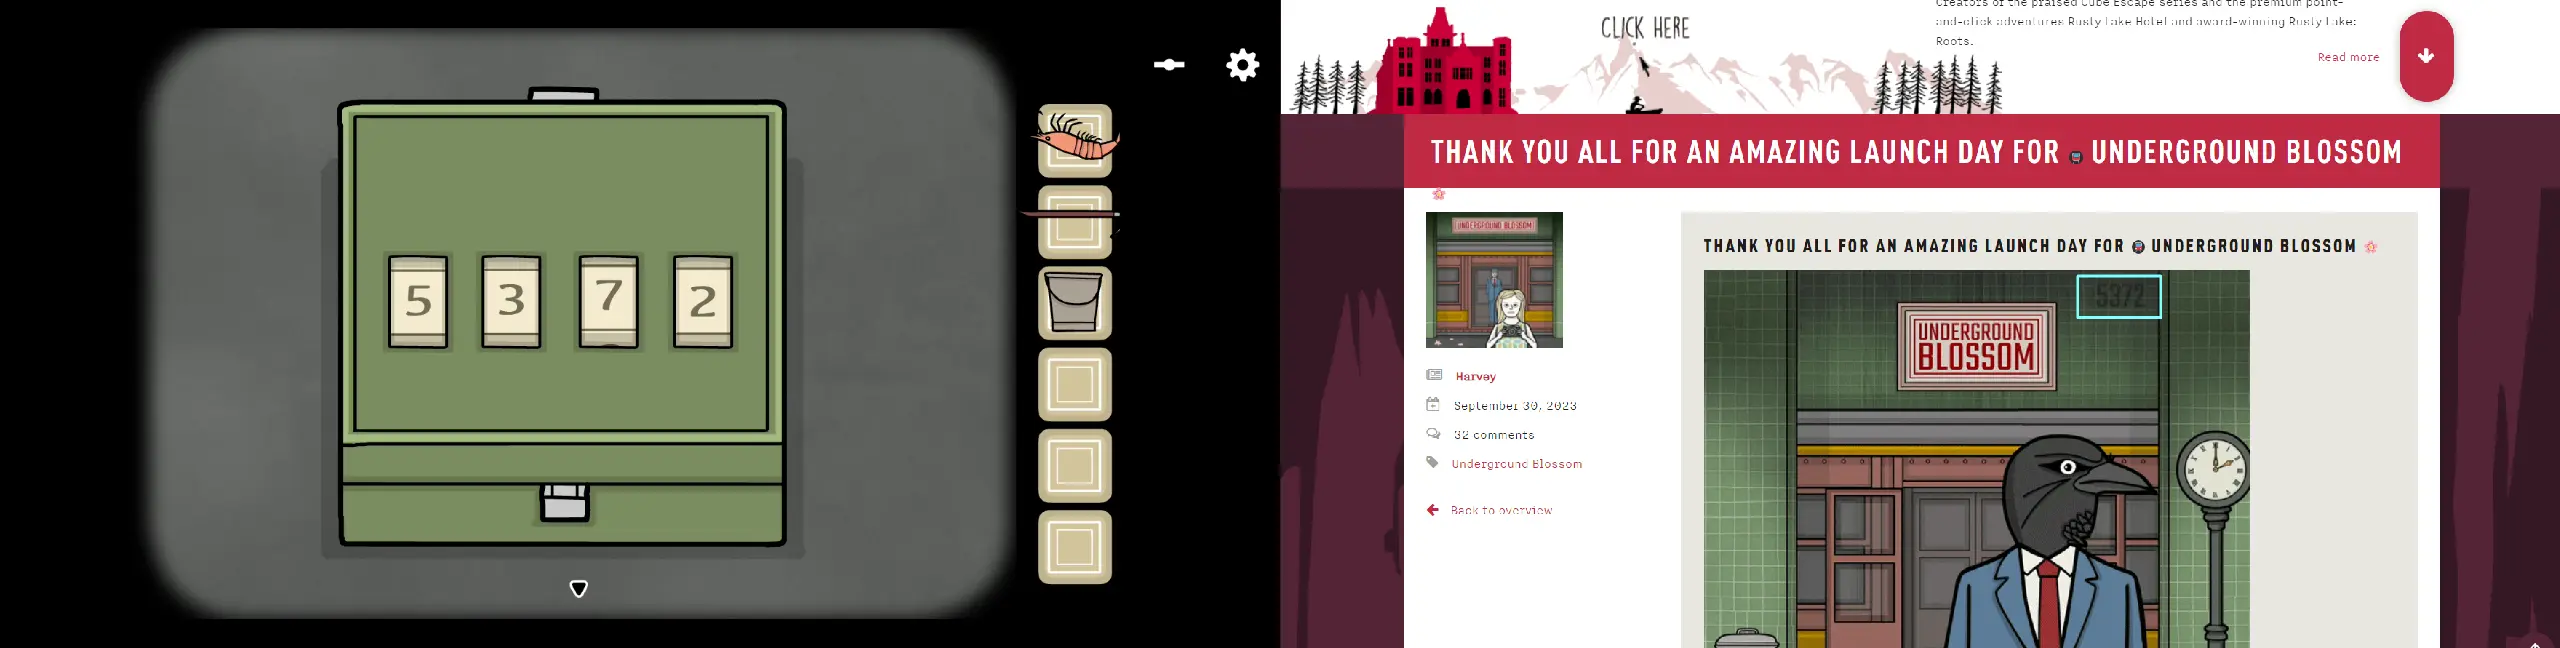
Once the green box opens, you’ll find a mask inside. Collect this and head back to Crib Station. Give this mask to Rose, which will earn you the Behind the Mask achievement.
The Hotel
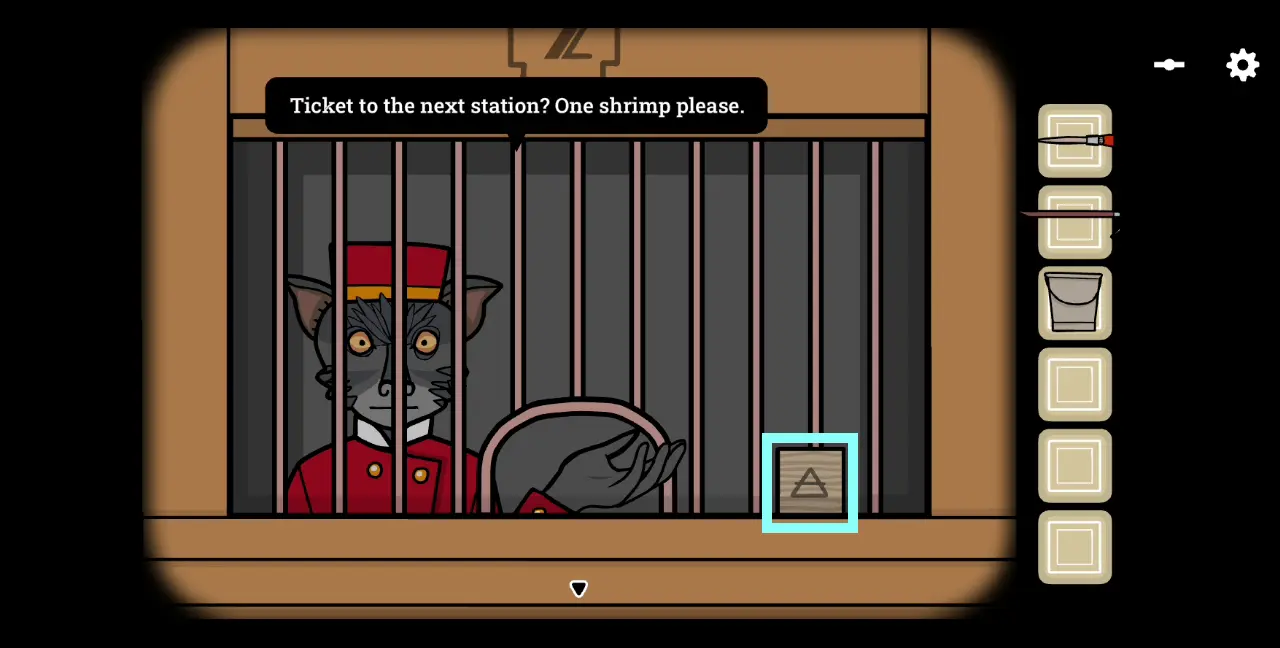
After giving Rose the mask, don’t leave Crib Station just yet. Instead, head to the ticket booth. If you recall, there’s a cat teller behind Booth 2 who asked for a shrimp when you obtained the Bronze Cube. Since you’ve received a shrimp from Mr. Owl, give this to the cat teller in Booth 2. Click the teller’s hand and he’ll produce a golden ticket. He will also inform you that the train leaves at 2:25.

Thus, go to the part of the station with the clock and move its hands so that the time will be 2:25. As expected, the train will arrive but it’s now gold and the conductor is Mr. Crow. Give him the golden ticket, have it punched, and board the train.
Upon arriving at the new station, you’ll immediately see a bell. Ring it. A boat will then appear. Ride the boat and, in the distance, you’ll see a building. Keep clicking this building until you’ve managed to get close to it. Click the door of The Hotel and you’ll find Mr. Owl waiting for you. Speak to Mr. Owl and this should earn you the Back to Work Achievement.

Best Kept Memory Distribution Center
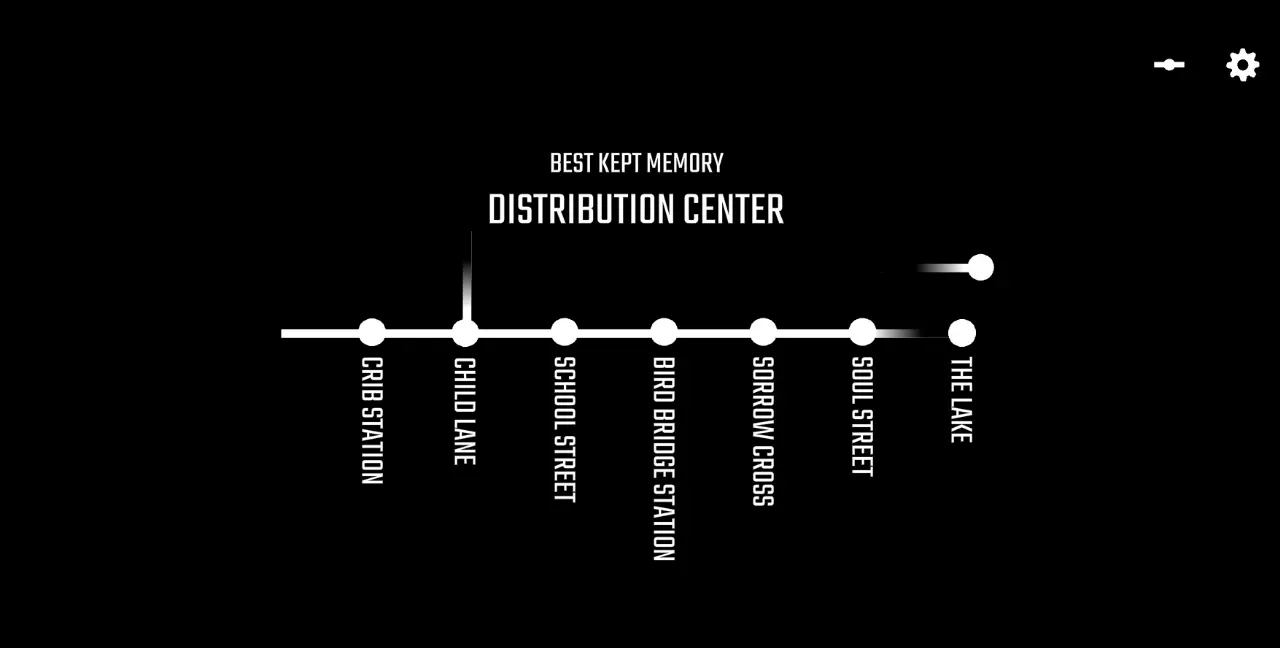
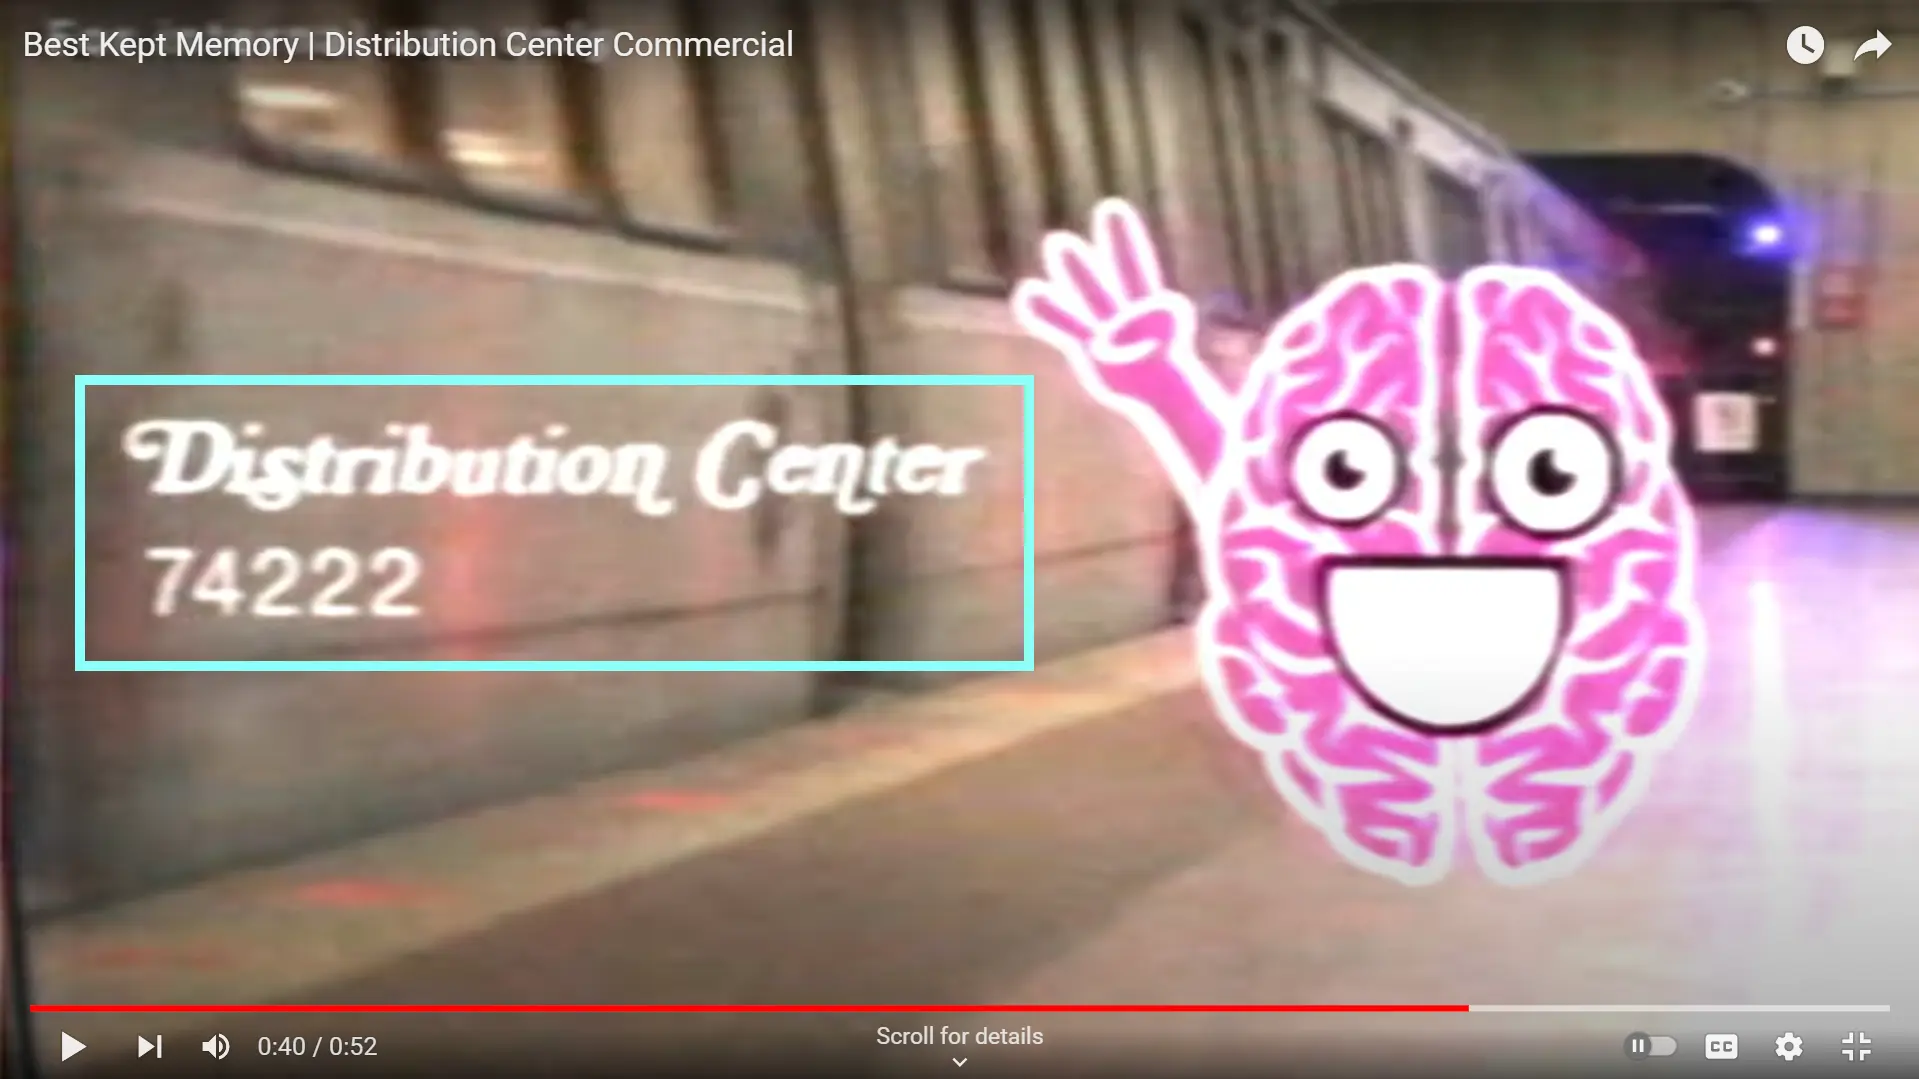
The Hotel isn’t the only new venue you can access. There’s also the Best Kept Memory Distribution Center. To unlock this area, go to Child Lane and access the phone booth. Dial 7-4-2-2-2. Like the second code of the green box, this number isn’t found anywhere in the game. Instead, this number is seen in a mock commercial from the official Rusty Lake YouTube channel. The fictional commercial is for the Best Kept Memory ARG, which can be found in an actual website (bestkeptmemory.com). If you watch the commercial, you’ll see the number flashed on the screen, as seen in this screenshot below:
After dialing the number, pick up the receiver and Chad Brunswick will answer. He will ask you whether you’re interested in visiting the Best Kept Memory and, if you are, you should take the “25 to 9 metro.”
What this means is that the train will arrive 25 minutes to 9. Thus, go to the area with the clock and move its hands so the time is 8:35. Board the train and it will send you to the Best Kept Memory Distribution Center.
Upon going down from the train, you’ll be greeted by a man in a white coat. Beside him is a VHS player and a TV. To get a VHS tape, though, you need to go to the area with the VHS archiver.
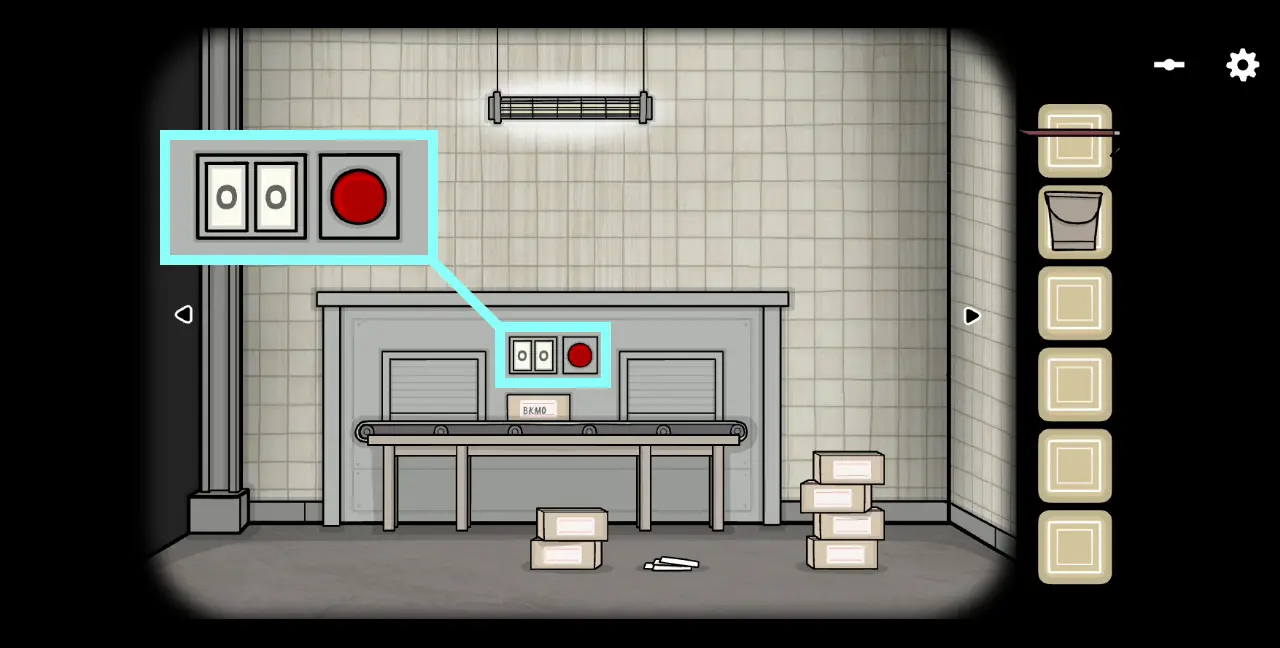
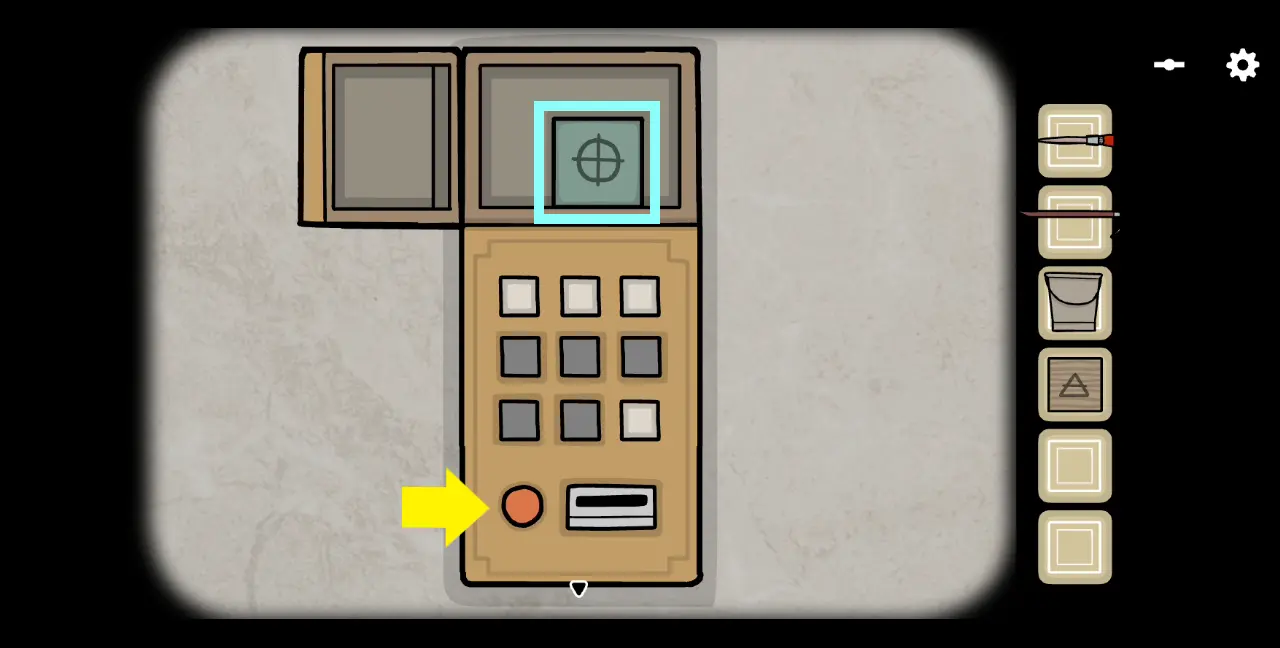
From the screenshot above, you can see that there’s a panel on the machine beside the big red button that will allow you to enter a combination of two digits, with each panel ranging from 0 to 9. Upon entering a combination and clicking the red button, a new VHS box will be delivered across the conveyor belt. Clicking on the box will stop the machine. If you click on the box again, it will open and reveal the VHS tapes stored inside.
Now you might be thinking that there are simply too many combinations before you find the right box containing the right VHS to get to some kind of secret or achievement. Don’t worry, because we have the answers for you. Again, these answers aren’t found in the game itself, but in the trailer for The Past Within, a co-op game set in the same universe.
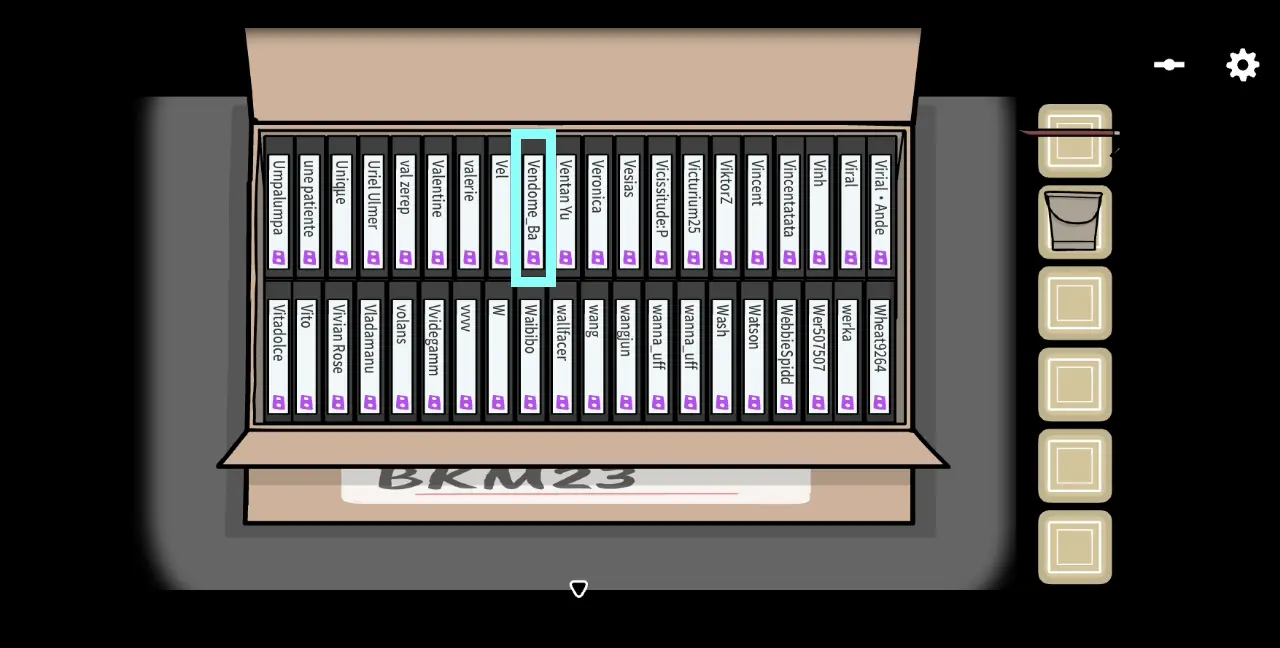
First, enter 2-3 on the machine panels and click the red button to access the BKM23 box. Inside are the VHS tapes. Take the one that is labeled Vendome_Ba (Vendome_Barroso). This label is actually an anagram for Rose Vanderboom.
Then, go to the area with the man in a white coat and a TV. Place the Vendome_Ba tape inside the VHS player and hit play.
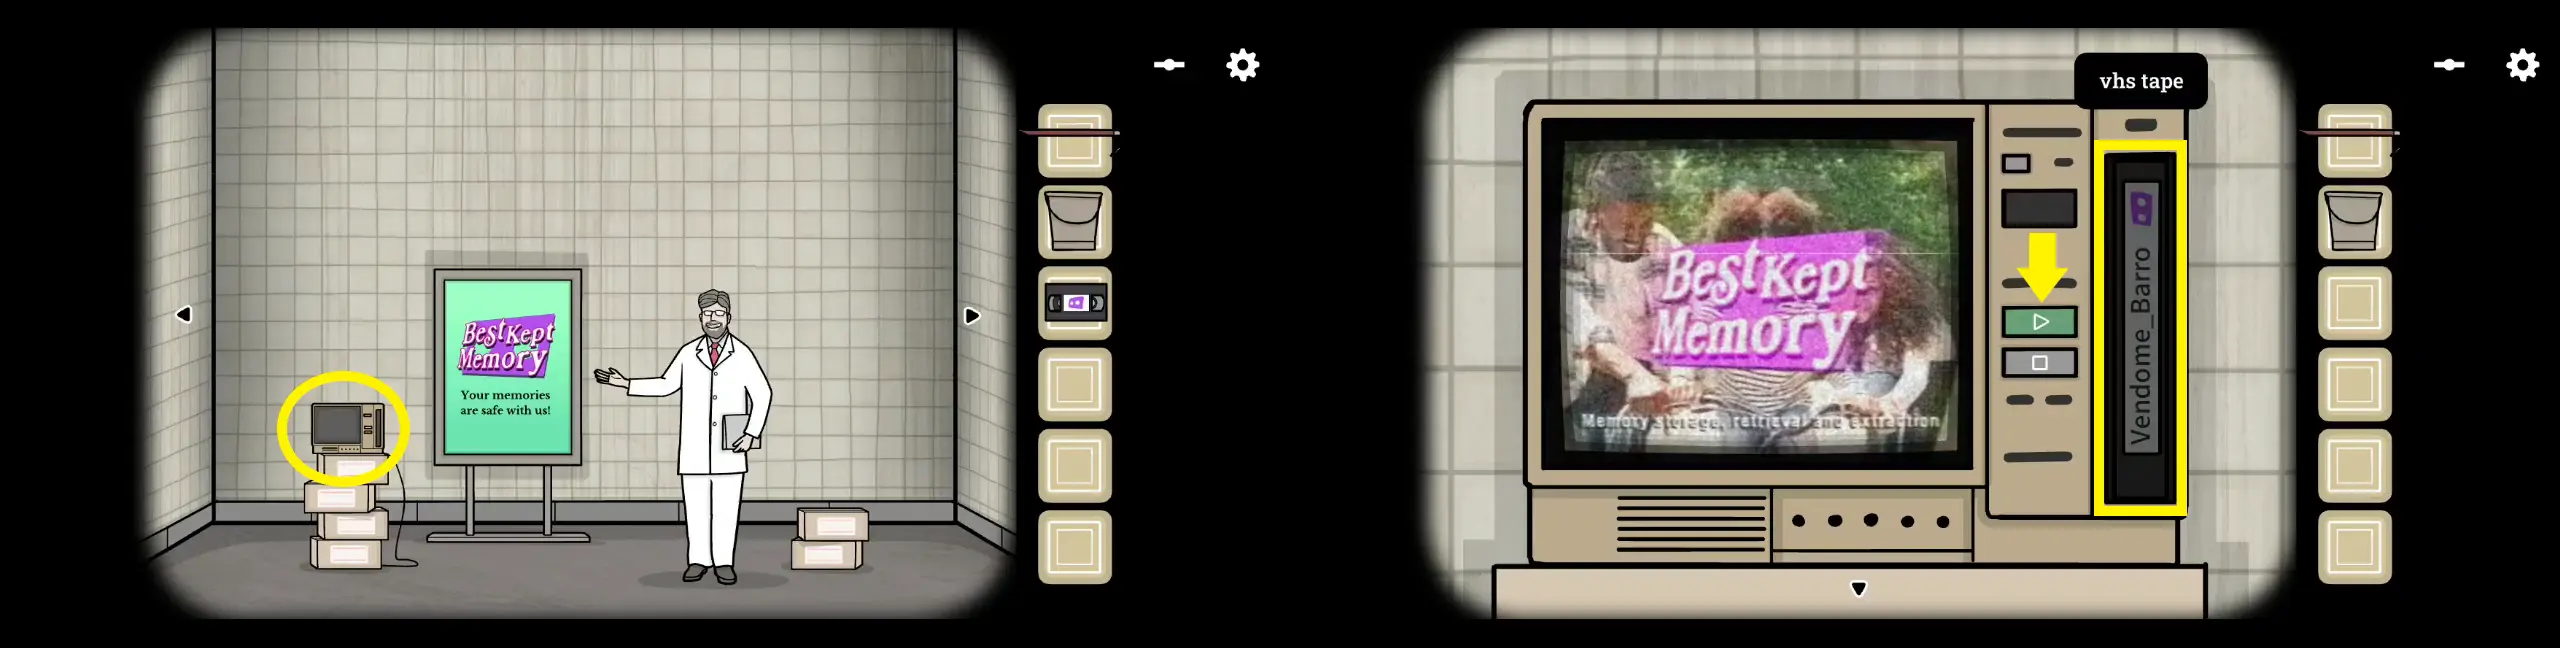
A series of images will flash on the TV. This will earn you the Your Memories are Safe with Us achievement. Click stop and take the VHS tape from the player. Don’t forget to do this and return it to its rightful place in the box or else you won’t be able to use the VHS storage machine properly.
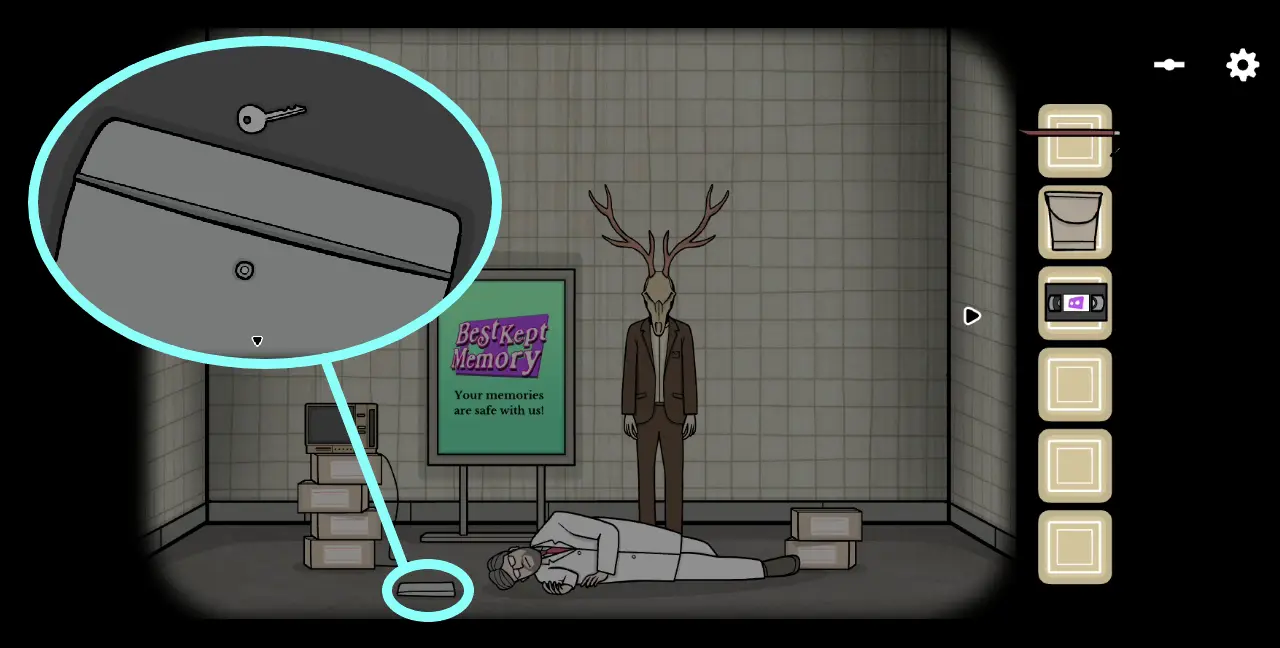
Before you can return the tape, you will find a familiar creature standing over the collapsed form of the man in a white coat. Beside the man is a folder. Click the folder and open it. Collect the key.
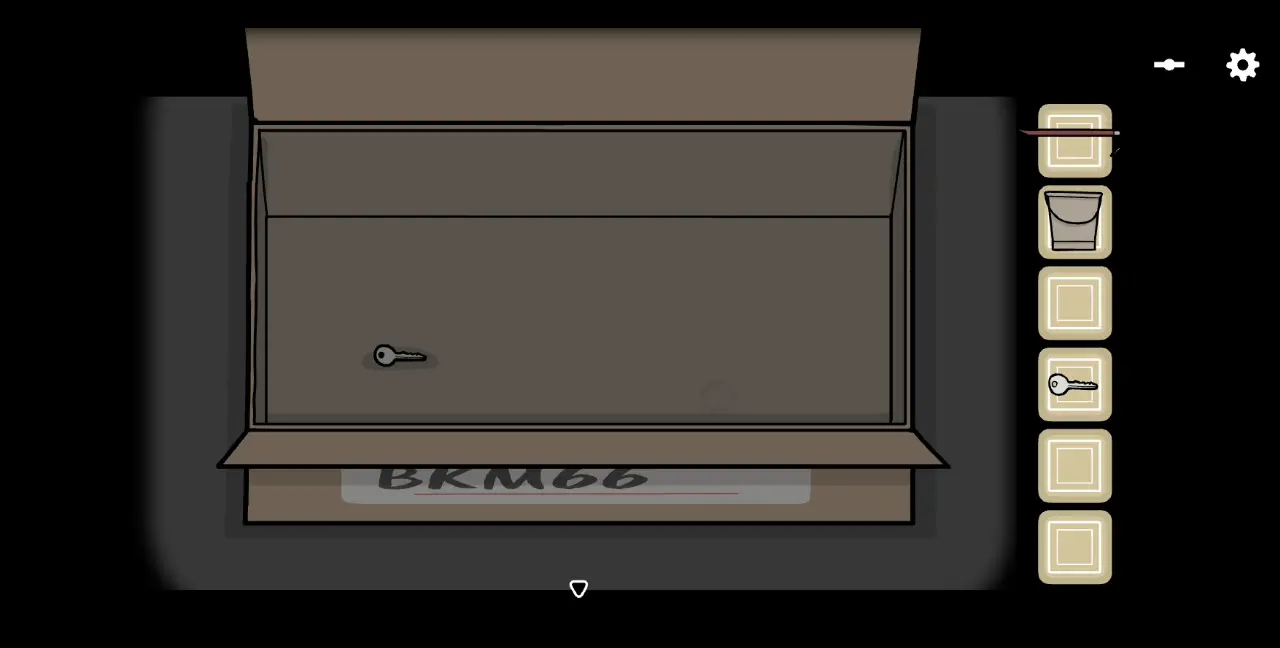
After returning the tape, change the number on the panels to 6-6 and click the red button. You will get BKM66. Open the box. Inside is another key. Collect it.
Next, go to the area with a door marked with yellow high voltage stickers. Beside it is a keypad. To open the door, you need to enter an eight-digit code: 8-3-5-7-9-9-2-4-4-2. This code is related to the winners of the Best Kept Memory ARG.
The door will open and reveal a new room. Click on the desk lamp three times. Again, a familiar creature will emerge and kick you out of the room. This will earn you the He is Back achievement.
Go back to the keypad and enter the eight-digit code once more. The door will open and you’ll discover that the room has been thrashed. However, the green cabinet remains standing. Use the two keys to open one drawer at a time. At the top drawer is an envelope, which will lead you to a contest form. In the bottom drawer is Mr. Memory. It’s up to you to participate in the contest, but just remember that Mr. Memory is important!

This concludes our walkthrough for Underground Blossom. What do you think of the game? Though there are many tense, creepy segments, what did you find the creepiest or most disturbing? Share your thoughts in our comment section below!