KingGroup Holdings’ State of Survival has certainly come a long way since it launched a little over a year ago. With its continuous updates and a growing number of fans and followers, State of Survival has earned more than 10 million downloads from the Google Play Store alone. The game has likewise maintained largely positive reviews from users across both Android and iOS platforms and has secured a firm grasp among the top 5 top grossing games on mobile in several countries.
State of Survival is brimming with content, to say the least, and from the first day of your dive into, you will always find something to do to improve your settlement and strengthen your forces. While there should be idle times between production and construction cooldown periods as well as waiting for stamina to replenish so you can venture out into the wild, efficiency requires more active time spent on the game. At some point, quick intermittent visits become more viable especially once your base loses its protection.
If you have just started playing State of Survival and still rummaging through its massive content, we urge you to read our State of Survival beginner’s guide first. The game’s style of quickly immersing you through the zombie-infested, post-apocalyptic world may be overwhelming so a good rundown of the basic aspects of the game you need to familiarize yourself with can help you survive it.

In this State of Survival guide, we will be focusing on more advanced tips and strategies to further boost your efficiency in production and farming as well as bolster both your offensive and defensive capabilities. In truth, you can go about all the upgrades and adventures in practically countless ways even without a sense of prioritization in mind.
You will still earn more power with each activity you initiate and spend time on and essentially, that is what you should aim for every time you jump in on the game. As far as efficiency is concerned, though, there are always better ways to go about each aspect of the game, and knowing it will save you both time and resources you can better spend on other matters.
1. Keep Your State Organized
Your ultimate goal in State of Survival is to develop and maintain a solid shelter for you and fellow survivors in the post-apocalyptic world. While it comes as a simple feat early on against mere zombies, the real challenge comes for when other survivors come to try and take what you worked for. Just like all other base-building strategy games on mobile, State of Survival has a highly competitive, PvP-centric environment and at the same time offers PvE content that can be very challenging even for experienced and veteran strategy game enthusiasts.
On this note, we would want to reiterate the importance of building as many farms and lumberyards as you can and keeping them upgraded and productive as well. Beyond all that, another way to boost your productivity is to keep the structures within your state organized. There are no clear-cut formulas on how you should do it so long as it works for you.
As an example, keeping your Barracks, Range, and Garage structure together for faster and more convenient training of troops is a good start. As your Headquarters reach new levels, you will also have access to additional farms and lumberyards so you should always check if you can build more of each structure. Allotting a space for the growing numbers of both structures can help ease collecting resources that they generate as well.
2. Focus On 3 Main Heroes
With trials, marches, and all other battles heavily, if not entirely, relying on your heroes, there is a continuous need to upgrade and enhance them. Without as many heroes to start your journey with, there is actually much fewer decision points relative to resource allocation as you will be inclined to invest upgrade materials in the first heroes that join you at the start of the game.
Upgrading the trio of heroes you use in most of your battles is a necessity but, at the same time, the acquisition of additional heroes, especially higher tier ones, will make you have to choose from among them which ones to concentrate your resources on. For the most part, even an efficient grinding will make it difficult for you to max out even just 3 heroes and, given this scenario, 3 heroes should be the limit of your focus.
While it may take some time before you can finally be decided on who your top 3 heroes will be given the random element of acquiring them and their extra fragments, having an idea how to delimit your choices should come early on to avoid unnecessary upgrading of heroes you will later replace with another one.

One of the factors to consider is the hero’s rarity. Heroes may either be rare (blue), epic (purple), or legendary (gold). Higher rarity means better stats, skills, or both stats and skills to begin with but this also means that the hero will be a lot more challenging to strengthen relative to hero fragments.
Although you can obtain certain legendary heroes for free, it will take a long while before you can actually have a trio of legendary heroes and if you are a free player, then upgrading them will become an even greater challenge. It is important to note as well that legendary heroes specialize in two types of activities, making them more versatile than epic and rare-grade heroes.
Another important point to consider is the type of troops that each hero commands in battle. Each hero will only provide buffs to a specific type of unit and since you will naturally rely on each type of unit equally, it is only reasonable to have one hero dedicated for each type of troops among your top priorities. In this regard, you should aim to always focus on a hero that specializes on Infantry, another for Riders, and a third for Hunters. You can check this out via the hero page.
Beyond specializing in a certain type of troops, each hero also has a specialty when it comes to the usual tasks you engage in that require their deployment. A hero who specializes in Patrol will excel in defending the city from attacks of other players and will earn buffs whenever they defend your settlement. Siege specialists, on the other hand, will be best on the offensive against other settlements either because they activate buffs for their marches when they attack another city or inflict debuffs on the city’s defenses.
There are also heroes that specialize in rallies and are best utilized for battles on the world map outside of cities. Heroes that specialize against the infected like Sarge and Candy are your best bets against clearing infected within areas as part of the campaign. Last, but not the least, are the gathering experts who can either carry a bigger carrying capacity from harvests from the wildlands or have an increased speed when doing so.
There are no best formulas to consider in terms of which combination or mixture of heroes work best across all scenarios. This is the part where your priorities in terms of which aspects of the game you want to specialize on should be considered. At best, though, it is advisable for your 3 main heroes to have distinct specializations so you can excel or at the very least perform well in at least 3 different functions.
Considering all of the above, you should do your best to focus on 3 heroes right away. As you chance upon new heroes to join your roster and decide to switch up your main focus, then at the very least continue to maintain the variety in terms of specialization relative to troop type and activity. Switching heroes can be a grueling experience as you would have to invest more resources in the new hero. Before you decide to consider another hero to join the ranks of your main team, therefore, you should ensure that he or she is an investment worthy for the longest term.
3. Always Play Defensively
In our beginner’s guide, one of the strategies we mentioned is that you should join an alliance as soon as you are able to and the next activity right after should involve you relocating your base to where your allies are. You need to understand that teleportation within the guild territory still has random properties and that you will be situated wherever there is a vacant space available.
While being in an alliance will tremendously be helpful to you on both offensive and defensive considerations, it will often still come with a lot of challenges. Just the same, being in an alliance is the only way to go and not belonging to one or being kicked out of one for inactivity will just be more difficult for you.
As far as the absolute defense is concerned, nothing beats having an active peace flare out. You start off with a good amount of immunity from attacks as you start building your camp. Once the 3-day peace period has lapsed, or if you inadvertently chose to attack another camp or even did a recon on it, you will always be prone to attacks even within the alliance territory.
There are a lot of extra preparations you need to set up before the peace flare expires and even if you have an extra peace flare or can afford purchasing them, no one can be shielded at all times. While shielded, you should know that all your heroes and troops that venture outside the city will be prone to attack and that the peace shield only immunizes your settlement and everything within it from assaults.
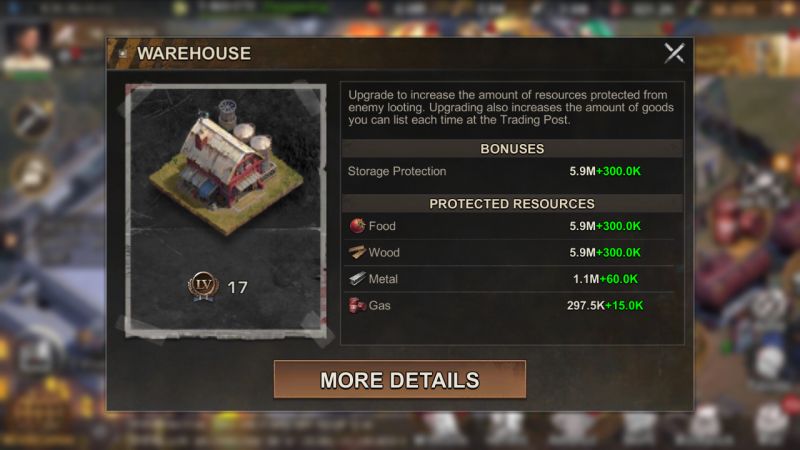
When attacked, you will lose valuable resources that you have in excess of what is protected by your warehouse, which is why you should keep your resources well within what you can save. Relative to this, you may encounter situations when you are lacking in certain resources early on to perform upgrades, training, researches and so and to proceed with the needed action, you will be inclined to consume crates within your backpack to instantly replenish your supply of the needed raw materials.
While doing so is okay and necessary, keep in mind that you should only consume crates enough for your current needs. Resources in crates are safe from plunderers in case you get attacked so keeping them that way is a sort of insurance for their protection.
If you are likewise a survivor who has lagged behind in terms of progression within the server, it may happen that you will always be attacked by much stronger players from time to time. More of ten than not, another player will attack your settlement following 3 conditions: they are certain that they will win, there is something to gain off of it, or simply flex how strong they are. While the last might not be acceptable at all, it is not so much of an extraordinary scenario in any base-building strategy game.
Relative to what we discussed earlier, this where keeping low to zero excess resources outside of what your warehouse can protect becomes critical. If your shelter is a potential target and based on recon, there is not much to gain from it, then chances are that aggressive attackers will pursue another target.
4. Move Your Troops To Safety As A Last Resort
Yet another good reason for other survivors to attack you is to simply add in to their kills, connected to flexing their prowess yet again. If you are on the receiving end of an attack that leaves all your troops in the hospital, then it is something that can be very difficult to counter on your own, most especially if the gap in power is tremendous in that even within allied territory, you are still attacked over and over again.
Fortunately enough, taking on the brunt of survivor attacks does not leave you exclusively to continue fighting, especially if the results are predictable enough and you will suffer casualties over and over again. As cowardly as it may sound, hiding your troops away is the smartest alternative than “feeding” them off to hungry survivors.
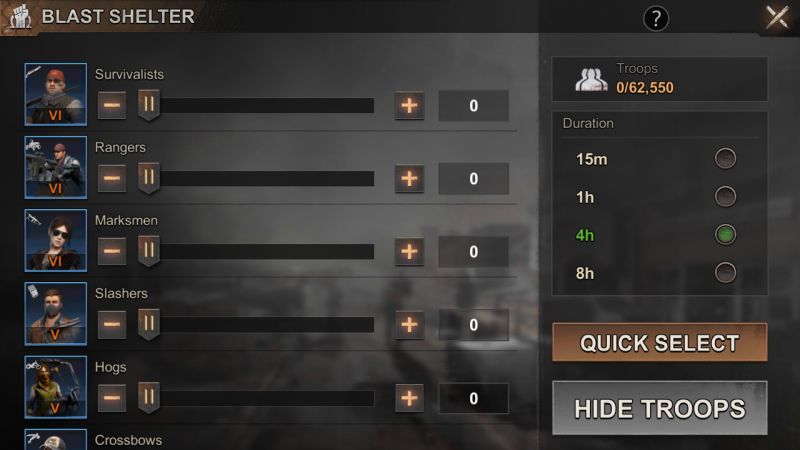
The in-house option for doing so is the is the Blast Chamber within your settlement. Note that based on its upgrade level, the Blast Chamber can only accommodate a limited number of troops, which is equal to a march. You can choose the duration within which these troops are locked within the Blast Chamber although you can recall them once instantly without penalty. Every second time you recall troops from the Blast Chamber prior to the lock-in period, there is a cooldown of at least 5 minutes. Troops hidden inside the Blast Chamber will not be lost if ever you camp is attacked.
Another option for you to consider if you want to save your troops from an incoming attack is to set them out into the wilderness and away from your camp. Although we already mentioned that troops outside your settlement can be attacked, this becomes an option when the settlement itself becomes the target of an attack and you have no peace flares left to shield your home. You do not necessarily have to settle at a resource spot or any specific tile within the wilderness, anywhere away from the camp for the duration of the enemy’s attack is good enough.
Relative to this, you should know that your troops outside your camp can only be attacked if they stop moving or are settled into a specific tile. A more active approach towards saving them may require moving through long distances through a rally devoid of any real targets or goals outside of self-preservation. You can choose to launch a rally towards a distant target and as your troops march to it, they will be untouchable for its entire duration.
You can also take advantage of fellow alliance members who have peace shield on. You can check any guildmate’s settlement to see how long they will still have their peace flares up so at the very least you know how much time your troops can serve as reinforcements to your fellow alliance member. Again, this only works when your fellow alliance member has his or her peace shields up and running. Otherwise you just run the risk of making him or her an even bigger target.
If the attack is imminent or for other reasons, any of the foregoing simply is not an option, then the only other thing you can rely on is the instant relocator. As this resource does not come cheap as well, it is best to weigh in what you would lose if you choose not to spend it before using it.
5. Influence Your Alliance To Be Defensive Or Find One That Is
Your alliance should stand as a bastion that reflects your very own strategies and inclinations in the world of State of Survival. For beginners, you would naturally want to join up with any alliance willing to take you in, potentially the ones with minimal or zero requirements imposed for newer players. While doing so will be critical to your survival on the early days or so, at some point, you will reach a predicament were some alliances who start out with maxed out members slowly dwindle out of existence as members start to grow inactive and the remaining active ones move on to stronger alliances.
As your personal growth and survival ought to be your number one priority, you should take an active role within your group and help out as much as you would want everyone else to shell out their active support. Providing assistance to speed up construction, upgrades, research, and training, as well as regularly contributing donations are just a start as you should continue to maintain active participation in guild exclusive content and features.
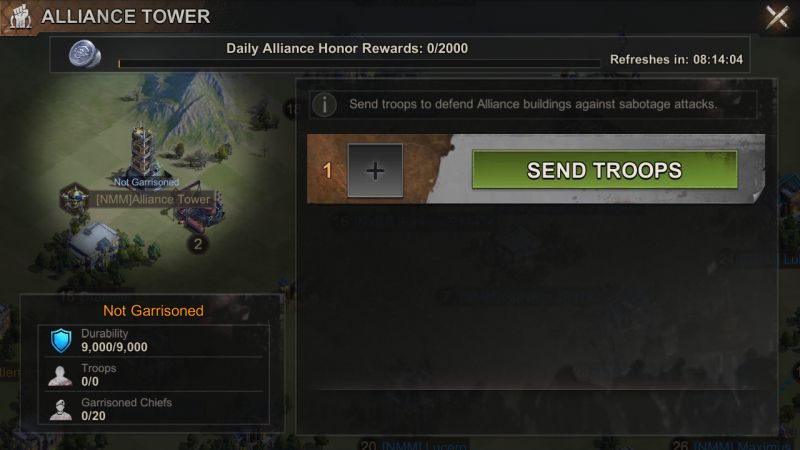
One key indicator of an alliance’s potential is how much fortified the alliance’s central tower or Capitol is. An active guild will likewise have strategically positioned observation towers around its territory garrisoned by its members. If you see that this, is far from the case within your alliance, then at the very least be a driving instrument towards a more defensive alliance strategy.
Another common predicament alliance fall into is retaliation, and en masse for that matter. Whenever two or more members of the alliance receive an attack from another survivor, there is this constant, tempting itch for vengeance. In some cases, fellow alliance members who are outpowered by the opposition will still choose to attack back and will even organize a rally to get as many fellow alliance members in on the march. As much as possible, however, these actions ought to be avoided as it will be costly for the alliance and not exclusively to members who chose to launch an attack.
One key element to keep in mind in the world of State of Survival is that defending is more advantageous than attacking. For one, every offensive march is limited in capacity and even if there are 5 alliance members who join in on the rally, chances are that the survivor they choose to attack will be aided by his or her guild. Another point to consider is that as a defender, troops are injured and will be healed back to full health after some time, while attacking troops will perish and will have to be replaced with new recruits.
Considering everything, therefore, it will always be a smarter choice in State of Survival to always be on the defensive, as an individual, and as a member of an alliance. If you happen to be in an alliance that does not seem to align well with your strategies and inclinations, or simply lacks enough activity or drive to match your enthusiasm for the game, then it is best to start looking for another one.
That concludes our State of Survival advanced guide and we hope that you learned much from the tips and strategies we shared. As we continue to dive even deeper into the game, it may happen that you have discovered some additional tips and strategies we have yet to realize on our own. If you happen to do so, then tell us about it through the comment area!