Rivengard is an exciting turn-based strategy game developed by Snowprint Studios where you command up to five heroes against rival forces, either in the campaign or through PvP matches. With different heroes to collect, gear to equip, and elemental affinities to take into account, Rivengard is a lot more in-depth than it appears on the surface. There’s even a variety of challenges available, either to sate your curiosity or your inventory needs.
All this can seem rather overwhelming at first and while the game does have a tutorial, our comprehensive Rivengard beginner’s guide will cover some details and mechanics that are easily missed. Whether it is simply mission-hopping or going toe-to-toe with other players, we are here to help you get started. Stay a while to see what Rivengard has in store!
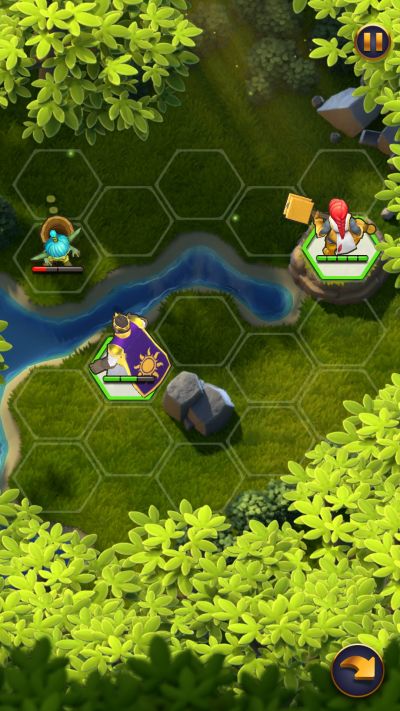
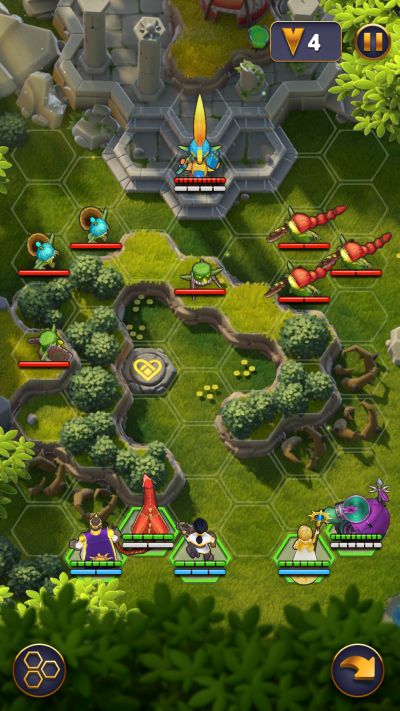
1. Movement, Maps, And Monsters
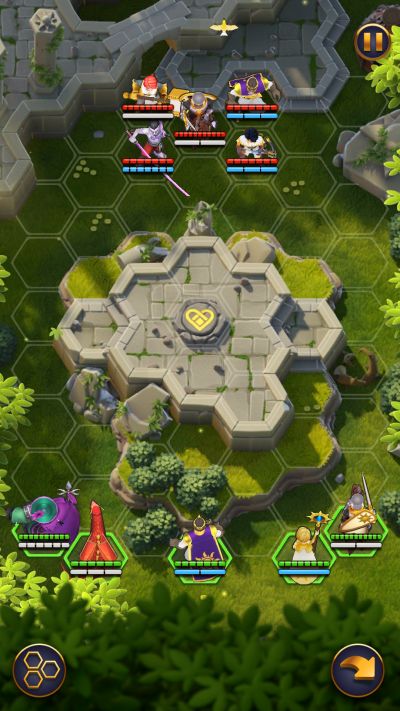
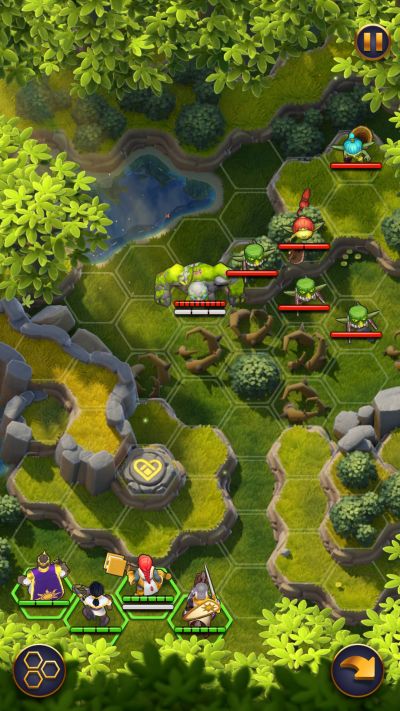
Barring the tutorial missions, any given match of Rivengard begins with you selecting what heroes you want to field, generally ranging from three to five slots. All heroes have two stats that determine movement and attack range, though the latter really comes into play with ranged heroes, and once they have moved or attacked, they can no longer be used for that turn.
Heroes also have an active ability and a passive ability. Active abilities are available at the start and can easily turn the tide if used properly. However, bear in mind that active abilities can only be used once per battle and will prematurely make your hero unusable for that turn. Passive abilities need to be unlocked but always take effect as long as the hero meets its requirements.
The map is a hexagonal grid with tiles that can restrict movement or give various effects should anyone stand on them. Some of these special tiles include:
• Thorns: Slows down anyone stepping on them and makes them take extra damage
• Bushes: Reduces incoming damage and does not restrict movement
• Healing Tile: Exactly what it says–heals anyone currently on it at the start of a turn
• Burning: Unless the unit is explicitly immune to it, they will take damage each turn the tile is on fire
On top of this, some tiles will be at different elevations, necessitating the use of nearby cliffs to climb onto them. This can be a bit deceptive on what tiles your units can cross. Any unit at a higher tile will deal more damage to enemies, even if they are melee-oriented, though only ranged units can attack enemies on higher cliffs. Some units have a means of bypassing these restrictions, while others are particularly affected by them.

Exclusive to the campaigns or through hero-specific abilities are generic monsters that rely on numbers to overwhelm your team, or serve as distractions for enemy heroes. They have no abilities, but are still subject to the same rules as everyone else. Monsters summoned by hero abilities are wholly independent and move and attack without player input.
2. Knowing And Managing Your Heroes
Completing the tutorial of Rivengard will unlock five heroes to start with, though you can summon more via the Summoning Portal available through the shop. Certain heroes (particularly those encountered as campaign bosses) are unlocked by finding enough Summoning Shards, which automatically reward the hero once enough Shards are collected. In both cases, using the Summoning Portal uses Gems, the game’s premium currency, or Summoning Tokens, which are awarded from chests.
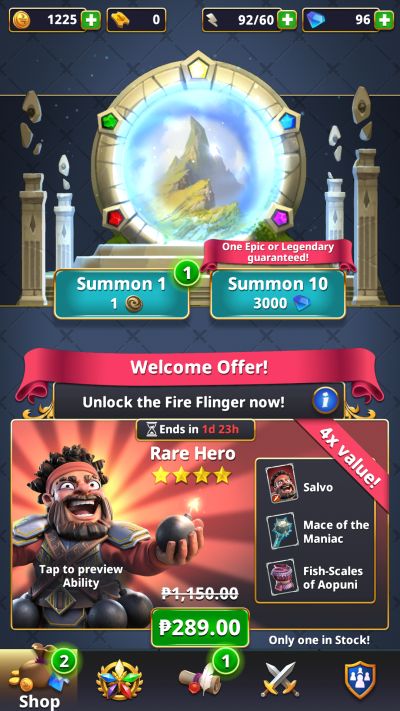
You can use the Portal once or ten times, with the latter choice guaranteeing at least one Epic or Legendary-tier reward. Furthermore, equipment and resources are also available via the Portal. Heroes are split into three categories: Warriors, Rogues, and Mages. Warriors deal more damage to Rogues; Rogues deal more damage to Mages; and Mages deal more damage to Warriors.
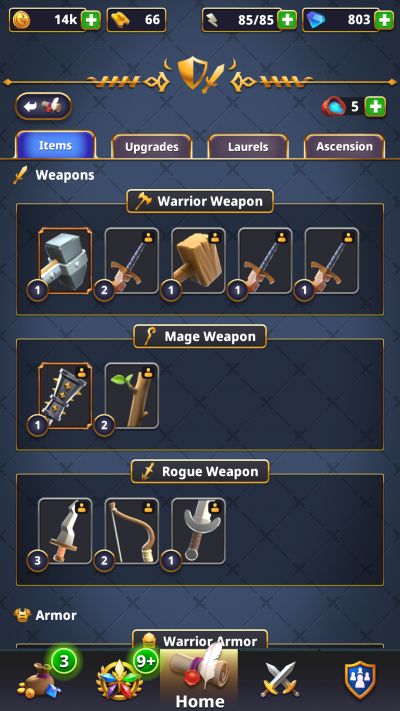
You can view all collected and future heroes through the Heroes Tab at the bottom of the screen, with the icons of un-acquired heroes grayed out. An individual hero gains experience by winning matches, even if they are killed, or through using Pamphlets awarded from chests. Heroes have two inventories: one for weapons and armor and one for stat upgrades. Both of these can be found as mission rewards, by completing daily quests, in chest drops, and in the above-mentioned Summoning Portal. A few notes on Heroes, Weapons, and Armor:

• Heroes can only accept up to six stat upgrades before you have to spend gold to consume them, rolling a new set of upgrades to find.
• Weapons give heroes a chance to deal a critical hit, which adds additional damage also listed on the weapon itself.
• Armor can increase a given hero’s health and armor value, or give them a chance to block a set amount of damage entirely with any excess damage affecting the hero normally. Armor value is split into two types: physical armor which absorbs attacks from warriors and rogues, and magical armor which absorbs attacks from mages, and lasts until it is depleted. Rogues are unique in that they can have either magical or physical damage depending on the individual hero.
• Weapons and Armor can be forged to improve their stats, which requires gold and item dust. Item dust is acquired primarily by dissolving unused weapons and armor, which also refunds any gold used to upgrade them. Some pieces of equipment require your hero to be a certain rarity, which can be done by using Laurels found in the same places as Summoning Shards. This also has the added advantage of boosting their stats.
Upgrading your hero’s rarity is also the only way to unlock their passive abilities. Some heroes start at a higher rarity, unlocking said passive ability right from the start. In the event that you roll Summoning Shards to heroes you already have, they will automatically be converted to Laurels.
All heroes are grouped into Factions, each dedicated to a given color: Light, Green, Red, Dark, and Blue (a lineup which might sound familiar to some people). Each color deals more damage to two other colors:
• Light-aligned units deal more damage to Red and Dark units:
• Green-aligned units deal more damage to Dark and Blue units:
• Red-aligned units deal more damage to Blue and Light units:
• Dark-aligned units deal more damage to Light and Green units; and
• Blue-aligned units deal more damage to Green and Red units.
Advancing through the tutorial will unlock all five heroes from the Light-aligned Radiant Order, who are listed below.
• Sigrid: The starting hero, a Warrior armed with her trusty hammer. Her active ability has her spin, dealing damage to all enemies adjacent to her, while her passive ability deals damage to nearby units provided there are at least three of them next to her.
• Areus: A lightning-wielding Mage. His active ability throws a thunderbolt that bounces on up to four enemies and his passive ability deals damage to the first melee enemy that attacks him.
• Sir Matteus: A silent knight whose noble steed allows him to pass through thorns without wasting a turn, and counts as a Warrior. His active ability summons a pair of spectral knights whose stats increase the longer Sir Matteus holds off in using the ability. His passive ability heals him for a small amount should he be next to one of his specters at the start of your turn.
• Monty: A young arbalest willing to prove himself, and is classified as a Rogue. His active ability fires a powerful bolt from his crossbow that ignores armor, deals up to half of his chosen target’s health, and knocks them back. His passive ability increases his damage provided he has not moved.
• Hanna: Another Mage who serves as your dedicated healer. She can heal allies by selecting them much like you would an enemy. Her active ability heals all allies adjacent to her for a greater amount, and her passive ability heals adjacent allies each time she heals someone.

Besides the starting five, we’ve also unlocked some additional heroes listed below. These may differ based on your playthroughs and luck:
• Taro: A portly pikeman Warrior from the Dark-aligned Waning Moon, his polearm deals more damage to mounted units like Sir Matteus. His active ability taunts nearby enemies into attacking him and grants him a special Force Shield that defends from both physical and magical attacks. His passive ability restores his armor provided he does not move at the end of his turn.
• Gibbo and Gobbo: A pair of goblin spearmen from the Green-aligned Rinji Dynasty who count as Rogues. Their spear also deals extra damage from mounted units. Their active ability targets any enemy two tiles away from them, pulls them to the nearest free tile, and deals damage. Their passive ability deals damage to anyone directly behind their target.
• Sunshine: A mechanical dragon from the Red-aligned Blazing Brew who strangely counts as a Rogue and behaves quite differently from other heroes. Being a machine means that she can only be repaired instead of healed, but repairs will also restore her armor. She also restores her armor at the start of your turn and her wings allow her to ignore terrain restrictions and obstacles, allowing her to quickly reposition herself.
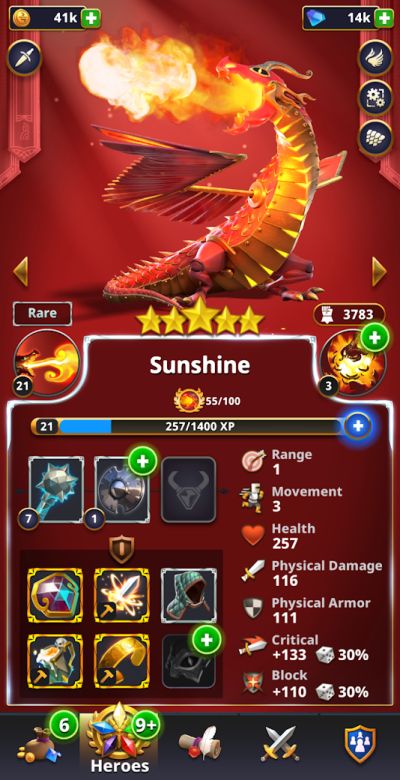
Her active ability can target up to three tiles away, dealing heavy damage to her target while igniting the tile they are standing on, as well as dealing splash damage to nearby enemies. Unfortunately, she cannot use it on enemies right next to her. Her passive ability, which is unlocked at the beginning due to her higher rarity, causes her to explode on death, damaging friend and foe alike.
• Cinder: A Warrior-Engineer also from the Blazing Brew, she deals and receives extra damage on the start of your turn and can repair mechanical units like Sunshine above. Her active ability allows her to deploy a turret next to her provided she does not move and it automatically fires on any enemy up to two tiles away. Her passive ability restores the physical armor of any allies near her.
3. Missions And Matches And Marauding, Oh My!
Rivengard has multiple missions you can unlock as you play which are all available via the Battle Tab. The first set of missions you have is the opening campaign where you butt heads with the Rinji Dynasty. Campaign mission performance is ranked with stars, with three stars achieved if all your heroes survive; two stars achieved if at least only one of your heroes is defeated; and one star awarded if only one of heroes is left standing. Each star awards a one-time bonus when you reach it for the first time. Completing a campaign mission in a set number of turns also awards a Lightning Victory bonus.
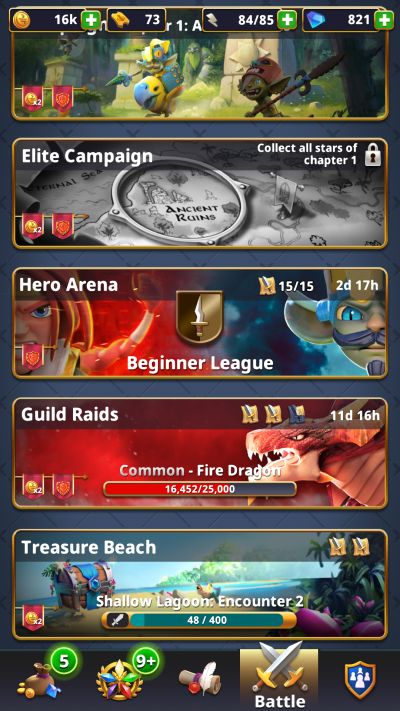
Should you get all three stars in a given mission, you can run the mission with raid tickets instead, automatically getting the rewards in exchange. However, all campaign missions can only be completed a set number of times and are refreshed at roughly 12:00 AM UTC. Campaign missions also consume stamina, which is refreshed at a quicker pace: one unit of stamina every five minutes.
However, this still limits your daily campaign progression. The campaign will be your primary source of coins, equipment, and Summoning Shards/Laurels. Later on you can unlock the Elite Campaign, which is naturally much harder but offers more lucrative rewards.
If you want to test your heroes’ mettle, you can fight in the Hero Arena, where you select your heroes to take on another player’s collection. The overall power of your heroes is listed by the Power Score value towards the right of the screen, so it is in your best interests to choose an opponent whose Power Score is close to yours.
Unfortunately, the game’s Power Score filtering is not perfect, and you may encounter players with a much higher Power Score than yours. In that case, you can spend a gem to reroll your opponents until you get someone you think you can take on. Winning a set number of fights will reward chests.

You can also unlock access to guilds, which can hold up to twenty people. These can be filtered by country or by joining an international guild. Guild members have periodic access to a raid (not to be confused with the raid tickets mentioned above) where the guild has to take on dragons of increasing health. Each dragon occupies up to three slots on the map, and pushes away any unit that happens to be beneath their landing site.
Players have a limited number of turns to deal as much damage as possible before the dragon flies off, and players can only engage the raid up to three times a day. Upon the dragon’s defeat, all current guild members are awarded a chest and go on to fight the next dragon.
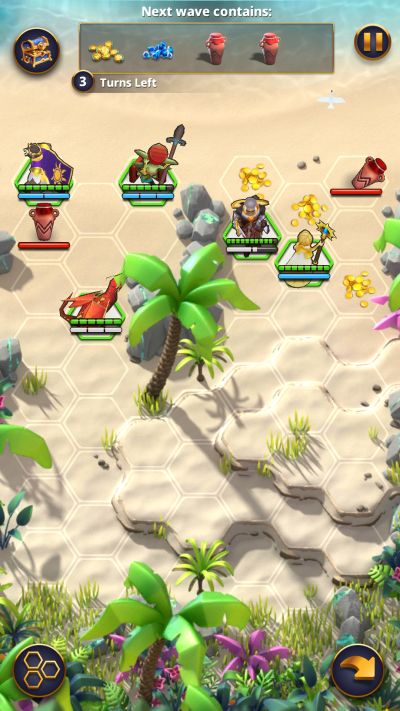
Lastly, you have Treasure Beach, where you command your heroes in gathering riches off the coast, dealing with the occasional enemy that washes ashore. Like raids, you only have a limited number of turns to collect whatever goodies come in and you can only visit the beach twice a day.
In all cases, completing missions, winning matches, and doing general tasks will add up to your Quests and these offer some nice bonuses for completing their requirements. The chests they award are the main source of Summoning Tokens as well.
4. Rules (And Tips) Of War
This section of our Rivengard beginner’s guide is split into two parts: a section for general tips and a section dedicated for beating the first set of bosses in the campaign.
• In all cases, always take a look on what your enemies are composed of, and build your party accordingly. If the enemy team is mostly warriors for instance, build your team towards mages to bypass their physical armor and lay off on rogues unless you have some way of drawing fire away from them.
• Although not much, elemental interactions can tip the scales in your favor ever so slightly, and it really comes into play in guild raids and treasure beach. Some enemies encountered there have the Elemental Affinity passive, which causes them to take double damage against opposing elements.
• Know the terrain of a given map, as it may have things like healing tiles in key areas or chokepoints to place your dedicated tanking heroes in while your ranged heroes can fire away.
• When it comes to summons, save up on Summoning Tokens as they are much easier to come by compared to gems. Go for ten summons each time: you will get more opportunities for rolling either a new hero, or Laurels to increase the rarity of preexisting ones.
Now we will discuss how to beat the esteemed members of the Rinji Dynasty:
• Your first boss is Boulder, a moss-covered golem who can opt to hunker down instead of moving, doubling his health at the expense of reducing his damage and hurting any enemies near him. Thankfully, his lumbering size means that he stops moving once he moves to higher elevations, so it is only a matter of having Areus (as you have yet to unlock Hanna at this point) and Monty focusing on him while Sigrid and Sir Matteus deal with Boulder’s reinforcements.
• Your second set of bosses are Gibbo and Gobbo (yup, the same goblin pair we mentioned earlier in this guide!), who have access to both their active and passive abilities. Be very careful with how you position your forces or else the duo can end up damaging your more fragile units, and they can pull someone out of formation with their active ability. They start off with magical armor, so have your warriors and rogues take them on.
• Your third boss is Sir Florianus, whose avian mount allows him to ignore the thorns that dot his arena., The real danger lies in his passive ability, where he counters the first melee attack he receives in a turn with a full 360 degree sweep.
This means surrounding him becomes quite the gamble, and it makes his active ability, where he damages his target and pushes them one tile back, rather pale by comparison. This can make getting all three stars in his fight quite a pain.
• Your fourth boss is Pari, who can launch a spider’s web that deals damage to any enemy up to two tiles away and damages up to two to three tiles behind her target. The webs are bad enough in that they act like weakened Thorns that dissipate after you cross them. Pari’s passive ability increases the damage she deals to anybody caught in her webs, and allows her to generate webs on any tile she travels to or attacks.
This makes it easy for her to kill one of your heroes on her first turn. Try to lure her closer by staying out of her active ability’s range and use bushes to reduce the damage of her active ability.
• The fifth and last boss of the Rinji Dynasty is Tawa Rinji, who comes with the ability to heal her allies. Her active ability is particularly mean, as she launches twelve to sixteen projectiles that deal low damage to random enemies within three tiles of her.
This is made worse by her passive, which causes any damage from her to bounce to any enemies next to her target, and allows her healing to bounce towards adjacent allies as well. Her active ability does prioritize summoned units however, so the likes of Sir Matteus can be used to bait out her most powerful attack and leave her vulnerable.
In all cases, defeating campaign bosses allows you to acquire their Summoning Shards, unlocking them for your own use. That being said, the Rinji Dynasty’s finest warriors can lend their strengths to you with enough time, as will later bosses you will run into during the campaign.
And that wraps up our beginner’s guide for Rivengard. We hope that our overview of the game, as well as the tips and strategies will come in handy when you decide to try this game out yourself. If you have any tips we might have forgotten or missed, please let us know in the comment area! Good luck and game on!
Anonymous
Tuesday 9th of May 2023
Gems code Six-34-roe
Vic
Wednesday 10th of March 2021
Did yo know, if you go yo profile settings - refer a friend and input this code: cub-24-few you'll get 100 gems and 1000 Virgins for free! Use it now and thank me later)
soulwarrior
Sunday 14th of February 2021
Thank you for this guide. It's great! I just wish I had read through it before I finished quite a couple of levels and ranked up some units. ^^