One of the longest running action MMORPGs has finally made its way to mobile devices! Dragon Nest M is the highly anticipated mobile version of the classic Dragon Nest. You can now relive the legend of the six heroes on any Android or iOS device! Fans from all over the world are raving about how well the game has translated into mobile. You get to experience the same action-packed battles, instanced dungeons, world bosses, and more. Choose one of the six classes and begin your journey in Lagendia.
Use different combo attacks and skills to take down enemies and bosses. Equip your character with various gears to increase your combat power. Once you are confident in your fighting ability, you can challenge players from around the world in the PVP Arena! Do you have what it takes to become the next Legend? Read our Dragon Nest M beginner’s guide in order to make it to the top!
1. Choose The Right Class

If you played the original game, you will notice that only six of the nine classes are available. The other three might be added in future releases, but for now, you will have to choose from what is available. Each of the six classes has its own set of advantages and disadvantages. Make sure you pick a class that will suit your style and mastery. Some classes are more difficult to use but can be powerful in the right hands. If you are still new to the game, we recommend that you pick the Academic. You will get the Alfredo skill during the tutorial and he will act as your personal body guard while you fire at enemies from a safe distance. We have listed the different classes below to help you decide.
Warrior – This is the basic melee class. He is a well-rounded fighter that has decent speed, defense, and damage. Overall, he is a good starter for beginners.
Archer – A ranged fighter, she is potentially one of the most powerful damage dealers in the game. She can be a little tricky to play since you need to move around a lot in order to use her effectively. Choose her if you are confident in your dodging skills.
Sorceress – Another powerful damage dealer, one of the main problems of this class is survivability. You will most likely need teammates if you want to choose this class.
Cleric – As the game’s tank and healer, this class has great survivability. The drawback is that he has lower damage than the other classes. You will be able to survive, but it will take you longer to complete dungeons on your own.
Academic – An adorable little girl who wields some heavy guns, she is perfect for newbies who play solo. Her assortment of robots helps her survive even without teammates.
Assassin – As you could probably guess, this is a damage dealer who specializes in quick and stealthy executions. He has a combination of heavy attacks and quick light attacks. He is a little more complicated to use than the Warrior, so pick him only if you are confident in your fighting ability.
2. Targeting Can Be Tricky
Dragon Nest M features an auto-target system that helps players adjust better to the mobile platform. Unfortunately, it will only make your character look in the direction of the enemy. Your skills and attacks will not automatically home in on your target. That means you can still miss even if your enemies are auto-targeted. Attacks have lower chances of missing. Skills can be trickier because of the casting delay and distance. You will need to anticipate the movement of your enemies to ensure your skills will land.
3. Upgrade The Right Skills

There are fewer skills available in Dragon Nest M compared to the original. With that said, there are still more skills available than you could fit into your hotkeys. You also have limited skill points, so you will need to invest them wisely. The good news is, you can experiment with the different skill combinations until you find the set that works best with your play style. The game gives players unlimited skill resets below level 30. This should be enough for you to figure out the skill path that you want to take. Do not be afraid to try out different skills in order to create the perfect killing machine.
4. Switch Between Different Views
There are three views available in the game: 2.5D, 3D, and 3D+. The first one is the default, and it positions the camera at a slightly higher angle to allow you to see more of the area you are in. It has a fixed view, so it can be limiting at times. The 3D view zooms in a little, letting you experience the battle up close. The camera is still fixed, so you won’t get too dizzy following your character around. If you are the type who likes to explore a lot, you could go for the 3D+ view which gives you the freedom to rotate the camera as much as you want. Just be careful while doing this in battle because you might lose sight of your target. Your character will still auto target enemies, but you won’t see if the incoming attacks if you rotate the camera the wrong way.
5. Tweak The Game Settings

Depending on the performance of your device, you might want to tweak the settings a little. If you are experiencing lag despite good internet connection, it might be the graphics settings of the game. Tap on your character’s icon on the top left corner of the screen to access settings. Tap on System to view the basic settings. Ch
ange the Graphics to Medium or Low to help your device run the game better. You could also reduce the Same-screen player count to reduce the lag further.
6. How To Take Down Bosses
Bosses are tougher and stronger than normal enemies. They also cast skills that cannot be interrupted. Luckily, boss skills will always give you a warning beforehand. You will see a red highlight on the area where the skill will hit. All you have to do is get out of that area before the skill is done channeling. Since there is always the danger of getting hit by boss skills, it is best if you play it safe until you break his armor.
The boss’ armor is indicated by the small yellow bar below his health bar. Once it is depleted, the boss will be stunned, leaving him vulnerable to attacks. You can then go all out with your own set of skills for as long as he is stunned. Make sure you keep an eye on the armor bar because it will slowly regenerate. If it fills up before you can kill the boss, he will be able move and cast skills again.
7. Aim For Three Stars

Every stage has three conditions that need to be met in order to gain a three-star rating. This is shown on the left side, before you enter the stage. Take note of the conditions and aim to meet them as much as you can. Once you collect enough stars, you will be able to open a star chest. These chests contain various rewards including currencies, equipment, and other items. The conditions often include completing the stage while keeping your health above a certain threshold. This is why it is important for you to play safe during boss battles as much as possible.
8. Activate Your Titles
As you progress in Dragon Nest M, you will be able to collect a few Titles. These are obtained through various means, including completing the main chapters of the story. Each Title gives out a bonus stat as well as added BP. However, you will need to ensure it is activated in order to gain the benefit. For example, the first Title you will acquire is the Beginner Title. This gives you a +5 VIT bonus as well as +50 BP.
You can activate Titles in the Character menu. Tap on the character icon on the lower right of your screen. Click the third button on the left to see the list of Titles. The once you don’t have yet will be darkened, but you will see the bonuses they give and how to unlock them. Tap on an acquired Title then tap on the Activate Attribute button at the bottom to gain its bonus. Keep in mind that you don’t have to display the Title you are using. You can choose a different Title to display by tapping on the Display Title button on the lower right corner.
9. Feed Your Fairies

When you reach level 7, you will be able to unlock the Fairy screen. You will also receive your first Fairy. Fairies give you bonus stats and added BP. The higher their level, the more BP you gain. To raise their level, you will need to feed them. Open the Fairy menu then tap on the paper bag icon with a pawprint on it. This will show you the different types of food you can feed your Fairy. Don’t worry about running out of food. You get to draw free rice balls up to five times each day at the Fairy Shop. Keep in mind, though, that your Fairy cannot exceed your level. You will need to regularly check back on your Fairy every time you level up.
You will be able to unlock additional Fairy slots at levels 10, 28, and 35. This means you will gain even more BP. Only the Captain, however, will be able to use his skill. Each Fairy has his own unique skill that can help you in battle. Make sure you choose a Captain that has a skill that will work well for your play style. For example, the Gustwalker skill gives you the chance to trigger Move SPD Increase with each monster you kill. While added movement speed is useful for all classes, it is exceptionally useful for Archers and Assassins who need to move around a lot while attacking.
10. Log In Daily For Rewards
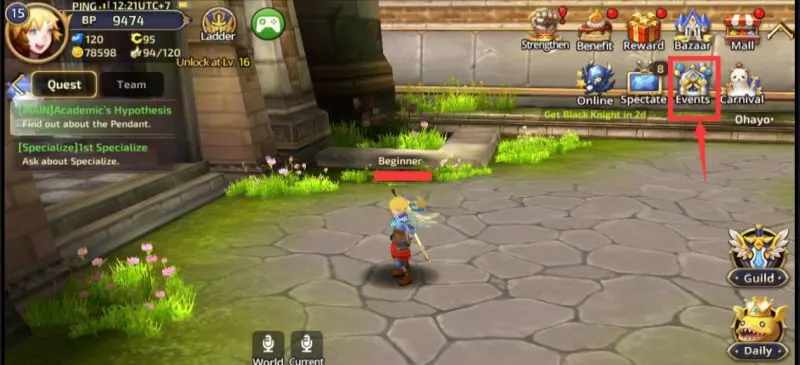
There are several icons on the top right of your screen. One of them is a cake icon called Benefit. Tap on it to view different freebies that you can get from the game. If you are new, you can get a reward for your first top up. What you are really after here, though, is the daily Sign-in Reward and the free Gold Chest. Daily rewards include Dragon Coins, Fairy eggs, enhancement materials, and more. Even if you don’t have time to play, you should at least log in to claim these.
Another icon you should check out is the Online icon. It is an ongoing even that gives you various items for logging in daily. Right now, logging in for three days will guarantee you an A-grade Fairy, so make sure you don’t miss it! Other rewards include Fairy food, stamina, Dragon coins, and even costumes!
11. Claim Achievement Rewards
While you are checking out icons at the top right section of your screen, you will notice a gift box labeled Reward. Tap on it to see Achievement, Level, and Target rewards that you have acquired. If a reward is waiting for you, you will see a red dot on the tab where it is located. You get various rewards for reaching level milestones, completing Nests, finishing story chapters, logging in daily, and winning in PVP. There are a lot of Gold and items waiting for you here, so make sure you check it often to see if you have completed any achievements.
12. Get Notified
Sometimes, when you are busy with life, it is easy to forget important events in-game. It’s a good thing the game provides push Notifications for situations like this. When you go to the Settings menu and tap on the Notification tab, you will be able to toggle On or Off the different push notifications. The game can notify you whenever the free stamina is available. You can claim it during lunch and supper. You can also get notified when the Guild and World Bosses are available. These are important events that occur at specific times of the day, so you won’t want to miss them. Turn on the notifications to ensure you are always updated!
Gear up, your journey awaits in Lagendia! Just follow our Dragon Nest M strategy guide in order to conquer dungeons with ease!

TheLongTimeFan
Friday 10th of August 2018
Can you have multiple characters/classes.