NEXON is known for publishing high-quality mobile games and the company’s latest title called Darkness Rises definitely lives up to its own standards. Darkness Rises is quite possibly one of the most polished action RPGs to ever grace mobile devices. The game takes pride in its immersive combat system and deep narrative, and it has every right to be proud. Forget about the cookie cutter action RPGs you have played before and prepare for truly epic battles filled with hard-hitting combat and jaw-dropping kill animation. Choose one of the four classes and embark on your adventure to defend the kingdom from marauding orcs. Follow a gripping storyline that will keep you intrigued from beginning to end. This is not your run-of-the-mill good versus evil fairy tale. The future of the kingdom, and the rest of mankind, rests upon your shoulders. Check out our Darkness Rises beginner’s guide if you want to succeed, as we are going to sharing some pretty cool tips and tricks!
1. What’s The Best Class In Darkness Rises?
There are four main classes in Darkness Rises, and the one you choose will determine how well you will enjoy your adventure. Each class has its own strengths and weaknesses, so the best option really depends on your play style. Familiarize yourself with the different classes before making a choice, so you won’t regret it once you have invested more time and resources. We have listed the different classes below along with recommendations for your reference.
Warrior – This is the melee DPS-Tank of the game. It has the highest defense among the four classes but it still deals good damage. This is the perfect class for beginners because of high survivability and straightforward combat style. Choose this if you are not used to action RPGs or just want to go through the storyline without much care about the combat system.
Wizard – This class is great at dealing magic damage but can be slow in releasing combos. Pay attention to your positioning and use your skills strategically in order to survive. Her average difficulty rating makes her a good choice for beginners while still providing enough challenge for advanced players.
Berserker – While this class has the highest attack rating among the four classes, he is also the slowest. He has average defense and good HP, helping him survive despite his sluggish speed. This is recommended for more advanced players since you can easily get overwhelmed by enemies if you cannot keep up with their speed.
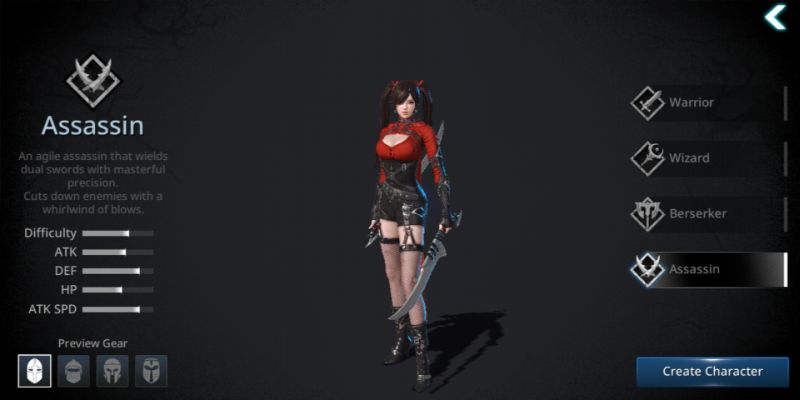
Assassin – By far the most difficult to use class in the game, this dual sword wielder has the lowest HP in the game and deals average damage. Speed is where she truly shines since she has the highest attack speed in the game. Choose this class only if you are comfortable with constantly moving around the battlefield to avoid getting hit. If you get caught for even a second, there is a good chance you won’t survive.
2. Customize Your Character
Do not be disappointed if you are taken straight to the story after choosing your class. The game walks you through the basics of combat first. Once you are done with the combat tutorial, you will be prompted to download the rest of the game. During the download, you will be taken to the character customization screen. Prepare to be impressed because this game has one of the most detailed character customization available. Aside from the presets, you get customization sliders for almost every part of your body. Feel free to explore all the options, from tweaking your eyebrows, to changing your body shape. Take time to customize as much as you want because it will cost you if you decide to make changes later on. Once you are satisfied with your character, just hit the start button to enter the full game.
3. Face Your Enemies
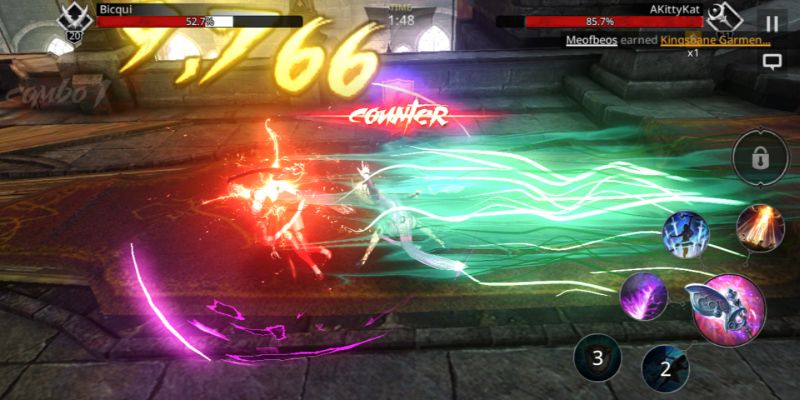
One of the reasons this game is so enjoyable is that the combat is truly immersive. You do not get coddled with auto-targeting that lets you win battles without even knowing where your character is. Of course, that means you need to actually pay attention to what your character is doing during battle. You will attack and cast skills in the direction your character is facing. If you were running away from enemies, make sure you turn around and face them first before casting or you will end up wasting your skill. You will even end up giving your enemies a free hit on your backside while your character stands there casting skills in the wrong direction.
4. Watch Out For The Skull
As you fight during battle, you will sometimes see a skull appear on the left side of your skill buttons. This is your rage skill. Tapping on it will treat you to a fun little scene where your character finishes off an enemy in slow motion. Make sure you tap on it quickly or you will miss your chance to use the skill. To know when your rage skill will be available, just check the rage bar right below your health bar on the top left of the screen. It slowly fills up as you rack up skills during battle. Using your rage skill is a great way for you to quickly pick off one or two enemies while looking absolutely cool in the process.

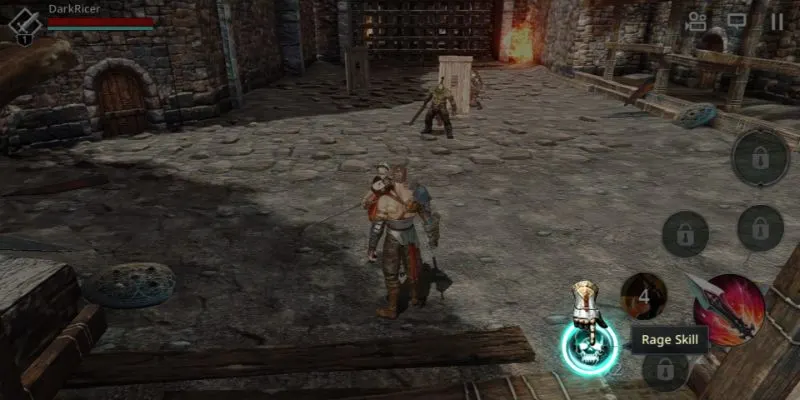
There are two additional types of rage skill that are triggered during battle. An orange skill indicates that an Elite monster’s health has fallen below 360% of your attack and can instantly be executed. A red skull means a Boss monster’s health has fallen below 400% of your attack and can instantly be executed. Both skills will use up your rage bar. Watch out for these two in order to quickly take out special monsters in battle. All rage skills can be enhanced further in order to trigger them sooner or take out more enemies at once.
5. Stay Alert During Auto-Play
Auto-play has become staple for mobile RPGs, and there is no harm in using it, especially when you are farming. If you use it for progressing through the stages, however, make sure you stay alert. Your character does not dodge during auto-play. That means you will need to manually tap the dodge button or your character will happily take the hit. Your rage skill is also not used during auto-play, so you will need to manually trigger it as well. If used correctly, auto-play can help you fight battles more efficiently since your will not be casting skills in the wrong direction. Keep in mind, however, that you cannot use auto-play in story mode, so don’t get too comfortable.
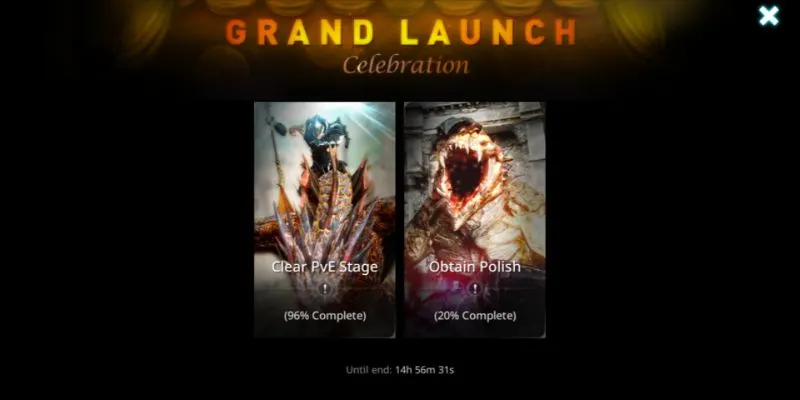
6. Don’t Forget To Gear Up
No RPG is complete without the use of equipment. You will be able to acquire gear from different sources, including playing through the different stages. Once you get a new piece of equipment, the game will prompt if you want to equip it if it is better than what you currently have. You can then proceed to the Gear menu to use your old equipment to enhance what you are wearing. Enhancing equipment requires materials as well as gold. Make sure you upgrade your gear as much as you can in order to maximize your power rating. You can use extra equipment to enhance your gear but using Polish will help your upgrade more quickly.
If you want even better equipment, you should pay the Blacksmith a visit. You can Fuse max level Gear, Jewels, and Runes in order to get higher grade versions. You can also craft equipment here if you have the necessary materials. Finally, the Blacksmith can craft Polish for you. You will need to upgrade him if you want higher grade polish, though. It takes a lot of Gold to upgrade the Blacksmith but it will become necessary late in the game when you need a lot of high-grade Polish for your equipment.
7. All About Skills
You character has multiple sets of skills. Skills for PVE, Co-op, Duel PVP, and Team PVP all need to be set separately. By default, your character will use the same set that is assigned for PVE. If you want to be able to play the game competitively, you will need to take time to assign a different set for each category. Some skills are better for PVP than PVE. Think about the type of battles you will fight when setting your skills. PVE battles mostly involve wiping out multiple enemies at once to keep yourself from getting overwhelmed. Solo PVP skills should focus more on disables and survivability. Team PVP will depend on the role you will play. Choose skills that will help the entire team, not just yourself.
Skills are unlocked as you level up. Make sure you upgrade your skills as much as possible. Since there are more skills than there are skill slots, you will need to prioritize the ones you actually use when upgrading. Don’t just use up all your skill points just because they are available. Upgrading skills cost both skill points and Gold. The cost increases as the skill level goes up, so you will eventually run out of resources if you try to upgrade everything at once.
8. Enhance Your Character
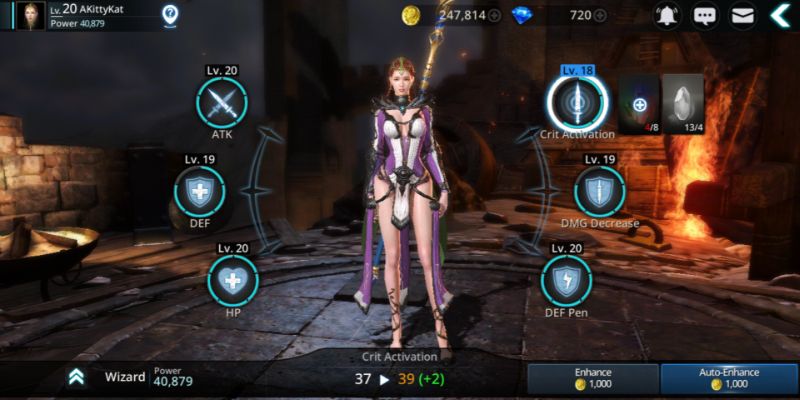
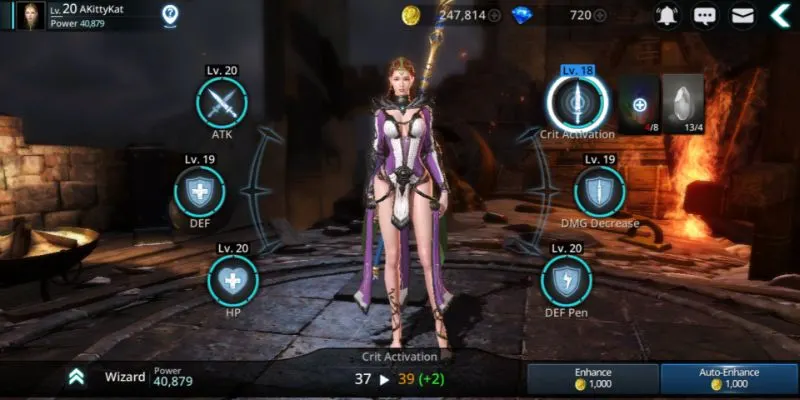
Enhancing your character helps raise your power rating. Tap on the three-bar icon on the bottom left of the screen then tap on Character. Choose Essence to enter the enhancement screen. Here you will see six attributes: ATK, DEF, HP, Crit Activation, DMG Decrease, and DEF Penetration. You will need essences to enhance each attribute. Once you upgrade all six attributes to milestone levels, you will be able to activate an additional boost that increases all your stats. The milestone levels occur every five levels. That means you just need to level up each attribute five times to get to the next milestone.
If you are short on essences, you can farm for more in the different Adventure stages. Just tap on the plus icon on the essence that you are missing to bring up the item details. Tap on the Source button on the lower right to get a list of all the stages that drop that essence. After that, just tap on the Go button beside the stage you want to farm in to automatically go there.
9. Unlock More Features
A lot of the features of the game are not immediately available when you start out. These will be unlocked after you complete certain PVE stages, both in Story and Adventure modes. All you have to do is keep playing these modes in order to unlock all the different areas in the game. For example, skills become available once you complete stage 1-3 in Adventure mode. Ultimate skills, on the other hand, are unlocked after clearing Chapter 2 in Story mode. Most features will tell you which stages you need to clear in order to unlock the, so you will know what to look forward to when you play through the PVE modes.
10. Before You Enter PVE Stages
Now that you know you can unlock a whole bunch of things in PVE stages, you might be excited to just rush through them. Before you do that, however, make sure you pay attention to the details of each stage you are about to enter. In Story mode, you will be given an overview of the stage’s story as well as the recommended power level. You will also see your current power level for easy comparison. If you do not meet the recommended level, make sure you take time to enhance your character before entering the stage. Otherwise, you will just be setting yourself up for failure.
The same is true for Adventure stages. Aside from the power recommendations, however, you will also be given three tasks that you need to accomplish in order to earn stars for that stage. You can also use a buff before entering the stage in order to increase the amount of rewards you receive. Make sure you are fully prepared before entry so you can secure those stars and earn even more rewards in the process.
11. Farming In Adventure Mode
Adventure mode is really your bread and butter in the early stages of the game. Not only do you unlock more features by playing through it, most of the resources that you need can be farmed here. The game provides a few good options for farming in Adventure mode. The first one is Repeat Battle. It allows you to automatically replay the same stage up to 200 times provided you have completed it with three stars and have the necessary adventure keys. This is a great way to farm for resources like essences from specific stages. You have the opportunity to stop the repeat play at the end of each playthrough, so don’t worry if you don’t want to go through the stage 200 times.
The second farming option is called Sequential Battle. This is available even if you have not completed the stage yet. Your character will play through the series of stages until you stop it or until your character fails. If you want to unlock stages quickly and you have the power rating to do so, you can use the Sequential Battle feature. This is best for breezing through the early stages of the game.
The final farming tool requires consumable items called Clear Tickets. By consuming Clear Tickets, you can instantly complete stages that you have already cleared with three stars. Since Clear Tickets are not easy to come by, make sure you only use this option when you have no time to play and must quickly use up keys or get necessary loot. Otherwise, it is much better to just use Repeat Battle.
12. Enter The Arena
Even if you are not the type who loves PVP, you will still need to drop by the Arena at least once a day if you want to maximize your progress. Unlike most mobile MMORPGs, there is no auto-battle in this game’s PVP Arena. You will have to manually control your character. That means if you have been overly reliant on auto-battle, you will be at a disadvantage. Battling in the Arena is a great way to earn rewards. If you manage to make it into the top 30%, you will start receiving Gems as well. Reaching milestone ranks for the first time will also reward you with Gems. On top of the rank rewards, the honor points you earn in the Arena can be used to purchase various items from the honor shop.

Aside from the regular set of skills that you have, you will probably be surprised to see a shield button when you battle in the Arena. Tapping on it will allow you to block an attack. Time it well and you will be able to counter right after parrying. Using both Evade and Block at the right time will help you win battles in the Arena, so make sure you practice.
13. Be Diligent With Quests
The game gives out various rewards for players who actively complete quests. Rewards include Gems, Gold, equipment, and other resources. The good news is that you don’t really have to go out of your way to complete the quests. All the tasks that the quests tell you to do are necessary to ensure that your progress in the game stays on track. One thing you should note, however, is that there are four different types of quests. We have listed them below so you can have an idea on how they work.
Main Quest – These quests mostly tell you to progress in the game’s main story. Aside from following the story, you will also be required to equip better gear and increase your power level. You will be rewarded with increasing amounts of Gems, different chests, and portrait decorations for your troubles.
Weekly Quest – This is sometimes confusing for players because the tasks in this category have to be completed daily. The Weekly Quest gives you 15 missions per day. You will need to accept and complete each mission one at a time, so make sure you return to this page as soon as you finish a task. Aside from the rewards that you receive from each of the 15 missions, you also get rewards for the number of missions you have completed each week. You can see your weekly progress at the bottom of the screen. If you feel like completing more missions after the first 15 of the day, you can refresh the list but that will cost Gems.
Daily Activity – These have nothing to do with the daily 15 missions that you get from the Weekly Quest. These mostly involve routine tasks that any active player should complete such as participating in the Arena, entering Co-op dungeons, and clearing Adventure stages. You will receive rewards for each task as well as additional rewards for reaching activity milestones.
Achievements – If you have played other MMORPGs, you will be familiar with this. Achievements are rewards you receive for reaching different gameplay milestones such as collecting a million Gold, killing 1,000 Elite monsters, achieving 60,000 power, and so on. You will be notified every time you have an Achievement reward waiting, so it is just a matter of collecting it as soon as possible.
14. Hang Out In The Village
There is a Village section in the game where you can hang out if you are not in the mood for combat. You can find three things in the village. The first one is the Lucky Wheel that gives out a free spin every 24 hours. You can also spend Gems if you want additional spins. The second part of the Village is the Hot Springs. Staying in the Hot Springs boosts the recover rate of your Rest Gauge. The bonus increases even more for everyone in the pool if a Bath Oil is used.
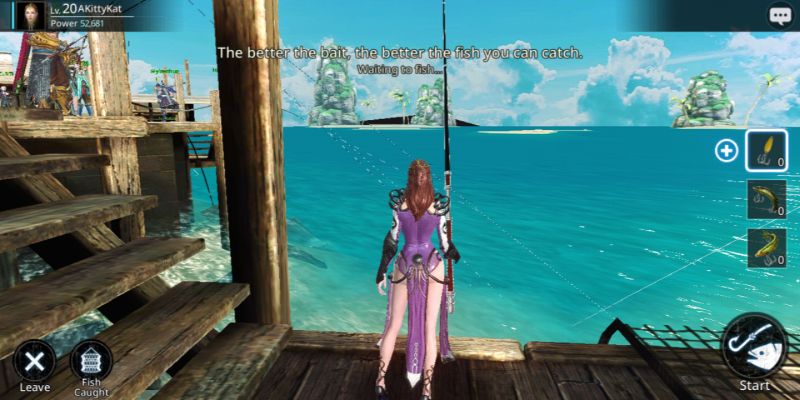
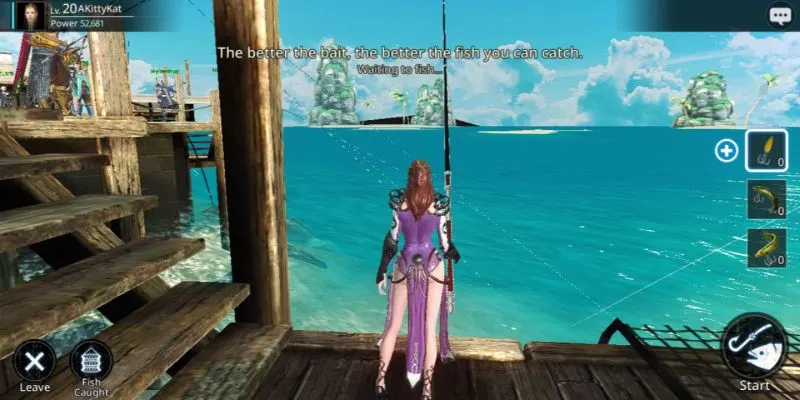
The last part of the village is the Fishing Yard. When you go there, you will see a fish icon appear on the right side of your screen. Tapping on it will put you in fishing mode. Once in fishing mode, you will find three bait options on the right. The better the bait you use, the better the rewards you get. The basic Fish Bait costs 500 Gold each. The Classic Fish Bait costs 3,000 Gold apiece. The best bait in the game is the Pro Fish Bait, and it costs 10 Gems each. Once you have bait, just tap on the fish icon again to start fishing.
15. Join An Active Guild
A guild can be created by spending 100,000 Gold. Coming up with this amount is easy enough to achieve within the first 24 hours of your gameplay. The problem is what to do once you have created a guild. A level 1 guild has very limited benefits. The benefits you get is not even worth the 100,000 Gold you will spend to create it. A guild is only useful if it has a lot of active members who contribute regularly, so that it levels up quickly. Unless you have a lot of friends who are waiting to join your guild, it is better if you find an existing guild first.
Aside from giving you more friends to play and exchange strategies with, guilds provide additional benefits. You can purchase various items from the Guild Shop including bait, Clear Tickets, Adventure Keys, Polish, and other resources. Guilds also provide temporary buffs that can be enhance further using Guild Points. Guild PVP also becomes available at guild level 5. This is why you need to join an active guild, if not a high level one. It would take a lot of time and resources to level up a guild where there are only one or two active members.
16. Freebies And Events
The game is generous with rewards, especially if you know where to look. There are numerous ways for you to rack up on various resources by just diligently claiming rewards. One of the first places you should look is your mailbox. If you have a red dot on the envelope icon at the top right of your screen, you should open it up immediately. Various freebies from the developers get sent to your mailbox, including pre-registration rewards, maintenance compensation, and celebratory giveaways.
Your next stop for freebies is the Bonus section of the main menu. There are three subsections here. The first one is the Check-In which gives you a reward for logging into the game every day. You get a special chest every seventh day, with a Rank A chest waiting for you at the end of your fourth week. Don’t forget to check in daily to receive your rewards.
The second subsection is the Rest Reward. Your Rest Gauge slowly charges up when you are offline or out of combat. You can claim rewards as long as the bar is not empty, but it is best if you wait until the bar is full. You can choose to claim EXP, Gold, or Skill Points from the Rest Reward. You can also spend some gems to be able to claim a reward twice.
The third subsection under the Bonus menu is the Event reward. It is similar to the Check-In reward in the sense that you are given a reward for logging in daily. The only difference is that Event rewards are limited to the Event period indicated at the top of the screen. If you manage to log into the game for all seven days of the Event period, you will receive and additional reward.
One last place you can get freebies from is the Chest shop. You get a free Weapon and Armor Chest daily. You also get a free Gold Chest every two hours. Finally, you get a free Costume Chest once a week. Make sure you return to the Chest shop regularly to claim all these freebies!
17. Participate In Events For Rewards

Not to be confused with the Event Bonus, the game also hosts seasonal Events that let you earn a lot of rewards for accomplishing tasks. The tasks change depending on the Event, but just as with the Quests, you get more rewards for completing more Event tasks. Check the banners on the right side of the main screen to see the ongoing events. You will see a red dot on them if you have rewards waiting for you. Rewards include Gold, Gems, essences, chests, and other resources. Try to complete as many tasks as you can before the Events end!
In a world that has been overcome by evil, you are the last remaining hope. Remember everything you learned from our Darkness Rises beginner’s guide if you want to emerge victorious!
Dawn
Wednesday 8th of August 2018
How do you get stats for pvp?
Aman
Thursday 28th of June 2018
For Dual PvP i won't recommend using Berserk as well as for some extend wizards . Attacks of berserk are predictable enough to counter easily