Scanning your computer is an annoying but necessary task. Viruses, bugs, malware, and other clutter can lead to a system bogging down or worse, crashing over time. But let’s take that concept and cross it with something left field, say the anime Cells At Work. So it’s Cells At Work but as an antivirus. And it has husbandos and waifus.
In short, you’re in command of the world’s hottest, most anime-esque antivirus.

As a new administrator of the Aether Gazer system, your job is to lead the Modifiers (or Mods, I use the term interchangeably) against the attacks of the vicious Visbane that threaten to destroy the foundation of the digital world. You’ll face off against both external and internal threats as you ensure that the Gaea system stays stable. And it better – it’s humanity’s last bastion after all, even if it is in a dystopian The Matrix-like setting. Aspiring admins can log on to Aether Gazer via the Google Play Store and the App Store.
Veteran character gacha players will likely be familiar with Aether Gazer’s many systems, though there may be a bit of a learning curve due to some concepts being glossed over in the tutorial. But whether you’re new to the mobile gacha scene (I pray for your soul) or an old hand, I bid you welcome to this beginner’s guide for Aether Gazer!

In this beginner’s guide, we’ll be covering:
- How to analyze your characters both stats and skills-wise.
- How to make your Modifiers stronger via levels, equipment, functors, sigils, and more.
- Basic and intermediate battlefield controls and options.
- Resource management – where and how to get resources and free stuff.
Reading Your Modifiers
Every character collection game demands that its players have at least a basic understanding of how to read their characters. Simply fumbling through the game won’t do if you want to have a team of lean, mean, Visbane-killing machines.
Quick Tips:
- Aether Gazer only has four stats – Hp, ATK, DEF, and crit rate. Even heals operate off ATK.
- All characters have six skills: one normal attack, 3 actives, one ultimate, and one dodge.
- Dodge effects are triggered via Extremity Dodge, meaning using the dodge skill just as an attack is about to hit you.
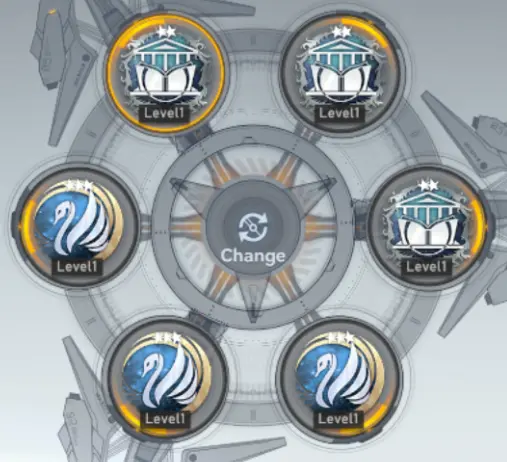
- Gen-zones are a character’s faction. The five Gen-zones are Shirou, Yggdrasill, Olympus, Nile, and Asterism.
- Having two characters of the same Gen-zone triggers a Modified Mode bonus effect. Having three characters of the same Gen-zone triggers a passive combat bonus as well.
- All characters use a primary battle resource: Divine Grace, Energy, Rage, and Trace. Characters both have ways to generate their resource and a way to spend it.
- Some characters have secondary battle resources that are exclusive to them.
- Learning to effectively juggle resource generation and spending is vital to getting the most out of your characters.
- If you’re on the fence about building a character or want to get a feel for them before committing, you can activate practice mode in their skill screen. You can only practice with characters you own.
Stats
I said it once, and I’ll say it again: breaking your favorite husbandos and waifus into raw numbers may be a reductionist approach that ignores their appeal, but it’s often the best way to see what a character can do. The fact that Modifiers are actual computer programs doesn’t help.
Unlike most other character collection gacha games, Aether Gazer eschews more complicated stats in favor of four simple ones:
- Max HP – how much punishment this character can take. More important for melee Modifiers, but everyone needs some HP.
- ATK – base attack power. All skills (yes, healers included) are computed off an ATK multiplier.
- DEF – defense power. How much punishment your Modifiers can take before the crap is beaten out of them (they’ll need to find more crap afterward).
- Crit rate – the chance of an attack or skill landing for more damage than usual.
Skills
All your Modifiers are ready to rock out of the factory with six skills. Knowing which skills you’ll be prioritizing on a Modifier is key to not only easier combat but also makes it easier for you to budget and ration leveling resources – more on upgrading skills later.
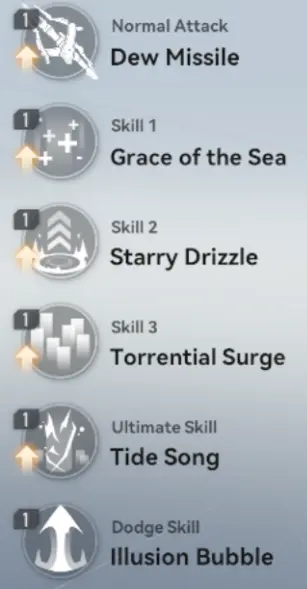
The six skills a character has are:
- Normal attack – happens when you tap the attack button. Vastly differs from Modifier to Modifier in terms of range, speed, damage multiplier, and so on.
- Skills 1, 2, and 3 – active skills. Much more powerful than basic attacks, and so much more varied: we can have direct damage, AOE damage, heals, buffs, and so on. Some skills have a cooldown, while others consume a resource. Each of these has a cooldown, so be sure to practice with a Modifier to perfect your timing and skill cycling.
- Ultimate – a character’s most powerful skill that triggers a cutscene. Requires energy to be used which you gain from fighting and getting hit. Can be chained into an Ultimate Skillchain – more on that in the Mastering Combat section.
- Dodge – each character has a dodge ability that can be used either for quicker battlefield traversal or to avoid an enemy’s attack. In the latter case, you can trigger an Extremity Dodge where your character both makes a quip and triggers their dodge skill’s Dodge Effect such as gaining a buff or slowing all enemies down.
Gen-zones
Aether Gazer’s tutorial will force you to equip a Functor on Verthandi not even five minutes in. And this tutorial doesn’t do you the favor of telling you what the hell a Gen-zone is.
A Modifier’s Gen-zone is their faction. Each Gen-zone draws from a certain pantheon of mythology and has its own specialization in battle that is triggered if you’ve got multiple Mods of a single Gen-zone. The Modified Mode buff only occurs if you have two Mods of the same Gen-zone. To trigger the passive buff, you need three Mods of that Gen-zone.
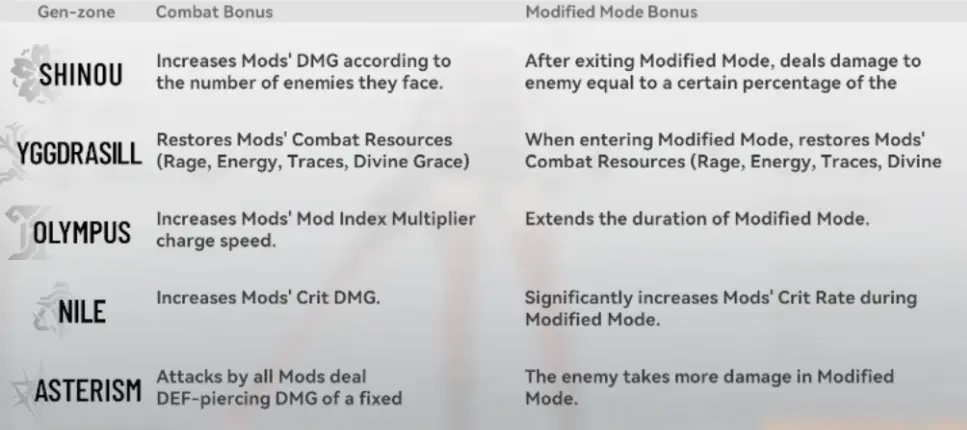
The Gen-zones in Aether Gazer (and their respective bonuses) are:
- The Shinou is represented by two five-pointed flowers. These Modifiers take their name from Japanese mythos and definitely dress for the part. Shinou Mods deal more damage depending on how many enemies remain on the battlefield, and they exit Modified Mode with a final burst of damage.
- Yggdrasill Mods draw from the legends of Nordic countries. Yggdrasill Modifiers are second to none when it comes to replenishing battle resources (more on that later) and allow their teams to lay on the hurt with a second burst of resources when entering Modified Mode.
- Olympus Modifiers, to no one’s surprise, hail from the Greek pantheon. These Mods inherently build up Modified Mode meter faster and extend Modified Mode’s duration.
- Nile Modifiers come from ancient Egypt. These Mods like to hit hard and fast – they passively increase everyone’s crit damage. To ensure the onslaught continues, Nile Mods provide a large buff to crit rate when entering Modified Mode.
- Asterism Mods come from…everywhere else, really. Maybe it’s the developers’ way of saying “Yeah we’re making a new faction Soon™”. They range from the Celtic Nuadha to the Hebrew/probably Mesopotamian Leviathan and the very popular Asura. Asterism Mods trade potential for consistency: their presence allows Mods to deal fixed, DEF-piercing damage while their Modified Mode boost simply increases the damage enemies take.
Battle Resources
Each Modifier uses a unique resource that’s denoted in their bio. These are Divine Grace, Energy, Rage, or Traces. Note that these only refer to the general battle resource that characters use; there may be secondary resources unique to that character. Also, keep in mind that these resources work differently from each other – Divine Grace is a stacking effect that empowers skills, while Energy tends to be generated by normal attacks and is required to use active skills.
These charges are earned by that character by performing certain actions, and they are spent by certain skills to either enhance their damage or trigger other bonuses. As a demonstration, let’s have a look at Verthandi’s skill rotation.
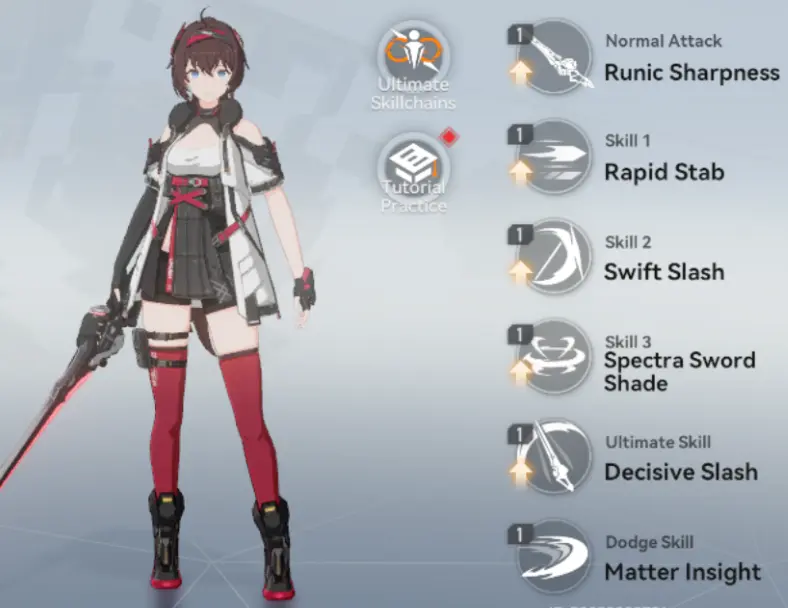
Verthandi is a Divine Grace character, and she has two main methods of generating said resource: landing hits with her normal attack generates 1 Divine Grace, while her Rapid Stab skill generates 50 Divine Grace if it hits an enemy with a Runic Mark while in its modified form. Finally, Verthandi uses Divine Grace charges via her Spectra Sword Shade 3rd skill, which transforms when her Divine Grace is maxed.
On a side note, you can keep tabs on how many stacks of a battle resource your character has via the purple bar at the bottom of the screen.

Skill Rotation
As we’re already on the topic, learning how to maximize both resource generation and spending is vital to getting the most out of your Modifiers.
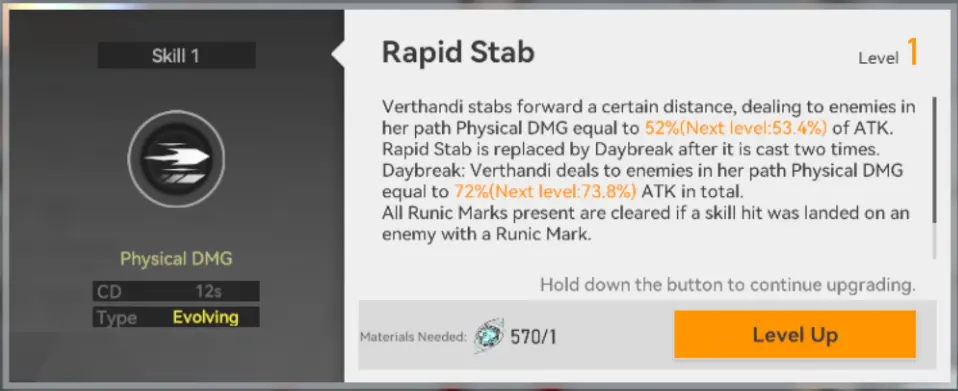
I did mention secondary resources, and Verthandi is one of those characters – in her case, she generates Runic Marks on top of Divine Grace. To generate a Runic Mark, Verthandi needs to hit with her 2nd skill, Swift Slash – this adds a Runic Mark to an enemy for four seconds. While that mark is up, you need to have used her Swift Stab twice to turn it into Daybreak, then hit that foe with Daybreak to generate 50 Divine Grace stacks. To help her with keeping momentum, both Swift Slashand Spectra Sword Shadereset the cooldown of Rapid Stab.
Thus, a good loop for Verthandi (normal attacks notwithstanding) could look like this:
- Rapid Stab -> Spectra Sword Shade -> Rapid Stab -> Swift Slash -> Rapid Stab (Daybreak)
This combo is quick and easy and allows you to generate 50 Divine Grace stacks to build up towards evolving Spectra Sword Shade into Raychaser Slash.
Luckily, you don’t need to keep mental tabs on skill mode switches. Skills whose alternate forms have been activated will be denoted by a yellow glow around their icon.
Was that too much information? Probably. It’s a lot to digest at once.
Practice Mode
Thank goodness there’s a practice mode.
Practice mode lets you fool around on a passive enemy. This allows you to get the hang of a character before deciding if you want to invest in them and saves you from the humiliation of battlefield testing. There’s no time limit here, so practice your rotations all you want!
To enter practice mode, go to a character’s skill menu and tap the Tutorial Practice button to the left of their skill list. Note that you can only practice with characters you already own, so you can’t use this as a “should I pull for XXX” test.
Strengthening Your Modifiers
Now that you have the basics of your Modifiers down pat – and hopefully found a few that you liked – it’s time to buff them up.
Quick Tips:
- Mods gain exp by fighting or eating Battle Records. Levels raise base stats.
- You need to limit break mods at certain thresholds to increase their level cap.
- Raise your skill levels whenever you limit break – more multipliers means more damage.
- While you’re leveling up your Mods, don’t forget to improve their Access Keys as well to keep their ATK up to snuff.
- Functors are augments to Access Keys that provide even more bonuses. Functors can be transcended by feeding them duplicates to improve their boosts.
- Mods can only equip Functors of the same Gen-zone.
- Signature Functors are tailor-made for specific characters. You’ll need to gain an unawakened Functor of a Gen-zone, then transform it into a specific Functor.
- To do this, switch the Functor gacha to the Gen-zone you want, then pull until you get an unawakened Functor. Go to Functor Evocation and select the Functor you want it to transform into.
- Duplicates of a character are transformed into intel. These intel files can be used to complete projects that increase a character’s stats and general strength. Completing all projects of a tier also raises a character’s rarity.
- If you already have an S-rarity lead character, pull until you get their signature Functor. If you don’t yet have one or don’t like the one you got, do character banners until you get one you like. Remember: not every Modifier needs to have their signature Functor, just your superstars.
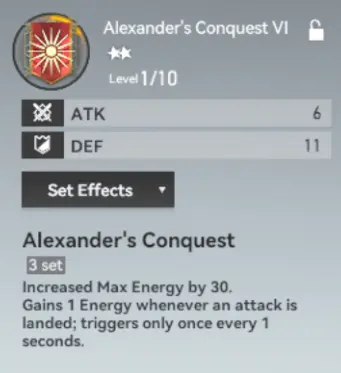
- Each Mod can equip up to six sigils. These give base stats, but more importantly, impart set bonuses if you equip at least three sigils from a set.
- Sigils can also be enhanced, limit broken, and enchanted to provide more bonuses.
- As a new player, don’t worry about min-maxing your sigils just yet. You’ll be fine with the free ones you get.
- Aether Codes modify a character’s skills. These need to be unlocked in sequence. Each character can only have three active Aether Codes at once.
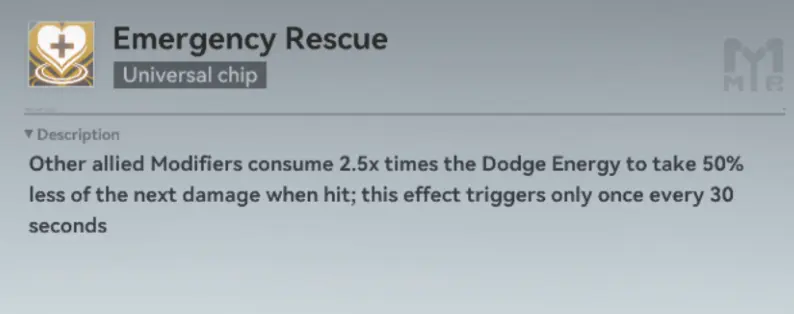
- M.E.O.W units provide passive buffs to your team. They can also be given M.E.O.W chips that function like Aether Codes in that they change basic functionality.
Leveling Up and Limit Breaks
The easiest way to strengthen a Modifier is to increase their level. This can be done by bringing them into battle, though it’s more practical to farm and feed them Battle Records.
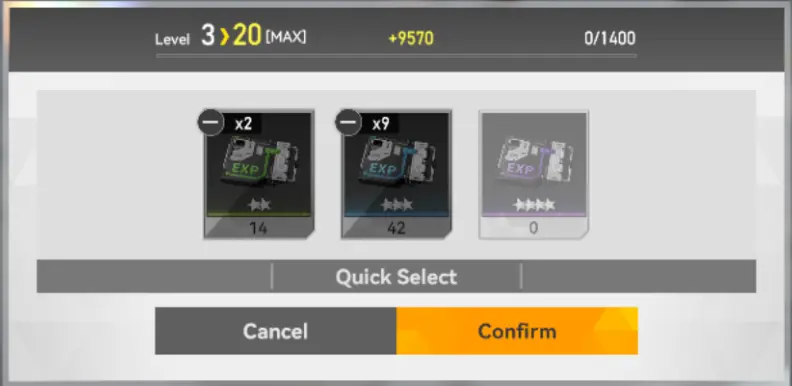
By increasing a Modifier’s level, you’ll slightly raise their base stats which will allow them to keep apace of stronger foes. However, leveling up only goes so far. At certain thresholds, you’ll need to limit break a character to raise their maximum level.
Skill Levels
Raising your skill levels should go together with your Mods’ limit breaks.
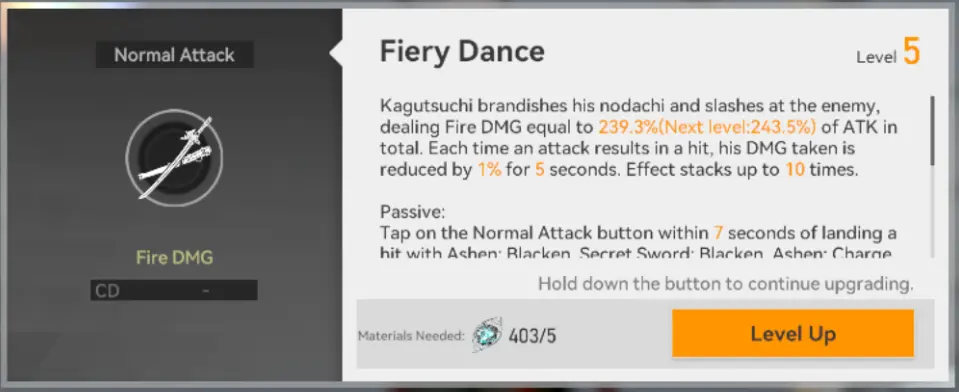
The higher a skill’s level, the better its numbers get. And because skill levels are so easy to raise in this game due to only needing one currency, there’s no reason you shouldn’t be raising your skill levels!
Access Keys
All Modifiers come with their own weapons, known as Access Keys. Upgrading your Access Keys is a simple and easy way to boost a Modifier’s power.

Just like Modifiers themselves, Access Keys can be leveled up and can undergo limit breaks to increase their level cap and gain a respectable boost to stats. To upgrade your Access Keys, you’ll need to feed them Sephirah Crystals or Functors and to limit break them, you’ll need Spirit Extract.
Functors
More importantly, each Access Key can be equipped with a Functor, an add-on that gives specific bonuses.
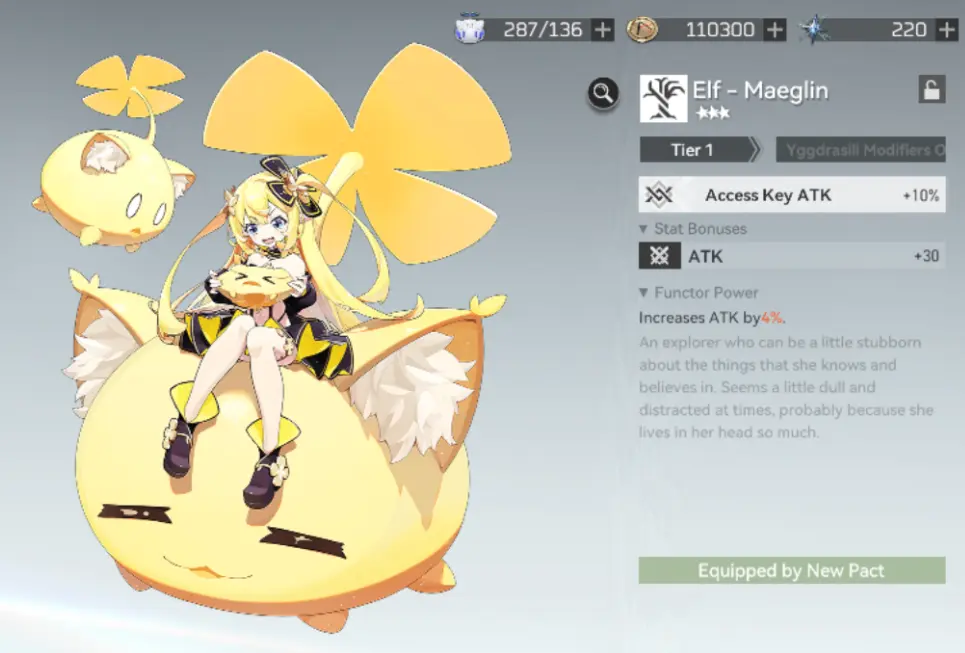
By equipping a Functor, you’ll not only increase the attack of its matching Access Key but also gain powerful passive bonuses depending on the Functor itself. If you want even more power, you can transcend your Functors by fusing duplicates of them!

However, Functors have a major limitation in that a Functor’s Gen-zone must match the Modifier it’s equipped to.
Signature Functors
While generic Functors can get the job done, getting a character’s Signature Functor gives them a massive power spike. Getting to that item is quite roundabout though.
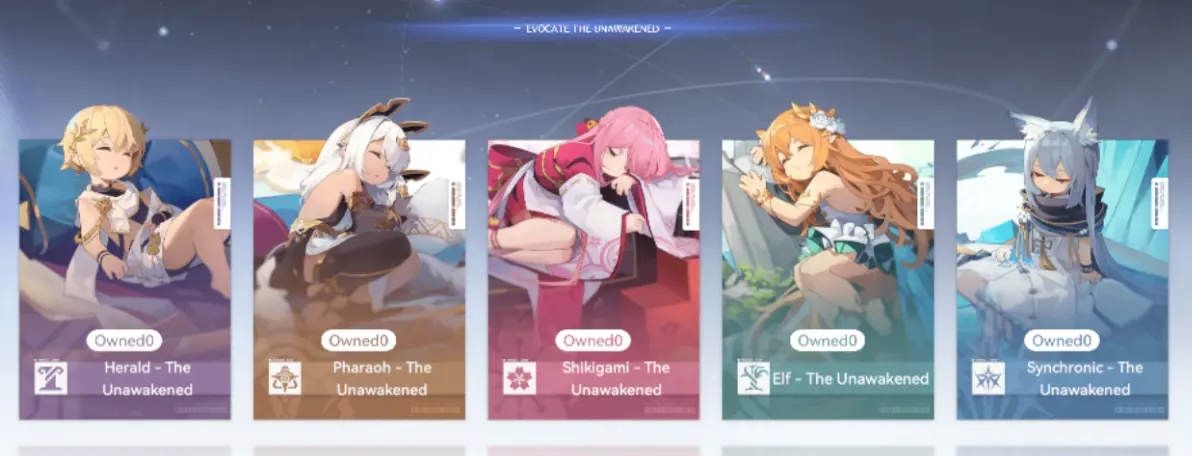
If you’ve progressed far enough in the main story, you may have seen the Functor Evocation button, which can be quite confusing. This system works in tandem with the Functor Scan – the Functor gacha, in essence. Before you pull on the Functor gacha, you can (and should) select a Gen-zone. This guarantees that the 5-star Functor you pull will be an unawakened Functor of that Gen-zone.
Once you have your unawakened Functor, go to the Functor Evocation screen and select which Functor you want to transform your unawakened Functor into. Yes, you can choose – but only within that Gen-zone. Awakening a Functor is cheap – all it needs is 100 Ain Soph coins.
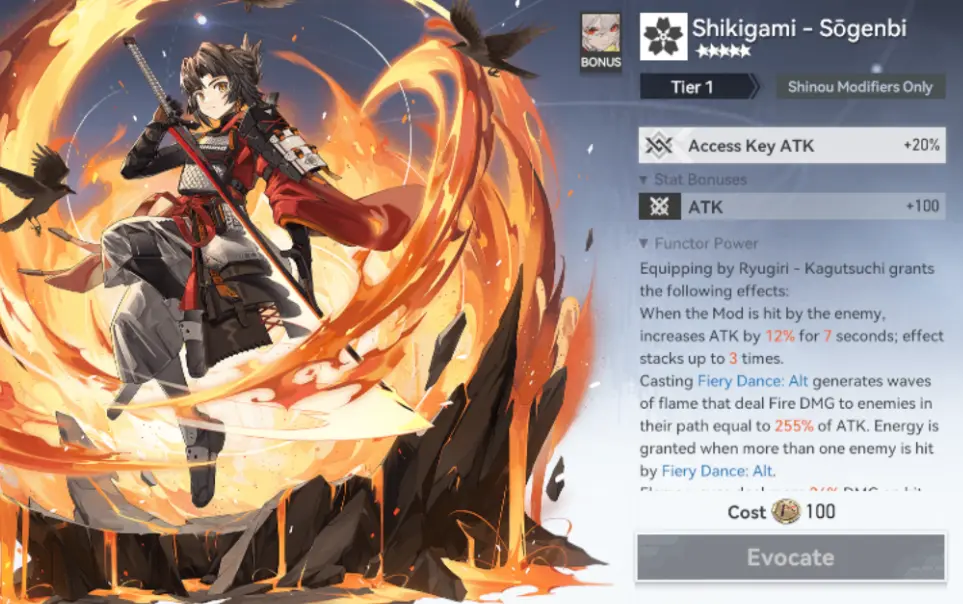
Your reward for all this is the creation of a signature Functor for a character. These Functors are leaps and bounds stronger than any generic Functor, though their special abilities only kick in for that specific Modifier.
This system minimizes randomness in that you can transform your unawakened Functor into the signature Functor of whoever your main characters are. Just remember to switch the banner’s Gen-zone if you’re gearing a new character!
Transcending
Yes, the characters are nice to collect, but what happens to duplicates? They become intel that’s used to transcend a character.
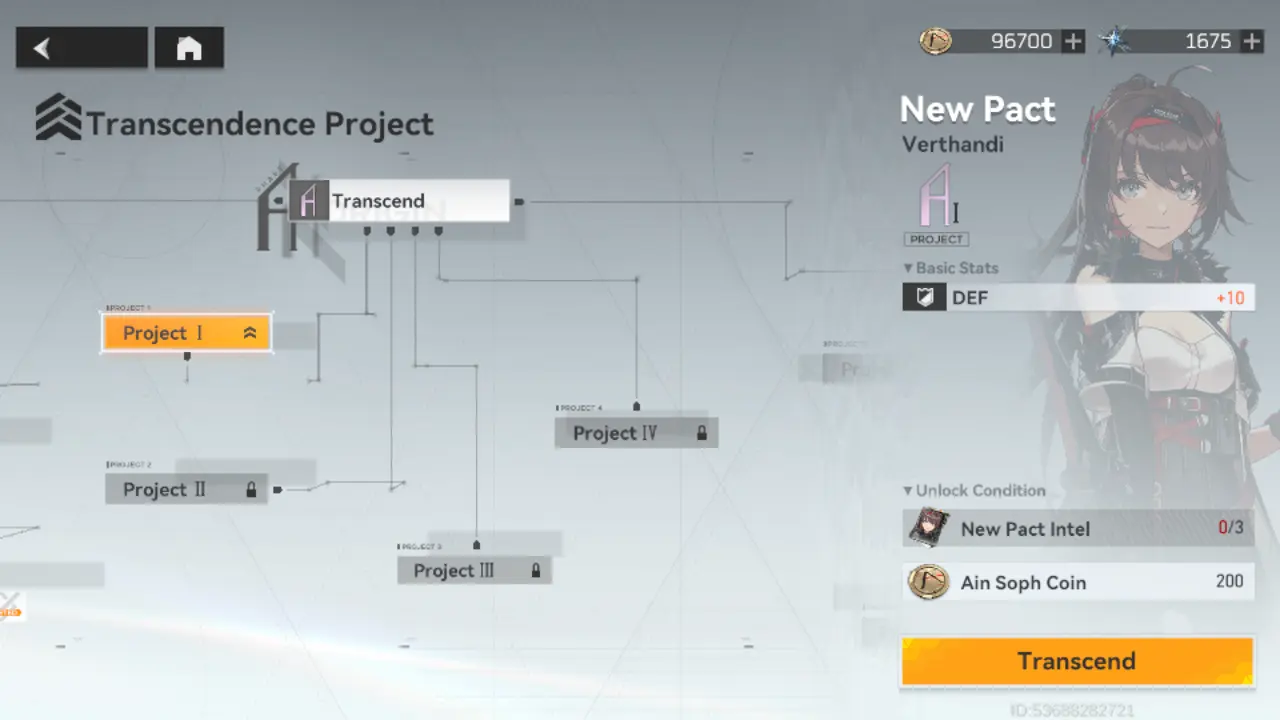
You can use a character’s intel to invest in certain programs and projects that give powerful passive boosts to that Modifier. Once you’ve completed all the projects of a tier, you’ll gain access to a project that raises that Modifier’s rarity and gives a significant stat boost.
This system means that with enough time and effort, even your low-rarity favorites can become much stronger. However, because transcendence level is tied to rarity, higher-rarity characters tend to be stronger off the bat and start higher on the transcendence project list.
Yes, there’s a transcendence project list. Projects also have rarity, from B to Omega.
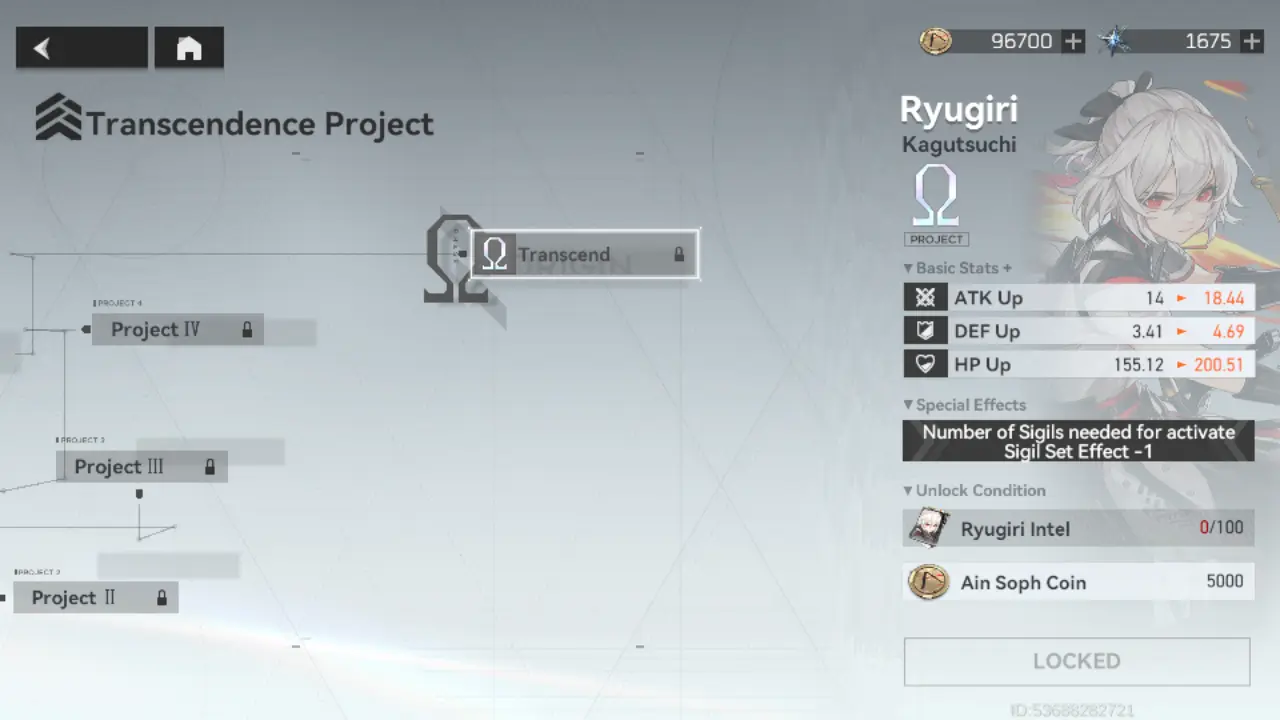
The higher up you go, the more expensive it becomes to complete projects, but the better the bonuses. And yes, this means that not even S-rarity characters are safe from needing transcendence!
Functor Awakening or Transcendence?
This is where it gets tricky. Both signature Functors and transcendence offer powerful stats, but both cost gacha pulls. So which one should you get, since both are good?

The short answer is it depends. Pulling for a signature Functor is a good idea if you’ve already got an S-rarity (no, not via transcendence) character as your lead. Finding and equipping their signature Functor will give them more than enough power to carry your team through most content.
On the other hand, if you don’t yet have an S-rarity lead Modifier (or worse, don’t like the one you got) then pull on the character banner first until you have someone you like. Transcendence projects may not be as potent as a signature Functor, but they still give a respectable power boost and they’ll be enough to help you farm for more Shifted Stars.
One more important thing: not all of your modifiers need their signature Functor to thrive. Save pulling unawakened Functors for your superstars.
Sigils
Sigils are a set of six items that can be equipped to a Modifier to further boost their stats. If you’ve played games with an artifact system like Genshin Impact or Honkai: Star Rail, this system is going to be very familiar.
Each sigil comes not only with a boost to base stats but also has a powerful set bonus that occurs when you equip at least three sigils of the same set. Since each Modifier can equip up to six sigils, you can mix and match sets to specialize and enhance your Modifiers. Of course, you just want to use a sigil as a stat stick, nothing’s stopping you.
Sigils have a rarity which is indicated by the number of stars they have. The more stars a sigil has, the better its quality, and you’ll likely get better returns on your growth material investments. Yes, growth material. Sigils can be leveled up, limit broken (I am making this a term), and enchanted to gain additional skills.
It’s important to note that dedicated sigil farming, enchanting, and enhancement are late-game stuff. As a beginner, you shouldn’t be worrying too much about them – focus on getting definite upgrades such as Modifier levels, skill levels, Access Key levels, and so on. You’ll be fine just slapping on whatever random sigils you get.
Aether Codes
Just as each Modifier has their unique combat style, so too does each player. To help you hone your edge, you can equip your Modifiers with Aether Codes to tweak their playstyles.
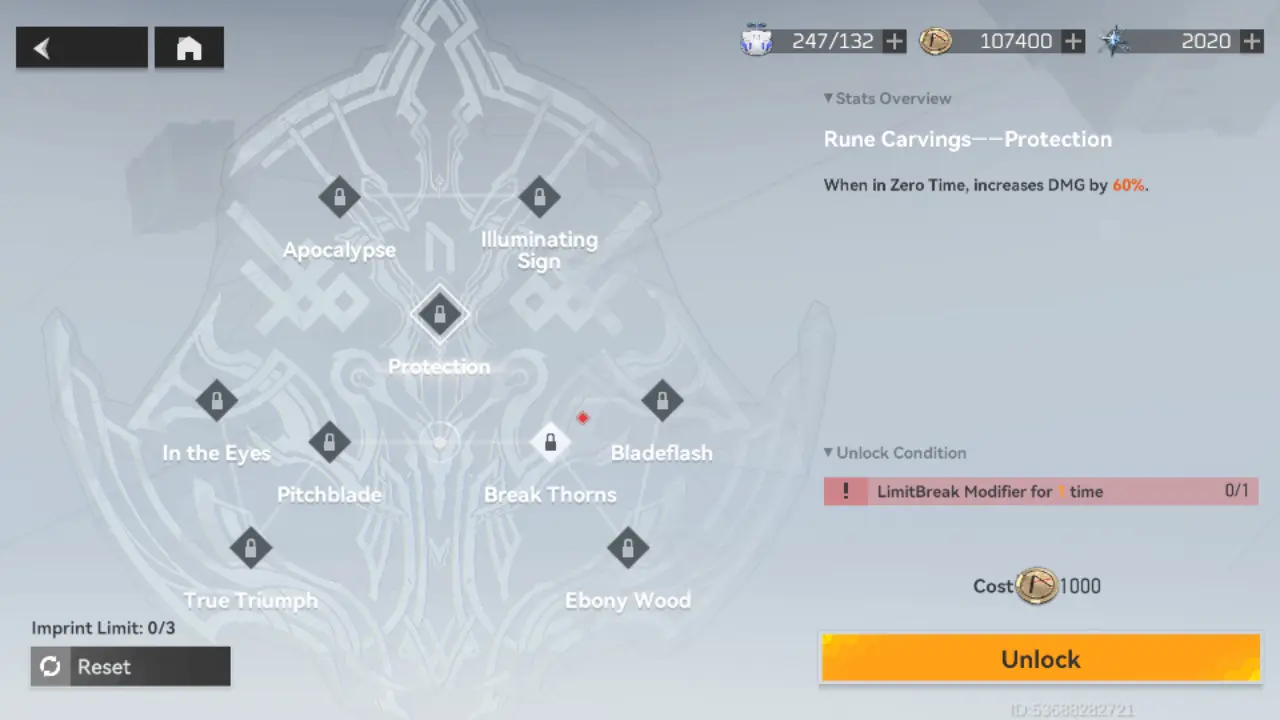
Each Aether Code modifies a Modifier’s skills – these adjustments can range from changing how the skill works, tilting it towards certain aspects (like less damage but bigger DOT), or just adding on to it. Modifiers can have up to three Aether Codes active at once.
Unlocking Aether Codes is also a “simple” affair. All you need to do is unlock the Aether Codes before the one you want in the tree (note the lines between codes) and fulfill the requirements to unlock that code. Often, Aether Code requirements simply require you to level up that Modifier and/or their skills, or limit break them. Do note that to unlock a Modifier’s first Aether Code, you need to play that Modifier’s tutorial in practice mode!
Aether Codes become available after clearing the first chapter.
M.E.O.W Units
While not strictly tied to your Modifiers, M.E.O.W units can nonetheless provide great passive bonuses to your team.
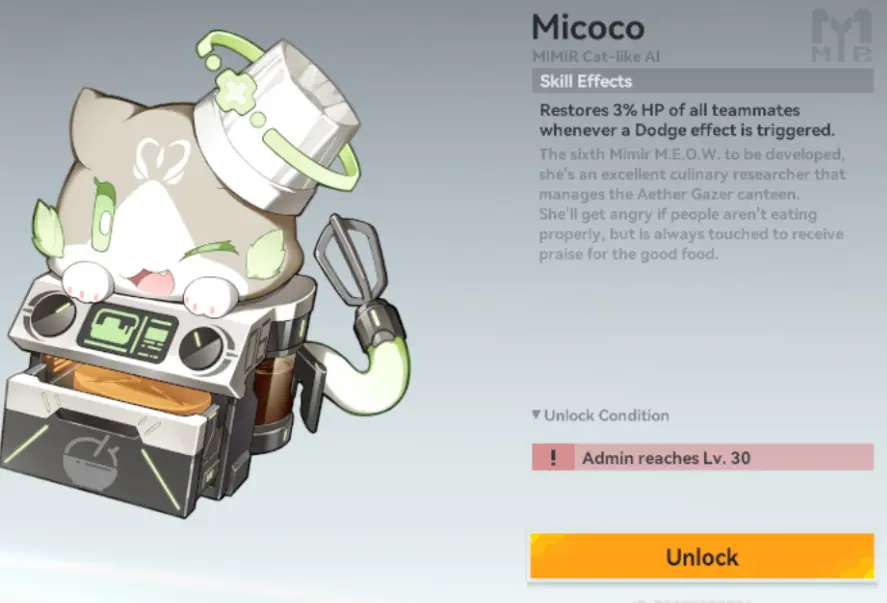
Not only does each M.E.O.W unit come with a passive effect, but they can also be equipped with M.E.O.W chips. These chips are similar to Aether Codes in that they offer more sweeping changes – the difference is that M.E.O.W chips affect combat in general, not a particular skill.
Just like Aether Codes, you’ll unlock both M.E.O.W units and chips by making progress in various parts of the story. Experiment with different support units and chips and find a combination that suits your playstyle!
Mastering Combat
Finally, it’s time to put what we’ve learned into some actual ass-kicking experience. While you may have gotten away with randomly mashing buttons in the first few chapters, you’ll need a better, more nuanced understanding of Aether Gazer’s combat system if you’d like to maintain smooth sailing in the chapters that await.
Quick Tips:
- Your team leader is the character you will control yourself. Your other two teammates will be controlled by the AI.
- Ultimates are executed by tapping on the ultimate icon when it’s ready. Compared to skills, ultimates are vastly more powerful and can help you control the flow of battle.
- Ultimate skillchains happen when specific Modifiers are put on the same team and are triggered by using your ultimate while your AI teammates are ready with theirs.
- Ultimate skillchains bring a lot of brute strength to the board as their damage is multiplied by each character’s ultimate skill level rather than a small additive damage boost.
- Ultimate skillchains require all involved characters to be on the team and have full ultimate charge. You can’t just use 2/3 characters.
- You can command an ally to use their ultimate by tapping on their portrait when their ultimate is ready. Allies benefit from invincibility frames during this time.
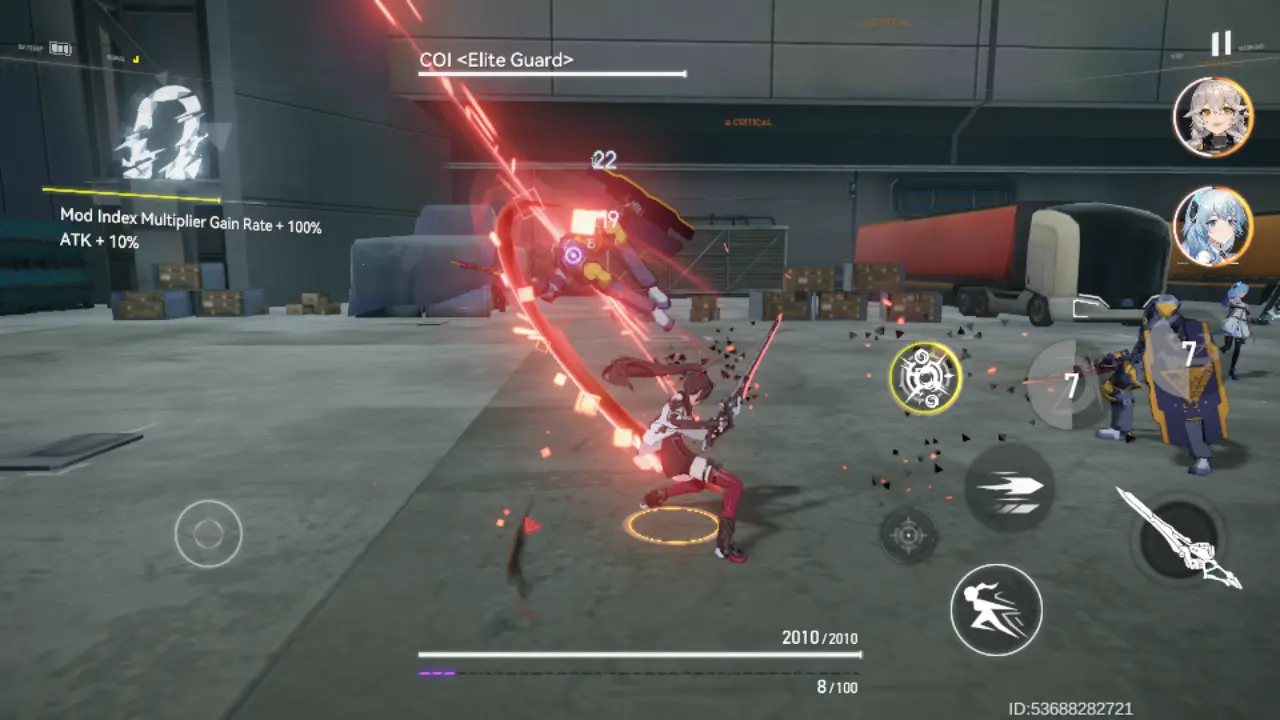
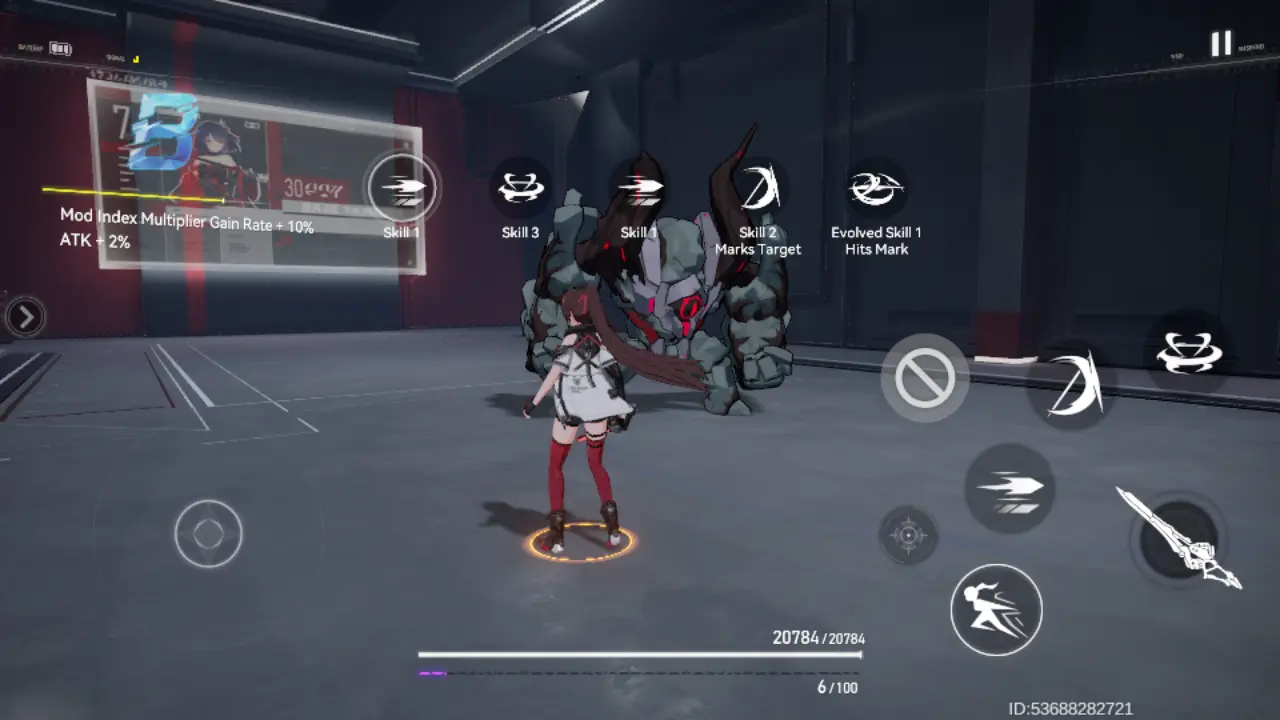
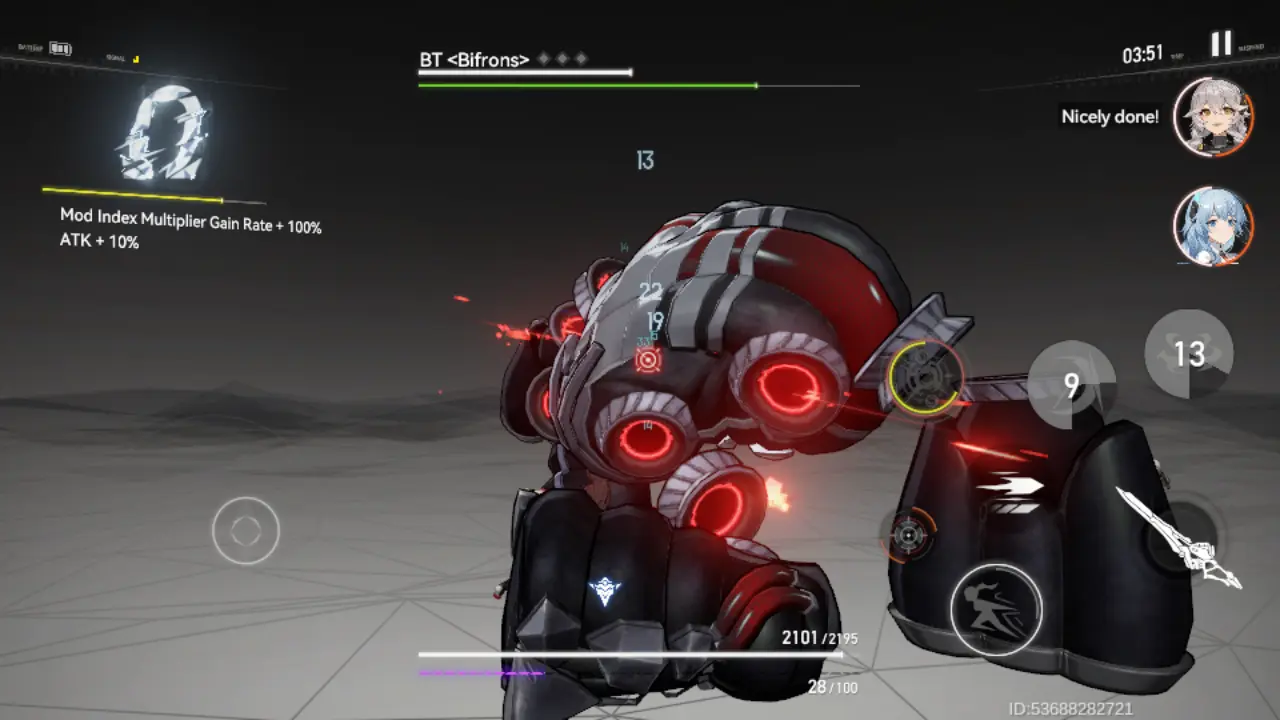
- Attacking and triggering Extremity Dodges fills up the combo meter. The higher you go, the bigger the Mod index multiplier and ATK bonuses get.
- The Mod index is the green bar below a boss’ health bar. Think of it as a stun gauge – when it fills up, you enter Modified Mode where time freezes, and you can focus entirely on attacking.
- You can escape stunlock by dodging. This works even if you’ve already been hit.
- Trigger Extremity Dodges and Zero Time by dodging just before an attack lands. It’s easiest to do this with AOE attacks with danger markers. Be mindful of your latency when attempting to Extremity Dodge.
AI Teammates
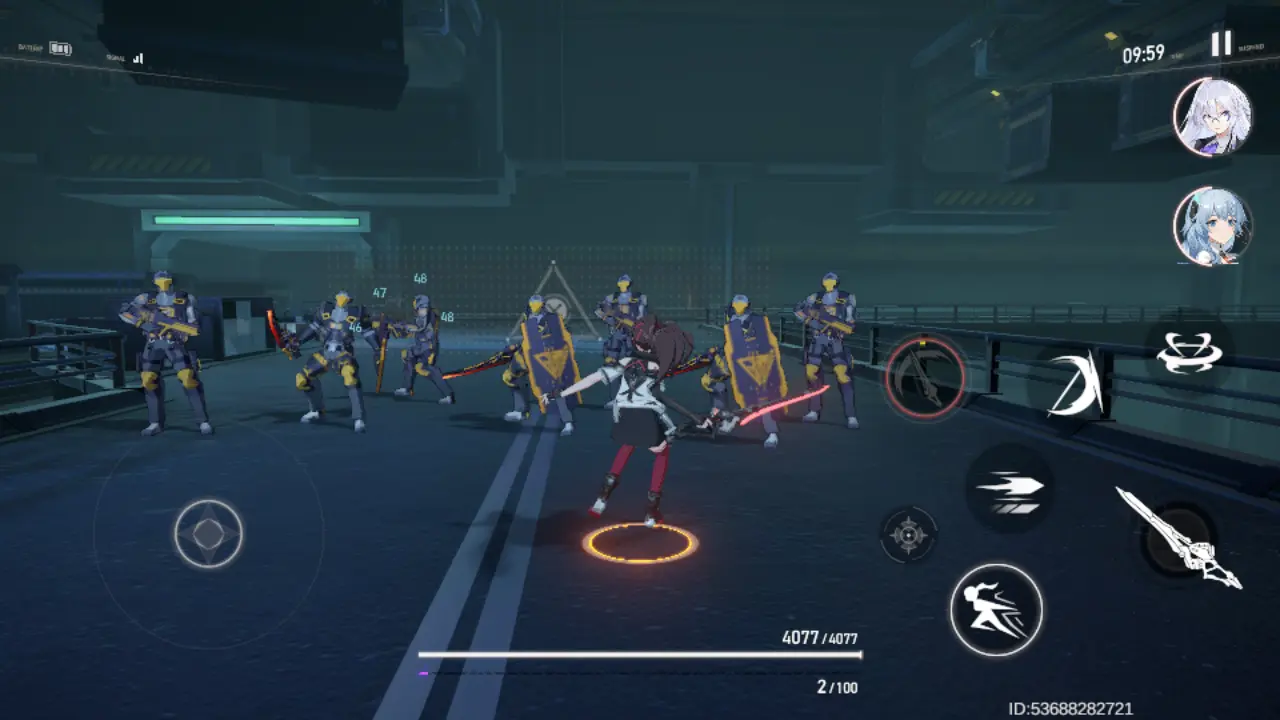
A combat team in Aether Gazer is comprised of one team leader and two companions.
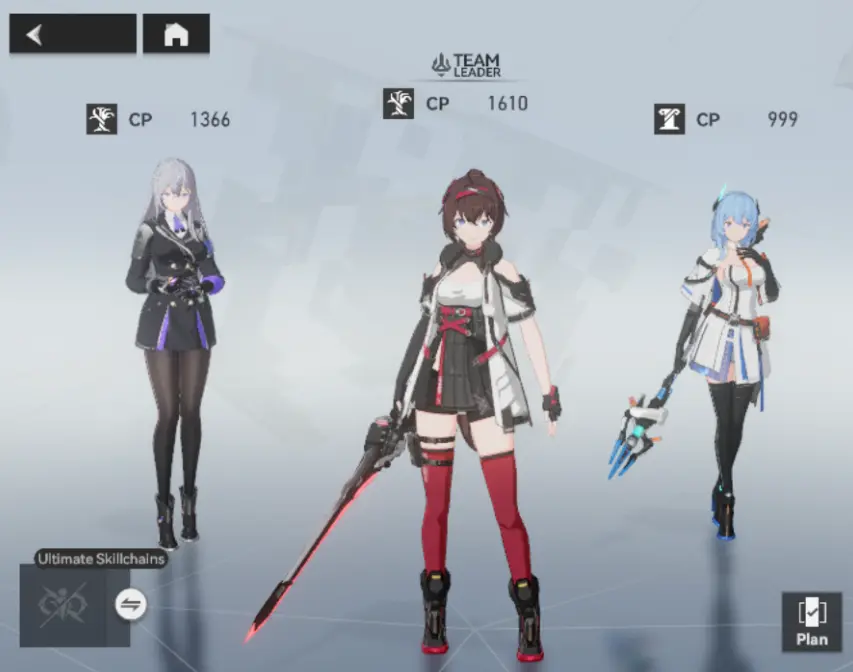
The team leader is the character you will be controlling manually. This gives you a lot of freedom in terms of execution, strategy, positioning, and tactics. The other two members of your team will default to AI mode – they’ll use their skills whenever and wherever they can, and they’ll follow your lead as much as possible. This system means that you can switch to whichever character in your team you need finer control over (or don’t want the AI to just unga bunga). At the same time, if your backup team is strong enough, you can just hang back and let them do the work as there’s no sweep function in Aether Gazer.
You can swap who the team leader is by dragging them to the center position in the formation screen.
Ultimates
As a character fights, they build up ultimate energy. Once they have enough of the stuff, they can unleash their ultimate – an incredibly powerful skill that can turn the tide of combat.
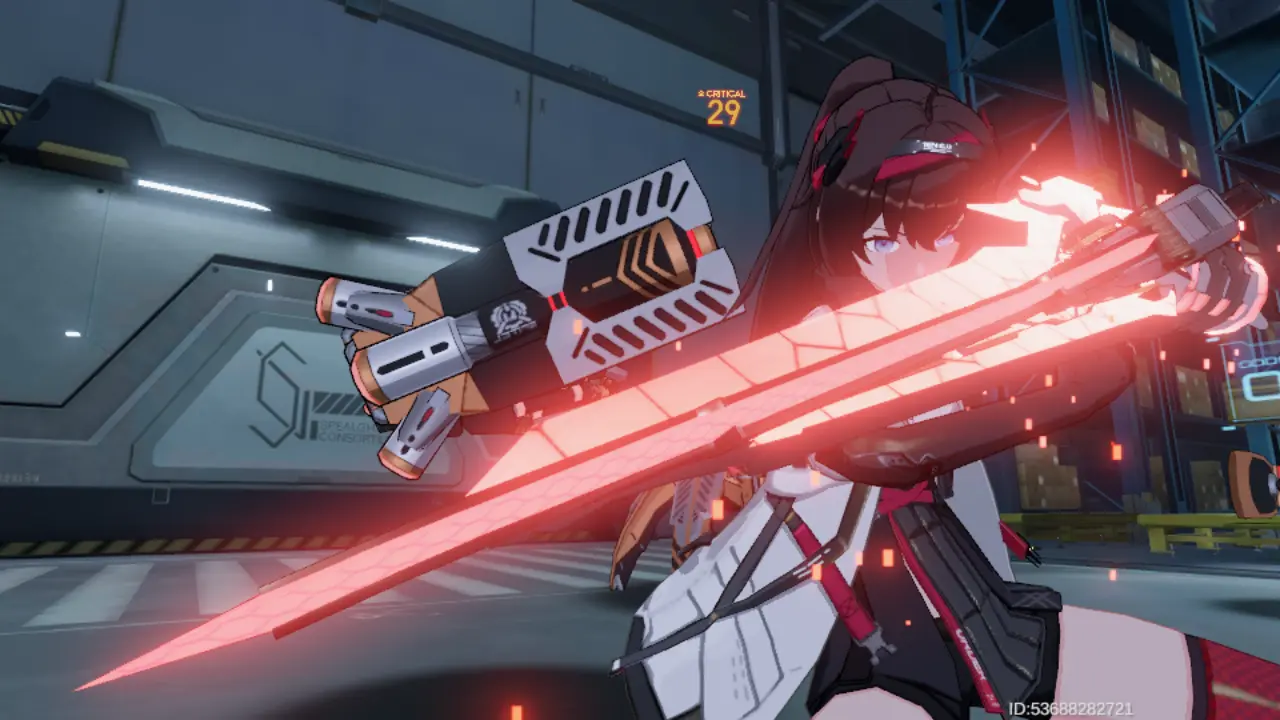
A ready ultimate will be indicated by a glowing yellow light around the ultimate icon. Time your attacks for the most impact. But what’s better than one ultimate?
Ultimate Skillchains
The answer: two or three ultimates at once!

Certain Mods interact with their peers especially well, and this bond culminates in an ultimate skillchain. An ultimate skillchain changes how two or more characters’ ultimates work, combining their ultimates into a move that’s leagues more powerful than the sum of its parts.
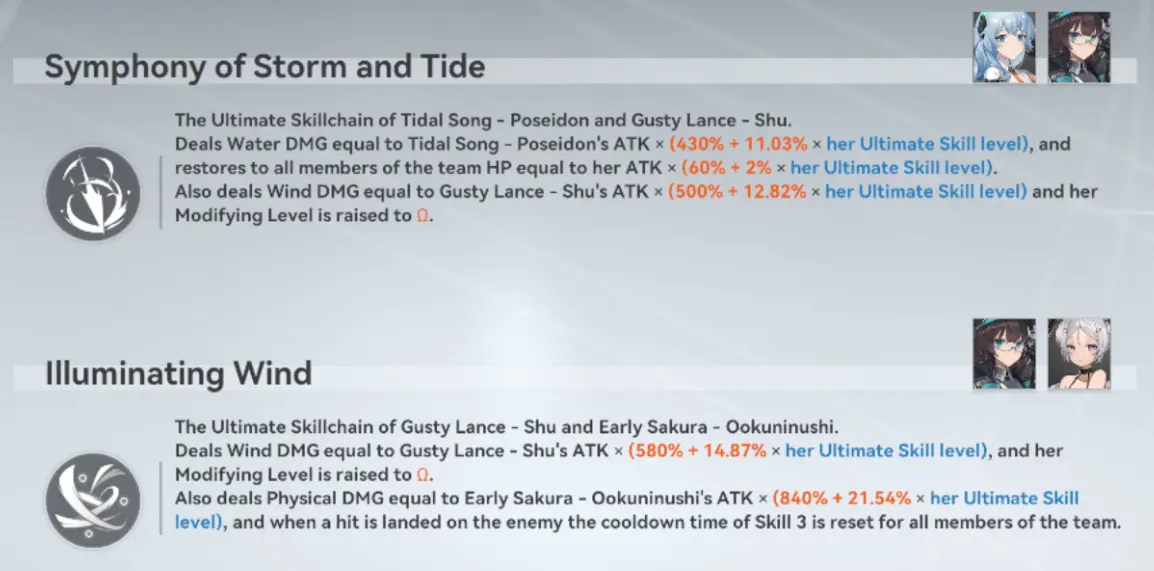
Ultimate skillchains work somewhat differently from their base forms in terms of calculation. The main difference between them is how their multipliers work. When a standalone ultimate is leveled up, its multiplier is increased by a fixed amount. If that ultimate is used in a chain though, it instead deals a set percentage of ATK times the user’s ultimate skill level. This means that while leveling ultimates for individual characters gets you some mileage, you’ll get a lot more bang for your back if you use that ultimate in a skillchain!
To illustrate this point better, let’s once again look at the damage of Verthandi’s ultimate and compare it against her part of the Tricolor Concerto ultimate skillchain.
| Verthandi – Decisive Slash | Verthandi – Tricolor Concerto |
| Deals 360% (369.2% at level 2) ATK to one enemy. | Deals 615.38% * ultimate skill level damage. |
As you can see, leveling up Decisive Slash to level 2 gets you a minor 9.2% damage increase; leveling it up to 2 also massively boosts Verthandi’s Tricolor Concerto section to a massive 1230%.76%! In short, always use an ultimate skillchain if you can if you’re pushing for raw power – you get a lot more mileage out of your invested resources that way.
Note that you must have all the indicated characters in the same team to trigger an ultimate skillchain and they have to all have their ultimates ready and full as the skillchain will eat all their ultimate energy. You can’t do a half-assed version if you have 2 of 3 characters; ALL of them must be present.
Tag Ultimates
Just because your AI teammates can’t skillchain with you doesn’t mean their ultimates are worthless as you can call on them to let loose anytime. What these lack in brute force they make up for in utility and strategy.

To command an ally to use their ultimate, tap on their icon when it’s glowing yellow. Note that the rest of your team benefits from the invulnerability frames of an ally’s ultimate!
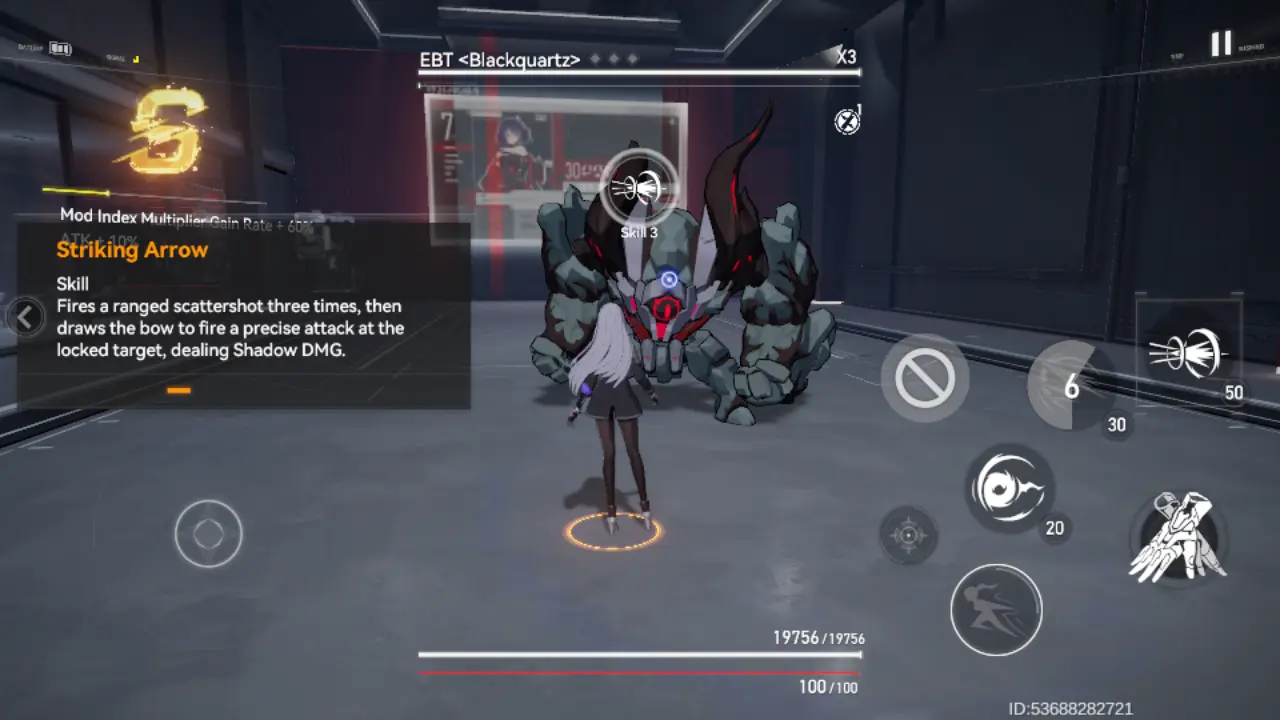
The Combo Meter
Aether Gazer’s combat is fast and dynamic, so it will naturally draw comparisons to similar games, like Devil May Cry. And just like DMC, Aether Gazer also has a combo system that rewards you for excelling in combat.

The combo meter has several levels, beginning at C and ending at Omega. Each level bestows powerful effects that allow you to push for even more damage:
- C-rank: No bonuses.
- B-rank: Mod index multiplier gain rate +10%, ATK +2%.
- A-rank: Mod index multiplier gain rate +30%, ATK +5%.
- S-rank: Mod index multiplier gain rate +60%, ATK +10%.
- Omega-rank: Mod index multiplier gain rate +100%, ATK +10%.
Filling up the combo meter is a simple affair. Every time you hit an enemy or trigger an Extremity Dodge, the meter fills up a little bit. Conversely, getting hit depletes the meter by a little bit – and it also passively decreases over time.
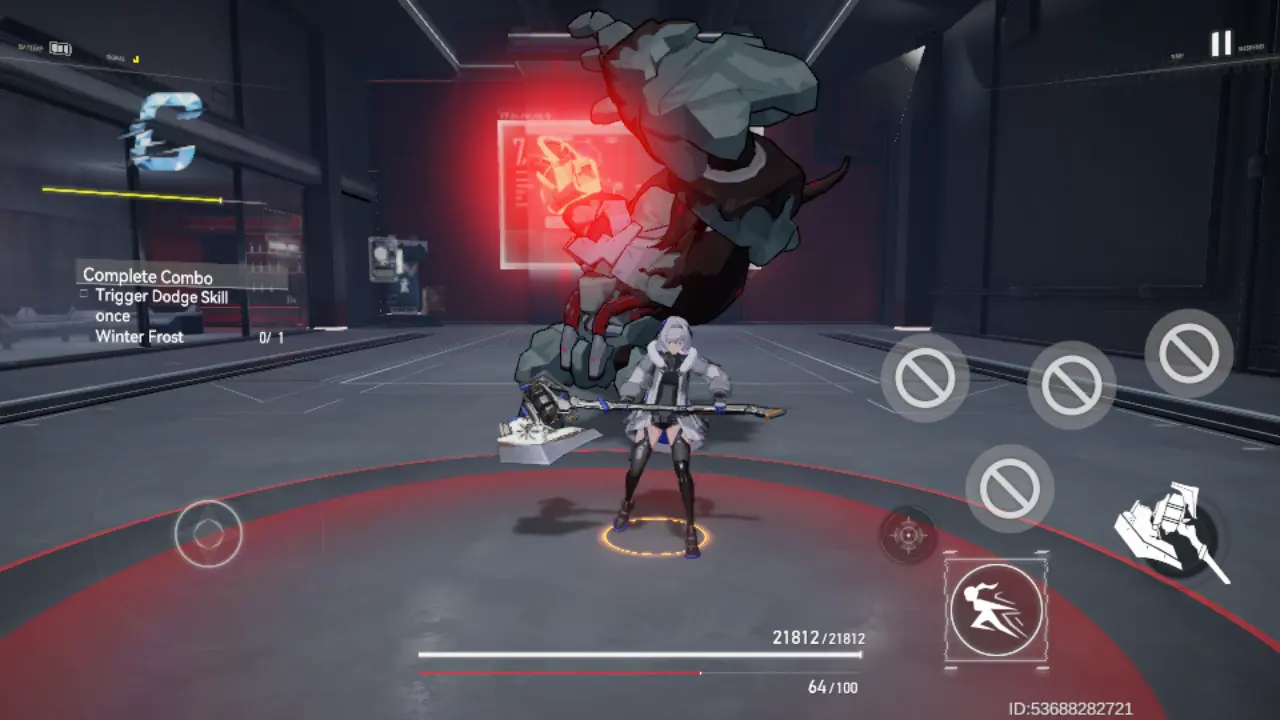
Modified Mode
Aether Gazer doesn’t exactly have an intuitive tutorial system, so you might be a bit lost looking for what exactly the mod index multiplier combo that the combo system refers to is. It’s rather simple – the mod index is the green bar that appears below a tough enemy’s HP bar. When this bar fills up all the way, the screen will shatter and your crew will enter Modified Mode!
In this state, time is frozen for enemies while you’re completely free to move around and wail on them as much as you can. Let loose with everything you’ve got while in Modified Mode. Note that it’s usually just bosses and mini-bosses that can be subjected to Modified Mode.
Escaping Stunlocks
Of course, having the same thing happen to you is far from pleasant. That’s where the break-fall system comes in, which just means “you can dodge out of stunlock”.
Note that you can dodge to cancel your stunlock even if you’ve already been hit!
Control Resistance
Modified Mode isn’t the only way to stop foes from acting. Some Modifiers have powerful effects such as stun or freeze that keep opponents from moving or fighting back.

However, this doesn’t last. Every time you inflict a foe with a crowd control effect, they gain a little more resistance to that effect. Trigger the effect too many times afterward and they become immune to all crowd control effects for a while.
When an enemy becomes immune to crowd control effects, they’ll have a yellow bar beside their name. Until the bar fills up and vanishes, they’re immune to your disables.

Extremity Dodges and Zero Time
As mentioned in the Skills section, Extremity Dodges are triggered by dodging just before an attack lands. While you can do this with most attacks, it’s easiest to trigger Extremity Dodges against AOE attacks.
To dodge a circular AOE attack, dodge just before the inner circle touches the outer one…
…while dodging a linear AOE requires you to dodge just before the inner rectangle reaches the end of the AOE area.

Triggering a “perfect” dodge in this way counts as an Extremity Dodge, which both activates Zero Time and any dodge effects the character may have. Be very mindful of your own latency when attempting to Extremity Dodge!
It’s important to note that while Zero Time triggers off any Extremity Dodge, characters have different Zero Time duration and effects. For example, Poseidon’s dodge effect only gives 2 seconds of Zero Time but gives her 50 Divine Grace, while Verthandi has 3 seconds of Zero Time but no other effects.
Finally, your AI teammates can trigger Zero Time, though this is a lot less reliable than your own dodges.
Basic Resource Management
Finally, let’s talk about resource management – where to get the (sometimes free) stuff you need to make your Modifiers stronger as well as how to maximize your resources at the start.
Quick Tips:
- Stamina saved is stamina earned. Focus on definite ways to get stronger – this means grinding for stuff like Battle Records and Divine Factors rather than things that might make you stronger, like sigils.
- New players get several coolant packs that expire in seven days. Pop them and build up a trove of leveling materials.
- The shop occasionally has free stuff up for grabs. You also get a Supply Pack every five admin levels that contains lots of stuff.
- Stages have 1-3 medals; the more medals you earn, the more prizes you can redeem in the stage reward screen.
Deterministic Strength
As a new player, focus on spending your resources on definite ways to get stronger – not sigils, not anything with a modicum of randomness. Your time and stamina are best spent on stuff like grinding Battle Records, Access Key materials, Divine Factors for skill levels, and limit break items. Yes, I know sigils are shiny and tempting, but they only -might- make you stronger. Build a solid foundation first!
Use Your Newbie Coolant!
One of the very first items you’ll get in Aether Gazer is a bunch of coolant, which is used to replenish swigs (stamina). However, unless you were paying close attention, you’ll probably gloss over the fact that a lot of this coolant will expire in seven days.
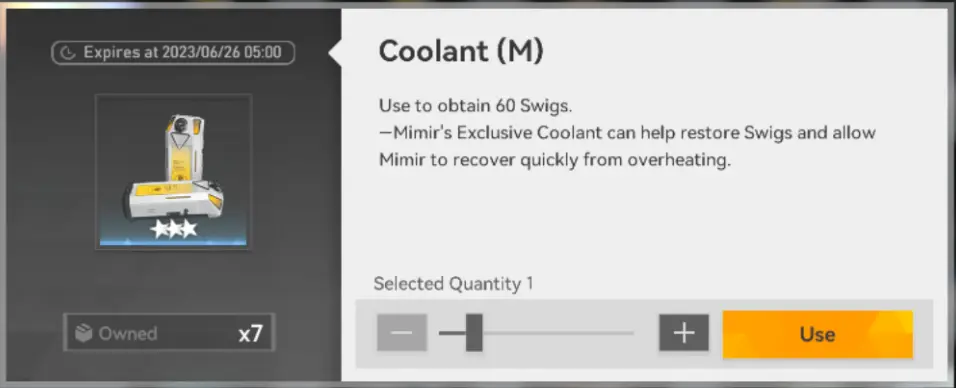
As I mentioned at the beginning of this section, it’s best to spend this extra stamina on grinding out exp and level break materials.
Newcomer Event
Aether Gazer really rolls out the red carpet for new players. As a beginner (or a veteran trying out the game), be sure to take advantage of all the good stuff the Newcomer Event shells out.
Among the prizes you can earn here are the characters Hodur and The Innocence – Osiris, scan vouchers for both Modifiers and Functors, Intel for Poseidon and Verthandi, the 5* Elf Functor Galadriel, and the School Days outfit for Zenkibo Tengu. Oh, and a whole bunch of Ain Soph Coins, leveling materials, and Shifted Stars.
Free Shop Stuff
Even if you’re fully F2P, make sure to swing by the shop sometimes as there’s occasionally free stuff up for grabs.

Of special note is the Supply Pack that’s available every five admin levels as it contains a wealth of materials for strengthening your Modifiers.
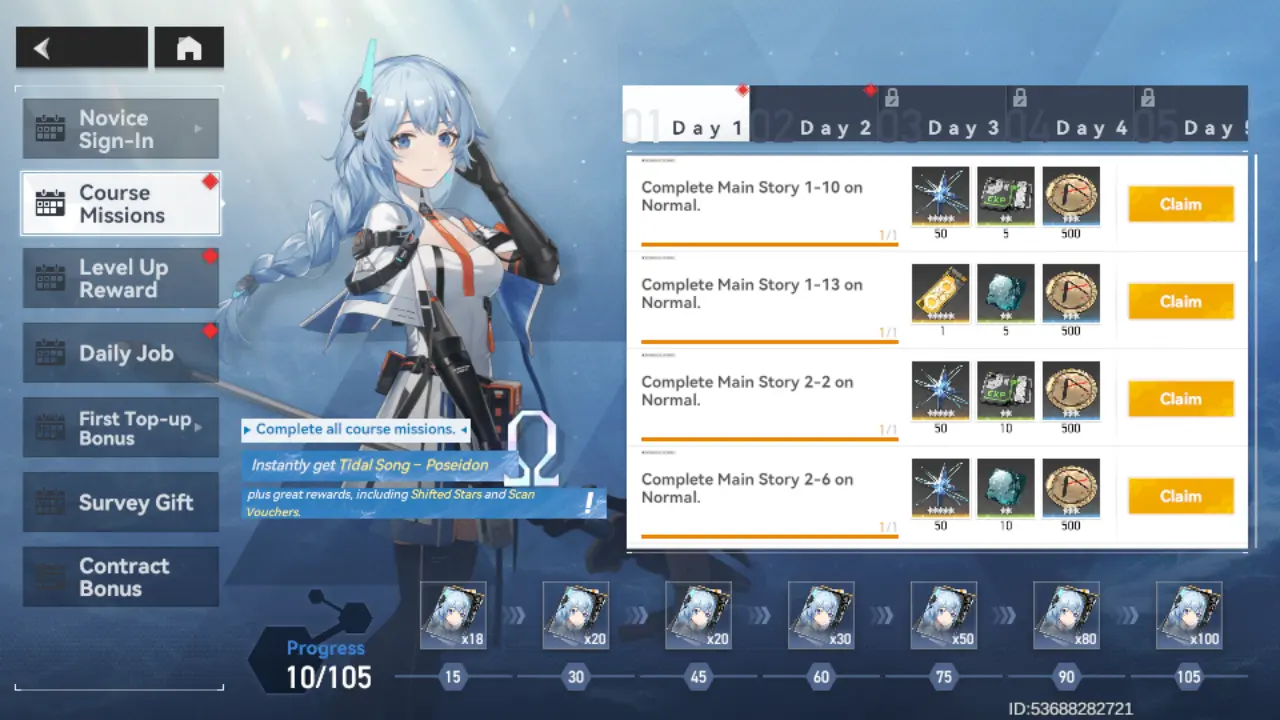
Missions
Daily, weekly, and story missions are a predictable but reliable way of amassing resources in any gacha game, and Aether Gazer is no different.
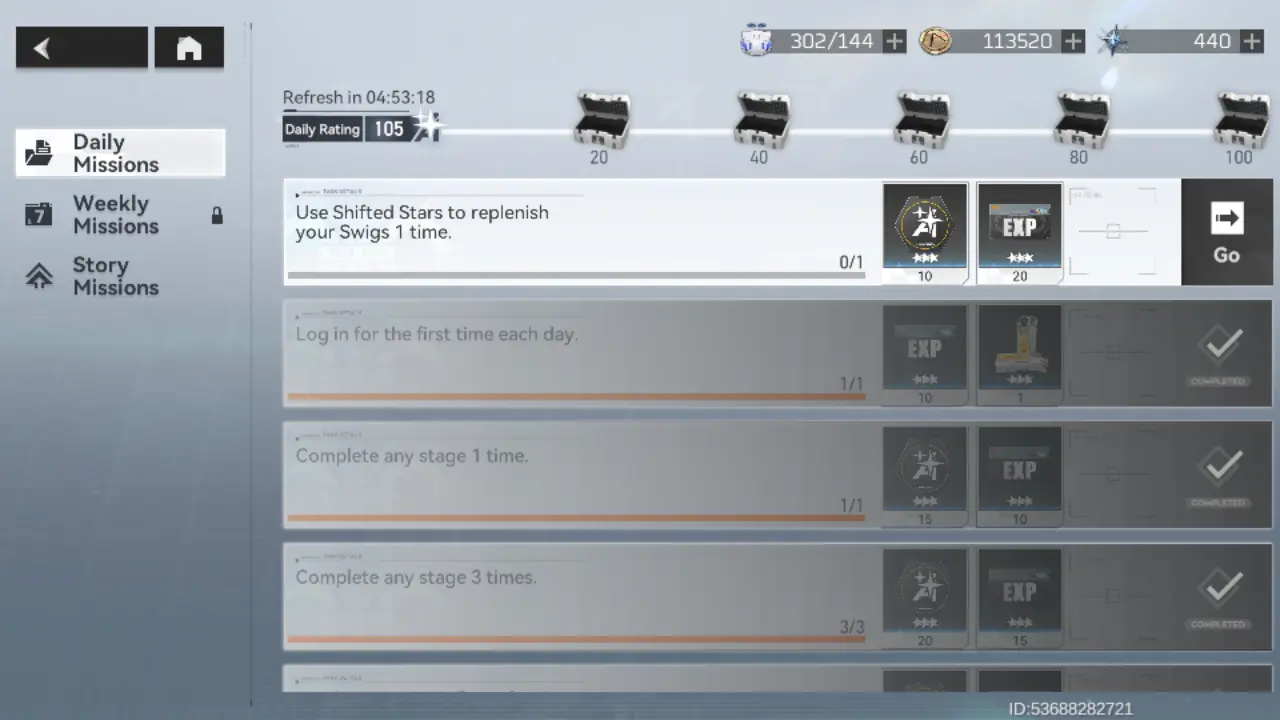
It’s important to note that Aether Gazer’s mission reward system is similar to the activity bar of other games; make sure you tap on the unlocked chests at the top of the screen to claim your stuff!
Stage Progress Rewards
Those emblems you get from completing a stage aren’t just for show. The more objectives you meet, the more emblems you get – and the more rewards you can claim.
This system gives out not only Shifted Stars but also Divine Factors and Revelations that you’ll need for strengthening your Modifiers.
Achievements and the Gallery
You’ll unlock achievements and gallery images over the course of normal gameplay. These aren’t just for show though – you can redeem rewards based on how many you’ve unlocked!
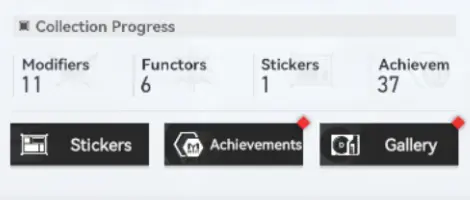
To access this menu, tap on your username in the upper left of the main menu.
The Battle Pass
Of course, there’s a battle pass.
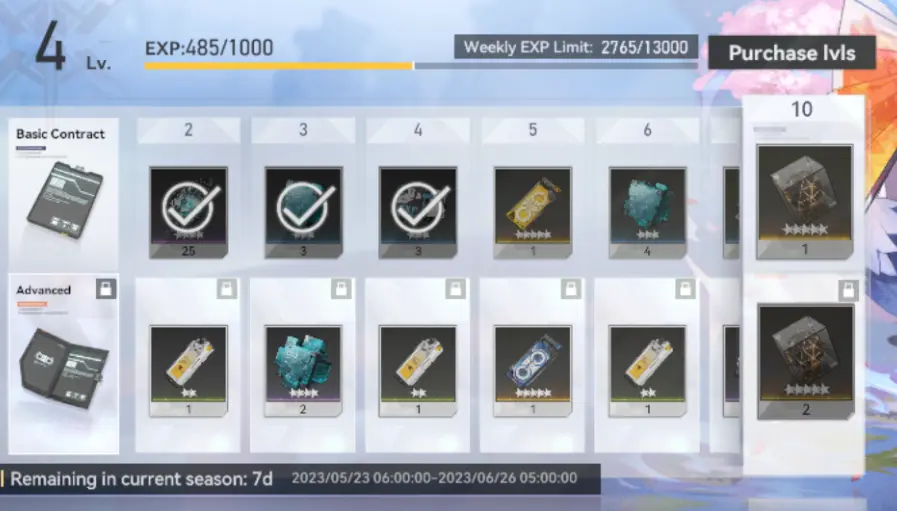
Like other battle passes, this one comes in both the free and paid versions, with the paid version having better goodies. To access Aether Gazer’s battle pass, tap Cooperation Agreement to the right of the main menu.
Premium Currency and Banners
Aether Gazer is one of those games with multiple currencies. I still can’t figure out why they do that. Learning which is which, as well as where to get the right kind of voucher for the banner you want to pull on can save you not only a lot of head and heartache but also keep your Shifting Stars safe!
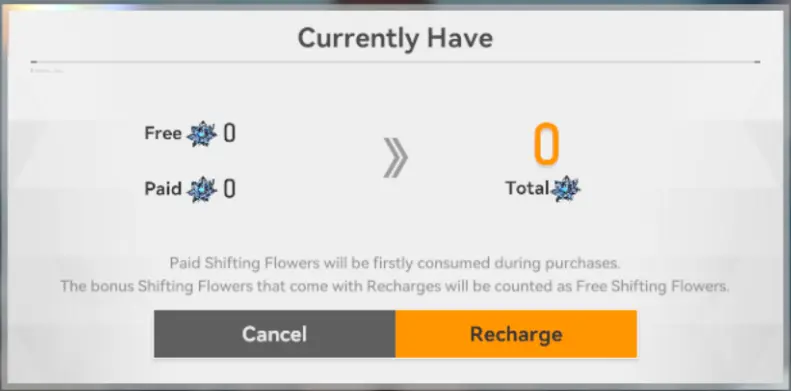
Currency goes like this: any paid top-up gives you Shifting Flowers. Shifting Flowers can be used to buy packs from the shop. If you want to use your Shifting Flowers for gacha, they need to be converted into Shifting Stars at a 1:1 rate.
Shifting Stars can be used to buy three types of vouchers:
- The Modifier Scan Voucher is for pulling on the standard character banner.
- The Precise Scan Voucher is for pulling on the limited character banner.
- The Functor Scan Voucher is for pulling on the Functor banner.
All these banners cost 200 Shifting Stars per pull.
Is There a Pity System?
Yes, there’s a pity system, and if players in Aether Gazer’s CN server are correct, it does carry over from banner to banner.
Real-Time Protection Online!
The battle to defend and secure Gaea and the safety of the digital world will never end, and only Aether Gazer stands between stability and chaos. But no matter where the threats come from, our Modifiers will be ready to meet any challenge head-on.

That concludes my beginner’s guide to Aether Gazer, and I hope that with this knowledge under your belt, you’ll have an easier time delving into more challenging levels and arenas. If you have any suggestions or tips of your own or have any comments on how to improve this beginner’s guide, make your voice heard in the comment area below!