Times have become difficult and chaotic in the island of Almora. Three magic stones have been missing from the mysterious Darkosen Circle, and nobody knows for sure what would happen should they be returned. Those who have gone on the journey to find them eventually give up and return home, changed for the worse.
Almora is already a dangerous place on its own and your older brother decided to set forth and find the stones himself. You followed suit, but on your way to find him, you got shipwrecked on Almora Island. Was it destiny that you’ve been drawn to this mysterious island? Will you find out the truth of what happened to your brother?
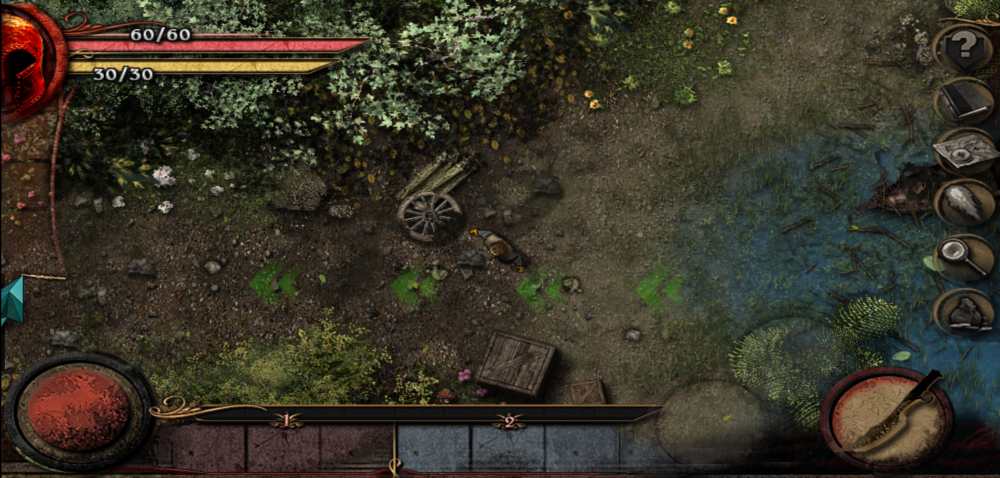
Gear-Studio, otherwise known as Grzegorz Borkowski, brings to you an intense adventure full of twists and turns wherever you go: Almora Darkosen. A top-down action RPG, the game itself is reminiscent of older titles like Dungeon Siege and Untold Legends. On mobile, it plays closer to Pocket Rogues. Here, you set off on a quest to find your character’s older brother and the three magic stones to restore the Darkosen Circle — an enigmatic altar that seemingly caused the chaos of the world after the stones have gone missing.
Will you be the one to find order and peace for Almora and its people? Are you already on this quest but might’ve forgotten your purpose? Do you simply wish to return to the basics and re-assess your position in the game? Read our Almora Darkosen RPG beginner’s guide below and perhaps we can bring you closer to your goal. Onward!
It’s Too Dangerous to Go Alone! Here, Read This!
Almora Darkosen’s interface may or may not confuse the player at first. One may wonder where their stats are, how to access the inventory, which skills they’ve learned, where the next quest is, etc. But don’t worry! This is where we come along. Below is a detailed explanation of how to navigate the interface. If you can memorize this (or bookmark this page and refer to it every now and then), then playing the game will be just as easy as breathing.
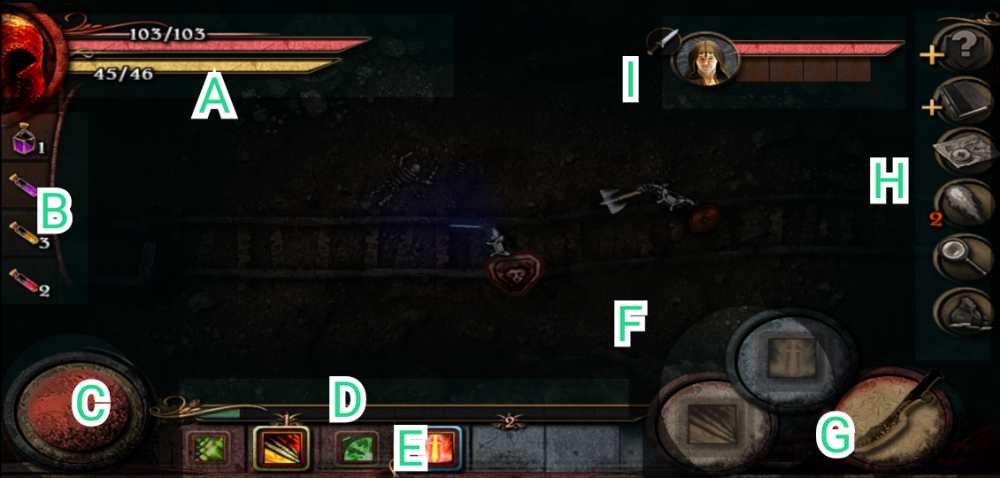
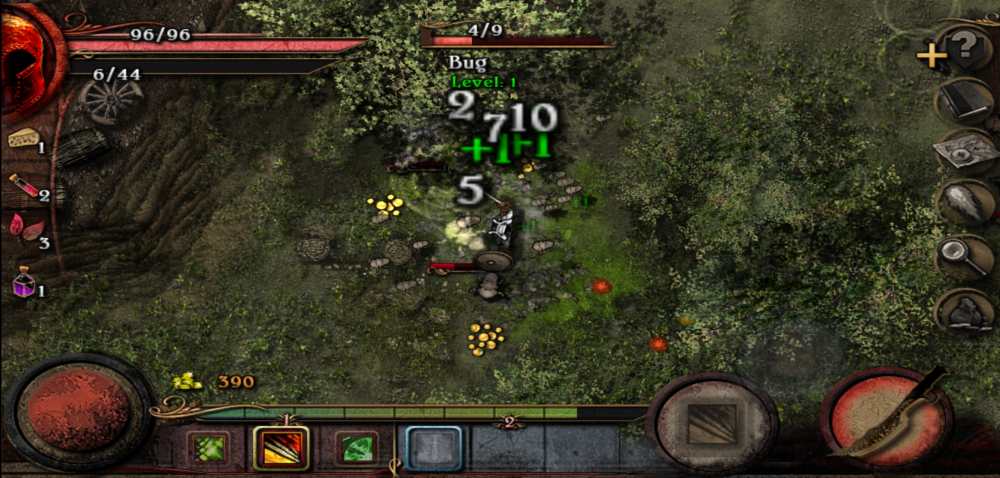
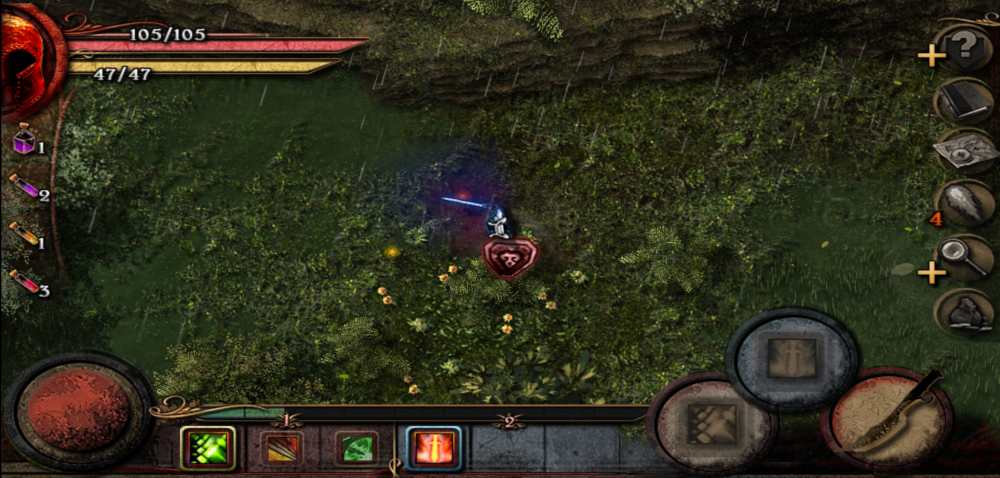
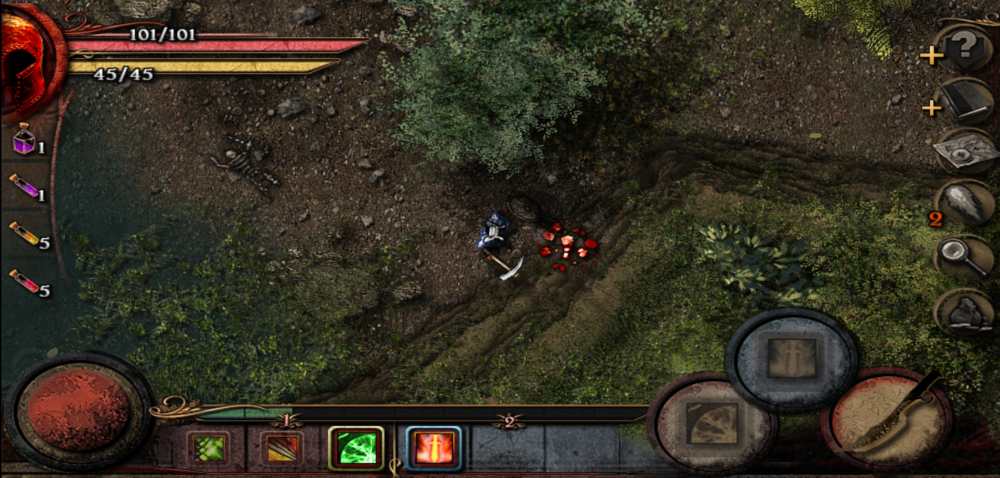
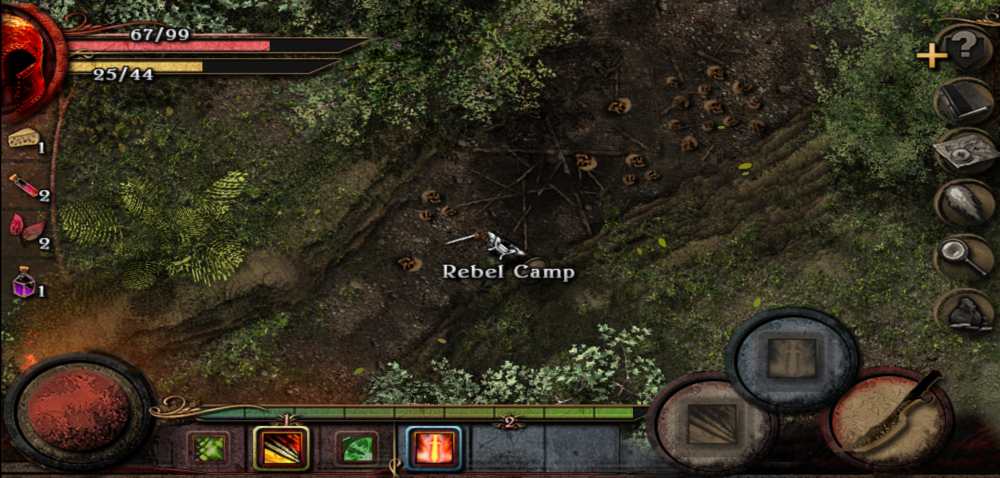
a. Player Gauges — These two bars tell you how your character is doing. The red bar signifies health while the yellow bar signifies your Power Points. Naturally, if your health hits zero, you die. If your Power Points hit zero, you cannot perform your skills. This can be fixed by eating food or drinking potions. Dying will make your character lose gold and experience points (or EXP).
b. Quick Inventory — The column of tiny slots placed vertically below your gauges is called your Quick Inventory. This is the place where usable items become available for easy access. This only includes food and potions. Think of this as Batman’s utility belt except you’re wearing it.
c. Joystick — This round object makes your character walk about by dragging it. Easy peasy. Just don’t try to do this too much with your map open. They might bump into walls or trees (no really, it’s a bit harder to walk with the map open, but you’ll get used to it).
d. Experience Bar — Every RPG player knows what this does! But in case you don’t, if you fill this bar with EXP, your character will level up. Upon doing so, they will receive 3 stat points and 3 skill points. You get EXP every time you kill something or complete a quest.
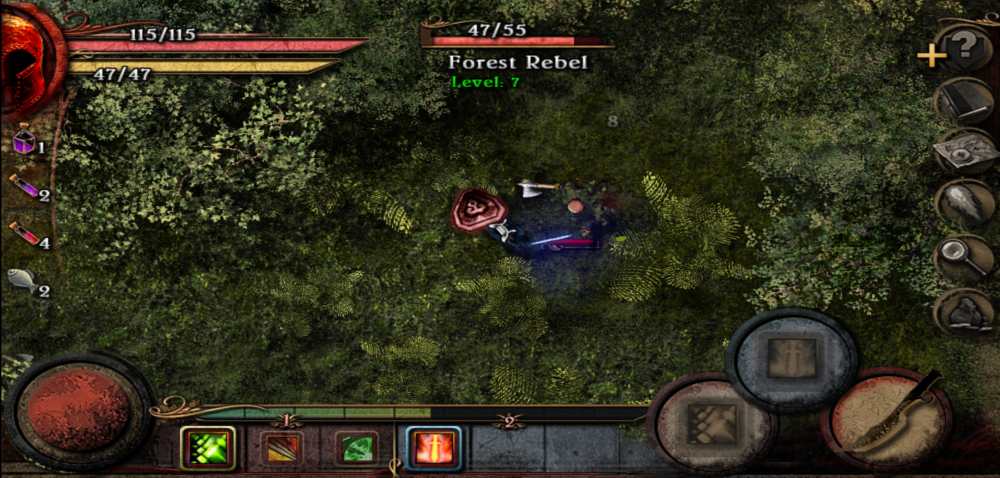
e. Skill Slots — At the very bottom of the screen, you will see 2 sections of 3 slots each. These are your skill slots. Tapping any of these skills will change the currently active skills in your skill buttons. You can change these as frequently as you’d like, even during a fight. Don’t show off too much, now!
f. Skill Buttons — Pressing any of these will activate the skill currently placed in them. The red skill button only takes skills from section 1 while the blue skill button only takes skills from section 2. Line your skills up wisely!
g. Attack Button — Pressing this button will make your character strike whatever’s in front of them. Go nuts!
h. Menus — This column of buttons are a set of menus. Let’s go through them one by one, shall we?
- Options Menu

This is where you go to Pause the game. Whenever you open any other menu, the game won’t be paused. You may also go here to manually save your game, return to the main menu, or even upgrade to Premium if you enjoy the game so much or wish to show your support to Gear-Studio.
- Quest Log
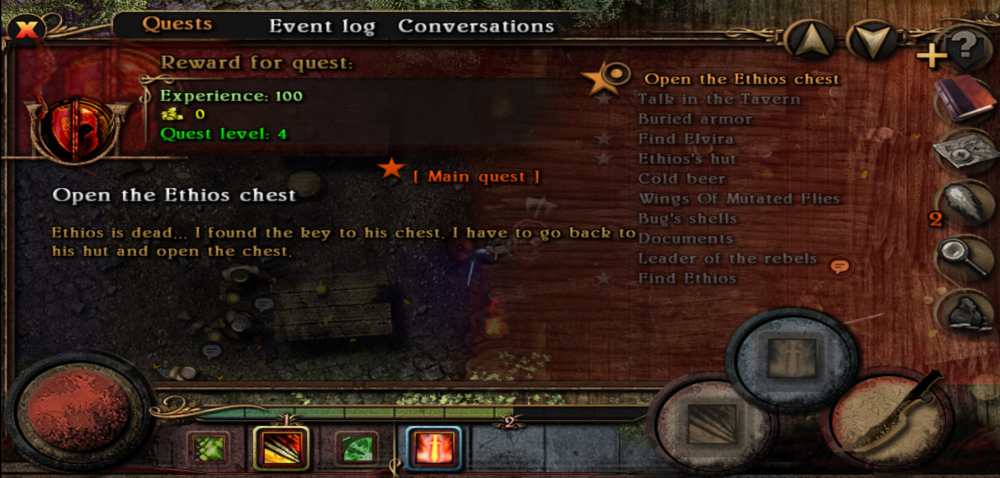
This is a log of all the quests you are currently undertaking as well as those you have completed.
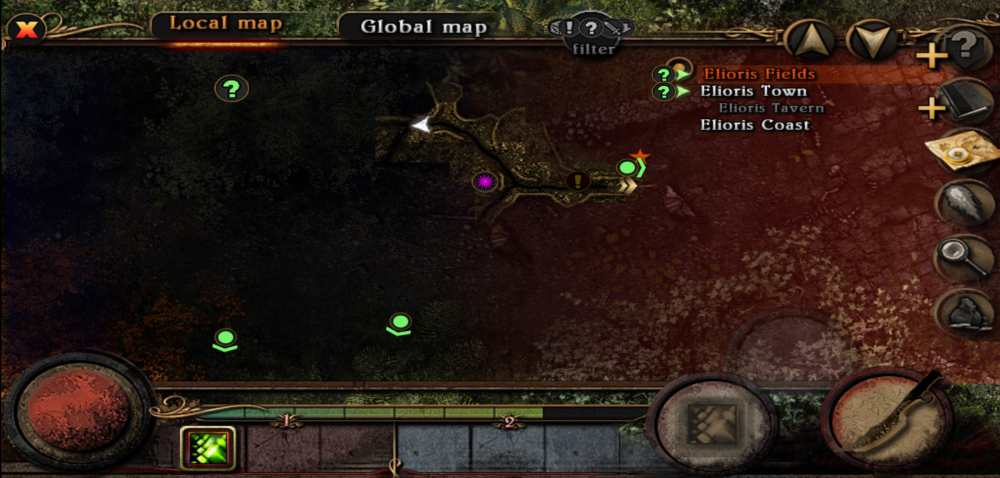
- Map

This displays the map. If you happen to get lost anywhere, open it up and give it a view. Speech balloons are NPCs you can speak to, exclamation points are NPCs that have quests for you, a purple pick and hammer crossed represents a crafting table, a downward pointing arrow is your storage, green arrows that point outward are where your quests should lead you, and green arrows marked with a star pertain to the objective of the Main Quest.
- Active/Passive Skills
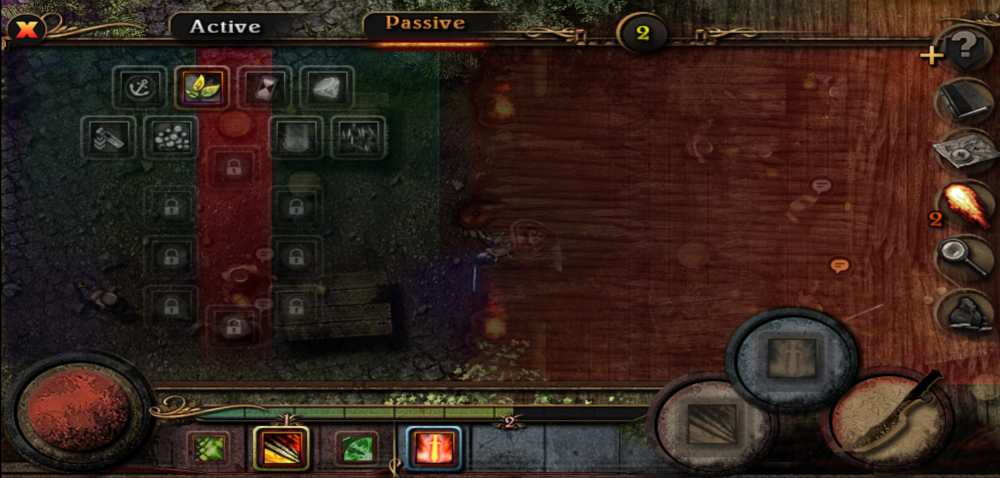
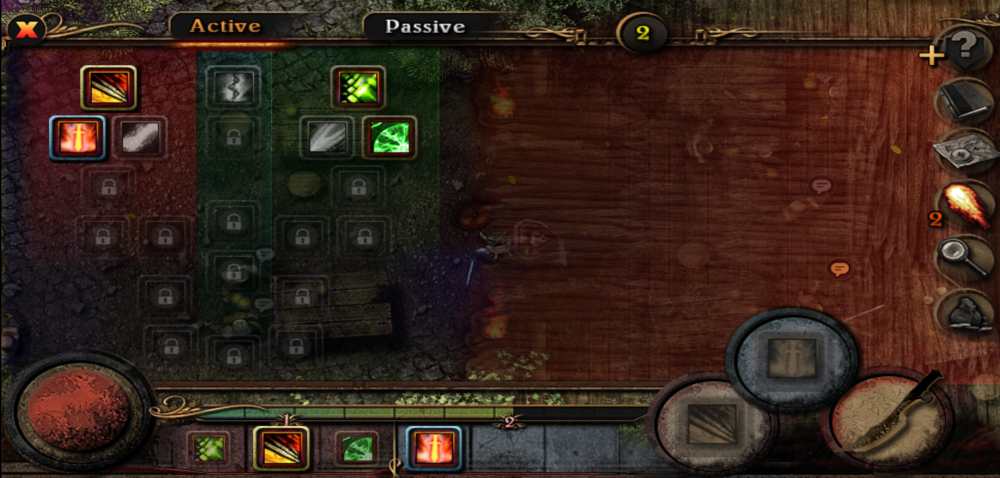
Active skills are those which can be activated in combat. Passive skills are always active, but help you in other means. For instance, a few of the starter passives help lower the prices of goods sold by merchants. Whenever you level up, you can choose among any of the available skills to improve at the cost of Skill Points.
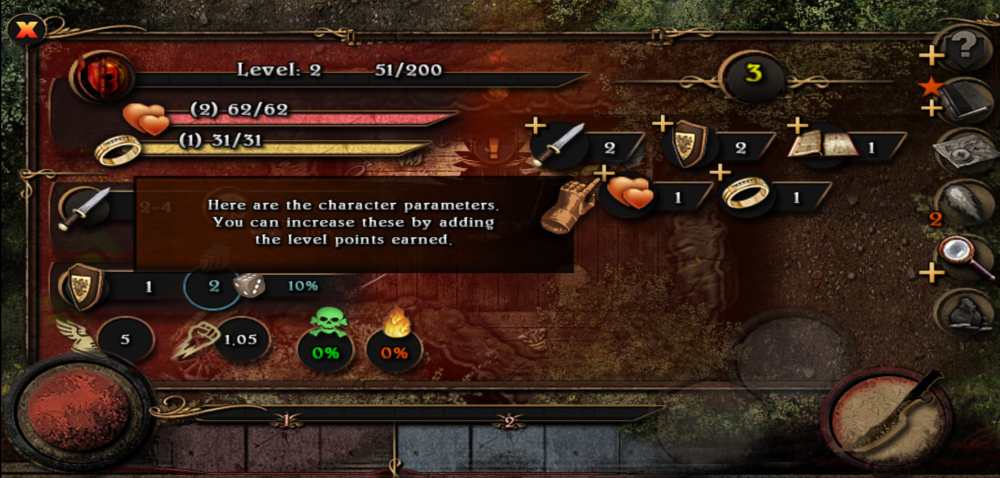
- Player Stats
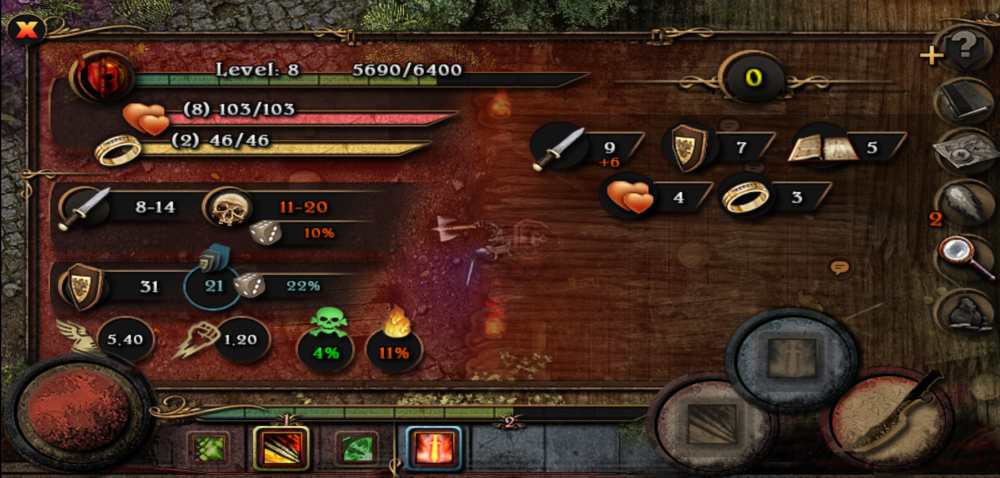
This menu is where you can view the current status of your character. After leveling up, you may assign your stat points here to improve your stats. If you aren’t sure of what does which, you may tap the icon of the stat to know more. We will discuss how you can build your character effectively down the guide.
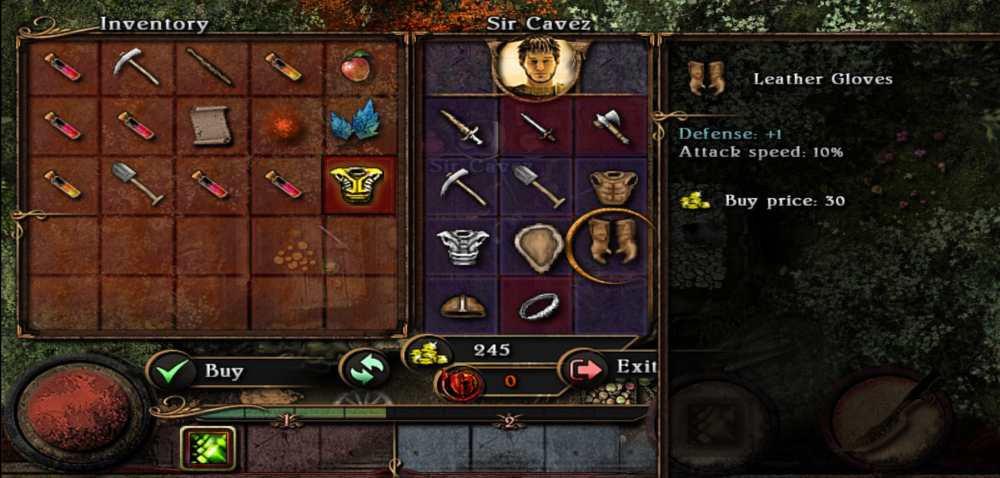
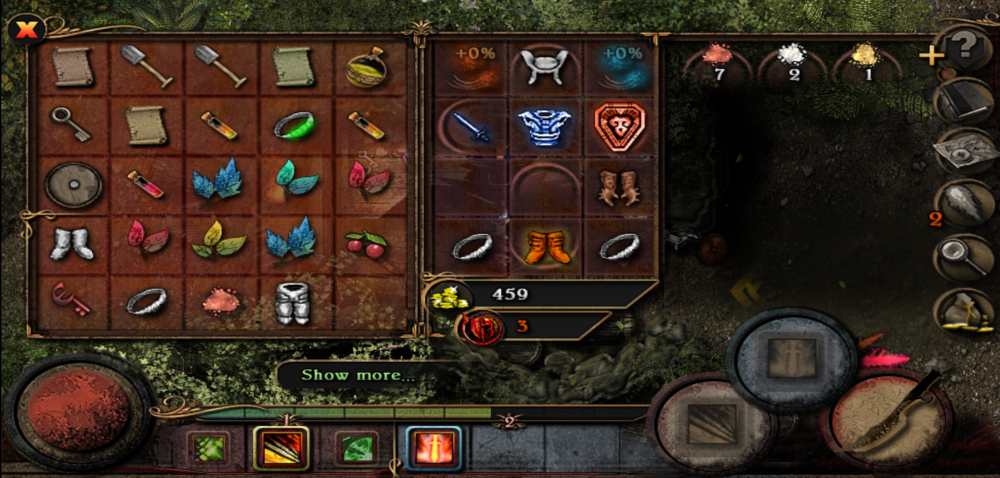
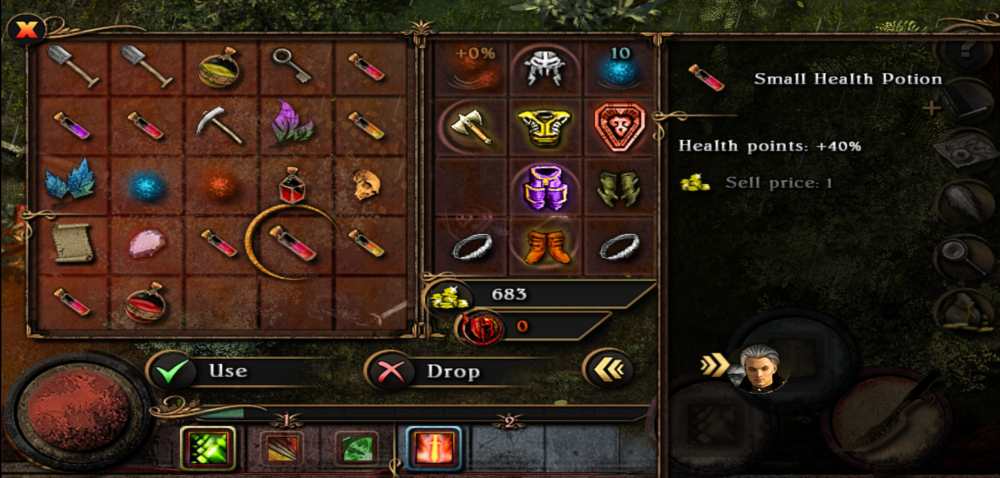
- Inventory
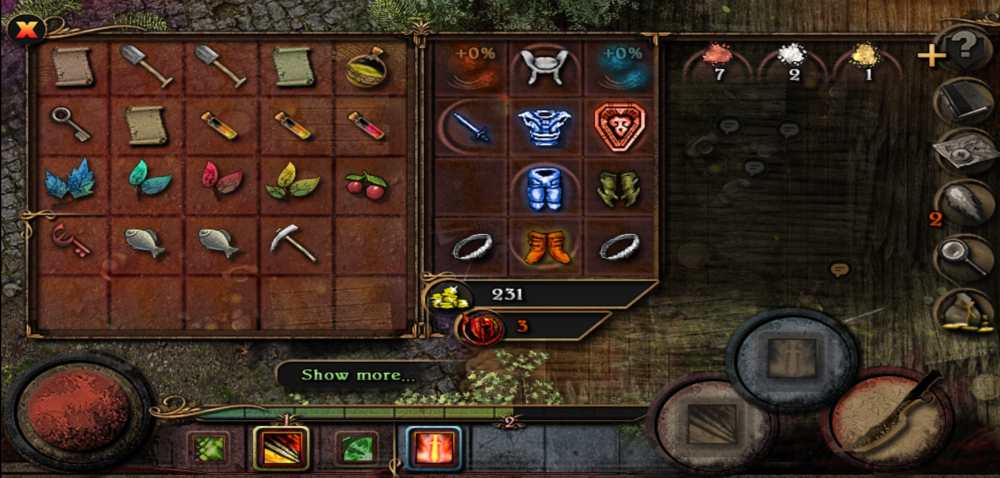
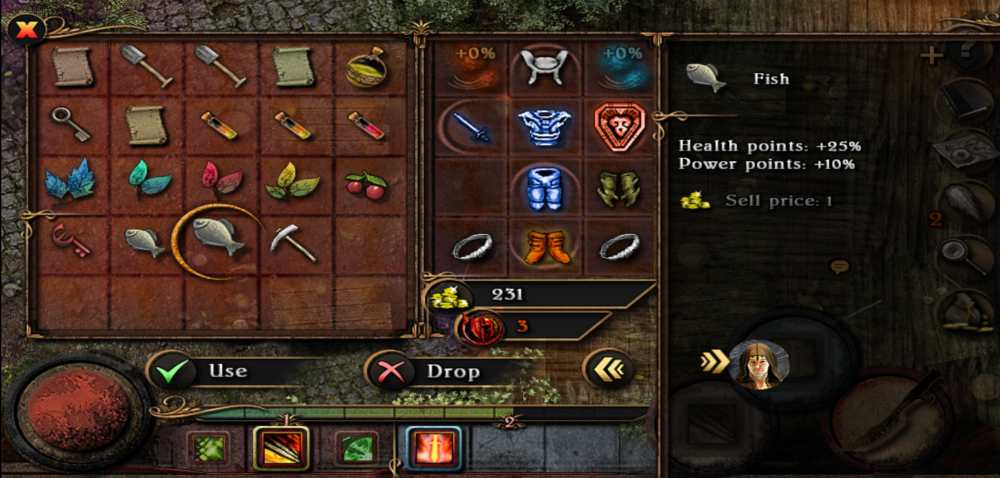
Your inventory is split into three sections. The left side is what is currently inside your bag. The center displays what your character is currently wearing as well as how much gold and Almora Tokens you have. The right side is reserved for stackable material which you can transfer to your bag by tapping them. These are commonly ores. This action is very important when crafting or enhancing. Tapping the Almora Tokens from the center transfers them to your bag one at a time.
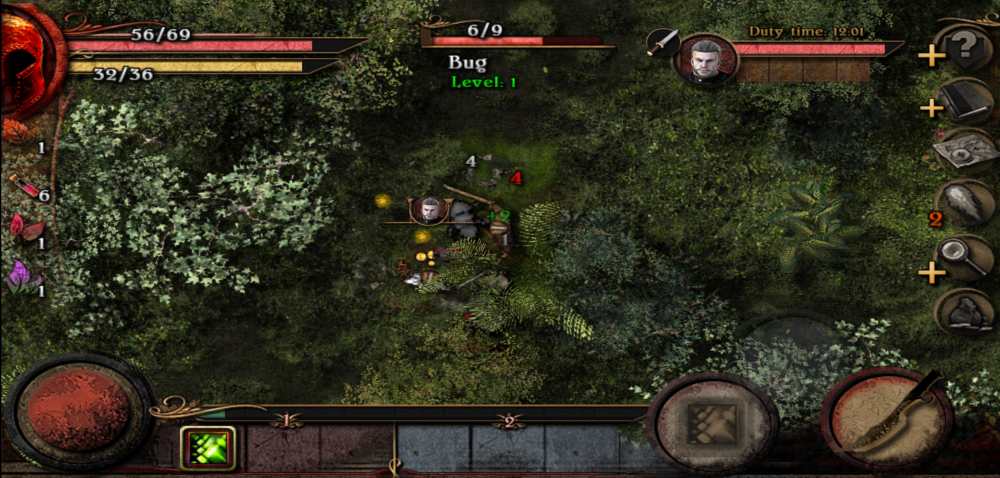
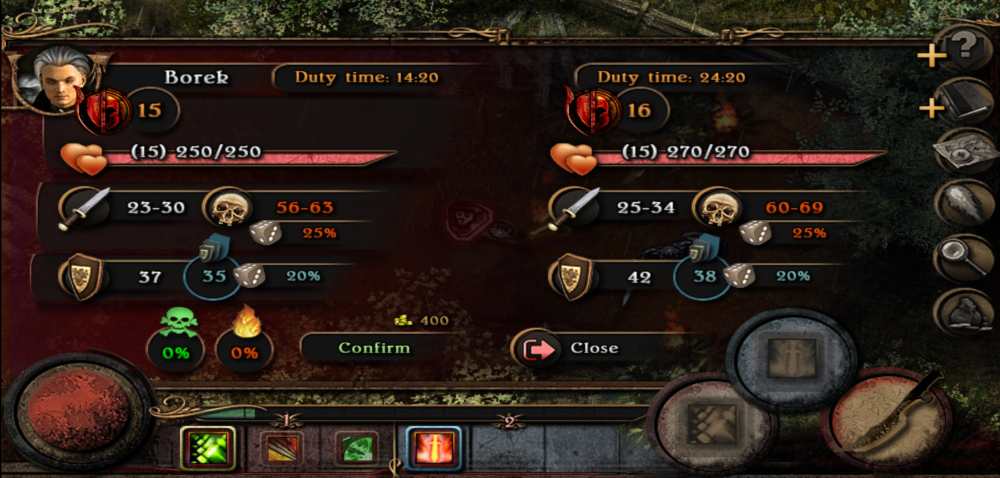
i. Mercenary Bar — This displays the current status of the Mercenary you hired. It includes their health, their quick inventory (which we will cover later), and their service timer. Once that timer expires, their contract with you will end. More on mercenaries later. WARNING: When hiring a mercenary but you can’t hire them yet and you want to speak to them later, DO NOT hit the Retire button to close the menu — you will send them away. Instead, open a menu item like your inventory to close the window.
Occasionally, you may find yourself lost on your way to your Main Quest. Keep an eye on signposts along the way and they’ll direct you where you need to go. Moving around and exploring your surroundings also helps since you might encounter portals or boatmen. These will also easily help you get around the island more efficiently. Their downsides, however, are that the boatmen require payment and the portals require their other ends to be found.
As you play through the game, the interface will start to grow on you. Naturally, there are some things you will need to get used to (like clumsily walking around while staring into the map or needing to pause the game in the Options Menu), but we hope that the pointers above will have made everything much clearer to you. After all, learning how to play any RPG out there is like learning a new language. But one thing still remains open to the player: how do you get through the perilous island of Almora?
Take that rucksack, pick up your favorite weapon, it’s time to go on an adventure. Below are our tips and tricks for beginners to make sure that they’ll see their journey through!
Almora Survival 101

As the story itself wasn’t a warning enough, the island of Almora is teeming with danger and adventure… Okay, mostly danger. You’ll be attacked from all sides by ruthless, relentless rebels and monstrous, malevolent mutant animals, so it pays to be prepared! If you find yourself dying often, here are a couple of tips and tricks to keep yourself alive.
1. Fight Smart
In any RPG adventure, the heroes (usually, you) are often beset by hordes of monsters, enemy soldiers, goblins, or other envoys of darkness. These pawns of the antagonist may or may not come with lieutenants that they fight for but when they do, it’s most certainly going to be a tough fight.
In the case of Almora Darkosen, you will encounter groups of enemies of varying levels (within the limits of the map, of course). As they close in, do you cut off the head and charge at the bigger, stronger monster? As practical as that may sound, it could end up killing you faster.
Weaker monsters in any part of Almora Island travel in large groups and they can be arguably as dangerous, or even more dangerous, as their larger counterparts. Attempting to fight bigger foes will cause you to get swarmed, putting you and your mercenary (if you have one) at risk.
To avoid this from happening, back away first from the tougher enemy and take out the weaker ones first. This will thin their numbers out and reduce the horde’s overall DPS against you, giving you a chance to recuperate and regroup in the scuffle.
When the enemy horde has been wiped, charge at the stronger enemies and give them hell! Though if they prove to be too strong, there is no shame in running away. The catch here is that these enemies will go back to where they came from and if you happen to leave the map and return, they will most certainly have healed with their allies respawned. But hopefully, when you return yourself, you’ll be much stronger than they are (we’ll get to that later).
There will be some occasions where you will find enemies that share the same color as the ground or the foliage. This becomes especially difficult when they all hit hard and chew easily through your armor. Draw them out into a place you can see them like roads or lighter-colored ground so you can see how many more of them are left.
The worst that could happen is you letting your guard down and then having a stealthy enemy come up to you at low health. Another way you can keep this from happening is by listening. If something sounds like it isn’t part of the ambient noise, you’re most likely being attacked.
Though, as you duke it out with groups of enemies at a time, did you know that you can stay in a fight without having to drink too many potions?
2. Consider Alternatives for Healing and Recuperation
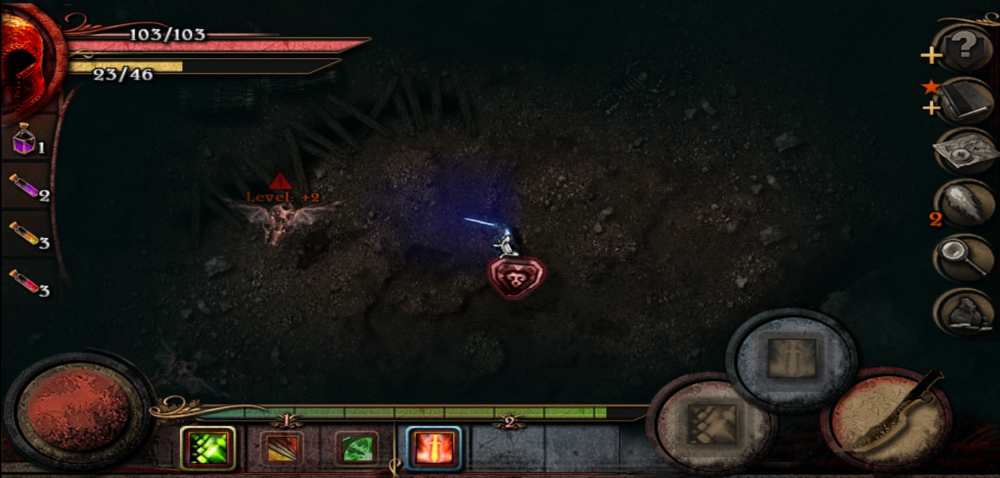
As you fight through groups of enemies, you may notice that they drop these curious tiny glowing orbs. Are they dangerous? Are they a means for your fallen enemy to take revenge on you by leaving biological explosives? They’re far from that. In fact, they’re the complete opposite — they’re good for you!
These mysterious orbs are called Essences. While attacking or killing any enemy you encounter, Essences will scatter all around you. In the moment of battle, you might be a little bit distracted since your focus is to stay alive.
But whenever any Essence drops at all, pick it up immediately to press the fight on. The red ones replenish your HP while the yellow ones replenish your Power Points. Taking any of these as you fight will somewhat spare you from consuming your potions too fast. However, don’t rely on them too much as the bonuses they give aren’t much.
Sometimes, Essences can be picked up and stored in your inventory. These usable Essences can be turned into potions given the right ingredients. Empty potion bottles and potions themselves can be bought from certain merchants. As efficient as they are in healing you, they can be quite pricey.
We recommend stocking up on fish from the tavern (especially if you’re still in Elioris), since healing yourself with a 25% to HP and a small boost to Power Points should be enough to get you through a fight. The fish are quite cheap, too. If you happen to run out of potions or fish, you may also try running around the map to find fruit or seats.

Fruits are good healing items, too, if you’re feeling cheap. Apart from buying them from some merchants, they can be found in the wilderness. Try looking near bushes or trees to find them — they’re usually there at random.
A last resort to recovering your character’s health would be places to sit. These are normally situated near fireplaces or furniture. Simply walking over to one of them and pressing the downward arrow that appears on the right side of your screen should make your character sit down.
Upon sitting down, your health and Power Points should recover at a great rate. Be warned that attacking will force your character out of their seat. Seats are scarce but quite needed when you see them, but in most occasions, nothing beats chugging a potion or swallowing a fish whole.
But with so many items in your inventory, using them can be difficult, especially when you’re being swarmed by dozens of enemy warriors. Time to review your quick inventory.
3. Prepare Your Quick Inventory
The quick bar is one of the best things to ever happen to the RPG landscape.
Having a quick bar for anything makes swashbuckling and raiding dungeons a breeze. No more clumsily searching for that Elixir of Complete Healing in a bag containing dozens of other potions resembling that very elixir. With the aid of a quick bar, that elixir can be placed in a slot that will get it ready for when you need it. Almora Darkosen’s Quick Inventory acts like a smaller window to your inventory that requires some item swapping every now and then.
Put essential items here, especially food and healing potions. The more of these you have in your bag, the better. This will also help you keep track of what you may need to restock on when you get back to town. If spamming your skills is part of your schtick, then you may need to stock up on Power Potions and put them there. Food is also a great option.
If you find yourself living off the land (e.g. you ran out of potions and are stocked up on apples and herbs instead), placing these in your Quick Inventory is a good alternative, at least up until you decide to make your trip back home.
Don’t forget to map any of these into your Quick Inventory by opening your inventory and then tapping your desired item. You should see a button with a golden ⏪ symbol. Tapping this will put it in your Quick Inventory. Conversely, tapping an item in the Quick Inventory will give you the option to put it aside, as well.
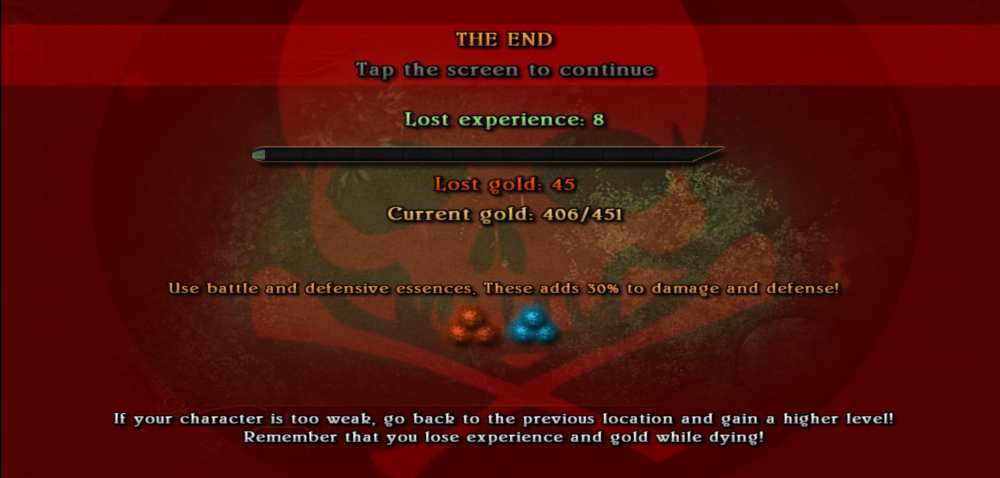
Sometimes, the Essences you extract from herbs can play a vital role in any fight. Save Defense Essences for boss battles so you can tank their hits like a champ. Putting these in the Quick Inventory will give you that second wind you need in order to beat almost any difficult boss.
On the bright side, if you happen to forget to map an item into your Quick Inventory, the game will prompt you with a button that will let you consume your needed item. To further elaborate our point, if your health hits a certain threshold, a health potion button pops up slightly above your skill buttons.
Don’t take advantage of this too much, since sometimes the health you recover won’t be enough to keep you alive, especially in higher levels. Eat your food or drink your potions just as you need them.
As you can see, items are quite important in Almora Darkosen. Not only the items that you ingest, but the ones you wear! Let’s talk about gear next.
4. Gear Up Before Heading Out
You know how it is in any RPG like this: wearing a legendary suit of armor and wielding a legendary weapon are sure to get you places and will make you kill the next boss easier. That said, it always pays to keep your gear in check.
Whenever you’re in town, always make sure to get the best thing you can wear. Though, we do mean what you can wear since equipment has stat or level requirements. Most special items will require Wisdom, but there are a variety of different gear pieces that also require other stats to be at certain levels. To decide on what to buy, first take a look at your gear under the inventory menu. This will give you an idea on what you should improve on.
If for some reason, you don’t seem to be taking hits very well, try saving up for better armor or a better shield. The better shield will also help improve your chance of actually blocking things. Are the enemies getting tougher? Maybe your weapon needs an upgrade. Save up for a better weapon and sell the old one. You won’t make much back, but it’s better to part with old duds than keep them for posterity. Inventory space is limited, so value that more than old gear!
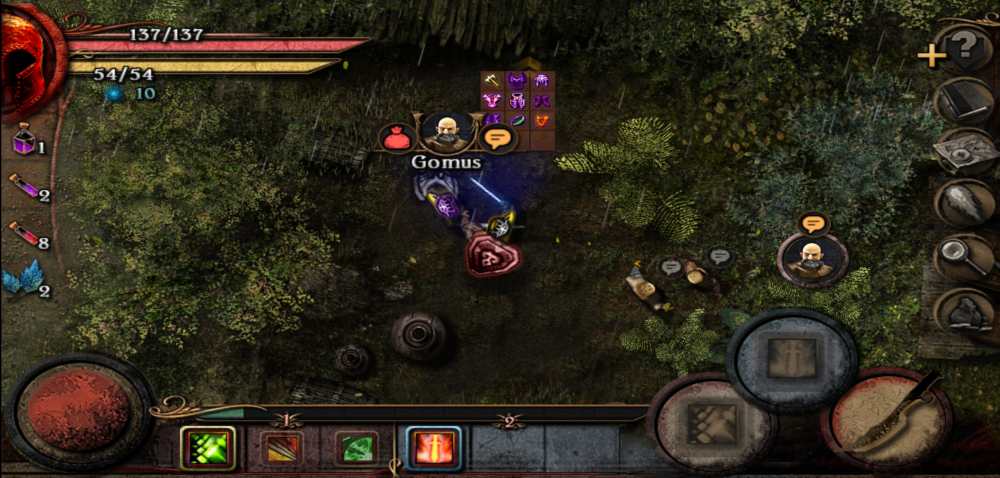
When you explore more places, you may find other merchants who sell different gear. They might be more expensive than the last shop you visited, so be prepared! In fact, somewhere in the outskirts of Elioris, a man named Gomus sells his gear for Almora Tokens. While he drives a hard bargain, the quality of his wares speaks for itself. It’s not every day that you encounter a flaming battle axe. It all depends on what you think might be worth your time in this case.
Speaking of Almora Tokens, be prepared to spend them on locked chests or even identify unknown items. They will most certainly help you on your journey. Do know that these tokens don’t come easy and that some crafting will be involved. Getting rare gear is a great way to keep your current loadout nicely upgraded as well as crafting but we’ll talk about that later.
Good gear helps win battles, but what about your character’s inner strength?
5. Build Your Character Well
Stats — this is the part where every RPG player nerds out or gets lost. There is no in-between.
Almora Darkosen’s stats are simple and descriptive on their own, but let’s go over them one by one, shall we?
- 🗡Strength — This stat affects your overall prowess in battle. Increasing it means you’ll hit harder and even have a better chance at striking critical hits.
- 🛡Endurance — This stat is your overall defense. Putting more stat points into this one will ensure that you stay longer in battle. It affects your defense and your block chance.
- 📖Wisdom — Wisdom affects the speed at which your skills cool down. In addition, it also allows you to wear special items sooner than others. Oftentimes, these special items are quite powerful.
- 💕Health — This is your overall indicator of your character being alive. More health means it’ll take much longer for your character to die.
- 💍Vitality — The last stat, Vitality, is what’s needed for casting skills. Having lots of Vitality means being in an abundance of Power Points.
Stats now thoroughly described, you might be wondering: how do you “build” your character? To briefly illustrate how this works, you might as well focus on a main stat and a sub stat every time you level up. Because you are given 3 stat points every level, give 2 points to your main stat and 1 point to your sub stat.
Basically, aim for priority increases above all else. Distributing your stats haphazardly may only spell difficulty for your run. Below are a few examples of what you can expect from point divisions between two stats that you’ll focus on every time you level up:
DISCLAIMER: Every player of this game is subject to distributing their stat points however they see fit. The table below merely represents a leveling scheme suitable for players who are still trying to understand how stats work.
| MAIN STAT (2 Pts per Lvl Up) | SUB STAT (1 Pt per Lvl Up) | RESULT |
| Strength | Strength | Character will hit much harder, but will severely lack in other departments. May die out quickly while fighting stronger enemies. |
| Strength | Endurance | Your character will be able to stay longer in a fight. They also have a slightly higher chance of blocking oncoming blows whilst hitting back even harder |
| Strength | Wisdom | Although soft, your character will be able to strike the enemy better albeit being able to wear powerful artifacts much earlier. Their skill cooldowns will also be significantly reduced. |
| Strength | Health | Similar to Strength + Endurance. Except, your character will be more prone to blocking attacks with their face more effectively without having to worry too much about what shield they're currently carrying. |
| Strength | Vitality | Your character will be able to give the enemy more fierce strikes while spamming skills on the side. |
| Endurance | Strength | A defensive step forward. Your character will be able to block attacks effectively and also fight back well when needed. |
| Endurance | Endurance | It's like a turtle and we don't mean the alligator snapping variety like the example right above this one. Use this at your own risk. |
| Endurance | Wisdom | Your character can block well AND wear some cool things early. Think of all the special shields that you can have. |
| Endurance | Health | A good offense is a great defense, as they say. Putting 1 point in Health and 2 in Endurance may help your character shrug off almost any attack with ease. If you didn't block, at least the damage won't be that great. |
| Endurance | Vitality | Blocking and skill spam. 'Nuff said. Use this if you favor skills over your regular attacks. |
| Wisdom | Strength | Using this will make your character wear special items sooner but also fend off any enemy attackers that want a piece of you. A good move for those who favor their equipment. |
| Wisdom | Endurance | Similar to the example above, but you'll be able to block more effectively as opposed to being a harder hitter. |
| Wisdom | Wisdom | Have you come here to fight or to study? Are you chasing that next best ring sitting in your inventory? Impatience can come at a price, but take that risk by all means if you know what you're doing. |
| Wisdom | Health | Having special items on you while having an increase in health? Why not? |
| Wisdom | Vitality | Since Wisdom also affects skill cooldown reduction, these two work hand in hand as well. |
| Health | Strength | Look at you, toughie. This'll surely make your character more intimidating, tanking blows without blocking whilst giving the enemy hell. |
| Health | Endurance | Unlike the Endurance + Health example we already gave up there, this one might also be good. Blocking isn't guaranteed, but taking a hit well should also keep your character in a fight much longer. |
| Health | Wisdom | Less chances of dying too hard, more certainty of wearing special items. What's not to like here? |
| Health | Health | Tons of HP but at the cost of everything else! Take this chance if you like. |
| Health | Vitality | More health, more Power Points. Making the mother of all gauges here. |
| Vitality | Strength | Your character will spam their skills more often and hit hard, too! |
| Vitality | Endurance | This will give your character more Power Points to spare, allowing them to retaliate with skills whilst blocking slightly more effectively. |
| Vitality | Wisdom | Your character gets a boost in Power Points with a step closer to putting on something fancy. |
| Vitality | Health | Just like Health + Vitality but with more spam. Hope you like it salty. |
| Vitality | Vitality | Tons of Power Points but nothing too noteworthy in other departments. |
The overall beauty of stat distribution is that in every level up, you don’t have to be tied down to a specific scheme. As you play through the game, you may find items that have certain stat requirements to fulfill apart from Wisdom. Rushing them is fine, as long as you are prepared for what you’ll be fighting next. Stay vigilant and always refer back to what you might have in your inventory. Generally, tank builds help in most situations, so focusing on stats like Strength, Health, and Endurance will greatly help you on your travels.
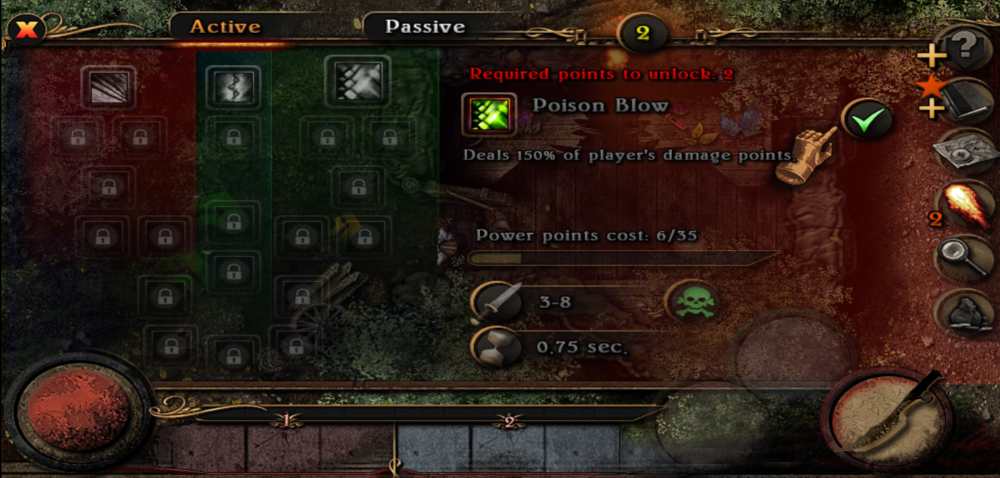
Stats aside, there’s also learning skills. Skills seem less diverse in choice but more diverse in function, but let us briefly touch upon this. Getting through the game will be much easier if you learn skills that have Poison or Fire properties. Their purpose here is to help you thin out the crowds of enemies you’ll be facing in your travels.
Not to mention, debilitating the enemy boss by poisoning or burning will easily chip at their HP as you personally hack away at them. You’ll be taking them down slowly but surely.
We’ve tackled combat so far. How about we now talk about the other fun part about RPGs: crafting?
6. Bring Pickaxes and Shovels Wherever You Go
Digging and mining are two things an adventurer should learn how to do.
While this was popularized by titles like Minecraft and Terraria, harvesting ore and digging for treasure in general has existed in earlier titles. They were also prominent in plenty of MMORPGs on the PC. Usually, what accompanies digging and mining is crafting, but we’ll get to that in a bit.
As you walk through Almora’s perilous plains, you’re bound to find veins of ore one way or another. A few appear in Elioris (the town you start with) and plenty more will be made present as you explore the island, especially in the caves.
These ore veins look like rocks of a different color and moving to them will prompt you to use a pickaxe from your inventory. Digging up ore will allow you to put it in your stack inventory — a space reserved for materials, mostly ore. Be warned that after using your pickaxes, they may break.
Less common than ores are dig sites. These look like areas where something had been buried. Nevertheless, you will be prompted with a shovel button if you wish to dig up what might’ve been buried there. Just like using a pickaxe, digging requires a shovel to be in your inventory, and yes, these also break after a couple of uses.
The breaking of both pickaxes and shovels can be a problem for the wandering adventurer. Our suggestion would be to keep at least two pickaxes and one shovel in your bag — two pickaxes because ore veins are quite common and a single shovel because you won’t encounter dig sites as frequently.
The next time you visit your local blacksmith, try stocking up on these so it may prepare you for what comes next on this list!
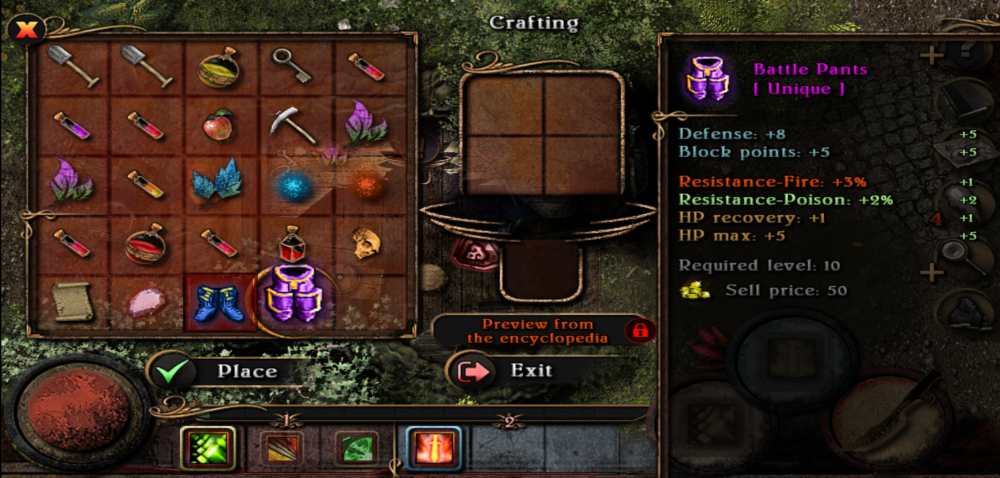
7. Enhance Your Equipment if Applicable
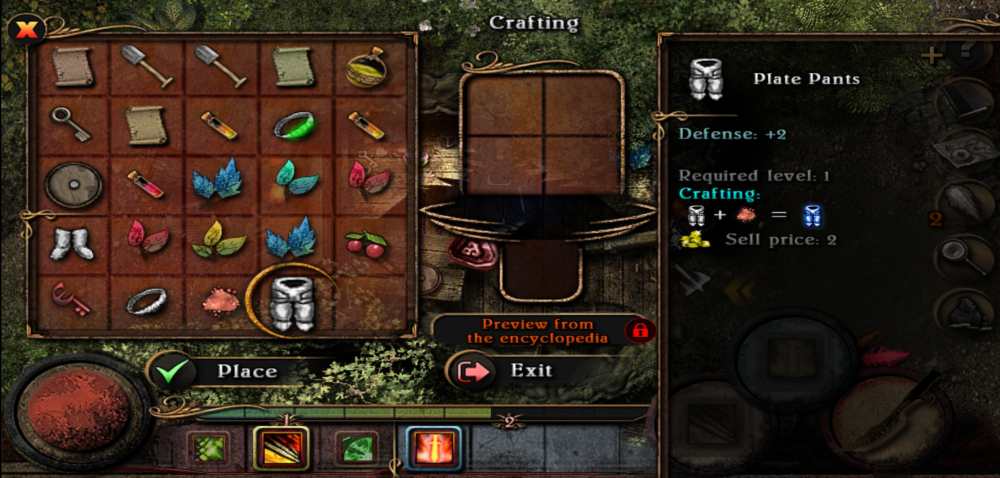
Enhancing is yet another important aspect in any RPG! For what good is a sword if you cannot improve it through magical or physical means?
Enhancing an item in Almora Darkosen is quite simple. Typically you will need the item that needs to be enhanced and a couple of ores. The catch here is that the amount of ore varies from item to item. Some items can’t even be enhanced at all! To know how you can enhance an item, simply tap on the item in your inventory and see if there’s a recipe for enhancement below. If there is, then you now need to find yourself a crafting table.
Before you enhance, there are a few conditions you must adhere to:
- The item to be enhanced must be unequipped and put in your inventory.
- The material used to enhance the item has to be in your inventory. To do this, open your inventory and tap on the desired material (e.g. iron ore) from the stack inventory from the right. You should be able to put the item in your bag.
- You will have to remove the item from the crafting table after enhancing.
- The enhanced item will gain a raise in requirements. Enhance an item that you will most likely use in the future.
At first, enhancement can be quite confusing to new players but after their first couple enhancements, they will find that this act can get quite fun and addictive, especially since it makes your character stronger. Just always keep in mind condition D above this paragraph.
To give you an example of what happens, enhancing a sword that requires 10 strength will bump up that requirement to 11 strength or of a similar value. Enhancing is great, but do this carefully. You wouldn’t want to unequip an item and enhance it, only to discover that you can’t re-equip it because it now has a higher set of requirements.
Finding ore can be exciting in a dark cave that’s full of creatures that want to murder you. This makes it incredibly dangerous, too! As we’ve mentioned earlier, you lose EXP and gold upon death. Let’s help you minimize that a bit more.
8. Explore Everything to an Extent
An action RPG shouldn’t be without its share of exploration.
Most action RPGs boast of large, sprawling maps teeming with wildlife and danger. But it’s these types of maps that awaken the adventurer within us all. We want to know what’s behind that one hill or the tale of the creepy statue sitting in the middle of the ruins — as humans, we are curious creatures.
Sometimes, it’s that very curiosity that could lead our characters to their unexpected demise. We cannot stress this enough, but in Almora Darkosen, death is a hindrance to your progress since you lose EXP and gold.
In every new map you encounter, explore it as needed. By that, we mean that you should only wander around if you have a quest in the area. It could get difficult if you find yourself surrounded by lots of high-leveled enemies. In times like these, don’t take them on — run away and find safety. While we are aware that you can get carried away and end up killing your character, minimizing deaths will keep you from hitting bumps in the road to success.
At the same time, if you happen to run into portals or boatmen, use them to your advantage while you explore. These will come in pretty handy once you return to these places stronger than before. Once you feel like you can take on bigger, badder enemies with your new set of armor and your brand-new weapon. Sometimes, if your equipment is good enough, you might even be able to take on enemies that are 2 or 3 levels above yours. Talk about hardcore!
Additionally, tying into item number 6 of this guide, dig up or mine stuff while you explore. It wouldn’t hurt to take stuff from the area you’re cautiously exploring. If you’ve found some interesting swag along the way and you need to run from a particularly vicious enemy, you’ll definitely come back stronger.
But this is also provided that you fill out the requirements of the equipment you found or that they aren’t items you are already wearing. Trust us when we say that at first you’ll gasp in awe at the sight of a Battle Helm and then sigh in annoyance when you see several of these handed to you on a silver platter.
You don’t have to explore these dangerous places alone, though. There’s always the option of hiring mercenaries!
9. Hire Mercenaries for Easier Battles
Why should you go on your journey alone when you can have someone join you?
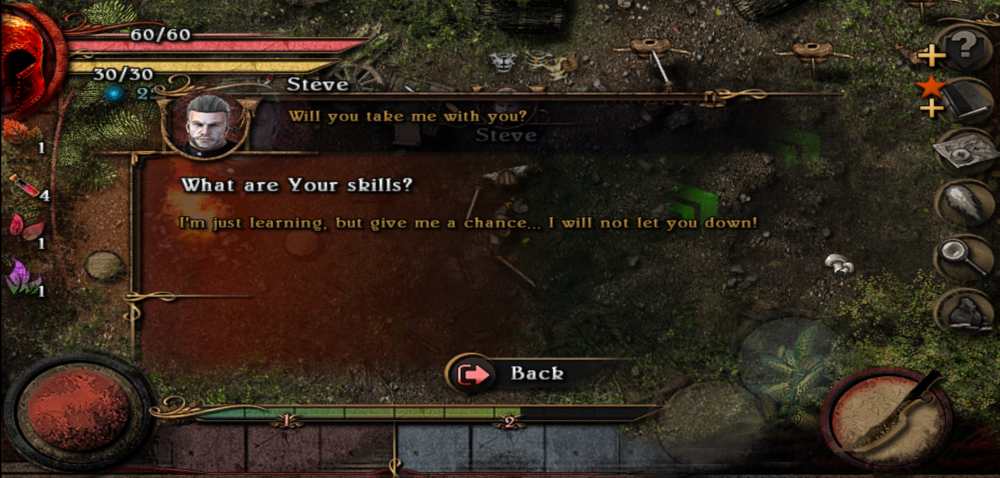
Mercenaries are strong warriors that provide their services for coin. They are normally seen roaming around towns and settlements, and hiring them if you have the money is always a great idea.
Let’s say you are in a particularly difficult part of the game where you have to find the first magic stone in a cave somewhere. The cave is teeming with vicious bats and a boss fight that we will not spoil. Having a mercenary here will certainly help you get through it without too much trouble.
There are a couple of caveats to hiring a mercenary, however:
- Mercenaries have a time limit and cannot level up like you. Instead, their stats and time limit can be increased with gold through Training.
- You cannot reassign new gear to your mercenary.
- Your mercenary can permanently die. They will also slow you down eventually when you enter an area with monsters that exceed their abilities.
As you can see, if you take care of the mercenary, they will take care of you in turn. They’re just really expensive. Of course, if you feel like a mercenary has become a burden to you (e.g. they drink too many health potions, they can barely keep up with the enemy even after you train them, you’re already much stronger than they are), you can let them go.
You can give the mercenary orders as you see fit… Well, okay, they aren’t as complex as you’d think they are, but you can change their behavior towards your enemies. They can be set to Offensive or Defensive. Offensive means they will attack any enemy that comes into view while Defensive means that they will strike at any enemy that is currently attacking you. Change these behaviors to suit the situation.
Lastly, you may donate some of your healing items to your mercenary. In your inventory, tapping any of your healing items will open up a prompt that looks like the face of your mercenary on the right side of the screen. Tapping this will instantly transfer the item to your mercenary’s inventory which is displayed directly under their life bar. They will use these items when their life reaches a certain threshold.
But a mercenary can only get you so far and the main quest can actually get quite punishing. What should you do now?
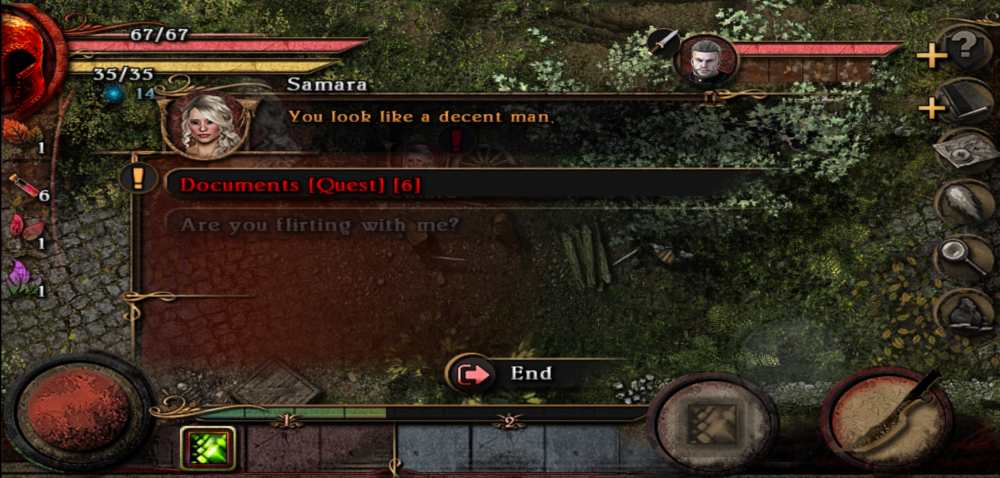
10. Side Quests Are the Best
While the main quest drives your character’s purpose forward, what should you do to make your character stronger other than grind?
There are jokes that often poke fun at an RPG where the player character does all the side quests in the game and then decapitates the final boss with a single stroke. This is mostly true since side quests give tons of rewards and EXP, dwarfing that which the main quest gives. The same can be applied here.
Do you find yourself a bit stuck? Have you been pursuing the main quest a bit too hard? Maybe it’s time to take a step back and try out some side quests. These quests, while simpler than the main quests, are just as rewarding and may provide you with enough EXP to get through a level or two. With each side quest done, you’ll probably be more capable of dealing with that one tough enemy at the end of the main quest’s chapter.
Finding side quests is quite simple. All you have to do is speak to NPCs and see if a topic comes up in a text that isn’t white. Speaking to them about this topic opens up the side quest. Conversely, you can also try checking your map. If you see that there are some green exclamation points anywhere NPCs might be, those are side quests waiting to be started. Don’t bite off more than you can chew, side quests can get very addictive.
As you can see, there is plenty to do in Almora Darkosen if you want to make your character stronger. How you use them is entirely up to you, but it pays well to remember the little reminders that you’ve encountered here so far:
- Remember to fight smart — kill weaker monsters, lure them to differently-colored ground if they blend in with their surroundings, listen for odd noises as you wander the map. You’ll avoid death better this way.
- Healing potions are great, but so are food and resting. Your resourcefulness should count, especially if you’ve run out of healing items. Also try living off the land by foraging for fruit and herbs.
- Always keep your Quick Inventory updated. You’ll never know when you might be 1 potion short.
- Your gear makes up for a lot of the fighting in the game. Keep them all in tip-top shape!
- Focus on a primary stat and a sub stat each level up. A primary stat is given 2 stat points and a sub stat is given 1 stat point. Also remember that fire and poison skills are your friends.
- Always keep at least 2 pickaxes and 1 shovel in your inventory. You’ll need them when you come across ore veins or dig sites. Ores also go in the stack inventory which is used in crafting.
- If your equipment can be enhanced, try to enhance it. Just beware that this might raise its requirements by a little.
- As you roam around maps, explore them with caution. You might run into some high-level enemies that can cut your run short! If you do, however, run away and come back with better equipment.
That way, your exploration will be much smoother and more fruitful. - Mercenaries are a great help for particularly difficult quests. Just remember to treat them well so they stay longer and fight better.
- If you’re stuck at a certain part of the main quest, do some side quests for EXP and extra rewards.
Almora Island is a difficult place. But this is where the powers that be have put you for you to fulfill your journey and your purpose. Find your way through its forests, traverse its shores, cut through the darkness of its caves, and restore order to the land. You are destined to become a hero — make that happen.
This concludes our beginner’s guide for Gear-Studio’s Almora Darkosen! If you still feel lost and wish to speak to other veterans of the island, you may access its official Discord server by tapping the Discord icon to the right of Almora Darkosen’s main menu. As of this guide, the developer even stated that a multiplayer feature is in the works. So stay tuned and travel safe!
Are you a local of Almora Island? Do you happen to know more tidbits about this dangerous and mysterious land? Would you also like to help steer newcomers the right way? Find the comment section down below and impart onto us your most valuable pearls of wisdom!
Frank
Sunday 16th of November 2025
Can't find Frank's key, Eva's key, Forest key, etc. Where are they? Or do I run the entire maps over a few hours to find them? Frustrating. I bought the game, btw. :)
Luis Martínez
Sunday 14th of May 2023
Good where you get the key in the dark town? Thank you