Huang YueFeng’s Wonder Blade has just hit the Apple App Store, and this should be the perfect game for those who feel nostalgic about ‘80s and ‘90s arcade gaming, but want something more than the usual hyper-casual fare Ketchapp and other companies deliver. In here, you play the role of a knight fighting a variety of different enemies, from goblins to spiders to golem-like creatures, and improve your knight as you go along, improving your skills and upgrading your spells. There are tons of levels to complete in this game, as well as more than enough mini-games to break the monotony of fighting enemies with weapons and/or spells.
Previously, we brought you a beginner’s guide for this game, where we talked about the basics of completing levels, managing your character, and defeating some of the easier, more basic enemies you will be facing in this title. In our new Wonder Blade strategy guide, we’re going to move on to more intermediate-level tips, discussing some tips and tricks you can use when facing some of the tougher enemies in the game. Read on if you’re looking to progress faster in this game and have a better chance of winning those boss battles, including the harder ones that you might have had to repeat multiple times before winning!
1. Surviving The Chase Minigames
As we said in our first Wonder Blade guide, not every stage in the game (and not every boss encounter) will require you to take out waves of enemies in the conventional manner. Sometimes, you’ll have to do something else to defeat the enemies, and that’s where the minigame mechanic of this title comes in — not everything is about swinging your weapon and casting spells.
One of the more common types of minigames you’ll encounter is something we like to refer to as the “chase” minigame. We call it as such because that’s what the bad guys are trying to do in these stages — your objective is to lose your enemies and make it to safer ground, aka the very end of the level, without getting killed on the way there. Sometimes you’ll have to dodge enemy projectiles as well while trying to run away to safety, or take out all the enemies before moving on to the next phase. So what can you do to increase your chances of finishing these minigames/stages?

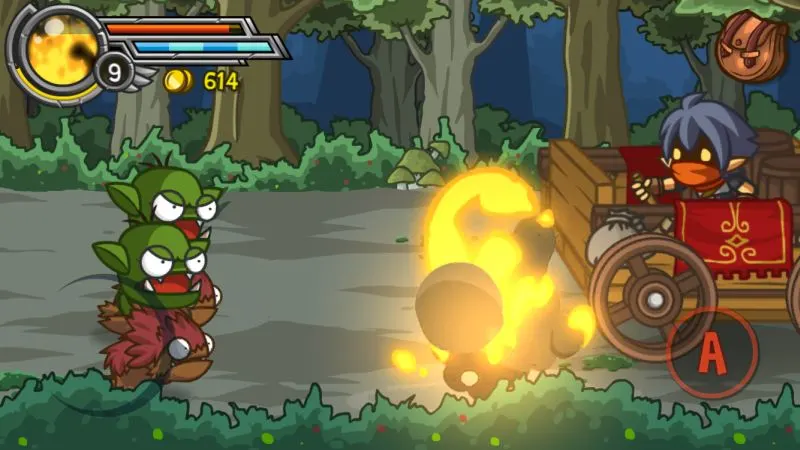
Talking about the chase minigame that starts out the Sharp Teeth Bay level, it’s best to stay in the corners and refrain from veering more than one lane away from the corners, and always returning to that safe spot after you’ve thrown a barrel at the middle enemy. Alternately, you can focus mainly on the leftmost or rightmost enemy and launch the barrel at just the right time, so as to prevent them from launching bombs your way. Keep this up until one corner enemy is gone, then work your way to the middle then to the opposite corner — once you’ve taken one enemy out (this could take some time), you’ll only need one barrel each for the other two.
Once you’ve survived this stretch, you’ll then be asked to avoid the obstacles, and while this could take some practice, this is very easy in concept — simply move out of the way once you see an exclamation point popping up ahead of you. If it pops up in the middle, move to the left or the right at the moment you see the exclamation point, and if pops up in a corner, then move to the middle.
After you’ve cleared that phase, the enemies will return on their mouths for another run. This will then be followed by a second phase of obstacles to avoid before you reach the end of the minigame. That’s just an example of what to expect in those chase minigames, and as you can see, acing these mini games is a matter of staying alert at all times.
2. Other Minigames Won’t Hurt You One Bit
Not all of the minigames in Wonder Blade are required for level completion, and not all of them are fraught with peril. Specifically, the ones that take place after a level’s big boss battle are more in the tradition of those Super Mario minigames where you try collecting as many coins as possible within a given timeframe, but don’t need to deal with any enemies. In this game, these post-boss fight minigames may require you to break as many barrels as possible within a minute, or destroy the car with your weapon within that same one-minute span of time. For the former, and other minigames with similar mechanics, you need to break as many as possible to ensure yourself of a greater chance to win more rewards once it’s over. For the latter, we recommend working all corners of the car to ensure its fast destruction and more coins won for destroying it well before your one minute has expired.
3. Beware Of The Blobs
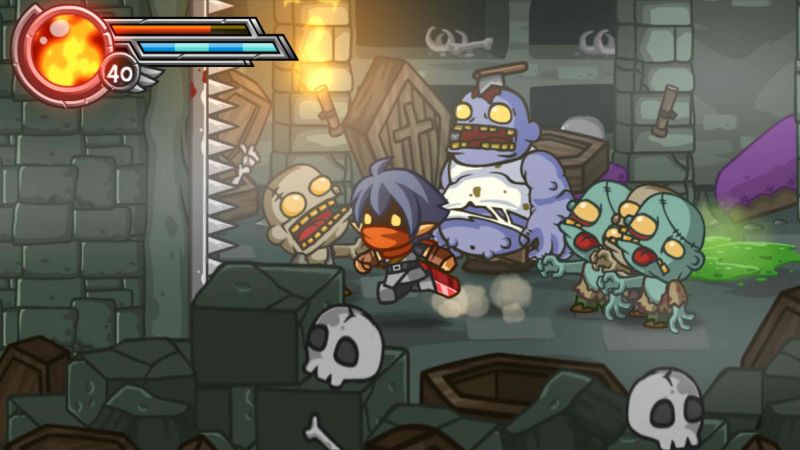
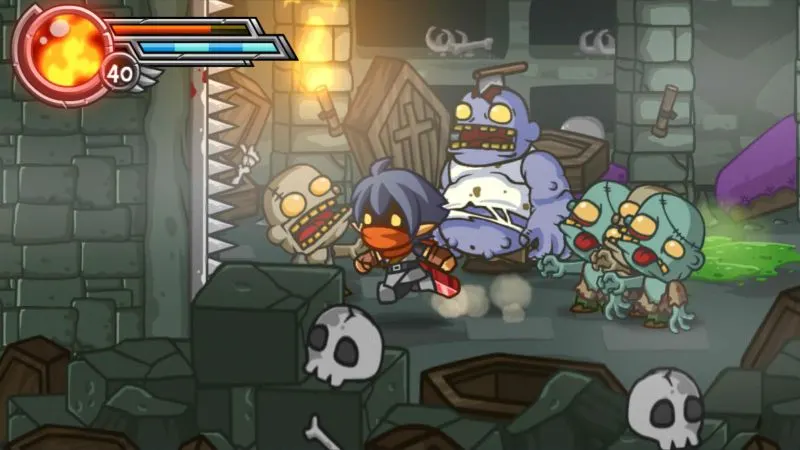
Once you reach the Savage Cave level, you’ll encounter the first enemies that we can say are completely different from the low-level minions you may have encountered in the earliest stages. Regardless whether you prefer to refer to them as blobs, green slime, or whatnot, these pesky little creatures attack by clinging onto you, and in order to get them off of you, you’ll need to hit the Y button rapidly in order to break free.
So far, we’ve noticed that the best way to deal with the blobs is to do a lot of jumping, specifically jumping, then hitting the “A” button to perform an aerial spinning move. We aren’t quite sure why this has worked so well, but it just does; standing back and hitting the blobs with magic also helps, but not as much so when you’re dealing with the larger blobs, which appear prior to the final boss battle in the Savage Cave. What happens here is that each of the blobs will become much larger at some point in this battle; they may be comparatively easily to deal damage on, but they can be quite pesky, and quite determined as they keep chasing at you and trying to cling to you.
These slimy creatures won’t be the only unusual ones you’ll encounter in Wonder Blade, but if you know what to do against them, they shouldn’t be giving you too many problems in the long run.
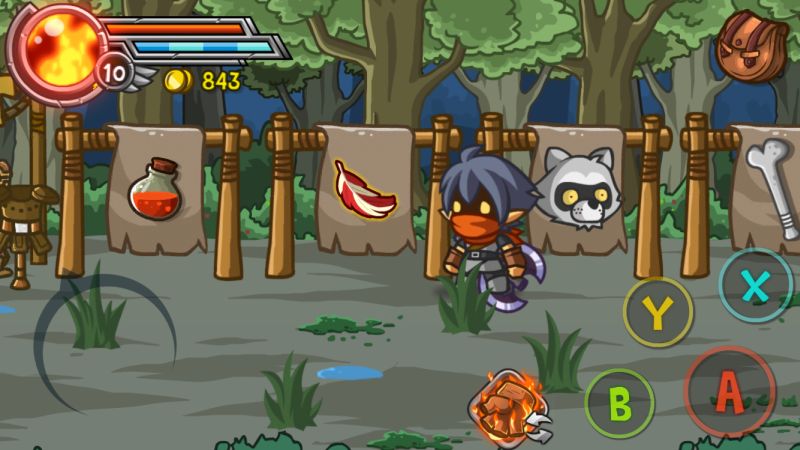
4. Shop For Items At The Traveling Merchant Tent
So you’ve got some gold from fighting in the previous levels, and need to spend that currency on something helpful for the titular Wonder Blade. Fortunately, you don’t need to go to the merchant tent you initially encountered, as you can head over to the Traveling Merchant Tent, which is designated by a yellow flag. This will allow you to shop for new weapons to improve your character’s chances against the tougher enemies, as well as Phoenix Feathers to resume boss battles from the point where you left off, and Health Potions that could restore your character’s health in the middle of a battle The Traveling Merchant Tent also sells pets, such as a Raccoon which costs 999 coins, as well as snacks which you can use to restore a lower amount of life if your character gets hurt in battle. As it isn’t uncommon for enemies to drop snacks after you kill them, you probably won’t need to buy snacks when you can otherwise get them for free. (Maybe one snack won’t hurt, in case you’re not in a particularly good spot where you just aren’t getting any free food via item drops.)
5. Toggling Your Magic Spells
At first, fire will be the only tool you have when it comes to magic attacks against the enemy, but as you keep leveling up and progressing in the game, you’ll have more options in the magic department, including your ice spells. Using ice could freeze your opponents in place and make it easier for you to attack, but based on what we’ve seen, ice doesn’t really do much damage as fire in its default form. Once upgraded, you can also encase yourself in ice as a defensive maneuver, though you may find it much easier to use it as a means of slowing down the enemies.
More spells will become available as you keep playing the game and leveling up, just as we said above.. Just tap on the bottom right button to the left side of the main buttons, and you can toggle between spells at any point during a battle. This could be a good way to throw those bad guys off, so use this ability as wisely as possible!
6. Unleash Your Ultimate Technique

Although it’s all well and good to use weapons and magic to string together a formidable combo, the most powerful move you can pull off in Wonder Blade is the Ultimate Technique. If you notice that the orb on the upper left of your screen is burning (or doing something similar for other spells such as your ice-related spells), that means you’ve filled it up completely and are all set to unleash the Ultimate Technique. This is an ultra-powerful attack based on whatever spell you have active, and it’s best used if you’re up against one of the game’s tougher and more powerful bosses. Resist the temptation to use it early on, because one Ultimate Technique on a few inconsequential goblins or other enemies would simply be wasted — you can beat them with a weapon or with your regular spells, so there’s no need to activate the attack when there’s nothing making the game especially hard for you.
7. Fighting The Goblin King
The Goblin King — he doesn’t seem to have a name, but that’s what the Savage Cave’s boss appears to be — is one of the tougher bosses you’ll take on in the earlier levels, and a lot of it is because he’s a virtual freak of nature out there, with unbelievable size and strength, and even fantastic speed that allows him to quickly catch up with your character. On top of all that, he also appears to be deceptively smart — don’t mistake him for a cretin just because he mostly communicates in grunts and growls!
There’s no two ways about it — the Goblin King won’t be an easy foe to knock out. So in order for you to win your boss battle against him, you’ll have to come prepared. Make sure you’ve been grinding it out in levels you’ve already completed, and save enough money to buy one potion and one Phoenix Feather at the Traveling Merchant Tent. You’ll need all of that in order to have enough life to outlast the Goblin King, who can chase you from one end of the screen to the next, lob bombs wherever you’re moving to, and quickly react to whatever plans you’ve employed. He also happens to be resistant to magic, or at least whatever magic spells you’ve unlocked at that point.
If the Goblin King has one weakness, it’s that he gets tired. (Don’t we all, though?) Notice those times when his eyes become red and his facial expression looks more pained than angry. That’s when you should attack him, because for about two or three fleeting seconds, he’s going to be virtually useless out there. You can try using your spinning move while jumping to throw him off and get some offense in without getting hurt too much, but it might be best to play evasive for the most part, and only attack the Goblin King if he gets close enough.
Once again, make sure your Phoenix Feather and potion(s) are ready, because you might need to get back into the boss fight after he kills you the first time around, or survive just a little longer to beat the Goblin King once and for all.
8. Watch Out For Spiders
Once you make it to Sharp Teeth Bay, you will encounter yet another type of enemy, the final one whom we will be spotlighting in this intermediate Wonder Blade strategy guide. On the first stage of this level, you will be confronted by a group of spiders — giant spiders, to be sure, but still much smaller than your character is. Their thing is lobbing poison spit your way, and that green ooze they spit out happens to be quite deadly! Small as the gobs are, they’re nasty enough to take out more hit points than previous enemies did.
When dealing with spiders, we found them to be rather squishy, but when it came to aiming our weapons or magic at them, it was much harder, due to the need to avoid those poison gobs. The best thing to do is to stay as far away from the poison as possible, but not so far away that your magic won’t hit. Jumping is another good way to avoid getting hit by the poison, and you can also use your jump to set up a spin move and do some damage on the spiders.