SIEGE: Apocalypse is an epic strategy game developed by Kixeye and Simutronics where you requisition Troops to besiege the enemy base while making sure they do not do the same to your own headquarters. You have a variety of forces and support powers (labelled as “Tactics,” in-game) to choose from, and you requisition them to maintain control of the battlefield or take on the enemy, depending on what roles they have. Set up your loadouts between matches and upgrade your equipment to keep yourself on top.
Rather than a historical setting like SIEGE: World War II, SIEGE: Apocalypse takes place in a world where everything is going to hell. Most of the buildings you will be fighting over are rickety shacks that will eventually give way with enough damage, and barring the bunkers of your base of operations is rather slapdash as well. Thankfully, this does not affect the efficiency of your forces or your Tactics; it is largely for flavor.
As detailed later in our SIEGE: Apocalypse beginner’s guide, gameplay is simple; it will be easy to pick up and go after passing the optional tutorial. This guide will more or less show what Troops and Tactics you start off with, and how you can use them to the best of their abilities. Now, with introductions out of the way, stay with us to learn what SIEGE: Apocalypse has in store!
1. Boot Camp
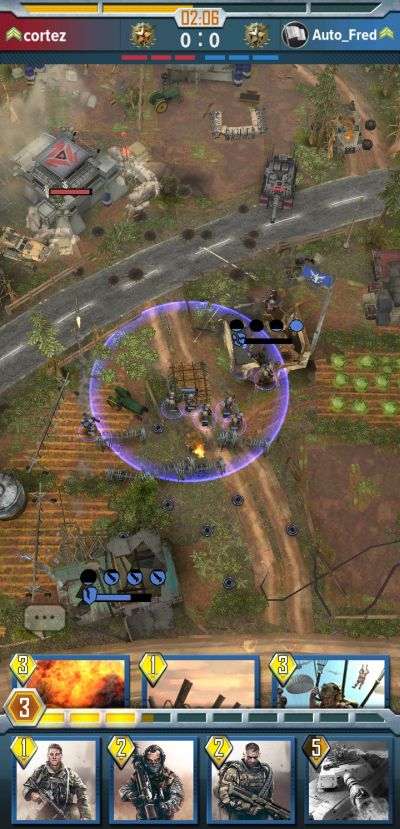
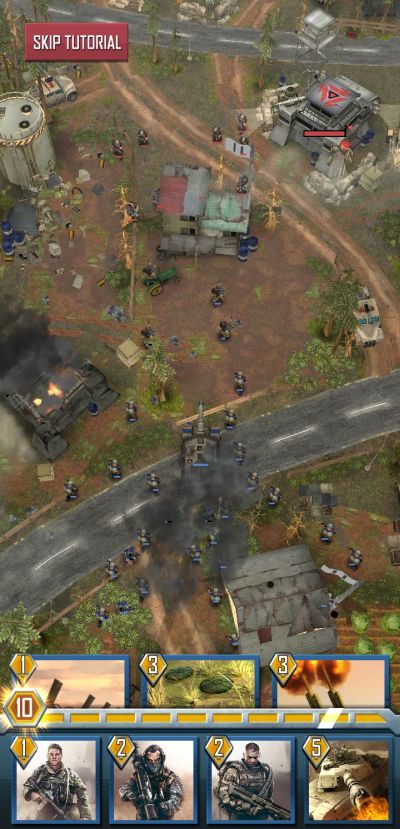
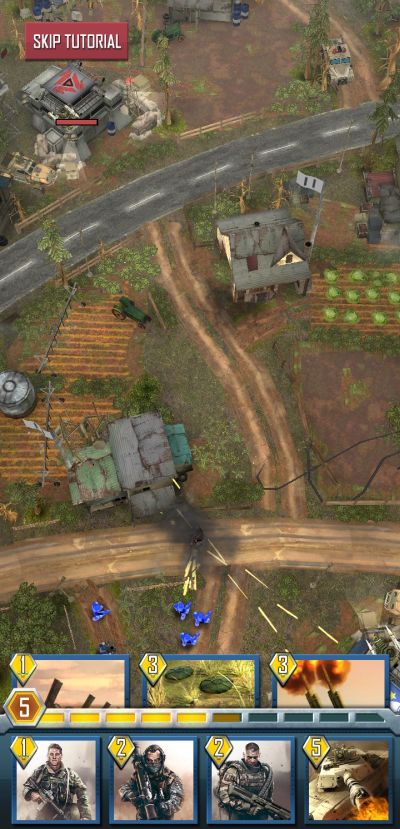
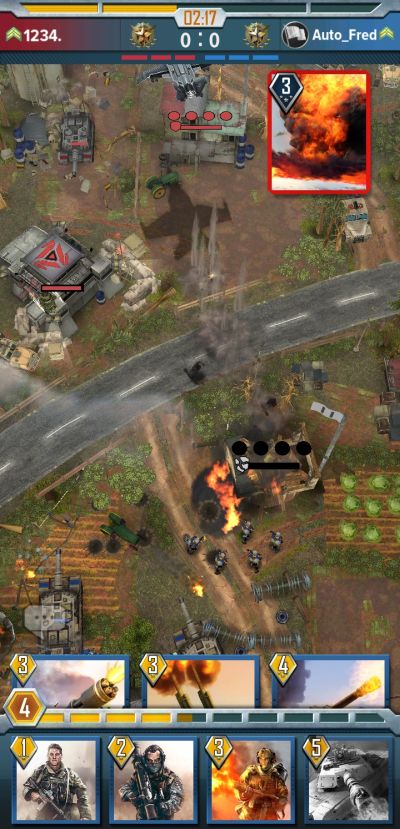
SIEGE: Apocalypse places both players in a vertical battlefield, with your base at the bottom and the opposing player base at the top, helpfully colored blue and red respectively. You can scroll the map by using your finger to move the camera up or down, allowing you to track your forces and any conflicts with the enemy. Newly-spawned enemies or activated Tactics are displayed with icons corresponding to their locations, so you are given advance warning on what may be coming towards your Troops.
Each base is protected by two bunkers that are fairly durable, but all buildings cannot be repaired: once a building is gone, it is gone for the rest of the match. Ultimately, your main objective is to destroy the enemy headquarters while keeping yours alive. Matches last for four minutes, and if neither base has been destroyed by that time, the game will give the win to whoever destroyed the most bunkers.
Thus, matches can tie if no bunkers were lost or if both players destroyed the same number of bunkers. Troops on both sides will open fire on the first enemy in range, meaning that you cannot really control what targets go down first.
In order to requisition either Troops or Tactics, you will need Supplies. These are displayed at the bottom portion of the screen. You have a cap of 10 supply units and each unit regenerates every second. Both Troops and Tactics consume a set number of Supplies so you have to choose wisely on what you want called in.

You can equip up to four Troop cards and up to eight Tactic cards in your loadout, but three Tactic cards are randomly selected from your loadout at the start of the match; whatever you used is replaced with a new Tactic, shuffling them as the match progresses. Troop cards are available as you have arranged them and can be summoned as long as you have the Supplies.
In the event that you lose a bunker, you awarded some bonus Supplies to help you turn the tide. Troops pour in from the bottom of the map, taking a while to show up, but Tactics have stricter usage areas. Tactics can only be used in a set area that your forces control, which are marked with blue borders. This area can change based on what Points your forces have control over.
Points are buildings that can be contested between the players, and there are four Points in total: two Points for each side of the map. Points can be garrisoned by up to four soldiers, but only select Troops can actually capture and occupy Points, while others will ignore them and move forward.
The Points can protect garrisoned soldiers from enemy fire, but not for long as the building will eventually collapse and leave any soldiers vulnerable. Points can still be contested despite this; expect anyone inside the ruins to go down fairly quickly thus changing where you can order most of your Tactics. Some Tactics have a greater area where they can be used, but they tend to be a bit more difficult to use in exchange.
2. Soldiers And Support
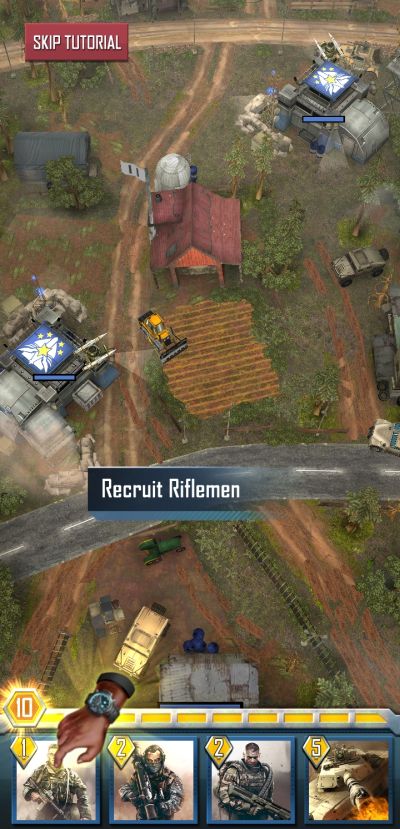
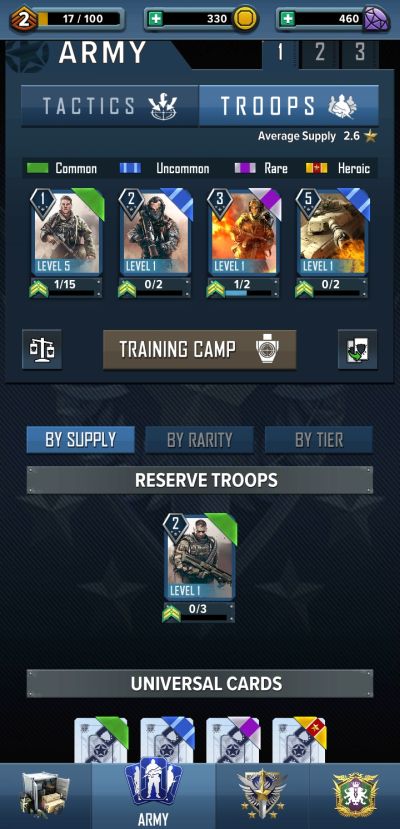
As you progress through the tutorial, you will get to see your starting Troops and Tactics in action. You have three loadouts in total to change Troops and Tactics as you see fit. Here we will discuss what your starting equipment is capable of, and their respective rarities: Common, Uncommon, Rare, and Heroic. We will first start off with the Troops:
- Rifleman (Common, uses 1 Supply): Your basic grunt, the Rifleman is a straightforward unit that shoots any enemy that gets into range. They are capable of capturing Points, and their low cost means they can be spammed in great numbers, provided your opponent does not bring Anti-infantry Troops to the field;
- Shotgunner (Common, uses 2 Supplies): Trading out some range for crowd control, Shotgunners can knock back anyone on the receiving end of their guns, even vehicles. They cannot occupy Points however, and their knockback has no effect on soldiers in buildings;
- Rocket Launcher (Uncommon, uses 2 Supplies): Your first anti-vehicle and anti-building option, Rocket Launchers can easily lay waste to Points and enemy armor. They can capture Points and garrison buildings like the Riflemen before them;
- Battle Tank (Rare, uses 5 Supplies): As expected, the Tank lays waste to buildings with little trouble, and while it can soak up gunfire with ease, rockets and explosives are a major concern. Whereas most Infantry Troops spawn in squads, the Tank spawns alone. Ensure that you have backup for it or anti-vehicle Troops will eat it alive.
Below is a list of all your starting Tactics. Unless stated otherwise, they are limited to your current Point Area, encouraging the capture of Points during matches:
- Landmines (Common, uses 1 Supply): Plants a field of landmines on the target location. Good for dealing with Troops with a low unit count, and can give Tanks a few hard knocks. Their detonation will not harm your forces, however stray fire from any source can set off a mine prematurely;
- Barbed Wire (Common, uses 1 Supply): Barbed Wire slows down any enemy travelling inside. It has a limited lifespan and it can be destroyed via collateral damage. It can buy your forces some time to get into position;
- Strafing Run (Common, uses 2 Supplies): Orders three jets to open fire with their machine guns, making short work of any Infantry in the jets’ firing line;
- Ammo Drop (Common, uses 2 Supplies): Airdrops a crate full of ammunition, buffing the firerate of all friendly Troops in range. The crate has a limited lifespan, but it easily falls onto explosive weapons;
- Artillery Barrage (Common, uses 3 Supplies): Calls a barrage of artillery fire on the target location. Deals heavy damage to buildings and vehicles, but it is a bit finicky to use on moving targets as the artillery shells still have to travel to their destination;
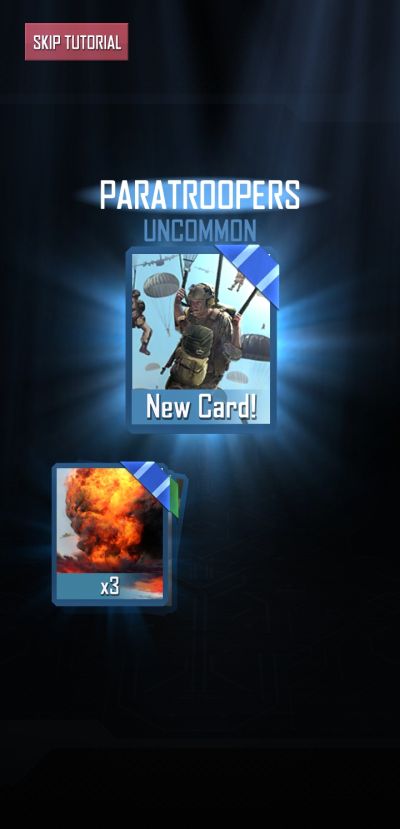
- Paratroopers (Uncommon, uses 3 Supplies): Spawns a squad of riflemen that parachute their way to the battlefield. Unlike most Tactics, this can be used on most of the map regardless of Points captured, with the only invalid area being the furthest enemy bunker. This makes it useful either for springing ambushes or quickly capturing a Point while in enemy territory. This Tactic is acquired over the course of the tutorial;
- Firebomb (Uncommon, uses 3 Supplies): Drops an incendiary bomb on the target area, creating lingering flames that damage Infantry and Buildings alike. This Tactic is not limited to Point control;
- Howitzer (Rare, uses 4 Supplies): Summons a howitzer onto the field that will target the closest building or vehicle in range, whichever is closer. Powerful, but like real-life artillery, it is vulnerable to enemy fire so it is best placed behind your Troops. Even then, it has a time limit before it is automatically destroyed.
New Troops and Tactics are acquired mainly through chests, awarded by winning matches. Chests come in different rarities and take some time to unlock, ranging from 10 minutes to two hours depending on the chest. This can be sped up in two ways: by watching an ad or by spending Gems, the premium currency of SIEGE: Apocalypse.
Troops and Tactics are rewarded as cards, along with caches of Coins and Gems. Aside from unlocking new things, duplicate cards are used to rank up preexisting Troops and Tactics, improving their performance. Players spend a set number of duplicate cards along with some Coins, going up as the selected Troop or Tactic goes up a rank.
Players can also buy specific Cards through the in-game market, spending Coins or Gems depending on what is available. There is also a daily gift from the market that players can get for free. Lastly, the market is the only place where players can get “wild” cards that act as duplicates for any Troop or Tactic, as long as they have the same rarity.
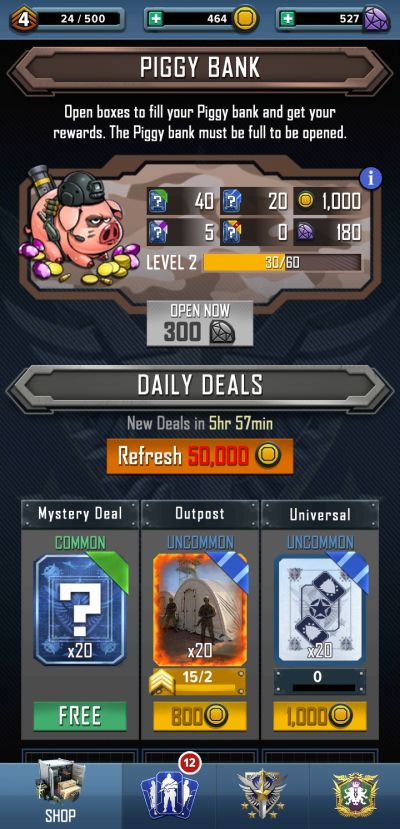
Winning matches is not the only way to get chests. Opening chests from matches will gradually fill up a “Piggy Bank” which saves a portion of the rewards to be opened later. Once the Piggy Bank is full, you have 24 hours to open the Piggy Bank or the rewards are lost.
Opening the Piggy Bank requires Gems, but depending on how the rewards were distributed, you might be able to break even. The second method is through medals, awarded by destroying bunkers or bases during matches. Bunkers award one medal each, while bases award three. Take note that the medals are only awarded when you win a match.
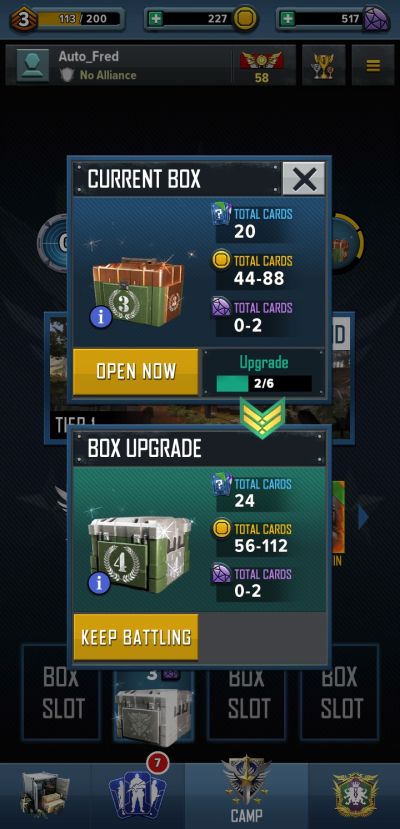
These medals are used to increase the tier of a reward box, found to the right of the battle screen, taking five medals to go up one level. You can choose to open the box now, or collect more medals to upgrade it further. Either way, you can only collect 75 medals per day.
3. Rewards For Your Rank Ups
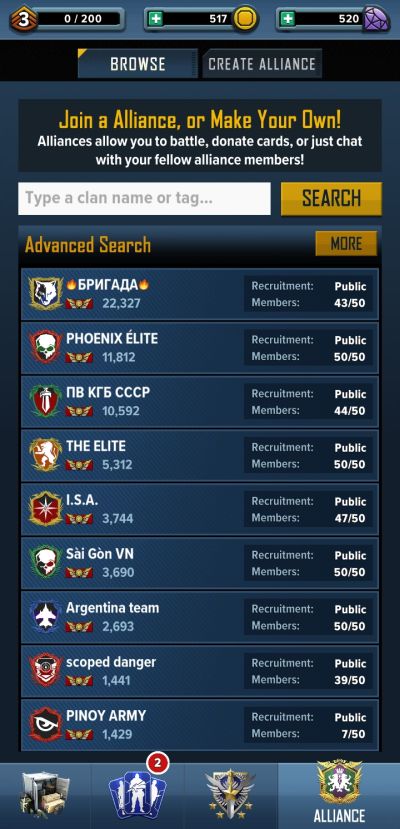
Regardless of whether you win or lose matches, you gain experience to rank up your account level. Reaching a new level increases the health and damage of both your bunkers and your base. Once you reach level 3, you can join an alliance. Aside from socialization, alliances let you donate spare cards to other members, and request cards to bolster your own forces. You can even fight with your alliance mates in order to practice, or to gather medals without waiting for an adequate opponent to connect.
Match performance is quantified by Victory Points, which are earned and lost via matches. Victory Points determine what opponents you can face in a random match, more or less balancing out encounters.
This system does have its flaws in that it does not take into account skill; a new player might end up facing a more experience commander who just happened to suffer a losing streak. So, while it is a decent metric, you should not rely on it too much. Victory Points also determine what units you can find in chests; more Victory Points mean that you can find more units.
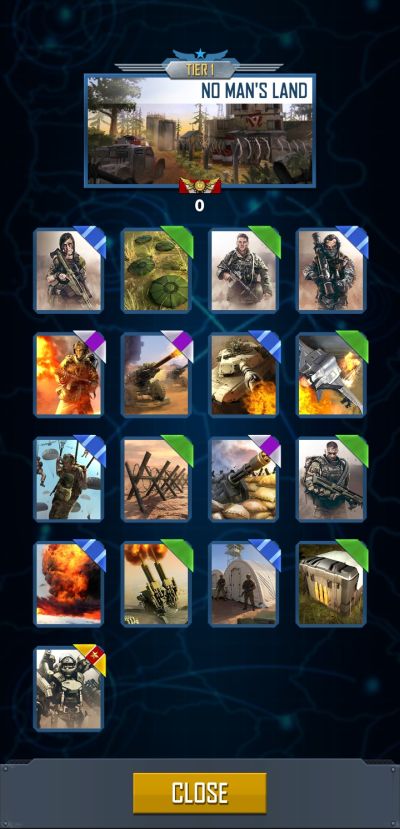
To check your current “unit tier”, press the Tier button in the middle of the screen. This will display all available units in those chests. You do not lose access to those units if your Victory Points go below the set thresholds. After collecting 800 Victory Points, you have the option of directly modifying your bunkers and base to better fend off attacks. This comes in handy as by that point, you will be facing off against seasoned players with equally-potent loadouts.
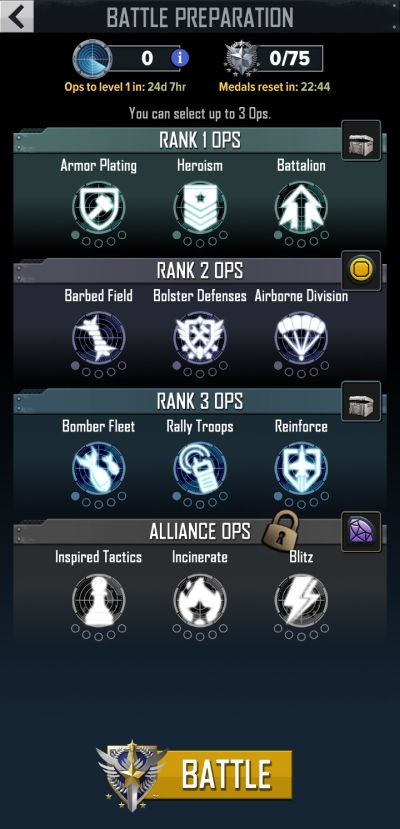
When you reach level 4, you unlock Ops, which are special abilities you can activate during matches. You can view your available Ops by selecting the radar icon next to the Base button. Up to three Ops can be selected before starting a match, but you can only use one of them during the match after one minute has passed, with the remaining Ops becoming unavailable for the rest of the match.
These Ops include buffing all present Troops, saturating the battlefield with bombs, or making a percentage of damage dealt to your buildings heal them instead. However, using a given Op puts it on a two-day cooldown before it can be selected again.
Choose your Op wisely, or even decide whether or not you need to use Ops when the option presents itself. You can speed up the cooldown by spending Coins, but you are better off using those Coins on your Troops and Tactics.
Ops can also be upgraded by spending Op Points, awarded by winning matches at roughly the same rate you get Medals. Ops can be upgraded up to five times, with each upgrade using Op Points in multiples of four. Since you only get Op Points from winning matches, it can take some time to get the necessary amount for upgrading your desired Ops.
4. Military Maneuvers
Now we can discuss tips and tricks to get the most of your rush defense experience.
When it comes to summoning Troops to the battlefield, we recommend sending out a Battle Tank first and letting it travel before sending anyone else. The tank can soak up a lot of damage, but it takes some time before it can actually engage the enemy. In addition, it is very common for new players to send out tanks as their first unit, so it is best to return the favor before your forces get flattened.
Once your first Battle Tank makes it past the first Point closest to your base, you can summon infantry to capture Points and provide fire support to your Tank as it soaks up fire. Going all in on Riflemen sounds tempting, but remember that Shotgunners work best against Infantry and their knockback can make you lose ground and since you cannot prioritize enemies. It is best to mix up some armored units to divert fire.
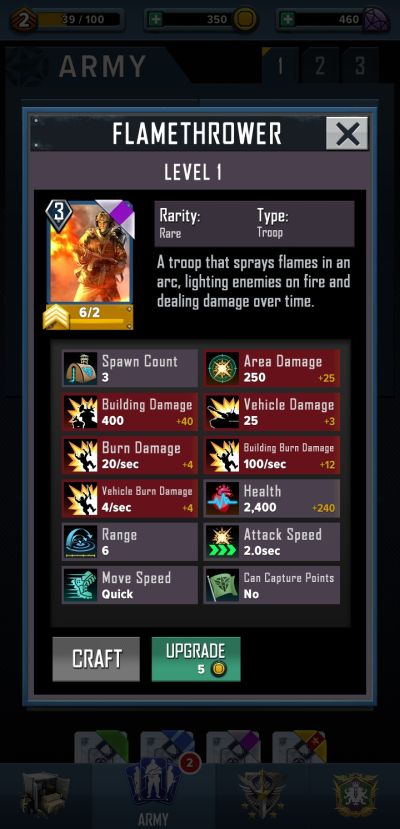
One particular Troop we found quite useful is the Flamethrower, a 3-supply Infantry Troop whose weapon of choice deals heavy damage to both Infantry and buildings, making them very good at clearing out Infantry blobs and burning Points to the ground.
On top of that, the flames persist for a short while so if the Flamethrowers are killed, the fires might finish off or at least cripple whoever they were shooting at. Their fires barely do anything against vehicles however, so you might want to have some Rocket Launchers escorting your firemen. As a bonus, these Troops are found in Tier 1 crates, so you can end up with some copies of the Flamethrower fairly easily.
Another Troop you should look out for is the Sniper, another 3-supply Infantry Troop who specializes in long-range takedowns. The Sniper can also occupy and capture Points, but their overall power is balanced out by the fact that they come in one at a time. If they get killed, they will have to be replaced by another Sniper. Make sure that they hang back while weaker, but more numerous units take the hits.
When it comes to your Tactics, remember that most of them run on a timer, so deploying them too early may result in them not being used to their full potential. To make the most out of your starting Tactics, here are some of our recommendations:
- Barbed Wire slows down any enemy who walks into it, but only lasts for about 10 seconds before it naturally decays. It is best used to stall invaders when they are encroaching on your territory, but only before they start attacking any Points under your control, let alone your bunkers.
That way, your Troops can catch up to them before they start making serious headway. If there is no good place to use it, either leave it alone for the rest of the match or just use it deep in your territory.
- Strafing Run and Artillery Barrage are quite powerful, but both the jets and the shells take some time to reach their destination. Unless you are good at leading your shots, use them when your enemies are currently tied up against your forces so that they stay still, making it more likely that the shots land. The Firebomb is similar, but since it leaves fires that persist for a short while, it is more likely to injure anyone who passes by.
- Landmines, Ammo Drop, and Howitzer all leave physical entities upon use that can be destroyed by enemy fire. If you do plan on using them, make sure something or someone else is being attacked. This is particularly evident with the landmines, as a stray tank shell can set some of them off early and waste Supplies in the process.
- One use of Paratroopers is to quickly capture a neutral Point while your forces are advancing on the enemy side of the base. Wait for your attack force to get into position and call in the Paratroopers. That way, any newly-spawned Riflemen can capture the Point with minimal damage to themselves.
- Use Tactics in concert with one another. For instance, slow down hostile Infantry with Barbed Wire then follow it up with either a Strafing Run or a Firebomb. This will allow you to cover for each Tactic’s weakness and make the most out of each of them.
Finally, when it comes to the Piggy Bank and the Medal chest, remember that opening either of them is your decision to make. If you need the Coins now for whatever reason, or you want to take a chance with your current Medal chest tier, go ahead and open it. For the Piggy Bank at least, consider opening it if the rewarded Gems can make up for the cost of opening the Bank in the first place, otherwise you are losing Gems.
And that concludes our beginner’s guide to SIEGE: Apocalypse. We hope that our advice and information help you dominate rival commanders. If you have any tips you would like to share with us, feel free to drop us a line in the comment area!. Have fun and game on!