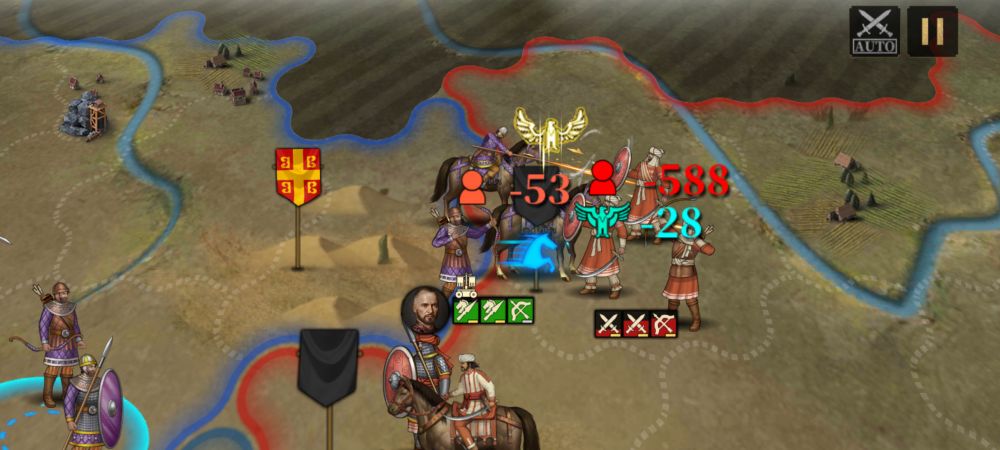
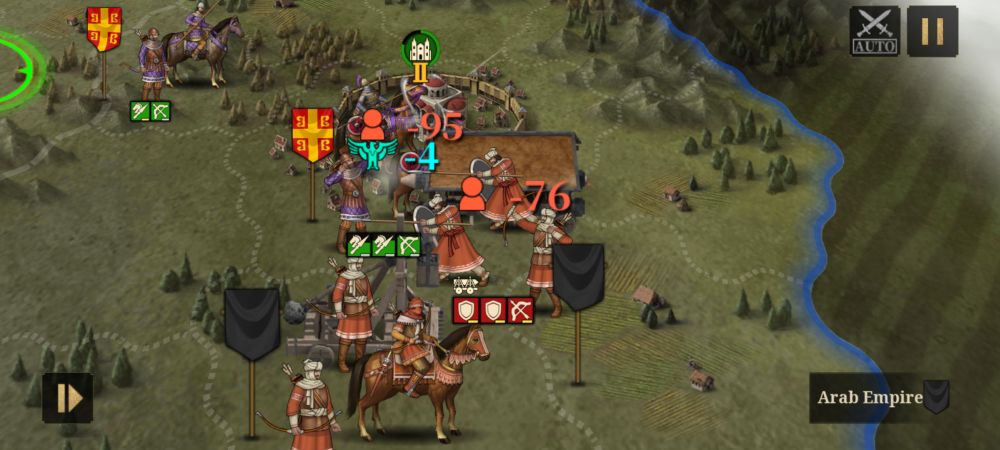
Grand armies clash with blade and shield, the battle lines pushing ever forward. As the enemy’s flank buckles from the pressure, you adjust your iron crown and raise your sword forward. Your steed is followed by a tide of horsemen, as you crash into the weakened enemy flank, allowing the foot troops behind you to pour through the beleaguered defenders.
Encouraged by the sight of your horsemen breaking through, your troops push forward ever harder, ruining the enemy’s formation with their effort. The enemy is encircled, and are slaughtered to a man, unable to escape and tired from the fighting. The battle is not yet over, as you see the real prize over the hill: A fortified city, where your hated foe resides. The infantry move in first. With a heave and a ho, they bash and bash the front gates with a battering ram while your bowmen fire at the defenders.
The gate is broken, and your troops pour in, cutting down the enemy garrison and anyone else in their way indiscriminately and with ruthlessness. You join them, and soon enough, you hold the enemy king’s head in your grasp, and toss it out of the keep’s battlements for all to see, as your troops tear down the enemy battle standard and raise your own over the city.
Welcome to our European War 7: Medieval Beginner’s Guide! European War 7: Medieval is part of the European War series of mostly single player (Mostly because they do have a very rudimentary multiplayer mode, but it’s merely other player’s army compositions being controlled by AI against your own troops which you control directly) turn based war strategy games, which span history as varied as this Medieval period, the Napoleonic era, and even the horrors of the First World War.

Anyone who’s played Advance Wars may find this fairly familiar, though the rock paper scissors of European War: Medieval make things a bit more complicated. You move your units across a map made of irregular shapes rather than a grid, with attacks being done when two units get within kissing range of each other, even the archers!
You can play a campaign spanning multiple ages of the Medieval period, starting from the fall of Rome and going through the rise and fall of the Byzantine Empire, and eventually the birth of the European nations as we know it. You also have the option of wrecking history rather than enforcing it via the Conquest mode, in which you play over a much larger map against multiple nations.
With detailed art and even differing skins for each nation’s basic units, a campaign that pays its due respect to medieval history (In spite of your ability to deploy Generals that might not even belong to the era the missions take place in, much less the nation you play as), highly tactical but not needlessly complex gameplay, and a relatively unobtrusive paid element, this game makes an excellent brain tickler.
You might find yourself laughing maniacally as you bring your elite troops to bear against an annoying target and finally crush them flat, or gasp in horror as the enemy get reinforcements at the worst possible time and location. Either way, this game is a fun time, and we’re here to help you win it.
THE BASICS OF EUROPEAN WAR 7: MEDIEVAL
The game could be considered a rather complicated (Though not insurmountable), non-grid based Advance Wars, with both Campaign Mode and especially Conquest Mode having a few different mechanics beyond “Move your troops into face-stabbing range, then stab the enemy in the face”. There are some mechanics that aren’t apparent at a glance but can be relatively easily understood after you’ve been playing a while.
Important things to keep an eye on are your income and by extension Population, positioning of your troops, where your Generals are, and the mission objectives, with Diplomacy being added if you’re playing in Conquest Mode. Here are some of the game basics to get you started.
Population And Income
Unlike most strategy games like Starcraft that have such a thing, the Population counter in European War 7 doesn’t limit your maximum troop count. Instead, it simulates how many civilians are left in your cities to do their jobs and therefore, make money.
Once your unit count goes higher than your Population count, your income will get reduced to the point that reinforcing your army will become much harder. Mostly because you sent everyone to the front and there’s too few left back home to produce goods to support the population and your army. You can increase your population cap by upgrading a City’s housing, thus also keeping your income safe and your army bigger and fatter.
Unit Mobility

Units move by way of Mobility Points, which they need in order to either move or attack. Terrain such as mountains and forests cost more Mobility Points to move through compared to boring old flat Plains, but some units (Usually mercenary units, since you need to go through the gacha to get them) are able to ignore or mitigate their movement costs, like Legion Spearmen, who have a perk that lets them climb mountains for the same cost as plains.
An attack usually costs 6 Mobility Points, and a unit that attacks from a standtill can normally hit twice. Certain Generals can mess around with this important mechanic, sometimes lessening the cost of Attacking so your troops can do hit and run strikes.
Terrain
The game’s terrain system is relatively complex, but isn’t so complex as to give one a headache: Different types of terrain have different effects, and some terrain types can overlap with each other.
The simplest and most important of them all are Plains, Forests and Mountains, since they have noticeably different movement costs. Forests and Mountains cost 5 Mobility Points to cross, but different units sometimes have the ability to cross either one with reduced movement costs. Plains only cost 3 movement points.
Then you have terrain like Deserts, which cause a morale penalty because it’s hot and sweaty and your troops get miserable when toasted alive by the burning sun. In Conquest Mode, sometimes it gets inconsistent, with certain areas having one more added Mobility Point cost even though the terrain type is the same as in other spots on the map!
You can check on a tile’s terrain type and effects by tapping on the tile, then checking the left of your screen to see the movement point cost. To see the effects, you tap the image of the terrain above the movement cost indicator.
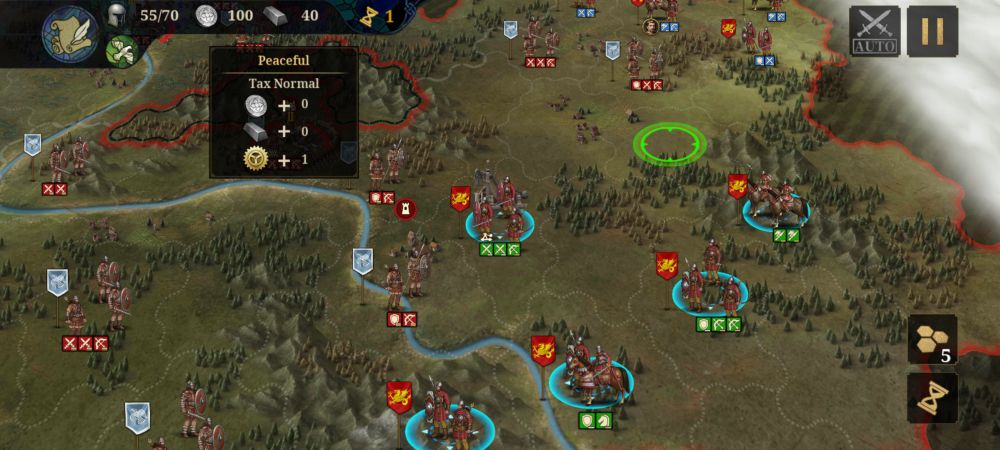
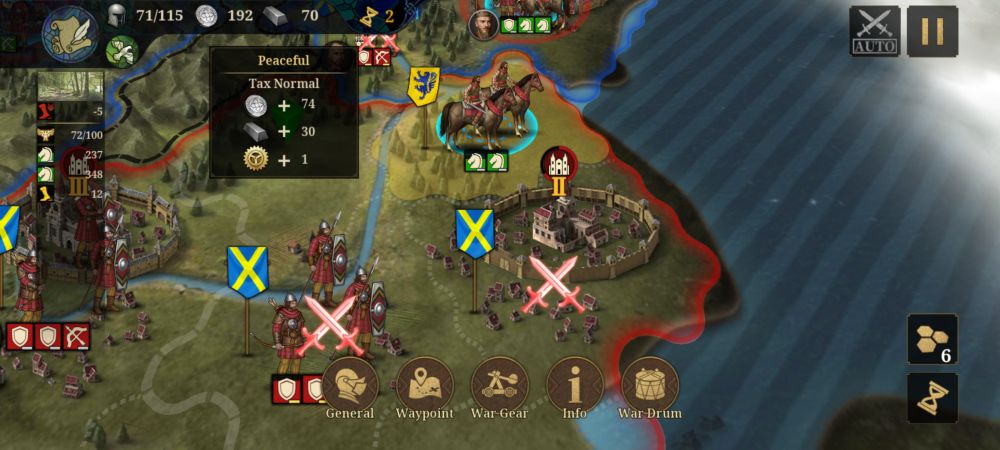
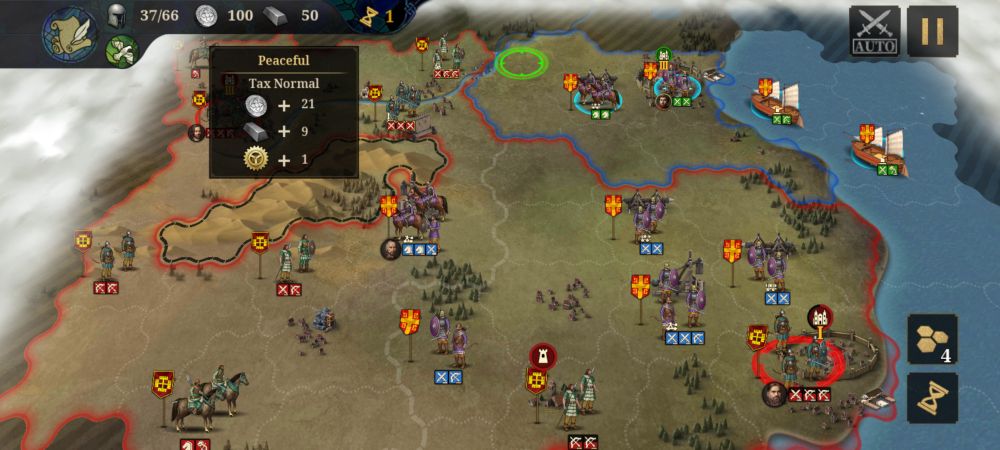
Policies
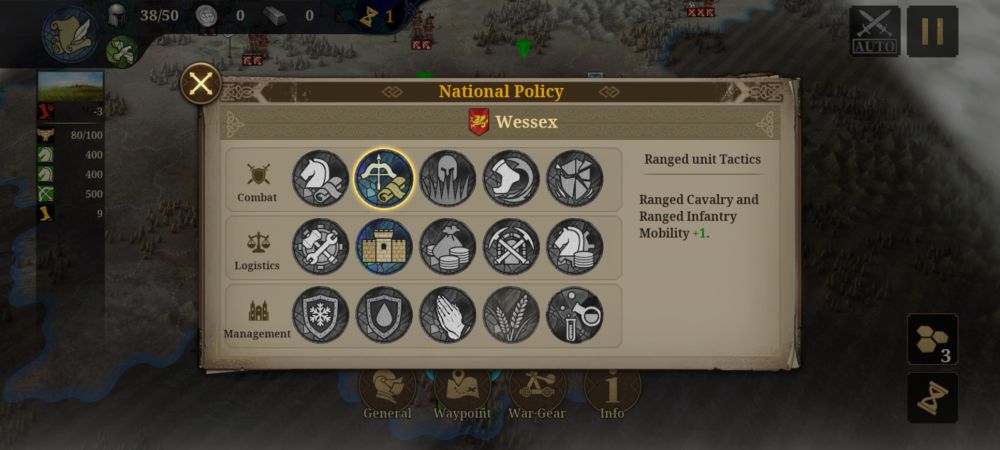
In the upper right corner of your battle screen is your National Policies tab. National Policies are most important in Conquest Mode, as they start blank and you can fill them up by researching using resources like Coins and Steel. Your overall long term conquest mode strategy is going to benefit from thinking your National Policy through.
That being said, it also factors in the campaign: While you cannot research national policies in the campaign, each mission usually gives you a pre-set National Policy, and it pays to keep it in mind when thinking of a battle plan. Say you have the Hide policy, you can use Forests to hunker down since they now give you a defensive bonus. If you have the Higher Taxes policy, then spamming Swordsmen might be on the cards. Always look at this tab at the start of every mission and plan accordingly.
Diplomacy
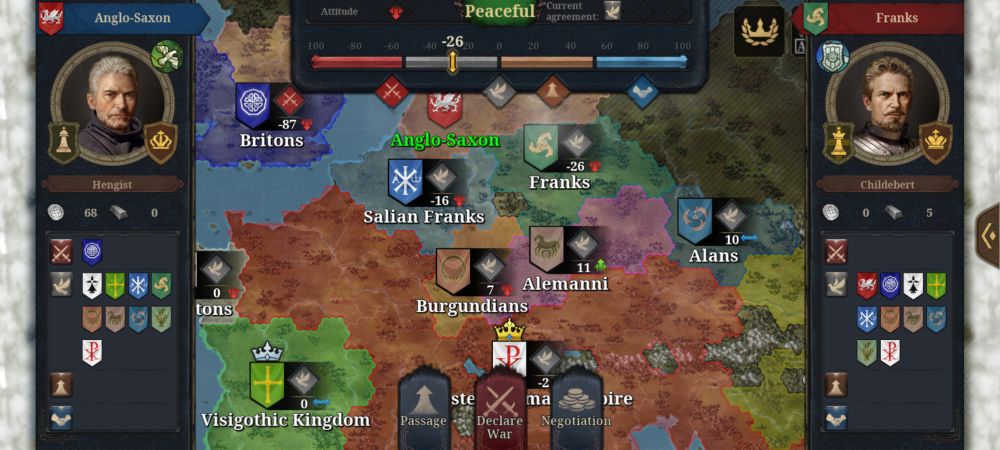
Only available in Conquest Mode, the Diplomacy button is located in the bottom left of the screen during a game. It isn’t particularly complex, but learning it is be important if you don’t want several countries declaring war on you at once or bullying you for tribute constantly.
You pick a country on the map, then you pick between 3 options: Passage, Declare War, and Negotiations. Negotiations are the first step to peace, and essentially consists of throwing money at a country until they like you.
Once you’ve buttered them up enough, you get the option to use the Passage button, which lets you walk your troops through their land. Usually to attack another enemy, or if you’re of a more ruthless bent, set up to backstab them by positioning your units to attack their cities easily. The more they like you, the better your chances of them agreeing to a Passage declaration.
And of course, you can declare war on them, if you’ve had it with them asking you for tribute. It’s usually a good idea to maintain good relations with nations bordering you if you’re at war with another nation, as fighting a multiple front war is historically proven to be a giant pain in the butt. Note though that it is expensive, with diplomacy costs usually being high enough to set up a full unit or two.
BATTLE TIPS
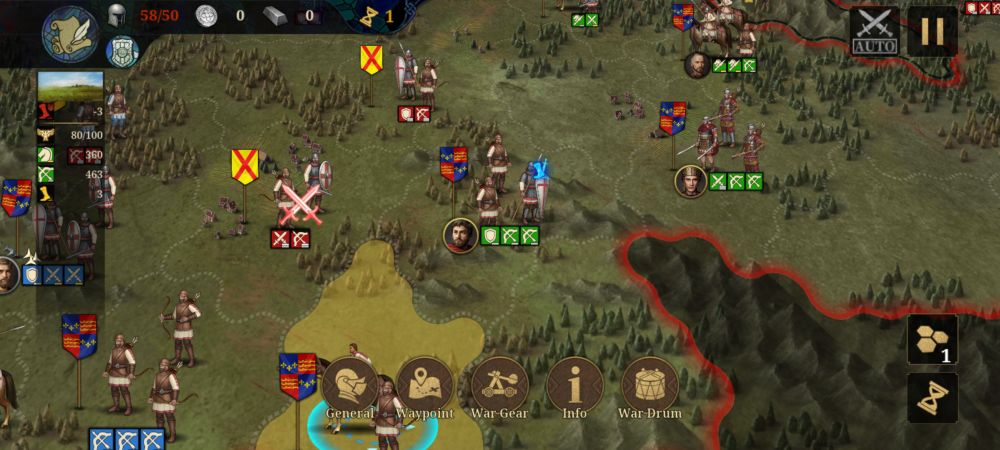
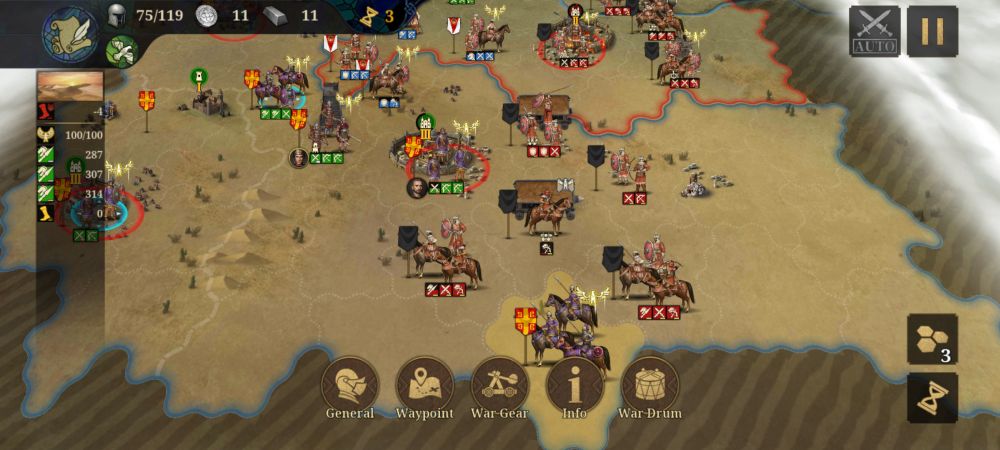
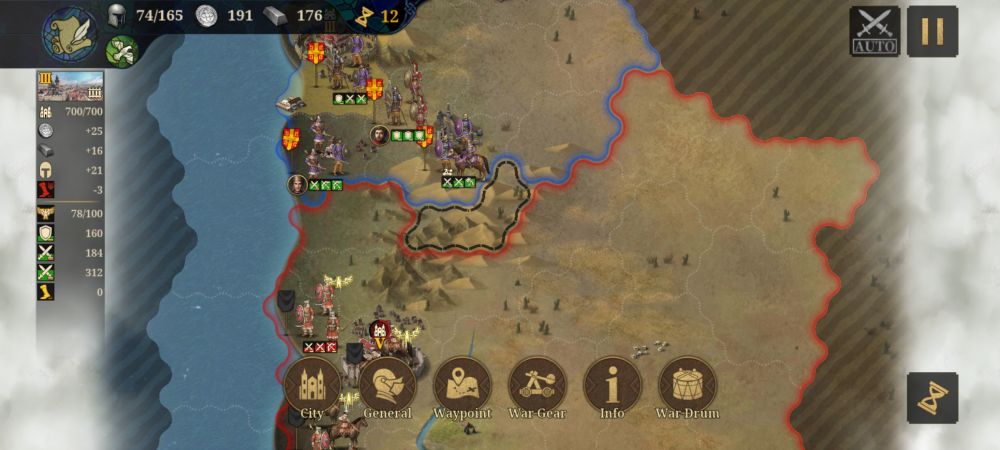
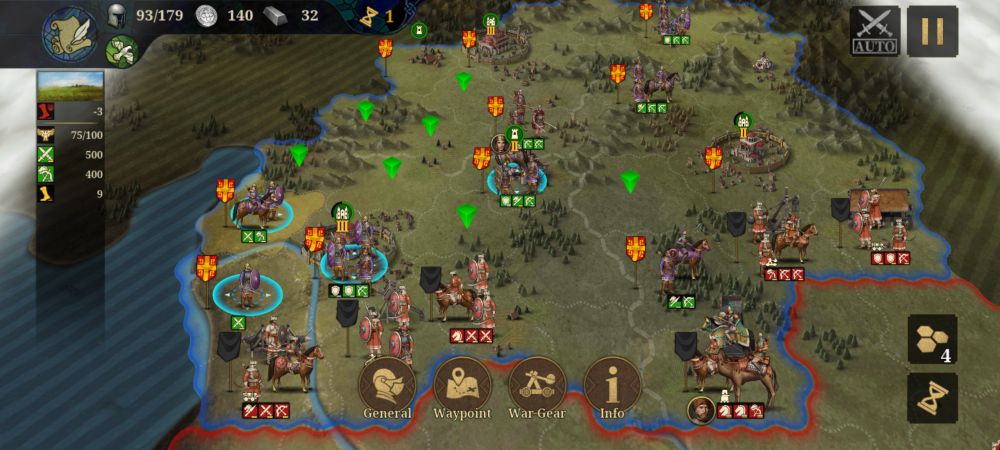
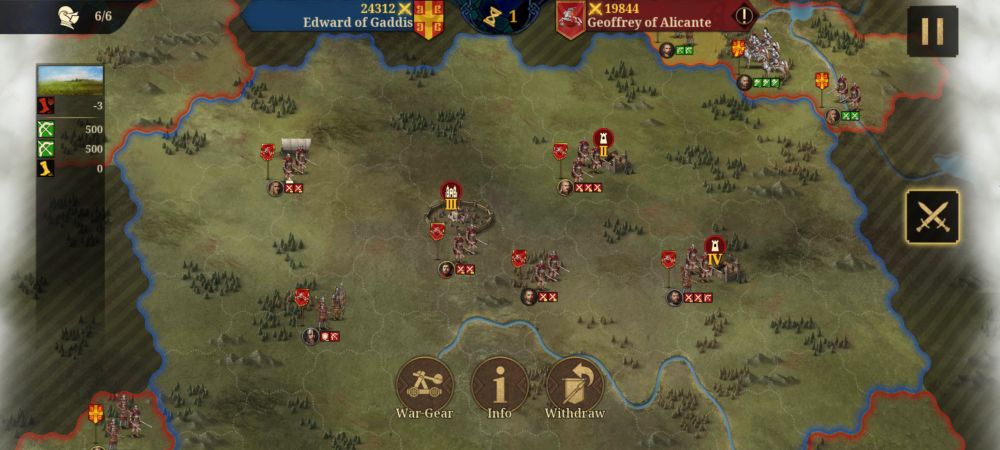
In medieval battles, positioning and formations are highly important. A lot of what you’ll be doing is probing for weak points in the enemy line, going around the enemy to hit objectives (Usually Cities), or positioning your forces such that many of your units can gang up on an enemy force, while preventing your own forces from being cut off from each other, surrounded, then massacred.
Keep an eye on enemy positioning and unit composition, your own troop positions, and the state of your AI ally if you have one. Here are some tips pertaining to battle planning.
Immediate Strike, Or Patient Ambush?
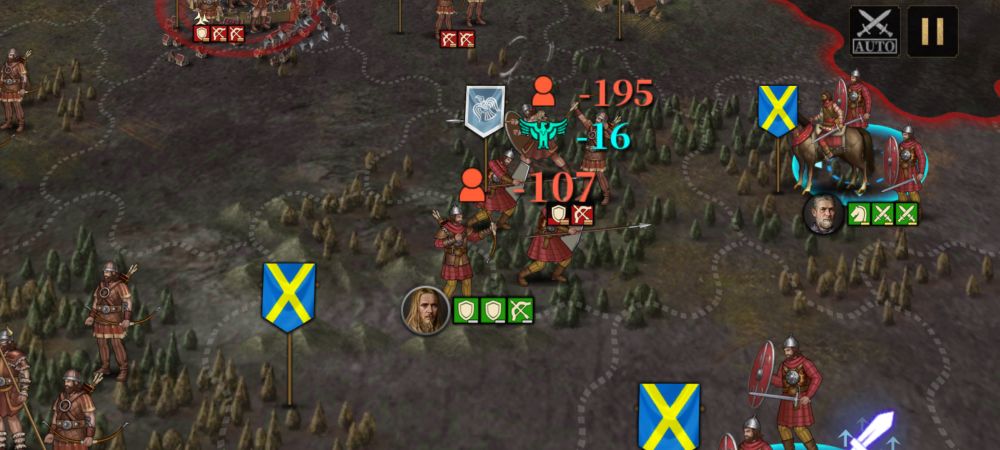
Much like Advance Wars, the damage your troops cause is based on how many of the soldiers within [treated as their HP] are left alive in a unit. Attackers always hit first, and defenders hit second, meaning defenders are always hitting less hard than they normally should. Note that this doesn’t mean you should just charge in: An injured unit attacking a unit with more HP or troops will still likely lose out in terms of damage numbers.
Even more important than that is taking the rock paper scissors into account, as even if the unit is moderately outnumbered, they will do more damage if said unit counters whatever they’re attacking or defending against. While it may be tempting to get the first attack in immediately, it may also be useful to wait for the enemy to come to you: Units attacking from a standstill usually have enough Mobility points to strike twice.
That being said, getting the first strike in can also allow you to maintain aggression and keep the flow of battle in your favor. Plan accordingly depending on the terrain. In an open field, it may be useful to be aggressive, but in a place full of chokepoints or slow terrain, it may benefit you to set up a defensive formation instead.
Maneuver Warfare, Medieval Style
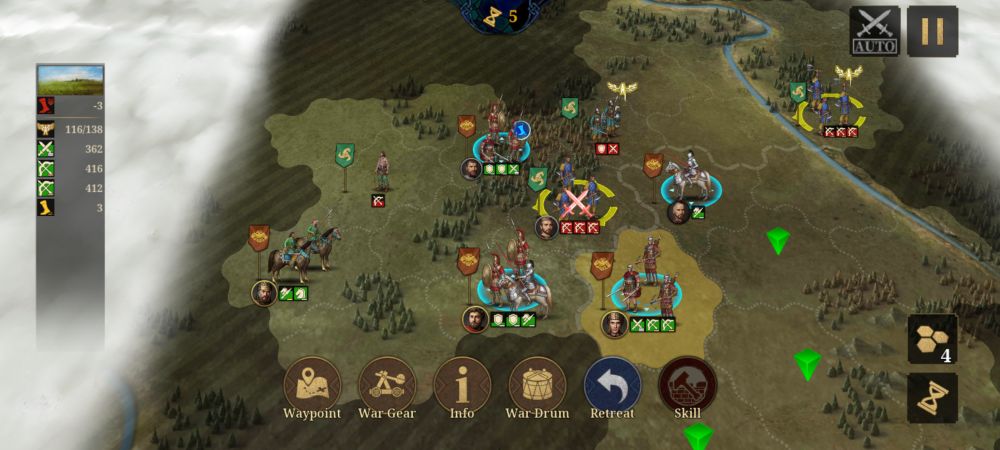
Your units can block travel for your enemies. Use this to your advantage: Sometimes, it may be better to move to an advantageous position to surround and destroy your target some time in the future, than to attack immediately and leave them an opening to retreat or worse, get reinforced or block YOUR troops from their flank.
Cavalry are quite good for this sort of flanking maneuver, though you can also do this with infantry if you’re clever. You can also use this defensively, moving in to plug gaps in your line rather than attacking immediately then getting flanked by enemy cavalry a turn later.
Infantry are preferable on the defense, but you can also use cavalry to plug a gap momentarily until your slower infantry units can move into position a turn or two later. You will often also use your deployed Generals for this, as the special Mercenary elite units they bring often have bonuses that let them ignore terrain movement costs.
Clear the Outside Before The Inside

When planning an assault on en enemy City, it may be a good idea to cut the city off then clear out all enemy units outside the city, rather than attacking the city and its garrison first. A city that has a full garrison (Namely, a force of 3 units) cannot make new units, but as soon as one of their units die, they can replenish it. Cutting them off and killing the rest of the army near the city first will ensure your forces can whittle the City down safely, in spite of its ability to replenish troops.
On the other hand, ignoring the units outside the city can turn a quick door-kicking operation into a horrible prolonged siege, as your units attack the enemy city while constantly being harried by enemies trying to help said city.
Castles And Cities Block Movement Even when Empty
Just because a City or Castle has no garrison doesn’t mean you can just charge in willy nilly: Their ramparts and gates can still be a source of giant irritation, thanks to their ability to block troop movement. Worst of all, allied Cities won’t let you move troops inside them to protect said cities, even though you can technically walk past them.
Keep this in mind when planning your movements, as not keeping track of Castles can mess up your plans to get behind the enemy. This is also why siege engine-type War Gear like Catapults and Battering Rams are so important: You will often need to wreck Cities and Castles , as not only are they annoying to deal with, they also happen to be very high value targets.
Cities For Profit
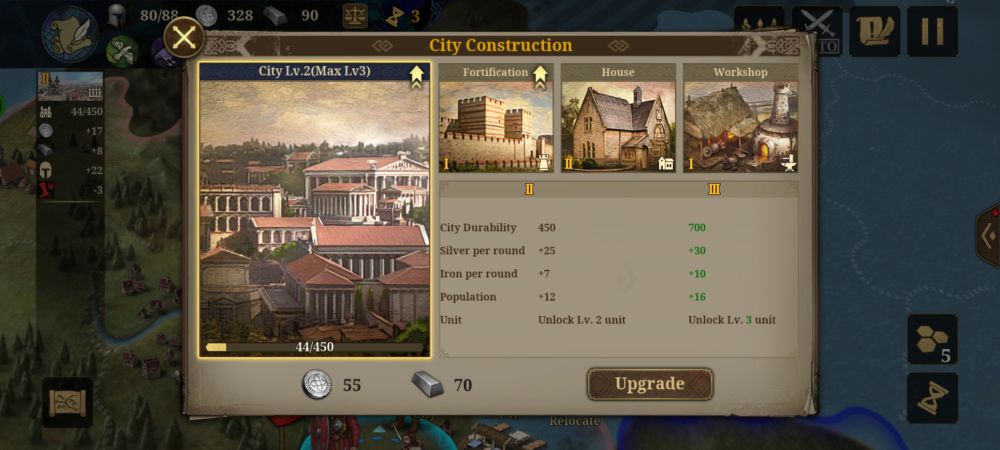
Speaking of Cities, you will often need to capture Cities as not only do they provide income and annoyingly tough defensive strongpoints, they are also where units are trained. Capping a City near the front will allow you to pour fresh troops into the fight more quickly, or let you pull weakened units back for replenishment.
They also provide territory control, turning a portion of the map to your team color along with any profit-generating tiles (Like Mines) in it. They are also often mission objectives in the Campaign, so again, keep bringing Battering Rams and Catapults if you have them. Or get at least one General specialized in siege warfare.
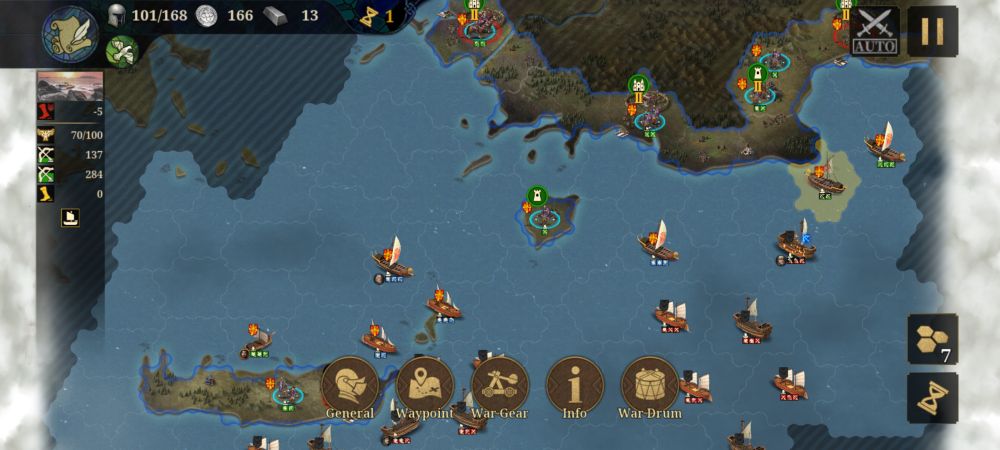
Warships for Infantry, Bathtubs for Cavalry
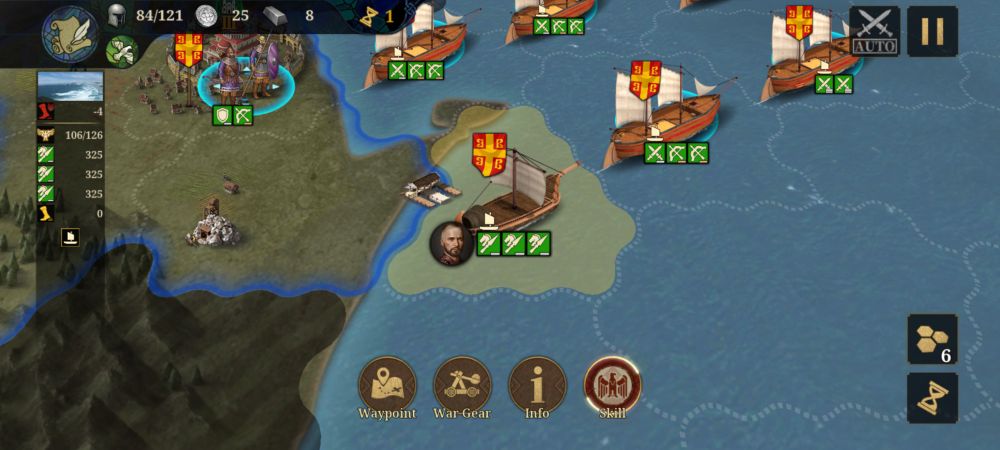
Naval battles work by assigning a ship to a unit (A ship counts as War Gear, and some ships are better at fighting than others), then sending that unit out to water. According to the tutorial and to the writer’s experience, infantry work best in ship-to-ship combat. Presumably because horses cannot be expected to fire arrows, board enemy ships, or man the ship’s broadside guns.
HP damage is equally distributed between all troops in the unit on board ships, as opposed to the normal way in ground combat where melee units usually take the brunt of the damage first. There are many kinds of ships available as collectible War Gear, and most water missions give you some ships for free in case you lack them in your inventory.
Conquest Mode in particular gives you an infinite numer of Transport Ships, which are incredibly useless in combat but nonetheless invaluable for transporting large armies across the water. As such, if you have any good high-tier warships to spare, give them to your infantry units if they have to cross water.
On the other hand, if you need cavalry to cross the sea, use the cheap Transport Ship and have them avoid all foes until they make landfall. Loading a proper warship like a Dromon flamethrower ship or a Manila Galleon full of thumb-less sea-sick horses is a waste of their firepower. You can also use Transport Ships for your infantry too if they aren’t expecting a fight, because in longer modes like Conquest Mode, you still only get to use your War Gear once per session.
Beat Your Allies To The Fight
AI Allies assigned to you, while quite helpful on the defense, have a habit of being overzealous on the attack, to your detriment. They will always move into any empty enemy city in their range (Thus negating your access to that city’s facilities), and are aggressive to the point that they might block your stronger unit just to send their weaker unit to their death, and in doing so delay the enemy’s death!
Always be wary of how your AI ally might move, and try not to move in the same path as they do: If they’re attacking in one direction, try to join up with them via a pincer or a flanking movement as opposed to following their units directly. This is less of a problem if you’re helping defend them of course.
Assign Generals
While you can only deploy a limited number of Generals and their elite units depending on the mission and map (Elite deployment slots are marked by a green circle on the map at the start of a mission), you can assign your other Generals to existing units, though they will not be deployed with the elite personal bodyguard you gave them.
This is useful, as it allows you to boost that unit’s fighting power (Provided you gave the unit a General that matches their troop composition, like giving Justinian I command of a unit with ranged troops in it) and make use of their active and passive skills.
Campaign Memorization
When all else fails, try again! The Campaign missions are pre-made and non-randomized in such a way that you can learn them much like a puzzle on an individual basis. As an example, the chapter 4 map Battles of Africa is a defense mission where you have 3 Cities and only need to defend 2. Eventually, the enemy gets reinforcements and will surround the third City to the south.
No biggie, you can just hunker down in the 2 cities left right? Wrong! The mission has a trigger that summons enemy warships loaded with powerful elite troops to your north if that southern City gets captured. The ones attacking the South may look threatening due to their numbers, but the navy they have waiting for that city is far worse. Knowing when and where seemingly “random” mission events happen is key to finishing the harder missions in the game.
UNIT TYPES
A big part of the game is its rock paper scissors mechanic: Certain units counter others, sometimes in different ways, and they also have certain roles they excel at in spite of the rock paper scissors.
While there are quite a lot of units, with each individual unit typically having some different ability such as being able to ignore terrain costs for mountains, having added defense in certain terrain types, or having the ability to bypass defenses, all those units are split between 6 main types, which have a general purpose on the battlefield: Melee Infantry, Defense Infantry, Ranged Infantry, Melee Cavalry, Charging Cavalry, and Ranged Cavalry. Here are those unit types summarized.
Melee Infantry
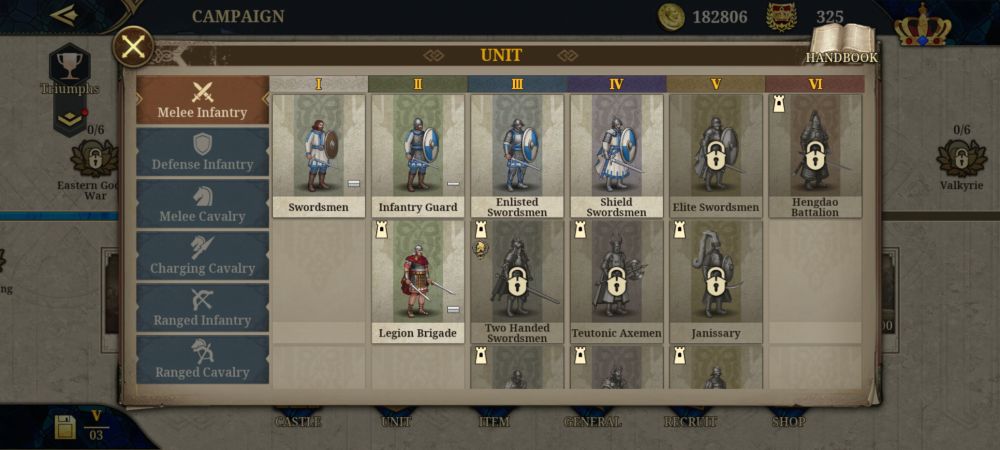
Melee Infantry are hard hitting damage dealers, and are typically the cheapest Infantry type in the game. They do well when attacking other Infantry and can even attack Cavalry decently, but do poorly against Cavalry when said Cavalry attacks first.
They’re best used to assault Ranged Infantry protected by Defense Infantry, and on the offensive in general. While they have more trouble fighting Ranged Cavalry than they do Ranged Infantry, Melee Infantry still take less damage against them and are a viable option if you don’t have Melee Cavalry at the moment.
Defense Infantry
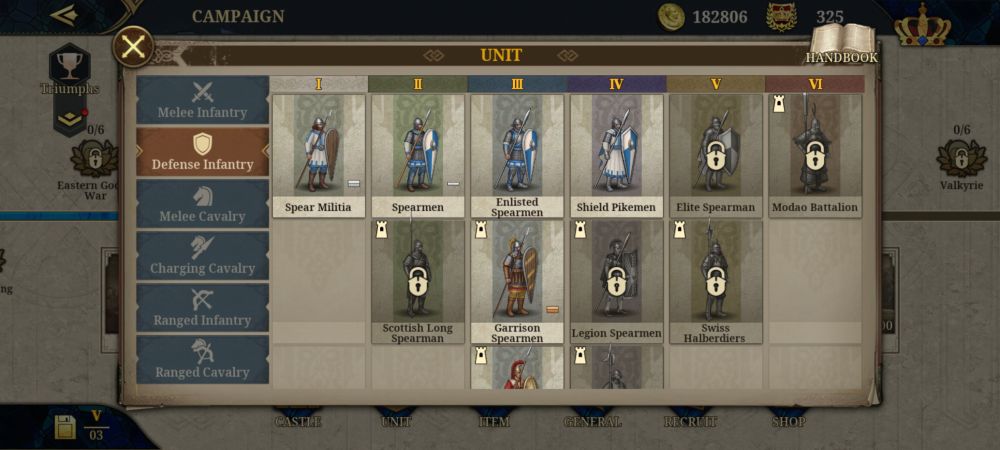
Defense Infantry would have been categorized as Spearmen in any other game, since all of them have spears and work great against Charging Cavalry in particular. Defense Infantry have a perk that lets them deal extremely severe counterattack damage to Charging Cavalry while giving them a chance to negate their Mobility based damage bonus.
Though they take more damage from Ranged units than Melee Infantry do, which is weird since you’d think their larger tower shields would be more useful for blocking against arrows.
Ranged Infantry
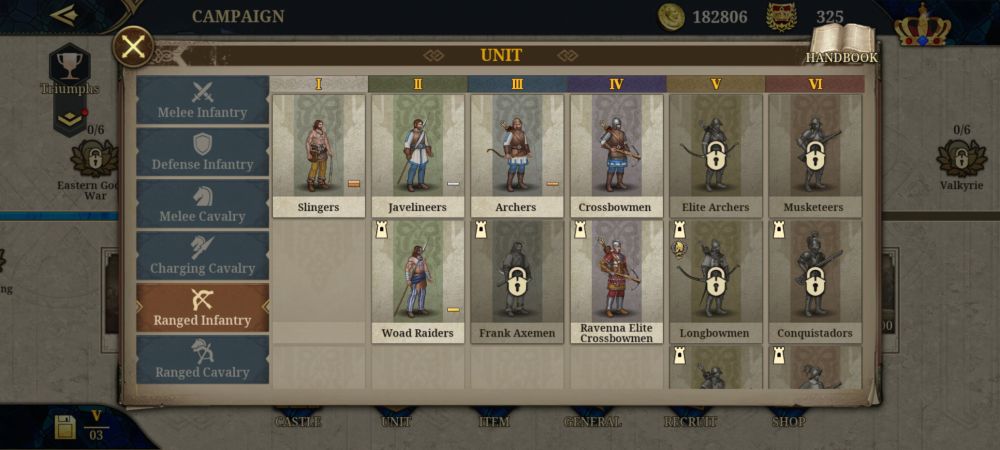
Ranged Infantry are special, in that they cannot be counter-attacked by melee units, since that’s how they simulate distance attacks in the game. This makes them very powerful on the attack, but very weak on the defense, at least when they aren’t mixed with close combat units.
Which is why you mix them: While having a melee unit like Melee or Defense Infantry in your primarily Ranged unit means they can be counterattacked by other melee units, the Ranged units themselves still take no damage from the counterattack while the melee units take the hit.
Oddly enough this also goes for when they’re attacked: The melee units take most of the damage to simulate them blocking most of the blow for the archers behind them. Of course, if the other guy brought archers too, everyone takes damage anyway!
Melee Cavalry
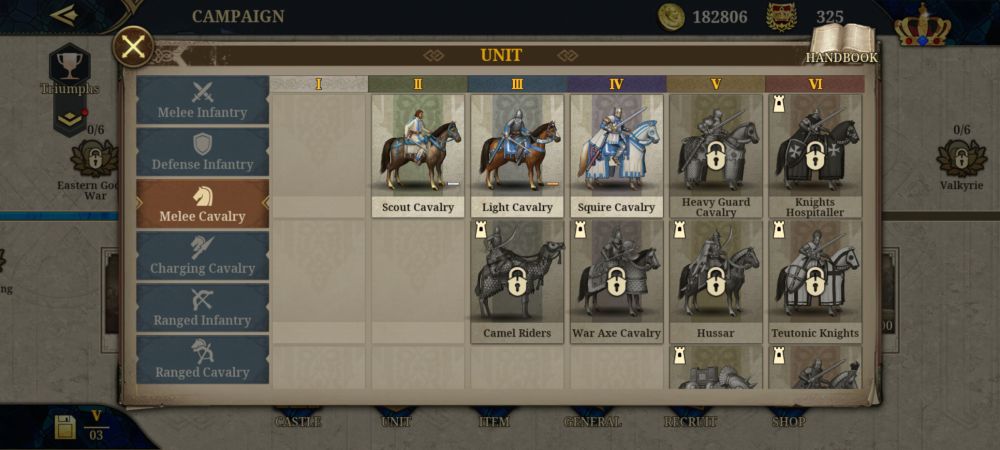
The fastest unit in the game, Melee Cavalry are decently hard-hitting units with loads of Movement Points at their disposal. Their best use is for trapping enemy units by flanking them, reinforcing an area quickly to buy time for your main force to make it, and hitting exposed targets like Ranged Infantry spam, injured enemies, or Cities whose walls have been demolished and are unoccupied but otherwise cannot be captured by your slower (or tired, usually troops who just finished demolishing a City and its garrison don’t even have enough movement points left to move into said city) troops. They specialize in chasing Ranged Cavalry down.
Charging Cavalry
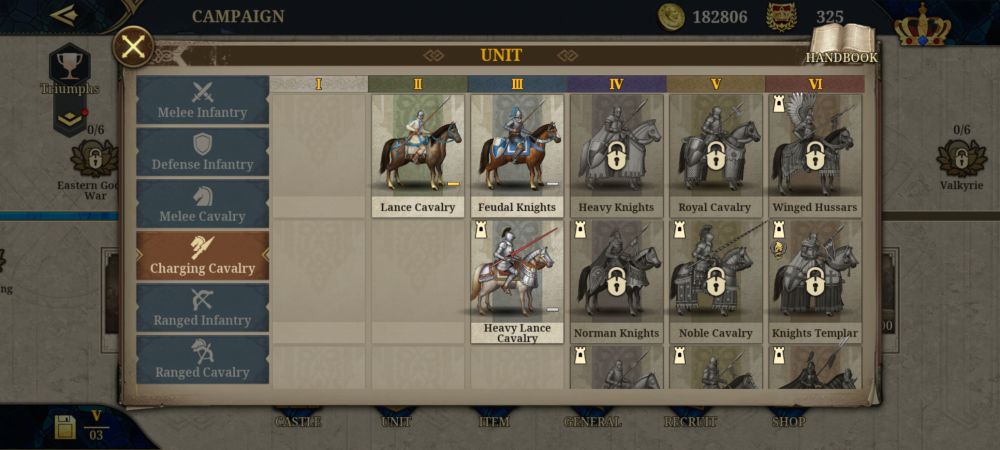
Slower than the Melee Cavalry but possessing much more killing power when used properly, Charging Cavalry have a weird quirk: If they have extra Movement Points left while attacking, they get a damage bonus to simulate them violently charging into the enemy with their huge, nasty jousting lances.
This means good positioning can help you make the most of them, and many decisions you make with Lance Cavalry will look like “Do I attack now, or wait for the enemy to come closer so my lancers can stab them harder?” The only time you should not joust a target is if they’re heavy with Defense Infantry use, mainly because your horses will just get impaled on their spears thanks to their incredibly specific bonus against Charging Cavalry.
Otherwise, they hit most things hard enough to be quite dangerous, especially Melee Infantry who even the lowest tier Lance Cavalry have a chunky 20% damage bonus against. That’s before taking the spare movement point bonus into account!
Ranged Cavalry
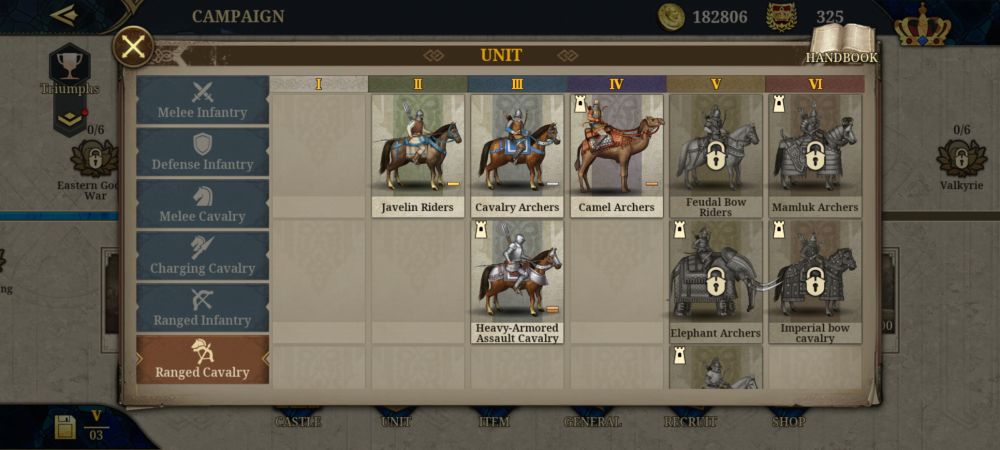
Essentially Ranged Infantry but faster and less good at attacking Cities, Ranged Cavalry are mainly used to bully melee units, especially Infantry in general. Just like Melee Cavalry, they’re a fast way to plug up gaps and attack exposed enemies, and Defense Infantry have a harder time countering them since they’ll just shoot the Defense Infantry from afar and have a damage bonus against them.
You’ll be using them rarely since you can use Ranged Infantry for most jobs that Ranged Cavalry will do, but they can be useful if you want some Rangers far away from wherever you are now. Their weakness is Melee Cavalry, as they have a damage bonus against Ranged horsemen.
OUT OF BATTLE LOGISTICS
Before every battle, or at least at the start of each log in, you’ll be checking on your War Gear, Generals, available mercenaries, unit leveling, among other things. As much as good tactics can get you through a battle, wars are often decided by boring old logistics, since well fed troops will always fight better than a crippled, hungry army, no matter how smart their Generals are. Here, instead of feeding them food, you feed them the materials and items needed to level them up and make them more powerful.
War Gear Deployment
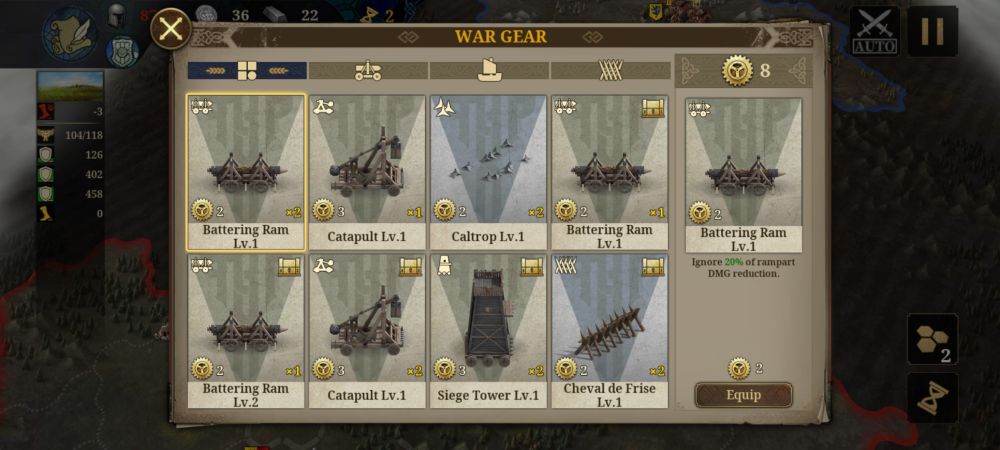
For every Campaign mission you play, you’ll be given a set of free War Gear in your inventory meant to be used in that mission only, much like the Supply Chest in old Monster Hunter games. Don’t let that stop you from using the not-free stuff in your inventory. The number of War Gear you have in your inventory doesn’t get depleted upon use: It only indicates how many of that War gear you can bring to every mission.
Win or lose, the War Gear you just used is returned to your inventory. So don’t hesitate to use that gold-tier Siege Tower or Rhinoceros battering ram even if all you want to do is crush a tiny low level City like an egg.
Troop Training
While Mercenaries are glamorous and very powerful, you typically need the Recruitment gacha to level them up and they’re usually only available as one-time call-ins or with Conquest Mode’s Castles, which come with a Tavern tab to summon them. And in the Campaign, their availability is limited since Campaign Castles typically only allow you to train certain historically accurate Mercenary units according to the mission, and lack a Tavern tab.
On top of this, their in-battle Coin and Metal cost is usually quite high. On the other hand, the basic bread and butter units trainable from Cities should be constantly upgraded when possible, and the lower their tier the more important since such units are cheaper to train. Between the Melee Infantry types, a high level tier 1 Swordsman can match or even do better than the tier 2 Infantry Guard at low level while costing no Steel, only Coins.
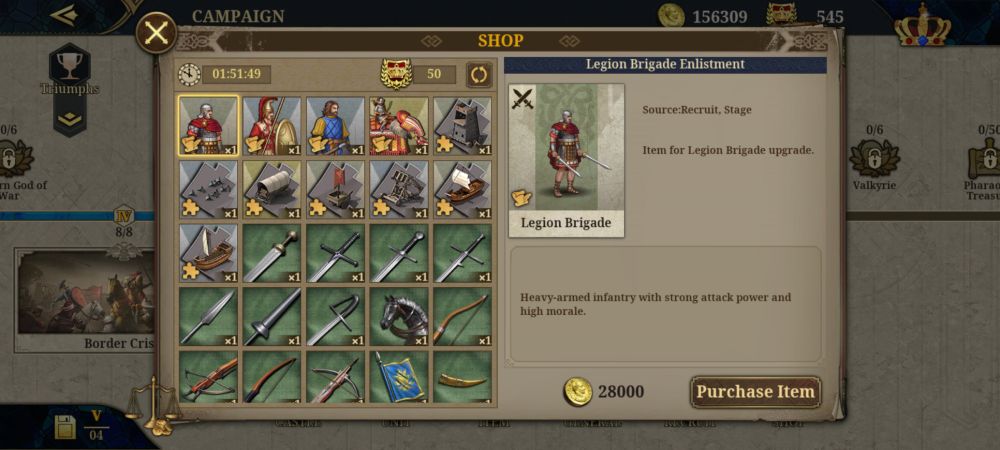
To upgrade basic units, you need Scarecrows for Melee and Defense Infantry, Quintains for Melee and Charging Cavalry, and Targets for Ranged Infantry and Cavalry. You can buy all these for Gold Coins outside battle from the Shop. Speaking of which…
Always Check The Shop
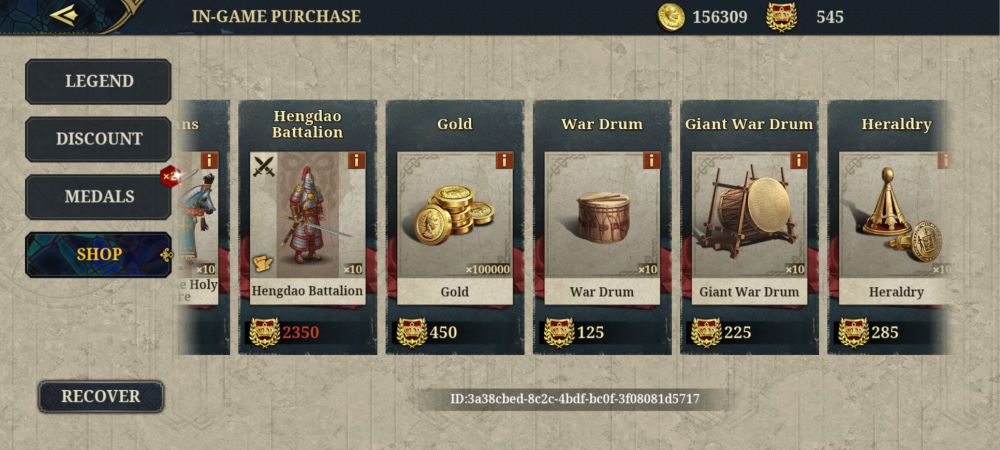
The Shop sells various items for Gold and Medals, with stock that refreshes every few hours. They sell everything from shards of new Units, equipment for Generals, to various upgrade items for different things, such as stuff for your basic troops or items that rank your Generals up and allow them to unlock troop slots for pre-deployment.
The equipment is particularly important, even the cheap stuff you can buy with coins: You’d rather have your Generals carrying cheap weapons in their secondary slots than suffering from Cheapskate’s Empty Item Slots Syndrome. Always check in every few hours for any items you may need.
There is also another shop if you tap the crown on the top right of the Campaign’s mission menu. Most of it is for real money purchases, but the Shop tab under that button sells items (And more importantly, Mercenary shards in bulk!) for Medals, which you can also earn from playing.
Daily Missions
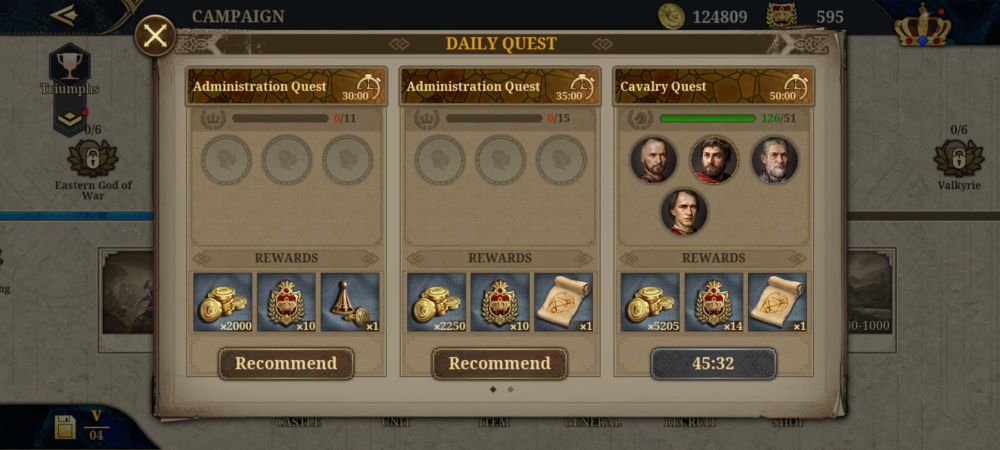
The Daily Missions tab acts much like Azur Lane’s Commissions: You send your Generals to go collect something via a timer. Thankfully you can still use those Generals in battle even if they’re busy doing it, so you can do them even early on when you only have a few Generals at your disposal.
Grind them constantly since they’re a reliable trickle source of Medals, needed for buying higher tier stuff such as new Generals or equipment from the Shop tab.
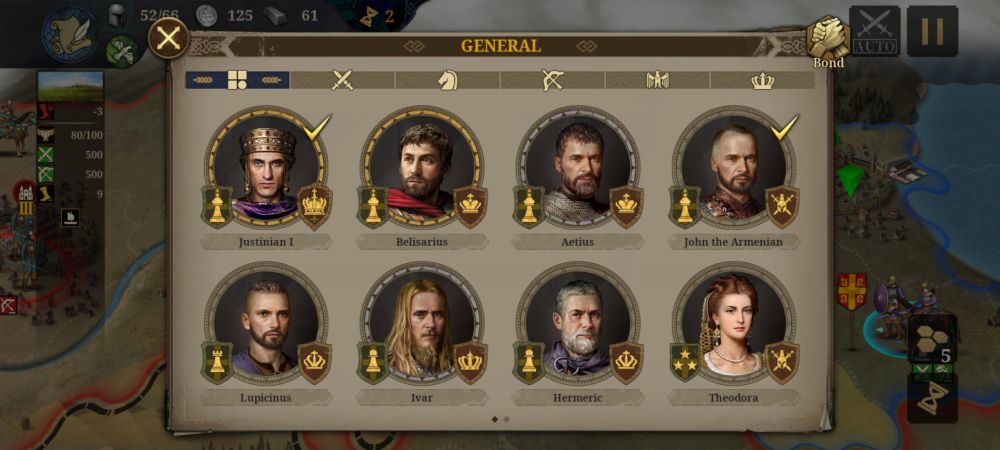
TIPS ON GENERALS, NOT TO BE CONFUSED WITH GENERAL TIPS!

Generals lead your troops, providing rather powerful buffs to the unit they’re attached to. They can either be deployed with an army of mercenaries you got from the Recruitment gacha, or deployed into existing units in the current mission you’re in.
Strengthening your Generals is important for all modes, but especially in Territory mode: You can get away with one or two high rank Generals in Campaign missions, but for Territory mode and the Campaign side missions, you’ll need a lot of them to be powerful enough to command a full 3 unit army. Here are some notes on powering your Generals up.
Building Elite Forces
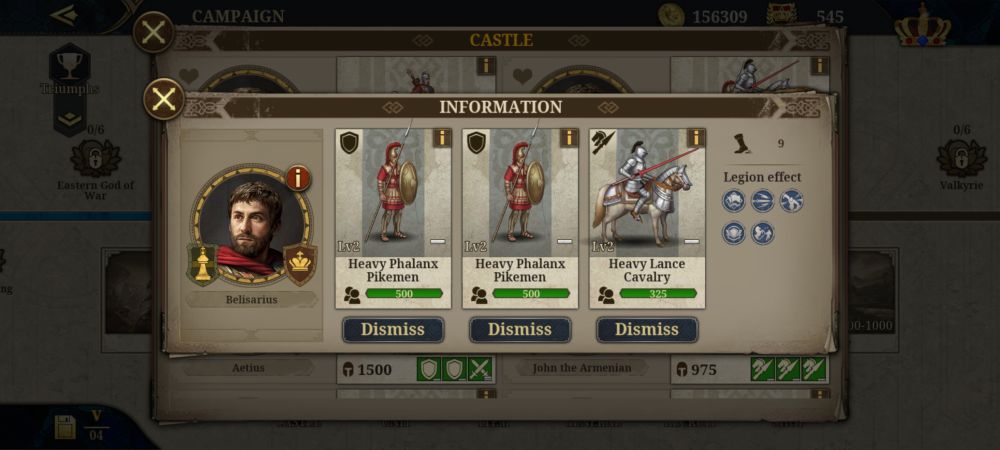
In the Castle tab, you can build armies that your Generals can deploy with, at least when they’re placed on a tile with a green circle in Campaign Mode, or summoned from a City’s Tavern in Conquest Mode. Read both a General’s stats and their various skills and perks before assigning troops to them: Some Generals are better with certain unit types than others, and Generals tend to have a niche they’re good at.
As an example, Emperor Justinian I has passive perks for ranged units and a damage bonus against castle fortifications, and his stats also say he’s better at commanding ranged units in general. His active skill partially repairs Cities and Castles, which also makes him decent for consolidating recently captured Cities and using them as forward operating bases, especially the ones he just finished destroying.
Taking into account his ability to lay waste to cities and his boosts for ranged combat, naturally you’ll give him a pair of Ranged units and maybe some Shield or Melee Infantry for protection, a weapon that boosts Ranged attacks, and once you deploy him into battle, you’ll usually hand him a Siege Tower from your War Gear tab and tell him to go do some demolition work.
He’s also got good Administrative perks, allowing him to be useful even if you don’t deploy him with a proper army that matches his strengths, but you’re supposed to make the most of him anyway.
Knowing this, it might be a good idea to occasionally reconfigure troop compositions for Generals in between battles, particularly for the Campaign: You may need a different type of unit composition if you notice the enemy is pre-deployed with lots of a certain unit you might have the counter for. You won’t do this often once you have enough upgraded Generals for each role though.
Ranking Up
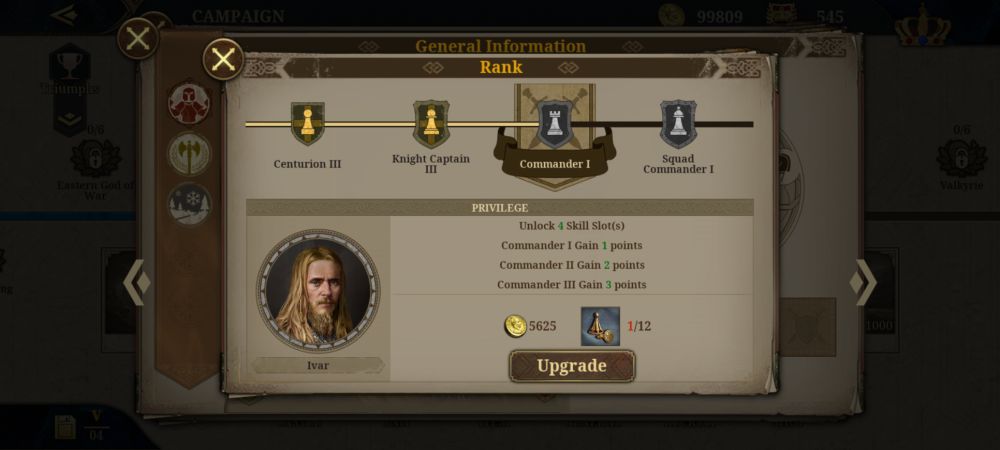
One item you’ll need a lot of early on are Heraldries, available from the Shop, Daily Quests, and beating Campaign missions. You need them since you need to rank your Generals to at least Lieutenant to unlock all their troop slots.
While you can play Territory mode as early as beating Chapter 4, it’s generally not advised until you have 6 Lieutenants all leading 3 unit armies in your roster, since that’s the maximum amount of troops you can use to attack and defend in that mode.
It will also give you more options for Campaign missions in terms of Generals to deploy: As much as the writer likes using Justinian to immediately delete Cities from the map, he’s not all that useful on maps where there are no Cities to kick down or put back up.
And certain Generals work well with different unit compositions, and having a comp available to you that can trivialize a specific mission (If the enemy is spamming Melee Infantry, a General with loads of Cavalry bonuses leading 3 units of Heavy Lance Cavalry will render them very, very dead) is a great way to make your life easier.
Stats
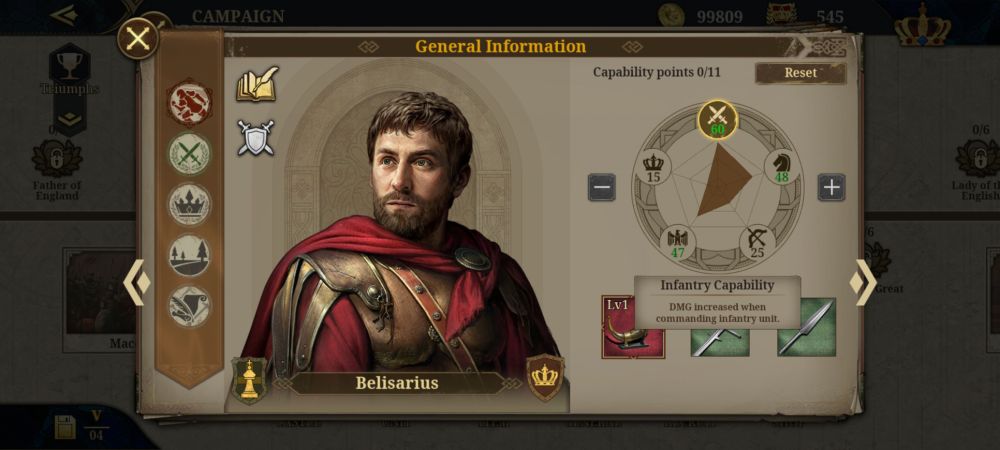
Ranking a General up also gives them Stat points which can be distributed among 5 stats: Infantry Capability, Cavalry Capability, Ranged Capability, Morale and Administration. The three Unit stats all give damage bonuses to their respective unit type: This along with their equipment and perks generally determine which units a General are most suited to command.
Administration is more important in Conquest than Campaign mode, but are still useful in both: It increases Income provided by the territory you control, and in Conquest Mode, can cut Policy research costs down depending on how high the stat is. The Morale stat increases a unit’s morale if a General is deployed to it, making them do more and take more damage before breaking.
Equipment
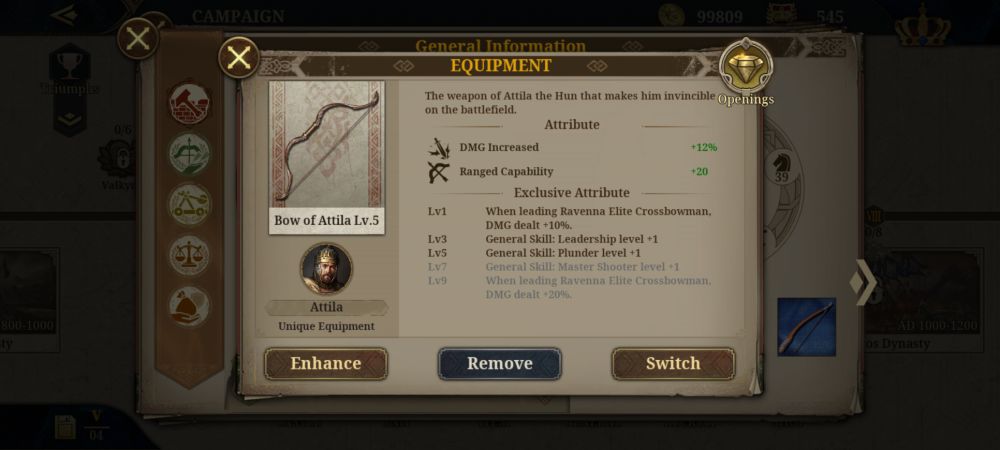
Each General has 3 equipment slots: A Main slot usually reserved for legendary weapons such as Attila the Hun’s bow, the sword Excalibur, or any other weird, historically relevant, or mythical tool, and two sub slots for more mundane equipment, usually another weapon or some armor.
For the sub slots, you can equip two different weapon types or a weapon and a suit of armor, but you cannot equip two swords of different types, two different or the same bows, two different or the same spears, or two suits of armor. Early on, you’re fine merely equipping a Main slot item based on the army the General brings, since you need that extra damage from the basic buff the item gives.
Later on though, you might want to match Generals to their Main Slot item, then match units to that item, since the Main Slot items typically give a unit specific buff when given to their owner, along with tons of other buffs.
Titles
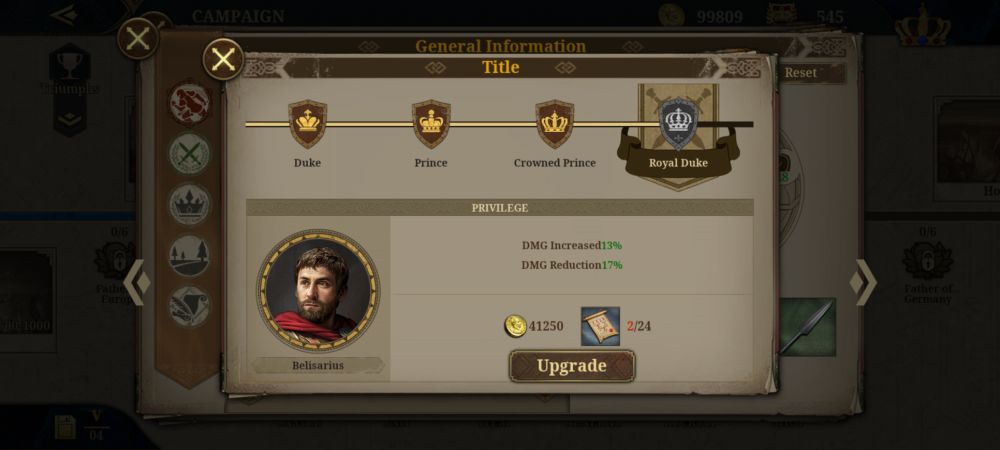
Titles are the closest thing to directly leveling up a General, separate from their Rank. While Rank determines how many troops a General can bring and their overall stats, Titles are civilian ranks that simply increase a General’s Defense and ATK buff given to the army they control. You use Gold and Seals to upgrade a General’s title, and the maximum title is Emperor.
Usually, the initial tier of a General also determines their starting title, and high tier Generals such as Justinian might already start as Emperors immediately. This is separate from a General’s actual stats.
GAME MODES
In European War 7: Medieval, there are 3 primary game modes, each playing moderately differently from each other but still making use of most of the basic mechanics of battle as we explained earlier. Campaign is the bread and butter mode that is the main way you progress through the game and become stronger.
After that, there is Conquest mode, a more complex mode played over a much larger map than what you find in Campaign matches, and played over a longer period of time too. Territory Mode is a simple PVP mode, where you set up an army to go on Expeditions (small battles where you pit your army against another player’s army composition, with the enemy player’s army controlled by AI), or invade a player’s Territory, who has also set up their defenses just like you did.
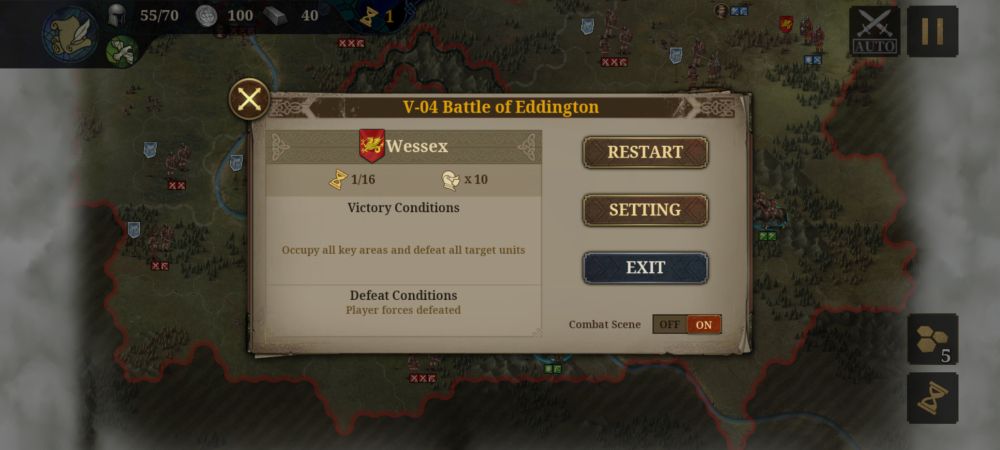
Campaign Mode
The Campaign is your main form of game progression. Not only does it give you rewards for beating missions, it also gives you a taste of medieval history should you read the various mission descriptions and dialogue. You are given a map, pre-deployed units, and sometimes a spot where you can deploy one of your Generals and the army you built for them.
You can also assign two other Generals to existing units you have, but cannot call in the special mercenaries you gave them. Your gacha luck only helps you with your first General deployment, as the Castles in this mode only allow you to build mission-specific mercenaries as opposed to whatever you have access to in Conquest Mode.
You must achieve an objective, ranging from defending a certain number of towns or allied units, to taking a certain enemy city or simply massacring everything on the map that isn’t yours. Game progression is tied directly to the campaign, as your mercenary and basic units can only be leveled up to a certain level depending on how far you are in the campaign, as opposed to simply being allowed to grinf to the point of having an overleveled army.
While this is the simplest mode to understand, this is the most important to do, as progress here will allow you to do better in the other modes. The Campaign tab also acts as the game’s true Main Menu, as that’s where you’re gonna find the shop tab and all the other stuff you need to manage your leveling, inventory and Generals, at least initially.
Conquest Mode
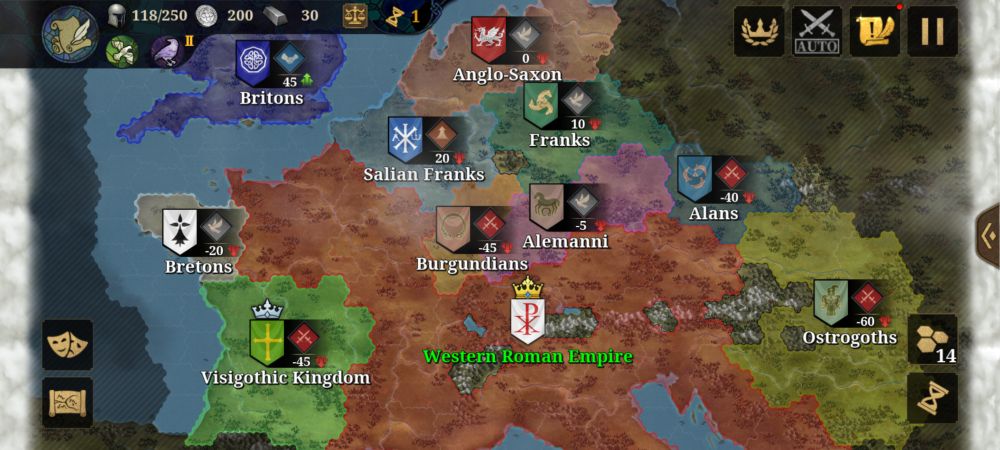
Conquest Mode is played on a far larger map than you’d expect from a Campaign mission, between several different factions depending on the size and era of the scenario you picked. You have some pre-deployed units and different objectives based on the nation you picked.
The main difference is how Generals are handled: You can summon all your Generals and the elite forces you built for them from a fee, in a City’s Tavern tab. Last but not least, you have a blank Policies tab (You access it by tapping the Scroll on the upper left of the screen) and you can use Coins and Steel to research Policies that give you passive buffs for the battle.
The Difficulty indicator is not the most reliable thing in the game: As an example, in the Barbarian Invasion scenario, the game will inform you that playing the Anglo-Saxons is the easiest of the factions, when compared to say, the Romans, who are very powerful but are also at war with nearly everyone else from the get-go.
The only big objective as Anglo-Saxons is to level your Cities up and conquer the Britons. Easy right? Yeah, the Huns invade right next door after a while, usually after the Franks surrounding you ask for money (Quite impolitely at that!), and declare war on you if you tell them to buzz off.
Now you’re at war with half the dang map, AND you don’t have the army Rome has to fight it… Unless you saw it coming! You can play this as soon as you unlock it after chapter 1 and you’ll do reasonably well provided you know what you’re doing, but you’re better off playing more of the Campaign to unlock more stuff and power up your Generals and units.
Just remember that your units are level-capped in Conquest Mode, and only level up once you fulfill the requirements to go up another age. The objectives for it are located in the upper left of the screen, with the blue button next to the green dove button.
Territory Mode
Territory Mode is the closest thing this game has to multiplayer PVP, mixed with the universe’s tiniest idle citybuilder. And by tiny, we really do mean tiny: You start off with a City in the center of the map, and you upgrade it and place a pair of castles in the area.
Afterwards, you deploy up to 6 of your Generals around the map to protect it, and you can give each unit an AI such as Attack, Defend or Patrol. A hostile player can deploy their own 6 units in the 4 red zones around your Territory. Other players can attack you, and the AI will try its best to handle its defense for you. You can also attack other players.
This makes positioning of your defenders rather important, so learn from other players on how they deploy their troops. It also has an Expedition Mode, where the 6 Generals you deployed in your Territory get sent to a different sort of battle map against other players who have their units pre-deployed by the AI.
We heavily suggest that you don’t play this mode right after unlocking it by beating Chapter 4, and taking the time to get at least 6 Generals with all their troop slots unlocked before you take on other players. But once you do, play it so you can reap the rewards!
And this ends our Beginner’s Guide for European War 7: Medieval. If you have any tips of your own, don’t hesitate to share them in the comments below!
Nikoniva
Monday 24th of October 2022
if you play in the "Territory" mode, you participate in the competition by collecting sickly buns from each award. If you buy 3 more battles for 50 medals at least once a day, a beginner can almost completely collect all the rewards. Nearly. It is better to make a purchase in the second store on the days of the sale, which are listed in the events window in the upper left corner, which is visible when you start the game.
Alex
Monday 24th of October 2022
A very good guide I liked it 👍👍