For years, the frost mist enveloped the world. Slowly, insidiously, the creeping cold engulfed the world.
And then, they came.
From behind frozen, lidless eyes, the horde destroyed without rhyme or reason. Civilizations fell, and all was thrown into chaos. But amidst this darkness, some survivors refused to give up. These intrepid warriors saw this not as an ending, but as a new beginning. With the power of the ancient dragons at their side, they could beat back the darkness and reclaim the world for humanity in Dusk of Dragons.

Dusk of Dragons: Survivors (which I’ll just refer to as Dusk of Dragons from here on out) is a survival sandbox where you’ll need to cook, craft, build, and fight to survive the eternal winter and the hordes of the undead that come with it. You’ll go from a simple survivor huddling against the cold and constant danger to a hardened veteran who thrives in the middle of the apocalypse. Dusk of Dragons is available on both the Google Play Store and the App Store.
While players of sandbox games will undoubtedly be able to intuit the game’s mechanics, beginners may be overwhelmed by the sheer number of options available from the get-go. Compounding this learning curve is the game’s rough translation (which hopefully, the devs are working on) as well as the tutorials that just lead you by the nose without giving you time to digest and experiment with what you’ve learned. If you find yourself lost and wondering what to do next after rushing each tutorial objective, you’ve come to the right place.
In this beginner’s guide to Dusk of Dragons, we’ll be going over:
- The Basics of Survival – our first priority is getting you ready for survival in this frozen hellscape. Here, we’ll cover your basic needs – food, water, and warmth – as well as how to defend yourself.
- From Shelter to Fortress – now that you’ve got the basics down, let’s talk about building and upgrading your base.
- Beyond the Walls – it’s time to step outside into the brave new world that the cold has brought us. We’ll talk about the basics of exploration in this section.
- Growing Stronger – you can be stronger still. From gear to dragons and dragon force, here are the many ways in which you can cultivate your strength in Dusk of Dragons.
- Free Stuff – where to get quests and freebies.
This guide will assume that you’re going to do the tutorial at the start of the game, which gives a bunch of bonus materials.
Lastly, if you’re looking for a quick read, you can jump to the “Quick Tips” subsections!
The Basics of Survival
Sandbox survival games have three elements in common – needs that must be fulfilled, combat, and crafting. In this first section, we’ll go over the basics of each.
Quick Tips:
- The basic needs you’ll need to tend to are satiety (food), hydration (water), and temperature (warmth). These can be seen in the upper left of the screen, below your health.
- If food/water hit 0, you’ll be hit with a massive attack penalty. You will also receive debuffs as these stats decrease. Always have something to eat and drink at hand!
- If warmth hits 0, you’ll eventually die. Keep this up by making and wearing warmer equipment and staying in warmer maps. Note that warmth on gear provides resistance to the cold, not immunity.
- While in your base, food and water increase by themselves. This means you can reserve your stockpile of consumables for when you do leave the base.
- You can forage and consume raw materials such as berries or clean snow to replenish your food and water. However, it’s more effective to cook these items in a cooking pot.
- To fight in Dusk of Dragons,tap the weapon icon on the left side of the screen. You will automatically fight whatever is closest to you or whatever is currently attacking you.
- Attacking an enemy depletes the durability of your weapon. Durability is indicated by the green ring around the attack icon.
- All you need to do to defend in Dusk of Dragons is avoid an enemy’s AOE markers. Note that some attacks are quick, so you’ll still need to learn enemy patterns.
- Most enemies can be easily defeated by a simple pattern of attack – retreat – repeat.
- You can assign 2 items to your quickslots to heal in combat. There’s no cooldown when using these items but be mindful that you will need to craft your own consumables.
- You can handcraft tools, armor, and extra facilities by tapping the “Craft” button. As a new player, craft an axe and a pickaxe for harvesting resources as well as an extra weapon.
Stayin’ Alive
Your basic needs will be a constant bother in Dusk of Dragons, just like in real life. These are food, water, and warmth.

- Satiety indicates your current hunger level. The maximum satiety is 100. As this decreases, you’ll be hit by more and more debuffs. When satiety hits 0, you’ll be hit with a very powerful ATK debuff. Luckily, this is easy to fix – just eat some food.
- Hydration indicates your current thirst. Just like satiety, letting this drop too low hits you with debuffs, and if it hits 0, you’ll get a hefty ATK penalty. To fix this, drink something.
- Temperature indicates your current warmth. Letting this drop to 0 will cause you to die, which will set you back some progress. You’ll need to find clothes with a higher warmth rating and stay on warmer maps to restore this.
- The warmth rating on your clothes provides resistance to the cold, not total immunity!
While in your base, both satiety and hydration will slowly go up on their own, so you can save your food and water stores for when you go adventuring.
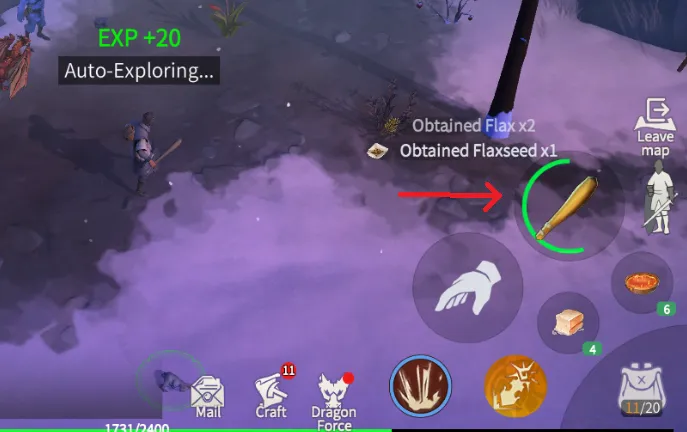
Naturally, the satiety and hydration systems imply that there’s cooking, and that’s our next step. While you can always eat and drink raw materials, these often come with a penalty. To gather stuff, simply walk up to it and tap the hand icon on the right side of the screen.

Refining these ingredients at a cooking pot will not only remove these maluses but also make the resulting items much more potent. We’ll talk about that in the next section.
Combat
Since we’re fresh out of a zombie apocalypse and all, the first thing you should know is how to fight and defend yourself. Luckily, combat in Dusk of Dragons is a simple mix of tapping buttons and avoiding attacks.
The game will automatically target neutral and hostile enemies near you. To attack them, tap on the weapon icon on the right side of the screen, which will cause you to attack that target.
Pay attention to the green bar around the button. This represents that weapon’s durability. Once a weapon’s durability hits 0, it breaks and you won’t be able to use it again, so be sure to have a spare!
Defensively, all you need to do in Dusk of Dragons is dodge. Almost every enemy attack is heralded by an AOE marker – all you need to do is stay out of it. Bear in mind though that some enemy attacks are fast, so you’ll still need to learn their patterns to avoid taking damage. The best way I’ve found to deal with enemies is attack – retreat – repeat.

If you do take damage, don’t worry – you can always use consumables to heal up. You have two slots for consumables in your inventory…

…so be sure to load up on healing items. There’s no cooldown on these, but be mindful that you’ll need to craft your own healing food.
If you die, the game isn’t over – you can choose to respawn in different methods.
- Forfeit revival. You’ll respawn back at your camp with the contents of your backpack gone.
- You can pay some gold to revive where you died. This is affected by your new player buff, which you can see here.

- Consume a revival crystal. You’ll also revive in place at the cost of a single crystal. Again, try not to make a habit of it, and save your revival crystals for important fights. You can buy more of these at the item shop.
Crafting
Crafting is an essential skill in every survival sandbox game. There are two layers to crafting in Dusk of Dragons – base crafting and handcrafting. We’ll cover handcrafting for now. Handcrafting allows you to build tools and structures for your base.

As a beginner, your main concern will be to create tools that will allow you to harvest the resources you need to build a base, as well as to make weapons with which to defend yourself. Luckily, the default handcrafting menu has all these:
- Stone axes and pickaxes allow you to harvest trees and stones/metal ore, respectively. Just like weapons, tools have durability!
- Your starter copper sword will break at some point, so build a basic wooden club as a backup weapon.
- Later on, you’ll be able to craft some basic armor.
As your level increases and you learn how to craft more advanced arms and armor, don’t forget to visit the handcrafting menu to make these items!
From Shelter to Fortress
Now that you know how to survive, fight, and craft, let’s talk about upgrading your crappy shelter. A well-stocked and fortified base can make all the difference between surviving and thriving!
Quick Tips:
- The resources lying around your base camp are great for getting your base up and running. However, these are finite. Once they’re out, you’ll need to explore other areas for resources.
- You can sweep clutter (a broom icon will appear overhead) around your base to get resources and free up space for building. You can only sweep one clutter piece at a time, and this can be sped up with gold.
- You can activate auto explore by tapping the button on the lower left. Auto explore will grab whatever resources it can find and fight mobs. However, this won’t repair or craft new harvesting tools, so be sure to have some before you start.
- You can also use auto explore on other maps, but be sure that auto combat can handle the mobs.
- To craft, move to a crafting station and interact with it. Some stations, like the cooking pot, require fuel.
- You can speed up the crafting process by watching an ad or using gold.
- You can claim your crafted items by opening the crafting station or tapping on the bubble above it. You don’t have to wait for the entire crafting queue to be done – you can tap the bubble any time to retrieve all finished items.
- You can tap on an ingredient to see which crafting station you need to make it. Rope, for example, comes from the loom.
- Crafting stations need to be upgraded to craft more advanced recipes.
- Tap on “build” in the menu to place building pieces as well as defensive structures, crafting stations, and decorations. You can build, rotate, upgrade, and recycle any placeable structure via this menu.
- When upgrading building pieces, you can optionally upgrade them all at once.
- When placing structures, remember that walls must snap to a floor.
- When modifying your base, remember to select the right layer on the lower left. This ensures you don’t accidentally remove floors and the like.
- Basic structure lets you modify set pieces like walls and floors.
- For everything else, select any other layer.
- Building stuff raises your prestige, which is needed for squires.
- You can build multiple of each crafting station. This becomes more important as you progress through the game and items start requiring several layers of refinement.
- You can see how many of each station you can put in the build menu.
- Your inventory is divided into carry-on and backpack.
- The carry-on inventory is your “safe” inventory; you should put essentials like tools, weapons, and consumables here.
- The backpack is the “unsafe” inventory. Dying in a map drops everything in your backpack!
- As space is very limited in Dusk of Dragons, don’t pick up needless things when out foraging.
- You can delete items from your inventory if you need space.
- You can build storage chests in your base to alleviate the problem of space. Crafting will automatically pull materials from chests.
- Iron Boxes are better solutions for your storage problems as they can be upgraded via diagrams. You’re provided with one Iron Box at the start and can get another one via your starter quests.
- Leveling up will grant you the blueprints to better backpacks. Prioritize crafting these.
- Squires allow you to automate resource gathering. New squires appear as NPCs near the entrance of your base. One new squire will appear every 24 hours if you have space for them.
- Each hired squire requires a Squire Bed to be built. Your maximum number of squires is determined by your beds and your prestige.
- Each squire comes with a set of skills – gathering tasks – that you can see at the bottom right of their character screen. Squires can be dispatched to bring back these resources. As a squire performs their tasks, they’ll gain experience, and higher level skills yield more materials per venture.
- Squires can optionally be given food to increase their yields. You can only assign food before dispatching a squire.
- Squires come in different classes – gatherer, scavenger, hunter, scholar, craftsman, and adventurer. A squire’s class determines what it can do and what skills it can get.
- Squires come in different rarities – common, elite, and master. The higher a squire’s rarity, the more skills it comes with and the higher the levels of those skills.
- You can give squires certain attribute-boosting items.
- You can reroll squire skills by using Work Notes. Make sure to lock the skills you don’t want to reroll!
- Squires can be dismissed after being unlocked.
Getting Your Starter Resources
Naturally, you’ll need resources such as wood, stone, and metal to get your base started. You can get these basic resources by harvesting stuff around your base. The ruins around your camp are chock-full of trees, rocks, plants, and mineral nodes that you can use to get a basic base going.

However, these resources are finite, meaning that once you’re out of wood, stone, or other materials in your camp, you’ll need to venture outside the safety of your walls. We’ll cover that in the next section.
Apart from raw resources, there’s also clutter lying around, like this:

Clutter requires time to be swept up, and you can only sweep one clutter piece at a time. You can spend gold to speed up cleaning, though I will say that there are better uses for gold down the road. Once the clutter is swept up, you’ll get a bunch of resources as well as free up some space.
If you don’t feel like gathering all your starter resources by yourself (understandable), you can tap on auto mode on the lower left of the screen to have your character harvest whatever resources they can find.

Do note, however, that they won’t replace destroyed tools, so be sure to have some extras on hand. Don’t worry about mobs, either, as auto explore mode will fight mobs too. However, if you’re using auto explore outside your camps, be sure that the auto combat AI can handle whatever mobs there are on the map – you don’t want to spill your backpack!
Crafting Stations
Next, let’s talk about advanced crafting. While you can handcraft a lot of stuff, you’ll need crafting stations to create the intermediate products that you need for those items.
As an example, let’s take a look at the cooking pot, which lets you craft food items.
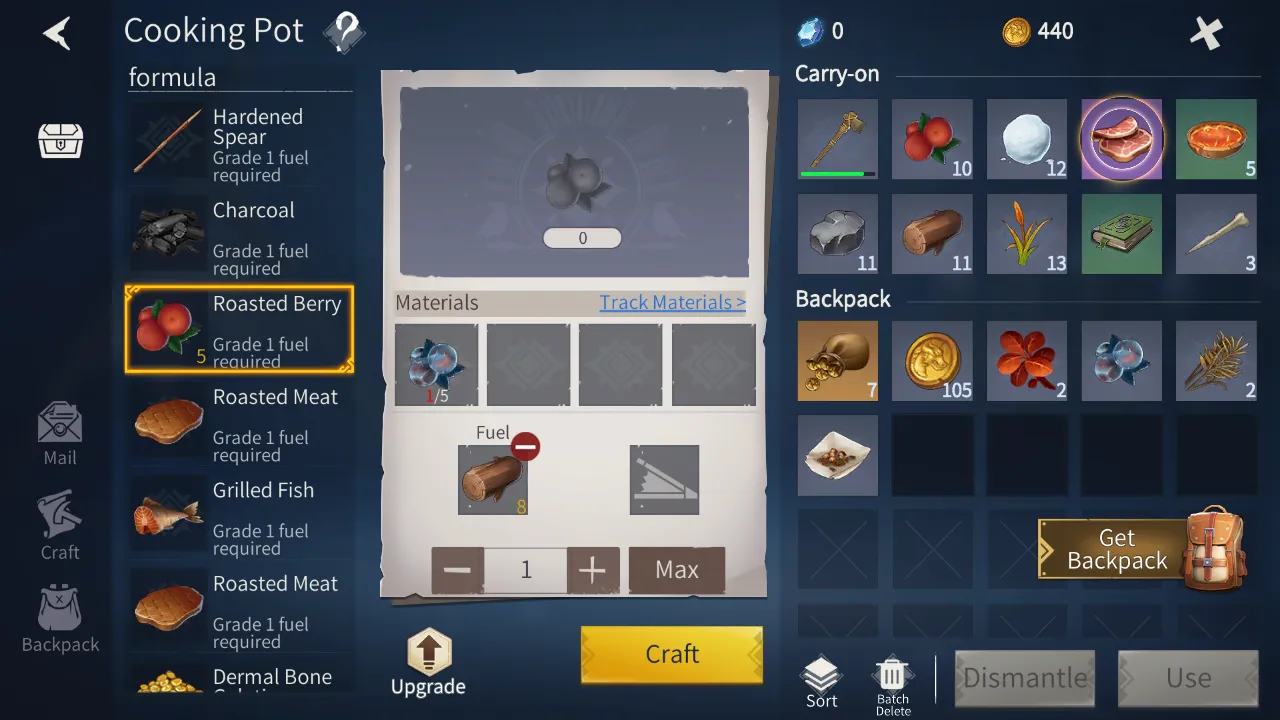
While in a crafting station interface, select the item you’d like to make on the left. For most crafting stations, that will be enough. However, the cooking pot – as well as some other heat-based crafting stations – require fuel. You can insert fuel by tapping on the fuel button; this will bring up all available fuel items. Note that some recipes, such as metal smelting, will require stronger fuel.
Once you’re satisfied, hit the craft button and wait a bit. Be sure to indicate how many of that item you want to make at the bottom. You can see the progress of what you’re cooking at the top of the interface:

You can spend gold to rush this timer or watch an ad. Keep these options in mind as you progress to longer, more difficult crafts.
When the timer is done, tap the item at the top of the screen or on the bubble above the crafting station to retrieve your new goods. You don’t have to wait for the station to craft 100% of the items – you can pick up each item when it becomes ready. For example, crafting 20 copper ingots will take around 30 minutes, but you can choose to pick up whatever ingots are ready by tapping on the bubble.

All crafting benches more or less follow this procedure of crafting, so once you’ve learned how to operate the cooking pot, it should be easy to figure out how the rest of them work. However, one other crafting method you’ll need in the early game is handcrafting, which can be done by tapping on this button:
If you’re wondering where to get crafting materials, you can always tap on their icons to see where they drop from or what crafting station they come from:

You’ll also need to upgrade your crafting stations to allow them to produce more advanced materials. To do that, tap on the upgrade button while in a crafting station’s UI:

Building New Structures
If you’re like me, you probably hate having to live in a ratty old shanty in the middle of the zombie apocalypse. That’s where building new structures comes in.
To bring up the structure building menu, tap on “Build” while in your base.

This will bring up the building interface, which lets you put down new structure pieces.

In this menu, you can build, upgrade, move, and decorate walls, floors, doors, and windows. Let’s start by fixing up those broken-down walls. Tap on any of them, then select “upgrade”. This will convert these Dilapidated Walls into Level 1 Solid Walls. Note that choosing to upgrade a structure piece will batch select all identical pieces and upgrade them in one go if you have the materials.
Now let’s try putting down some new walls. You’ll need to start with a floor, as wall pieces will only snap to a floor. A grid will appear once you select a floor; all you need to do is confirm the placement. Once the floor is down, you can select from the wall structures and snap them on each side of the floor.
Next, let’s clean up our base a bit by moving stuff around. To move, rotate, recycle, or upgrade stuff, you’ll need to select the appropriate layer. You can select the layer on the lower left of the build screen.

- Basic structure lets you modify set pieces like walls and floors.
- Functional structure, defensive structure, and decoration let you modify everything else, from crafting stations to cheval de frises (cavalry spikes) and decorative elements.
While all this may seem like fluff, it’s important to build and develop your base as it increases your prestige – which you need for hiring more squires.
Lastly, note that you can build several of each crafting station. In the beginning, there will hardly be a need for this. However, as you progress, you’ll find that refined resources will need to be upgraded over and over again, and that’s where multiple crafting stations come into play.
You can see how many of each crafting station you can place in the build menu.

Storage Problems
As with most games of the same genre, one of Dusk of Dragons’ main pain points is the limited inventory. Your inventory is divided into two sections – carry-on and backpack. The carry-on inventory is essentially your pockets, while the backpack is for your extra stuff.

- Your carry-on inventory is your “safe” inventory. Stuff here is pretty much protected from being lost. It’s a good idea to fill this with the essentials, such as tools for harvesting, a spare weapon or two, and food and drink to last you while you’re exploring outside of your camp.
- Your backpack is your volatile inventory. Stuff you put here is unsafe until you get back to your base; if you die, you lose the contents of your backpack.
Now, you have very limited space by default – 10 slots in your carry-on inventory and 10 more in your backpack. This means that, more often than not, you’ll need to restrict yourself to the types of materials you gather to get the best returns for your stamina. This means you shouldn’t just pick up random crap when exploring,and keep the materials you need in mind when gathering.
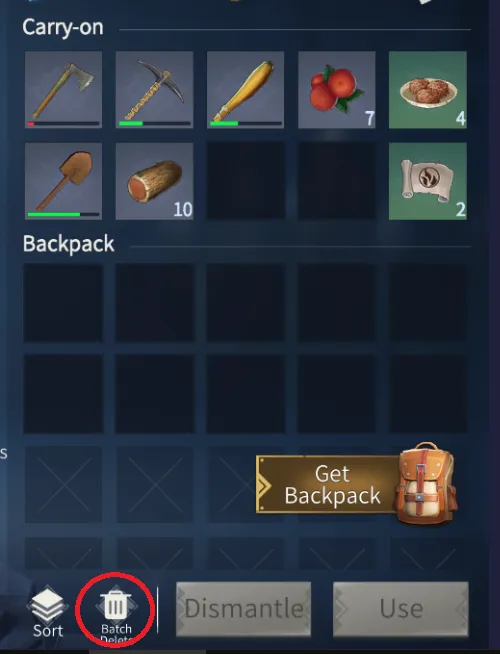
If you ever find yourself laden with too many materials that you don’t want, you can always delete items by tapping on the trash can at the bottom of the screen. You can either batch delete items or select the item you want to delete, then tap on the can.
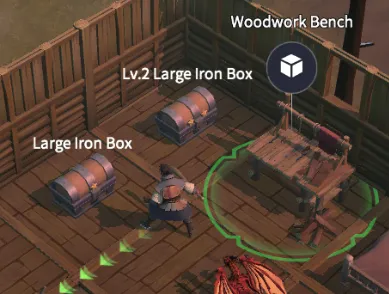
To help with the problem of storage, you can build chests in your home base. As expected, you can store stuff in chests. More importantly, crafting automatically pulls resources from chests!
You can have 50 Simple Boxes, as long as you can find the space to place them.
If you don’t feel like making 50 Simple Boxes and dealing with the hassle of putting the wrong things in the wrong chests, you can upgrade your Iron Boxes instead. You start with one Iron Box and get another one for free over the course of your starter quests. More importantly, Iron Boxes, like crafting stations, can be upgraded by sacrificing Expansion Diagrams.

These can be earned from events or by grinding the Icebound Harbor dungeon. You can also buy them from the cash shop.
Lastly, note that you can craft better backpacks as you level up, the first of which is the combat backpack.

Be sure to craft these backpack upgrades as soon as possible to make your adventures more profitable!
Squires
Sure, you can go out and gather resources – but it’s always better to have someone else do the dirty work for you. That’s where squires (or mercenaries, the game can’t seem to make up its mind on what to call them) come in.

You can recruit squires by talking to the people hanging around your base entrance. To hire a squire, you must have both a free Squire Bed (you can build more, they’re pretty cheap) as well as have enough prestige to take on another squire. If you don’t like the squire on offer, a new one will appear after 24 hours. You can also use squire tickets, like this one:

This will instantly drop a new squire for recruitment whose parameters can change based on the ticket you used. Note that you can only have four squires via ticket at once, so be sure to dismiss any you don’t want – though as a new player, I suggest you take all the help you can get.
The most basic use for squires is as resource gatherers. Each squire has a set of tasks – called skills – they can perform, which will give you a different set of materials once their timers run down. You can see a squire’s tasks here:

You can also optionally give your squires food, which will raise the efficiency of their gathering task. Tap on the meat icon to bring up a list of food that you can give your squires. Higher-level food gives a bigger production bonus, so you may as well feed it to your squires if you’re not saving it for yourself or your dragon. Note that food can only be assigned before dispatching a squire.

As you can see, you won’t always get the resources you need, so it’s a bit of a mixed bag. However, the more a squire performs their work, the better they’ll get at it, and the more resources they’ll bring back. You’ll be able to see how much experience a squire has for each of their tasks below the task icon.

Squires are divided into different professions – gatherer, scavenger, hunter, scholar, craftsman, and adventurer – which determines what resources they can gather. Squires also have a rarity – common, elite, and master – which determines how many skills (again: gathering tasks) they start with, as well as the potential levels of those skills. Common squires start with one, elite squires start with two, while masters can start with three.
Luckily, you can customize your squires. Somewhat.

You can use special items on the top slots of a squire to give it certain boosts, and you can use squire skill books to give it random skills (collection errands) thus allowing you to slowly customize what resources each squire will fetch you. Note that rerolling skills will affect all learned skills unless you lock them, so be sure to lock any good skills before hitting that reroll button. Rerolling skills requires a Work Note item.
Lastly, you can dismiss an idle squire by tapping “dismiss” at the bottom of their character screen. You need to unlock a squire before you can dismiss them, so don’t worry about doing this accidentally.
Beyond the Walls
Now that you’re familiar with what you need to do to stay alive and make your base better, it’s time to explore beyond our camp’s walls. As I mentioned earlier, the resources in your base are finite, and you’ll need a huge variety of resources to go from surviving to thriving.
Quick Tips:
- You can preview the resources, suggested defense, and coldness of a map before going in.
- Harder maps tend to have more resources. Some resources will only drop on harder versions of a map.
- To unlock the next difficulty of a map, defeat the boss on the current difficulty. For example, to unlock nightmare, beat the boss on hard.
- You can sprint or walk to a map. Sprinting costs stamina but is almost instant while walking is free but takes a long time.
- Use the resource preview to find the resources you need. Remember that backpack space is limited!
- Fight enemies and open chests to get some bonus loot. Note that some resources only come from killing enemies.
- Remember that you can use auto explore if you’re feeling lazy or confident in your gear.
- The minimap is useful not just for navigation but also because it shows unharvested resources in the current instance.
- There are 3 types of maps, which you can determine by the color of the icon above the map:
- Yellow maps are settlements, such as your camp and the market. These are relatively safe.
- Blue maps are gathering maps. These maps have a light enemy presence and are mainly used to harvest lots of resources.
- Red maps depict instances or dungeons. Expect heavy enemy presence, as well as bosses that drop fabulous loot. Red maps often have restrictions – instances, for example, need some time to reset, while some dungeons can only be entered a certain number of times per day.
- Instances also have one-time rewards for clearing them for the first time per difficulty. Tap on “Challenge Target” when selecting the instance to claim your prize.
- Some maps will have NPCs that give you quests. Once you complete the quest’s requirements, the items, if any, will be removed from your inventory and you’ll get your prize in the mail. You can see these quests in the “Bounty” tab to the left of the screen.
- There are two types of quests: Night Watch and daily bounty. Night Watch quests are one-time big-time quests, while dailies can be taken from the Bounty Issuer at the market. You can take 5 daily bounties per day.
- Multiplayer is available for instances and dungeons. Open the multiplayer screen by tapping “Team” on the lower left while looking at the overworld. You’ll be able to see public parties and make your own.
- If you make your own party, don’t forget to set it to public if you want randoms to join!
- You’ll sometimes see invasion armies on the world map. After their timer runs out, that enemy army will attack your base.
- The strength and drops of invasion armies scale with your level. Always aim to equip yourself with the best equipment, dragons, and Dragon Force skills before riding out to meet your foes.
- Each enemy you kill while intercepting an army drops their unit count and overall power. You can see both in the info panel before intercepting an army.
- You can also use the invasion info panel to determine whether you should confront an enemy army or allow it to break itself on your defenses.
- You’ll sometimes get random unscripted mini invasions at your base, where a horde of weak enemies will spawn. This is mostly just to get free monster drops.
Expedition 101
It’s time to leave your camp and set out into the world. To leave your camp, either walk through the green area at the upper left (consult your minimap) or tap on “Leave Map” on the right side of the screen. Once you leave, you’ll need to select your destination.

Tap on a location to bring up an info panel that shows its details. The most important things to look at here are:

- The resources you can get from this map, which you can see on the right side of the screen. Note that some resources will only drop from hard or nightmare versions of the map.
- The difficulty level, which can be found above the resource list. Harder versions of a map have tougher enemies but tend to yield more resources. Certain resources, as mentioned earlier, will only spawn on higher difficulties.
- To gain access to a higher difficulty, defeat the boss of the map on the previous difficulty.
- On the left side of the screen, you’ll see the recommended defense and warmth requirements for each difficulty. Harder levels require more defense and warmer gear. Bear in mind that your warmth gear provides resistance to freezing, and it’s wise to have items on hand that will warm you up, such as animal fat.
When you’re ready to depart, tap either the walk or sprint button to go to that map. Walking to a map costs no stamina but a lot of time, while sprinting gets you to a map near-instantaneously but consumes stamina.

Once you arrive at your destination, you’re free to fight, harvest, or leave as you please. As I mentioned earlier, it’s always a good idea to hone in on the resources you need, though you’re free to gather as you please.
Apart from the usual resources, you should be on the lookout for two extra things while exploring:
- Enemies, and not just because they can hurt you, but because you’ll need their drops for crafting – especially bones in the early game.
- Chests, which can contain a lot of loot.

Lastly, remember that you can use auto explore for easy gathering and combat. Just be sure that your armor is up to snuff and that you can take the monsters in the area lest you lose your loot!
Use the Minimap!
The minimap is a useful tool that not only helps you navigate maps but also shows you nearby resources.

You can refer to the minimap to see nearby resources. Stuff like rocks and trees are pretty obvious, but the minimap also shows lootable corpses via an X, if for some reason you forgot to pick up their stuff.
Map Types
The icons above an area aren’t just for show – they represent what type of map an area is.

In general, there are three types of maps:
- Yellow icons represent settlements. These maps are *generally* safe, and often have unique facilities that you can make use of. Such maps include your camp and the market.
- Blue icons represent gathering zones. These maps have a low monster presence – their main use is harvesting raw materials.
- Red maps represent instances and dungeons. Expect heavy combat and challenging foes on these maps. These maps often have time restrictions – instances, for example, need to reset to respawn all their mobs, while some dungeons can only be challenged a certain number of times per day.
- Instances have their own timers. Smaller ones like Burke Village refresh quite quickly, while bigger instances like Icebound Harbor take a full 24 hours to reset.
- Instances have one-time rewards for clearing their boss on each difficulty. Tap on “Challenge Target” at the bottom of the screen when selecting that instance to get your goodies.

Instances also allow you to reset their timers by spending stamina and Time Magic Scrolls. Once you have access to unbreakable equipment, you can also spend energy to sweep these maps, completing them instantly and harvesting the rewards – the whole point of running instances is pretty much to fight the boss, so we may as well streamline that.
Quests
You’ll sometimes find NPCs in maps, who will give you quests if you talk to them.

When you take a quest, it will appear in the “Bounty” section of the quests tab, to the left of the screen. Ideally, you’ll want to complete a quest in the same map that you took it so as to save stamina. Once you’ve cleared a quest’s requirements, the items (if any) will be removed from your inventory, and you’ll get your prize in the mail. Easy.
There are two types of bounty quests:
- Night Watch quests are one-time quests that give large rewards. You get these from the guys who are hanging around maps.
- Daily bounties can be accepted from the Bounty Issuer NPC at the Market. You can do up to 5 of these per day.
Multiplayer
If you’re not confident in your combat abilities, why not challenge the wilds as a team?

To form or join a party, tap on “Team” on the lower left of the menu while looking at maps. You’ll be able to sift through the different instances and dungeons and see if there are any public parties available. Note that instances only support up to 2-player parties, while dungeons can support more.
If there are no parties available, you can make your own by tapping “Create Team”. You’ll be able to set the target instance/dungeon, level requirements, and whether you want to set it to be a private or public party.
Invasions
While you’re out and about, you might see enemy hordes on the world map. These are enemy invasions, and if you don’t do anything to intercept them, your base will bear the full brunt of their assault.

To intercept an enemy invasion, tap on the undead army and move to their location. This will cost some stamina. Once you intercept an invasion, you’ll be placed on a random map with every enemy in that invasion. Kill as many foes as you can, but note that invasion strength scales with your level, so you’ll need to make sure that your equipment, dragons, and Dragon Force are up to par – more on all those in the next section. However, the rewards for thwarting an invasion will also grow as your level increases.
You don’t have to kill every single enemy in an interception. Every enemy you fell during your interception attempt will decrease the number of foes that will attack your base. When you tap on an invading army, you’ll be able to see how many guys they have left, as well as the overall attack power of the horde.

You can use this to determine your strategy – will your base crumble under their attack, or are your defenses firm enough? And will you have time to build additional defenses before they arrive?
Lastly, you can also get random, non-scripted invasions. These involve a horde of weak enemies swarming from your base entrance. These enemies are usually well below your strength, so this does nothing but give you free monster resources.
Growing Stronger
With a few victories under your belt, you’re no doubt becoming more and more confident in your ability to survive in Dusk of Dragons. But you can grow stronger yet. From cultivating your dragon to getting better gear and awakening the dragon force within you, here’s how to bulk up.
Quick Tips:
- The simplest way of getting stronger is leveling up. Beat foes and harvest resources with tools to gain experience.
- The stat gain on leveling up is minute. The big thing that leveling up does is grant you access to higher tiers of gear.
- Always be sure to handcraft better equipment as you gain access to it. Higher tiers of equipment grant you the base stats you need to survive at that level.
- You’ll eventually gain the ability to repair equipment. Note that repair costs are commensurate to the damage an item has taken. This means that you should save repairs for high-rarity gear.
- An item needs to be in your backpack (not equipped) to be repaired.
- Later on, you’ll also unlock the ability to increase an item’s durability.
- Crafting items increases your proficiency. The higher your proficiency, the rarer the items you can make. The higher the rarity of an item, the better its stats.
- Unlocking recipes for higher rarity items does not guarantee that you’ll always make those, rather, it adjusts the pool so that you now have a chance of making items of that rarity.
- Proficiency does not lock you out of crafting base rarity high-tier gear – you only need levels for those.
- Build a recycling bench to convert the items you craft (and practice with) into Recyclable Material. The rarer the item you scrap, the rarer the Recyclable Material you get. There are no takebacks once you scrap an item.
- Recyclable Material can be traded at a merchant in the market for blueprints and decorations.
- Dragon Force serves as your character’s skill tree.
- Dragon Force trees have both an active and a passive skill tree. You can only equip one active skill at once (shared across all trees), though all passives will stack.
- You get the materials for Dragon Force from the Dragon’s Tomb daily dungeon.
- Dragon’s Tomb can only be run thrice per day, and once per instance; i.e., you can only run the fire version once per day.
- You must have a dragon of the same element when entering a Dragon’s Tomb. To enter the ice tomb, for example, you must have an ice dragon companion. You need to check both “Follow” and “Prepare for War” on the dragon in question.
- As Dragon’s Tomb gates progress for both your character and your dragons, be sure to do it every day.
- After getting Dragon Tomb materials, convert elemental crystals and then use those crystals to make energy. This must be done at the appropriate elemental nest, i.e., Fire Crystal -> Fire Dragon Crystal -> Fire Dragon Energy must be done at the Fire Dragon Nest.
- You will also need Soul Dust, which drops from instance bosses.
- Dragon Force skills can be upgraded multiple times, though note that some may have prerequisites such as a minimum level and skill books.
- Build new nests and raise new dragons to unlock new Dragon Force trees.
- The higher your Dragon Force level, the more energy you need to gain a skill point.
- Once per day, you can soak in the Dragon Blood Pool (a buildable structure) to gain one Energy of your choice.
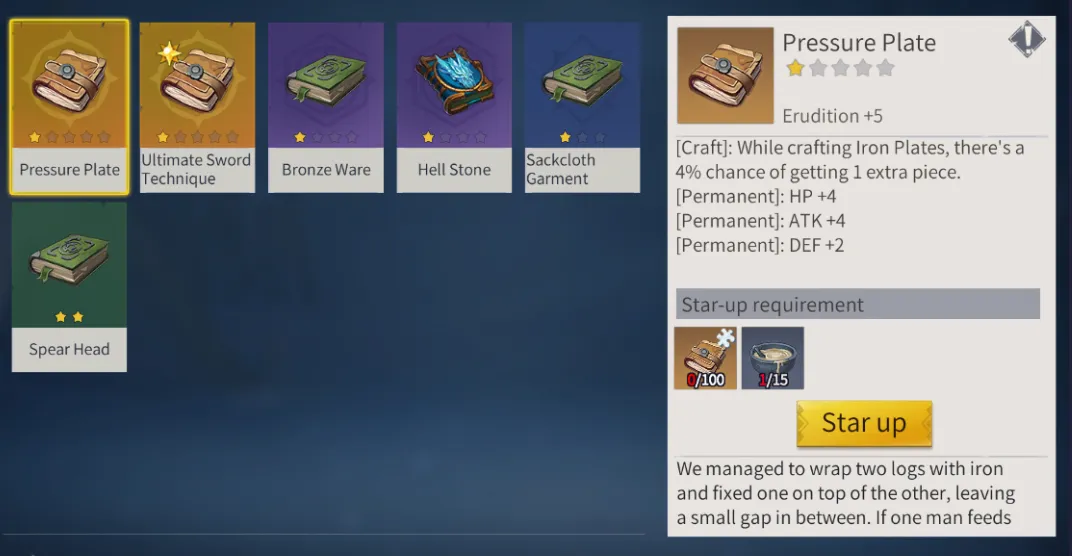
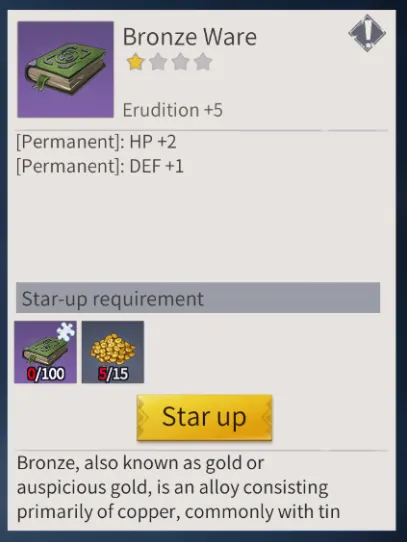
- Books provide minor passive bonuses. Rarer books provide unique abilities.
- To gain the passive bonus of a book, you’ll need to restore it until it reaches a star. This is done by collecting scraps of that book (or using generic pages) and using glue items, which you can craft. Each star increases the bonus that a book gives.
- Books are earned via the Prayer gacha.
- Completed books can be researched by scholar squires to further improve their stat boosts.
- Dragons serve as combat companions. When deployed in battle, dragons will use their breath attacks alongside you, vastly amplifying your firepower.
- Dragons also have a satiety bar. Unlike you, they have huge hunger needs, so save high-satiety foods (100+ satiety) for your dragons.
- Dragons level up as you do. Each level grants them more stats.
- Dragons can gain star ranks to boost their abilities.
- The materials for dragon stars also come from the Dragon’s Tomb daily dungeon. Once again, be sure to exhaust all your Dragon’s Tomb daily attempts.
- Don’t forget that you need to convert crystals in the appropriate nest.
- This also means that you need to choose whether to use crystals on your dragon or for your Dragon Force.
- When a dragon gains a star, it gains a new random skill. This can be reset with heritage crystals (again, from the Dragon’s Tomb) though don’t worry about min-maxing your skills in the early game.
- Dragon skills can be activated in combat; each one has an energy cost. You can see the dragon’s current energy as the blue ring around the skill icon. Energy is generated while fighting.
- Dragons also help with farming. While following you (and periodically in their nests), dragon droppings will accumulate. These are used to craft in fields.
Leveling Up
The simplest way of getting stronger in Dusk of Dragons is leveling up. Fighting enemies and harvesting resources using tools are the most consistent ways of gaining experience. Once you earn enough experience, you’ll earn a level as well as a minor boost in stats.

Mind you, the stat gain from leveling up is extremely minor. The main use of leveling up is unlocking blueprints for making better equipment.
Gearing Up
As you level up, you’ll gain access to better equipment. You can see all craftable equipment in your handcrafting menu.

Each tier of equipment represents a significant improvement over its predecessor. Higher tier body armor, for example, not only boasts a bigger defense bonus but also has more warmth and bonus HP.
Now, you might be asking, “What’s the point of making better gear since most everything breaks anyway?”. That’s where the equipment bench comes in.

The equipment bench is a crafting station that you’ll unlock that allows you to repair damaged equipment (which must be in your inventory, not equipped) instead of leaving it to break. Keep in mind that the repair cost of an item increases as it takes more damage – this means that, ideally, you’ll save repairs for the high-rarity gear that you craft. As you make more progress in the game, you’ll also be able to raise the maximum durability of your items, meaning that so long as you’re careful, you can avoid replacing your items!
Crafting Proficiency
You can’t expect to make god-level gear the very first time you craft anything. Practice makes perfect, after all, and in Dusk of Dragons, this is reflected in the proficiency system.

You might have noticed your character gaining proficiency points whenever you crafted a piece of gear. These proficiency points go into your proficiency bar, and once you earn enough experience on the bar, you’ll unlock the ability to craft higher-rarity versions of items. To check your proficiency level, tap on the “Craftsmanship” icon at the top of the screen while in the handcrafting menu.
To craft a higher rarity piece of gear, just craft the base recipe. Depending on your unlocked rarities, there’s a chance that that item will be of higher rarity – and thus quality – than normal. You can’t escape the RNG grind.

Note that proficiency does not prevent you from crafting base rarity high-tier gear. If, however, you’d like to maximize the stats that your gear gives you, craft away!
Raising your crafting proficiency involves making lots and lots of items, and it’d be a waste to just chuck them away. That’s where the recycling bench comes in.
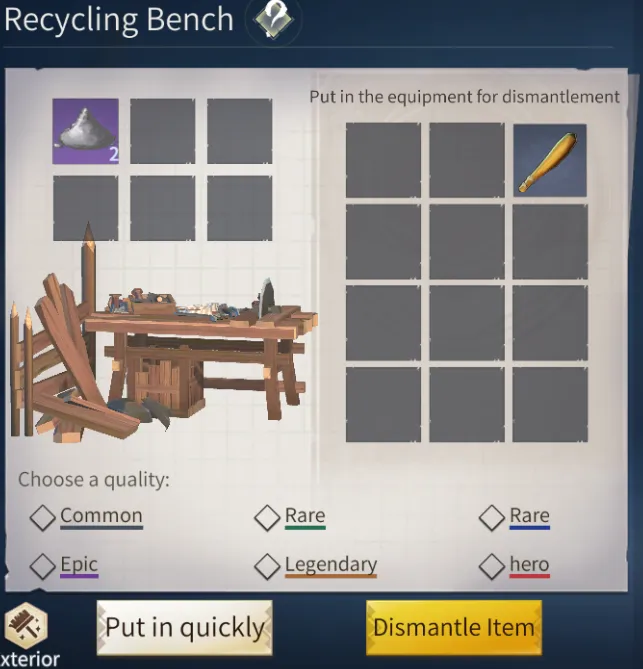
The recycling bench is a crafting station that allows you to convert equipment you don’t want into Recyclable Material, which is a special currency that can be spent at the market, which you can visit while in the overworld. Note that there are no takebacks once you scrap gear, so be sure that you’re only chunking the items you absolutely don’t need!

The recyclable material merchant will trade decorations and blueprints in exchange for your scrap. However, note that his better wares require higher-quality Recyclable Material!
Dragon Force
By taking in the power of the ancient dragons for yourself, you’ll be able to tap into long-dormant skills and abilities. This is known as Dragon Force.

The Dragon Force is essentially Dusk of Dragons’ skill tree and where the bulk of your stats will come from, apart from equipment. There are two parts to each Dragon Force tree:
- The top part shows your active skills. Fire Dragon Force allows you to pick either Burst of Speed (which increases your move speed) or Burst of Combat Power (which increases crit rate and crit damage). You can only equip one active skill at a time – shared across all trees – and can only switch them if they’re not in cooldown.
- The lower part shows your passive skills. These are mundane but highly useful. You’ll find stuff like more attack damage, more DEF, higher base warmth, and more. Dragon Force passives from different elemental trees stack.
To level up your Dragon Force, you’ll need to spend Dragon Energy of the corresponding element – for example, getting points for the Fire Dragon Force tree requires consuming Fire Dragon Energy. This is a multi-step process, and the first step requires understanding the Dragon’s Tomb daily dungeon.

The Dragon’s Tomb dungeon is where you get elemental crystals, and is very important as it gatekeeps much of your and your dragons’ personal growth. This dungeon can be challenged thrice per day, with different elements – meaning that if you run the fire version twice, you’ll get nothing on the second run. Attempts will only count if the boss drops something, though. Since this is a strict limit on your development, make sure you’re getting the correct element of crystal, and be sure to do this every day.
Apart from this, you must also be accompanied by a dragon of the same element as the dungeon you want to challenge. For instance, if you want to do the ice version to get ice dragon materials, you need to have an ice dragon beside you. Note that both the “Follow” and “Prepare for War” boxes on the dragon must be ticked for it to follow you into the dungeon!
When all that’s done, you’ll have elemental crystals on hand. To convert that into Dragon Energy, we need to tune them into Dragon Crystals. This is done by crafting them at the appropriate nest; Fire Crystals, for example, are refined into Fire Dragon Crystals at the Fire Dragon Nest. Once you have those attuned crystals, craft them into Dragon Energy at the same nest (again, same element, so if you want Fire Dragon Energy, you need to do it at the Fire Dragon Nest). This also requires some Soul Dust, which drops from instance bosses – so go visit Burke Village and the Icebound Harbor if you need some.

Once all that’s done, go to your Dragon Force menu, select the appropriate element, then choose “Absorb”.

Dragon Force skills can be upgraded multiple times. However, you can’t buy every Dragon Force skill at once. Some skills (and their upgrades) require higher base levels, and higher skill levels will require skill books on top of the Dragon Force points.
Note that you can only level up Dragon Force skills for dragons you’ve already hatched. If, for example, an event gives out Ice Dragon Energy, you can’t consume that energy and learn Ice Dragon Force skills until you have an ice dragon!

As Dragon Force is bound to different elemental dragons, so too will you learn from them. To unlock more trees and options in the Dragon Force menu, you’ll need to build and raise new elemental dragons – so be sure to build new nests and do your quests to get more dragons!
The higher your Dragon Force level, the more energy you’ll need to absorb to gain a skill point. You can see the amount of energy you need to absorb per level at the top of each Dragon Force tree.

Lastly, make sure to build a Dragon Blood Pool ASAP, as soaking in it gives you one free energy point of the type you choose – though only once per day!
The Library
Another way of passively improving your character is through the use of books. By collecting books, you’ll give your character some minor bonuses. Not as fantastic as Dragon Force, but every bit helps!
Each book gives you a small boost to certain stats; the rarer the book, the bigger the bonuses it can give you, with the highest tier books containing unique bonuses. However, books often arrive tattered and in pieces, and you’ll need to restore them before you can claim their passive boosts. To do that, you’ll need to gather their pages and use some kind of adhesive – paste or bone gelatin, depending on the book’s rarity – to increase the star rank of the book. You’ll also sometimes get generic book pages (which you can see at the top of the screen), which can be used instead of shards of a book, though note that the pages must match the book’s color rarity.
The main way of getting books is via prayers, which is the game’s gacha system. I hope you didn’t think you could escape the gacha.

To roll in the gacha, tap on “Prayer” on the left side of the screen. After that, go to “Ancient Silver Coin Prayer”, then pray to the RNG. It costs 50 Diamonds per pop, though you can earn coins by doing quests and from events.
Books that reach max stars can be researched for additional stat bonuses. To research a book, tap on that book, then tap “Research”. This will bring you to this screen.

To conduct research on a book, you’ll need to assign an idle scholar squire. Again, it isn’t much, but every passive boost helps.
Lastly, you can get prizes for reaching certain star levels on your books. Tap on “Big Pack” on the lower right of the screen.

Unfortunately, you don’t get generic pages for this. It’s…something.
Dragon and You
One of the first force multipliers you’ll encounter in the game is your fire dragon. The game is very insistent that you go get your dragon right away. Follow the tutorial, and you’ll hatch the dragon.

The first thing you should know about your dragon is that dragons can accompany you into battle. While you’re fighting, dragons will use their breath weapon alongside you, vastly improving your damage output. You’ll also be able to call upon their skills in battle.
However, dragons are limited by their satiety. While a dragon accompanies you, its satiety will drop. Unlike you, dragons need to eat much, much more.

This means that:
- You should save food that gives tons of satiety (100+) for your dragons. Your character will be fine living on scraps, anyway.
- If you can’t afford to feed your dragon, you can have it stay at home by unchecking the “Follow” box in the “Dragon” menu.
Like you, dragons can grow stronger by leveling up. However, dragons can also gain star ranks to vastly improve their combat prowess and gain access to new skills.

To increase a dragon’s stars, you’ll need to sacrifice both obsidian and crystals that match that dragon’s element, both of which can be earned from the Dragon’s Tomb dungeon – yes, the Dragon Force dungeon. I’ll remind you once again to do this every day. As with refining your Dragon Force materials, you’ll need to convert raw crystals from the dungeon into elemental dragon crystals before you can use them to strengthen your dragon. This also forces you to choose between saving your elemental crystals for your Dragon Force or your dragon. It’s your call.
Each star also gives your dragon a new skill that it can bring into battle.

These skills are randomized and can be reset using element-appropriate heritage dragon crystals. Don’t worry about this for now – this is pretty much mid to endgame stuff. Skills are used by tapping on the skill icon in battle (to the left of your dragon force skill).

Dragon skills have both a cooldown and an energy cost. A skill is off cooldown when its color is filled in (in the image above, it’s grayed out) while your dragon’s current energy is represented by the blue ring around its skill. Note that each skill uses a different amount of energy. Dragons gain energy by fighting alongside you.
As you make progress in the game, you’ll unlock more options to make your dragon stronger, such as giving it equipment and boosting its elemental damage. You’ll also make more dragon allies – so, once again, don’t forget to build more elemental dragon nests as you unlock their blueprints!
And since we’re already on the topic of dragons, let’s talk about using their waste to farm.

The core of farming in Dusk of Dragons is the Fire Dragon Field structure. While this may look like farmland, it’s easier to think of it as a crafting station that transforms seeds and dragon droppings into plants that you can craft with. Your dragons will leave waste all over your base, which can be picked up and used for growing plants. The dragon nest structure also periodically produces dragon crap that you can harvest like with any crafting station.
Free Stuff
We’re almost through – the last thing I’ll teach you is where to get free stuff in the game. There are a lot of freebies up for grabs, so here’s how to nab them all.
Quick Tips:
- Most, if not all quest rewards are placed in your mailbox.
- Currencies, such as gold and diamonds, must be used to be added to your pool. You can view your currencies in your inventory.
- Be sure to nab your sign in bonuses – they’re to the lower left of the minimap.
- Dailies and weeklies get you some resources and some free gacha pulls. You can find these to the lower right of the minimap.
- The cash shop has some daily freebies, such as diamonds, resources, and gold.
- The battle pass gives you prizes for reaching new levels, which you do by completing quests. There’s both a paid and free version.
- Achievements give you bonus resources (mostly gold, but sometimes more) for completing certain milestones. This system works on an activity bar like dailies/weeklies.
- Always participate in any live events – the prizes are sure to be great!
The Mailbox
Unlike most games, Dusk of Dragons consolidates all your rewards in your mailbox. Be sure to check your mailbox if you’re missing out on any prizes.
Use Your Currencies
Most quests and freebies will give you currency, yes, but it will drop them into your inventory in a solid form. Stuff like gold coins and diamonds enter your bag as “hard” items and need to be used before they can be spent.

You can see all your “liquid” currencies by tapping on the “Currencies” button in your backpack.
Sign In Bonuses
Dusk of Dragons has some nice login bonuses, such as free gacha pulls for both the book and equipment.

Claim your login bonuses by tapping “Sign In” to the lower left of the minimap.
Daily and Weekly Quests
Dusk of Dragons has both daily and weekly quests that you can complete to get a small burst of income.

Each completed daily or weekly quest provides some activity points to the bar, and at certain activity point thresholds, you can redeem a chest. This serves as a small but reliable and renewable source of diamonds as well as some extra stuff, such as a stamina potion for your dailies and two Ancient Gold Coins (for the equipment gacha) for finishing your weeklies!
Dailies and weeklies are located under the minimap.
Store Freebies
The cash shop has some small bonuses that you can claim by watching ads.

These items can be found under:
- Diamond Shop: Gold Coin Pouch 200 (gives you 200 gold daily)
- Best: Ad Benefits (gives you chests with random materials up to eight times per day)
- Best: Free Pack (gives you one Ancient Silver Coin, 10 Diamonds, and some consumables daily)
You can also get some free packs for newbies by tapping the Newbie Bonus button in the upper right.
- Newbie Bonus: Special Offer Package (gives 5 Large Meatballs and 20 Diamonds daily)
- Newbie Bonus: Icefield Fund (gives you gold based on how high your level is)
Battle Pass
Dusk of Dragons has a battle pass. Surprise, surprise. There’s both a paid and free version, and completing quests nets you some neat stuff, even if you’re just on the free track.

Access the battle pass by tapping “Season” in the upper right.
Achievements
The achievements system rewards you for completing remarkable (and sometimes not-so-remarkable) feats as you continue your journey through the frozen wasteland.

Achievements belong to different categories. Whenever you complete an achievement, you’ll gain some achievement points for that category, and just like the daily and weekly activity bar, you can redeem rewards after reaching certain achievement point thresholds.
The achievements menu can be viewed via the main menu (the three bars on the upper right).
Events
As with virtually every live service game, events are the lifeblood of Dusk of Dragons. You can check the current events here…
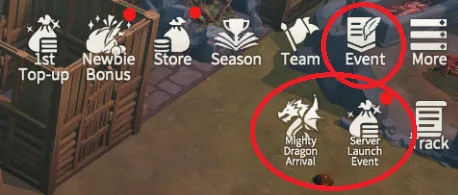
Be sure to pop in and check events whenever there’s a red dot on any of these icons as that means there will be a ton of stuff up for grabs, should you participate!
Take It All Back!
With that, you now have a basic understanding of how to stay alive and get stronger in Dusk of Dragons. But don’t think that’s where the game ends – this is just the beginning. Keep developing your base, improve your Dragon Force, find a guild, and take on the world!

That concludes this beginner’s guide to Dusk of Dragons. If you have any suggestions on how to improve this guide, or any corrections to make, let us know in the comment box!